1. Orders Menu
The Odoo 18 Purchase module's
‘Orders’ menu provides a
consolidated, comprehensive
platform for handling every
facet of the procurement
procedure. It gives customers
access to essential features
including Purchasing Orders
(POs), which are created once
RFQs are confirmed, Purchase
Agreements, which permit
blanket orders or long-term
supplier contracts, and
Requests for Quotation
(RFQs), which allow users to
start purchasing inquiries
with suppliers. The menu also
has a Vendors area where
users may track performance,
manage supplier data, and
keep contact and price
information current.
Businesses may effectively
manage their buying
operations from a single,
simplified interface thanks
to its organized style.
1.1 Requests for Quotations
The Odoo 18 Purchase module
simplifies and enhances the
process of creating and
managing Requests for
Quotations (RFQs), helping
businesses improve
procurement efficiency.
Whether you're sourcing goods
or services, Odoo allows you
to generate RFQs, compare
vendor offers, and make
informed decisions to select
the most suitable supplier
To manage RFQs, go to the Orders
menu in the Purchase module,
where you’ll find a clear,
organized interface
displaying both active and
historical RFQs, making it
easy to track and manage all
procurement activities in one
place.
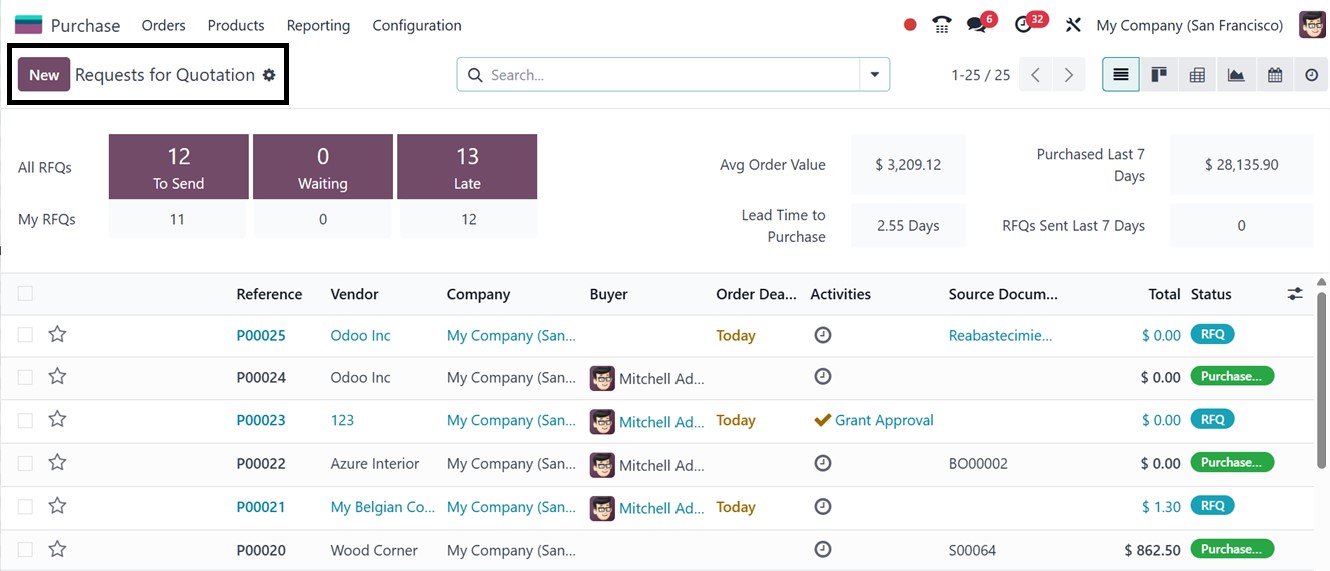
The dashboard window will show
the total number of RFQs
based on different stages
including To Send, Waiting
and Late. You can see the
Average Order Value, Lead
Time to Purchase, Purchased
Last days, RFQs Sent Last
Days along with the detailed
list view.
By default, the RFQ list view
displays a clean, structured
table containing key details
such as the Reference number,
Vendor , Company, Buyer,
Order Deadline, Activities,
Source Document, Total
amount, and Status. Then, you
can click on the (*) star
icon provided in each RFQ
column to mark important or
urgent RFQs, helping you
quickly identify and
prioritize them for timely
follow-up. Users can switch
between multiple views such
as Kanban, Pivot, Graph,
Calendar, and Activity based
on their operational needs,
with each view offering a
unique perspective on RFQ
data, as illustrated in the
screenshot below.
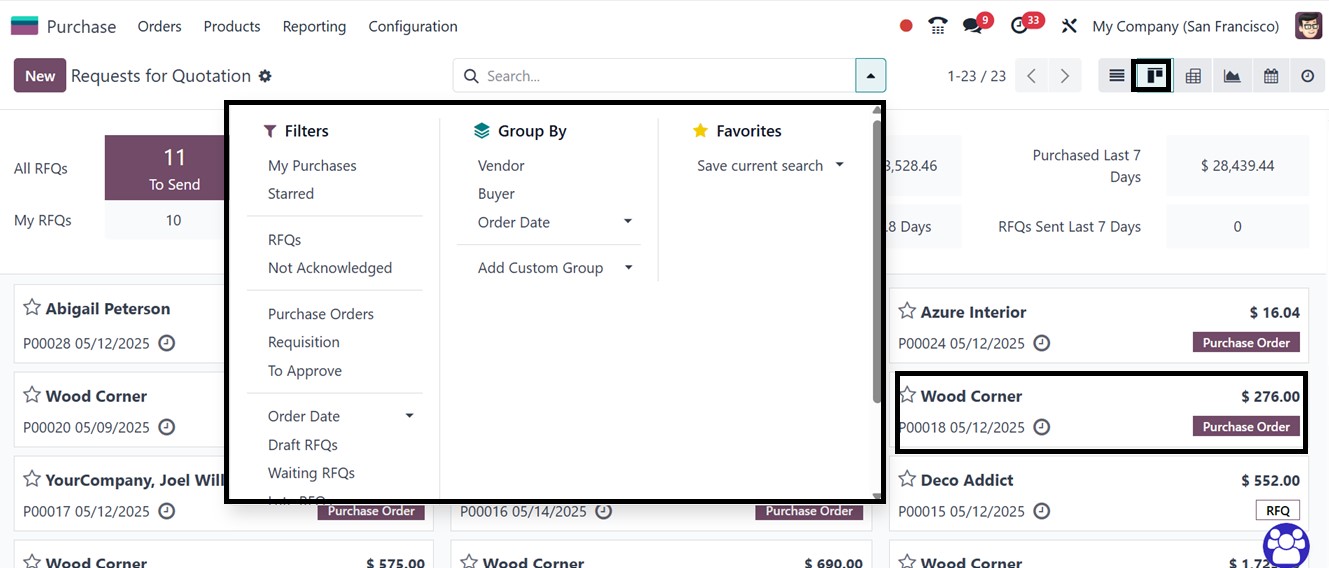
To enhance efficiency, you can
utilize the Filters and Group
By options from the search
bar area, allowing you to
quickly locate specific RFQs
using predefined filters like
My Purchases, Starred,
Purchase Orders, To Approve,
Draft RFQs, and more. To
customize specific filters,
you can utilize the ‘Add
Custom Filter’ option. The
RFQs can also be grouped by
criteria such as Vendor,
Purchase Representative, or
Order Date, making it easier
to analyze and manage
procurement activities
effectively. Customizing new
groups can be done through
the ‘Add Custom Group’
option. Finally, utilize the
‘Favorites’ option to save
recent searches or important
data.
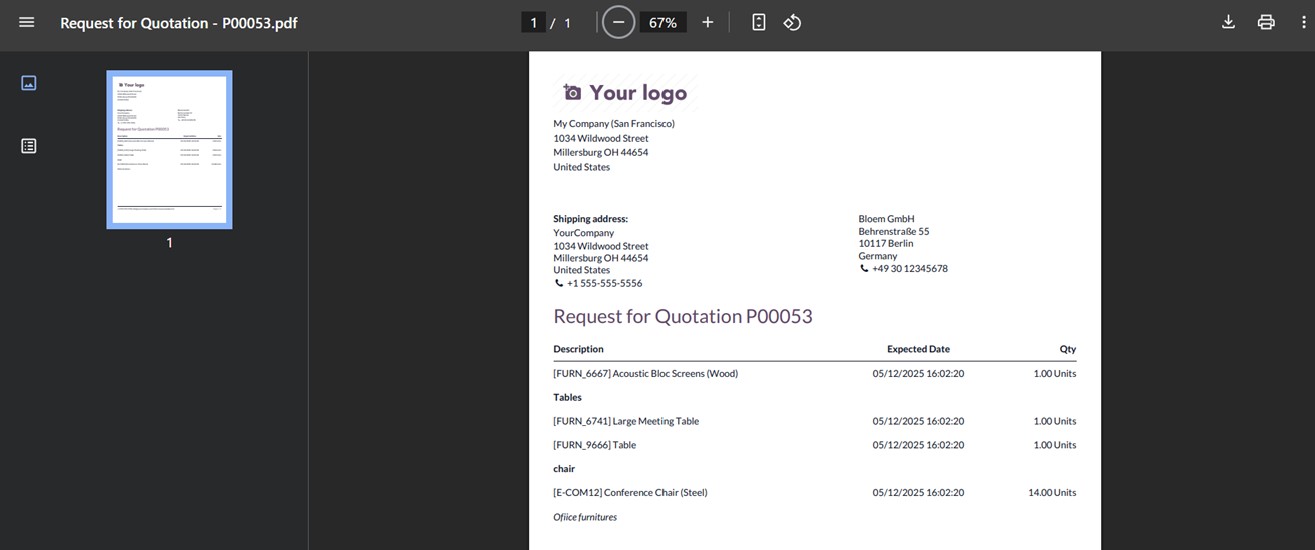
To create a new Request for
Quotation (RFQ) in Odoo 18,
navigate to the Request for
Quotation menu and click on
the New button. In the RFQ
creation form, begin by
selecting a vendor from your
list of configured suppliers,
which can be managed in the
Vendors section of the
Purchase module, as depicted
in the screenshot below.
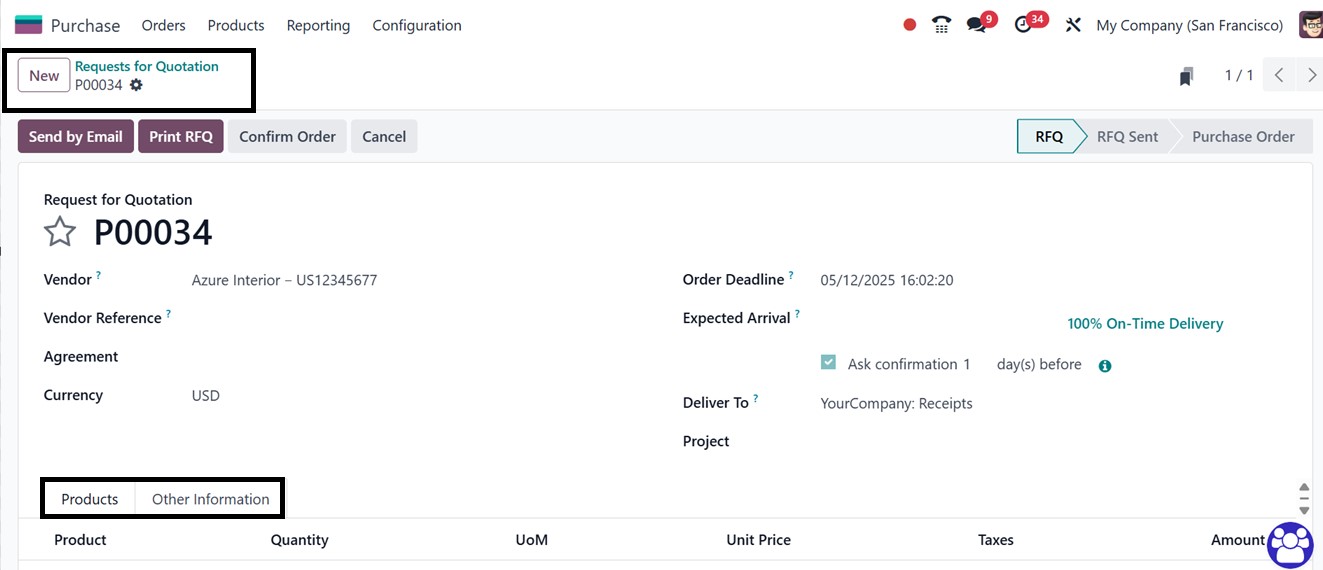
You can enter a Vendor Reference,
typically the vendor’s order
or bid number, to help match
incoming deliveries with the
RFQ. If a Purchase Agreement
exists, you can link it to
the RFQ in the ‘Agreement’
field . Then, choose your
Currency and set an Order
Deadline to indicate the
latest date by which the
quotation should be
confirmed. Specify the
Expected Arrival date for the
products, and enable the Ask
Confirmation option to
automatically send a
confirmation email to the
vendor, requesting
verification of the delivery
timeline.
Finally, specify the Operation
Type for the incoming
shipment in the Deliver To
section, and indicate the
Project associated with the
RFQ, if applicable.
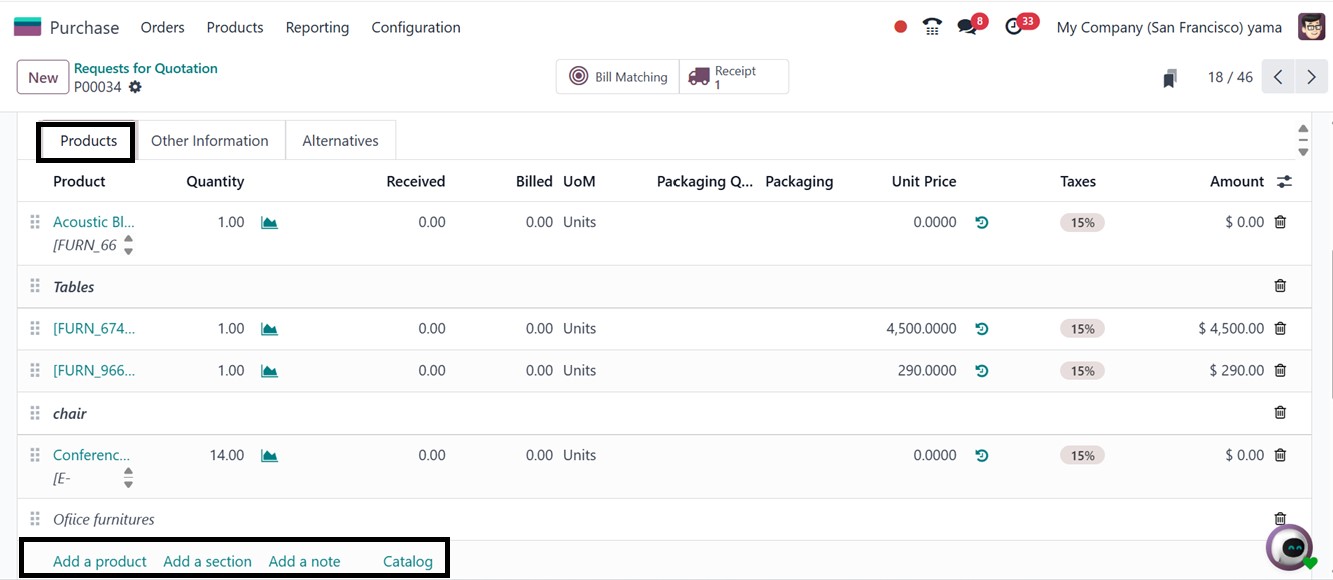
In the ‘Products’ tab, you can
conveniently add items from a
predefined product catalog by
clicking the Add a Product
button or choosing directly
from the products dashboard
using the ‘Catalog’ button,
allowing you to select the
desired items for purchase
from the vendor.
- Add a section: By
generating separate
sections or
categories, the ‘Add a
section’ button
enables users to
arrange and combine
goods or services in
the purchase order,
purchase agreement, or
request for proposals.
This makes it simpler
to track and assess
purchases according to
their particular
categories or
requirements by
classifying products.
- Add a note: You can add
more remarks or
directions to the RFQ,
purchase order, or
purchase agreement by
clicking the "Add a
Note" option. To
improve communication
and understanding
between the customer
and the vendor, notes
can be used to offer
context, special
instructions, or
explanations
pertaining to the
transaction.
The functionality of the sections
and notes feature is
demonstrated below, showing
how items like Tables and
Chairs can be organized into
separate sections for clarity
and a note regarding the
products in Italics font.
In the Other Information tab in
Odoo 18's Purchase module
allows you to enter
supplementary details related
to the procurement process.
Here, you can specify the
Buyer responsible for
managing the purchase, the
Company making the
transaction, and any Source
Document that links the RFQ
to another record.
Additionally, you can define
the Payment Terms to set the
expected payment schedule and
conditions. In Odoo, the
'Incoterm' and 'Incoterm
Location' fields are used to
define the terms of
international shipping and
delivery for purchases and
sales.
The Incoterm determines the
responsibilities of both the
buyer and seller, such as who
handles shipping, insurance,
customs, and when the risk
transfers. The Incoterm
Location specifies the exact
point, such as a port or
warehouse, where these
responsibilities shift.
Together, these fields help
clarify delivery terms and
reduce potential
misunderstandings in
cross-border transactions.
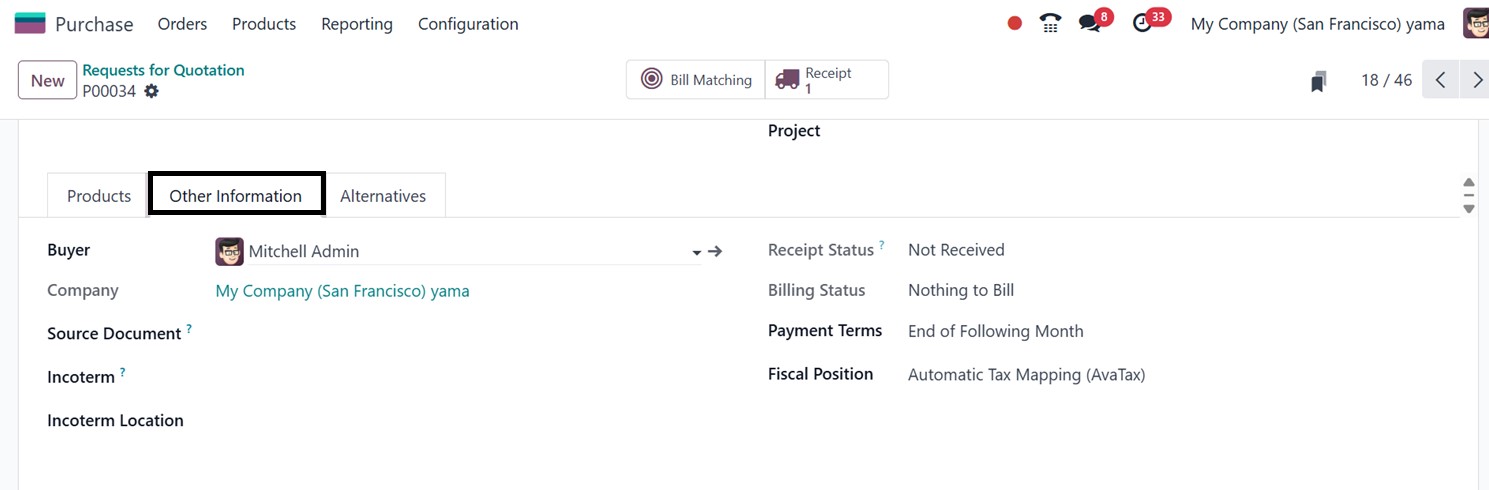
The Fiscal Position field helps
automate the application of
correct tax rules and account
mappings based on the
company's or region's
specific tax regulations,
ensuring accuracy and
compliance.
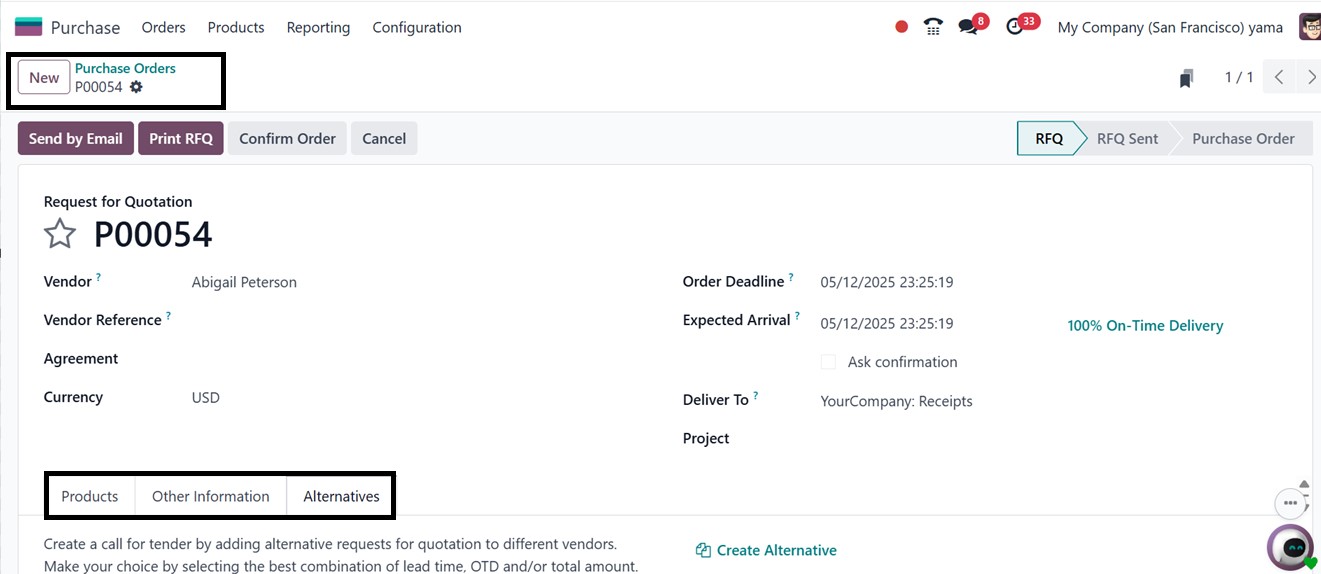
Under the ‘Alternatives’ tab,
Odoo 18 adds a potent tool
that enables users to handle
and contrast several Requests
for Quotation (RFQs) from
various suppliers for the
same product. This feature is
particularly helpful when
comparing supplier choices
according to terms, delivery
schedules, and price.

You can quickly create new RFQs
for the same item while
choosing other suppliers by
clicking the ‘Create
Alternative’ button. This
will open a pop-up window,
where you can choose an
alternative ‘Vendor’ and
enable the ‘Copy Products’
option to copy the product
quantities from the existing
Purchase Order, as depicted
in the screenshot below.

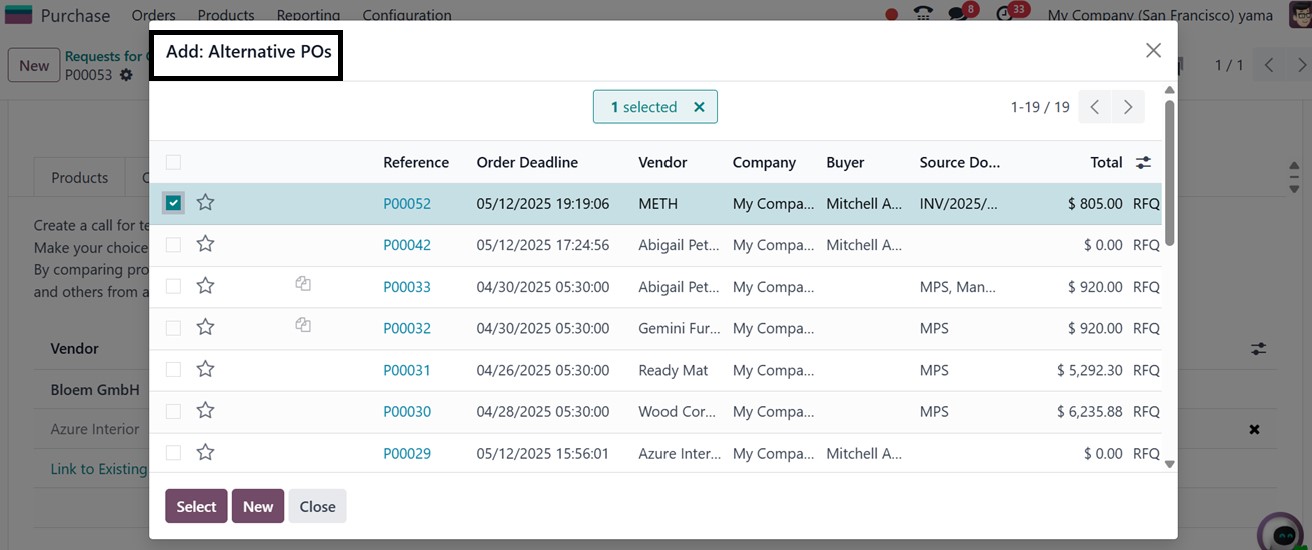
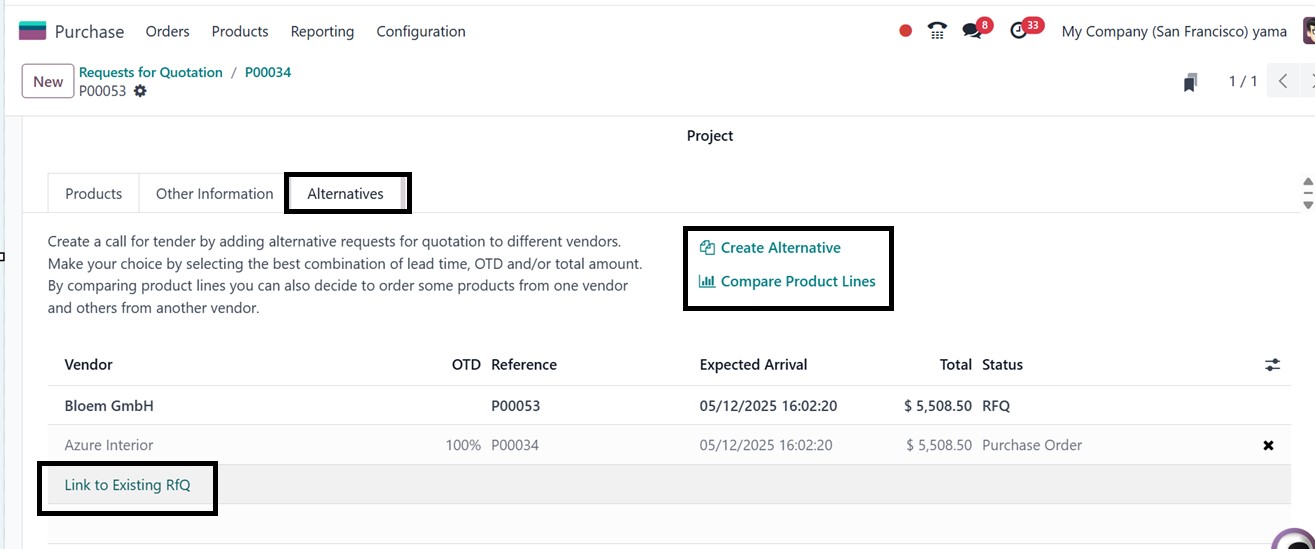
Furthermore, you can connect
previously prepared RFQs to
the present comparison view
using the ‘Link to Existing
RFQ’ option, and add an
alternative Purchase order
from the displayed orders
which removes the need for
duplication of work, as you
can see from the screenshot
below.
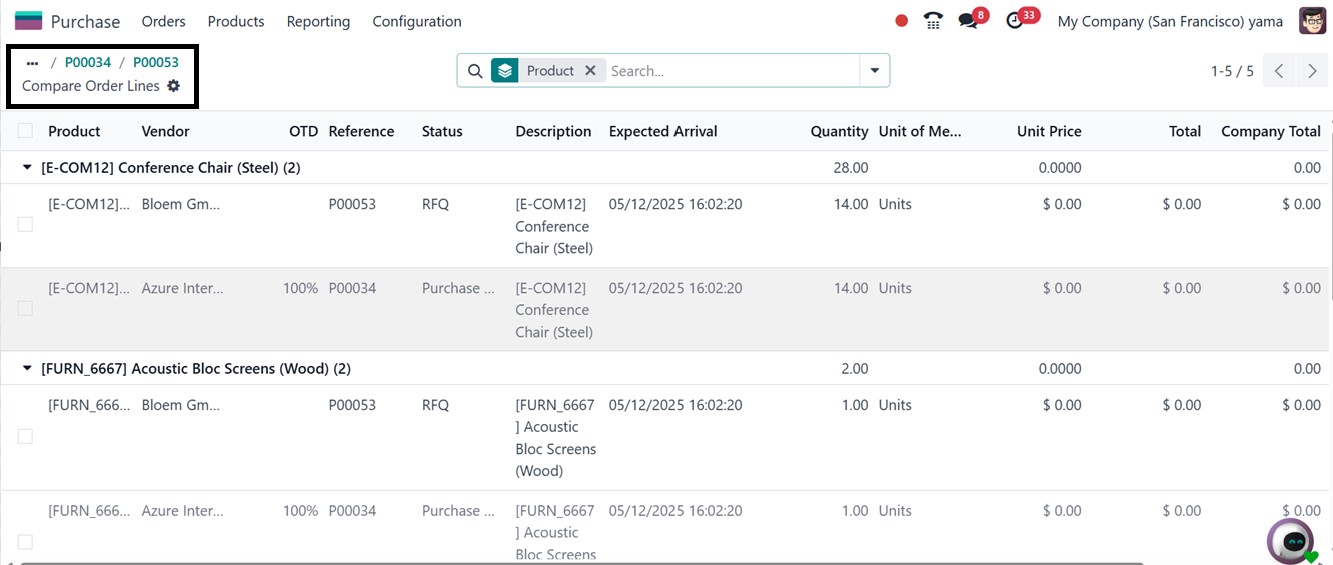
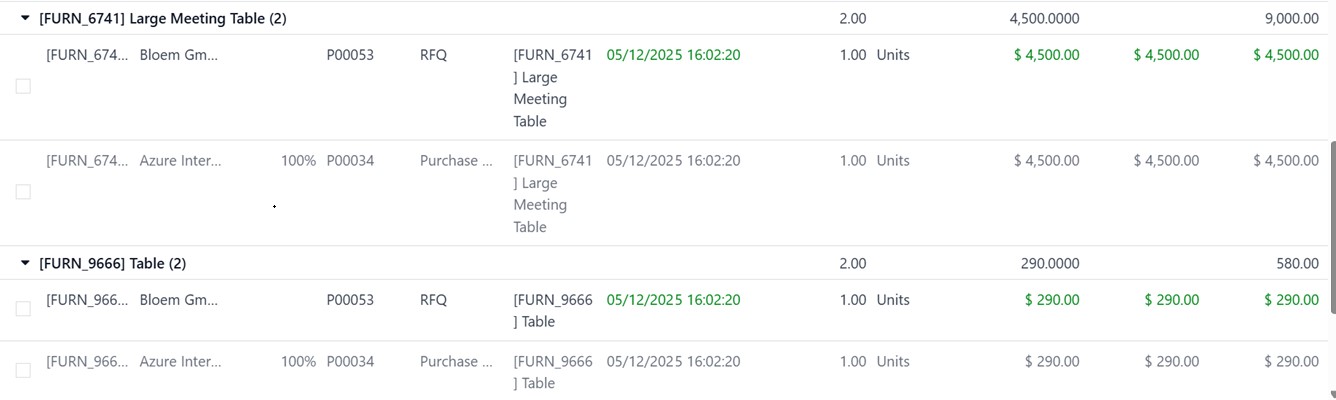
After linking several RFQs, you
may compare all vendor offers
side by side using the
‘Compare Product Lines’
option, which will assist you
in making well-informed
procurement decisions based
on service quality and
cost-effectiveness.
Important information including
the Product Name, Vendor,
Reference, Status,
Description, Quantity, Unit
Price, Total Cost, and
Company are displayed on this
page. By choosing the best
vendor for each product, the
comparison tool helps you
assess these important
criteria side by side and
make more informed and
strategic purchases, as
depicted in the screenshot
below.

After comparing order lines and
saving all the details, click
on the ‘Send by Email option
in Odoo 18 to forward the RFQ
to your vendor.
For the RFQ, the system will
automatically provide a
pre-filled email template
that you can modify to meet
your needs, as depicted in
the screenshot below.
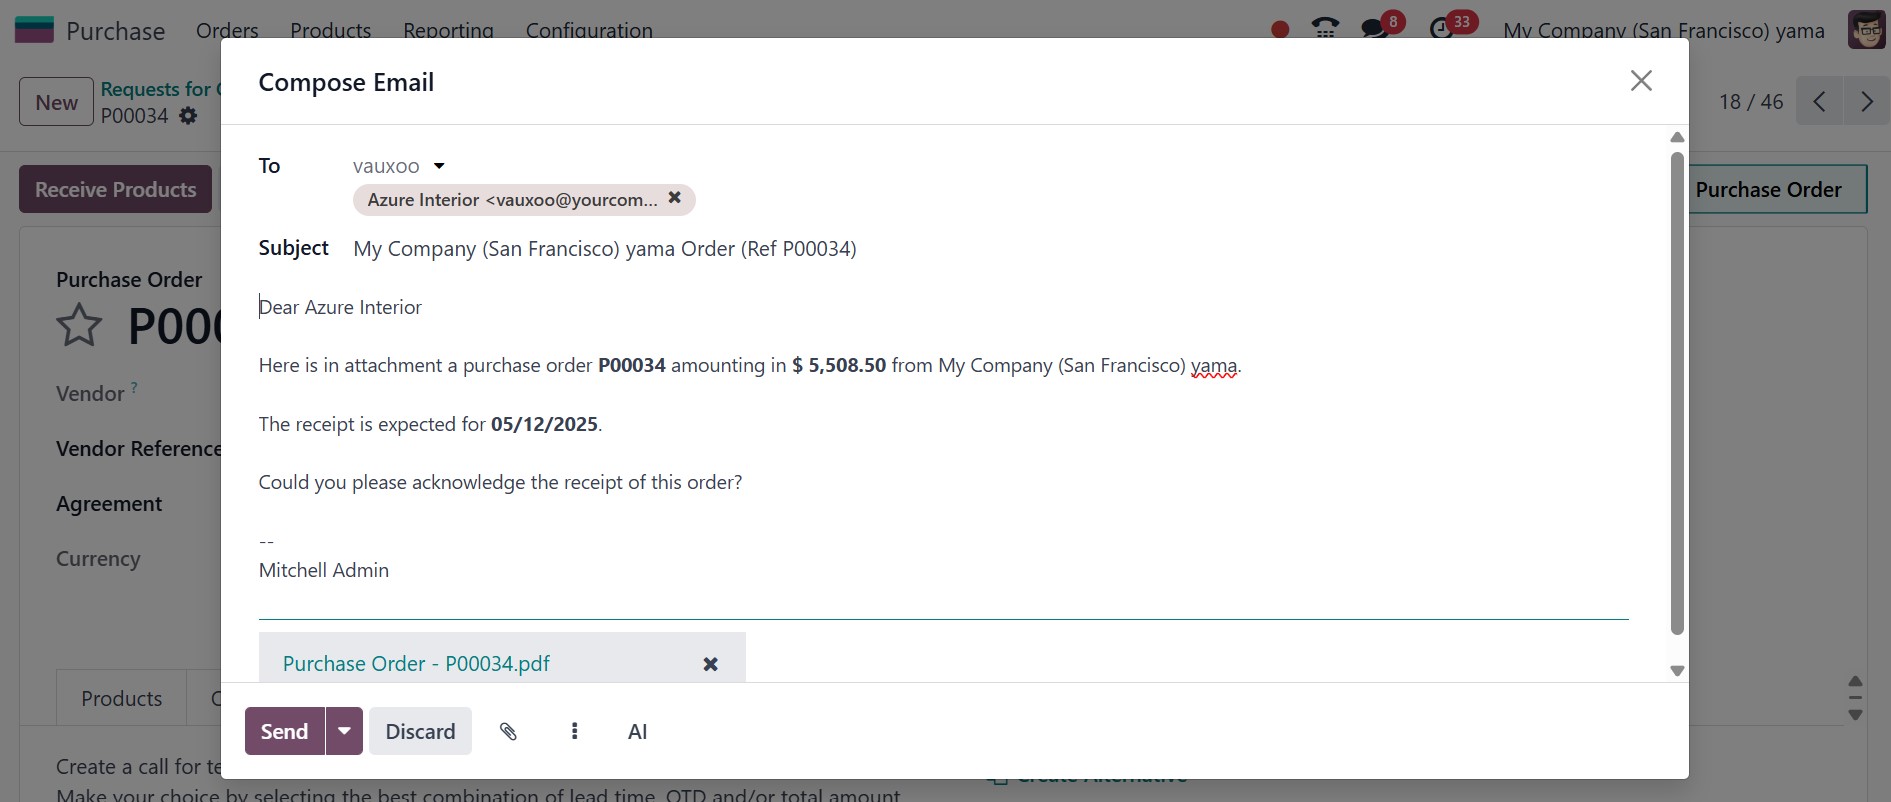
Additionally, you can designate
recipients in the ‘To’
section and attach any
supporting documents using
the Attachments icon.
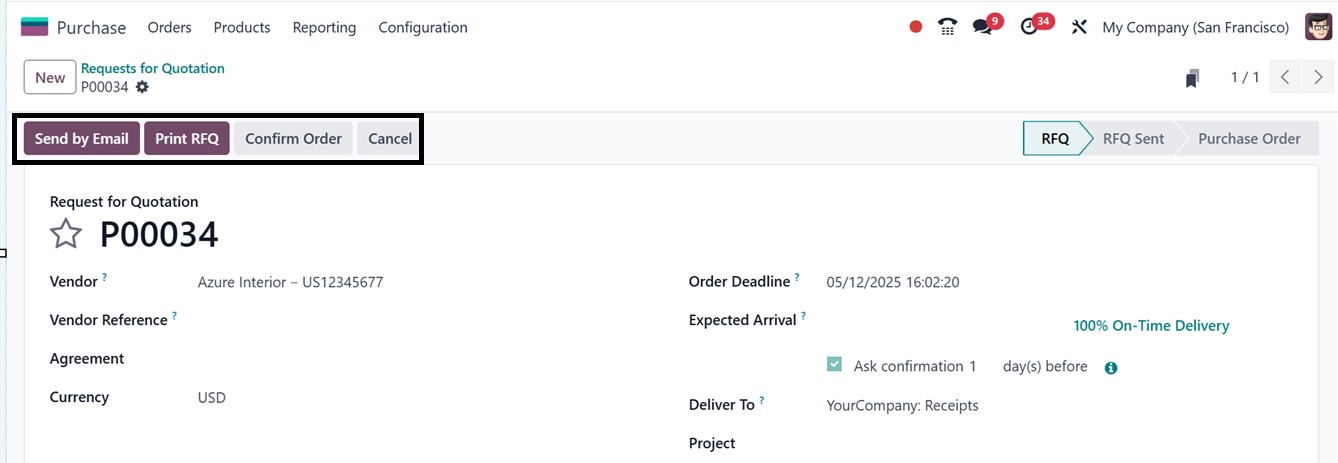
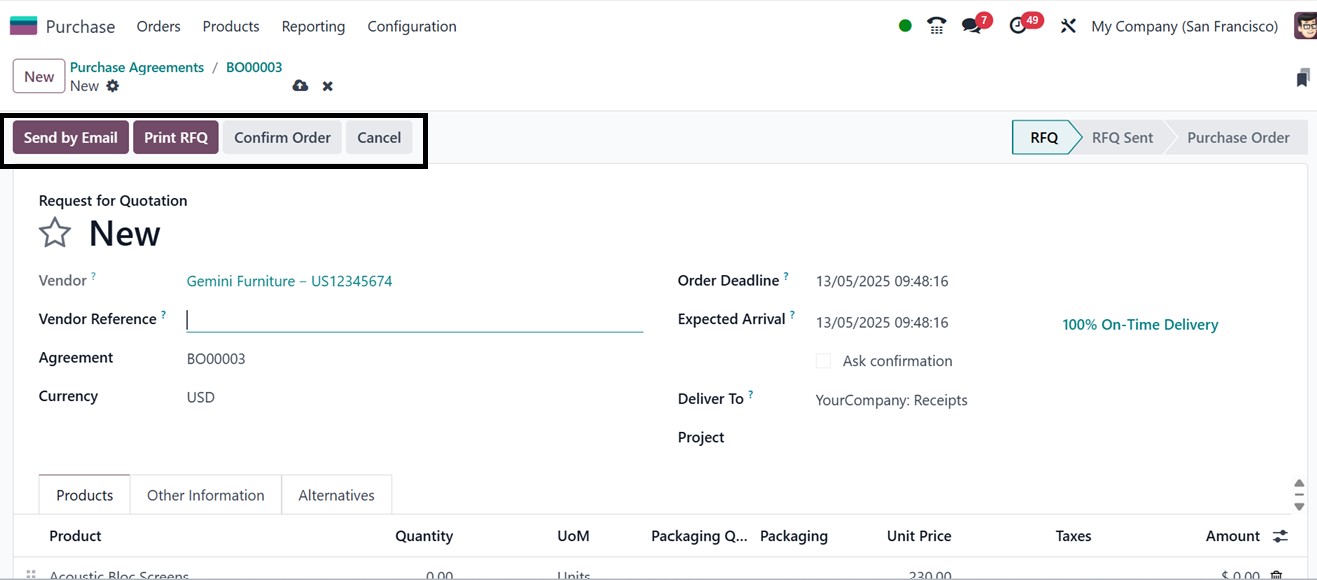
Finally, click on the ‘Send’
to send the RFQ after you've
checked the content. The RFQ
status will change to RFQ
Sent when it has been sent.
By clicking the Cancel
option, you can end the
request whenever you choose.
The ‘Confirm Order’ button will
confirm the purchase order in
a single click. The ‘Print
RFQ’ feature that enables you
to generate a physical copy
of the Request for Quotation
for documentation or
record-keeping purposes.
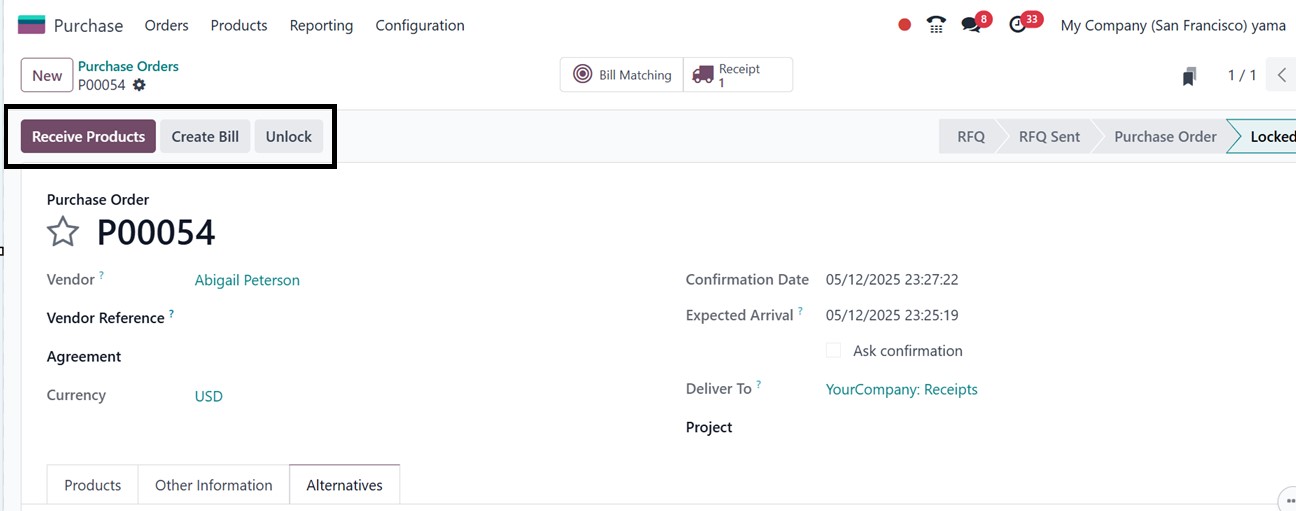
1.2 Purchase Order Management
After confirming the purchase
order using the ‘Confirm
Order’ button, Odoo 18 will
display various tools to help
you manage and track the
order effectively.
To effectively manage the
procurement process, you can
perform a number of crucial
tasks in the Purchase Order
form. As soon as the seller
ships the products, consumers
may start the goods receiving
procedure by selecting the
‘Receive Products’ option.
Once the items are received,
a vendor bill can be created
using the ‘Create Bill’ tool
in order to execute payment.
You can also click the
‘Cancel’ option to cancel the
purchase order if they need
to withdraw the purchase for
any reason.
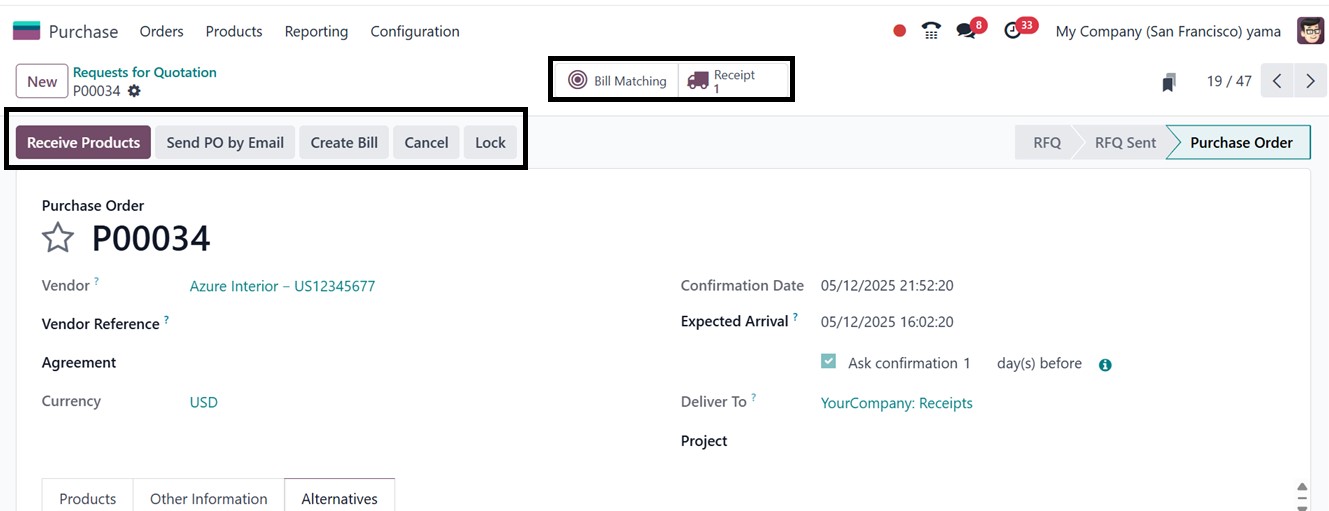
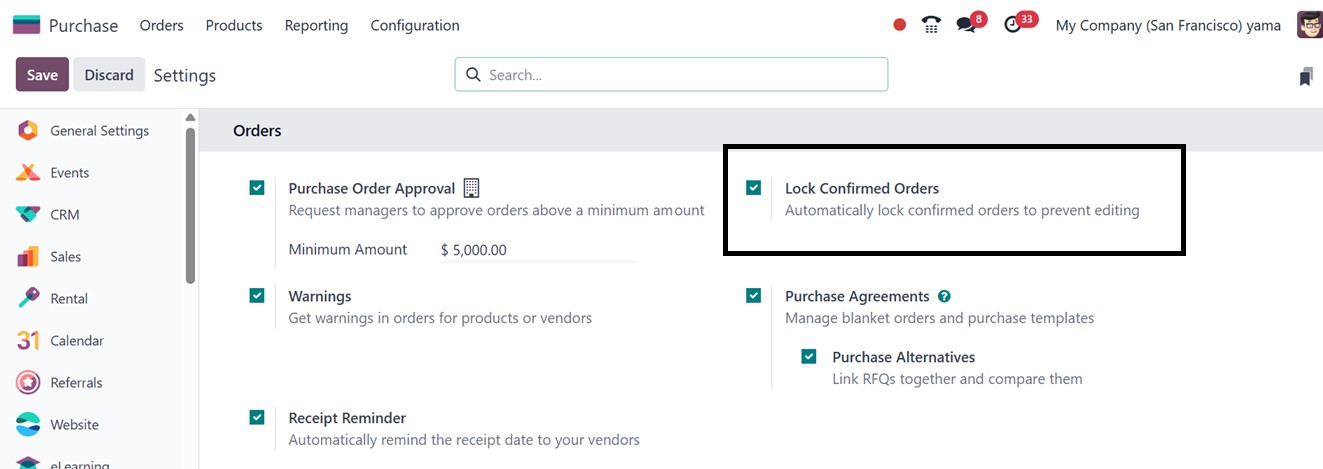
To safeguard against unintended
changes after a purchase
order is confirmed, Odoo 18
includes a feature that
allows you to lock orders.
This can be enabled by
activating the Lock Confirmed
Orders option from the
Purchase module’s ‘Settings’
window, as highlighted in the
screenshot below.
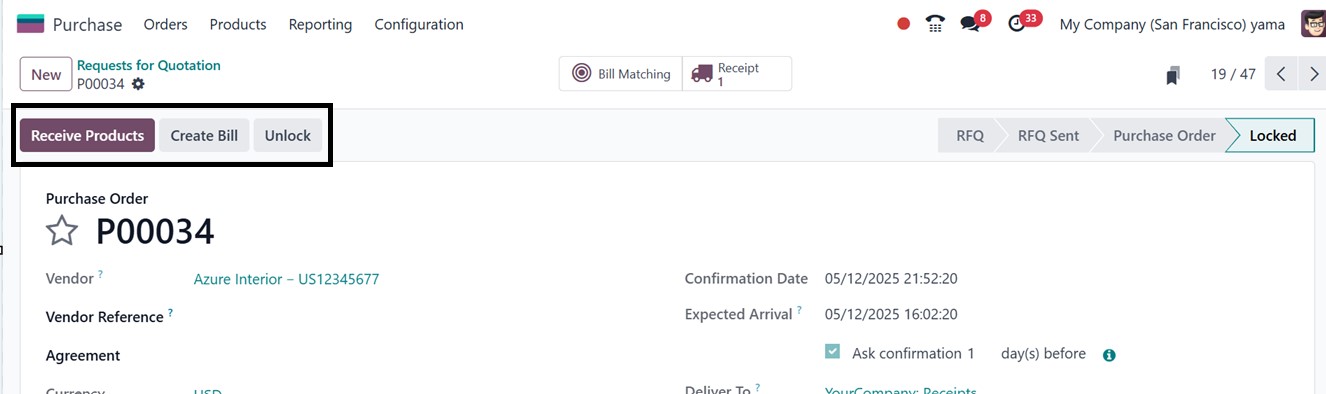
Once this setting is applied, all
confirmed purchase orders are
automatically locked using
the ‘Lock’ button from the
form view, preventing any
further modifications without
approval. If updates are
necessary, users can manually
unlock the order by clicking
the Unlock button.
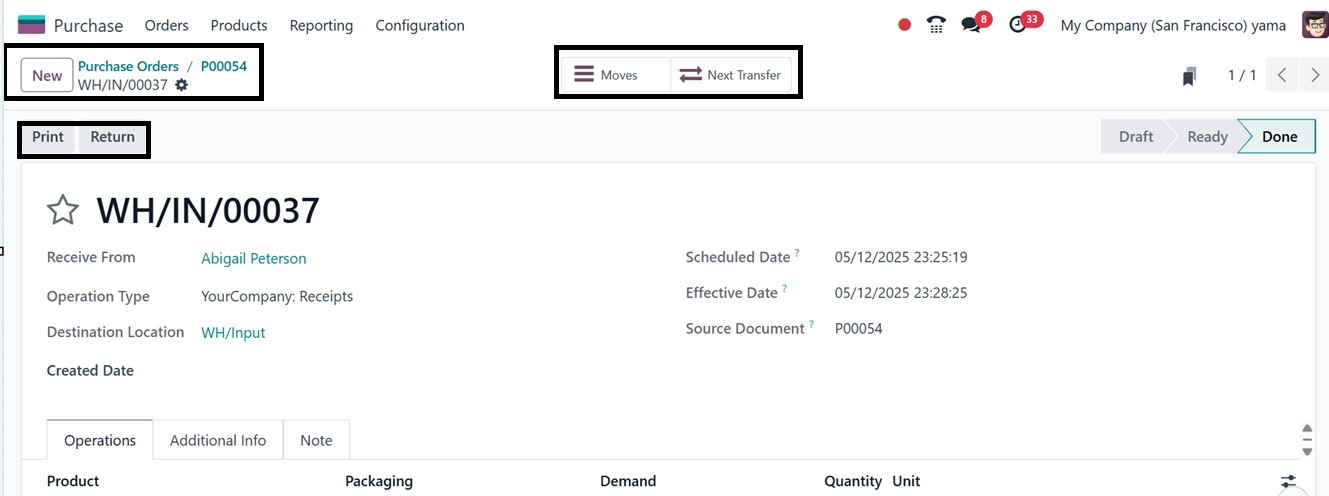
Receiving the items from the
seller is the next step after
confirming a purchase order.
To guarantee that every
inbound cargo is accurately
monitored and verified, Odoo
provides a simplified
procedure. Users can start
the reception process when
the vendor ships the goods by
clicking the ‘Receive
Products’ button on the
purchase order.
In addition to being accessible
through the ‘Receipt’ smart
button connected to the
purchase order, this opens a
new window displaying the
shipment information.
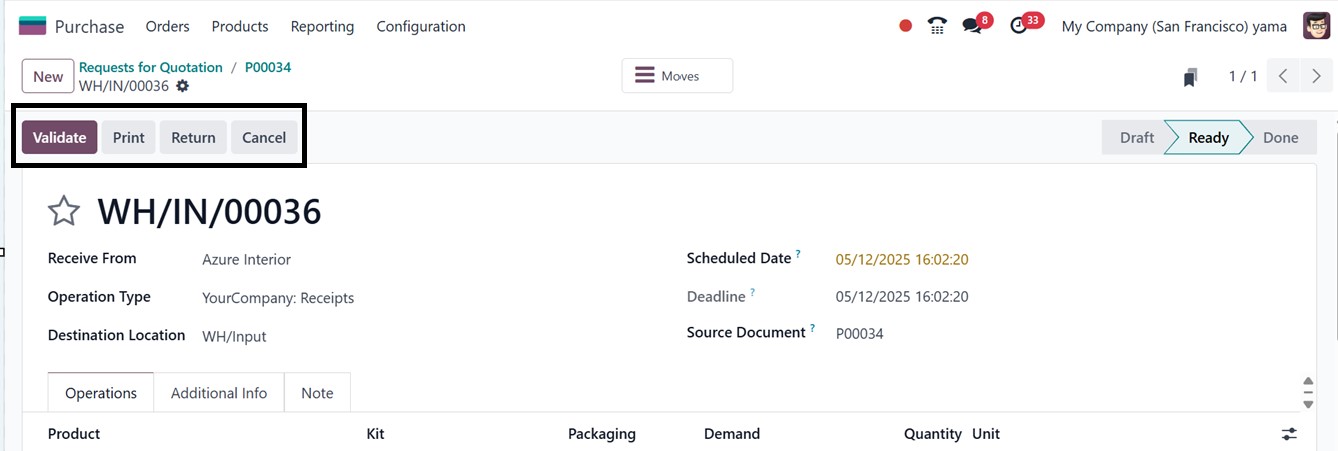
The receiving form window
provides essential details
about the incoming shipment,
including the supplier's name
under Receive From, the type
of operation being performed
under Operation Type, and the
expected and required dates
for receipt, listed as
Scheduled Date and Deadline,
respectively. The Source
Document field references the
original purchase order,
which serves as the basis for
the shipment, as depicted in
the screenshot below.
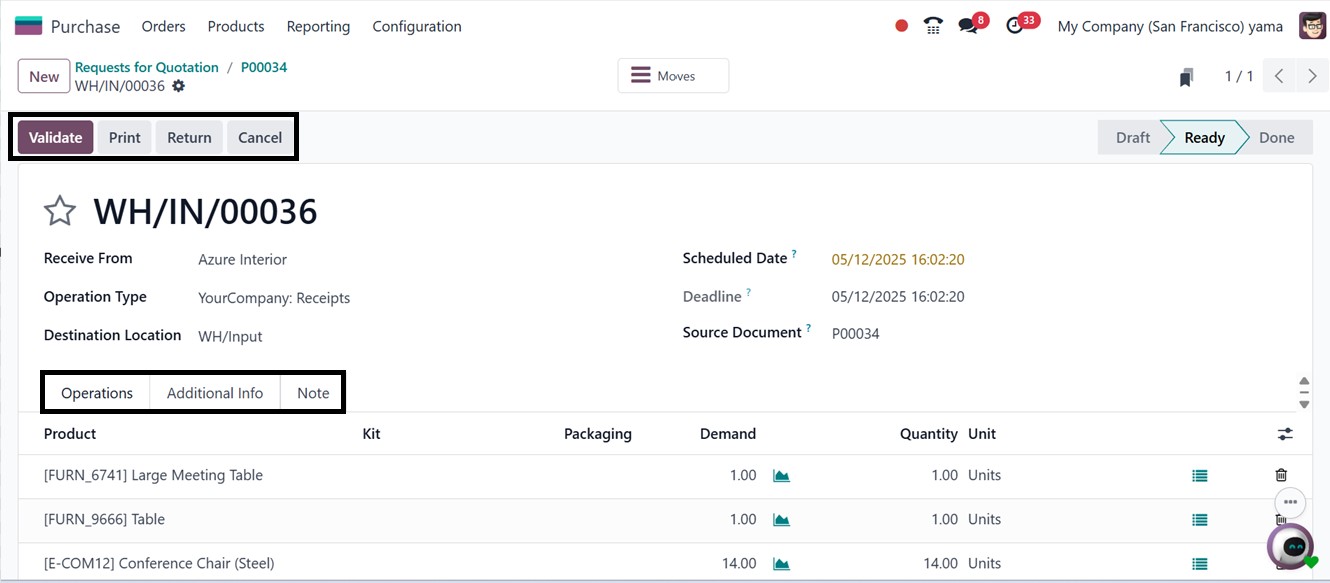
In the Operations tab, users can
view specific product
details, including the
Product (the items ordered
from the vendor), Demand (the
required quantity as per the
purchase order), Quantity
(the actual number of
products to be received), and
the Unit of Measure (such as
units, kilograms, or liters).
Users can also access product
forecast reports and detailed
operational data by clicking
the relevant buttons next to
the Demand and Unit of
Measure fields, offering
complete visibility into
stock movements and product
handling.
Additionally, the Additional
Information tab displays
shipping and delivery details
related to the order, further
enhancing transparency in the
receiving process.Key
information about the
shipment is provided in the
‘SHIPPING INFORMATION’
section including: Weight
(the total weight of the
products), Tracking Reference
(the tracking number for the
shipment), Carrier (the
logistics company handling
the delivery), and Shipping
Weight (the actual weight
recorded during shipping).
You can learn more about the
business and the accountable
employee in the ‘OTHER
INFORMATION’ section.
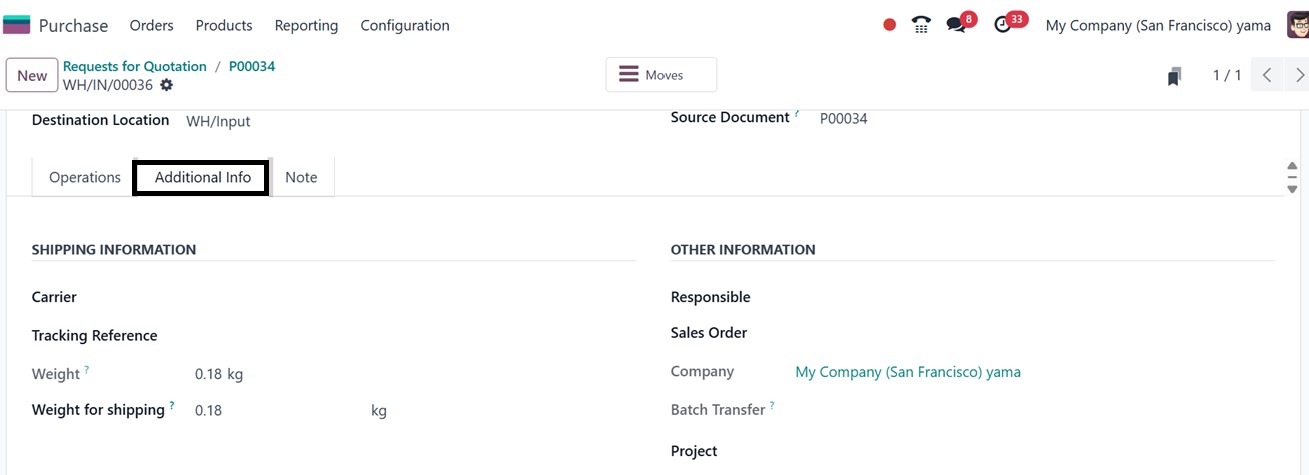
The ‘Note’ tab also shows any
additional observations or
notes pertaining to the
inbound cargo, providing
further information and
context.
After reviewing all shipment
details, users can click the
Validate button to confirm
the receipt of the products.
Once validated, the status of
the receipt updates to Done,
signaling that the transfer
of goods has been
successfully completed, as
you can see from the
screenshot below.

After completing the process, you
can print the order details
using the ‘Print’ button and
return the products using the
‘Return’ button. The ‘Moves’
smart button will show the
product movement details from
a location to another in a
dashboard. The ‘Next
Transfer’ button can be used
to create another transfer
order from this quotation.
The ‘Action’ menu placed on the
upper left side of the form
window can be used to print
various documents, duplicate
form data, delete, add extra
form fields, request
signatures, unreserve,
lock/unlock, mark scrap,
split, create quality alerts
and quality check using the
relevant icons, as
illustrated in the screenshot
below.
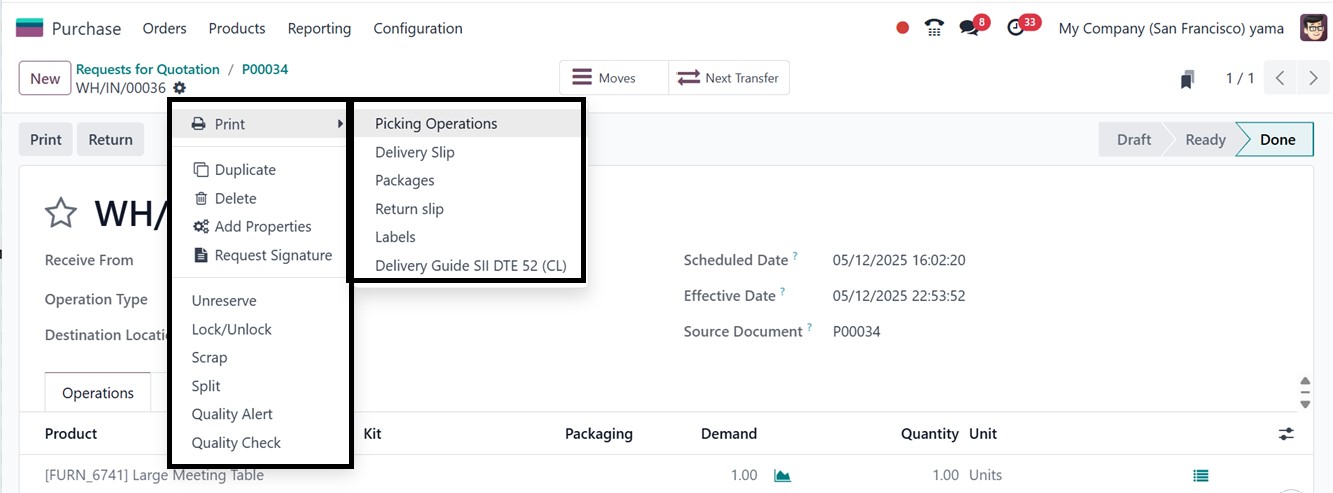
- Print: Generate printable
versions of relevant
documents such as
purchase orders,
receipts, or product
labels.
- Duplicate: Create a copy
of the current form,
which is useful when
entering similar
records without
retyping all details.
- Delete: Permanently
remove the current
form or record from
the system.
- Add Properties: Introduce
additional fields to
the form for capturing
specific information
as per business
requirements. Clicking
on this button will
open a new field
editing pop-up window,
as shown below.
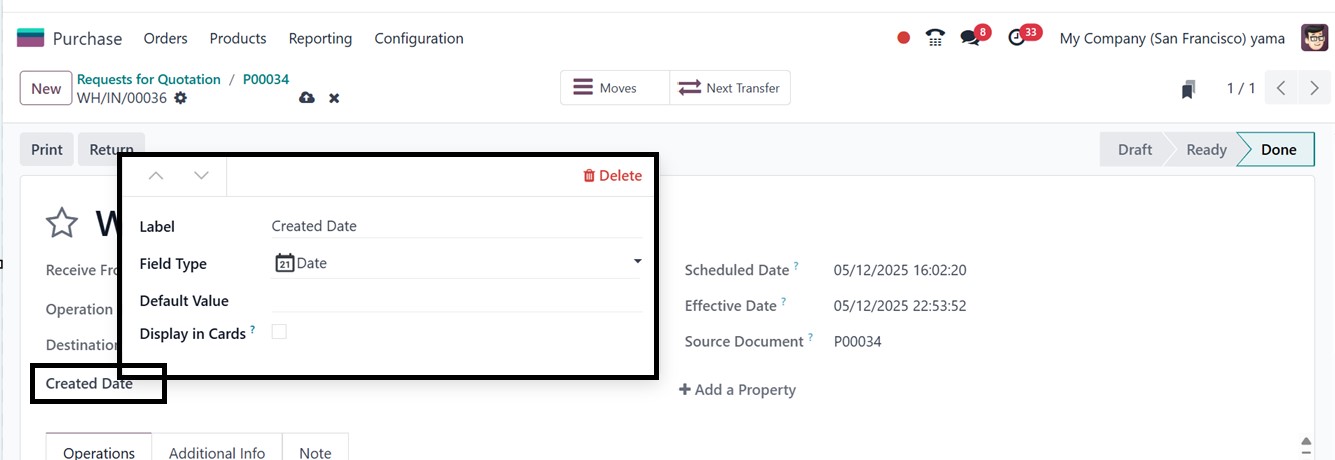
You can specify the new field's
properties in the pop-up box
that opens when you click the
"Add Properties" button. The
field name can be edited in
the ‘Label’ area and the data
type (text, date, integer,
selection, etc.) can be
chosen from the ‘Field Type’
field. Then, edit a Default
Value, and enable or disable
any visibility criteria in
the ‘Display in Cards’
option. By becoming a part of
the form view, these custom
fields creation features
allow for more accurate data
gathering and increase the
system's adaptability to a
variety of operational
requirements
- Request Signature:
Initiate a digital
signature request
process, useful for
approvals or
contractual
acknowledgments.
- Unreserve: Release
reserved stock back
into inventory,
allowing it to be used
for other orders or
operations.
- Lock / Unlock: Prevent or
allow edits to the
record. Locking
ensures data integrity
after a form is
finalized.
- Scrap: Flag items as
scrap if they are
damaged or unusable,
removing them from
usable inventory.
- Split: Divide the
quantity of items in a
record into multiple
lines, which helps in
managing partial
deliveries or handling
units separately.
- Quality Alert: Report a
quality issue related
to the product or
process, triggering
the quality control
workflow.
- Quality Check: Launch a
manual quality check
process for the
current item or
operation to ensure
compliance.
1.3 Purchase Order
Once the request for quotation
(RFQ) has been generated, it
can be forwarded to the
respective vendor for
approval. The confirmation of
the purchase order follows
the submission of the RFQ to
the vendor. Odoo 18 provides
a dedicated platform for
managing purchase orders
within the Orders menu of the
Purchase module.
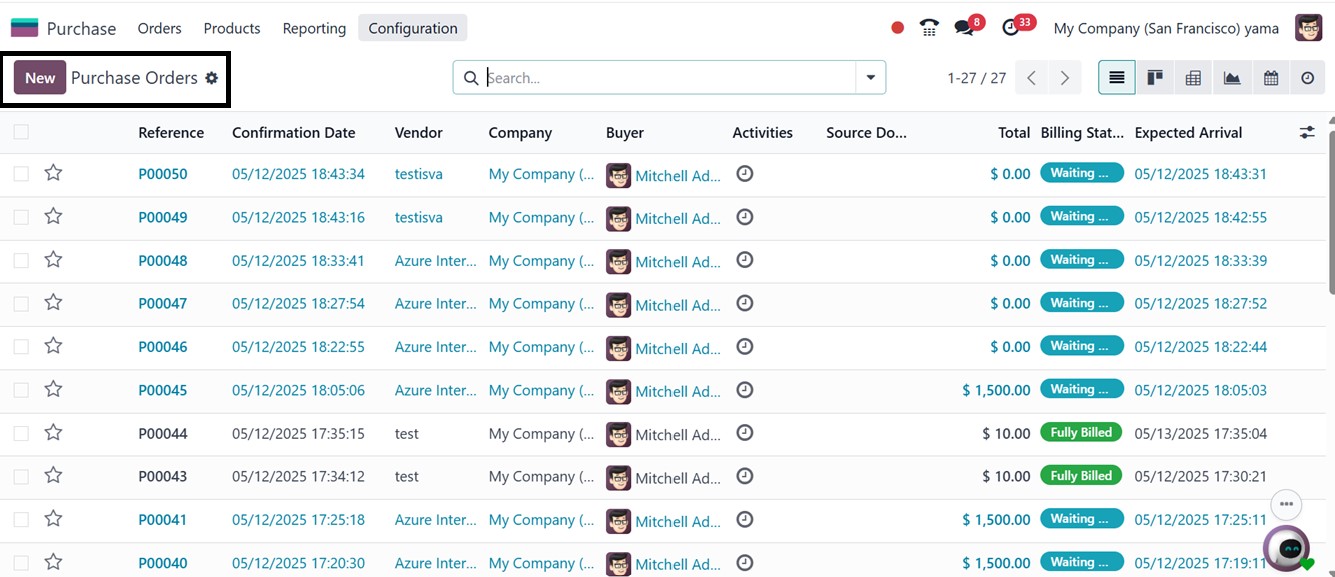
This interface closely resembles
the management window for
RFQs. It provides details
such as Reference,
Confirmation Date, Vendor,
Company, Buyer, Activities,
Source Document, Total,
Billing Status, and Expected
Arrival Date. A new purchase
order can be created using
the "New" button.
Once all parties agree to the
terms and conditions
specified in the RFQ, it can
be converted into a Purchase
Order by clicking the
"Confirm Order" button. This
action updates the document's
status, officially turning
the RFQ into a Purchase Order
within the system for further
processing.
The receipt of products can be
managed through options such
as "Receive Products,"
"Confirm Receipt Date," and
"Verify Receipt Date" in the
Purchase Order window. To
generate a vendor bill,
select "Create Bill," and to
cancel a purchase order,
select "Cancel."
The next procedure for confirming
and validating a purchase
order is same as the RFQ
order procedure, that we have
discussed in the above
section.
You can use the "Lock’ and
"Unlock" buttons to prevent
unauthorized edits to
confirmed purchase orders.
After order confirmation,
users can receive goods by
clicking the "Receive
Products" button, which opens
a window showing shipment
details. This can also be
accessed via the "Receipt"
smart button. Users can
review information like
supplier, delivery address,
scheduled date, and source
document. Under the
Operations tab, product
quantity, unit of measure,
and forecast reports are
available. Shipping details
such as carrier, tracking
number, and weights are found
under Shipping Information,
while the Other Information
section includes responsible
staff and notes. Clicking
"Validate" confirms the
receipt, changing its status
to "Done", indicating
successful product delivery.
Finally, you can print or return
the products, check product
movement details and create
the next transfer using the
relevant options available in
the purchase order form, as
illustrated in the screenshot
below.
The next sub menu option in the
‘Orders’ menu. So, let’s
examine how the Purchase
module facilitates the
creation of purchase
agreements.
1.4 Purchase Agreements
A purchase agreement is a
contractual arrangement
between a seller and a buyer
that outlines the terms and
conditions of a purchase.
Prior to confirming a
purchase order, both parties
must approve the agreement.
The Purchase module in Odoo
18 offers a dedicated
platform for creating and
managing purchase agreements,
allowing businesses to
establish multiple agreements
with the same or different
vendors for various products.
These agreements can be
utilized while placing
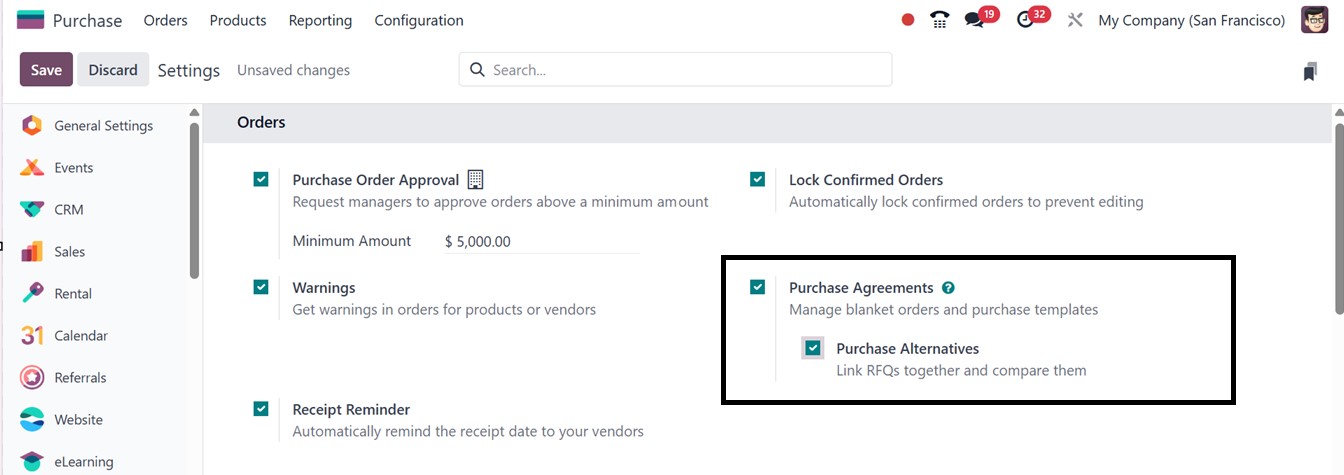
purchase orders in Odoo18. To
enable this functionality in
the Odoo18 Purchase module,
activate the Purchase
Agreement option in the
module’s Settings menu.
Types of Purchase Agreements:
Odoo18 provides two primary
types of purchase agreements:
Blanket Orders and Calls for
Tenders.
- Call for Tender: This
option is useful for
comparing offers from
multiple vendors for a
specific set of
products. It allows
users to generate
requests for
quotations (RFQs) from
different suppliers.
When creating an RFQ,
the ‘Alternatives’ tab
enables the inclusion
of multiple quotations
from various vendors,
facilitating a call
for tender, as
depicted in the
screenshot below.
- Blanket Orders: This type
of agreement is
beneficial when
dealing with regular
suppliers. It helps
customize products and
price lists for
specific customers and
is useful when making
repeated purchases
from the same vendor,
acquiring the same
product from different
suppliers, or
receiving multiple
products through
scheduled deliveries
within a specified
timeframe.
1.5 Managing Blanket Orders
To configure and manage Blanket
Orders in Odoo18, navigate to
the ‘Orders’ menu and select
the ‘Purchase Agreements’
option. The dashboard preview
list displays details such as
Reference, Purchase
Representative, Company,
Ordering Date, Agreement
Deadline, Source Document,
and Status, as shown in the
screenshot below.

You can also change the list view
into a kanban view. If
multiple agreements entries
are available in the
dashboard, utilize the
advanced search bar Filters
and Group By options to sort
out the relevant data.
Clicking on the ‘New’ button
opens a window where details
of the order can be entered.
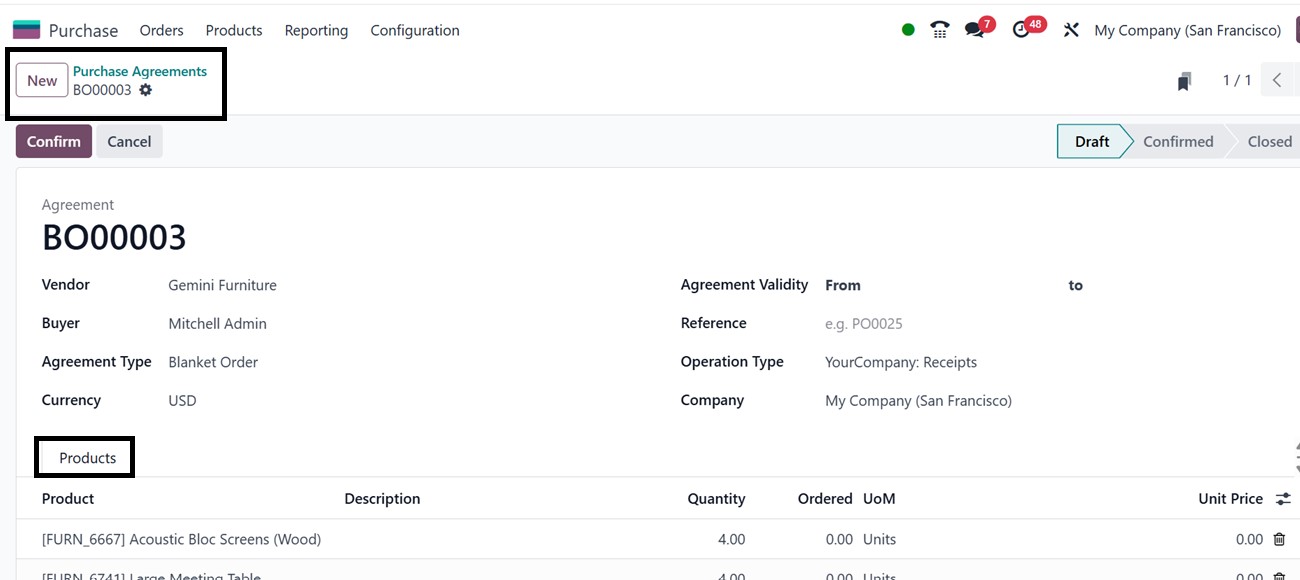
- Buyer: Enter the name of
the purchasing
representative.
- Agreement Type: This
field will be
automatically set to
Blanket Order.
- Vendor: Select the vendor
from the contact list.
- Currency: Specify the
currency used for the
transaction.
- Currency: Specify the
currency used for the
transaction.
- Agreement Validity:
Define the deadline
for the blanket order.
- Reference: Provide any
reference orders that
have been recently
created.
- Operation Type, and
Company Information:
Fill in the respective
fields.
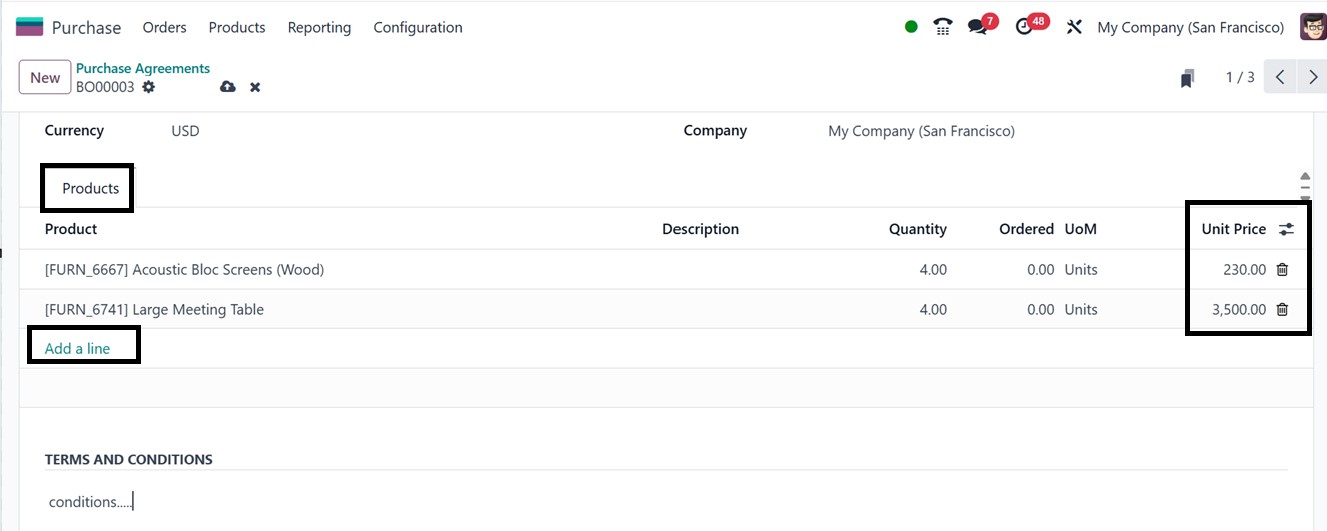
Under the Products tab, you can
add items to the purchase
agreement by clicking the
‘Add a line’ button. It is
essential to specify the Unit
Price for each item included
in the agreement. Then, you
can utilize the ‘TERMS AND
CONDITIONS’ field for
mentioning the terms and
conditions of the agreement,
as illustrated in the
screenshot below.
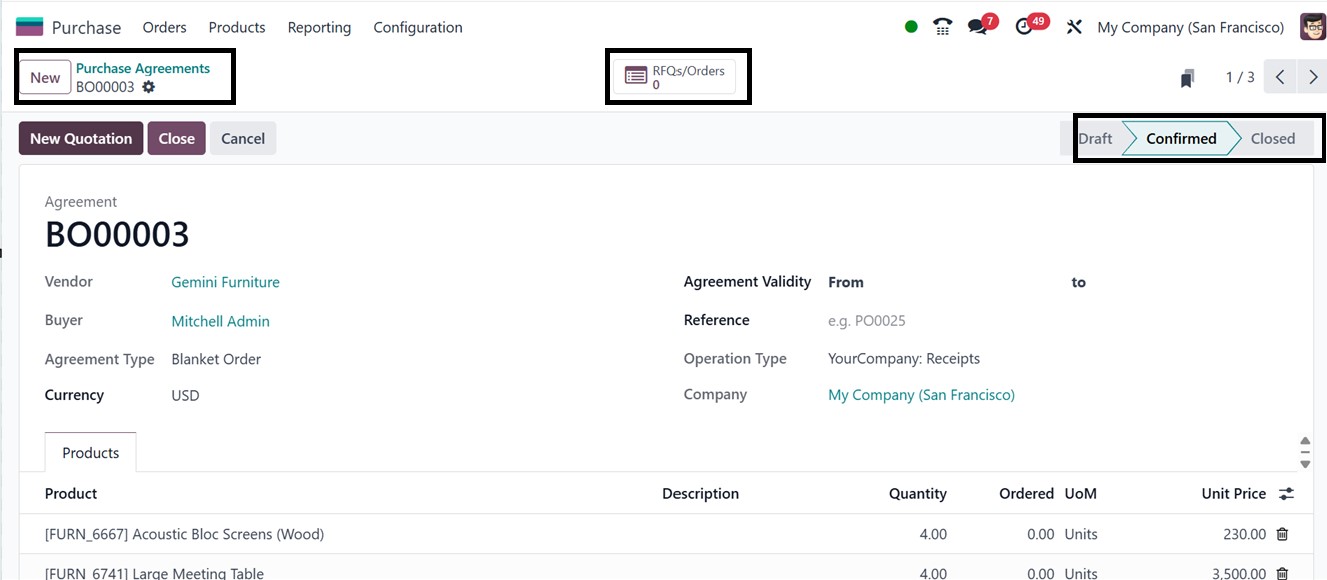
Once all the details are entered,
the blanket order can be
confirmed using the ‘Confirm’
button option. Upon
confirmation, Odoo will
change the status from Draft
to Confirmed. When the
deadline expires, the
agreement will automatically
transition to the Closed
state, as depicted in the
screenshot below.
Odoo allows users to generate new
RFQs and Purchase Orders
directly from the blanket
order using the ‘New
Quotation’ button on the
blanket order form. This
option provides direct access
to the quotation creation
window and all the
information from the purchase
agreement will be
automatically populated in
the RFQ fields, as
illustrated below.
After checking all the quotation
details, you can confirm the
order using the ‘Confirm
Order’ button. Then, verify
and manage all the other
procedures of this RFQ as we
have discussed in the Request
for Quotation section.
The blanket order remains
available for multiple
purchases from the same
vendor within the specified
timeframe. And you can create
multiple quotations from a
blanket order using the same
procedure or close the
blanket order using the
‘Close’ button from the
purchase agreement
configuration form, as
depicted in the screenshot
below.
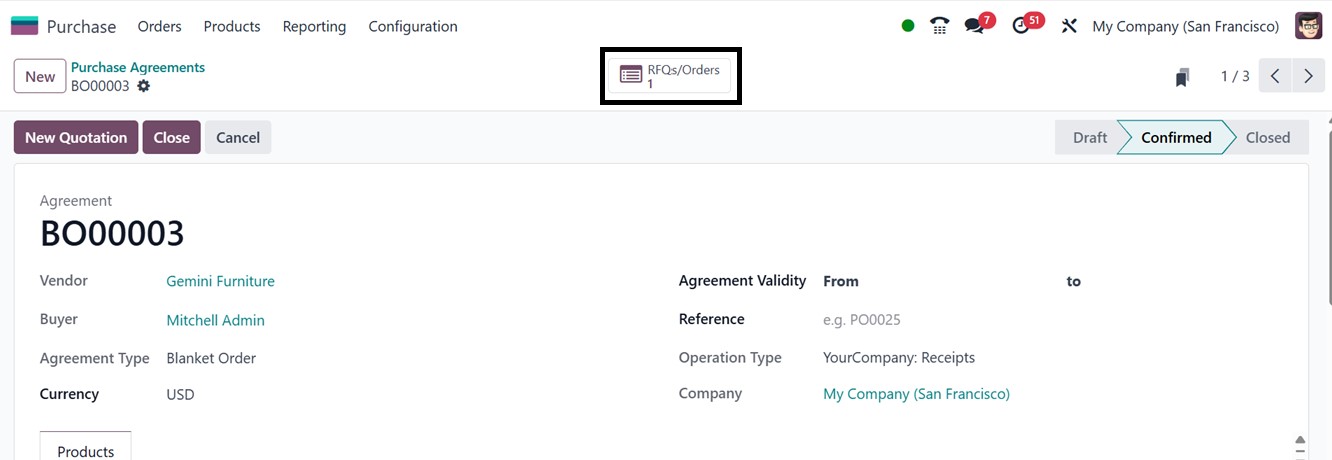
The ‘RFQs/Orders’ smart button
will show the available RFQ
orders or quotations
connected with this purchase
order as a blanket order.
1.6 Purchase Templates
The ‘Purchase Templates’ are a
sort of purchase agreement
that helps to speed up the
drafting of requests for
quotes (RFQs) for recurrent
purchases. They let users add
goods and alter quantities as
needed, making them both
versatile and efficient.
Unlike blanket orders, which
are big orders separated into
many deliveries for a single
vendor, buy templates can be
shared with multiple
suppliers, saving time and
simplifying the RFQ process.
They can also reproduce
amounts, which is very
beneficial for regular
orders.
To enable this function, open the
Configuration Settings
window. To implement the
changes, tick the ‘Purchase
Agreements’ option from the
Orders section and save the
feature.
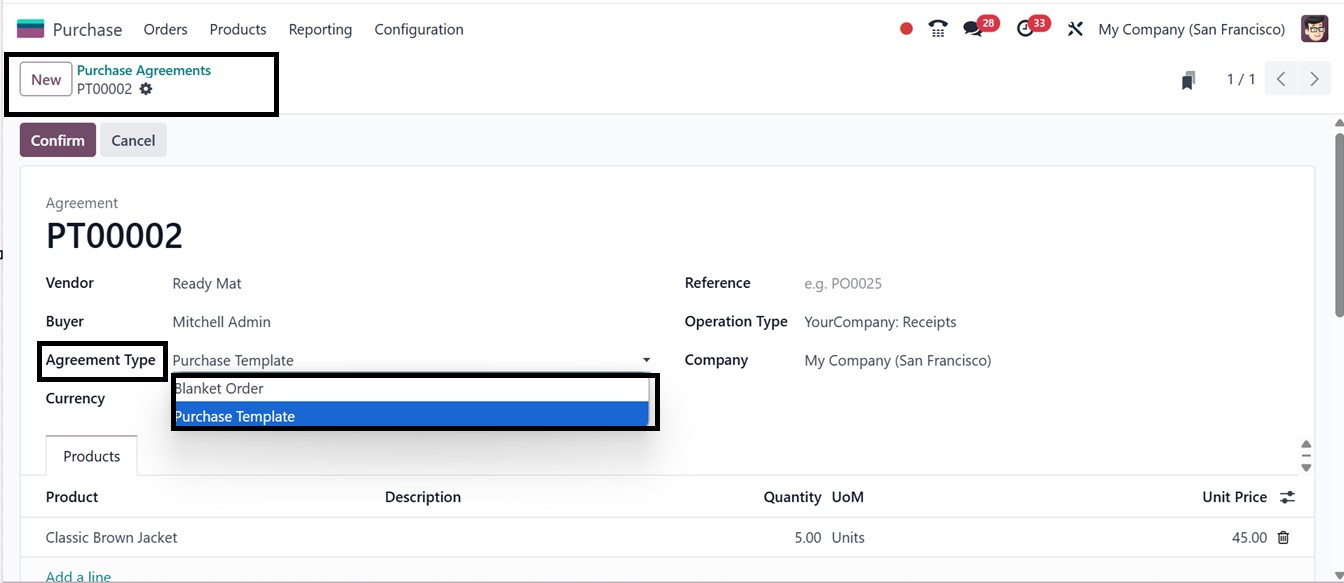
After saving the settings, you
can open a new Purchase
Agreement creation form and
choose the vendor. To create
a purchase template, select
‘Purchase Template’ from the
‘Agreement Type’ drop-down
field and fill out the other
boxes as needed, as depicted
in the screenshot below.
In the Products tab, choose a
product, enter the quantity,
and manually specify the unit
price, as prices do not
auto-fill. Once all of the
goods have been added, click
the ‘Confirm’ button to
complete the template.
Following validation, fresh
RFQs may be generated by
clicking fresh Quotation on
the template, as we have
discussed in the previous
section.
1.7 Vendor Bills
Creating vendor bills is a vital
step in the procurement
process and must be handled
with accuracy. In Odoo 18,
this process is simplified by
allowing payments to vendors
to be recorded as vendor
bills, which are
automatically linked to the
respective configured
vendors. Companies can choose
to generate these bills based
on either the quantities
ordered or the quantities
received, depending on their
internal billing policies.
This preference can be set
directly in the Settings menu
of the Purchase module,
ensuring the billing workflow
aligns with the
organization’s operational
requirements. Within this
menu, the policy for
generating vendor bills can
be specified using the "Bill
Control" option located under
the "Invoicing" tab. This
feature allows users to
determine how vendor invoices
should be managed.
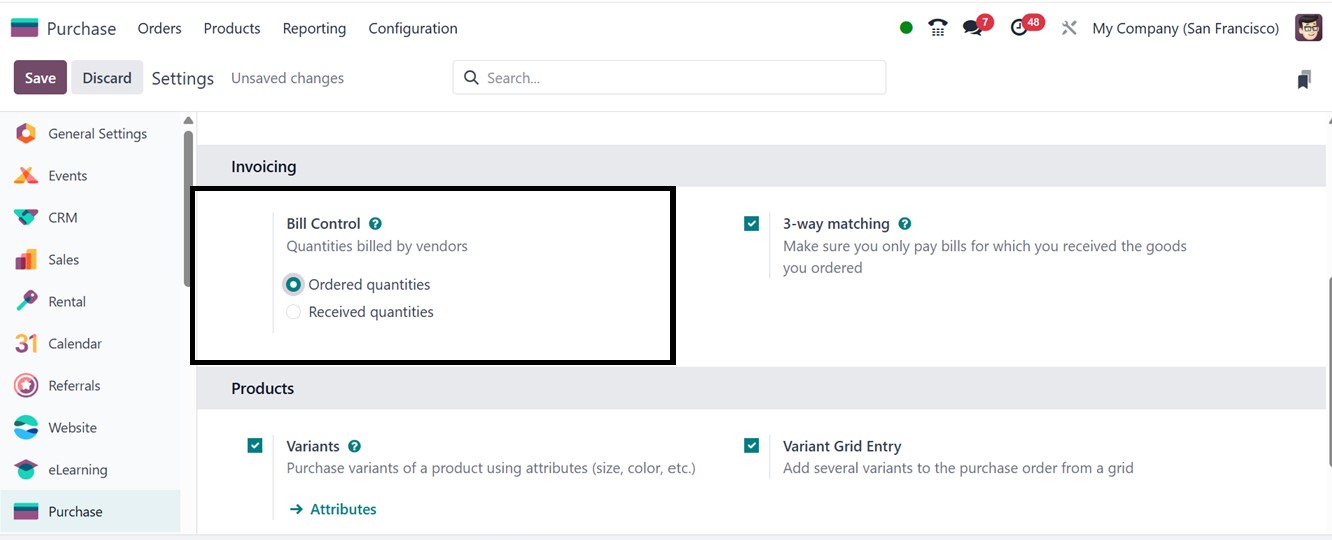
The timing of vendor bill
payments upon purchase order
confirmation depends on the
selected control policy.
Vendors can be paid either
before or after receiving the
goods. The "Ordered
Quantities" bill control
option allows users to
process vendor payments as
soon as the purchase order is
confirmed. In this case, a
draft vendor bill is
generated based on the
quantities specified in the
corresponding purchase order.
Alternatively, vendor bills
can be created based on
received quantities using the
"Received Quantities" option.
With this option, payments
are processed based on the
actual quantities received.
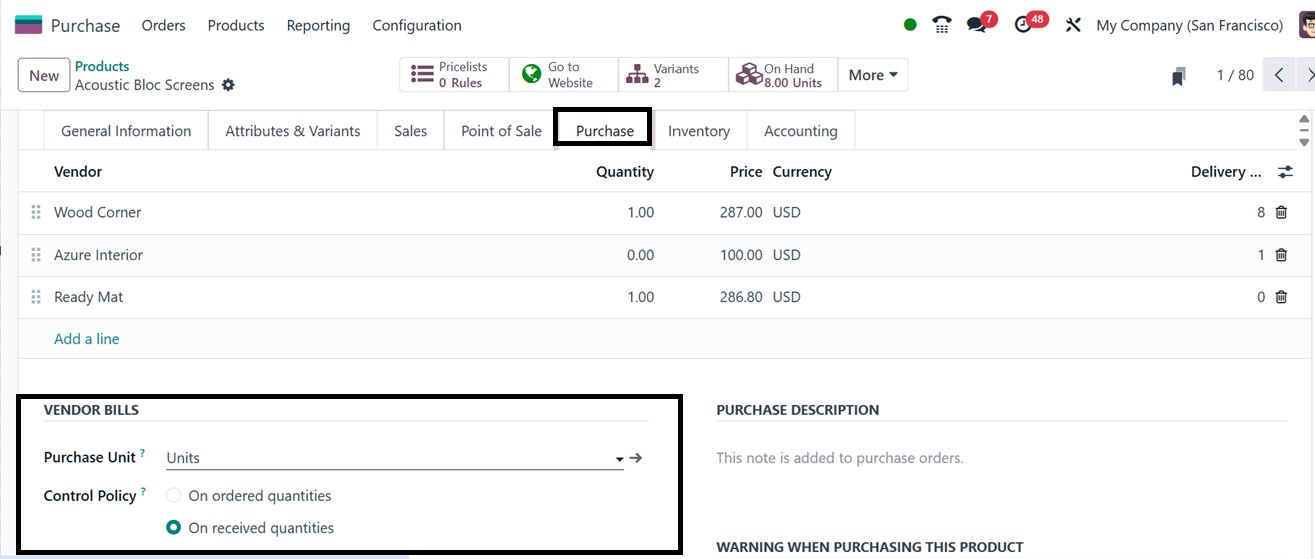
When a "Bill Control" option is
selected from the Settings
menu, it is automatically
applied as the default policy
for all newly created
products. However, users can
customize the billing policy
for individual products by
modifying the "Control
Policy" field found under the
"Purchase" tab in the
product’s detail form. This
functionality allows
businesses to manage billing
preferences on a
product-by-product basis,
offering greater flexibility
and control over how vendor
bills are generated for
different items, as depicted
in the screenshot below.
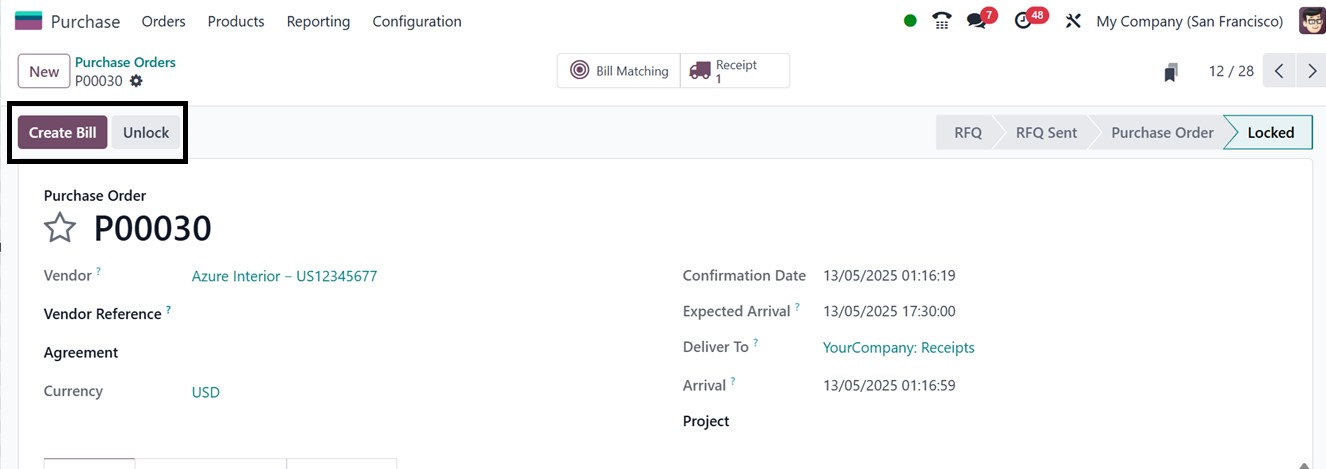
Generating a Vendor Bill
To check the vendor bill
generating feature, create a
new purchase or RFQ order,
edit the details and confirm
the order. Once a purchase
order is completed, you can
see the "Create Bill" button
at the top of the form view,
as illustrated in the
screenshot below.
Clicking on the ‘Create Bill’
button takes you to a new
screen where a draft version
of the vendor bill is
automatically generated by
Odoo 18, as shown below.
Before approval, users can review
the details provided in the
draft vendor bill. The
information includes Vendor,
Bill Reference, Bill Date,
Accounting Date, Payment
Reference, Recipient Bank,
Journal, and Due Date. To
automatically populate the
form, users can upload a
previous bill or purchase
order.
The "Invoice Lines" section
provides an overview of the
ordered items. The
corresponding fields display
journal entries and other
relevant details related to
the vendor bill. To finalize
the vendor bill, click the
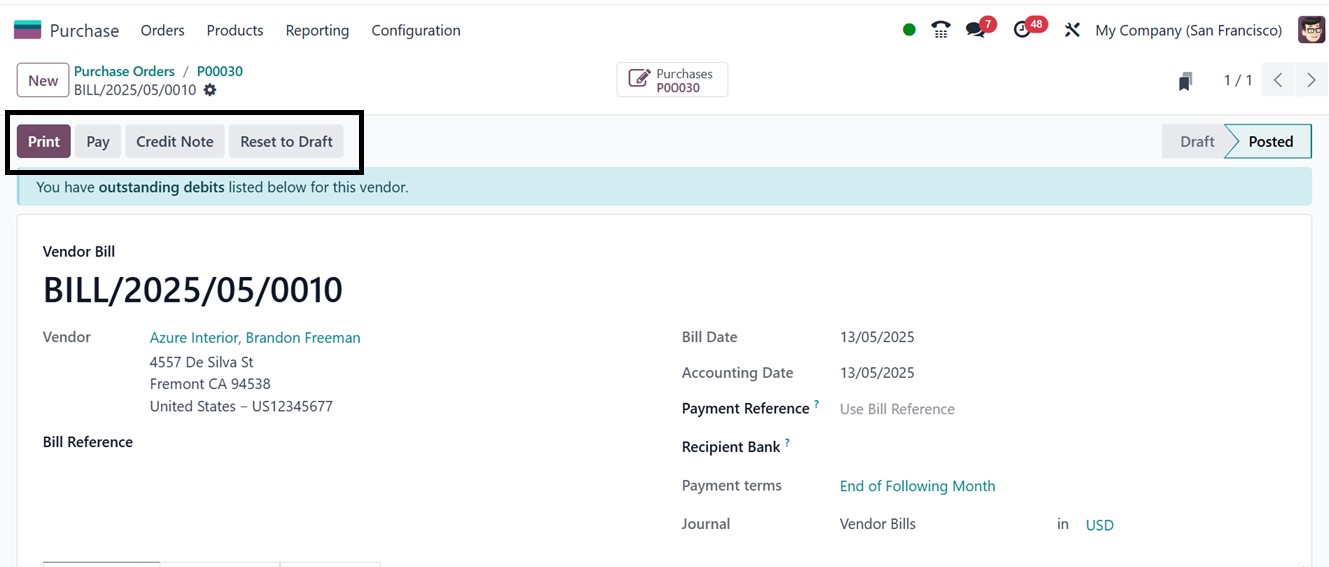
"Confirm" button. Then,
proceed to the payment
process using the ‘Pay’
button.
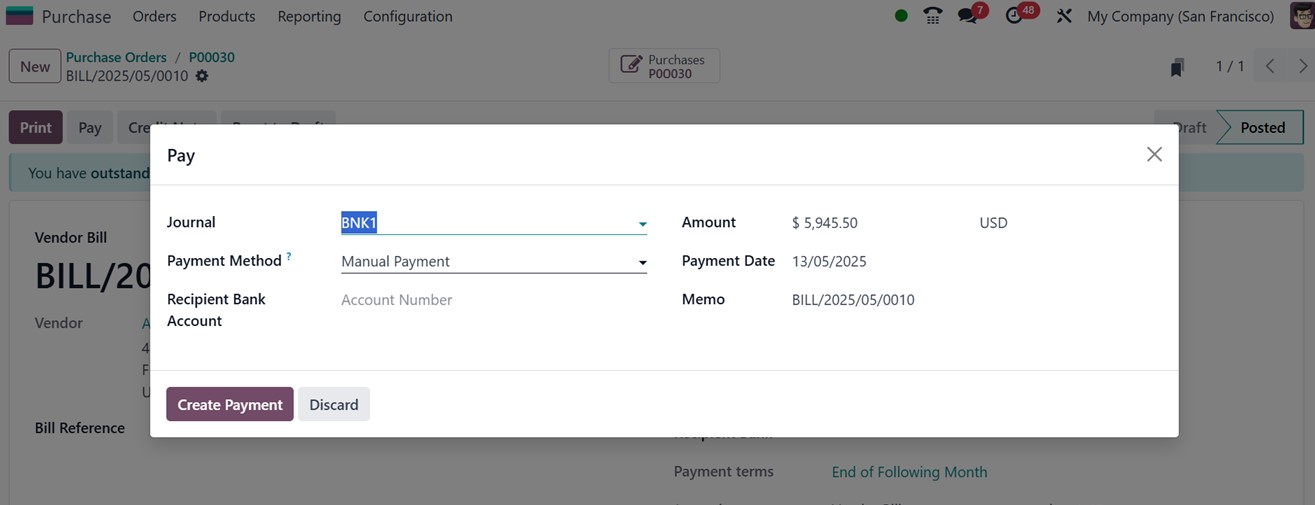
Then, you have to create the
payment from the ‘Pay’ window
by choosing the appropriate
Journal, Payment Method,
Payment Date, Payment Date
and other details. Also click
on the ‘Create Payment’
button to complete the
process, as shown below.
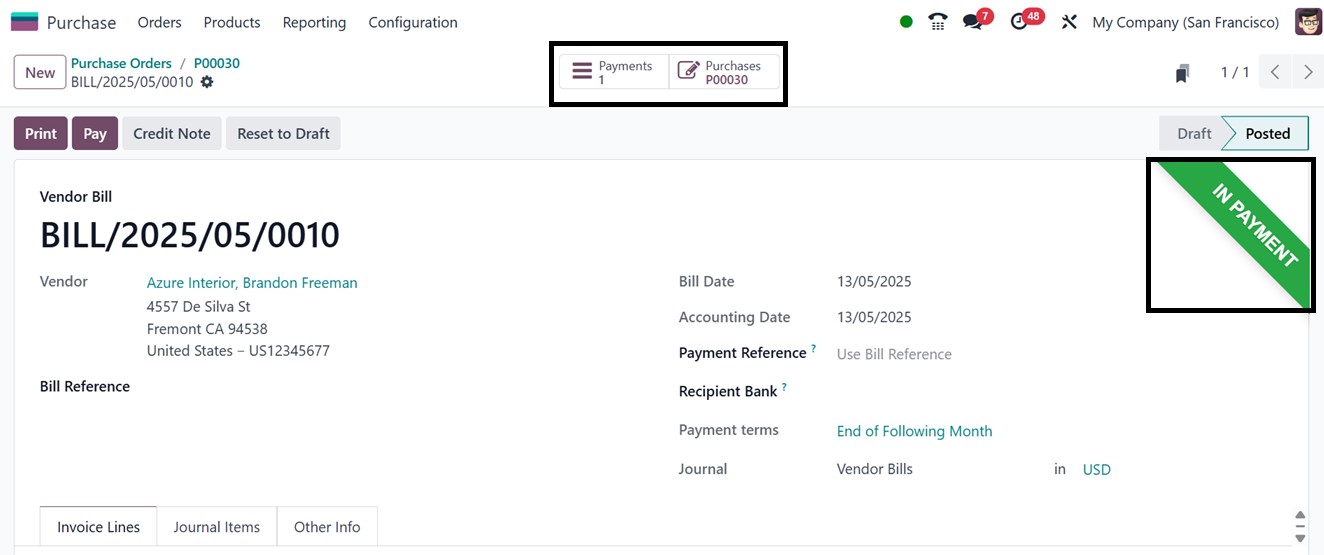
Upon completion of all payment
steps, the vendor bill status
updates ‘IN PAYMENT’ and
then, "PAID," as illustrated
in the screenshot below. This
process outlines how vendor
invoices are generated for
received goods.
Next, we will explore vendor
management within the
‘Orders’menu of the Odoo 18
Purchase module.
1.8 Vendor Management
Maintaining strong relationships
with suppliers is essential
for effective procurement
management within an
organization. The Odoo 18
Purchase module facilitates
the efficient creation and
management of vendor records,
ensuring seamless access to
supplier information. With
this module, users can
centralize vendor-related
activities, streamlining
operations in a single
platform. The ‘Orders’ menu
within the Purchase module
provides access to the vendor
management interface.
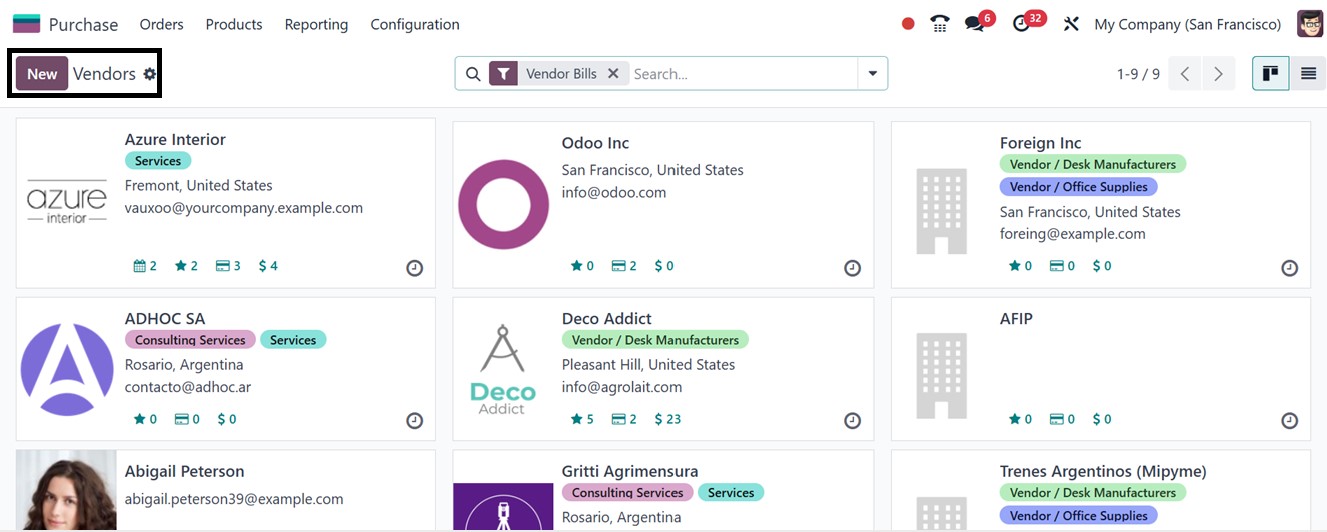
To view the vendor database,
navigate to the Orders menu
and select the Vendors
option. This action will open
a dedicated window displaying
all registered vendors. Users
can switch between Kanban and
List views using the icons in
the top-right corner of the
screen.
The Kanban view provides a quick
overview of each vendor’s
profile, including essential
details such as name,
address, email, tags,
scheduled meetings,
opportunities, purchase
history, and sales records.
The List view presents
structured data, displaying
vendor details such as Name,
Phone Number, Email,
Salesperson, Activities,
City, Country, and Company.
Additionally, users can
schedule an activity with a
specific vendor directly from
their profile page by
clicking on the clock icon.
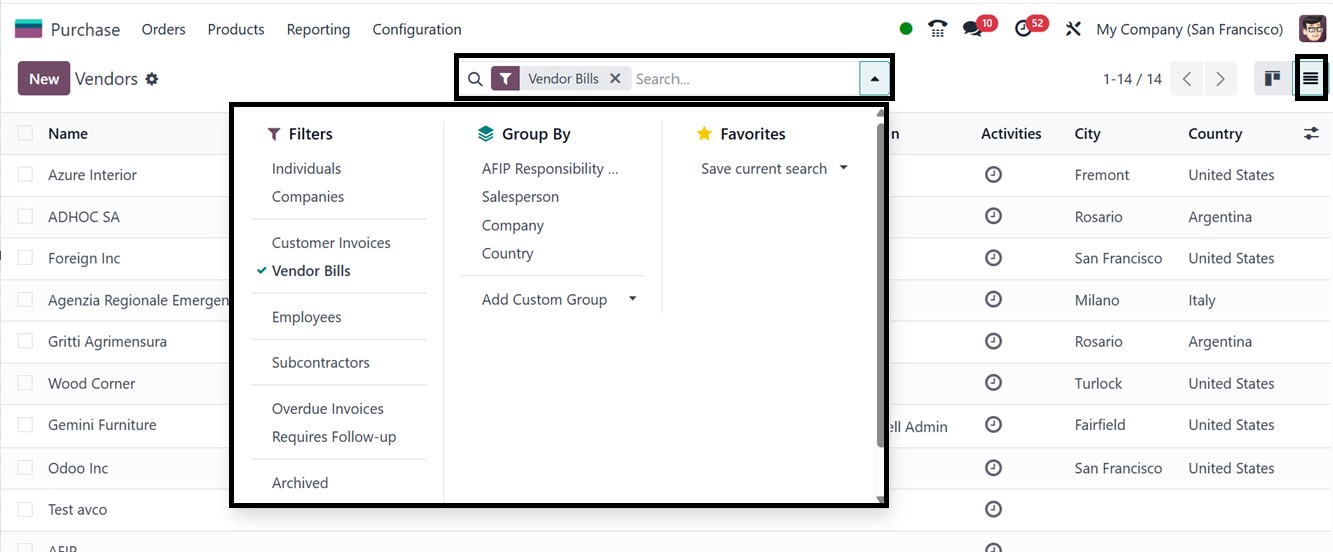
Odoo 18's integrated features for
vendor management make it
simple to alter the vendor
list. To refine search
results according to certain
standards, you can apply both
predefined and custom filters
from the ‘Filters’ feature of
the search bar area. Vendors
can also be categorized using
the ‘Group By’ function based
on specific parameters like
Country, Company, Salesperson
or FIP Responsibility.
Furthermore, the ‘Favorites’
feature enables users to
store commonly used filter
combinations for convenient
and speedy access in
subsequent sessions,
simplifying the management
and retrieval of vendor data
as required.
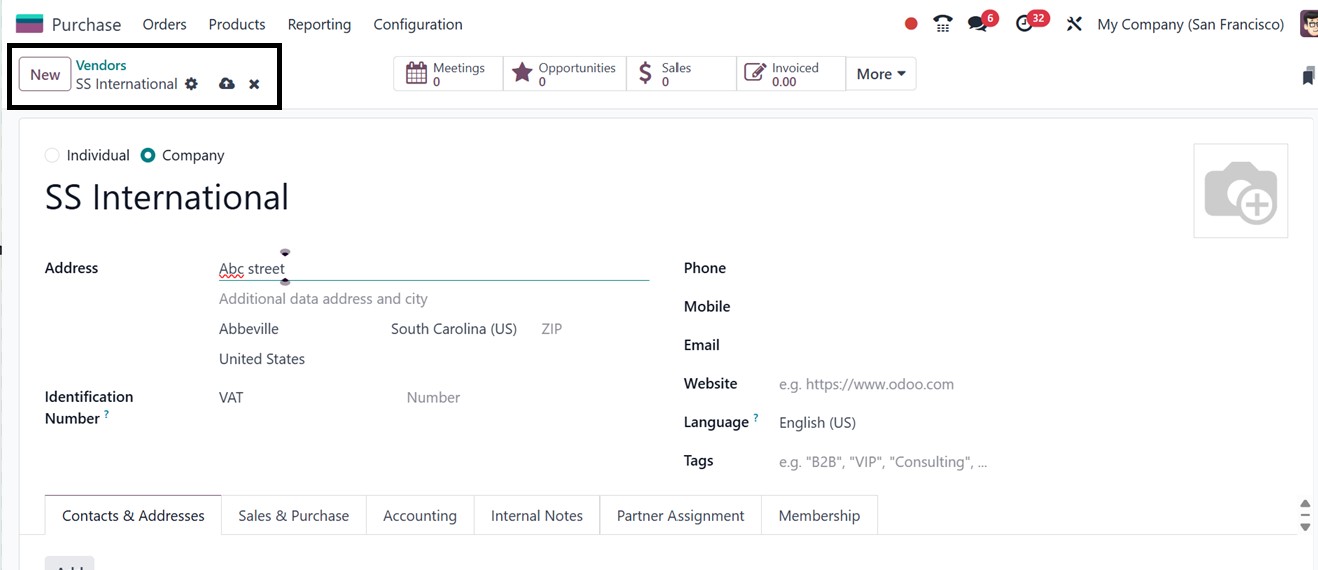
To register a new vendor, click
the New button and enter the
necessary details.Setting up
a new vendor in the Purchase
module follows the same
procedures as a customer
configuration in the Sales
module. So, you can complete
the Contacts & Addresses,
Sales & Purchases,
Accounting, Internal Notes,
Partner Assignment and the
Membership tabs with relevant
information, as depicted in
the screenshot below.
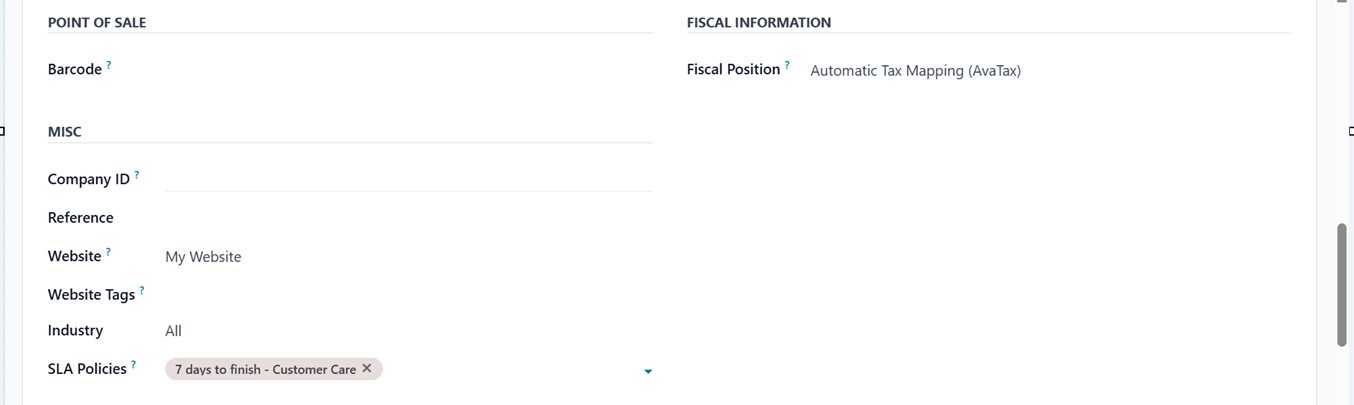
In the vendor configuration form,
the 'Sales & Purchases' page
is dedicated to handle a
vendor's key commercial
information. Users can
provide purchase-specific
details including the
vendor's preferred Payment
Terms, Payment Methods,
Pricelists, Delivery Methods,
Avalara Partner Code and
Avalara Exemption details for
sales and purchase orders.
The same tab allows users to
enter pertinent sales
information, such as the
Fiscal Position, Price lists,
and customer payment
conditions, if the vendor
also serves as a client.
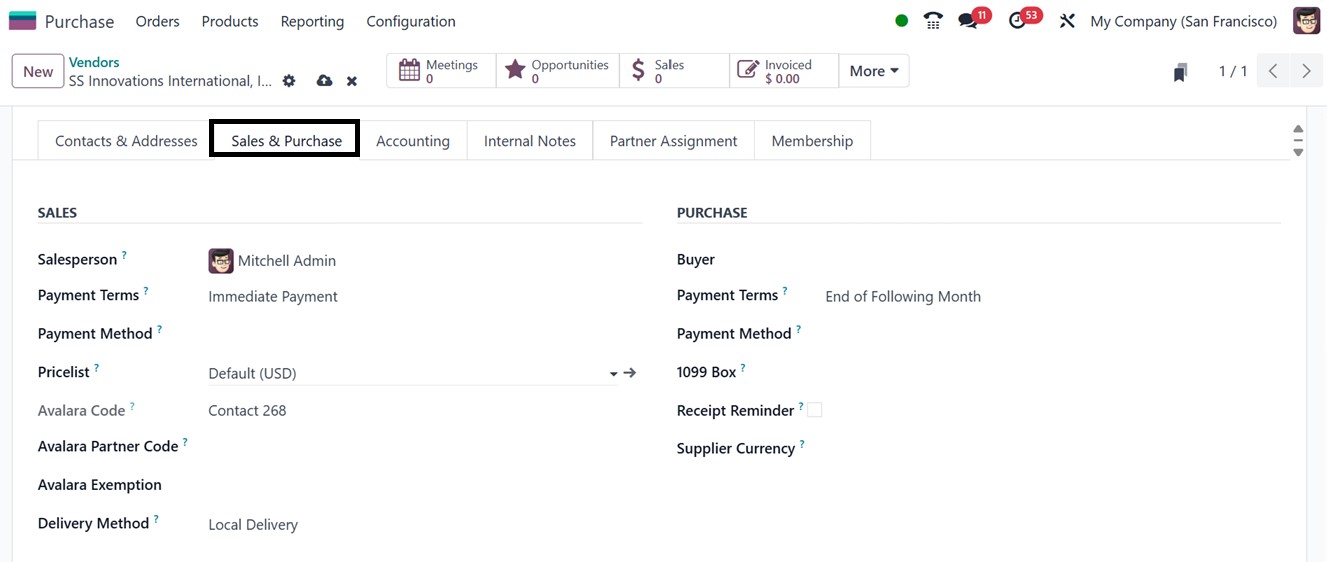
Furthermore, consumers have the
option to specify the
transaction Currency, which
is very useful when dealing
with foreign providers. The
provision of personalized
pricelists for sales and
purchase operations is also
supported by this tab.
Overall, this area makes sure
that the sales and
procurement processes operate
together seamlessly,
especially for companies that
engage with partners in
different capacities.
Upon completing the vendor
configurations and saving the
data, some additional smart
buttons will appear on the
vendor profile providing
access to key insights and
records including the
Meetings, Opportunities,
Sales, Invoices,
Subscriptions etc, as
illustrated in the screenshot
below.
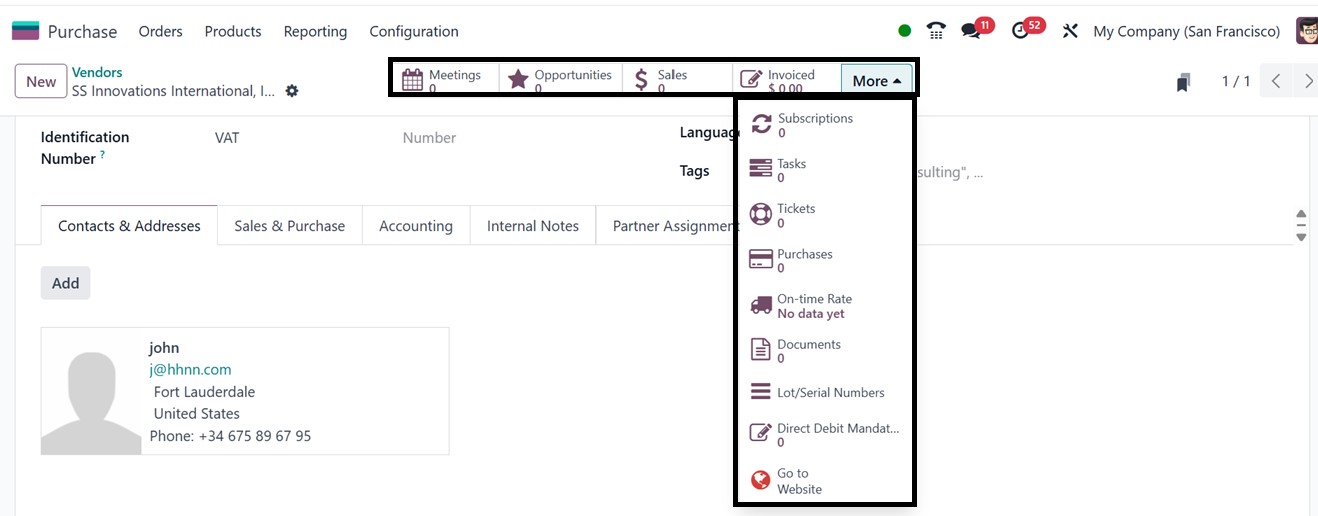
- Meetings: Displays all
scheduled appointments
with the vendor.
- Opportunities, Sales, and
Invoiced: Tracks
business interactions
with the vendor.
- Tasks and Tickets:
Provides an overview
of assigned tasks and
support tickets
related to the vendor.
- Additional Smart Buttons:
Under the More option,
users can access
details about the
vendor’s
Subscriptions, Tasks,
Tickets, Purchases,
On-time Delivery Rate,
Lots/Serial Numbers,
Direct Debit Mandates,
and Documents. You can
also check the website
interface of the
vendor using the ‘Go
to Website’ button.
The ‘Action’ button in Odoo 18
offers several additional
vendor management tools,
including the ability to
process follow-ups, duplicate
or delete vendor records,
send SMS messages, download
vendor details as a vCard,
perform privacy lookups, and
archive vendor records when
needed along with other
options, as highlighted in
the screenshot below.
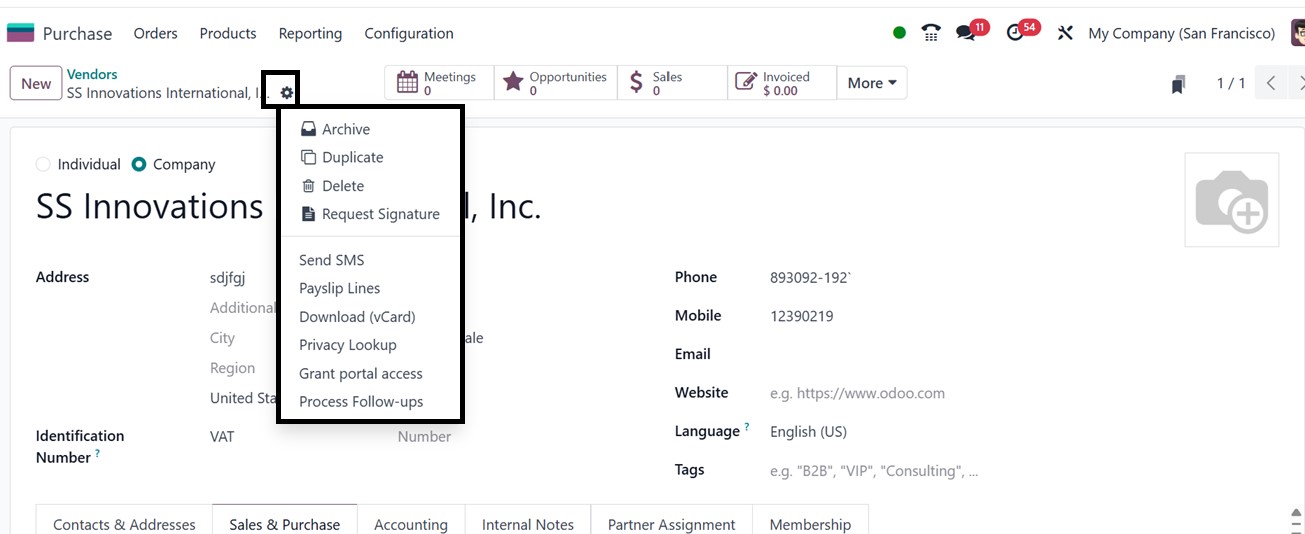
Here are the functions of the
Action button .
- Archive: Temporarily
deactivate a vendor
without deleting the
record, preserving
historical data.
- Duplicate: Create a copy
of an existing vendor
record for faster data
entry.
- Delete: Permanently
remove a vendor record
from the system.
- Request Signature: You
can use Request
Signature to initiate
a digital signature
process for
vendor-related
documents,
- Send SMS: Communicate
with vendors directly
by sending SMS
messages from within
Odoo.
- Payslip Lines: Provides
access to any related
payslip data linked to
the vendor, often
relevant in cases
where vendors also
serve as contractors.
- Download vCard: Export
vendor contact
information as a vCard
file for use in other
applications.
- Privacy Lookup: Review
data access
permissions related to
the vendor record.
- Grant portal access:
Provides vendors with
login access to view
their documents.
- Process Follow-ups:
Initiate follow-up
activities or
reminders related to
vendor transactions.
In Odoo 18, the vendor management
process is highly structured
and efficient allowing
businesses to maintain an
organized supplier database.