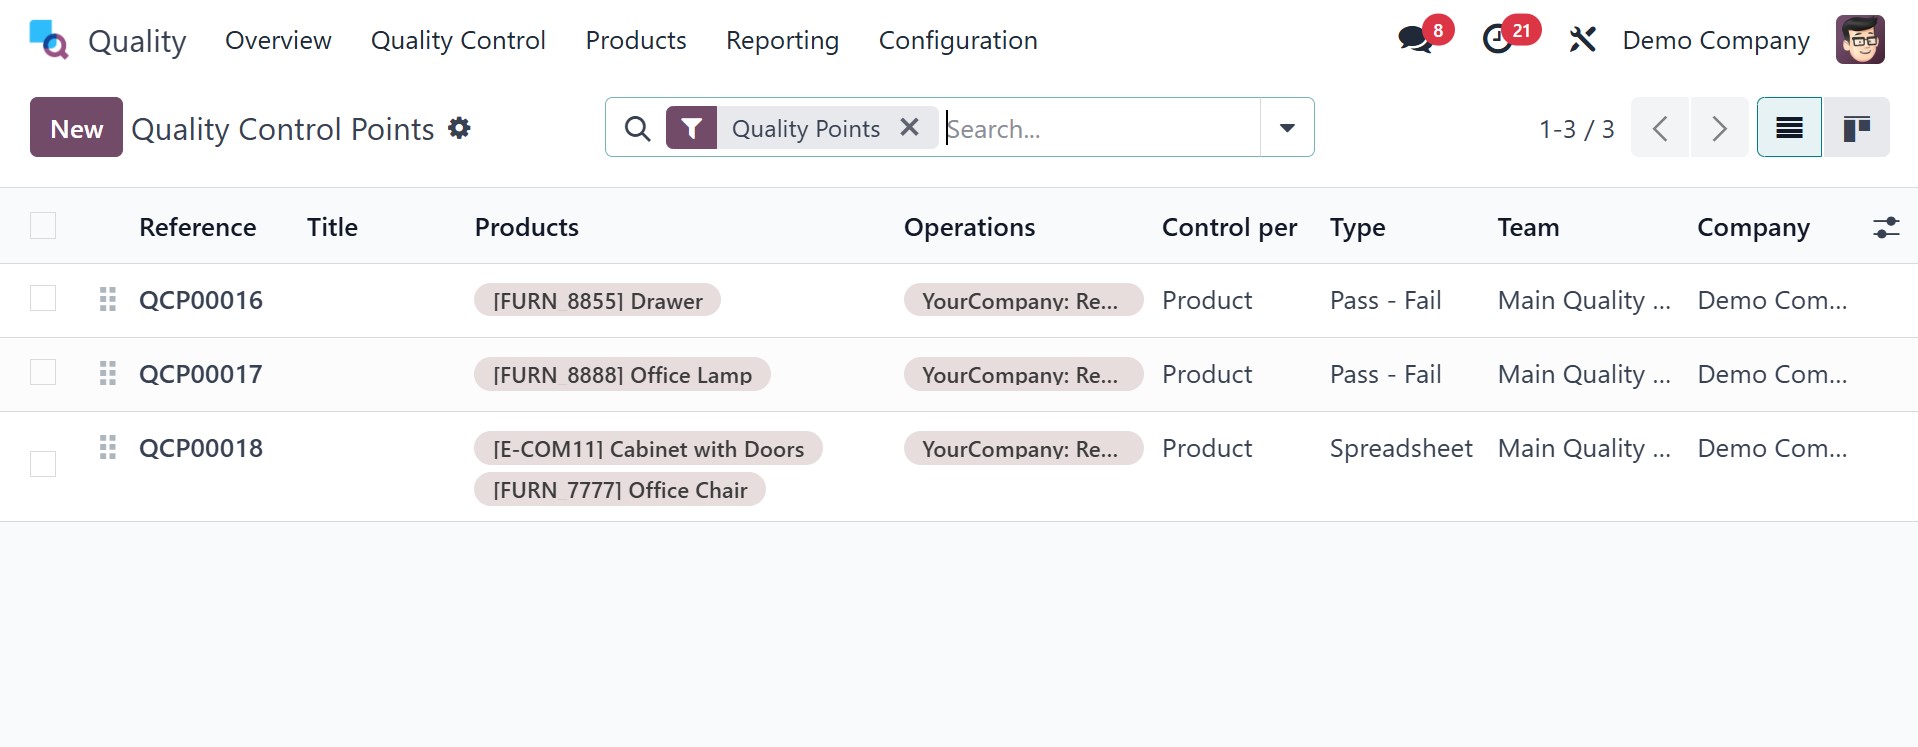
2. Quality Control
2.1 Control Points
Quality control points assist in
reaching the phases where an
item must be inspected.
Identifying the methods for
assessing the quality of a
product is easy. Select the
Control Points menu from the
Quality Control tab to obtain
these standards. The details
of each quality control
point, such as Reference,
Products, Control Per, Team,
Title, Company, Type, etc.,
are defined in the List view
of the Quality Control Points
window. By choosing a Quality
Control point from the list,
you will be provided with
full details regarding that
specific point. To build
brand-new Quality Control
Points, click the New button
You can browse through a number
of options that have to do
with the open screen. In the
Title field, type in the name
that was selected for the
quality control point. The
products that are used on the
quality control point can
then be chosen in the
Products field. Other Quality
Control Points, items that
fall under the product
category of your choice,
trigger quality points. In
the Product Categories field,
users can cite the product
category that is applicable
to some products.
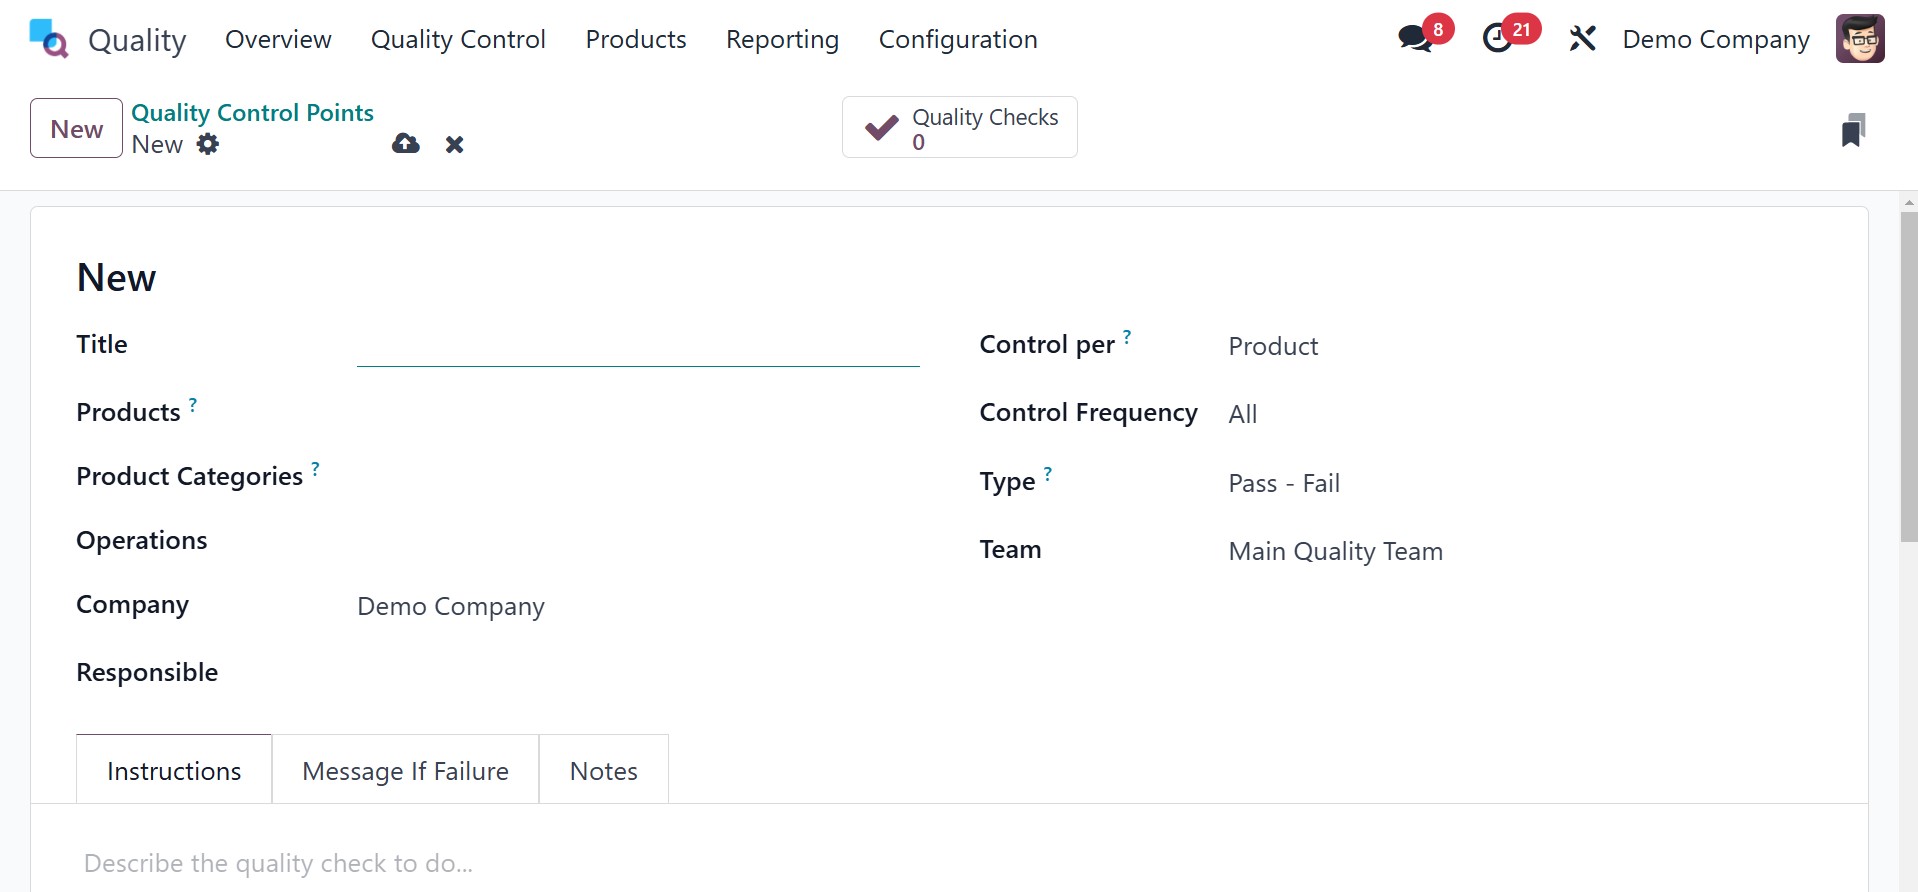
You can select the stage where
quality is to be checked in
the Operations field. Next,
in the Company field, choose
the company that is linked
with your generating quality
control point. Also, you can
define the quality check
request for every field in
the Control according to the
Product, Operation, and
Quantity.
If you choose the Operation
option under Control per
field, you can request a
quality check at the
operation level. If you
choose the Product option,
you can retrieve the quality
check based on the product.
Choose the Quantity option
under Control per field to
request a quality check on
the quantity of a recently
registered product.
The Control Frequency field
enables users to define
particular intervals for
quality inspections.
Intervals can be received
periodically, All, or
randomly.
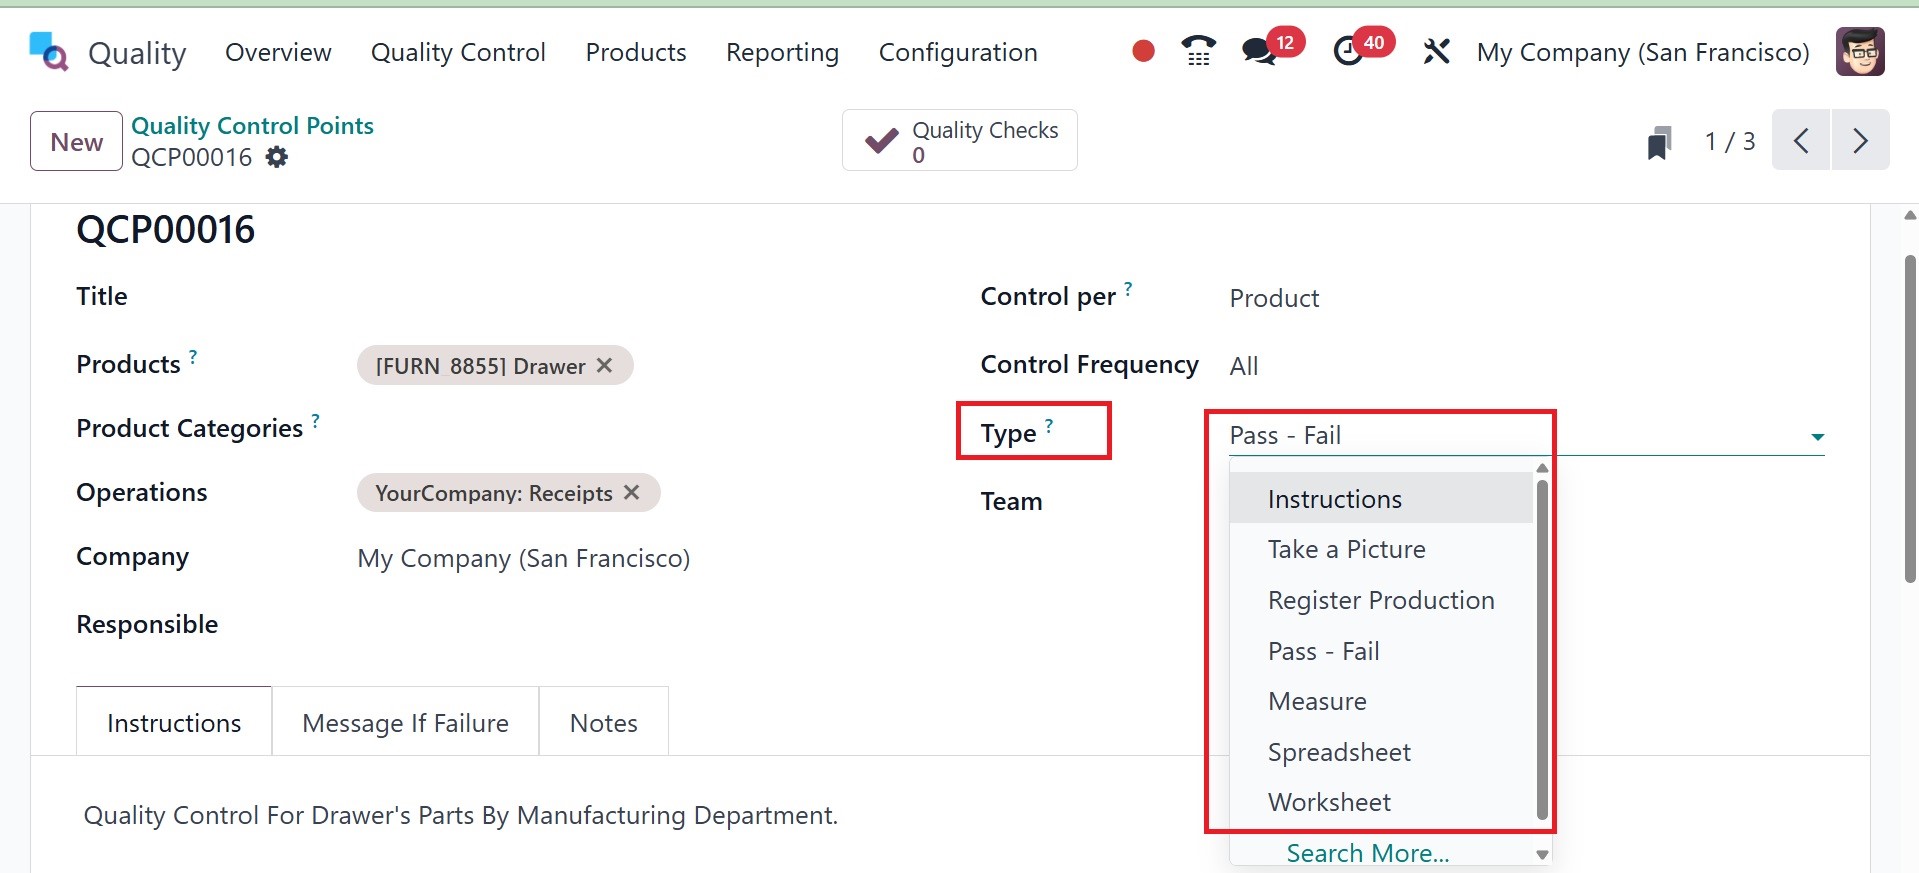
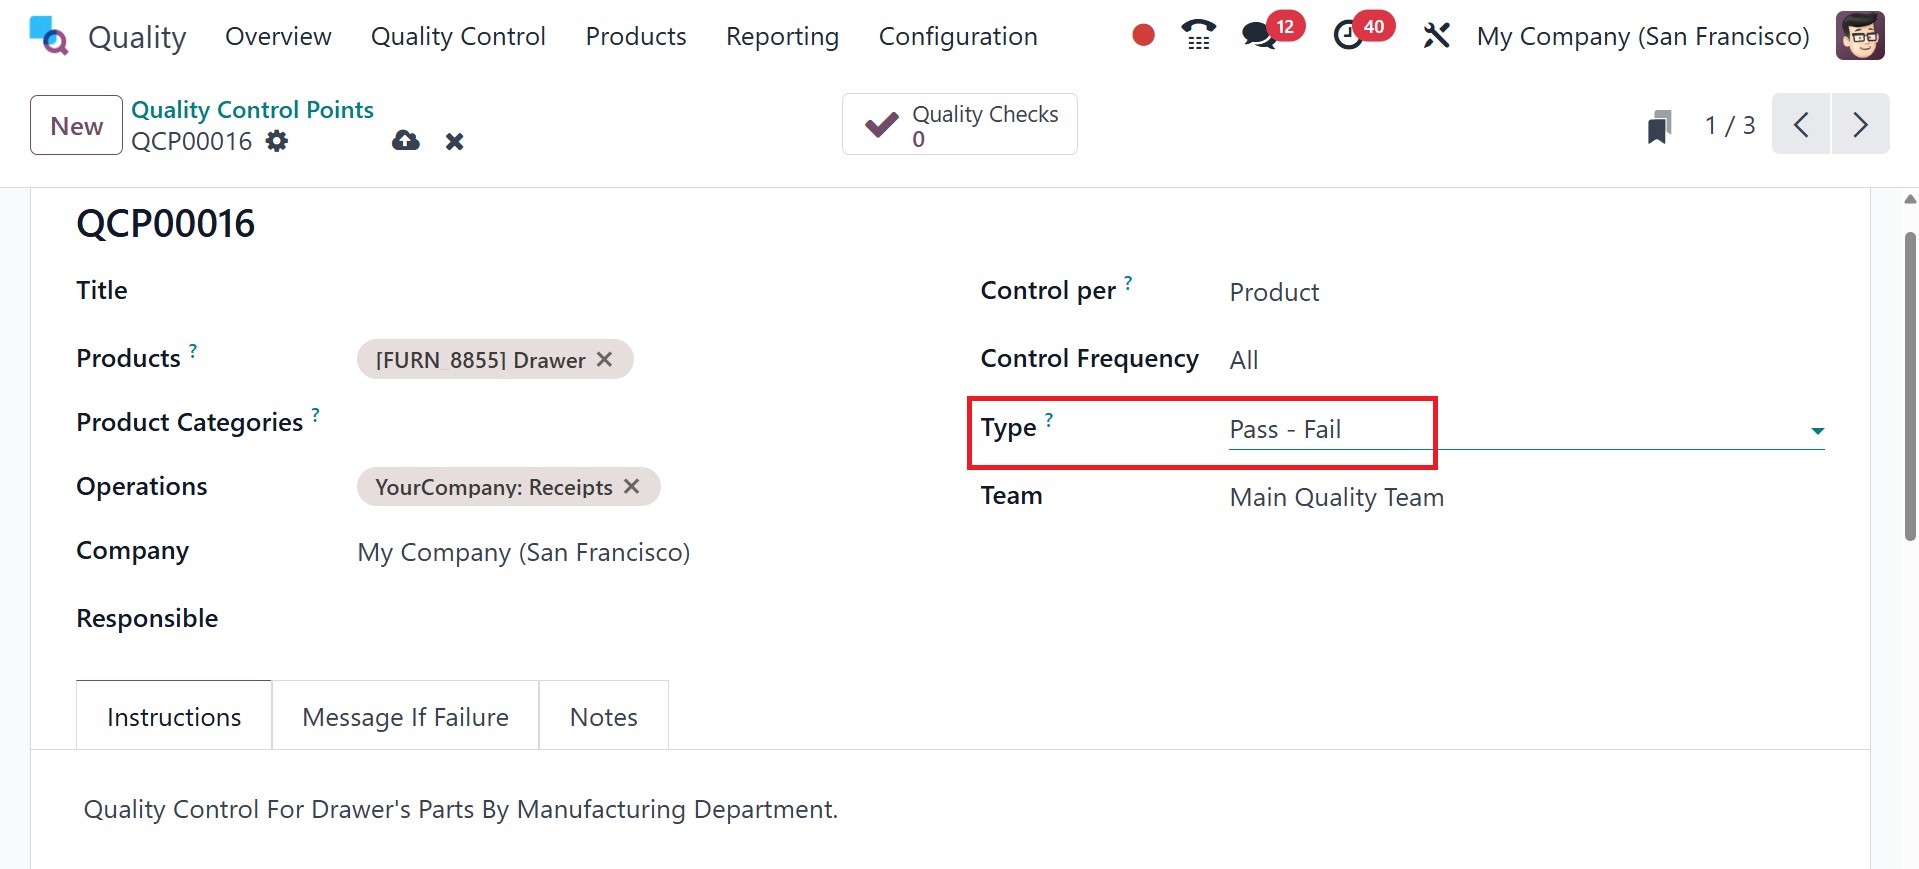
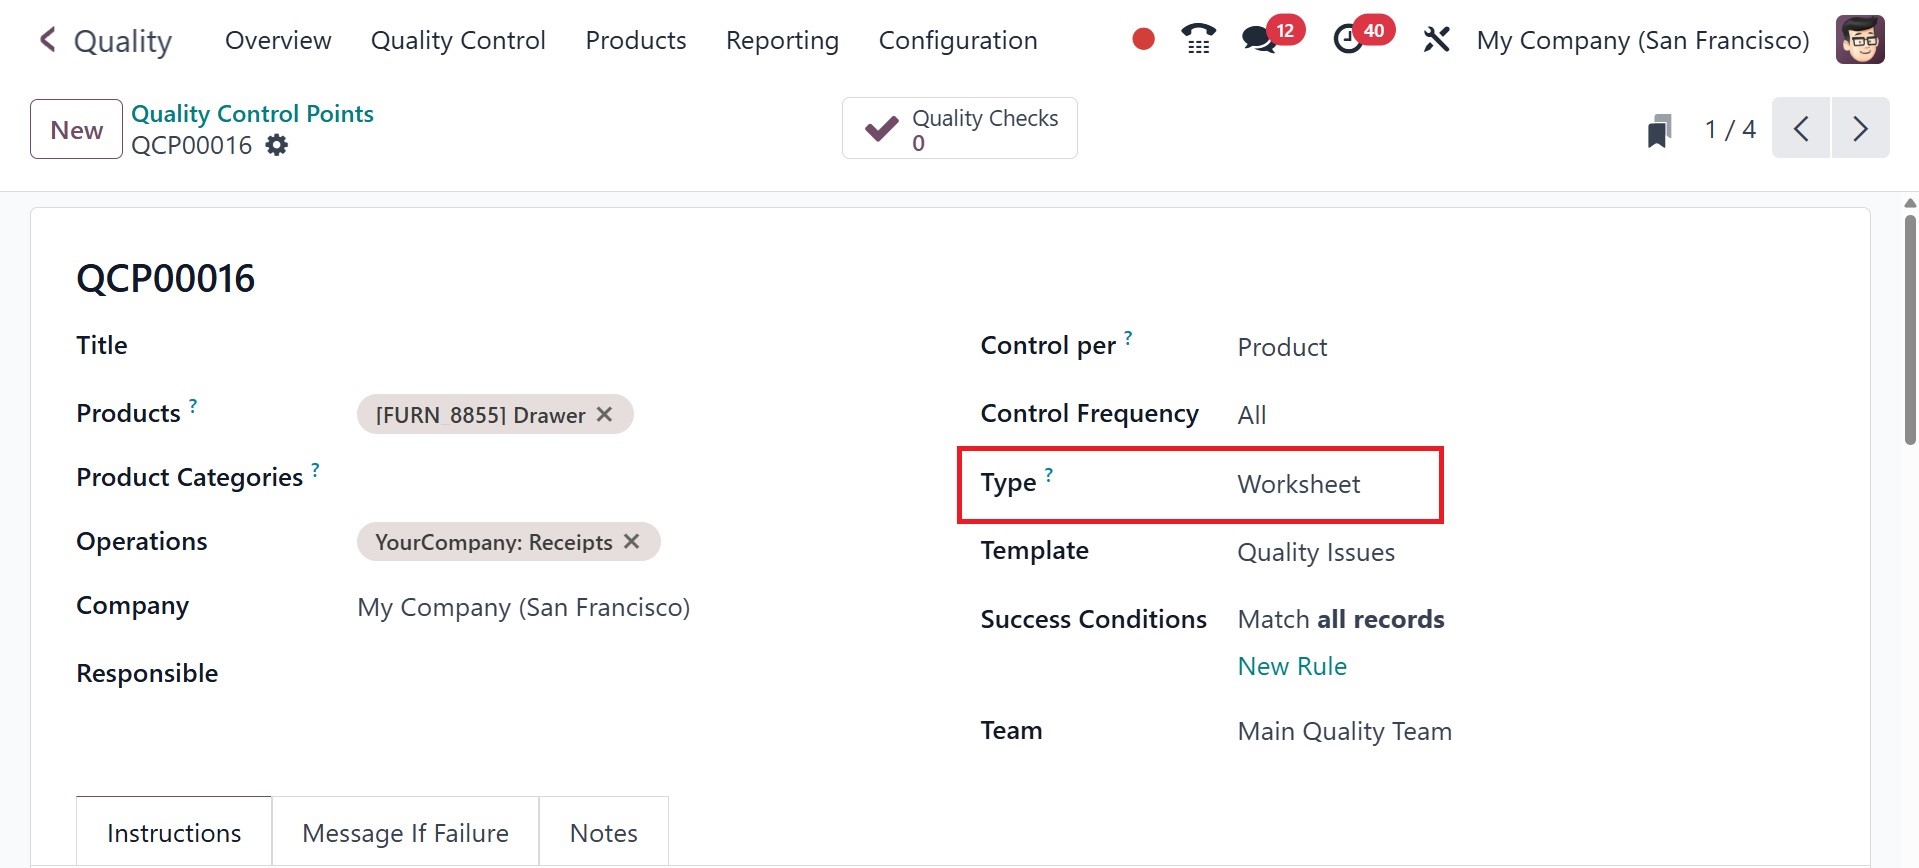
The Type option enables us to
define the category of the
quality control point. It is
classified as instructions,
take a picture, register
production, pass-fail,
measure, spreadsheet, and
worksheet. You can apply the
above types when performing a
quality check.
When doing quality checking, say,
you may check pass and fail
options when you put in
Pass-Fail in the Type field.
Through this, you can
identify if a product will be
a pass or a fail.
Let us look at each type in
detail.
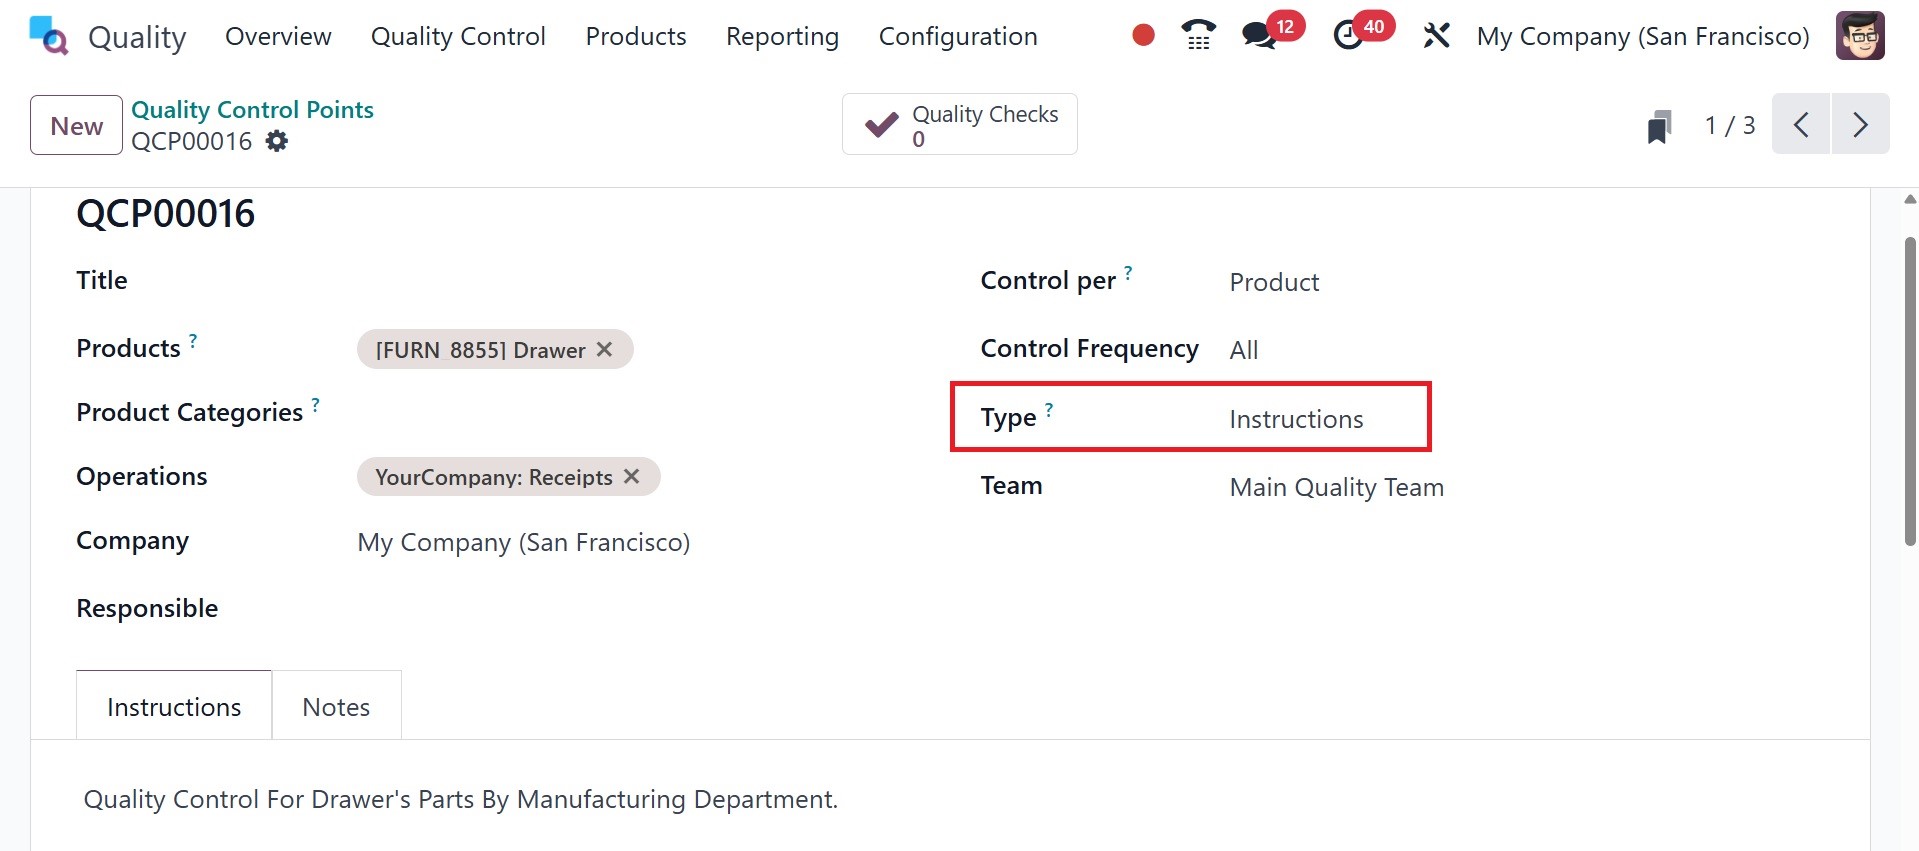
Instructions: During the
manufacturing process, Odoo
18's instructions quality
checks make sure that
operators follow established
instructions or guidelines.
Businesses can preserve
precision and consistency in
manufacturing operations by
implementing standardized
procedures. Errors are
avoided, variability is
decreased, and items are made
in compliance with standards
thanks to these inspections.
There are several approaches to
handling quality checks for
instructions. A quality check
can be done immediately
within a work order,
inventory, or manufacturing
order if it is associated
with that order. As an
alternative, the check can be
processed straight from its
own page.
Select a quality check and
complete the check by
following the given
instructions.
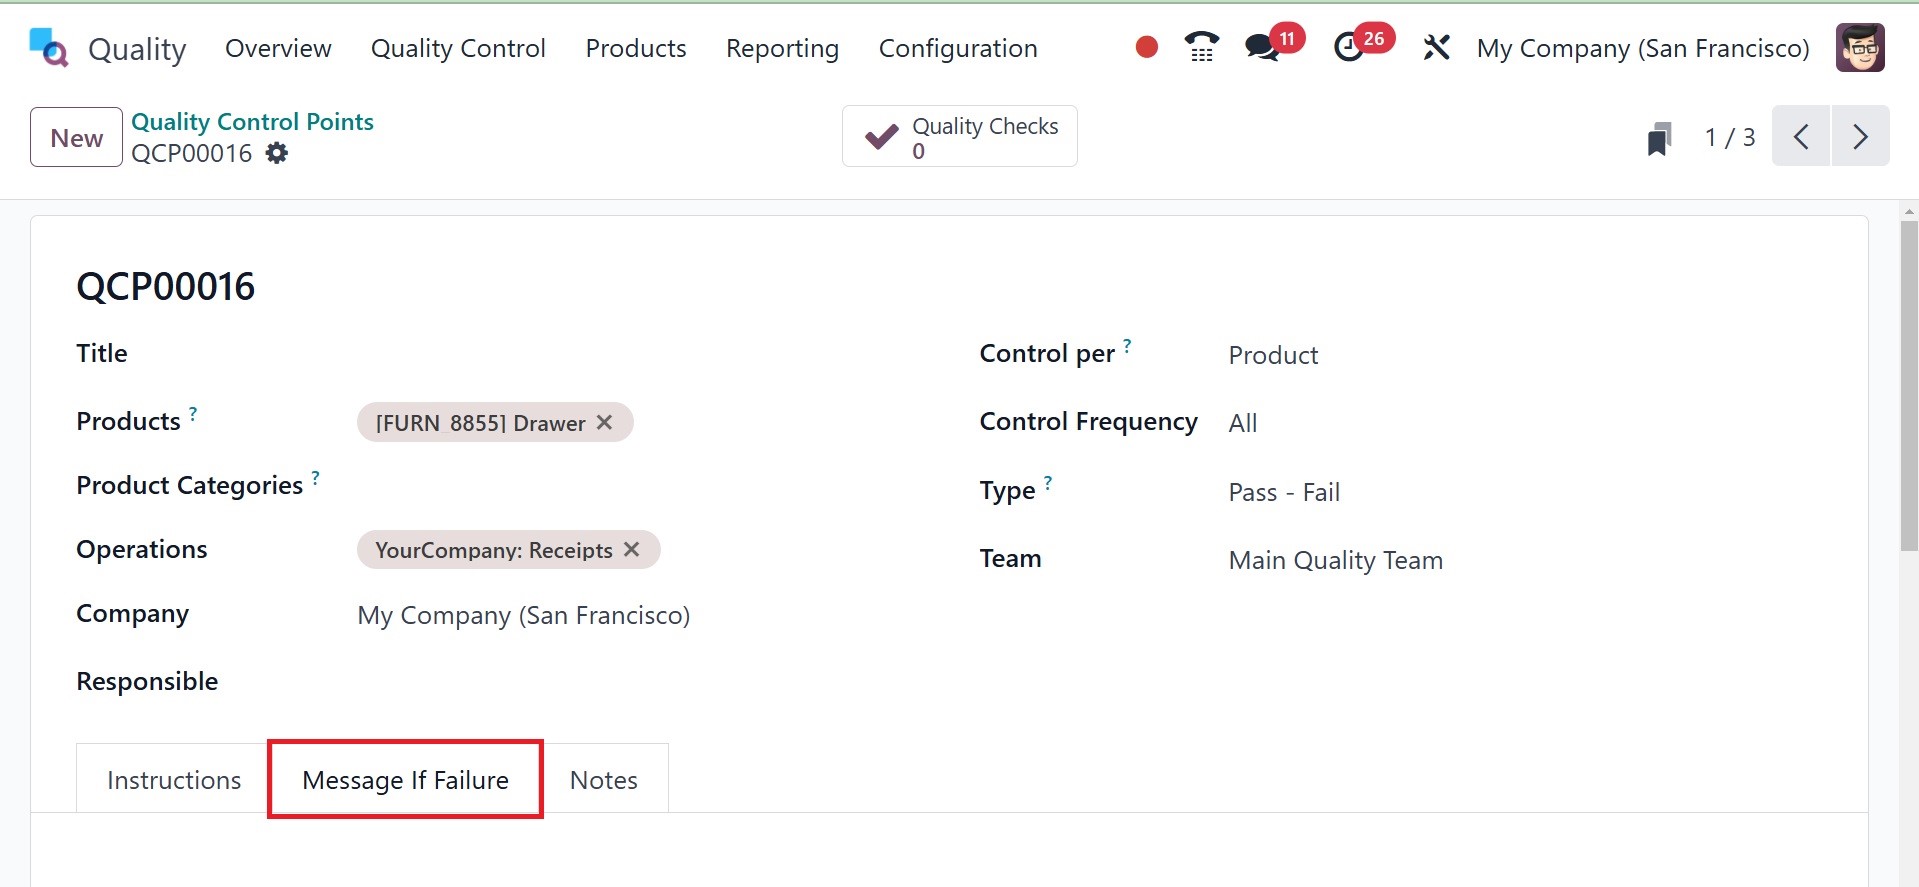
Pass-Fail: In Odoo 18, pass-fail
quality checks verify if a
product satisfies predefined
standards or requirements. A
product's success or failure
is determined by comparing it
to predetermined quality
standards. Businesses can
find non-conformities and
take immediate corrective
action by using pass-fail
tests, which offer a rapid
and simple method of
assessing product quality.
Pass-fail checks include a text
box that allows the developer
to specify particular
requirements necessary for a
product to pass the test.
There are two main ways to
create pass-fail quality
checks. The first option is
to manually build a single
check. Second, it is possible
to set up a Quality Control
Plan (QCP) to produce
inspections automatically at
predetermined intervals.
Use these procedures to start a
single Pass-Fail quality
check:
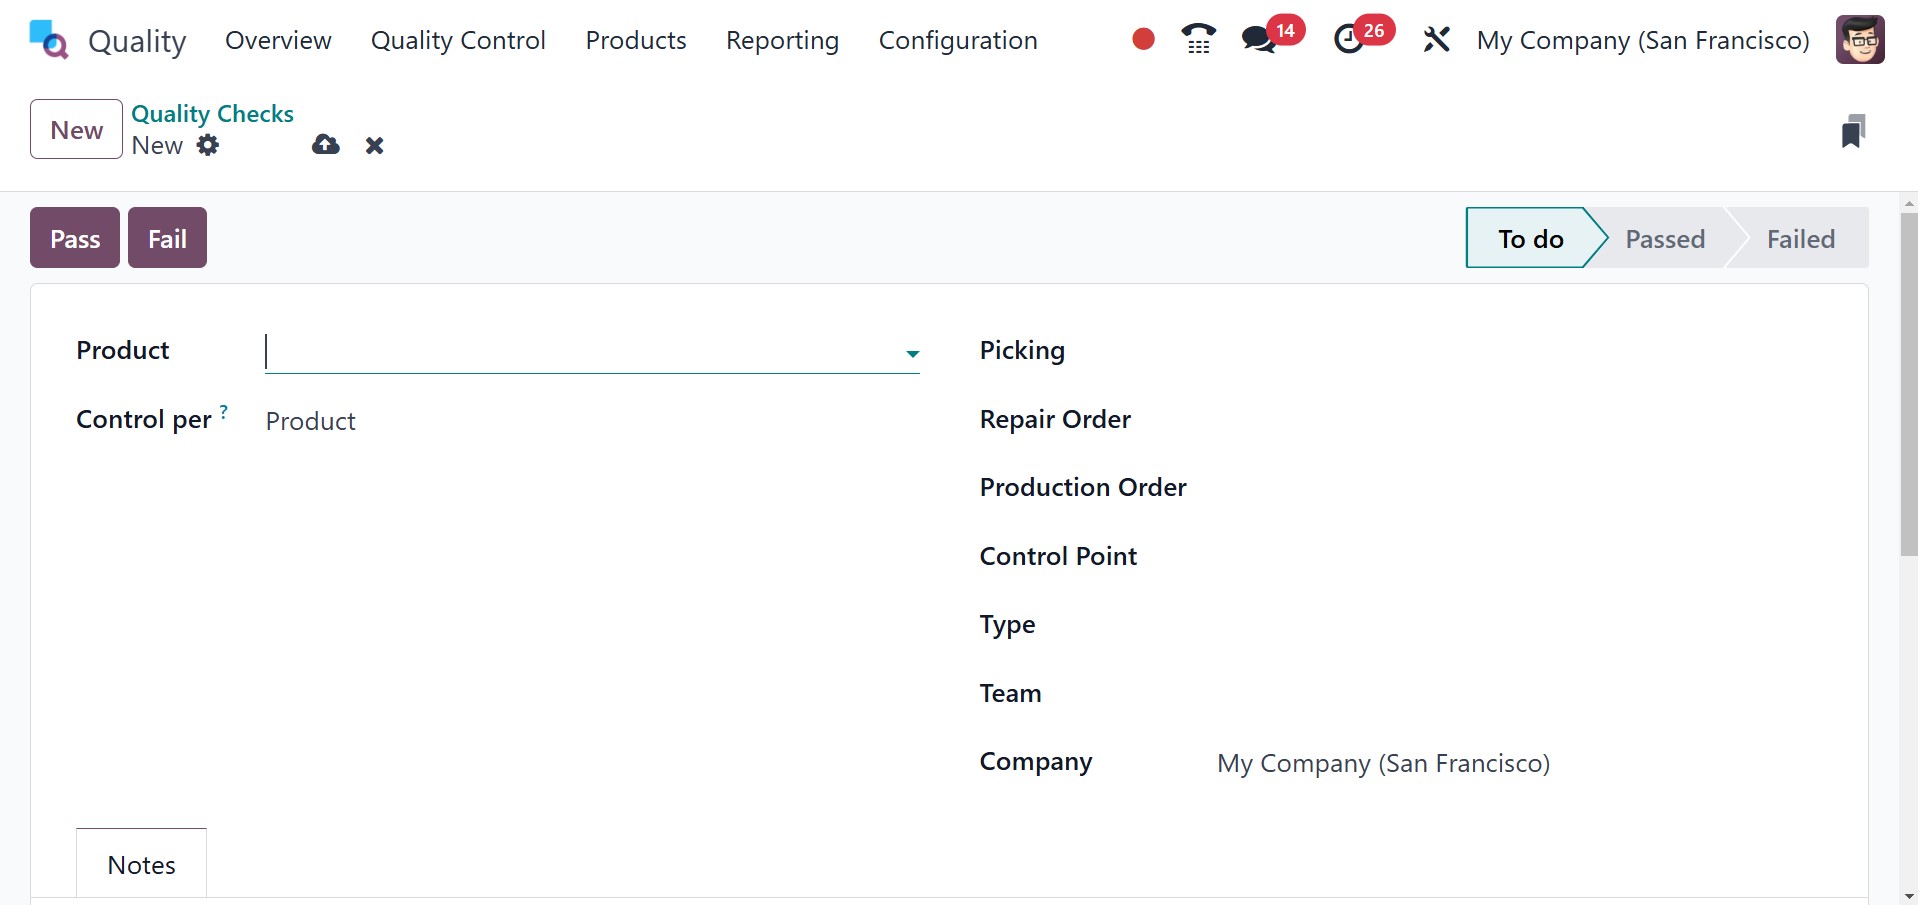
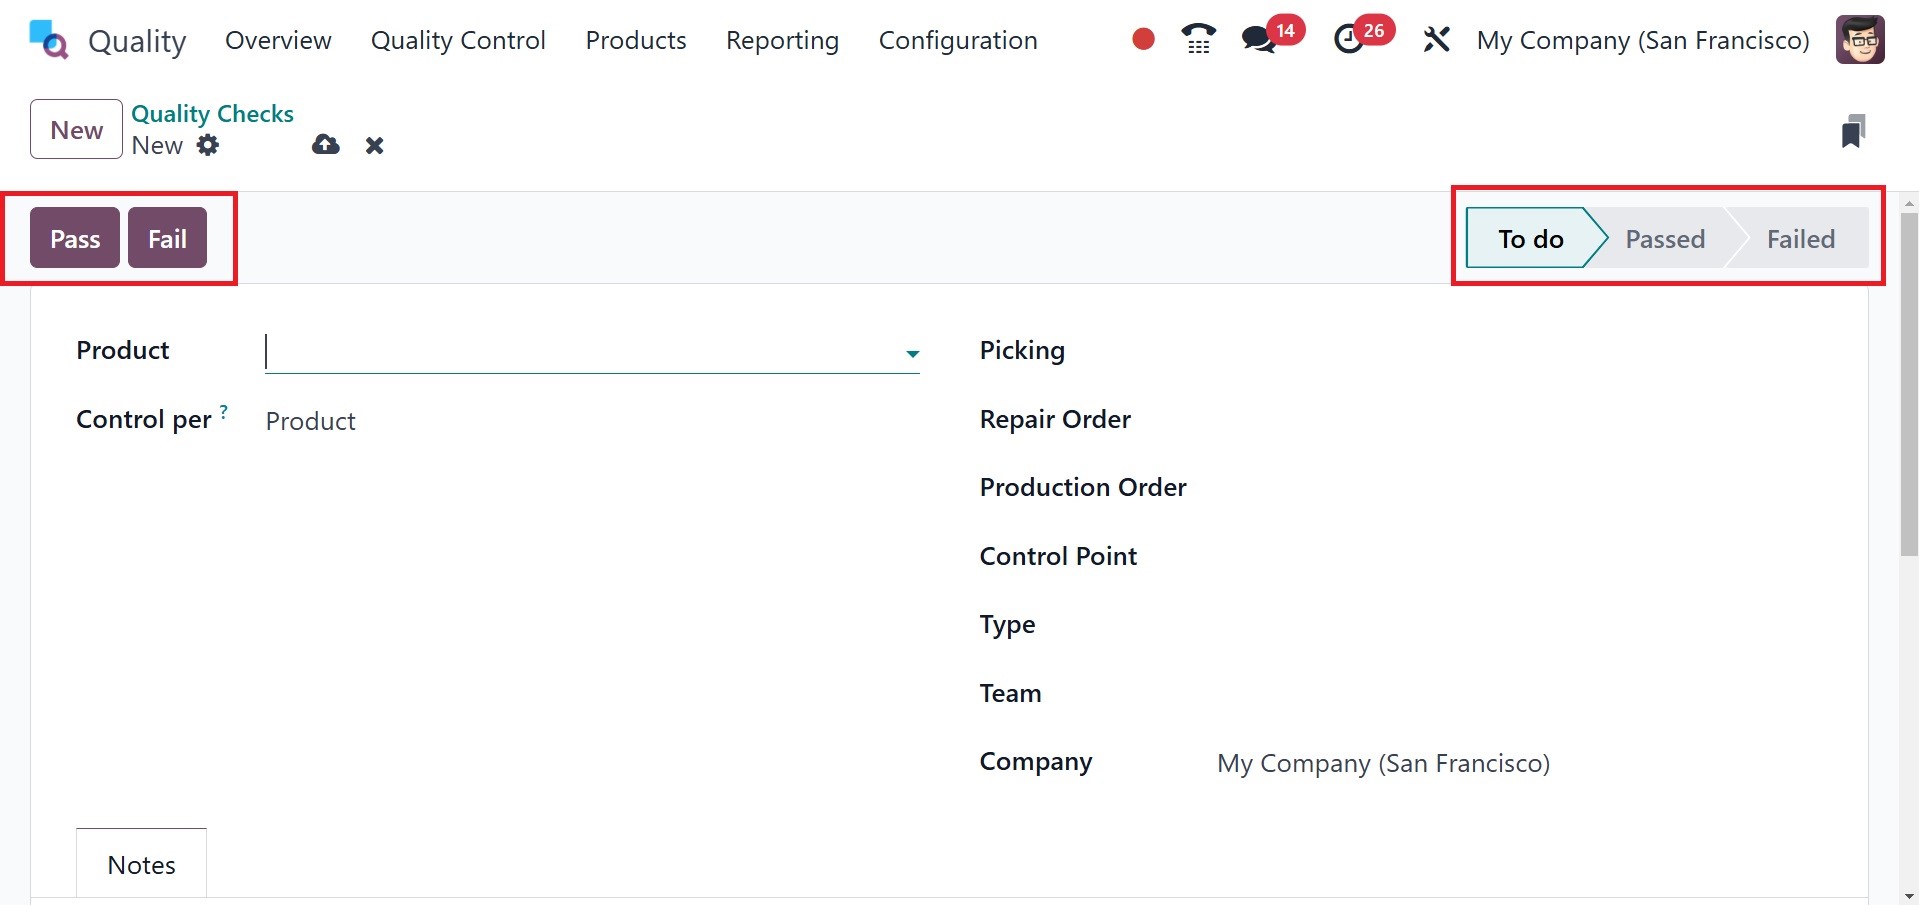
1. Click "New" after selecting
Quality > Quality Control >
Quality Checks.
2. Select the Pass-Fail quality
check type from the Type
drop-down menu.
Then, you will get the pass and
fail options, as shown in the
image below.
3. From the Team drop-down menu,
choose the quality team
responsible for managing the
check.
4. Go to the Notes tab and
include instructions on how
to carry out the quality
check and list the
requirements that must be met
for the check to be
considered successful.
Click the "Pass" button in the
upper-left corner of the page
if the requirements are met.
On the other hand, select the
"Fail" button if the
requirements are not
fulfilled. Use these
procedures to create a
Quality Control Plan (QCP)
that creates Pass-Fail
quality tests automatically:
1. Click "New" after selecting
Quality > Quality Control >
Control Points.
2. Select the Pass-Fail quality
check type from the Type
drop-down menu.
3. From the Team drop-down field,
choose the quality team
assigned to manage the checks
produced by the QCP.
4. Type instructions on how to
perform the quality check and
what criteria must be met for
the check to be considered
successful in the
Instructions text area.
Measure: Measurable evaluations
of product characteristics
including weight, volume, and
dimensions are part of
measure quality checks.
Businesses may specify
precise measurement standards
and tolerances for any
product attribute in Odoo 18.
Products are evaluated in
relation to these standards
during production to make
sure they fulfill the
necessary requirements.
Measure quality checks give
firms reliable measures that
enable them to confirm the
quality of their products and
their compliance with
requirements.
The recorded measurement must be
within a given tolerance
range of a norm value in
order for the quality check
to be successful. Measure
quality checks can be created
in two primary ways. Making a
single check by hand is one
approach. As an alternative,
checks can be automatically
generated at predetermined
intervals using a Quality
Control Plan (QCP).
Use these procedures to produce a
single Measure quality check:
1. Click "New" after selecting
Quality > Quality Control >
Quality Checks.
2. Select the Measure quality
check type from the Type
drop-down menu.
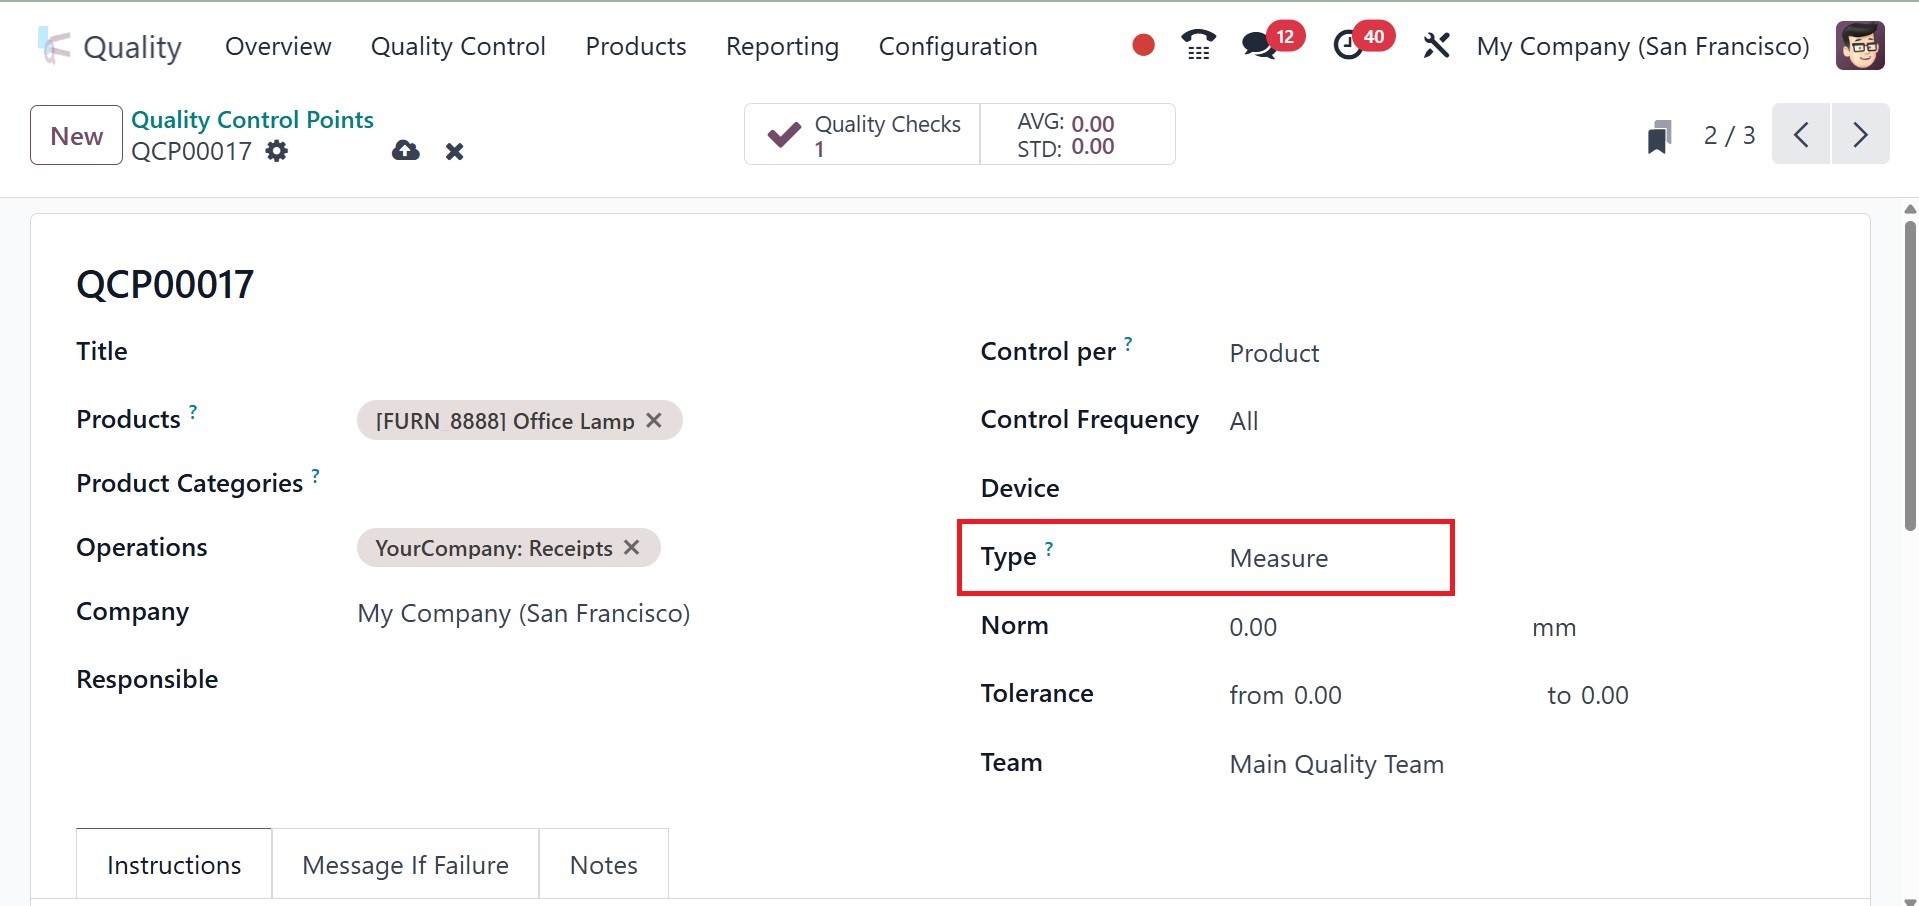
For quality checks, Norm and
Tolerance are used to specify
acceptable measurement
ranges, particularly for
measure-type controls like
weight, temperature, and
dimensions.It is essential
for maintaining constant
product quality and
minimizing flaws in
manufacturing, receiving, or
delivery.
The ideal or target value
anticipated for a certain
quality metric is known as
the Norm. It specifies what
the ideal measurement is. The
permissible range of
deviations from the norm is
defined by tolerance.
Then, you will get the measure
option, as in the image
below.
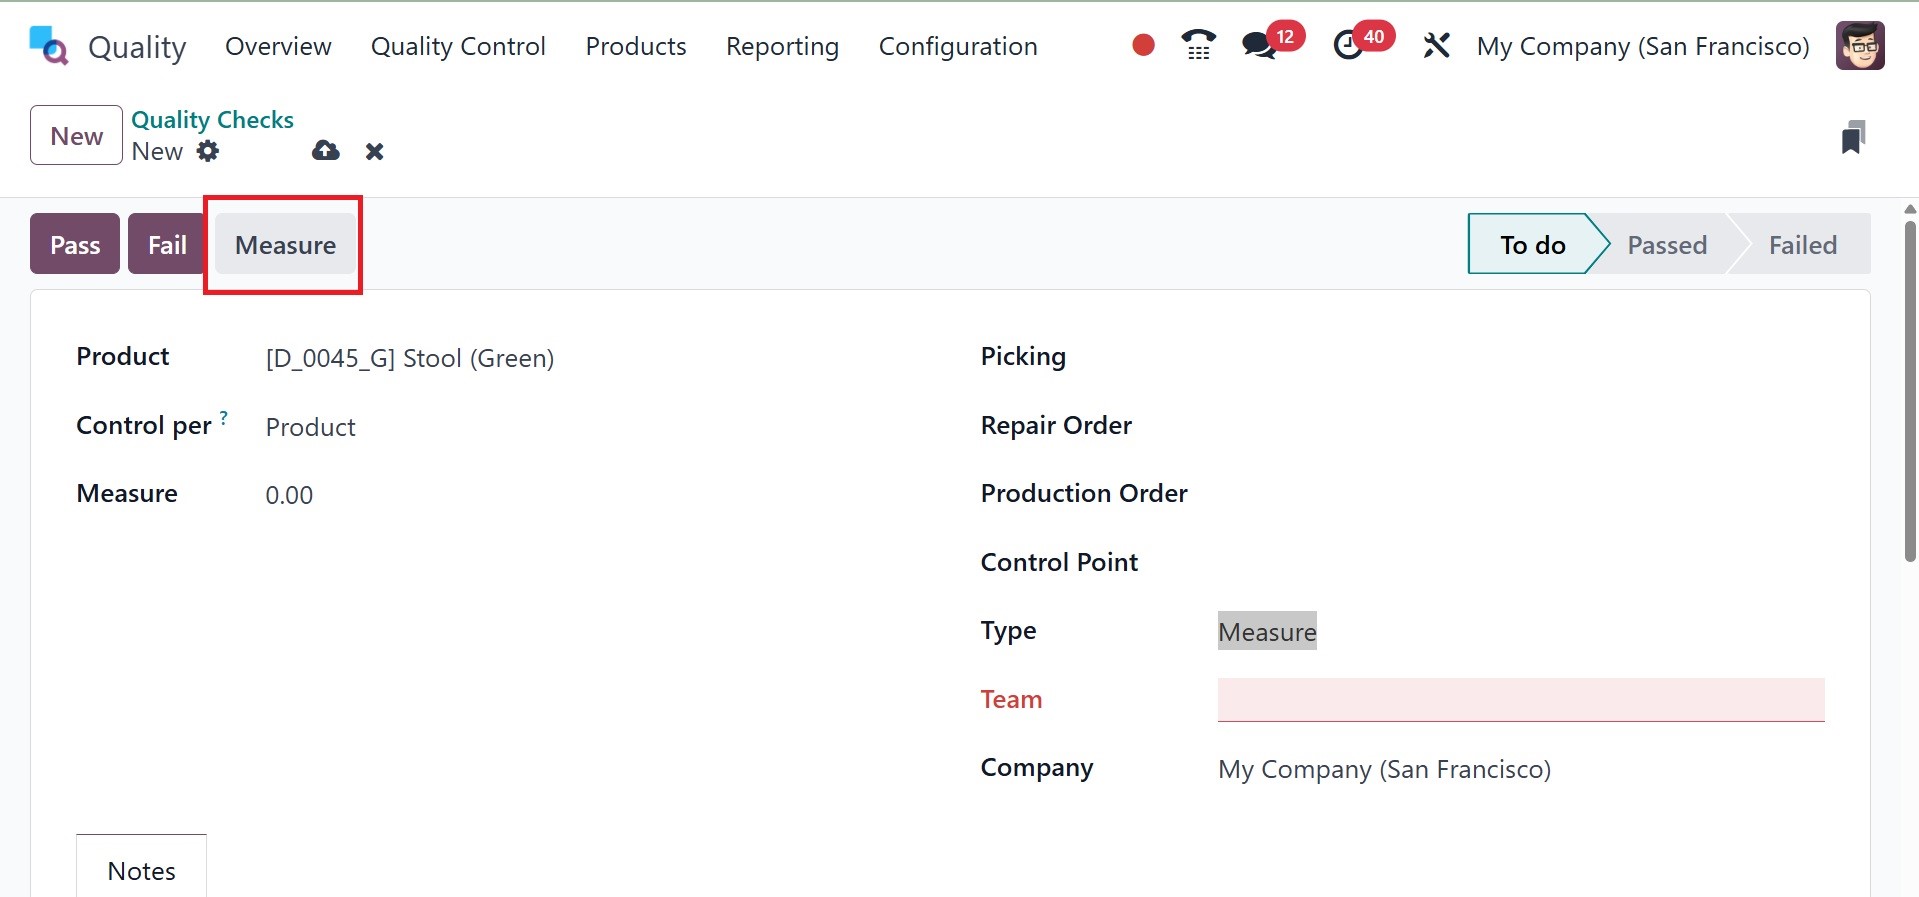
3. From the Team drop-down menu,
choose the quality team
responsible for overseeing
the check.
4. Select the Notes tab and fill
in the Instructions text area
with instructions on how to
take the measurement.
After obtaining the measurement,
put the value in the quality
check form's Measure area.
Click "Pass" or "Fail" in the
upper-left corner of the
check to manually determine
if it passes or fails.
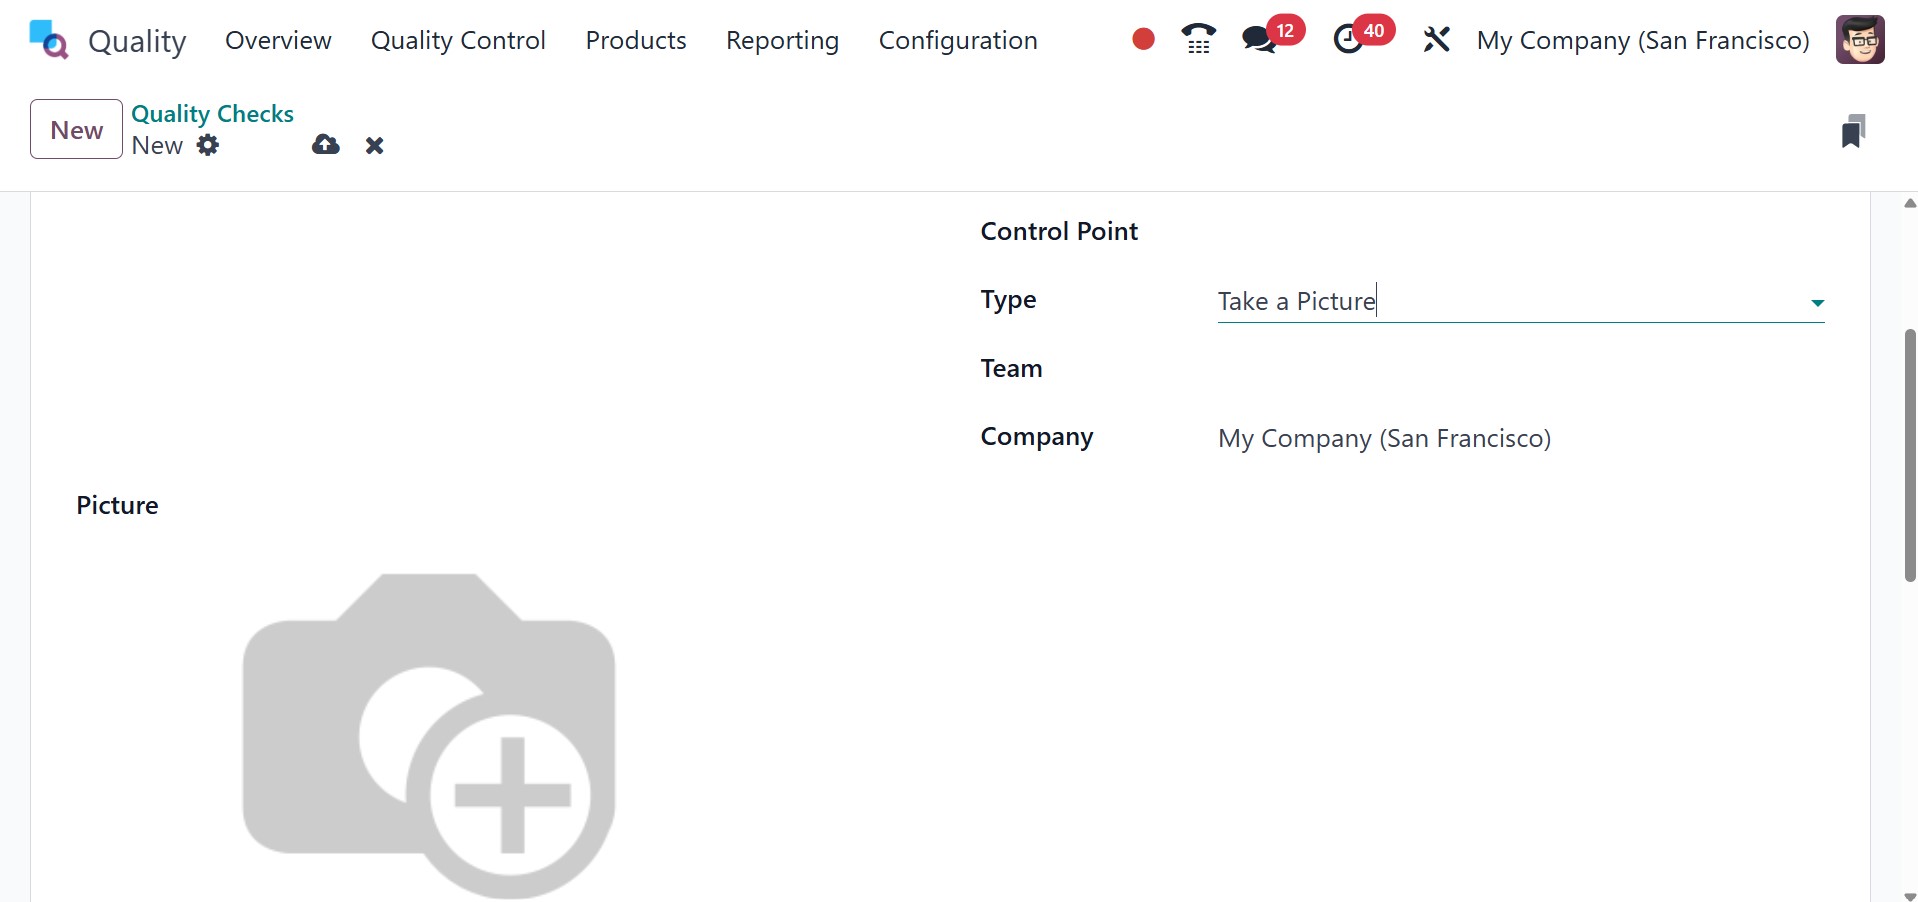
Take a Picture: In Odoo 18,
quality checks entail taking
pictures of goods or
manufacturing procedures for
visual examination.
Businesses can visually
evaluate product quality and
spot flaws or irregularities
by including picture capture
technology into quality
inspections. Problems like
surface flaws,
irregularities, or departures
from quality norms can be
found in images through
analysis. By offering visual
proof and enabling thorough
inspections, take-a-picture
quality checks improve
quality control initiatives.
In order for the quality team to
examine "Take a Picture"
checks, an image must be
attached to the check. There
are two ways to set up Take a
Picture quality checks:
either manually create each
check or set up a Quality
Control Plan (QCP) to
generate checks automatically
at predetermined intervals.
To produce a single Do a picture
quality check by doing the
following:
1. Click "New" after selecting
Quality > Quality Control >
Quality Checks.
2. Select the Take a Picture
quality check type from the
Type drop-down menu.
3. From the Team drop-down menu,
choose the quality team
responsible for overseeing
the check.
4. Give instructions on how to
snap the photo in the Notes
tab's Instructions text
field.
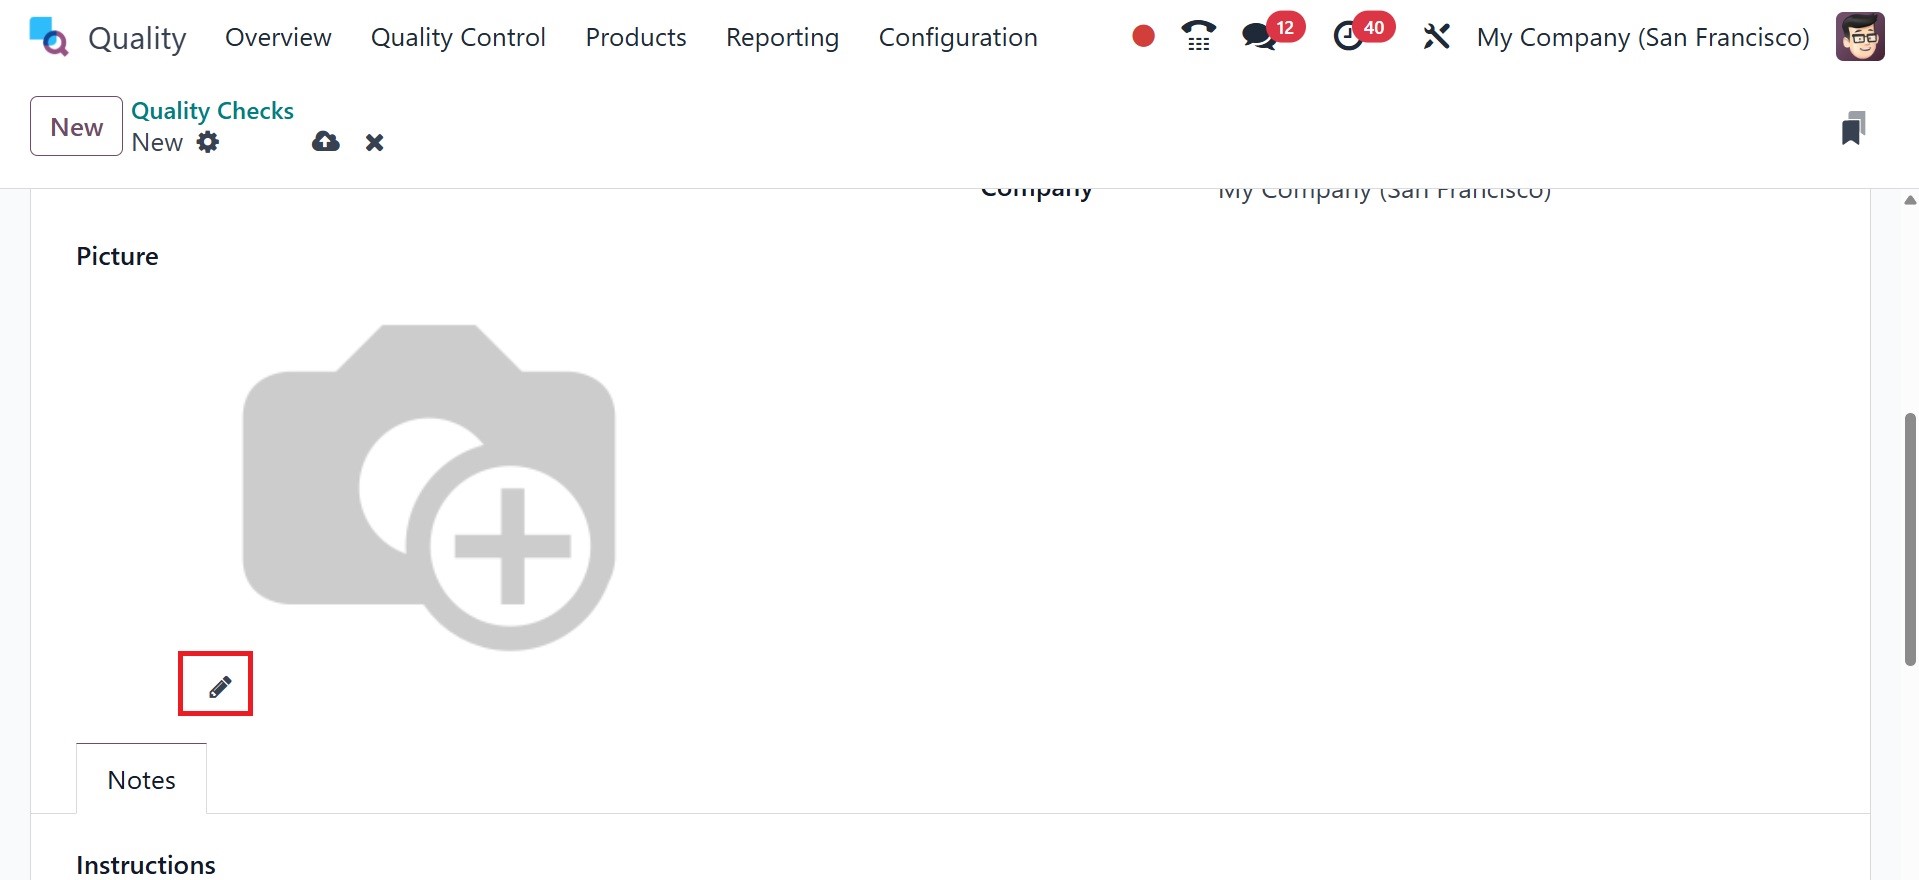
A "Take a Picture" quality check
can be completed on the
check's page by taking a
picture as directed. Make
sure the image is stored on
the computer, tablet, or
other device being used for
the quality check.
Register Production: Quality
checks that take place
throughout the production
process are referred to as
"Register Production" type
QCPs. These inspections
guarantee that goods fulfill
quality requirements
throughout the production
process.
Select the type as register
production fro the type, as
in the image below.
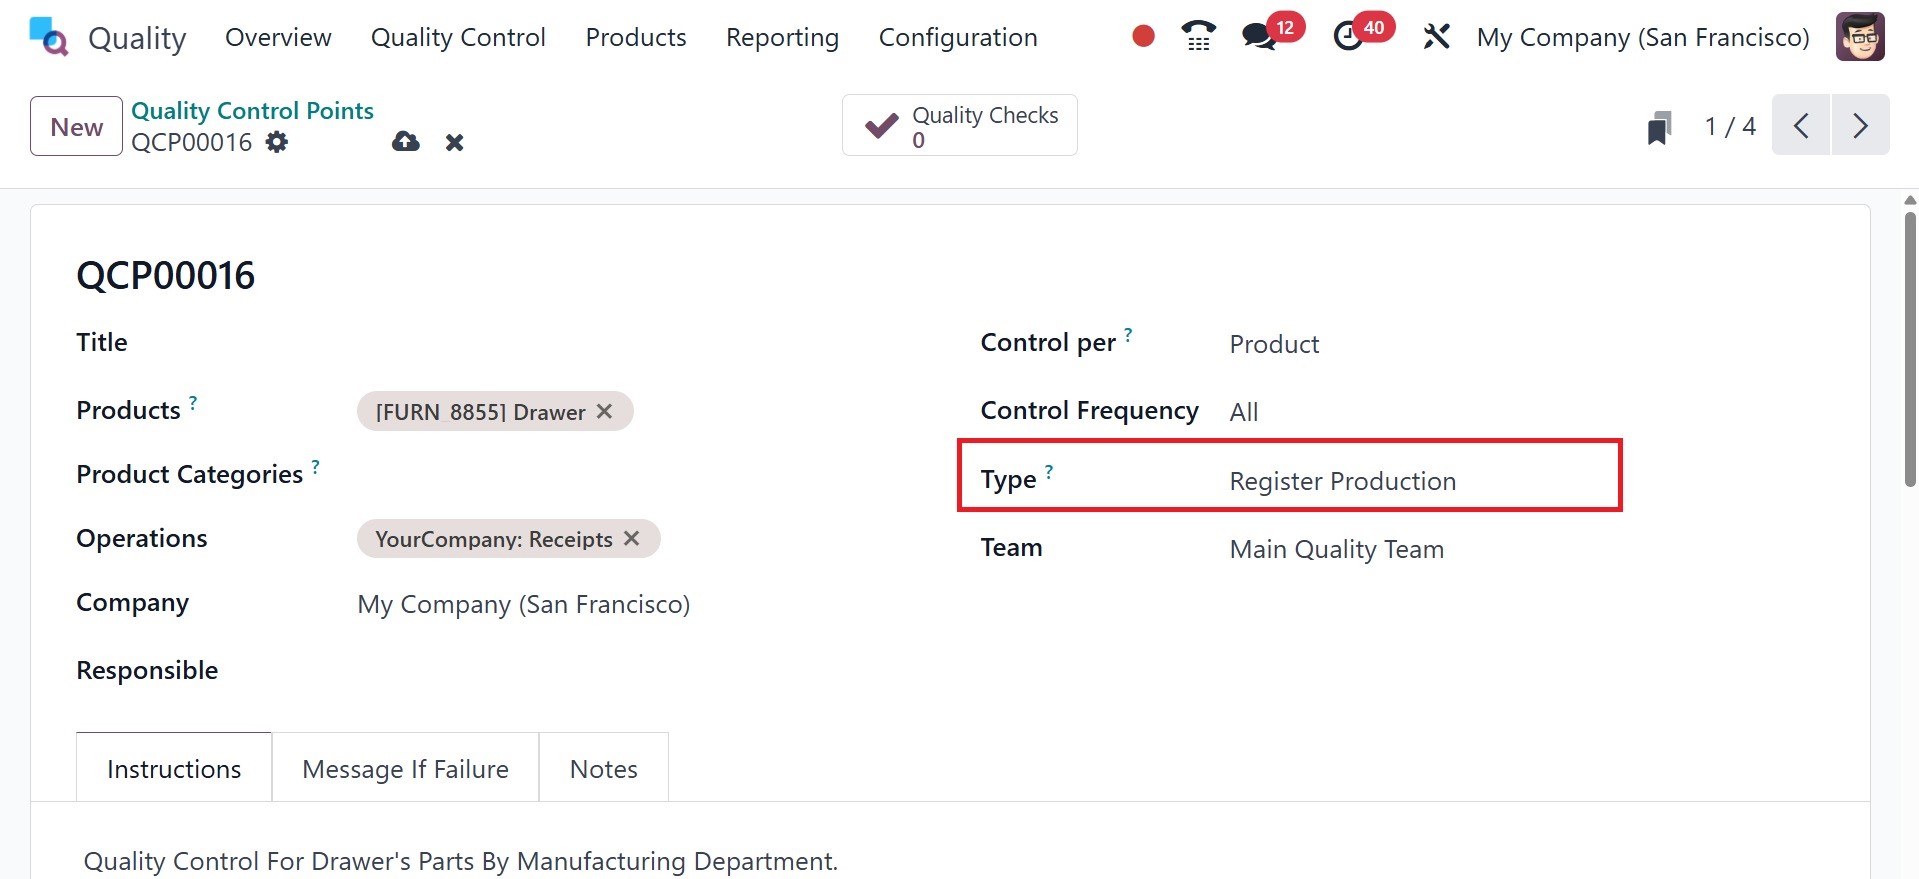
The type guarantees quality
throughout the whole
production process. Minimizes
flaws prior to final
assembly. Enhances adherence
to quality requirements.
Improves the traceability of
defective goods.
Spreadsheet: Users are able to
record several measurements
in a tabular (spreadsheet)
manner using the
"Spreadsheet" kind of Quality
Control Points. This is
helpful for intricate quality
checks that ask for the
systematic collection and
analysis of numerous data
points. Spreadsheet templates
allow you to quickly create
spreadsheets without starting
from scratch.
The layout, calculations, and
logic of a quality check are
specified in a bespoke
Excel-like document called a
spreadsheet template, which
is made with Odoo's
integrated spreadsheet
editor.
It is employed when a more
intricate quality control
procedure is required, one
that goes beyond simple
measurement checks or yes/no
or pass/fail assessments.
And the success cell option is a
specific cell reference in
the spreadsheet that tells
Odoo where to look for the
pass/fail result.
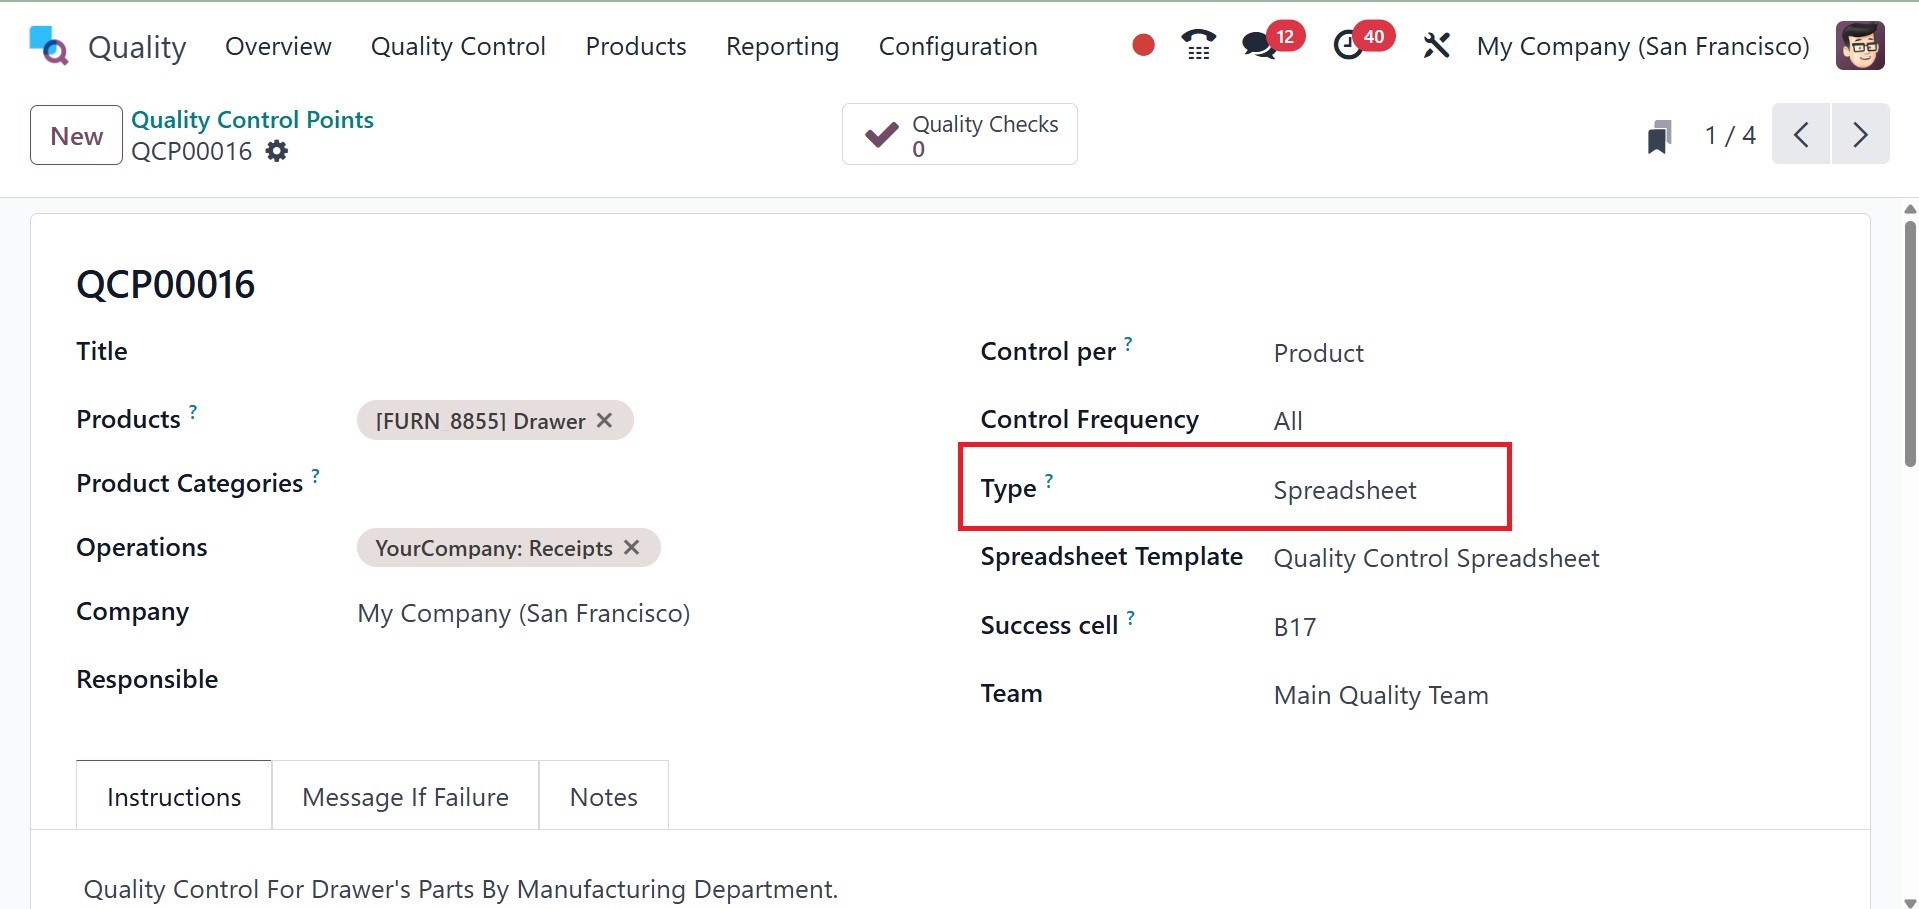
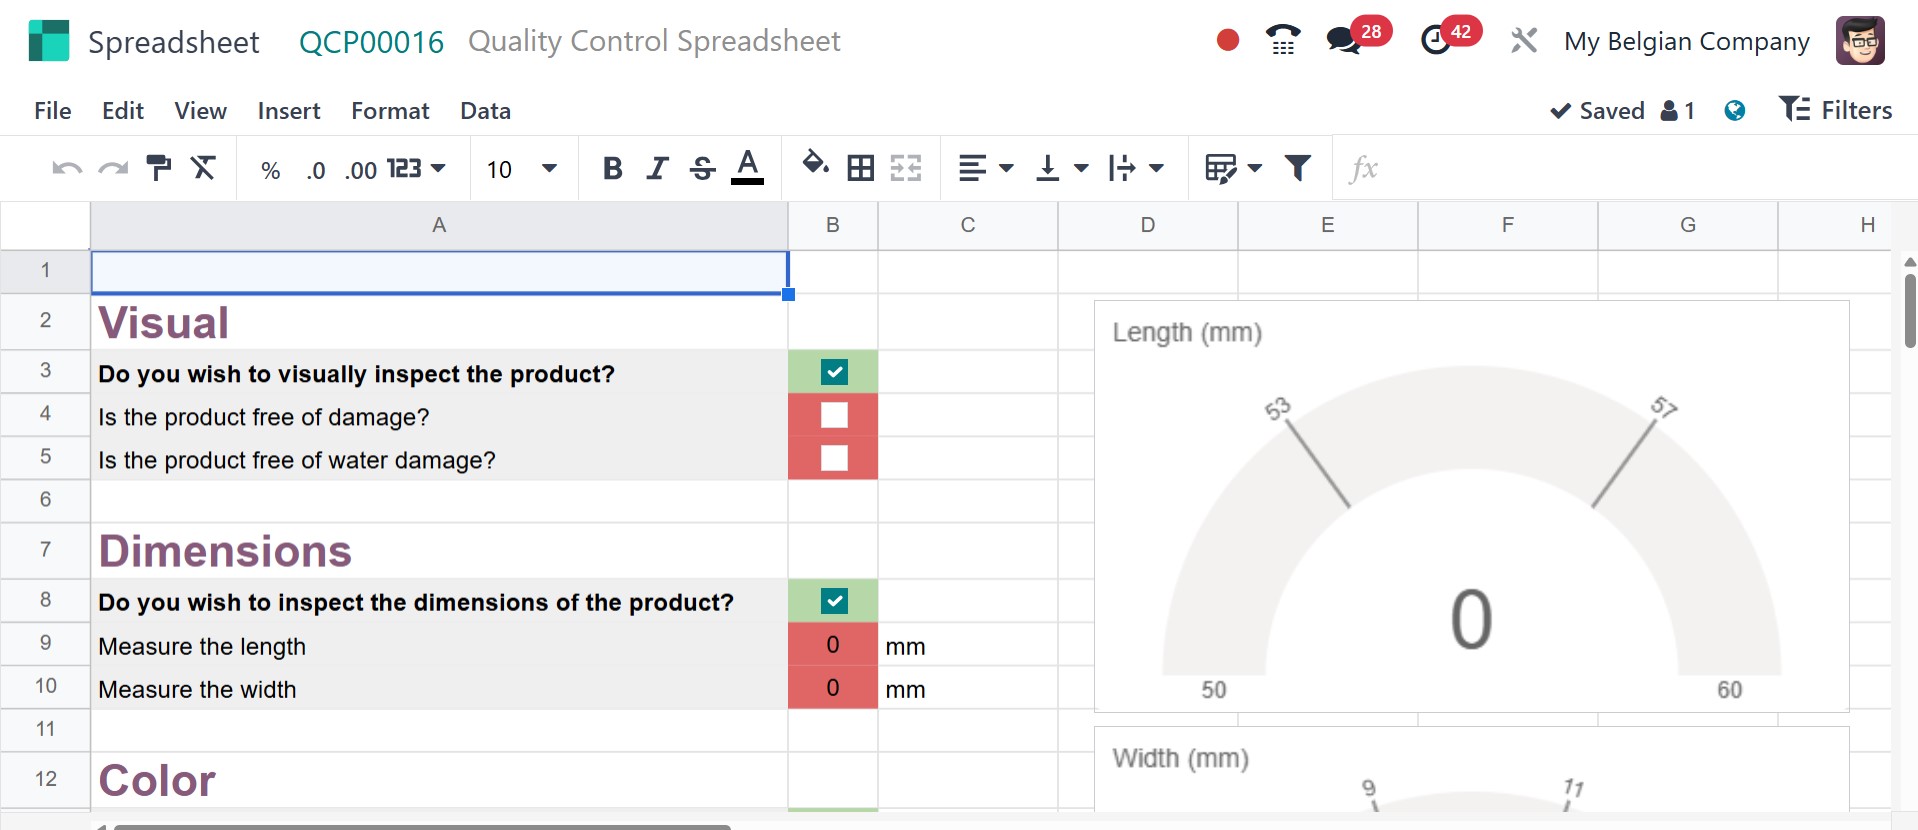
On selecting the type as
spreadsheet, you will get the
spreadsheet template option
and a success cell. On
providing the spreadsheet,
you can move to the quality
control spreadsheet using the
internal link, and the page
will be, as in the image
below.
Perfect for businesses that
depend on precision, such as
food production and
medicines. It facilitates
monitoring changes in
production parameters and
helps with compliance audits
by keeping thorough
documentation.
Worksheet: You can attach a
comprehensive worksheet (in
PDF or Google Sheet format)
for operators to follow while
doing quality checks when
using the "Worksheet" kind of
Quality Control Points. When
thorough instructions,
checklists, or compliance
documents are needed for
quality inspections, this
kind is helpful.
These are the types of quality
control points in odoo 18
Quality. Now, choose your
team in the Team field to
evaluate the quality control
point. Also, enter the name
of the person who manages
your quality control point in
the Responsible field. You
can select the Custom or
Specific page of the
operation sheet as the source
document in the Step Document
option.
In the Instructions tab, we can
include additional
information regarding the
quality control points. Most
instructions will specify the
product quality checks
required.
You can also enter any product
failure message in the
Message If Failure tab.
Include the information
needed to complete the
quality check in the Notes
tab.
All applied data is instantly
saved in Odoo 18 Quality.
Users can access the
generated sample in the
Quality Control Points
window.
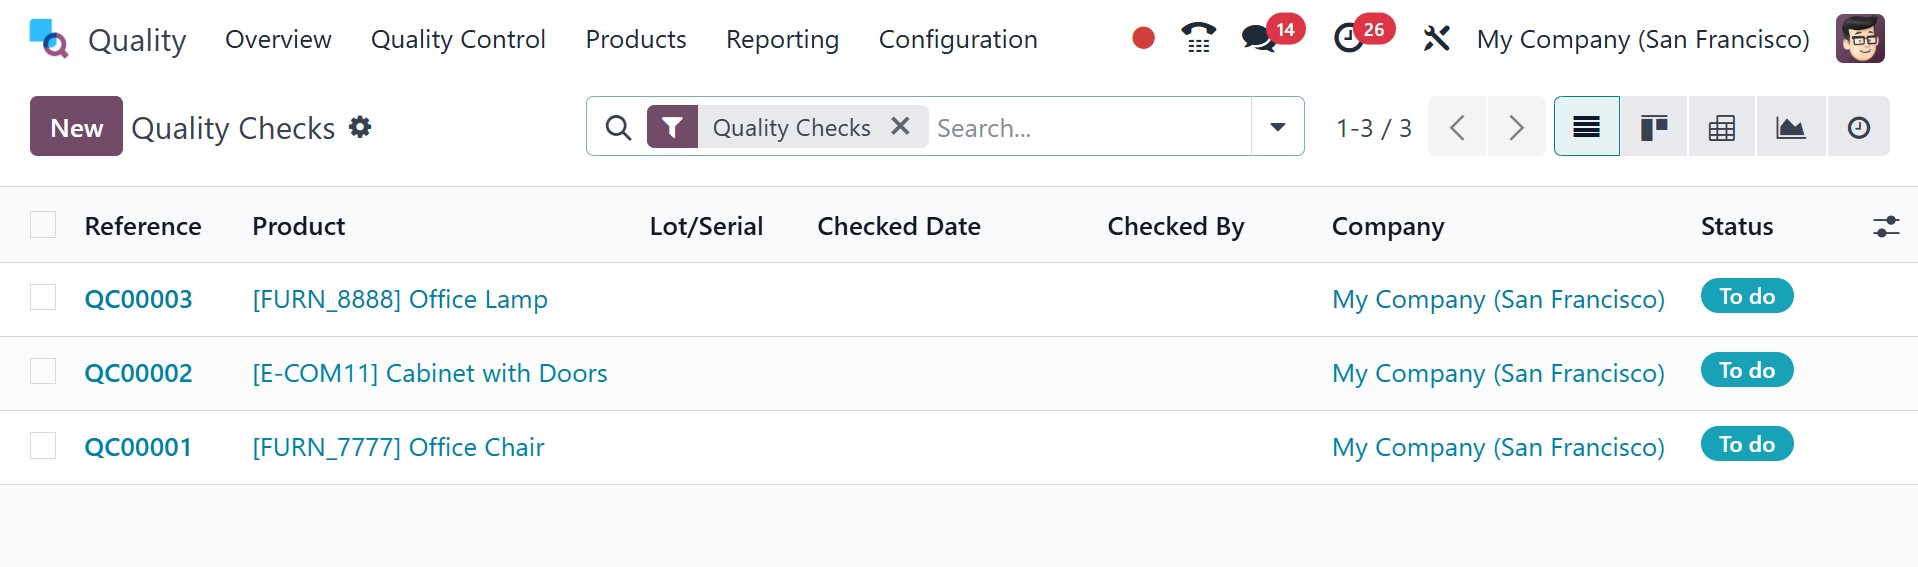
2.2 Quality Check
Quality checks are applied to
find needed defects in a
specific product or service.
It gets automatically
generated upon manufacturing
transfers and orders. When
you select the Quality Checks
menu from the Quality Control
tab, you might find details
about all the things that
need to be checked in your
organization. We can notice
in the List view that data of
each product, such as
Reference, Product, Team,
Lot/Serial, Status, etc., has
to be checked. By clicking on
the New button in the Quality
Checks window, a new quality
check can be easily created.
You can choose the commodity to
be verified under the Product
field on the open screen.
Determine the steps for each
field's quality checks to
follow. Executing quality
checks at the level of
quantity, product, or
operation is easy. Indicate
the principal warehouse on
the picking field
subsequently, where
manufacturing items are
processed.
In the Production Order field,
you can choose the order
number of the item. In the
Control Point field, you can
also select the point id of
the product. Then, choose
your group in the Type field
for quality checking.
Worksheets, Print Labels,
Instructions, Measure,
Pass-Fail, and others can be
chosen as the type. In the
Team field, choose the team
to check the quality of the
product. After the team has
been selected, choose the
company name from the Company
field.
In the Notes tab, users can
obtain additional information
on product quality checks.
Additional comments on your
quality check can be
conveniently inserted in the
Notes and Instructions fields
located in the Notes tab.
The Pass and Fail buttons in the
Quality Checks window inform
you if the product has passed
or failed a test. Users can
select the product's quality
check status using these
buttons. The stage is marked
as Passed when you press the
Pass button. On the other
hand, the stage can be seen
as failed, and the Fail
button defines the product
failure.
2.3 Quality Alerts
Rather than making production
orders, we are able to make
quality alerts for deliveries
and services in Odoo 18.
After enabling quality
alerts, reminding the
responsible party to check
the product/service quality
is easy. When you choose the
Quality Alerts option from
the Quality Control tab, data
for quality alerts will be
accessible.
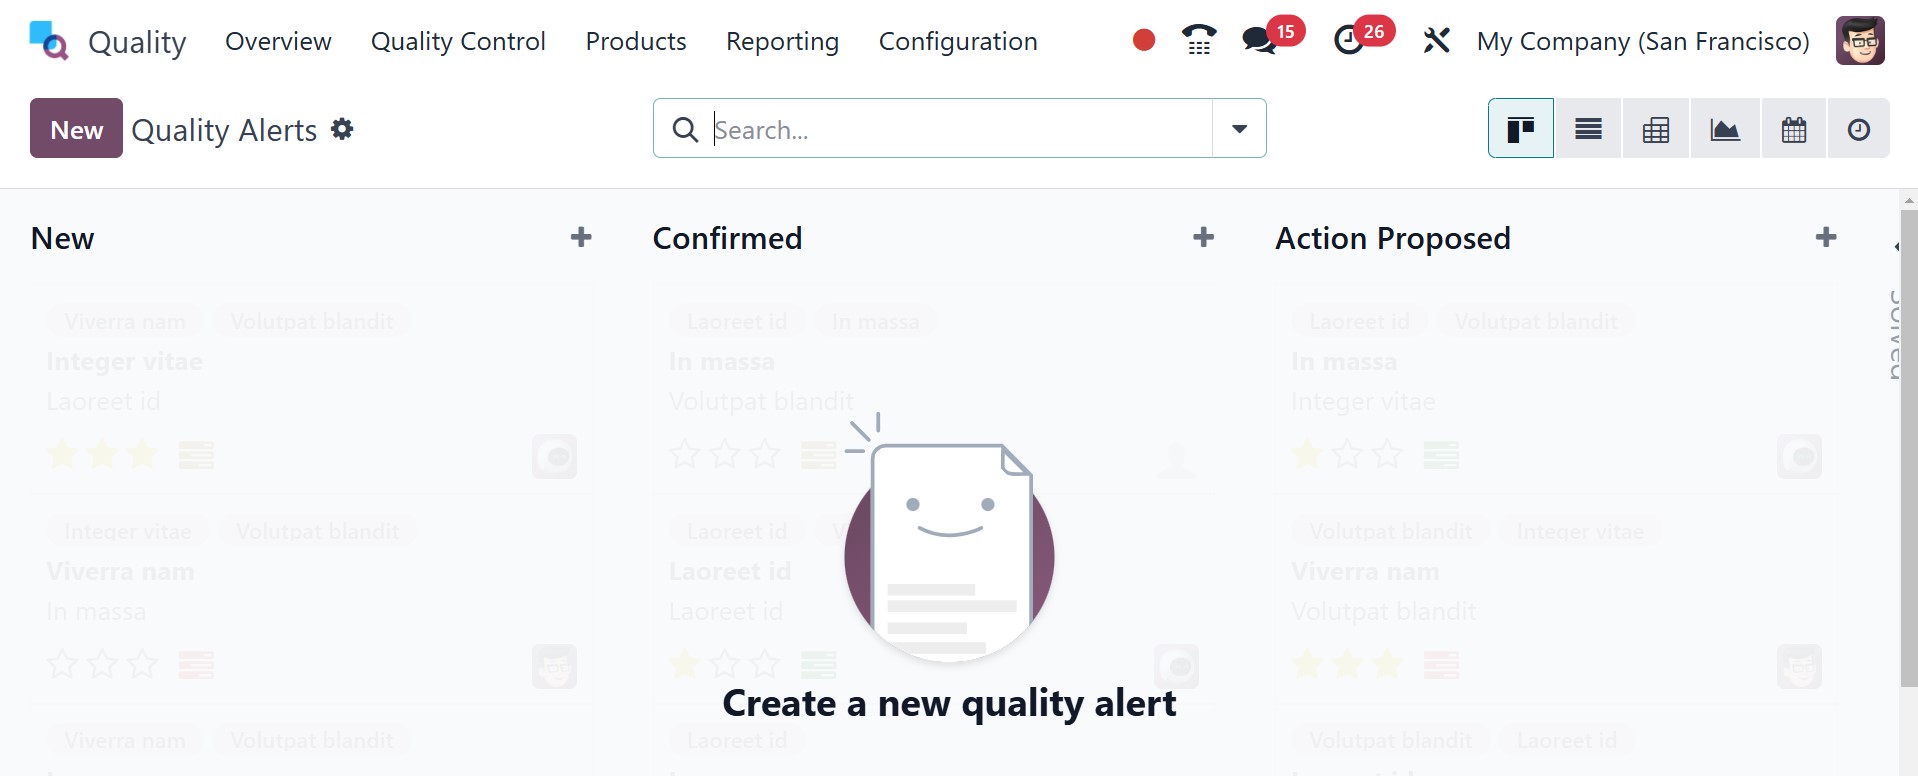
Each alert's unique details,
including Name, Work Center,
Responsible, Date Assigned,
Team, etc., are shown
separately in the List view.
To create a new alarm, click
the New icon on the Quality
Alerts panel.
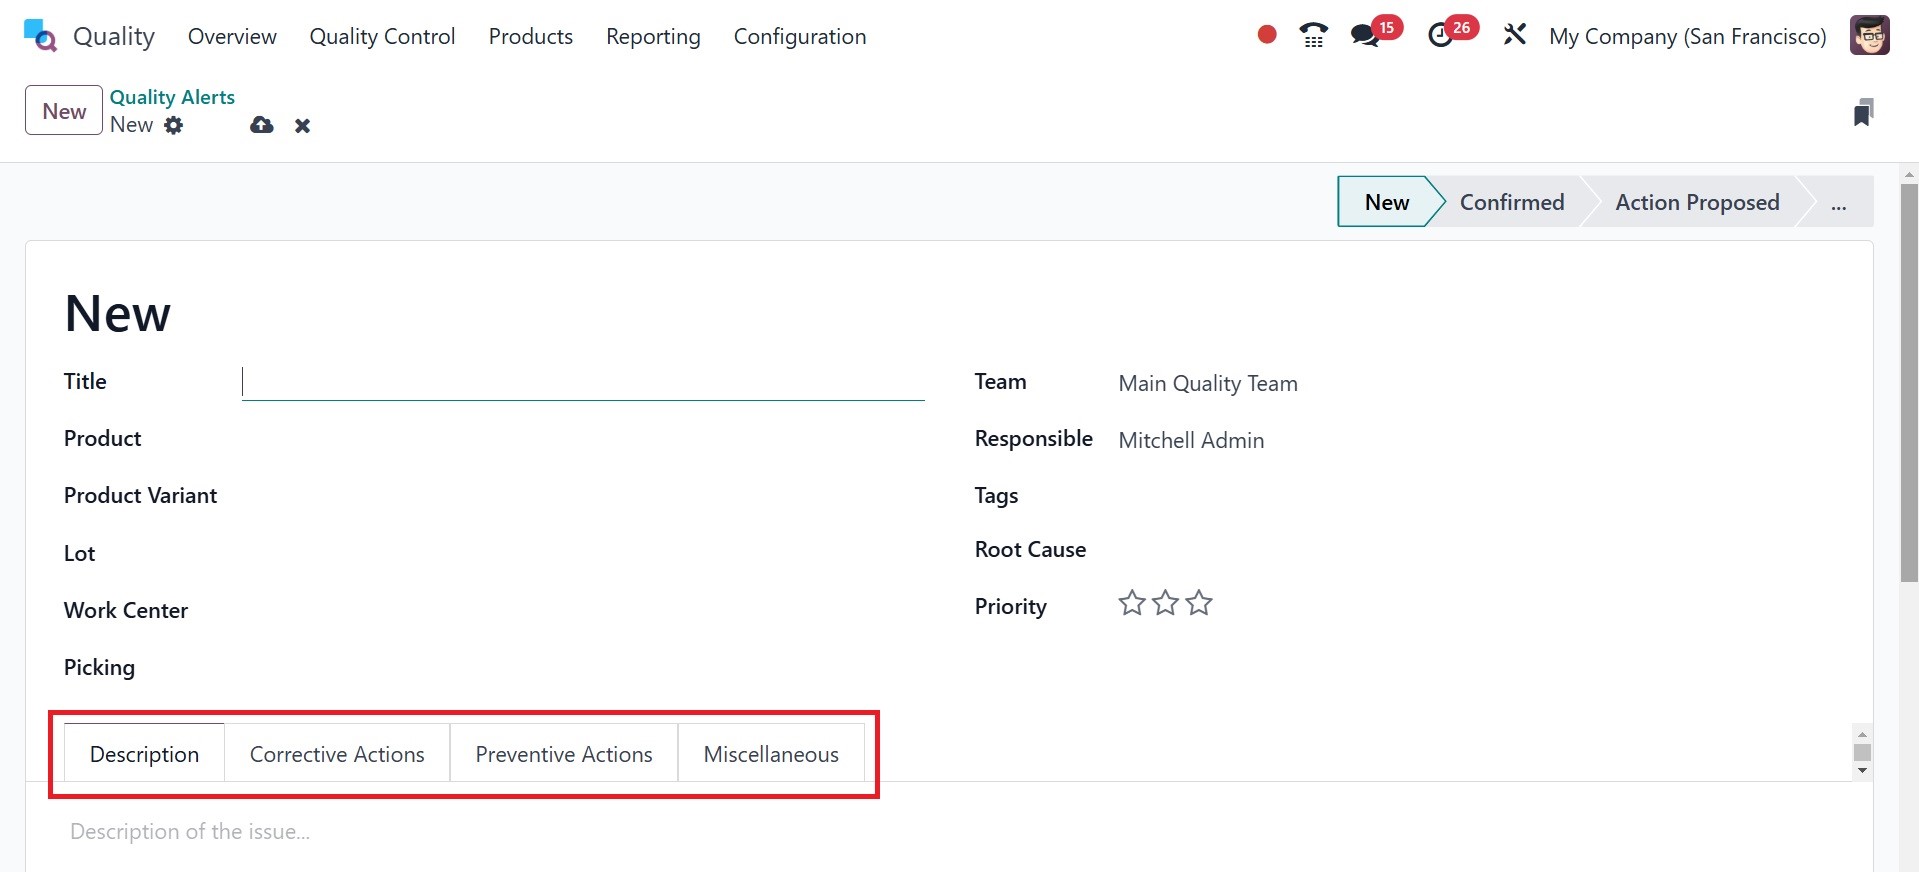
On the given page, we can fill in
various details. Let us
consider each option's
details in the Quality check
window separately below:
Title: On the Title line, you can
add the quality alert's name.
Product: The Product line shows a
list of all the items of your
company. Under the Product
option, choose the exact
product for which you need a
quality alert.
Product variant: "Variant" is a
product type with various
sizes and colors. In the
Product variant field, select
the variant that corresponds
to the chosen commodity.
Lot: A lot number is a
distinctive number for a
specific item or quantity of
an item produced by one
manufacturer. The user can
input the product's lot id in
the Lot box.
Work Centre: A work centre is
where all production
activities are carried out.
Choose the work centre field
that best represents the
central hub of your product
or piece of equipment.
Picking: Picking is the transfer
number where the quality
needs to be guaranteed. To
trigger the quality alerts,
you can enter the picking id
of your products.
Team: Designate a team to verify
the items' quality alerts.
The Team field enables users
to mention the team name.
Responsible: Choose the user in
the Responsible field who
confirms the quality checks
of the goods/services.
Tags: A tag which is attached to
specific products with the
intention of identifying the
products. In the Tag option,
you can select the necessary
tags for quality alert
generation.
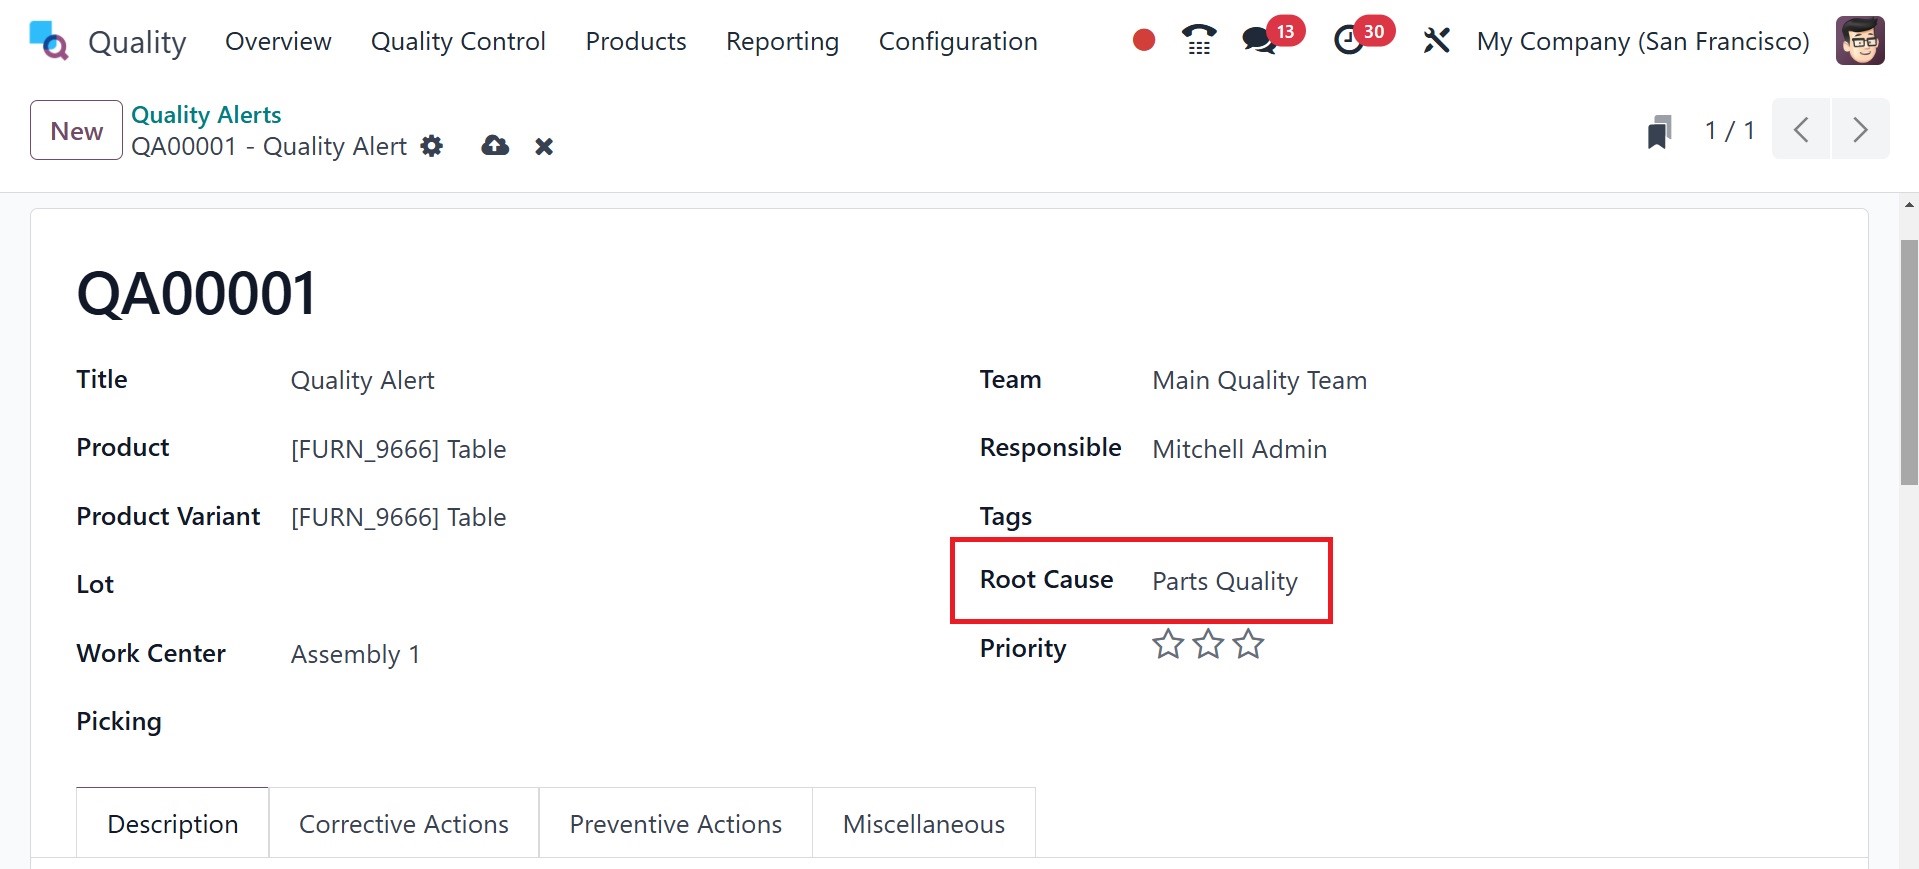
Root Cause: We can add the reason
for generating the quality
alerts to the Root Cause. You
can select different types of
reasons for the cause such as
work center failure, work
operation failure, parts
quality failure, etc.
Priority: It is possible to
change the priority of
quality alerts using the star
icon under Priority. The
initial issue will be soon
resolved by the primary
backend team.
Description: On the Description
tab, the root of the issue
can be easily identified.
Corrective Actions: On the
Corrective Actions page, you
can detail the actions taken
to rectify product-related
problems.
Preventive Actions: The actions
you need to take to avoid
quality failure of your
commodity are outlined below
in the Precautionary Measures
tab.
Miscellaneous: The Miscellaneous
tab enables you to view
information regarding a firm,
an assigned date, a vendor,
and an email address.
Every entered value is manually
entered into the Quality
module of Odoo 18. The
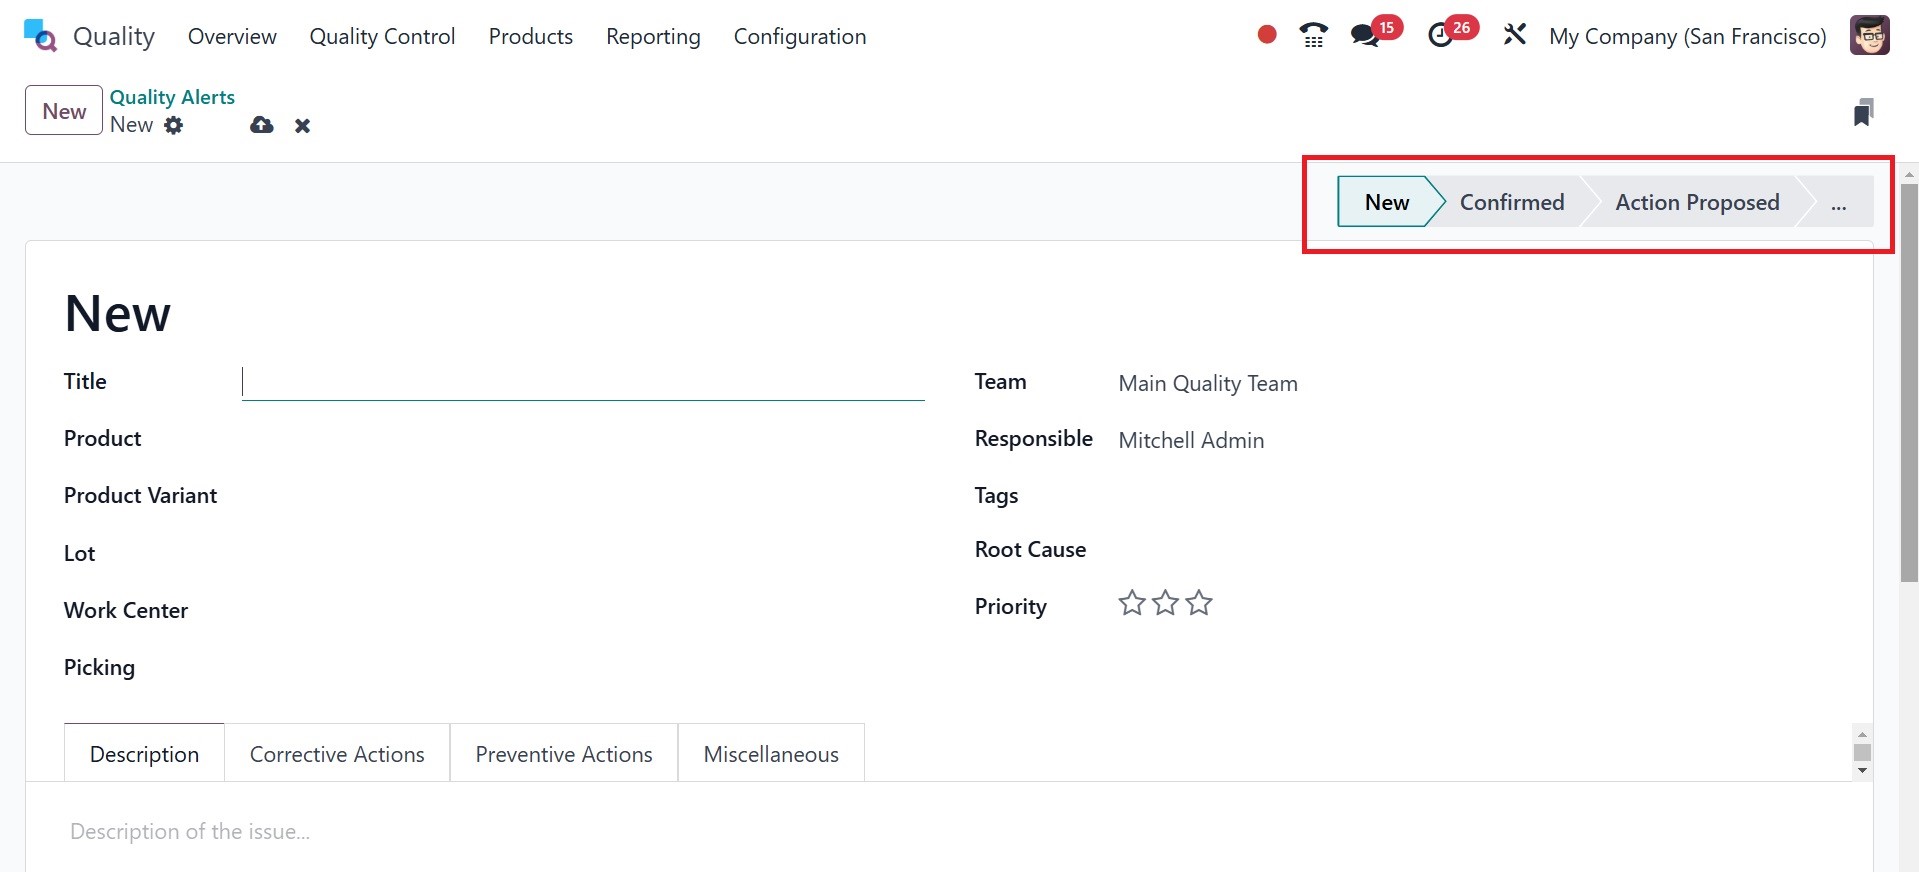
Quality Alert stages are NEW,
CONFIRMED, ACTION PROPOSED
and so on, and are different
for every operation.
The following is an example of a
quality alert set using an
Odoo 18 manufacturing order.
Click the Operations tab's
Manufacturing Orders menu.
The user is able to get all
the created manufacturing
orders along with details
like Reference, Product,
Component Status, Quantity,
etc. In order to create a new
order, click on the New icon
in the Manufacturing Orders
page.
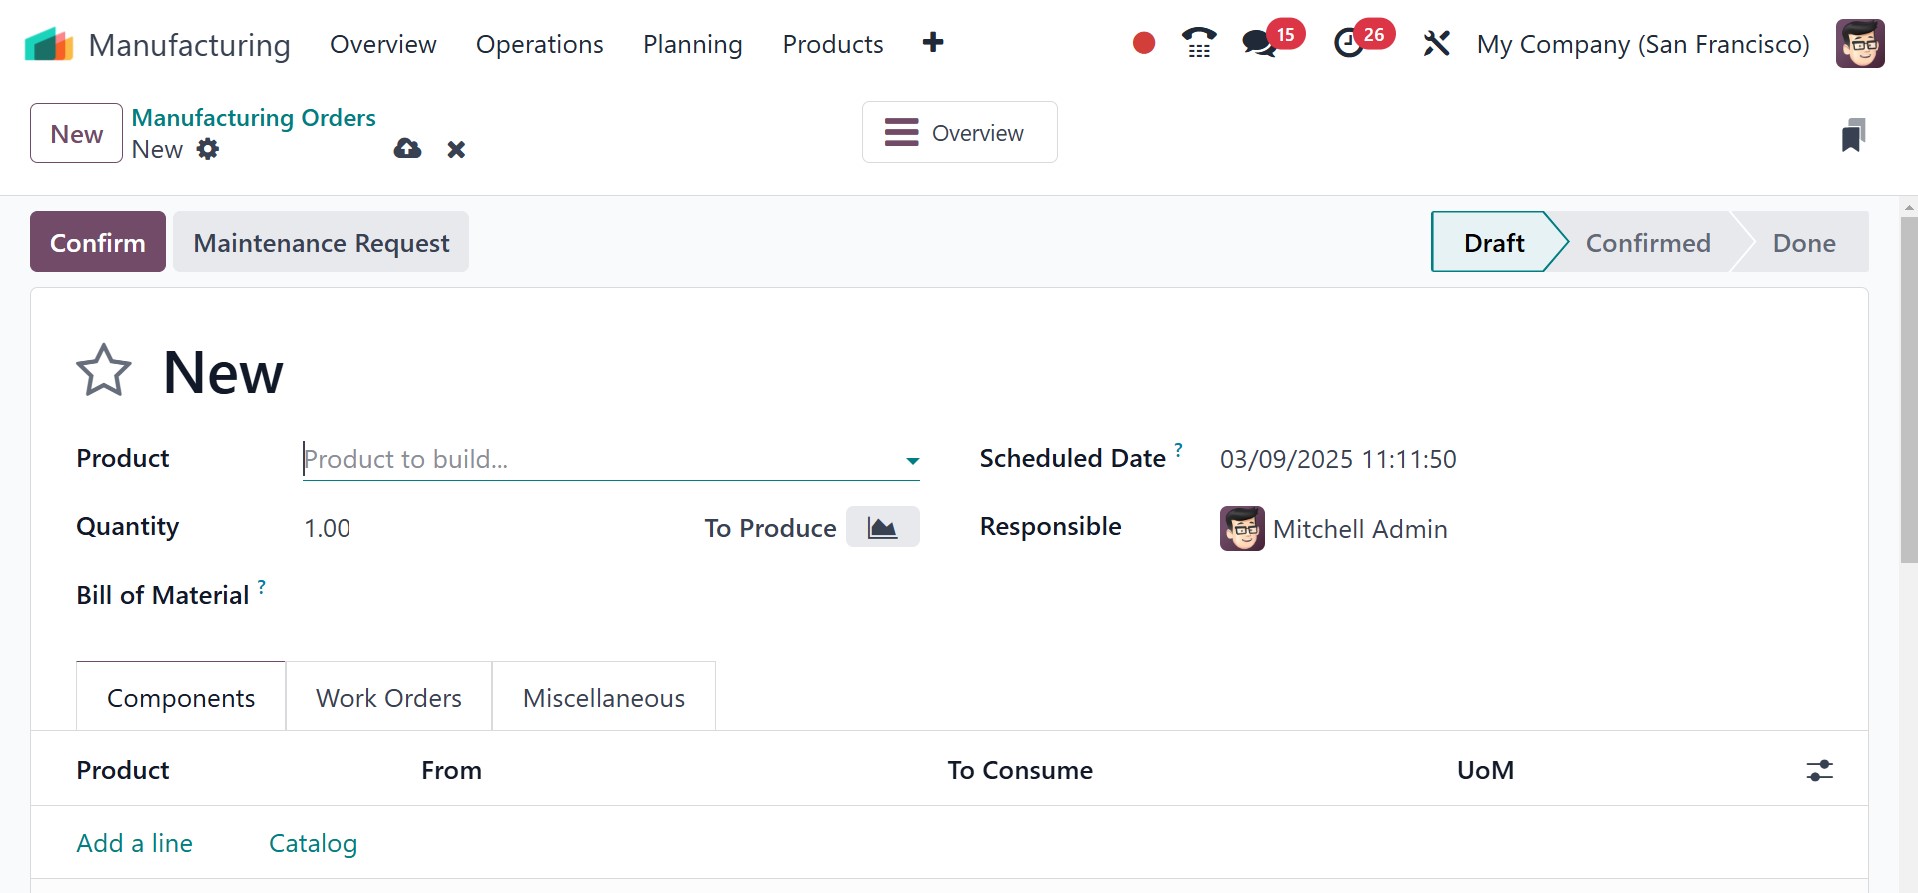
A new screen appears, and you
should choose your product
from the Product option. The
list of required components
will then show up under the
Components tab after you
select your freshly created
BoM Table.
Enter the quantity you want in
the Quantity field. The
Scheduled Date column also
provides you with the
manufacturing order's planned
date. The Responsible option
should then be assigned to
the user who is responsible
for the manufacturing order.
The information is saved
manually in Odoo 18 after
handling each piece of
information. Once you have
stored your information,
click on the Confirm icon.
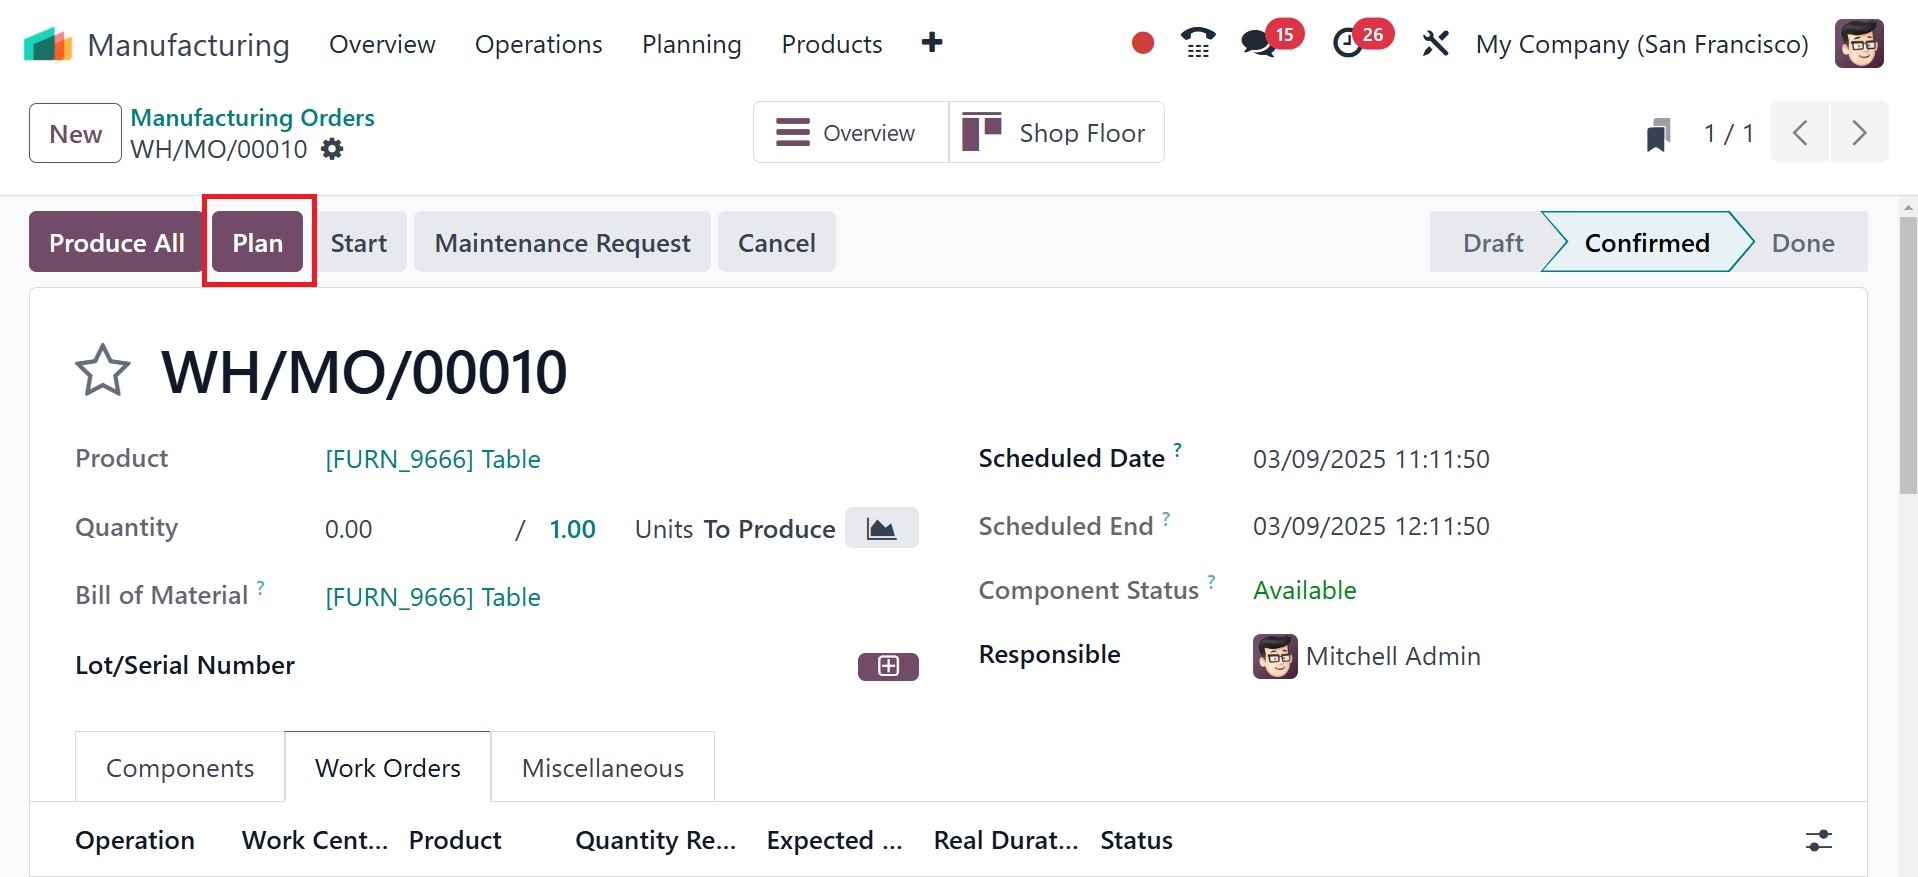
The shop floor smart tab can be
seen in the page, which
improves manufacturing order
management efficiency,
particularly with regard to
quality checks. The Shop
Floor Smart Tab facilitates
quality control procedures on
the shop floor by integrating
with the production order
workflow.
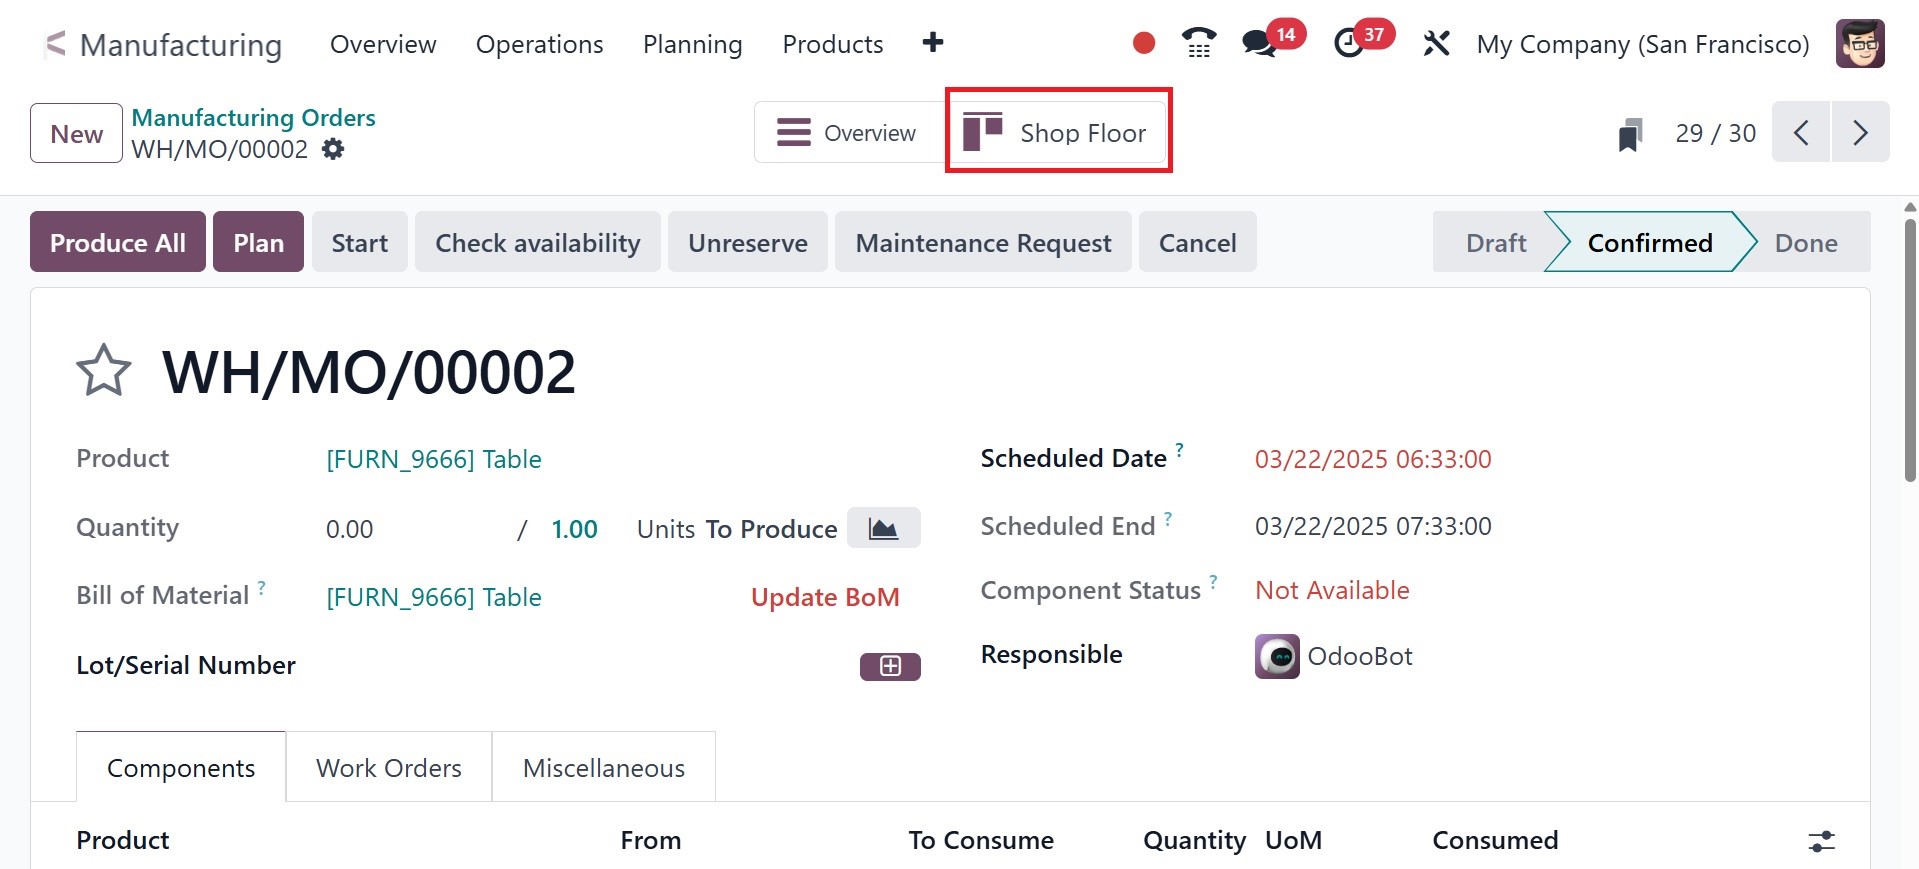
In the Work Orders tab, you can
view information regarding
the work center.
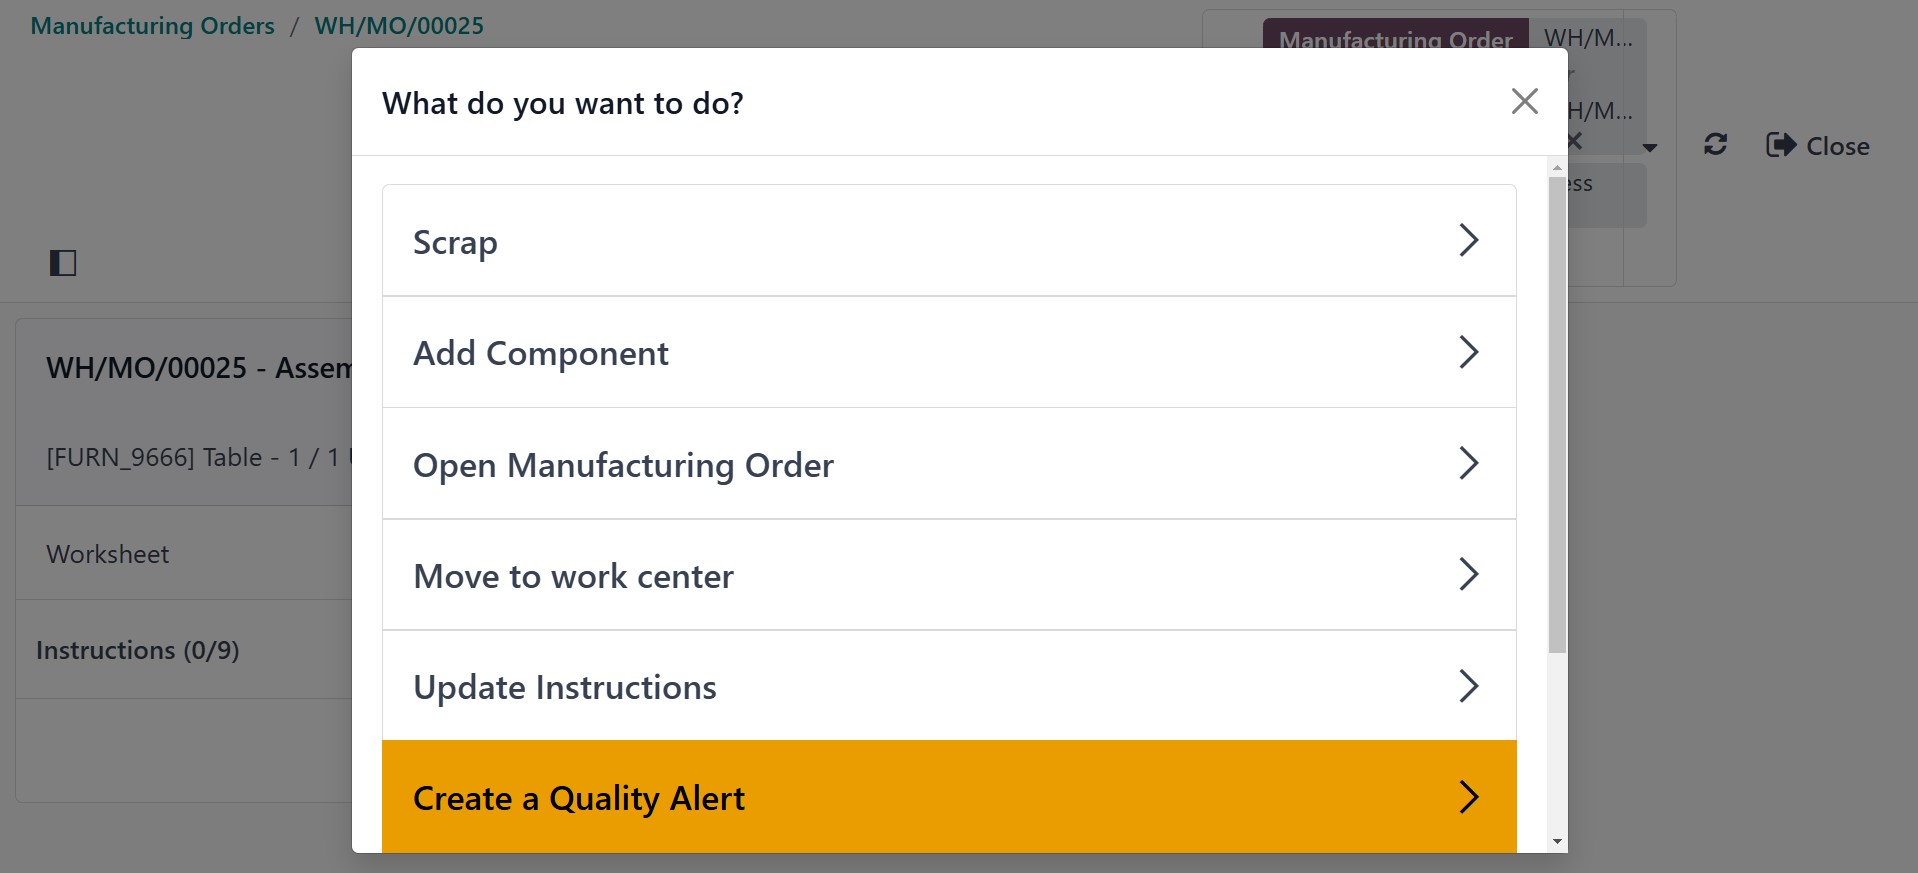
The new window holds the product
details. In case an employee
encounters an issue, they can
create a quality alert. The
user can get access to
features such as Scrap, Add
Component, BLOCK, and others
by choosing the Top Left menu
in the window. Choose Quality
Alert from the user-visible
menu.
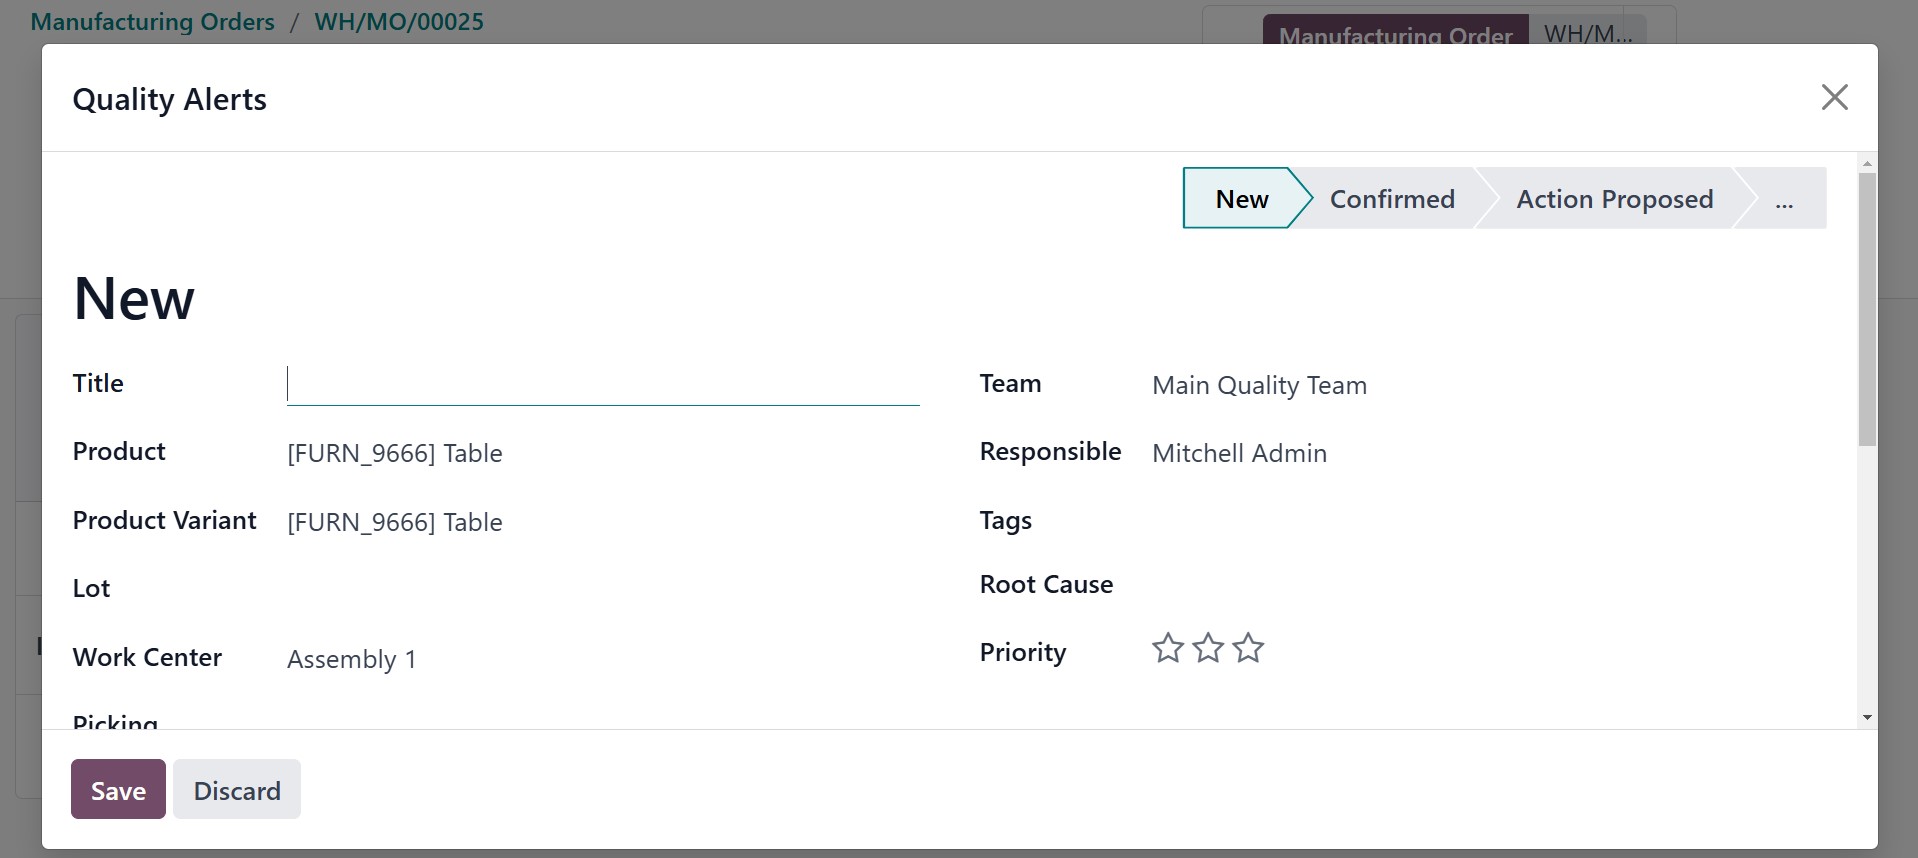
Entering the name of the quality
alert in the Title field
automatically updates the
user's other information.
Click the SAVE icon after
providing an explanation of
the product quality alert's
trigger under the Description
tab.
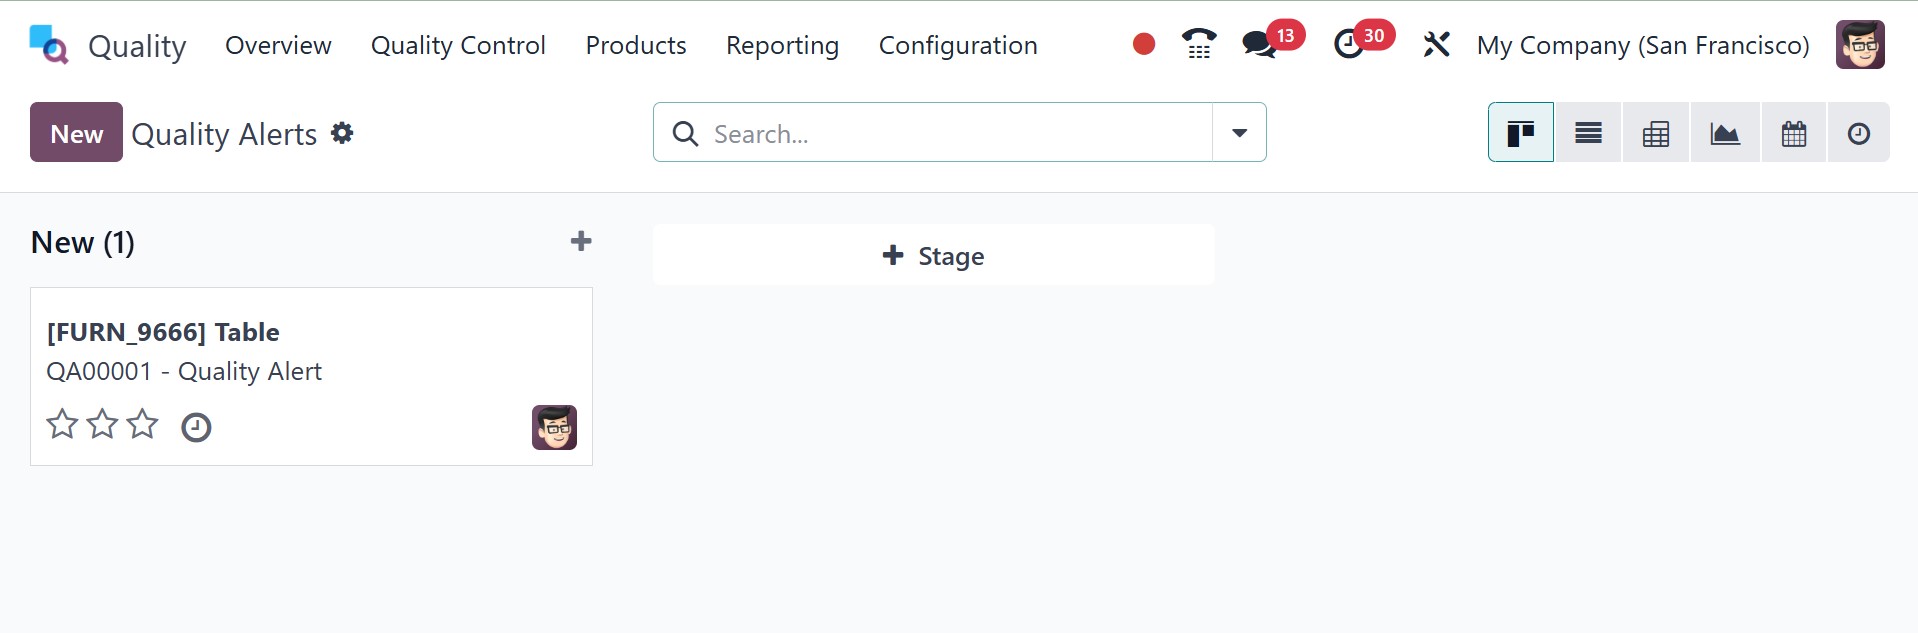
Now let's check the Odoo 18
Quality module for the
Quality Alerts pane. The
created quality alert for the
Table is visible inside the
New stage.
Next, explain the reason for the
product quality warning in
the Root Cause area.
After managing the data, change
the stage to Action Proposed.

The next step is to choose your
Manufacturing Order in the
Odoo 18 Manufacturing module.
As we can see, there was only
one quality alert generated
for the order.
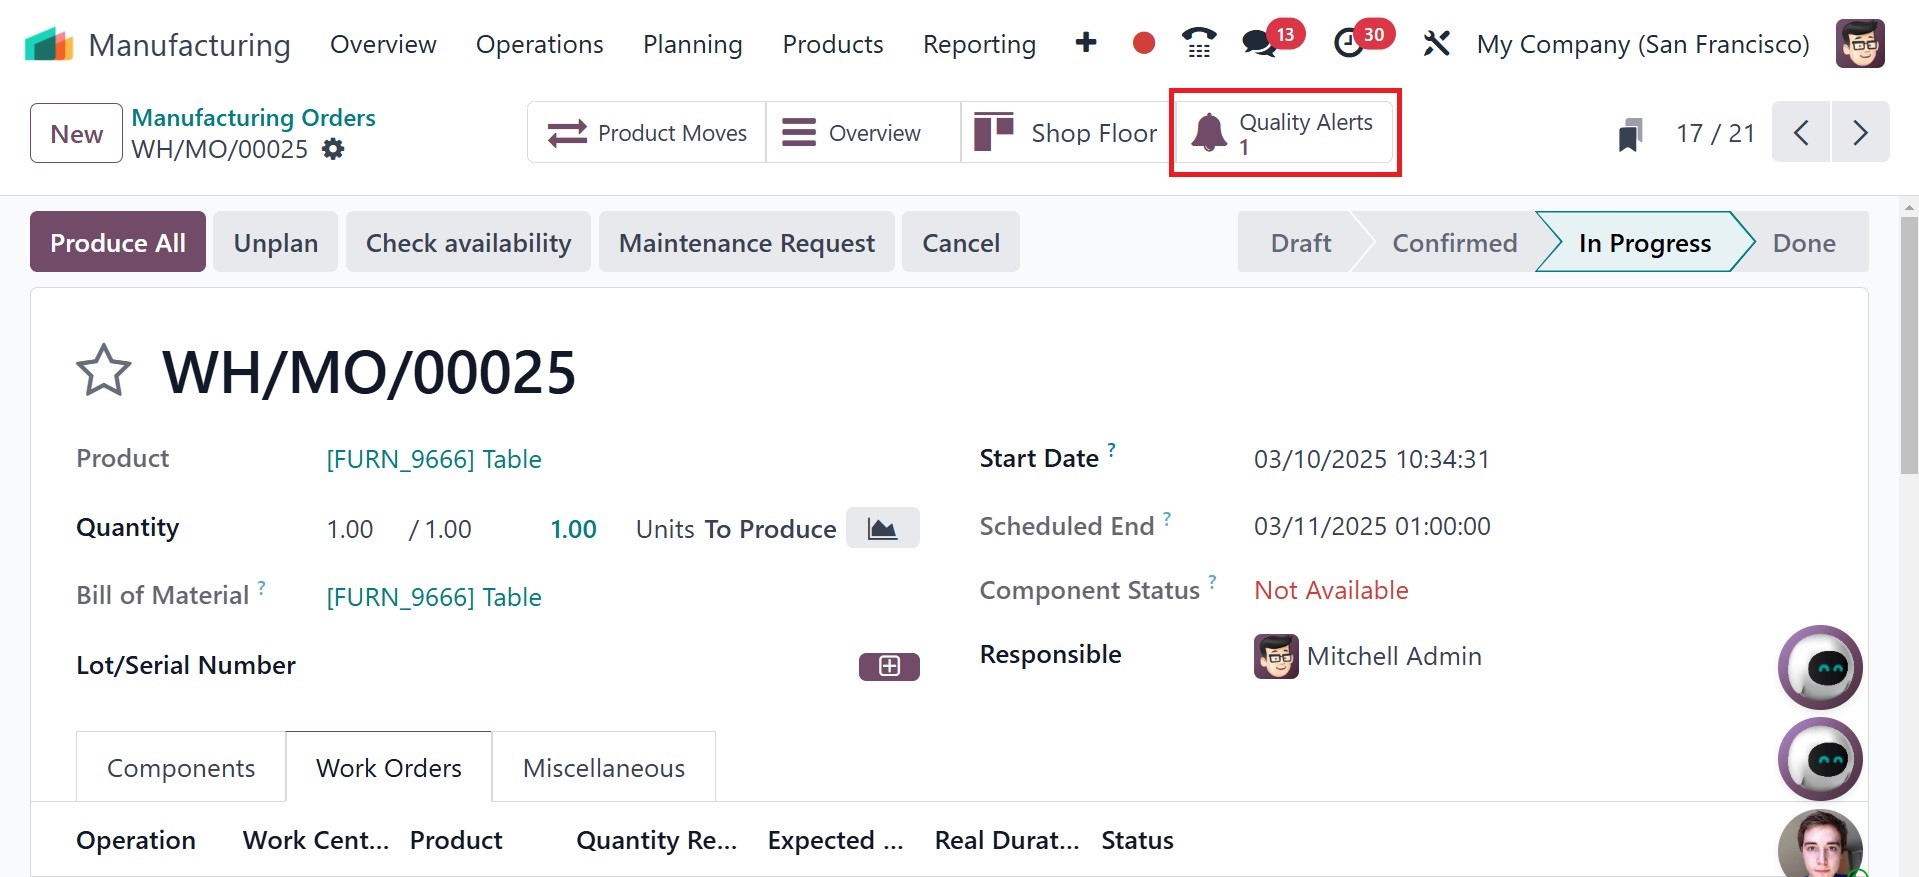
Consequently, passing the quality
alert within a production
order is easy.