1. Applications
Menu
The "Application" menu option in
Odoo 18's Recruitment module
acts as an administrative
center for managing job
applications. It allows
recruiters to efficiently
access, sort, and manage
candidate information. This
menu streamlines the
recruiting process by
including submenus such as
'By Job Positions,' 'All
Applications,' 'Candidates’,
‘Offers,’ and ‘Job Boards
Posts’ as well as built-in
tools for filtering,
maintaining applicant
profiles, job offers,
employer posts, and tracking
real-time modifications.
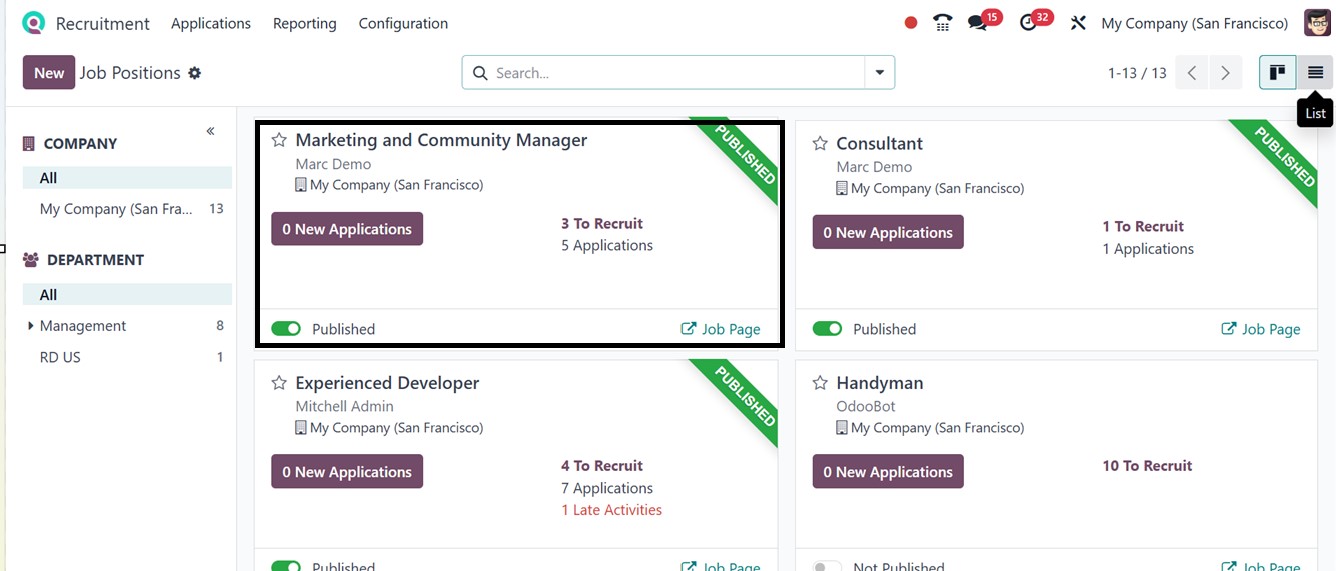
From the home dashboard, users
can view all currently open
positions listed under the
‘By Job Positions’ section,
as illustrated in the
screenshot below.
Both Kanban and List views are
available, allowing HR staff
to interact with job data
based on their preferences.
The interface also includes
options for filtering,
grouping, and saving favorite
views. Each job entry clearly
shows the number of new
applicants.
Selecting a specific job takes
you to a dashboard where all
related applications are
displayed. This board
outlines different phases of
the hiring process, like
screening, interviews, and
final selection.
You can easily add stages by
clicking the ‘+Stage’ icon.
These stages can be modified
or rearranged, and additional
tools like “Filter,” "Group
By" and "Favorites" options
from the search bar area make
navigating through the
candidate applications more
efficient.
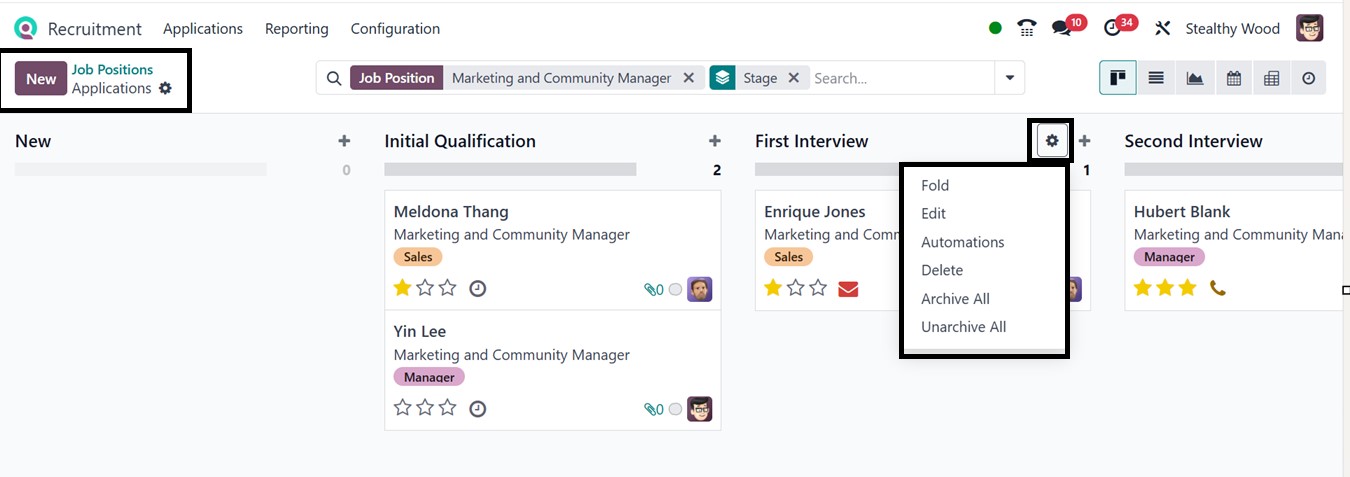
Every recruitment stage includes
small settings icons for
actions such as folding the
view, editing the stage,
automating actions, and
archiving records. In Kanban
view, you can fold stages or
edit existing ones. The
‘Edit’ option allows you to
rename the stage and assign
an email template to
streamline candidate
communication. You can mark
stages as hiring points or
limit them to specific job
roles.
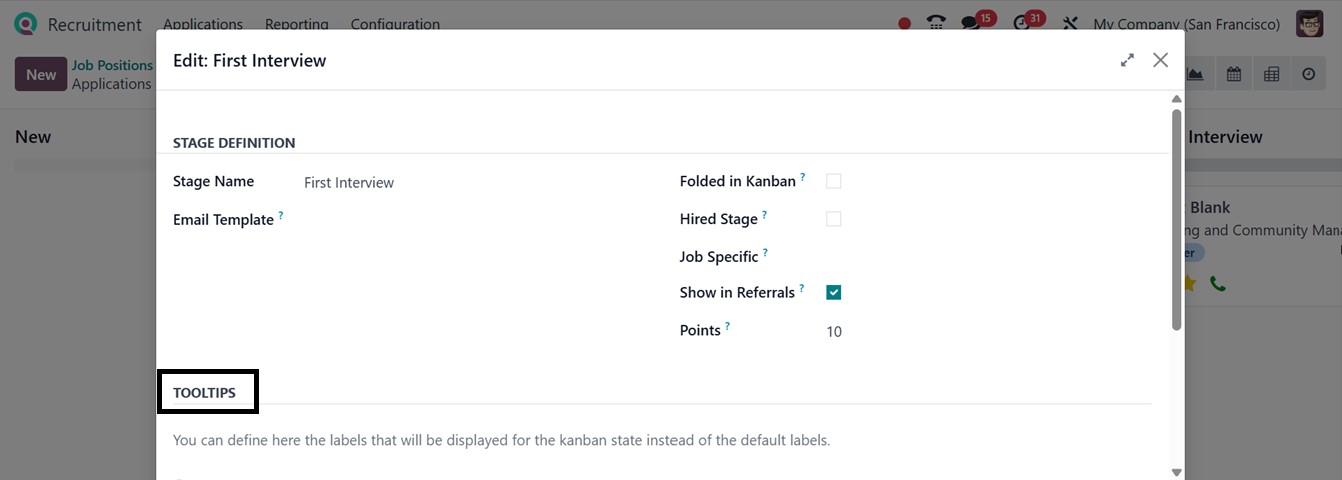
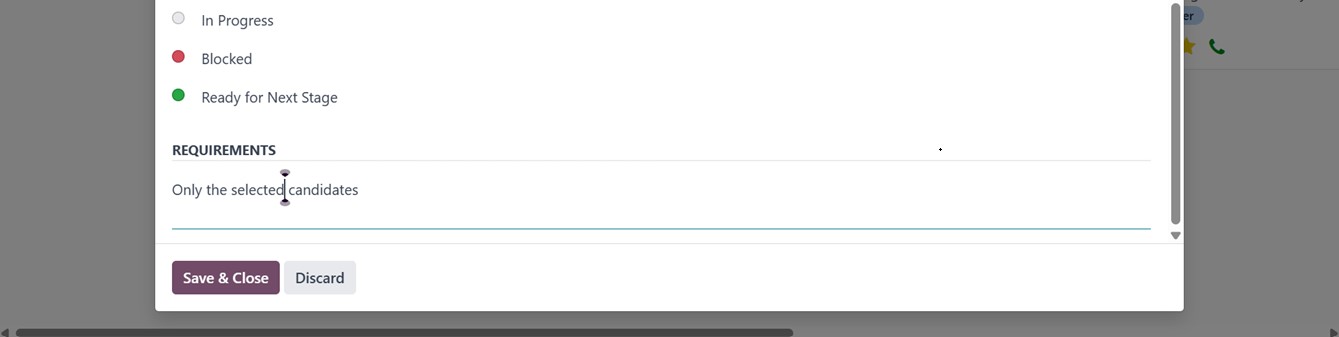
The TOOLTIPS tab offers labels
like In Progress, Blocked, or
Ready for the Next Stage to
help visually track candidate
progress. You can also rename
or recolor these tooltip
stages as per your desire.
Developer mode reveals an
extended Stages menu where
you can define new phases and
customize them further. The
Automation feature allows you
to set up rules that trigger
specific actions based on
conditions.
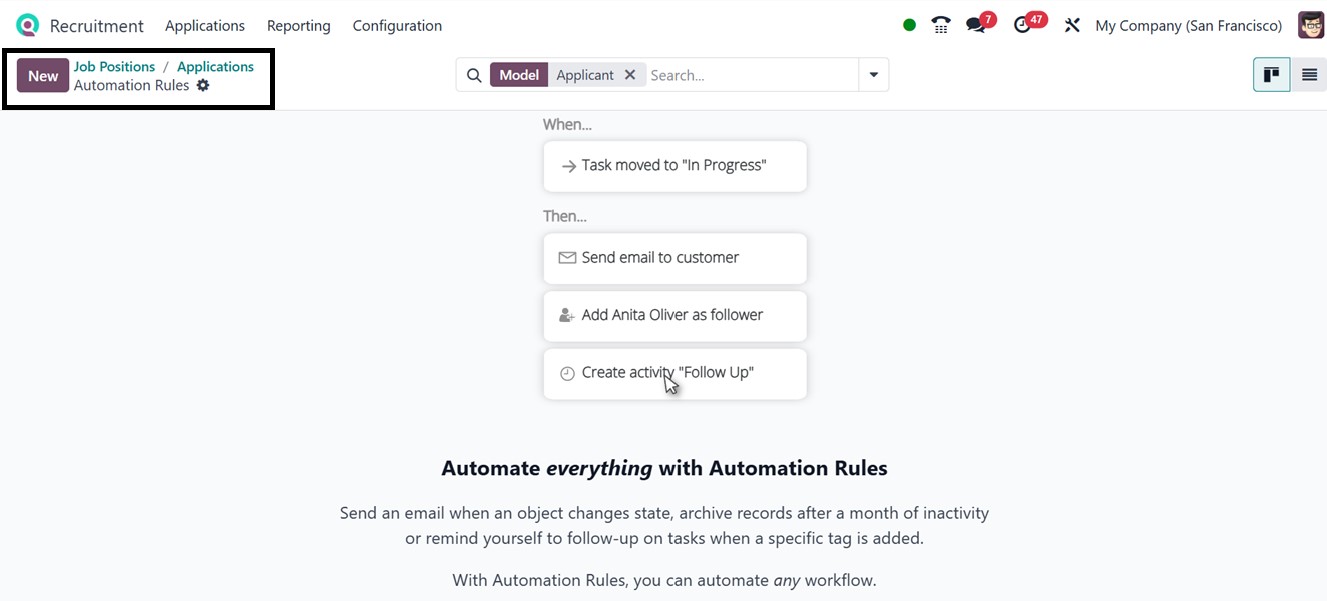
Clicking “New” in the Automation
setup opens a configuration
window to define the
automation models and the
Trigger option in the
relevant fields, as
illustrated in the screenshot
below.
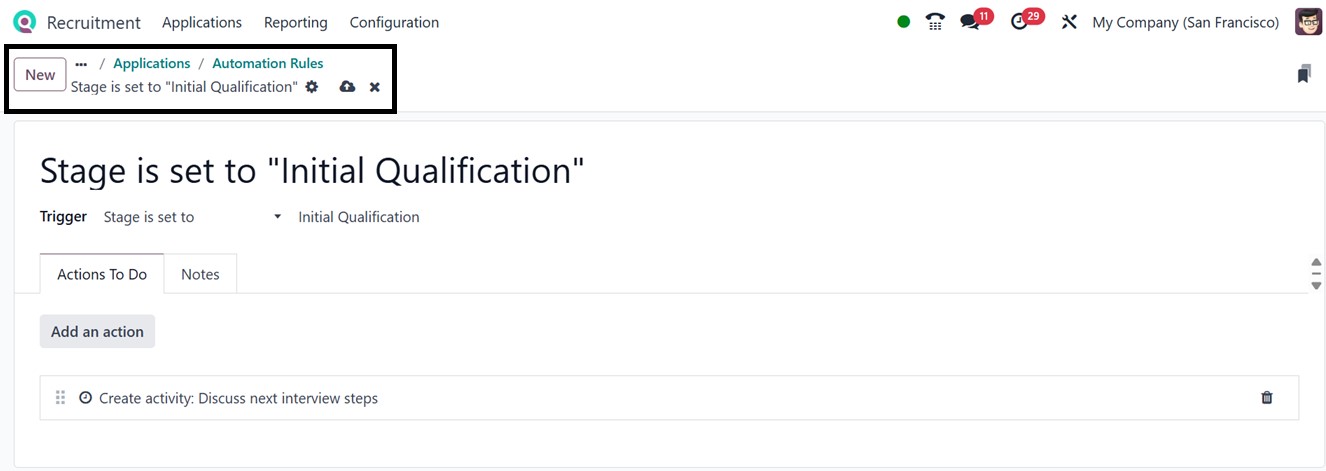
The ‘Trigger’ conditions, like
when a record is created,
changed, or reaches a
particular point in the
hiring process, can be
defined by choosing from the
dropdown menu. Here, I have
applied a trigger to the
application stages by
choosing the ‘Stage is set to
‘Initial Qualification’
option.
To speed up the application
workflow, you can designate
automatic activities to be
carried out based on these
triggers, such as sending
emails, changing certain
fields, or starting server
operations under the “Actions
to Do” tab by clicking on the
‘Add an action’ button.
In the Action settings box,
select an action ‘Type’ to
determine the automation's
actions. You can choose from
a variety of choices,
including Update Record,
Create Activity, Send Email,
Send SMS, Send WhatsApp, Add
Followers, Remove Followers,
and more, as illustrated in
the screenshot below.
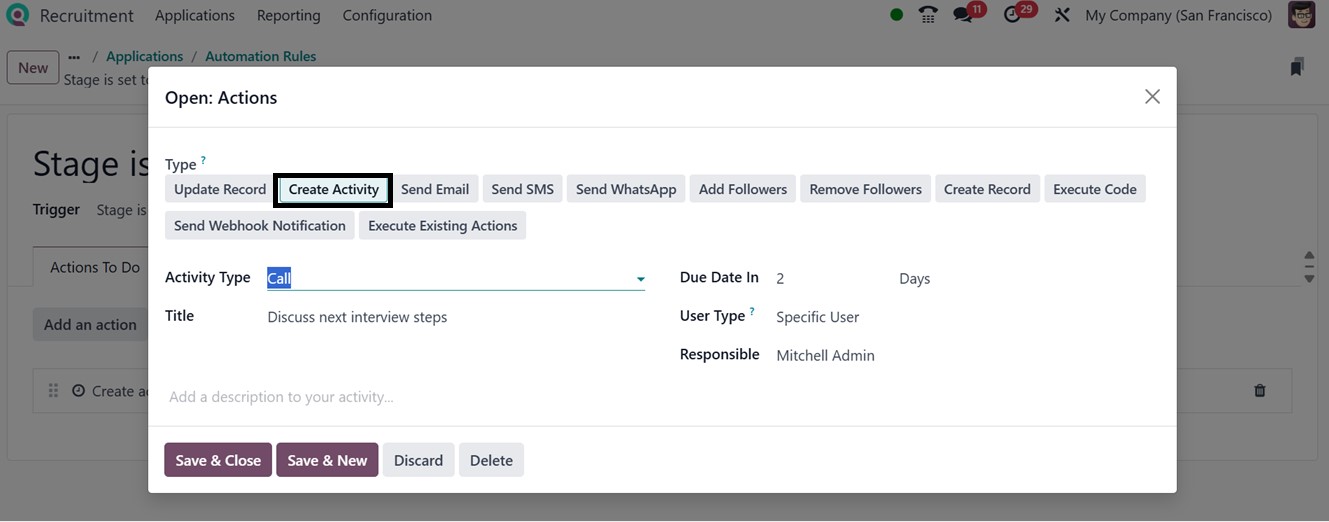
Then, choose an Activity Type,
including Meeting, Call, SMS,
To-Do, Upload Document, and
any other option according to
your requirements. Then,
provide a Title for the
activity, Due Date, User
Type, and the Responsible
person in the relevant
fields. Finally, save the
configuration to enable the
automation rule, which will
execute the specified actions
based on the defined activity
conditions.
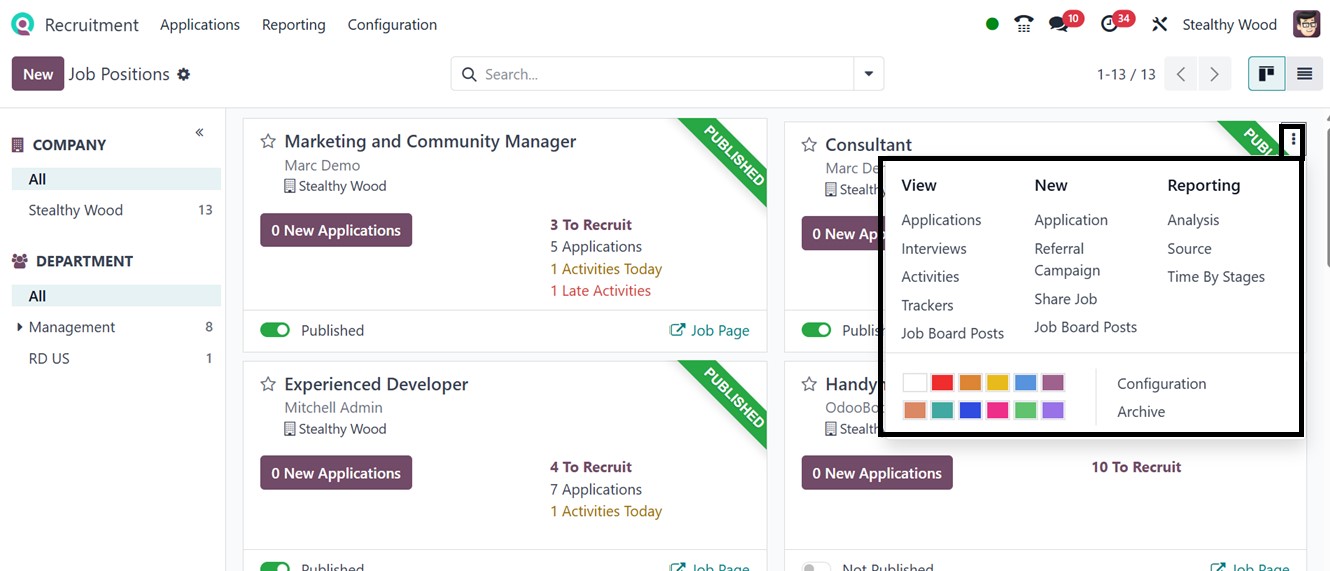
2.1 Applications By Job
Positions
The main page of the Recruitment
module in Odoo 18 displays an
overview of all current job
opportunities, which
corresponds to the 'By Job
Positions' submenu. This area
displays each job opportunity
together with relevant
details, such as the number
of applications received,
allowing you to follow
recruiting progress at a
glance.
To assist recruiting teams keep
informed and quickly respond
to incoming candidates, each
job posting includes a direct
link to view new applications
related to that position.
Managing several job
vacancies on a single
platform is made more
efficient by this simplified
interface.
To view the applications for a
specific job position, simply
open the corresponding Kanban
tile from the Job Positions
dashboard. If you want to add
a new application for that
vacancy, click the ‘New’
button within the job
position's dashboard, making
it quick and easy to create
and manage candidate entries.
Creating New Job Positions
To create a new Job Position,
click on the ‘New’ button
from the Job Position window.
This will launch a Job
Position creation form that
allows you to specify the
job's specifics including the
name of the Job Position and
Application email, as
illustrated in the screenshot
below.
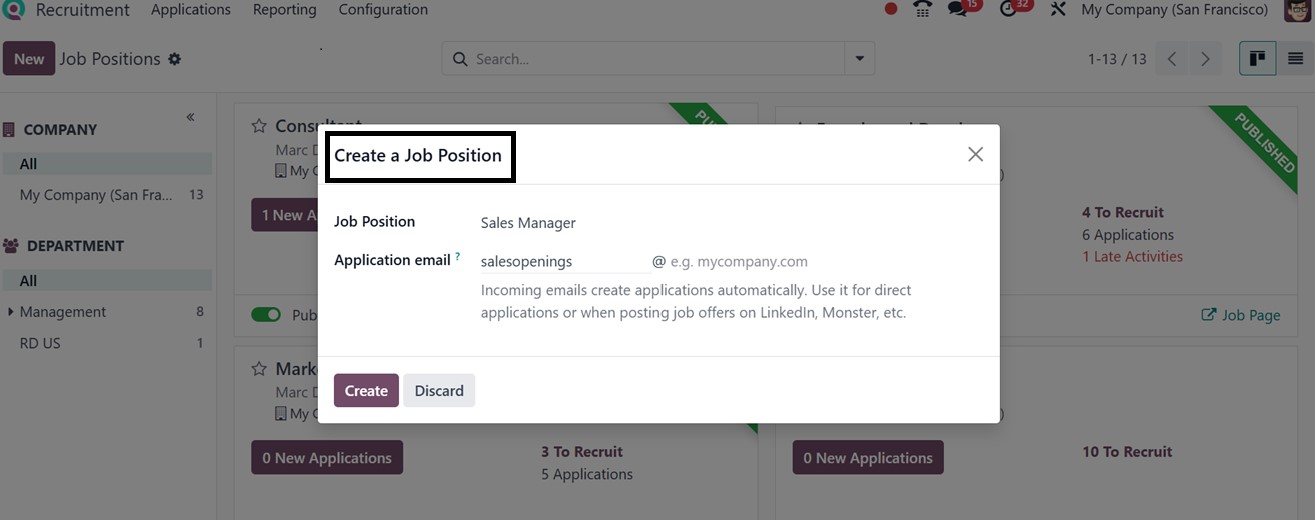
After editing the job position
name, click on the ‘Create’
button to proceed. The newly
created position will be
automatically added to the
Job Positions dashboard. You
can further alter the job's
settings once it has been
created from the
‘Configuration’ button from
the job card by clicking the
three vertical dots (options
menu).
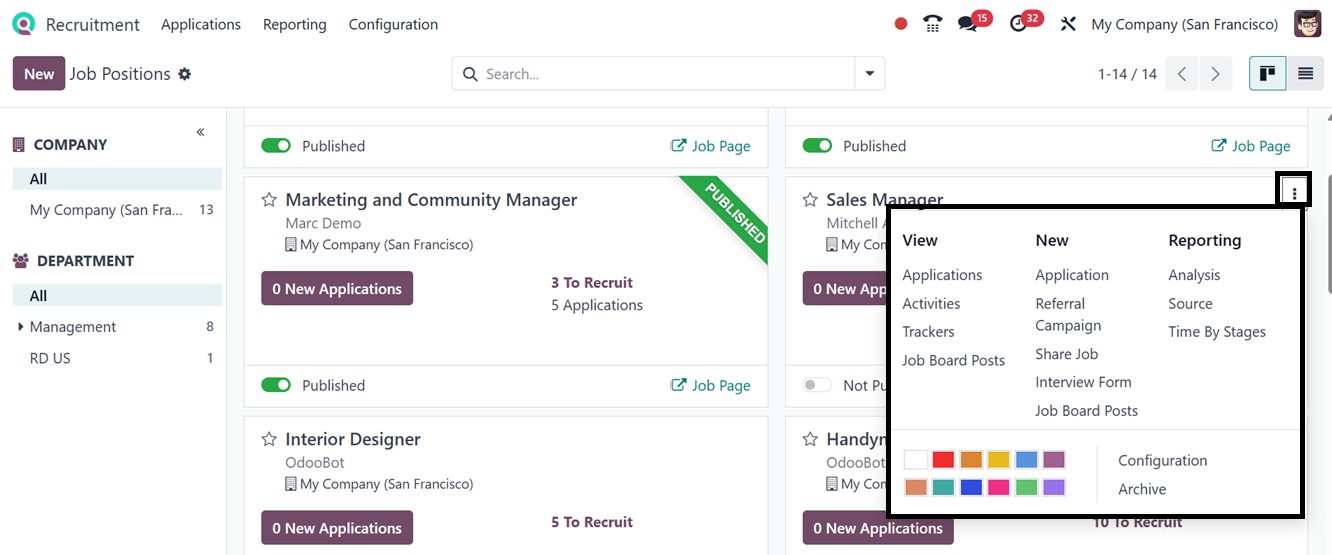
The ‘Configuration’ button will
open the job configuration
page, where the job title
appears at the top with some
tabs, including Recruitment,
Job Summary, Job Boards and
Application Info, that allow
you to mention all the job
specifications and
requirements to determine
recruiting objectives, assign
interview stages, and
configure other
hiring-related options, as
depicted in the screenshot
below.
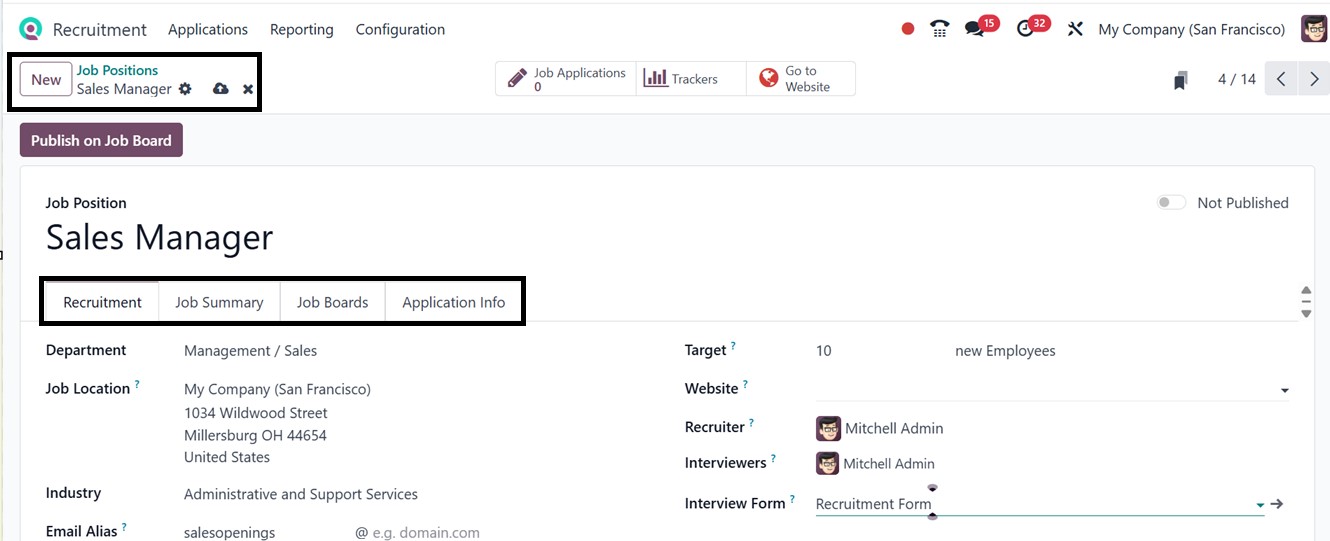
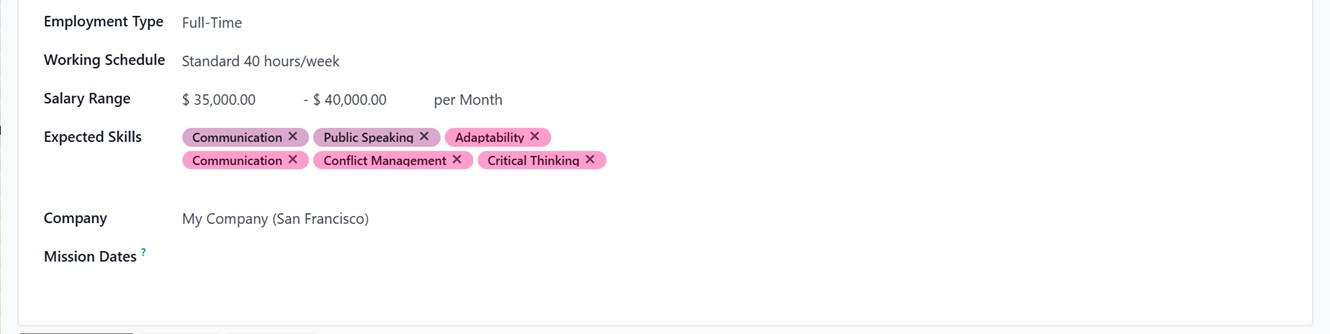
The ‘Recruitment’ tab allows you
to specify how the hiring
process for a certain
employment post will be
handled. The job position
configuration form lets you
set key details such as
Department, Job Location
(leave blank for remote
roles), Industry, Email Alias
for resume submissions,
Employment Type, Working
Schedule, Salary Range, and
Expected Skills. You can also
specify the Company and
Mission Date to mention job
post closure date. Then
provide a hiring Target,
assign a Recruiter, select
Interviewers, and attach an
Interview Form in the
relevant fields.
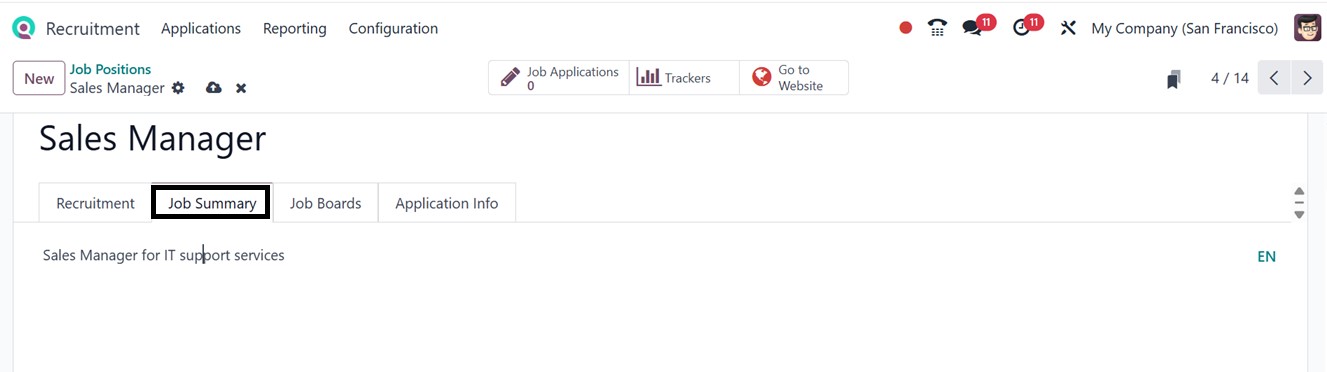
The ‘Job Summary’ page allows you
to summarize the important
features of the employment
role. This information helps
applicants and internal teams
understand the position's
purpose and scope.
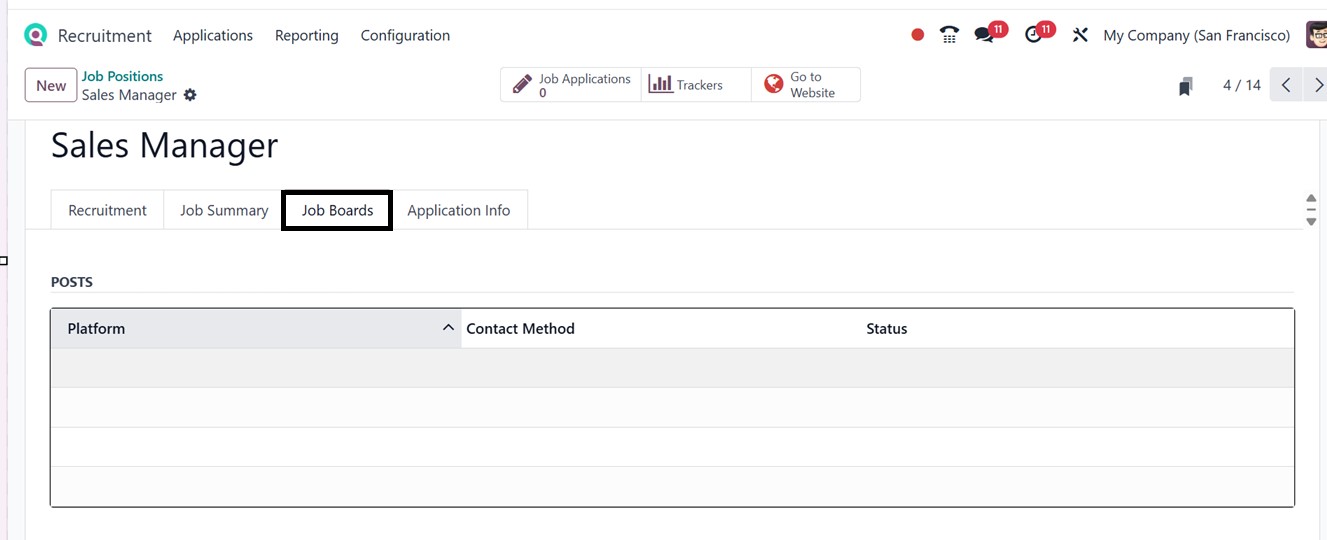
The ‘Job Boards’ option regulates
how visible the job ad is on
various sites. If third-party
integrations are utilized,
you can manage job board
channels, preview or copy the
job URL, and post the listing
on your website. This expands
the job posting's audience
and aids with larger hiring
initiatives.
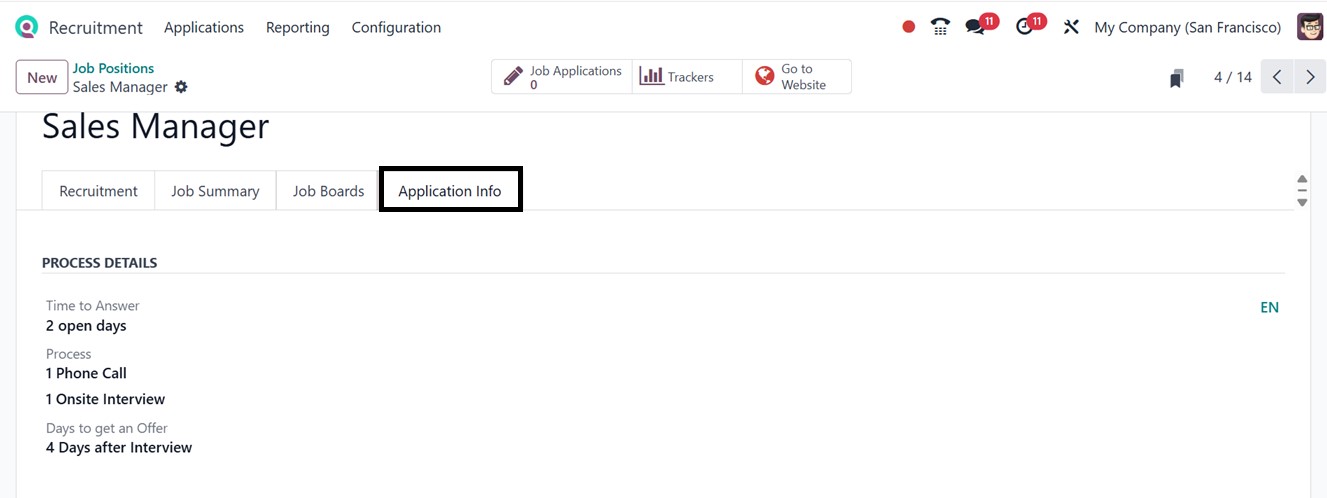
Managing the receipt and
processing of employment
applications is the main
responsibility of the
‘Application Info’ page.
Here, you can specify the
interview process details,
including the Time to answer,
Process steps, and Days to
get an Offer. This tab makes
sure that application data is
handled consistently and
systematically.
The 'Publish on Job Board' button
will help you to display a
job posting on the company's
website or any other job
portals, making it publicly
available. Once enabled, the
job posting is made available
to external applicants, who
may browse the details and
apply directly through the
website.
Pressing the button will open a
‘Publish on a Job Board’
pop-up window where you can
choose the Job Board, Apply
Method, Job URL, Application
start and end dates (From &
to), as depicted in the
screenshot below.
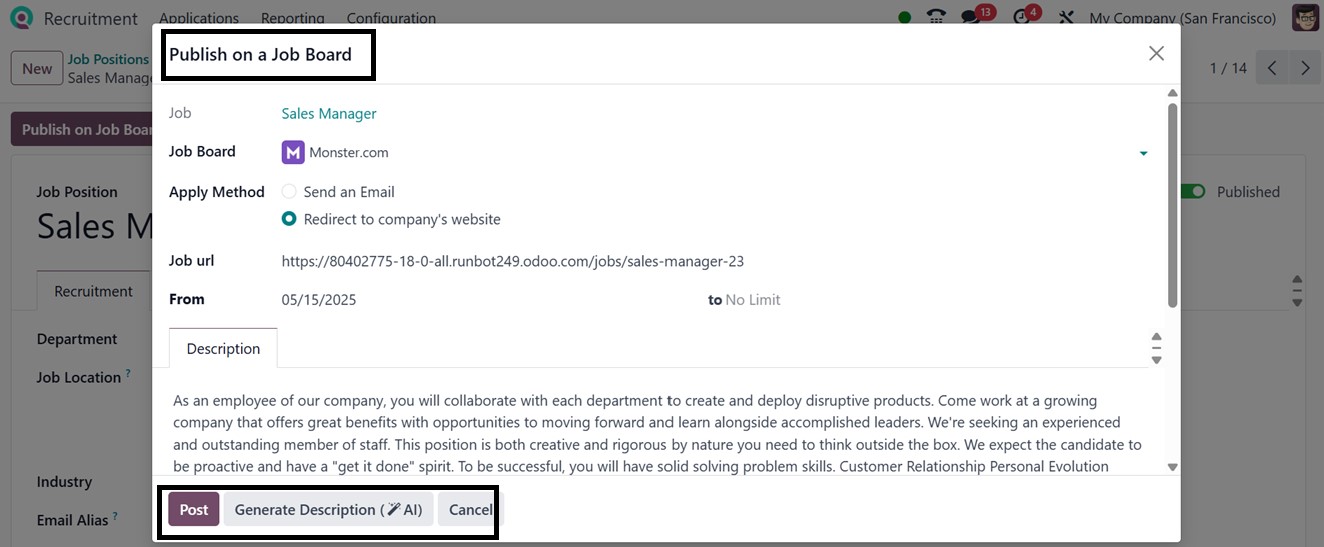
You can manually write a job
description in the
‘Description’ tab or create
an AI-generated description
about the job position using
the ‘Generate Description
(AI)’ button. Finally, post
the job using the ‘Post’
button. If you have published
this job post on multiple job
boards, these posts will be
listed inside the ‘Job Board’
smart button, as well as in
the ‘Job Boards’ tab section
of the form, as depicted
below.
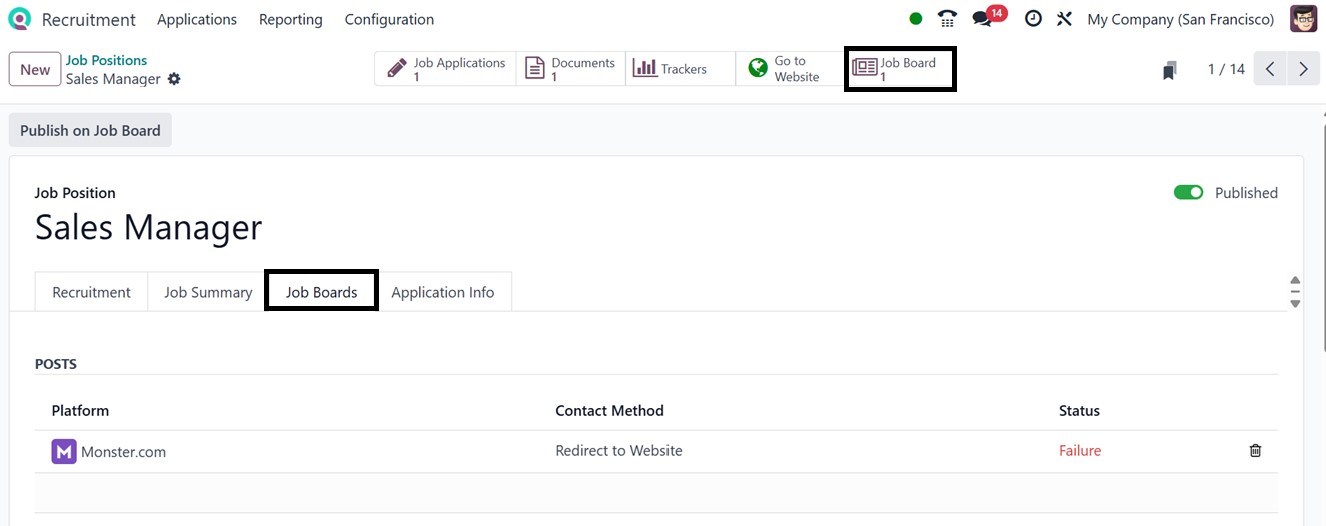
This ‘Publish on Job Board’
feature streamlines the
external recruiting process
by attracting outside
applicants and collecting
their applications within the
Odoo platform.
After saving the details,
additional actions like
Duplicating, Archiving, or
Deleting a job record are
accessible via the Action
button placed at the top of
the form, as illustrated in
the screenshot below.
The ‘Add Properties’ option
allows you to customize the
job application form by
introducing new input fields.
Clicking the ‘Add Properties’
button will open a new field
property editing window, as
shown below.
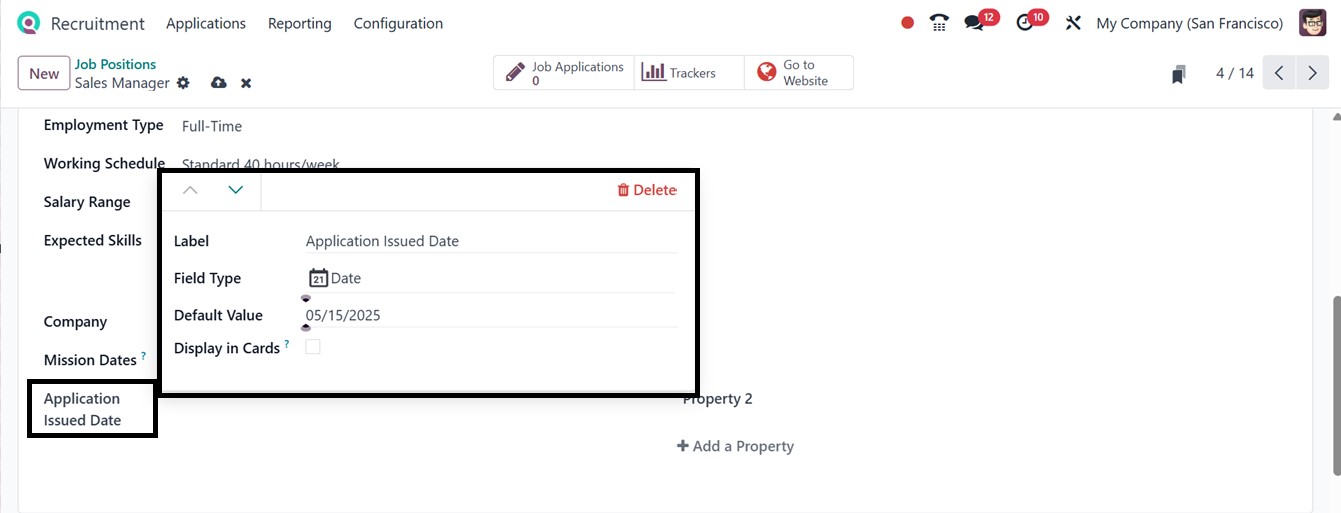
You can define the field name in
the ‘Label’ area and mention
the ‘Field Type’ (e.g., text,
checkbox, date), and
determine whether it should
appear on job cards by
enabling the ‘Display in
Cards’ button and mark it as
a default value by entering
it in the ‘Default Value’
field. After saving the new
field specifics, you can
reedit them accordingly.
The ‘Request Signature’ button
from the action menu can be
used to request any signature
inside a job position
document.
Smart Matching with Applicants:
The ‘Action’ button also
includes a Search Matching
Applicants tool, which
filters and identifies
potential candidates based on
qualifications, skills, or
experience. Clicking on this
button will take you to the
dashboard of matching
candidates, if any applicant
matches the criteria, as
shown in the screenshot
below.
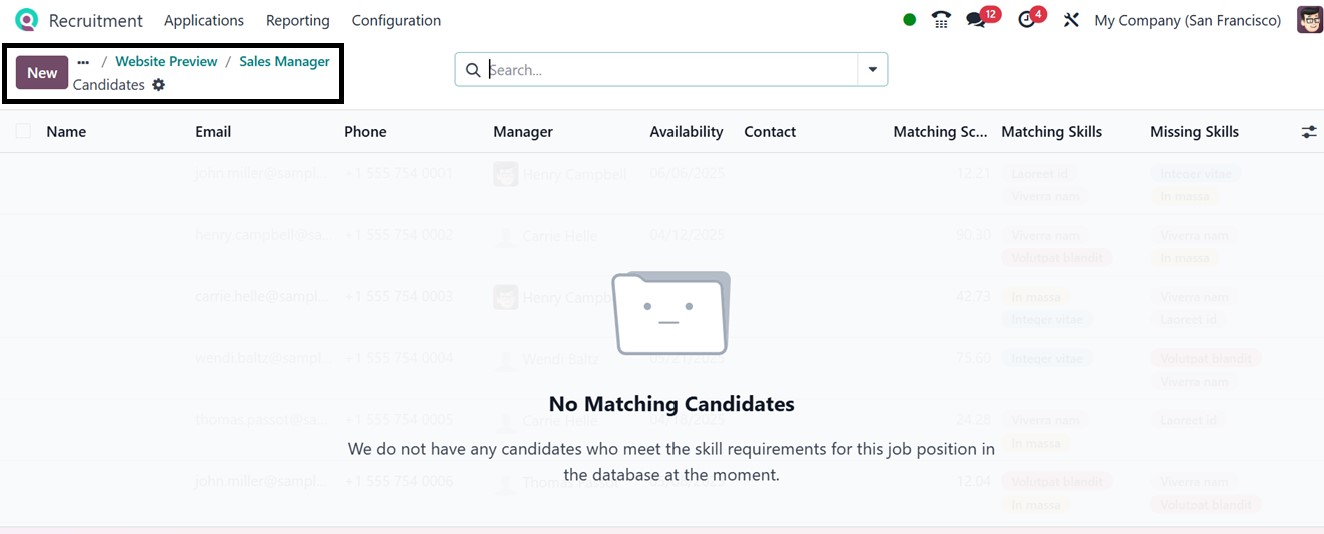
This feature greatly improves
efficiency by highlighting
applicants whose profiles
align with the job
requirements. If no matches
are found, the system
displays a warning message
‘No Matching Candidates’, as
you can see from the above
screenshot.
If any applicants are
shortlisted, they are
displayed in a list format,
making it easy to proceed
with evaluations. This tool
ensures that only the most
relevant profiles are
considered, helping
recruiters make informed
hiring decisions faster. You
can also create new candidate
data for this job post using
the ‘New’ button.
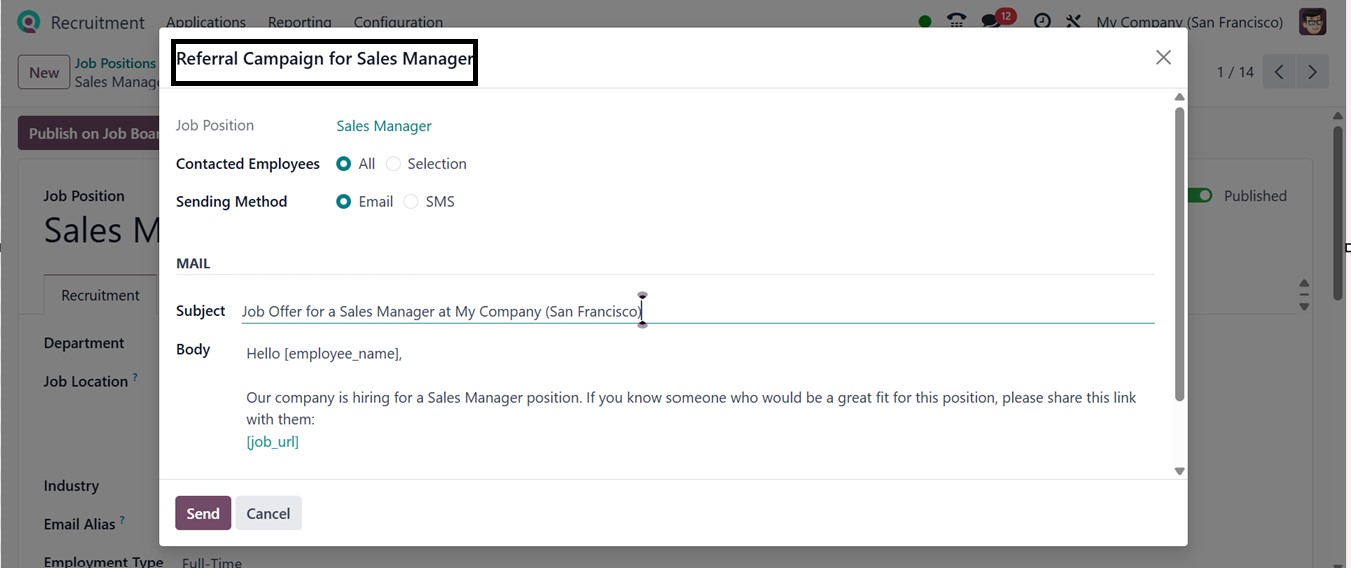
Referral Campaign: The Referral
Campaign feature in the
Recruitment module lets
employees refer candidates
for job openings through a
gamified, user-friendly
system. Staff earn rewards
when referrals apply,
advance, or get hired.
If you are an HR personnel, you
can customize a referral
campaign by selecting the
target audience in the
Contacted Employees field,
either All employees or
specific individuals. Next,
choose the Sending Method
(Email or SMS) to determine
how the campaign will be
delivered. Based on the
selected method, you can then
tailor the SMS content or the
Mail Subject and Body
accordingly and send the
mail, as shown in the
screenshot below.
The Integration of the
Recruitment Module with the
employee portal enables easy
referral sharing and progress
tracking. This feature helps
reduce hiring costs, speed up
recruitment, improve
candidate quality, and boost
employee engagement.
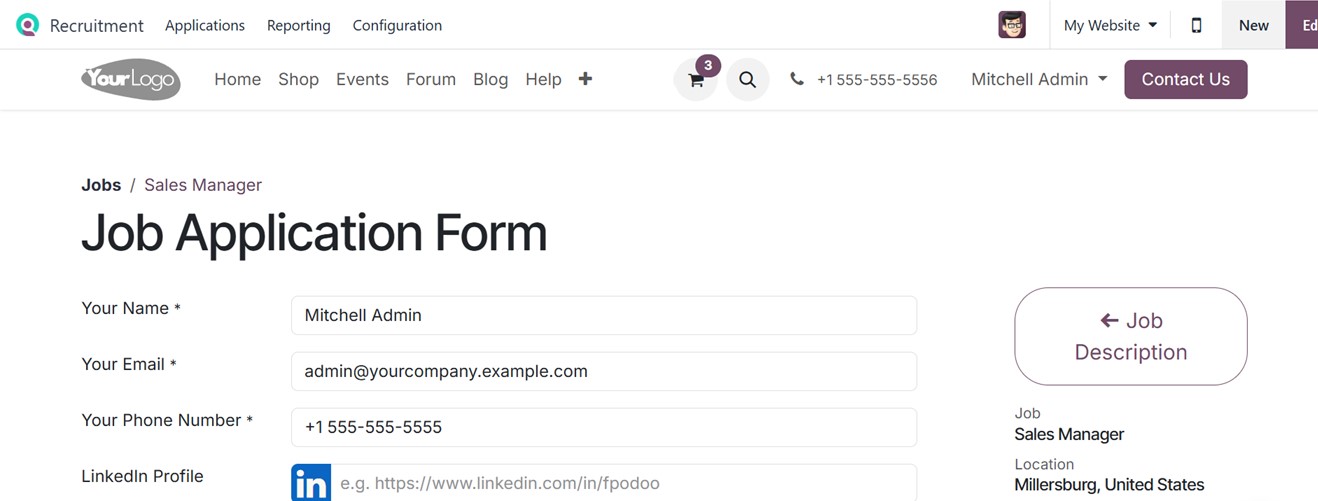
To preview how the job appears on
your website, click on the
"Go to Website" smart button.
This takes you to a
public-facing page with an
"Apply Now" option.

When applicants click this,
they’re presented with a form
to input their name, email,
phone number, LinkedIn
profile, resume, and a short
introduction. Submitting the
form is done via the "I’m
Feeling Lucky" button. To
edit the button name and
other form designs, you can
utilize the ‘Edit’ button to
edit the webpage with Odoo
Studio integration
properties.

Jobs can also be published or
unpublished directly from the
job configuration form using
the ‘Publish/Unpublish’
toggle button on the top
right, eliminating the need
to switch to the website
interface. The ‘Job Position’
button of the website view
will take you to the backend
form of the job position
configuration.
The 'Job Application' smart
button in the form view
displays all job applications
for that particular vacancy.
The 'Documents' smart button
allows you to view any
materials associated with
your job application, such as
role-specific terms and
conditions. Meanwhile, the
'Tracker' smart button
provides a dashboard view of
the applicant's social media
or LinkedIn accounts, as seen
below.

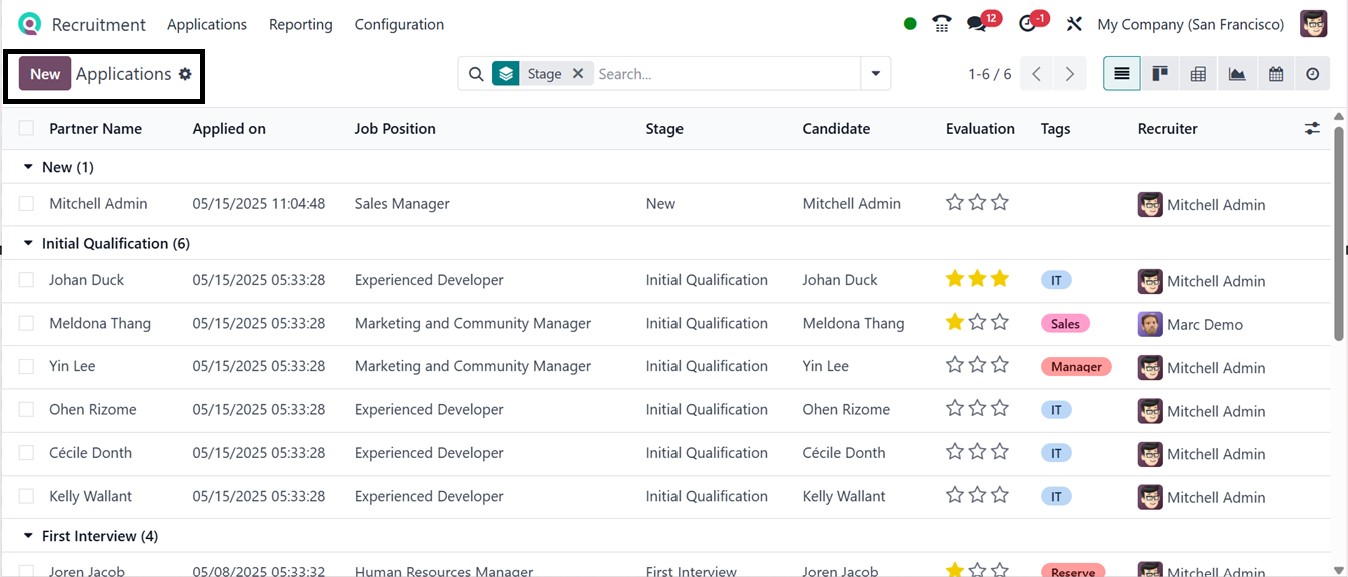
2.2 All Applications Overview
The "All Applications" section
provides a consolidated view
of every job application
submitted, along with the
applications in different
application stage categories
such as New, Initial
Qualification, First
Interview, Second Interview,
etc.
This page displays detailed
records including Partner
Name, Applied on date, Job
Position, Stage, Candidate,
Evaluation, Tags, and
Recruiter assignment, as
illustrated in the screenshot
below.
In this window, multiple views
are available, including
Kanban, List, Pivot, Graph,
Calendar, and Activity. So,
you can switch the views into
the required format by
clicking on the relevant
icon. Selecting any
application column will open
the form view of the
application and the
candidates' detailed profile.
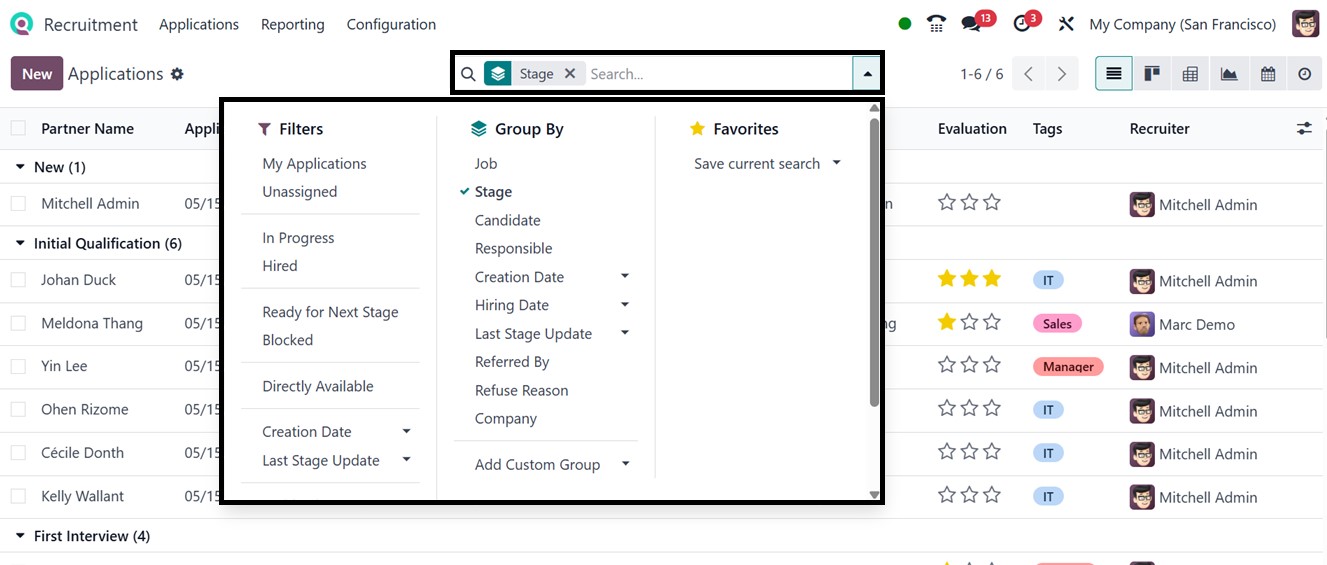
From the dashboard, applications
can be filtered, grouped, and
saved using the various
search bar options included
under the Group By,
Favorites, and Filters
sections. It is also possible
to create customized filters
and grouping options using
the ‘Add Custom Filter’ and
‘Add Custom Group’ options
from the relevant sections.
You can also use the "New" button
to manually add applications.
Within the displayed
application form, you’ll find
fields for mentioning the
name of the Candidate, Email,
Phone, LinkedIn Profile, Job
Position, Recruiter,
Interviewers, and Tags, as
shown in the screenshot
below.
The "Notes" tab lets recruiters
jot down any observations
regarding the applicant. In
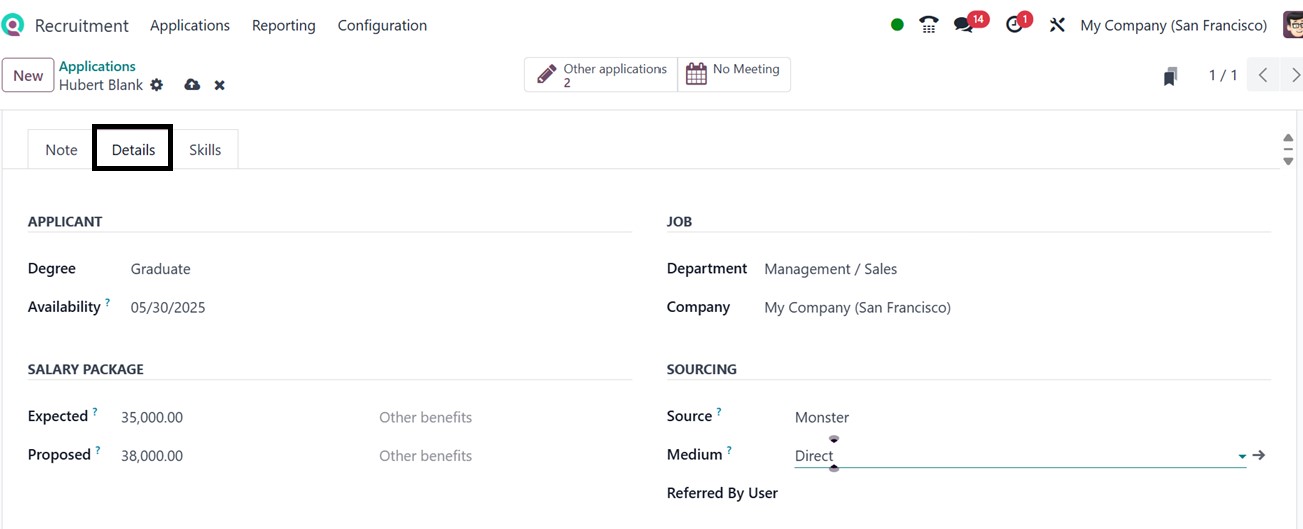
the "Details" tab, the
‘APPLICANT,’ ‘JOB,’ ‘SALARY
PACKAGE,’ and ‘SOURCING’
sections are available for
entering applicant Degree,
Availability, Expected and
Proposed salary expectations,
Department, Company, Source,
Medium, and Referring
details.
The employee's skills can be
added under the "Skills" tab
using the ‘ADD’ button.
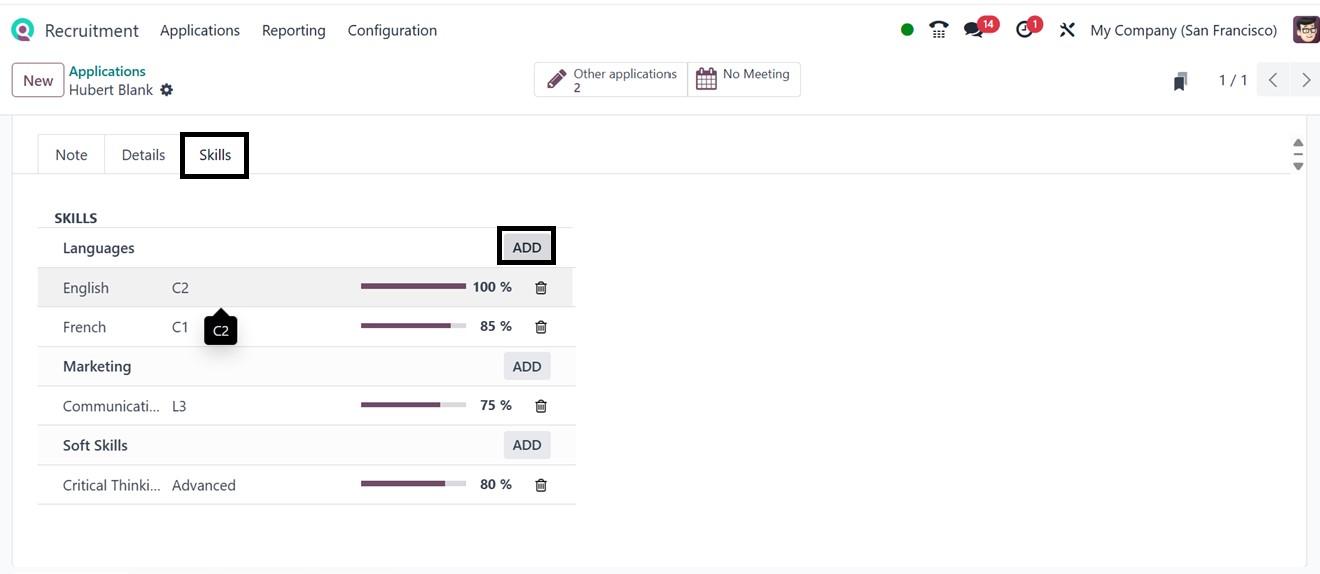
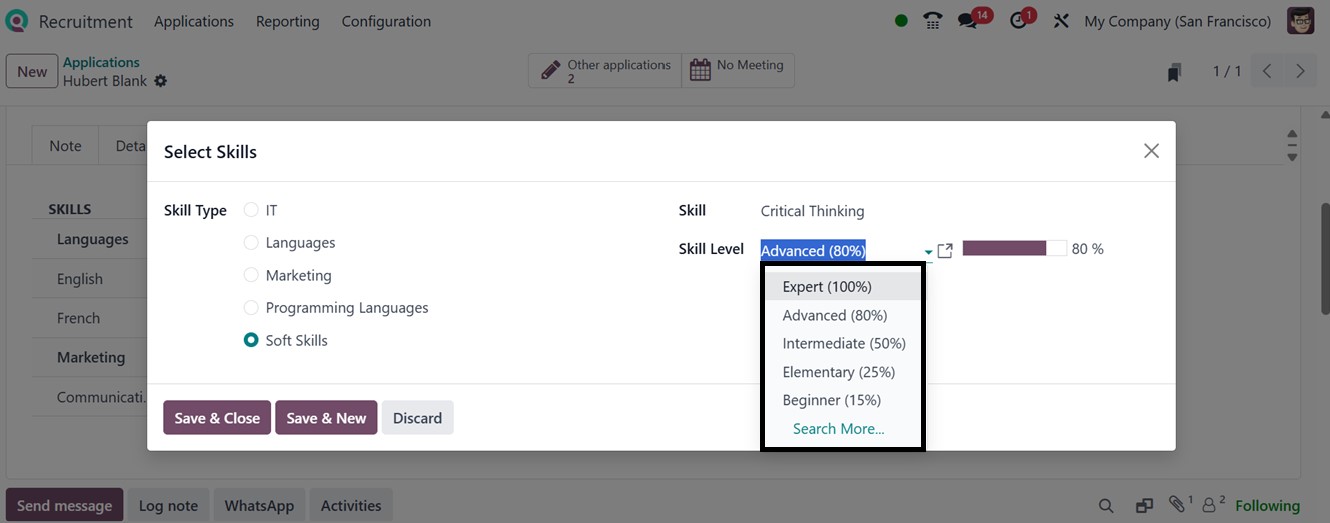
By clicking on the "ADD" button,
a pop-up appears to help you
choose a Skill Type, Skill
Name, and Proficiency Level.
You can repeat this to add
more skills.
After reviewing a candidate,
recruiters can use buttons
like "Generate Offer" to
generate a job offer to the
applicant or "Refuse" to
reject application. The
"Other Applications" smart
tab shows other roles the
candidate has applied for,
while the "Meetings" tab
helps schedule interviews
with the candidate. Finally,
the ‘Offers’ smart button
will list down all the job
offers received by the
candidate..
The top-left "Action" menu offers
options to archive,
duplicate, or delete the
application. The "Add
Properties" button here
allows you to create
additional custom fields, as
we have discussed in the
above section.
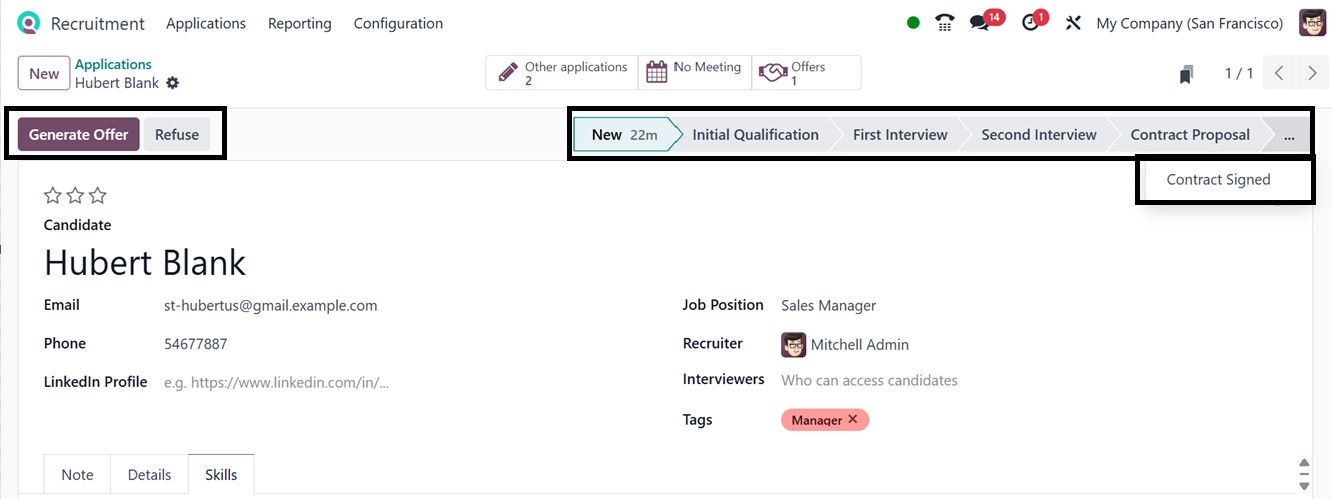
Managing Interviews and
Hiring
As candidates move through
recruitment stages such as
"Initial Qualification,"
"First Interview," "Second
Interview," and "Contract
Proposal," you can manually
shift them using stage
buttons. When they reach the
final stage, "Contract
Signed," a "Create Employee"
button becomes available, as
shown below.
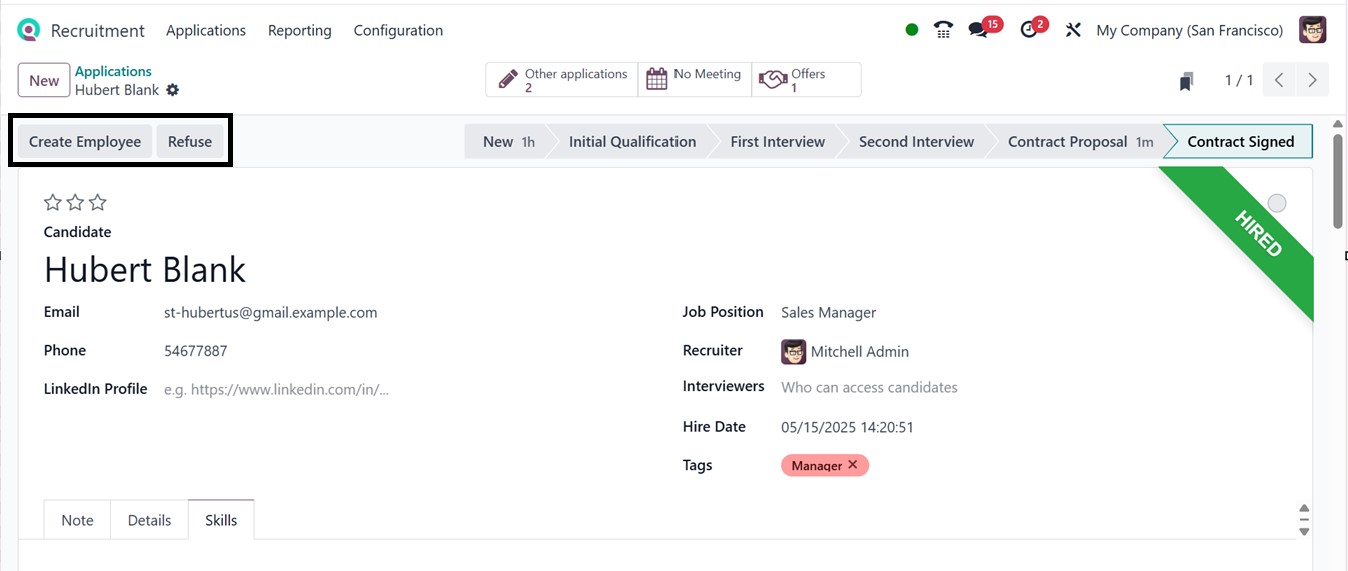
Clicking on the ‘Create Employee’
button converts the candidate
into an employee. A "HIRED"
label will then appear,
signaling the candidate's
successful onboarding. You
can either complete this
process or use the "Refuse"
option if needed.
The ‘Create Employee’ button will
immediately add the applicant
as a new employee, and you
will be directed to an
employee record creation
form, as shown below.
2.3 Candidate Management
The "Candidates" menu provides a
Kanban-style overview of all
the candidate profiles with
the Candidate Name, Job Post,
and options to call and send
SMS, as depicted in the
screenshot below.
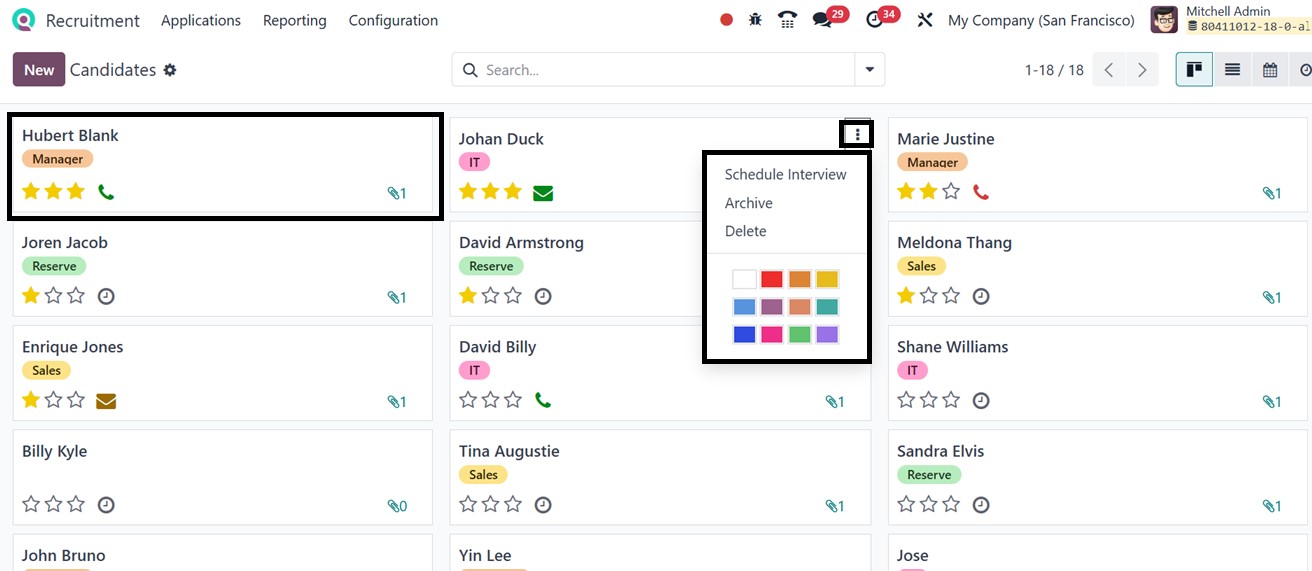
Apart from the kanban view, you
can also switch the view into
a List, Calendar, or Activity
view as per the requirements.
The vertical menu provided
inside the kanban card
includes options to archive,
delete, or schedule
interviews via a calendar
interface. Clicking the
"Schedule Interview" button
will take you to the calendar
view of the candidates menu.
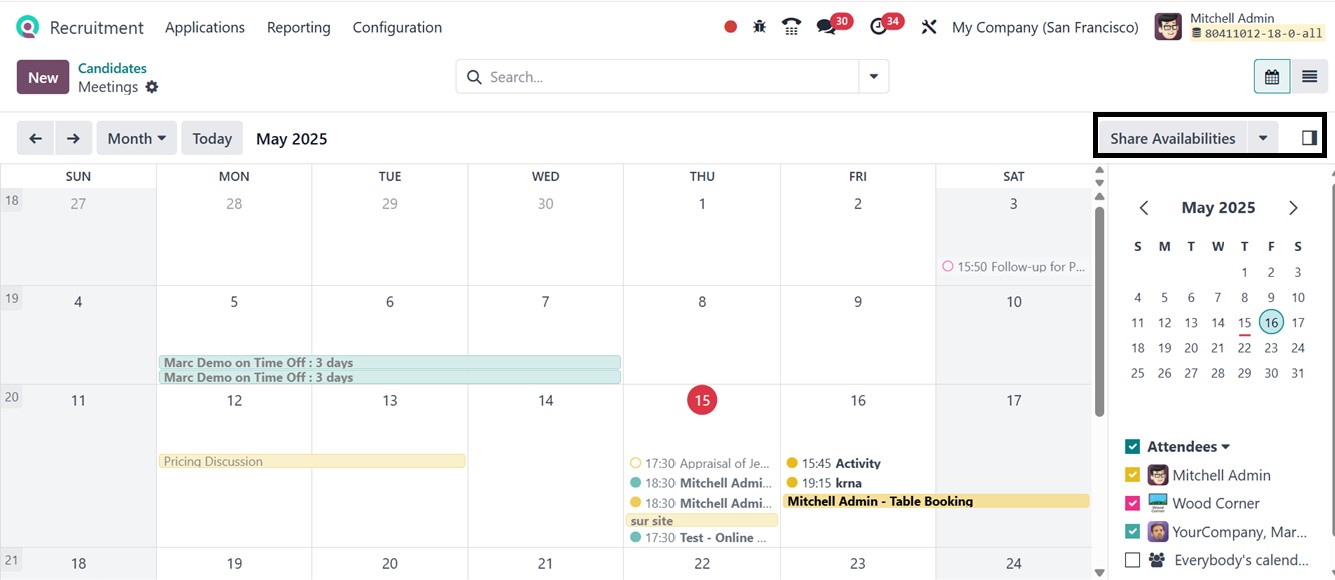
From the calendar interface, you
can see the recent meetings,
appointments, or any tasks
scheduled for the candidate,
as illustrated in the above
screenshot. Click on any
dates to create a new event,
task, or activity by opening
a new meeting form and
setting Start Date,
Attendees, Videocall URL, and
a Description, as shown in
the screenshot below.
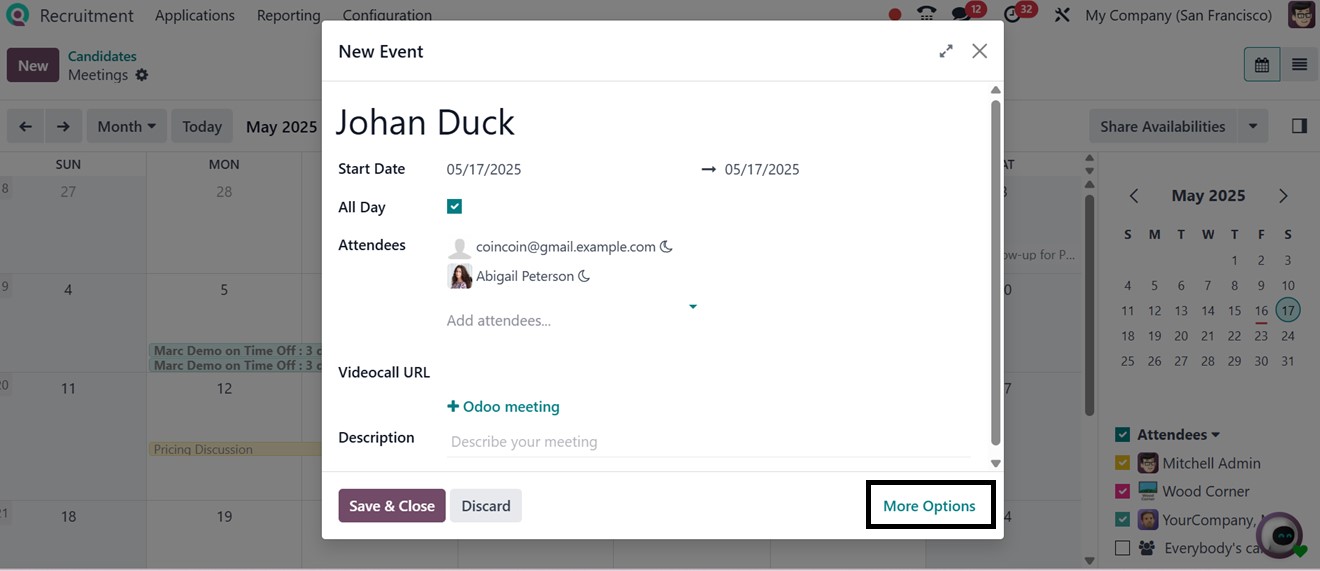
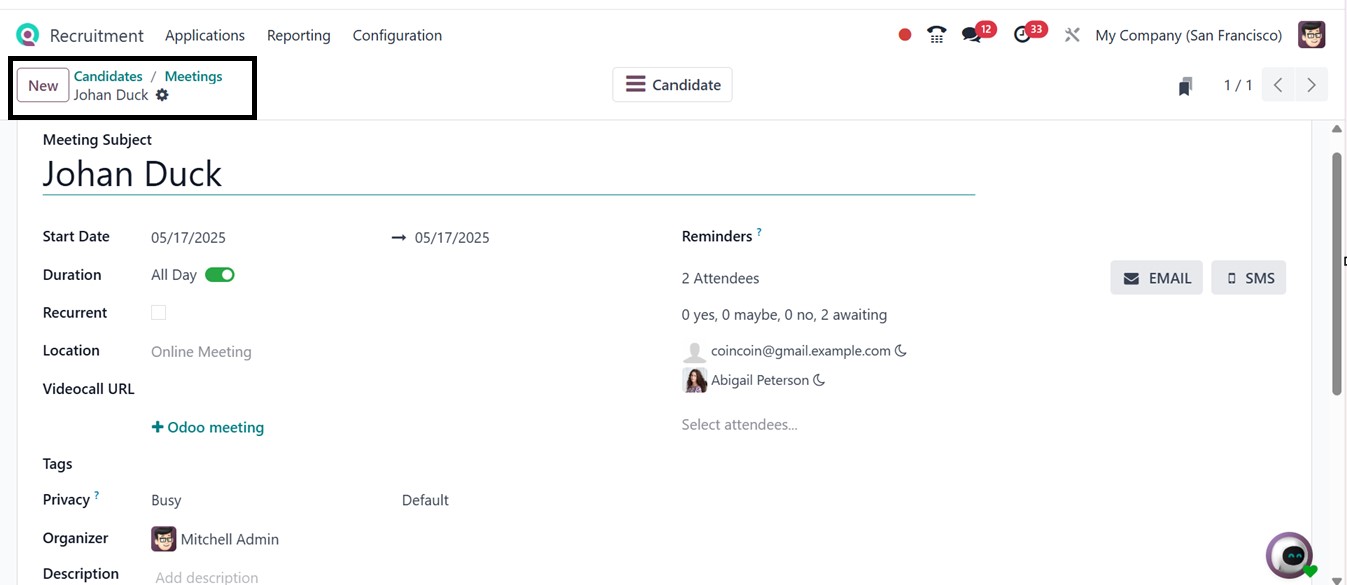
The ‘More Options’ button will
open the detailed meeting
configuration window, where
you can specify extra details
about the meeting, as
depicted in the screenshot
below.
Once the meeting details are
saved, you can notify
candidates via EMAIL or SMS.
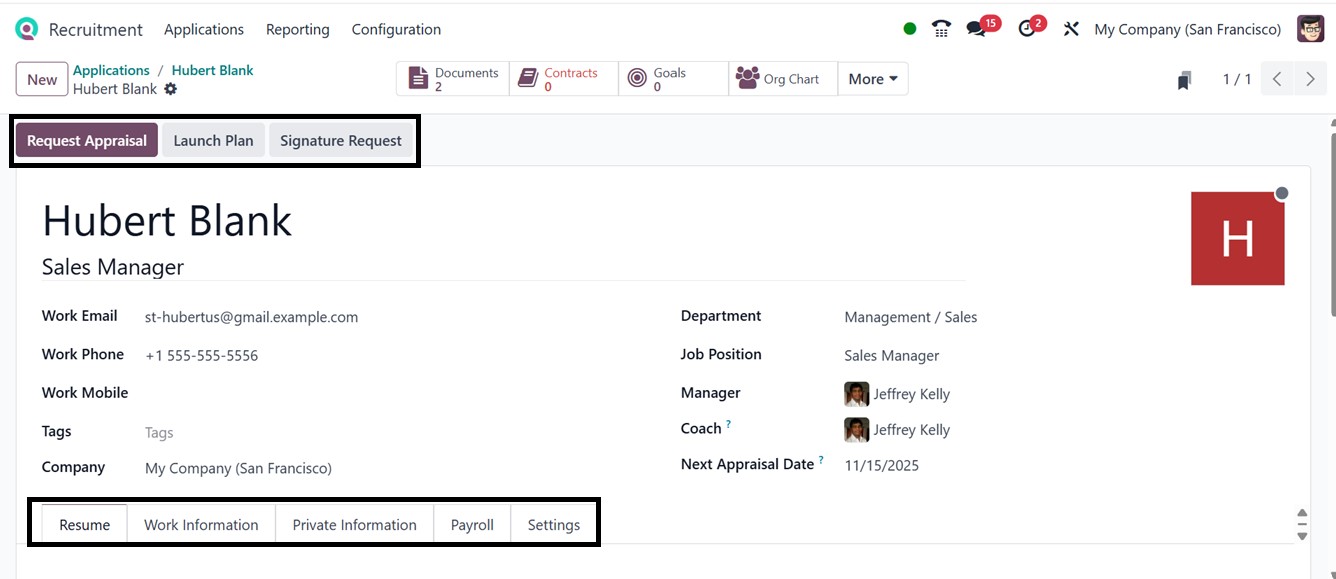
Clicking on the ‘Candidate’
smart button will open a
detailed form view where you
can track total applications
and the meeting history of
the candidate.
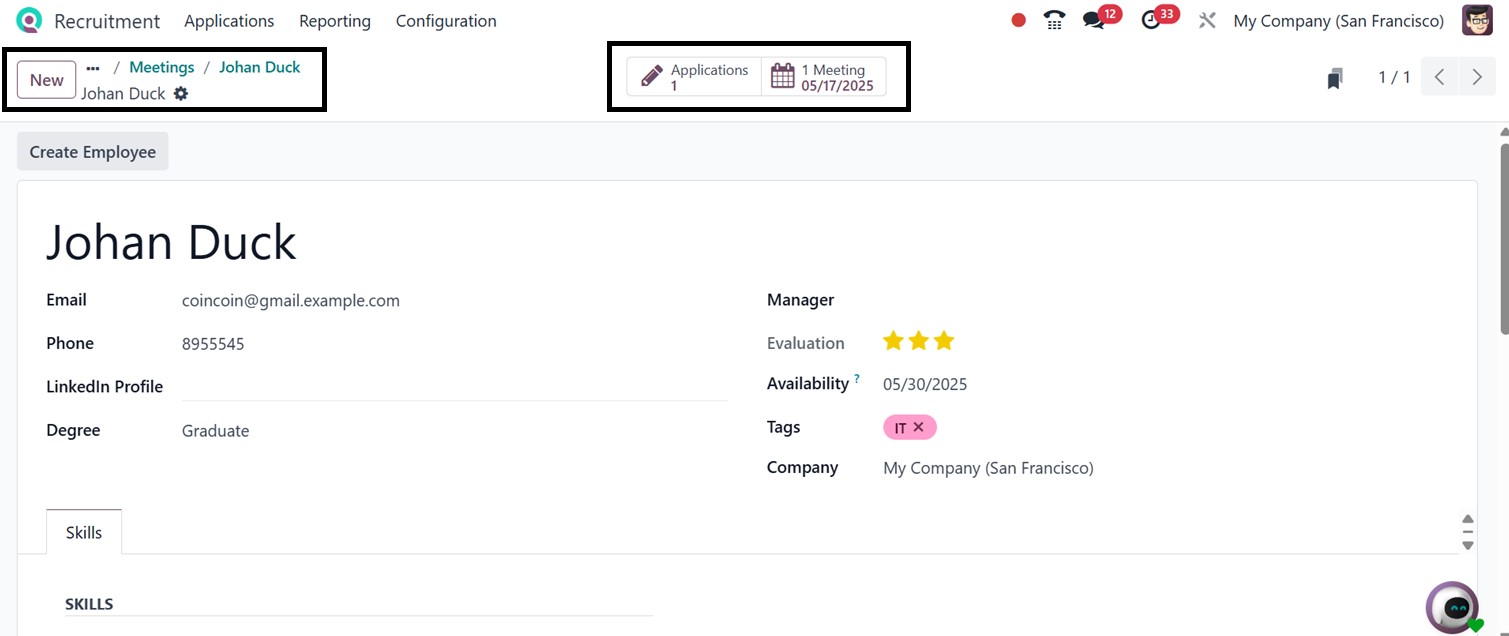
You also have the option to
instantly hire a candidate
using the "Create Employee"
button from this view. Doing
so unlocks smart tabs for
managing Contracts,
Documents, Time-Off, Goals,
Timesheets, Equipment, and
Contacts, as shown in the
screenshot below.
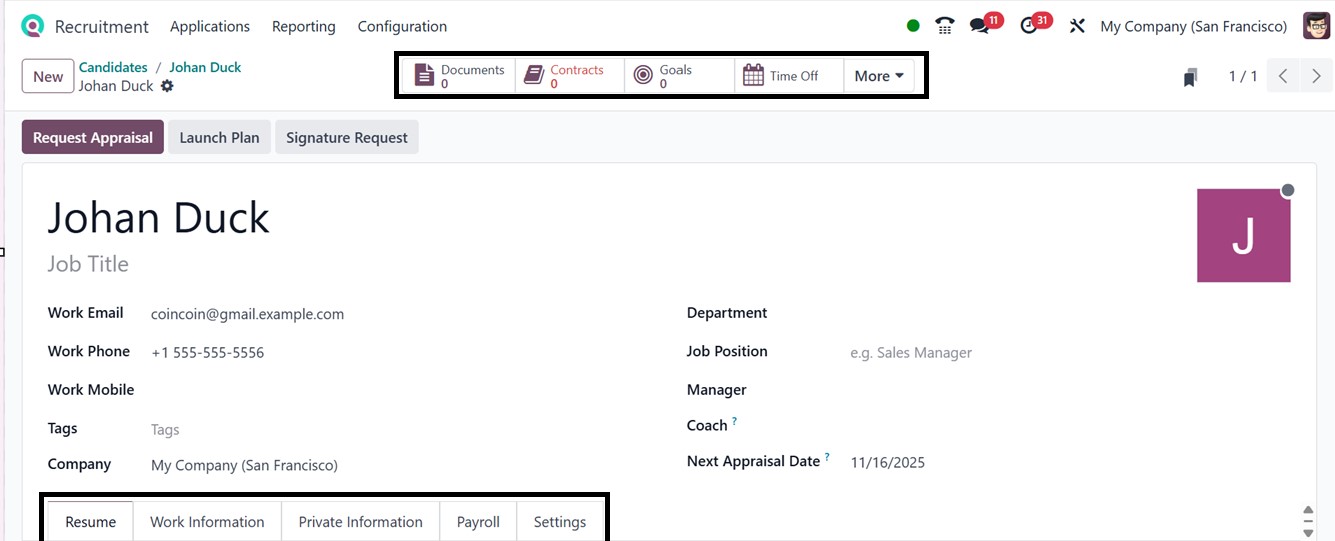
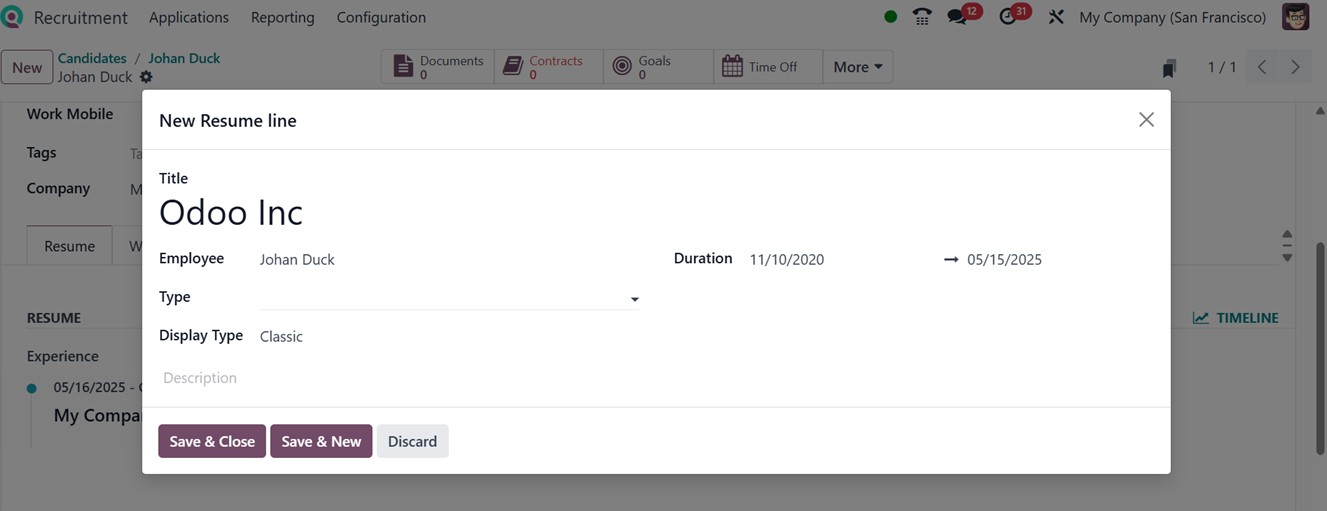
In the "Resume" tab, you can add
or update skills and
professional experience.
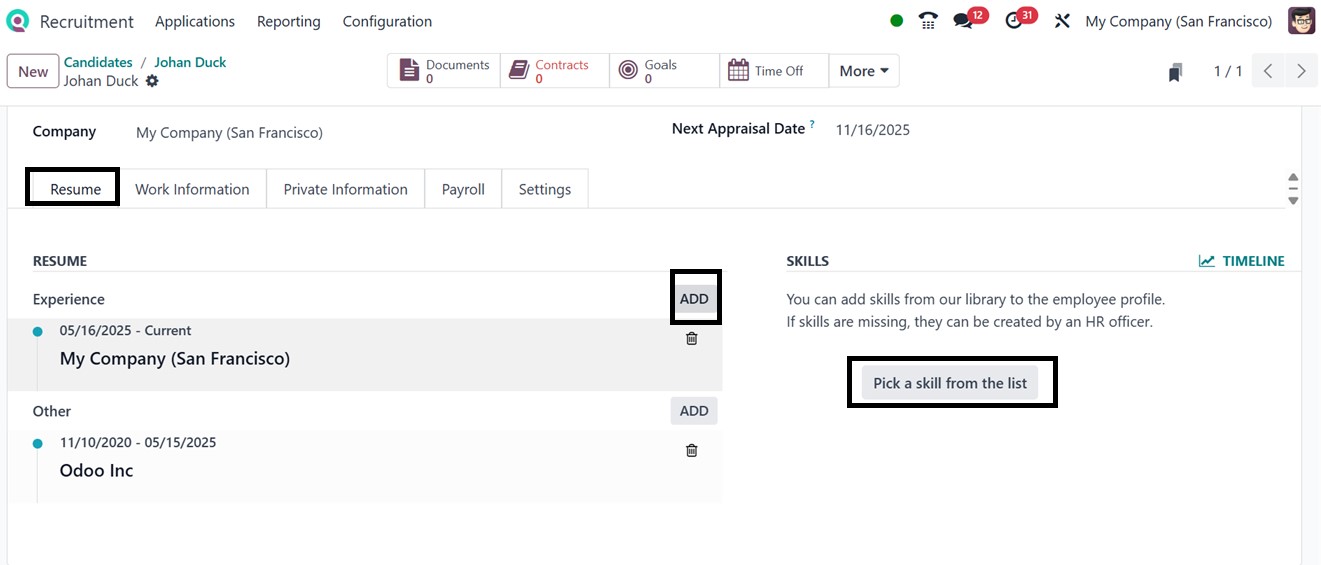
Clicking the "ADD" button allows
you to specify resume line
Titles, Types (such as work
experience, course,
education), and details like
Duration and Display Type.
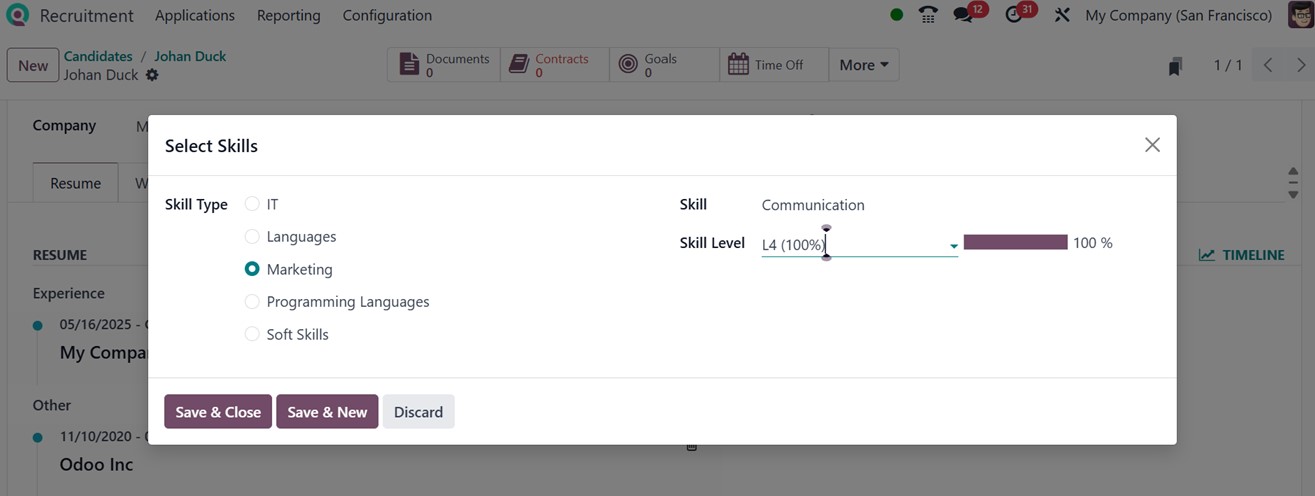
To add any skill set, click on
the ‘Pick a skill from the
list’ button and choose the
Skill Type, Skill, and Skill
Level from the available
options, as shown in the
screenshot below.
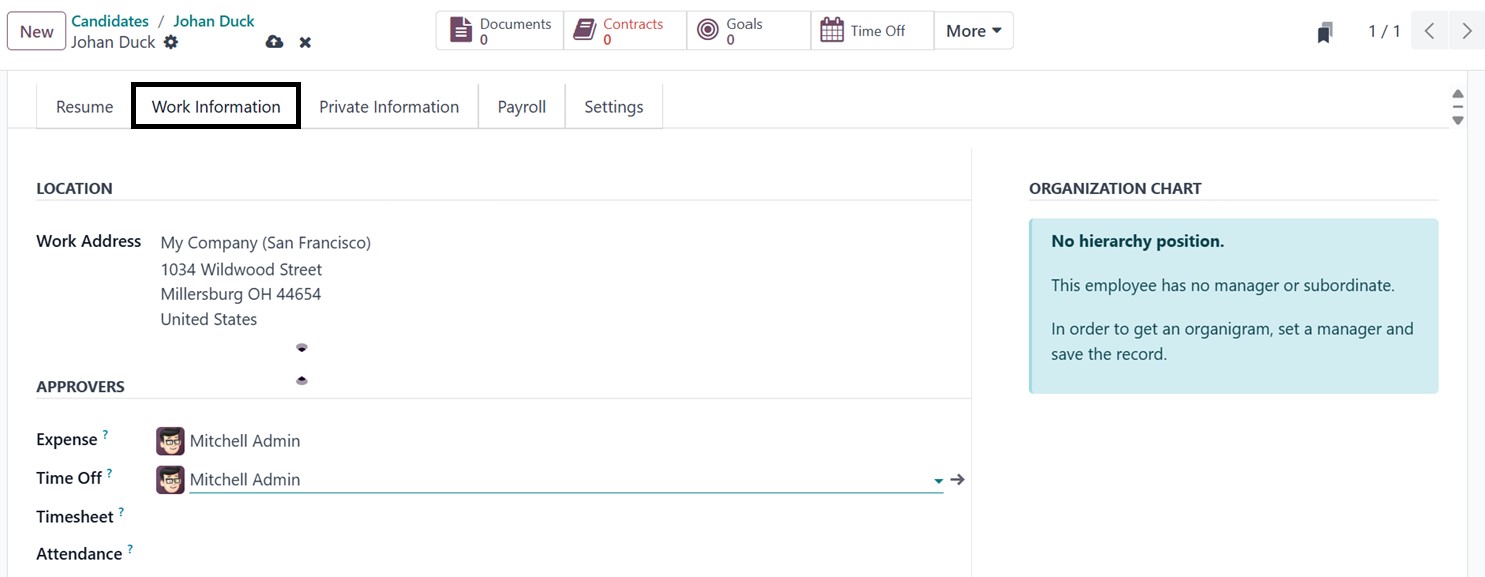
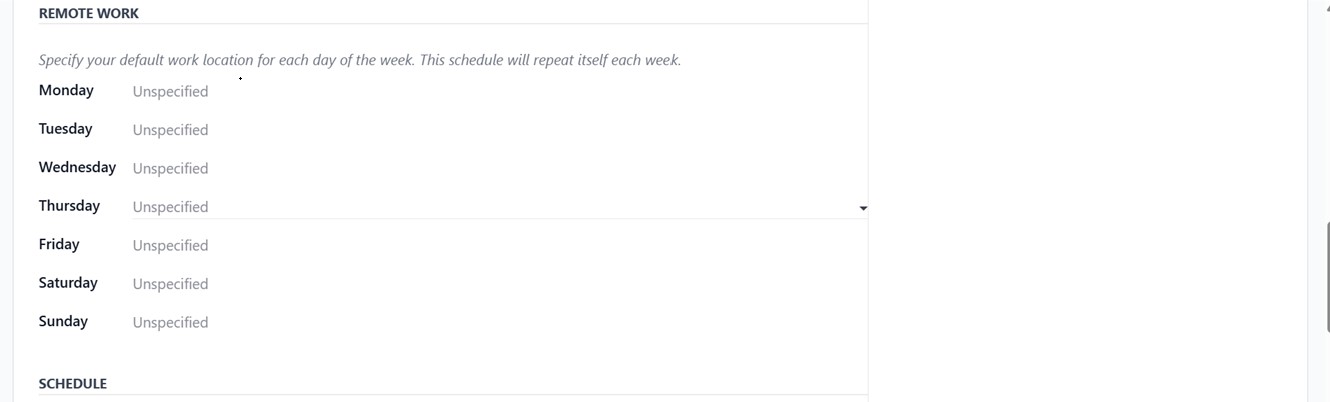
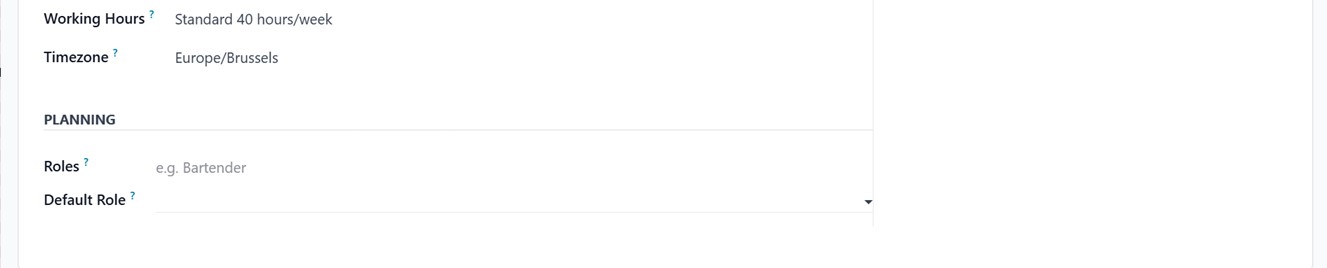
The "Work Information" tab lets
you set the Work Address,
Approvers, Remote Work
preferences, Working
Schedules, and Planning, as
depicted in the screenshot
below.
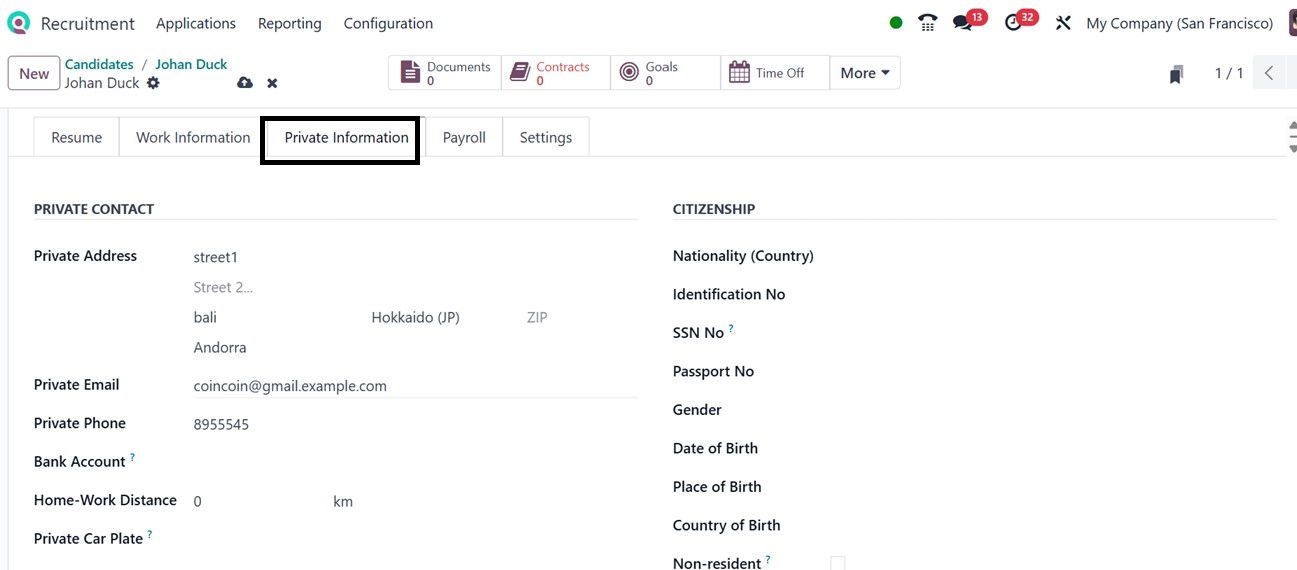
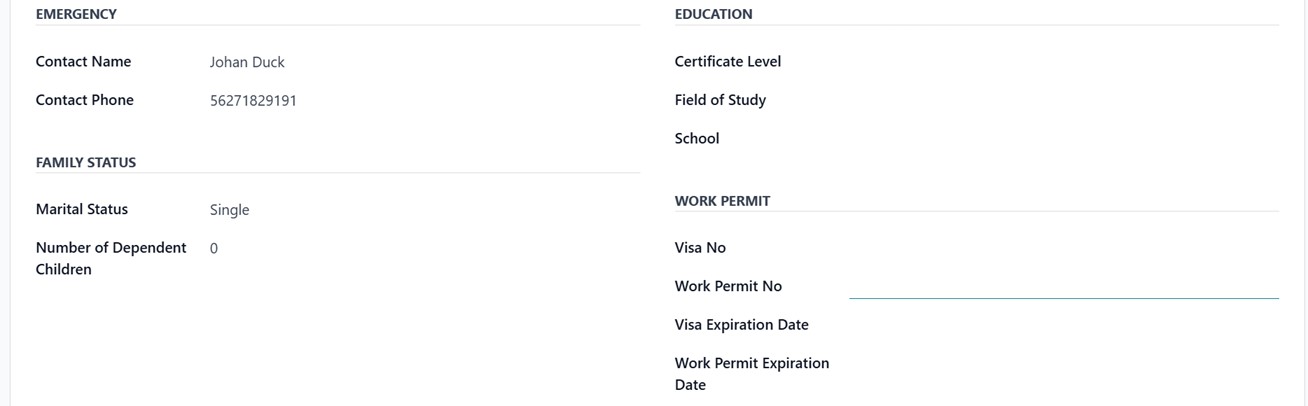
The "Private Information" tab
collects data on PRIVATE
CONTACT, CITIZENSHIP,
EMERGENCY CONTACTS,
EDUCATION, FAMILY STATUS, and
WORK PERMIT details, as
illustrated in the screenshot
below.
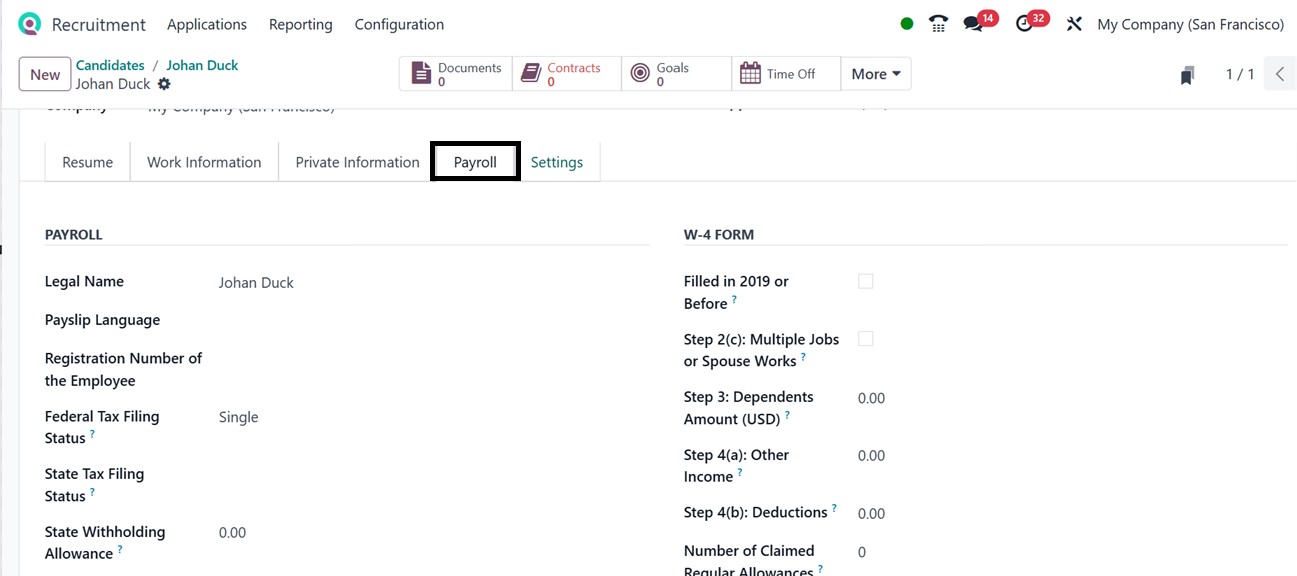
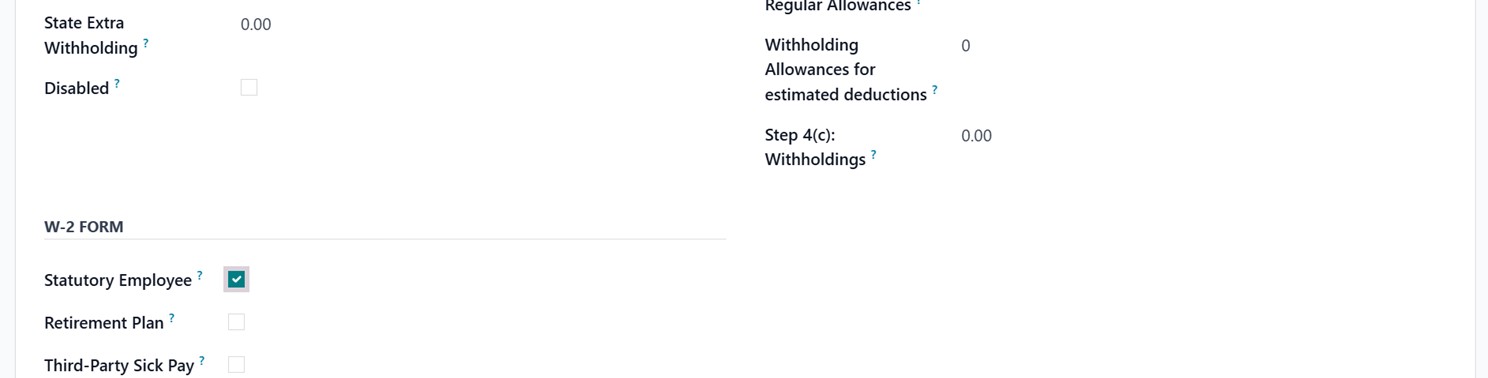
The ‘Payroll’ tab can be used to
set the payroll specifics of
the employee, including their
PAYROLL, W-2 FORM, and W-4
FORM specifics, as
illustrated below.

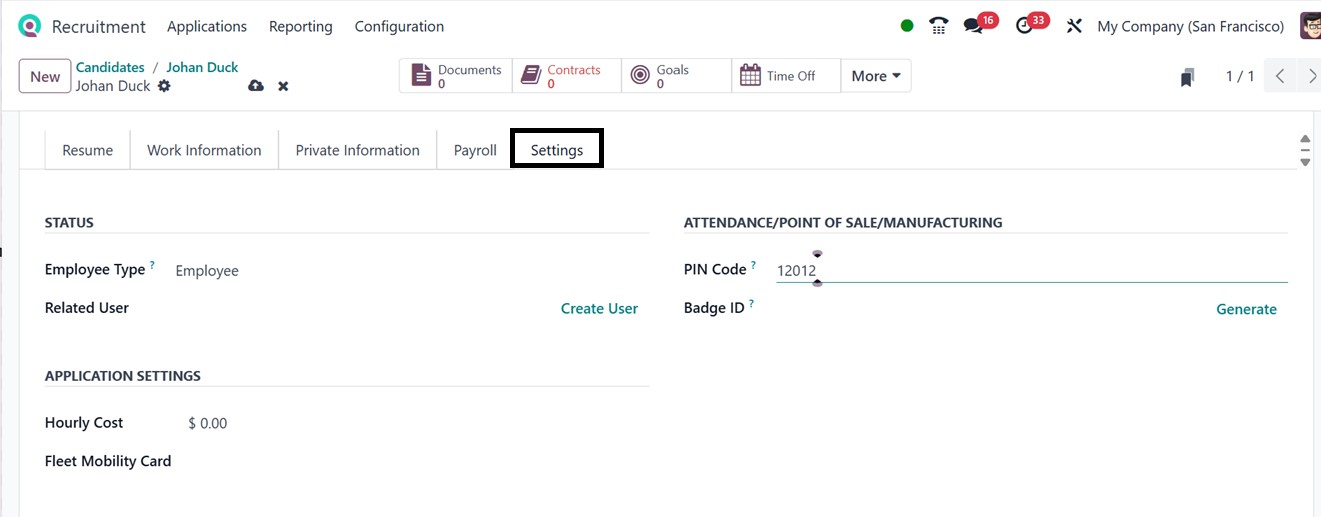
Finally, the "Settings" tab
manages employee STATUS and
APPLICATION SETTINGS
configurations. You can also
generate check-in credentials
like a PIN or Badge ID, as
demonstrated in the
screenshot below.
2.4 Offer Management
The ‘Offers’ menu makes it easier
to manage and monitor various
employment offers, which aids
in effective recruitment
offer management.
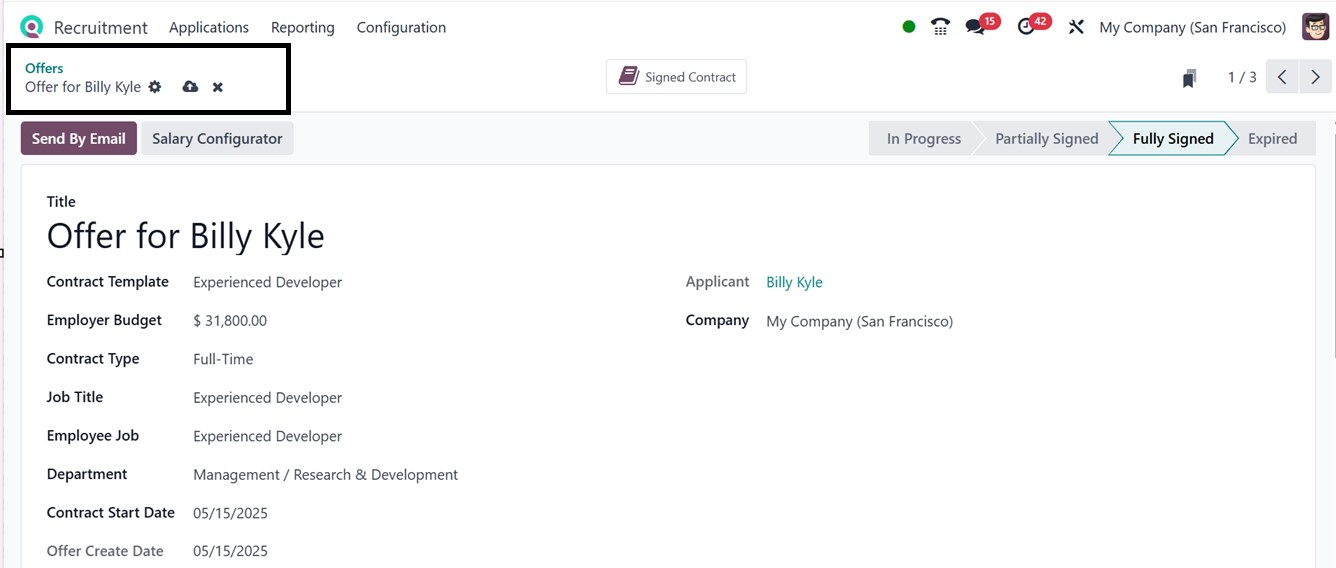
The ‘Offers’ dashboard will show
the list view with the Offer
Title, Employee, Applicant,
Contract Signed, Employer
Budget, and Employee Job
based on various contract
stages, including Fully
Signed and In Progress, as
depicted in the screenshot
below.

To get more details about a job
offer, click on the relevant
offer column. This will open
its form view with the Offer
Title and other details, as
shown below.
The ‘Salary Configurator’ button
in the Recruitment module of
Odoo 18 makes it simple for
HR to create and modify
structured compensation
offers for candidates,
expediting offer stage
conversations and approvals.
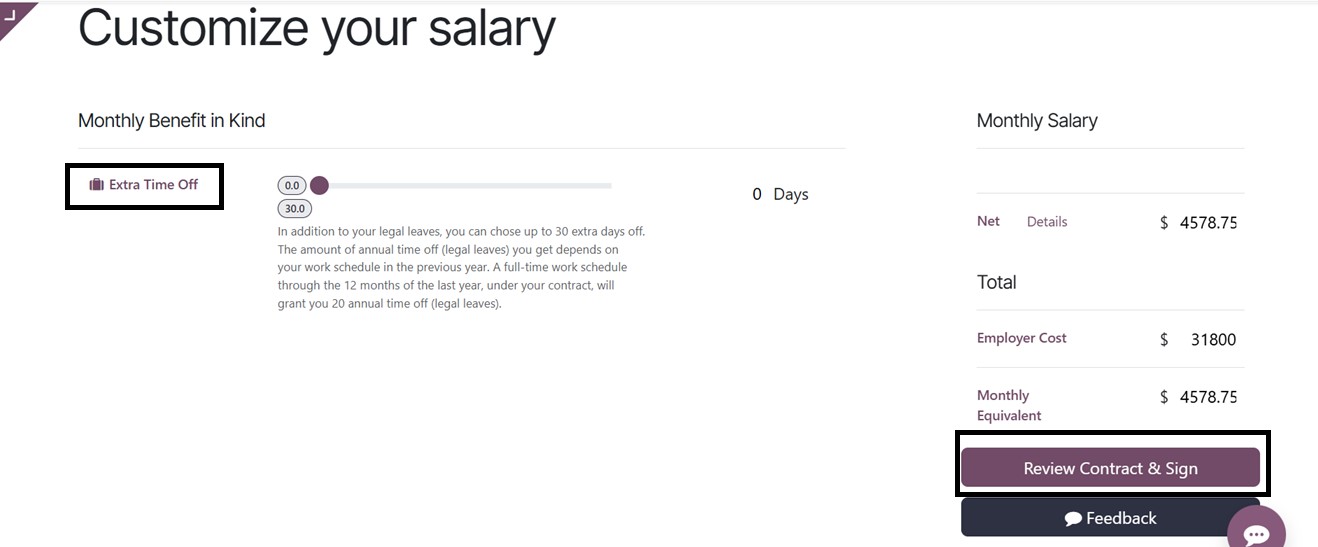
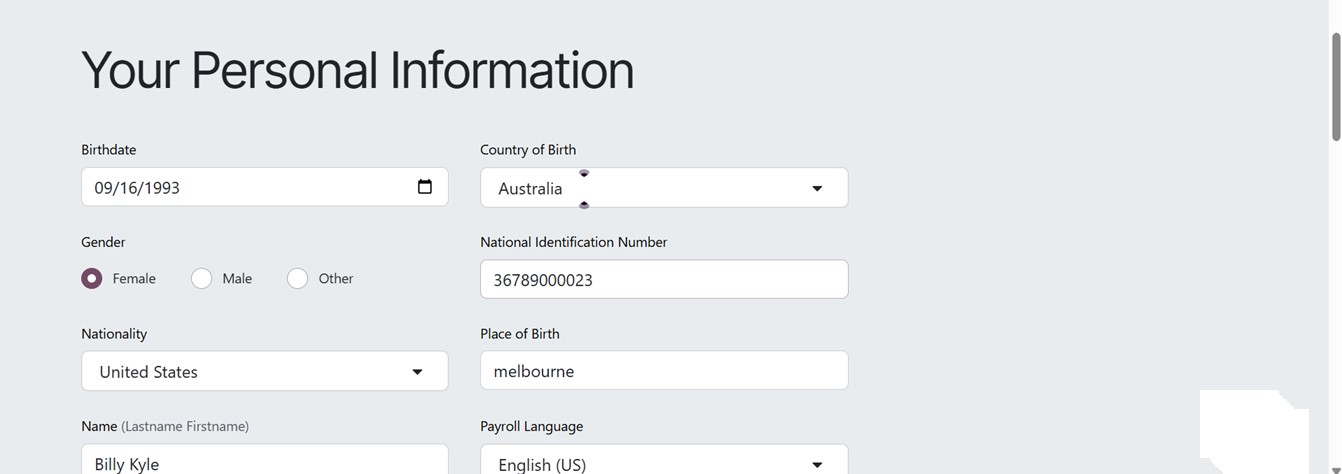
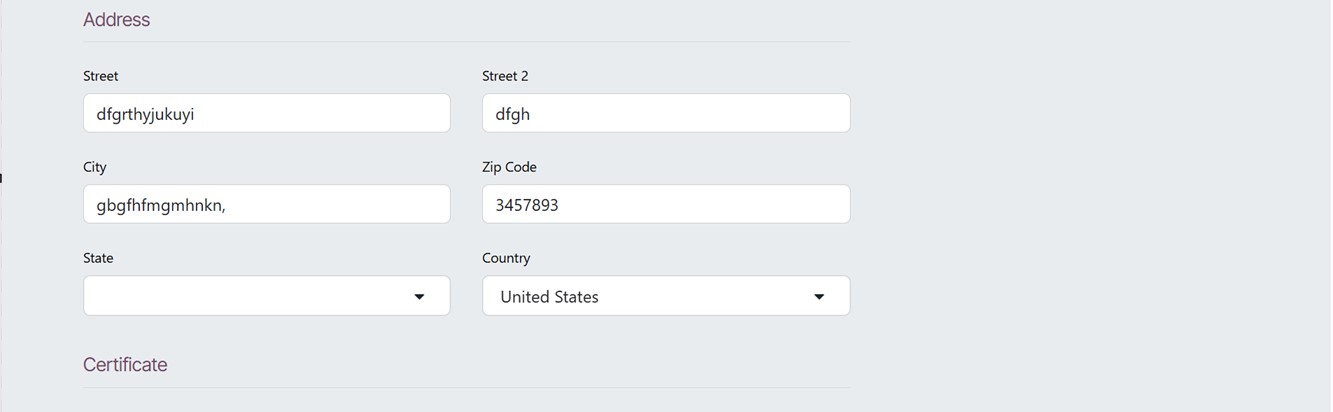
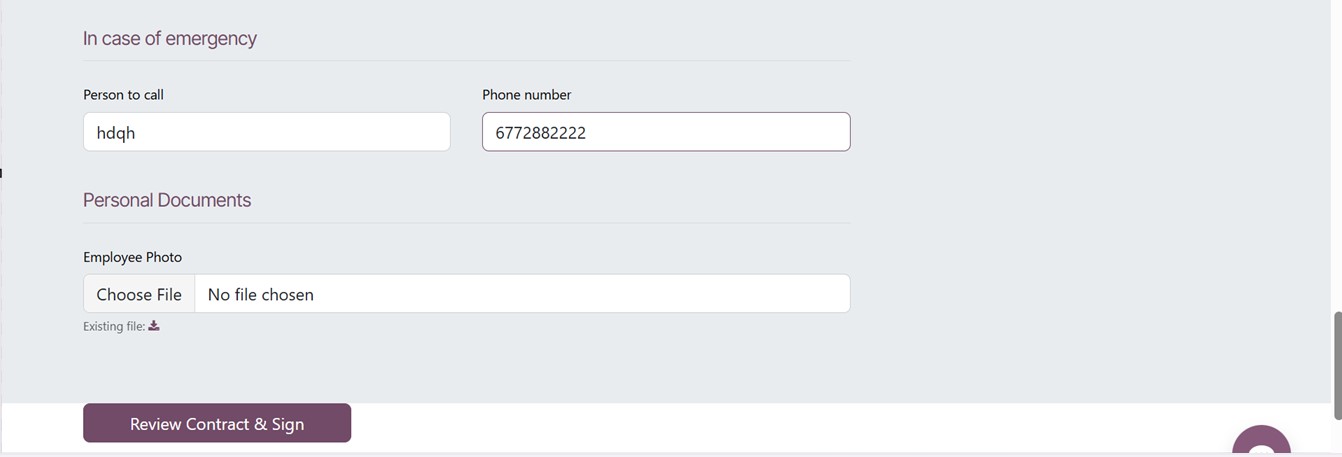
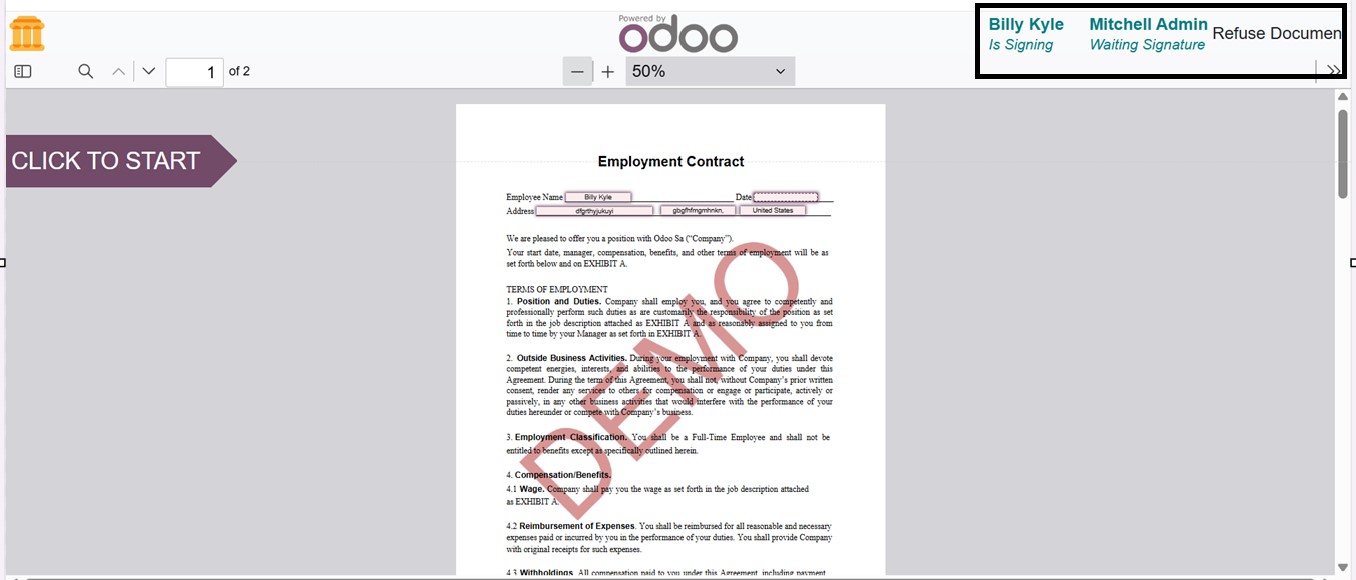
After reviewing the salary and
job contract, click on the
‘Review Contract & Sign’
button to sign the job
contract. Then, you can see
the contract form and edit
your sign in the relevant
area or reject the document
using the ‘Refuse Document.’
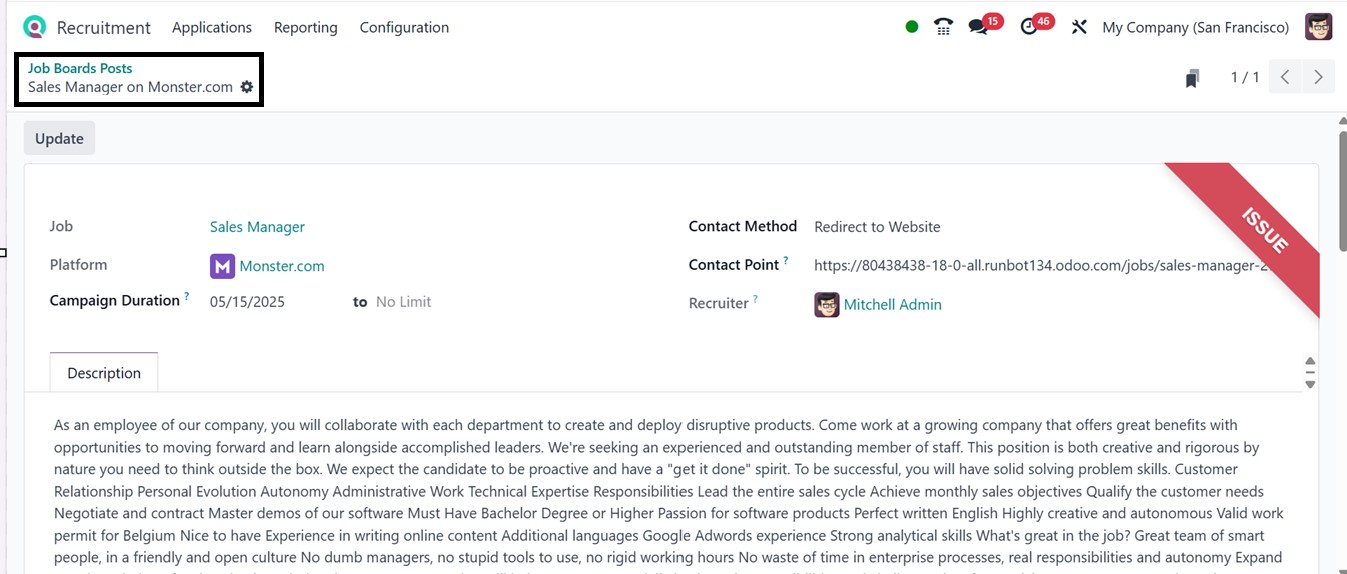
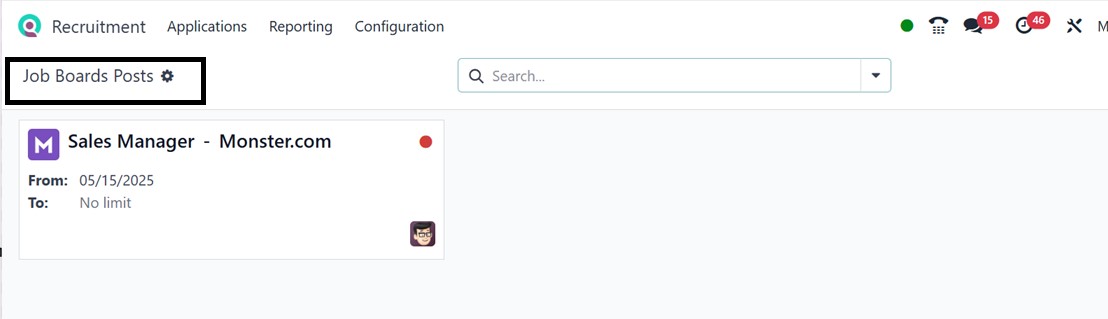
2.5 Job Board Posts
Employers can manage and post job
vacancies on various job
portals or company websites
using the ‘Job Board Posts’
option provided under the
‘Applications’ menu. This
will show the dashboard of
all the websites that you
have published your job post
with the Job Post name,
Website, From and To dates,
as illustrated in the
screenshot below.
You can choose targeted
platforms, manage campaign
duration, modify job
descriptions, and manage post
visibility using the ‘Update’
button, as illustrated in the
screenshot below.