Getting input from consumers and
clients about the products
and services the company
provides is essential.
Surveys are the most
effective method of obtaining
audience opinions. It will
also help the company
evaluate the requirements,
interests, and ideas of its
customers. Surveys are now a
more feasible option for
obtaining responses because
they are available in digital
format. The Odoo 18 Survey
module is an easy-to-use
platform for making online
surveys for your clients and
staff. It is easy to create
and publish a survey in Odoo
18 for public feedback. Since
the audience's answers will
be automatically logged in
the backend, you may use them
to generate reports regarding
the survey.
You can use survey results to
evaluate your marketing
approach and implement the
report's suggestions to
increase business
productivity.
With the Odoo 18 Survey module,
you can design surveys that
meet your needs. While
staff-based surveys can be
used to get input on
requests, working conditions,
and employee happiness,
customer-based surveys will
be helpful for learning more
about your products and
services. This chapter will
cover the Odoo 18 Survey
module in detail.
After the installation is
finished, you may choose the
Survey module from the
application module to find it
on Odoo's main dashboard.
1. Surveys
Entering the Survey module on
this platform displays all
created surveys, as seen in
the figure below.
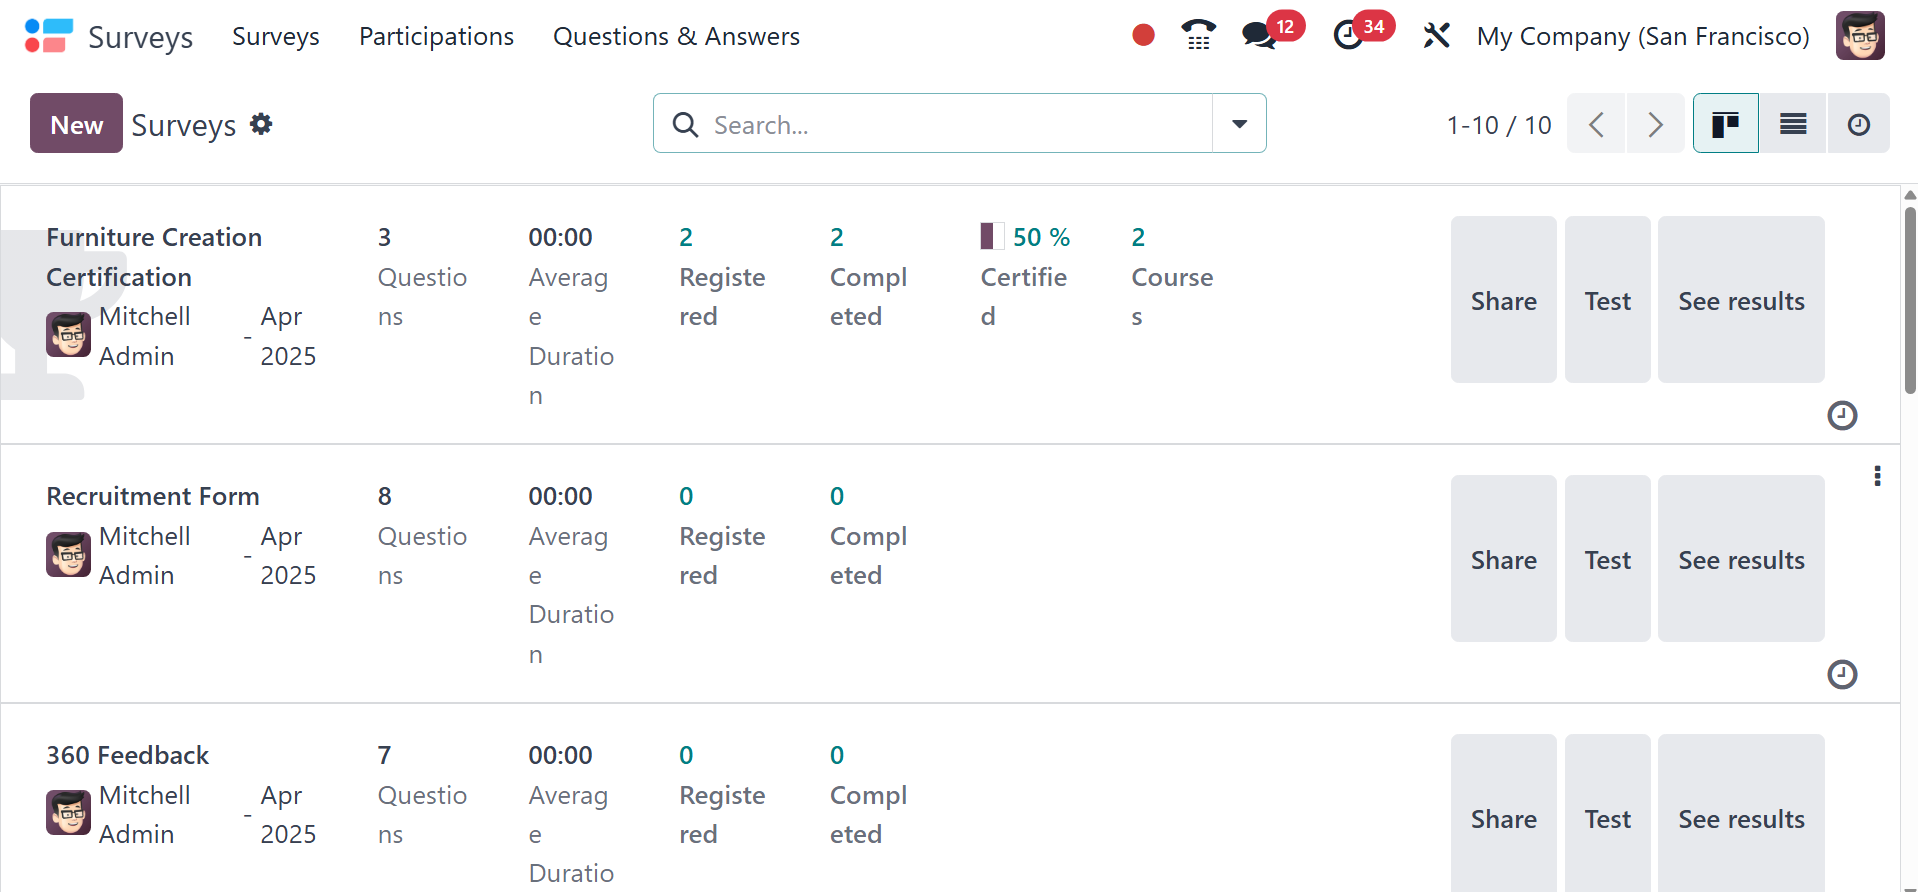
The name, number of
responses, certified, passed,
and success rate of each
survey will be shown in the
Kanban view of this window.
The Kanban, List, and
Activity views are available
on this platform. The simple
and adjustable Filters and
Group By options will be
useful for searching and
sorting surveys.
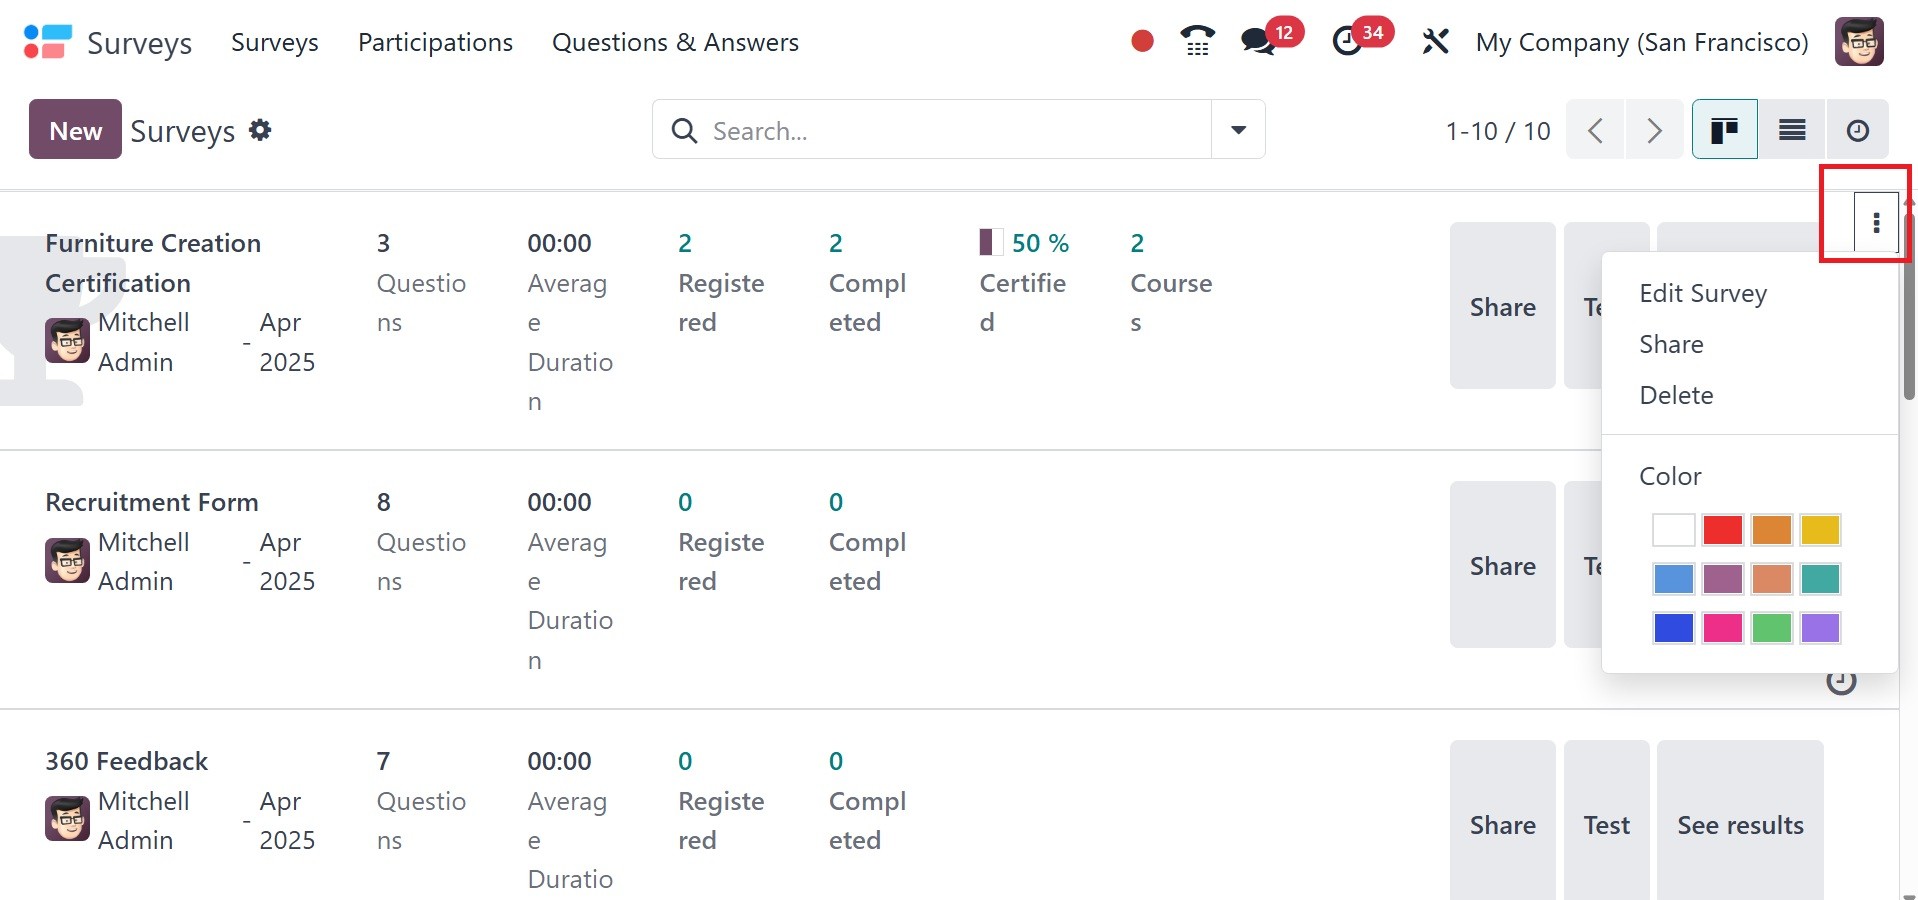
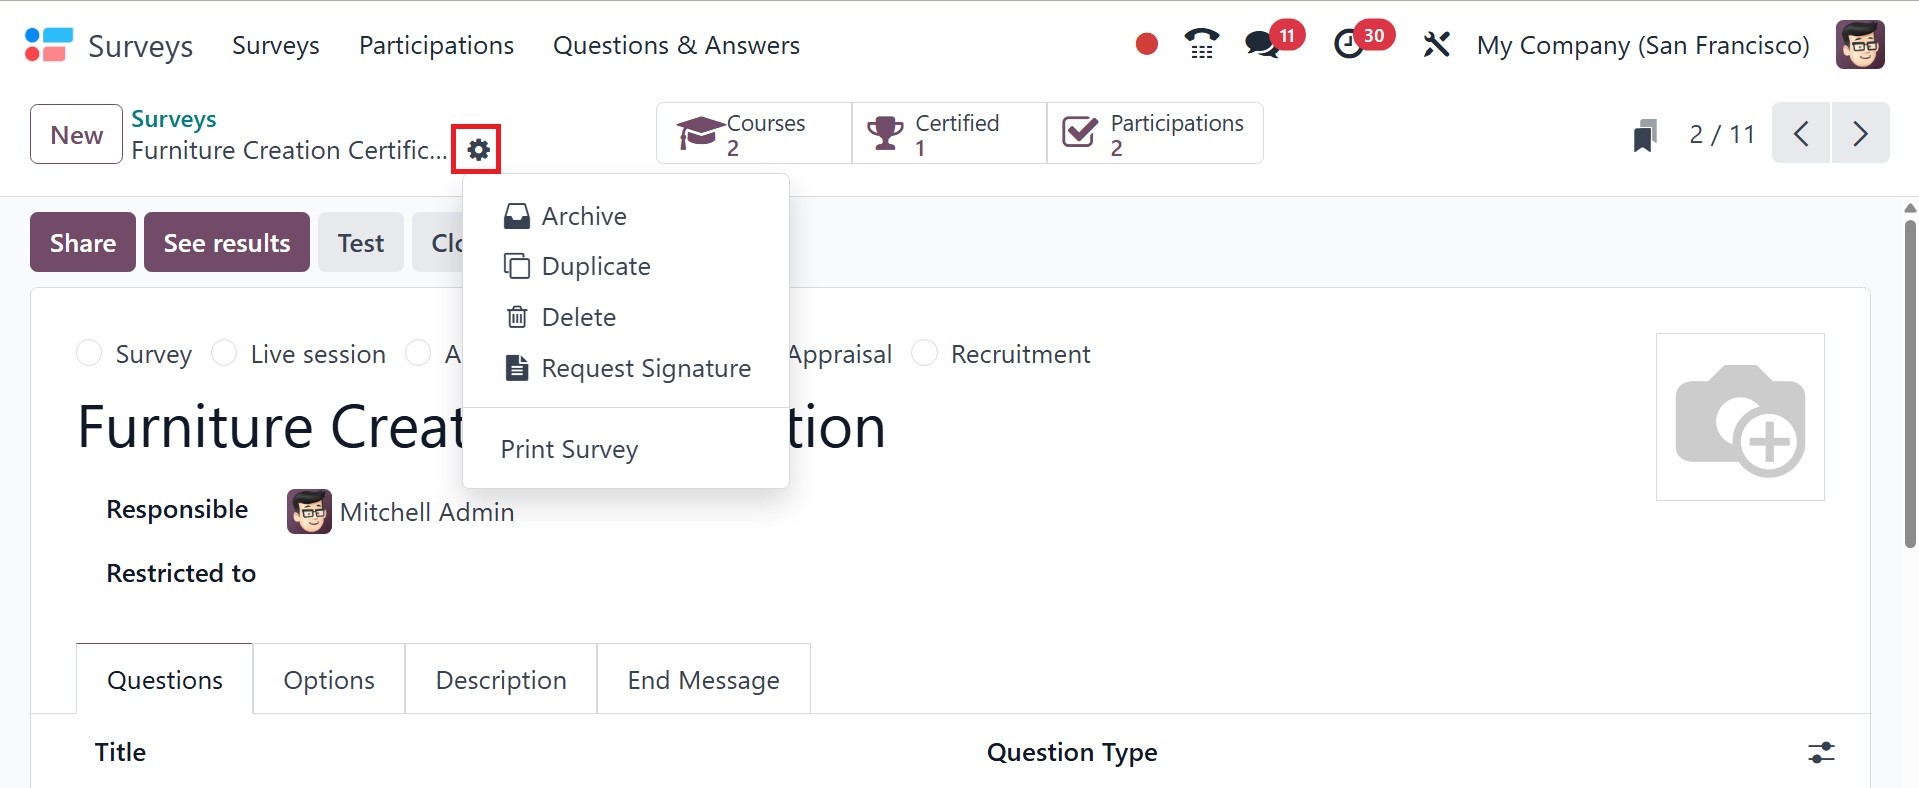
The survey can be edited, shared,
or deleted using the three
vertical dots that show up in
the top right corner of each
survey tab. You may plan a
lot of survey tasks by using
the clock symbol that appears
on each survey tab, as seen
in the above image.
To begin a new survey, click the
New button.
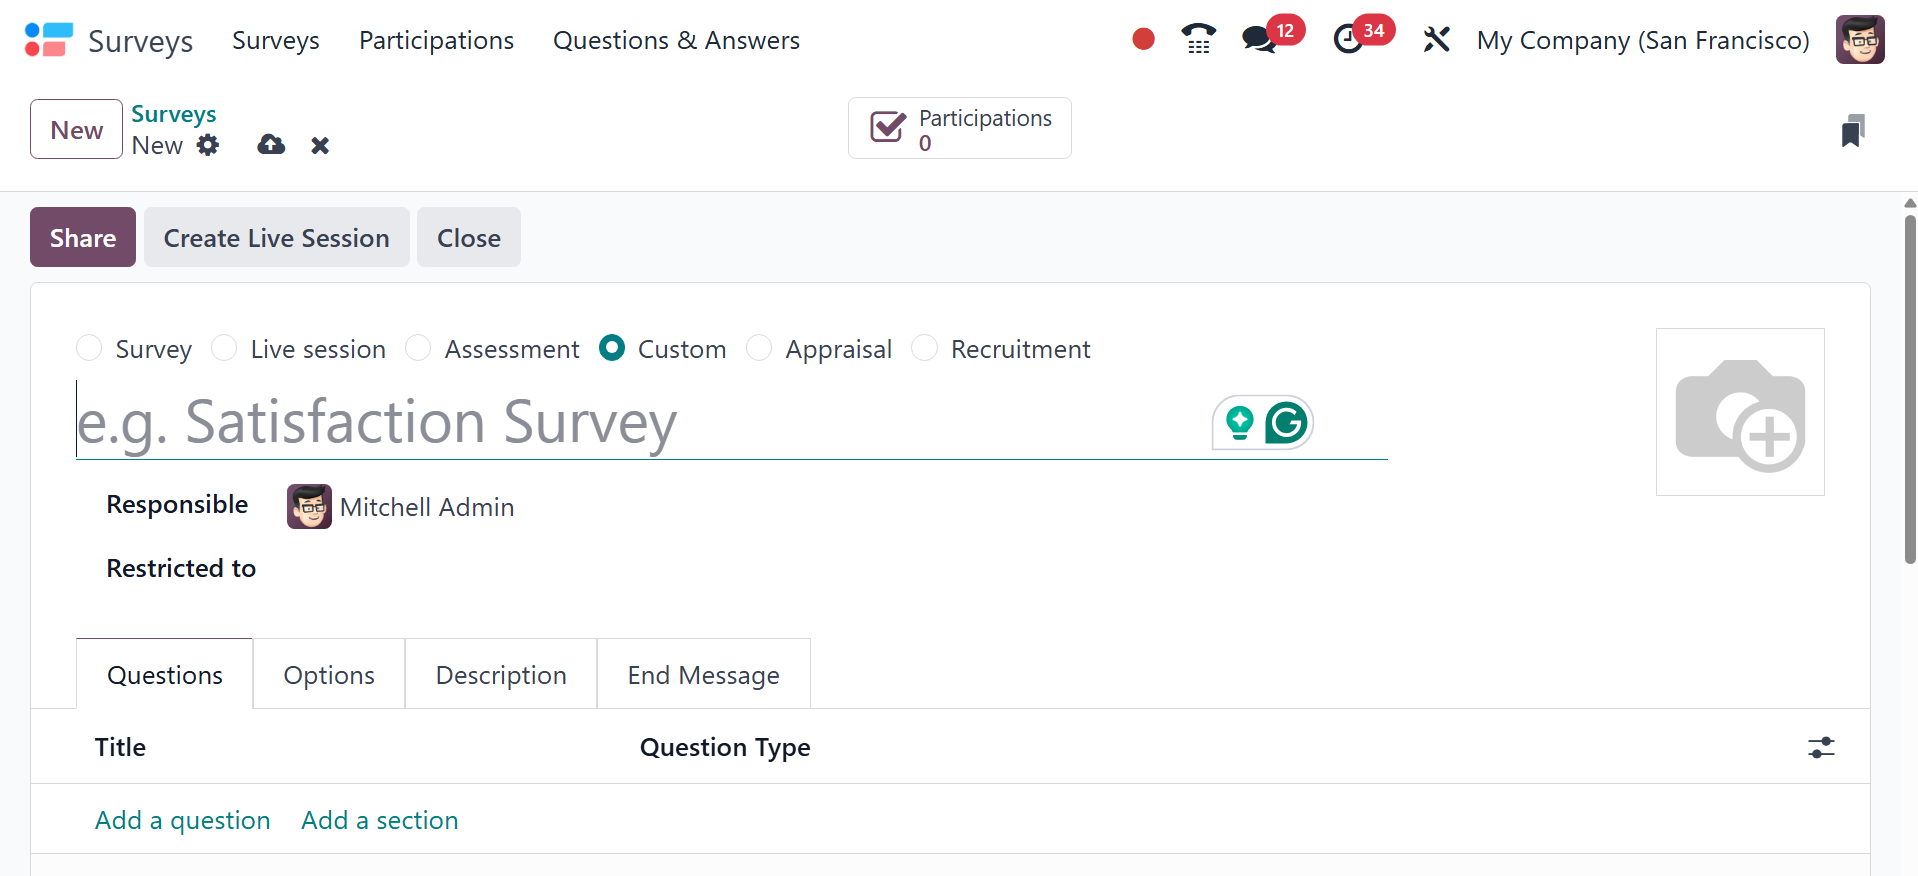
A survey form can be used for a
variety of purposes, such as
administering tests or
evaluating employees. The
survey creation type is
selected based on usage and
can be selected from the top
of the screen.
Survey: This is used to include a
standard survey form, such as
one for gathering client
feedback.
Live Sessions: In e-learning
courses, live sessions are
utilized to conduct sessions.
Assessment: Exams and
certifications use this.
Custom: There are specific uses
for these.
Appraisal: Employee appraisal
forms are created using this
kind of survey.
Recruitment: During the
recruiting process, a survey
can be used to evaluate
applicants, learn more about
their qualifications, or even
serve as a pre-employment
evaluation.
In the Survey Title field, you
can type the new survey's
title. This survey can be
completed by a worker you
select in the Responsible
field. In the designated
field, you can also upload a
suitable image for the
survey. And you are provided
with restricted options, for
limitations on access,
including who is eligible to
participate and the maximum
number of attempts. In
particular, it enables you to
restrict access to the survey
by limiting the number of
attempts, requiring login,
and controlling who has the
link or has been invited. To
add new questions to this
survey, choose 'Add a
Question' from the Questions
menu.
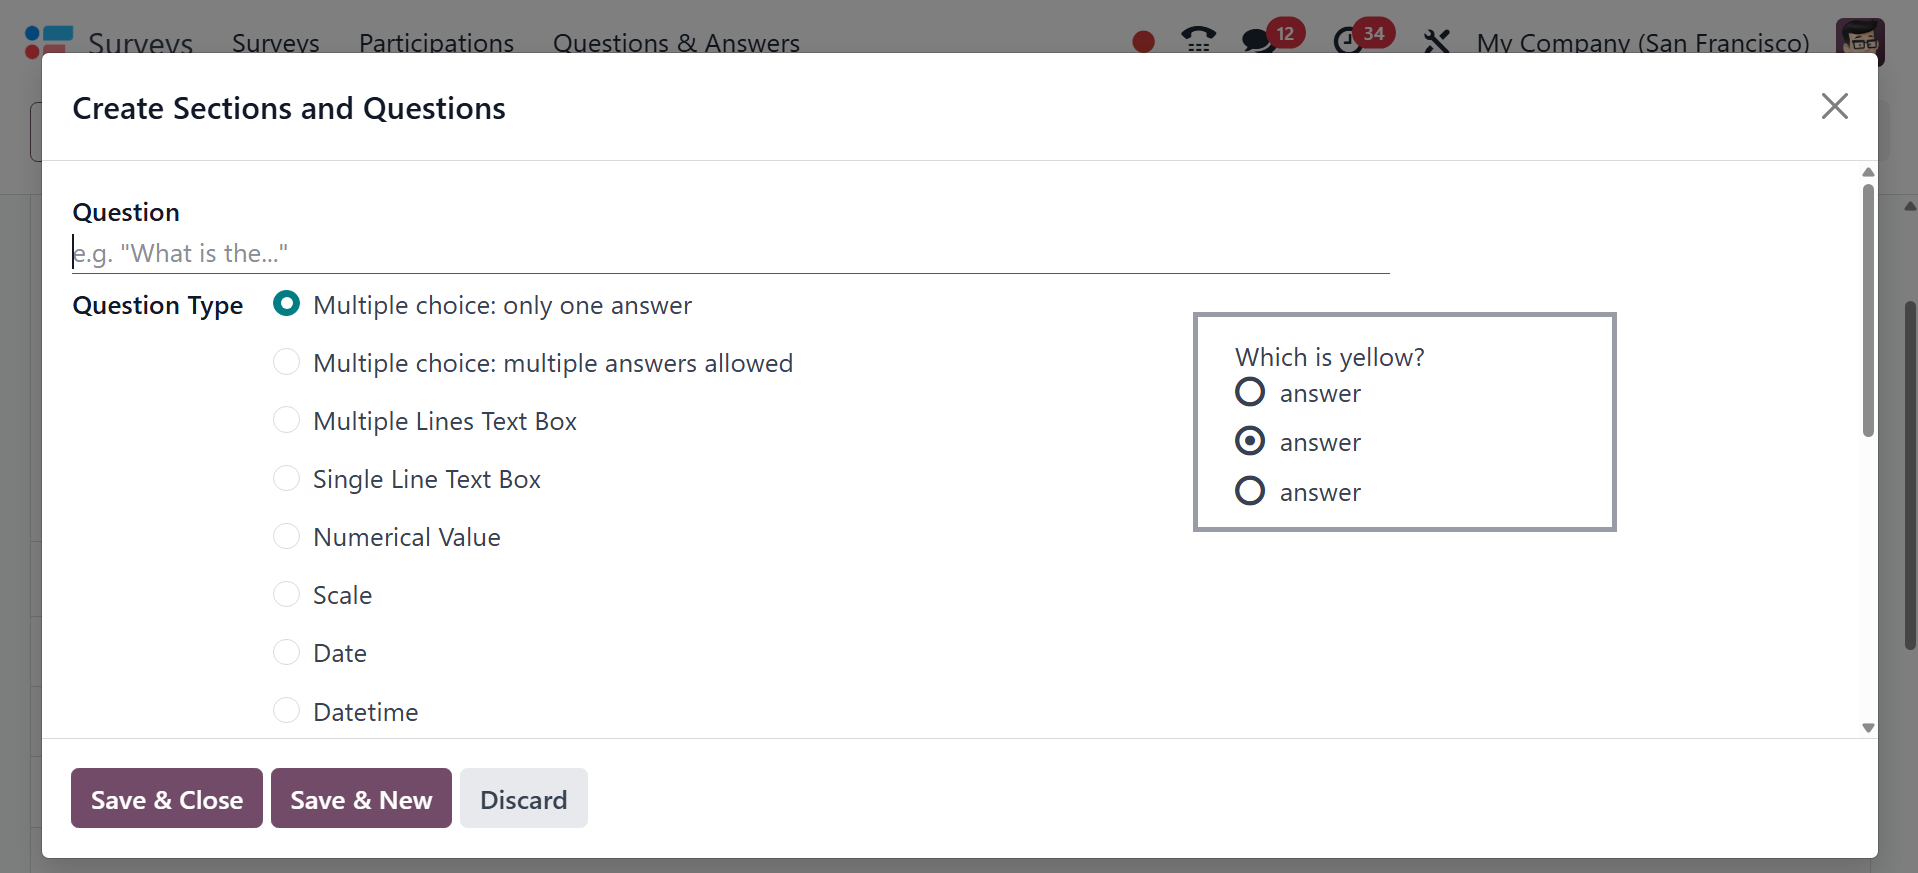
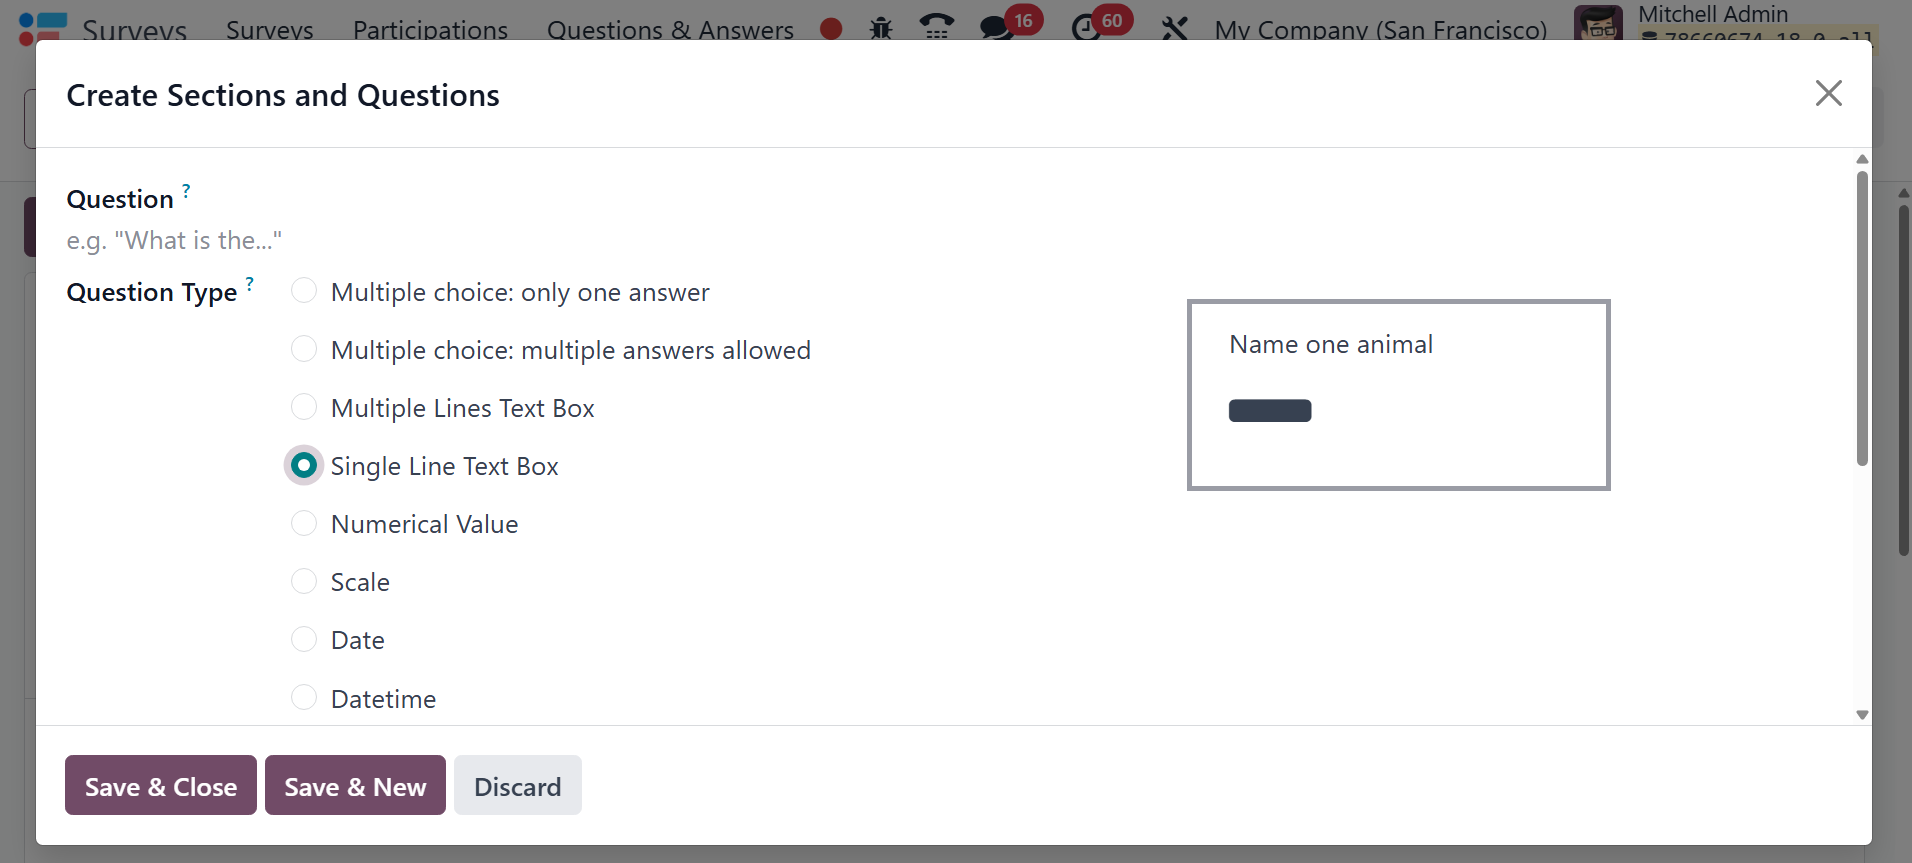
You can input the question and
question type in the pop-up
window that appears, as shown
in the example below.
Single line text box, numerical
value, scale, date, and
datetime can all be used as
the question type. Multiple
choice questions come in
three varieties: matrix,
multiple choice with several
responses permitted, and
multiple choice. Depending on
the query, different
responses will be given. For
example, the many-line text
Box allows customers to
respond to the inquiry in
several lines. Only one line
of text should be entered by
respondents in the Single
Line Text Box.
You can create questions with a
variety of options for
participants to select from
when you use the Multiple
Choice: Only One Answer type.
There will only be one option
in this type of
investigation, and that is
the correct answer.
The Answers page will display the
relevant alternatives based
on the question type you
select. If the question is of
the 'Multiple Choice: Only
One Answer' kind, you can
specify the answers on the
Answers tab. Once the options
have been listed, select the
box next to "Is a Correct
Answer" in the column that
best represents the
appropriate answer.
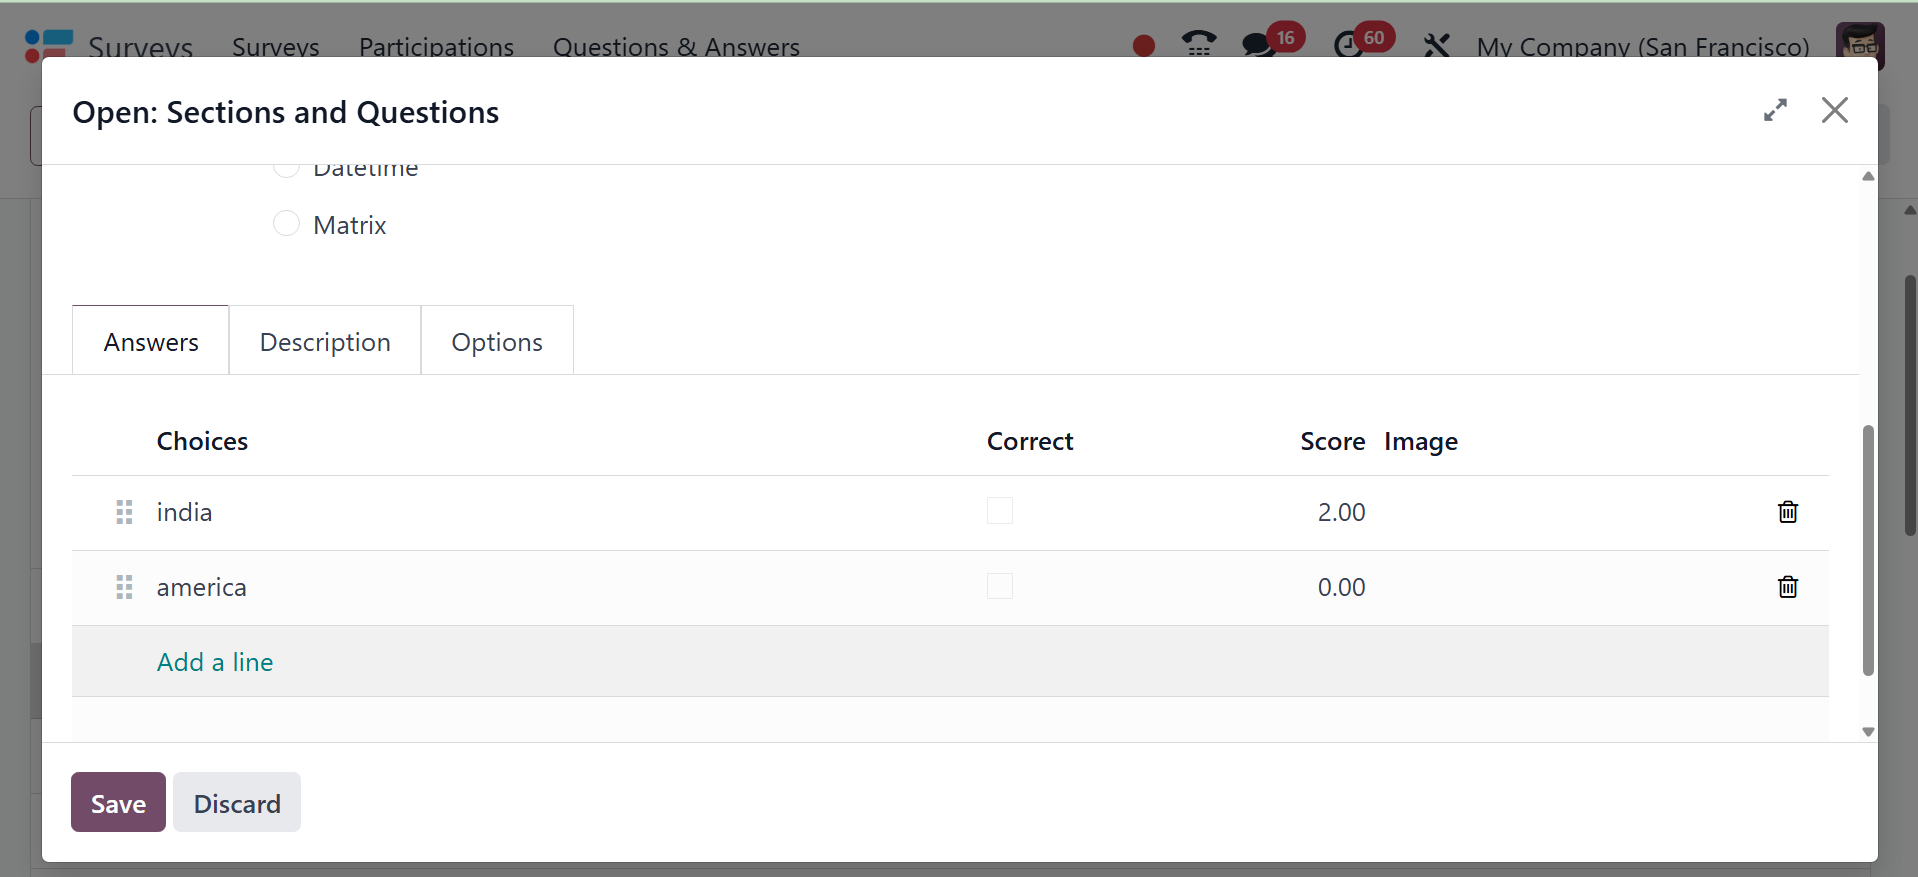
Then, in the Score for this
Answer section, enter the
grade for the correct answer.
Here, you can also add the
score required for the
answer.
Here, you can provide the
required score for the
question created.
If a participant selects the
correct answer from the list
of possibilities, they will
be awarded the assigned
score.
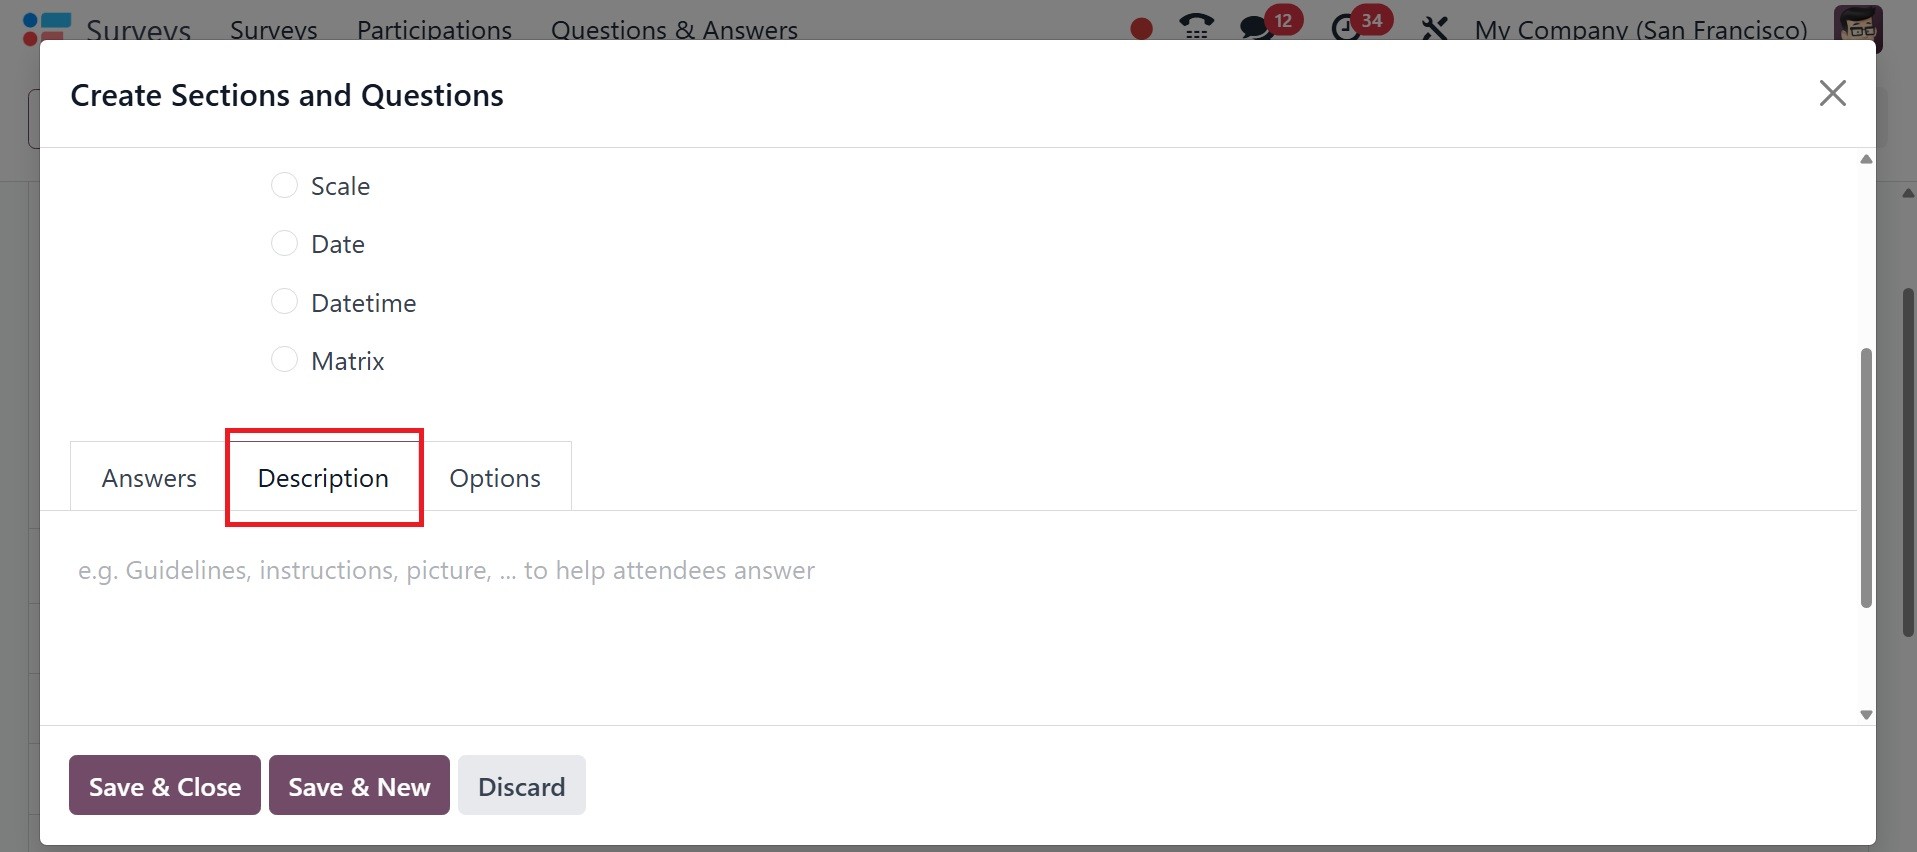
The Description tab is where you
may add more details about
the inquiry. The choices tab
contains a number of choices
to specify depending on the
type of question.
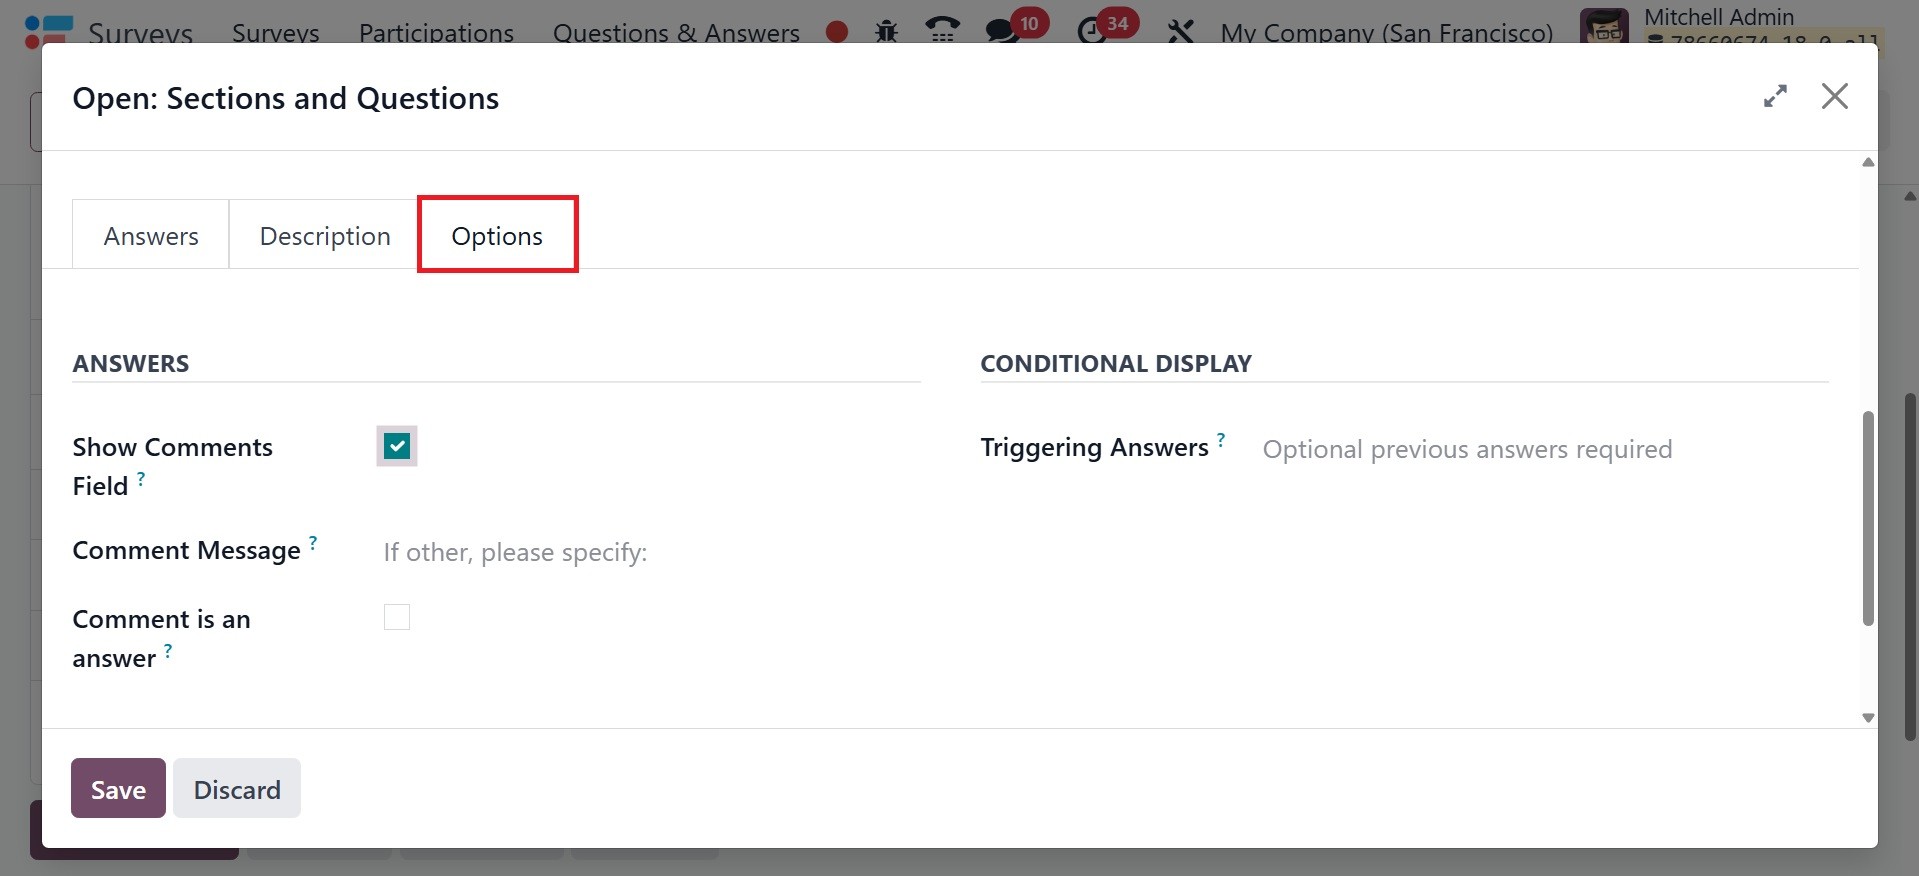
The Answer action includes the
Show Comments Field. The
Comment Message has room to
be added. To treat the
comment as a response, check
the "Comment is an Answer"
box. If the question calls
for a mandatory response, you
can activate the mandatory
answer field. This question
is included here so that
customers can receive an
error message if they decide
to skip it. You can only show
this question if the customer
selected the correct
conditional response in a
previous question.
To accomplish this, add the
desired question to the
Triggering Question field and
activate Conditional Display.
During Live Sessions, you may
set a time limit for each
question in the Question Time
Limit box. Click Save & Close
once you have completed the
question creation window. To
make a new question, you can
click the Save & New option.
You can view different types of
questions here, such as
Multiple choice: only one answer
is respondents can select one
answer from a list, Multiple
choice: multiple answers
allowed respondents can
choose multiple options from
a list Multiple, Lines Text
Box is a short answer input
for open-ended responses,
Single Line Text Box,
Numerical Value is input
restricted to numbers, Scale,
Date provides a calendar
picker to select a date, and
Datetime allows selection of
both date and time.
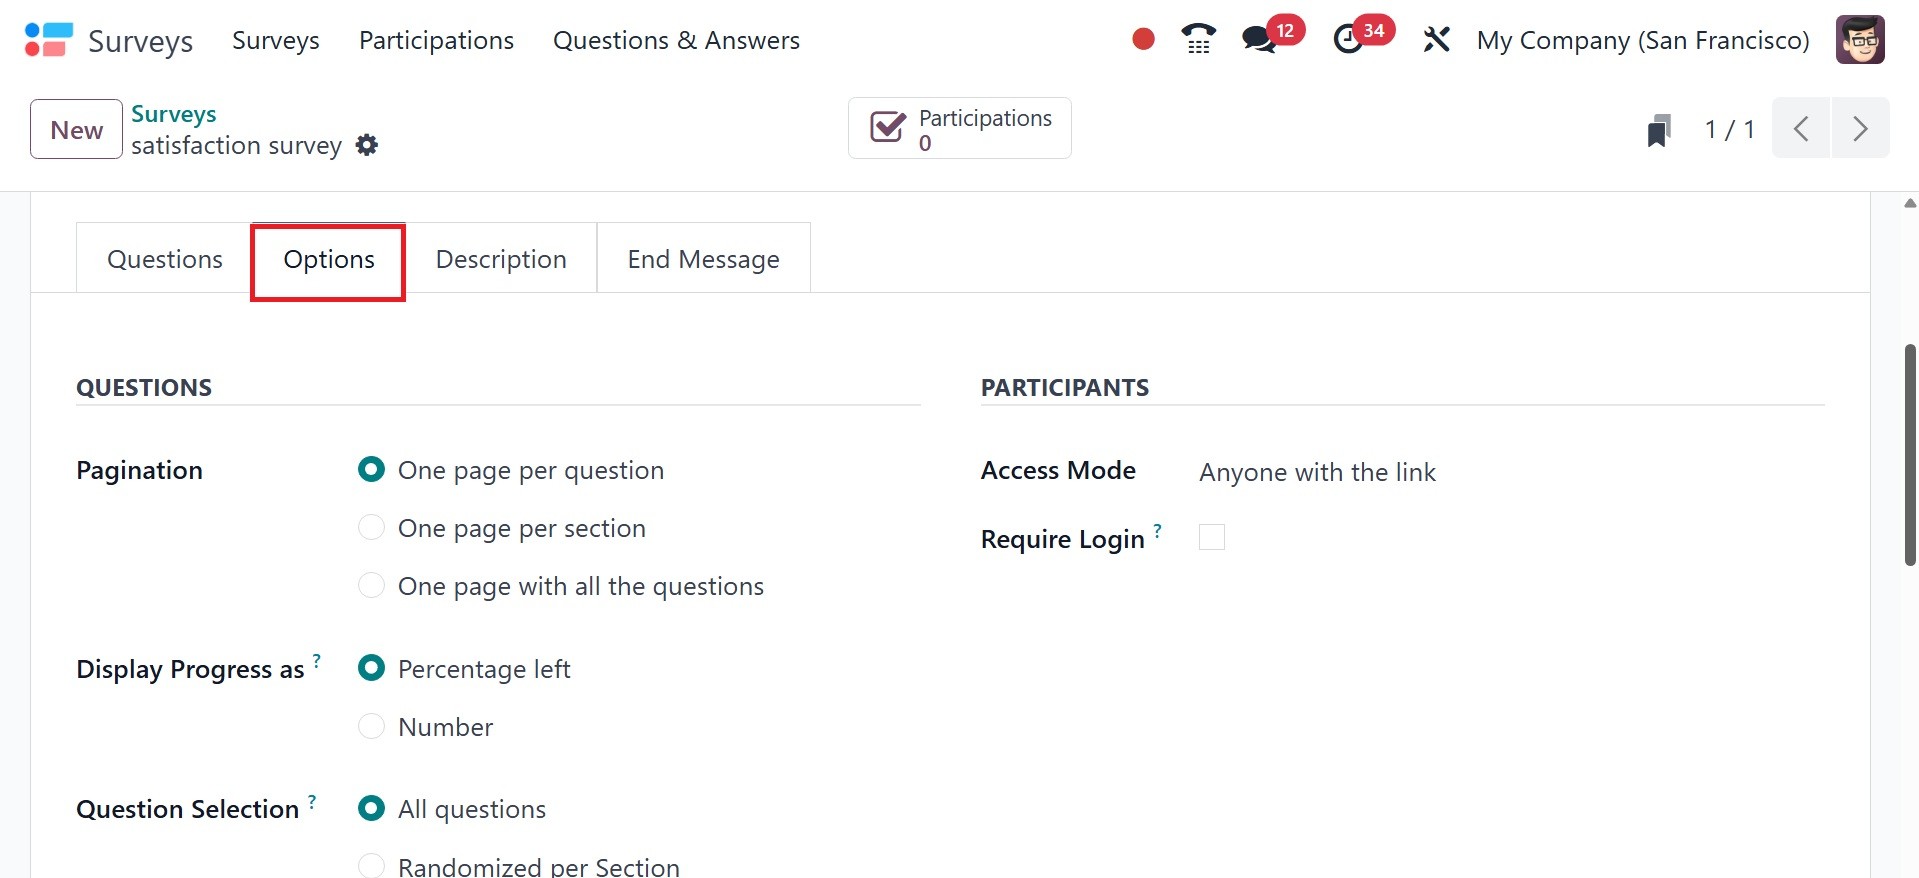
The Options tab comes next. The
Questions section offers a
number of options. One page
for each question, one page
for each part, and one page
for all the questions are
some of the options for
pagination. Progress can be
shown using either the number
or the percentage of time
remaining. Each segment may
contain all questions or a
random selection of
questions. If the Randomized
option is chosen, the
questions can be chosen at
random. This mode is not
utilized during the live
session. If the Back Button
is selected, the user can go
back to the previous page.
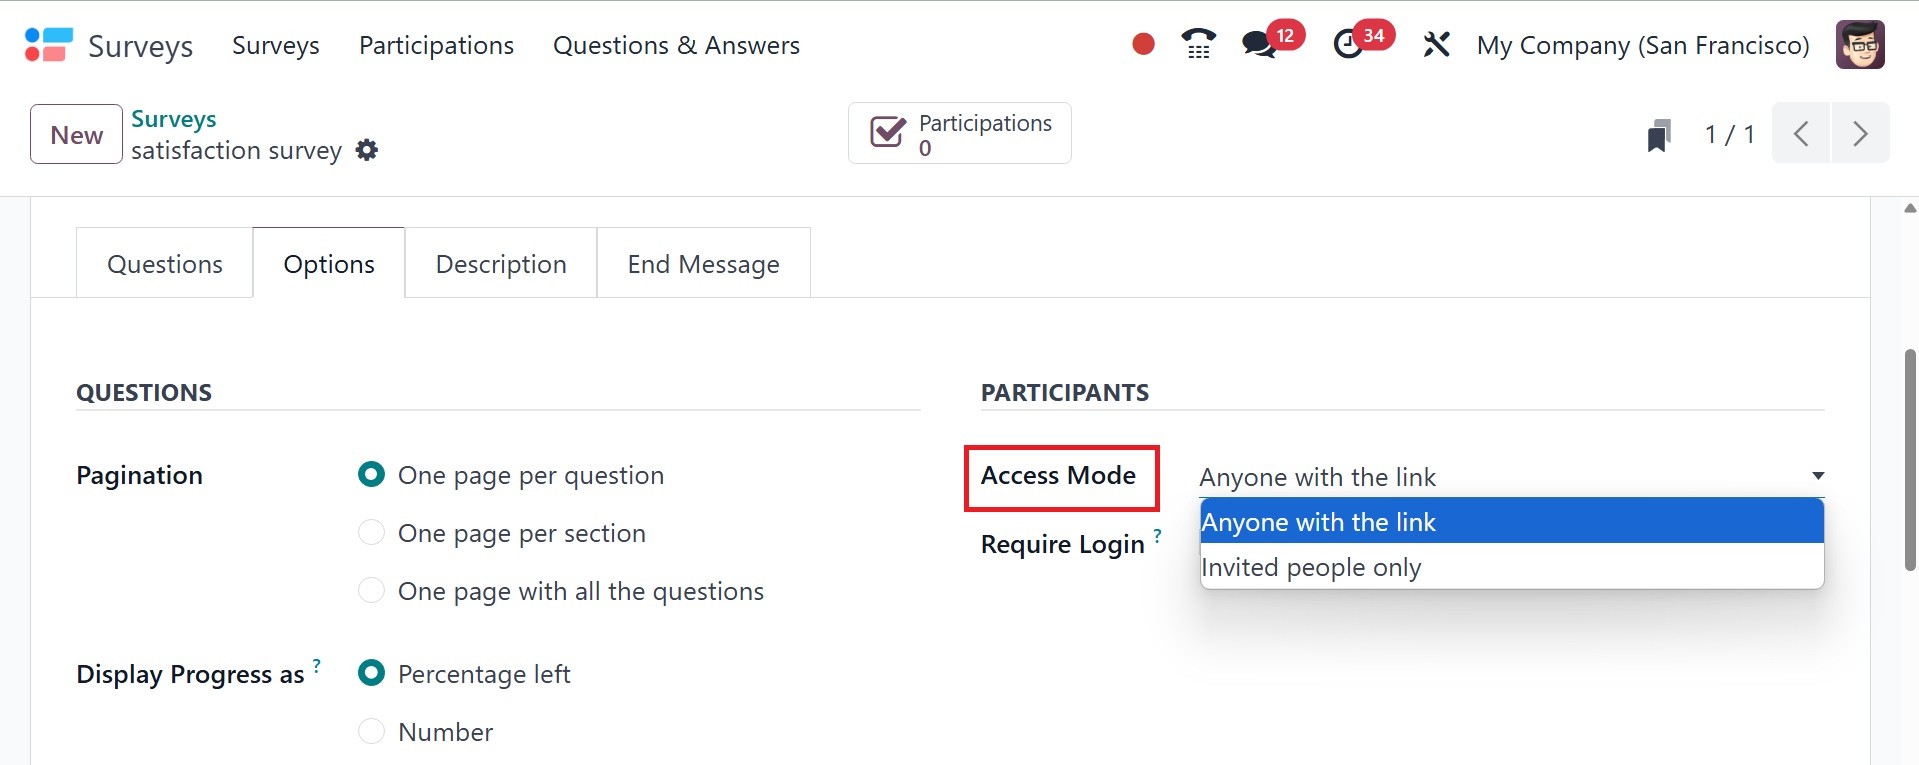
In the participant session, there
are two options for access
mode: anyone with the link or
those invited. If Require
Login is enabled, the user
must log in with a valid
token before answering the
survey questions. To restrict
the number of login attempts,
use LimitAttempt. The number
of allowed trials can be
specified there.
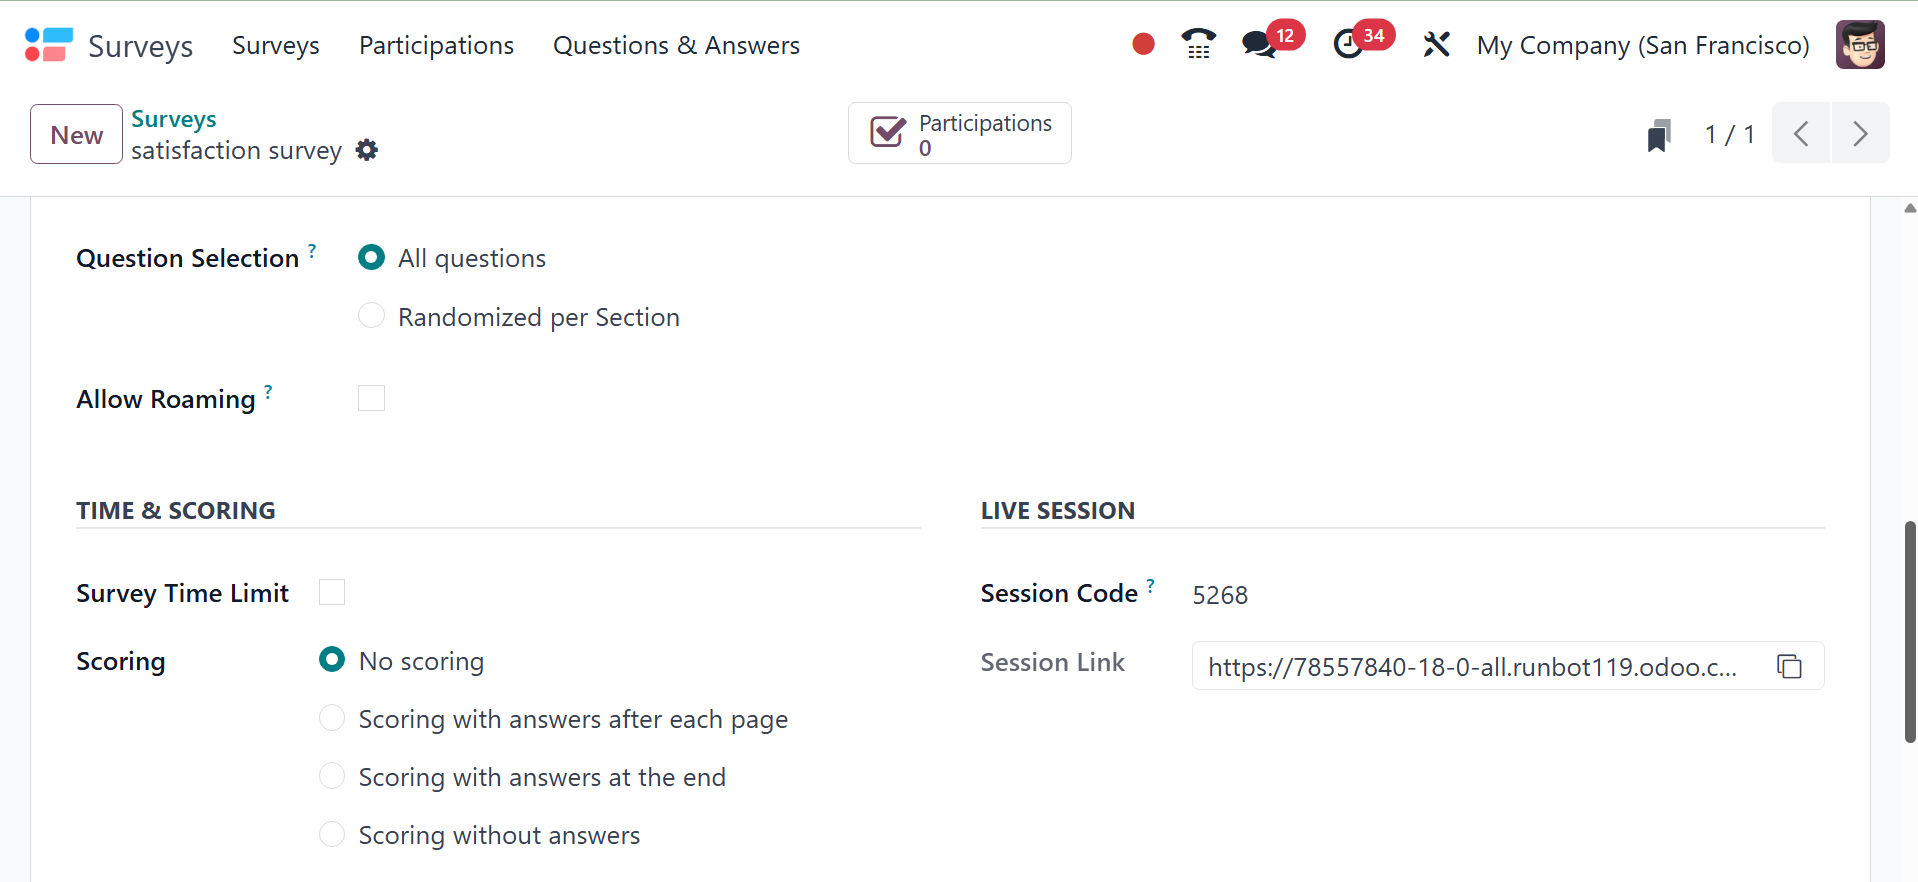
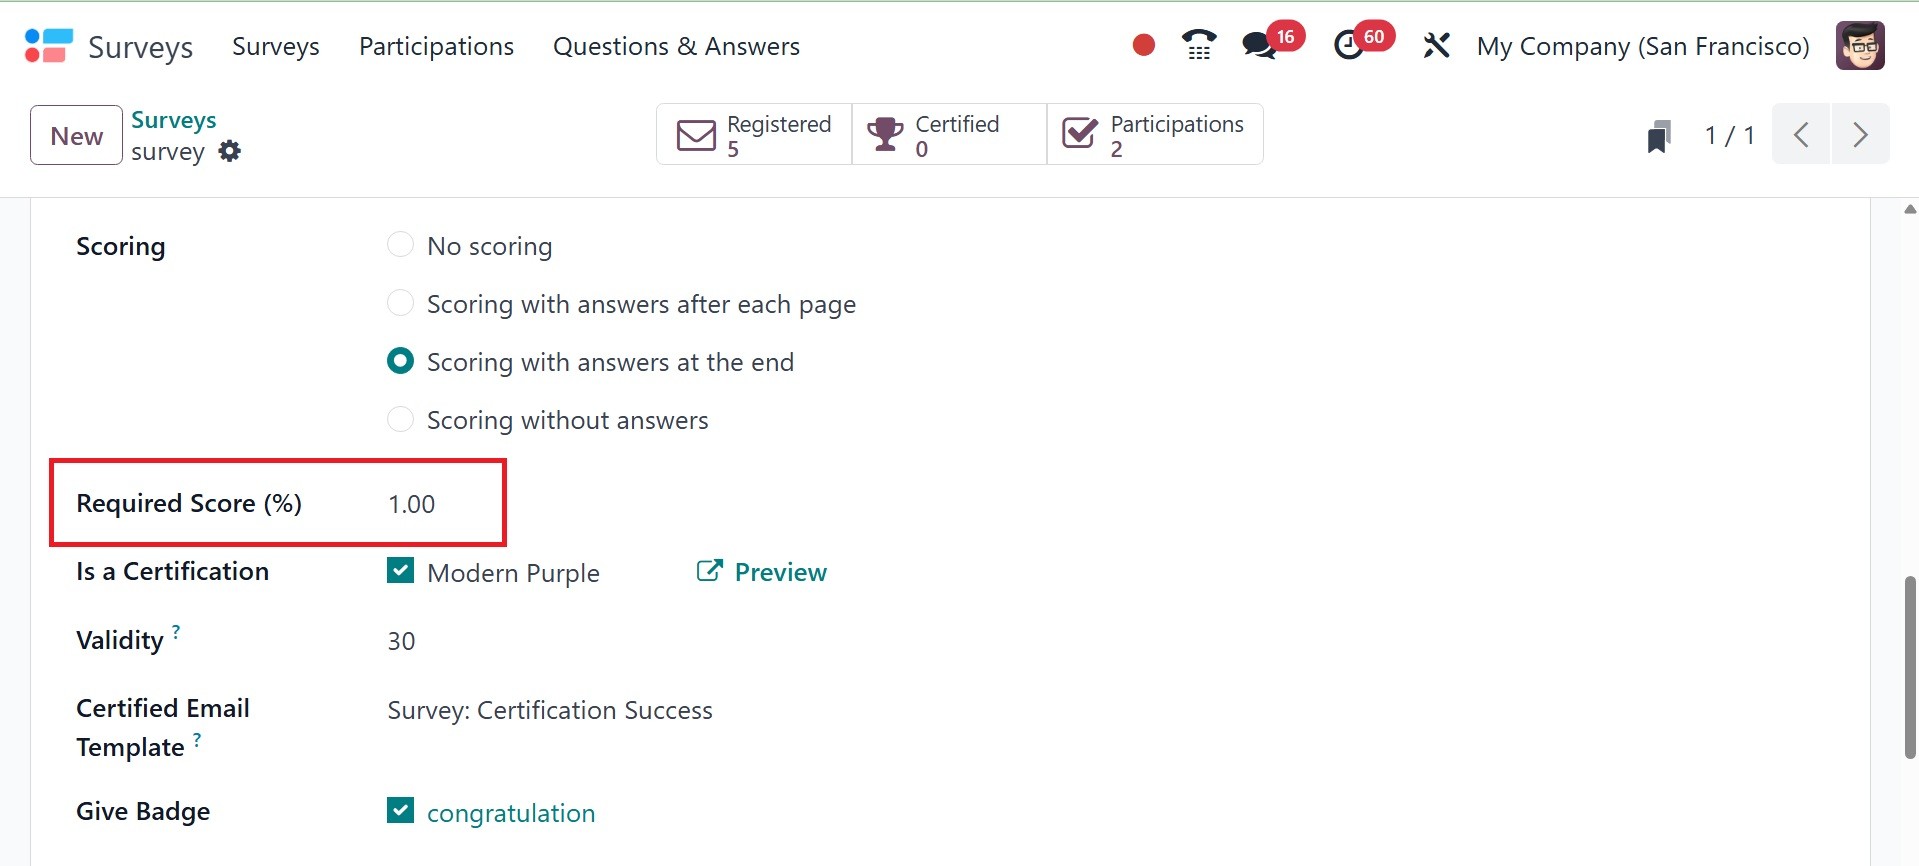
The Survey Time Limit can be
changed during the Time &
Scoring session. No scoring,
scoring with answers at the
conclusion, or scoring
without answers at the end
are the options available to
you. If the Is a
Certification option is
enabled, you can choose the
Certified Email Template
option.
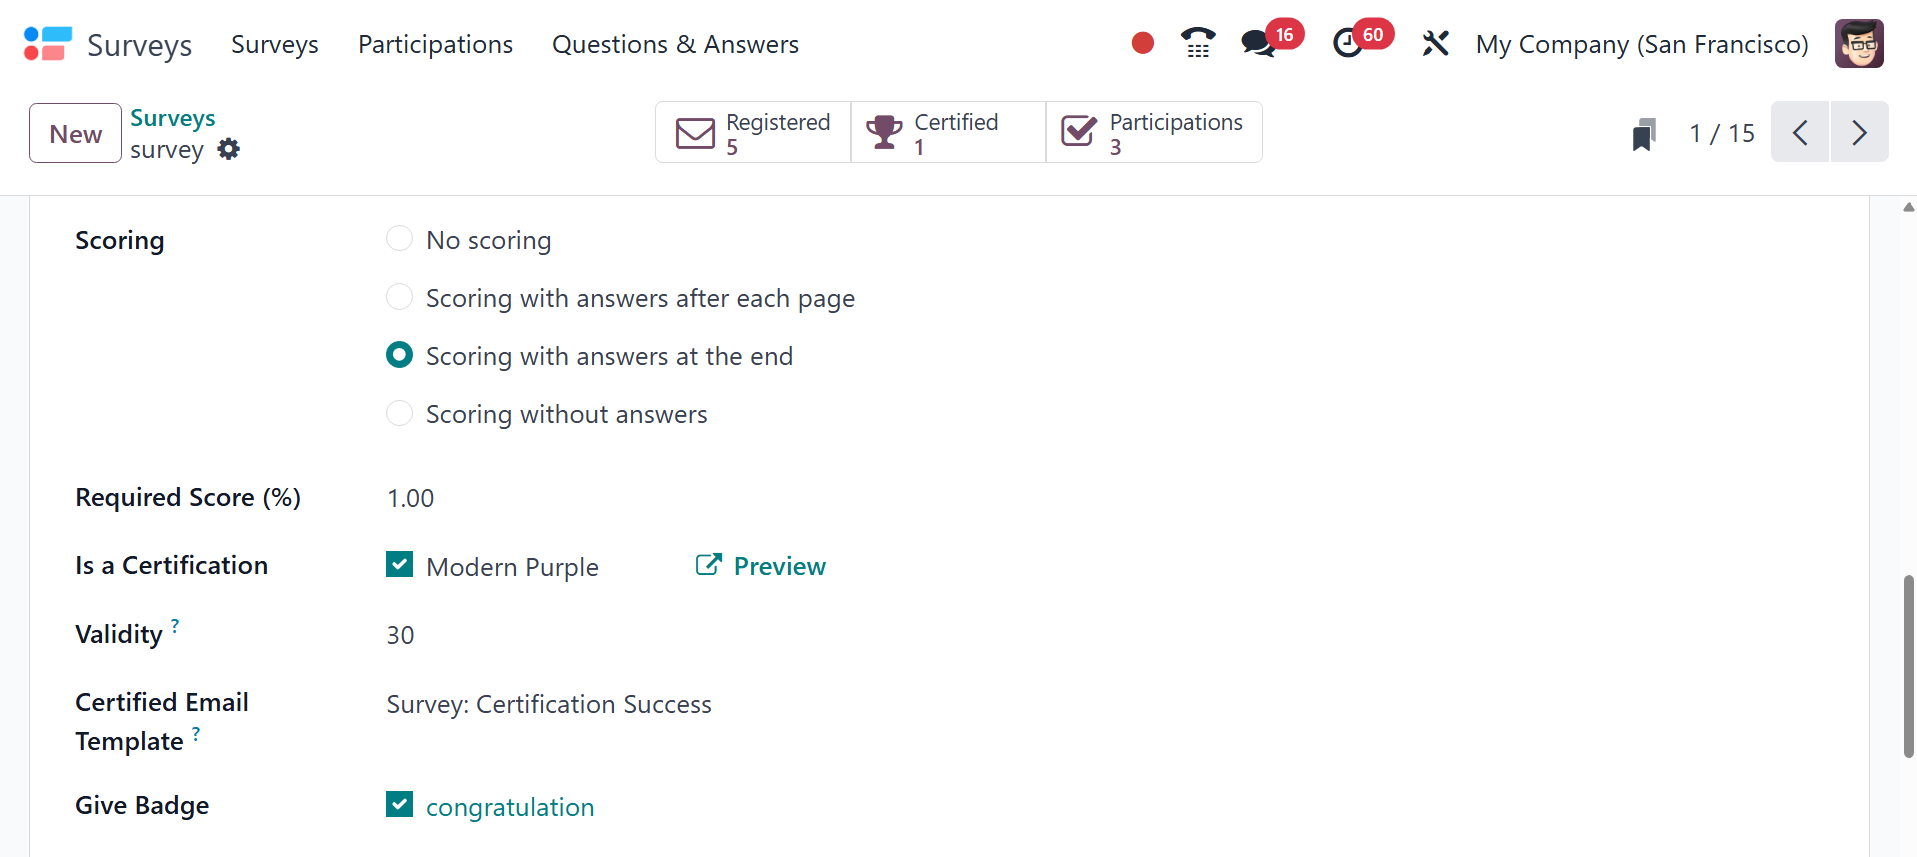
The required score option
specifies the minimum
percentage score a
participant must obtain to
successfully pass the survey.
Validity option determines
how many days the certificate
is valid for after completing
the test. A certified email
template is used to generate
a PDF certificate for
participants who pass the
survey. And Give badge option
enables you to give the
participant a gamification
badge if they successfully
finish the survey.
The Session Code for the live
session contains the Session
Link configuration. Reward
Quick Answers allows users to
earn bonus points for quick
responses.
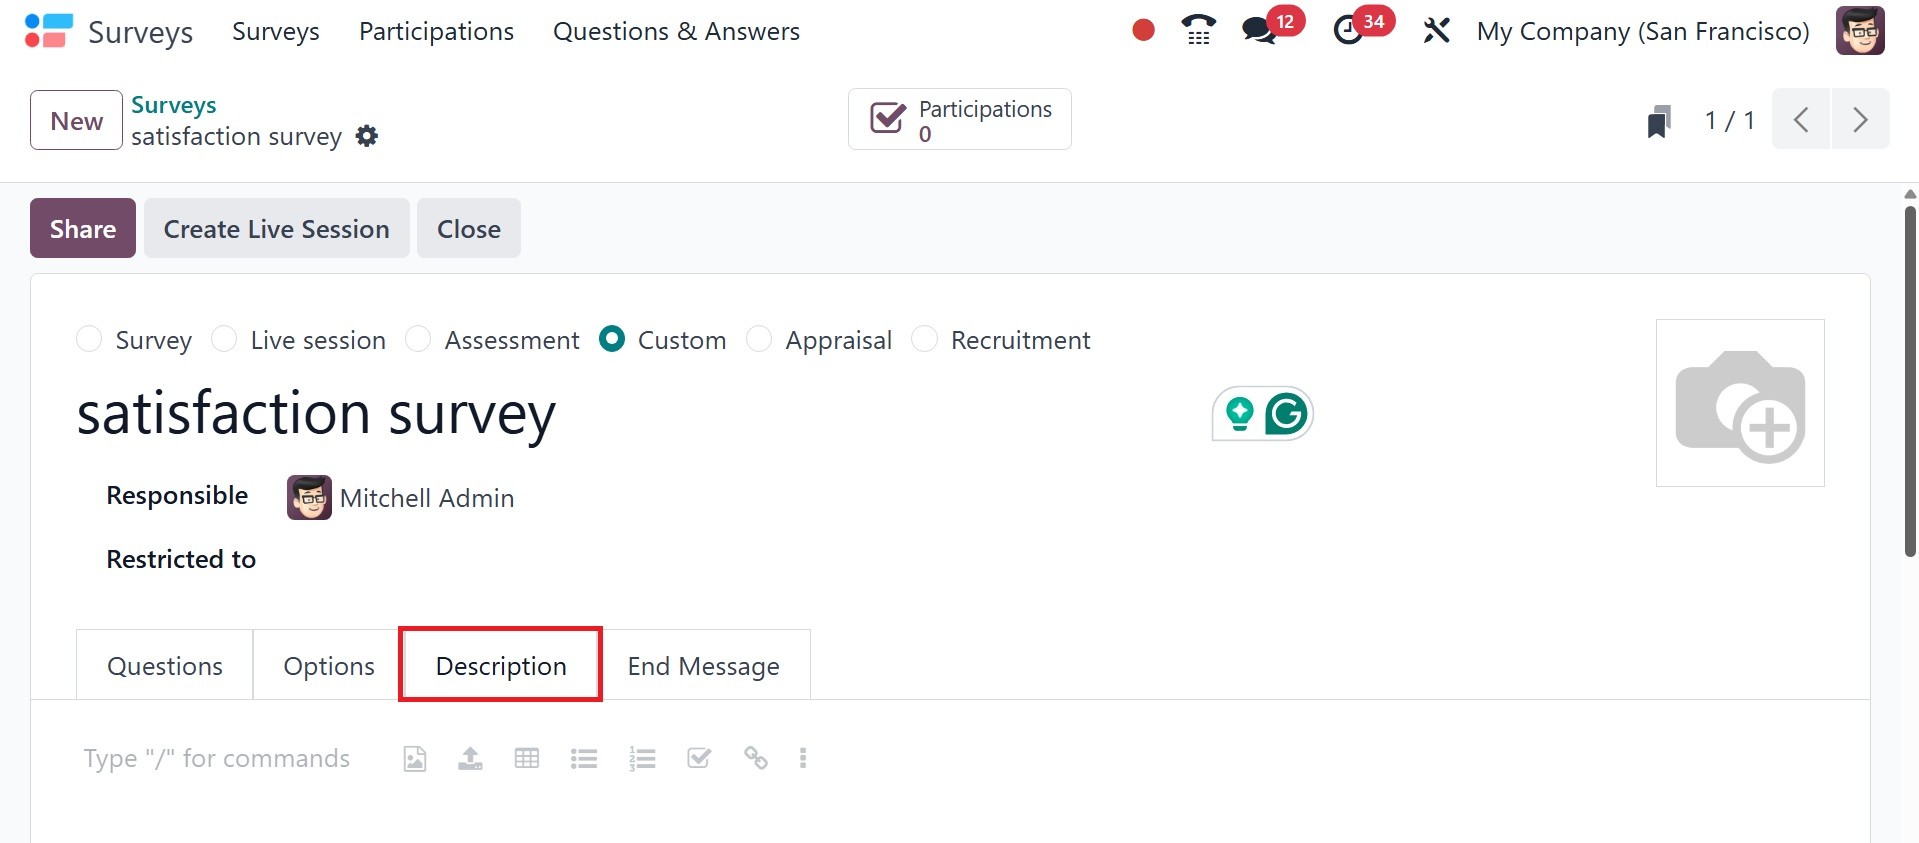
You can include a description of
the survey in the Description
tab. This will appear on the
main page of the survey. You
can use this explanation to
help your applicants
understand the purpose and
guidelines of the survey
before they start.
The client will see the message
that was entered in the End
Message tab once the survey
is complete.
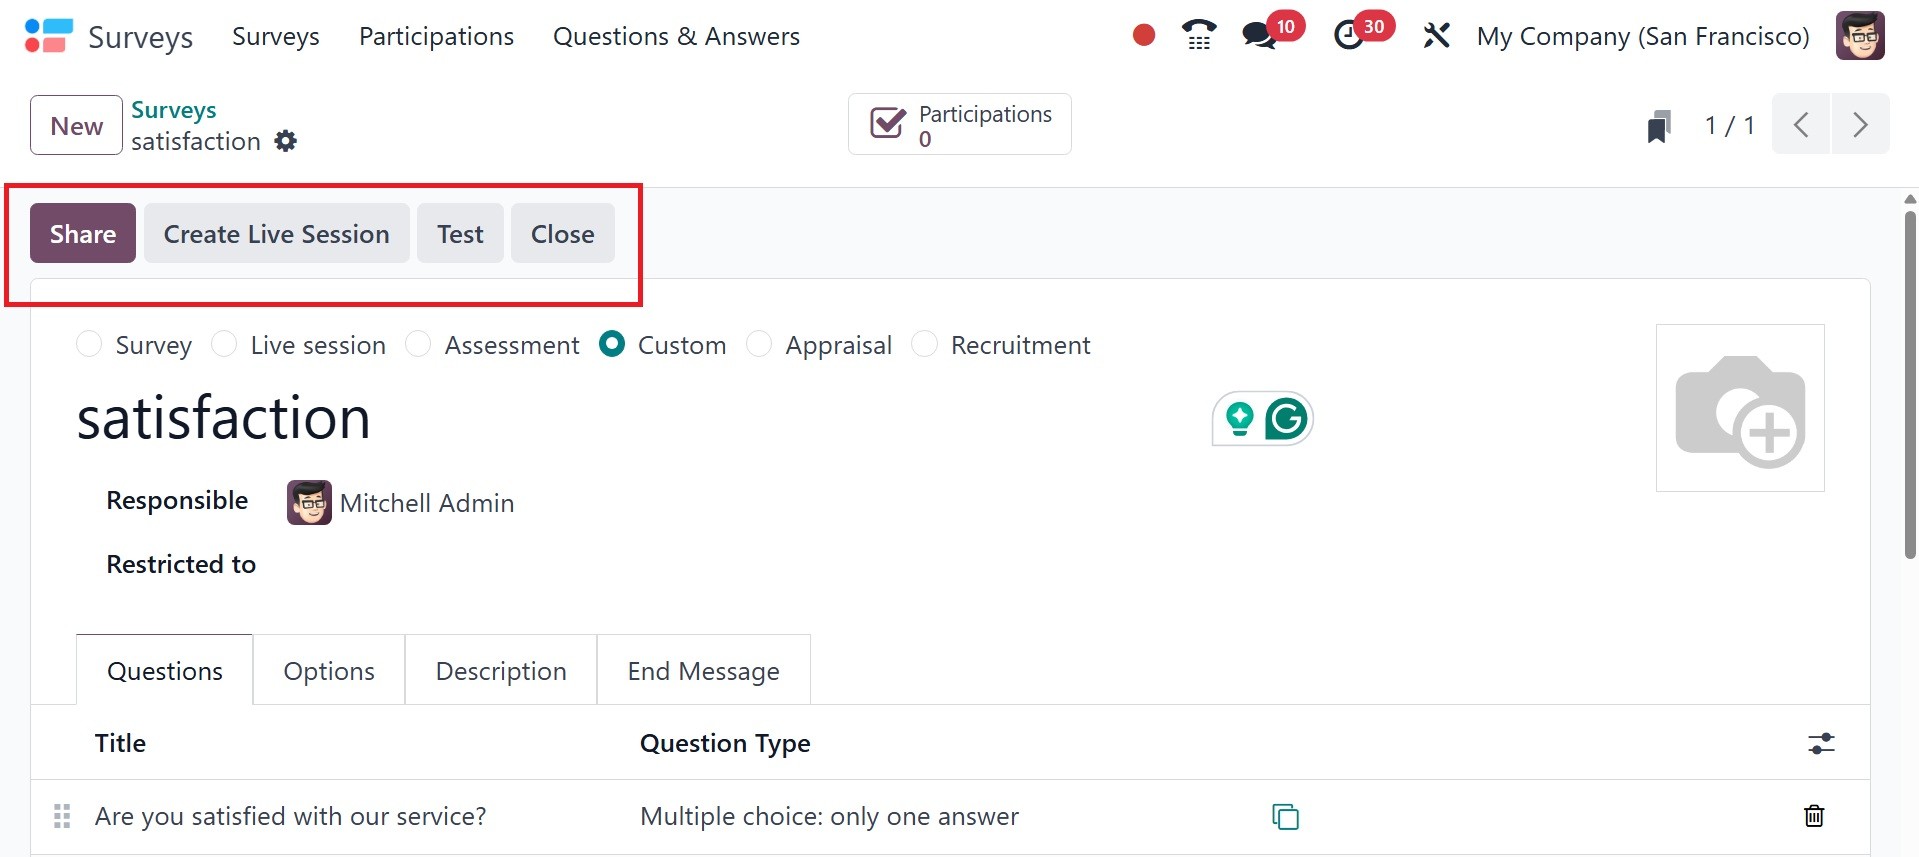
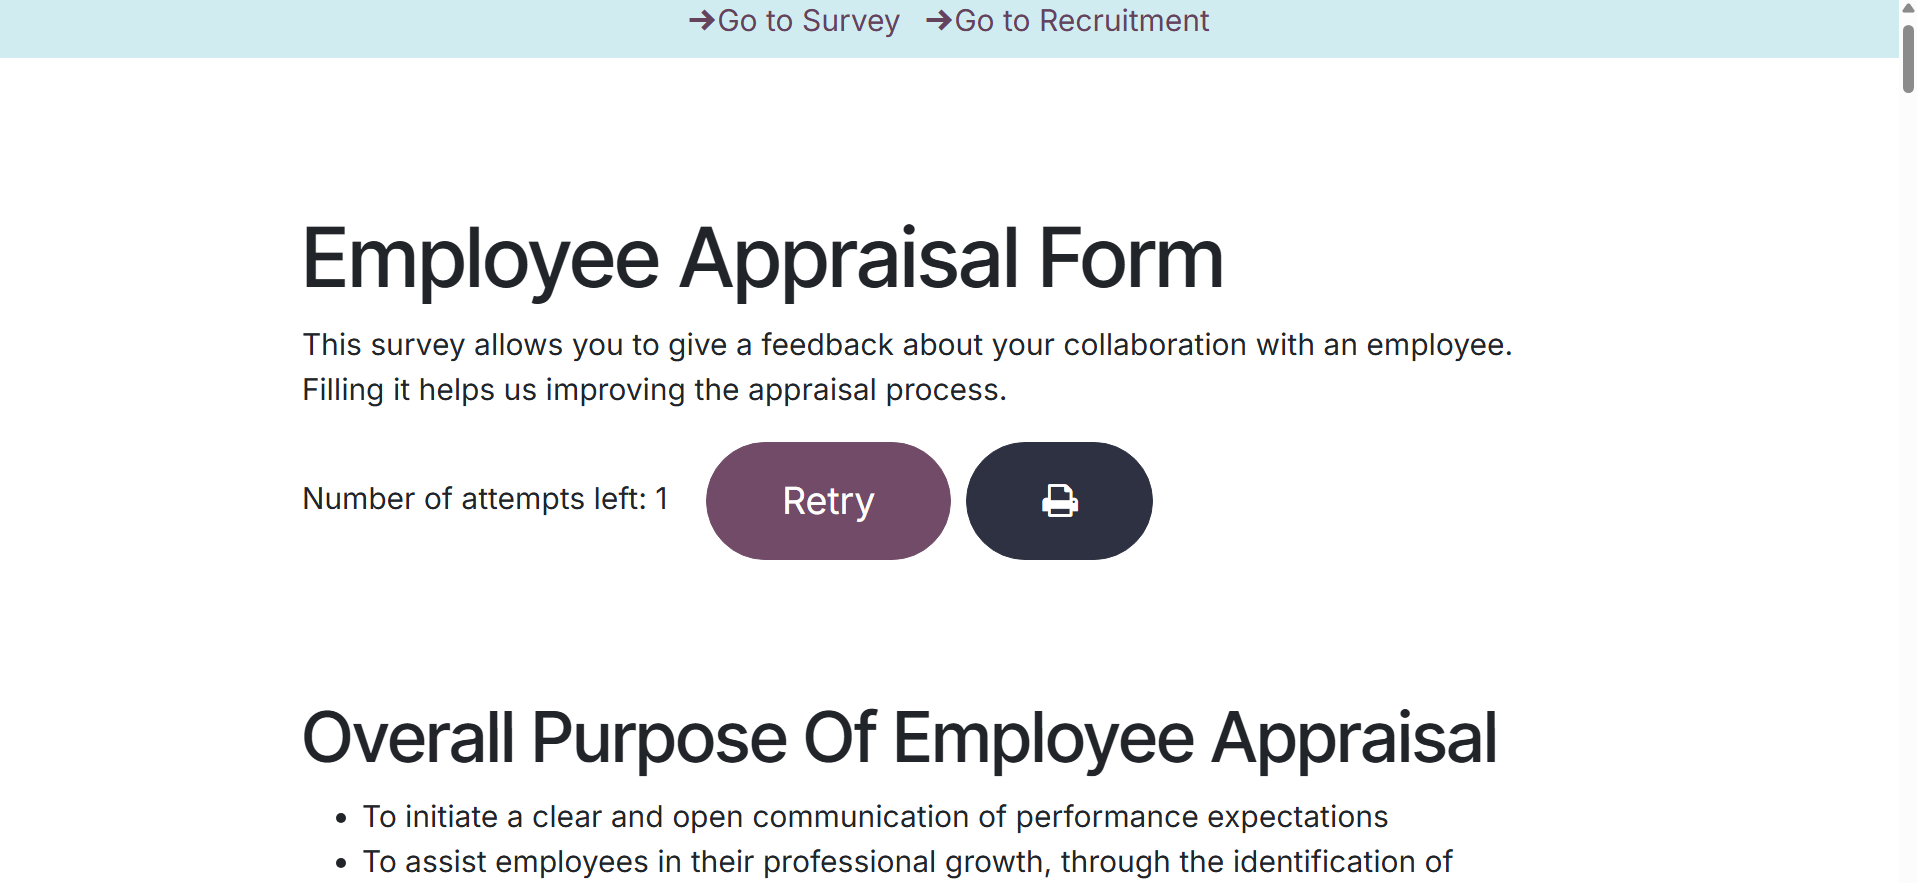
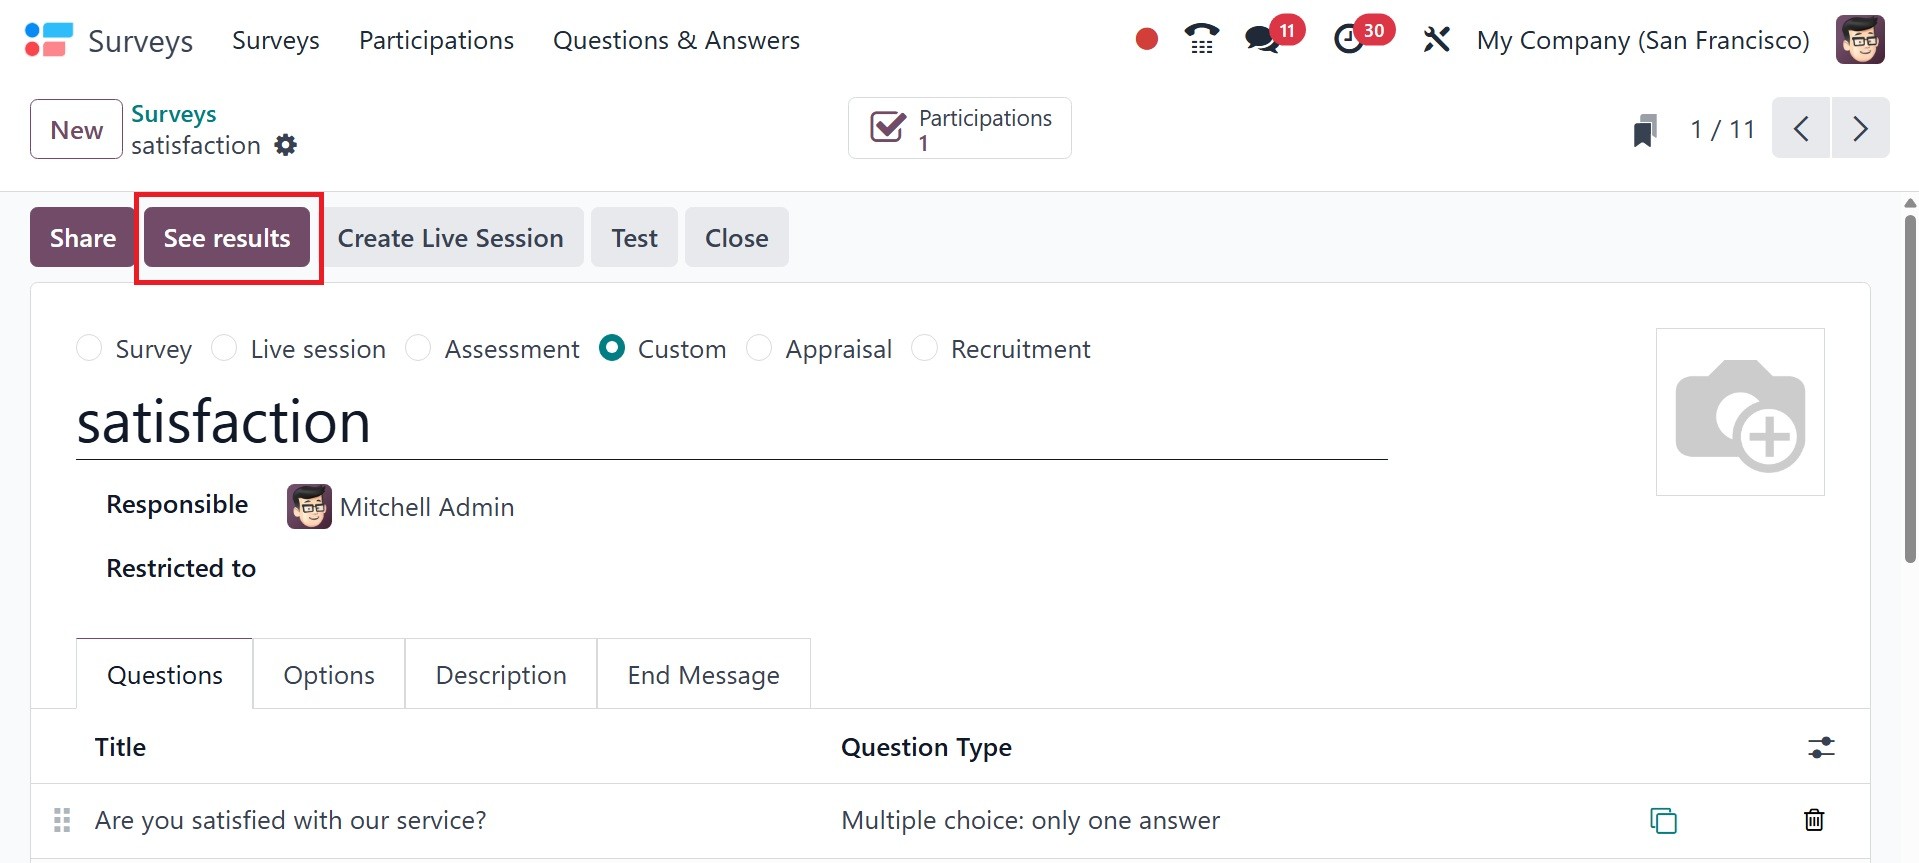
After filling out the new survey
creation box with all the
necessary data, you can save
the survey by selecting the
Save option. There will be
buttons on the window to
Close, test, Share, and
Create Live Session.
You can use the Test button to
test the survey before
distributing it to the
public. Testing enables you
to verify the accuracy of the
survey. You can change any
questions that are difficult
to comprehend or unclear by
testing the survey. When you
click the Test button, a new
page will appear as seen
below.
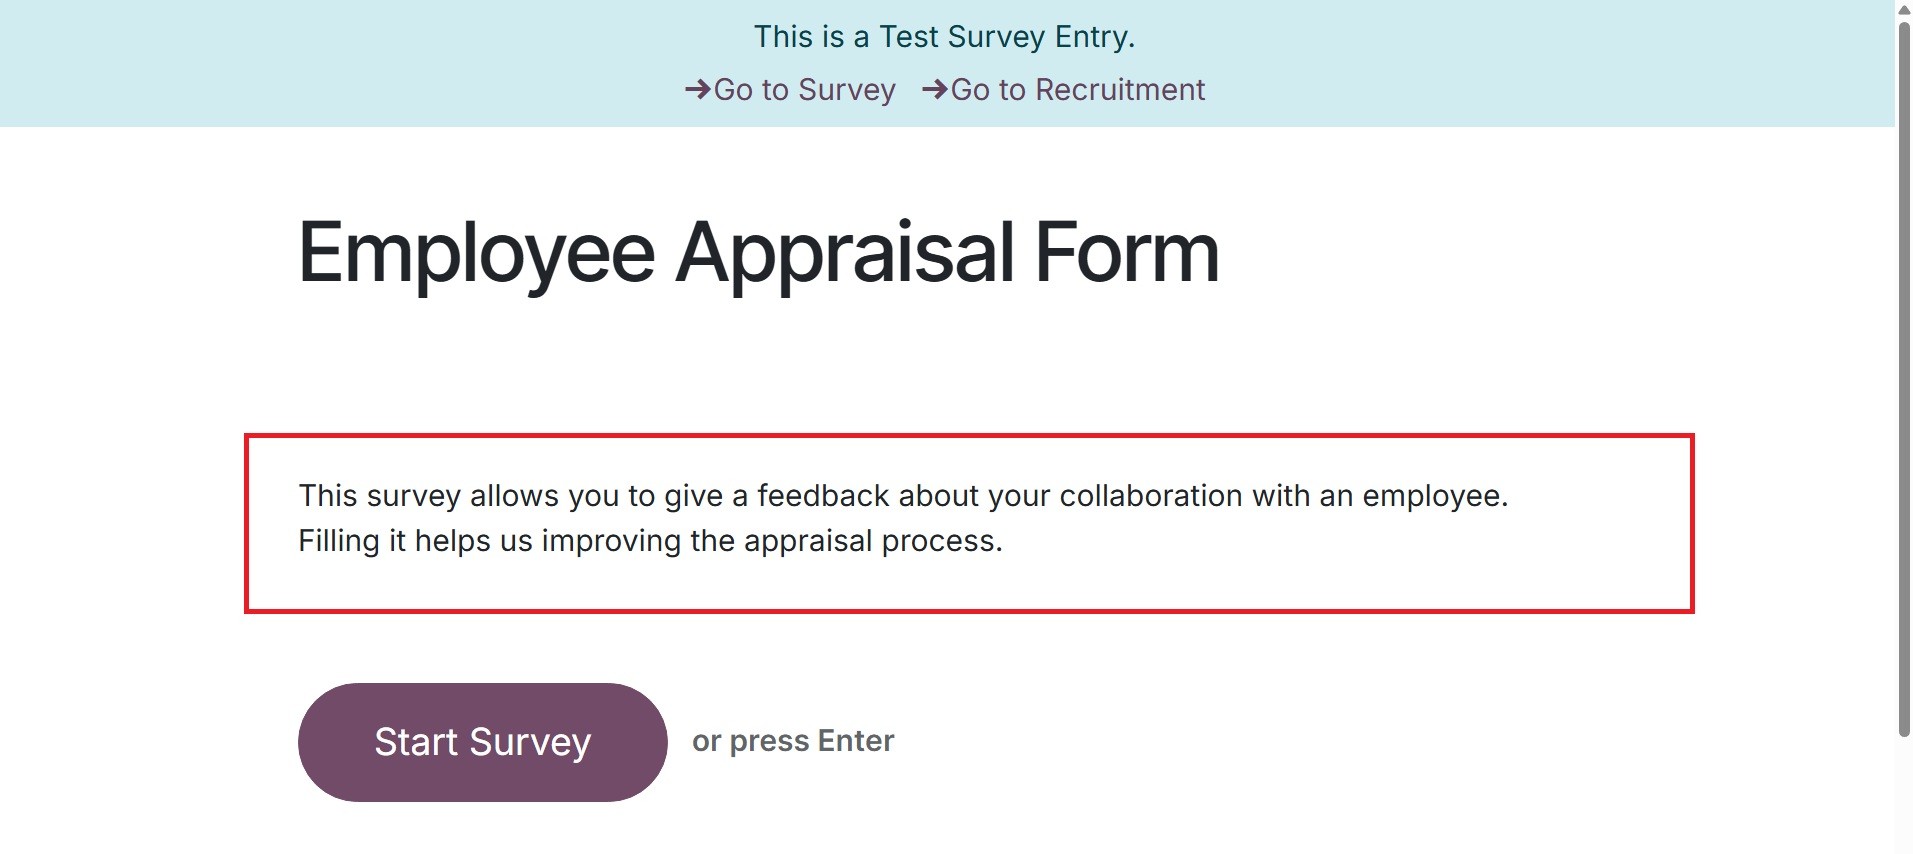
You can see the description of
the survey on the homepage
itself. The Start Survey
button allows you to test the
survey.
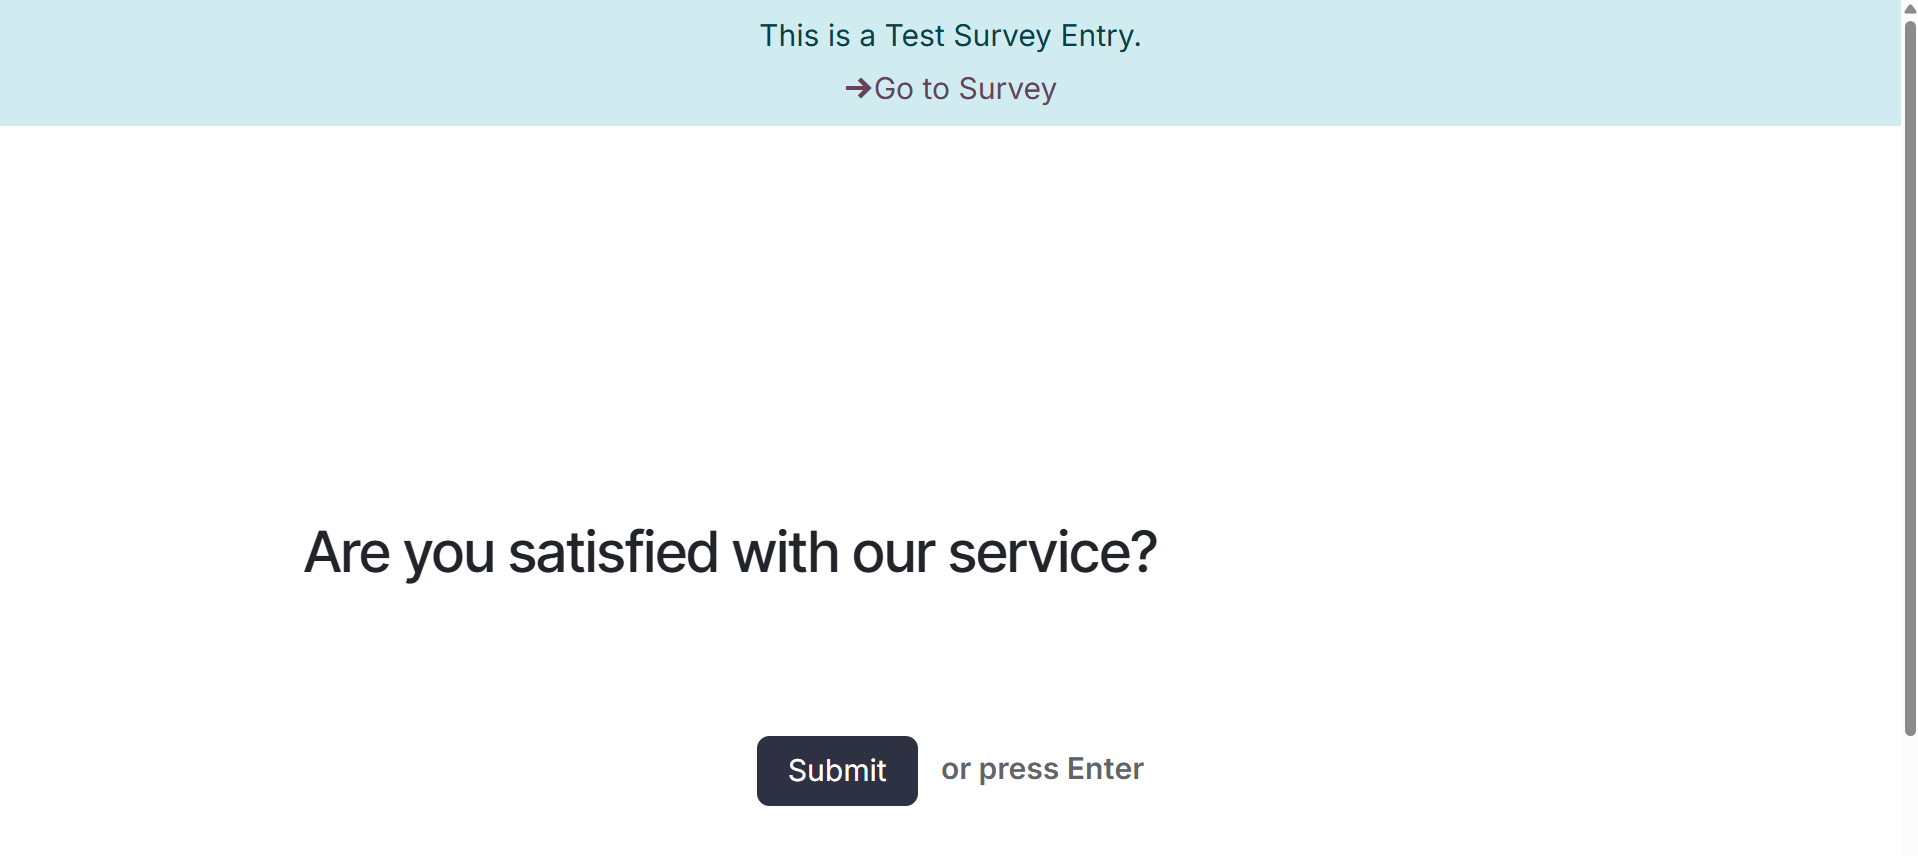
You can go over each question in
detail and answer each one
separately. Let's initially
understand what the Single
Line Text Box is, as in the
image below.
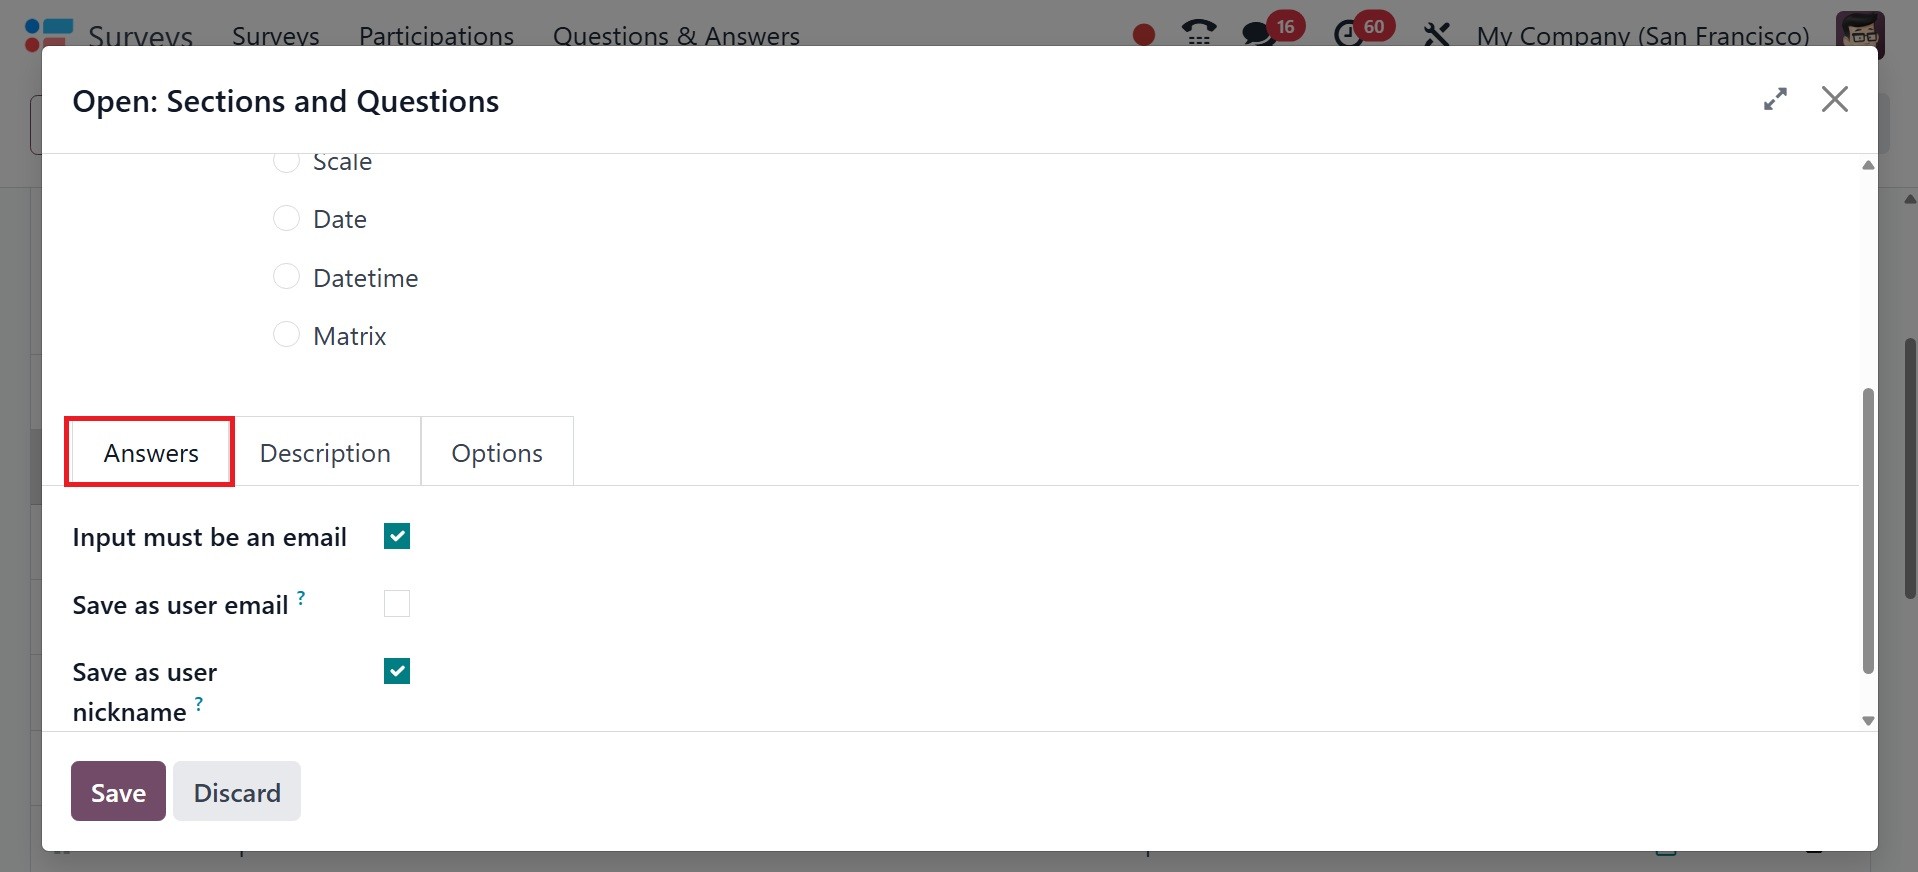
The Answer tab options, such as
Input must be an email, Save
as user nickname, and Save as
user nickname, can be
configured. Further, if there
is any description available,
the respective question list
can be defined in the
description tab.
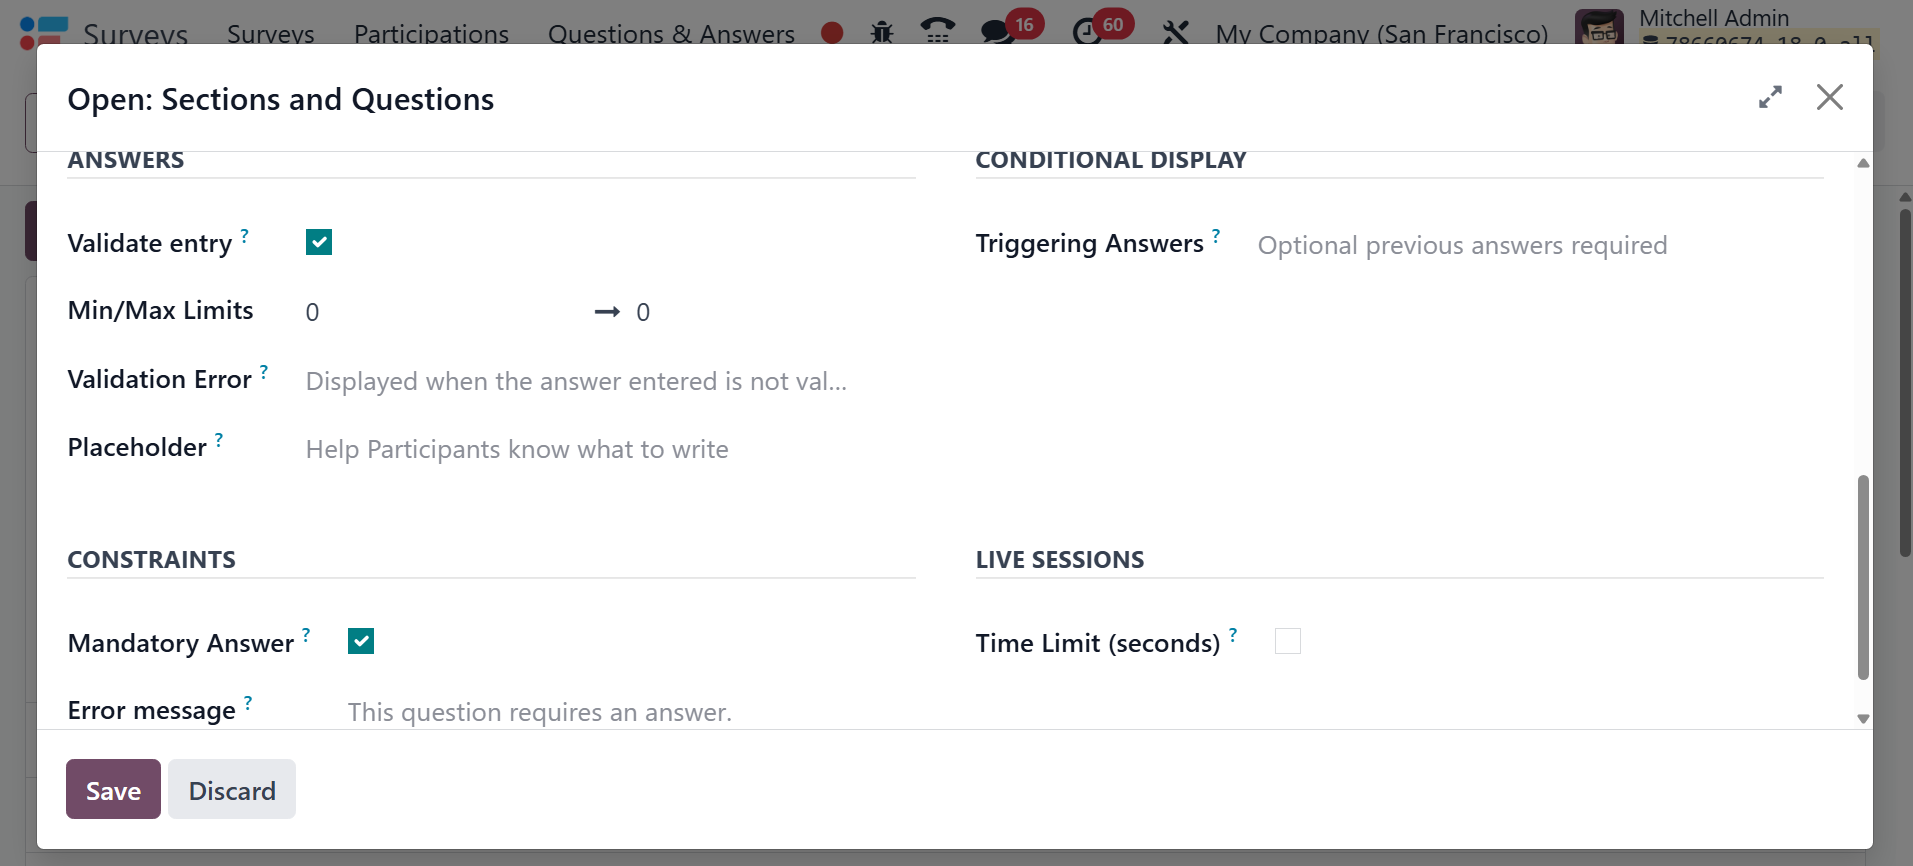
The different configurations can
be made under the Options
tab. Only when the Mandatory
Answer Option is enabled can
the Constraints options,
including the Error message
and the Mandatory Answer, be
specified. Additionally, the
Answering conditions can be
defined by turning on the
Conditional Display option.
You should specify the
Question Time Limit if you
want the survey question to
be timed and live.
After defining the question, you
can choose the Save & New
option, which will display
the same window with no
entries. The survey will
retain the questions you have
previously defined and
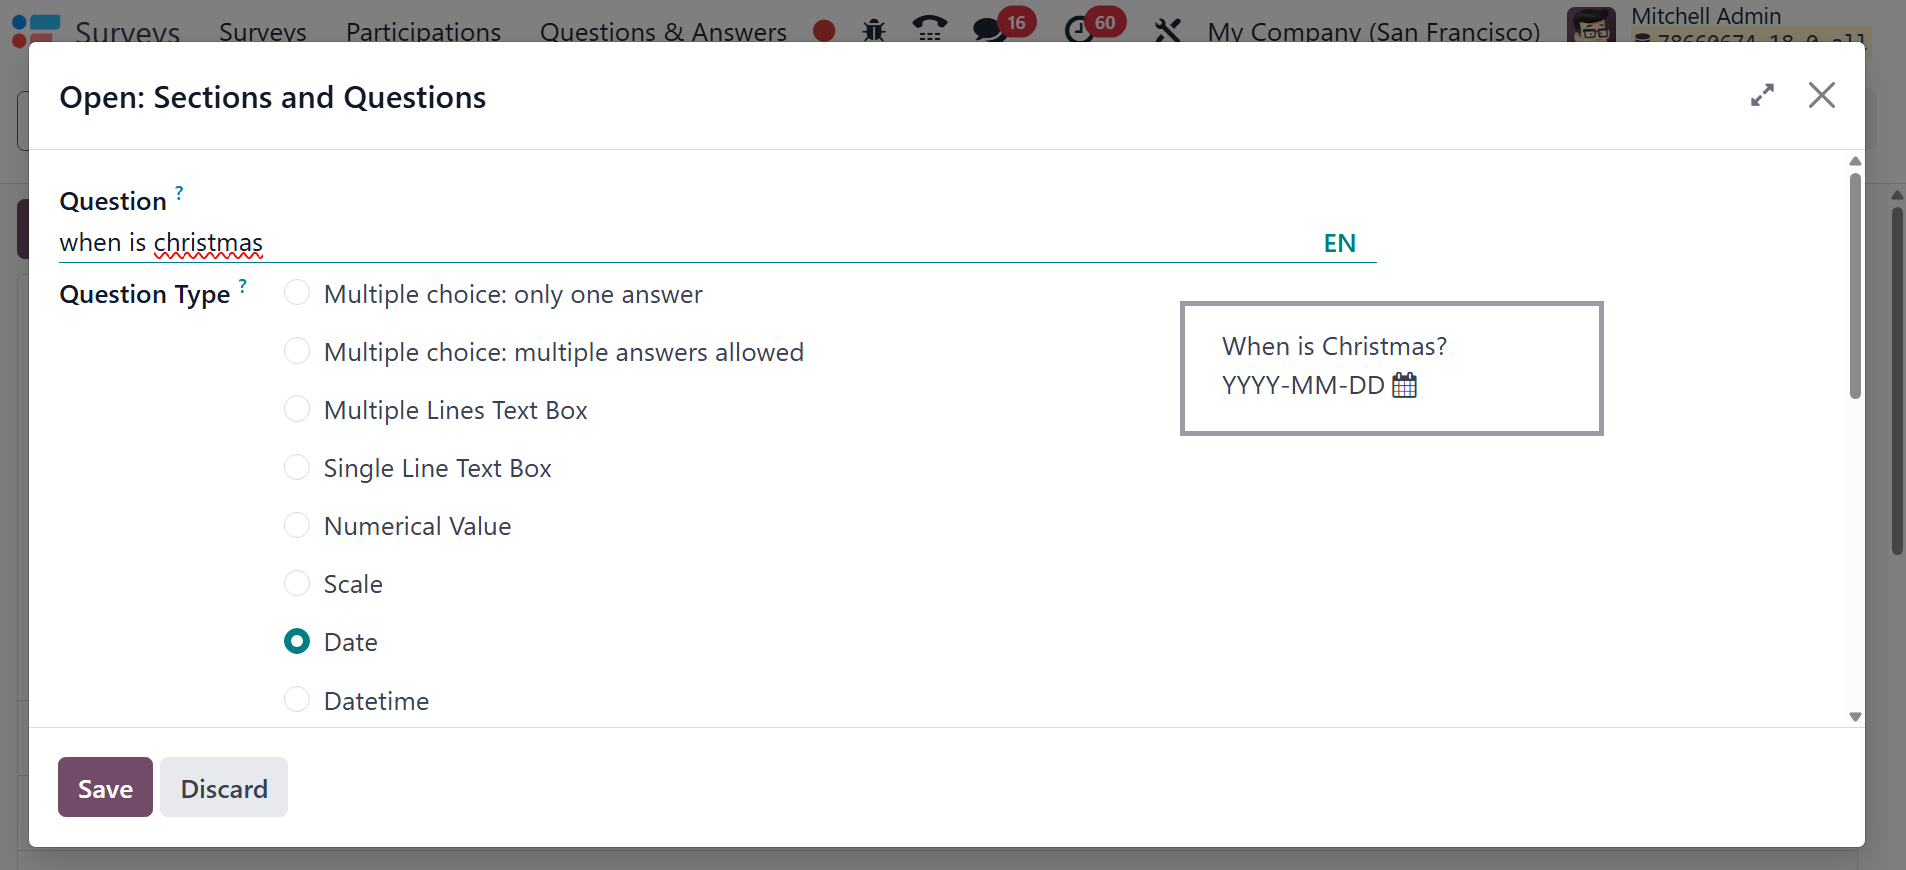
created. Let's now examine
queries that involve the date
component. In this case, the
Date of Birst is posed as a
question, and Date is chosen
as the question type.
Additionally, the element
needed to confirm that the
candidate has the error
message declared and the
mandatory field enabled.
Choose the Save & New option
after the question has been
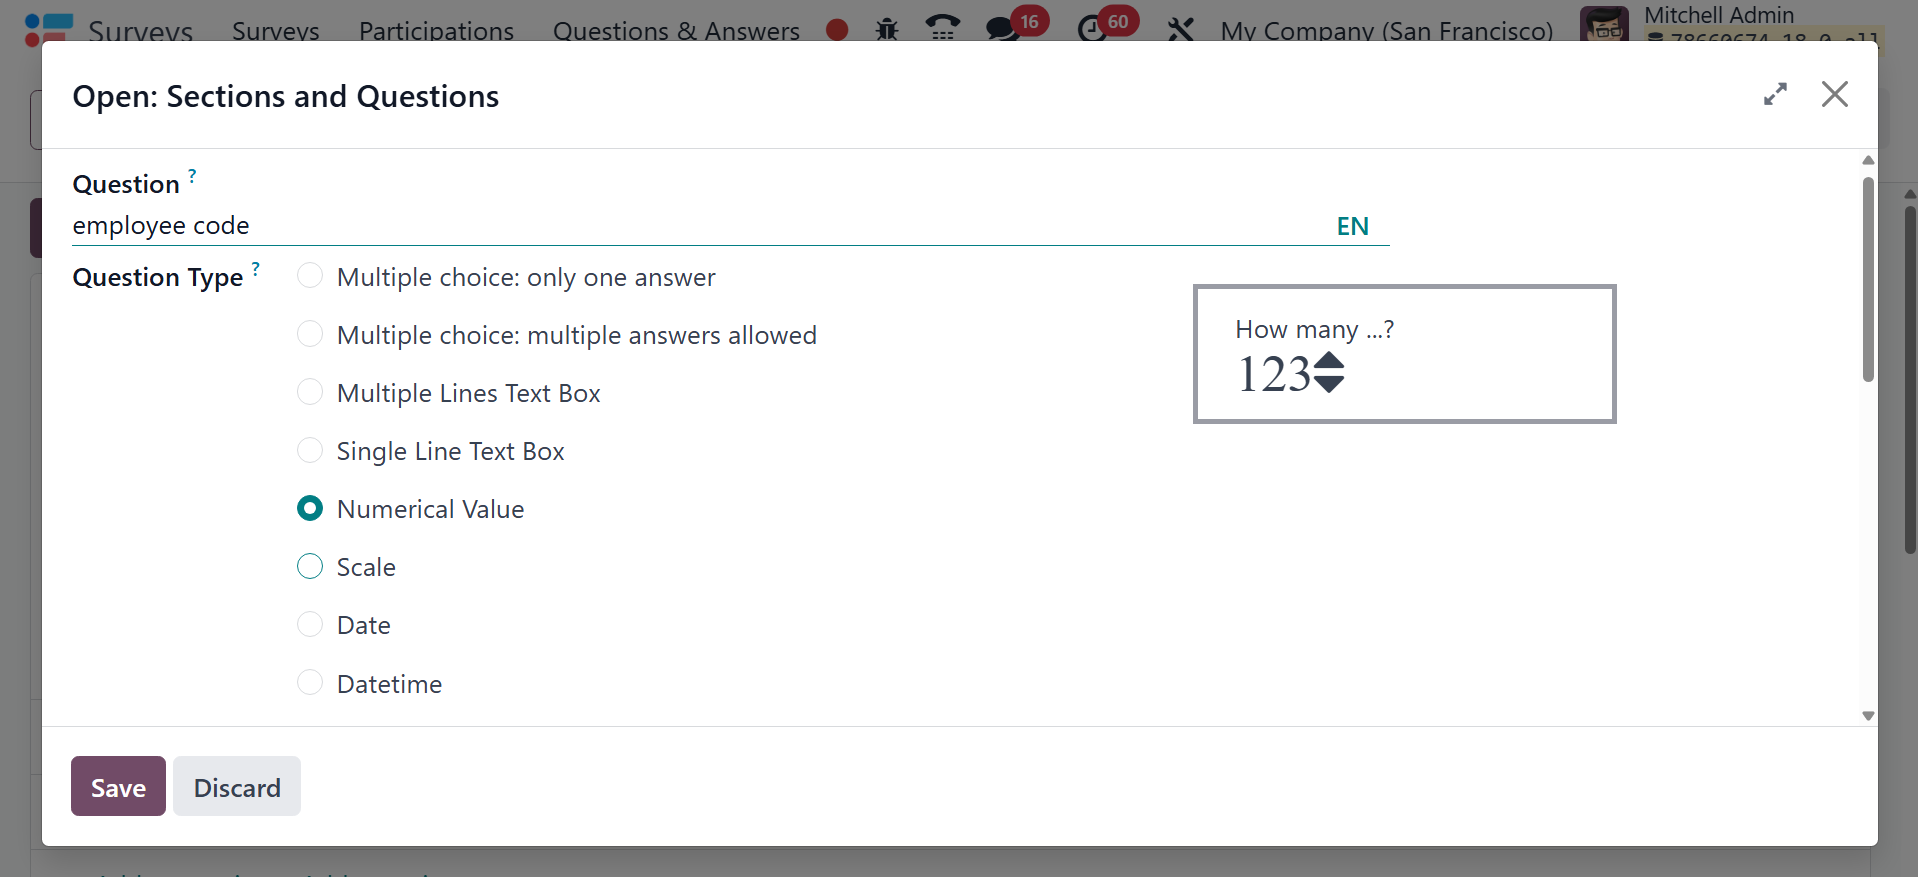
defined. In this case, the
Employee Code is the defined
question, the Mandatory Field
is enabled, and the Numeric
Value option for the Question
Type has been selected.
You will see the same question
configuration window after
saving the question and
choosing to enter a new one.
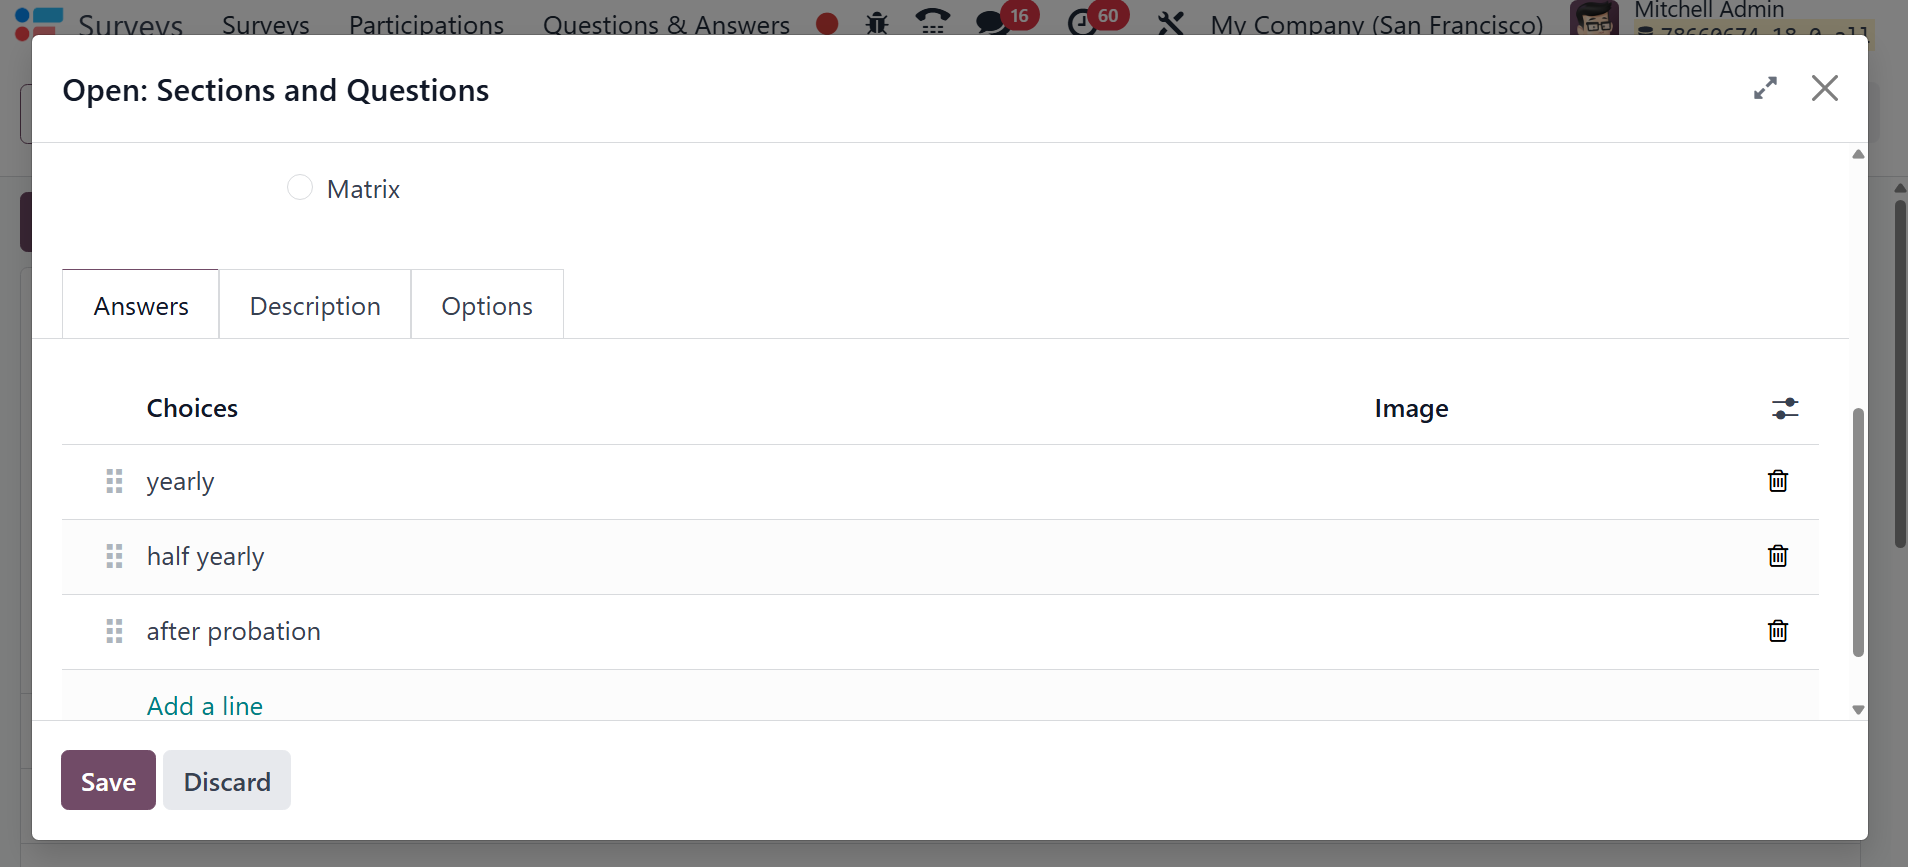
This time, we're going with a
multiple-choice question with
only one possible response.
The query is an appraisal
term that specifies the kind
of appraisal for which the
worker is submitting an
application. There is just
one response available for
the multiple-choice question
type. Survey respondents can
choose from the Half Yearly,
Yearly, and After Probation
options under the Answers tab
when responding to the
corresponding question.
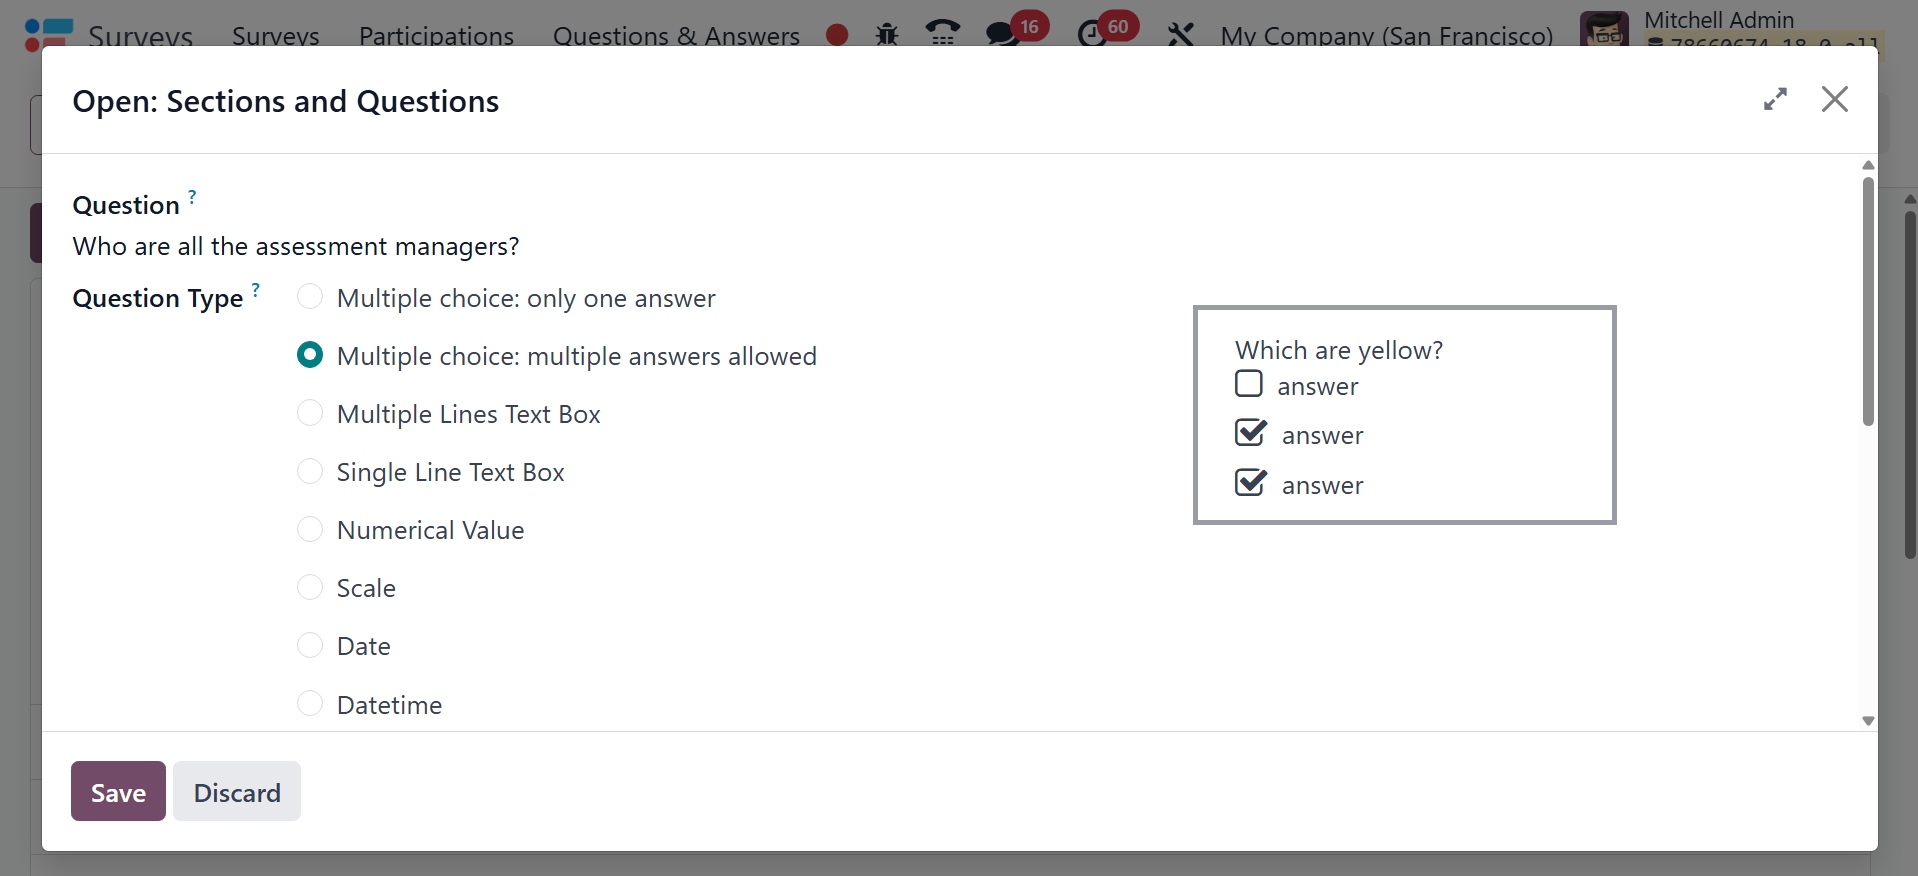
Depending on the needs of the
candidate, we will now select
the multiple choice: numerous
answers authorized options,
where different answers can
be chosen from the specified
ones. The question here is,
"Who are all the assessment
managers?" Four employees
offer choices in the Answer
section, which are
categorized by the functional
area of their roles. The
candidate will therefore have
a variety of options from
which to choose.
The questions defined in the
corresponding area will be
described when you return to
the Surveys after choosing
the Save & Close option.
Similarly, you have different
other kinds of questions,
which can be selected
accordingly. After responding
to every question, click the
Submit button.
You can review your answers by
choosing the Review Your
Answers option, and you can
retake the survey by clicking
the Take Again button. To
modify the survey, click the
Edit Survey button.
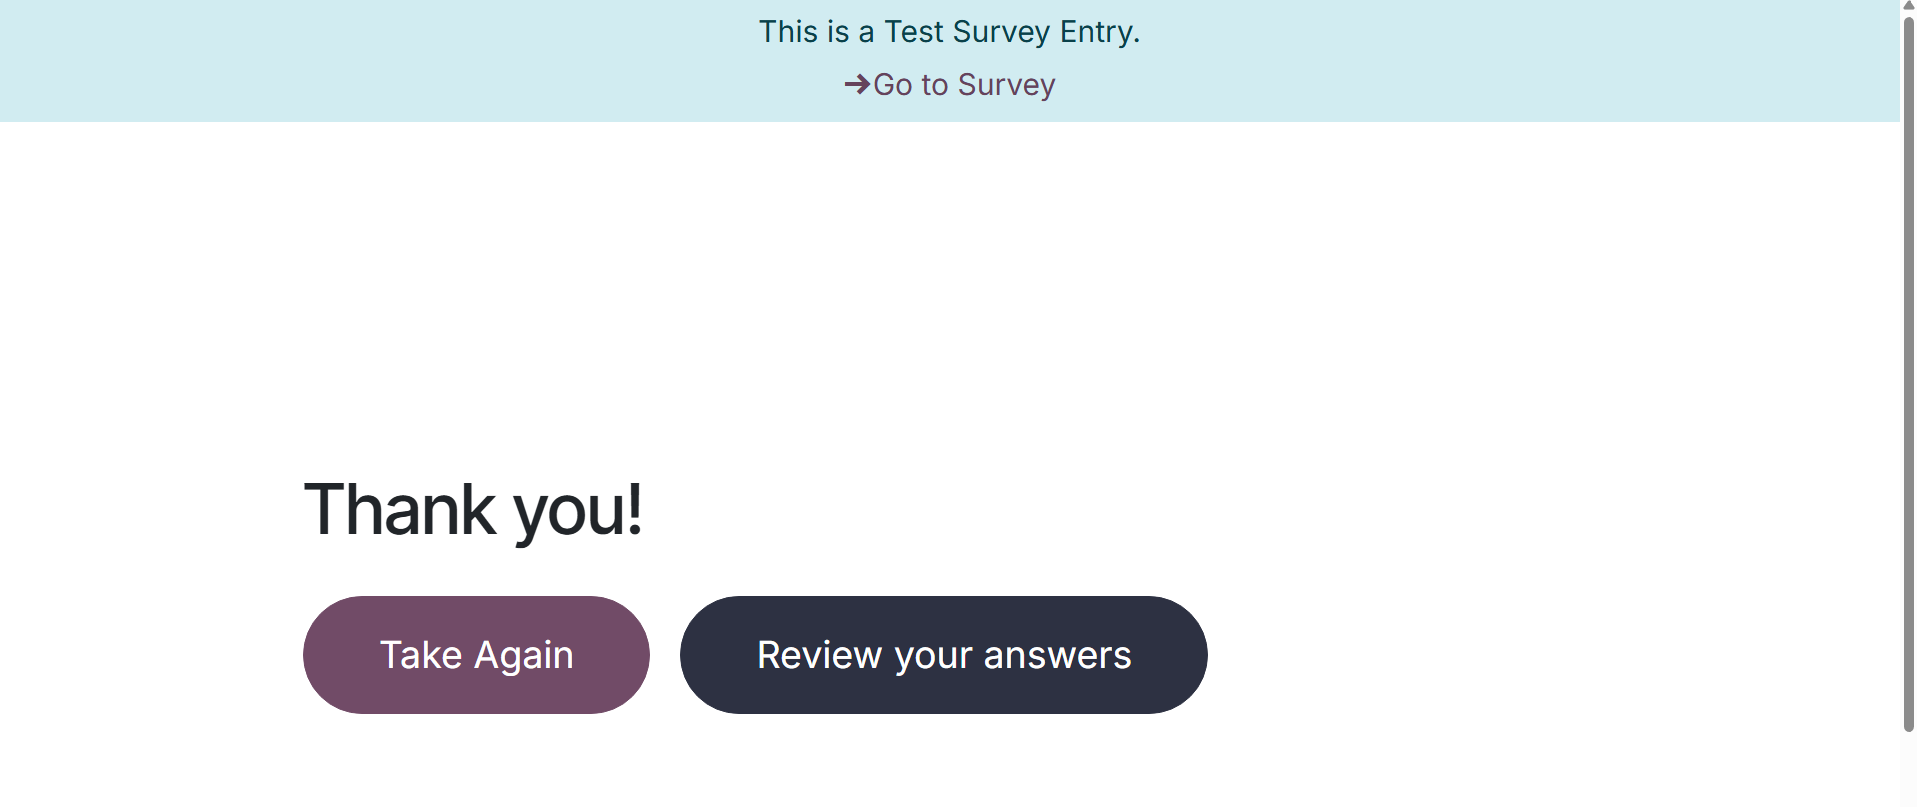
Here, on selecting the review
your answer option, you will
have the page, as on the
image below.
Now, if scoring is required, you
can select the option of
scoring, as in the image
below.
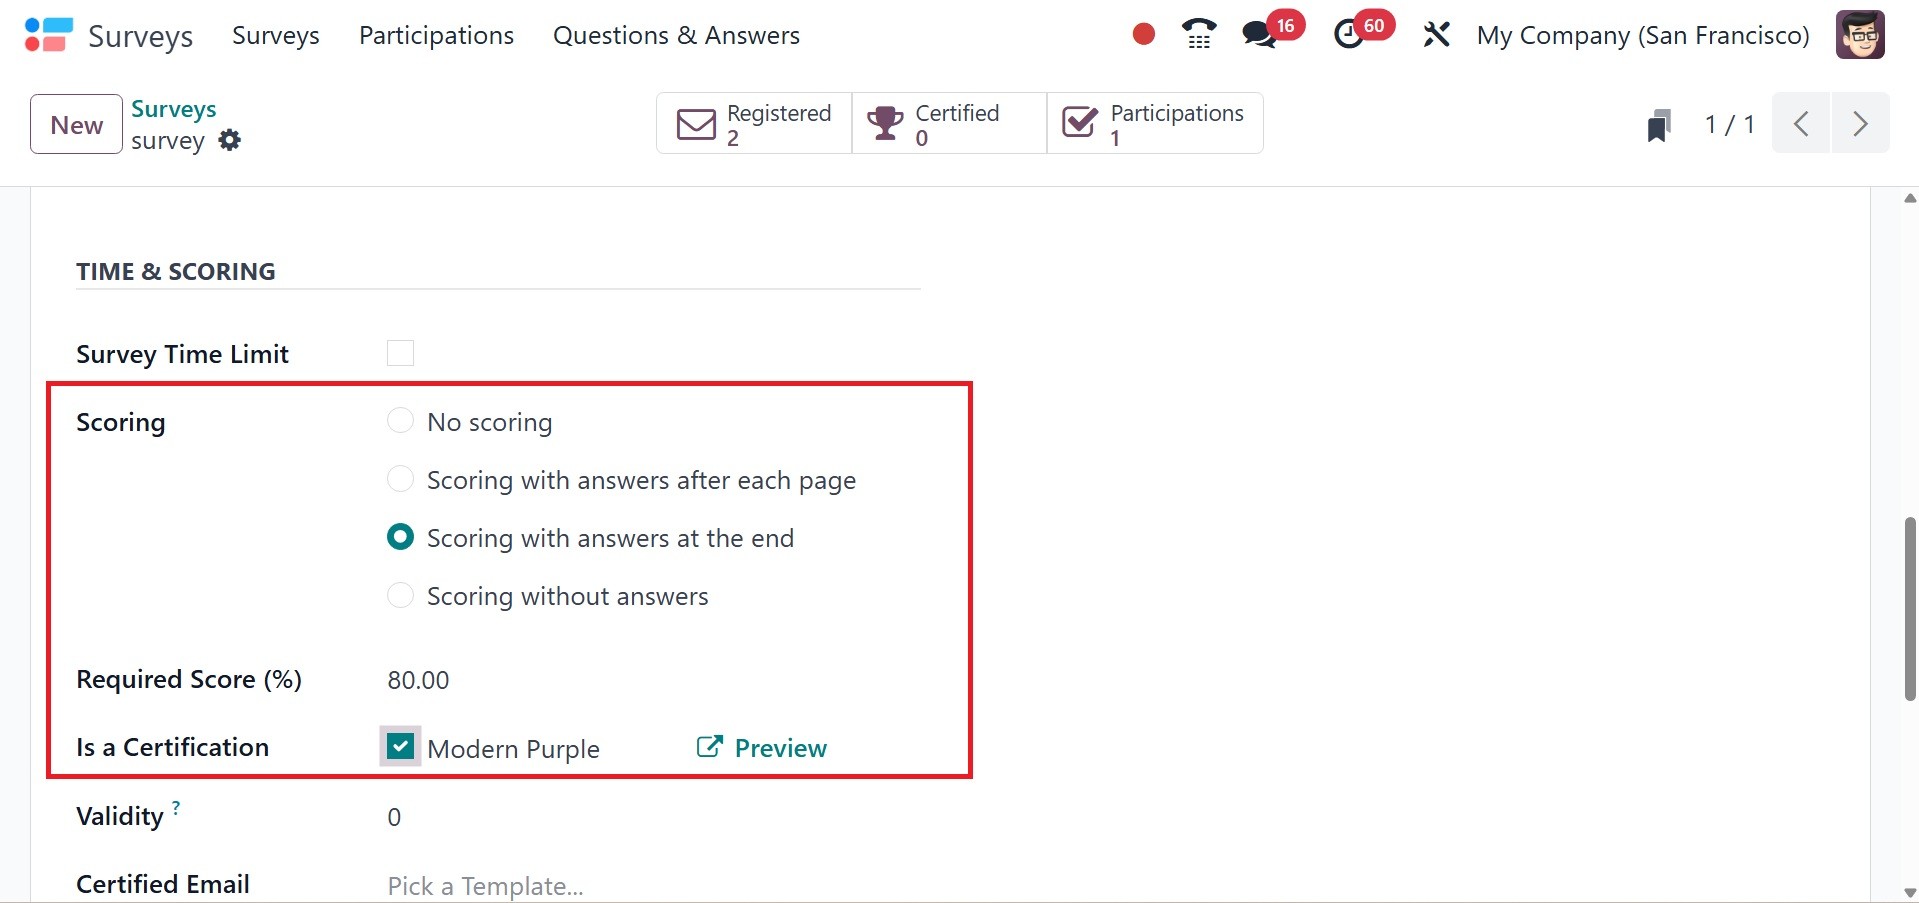
There, it can be set as no
scoring, scoring with answers
after each page, scoring with
answers at the end, and
scoring without answers. You
can also add the required
score in the provided space.
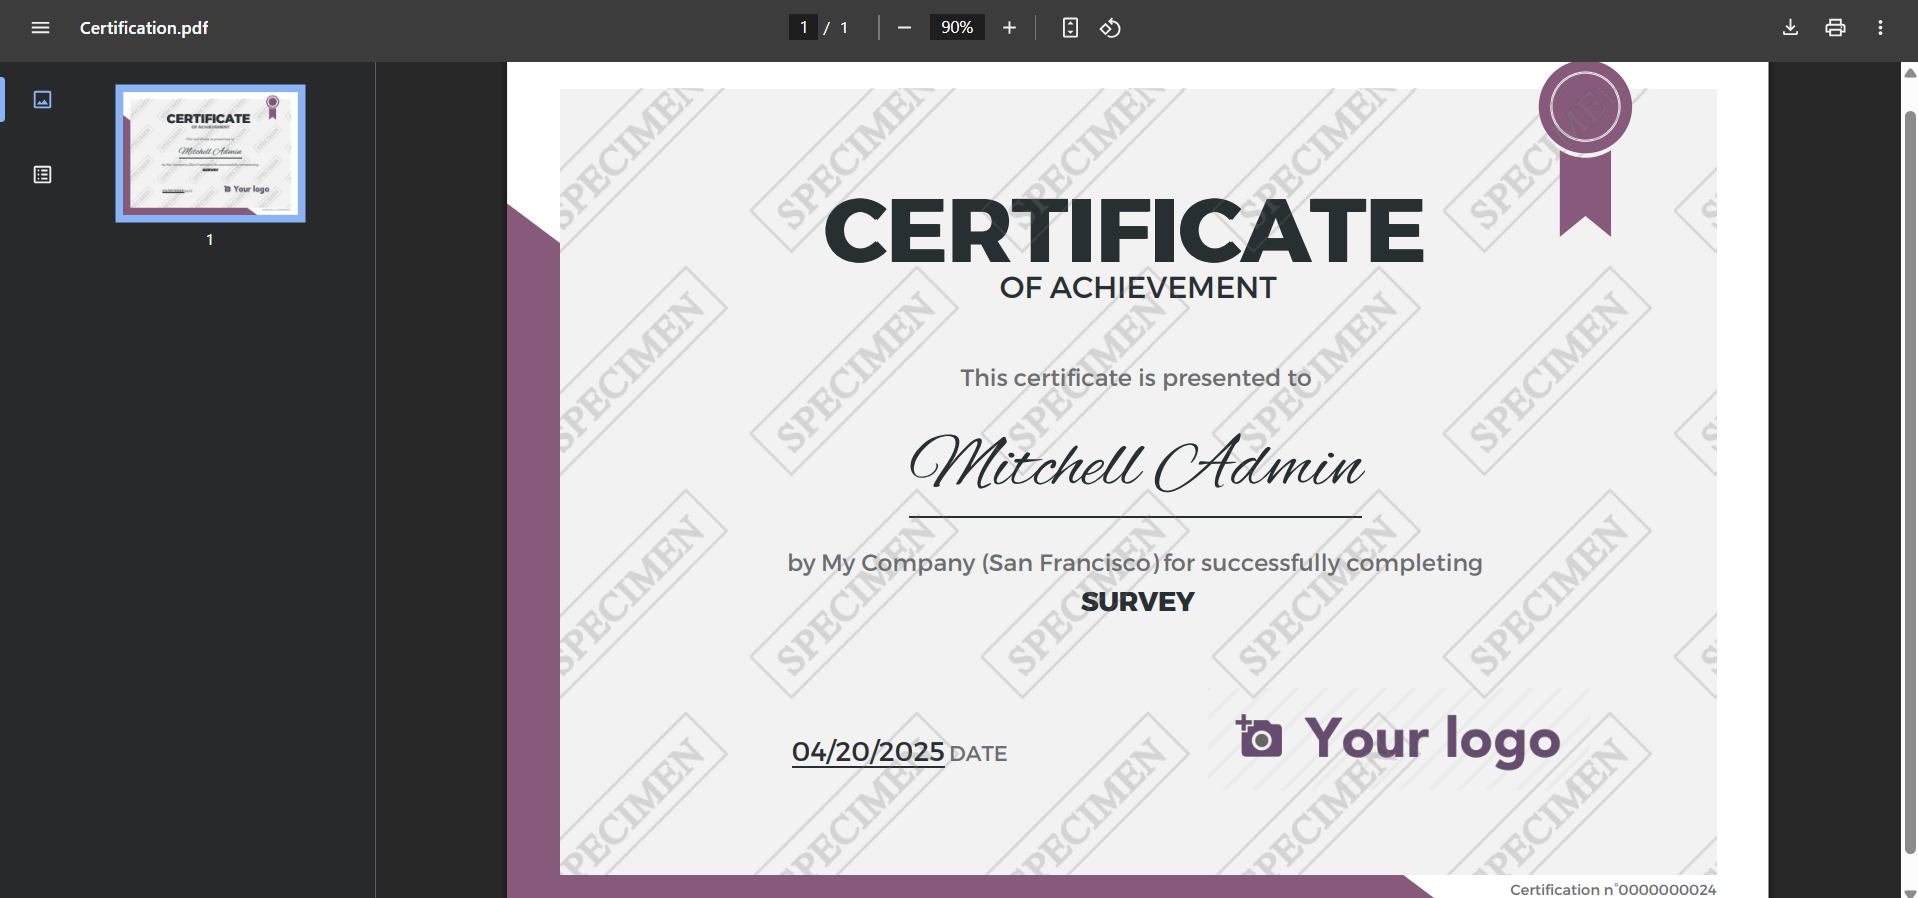
And now, if the survey is
passed, then you can download
the certificate using the
option download
certification, as in the
image below. Here, you can
also view the score that you
have obtained.
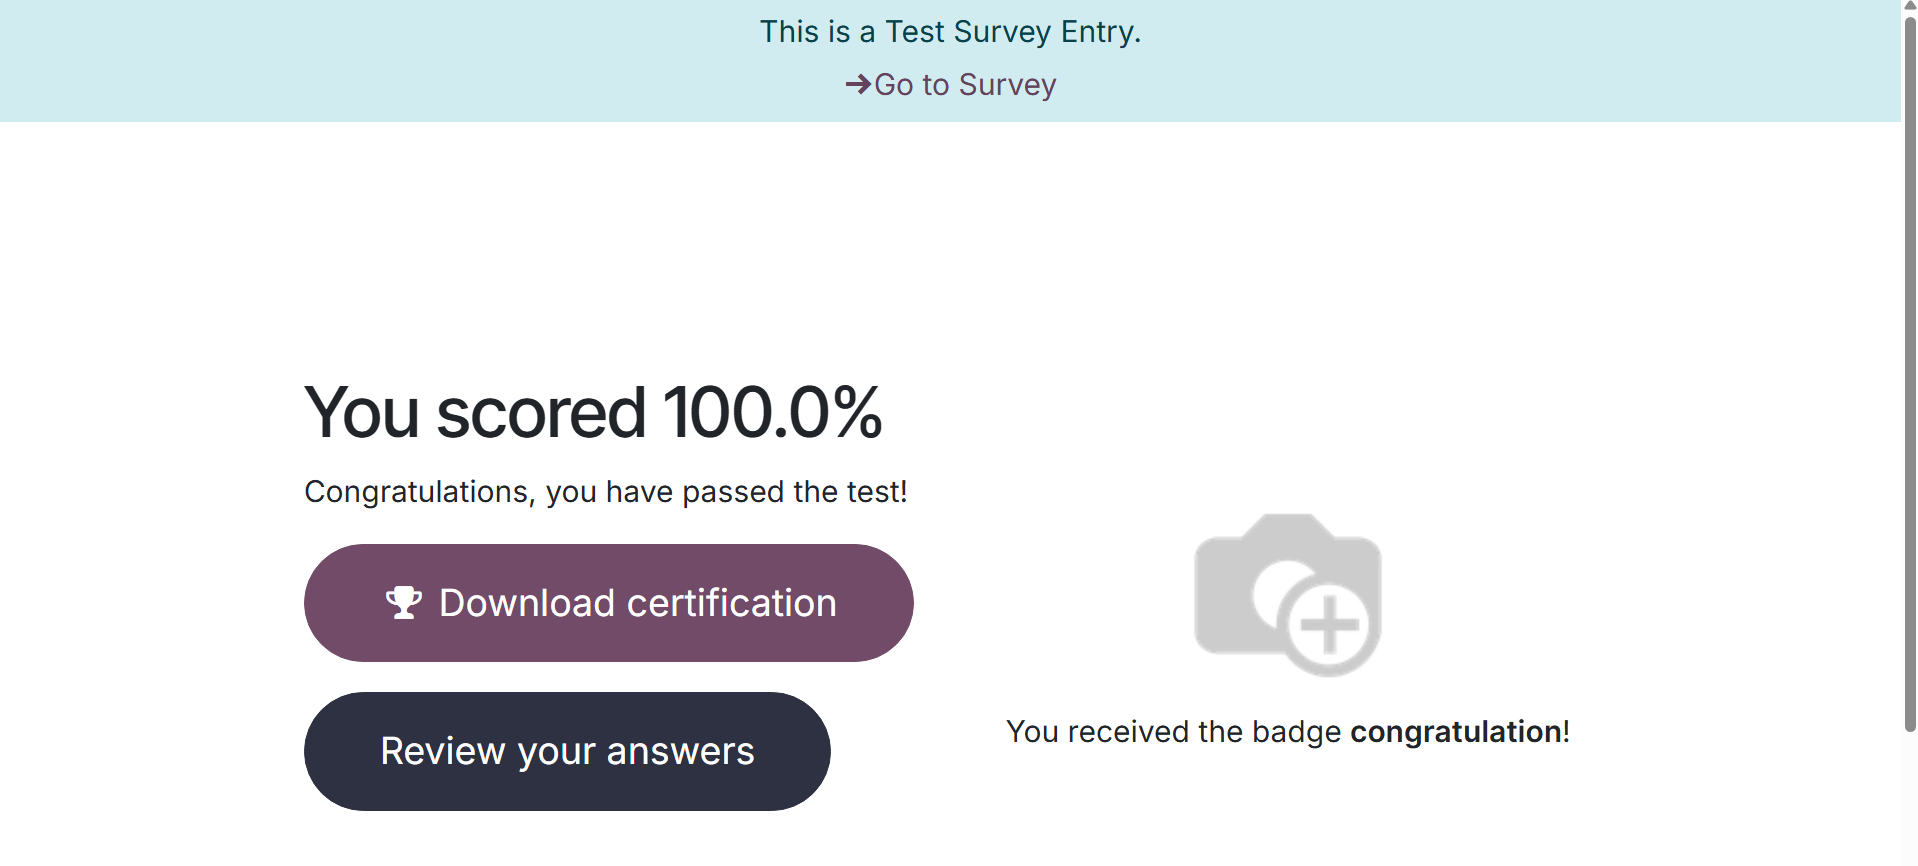
On selecting the option, you can
download the certificate, as
in the screenshot below.
To tell others about the survey,
click the Share button. This
will help you send an email
invitation to the target
audience.
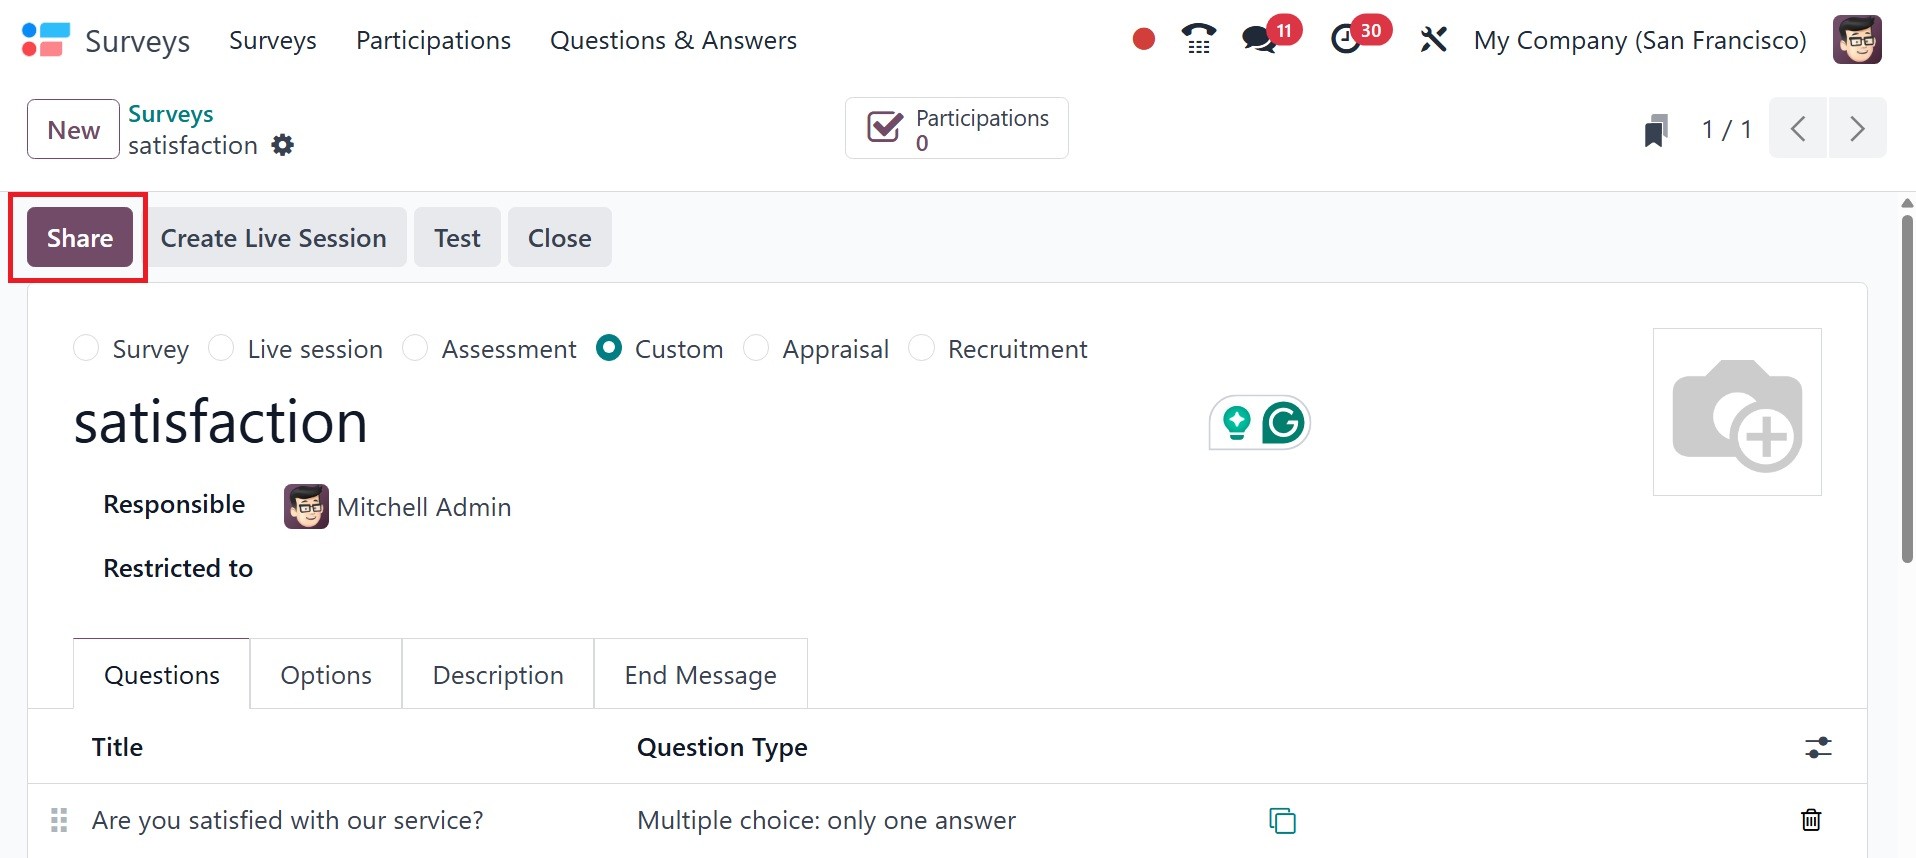
An invitation will appear in a
pop-up window by default.
After adding the recipients'
names to the email body, just
click the Send button to send
the invitation.
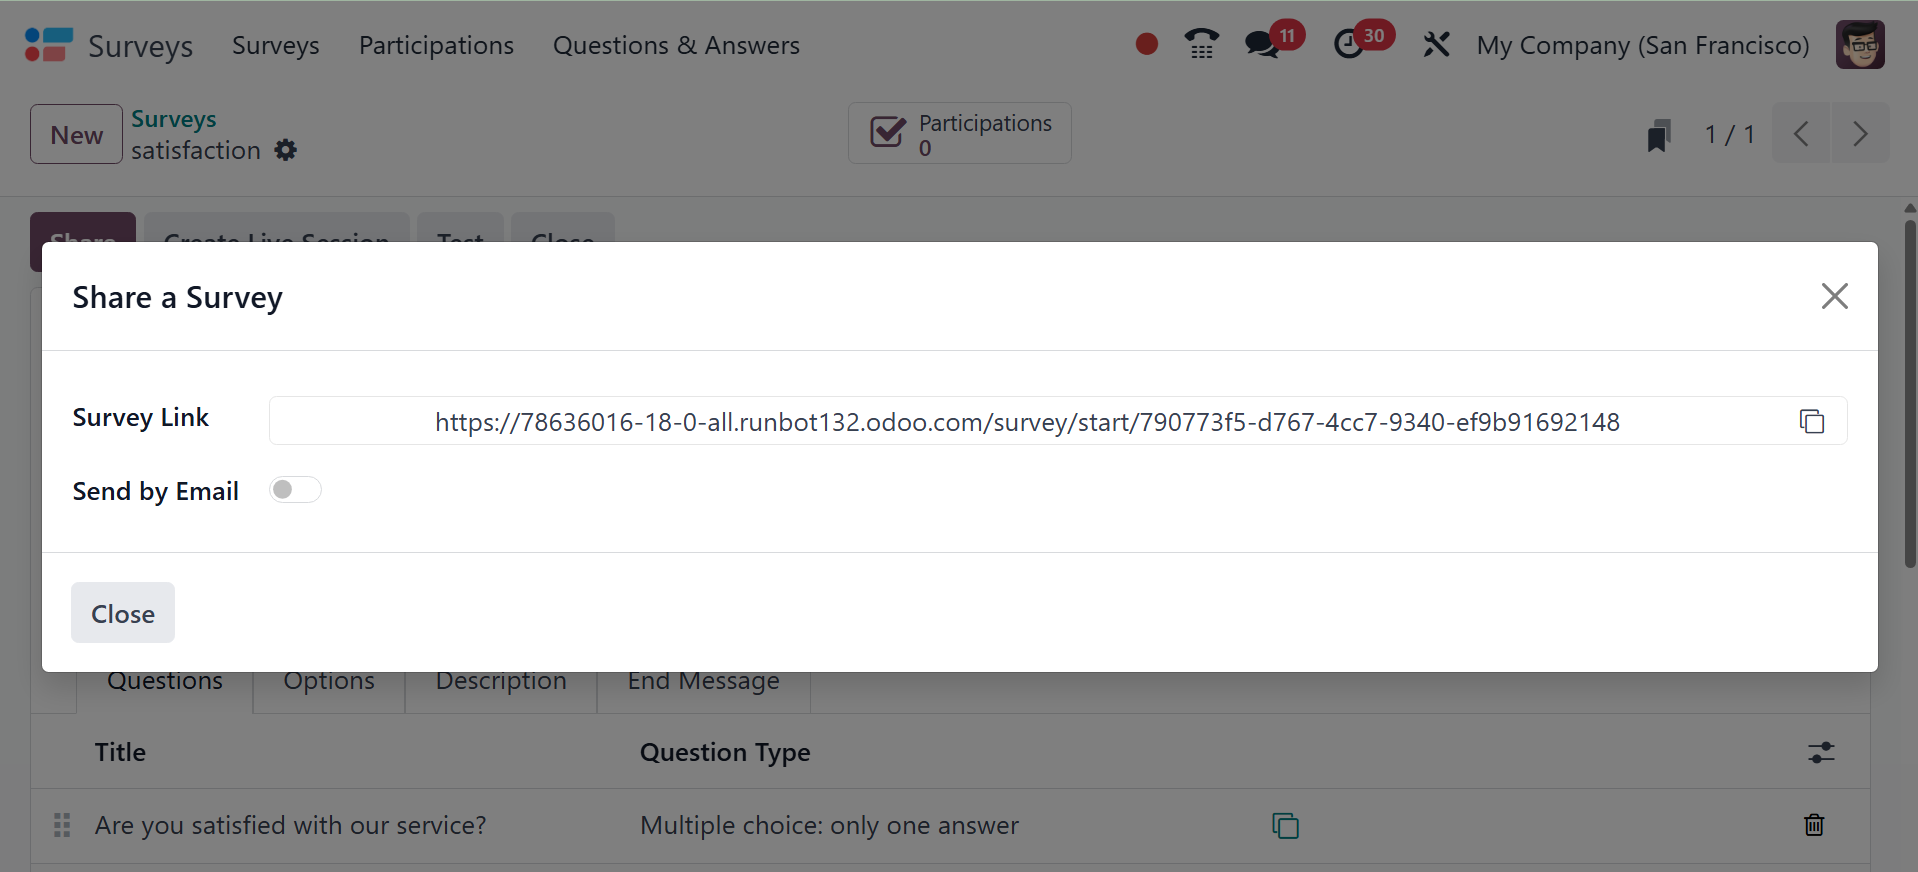
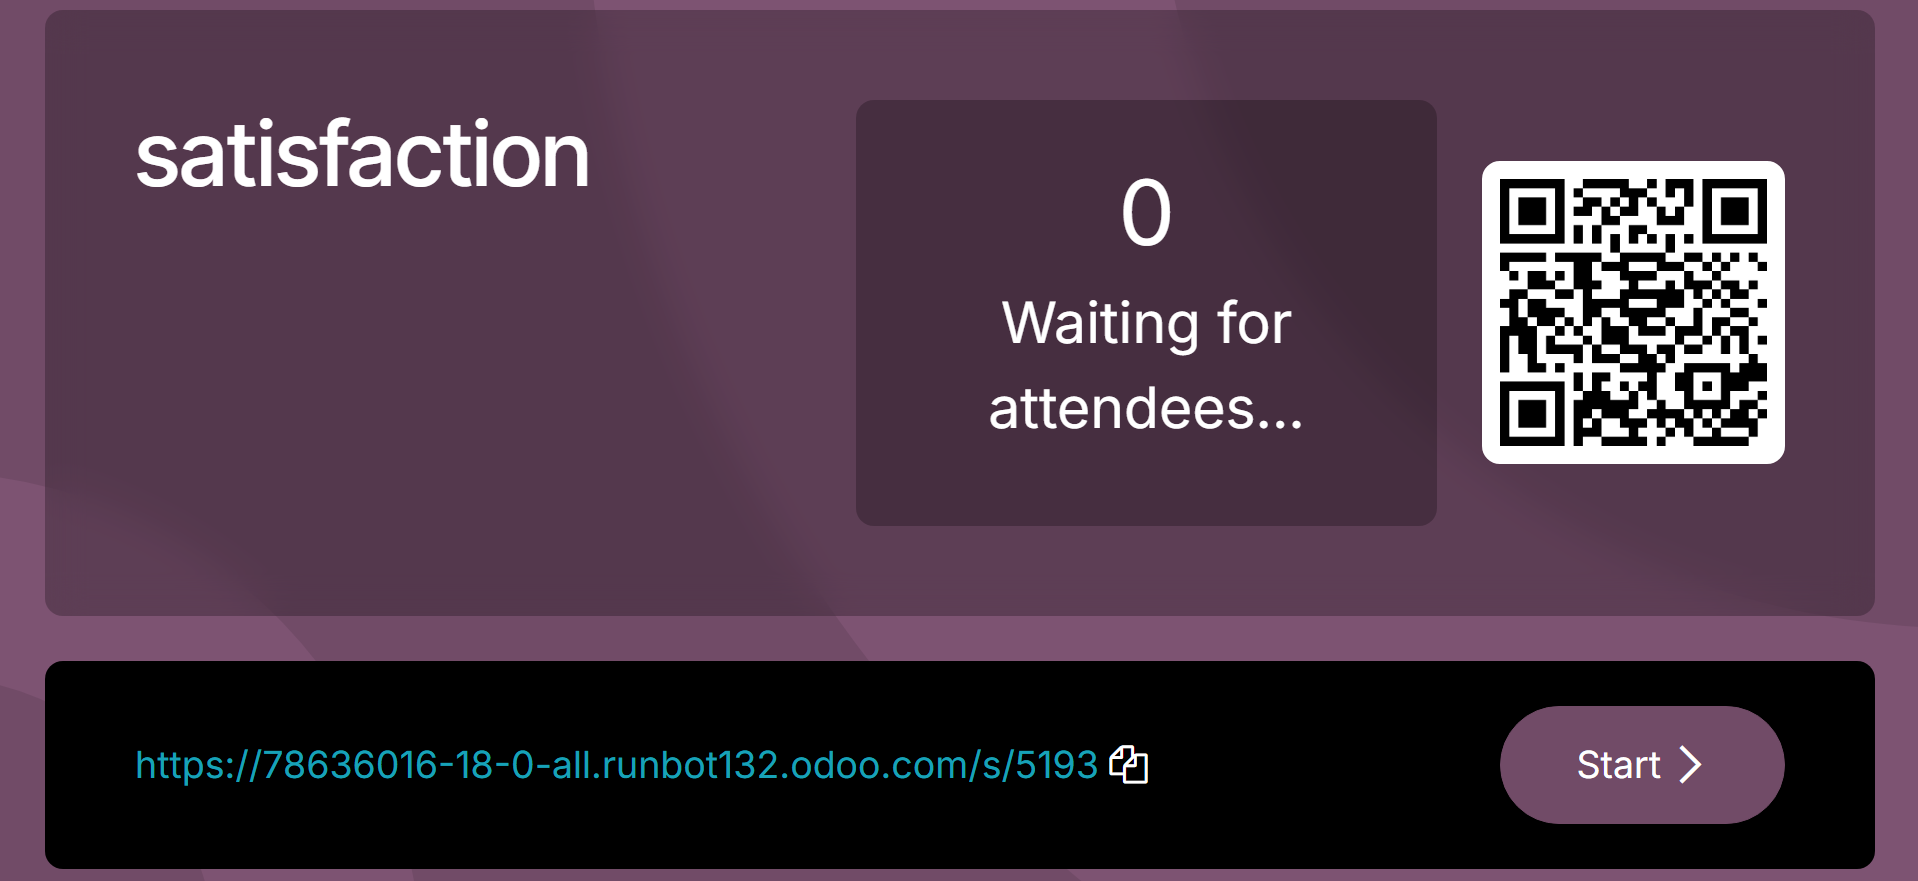
To start a live session for this
survey, click the Create Live
Session button.
As soon as the invited
participants show up for the
live session, you start the
survey.
By selecting the Close Live
Session option in the
backend, you can terminate
the survey's live session.
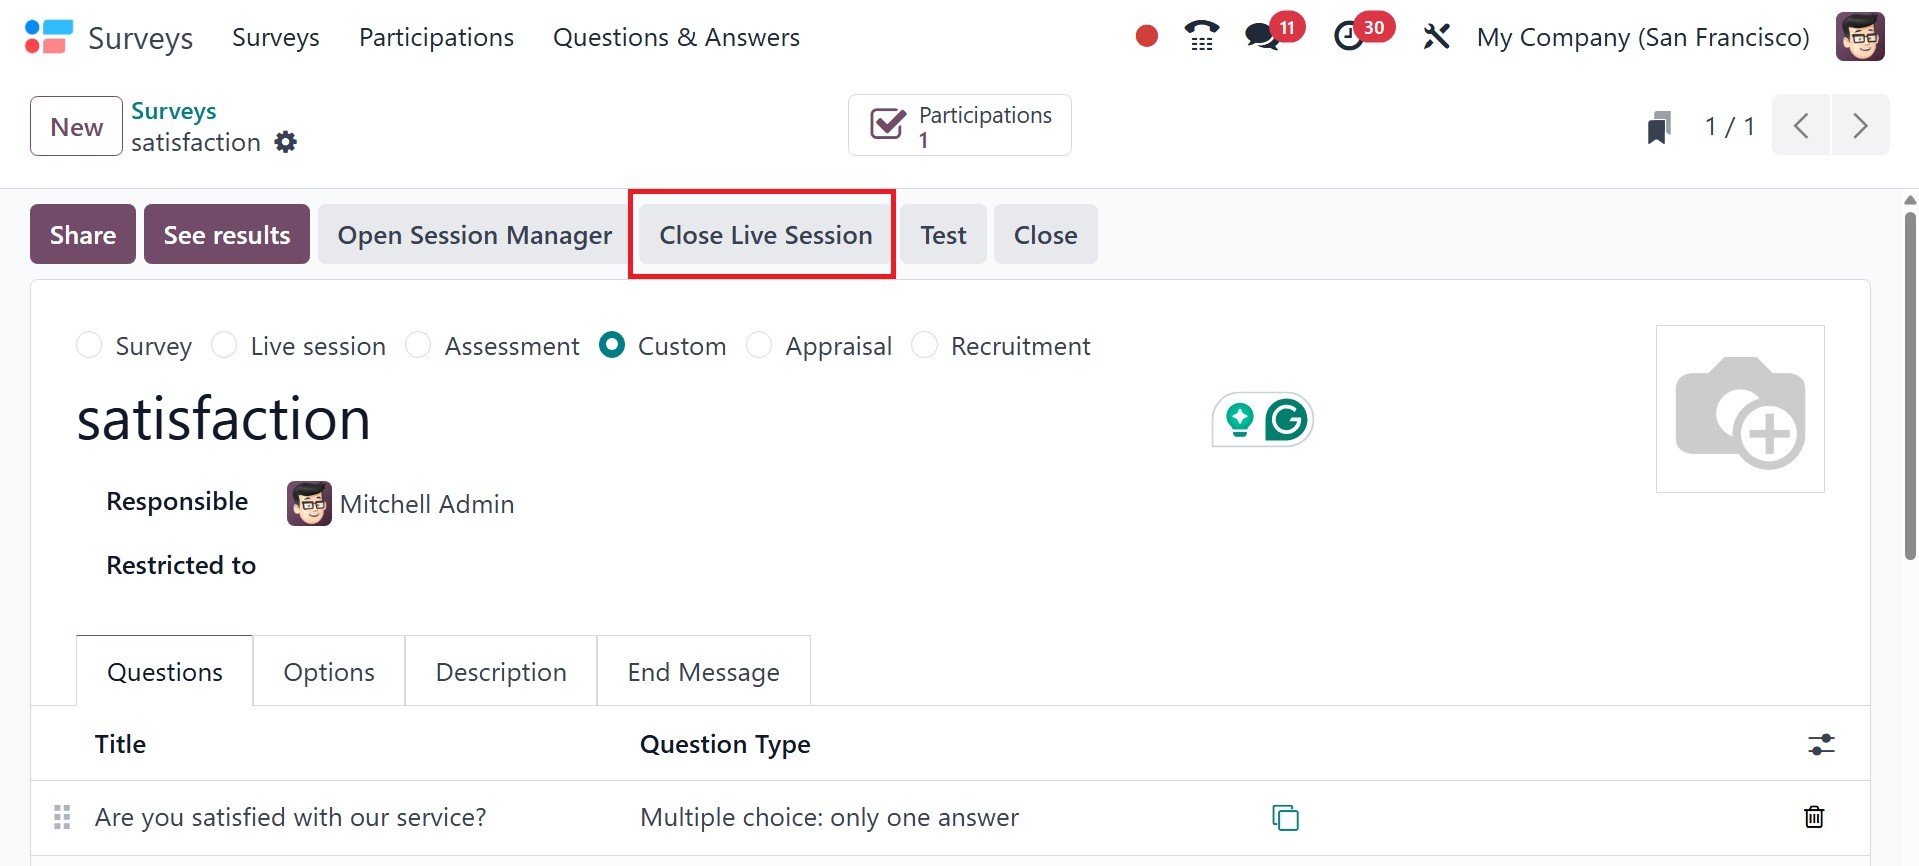
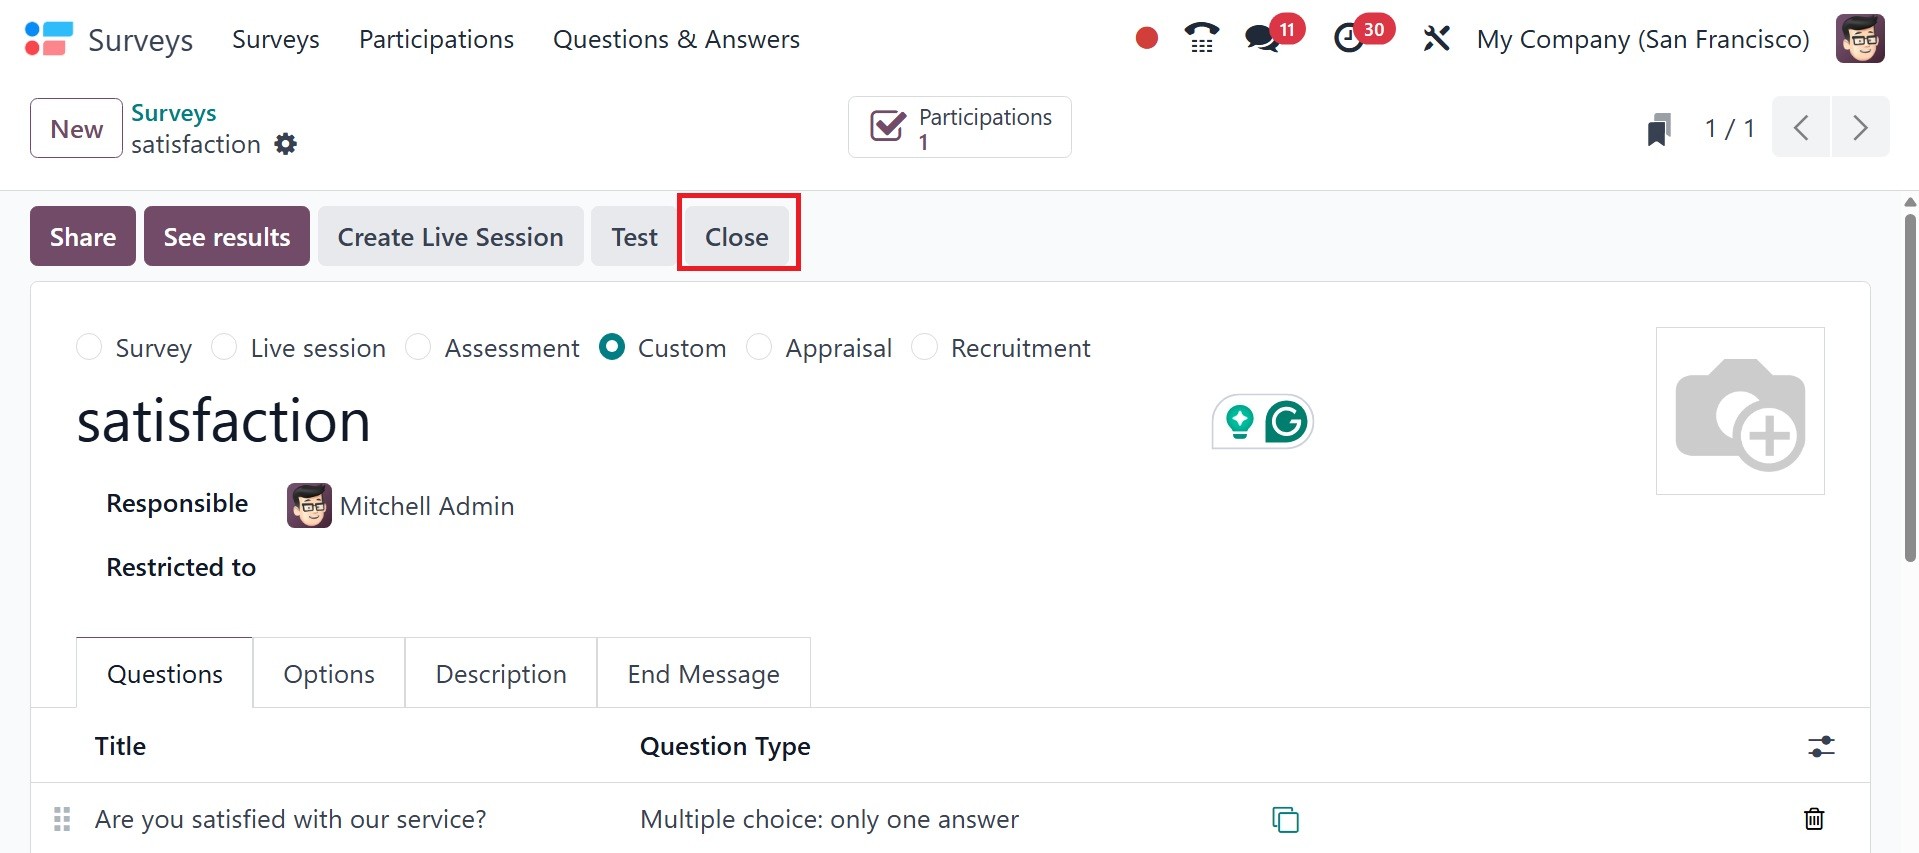
The survey can be canceled by
clicking the Close button.
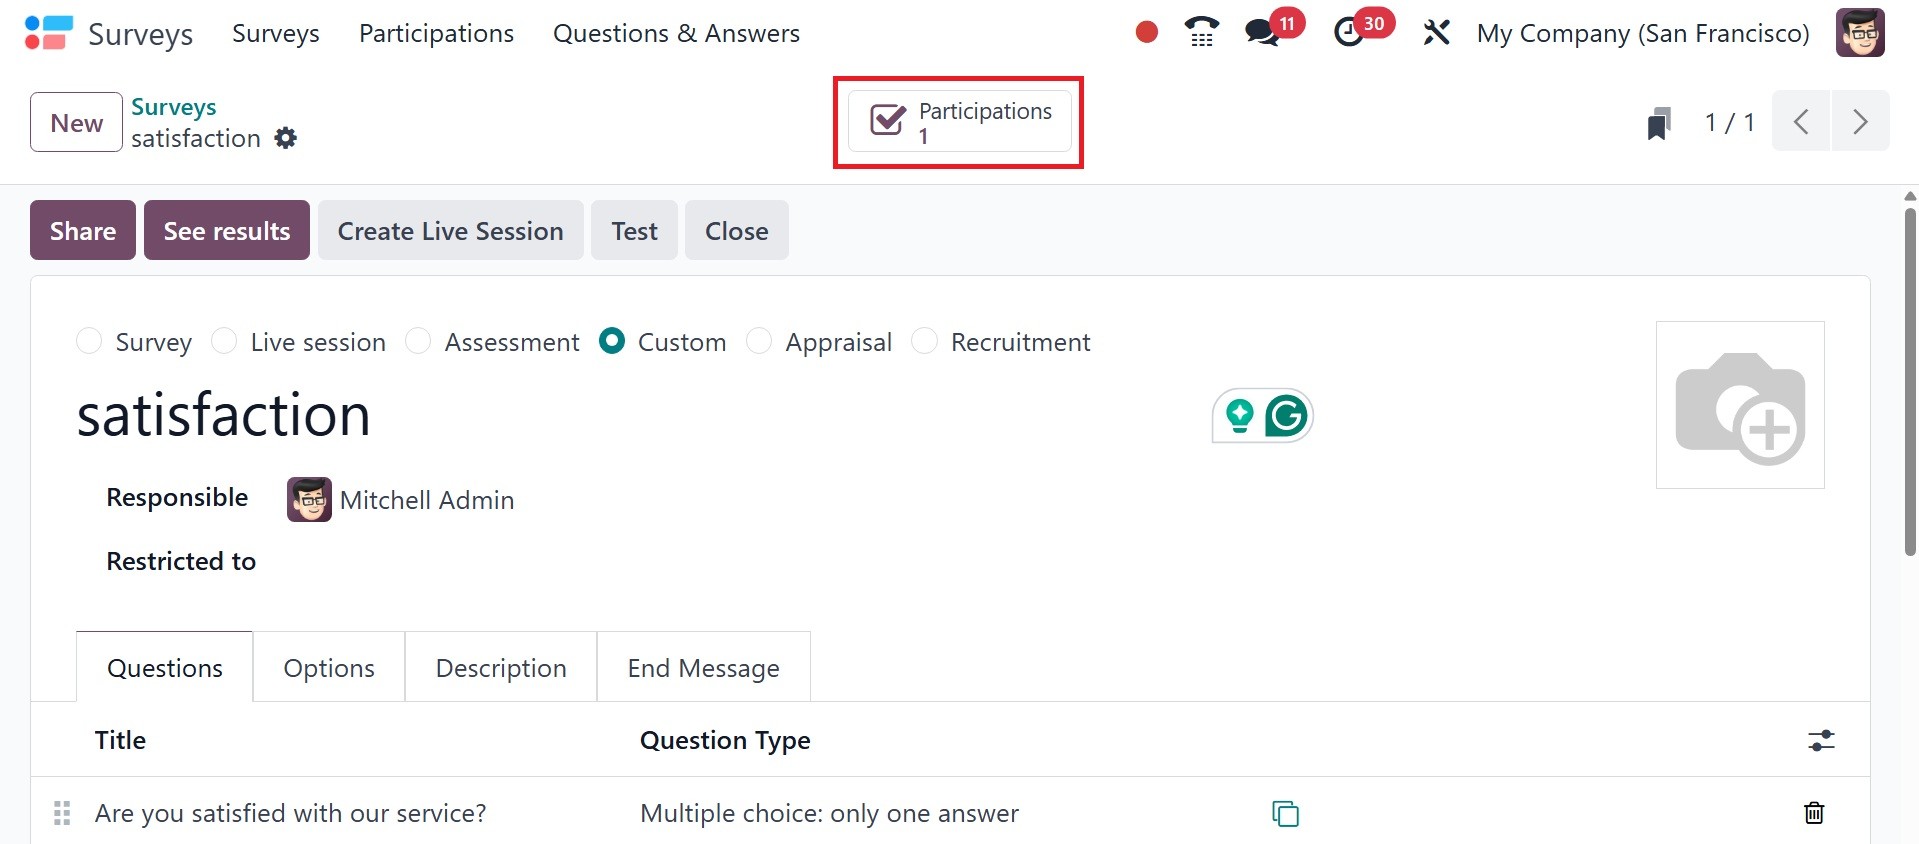
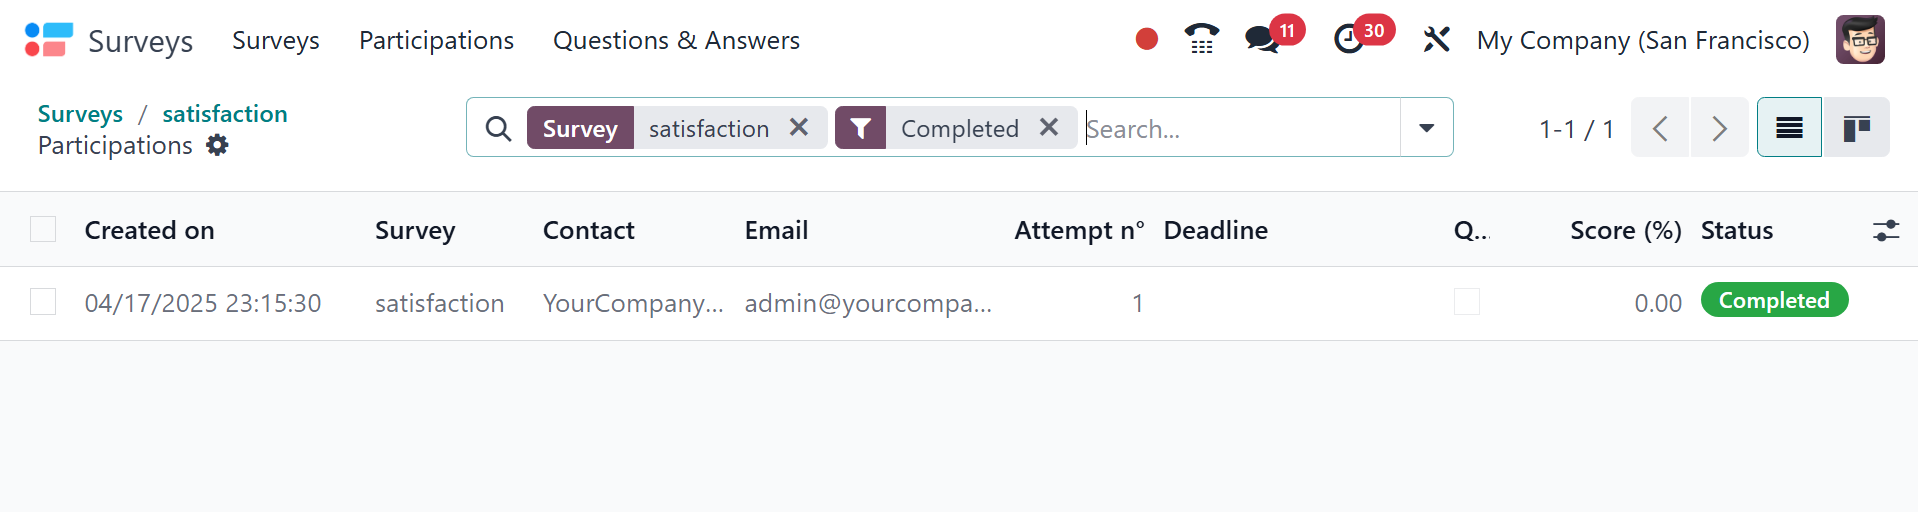
Responses from attendees will be
stored in the Participation
smart button, as shown in the
screenshot that goes with it.
This platform's list view shows
the survey's Created on,
Deadline, Partner, Email,
Number of Attempts, Status,
Quiz Passed, and Score. You
can select a survey from this
list to learn more about the
answers each participant
gave.
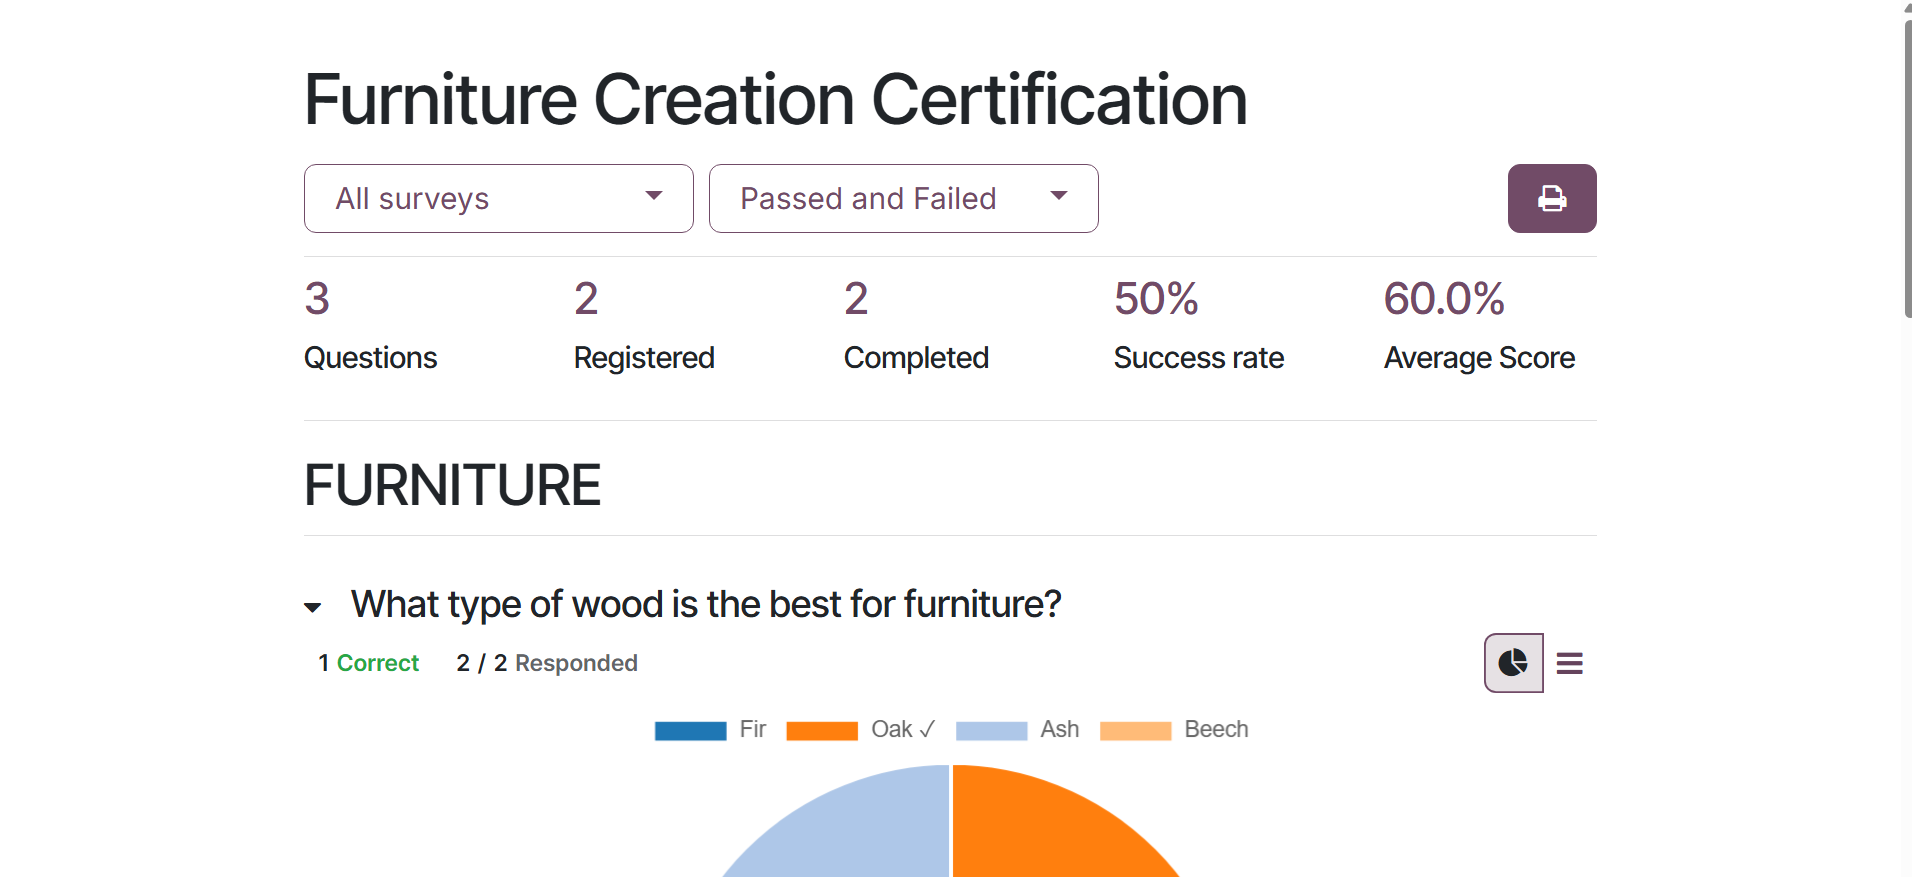
The See Results option allows you
to generate survey reports.
A new window containing the
details of user answers for
each issue will open, as seen
below. You can see how many
people answered and skipped
each question in this window.
The Action menu contains the
options to archive,
duplicate, and remove the
survey.