Management Options
One of the most vital and significant elements is the oversight of an organization's accounting function. If your financial operation is not correctly managed with care and attention, it will become a headache. Implementing suitable management controls and processes is so essential. The best Odoo18 software offers ample management and regulation capabilities, which is really beneficial for efficient accounting-related procedures. You can easily set everything up thanks to its state-of-the-art features and tools.
All of the business's financial duties can be managed using this specialised Odoo18 Accounting application. The platform's well crafted management capabilities have the power to fundamentally alter how a business handles its money. The following section provides a detailed analysis of the management choices accessible in the Accounting module's Configuration tab.
Asset Models
Effective asset management is essential to every organization's operation. It entails managing a business's financial, tangible, and intangible assets to optimize their value and efficacy. It comprises monitoring the assets' use and upkeep, adopting proactive measures to reduce associated risks, and ensuring that they are replaced as soon as necessary. Businesses can utilise asset management to make informed decisions about how to manage their current resources and where to invest in new ones. Effective asset management can help companies reduce expenses, reduce liabilities, and promote long-term growth.
You may create depreciation entries and manage your company's fixed assets with the help of the Asset Models in the Odoo 18 Accounting module setup. It allows you to calculate depreciation, track asset costs, and generate financial reports. This feature allows you to manage and monitor each asset's insurance, maintenance, and other pertinent data. It also helps in tracking the costs of assets and the associated depreciation over the length of their useful lifetimes. The asset models also provide a way to monitor the asset's current book value and its value over time. Reports detailing the asset's current value and historical performance can also be produced using asset models.
he Odoo18 Accounting module allows for the definition of the following asset models:
- Fixed assets: Physical objects with long-term value that a business employs frequently are known as fixed assets. Some examples include land, buildings, furnishings, and equipment.
- Depreciation: Depreciation causes assets to lose value over time. This can be done using a variety of depreciation methods, such as straight lines, declining balances, and based on the number of days in a period.
- Leasing: You may lease assets from a third-party vendor.
- Intangible Assets: Intangible assets include non-physical assets including trademarks, copyrights, and patents. These assets are shown as assets that will gradually lose value on the balance sheet.
- Impaired:An asset is considered impaired when its fair value declines. Numerous factors, such as competing dynamics, market conditions, or technological obsolescence, could be to blame for this. The impairment must be shown in the financial statements.
The Asset Models feature in Odoo18 allows you to determine the guidelines for how assets are managed and tracked. This feature allows you to configure an asset's value, depreciation rate, and depreciation calculation method. Additionally, users can build up specific depreciation rules for individual asset types, such as different rates for one asset type and different calculation methods for another. As a result, Odoo18 offers more options for asset management and maintains accurate and up-to-date data.
The main objective of the asset models feature is to provide an organisation with an easy way to track and manage its assets. The unique Odoo18 Accounting module frames the asset management procedures with the help of the Assets Models menu, which can be accessed via the Management part of the Configuration tab of the module.
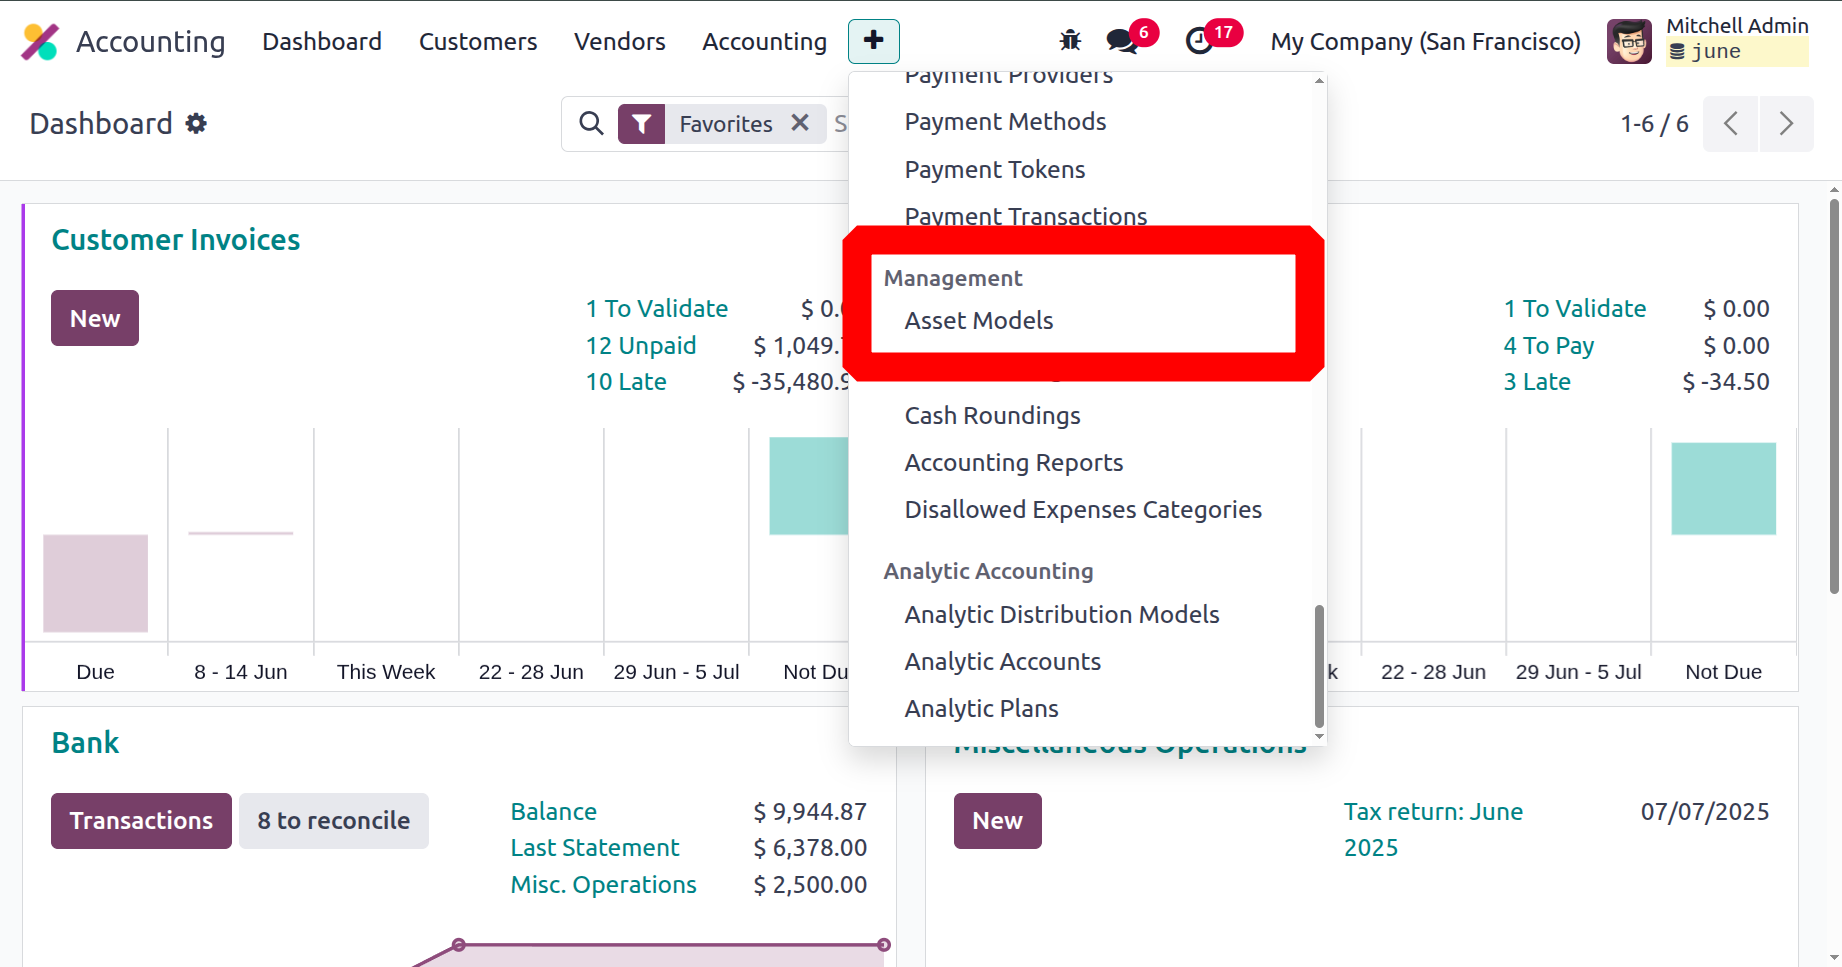
This menu will take you to the Assets page. As seen in the screenshot below, you can view all of the asset models that are currently in use on this page, along with details about each one, including the Asset Name, Fixed Asset Account, Depreciation Account, Method, Number of Depreciations, and Period duration.

To explore a previously configured asset model in greater detail, select it. The interface's Filter, Group By, and Search features can be used to locate and group the appropriate asset model from the complete list. The new Asset model can be created by choosing NEW. Below is a screenshot of the creation form.
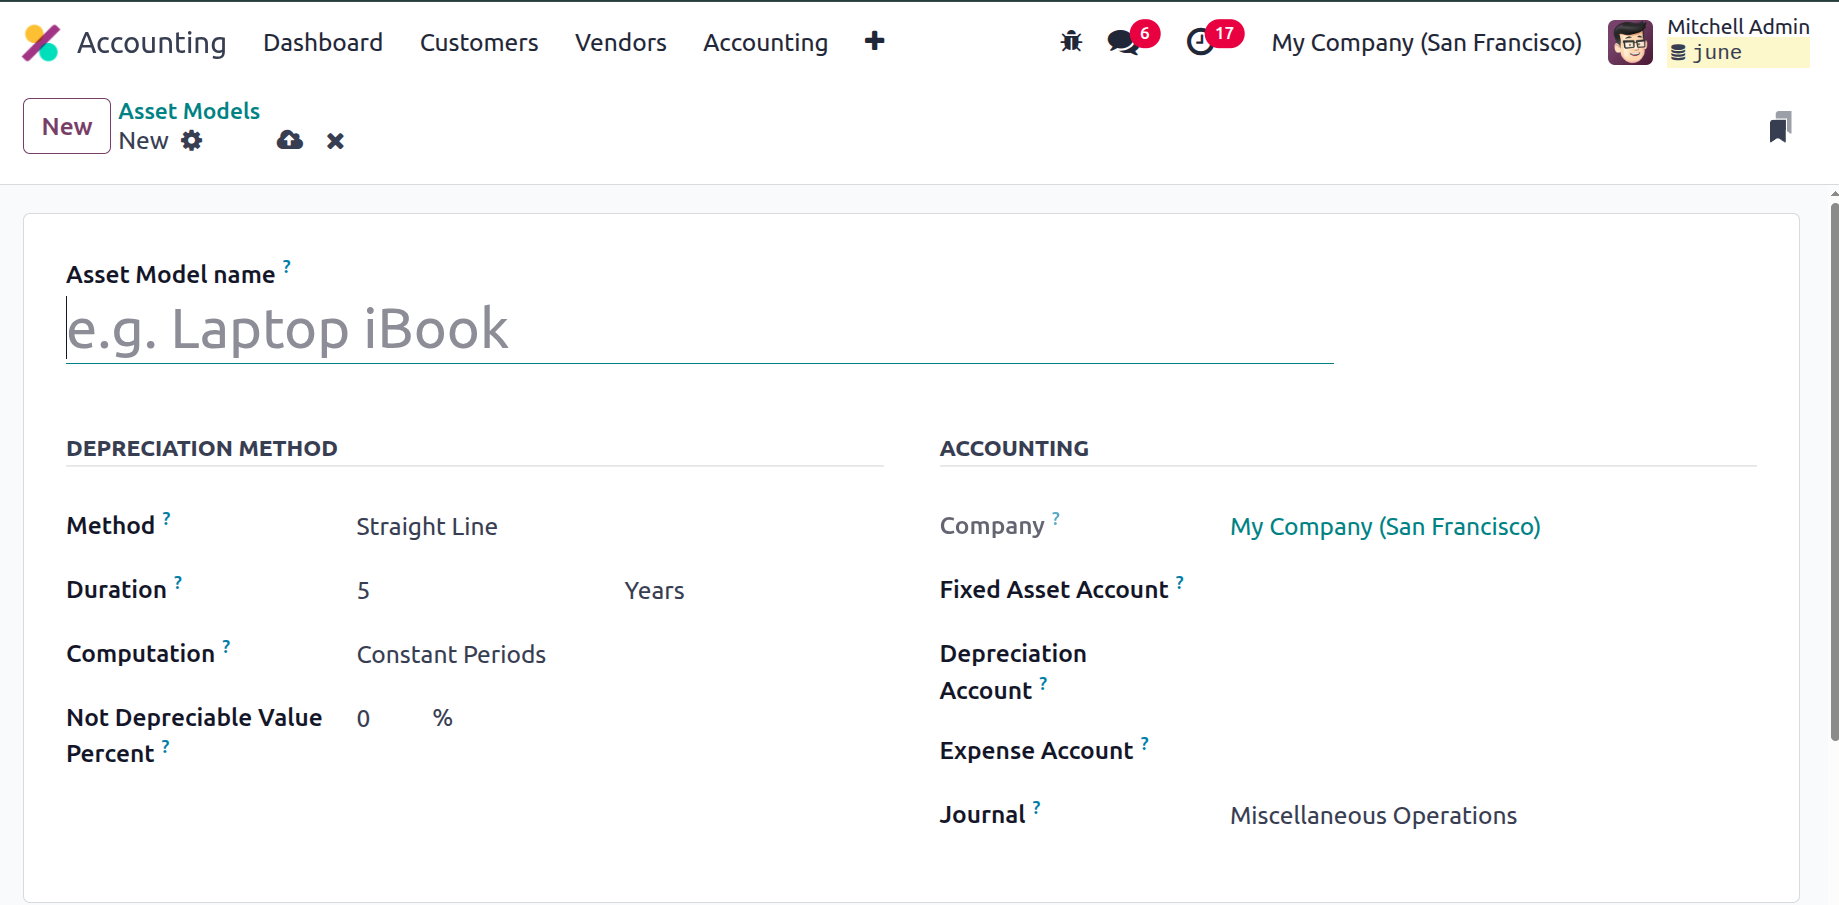
To define a new asset model, type its name into the Asset Model name field. You can then configure its functioning components in the appropriate fields. The DEPRECIATION METHOD section displays a few fields to determine depreciation features. You can choose the best approach to employ to figure out how many depreciation lines to use. Declining, Declining then Straight Line, or just Straight Line are some ways to characterise it. When you choose the straight line, the Gross Value/Duration will be calculated. In the event of a decline, it will be decided by the residual value. Lastly, a decrease followed by a straight line with a declining trend will yield a minimal depreciation value equal to the straight line value.
The Duration box can then be used to assign the number of depreciations needed to depreciate your asset depending on either years or months.
Values entered in the computation area will determine whether the depreciation calculation is based on "No Prorata," "Constant Periods," or "Based on Days Per Period." If there is no protara, the depreciation period will start at the start of the fiscal year and the asset's acquisition date will not be considered. When the computation is set to "Constant Periods," the purchase date or prorata date is used to calculate the depreciation board. Every day for every period, the depreciation board will be determined using the third calculation method, "Based on days per period." Initially, it will compute the daily depreciation throughout the full term. A monthly or annual (duration frequency) depreciation board will be computed based on the daily depreciation.
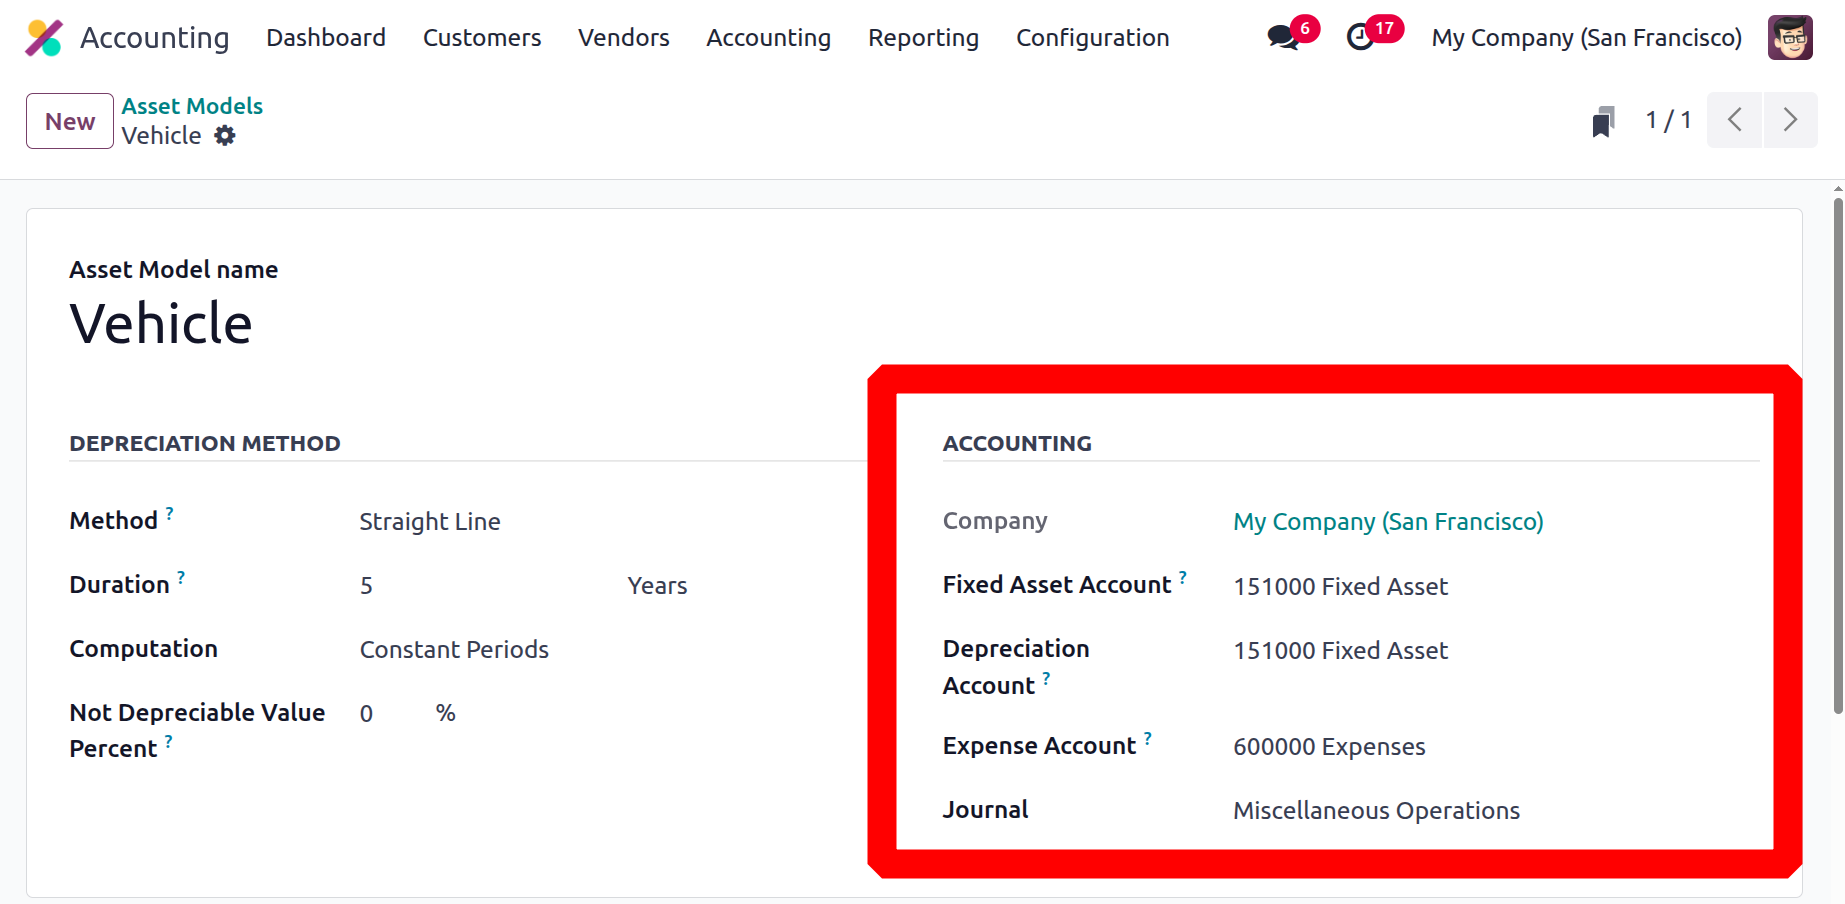
In a similar manner, the Company field in the Accounting section of the Asset models creation window allows you to specify the Company associated operation. The field will be assigned automatically by the system. You can designate the account that was used to record the asset's original purchase price in the Fixed Asset Account section. After that, you can choose the Depreciation Account, which is the account used in the depreciation entries to lower the asset value. It is also possible to define the Expense Account, which is the account used in periodic entries to record a portion of the asset as an expense. Finally, you can choose a journal in the Journal section. Here, dropdown options display every account and journal that we have previously configured on the platform, allowing you to choose the one you require.
After you've entered all the required data, the system will store the updated Asset model. You can now add followers to this particular Asset model by choosing the Follow option at the bottom left. As can be seen in the figure below, the system also provides the Knowledge Article Search option and the Attachment option.
Using the Follow feature, you may monitor the asset model's progress and receive notifications if something changes. The Attachment option allows you to contribute papers, images, and other kinds of resources that are pertinent to the asset model. Users can search the Odoo 18 Knowledge Base for relevant articles that could be useful while creating an asset model thanks to a new feature added to the Odoo 18 edition. As seen in the figure below, the Send Message, Log note, and Activities options are located in the lower left corner of the creation form.
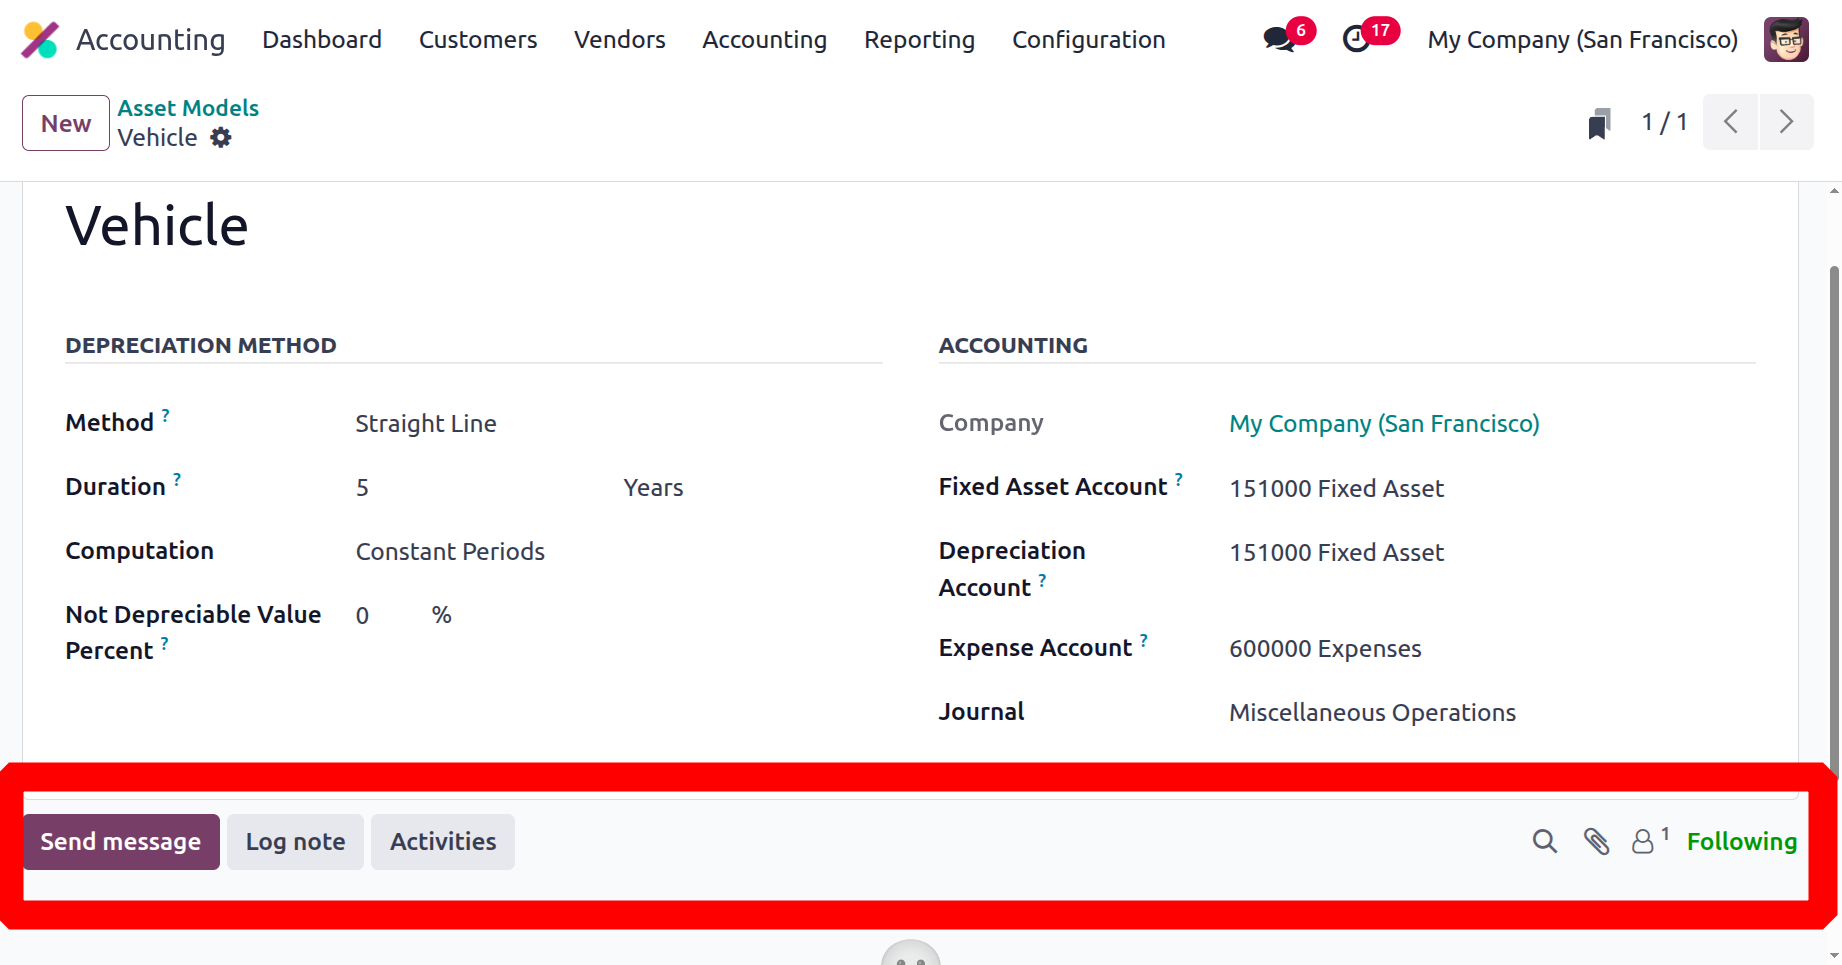
The transmit messages option allows you to send data to the asset model's recipients. The Log note option will record all changes made to the asset model, while the Activities menu allows you to plan an activity with the followers about the asset model. This option allows you to add, view, and monitor actions related to the asset model.
Based on our conclusions regarding the Asset Management option that is already included in Odoo18 Accounting, we can learn more about the Product Categories feature.
Product Categories
Product Categories in business software are useful for managing and organising large volumes of inventory. It facilitates the identification, ordering, and reporting of items and aids in the creation of a productive product tracking system. Keeping a well-organised inventory of goods and commodities can also help ensure that customers are presented items that are pertinent to them. Product categories can also help businesses spot trends in the way customers buy. The Odoo 18 Accounting module has a feature called Product Categories that helps users better arrange and control the items in their inventory. Product categories can be used to group items together, making it simple to locate them in the inventory.
Product Categories also lets you establish different pricing criteria for each category, which makes it easier to set different rates for different types of products. Product categories can also be used to generate reports that give a summary of products and their sales performance. Dividing your financial data across multiple product categories is made easy by this feature. You may easily group your products into different categories and see the related financial information. This capability can also be used to forecast and budget by product category and evaluate the performance of each in relation to industry norms. You may also monitor the profitability of each product category and analyse how pricing strategies impact overall performance.
The Configuration tab in the Management section of the Odoo 18 Accounting module has the Products Categories menu. This option allows you to easily access the Product Categories window.
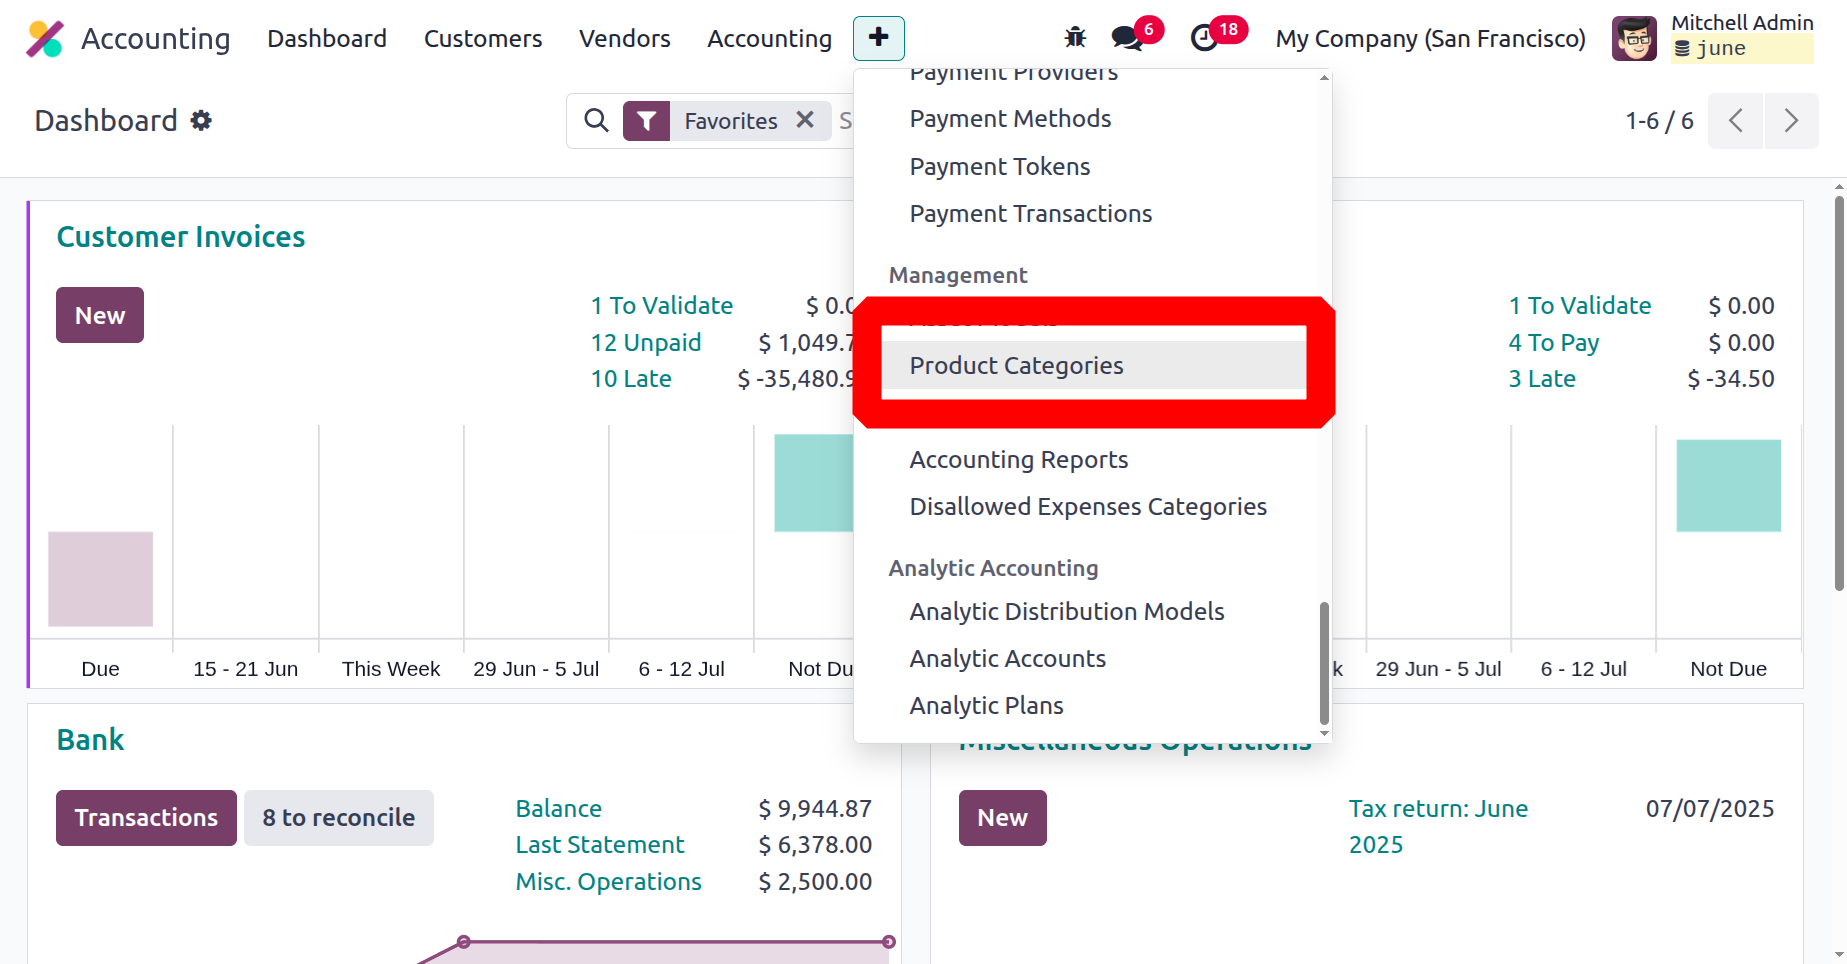
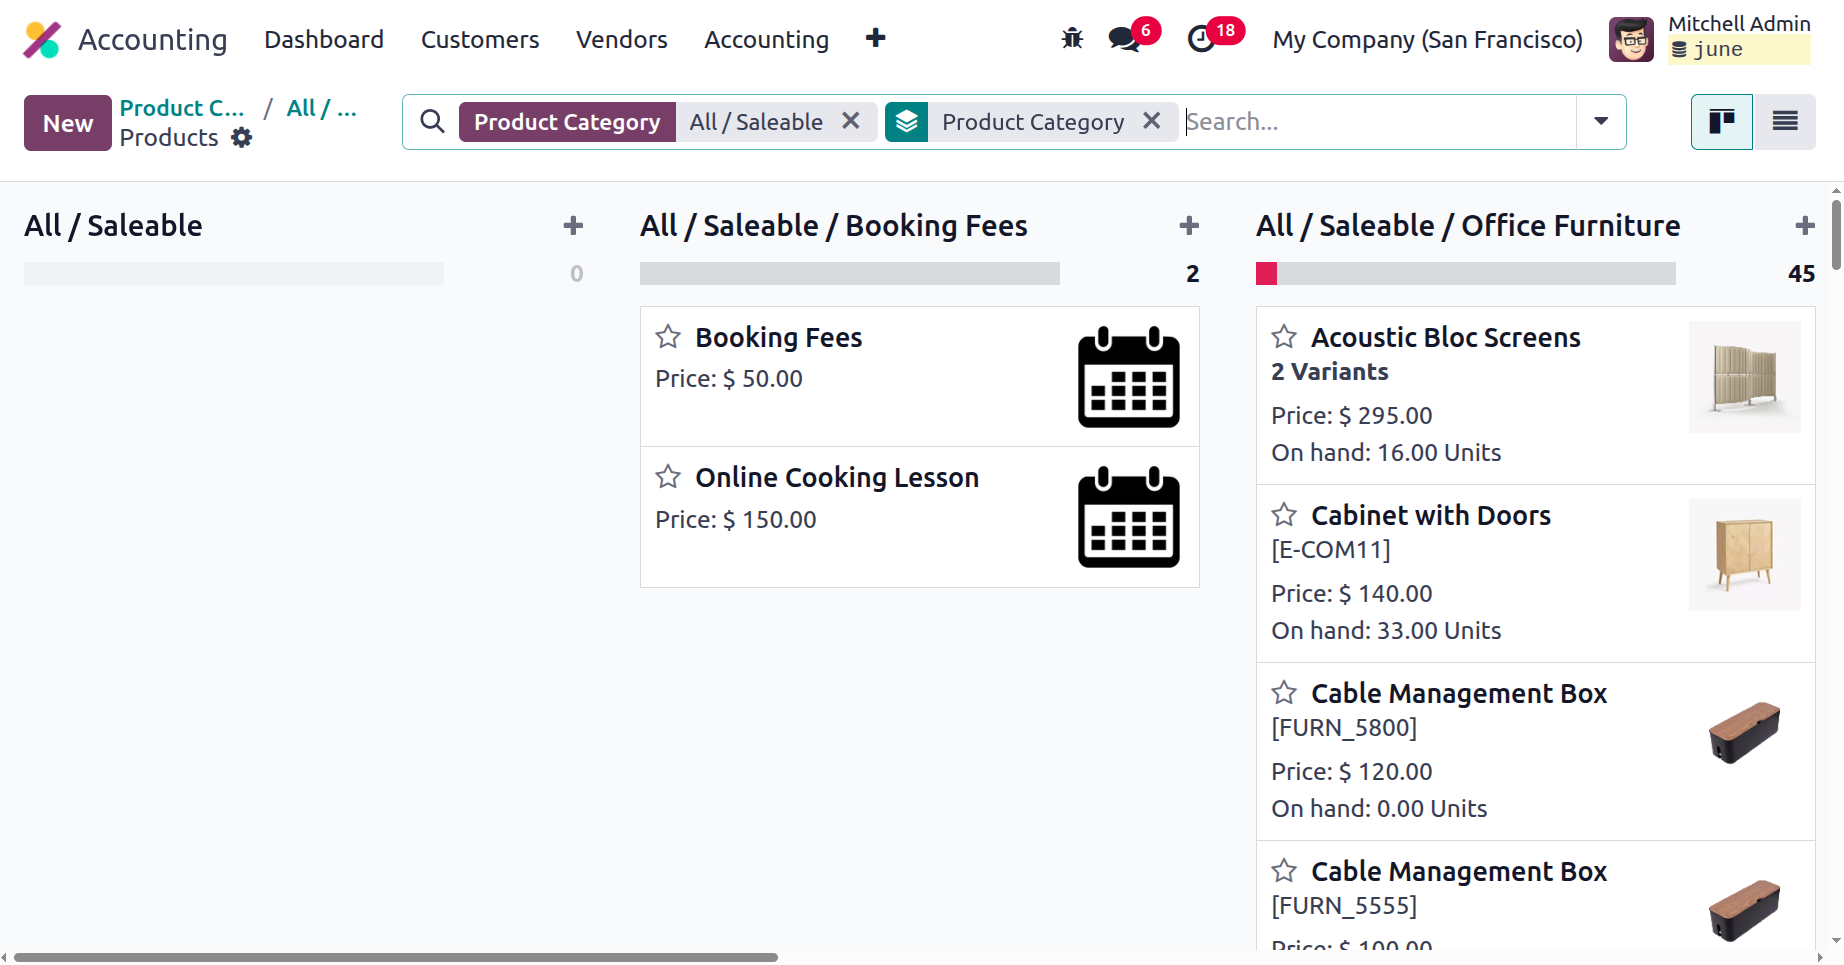
As seen in the example below, the window will maintain a list of every entry for previously specified categories. Using the Filters and Group By tools, you can easily locate and organise the product category you require. Any of the established categories are available for you to select from, examine in depth, and modify the records as needed. You can also add a new Product category by using the NEW button.
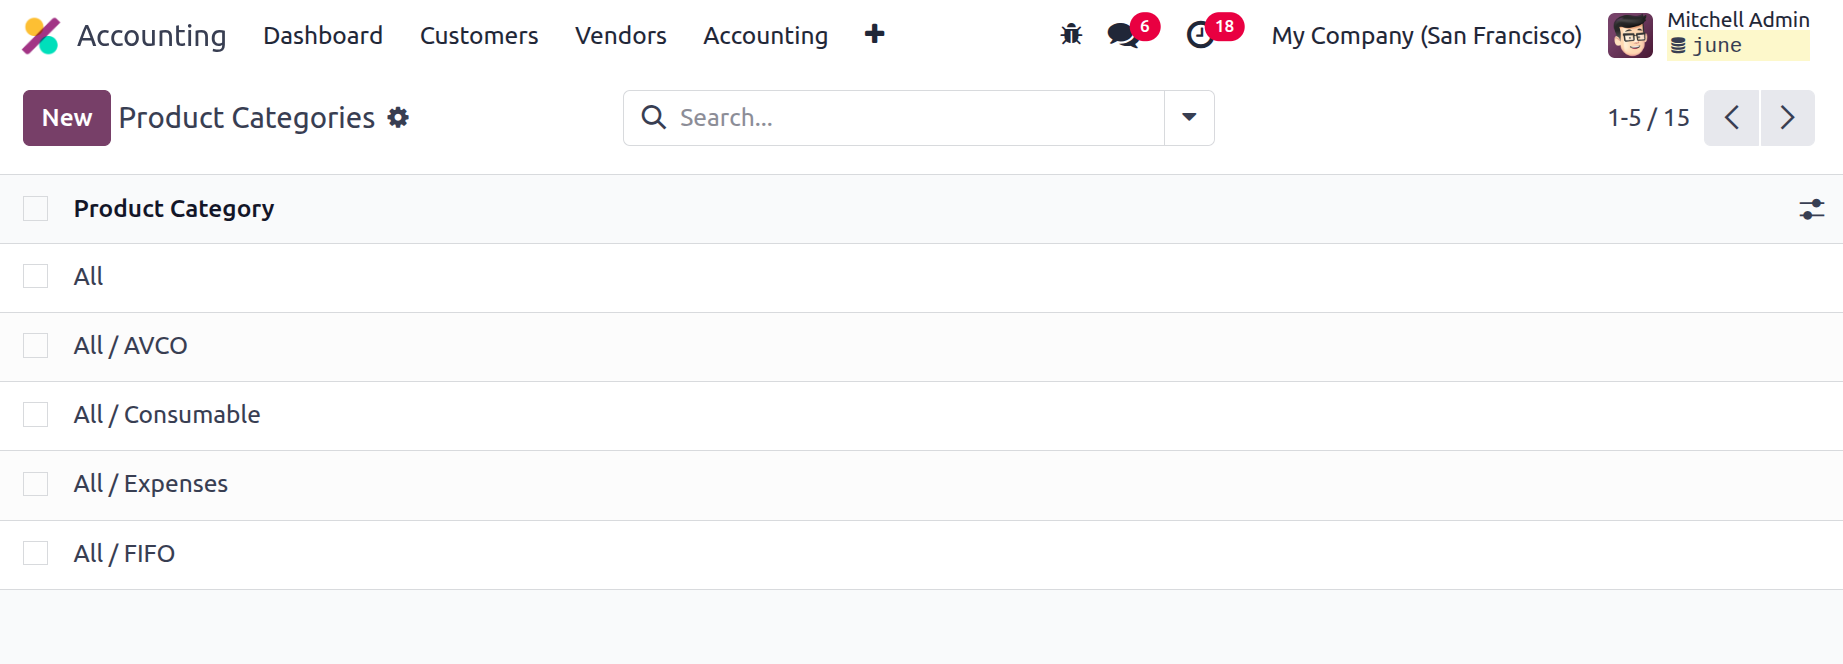
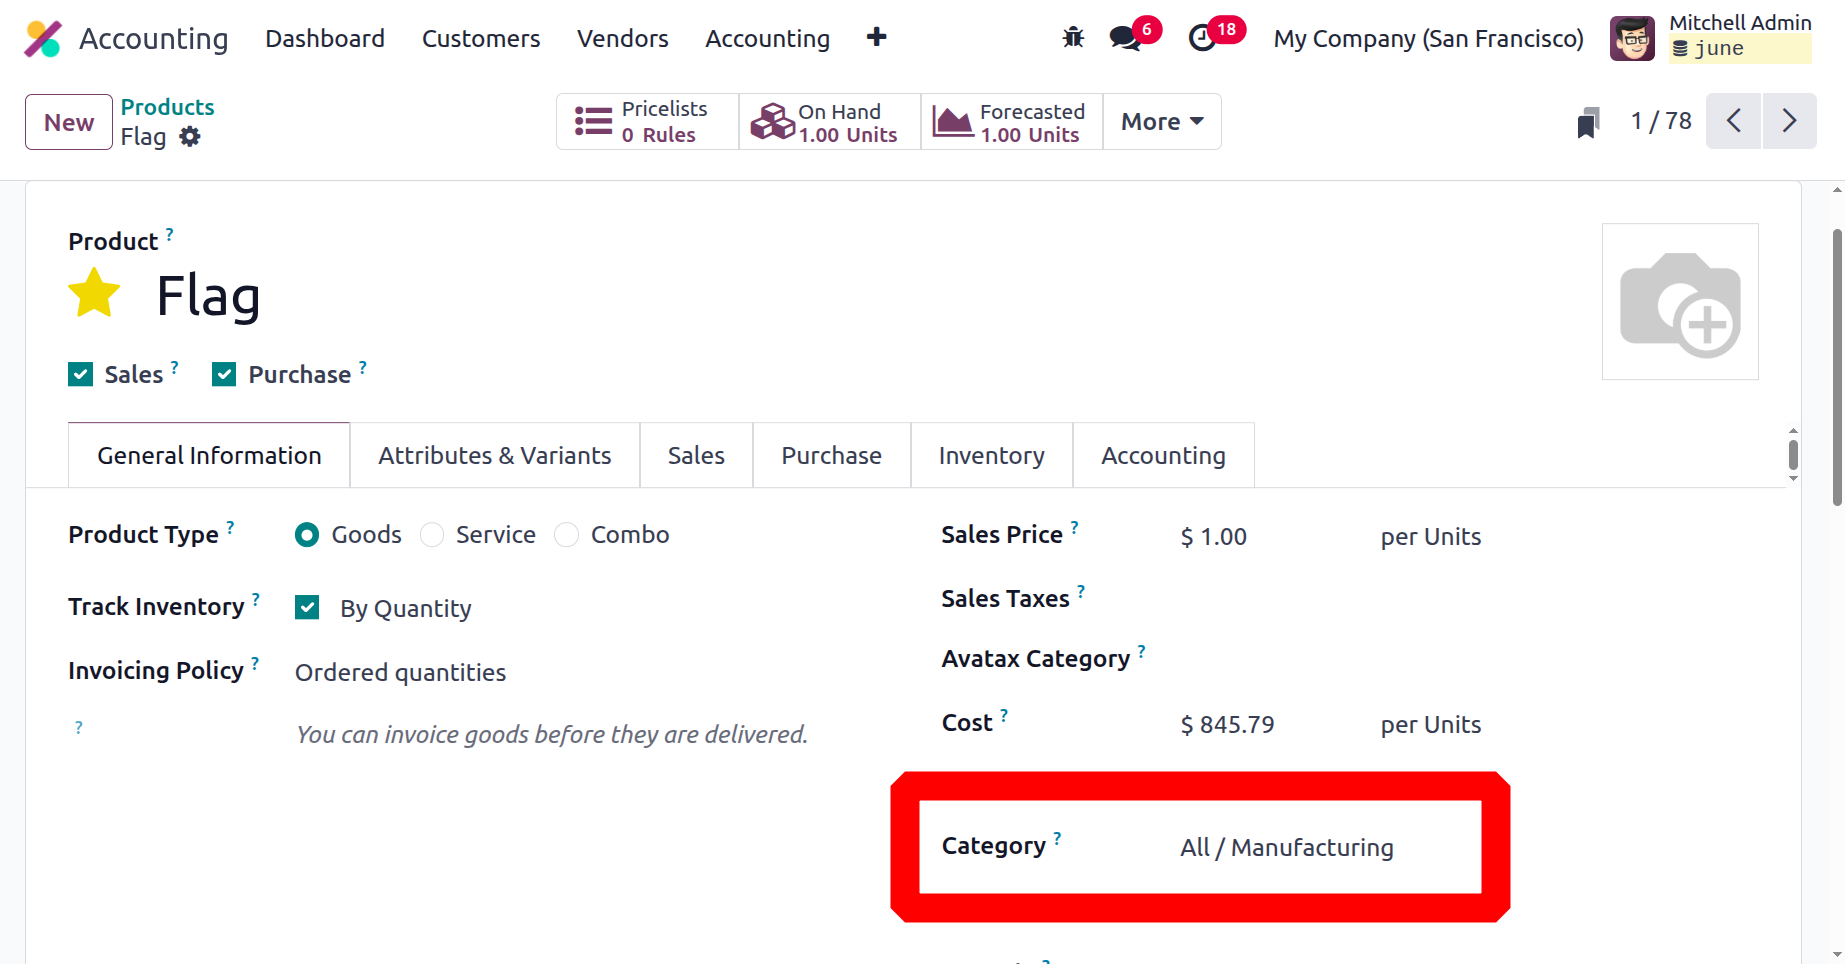
Initially, you can input the category name in the Product Categories creation form's Category section. The Ava tax category and the Parent category can then be assigned. Similarly, you can construct fields related to ACCOUNT PROPERTIES, such the Expense Account and the Income Account, by defining a new field or choosing one from a dropdown menu. All profits from this product category will be tracked by the revenue account, and all associated costs will be tracked by the expense account.
In the LOGISTICS section, the "Force Removal Strategy" for the Routes and Reserve Packaging can be covered. The dropdown menu in the Force Removal method column allows you to choose a certain removal technique. In that instance, the removal approach will be applied for this product category, independent of the source's location. Among the numerous removal methods that Odoo18 suggests are:
- FIFO (First In First Out): If you wish to sell the item that was stocked first, you can employ the First In First Out strategy. The first lots of things that were stocked will then be taken out. This approach is used when goods need to be used or sold in the same order as they were made or acquired. This method is commonly used to organise product categories since it ensures that the oldest item is used up first.
- LIFO (Last In Last Out): The LIFO method may be applied when it is necessary to move the last-stocked item into the first position. This approach, which is the reverse of FIFO, is employed when things that are manufactured or purchased last are used first. This strategy works best when prices are rising and taxes need to be maintained low.
- Closest Location: If you select the closest location option, the products must be removed from the nearest storage facility first. When items need to be delivered to a customer, this is beneficial because it saves time and effort.
- Least Package: When the products are added to packages, then the least package will be removed from the location first.
- FEFO (First Expiry First Out): When a product has an expiration date, the last technique, FEFO, is used. Making sure that the products with the earliest expiration date are consumed first is very important. For goods with a short shelf life, such as food, medications, and other items, this is essential.
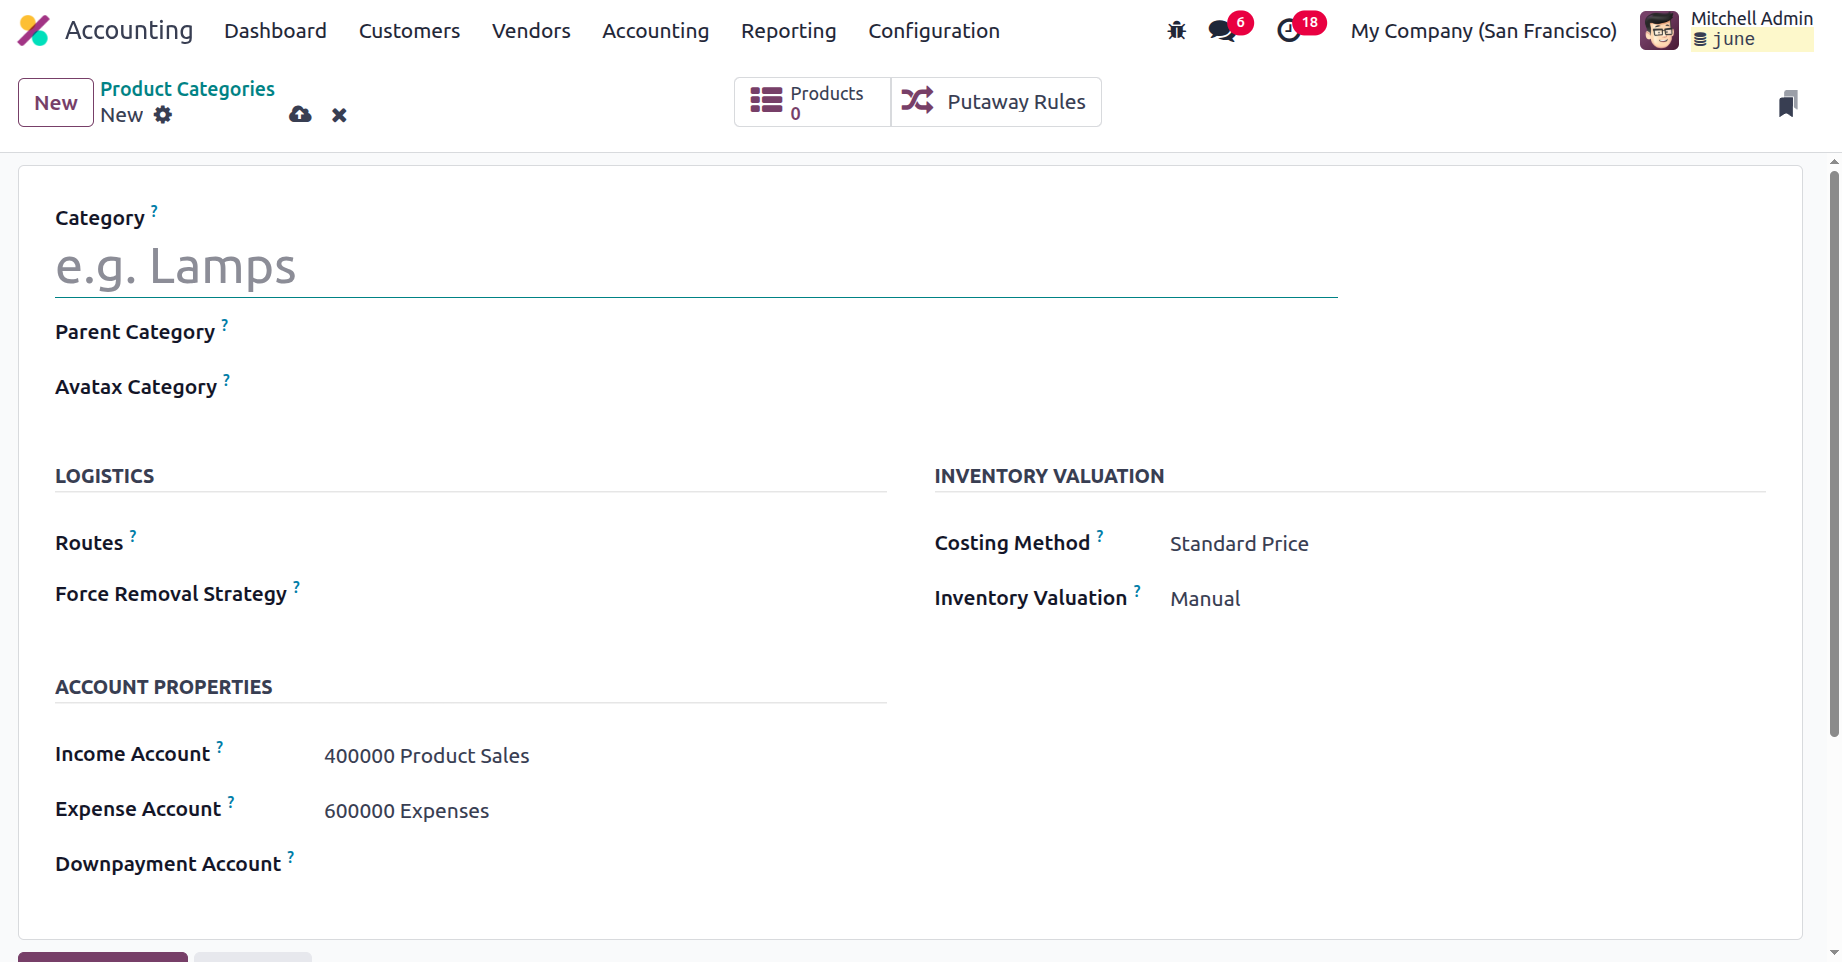
Additionally, the inventory valuation configuration options, such as Costing Method and Inventory Valuation, can be set up in the INVENTORY VALUATION section. The costing methodology is defined as either Standard Price, First In First Out (FIFO), or Average Cost (AVCO). The Standard Price option allows you to set a fixed cost per product, whereas FIFO and Average Cost are dynamic methods that rely on the product's purchase price and the quantity in stock. Average cost uses the purchase price of all available stock, whereas FIFO uses the price of the oldest stock.
The platform gives you the option to execute both manual and automated tasks, and the Inventory Valuation is carried out to verify how stock journals should be set for this particular category. Before beginning Automated Inventory Valuation, you must define the stock accounting attributes as needed under the ACCOUNT STOCK attributes section.
This area allows you to add the Stock Valuation Account, which will hold the current worth of the product when automatic inventory valuation is enabled. After that, the Stock Journal can be displayed. This stock notebook will be useful when inventory appraisal is automated. Stock movements will automatically result in entries being made in this account diary. You can specify the Stock Input Account to publish equal journal items for all incoming stock moves if there isn't a specific valuation account. The Stock Output Account, which tracks all stock movement, will be mentioned as you wrap up. If no special valuation account is used at the destination, this will be the default value for all products in this category. The accounting tools won't be available here until you select the Automatic Accounting option in the Settings.
Once all of these options have been filled out, you have successfully set a Product Category. In addition to all of the options, the window will display smart tabs in the top right corner, such as the Products and Putaway Rules tabs, as shown in the illustration below.
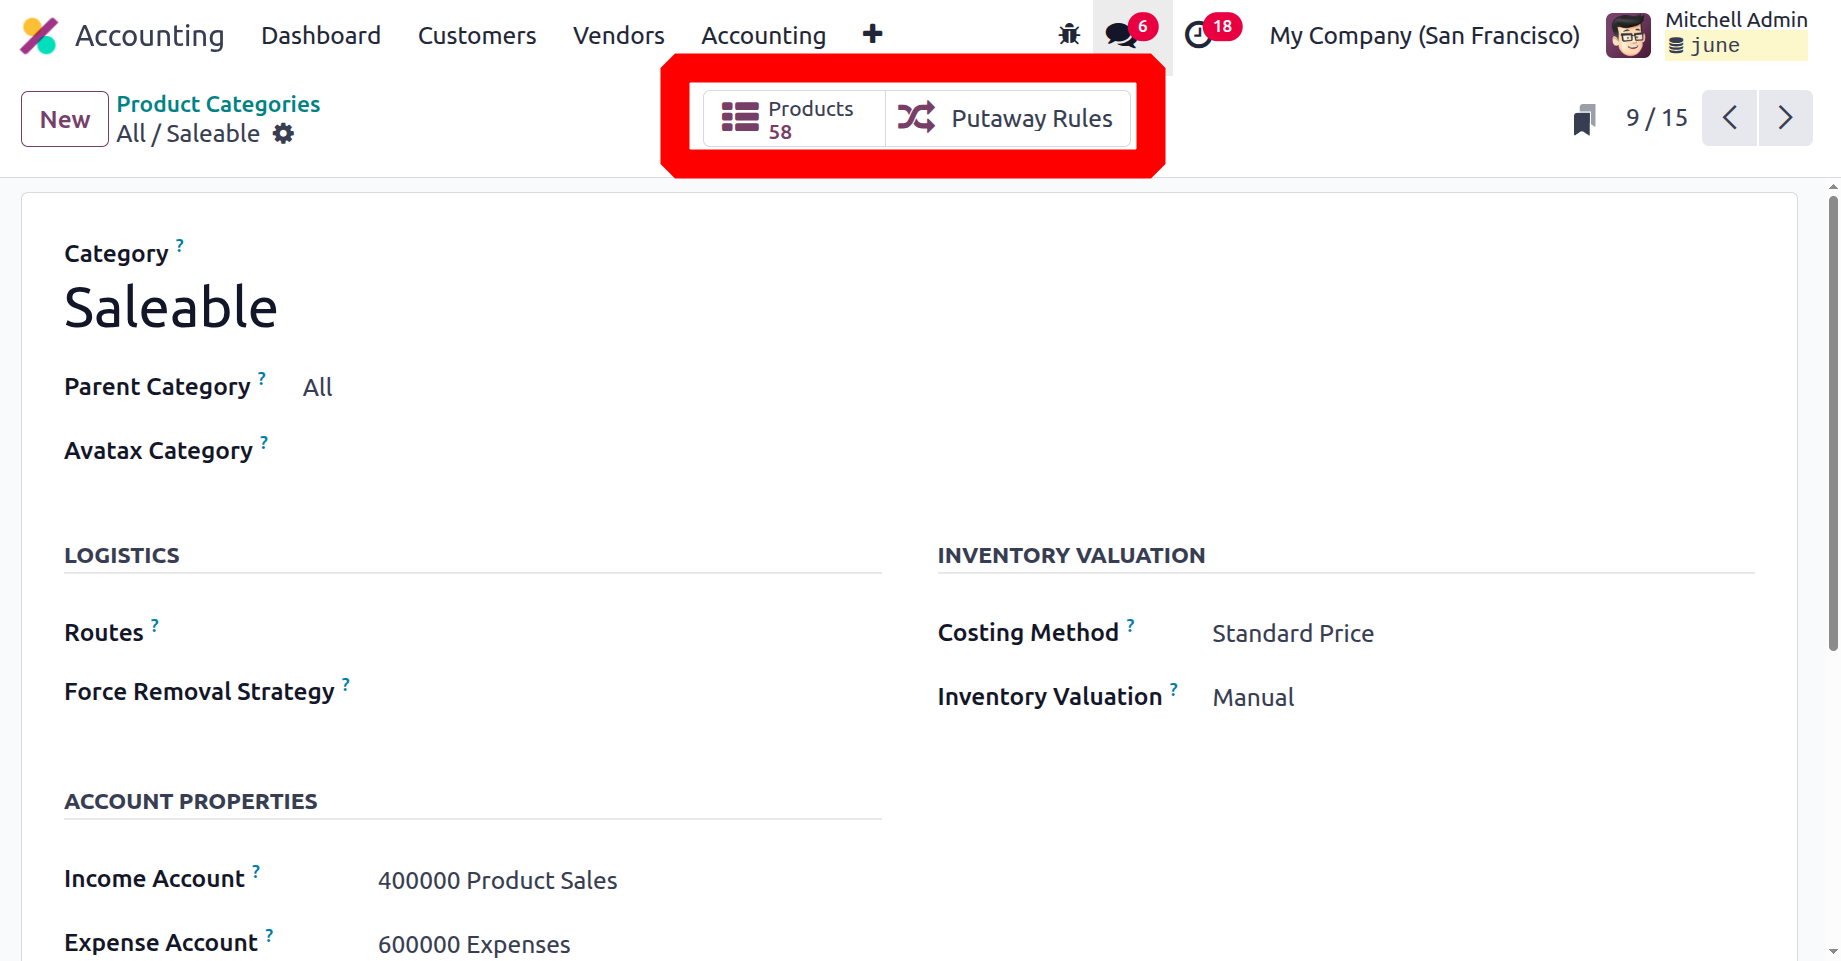
The product information in the product menu will be shown according to the various phases and the way the particular product category is constructed. If you remove the filters, you may also see all of the products that are being stored.
The category form's smart tab Putaway rule shows all of the putaway rules that have been specified for the product that belongs to that particular category. To ensure that all products falling under this category are removed from the warehouse in compliance with the designated removal strategy, define the routes and removal strategy under Logistics.
It is simple to add the generated product category to the product.
Now that we have a clear understanding of how to configure Product Categories in the Odoo18 Accounting module, let's proceed to the next section, which discusses Cash Roundings configurations.
Cash Roundings
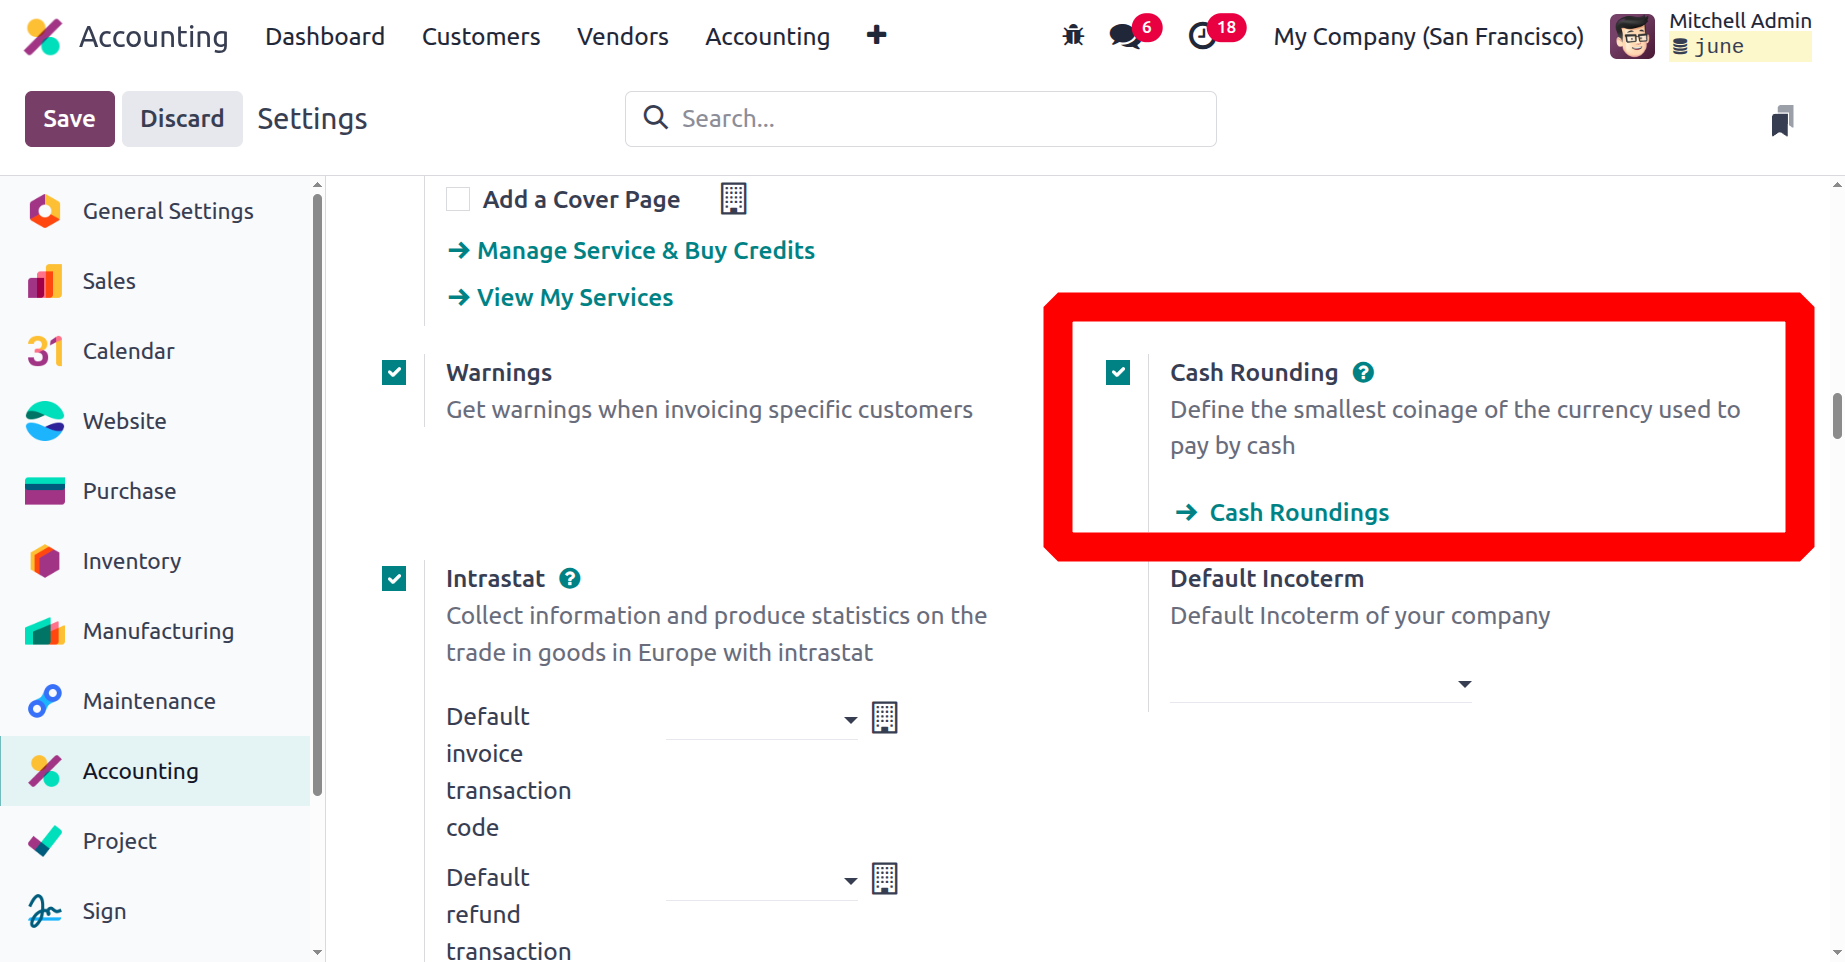
The Odoo18 Accounting module's Cash Rounding feature allows you to rapidly and accurately round off the entire amount of a sale or purchase invoice. Depending on your preferences, you can use this to swiftly round up, down, or to the next whole number. This feature is especially useful for businesses that take cash payments because it ensures that the entire invoice amount is rounded off precisely and appropriately. This functionality can be configured to apply automatically to all invoices or selectively to specific invoices, as needed. It is recommended to refrain from paying with pennies or little coins. Automatically, the amount is rounded to the nearest lower denomination. This service is advantageous for companies who receive a lot of cash payments, such as merchants. It helps cut down on the amount of time needed to finish payments as well as the number of coins or small notes needed. All currency quantities must be rounded to the next denomination for businesses that deal with cash on a regular basis.
In the Accounting Settings section of the Configuration page, this feature can be made active. After turning it on, users can select a rounding increment of 0.05, 0.10, 0.25, or 1.00. When establishing a receipt or sending out an invoice, the amounts will be rounded up or down to the appropriate increment. This application is useful for organisations that need to ensure that all cash transactions are rounded off to the nearest denomination, eliminating the need for human rounding off of cash payments. If this feature is enabled, you can create rounding rules in the Accounting module. With the assistance of this tool, users can quickly round up or down any sum to the closest applicable denomination.
Users can set the system up to, for instance, round off all payment amounts to the nearest dollar. This feature is useful for companies who take cash payments and need to precisely round off customer payments. Additionally, cash rounding can be used to automatically round off invoices and other financial records. This feature helps guarantee that all transactions are appropriately documented and that the amounts paid are exact.
The Cash Rounding option may be found in the Odoo Accounting module's Configuration Settings. You can designate the lowest denomination of the currency that is used to make cash payments by activating the Cash Rounding option. After you have enabled the setting in settings, you will be able to see the menu in the Accounting module.
By choosing the Cash Roundings option from the Management area of the Odoo18 Accounting tab, you can view and define the Cash Roundings.
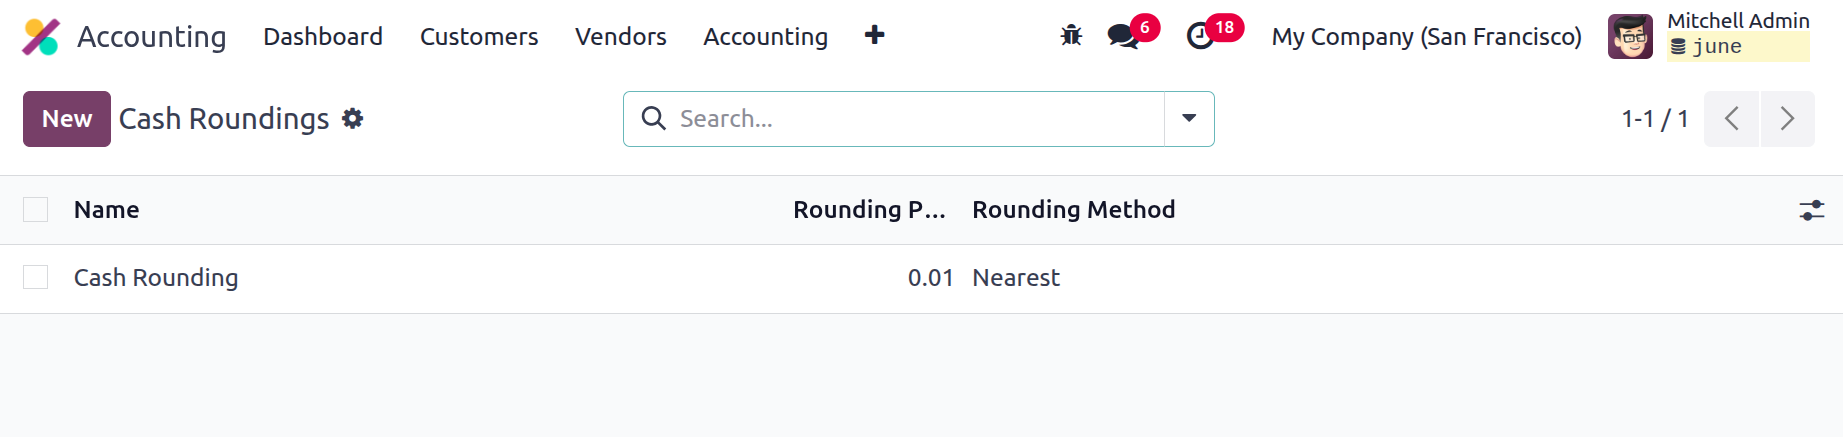
A preview of all the Cash Roundings records that have already been defined is shown in this window. Name, Rounding Precision, and Rounding Method are among the details displayed. All of these fields can be changed, and comprehensive views are accessible. Additionally, you can rapidly search for and discover the required data by using the numerous pre-set and customised filters and grouping options. The NEW button will let you enter the Cash Rounding creation form. The following screenshot displays the window.
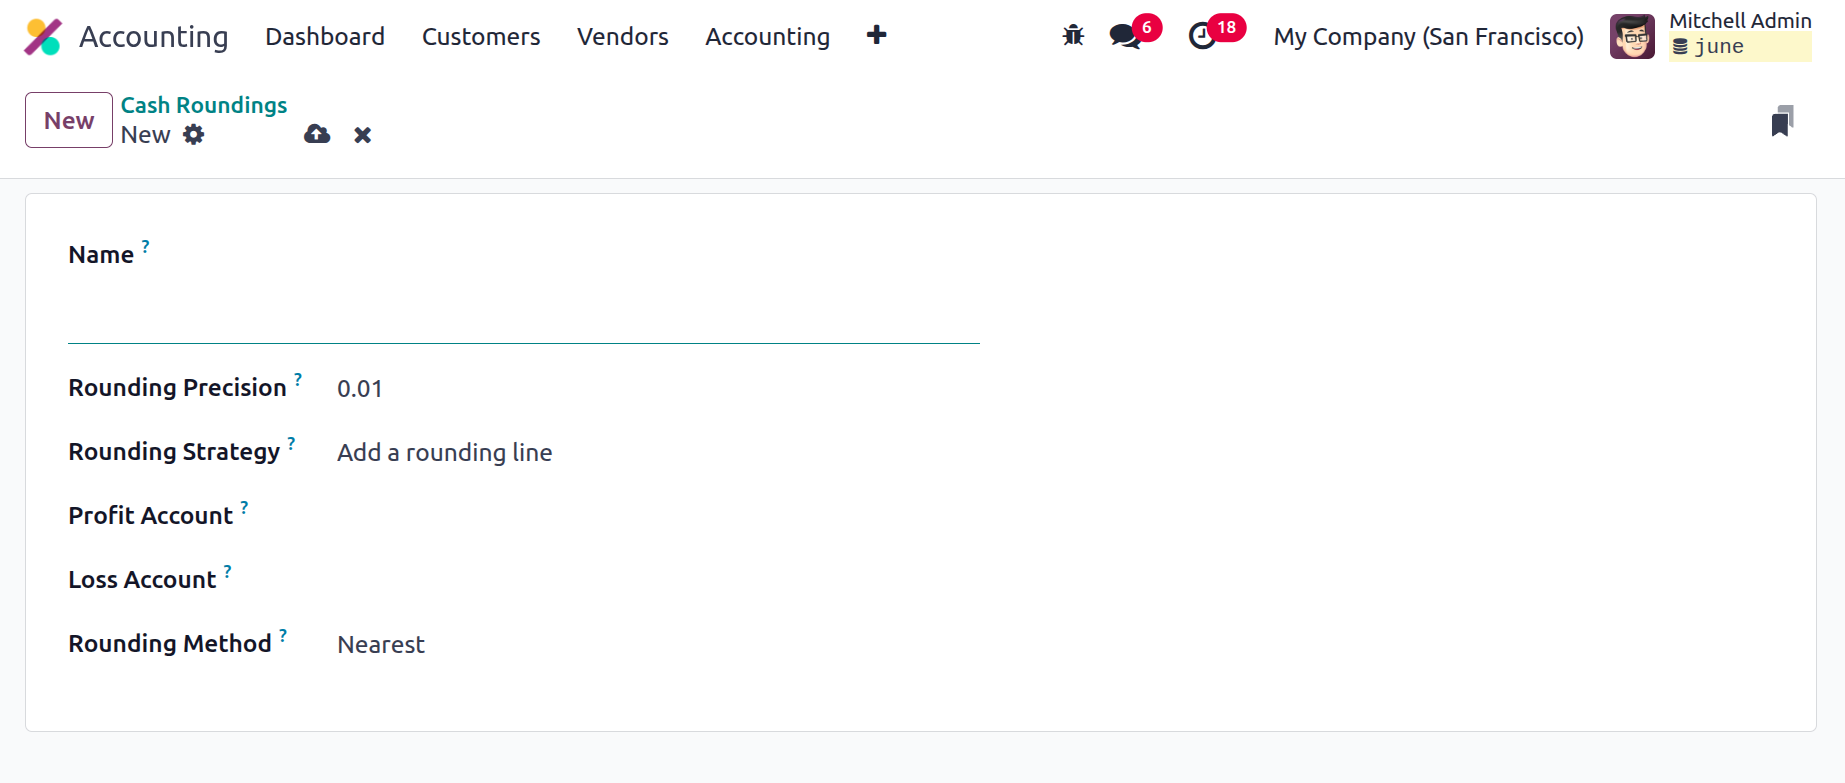
In this form view's Name box, you can give the cash roundings a name. The Rounding Precision field can therefore be used to represent the smallest denomination with a non-zero value. You can specify how the invoice amount will be rounded to the required rounding precision in the Rounding Strategy section. Here, you can apply the rounding approach in one of two ways: Change the tax amount or add a rounded line.
These settings allow you to determine how Odoo18 should handle rounding amounts when creating invoices in the Accounting module. Selecting Add a Rounding Line adds a line with the rounding amount at the end of the invoice, and selecting Modify Tax Amount allows you to adjust the tax amount on the invoice to incorporate the rounding amount. This can be used when the rounding amount is not significant enough to warrant a separate line item.
After defining the rounding strategy, the profit and loss accounts can be indicated. The total rounded number will ultimately move to a higher infinity as a result of the rounding process, resulting in a profit that will be noted in the profit account. If the total round value moves to the lower infinity, a loss will be generated and entered into the Loss Account. One last choice is to use the Rounding Method. On the Odoo18 platform, you may define it in three different ways. HALF UP, DOWN, UP.
- UP: When the value is UP, it rounds to plus infinity. The value will be rounded to the closest specified amount if this option is chosen. For example, if the amount is $15.20 and the specified amount is 20 cents, the result is $15.40.
- DOWN: To the down method, the value is rounded. In this case, the total will be rounded to the nearest specified amount. For example, if the amount is $15.20 and the specified amount is 20 cents, the result is $15.00.
- HALF UP: If the decimal value is greater than 0.5, it will be rounded up; if it is less than 0.5, it will be rounded down. Stated otherwise, the total will be rounded to the closest specified amount. For instance, if the sum was $15.20 and the needed amount was 20 cents, the result would be $15.00.
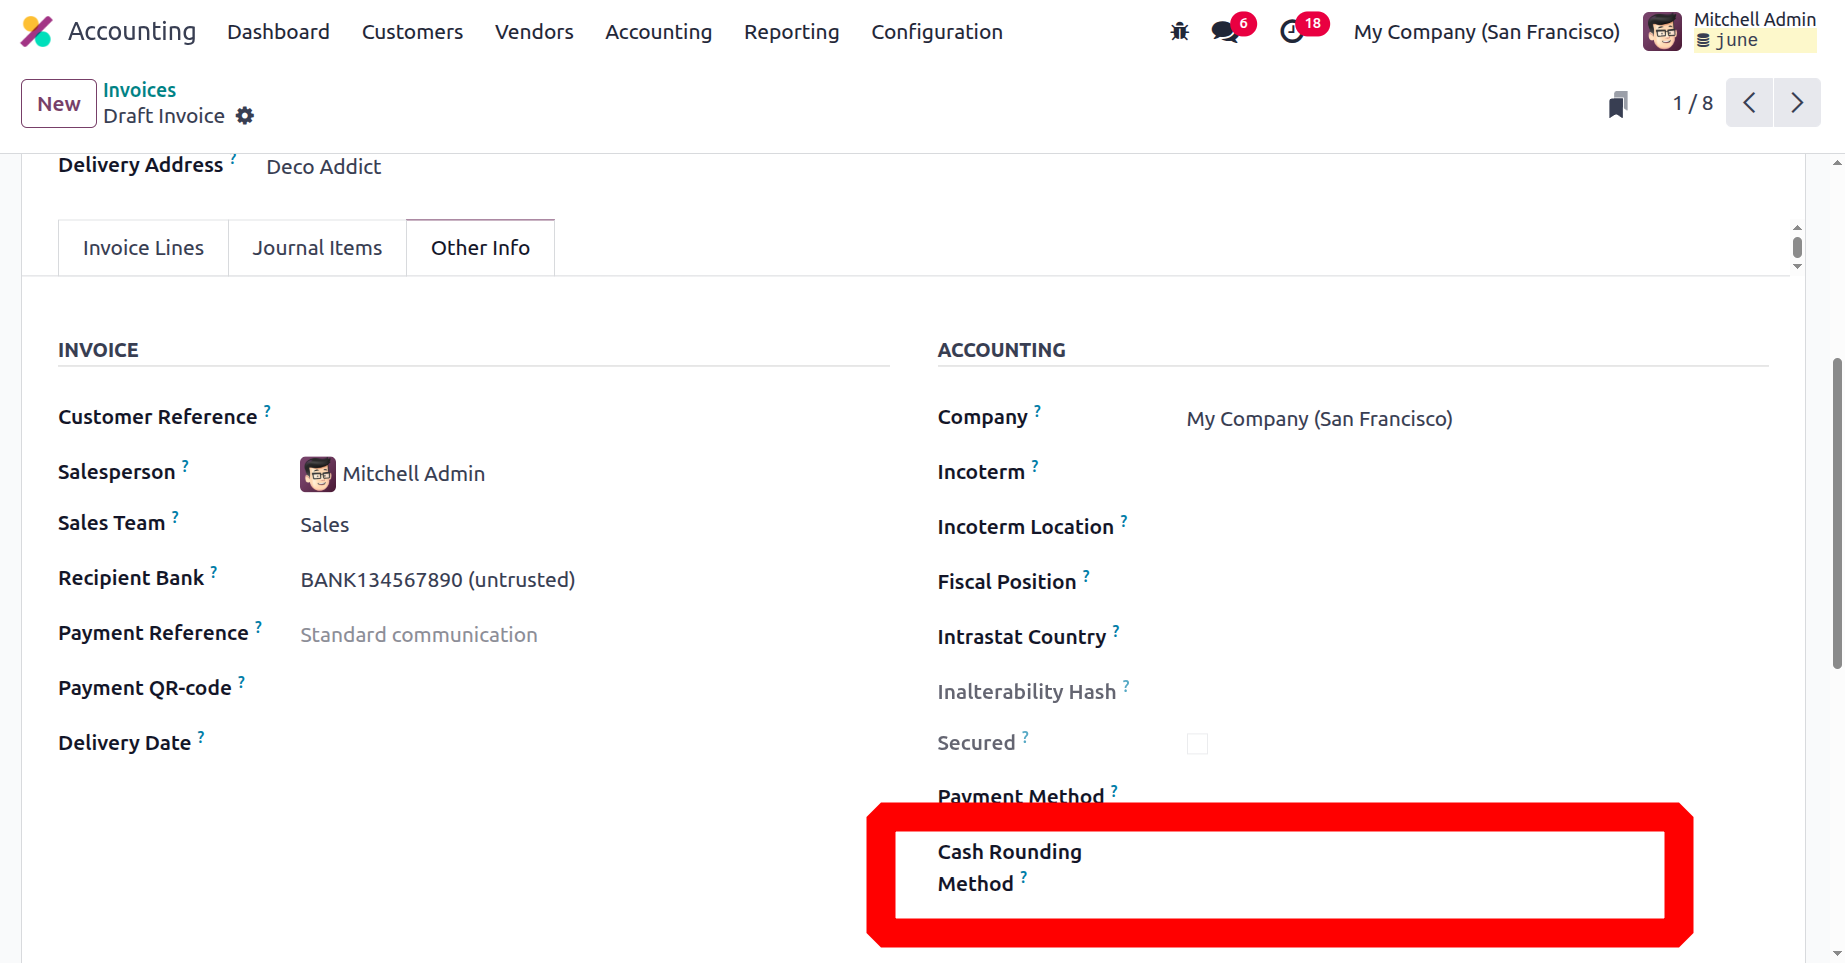
You can save it once you've chosen Cash Rounding, and it will show up in the menu. This rounding can be used to vendor or customer invoices to round the total amount. The additional information tab of the invoice allows for rounding. Furthermore, you are free to alter your specified Cash Rounding configuration at any time.
Now that we have a clear understanding of how Cash Rounding is configured, let's move on to the following part, which discusses budgeting issues.
Unlike the previous version, Odoo 18 lets users customize almost all financial reports. Odoo18 users can construct domains, equations, and associated values in addition to adding extra rows to each report. Then, using the given equation, these numbers will be updated in the new line.
After the report has been launched, you can choose the Lines tab to add more lines.
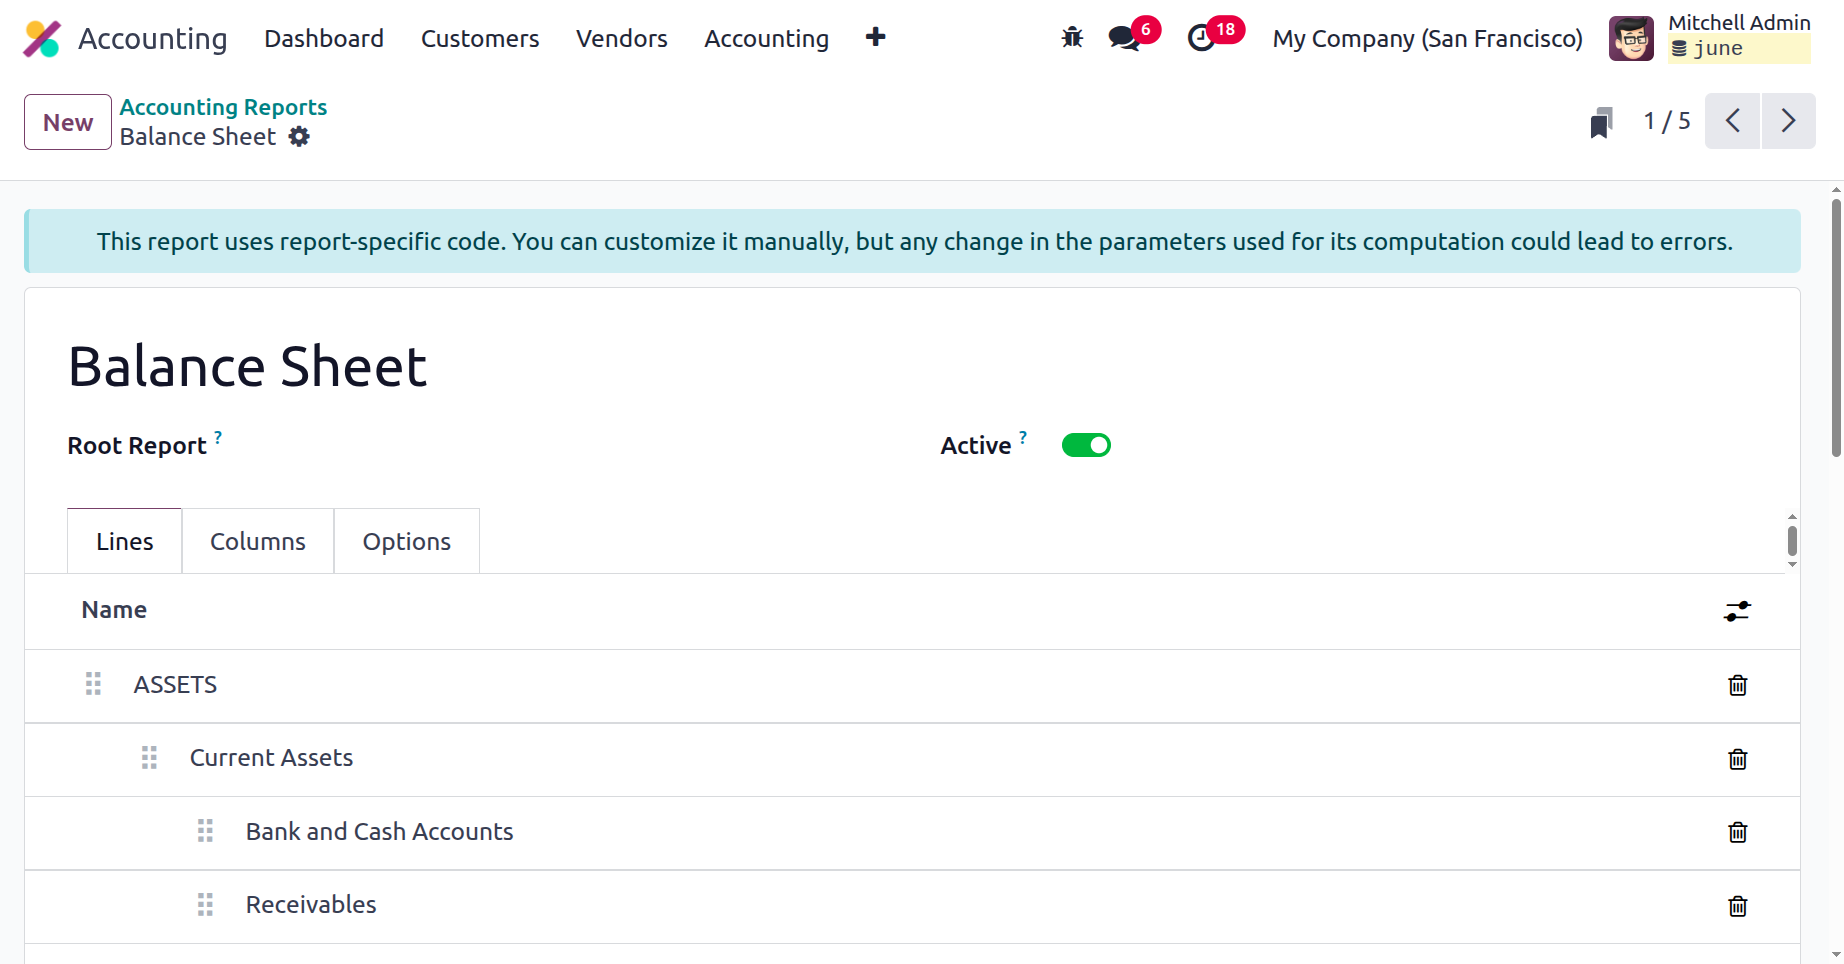
When drawing a new line, you can include the parent line's code to make it appear beneath the parent line. The foldability of the line, whether or not the text that follows it prints on a new page, and the under-label calculation for the following line are examples of additional information that could be supplied.
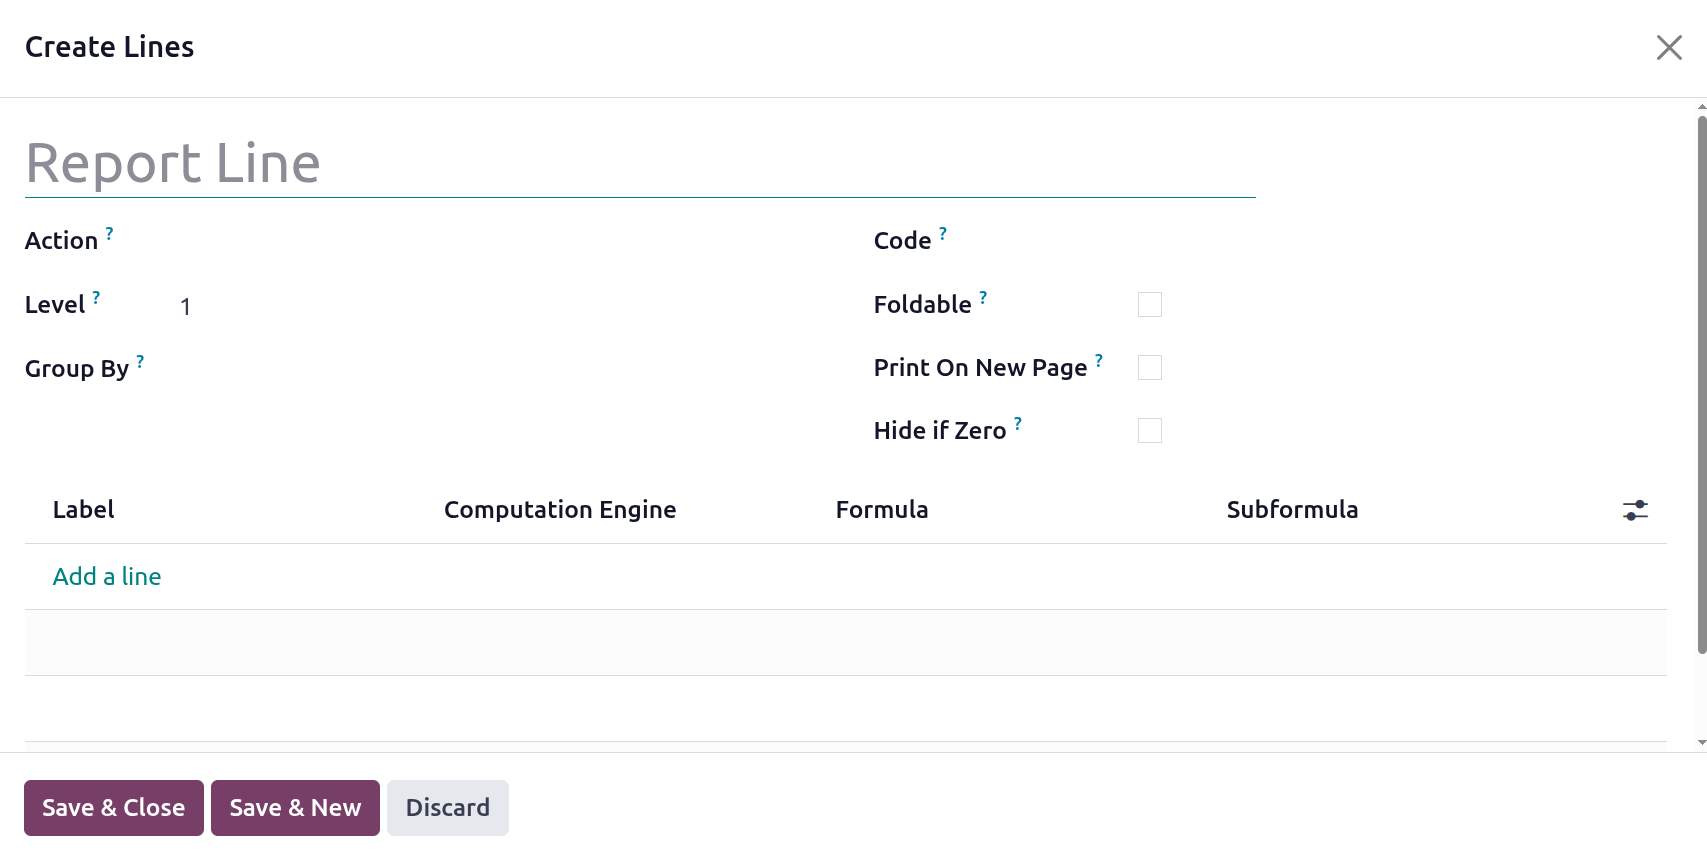
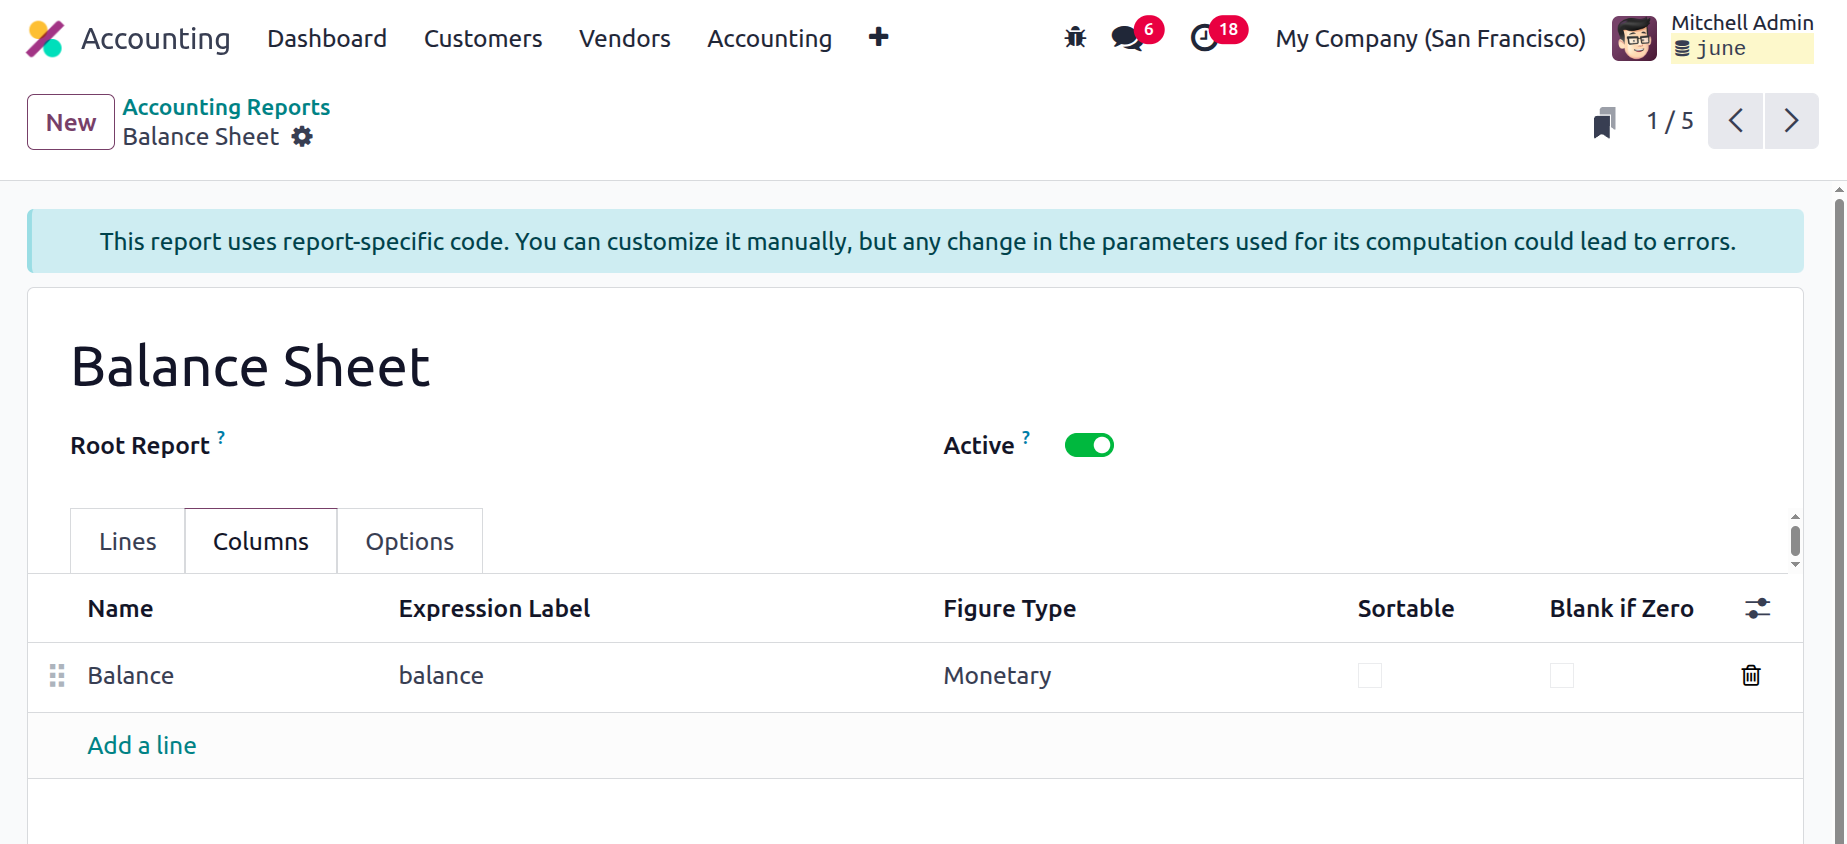
After inserting the expression on the definition tab, you can define the formula, the sub-formula, and the computing engine. The computation engine allows us to calculate the formula. Odoo18 comes with a number of different compute engines, as the screenshot below illustrates.The accounting report's columns tab defines the columns in the accompanying financial statements.
The 'Options' tab allows you to select the financial statement filters for the accounting report.
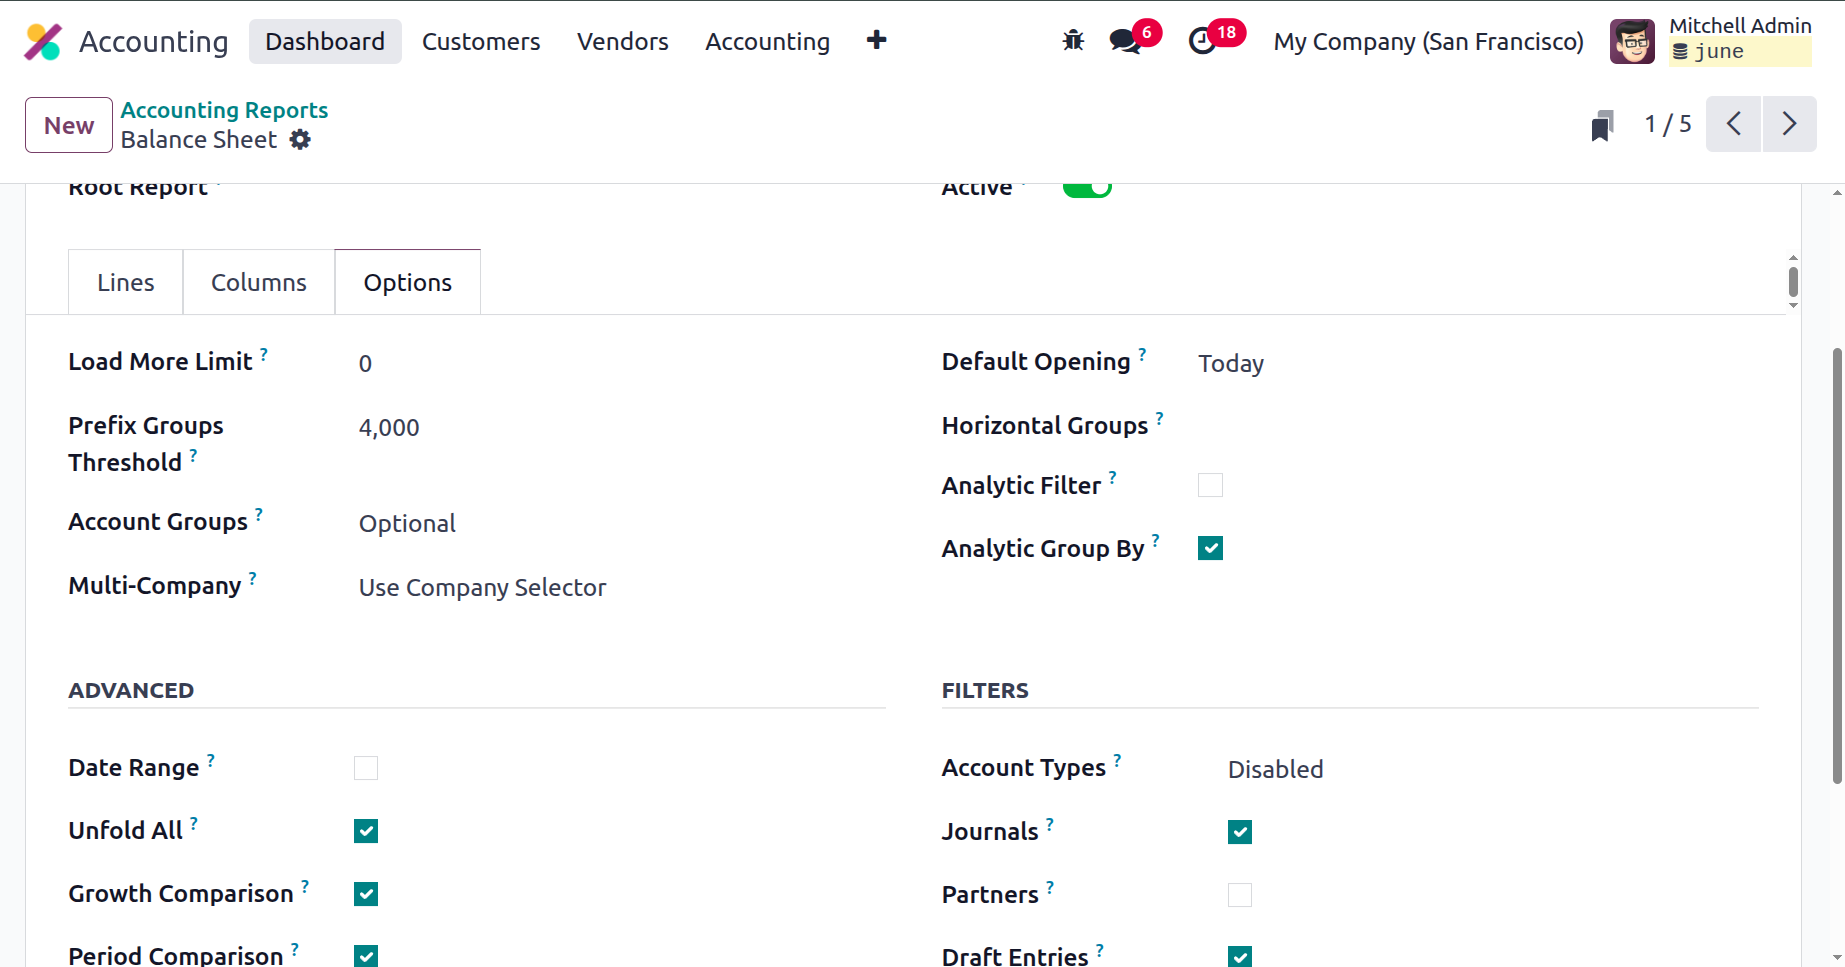
The 'Load more Limit' argument restricts how many rows are seen when it unfolds. The default opening defines the default filter data that will be based on this year, this month, today, etc. Account groups, multi-company, default horizontal groups, analytic filter, and group by can all be further customised. Additionally, we will be able to filter by section and verify the required default filter for the financial report under advance.
Let's continue talking about Odoo 18 accounting reports by moving on to the next topic, Disallowed Expenses Categories.
Disallowed Expenses Categories
Disallowed expenses are those that are specified in Odoo 18's Accounting module and cannot be claimed as tax-deductible expenses or items. For the person, the home, and the family, these include spending for food, entertainment, travel, gifts, and other non-work-related costs.
There are several benefits to disallowed expenses, including
- Reduced taxable income: An individual or corporation's taxable income is reduced by unallowable expenses. Cash flow and profitability can be improved by lowering tax obligations.
- Avoid penalties and interest: Individuals and organisations can avoid potential penalties and interest by not deducting Disallowed expenses from their tax returns.
- Better Accuracy: If disallowed expenses are not accurately reported, the Internal Revenue Service (IRS) may encounter problems. By accurately identifying these expenses that aren't claimed on tax returns, organisations can increase the accuracy of their files.
- Streamlined Compliance: Reducing the possibility of an audit by distinguishing between authorised and non-authorized expenses aids individuals and companies in adhering to tax regulations.
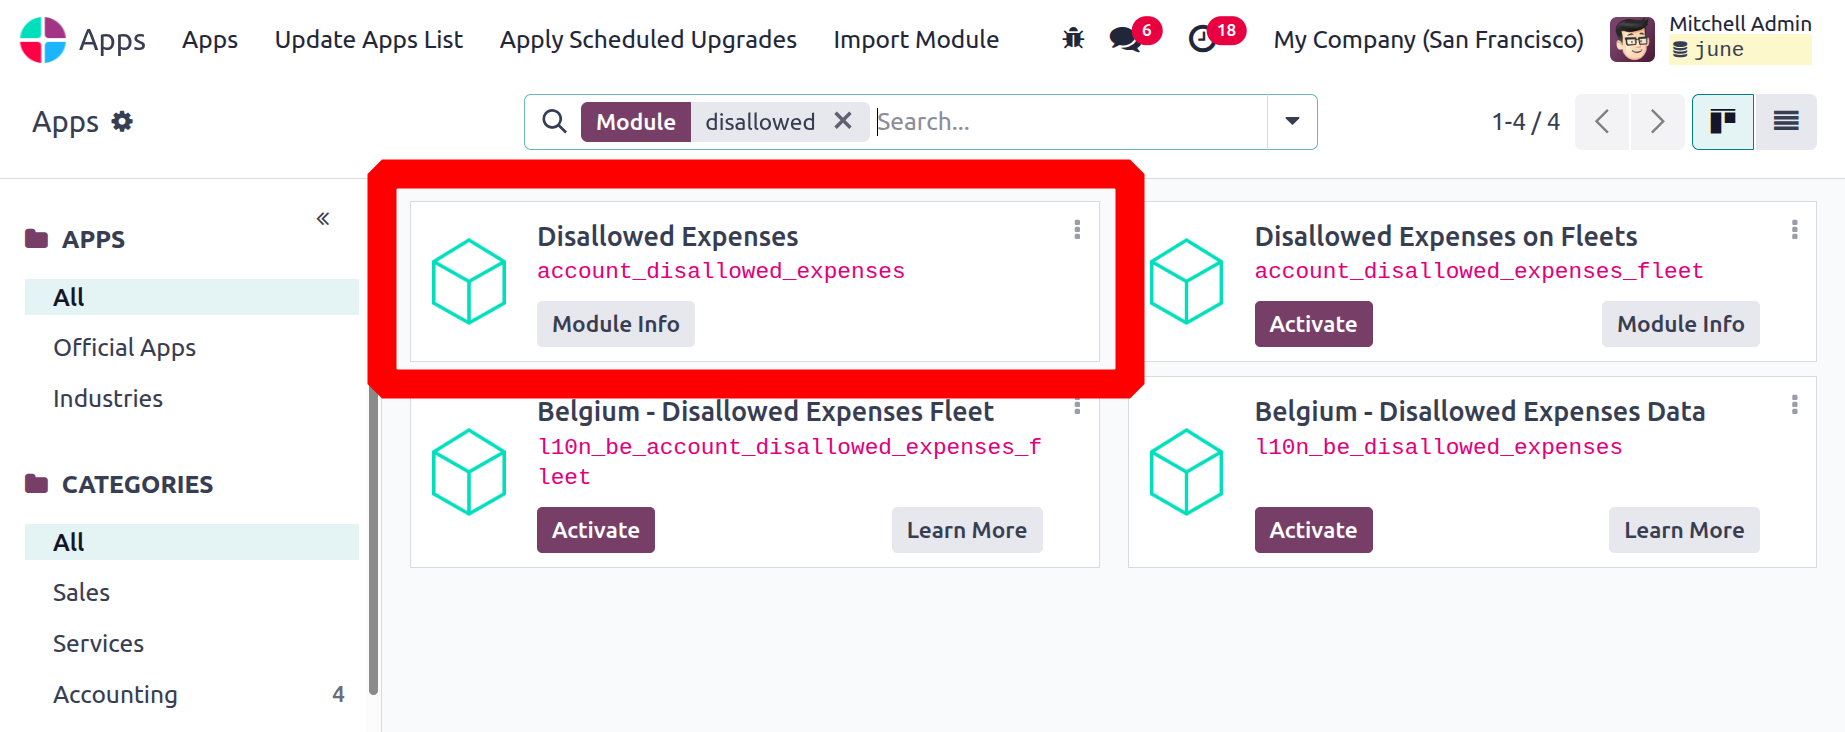
Consequently, you may use Odoo18's Disallowed expense function to remove the relevant costs from the bookkeeping result without also removing them from the fiscal result. Therefore, you will be able to see the financial results in real time by setting up forbidden spending categories and receiving regular notifications. To access the rights of this option on your system, you must first activate the Disallowed Expenses modules from the App Store. After removing the Apps filter to install the module, you may use the search box to look up "Disallowed Expenses." The result will now be shown by the system as seen in the figure below.
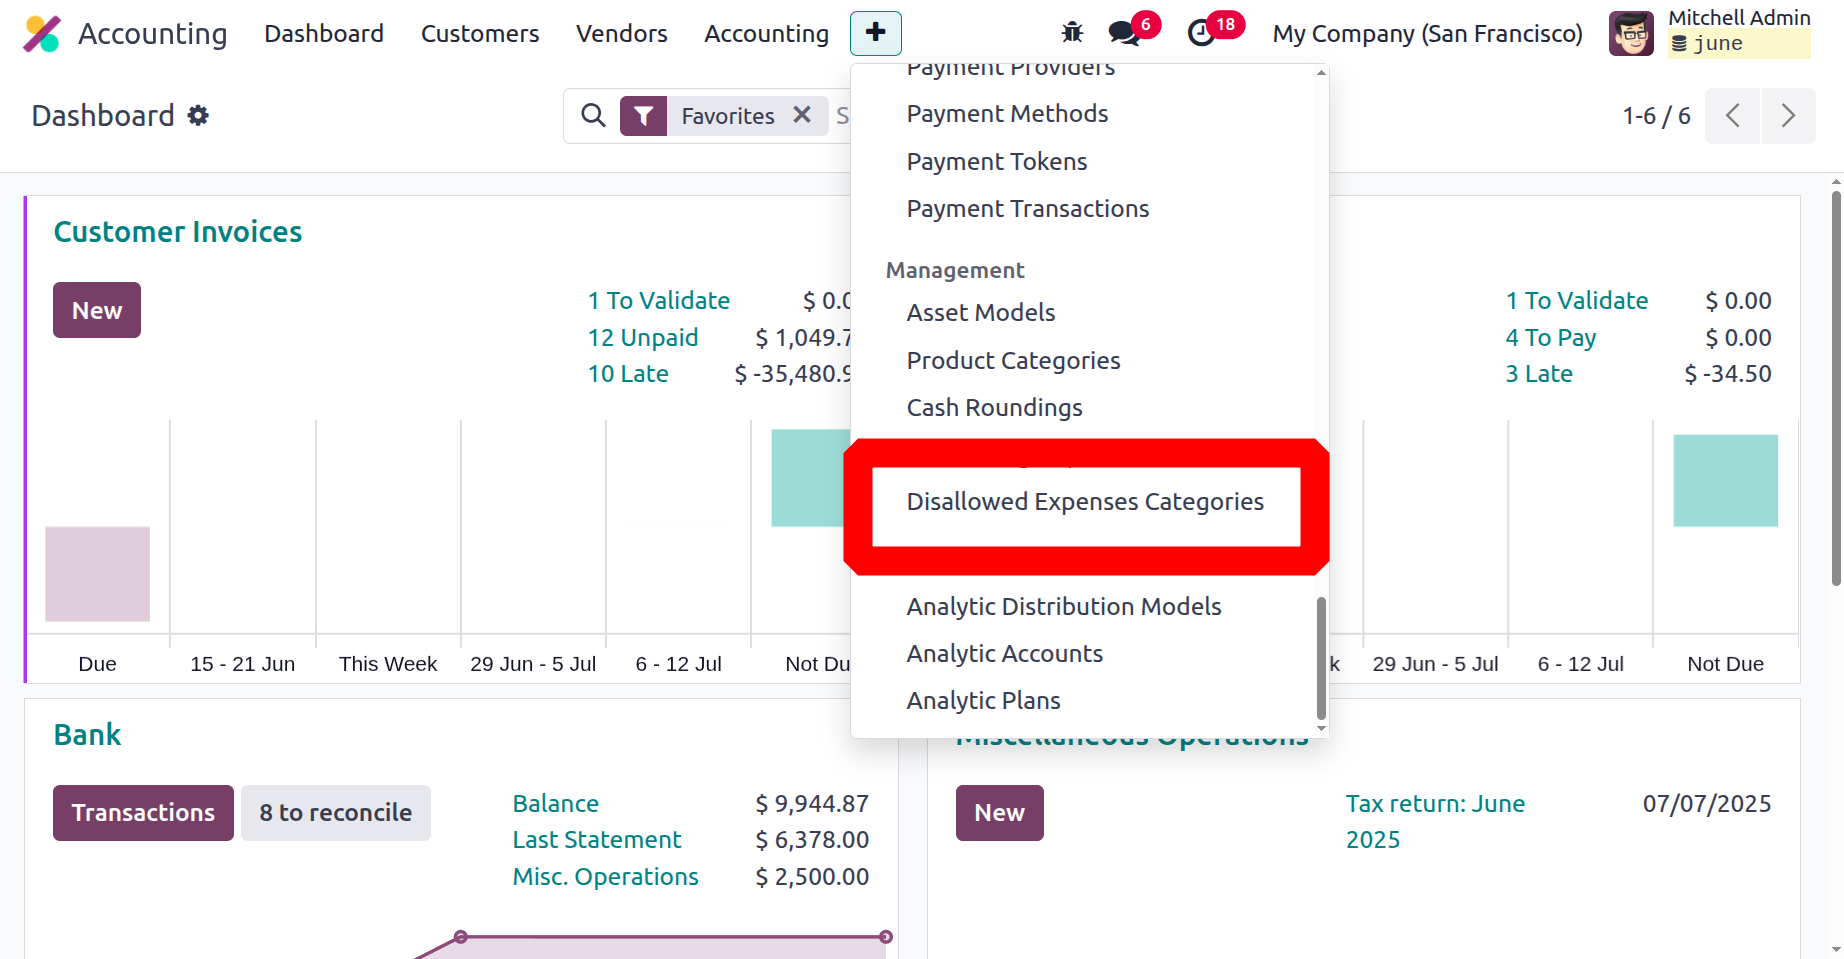
After the module has been activated, the Disallowed Expenses Categories menu can be accessed in the Management section of the Configuration tab of Odoo18 Accounting.
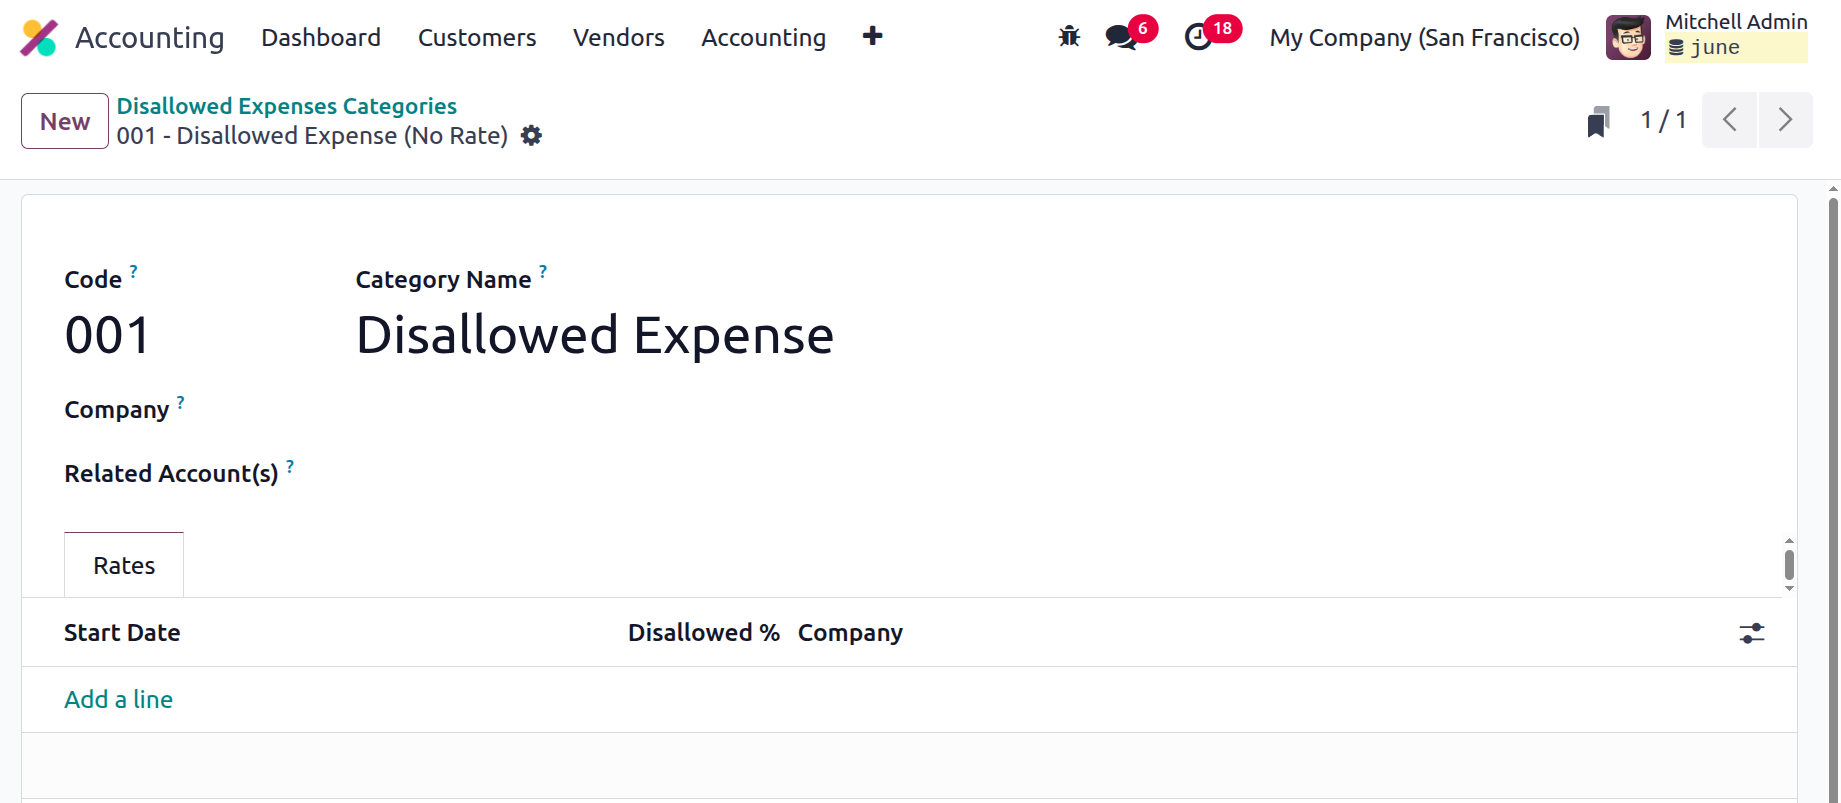
The NEW option allows you to add new Disallowed Expenses Categories, and the system will help you manage all of the Disallowed Categories that are set up.
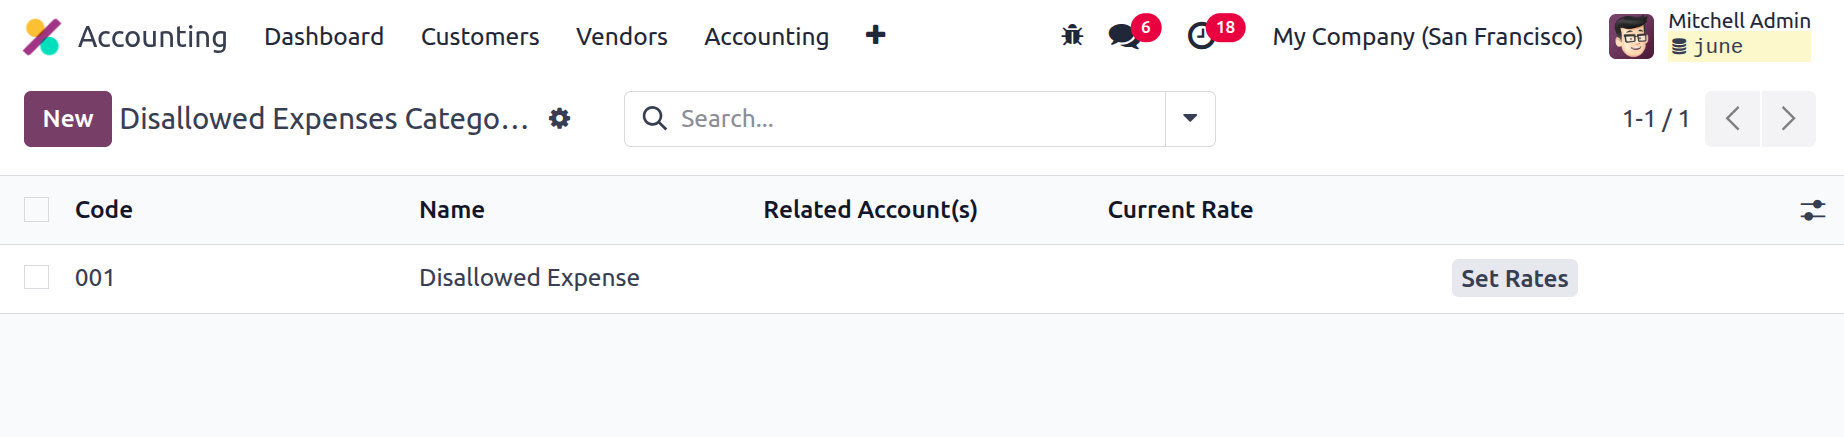
When creating a new category of expenses that are not allowed, you can first input the Code and the Name. After that, you can choose related accounts by using the list of preset accounts. You can also create a new account directly from this page. Additionally, by choosing the SET RATES option on the far left, you can assign the Current Rate. You will then be able to see the entire Rates tab window where you may set the rate.
Once you provide the Start date and the rate of the Disallowed Expenses, the Company field will be automatically given when you select the Add a Line option. Managing several businesses is made easier with this field.
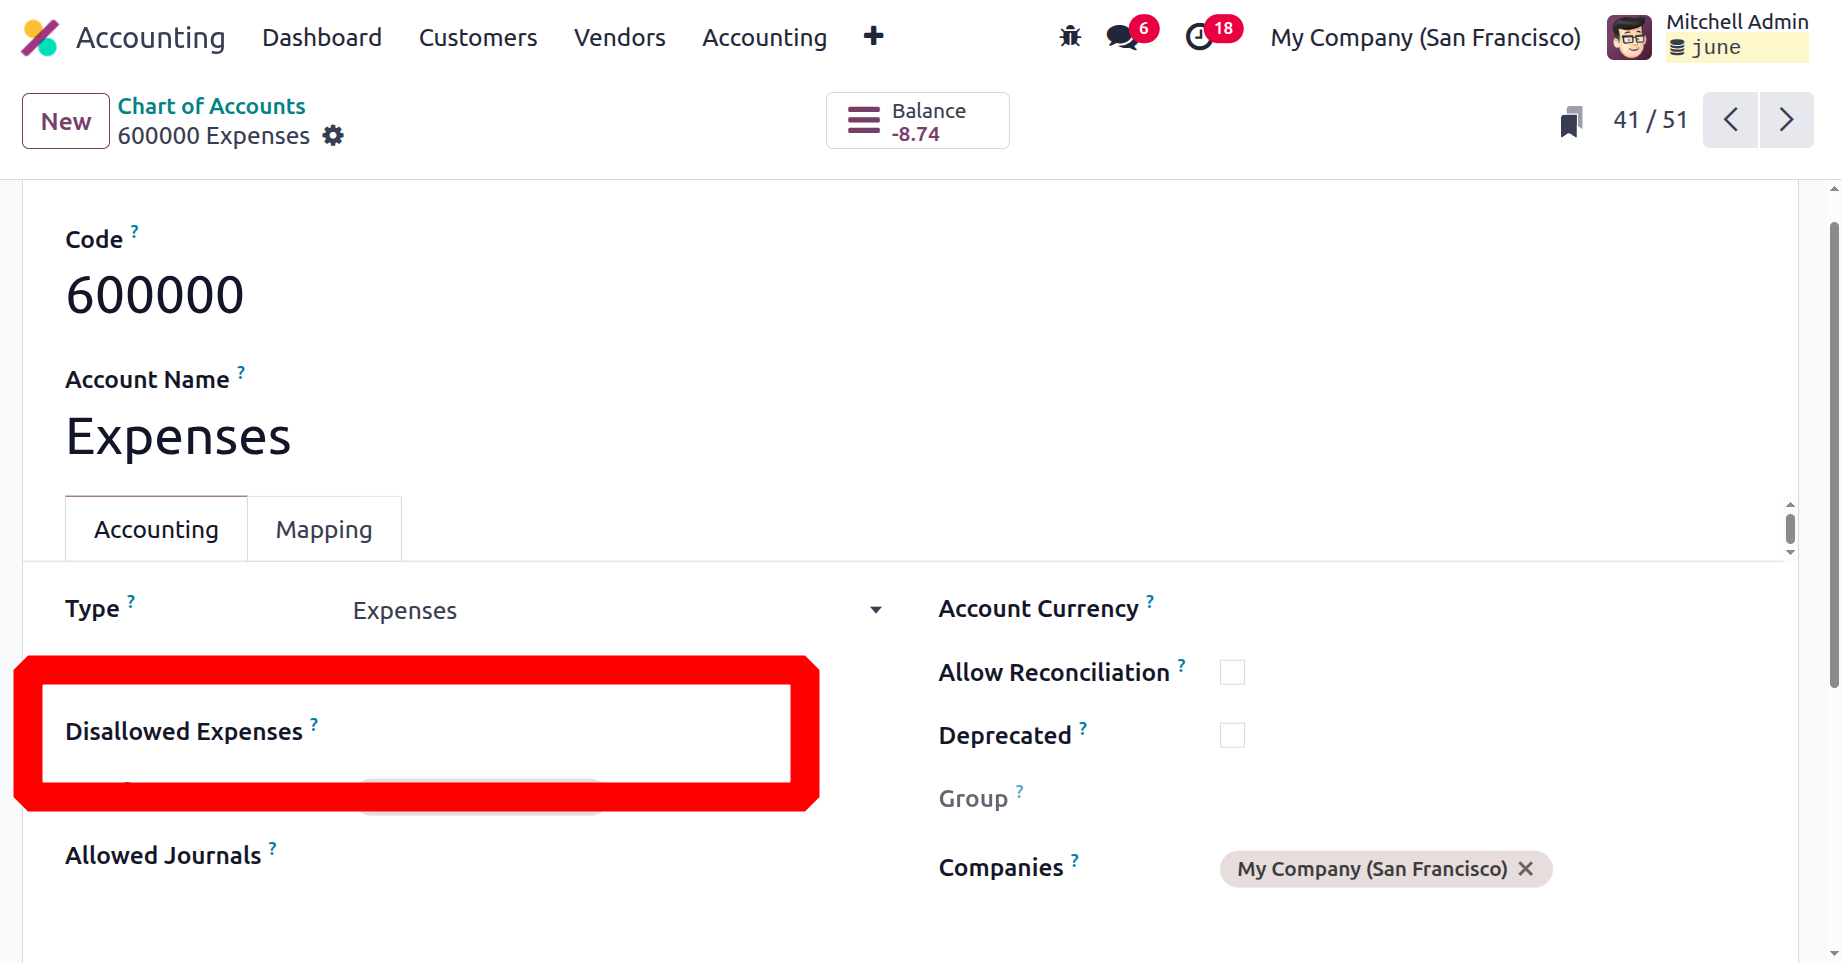
Furthermore, the Expense Account and the Disallowed Expenses Category are immediately connected when you create a Chart of Accounts. To view it, navigate to the Chart of Account pane, where you can create a Chart of Account with an expense type. The Disallowed Expenses Category selection option is now visible to you and will be directly linked to the corresponding account.
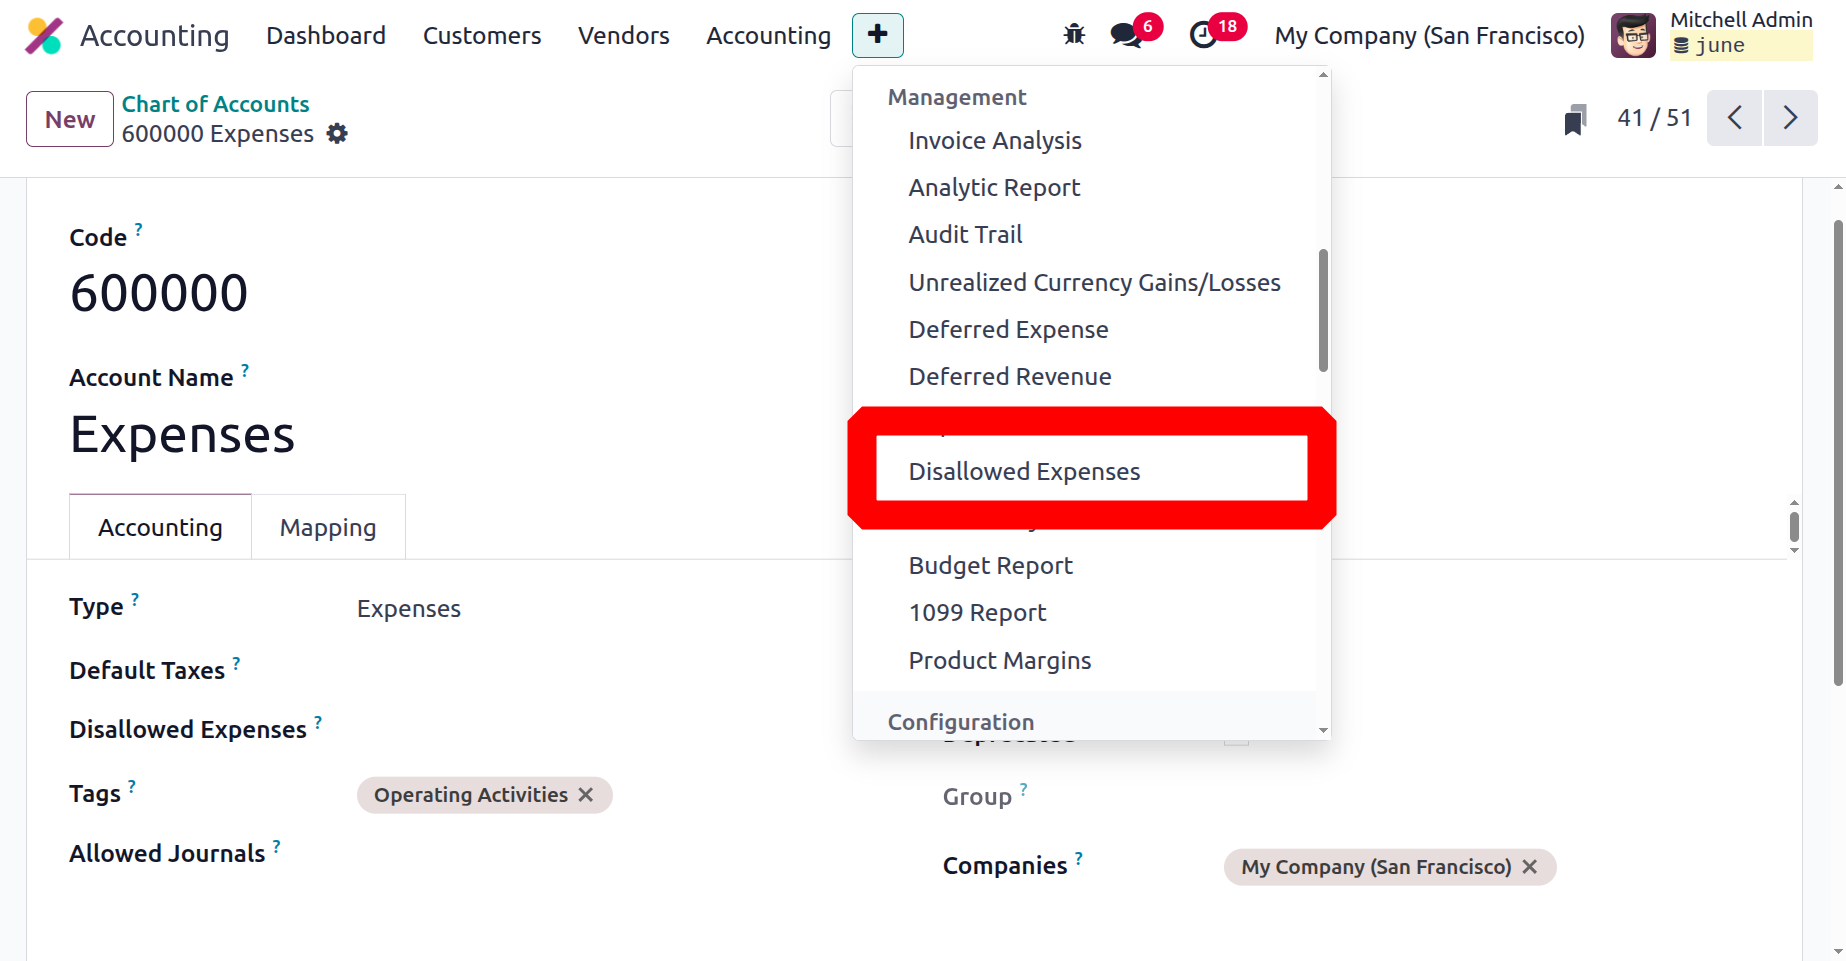
You can view the new report called Disallowed Expenses under the Reporting menu of the module.
One of the primary benefits of the platform is its capacity to generate a wide range of Disallowed Expenses Categories. We may now examine the following attributes, which control the analytical items, as we have a thorough understanding of these traits.