Management Based Reporting
The management of the financial aspects of the business is a crucial component, and managers are always searching for tools and ways to streamline and improve the process. As a management tool, the reporting and report production tools will be used to assess the state of your business's accounting processes. Furthermore, by quickly looking at the accounting-based data, you may quickly comprehend how the company's financial operations are progressing because the reports are real-time.
As an advanced management tool, Odoo offers a variety of reporting options in addition to the ability to generate reports for operations and business management. A finance management module is available that offers a wide range of operational and reporting functions. Reporting tools for financial operations and accounting management elements, including invoice analysis, analytical reports, unrealised currency gains or losses, depreciation schedules, deferred expense, deferred revenue, disallowed expenses, loan analysis, budget report, and product margins are all included in Odoo's accounting management module. In the sections that follow, we will examine each of these report production components in further detail.
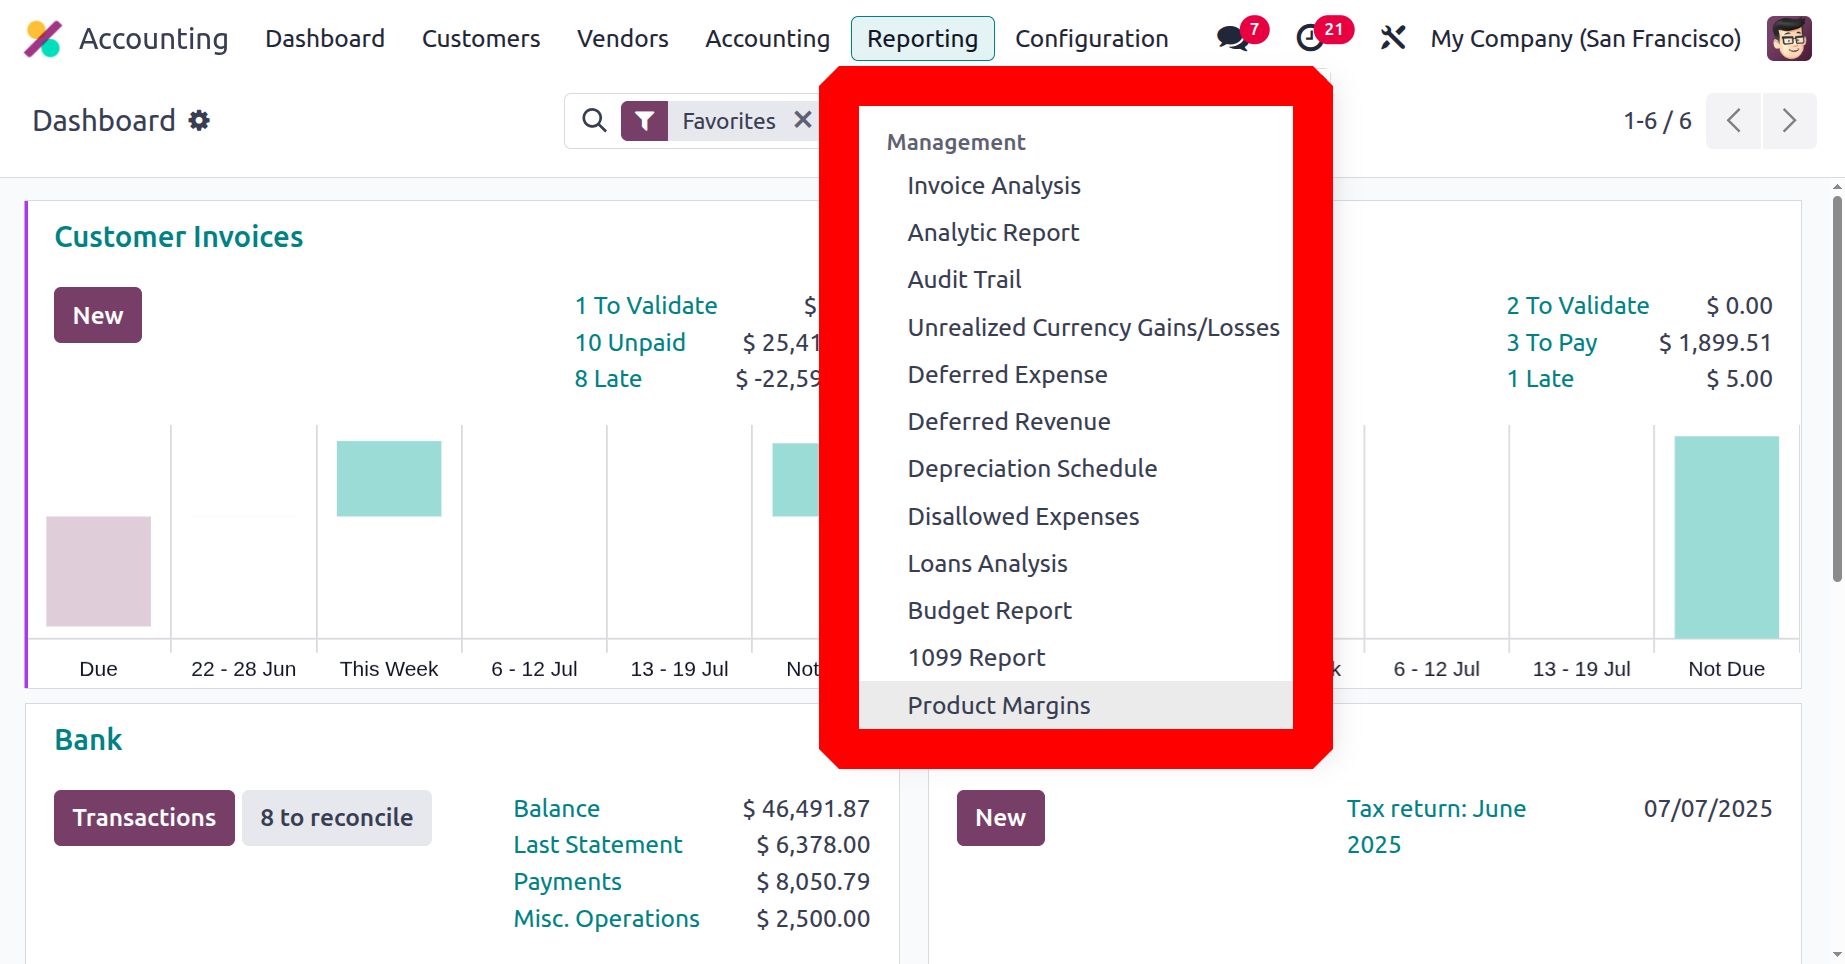
Invoice Analysis
The most popular type of accounting management report that the Odoo Accounting module offers is the Invoice Analysis report. Both complete invoices and those that are still in the creation stage of operation will be examined in this report. All invoices related to customer-based activities in the sale of goods and services will be included in invoice analysis reports. Use pie, bar, line, and other chart types to view invoice analysis reports. By using the filtering and grouping capabilities included in the invoice analysis report, you can view the report according to your needs.
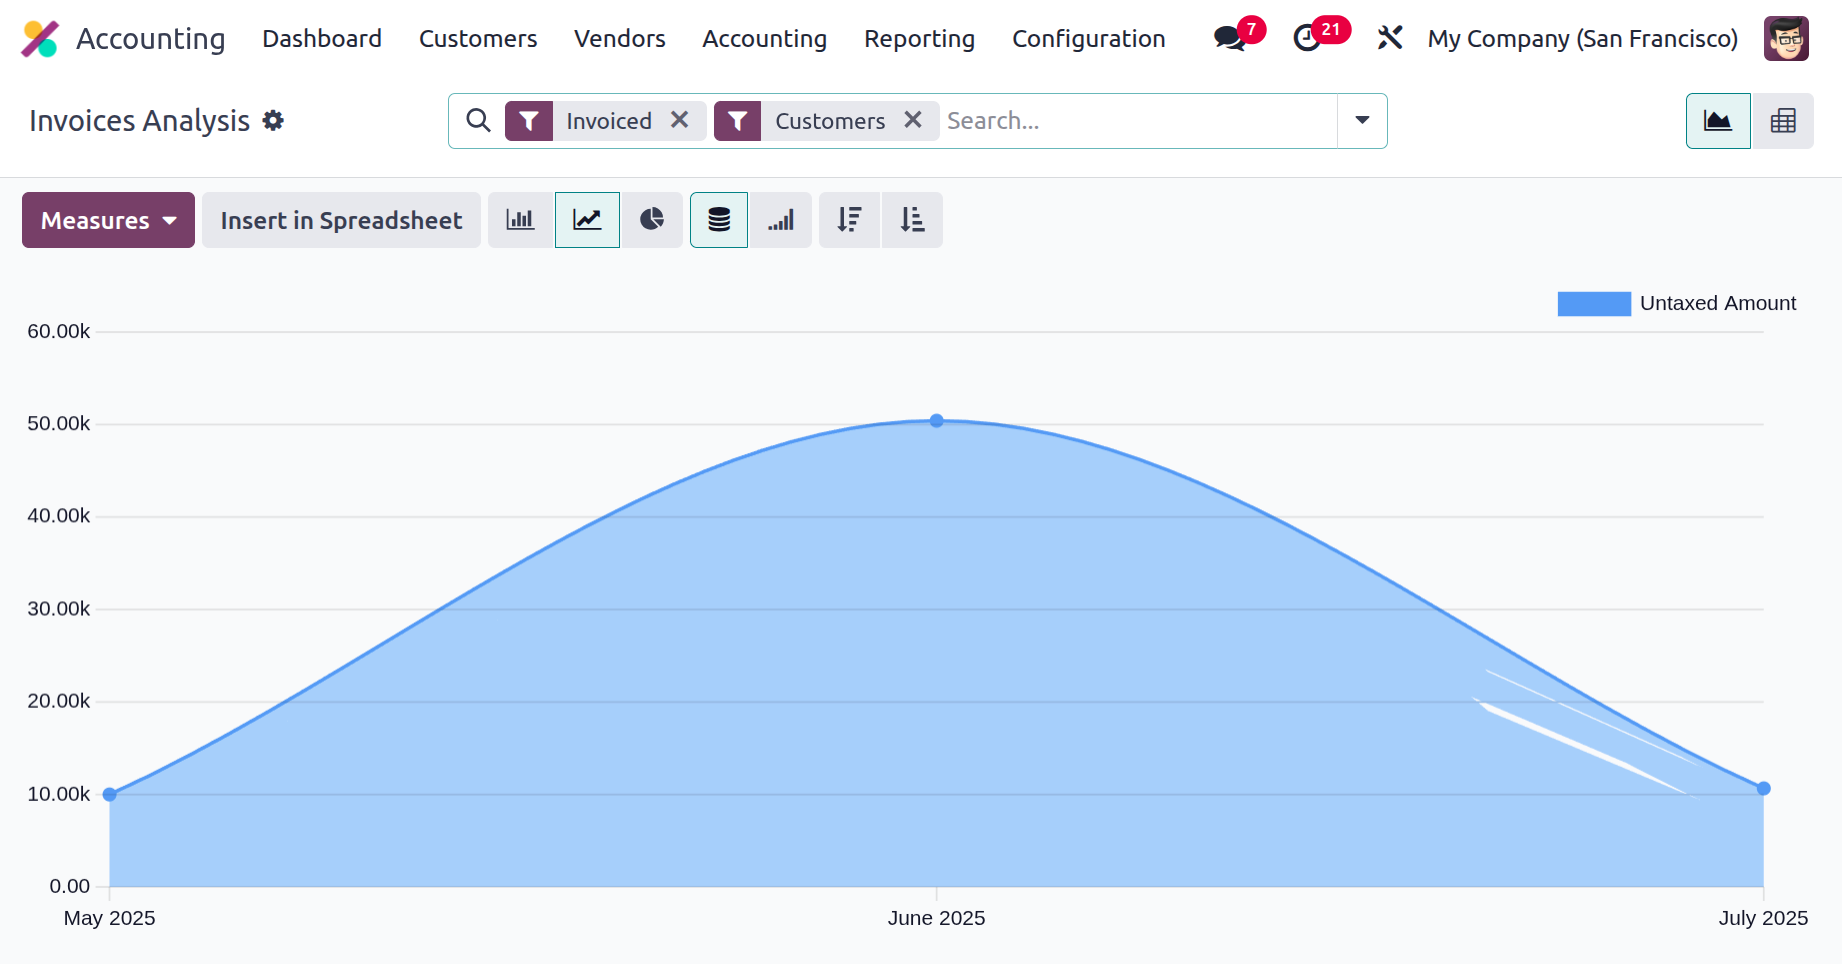
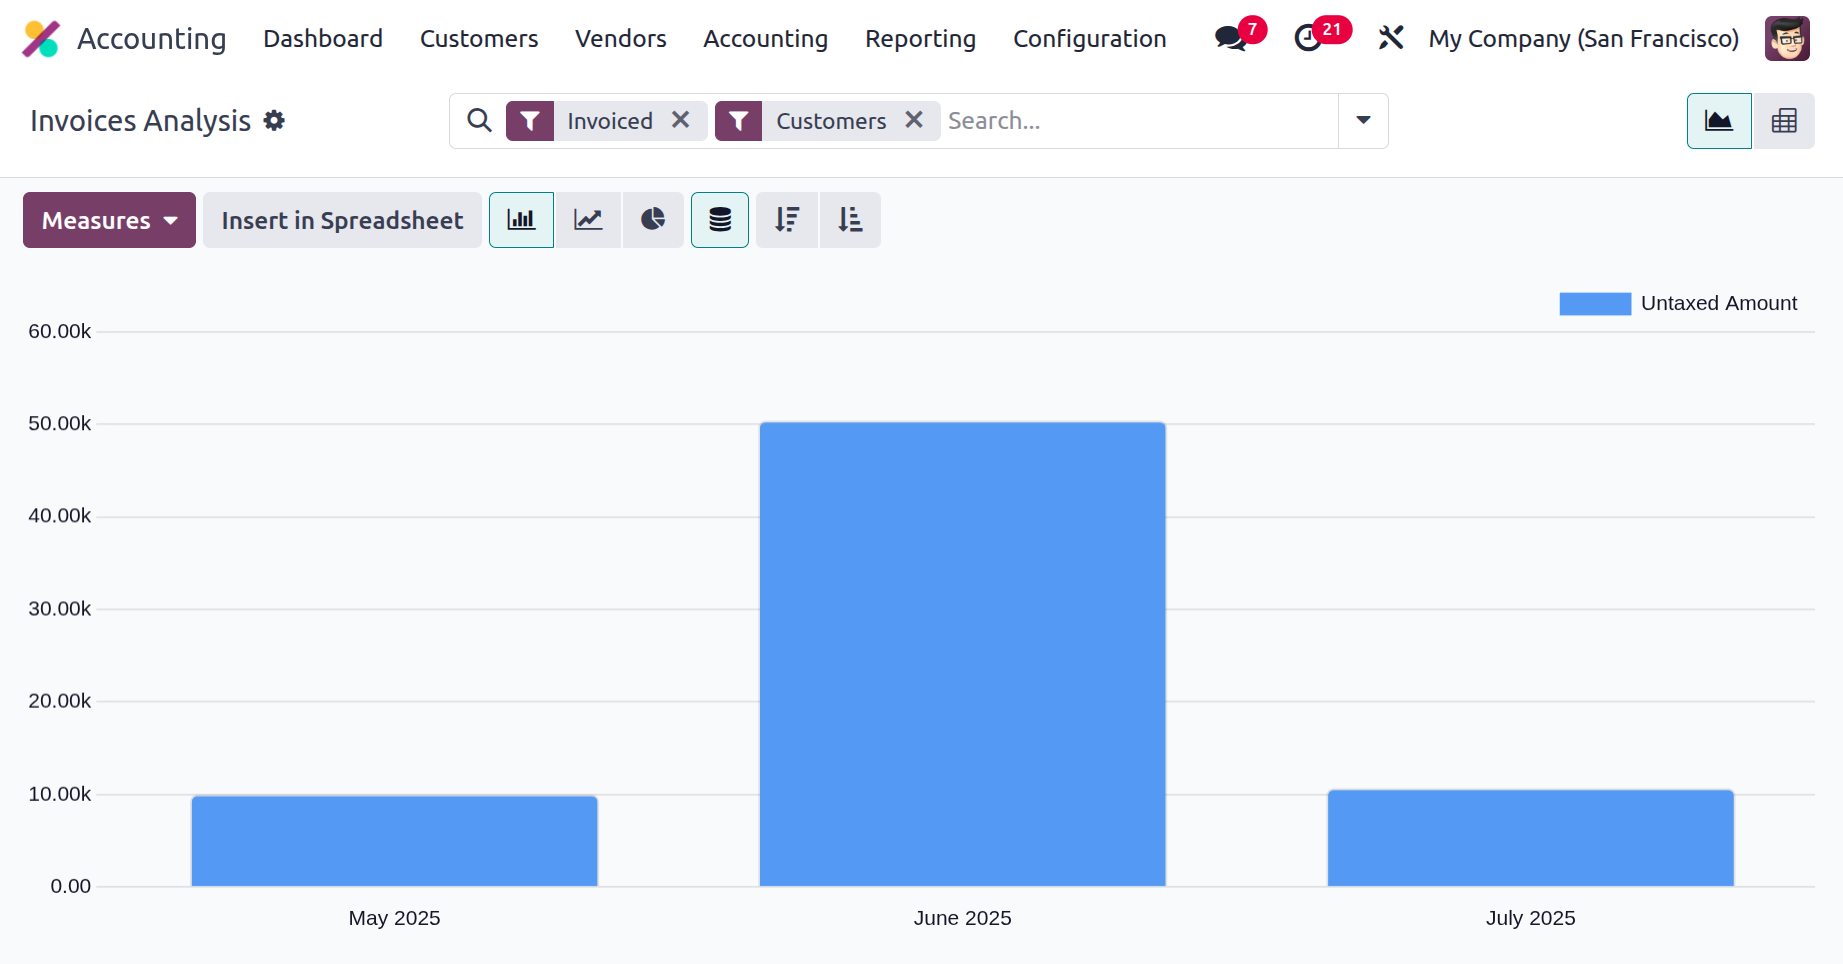
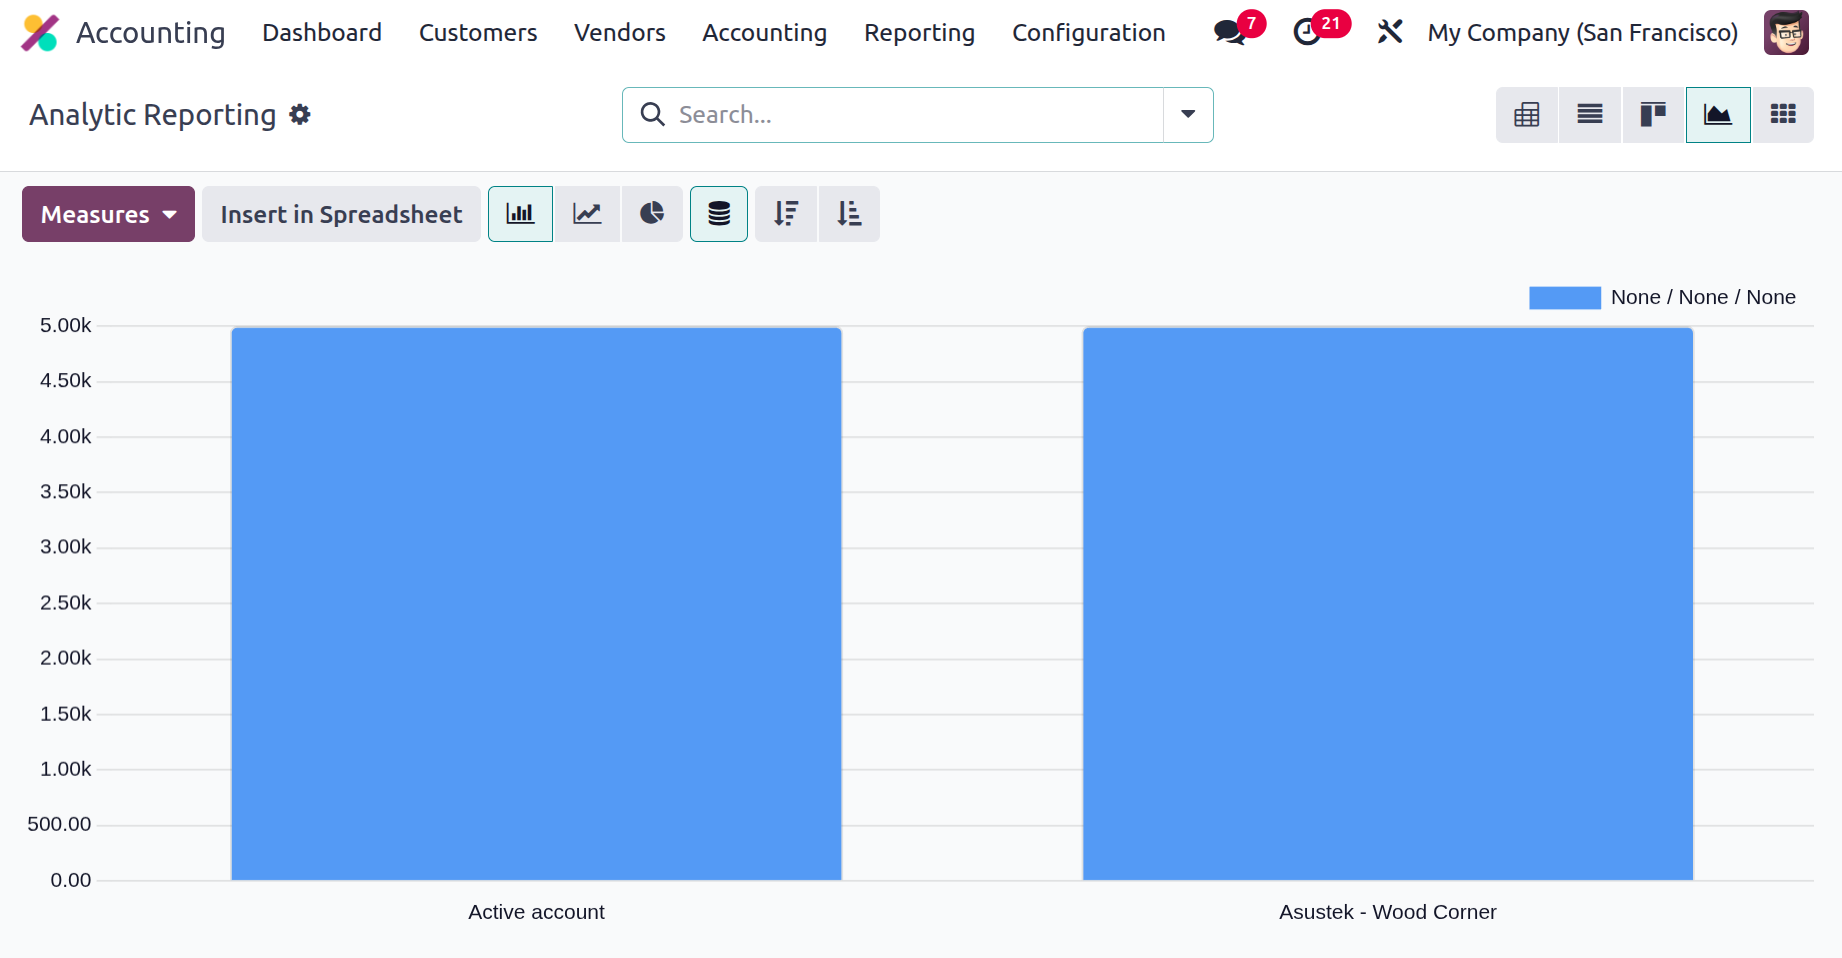
The following screenshot displays the invoice analysis report bar graphs, which are color-coordinated as needed. Organising the relevant data about the generated bills is made easier by filtering and grouping by options.
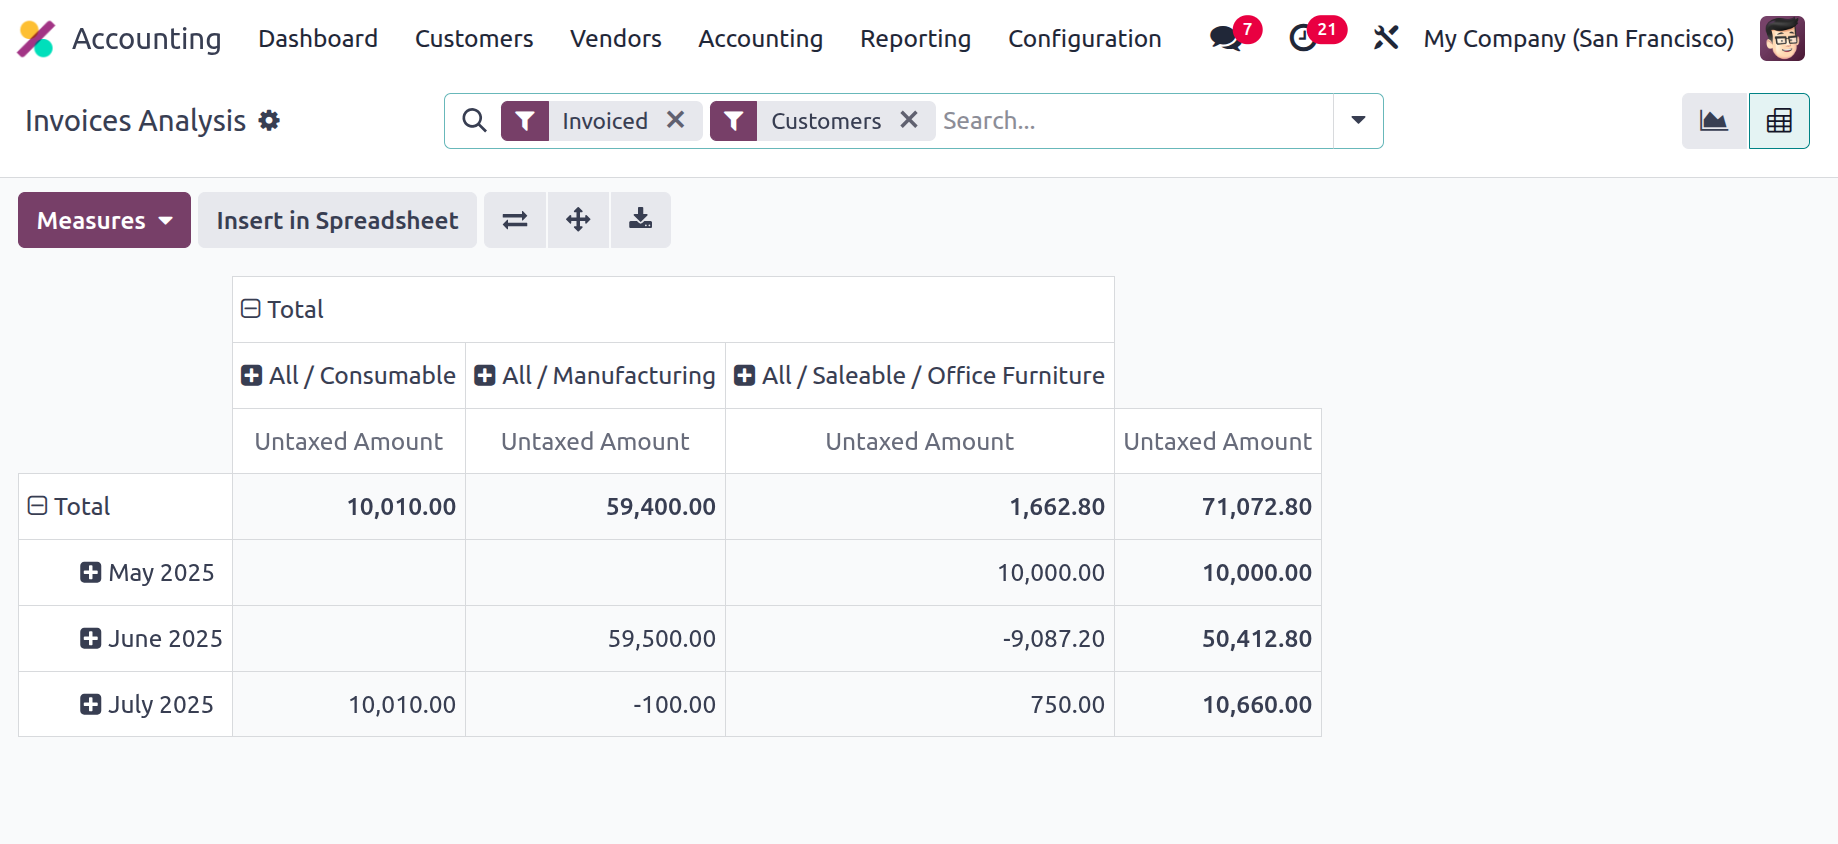
Additionally, you can create reports in a different manner with the Kanban view, which is an alternative to the graph view. You can expand and depreciate the reporting features in relation to the defined entries, as well as filter the report in a Kanban manner, which lets you show only the important + and - aspects. Additionally, you can build the report using both the default and customized parameters by using the Filtering and Group by options. Additionally, you can define the measures that the measurements are based on by using the Measures configuration options, which will help you define the measures that have been used to construct the Invoice Analysis reporting parts.
For the sake of accounting management options for the business's operations, the Invoice Analysis reporting is an exception tool that has been defined with reference to both created and currently used invoices. Let's proceed to the following section, which outlines a menu for creating analytical reports, now that we have a better understanding of Odoo Accounting's invoice analysis reporting menu.
Analytic Report
You can specify analytical functions pertaining to the organization's accounting components using the Odoo platform's analytical reporting tool. A quantitative summary of all the identified elements of the company's accounting is also included in the report. The screenshot displays the available Odoo Analysis Report pane. All of the elements of Odoo's accounting features are shown here, together with reference data for the financial operations, the partners engaged, and the remaining balance, as shown in the snapshot that follows.
There is also a filter for analytical accounting that can assist you in filtering each of the defined analytical accounts, as well as a Group by tool that can assist you in grouping the entries based on the fiscal and operational periods. A sophisticated filtration tool can also be used to modify the various settings with regard to the analytical entries that need to be filtered.
As seen in the image below, after you select each entry in the analytical report, you will view all financial actions related to the financial aspects. Here, we have selected the Costs & Revenues menu item. The operations' Date, Description, Analytical Account, and Amount will be specified by the menu.
Additional filtering and grouping techniques are available to help find the pertinent entry. You may also add new entries by choosing the available Create option. It is also possible to modify an entry by selecting the defined entry.
You can read an entry's details, such as its description, analytical account, tags assigned, reference information, partner name, and entry date, by selecting one of the entries. The degree of information will be specified, together with the unit of measurement and the amount and quantity assigned to each product. Accounting terminology like Financial Account and Journal Item will be defined. By selecting the edit option, you can change the information that has been defined here as necessary.
By giving you additional information about each activity, the analytical report tool will assist you in controlling the analytical accounting entries, which makes it an essential tool for the financial management of the business. Let's go on to the part that discusses the reporting requirements for unrealised currency gains and losses in Odoo Accounting now that we understand how the analytical report operates.
You can find out the company's filtering gains or losses for the chosen fiscal quarter by selecting the Unrealised Currency Gains/Losses option in the Odoo accounting reporting tools. The impact of foreign exchange rates on the business's operations is what causes these gains or losses. Moreover, unrealised currency gains and losses are usually associated with activities using multiple currencies or multinational corporations that function globally. This option is available in Odoo 18 accounting reporting since the Odoo platform enables the firm's operations to be carried out in many currencies.
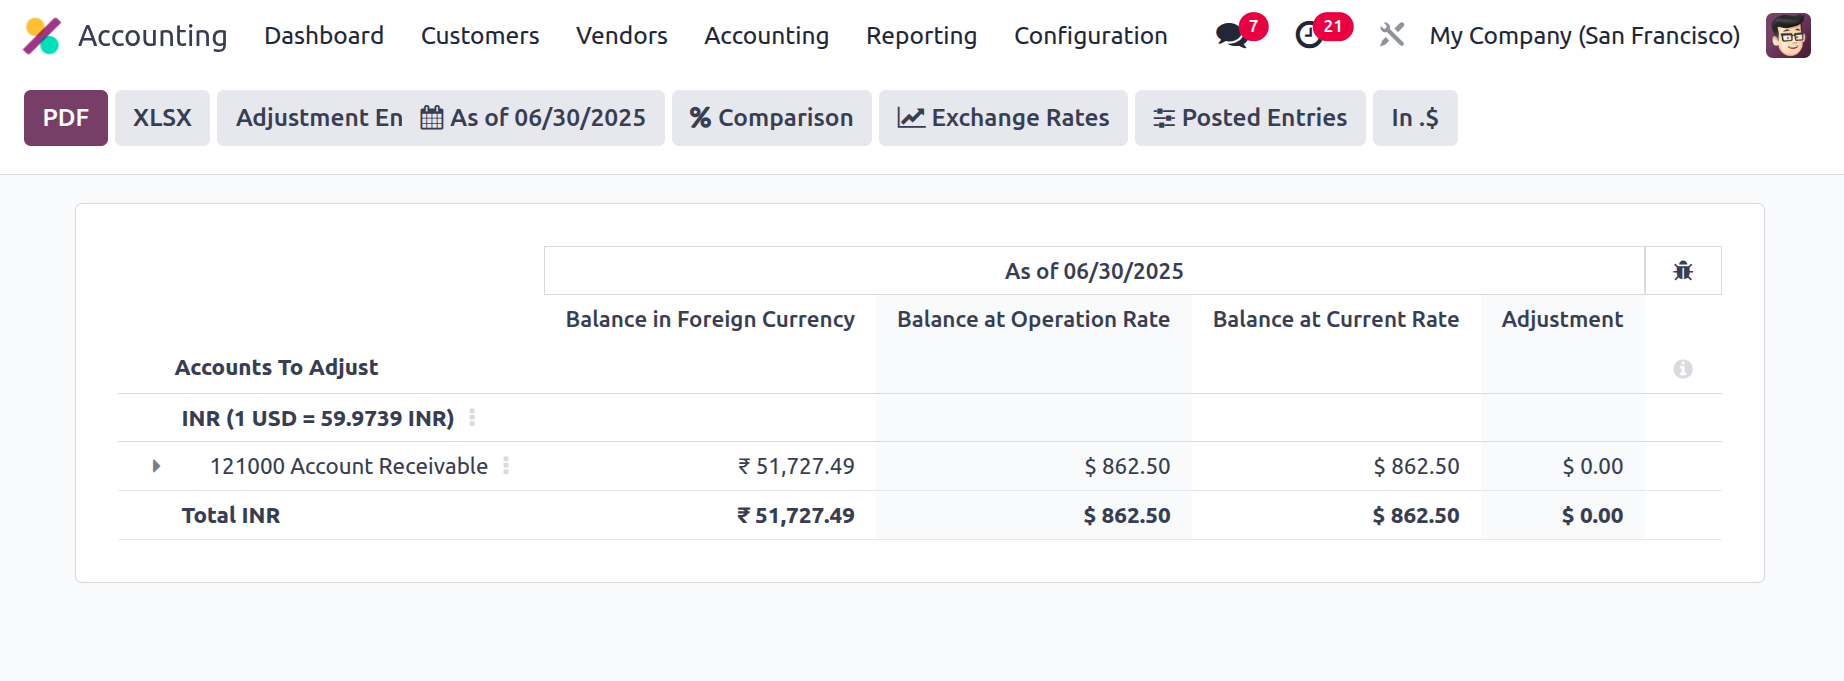
The filters applied for the fiscal periods specified for the report will determine the items in the Unrealised Currency Gains/Losses reports. Additionally, a variety of filtering tools can be used to help with the filtration elements, and custom ones can be created depending on the needs. The preset conversion rates for the currencies that your company and the Odoo platform utilise can be used for filtering. With the aid of the chosen filters, you may arrange the data according to the defined Draft and Unposted items.
The filters applied for the fiscal periods specified for the report will determine the items in the Unrealised Currency Gains/Losses reports. Additionally, a variety of filtering tools can be used to help with the filtration elements, and custom ones can be created depending on the needs. The preset conversion rates for the currencies that your company and the Odoo platform utilise can be used for filtering. With the aid of the chosen filters, you may arrange the data according to the defined Draft and Unposted items.
Let's move on to the section on Depreciation Schedule-based reporting after discussing the Odoo Accounting module's Unrealised Currency Gains and Losses reporting capability.
Deferred Expenses
Deferred expenses are costs that have been incurred but have not yet been recognized. To put it another way, they are expenses that have already been paid for but will not be expensed right away. Because they allow businesses to account for costs related to assets that will be used over an extended period of time, deferred expenses are essential.
To handle such costs, Odoo18 Accounting uses deferred expenses. The structure for the system's handling of postponed expenses is what these are meant to outline. For example, this can be used to outline the rules for posting accounts and the appropriate time to identify costs. It can also be used to open an account for postponed expenses. This account is used to track deferred expenses and is updated whenever charges are recognised or repaid. This makes it easy for companies to keep an eye on their finances, manage their delayed charges, and perfect the expense operations of subscription-based products. The Deferred Expenses account for expenses such as
- Prepayment:Under this agreement, the company pays a cost prior to the delivery of the good or service. Usually, it is used to cover large expenses like rent, insurance, or subscriptions
- Accrued Expense: When a business incurs expenses but does not immediately pay for them, it employs the accrued expense model. This could be the case for things like staff bonuses or overdue loan interest.
- Depreciation: This model is used when a business purchases an asset and expenses it over the item's useful life. This could be the case for vehicles, machines, or buildings.
- Amortization: The amortization strategy may be used when a business pays for expenses over time, such as software license fees or loan payments.
The subscription-based products and services that are purchased from several vendors are directly linked to the deferred expenses. To view the Deferred Expenses window, go to the Accounting module. As seen in the picture below, you may view the Vendor Bills window here under the Vendor menu.
The following represents the Deferred Expenses generated in Odoo 18 from the bill:
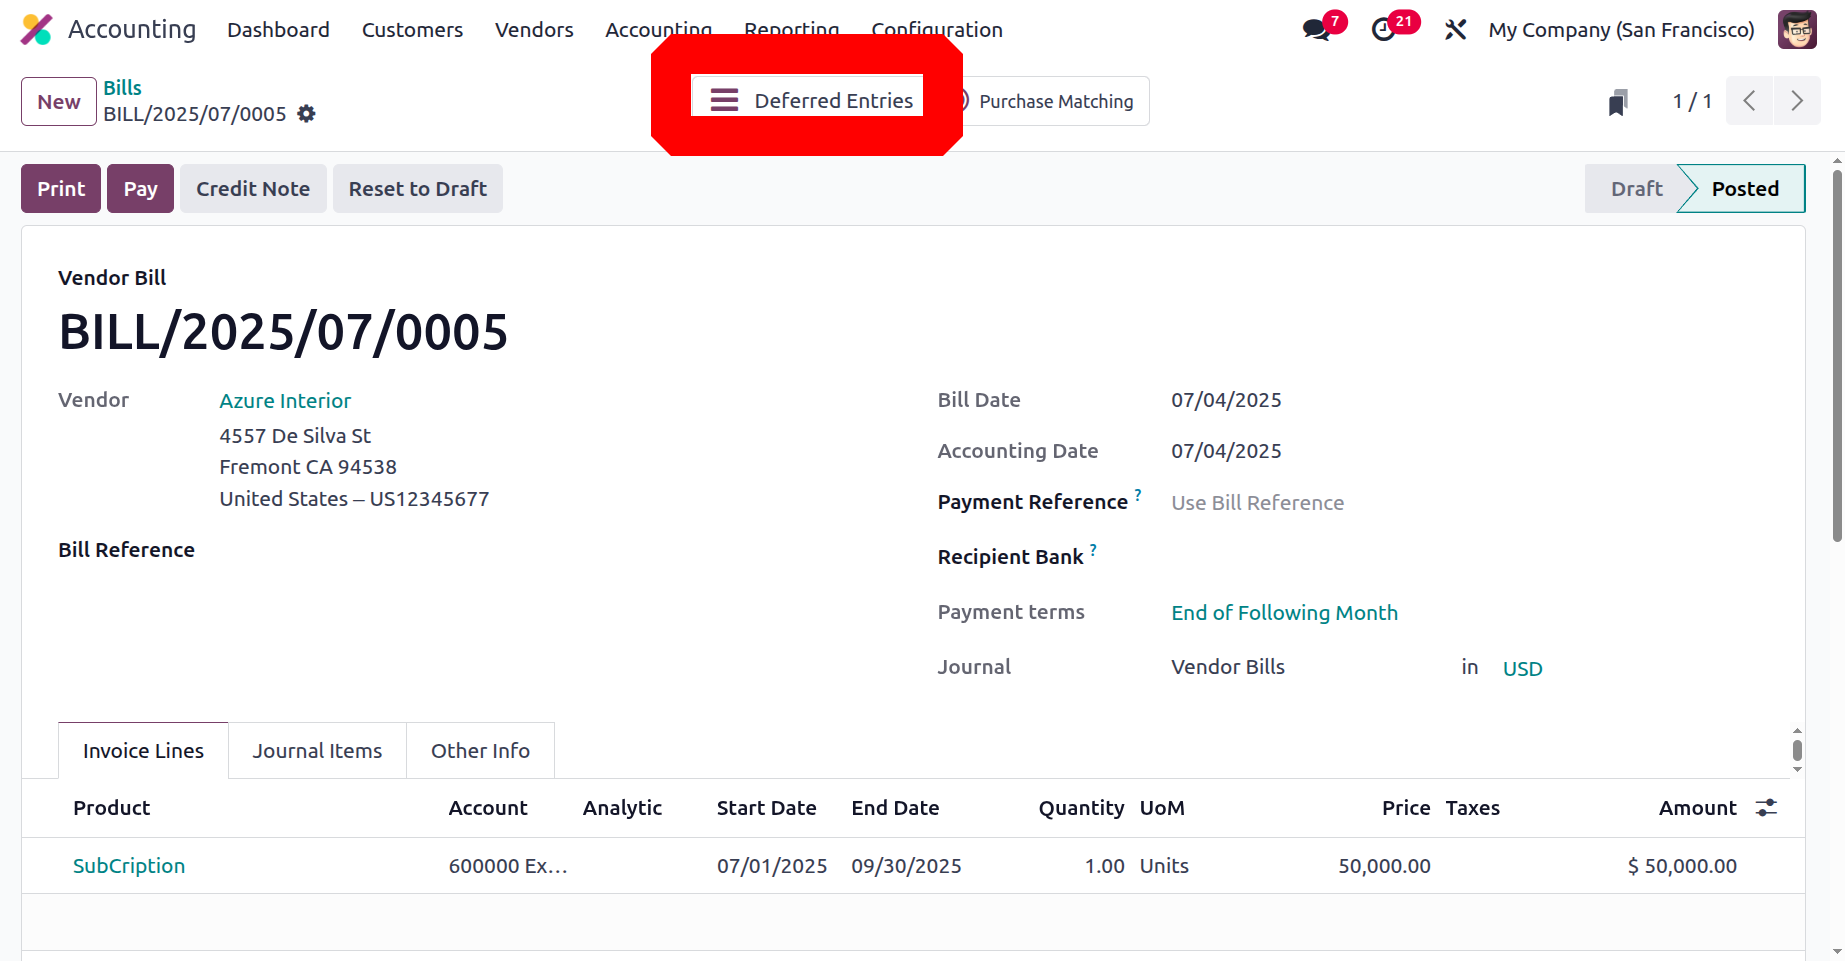
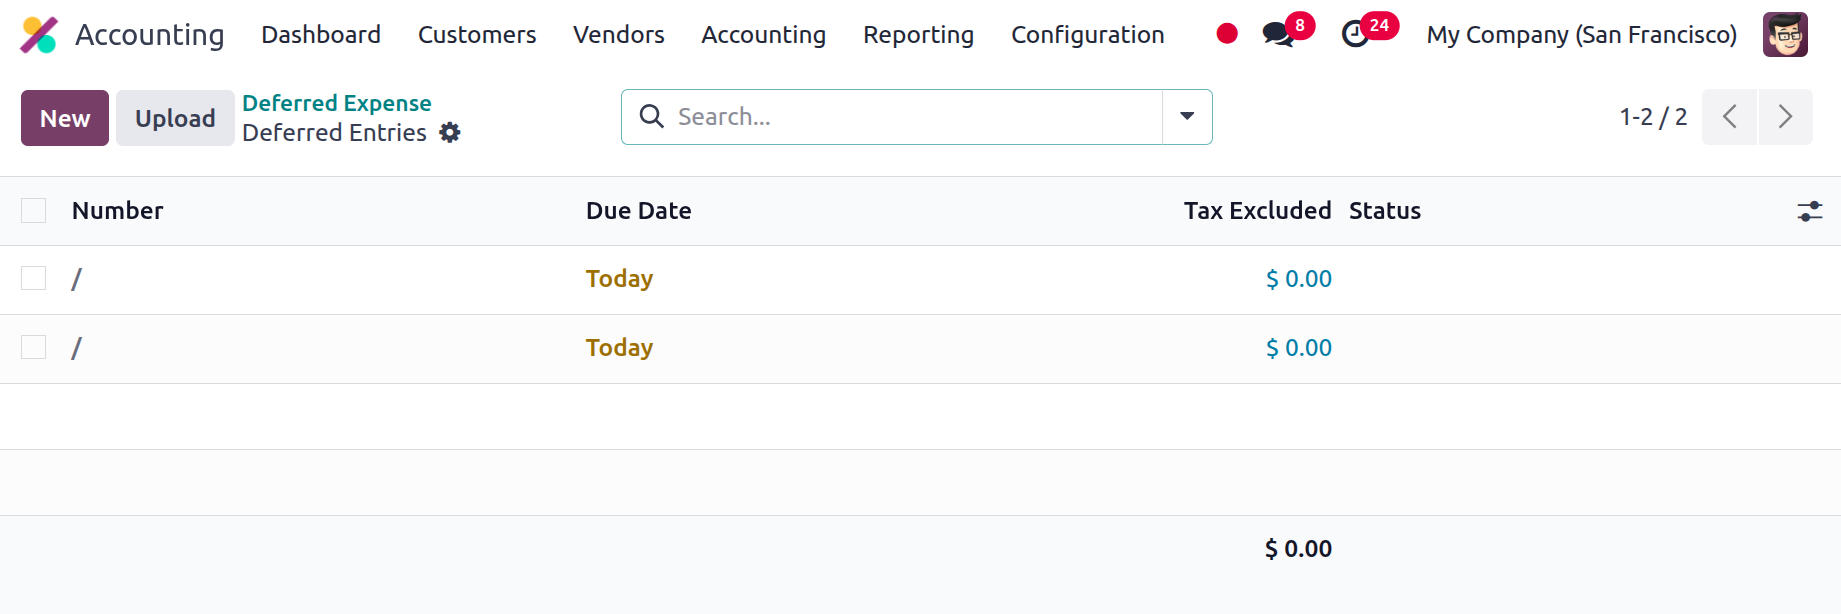
Add the product and the vendor to the vendor bill. The start and finish dates set the start and end dates of the postponed entries. Therefore, the Start Date is when the postponed expense starts. The End Date is the date on which the deferred expense expires. As previously stated, click the "Confirm" button to validate the bill. A clever tab named "Deferred Entries" then shows up. After turning on the Smart Tab, users can view the Deferred Expense Entries. The entries page shows the date, journal entry, account, label, taxes, debit, and credit.
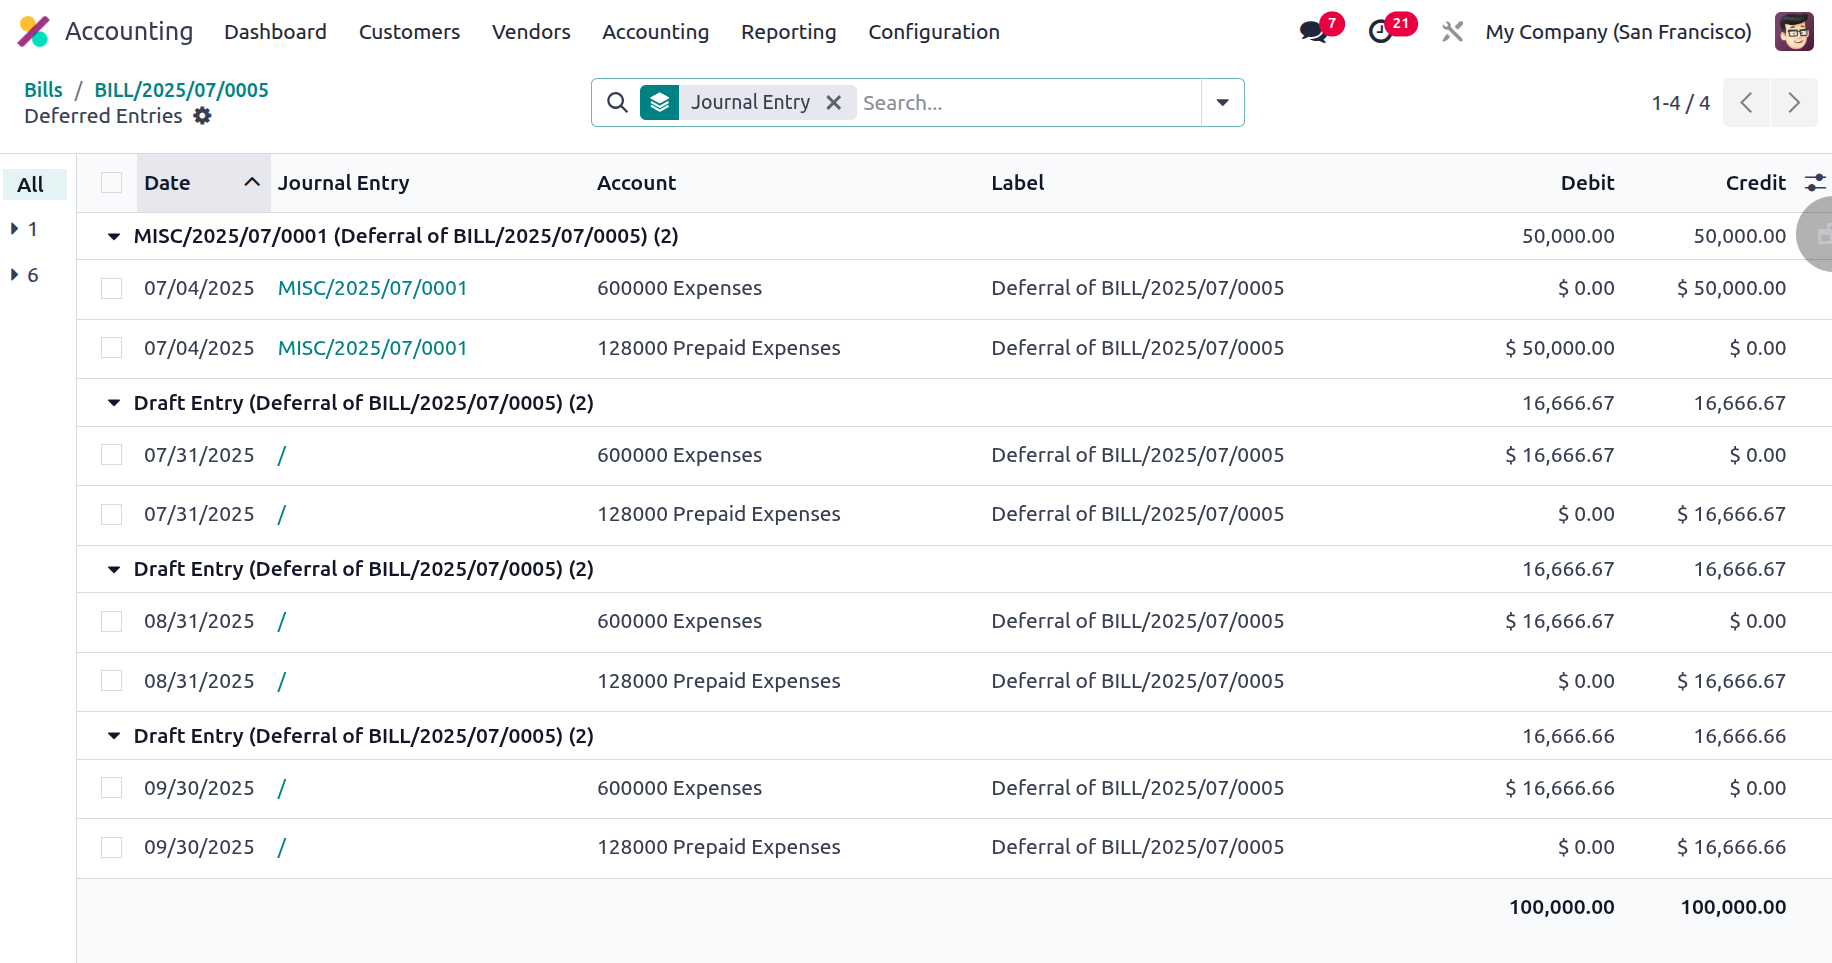
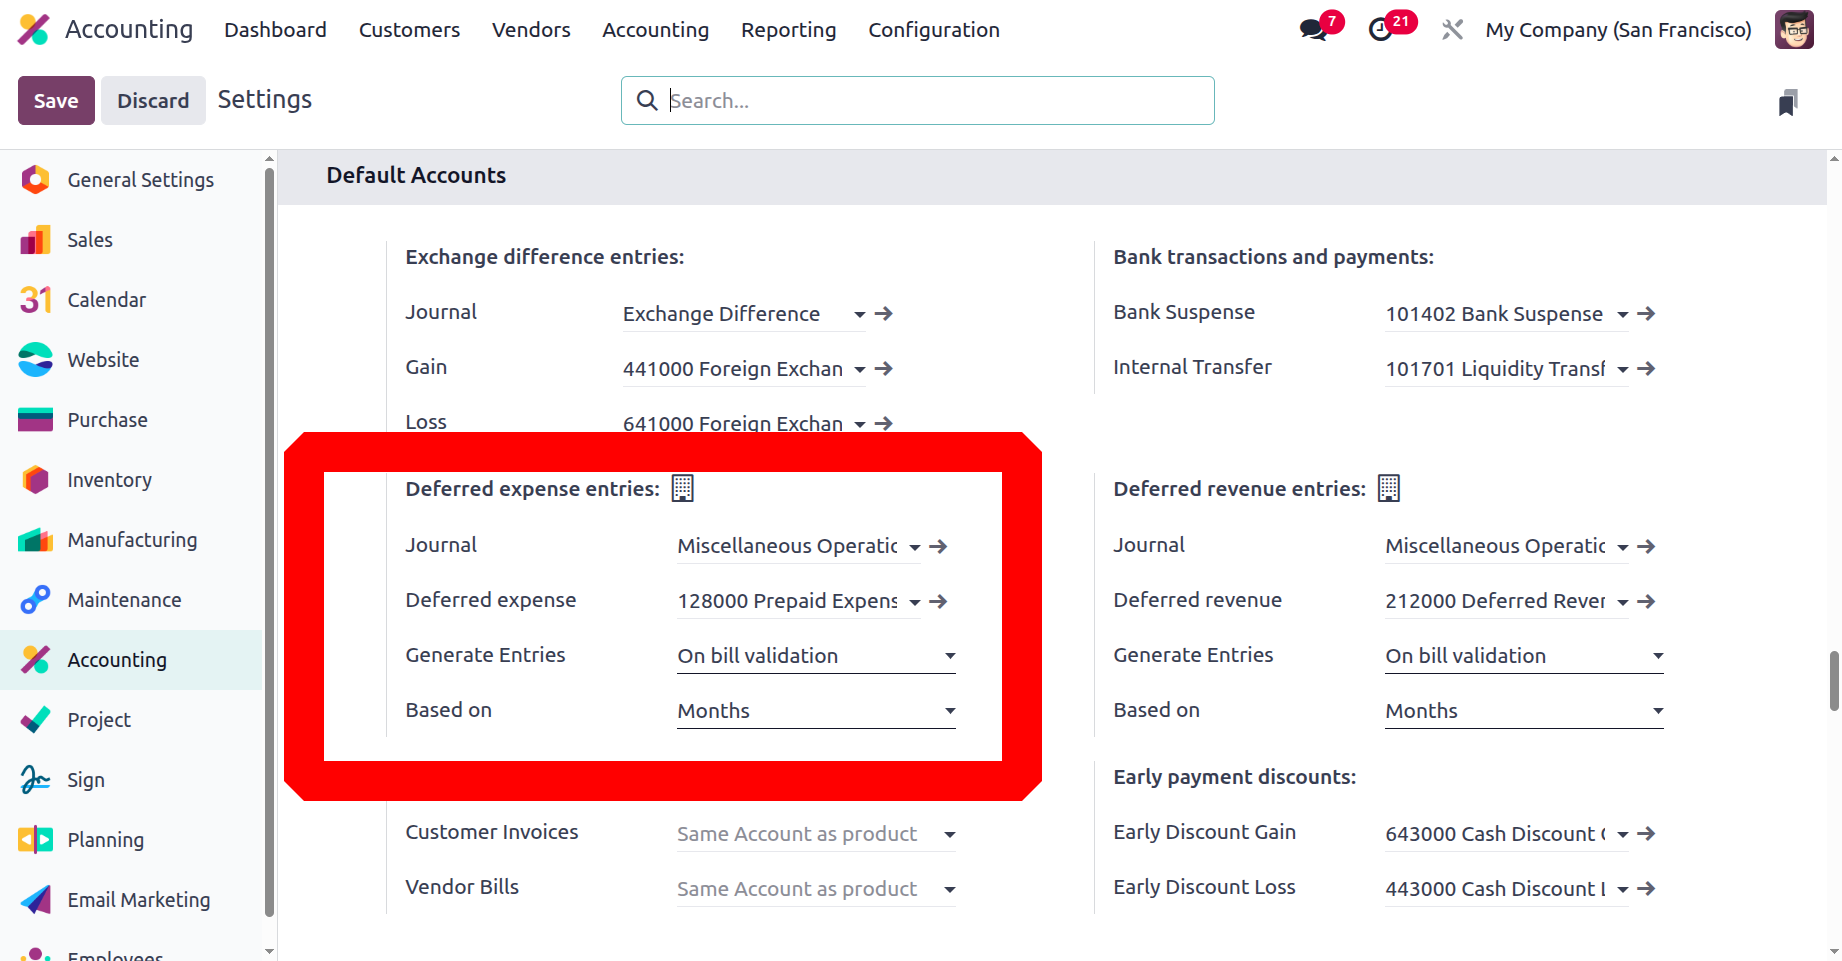
The accounts for deferred entry posting can be chosen by the user. These accounts are mentioned in the settings. There is the "Default Accounts" section. The default accounts for those entries are thus mentioned. The delayed expense entries can be created manually and grouped, or they can be generated using vendor bill validation. The total can then be computed using the days or the equal of all the months.
Every deferred expense item that has been made is shown in the Deferred Expense Report, which is found in the Management section. The account, total, and depreciation amounts are shown in the report.
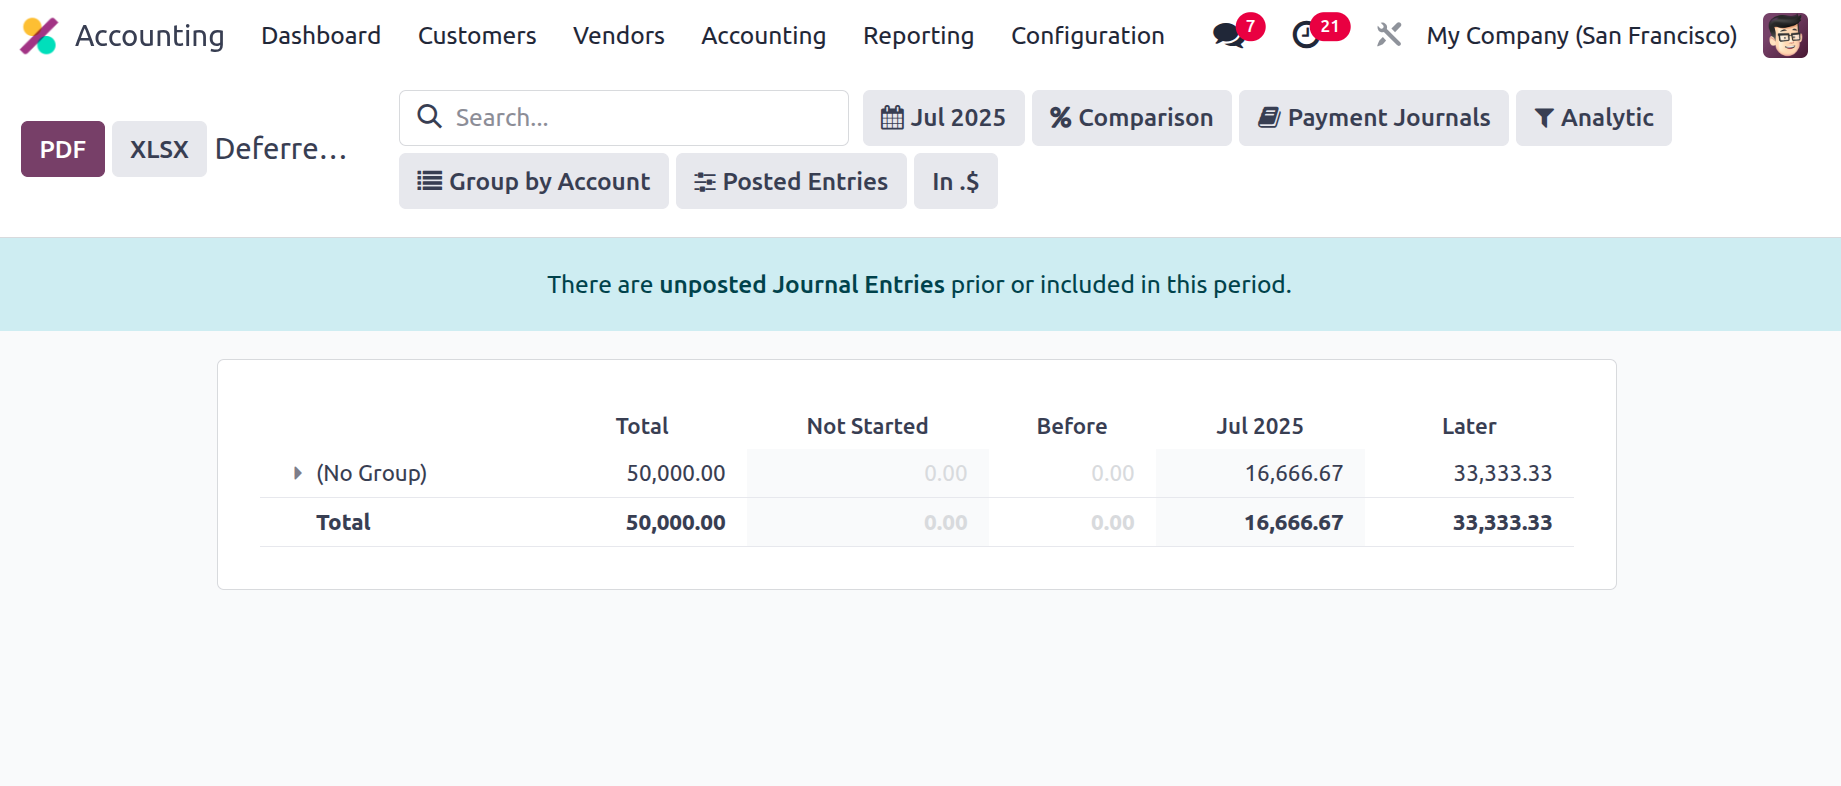
It can be saved as a PDF or XLSX file on the computer. To save the report to the Documents module, click the Save button.
There are two methods for generating entries. If the generated entries are set as Manually & Grouped, then after the bill is confirmed, journal entries will not be created automatically. So, after confirmation of the bil,l go and check the Deferred Expense Report.
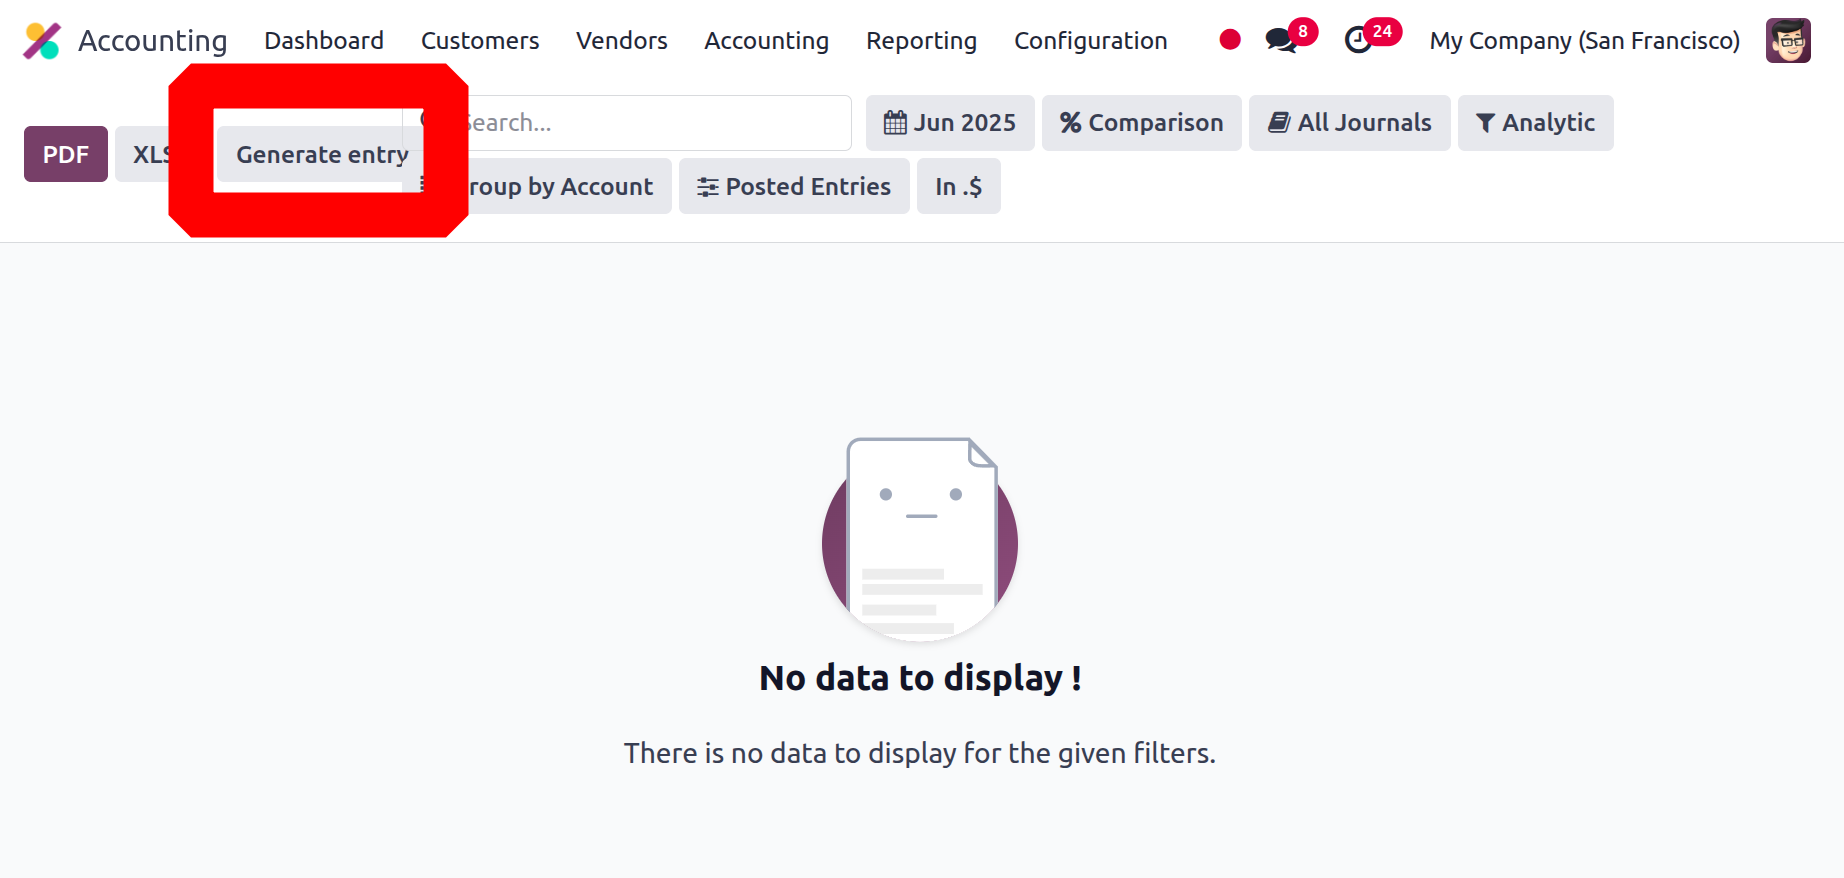
Then click on the Generate entry button to generate manually. Then the corresponding entries will be created, as shown below.
Deferred Revenue
Because it allows organisations to track client payments made in advance for goods or services that have not yet been received, the Deferred Revenue feature is particularly useful for enterprises that offer subscription services or have a recurring revenue model. When a customer pays in advance, the amount is documented as deferred revenue. This amount is then reported as revenue after the service or product is rendered. Businesses can have greater control over their financial statements and more readily track their revenue with the use of this application.
Deferred Revenue in the Odoo 18 Accounting module is easy to set up and use. The deferred revenue agreement's parameters, including the payment amount, the delivery date, and the due date, are easily specified. When a customer pays in advance, the money is then recorded as deferred revenue, and the revenue is recognised upon the delivery of the service or product.
It is thought to be an excellent tool for any business that offers subscription services or recurring revenue patterns. Reliable income tracking and safety measures for financial data are advantageous to businesses. In order to precisely monitor the company's current and upcoming liabilities, which will help to guarantee that the company can fulfil its financial obligations and maintain compliance with accounting rules. The deferred revenue model helps the business better manage its cash flow by letting it know when and how much money it expects to receive in the future. It is suitable for products or services that need payment in advance, such as memberships or subscriptions.
For example, a company may charge a customer for a subscription-based service before delivering the goods or service. On the balance sheet, the payment will be shown as "deferred revenue," signifying that the revenue has not yet been earned. This postponed money will be recognised as actual revenue after the service is performed.
For example, a company may charge a customer for a subscription-based service before delivering the goods or service. On the balance sheet, the payment will be shown as "deferred revenue," signifying that the revenue has not yet been earned. This postponed money will be recognised as actual revenue after the service is performed.
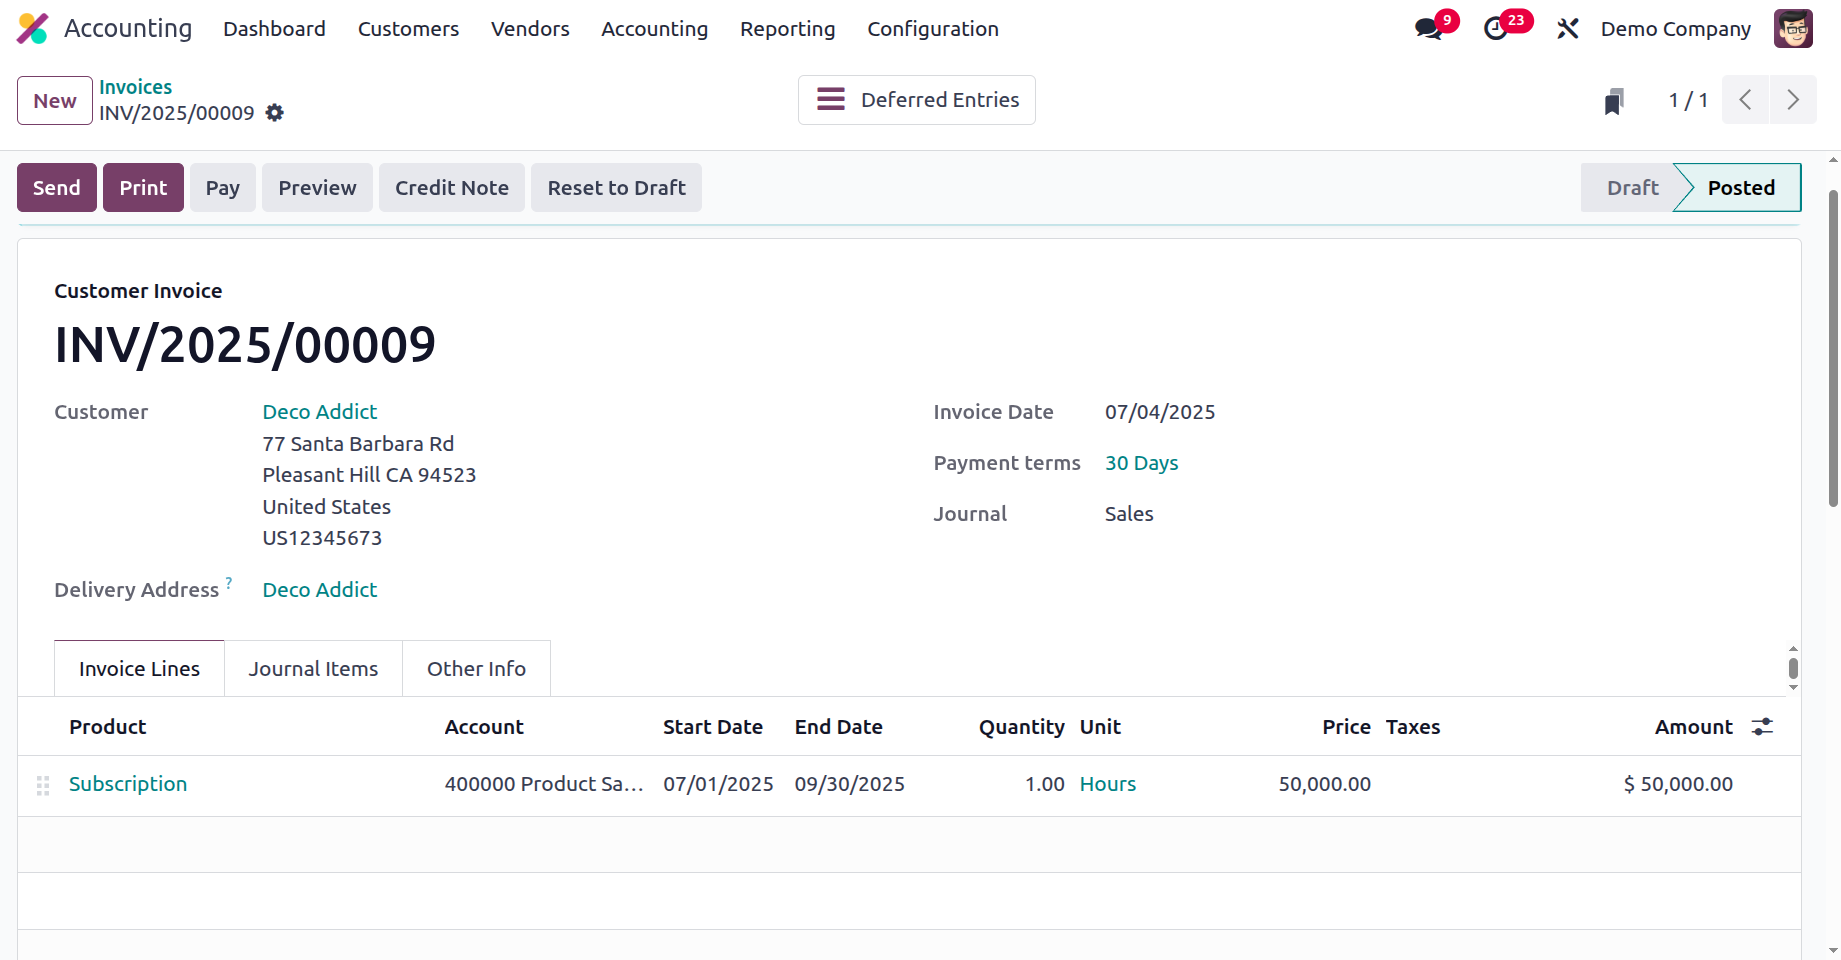
One invoice in the Odoo18 Accounting module can be used to handle the company's deferred revenues. On the Customers menu, you can find the invoice. From within the invoice lines, choose the customer and the subscription item. Additional details like the account, quantity, and unit pricing are included on the invoice line. It also contains the service's start and end dates. The start and finish dates set the start and end dates of the postponed entries. Therefore, the Start Date is the day that the deferred revenue starts. The End Date is the date on which the deferred revenue expires. After entering the required data, the user can check the invoice. After the invoice is validated, a new smart tab named Deferred Entries will show up.
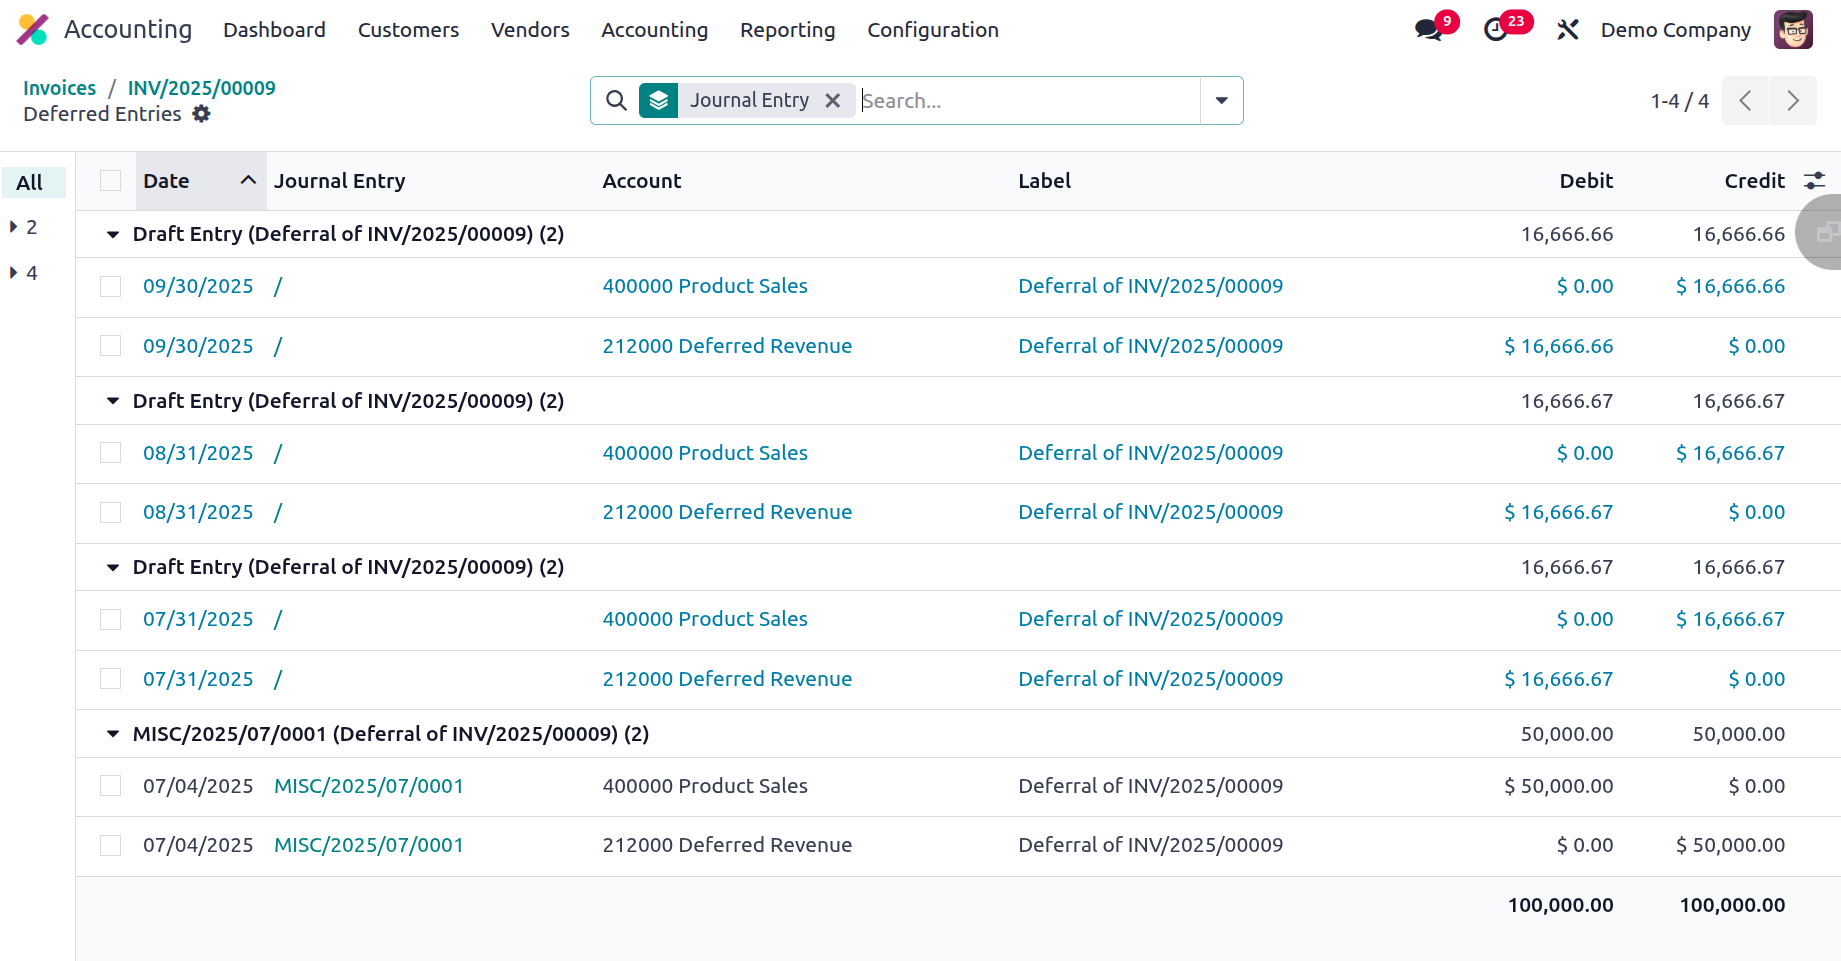
When you click the Deferred Entries smart button, you will be able to view all of the generated entries. The date, journal, account, partner, label, debit, and credit amount are among the various details that are accessible.
You can look at the Default Accounts section, which lists the accounts that are taken, after selecting Settings.
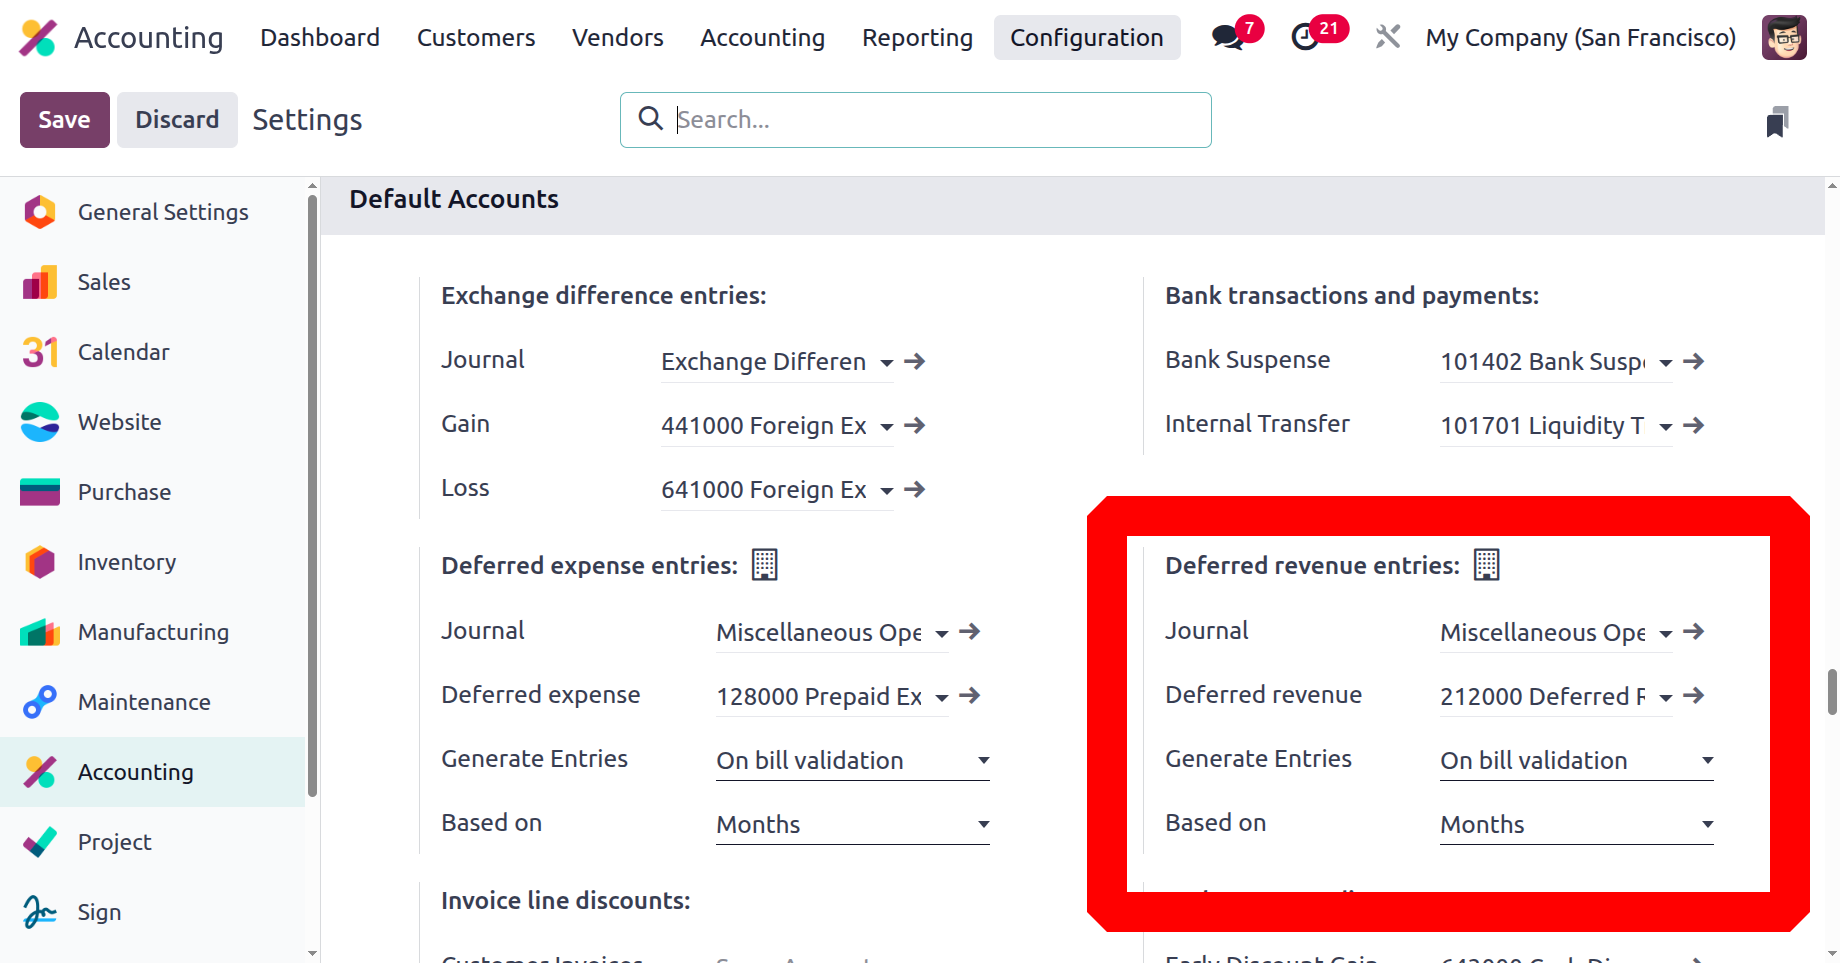
There, the default Deferred Revenue can be set. Next, the Generate Revenue Entries option determines the mechanism used to generate the deferred entries. There, users can choose between On invoice validation and Manually & Grouped. A money Computation field allows you to determine how the total amount of money is distributed across the period. It can be calculated using the number of days or divided equally into months.
If such an entry is made, it can be seen in the Deferred Revenue Report, which is under the Management section. The account, total, and monthly depreciation amount may all be shown there.
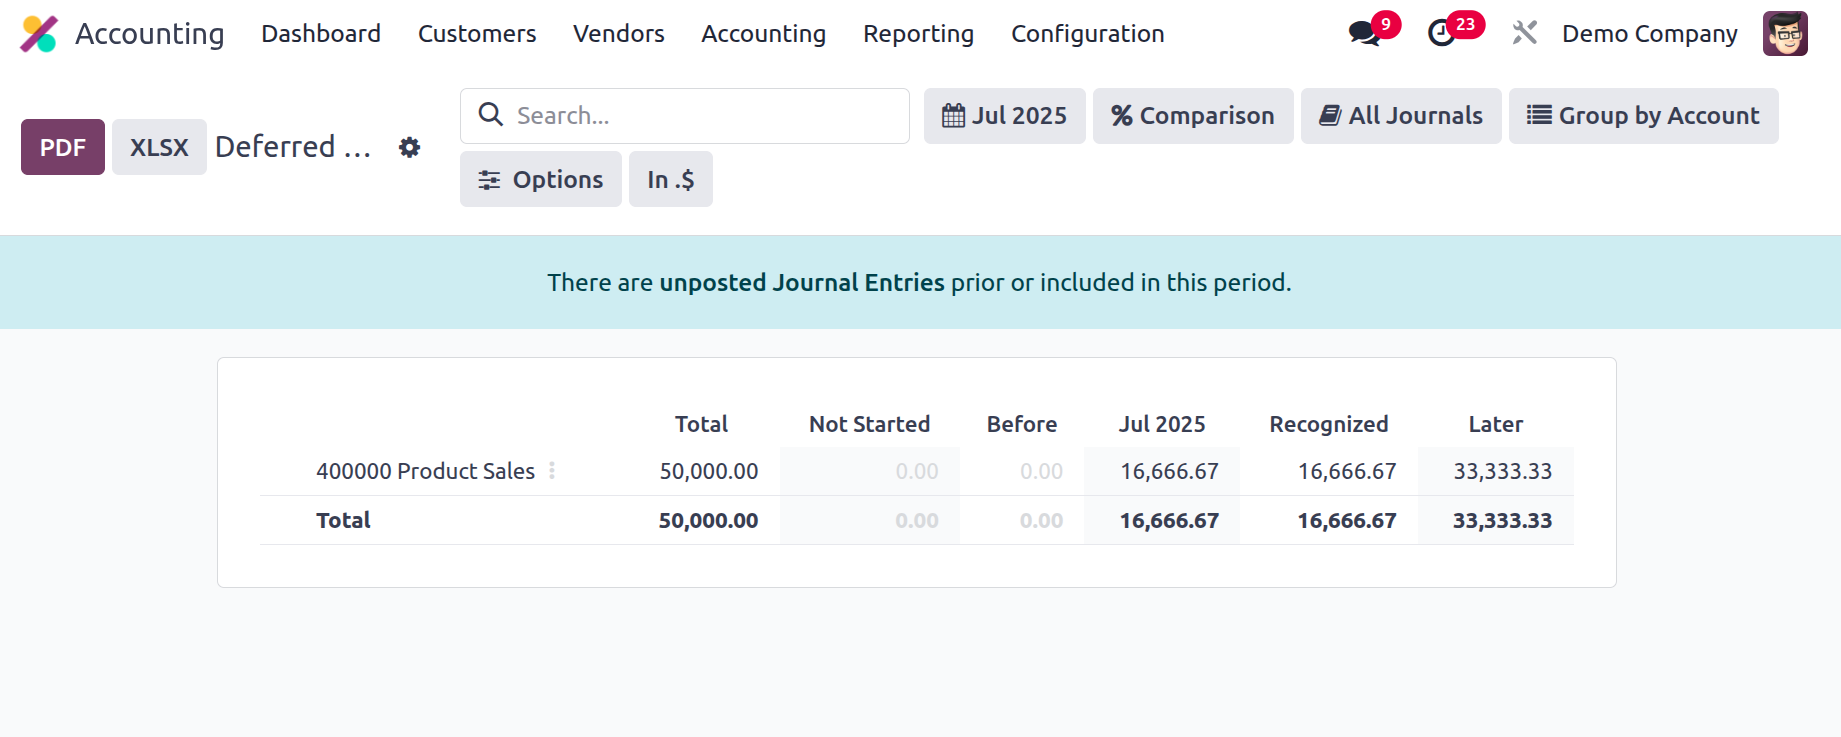
The report can be downloaded to the system in both PDF and XLSX forms. The report can be saved to documents by clicking the Save button.
Depreciation Schedule
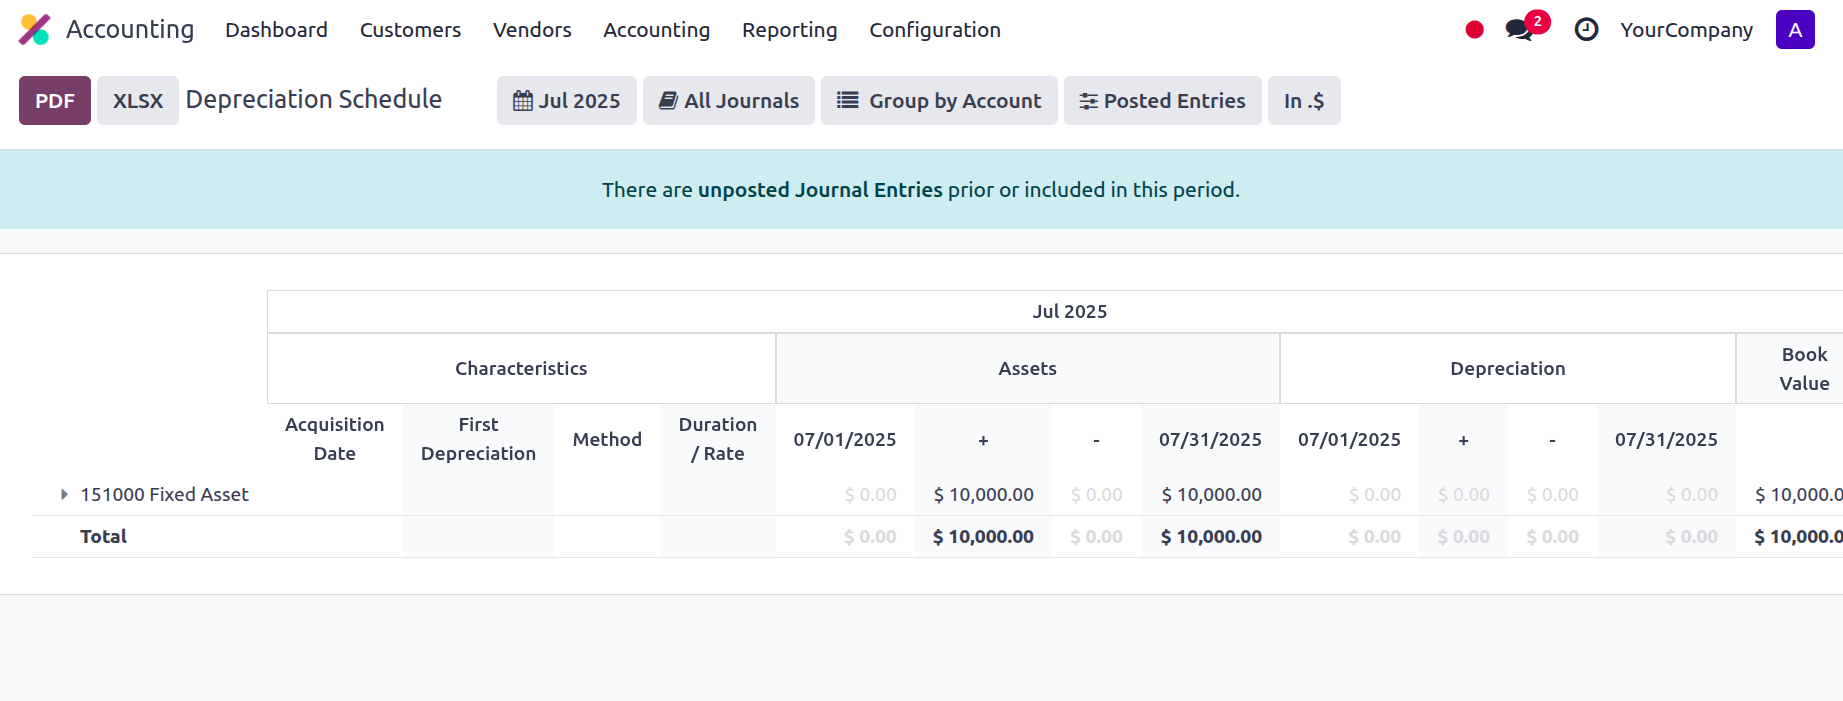
You can find out how quickly an item chosen for use in your business depreciates by using the Depreciation Schedule-based reporting. The assets you have previously identified may be defined by the assets of your business. The Accounting module's reporting tab provides access to the Depreciation Schedule reporting option. As demonstrated in the figure below, the reports on the Depreciation Schedule will be displayed when you make your selection. Operations will specify the Asset-based Chart of Accounts and any Journals established on it.
Furthermore, the following characteristics will be defined: Acquisition Date, First Depreciation, Method, and Depreciation Rate. The parameters of the asset shall be expressed in terms of operating duration and months. The asset's depreciation during the specified time period will also be shown. Additionally, the book value details for each asset's Depreciation Schedule will be established.
Additionally, you will have the Filtering and Group by tools available depending on the Fiscal period or the entries, just like in all other Odoo platform menus. These are the standard grouping and filtering options; the noble tools can be used to create more. You can store these specifically designated ones as favourites and use them later on in the Depreciation Schedule reporting features filters.
Select each entry under the relevant Chart of Accounts to find out more about the Journal and the entries it describes.
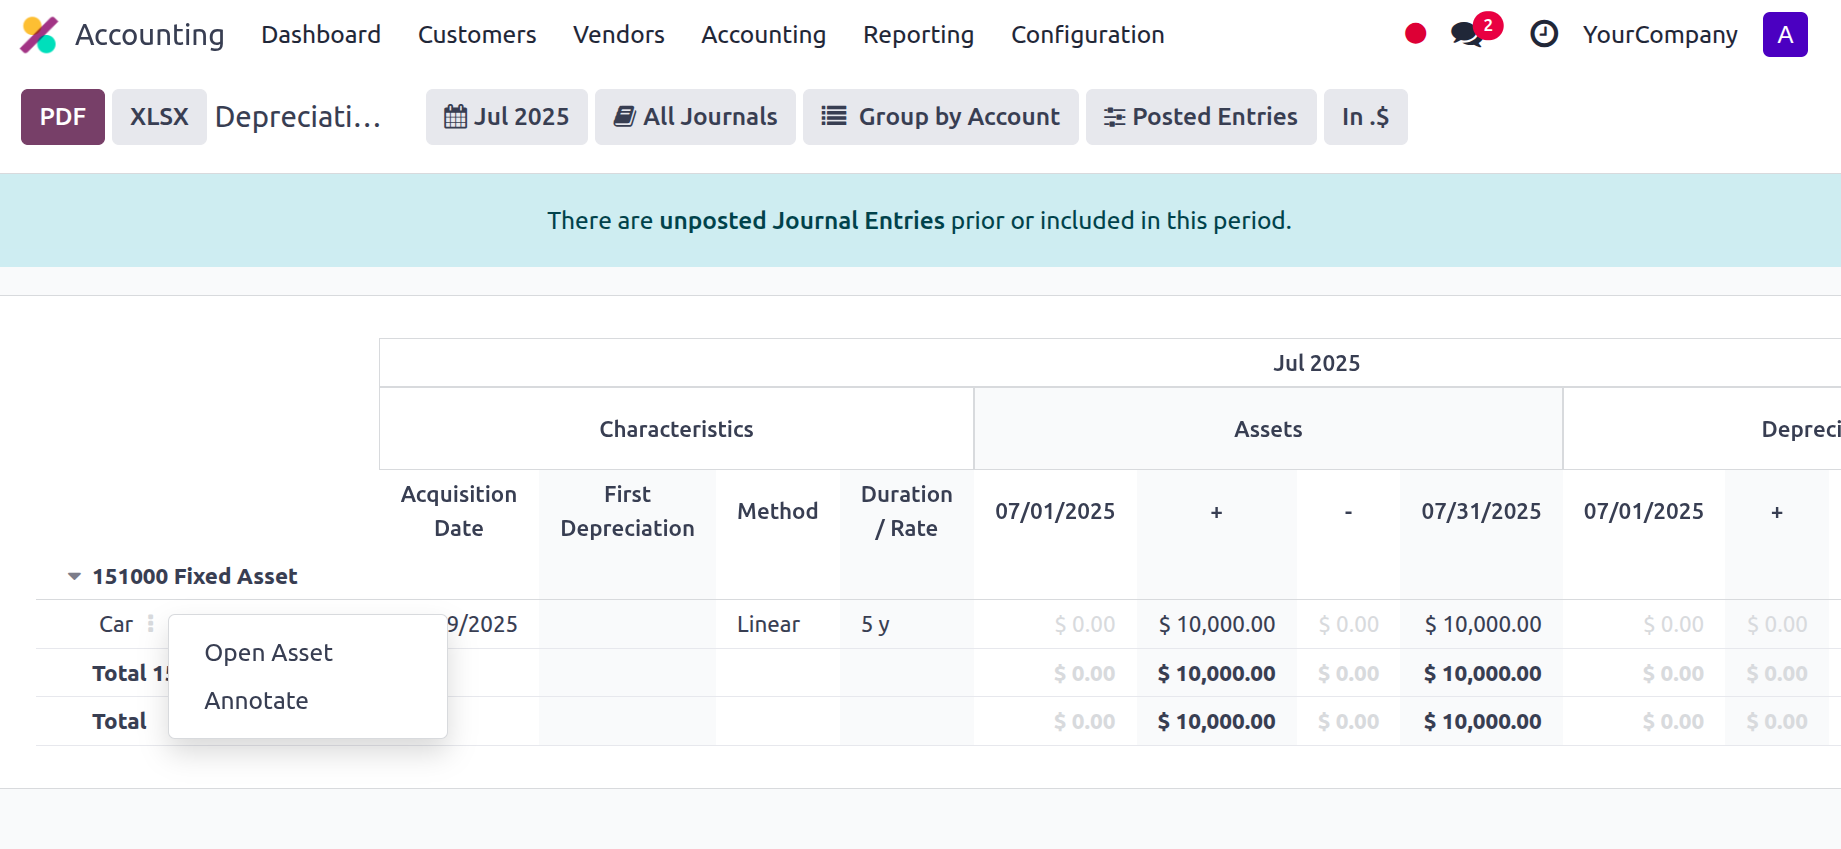
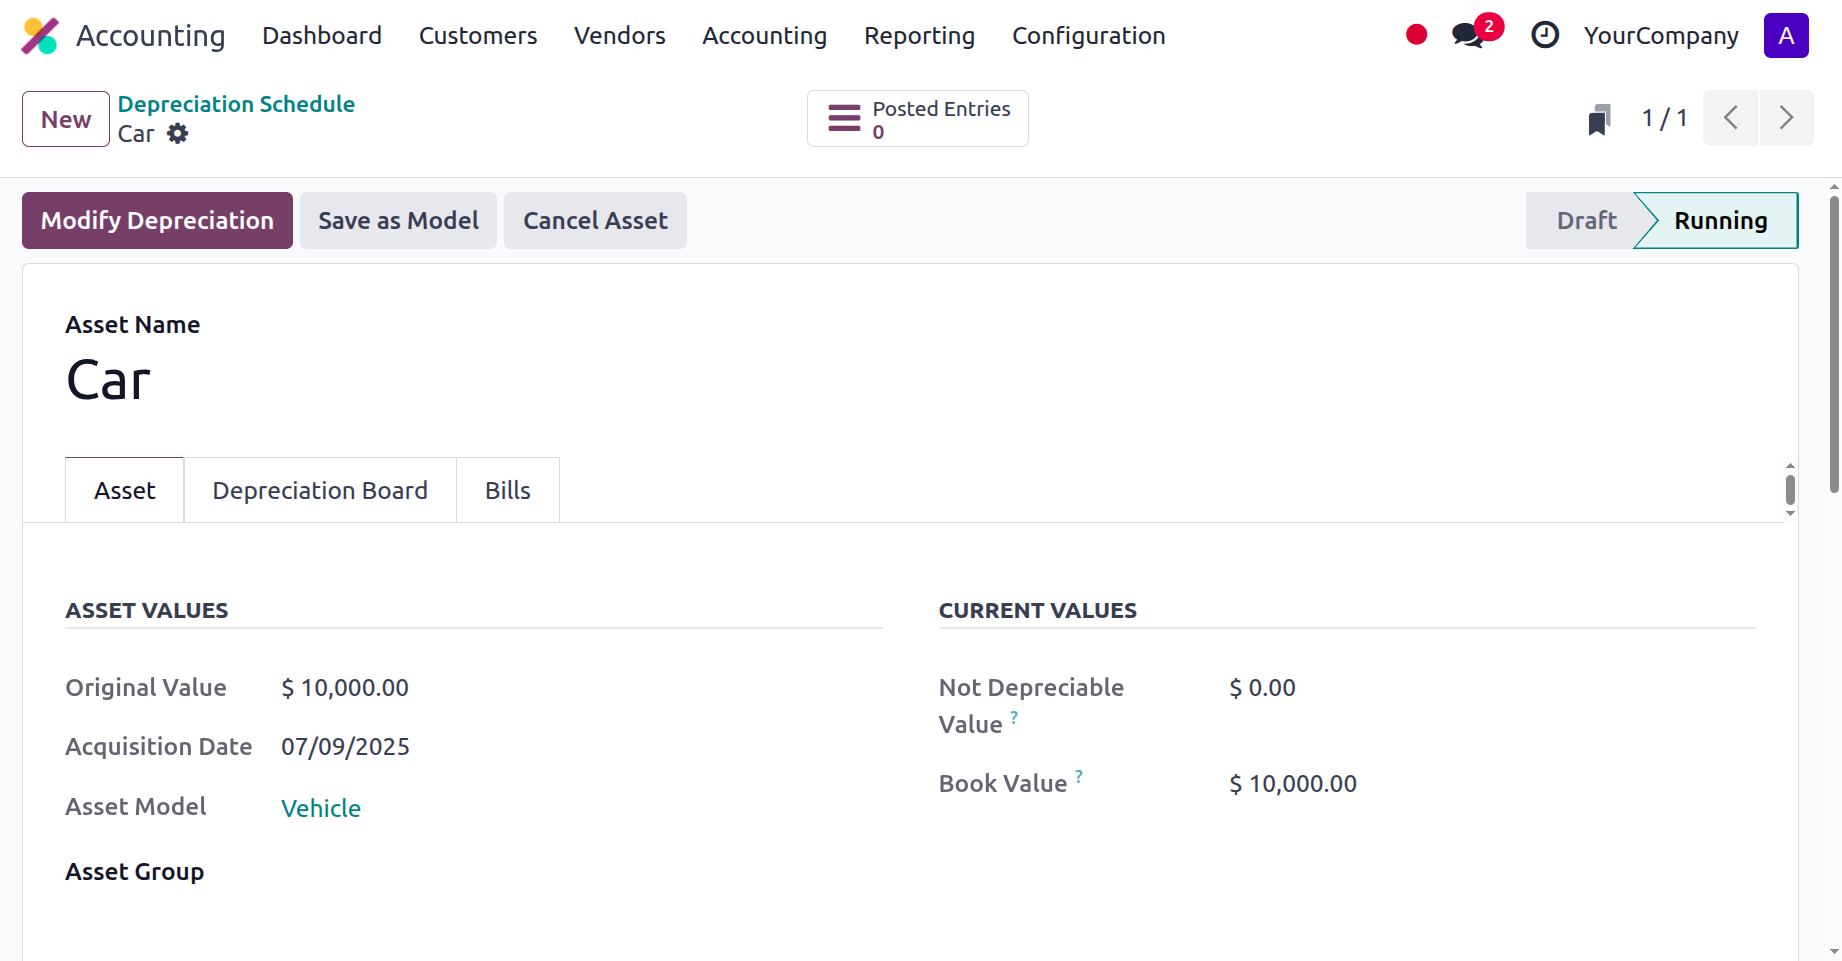
Click Open Asset to view the asset details. Alternatively, you may use the provided Edit option to change the journal's details. The option to sell, dispose of, reassess, and halt asset depreciation is offered via the MODIFY DEPRECIATION option. Selling or disposing of the asset is one of the options under "Sell or Dispose." By selecting the available Re-evaluate option, you can alter the depreciation with respect to the asset.
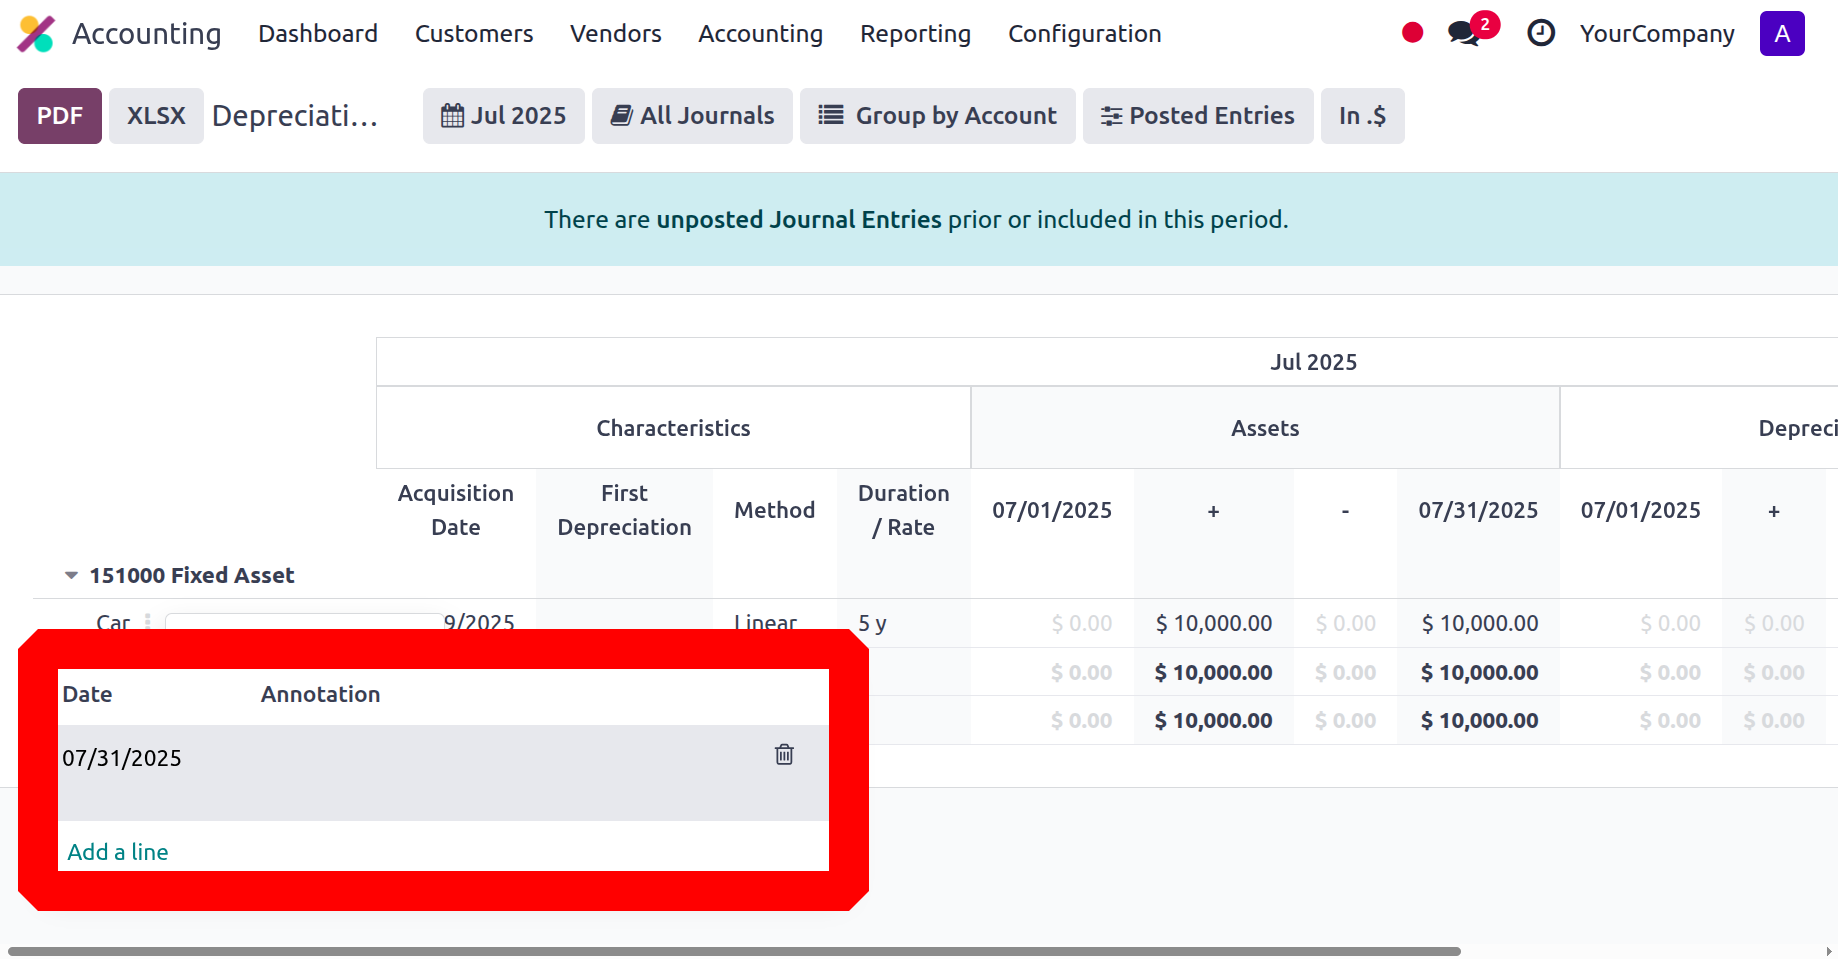
The Annotate window, as seen in the screenshot below, will open when you choose the relevant Annotate option for the Journal listed in the Depreciation Schedule. The Annotate actions can be described and saved using the Save option.
You may gain a thorough understanding of every aspect of your business's asset depreciation by using the Depreciation Schedule reporting tool, which is available on the Odoo platform. After discussing the Depreciation Schedule techniques, let's proceed to the following section, which will generate the Budget Analysis reports for the Odoo Accounting module.
Disallowed Expense Report
In Odoo 18 Accounting, disallowed expenses are charges that, because of internal or regulatory policies, are typically not deductible or reimbursed in the framework of company accounting. These costs are not included in the calculation of taxable income or reimbursable amounts.
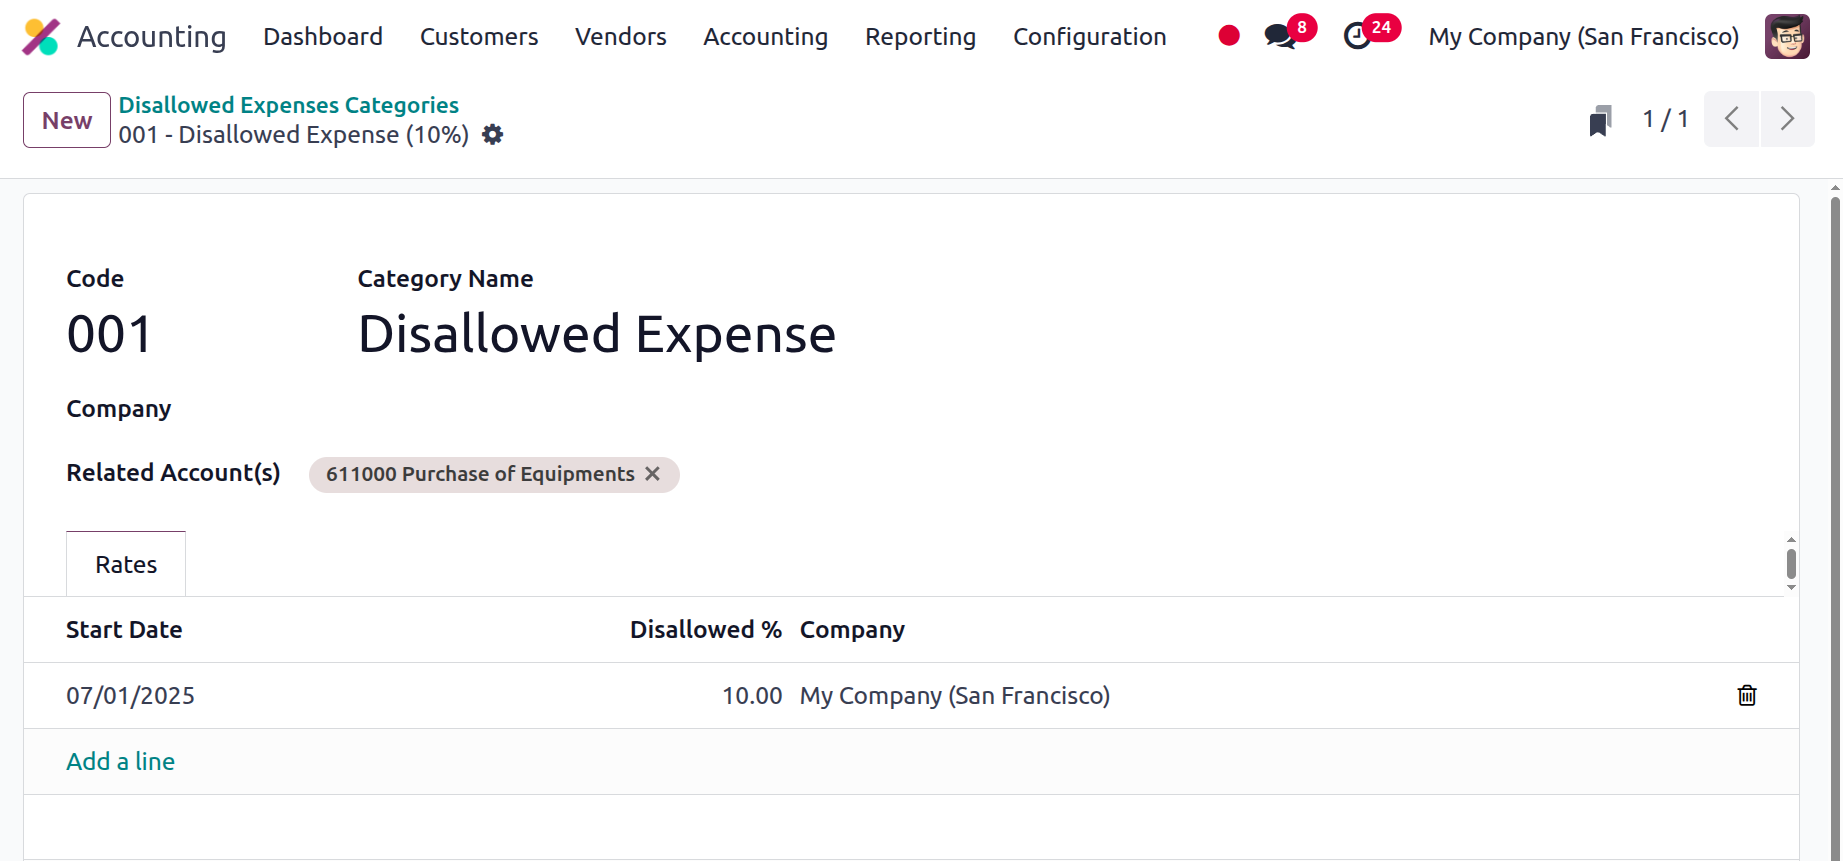
Disallowed Expense Categories can be created from the Configuration tab. Inside the categories, mention the code, category name, company and related account. Then, inside the Rates tab, add the start date and disallow%.
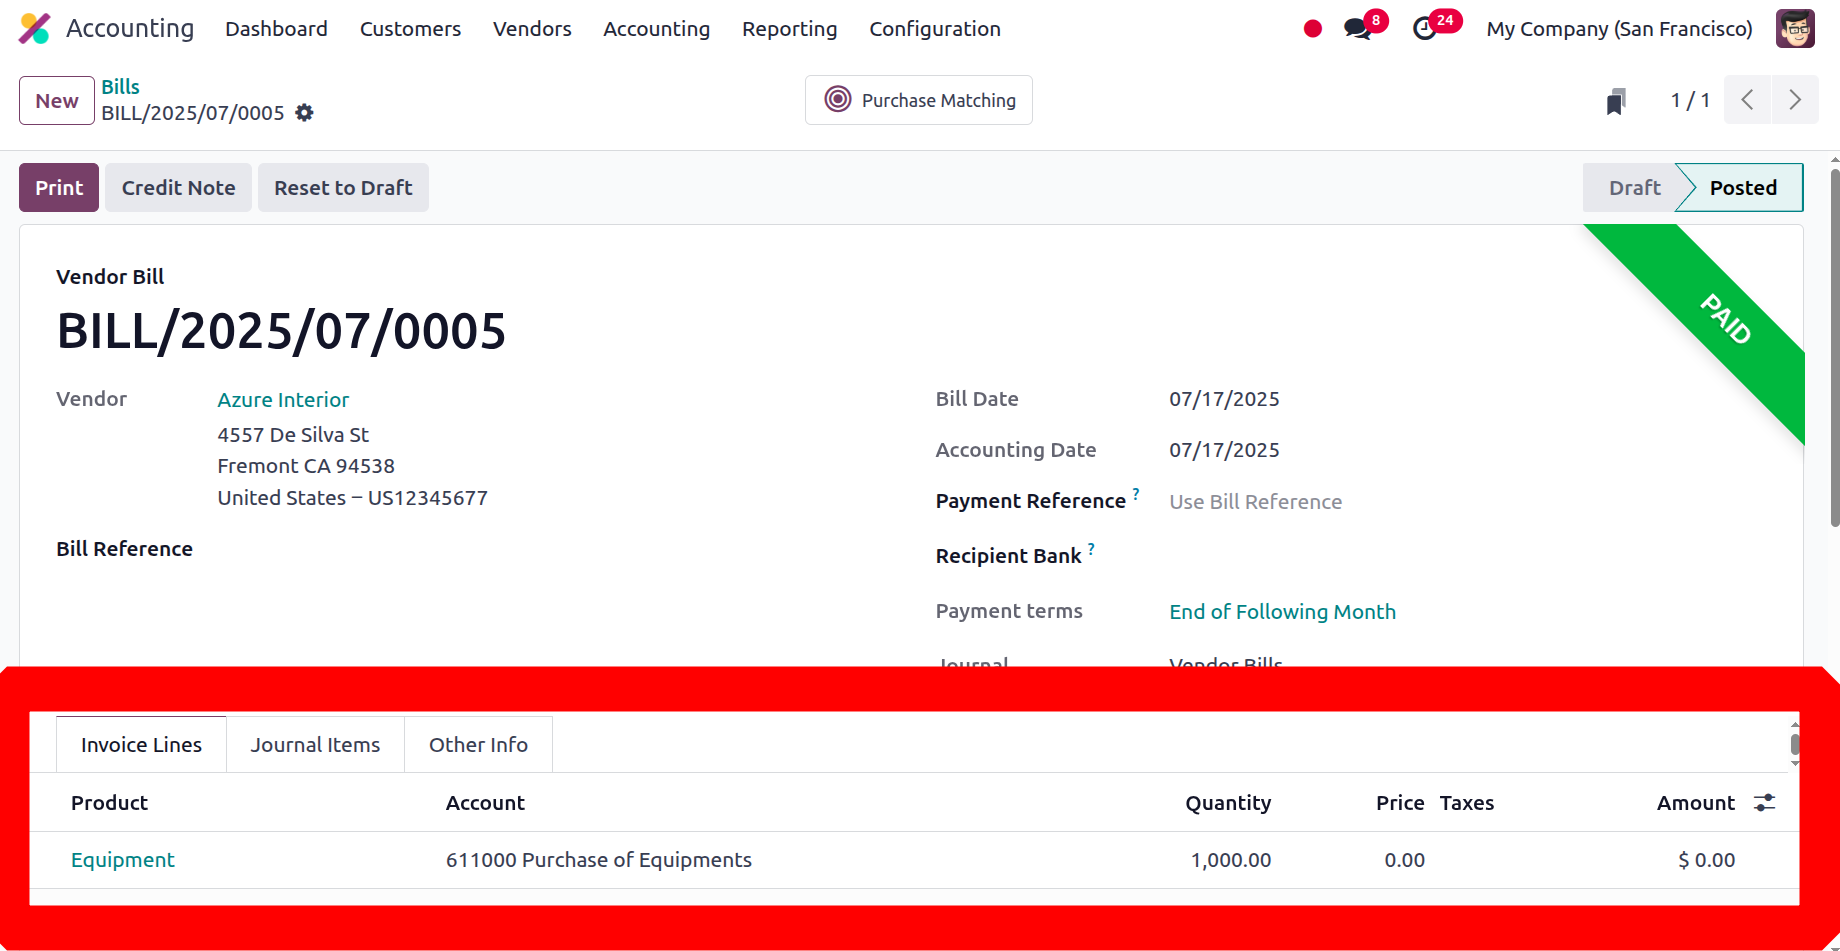
Then create a vendor bill. Add the vendor, product with quantities, price etc. Here the account should be the related account added inside the disallowed expense category. Then confirm the bill.
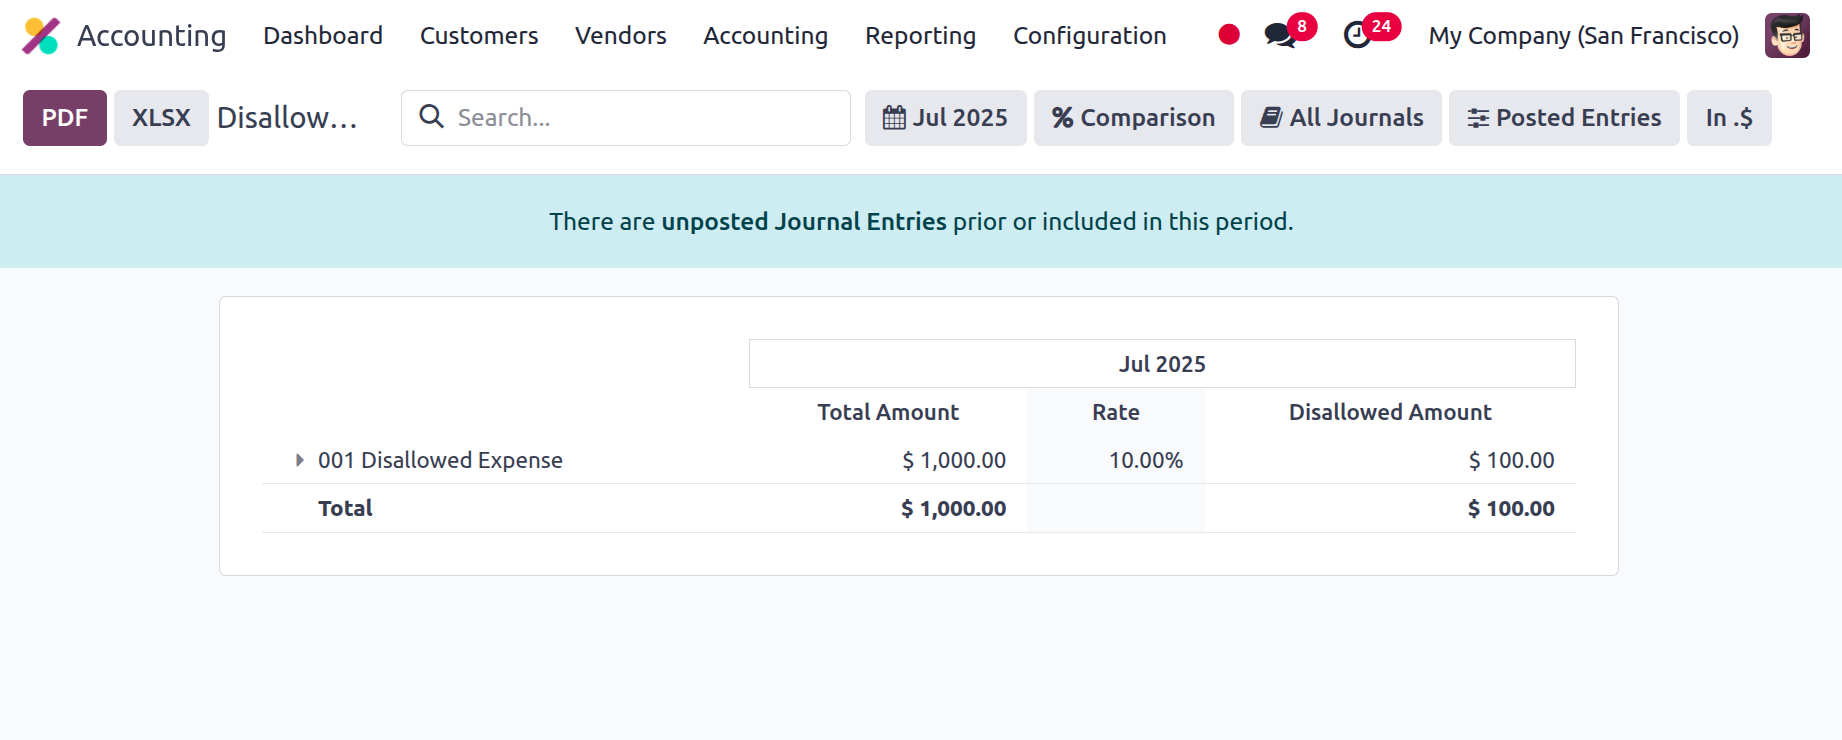
Consequently, as can be seen below, these false charges are displayed in the Disallowed Expense Report under Management. The report contains every detail of each Disallowed Expense item. The disallowed amount, the disallowed rate, and the total amount are shown in the report.
Here, the disallowed expense rate is set as 10% and the total bill amount is $1000. So, 10% of the total amount is shown inside the Disallowed Expense Report.
The report can be easily downloaded to the system in either PDF or XLSX format. The report can also be saved to the Documents by clicking the Save button.
Loan Analysis
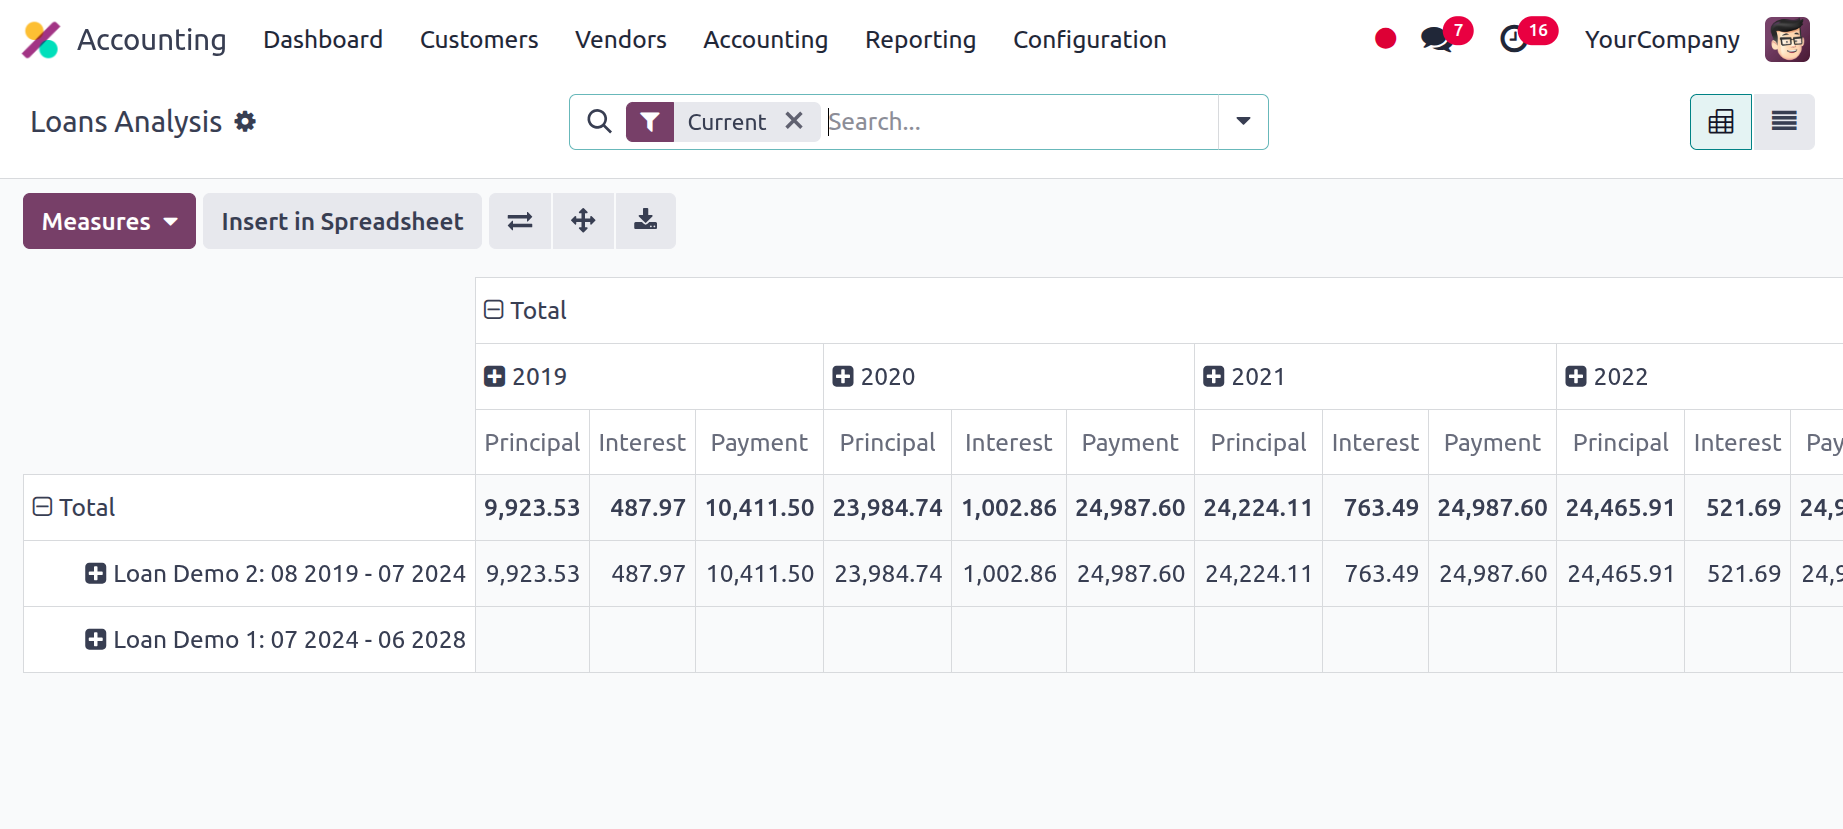
Odoo 18 Accounting's Loan Analysis Report offers a thorough summary of all employee or business loans, keeping track of interest rates, repayment plans, and outstanding balances. It assists companies in keeping an eye on loan recoveries and disbursements, guaranteeing compliance and financial accuracy. For lucid and useful insights, the report can be filtered by employee, loan status, or date range.
Budget Report
A company's budget is the primary source of information used to plan its financial operations for a given fiscal term or period. A corporation's fiscal department will develop a single budget in addition to multiple others, depending on the operational and functional needs of the business. The Accounting module of the Odoo platform has a comprehensive Budget Analysis reporting menu that allows you to modify the reporting elements of the different budgets. A thorough image of the company's budgetary operations can be obtained from the Budget Analysis Report, which is accessible through the reporting page of the Accounting module.
All Odoo platform menus have the ability to filter and group by options, which may be used to organise the Budget Analysis report entries according to requirements.
These grouping and filtering possibilities are typical, and the noble tools can be used to create more. You can store these specifically designated ones as favourites and use them later on in the Depreciation Schedule reporting features filters. All budgeted operations from previous fiscal quarters as well as those that are currently underway,y will be defined in the report. It is simple to extend these sections to include the different financial elements of the budget.
In addition to the Start Date, End Date, Planned Amount, Practical Amount, Theoretical Amount, and Achievement Percentage, the budgetary situation and analytical account will be established.
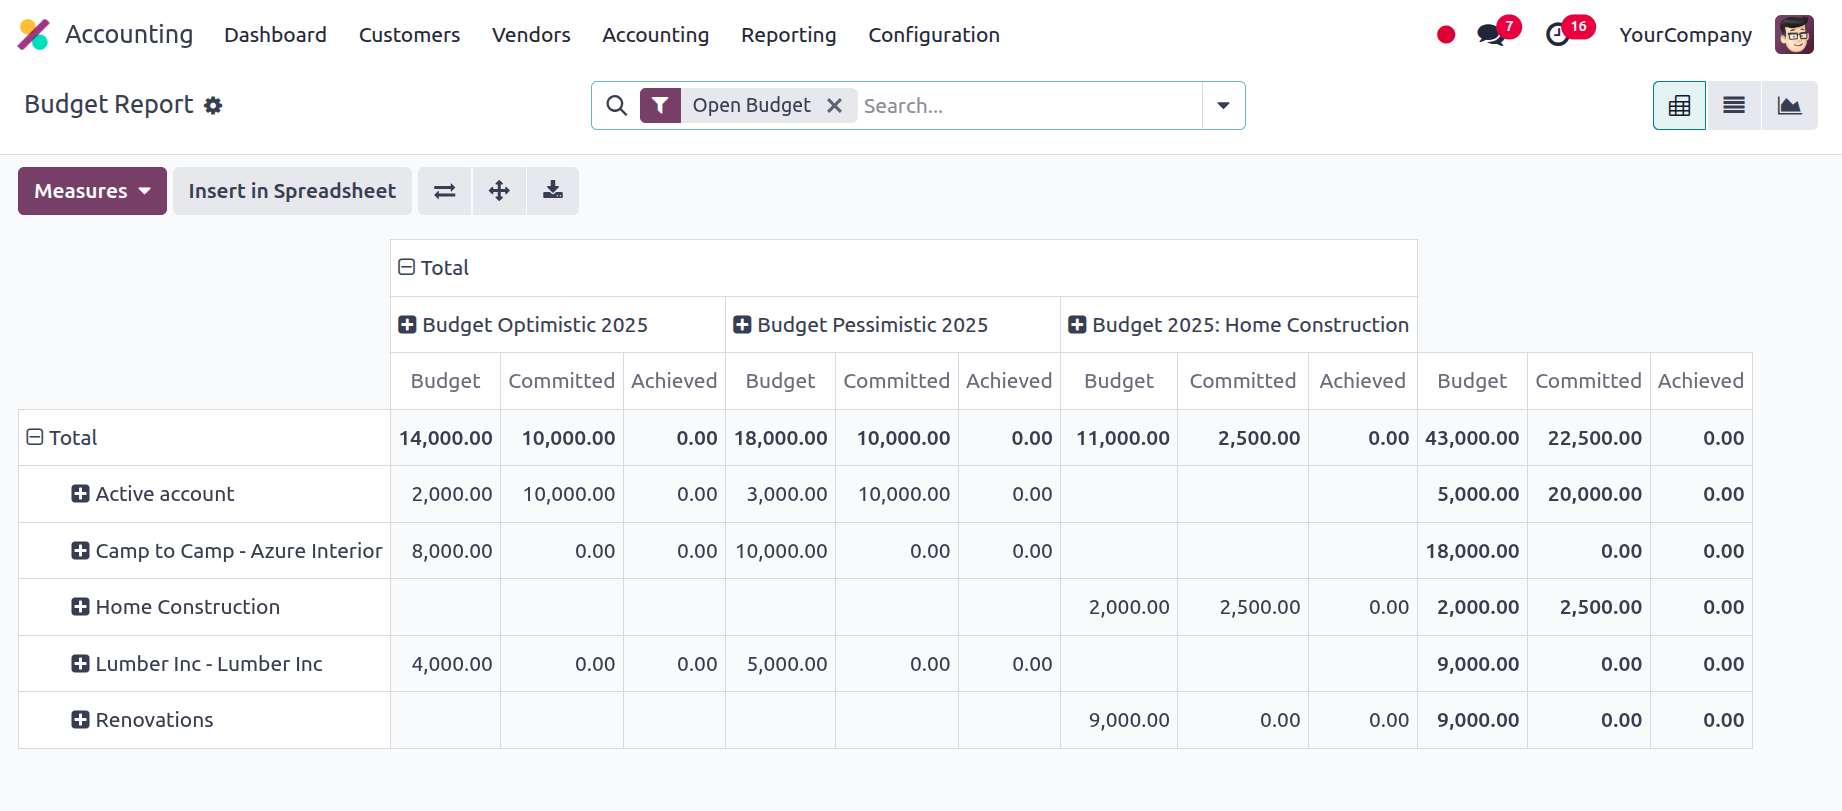
By choosing it from the menu on the right, you can view the budget analysis report in List, Pivot, or Chart views. The Budget Analysis report's list view was displayed in the earlier images. The Pivot View of the Budget Analysis report is displayed in the screenshot above. The Measures for the aspects that have been developed for the various qualities of the entries to be sorted out can be specified in the pivot view. You can add the default Measures that have been defined in both report axes by using the + and - signals. This feature allows you to create and distribute reports based on the budget's operational components.
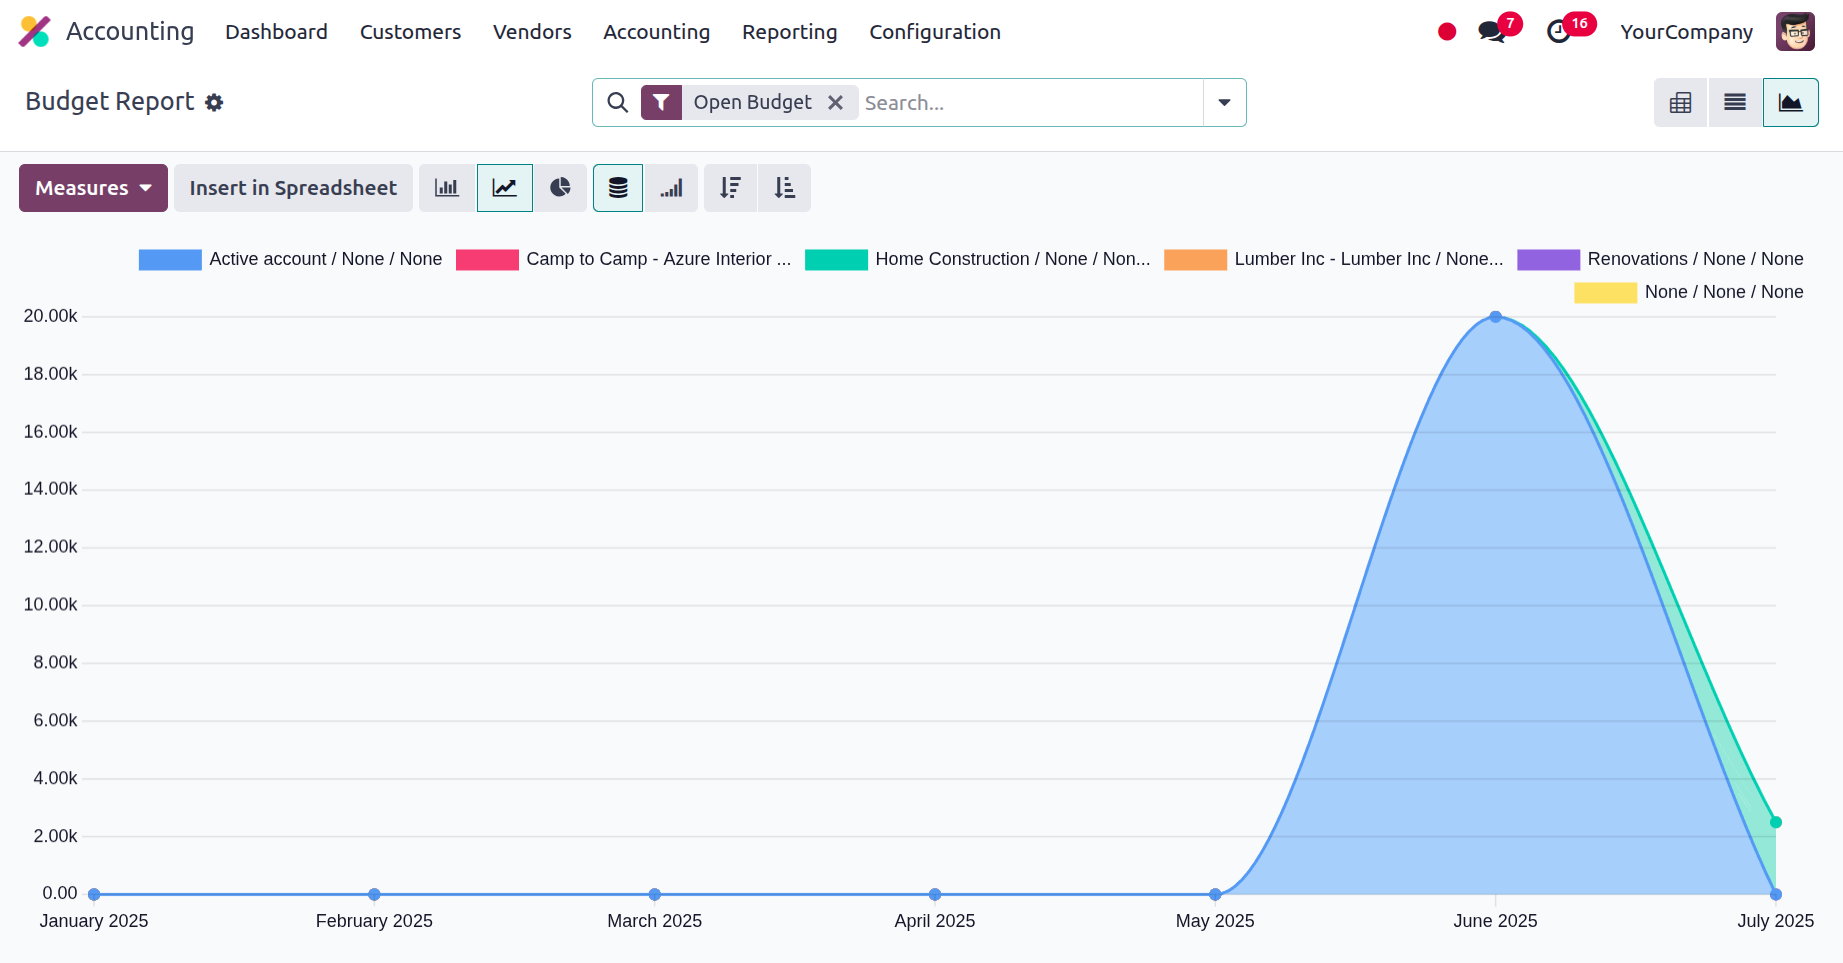
The budget analysis reports will provide you a comprehensive understanding of how your company's budget is operating in addition to the graph view. Additionally, by using the clear and accurate filtering and group by options that are offered, you will be able to separate the necessary entries of each of the reports that have been defined based on your needs. You can now understand the various elements of budget management reporting thanks to Odoo's special Budget Analysis reporting management solution. Let's go to the section that outlines the Project Margins reporting in Odoo Accounting.
Product Margins
The profit you make when you sell something you made or purchased is known as the product margin. Accurate information about the items that businesses will produce based on product sales can be obtained from product margins and their examination. The Product Margin can be described mathematically as follows:
Product margin= (selling price – cost of product) / selling price
If the selling price is greater than the cost price, the product is profitable for the business and the margin % is positive. However, the business loses money and all sales activity results in a negative margin if the selling price is less than the cost price. The Odoo platform has developed a unique reporting feature in the Odoo accounting module specifically for this reason, since it recognises the significance of the production margin in business operations. Product margin reporting offers a concise overview of a business's product margin performance and is available via the Reporting menu in Odoo's accounting module.
The pop-up box seen in the image below will appear once you choose the Product Margins option. Here, the General Information data must be set up, including the From and To options, which need to be explained in more detail. From the drop-down menu that is accessible, you can choose Invoice State.

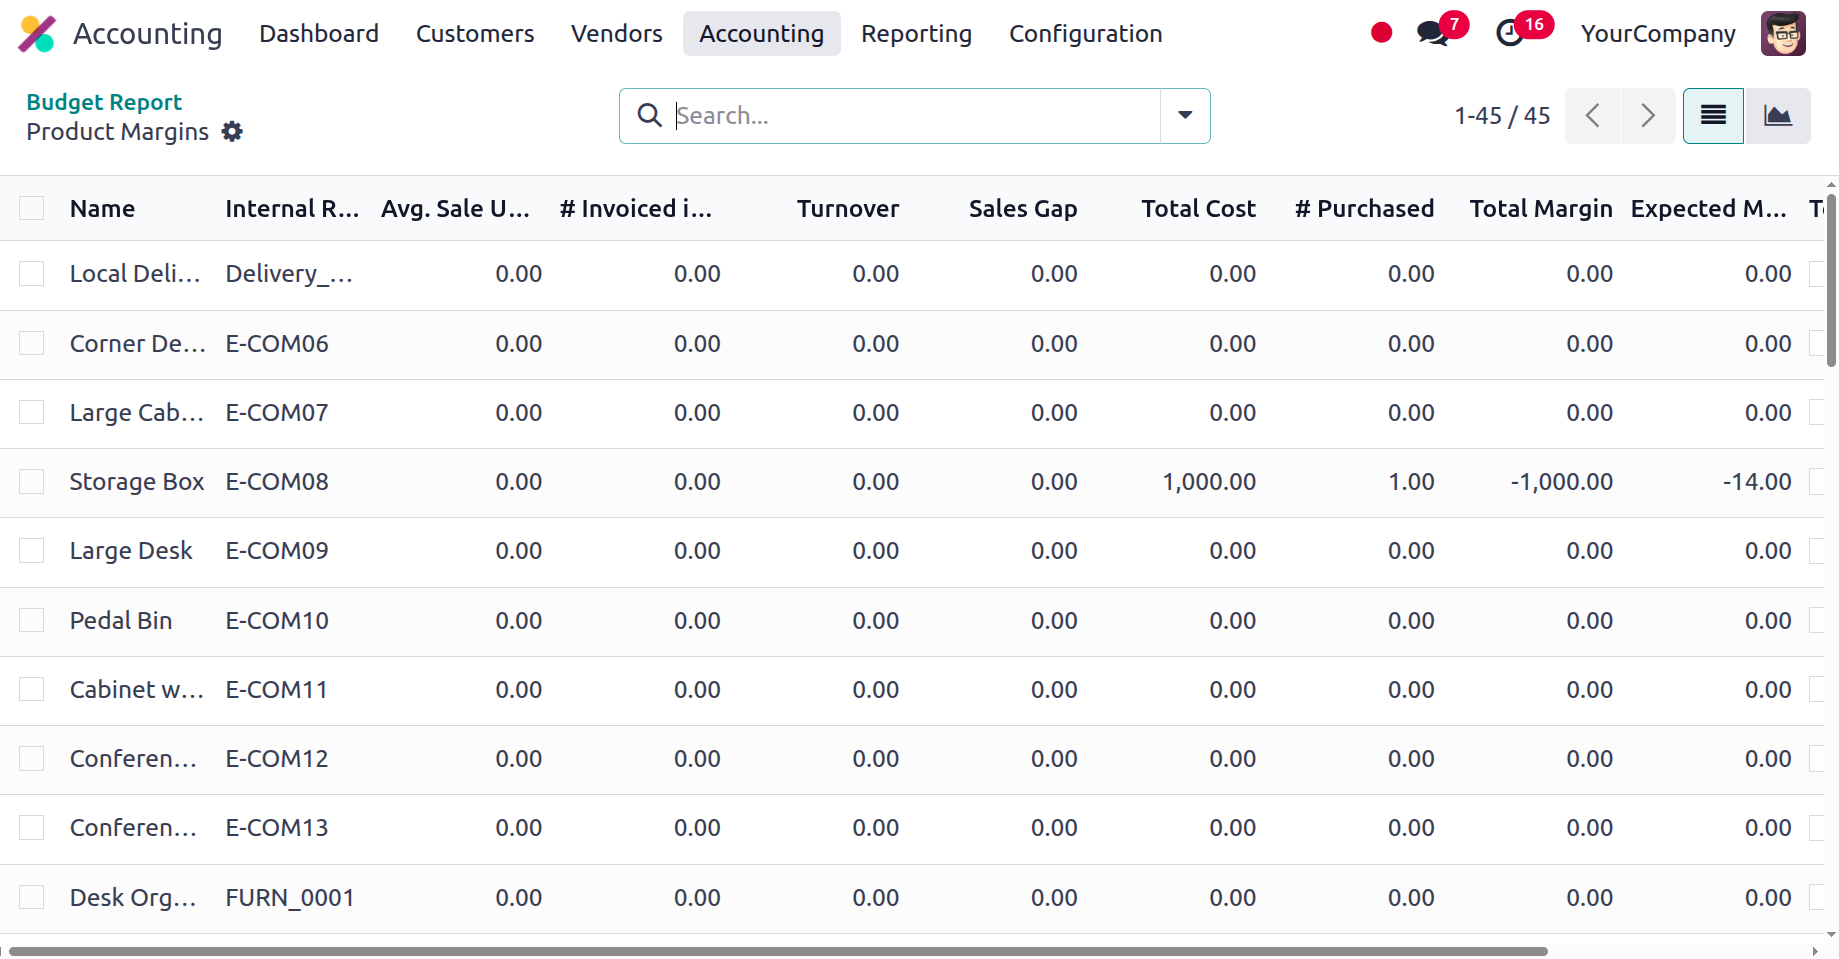
To display the Product Margins report aspect and the configurations aspect after configuring the operations aspects, choose the Open Margins option. The budget analysis and the specified options will determine how the product margin reporting is shown. Product names, turnover, sales gap, average sales unit price, invoiced sales amount, total cost, purchased amount, total margin, projected margin, total margin rate percentage, and forecasted margin percentage are all shown here. Internal reference data is also included.
Additionally, the Product Margins report inputs can be arranged in accordance with needs with the help of the Filtering and Group by tools, which are accessible in all other Odoo platform menus. These are the standard grouping and filtering options; the noble tools can be used to create more. When filtering the Product Margins reporting features in the future, you can store those that are specifically customised to your needs as favourites.
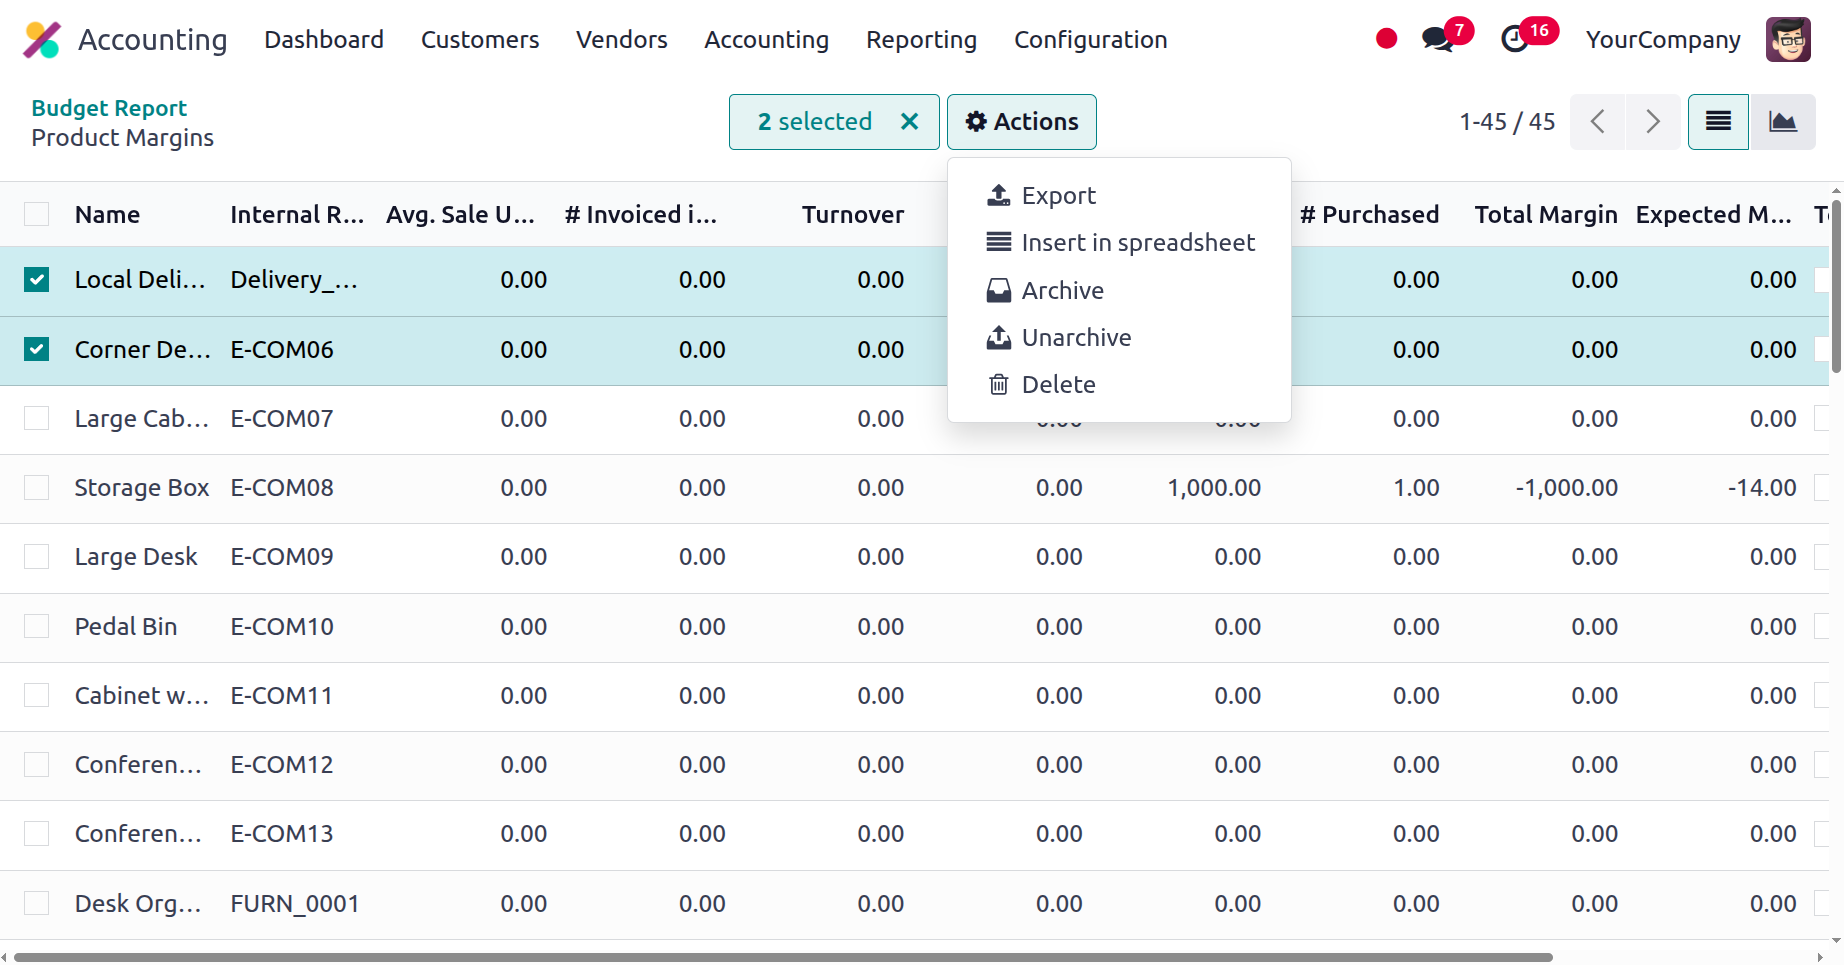
Additionally, as shown in the image below, you can use the available Tick box option to choose from a variety of specified products. This will bring up the Action option, which will display the Export, Archive, Unarchive, Delete, and Generate Price List options.
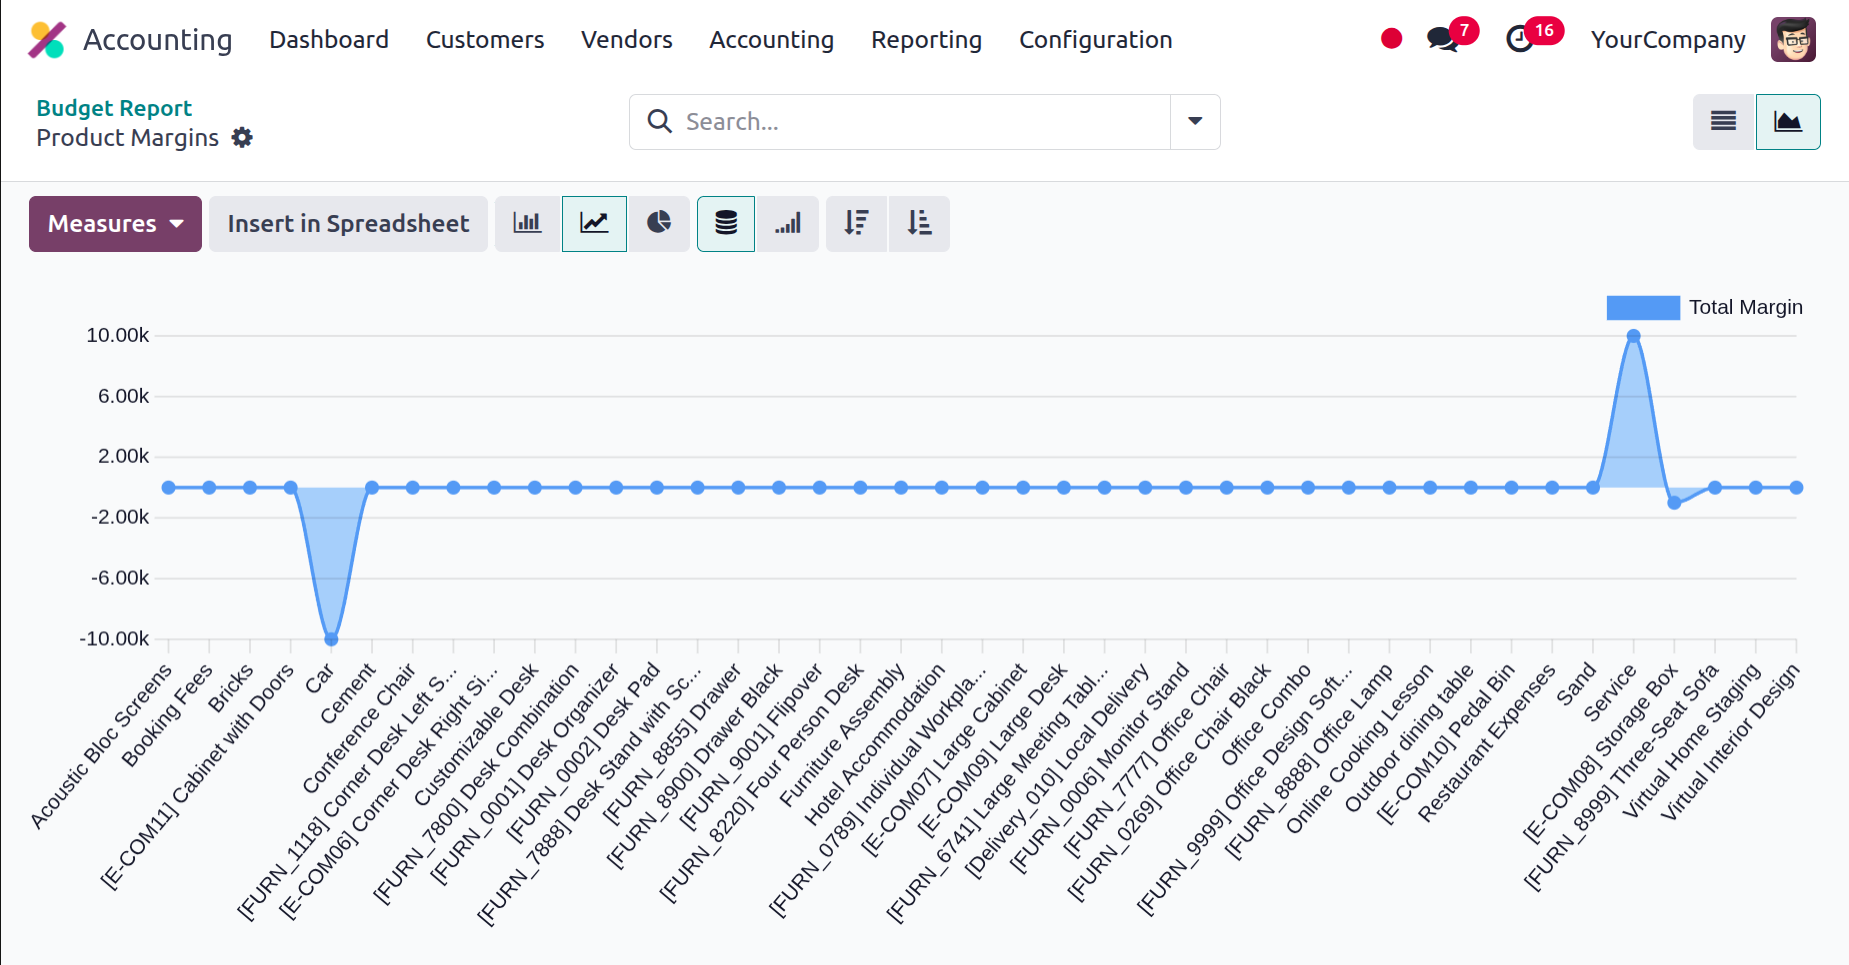
Additionally, Graph View, which offers a more statistical perspective on the Product Margins, can display the Product Margins reporting menu. The Bar Chart View of the Product Margins reporting is displayed in the screenshot below. Depending on your needs, you can also decide if it should be shown as a pie chart or a line chart. Both basic and custom filtering methods are available, along with pre-established grouping choices. By choosing from the designated default measures, the measurements can be defined as needed.
The screenshot below shows the Line chart for Product Margins reporting, where lines reflect the various qualities of the defined entries.
Up until now, we have talked about the Odoo Accounting module's management-based reporting capabilities.
The reporting features of the Odoo Accounting module are the exclusive subject of this chapter, which also offers a thorough explanation of their operation. Statement reports, partner reports, audit reports, and management-based reports were among the reporting tools we covered. Configuring Odoo's general settings, which are essential for accounting processes, will be the main topic of the upcoming chapter.