Configurable Options in the Accounting Module
The Odoo platform's accounting module provides thorough operational administration of the financial aspect of any business's operations. Since Odoo is a customisable tool, many aspects of accounting and financial administration can be altered. Furthermore, the Odoo platform's Accounting module features a setup menu with a number of adjustable default options. Users can completely customize each Odoo module's performance and functional administration through its configuration menu.
As part of the available adjustable settings, you can use the checkbox to enable and disable this. Additionally, you can design an action that allows you to choose an entity from a drop-down menu. A particular functional need serves as the basis for the definition of each of these alternate categories. Building the platform gives you the chance to incorporate special features, which you may accomplish with the assistance of skilled Odoo developers. Installing different third-party Odoo applications from the Odoo application store gives the designated modules more customisable options for defining functionalities. The Studio module also allows you to modify the default modules that are offered. Like any other basic module, the Odoo Studio module has customisable settings for creating bespoke modules.
Under the Settings tab, you may choose from a number of module configuration options. You may clearly specify the roles of accounting and financial management using these options. Furthermore, both the Community and Enterprise editions of Odoo come with these default settings. The commercial versions are far more sophisticated than the community version, which has fewer practical capabilities. As we proceed to the Accounting module settings page, we will continue to learn more about how each option functions in the sections that follow.
Accounting Import
You may manage the initial setup, including setting up the Chart of Accounts, in the accounting import area.
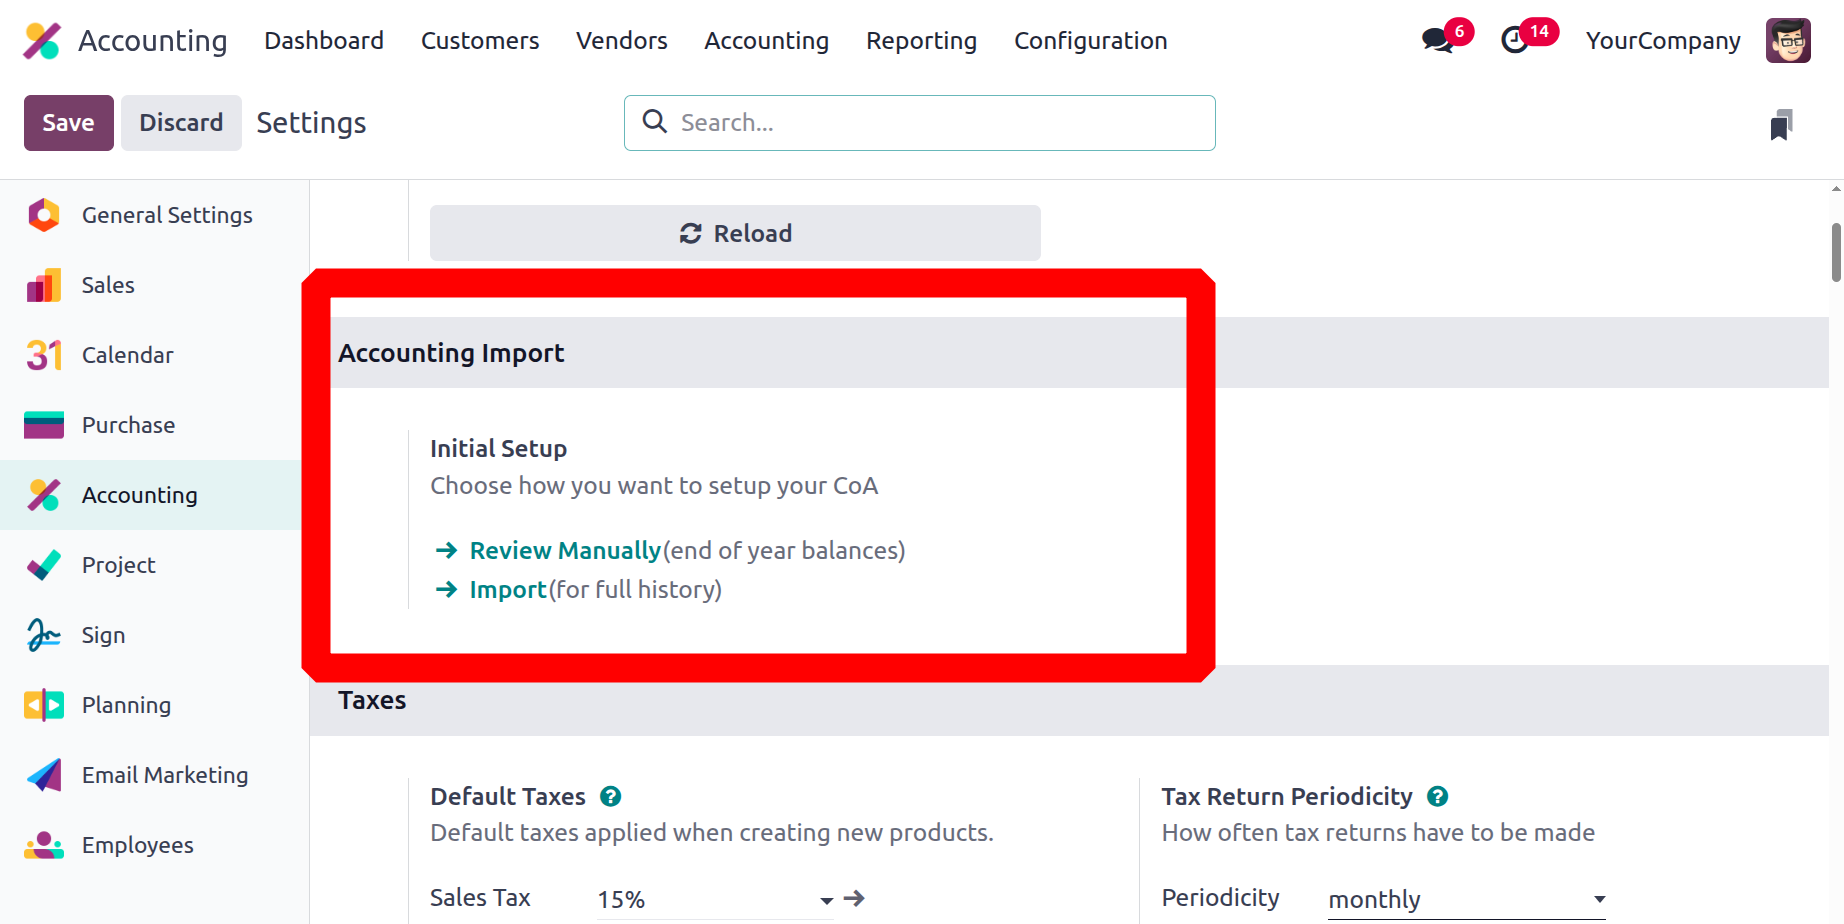
You can also import the Chart of Accounts, open balances, contact details, and journal data. In essence, it is designed to rapidly and efficiently import the required data from an external source into Odoo rather than requiring manual entry.
You can configure starting debits and credits, or even import the beginning balance from the favourite import record option, by selecting the manual view option, which takes you to the chart of accounts. Even if the opening balance has already been posted, we can still verify it here.

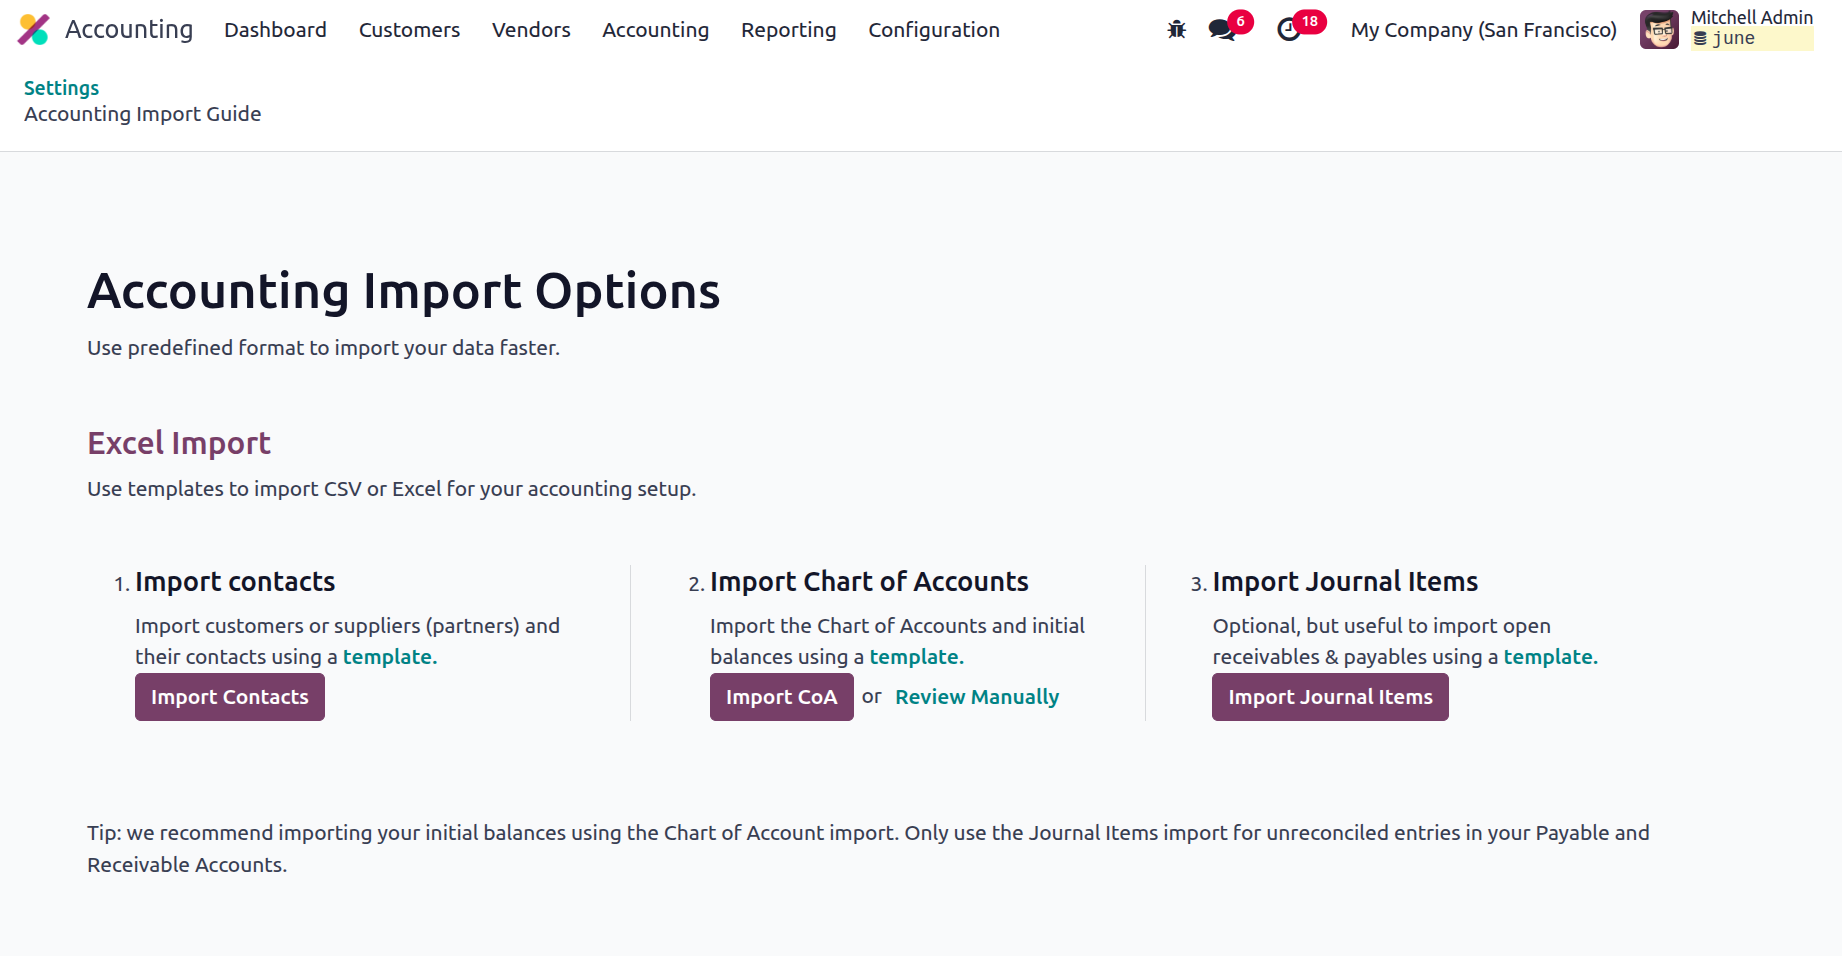
You can import journals, charts of accounts, and contact information by selecting the next Import option, which will direct you to the accounting import tutorial.
Using a pre-made template will speed up the data import process. Accounting data can be imported using Excel templates or CSV files. It is possible to import partner information (both supplier and customer) by importing contact details. The opening balances and chart of accounts can be imported. You can import journals into Odoo by using the import journals feature. When importing open receivables and payments using a template, this is a helpful but optional feature. Odoo advises utilising the Chart of Accounts Import to import your opening balance and Journal Import just for unreconciled entries in your Payable and Receivable Accounts.
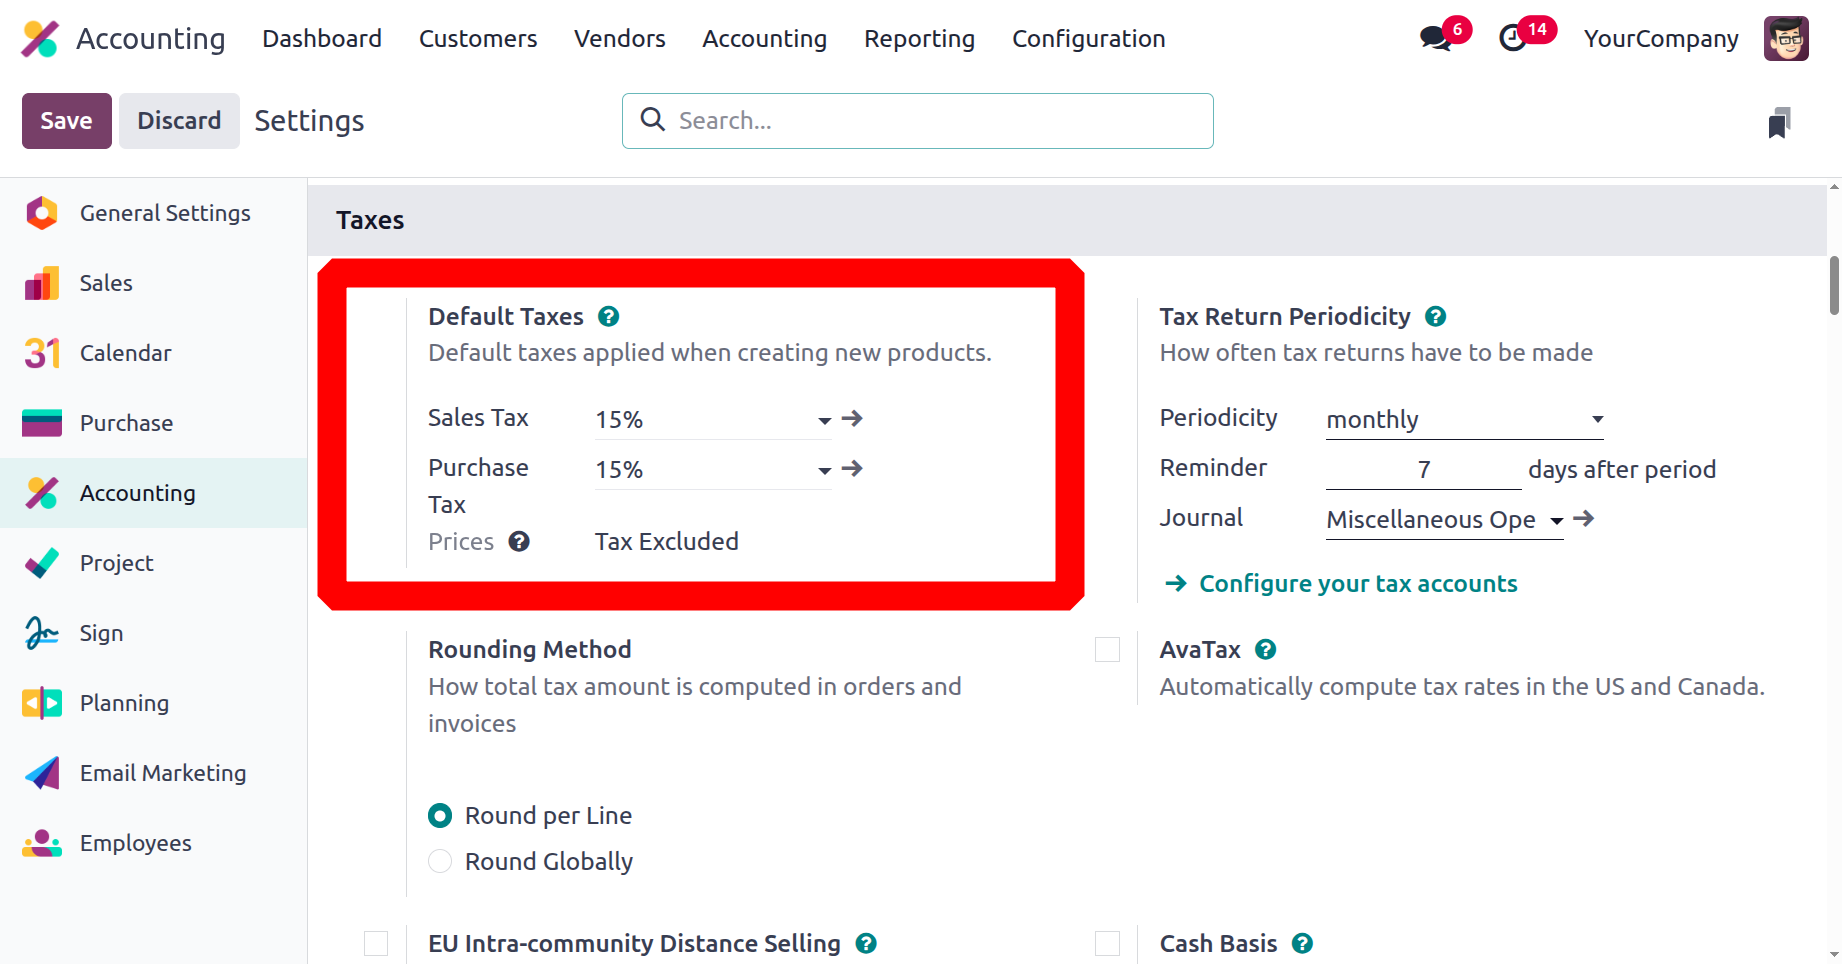
Define the Taxes Based on the Region
Establish operational taxes for the running parts of your company in the Settings > Taxes menu. The taxes listed below are applicable to both buying and selling operations and are taken into account in the activity if there is no specific tax applied to the product. Let's now examine the options found in the Accounting module settings menu's Tax Setup section.
Default Taxes
To begin using the platform to manage your business, you can specify default taxes in the Taxes area. These taxes apply to all local transactions that are defined on the platform. Here, the drop-down menu allows you to choose between the VAT and purchase tax alternatives. The Taxes menu item in the Accounting module's Settings menu allows you to set taxes; all you have to do is adjust the relevant rates to suit your needs. The following screenshots show the Settings tab of the Accounting module's Default Tax Settings menu.
Tax Return Periodicity
At predetermined times, the collected tax must be remitted to the authority; the exact time may vary based on the policies of the authorities and/or businesses. Returns may be made monthly, quarterly, annually, or more frequently, depending on the appropriate authorities. You can modify the return's settings, which specify how frequently the returns need to be delivered, in the Tax Return Periodicity option. It is possible to configure the cycle to happen annually, semi-annually, every 4 months, quarterly, every 2 months, and monthly using the options below. Furthermore, you have the option to schedule a reminder for the days after the period.
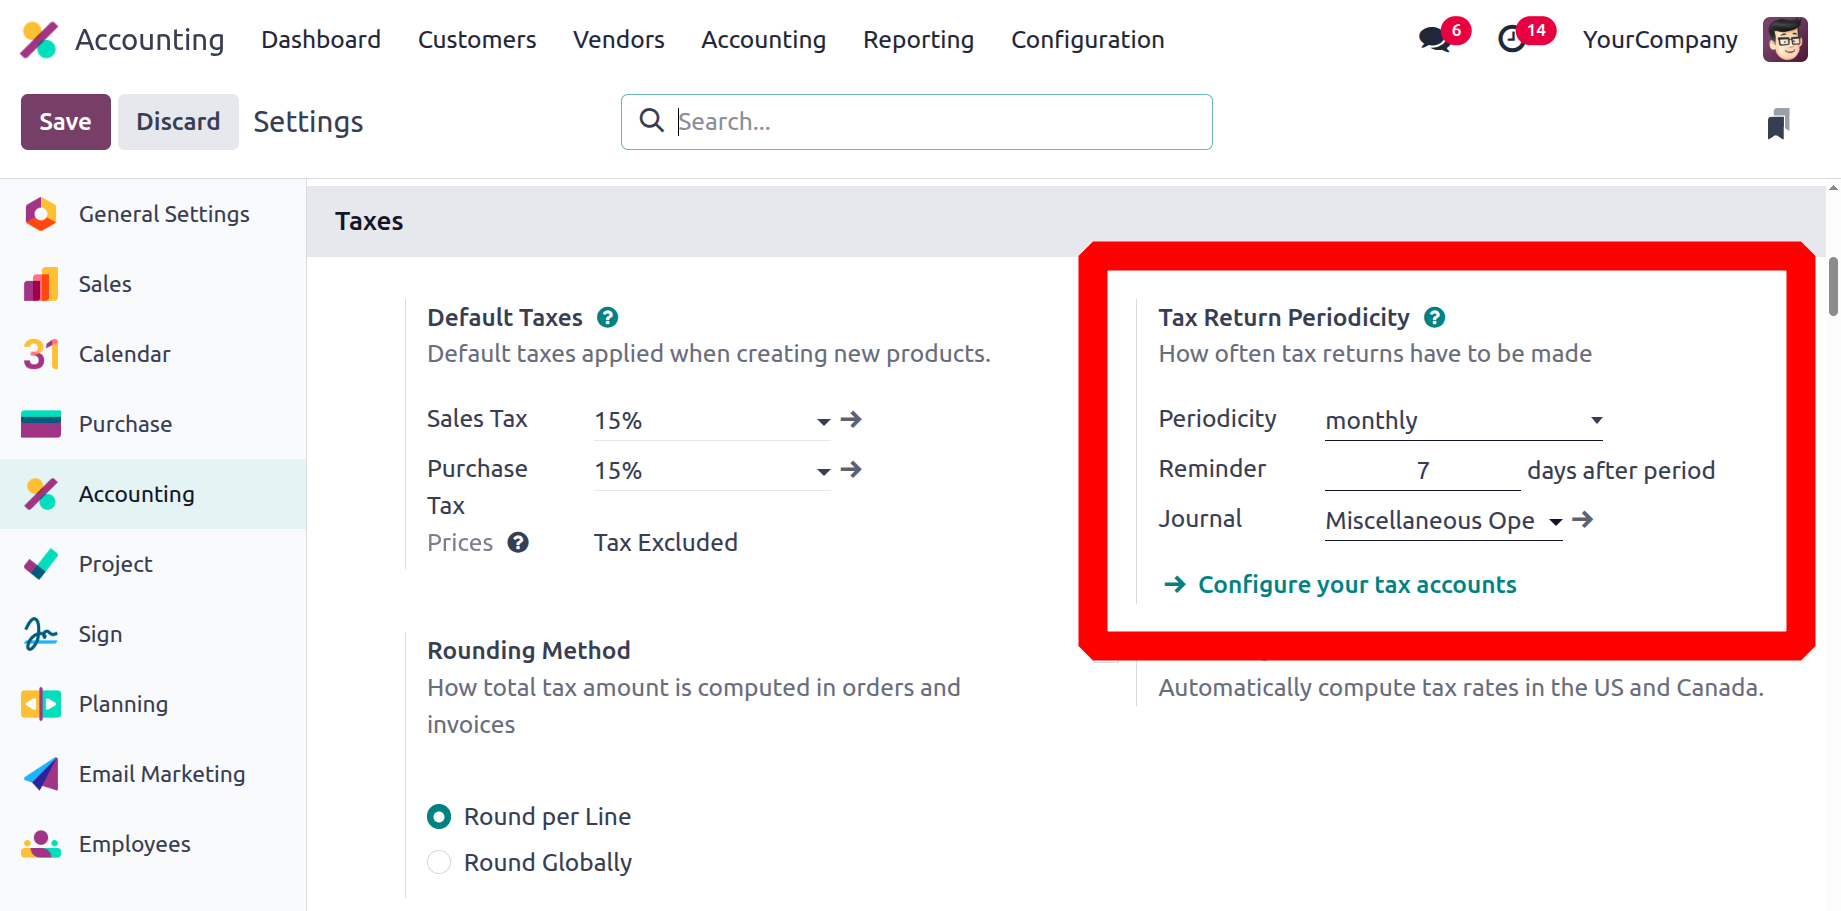
Furthermore, the work platform has already established journals that are used to document taxes collected and are defined under the journal.
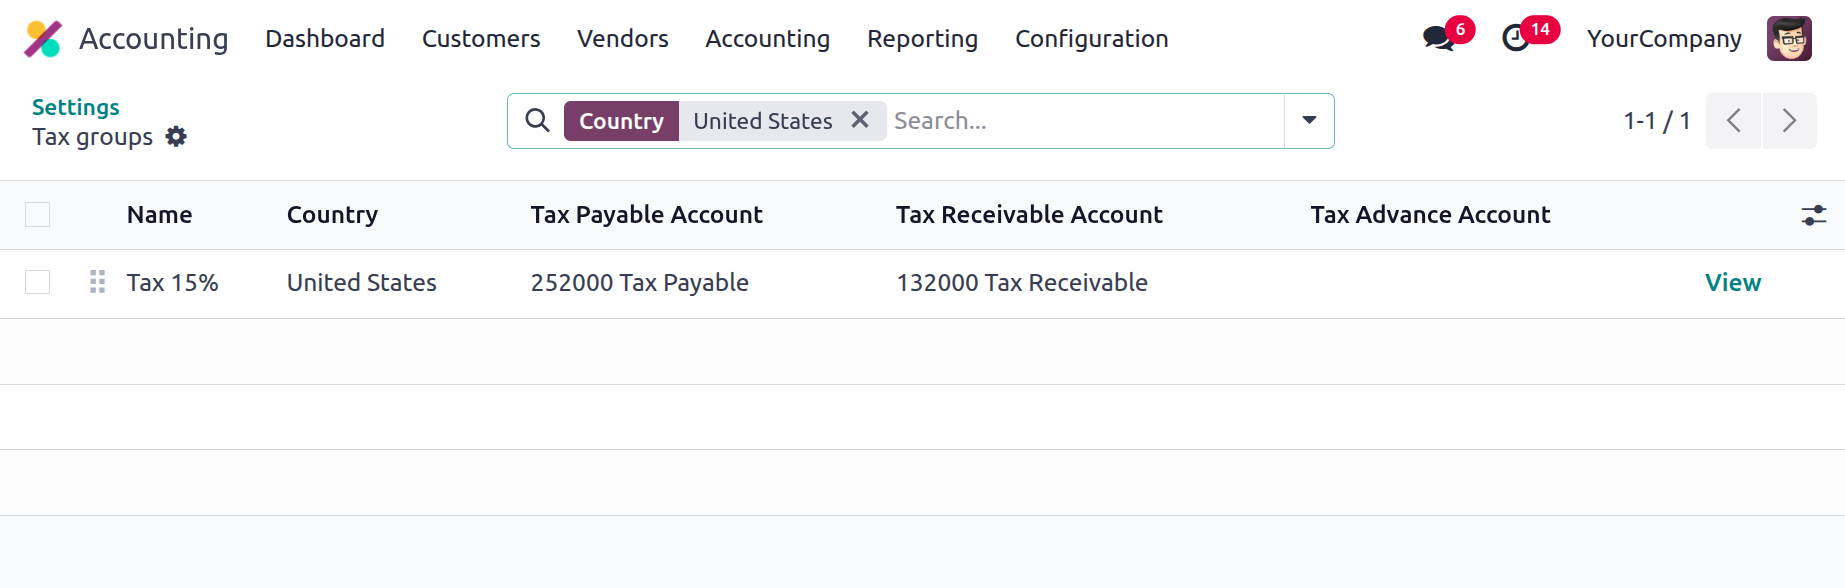
Additionally, you can create tax accounts by choosing Set Up Tax Accounts. This will open the Tax Groups box, where you can enter the details of your tax accounts. You can create a tax account by choosing one of the defined taxes that are shown here. The Tax Prepayment Account, Tax Utilisation Account (payable), and Tax Utilisation Account (receivable) can all be defined from the Tax Groups menu, as shown in the illustration below.
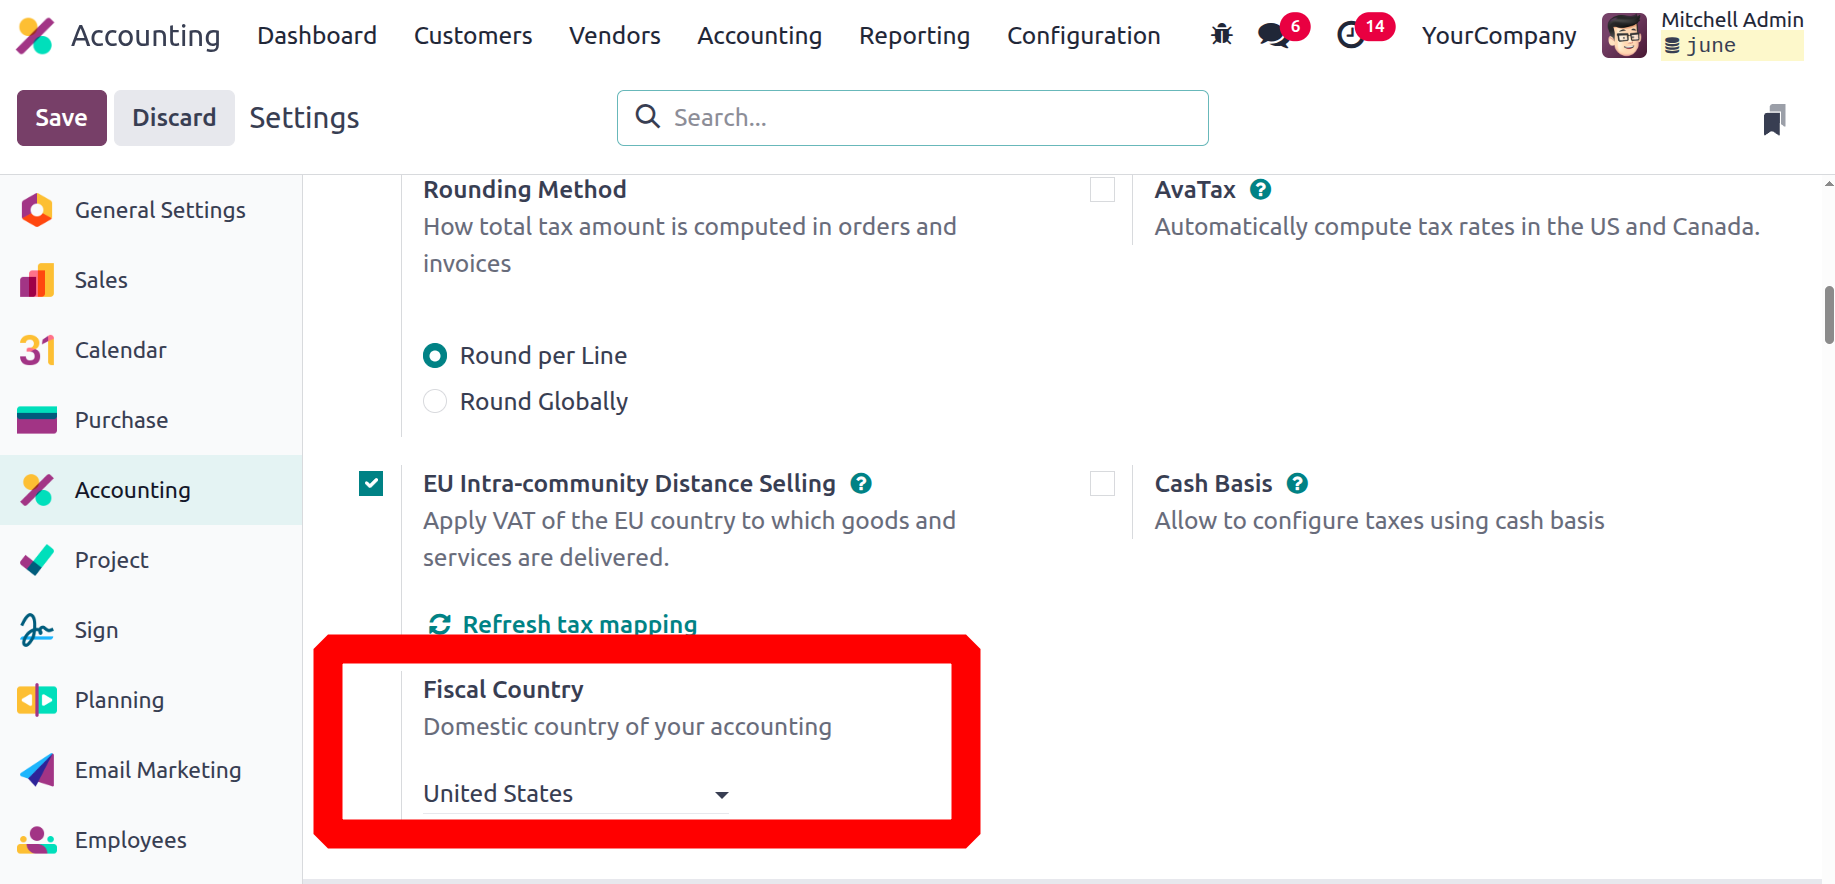
Rounding Method
Another feature that can be set up from the Taxes menu is the rounding of the taxes received, which can be based on the two default settings in Odoo. You can use Round Globally or Round per line. Generally speaking, based on your work requirements, you can select one of these two options.
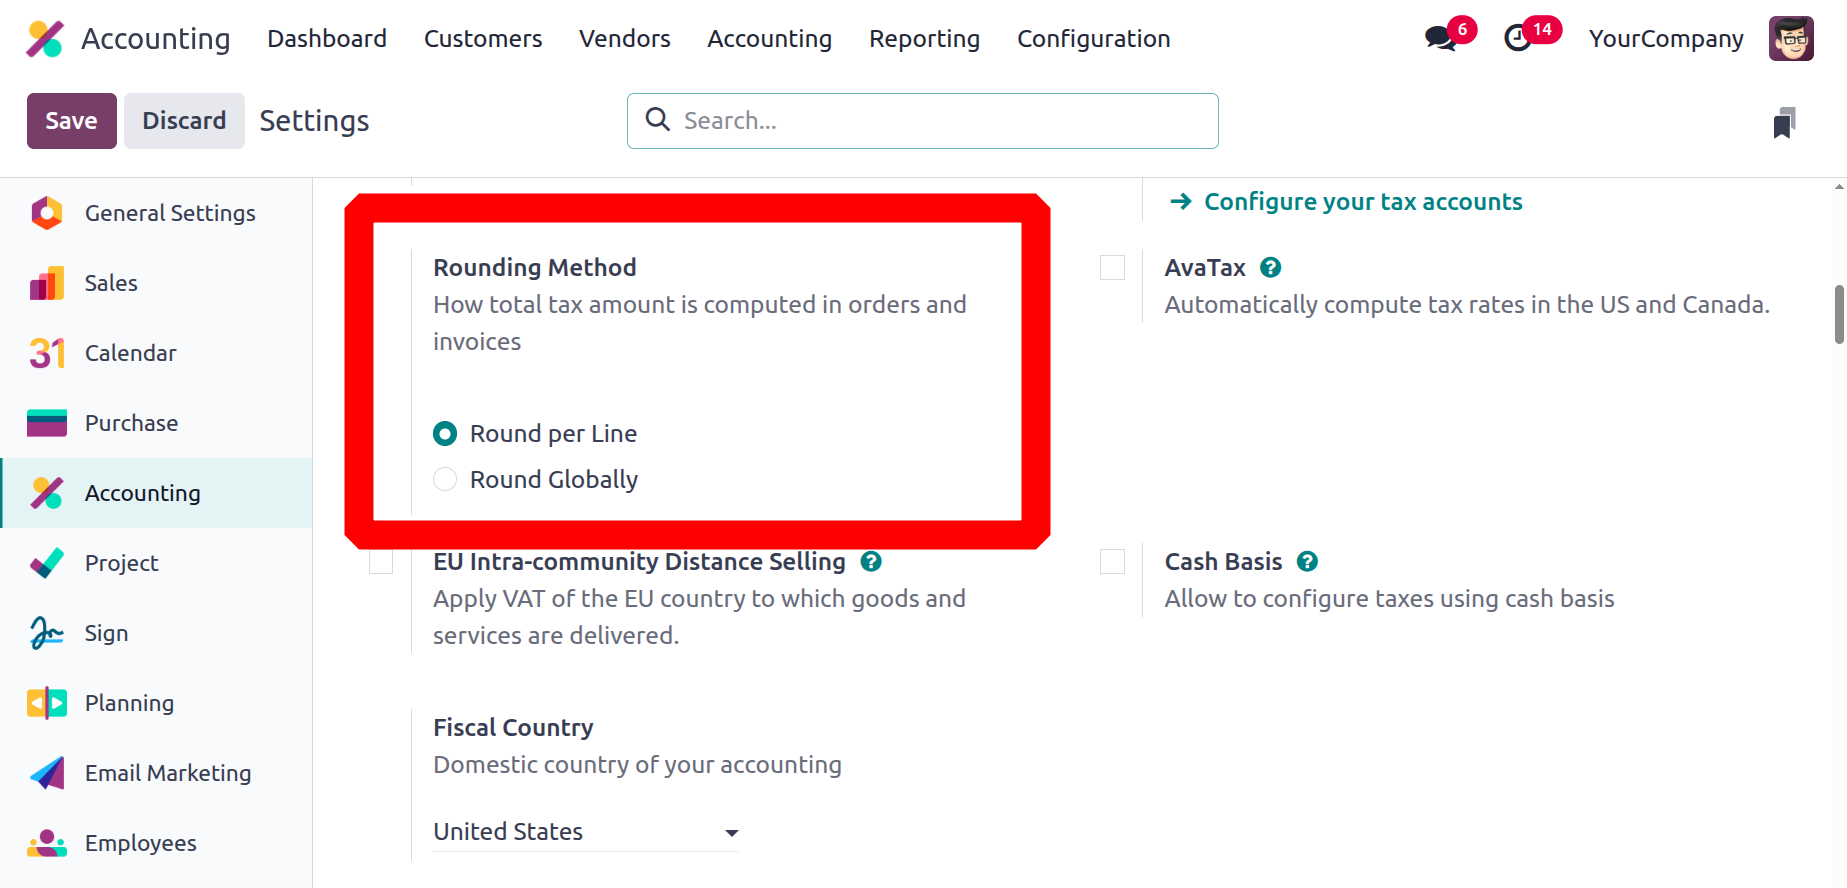
By guaranteeing that rounding is applied independently to each line item, the "Round per Line" option in Odoo accounting enables more precise and focused rounding for specific items or services inside a document. This technique can be useful when various items in the same document need different rounding.
In Odoo accounting, rounding to the entire amount of a document is done consistently when "Round Globally" is selected, ensuring consistency across all line items. This method simplifies the rounding procedure by handling the document as a whole instead of rounding each line item independently.
AvaTax
With Odoo 18's support for AvaTax integration, users can map taxes according to areas and tax registrations. One tax engine that helps with tax compliance is AvaTax. Avalara AvaTax is an integrated third-party program that allows businesses to calculate sales tax amounts on their invoices based on the location of their customers.
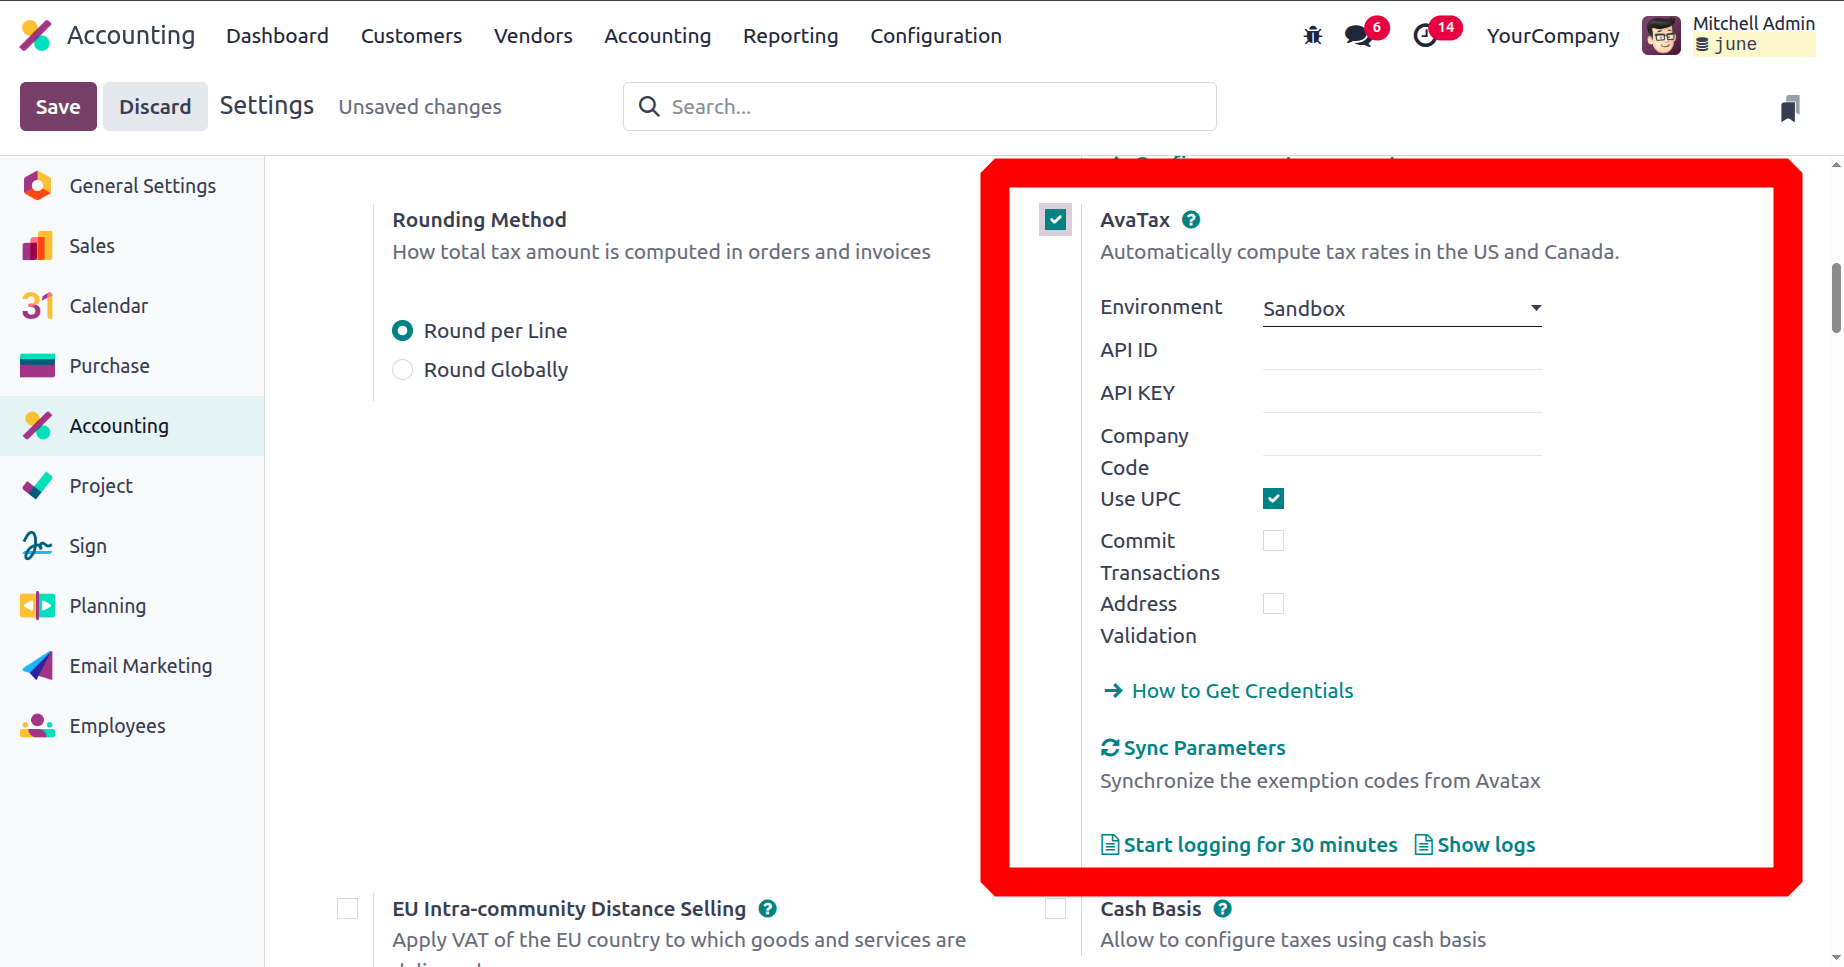
Avalara offers pre-built connections and custom integrations with well-known accounting, ERP, e-commerce, and other business programs to simplify tax compliance for customers.
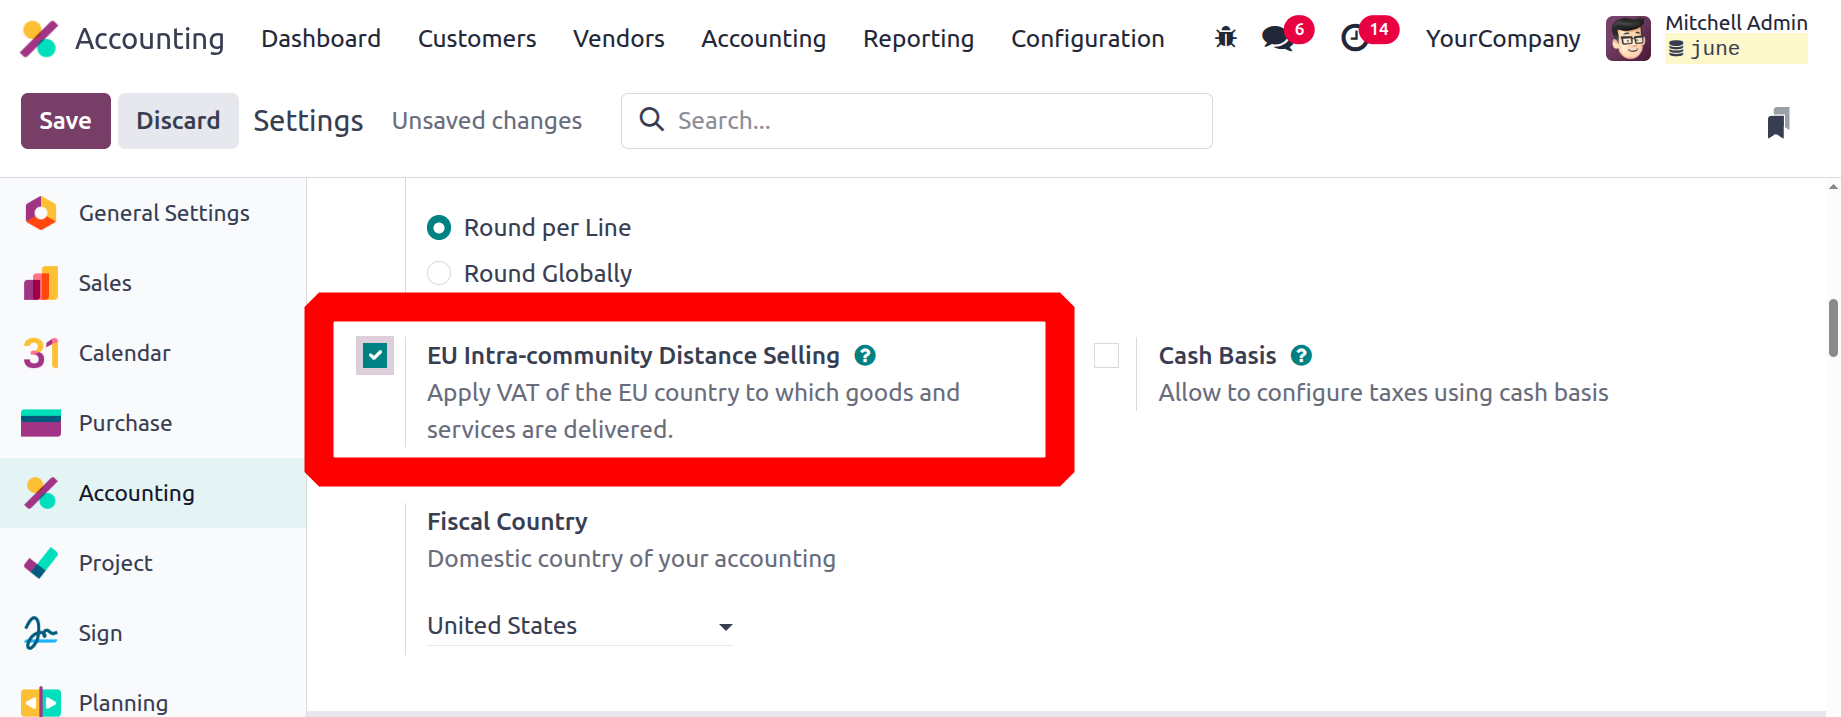
EU Intra-Community Distance Selling
The sale of goods and services to customers (B2C) in EU member states by vendors who are registered for VAT purpose is known as EU intra-community distance selling. This remote transaction is typically conducted via phone, postal order, online platforms, or other means of communication.
Within the EU, certain VAT legislation and regulations apply to distance selling. The vendor is required to charge VAT at the rate that is in effect in the buyer's country. Even if the merchant is located outside of the European Union, this is still true.
The EU Intra-community Distance Selling function helps you comply with this law by creating and setting up new tax positions and tax rates based on the country where your company is located.
Click Save to activate EU Intra-community Distance Selling after selecting it under Accounting ? Configuration ? Settings ? Taxes.
You must comply with the EU VAT regulations for digital products if you sell goods based on digital technology in the nation where your company is headquartered. With EU-based Odoo, which handles it as a localisation component, you can enable or disable EU VAT for digital goods. To tax your Odoo-related operations in the chosen country, you may also choose the fiscal activity country from the drop-down option.
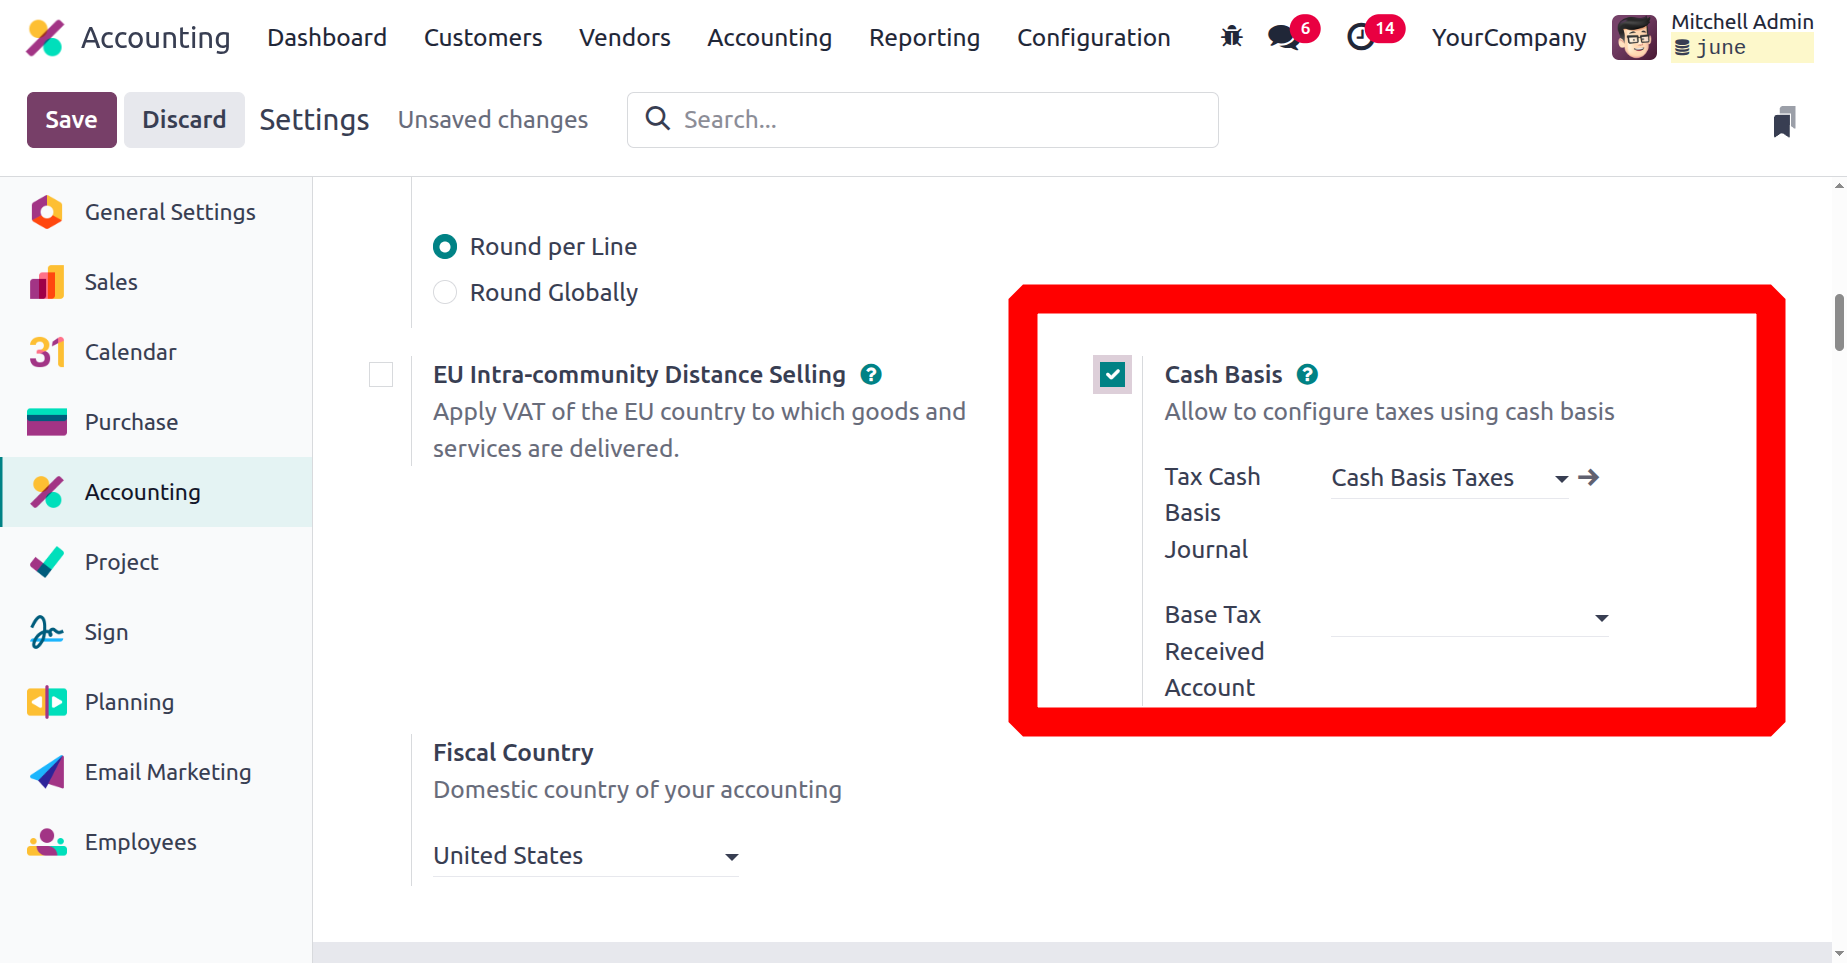
Cash Basis
You may manage the tax processes for accepted cash payments by selecting the Cash Basis option from the Taxes menu. Corporate policy may determine whether this feature is enabled or disabled. To comprehend the next operating menu, let's proceed to the next section of the settings, which is devoted to currency management.
Fiscal Country
Your company's home nation is determined by its fiscal country, which in turn defines the implications of the tax rules for your enterprise. This information is essential for figuring out the tax rates and regulations that apply to the financial transactions of a business.
Regarding taxes, the chart of accounts, journals etc, every nation has its unique accounting procedures. First, we need to specify the country of our business when we set it up in Odoo. The choice of accounting localisation is made by us.
As soon as you specify it in the company's details currency, it will immediately change according to the company nation, and the Fiscal Country in the settings will be the home country of your firm, such as the United States.
The base currency of the business is immediately changed in line with this. In order to install the accounting package specified in the Fiscal Localisation section for each country, a fiscal localisation must be established in the accounting configuration when establishing a new business.
All default charts of accounts, taxes, journals, tax rates, etc. are immediately installed in the database after this package is inserted and saved; no additional configuration is required. Additionally, you can alter the installed localisation package if you would like to add or modify it, but only prior to generating any accounting entries.
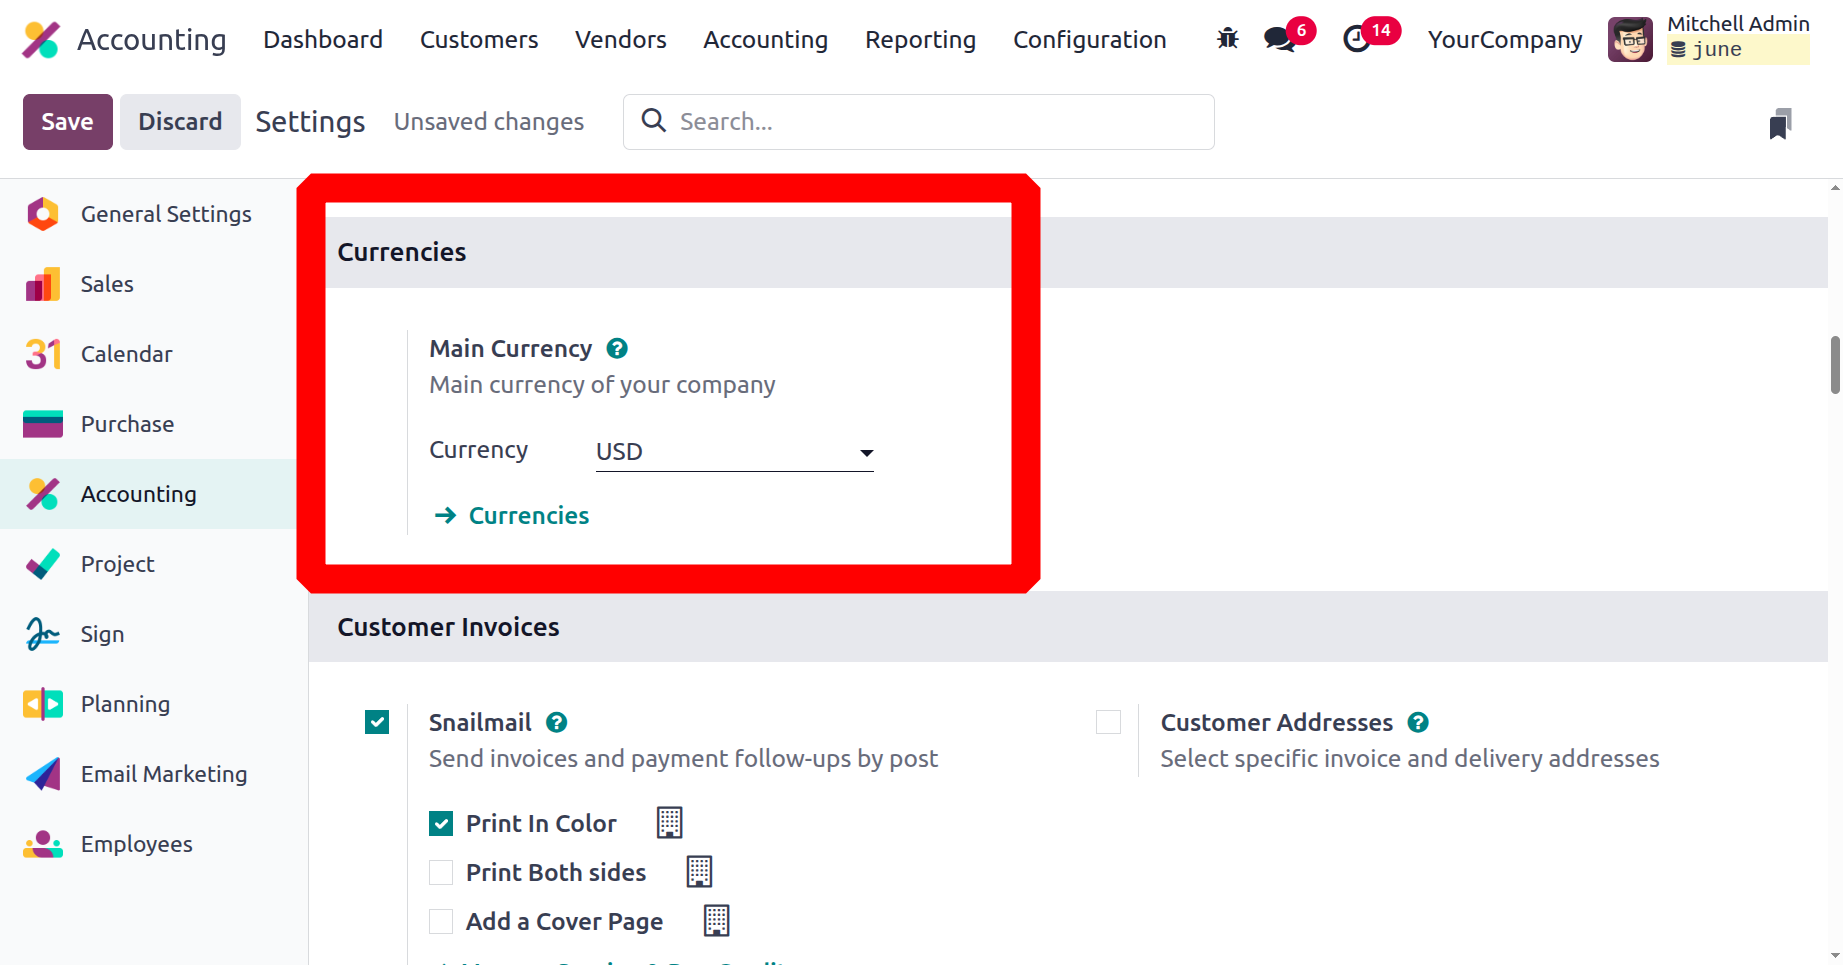
Currency Management
The Currencies option in the Accounting module's Settings tab allows you to set up your business's currency operations with Odoo. You can choose the primary currency used by the business under this menu. The currency can be chosen from the choice drop-down menu. This article defines all of the currencies that are available. You can use other currencies to run your firm, but the currency in which it is defined also serves as the main unit of account.
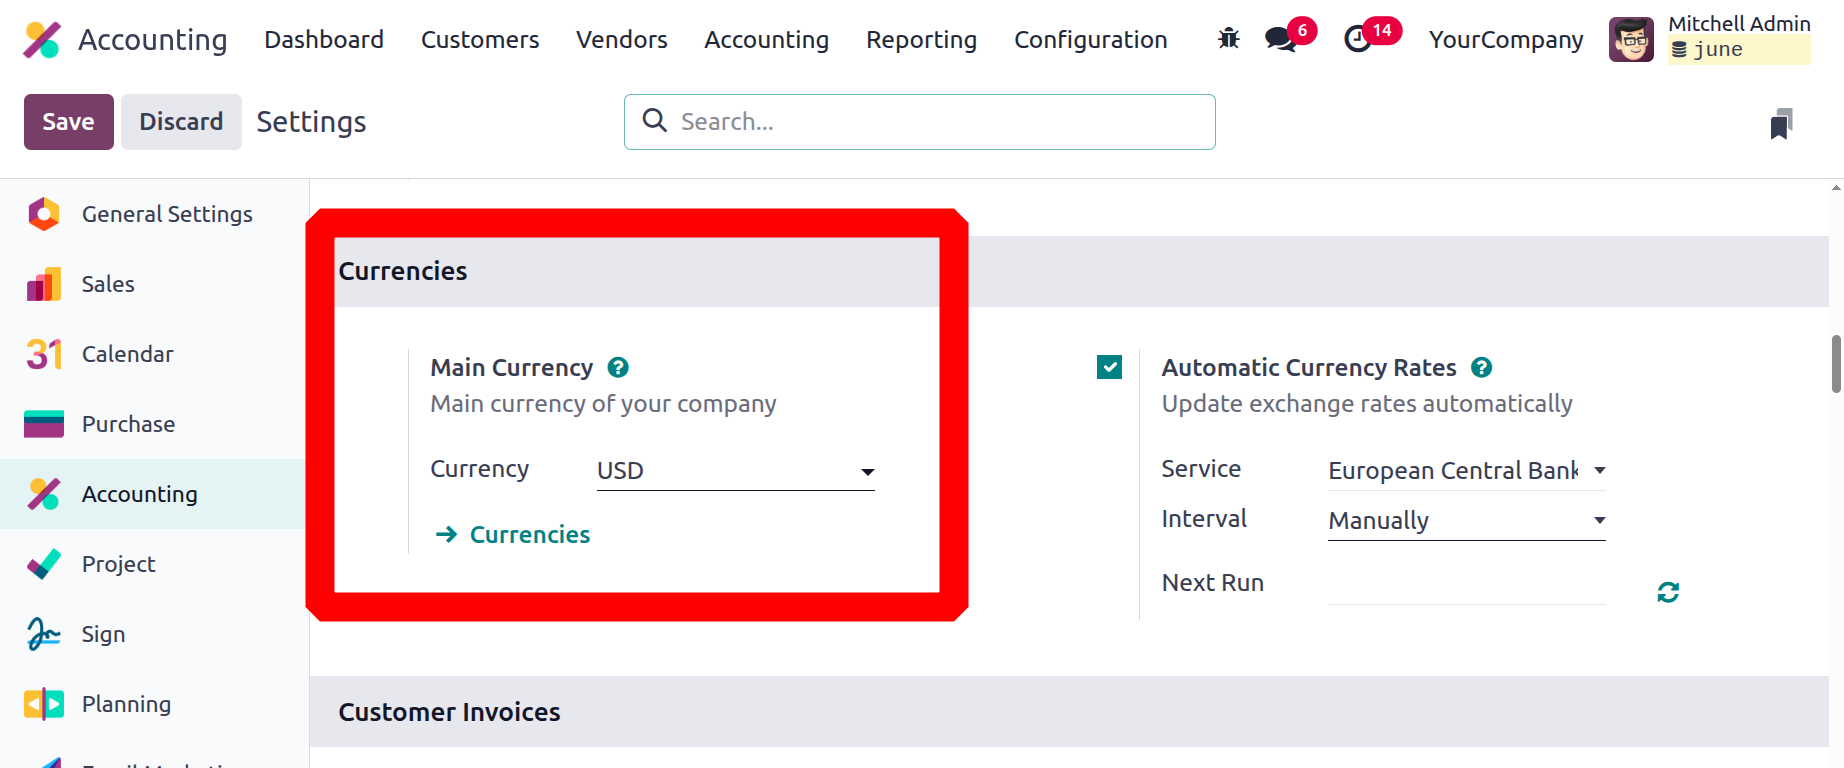
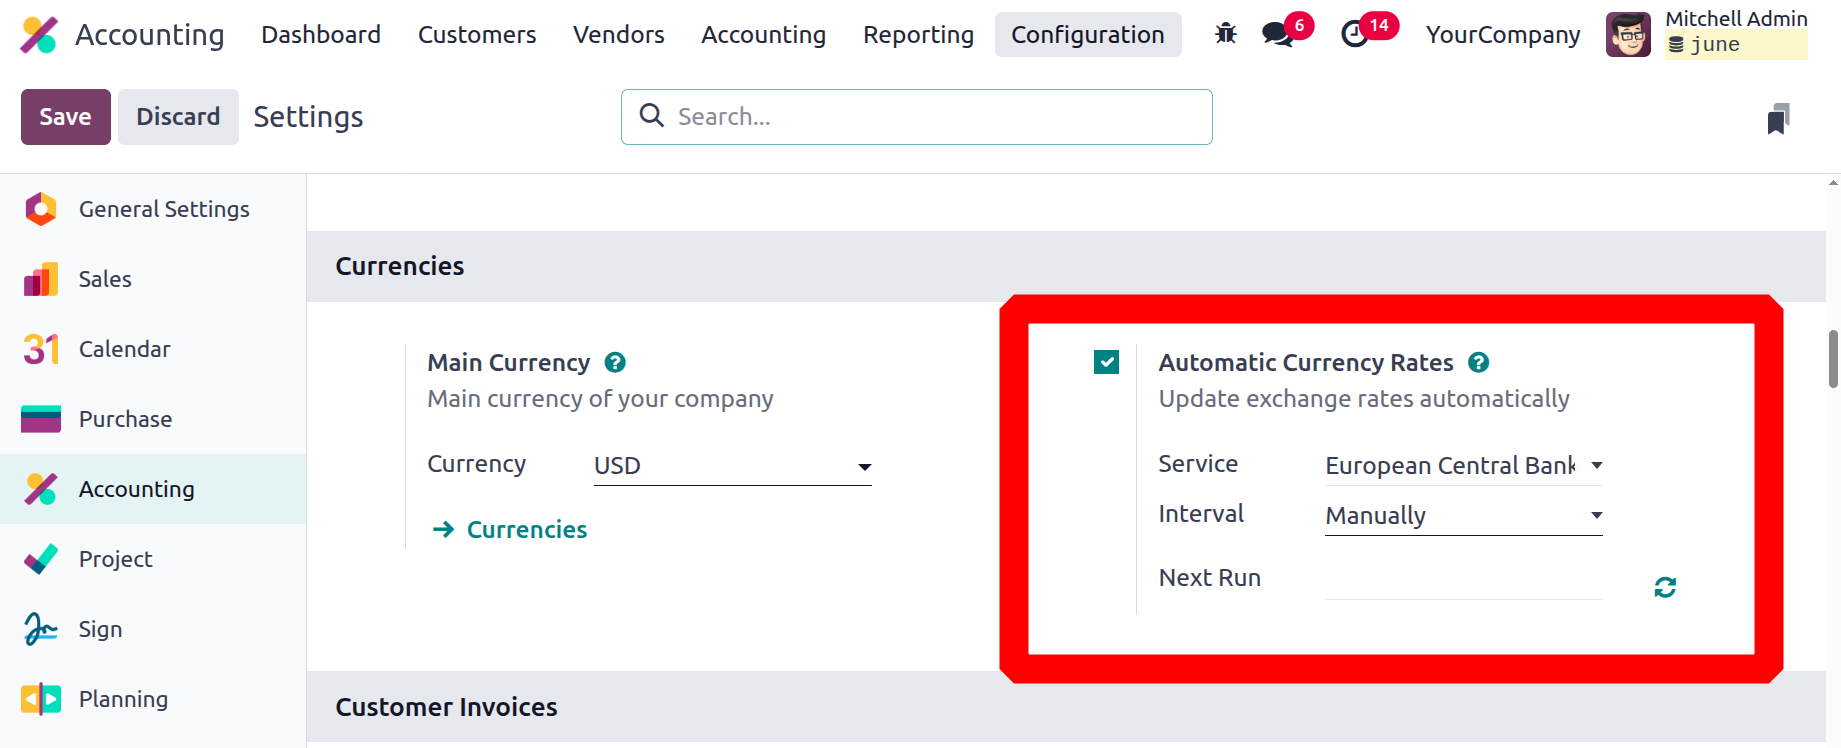
Additionally, you must appropriately handle the currency in each region if your nation serves as an international tag. This allows you to configure the Multi-Currency feature of the Odoo platform, which allows you to use any currency and automatically adjust exchange rates. Choose Automatic Currency Rates to assist with automated currency rate updates. This can be done manually, daily, monthly, or annually at certain periods.
Let's proceed to the following section, Invoice Management, which may be accessed from the accounting module's Settings.
Efficient and Comprehensive Invoicing Solutions
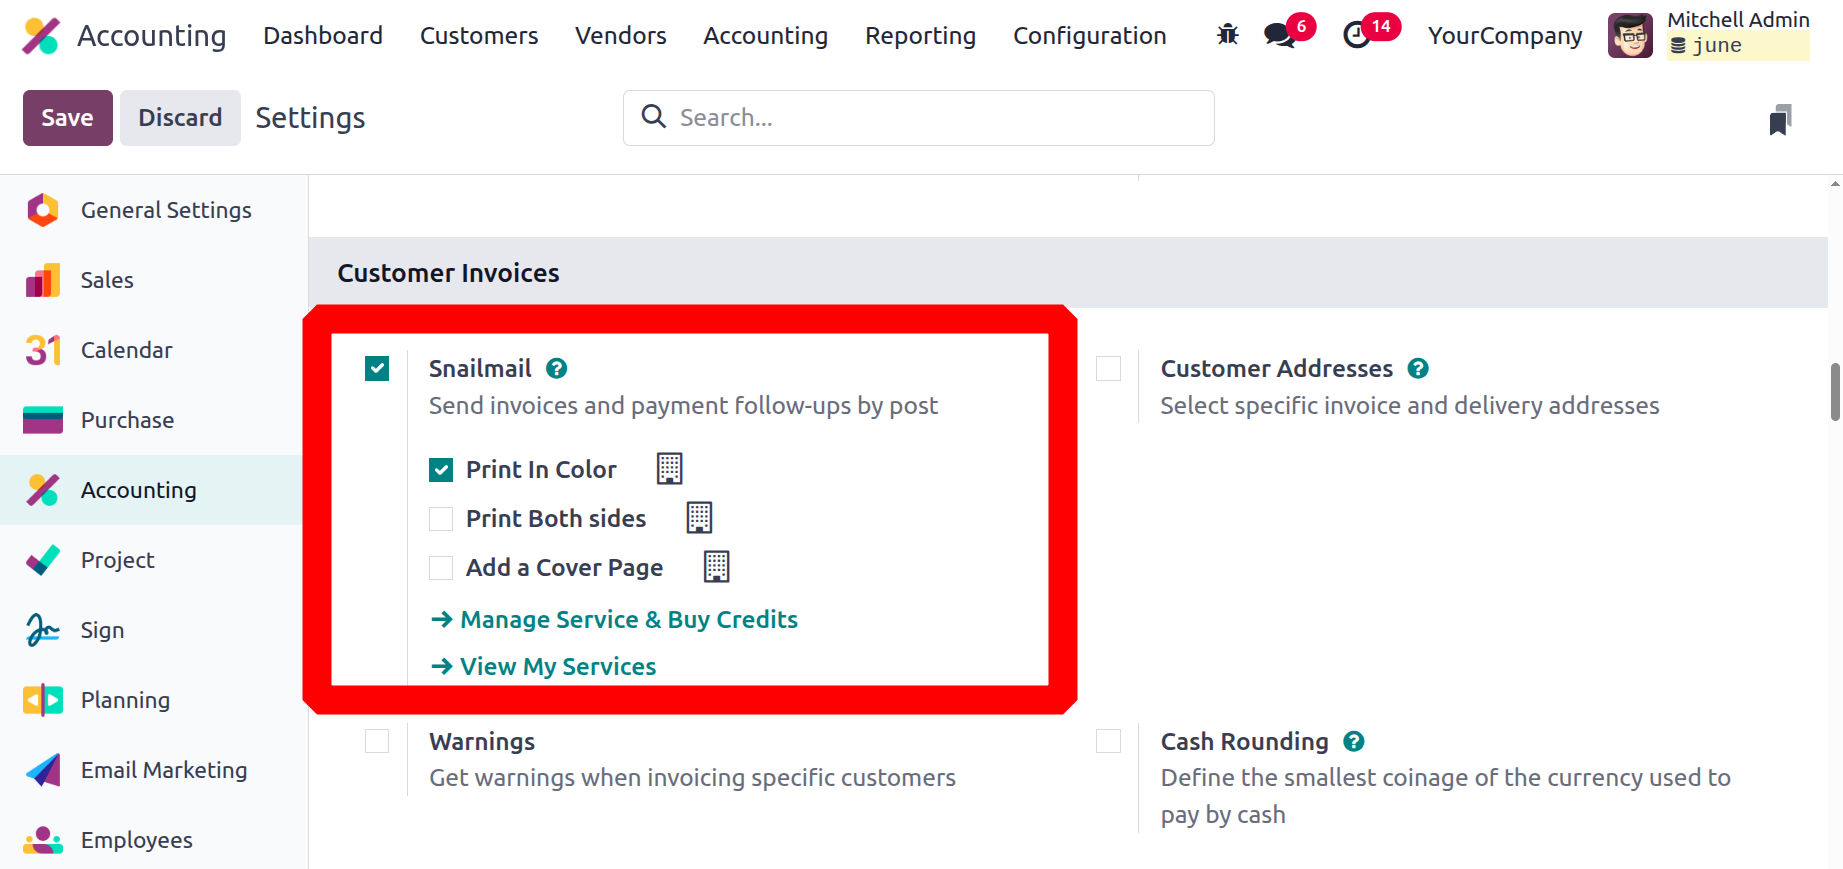
Including control components in client invoices enables you to effectively and completely oversee the invoicing process. First, the Customer Invoices section's default configuration option needs to be set up. Snail mail is one localization option that allows you to send invoices or payment followups through post. By turning on Snailmail under Customer invoices, you can create direct customer invoices. By default, Snail Mail allows you to add a cover page, print in colour, and print on both sides. Because the operation of the service is integrated based on the cost of credits, the platform also features a Buy Credits option in the Settings menu. Selecting this option will direct you to a website where you can purchase Odoo Credits for Snail Mail.
In the Customer invoices area, you can also enable or disable a number of other parameters, such as the default terms that are shown on the invoice, warnings, cash rounding, Intrastat, default incoterm, and sales receipt. Let's examine these choices in more detail.
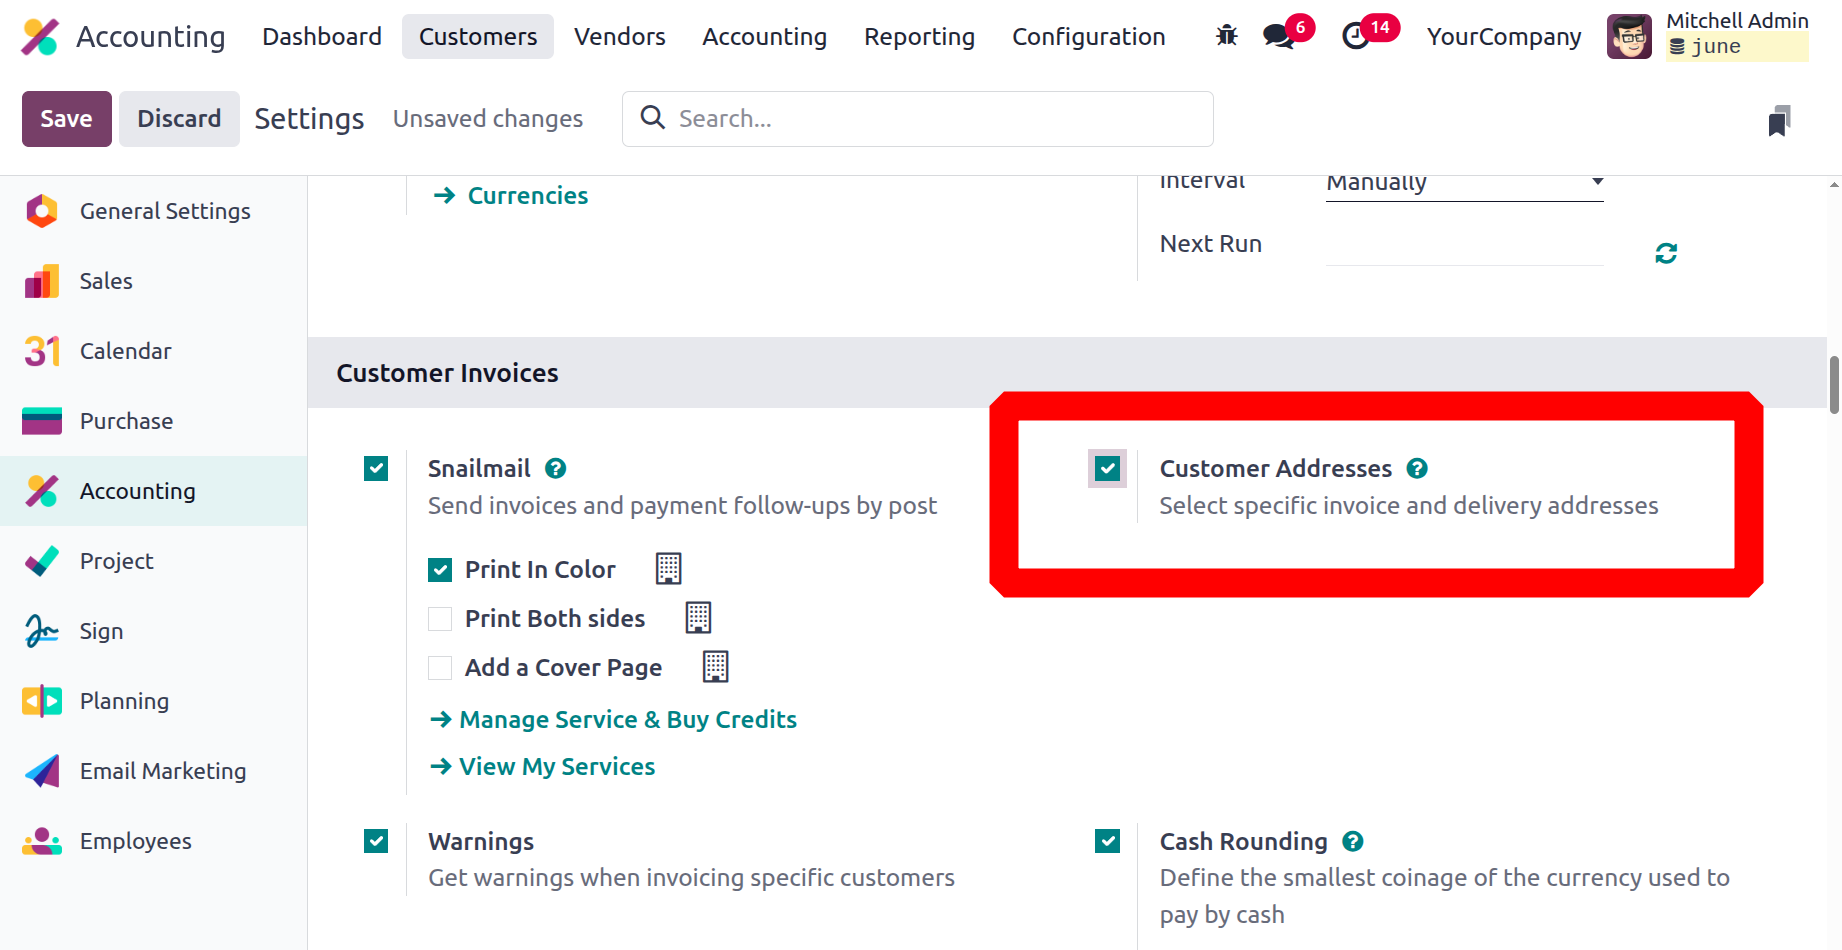
Customer Addresses
You can designate more than one shipping and billing address with Odoo Sales. Some clients find that having individual billing and shipping addresses is quite helpful. Not every one of them has the same delivery address as the billing address. Customers can use this functionality to add a different delivery address in Odoo 18.
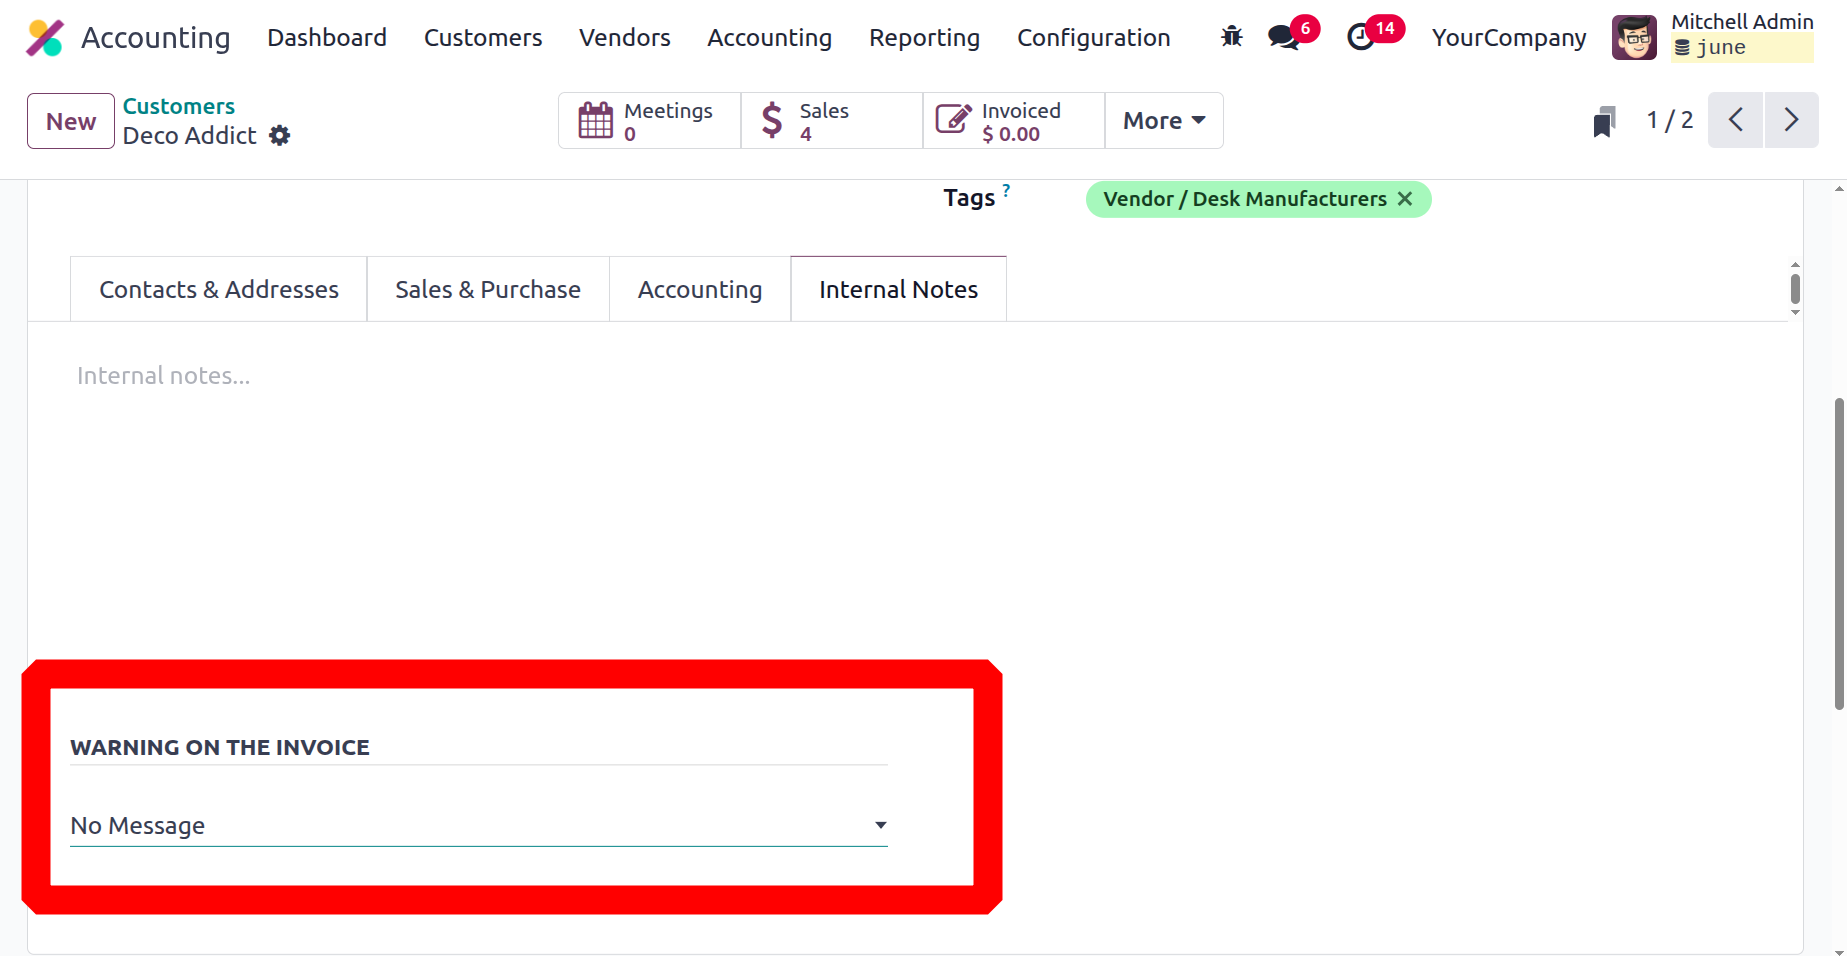
Warning
You can set warnings for certain clients that have been recognised in the Odoo platform by turning on the warning option.
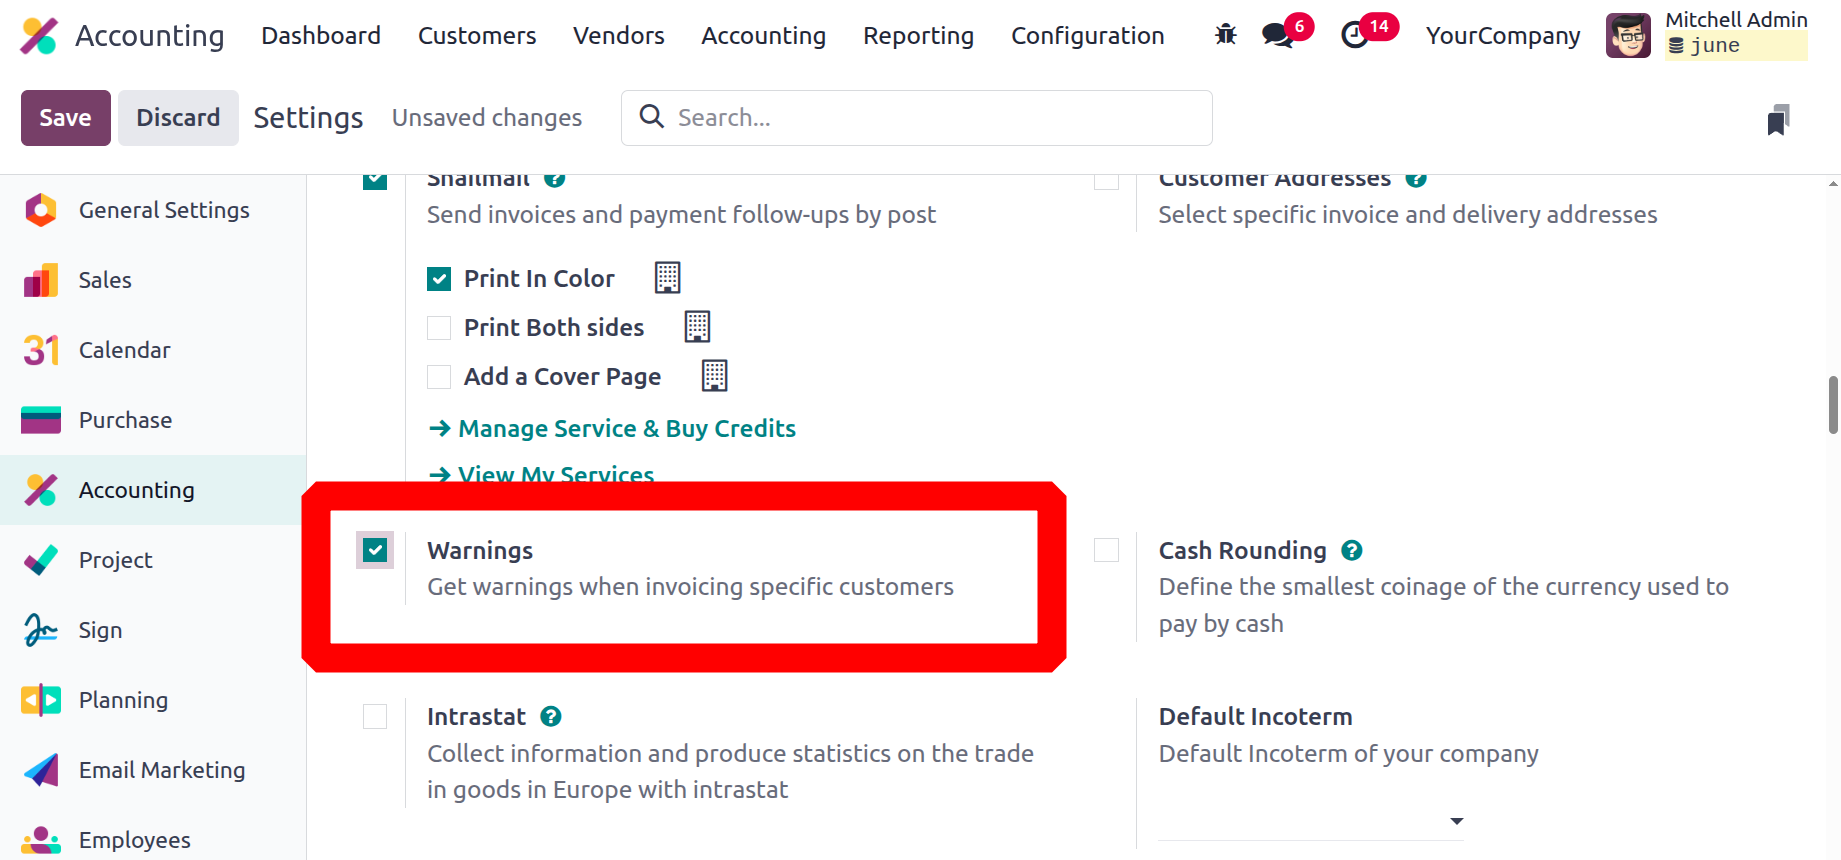
Following the creation of the invoices, these warning notices will show up. Additionally, these notifications can be customized to meet your demands in order to notify operators according to the customer. Consequently, you will be able to generate an invoice for that customer and cancel the transaction.
Cash Rounding
Since it is unlikely that a client would receive exact change or that the counter will have enough coins to complete their transaction during retail hours, the invoice pricing will be adjusted to the closest whole number. You can alter the Cash Rounding process in Odoo to suit your unique needs and the currency being used. You can define cash roundings by selecting the cash rounding menu icon, which will show up if you enable the cash rounding option.

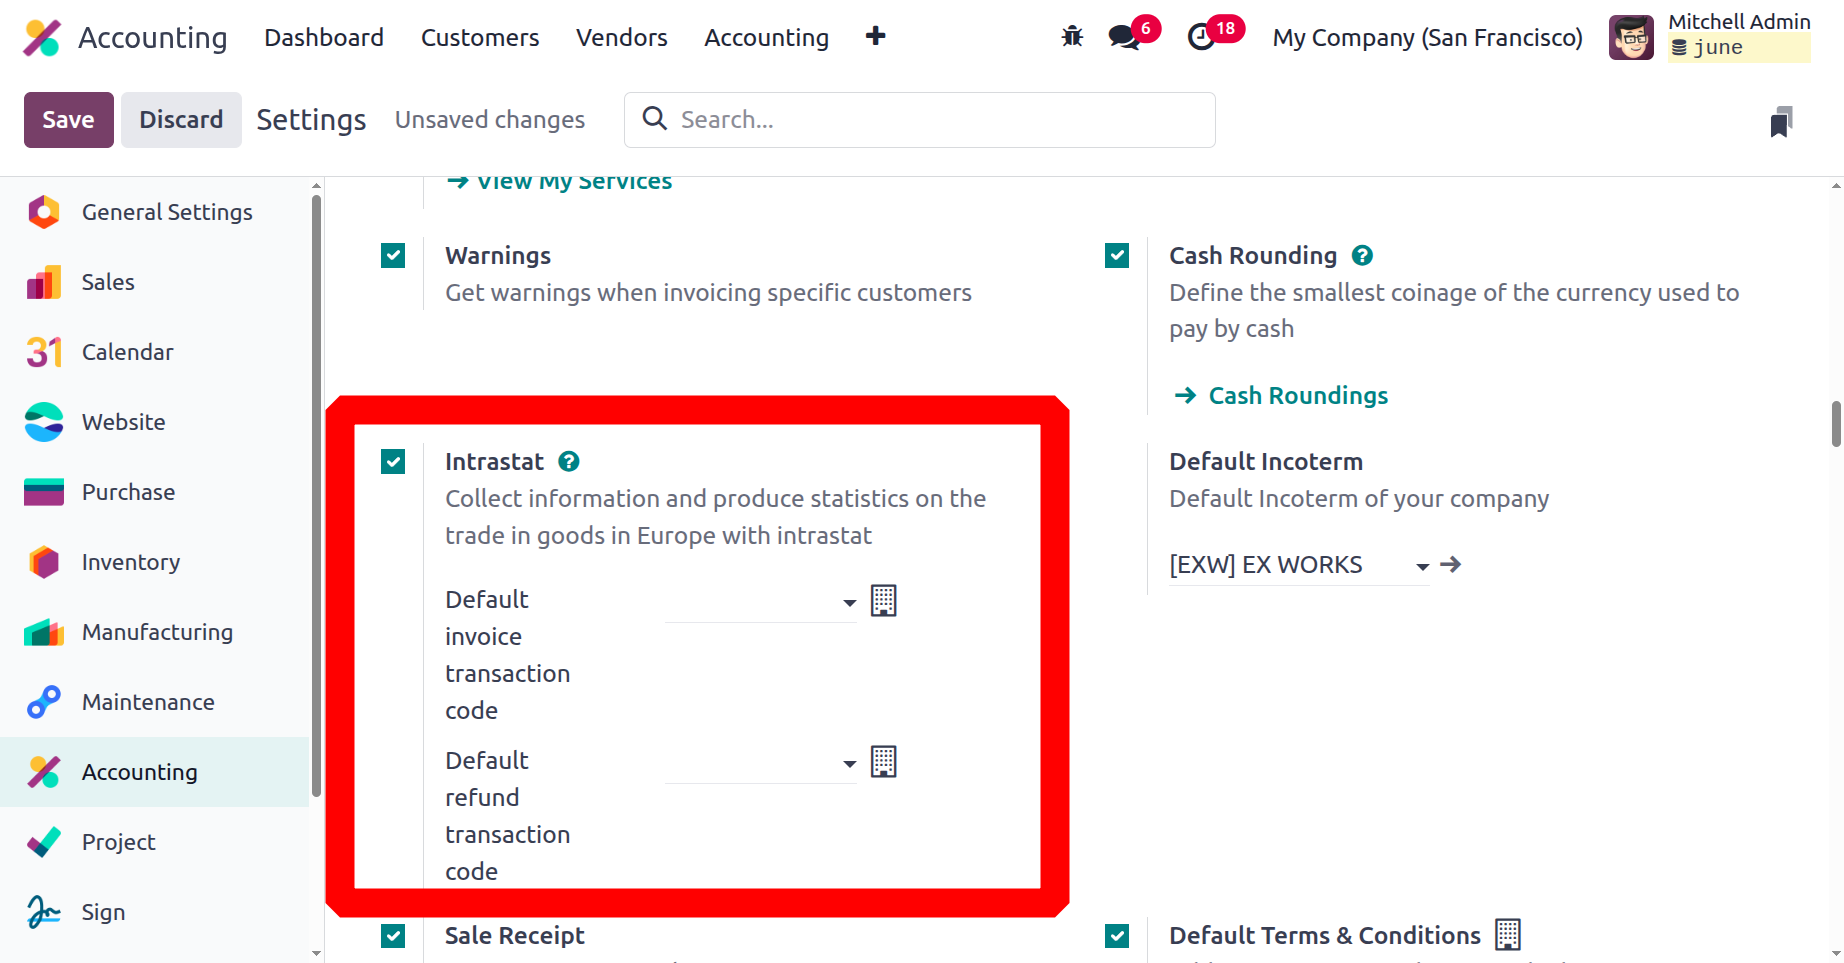
Intrastat
Another aspect of localisation for Odoo's business operations in Europe is setting up Intrastat, which may be accomplished here by turning on the option. You can choose the Default Invoice transaction code and Default refund transaction code to be used from a drop-down menu that appears when you enable the option.
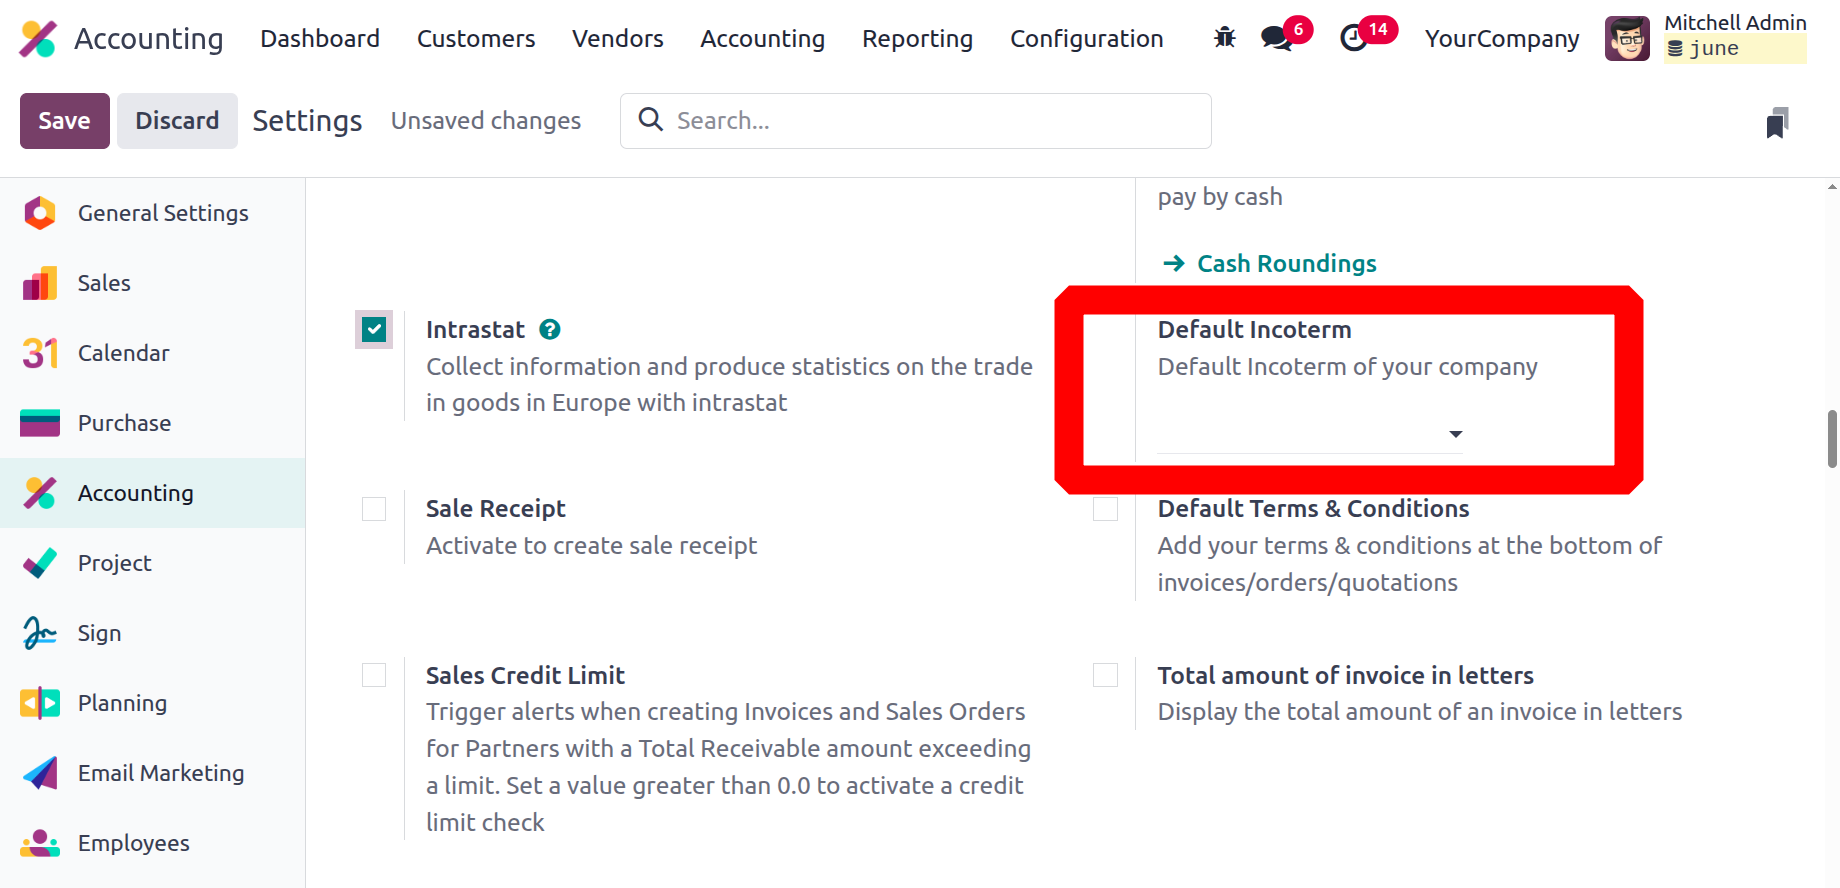
Default Incoterm
The Odoo Accounting module settings allow you to modify the default incoterm in addition to defining it. Choose the default incoterm to be used from a drop-down menu that appears when you enable the option.
The International Commercial Terms (Incoterm) feature in Odoo 18 Accounting outlines the obligations of buyers and sellers in cross-border transactions, outlining who is responsible for the expenses and risks associated with shipping. You can also choose the default Incoterms using a drop-down box.
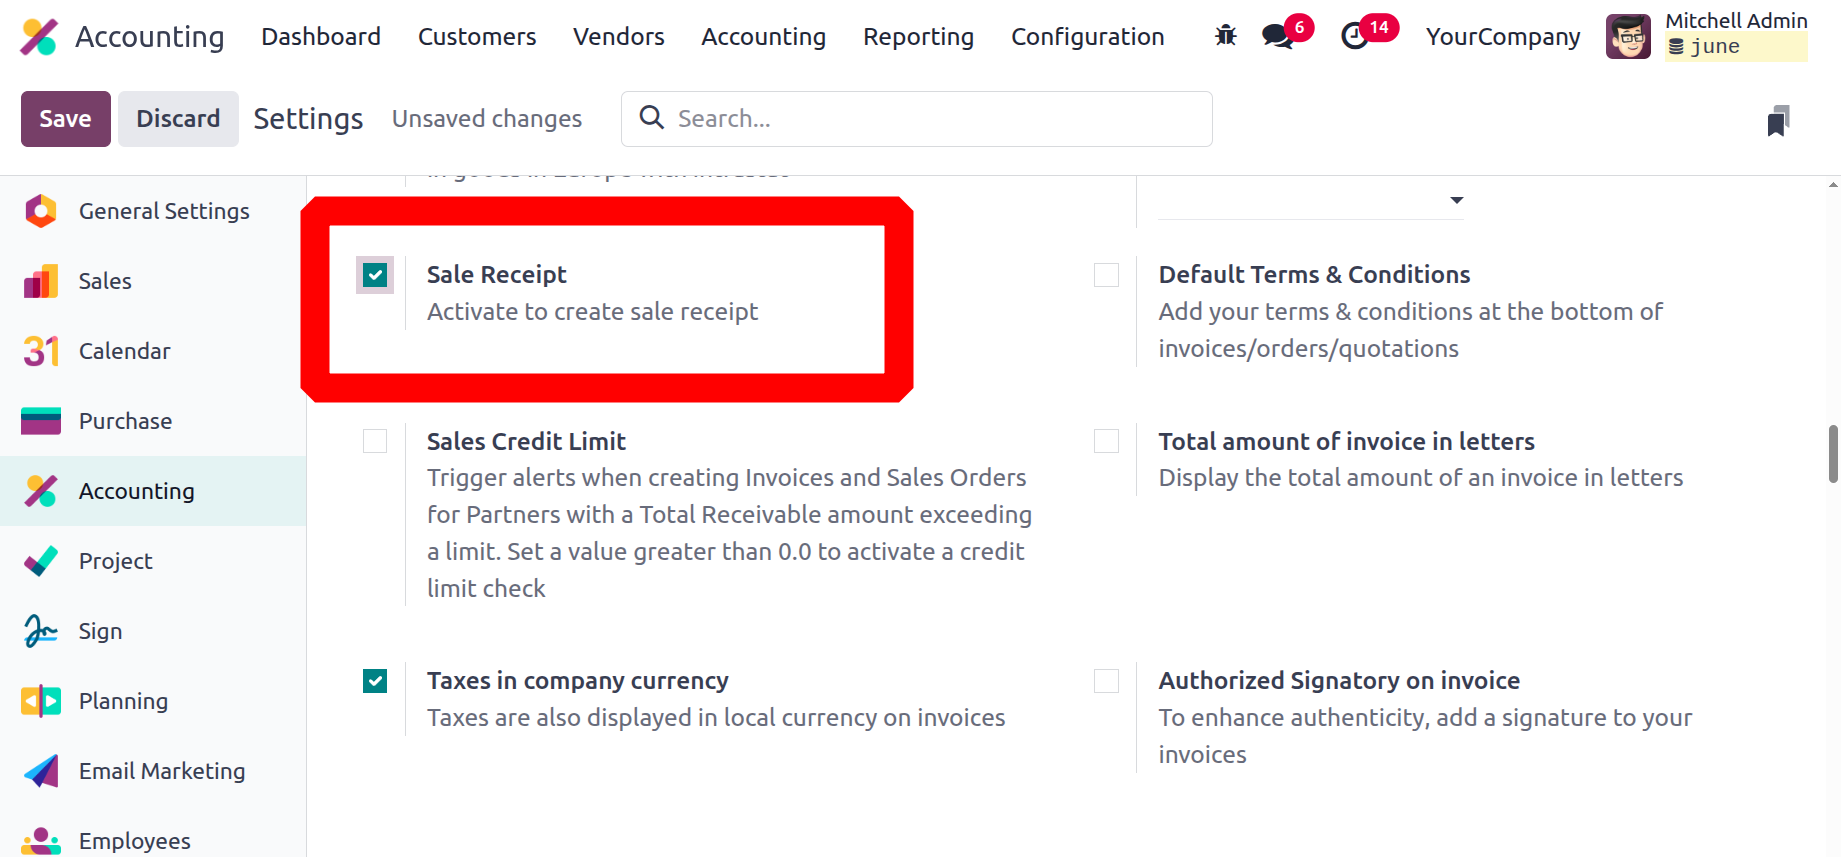
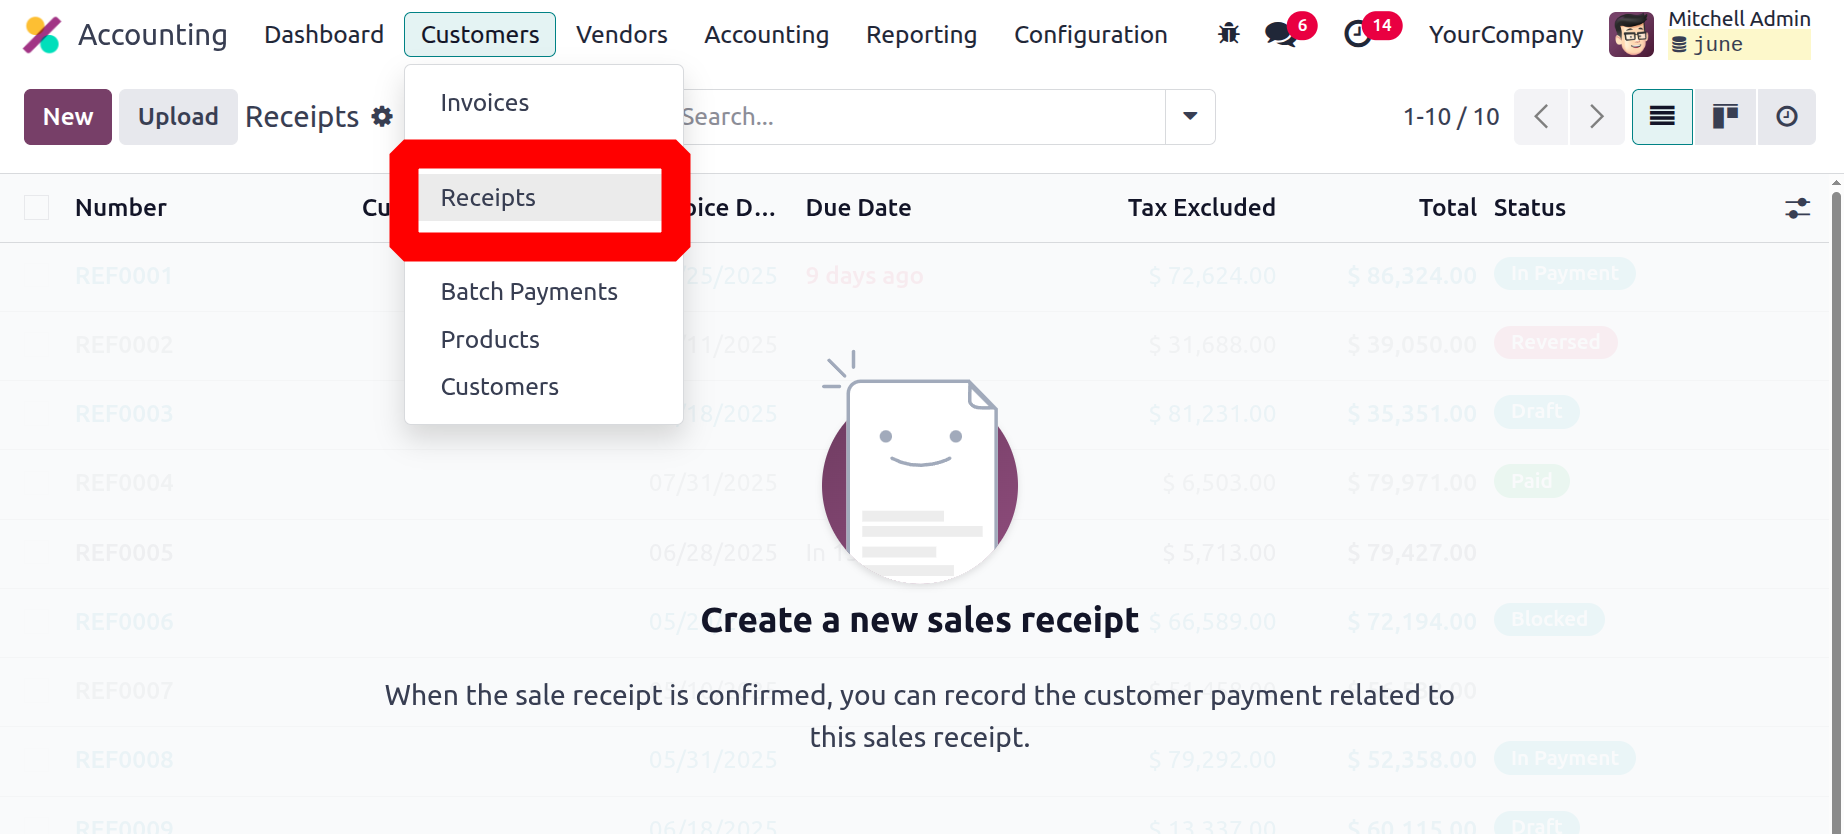
Sales Receipt
A receipt for the product sale can be generated following the sale if the Sales Receipt option is enabled. Consequently, the same quantity of goods is sold, billed, and dispatched.
The accounting module's customer invoice management component offers every setup choice. We'll go to the following part, which contains configuration choices for handling client payments.
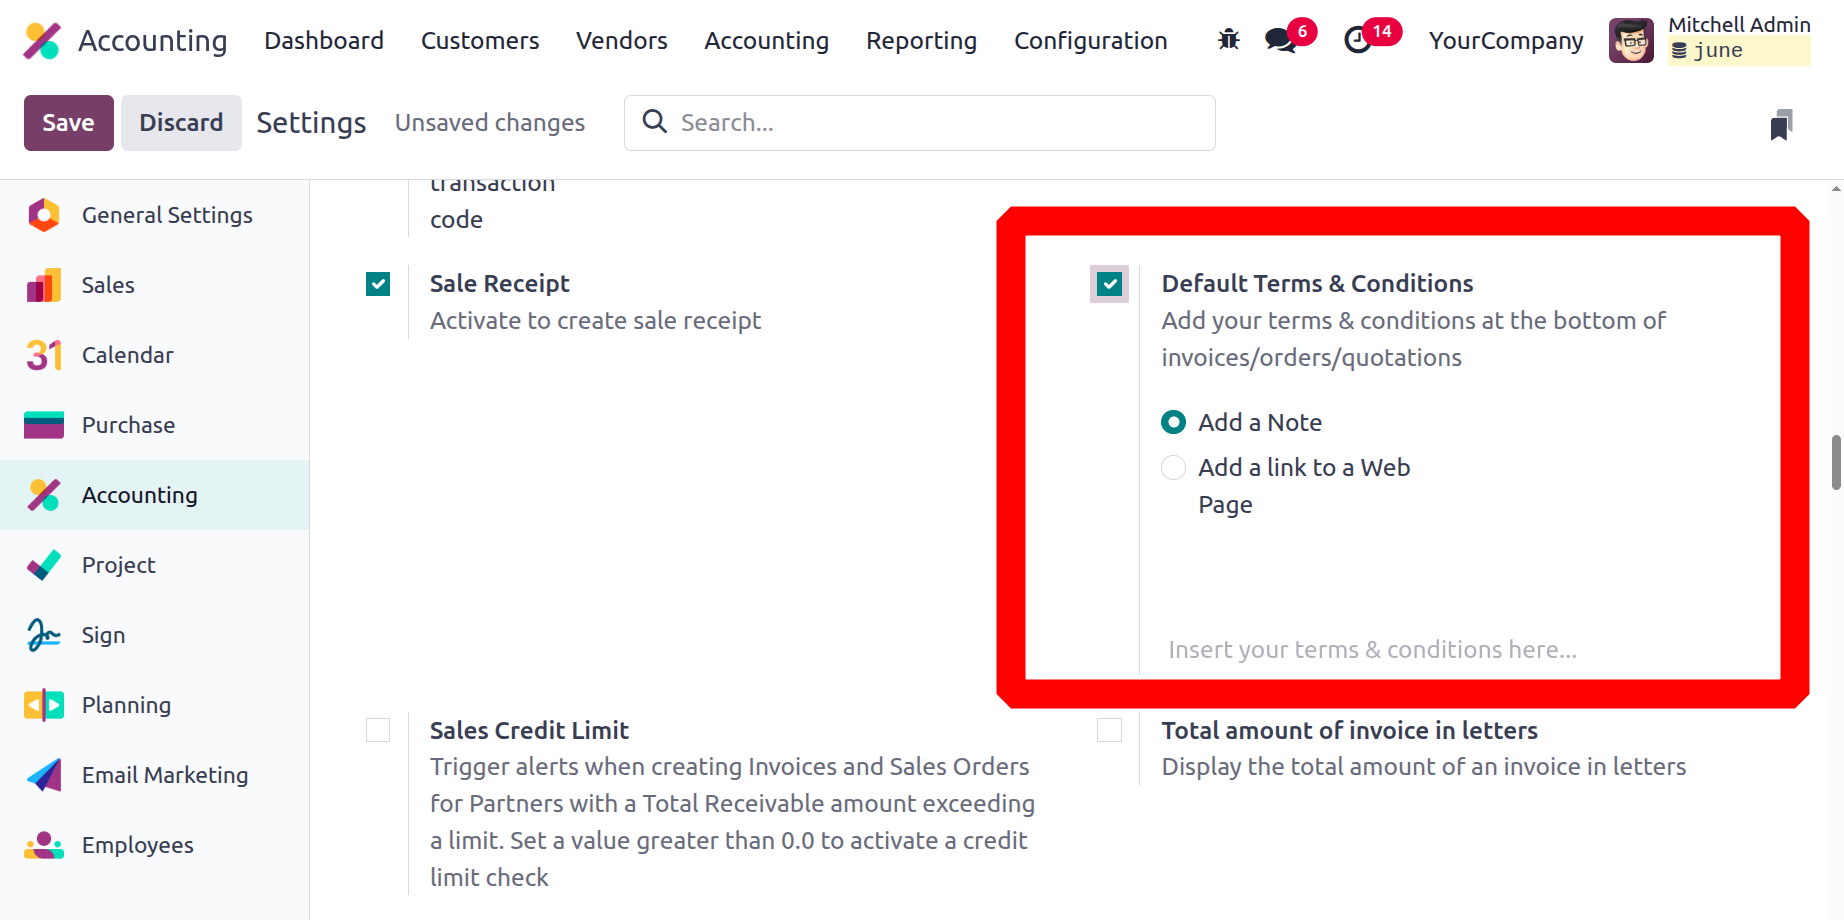
Default Terms & Conditions
It takes a lot of small but important information to write comprehensive and accurate terms and conditions on sales invoices, including the company's information, the description of the products or services being sold, and any applicable taxes or discounts. The default terms and conditions can therefore be added under terms & conditions, and they will appear in the invoices, sales orders, and quotations as comments or links.
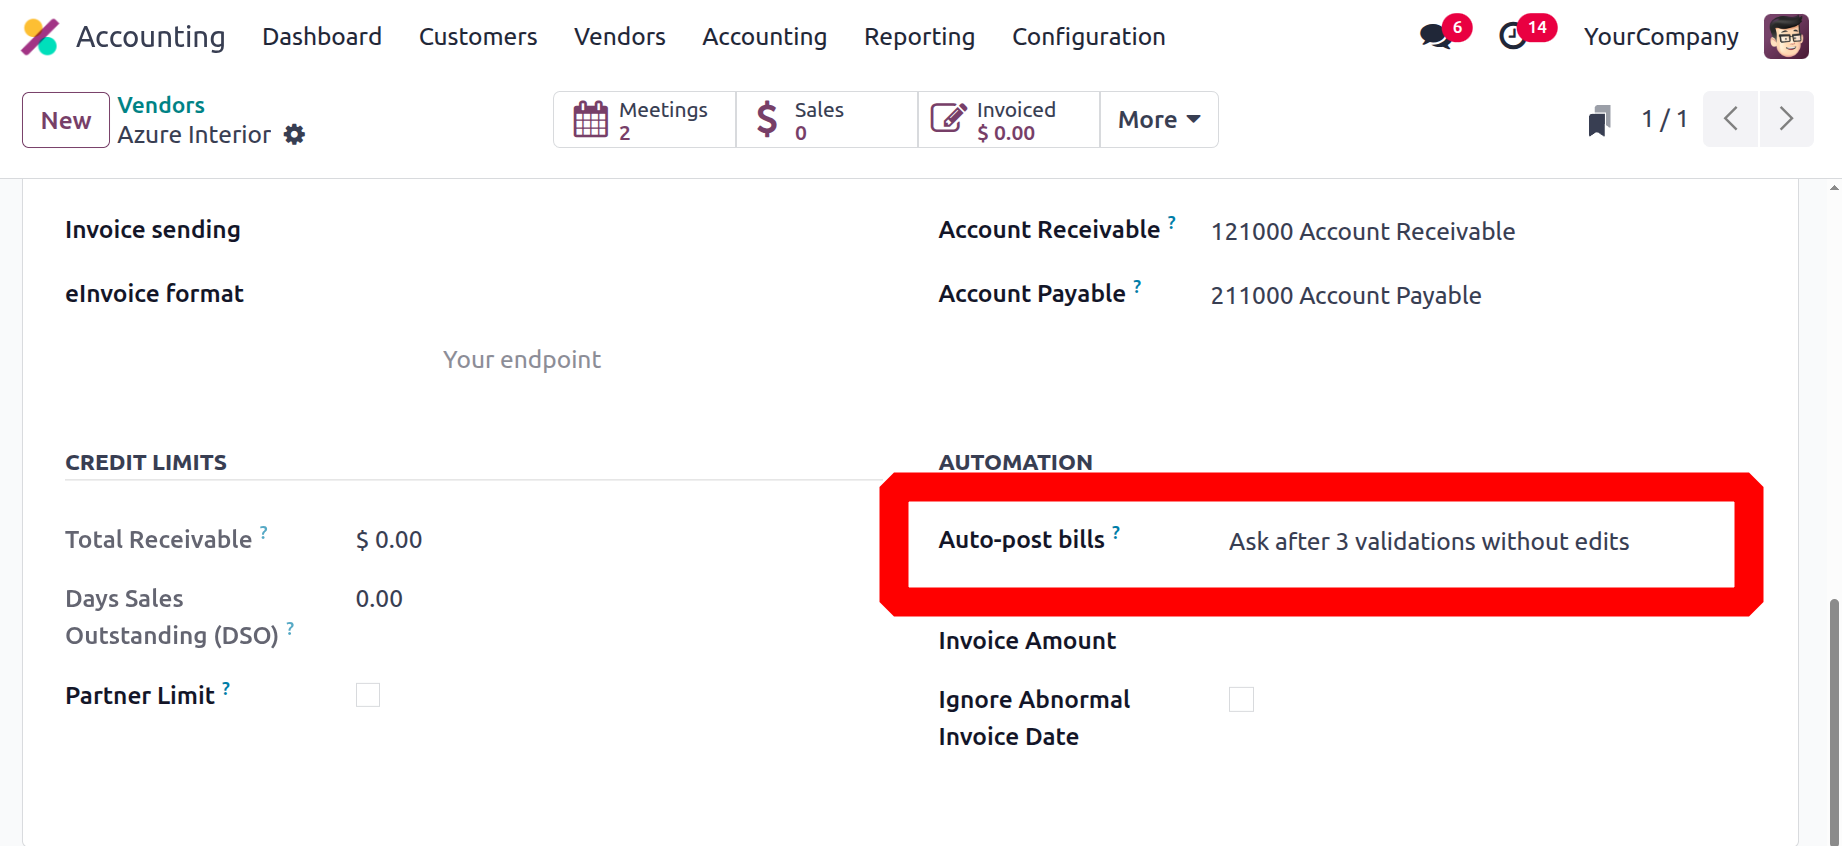
Sales Credit Limit
A credit limit is the highest amount of credit that a consumer can have. It serves to lessen the damage incurred by the business in the event that the client declines to make payment. The finance department determines the credit limit's amount. As a corporate policy, we can establish a sales credit limit in the accounting settings that can be applied to every partner.
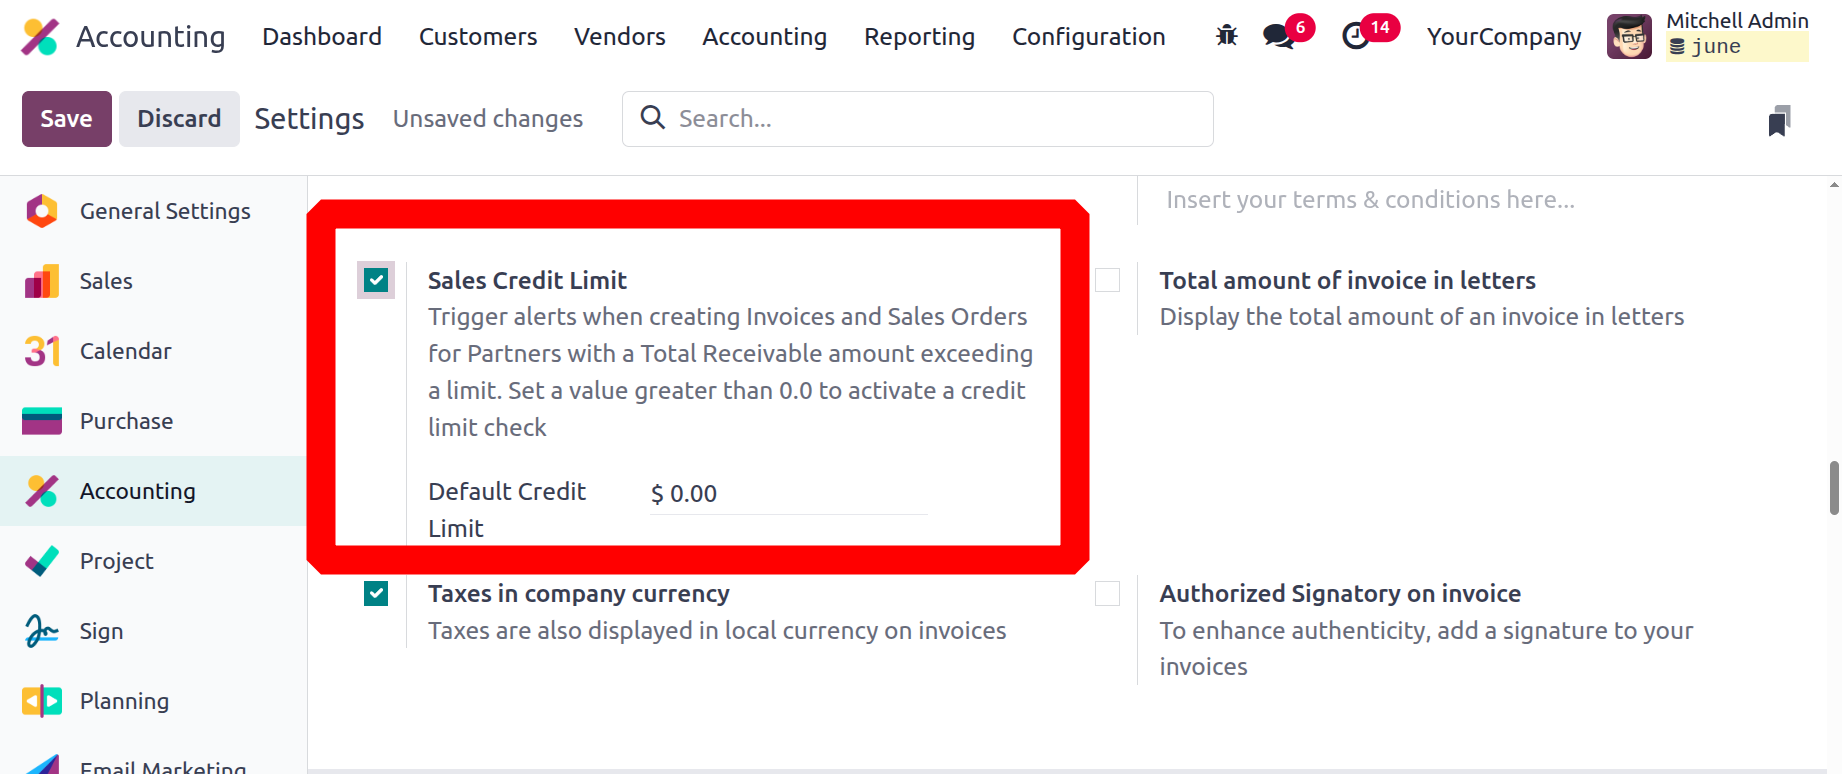
You can also establish a maximum credit limit for specific partners with Odoo 18. Therefore, if this feature is enabled, we can use the partner form to create a credit limit for the partner and view their requirements.
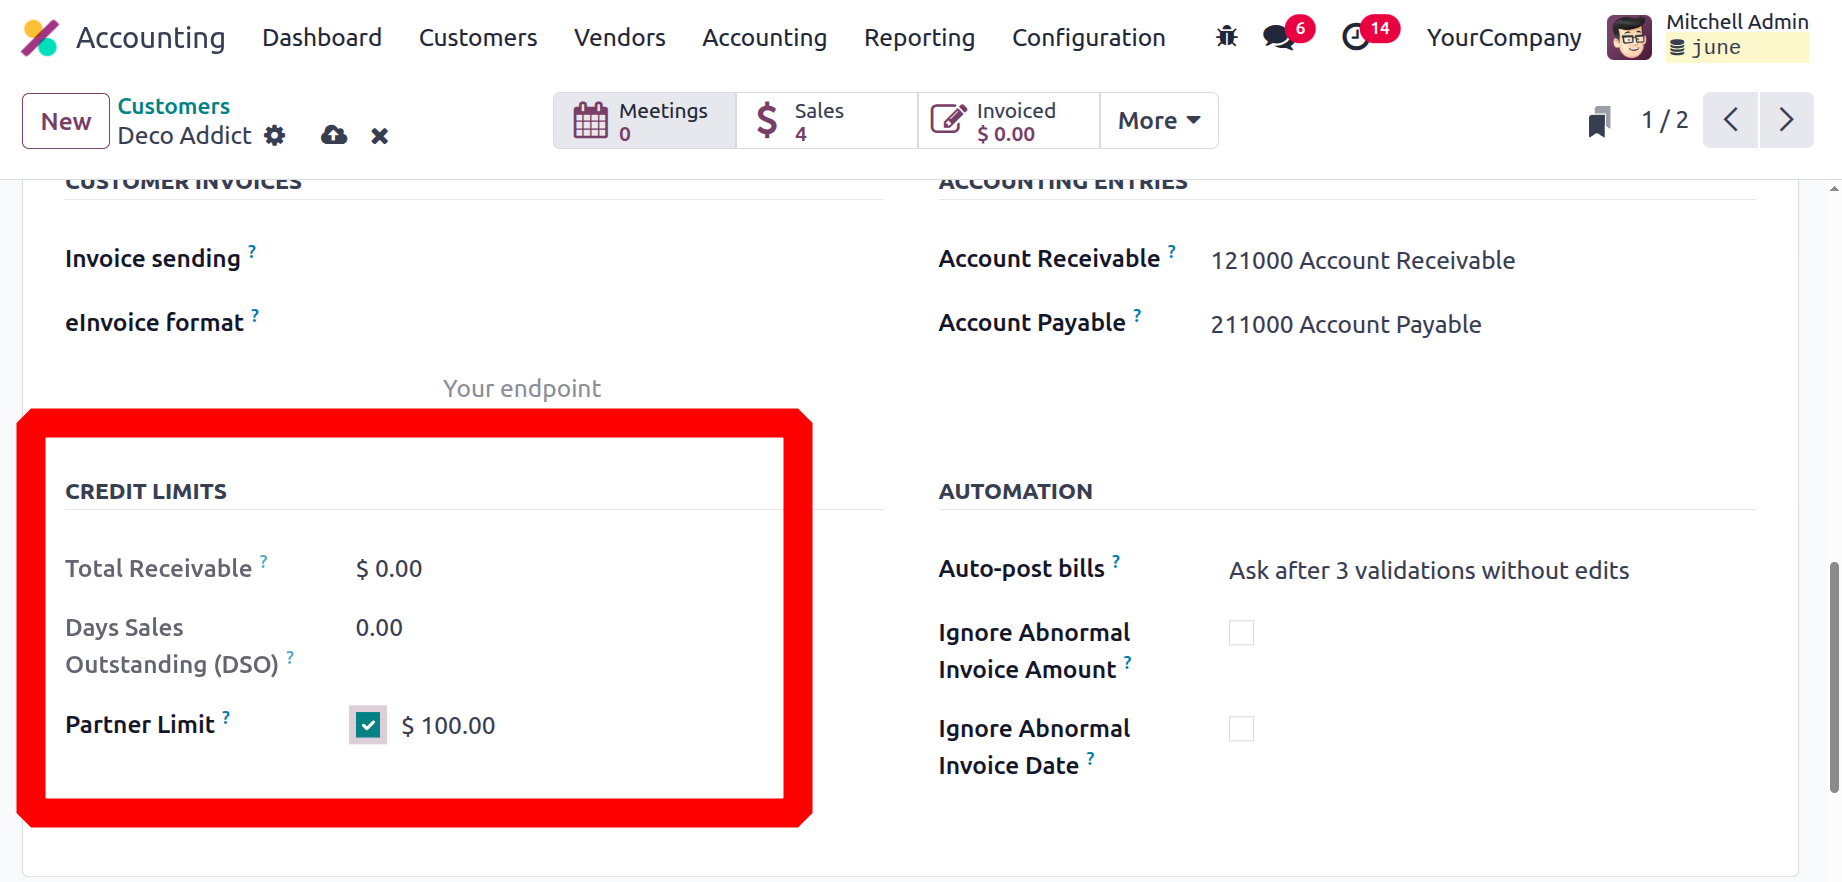
Here the Total Receivable is the total amount this customer owes you and the Days Sales Outstanding (DSO) is calculated by [(Total Receivable/Total Revenue)* Number of Days since the first invoice] for the customer.
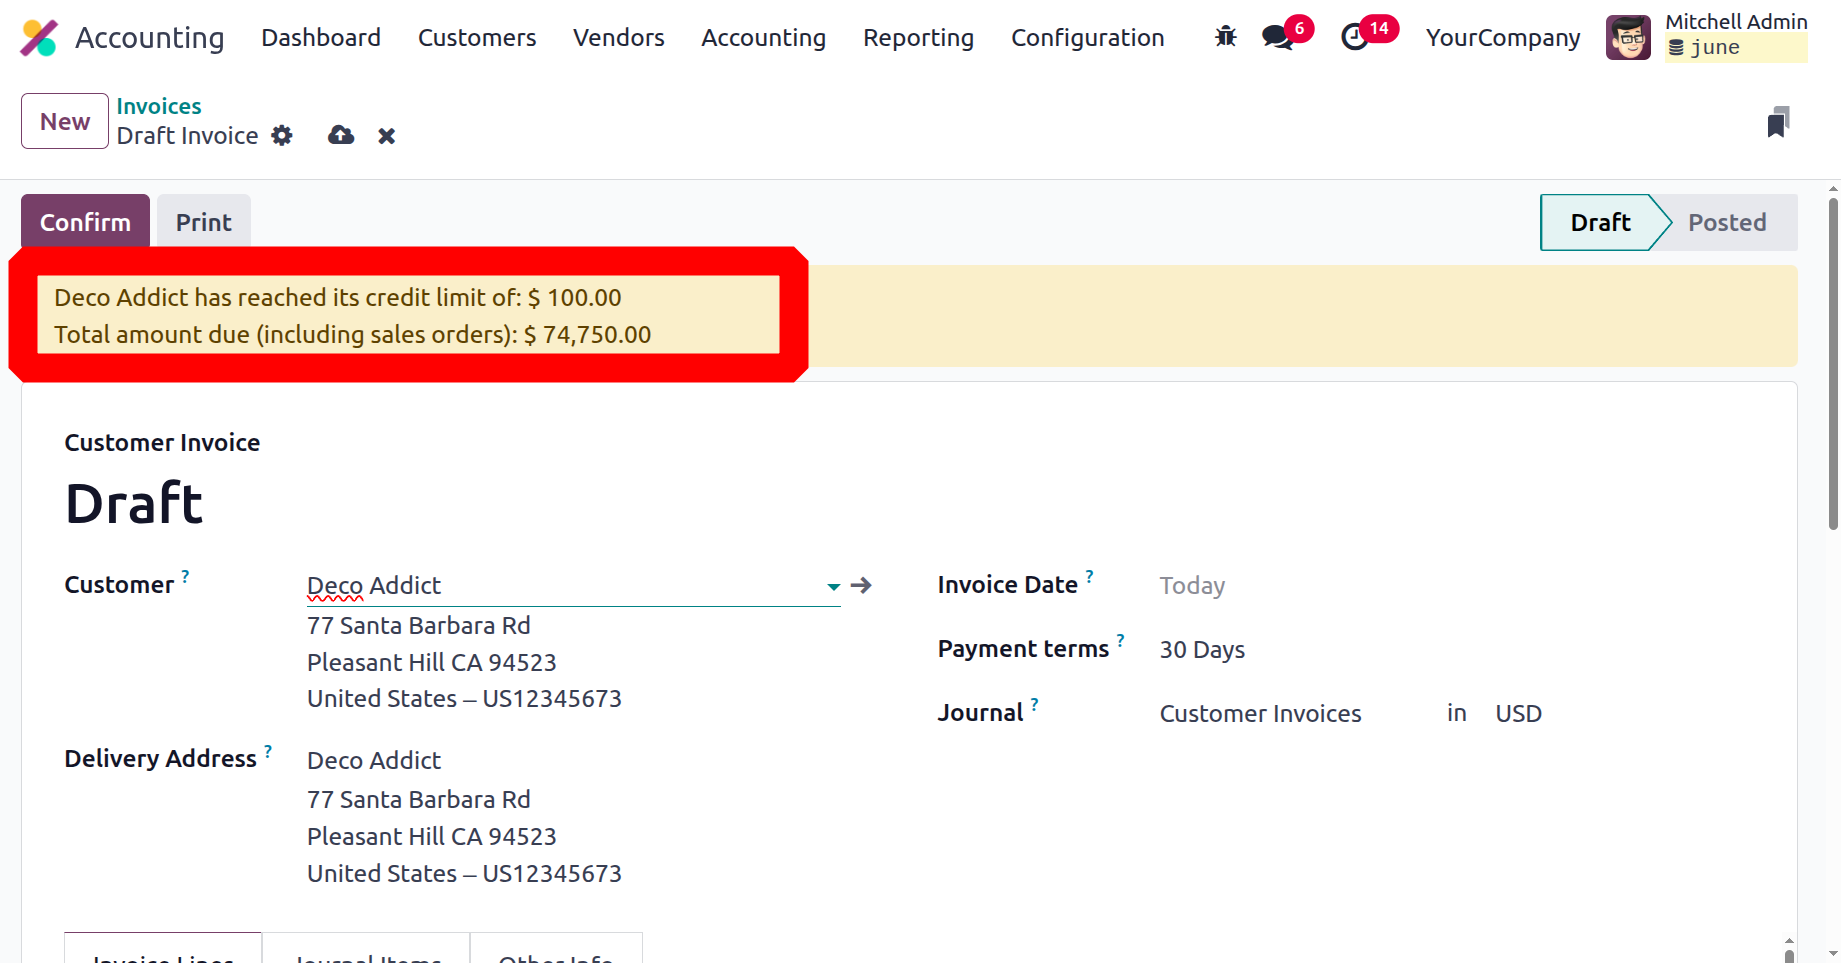
Future bills will indicate that a partner has achieved their credit limit if the amount of their receivables surpasses that level.
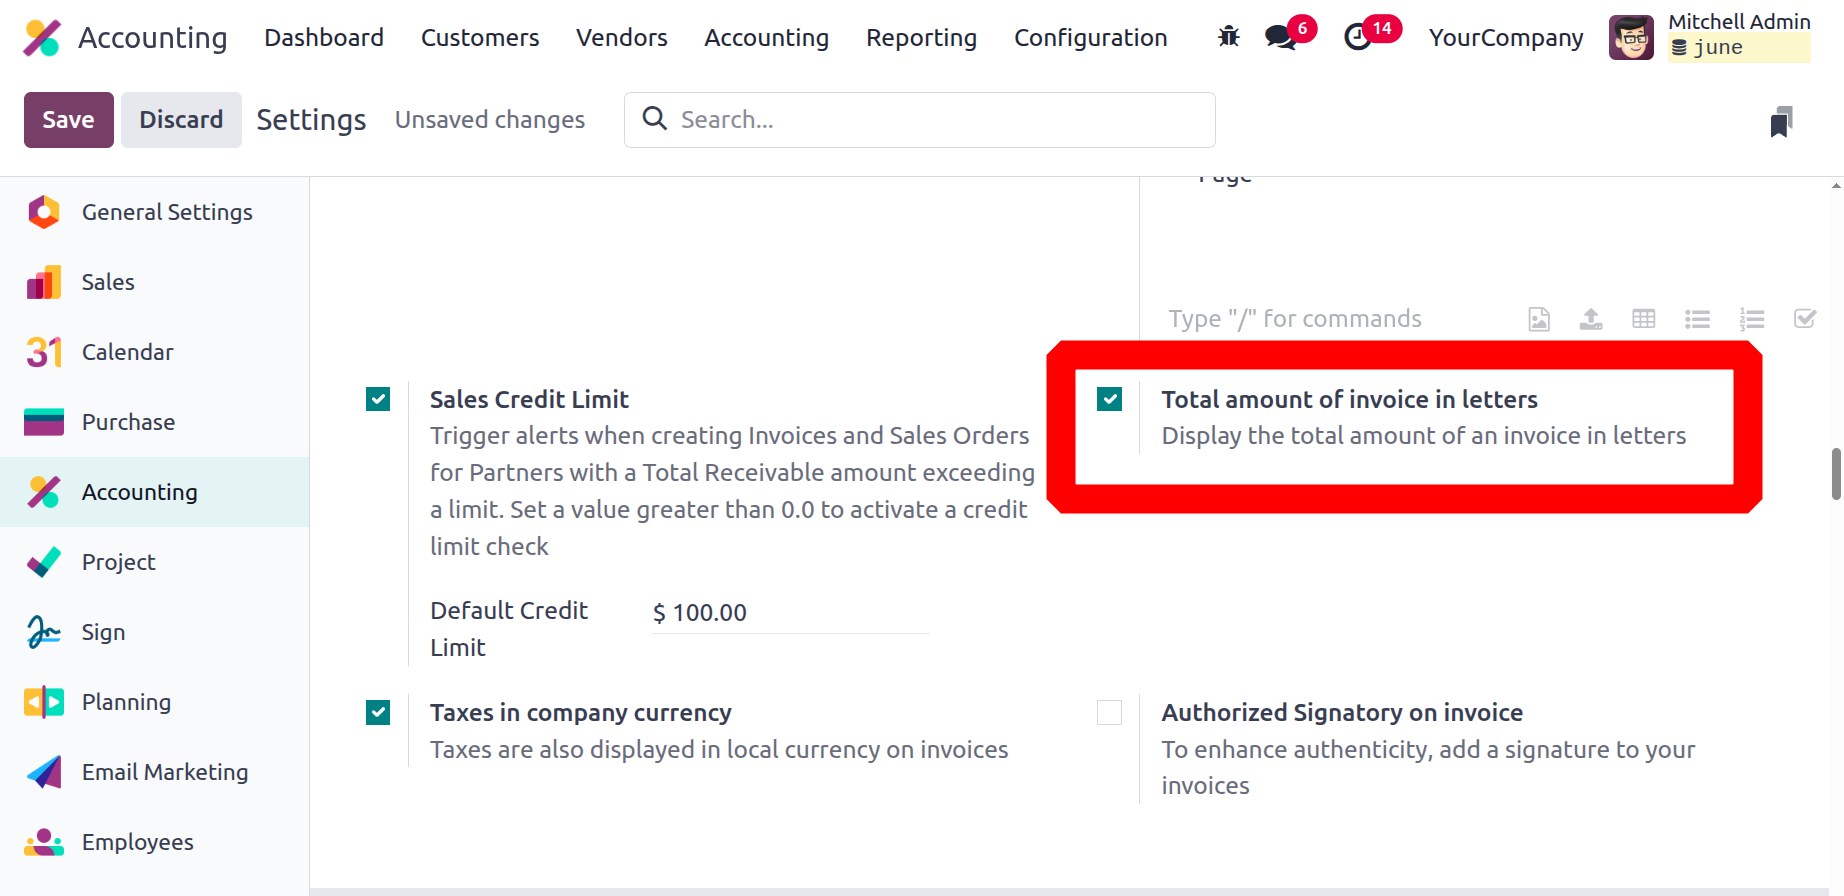
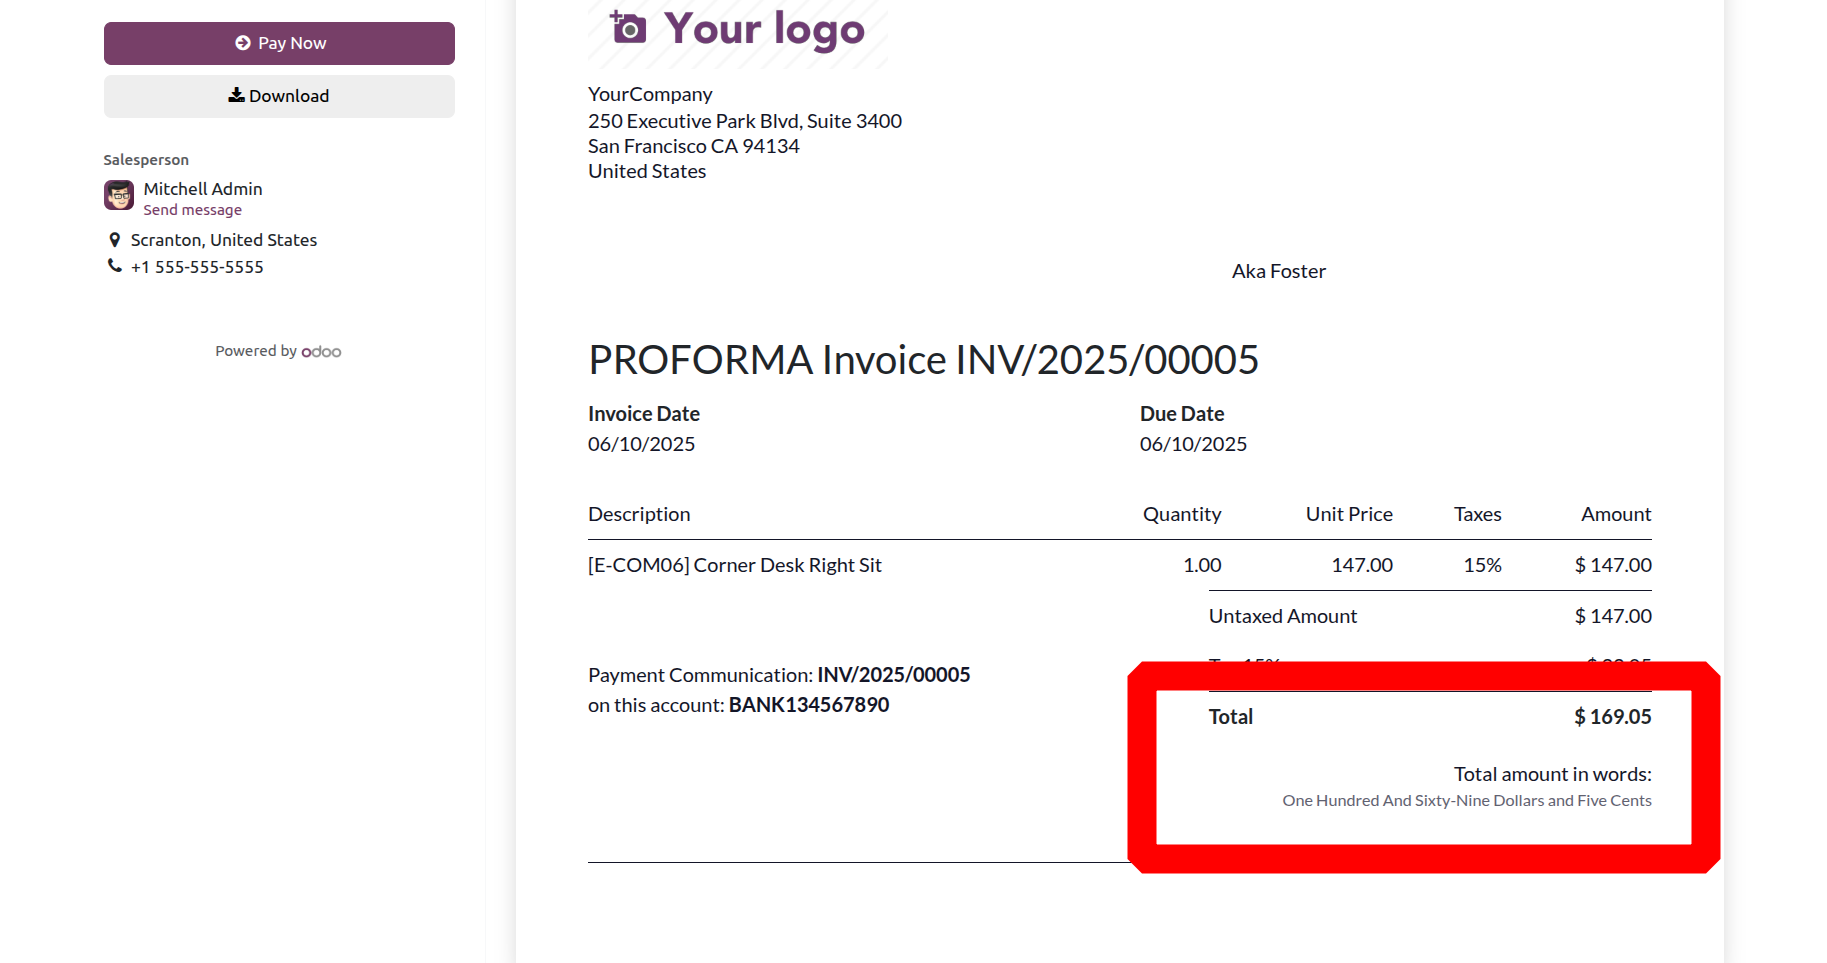
Total Amount of Invoice in Letters
You may now print the total number of invoices in the letter using a new feature in the Odoo 18 accounting module. As indicated below, enable this from the Accounting module's settings under the Customer Invoice section.
Let's produce and verify an invoice for a customer after turning on this feature. Once the invoice has been verified, print it out. It will display the total invoice amount in the letters that are displayed below.
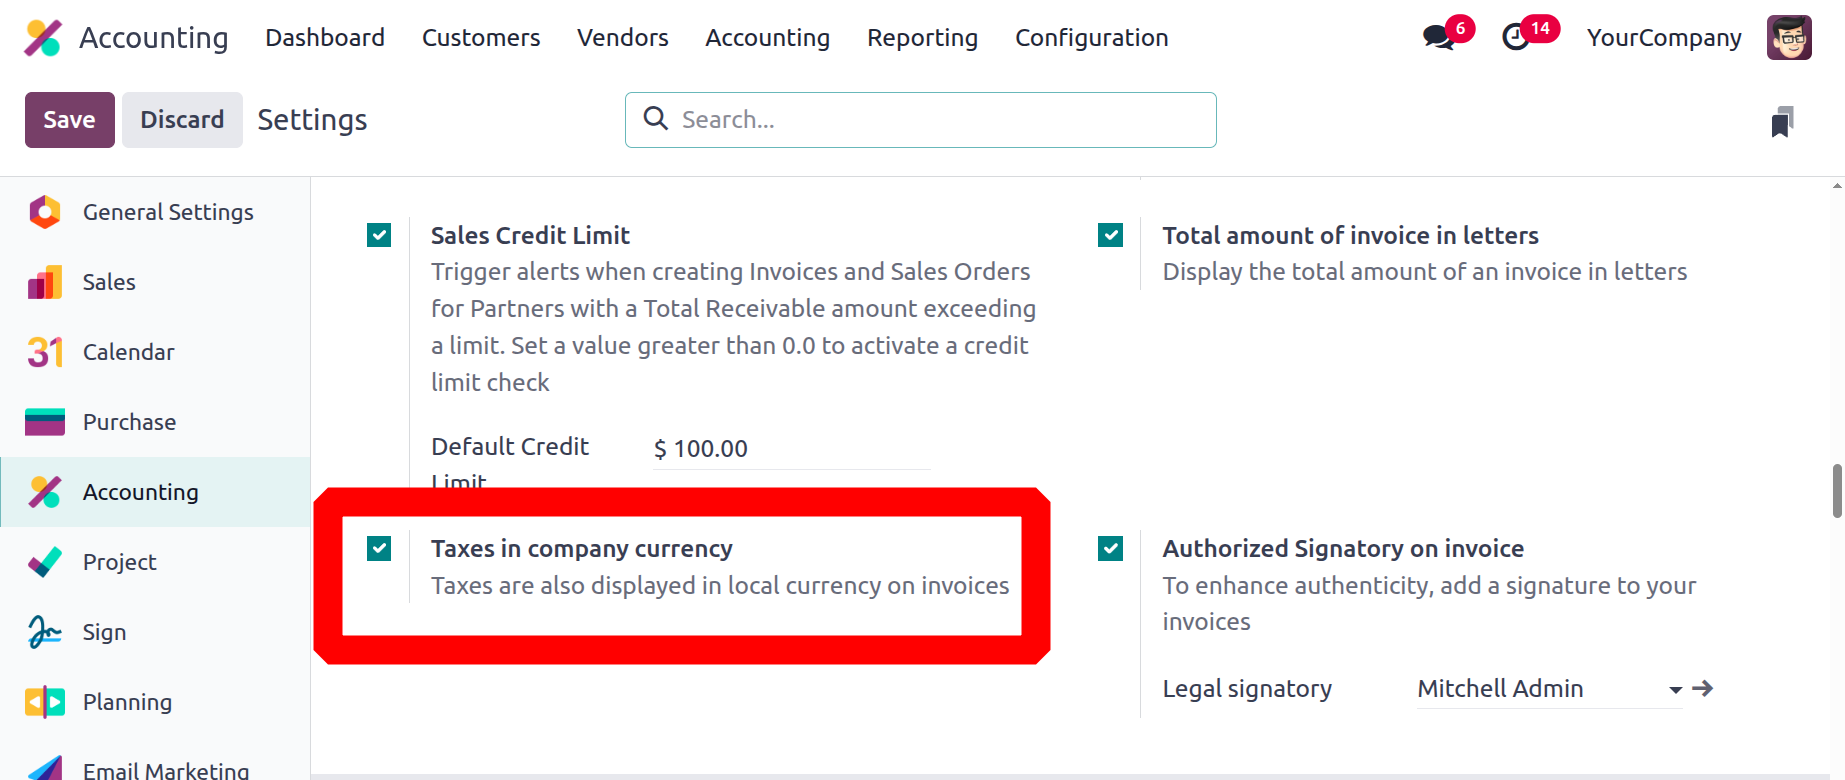
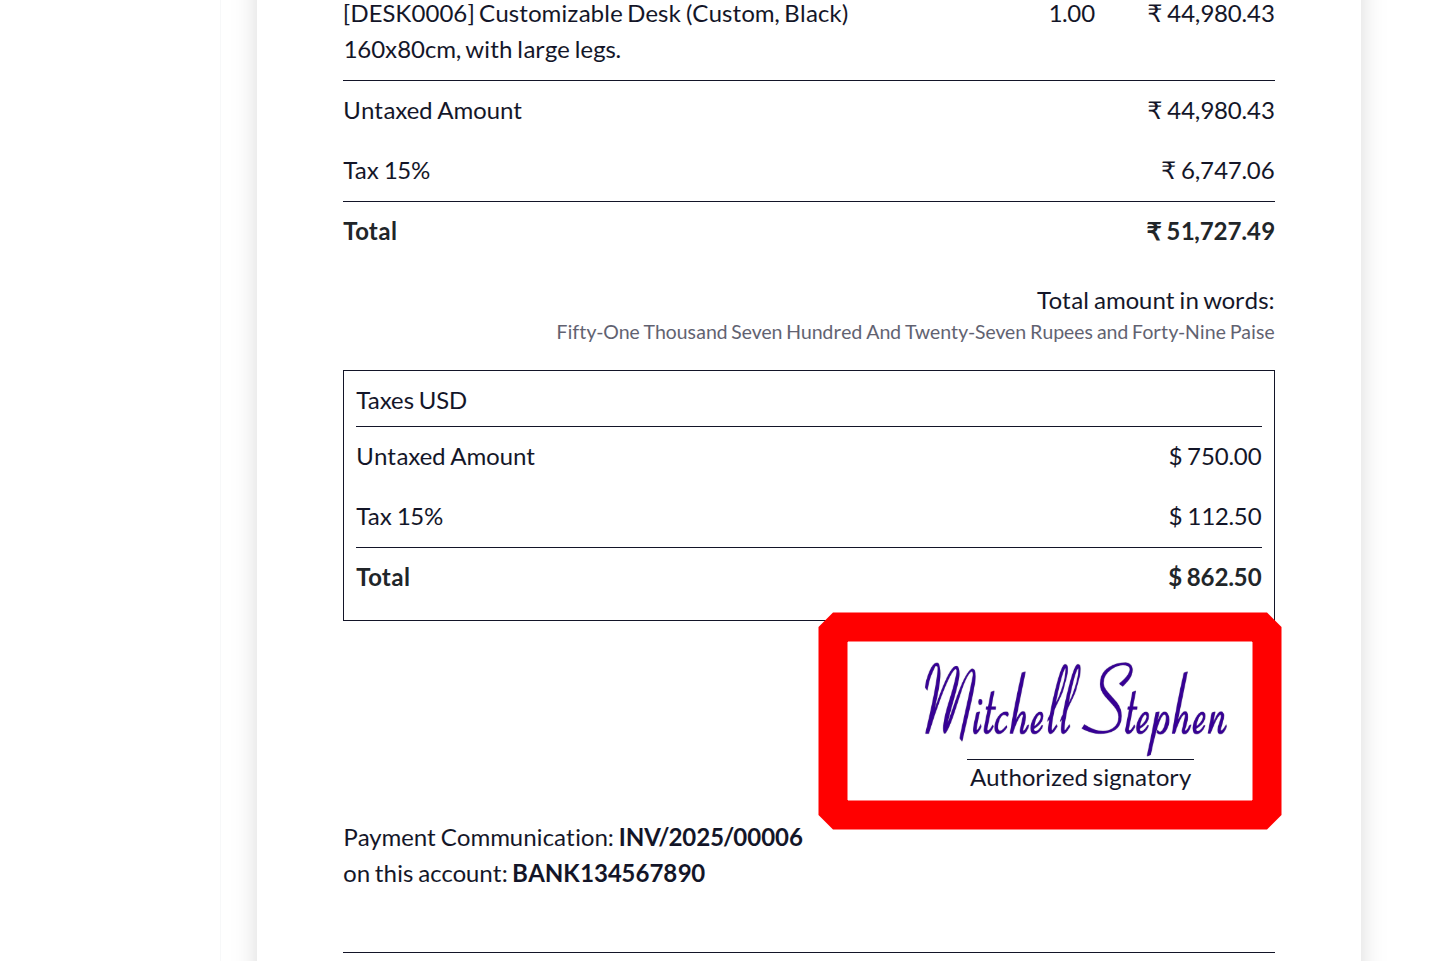
Taxes in Company Currency
Odoo 18 accounting supports several currencies, and the additional taxes shown in local currency on invoices can be viewed by selecting the Taxes in company currency option from the settings.
Let's produce and verify an invoice for a customer after turning on this feature. Once the invoice has been verified, go to the customer preview. It will display the taxes in the company currency that are displayed below.

Authorized Signatory on Invoice
Authorised Signatory on invoice is a new option in Odoo 18 accounting settings that allows you to add a signature to your invoices and increase their credibility. Once enabled, enter the name of the legal signatory before saving the configuration.
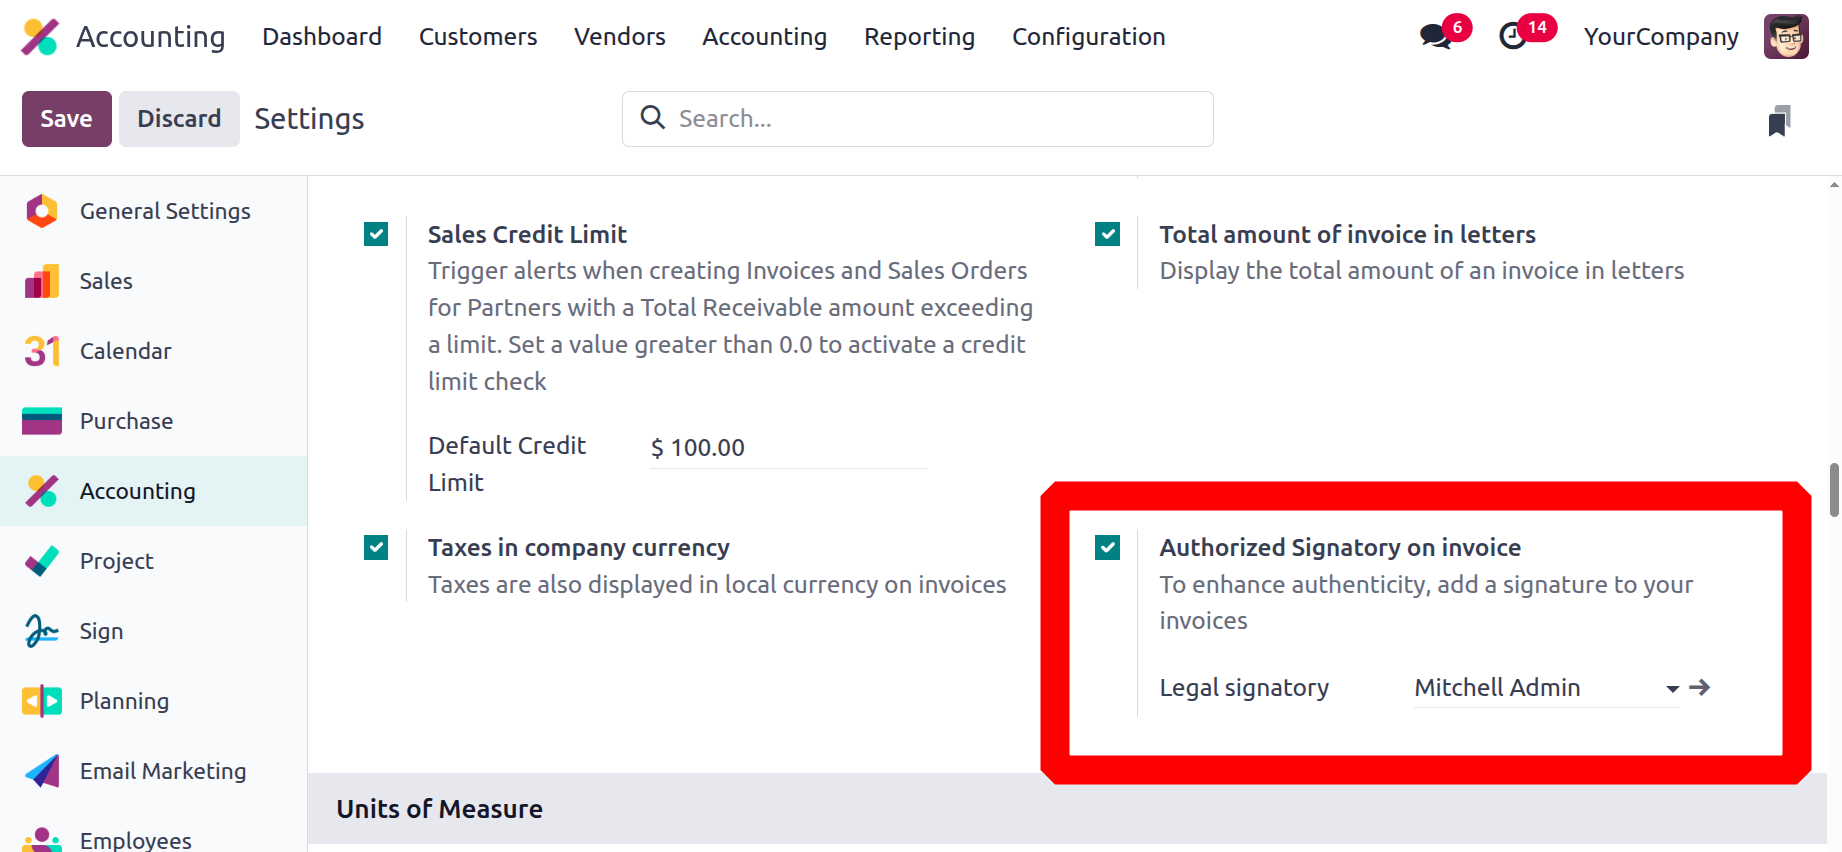
And the signature of the legal signatory can be viewed inside the invoice as shown below.
Streamline the Customer Payments
Any company's financial operations revolve around the management of customer payments, and the Odoo accounting module's setup menu provides a number of options for this purpose. By turning on services like Invoice online payments, you can allow customers to pay their invoices online. Additionally, the option to pay in installments can be enabled, enabling the customer to pay multiple bills simultaneously. SEPA Direct Debit (SDD), a helpful localisation option for European nations, allows for quick payment collection from clients utilising Euro-SEPA services. The image below displays the client payment management options available in the accounting module's Settings menu.
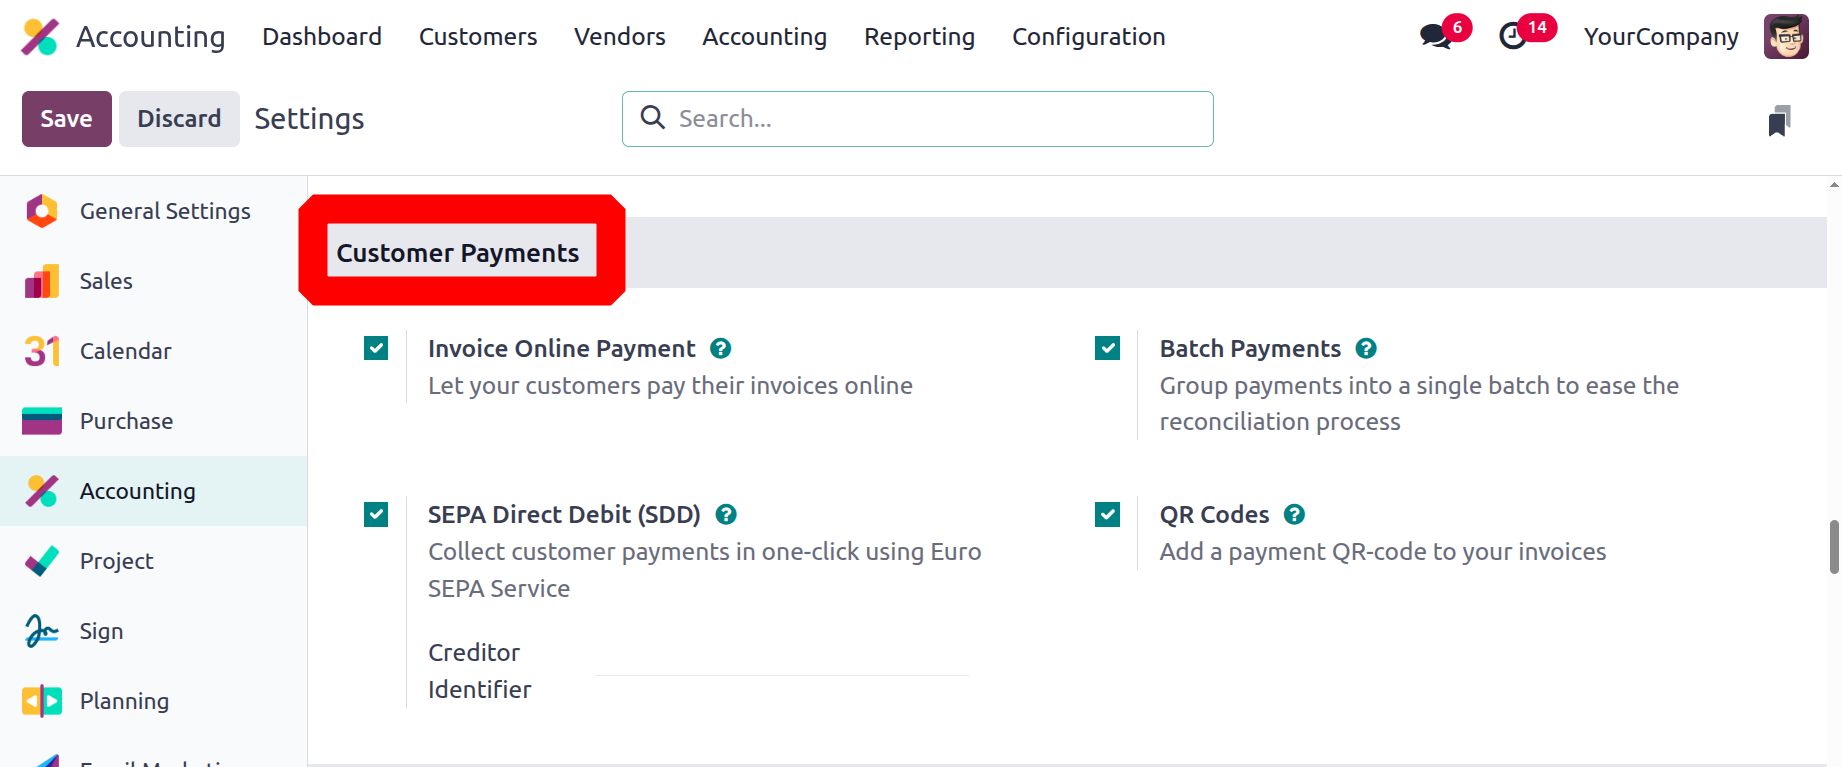
The Batch Payments feature in Odoo allows you to efficiently handle multiple payments at once with less manual labor. It makes it easy for businesses to plan and pay many bills or invoices in a coordinated and efficient manner.
You can include QR codes on your invoices that customers can scan to make payments if you enable them. You can accurately describe and process consumer payments with all of these possibilities. Creating customer invoices and handling payments have been our topics thus far. We'll talk about managing vendor invoices in the following section.
Efficient Vendor Bill Setup and Management
Keeping track of vendor invoices for goods purchased is made simple by Odoo's accounting module. You must select the appropriate settings in the accounting module's setup menu in order to handle vendor bills efficiently. By using past supplier invoices, the Odoo Platform accounting module's advanced option enables you to proactively comprehend vendor bills.
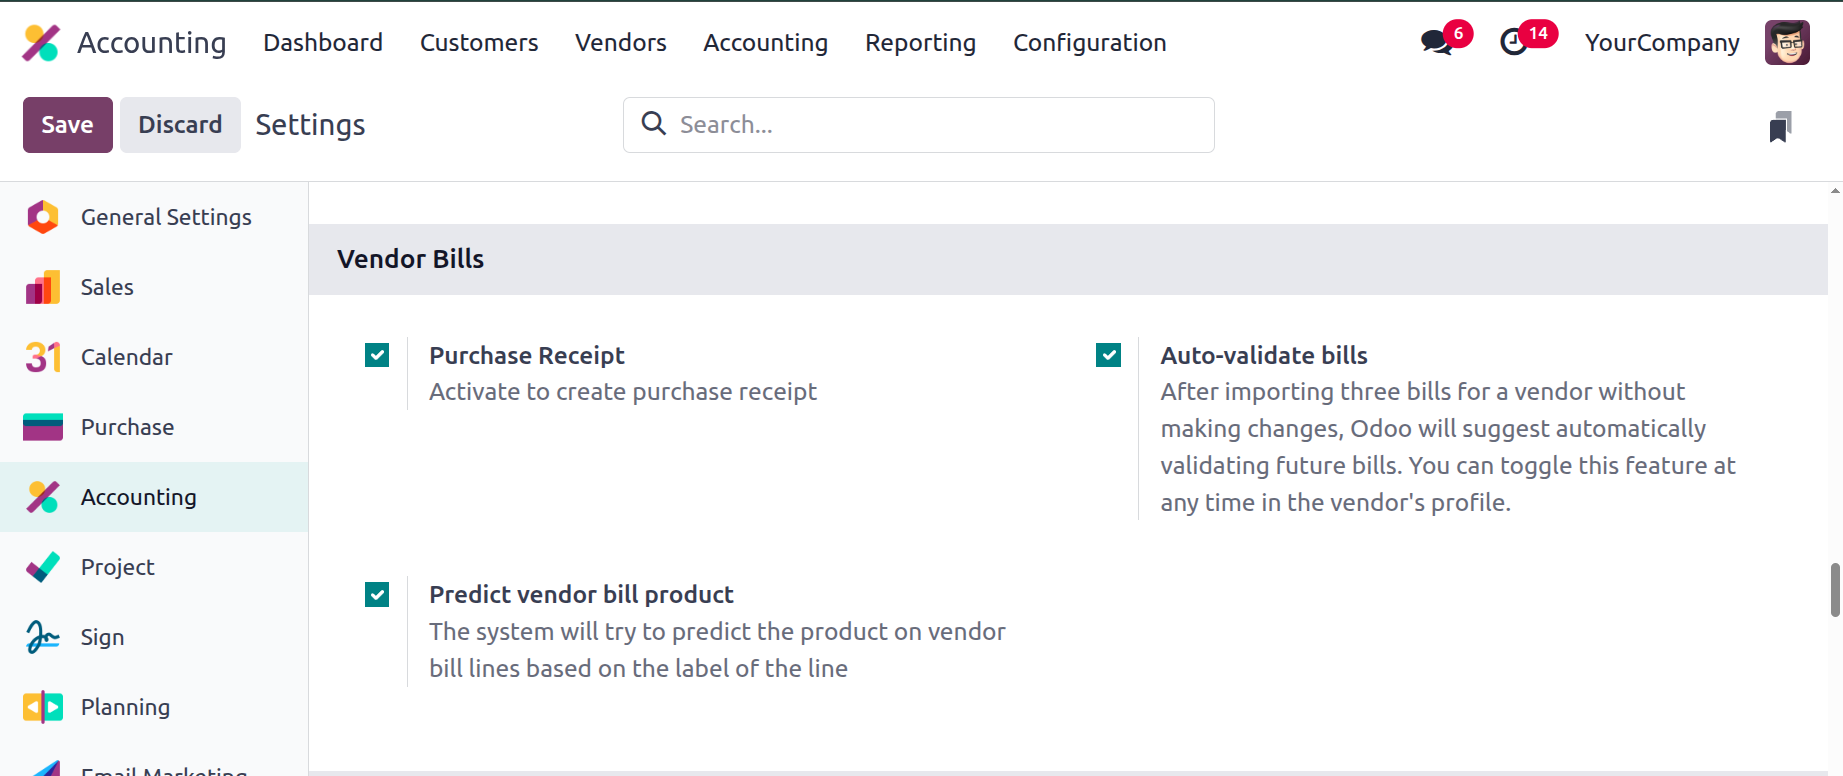
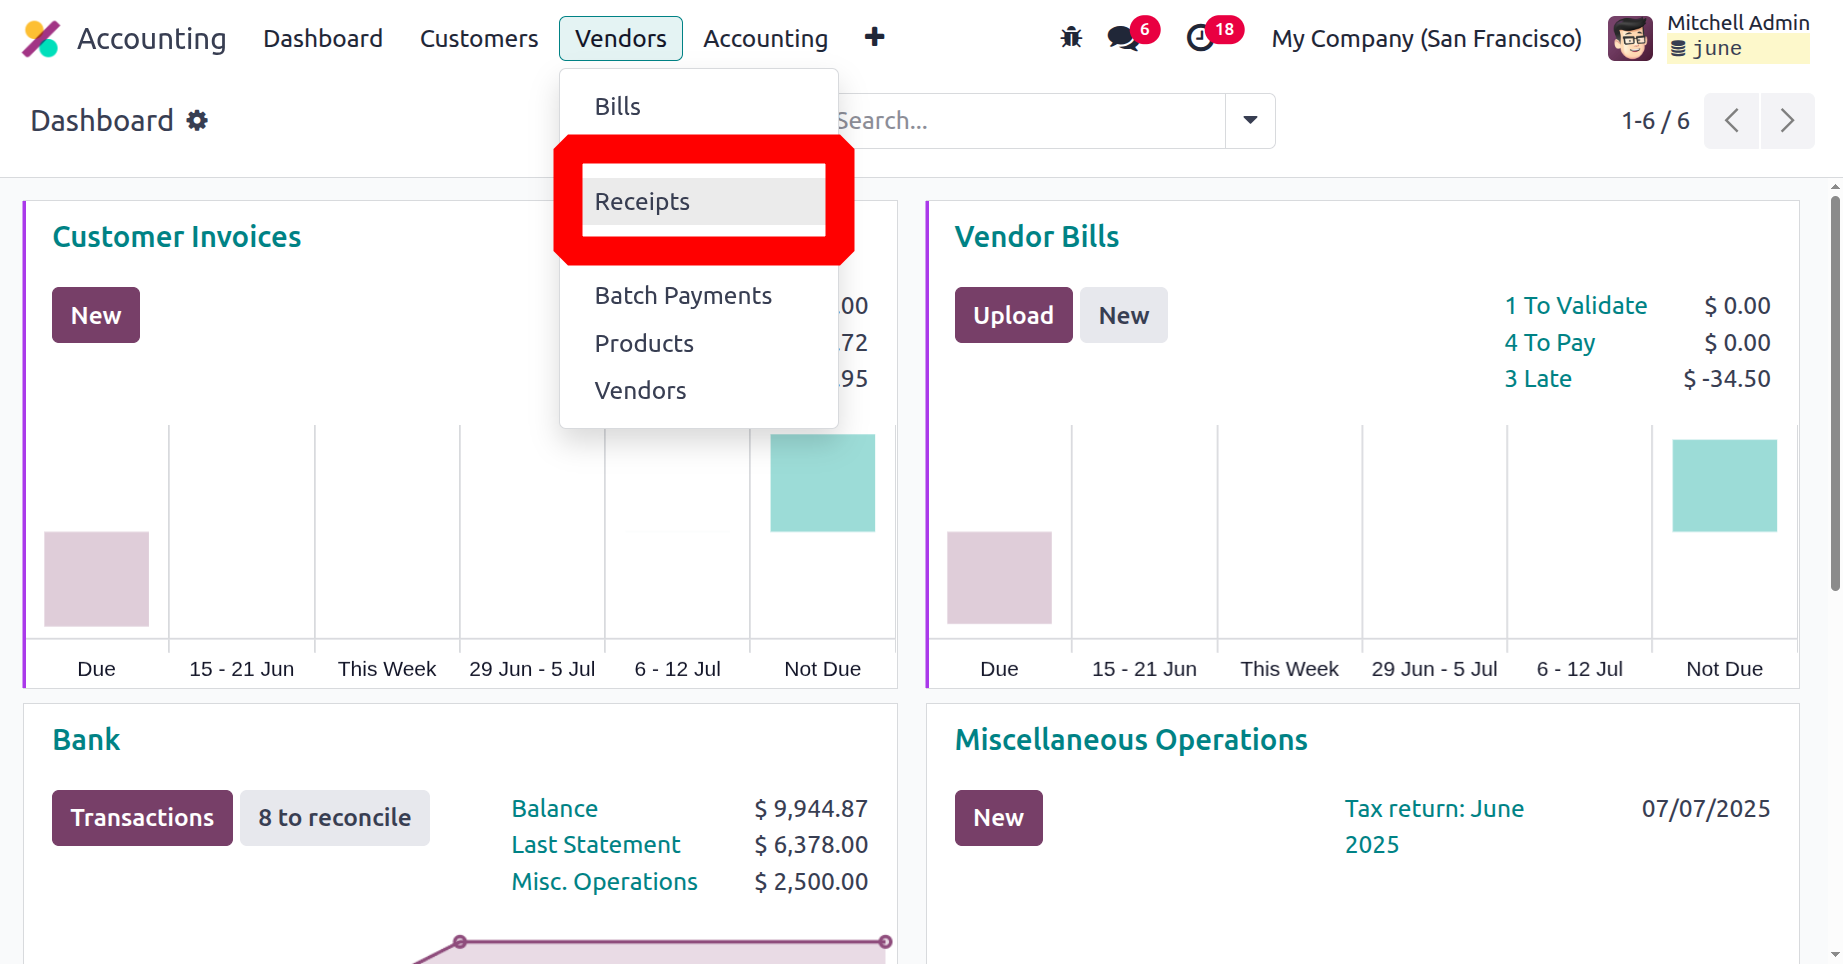
A purchase receipt is a document created in Odoo 18 Accounting when products are acquired from a vendor. It serves as evidence of delivery and initiates accounting and inventory entries prior to the receipt of the vendor bill. By enabling this from the Vendors menu, the user gets a Receipt option. And new receipts can be created from there.
After importing three bills for a vendor without making any changes, Odoo will automatically recommend validating subsequent bills if the Auto-validate bills option is enabled. In the vendor's profile, you can turn this feature on and off at any moment. After enabling, check the Vendors.
The system will attempt to anticipate the product on vendor bill lines based on the line label if the anticipated vendor bill product option is enabled.
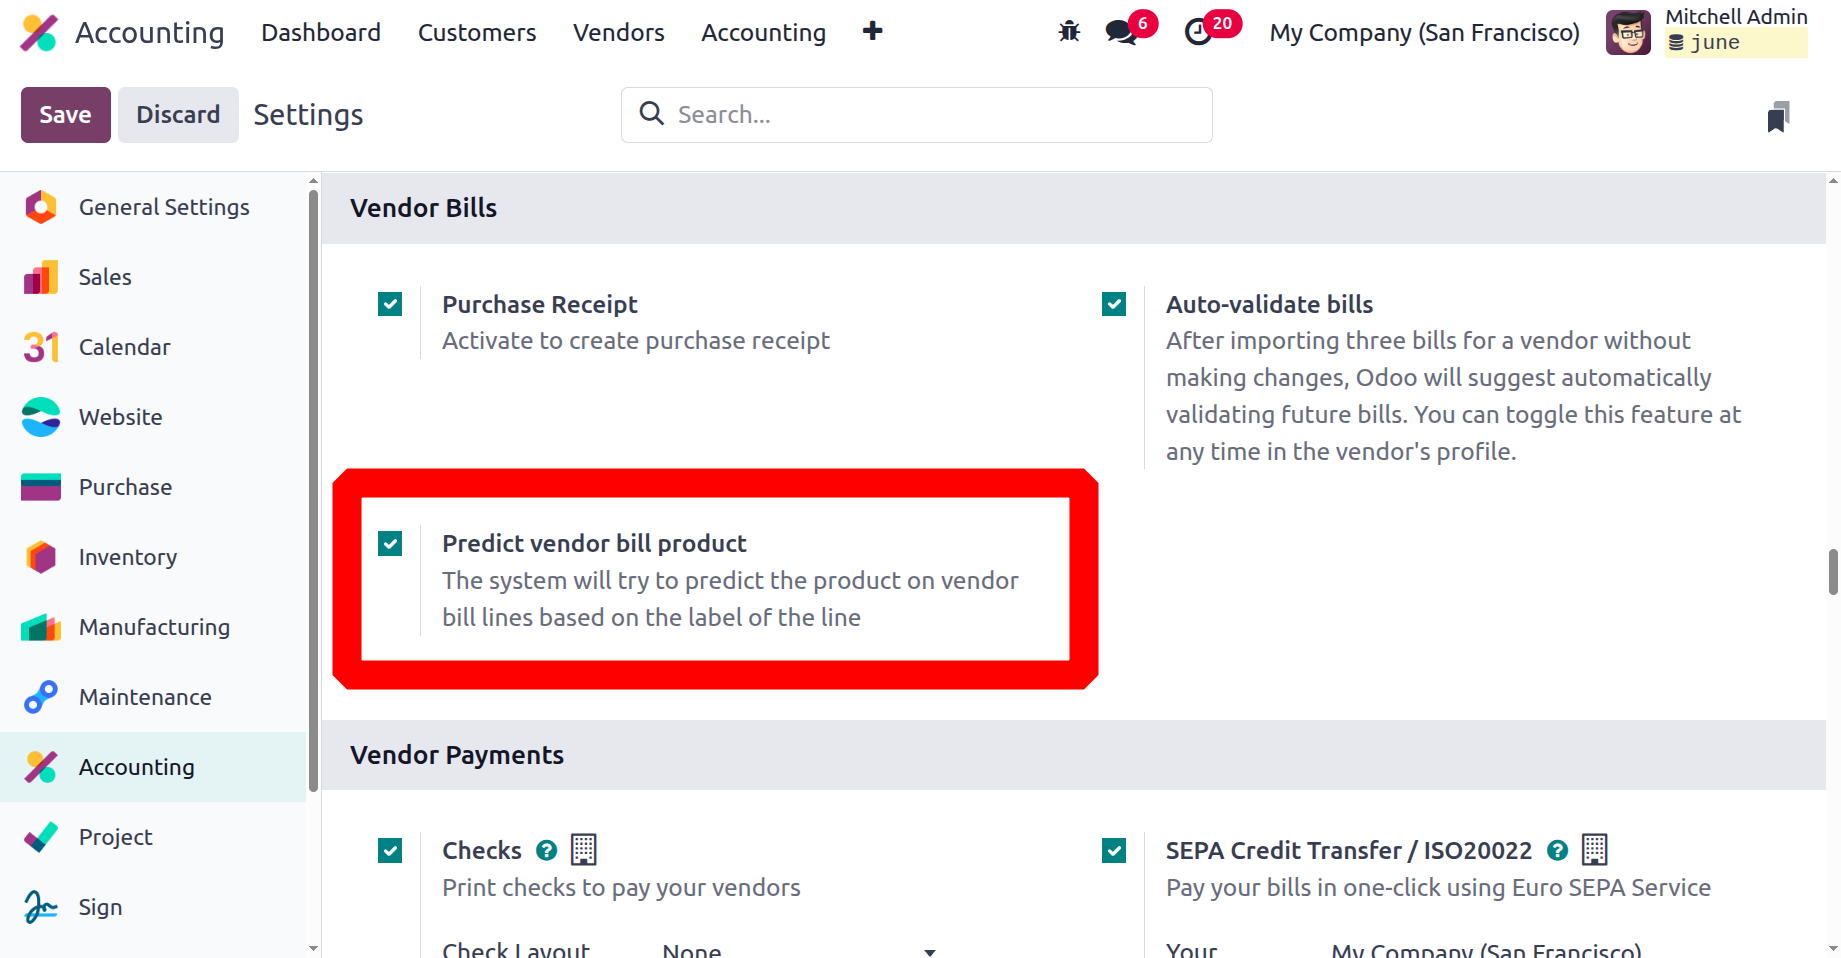
The "Predict Vendor Bill Product" function in Odoo 18 Accounting uses past data and vendor-specific purchase trends to intelligently recommend the right product when generating a vendor bill using label or description. By using machine learning to examine past transactions, it minimizes manual labour by automatically filling in the product column. This guarantees uniformity in product selection, improves billing accuracy, and expedites the invoicing process.
Effortless Management of Vendor Payments
The company's financial management capabilities benefit from the sophisticated vendor payment management features provided by Odoo's accounting module. By turning on checks and choosing Check Layout from the drop-down menu, you can change this. You can also activate the Multi-Page Control Loop and adjust the Control Top Margin and Control Left Margin settings.

Additionally, businesses in European nations have the option of SEPA Bank Transfer (SCT), which enables them to use Euro-SEPA services to pay their invoices with a single click. To find out more about the banking and cash management choices available in the Odoo accounting module's settings menu, let's proceed to the following section.
Effective Financial Control with Bank and Cash Management
The accounting module's setup section bank and cash management choices offer a thorough understanding of operational efficiency. You can use the option to set up transfers between banks by describing the transfer account and using it. Additionally, bank statements can be imported automatically by turning on automatic import. You can also activate the CVS import option if you wish to import bank statements into a CSV file. You can import bank statements in QIF format by turning on the QIF import feature.
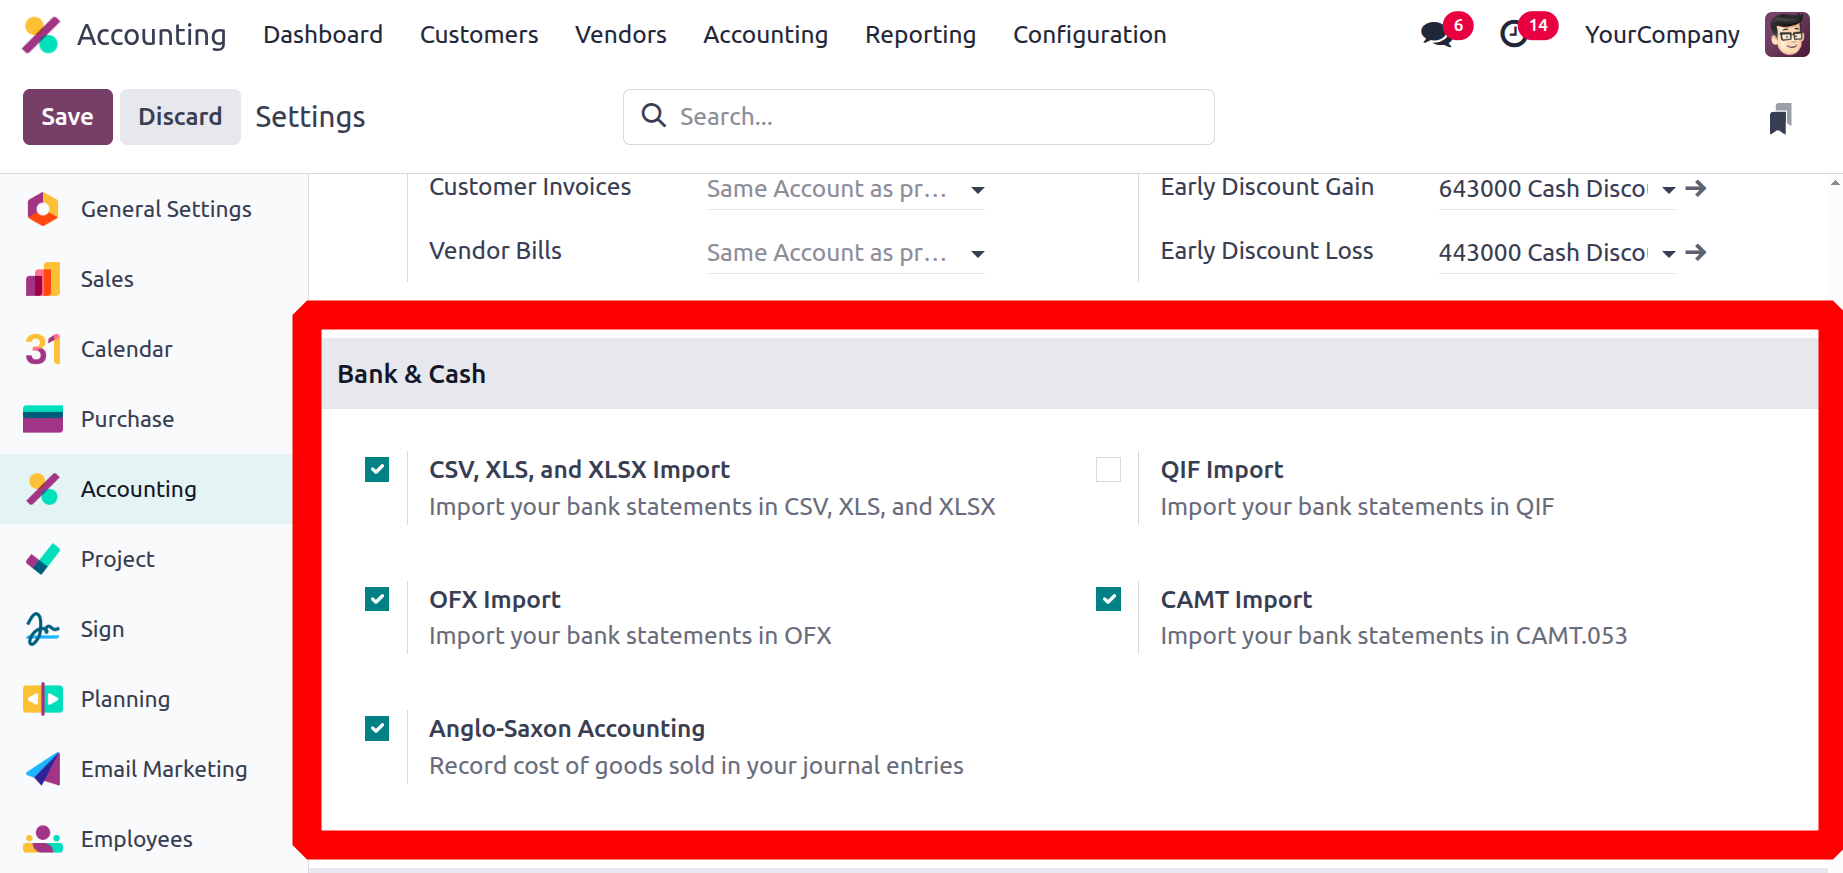
You can also choose to allow the import of bank statements in these formats using QFX Import and CAMT Import. The Default Accounts section allows you to specify which default accounts are used for various tasks. Interbank transfers can be set up from the menu when you create and utilise an internal transfer account.
Turn on Anglo-Saxon accounting, sometimes referred to as real-time accounting. This approach matches costs and revenues in real time by recording the cost of items sold at the time of product delivery. By emphasising inventory valuation and expense recognition at the point of delivery rather than at the time of invoice, this approach differs from continental accounting.
Digitization
In Odoo 18, invoice digitization is the process of automating invoice processing and data entry by transforming paper or digital invoices into a structured format inside the Odoo system, utilizing AI and OCR technologies. This entails scanning, extracting data, and automatically creating draft bills utilizing Odoo's built-in functionality.
Do not digitise invoices, Digitise invoices only upon request, and Digitise all invoices automatically are among the options available on the menu. You can choose one of the Purchase Credits options to acquire the credits you need if you need to digitise an invoice. The OCR Single Invoice Line Per Tax option also allows you to receive only one invoice line per tax. Additionally, it is possible to incorporate the possibility of making purchase receipts for product procurement procedures.
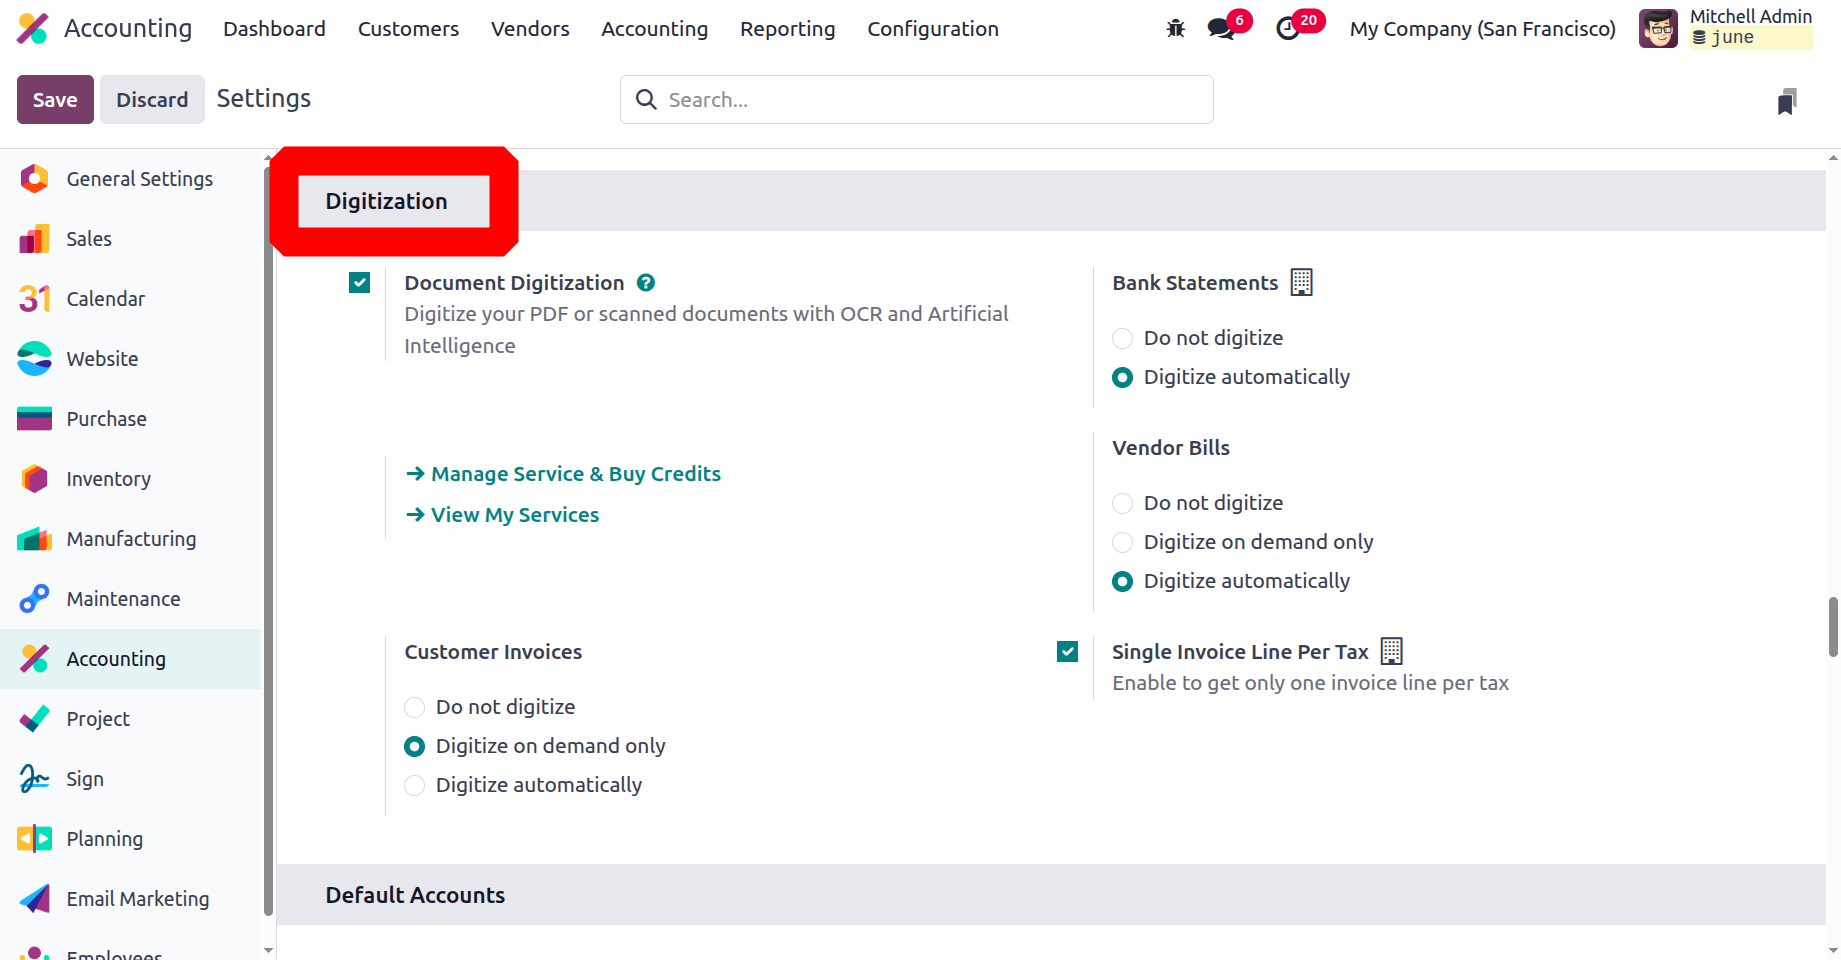
To get just one invoice line per tax, enable the Single Invoice Line Per Tax option.
Odoo 18 is great for digitizing vendor bills and bank statements. In the settings, you have the ability to choose which method to use for digitizing. For vendor bills, have three options: Do not digitize, Digitize on demand only, and Digitize automatically. For bank statements, Do not digitize and Digitize automatically are the only options available.
Setting Default Accounts
Profit Accounts, Loss Accounts, Bank Suspense Accounts, Outstanding Receipts Accounts, Outstanding Payments Accounts, Internal Transfer Accounts, Cash Discount Accounts, Cash Discount Loss Accounts, Deferred Expenses Account, Deferred Revenue Account, Income Account, Expenses Account, and so on are all defined in the Default Accounts section. Every account has a distinct purpose.
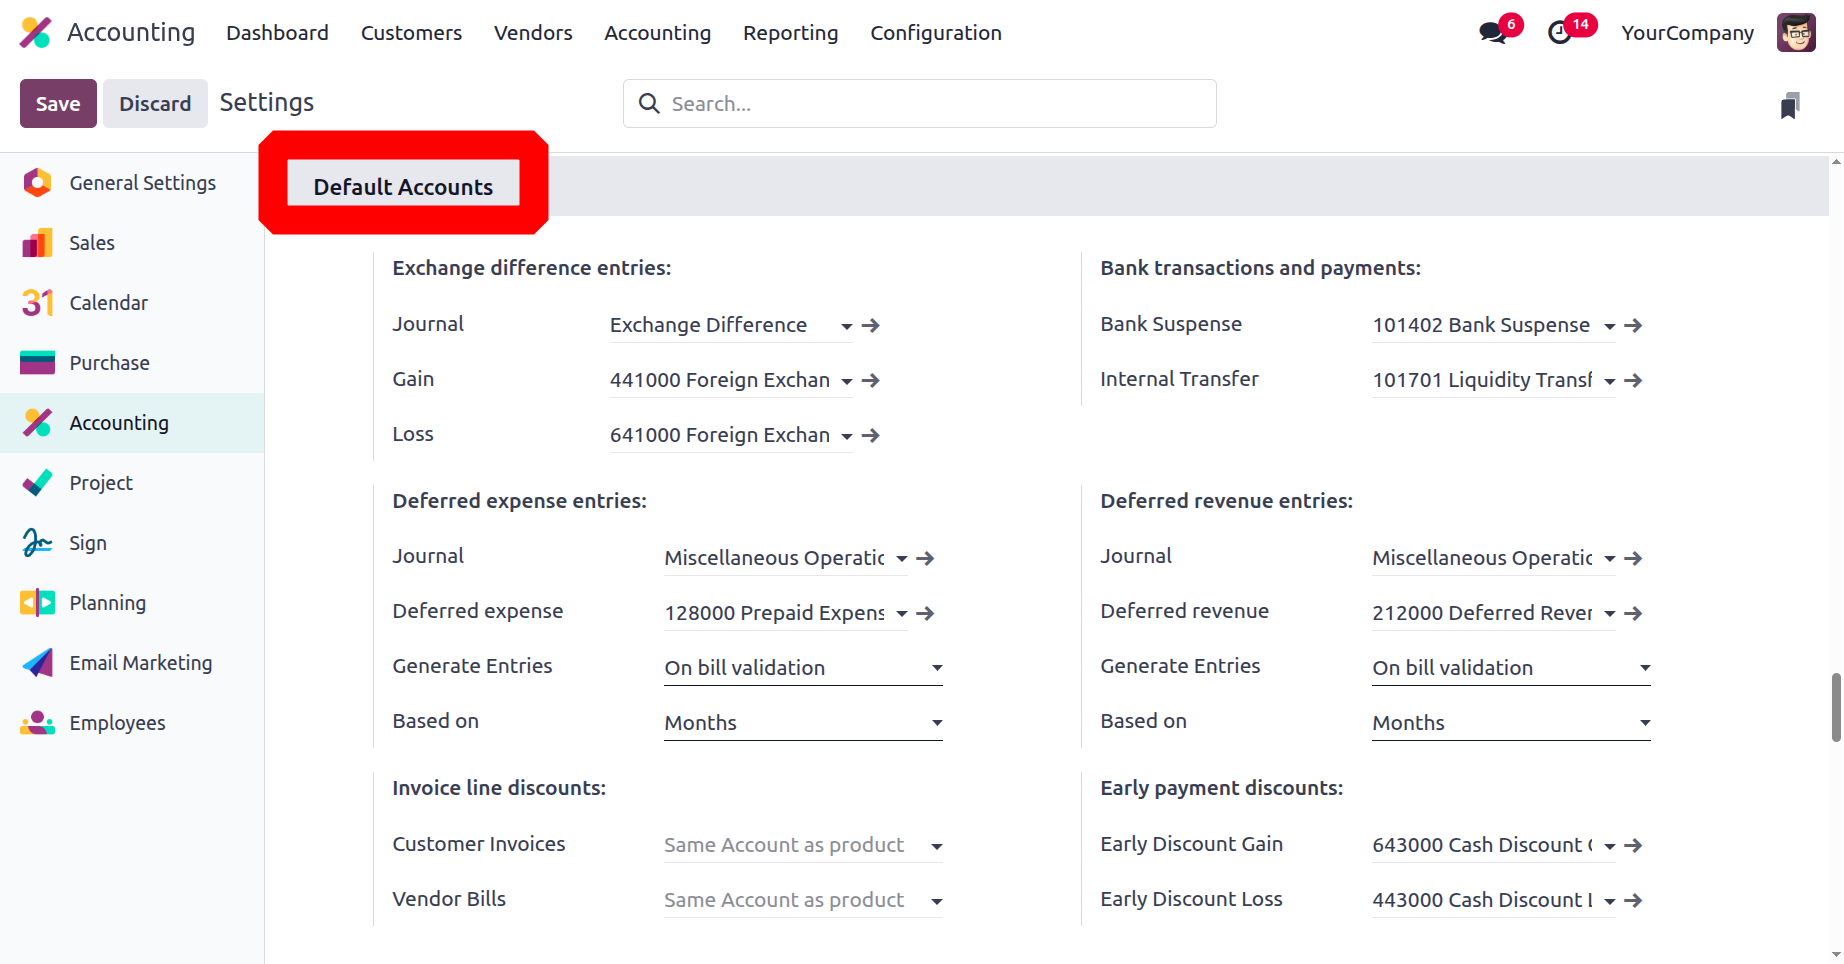
The exchange rate difference that transpired during the transaction is reflected in the profit and loss accounts. Depending on the circumstances, a change in the exchange rate causes the corporation to either lose money or make money, and depending on the outcome, these losses or gains are shown in the income statement. The mixed journal shown in the Journal field contains the journal entry that corresponds to the exchange rate differential.
When the precise account is unknown, Odoo users can settle bank statement transactions using a Bank Suspense Account, a temporary account. Since the precise match is unknown, they are essentially employed to display the amounts on the bank statement up until the reconciliation date. After being paid or reconciled, trust transactions can then be tracked on a regular basis and moved to the appropriate accounts.
Unreconciled data will be stored in the interim Outstanding Receipts Account and Outstanding Payments Account. These accounts are utilised to steer clear of circumstances in which the reconciliation of accounts payable and receivable is directly related. The money is transferred to the bank after the reconciliation is complete. An intermediary account for interbank transactions is known as an internal transfer account.
The Cash Discount Loss Account and Cash Discount Gain Account follow, which are used to record the rebates or discounts provided in the accounting transaction and are credited to the appropriate accounts. In the following part, let's take a closer look at the Odoo accounting module's definition of fiscal periods.
A major change has been made to the automatic stock valuation setting in Odoo v18, and a new configuration has been added to include the "Cost of Production" account. From the consumption of raw materials to the stock valuation of completed goods, this will contribute to transparent stock movement and value as part of the Cost of Production account ledger. As indicated below, activate the feature from the accounting module's settings under the Stock Valuation section in order to add the account.
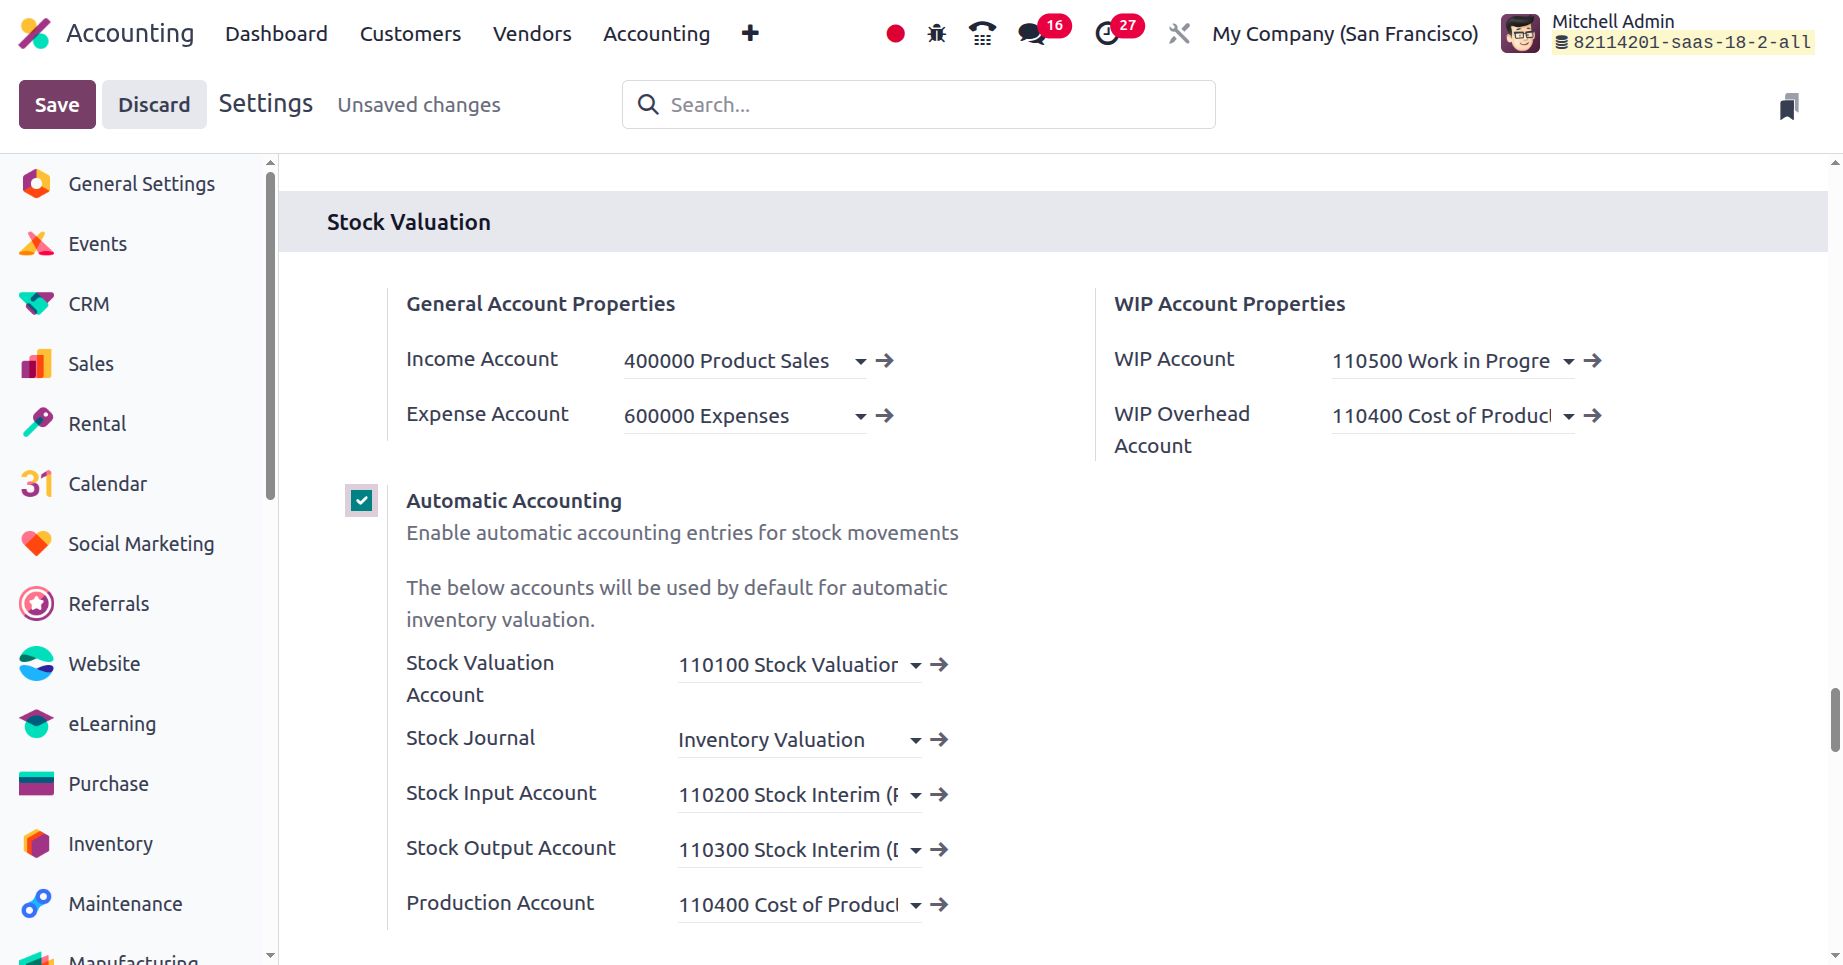
Work in Progress accounts are known as WIP accounts. Tracking ongoing costs like labour and supplies without early revenue recognition is made easier with Odoo 18's WIP accounts. This makes it possible for businesses to continue to follow accounting regulations and make prudent financial decisions.
Configurable Fiscal Periods and Positions
You can specify the accounting period in which your business works in the accounting module of Odoo. By selecting the end day and month in the Fiscal Year field, you can define a fiscal period. If the fiscal activities are conducted according to fiscal years, you activate the option. When you establish the invoicing switch threshold, you may also choose a date from the calendar to define an invoicing threshold. Cancelled status is applied to every invoice generated on any prior date that is entered as the Invoicing Threshold made before that date. Additionally, you begin the operation after removing the reporting and earning components.
The threshold option to remove all test data from invoices, vendor bills, and associated income is a useful feature of Odoo during development. Put another way, the platform reverts to its original state after the test actions are finished and the threshold is established, guaranteeing that no test actions are carried out.
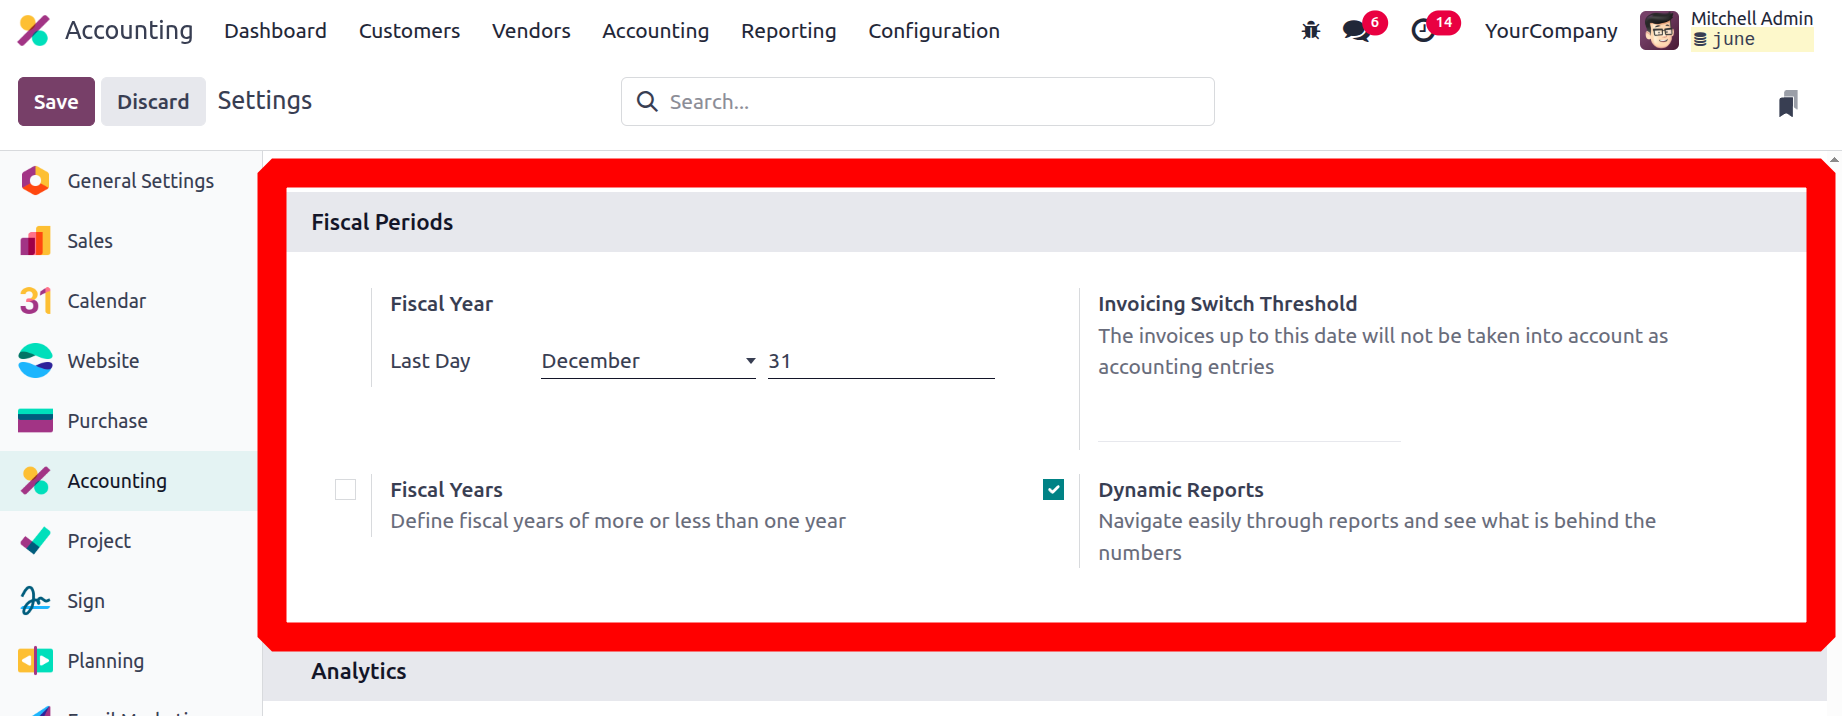
The Dynamic reports is a feature in the Odoo 18 Accounting application. With the help of this tool, you may quickly browse reports and discover what is behind the figures.
The accounting module's analytical accounting and budget management will be covered in the next section
Analytical Accounting and Budget Management
You can advance in your company's financial management duties with Odoo's analytical accounting capabilities. The Analytics menu in the Settings tab of the Analytics module allows you to define every analytical accounting setup option. You can activate and deactivate the analytical accounting aspect of your business's operations using the menu option. The classification of analysis accounts and associated procedures is made simpler by the ability to apply analysis identifiers in accordance with operational requirements.
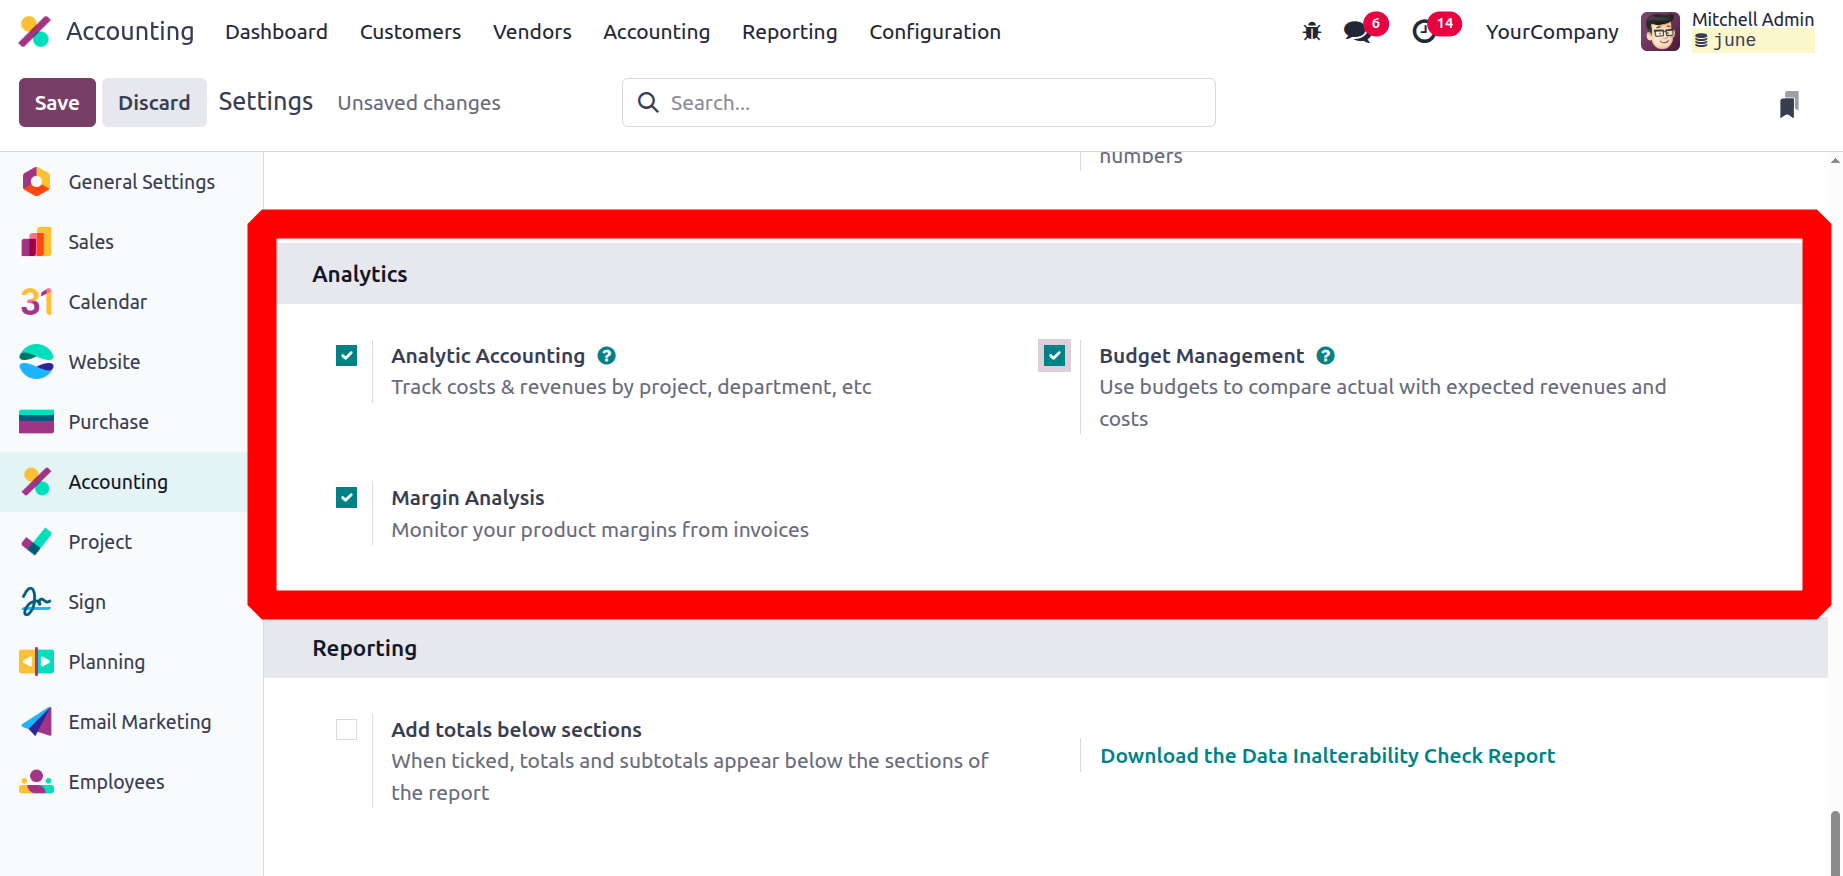
Additionally, the budget management tools guarantee that you have sufficient control over the operations associated with the financial budget and the company's free cash. You may also monitor the product margins from invoices by turning on the Margin Analysis option. The Accounting module's Settings menu shows the options accessible in the Analytical Accounting settings. We shall discover more about the setting options for creating analytics reports as we proceed.
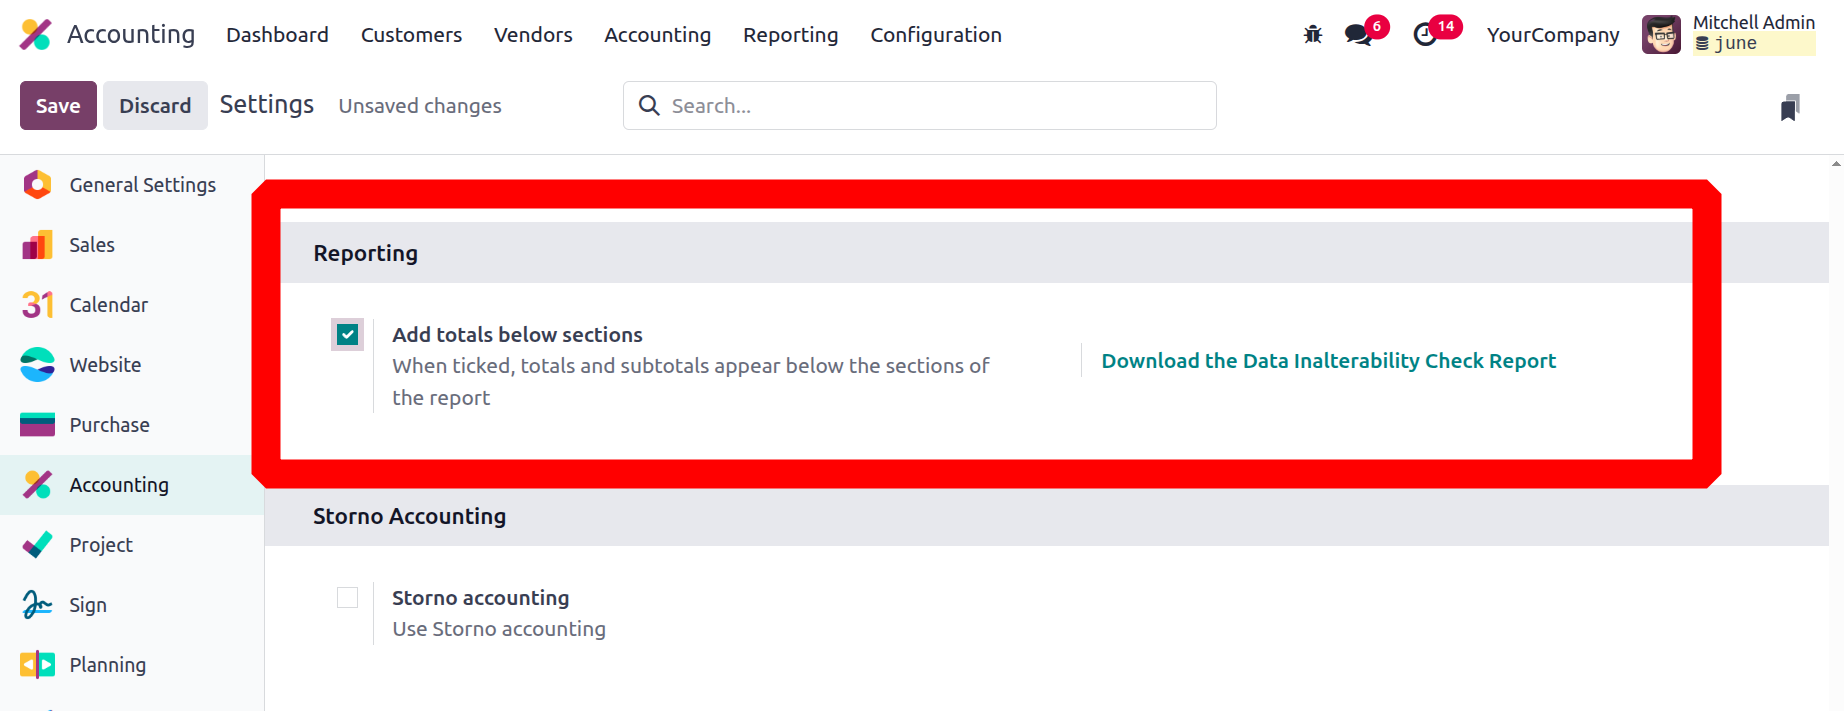
Create Informative Reports
There are two ways to generate reports in the Reporting and Analysis section. Under the sections that explain the sum of the report's components, you can first activate the Add Totals feature. Additionally, the report can be downloaded to your computer by choosing the Download Data Audit Report option from this menu.
The Odoo platform's accounting module's setup menu offers a wide range of customisable options based on usage requirements. To have the operational control you require over the finances of your business, you can easily alter them.
We went over the fundamentals of Odoo, including how to install and host it, at the start of this chapter. The platform's localisation functionality is subsequently covered, and finally the Odoo accounting module's installation features. All of the options in the accounting module's configuration panel have been thoroughly discussed in this chapter.
We will go into greater detail about the compute module's configuration tools in the upcoming chapter.
Storno Accounting
In Odoo 18, reversed entries are recorded as negative using Storno Accounting. The financial statements display both negative credits and debits in red. Since they all show up in the same debit or credit column, the initial transaction is "zeroed out" for every reversal transaction.

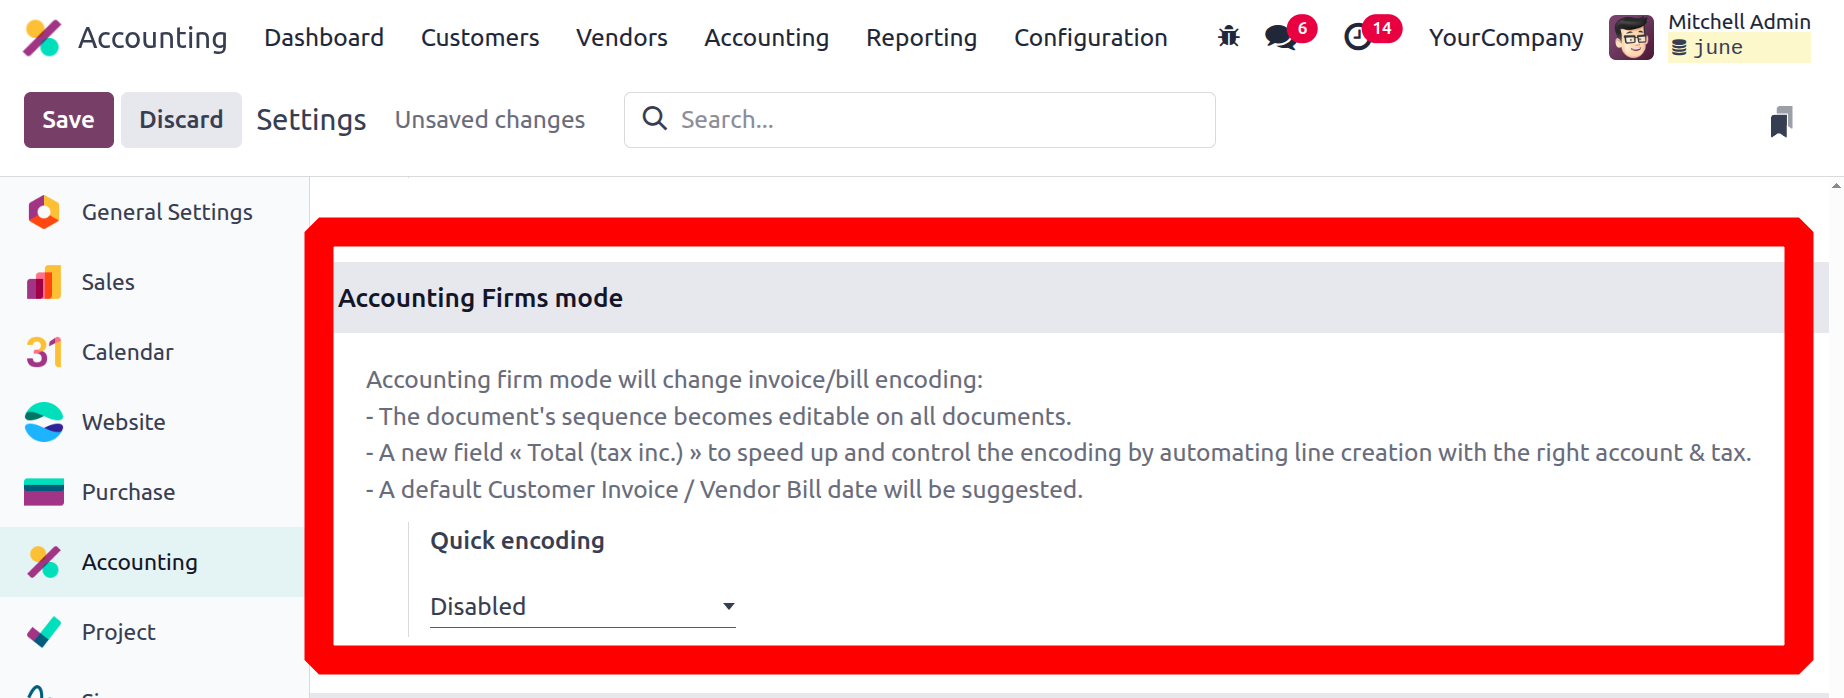
Accounting Firm Mode
The Accounting Firm Mode in Odoo 18 is an additional functionality that facilitates altering the bill/invoice sequence. It is possible to define a ?Quick encoding? field and use the coding to determine whether or not a group of documents is interchangeable. You can add a tax-included value to your invoice document using the total (tax inc.) field, and the service amount and tax will be automatically separated in the invoice line. The billing date will also be automatically recommended.
The Odoo platform's accounting module has a number of customisable features that can be specified in the configuration menu based on user needs. They can be easily customized to provide the operational and functional administration of your company's finances.
We went over the fundamentals of Odoo, including how to install and host it, at the start of this chapter. The platform's localisation functionality is subsequently covered, and finally the Odoo accounting module's installation features. All of the options in the accounting module's configuration panel have been thoroughly discussed in this chapter. We shall go into greater detail about the accounting module's configuration tools in the upcoming chapter.