Efficient Vendor Financial Handling in Odoo 18
For a business to function properly, supplier management is just as important as customer management. Every product in your company has a variety of vendors from which to choose, and you probably have more than one vendor for the same product. Price, the quality of the product or service, and other crucial elements are some of the operating criteria that determine which provider is best for your company.
A management system that can effectively handle the difficulties of overseeing several vendors is necessary for enterprise operations. Only with the aid of specialised accounting software can the accounting component be managed effectively, which is crucial. The Odoo Accounting module facilitates the management of both single and multiple suppliers in business operations. Furthermore, the Odoo platform has a supplier management tab that was created especially to increase your productivity with special and potent tools and menus.
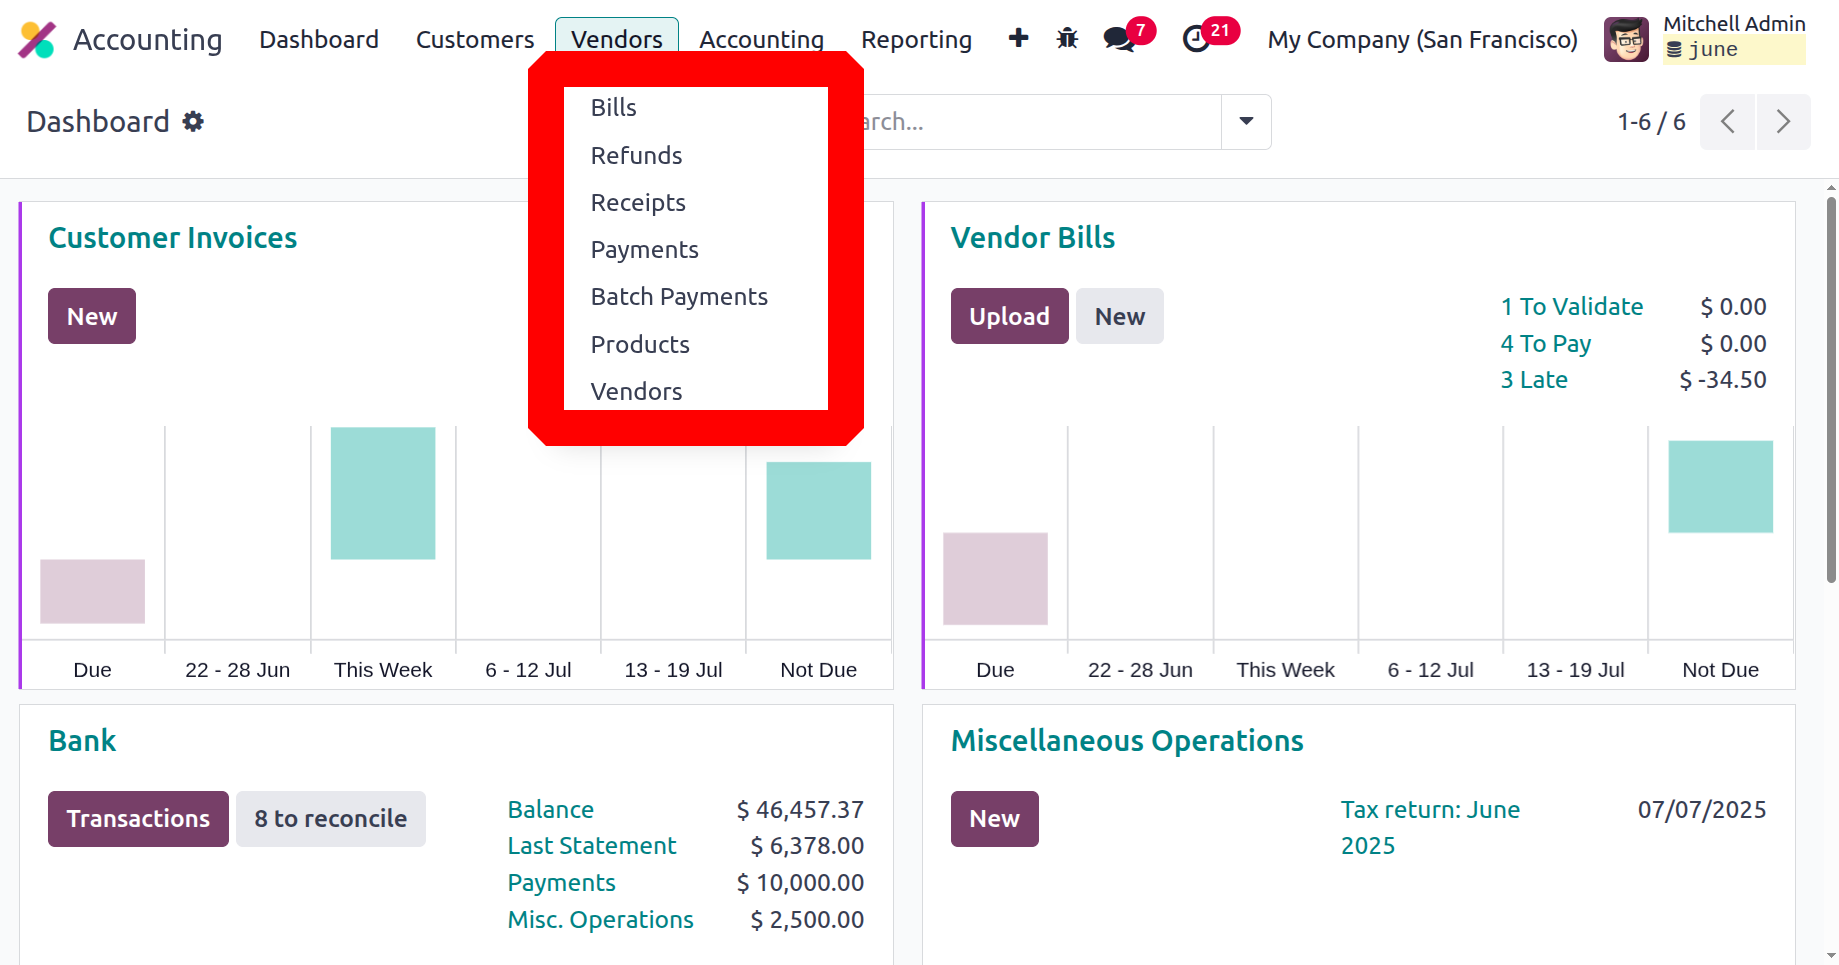
Options for managing vendor bills, refunds, vendor receipts, bill payments, batch payments on vendor bills, items based on vendor descriptions, and a separate vendor management menu are all available on the vendor management page. In the part that follows, let's examine each of these options and menus under the Accounting module's Vendors tab.
Vendor bill management
Keeping track of purchase invoices is a crucial aspect of the business. Invoices are created by suppliers in accordance with the conditions that have been agreed upon for the cost of the goods and the quantities that must be delivered or supplied. The Dedicated Vendor Bill management option is accessible through the Odoo accounting module's Vendor tab. Here are all of the vendor bills that have been prepared and forwarded to the business. Details of unapplied taxes, the total amount owed, the vendor, the bill number, the bill date, the due date, the reference, the next step, and the status are all given. You can alter the details on the designated invoice by choosing the relevant one and then selecting the edit option.

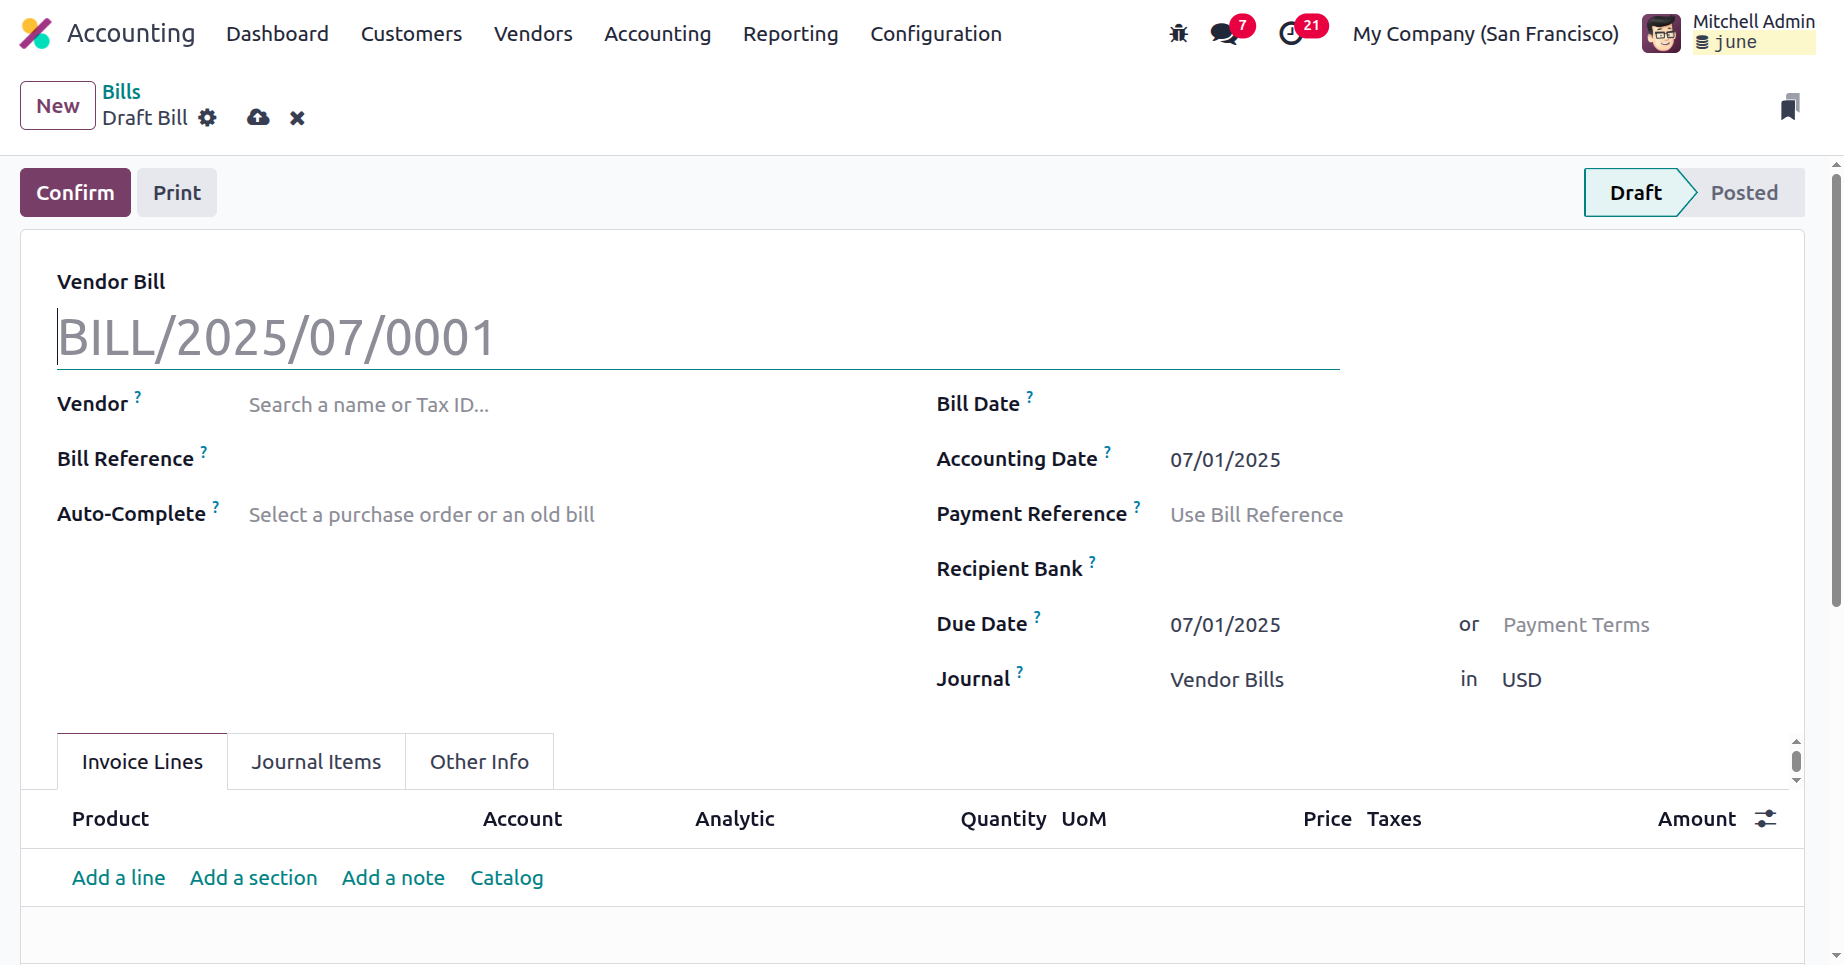
If you wish to generate a new bill, select the New option, which will bring up the Bill creation window seen in the screenshot that goes with it. You must provide the vendor's details, such as the bill reference, payment reference, receipt bank, and auto-complete information, even though the vendor bill number will be shown automatically. Dates that should be noted include the following: the date the bill is created, the date the accounting entries are to be made in the ledger, the due date, the journal details, and the currency in which the transactions are conducted.
Additionally, the Invoicing lines for the pertinent Vendor Bill can be set by selecting the Add a Line option. The product details, label, account details, analytical accounting details, quantity, price, tax details, and subtotal will all be specified here. You can add notes to the invoices by selecting the Add a Note option, and you can create additional sections by selecting the Add a Section option.
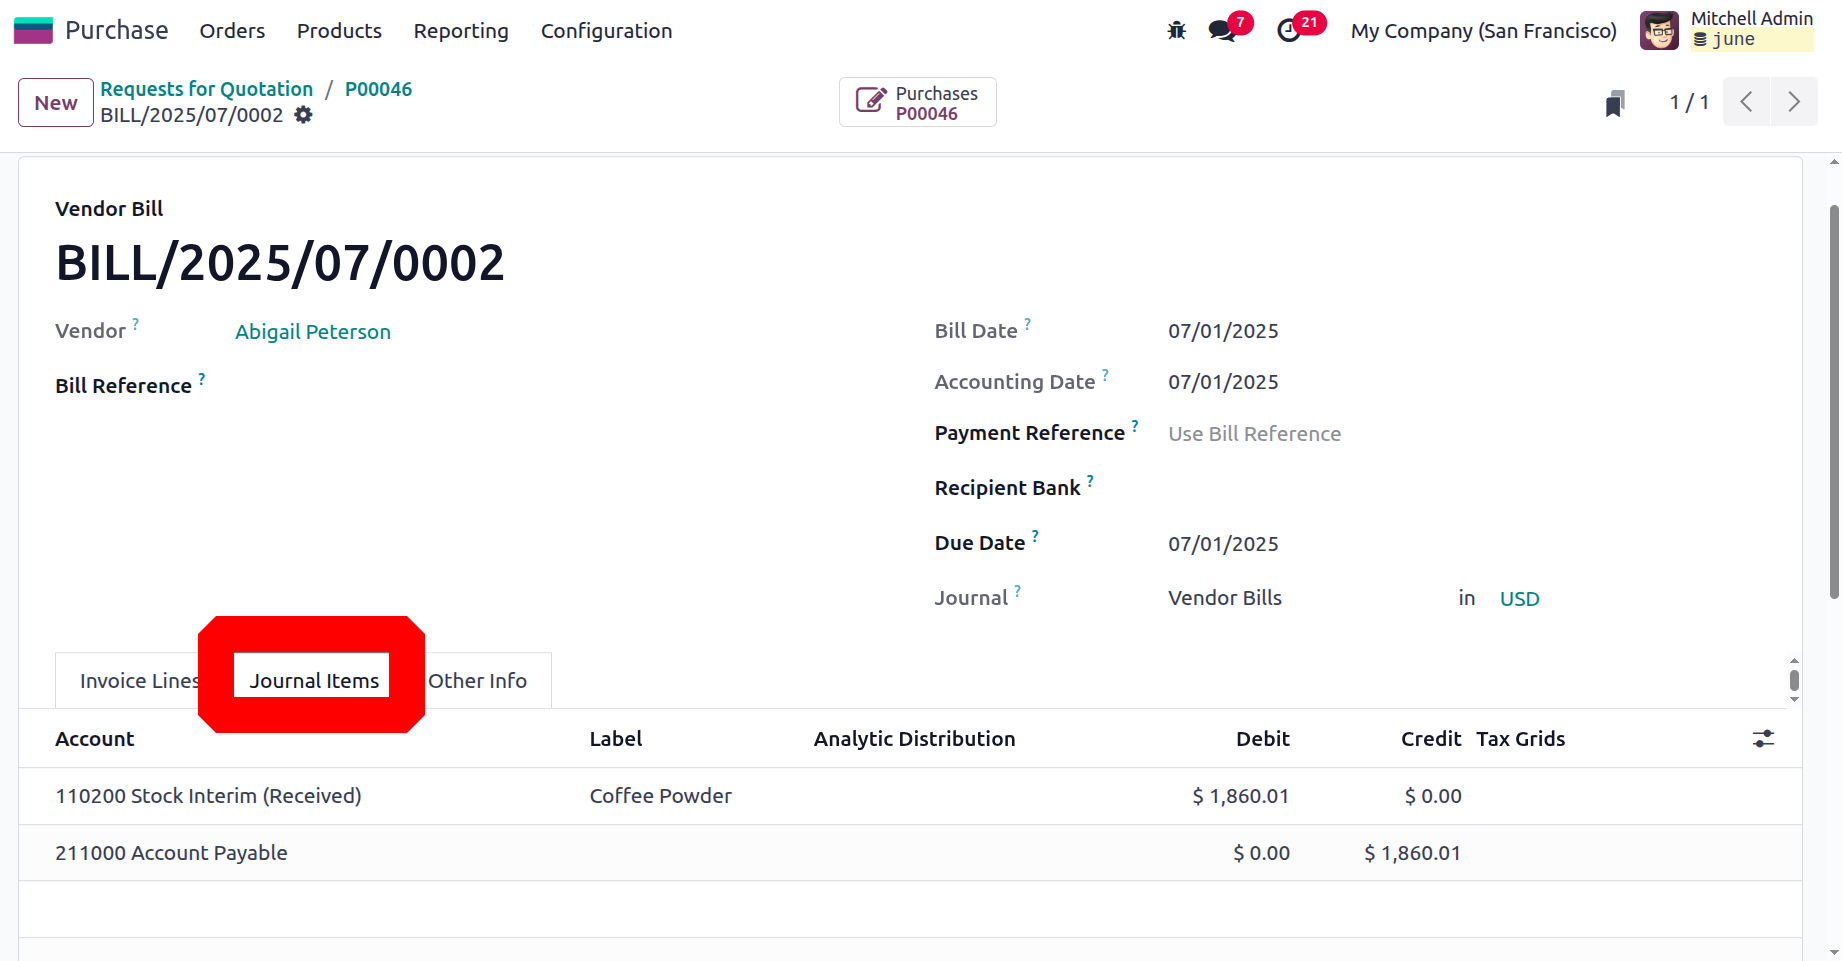
Additionally, the Autocomplete fields can be used to swiftly generate the bill of purchase orders. Instead of entering the products, quantities, price, and other information in the Order Line one at a time, we can choose Purchase Order from the Autocomplete form. Consequently, all of the Purchase Order data will be instantly updated in the Bill form. If we include several purchase orders, we can generate a single bill against multiple purchase orders for the particular vendor. After we save all of this information, the Vendor Bill Number is automatically generated. The list view of the bill displays the source document for the generated bill, which consists of the Purchase Order numbers separated by commas.
The Journal Items page will automatically show the impacted accounts and the amounts that are credited or debited as soon as the products are entered into the Order line. Here are the ledgers that were used in the Bill production. Additionally, throughout the bill preparation process in Continental accounting, the Account Payable, Expense Account, and Tax Account are influenced. The Account Payable receives credit as it is an asset by definition, and the asset is depreciating. Furthermore, the expenditure account is by definition an expense, and it is debited along with the tax account when an expense occurs.
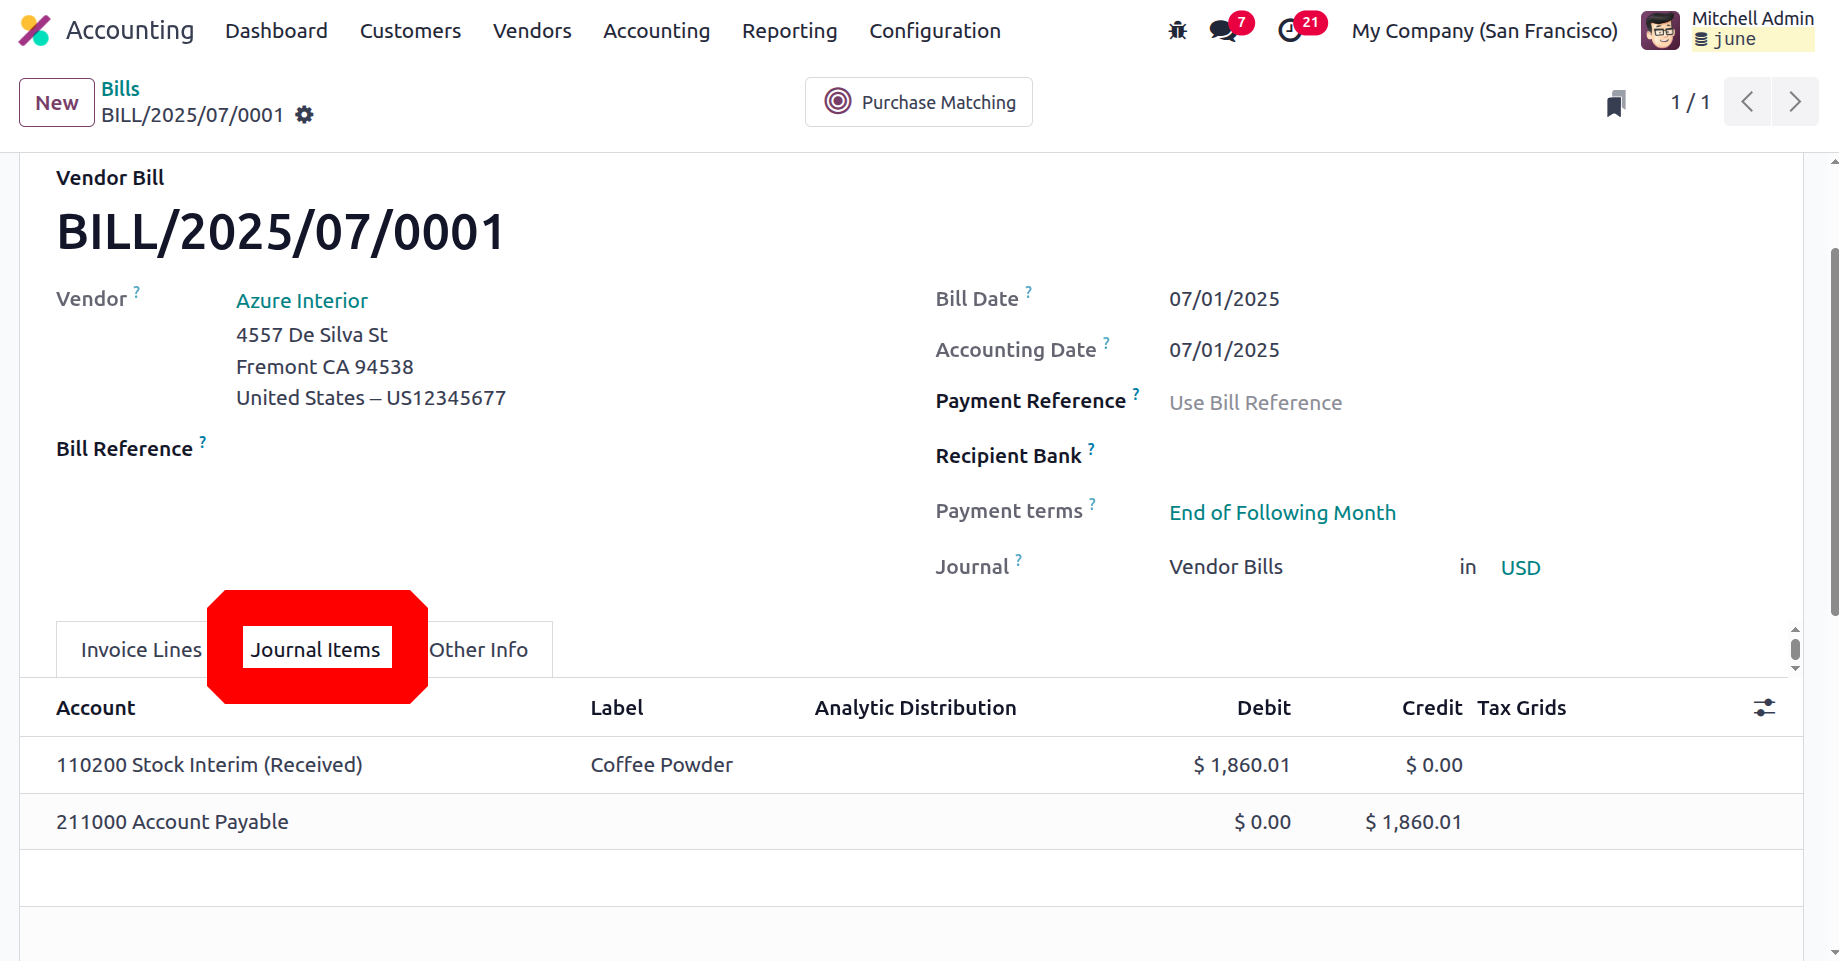
There is a smart tab named Purchase Matching. In Odoo 18 Accounting, purchase matching is the process of automatically comparing bills with purchase orders and receipts in order to guarantee accuracy and avoid inconsistencies.
In Anglo-Saxon accounting, the creation of a bill has an impact on the ledgers. In this case, the Account Payable will be credited and the tax and stock input accounts will be debited. Because, the Anglo-Saxon Accounting Expense Accounts will be affected once the sales have been verified.
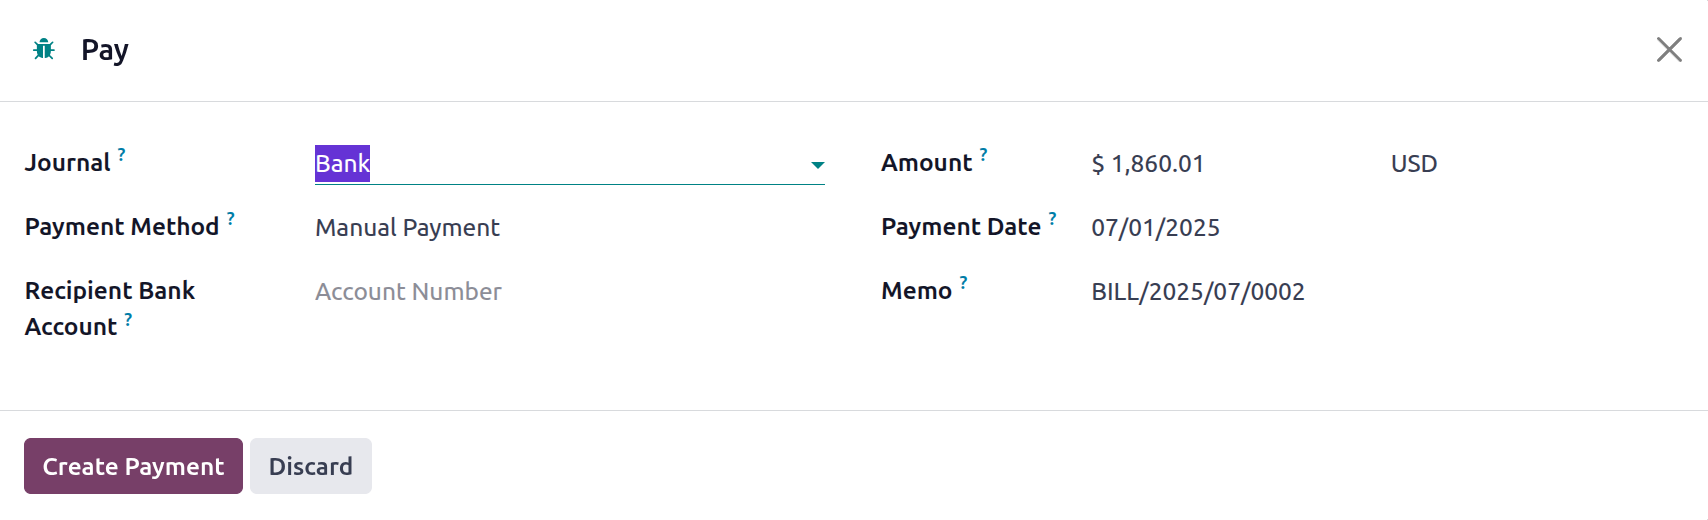
By choosing to register the payment after the vendor bill has been generated, you can choose to verify the payment. You will see the Register Payment menu, as seen in the screenshot that goes with it. Checks, SEPA credit transfers, or manual payment methods may be used in this situation. Along with the Amount, Payment Date, and Memo information, the Receipt Bank Account information can also be defined. After all the factors have been established, you should select one of the many Create Payment options.
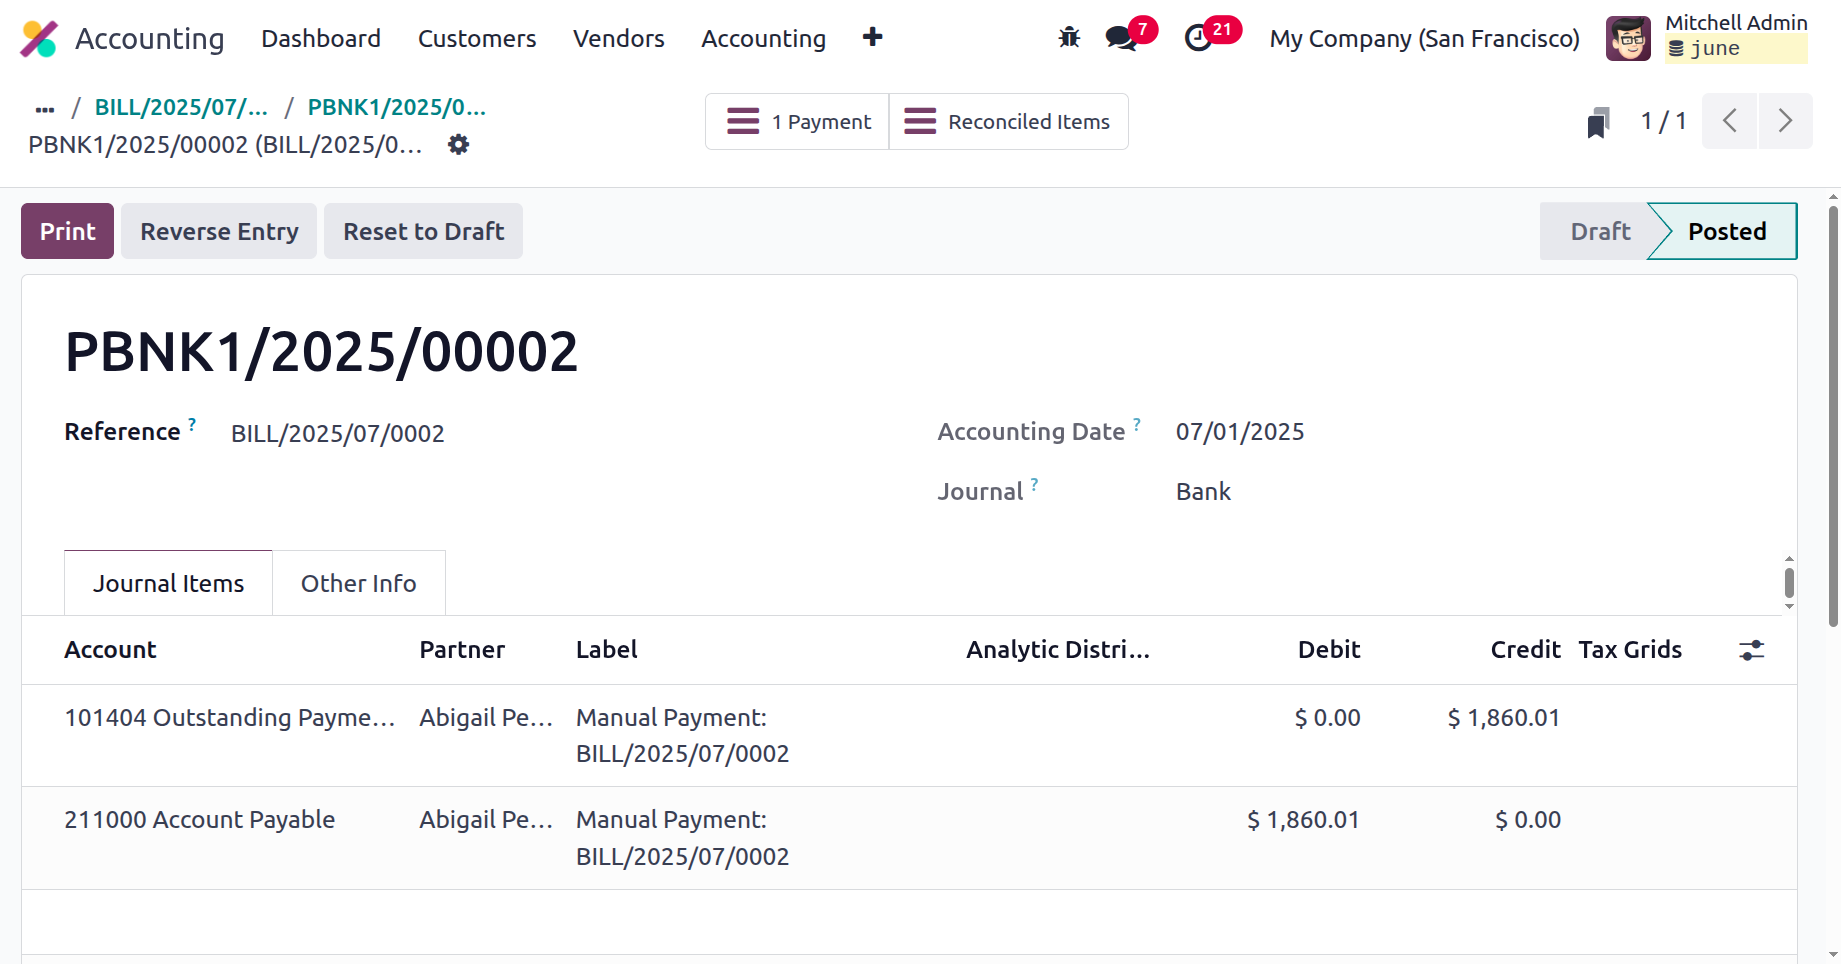
After the payment has been made, the Outstanding Payments Account will be credited and the Account Payable will be debited. Only after a bank statement reconciliation will the amount be transmitted to the bank. This Outstanding Payments Account will be part of the Bank or Cash Journal setup, for which the entries are moved to the Outstanding Payments Account. This implies that instead of using the Account Payable for reconciliation, the outstanding Payment Account will be used.
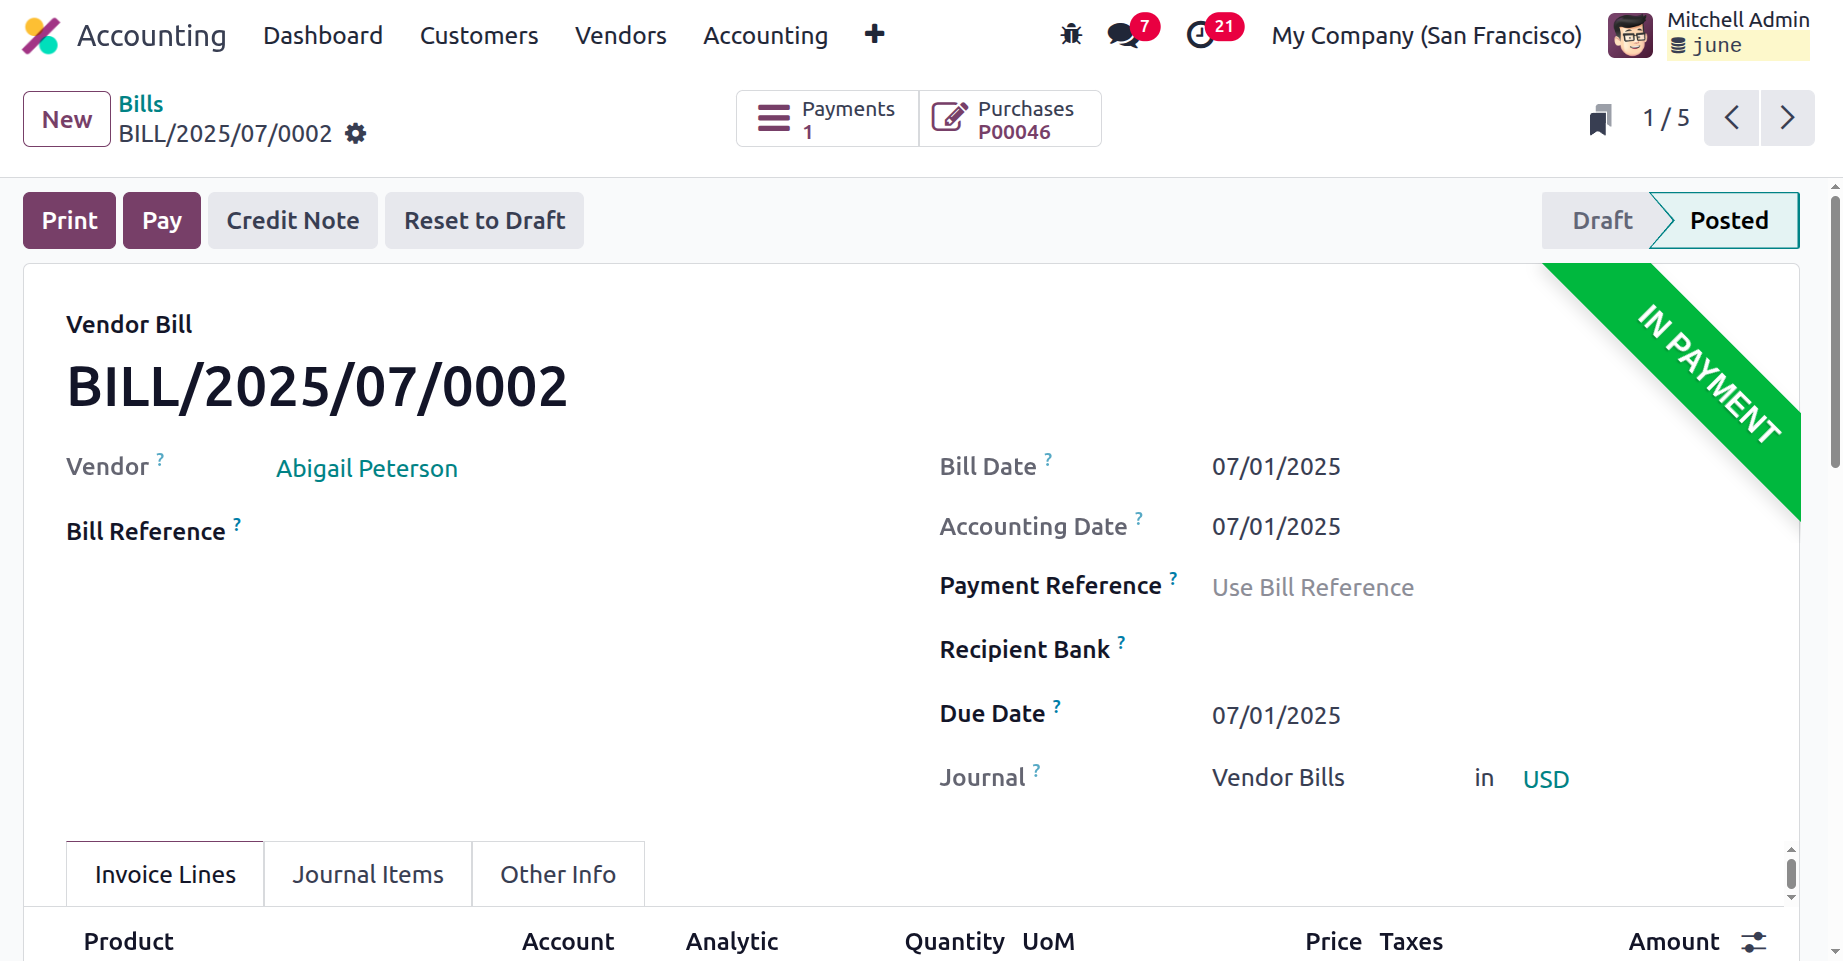
Consequently, following reconciliation, the Outstanding Payments Account is debited and the Bank Account is credited. Once the payment has been logged and completed, the relevant vendor bill will be labelled as In Payment, as shown in the screenshot below. If the payment has been made, the label will read Paid.
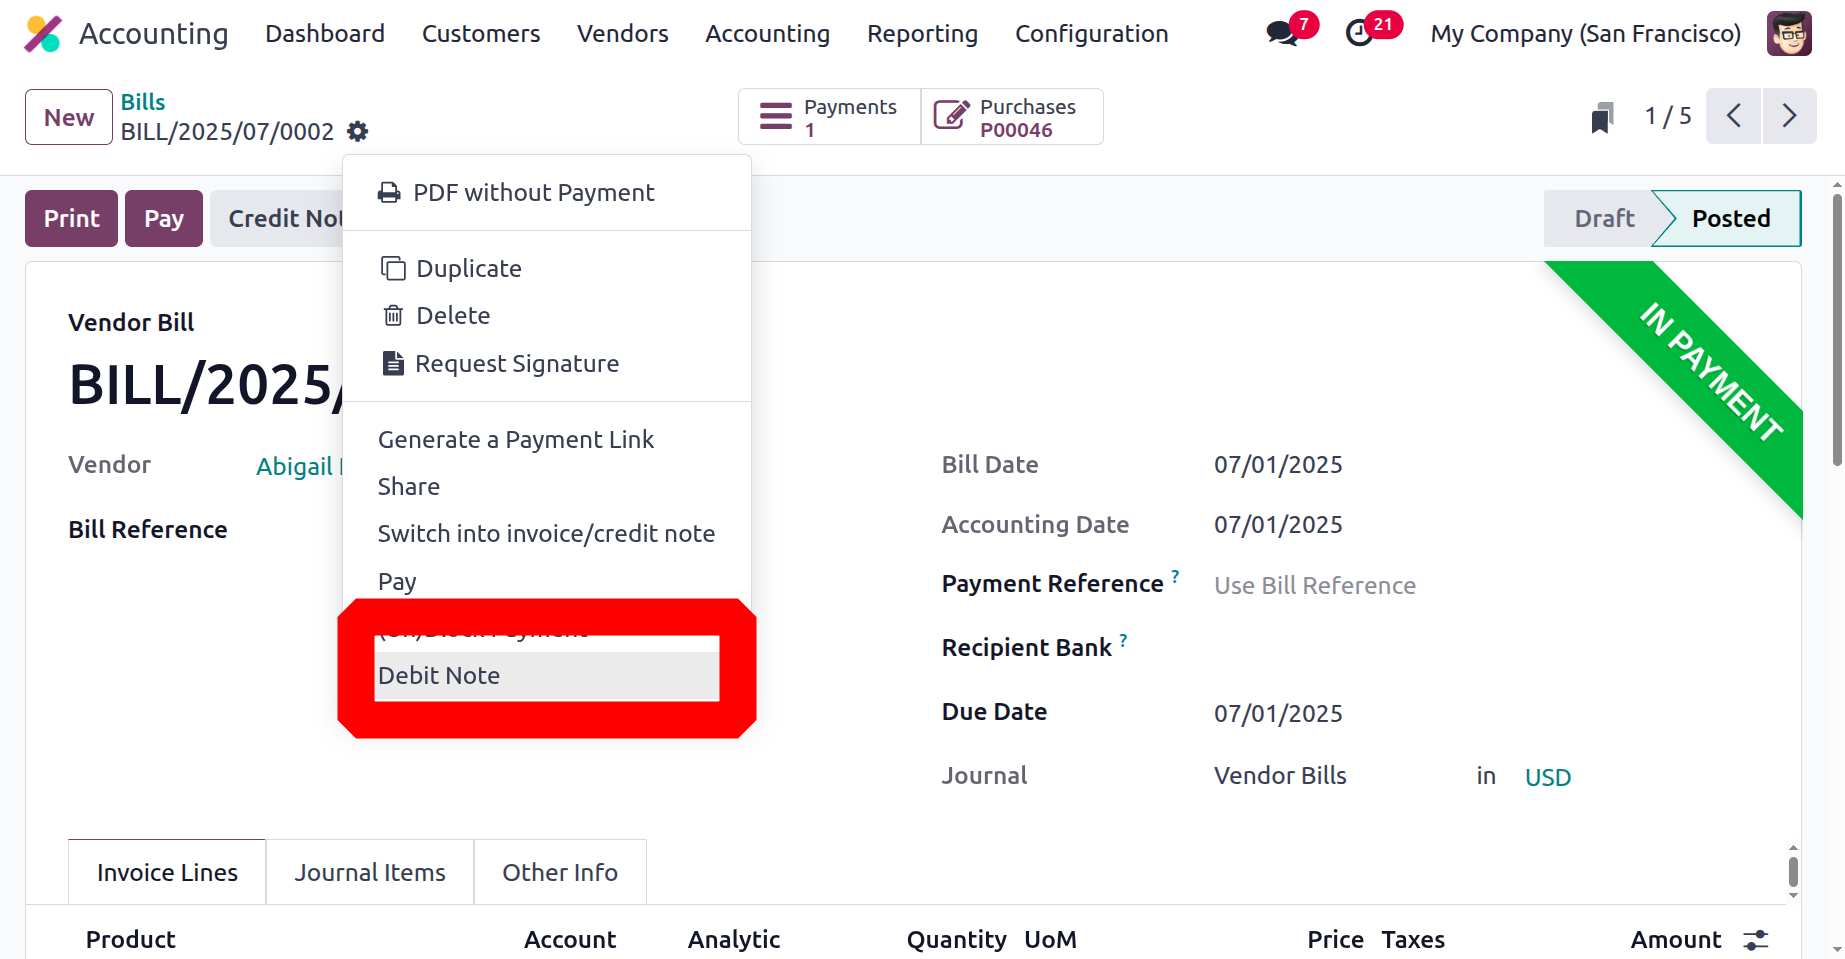
The Debit Note for the particular vendor bill can also be defined by selecting one of the Debit Note choices from the menu. A debit note is a document used in Odoo 18 accounting to raise a customer's balance, either as a result of extra services rendered, adjustments made to an invoice that was undercharged, or other additional charges. When a vendor supplies more items than were originally billed, a debit note may also be used to increase the amount that the client owes.
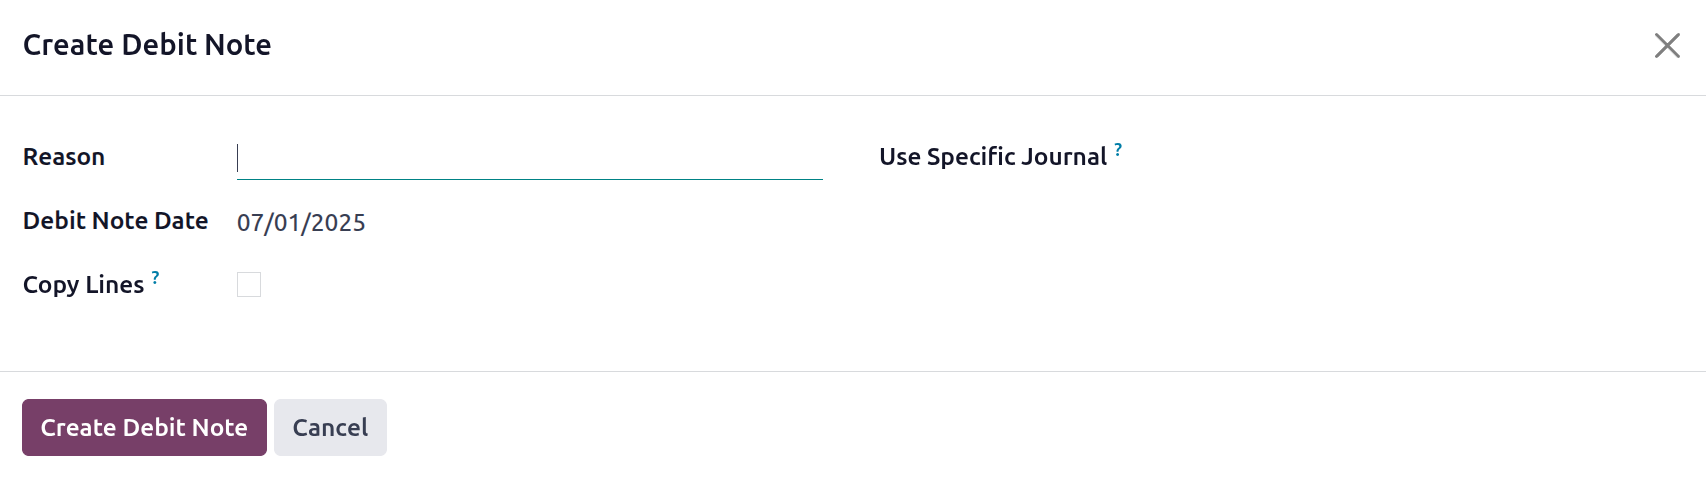
After selecting to generate a debit note, you will be taken to the pop-up box seen in the accompanying screenshot. Here, you can indicate the exact journal to be used, the date of the debit note, and the reason for the refund in the Use Precise Journal area. It is also possible to enable the Copy Lines option, which is useful for copying the lines for modifications when needed.
You can select one of the options to reverse the generated vendor bill payment and send the credit note to the relevant vendor when the debit note description is finished. The Credit Note function, which is accessible in the Vendor menu and in the Customer's setup here, is a useful tool for the accounting operations management of the particular vendor operation. The next highlighted choice under Vendor management is the Refunds option. Let's move on to that section.
Manage Your Refunds
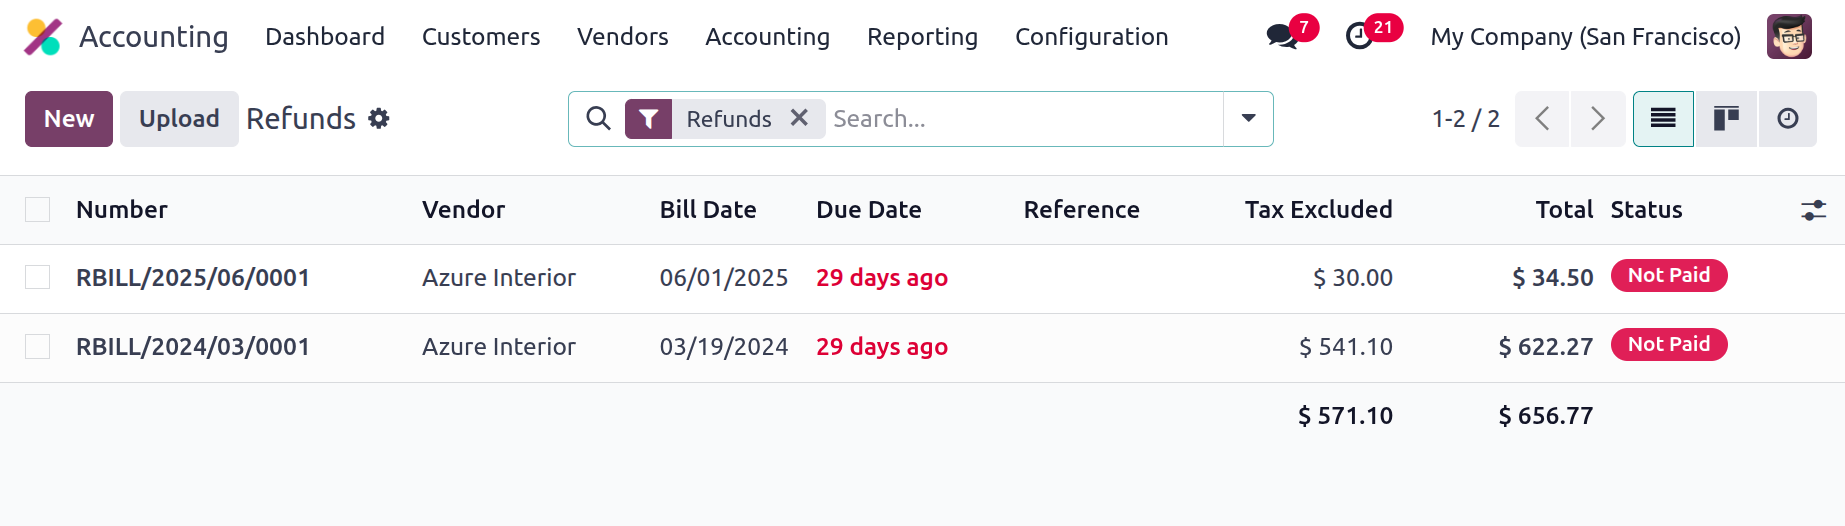
Receiving refunds from vendors occurs as part of a business's operations, just like issuing refunds to vendors based on business operations. The Refunds on Vendors sections are supported by a special menu found in the Vendor Management tabs of Odoo's Accounting module. This section will define all completed refund activities as well as those that have already been initiated. Bill Number, Vendor Name, Bill Date, Reference Information, Next Activity Scheduled for the Refund Operations, Tax Excluded Amount Along With The Total Amount, and Operational Status will all be included in the description of the refund.
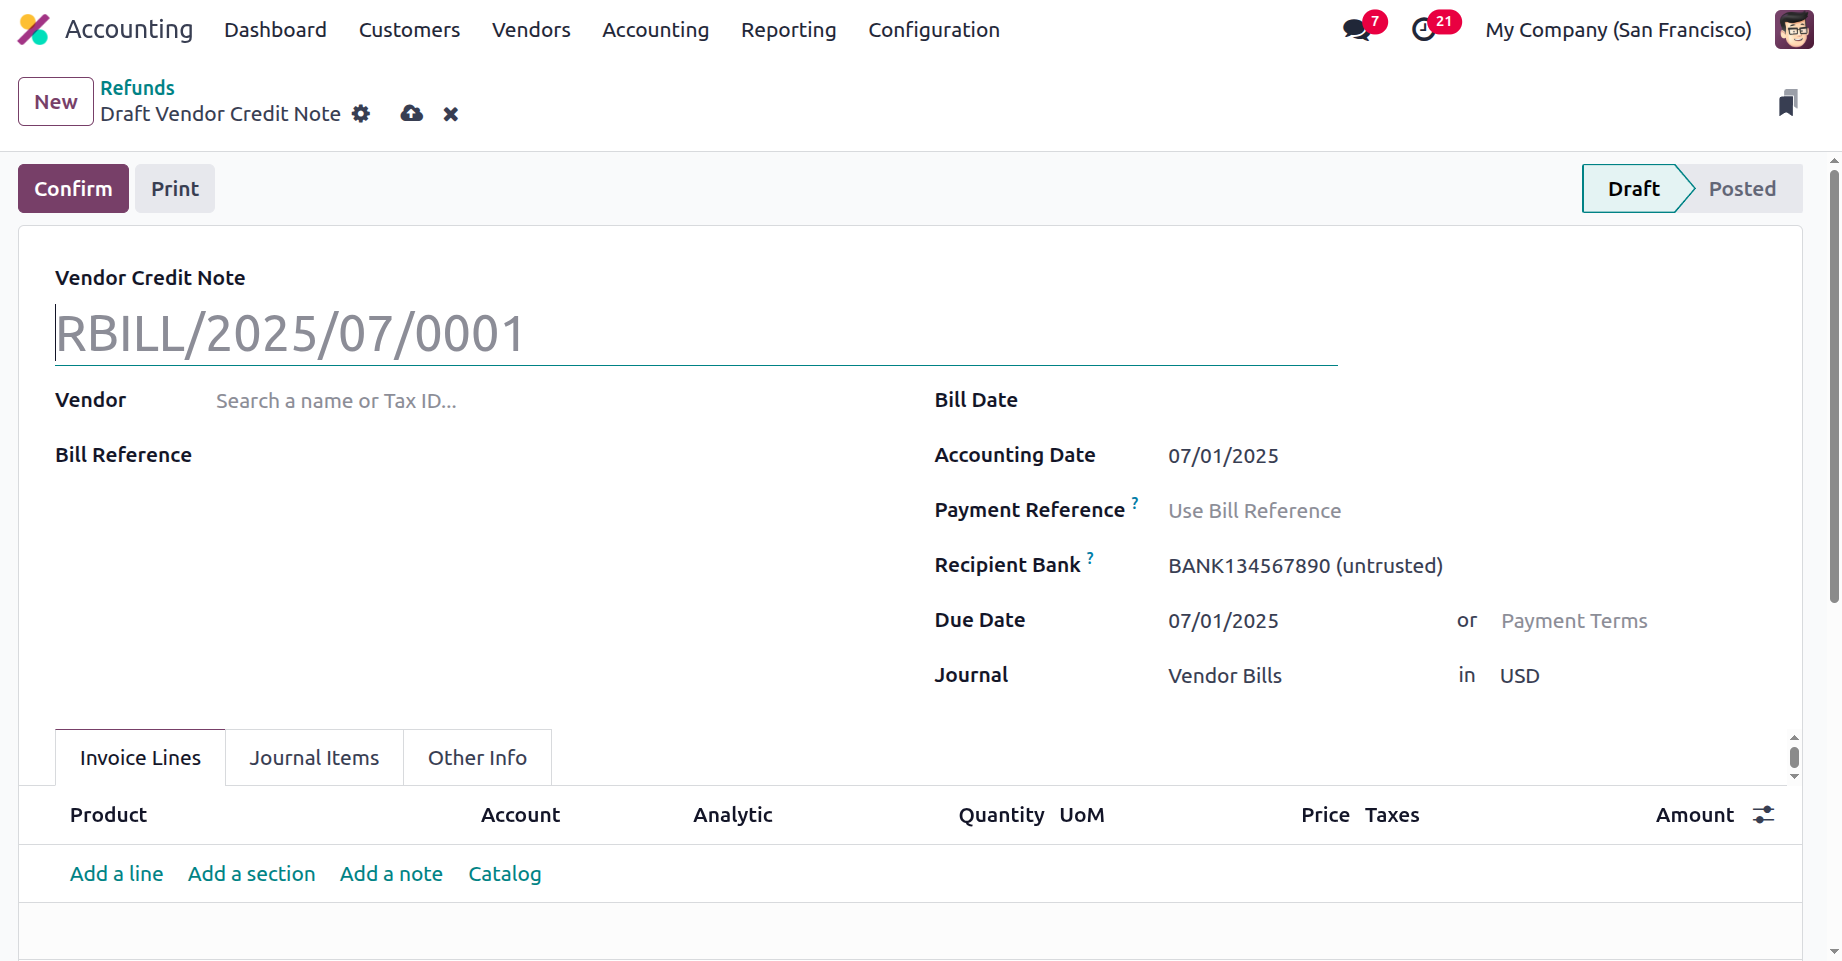
The defined refund procedures that have previously been completed, where each refund is defined, will be editable by you. To create a new refund operation, select the New option from the Refund menu. This will open the window shown in the screenshot below.
The bill reference, payment reference, recipient bank, and vendor name can all be entered in this field. It is also possible to define the Bill Date, Accounting Date, Due Date, Journal Details, and Currency. The Invoicing Lines can be used to establish the Product Details, Label, Account Details, and Analytical Accounting Details. We will define the Subtotal, Quantity, Price, and Tax information. You can now specify products using the Add a line option, and you can add new sections to the Product Lines using the Add a section option. The refund explanation may also contain a customised note. Together with the tax information, the total of the refund bills taxed and untaxed amounts will be supplied.
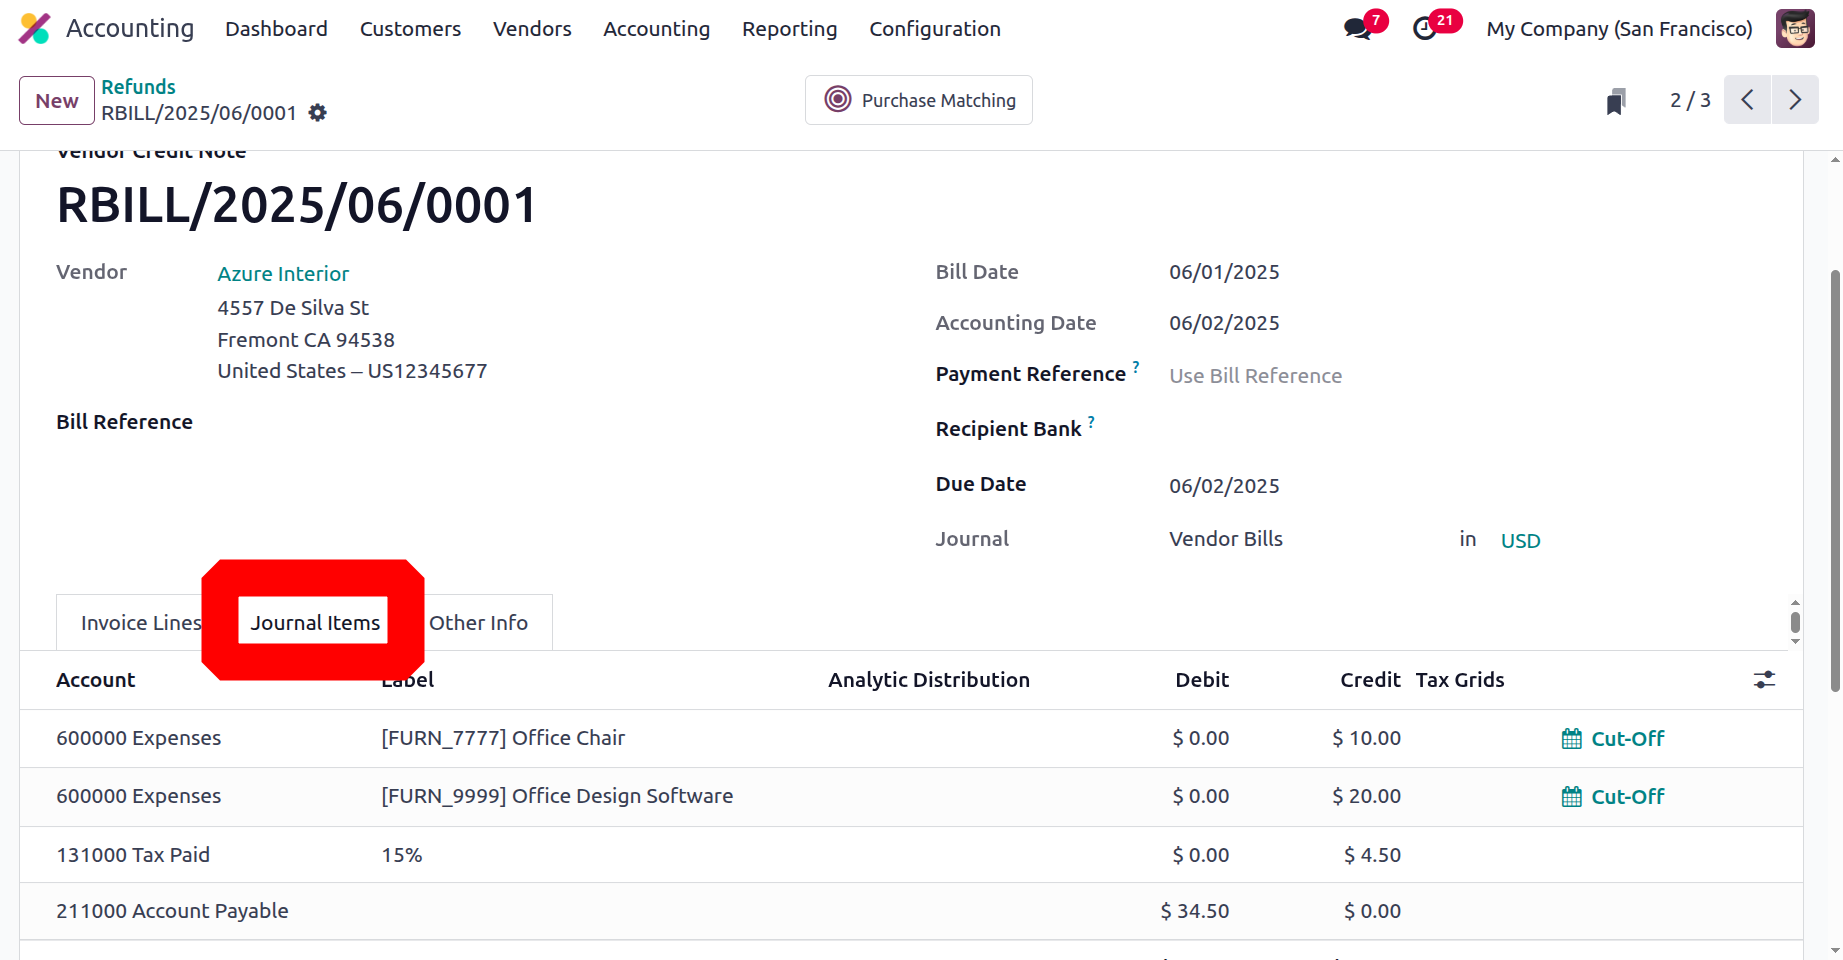
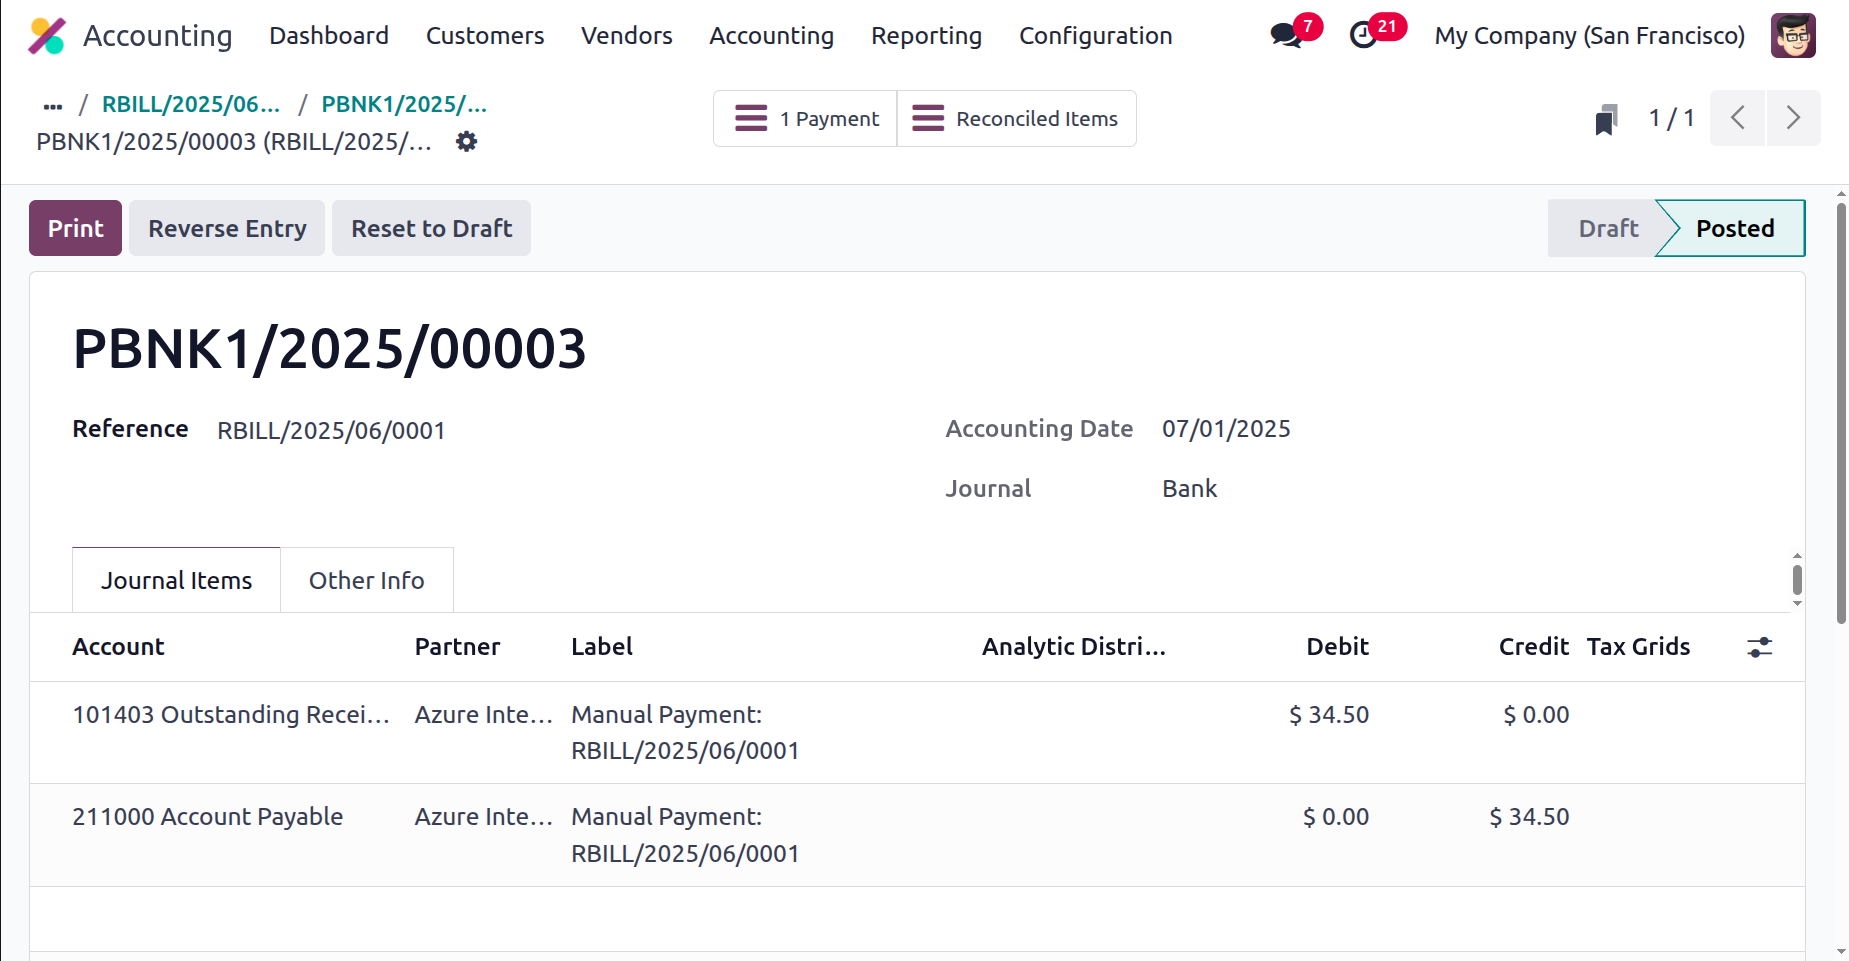
The Journal Items of the applicable Refund will define the specifics of the Journal Account, Label, Analytical Tags, Debits, and Credits, along with the Tax Grid. Additionally, throughout the Reverse Billing process, the Expense Account will be Debited and the Account Payable will be Credited.
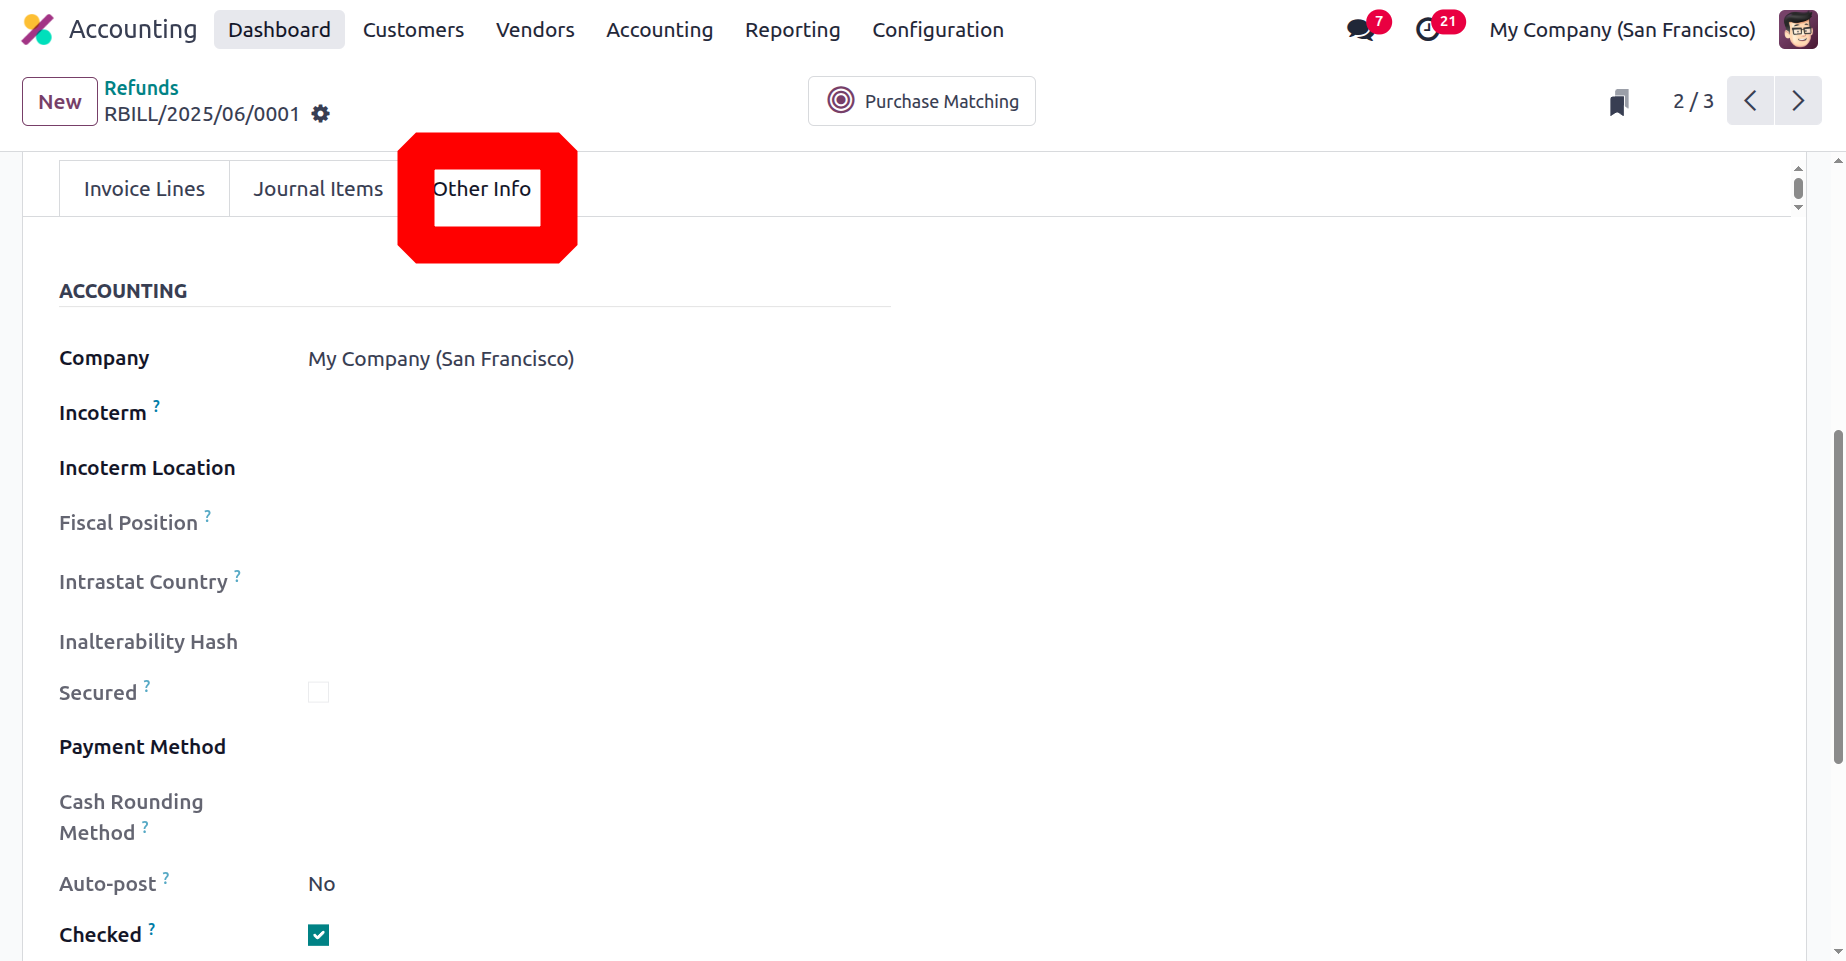
In the Other Info page of the corresponding Refunds menu, you may also modify the Accounting details, including the Incoterms, Fiscal Position, Intrastat Country, Intrastat Transport technique, and the Cash Routing technique. Additionally, Post Automatically and To check are options to specify and implement in the particular Refund method.
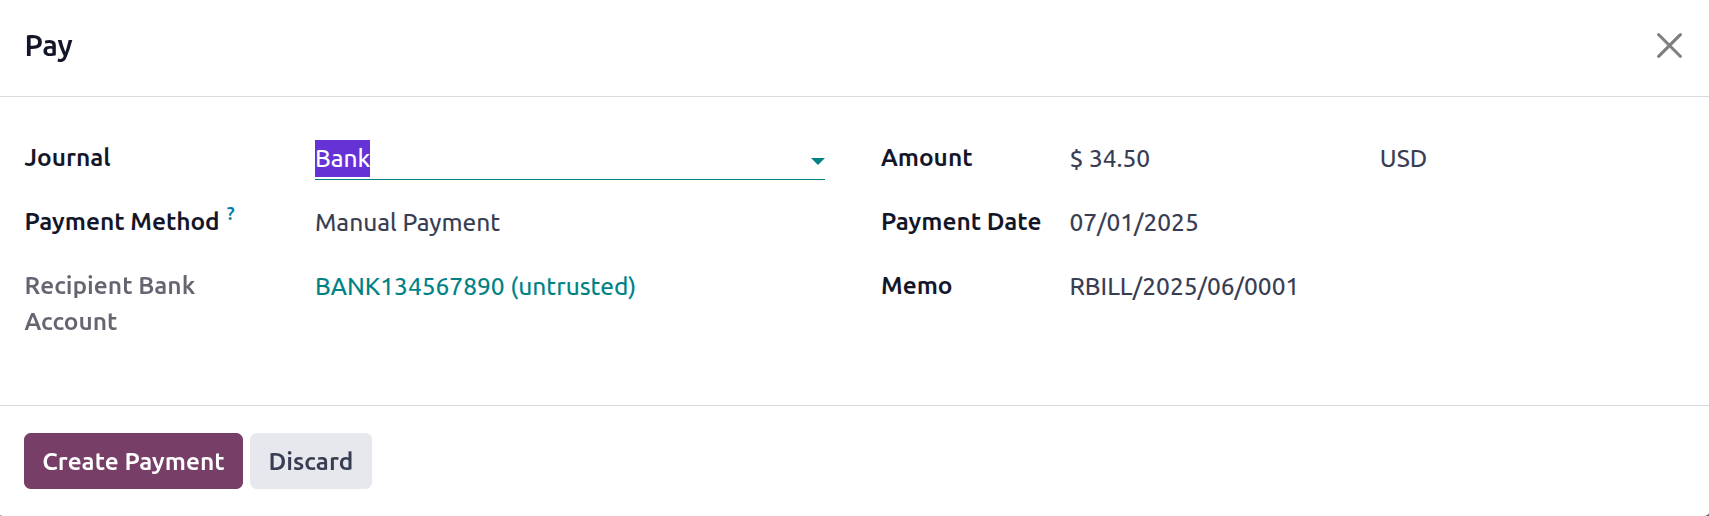
Once all of the Refund's Configurations components have been established, selecting the Register Payment option will take you to the Register Payment window, as seen in the screenshot that goes with it. After that, you may decide whether to preserve the description. In this instance, the Journal and the Payment Method can be configured to Manual, SEPA Direct Debit, or Batch Deposit. On each return, you can provide the Amount, Currency, and other specifics of the reimbursement in addition to the Payment Date and the Memo. After completing the Register Payment setting parameters, you may select the Create Payment option.
The Outstanding Receipt will be debited and the Account Payable will be credited upon payment registration.
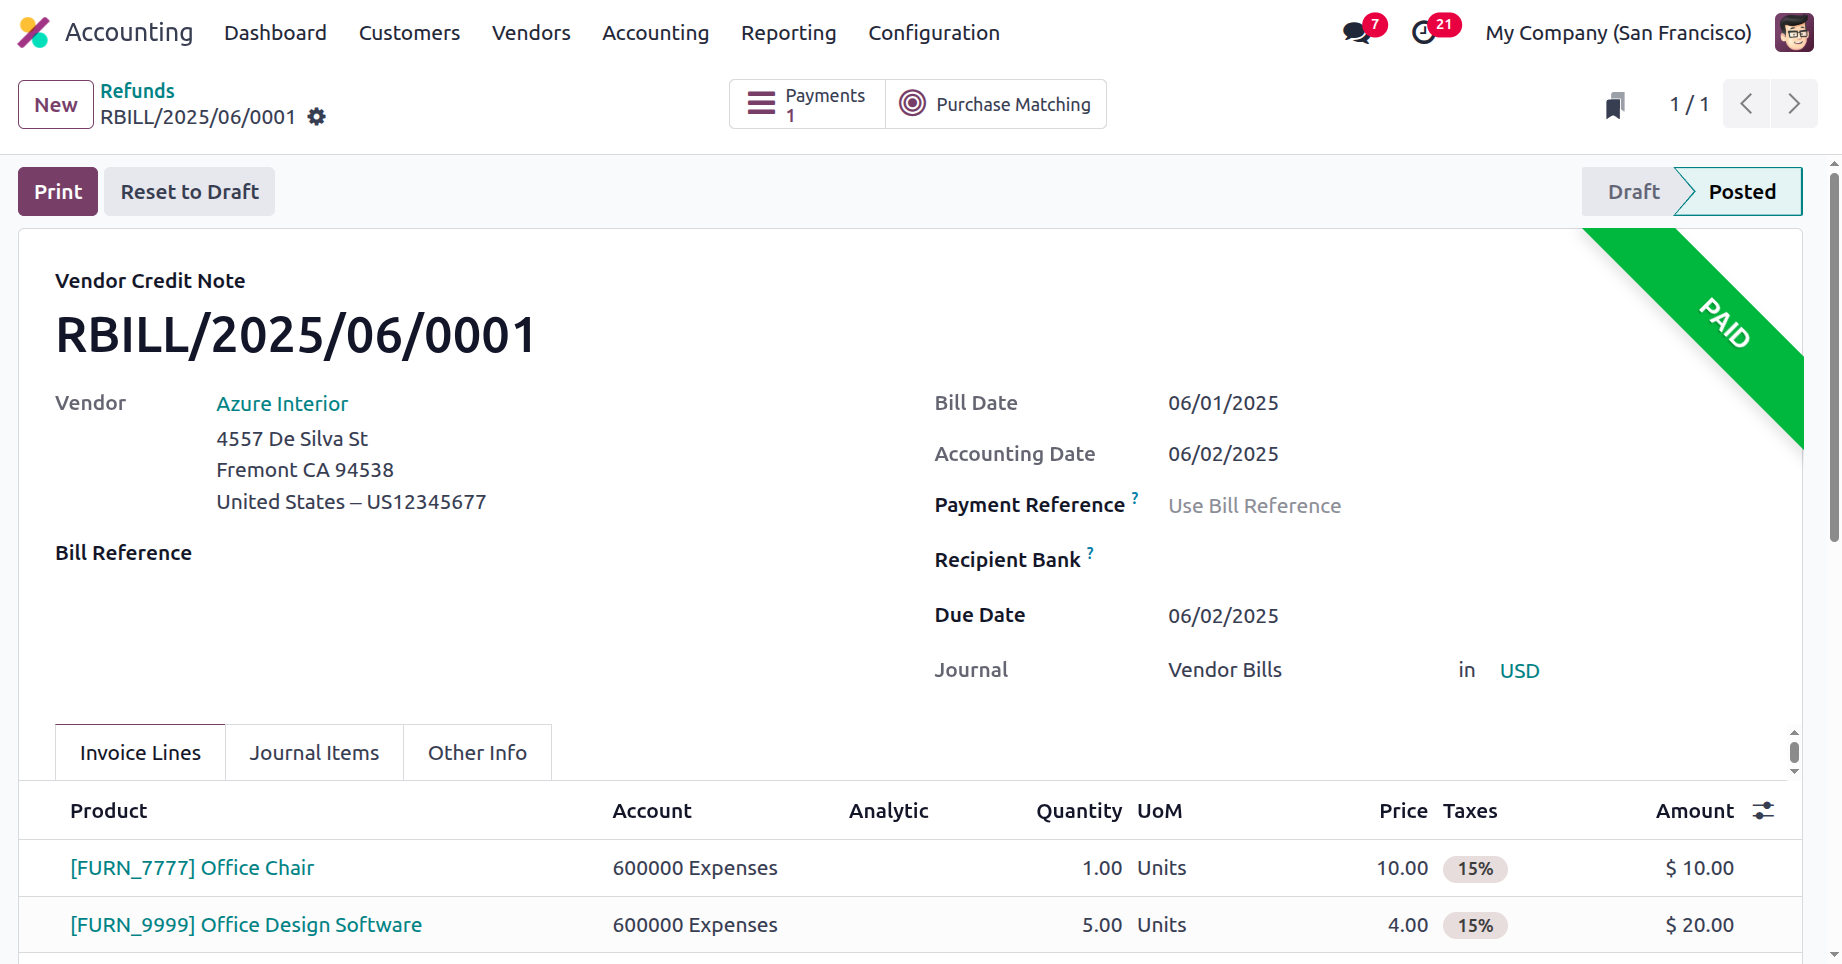
You will be billed with the relevant Refund menu once the payment has been processed. If the payment has been made, you can choose to Reset To Draft on the particular refund that was stated; if not, the label will read Paid.
Refunds for vendor operations can be efficiently managed using the specified menu. Now that we have a clear understanding of the components of refund administration, let's proceed to the next section, which will address the management of vendor receipts.
Vendor Receipt Management
As soon as the products are received, you have to acknowledge them to the suppliers in line with the received purchase orders. The Odoo Accounting module's Vendors tabs facilitate the creation and management of receipts and related financial elements. The Accounting module's Receipt Management menu's Vendor Management item contains a list of all receipts generated in connection with business operations. You can filter and group by the list to get the required receipt from the menu.
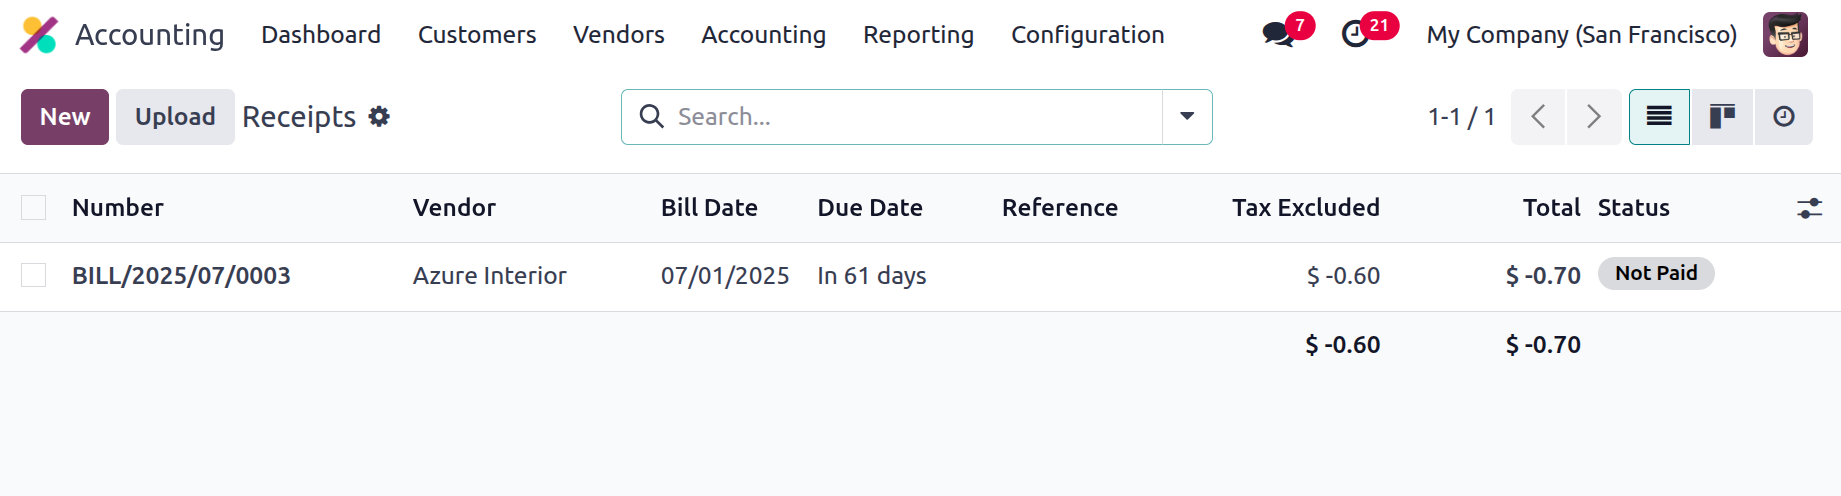
Additionally, by selecting a specific receipt from the menu and then selecting the Edit option, you can change the data contained in that receipt. Choose the New option to open the box where new receipts can be created. A screenshot of this window can be found below. The purchase receipt number will appear here automatically, and you may either manually enter or choose the vendor, bill reference, payment reference, receipt bank, bill date, accounting date, due date, journal, and currency of operation.

By selecting the Add an Available Line option, the Products can be specified in the Product Lines. New sections can be added to the invoice by choosing the Add an available section option. Additionally, the Journal Entries and Other Information for the Receipts can be created in the appropriate menu, similar to the Refunds management part that was covered previously in this chapter. After making the required changes for the applicable receipt, you can register payment by choosing the appropriate option from the menu. This will bring up the pop-up window that is depicted in the image below.

Here, you can describe several aspects of the Register Payment process by defining the Journal and the Payment Method as SEPA Credit Transfer, Manual, or Checks. To set the recipient bank account info, you can also choose an existing recipient bank account from the drop-down menu or establish a new one. Additionally, the type and amount of currency to be used for payment can be specified. Furthermore, the applicable Payment's Memo information and Payment Date can be specified.
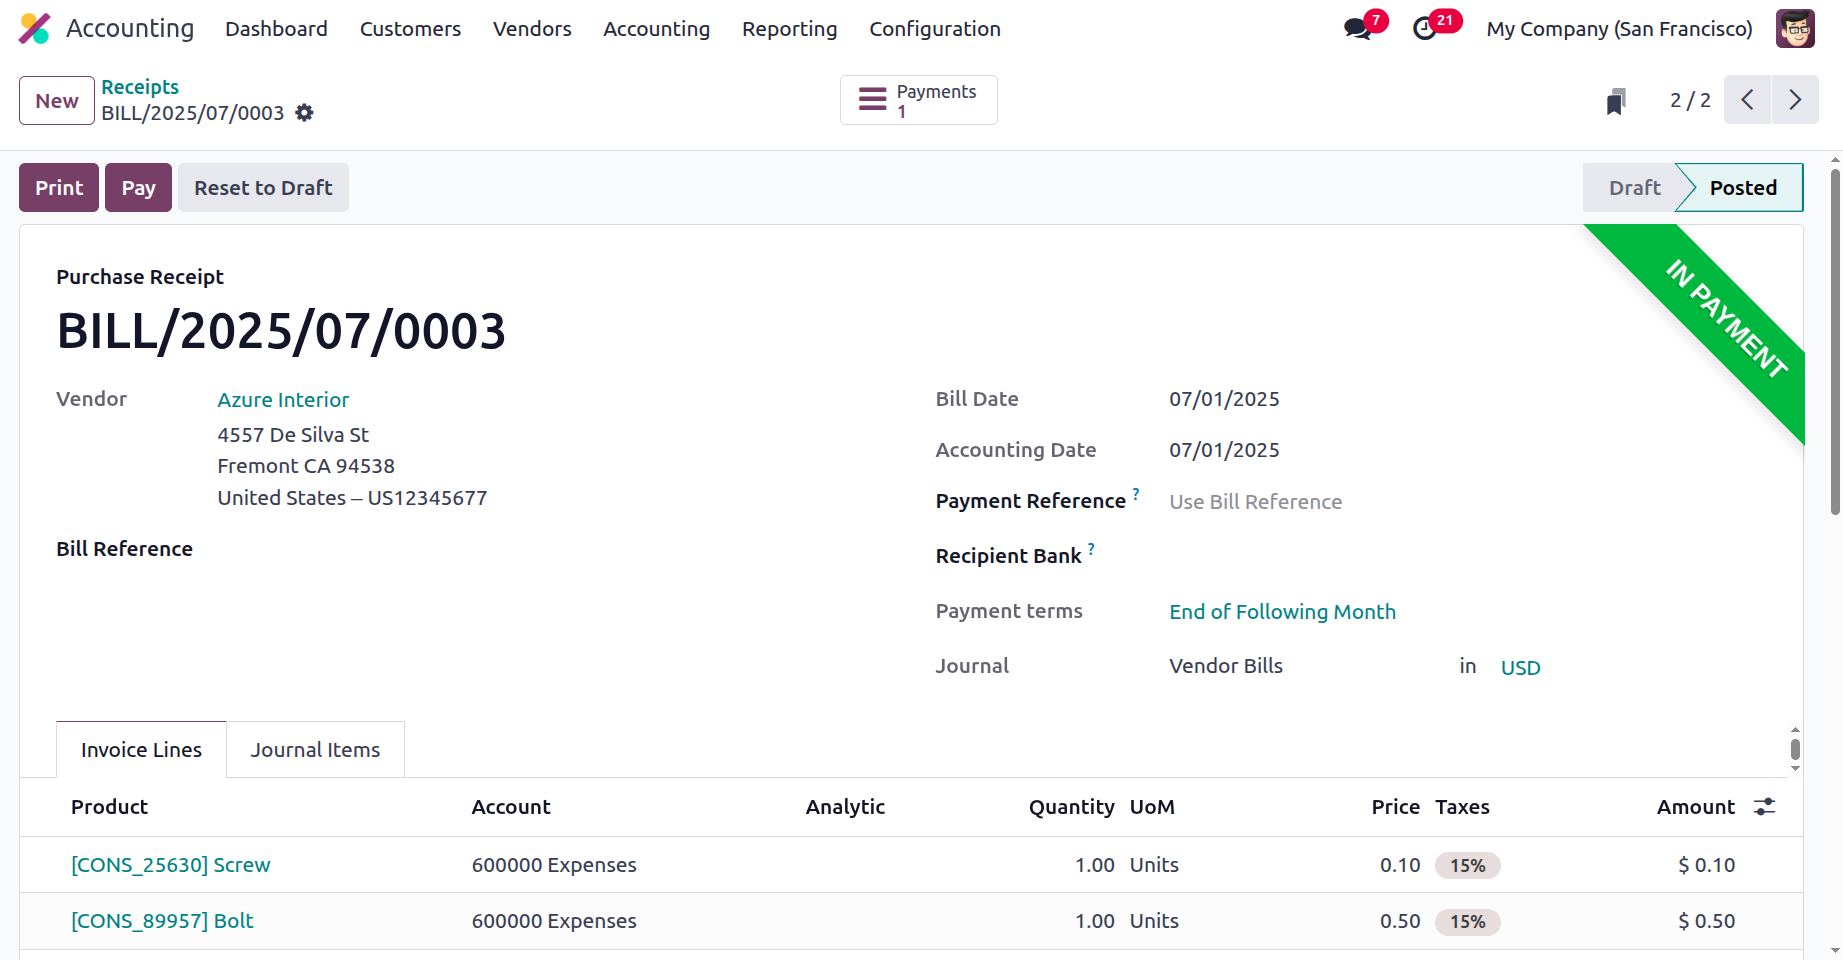
Once the Payments have been registered in the relevant Receipts, a label stating that the Receipts is In Payments will display, as shown in the screenshot of the Receipts below. If the payment is successful in this case, the label will read Inpayment.
When managing the accounting aspects of product delivery that need to be clearly and succinctly explained, receipts and their administration will be a useful tool. By utilising this Odoo Accounting module capability, you might enhance your company's financial management abilities. In the section that follows, let's talk about handling vendor bill payments.
Manage the Vendor Payments
Use the unique management menu in Odoo's accounting module to efficiently handle vendor invoices and associated payments. The management of vendor invoice payments dominates a company's activities with its product suppliers, necessitating a specialised operating system. The accounting module in Odoo allows you to systematically and systematically specify the components of supplier invoice payment management as part of business activities.
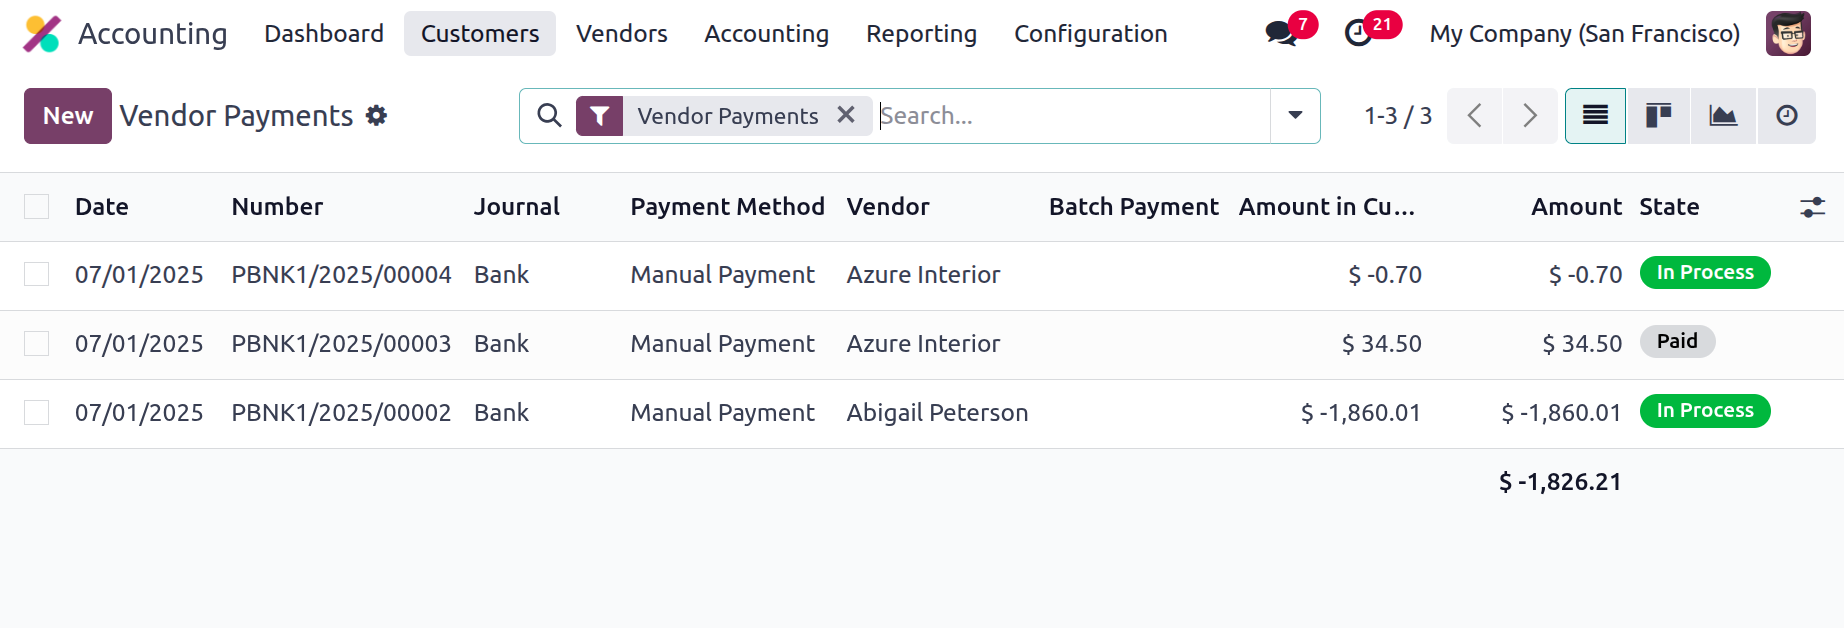
The vendor invoice management option in Odoo's accounting module is shown in the screenshots below. This is where all vendor invoice payments are shown. The payment data, such as the invoice number and date, will be displayed to you. The SDD system, journals, payment methods, suppliers, batch payments, embedded amounts and payment currencies, and payment statuses will also be discussed. The normal filter and group by settings can be used to sort the necessary payment information. In accordance with your filter needs, you may also save group settings and like special filters for later usage.
You can make new payments by choosing New. This will display the creation menu that is displayed below. In this case, the payment type must be originally specified to either send or receive money. The partner type, supplier/customer information, destination account information, currency and amount assigned, payment date, and note can then be set. By using the Whether Internal Transfer option, you may additionally designate the payment as an internal transfer. The journal can be chosen from the drop-down menu, and the payment method can be either manual or cheque. The recipient's account number may also be included, depending on the circumstances.
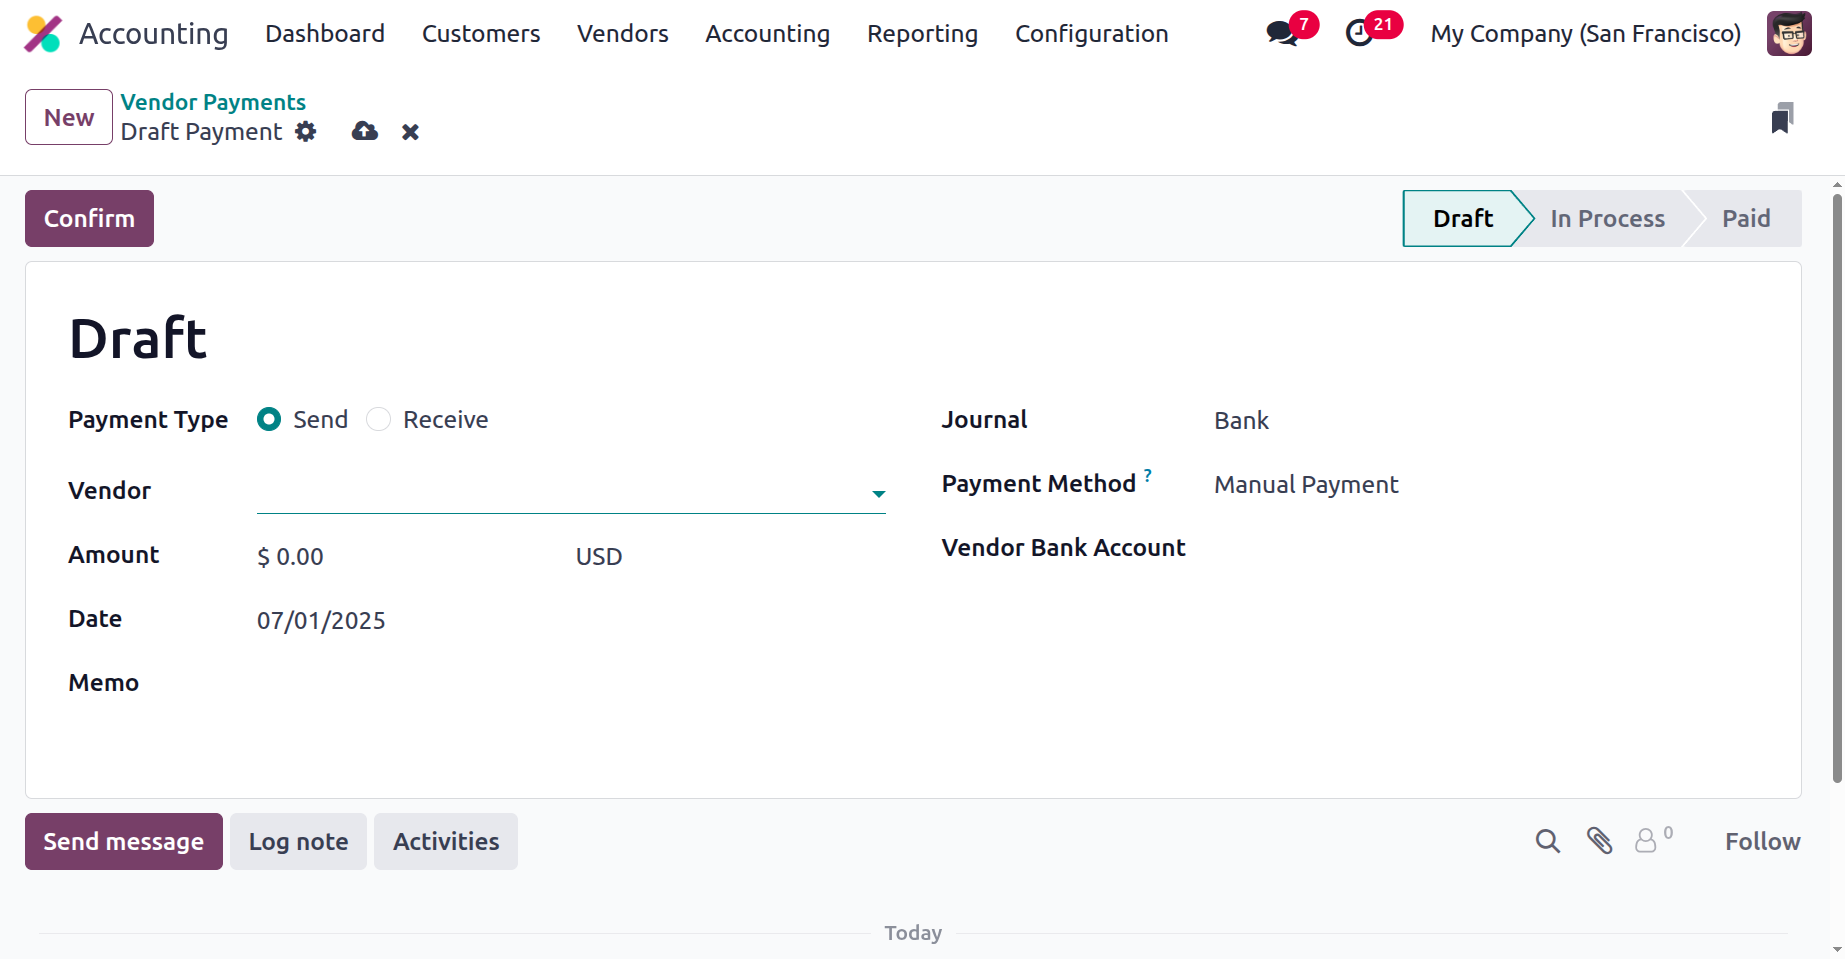
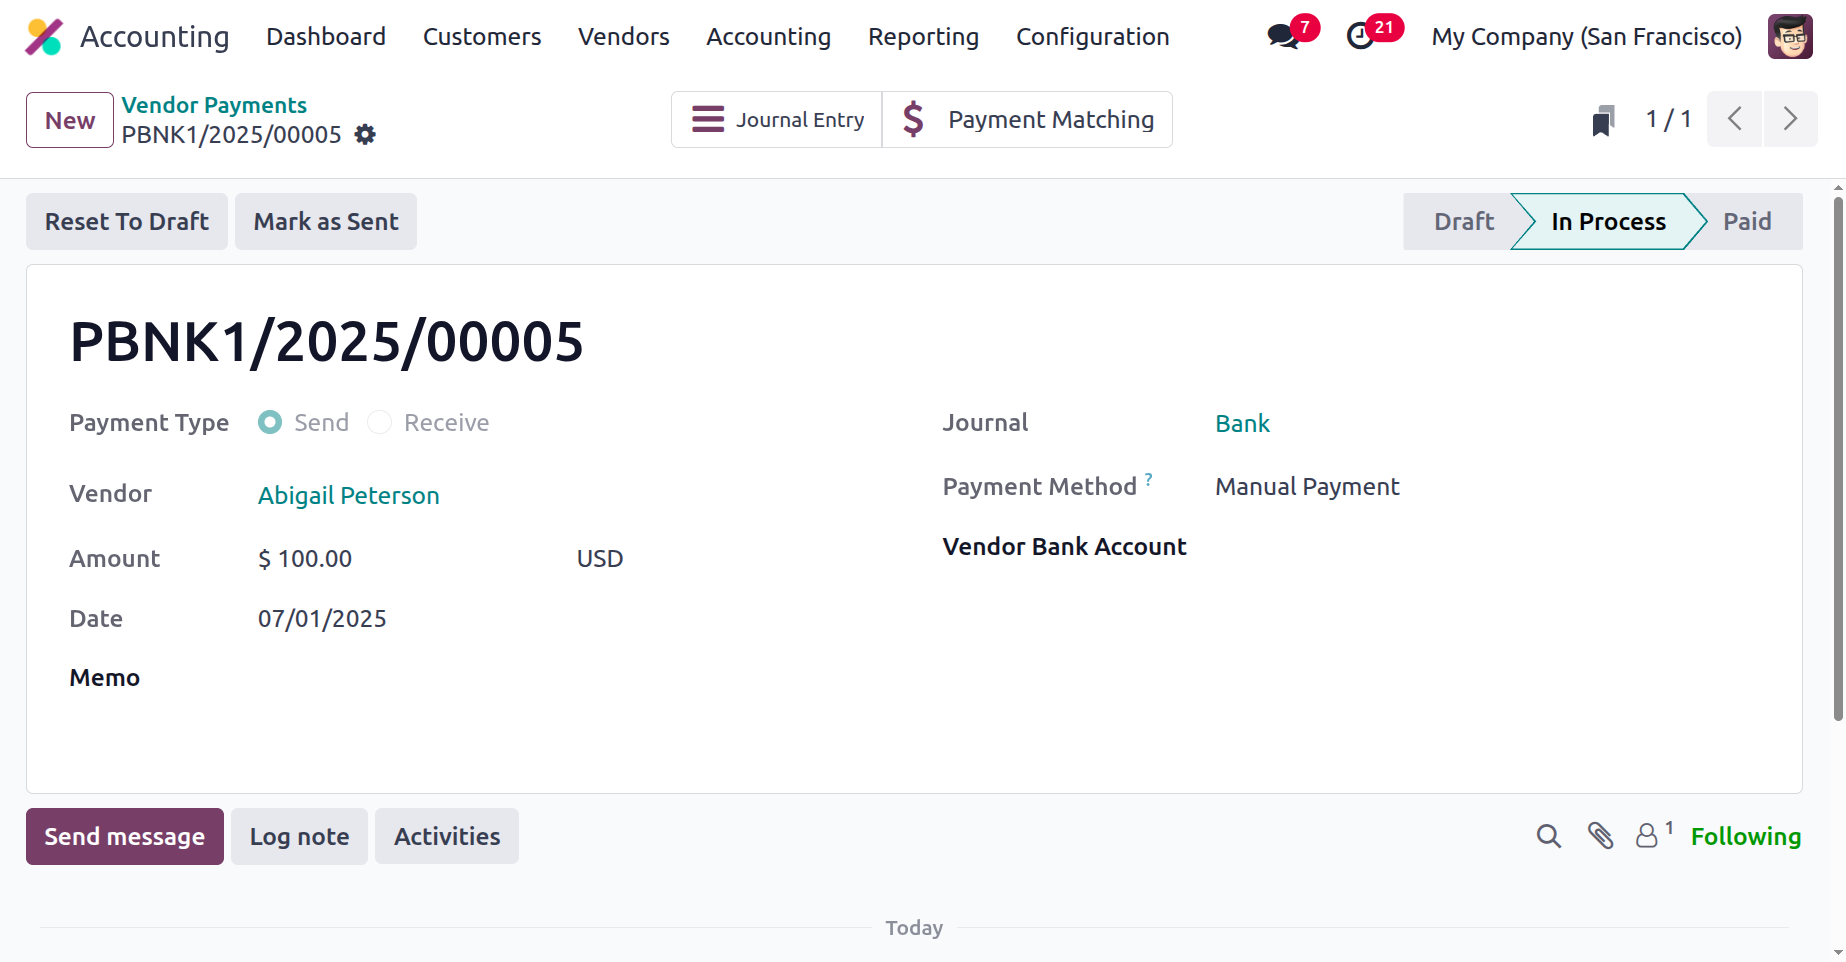
Confirming the specified payments comes next after the payment setup is finished. These vendor payments can subsequently be added to vendor bills after choosing Confirm. When the funds are confirmed, the text "Send" will come up, as seen in the screenshot below.
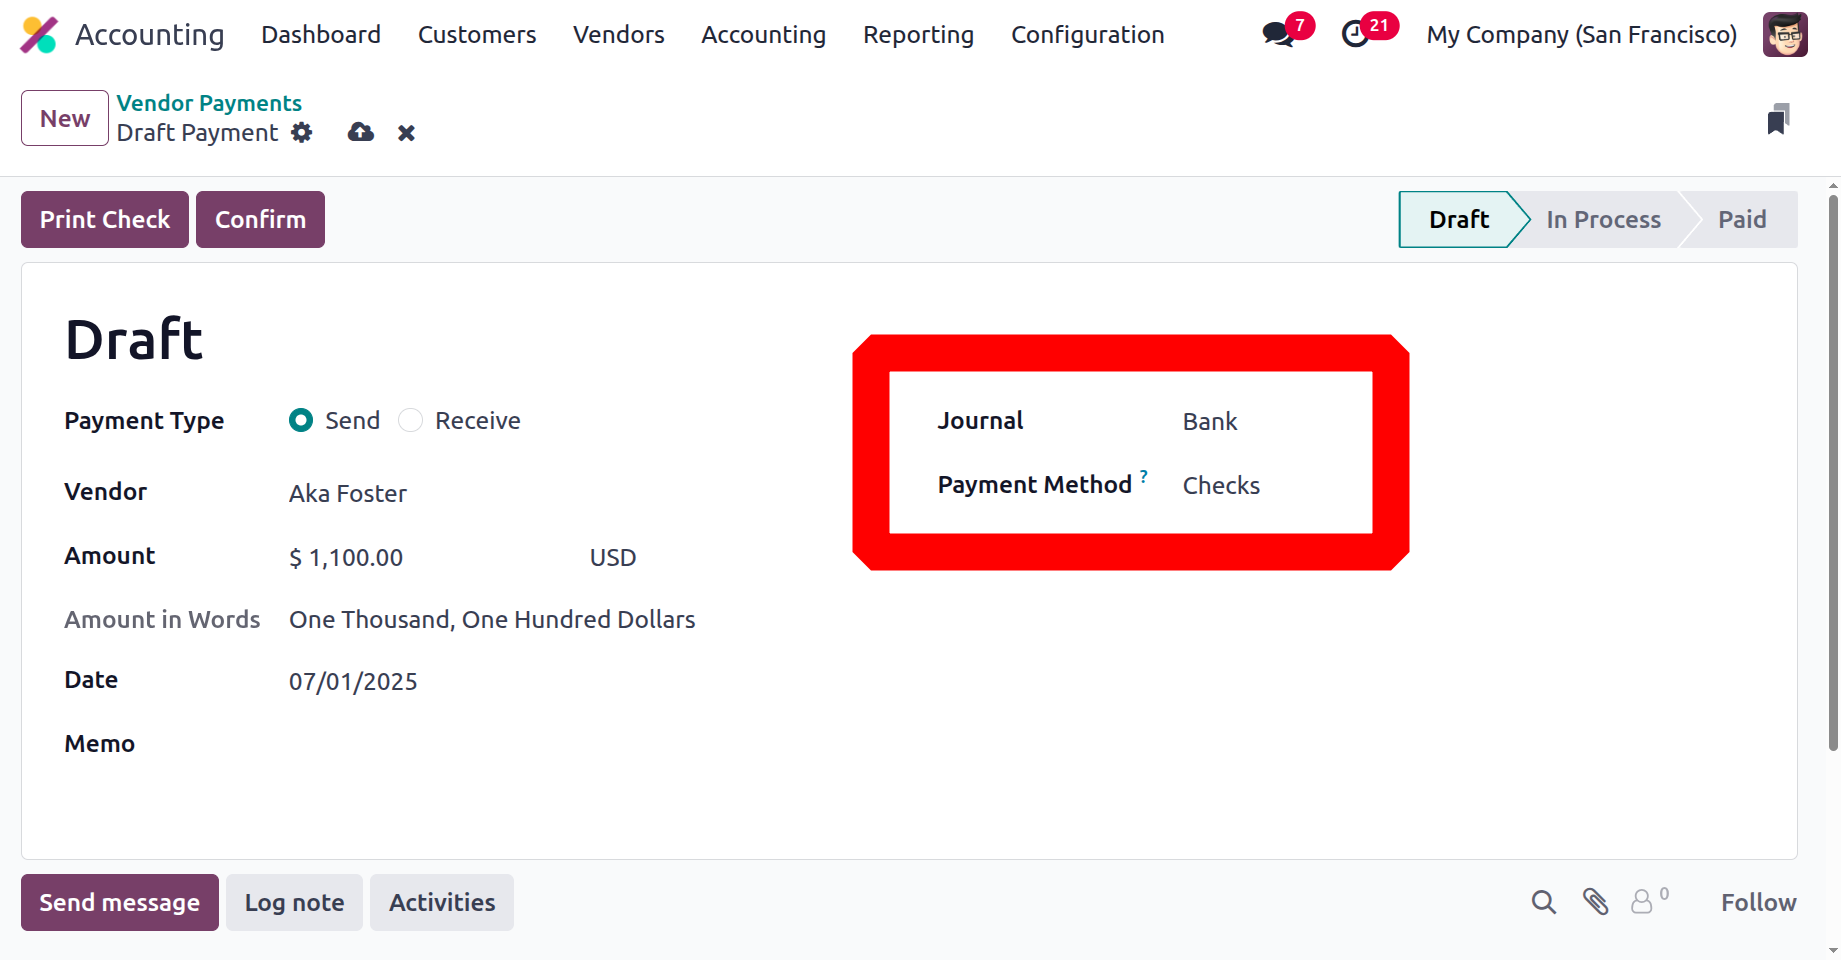
You must now choose the check payment option, as seen in the screenshot below, if you are paying with "checks."
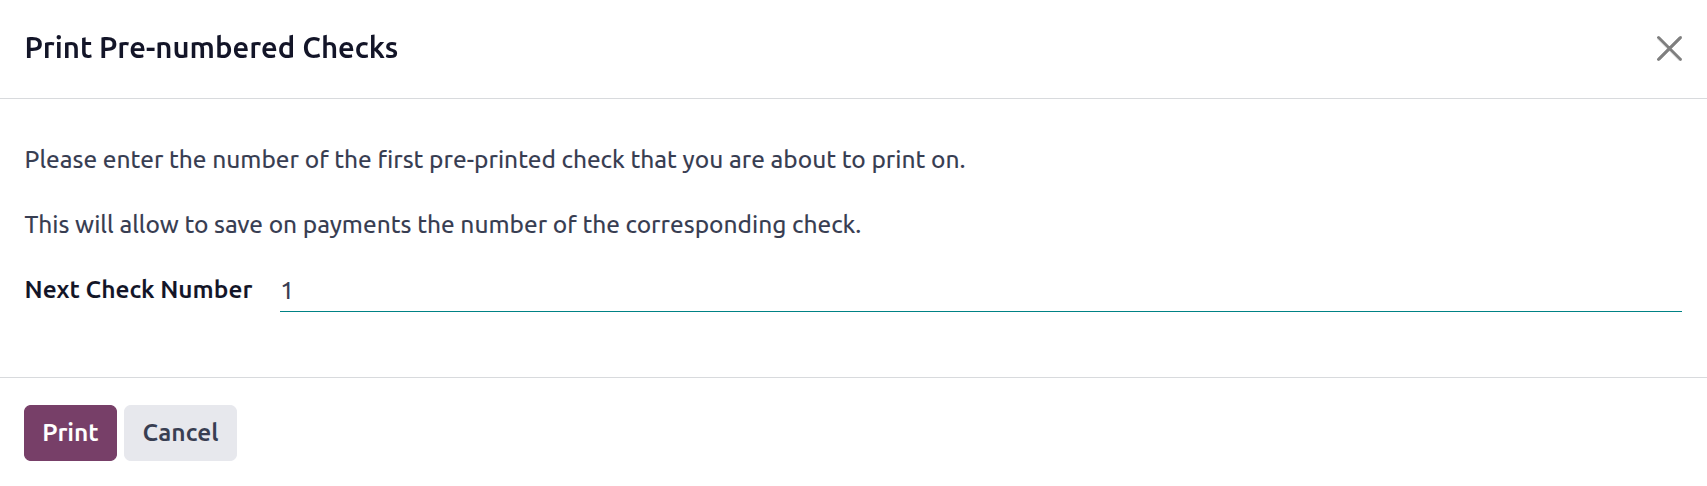
You can set up the next check and view the pre-numbered checks that will be printed by choosing Confirm if the payment aspects are set up to utilise checks. When the Print Pre-numbered Checks option is selected, the Print option can be chosen.
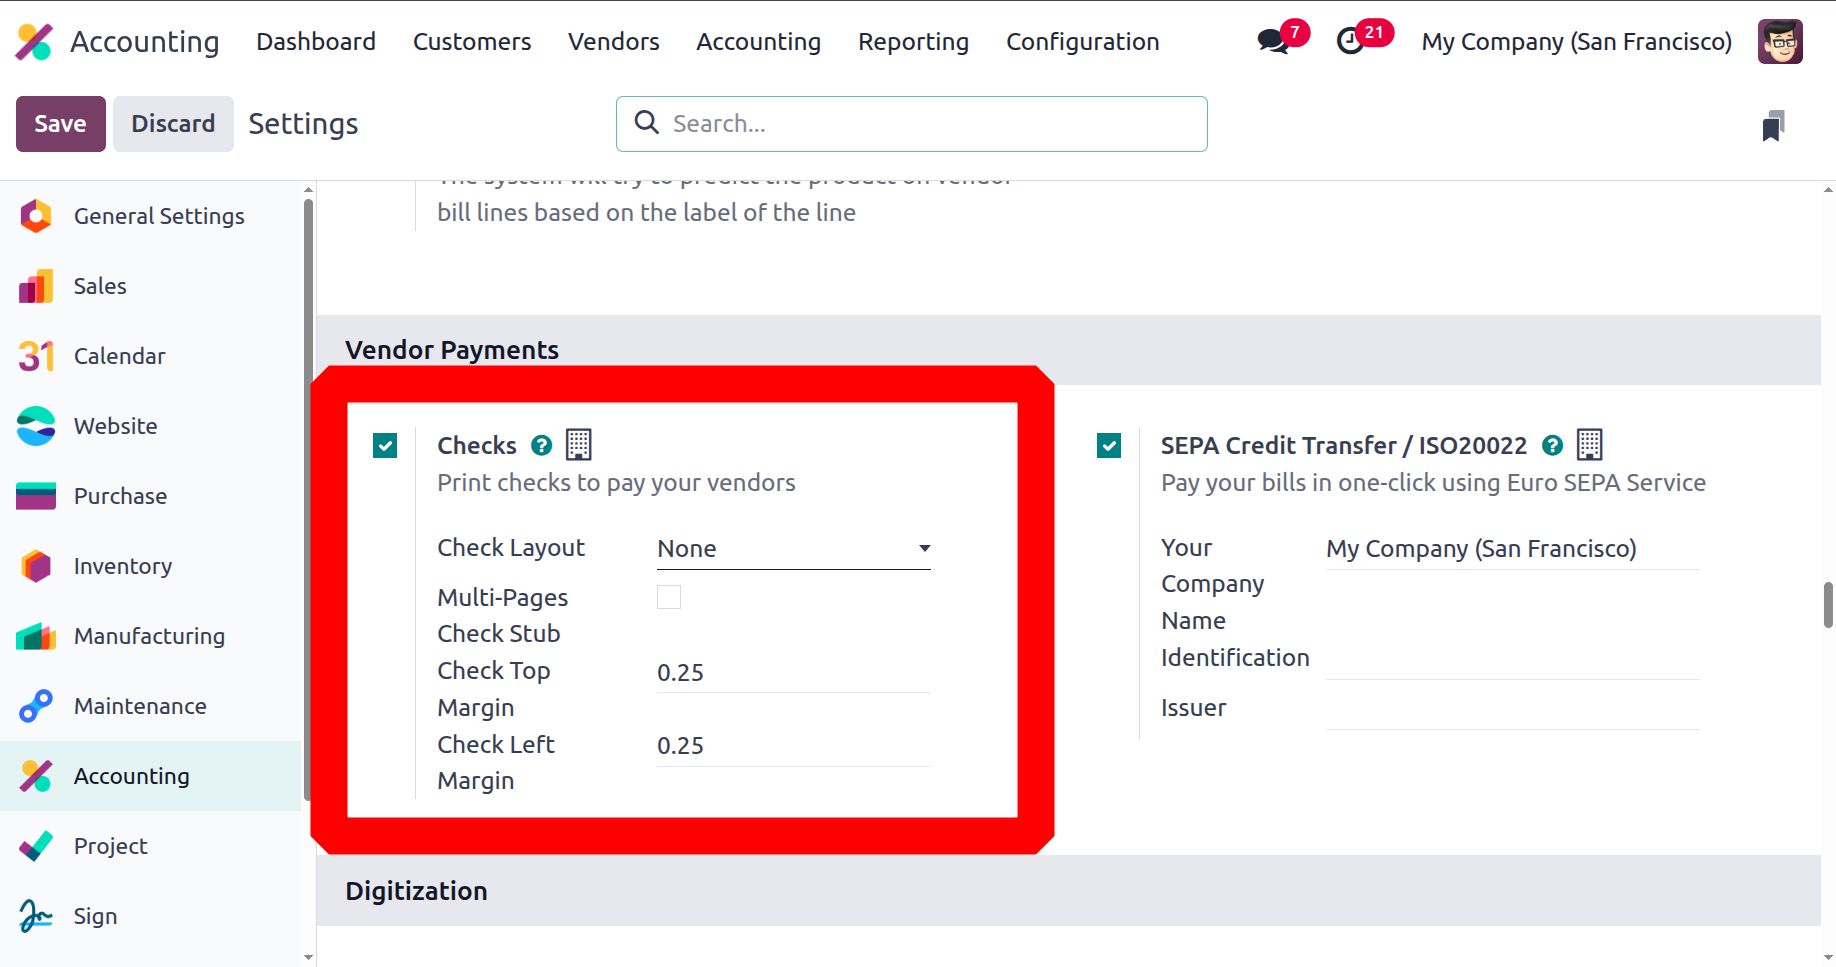
The following warning message will show up as seen in the following image if Check Layout is not set. There is a Go to Settings Panel option.
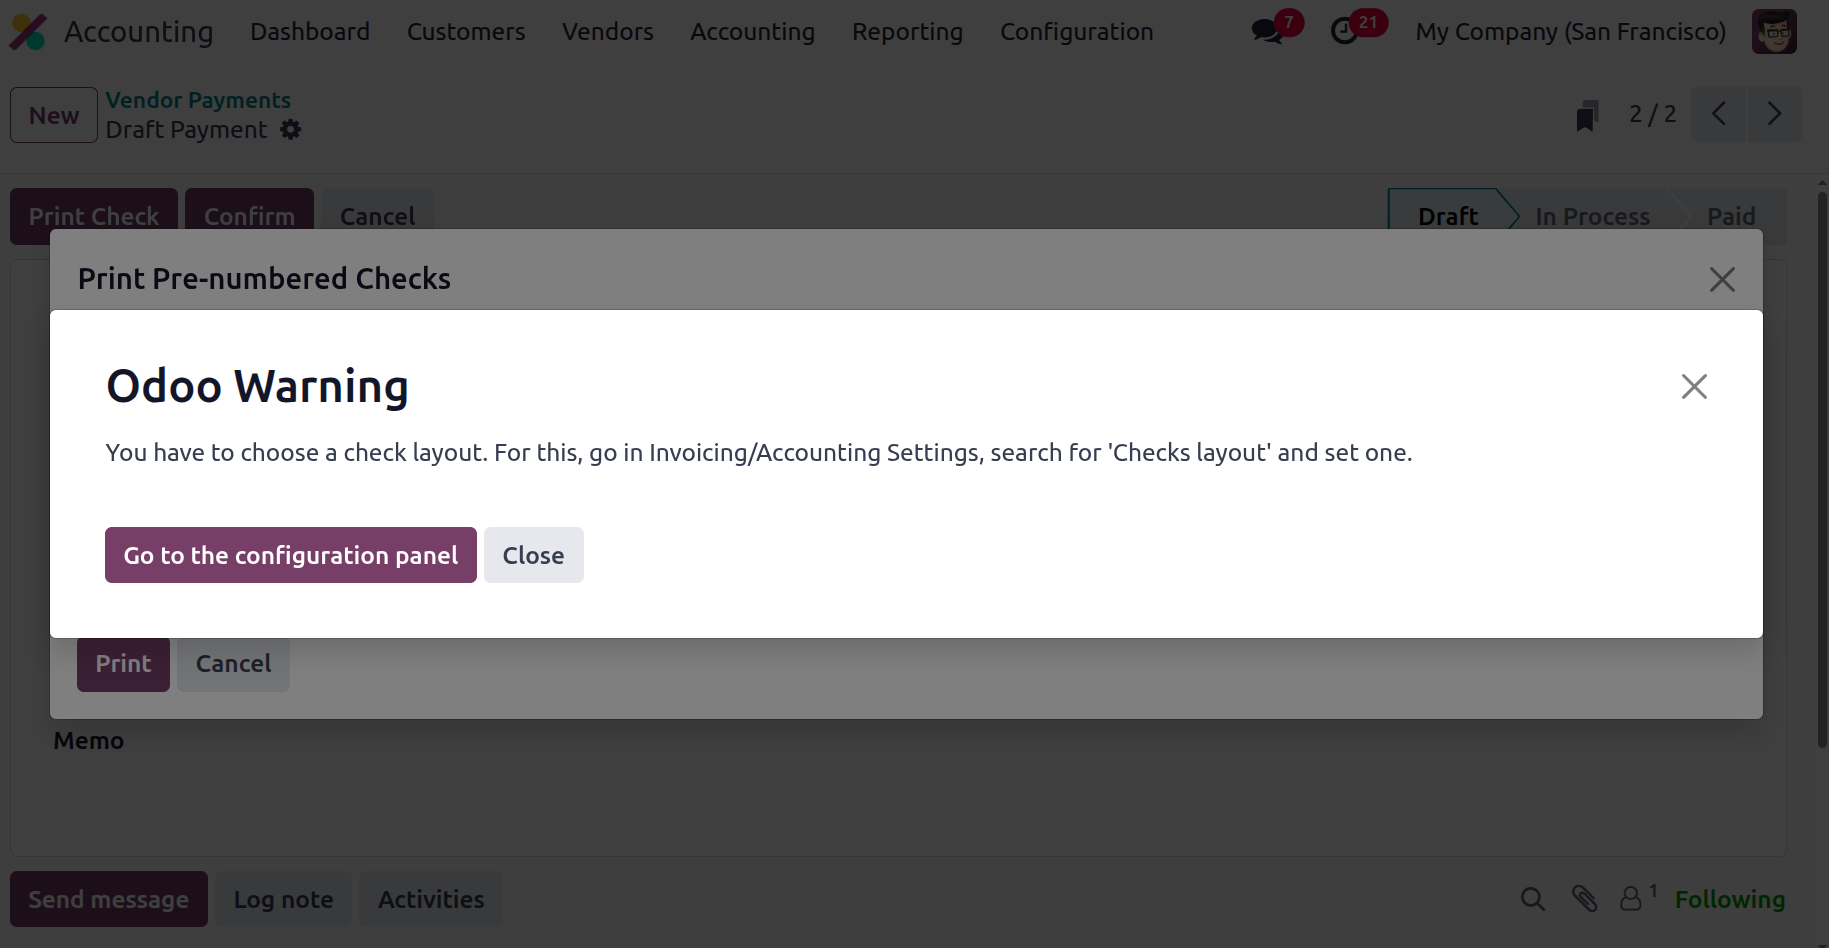
This will bring up the Accounting module's Settings menu, where you can set up Checks items under Vendor Payments. Print Check (TOP), Print Check (MIDDLE), or Print Check (BOTTOM) are the three options available when Control Layout is activated.
It enables you to create payments for the business or make new payments to suppliers. The greatest tool for handling the accounting tasks associated with the monetary portion of these payments is Odoo Payment Management. The components of the vendor bill batch payments are defined in the following section.
Batch Payments on Vendor Bills
You will make multiple purchases from a vendor during the course of the business's real-time activities while the company is open for business. In accordance with a formal agreement or arrangement that has been established by both parties, you will be paying all of the vendor bills for the purchases you made at once rather than paying each one separately. Occasionally, the agreement is determined by the number of bills or invoices rather than the total amount of money owed.
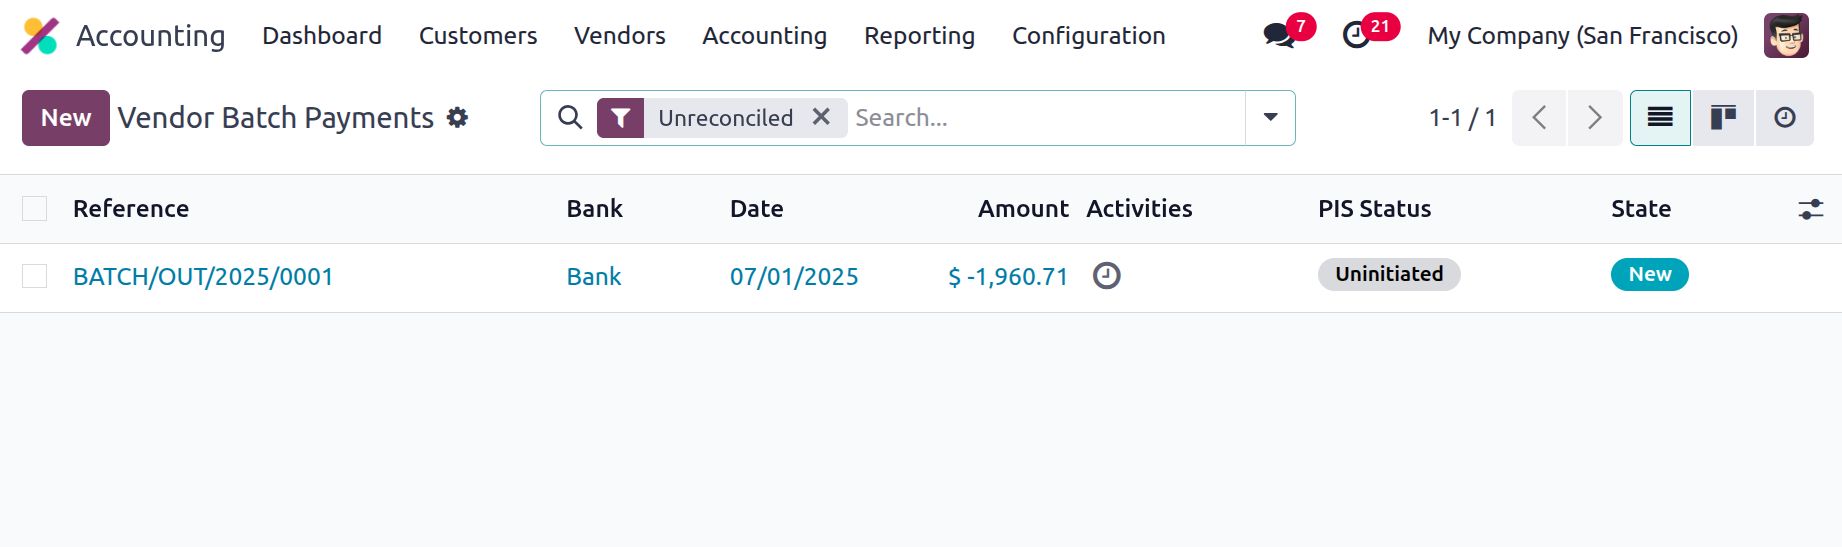
The Odoo platform offers a unique menu of operations where all vendor bill-related batch payments are configured in order to support the features of the vendor bill batch payments. Definitions for the Reference number, Bank details, Batch Payment Date, Amount, and Status are provided here. Use the Filtering and Group by options, which are consistently available in every menu on the Odoo platform, to sort through the long list of declared batch payments.
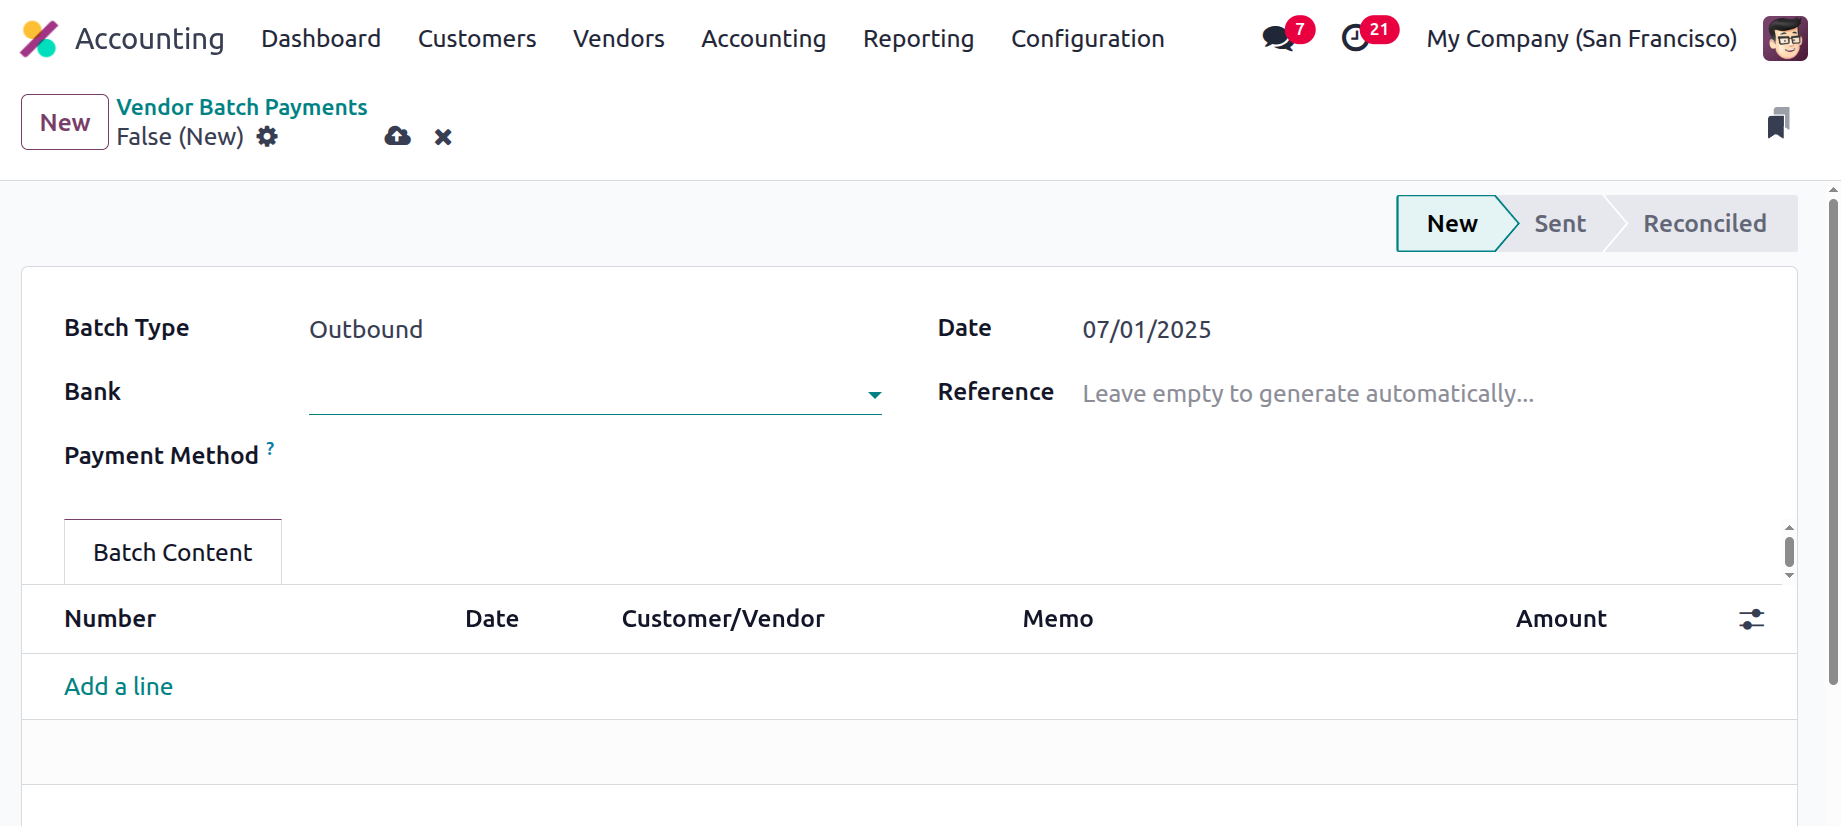
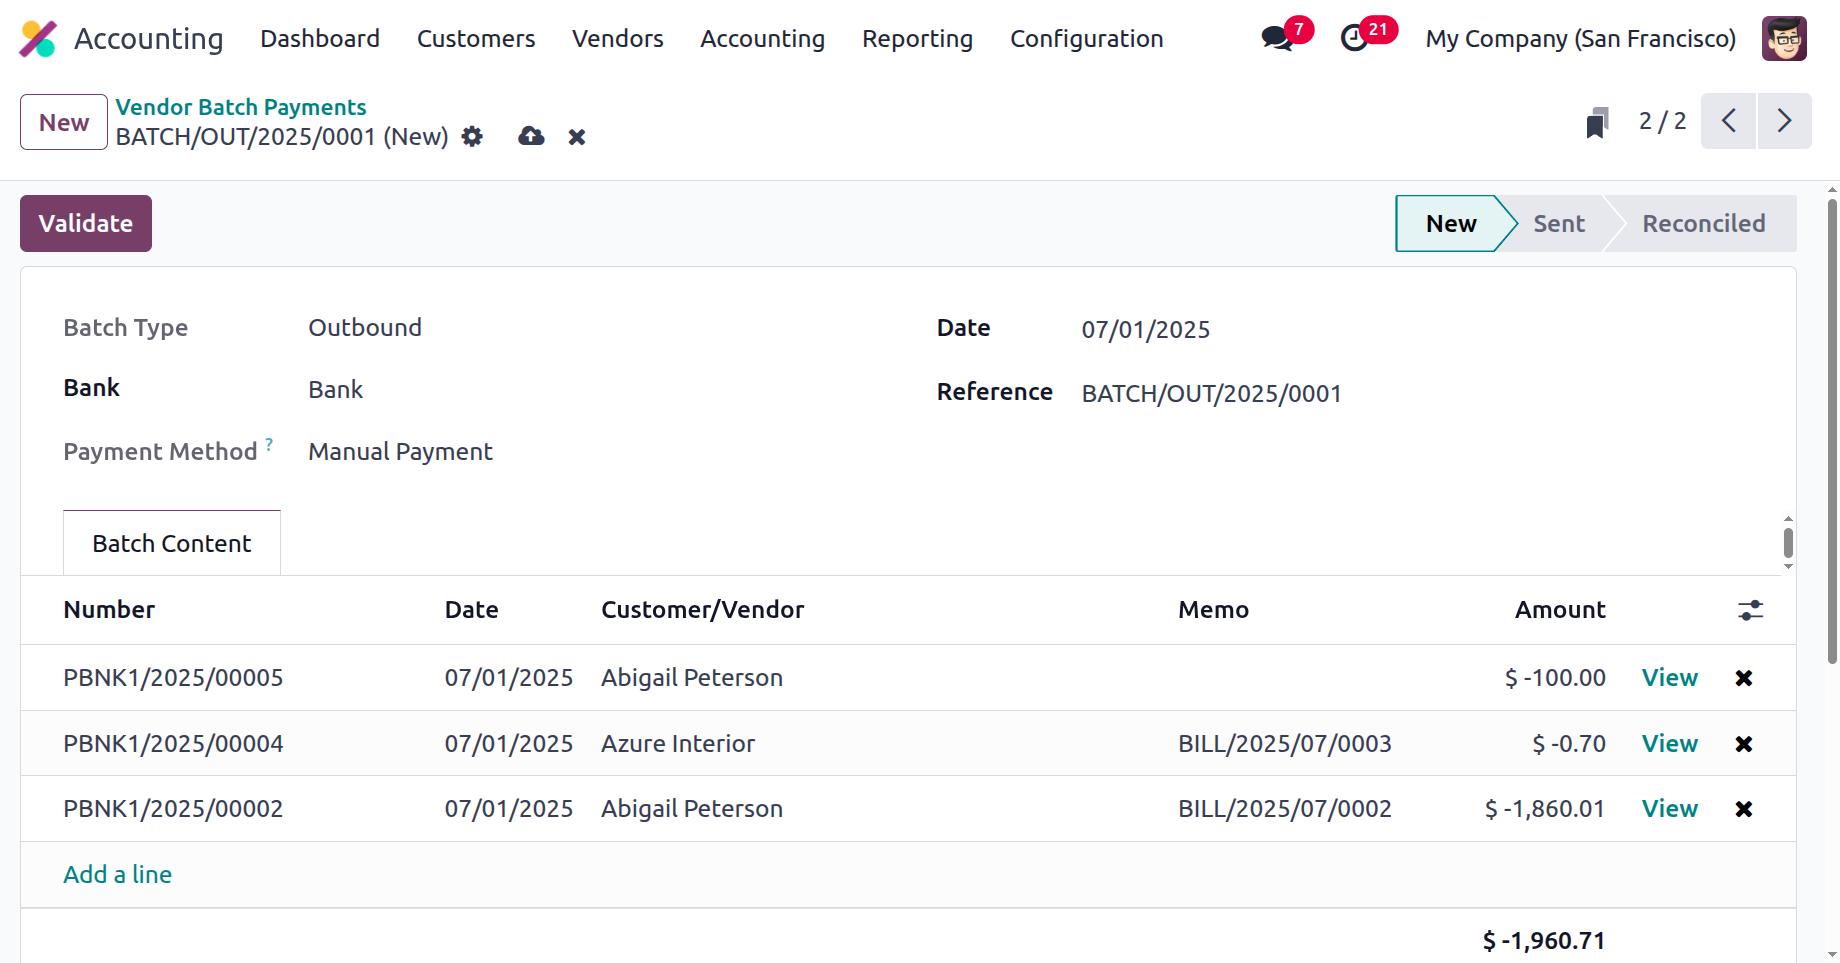
Choose the New option to create a new batch payment on vendor invoices. This will bring up the Batch payments creation box, as seen in the attached image. In this case, either choose the appropriate options from the drop-down box or enter new values for the Bank Type, Bank, Payment Method, Date, and Reference. Additionally, the available Add a Line option may be used to set the Batch Content information where the Payments may be batched.
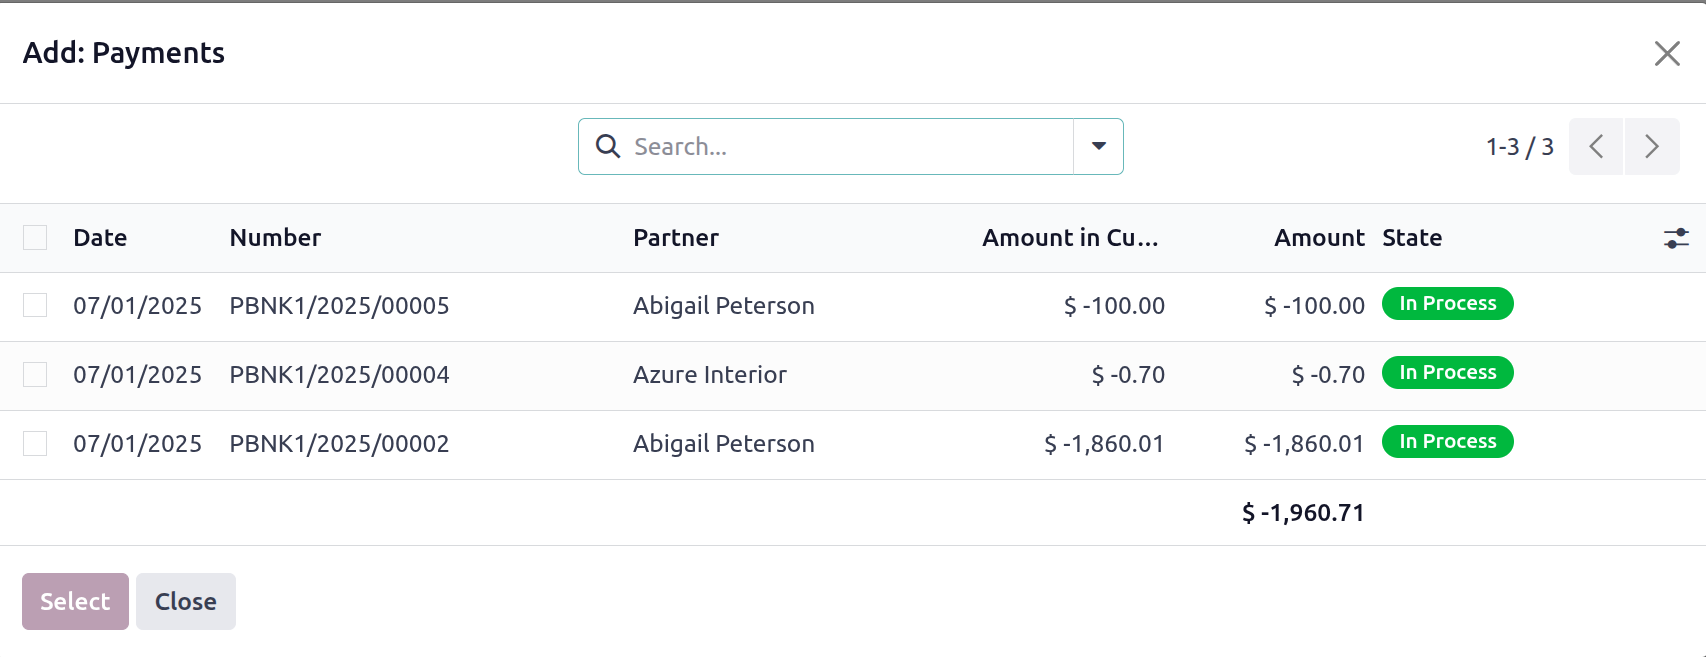
A pop-up window listing all of the supplier payments that must be made will appear when you choose to add the payment to the batch. You can use the supplied Tick Box to select from a range of payment options. The invoice date, bill number, journal information, payment method, client information, amount, payment status, SDD scheme information, and currency specifications will all be covered in this description of the pertinent payment. You can arrange the specified Payments using the Filtering and Group by options that are also accessible.
You can approve the transaction and choose the Register Payment option to have the batch payments appear on vendor invoices after the payments have been added to the appropriate batch.
Let's go on to the following section, which will discuss the Products menu based on vendor descriptions, after discussing how to handle batch payments on vendor bills.
Products menu based on vendor description
When choosing the product of operation for business operations, vendor operations should be considered. For the business to function effectively, the vendor descriptions and the product descriptions should match. The Odoo Accounting module's Vendor tab has a special Products option that allows you to specify the Products based on the Vendors. This menu will support the product administration component in the same way that it supports customer operations.
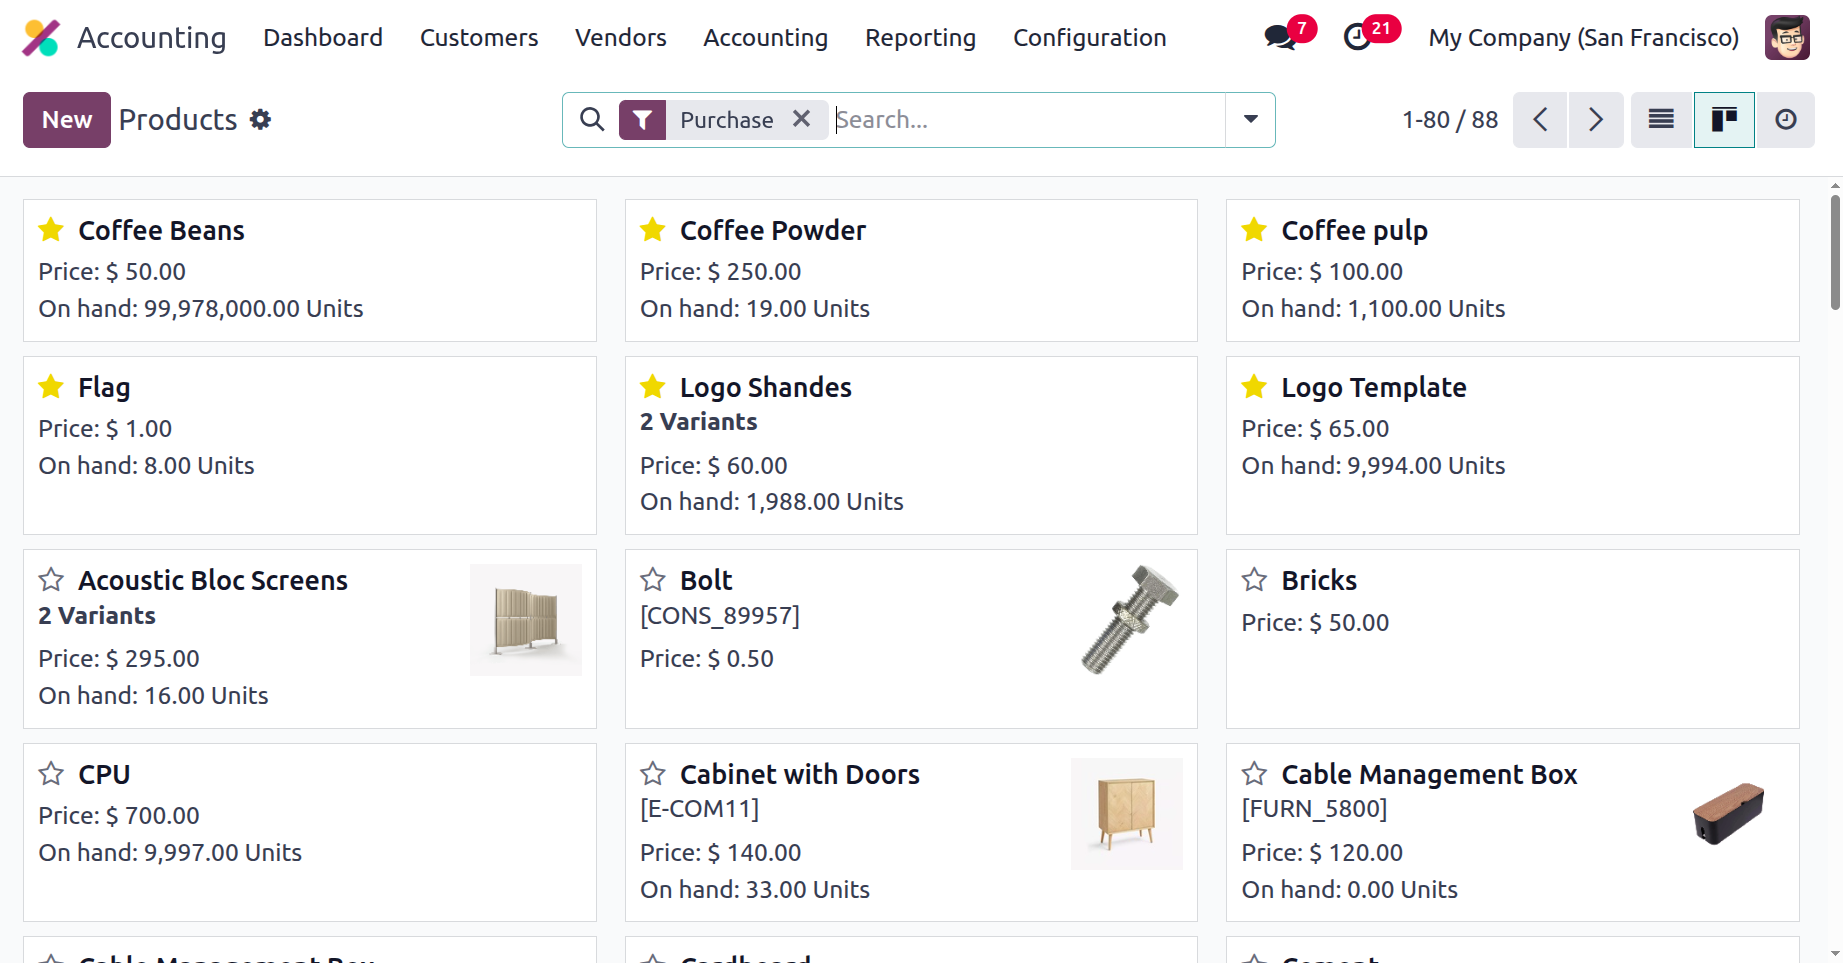
Depending on the vendor description, the Products menu can be accessed via the Vendor tab on the Accounting module dashboard. Depending on the seller, the menu will specify the product for each operation; it can be seen in List, Kaban, or Activity mode. You can sort the required item out of the long list in addition to using the already available Filter and Group by options. The Products menu as configured in the Kanban view is displayed in the following screenshot.
You can add new items to the menu by selecting the Create Available option, which will take you to the Creation window seen in the image below.
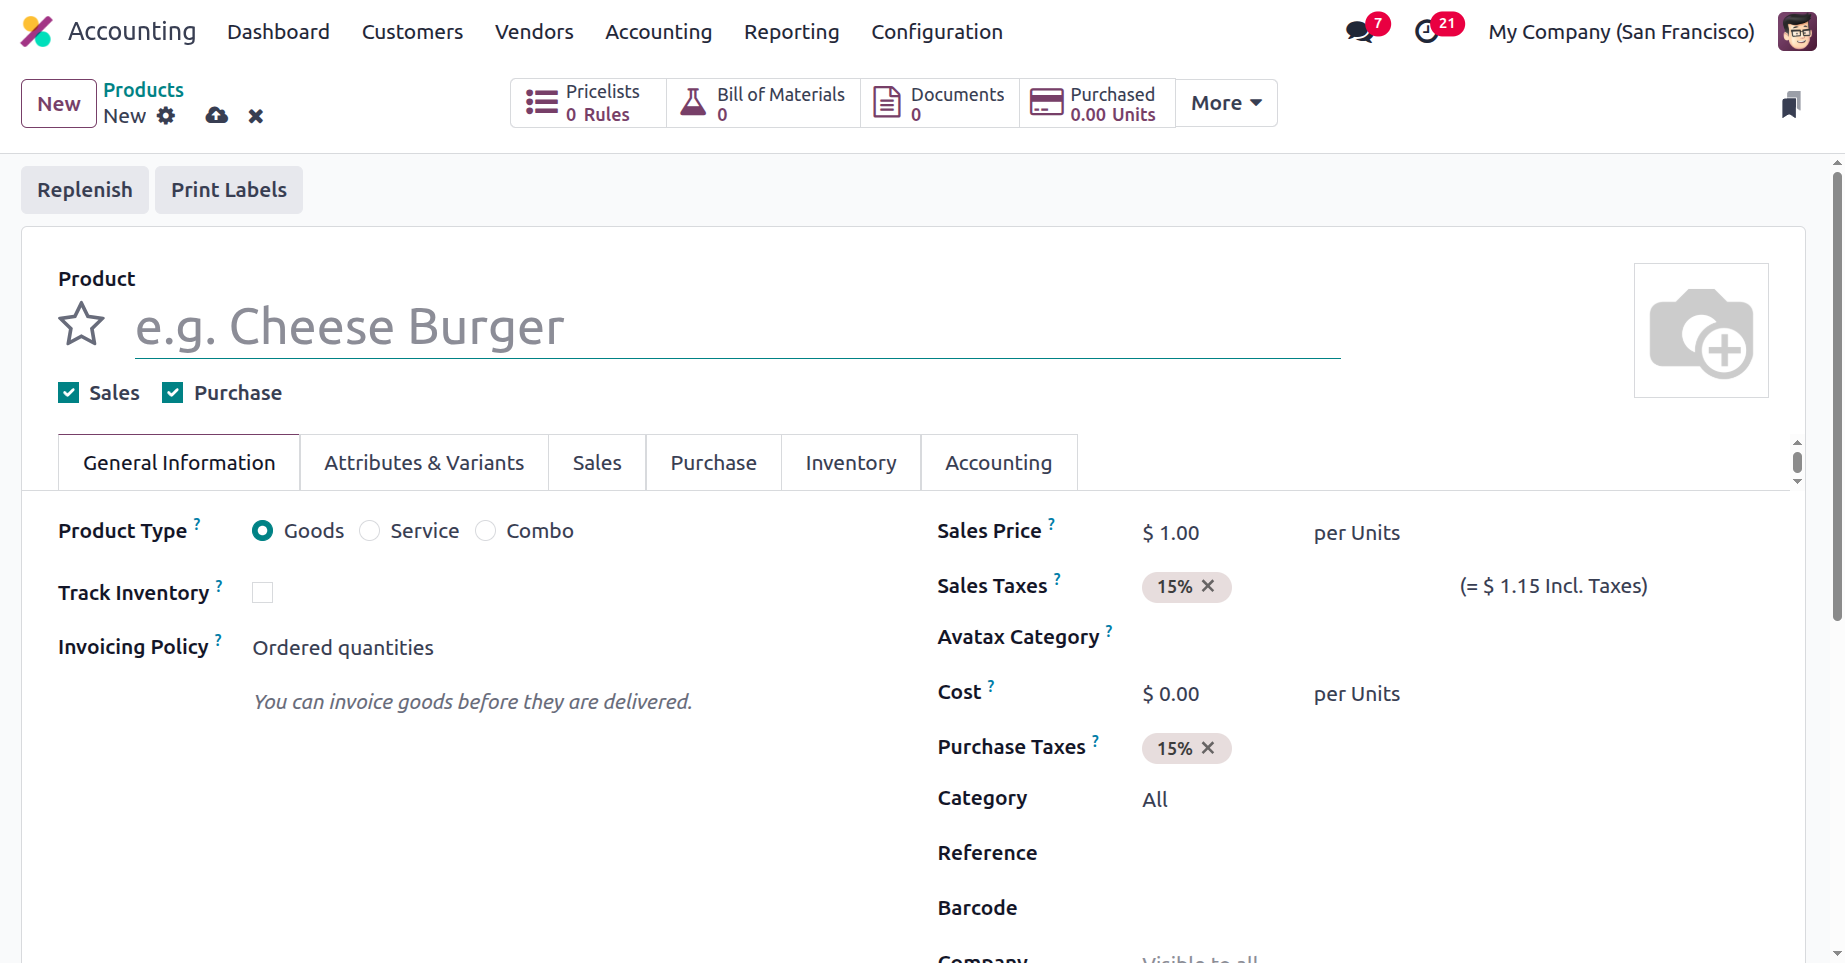
Here, the product name and its attributes, including whether it may be bought or sold, can be specified. You can also configure the Product Type, Product Category, Internal Reference, Barcode description, Sales Price, Customer Taxes, TaxCloud Category data, and Cost information under the General Information page. The Internal Notes may also be defined using the criteria. The Product creation window's other tabs are comparable to the one discussed in the Customer management and Product management sections of this chapter.
Vendor operations' product management component is run in a manner akin to that of customer operations. The particular Vendor management menu is covered in the section that follows.
Dedicated Vendor Management Menu
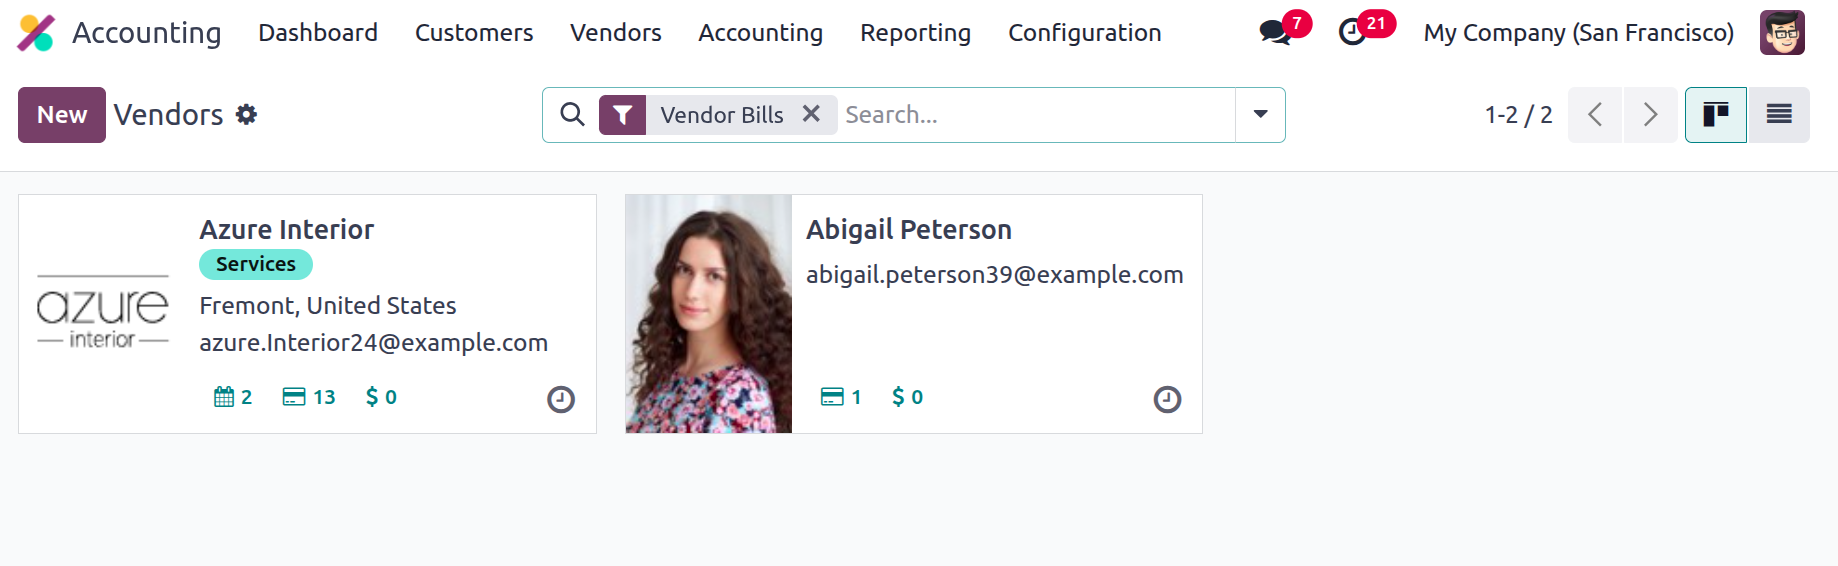
Because you will be working with multiple vendors in real time, managing your suppliers is just as crucial to a business as managing your customers. It's also important to keep an eye on the various suppliers of operations for a certain good or service that are selected for internal business purposes. The Vendor's tabs of the Accounting module in Odoo include a clear and attractive Vendor administration menu. Similar to the customer menu, all vendor information will be listed here, along with the business partners who also serve as vendors in the operations.
The menu will list every vendor for the specified operations along with some basic details about each of them. There is also a list-style version of the menu that contains a list of all the vendors. To help you sort and exclude the important suppliers from the long list, you may construct your own filtering and grouping choices, which are accessible by default.
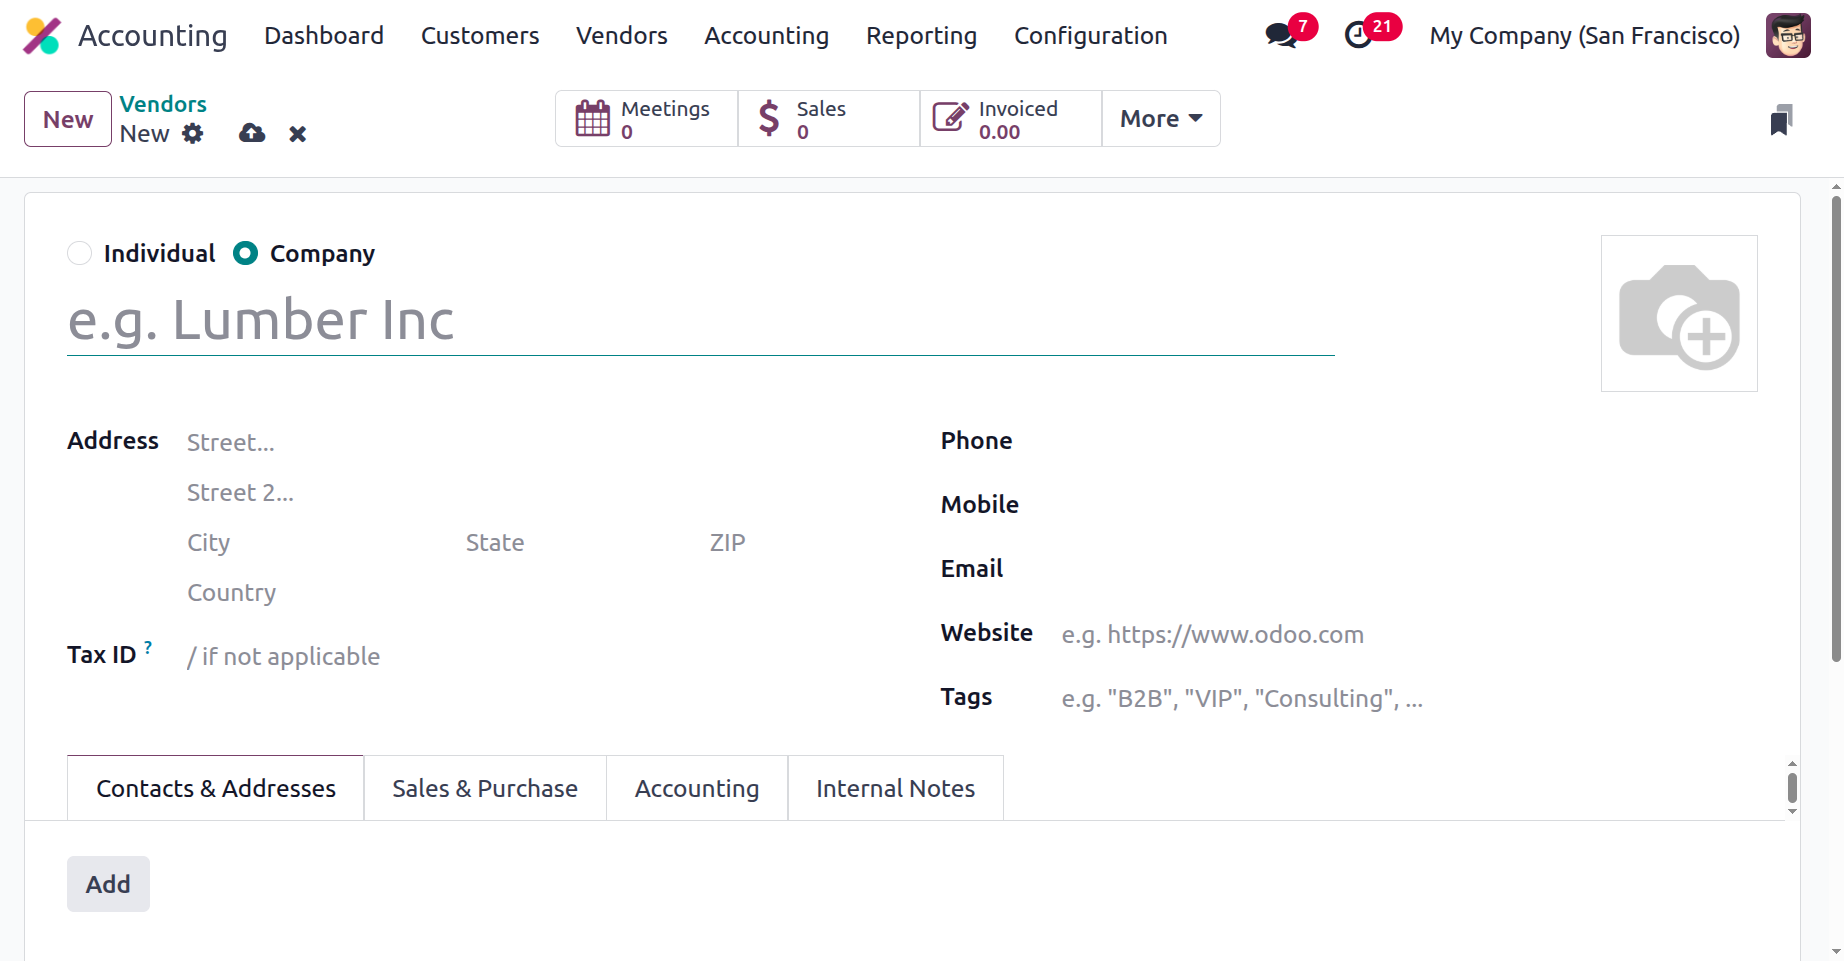
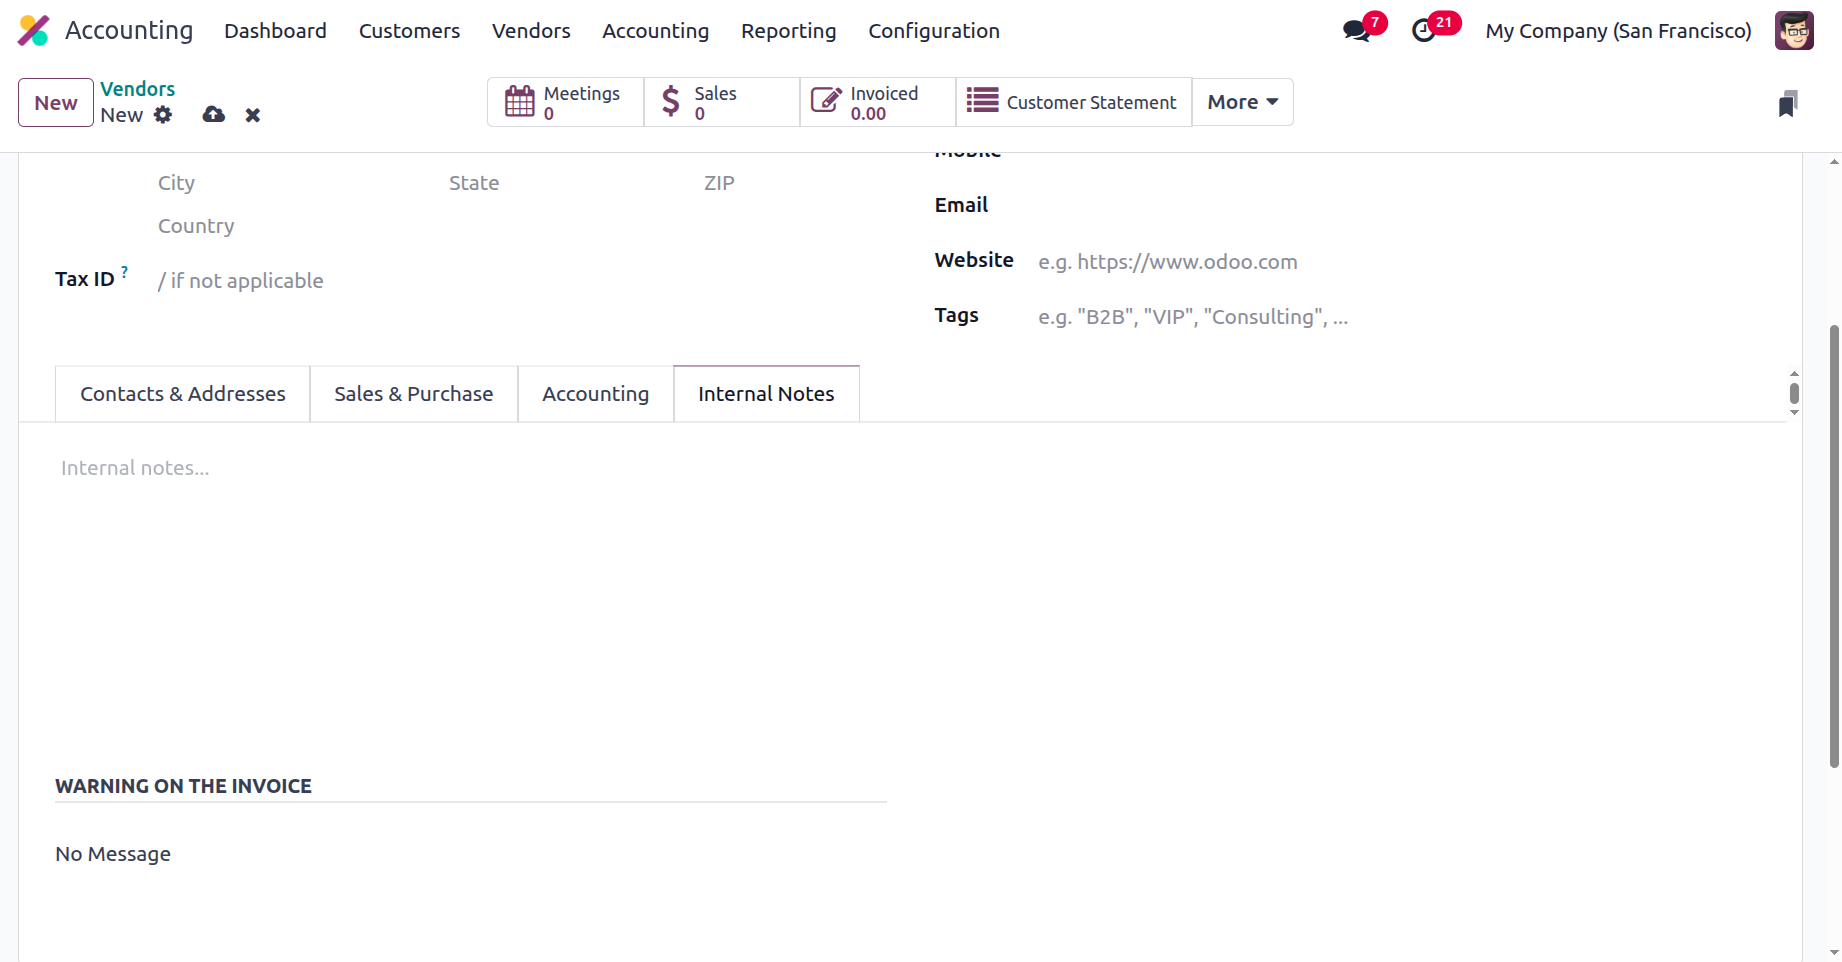
As seen in the image below, choose the Create option to open the Vendor creation menu if you want to add a new vendor. After determining if the vendor is an individual or a business, the vendor's name, company address, operating country, and ZIP code must be supplied. The Tax ID should also be included, along with contact details like the company's phone number, mobile number, email address, and website address. You can define the tags for internal use on the appropriate vendor.
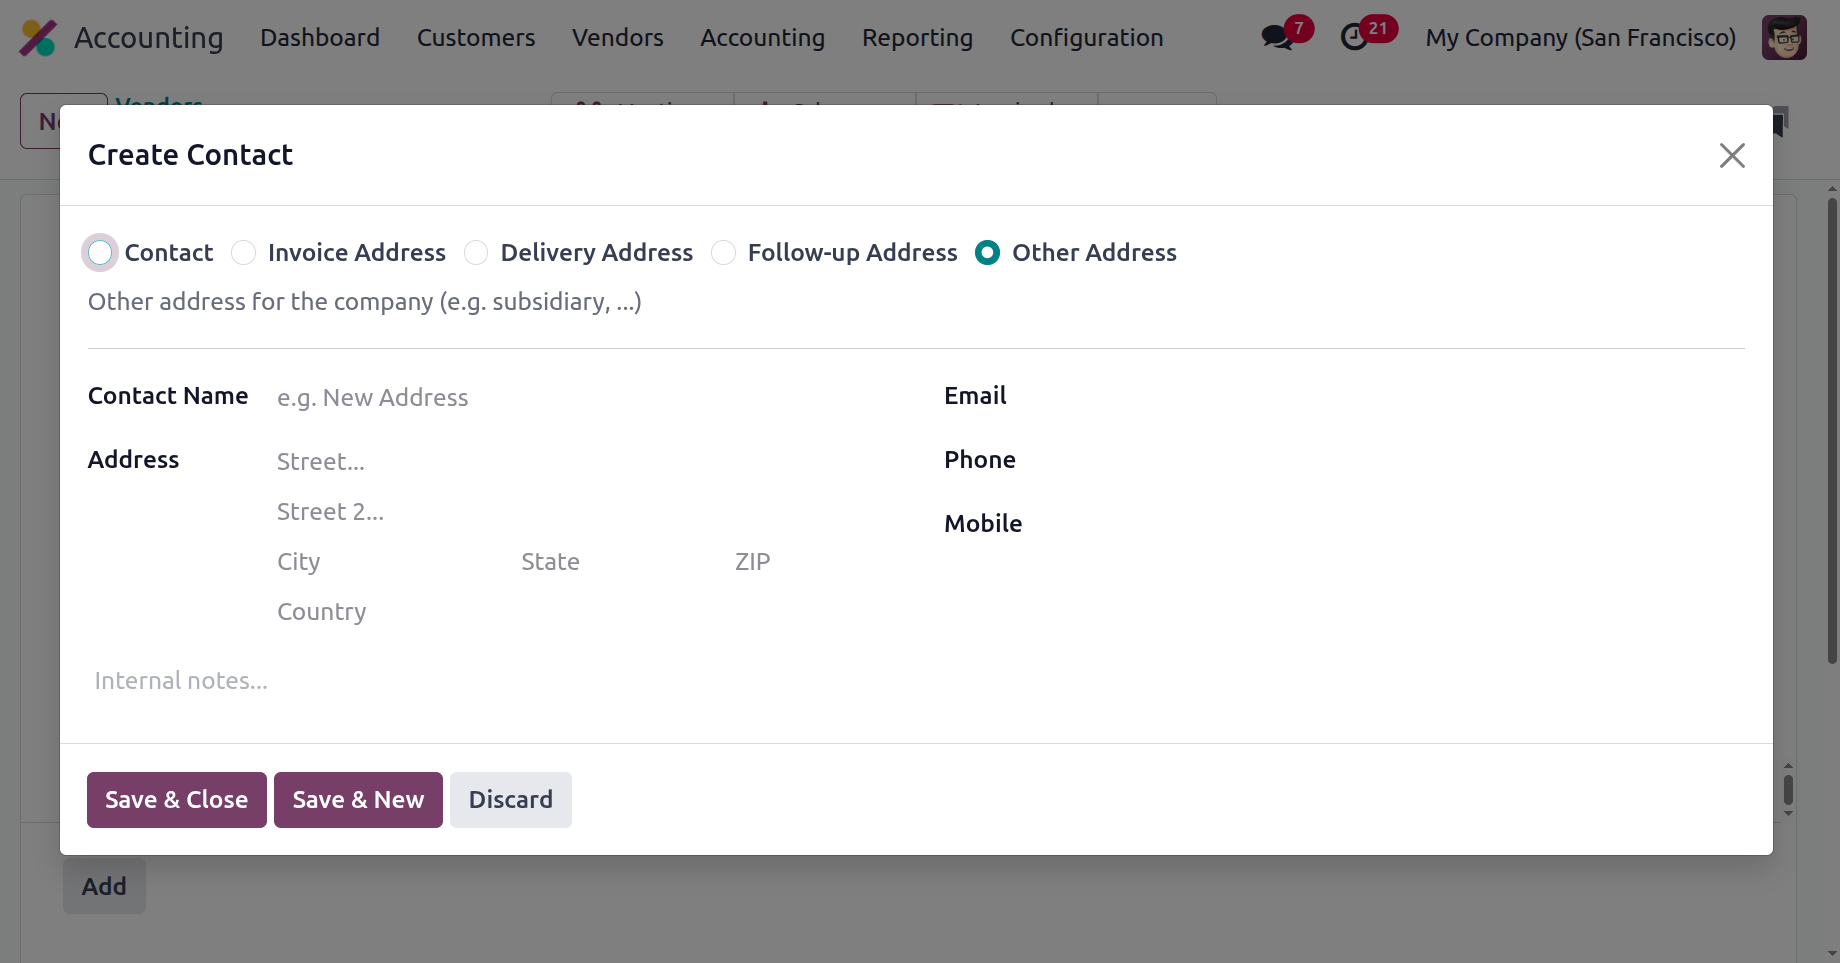
You can input the names and working addresses of everyone connected to the vendor and everyone your business contacts regarding the purchase activity under the Contacts & Addresses tab. To add the Contact and their address, choose the Add option in the ensuing pop-up window. The first step is to determine what type of address is suitable in this case. Invoice Address, Delivery Address, Other Addresses, Private Address, and Follow-up Address are some of the contact type options. You must now provide further details about the Contact Information after defining the Address type. The contact's name, address, zip code, and country must be included. Along with the email address, phone number, and mobile number, you can also include any notes on the pertinent address. When entering new contact details for a selected vendor, you have the option to select between Save & New and Save & Close.
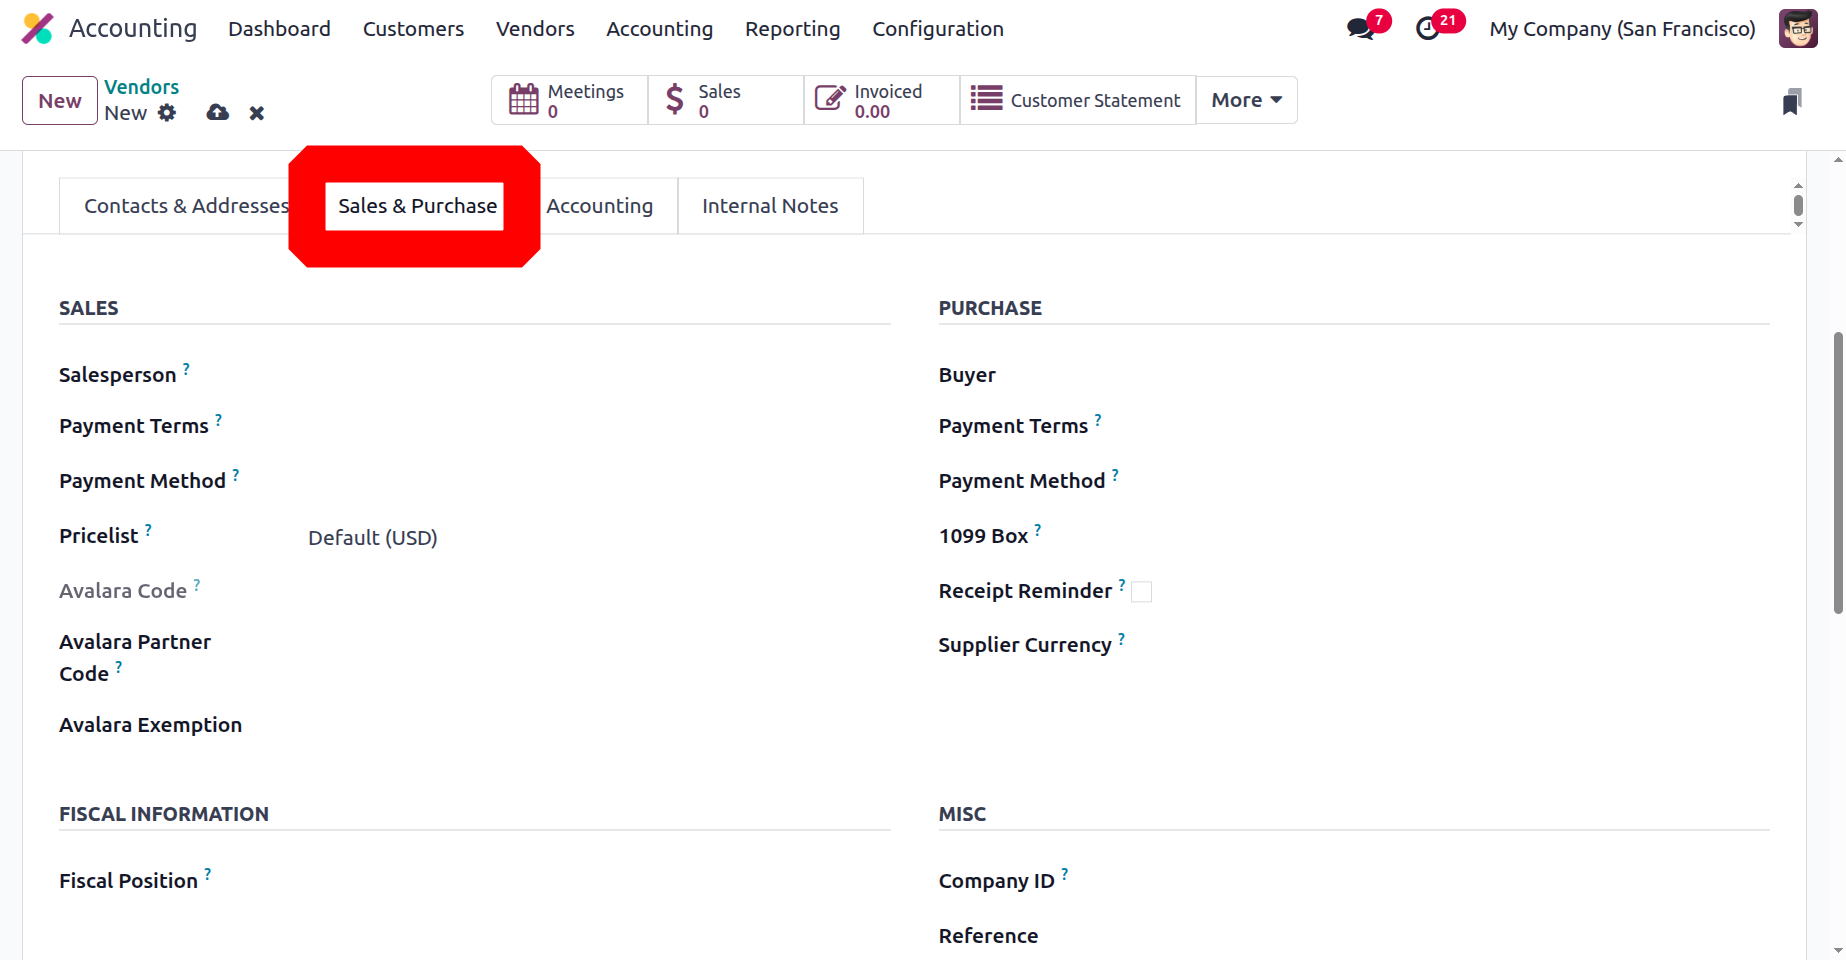
The next step is to create the Sales & Purchases page, where you may work with the vendor to arrange all aspects of the purchase process. You must establish the components of the sales activities if sales are being made and the relevant vendor is also a business partner. Details about the Salesperson, Payment Terms, and Pricelist should be specified under the Sales tab. Under the Purchase tab, you can also configure the Payment Terms and the Payment Method. The Fiscal Information Tab defines the Fiscal Position. The company or industries they operate in, as well as other generic criteria like references gathered from the vendor, may also be defined.
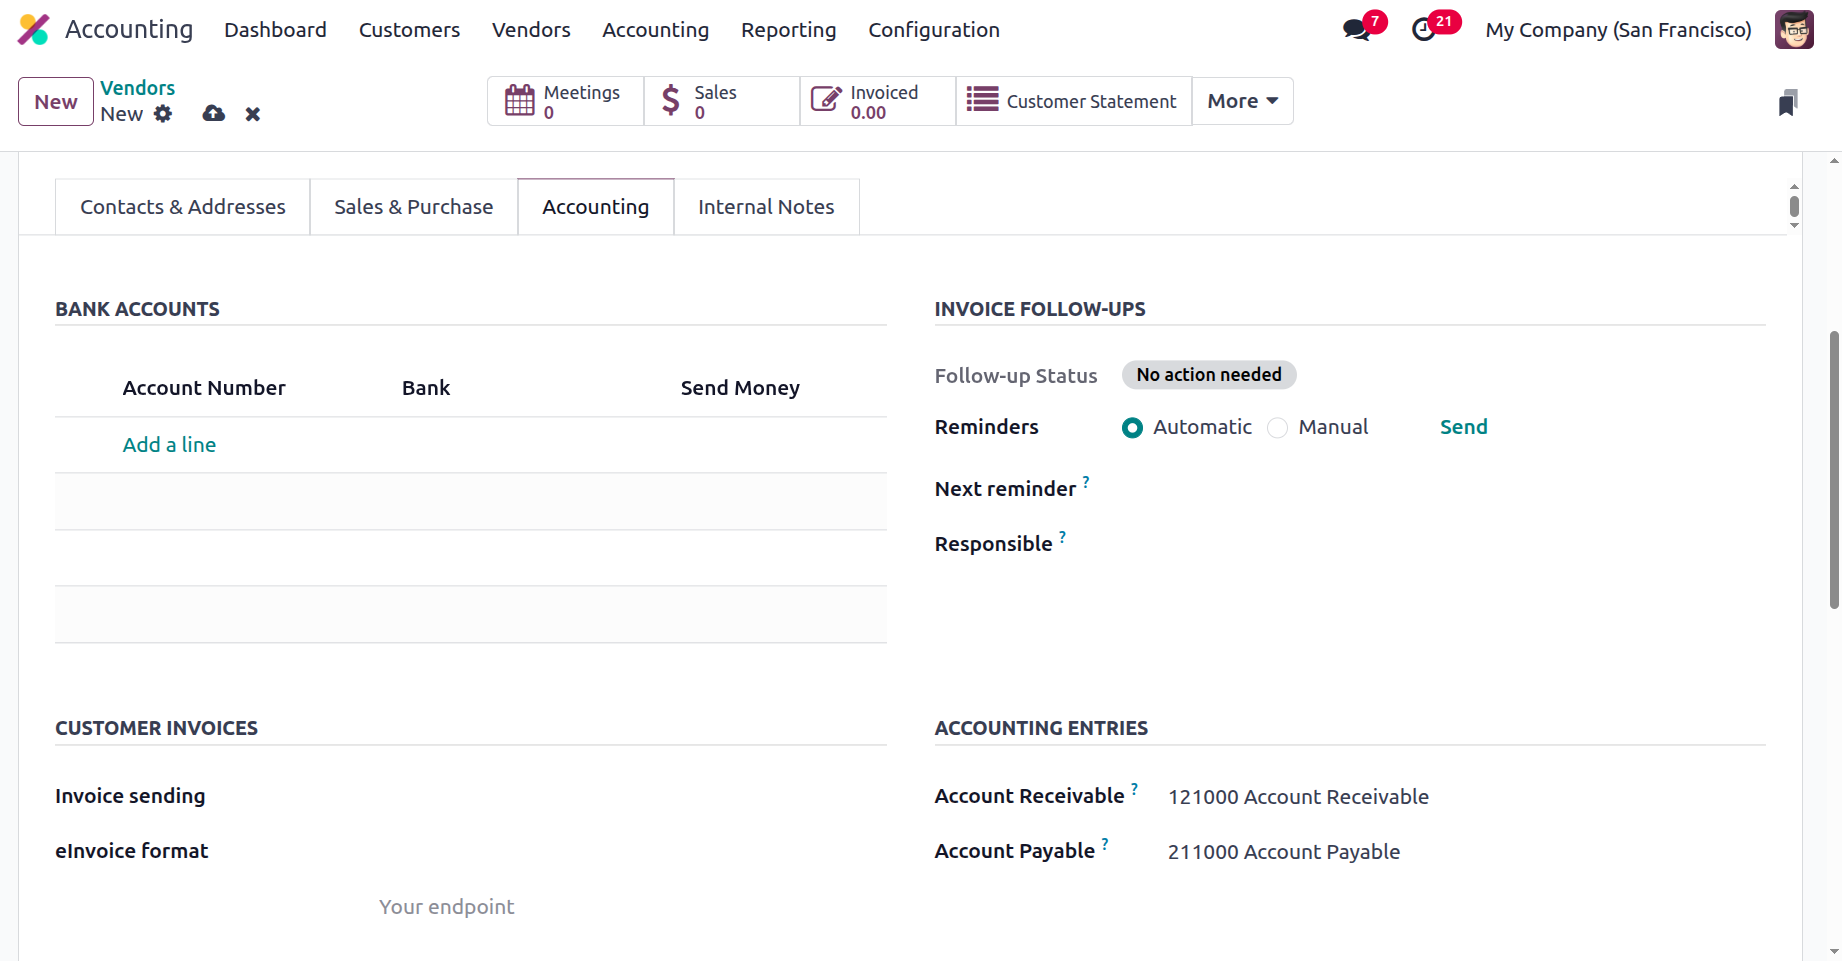
By using the Add a Line option, you can create the bank account information for the business activities under the Accounting tab for the vendor. Furthermore, many accounts may be defined if needed. Use the "Accounting" page to view a description of the Accounts' details. When you choose the "Add a line" option, a menu with the account number and bank information will show. For our partners, we will be able to record different bank accounts. For the designated accounts of company activities, accounting entities such as accounts receivable and accounts payable can be chosen.
Partner receivables may also be subject to partner credit limits. The whole amount of receivables from the partner can be shown in the whole Receivable field. Because of this, a warning notice indicating that a partner has used up all of their available sales credit will appear when an invoice for that partner is added.
The Primary Vendor details can also be viewed on the Internal Notes page, along with a warning that may or may not be a message on the invoice. You can always choose not to receive any vendor alerts or notifications by changing the warning and message definitions.
All of the above vendor management solutions, which can be managed and controlled by these unique tools and capabilities, will help the company's vendor operations run more smoothly.
In summary, this chapter was solely devoted to talking about the financial management facets of vendors and customers who make use of the specialised Odoo Accounting module. All of the functional tools for managing customers and vendors are covered in detail, along with all of the different tools and menus. The following chapter will go into greater detail about the Odoo Accounting module's accounting management features as well as several of its various components.