User Settings
Numerous options are accessible on the Odoo platform for configuring platform users, their operational potential, and the authorisation that is offered. The Odoo system software is considered the best business management solution since it makes it possible to systematically group individuals based on their authorisation levels and priorities, which is essential for giving the business management team better visibility. Additionally, Odoo offers a feature that lets users manage their businesses with the right kind of freedom, flexibility, and access while performing their tasks in accordance with their individual job titles inside the organisation. It is not logical to provide a lower-level employee complete authority and authorisation to manage every aspect of the company in real-time operations since this would complicate and complicate operational procedures.
Odoo's developers and creators recognised this and developed a hierarchical authorisation level for users to help with effective management. This platform will serve three distinct user types for the operation of the system, which are
- Internal User
- Public User
- Portal user.
Employees of a business organisation are Odoo's internal users. They could be normal employees who work in different departments within the company and only have access to those areas, or they could be admin users who have complete access to the ERP. Internal users also include department heads who have complete access to the operations of their particular department but lack full access rights to the organisation.
Thus, this internal user group includes both admin users with full access and employees with restricted access capabilities. In the first scenario, an individual who has complete access to the Odoo system is regarded as the system's highest-level user and is able to do anything, including assigning rights, modifying system configuration, creating additional users, and configuring views and menus. Because they have administrator privileges on their superuser account and a talent for administration, they have power over all other users. Business managers and team leaders frequently fall under this category of authority.
Furthermore, several Admin users can operate on the Odoo platform, each of whom is granted a unique authorisation to fit into this category in accordance with the specifications. By doing this, the related admin user will be guaranteed safe and secure management control over the department or team. The only person who can edit existing modules or create new ones is the admin user. The second category of internal users consists of people who are working for the company, excluding managers and management teams.
The executives and other employees who report to the boss are probably among them. For these types of users, the Odoo system offers a unique login and log-out code of operation, and it will gather information about each employee's performance and operations. It is possible to record attendance, take time off, and determine how an employee's timesheet of operations connects to organisational functioning using the same operational elements that are used for logging in and out.
Public Users, or website visitors, make up the second group of users. In contrast to the other user kinds, portal users are the third form of user and are frequently used to allow customers access to the Odoo portal. The backend of Odoo is restricted to portal users. Since they typically don't have access to Odoo's back end, they could be able to access public areas like the website, customer portal, and other locations.
Customers, vendors, and other external entities frequently use portals. They allow suppliers or customers to use the Odoo platform without having complete access to the system. This user can access documents and do tasks such as placing orders, verifying quotes, determining whether specific items are in stock, determining whether services are available, and so forth. The responsible authority of the organisation can also decide how much access these portal users should have.
The three categories that were just covered are the three basic user types that Odoo allows you to manage within the platform in order to do various organisational tasks. The Odoo platform manages all of these users with ease thanks to its most comprehensive User configuration options and the easily navigable Management menu. After discussing users on the Odoo platform, let's take a closer look at the User menu and all of its configuration choices.
h3 class="subhead-level-2" id="H1">User Menu
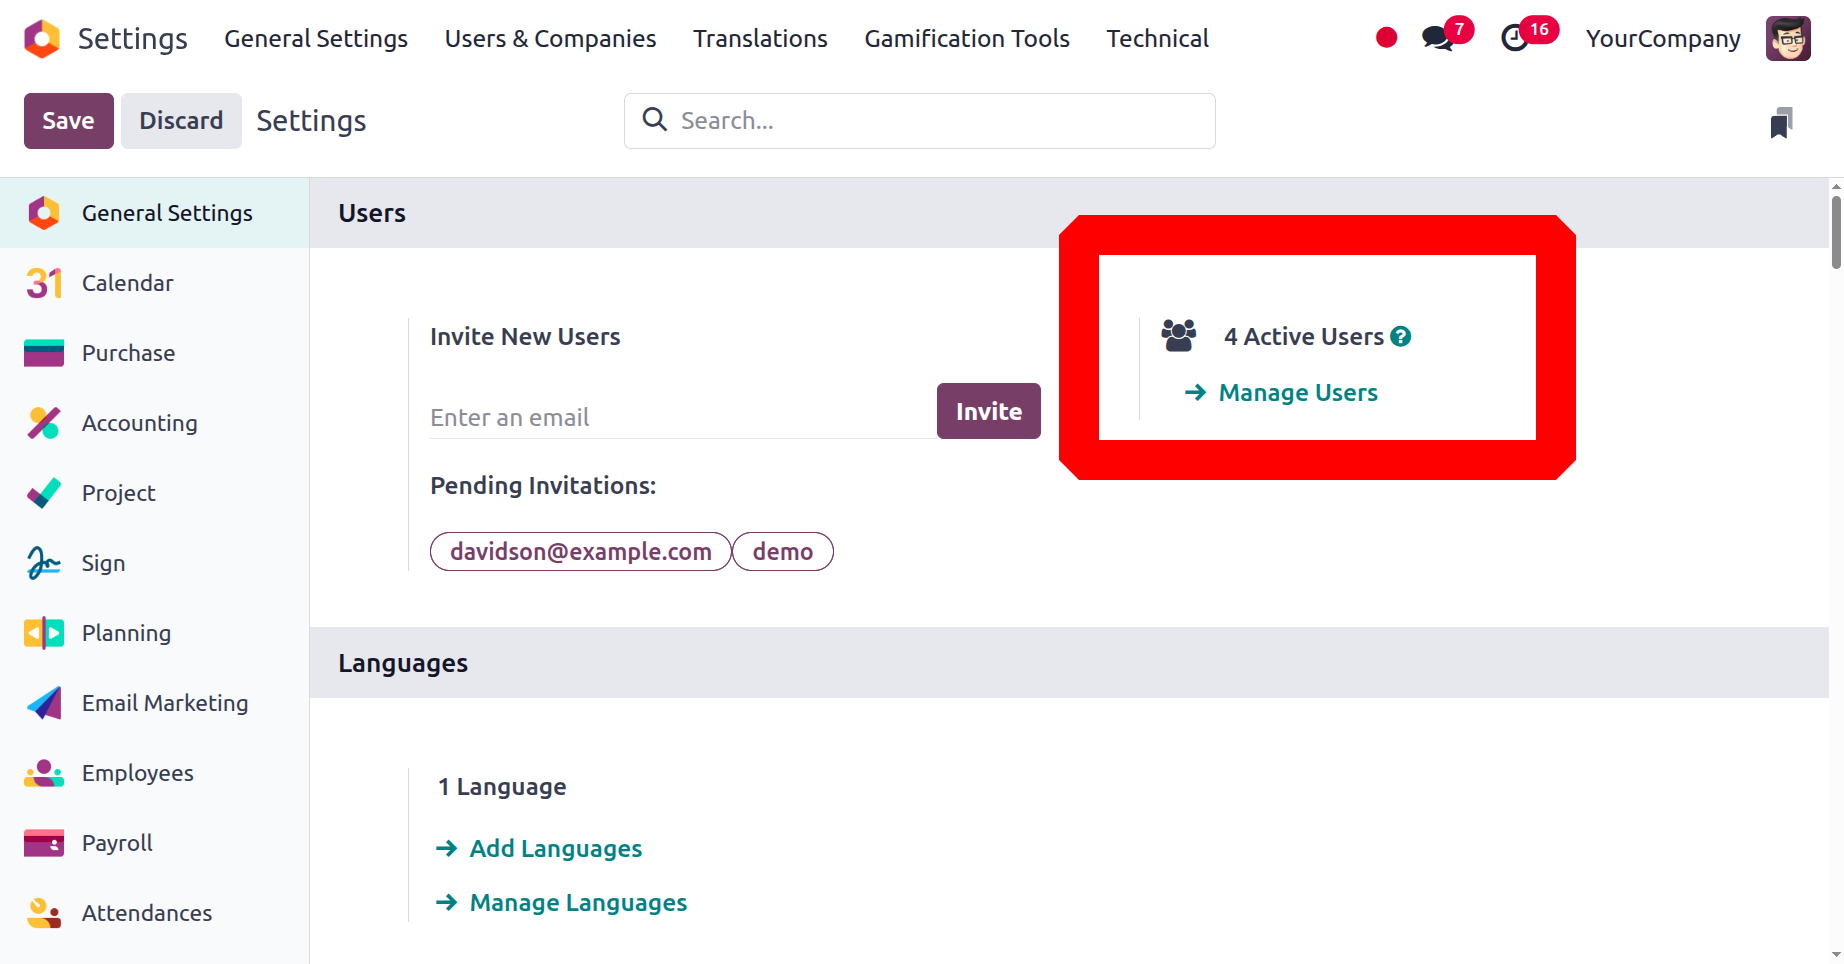
The User menu in Odoo lets users add their own settings and preferences to the user interface. It is located in the upper right area of the interface and provides access to several customisation options. The Users menu can also be accessed from the Settings module's Users & Companies page.
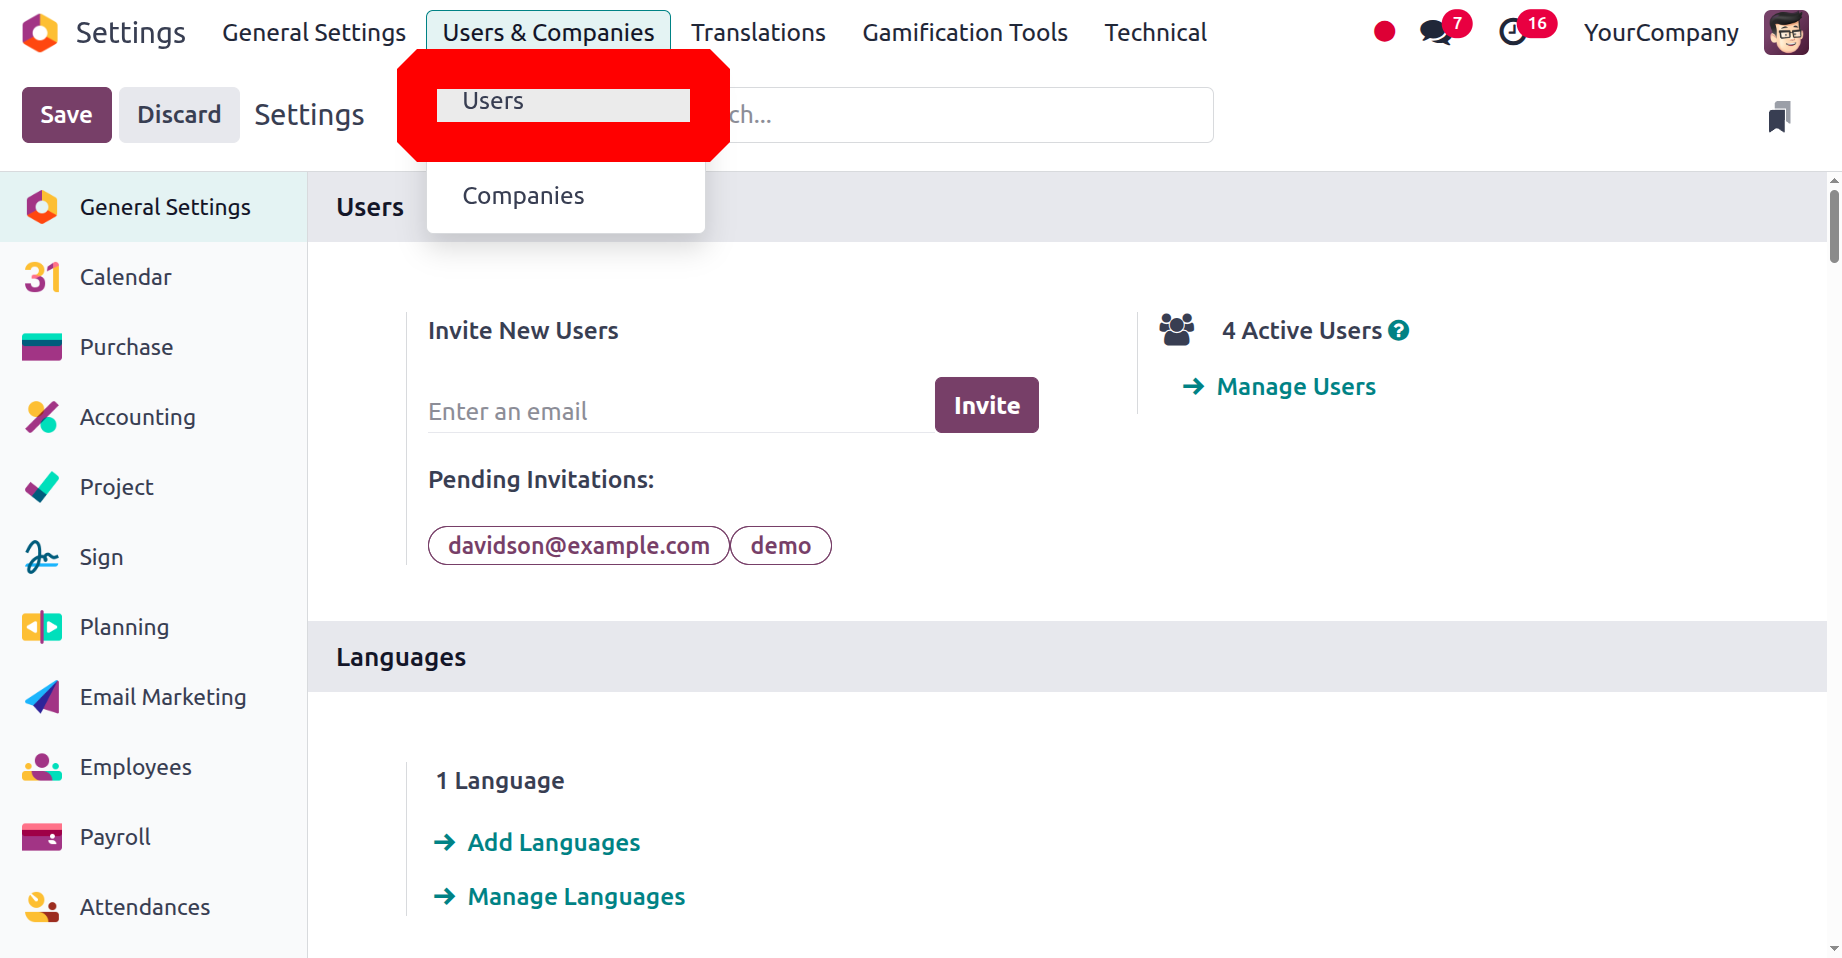
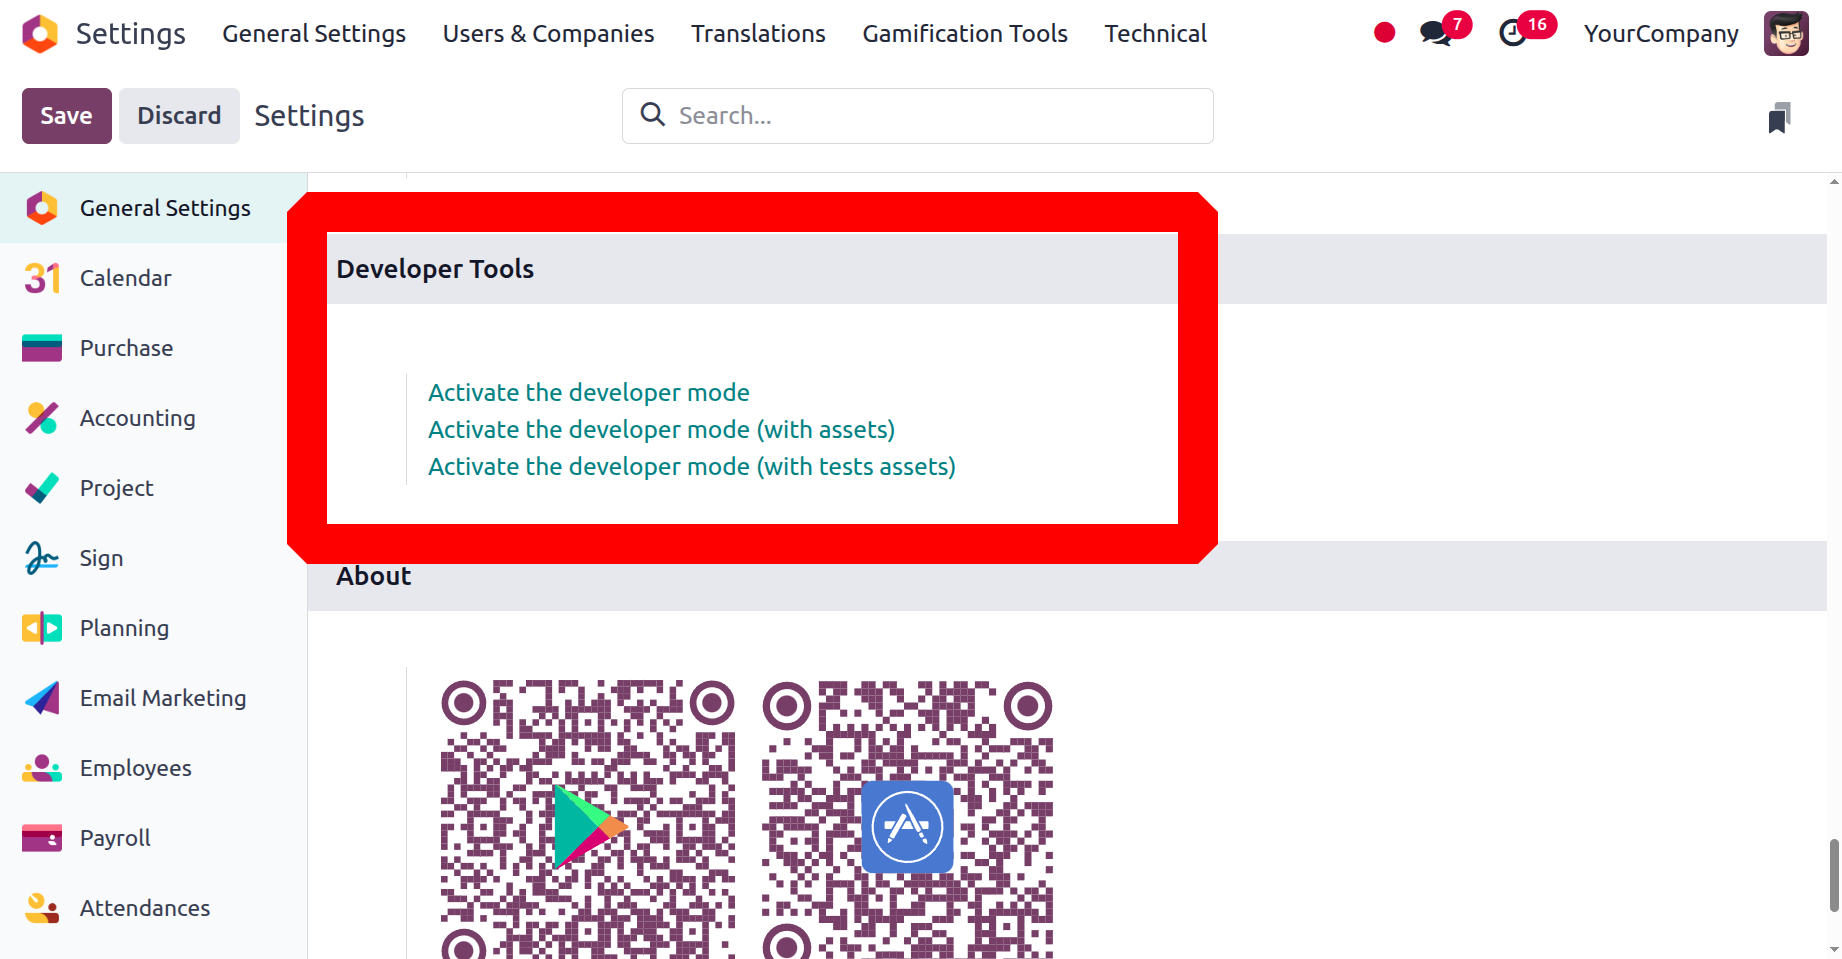
The user can select their preferred language, theme, business, notification options, and more. It also provides access to the user's profile, preferences, and settings. The specialised Users management menu in the General Settings and Dashboard of the Odoo system can be used to construct the Users menu seen in the above image. By enabling the Odoo Developer mode from Odoo Settings, you may access more sophisticated functional tools and capabilities that will be helpful in platform configuration, as well as additional features, functions, and operational aspects.
The Developer tools' General Settings option allows you to access the Developer mode, as shown in the image below.
Additionally, there will be a Debugging option on the Odoo platform dashboard that can be chosen to activate developer mode. In a similar vein, you may instantly activate or disable the Developer and Debugging modes of the Odoo platform using extensions and other tools for Chrome, Firefox, and other popular browsers.
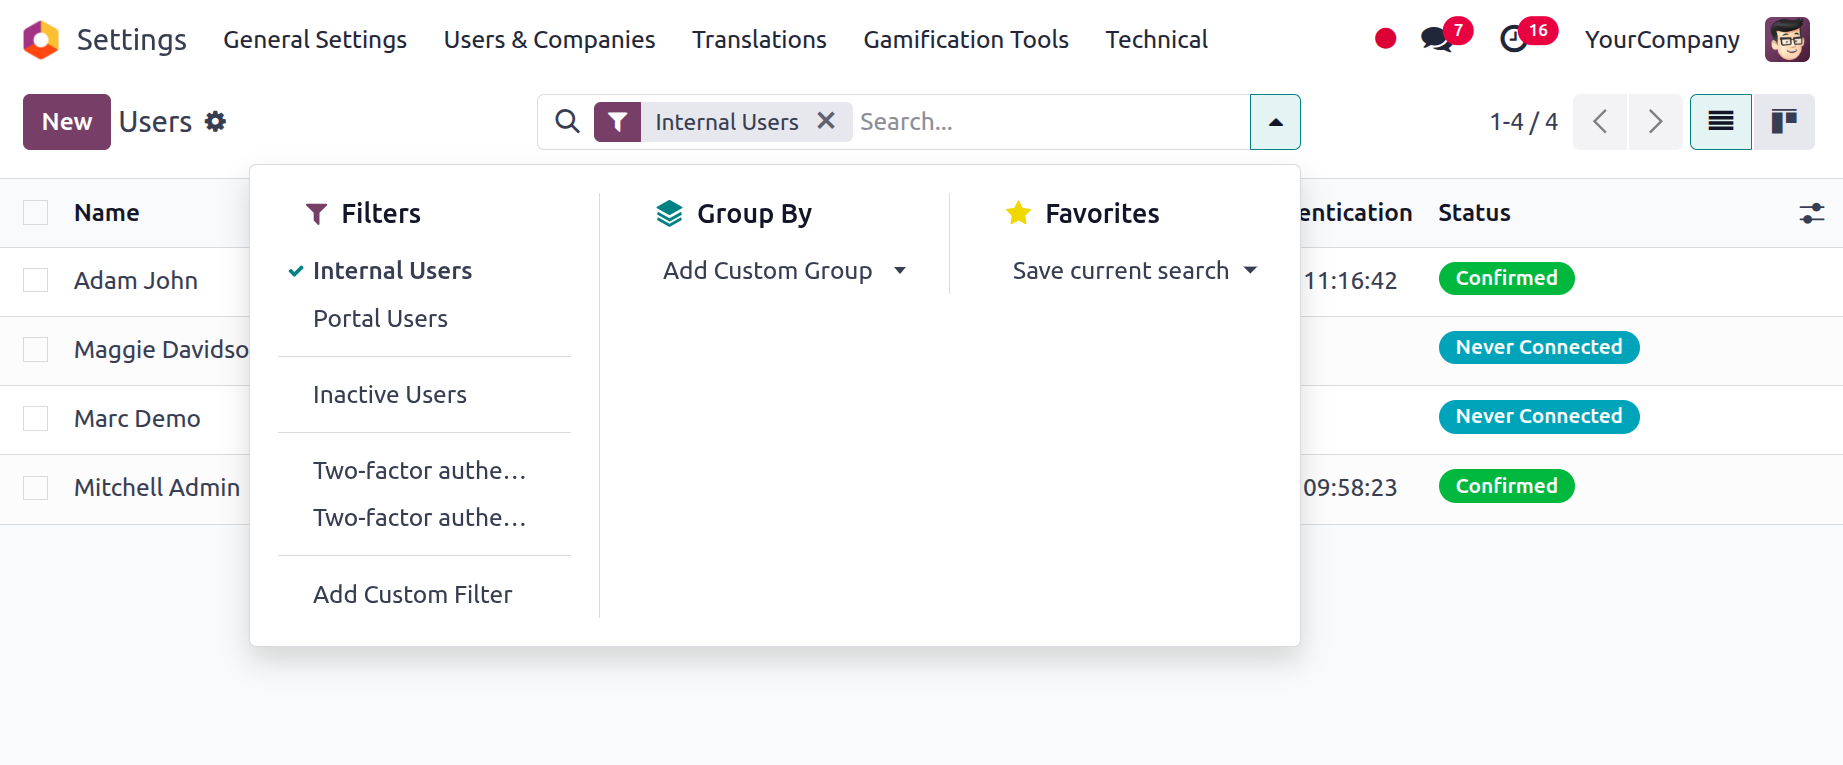
You can view every user that has been identified in the platform by selecting the User option, which will open a new window. Key user data, including the user name and login ID, the company and language of operation, and the most recent authentication information, will be shown in the window.
By clicking on the respective line, you may read the Users' information preview in its entirety and make any necessary edits. You can add more Users with the New button in this window.
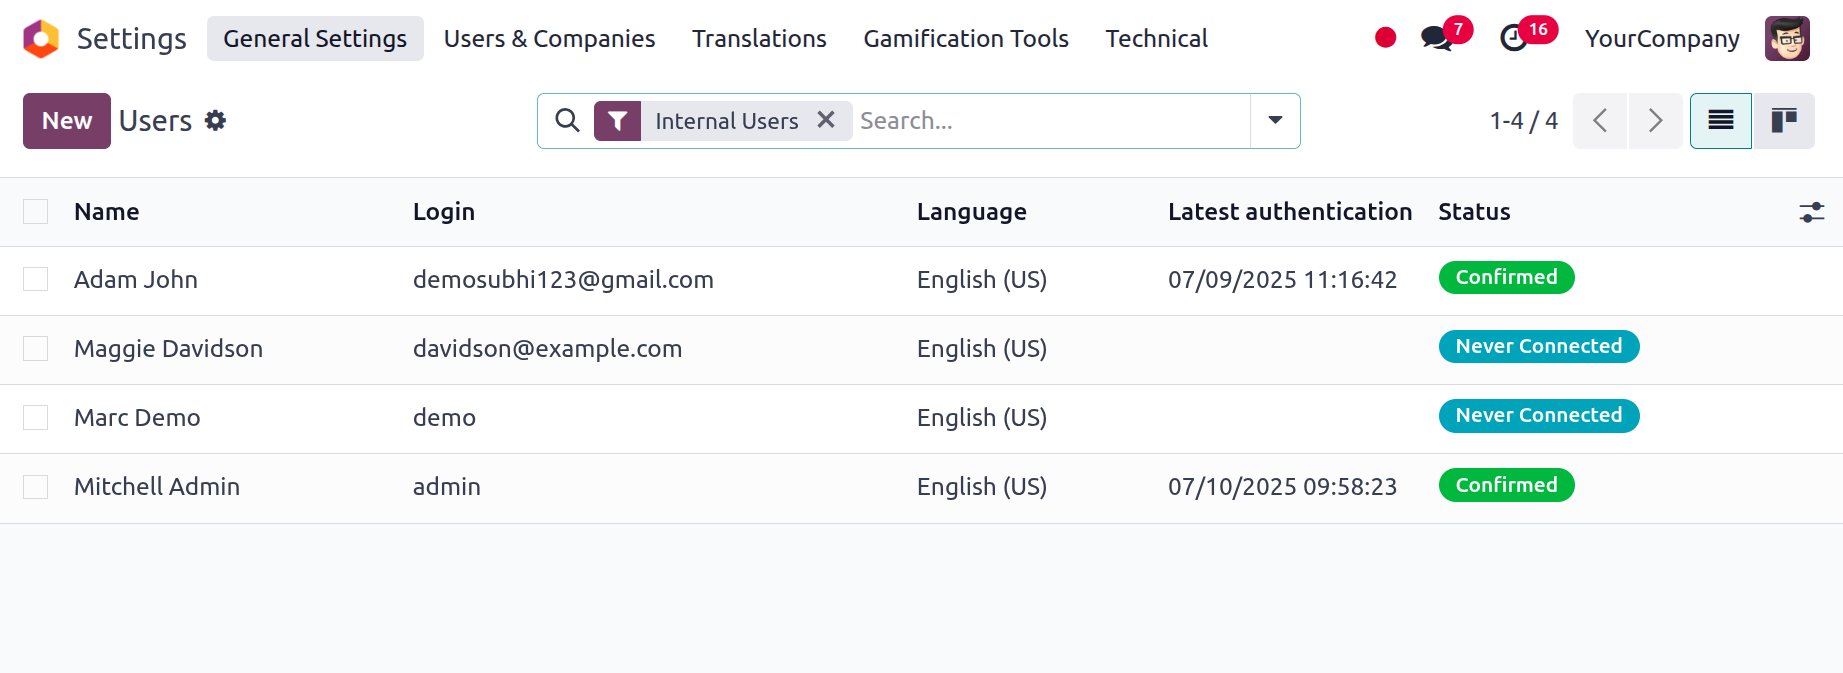
Additionally, the many sorting options at the window's top will be quite helpful for grouping, filtering, and finding the information you need. To help you find your urgent record quickly, the Filters tab offers a number of preset and customisable filtering options. The pre-selected filters displayed under the Filters tab are Internal Users, Portal Users, Inactive Users, Two-factor authentication enabled, Two-factor authentication disabled, and, of course, the Add Custom Filter option. As shown in the graphic below, the Favourites tab offers options like Save current search. You can sort users by group by using the Group By option, which lets you add a custom group.
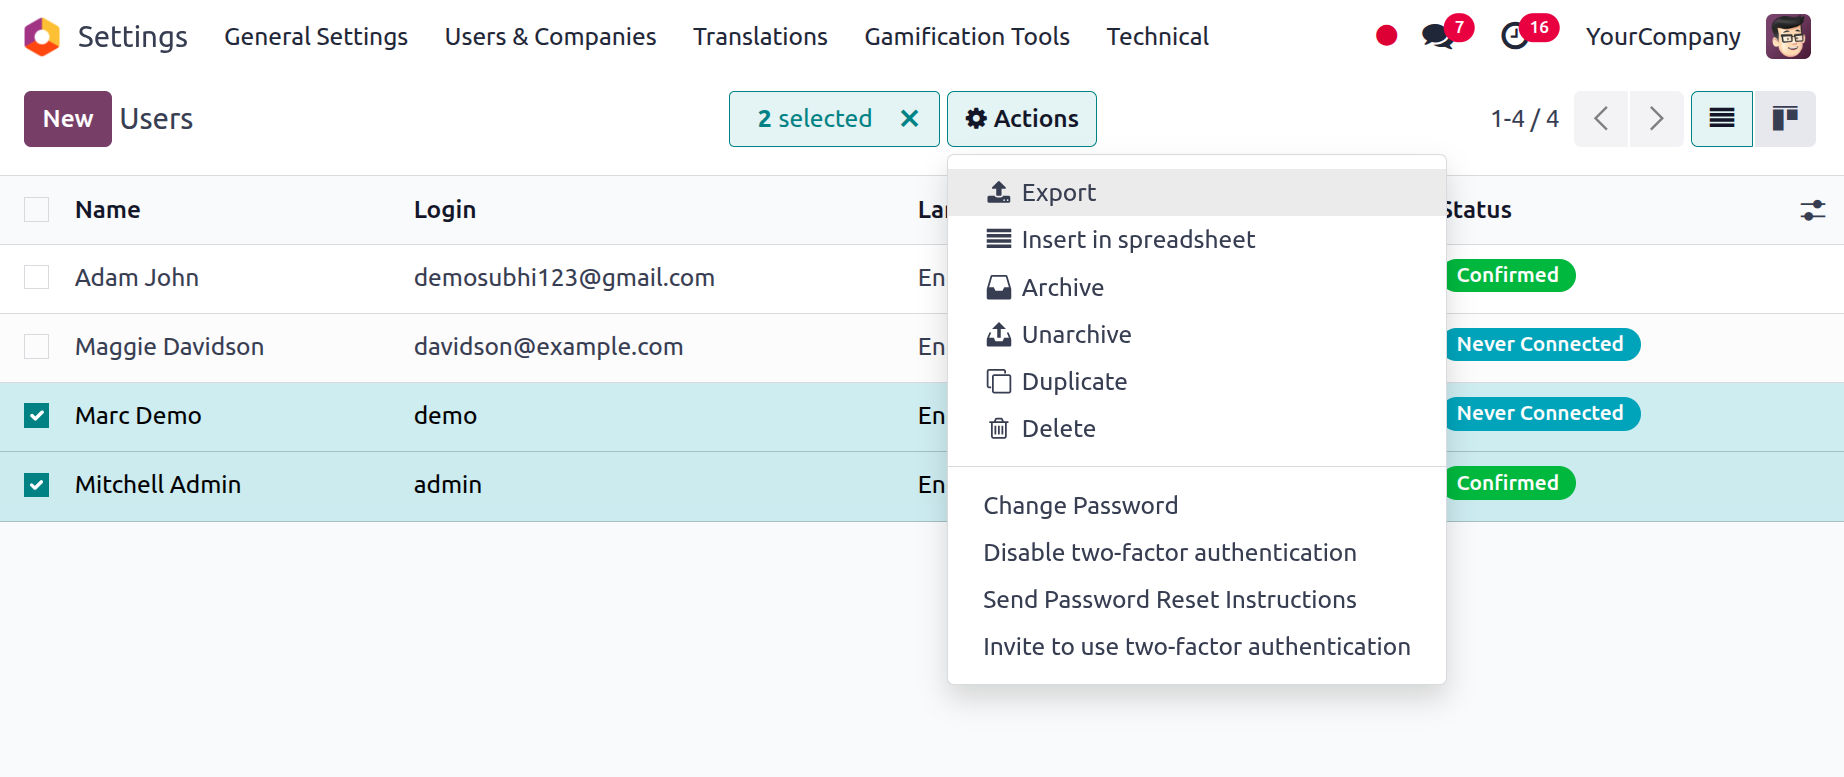
Additionally, each user record has a checkbox option that you can use to choose a previously created user in Odoo. As shown in the image below, when you activate it, the system will control a top Action and Print button. Export, Archive, Unarchive, Delete, Change Password, Disable two-factor authentication, Send Password Reset Instructions, and Invite to use two-factor authentication are among the activities you can perform under the Action button.
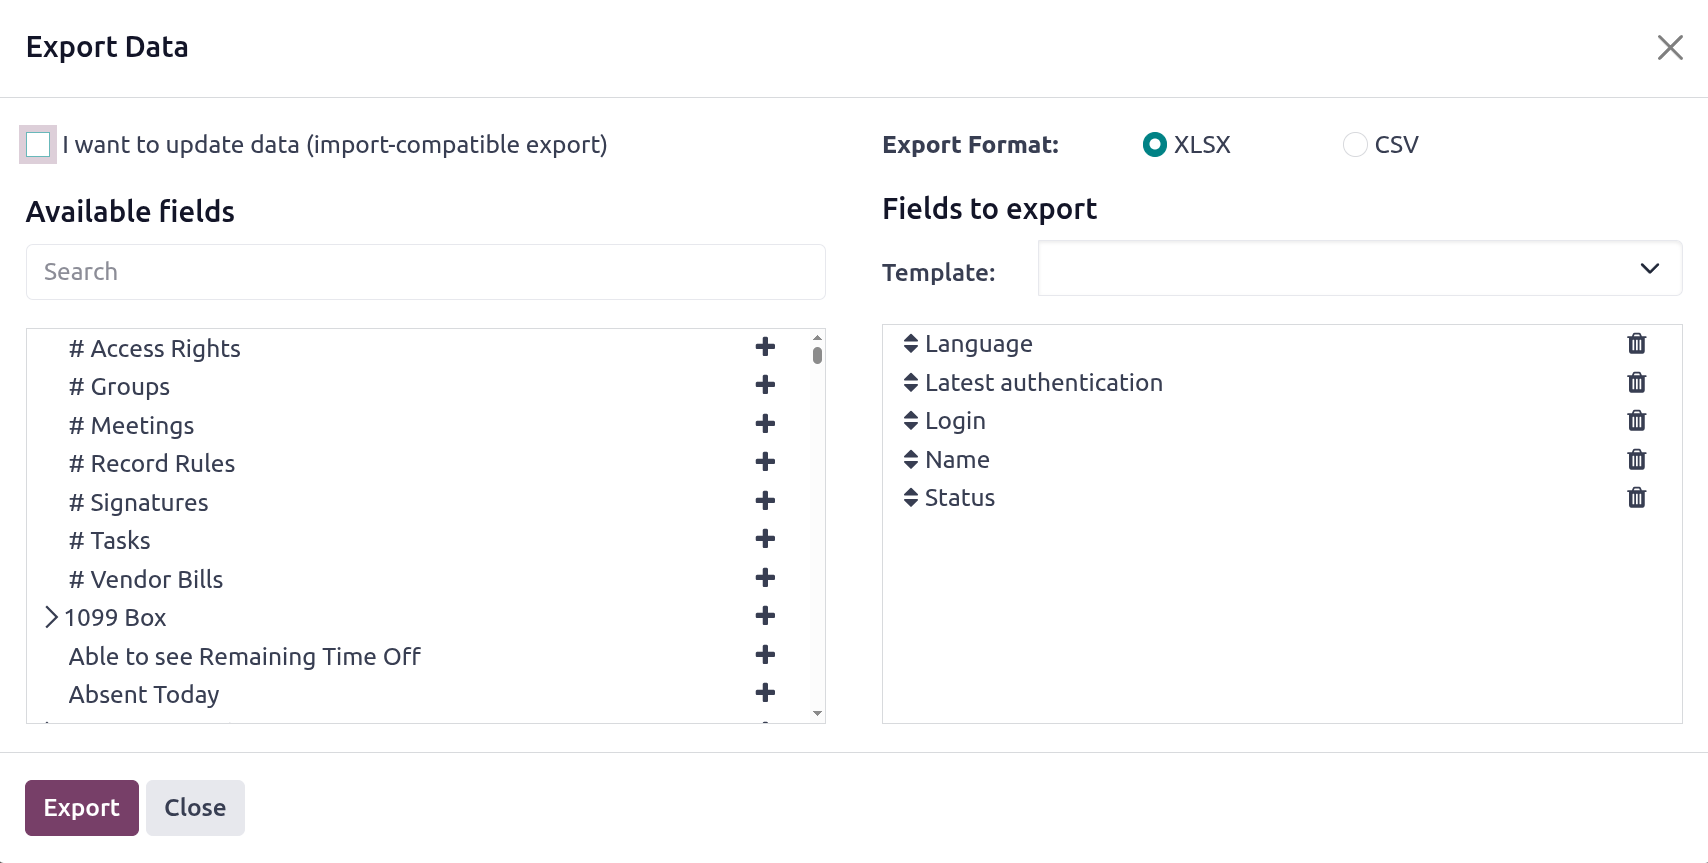
When choosing the Export button, the user can choose to export the fields in either CSV or XLSX format. Before pressing the Export button to begin exporting their data, users can also choose which fields to export.
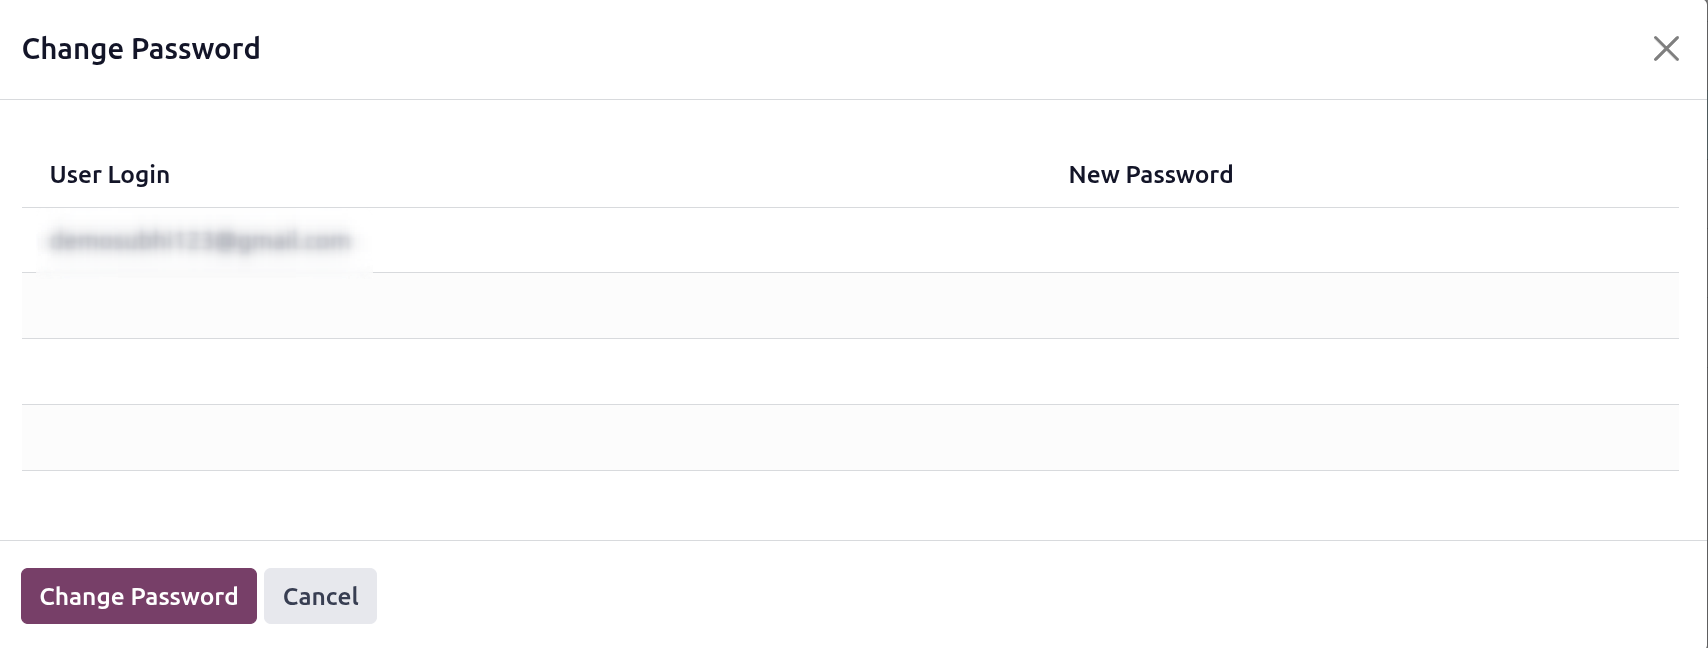
You can archive and unarchive the designated record using the Archive and Unarchive buttons. And by only clicking the Delete button, it is able to remove the chosen users. To change the user's password, select the Change Password option. The modified password will then appear in a new window, as seen below.
By using the Kanban view menu button in the top right corner, you may also access the User window in Kanban format. From there, as shown below, you can see the user's profile details and photo.
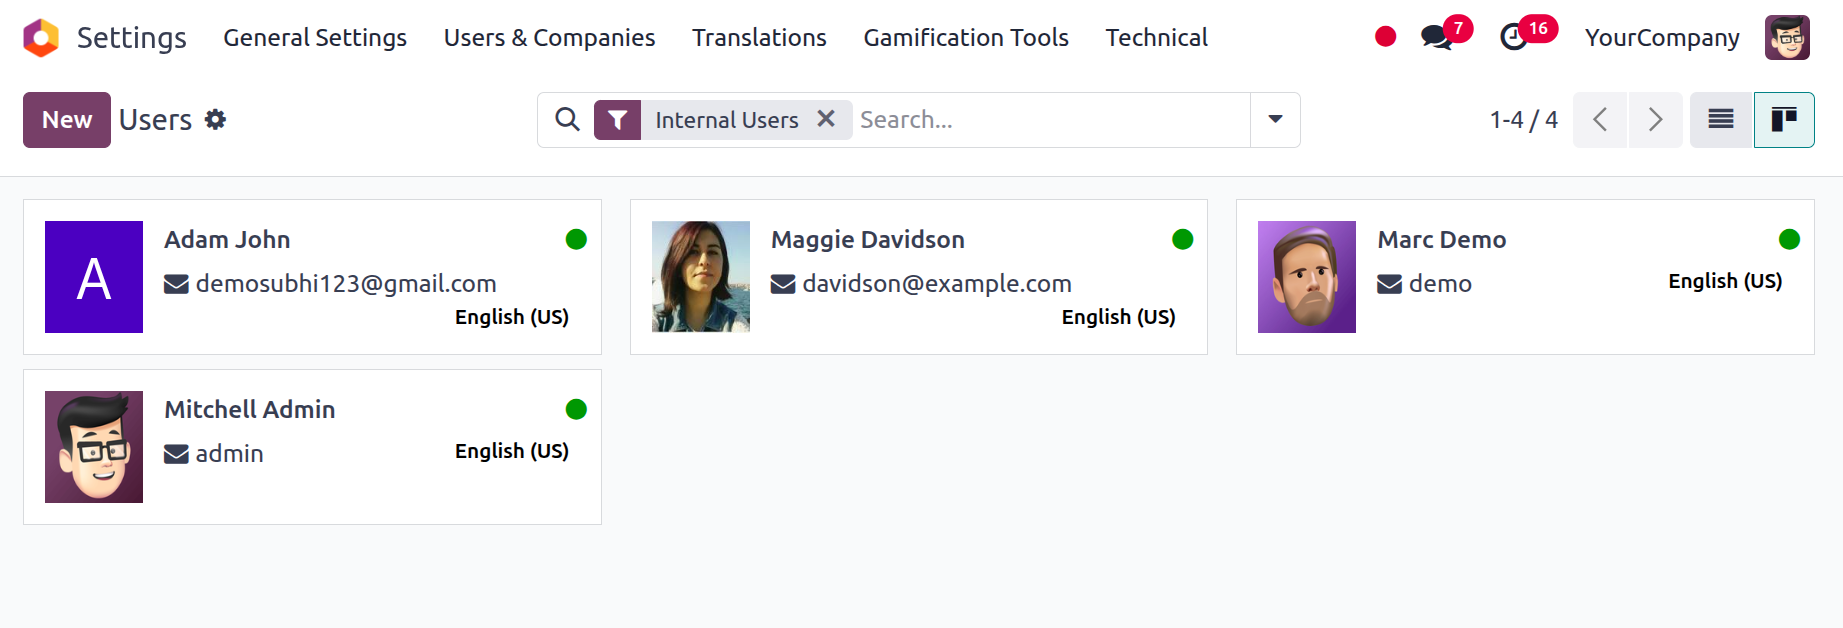
A green signal in the upper right corner of each user record makes it obvious if a user is online or offline when viewing this window.
The Odoo platform's exclusive User menu offers the most administrative functionality along with a thorough overview of your Odoo system's users. Let's move on to the specifics of creating a new user now that we have a clear understanding of the Odoo platform's user administration menu.
Creation of a New User
The New button allows us to create new users, as we mentioned in the previous section. The creation form, which includes all the information required to set up a new Odoo user, is opened with a single click on the New button. This creation form allows you to set up as many users as you require for your business operation. First, look at the creation window.
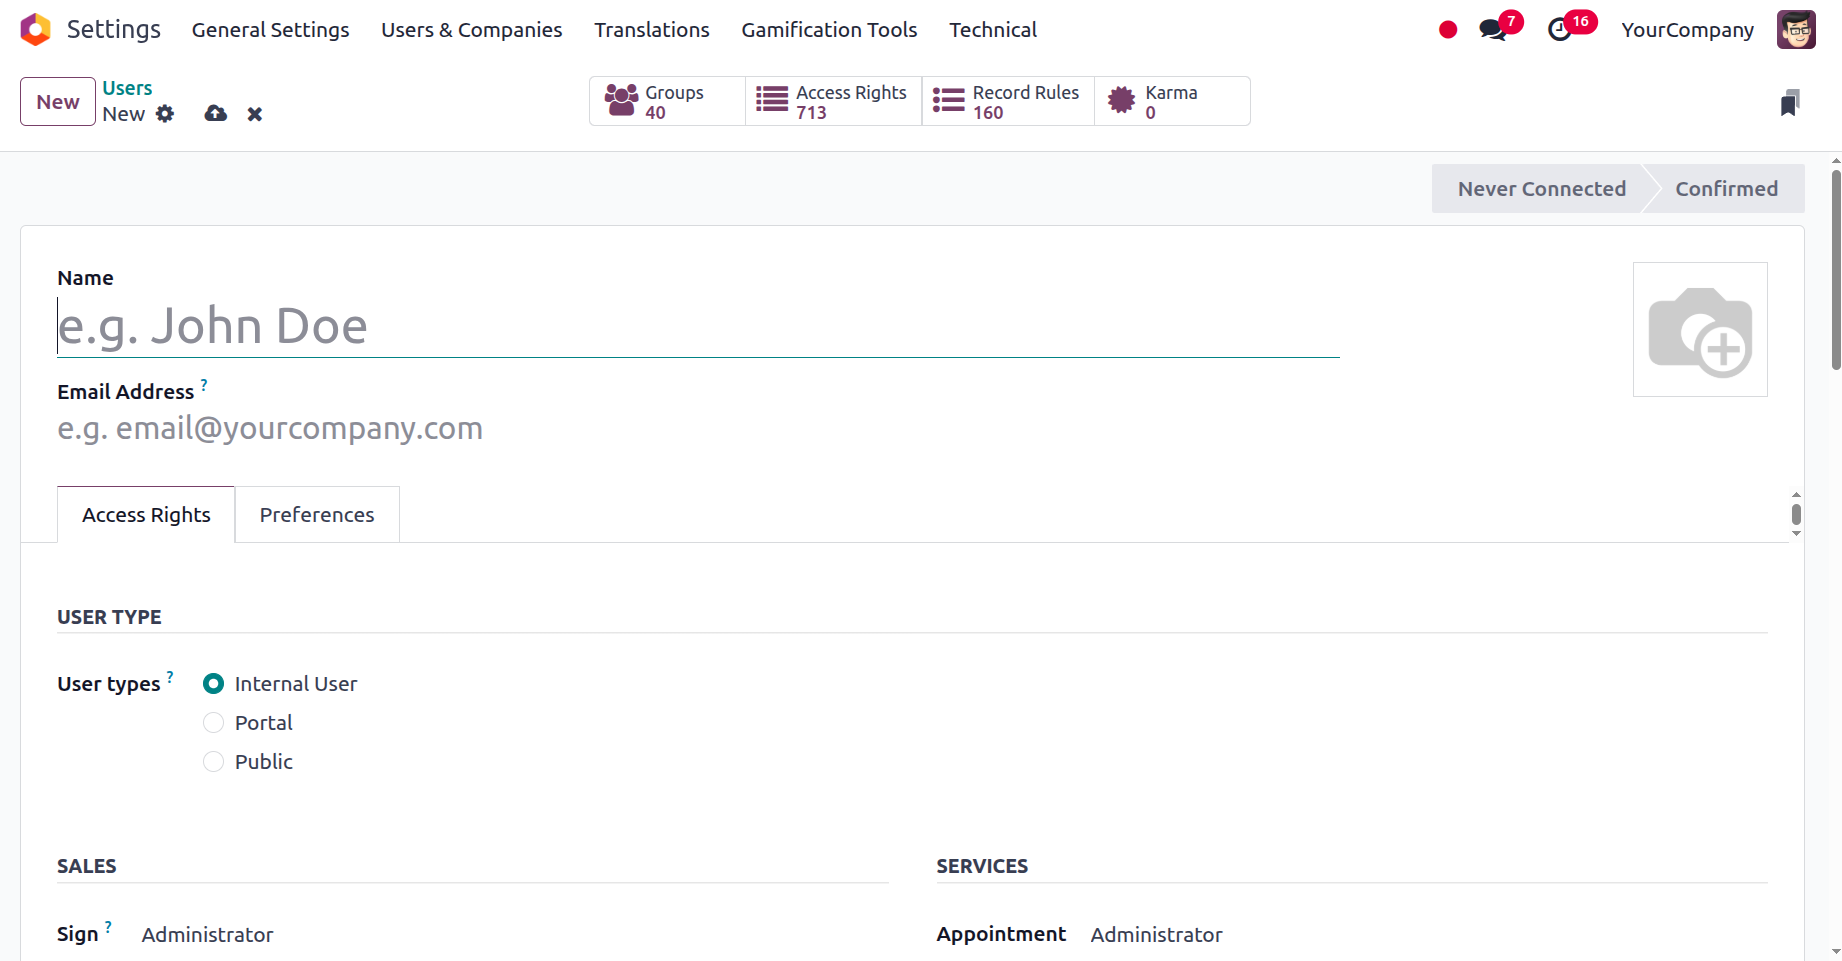
The Name box on this User Creation form is where you can initially enter the user's name. After that, the user can input their email address in the relevant section. You can also upload the user's photo in the designated space. Once these fundamental configurations are finished, you can modify the user's access permissions and preferences under the Access Permissions and Preferences tabs, respectively. Let's discuss each of the tabs below.
Access Right Configuration
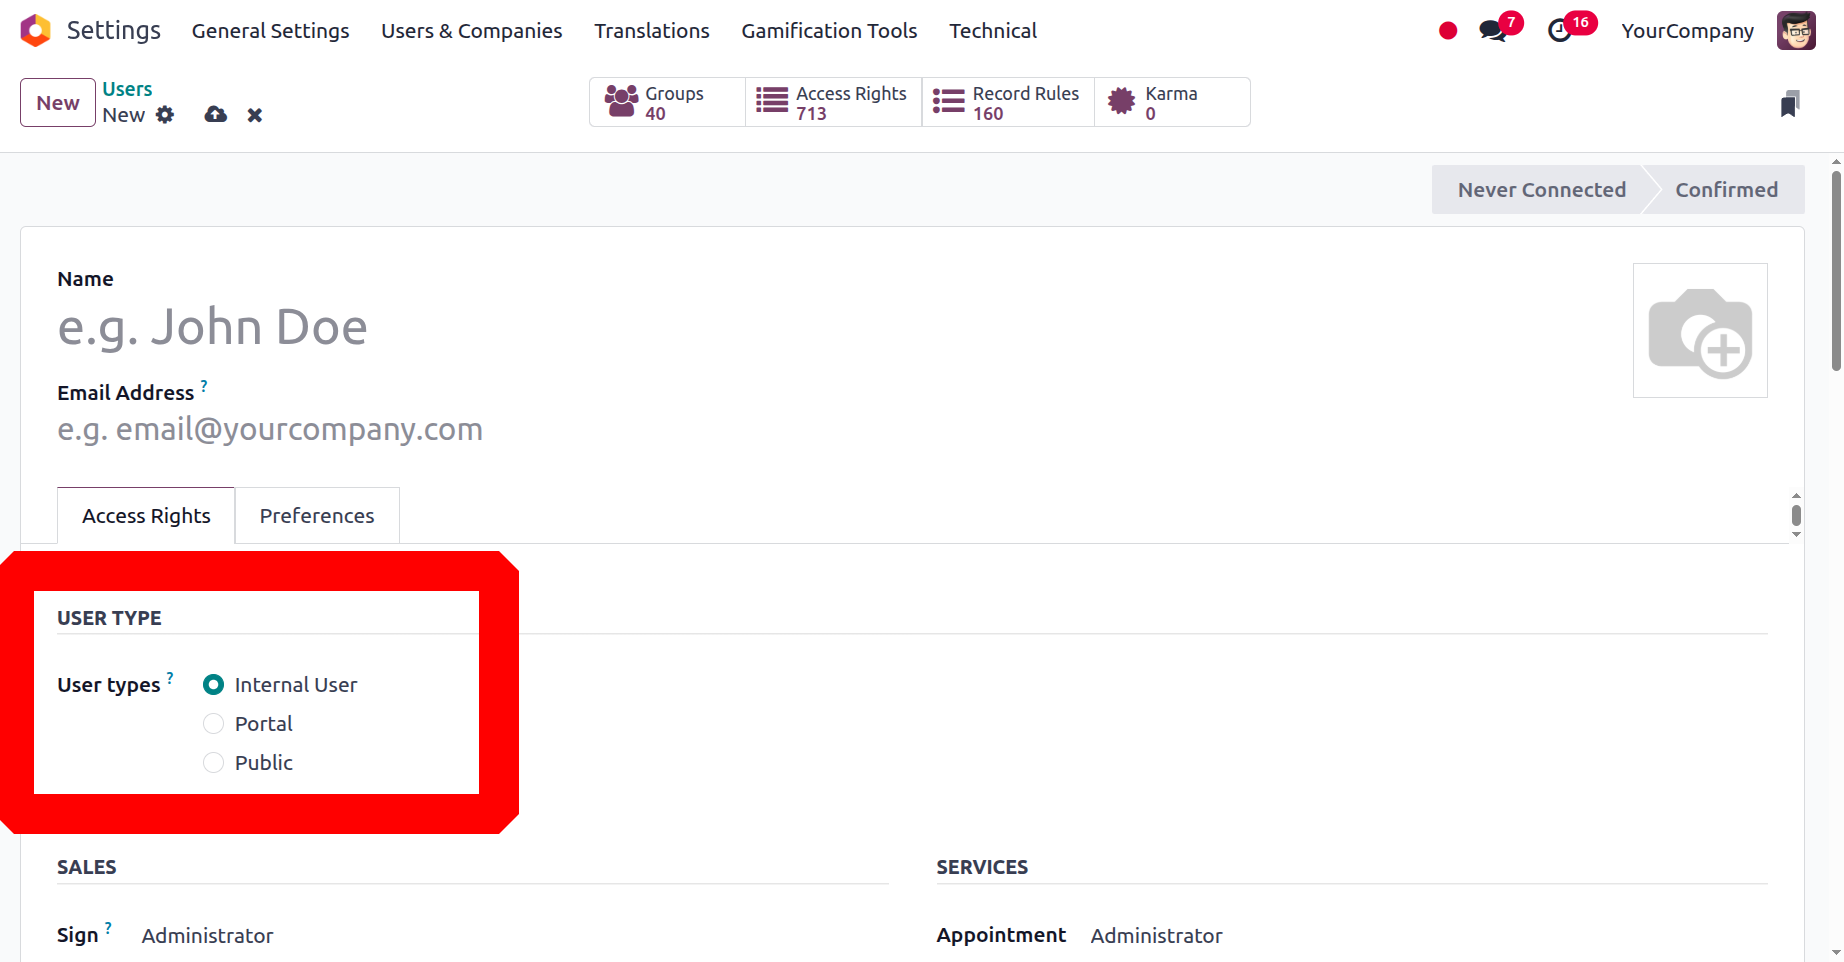
You can specify the user's access rights-related details on the Users setup form's Access Rights tab. The Access Rights tab has a number of fields. You can start by outlining the facts related to the several firms, including Allowed firms and Default Companies. If the system is multi-company, you can define which firms the user can access under the Allowed firms area. The user can designate their default company using the Default Company option. You can then select the most suitable option from the three alternatives the platform provides under the User types section: Internal User, Portal, and Public.
After that, you may discuss the user's sales potential. Three choices are available in the Sales area's dropdown menu: Administrator, User: All Documents, and User: Own Documents Only. The user can examine his personal information in the Sales application if you select the first option. The user will be able to view each user's sales application record in the second case. In the Administrator's situation, the user will have access to both statistical data and the sales configuration.
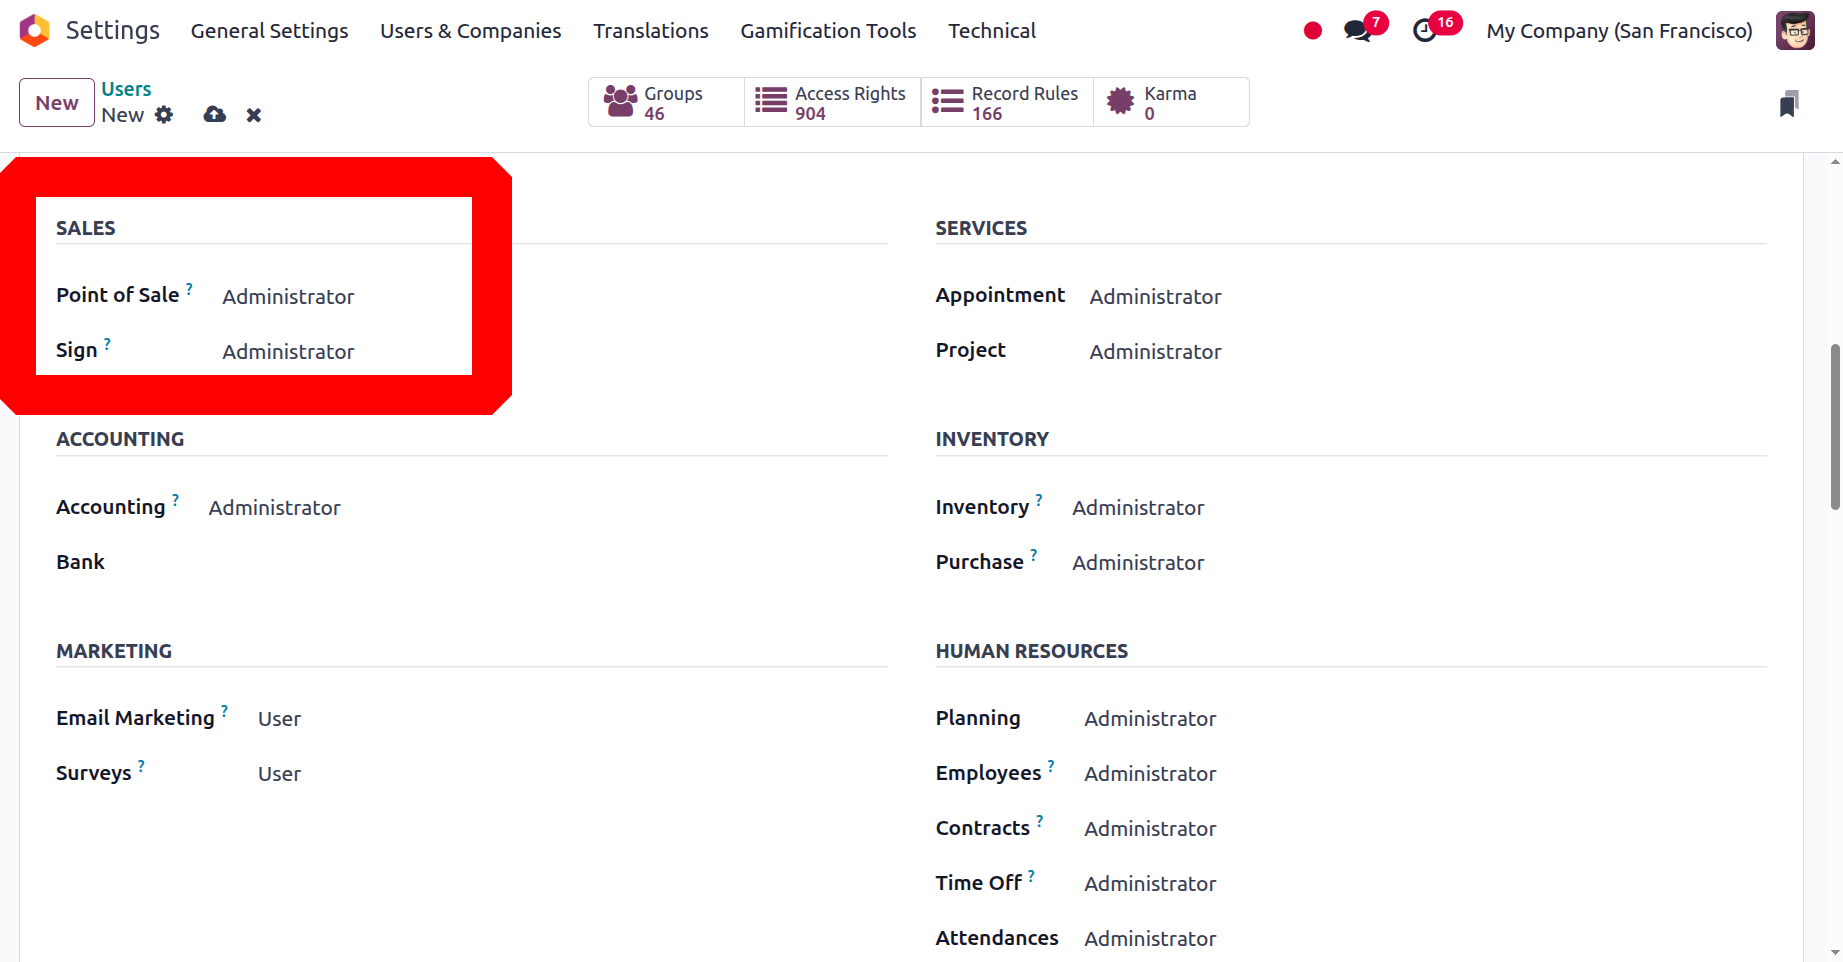
Additionally, there are User and Administrator options in the dropdown menu under the Point of Sale box. With features like automatic pricing list generation, streamlined payment mode encoding, and quick sale encoding, you can make the most of your point of sale by setting a decent one immediately. Likewise, the Sign box facilitates the process of signing and completing your documents by letting you choose the most appropriate option from "User Own Templates or Administrator."
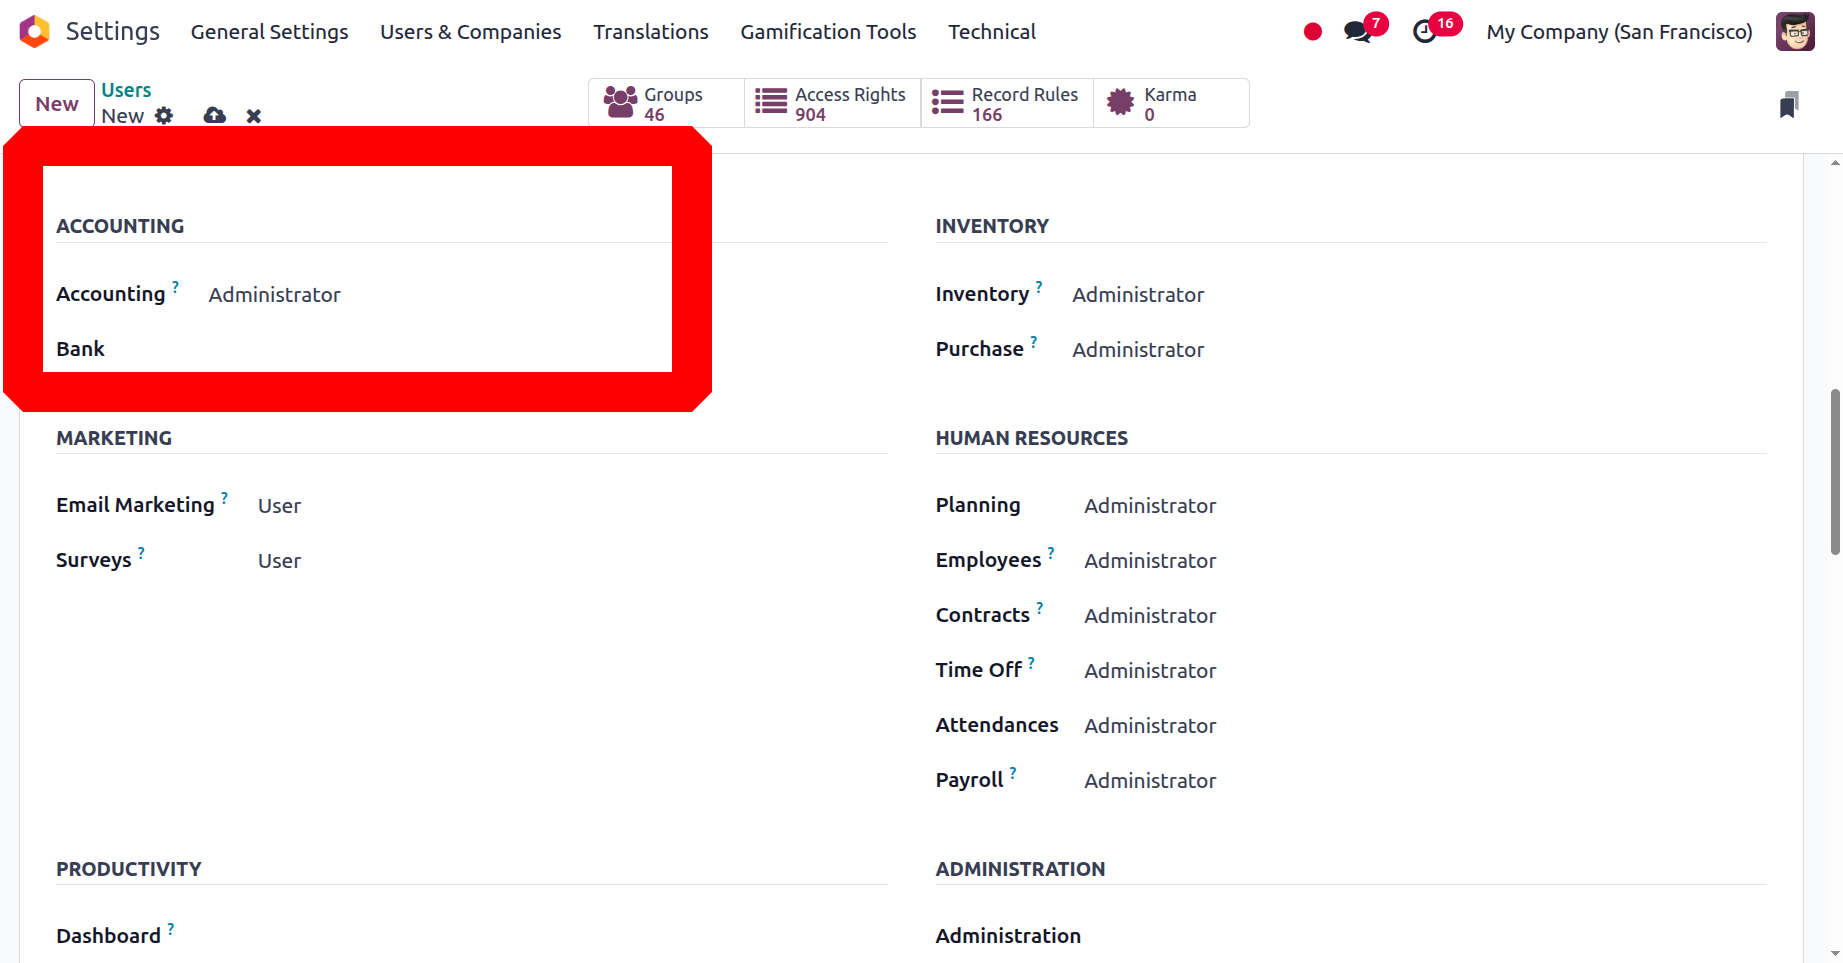
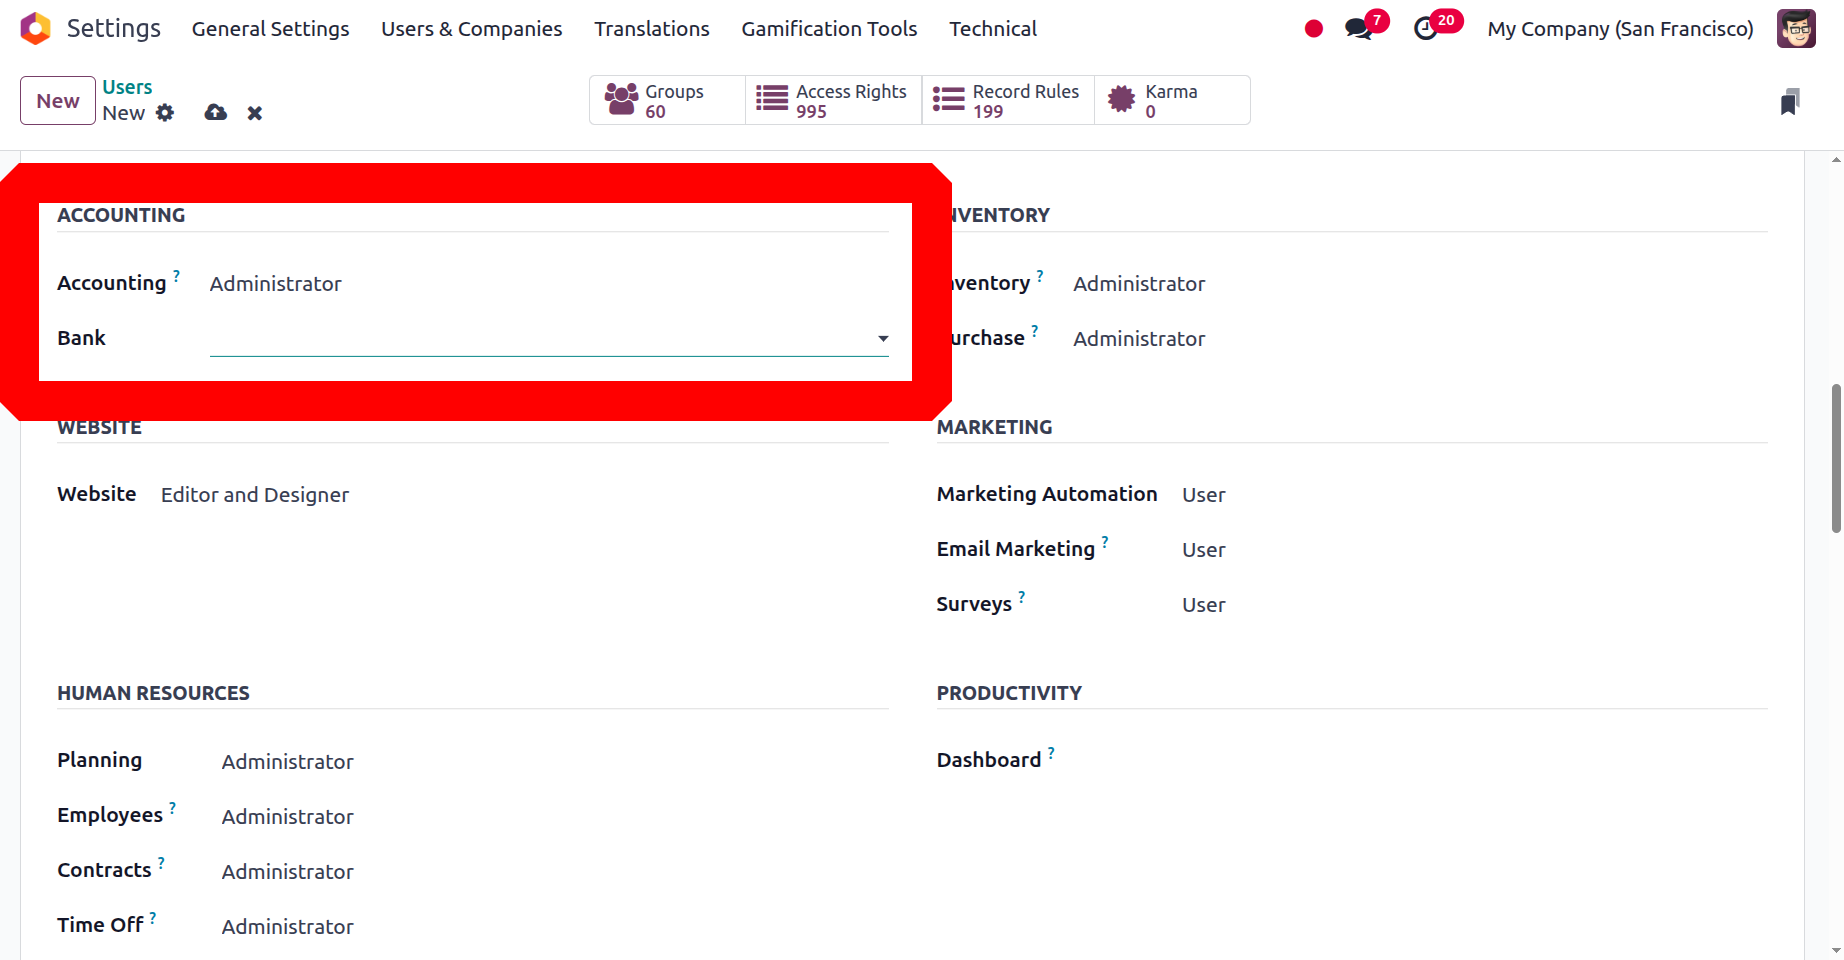
It will be simpler to handle accounting demands if you detail the accounting-related components after that. Billing, read-only, bookkeeper, and accountant are among the options available to you; we shall discuss these in further detail later. In the corresponding field, the user's manufacturing attributes may also be categorised as Administrator or User.
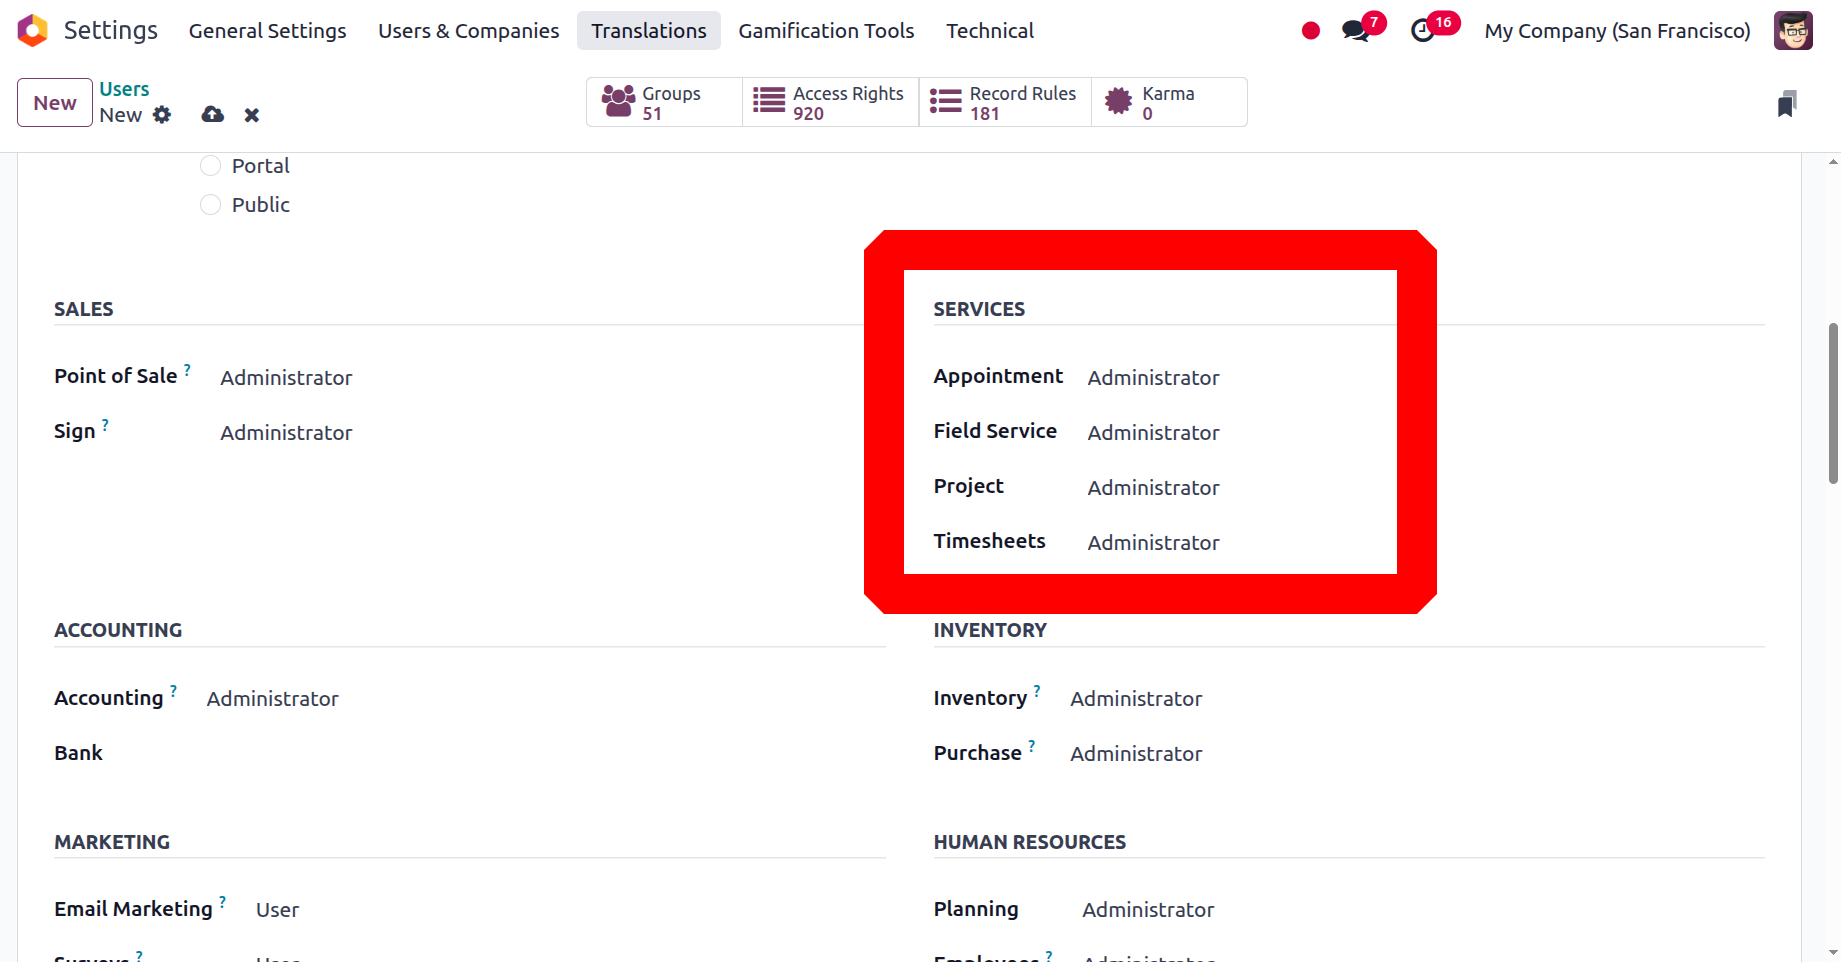
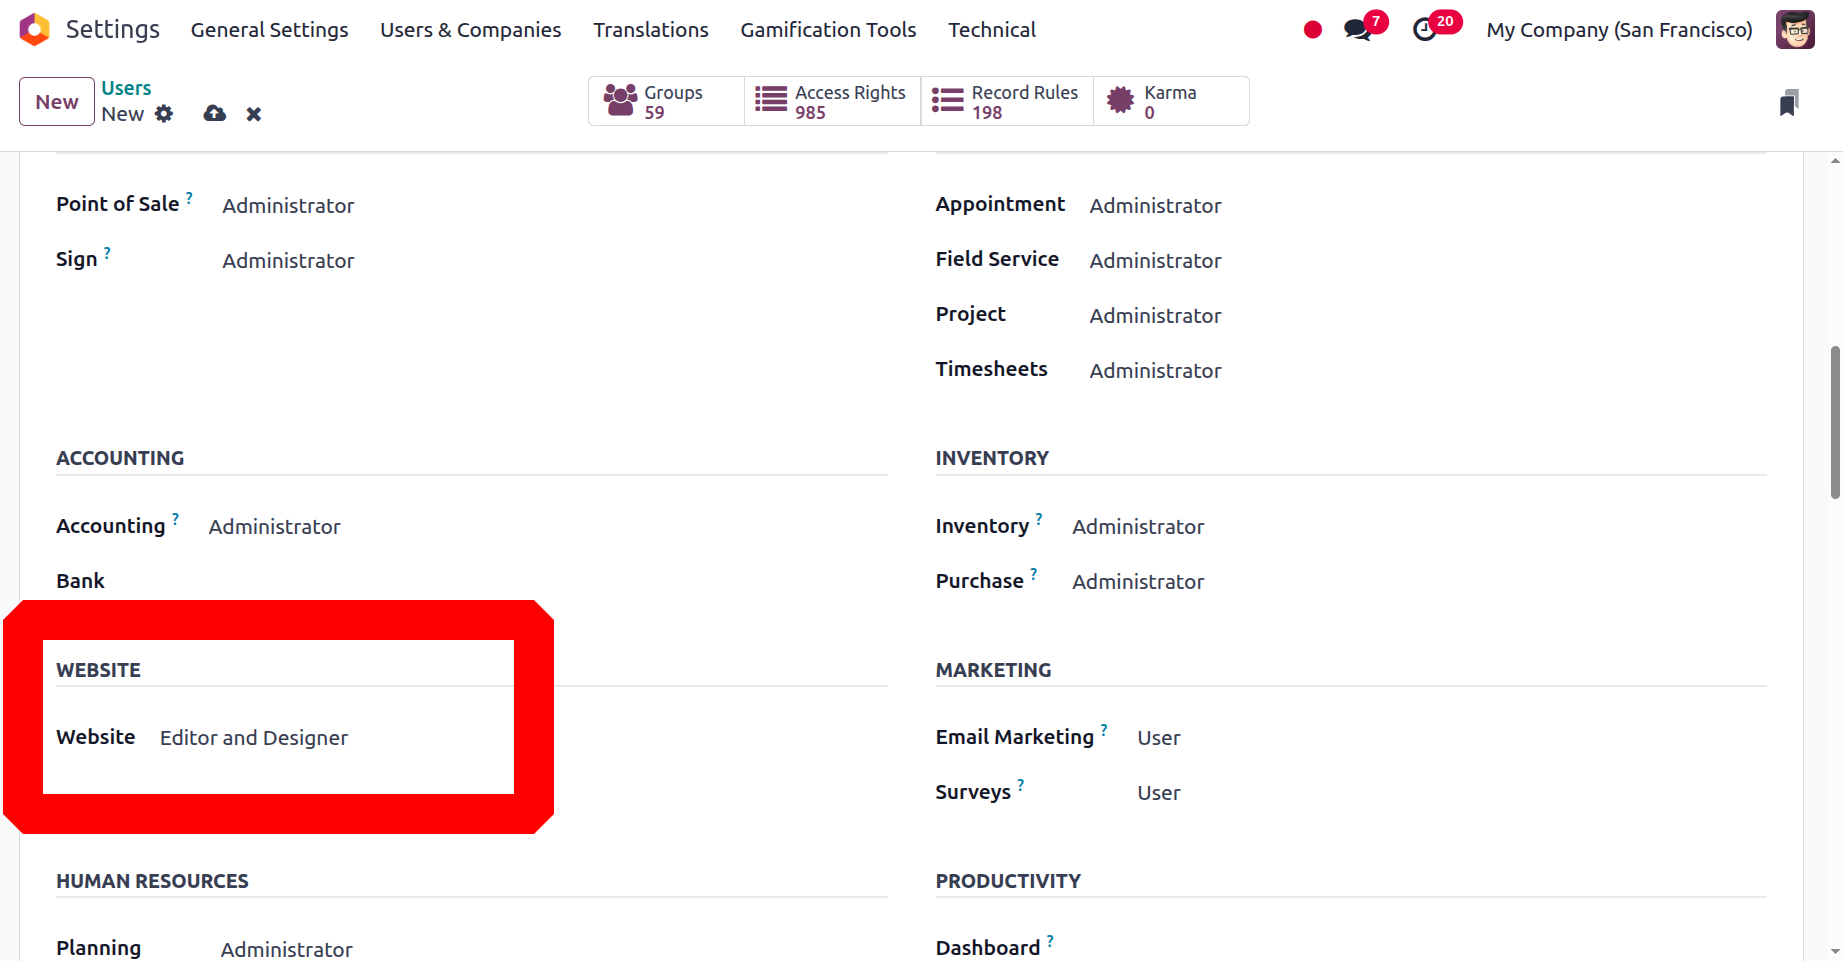
You can then define the Field Services, Project, Timesheet, and Helpdesk under the Services section. Additionally, the Inventory and Purchase sections, which are used to manage stock activities and inventory operations, give you the option to select Administrator or User based on the specific user. The Website section then has the Live Chat, eLearning, and Website fields. If the Live Chat box is set to Administrator, the user will be able to delete the channels of support. If the support channel is assigned to a user, the user will have the power to delete it.
In a similar vein, you could assign the user the title of Officer or Manager in the eLearning domain. You can choose between 'Editor and Designer' and 'Restricted Editor' under the Website section.
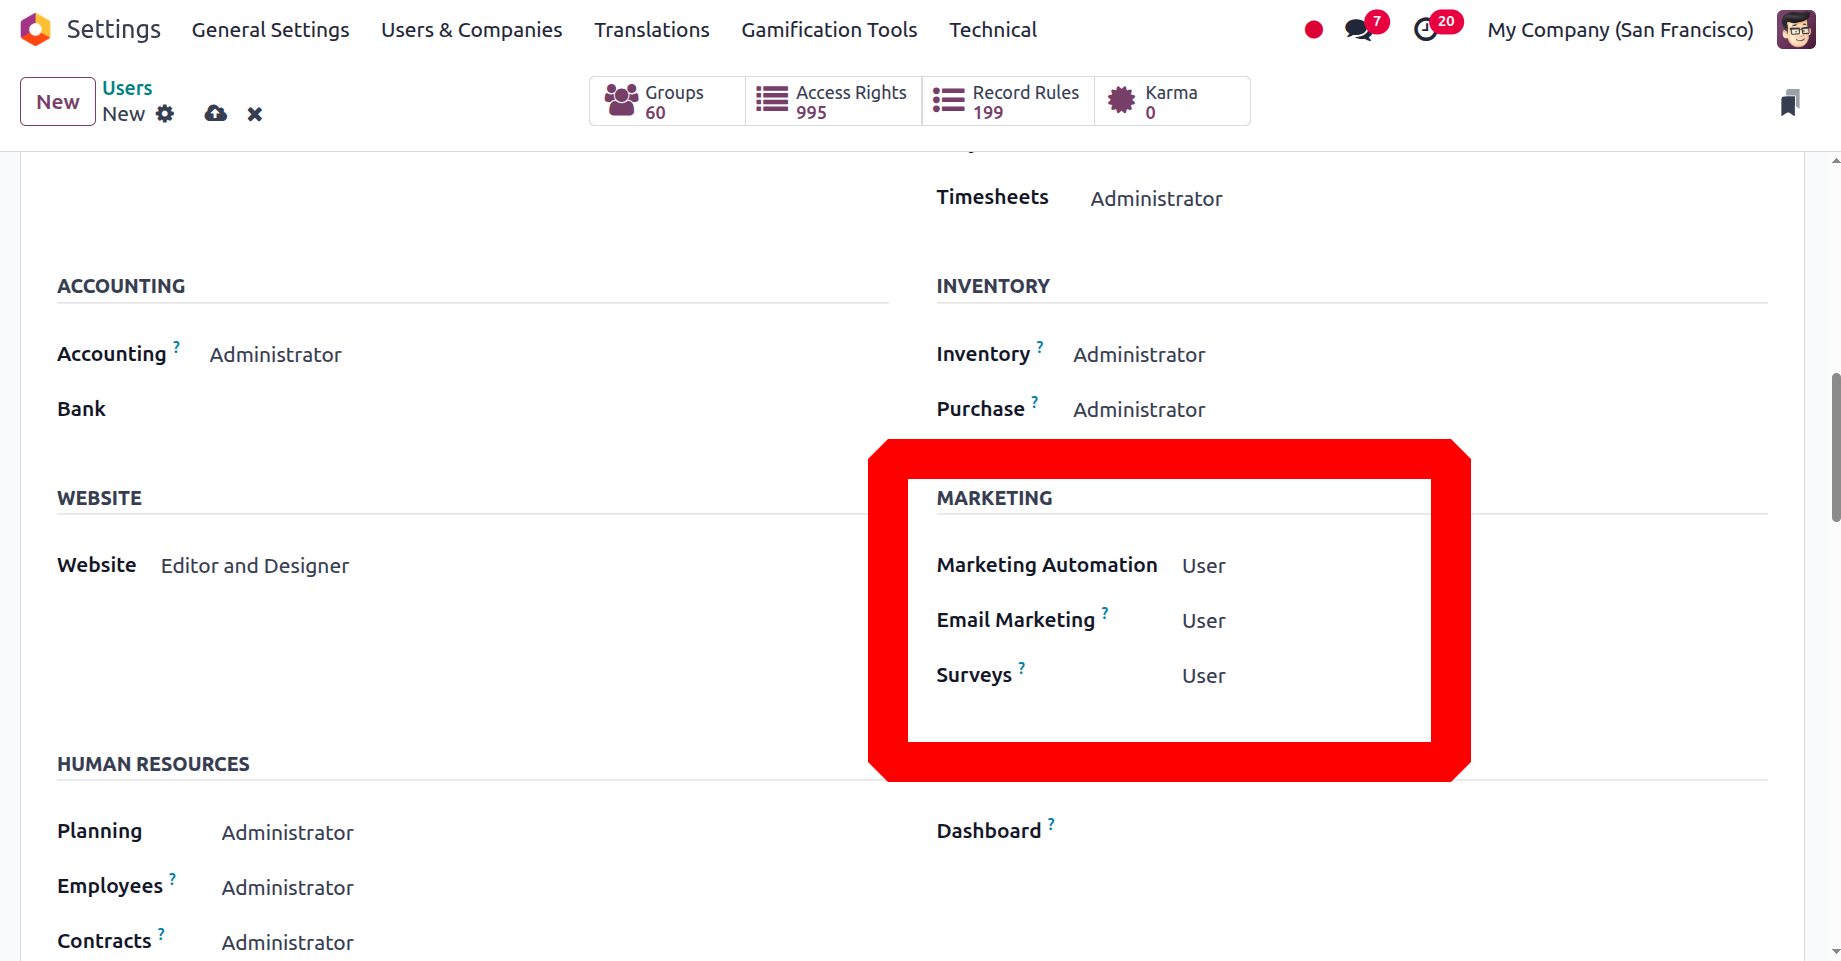
Additionally, you can use the sections on online appointments, social media marketing, marketing automation, events, email marketing, and surveys to outline the key components in the marketing area.
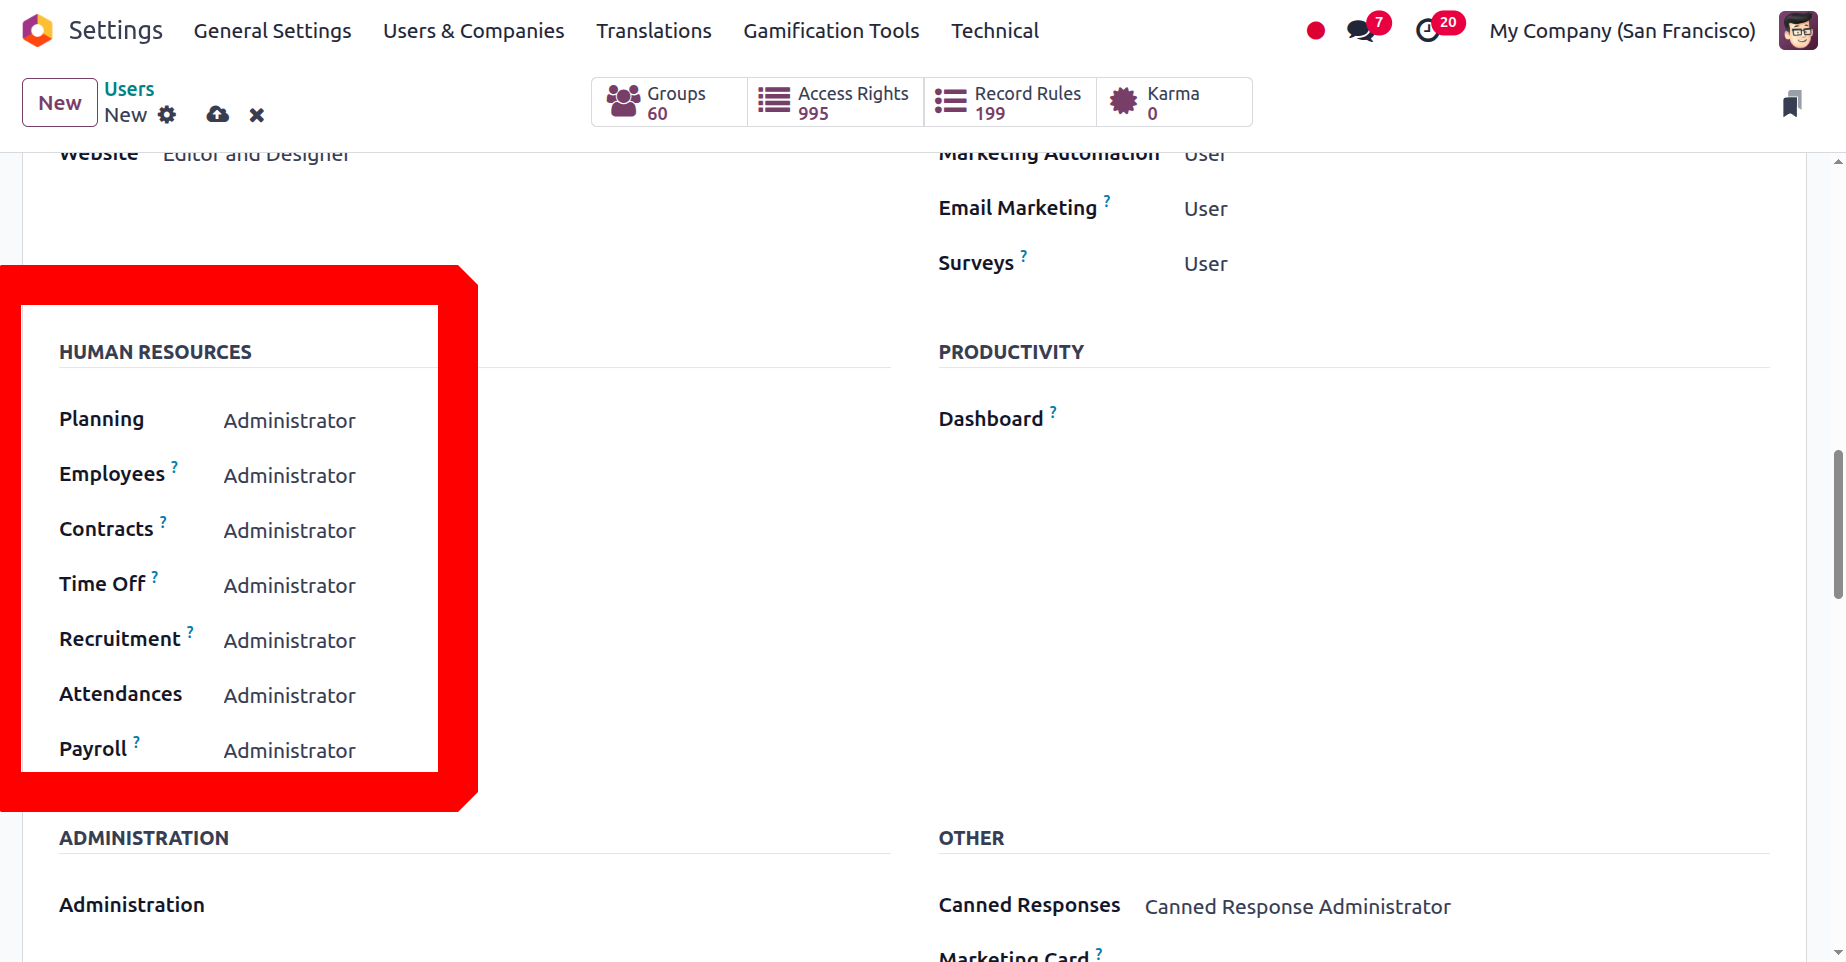
A number of fields, including Fleet, Lunch, Planning, Employees, Approvals, Contracts, Time Off, Recruitment, and Expenses, are then visible under the Human Resources section. Additionally, you may indicate whether the user has 'Access Rights' or 'Settings' access using the Administration option. Likewise, you can input a suitable option from the drop-down choice in the Documents box under Productivity.
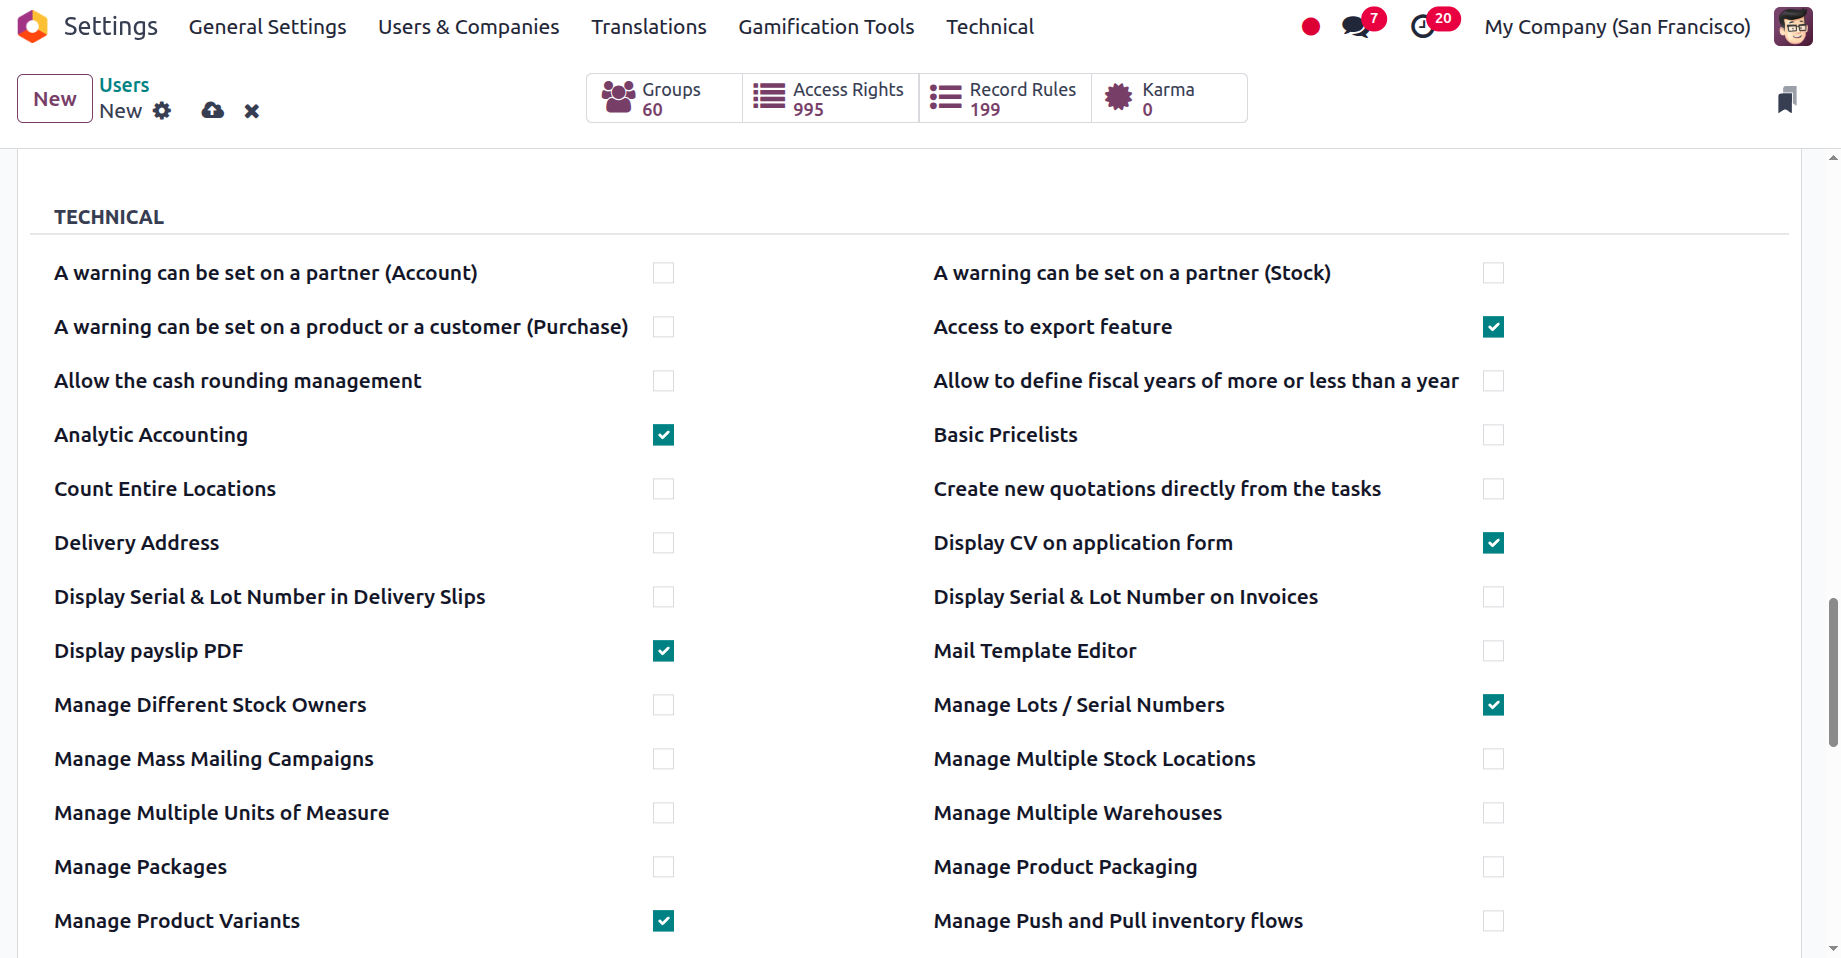
Now available in the Technical area, boolean fields can be enabled or disabled based on the user. A partner (Account), a product, a customer (Purchase), and a number of other factors can all be subject to a warning. Access to private addresses, current price lists, Allow for the definition of fiscal years that are either longer or shorter than a year, Basic Pricelists, the instant generation of a new quote based on the tasks, the reduction of lines, delivery slips, and the display of lot and serial numbers.
Show the Incoterms on the Sales Order and any associated invoices. Lock Verified Purchases, Limit Template Access, Manage Several Units of Measure, Manage several stock owners, manage bulk mailing campaigns, manage packages, manage product variations, and manage storage categories. Print GS1 barcodes for lots and serial numbers, make templates for quotes, award referrals, and issue purchase receipts to responsible users. Show recurring revenues, show customer reviews, Useful features include B2B tax display, Time Off Responsible, Default Unlocked, and Operation Dependencies.
Utilise the reception report, subtasks, and recurring tasks. Make use of time billing Among other things, a warning might be placed on a consumer (sell), a product, or a partner (stock). access to the export feature Cash management, analytical accounting, price comparison, shipping address, resume display on applications, and clear serial and lot numbers on invoices are all made possible. Turn on the Mail Templates signature order editor. Manage Work Order Operations, Push and Pull Inventory Flows, Multiple Stock Locations, Multiple Warehouses, Product Packaging, and Lots/Serial Numbers Proforma invoices, a number of websites, an order receipt, a job interviewer, delivery orders that require a signature, To confirm delivery, send an automated email reminder.
Show the Lead Menu SLA Guidelines, kindly use UOM Price Display for B2C and eCommerce, and Tax Display Employ benchmarks, Make use of the project rating. Utilise the Reception Report, Manufacturing Orders, and Project Stages. Make use of task dependencies and wave pickings. Similar steps can be taken to enable or deactivate the other rights categories, like Contact Creation and Multi-Currencies. Setting up the Technical and Access Rights aspects will assist the relevant user in controlling all of these actions on your platform. Additionally, each of these configuration components will only help you with the user's permissions on your Odoo platform.
After talking about how the User's Access Rights description works and is maintained thus far, we can move on to the next section, which will address configuring the preference selections.
Preference Options Configuration
After discussing the options available on the Users creation window's Access Rights page, let's move on to the Preferences tab, where you may view the options shown in the following image.
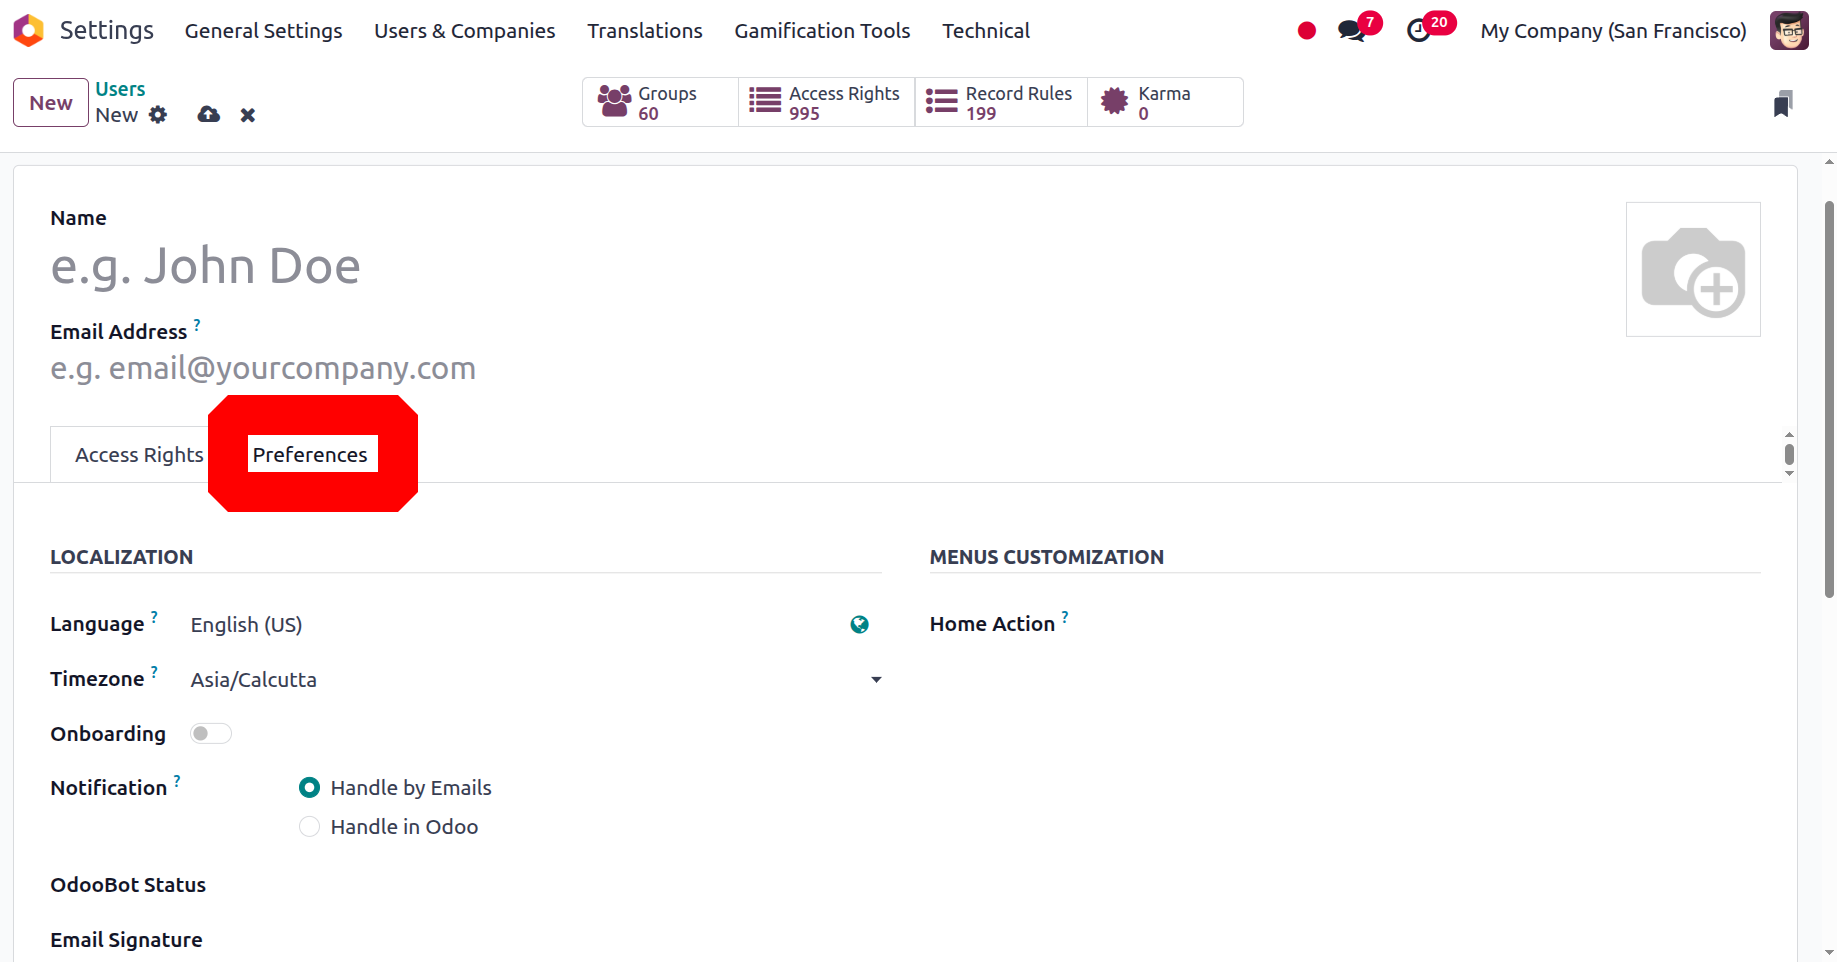
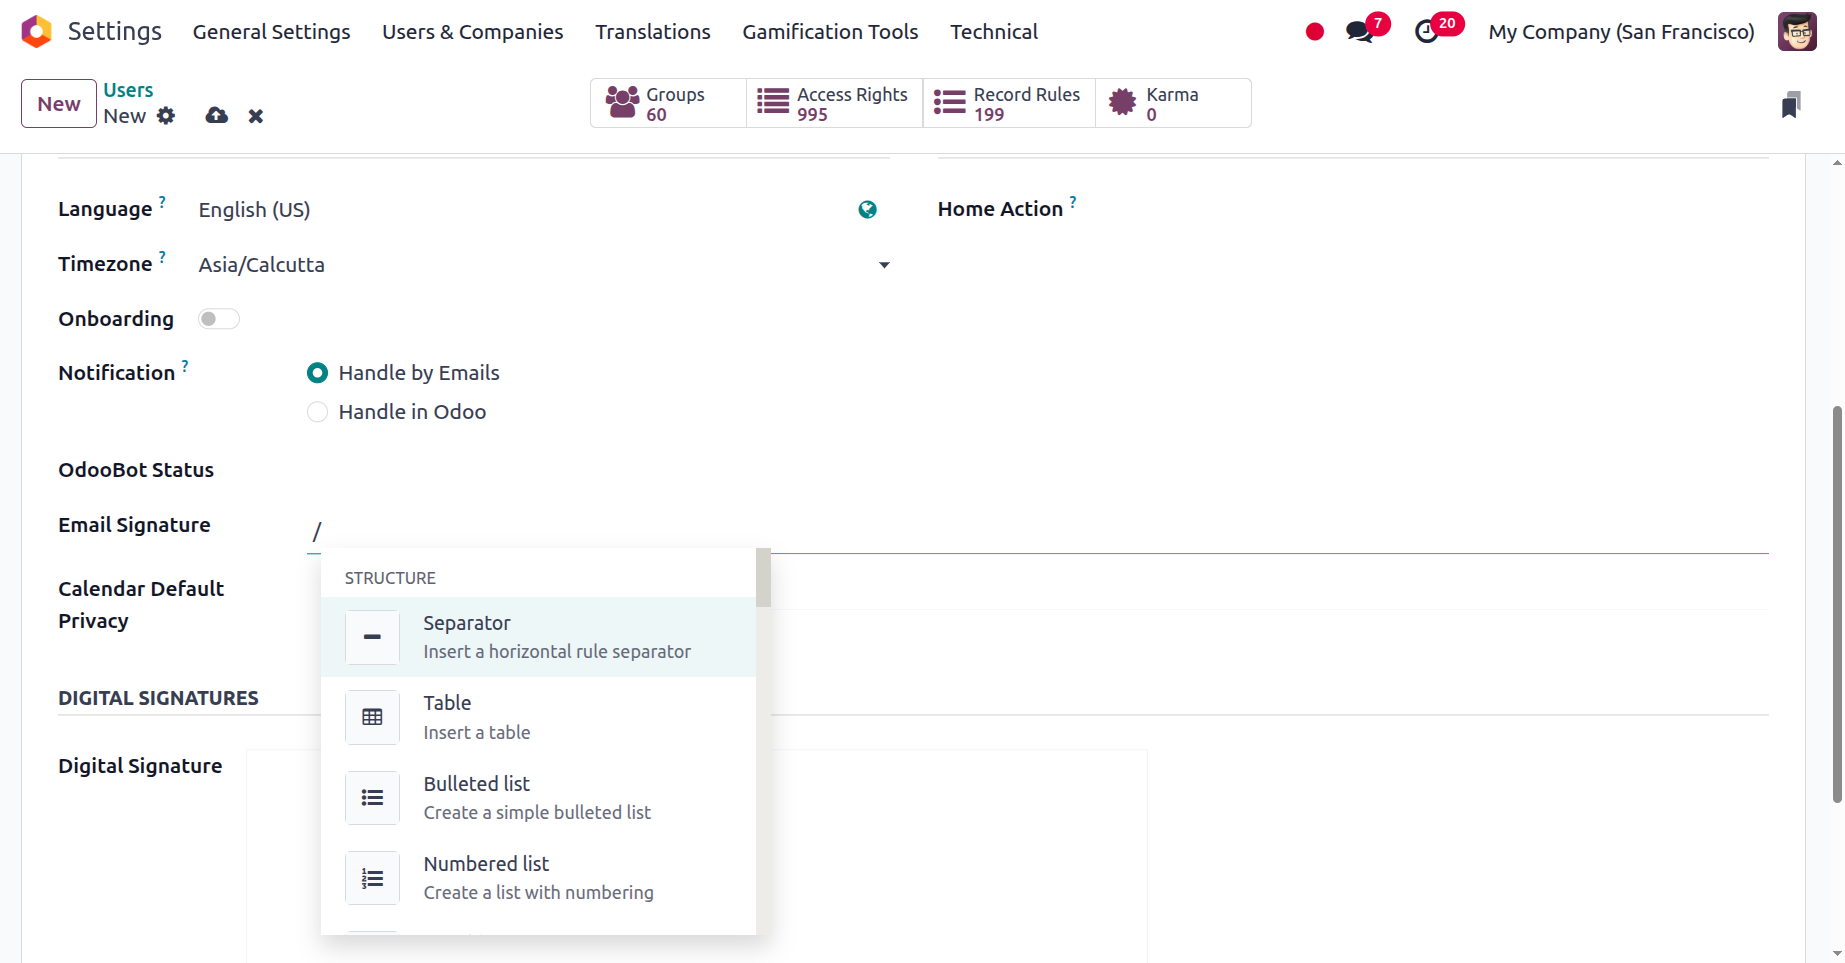
On this Preferences tab, you can modify the related user's Preferences attributes. The LOCALISATION area is where you can first assign the localisation information. Here are a number of fields. To have all emails and documents sent to this contact translated into the selected language, you can first select your preferred language by typing it in the Language field.
The dropdown menu can then be used to choose the time zone. You can also choose the protocol for managing Chatter alerts.
For this reason, it is possible to handle user operation notifications in Odoo or by emails. Selecting emails (Handle by Emails) will result in notifications being sent to your (the user's) email address. This means that turning on this option will alert the user to the corresponding email IDs, which is helpful for users who don't use the Odoo platform very often because they work for a company that doesn't greatly benefit from it. In the second case (Handle in Odoo), the notifications will appear in your Odoo mailbox.
Additionally, as administrators, you can provide the current status of a certain user's OdooBot account. There are numerous ways to set it, and the dropdown menu will provide all of the possibilities.
- Not Initialized
- Onboarding emoji
- Onboarding Attachment
- Onboarding command
- Onboarding ping
- Idle
- Disabled
- Onboarding Canned
You can also create an email signature in the Email Signature box, where you can type "/" to input a command. You can then select from a range of Structures, Formats, Images, Navigation, Widgets, Basic blocks, and other options using the drop-down menu that the system will display. With these options, you can include text, images, and a variety of other elements in the email signature.
The 'Karma' field is another. You can enter a number in this field that represents a user's level of activity on the Odoo platform. It is calculated by considering the user's work on tasks, projects, and documents, as well as their interactions with other users, including postings and comments. A user's karma worth increases with their level of engagement.
In a similar manner, you can choose from a drop-down menu in the field to access Home Action's MENU CUSTOMISATION options, or you can even create a new one according to your requirements. With this option, administrators can select an action that users will see when they log in, in addition to the standard menu. Likewise, a digital signature can be added to the DIGITAL SIGNATURES field. You can click the Signature description box to add your signature in a new window.
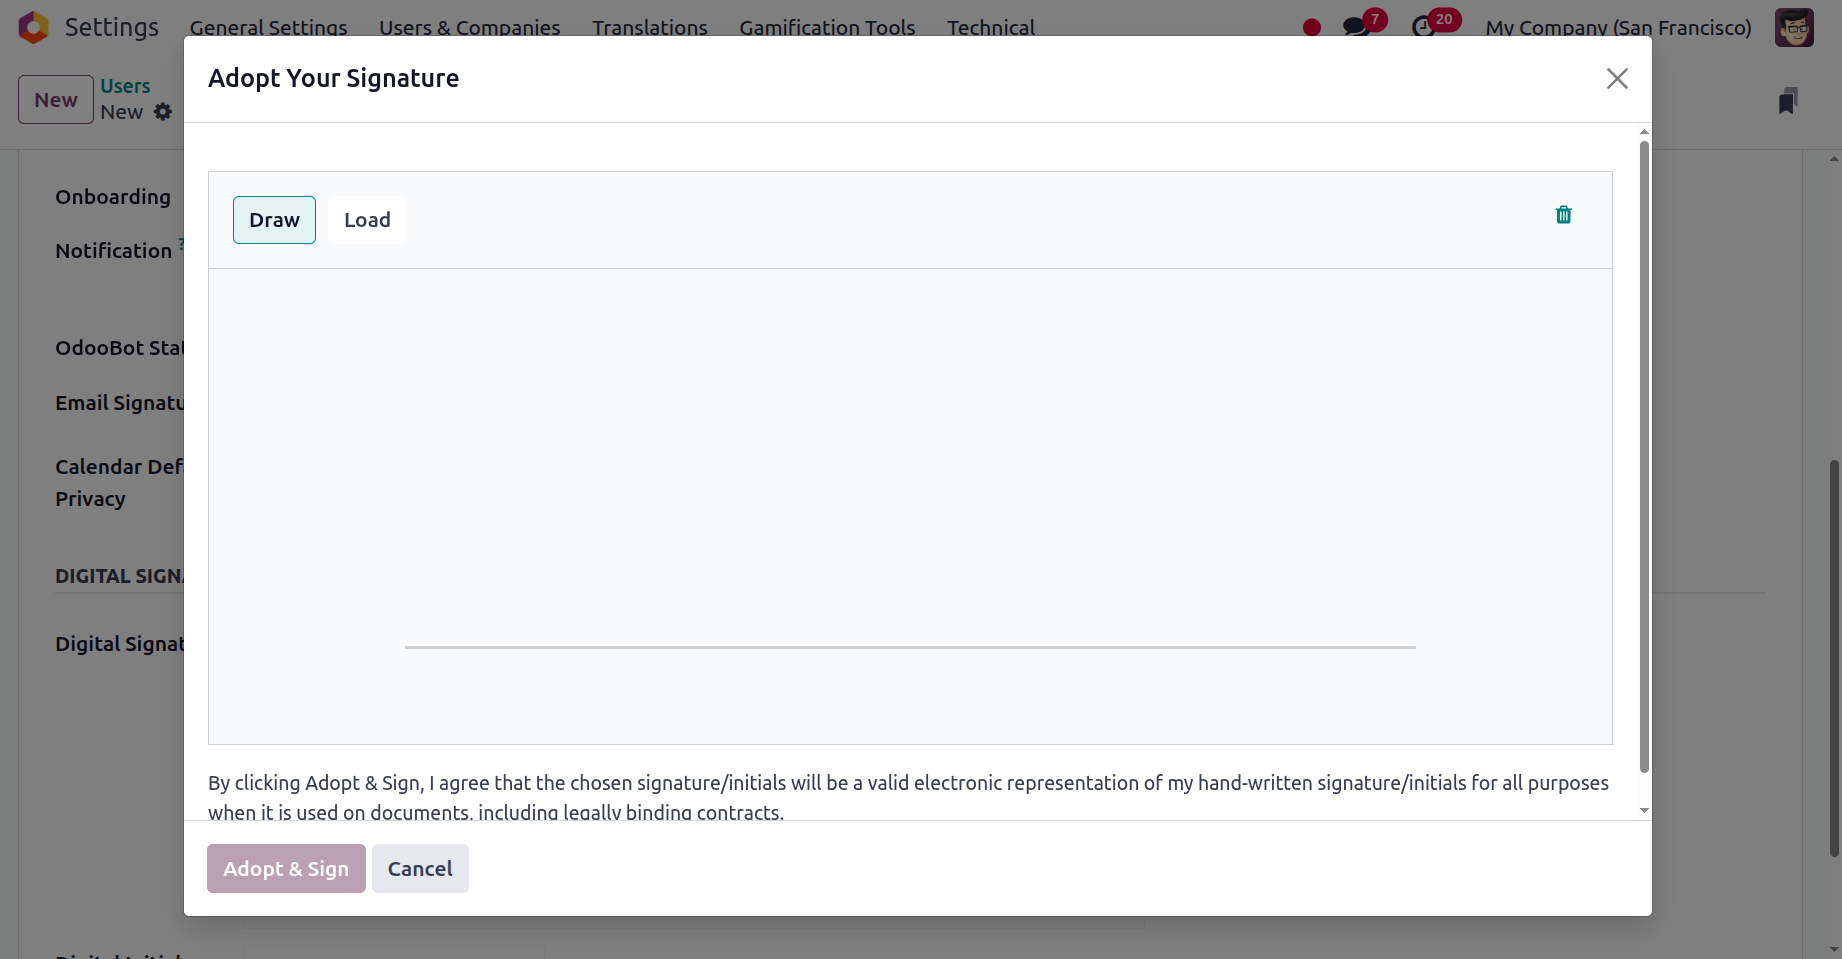
You can either draw or load signatures here, depending on your preferences. The same applies to the Digital Initials field. Lastly, the Live Chat capabilities can be accessed using the Live Chat Username field.
The following section will concentrate on the various user types and the functional aspects they offer in conjunction with the accounting management of the business operations. It became evident that the Odoo platform allows for the configuration of user preference management.
Access Rights for Users in Odoo Accounting
Enabling authorization-based degrees of operation among employees is essential for a company's seamless operation as well as for protecting sensitive data, limiting access to specific areas of the system, and preventing the unapproved release of private information. Additionally, it can reduce the risk of hacking by ensuring that employees only have access to the data they need to do their duties.
Additionally, restricting access to specific areas can help avoid destructive attacks and guarantee that only authorised users can access the system. In a similar vein, the authorization-based levels of operation will demonstrate who is in charge of what areas of the organization's operations and who has the authority. Through the development of default user settings, the sophisticated Odoo platform facilitates hierarchical operations. To specify the associated user's authority in this feature, you can provide the default user options that can be used.
According to the financial operations of the business, you can designate a new user as a billing, read-only, bookkeeper, or accountant when you set them up on the Odoo 18 platform. In Odoo Accounting, access control lists are used to assign users access capabilities. Depending on their role within the company, users may have their access permissions granted, modified, or revoked. Access rights for the Accounting module might vary from complete control to read-only access. To make sure that only people with permission may view and alter financial data, it is also used to limit access to certain financial transactions and data.
The Administrator will be granted the highest honour of authority over the financial management operations of your business, in accordance with the hierarchy. The Bookkeeper and Invoicing & Banks follow. Read-only workers are lower in the hierarchy and have less access to organizational resources than the bookkeeper and Invoicing & Banks. This is because they are employed in the customer-facing department of the business, where their main duties include interacting with customers, closing deals, and doing billing desk tasks. The least priority user has access rights to Invoicing. Only those with access to the trusted bank accounts are now permitted to validate them. You can either select "validate bank account" or leave "Bank" empty under the accounting section.
An organization's accountant is responsible for filing and arranging the accounting components in a way that complies with regulations and legal requirements. Every bill and invoice is completed by the accountant, and they are all managed as required. An accountant will also be in charge of allocating cash in accordance with the requirements and prerequisites of the business's operation, as well as the purchasing activities that are carried out. All aspects of the financial operation's administration, such as the Chart of Accounts, Ledgers, and Journal entries, will be overseen by the accountant in Odoo.
The Bookkeeper's access privileges are determined by the second level of the Odoo user hierarchy. In addition to managing clients and vendors, a user with bookkeeper access credentials will have access to the accounting dashboard. Journal entry production's accounting features, asset-deferred revenue/expense management tools, and reporting elements.
Access-rights holders Billing will be able to generate invoices, bills, and payments in addition to some management reports, including unrealised currency gain/loss reports, depreciation schedules, and invoice analysis, but it will not have access to the accounting dashboard.
The read-only access right, which enables Odoo users to view the accounting dashboard in read-only mode, is specified at the next level of the hierarchy. In addition to having read-only access to all other accounting and administrative tasks, including asset management, deferred revenue/expense, reporting, and partner payments, it will be able to generate partner bills and invoices.
For this, the Odoo platform works quite well. You should provide each employee with specific authority and access based on their qualifications, abilities, and titles in order to ensure the proper operation of the company.
Additionally, the platform's state-of-the-art features and capabilities will provide a comprehensive solution for effective and seamless business management. With the help of the program, you can keep an eye on if employees are misrepresenting the business's operations and whether they have the right opportunities and access.
The many types of users indicated in Odoo 18 with the accounting activity are now evident. Giving each member the right amount of authority will be very fulfilling and advantageous. Now let's investigate the Companies' setup elements and the related Settings options.