Accounting Configurations
Odoo19 offers a range of accounting options for managing the finances and bookkeeping of your business. Out of
all the parameters, it has the highest priority. You can set up the system's financial records using Odoo19's
accounting configuration tool. It can be used for account management, tax preparation, invoicing, and bank
account balancing. It also enables you to create charts of accounts, manage budgets, and set up multi-currency
accounting. It may be used to create reports and offers a variety of choices for handling payment arrangements.
Establishing the accounting settings is necessary before starting the organization's financial management
operations. Since accounting arrangements affect every facet of the company's operations, it will be challenging
to alter them once they are in place. The Chart of Accounts and Taxes are the two primary components that need
to be posted initially under this page. In the sections that follow, we may fully comprehend the configurational
features of accounting.
Chart of Accounts
An integral component of a company's financial management practices is the Chart of Accounts. It is a list of all
the accounts or ledgers a company employs to monitor its profits, expenses, assets, liabilities, and equity. The
Chart of Accounts usually contains equity accounts, sales and expense accounts, cost of goods sold, and
operating expenses in addition to asset accounts like cash, accounts receivable, inventory, and fixed assets.
Liability accounts include things like loans and accounts payable. The chart of accounts, which guarantees that
financial transactions are documented in the proper accounts, is an essential part of financial reporting.
The format of the accounts used in financial reporting is specified by a chart of accounts, which is crucial to
accounting. It is an essential tool for keeping an eye on a business's financial situation and allows users to
quickly assess their entire performance. Additionally, it helps ensure accurate and truthful reporting of
financial transactions. You will be able to create, amend, and see all financial accounts with ease, as well as
manage and customize your financial statements and reports.
Balance sheets, income statements, and other accounts are included in Odoo19's Chart of Accounts, a traditional
double-entry accounting system. You can establish your own accounts and categories and alter the system to suit
your particular accounting needs because of its versatility. The system will always guarantee that the records
of your financial operations are correct and suitable for future use. Configuring the Chart of Accounts is the
first and most crucial step in starting your accounting and financial management with the Odoo 19 accounting
system. This is because it serves as the foundation for every action that follows. For total control over the
administration of the financial operations, Odoo19 enables the creation of a bespoke chart of accounts based on
the needs of the business.
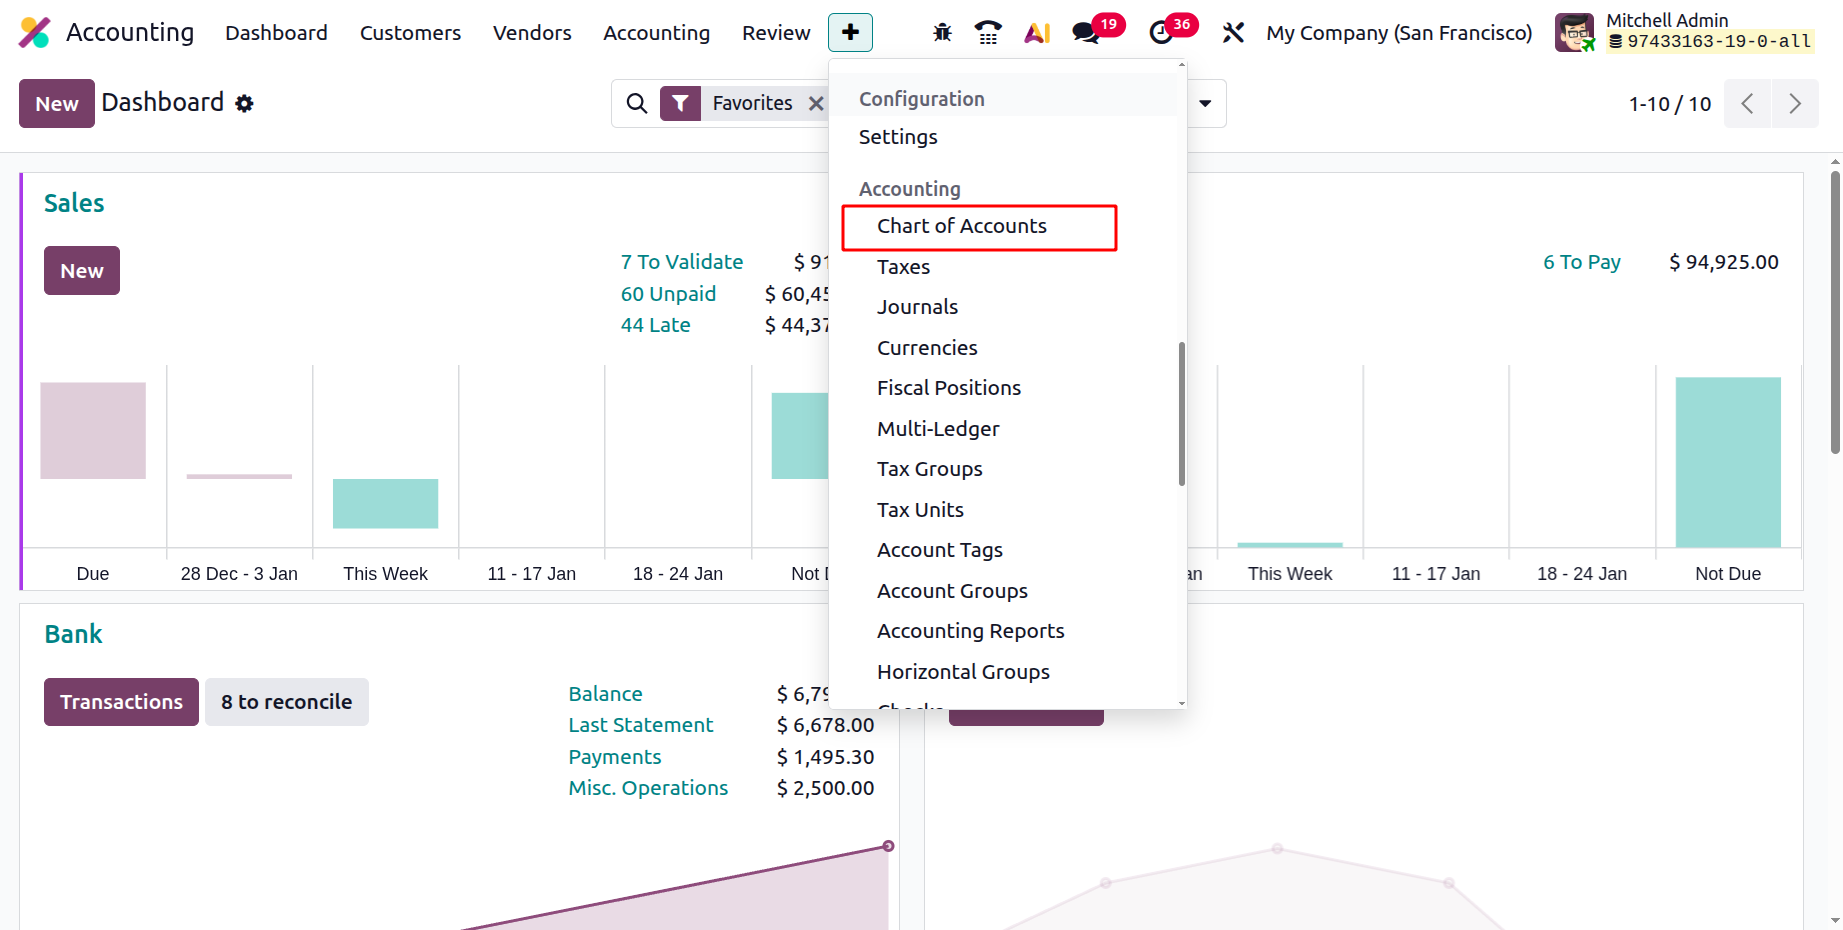
Odoo's chart of accounts is rather easy to define. As seen in the figure below, all you have to do is choose the
Chart of Account menu in the Accounting part of the Configuration tab of the Odoo 19 Accounting module.
All of the pre-configured chart of accounts details are shown below in the Chart of Accounts box. All of the
created Chart of Accounts records are shown with the relevant data, such as Code, Account Name, Type, Account
Currency, Company, and others, as can be seen in the screenshot below.
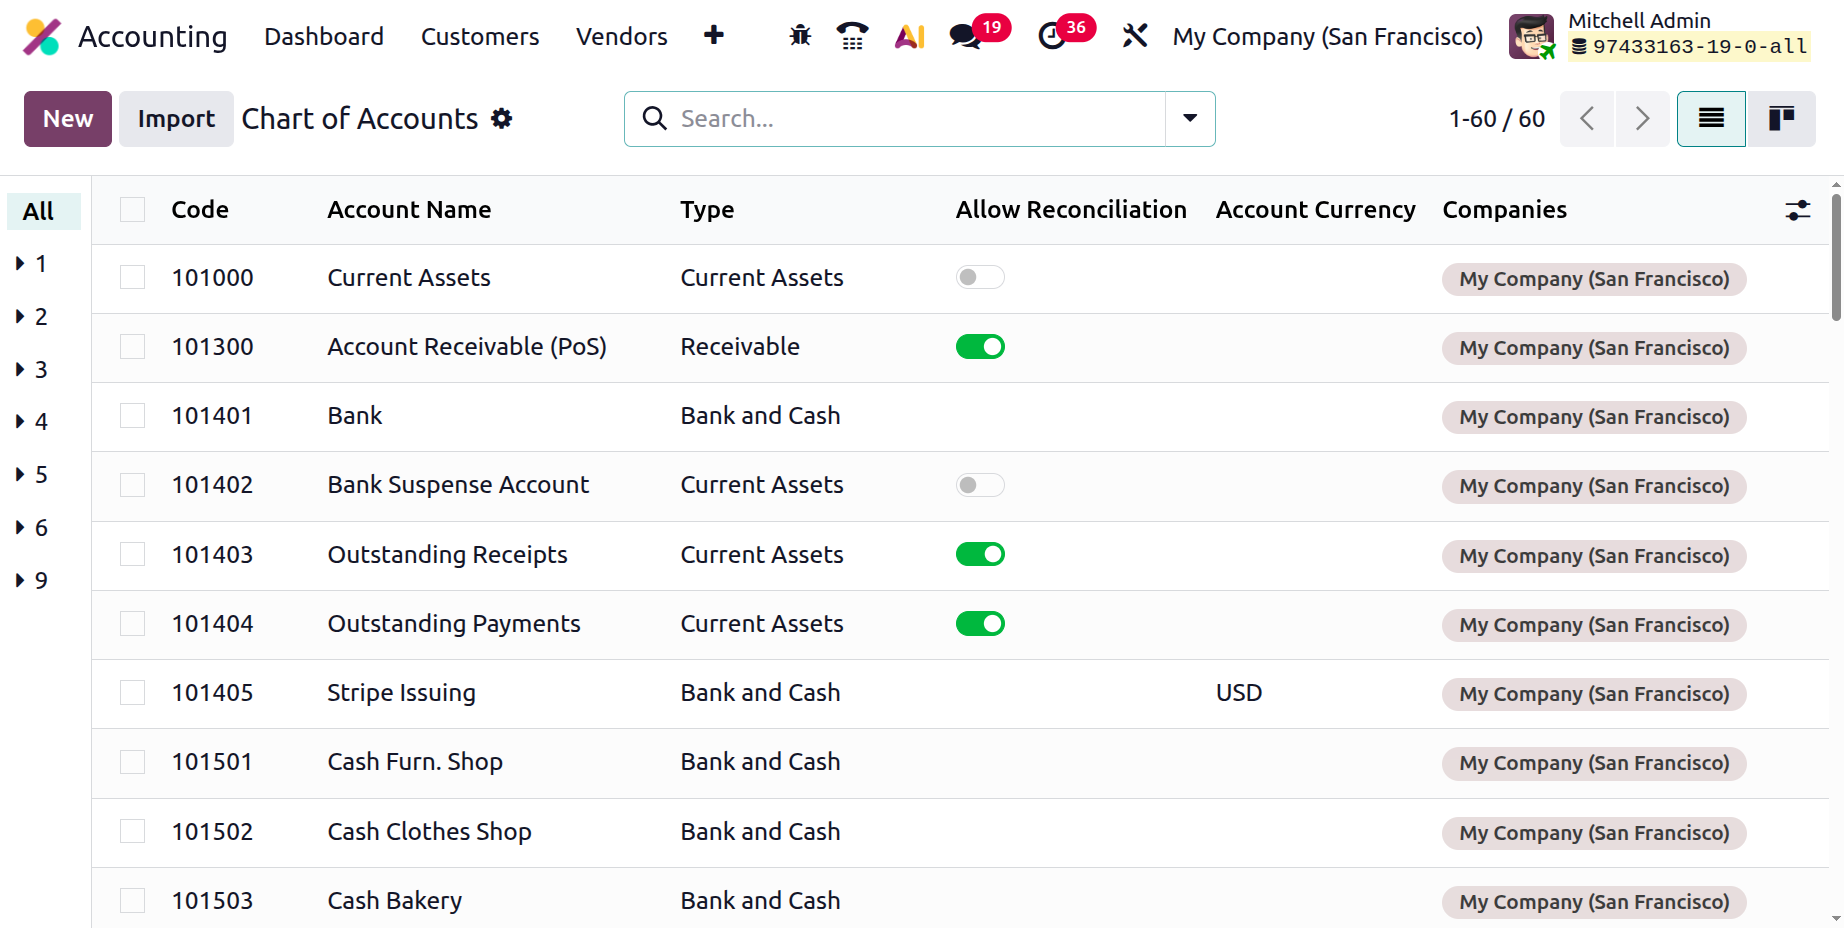
A setting with a toggle switch is also visible. If you choose this option, you can set up reconciliation for the
particular chart of accounts. Since the Kanban view is a list view, you can access the details by selecting the
Kanban view menu icon. Any specific Chart of Accounts can be retrieved using powerful sorting tools like
Filters, Group By, and Search options. You can define a collection of entries based on similarity or other
criteria by using the collection By option.
Additionally, you have the option to either enable or disable the Allow Reconciliation section. Include the firm
and the account currency. The hierarchy of the Chart of Account activities for the Odoo19 platform may be easily
defined at the start of the process. The relevant team can construct the hierarchy of operations for the
specific chart of accounts once your company activities have been recognized.
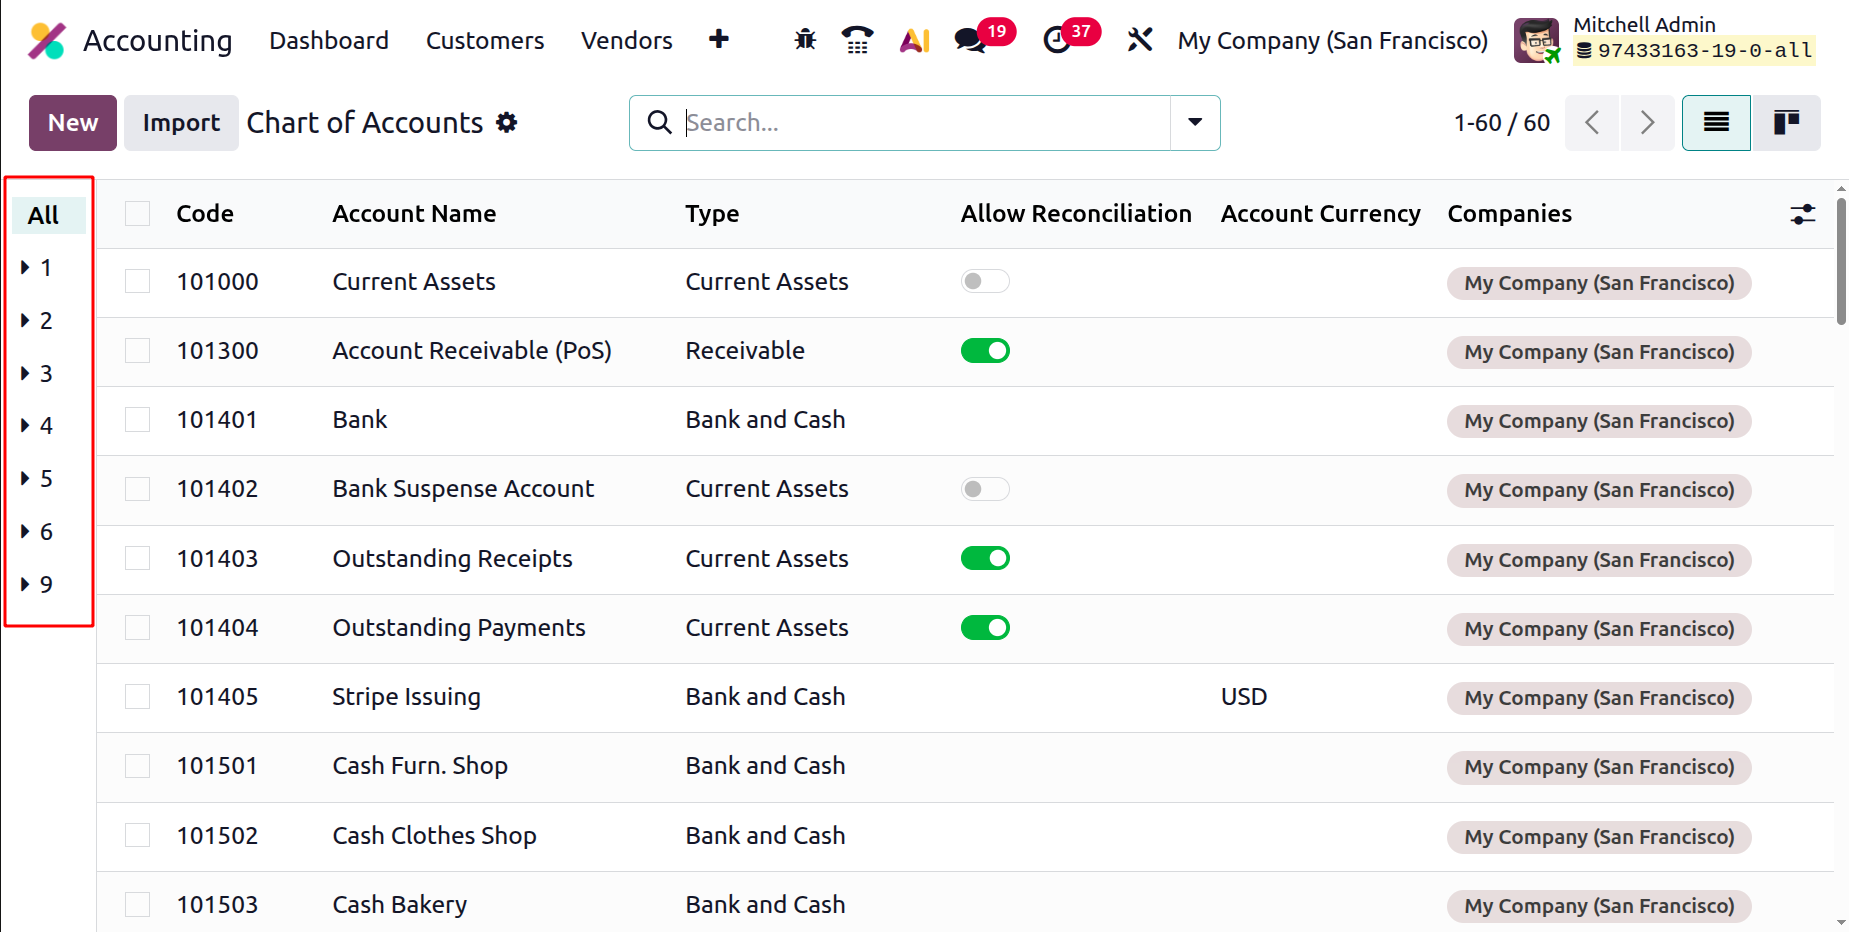
The numbers in reference to the hierarchy are displayed on the very left side of the Chart of Accounts box. As
seen in the figure below, all you have to do is choose the arrow options that show up on the left side of the
window.
Additionally, the "Balance" smart button will give consumers a comprehensive explanation of the financial
activities of the Chart of Accounts inside the organization by enabling them to view relevant journal entries
relating to the Chart of Accounts. The default tax of activities for the relevant chart of accounts can also be
established, which will be very useful in showing that the specified taxes are connected to the financial
operations carried out.
Additionally, you are able to select and explain the categories for the relevant chart of accounts based on the
area in which the business works.
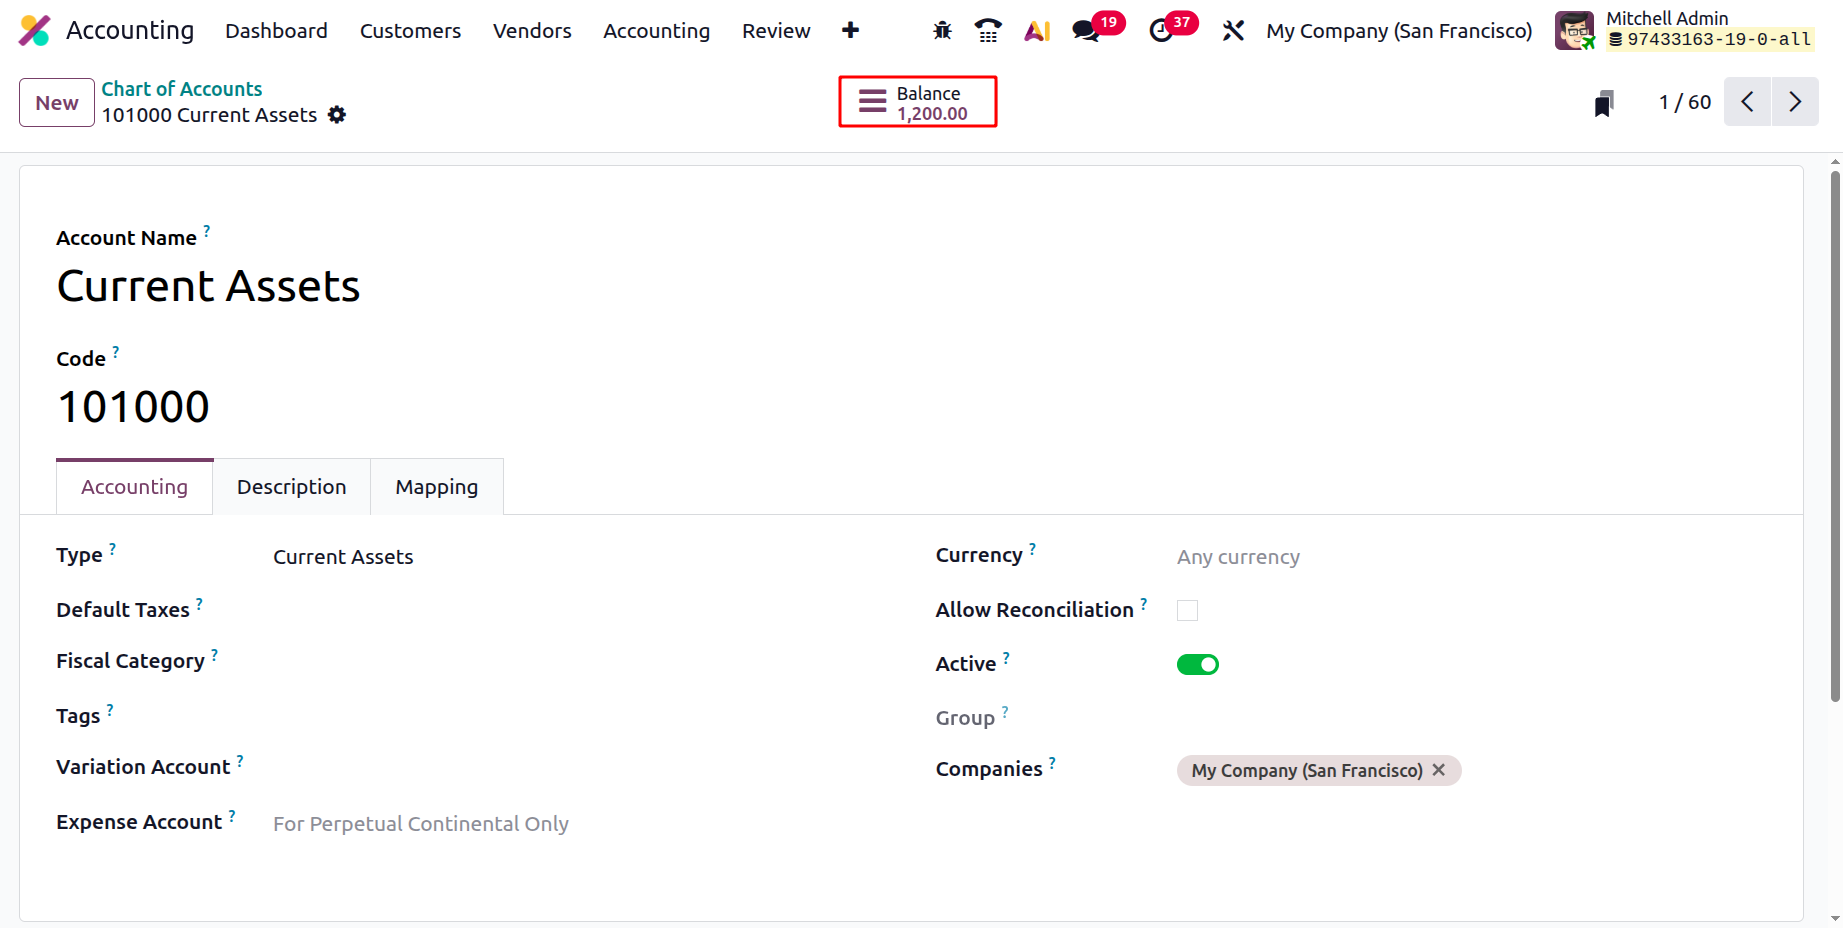
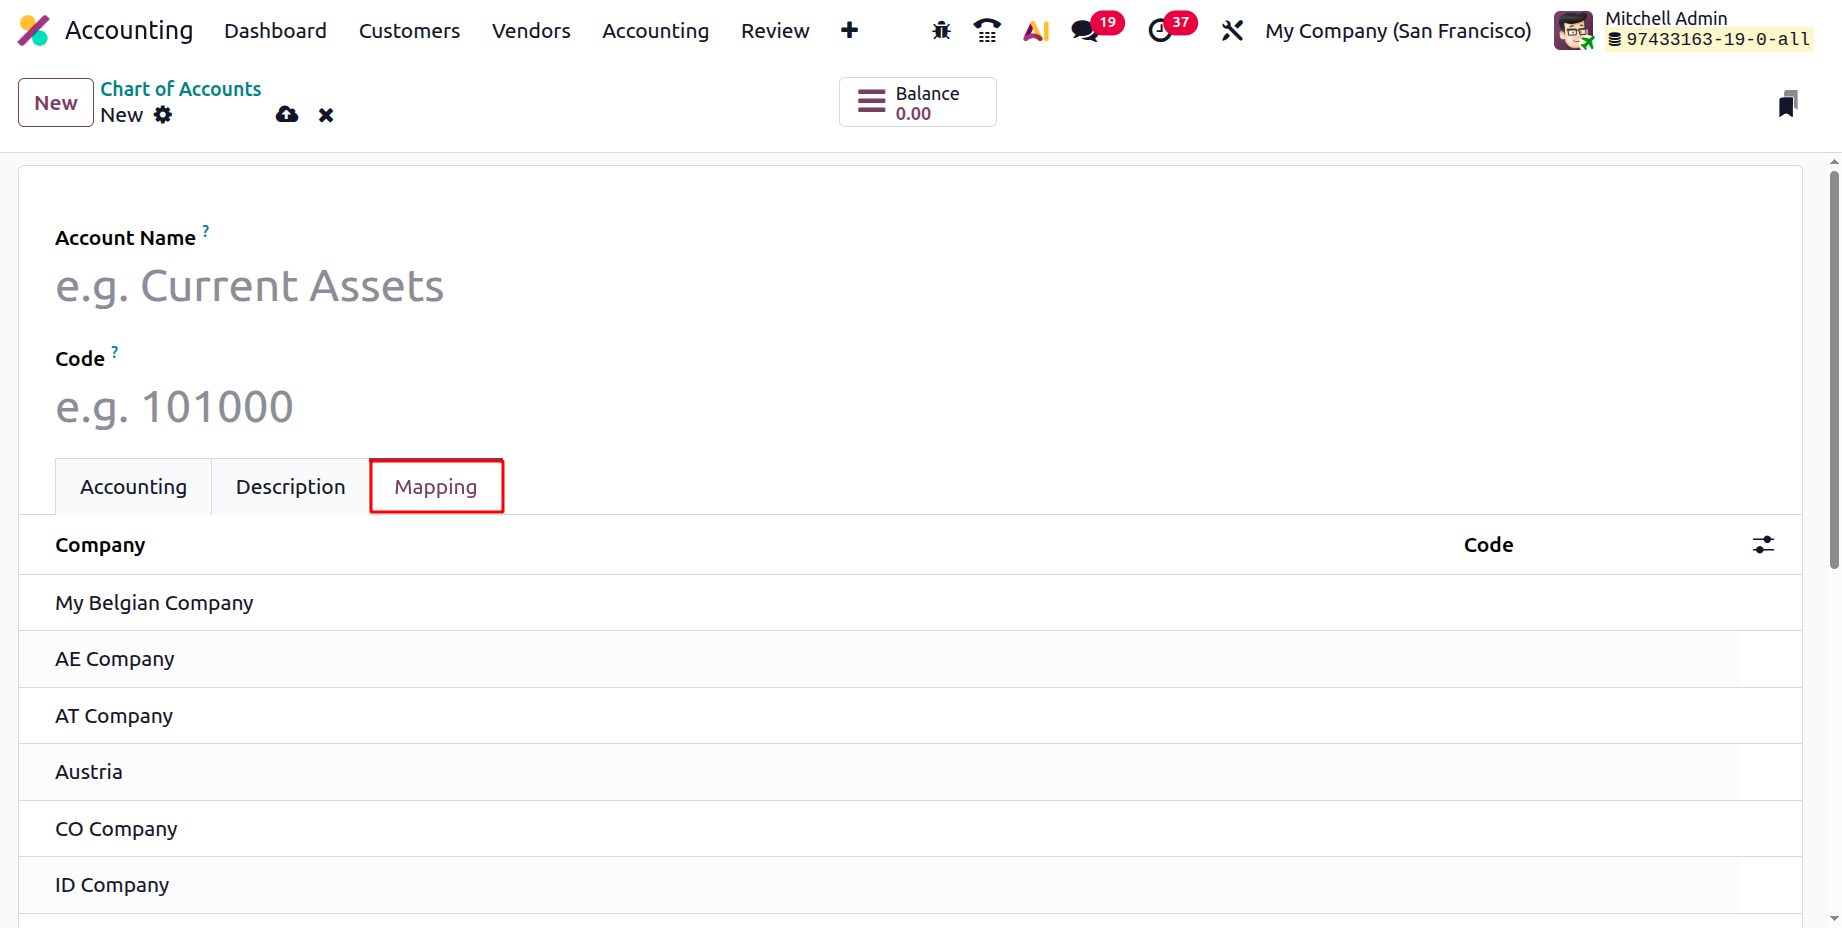
The Description tab facilitates the addition of account descriptions. Here, several organizations can share the
chart of accounts using the Mapping tab. In the Mapping tab, enter the company name and code of that business's
chart of accounts.
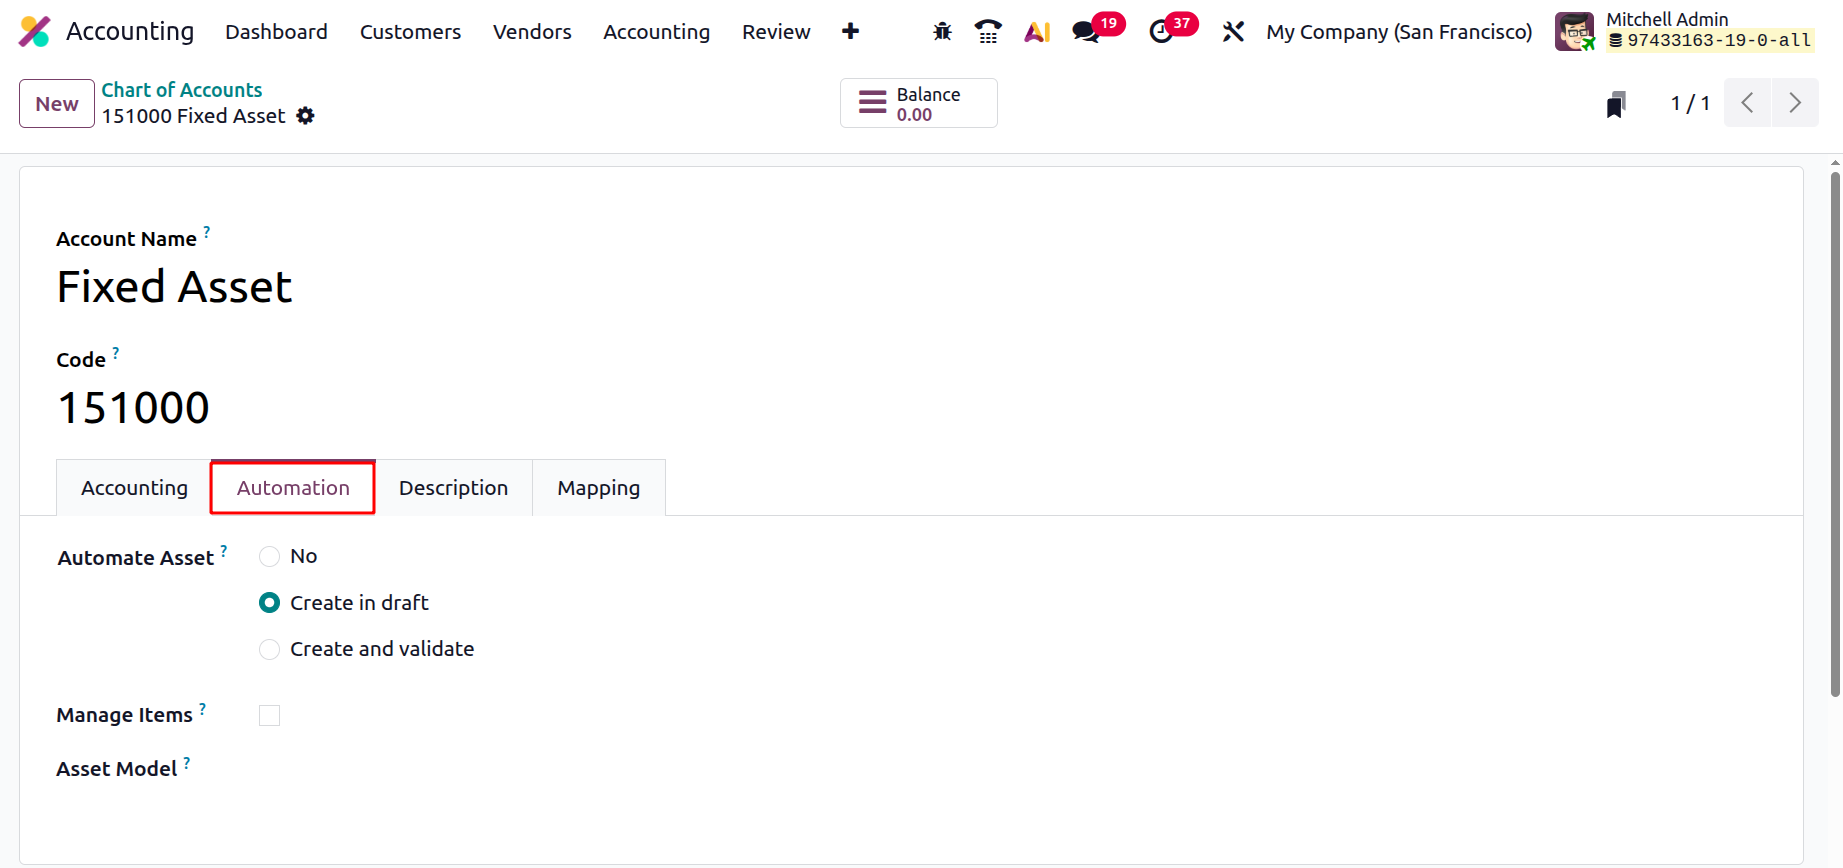
Take a look at the Fixed Asset account, which has an asset automation tab. Three options are available for
Automate Asset: No, Create in draft, and Create and validate. If the Manage items option is used, multiple asset
items will then be generated based on the bill line quantity of a single global asset. An asset will then be
created for each asset model each time this account is utilized on a vendor bill or refund.
How to create a new Chart of Accounts?
To use the Odoo 19 Accounting module, simply click the New button. The modified Chart of Account can be described
on the newly displayed line. Once the Code, Account Name, and Chart of Account Type have been entered, you can
set up the Reconciliation option.
You can enter the necessary data in this Chart of Account configuration box. The code, account name, and account
type that were previously entered will be shown. The Automation and Accounting sections also have settings.
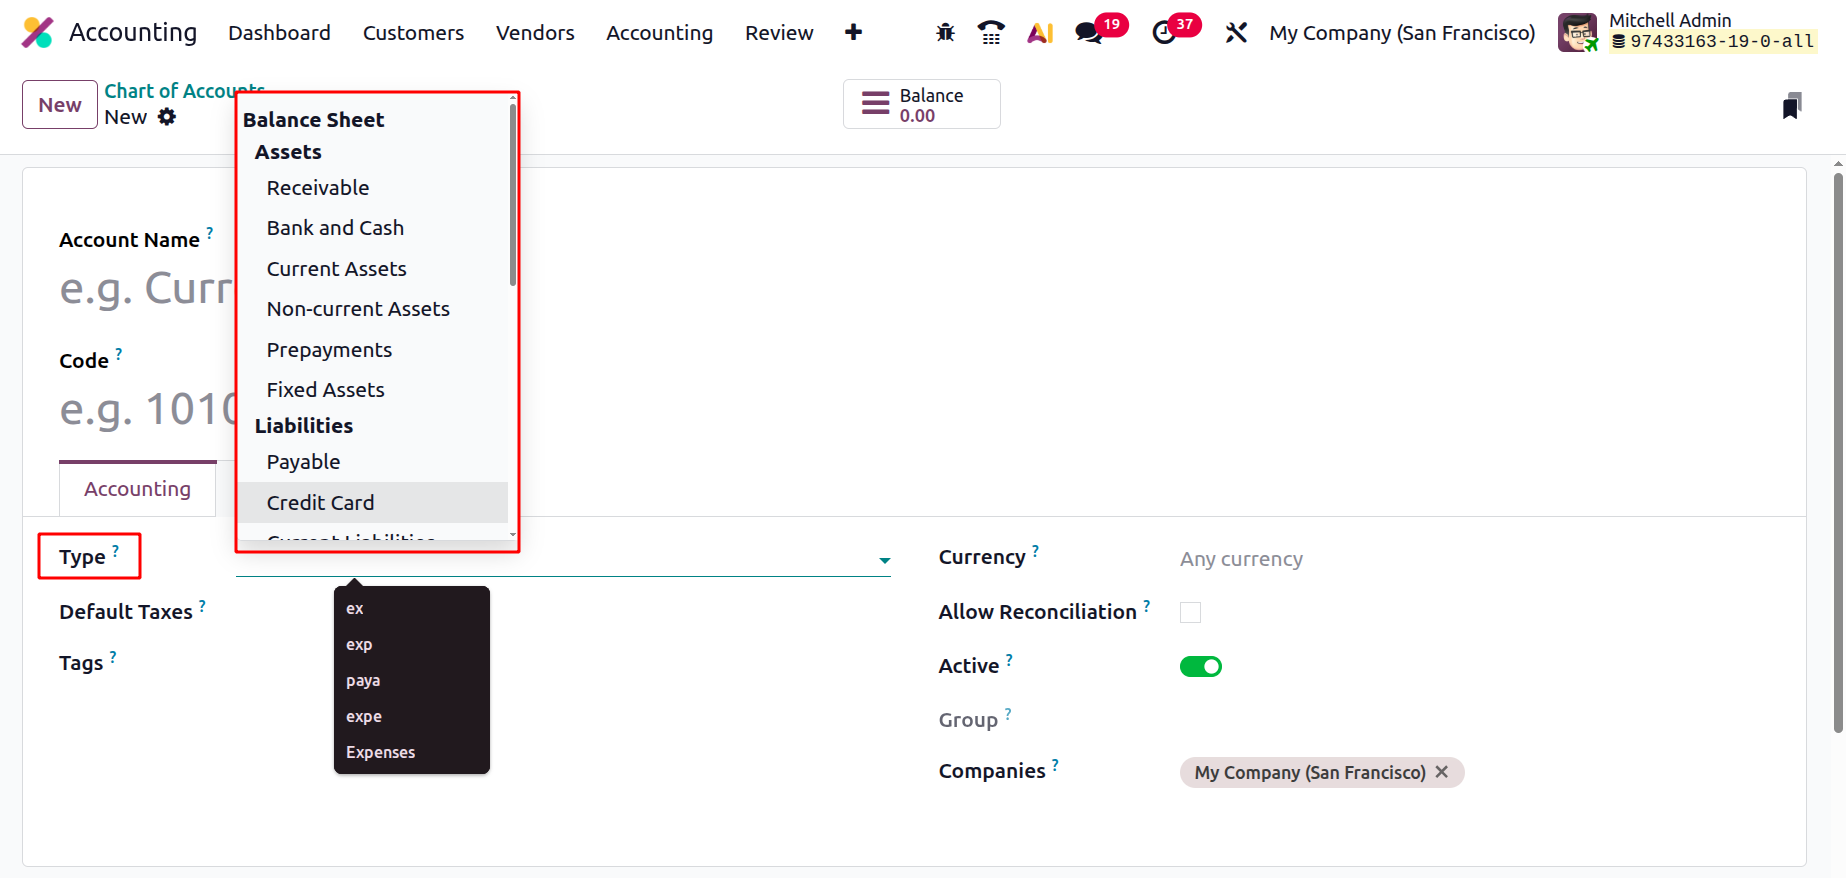
You can specify the Account Type using the Accounting tab. By generating starting entries, defining the
guidelines for ending a fiscal year, and offering legal reports created for certain countries, the account type
fulfills informational goals. Using the dropdown menu, select the Account Type in the Type area. All of the
preset types will be shown in the dropdown menu. Asset, Liability, Equity, Profit Loss, Expense, Income, and
Other are possible classifications. Every account type will also have a number of subcategories, as the
screenshot below illustrates.
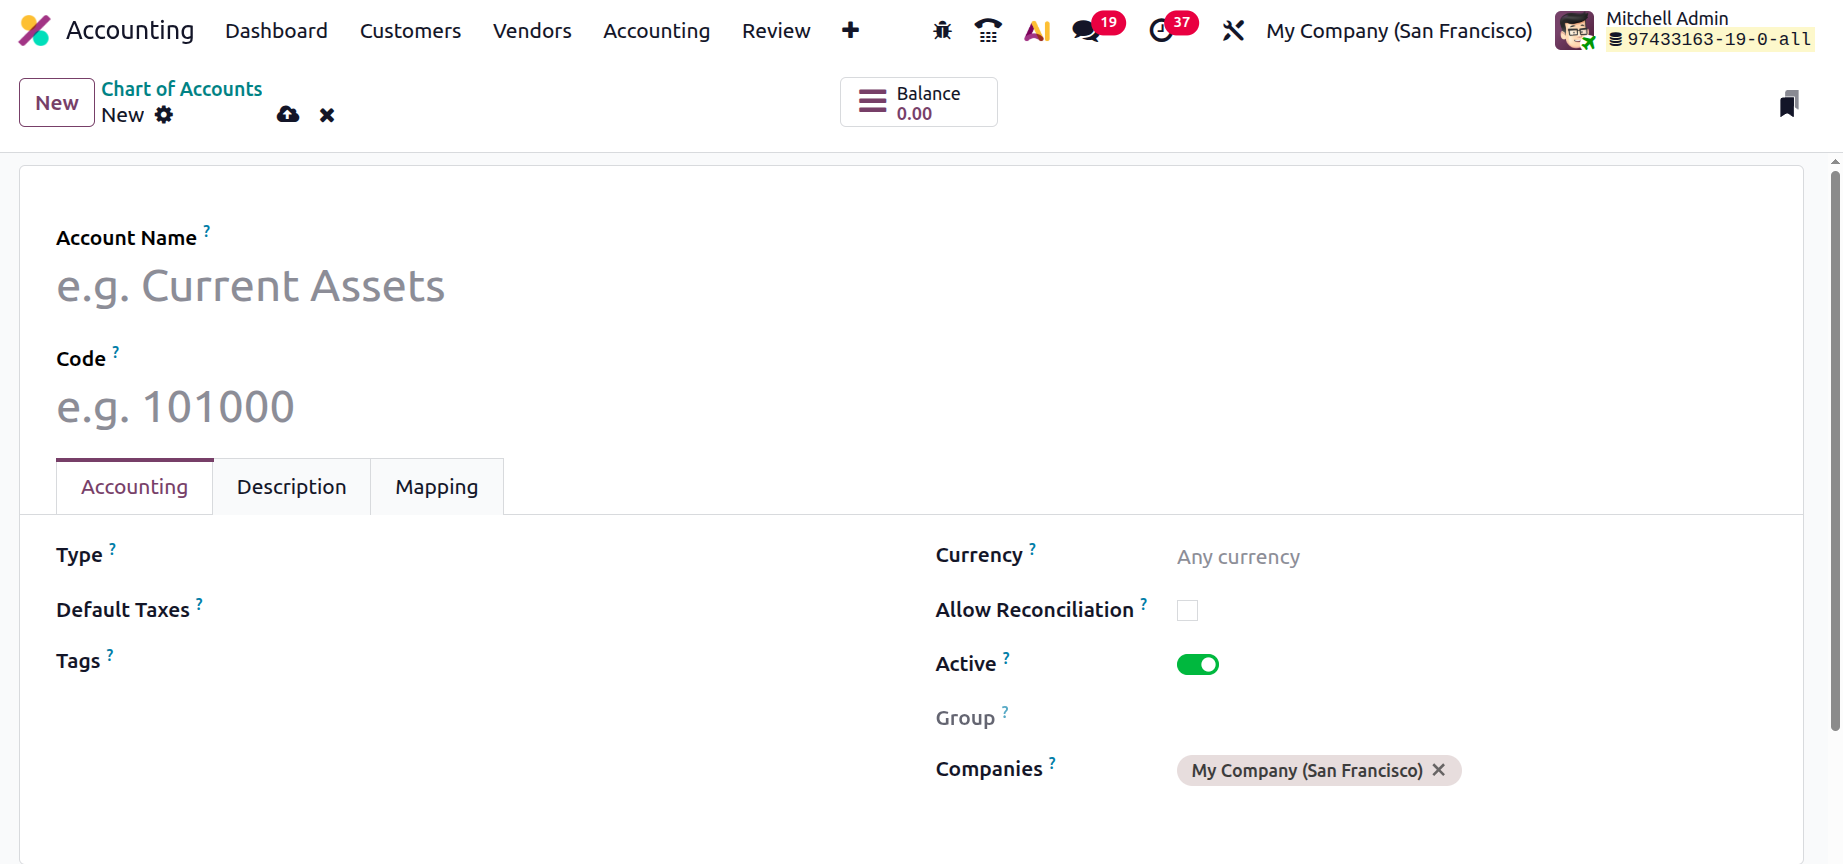
Next is the Default Taxes option. The optional tags you need to utilize for customized reporting can then be
listed in the Tags section. In the Allowed Journals section, you can now list the journals in which this account
is permitted. If this account is left empty, it can be used in any journal. The Account Currency can then be
mentioned. In order to force this particular money to be used throughout the account's journal. Any currency may
be entered if no currency is chosen. You can activate the Allow Reconciliation feature if this account allows
journal items to be matched to invoices and payments.
By merely shifting the cursor over the pertinent fields, you can also modify the Chart of Account. An upload icon
will show up at the top to save your changes. The 'Balance' smart tab also displays the account's balance, which
is determined by numerous journal entries.
The 'Balance' smart tab also displays the account's balance, which is determined by numerous journal entries.
By merely shifting the cursor over the pertinent fields, you can also modify the Chart of Account. An upload icon
will show up at the top to save your changes. The 'NEW' button in the upper right corner of the form view also
makes creating a chart of accounts easier.
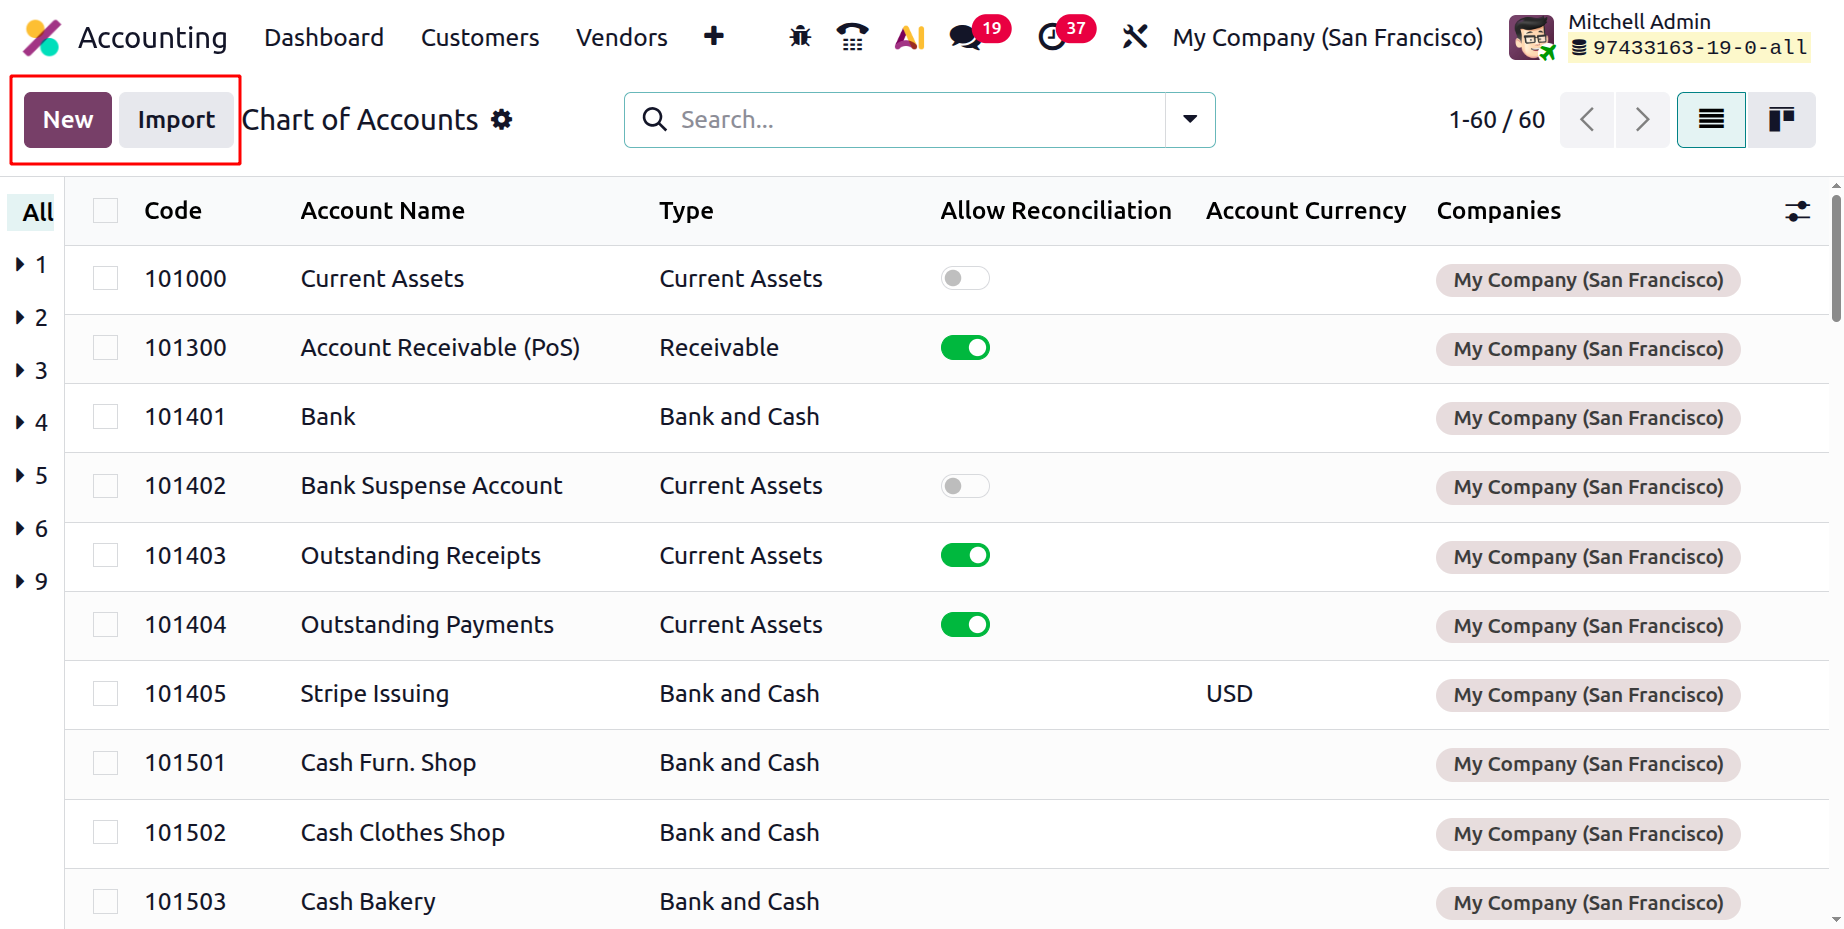
The Odoo 19 Accounting module allows you to import or create a number of Charts of Accounts, depending on the
requirements of the business operation. This tool allows summarizing each financial management's accounting
practices quickly and easily. It is simple to locate the option to import records. By choosing the 'Import
Records' option next to the New button, you can import Chart of Accounts data in CSV or xlsx format.
In the upcoming session, which will focus on tax creation, we can look at the many aspects of imposing taxes on
business operations based on the region. Up until now, we have been talking about the Chart of Accounts option.
Tax Configurations
In order to guarantee that the company complies with local laws, taxes are a crucial component of the business
process that must be effectively managed. Setting up taxes is possible with the Odoo 19 Accounting application.
This section will teach you how to set up taxes in Odoo 19. Since taxes are an expense that must be recorded on
financial accounts, they are a crucial part of accounting. Accounting for taxes requires an understanding of the
numerous tax laws and regulations. Another requirement is to accurately record, file, and pay taxes to the
appropriate tax authorities. Tax accounting combines accounting and tax expertise.
It is necessary to determine the correct tax liability, prepare tax returns, and submit them to the relevant tax
authorities. It also entails monitoring all tax-related transactions, including payments, credits, and
deductions. Additionally, financial statements are created to display a person's or company's tax obligations.
The amount that must be deducted from employee wages in order to pay taxes is also determined using tax
accounting. Another use for tax accounting is figuring out how much should be deducted from employee pay checks
for perks and other expenses. Creating tax forecasts and budgets that a person or business may utilize to manage
their cash flow and tax obligations is another aspect of it. Tax planning is essential to ensuring that a
company or individual complies with the applicable tax laws and regulations. But it's a complicated topic that
calls for a deep comprehension of the many tax rules and regulations. Tax preparation, filing, and payment can
be aided by qualified accountants and tax preparers. The tax preparation, filing, and computation procedures may
also be automated by software applications such as Odoo19 Accounting.
In exchange for a favour, taxes are regarded as a debt owed by the client to the service provider. When the
organizations file their taxes, they must pay the same amount to the government or other authorities. Every
nation has a unique tax system with varying percentages, and each nation's local government has complete control
over it. Your company's accounting management tool needs to be able to configure specific taxes for various
operations, and the Odoo19 Accounting software is quite good at doing so.
For creating all tax types for their sales, purchases, and services rendered, the Odoo 19 Accounting platform is
quite helpful. It could be defined based on the nation where the company operates. One of the localization tools
on the Odoo19 platform may provide this feature.
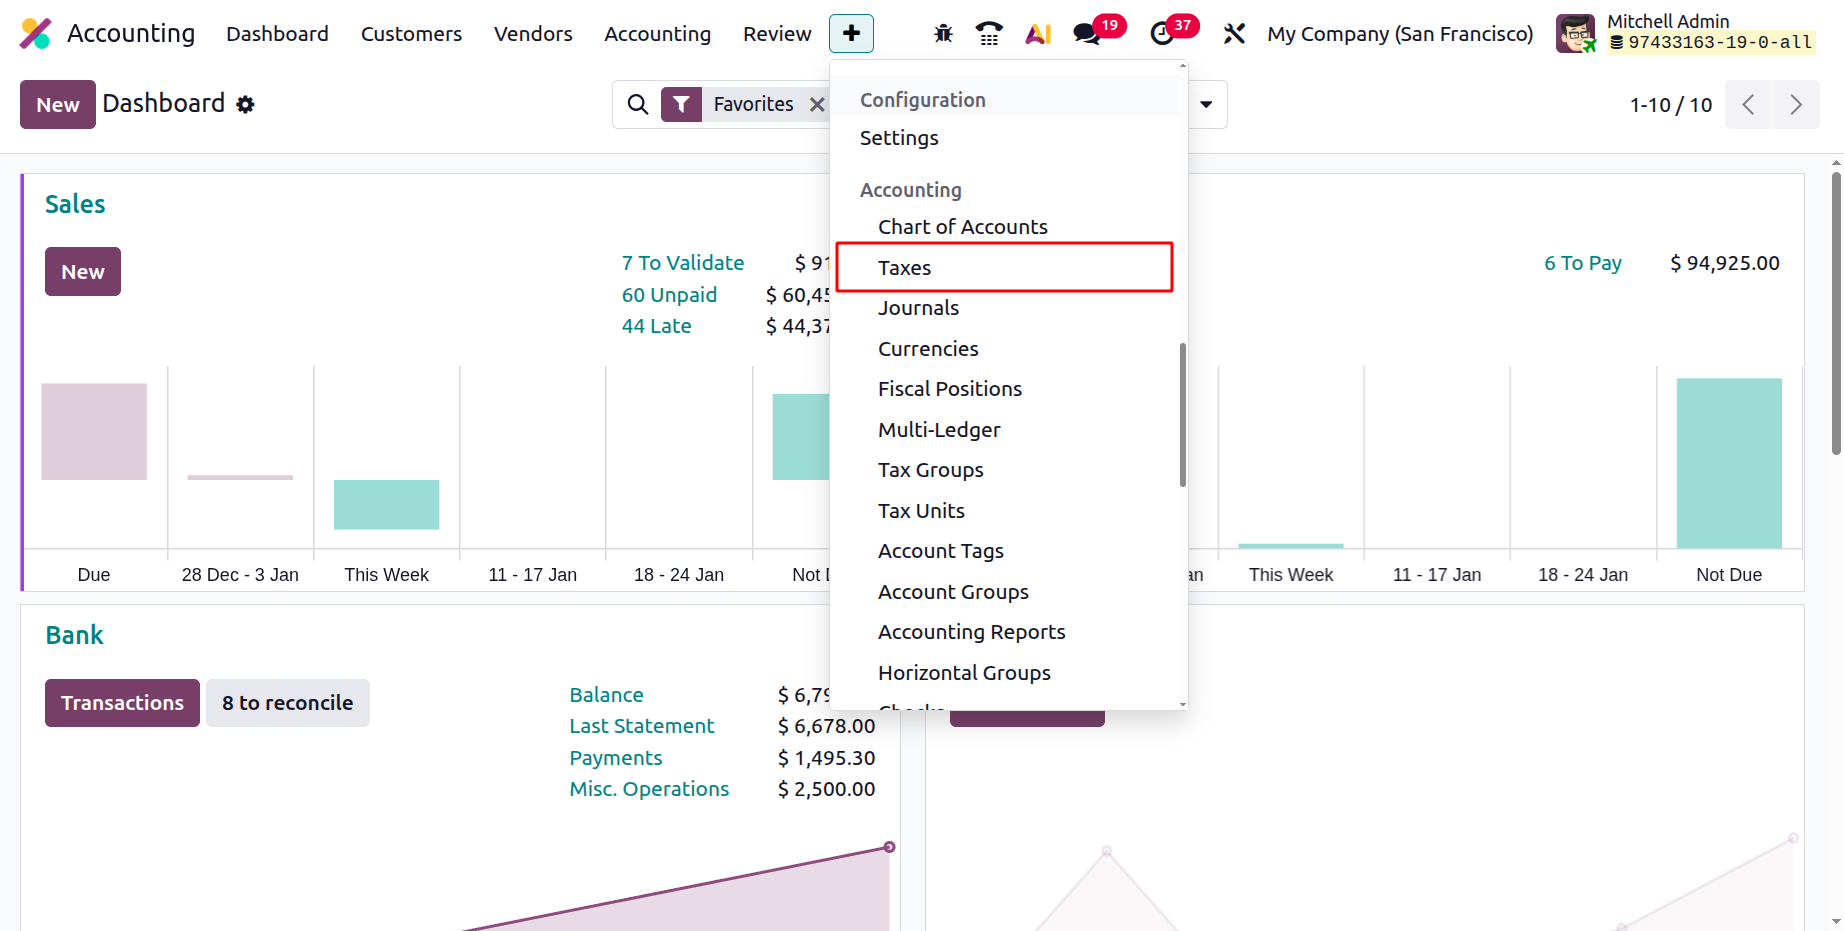
To set up taxes for your company, follow these steps. After going to the Accounting module, select the
"Configuration" menu from the menu list on the left. As seen in the image below, select the 'Taxes' menu from
the Accounting section of the Configuration menu.
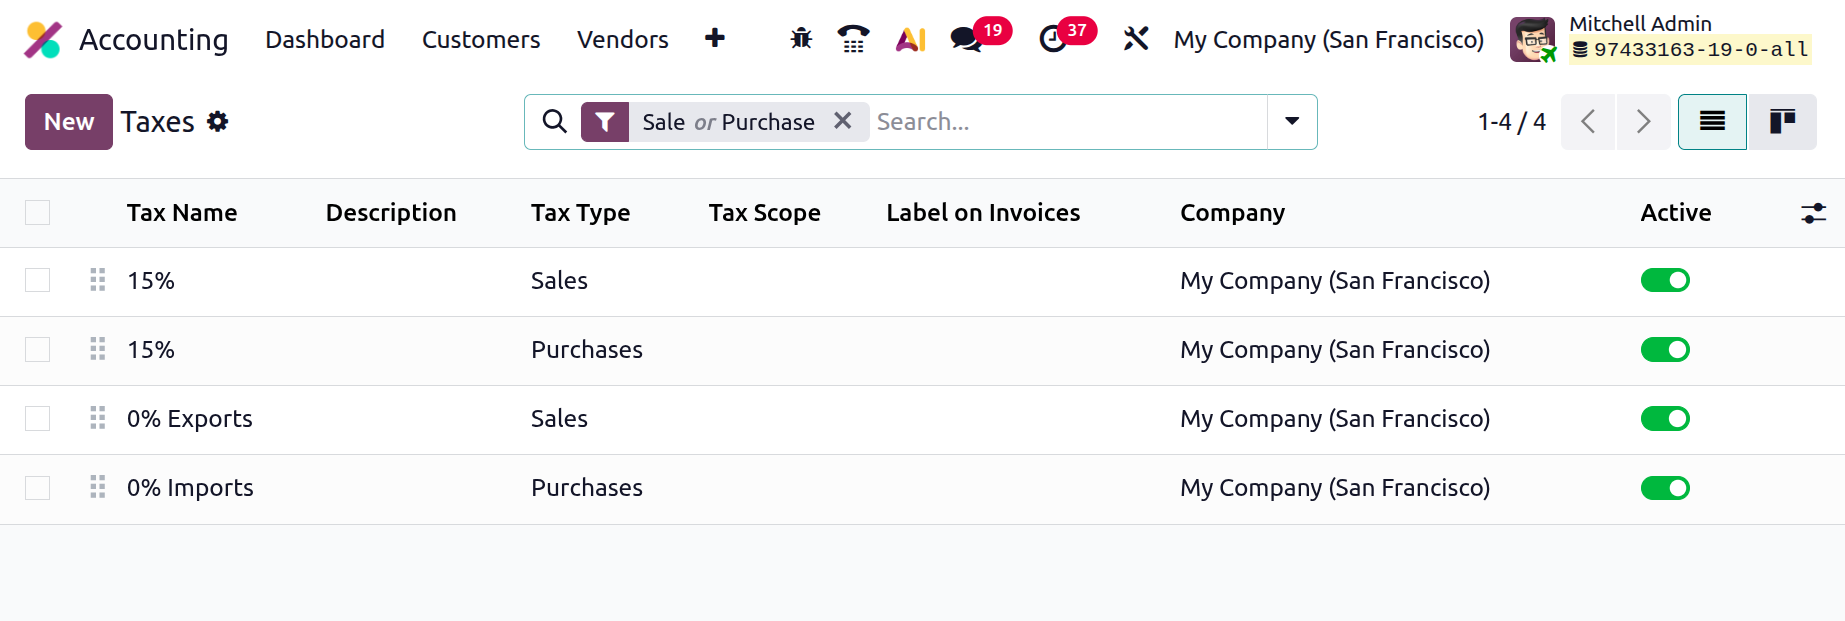
To add a new tax, click the New button in the Taxes window. Additionally, as seen in the picture below, the Taxes
window will provide the specifics of all previously set taxes. The present taxes can also be changed. Important
information about the configured taxes, including the company, invoice label, tax name, tax type, and tax scope,
will be shown in the window. In addition to these options, you may view a boolean field called Active to enable
or disable the specific tax.
Therefore, it is extremely easy to construct tax computations for the applicable taxes that are already defined
utilizing the Odoo19 platform. The platform also provides Fixed, Percentage of Price, Percentage of Price Tax
Included, Group of Taxes, and Percentage of Price as default tax computations.
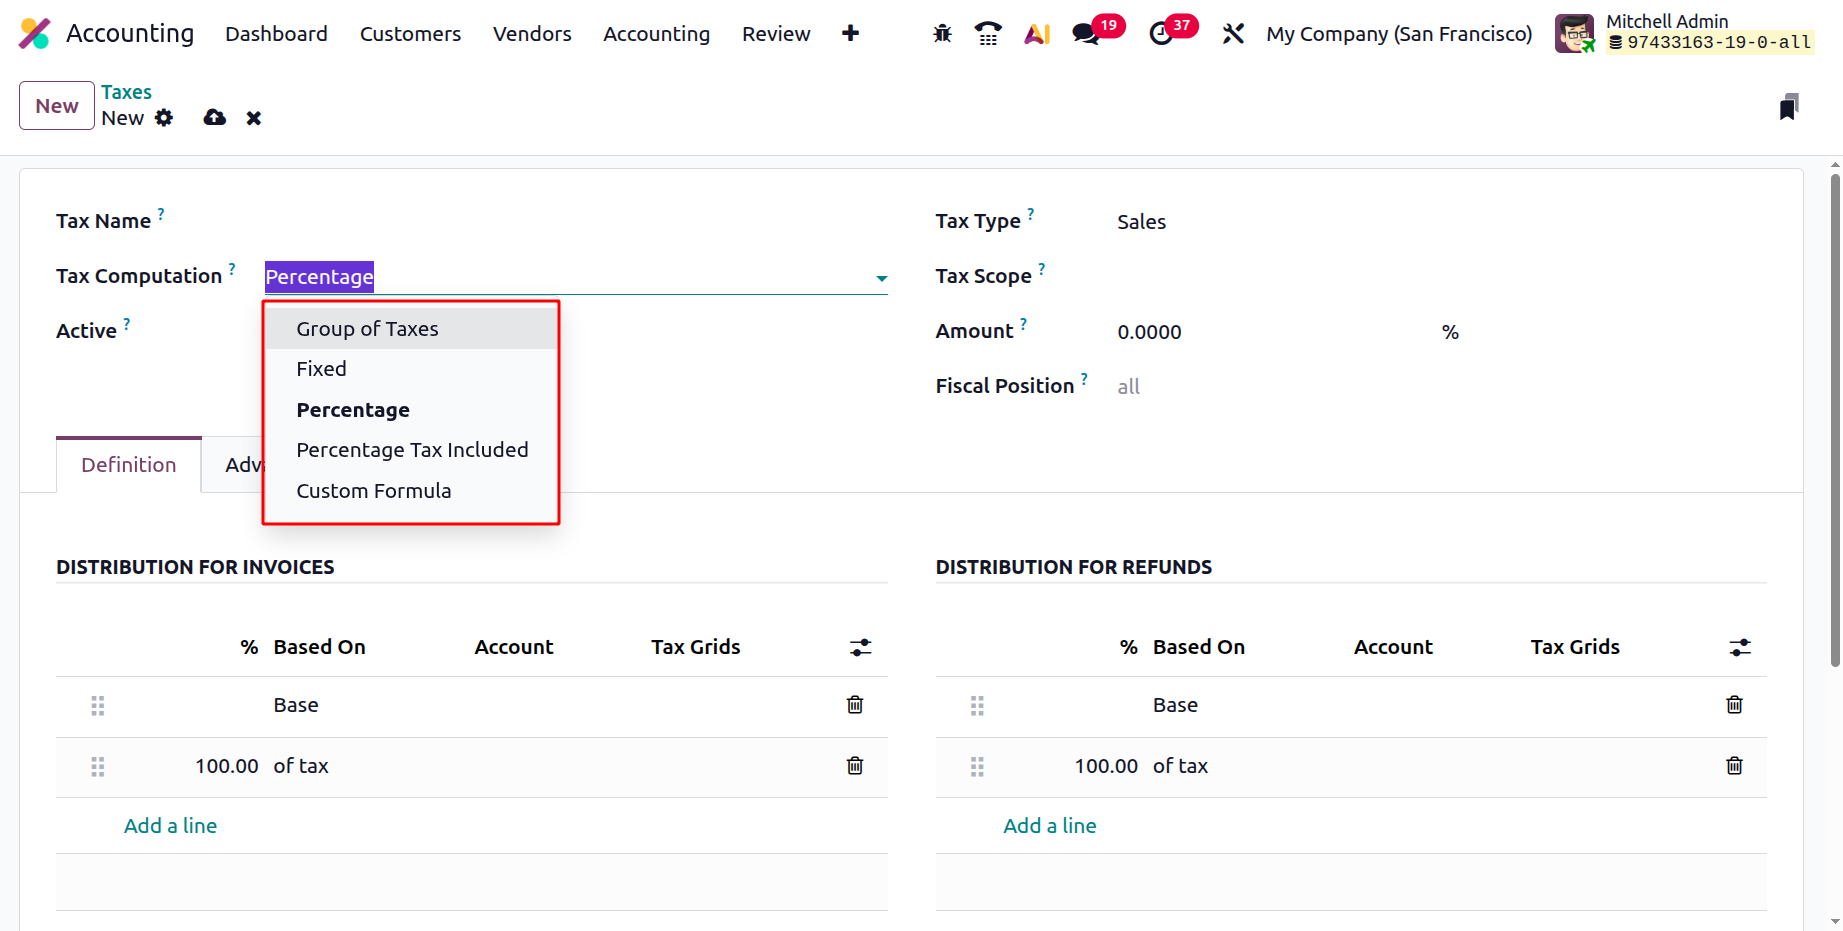
- Fixed Tax Computation: Using a preset set of rules and tax rates, taxes can be calculated in Odoo19 Accounting
using the automated tax computation method known as Fixed Tax Computation. This system can be used for tax,
sales, and purchase calculations in addition to payroll and other financial operations. Businesses who have a
lot of transactions and need to compute taxes fast and precisely will find this solution helpful. For businesses
that need to keep accurate records for tax compliance, Odoo19's fixed tax computation may be beneficial.
- Group of Taxes: The Group of Taxes in Odoo 19 Accounting You may set up and manage various tax rates with a
computation tool. Additionally, taxes can be grouped and applied to transactions. It is possible for users to
establish various tax groups, allocate taxes to them, and then utilize those taxes in their transactions. This
makes it easier to guarantee that all taxes are calculated correctly and consistently.
- Percentage of Price: This depends on the kind of tax applied in the Percentage of Price Tax Computation. For
instance, a normal VAT rate might be 20% but a customs duty rate might be 10%. Numerous kinds of transactions
may be subject to a certain tax at a specific rate. It will rely on the predetermined fixed percentage of the
entire sum.
- Price Tax Percentage Included: Finally, the structure of the tax regulations affects how the Percentage of Price
Tax Included is calculated. The percentage of tax included in the price will be automatically computed depending
on the applicable tax rate once the tax regulations are established. The tax settings in Odoo19 Accounting
contain the proportion of price tax that is incorporated in the computation. The award amounts will include the
tax amount.
- Custom Formula: Lastly, the tax computation is possible on the basis of added Python code.
Returning to the Taxes window will show you the numerous fields that must be filled out in order to produce a tax
in the Taxes Creation window. Below is a screenshot of the creation form. To begin, enter the tax name in the
Tax Name area of this window. The Tax Type may then be displayed. Using the dropdown menu, you can choose Sales,
Purchase, or None. Where the tax can be chosen depends on this tax kind. The 'None' option indicates that the
tax is ineffective on its own. However, it can still be used by a group.
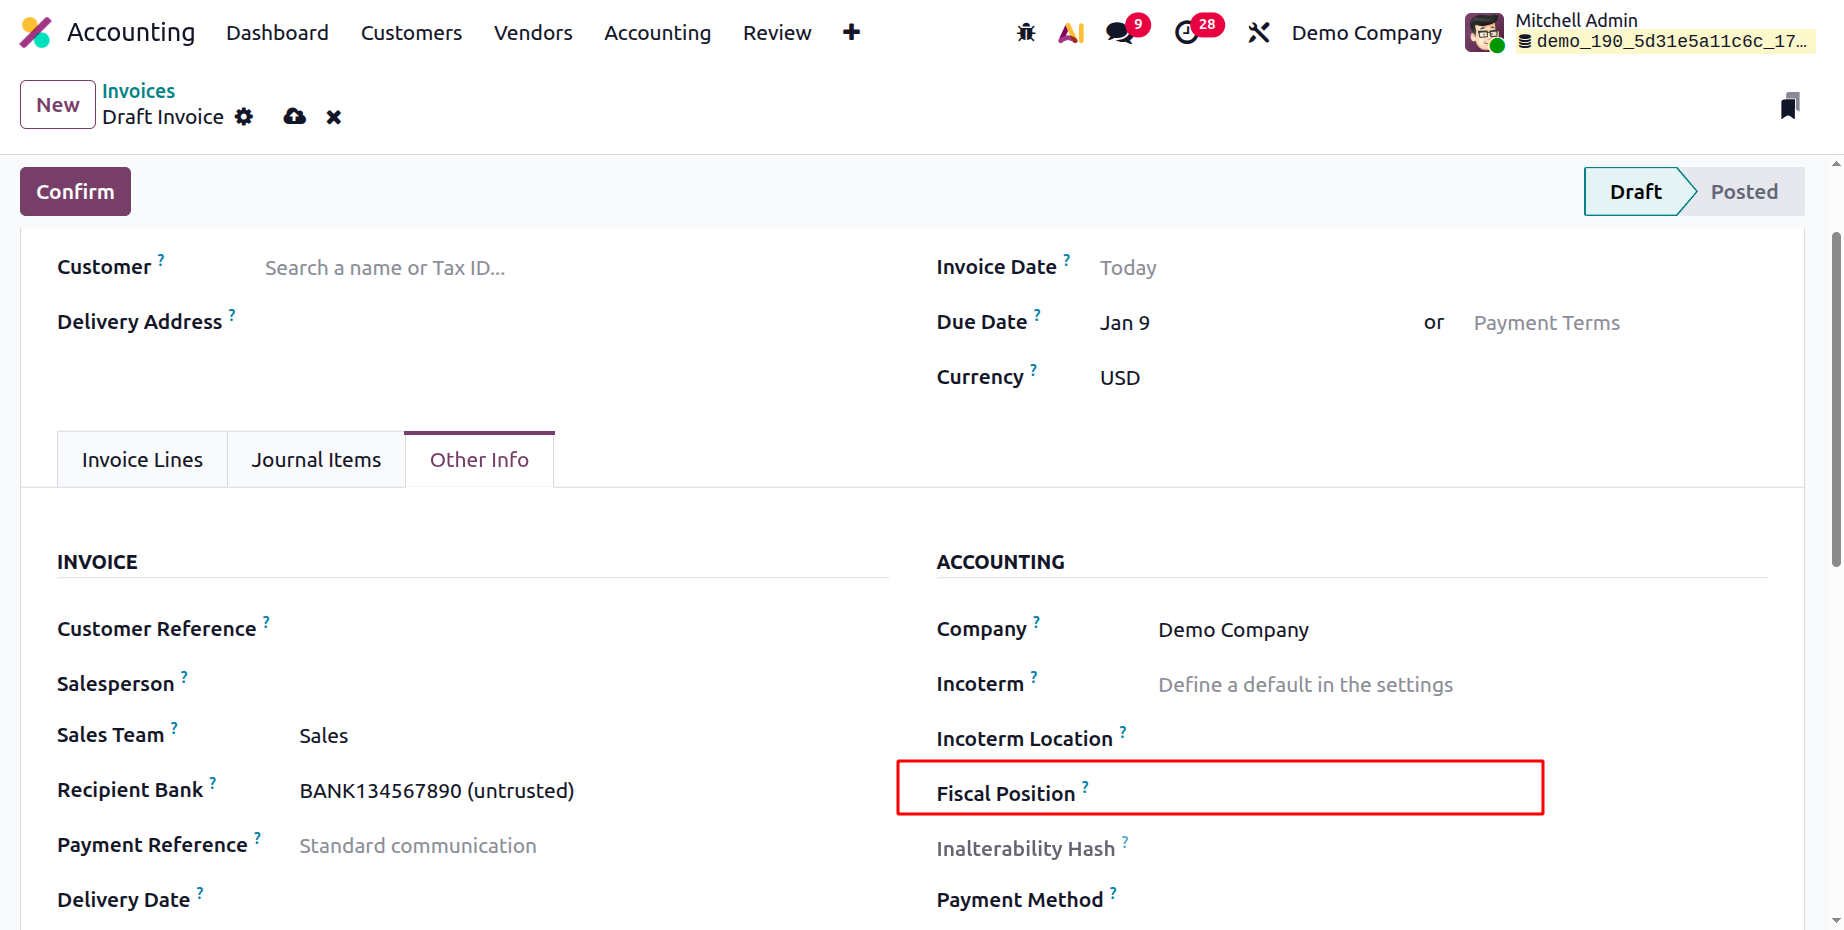
In Odoo 19 the Fiscal Position can be chosen inside the taxes.
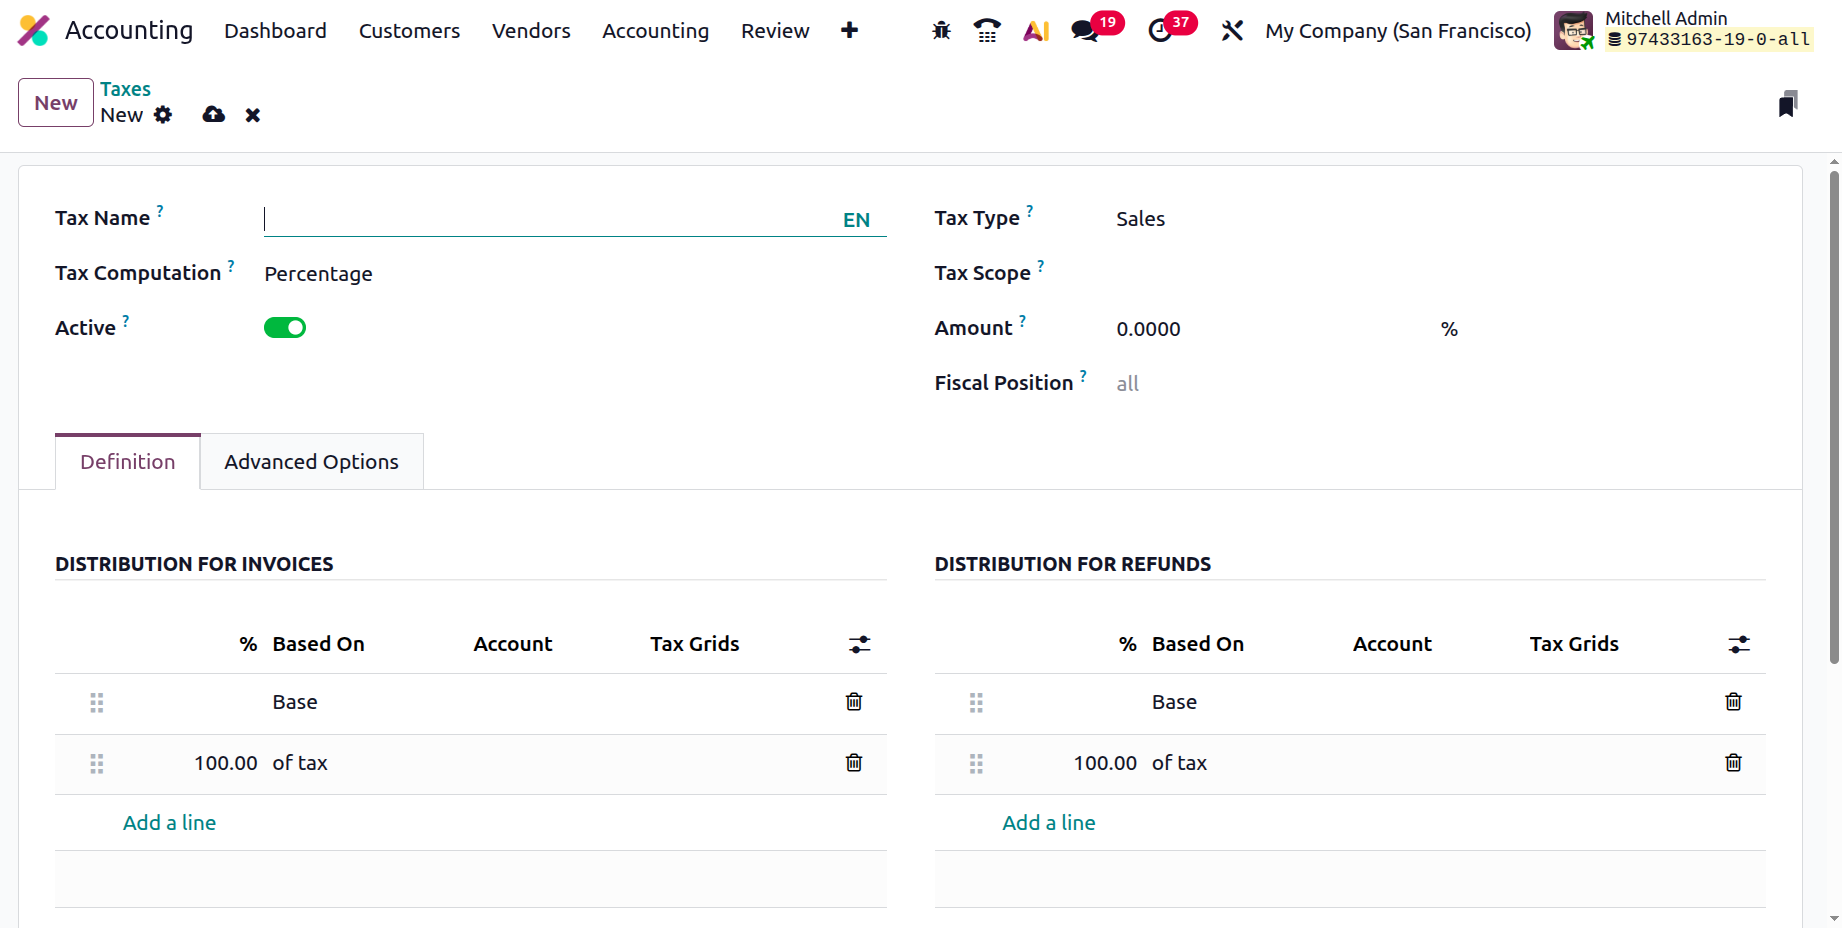
You can fill out the Tax Scope form after selecting the appropriate option in this section. Either goods or
services are available for selection. You can limit the application of taxes to a certain category of goods or
services by using this option. The tax amount can then be entered in the Amount column as a percentage.
The Tax Computation option is also available via the dropdown menu. Group of Taxes, Fixed, Percentage of Price,
Percentage of Price Tax Included, and Python Code are among the possibilities in the drop-down menu. The chosen
option can be used to specify the Definition tab. Therefore, by opting to set the Tax active boolean field to
false, you can conceal the tax without truly eliminating it.
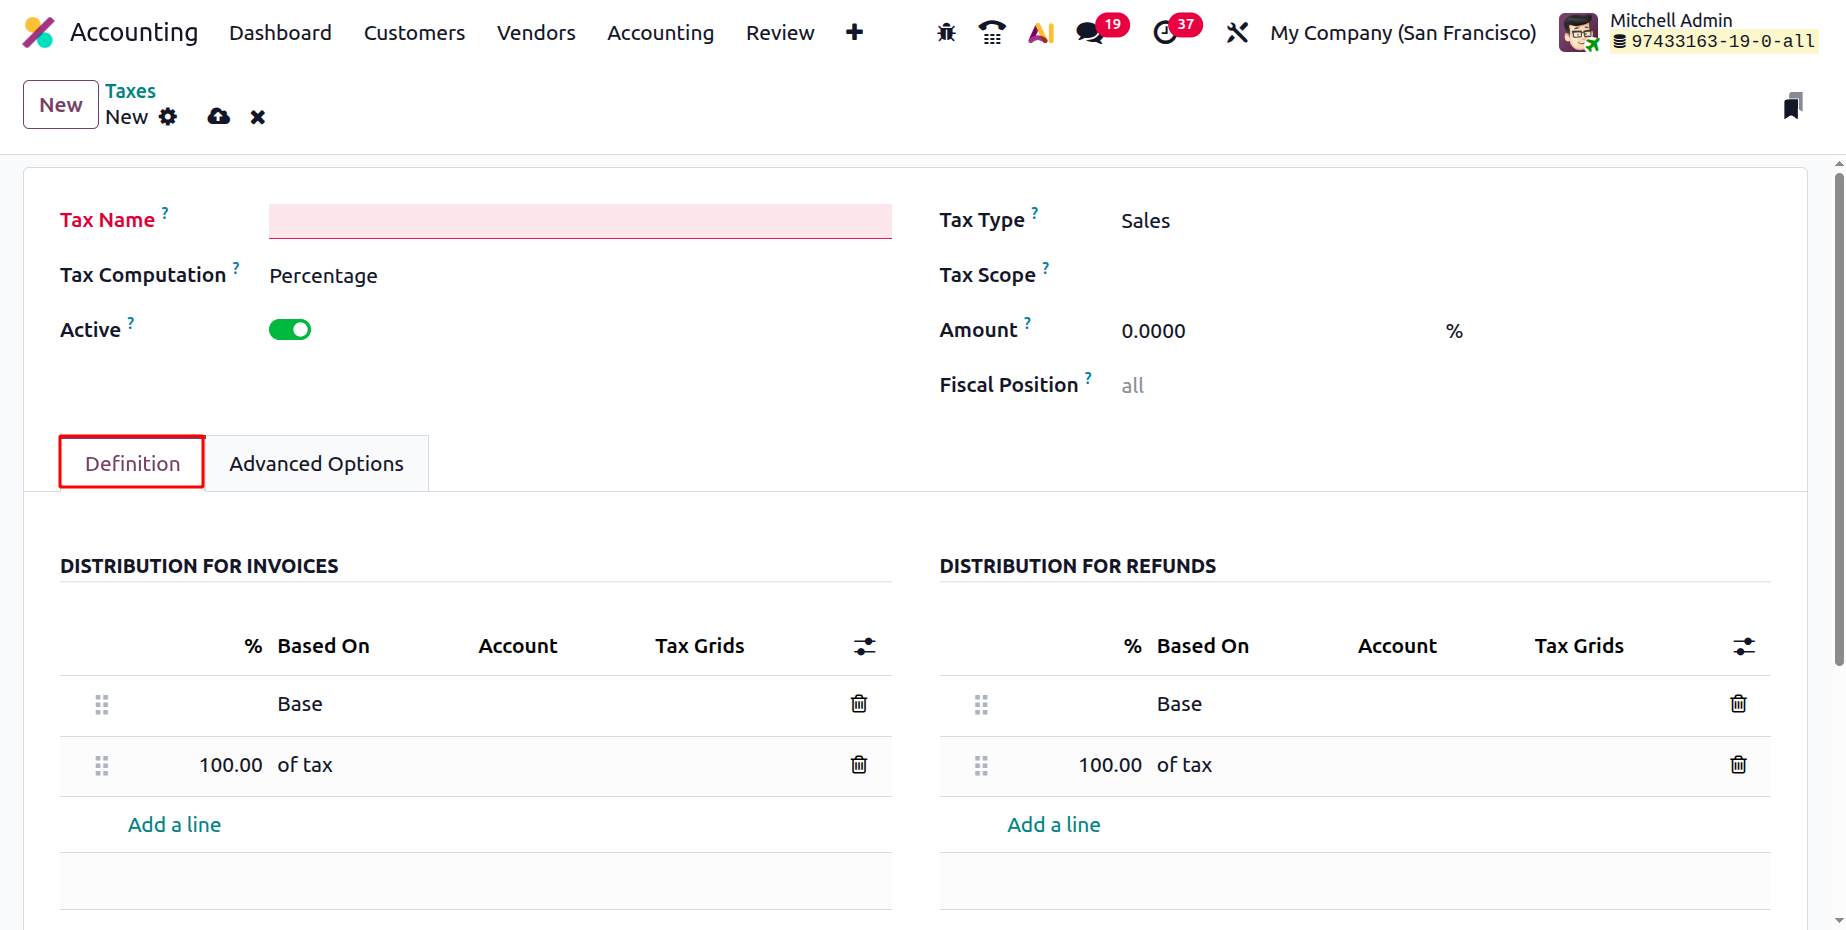
Under the Definition tab, you can additionally specify how the tax is defined in relation to the different
aspects of business activities. A description of the Distribution of Invoices should be included in the
DISTRIBUTION FOR INVOICES part of any tax computations other than the Group of Taxes. Here, you can use the "Add
a Line" option to describe the tax definition, the "- based on," the account that should be used to post the tax
amount, and the tax grids.
By creating a line, it is also feasible to eliminate the current definition and create a new one. The
DISTRIBUTION FOR REFUNDS can likewise be defined using the same technique.
Other fields, including Label on Invoices, Description, Tax Group of the defined tax, Include in Analytic Cost,
and many more, were also available under the Advanced Options tab in the Taxes creation window.
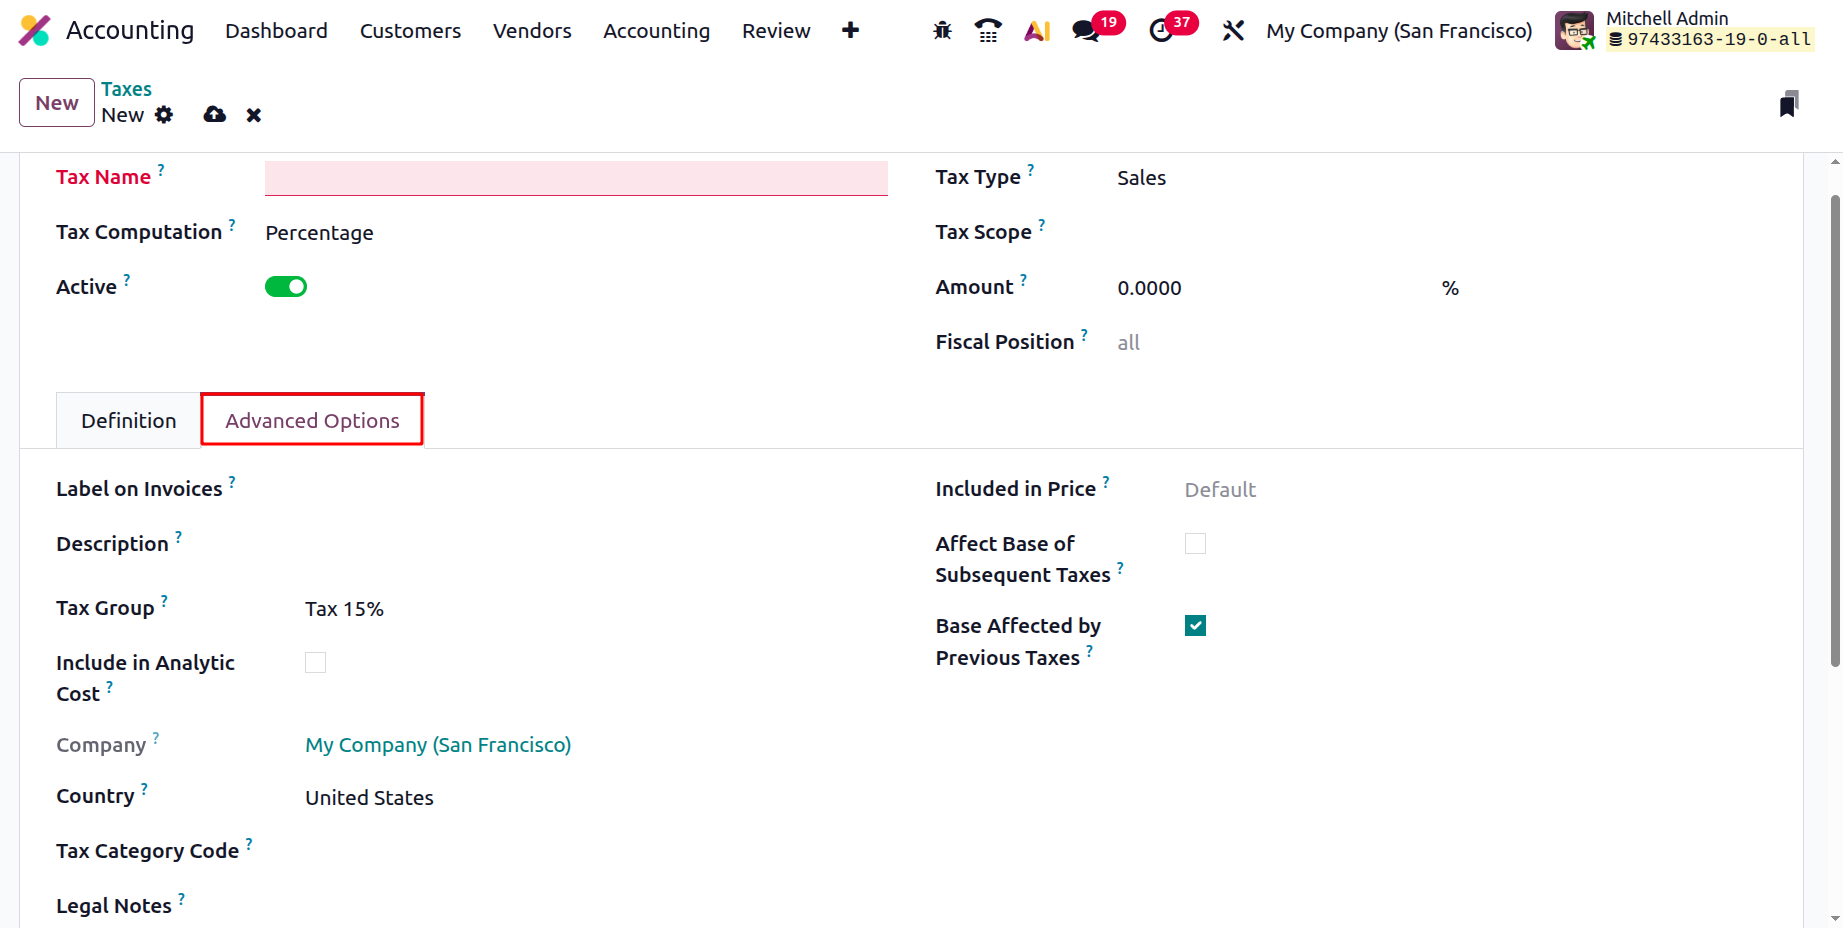
You can tick or uncheck the "Include in Analytic Cost" option. The amount determined by this tax will be assigned
to the same analysis account as the invoice line if you select this option. The 'Include in Analytic Cost'
option is only accessible when Analytic Accounting is activated. The business and the nation for whom this tax
is applicable can then be identified using the pertinent components.
The legal remarks are the ones that need to be printed on the invoice. If the pricing you use for the items and
invoices includes the tax amount, you may additionally check the box next to the "Included in Price" option.
Additionally, taxes higher in the series than this one will be affected if you enable the "Effect Base of
Subsequent Taxes" field.
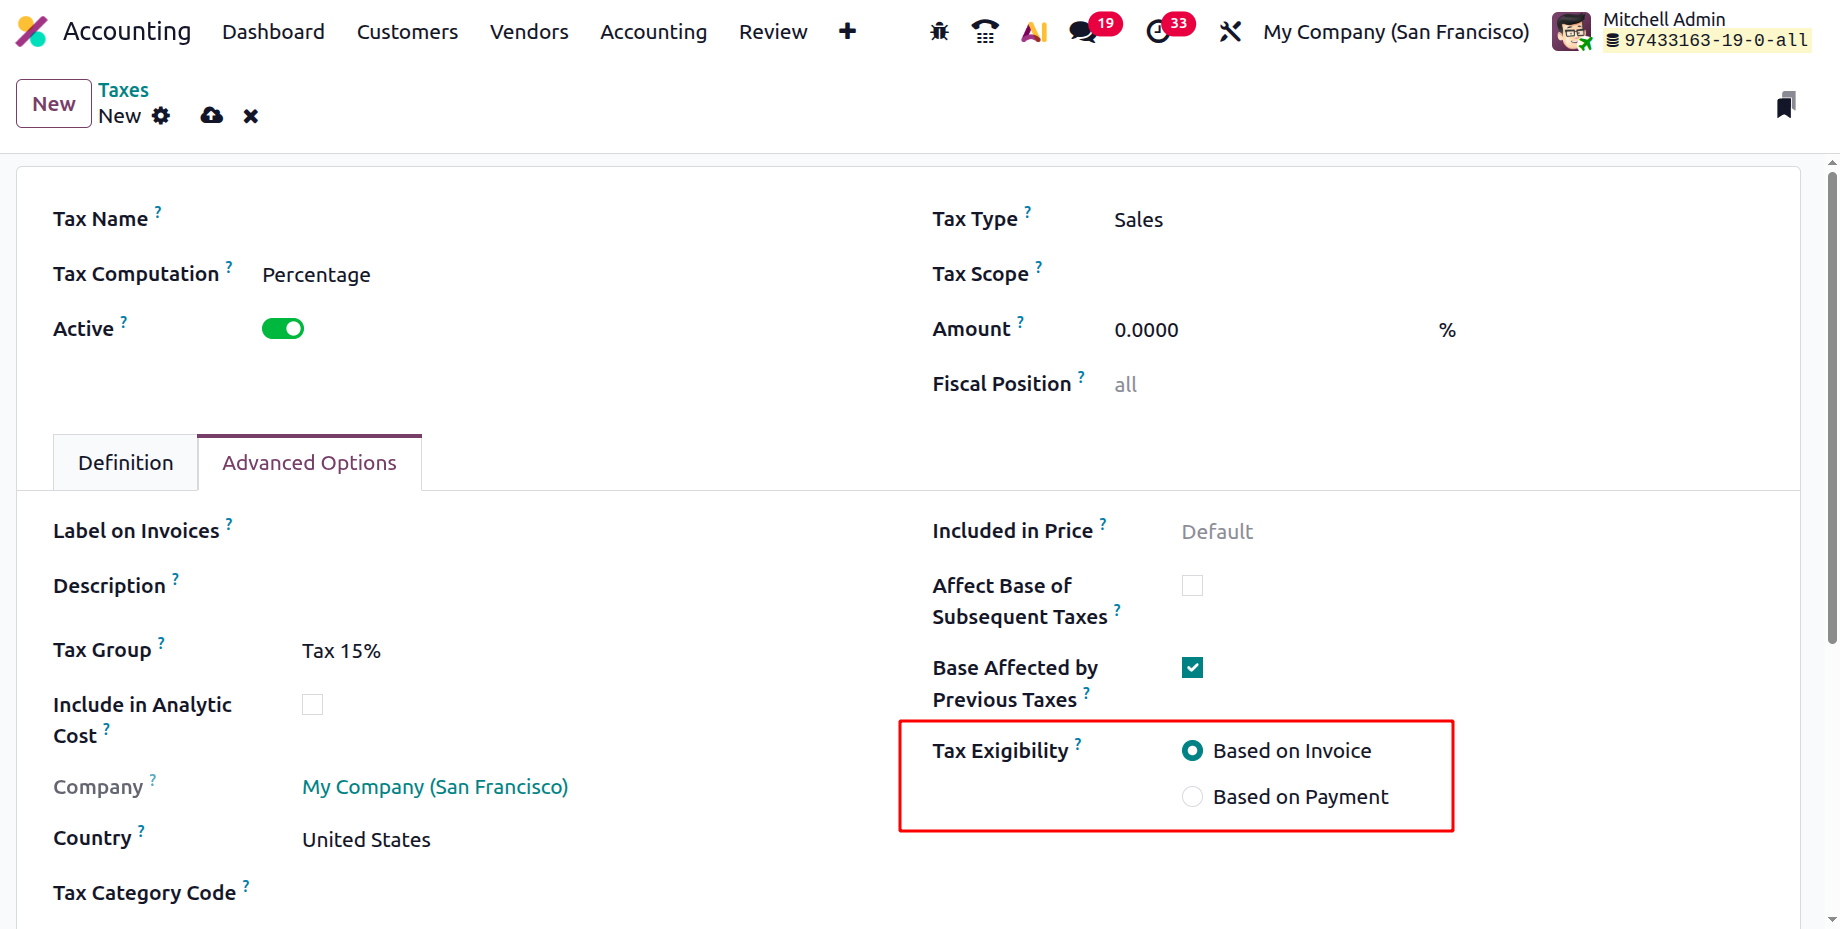
The Tax Exigibility section is the last one and has two options: "Based on Invoice" and "Based on Payment." The
tax is due as soon as the invoice is validated if you choose Based on Invoice. Payment must be made as soon as
the invoice is paid if it is necessary for tax exemption. All of the data pertaining to the Tax Configuration is
contained here. A successful tax setup can be used for commercial objectives. This function allows you to set
all sales taxes, purchase taxes, and service taxes, which will be applied to each good and service in accordance
with the specifications.
Cash Basis Tax Configuration
When using a cash basis tax structure, revenue is recorded as soon as funds are received, and costs are recorded
as soon as funds are disbursed. Businesses with high costs but few sales can benefit from this kind of
accounting. This is one of the most crucial things to consider when your company spends cash. According to
Odoo19's concept of Cash Basis, taxes are recorded when the payment is completed rather than when the goods or
services are delivered or the invoice is validated. This feature allows you to record and report your taxes on a
cash basis instead of an accrual basis. Smaller firms who must immediately declare their taxes or adhere to
specific requirements may find this helpful. Odoo 19 Accounting will track your taxes as you pay them under the
cash basis tax system, providing you with a more accurate and up-to-date picture of your financial status. This
could help you make better tax payment plans and make sure you pay your taxes on time.
You must first activate the Cash Basis option from the Odoo Accounting platform's Configuration Settings window
in order to activate the Cash Basis Taxation feature on your Odoo19 platform. The 'Taxes' area is located here
in Settings, as seen in the figure below.
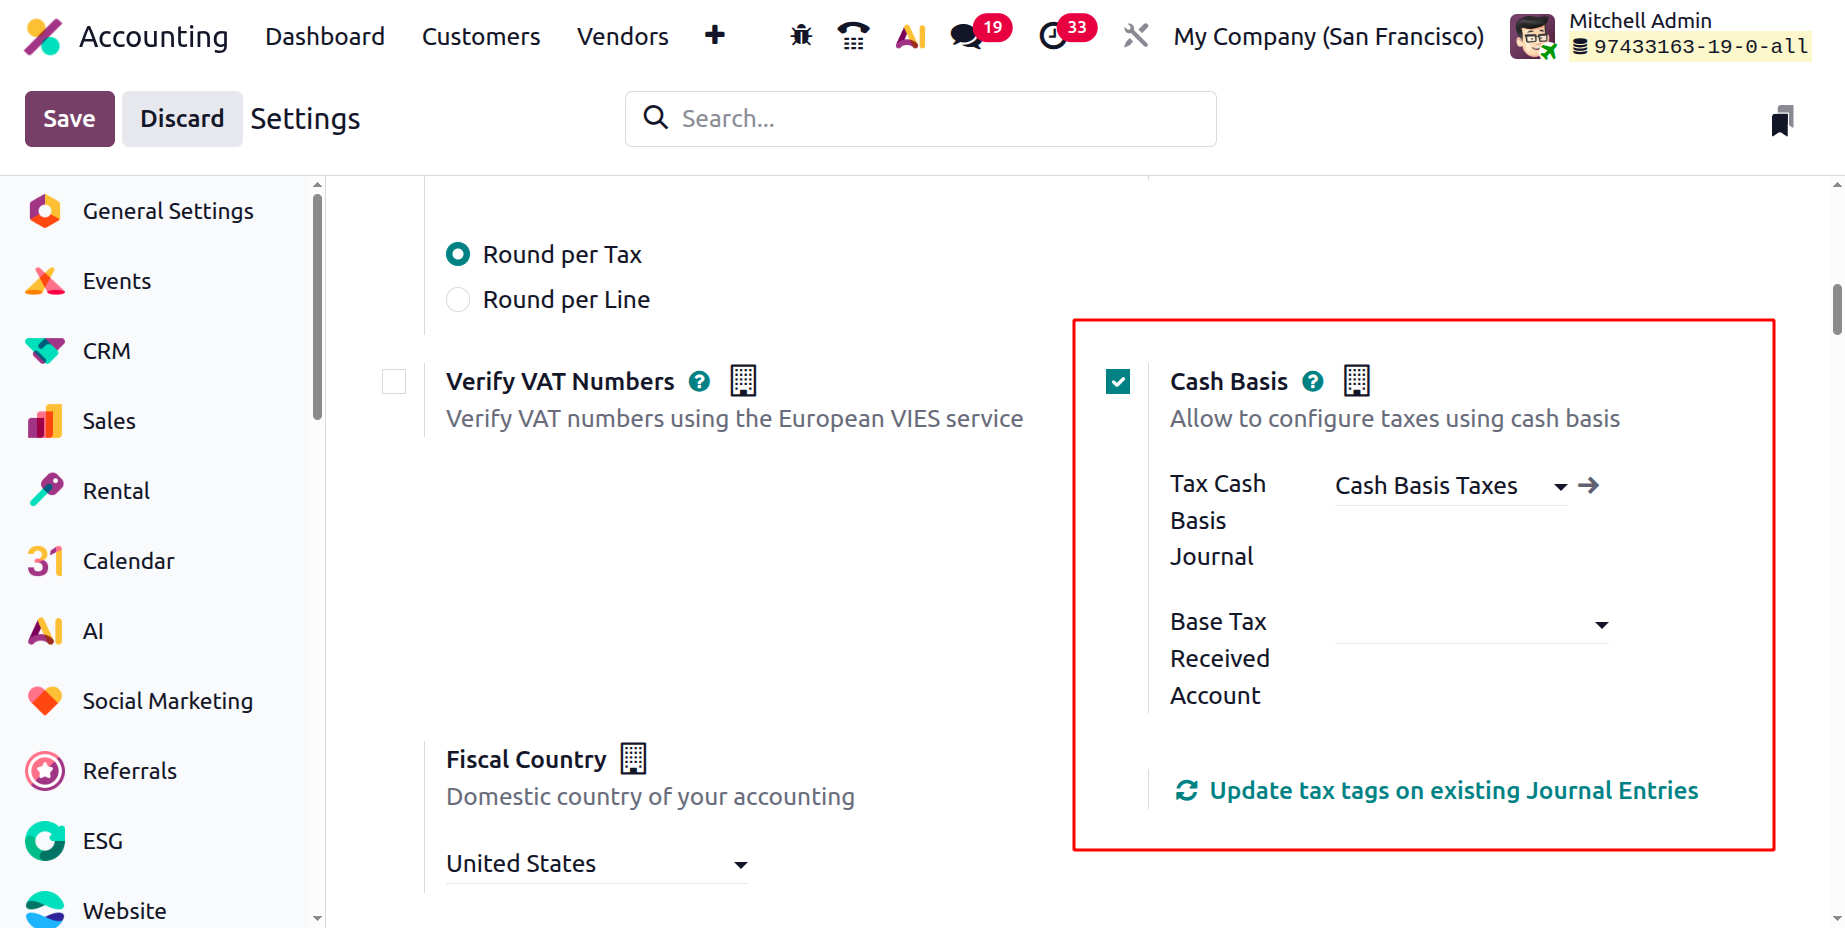
The Base Tax Received Account and the Tax Cash Basis Journal must be defined if you want to set up taxes on a
cash basis. Consequently, during reconciliation, these taxes will be recorded on the allocated account.
As we indicated earlier, the Tax settings box will only let you enter the amount of tax due once you select the
option from Settings. This implies that the Tax Exigibility option will appear under the Advanced Options tab
when setting up taxes, as illustrated below.
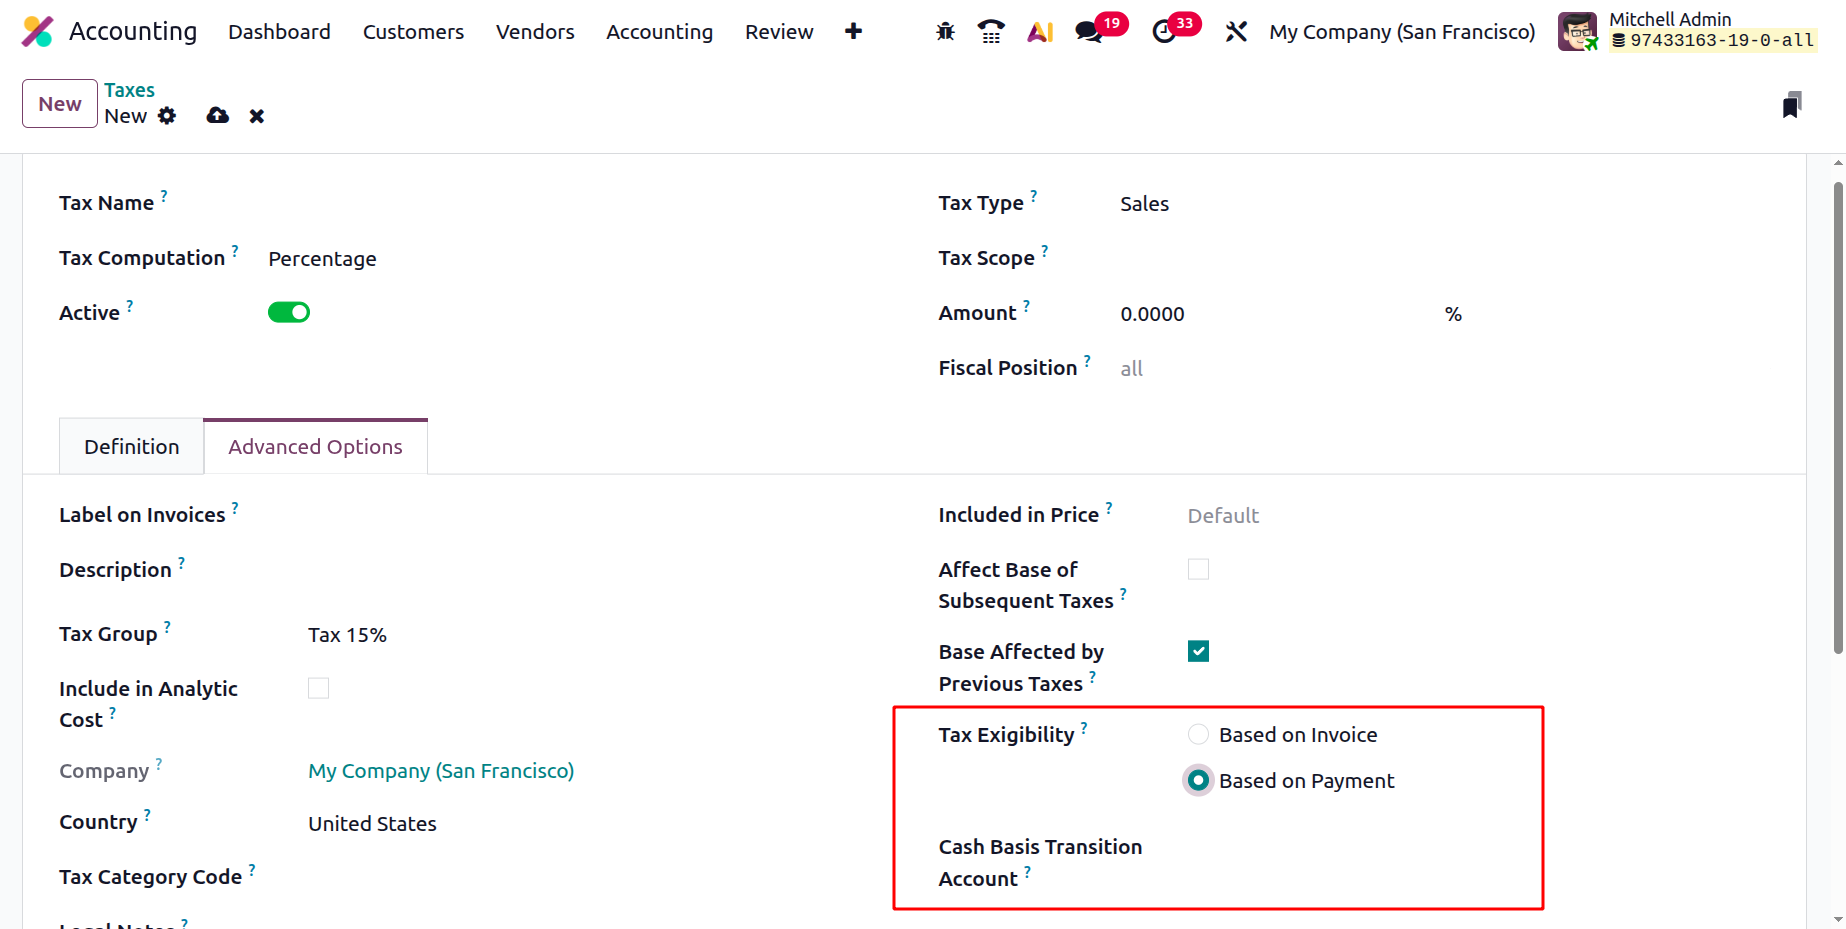
A company's tax structure and financial management will suffer if this alternative is chosen to satisfy local or
state regulations. Thus, upon reconciliation, the tax on the good or service will be credited to the temporary
tax account following the determination of the Cash Basis Tax. The Tax Received Account will be credited with
the appropriate sum.
Now that every aspect of the tax system is clear, let's move on to the following section, which will cover the
Tax Group.
Tax Group
Tax groups are used to categorize various taxes in the advanced tax setup options.
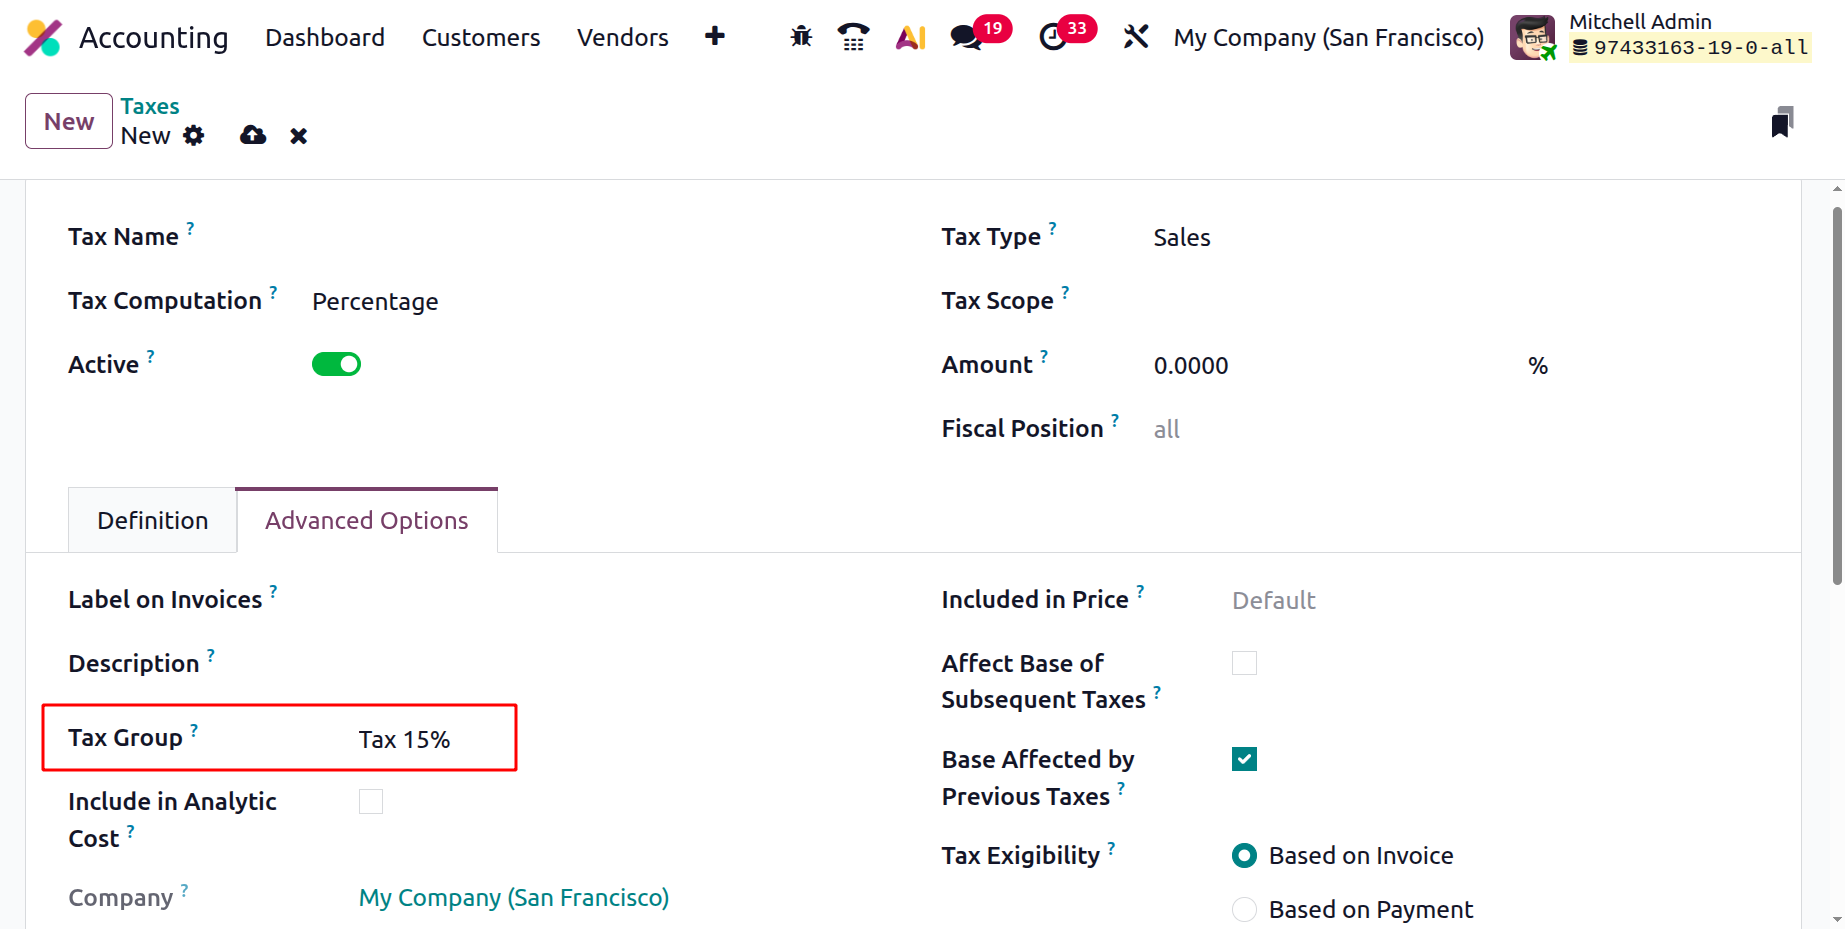
There are many different types of taxes, such as GST, CESS, VAT, and retention taxes, depending on the nation.
Odoo 19's tax setting is applied to bills and invoices to determine the total, which includes the tax amount.
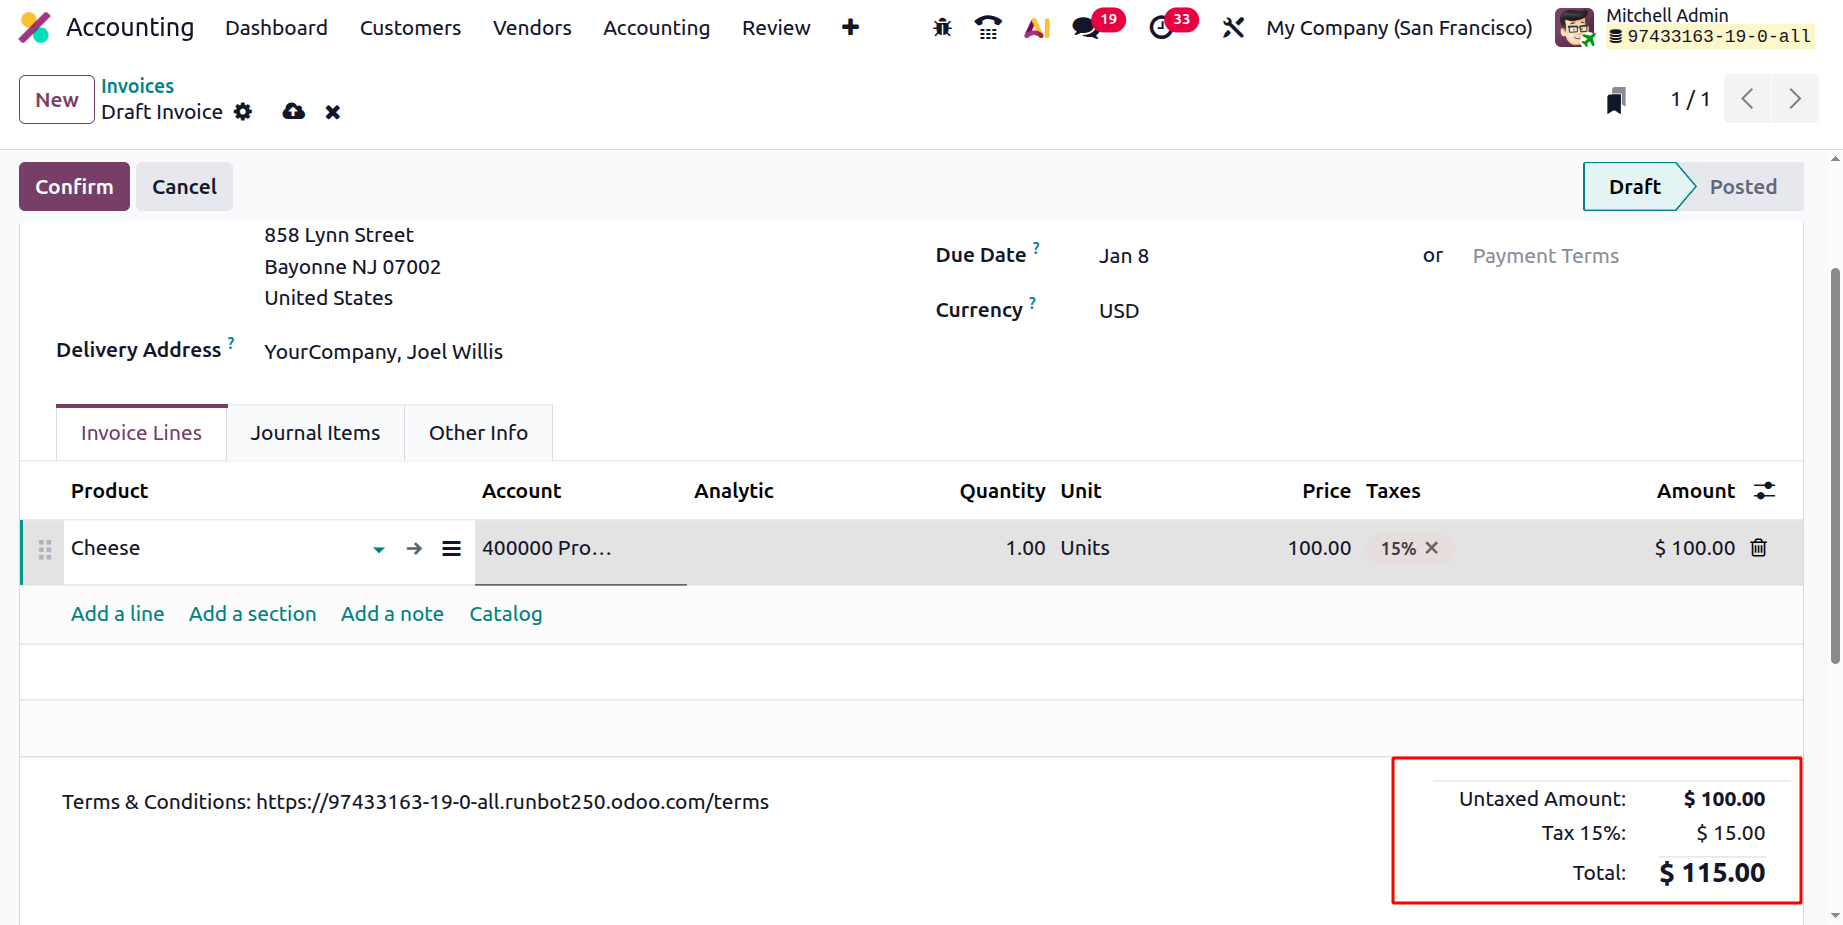
An invoice may be charged with more than one tax in some circumstances. As a result, we can use a tax group to
precisely identify each tax. Individual taxes are shown in the tax report and invoice.
Tax Units
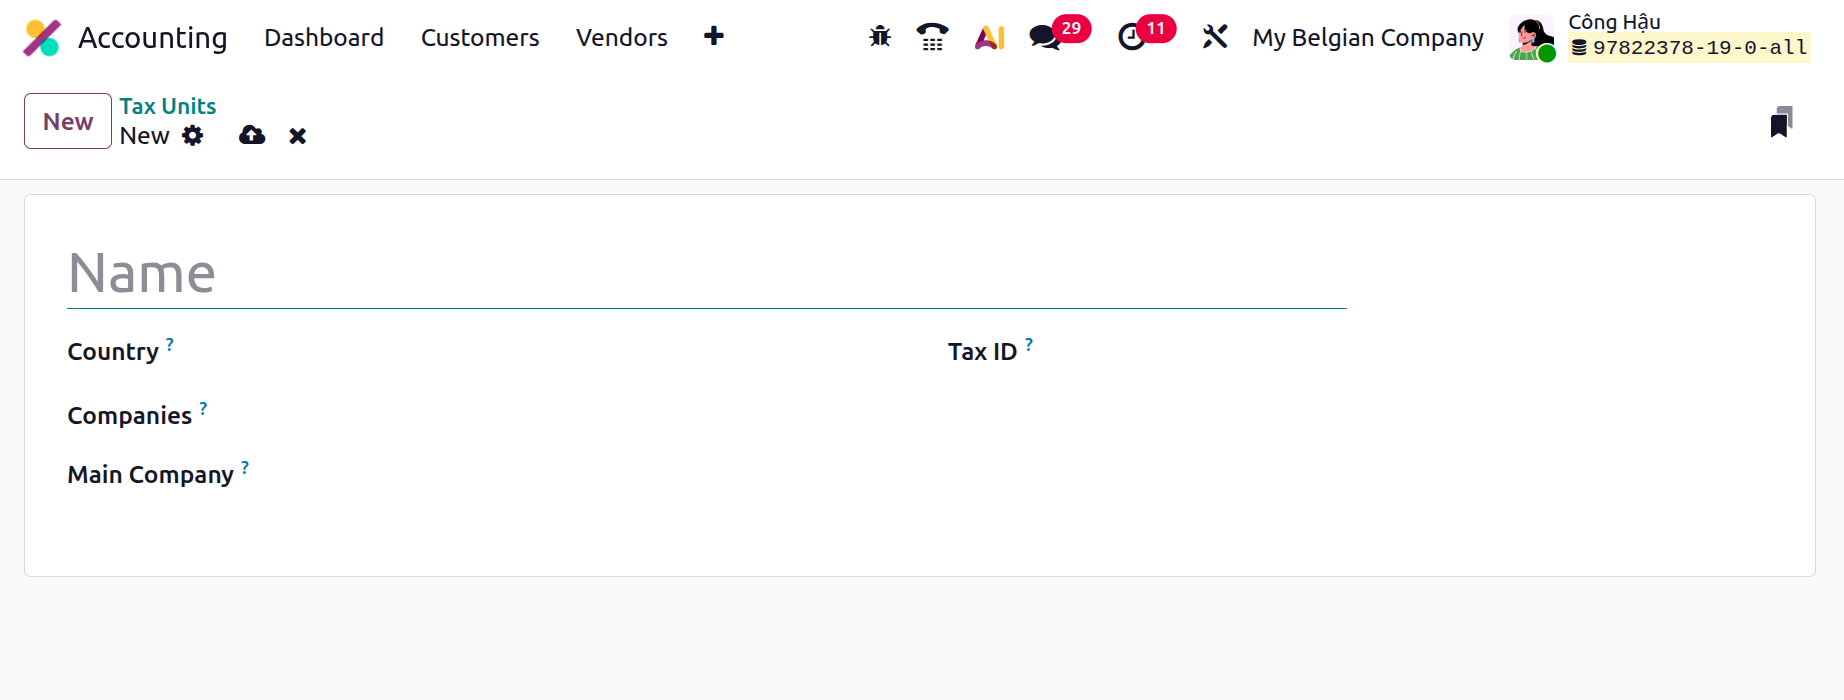
Multiple businesses within a group can be represented as a single entity for tax computation and reporting in
Odoo 19 Accounting thanks to Tax Units. By combining taxes while maintaining the independence of each company's
accounting records, they make tax compliance easier.
To create a new Tax Unit click on the New button. Add the Name first, then mention the Country, Companies, Tax
ID, Main company.
Now that we have a solid understanding of taxes, let's move on to the journals in the following part.
Journal Configurations
Journal entries, the initial stage of the accounting cycle, are used in the accounting system to document all
financial transactions. A "journal entry" is a straightforward accounting record that contains a brief
description of a business transaction together with the date, amount, and affected account. Journal entries are
essential to the double-entry accounting system, which requires that each financial transaction be recorded in
at least two accounts.
Accounting transactions are recorded in journals in Odoo 19 Accounting. Sales, purchases, receipts, payments, and
other transactions that impact the company's financial status are documented in journals. Additionally, the
journals offer a summary of the company's financial situation at any given time. Account reconciliation,
financial trend analysis, and report compilation are all feasible. It will give a record of the reason, amount,
and occasion of each transaction. Journals can be made on a monthly, quarterly, or annual basis.
Journals are crucial to any company's financial processes, as everyone knows. They serve as the foundation for
financial operations and help categorize particular processes. All kinds of businesses need to keep journal
entries. One of the most useful features of the Odoo 19 Accounting module is the ability to create and maintain
custom journals. This option allows you to specify each journal. Journals is a separate option in Odoo 19's
Accounting part of the Configuration menu for managing it. Below is a screenshot of the Journals window.
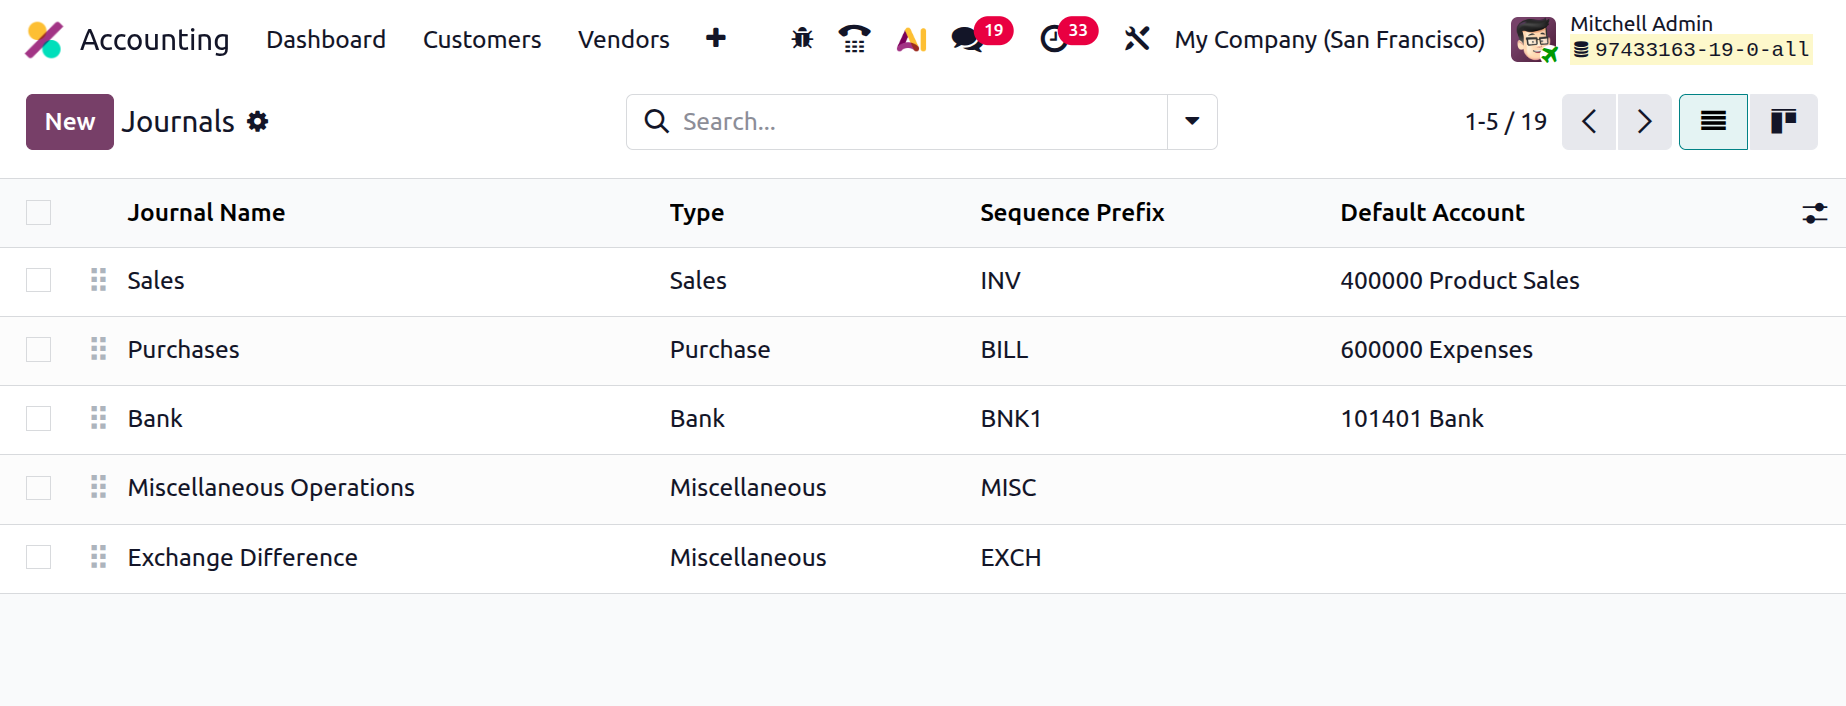
The Journals window allows you to start a new journal in addition to giving you a clear view of the journals that
have already been made. The pane displays crucial details about the journals, such as the short code, default
account, journal titles, types, and groups, as can be seen in the image above.
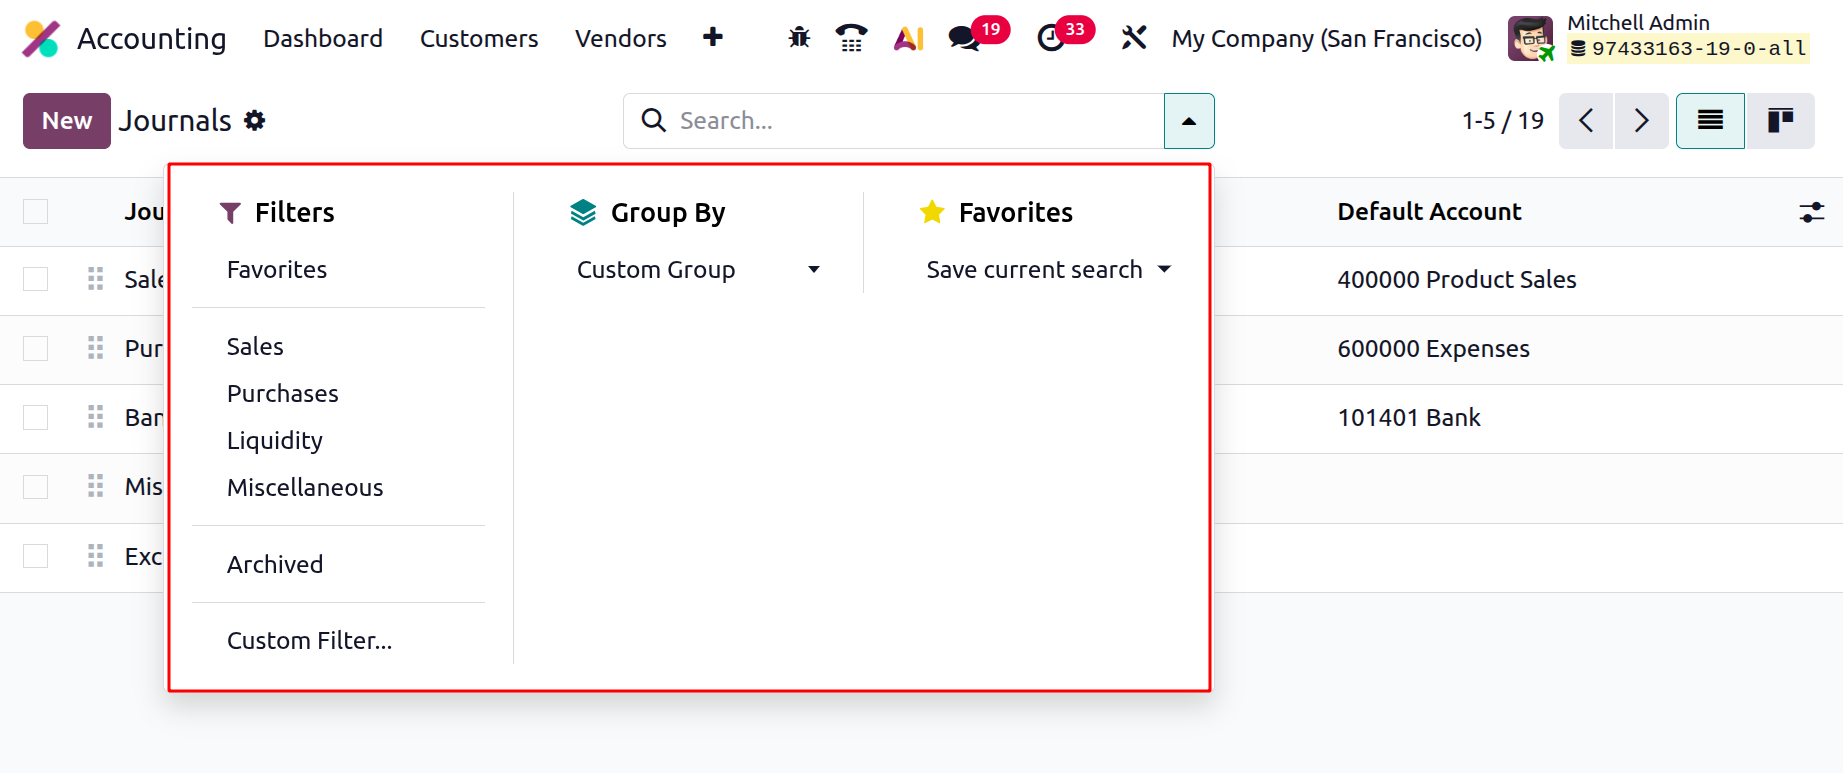
You can switch between the Kanban and List versions of the window by choosing the corresponding menu icon in the
upper right corner. The Filters and Group By choices under Favourites, in addition to the search field, can be
modified or left as default, carrying out the necessary functions, like preserving the current search.
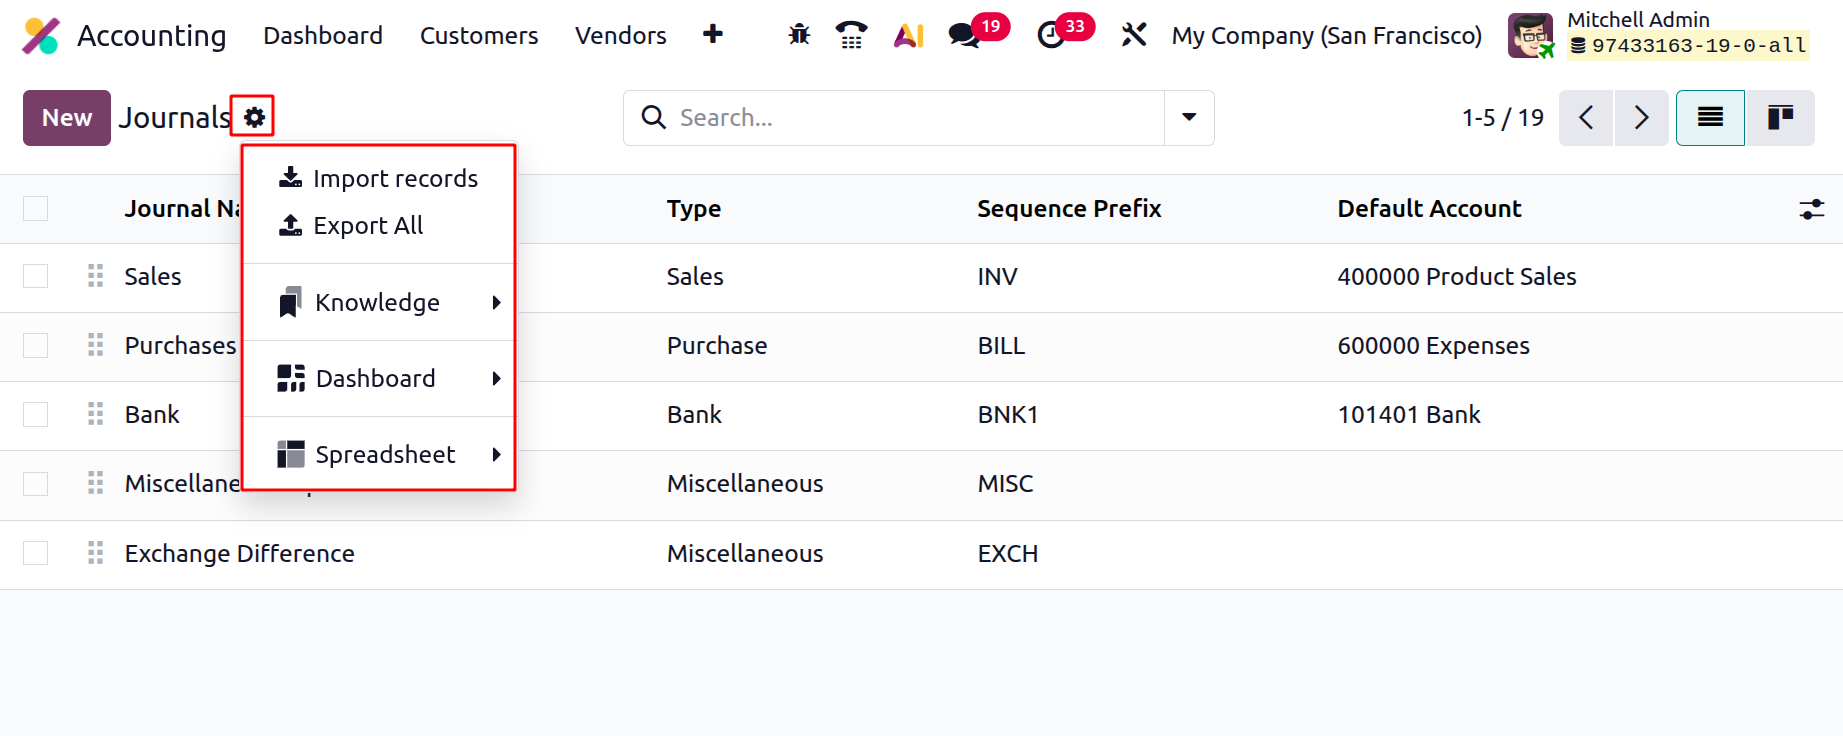
Using knowledge capabilities such as Insert view in article and Insert in article, it is possible to import and
export activity records. Journals can also be added to "My Dashboard," and users can add information using the
spreadsheet feature's "Insert list in spreadsheet" and "Link menu in spreadsheet."
From the longer list of chosen journals, all of these options are quite helpful for finding the required journal
quickly. Additionally, the specific Odoo19 module makes it very easy to select journal types depending on those
that are already set as defaults. Additionally, each defined journal has the option to select a journal type.
Cash, bank, sales, purchases, credit card, and miscellaneous are examples of journal types.
Every sales transaction in a company is recorded in the sales journals in Odoo 19 Accounting. Invoices and any
other associated transactions may fall under this category. Sales journals can be used to create a number of
reports, including trend analysis and sales reports, and they make it easier to handle all sales-related data.
Purchase journals are a useful tool for monitoring all business-related purchases. These journals are used to
generate financial accounts and to monitor the cost of the goods and services purchased. The purchase's debit
and credit sides are noted in the journal entries, which are then posted to the general ledger. The purchase
notebooks record the price of the goods and services as well as any applicable taxes. Purchases of inventory,
raw materials, and completed goods are documented in the buy diaries.
The purchase record details all of the company's purchasing actions, just as the sales journal details all of the
sales operations entries. Similarly, each cash operations entry in the Cash Journal will explain how the company
uses cash payments. Additionally, it is the same as the Bank Journal, where all bank transactions are
documented. The bank and cash journal are identical to the credit card.
Any transaction that does not fall into one of the predefined transaction categories is recorded as a
miscellaneous journal entry in Odoo 19 Accounting. Bank fees, allowances, returns, discounts, and other
inaccurate data can be entered using it. Any accounts that need modifications outside of the typical accounting
period can also have their balances adjusted using this procedure. The following are some of the Odoo 19
Accounting Miscellaneous Journals:
- Salary Journal
- Adjustment Journal
- Inventory Adjustment Journal
- Currency Exchange Journal
- Stock Valuation
- Expense Journal
- Miscellaneous Journal Entries
- Tax Journal
You can organize all of the entries that don't belong in any other journal in the Miscellaneous journal. Click
the New button in the Journals box's upper left corner to start a new Journal. You can begin by entering the
journal name in the creation form. Next, select the appropriate Journal Type from the drop-down option. All
journal types, including Sales, Purchase, Cash, Bank, Credit card, and Miscellaneous, are available in the
dropdown menu.
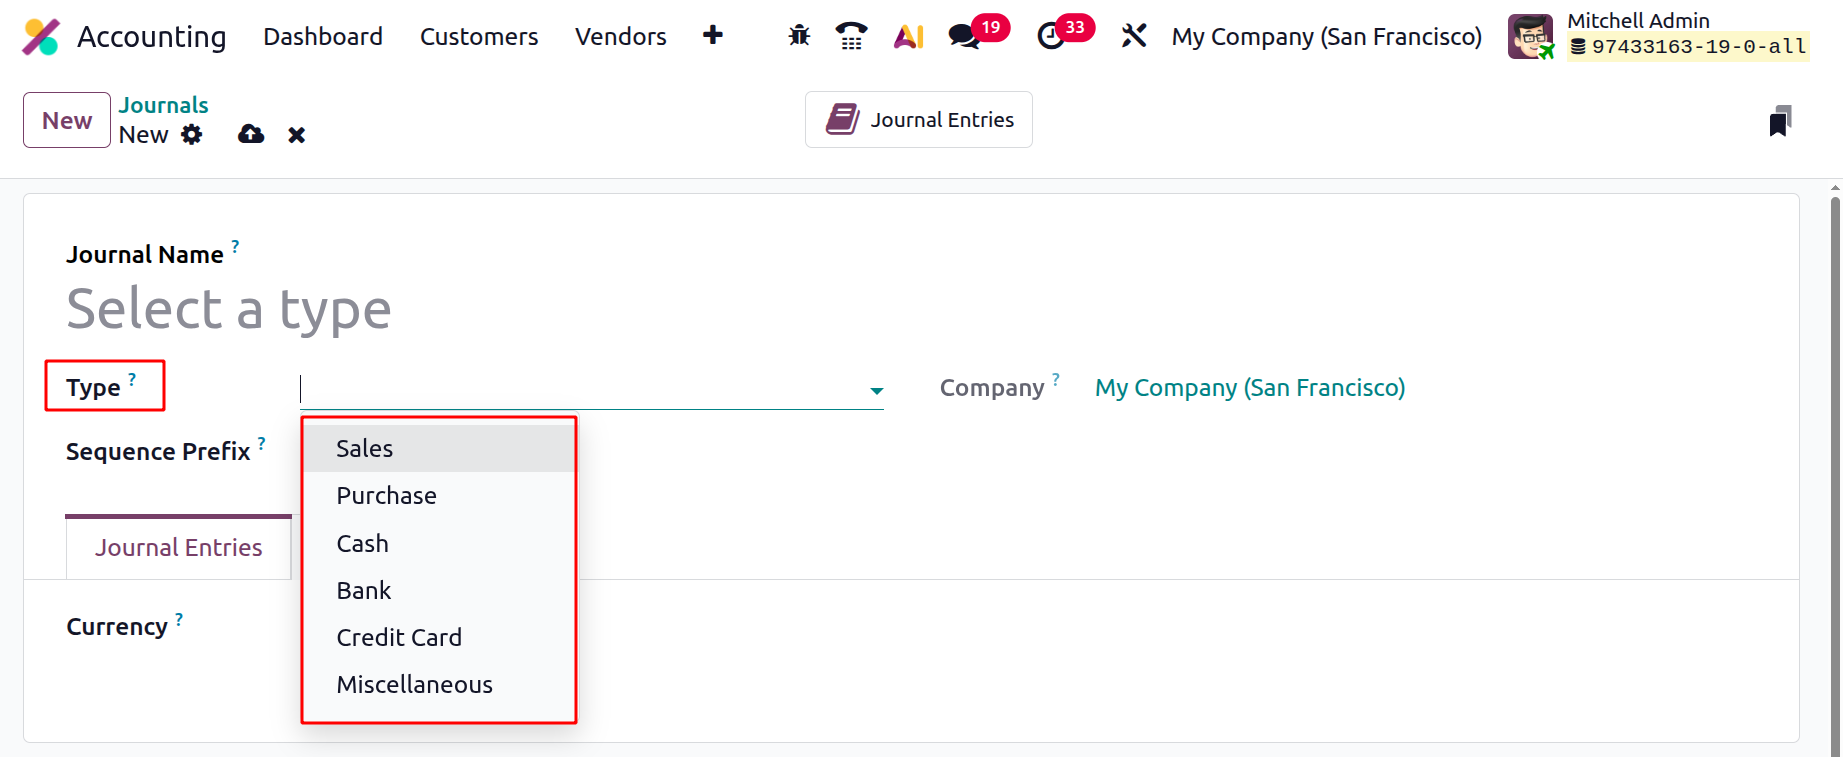
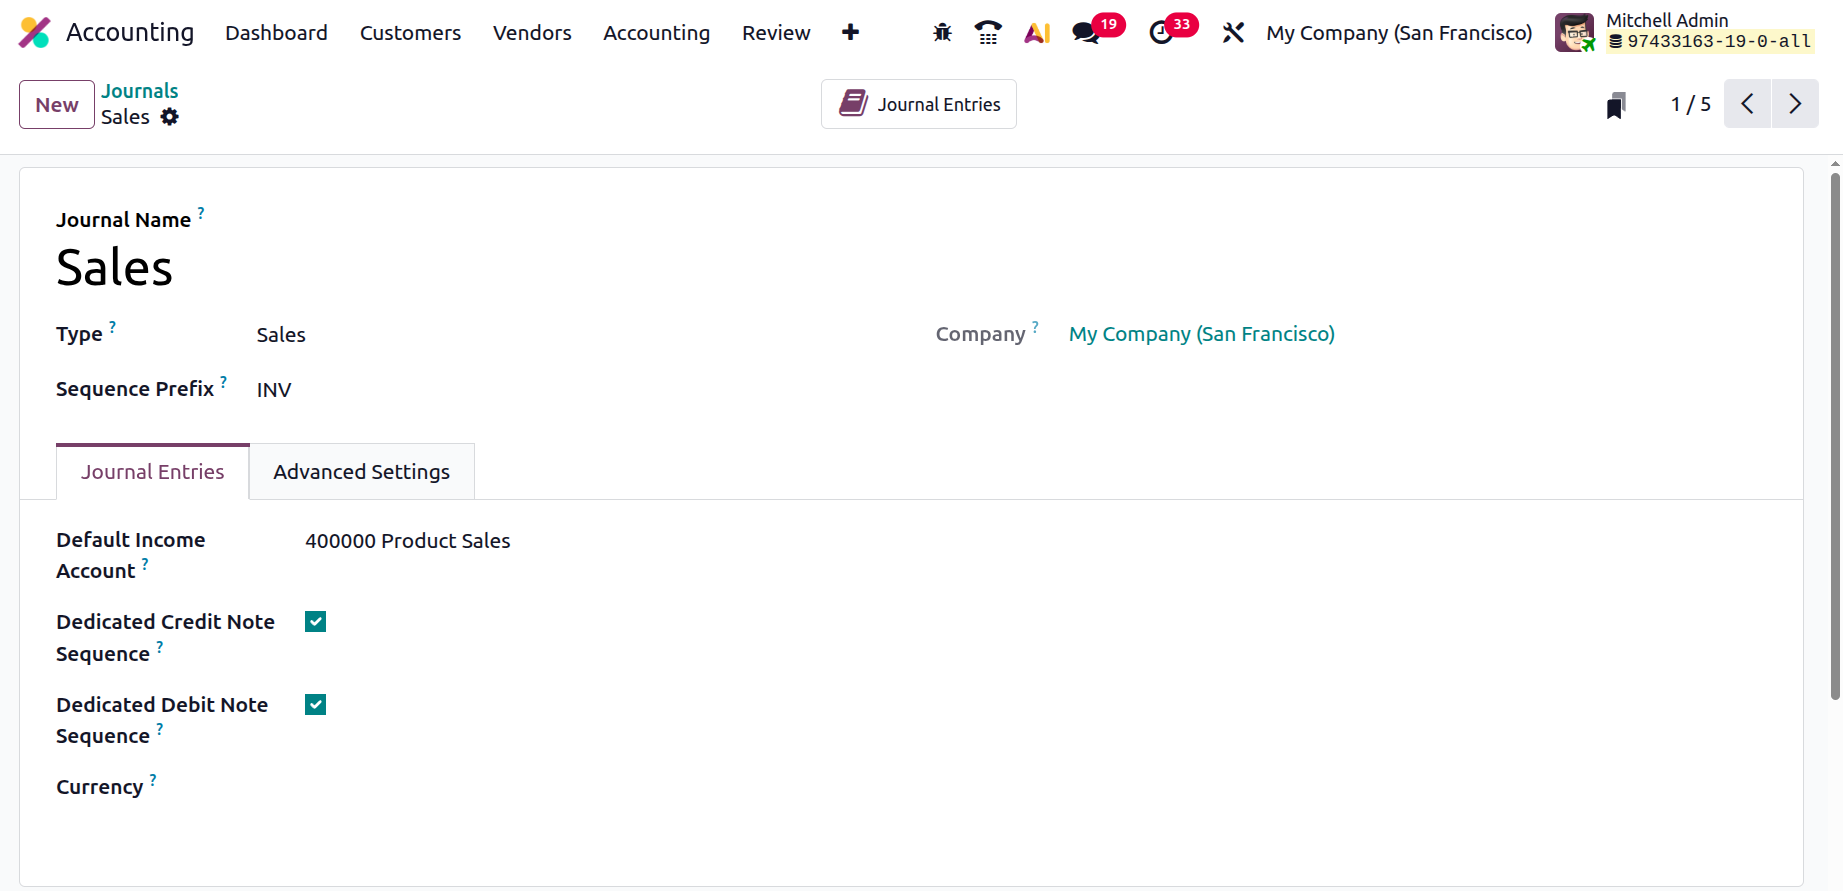
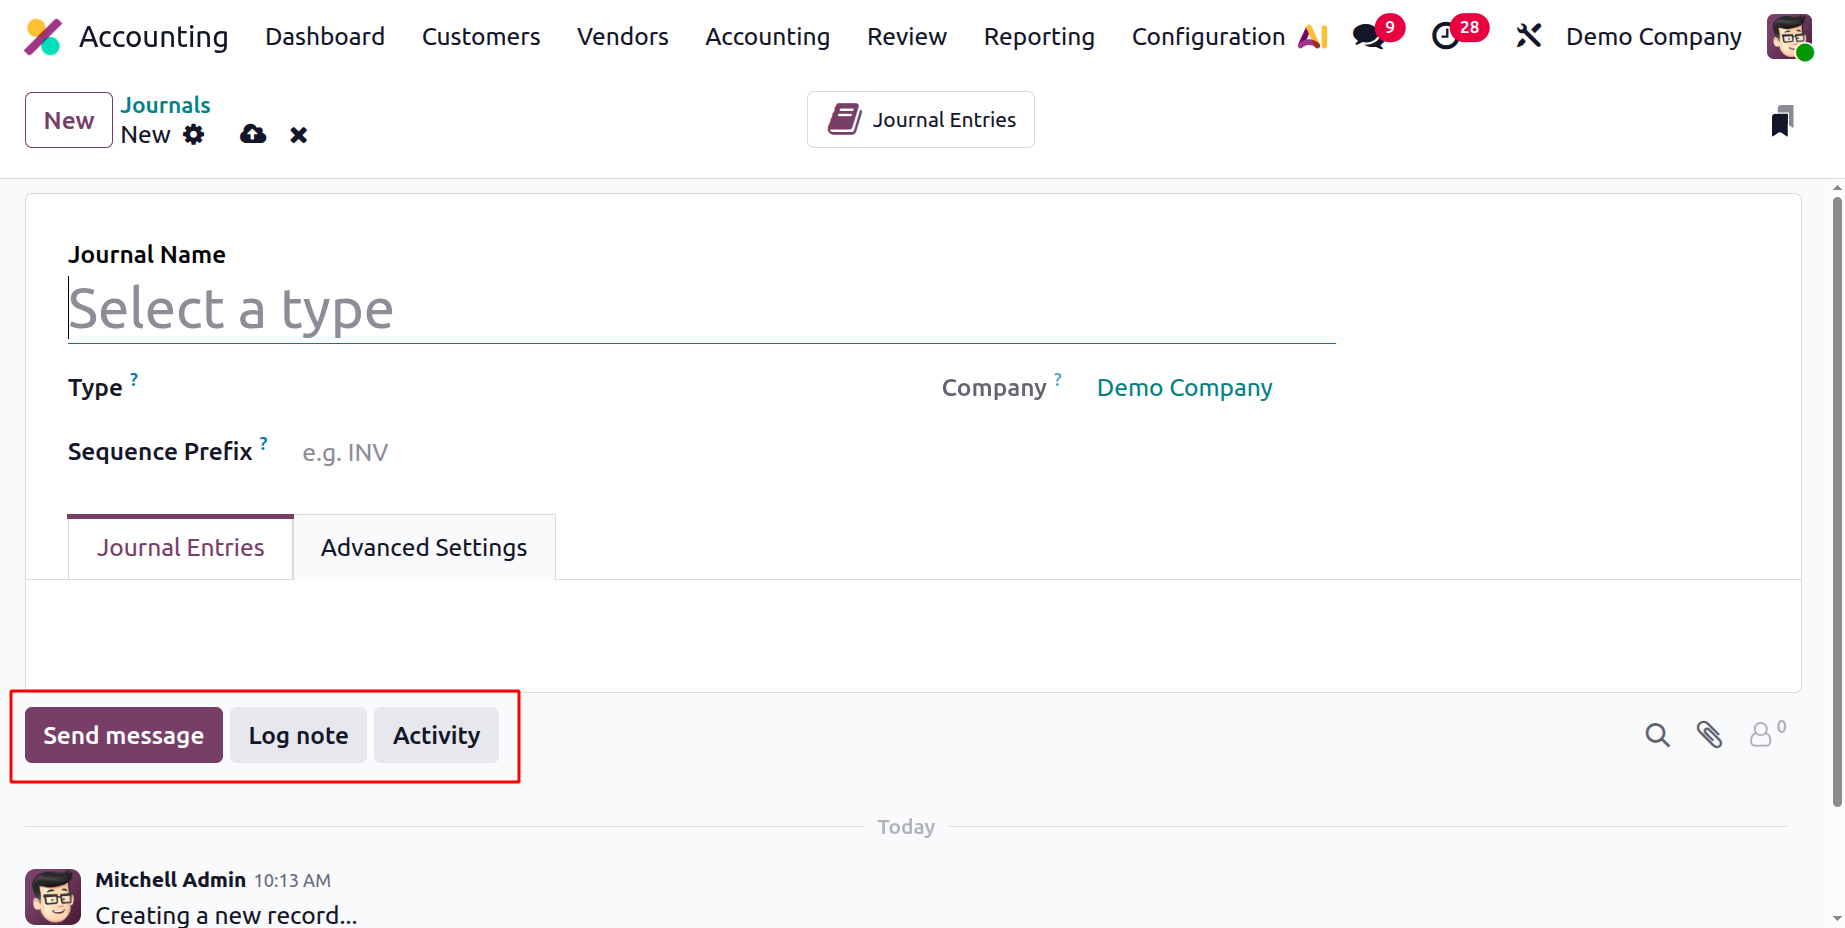
The accounting information, such as the currency and short code, can also be specified using the Journal Entries
option. You can enter your preferred abbreviated name in the Sequence Prefix section. By default, this prefix
will also be used in the names of the items in this journal. It is very helpful to ensure that credit note
entries and invoices begin with the correct code. For instance, if we define a short code like this, invoice
creation will begin with the term "INV" before moving on to the sequence number.
Additionally, you can choose the Default Income Account if it is a sales journal, in the appropriate box using
the dropdown menu. You can leave these fields blank if you don't want any control.
You have the option to enable or disable the "Secure Posted Entries with Hash" box. The invoice or accounting
record is hashed upon publishing and cannot be changed if this field is enabled. This is a great way to make
sure that no invoice created under a certain journal is altered. Once posted, it cannot be changed to a new
format or returned to draft state.
In the EMAILS section, you can also configure email servers. An invoice will be produced if the email is received
under the correct server domain.
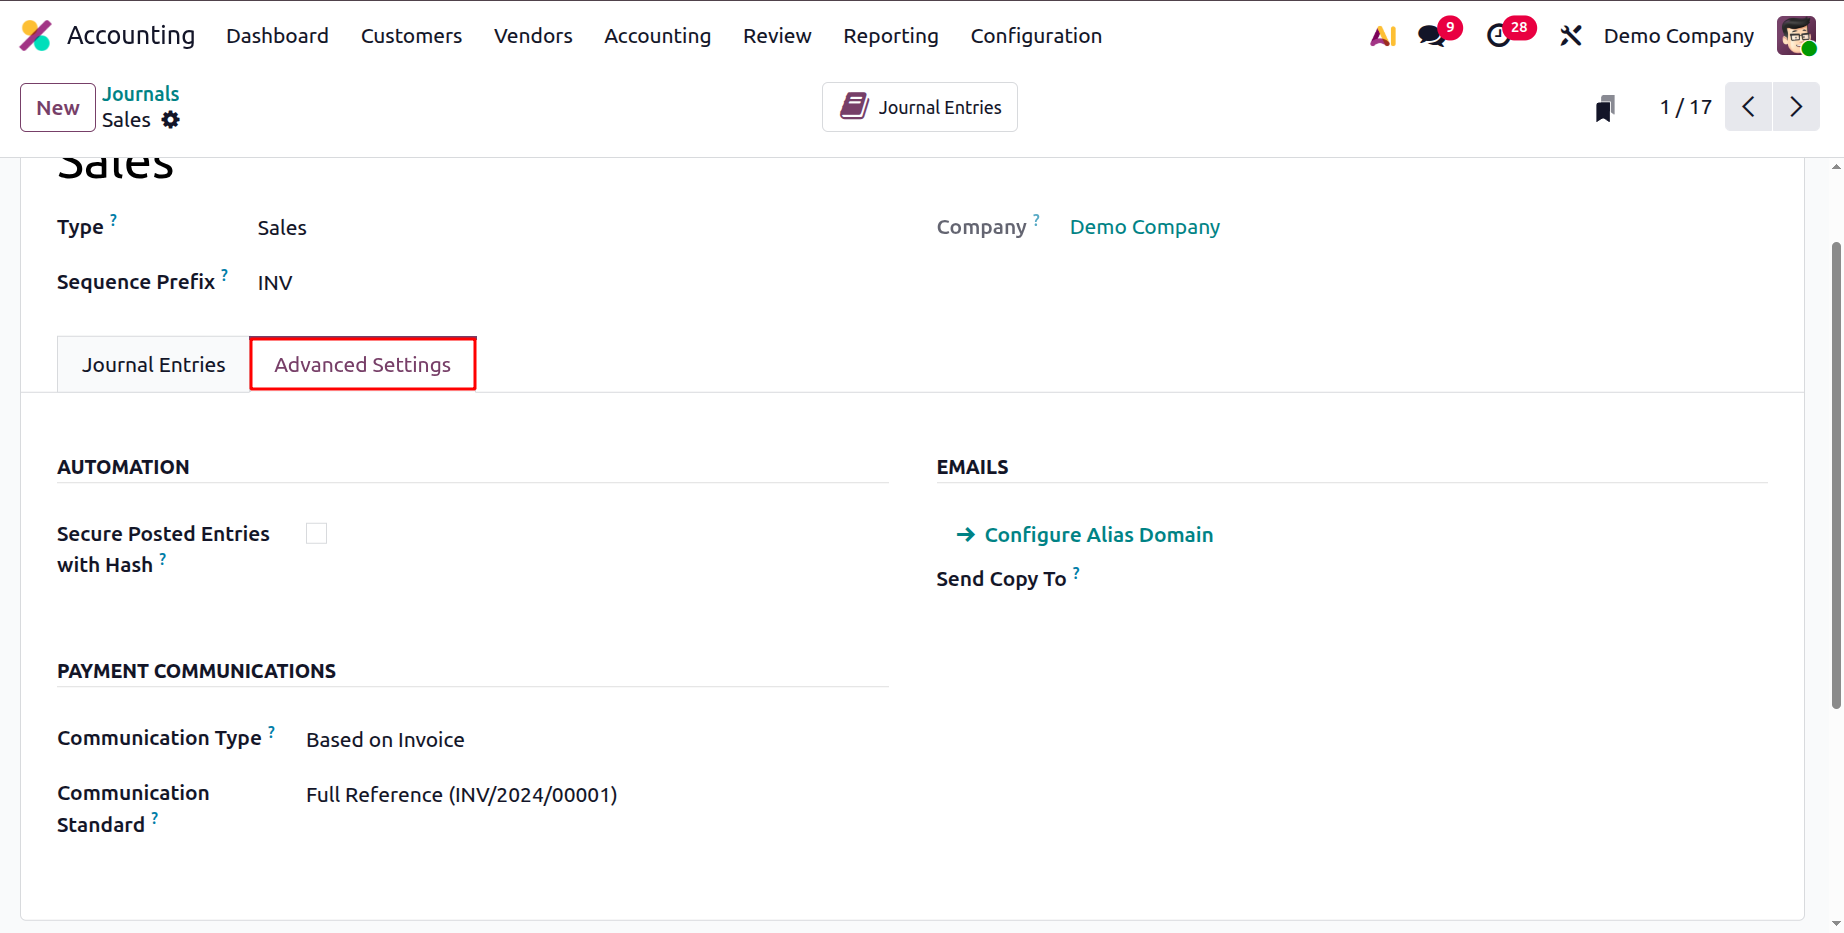
The Communication Type and Communication Standard fields are located in the PAYMENT COMMUNICATION section. Based
on Customer, and Based on Invoice are the two choices available here. You can use the same process for the
Communication Standard field. You can select a different model in this column for each kind of reference; "Odoo
reference" is the default option.
As seen in the image below, the smart tab is also accessible in the window's upper right corner in addition to
all of these options. The 'Journal Entries' smart tab will display each entry made in that specific journal.
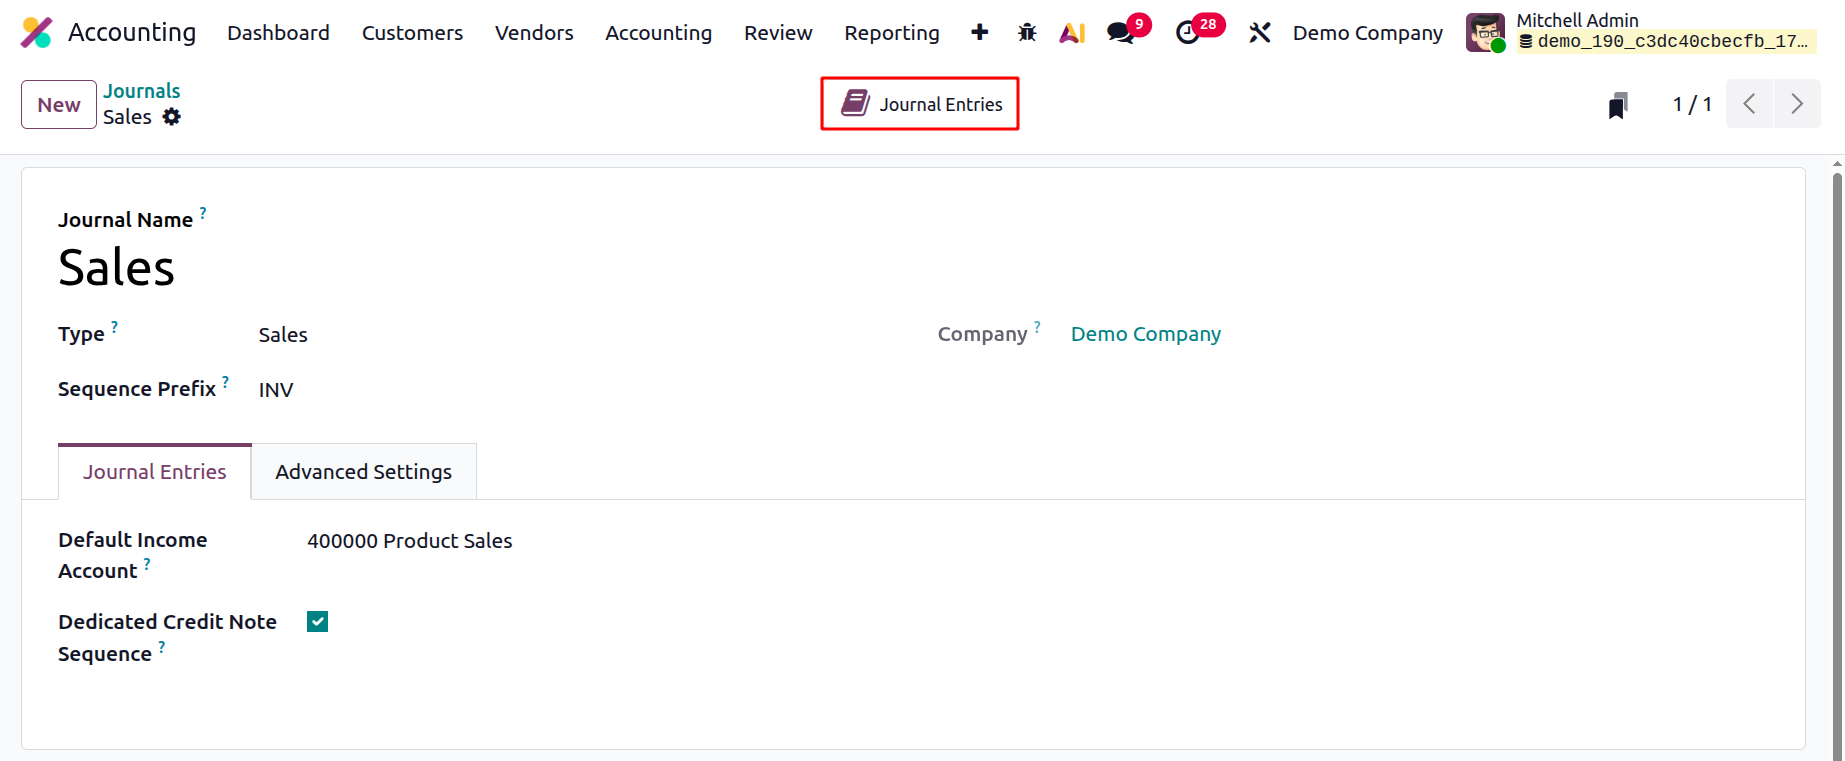
This is the setup for the Sales journal type. In Odoo 19, the processes for creating the Purchase, Sales, and
Miscellaneous journals are the same. The Sales, Purchase, and Miscellaneous journal types have distinct setting
processes from the Bank journal.
Followers may be other users of the Odoo 19 platform, such as staff members or associates of your business. The
Log Note option allows you to record the changes made by the staff and gives a description of them along with
the time and date, while the Send Message option is quite helpful for alerting anyone of any pertinent
information.
The creation box will show the various components, including Journal Entries, Incoming Payments, Outgoing
Payments, and Advanced Settings, when you choose Bank as the Journal Type.
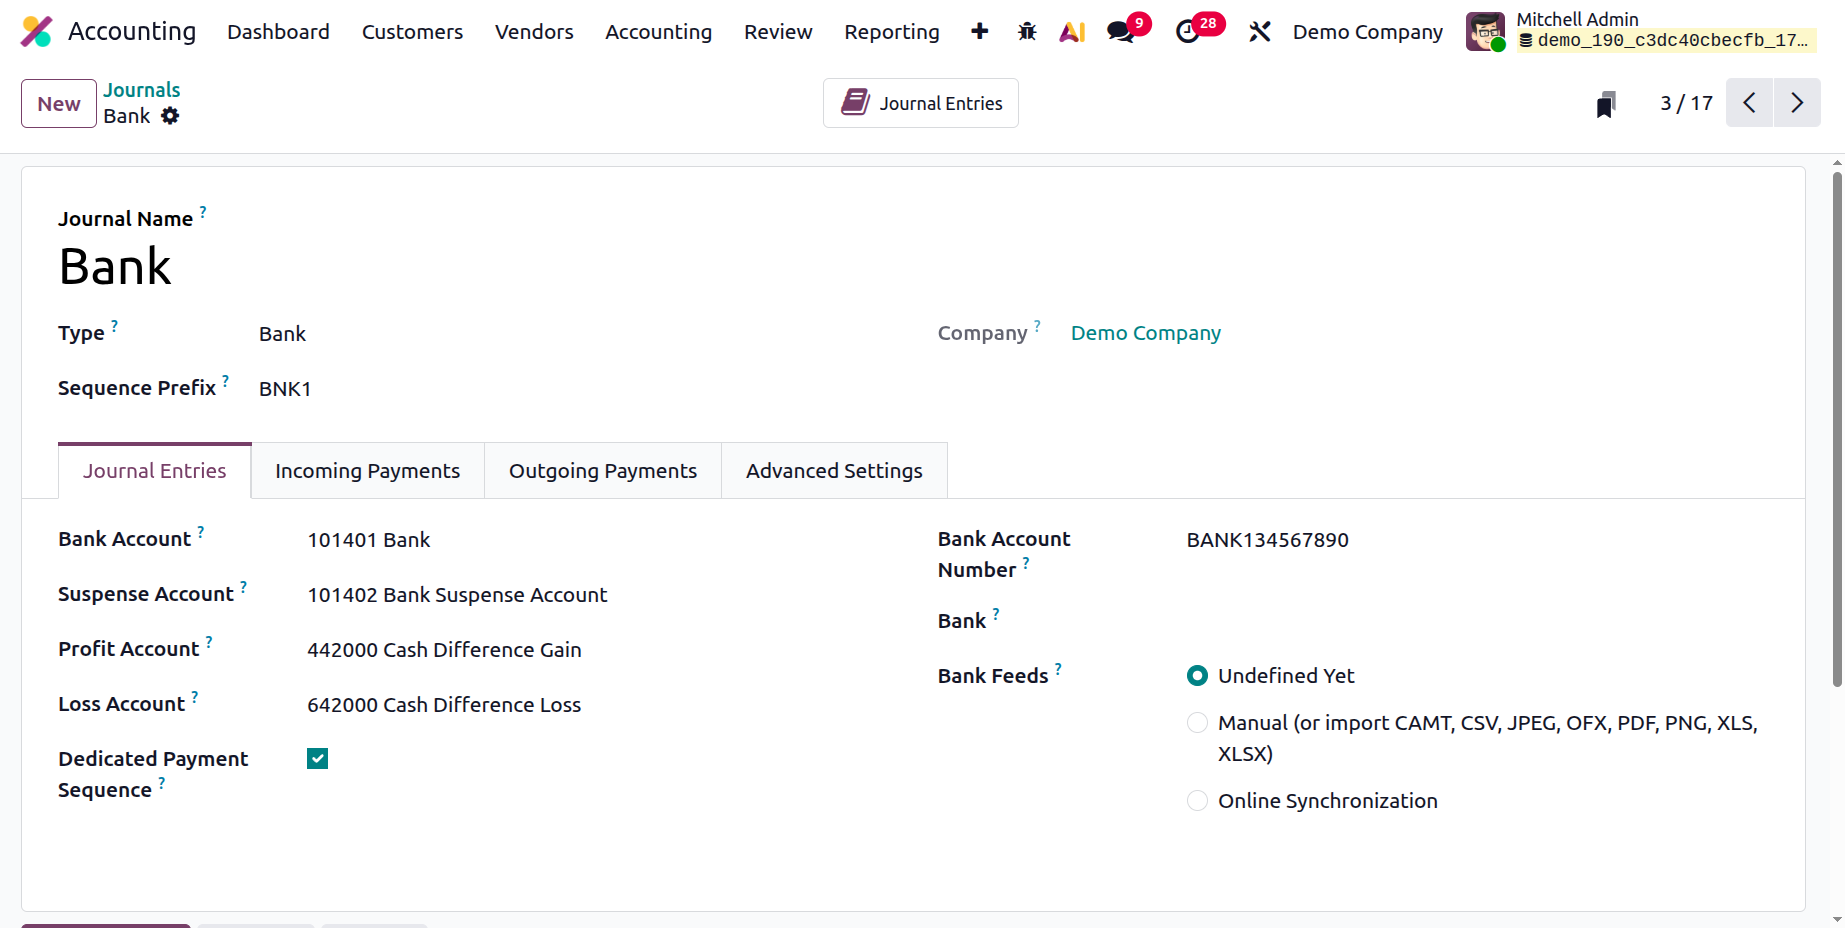
You must submit details about journal entries under the "Journal Entries" tab. The Bank Account, Suspense
Account, Profit Account, Loss Account, and Currency information can then be added. The Suspense Account is used
to post bank statement transactions until the bank account is balanced with the payments and acts as a temporary
account until the bank statement transactions for each journal activity are reconciled.
A profit is also noted in the profit account when the cash register's final balance deviates from the system's
computation. When the cash register's closing balance differs from the amount calculated by the computer, it is
advantageous to document a loss in the loss account. The Dedicated Payment Sequence activation option is also
shown in this section.
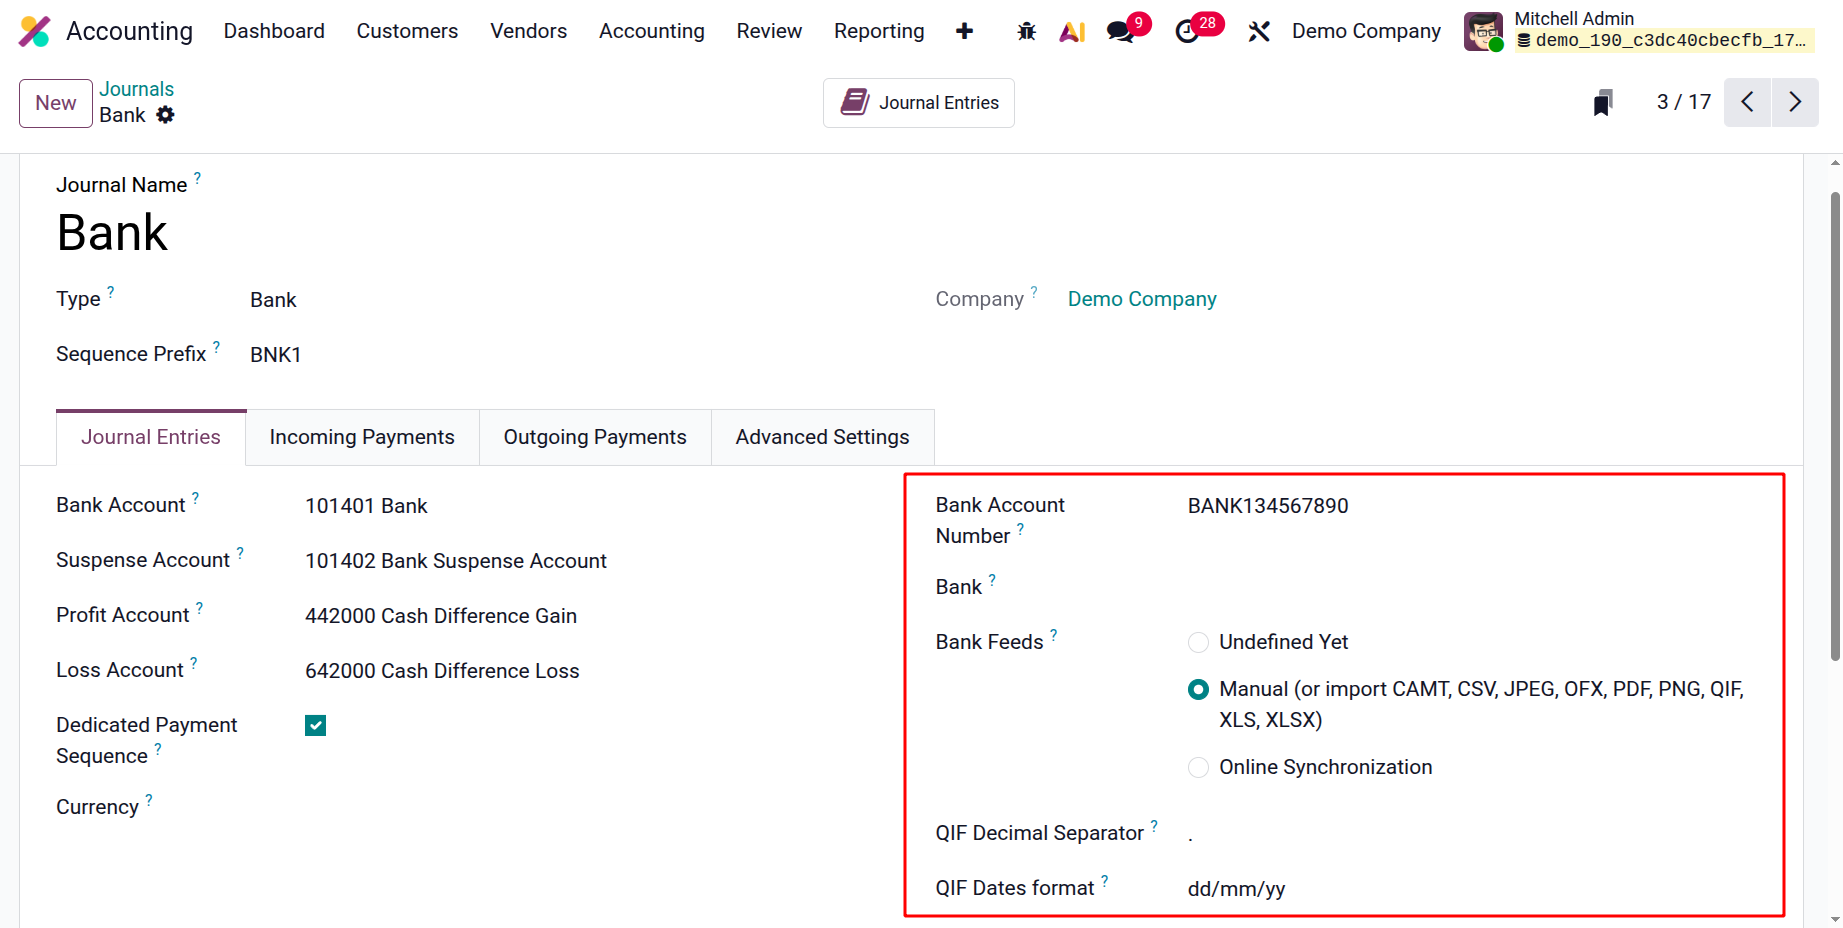
In the 'BANK ACCOUNT NUMBER' section, the Account Number can also be put in the appropriate field. Additionally,
you have the option to decide which Bank Feeds to use, and your choice will determine how bank statements are
registered. Three options are available here: Automated Bank Synchronization, Undefined Yet, and Import ( CAMT,
CSV, JPEG, OFX, PDF, PNG, XLS, XLSX). When you select the Import option, more fields will show up. These include
the QIF Dates format, where you can select between mm/dd/yy and dd/mm/yy, depending on the company, and the QIF
Decimal Separator, which is necessary to prevent conversion problems. Turn on the third field, Split
Transactions, to split group payments for CODA files. You can import data from the dashboard using the Import
option.
The Odoo 19 platform may be able to instantly receive the invoice payment details from the bank servers by
selecting Automated Bank Synchronization. You will also be responsible for reviewing the synchronized operations
using the Dashboard.
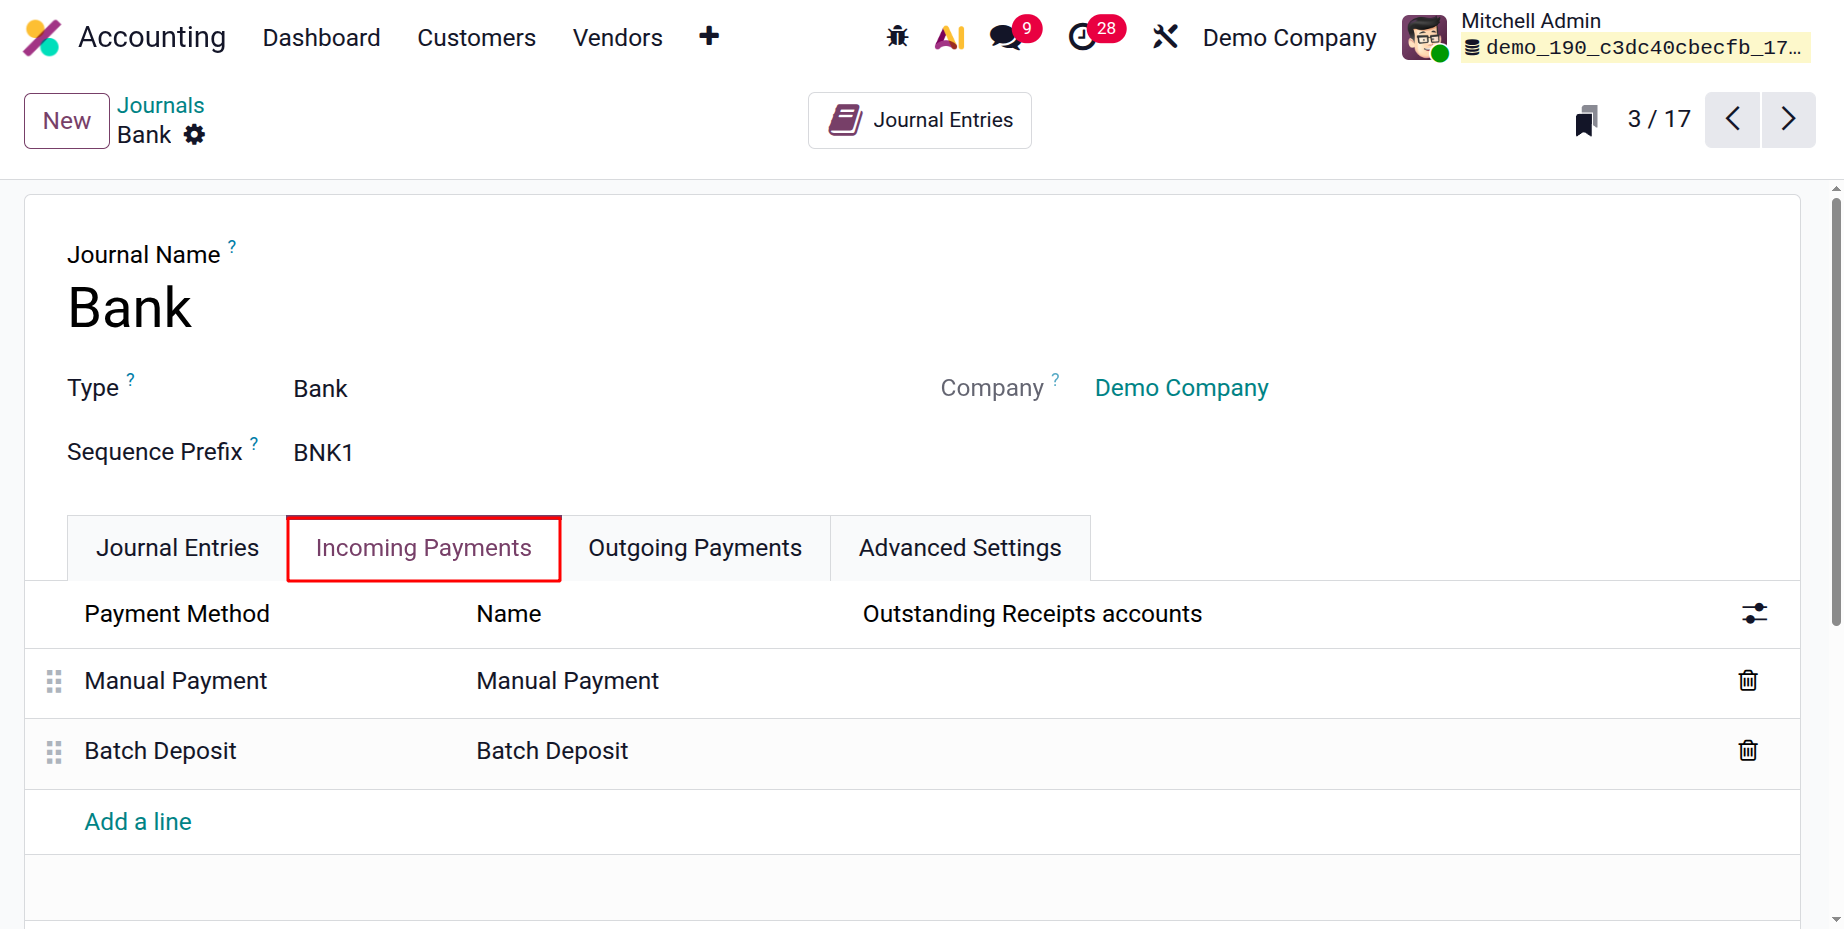
You may now define the setup details for receiving payments using the Incoming Payments tab. As a result, you can
enter the Name and Payment Method using the Add a line option.
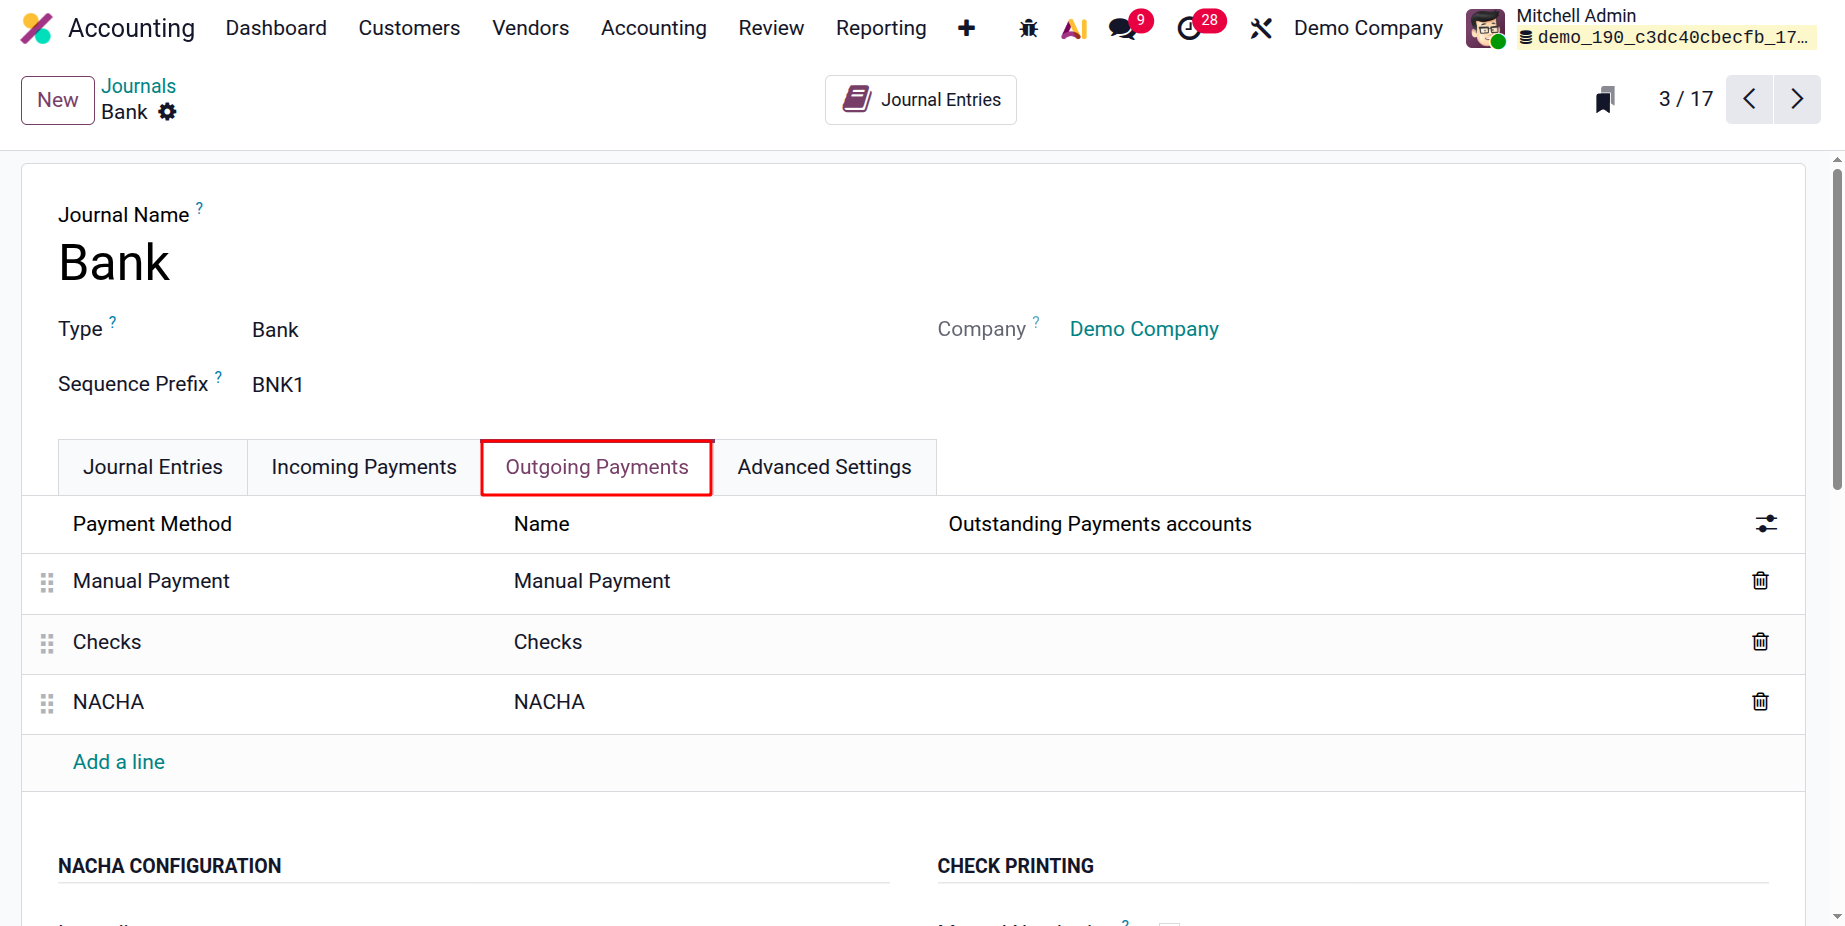
You have to set up the outgoing payment methods on the Outgoing Payments tab. The 'Name' and 'Payment Method' can
be given using the Add a Line option because it is almost exactly the same as the Incoming Payments option. You
can select a method from the drop-down menu and use it. If the payment mechanism is new, it won't be hard to
configure.
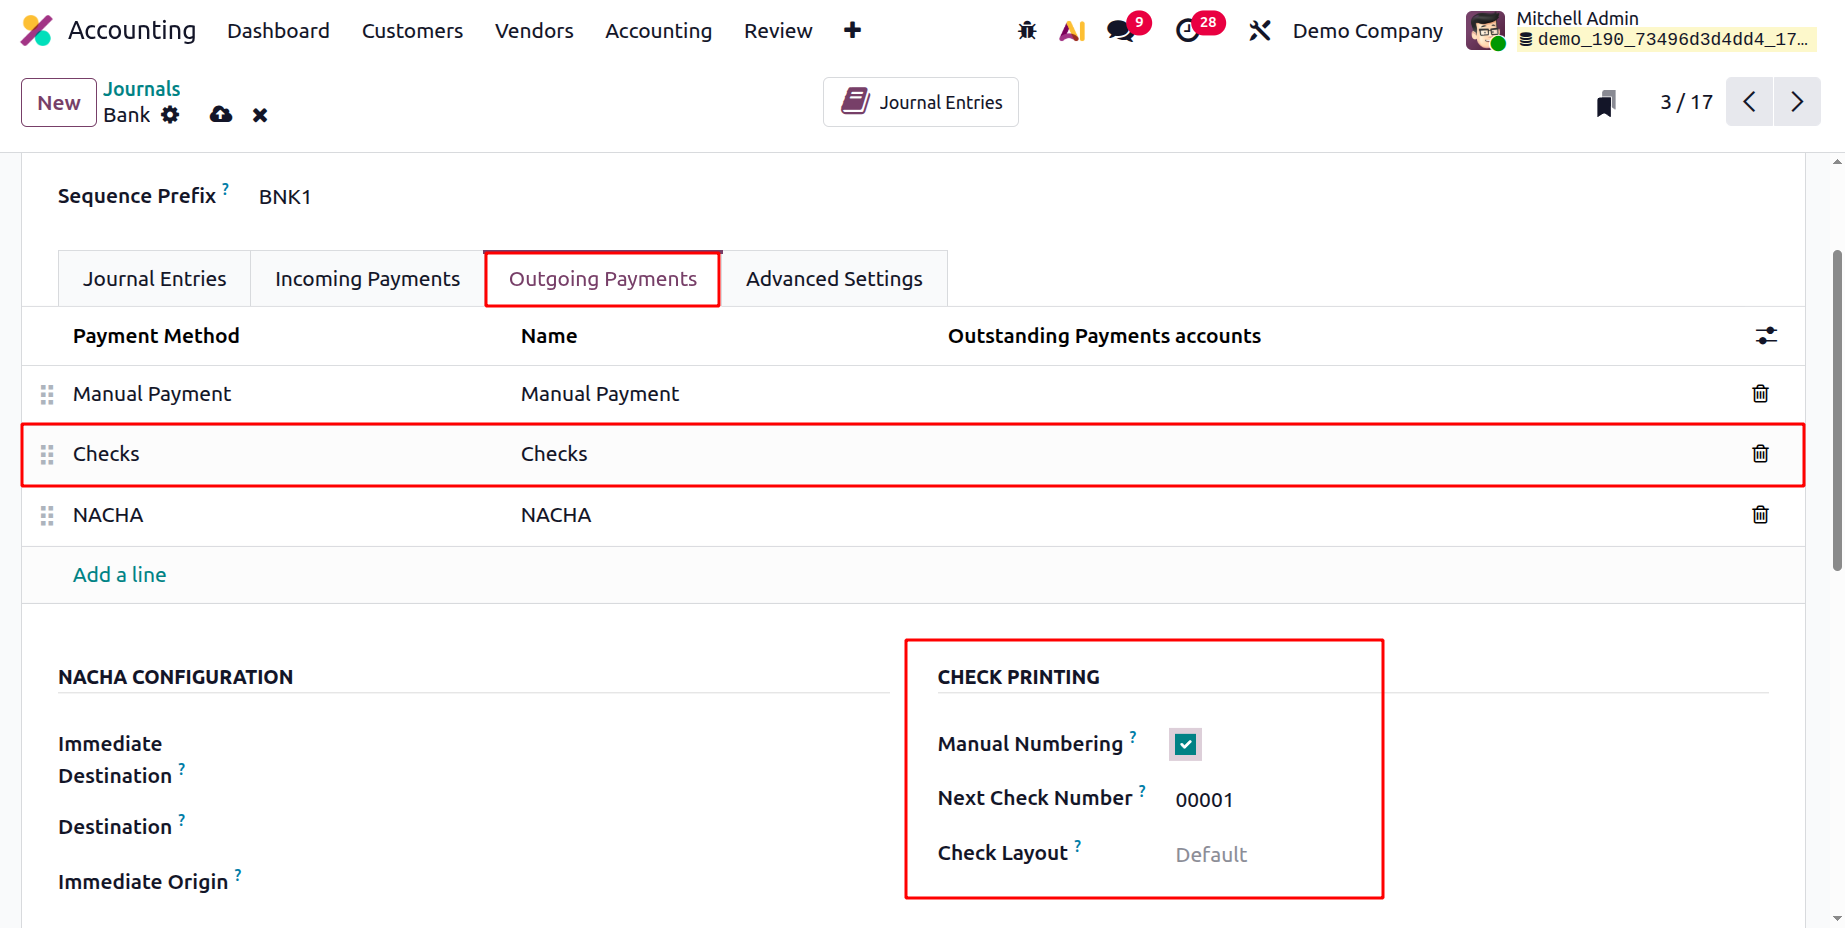
You can also activate the Manual Numbering field in the CHECK PRINTING section if your pre-printed checks aren't
numbered.
Additionally, the NACHA CONFIGURATION offers a number of fields, including Immediate Destination, Destination,
Immediate Origin, Company Identification, and Originating DFI Identification, Standard Entry Class Code, Company
Discretionary Data, Generate Balanced Files. The bank will supply all of these facts.
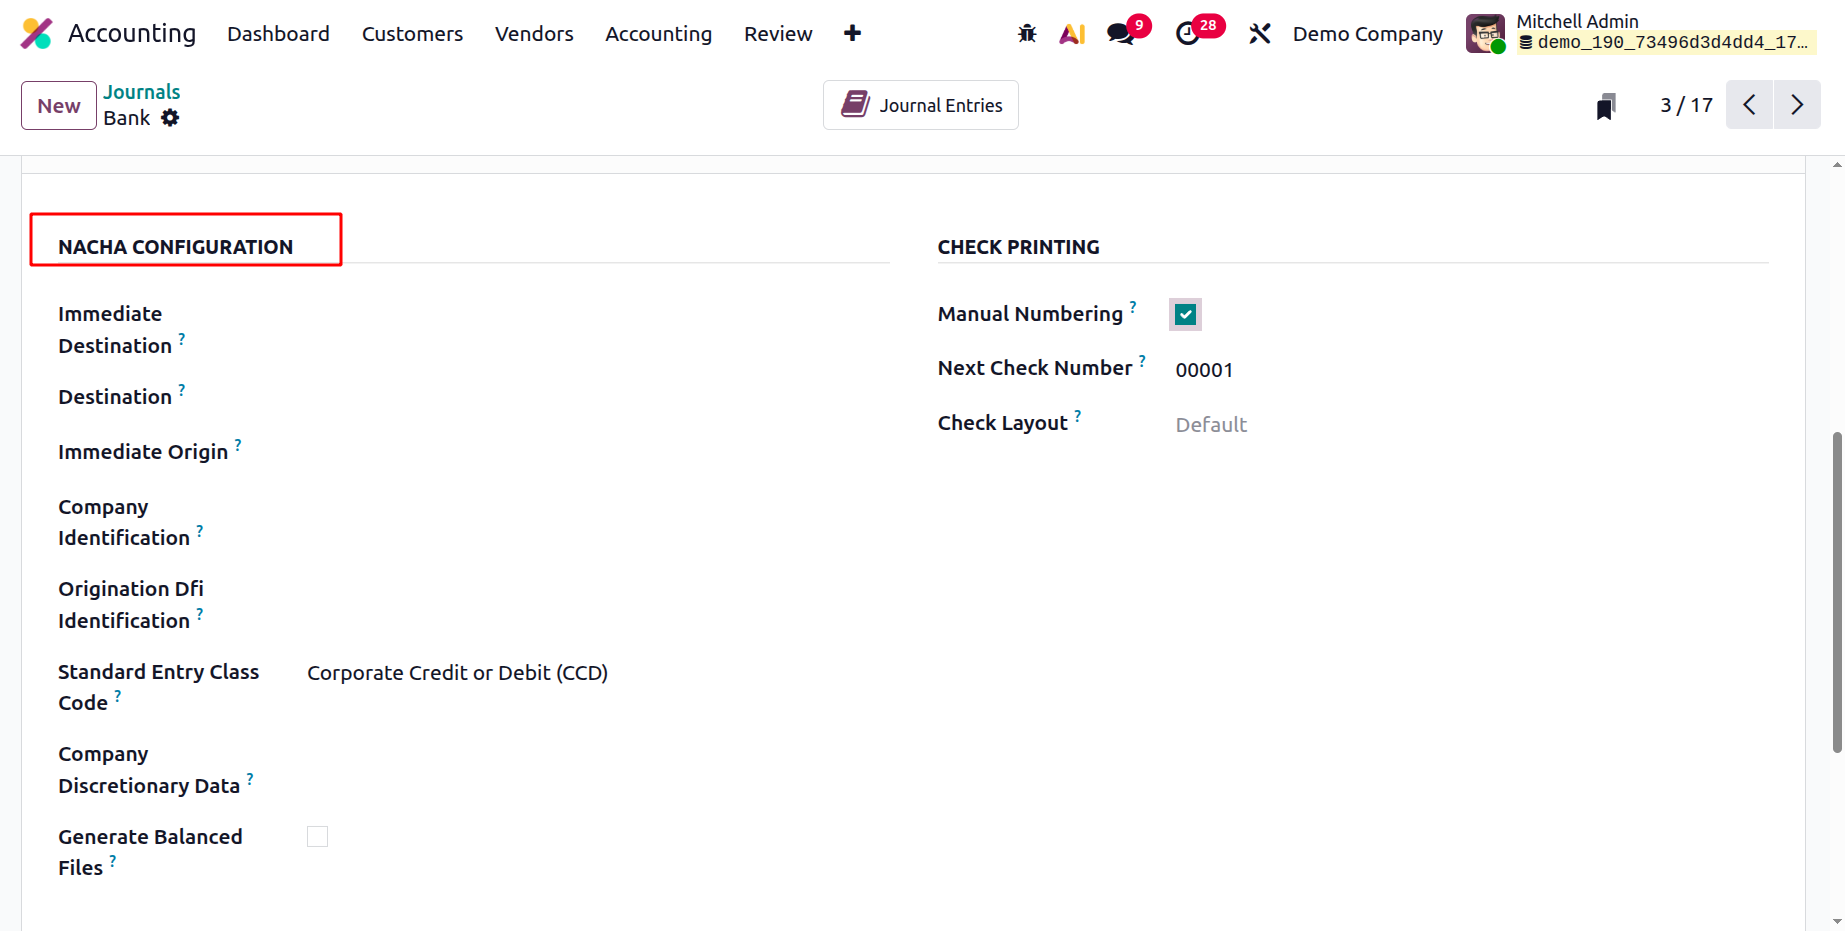
NACHA CONFIGURATION: The US localisation will be used to construct the National Automated Clearing House
Association compliant ACH file, or NACHA for short. Details like the corporate identity, the origin DFI
identifier, the immediate destination, and the immediate origin can be given at the right place. Your bank will
frequently let you know when you can send money via ACH. This payment method allows you to pay a vendor and
create the corresponding NACHA file.
Instead of being instantly credited to the bank account when a customer pays an invoice, the funds are
transferred into the Outstanding Receipt Account, which is described here. The funds won't be sent into the
company's bank account until the bank statement has been reconciled, either automatically or manually. The bank
will be reconciled with overdue payment entries rather than the payable account when the bank statement
reconciliation procedure is carried out in connection with the vendor bill. The amount for the vendor bill will
likewise be produced from Accounts Payable and sent to the Outstanding Payments Account in the event of a
purchase payment.
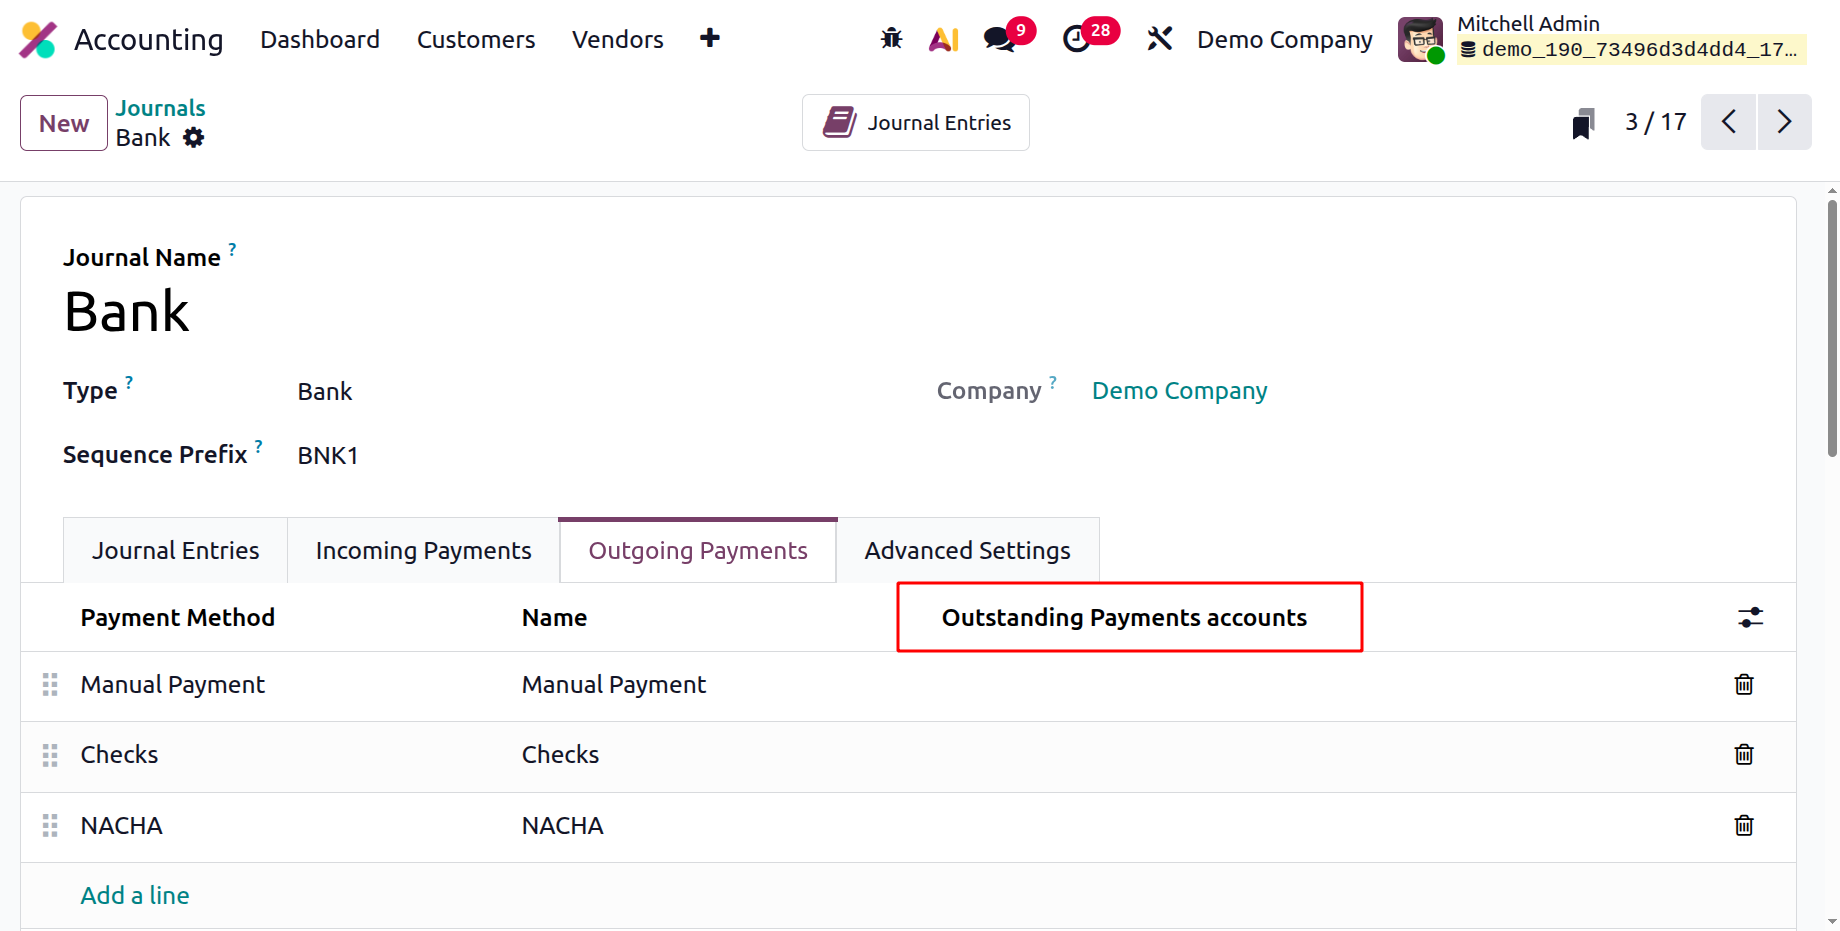
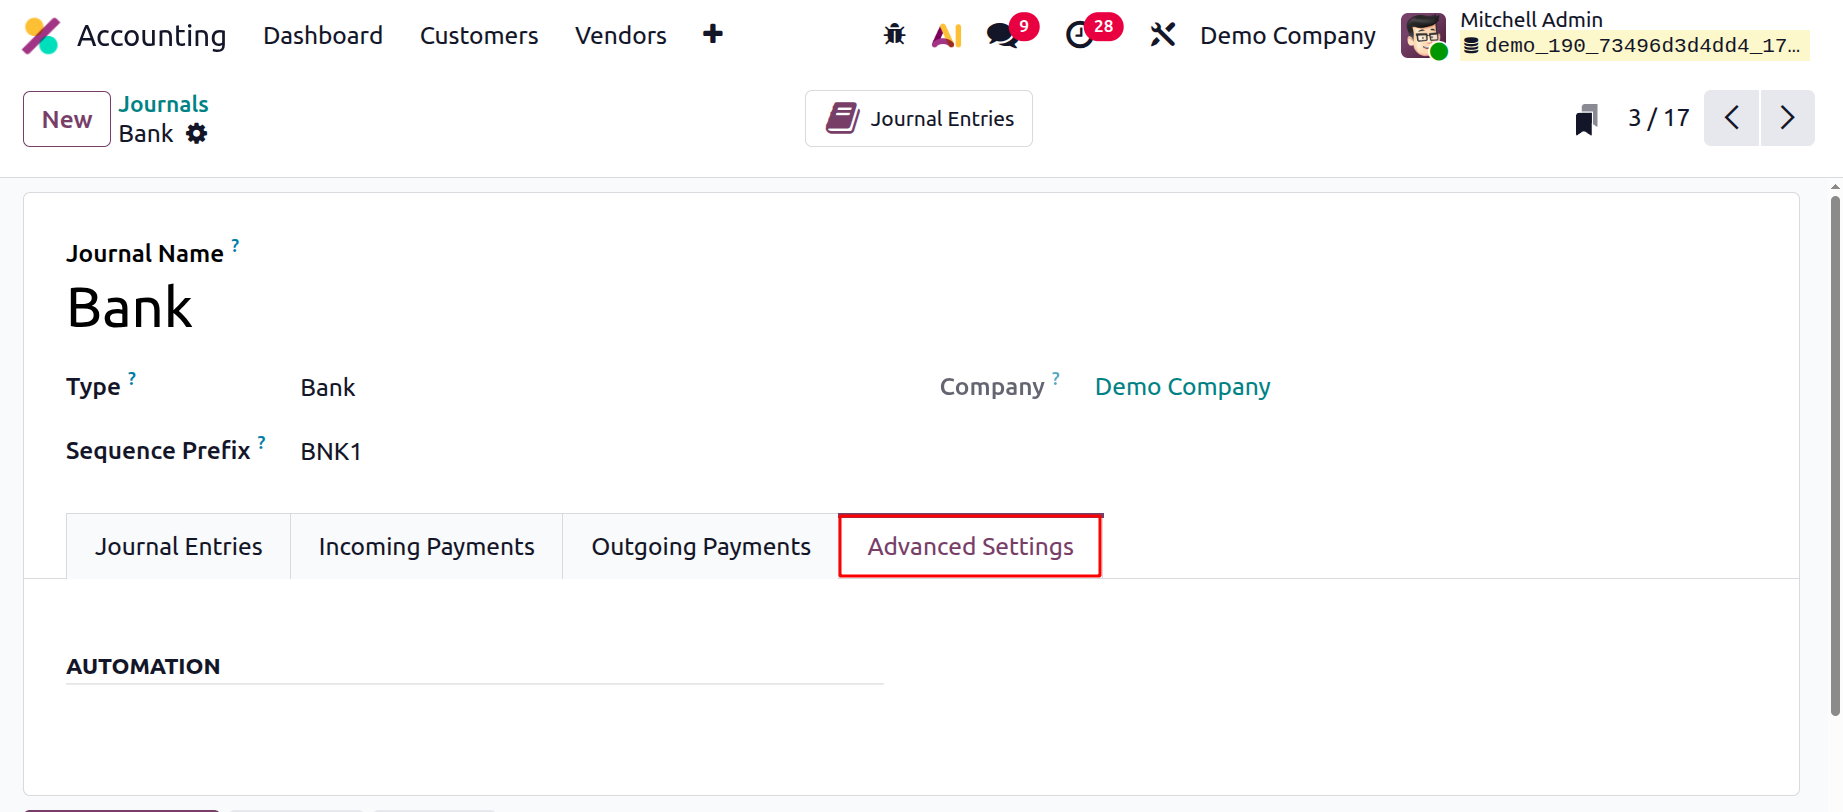
The Sales, Purchase, and Miscellaneous accounts in the Journals settings are the same as the last choice,
Advanced Settings. As a result, the Cash and Bank journals' account operation data can be modified to meet
operational needs.
These suitable journal generation and editing approaches can be used to make journal entries for an
organization's financial administration. We can now examine currency management after going over each component
of journal design.
Currency Management
The Odoo 19 Accounting module's extensive currency management capability makes it simple for users to manage
several currencies in their accounts. This feature consists of a currency rate system and an automatic currency
conversion method. Users can choose their desired rate for each type of currency and set the exchange rate using
the currency rate technique. Users can also use this method to set various rates for different kinds of
transactions.
The automated currency conversion technology allows users to automatically convert any transaction amount between
different currencies. The rate specified for each type of transaction and the technique for determining currency
rates are used for this. Additionally, when presenting quantities in several currencies, you may choose which
currency symbol to use. This ensures that the exchange rates are applied appropriately and that all values are
displayed in the appropriate currency. Additionally, users may easily keep an eye on and report on transactions
in various currencies. It is quite helpful to have a clear image of their accounts and transactions in multiple
currencies.
Multinational corporations frequently have a sizable number of foreign suppliers and clients. The robust currency
management mechanism we have incorporated into the Odoo19 platform is therefore extremely relevant. This is
mainly because all of the organization's operations will be conducted in a set of currencies, and various
payments, such vendor bills and invoices, must be made in the appropriate currencies. As a result, the
platform's Currency Management feature makes managing many currencies simpler.
As shown in the screenshot below, the Odoo 19 Accounting module's Configuration menu contains the Currencies
option. The Currencies window, seen below, can be opened with a single click.
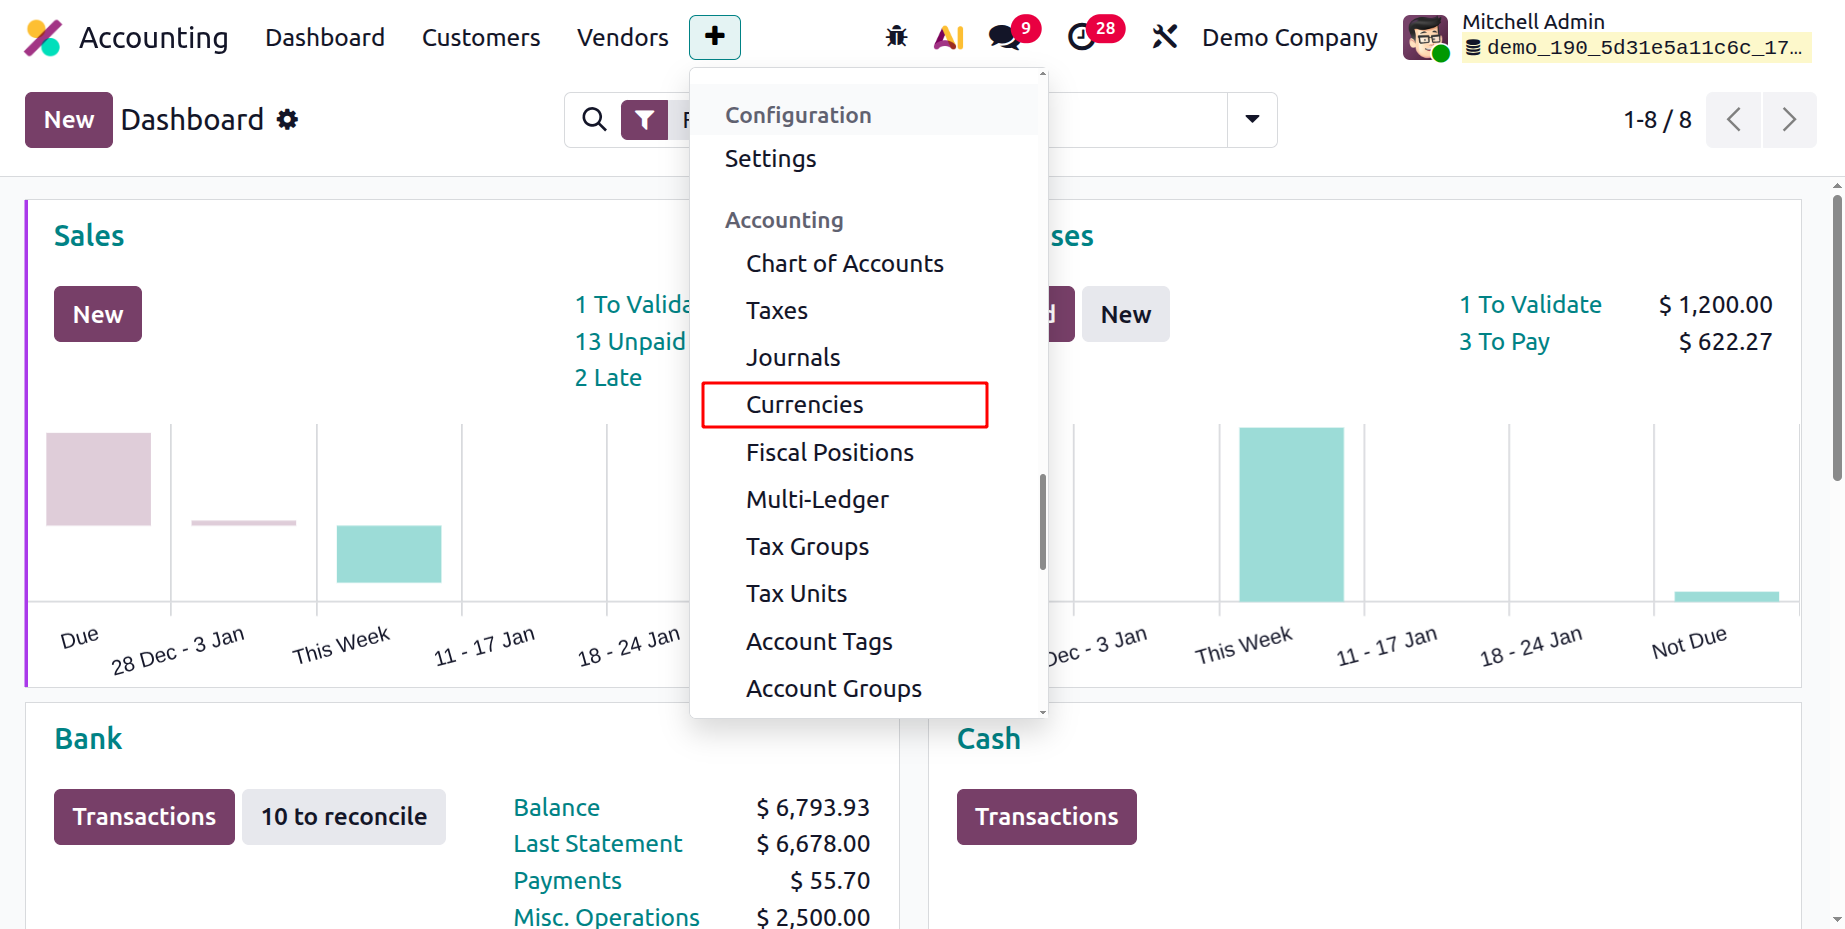
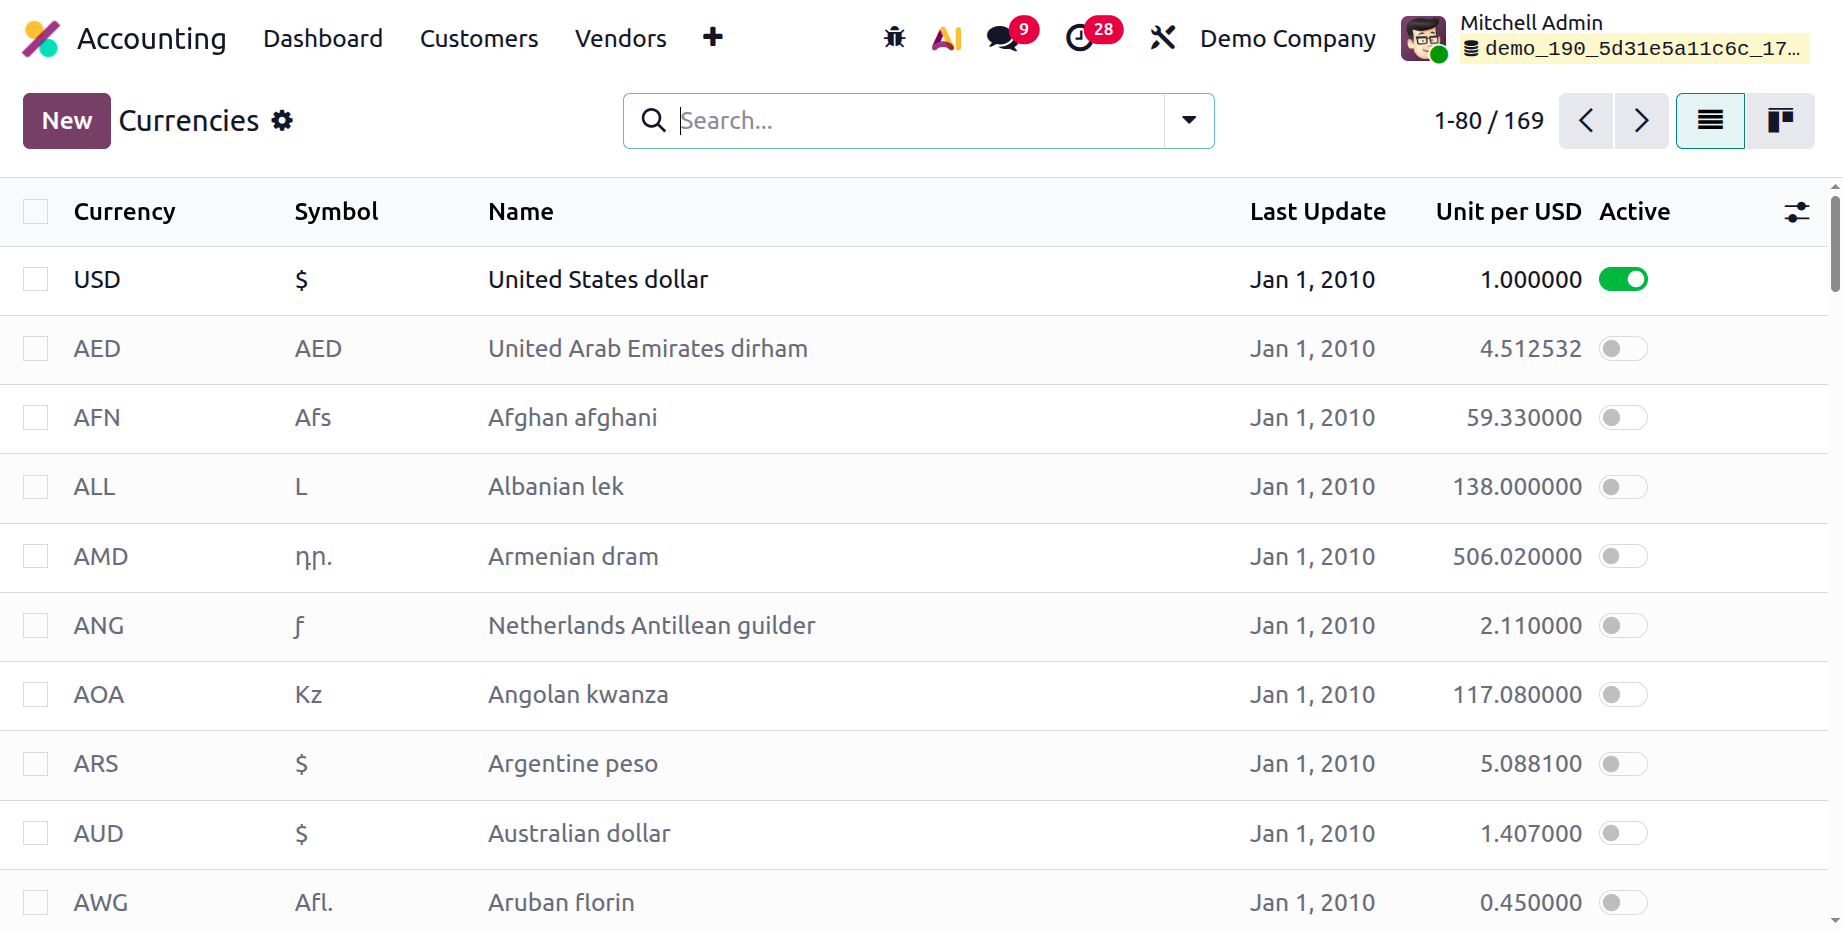
The list of major currencies used worldwide will be displayed in the dedicated window. By selecting the Kanban
menu button located in the upper right corner, you can also open the window in Kanban view. Each currency's data
are shown in this window, including the currency name, symbol, name, last updated date, and current rate (with
reference to the given base currency). Depending on the organization's preferences, the Active option can be
either enabled or deactivated.
Any of the default currency records can be selected, and you can use the relevant options under the Action button
to carry out a variety of tasks, including archiving the currency, making a duplicate record, deleting it, or
displaying currency rates.
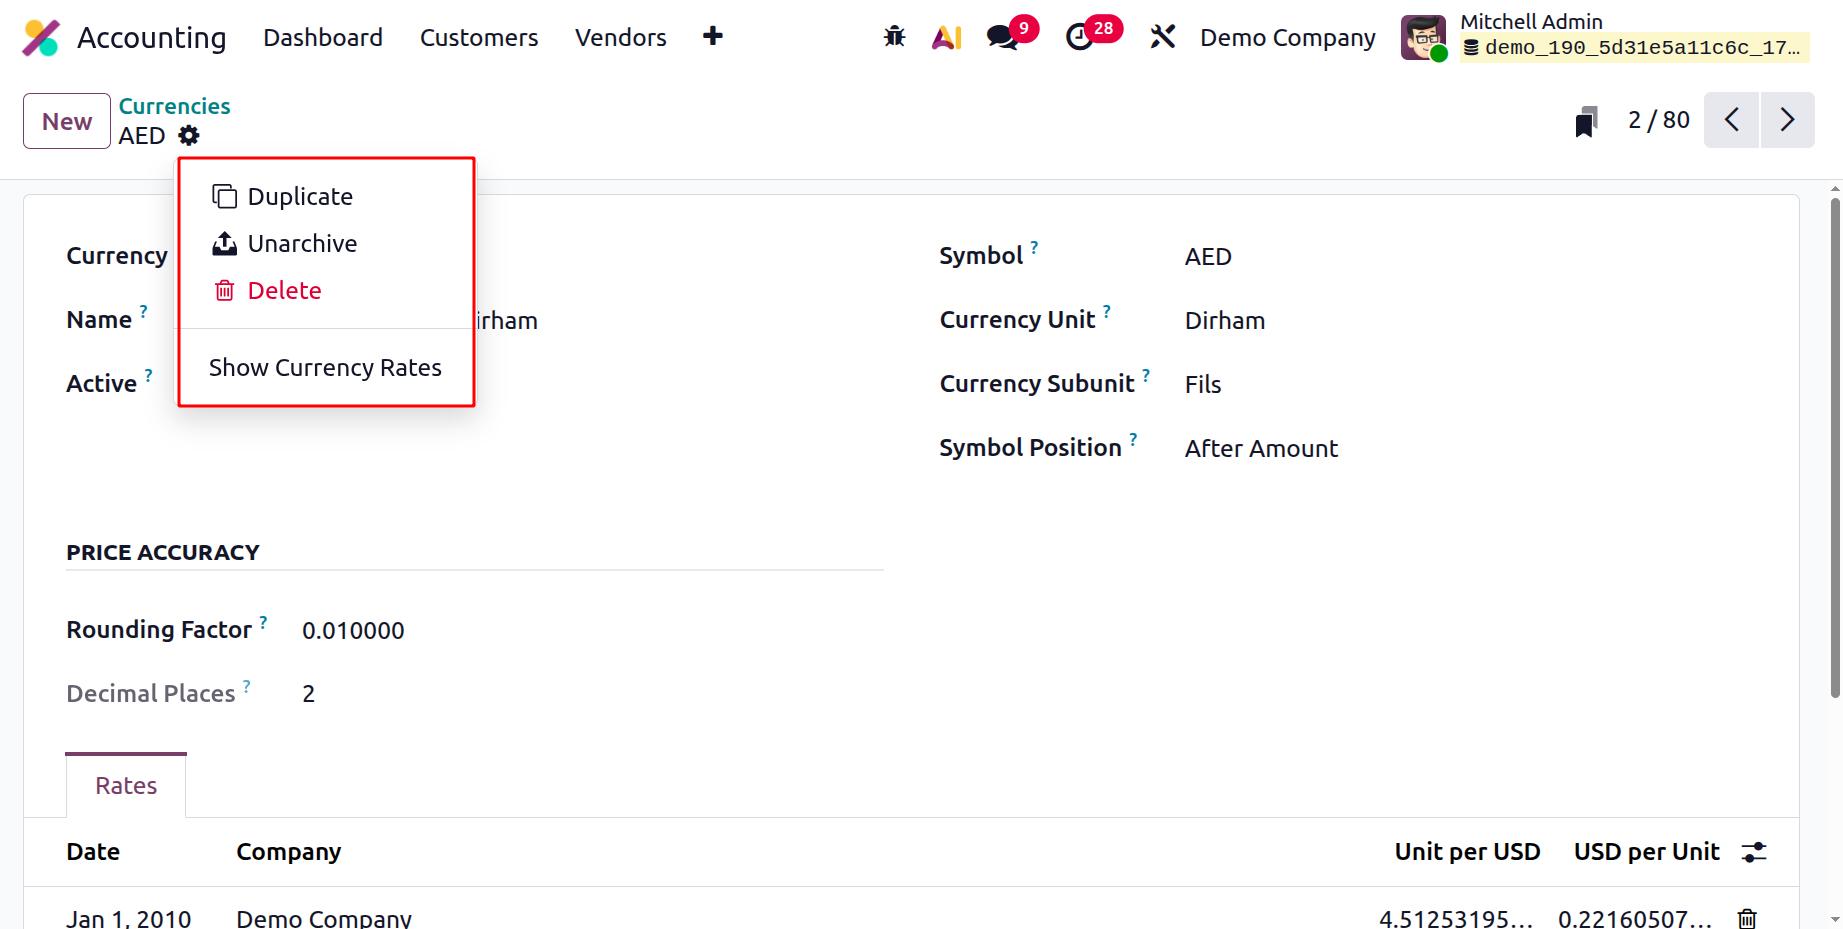
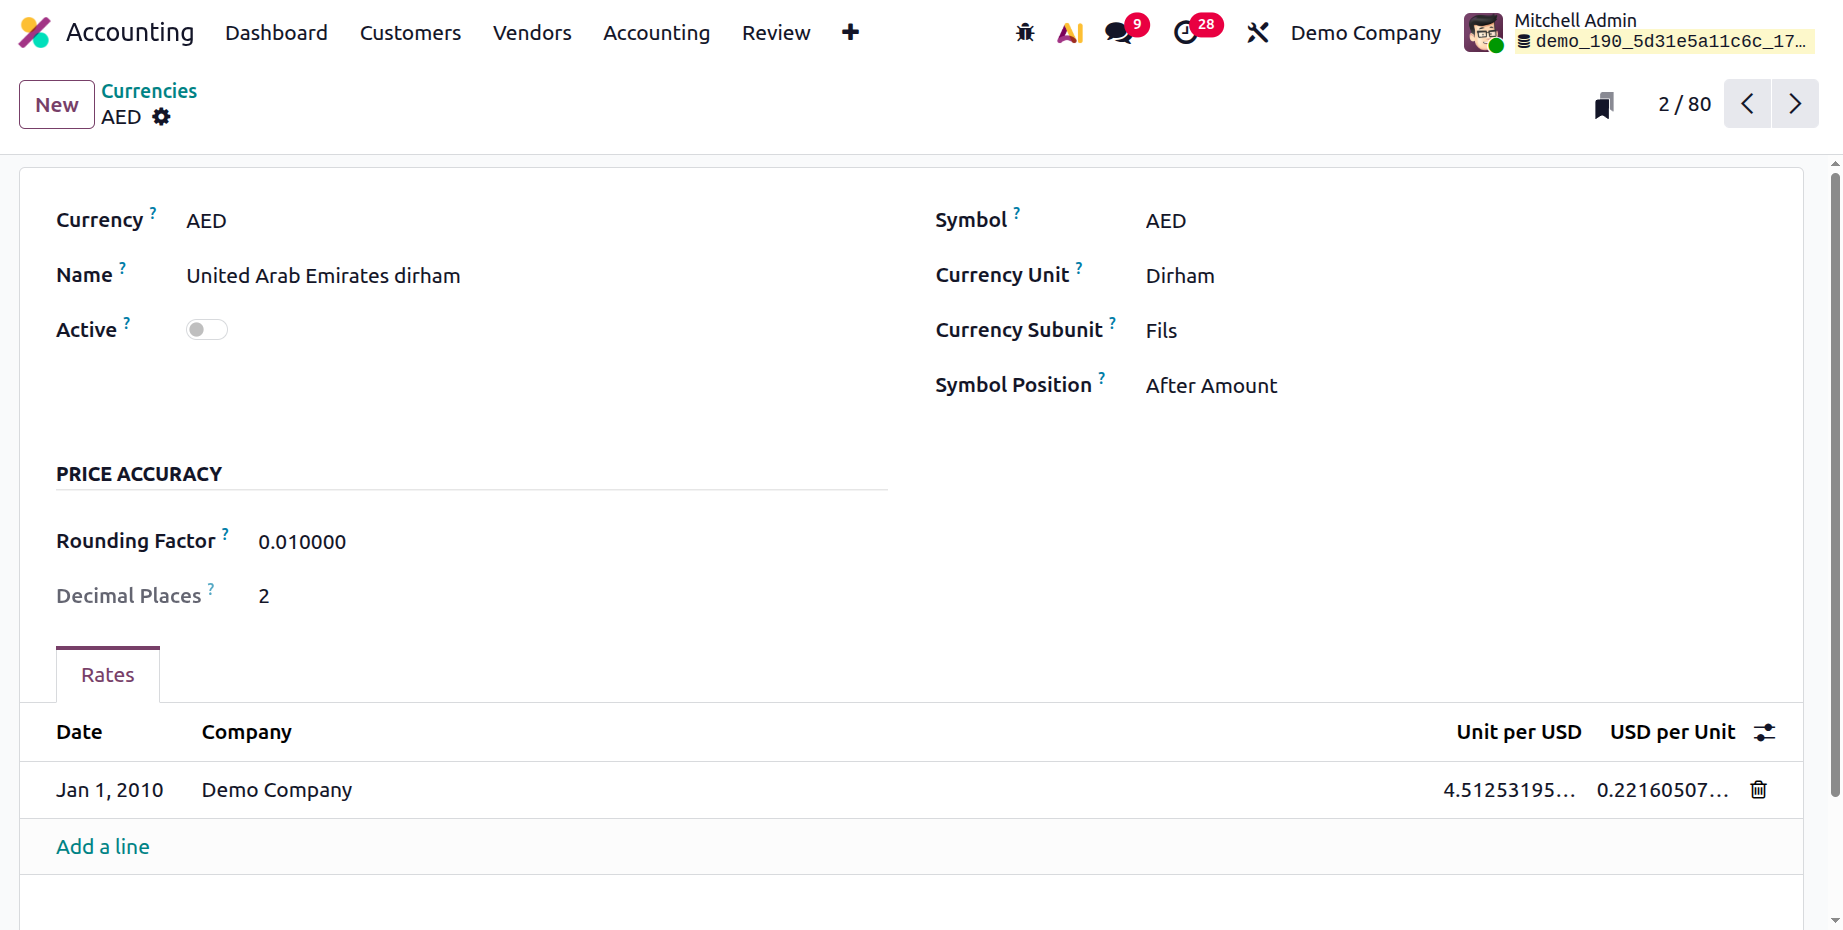
If you need to set up a new currency, select the New button in the Currencies box. Now, the creation form will be
sketched as shown below.
In the Currency area, you can enter the currency code. You can enter the Name, Currency Unit, and Currency Sub
unit in the appropriate fields. Similar to this, depending on the circumstances, the Active field can be turned
on or off. According to the rounding factor, the amount in this currency is rounded to the nearest multiple of
the rounding factor. Decimal places are taken into account while making decisions about the amount in this
currency. It is determined by the rounding factor.
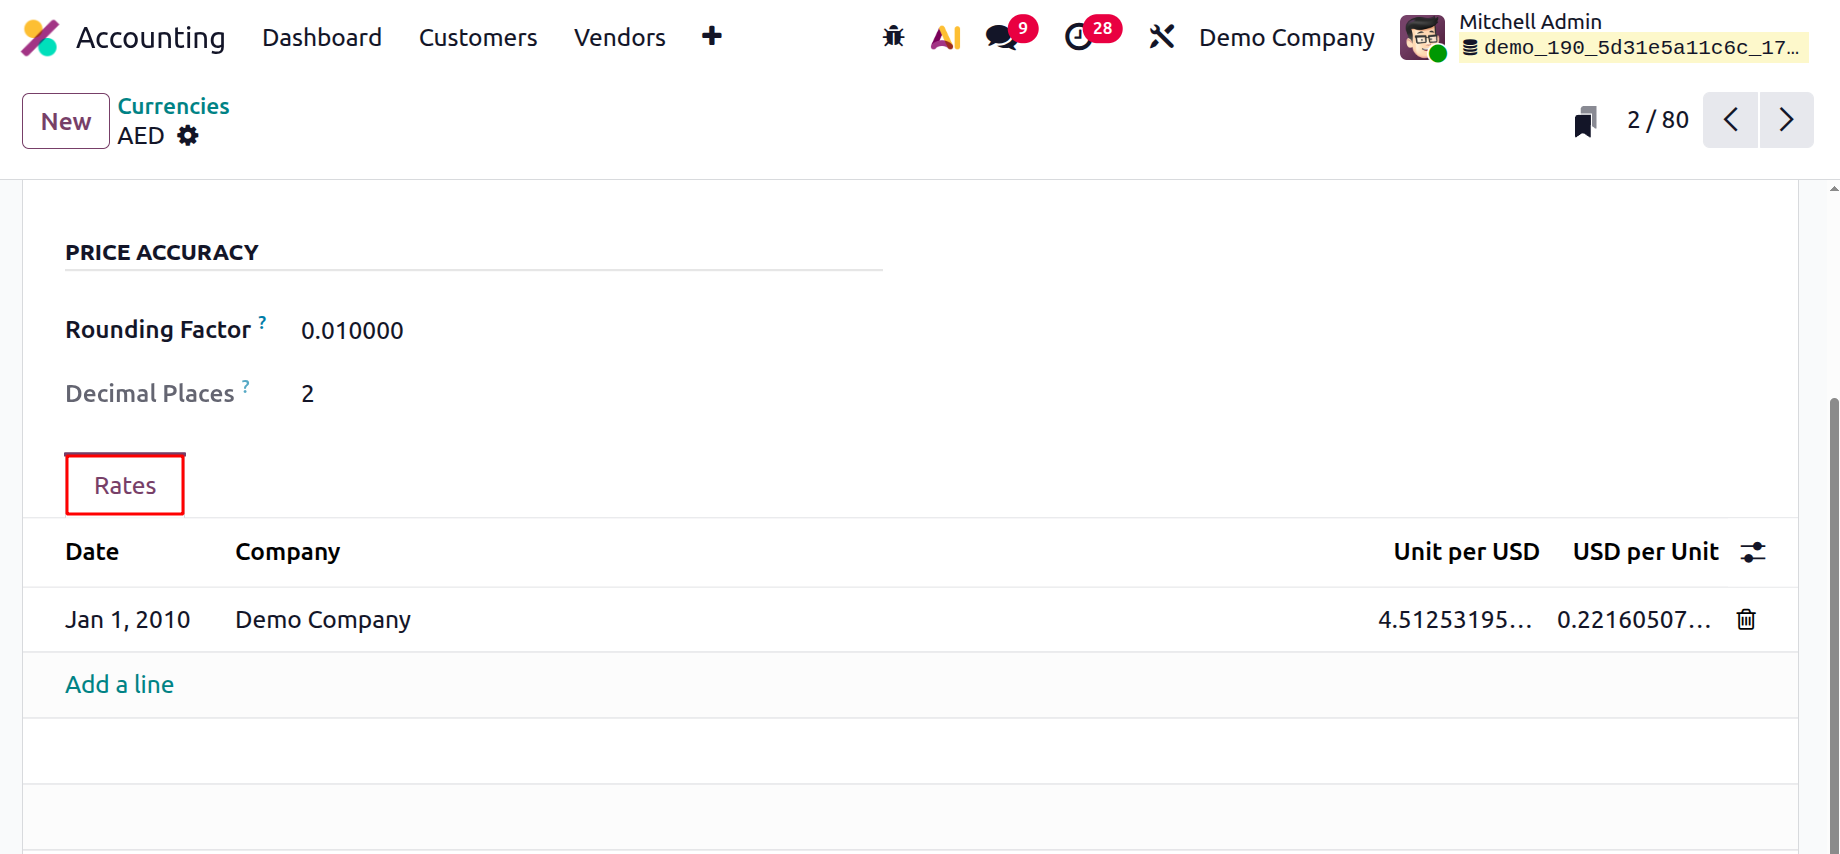
Finally, the currency rates are located on the Rates tab. Here, you can generate new currency exchange rates
based on the most recent changes. Under the Rates tab, you can enter the Date, Company Name, Unit per USD, and
USD per Unit.
Automated Currency Rates are another option available on the Odoo19 platform. It may be accessed via the Settings
panel of the Odoo 19 Accounting module. The option can be found in the Configuration Settings' Currencies
section, as seen in the following figure.
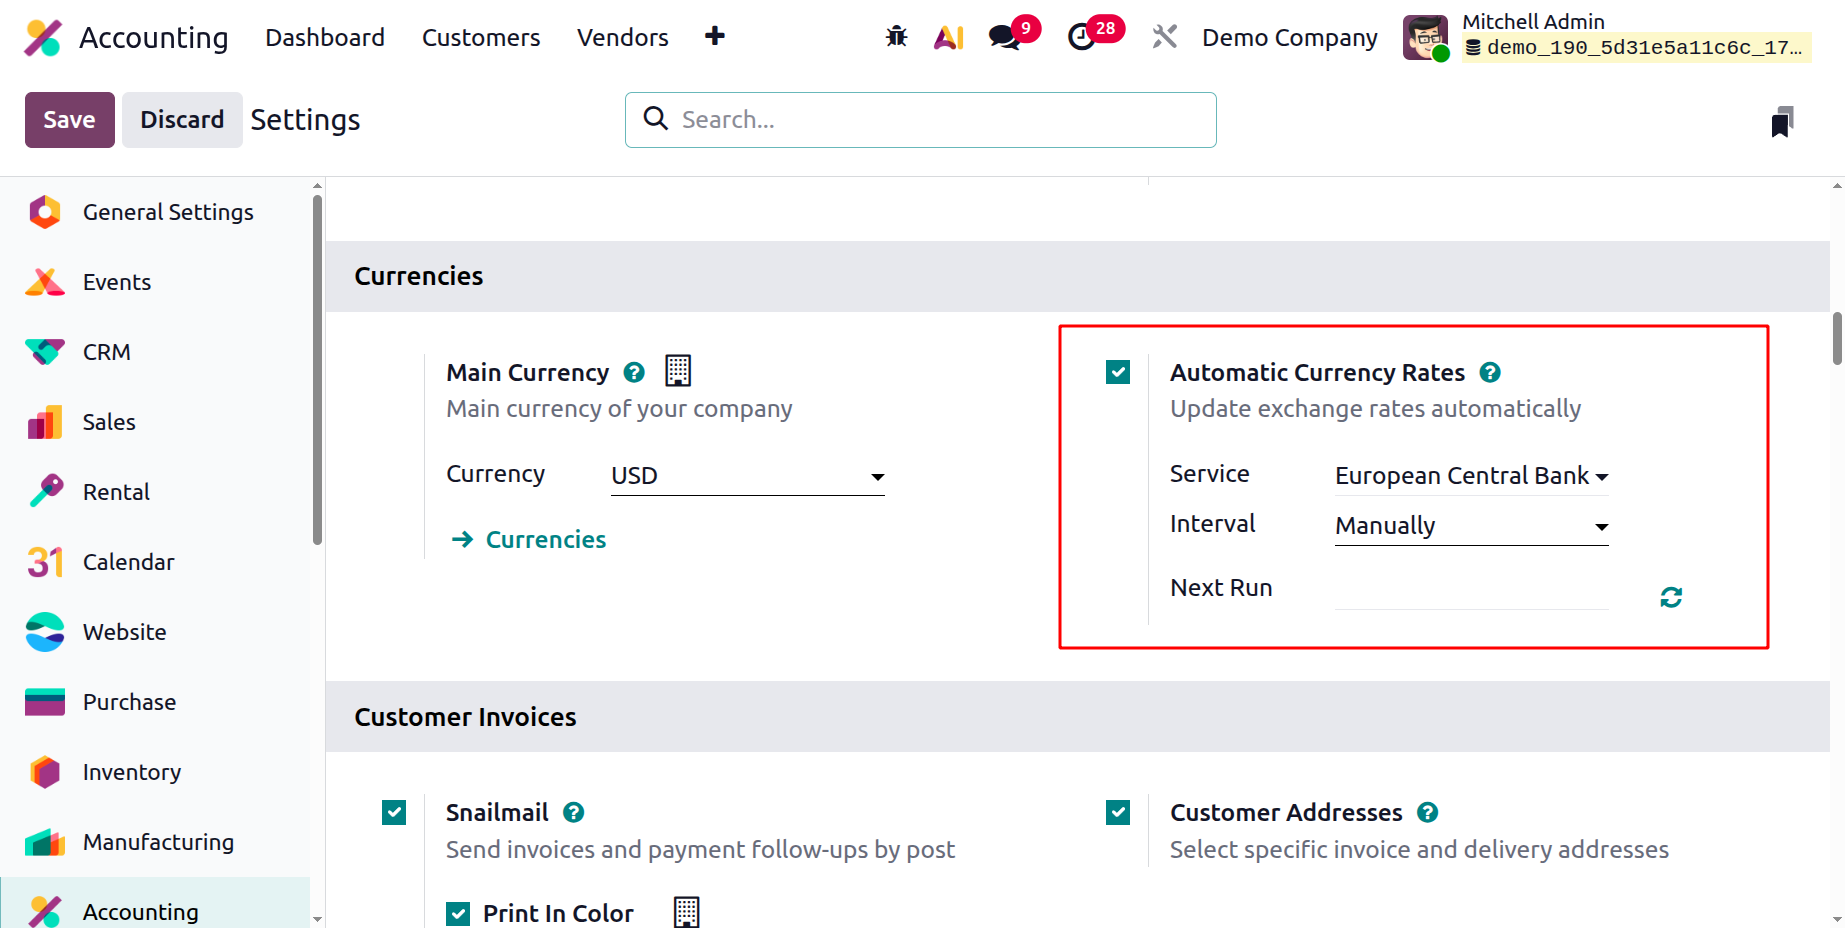
If you choose the Automated Currencies Rates option, exchange rates can be updated automatically. You must select
the currency rate update service provider from the dropdown list that shows up in the Service field in order to
achieve this. For instance, your business can use the dropdown to select the Bank of Canada, the Mexican Bank,
the European Central Bank, etc., depending on where it operates. Additionally, you have the option of having the
currency adjusted manually every day, every week, or every month. The calendar pop-up that shows up underneath
the "Next Run" column allows you to change the update's next date.
As a result, the Odoo 19 Accounting module offers a unique tool for handling exchange rates. Because it makes it
simple to change a currency's conversion rate within the system, they are compatible with a variety of
currencies. Users will be able to trace their transactions in many currencies thanks to the module's support for
multi-currency transactions. It also offers reports for monitoring currency performance and exchange rate
analysis. Additionally, the module offers a variety of options for customers to customize their currency
exchange rate settings. They are therefore in a better position to handle and manage their finances.
The Odoo19 Accounting Settings window's Default Accounts section contains the Post-conversion difference entries
tool, which gives you more flexibility over currency conversion rates. A screenshot of the tool is shown below.
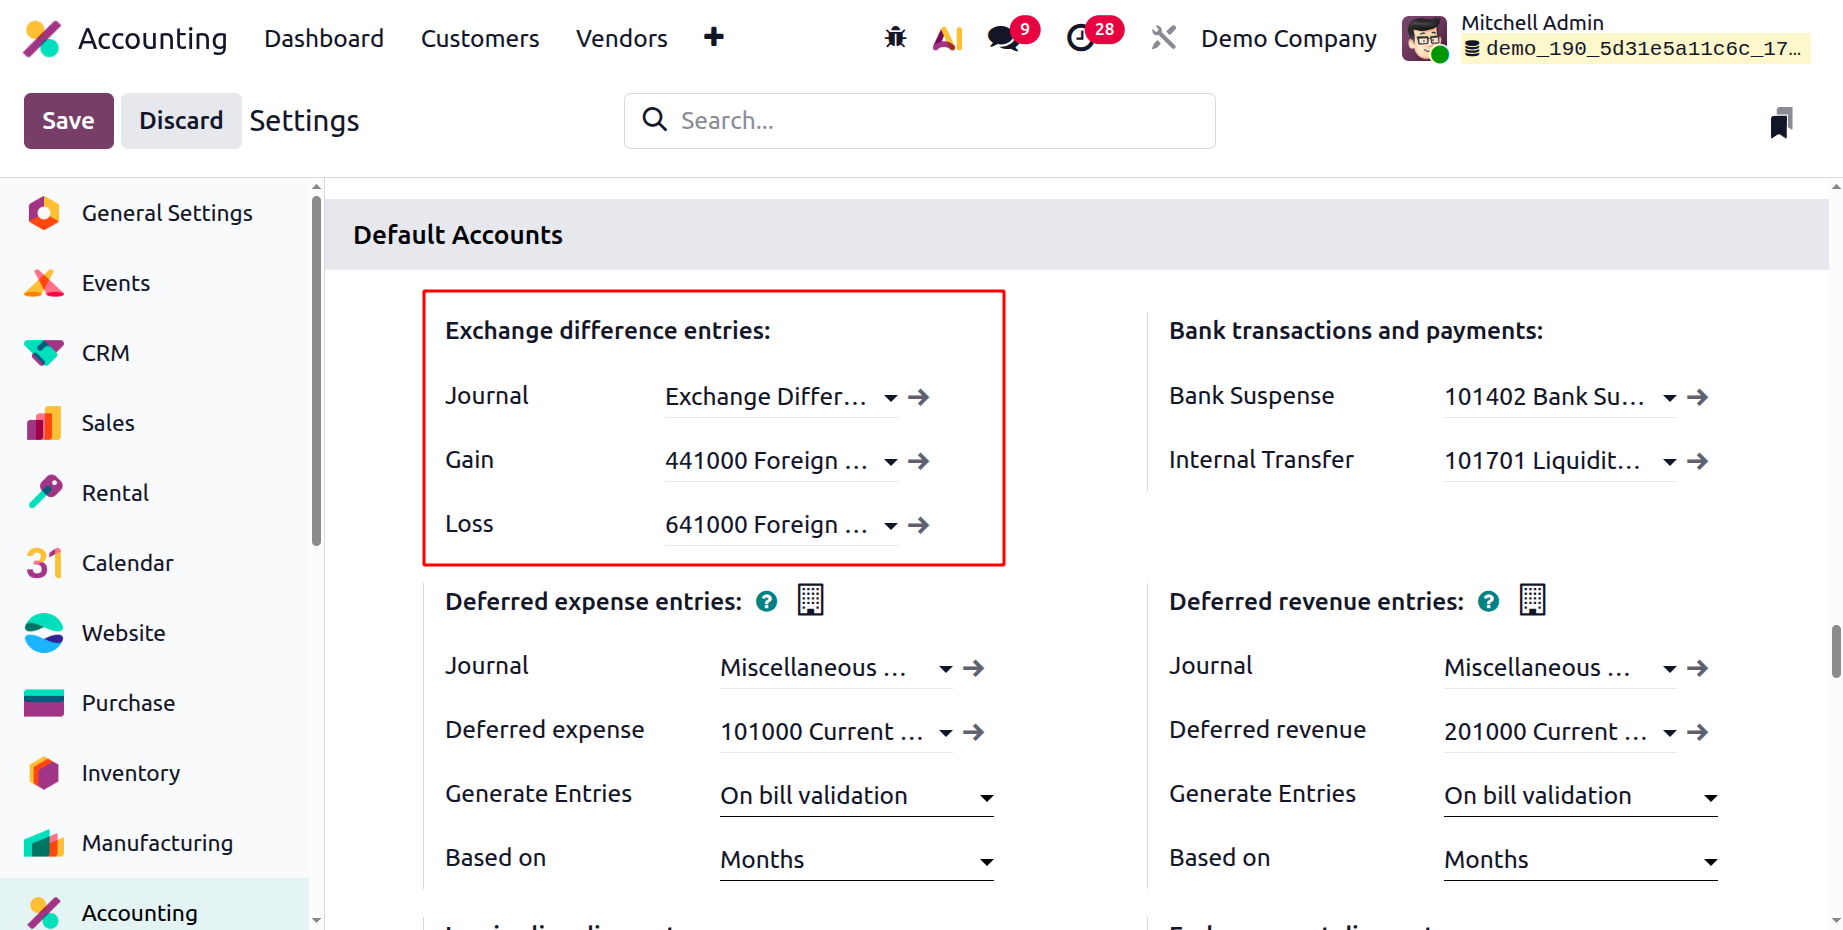
Users can define the Journal, Gain Account, and Loss Account using this feature on the site. Therefore, the
transaction will be recorded in the Loss Account, which is currently being built, if it suffers a loss due to
exchange rate variations. On the other hand, the money will be credited to the Gain Account you mentioned above
if the transaction generates profits due to changes in exchange rates. These developments plus the platform's
multi-currency management feature may make it simpler for you to carry out profitable international business
operations.
Let's go on to the Fiscal position functionality after learning about the multi-currency management aspects of
the Odoo19 Accounting platform.
Fiscal Position
The tax regulations that may be applicable to a client, vendor, or item are outlined in the Fiscal Position
section of the Odoo 19 Accounting module. Depending on their nation, state, and other factors, you can assign
clients to various tax laws. This facilitates the management of the various tax laws in many nations. This is
advantageous for companies that sell goods or services to clients abroad. This is really advantageous because it
makes it simple to adhere to the tax laws of numerous nations. With the help of this tool, you can adjust tax
regulations according to the customer's location or type of purchase. It can be used to establish various tax
rates for specific clients or goods. This account management organization is the ideal choice for a company's
global financial administration. The bank accounts and taxes related to the transactions can be automatically
adjusted thanks to this tool.
The Odoo19 Accounting software's Accounting part of the Configuration tab contains a menu called Fiscal
Positions.
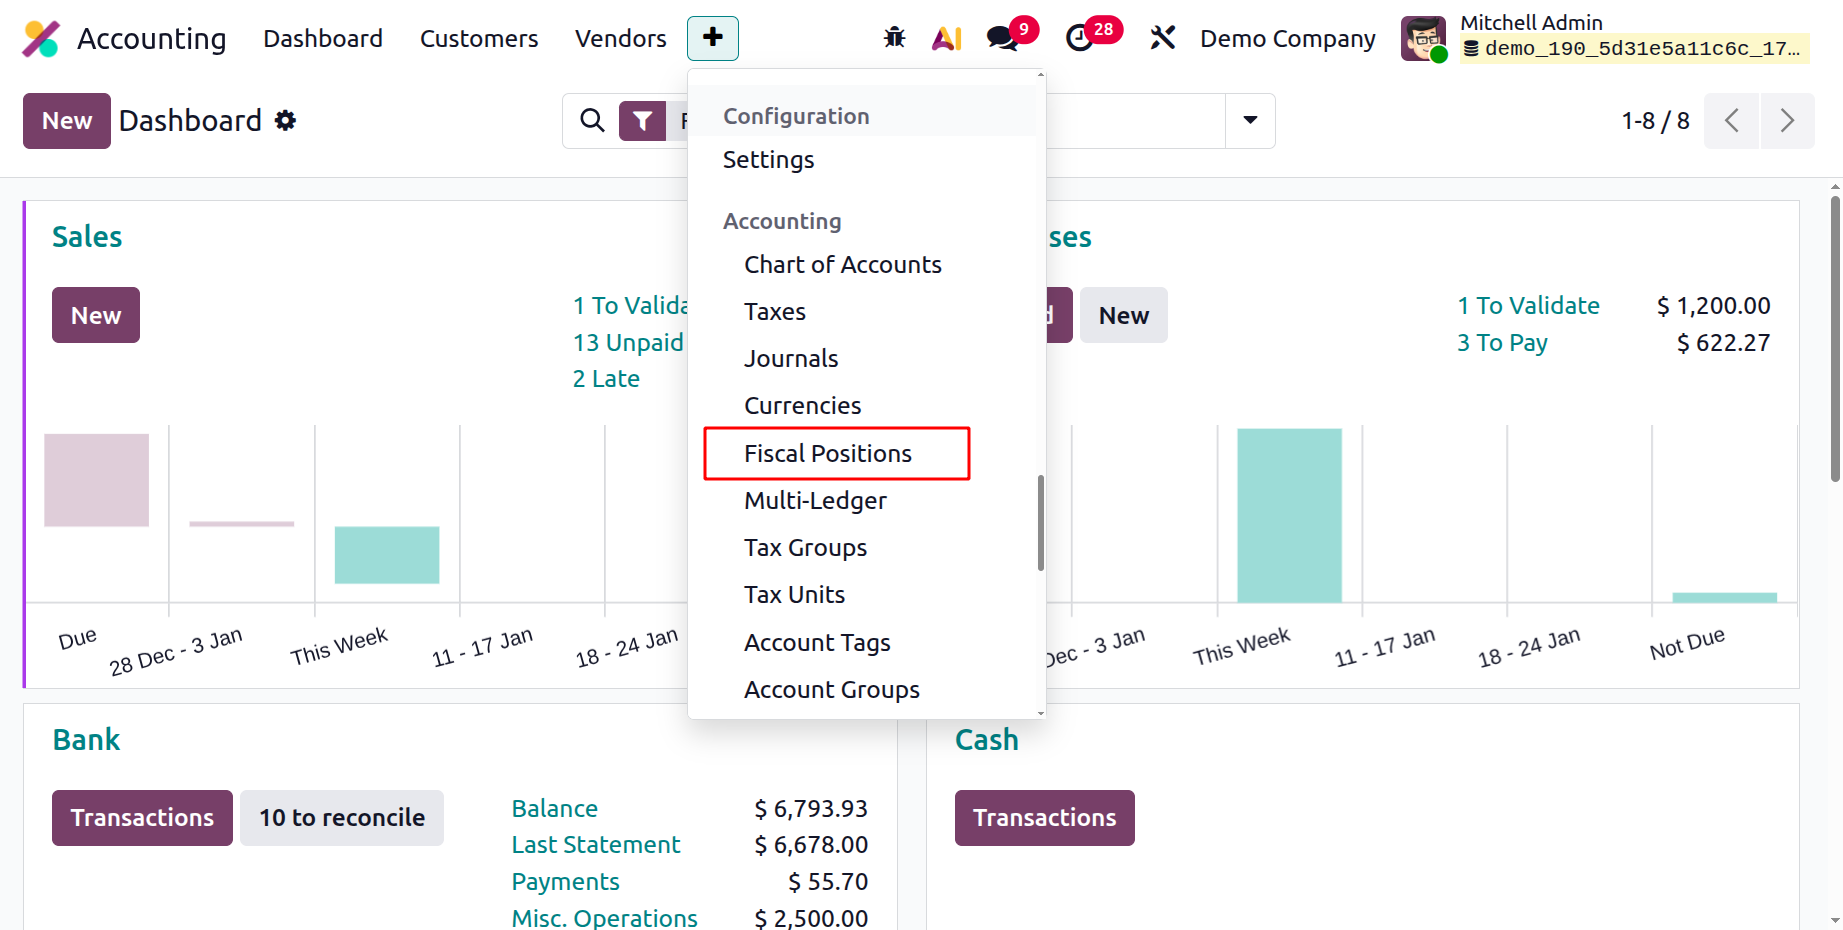
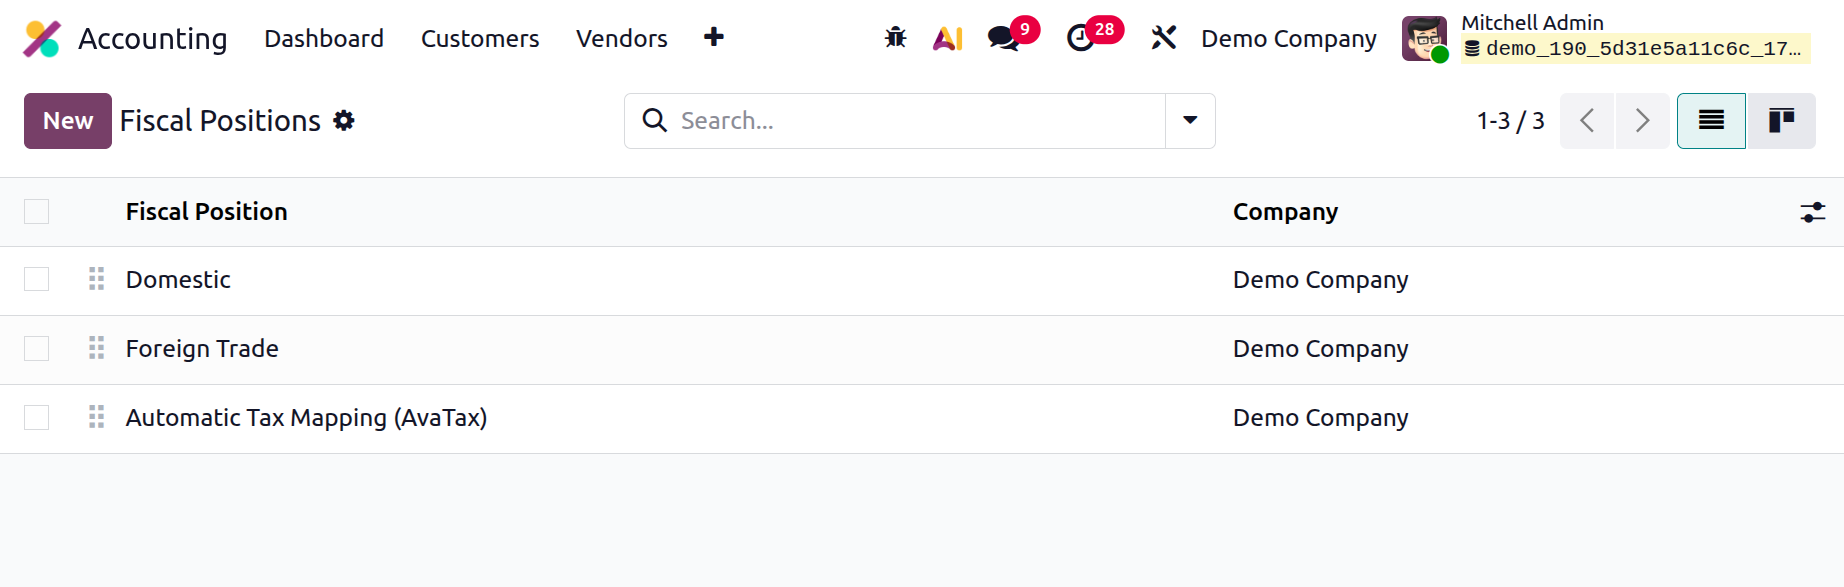
You can manage each fiscal position entry in the Fiscal Positions window by using the Fiscal Positions menu as
its key. The window will show each predetermined fiscal position, as shown in the image below.
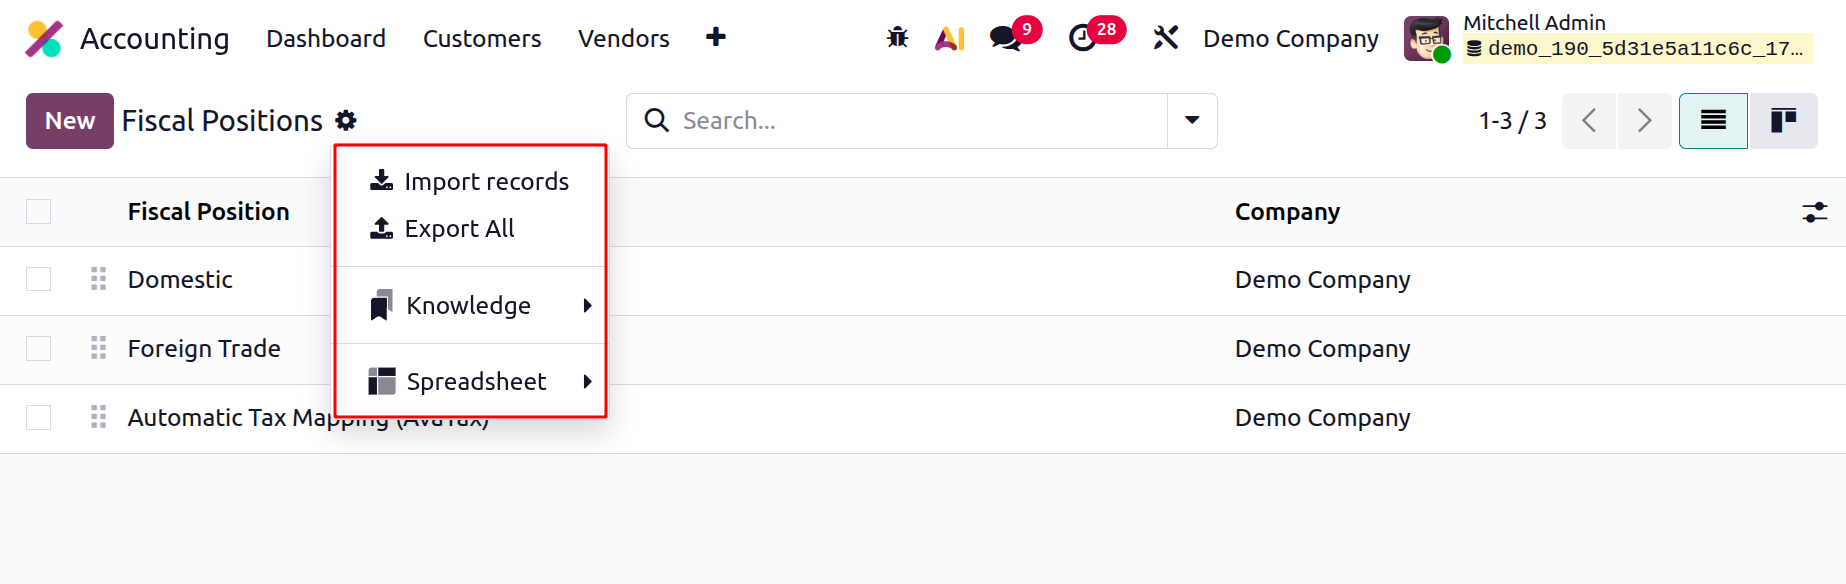
You can view all of the data for a particular fiscal position record by choosing one from the defined fiscal
position records, and you can select any field in the window's display. If the platform manages many Fiscal
Positions, the necessary Fiscal Position can also be retrieved using the Filters, Group By, advanced Search
tools, and the ability to Save Current Search. The gear wheel icon makes it easier to import records, link menus
in spreadsheets, insert views and links in articles, add lists to spreadsheets, and add options to my dashboard.
Both List view and Kanban view are available for accessing the pane. The window's Kanban view is shown below.
Offering the necessary Fiscal Positions is a fantastic method to use the NEW button. The Fiscal Positions
creation form is shown below.
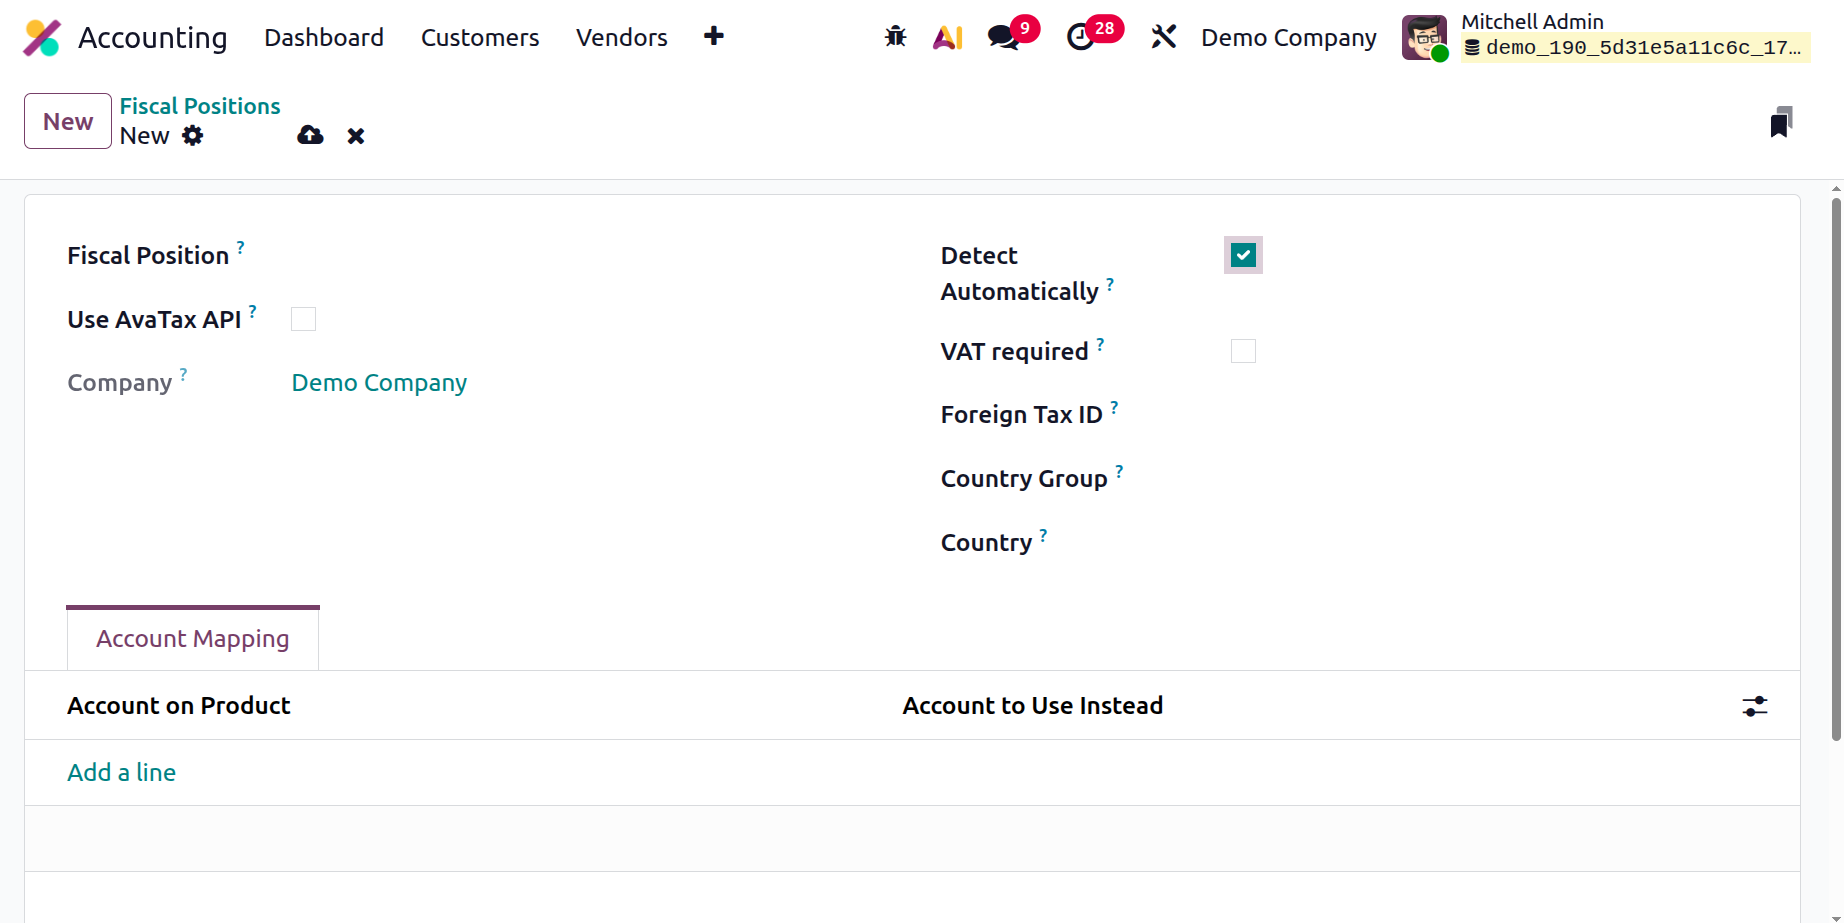
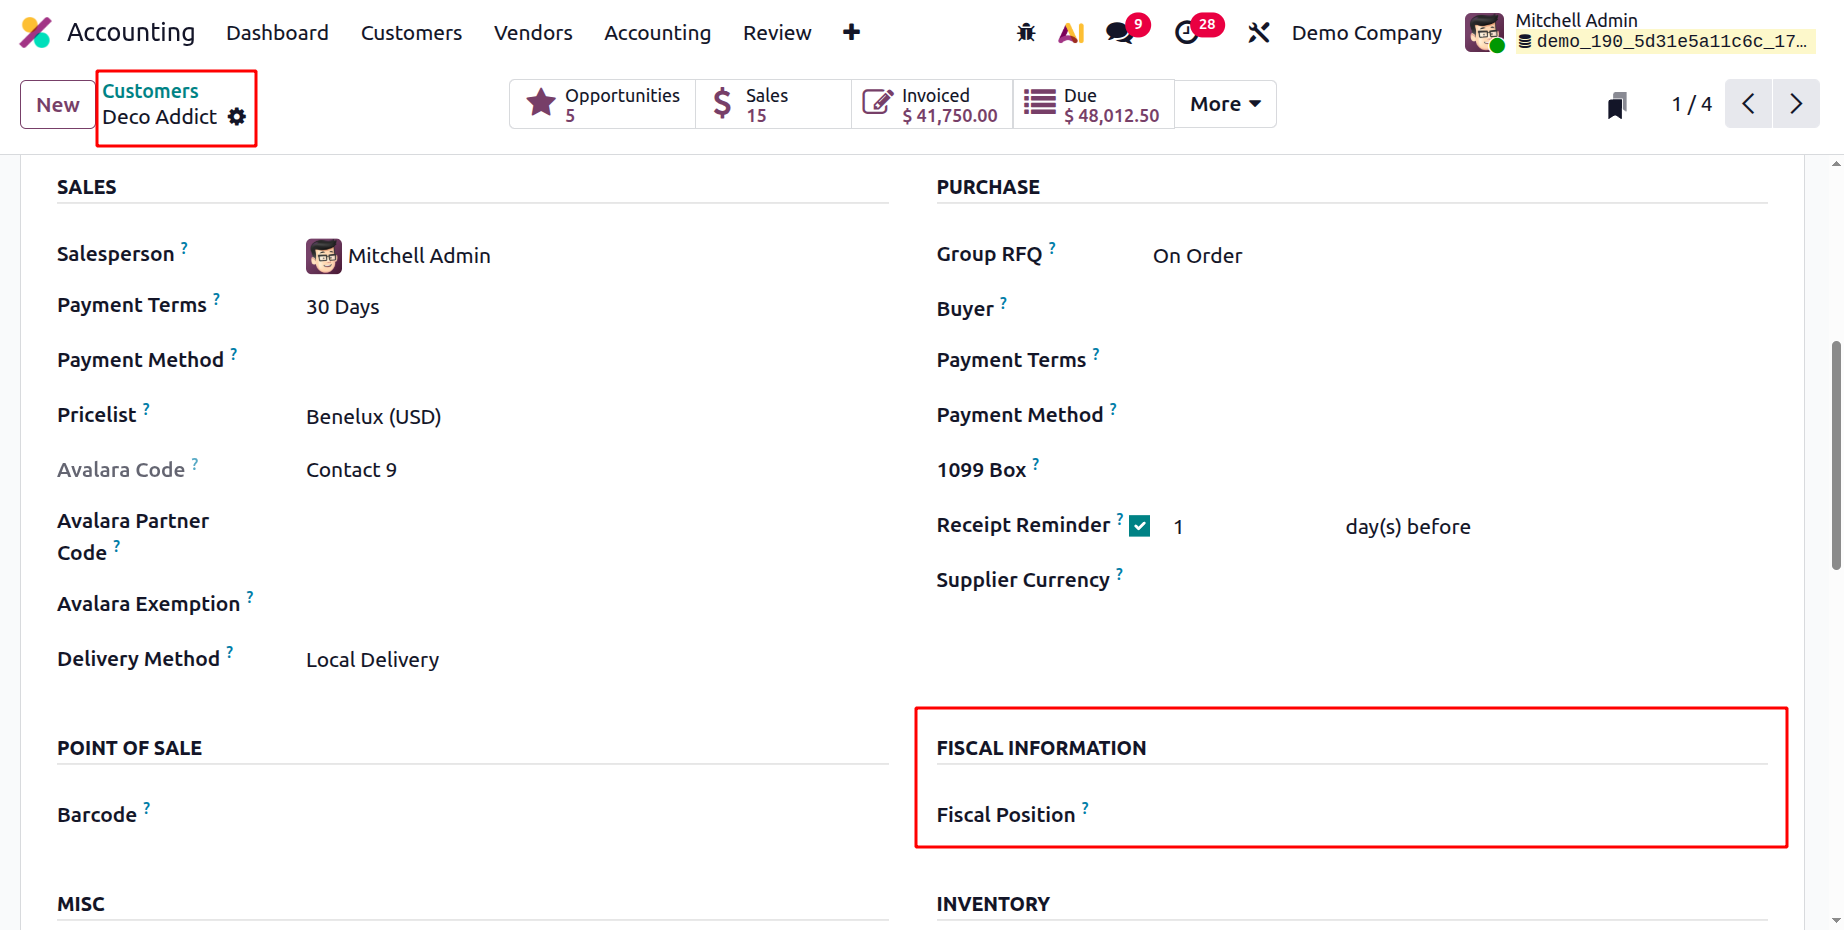
In the Fiscal Position section, you can type the fiscal position's name. There may then be more fields to set,
including Use AvaTax API, Detect Automatically, and Foreign Tax ID. It is possible to enable or disable each of
these fields. By selecting the Detect Automatically option, you can automatically apply this financial position
to the partner business's country, country group, cities, or federal state. If you only want to apply to that
country, you can also specify the country group and country. Foreign Tax ID fields are displayed there, and VAT
is necessary.
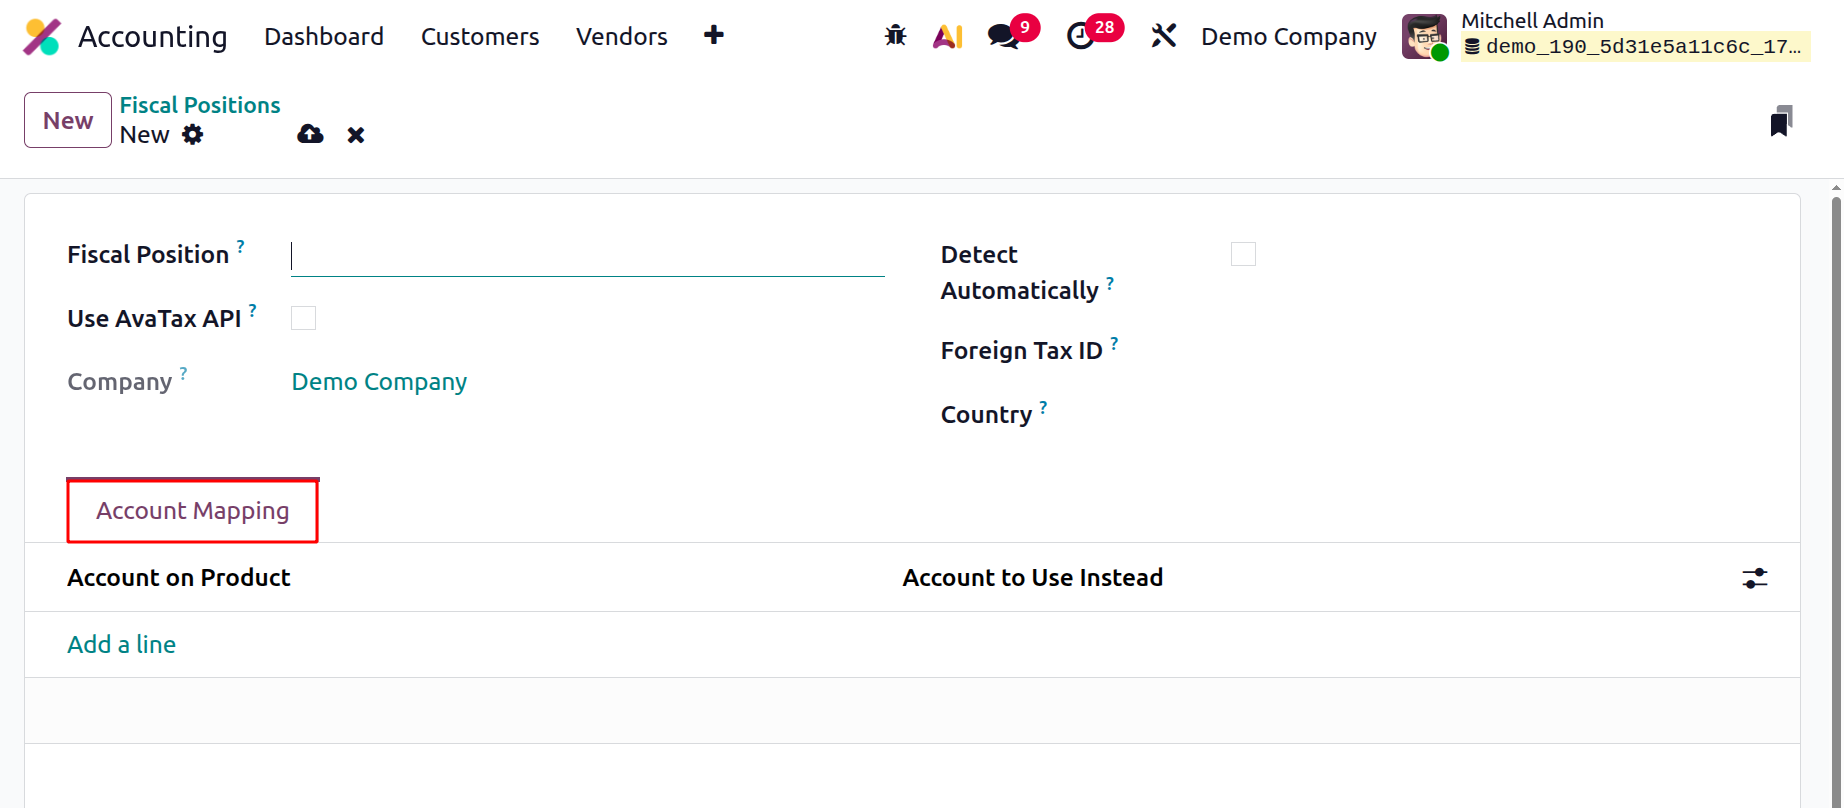
You can choose the Account on Product and the Account to use instead of the "Add a line" option by using the
Accounting Mapping tab. The legal notes that must be printed on the invoices can also be included using the
appropriate Legal Note line.
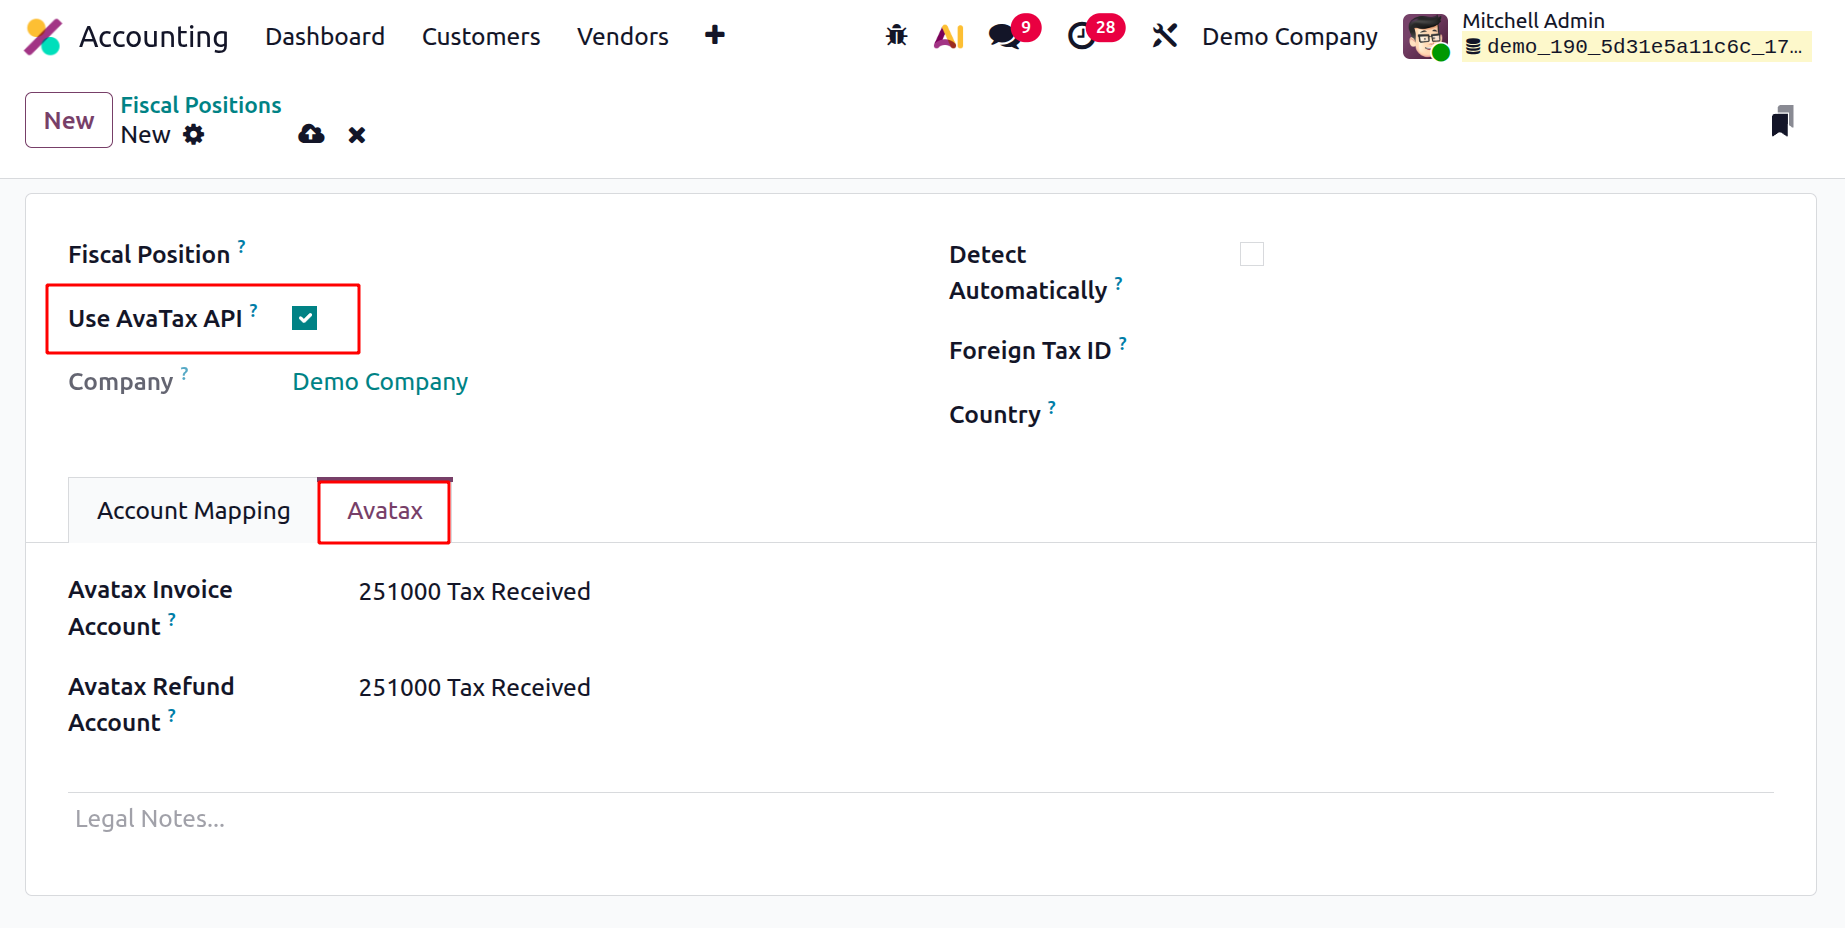
The Fiscal Positions creation form's Avatax settings page allows you to specify the Avatax Invoice Account and
Avatax Refund Account, which are the accounts that Avatax will use for invoices and refunds, respectively.
Include the Avatax Refund Account and Avatax Invoice Account. In the designated space, legal notes may also be
added.
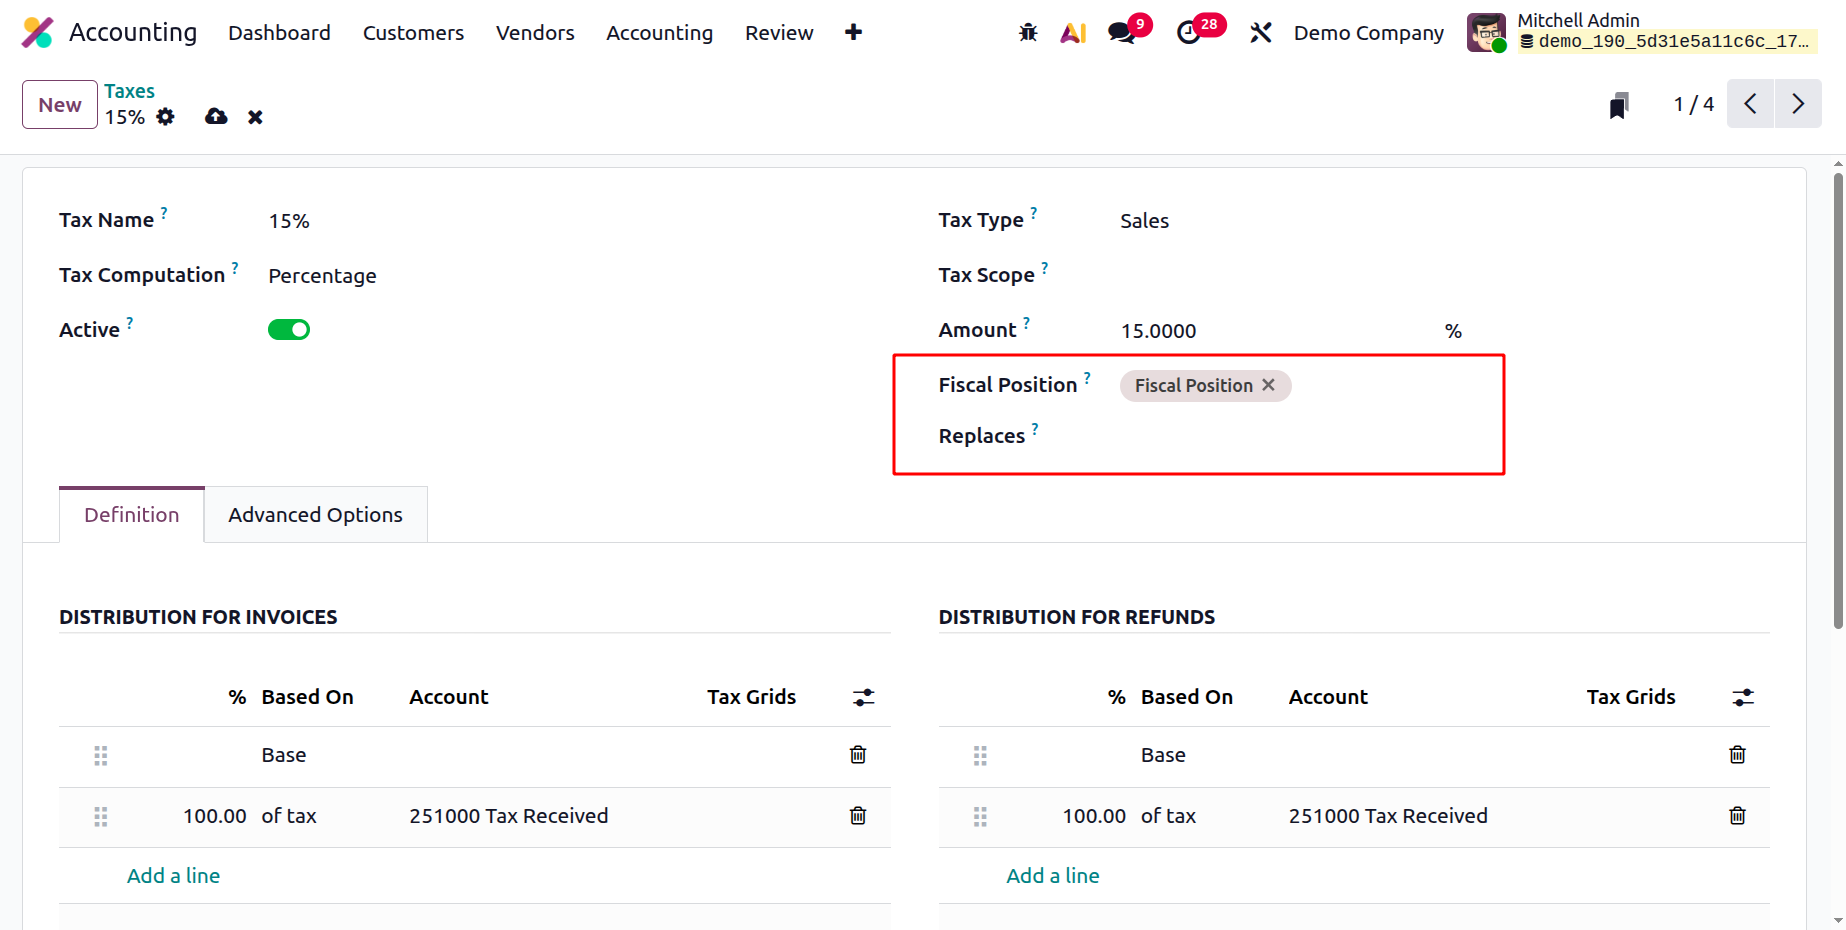
Then choose the Tax from the Configuration menu. There is a field named Fiscal Position. And if the created
fiscal position is chosen, another field named Replaces will appear as shown in the below screenshot. The
Replaces field gives a list of taxes to replace when relaying any of the stipulated fiscal positions.
After all of these components are configured, you may map the accounts and taxes in accordance with the example's
rule by applying them to bills and invoices.
The financial standing of partners is automatically evaluated based on the given federal states, country, and
country group.
Let's move on to the Multi ledger feature of the Odoo19 Accounting module now that we have a better understanding
of the Fiscal Position menu and its customizable components.
Multi Ledger
You will have the opportunity to classify a range of business operation objects because classification is a
crucial part of business operations. For a company's accounting procedures to go smoothly, you can define a
variety of journals using the Odoo19 platform. When entries are defined in different journals, there is a
considerable chance that they will be confused. As a result, the Odoo19 platform provided a special feature for
journal organization. Classifying all of the configured journals will be made much easier by this cutting-edge
functionality.
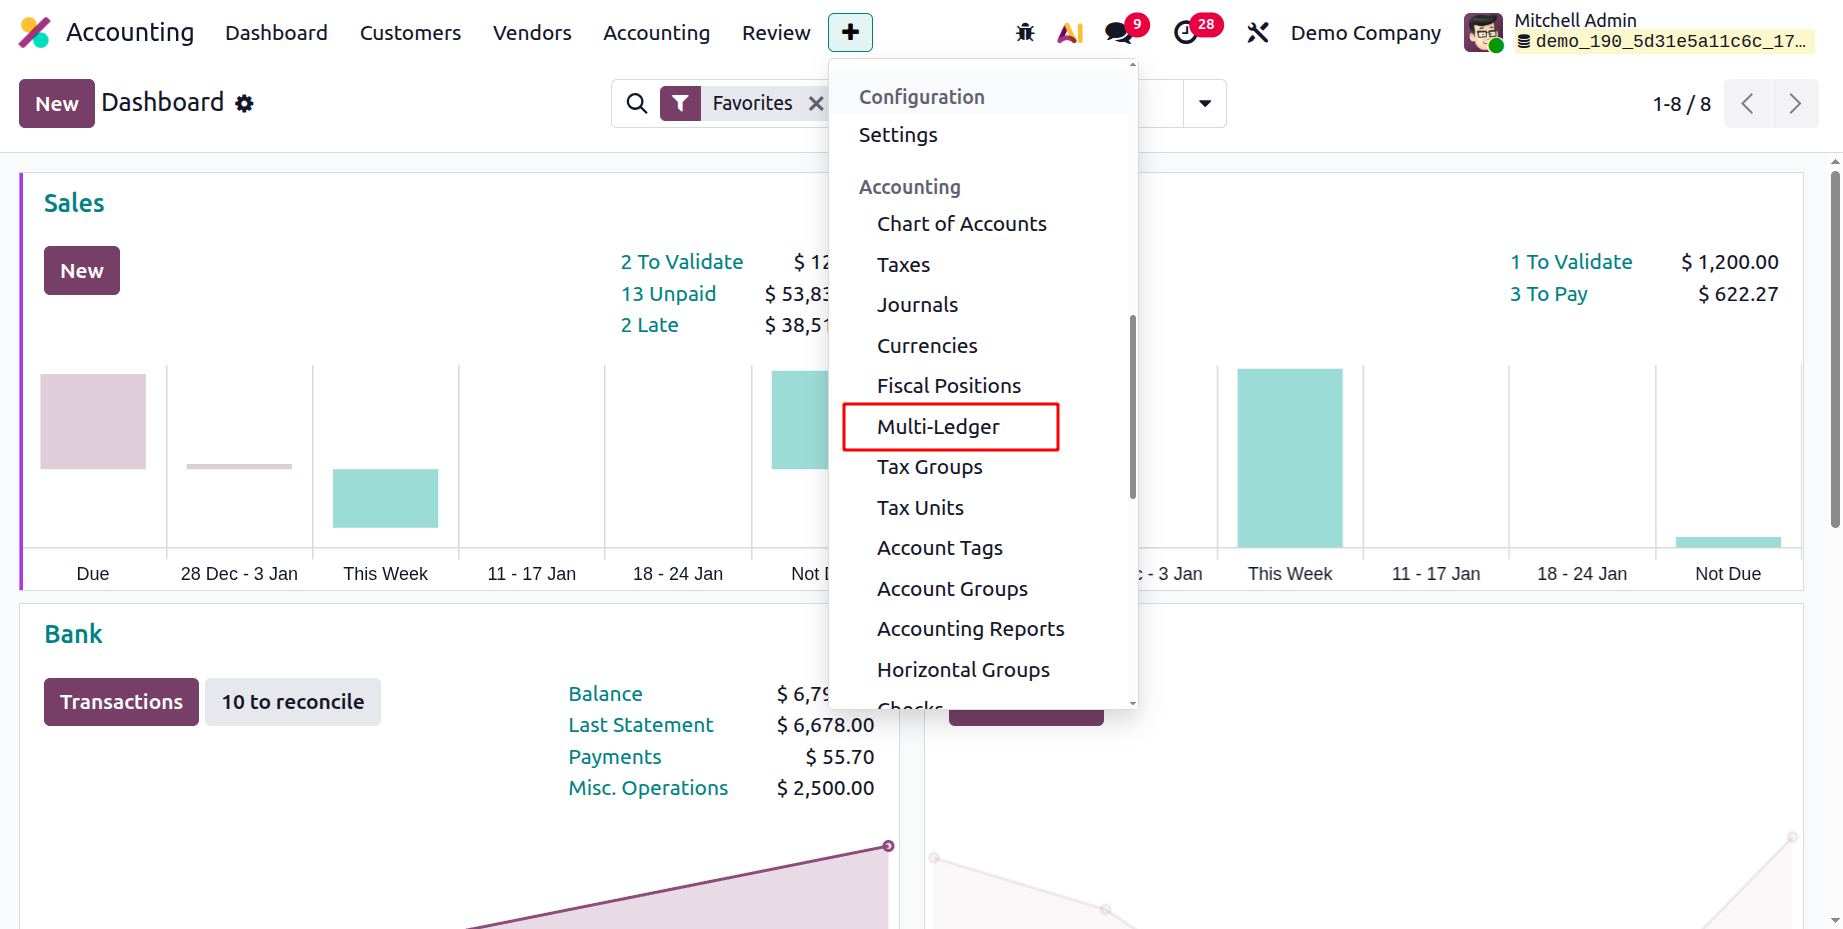
Go to the Multi Ledger option from the Accounting module's Configuration menu to view every journal group that
was previously discussed in the Multi Ledger window.
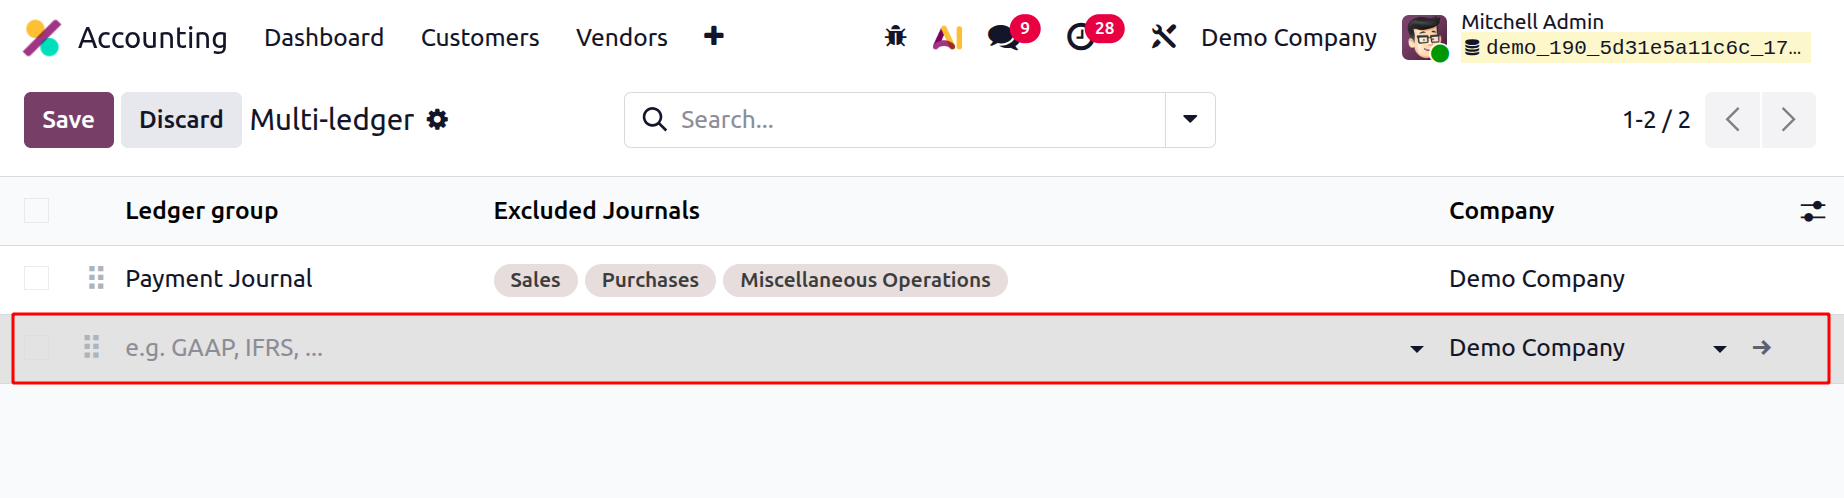
The window will open when you select the Multi Ledger menu. You can make new Journal Groups by using the New
button. A new line for creating journal groups will show up in the same window when you move your cursor over
the New button. The names of the journal groups and a list of the excluded journals can be found there. Although
it will be assigned automatically, the Company field can be customized.
Additionally, Odoo19's several sorting features are accessible through this window. You may rapidly sort out the
necessary categories using the Group By choices and the pre-set and customizable filters.
One of the most prominent aspects of the Odoo 19 Accounting module is Journal Grouping, which allows you to
classify your accounting journals. The groups can be used to organize accounting data more efficiently and
expedite reporting. This feature will make it easier for users to keep an eye on all of their transactions. By
offering a centralized method of comparing the various kinds of transactions, journal grouping also enhances the
accuracy of the financial records. Financial data can then be more effectively organized and analyzed using
these categories.
You can organize journals using this functionality based on the company, transaction type, or other factors.
Users can now easily search for and obtain certain journals as needed. Users can keep their finances managed by
organizing journals according to the type of transaction. Users' ability to quickly determine which journals
require reconciliation helps in accounting reconciliation.
In reporting, these journal categories are utilized to gather pertinent data for display. For many journal and
accounting duties, you can complete the Filtering and Group By chores. The Odoo19 platform places a high
priority on report generation, and by utilizing the filtering options, a variety of reports pertaining to
accounts may be obtained in a matter of seconds. To expedite the process, all you have to do is select Journal
Types as the filtering criterion.
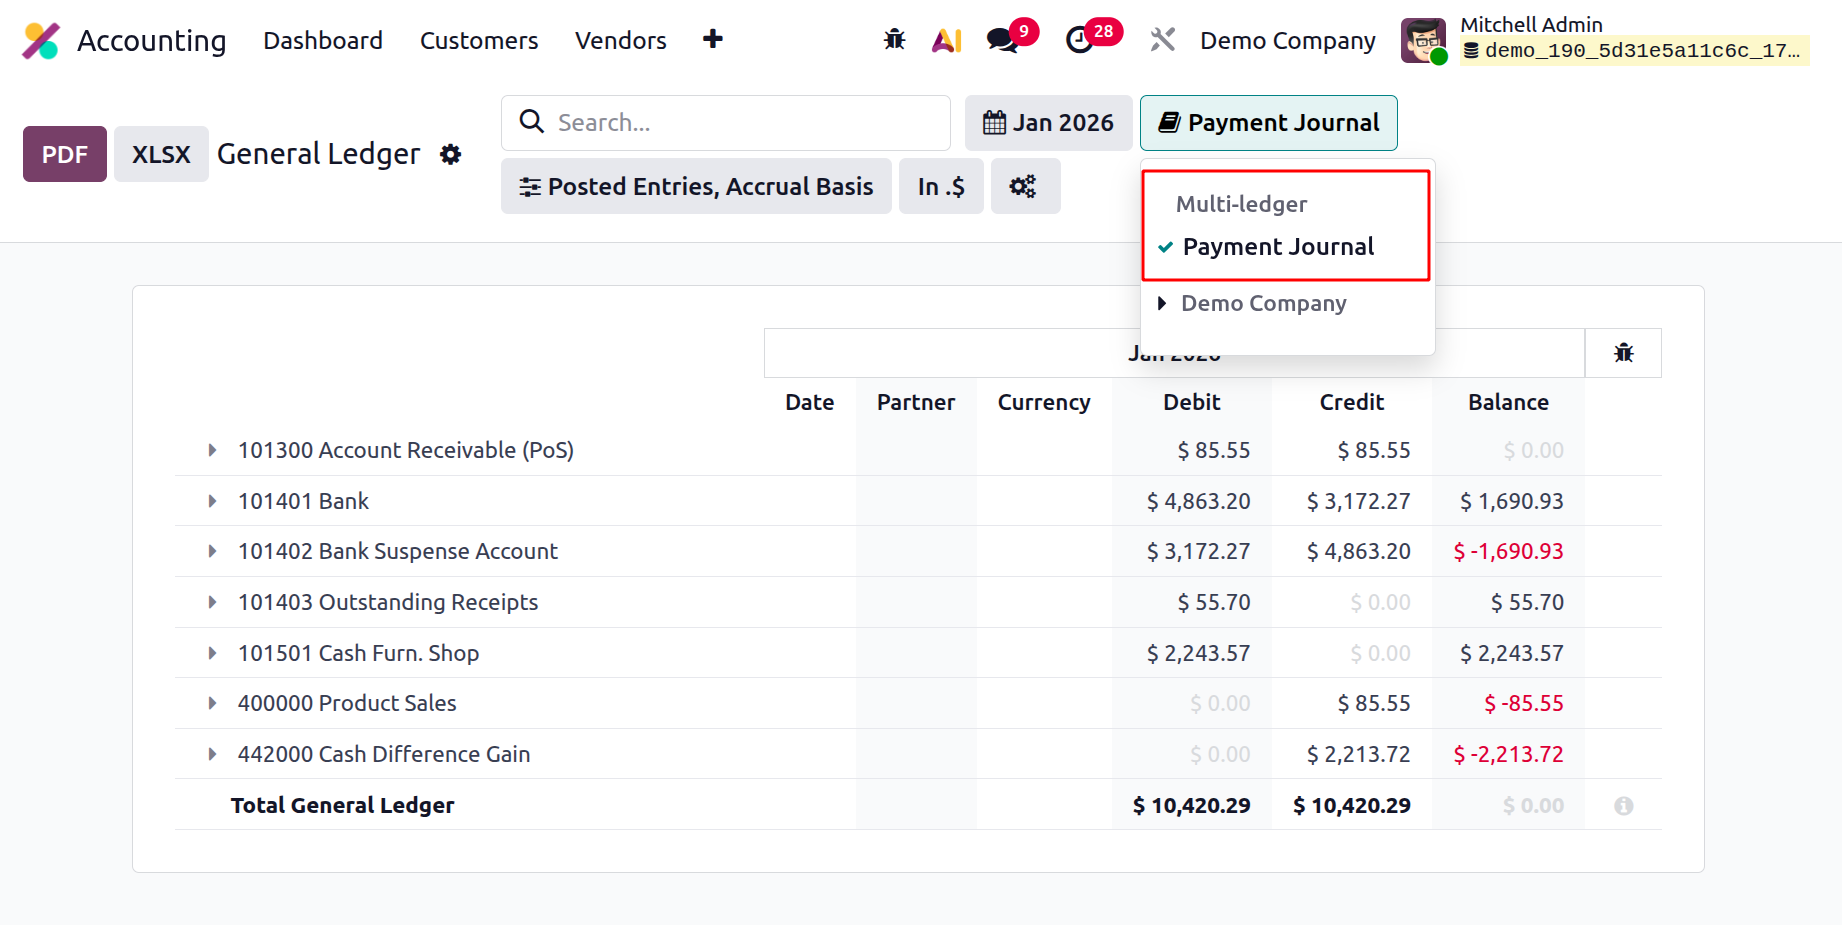
The journals Bank, Cash, and Cash Basis Tax that are mentioned in the report will not be included in the filter
of reports since the journal group "Payment Journals" has been selected in the report. As a result, any
organization's accounting department is greatly impacted by the Journal Group feature for the efficient running
of journal management operations.
After completely understanding Multi Ledger's characteristics, let's look at the Odoo 19 Accounting module's Cash
Rounding tool in the following part.
Cash Roundings
The Odoo 19 Accounting module's Cash Rounding feature allows you to rapidly and accurately round off the total
amount of a sale or purchase invoice. This allows you to quickly round up, down, or to the next whole number,
depending on your preferences. Because it guarantees that the full invoice amount is rounded off accurately and
appropriately, this function is particularly helpful for companies that accept cash payments. If necessary, this
feature can be set up to apply automatically to all invoices or selectively to certain invoices. Paying using
pennies or small coins is not advised. The quantity is automatically rounded to the closest lower denomination.
Merchants and other businesses that receive a lot of cash payments benefit from this service. Both the time
required to complete payments and the quantity of coins or tiny notes required are reduced. Businesses that
regularly handle cash must round all currency amounts to the next denomination.
This functionality can be activated in the Configuration page's Accounting Settings section. Users can choose a
rounding increment of 0.05, 0.10, 0.25, or 1.00 after turning it on. The amounts will be rounded up or down to
the proper increment when creating a receipt or sending out an invoice. Organizations that must guarantee that
all cash transactions are rounded to the closest denomination will find this application helpful as it
eliminates the need for manual rounding off of cash payments. The Accounting module allows you to establish
rounding rules if this functionality is enabled. Users can easily round any amount to the nearest appropriate
denomination with the help of this tool.
For example, users can configure the system to round all payment amounts to the closest dollar. Businesses who
accept cash payments and must accurately round off client payments would find this feature helpful. Invoices and
other financial records can also be automatically rounded off using cash rounding. This function aids in
ensuring that all transactions are accurately recorded and that the amounts paid are precise.
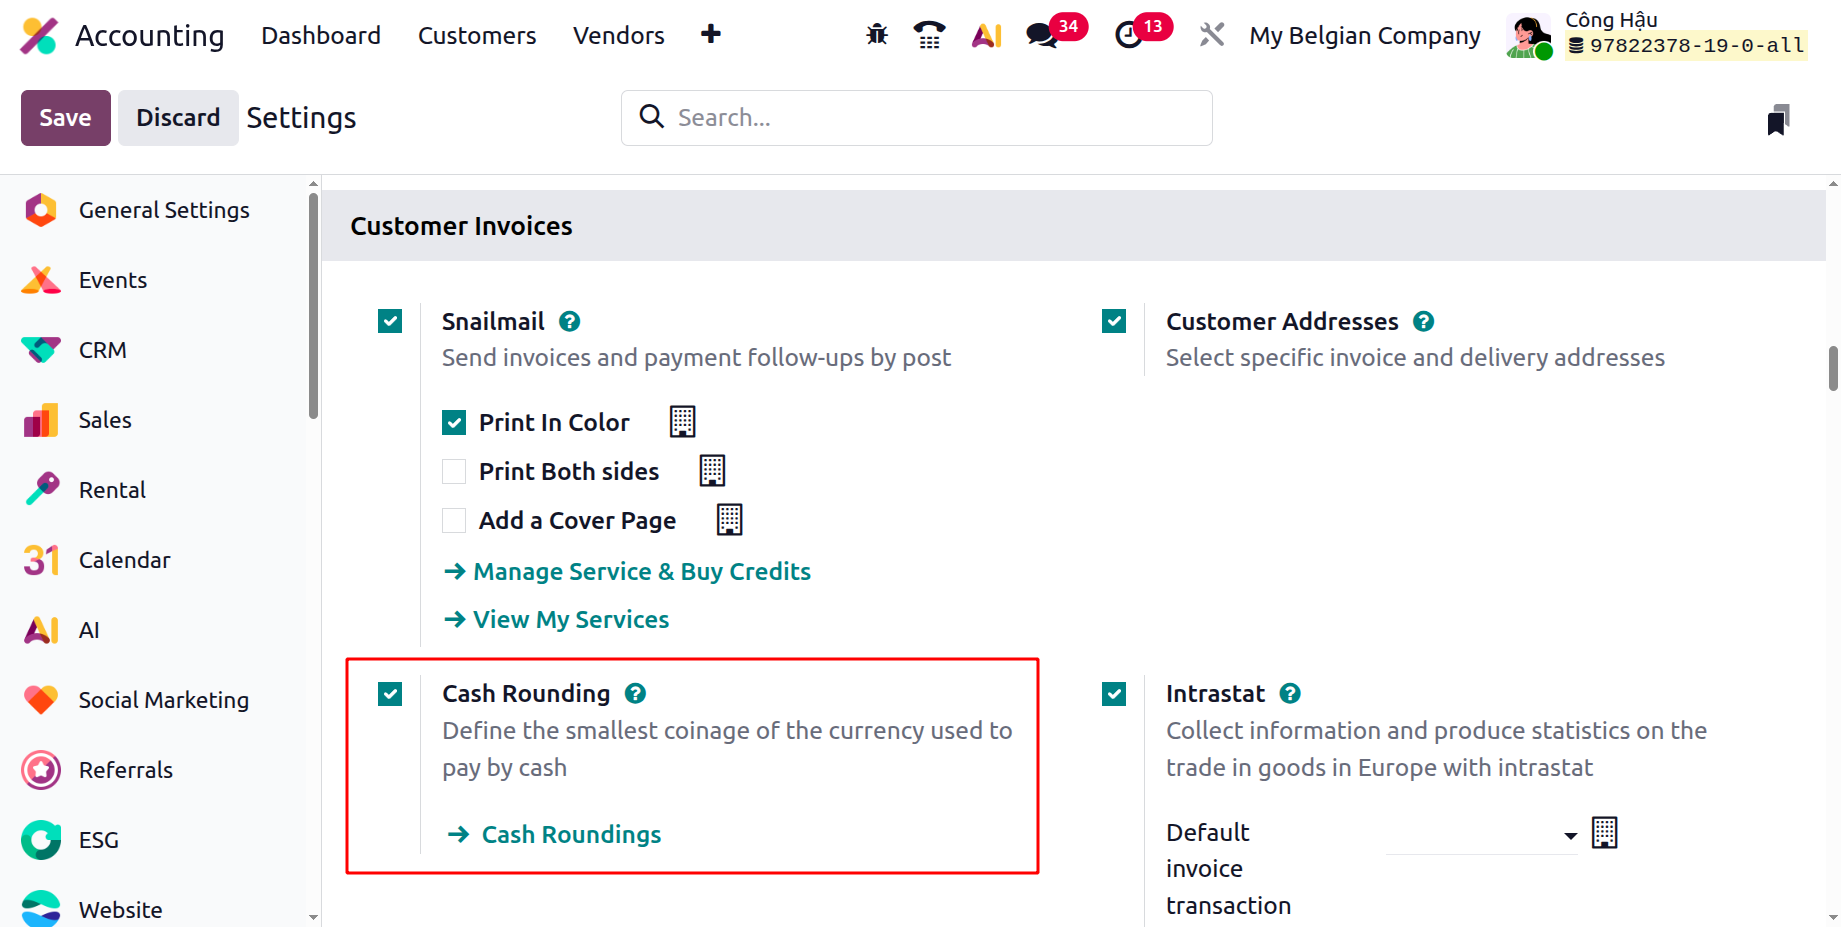
The Cash Rounding option is located in the Odoo Accounting module's Configuration Settings. You can designate the
lowest denomination of the currency used to make cash payments by activating the Cash Rounding option. After
you've enabled the setting in settings, you may see the menu in the Accounting module.
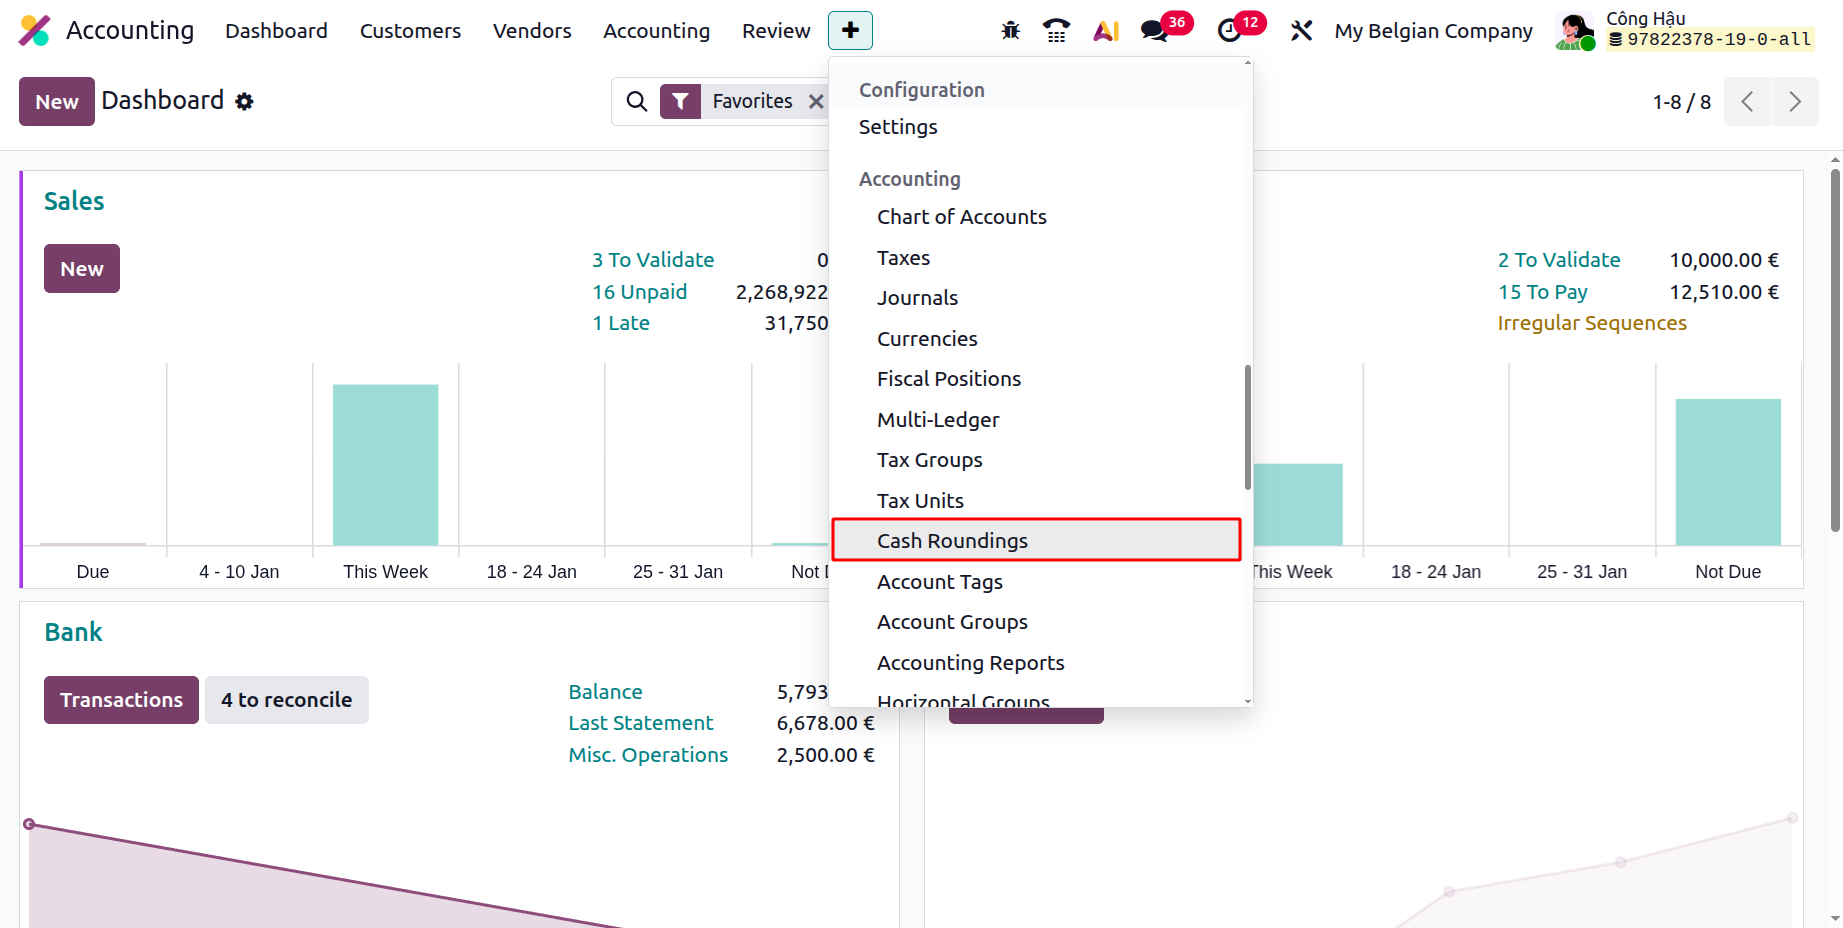
By choosing the Cash Roundings option from the Accounting section of the Odoo 19 Accounting tab, you can inspect
and define the Cash Roundings.
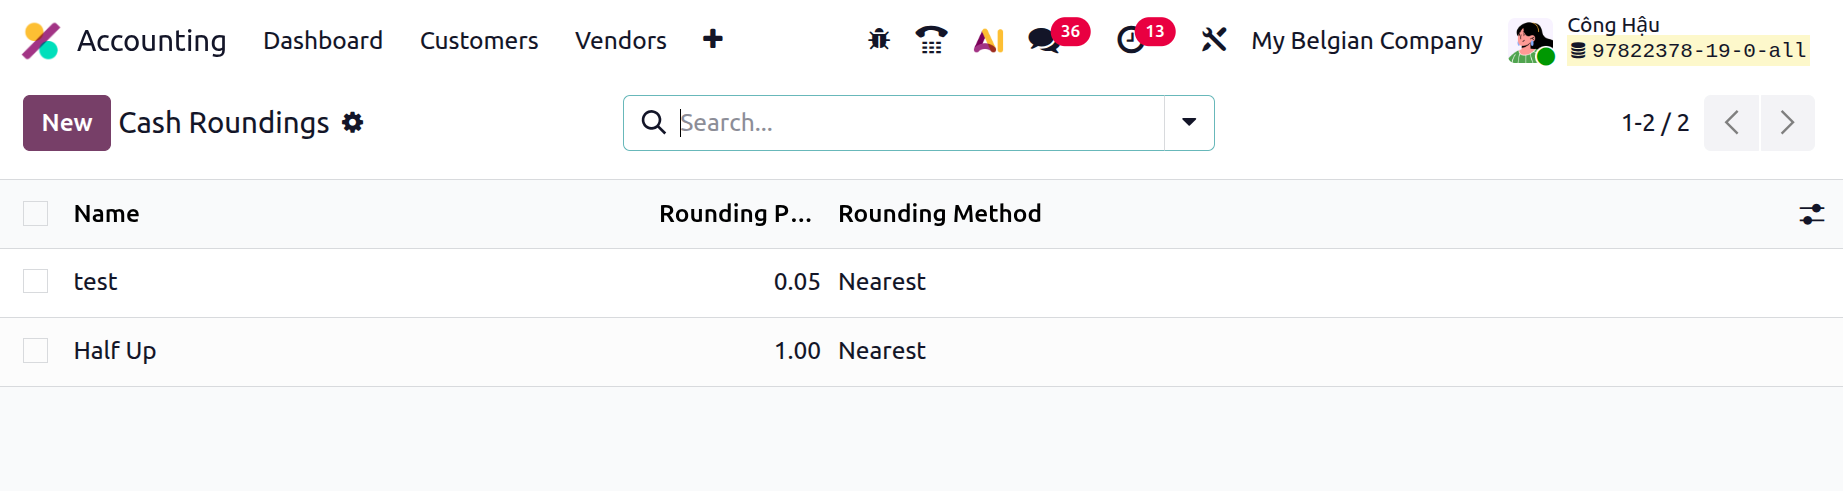
This window displays a preview of every Cash Roundings record that has already been defined. Among the
information shown are Name, Rounding Precision, and Rounding Method. Comprehensive views are available, and all
of these fields are modifiable. You may also swiftly search for and locate the required data by using the
numerous pre-set and custom filters and grouping options.
You can fill out the Cash Rounding creation form by clicking the New button. The following screenshot displays
the window.
You can name the cash roundings using the Name box in this form view. Therefore, the Rounding Precision field can
reflect the smallest denomination with a non-zero value. In the Rounding Strategy area, you can select how the
invoice amount will be rounded to the necessary rounding accuracy. There are two ways to use the rounding
approach in this situation: Add a rounding line or Modify the tax amount.
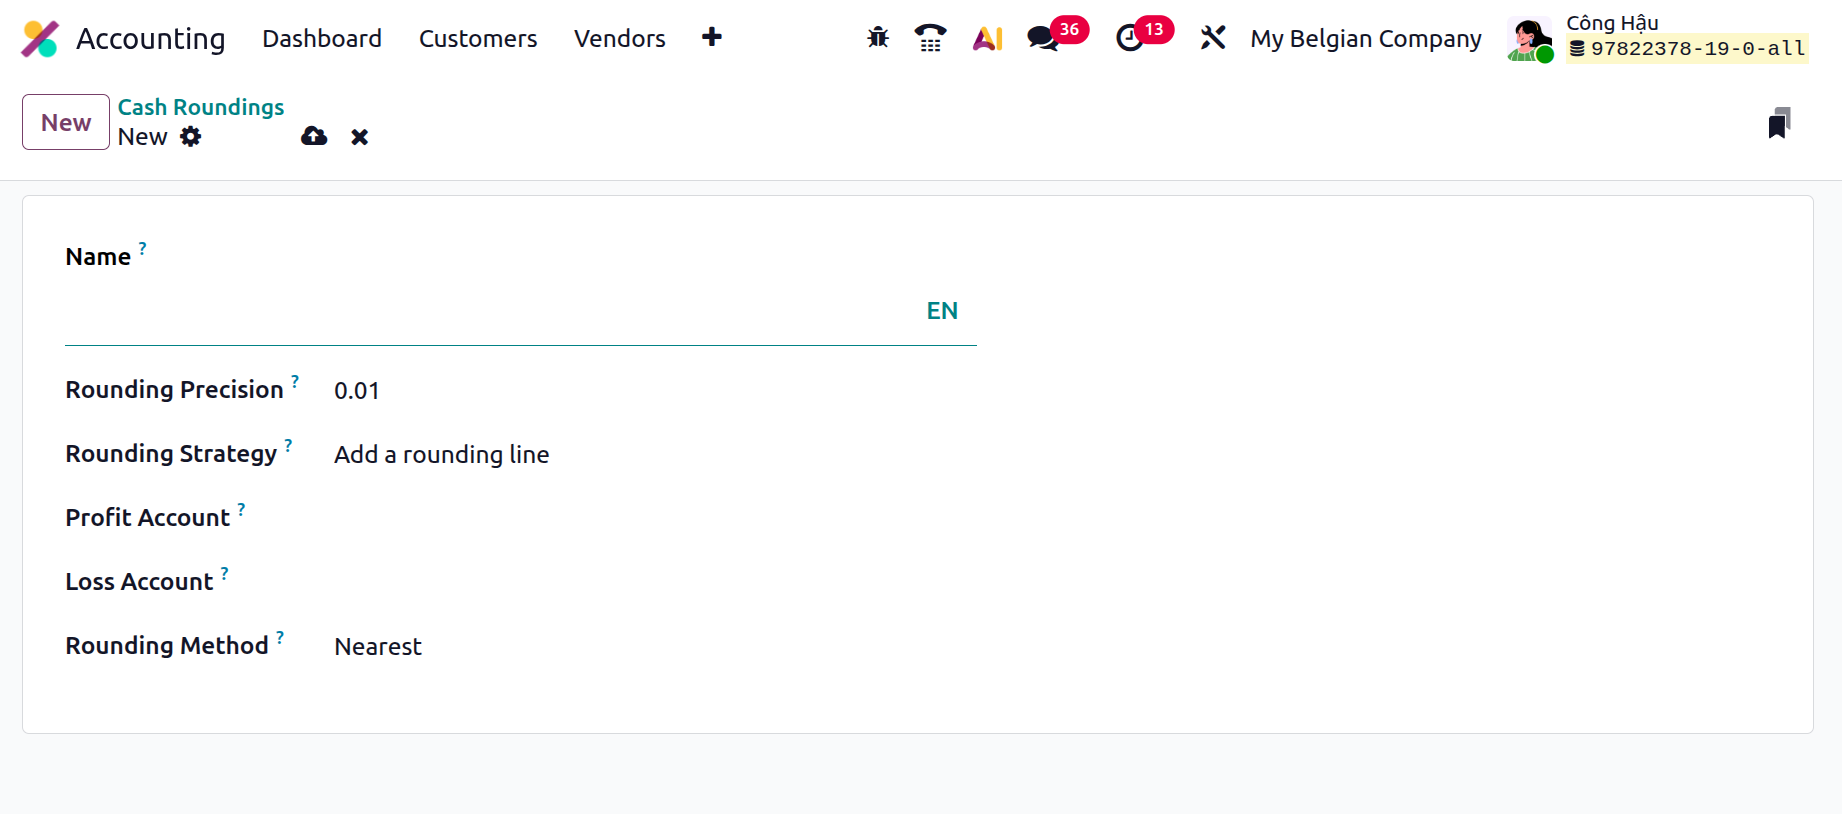
You can choose how Odoo 19 should handle rounded amounts when generating invoices in the Accounting module by
using these parameters. Choosing Modify Tax Amount enables you to change the tax amount on the invoice to
include the rounding amount, while choosing Add a Rounding Line adds a line with the rounding amount at the end
of the invoice. When the rounding amount is not substantial enough to justify a distinct line item, this can be
utilized.
The profit and loss accounts can be shown once the rounding strategy has been established. The total rounded
figure will eventually move to a higher infinity as a result of the rounding process, creating a profit that
will be noted in the profit account. If the total round value moves to the lower infinity, a loss will be
generated and documented in the Loss Account. The Rounding Method is the final option. There are three ways to
define it on the Odoo19 platform. Nearest, DOWN, UP.
- UP: The value rounds to plus infinity when it is UP. If this option is selected, the value will be rounded to the
nearest given amount. For instance, the outcome is $15.40 if the sum is $15.20 and the designated amount is 20
cents.
- DOWN: The value is rounded when using the down approach. In this instance, the sum will be rounded to the closest
predetermined amount. For instance, the outcome is $15.00 if the sum is $15.20 and the designated amount is 20
cents.
- Nearest: The decimal value will be rounded up if it is more than 0.5 and down if it is less than 0.5. In other
words, the sum will be rounded to the nearest predetermined amount. For example, the outcome would be $15.00 if
the balance was $15.20 and the required amount was 20 cents.
Once you've selected Cash Rounding, it will appear in the menu, and you can save it. The entire amount on vendor
or customer invoices can be rounded using this method. Rounding is possible on the invoice's further information
tab. Additionally, you can change your chosen Cash Rounding setting whenever you want.
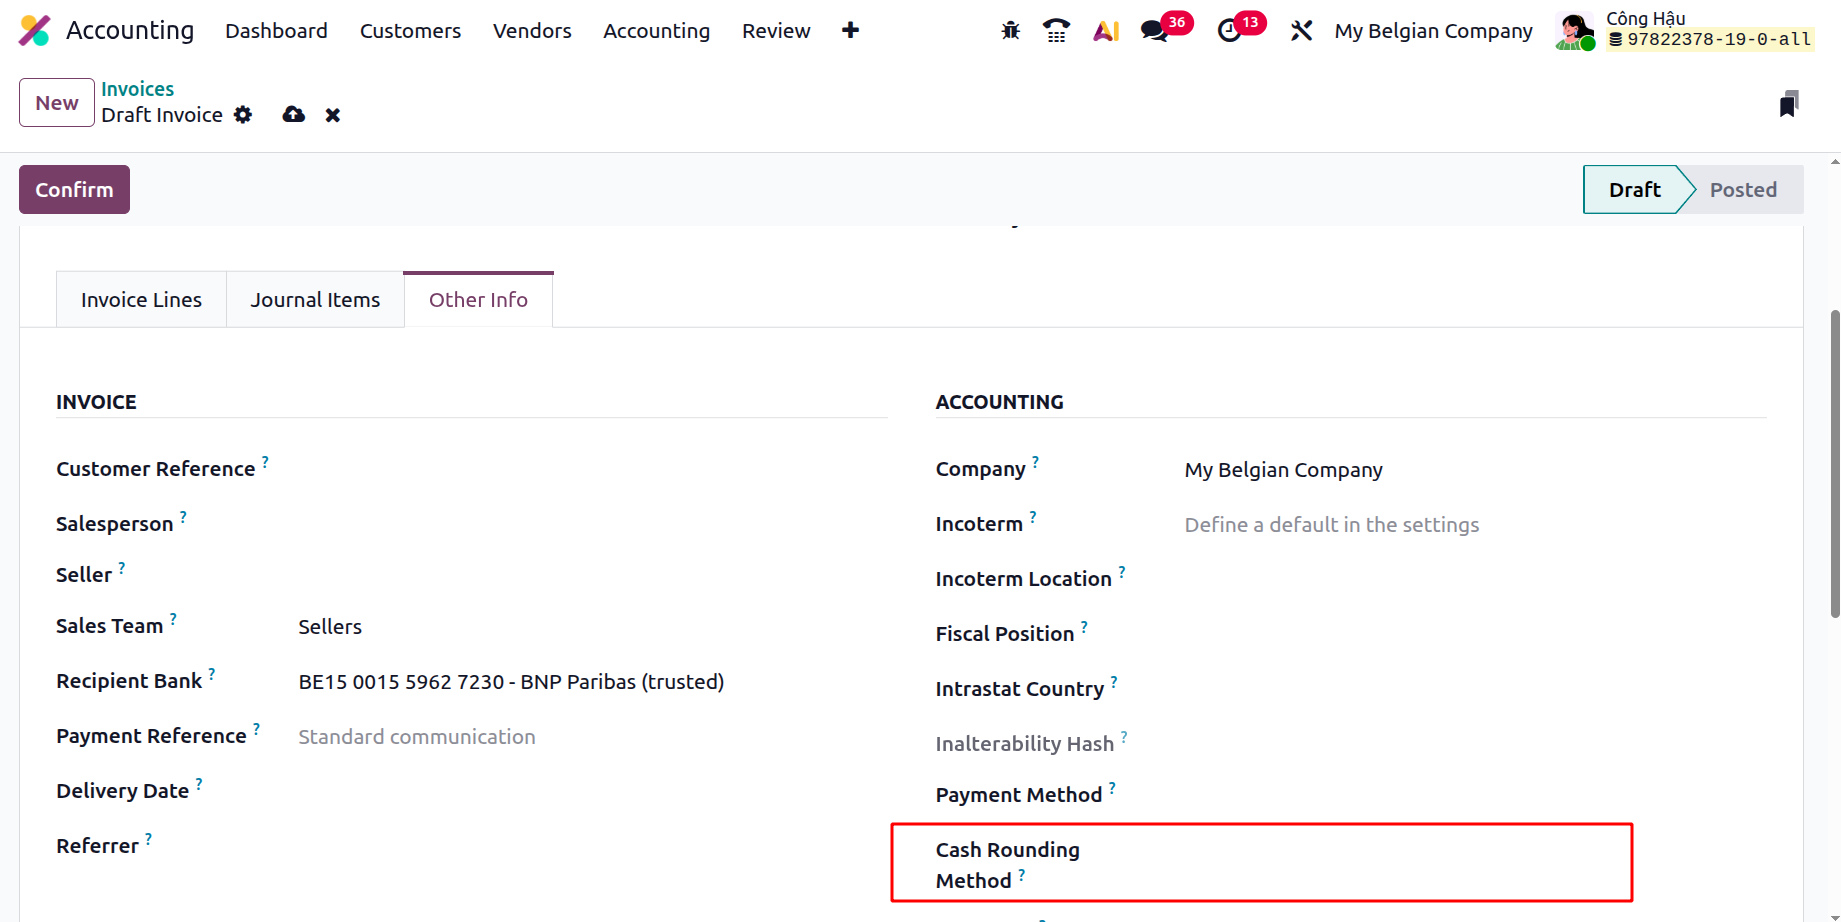
Now that we know exactly how Cash Rounding is set up, let's go on to the next section, which addresses Account
tags.
Account Tags
Account Tags come next. When you click on Account Tags, a list of all the created account tags appears on the
screen. There, the country, tag name, and applicability are displayed. Click the New button to add a new account
tag.
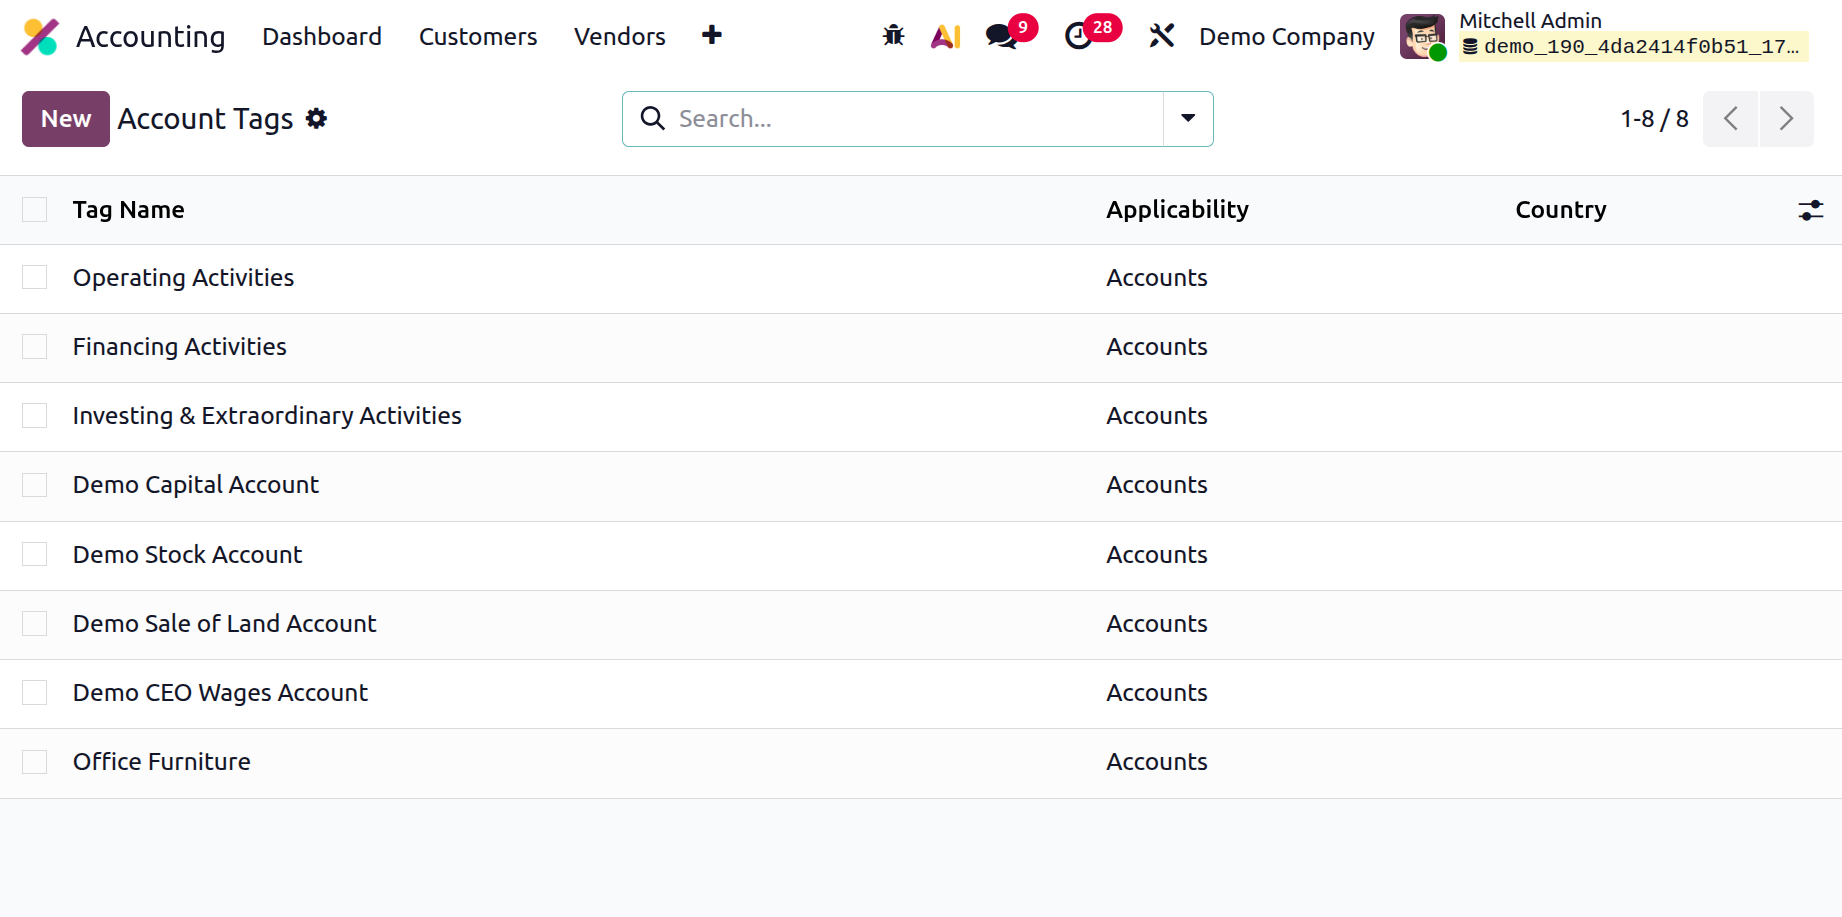
Include the Applicability and Tag Name. Users can select Accounts, Taxes, and Products from the applicability
field.
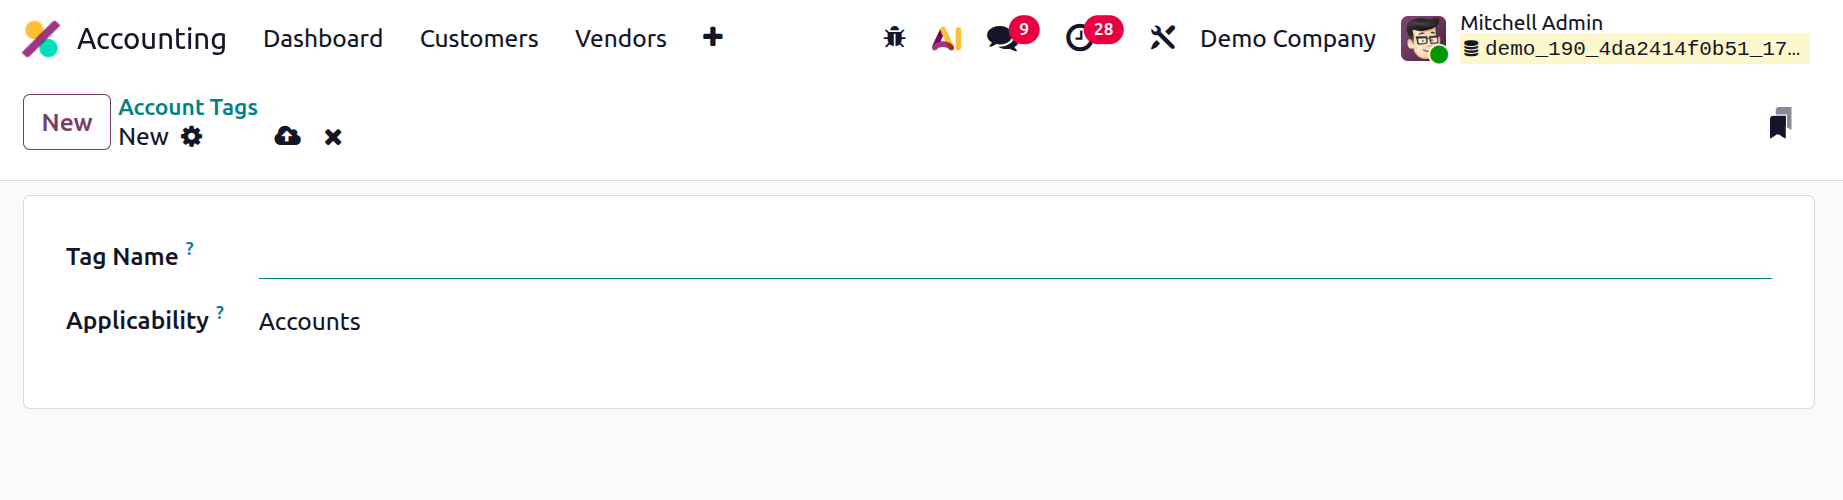
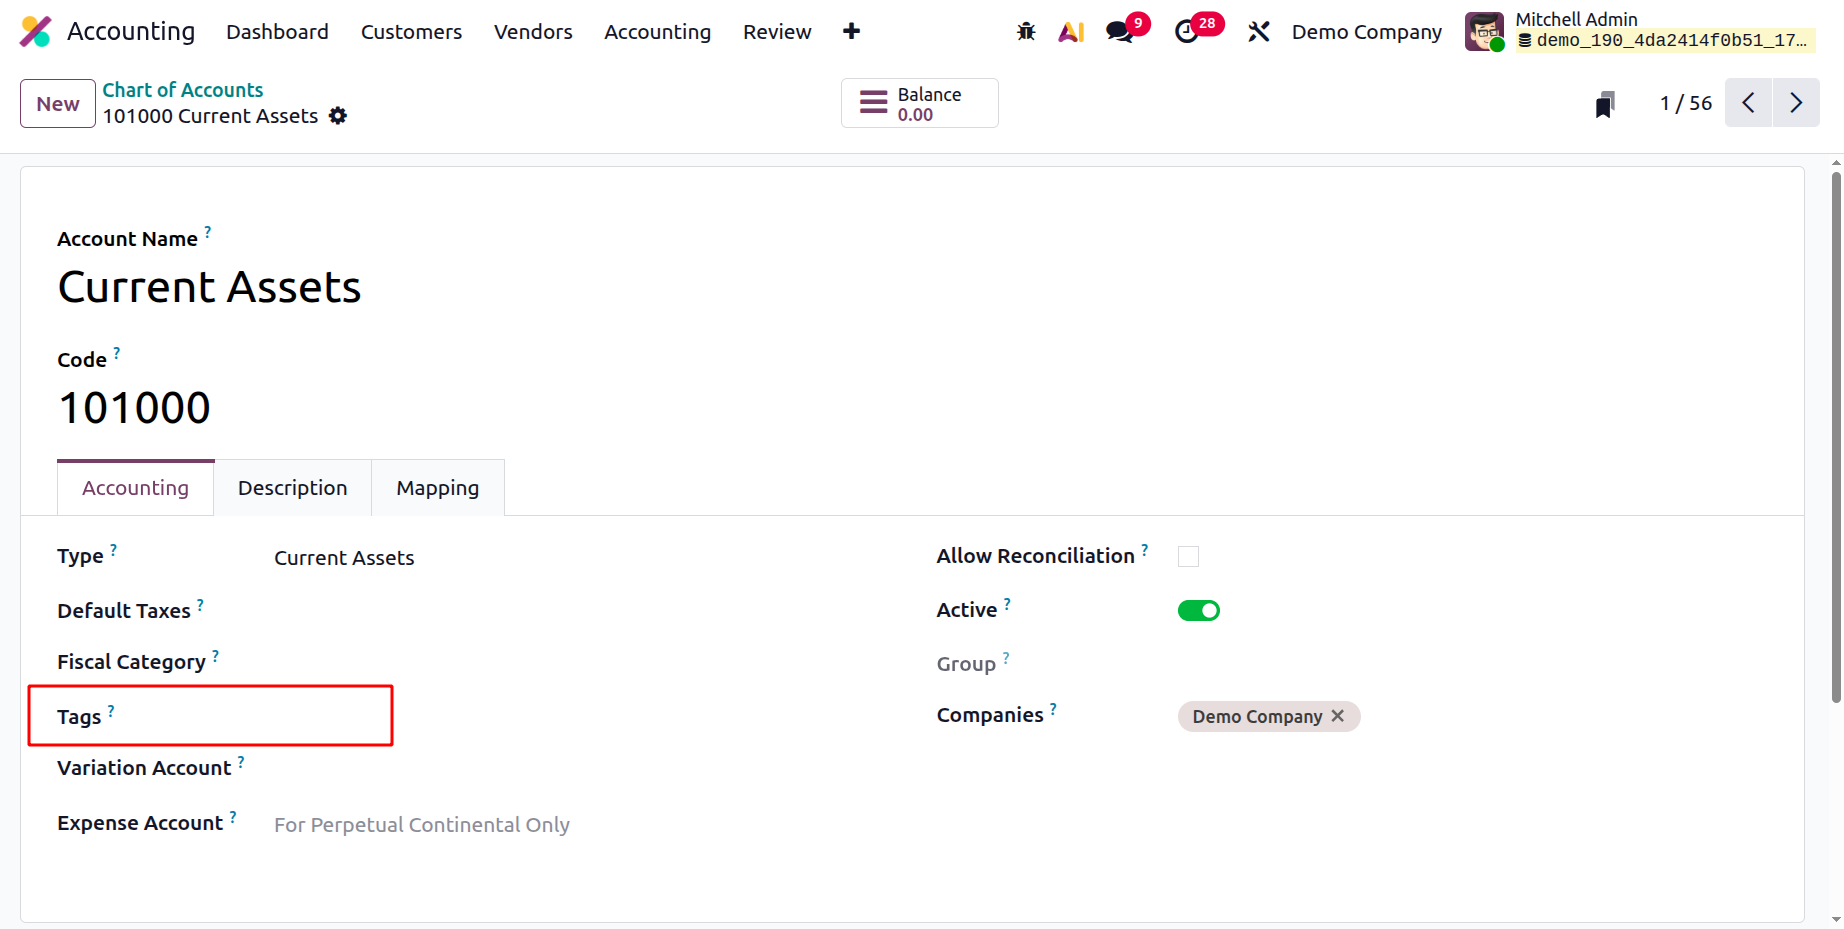
You can add Create Account Tags within the Chart of Accounts, as seen in the screenshot below. You may want to
use these optional tags for custom reporting.
Account Groups
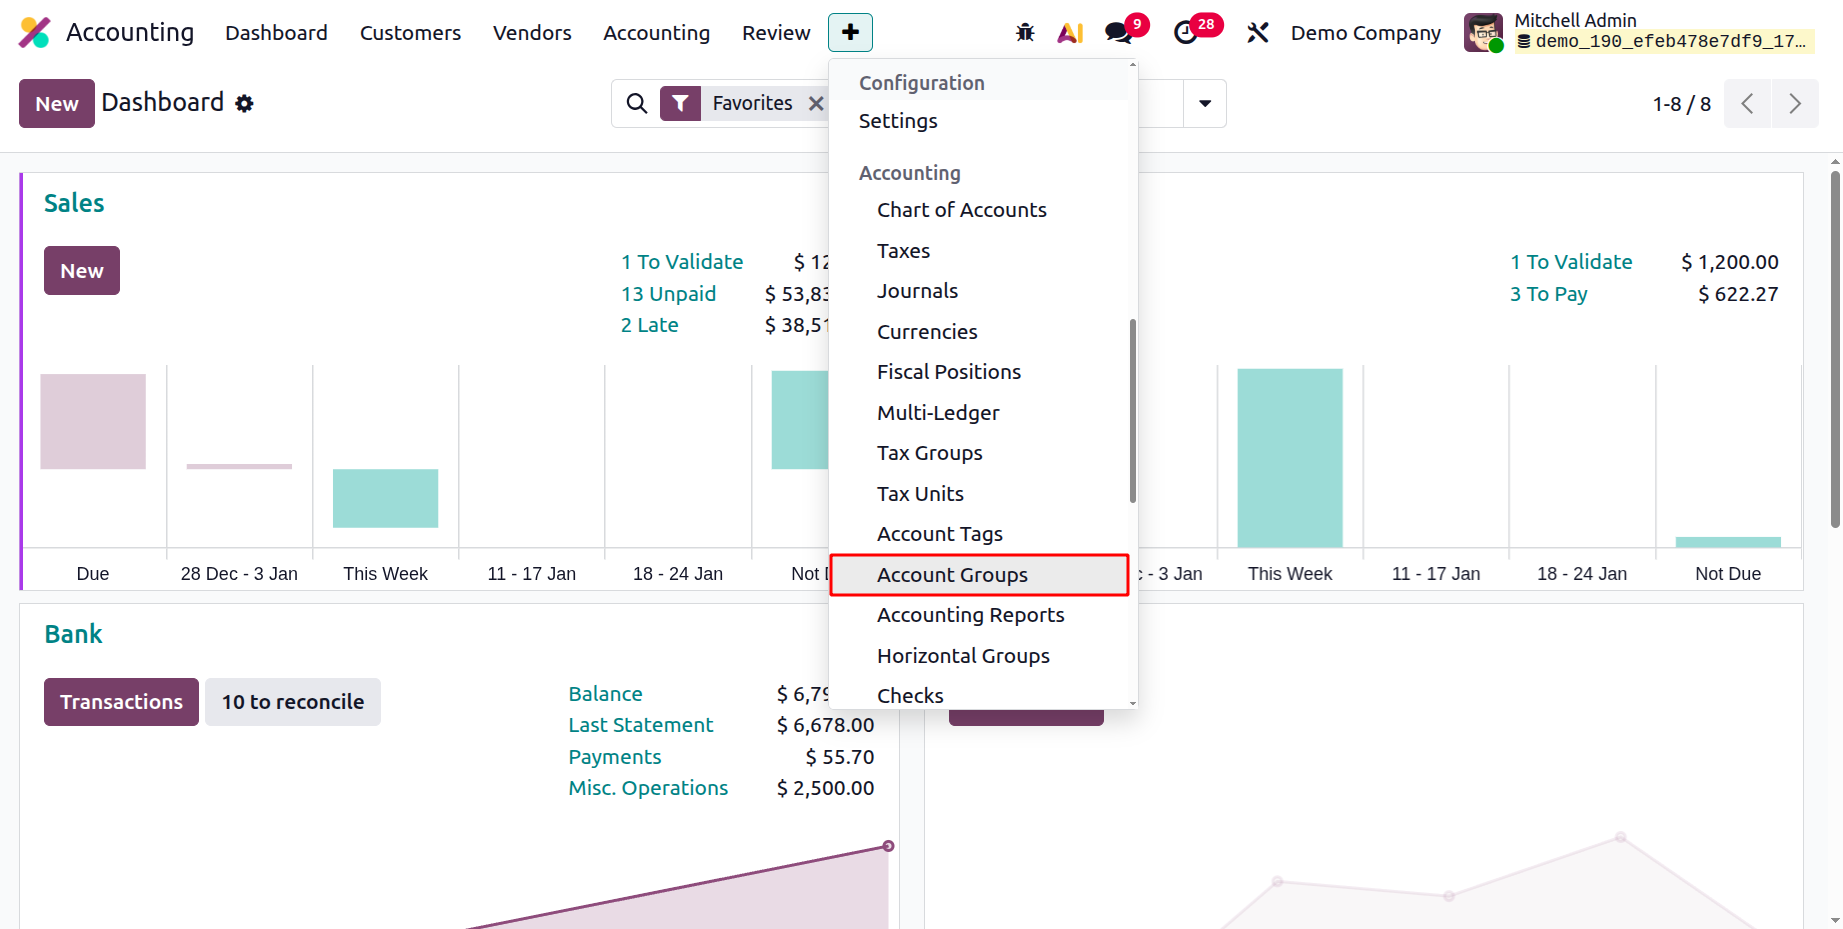
Account Groups are used in Odoo 19 Accounting to organize and classify accounts into logical hierarchies for
better financial reporting and analysis. They help arrange the chart of accounts, which makes it easier to
create accurate balance sheets and profit and loss statements. From the Configuration, select the Account
Groups.
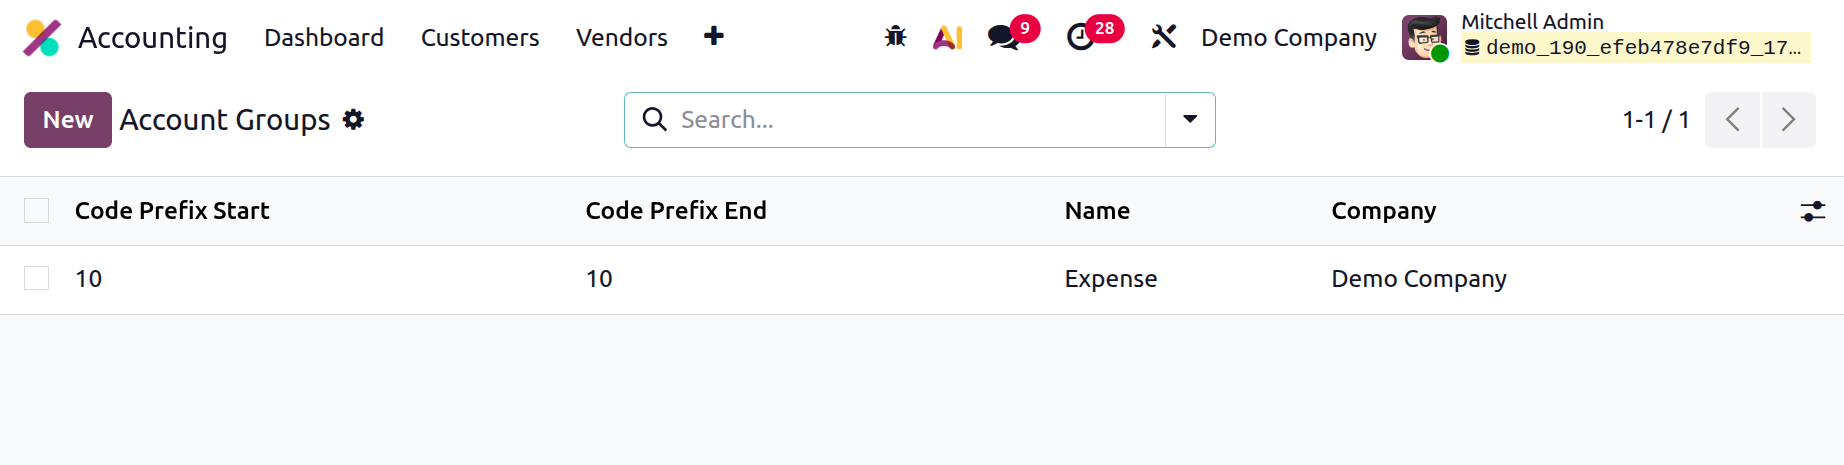
It displays the code prefix start, code prefix end, name, and company.
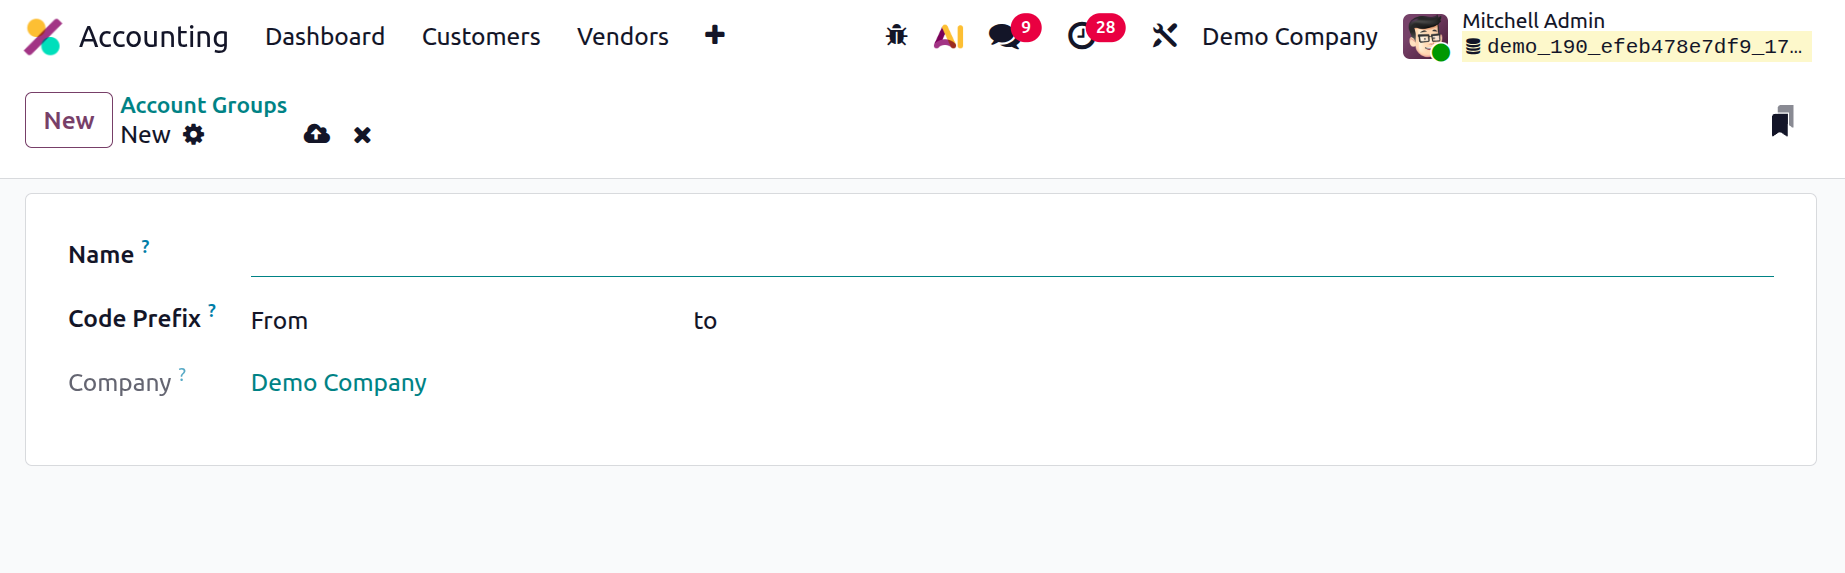
Use the New button to add a new one. Next, include the prefix "from" and "to" in the name code.
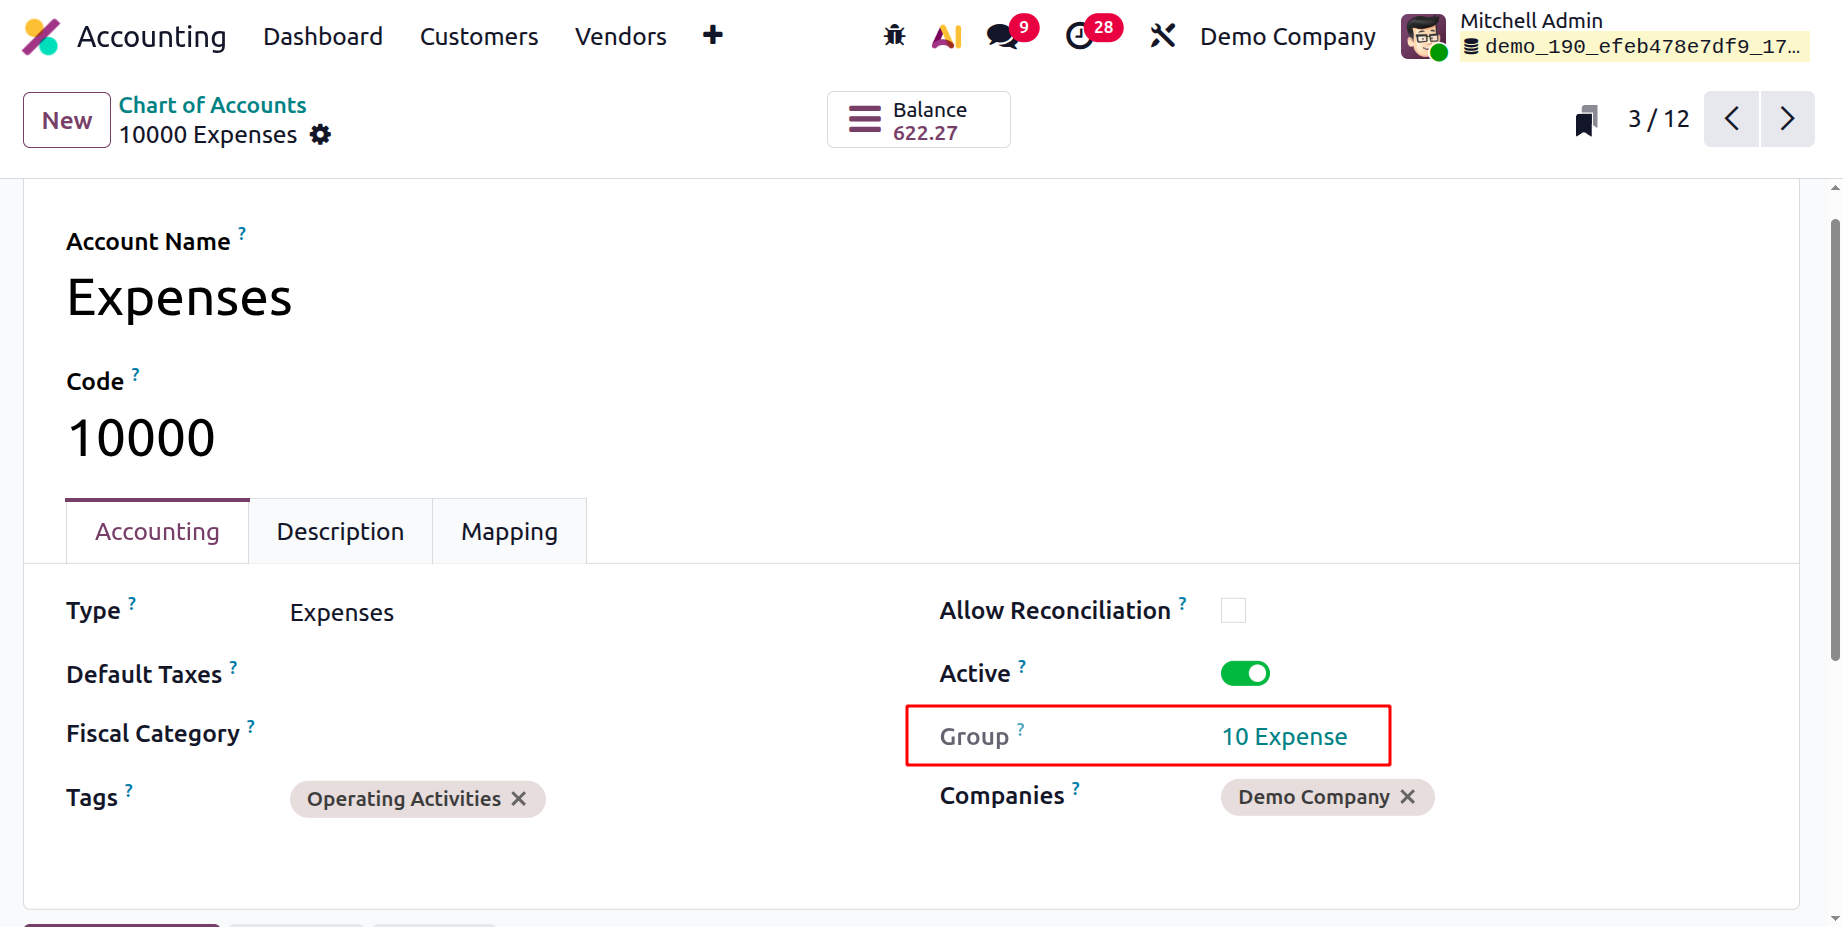
As seen below, the Chart of Account allows you to select the Create Account group.
Accounting Reports
Accounting Reports in Odoo 19 Accounting offer standardized financial statements like the Cash Flow, Profit and
Loss, and Balance Sheet reports. For in-depth financial analysis, they provide real-time data with drill-down,
comparison, and filtering capabilities. Businesses may monitor performance, guarantee compliance, and facilitate
well-informed decision-making with the use of these reports.
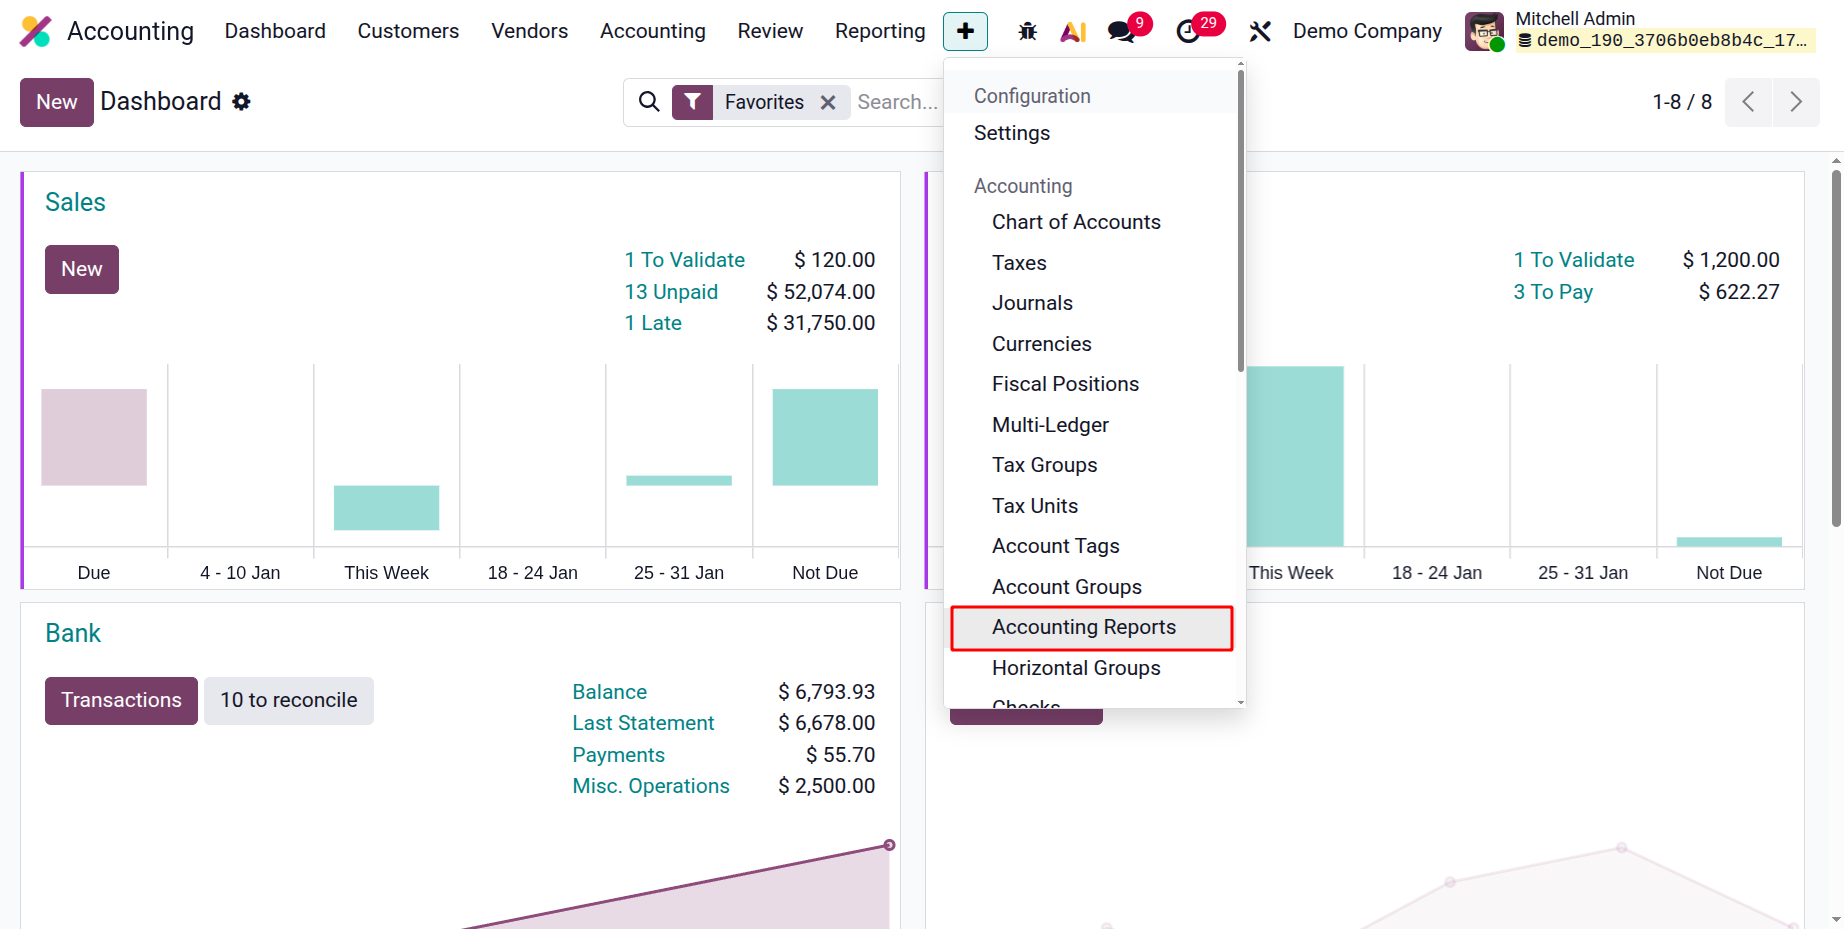
The Accounting Reports are available in the Configuration menu and included under the Accounting section.
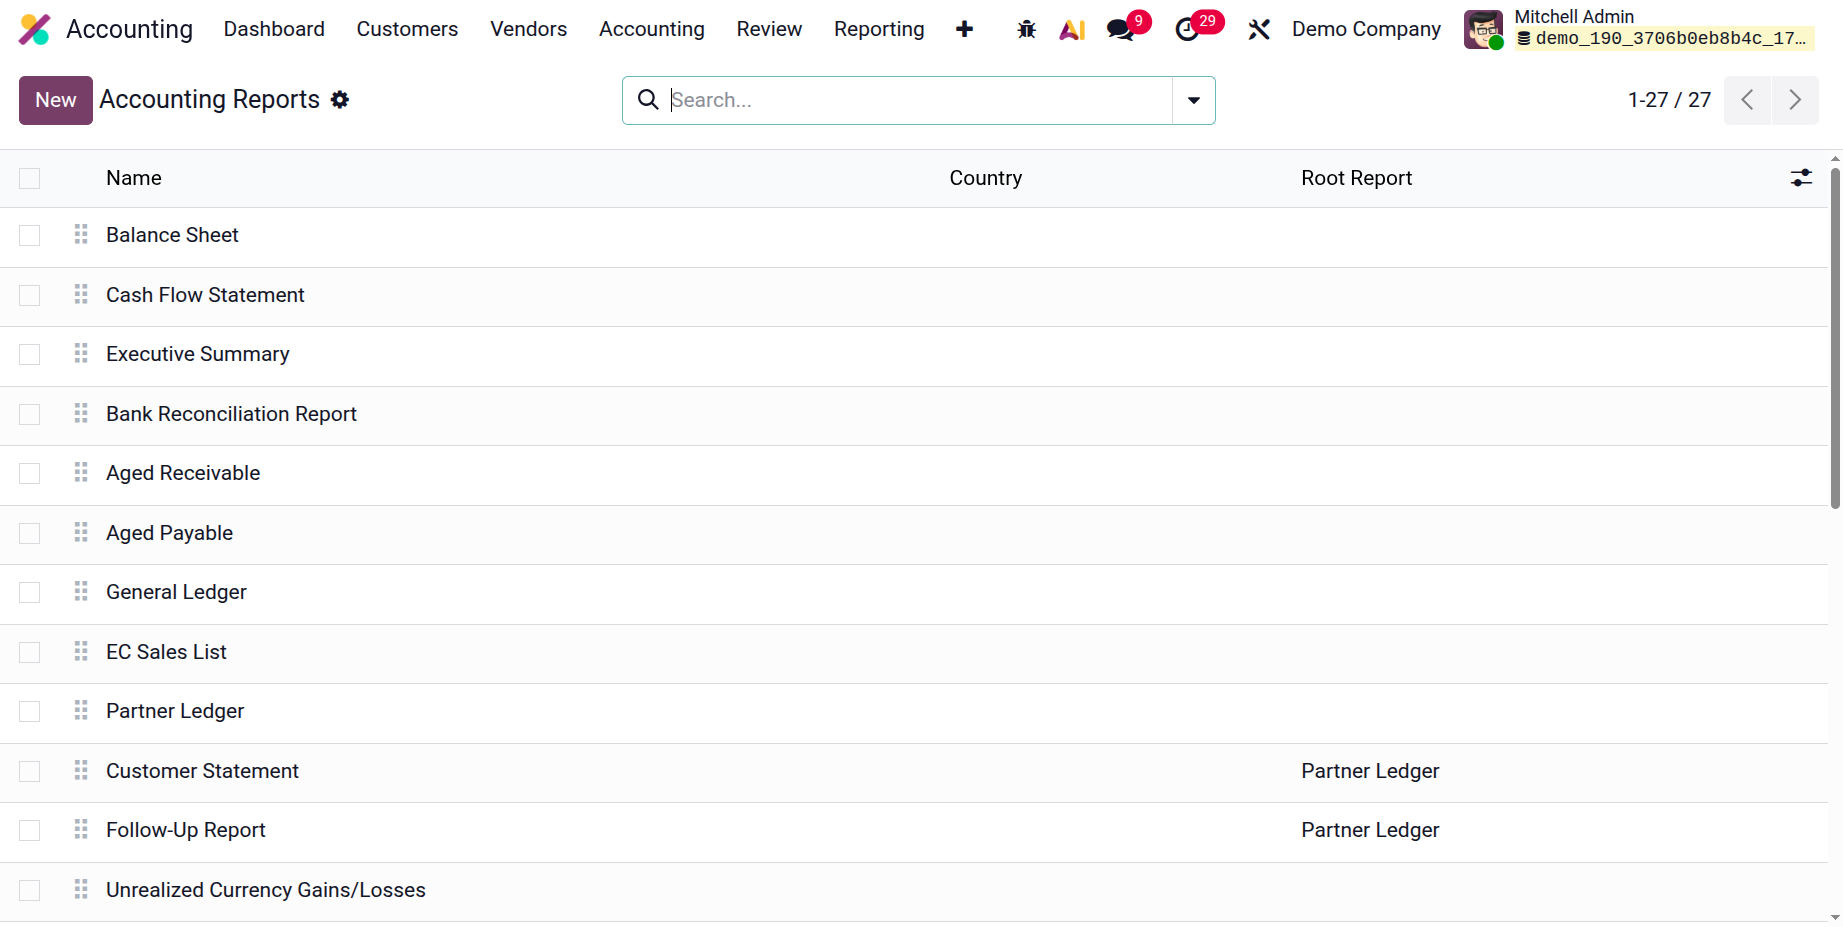
The Accounting Reports show all the Reports available. The users can customize the available reports. The list
shows Name, Country, and Root Report. Click on the New button to add a new Accounting Report.
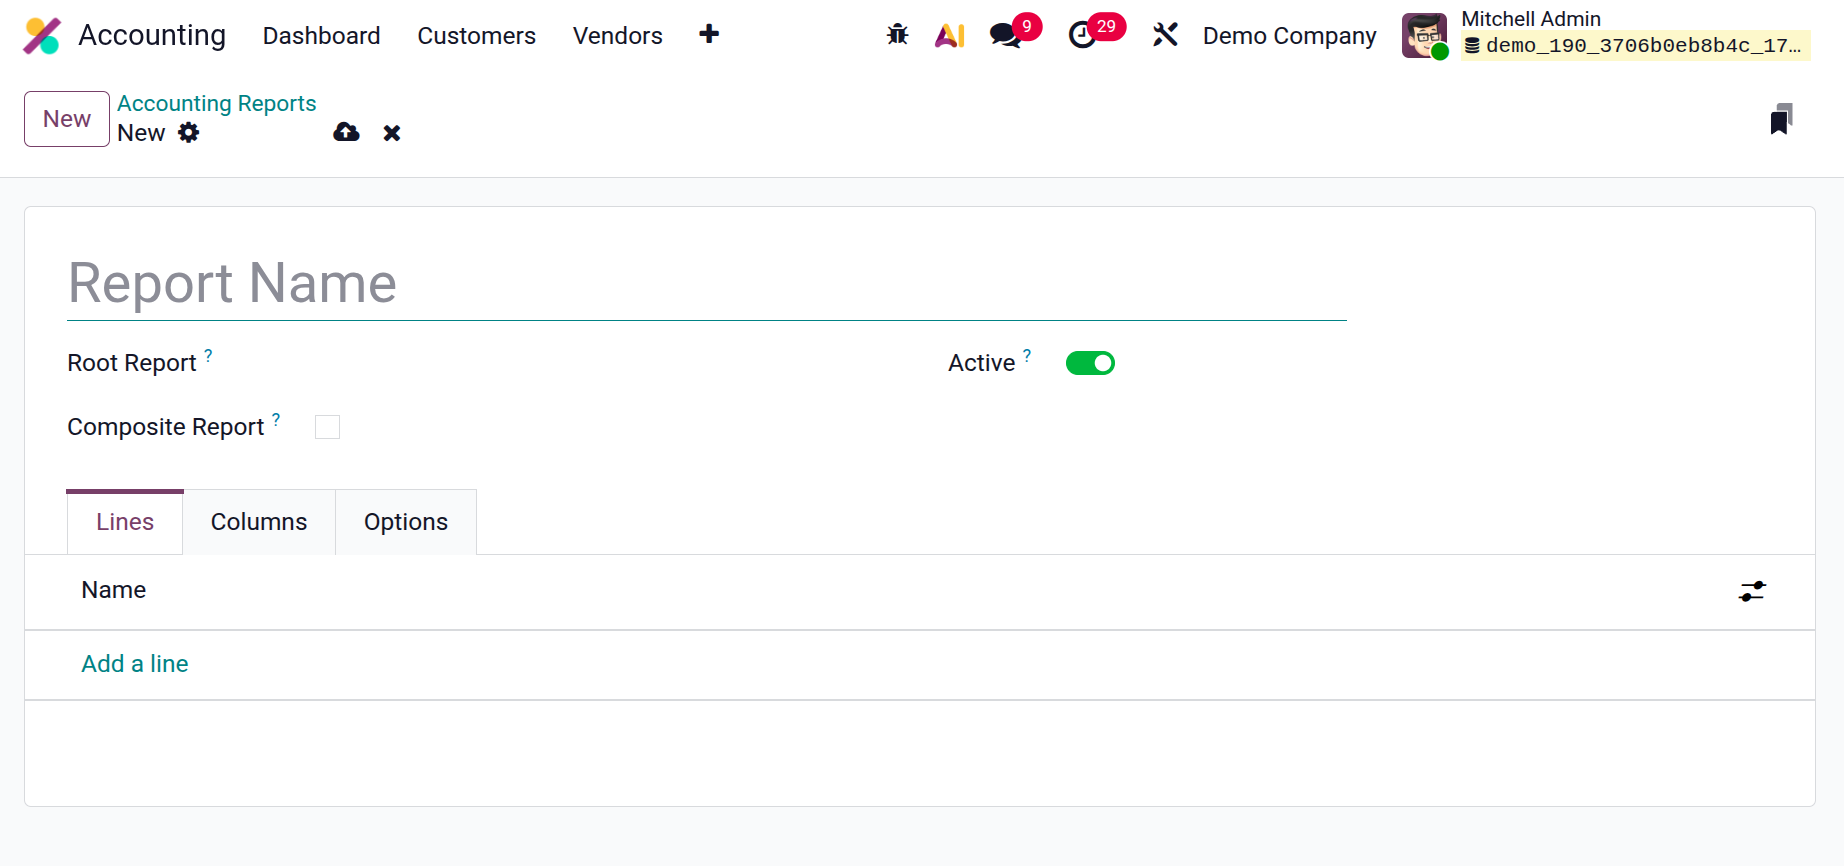
Add the Report name, then choose the Root Report and Composite Report. Under the Lines tab, by clicking on the
‘Add a line’, users can add the report lines.
Then another window will open as shown below. Inside the lines, add the Report lines name, Action, Level, Group
By and Code. By setting the Action field, this will turn the line into a link, executing the action when
clicked. Code is the unique identifier for the line.
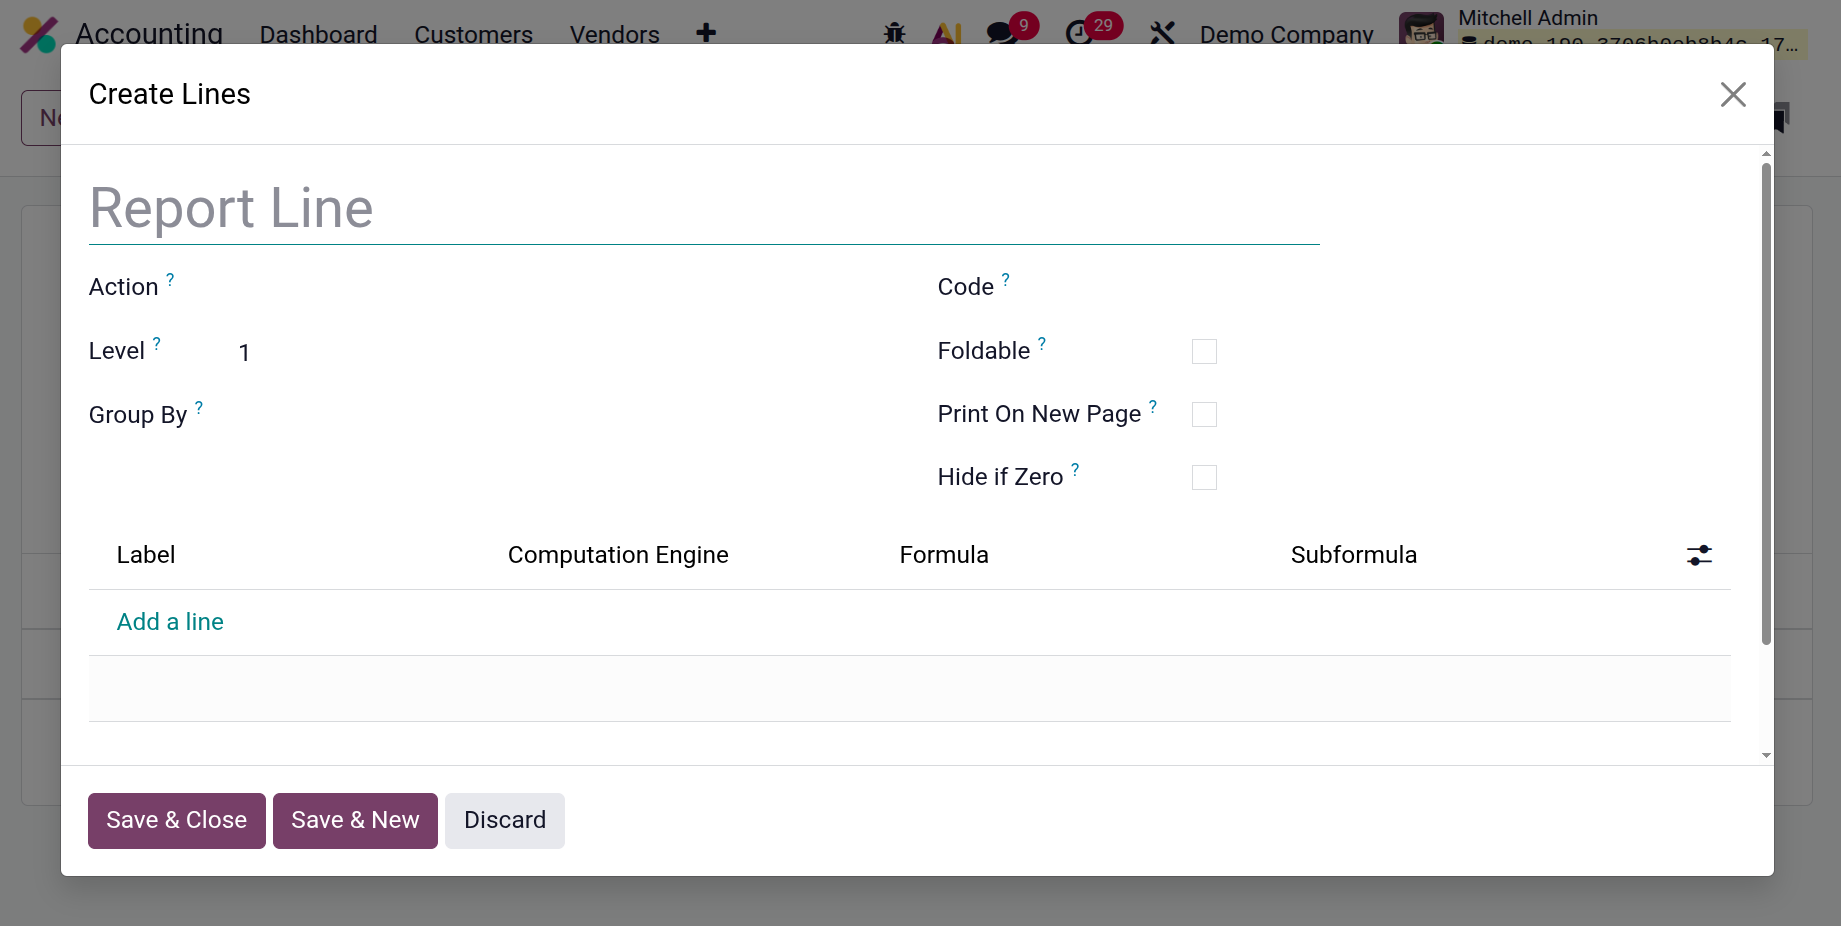
- Foldable: We always unfold the possible lines by default. If this is selected, a folding button will appear and
the line won't unfold by default.
- Print On New Page: Everything that follows will be printed on a new page after this line is checked.
- Hide if Zero: If every column in this line and its offspring is zero, they will be hidden.
Then add the Label, Computation Engine, Formula and Subformula. Click on the Save & Close button to save the
line. To add a new line, click on Save & New, and to discard the line, click on the Discard button.
Next is the Column tab, click on Add a line. Add the Name, Expression Label, Figure Type, Sortable, and Blank if
Zero. The Figure Type can be Monetary, Percentage, Integer, Float, Date, Datetime, Boolean and String.
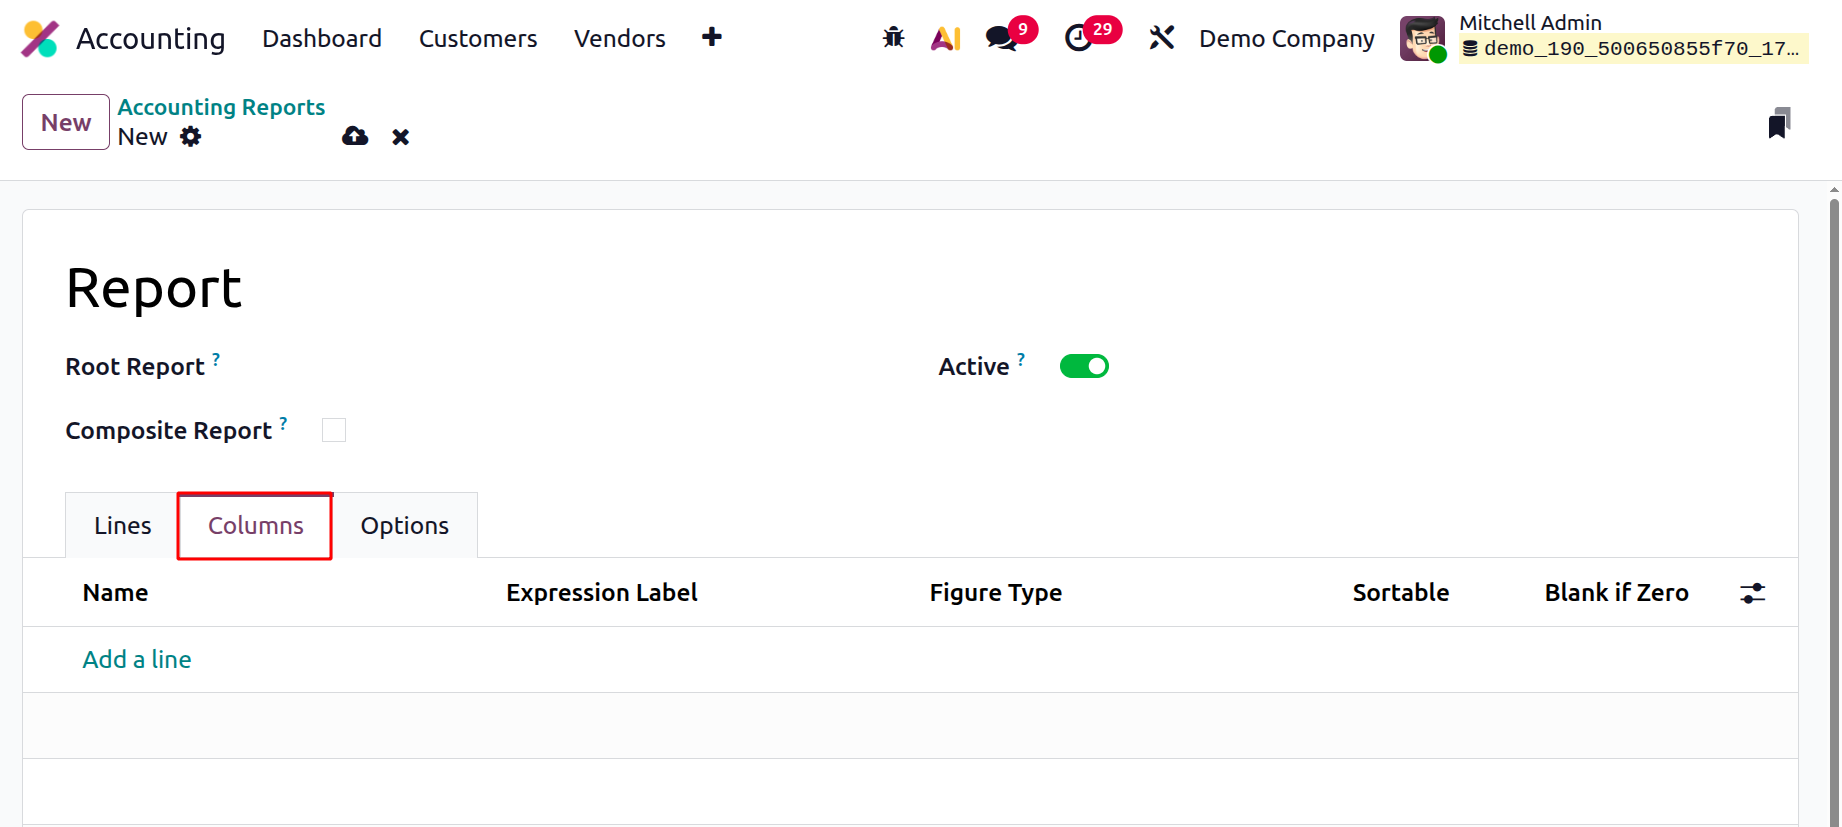
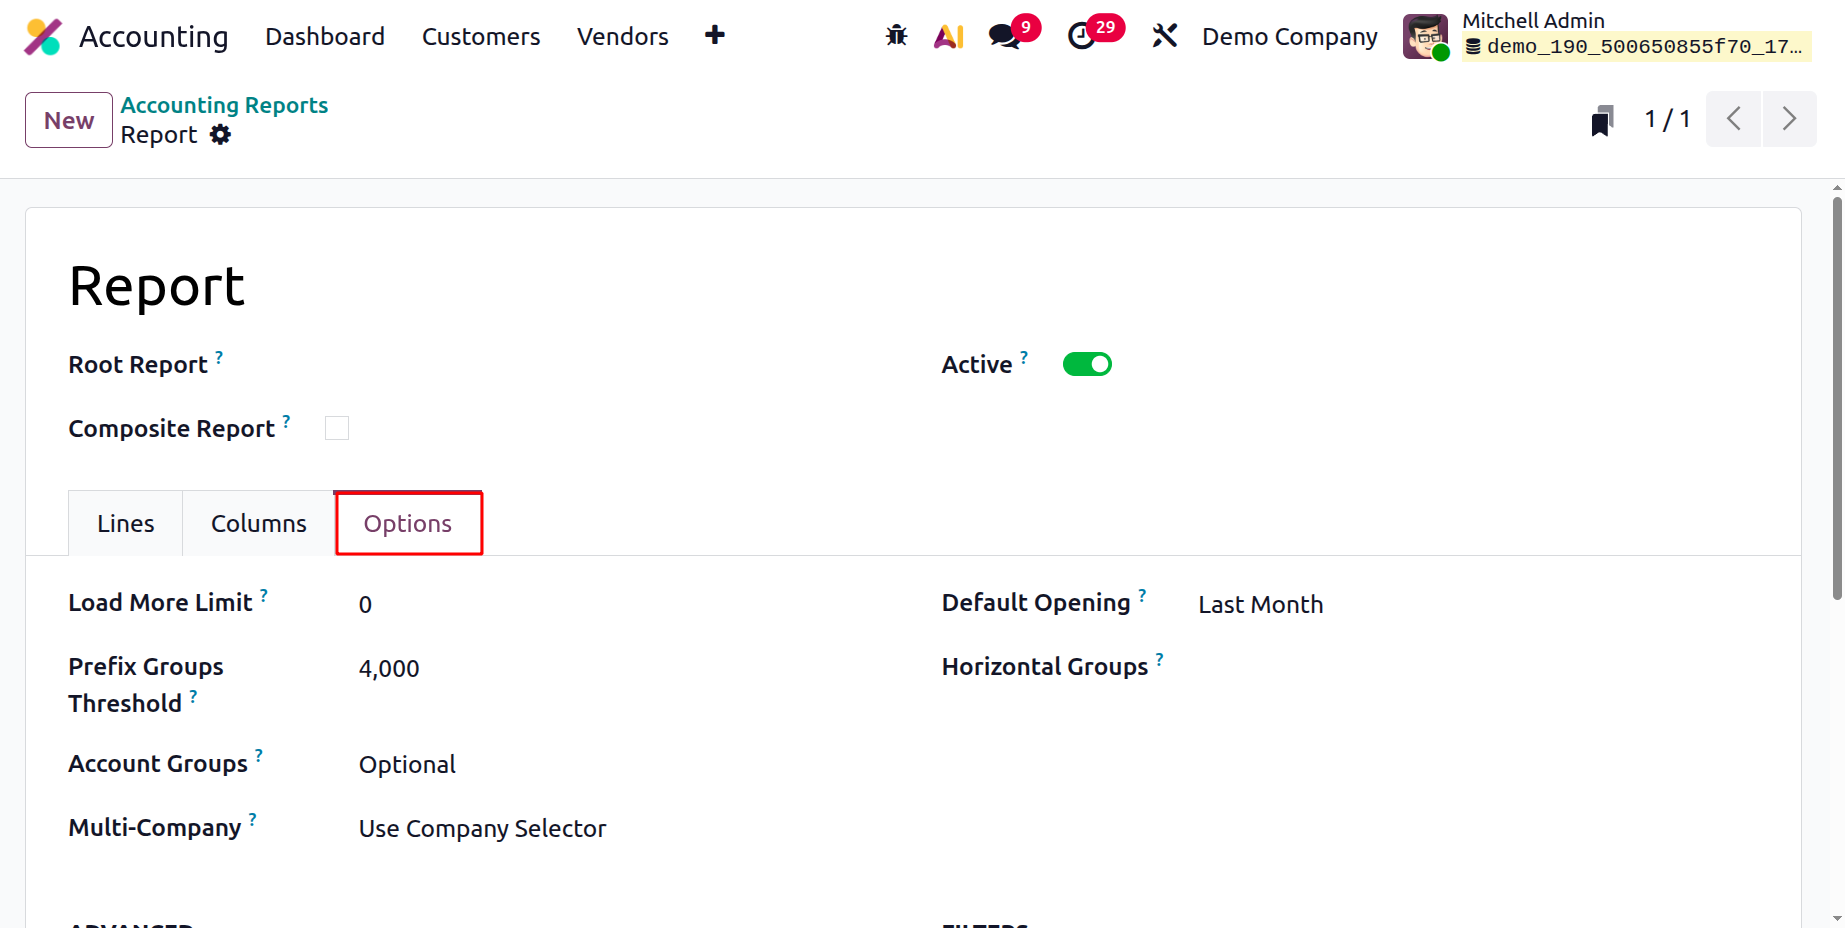
Then, in the Options tab, users can choose the Load More Limit, Prefix Groups Threshold, Account Groups,
Multi-Company, Default Opening and Horizontal Groups.
Under the ADVANCED section, the users can enable the check boxes like Date Range, Unfold All, Growth Comparison,
Period Comparison, and Cash Basis. The Integer Rounding can be chosen as Nearest, UP or Down.
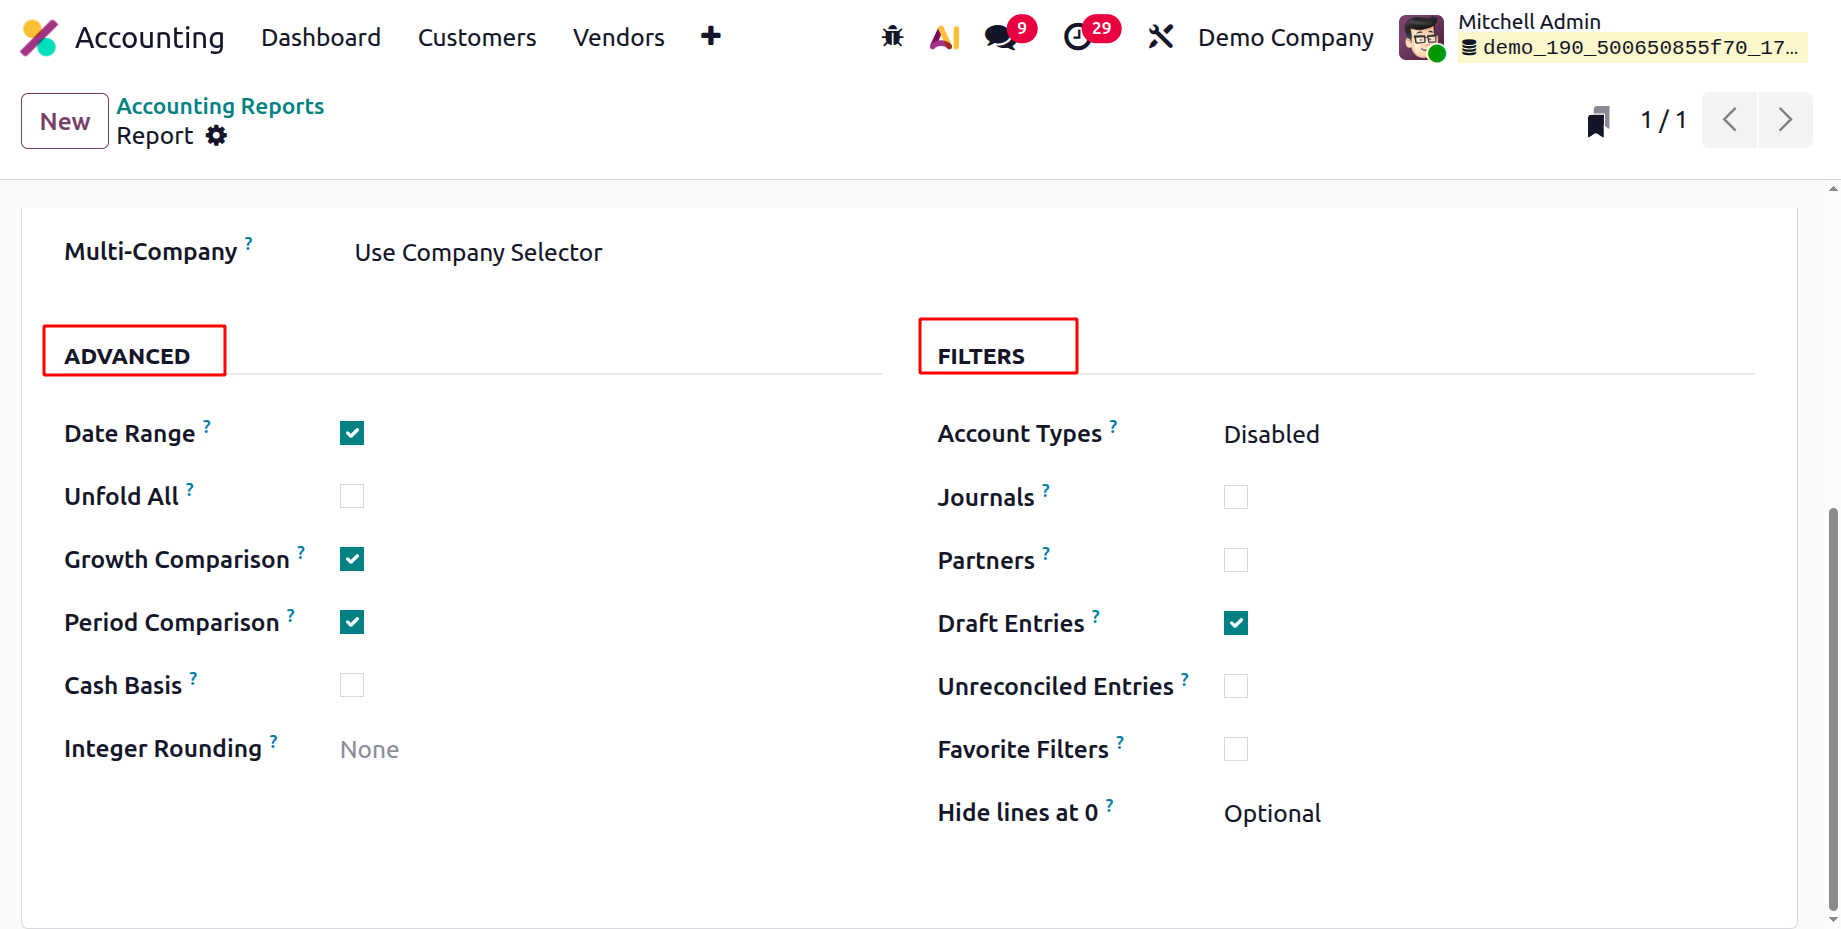
Then under the FILTERS, the check boxes available are Account Types, Journals, Partners, Draft Entries,
Unreconciled Entries, Favorite Filters, and Hide lines at 0.
Next, let's examine Odoo 19 Accounting's Horizontal Reports.
Defining Horizontal Groups
One of the improved features of the Odoo 19 Accounting module is Horizontal Groups, which establishes specific
needs. The financial statements can be filtered using these horizontal groups. Only when developer mode is
enabled can this function be accessed via the configuration menu of the accounting application.
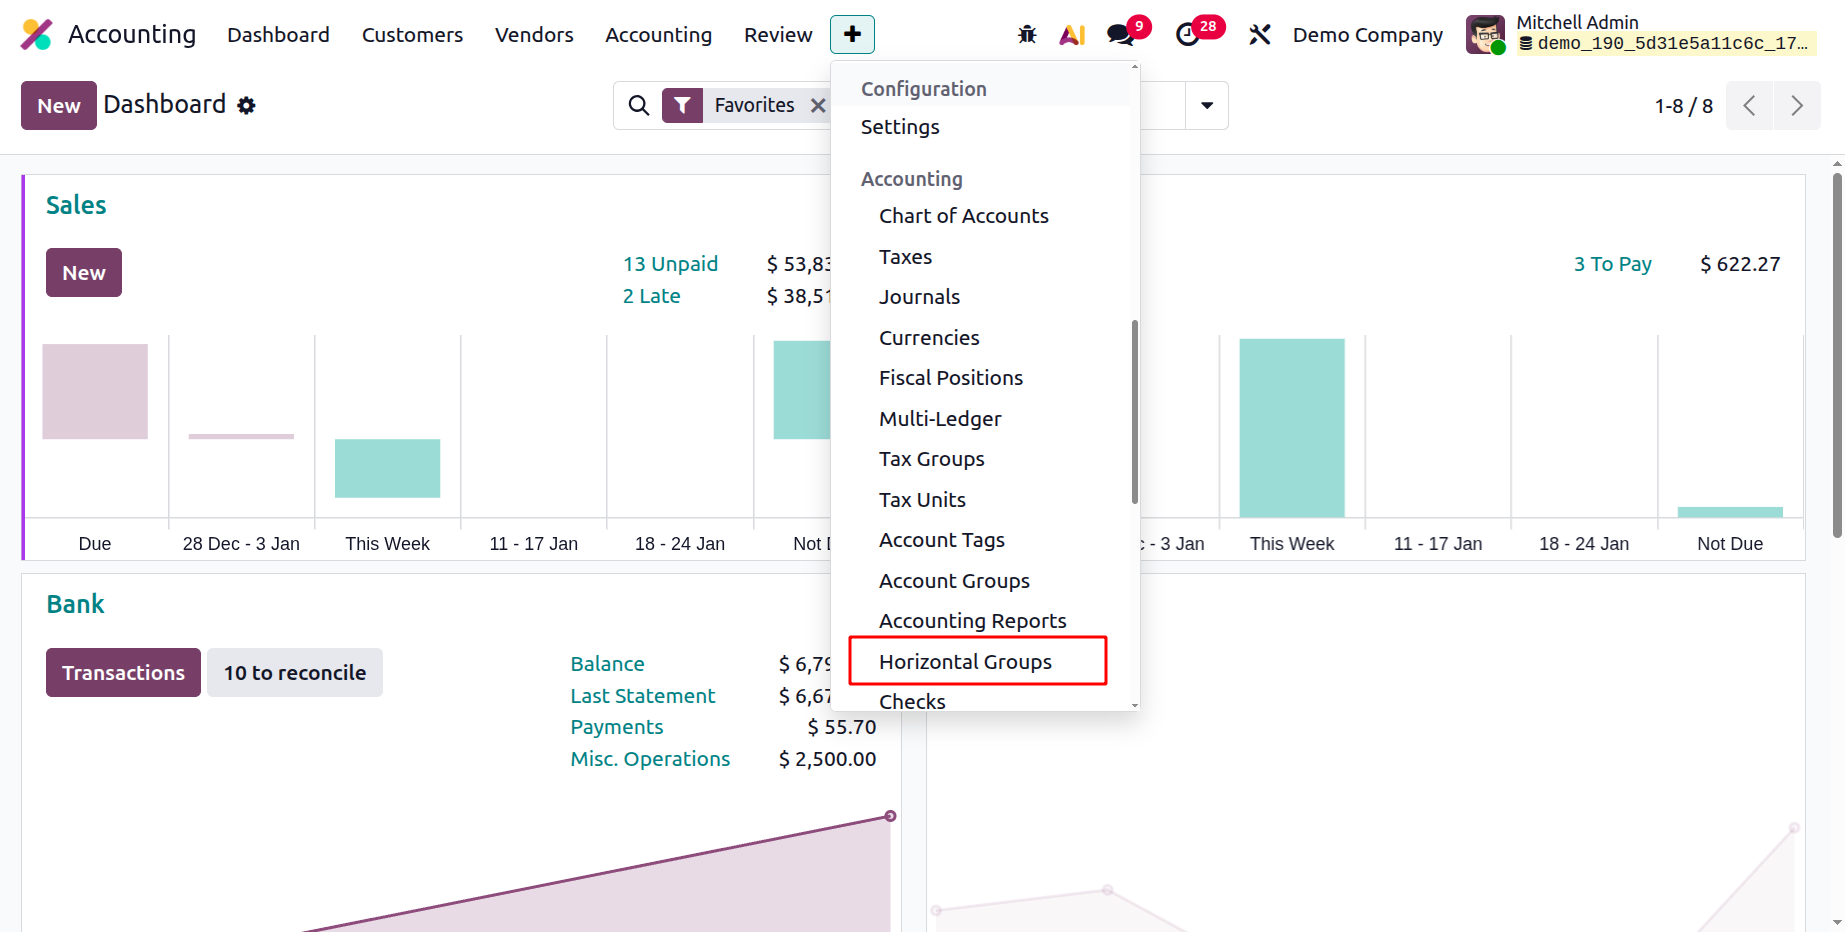
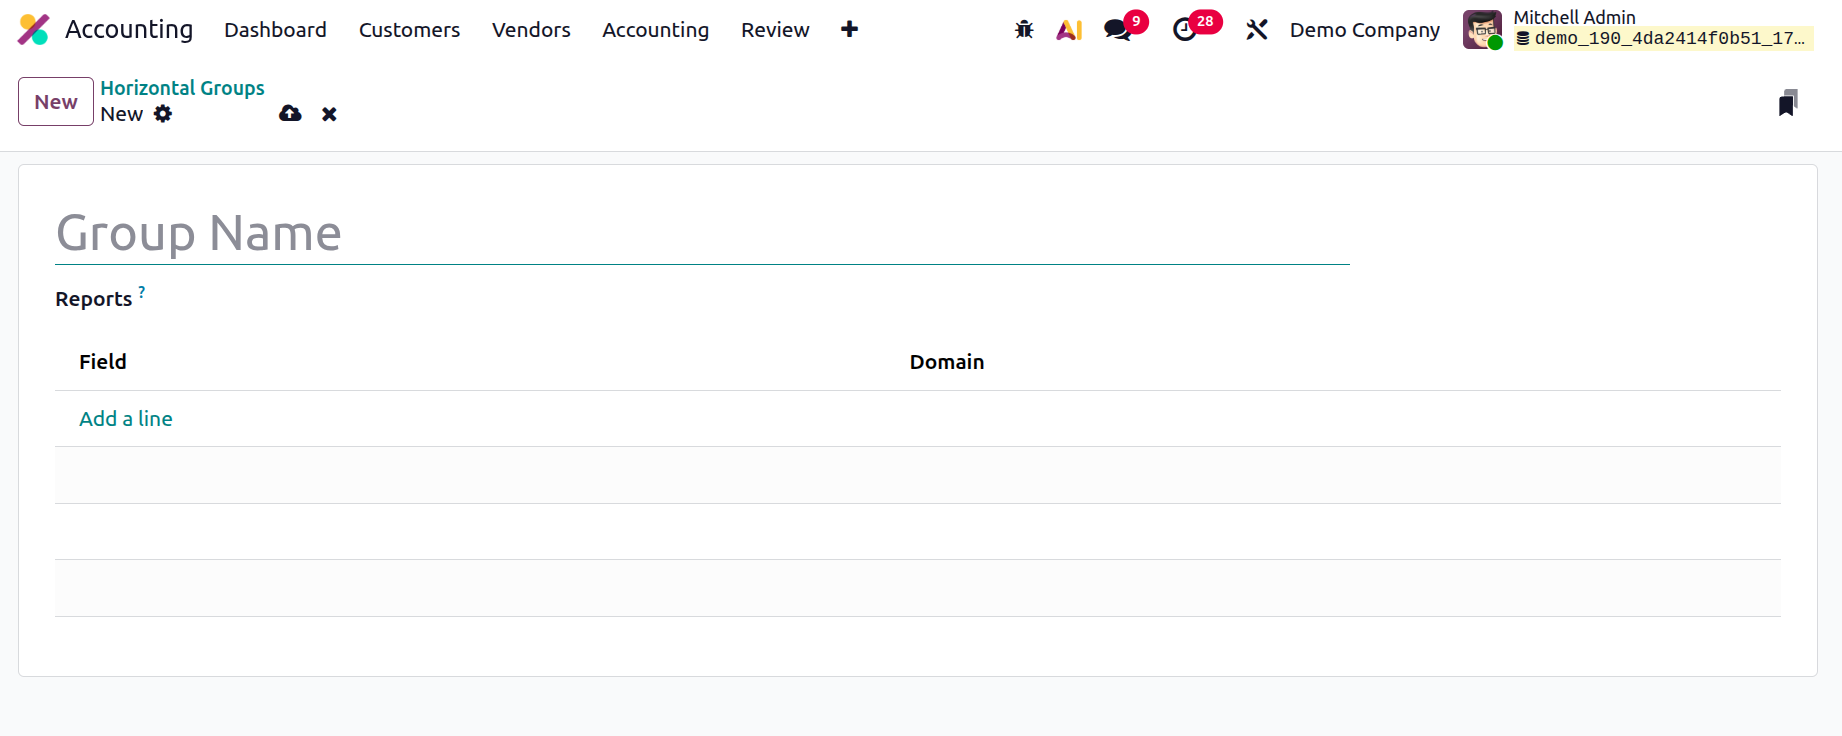
You can create new horizontal groups by using the New button in the horizontal groups. When designing financial
reports, we can specify which ones will contain a horizontal group.
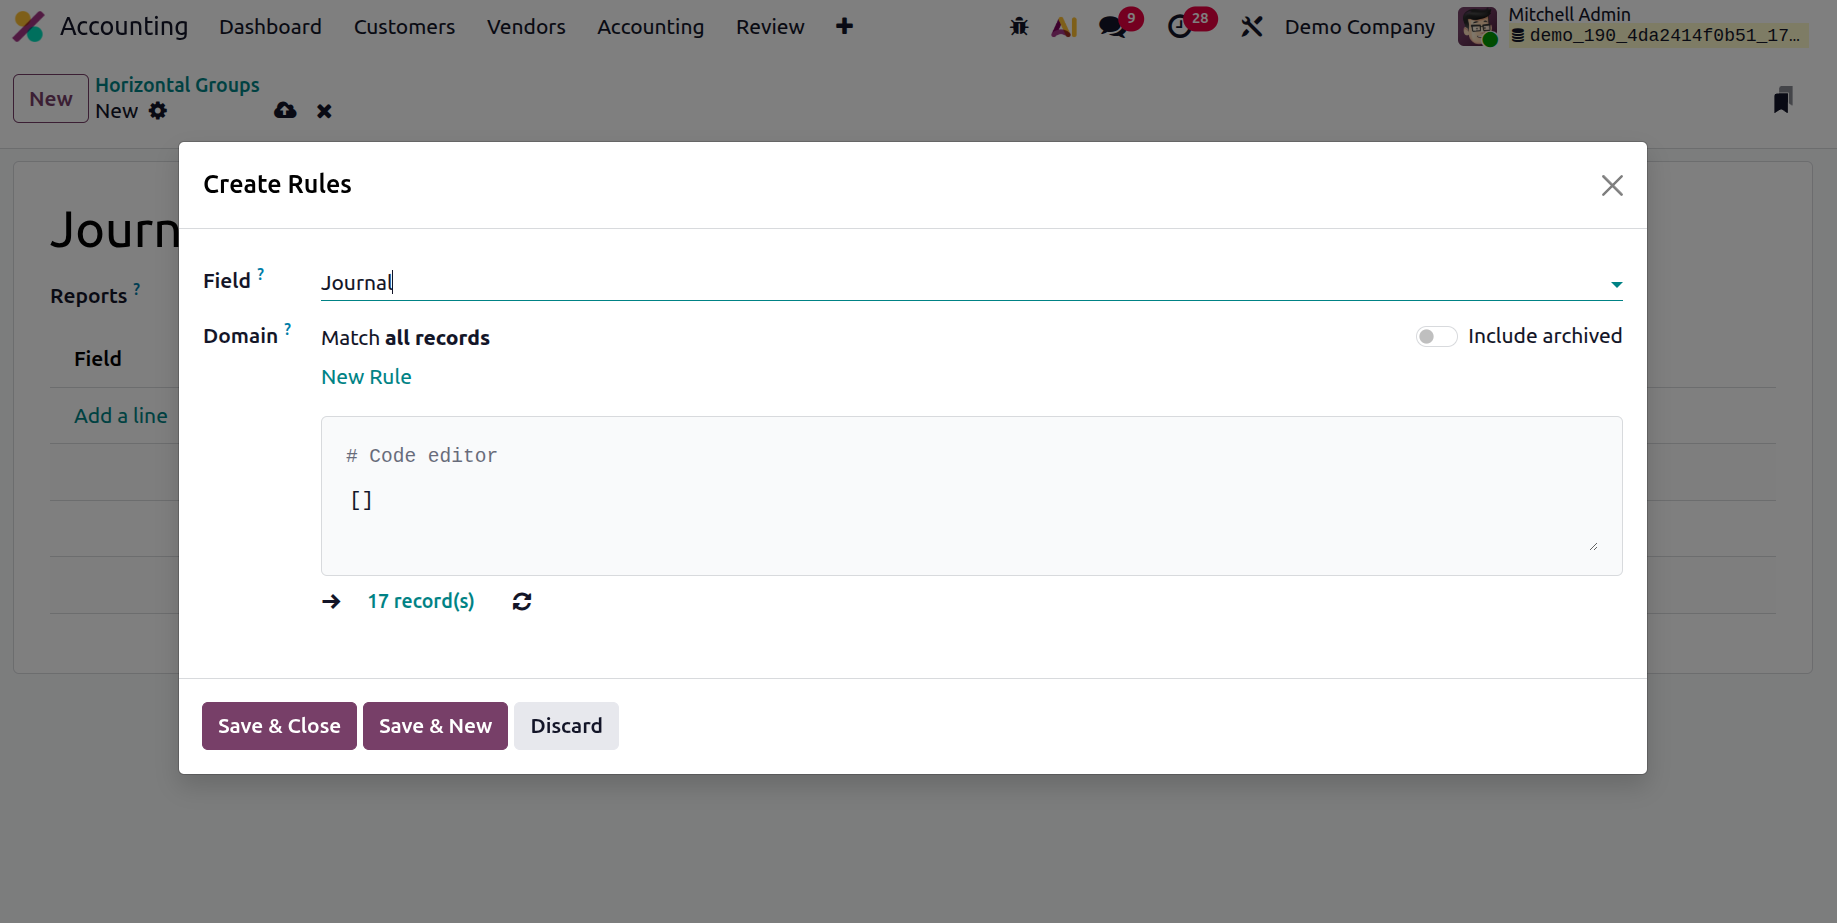
The section field is where you can insert the domain.
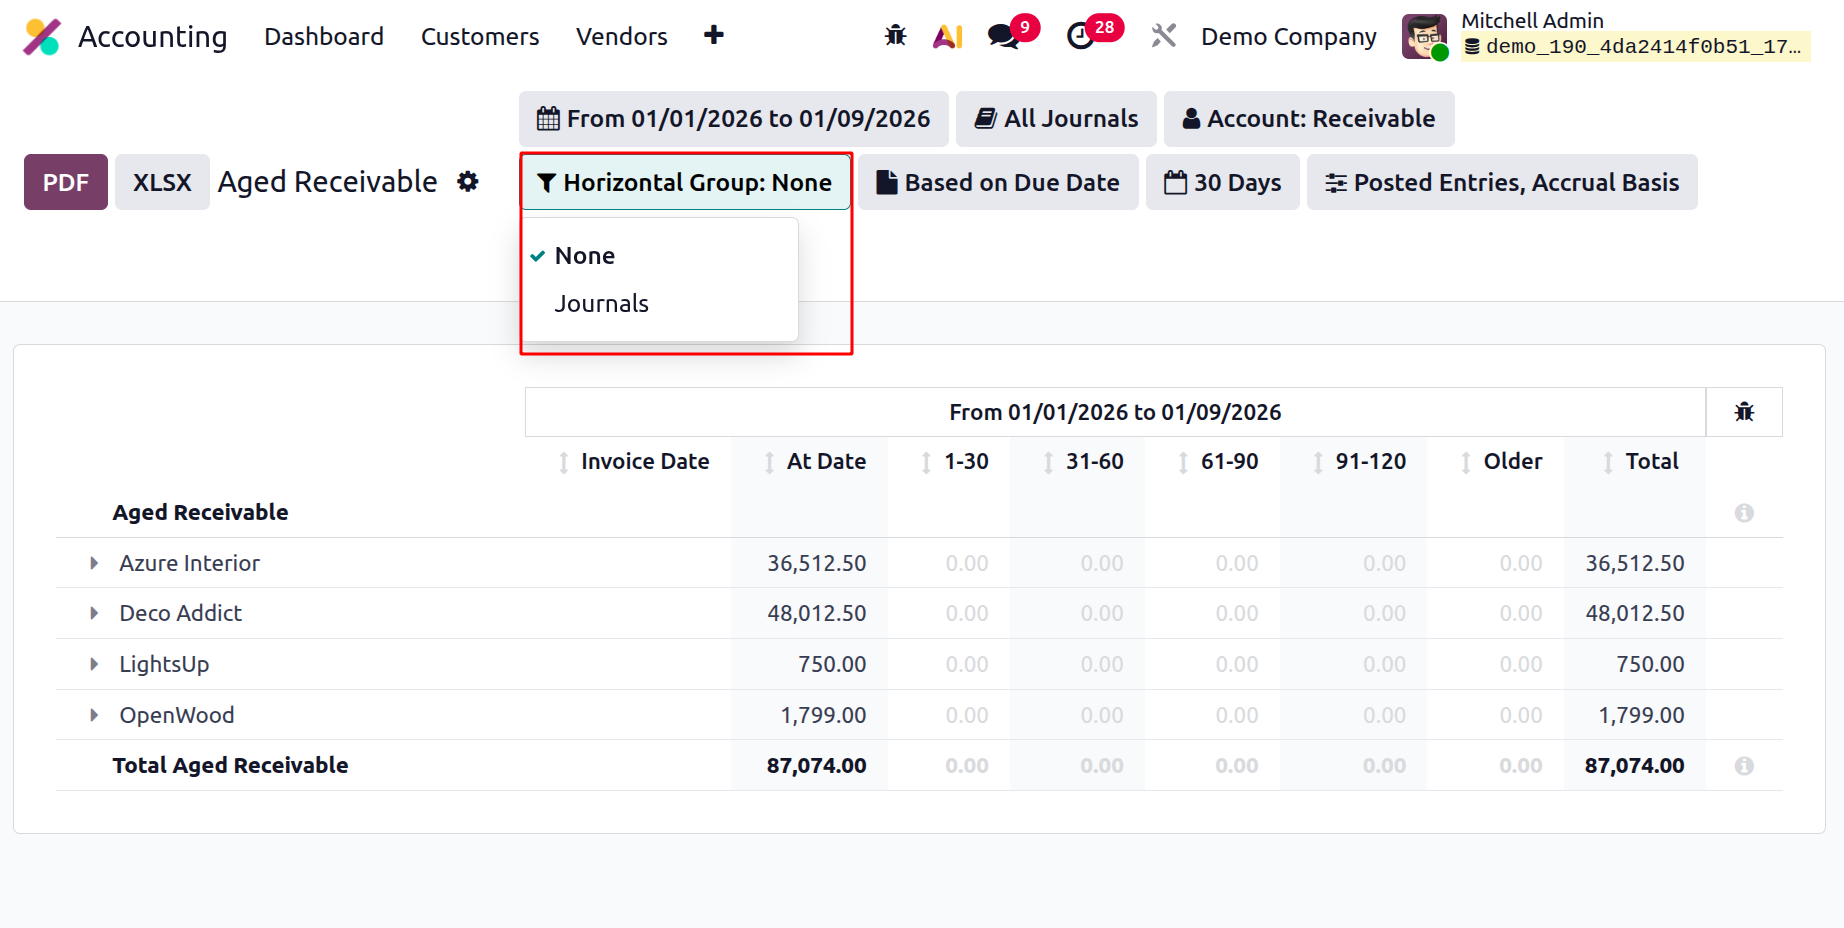
The data in the financial reports was filtered according to the domain after the horizontal group was applied.
Checks
Check templates that are newly introduced in Odoo 19 accounting. To get this, click on the Configuration menu and
choose the Checks from there. The list shows the Title, Tax Return/ Audit and Cycle. To add a new one, click on
the New button.
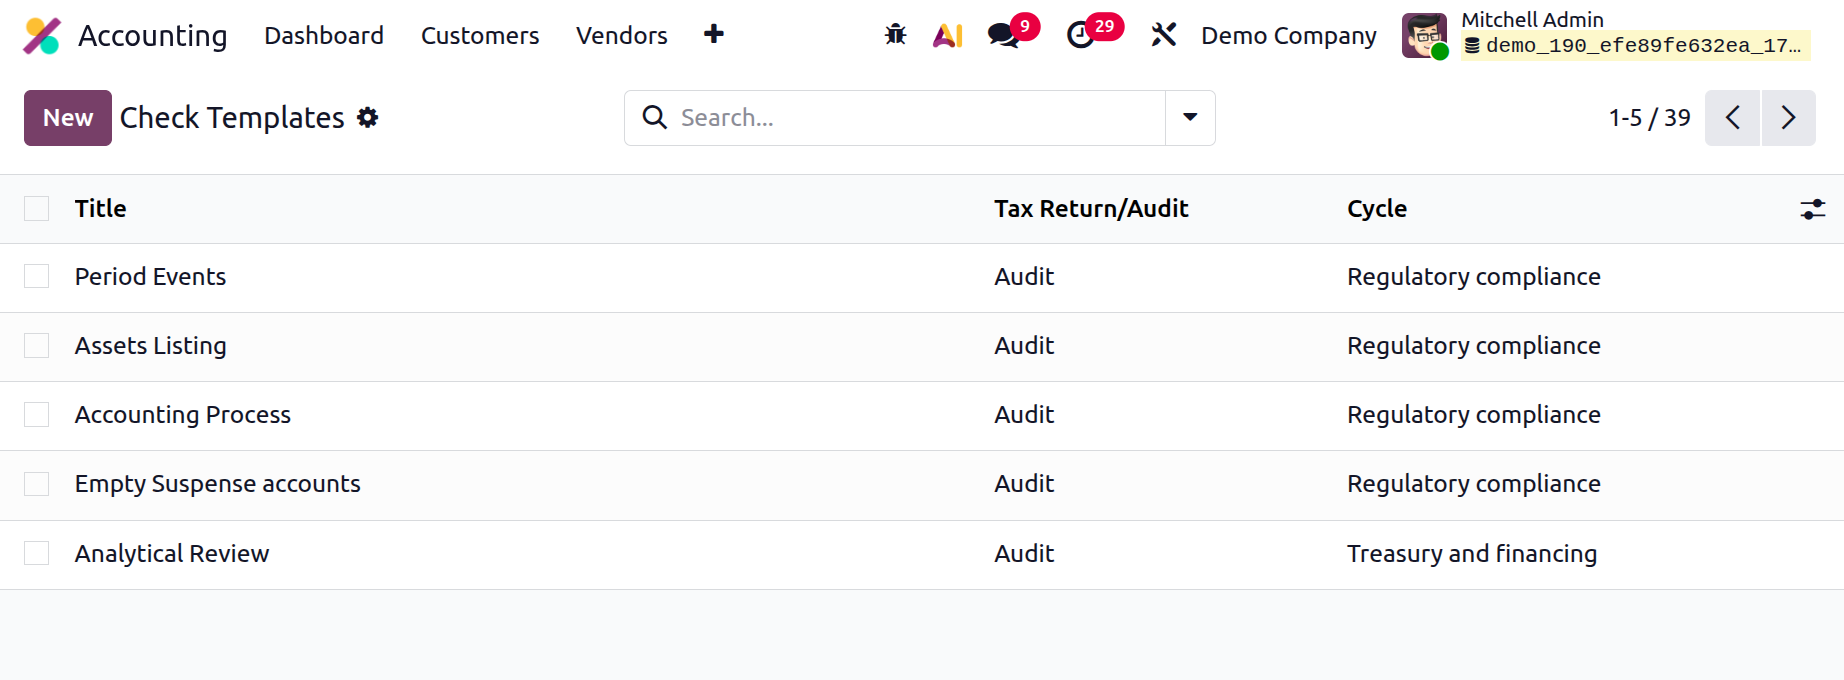
Add the Title, Cycle, Tax Return/Audit,Action on Click, Activities. Then choose the Type either as Checks or
Upload Document. Under the Description tab add the description.
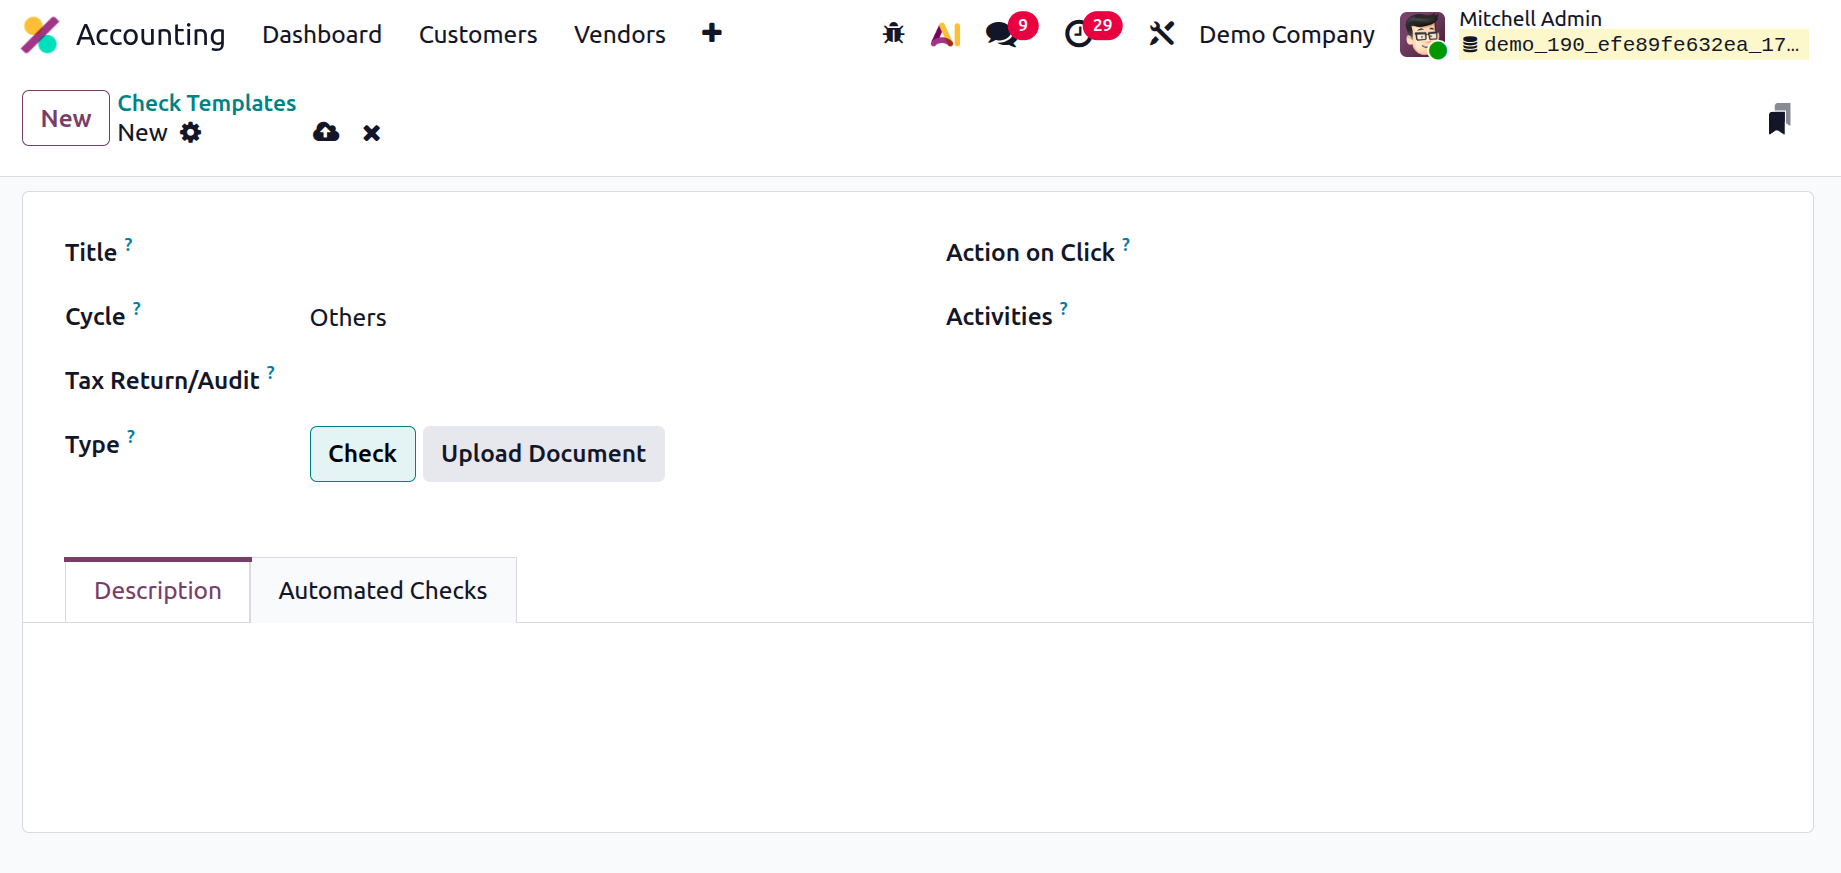
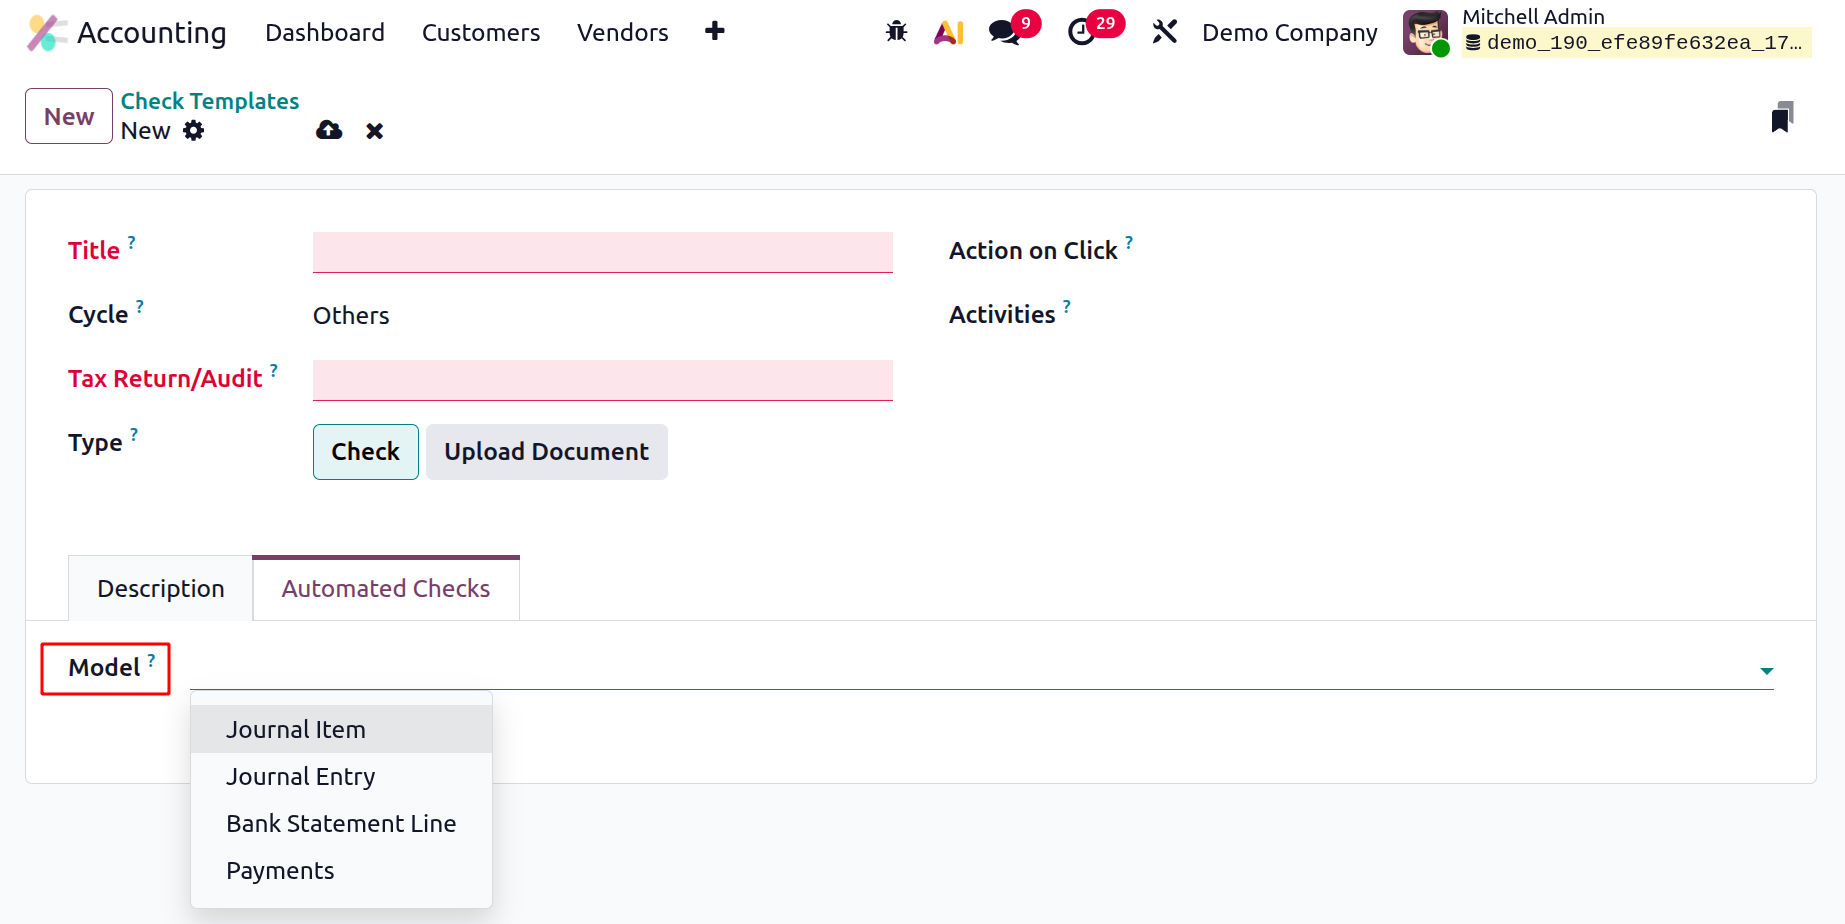
Then, under the Automated Checks tab, the users can choose the Model.
Fiscal Categories
The expenses listed in Odoo 19's Accounting module that are prohibited from being claimed as tax-deductible
expenses or items are known as fiscal categories. These include expenditures for food, entertainment, travel,
presents, and other non-work-related expenses for the individual, the home, and the family.
Disallowed charges have a number of advantages, including,
- Decreased taxable income: Unallowable expenses lower the taxable income of an individual or corporation. Reducing
tax obligations can increase cash flow and profitability.
- Prevent fines and interest: By not deducting prohibited expenses from their tax returns, individuals and
organizations can prevent potential penalties and interest.
- Improved Accuracy: The Internal Revenue Service (IRS) may face issues if disallowed expenses are not accurately
reported. Organizations can improve the accuracy of their records by precisely identifying these costs that
aren't reported on tax returns.
- Streamlined Compliance: Individuals and businesses can better comply with tax laws by lowering the likelihood of
an audit by differentiating between authorized and non-authorized expenses.
As a result, you can exclude the pertinent expenses from the bookkeeping result without simultaneously
eliminating them from the fiscal result by using Odoo19's Fiscal Categories function. As a result, by creating
categories for prohibited spending and getting frequent alerts, you will be able to view the financial outcomes
in real time.
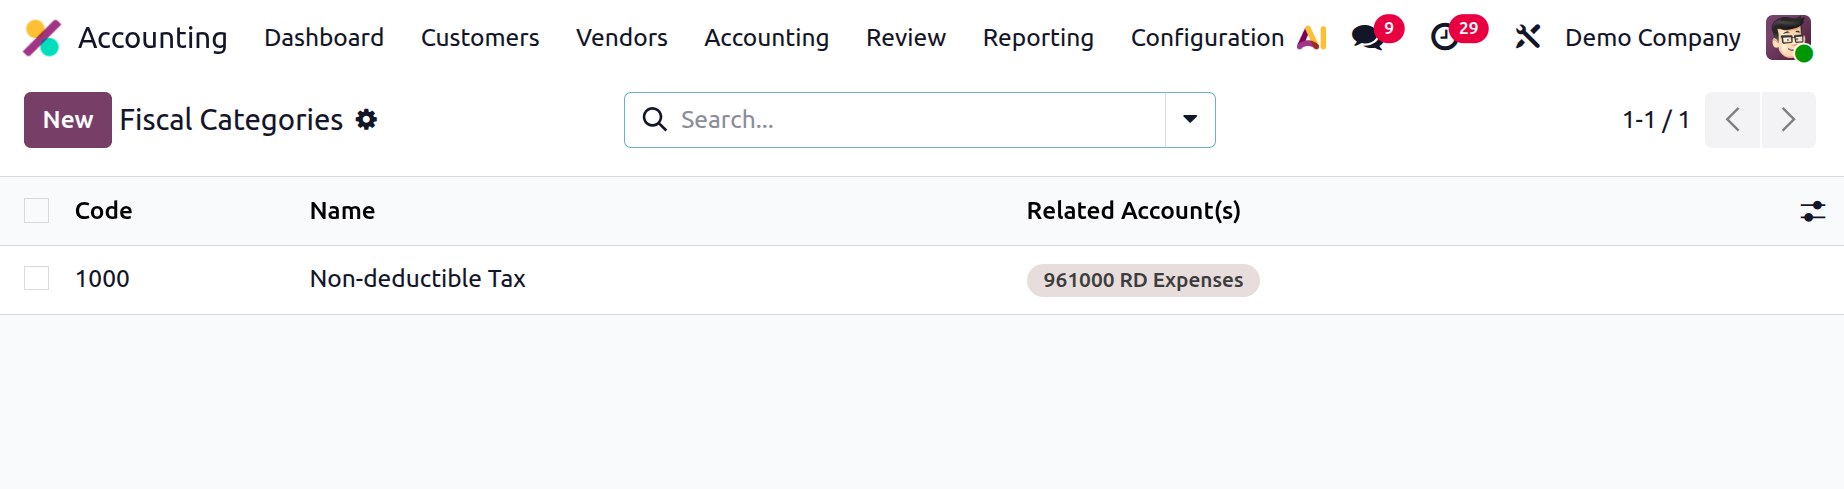
You can add new Fiscal Categories using the New option, and the system will assist you in managing all of the
established Fiscal Categories.
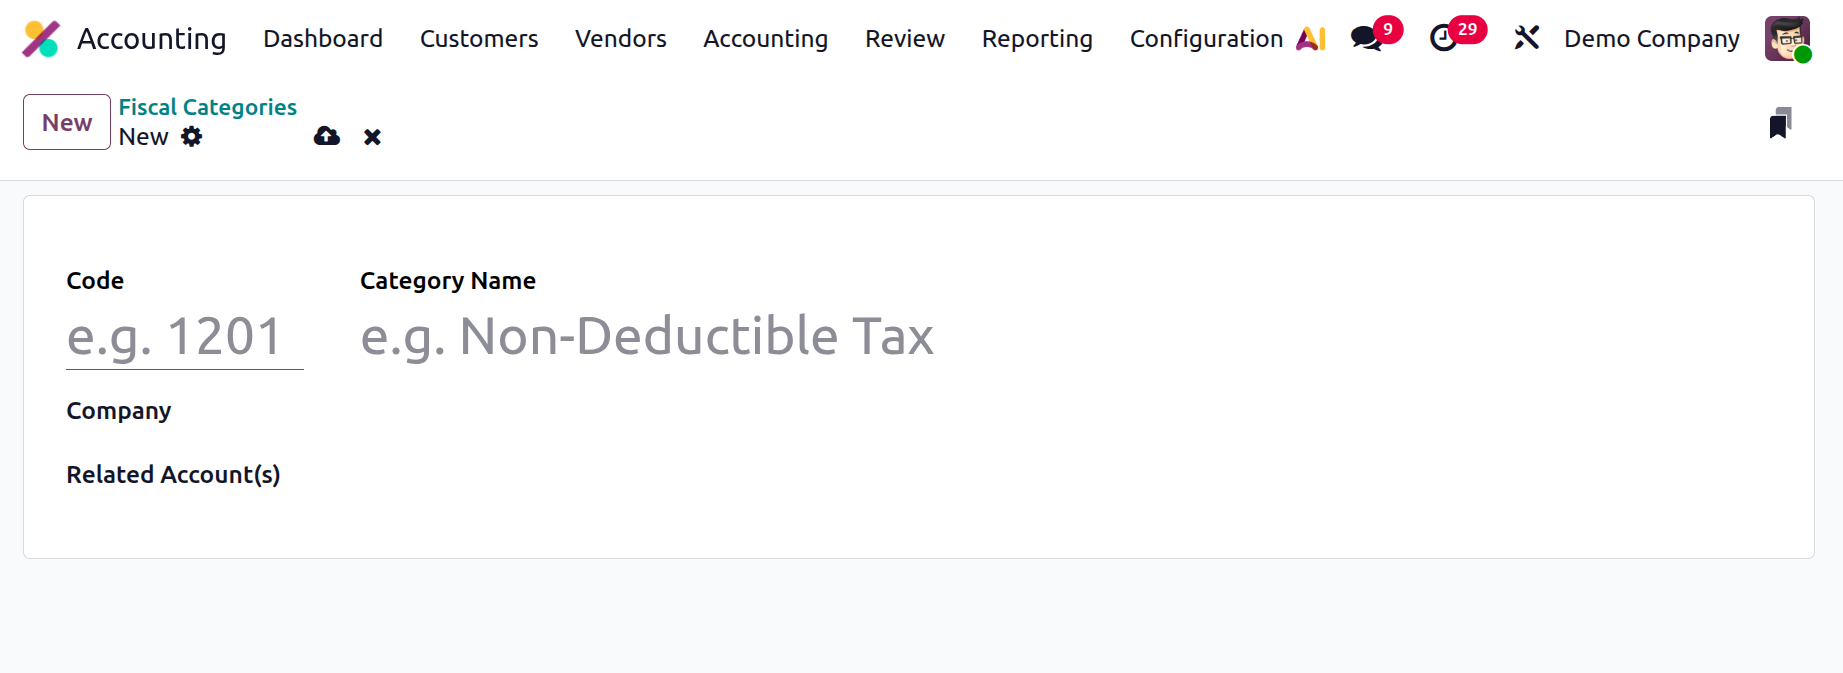
You can enter the Code and the Name first when creating a new category of prohibited expenses. The list of preset
accounts can then be used to select linked accounts. Additionally, you can register for a new account right from
this page.
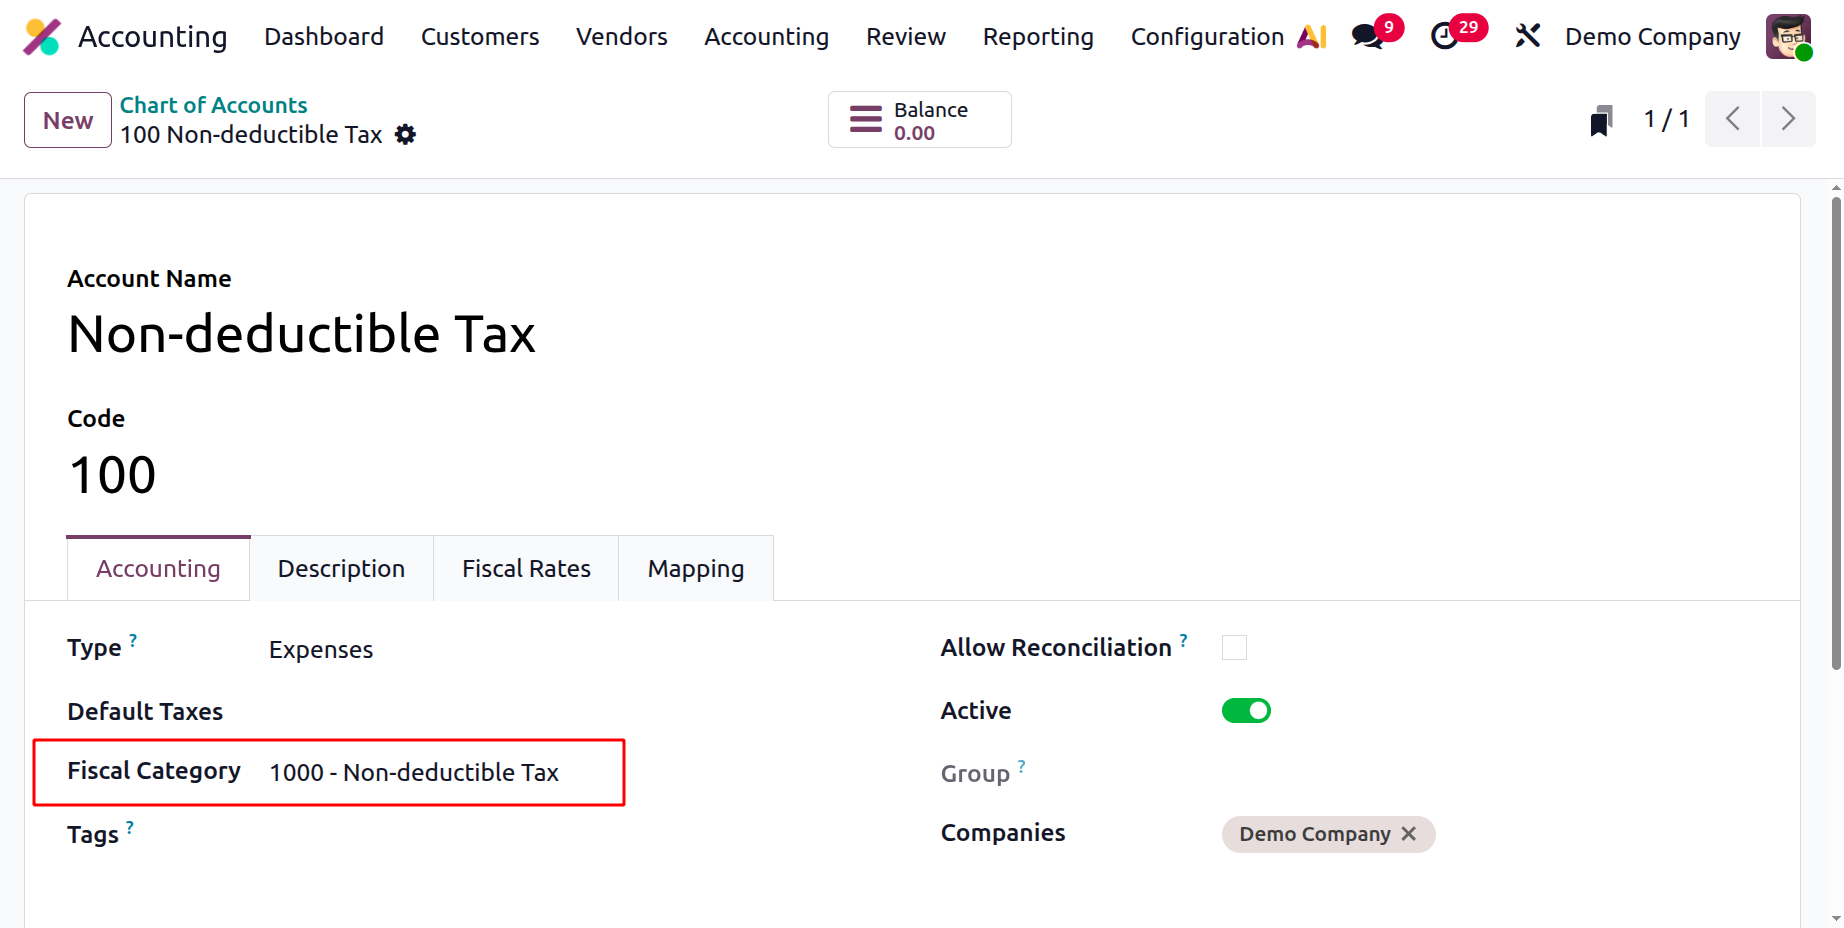
Additionally, when you make a Chart of Accounts, the Expense Account and the Fiscal Category are instantly
linked. You can build a Chart of Account with a cost type by navigating to the Chart of Account window. You may
now see the Fiscal Category selection option, which will be directly connected to the relevant account.
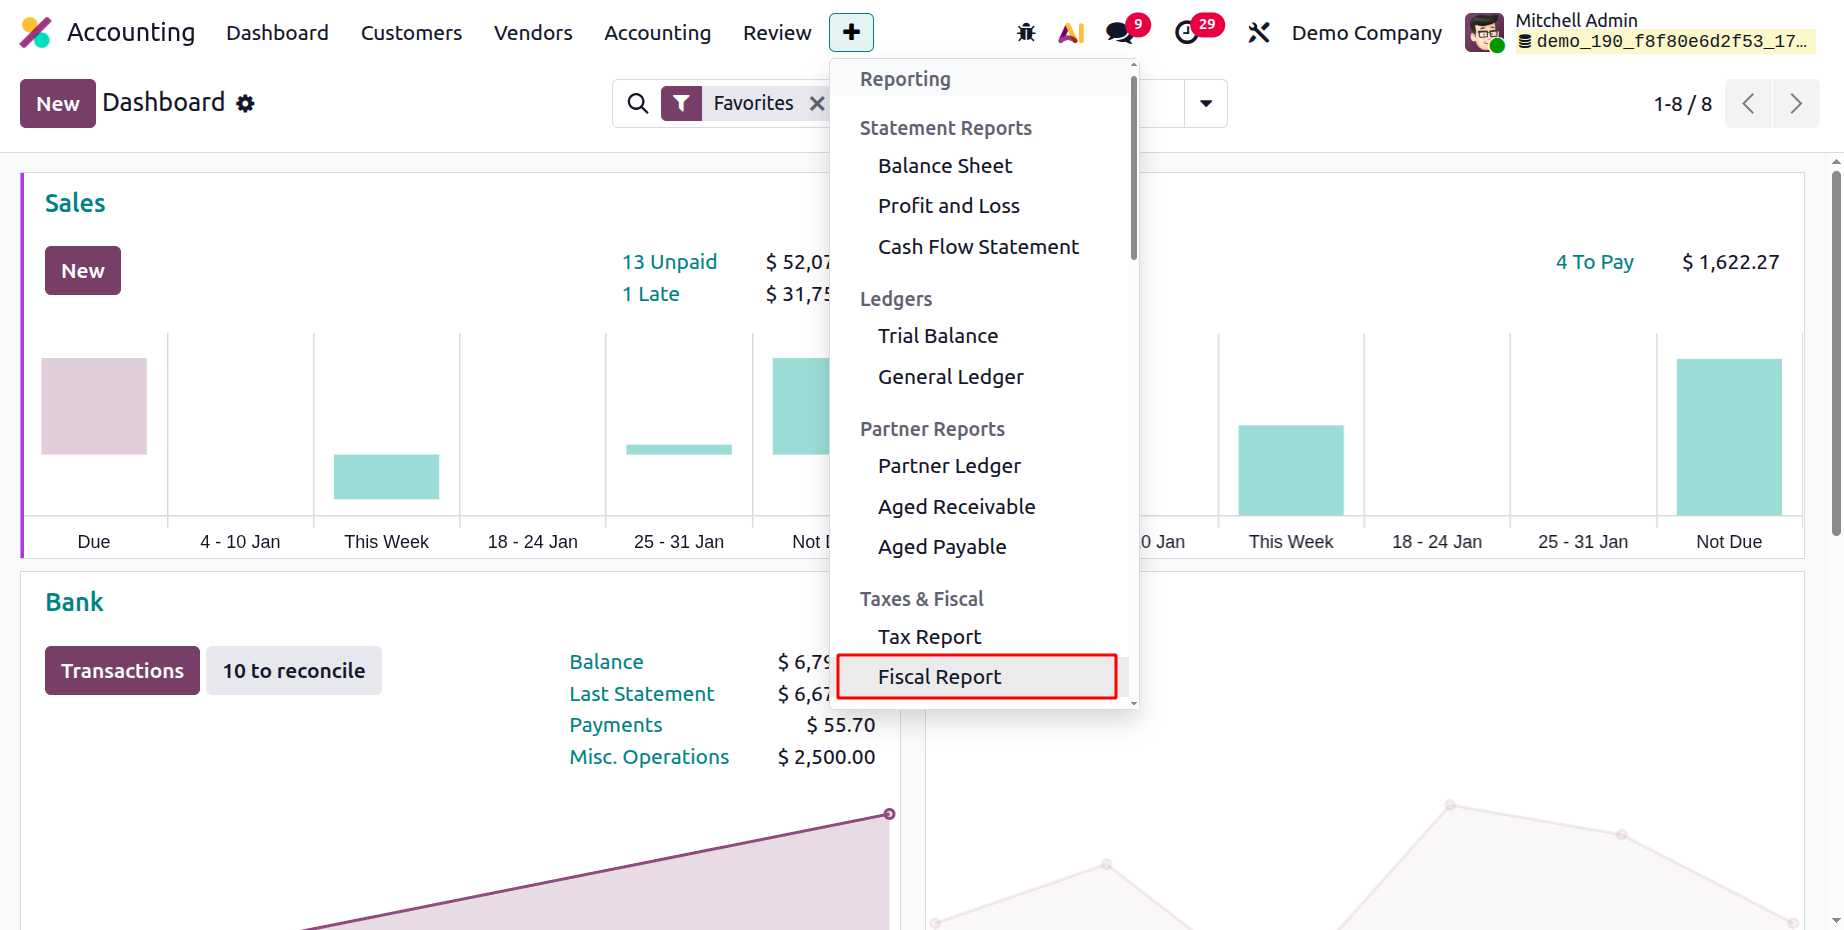
The Fiscal Report is a new report that can be viewed using the module's Reporting menu.
The platform's ability to produce a variety of Fiscal Categories is one of its main advantages. Now that we have
a complete understanding of these characteristics, we can look at the following characteristics that govern the
Assets Models.
Asset Models
Every organization's operations depend on efficient asset management. It involves optimizing the value and
effectiveness of a company's tangible, intangible, and financial assets. It means monitoring the assets' use and
upkeep, adopting proactive measures to reduce associated risks, and ensuring that they are replaced as soon as
necessary. Businesses can use asset management to make well-informed choices about where to invest in new
resources and how to manage their existing ones. Businesses that manage their assets well can cut costs, lower
liabilities, and foster long-term growth.
The Asset Models in the Odoo 19 Accounting module configuration allow you to manage your company's fixed assets
and make depreciation entries. It enables you to track asset costs, compute depreciation, and provide financial
reports. You can manage and keep an eye on each asset's upkeep, insurance, and other relevant information with
this tool. Additionally, it facilitates the tracking of asset expenses and related depreciation over the course
of the assets' useful lives. Additionally, the asset models offer a means of tracking the asset's worth
throughout time as well as its present book value. Asset models can also be used to generate reports that
describe the asset's previous performance and present value.
The following asset models can be defined using the Odoo19 Accounting module:
- Fixed assets: These are tangible items with long-term worth that a company regularly uses. Land, buildings,
furniture, and equipment are a few examples.
- Depreciation: Over time, assets lose value due to depreciation. Many depreciation techniques, including straight
lines and diminishing balances, depending on the number of days in a period, can be used for this.
- Leasing: Assets from a third-party provider may be leased.
- Intangible Assets: Trademarks, copyrights, and patents are examples of intangible assets, which are non-physical
assets. On the balance sheet, these assets are shown as assets that will progressively lose value.
- Impaired: When an asset's fair value decreases, it is deemed impaired. This could be caused by a variety of
circumstances, including competing dynamics, market conditions, or technical obsolescence. The financial
statements have to reflect the impairment.
You may establish the rules for asset tracking and management with Odoo 19's Asset Models functionality. You can
adjust an asset's value, depreciation rate, and depreciation calculation technique with this function. Users can
also create unique depreciation rules for distinct kinds of assets, such as different rates for one kind of
asset and different computation techniques for another. As a result, Odoo19 keeps accurate and current data
while providing additional options for asset management.
Giving an organization a simple way to monitor and manage its assets is the primary goal of the asset models
feature. The unique Odoo19 Accounting module outlines the asset management procedures through the Assets Models
menu, which can be accessed via the Management section of the Configuration tab of the module.
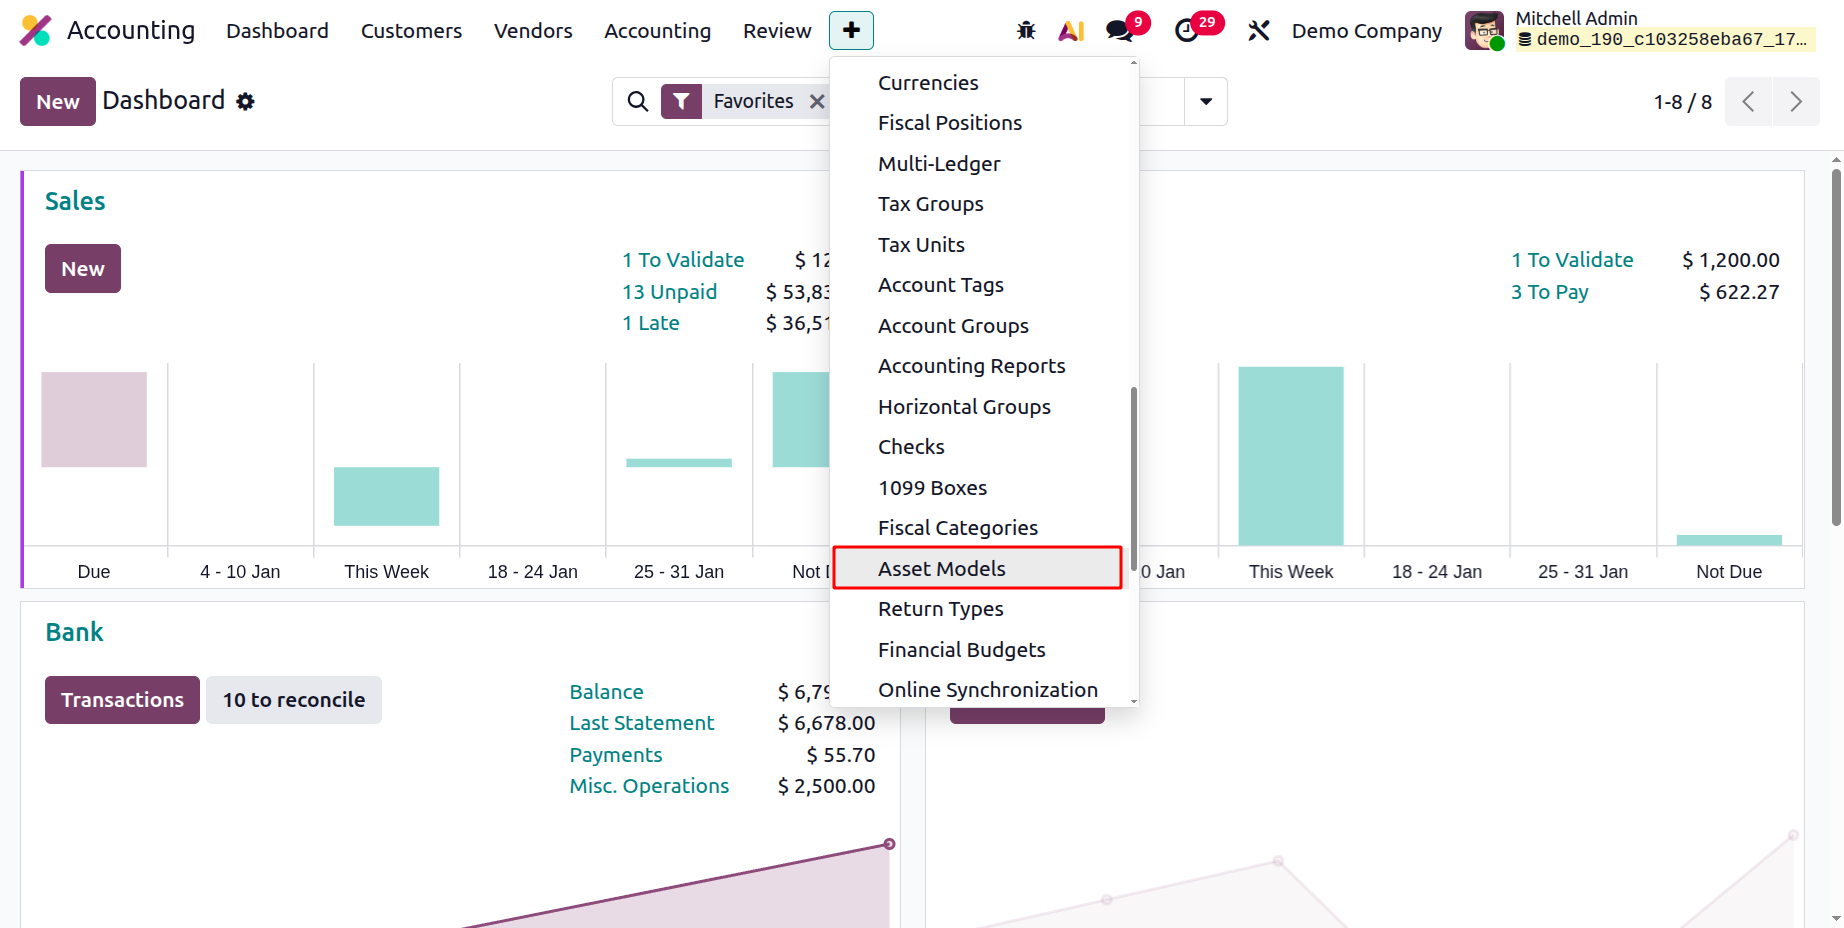
This menu will take you to the Assets page. You can see all of the asset models that are currently in use on this
page, as shown in the screenshot below, together with information about each one, such as the Asset Name, Fixed
Asset Account, Depreciation Account, Expense Account, Method, Number of Depreciations, and Period length.
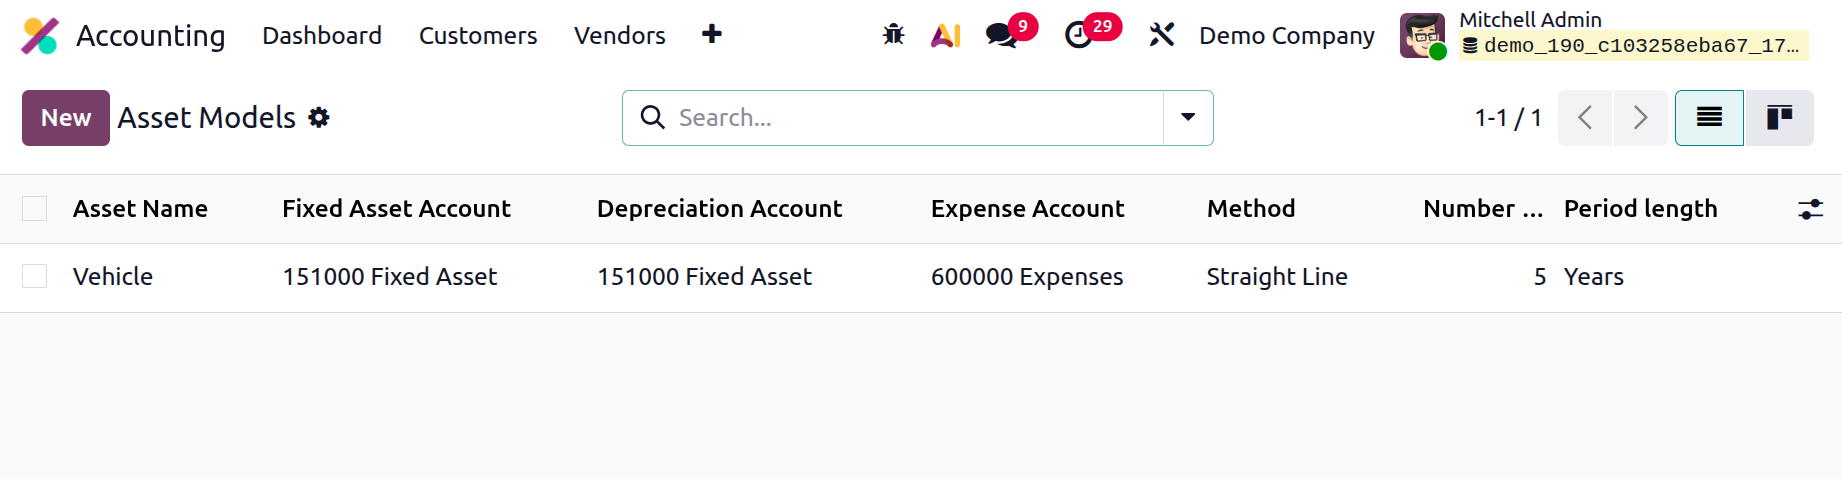
Choose an asset model that has already been configured to examine it in more depth. To find and group the right
asset model from the entire list, utilize the interface's Filter, Group By, and Search functions. By selecting
New, the new Asset model can be generated. A screenshot of the creation form can be found below.
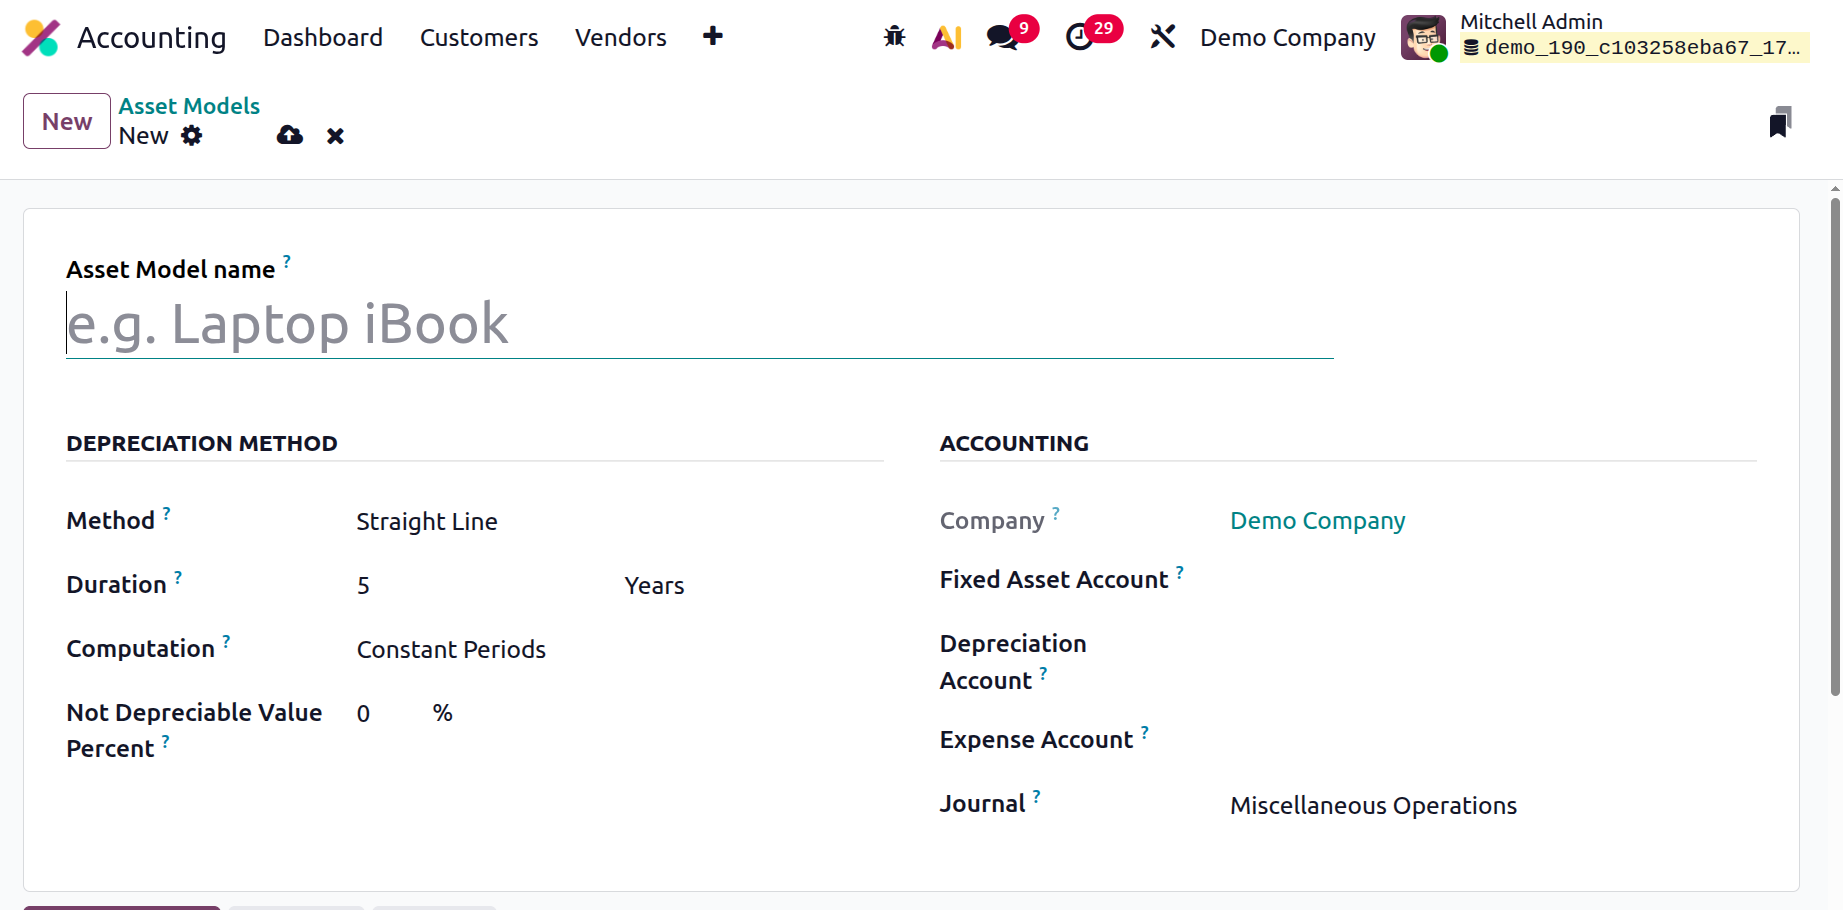
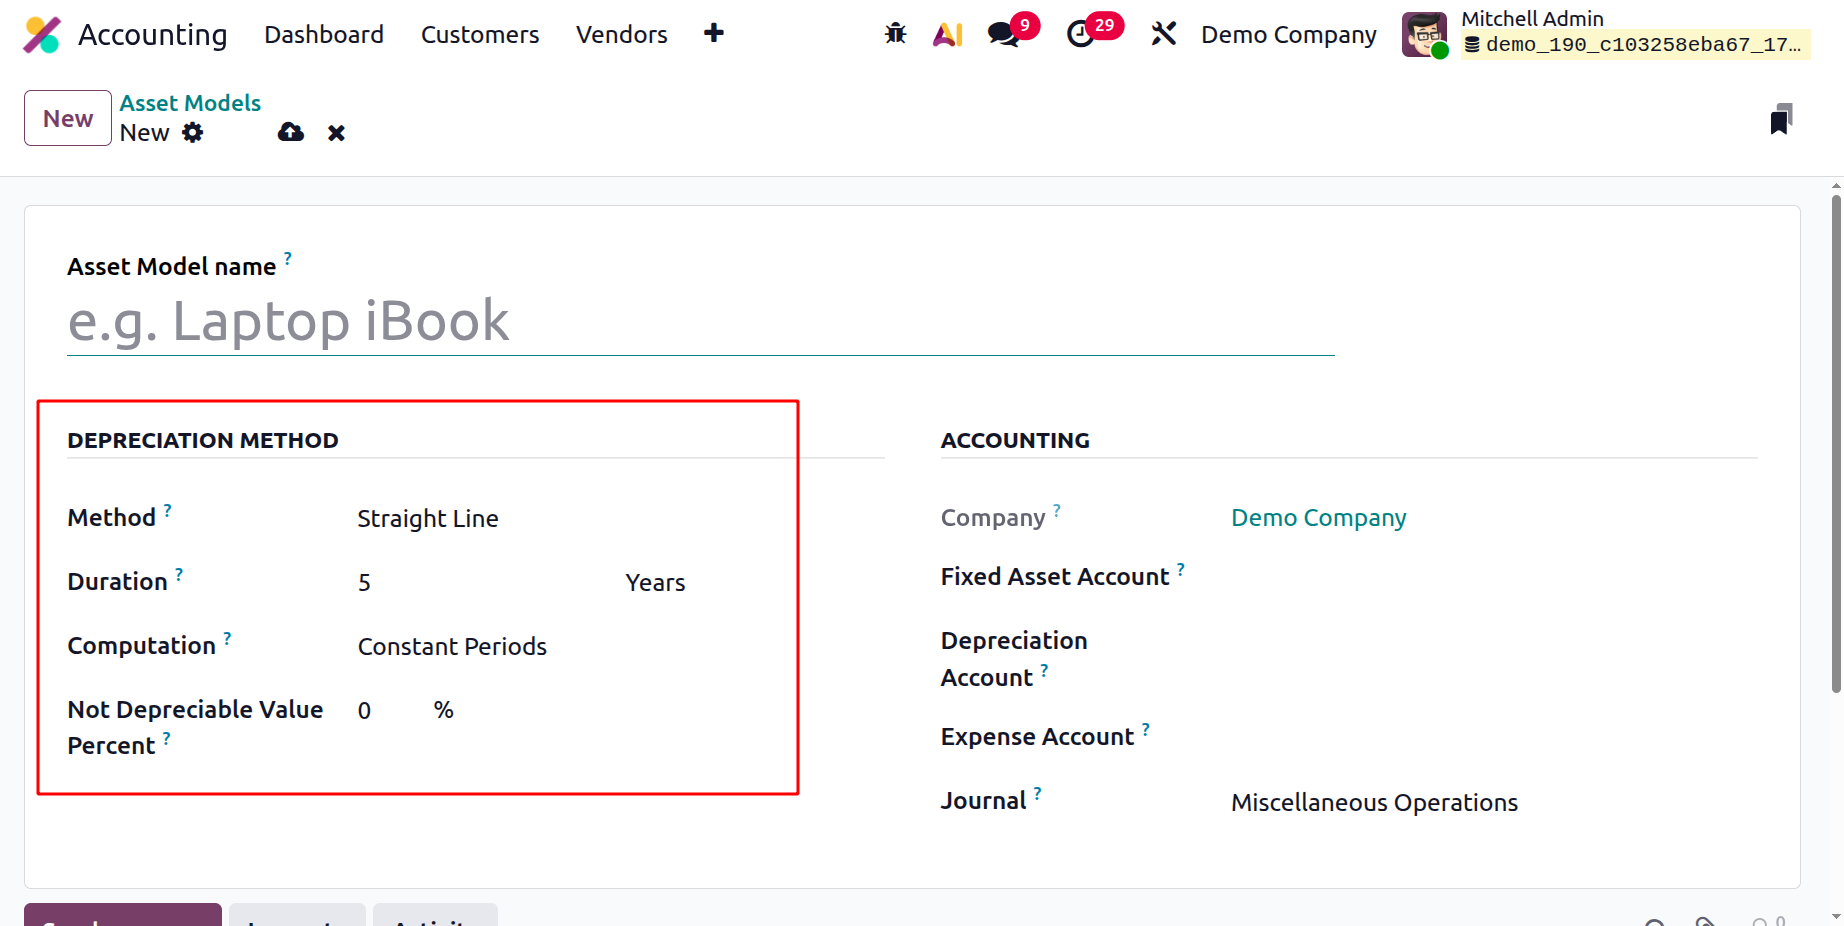
Enter the name of the new asset model in the Asset Model name field to define it. After that, you can set up its
working parts in the relevant fields. A few fields to determine depreciation features are displayed in the
DEPRECIATION METHOD section. To determine how many depreciation lines to utilize, you can select the most
effective method. It can be described as either Declining, Declining then Straight Line, or simply Straight
Line. When you choose the straight line, the Gross Value/Duration will be calculated. The residual value will
determine whether there is a drop. Lastly, a decline followed by a straight line with a declining tendency will
yield a minimal depreciation value equal to the straight line value. The number of depreciations required to
depreciate your asset based on either years or months can then be assigned using the Duration box.
The computation area's values will dictate whether the depreciation calculation is based on "No Prorata,"
"Constant Periods," or "Based on Days Per Period." In the absence of protara, the asset's acquisition date will
not be taken into account, and the depreciation period will begin at the beginning of the fiscal year. When the
computation is set to "Constant Periods," the depreciation board is computed using the purchase date or prorata
date. The depreciation board will be calculated daily for each period utilizing the third calculation technique,
"Based on days per period." It will first calculate the daily depreciation for the duration of the period. The
daily depreciation will be used to calculate a monthly or annual (duration frequency) depreciation board.
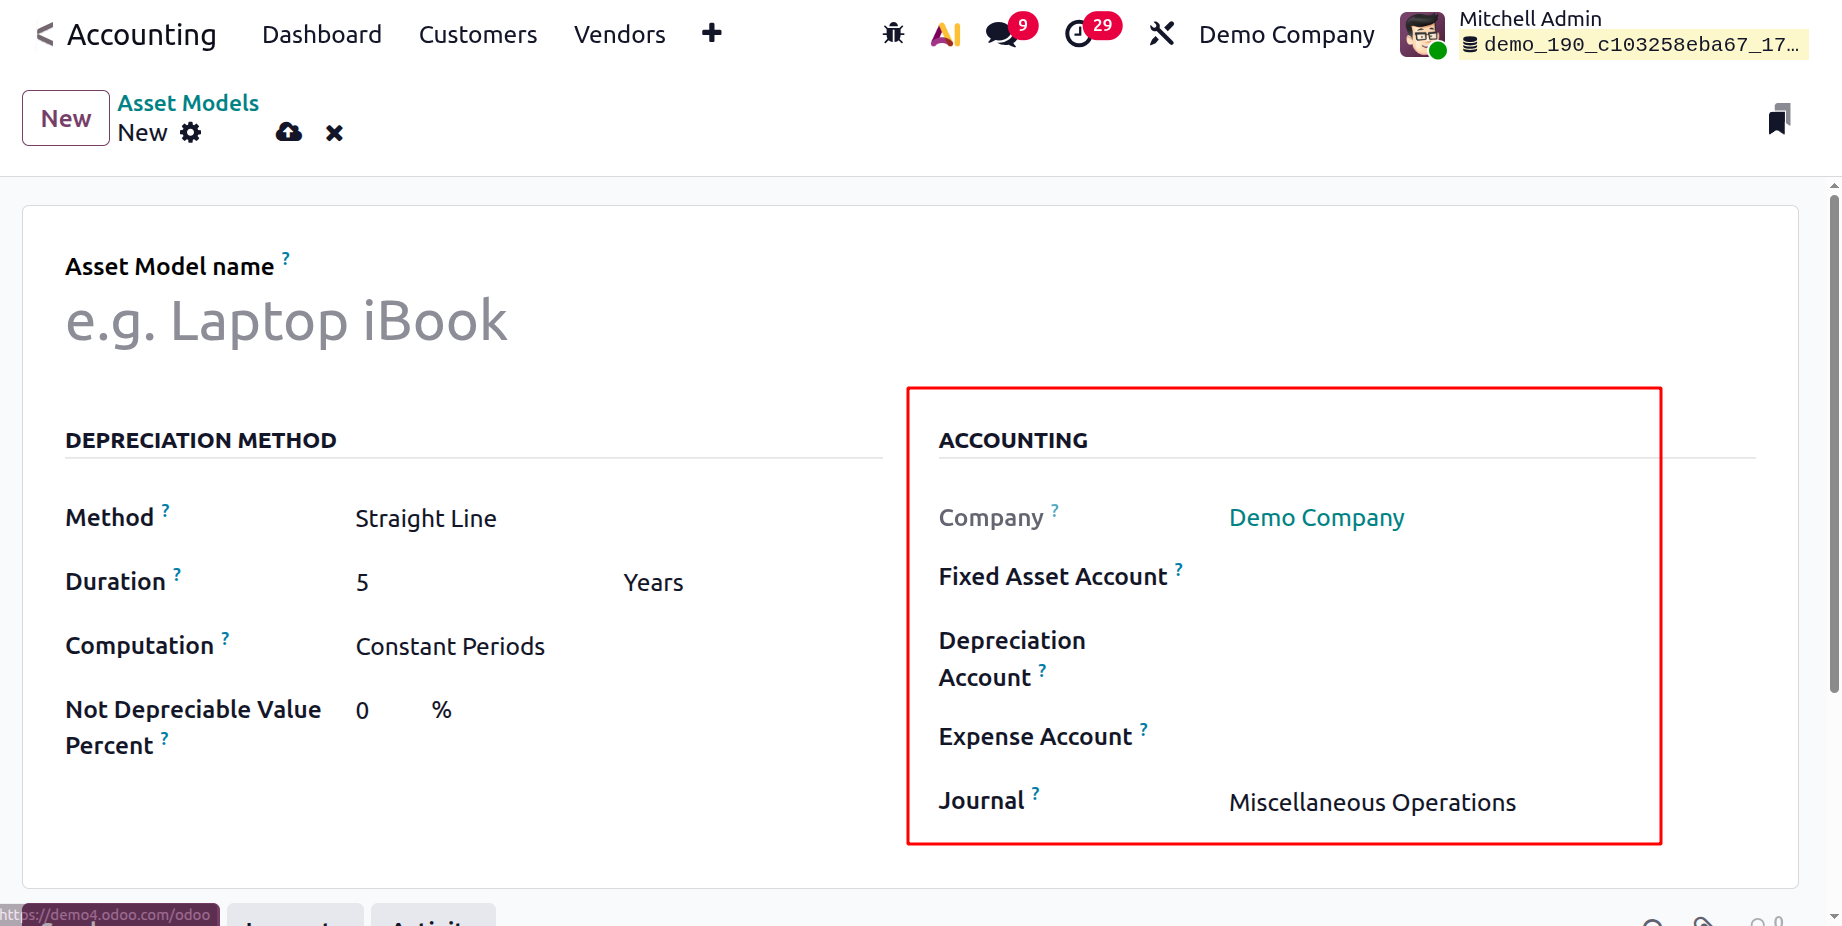
Similarly, you may indicate the Company linked operation using the Company field in the Accounting part of the
Asset models creation window. The system will automatically allocate the field. In the Fixed Asset Account
section, you can specify which account was used to document the asset's initial purchase price. The Depreciation
Account, which is employed in the depreciation entries to reduce the asset value, is the following choice. The
Expense Account, which is the account used in periodic entries to record a portion of the asset as an expense,
can also be defined. Lastly, the Journal section allows you to select a journal. All of the accounts and
journals that we have already created on the platform are shown here in dropdown menus, allowing you to choose
the one you require.
The system will store the new Asset model once you've provided all the relevant information. By selecting the
Follow option at the bottom left, you can now add followers to this specific Asset model. The system also offers
the Knowledge Article Search and Attachment options, as shown in the figure below.
You may keep an eye on the asset model's development and get alerts if anything changes by using the Follow
feature. You can add documents, photos, and other resources that are relevant to the asset model by using the
Attachment option. A new feature in the Odoo 19 edition allows users to search the Odoo 19 Knowledge Base for
pertinent articles that can be helpful while constructing an asset model. The Send Message, Log note, and
Activities options are found in the lower left corner of the creation form, as seen in the figure below.
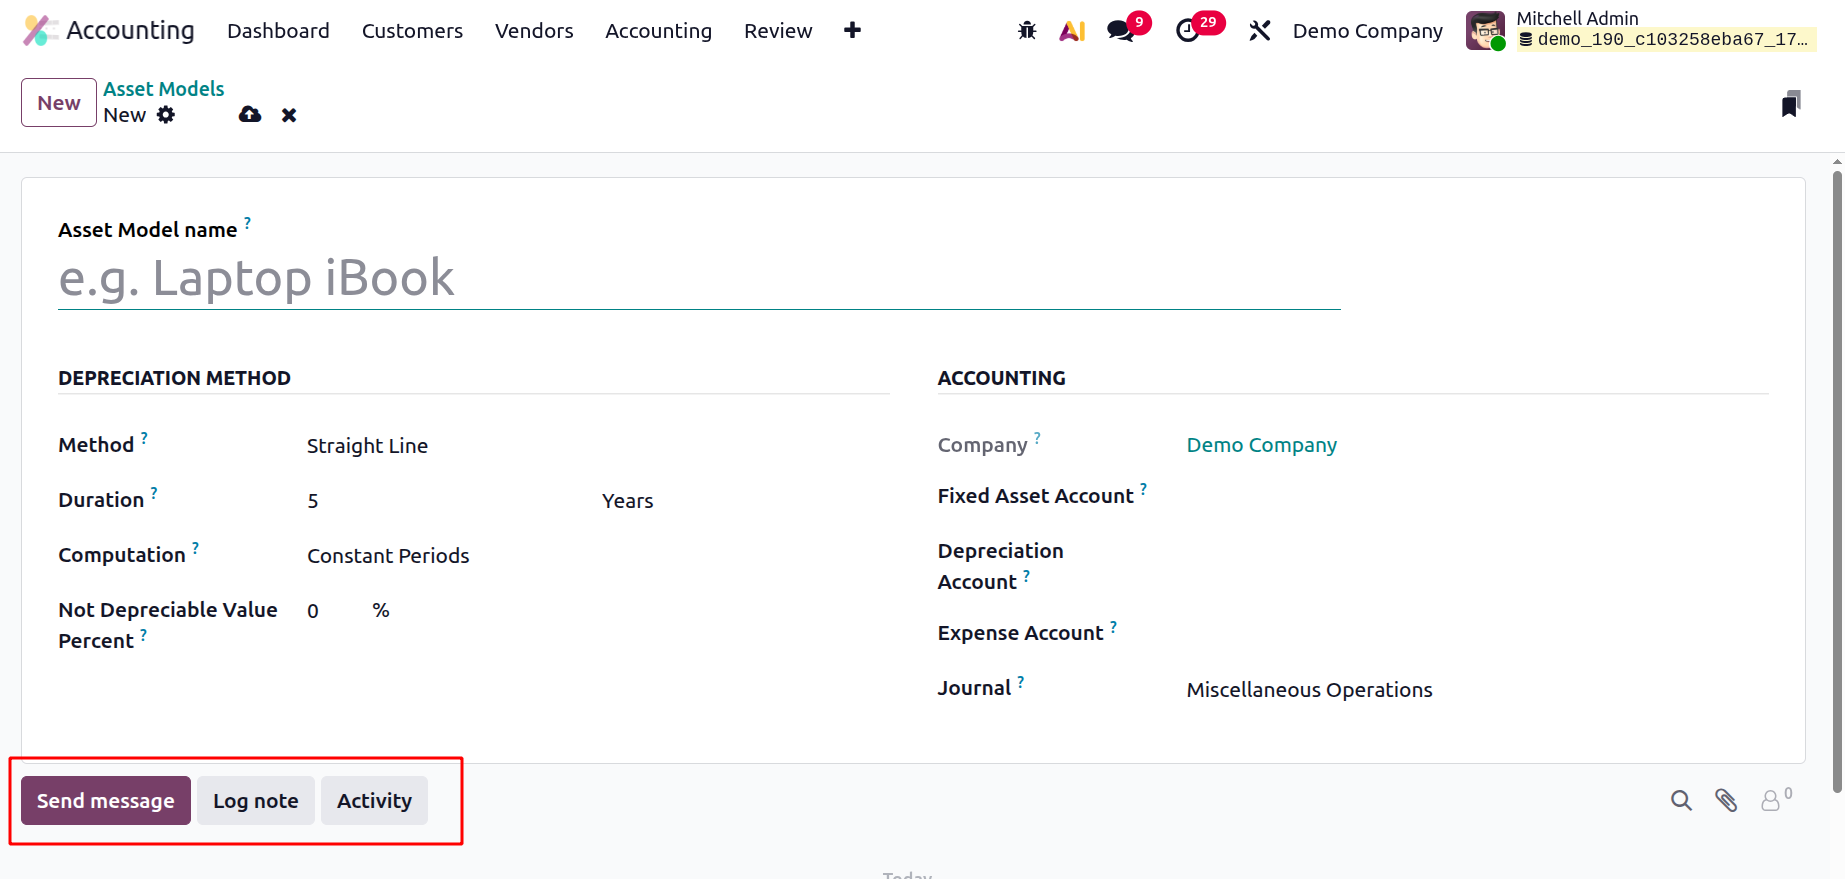
You can send data to the recipients of the asset model by using the transmit messages option. You can organize an
activity with the followers regarding the asset model using the Activities menu, and the Log note option will
document any modifications made to the asset model. You may add, view, and keep an eye on asset model-related
actions with this option.
We can discover more about the Product Categories feature based on our findings about the Return Types option
that is already included in Odoo19 Accounting.
Return Types
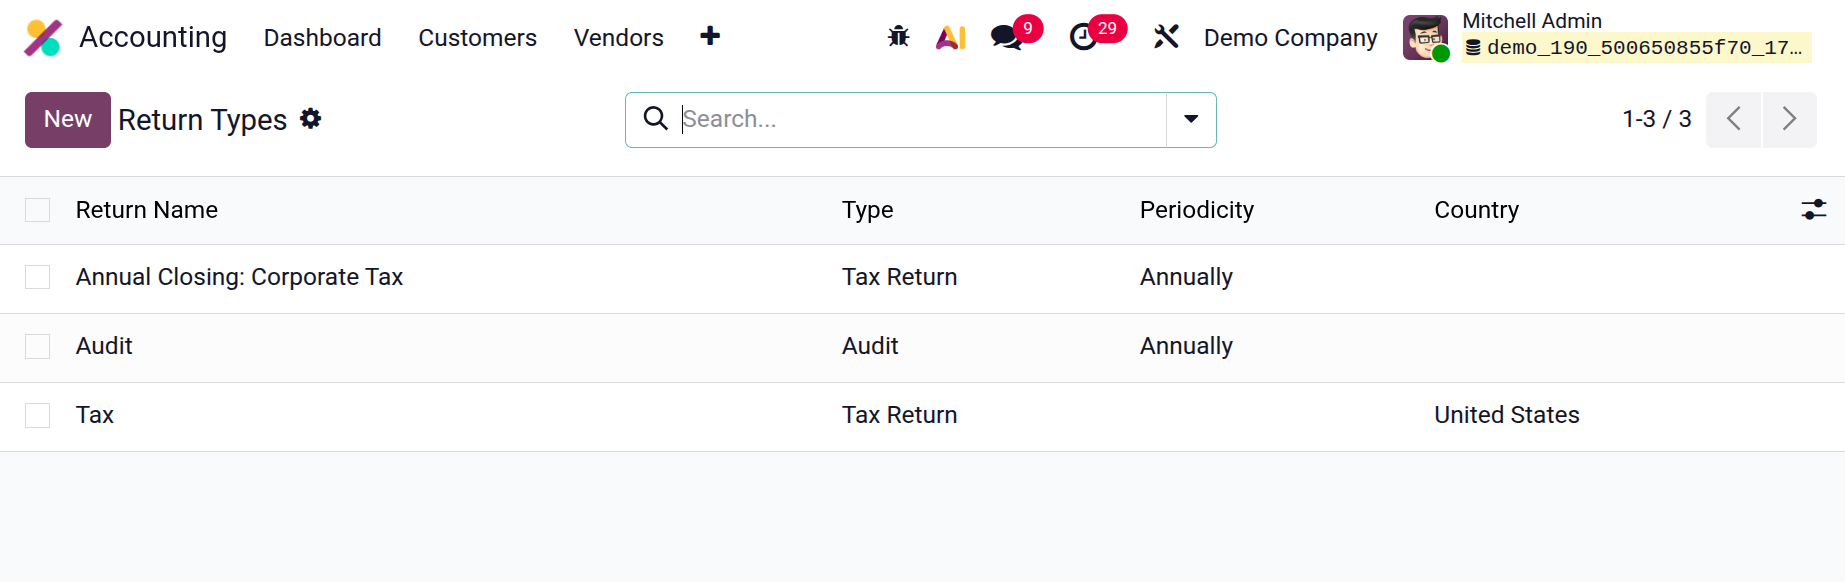
The Return Types are newly introduced in Odoo 19 Accounting and are available in the Configuration menu, under
the Accounting section. The Return Types show Return Name, Type, Periodicity and Country. To add a new one,
click on the New button.
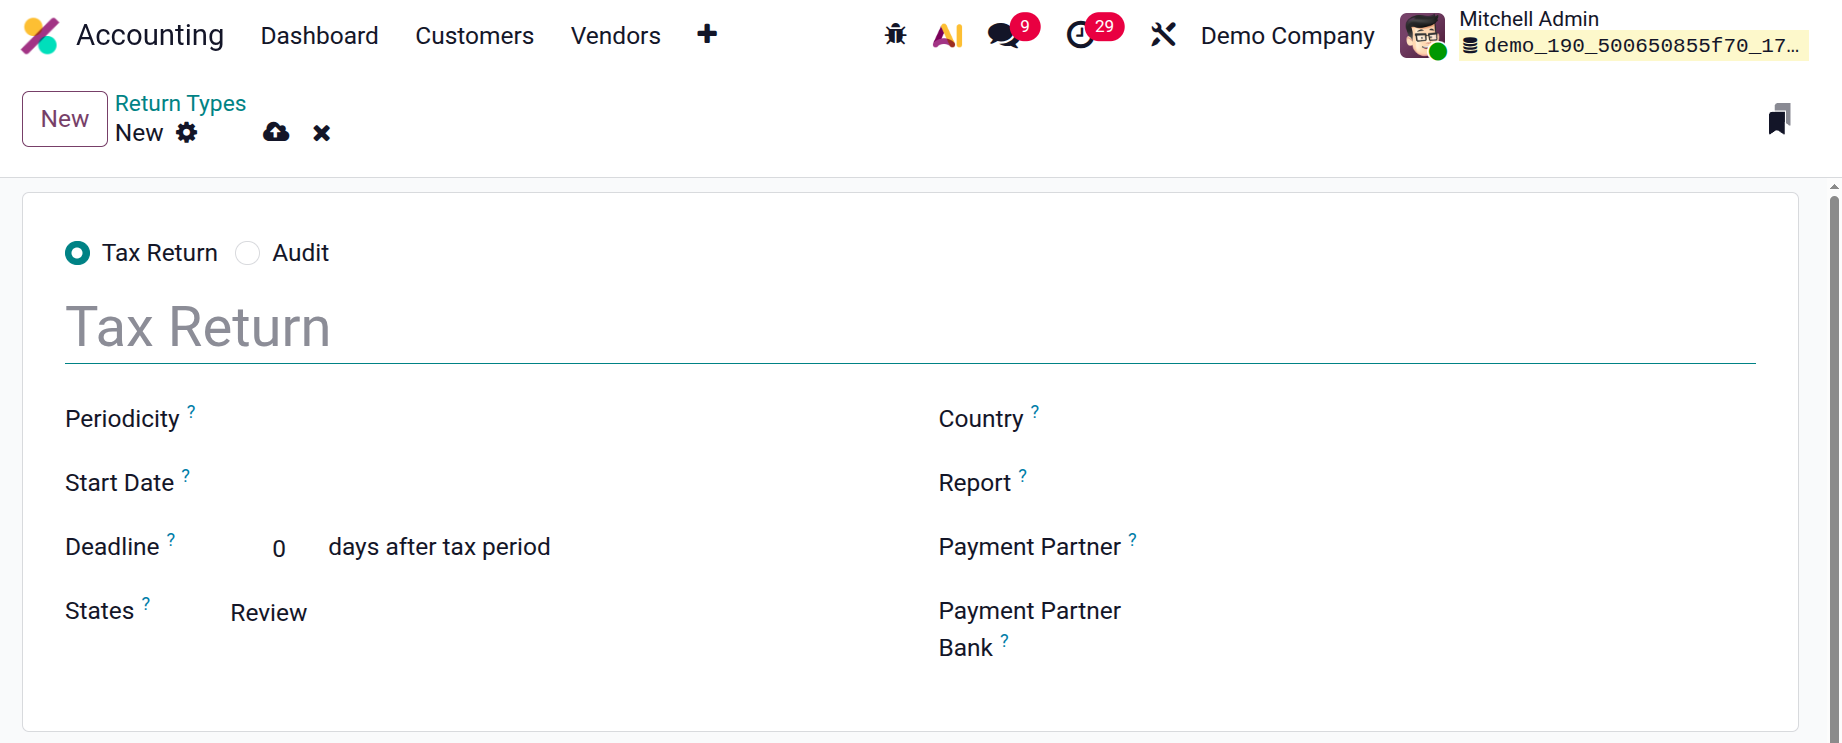
Choose the boolean Tax Return, then add the Name. Choose the Periodicity, which can be Monthly, Every 2 Months,
Quarterly, Every 4 Months, Semi-Annually and Annually. Add the Start Date, Deadline, Country, Report, Payment
Partner and Payment Partner Bank. States will determine the workflow of the return.
Financial Budgets
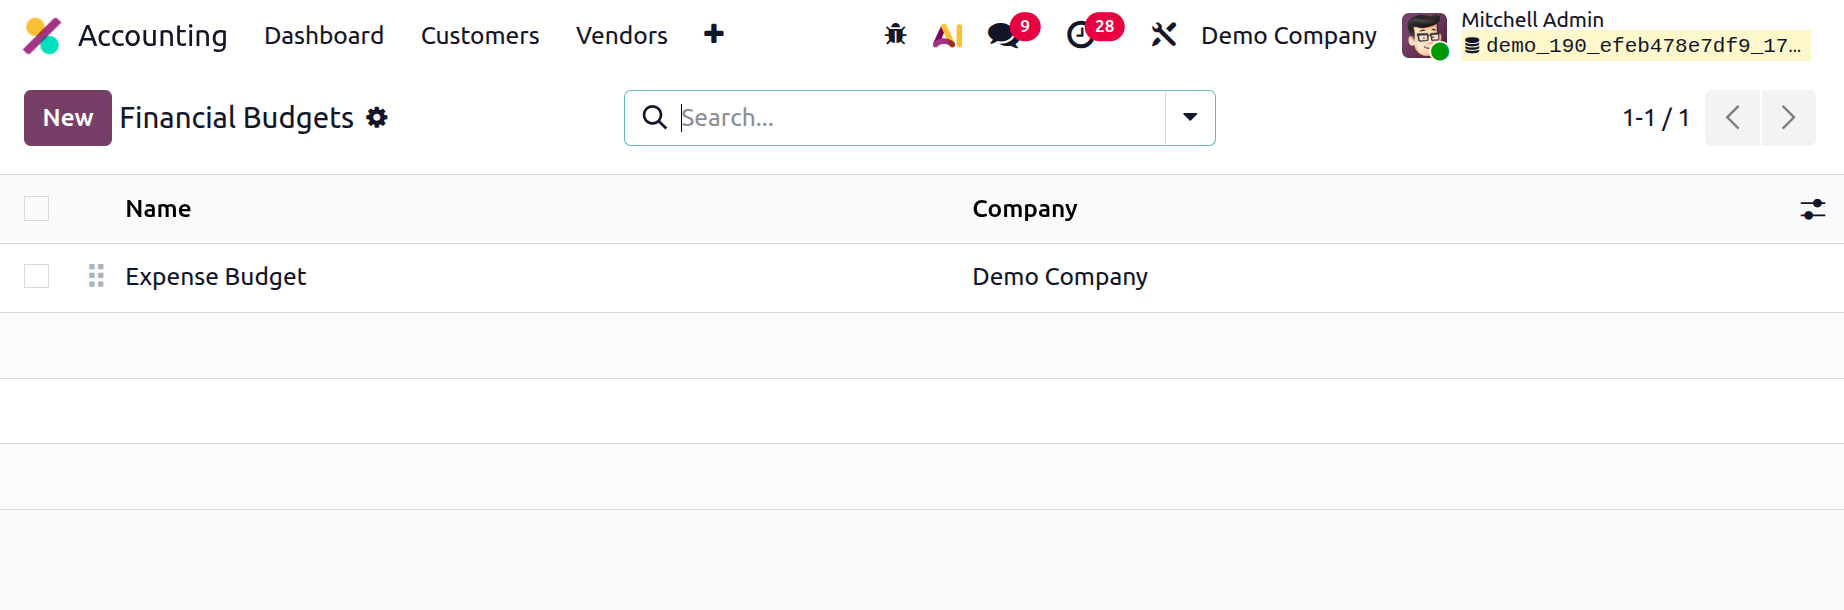
The Financial Budget feature in Odoo 19 Accounting allows businesses to set expected income and expenditure goals
for specific accounts over a given time frame. By comparing actual performance to the budget, it makes better
financial control and decision-making possible.
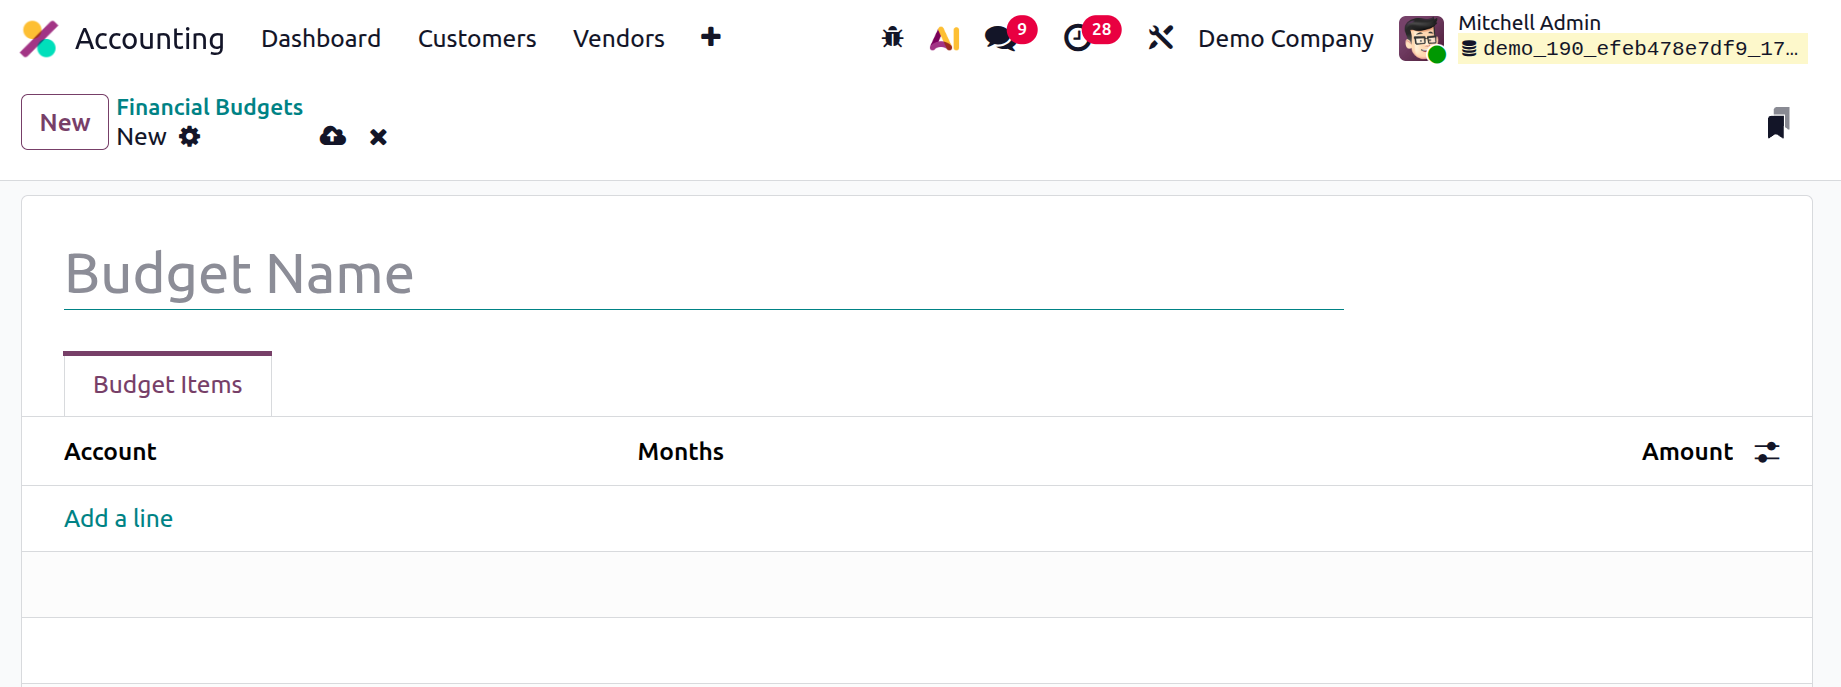
Thus, from the Configuration menu, select the Financial budget. Click the New button to add a new one.
First, add the name. The Budget Items tab comes next. In the Budget Items tab, add the Account, Months, and
Amount.
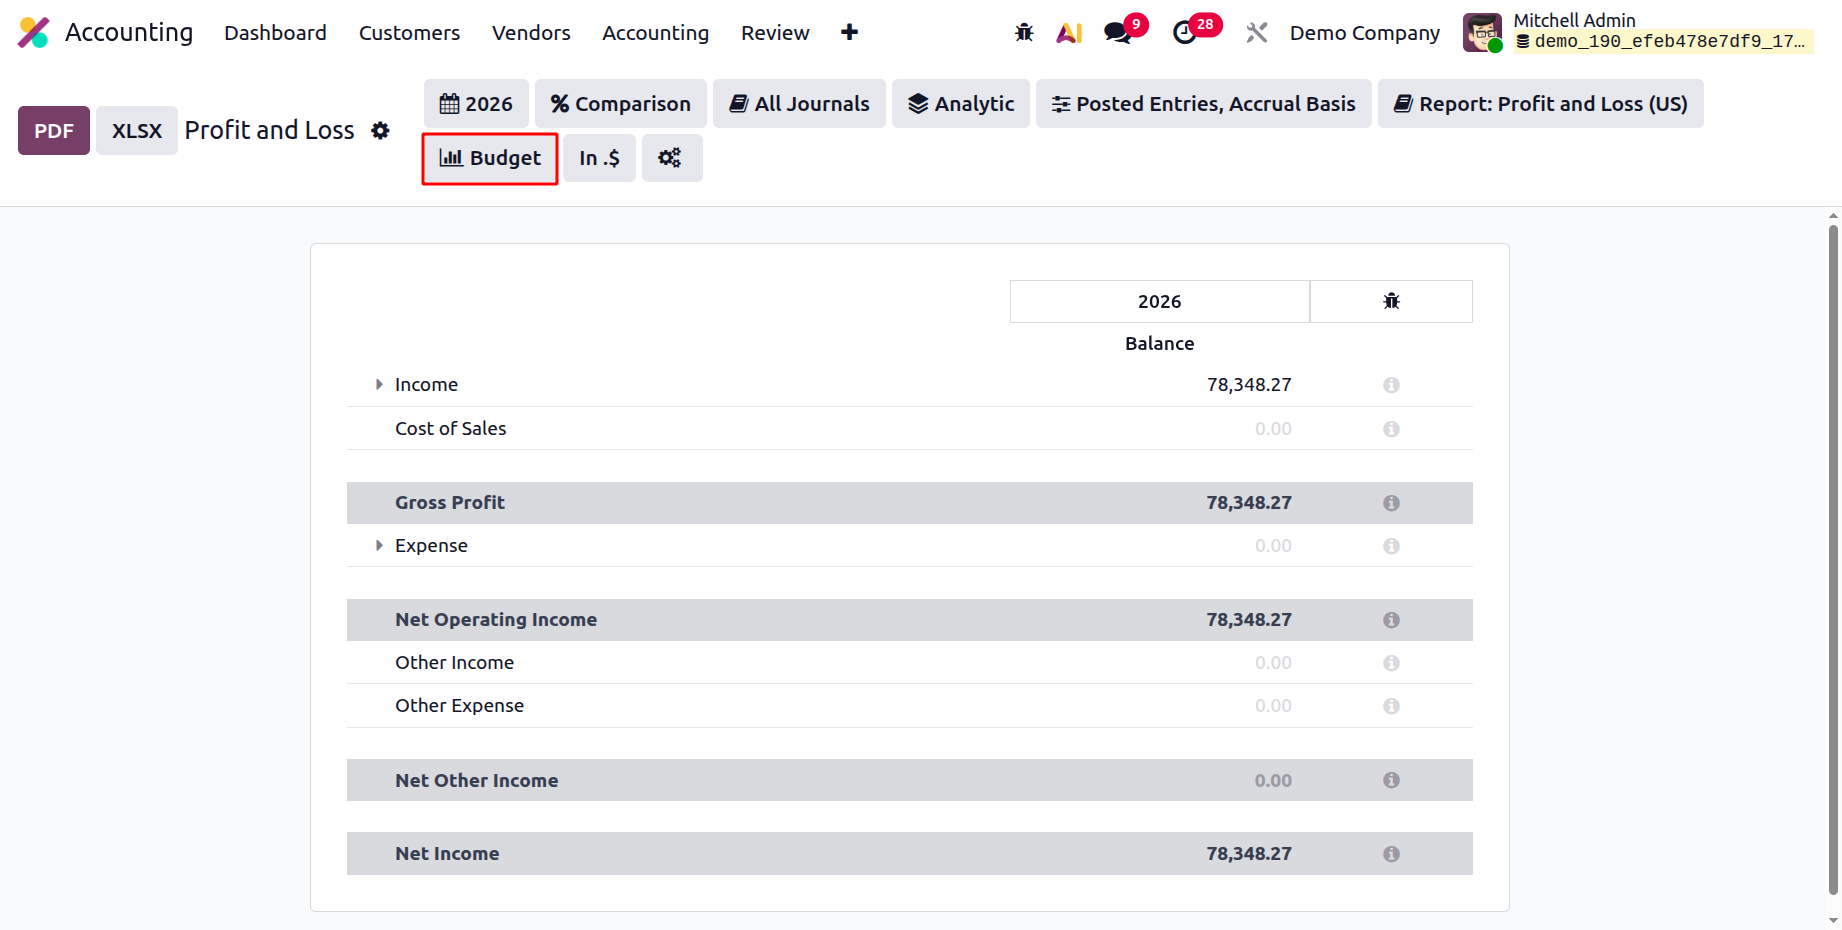
Users can then filter the data based on the created budget from the Reportings. As a result, users may quickly
compare the additional account's real value with the desired amount specified in the budget.
Online Synchronization
One helpful accounting feature in Odoo 19 is online synchronization, which allows users to keep their books or
records up to date and in sync with their external accounts. Instantaneous synchronization and import of data
from external accounting systems occurs. Invoices, payments, and journals can be automatically created by users
who map their accounts. Users can maintain precise and balanced records thanks to the double-entry bookkeeping
functionality. To make sure that every transaction in your bank account is recorded, you can quickly reconcile
them.
This useful application makes data collaboration with other systems easier by allowing you to synchronize your
Odoo19 Accounting data with an external system and keep your accounting data accurate and up to date.
Establishing a connection between two systems, like Odoo 19 and an external accounting system, is how the online
synchronization functionality functions. The two systems can instantly share data once the connection has been
made. This implies that whenever a new entry is made in the first system, the other system will automatically
update.
You can set parameters for the data flow between the two systems using this functionality. You can decide which
fields aren't synced, for instance. You can also specify how the data will be handled if the two systems cannot
agree on how to utilize it.
Using the Online Synchronization tool is the most effective approach to check if Odoo 19 and your bank account
are synced. This enables you to synchronize your Odoo cloud instance with your Odoo19 database. This function's
goal is to improve the dependability and efficiency of data transfers between various databases. The sync
feature, which also downloads changes from the cloud instance, enables regular data transfers from the Odoo
database to the cloud instance. This guarantees that both databases are current and that any changes made to one
are mirrored in the other.
You must first connect and authenticate their local database with the Odoo cloud instance before you can use the
syncing capability. This is carried out in the Configuration part of the Odoo interface. To access the Online
Synchronization option, navigate to the Accounting section of the Configuration tab, as shown below.
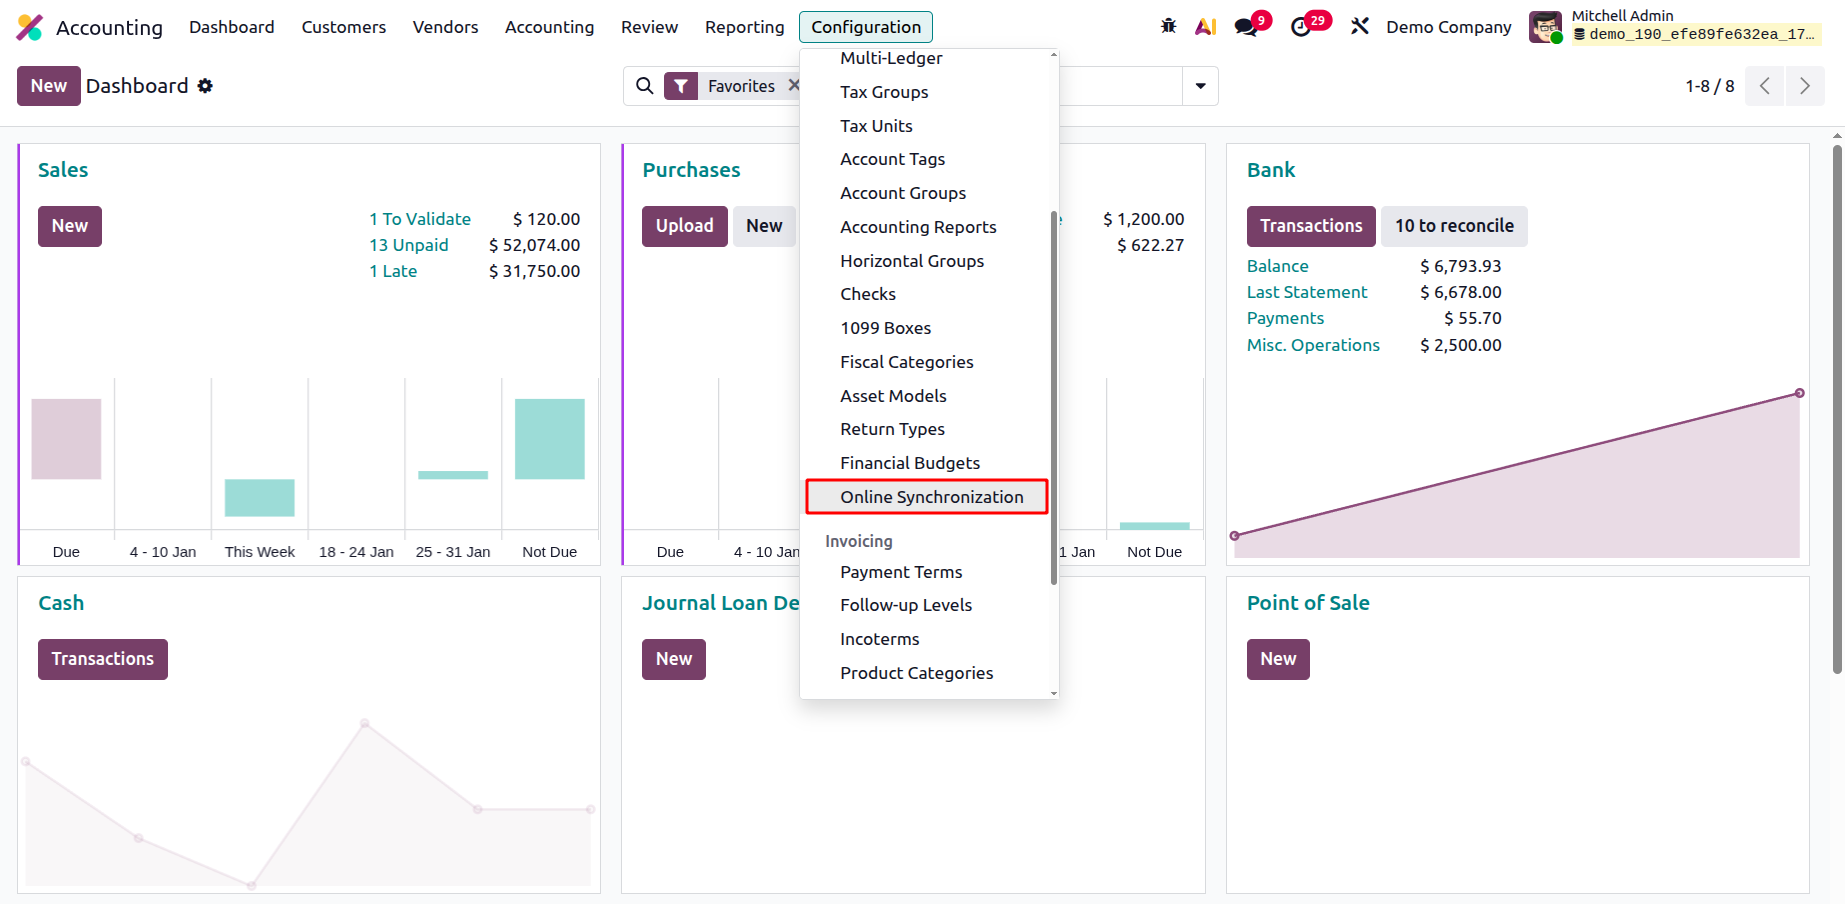
You can set up the synchronization parameters, such as frequency and the data to be synced, after a link has been
created.