Products
You may access a number of settings that facilitate eCommerce connection and backend product management under the Configuration tab in the Product section. Pricelists, eCommerce categories, attributes, product tags, combo options, and product ribbons are some of these. Some of these configurations are crucial in determining how products are managed and displayed in the online store, even though they are mostly used in sales operations. Here, if the product type is set as combo, then, you can have the option of combo choices, as shown below.
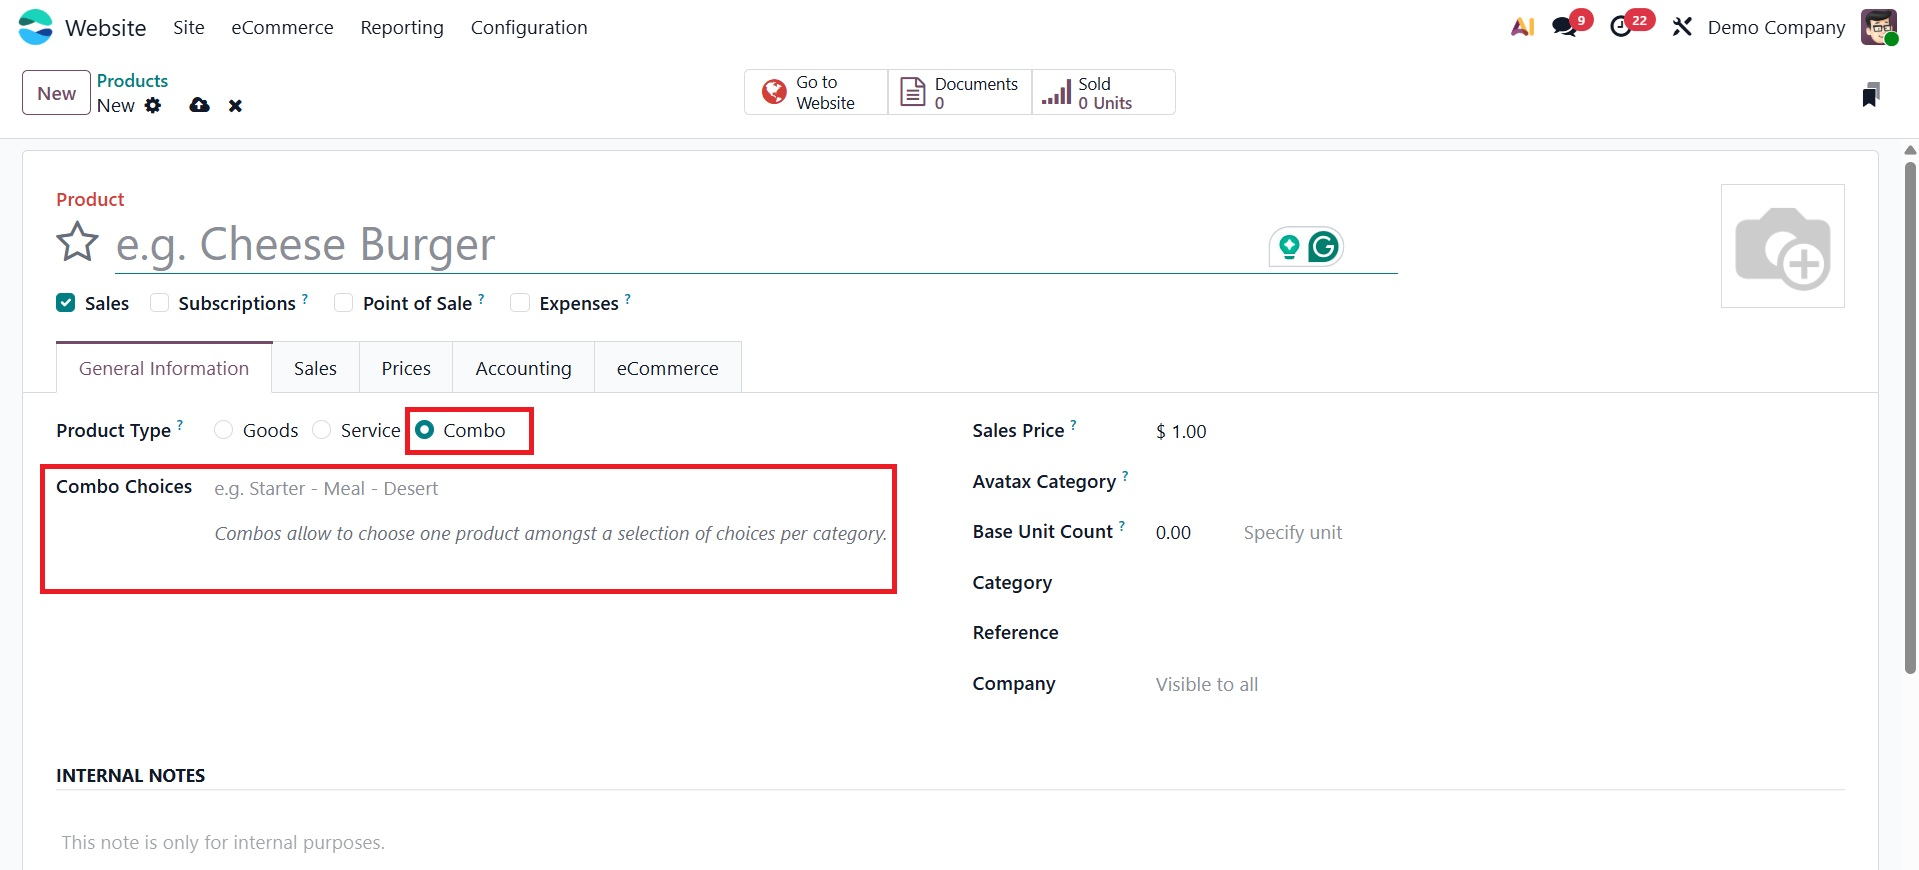
Combos allow you to choose one product amongst a selection of choices per category.
The Sales tab of the product form has fields for defining Accessory Products, Alternative Products, and Optional Products.
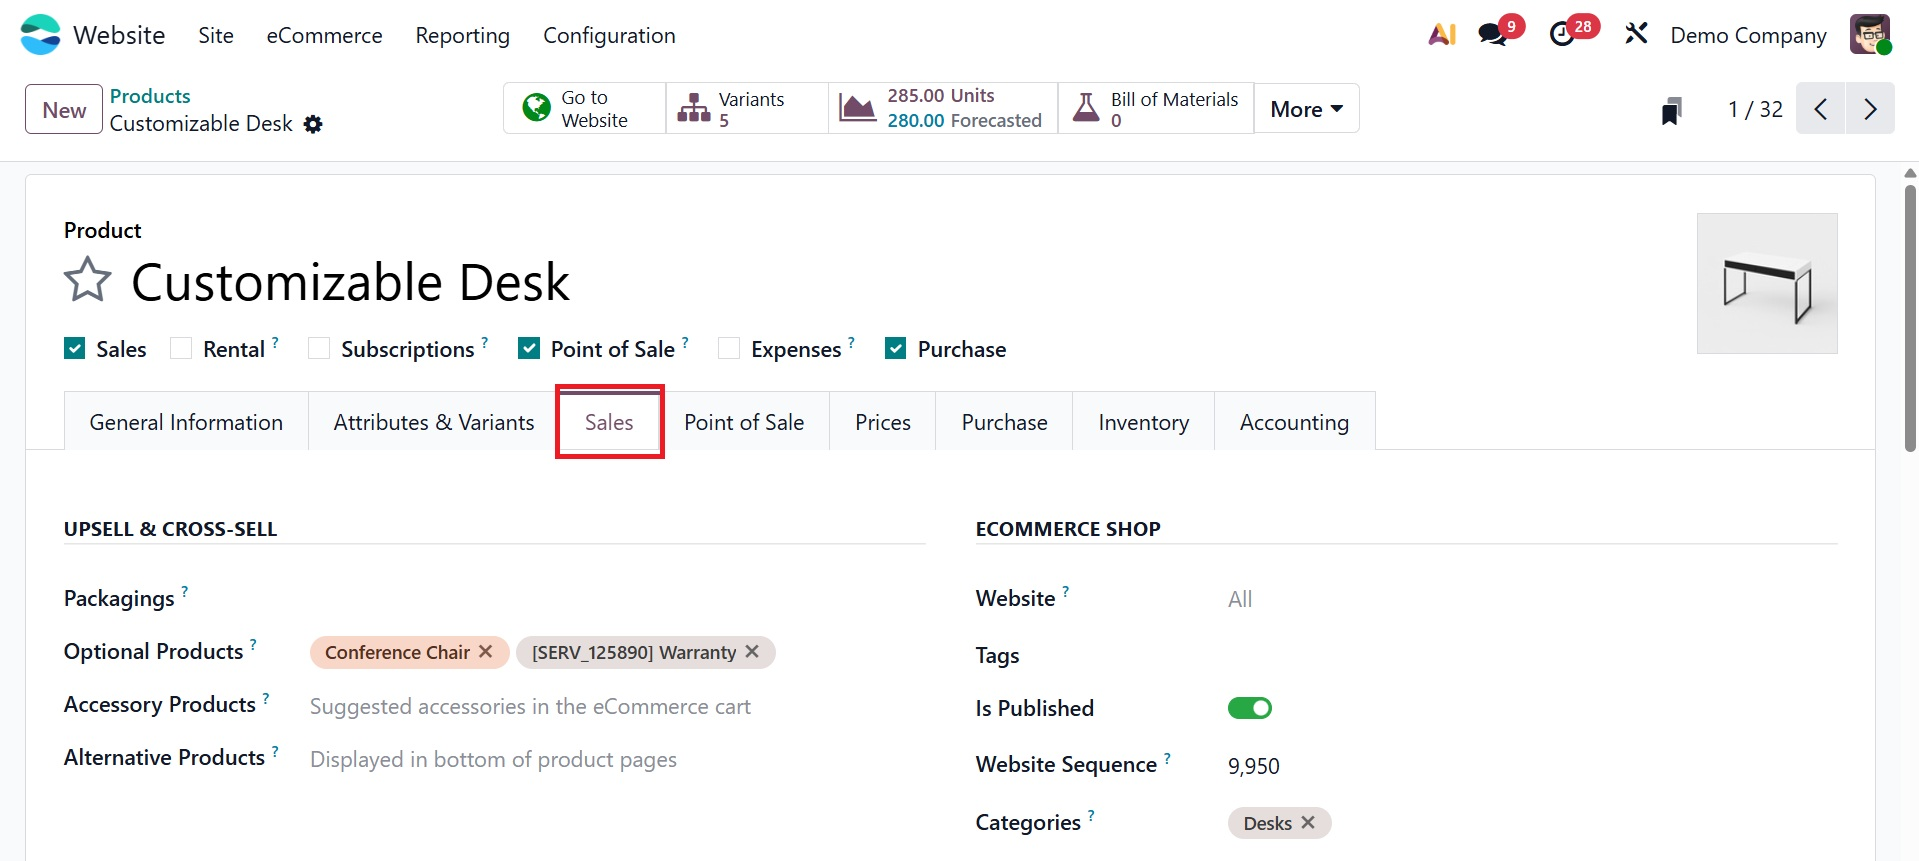
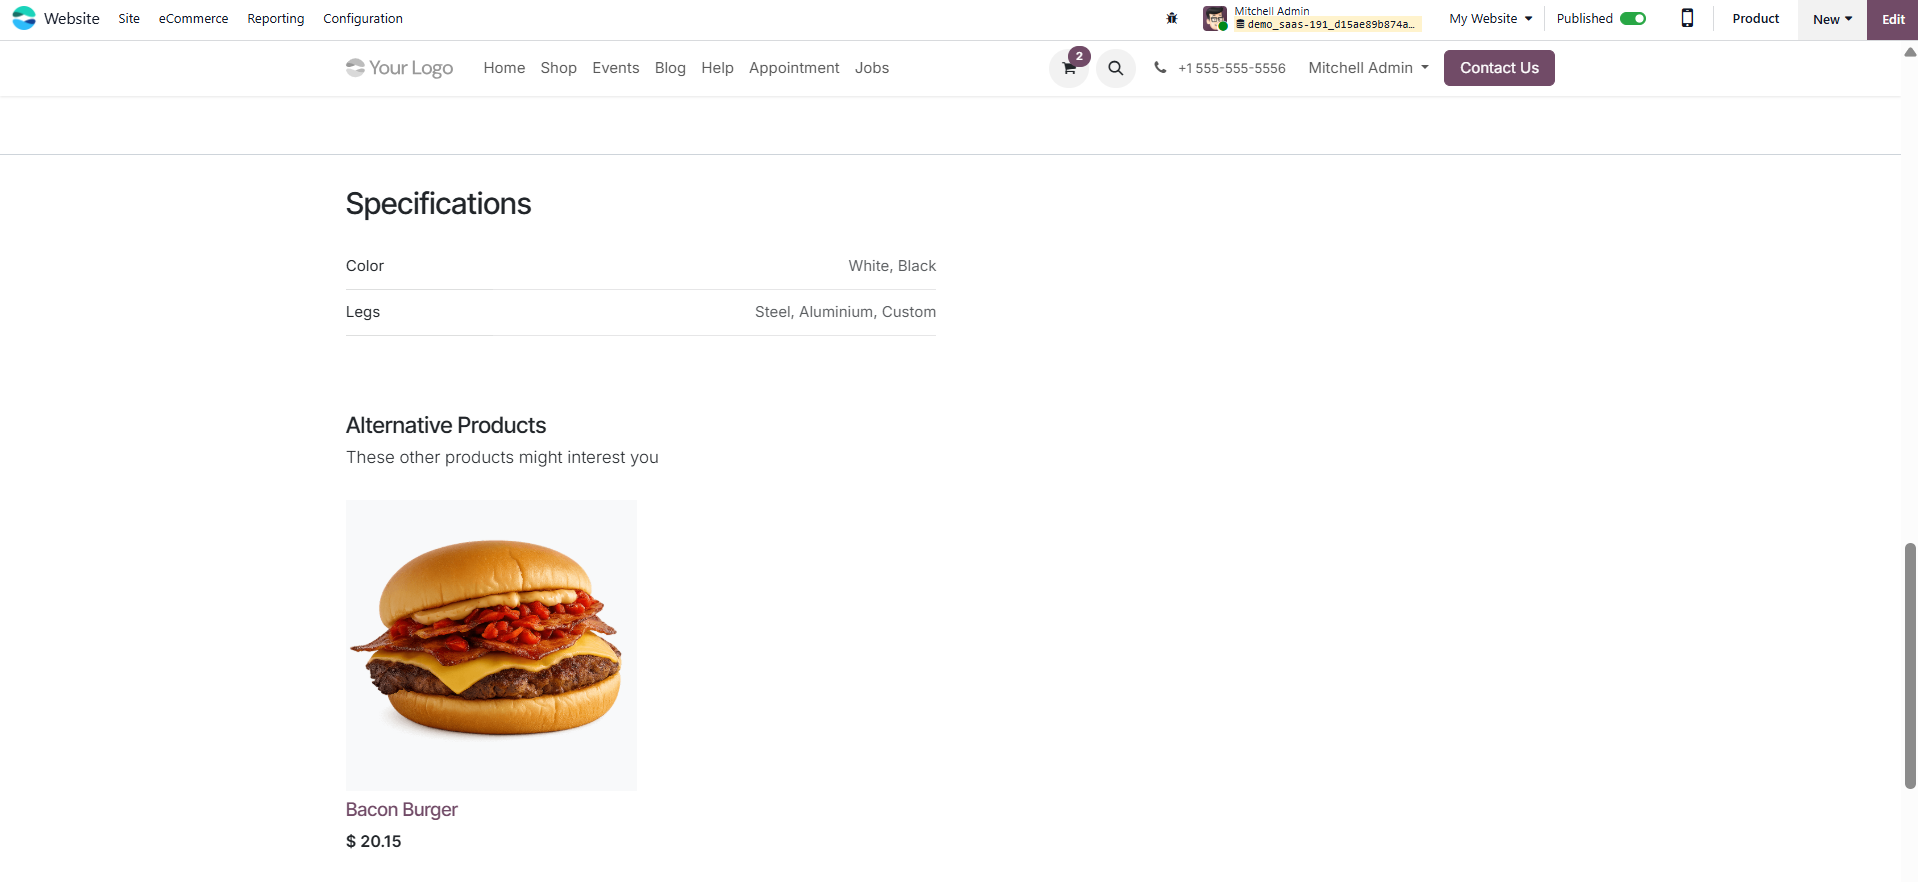
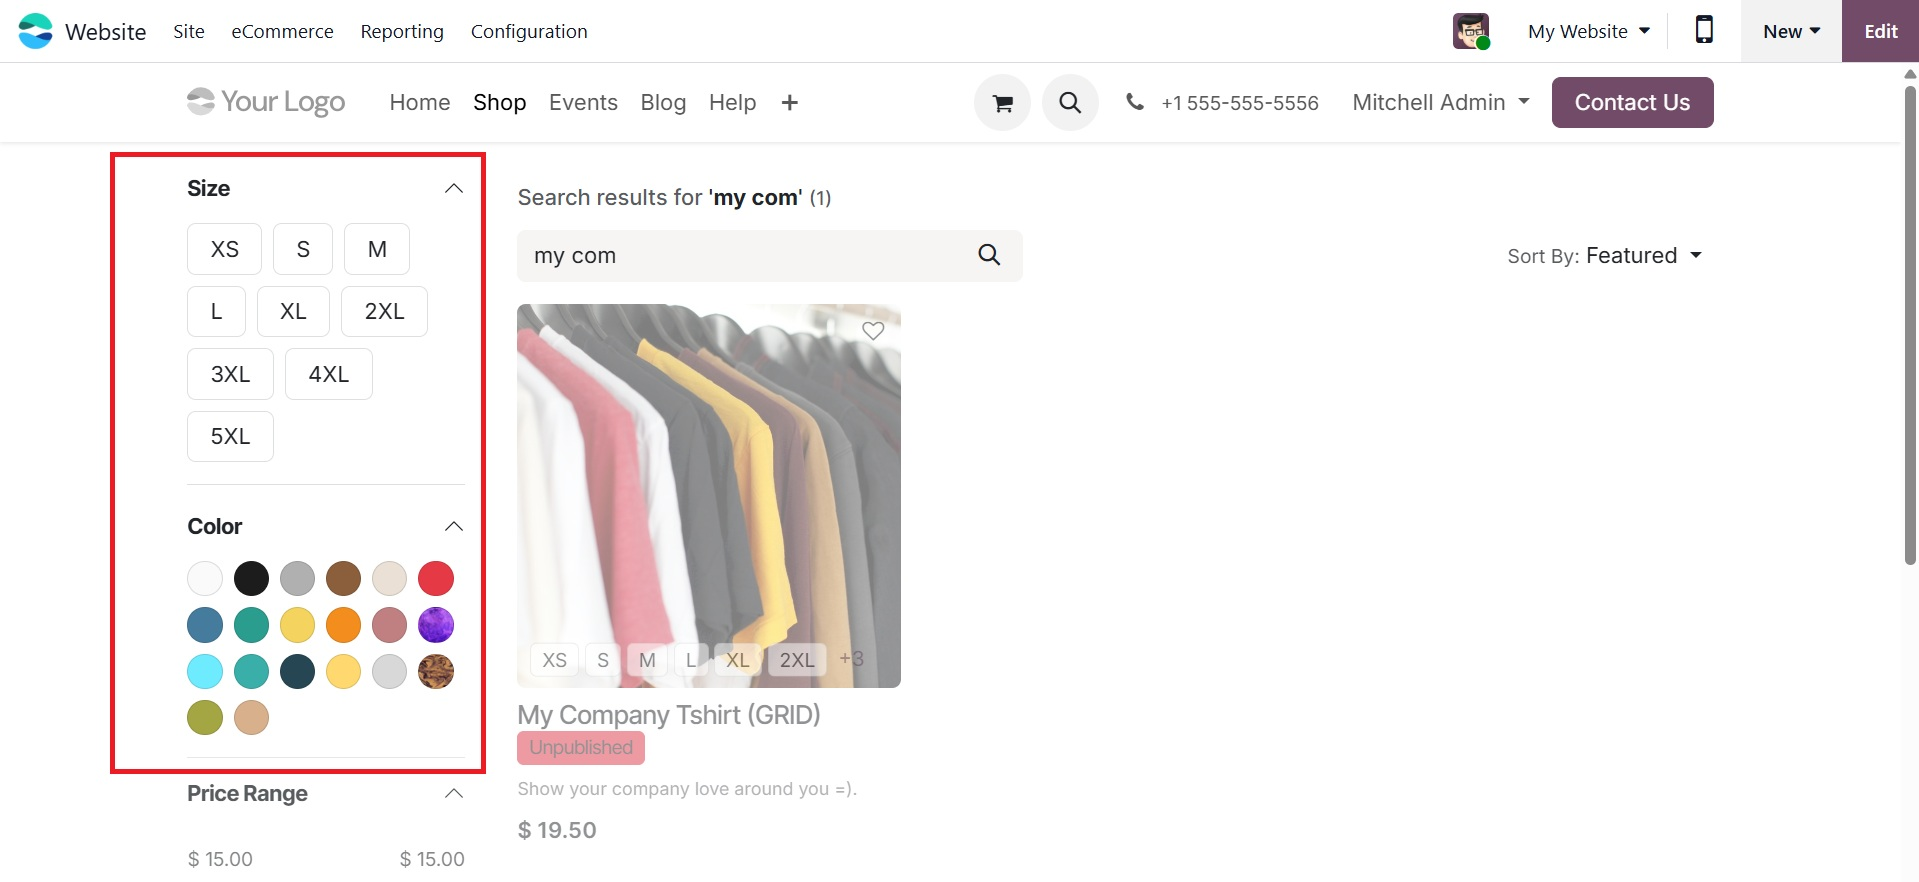
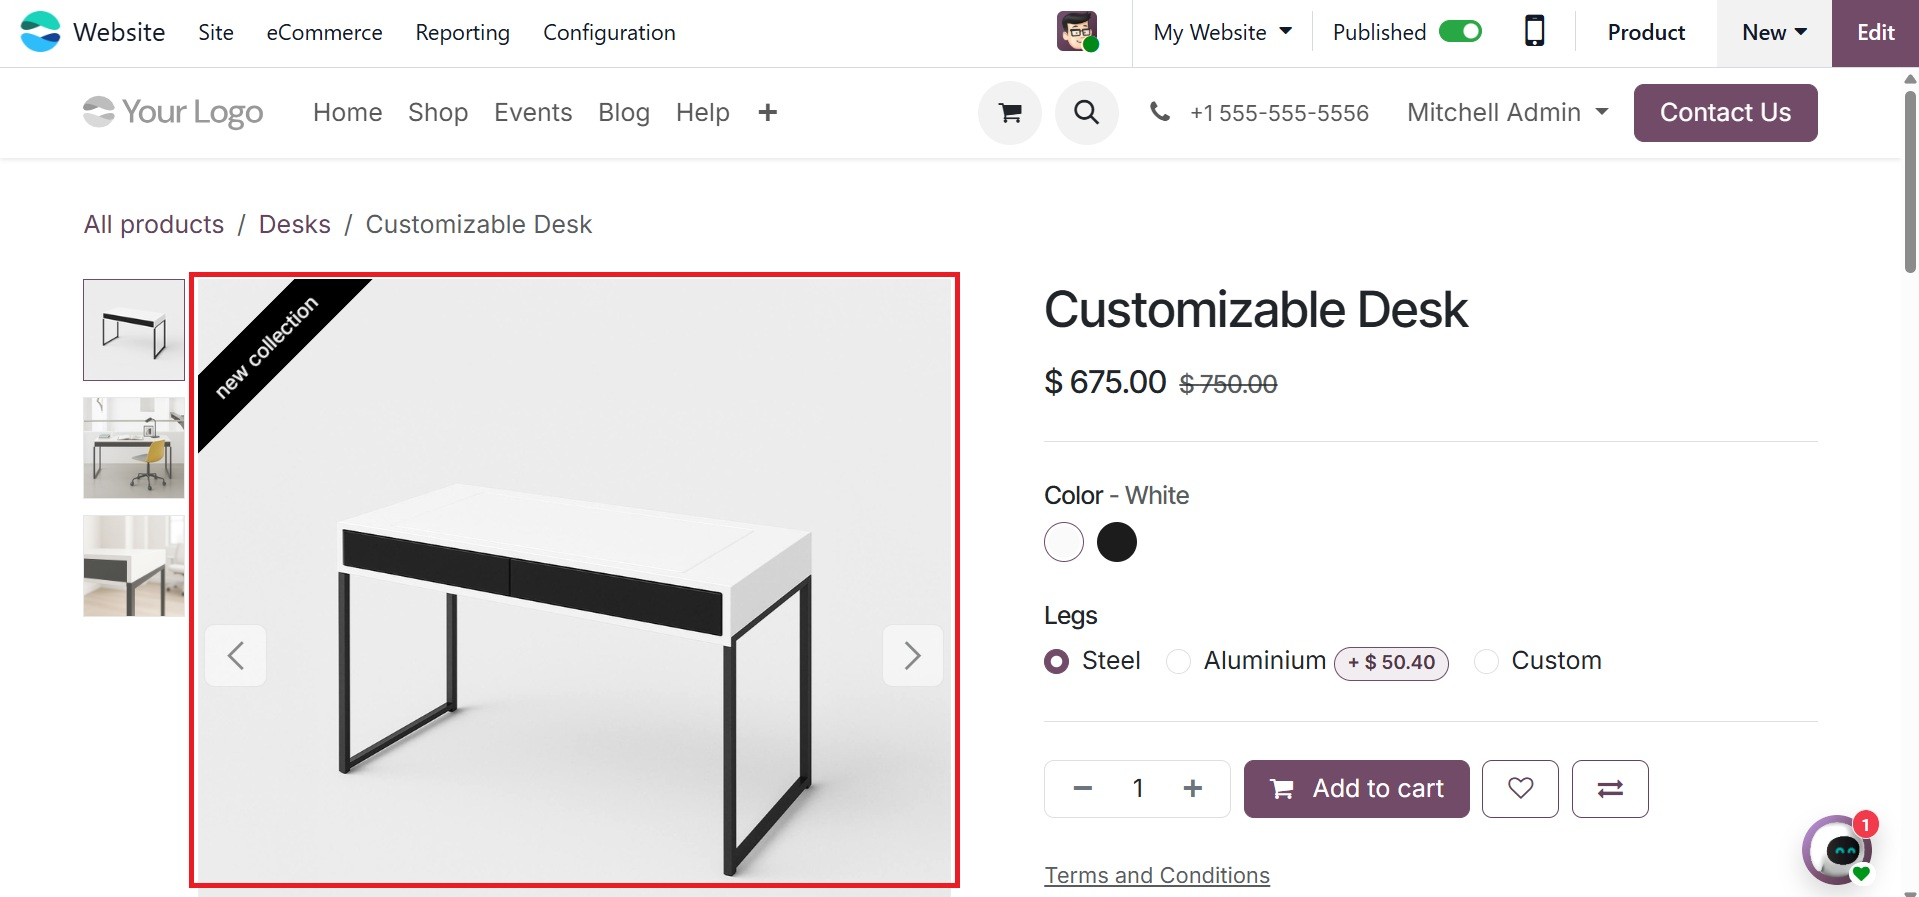
During the checkout process, optional products are displayed as extra items that the customer may find helpful. If the original product is not available or to provide variety, alternative products are shown on the product page as recommendations. Accessory products are complementary goods meant to improve the primary product and entice buyers to buy related products in tandem. In an online store, these choices are useful tools for upselling and cross-selling. Those added products will be shown in the website page of the product, as shown below.
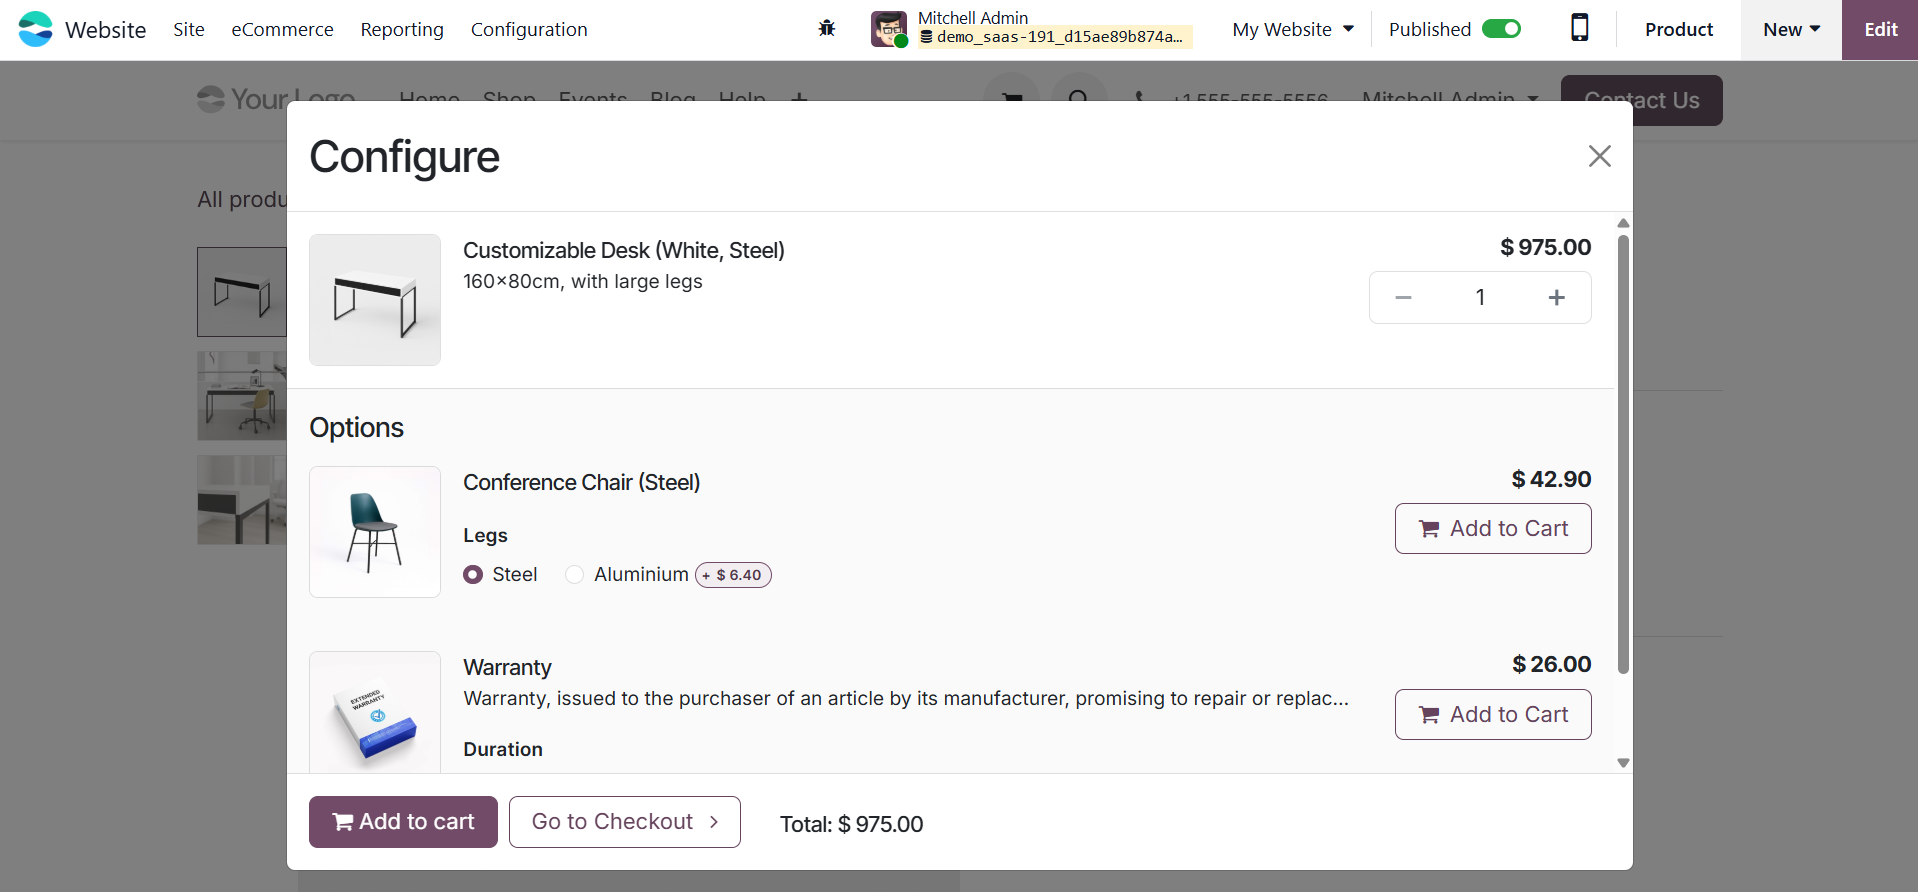
Shown products are those optional products. The accessories product is shown in the cart.
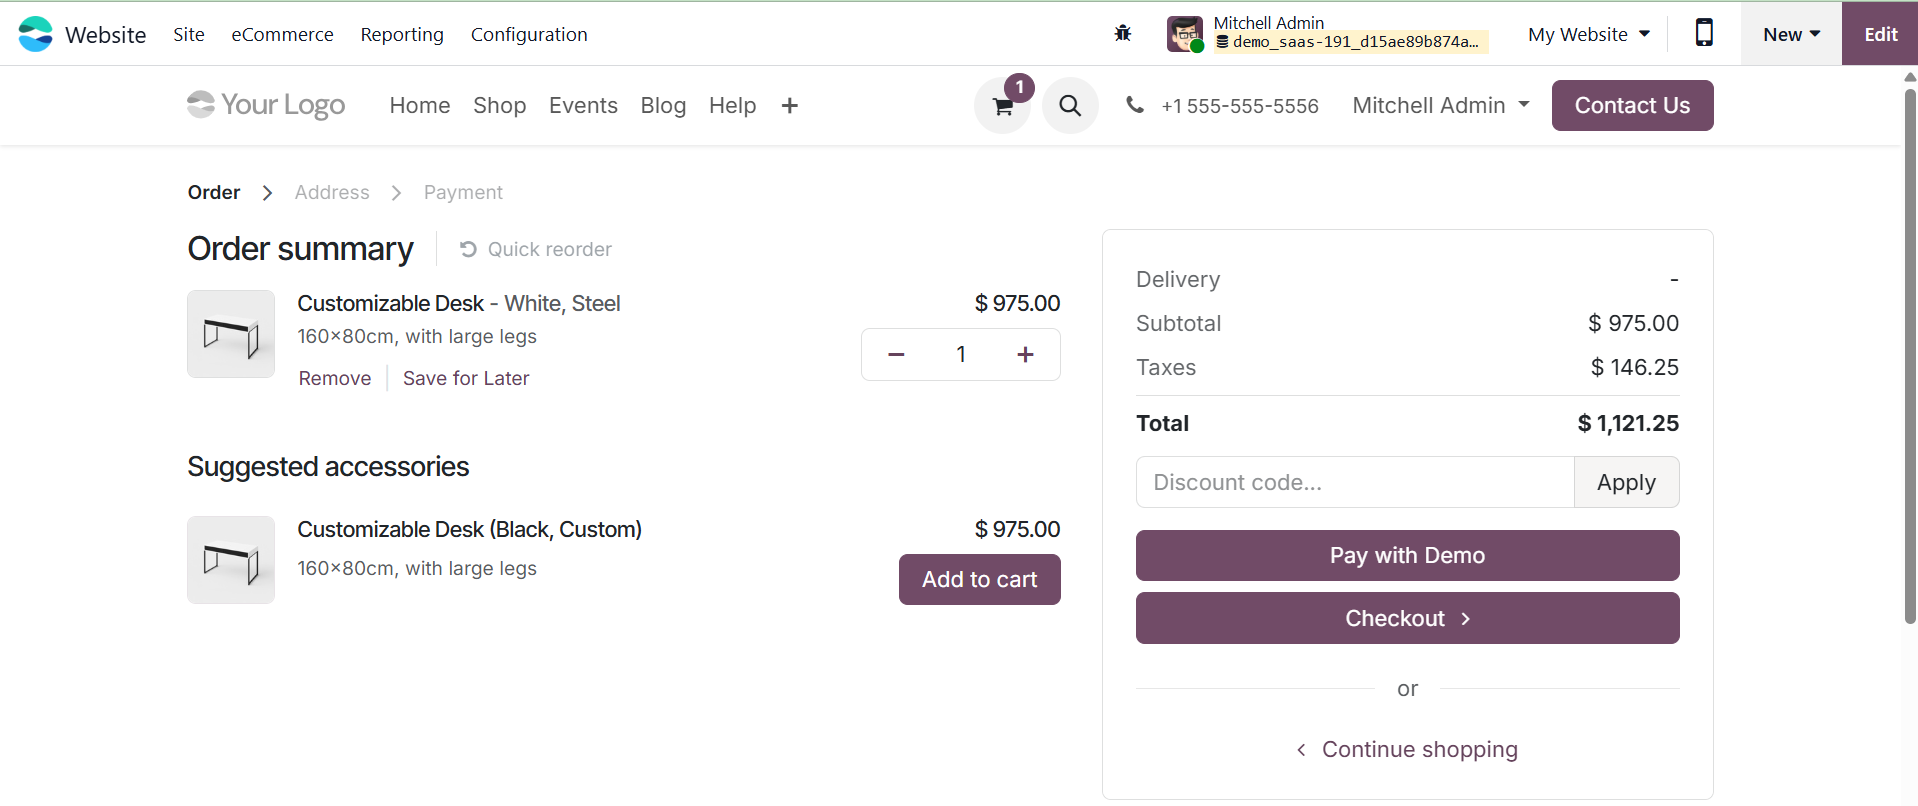
And the alternative product can be seen when you scroll down.
Odoo also offers specific areas for handling eCommerce descriptions and media. To visually represent the goods in the online store, you can submit particular photos or videos, making your presentation both eye-catching and educational. In addition to the internal description used for backend users, the eCommerce Description field lets you write material specifically aimed at online shoppers. This aids in improving the product page's SEO performance, clarity, and engagement. Open the product form, select the Sales tab, and then slide down to the eCommerce Shop area to enter this description. The E-commerce Description field is located there. To apply the appropriate text, type it in and click Save. This description will show up on your website's product page.
You can assign products to particular Website Categories, change visibility settings, and regulate their availability in the online shop using the eCommerce Shop section of the product form.
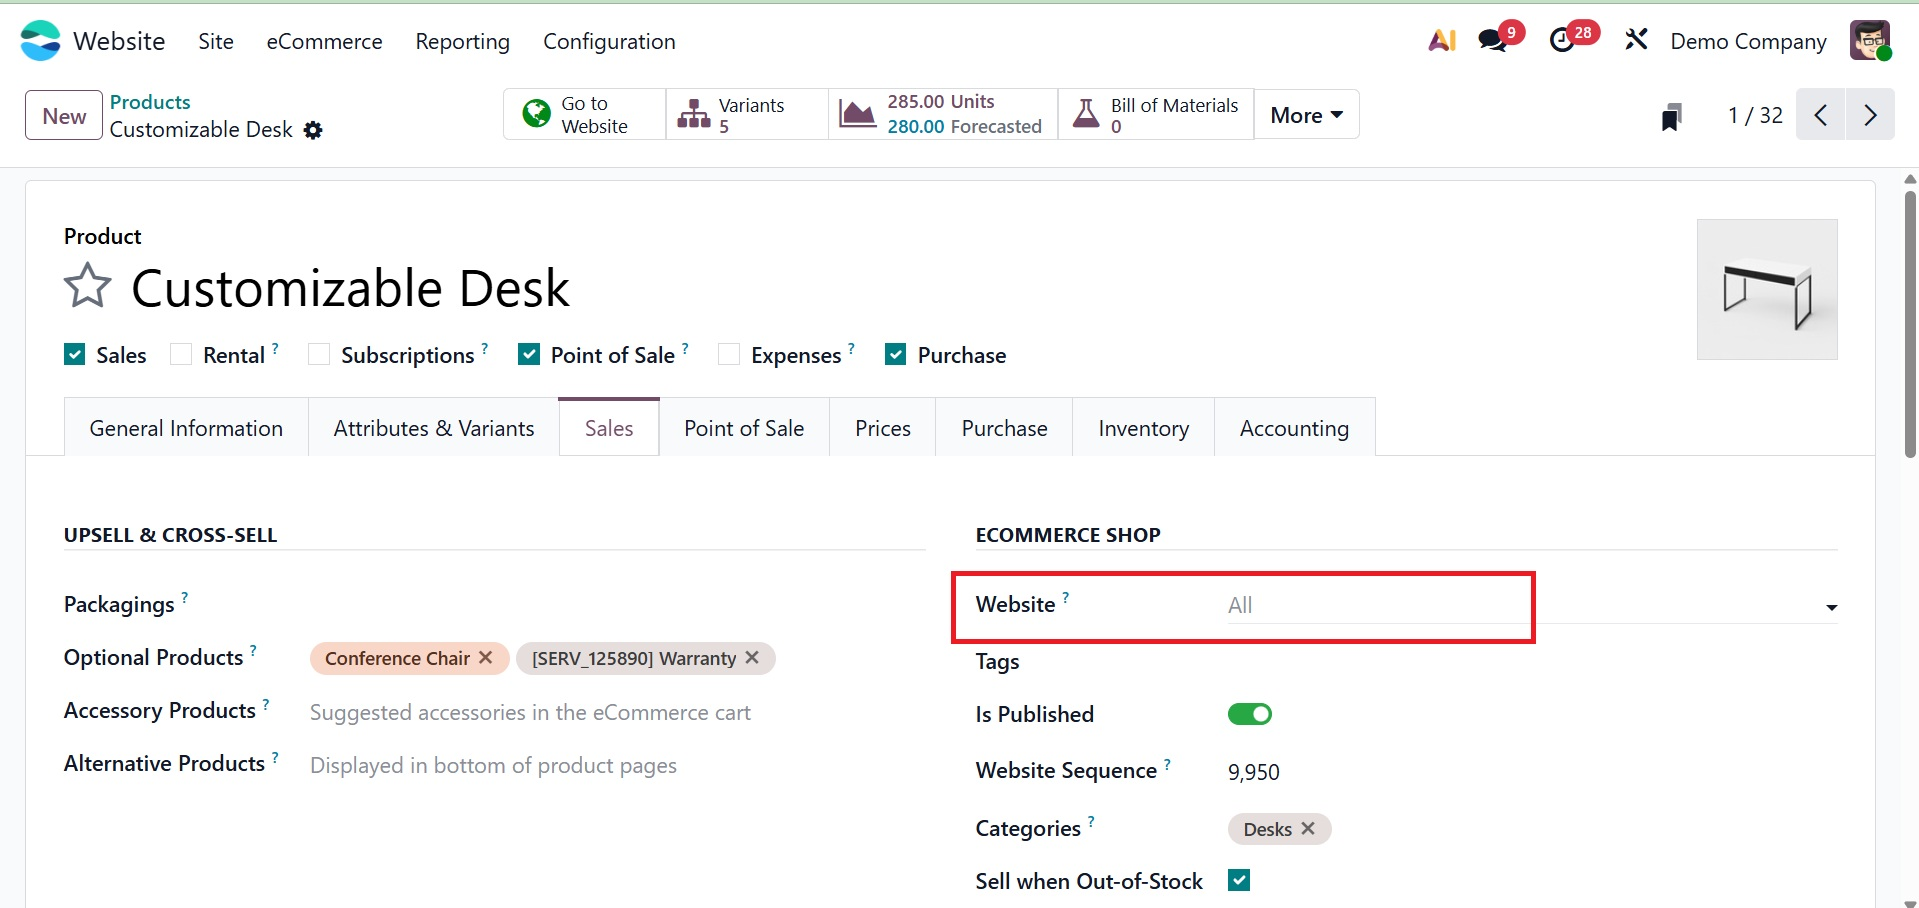
- Website:Specifies the website(s) on which the product will be available when using a multi-website setup.
- Tags: Keywords used to group, filter, and search products on the eCommerce website.
- Is Published: Determines whether the product is visible and purchasable on the website.
- Website Sequence: Controls the order in which the product appears in the shop or category listings on the website.
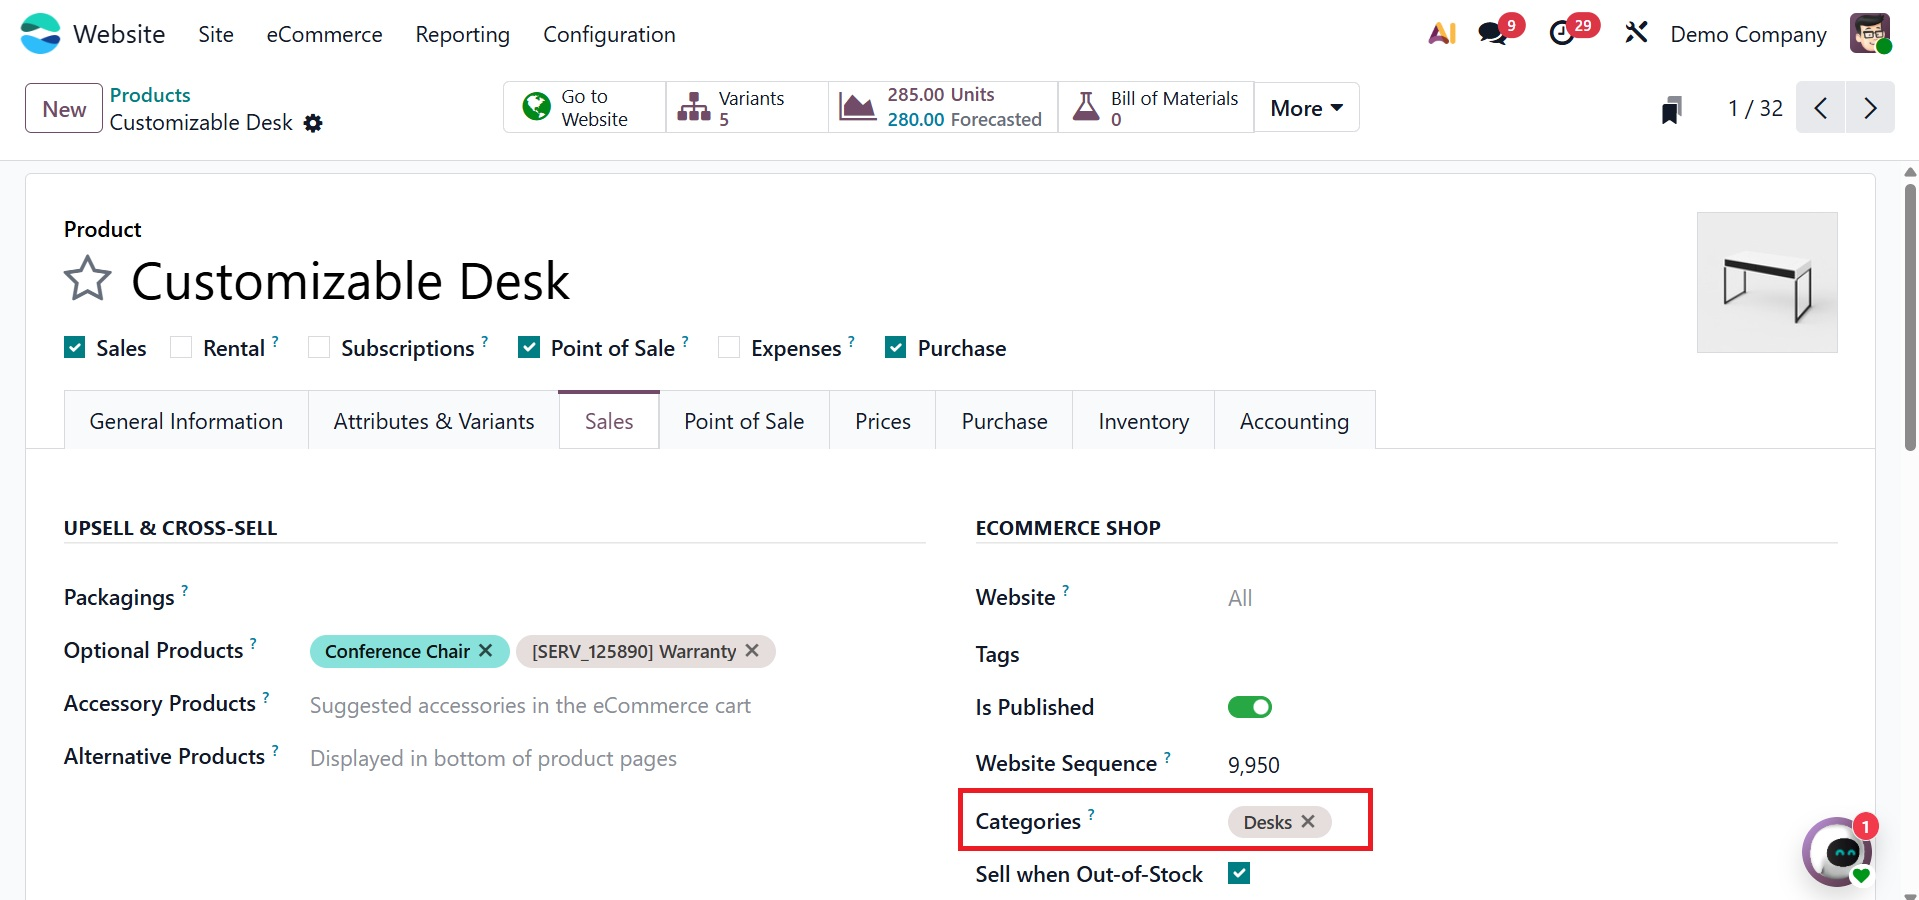
- Categories: Defines the eCommerce categories under which the product is displayed in the online shop.
- Ribbon: Displays a visual label (such as New, Sale, or Out of Stock) on the product image in the webshop.
- Sell when Out of Stock: Allows customers to place orders even when the product’s inventory quantity is zero.
Additionally, you can create unique URLs for improved search engine optimization and intuitive navigation. These choices guarantee that your product is searched and positioned correctly in your online marketplace.
Please consult the Sales module for a more thorough description of product-related choices and sophisticated configurations like pricing schemes, units of measurement, or variant handling.
1.1 Pricelists
The Pricelist feature in Odoo 19 makes it simple for companies to specify several pricing strategies for their goods or services. Consider price lists as a collection of pricing guidelines that establish a product's price based on variables like customer discounts, the country of purchase, or even the time of year.
Additionally, you may set different pricing for the same product depending on who is purchasing it thanks to the Pricelist functionality, which serves as a potent localization tool. For instance, you can make a different price list just for your devoted clients in order to give them exclusive deals or discounts.
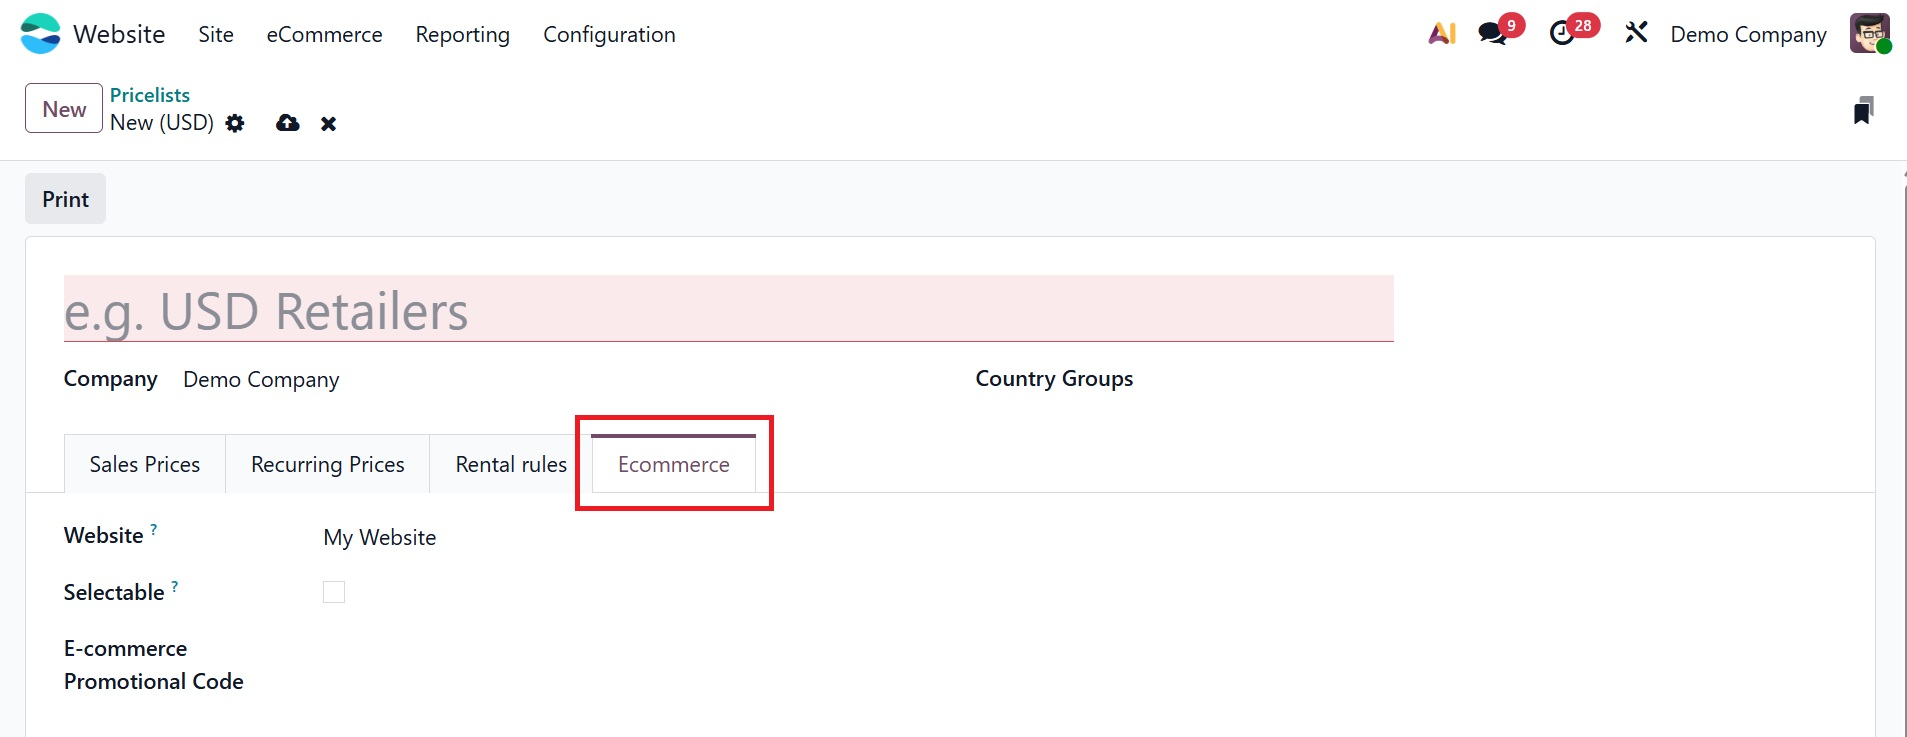
Navigate to the eCommerce tab in the Website module to access the Price Lists menu. Before continuing, just make sure the Pricelist option is activated in the Settings window.
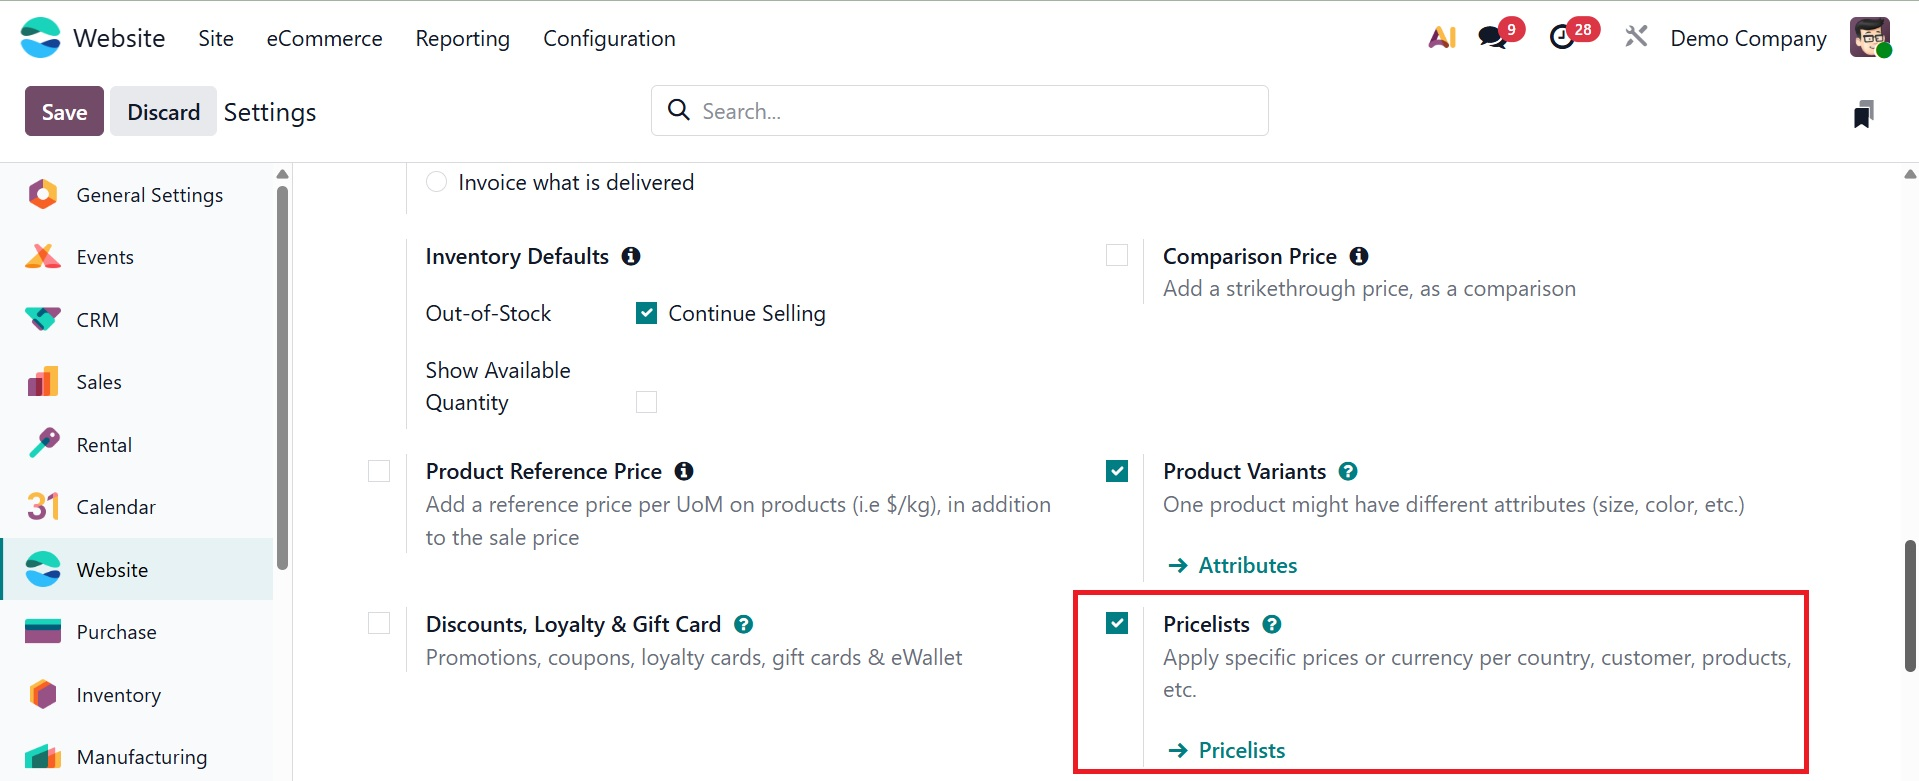
Product pricing in Odoo 19 is controlled by a unified pricelists system that integrates advanced pricing rules and several pricing alternatives per product into a single setup. This implies that Odoo 19 lets you establish different pricing schemes straight from the pricelist itself, rather than using separate procedures. Depending on certain consumer segments, nations, currencies, or minimum quantities, you can set alternative prices for the same product. Advanced pricing rules, such as discounts, cost-based calculations, price rounding, and margin adjustments, can also be used. Because of this flexibility, companies can dynamically adjust prices without having to manage several different pricing systems.
The Pricelist menu is included in the Website module's eCommerce tab. The Settings window's option must first be enabled in order to utilize this feature. The Price List Name, Currency, Selectable, Website, and Company fields will appear in the window. The Price Rules tab allows you to set up price rules, and the New button allows you to build new price lists.
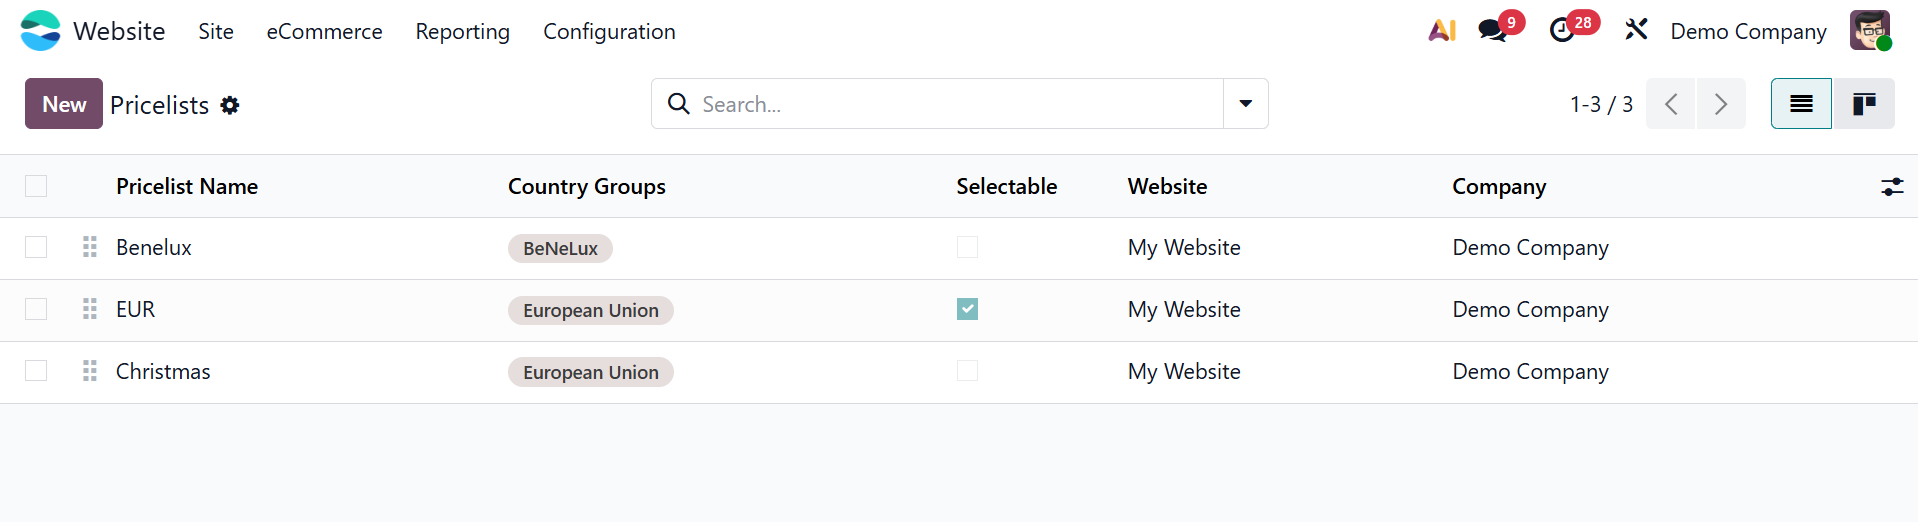
You can access the creation window by clicking the New button. You can give the pricing list a name and complete the necessary fields, including Company and Currency, in this window. Under the Price Rules tab, you can also set up Price List Rules.
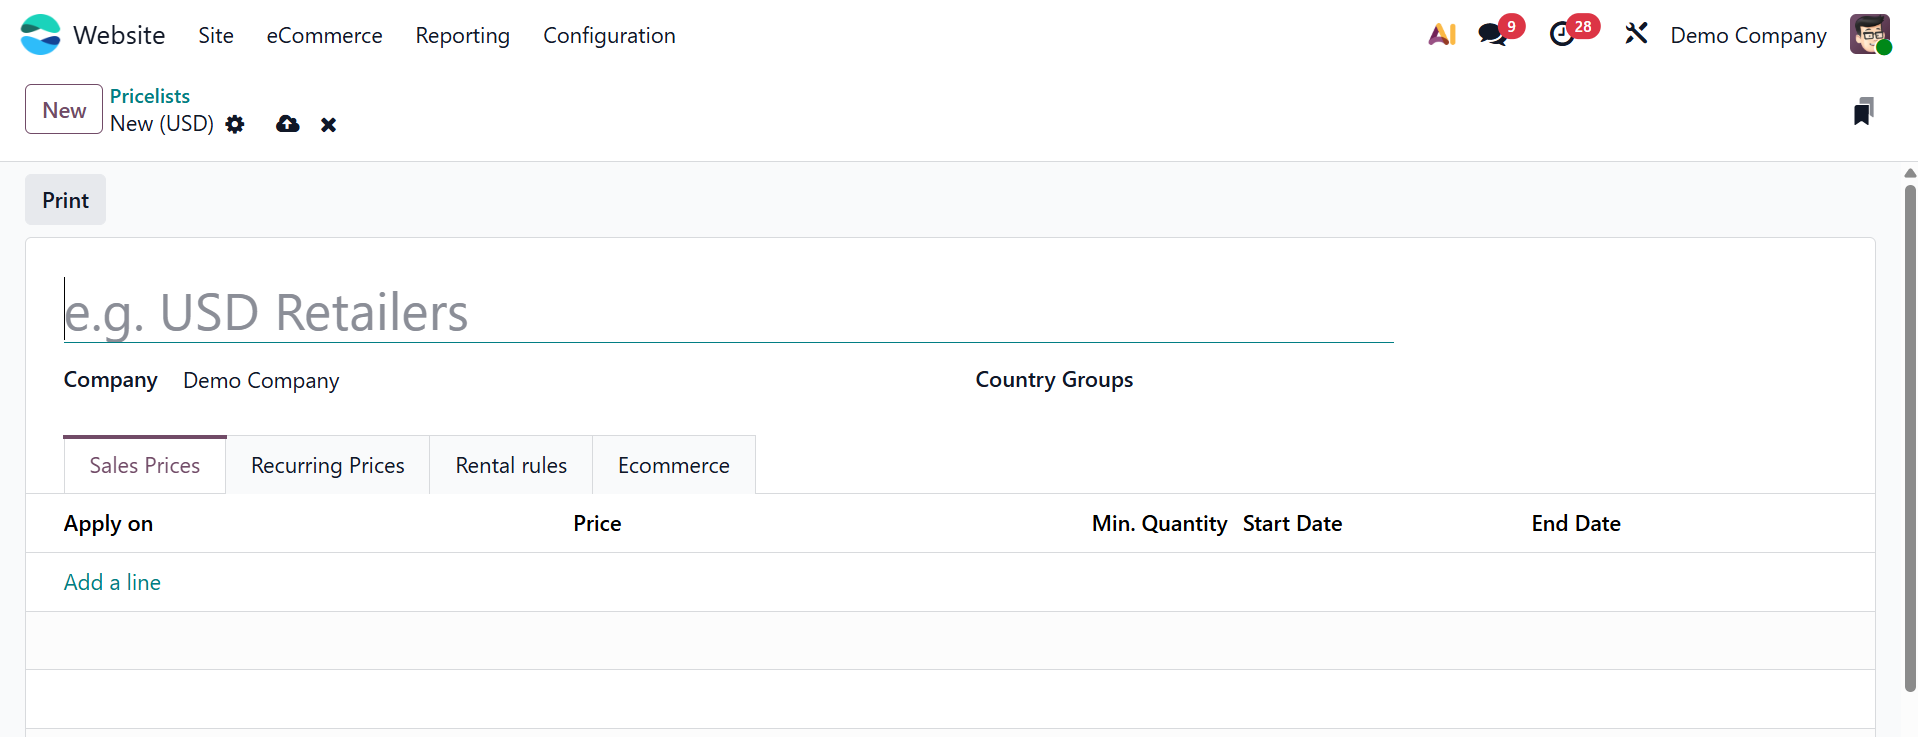
Click the Add a Line button to add a price rule. You can enter information about the product and its variations in this way. In order to guarantee that the pricing rule only applies to orders with a quantity equal to or more than the designated value, you may optionally provide the Minimum Quantity.
Additionally, you may set the Start and End dates for the pricing list item's validity using the calendar pop-up.
Now let's examine the Pricing Rules for the Pricelist approach in more detail. Navigate to the Website module's Settings menu to enable this option. As previously mentioned, you can access the Pricelist creation window after the option is enabled.
Click the Add a line button under the Price Rules tab to set pricing rules after entering the Pricelist Name, Currency, and Company. In order to configure the necessary rule settings, this operation will open a pop-up window, as seen in the image below.
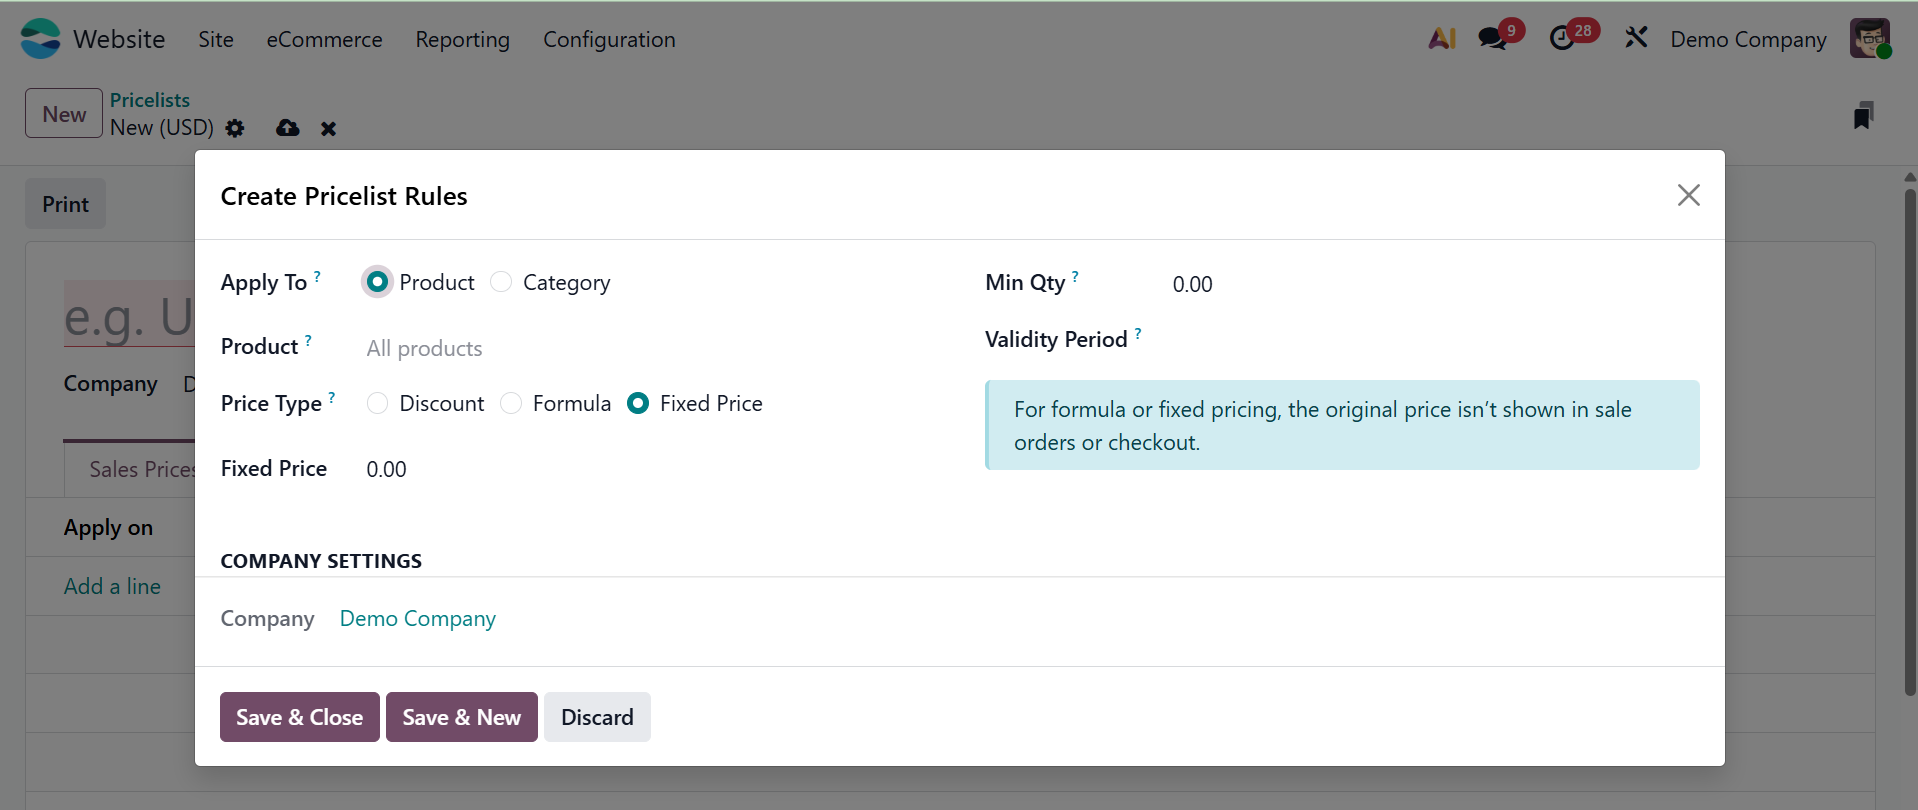
In the pop-up window, you can specify the price computation method. Depending on your selection, the rule can be applied to a specific product, product category, or product variant by adding the relevant item.
Odoo provides multiple pricing computation methods to suit various pricing strategies:
- Fixed Price: Allows you to set a specific price for the selected item. Once selected, an additional field will appear for entering the fixed price value.
- Discount: Enables you to apply a percentage-based discount. Choosing this option will display a Discount field where you can specify the discount percentage.
- Formula: Offers advanced pricing logic based on cost, public price, or another price list, with options for applying discounts, surcharges, and rounding rules.
You can define the price rule in more depth by choosing the Formula option, which will bring up additional fields as seen in the image below.
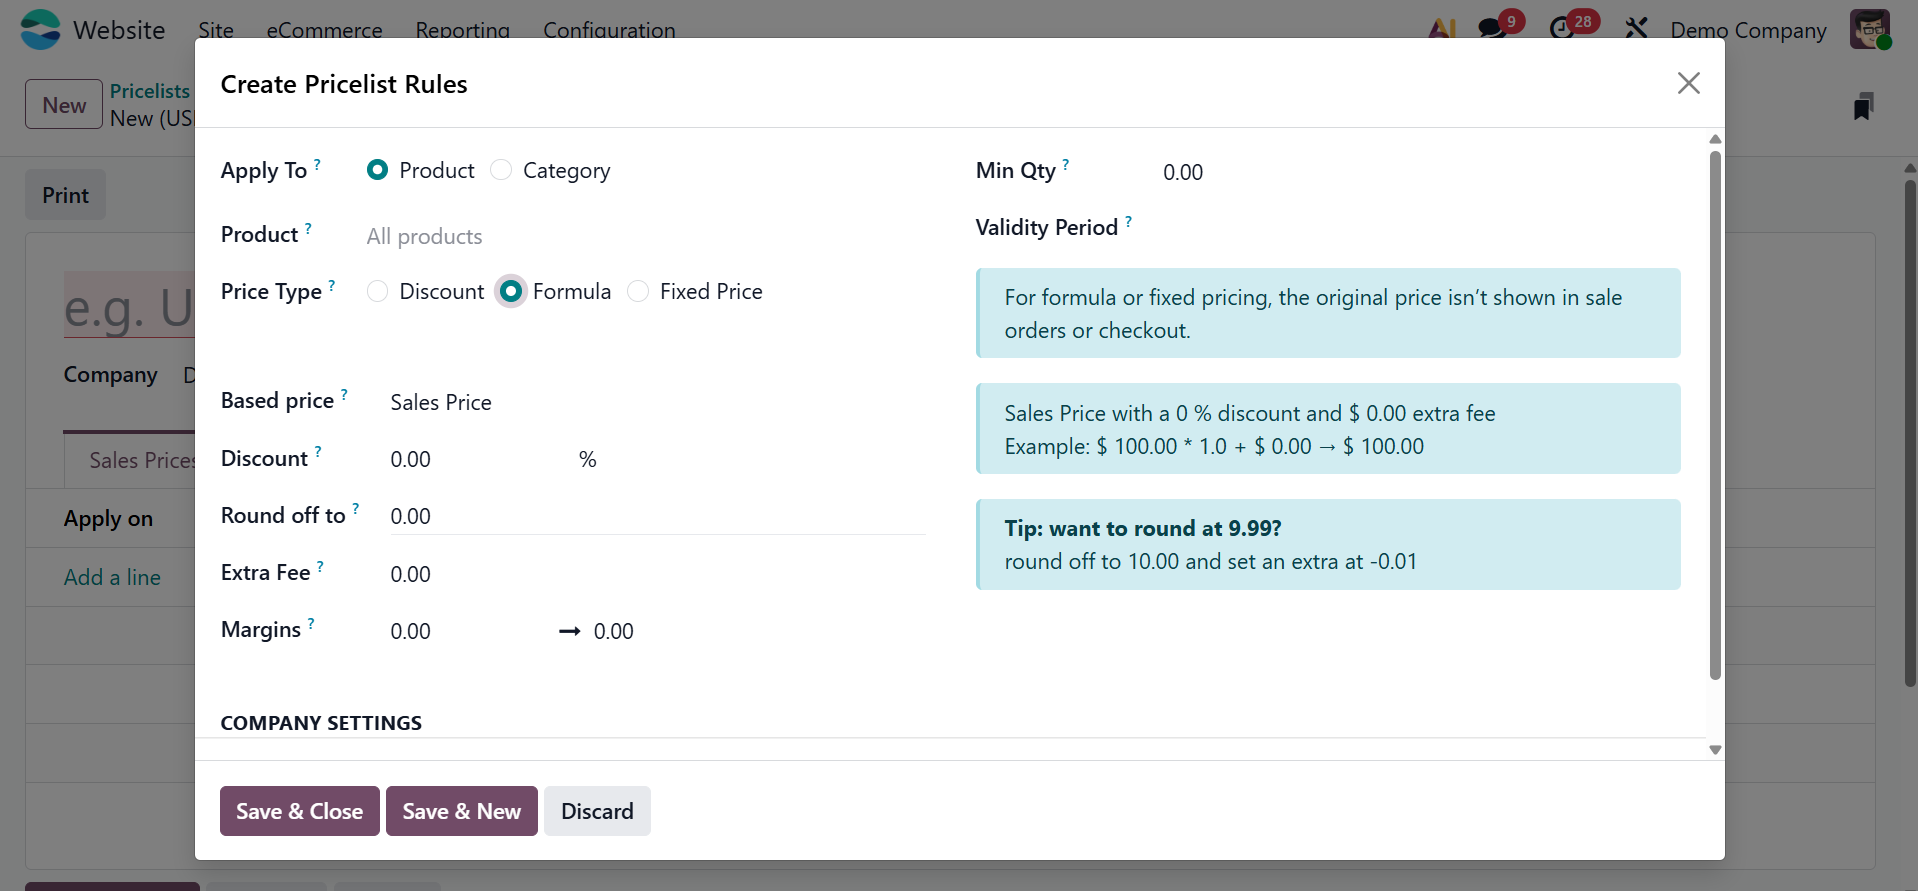
Discount, Surcharge (Extra Fee), Rounding technique, and Margins are extra configuration fields that appear when the Formula technique is chosen for price computation.
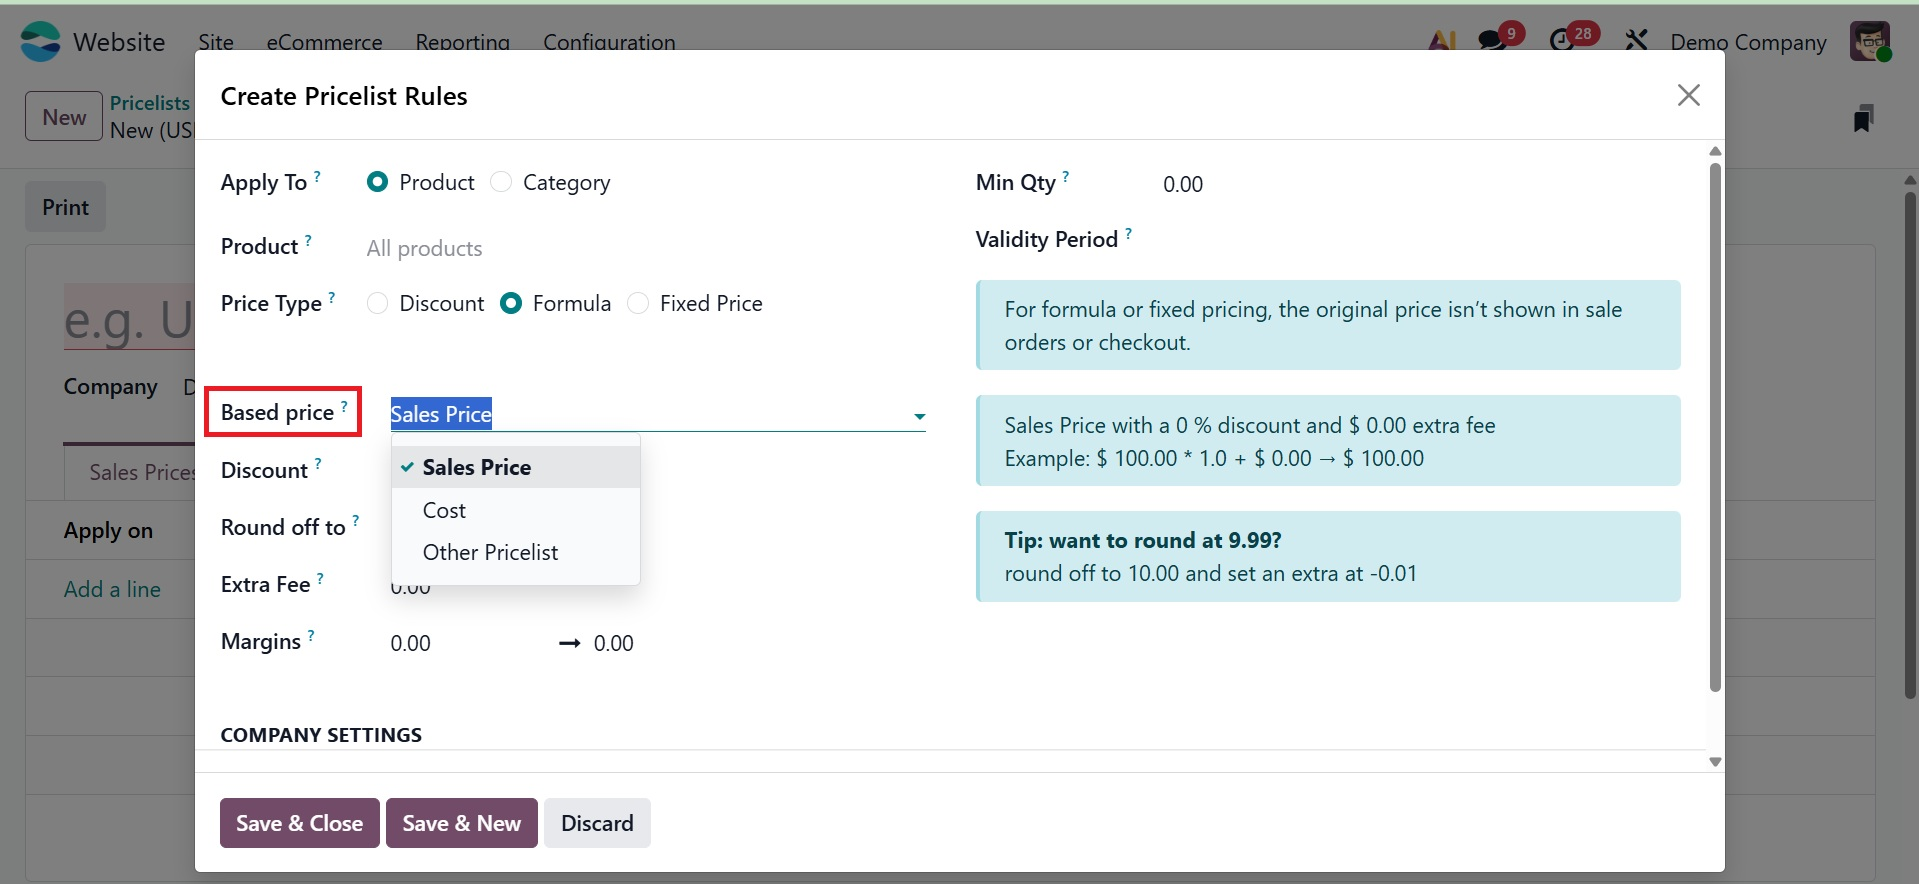
You can choose the base price that will be used to generate the pricing rule in the Based on box. There is a drop-down menu in this field with the following choices:
- Sales Price: To utilize the product's public (sales) price as the starting point, select this option.
- Cost Price: Select this to determine the internal cost of the product.
- Other Pricelist: This lets you find the base price by consulting another pricelist that already exists.
Flexible pricing plans that cater to different business needs are made possible by these possibilities.
By putting a negative value in the Discount column, you can set up a markup. This enables you to raise the price in relation to the starting point. After applying the discount, a predetermined amount can be added or subtracted from the calculated price using the Surcharge (Extra Fee) column. The price will rise when a positive value is entered, and it will fall when a negative value is entered.
You can change prices to the closest specified multiple by using the Rounding Method. Rounding is applied by the system prior to the surcharge and following the discount. For example, set the surcharge to -0.01 and the rounding value to 10 if you want the final price to end in 9.99. This makes it possible for the prices to match stable, psychologically pleasing numbers.
You can specify which product variations will be subject to the price rule by choosing the Product Variant option. When handling product changes, such size or color, this option enables more precise control over price.
You can indicate the Minimum Quantity needed for the rule to apply after the Conditions have been established. To activate the price rule, the quantity entered here must be either fulfilled or exceeded. The default unit of measurement for the product serves as the basis for this value.
Lastly, you can specify how long the price rule is valid. It is possible to specify the beginning and ending dates of the price list item's validity. The precise start and end times for the rule's activation will be determined by the system based on the time zone you have chosen.
The same procedures are used to configure Advanced Price Rules and Multiple Prices per Product, guaranteeing uniformity throughout your pricing tactics.
A promotional code that will be utilized on the e-commerce platform can be entered in the E-commerce Promotional Code field. This enables you to provide discounts that are directly related to the price list that has been established.
When discounts are applied through Pricelists or promotions in Odoo 19, the system automatically manages how the discounts are shown on sales order lines. To ensure customer transparency, the discounted amount is prominently shown alongside the original public price. In contrast to earlier iterations, the system now comes with this feature by default; there is no longer a separate Discount Policy setting to explicitly configure this.
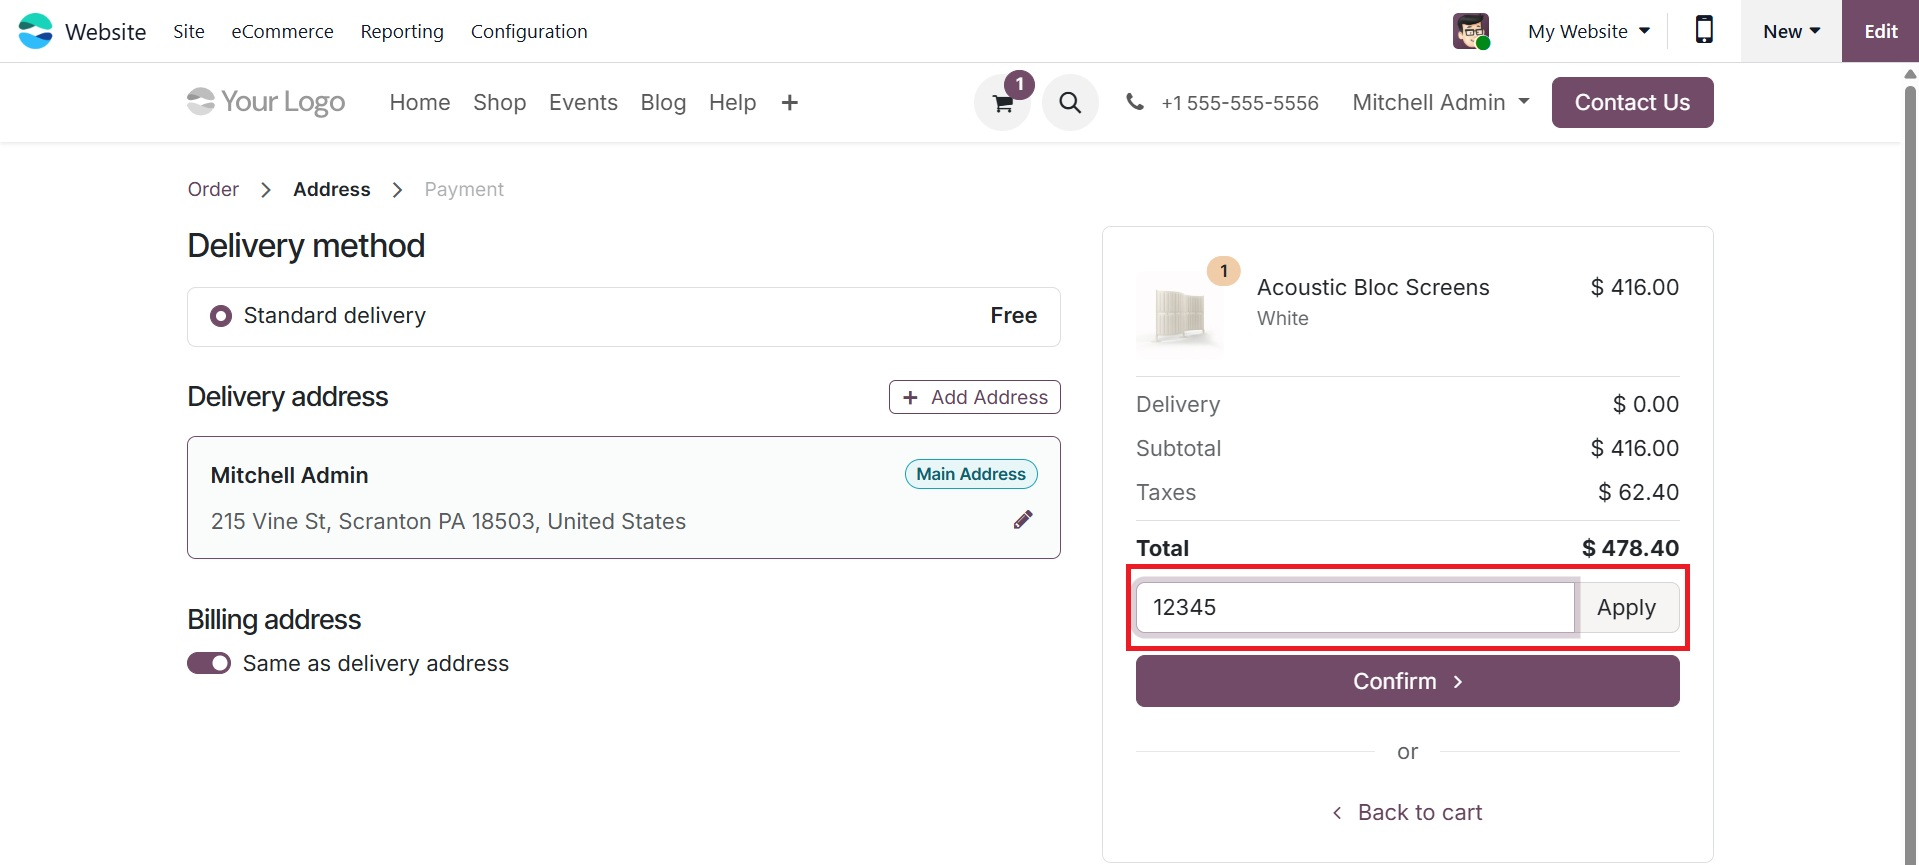
Click the Save button to save the newly formed pricelist when all the required data has been input and configured. The created pricelist with the promotional code can be applied in the provided space, as shown below.
1.2 E-commerce Categories
To arrange and categorize products on your online store, you can set up eCommerce Categories in Odoo 19. This functionality is crucial for your eCommerce website's navigation, product discoverability, and product classification and differentiation.
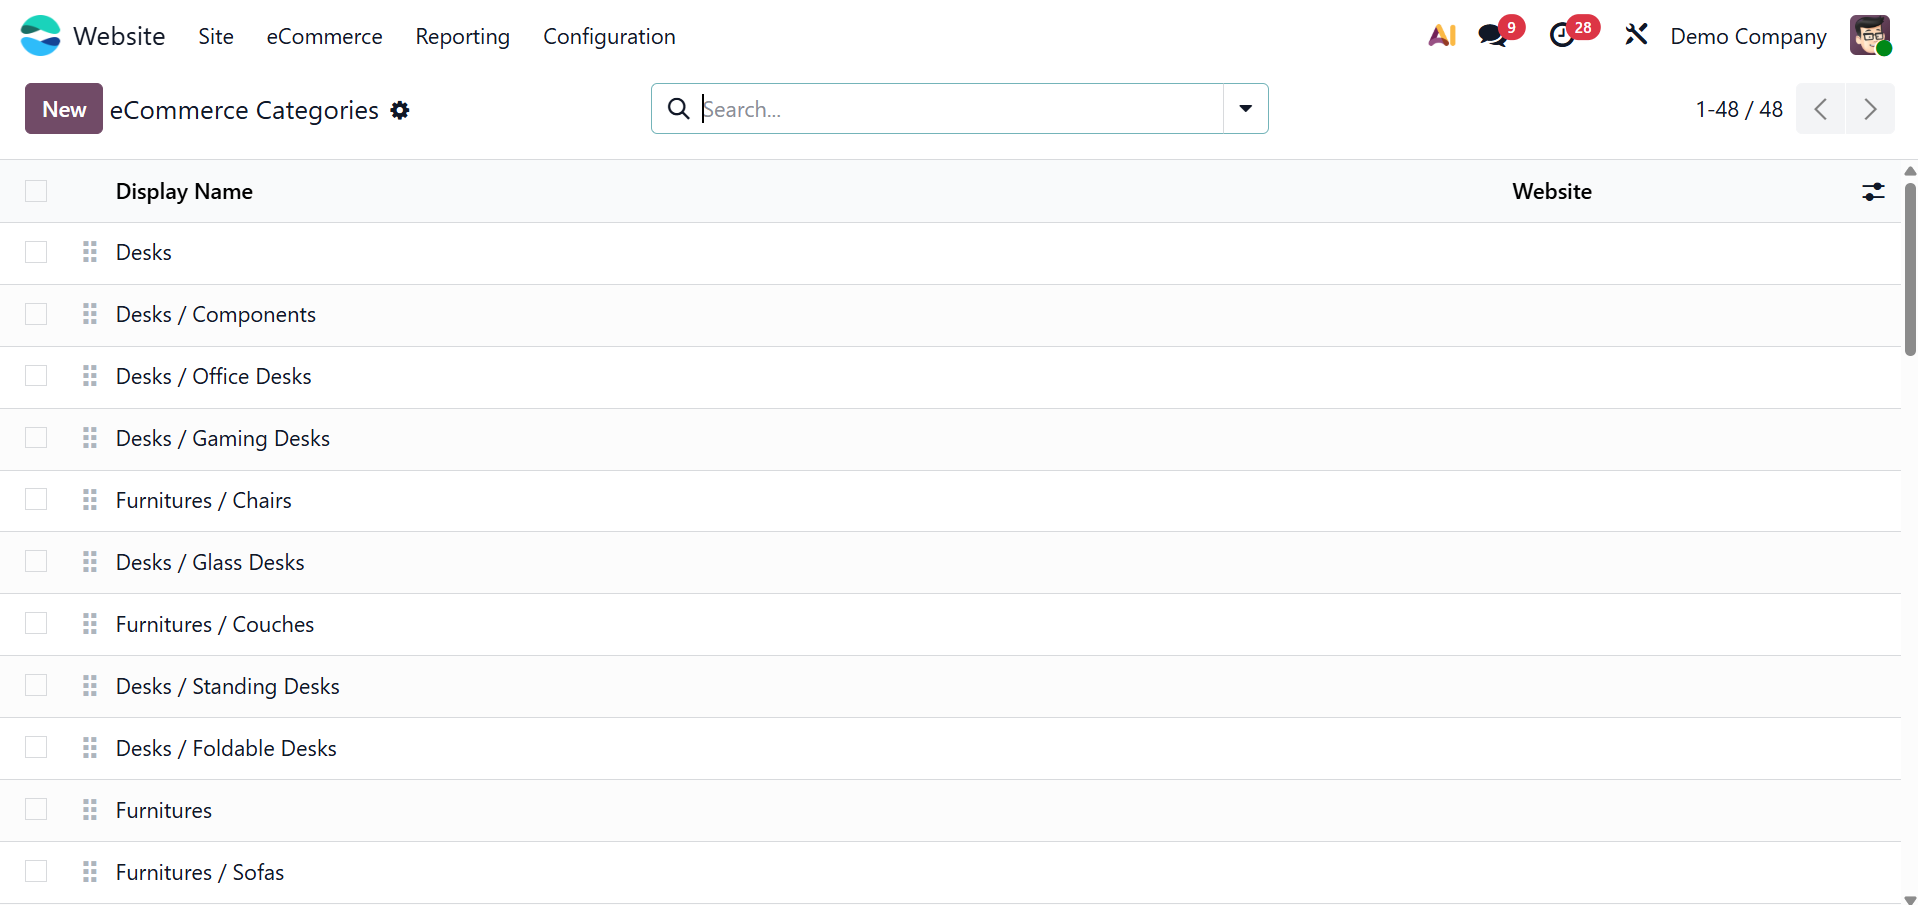
Go to the eCommerce Categories option under the Website module to access the eCommerce Categories. You will be taken to the eCommerce Categories window after choosing this option. You may view and control every eCommerce category on the platform with this window. The window offers a thorough overview of all the current categories, which makes it simpler to arrange your merchandise in a way that complements the layout of your store and the consumer experience.
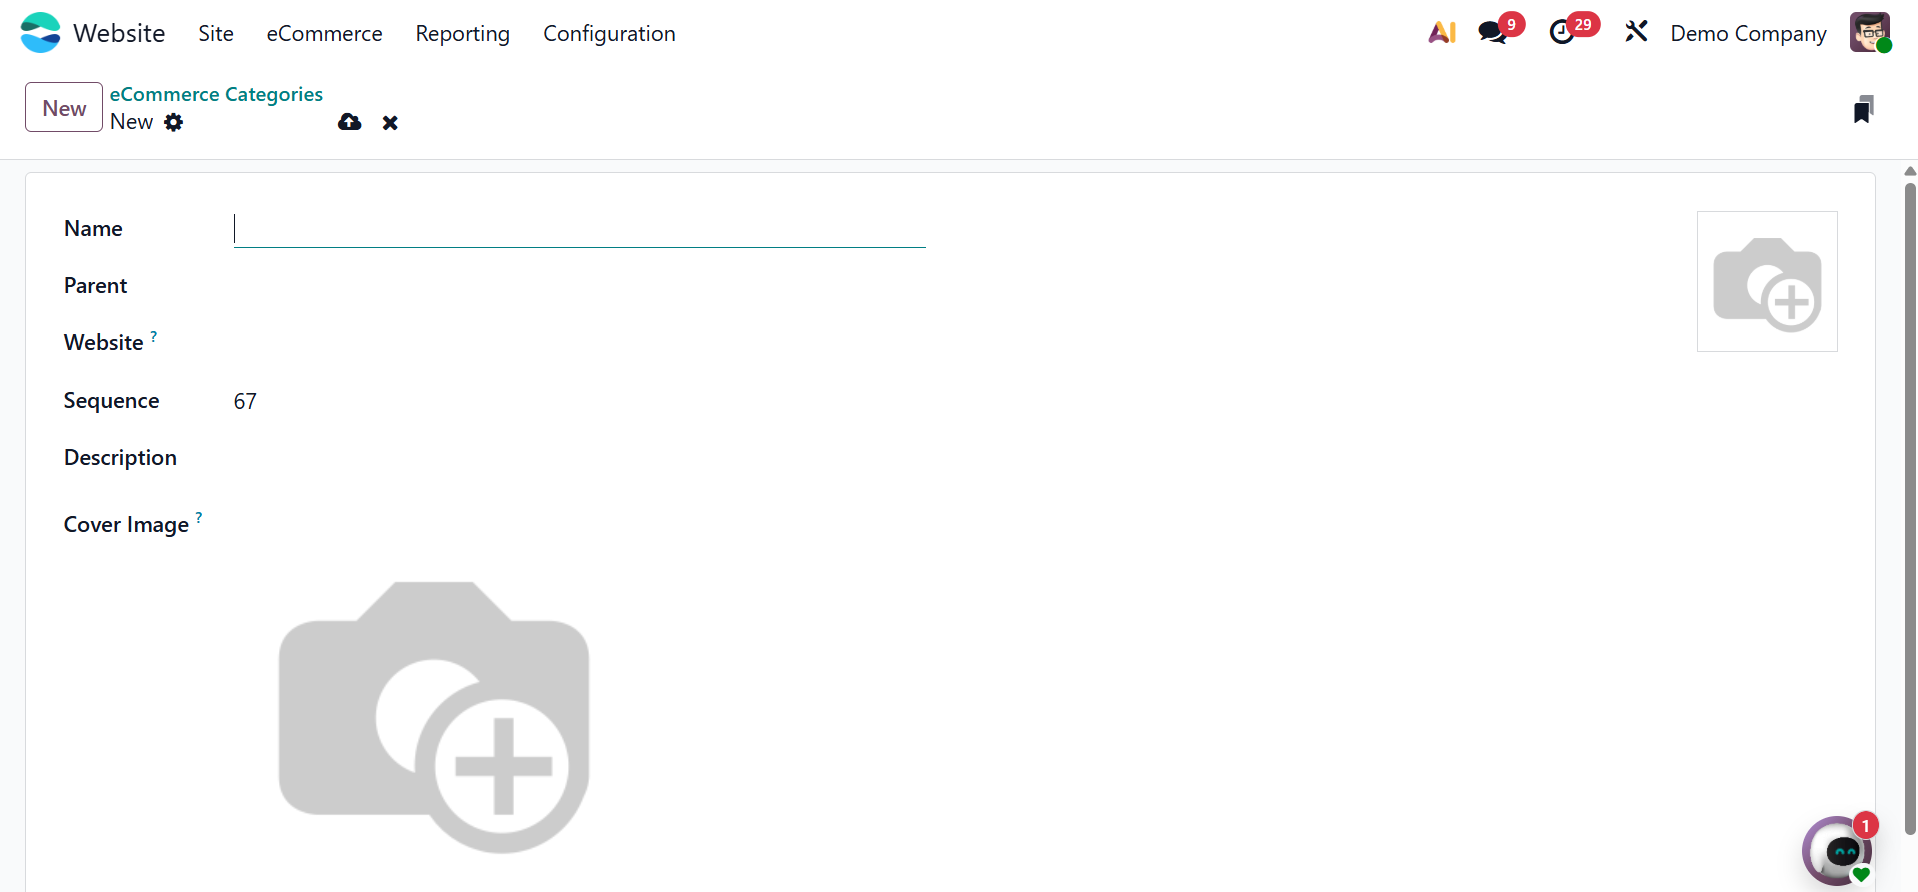
To begin a new one, click the New button in the window's upper left corner.
Here, you may enter the e-commerce category's name and image. In the appropriate areas, you can enter the Parent Category, the pertinent Website, and the Sequence number. Once all the required information has been provided, save the data for the new eCommerce category.
Go to the Website module and open the product you wish to modify in order to allocate it to an eCommerce category. The Website Categories field is located under the eCommerce Shop section of the Sales tab in the product form. Here, you may choose the eCommerce category the product should be shown under. If necessary, this enables the product to be shown in several categories on your online store. Click Save to make the necessary modifications after choosing the desired categories.
Customers can improve navigation and product discoverability on the website by filtering products by a certain category, which will immediately display all products assigned to that category, including the one you just added.
1.3 Attributes
You may easily define different product attributes using the Attributes menu, which is found under the eCommerce tab of the Website module.
In an e-commerce setting, where variations like size, color, or material are frequently employed to expand product possibilities, this functionality is especially helpful for managing products.
You may streamline your product management workflow within the system and provide customers with a more customized and flexible shopping experience by customizing attributes.
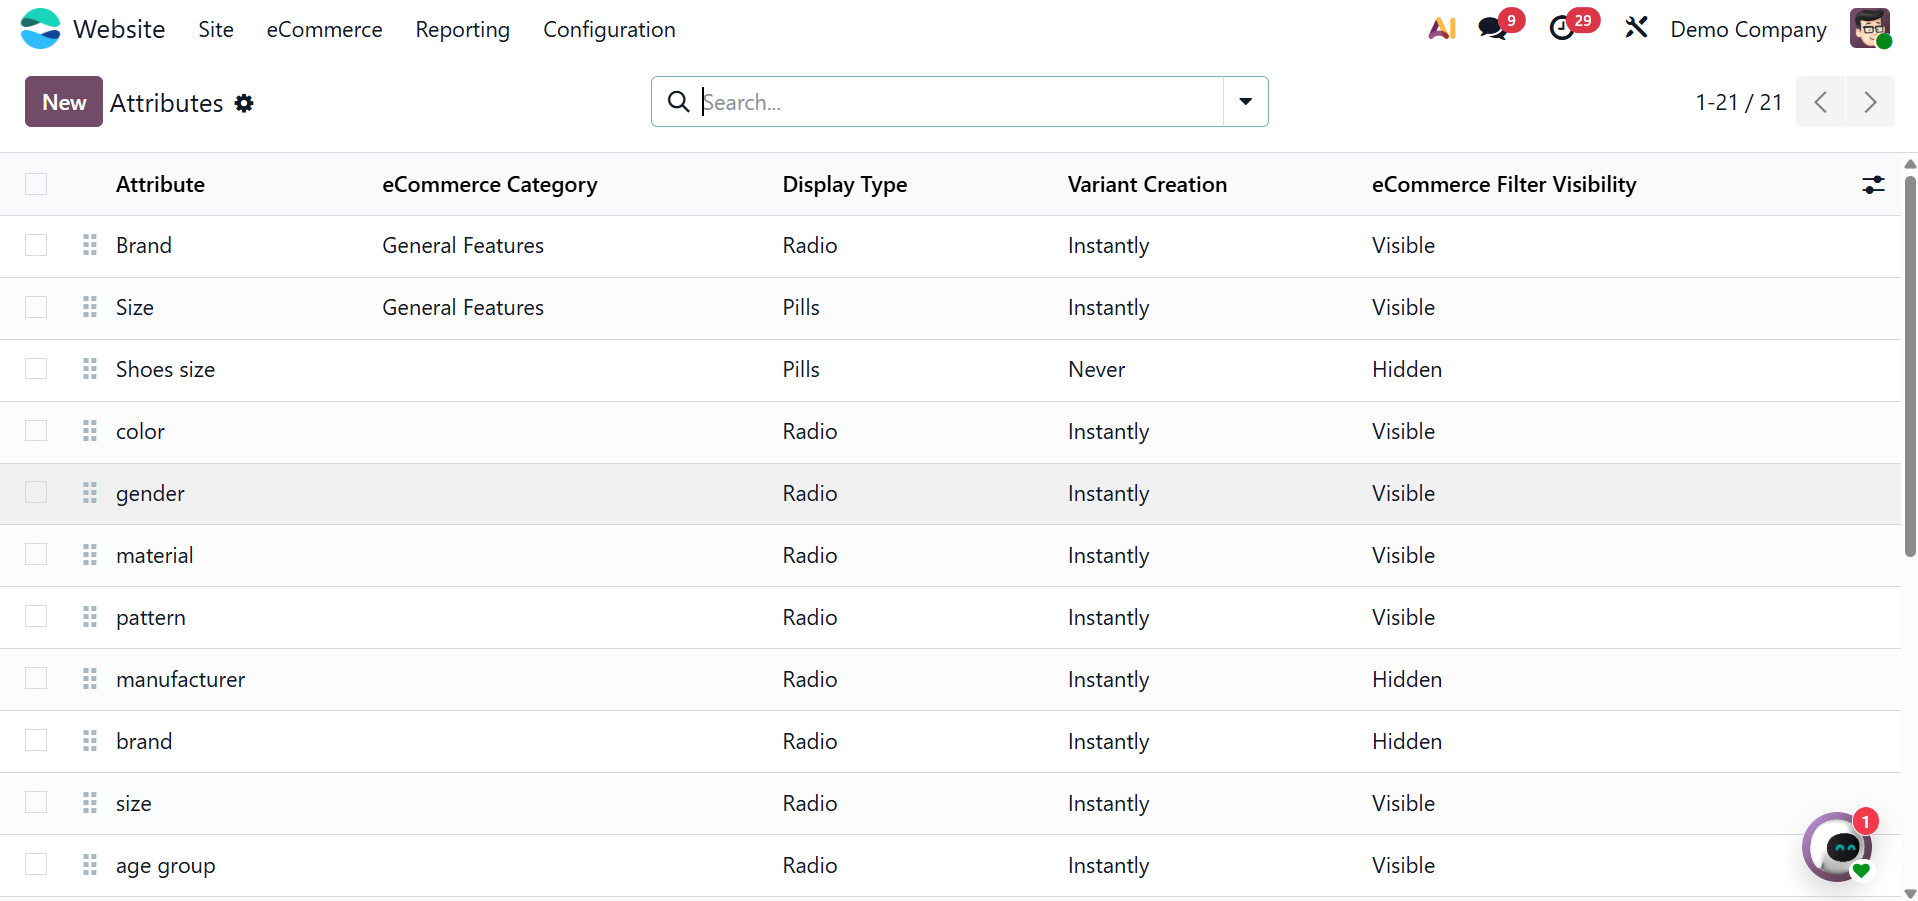
By viewing the Attribute pane, you may obtain a preview of each attribute that is described in the platform. Each attribute's name, category, display type, variation generation mode, and eCommerce filter visibility are all displayed in the pane. To see the preset property in more detail, click on the relevant record. To add a new attribute, click the New button. An image of the creation window can be found below.
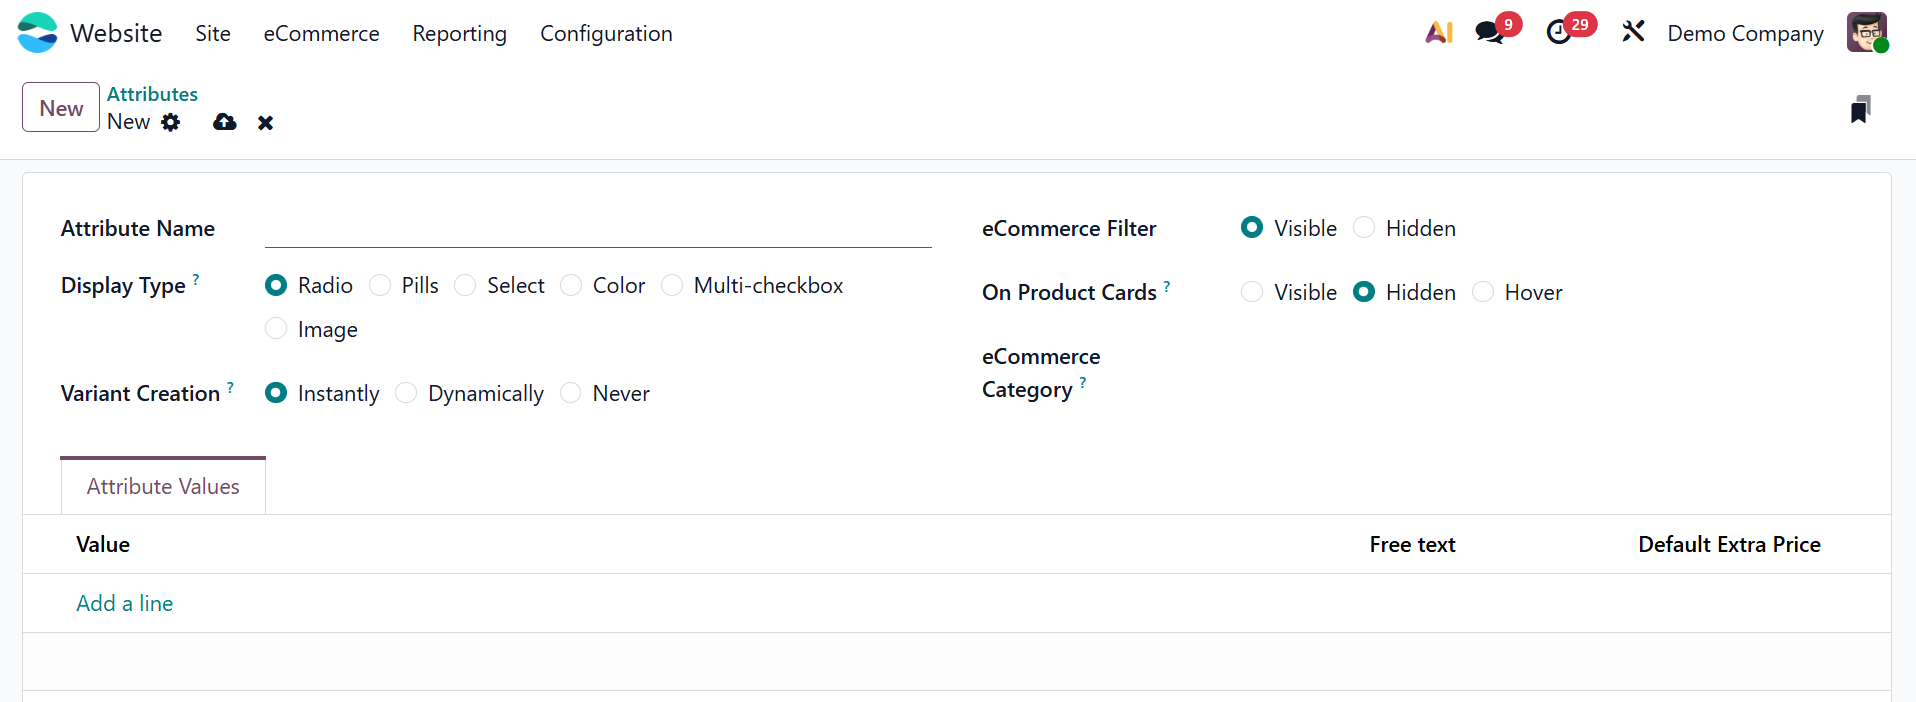
In Odoo 19, you will start by entering the Attribute Name in the relevant area when defining a new attribute from the Attributes menu under the eCommerce tab of the Website module. Additionally, you may give the property a Category, which makes it easier for customers to compare products by grouping related attributes into a single area on the eCommerce comparison page.
You can select how the characteristic is shown in the product configurator by using the Display Type option. You can customize the selection interface to fit the attribute's characteristics and improve the buying experience with the available display options, which include Radio, Pills, Select, and Color.
Additionally, Odoo 19 offers three modes under the Variants Creation Mode:
- Instantly: When an attribute and its values are added to a product, all potential product variations are created instantly.
- Dynamically: Only when matching attribute values are added during a sales order are variations generated.
- Never:No product variations will be produced by the attribute.
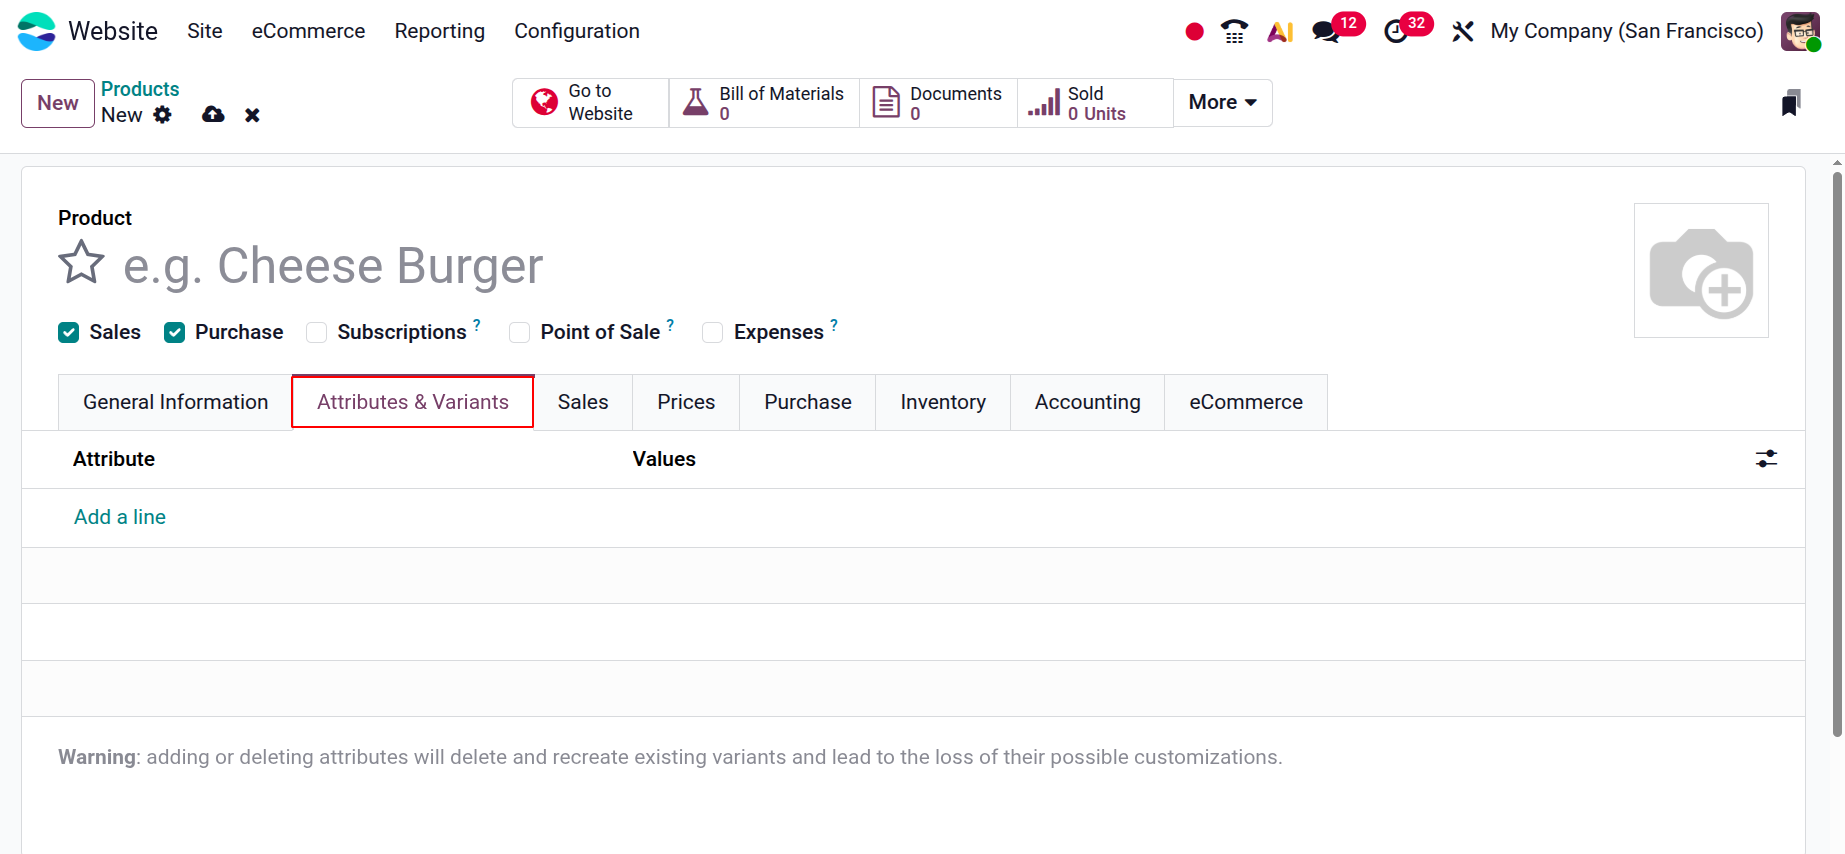
The created Attribute can be added inside the Product. There is an Attributes & Variants tab, add the Attributes and Values there.
Depending on whether you want the characteristic to show up as a filter on the website, you can also set the eCommerce Filter Visibility to either Visible or Hidden. To specify particular values for the attribute, utilize the Add a Line option under the Attribute Values tab. Those created attributes for a particular product can be viewed in the website page, as shown below.
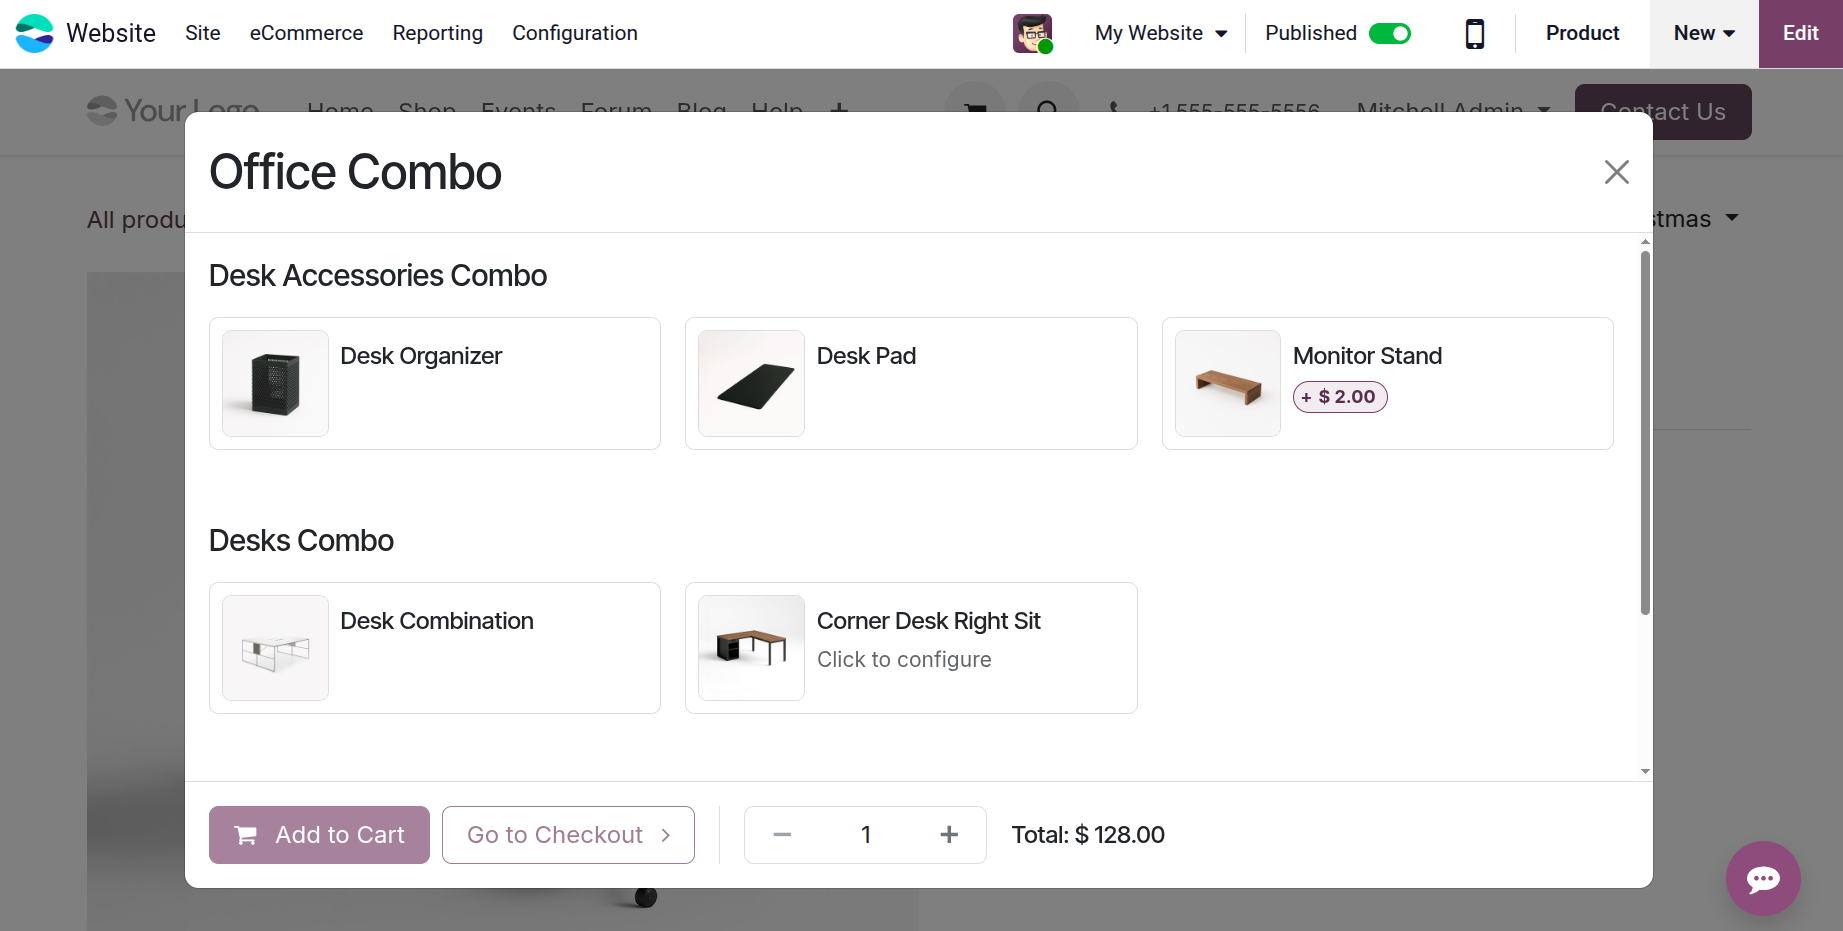
1.4 Combo Choices
You can use your eCommerce site's Combo Choices feature to build product bundles that users can purchase as a single item. This is perfect for promotional combos, gift sets, and product bundles.
Navigate to the Website module → Products → Combo Choices to access it. A list of current combos with information like Combo Name, Website, and Company will be displayed. To make a combo, click New.
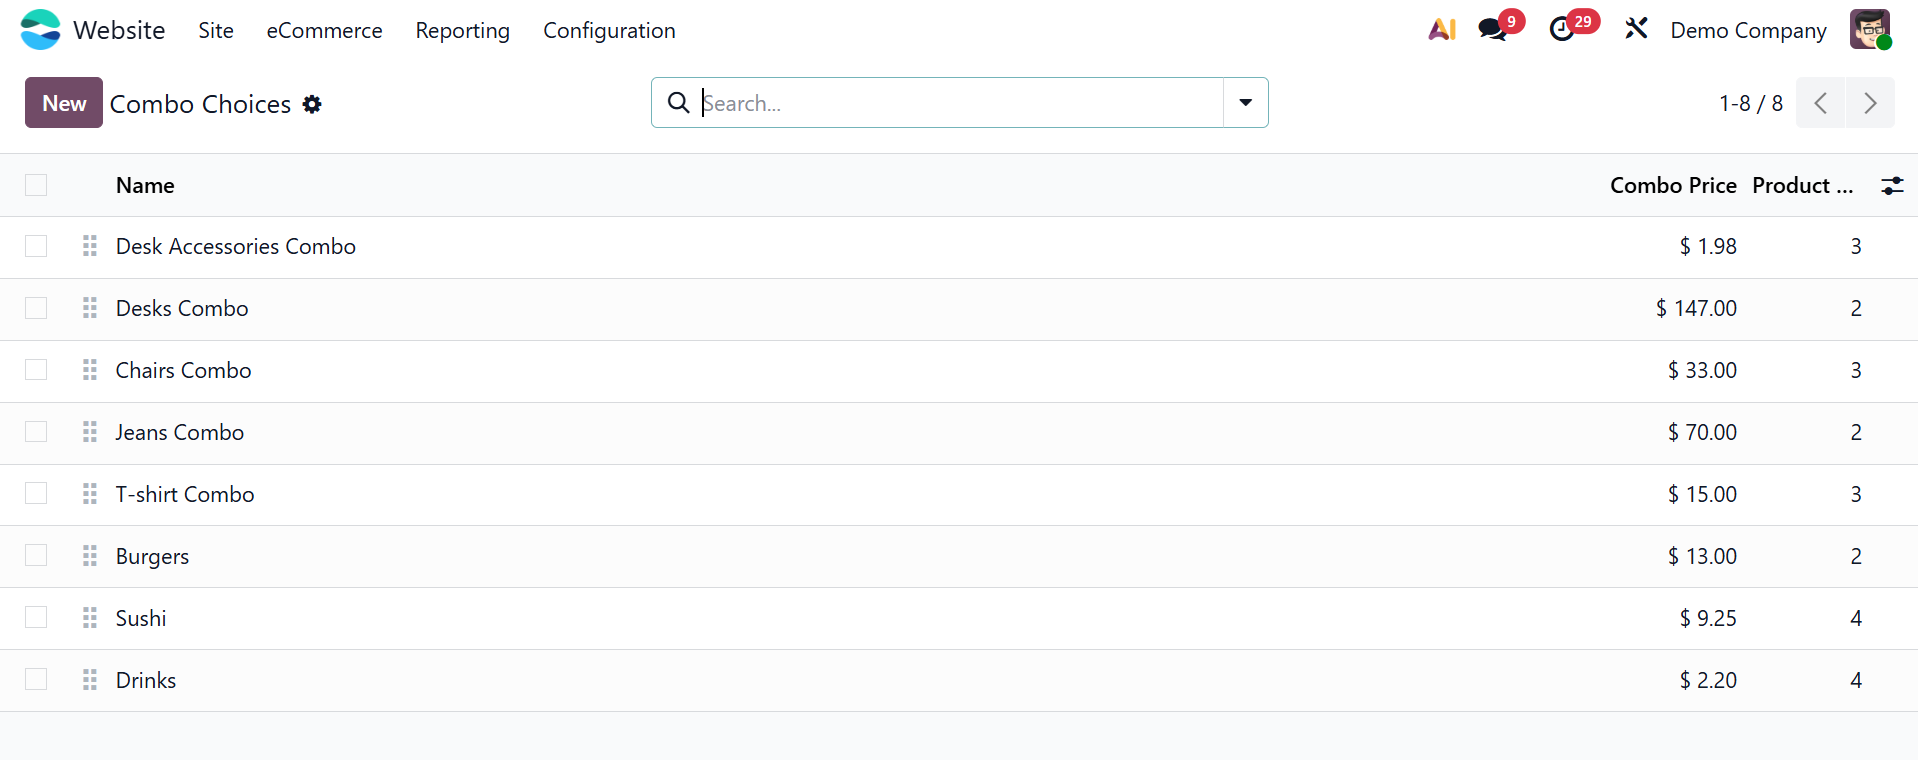
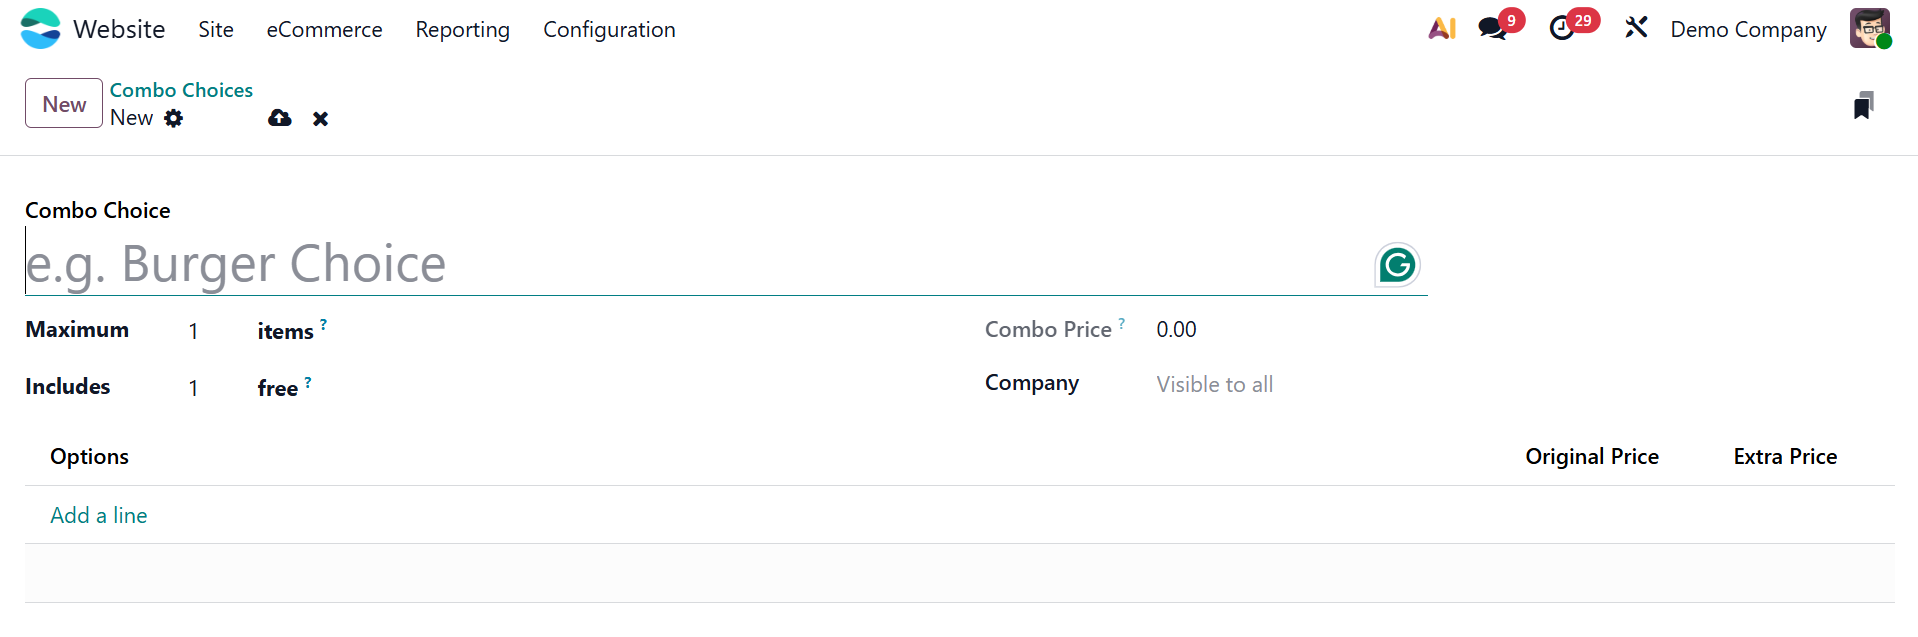
You can give the combo a name, such as "Burger Choice" or "Desk Accessories Combo," in the Combo Choice area at the top. This label makes the combination easier to find on the platform. The combo's related company is indicated by the Company field just below; if it is set to "Visible to all," the combo will be accessible across all companies in a multi-company setting.
You can add more than one product to the combo by using the Add a line option in the Product section.
Original Price and Extra Price are two important price sections that appear for every product line you add. While the Extra Price enables you to apply a bespoke price adjustment for that product within the combo, the Original Price represents the regular price of the particular product. You may easily build appealing discounts for your eCommerce clients with this setup, which gives you flexibility in creating special pricing for bundled offers.
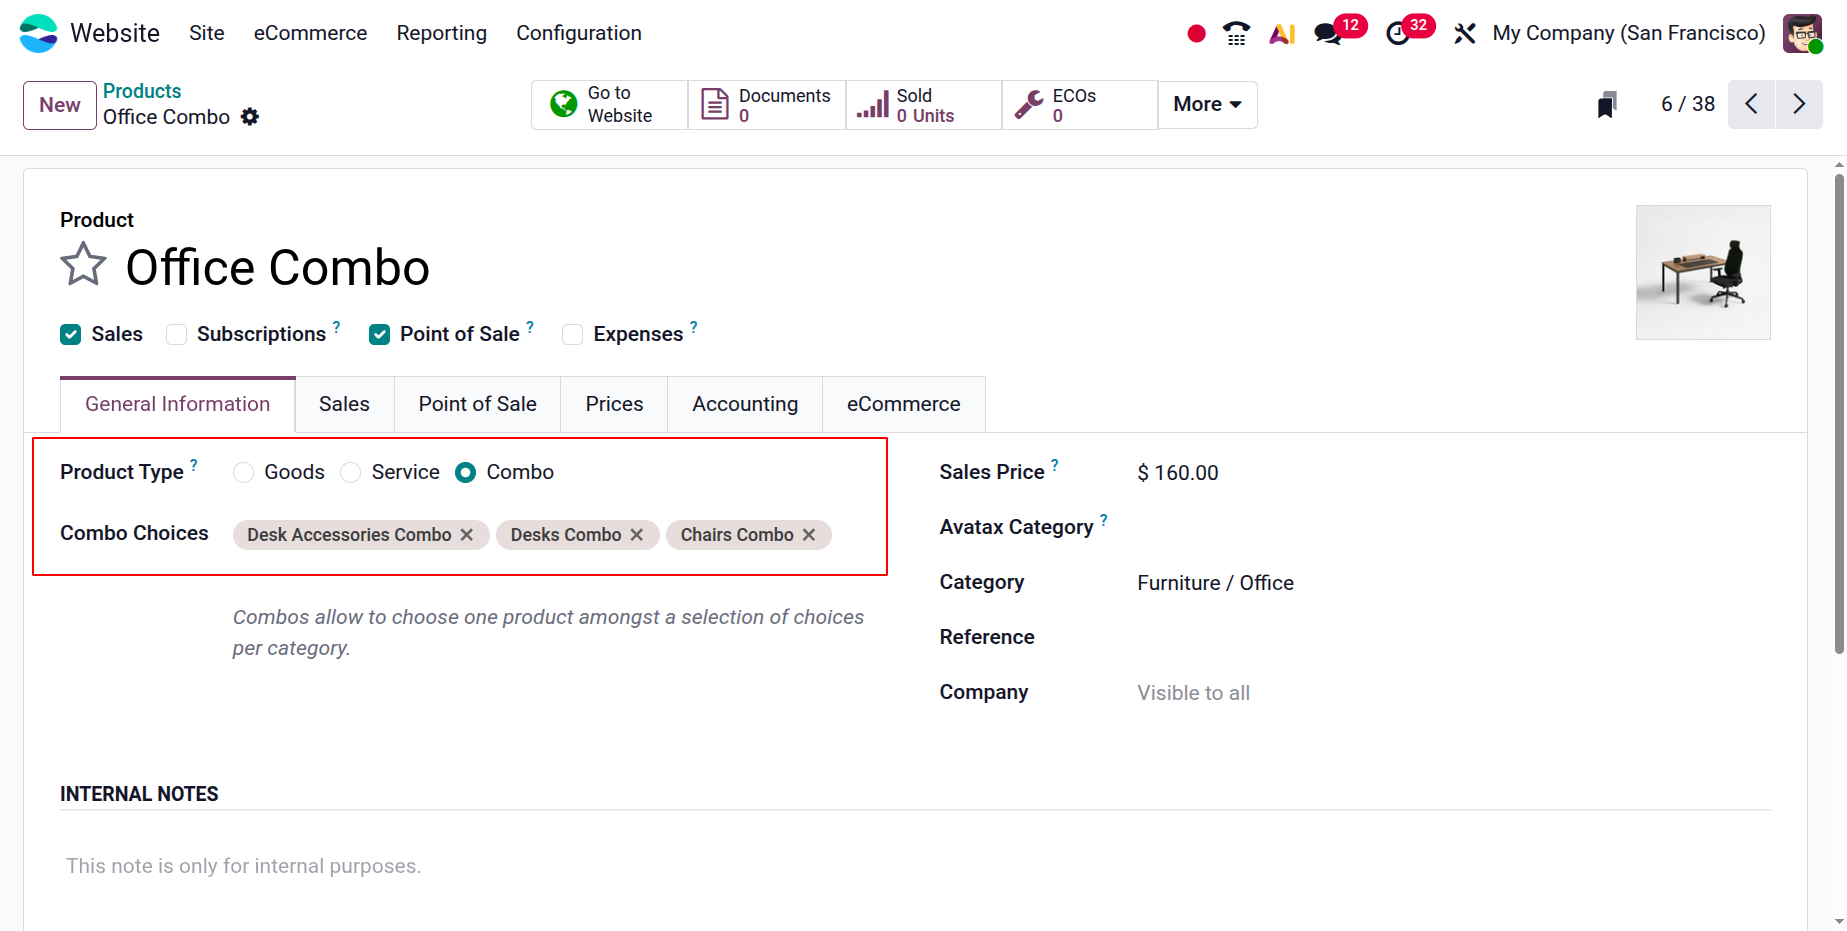
The created Combo Choices can be added inside the Product. For that the Product Type should be chosen as Combo.
These combinations can be shown on the product page of the website, making it simpler for clients to purchase several related items at once.
1.5 Product Tags
The Product Tags option is located under the Product part of the e-commerce menu. Click the New button to start a new product tag. You can specify the tag name and designate a color for visual identification in the creation form.
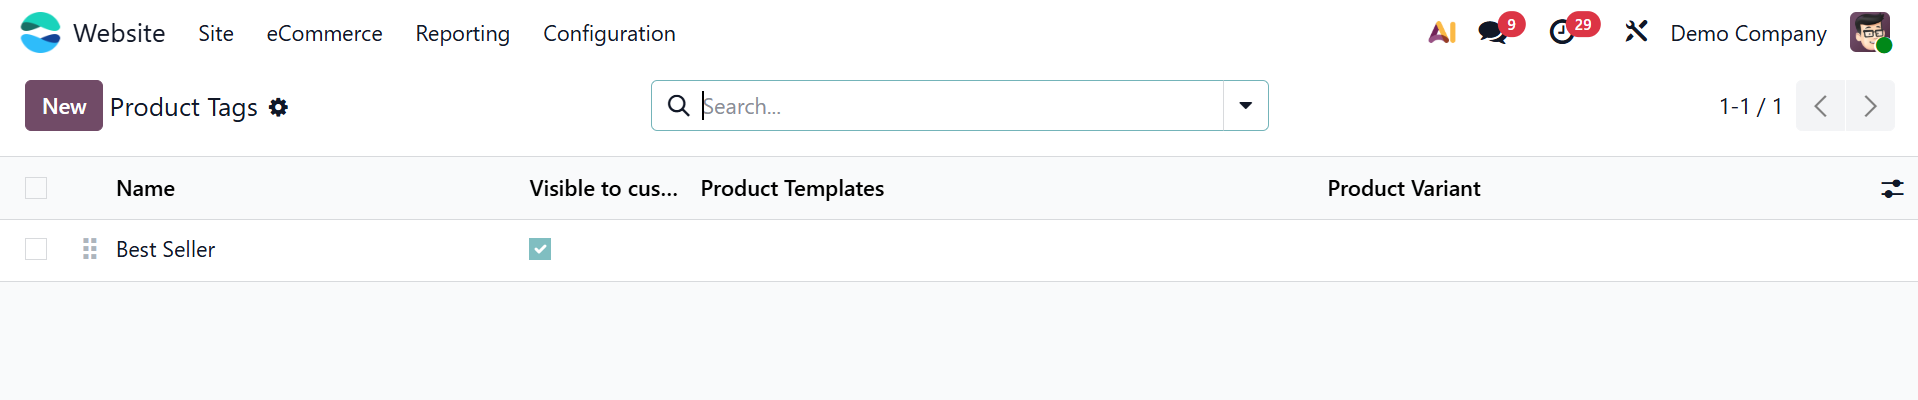
In the designated field, you may also indicate which Product Variants this tag applies to. This feature makes it possible to properly arrange and classify your products, which improves both internal management and website navigation for customers.
1.6 Product Ribbons
You can use custom labels to highlight products on your e-commerce site with Odoo 19's Product Ribbon functionality. This promotes special things and draws in customers.
Go to the Website module → Configuration → Product Tags to set it up. To make a ribbon, click the New button.
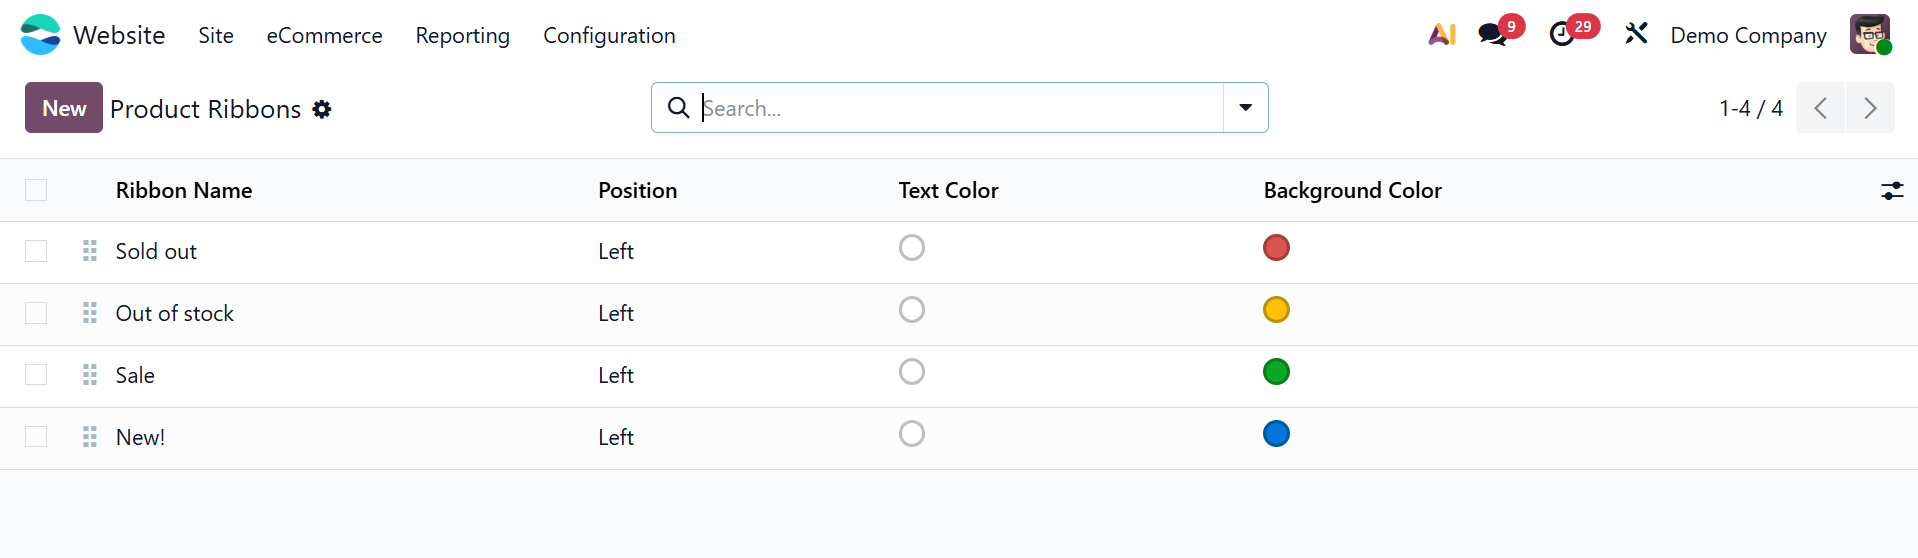
Enter the Ribbon Name, pick a Ribbon Text (such as "Best Seller"), pick a Ribbon Color, and use the Add a line option to attach it to particular product variations.
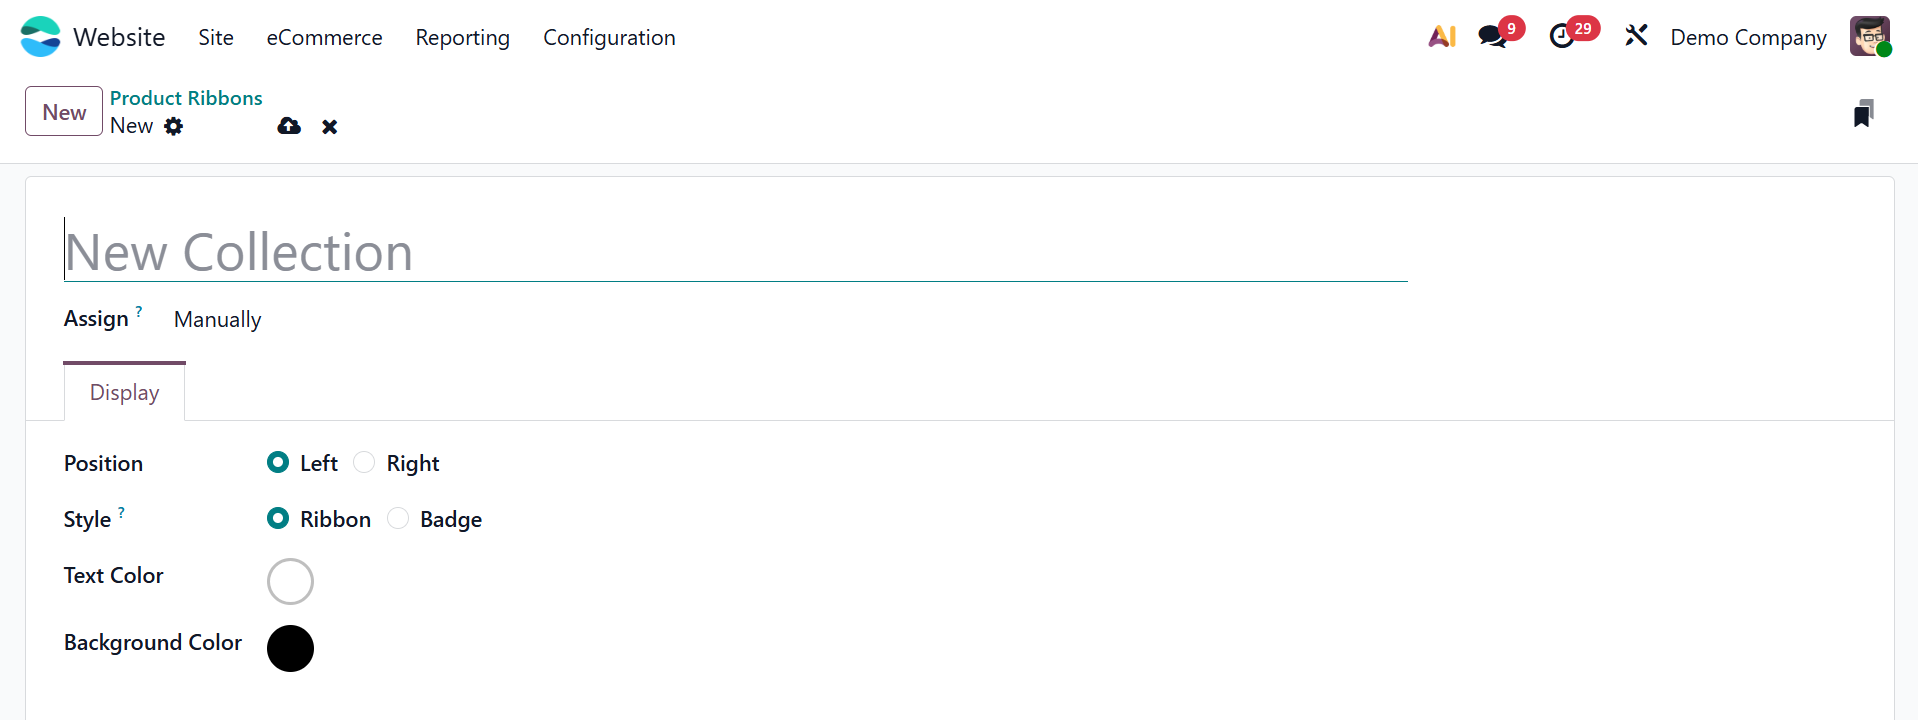
After creating and saving the ribbon, you can use the Website module's product form to add it to a product. The Ribbon field is located in the eCommerce Shop section's Sales tab. Click Save after choosing the desired ribbon from the drop-down menu. The ribbon will cover the product image on the page after it has been saved, making it more noticeable and drawing in customers.
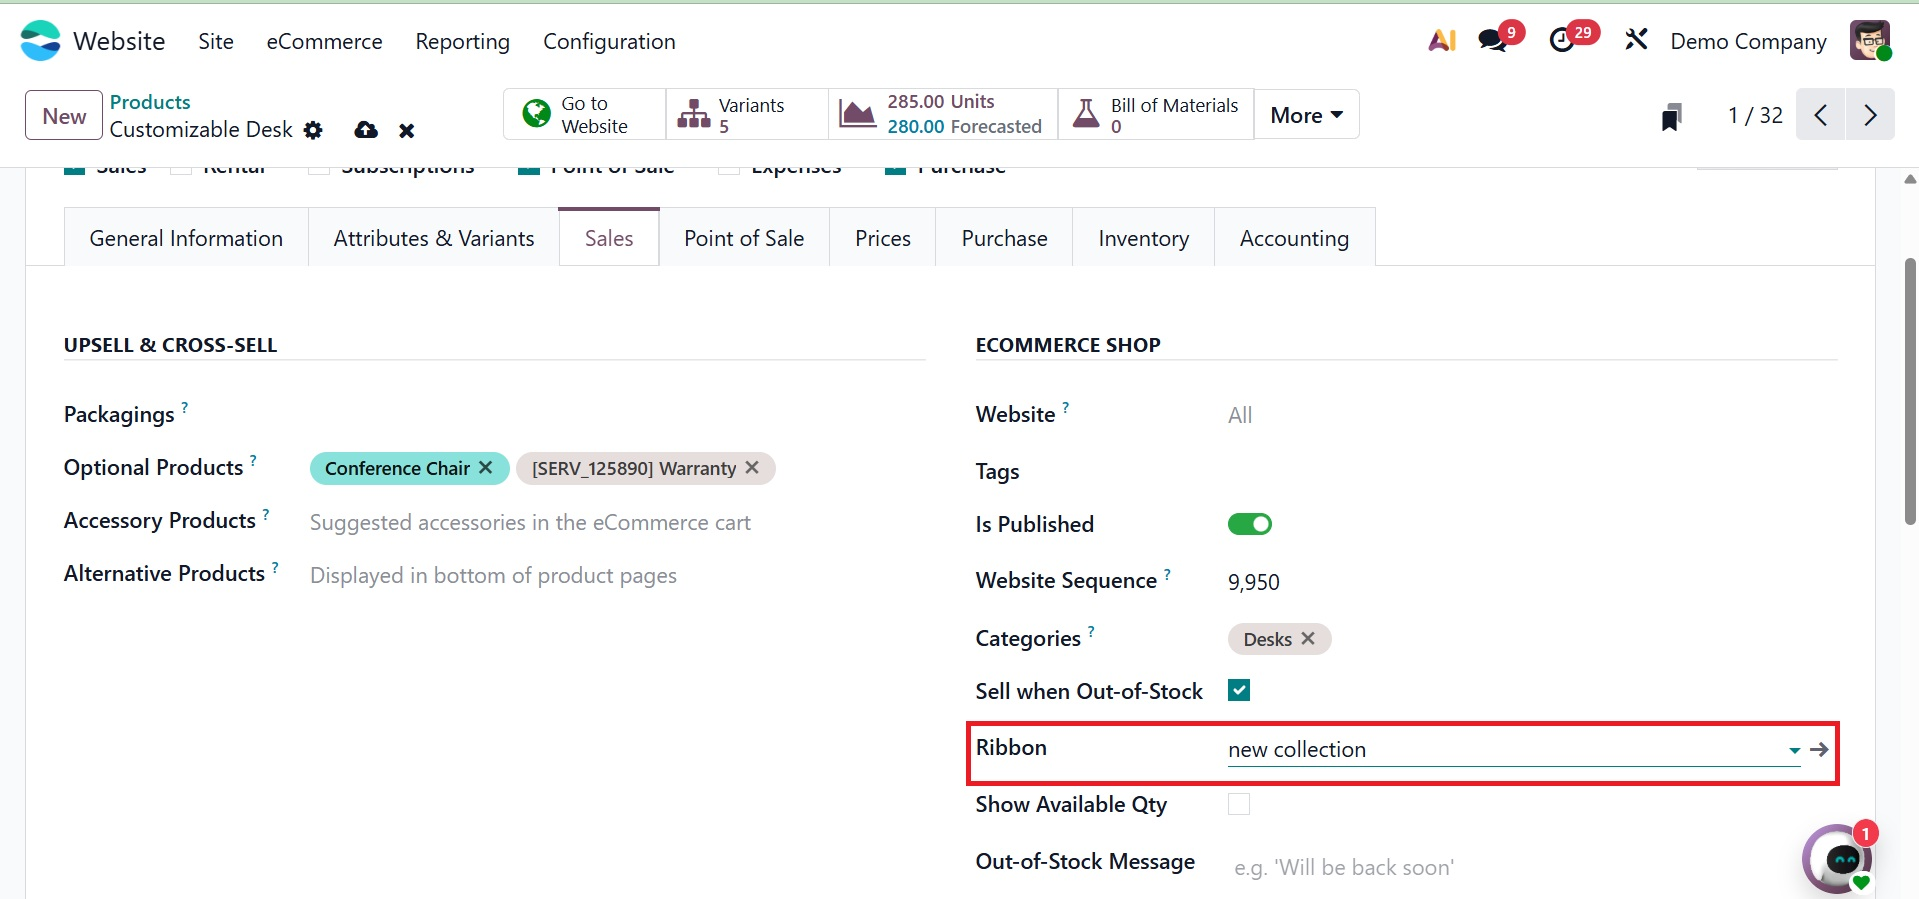
The ribbon will show up on the product image on the website after it has been configured.
1.7 Attribute categories
Odoo's Attribute Categories submenu makes it easier to manage and arrange product attributes. Once the eCommerce module is installed, this option is located under Website > Products.
By grouping comparable attributes together, attribute categories enhance product filtering on the website and give customers a better buying experience.
You may make things easier to compare and choose during the buying process by classifying characteristics like color, size, or material.