Project Management
With the aid of the project management module, you can arrange each step of the project completion process in an orderly fashion. You may simply handle multiple projects at once with the help of the project management module. All functions will be accessible within the module, which has an excellent level of actual project monitoring and organization. Using customization options, you may manage and oversee different phases and tasks to satisfy corporate needs. The module, which gives every detail about ongoing projects in the organization, is incredibly time-saving. Let's examine the many options and how they work under the project management module.
Upon choosing the Project Management module, the dashboard will appear, as depicted in the picture below. The page will appear in the Kanban view, which is also visible in other views. You will see an already-configured project on the page, similar to the one in the picture.
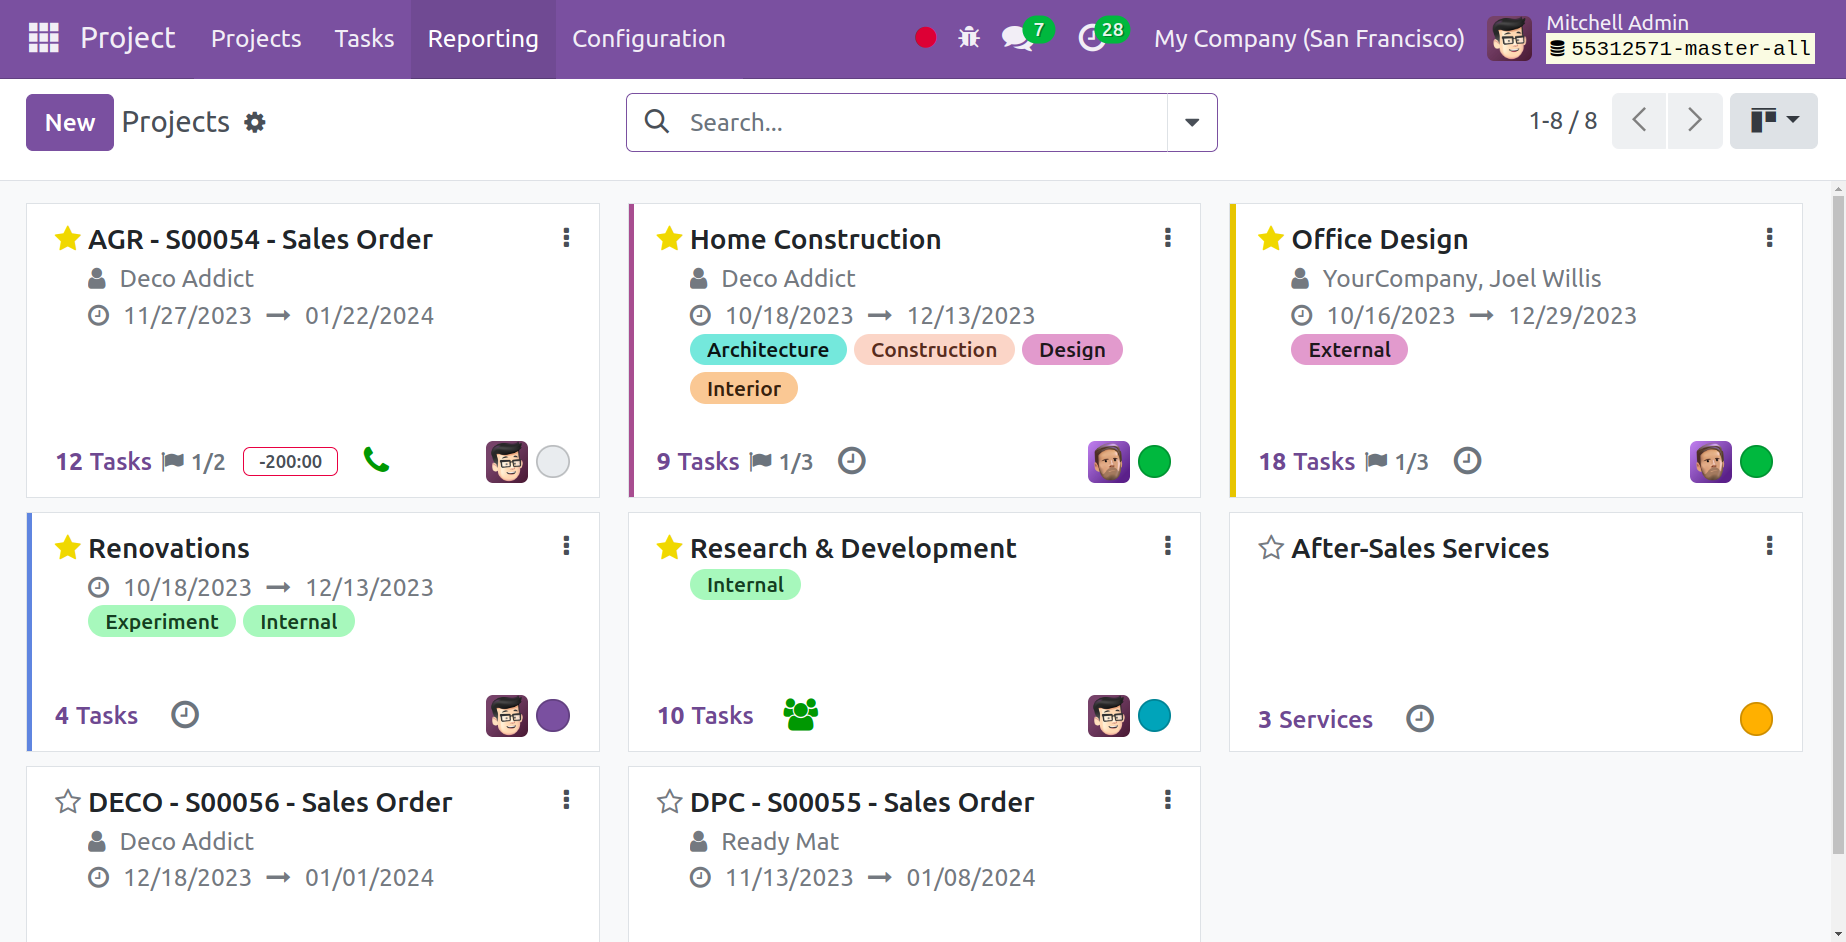
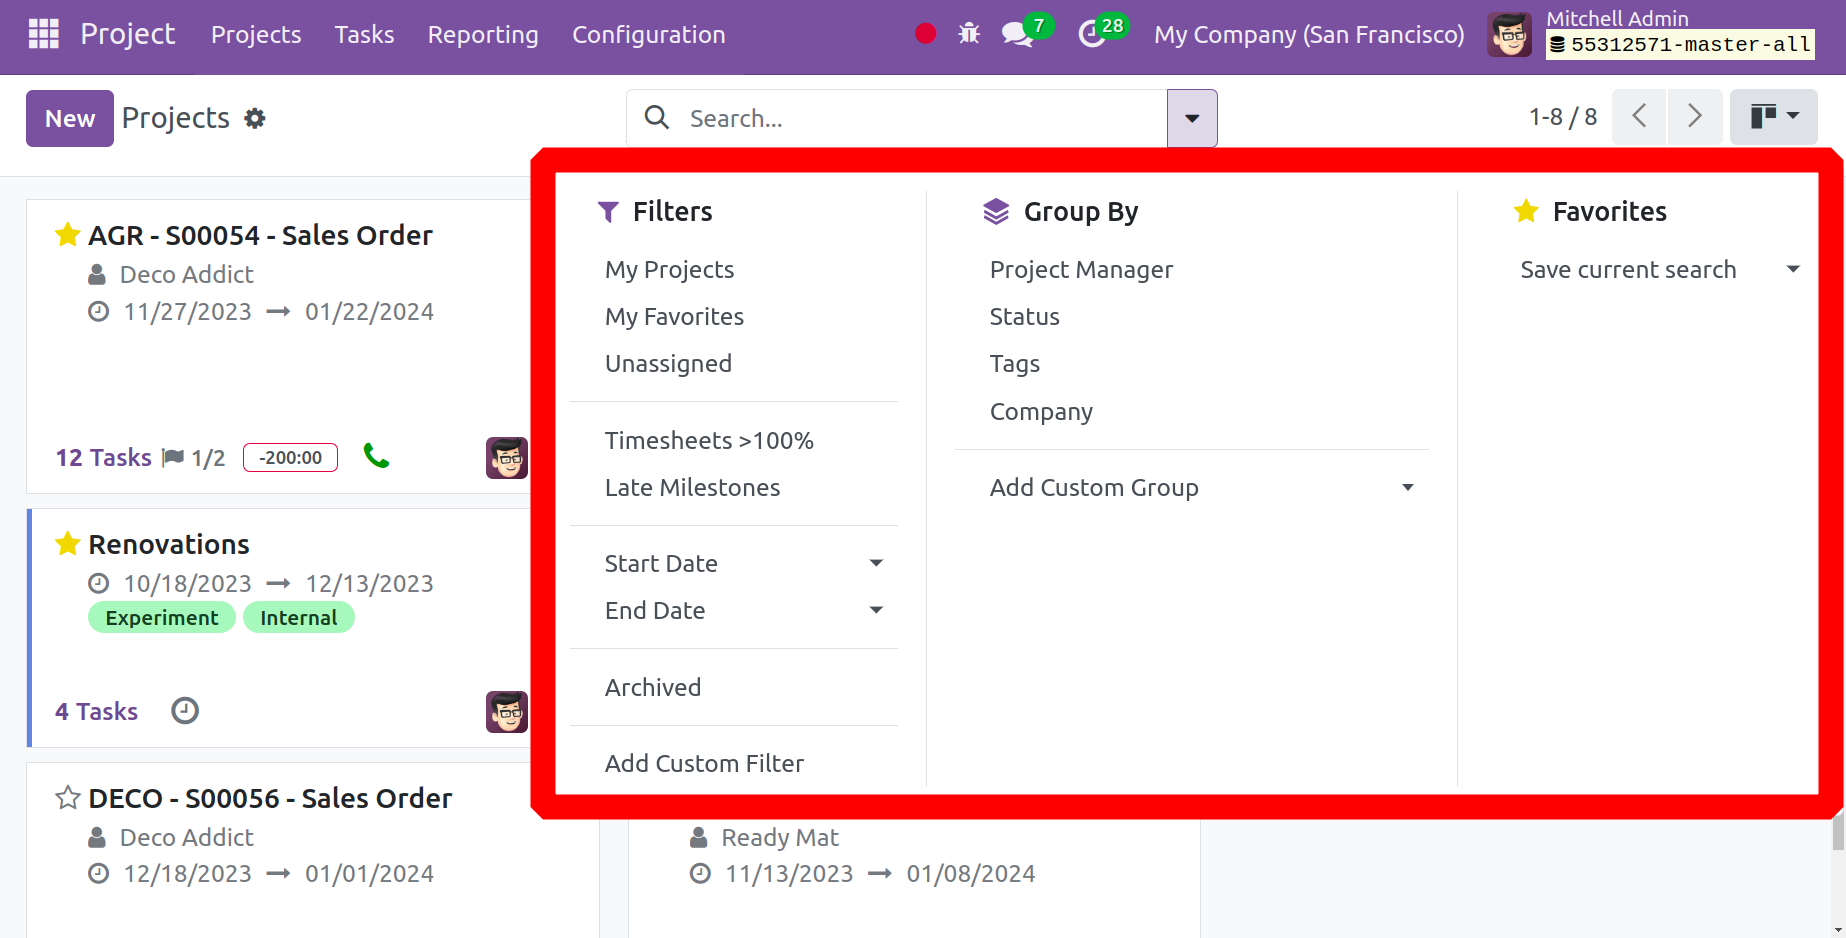
All of the projects are displayed in Kanban view on this page. In addition to the Kanban view, it can also be viewed in the list view. If necessary, the Filters, Group By, and Favorites features can also be utilized. You can choose from a variety of options under the filters, including: my projects, my favorites, my team, my department, followed, unassigned, late milestone, start date, end date, archived, and add custom filter options. You can choose from options like project manager, customer, status, and add custom group options under the group by option section. Lastly, there are sub-options for favorites, like add to my dashboard options and store the current search. You can use each of these alternatives appropriately.
You will receive information about each project, including its name, the number of tasks allocated, and the total number of hours needed to complete each work.

Every stage has three dots, which makes it easier for you to understand the different phases of each project. The person who created the project is depicted in a tiny circle next to the edit. Now, by clicking the three dots in the upper right corner of the screen, you may access several options, including the ability to examine tasks, timesheets, sales orders, and project updates. Task analysis can also be used to create a burndown chart for a specific project by using the reporting option. Additionally, you have alternatives that you can utilize as needed, such as Settings and Share Project. You can obtain a comprehensive overview of the project and its associated details by choosing a specific one from the given list.
Project updates and profitability
As you click on Project Updates, the screen that appears below will pop up. As a result, the project updates will display the updates.
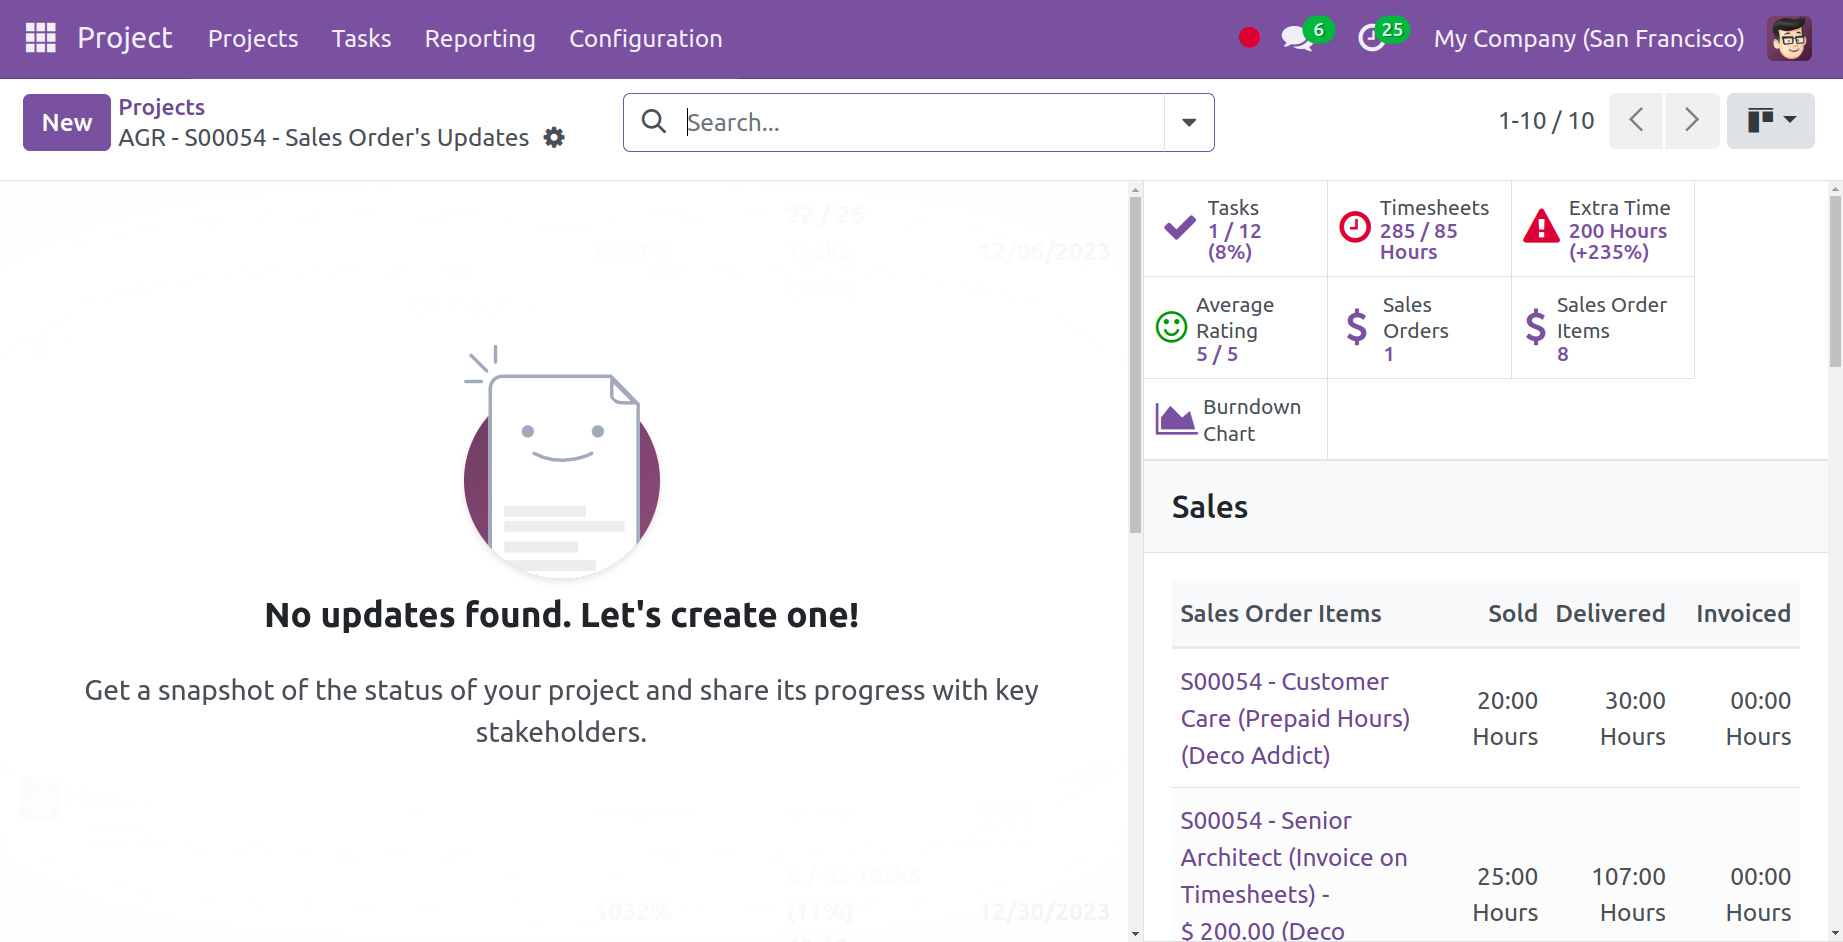
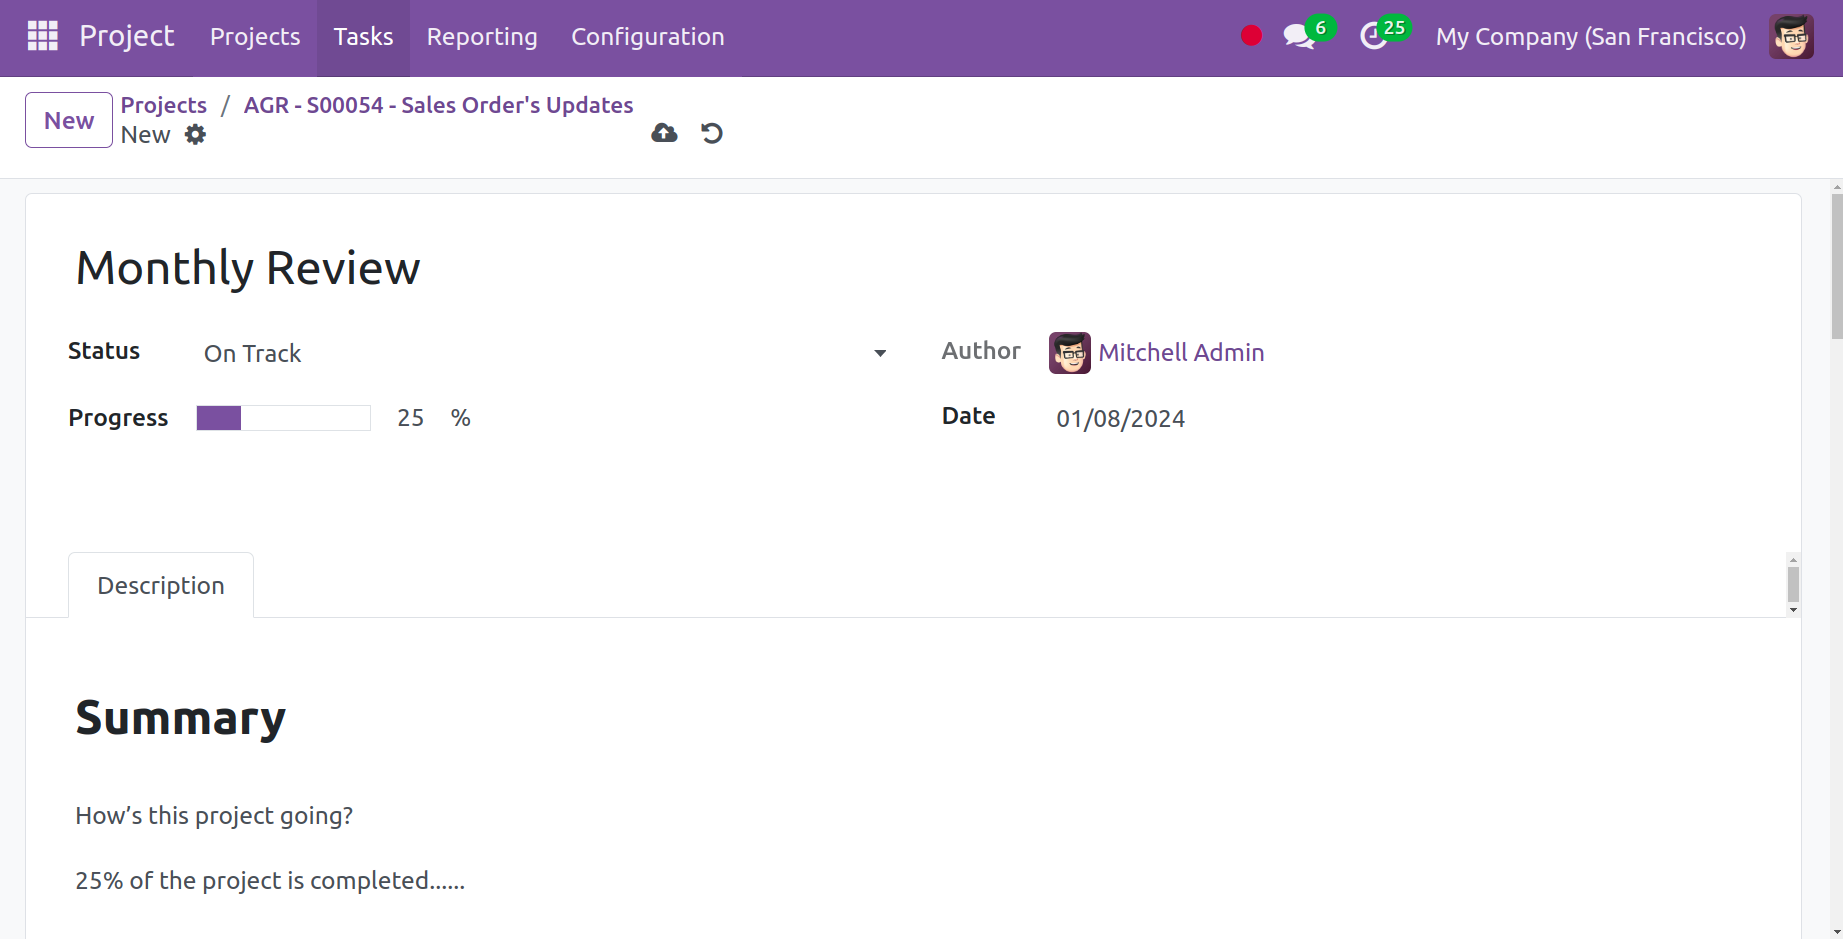
Click the New button to add a new entry. Put the author's name, date, title, and progress in. It is then feasible to include a description.
The total number of produced tasks, customer ratings, sales orders, timesheet, and user-added extra time are displayed on the right side of the screen. From there, you can also see the project's Burn Down Chart.
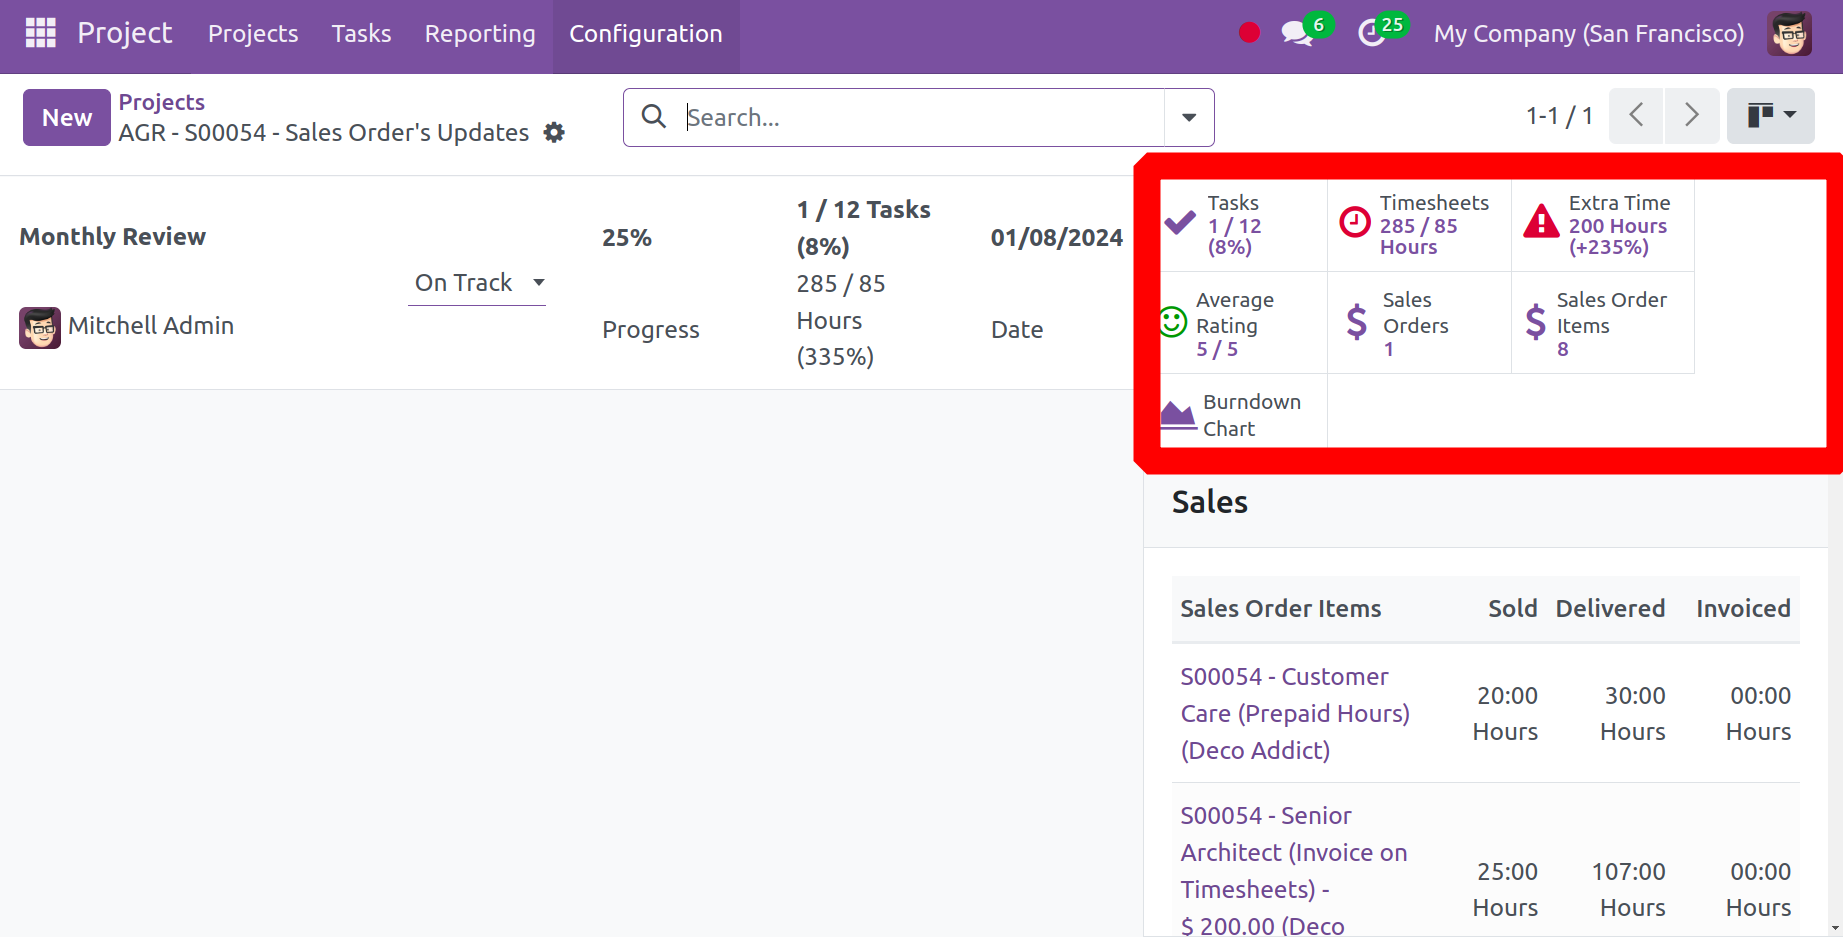
The project profitability can be estimated from the project updates. It depicts the revenue generated from the project and the cost or expense that occurred during the project. Hence the difference will give the profitability of the project. As the difference is a positive value, it defines the project as in profit.
Burn Down Chart
A burndown chart is only a graphical depiction that aids in the user's comprehension of the status of tasks. The tasks completed in each month are displayed in the image below, along with their corresponding stages. It's really simple to grasp because different stages are displayed in different colors.

The Profitability section on the right side of the screen is where you may also calculate the profitability of a project. The profitability of a project is determined by subtracting total costs from total revenue.
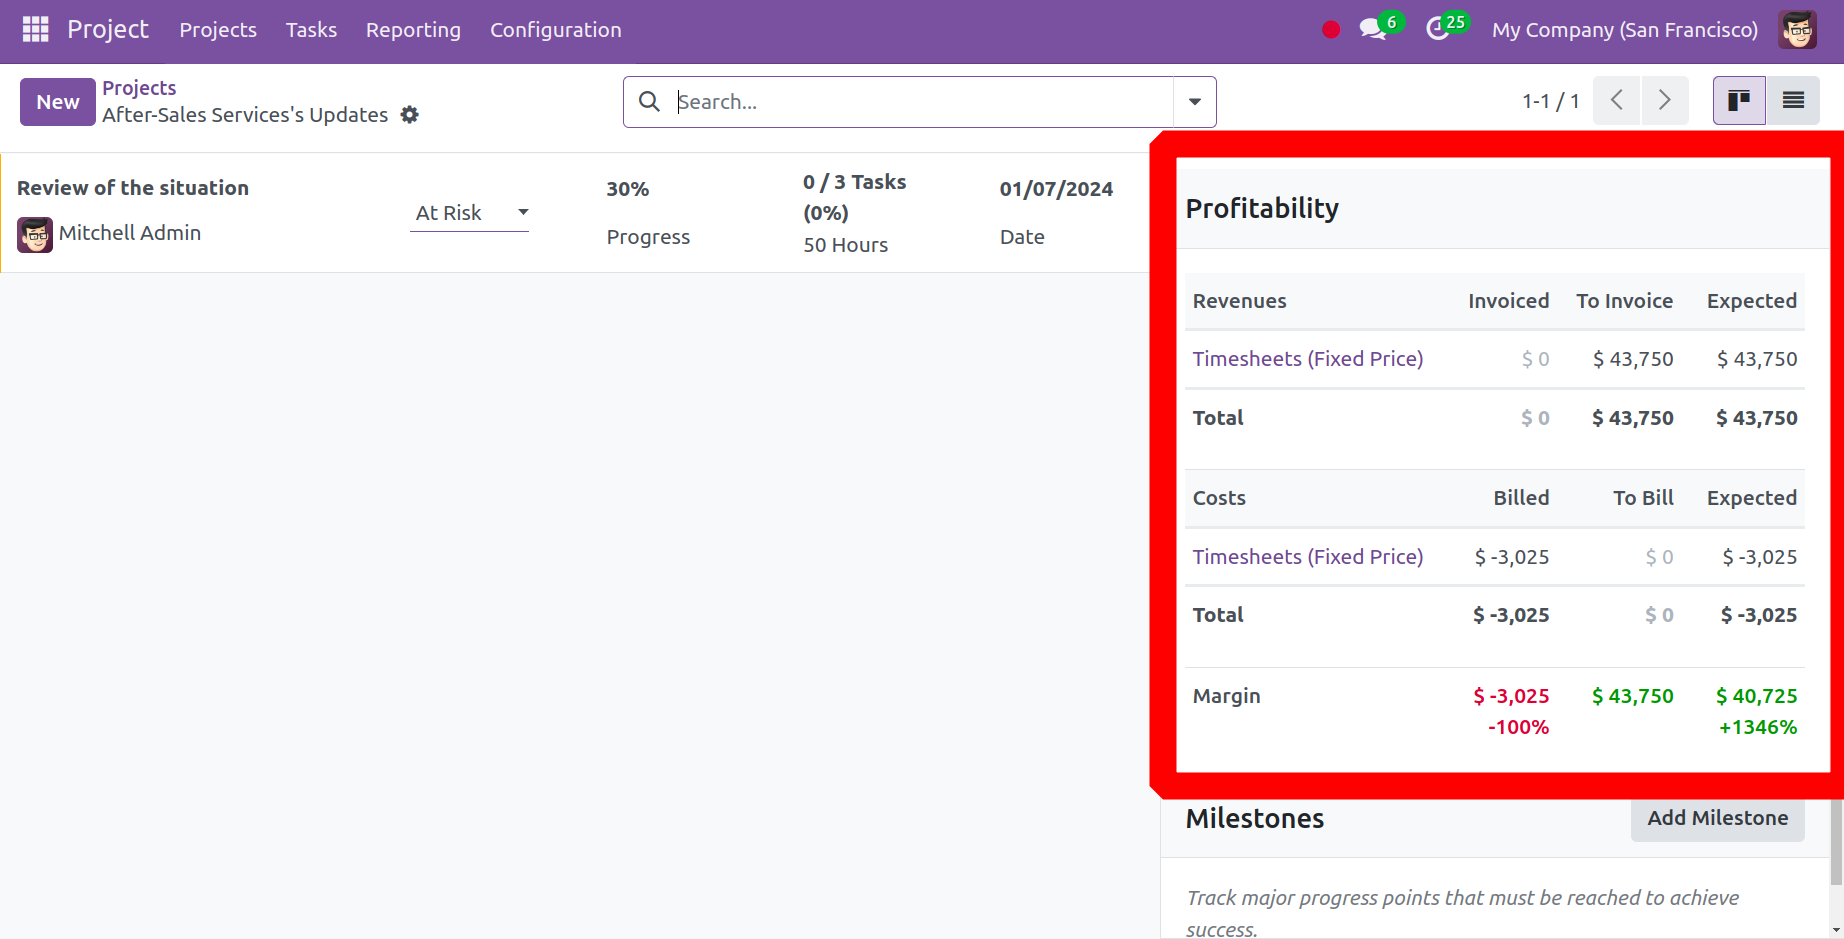
The project's total revenue and cost can be seen individually in the Profitability section as shown in the image above.
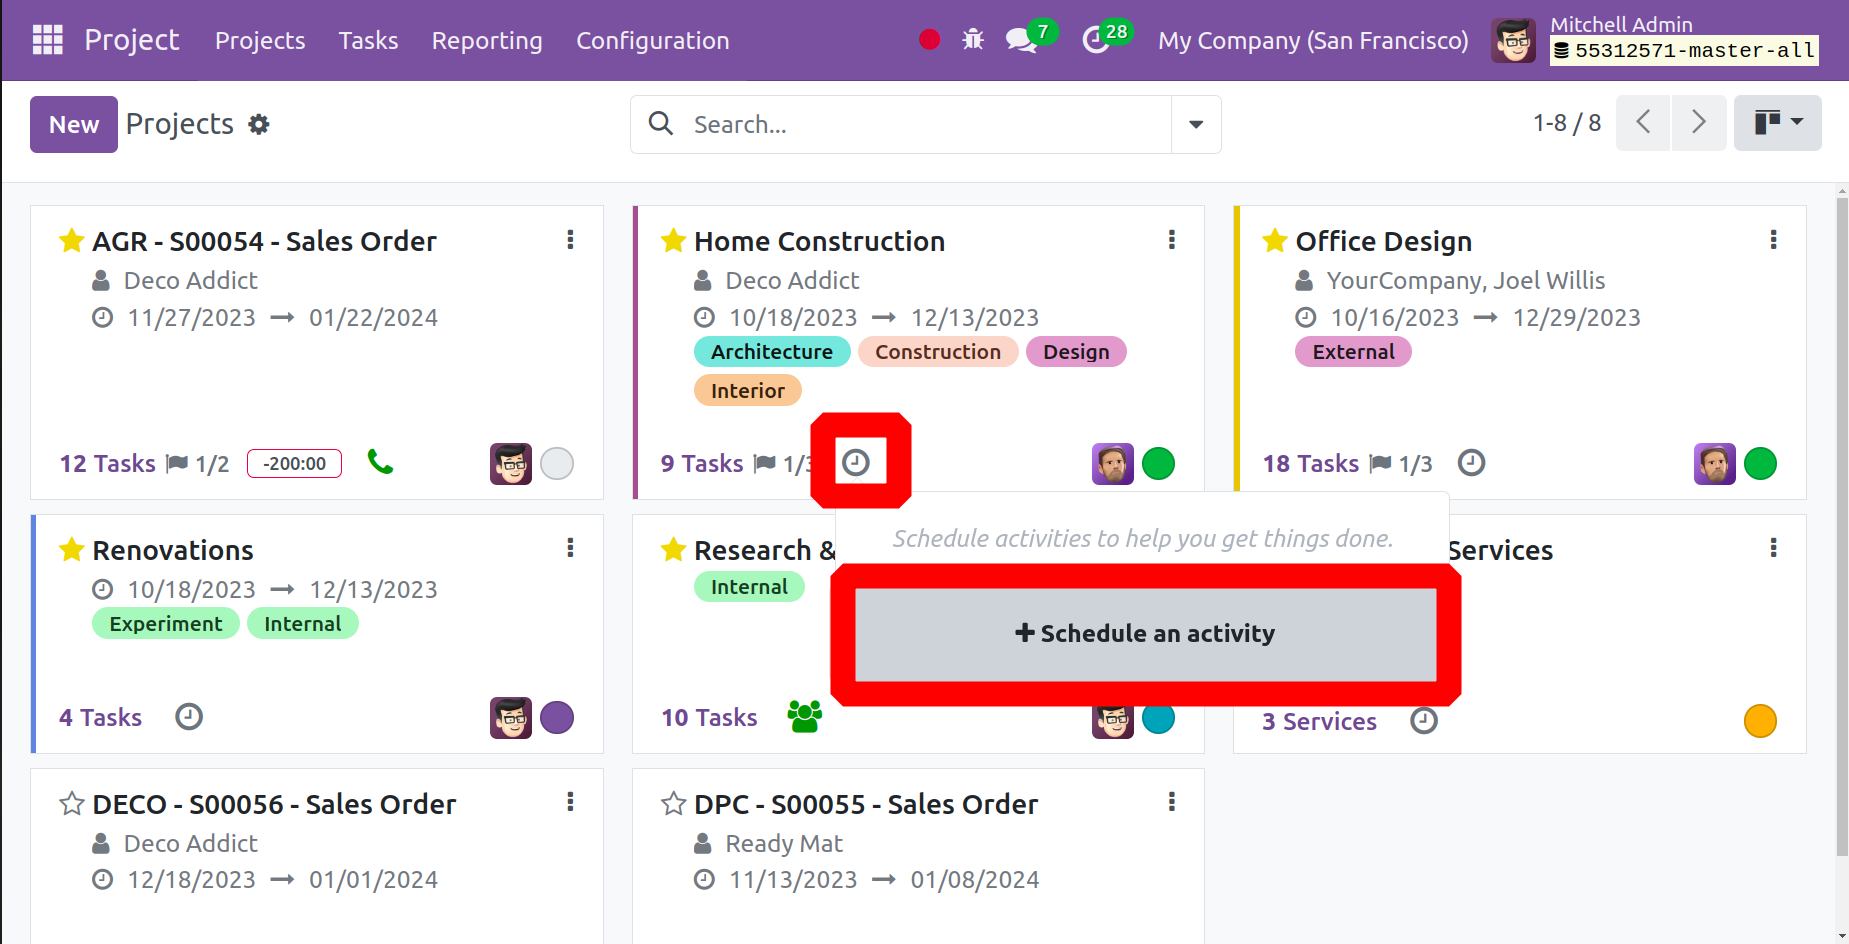
The ability to schedule an activity is now available to you; this feature aids in arranging an activity and is shown by an icon that resembles a clock.
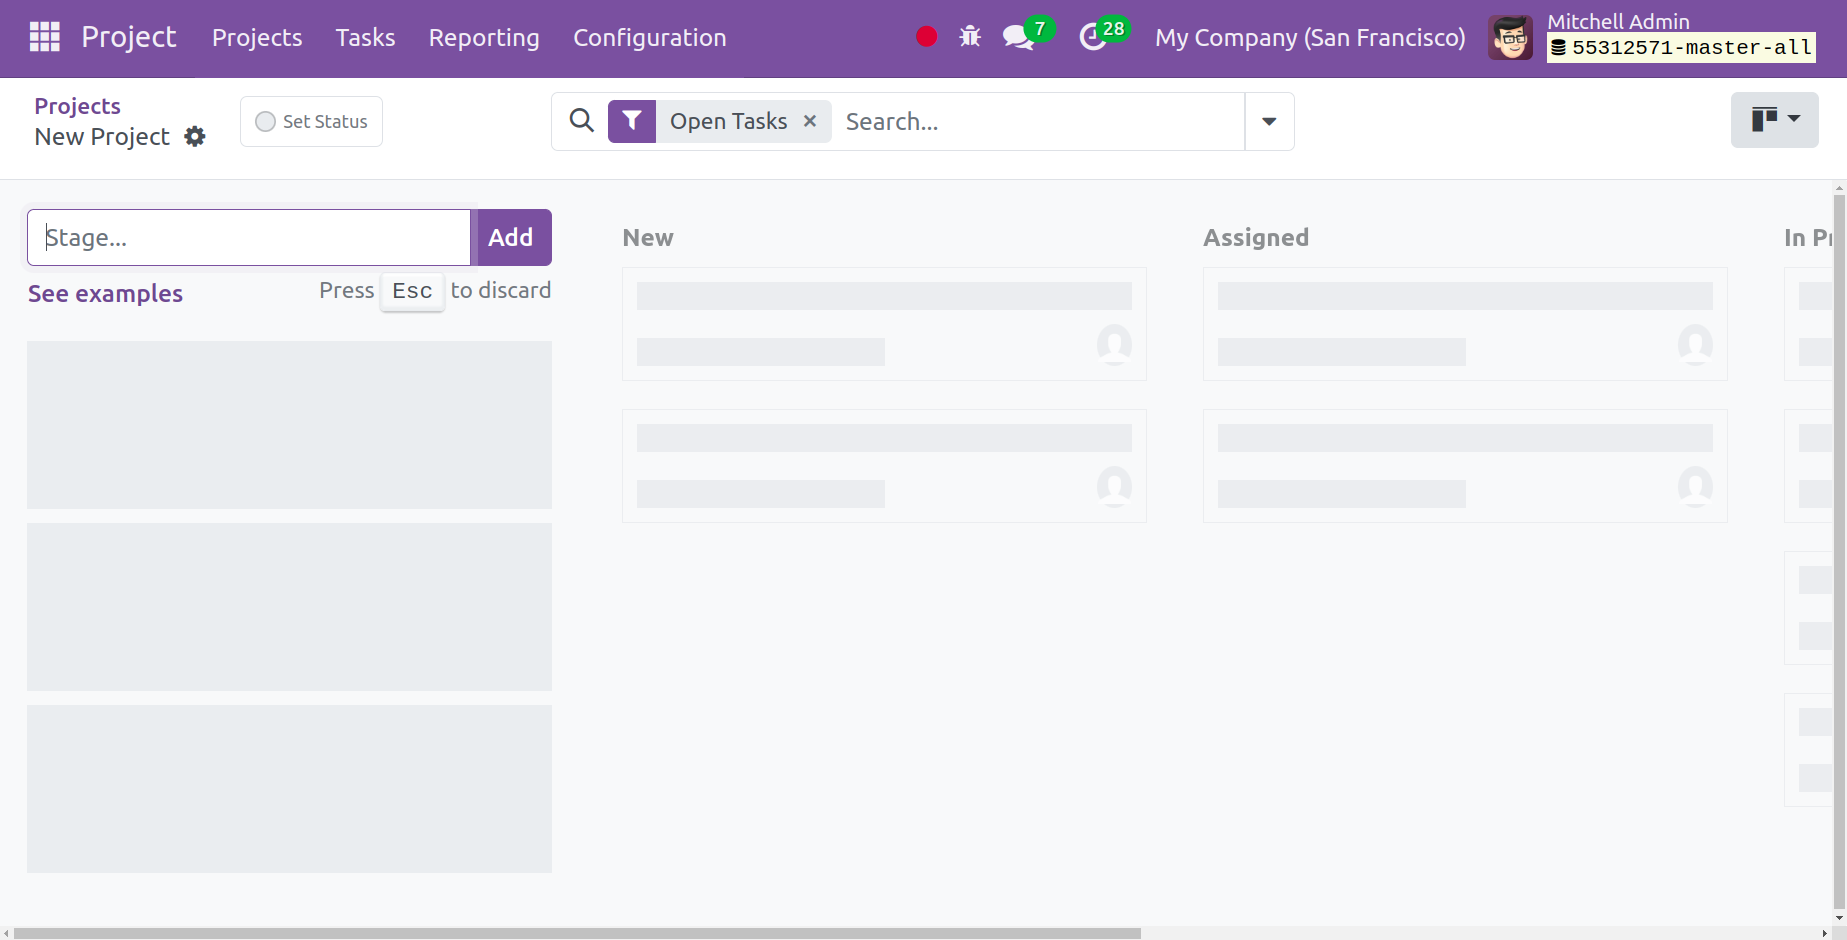
You can simply create a project on your own by following the steps listed below with the New symbol. When you choose New, like in the screenshot below, you will be taken to the project's creation page.
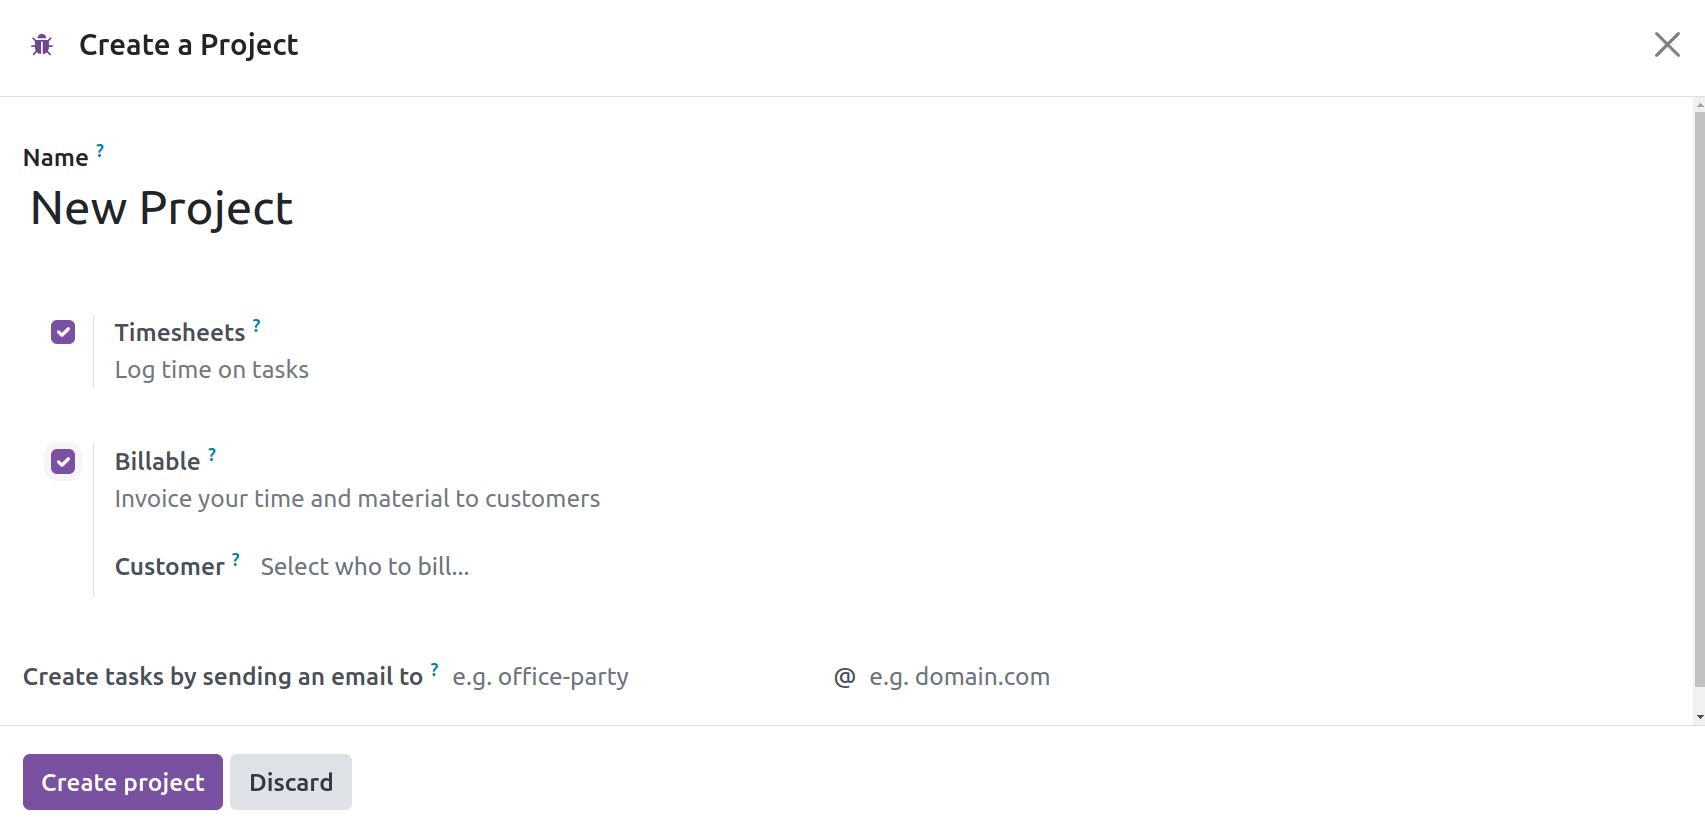
The page displays the available options, including the option to trigger a Billable field underneath the space designated for the project name, which must be entered. You may quickly invoice the time and materials used on the assignment with the help of this option. The Timesheet will be activated in the project well when the option to activate the timesheet is selected below. Once you have completed entering all necessary information, select Create Project. When you choose the "Create Project" option, a new page will appear where you can quickly add more tasks to the already-created project. The screenshot below represents the new page.
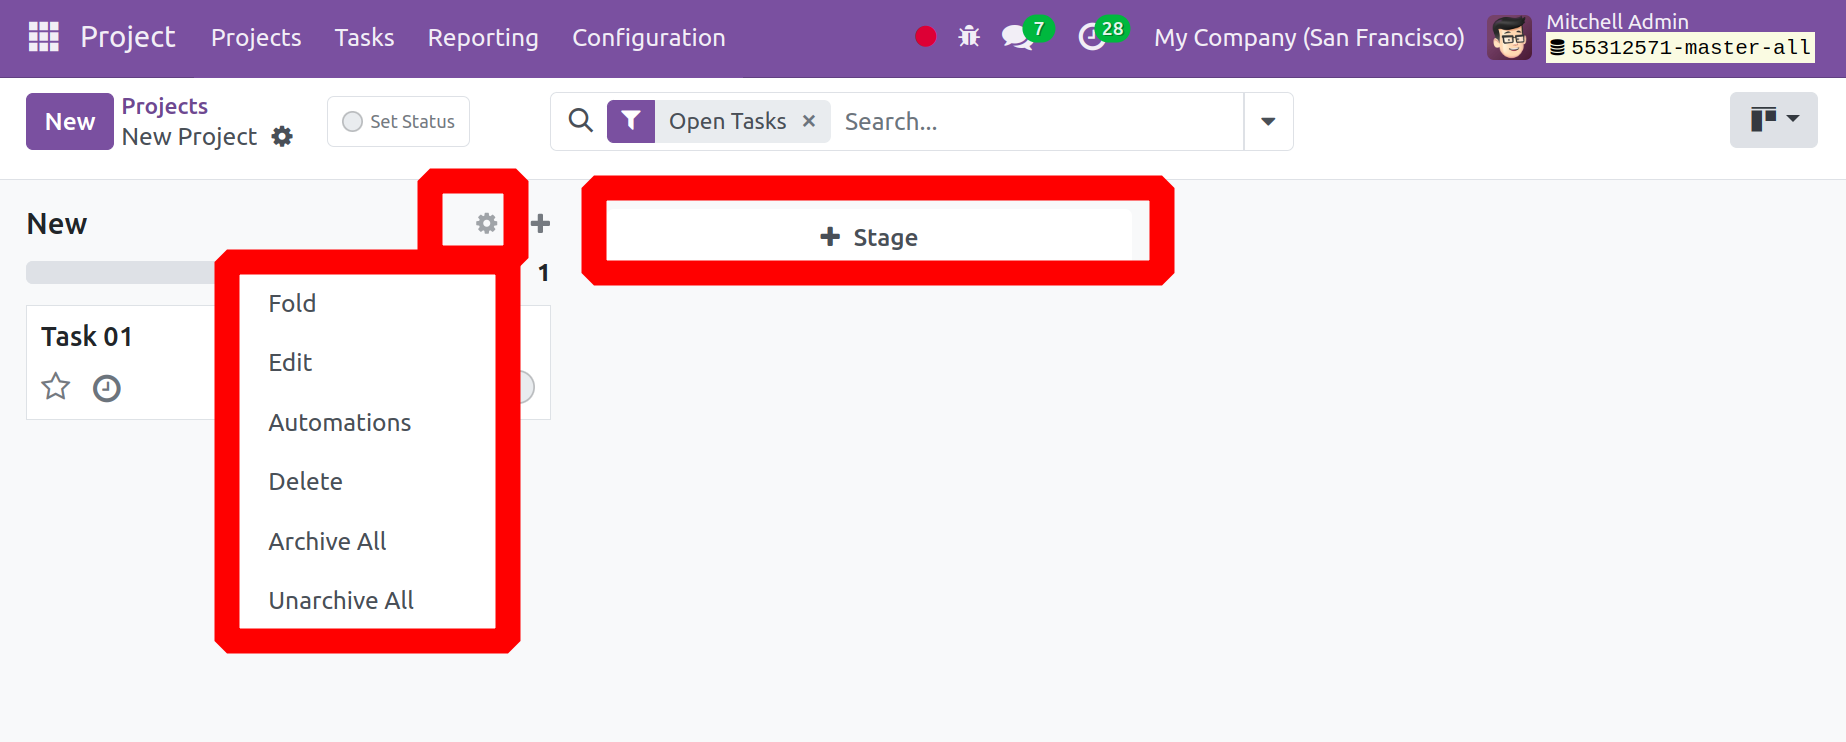
You can see the alternatives on the page, such as putting the task to the designated spot. In order to add the newly generated column to the list, you can alternatively enter the column title in the designated space and then choose the add icon.
The newly added Stage has three dots located in the top right corner. A tiny settings icon is also given to you, containing options like fold, edit stage, automations, delete, archive all, and unarchive all, in that order.
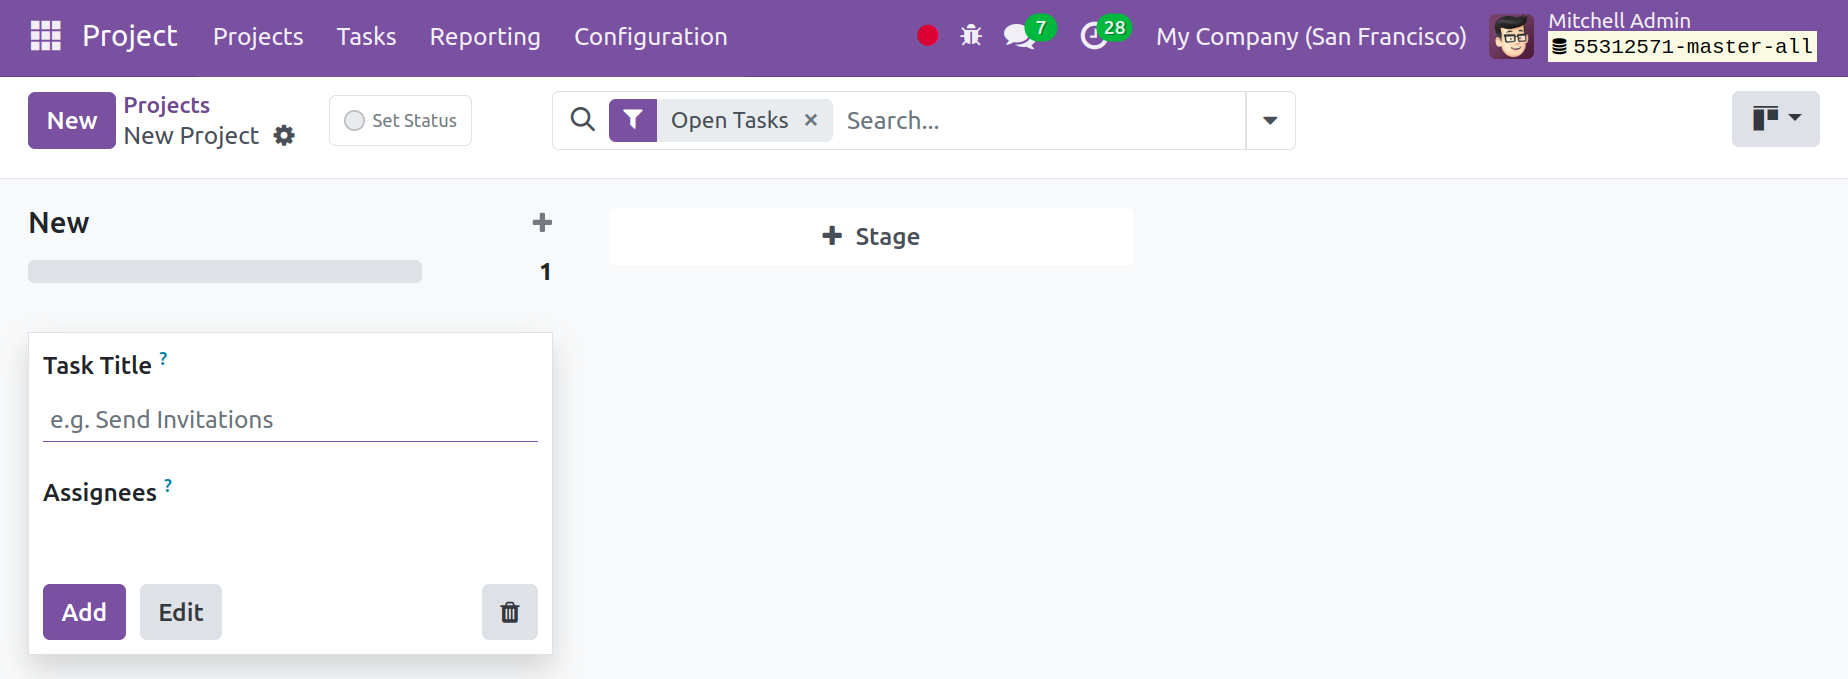
Additionally, you can utilize the plus icon to add a new task. You will be prompted to enter the task title and the names of the employees when you pick the Add icon.
As previously said, this area allows you to add the task and, if needed, make the appropriate modifications. If the stage is not needed, you may easily remove it by utilizing the detail icon that is located in the stage's lower right corner. The three vertical dots can now be utilized for the tasks of sharing, altering, and configuring the cover picture.
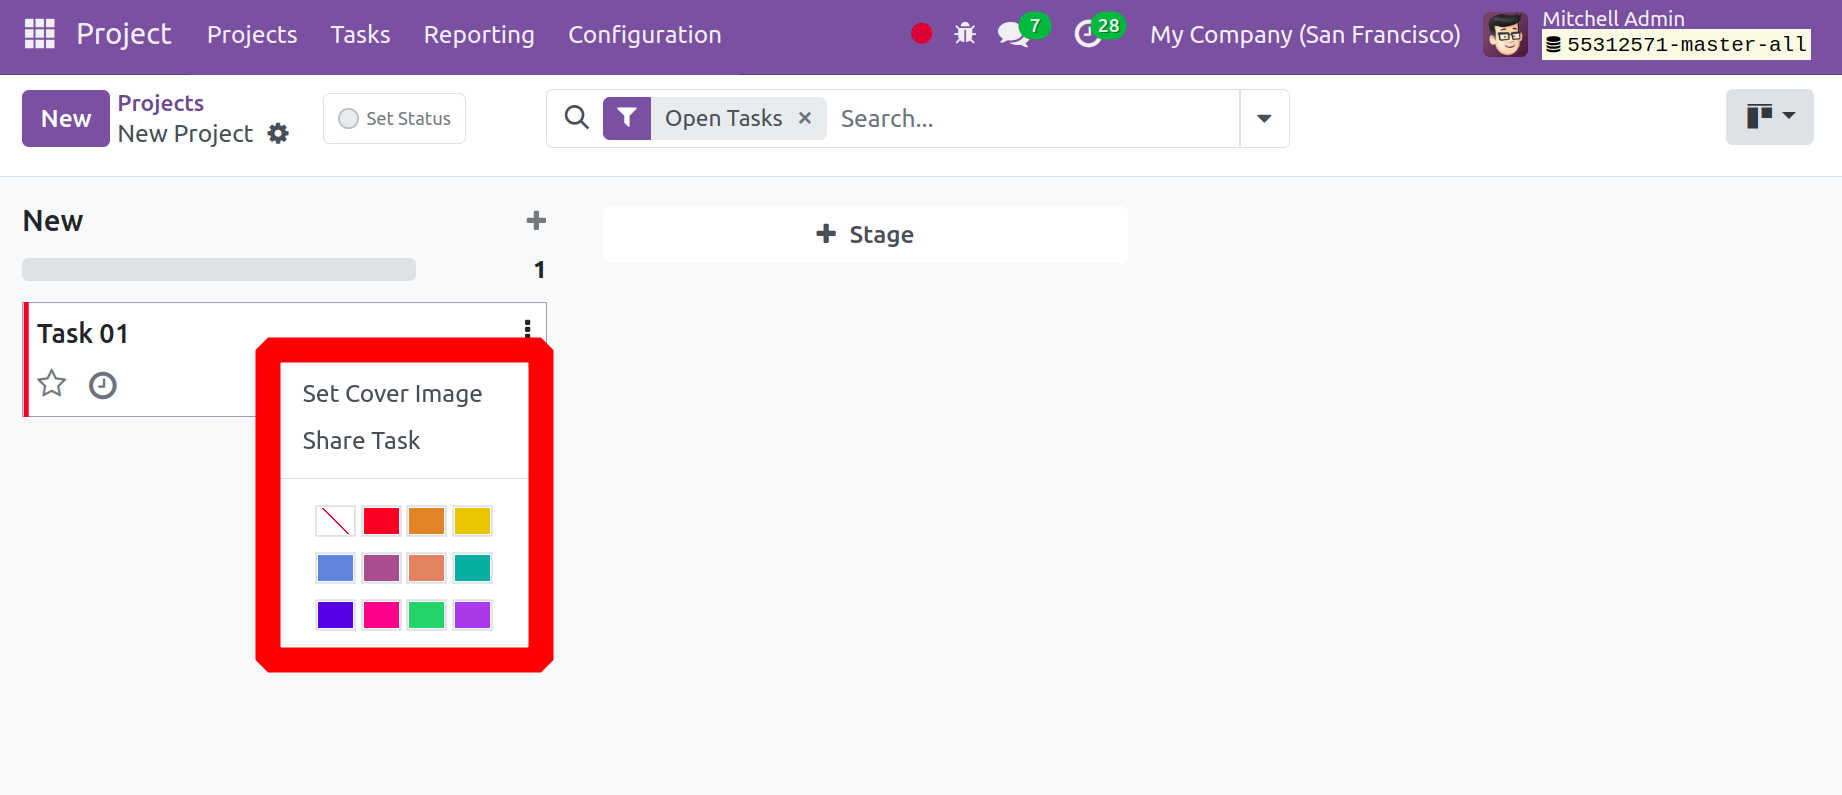
In this section, you will find color schemes and useful tools like share, and set cover pictures. As you can see in the screenshot below, a box will emerge when you click the option to set the cover image.

The upload and set options are available to you here. It can be applied appropriately to obtain a fresh cover image for the assignment.
Next, select the Add option if the task needs any revision. Next, select the Edit option, where the modification is available. As seen in the screenshot below, the option will be visible.
You can now choose to amend the newly added task if necessary by selecting it. In other words, you can use the options if there need to be any corrections. The edit page will look like the one in the screenshot below.
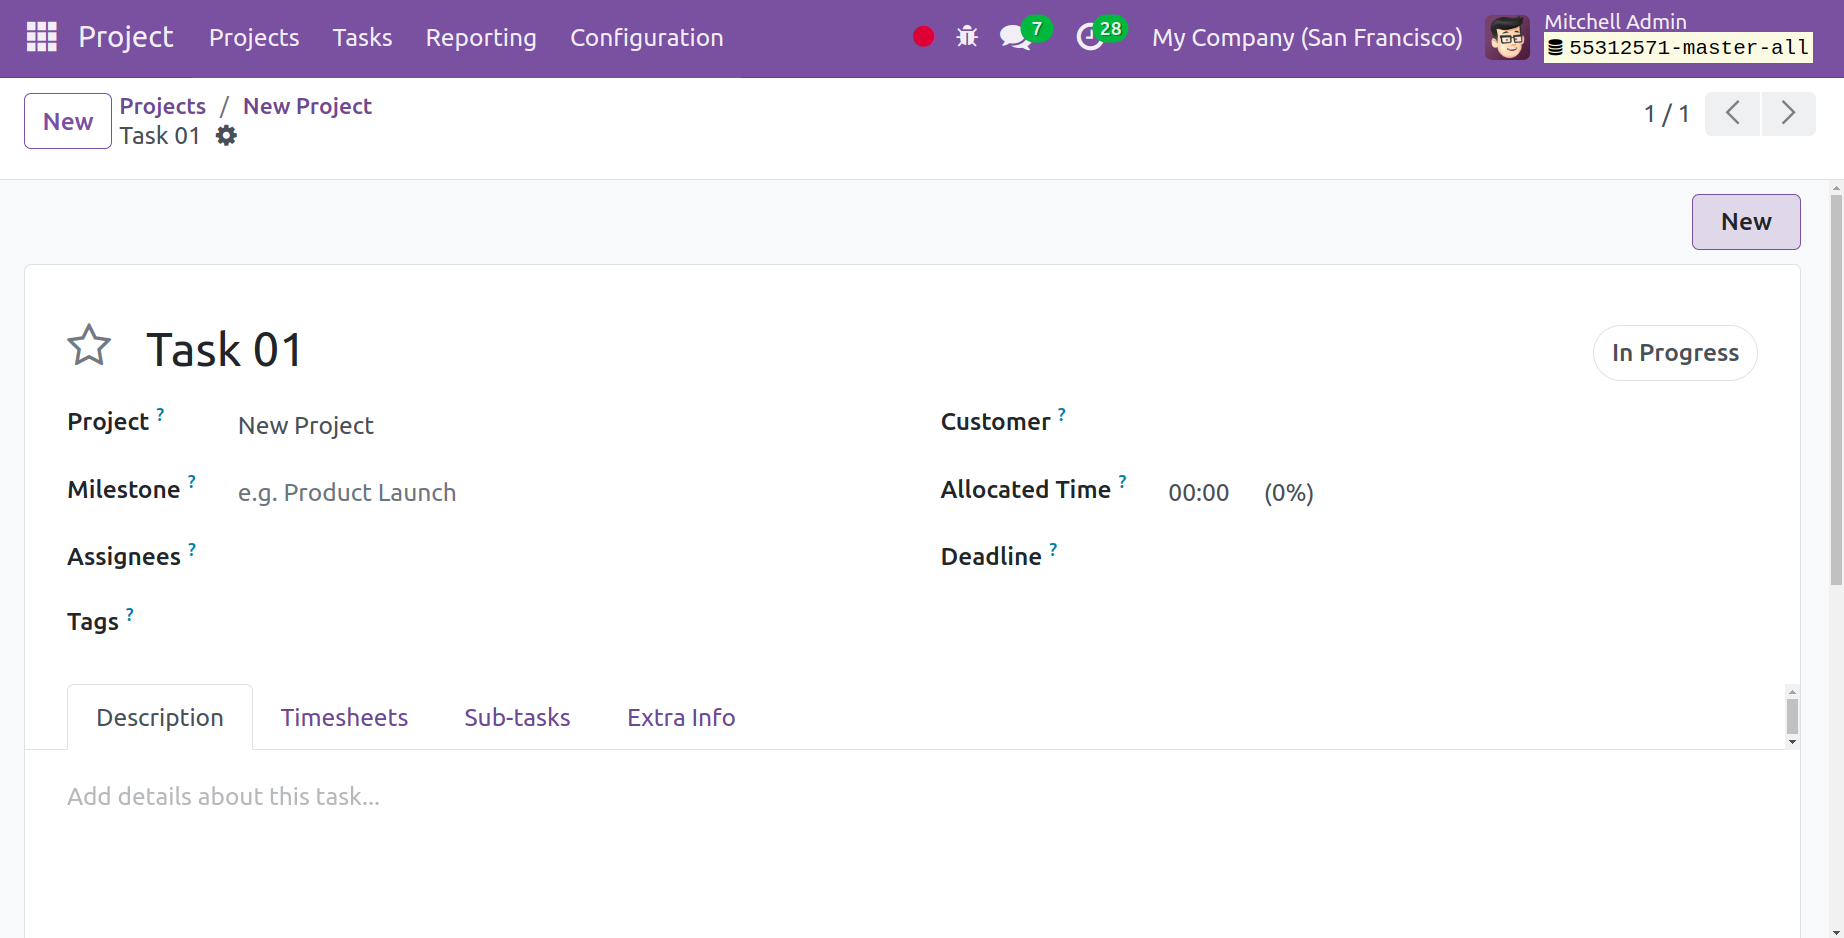
The editing page allows you to set the parent task in addition to providing the name of the task, project, and list of assignees for that specific project. It is also possible to enter the customer's name, the work deadline, and relevant tags. A sales order will become available when the customer is selected in the designated area. The time spent on the task can be added using this option, which makes it easier to invoice the chosen item. If you establish a Milestone, you may attach it to a sales order item and have the service delivered automatically when the milestone is reached. You can provide a brief summary of the assignment you are working on in the Description tab.
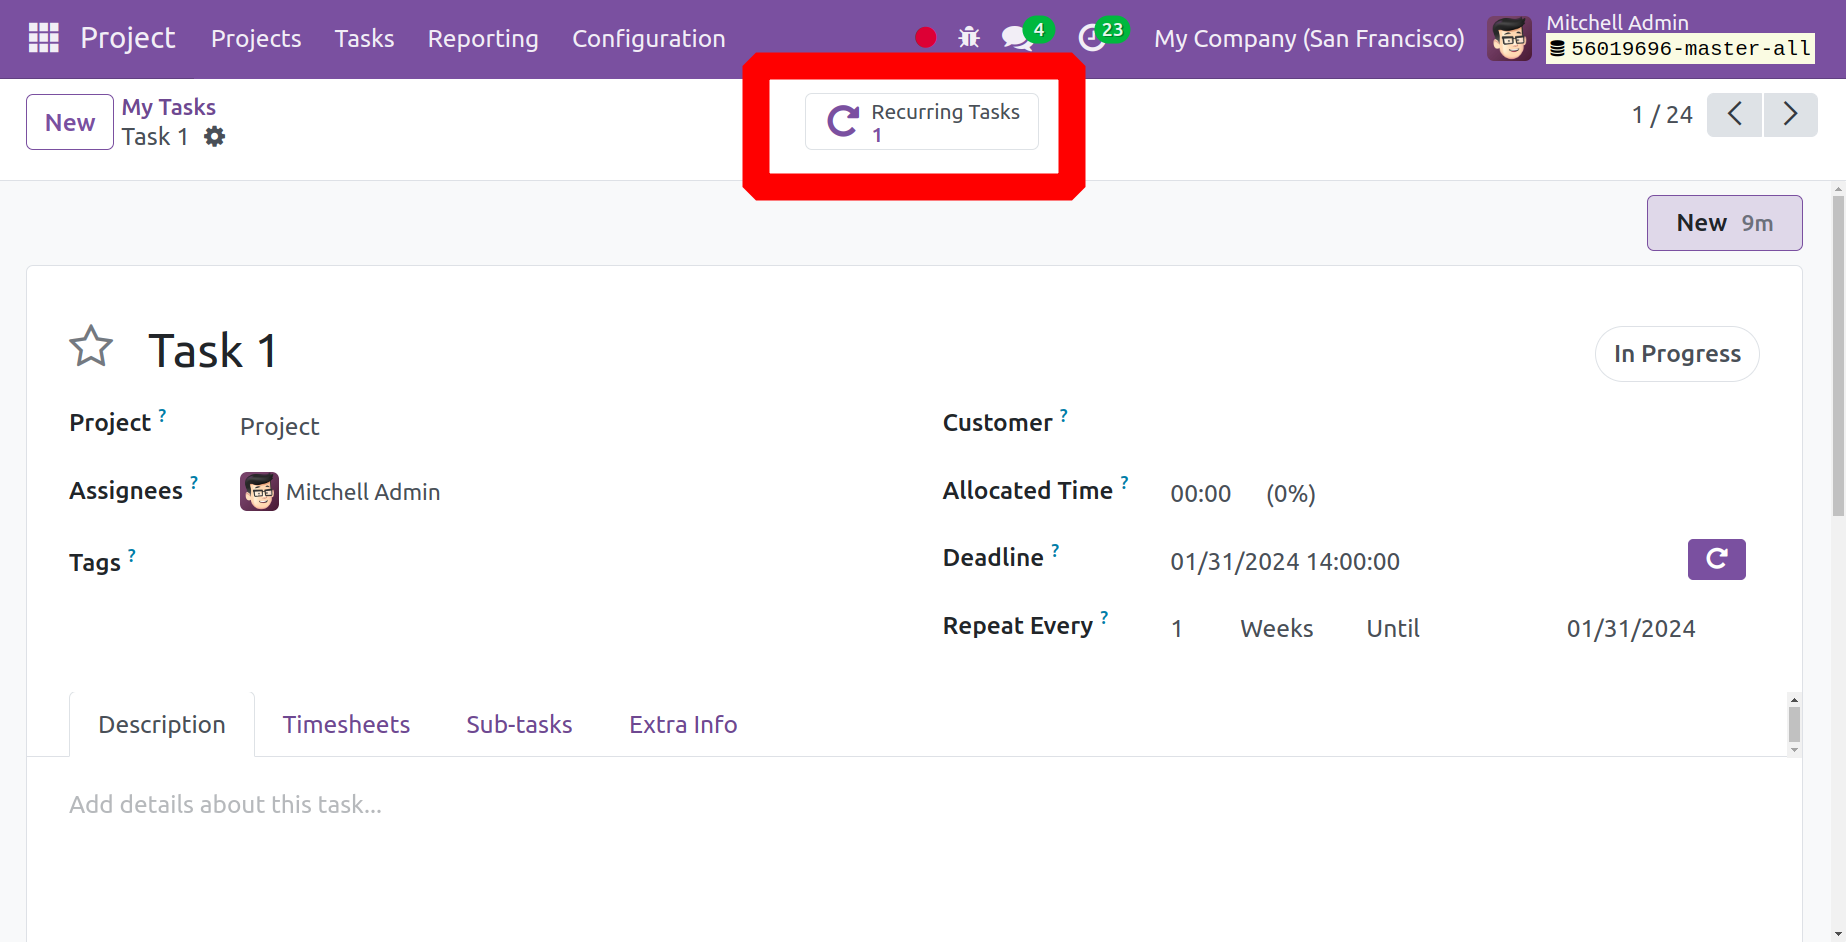
You can enable the Recurring Task option from the Configuration Settings to repeat tasks automatically if you want the task to repeat itself at predetermined intervals.
After giving the task a deadline, click the Recurrent button that is next to the Deadline box. Thus, there will be a new field called Repeat Every. There, bring up the repeat interval.
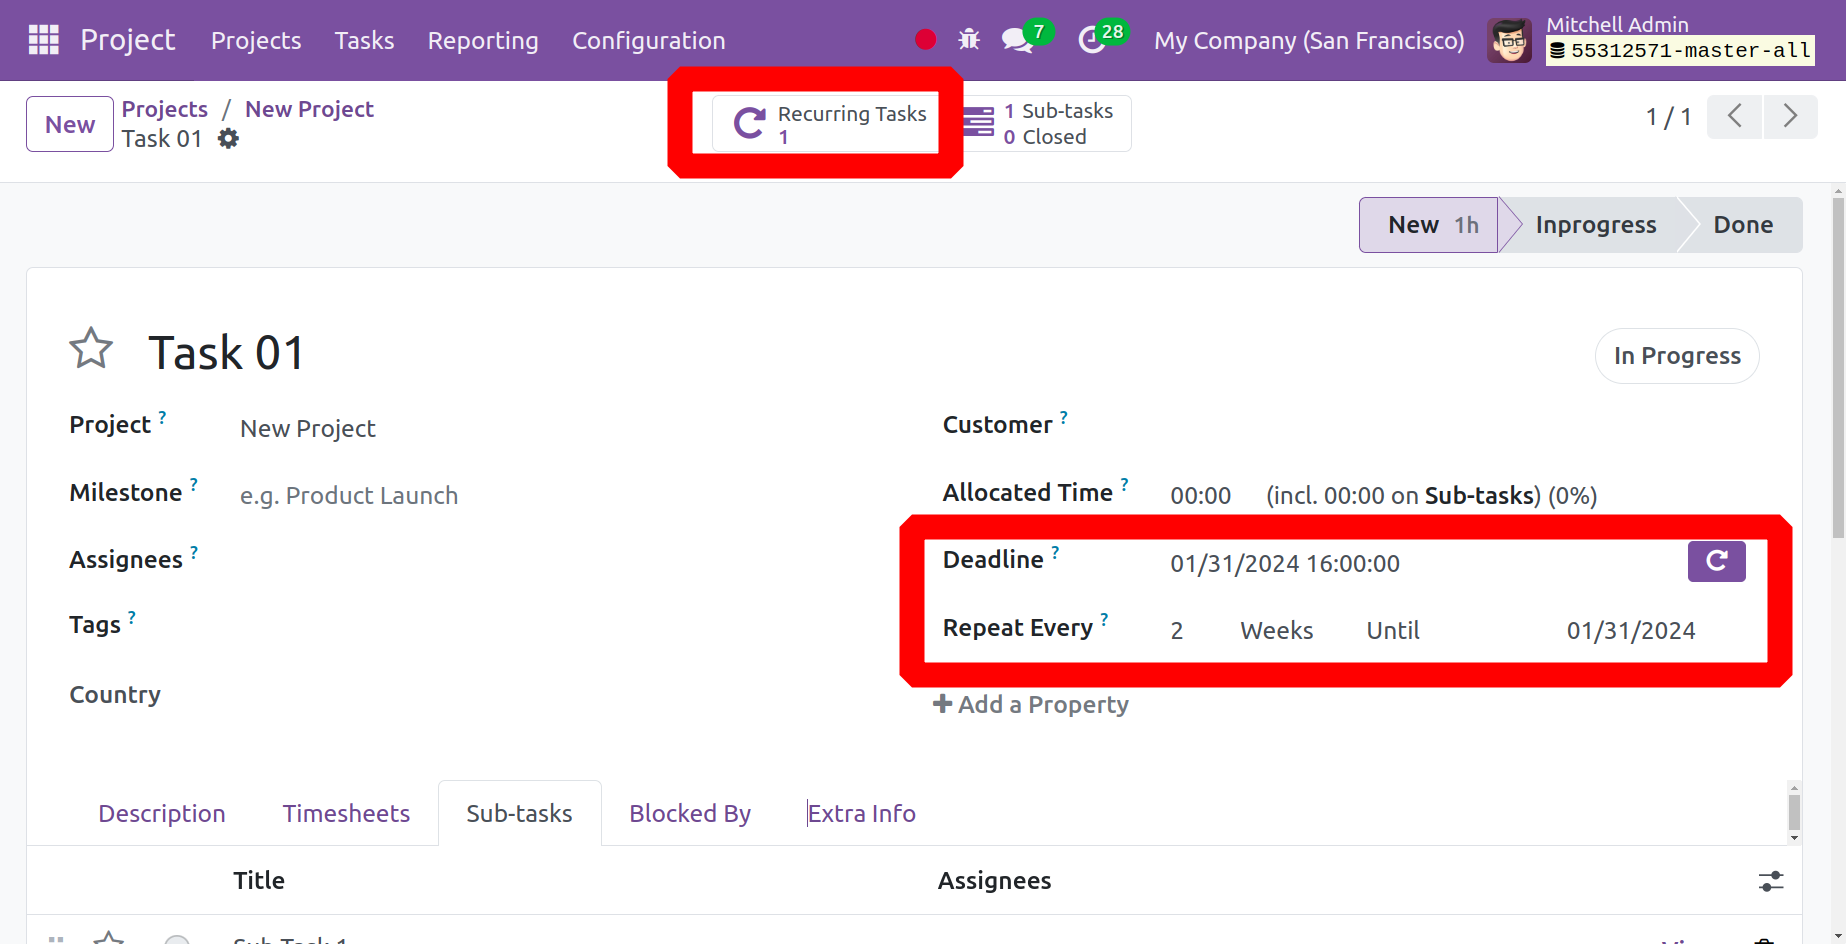
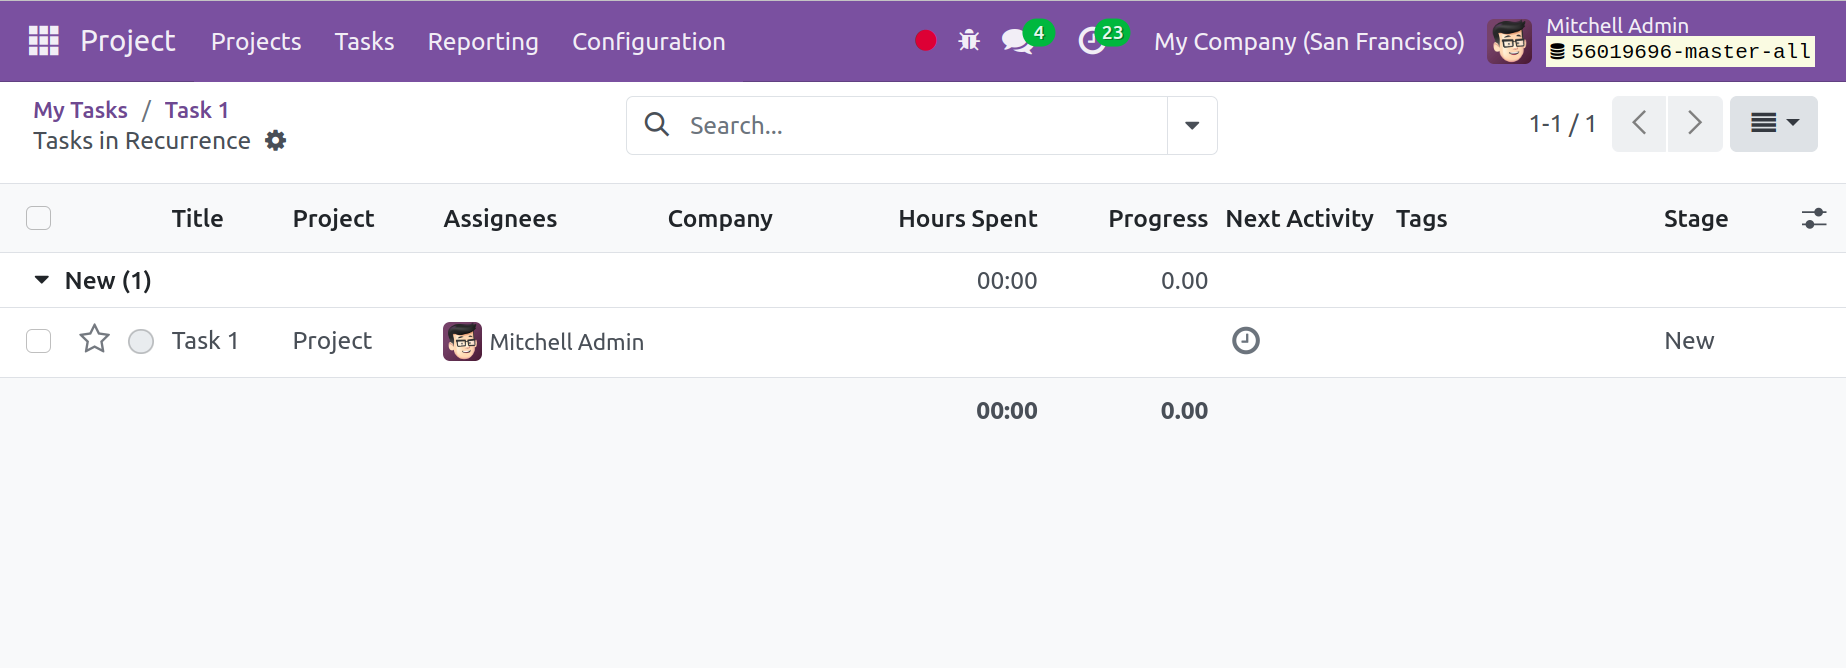
The dates you have selected to finish this task will be shown on a smart tab that you will receive. If you establish a recurrence for a job, it will run automatically even after the current task has been marked as finished.
The Timesheet tab, which is located next to the description tab, assists you in entering the amount of time needed to complete the work. As seen in the screenshot below, you must provide certain information while choosing the timesheet.
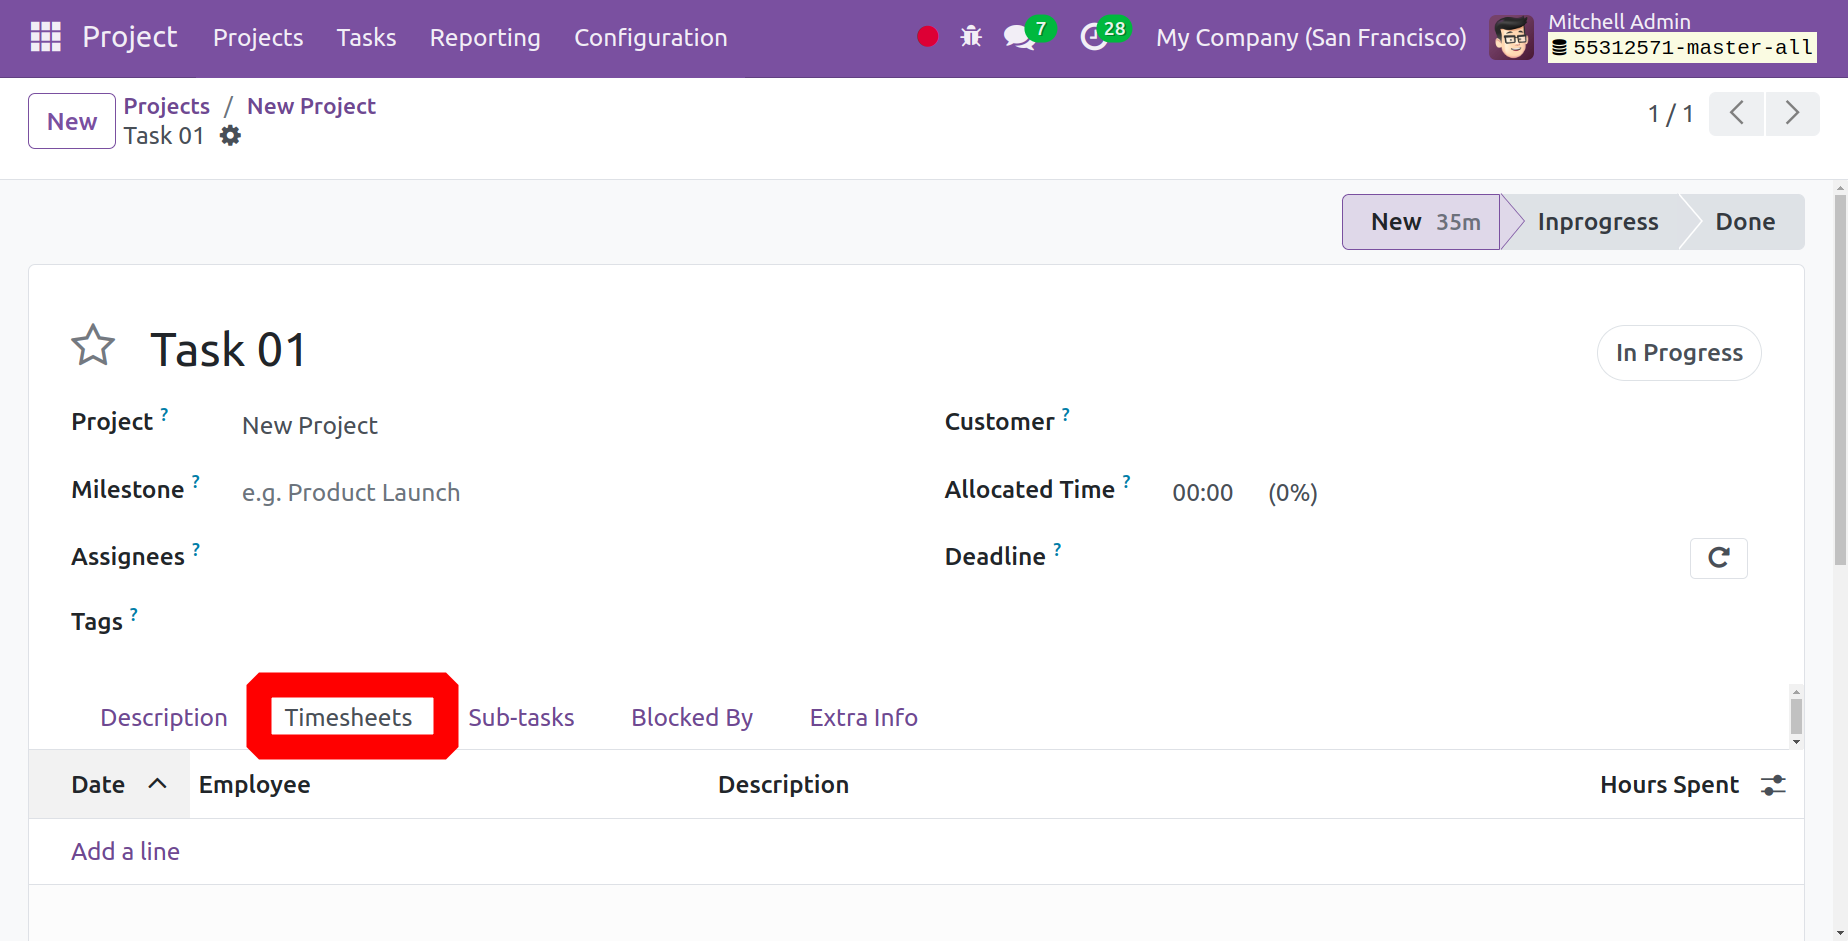
You must enter the date, the employee's name, the task description, and the number of hours worked on the task under the timesheets tab. You can record the amount of time required by allocated personnel to complete a specific task by using the Add a Line option.
Under the Sub-task tab, the subtask can also be added to the current task. The subtask pane facilitates task splitting, allowing you to divide the work into smaller milestones. As seen below, the sub-task choice will be accessible on the creation page.
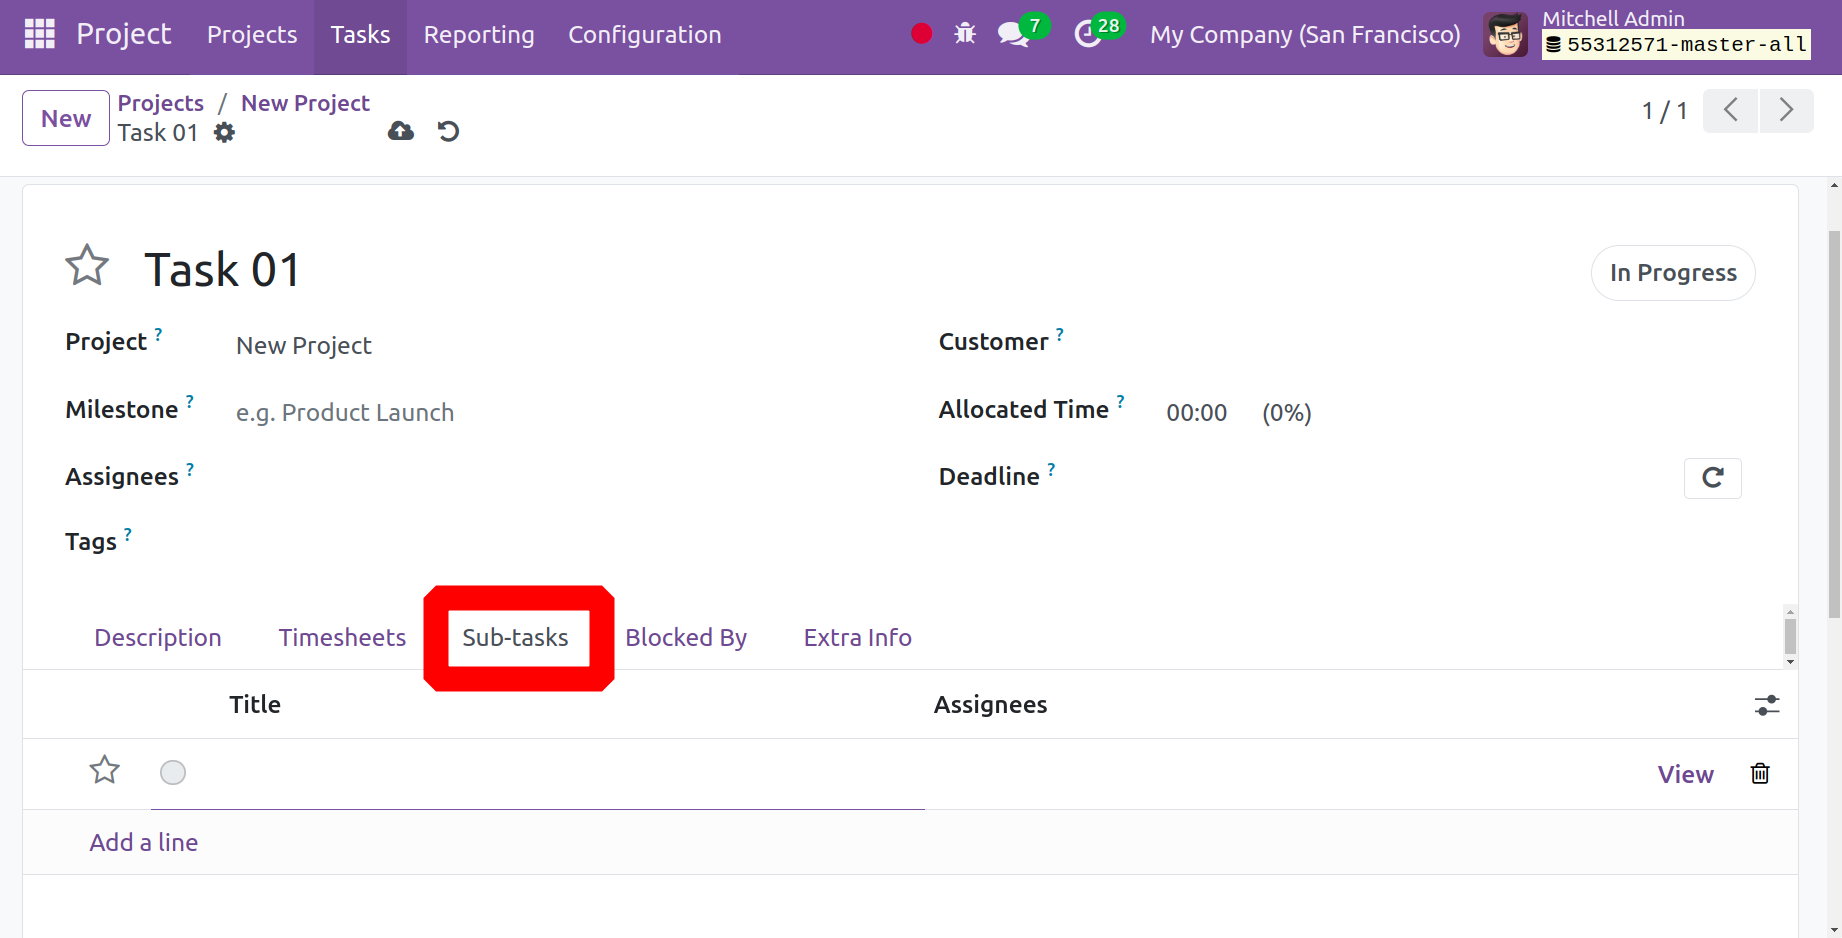
This is where the subtask choice appears in the window. The title, assignees, deadline, and phases can all be added there. For that reason, you can select the Add a Line option. You can see the newly generated task by selecting the "View" option after saving the primary task.
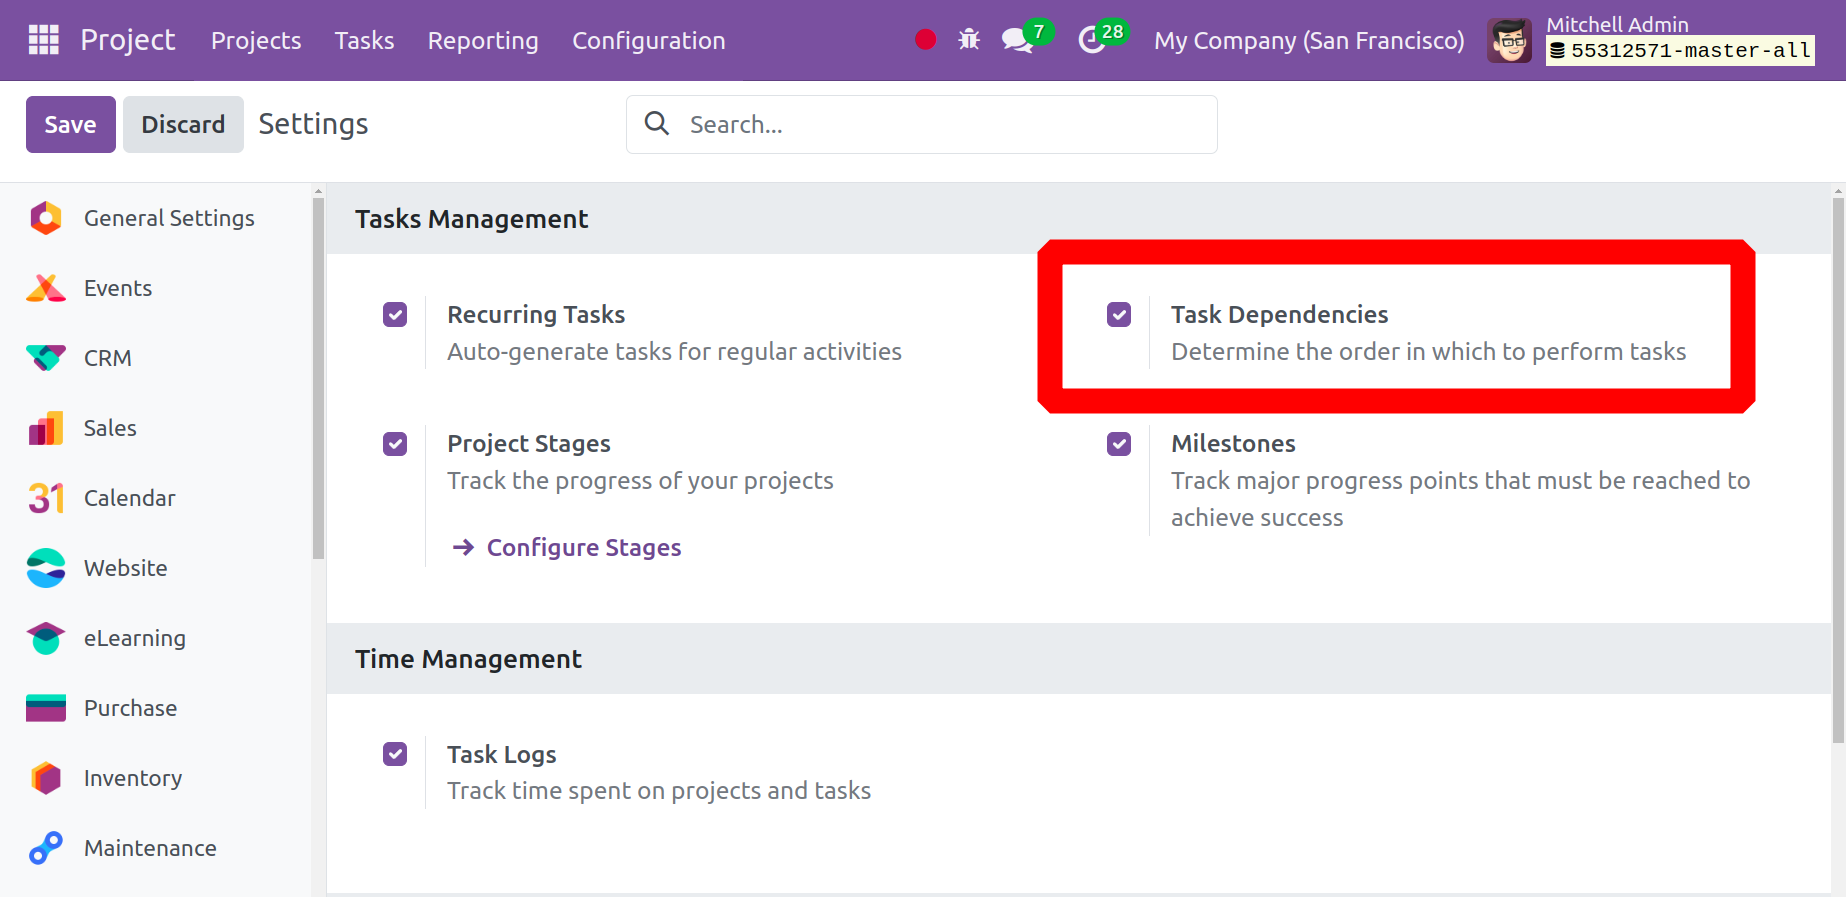
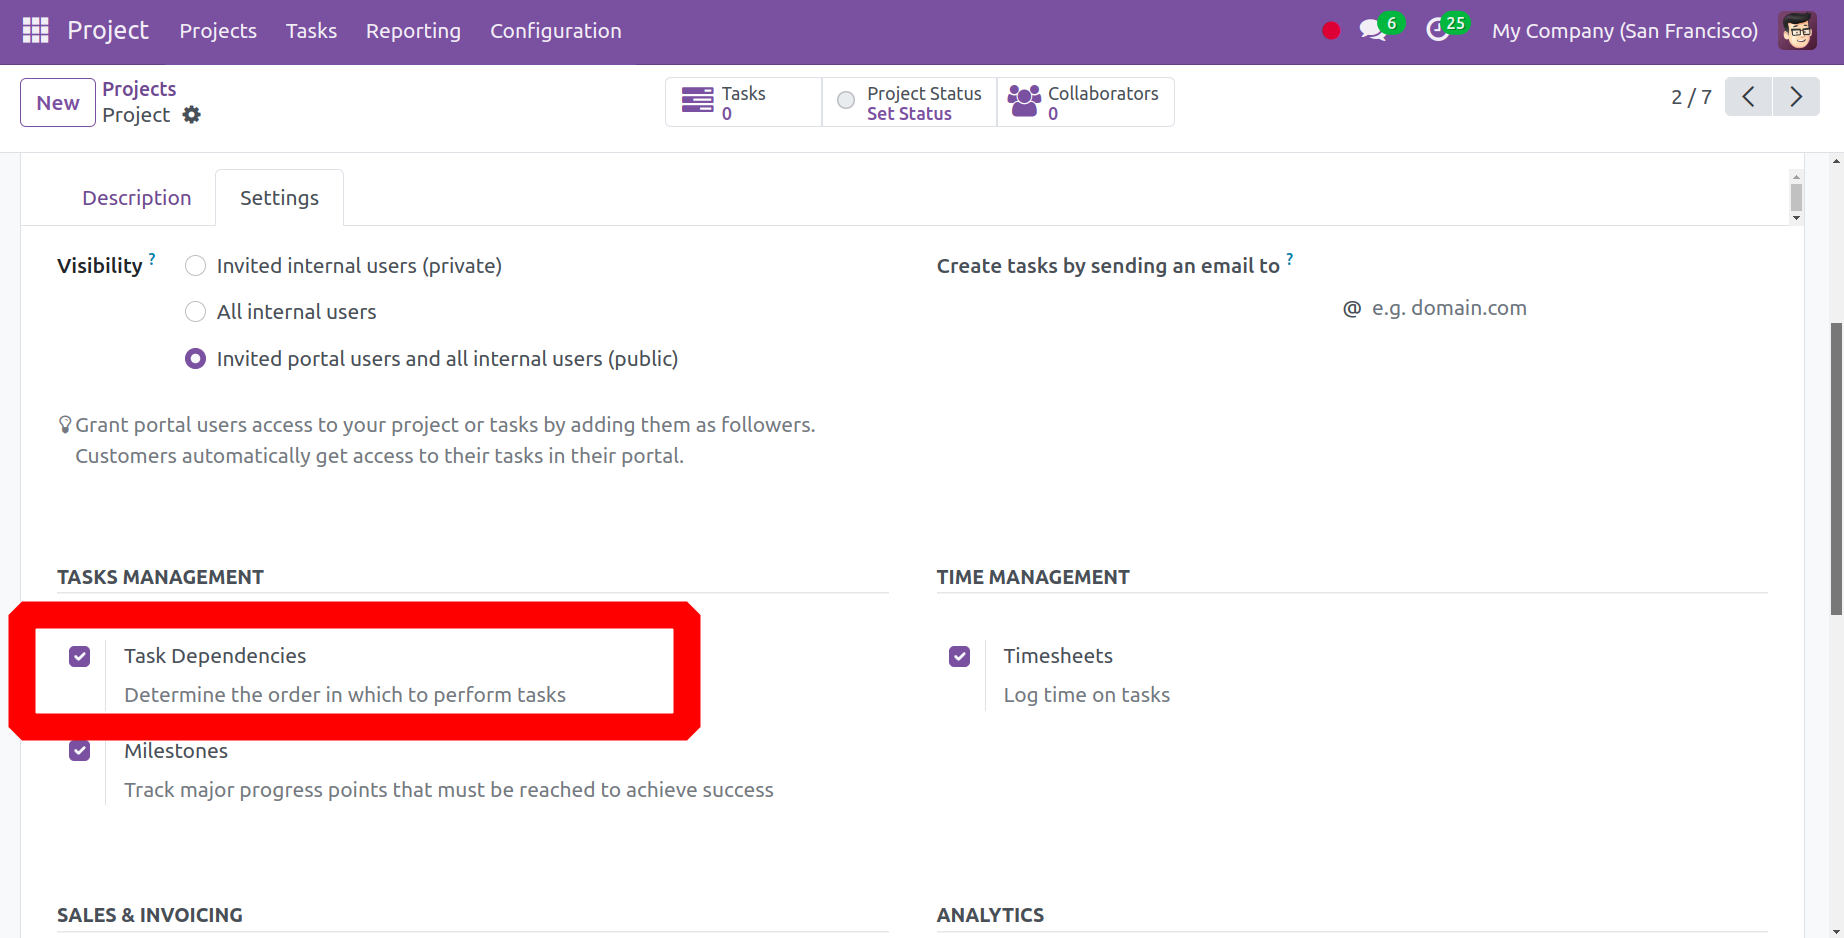
Task dependencies are now an option under the Settings option, which is accessible through the project management module's Configuration menu. You can choose which order to complete the tasks in by selecting this option. You will be taken to a new page when selecting the option from the settings. As seen in the screenshot below, this is the configuration choice.
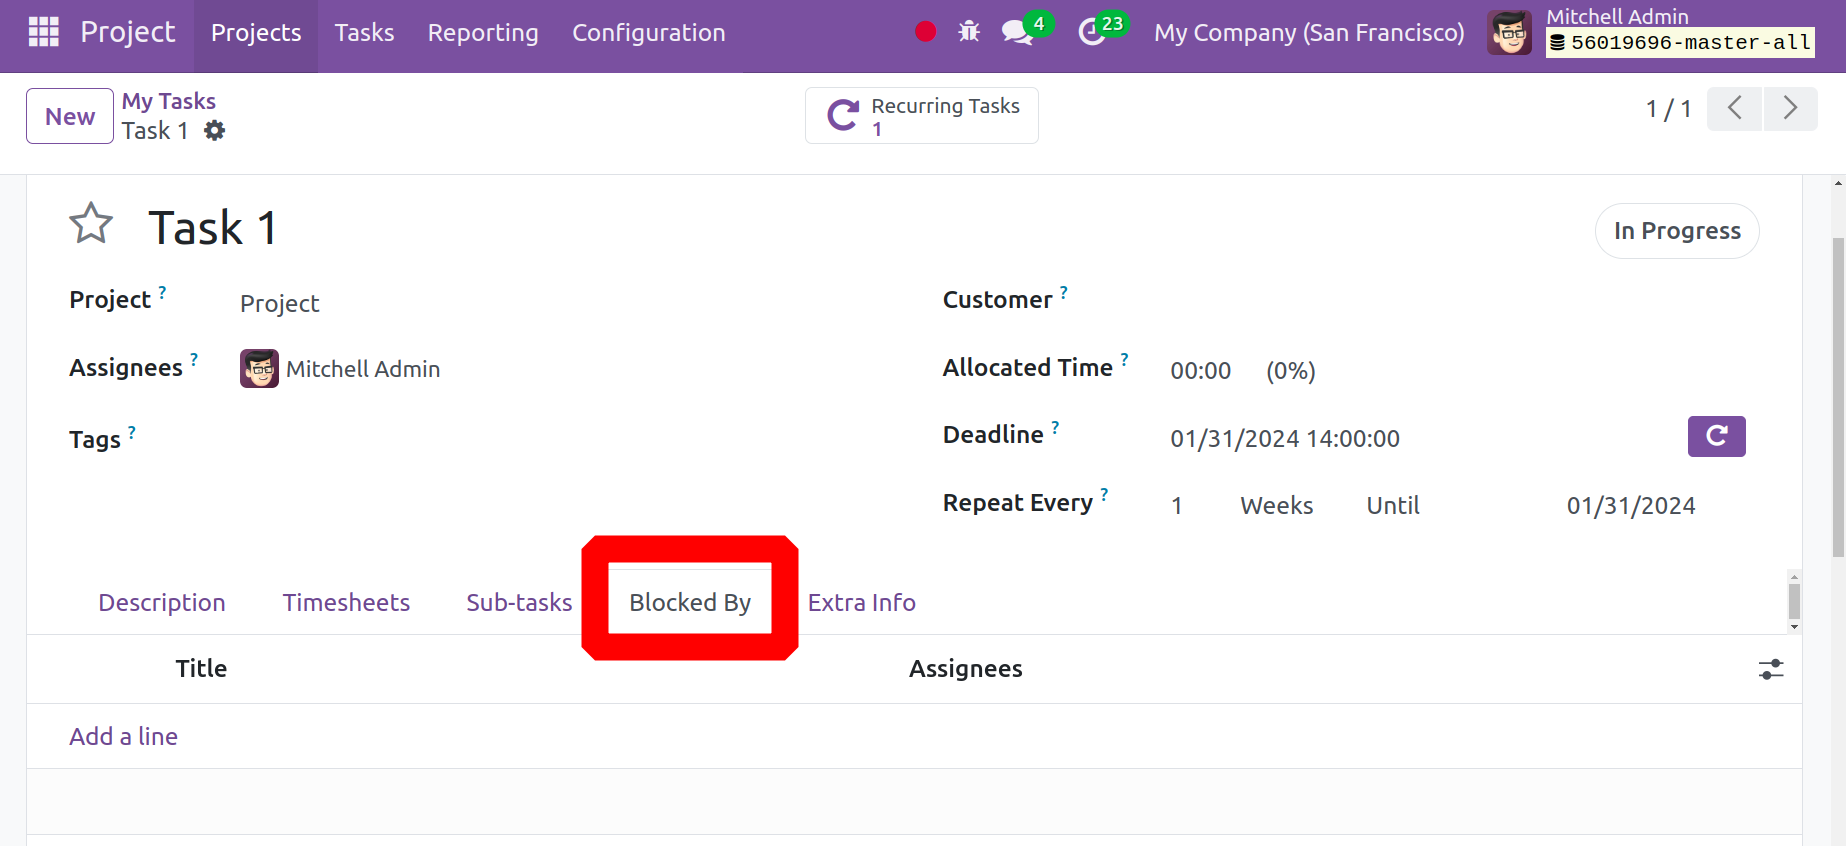
This option lets you choose the sequence in which the tasks should be completed. You will see the tab "Blocked by" on the task creation page when you enable the blocked by option. The screenshot below represents how the page will look.
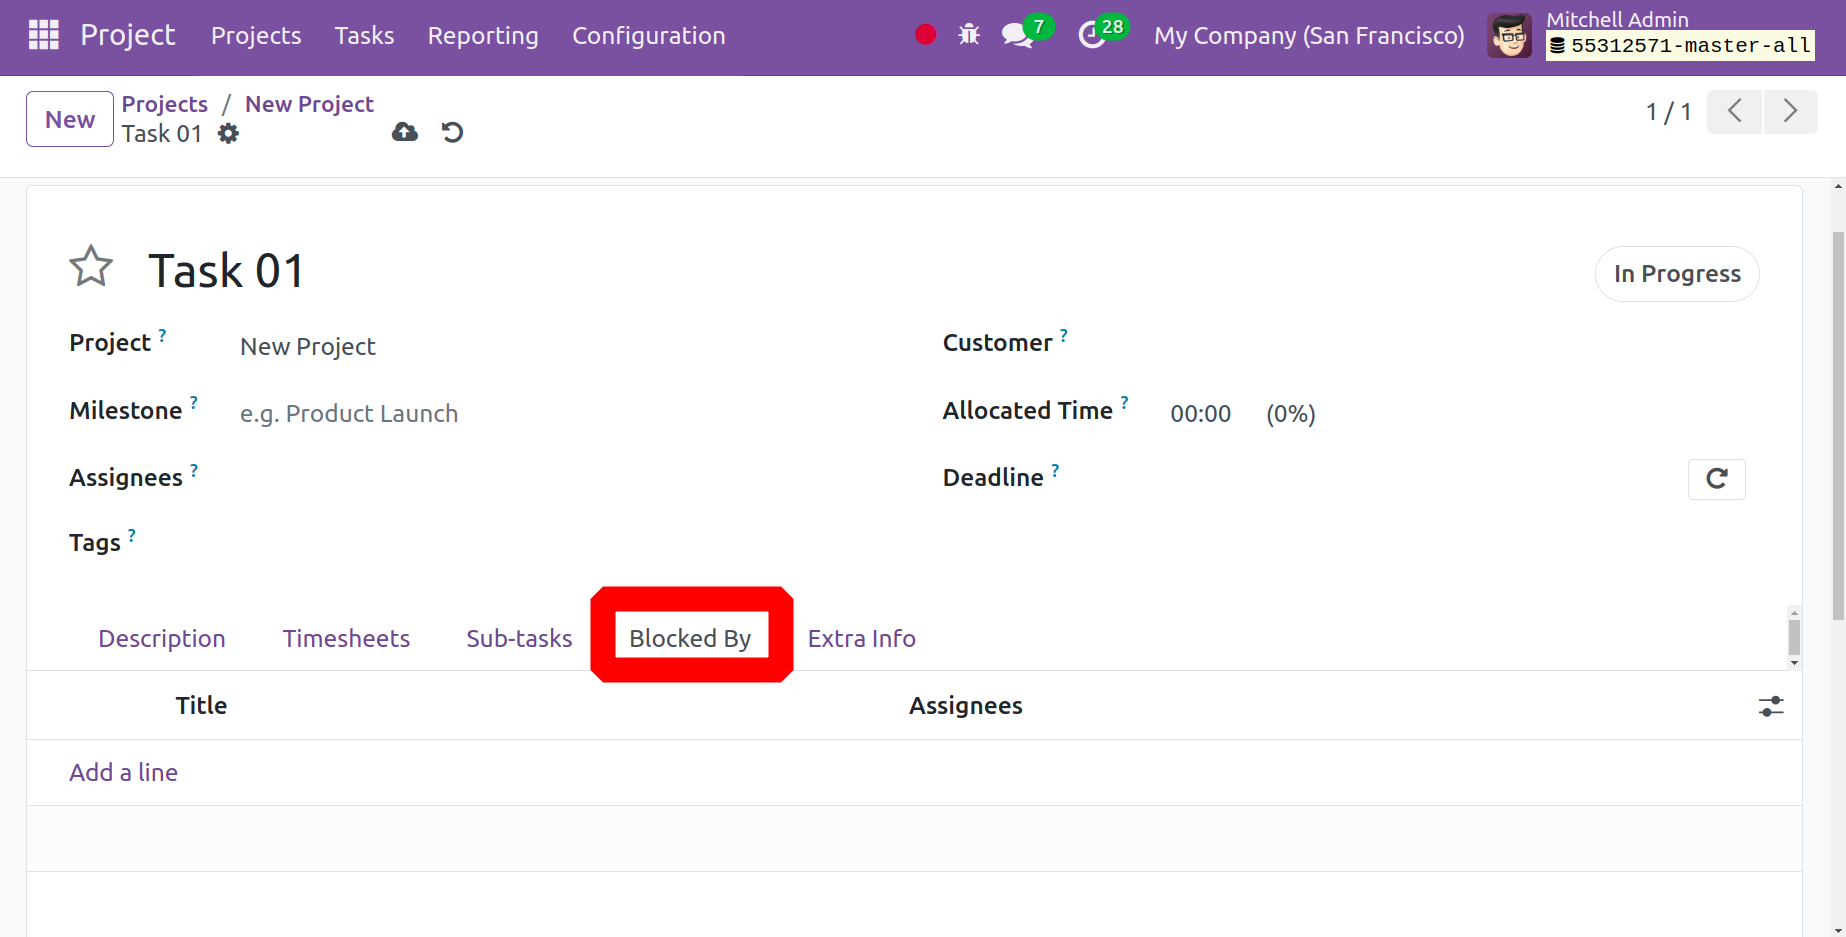
This is where you can enter the information that is indicated by the options that are blocked, such as the title, assignees, deadline, and phases. You can add the lost task that you want to block in order to complete the current work before the blocked task by using the add a line option.
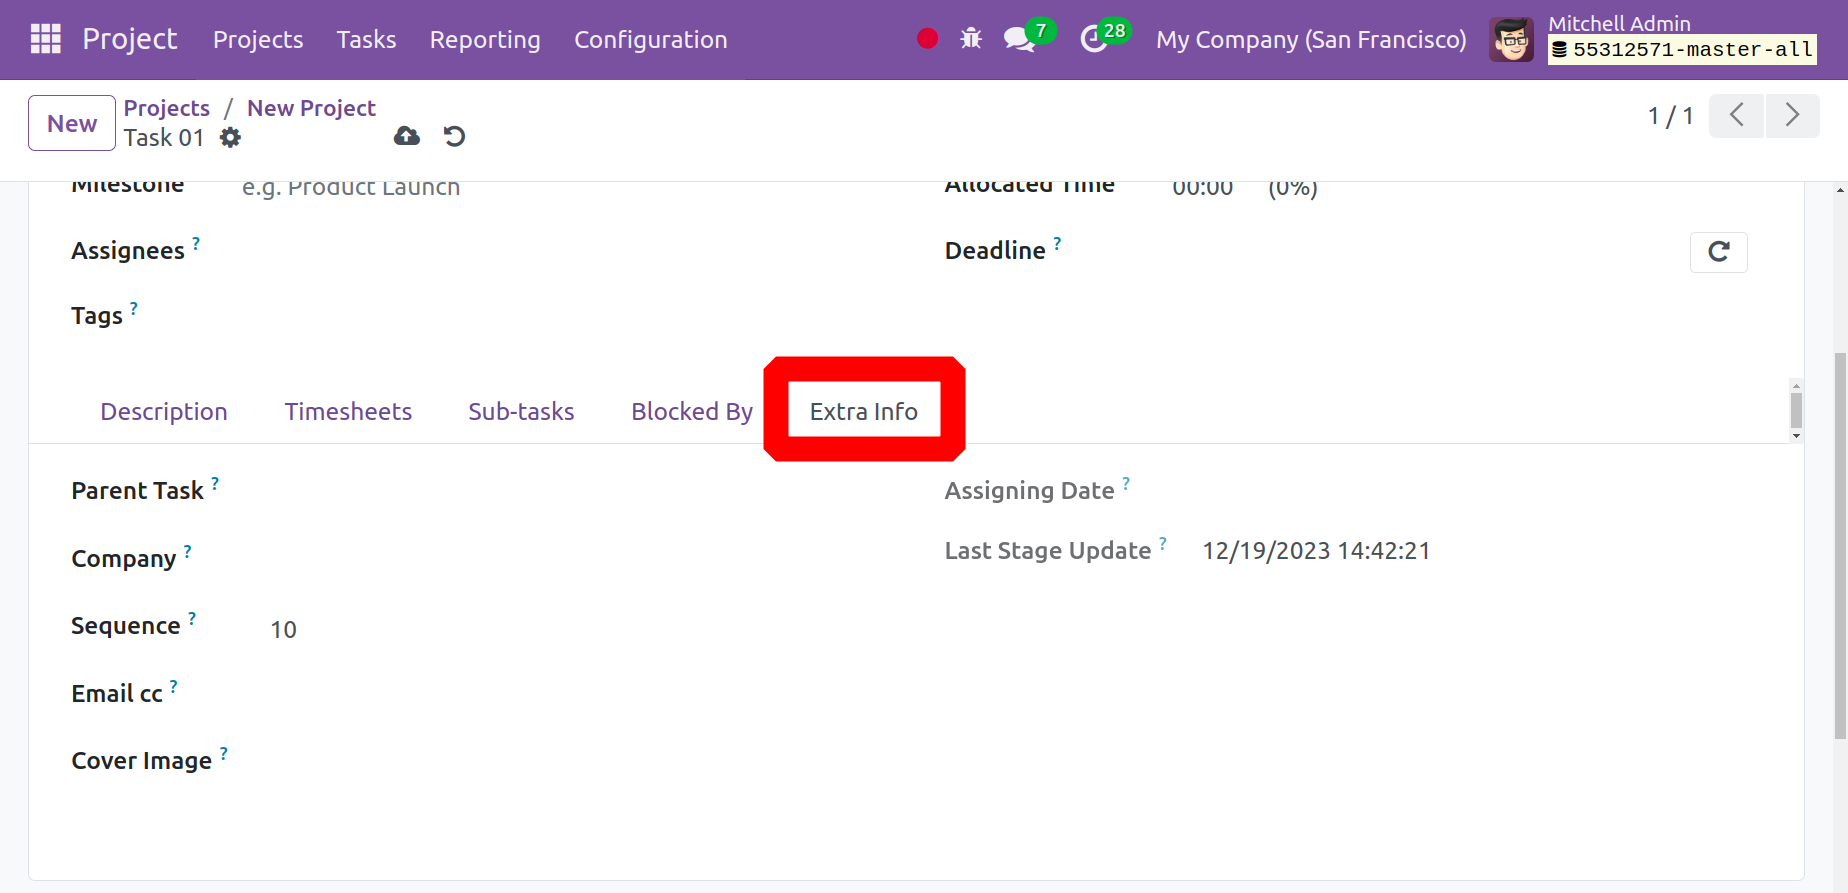
The final option, supplementary info, allows you to include more details about how a task is created. The "Extra Info" tab has some fields that need to be filled in. These include the parent task, the company name, the sequence, the email address to which the cover picture should be sent, the assignment of a date, and the latest date of the update.
Once you have completed entering all the required information, select the Save symbol to add the newly formed order to the current list of Tasks. You may now see specific tabs, specifically Sub-task, as seen in the screenshot below.
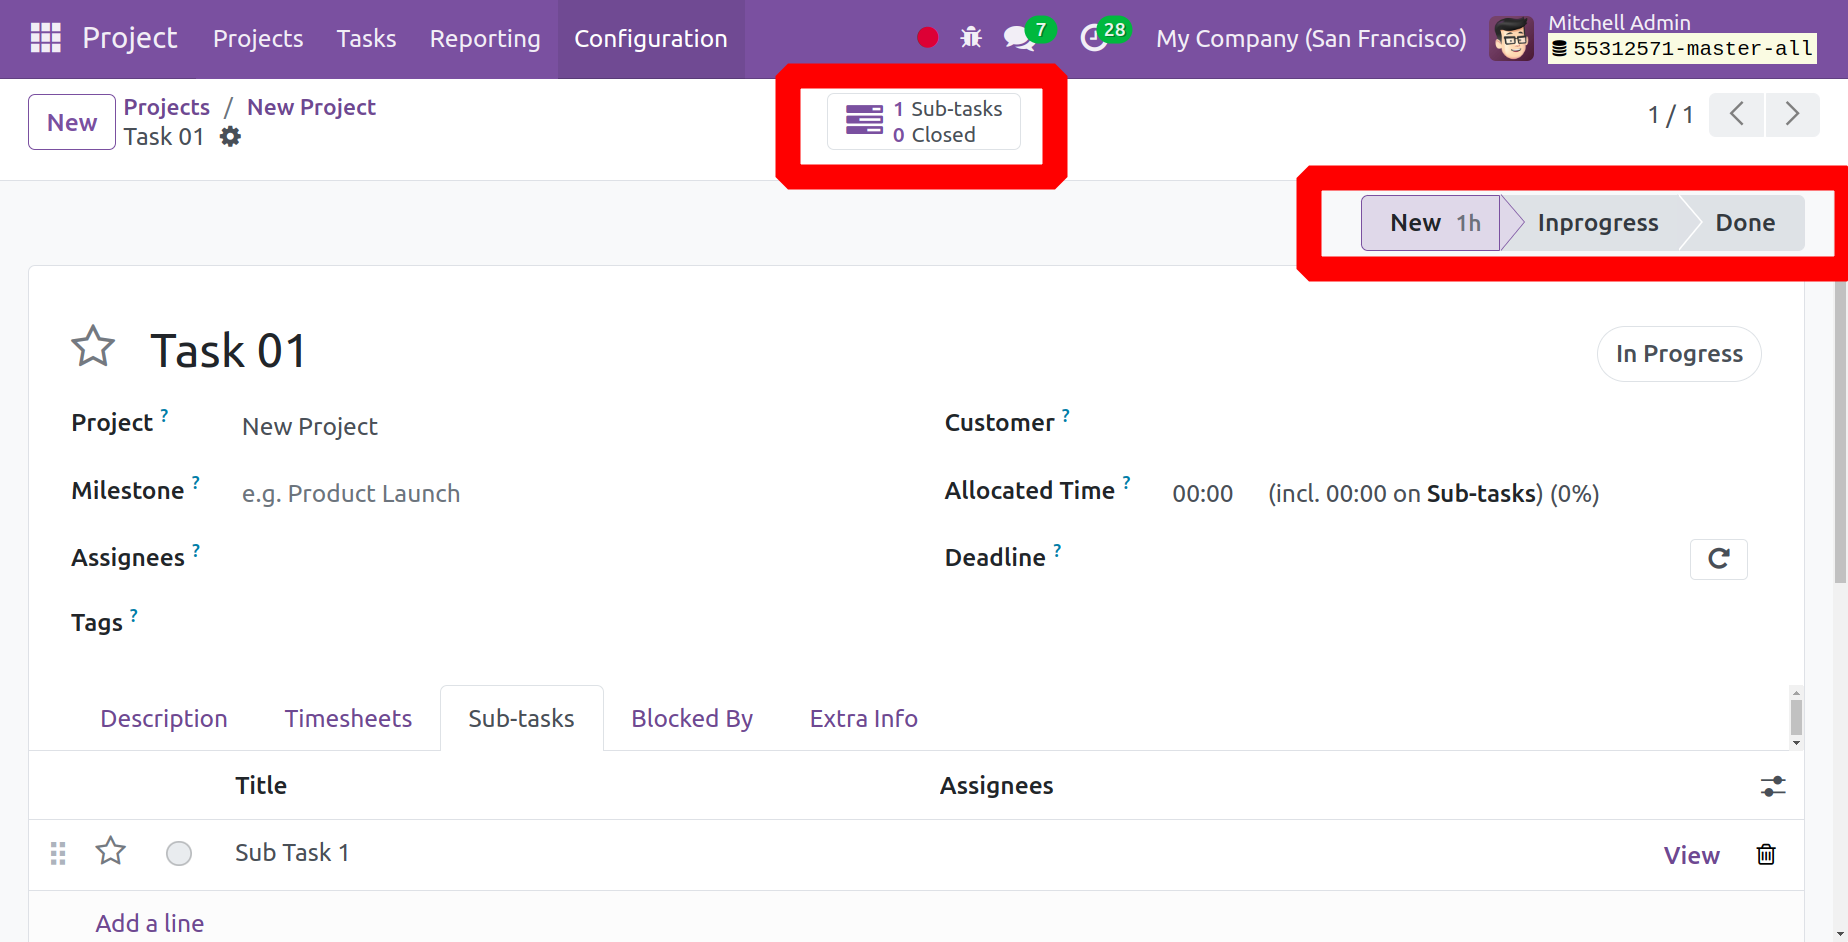
The task is currently in the New stage, and the stage has a time indication. This displays the length of time the work has remained in this phase.
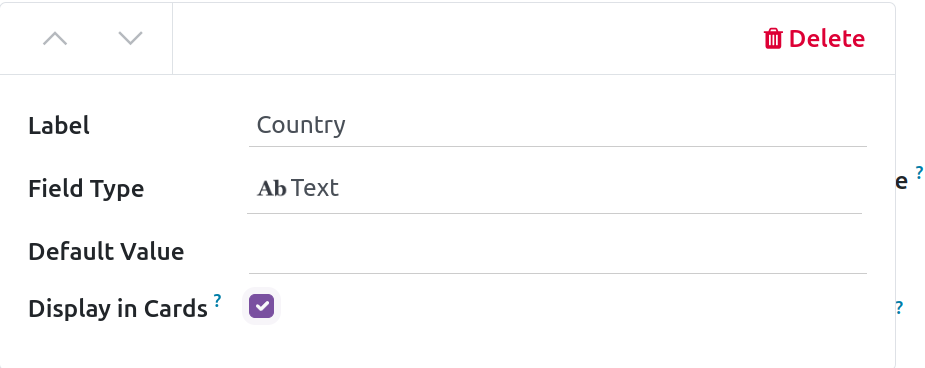
Additionally, you have the option to Add a Property from the Action button, which facilitates the addition of the property and allows you to specify the default value and field type. The property's name may also be stated from the outset.

Add the field types, default values, and property labels after that. If this property field's appearance on the Calendar is determined by the Display in Cards option,
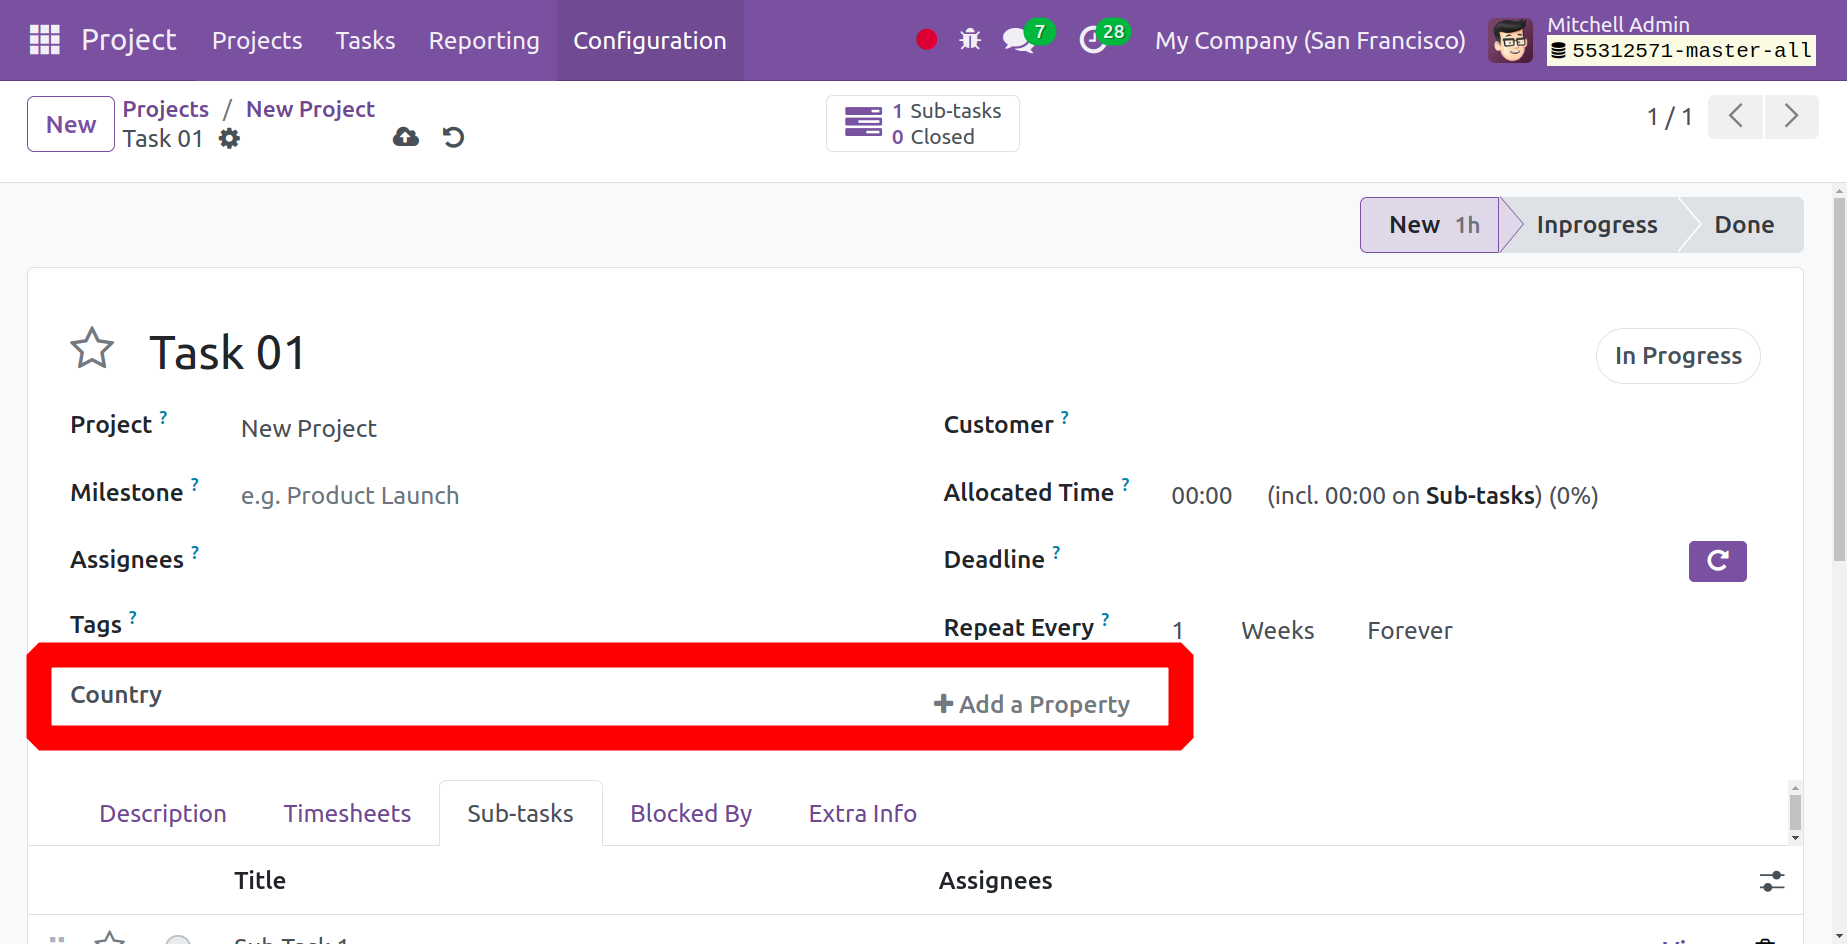
The page will display the generated Property. Additionally, you can add more by clicking the +Add Property button.
My Task
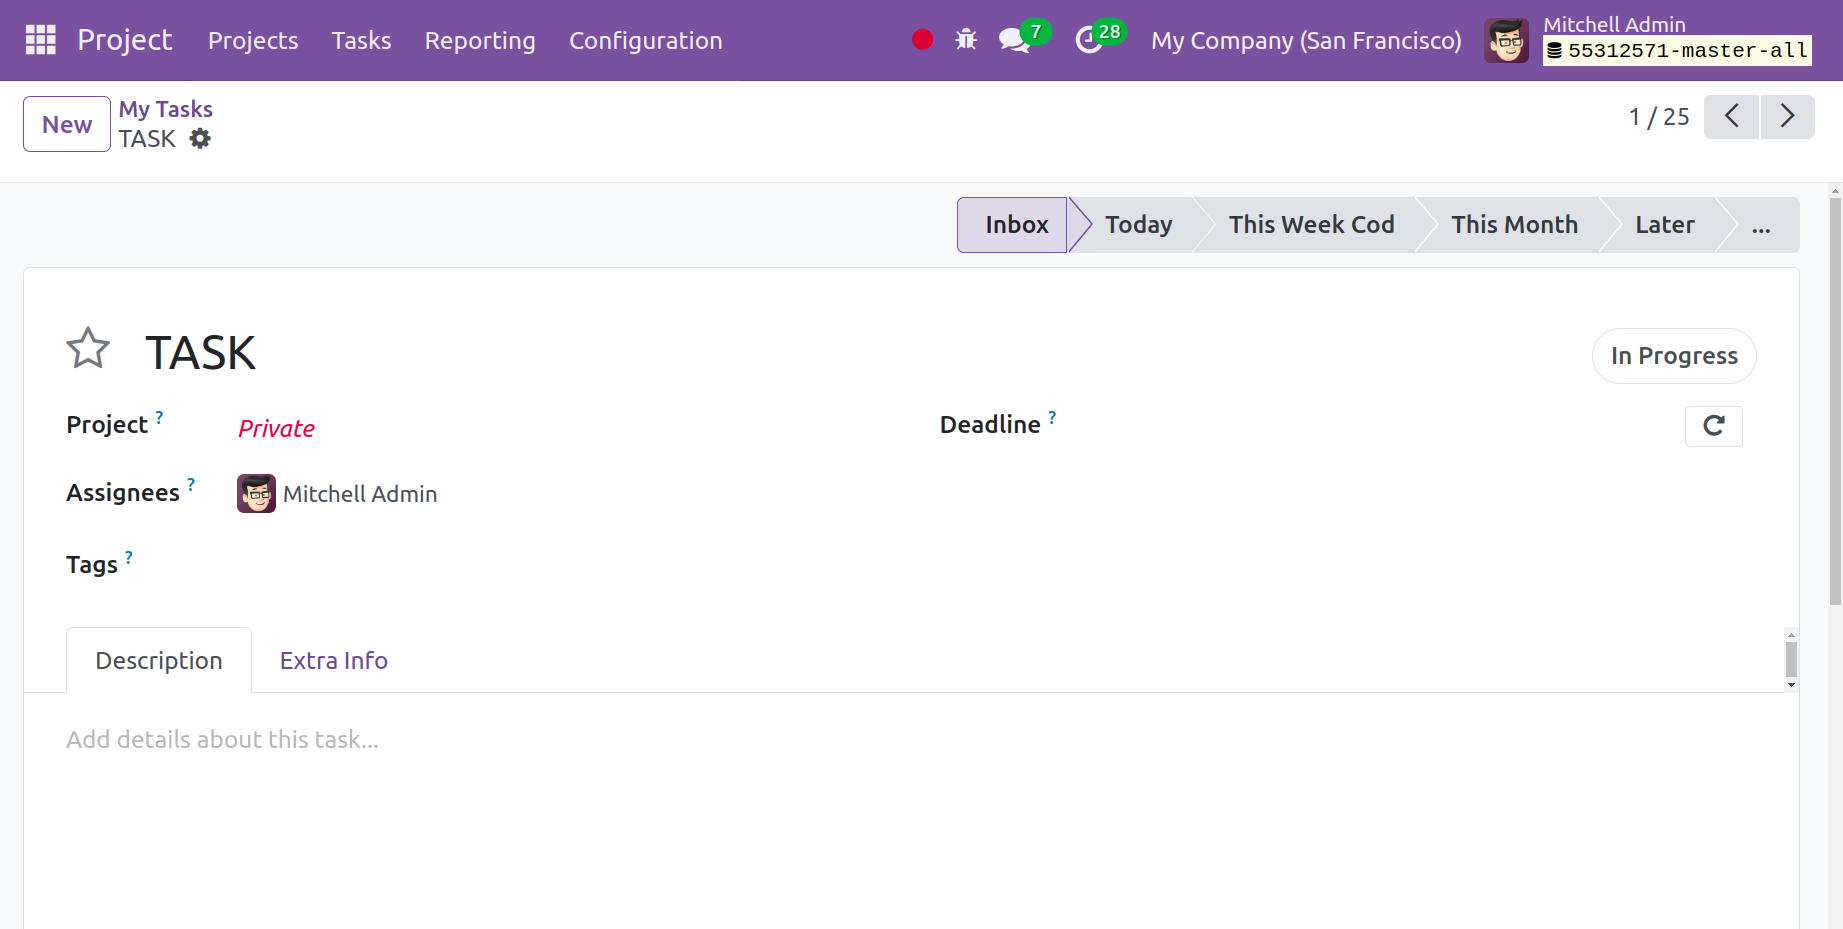
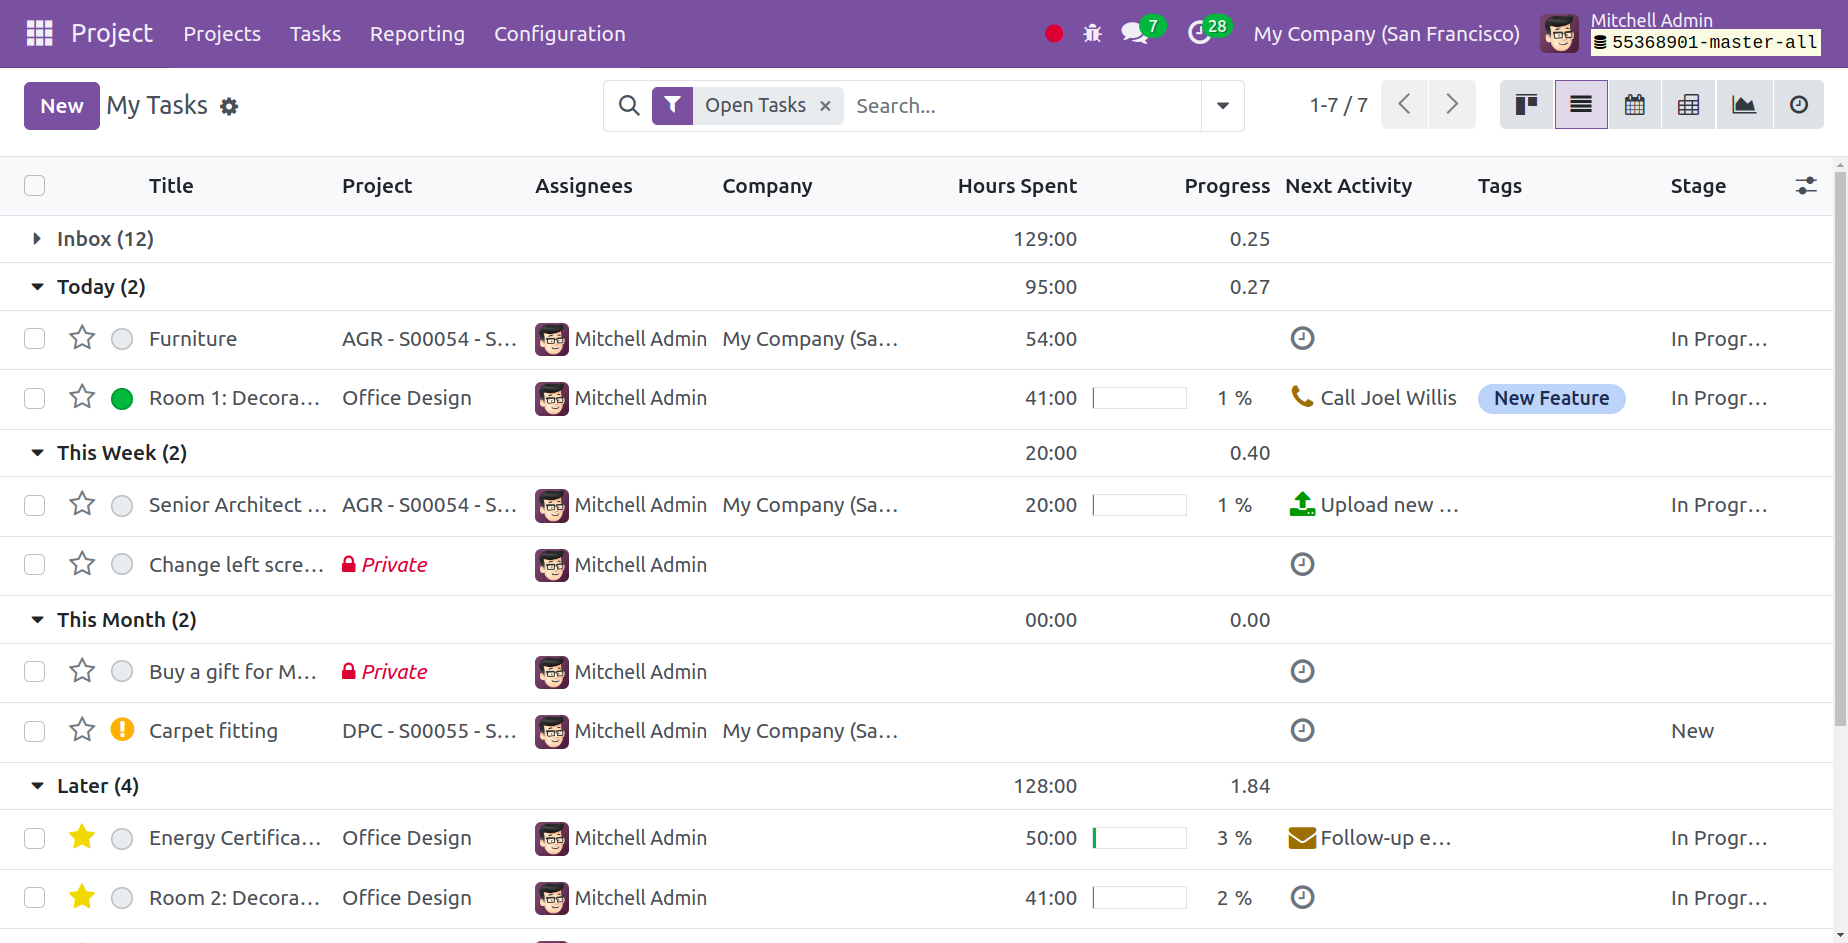
The My Task option, found under the main dashboard, makes it simple to organize and control every activity. The screenshot below illustrates what my task's page will look like.
The page displays several preconfigured tasks that are available. If necessary, you can utilize the Favorites, Group By, and Filtering options there. My task, my private task, followed task, my team task, my department task, unassigned, my projects, my favorites, my team's project, my department's project, high priority, low priority, late milestone, late task, task due date, ask in overtime, the task soon in overtime, open tasks, closed task, closed last 7 days, closed last 30 days, satisfied, dissatisfied, okay, no rating, archived, and add custom filter options are among the options available under the filters option. The various options, including stage, personal stage, assignees project, milestone, customer, sales order item, Kanban state, deadline, creation date, and add group options, are now visible under the Group By option. The last two options are to add to my dashboard options and save the current search, respectively. You can use the necessary one in that way.

In addition to Kanban, the page can also be viewed in List, Calendar, Pivot, and Graphical modes. If necessary, you can also use the Search icon. The provided pages display many phases, all of which are simply produced by selecting the "add a stage" option. To create a task that is similar to this one, click the New symbol. The screenshot below illustrates how the task creation page will look.
You must provide some information on the task option's creation page, including the task's name or title, project details, the assignee's name, the customer's name, the project's deadline, and any relevant tags. Right now, beneath the heading. You can add the work description in accordance with that. Once you have completed entering all the necessary information, you can select the "Save" button.
The recently created tasks will thereafter be seen in the list of tasks that have already been created. Currently, many stages, including today, this week, and this month, are visible on the left side of the page and will be assigned to the corresponding stage. You will now also see the data in listview. You can utilize the filters, group by, and favorites choices appropriately in each display. Let's now examine how to make a project invoice.
All Task
Every task that has been created is displayed in the All Task menu. Under this All Task, a list of every task that has been assigned to every user is displayed.
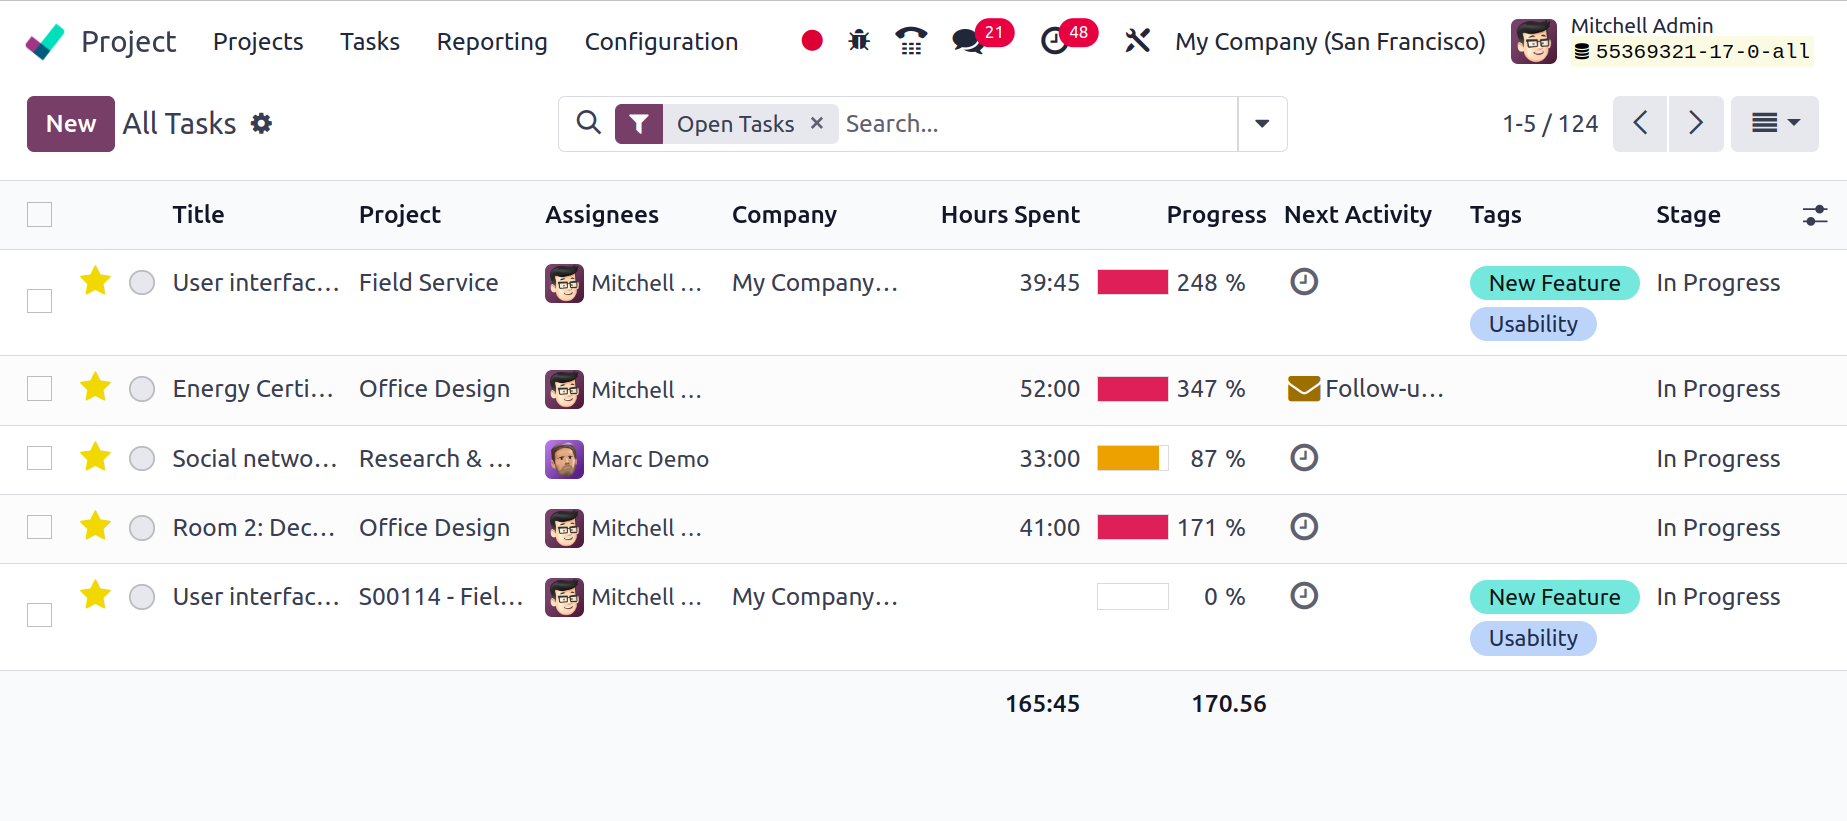
Projects can also have extra tasks added to them by using the New button.
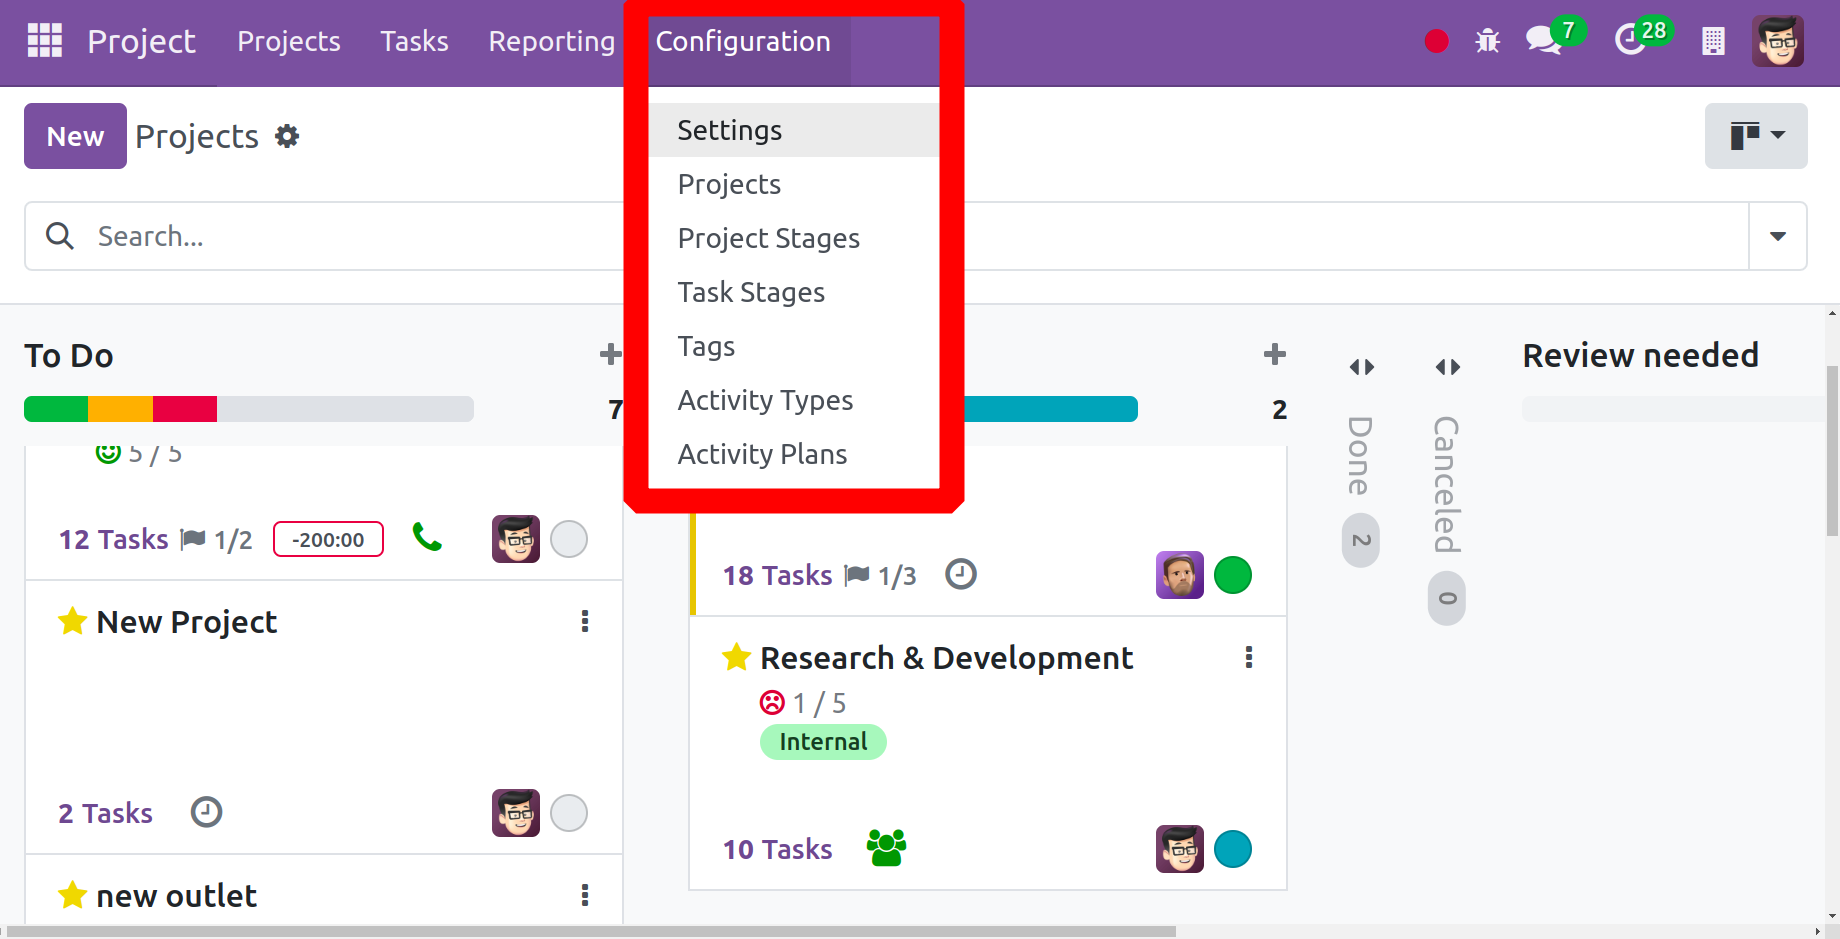
Configuration
You will now see options like Settings, Project, Project Stage, Task Stage, Tags, Activity Types and Activity Plans under the Configuration menu on the project module's main page.
Let's look at how to create a new project using the setup menu now.
Settings
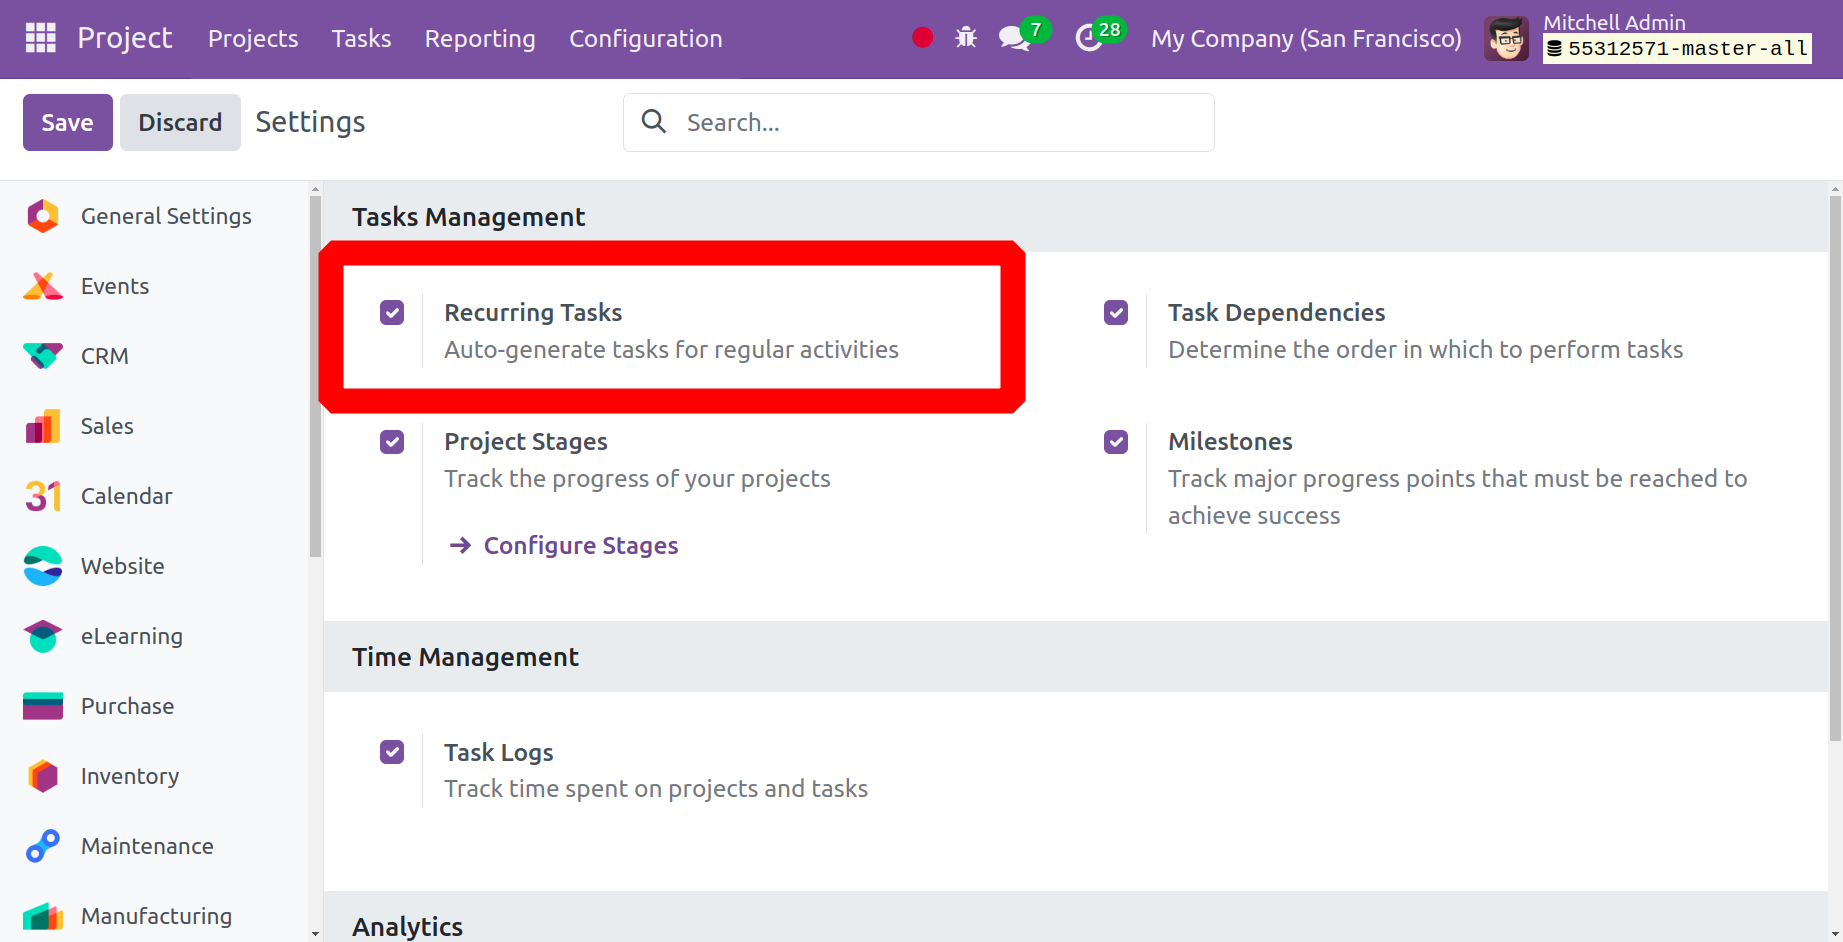
The three areas of the settings menu are titled Analytics, Time Management, and Tasks Management.
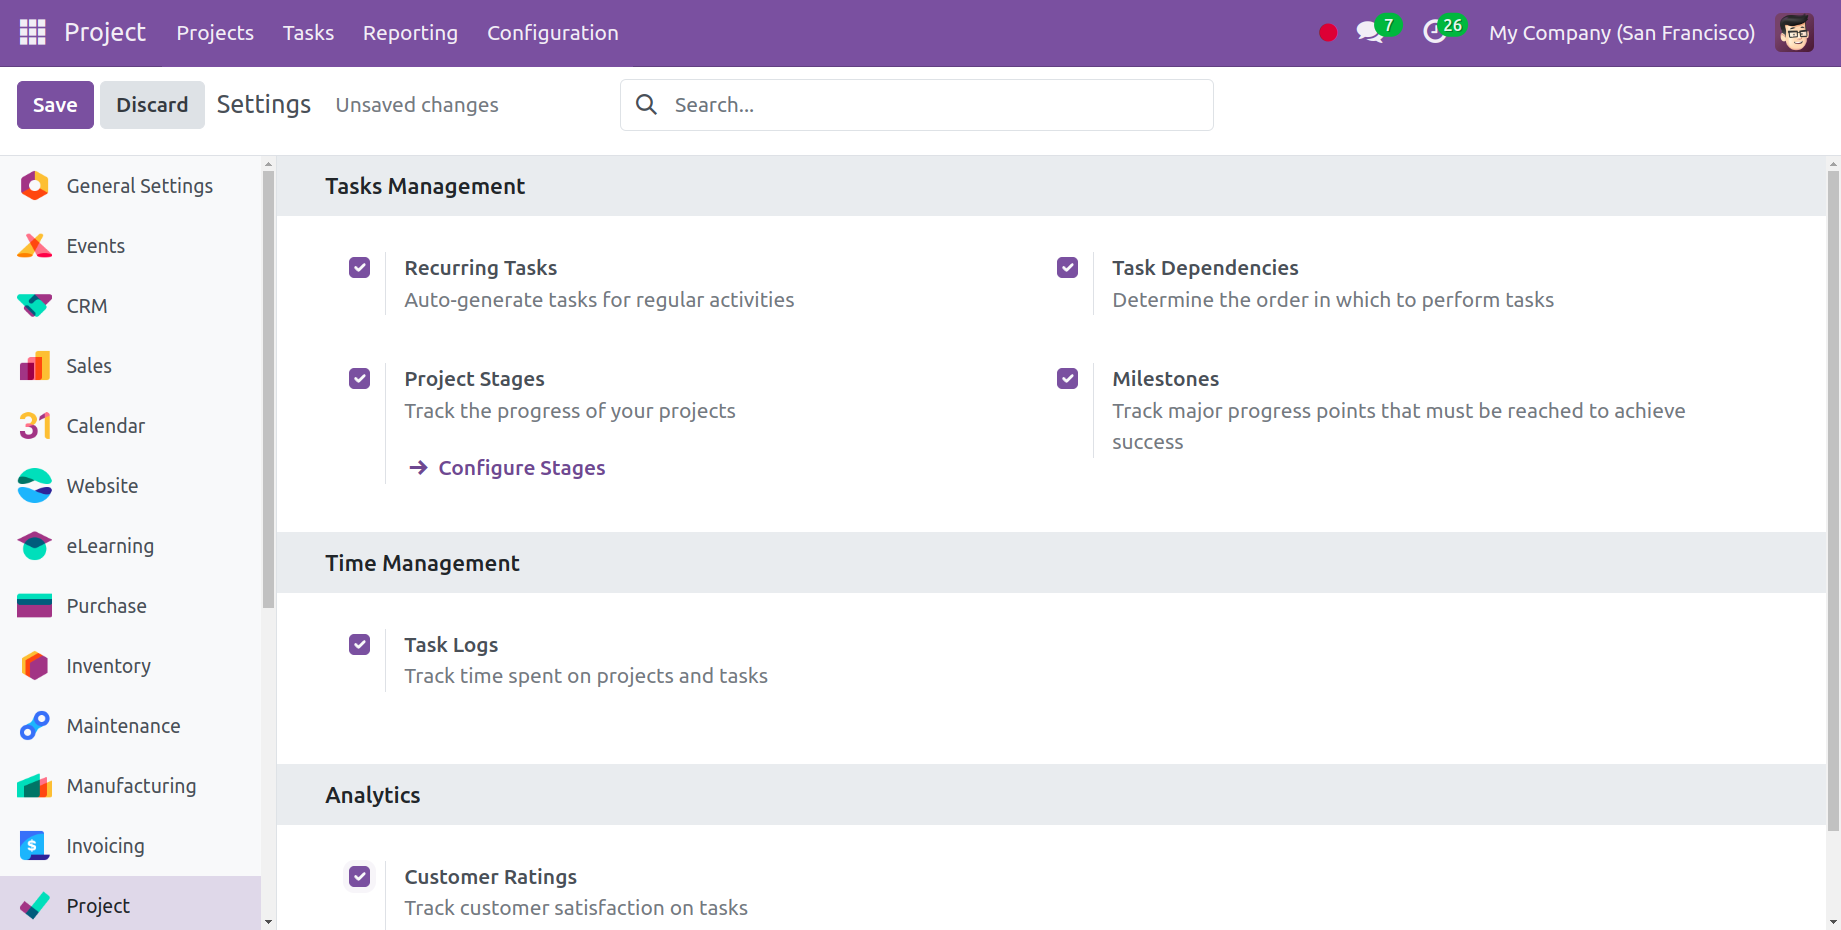
Recurring Tasks
The Recurring Tasks can automatically produce tasks for recurring actions thanks to the Tasks Management. Once this option has been enabled, examine the task to see how it is recurring. There is a recurring icon next to the deadline box; click on it. Next, a new field named "Repeat Every" was added to that area. Users can specify how often the task has to be repeated inside that Repeat Every field. Save the task when you've selected the recurring option.

After that, a new smart tab called Recurring Tasks will appear. This generates a single recurring job. To view the created task, click the smart button.
The next recurring task will be automatically generated when the recurrence is set and the job is marked as completed.
Task Dependencies
The Task Dependencies field facilitates the process of deciding which tasks to complete first.
After you enable Task Dependencies and save it, a new boolean called Task Dependencies shows up in the project's Settings tab. This is displayed in the TASK MANAGEMENT area.
While enabling this feature a new subtab will appear inside the tasks named ‘blocked by’, where users can mention the order in which the task needs to be performed. Using the Add a line option add the tasks.
A new window is opened by using the add a line there. After going through each assignment, they chose the one they needed to do and hit the Select button. Click the New button to add a new assignment.
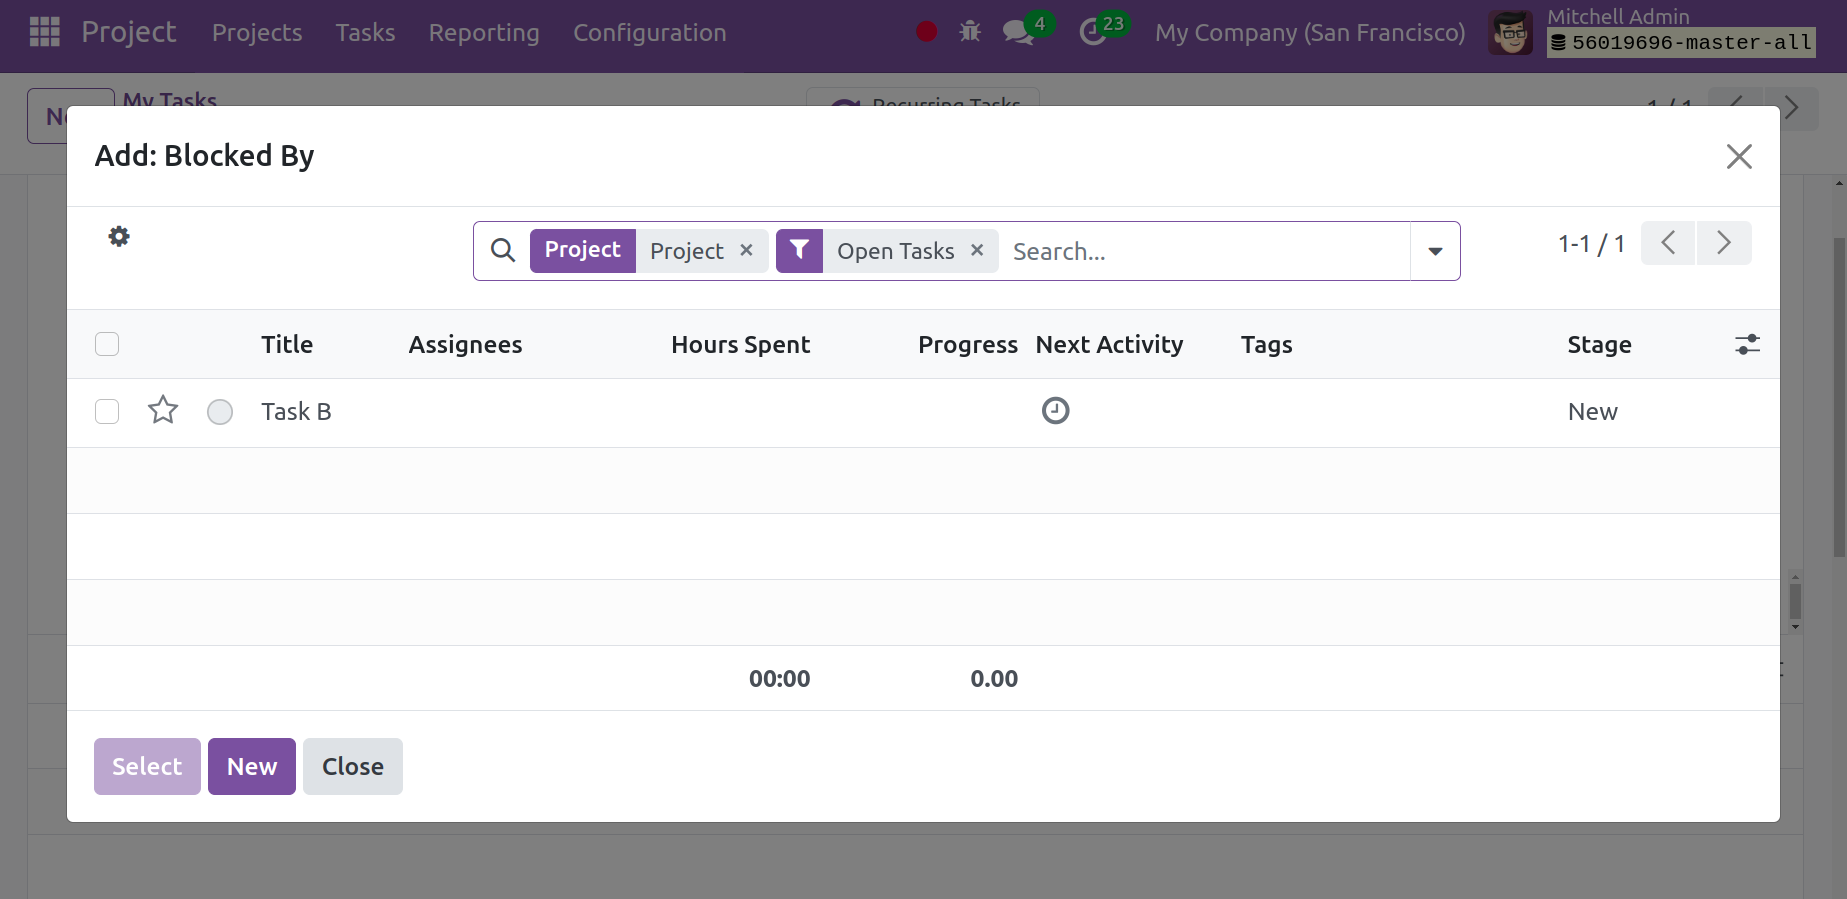
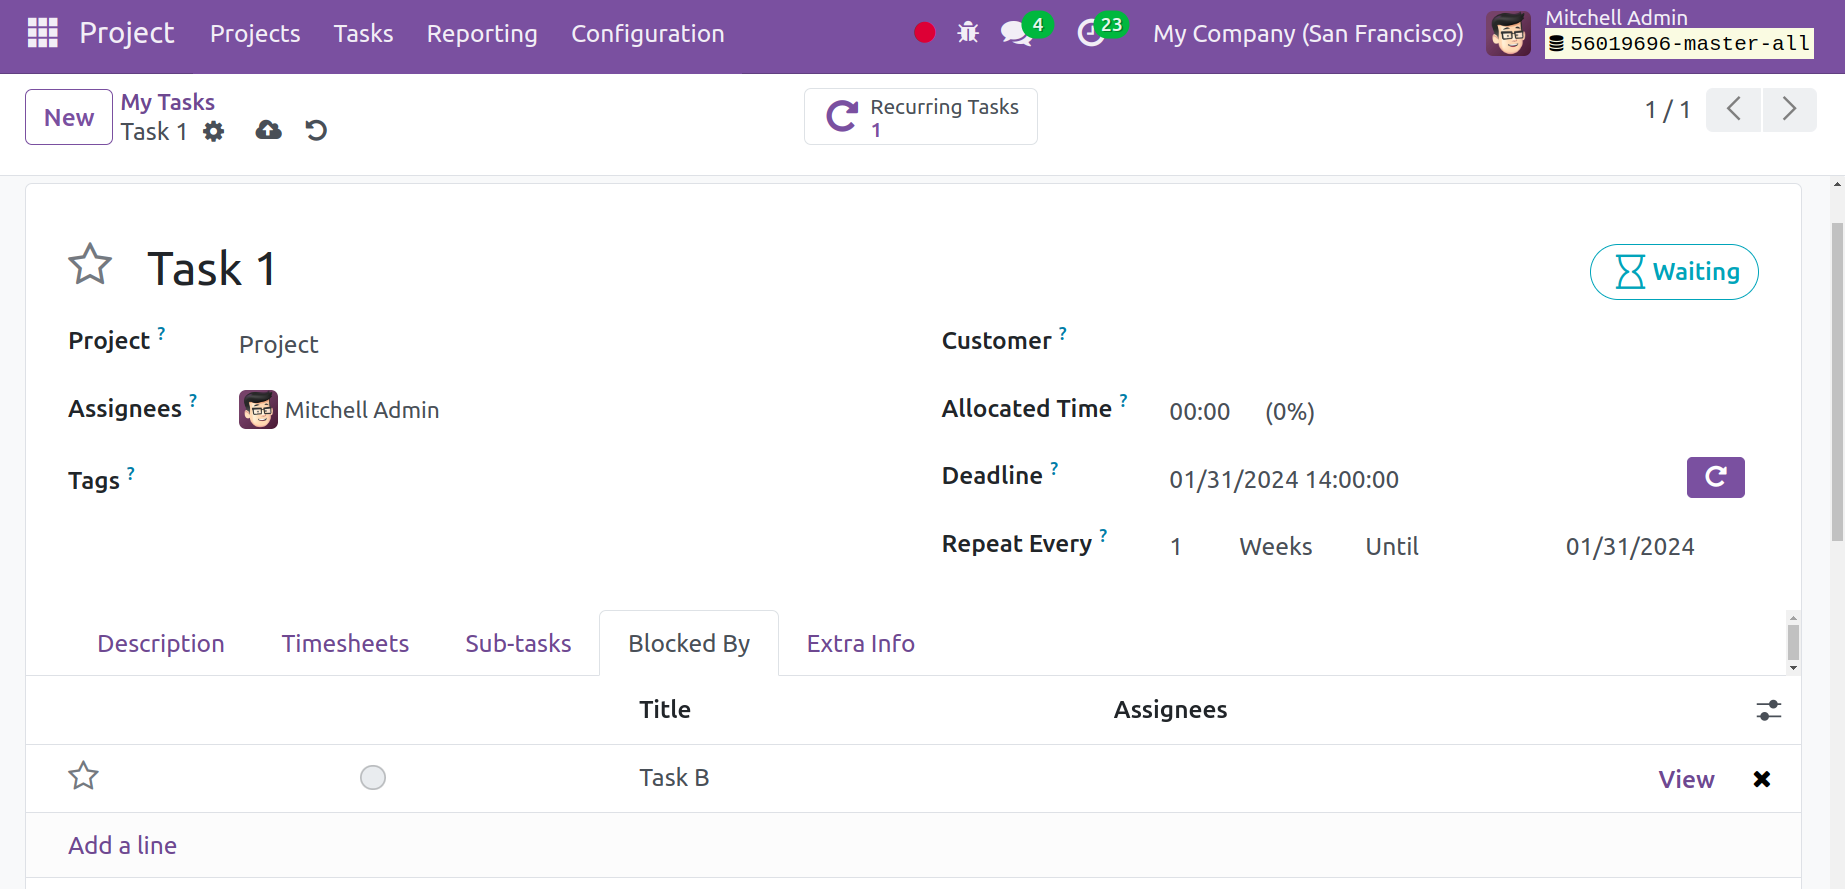
Then, the task will be added under the Blocked By tab. Then, a Waiting tag will appear on the top. Here, Task 1 is blocked by Task B, which means Task 1 only performs after completing Task B.
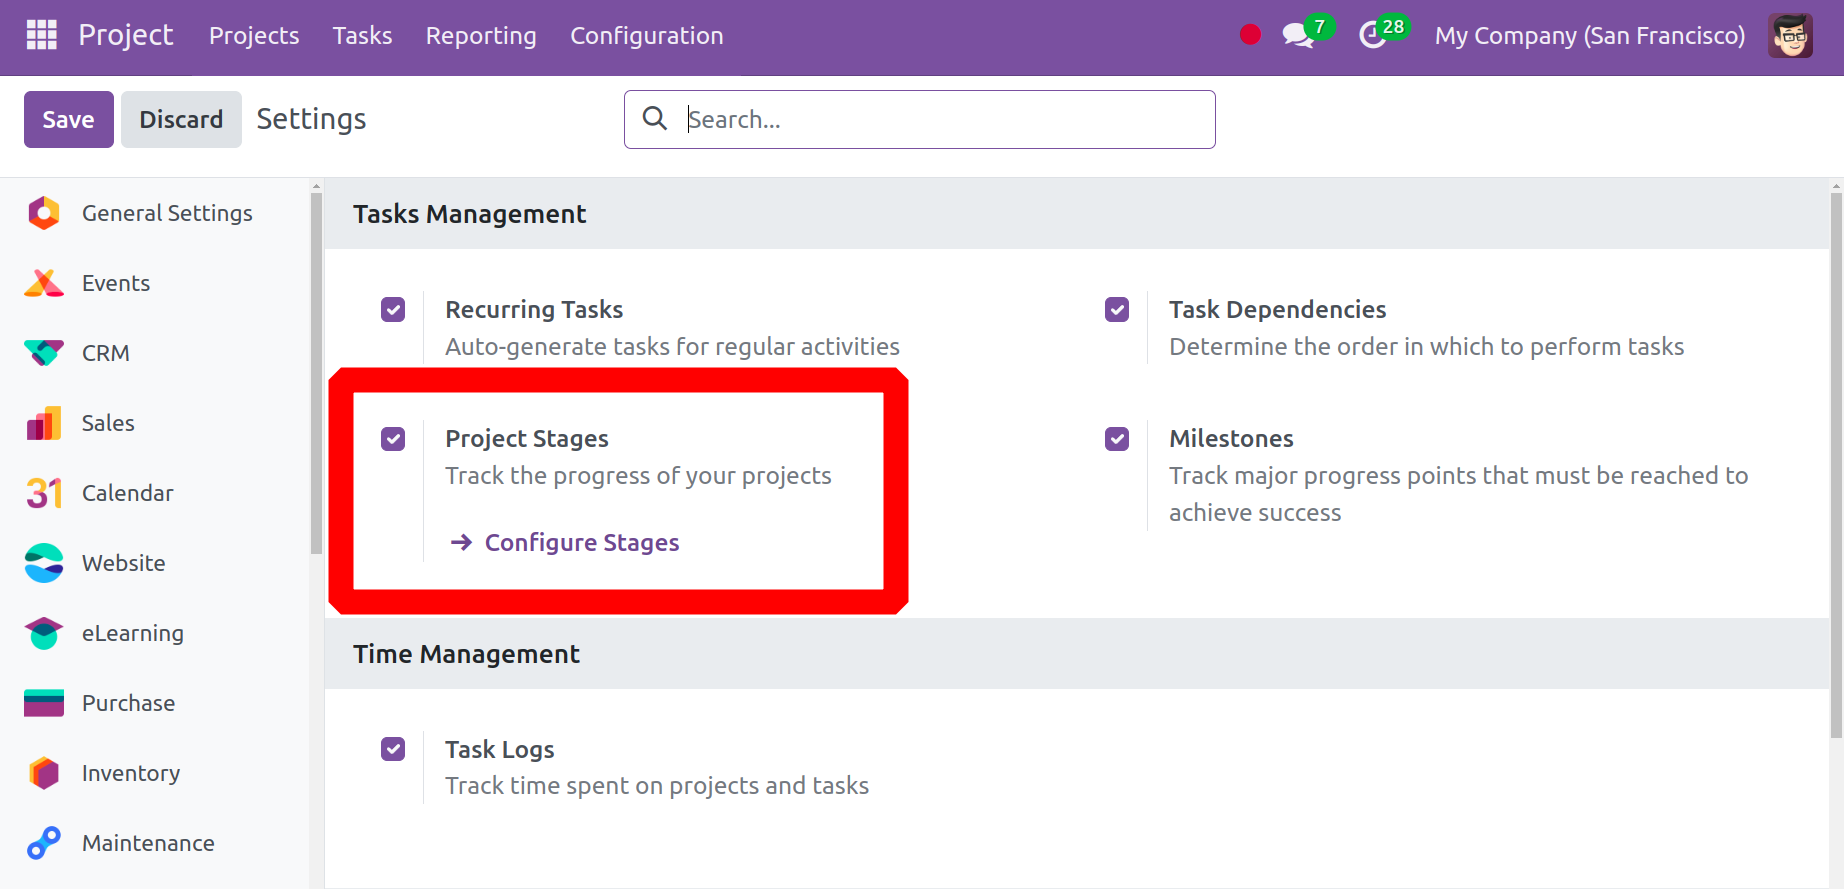
Project Stages is the next option, which aids in monitoring the development of your projects. Adding new stages is aided by the Configure Stages feature.
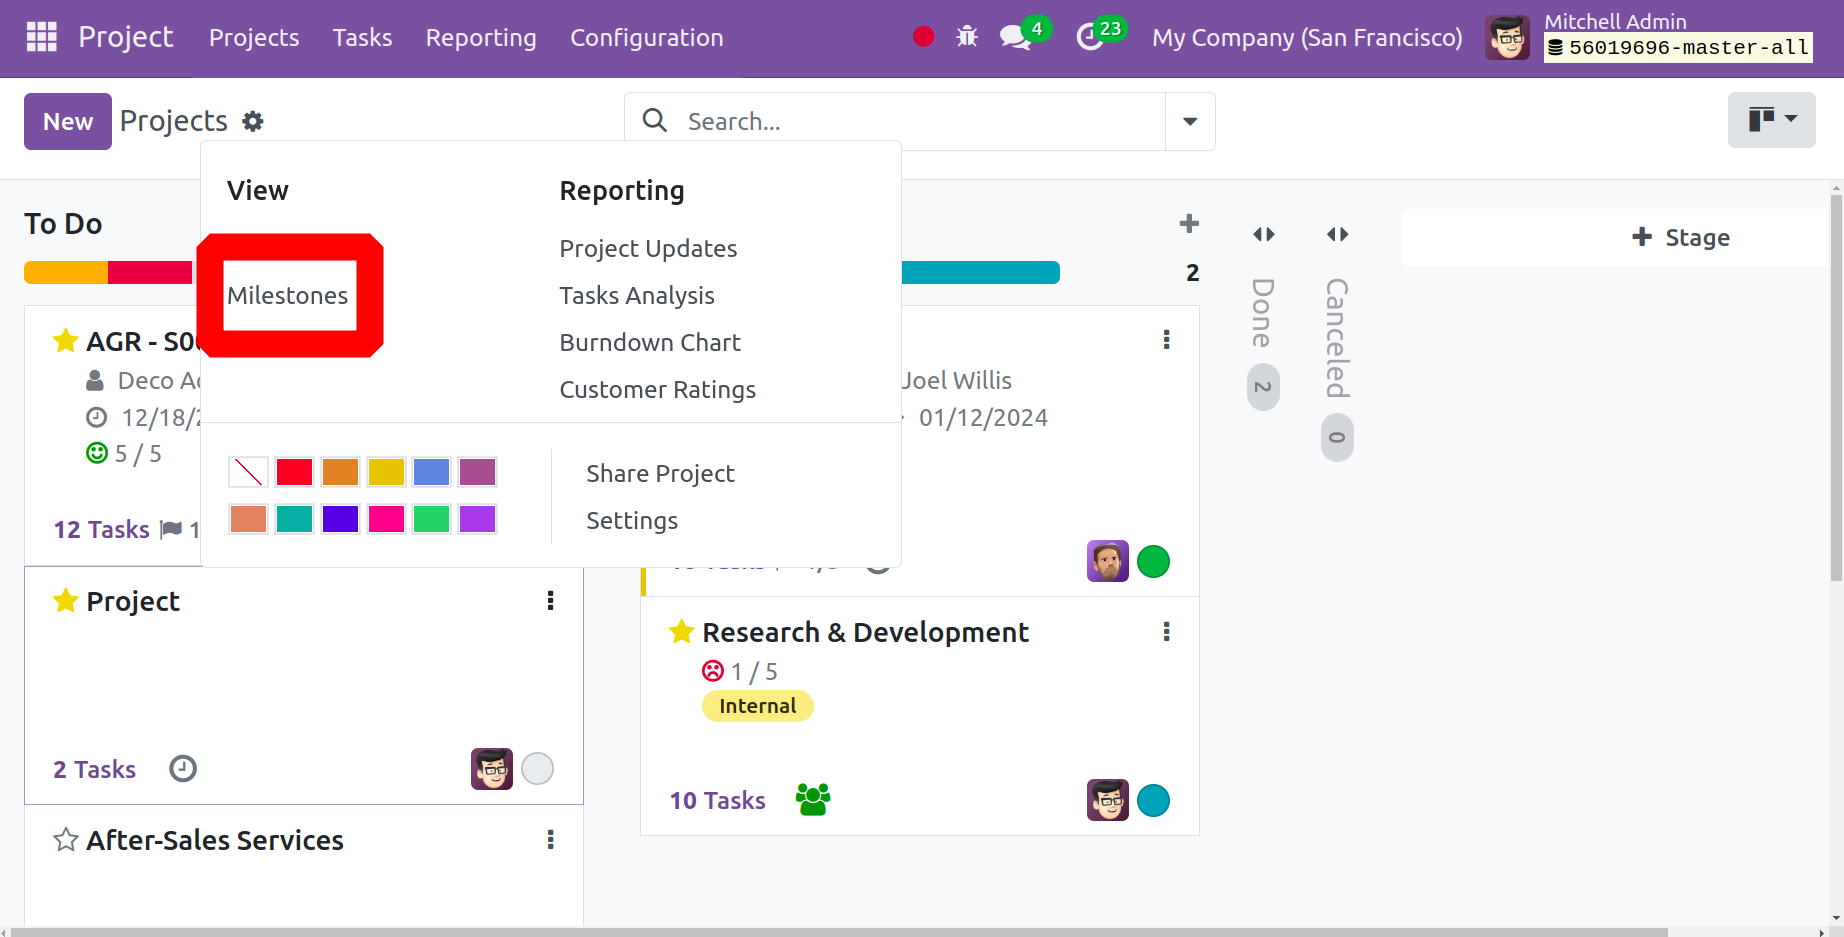
The final choice in the section is Milestones. Milestones are nothing more than significant benchmarks for achievement that must be met in order to succeed. Milestones for a project can be added with ease, as the image below illustrates.
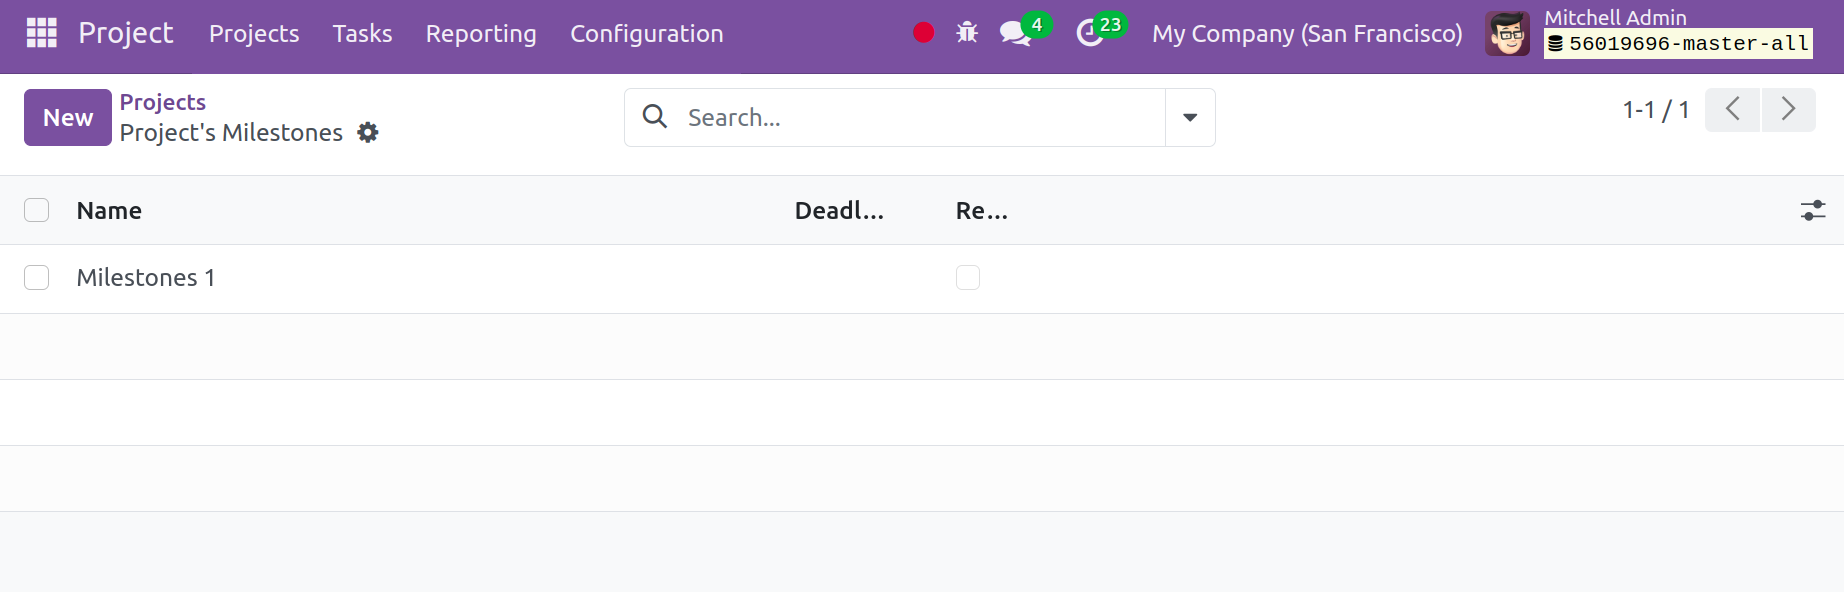
To add new milestones, select the New button. Mention the name of the milestone: deadline. Enable the Reached field once the milestone has been reached.
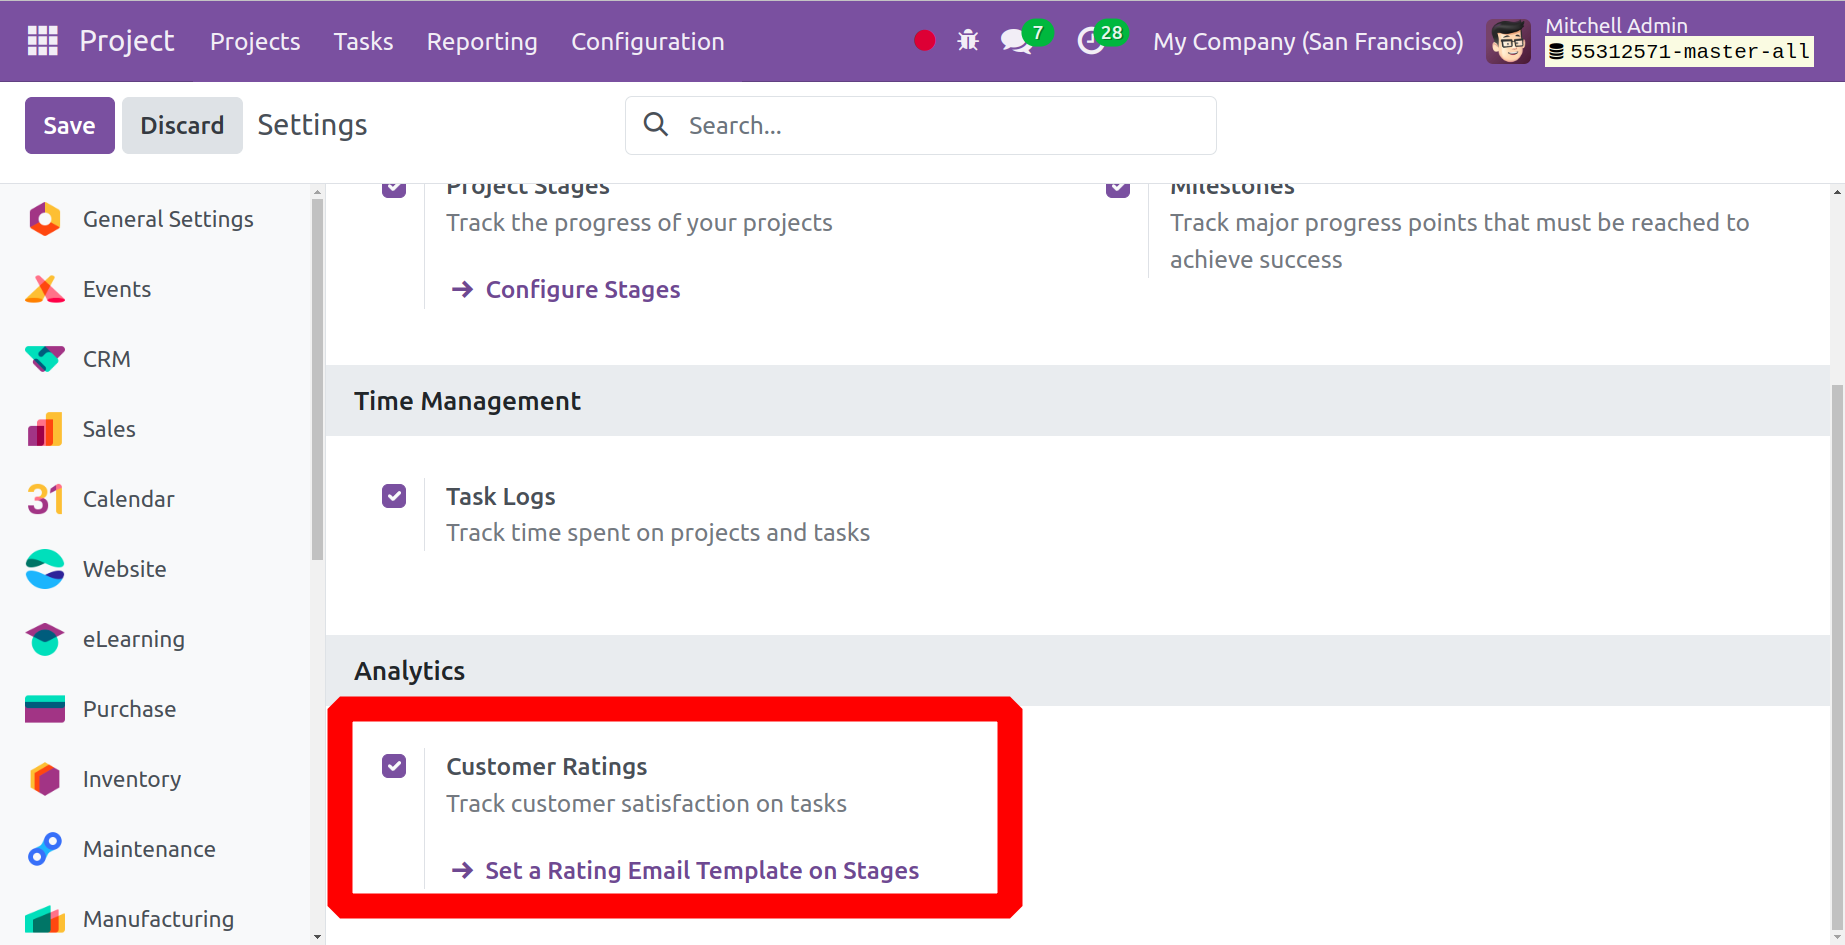
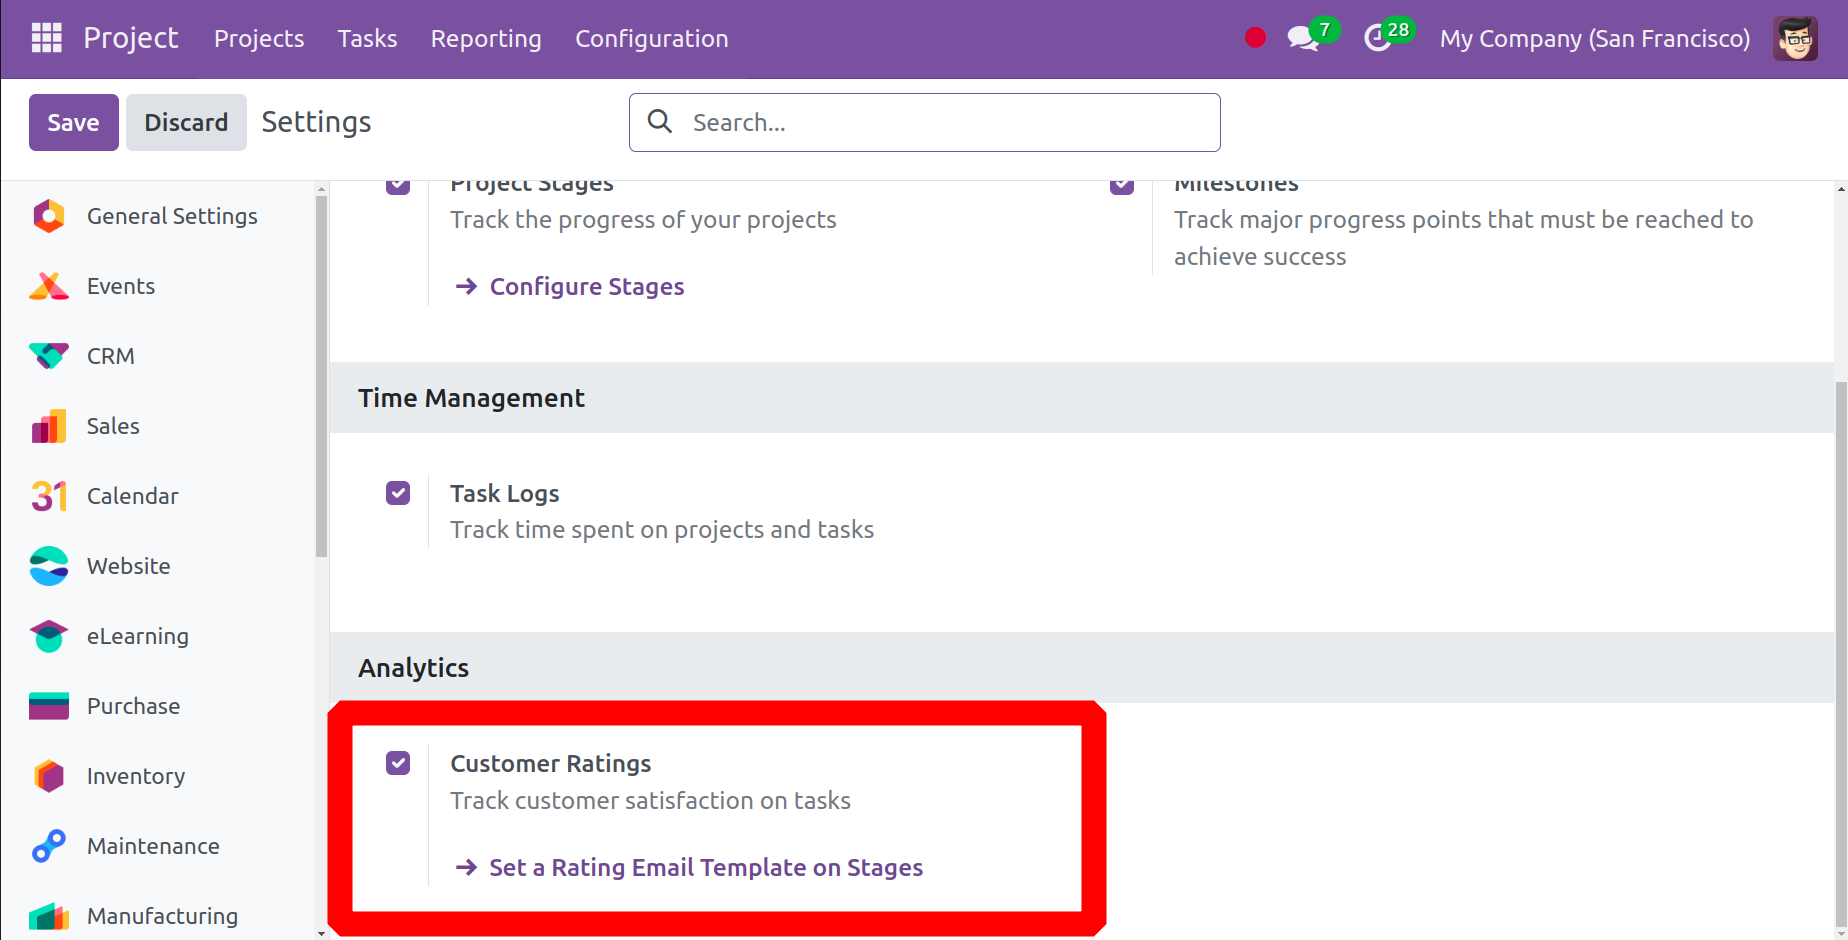
Enable the Task Logs in the Time Management section to keep track of the amount of time spent on tasks and projects. The Customer Ratings option in the Analytics section facilitates the tracking of task satisfaction among customers.
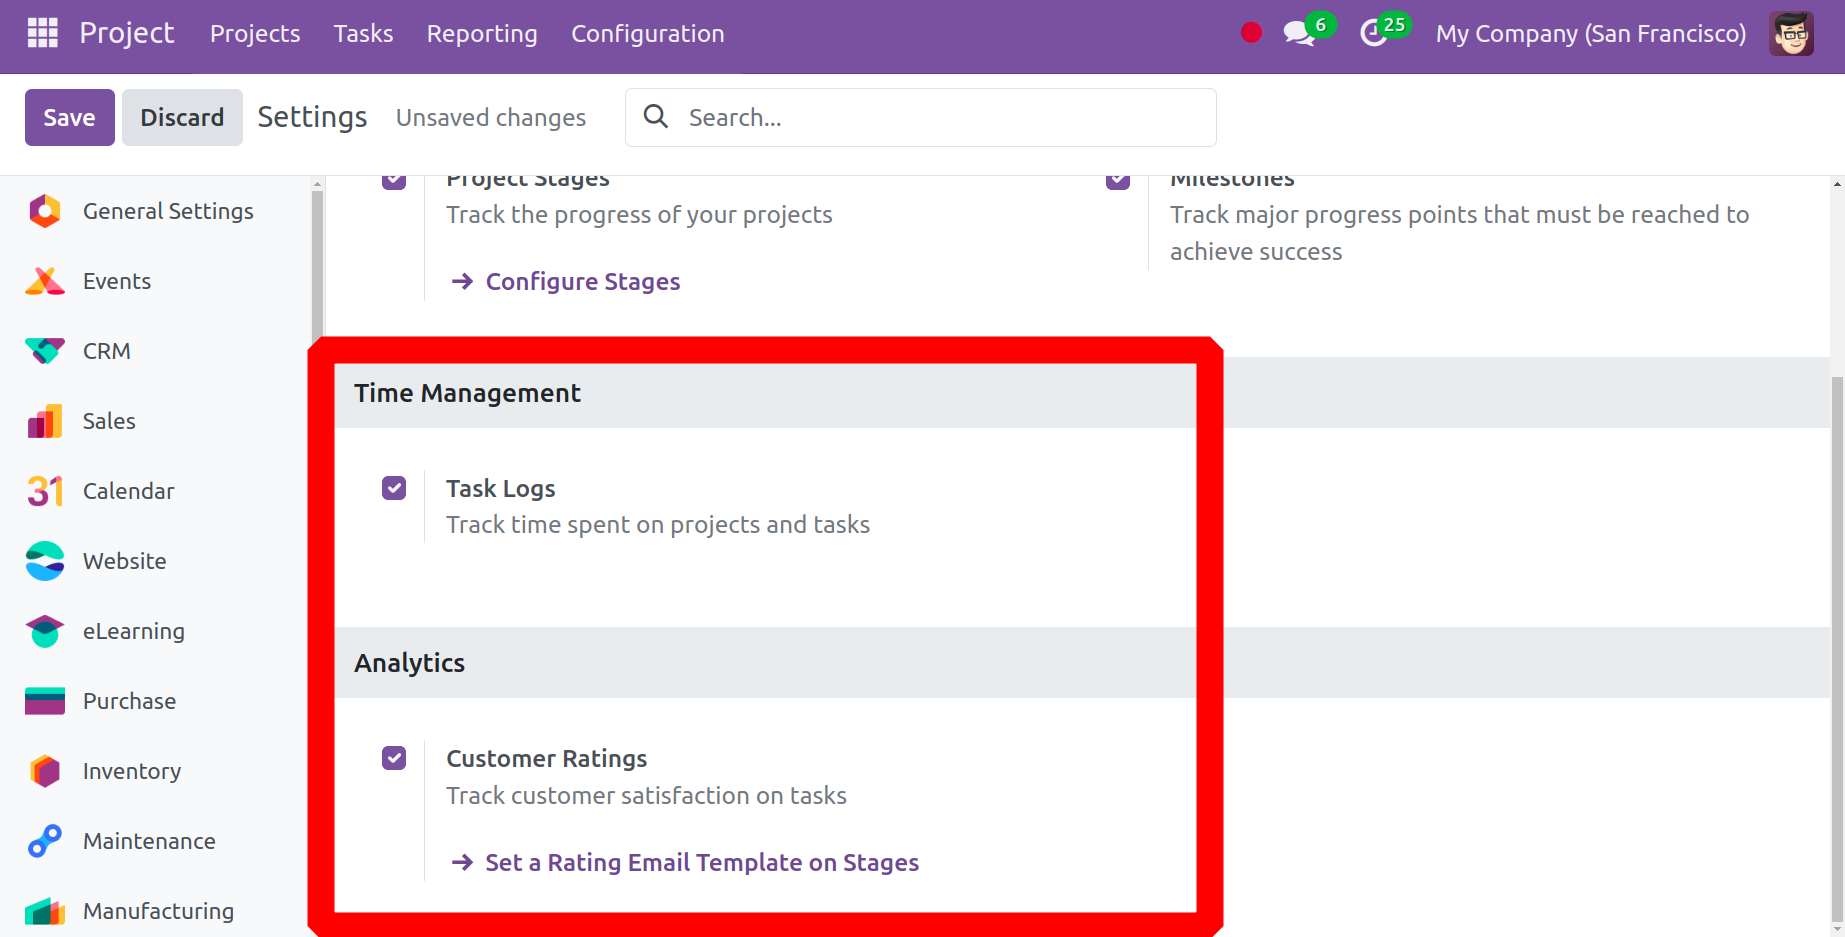
By selecting the Set a Rating Email Template on Stages option, users can create a rating email template.
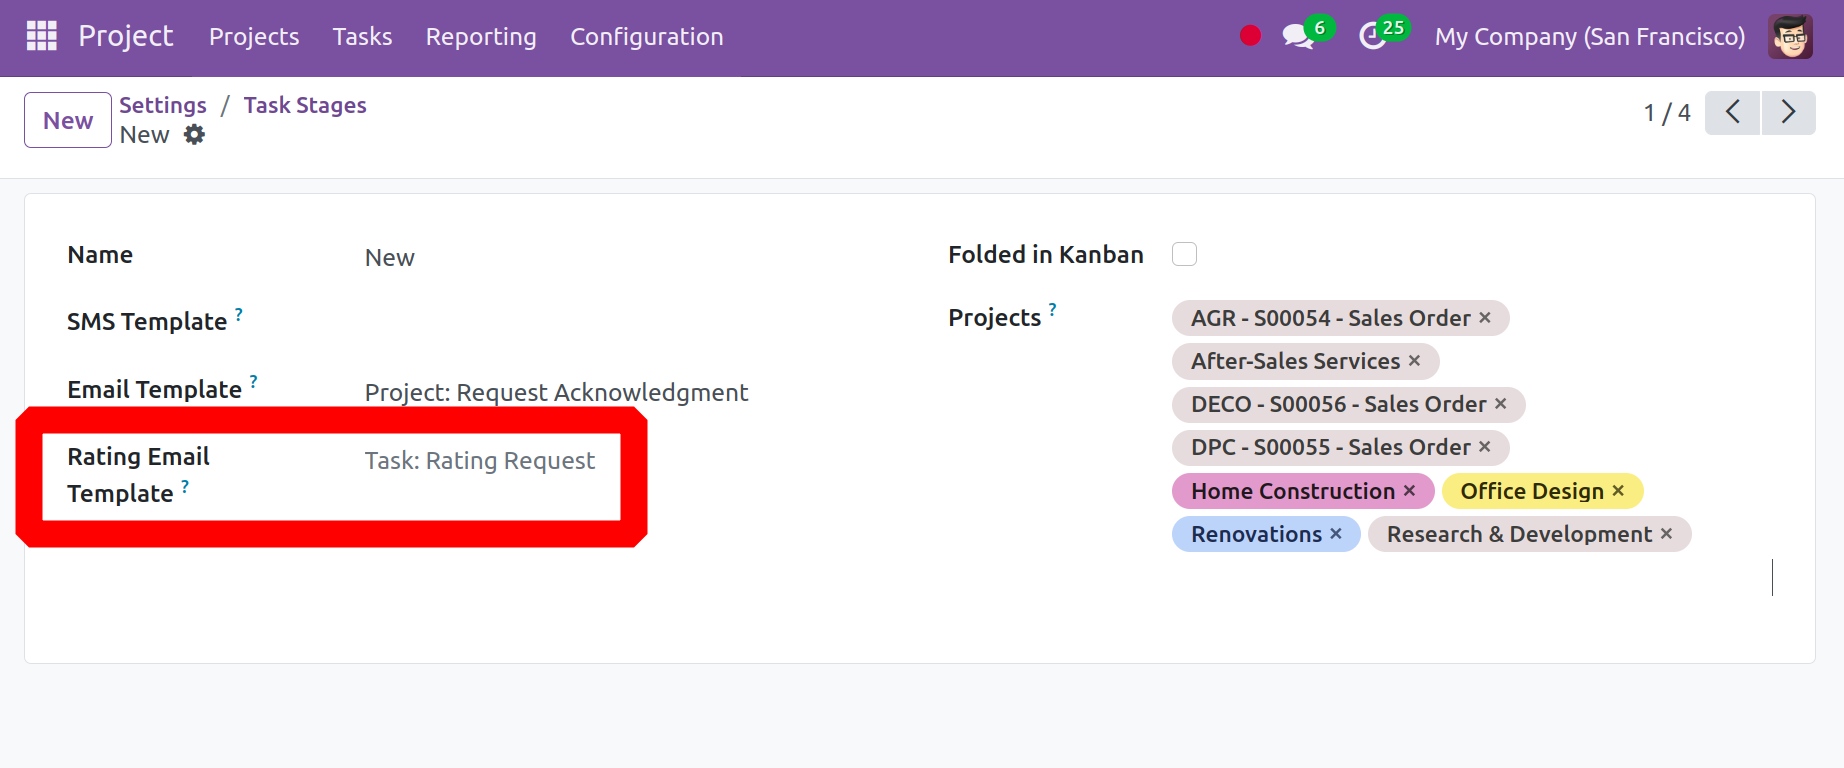
One of the fields on the task stages setup page is labeled Rating Email Template. Incorporate the email template there. The customers will receive the related email if the task reaches this level. Therefore, the clients can quickly add their reactions by email.
Project
To establish a new project, choose the Project choice from the settings. The project page will look like the screenshot below.
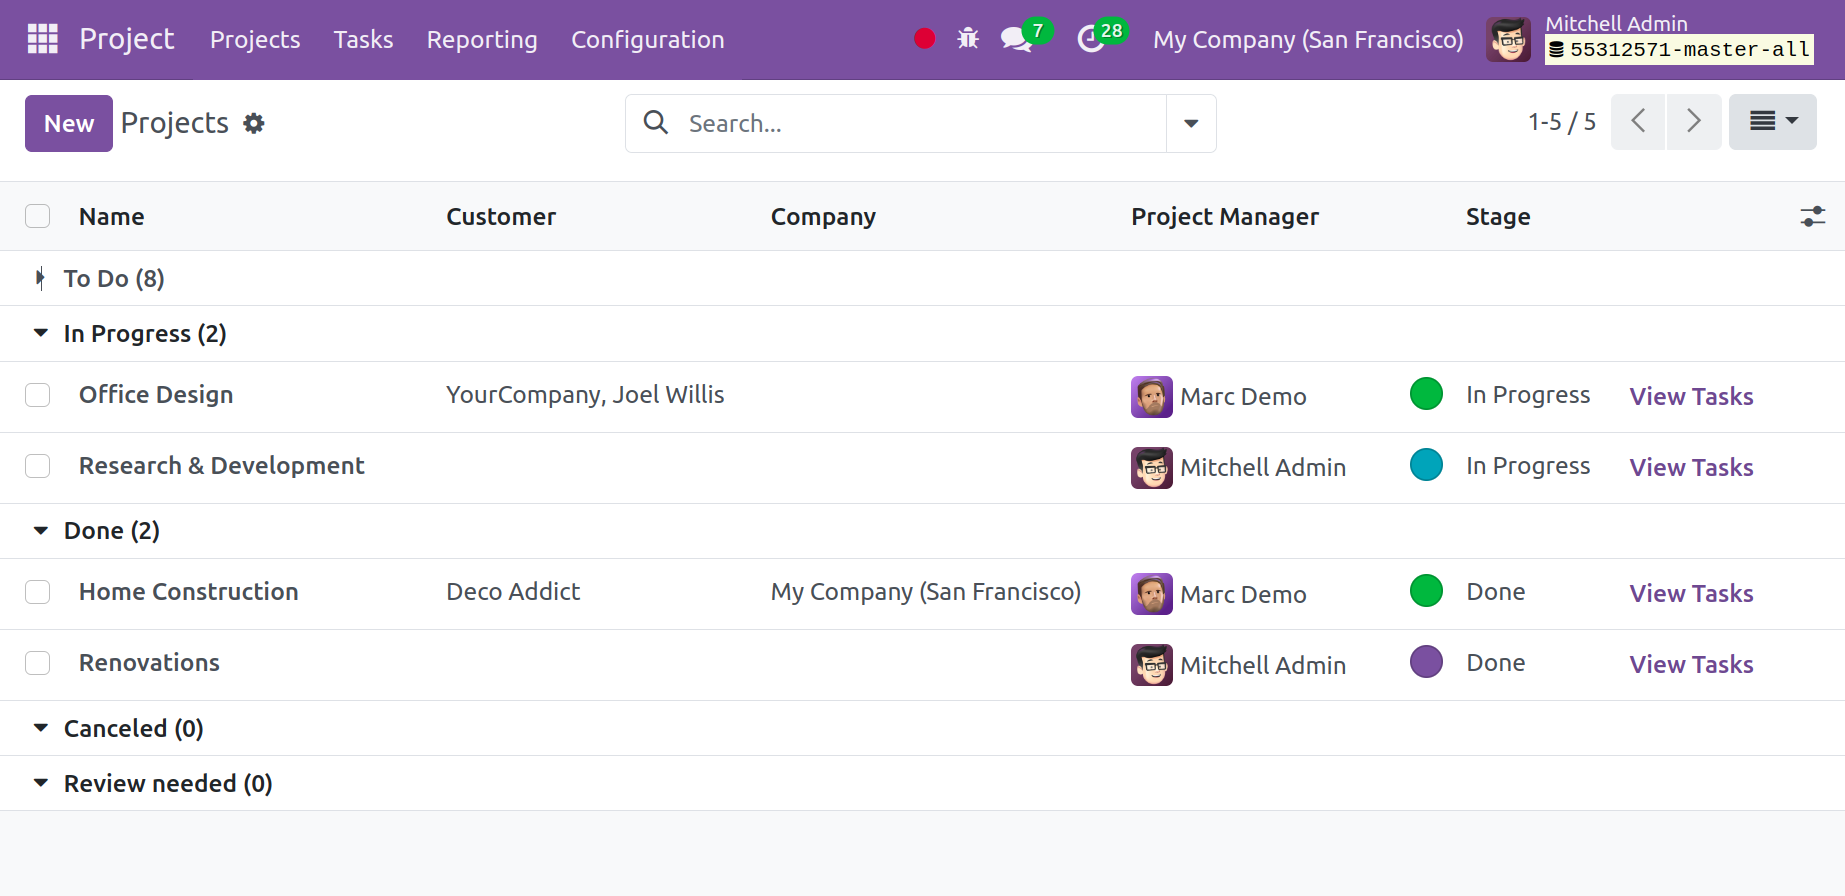
As seen in the screenshot above, you will see a list of previously created projects on the projects page. Next, you may see the specifics, including the project name, client, firm name, start and end dates, hours allotted for the project, project manager name, and the phase at which the project is offered. Using the View Task button, the created task for the project can be viewed.
If necessary, you can also utilize the Group By, Favorites, and Filters features. Simply select the New symbol located on the left side of the page in the above image to start a project of a similar nature. The screenshot below illustrates how the projects' creation page will look.
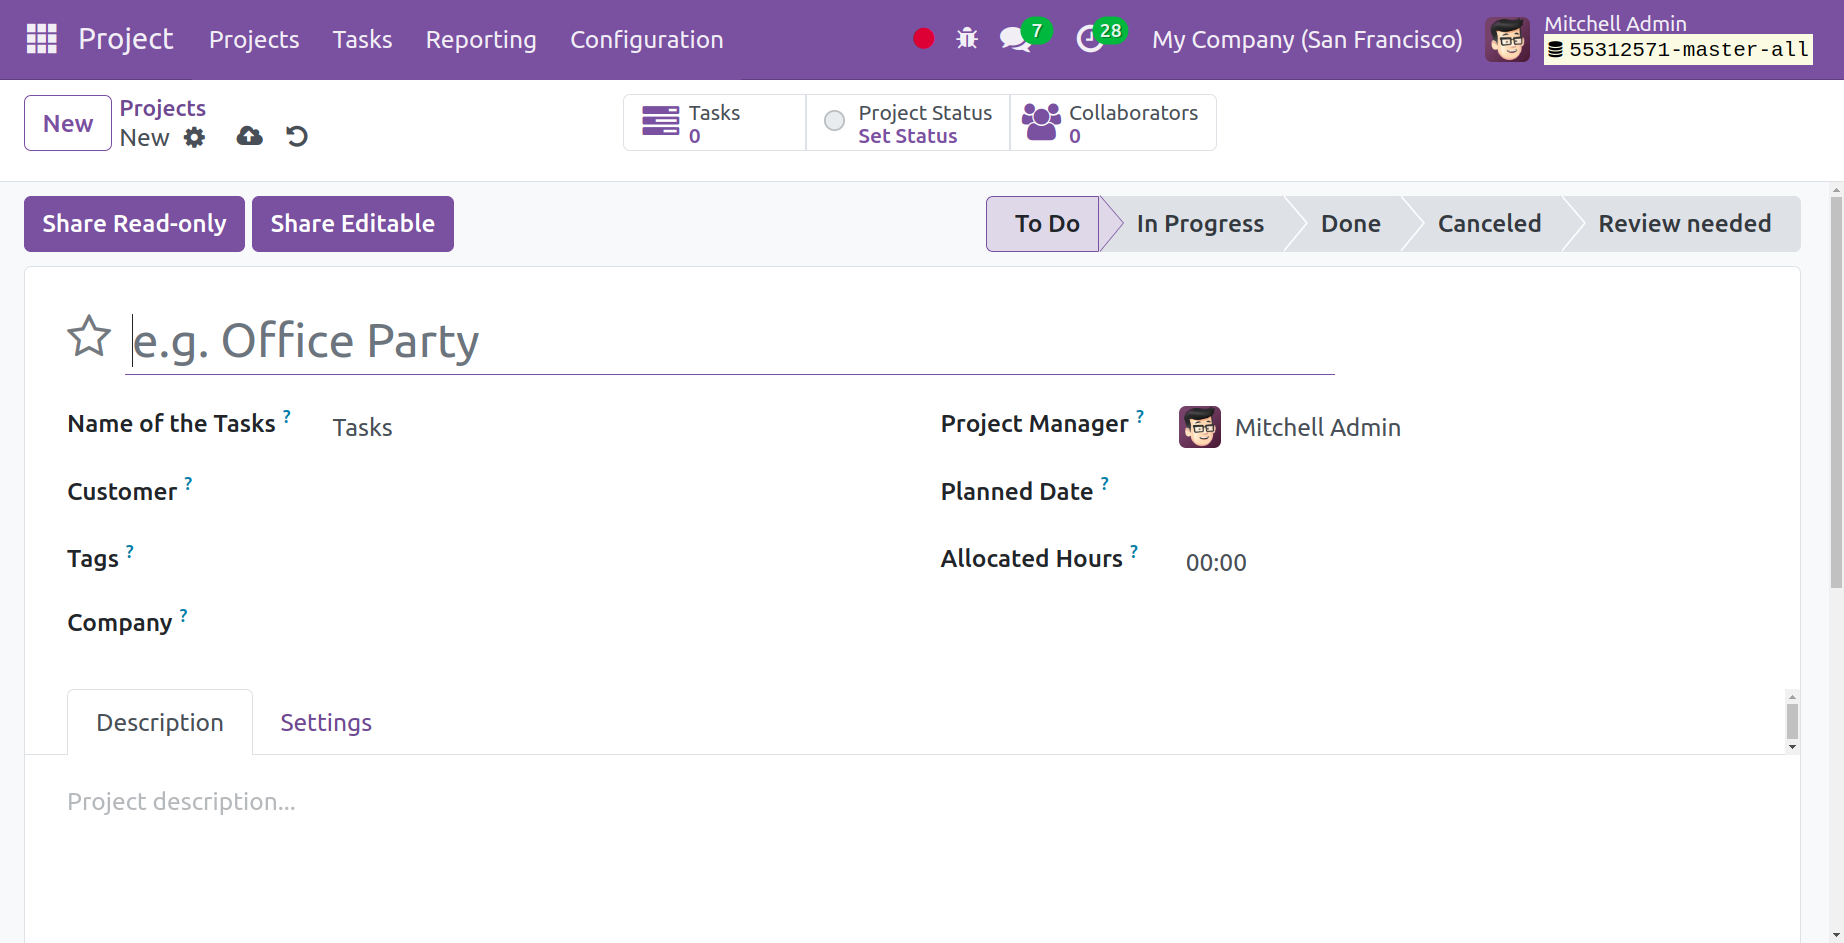
You need to fill up a few spaces on the project's creation page. First, enter the project's name (which you must establish) and Name of Tasks, followed by the customer, any relevant project tags, the firm name, the project manager's name, the project's planned date, and the allotted hours.
Two tabs, such as Settings and Description, are located beneath it. You can complete the short description of the project on the description tab, which includes a word count for the assignment, a link to the refuse, and many other things. You can now enter specific information under the Settings tab, as seen in the screenshot below.
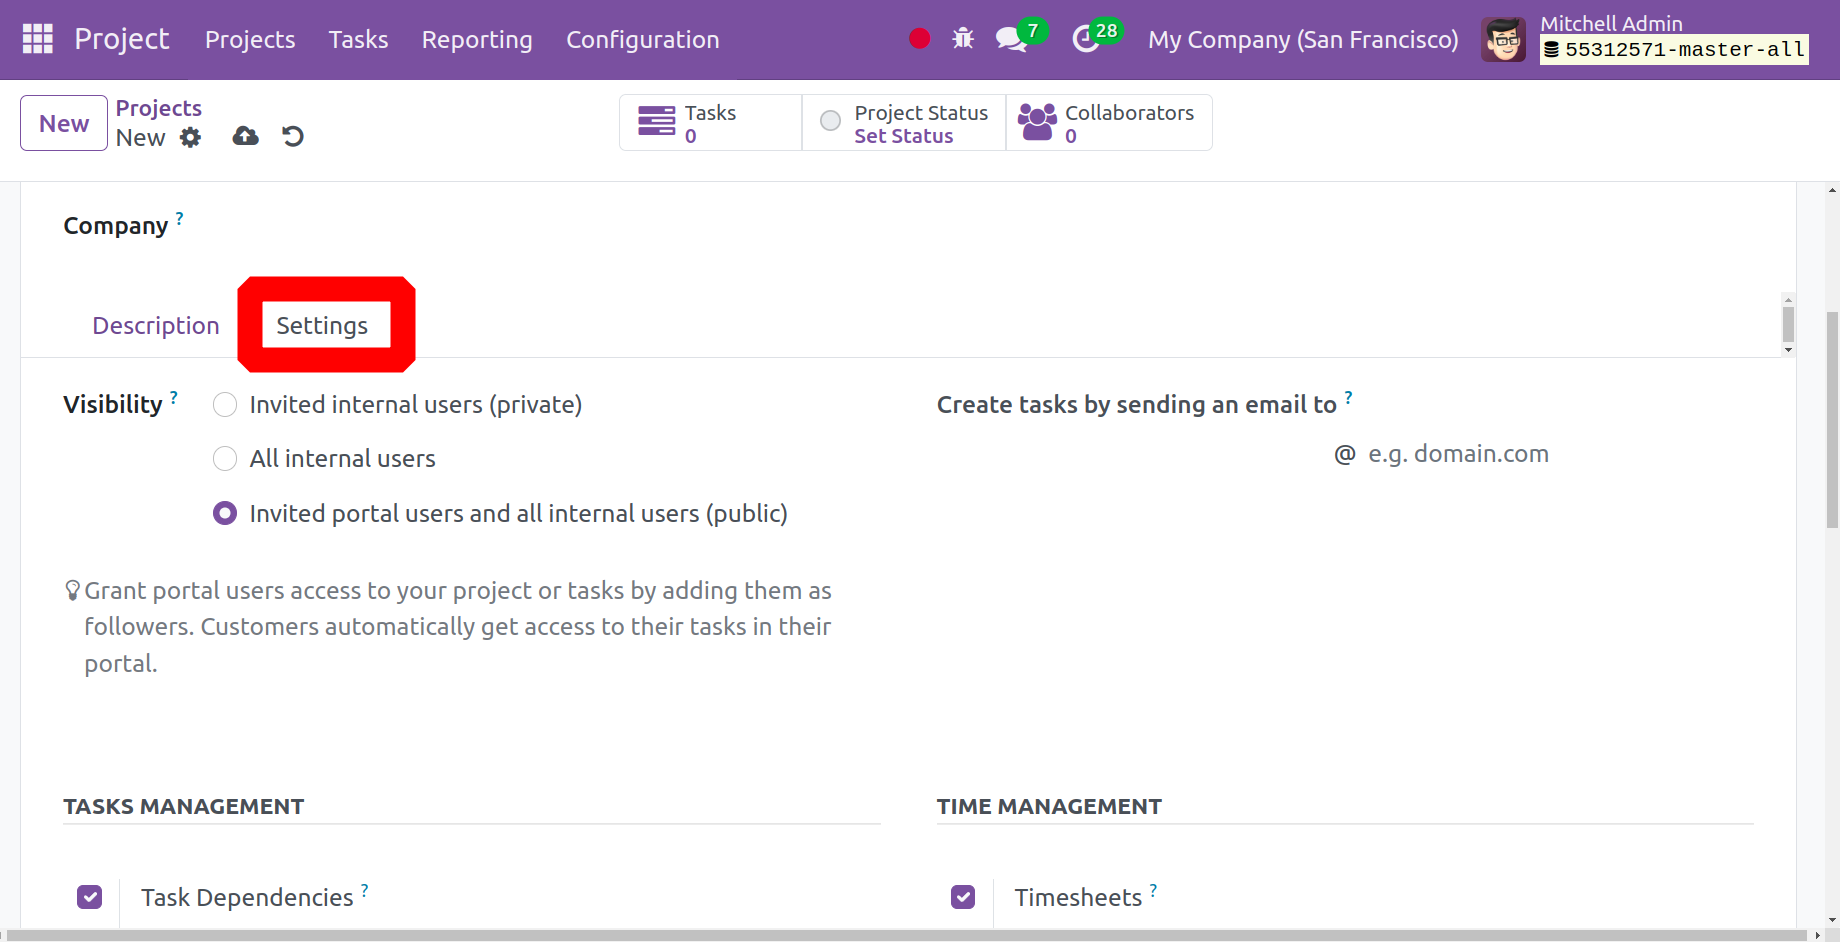
You can select Invited Users, All Internal Users, or Invited Portal Users and All Internal Users under this section's Visibility option. You can add the necessary people as followers to direct portal users to your project or assignment.
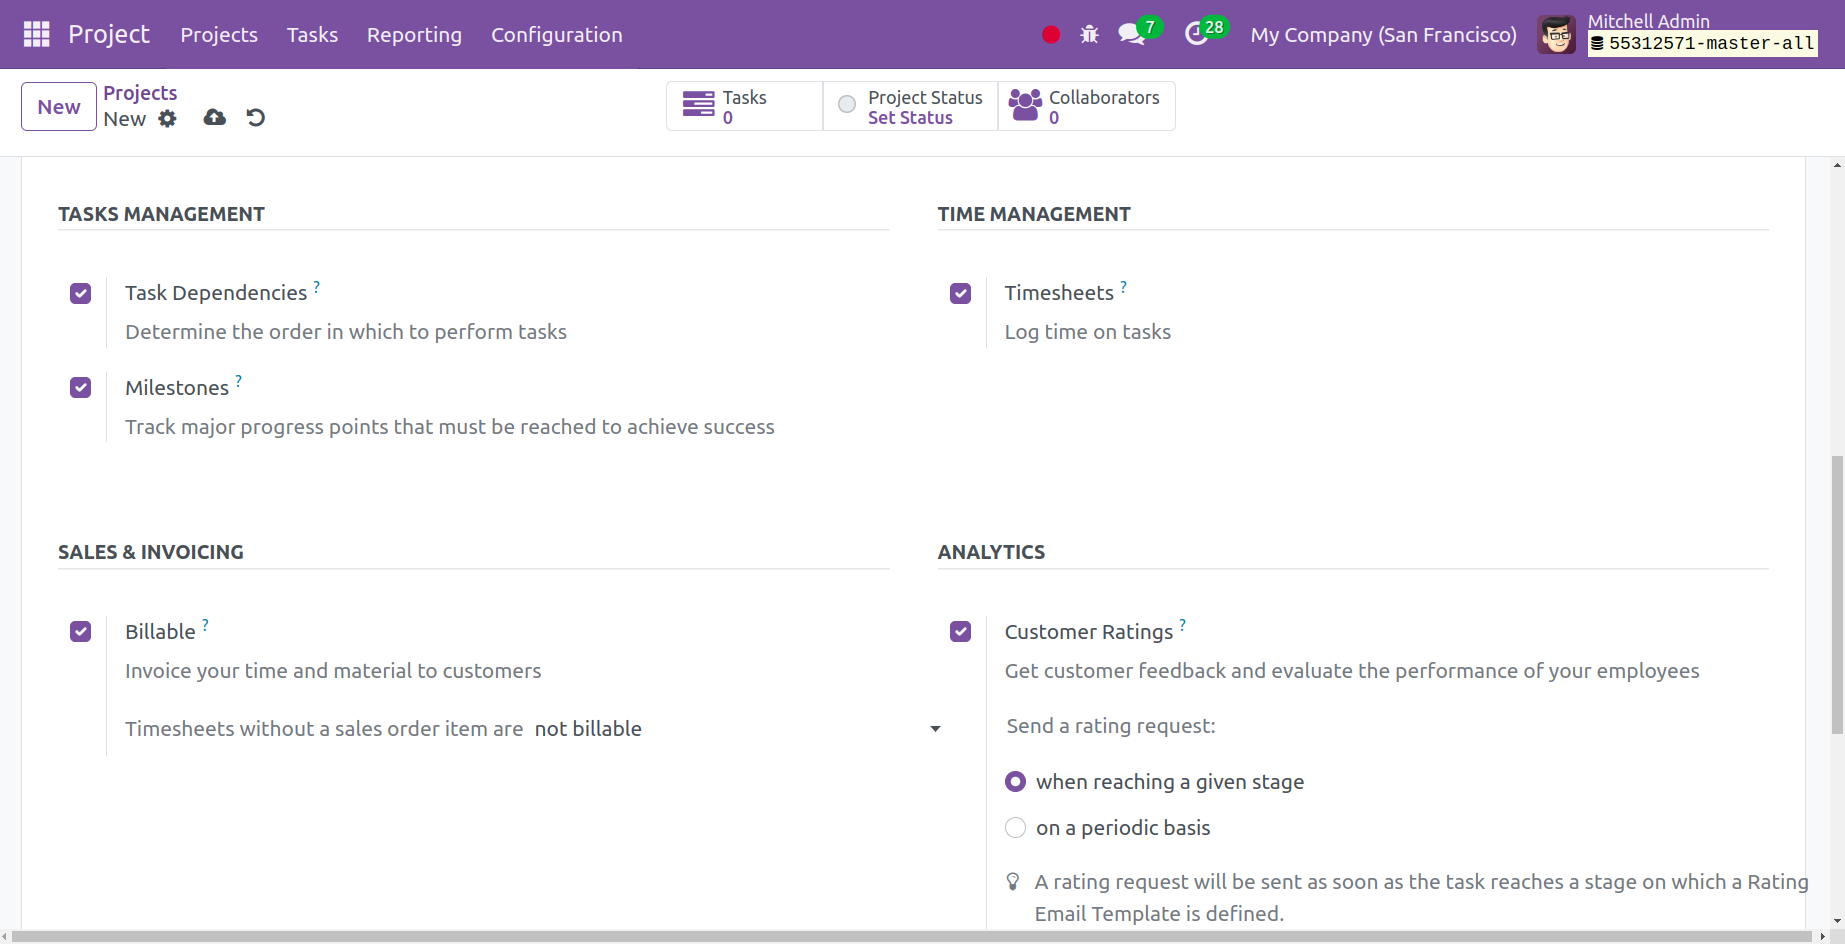
The TASK MANAGEMENT choice is the one that appears next. It has several sub-options, including Task Dependencies, and Milestones. You may use the Task Dependencies option to help you decide which activities to complete first. Lastly, you need to use the Milestone option to keep track of the significant milestones that you need to meet to achieve success. Currently, you have the TIME MANAGEMENT option, where you may activate the Timesheet option and log time on the task. Lastly, you need to select the SALE & INVOICING option. There, you can turn on the Billable option, which will allow you to bill the necessary clients for your labor and materials. The Customer Ratings can be enabled in the ANALYTICS section. This allows the user to assess employee performance and obtain client feedback. Send a rating request section can be selected periodically or upon achieving a specific level.
Once you have completed using all of these capabilities, click the "save" icon to add the newly formed project to the list of completed projects. As soon as you save the information, a few options will appear on the left side of the page, including Share Editable and Share Read-only.
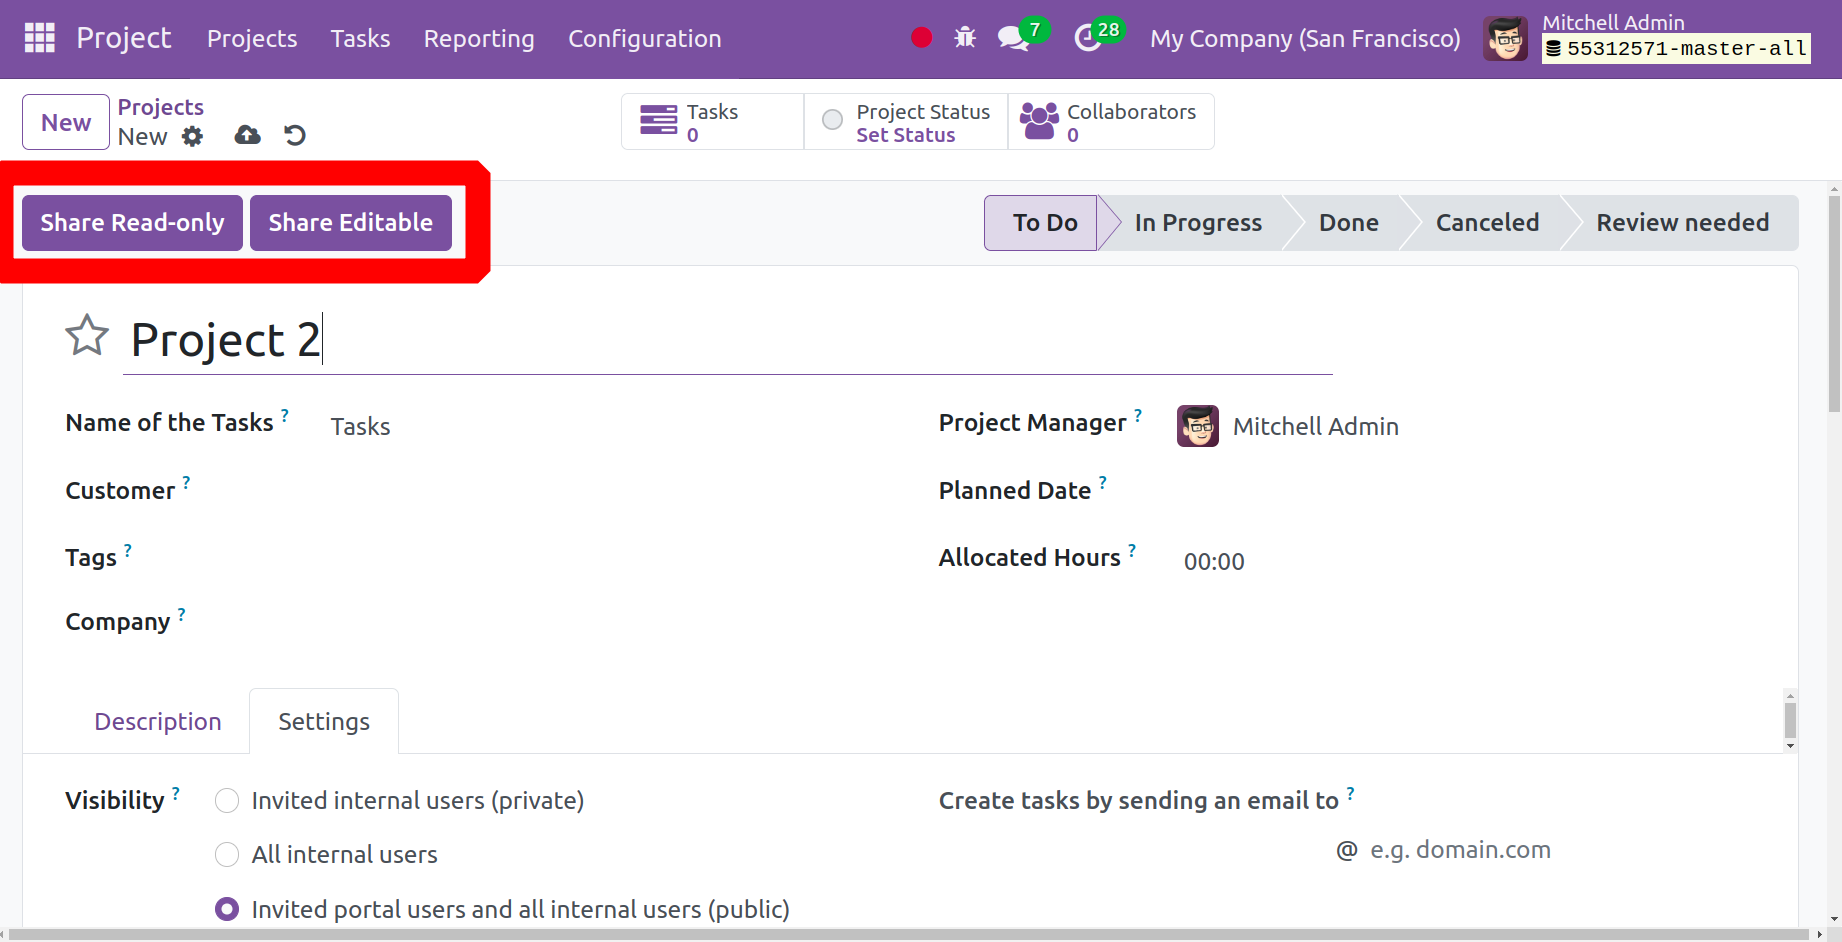
If you want to share the project read-only, readers can work on it independently, and no outside party can make changes. Use the share editable option if an outside party was required to complete the alteration. The options for tasks, milestones, customer ratings, burndown charts, billable time, gross margin, and collaborators are now available to you while editing. Only after activating the gross margin and customer rating options from the project module's settings option will they be accessible.
You can now activate the Customer Rating feature to find out how satisfied the client is with the job. The setting's option will look like the one in the screenshot below.
This is where the customer rating option is located. When it activates, it will assist you in monitoring the customer's level of satisfaction with the project.
Project Stages
You can handle different phases under project management to set them up in accordance with the progressions. You can quickly ascertain each project's status by identifying its various phases, and you can then respond appropriately. You must select the appropriate choice from the options in order to configure the project stages.
You are able to monitor and manage the project's progress after the option is activated. The project stages option will be available on the setup menu.
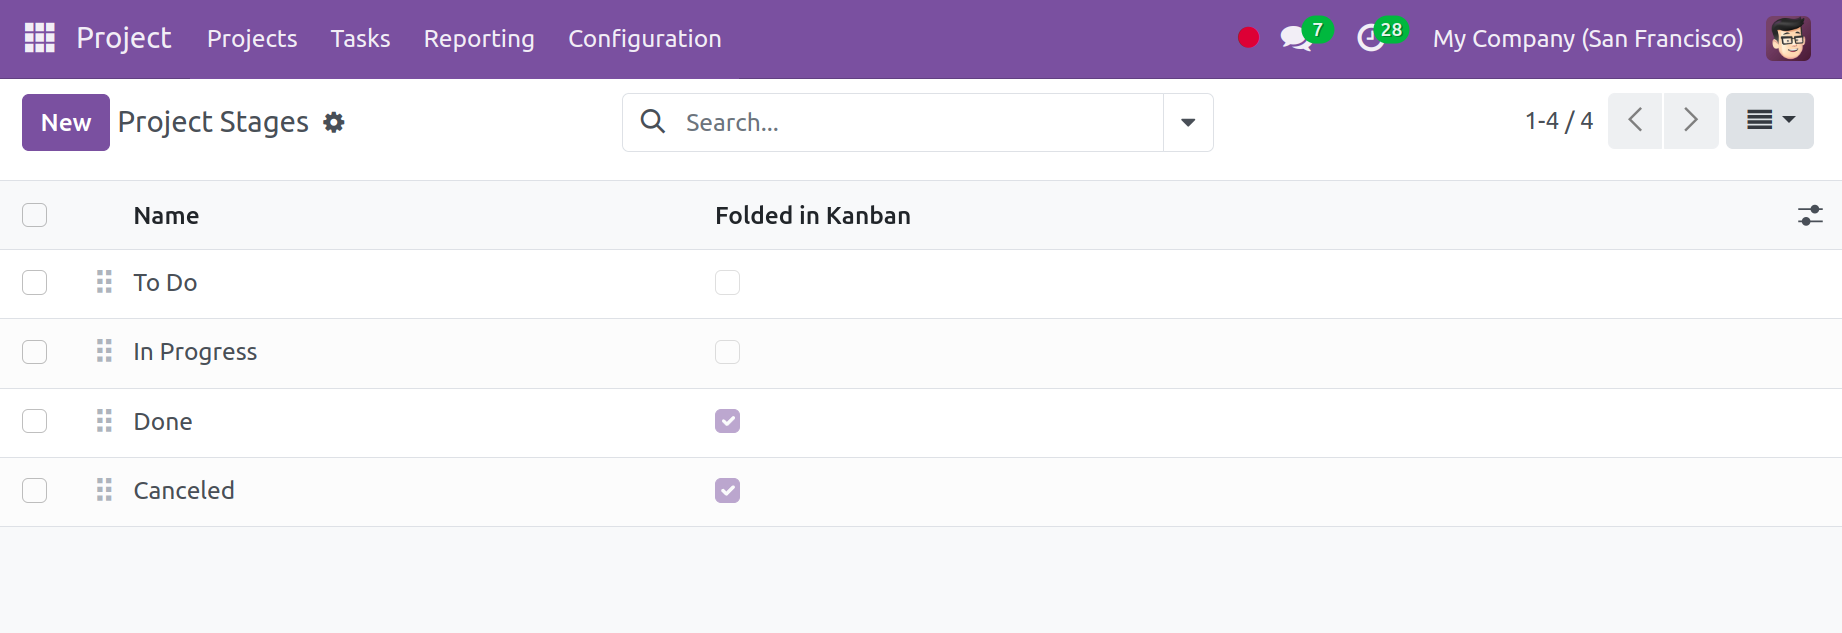
This is the project stage page that is folded into the Kanban option and contains information such as the project name. Depending on your needs, you can utilize the filters, group by, and favorite option. In addition to the Kanban view, the page may also be viewed in a list view. It is possible to create new stages using the New option. You will find the additional line needed to create the new one there.
As seen in the figure below, the dashboard displays all of the stages that have been generated. Users can set up more stages by clicking the +Stage button on the dashboard. Options like Fold, Edit, Automations, Delete, Archive All, and Unarchive All are available via the settings icon.
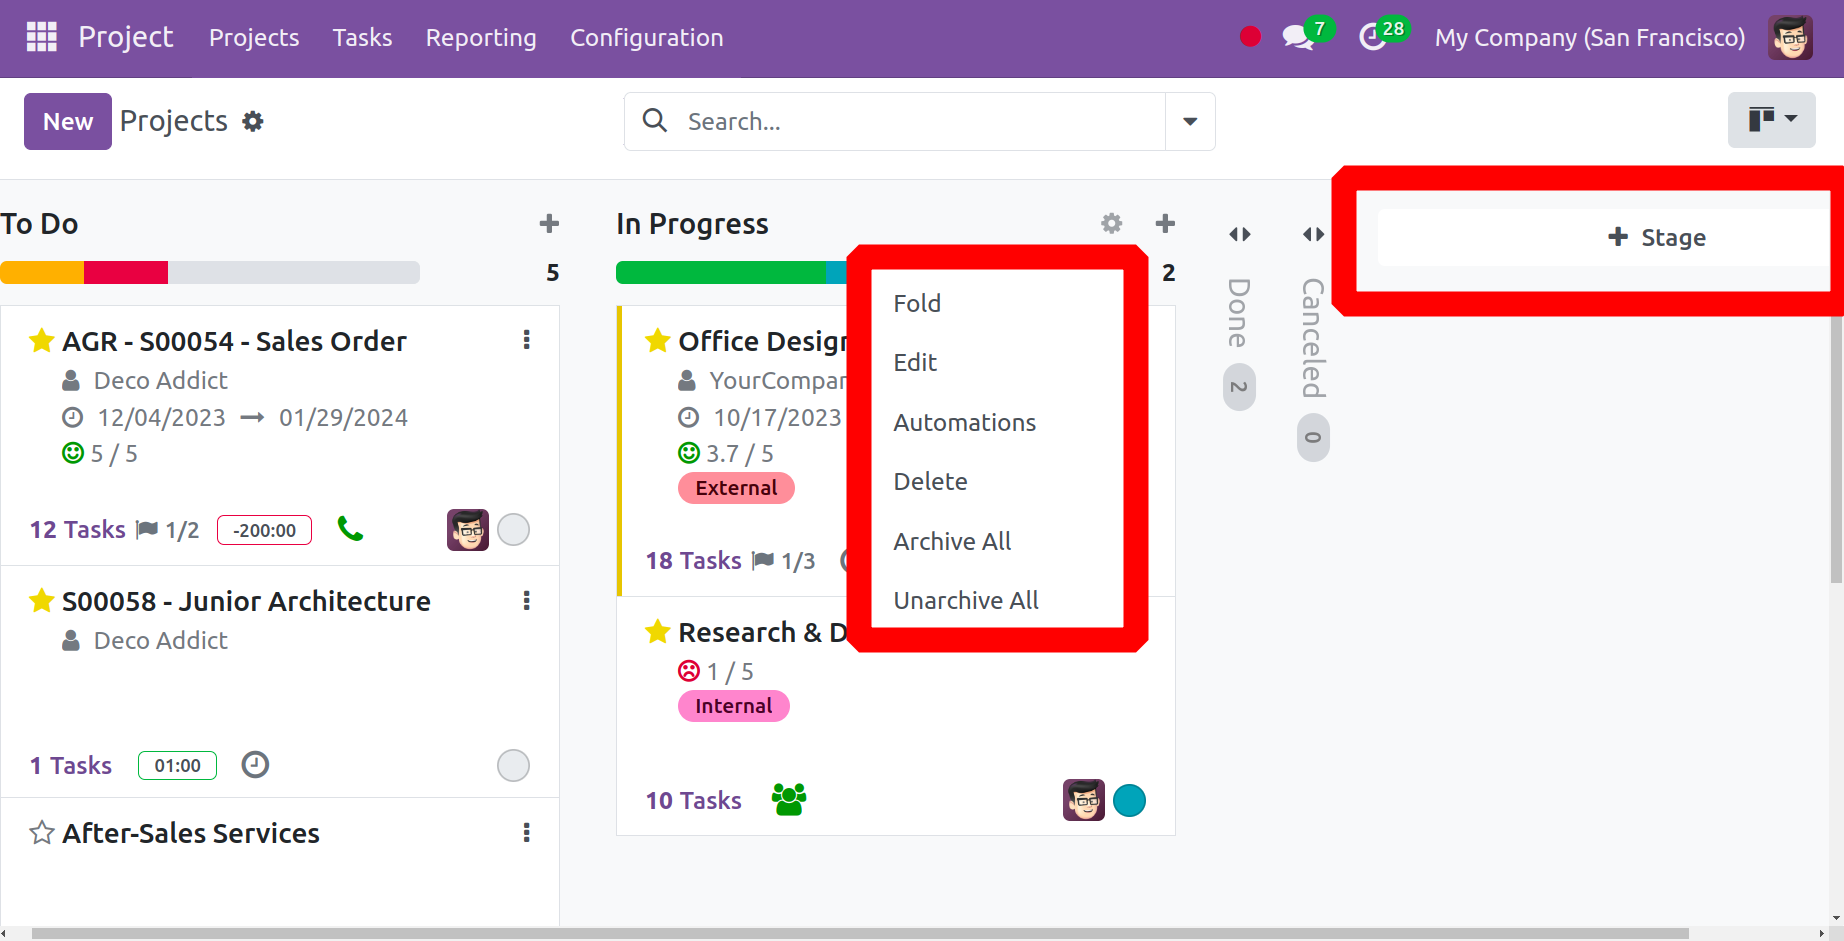
You can fold the stage in the kanban view by selecting the Fold option. Click the Edit or Delete buttons to change or remove the stage, respectively. Back in time, the Archive All and Unarchive All buttons on the stage can be used to archive or unarchive the records.
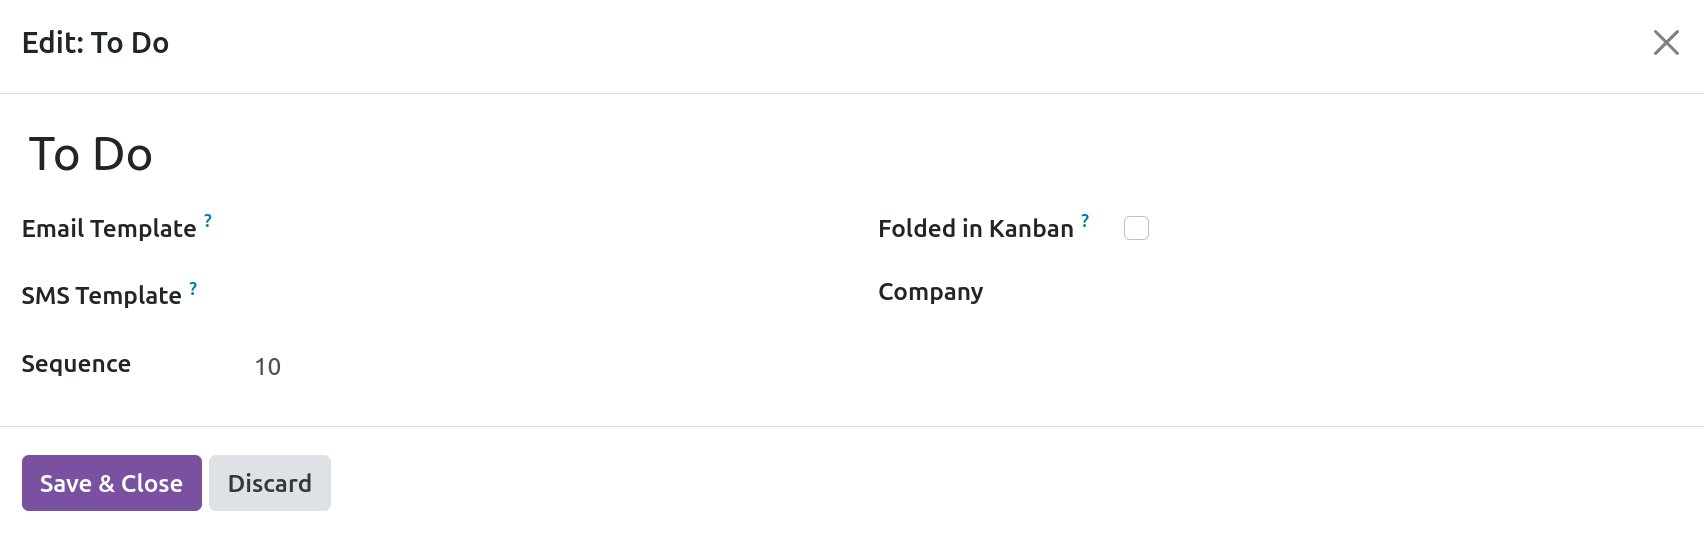
The popup window for editing the stage will show up when you click the Edit button. When the stage is reached, an email will be sent to the customer automatically if the Email Template is configured. If the SMS Template is configured, the consumer receives an SMS when the stage is reached. Then select the Folded in Kanban option to fold the stage in the kanban view.
We can establish automation rules for the stage thanks to automation. To add a new rule, click the New button. Select the model that the automation rule operates on initially. The condition must be met before the record is updated if a filter rule is added in the Before Update Domain field. Users can specify the activity that needs to be taken inside the Actions To Do tab. To add an action, click the button.

From the window, select the Action Type. You can select from a variety of categories, including update records, create activities, send emails and SMS, add and remove followers, create records, run code, send webhook notifications, and carry out already-started operations. Select the groups that are able to carry out the server action in the Allowed Groups section. The regulation was then established under ACTION DETAILS.
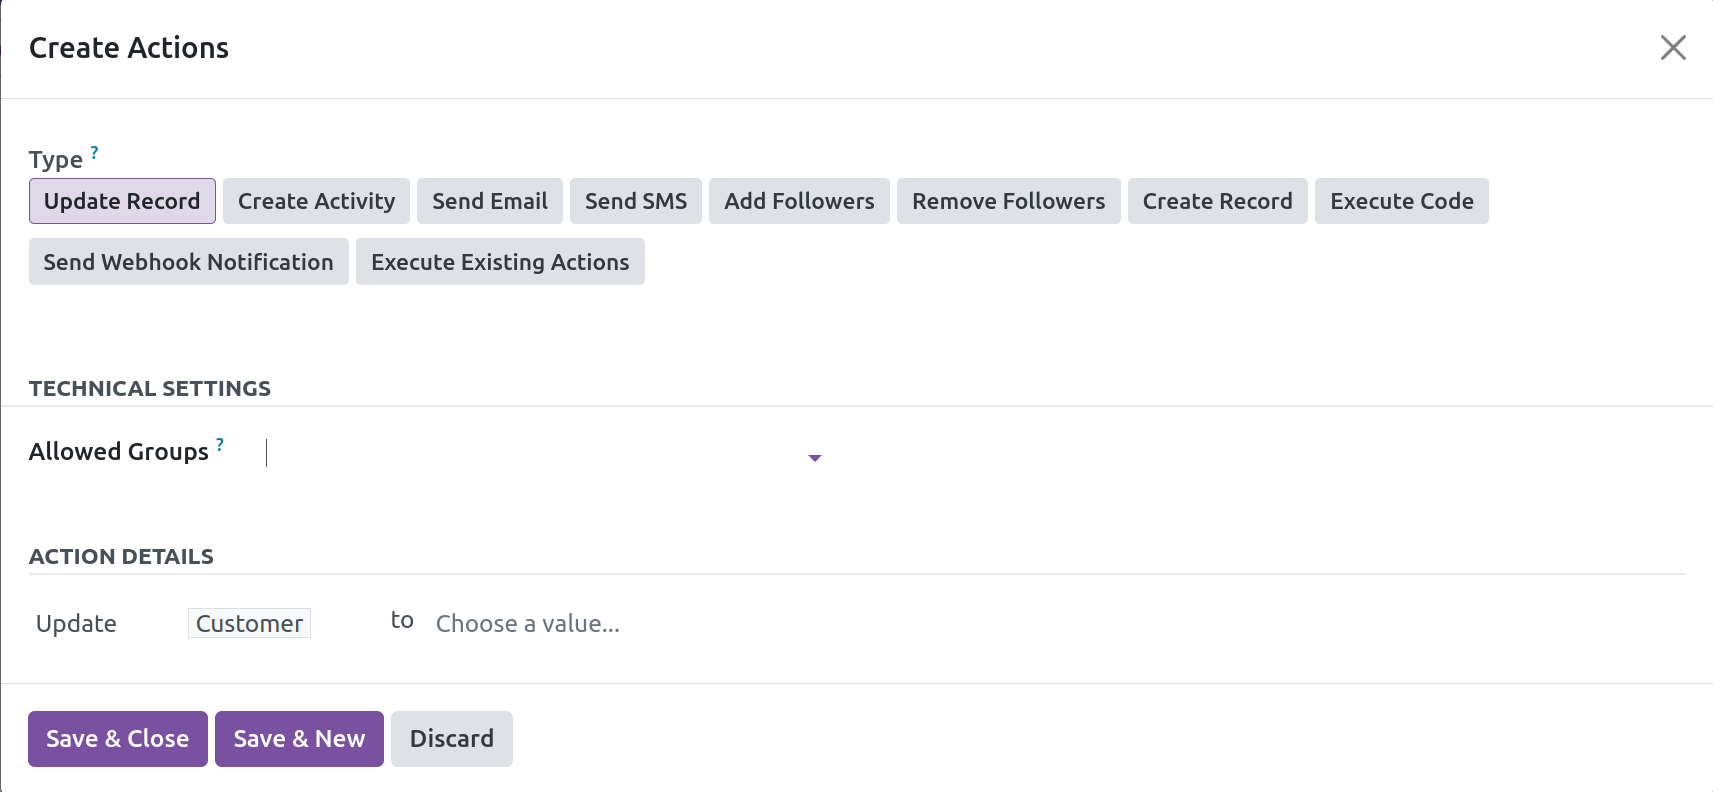
Then click on the Save & Close button.
Task Stage
We have spoken about how to create the task stage within the project module thus far. Let's now examine how to establish a Task Stage, accessible inside the Configuration menu. You can learn about the actions taken on each project task and their progress by describing the various stages of the project task.
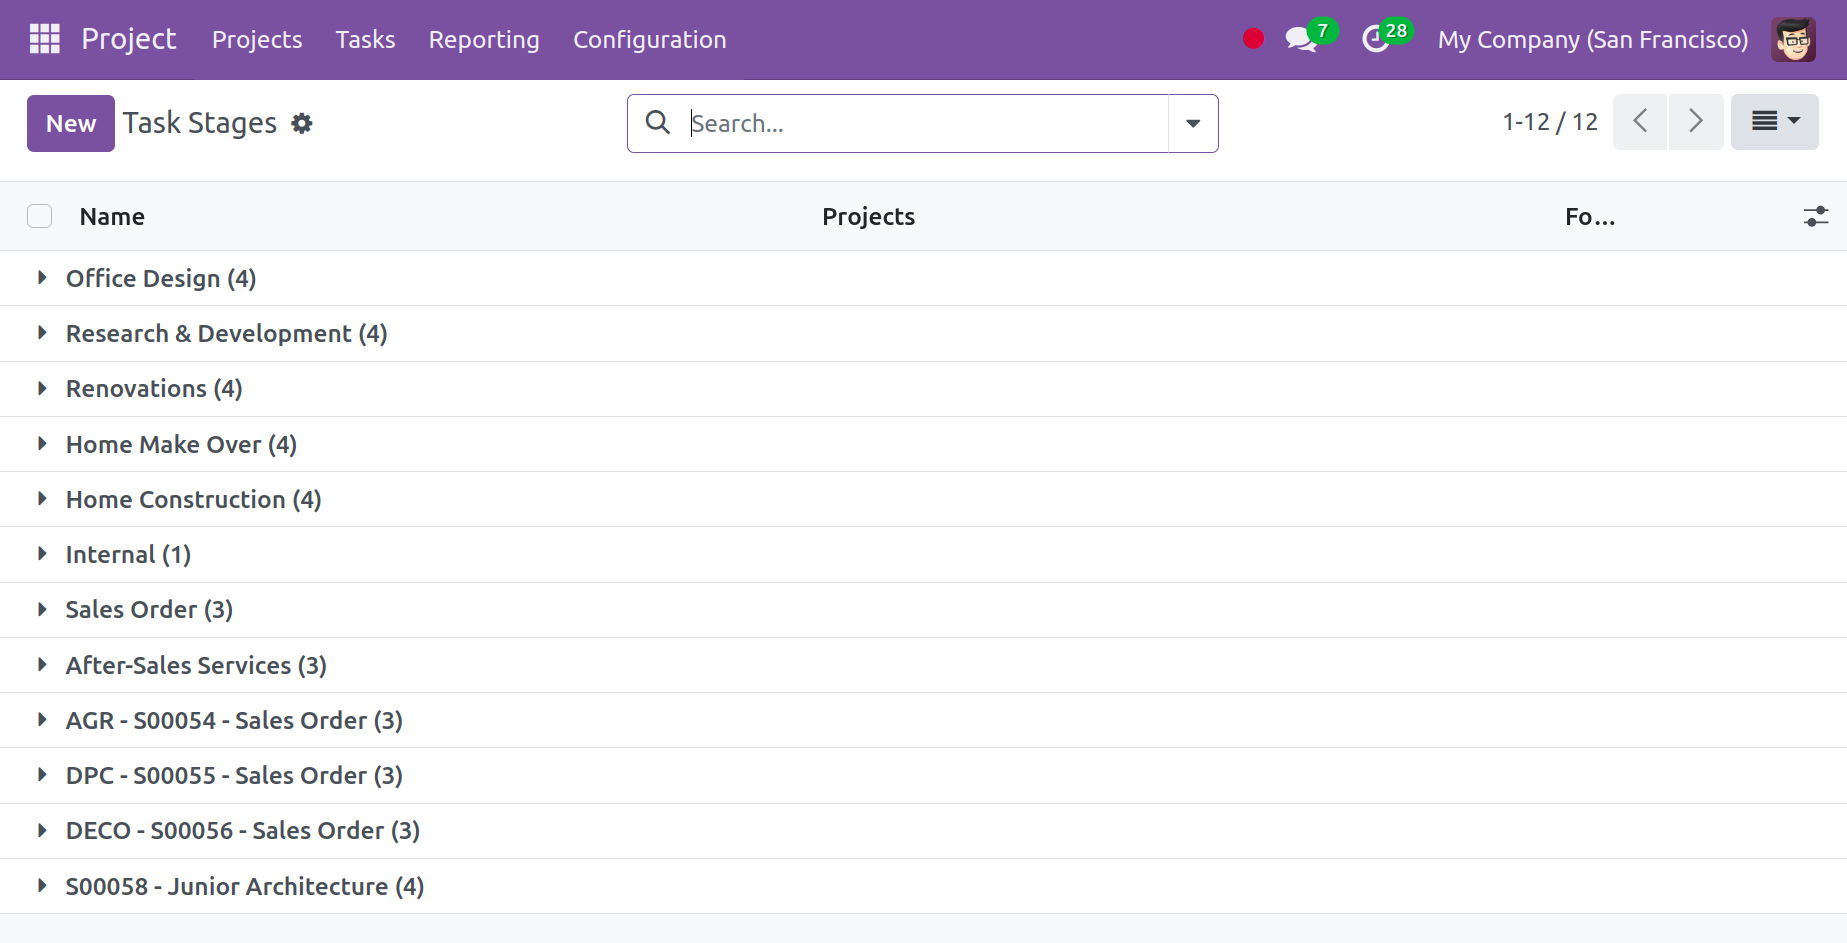
You can view a list of previously created task stages on the task stage page. You will be able to utilize the appropriate Filters, Group By, and Favorite choices. The stage's name, project, and Folded-in Kanban View are among the details that are given.
You can use the New option located on the left side of the page to create a task stage that is comparable to this one. The screenshot below depicts the creation page that will be displayed.
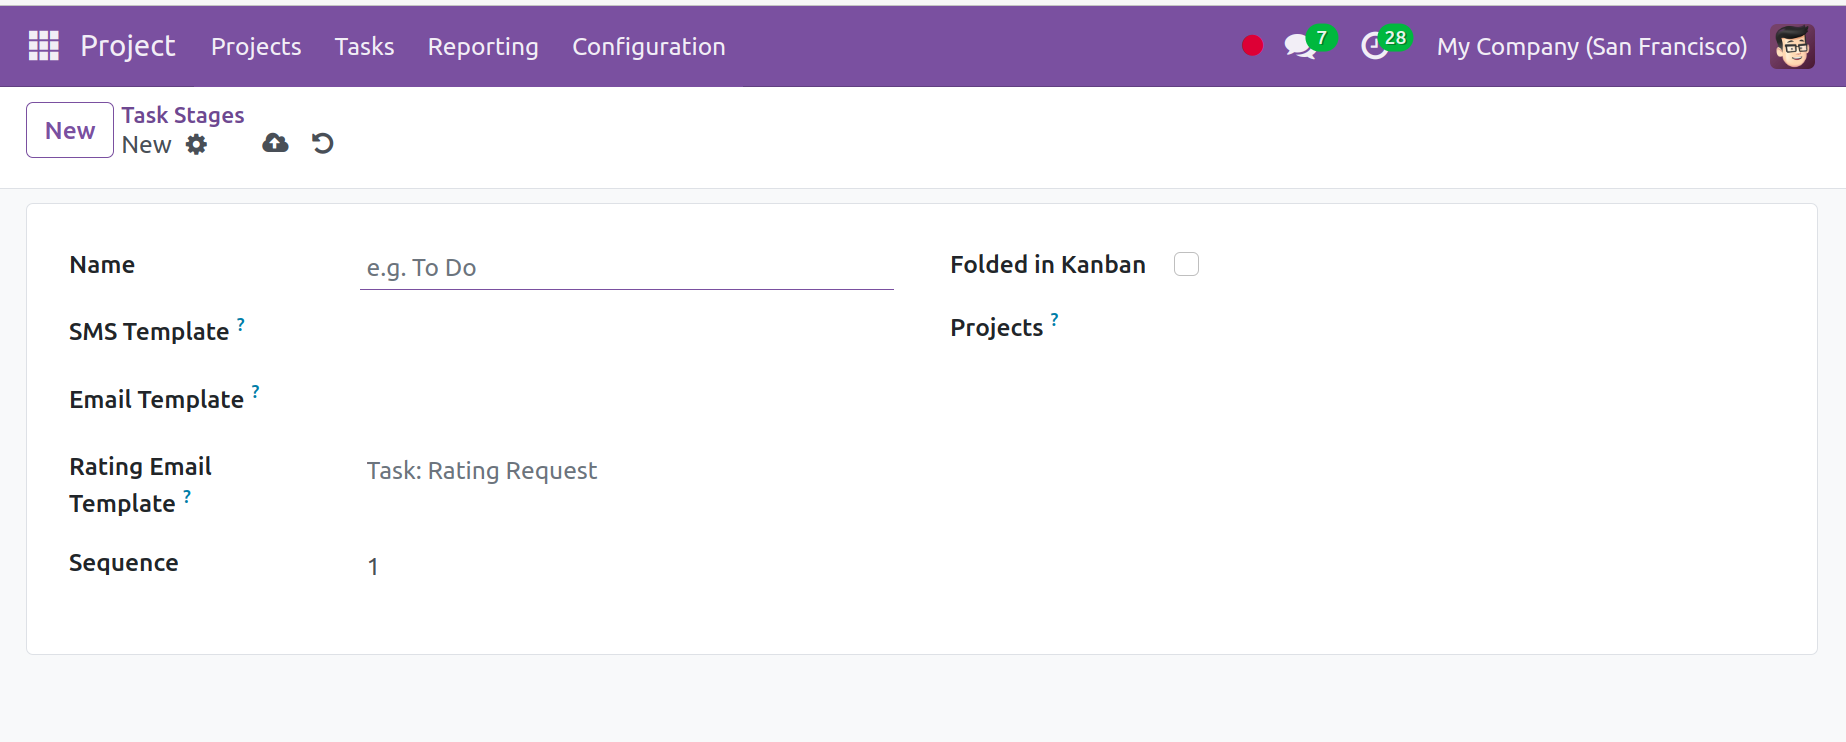
You must now enter some information about the task stage. The task stage name must be entered in the designated space first. The Folded-in Kanban option to be activated, the number of sequences, and the SMS and email templates can then be added. Additionally, you may use the drop-down menu to add the necessary project to the information.
When the task reaches this point, if the Rating Email Template is configured, the client will automatically receive a rating request via email. Alternatively, based on how your project is configured, it will be issued on a regular basis for as long as the job is in this state. You must first enable the Customer Rating option from the Settings in order to use this feature.
Make sure the Customer Rating option is activated on the project in order to utilize this functionality. In order to add the newly generated task stage to the current list of stages, select the save icon at the end.
Tags
In the project management module, adding relevant tags to a project is now a simple procedure using the Tags option available in the Configuration menu. You will see a page similar to the one in the screenshot below when you select the tags option from the setup menu.
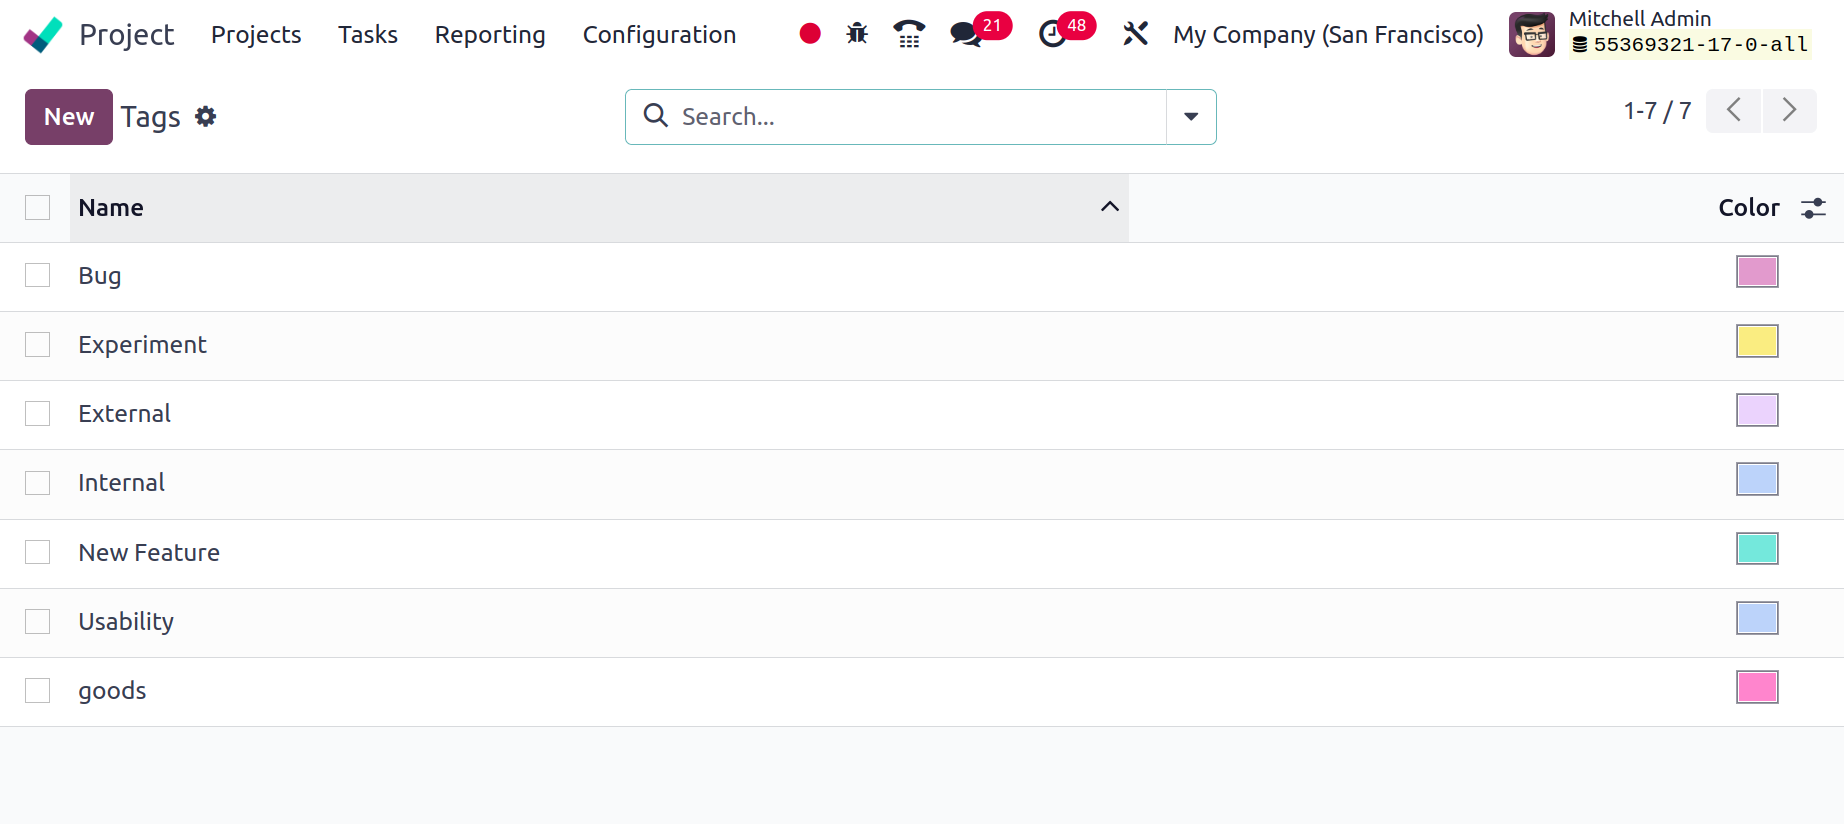
The page displays a list of previously established tags together with the color that corresponds to each tag. If necessary, you can utilize the favorites and organize by filters. It is possible to create tags that are similar by using the New option.
When the renew option is chosen, a new line will be added to the list in order to add the new tags. Creating the list only takes a few simple steps.
Activity Types
This makes scheduling activities under the project management module a relatively simple process. As seen in the screenshot below, once you select the Activity Type option under the Configuration menu, a list of all the activities will appear.
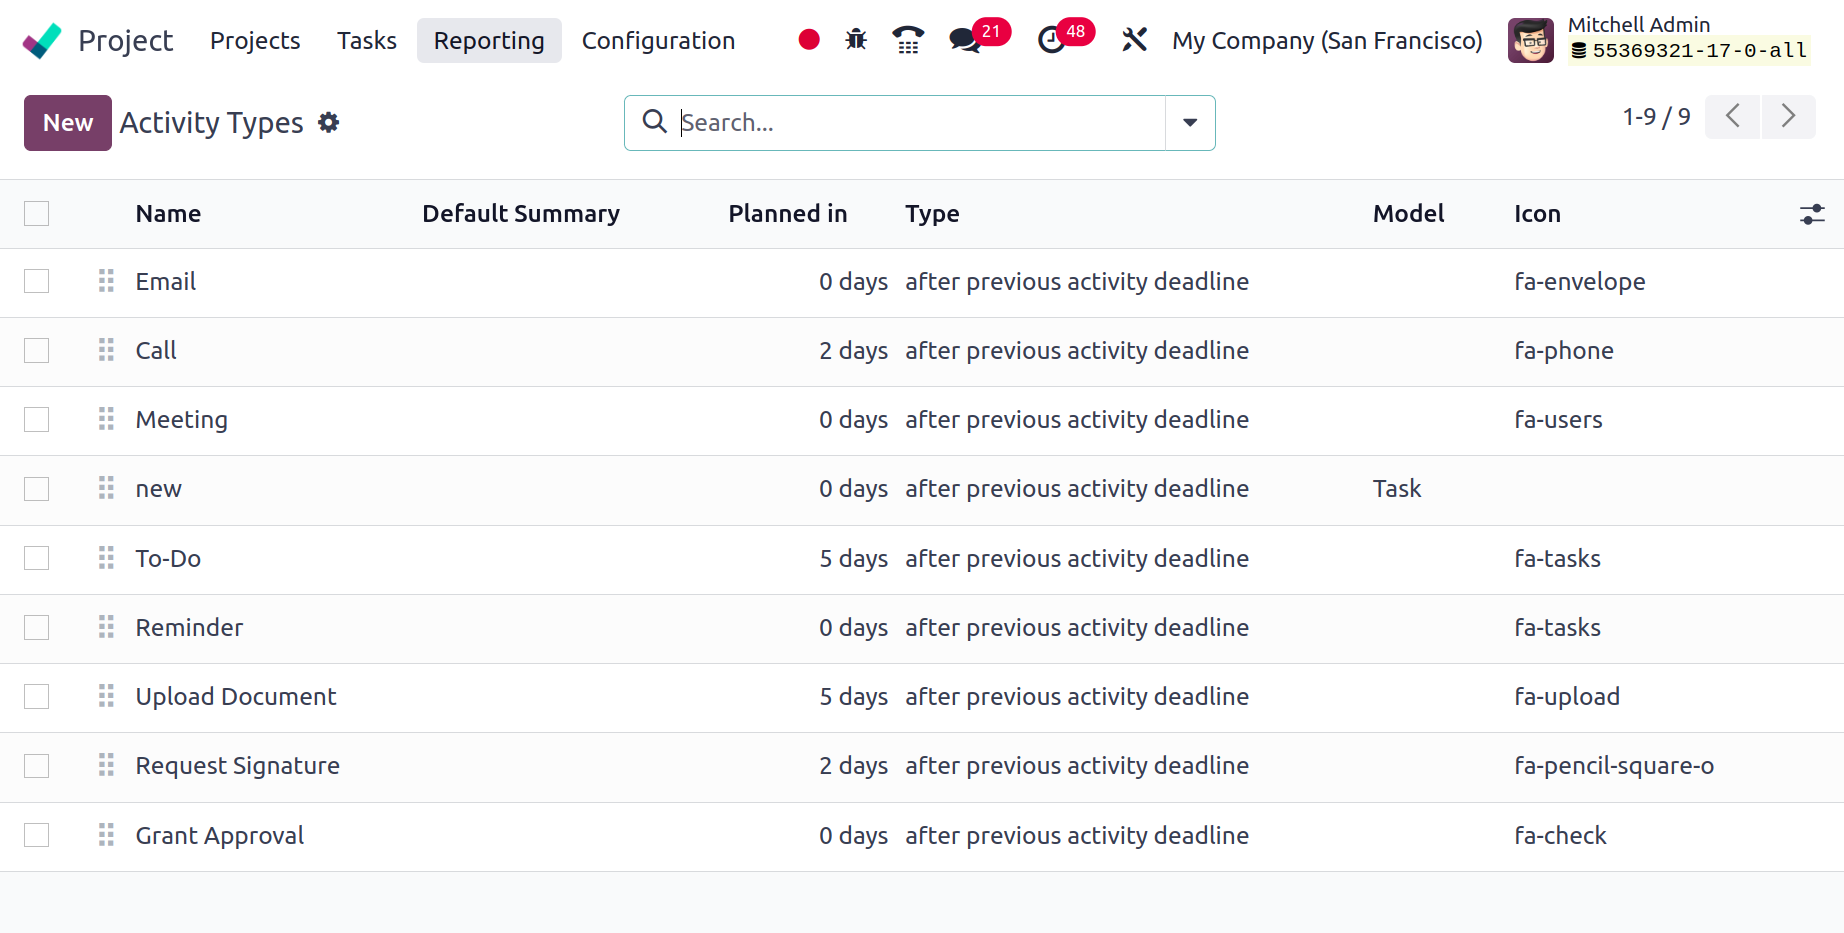
All of the planned activities are listed on the website. The activity name, default summary, scheduled in, kind, model, and icon are among the details pertaining to the activity. Simply select the New icon, as indicated in the screenshot below, and provide all the pages to create a similar type of scheduled activity.
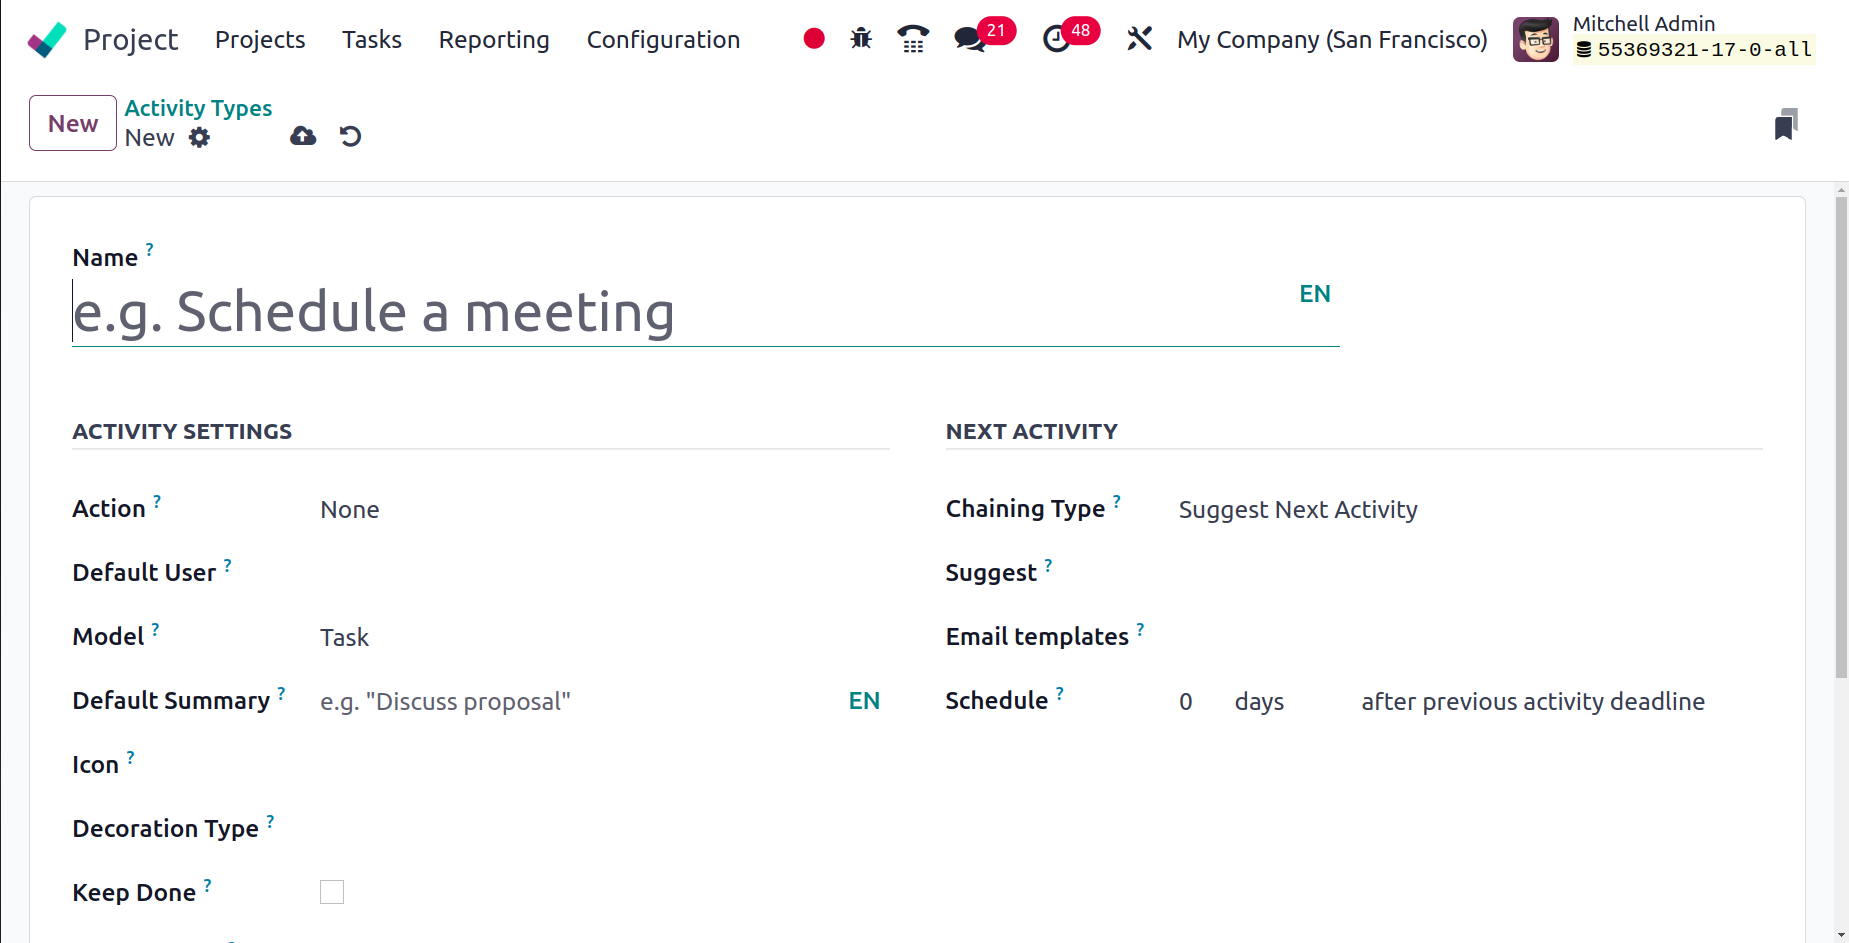
You need to include some information about the activity on the page, including its name at the top. Next, you may add the action from the drop-down menu, along with the default note, type, default user, default model, default summary, icon, and icon, under the ACTIVITY SETTINGS option. You can now include the chaining type as a trigger for the following activity or recommend it within the NEXT ACTIVITY section. Make recommendations for a choice, email templates, and scheduling window, in that order. When the current action is marked as completed, the activities listed below will be automatically scheduled if the chaining type is configured as the trigger for the subsequent activity. When the current task is marked as completed, the suggested activity, if any, will be suggested. You can select the save icon once you have finished entering all the information.
Activity Plans
Several activity plans can also be included in the setup to complete the work. To add such plans, go to the Configuration menu and select the Activity Planning option. Next, in order to add a new plan, click the New option.
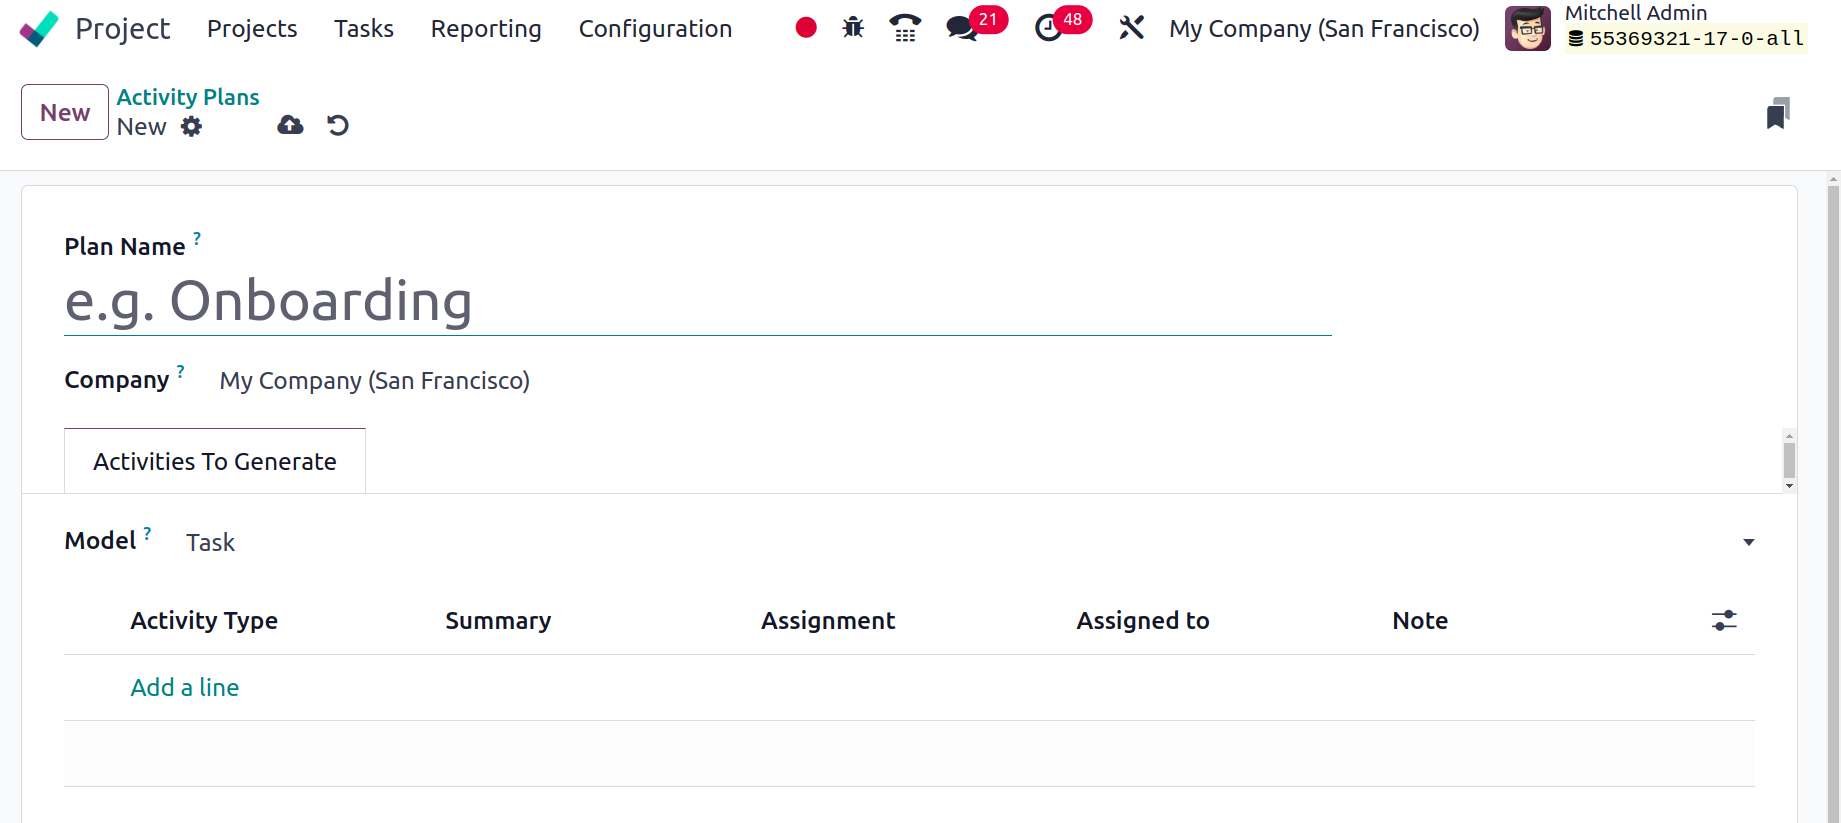
Give the name of the plan and the firm first. Next, add the Activity Types to the Activities To Generate tab using the Add a line tool.
Invoicing a project
You can simply add the desired project within the project management section. The billable option should first be activated from the project management module's settings menu if you need to obtain the option to invoice. You will be given the option to invoice when activating the billable opinion in the settings, which facilitates the invoicing of a project.

The billable options are displayed here in the project settings tab that you have chosen. You will see the invoice tab on the page when you select the chargeable option. The screenshot below shows the option.
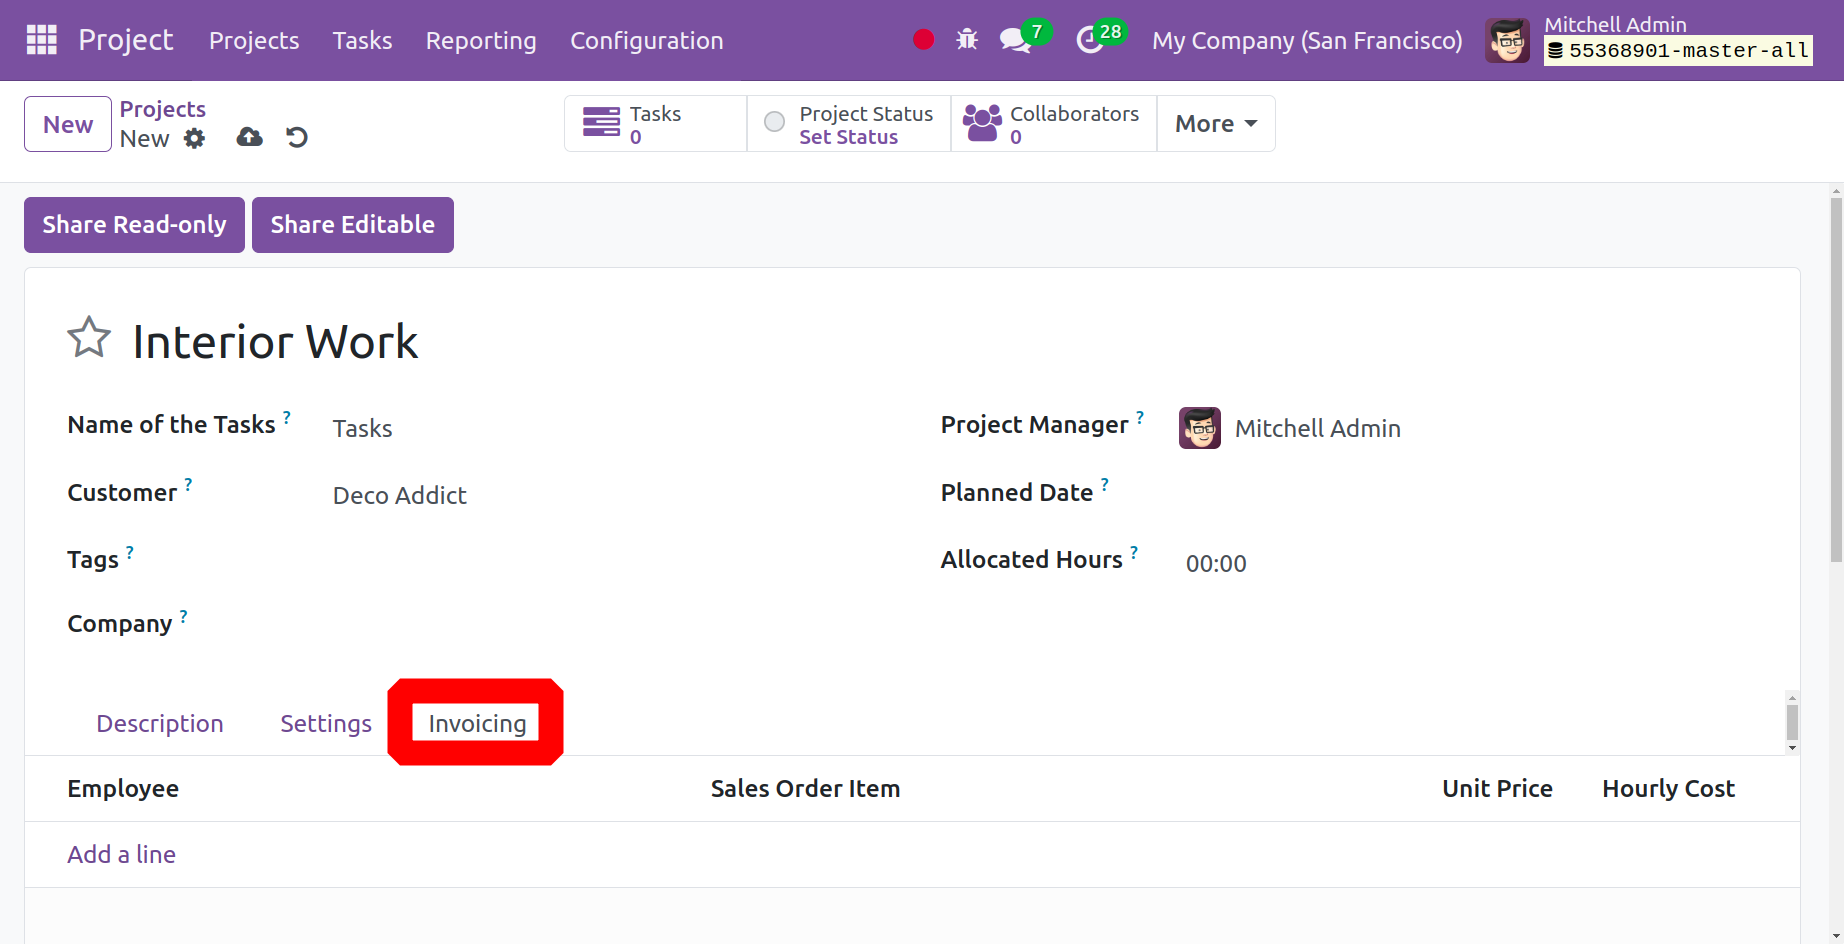
You can see the invoice tab on the page, which has the ability to activate the chargeable option. You can enter the sales order item that the task or project is associated with in the area provided below under the Invoicing option. For the purpose of the sales order item, which is defined on the project, link the timesheet entry. The cost per unit and the number of hours worked on a project are other options. The employee's name may also be mentioned appropriately at the outset. The option to add a line can be used to add the details. You can select the save icon once you have finished entering all the information.
Timesheet, fixed/prepaid, delivered quantity, and milestone are the three different possibilities for which invoices can be prepared under the project management module. The time sheet will be helpful in obtaining the invoice for each employee's precise working hours for the project they worked on within the organization.
You can create a sales order to accomplish that. Activate the invoicing policy in accordance with the timesheet in the general information tab after creating a service-type project in order to invoice the timesheet of a specific project or task. Stated otherwise, suppose a junior architect's invoice timesheet could be generated as a service product, and then the product could be used to generate a sales order. In other words, you will see the junior architect when you choose the sales module under the product choice.
From there, you may access the General Information tab to view comments about things like Product Type, Invoicing Policy, and Create on Order alternatives. Making a sales order is now a simple process. The sales module page will look like the one in the screenshot below.

When selecting a service as the product type, many invoicing policies are displayed.
1. Prepaid/Fixed: In the event that the billing policy is Prepaid/Fixed, ordered quantities will be invoiced as soon as the service is rendered.
2.Based on Timesheet: For activities or projects you'll generate later, bill according to timesheets (amount delivered). For instance, the invoice will only be created for 4 hours if the employee added a timesheet for 4 hours even though the ordered quantity was 5 hours.
3. Based on Milestones: Depending on the number of milestones in your project, you may be able to bill for them as they are reached.
Create on Order: This product has the ability to create a task or project upon confirmation of the sales order. You can follow the service you are selling from those. "In the project for sale orders": If a project has been configured for the sale order, it will use it; if not, it will create a new project using the chosen template.
The graphic above displays the options described above. After the sales order has been confirmed, you can choose to create an invoice. If not, the sale order can be added to the invoicing page under the relevant project and set as the default sales order item.
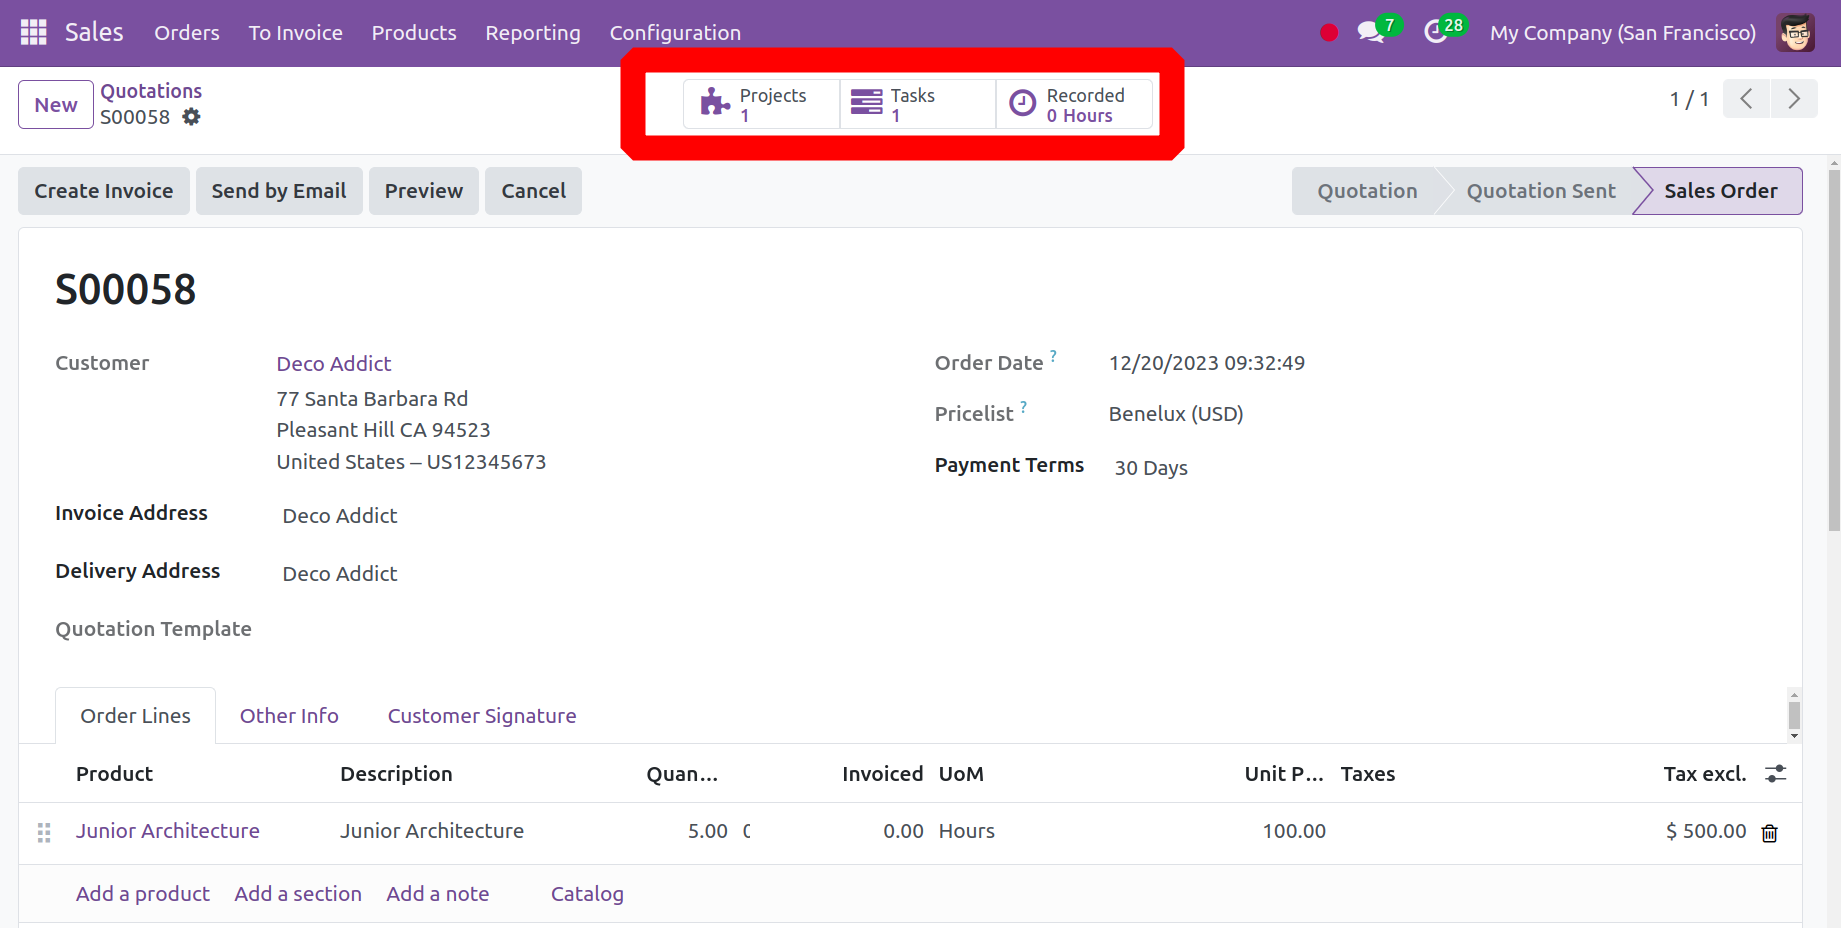
You have the ability to place a sales order on the smart panel. When you choose that option, a new window will open, as seen in the screenshot below, and it will be located on the upper portion of the page.
To add the employee timesheet, open the task. Within the sales order, the Allocated Time is immediately inserted as the ordered quantity. The employee can add his timesheet under the Timesheet tab. The percentage will be automatically determined based on the allotted time and the additional time, as seen in the image below.
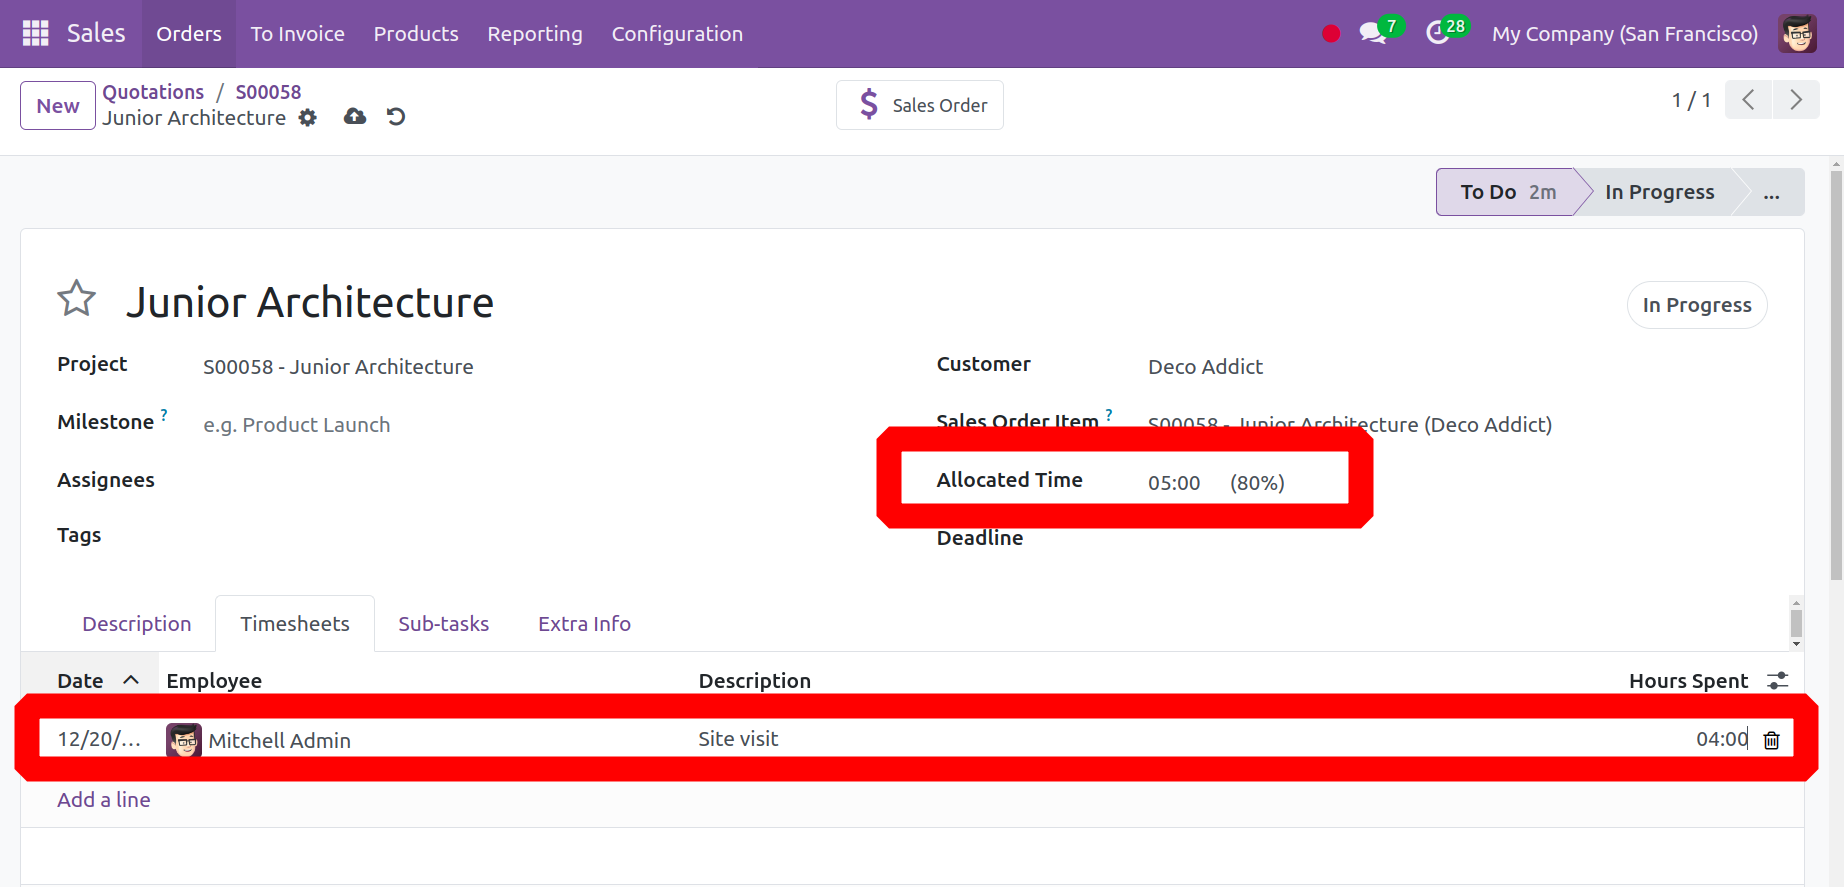
Upon examining the selling order once more, it is evident that the delivered quantity has been updated with the added timesheet.
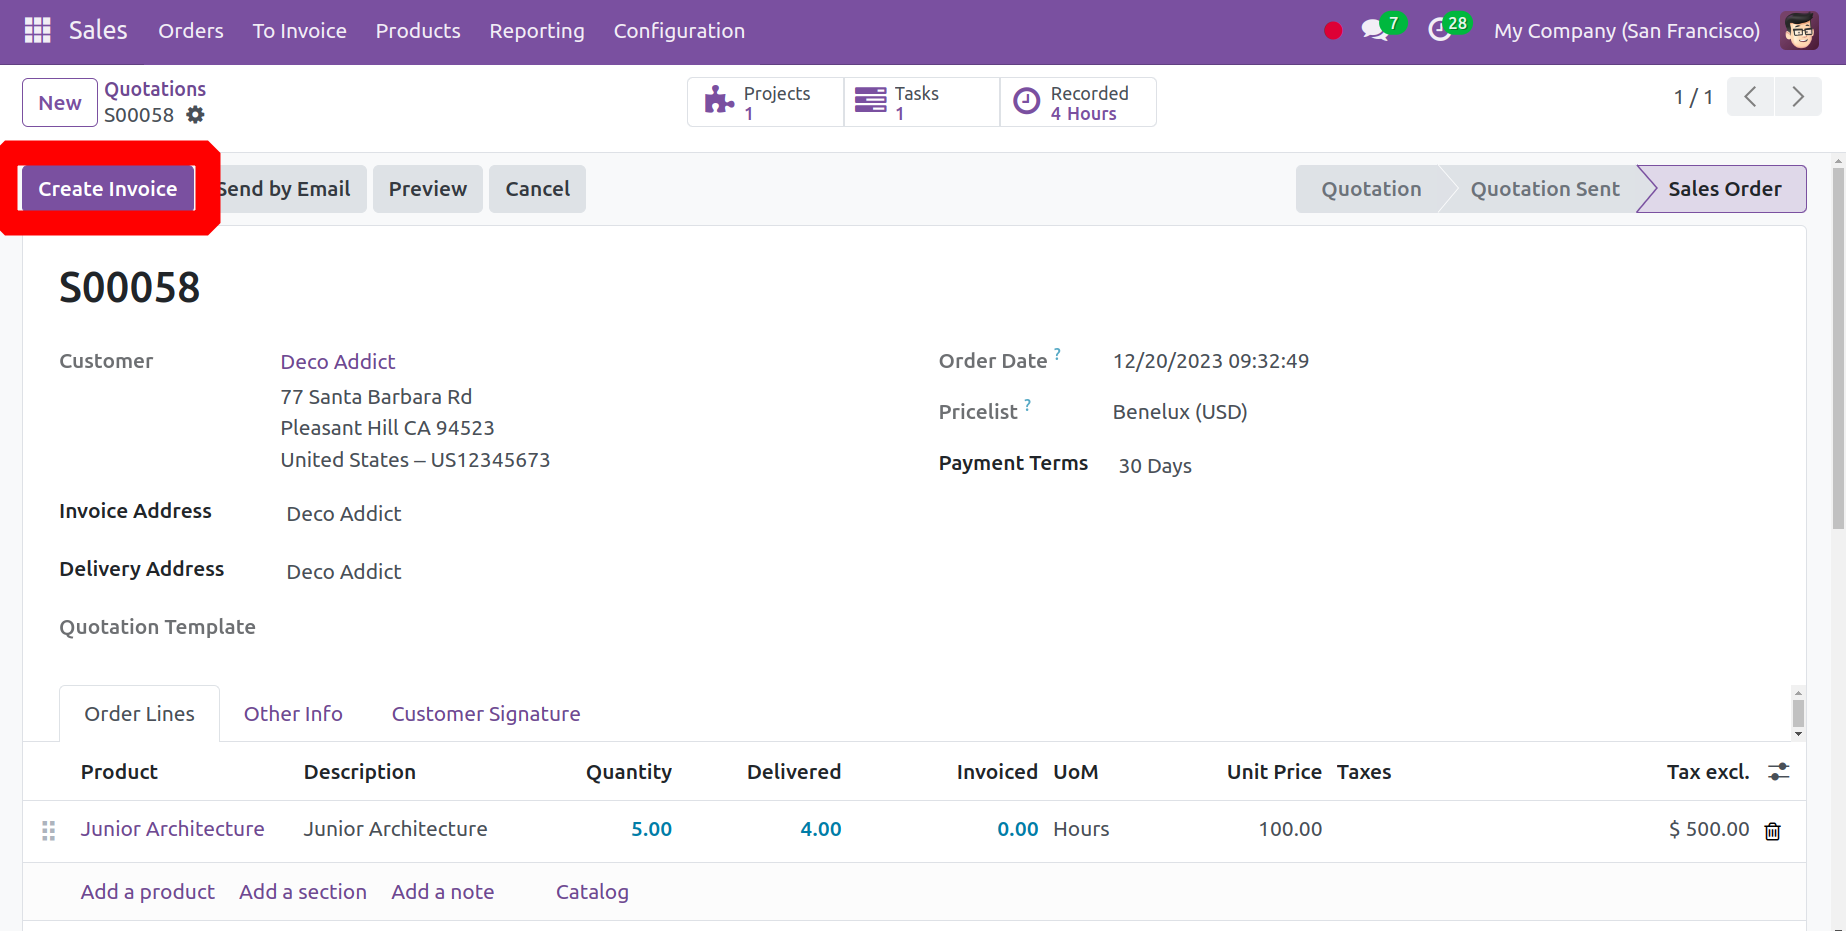
As you can see in the image, a new page will appear when you click the Create Invoice option.
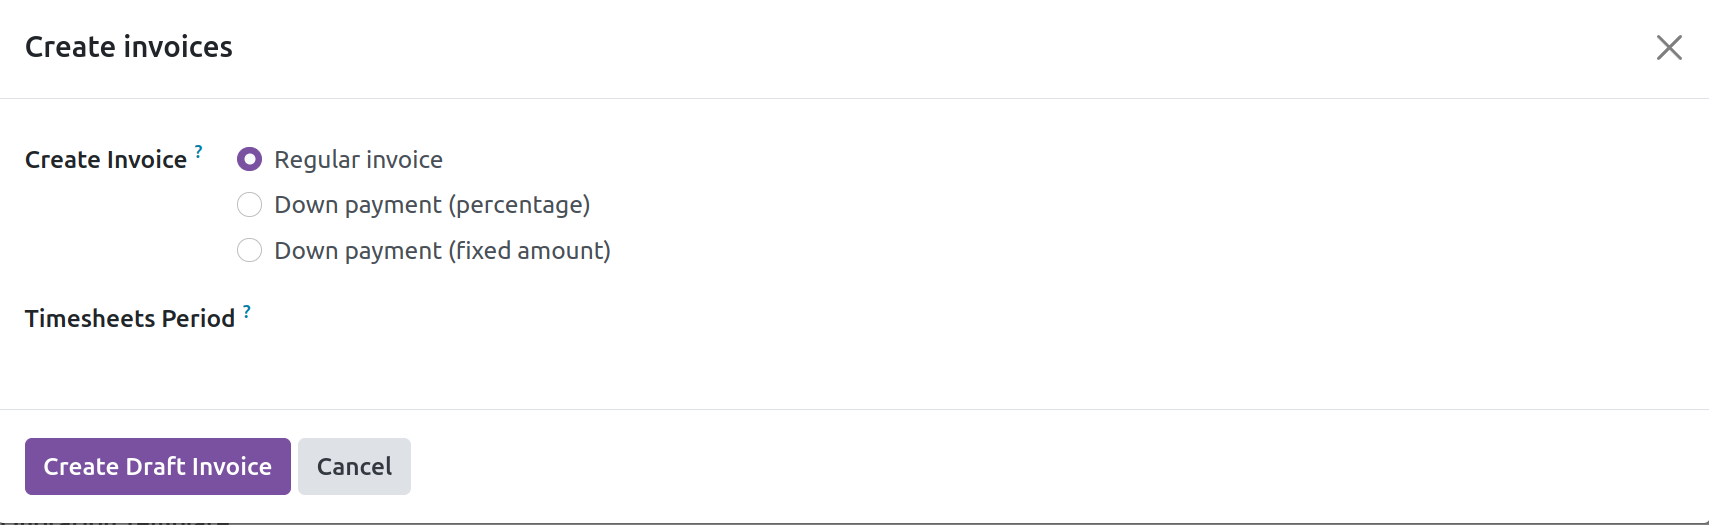
The information that needs to be supplied, including making an invoice as a regular invoice or setting a down payment as a fixed amount or as a percentage, will appear on the pop-up window. After choosing Create Draft Invoice, the page will appear as it does in the picture below.
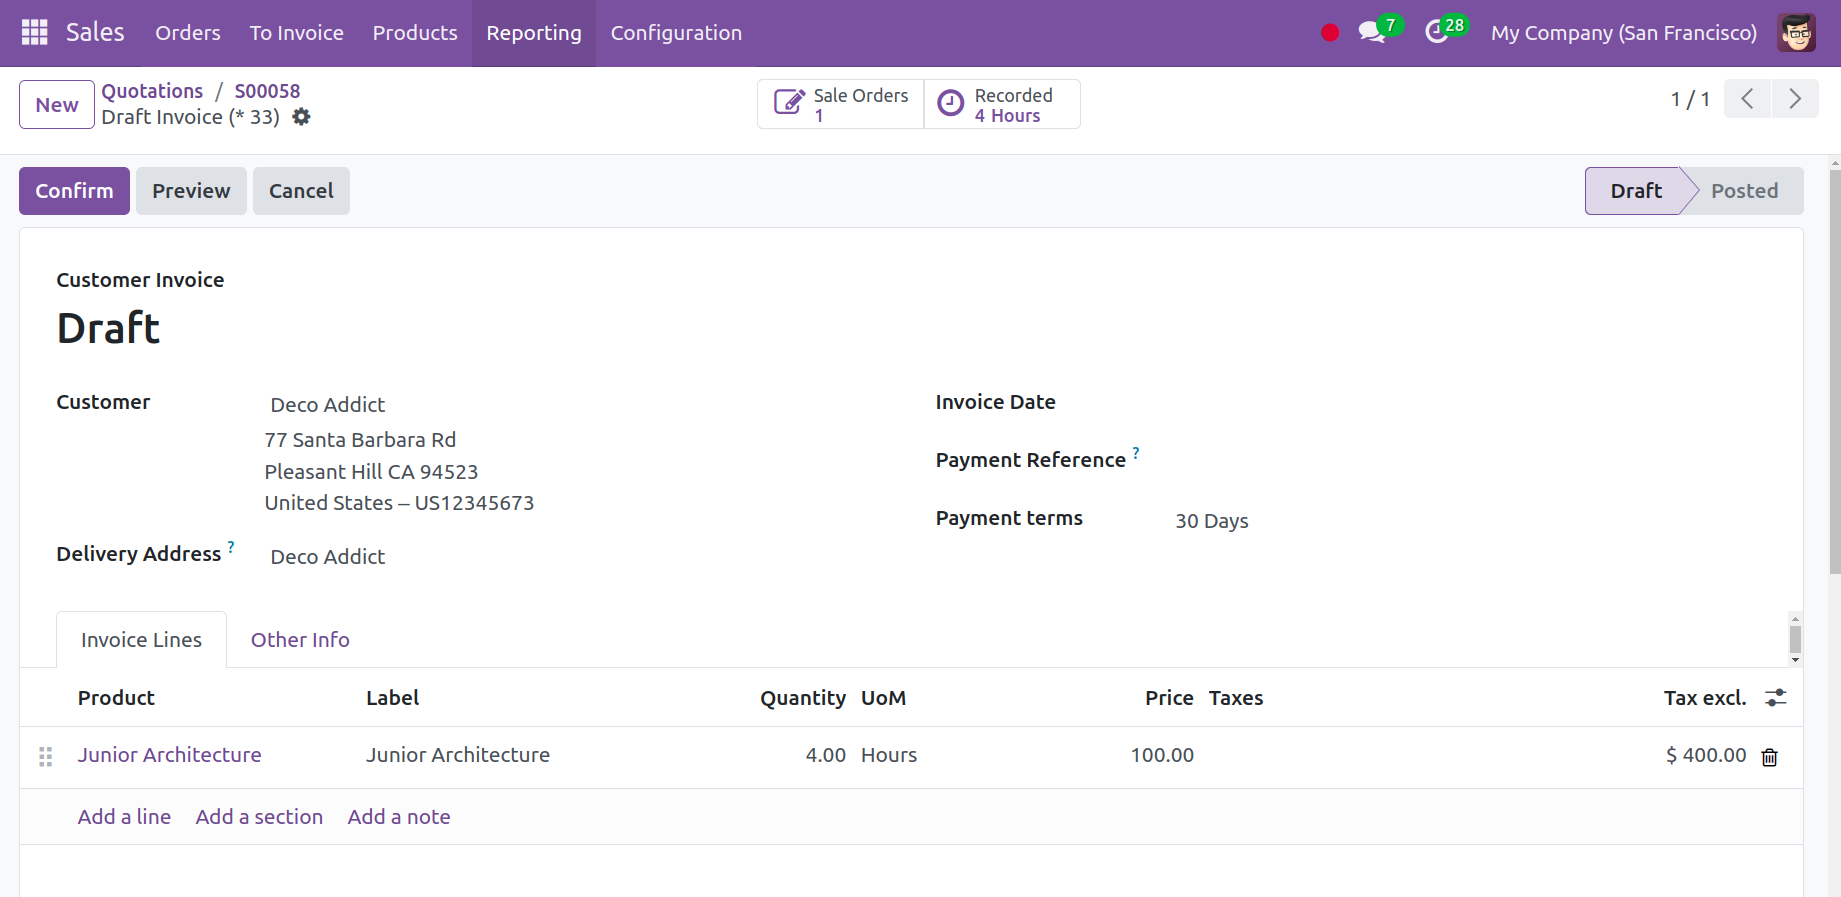
To verify the invoice and proceed with the payment, click the Confirm icon here. Here the employee ordered 5 units but delivered only 4 units, so the invoice is created only for the quantity delivered.
These are the procedures that must be done in the project management module in order to create invoices for the timesheet of the specific project. Choose the invoicing policy in accordance with the prepaid or fixed prices if you must bill a project based on a predetermined or fixed price. To put it another way, imagine that a customer requests 12 units of a service product, but only 5 units arrive. Additionally, if the pricing is fixed or prepaid, an invoice will be generated for each item the customer orders. In certain situations, the quantity won't be taken into account, and the service product will be offered at a set cost or as a prepaid service. For a project with multiple stages, the milestone-based invoicing policy will be applied when billing the delivered quantity or the stages that have been completed. There may be several stages to the project, and you may then make invoices for each stage in its entirety. Assume that for a given project, we decide on phases for design, testing, and planning, and that each stage is finished. After deciding on an invoicing strategy based on the milestone, bill the project's finished phases.
Reporting
You can access the project management module's reporting section to view the reports for those projects. The website offers the visual depiction that appears in the screenshot that follows.
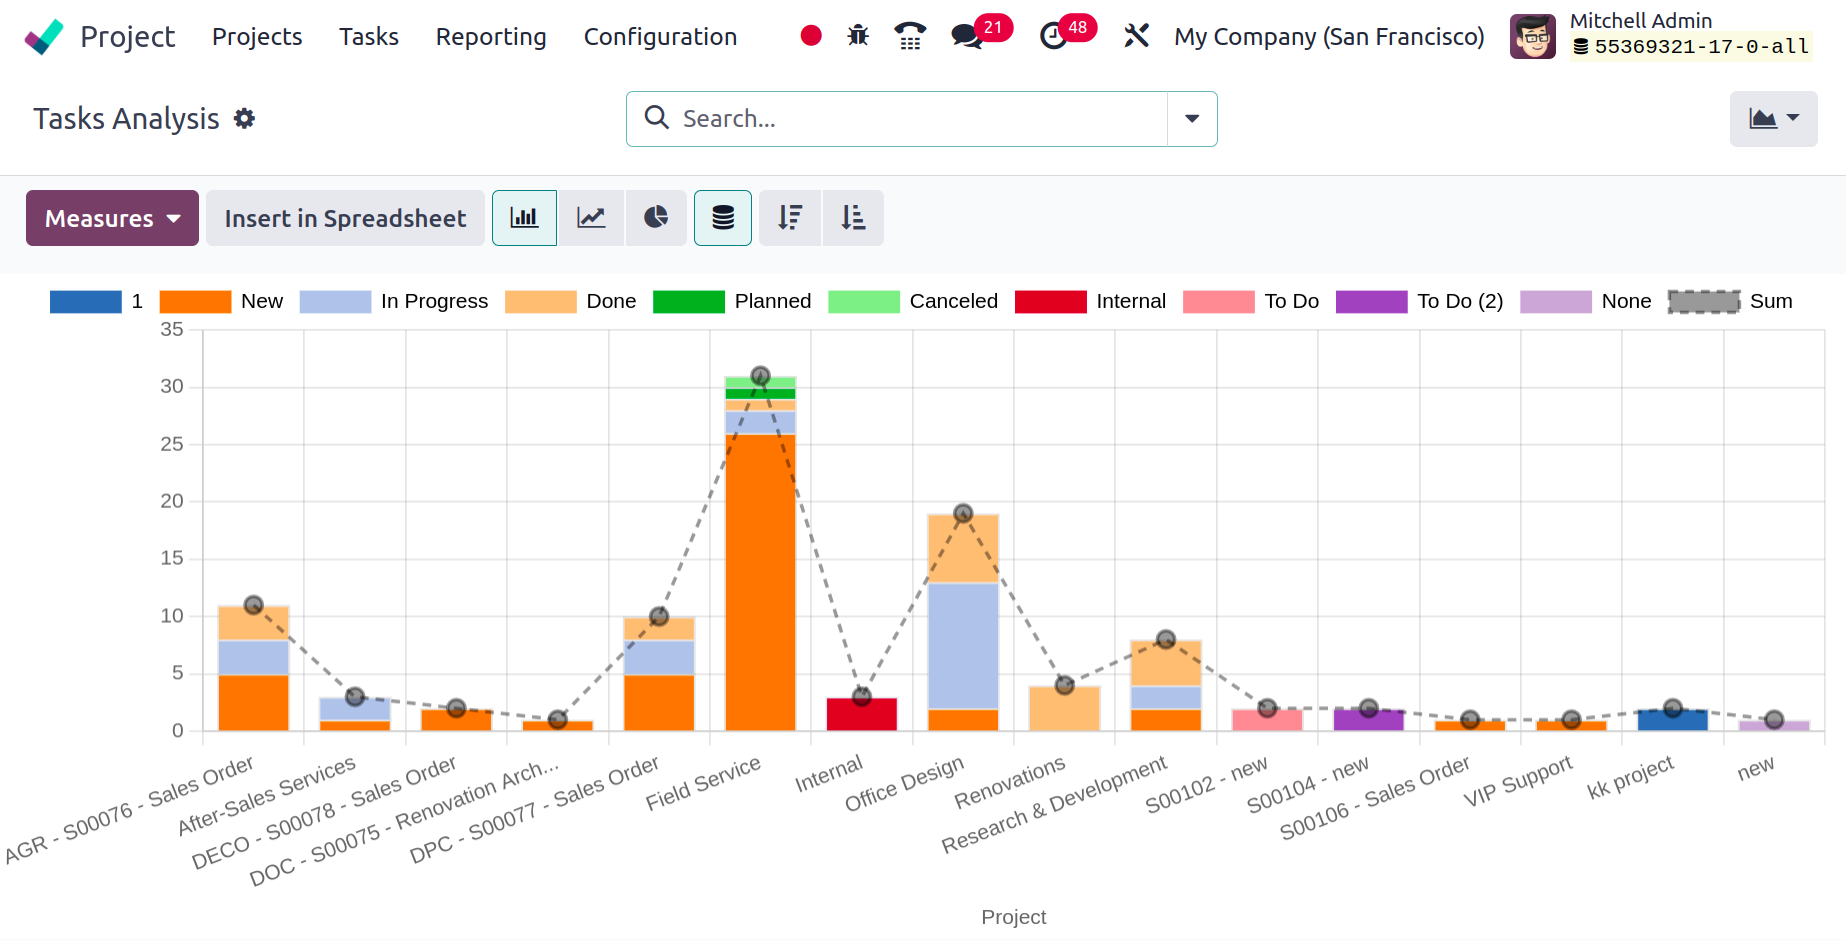
The graphical view is available on the reporting page. The page offers Favorites, Group By, and Filters that can be applied appropriately. The graphical view is also available as a line, bar, or pie chart. Different colors correspond to different levels. Utilizing the Measures is possible; they can be chosen appropriately from the drop-down menu.
The corresponding Customer Rating that is available in the module's Settings menu may be found in the Reporting menu. The option is displayed as it appears in the screenshot.
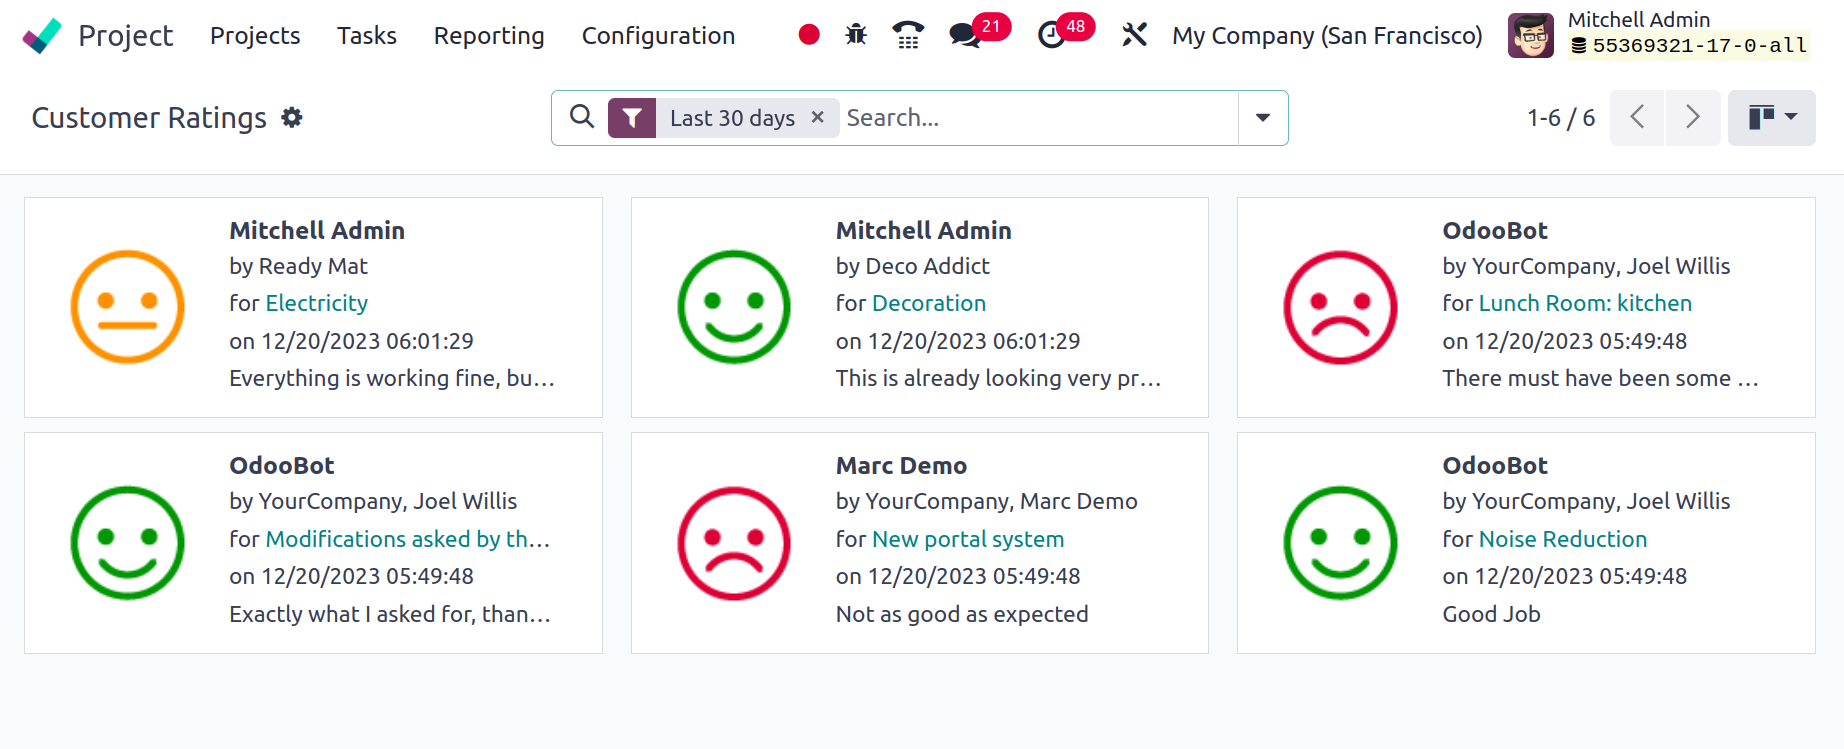
The choice aids in our comprehension of the clients' pleasure with their work. The Kanban, list, pivot, and graphical views of the page customer rating are also available. The page will look like the illustration above.
All things considered, the project management module aids in your ability to oversee and control tasks in an organized way. To make the operations and procedures under this module easier to manage, the project might be divided into tasks and subtasks.