Inventory Adjustments
With the help of the Inventory Adjustments feature, you have a special tool to monitor the company's inventory and quickly update its number. You can make sure you have enough products to complete the necessary inventory procedures with this feature. Click "Inventory Adjustments" from the Operations tab's dropdown list to open this window.
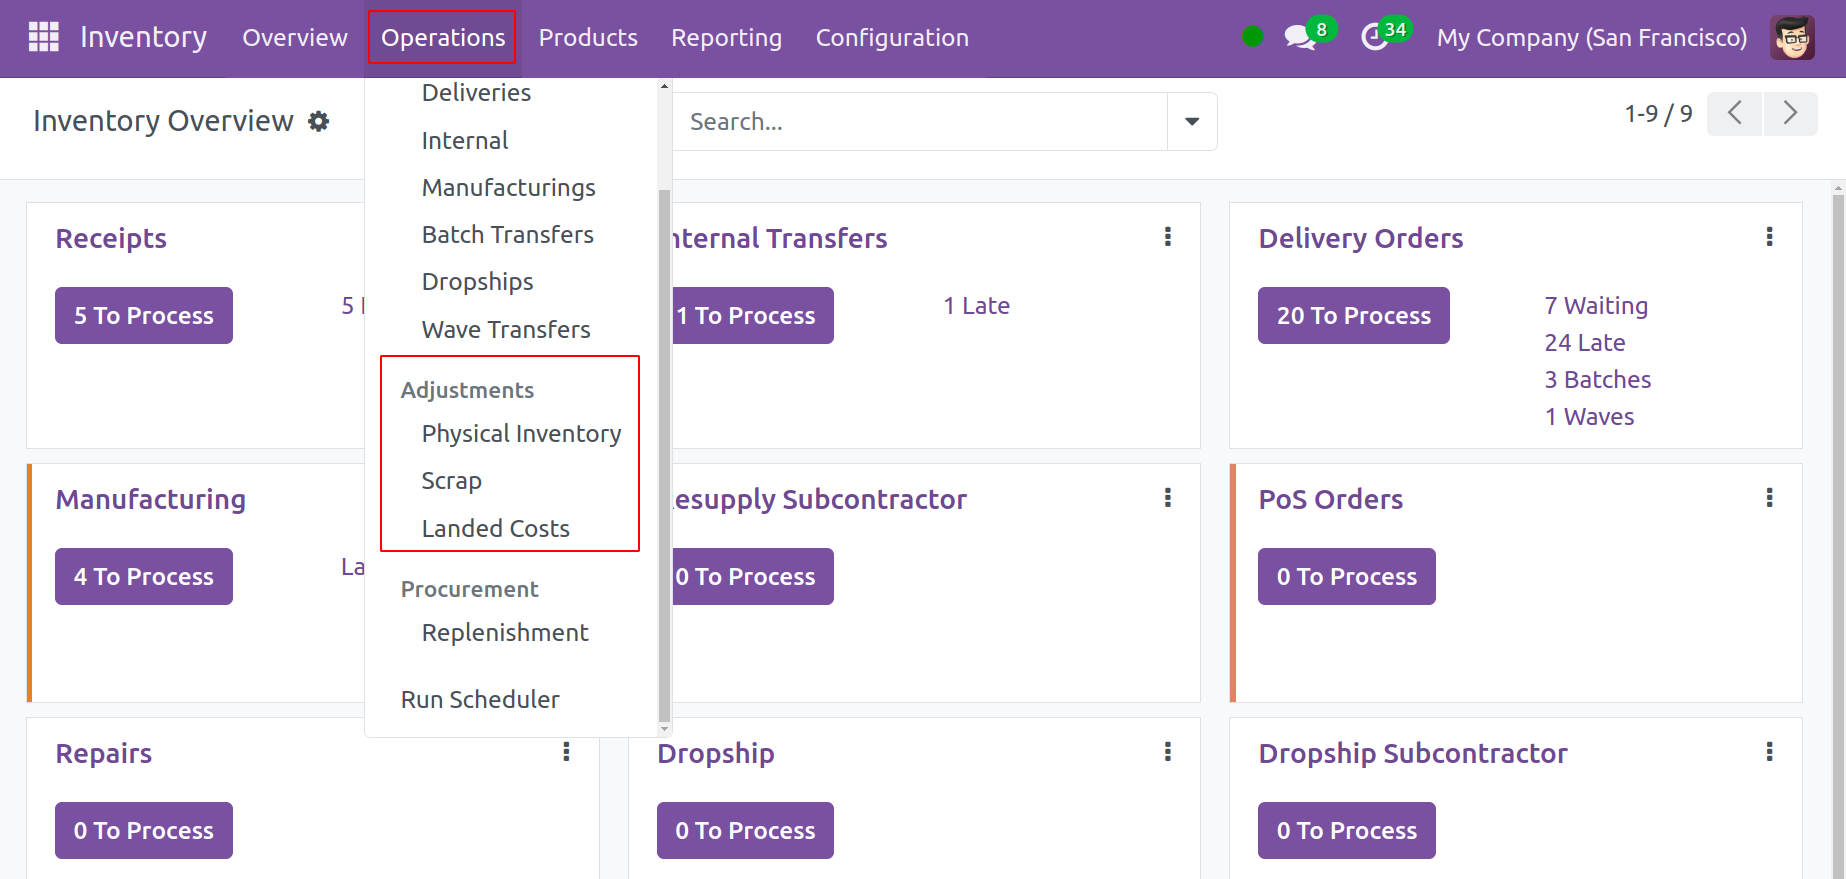
Physical Inventory
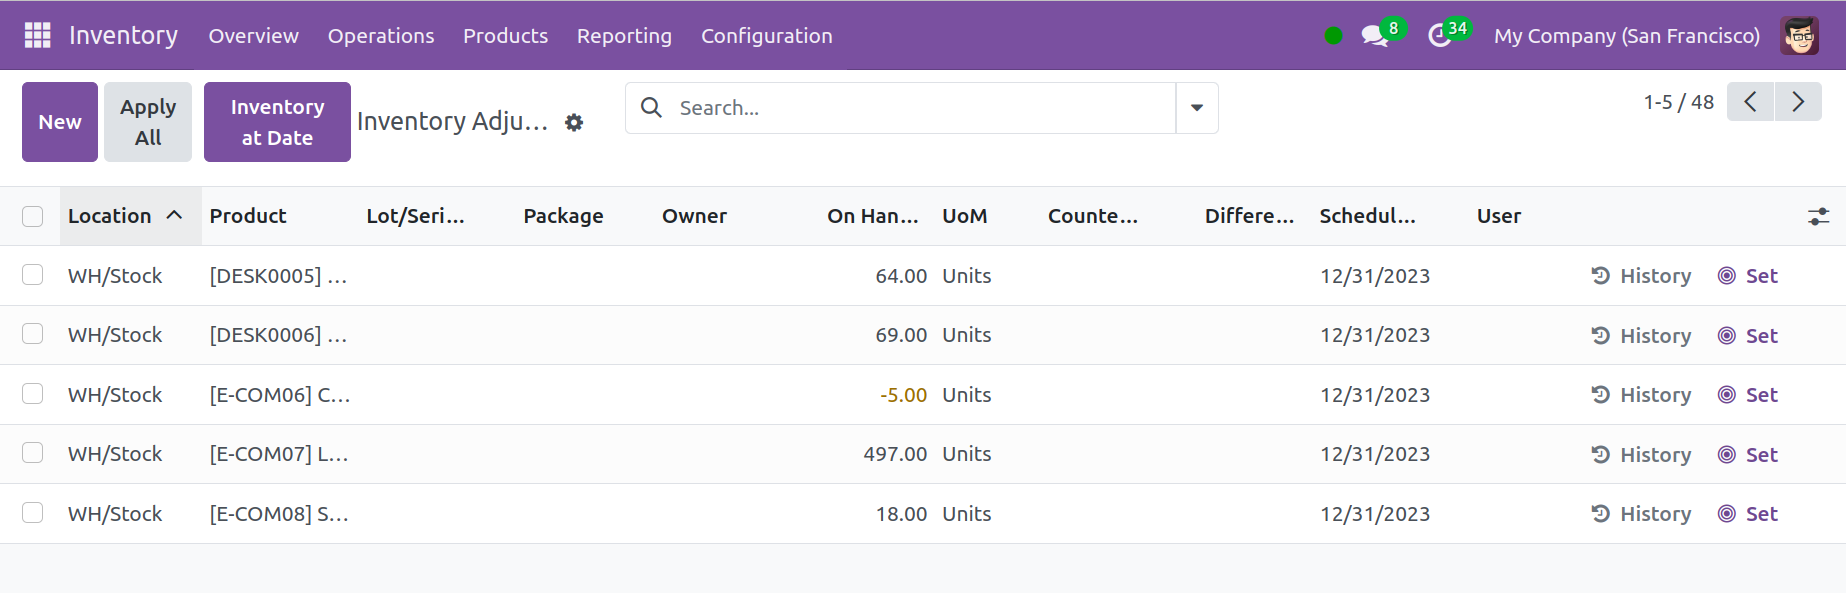
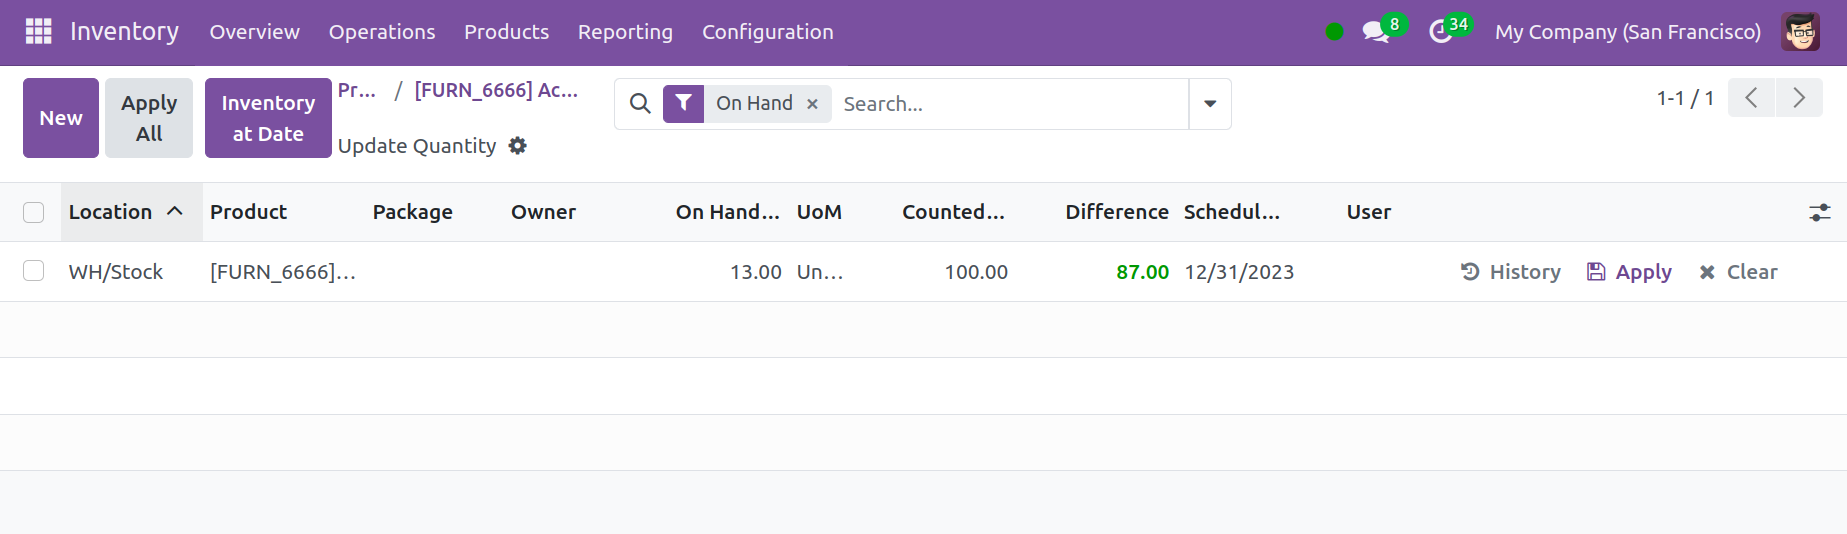
The product name, together with its details such as Lot/Serial Number, Package, On Hand Quantity, UoM, Counted Quantity, Difference, Scheduled Date, and User, are displayed in this window. In this case, "Difference" denotes the discrepancy between the theoretical and counted amounts of the product. The next date to measure the quantity on hand is determined by the "Scheduled Date."
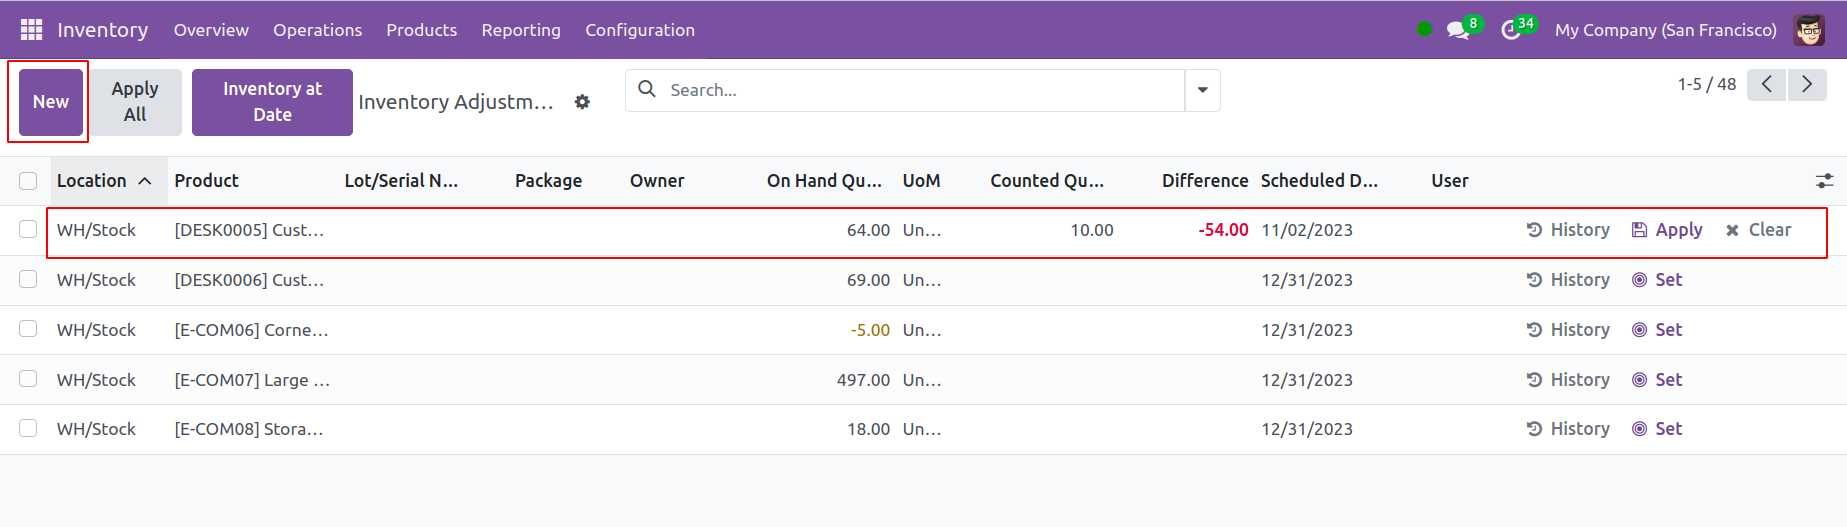
To add a new Inventory Adjustment procedure, click the New button. The required details will be mentioned in a line that appears beneath the current list. When you select "Counted Quantity," the matching "Difference" field will be filled in for you. To implement this updated change, click "Apply," as indicated below.
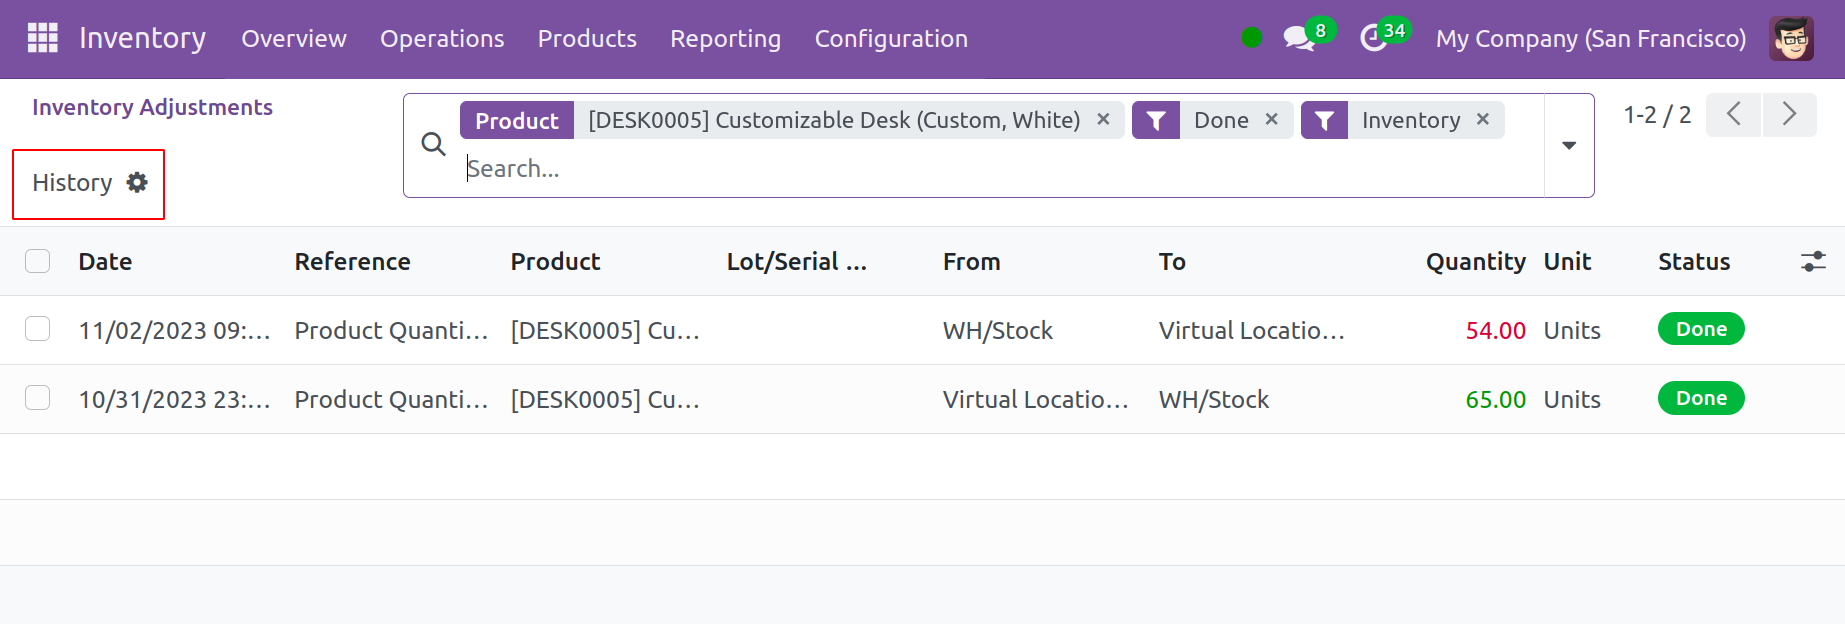
Click the History icon next to the product you want to view the specifics of the inventory adjustments made on that particular item. Below is a model of the Inventory Adjustments History pane.
Click the Set icon next to any product to reset its most recent stock update.
To apply the updated inventory modifications to the relevant products, click the Apply button, as seen in the image.

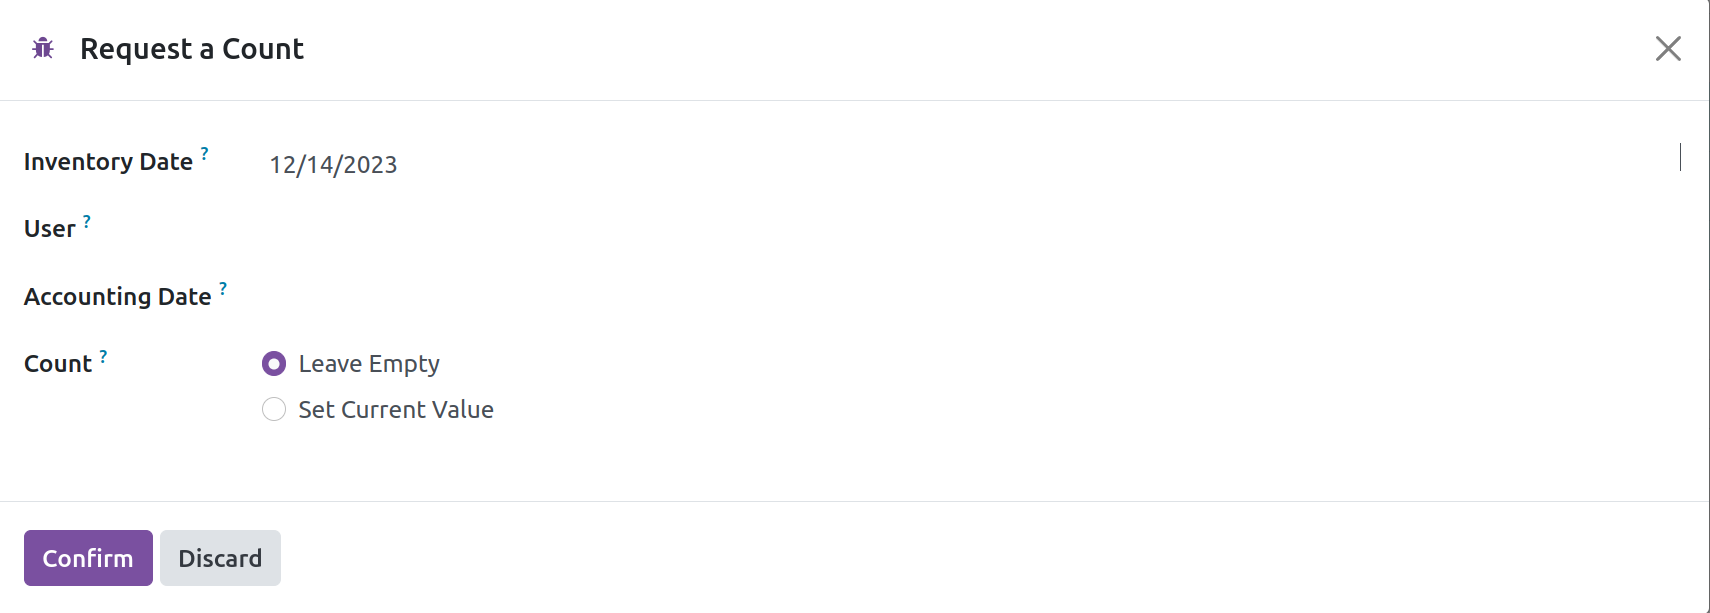
You can request a count for the chosen inventory modifications by clicking the Request a Count button. To receive the inventory on that day, select a date in a pop-up window. You can modify the current value in the Count box to fit your needs, or you can leave it blank. Look for "Confirm" on the menu. We handle inventory updates similarly in Odoo17.
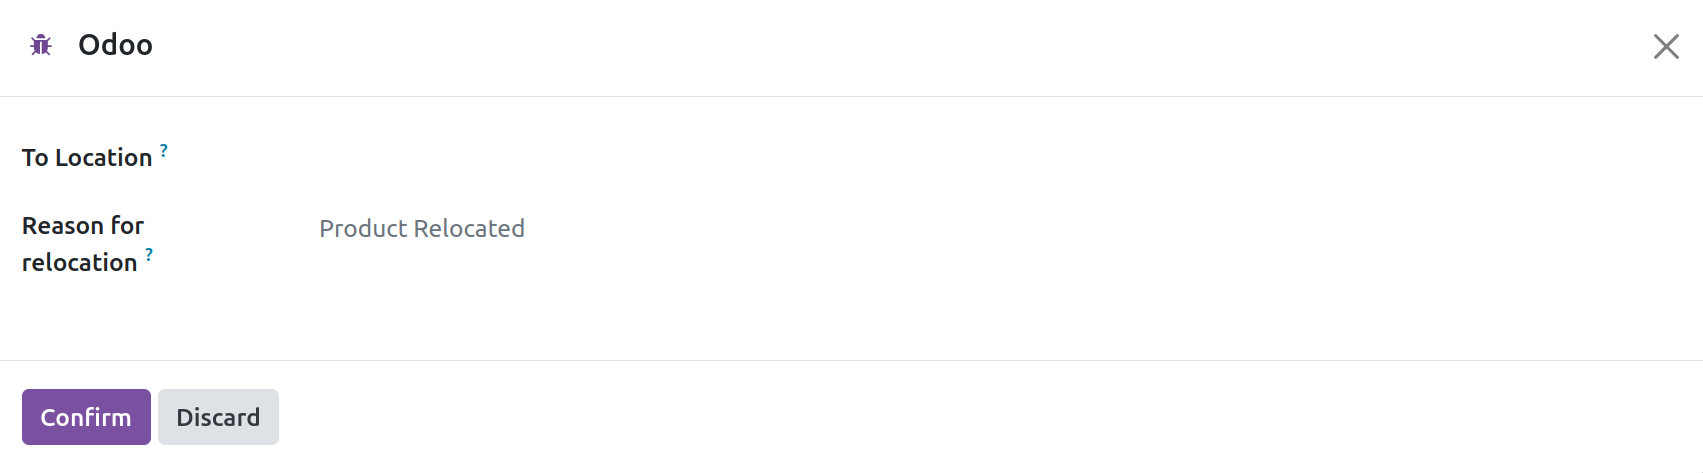
It is now simpler to move products from one location to another with Odoo 17's "Relocate" feature. In the popup box, you can add To Location, To Package, and explain why the relocation is necessary. Next, confirm.
You can schedule the day and month of the yearly inventory counts using the Odoo 17 Inventory module. To change this timing, select the Configuration tab and select "Settings." In the Operations section, the "Annual Inventory Day and Month" is listed.
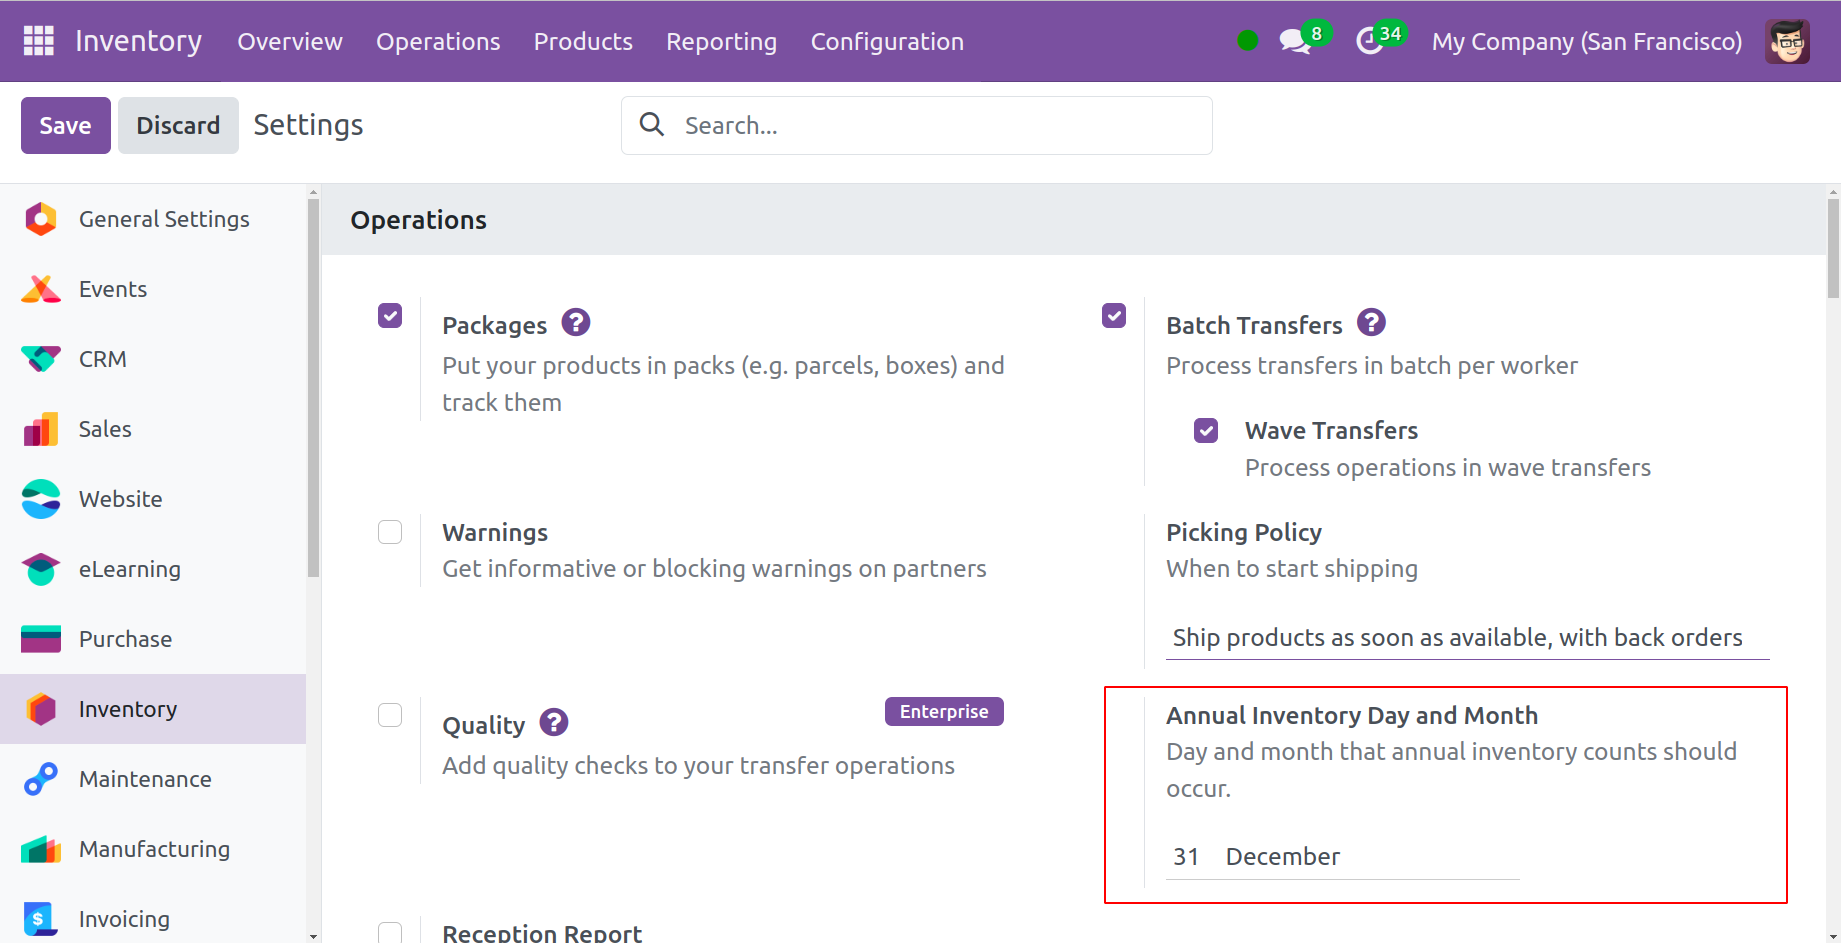
If the count is 0 or negative, the system will automatically designate the first day of the month as the count day. The system will choose the last day of the month if it is greater than the last day.
Update Quantity
From the Products window, you can easily change a specific product's quantity. Click "Products" from the Products tab to access this function. To view the form view of any product, click on its preview.
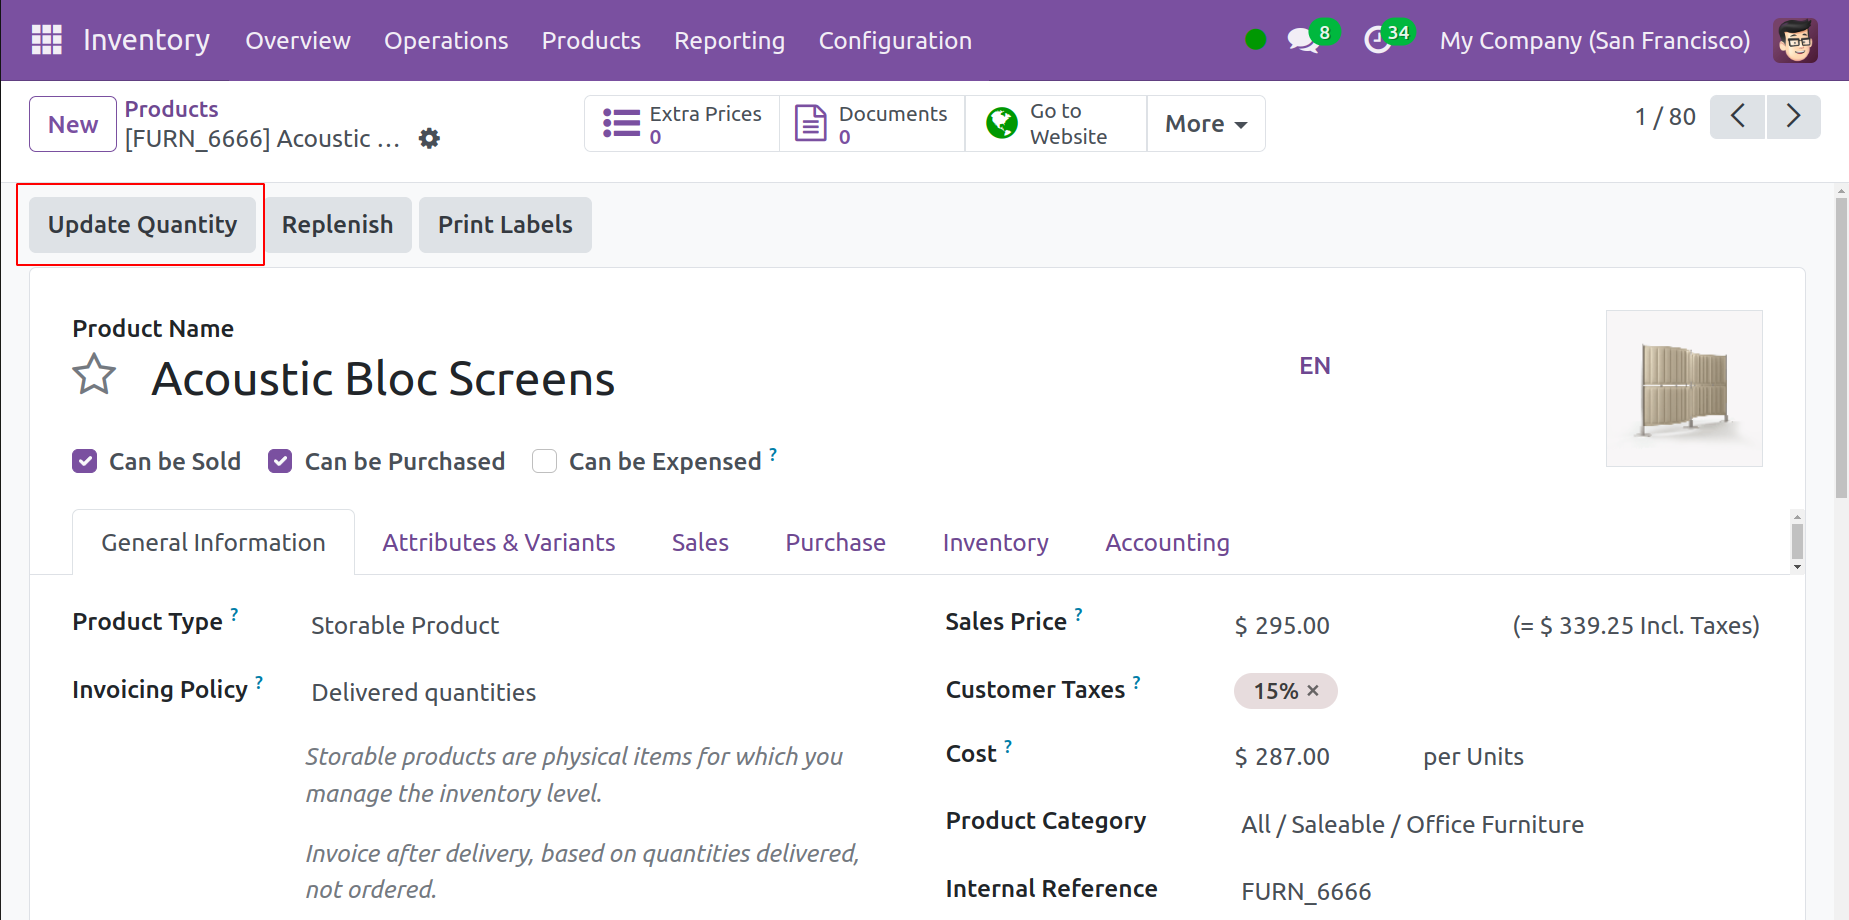
You can input the amount of the product that is available in the warehouse in the window that appears when you click the Update amount button.
Once you select "Counted Quantity" in this box, the Difference field will display the difference between the counted and on-hand numbers. Save once the necessary data has been added.
Scrap Management
Unquestionably, scrap is produced by every firm; it is garbage that has little to no economic worth. Odoo 17 offers a scrap management platform that is well-facilitated. A product that is added to scrap will no longer be in the company's inventory. Products that are damaged or have expired must be taken out of stock as quickly as feasible. The scrap's reusable components can be used for recycling projects in the future. The scrap might be kept in a designated scrap area. You can designate a spot for scrap in Odoo's storage location.
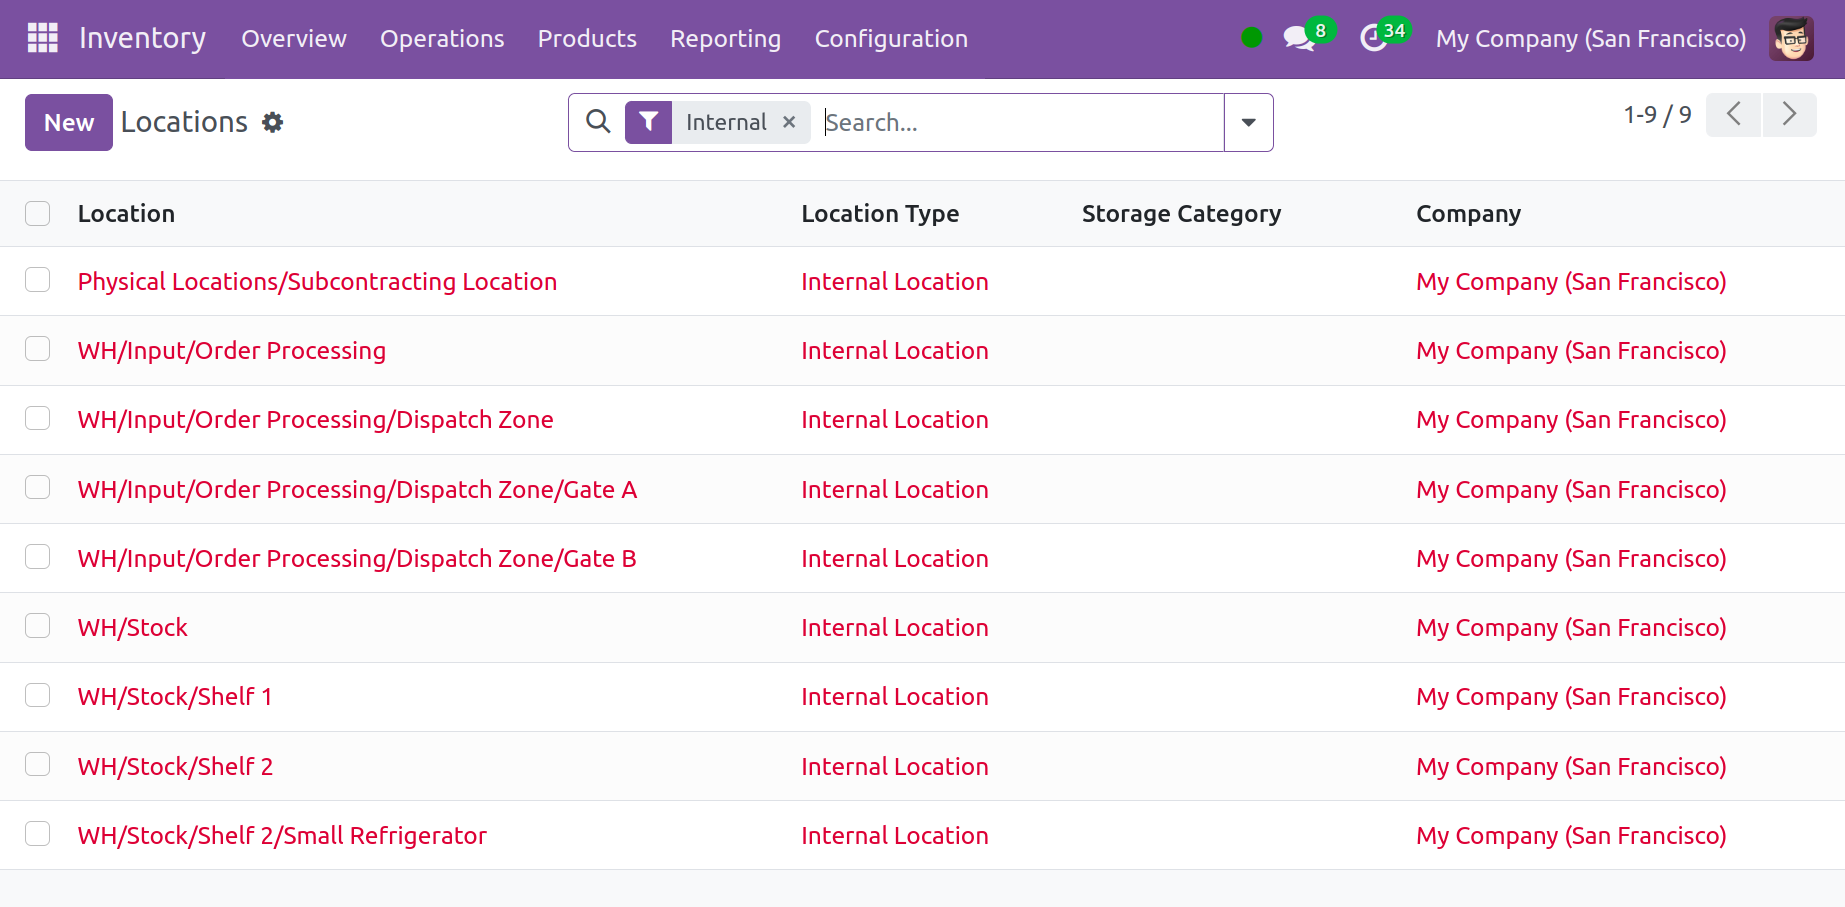
Let's examine how to set up a scrap location in Odoo 17 to guarantee efficient scrap management. You can control your storage's scrap locations with the aid of Odoo. Earlier, we talked about setting up storage locations in the Odoo 17 Inventory module. The similar procedure can be used to set up a site for scrap as well. Navigate to the Configuration menu's Locations menu.
To establish a new scrap spot, click the New button.
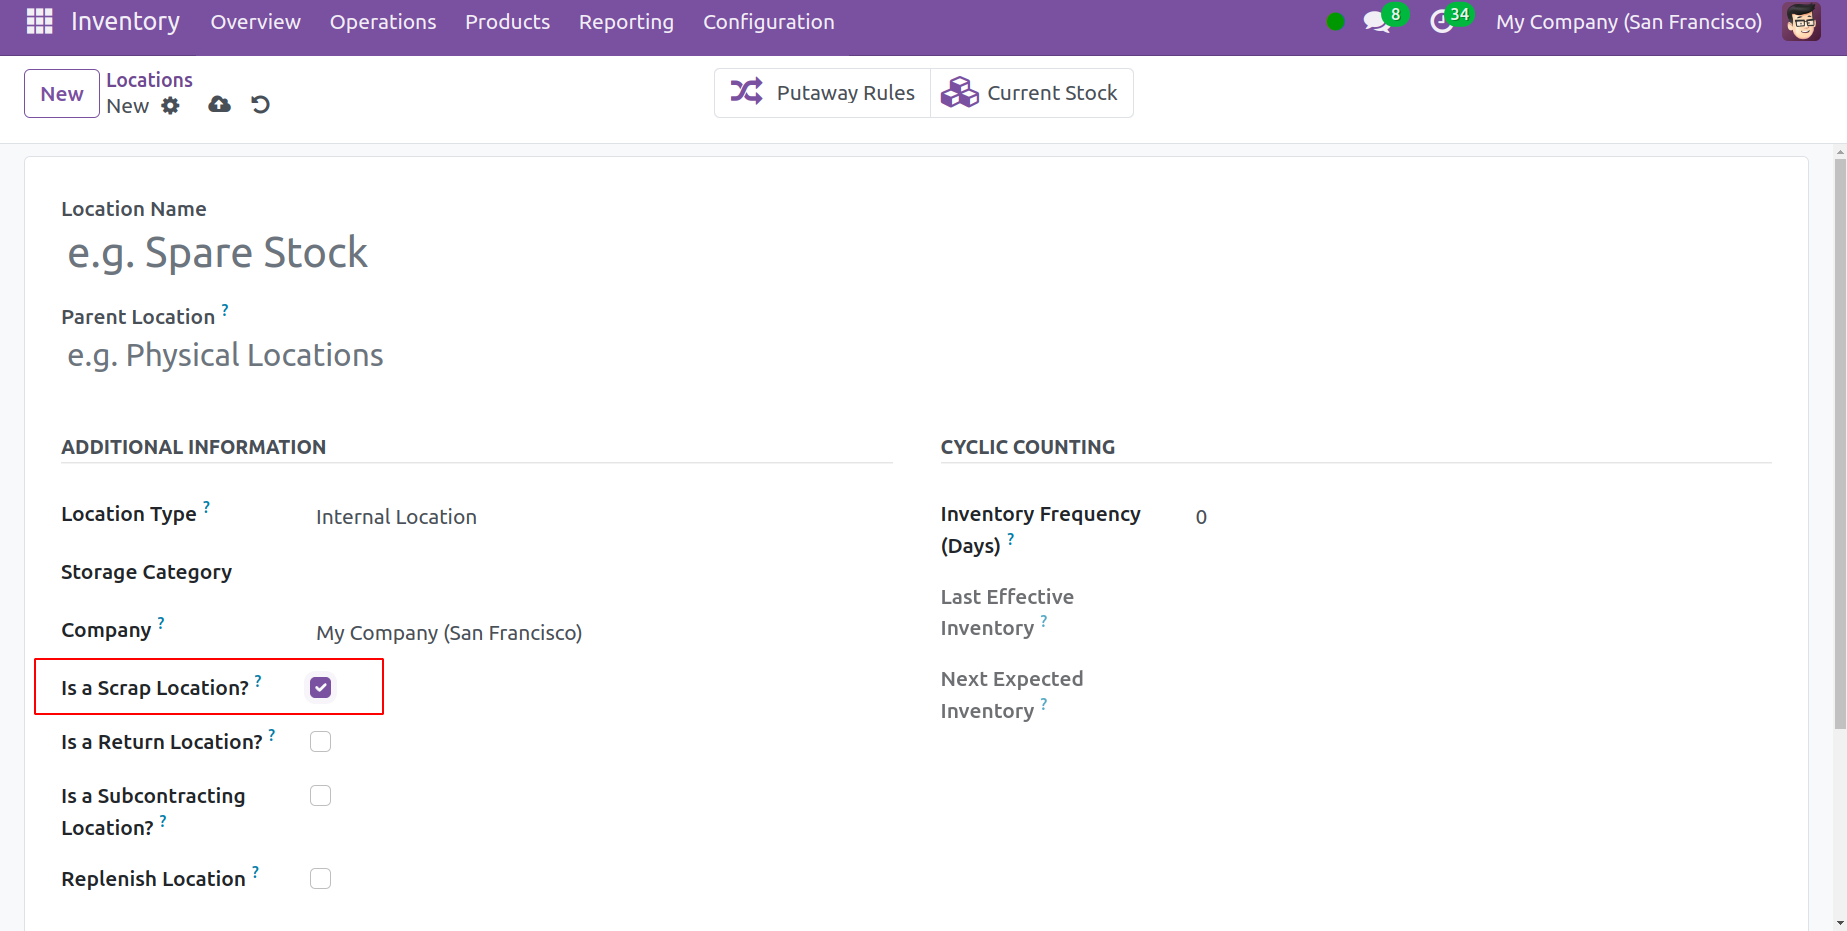
Listed Scrap place as the name of the place in the required field. Just as we previously described in the Location setting section, you can take the same actions. To treat this site as a scrap location, check the Is a Scarp Location box. This will mark the place as a scrap spot on record. By using the same technique, you can make more scrap sites similar to this one.
Let's now examine how to add products to the scrap location and manage scrap in Odoo 17. Select "Scrap" from the Operations menu. The Scrap Orders window, as seen below, will appear.
The scrap order's Reference, Date, Product (name), Quantity, Unit of Measure, Company, and Status are all shown in this window. Select the "New" option to include a fresh scrap order.
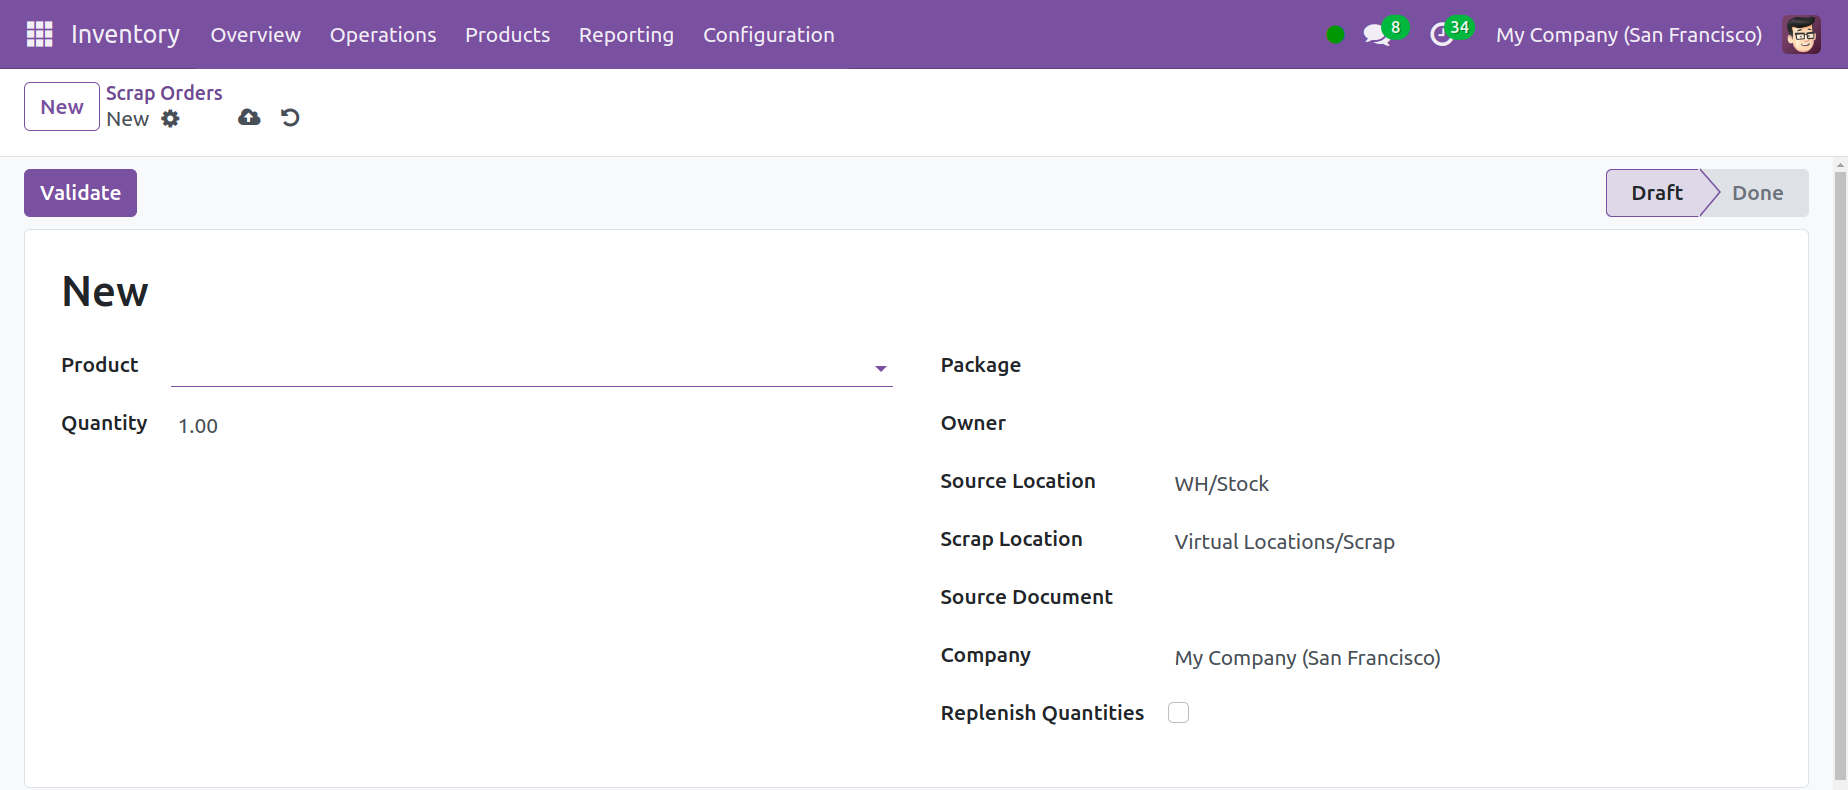
Choose the product name from the "Product" selection list. Give definitions to the fields Company, Source Document, Quantity, and Package. Click "Validate" after inserting this information.
Using inventory's various operations, such as internal transfers, manufacturing, receipts, etc., Odoo assists you in creating scrap orders. Below is a model of a validated receipt.
To move this item from the company's stock to the scrap area, click the Scrap button.
Landed Costs
The entire amount you charge the customer after deducting all relevant costs—such as the product's pricing, shipping and delivery fees, etc.—is known as the product's "landed cost." The product's initial selling price is established by this expense. Two businesses may not have the same Landed Cost for the same product because the cost of a product varies based on the policies and practices of the organization.
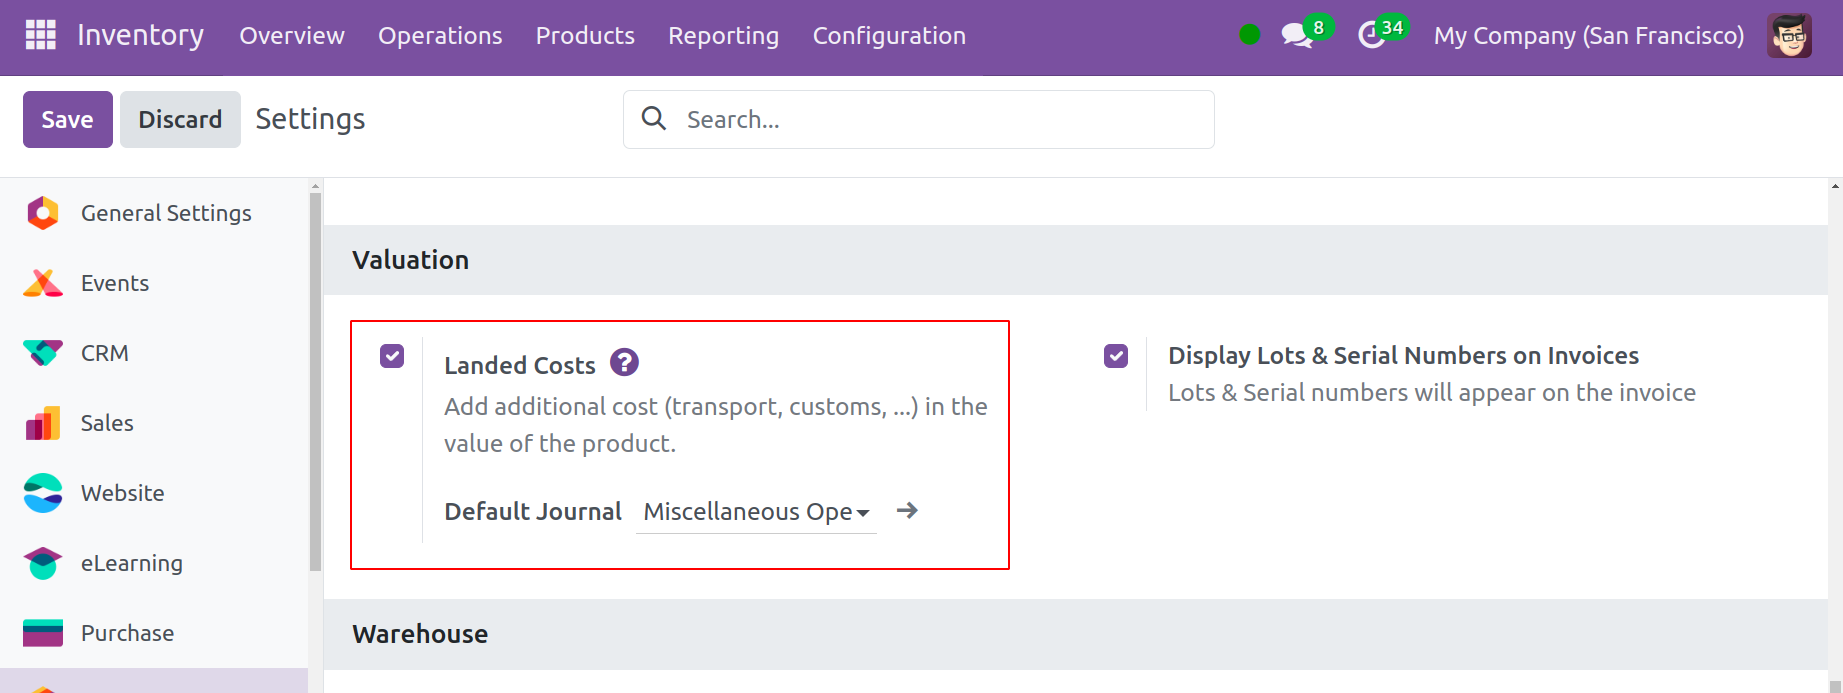
In the Settings window's Valuation section, you can turn on "Landed Costs."
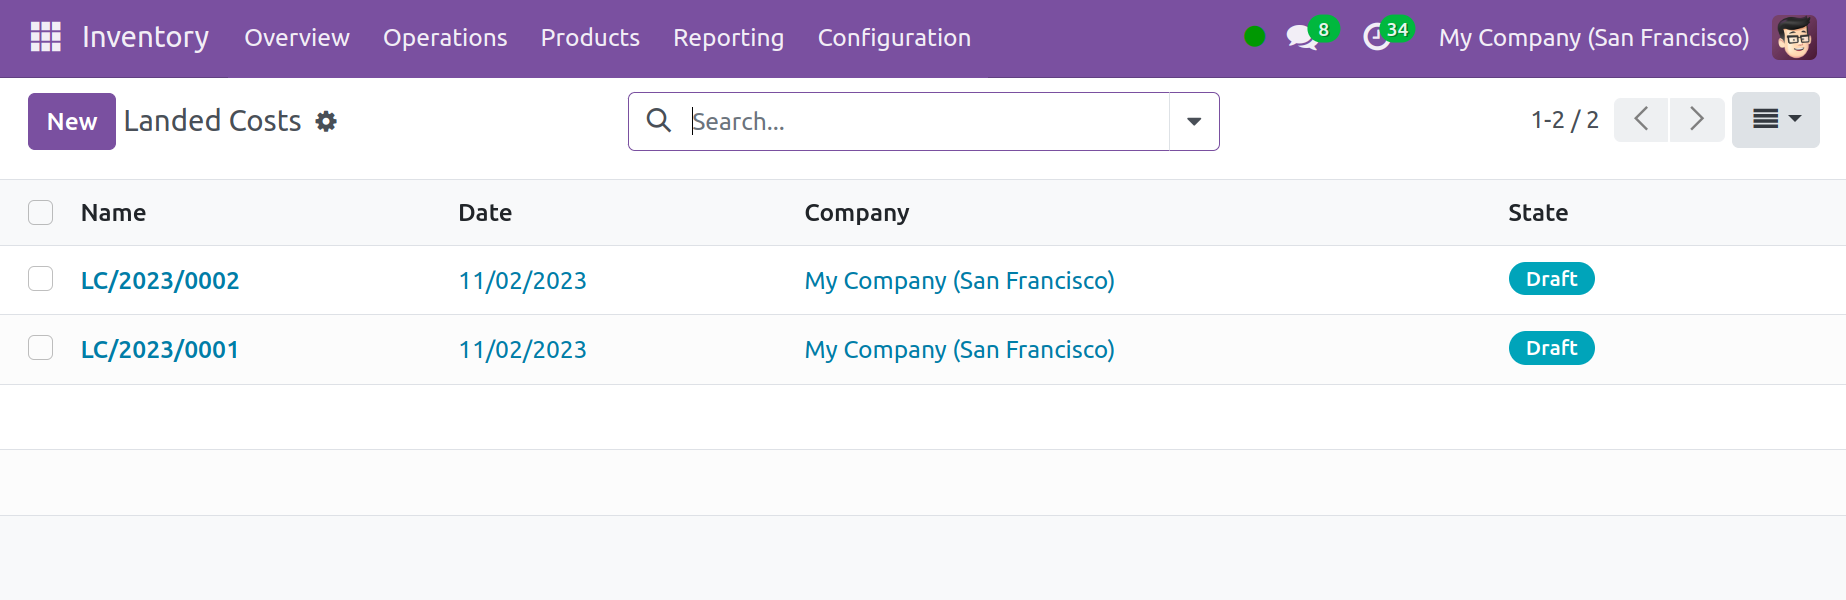
The Landed Costs menu will now appear in the Operations tab's dropdown list. To see the Landed Costs window, click on it.
This displays every Landed Cost that has been added to the module. By default, the window shows all the details in a List view. However, you can switch to a Kanban view by clicking on the respective icons located in the upper right corner of the window. You can rapidly locate, filter, and categorize the records by using the Filters and Group By options. Add your most frequently used filter or criterion to your "Favorites."
Click on the Configuration tab and select 'Product Categories' before adding a new Landed Cost. Choose any category from the provided list.
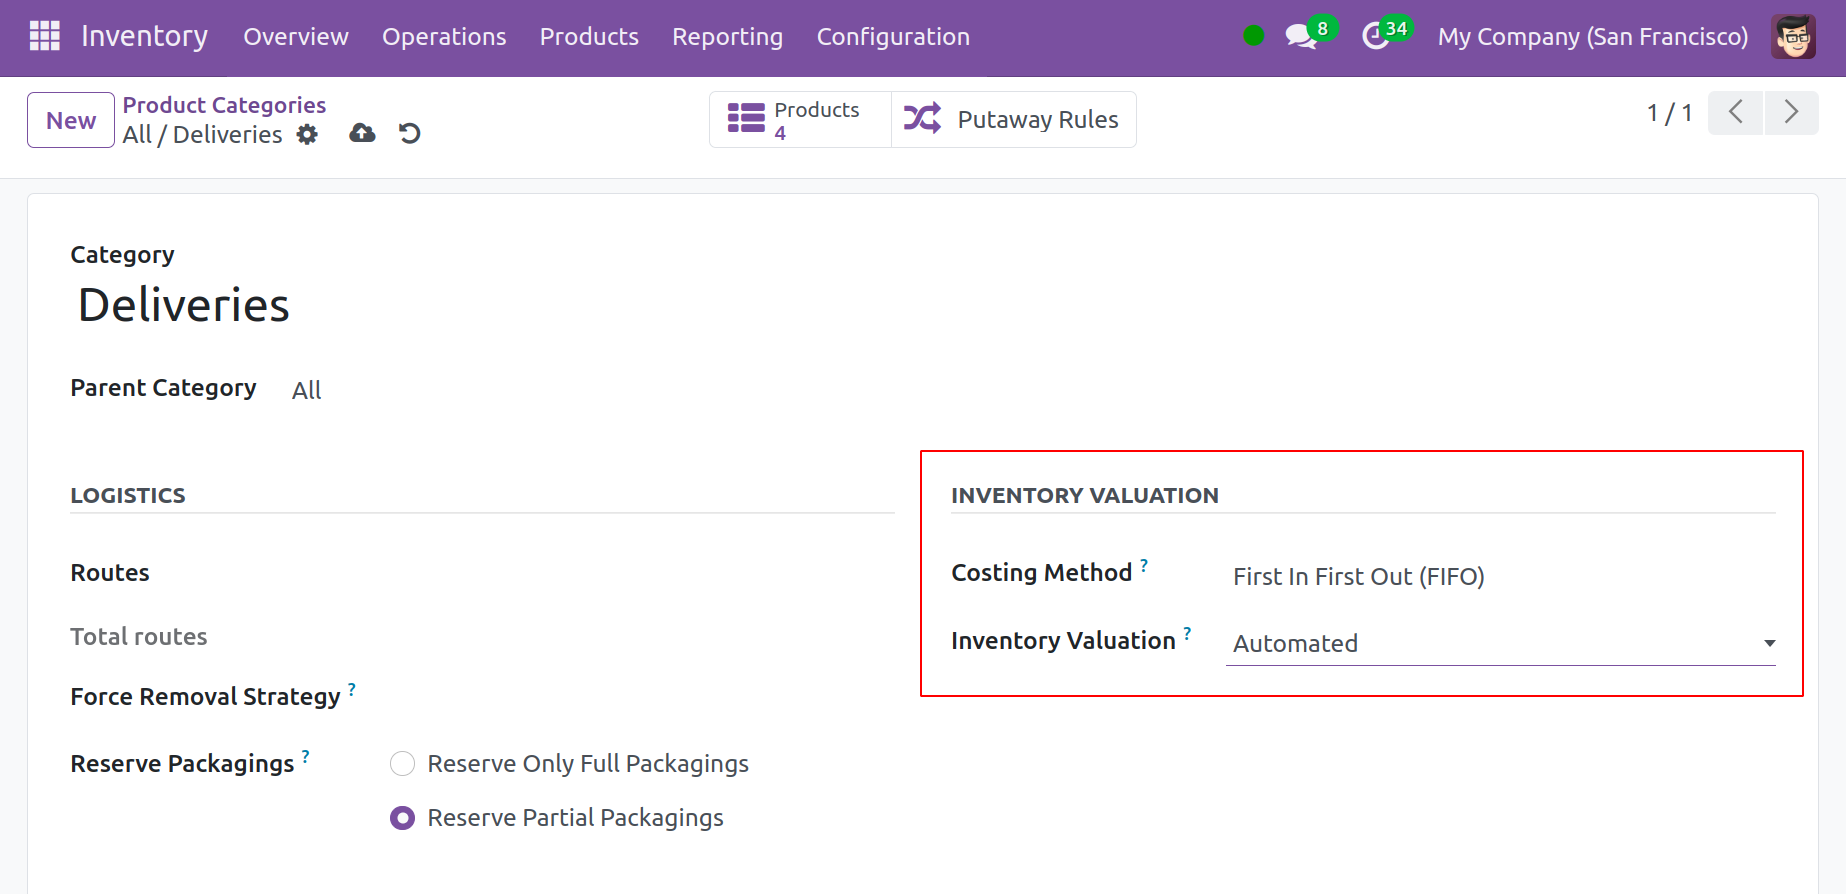
Choose "Standard Price," "First In First Out (FIFO)," or "Average Cost (AVCO)" as your "Costing Method." Standard Price enables you to set an approximate cost since it is hard for manufacturers to anticipate actual costs ahead of time. Use FIFO as the costing approach if the products that are produced first are likewise sold first. When using average costing, the cost of all the materials needed is divided by the entire number of items, and that cost is then allocated to the goods.
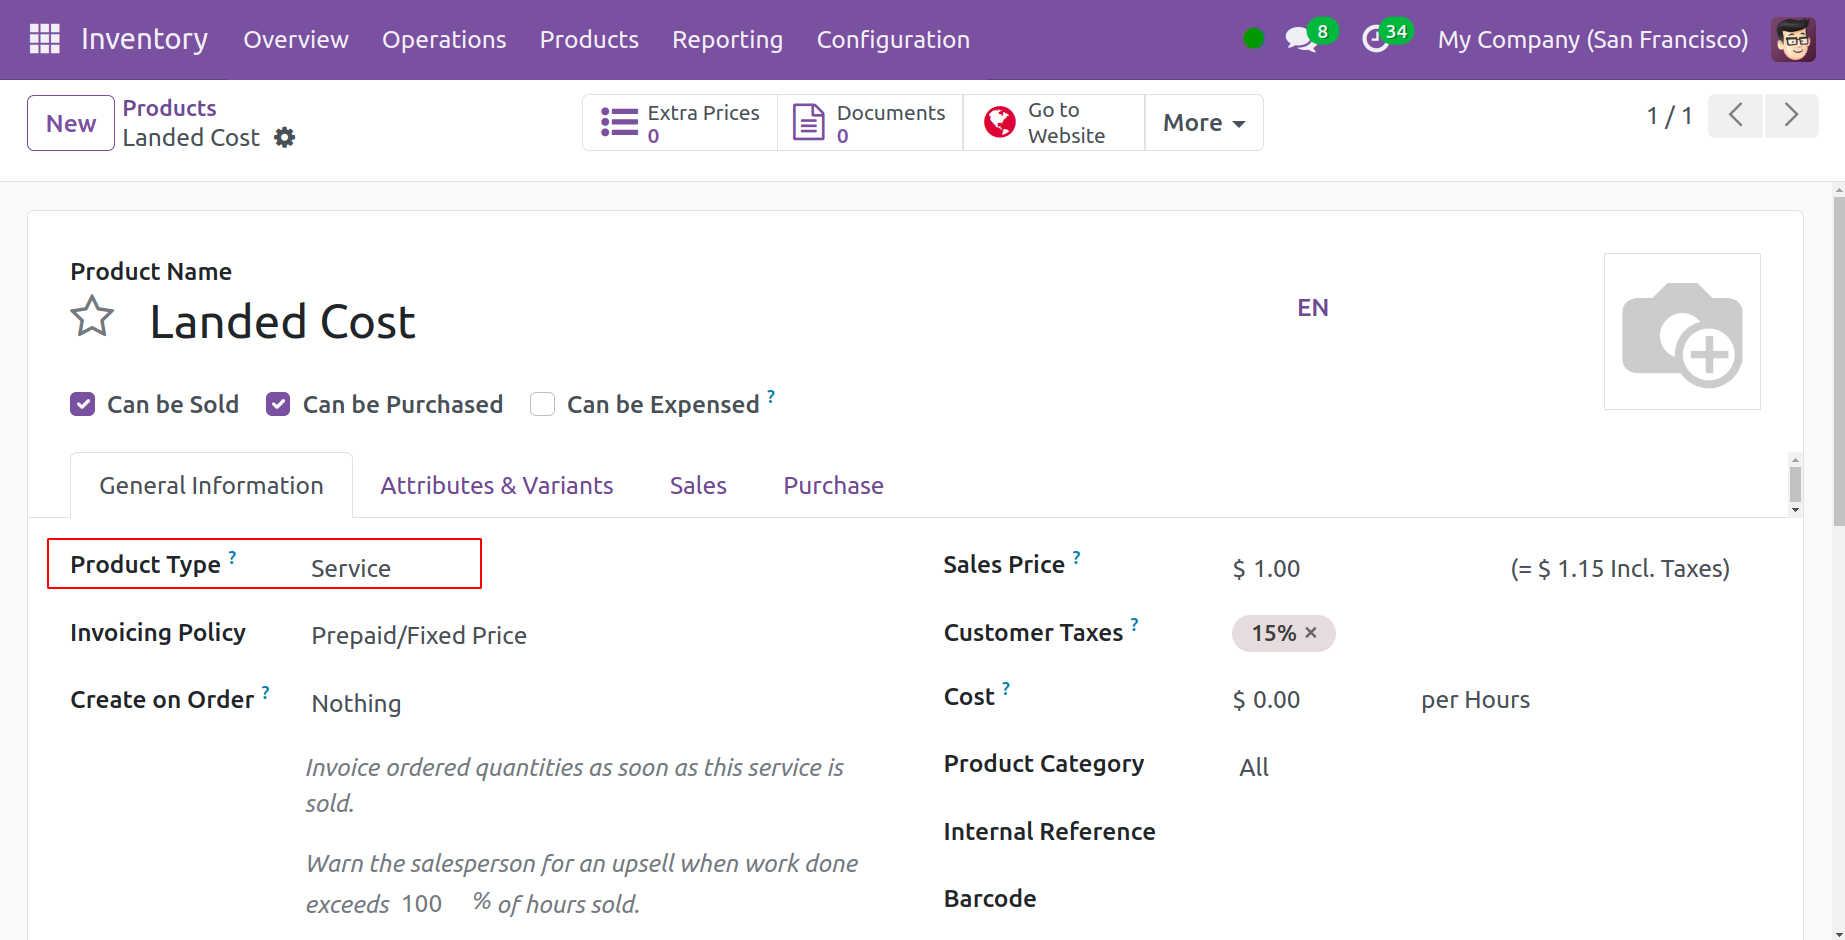
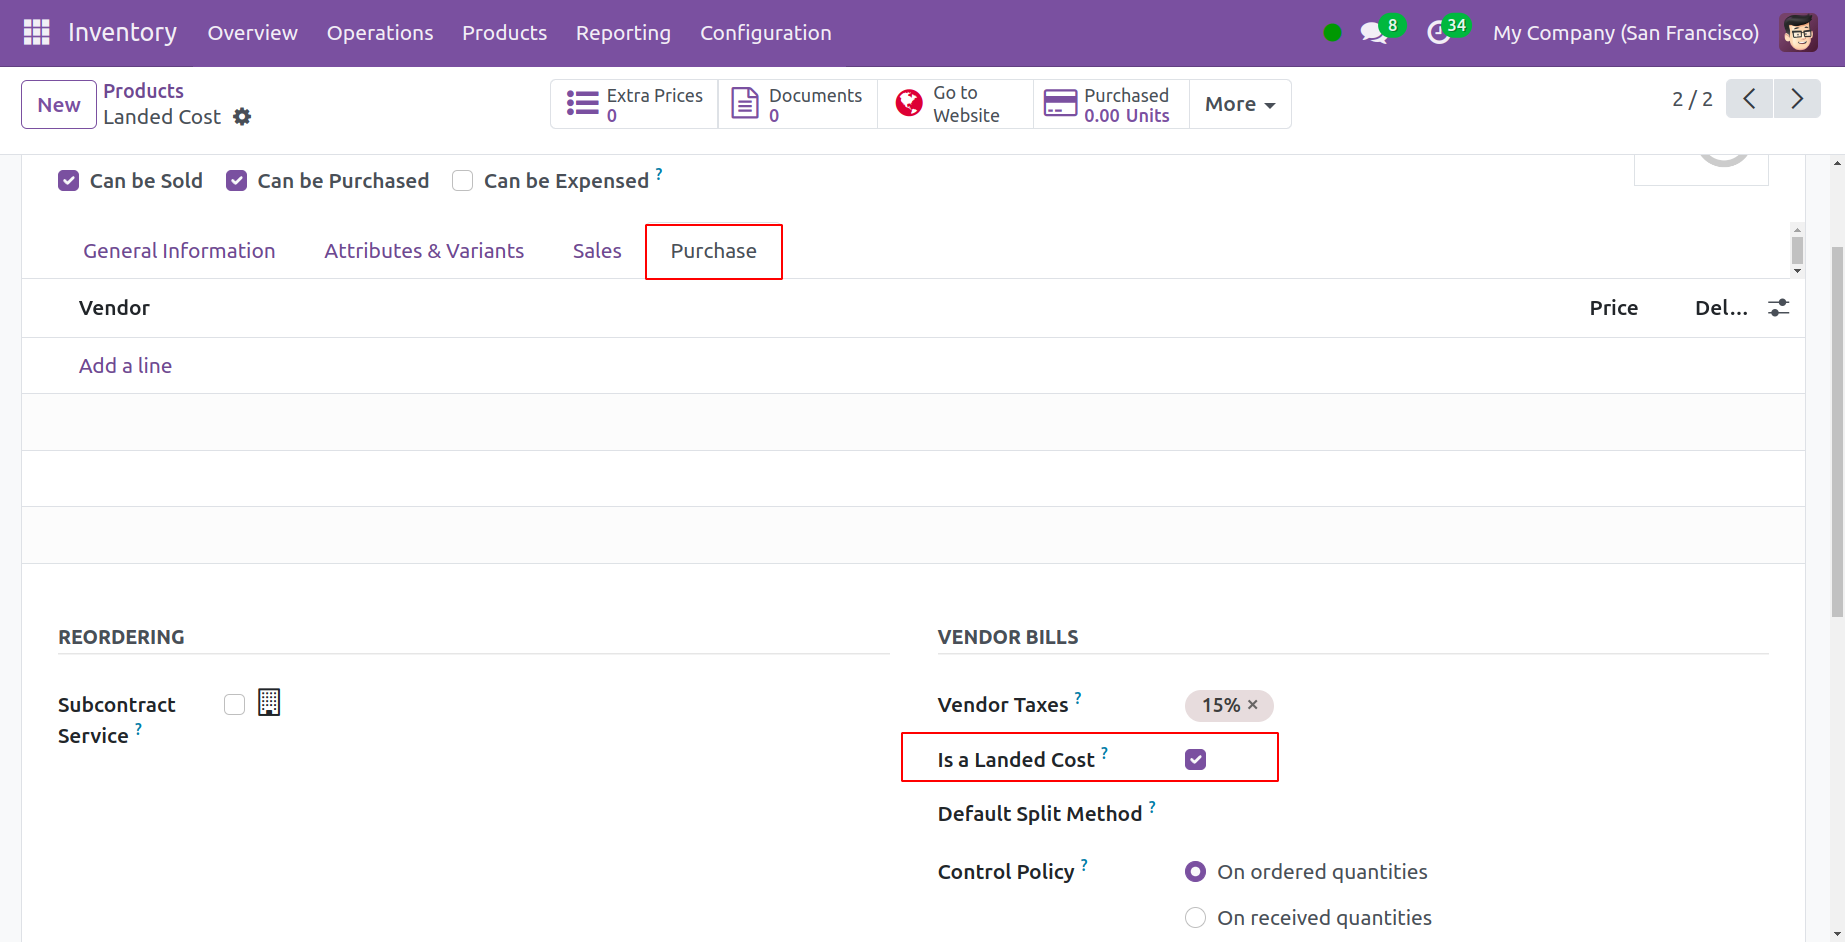
Click "New" in the Products window to access the form view now. In order to configure a service that defines landed costs, set the "Product Type" to "Service."
To assign pricing methodologies to this service, turn on the "Is a Landed Cost" option found under the Purchase tab. You can specify how you wish to divide the cost in the Default Split Method section.
Click the New button in the Landed Costs window to add a new Landed Cost.
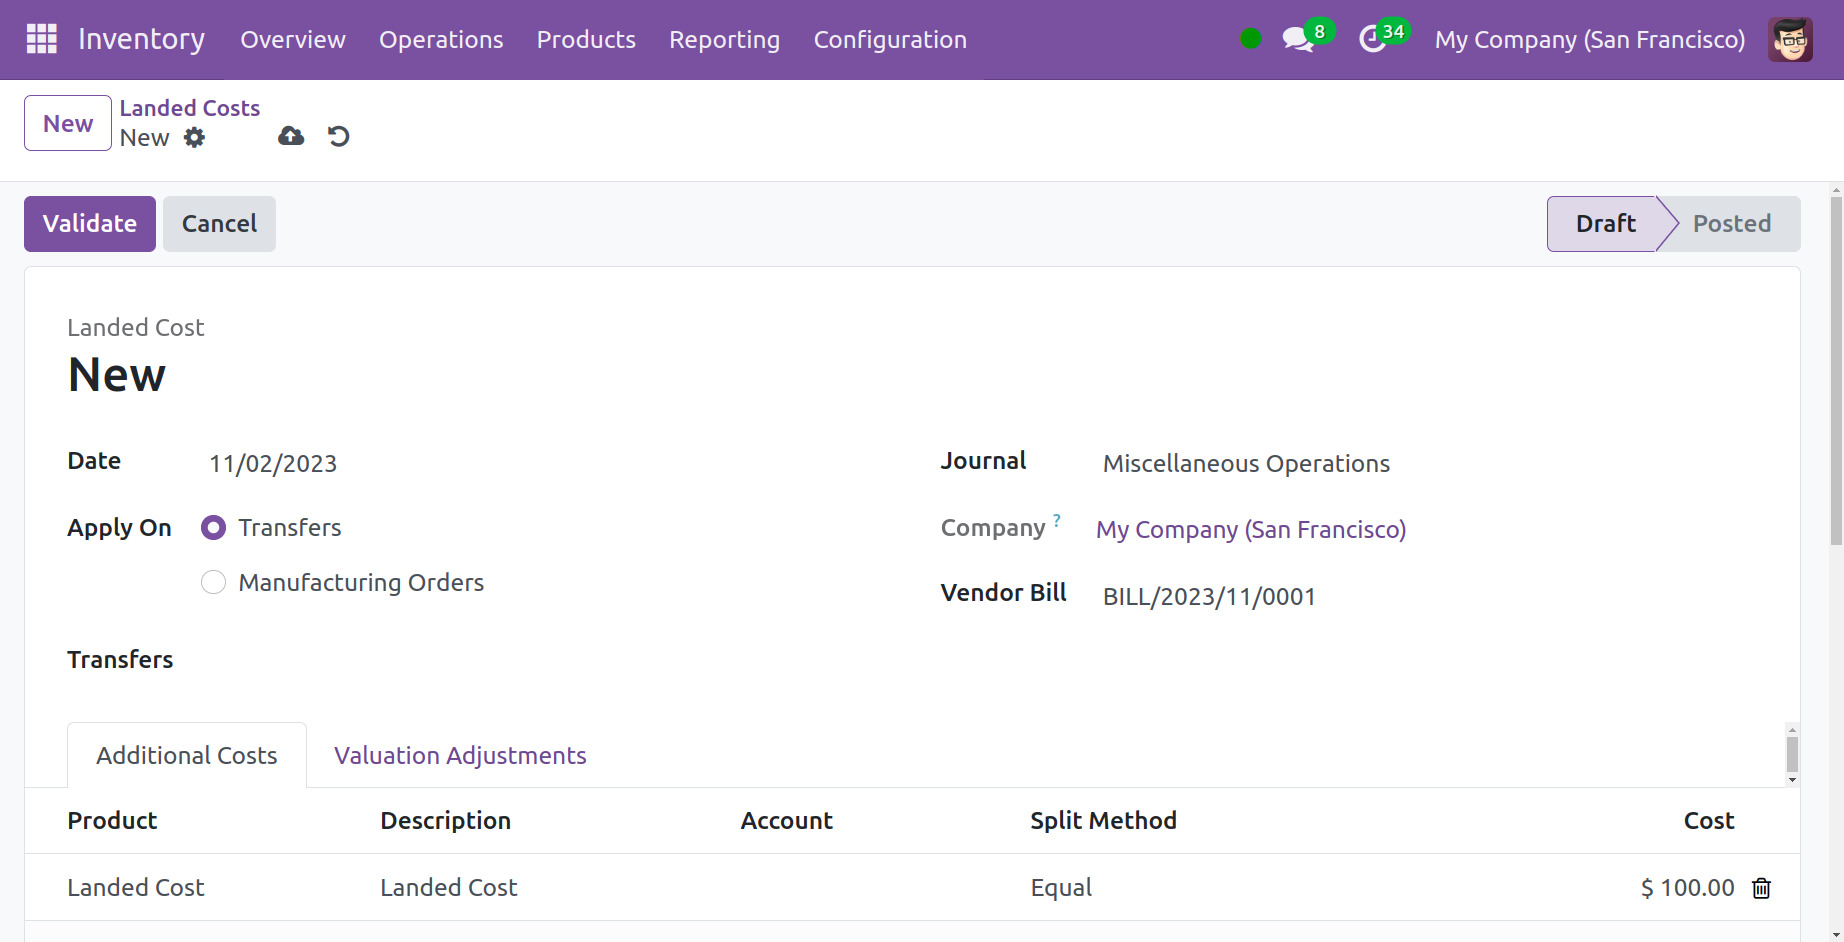
Indicate fields such as Vendor Bill, Date, Journal, Transfers, and Company. Transfers and Manufacturing Orders are the two alternatives for the "Apply On" characteristic. It chooses the domains where Landed Costs should be applied.
The Add a Line button can be found under "Additional Costs." In the Product area, you can choose the product by selecting it from the dropdown list. Include information about the account, description, split method (the way landed costs are divided), and cost.
Several numbers are displayed under the Valuation Adjustments tab when you click "Compute."
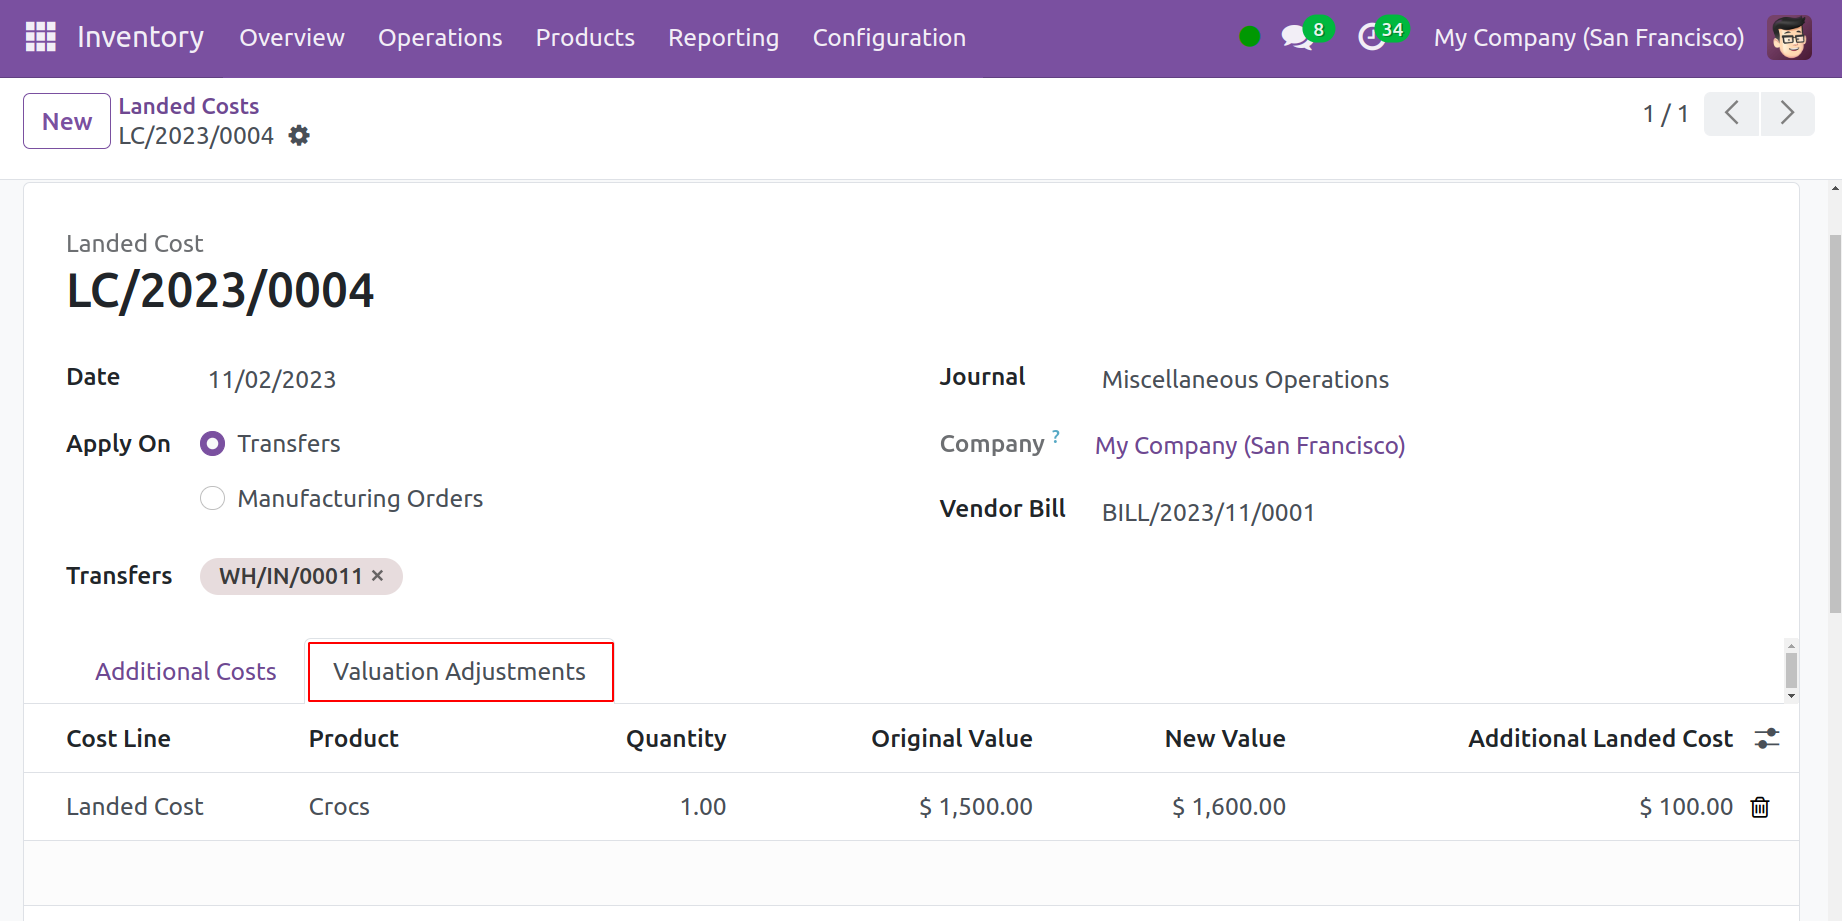
Data such as Cost Line, Product (name), Quantity, Original Value, New Value, and Additional Landed Cost are displayed here. In order to post the landed cost, click "Validate."