Odoo 17 Expense Management
The expense management module facilitates the organized management and control of
company expenses. This module makes it simple to record daily spending, which aids
in maintaining employee records in an organized manner. Additionally, it aids in
strengthening the company's financial foundation. The scale of the company is irrelevant
in this case. The improvement of the organization's profit margin is largely dependent
on effective expense control. In certain instances, the worker will be required
to pay the full cost of the components or equipment without receiving any advance
payment. In these situations, the employees can quickly create reports detailing
their spending under Odoo expenses and send them to the boss for approval.
Let's examine how you use Odoo software to control and monitor employee spending.
The module's primary dashboard will look like the screenshot below.
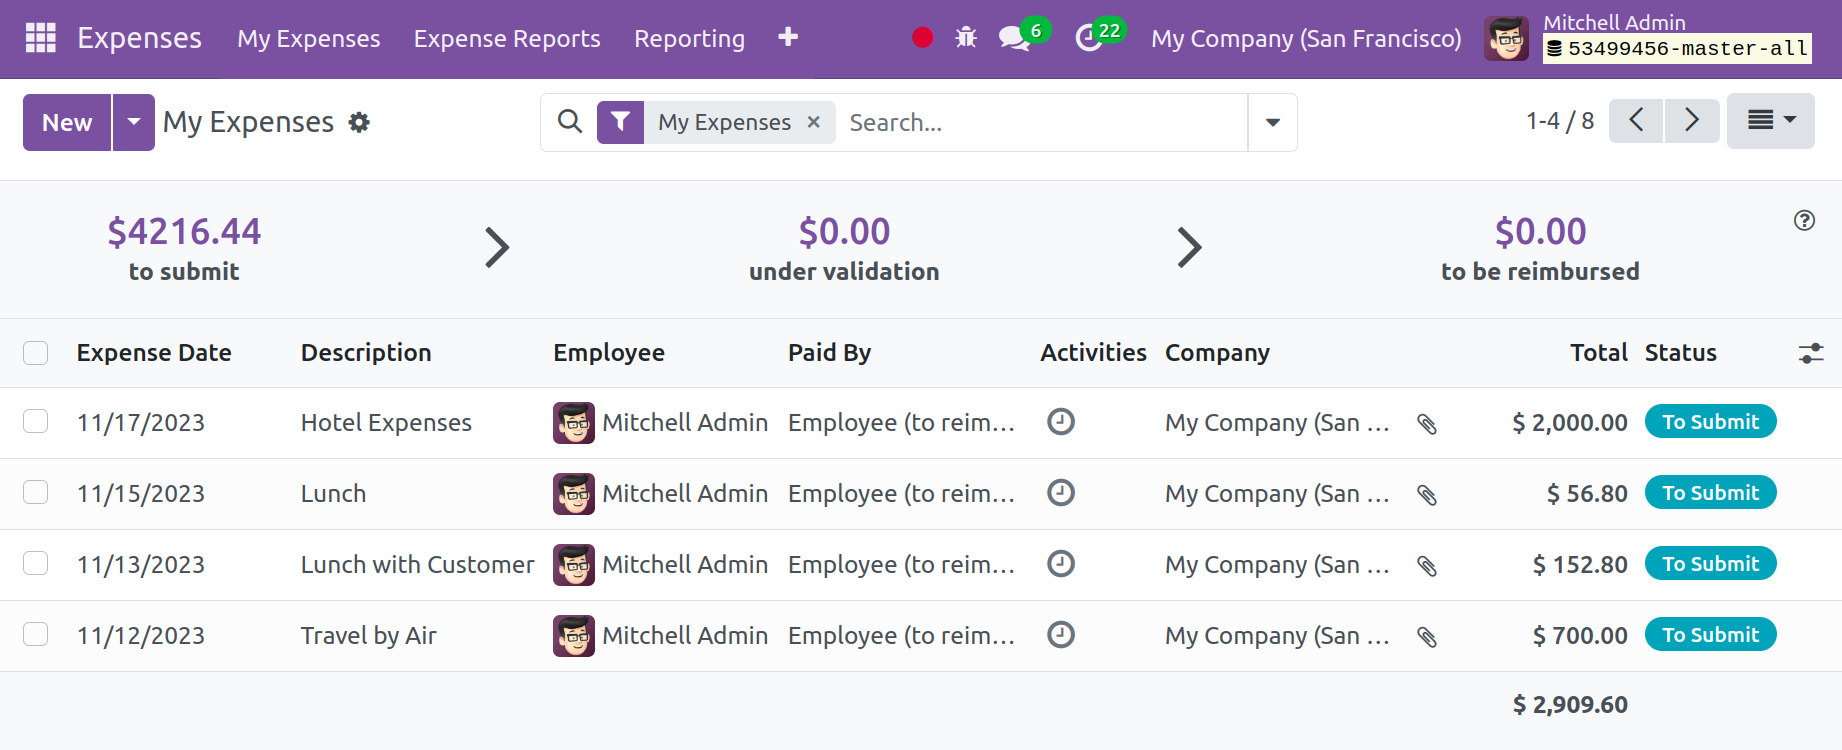
The provided page displays the costs associated with the reports that are sent to
the management of that specific business for approval. Accordingly, you can utilize
the group by, favorite, and filters. You will find the following sub-options under
the filters option: my expenses, my team, to report, refused, expense date, past
employees, and create custom filter options. You may now see options like employee,
category, status, company, expense date, and add custom groups in the group by option.
Right now, I can save a current search and add it to my dashboard using the favorites
option. Here, you can find the information on the given list, including the date,
type, and description of the expenses; employee data; paid by; firm; activity; amount
paid; total; and status of the expenses. Other than the Kanban view, the page is
also visible in list, pivot, and graphical views.
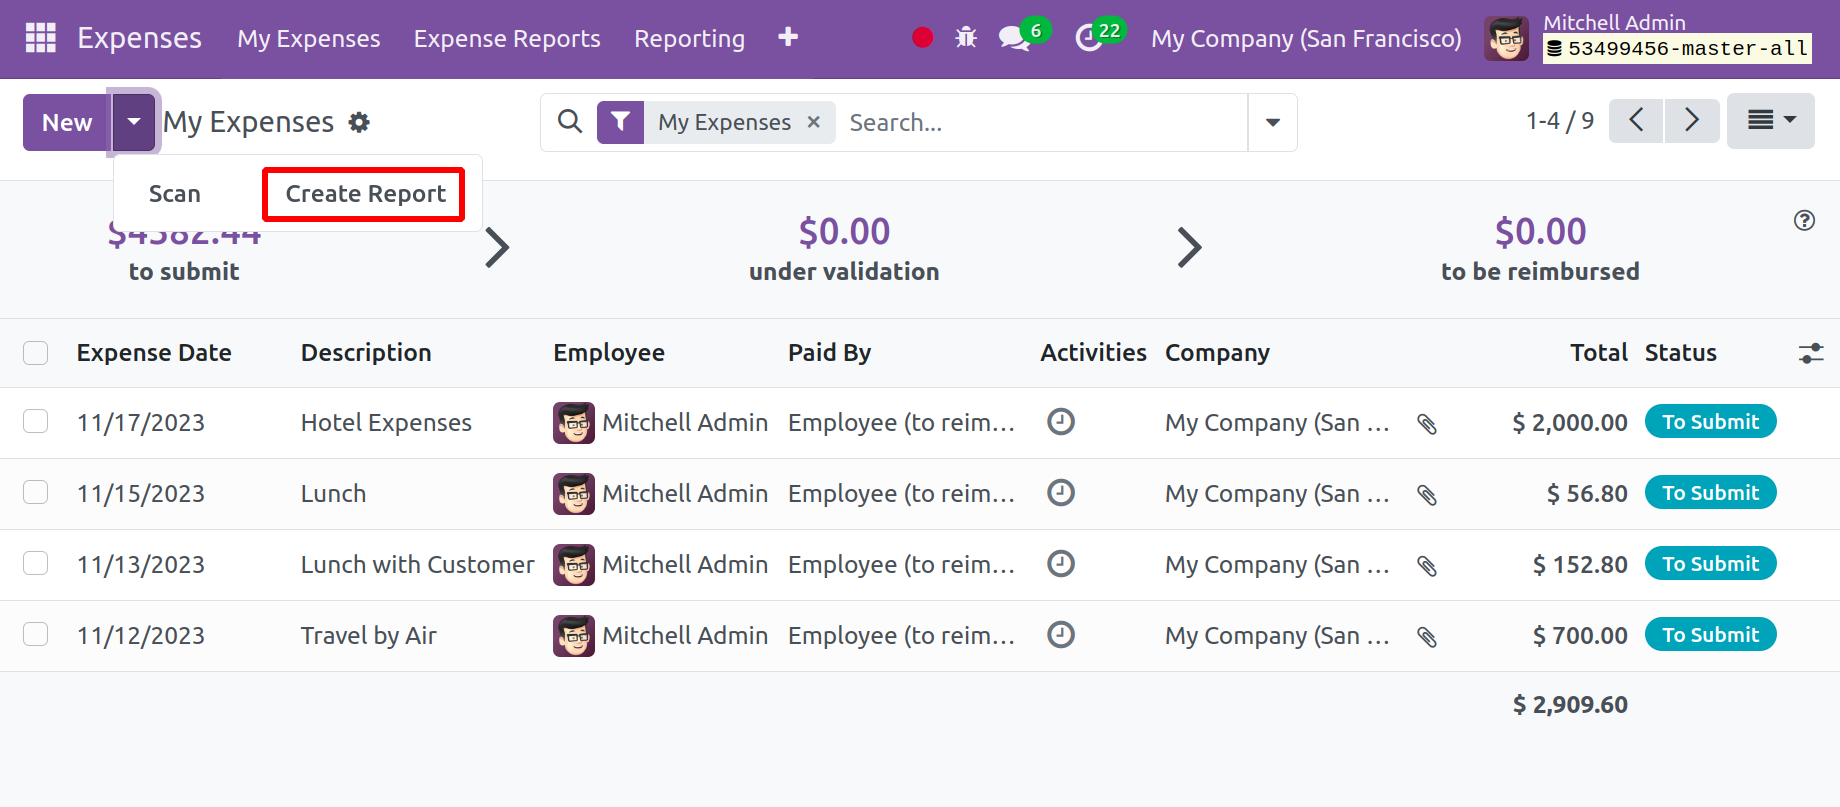
You can now click the New icon on the left side of the screen to generate an expense
report of a similar type.
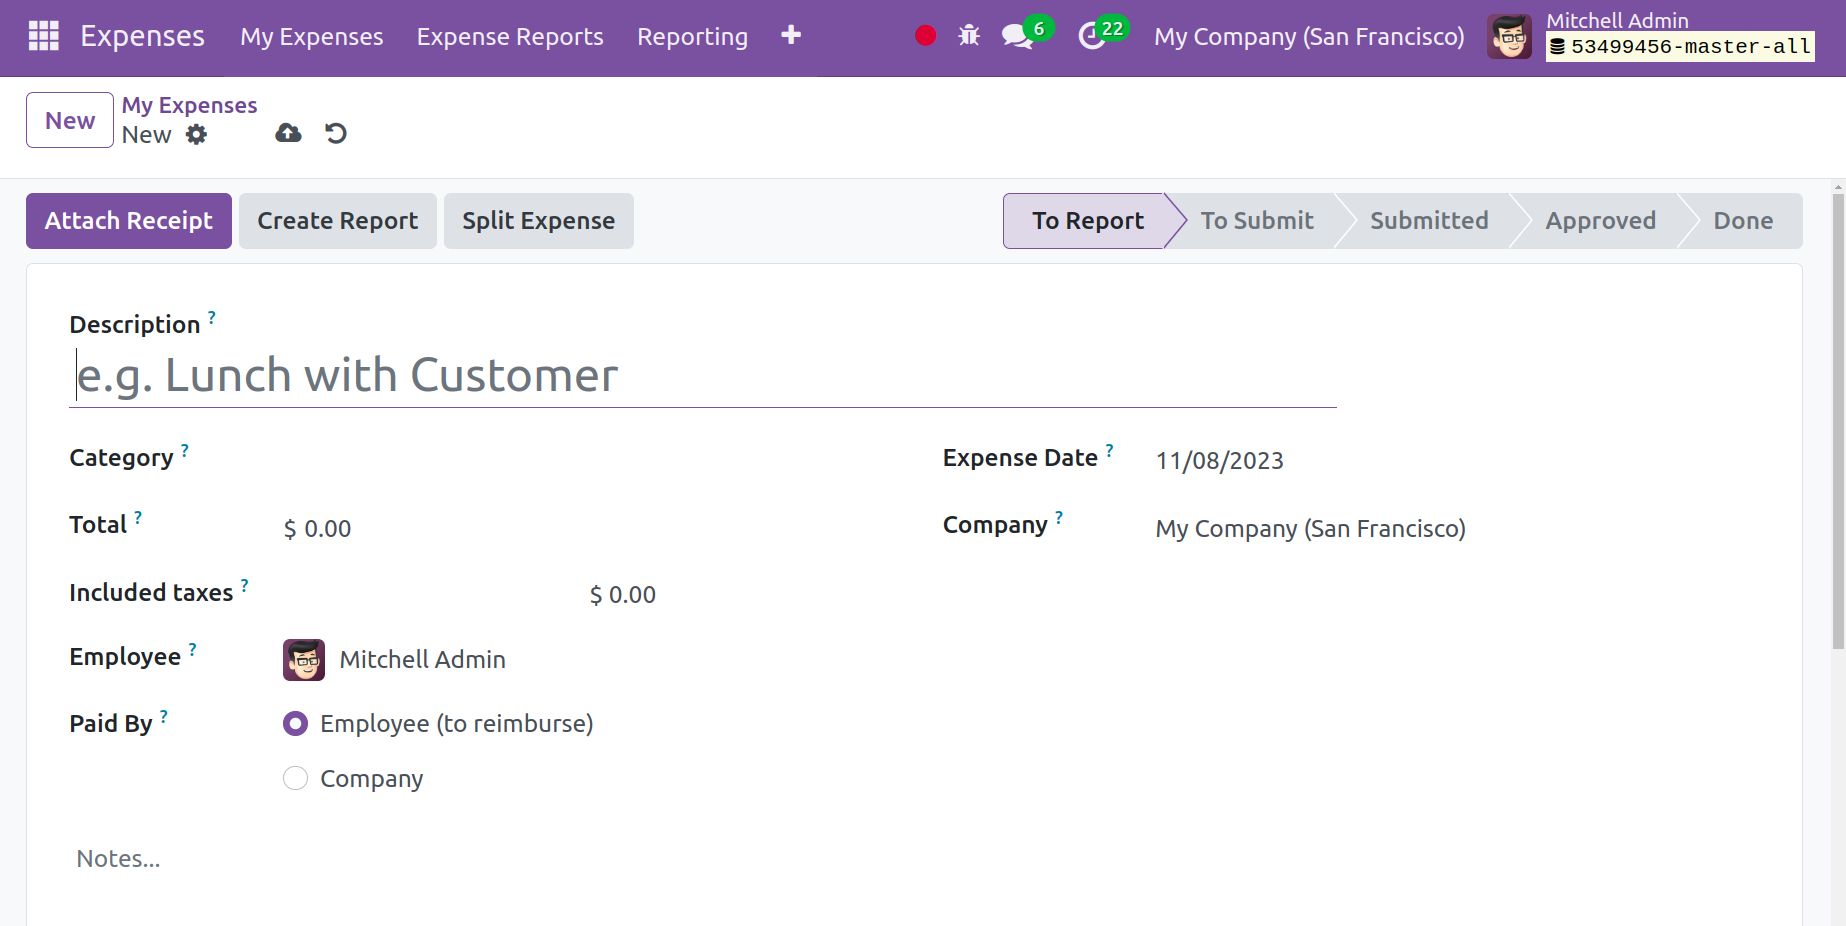
The expense title can be entered in the description field. The category can now
be chosen using the drop-down menu that is situated beneath the description option.
You can add the employee's name in the designated space. You can choose the paid-by
option as an employee or company below that. You can enter the bill reference in
the following field. You can also add the name of the firm, analytics, account details,
and the date of the expense to the designated section. You can add more remarks
in the designated space if necessary. After entering all the necessary information,
you can select the Save icon.
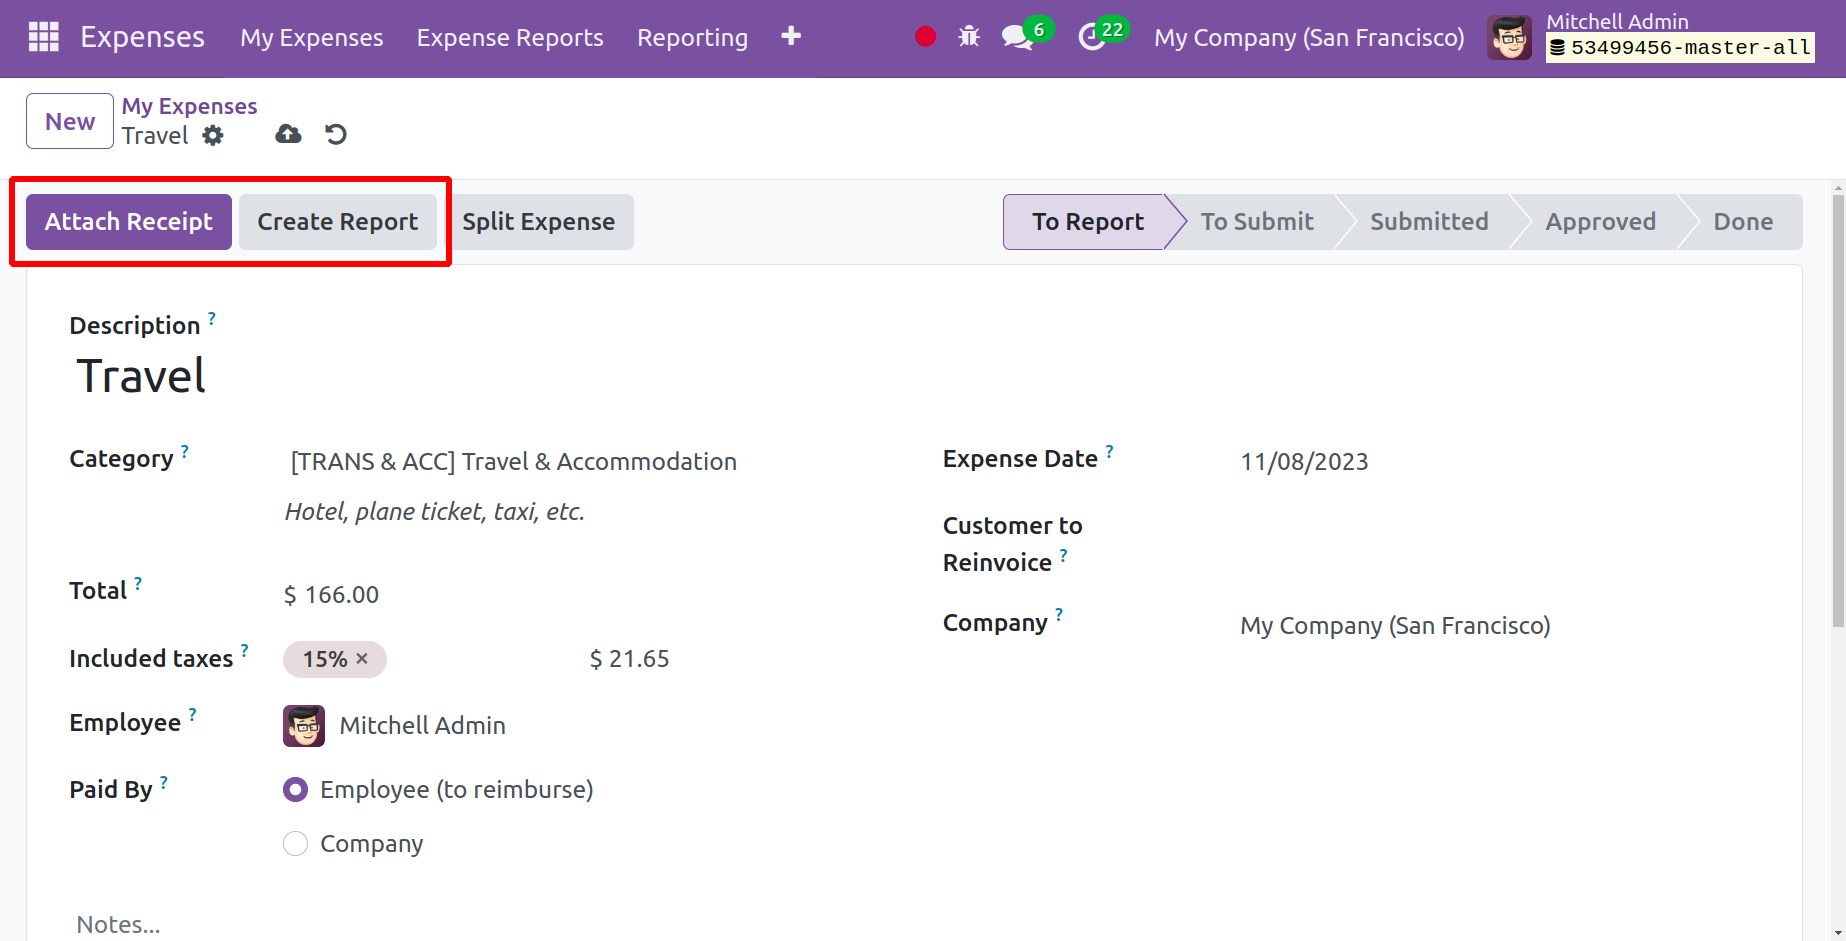
You can attach a receipt to the newly created expense by selecting the Attach Receipt
option when you save it, as shown in the screenshot above. As seen in the screenshot
below, you may now generate a report by using the Create report option that is available
on the expense page.
The expense report summary will appear when you click the "Create Report" option,
as seen in the image below.

Here, you can send the generated expense report to the necessary person for approval
by selecting the Submit to Manager option.
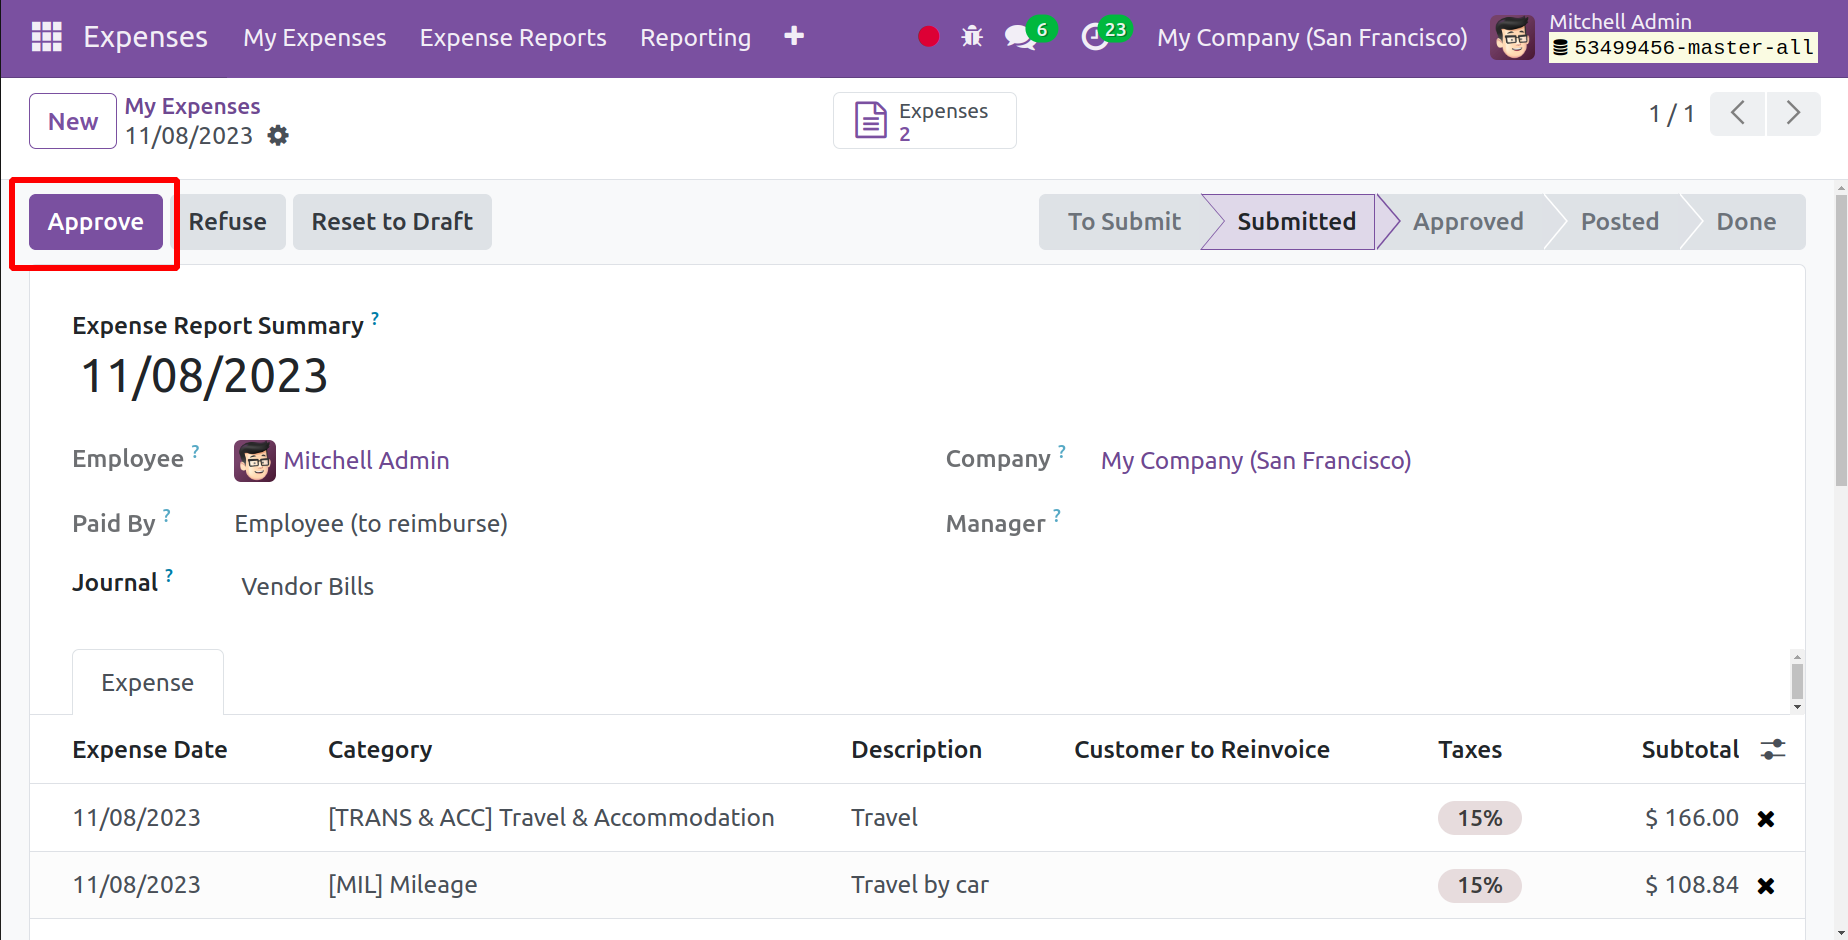
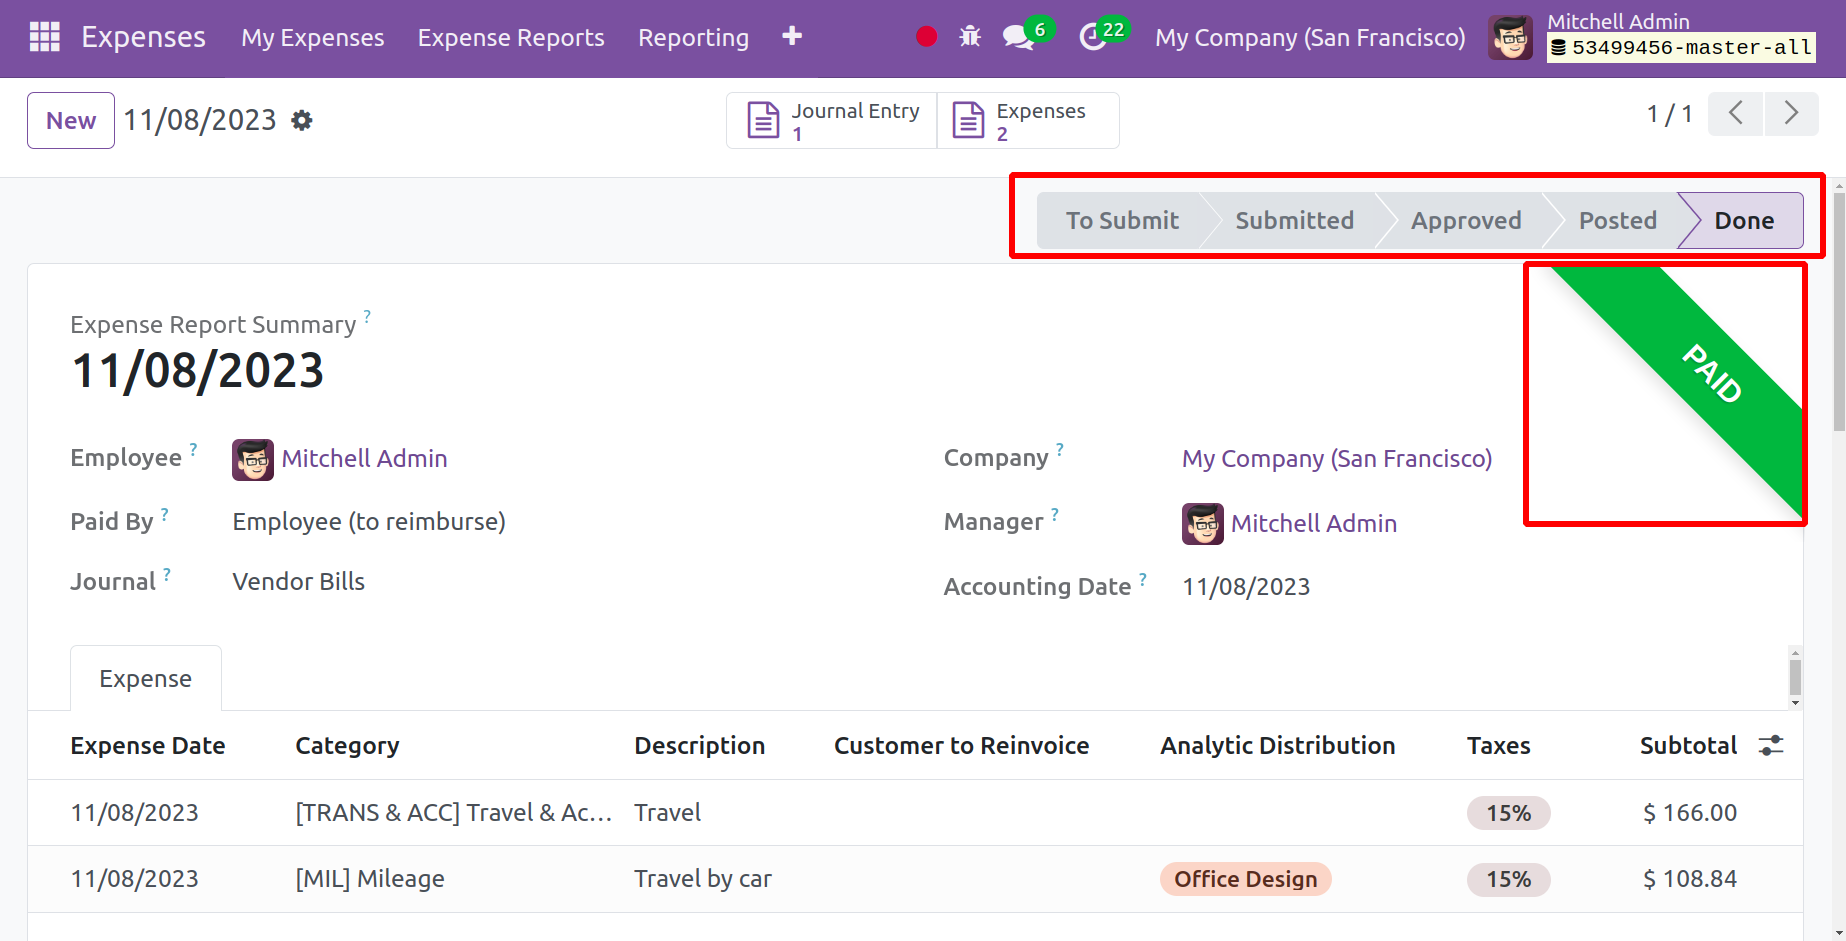
As you can see on the right side of the page, the management has the ability to
Approve or Refuse the report to the draft in accordance with that decision. The
manager can select the option that has been authorized and go on to the payment
procedure if the report is ready for approval.
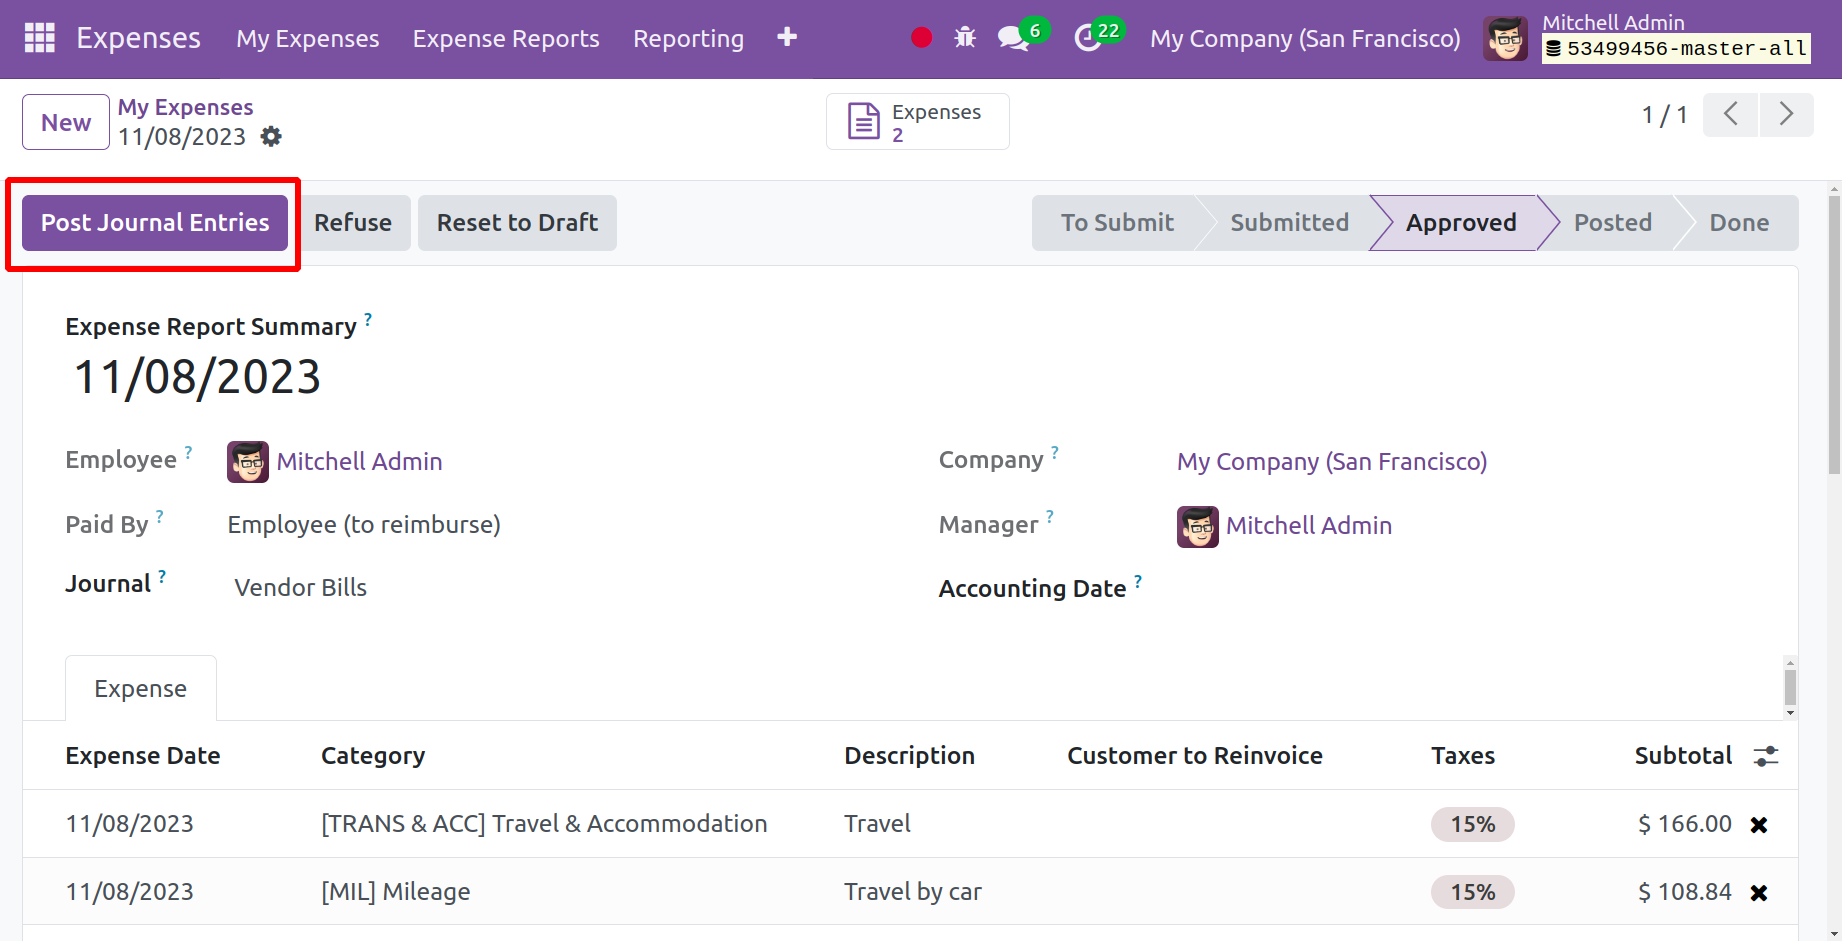
Posting journal entries to the expense report right away is made easier with the
Post Journal Entries option. The manager can register the payment by selecting the
Register Payment option, as seen in the screenshot below.
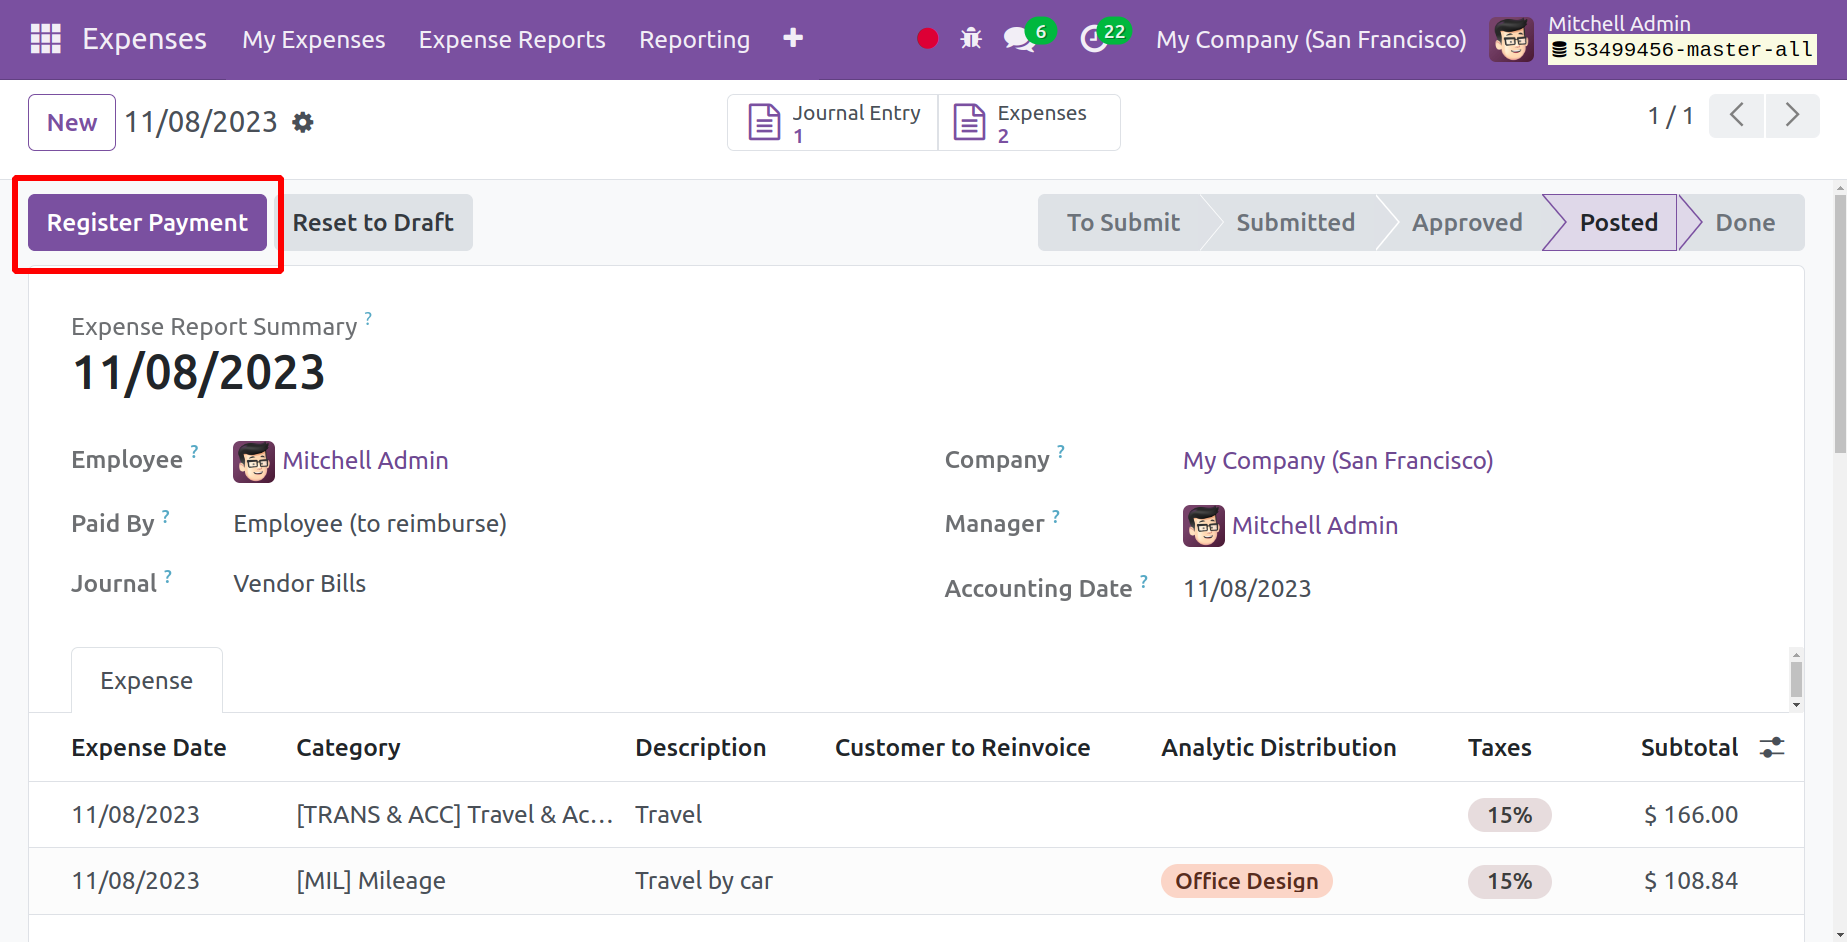
As seen in the image below, a pop-up window may appear when you choose the Register
Payment option.
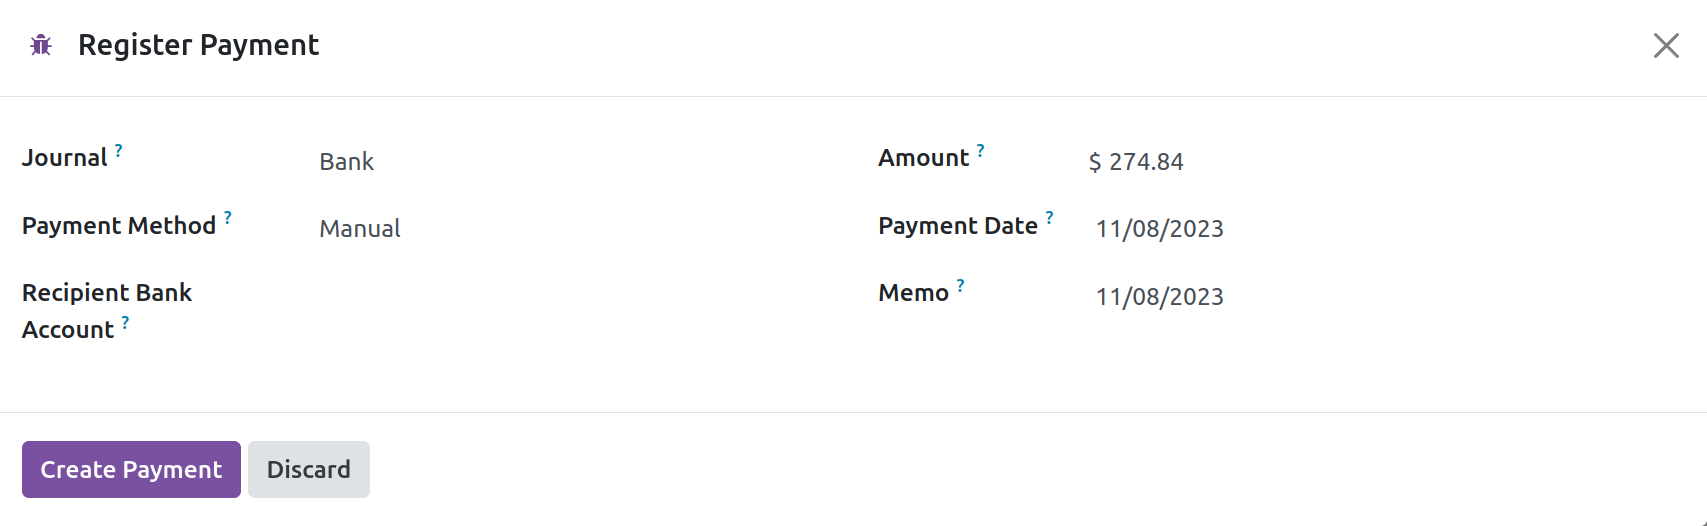
Here, you can enter the journal name, payment method, recipient's bank account information,
payment amount, payment date, and memo, in that order. Upon choosing the Create
Payment option, the recipient's account will be credited with the amount supplied,
and the status will display as Paid, as illustrated in the figure below.
These are the procedures for using the Odoo software to create a new expense under
the expense module.
My Reports
You will find my report option under my spending menu; it is displayed in the screenshot
below.
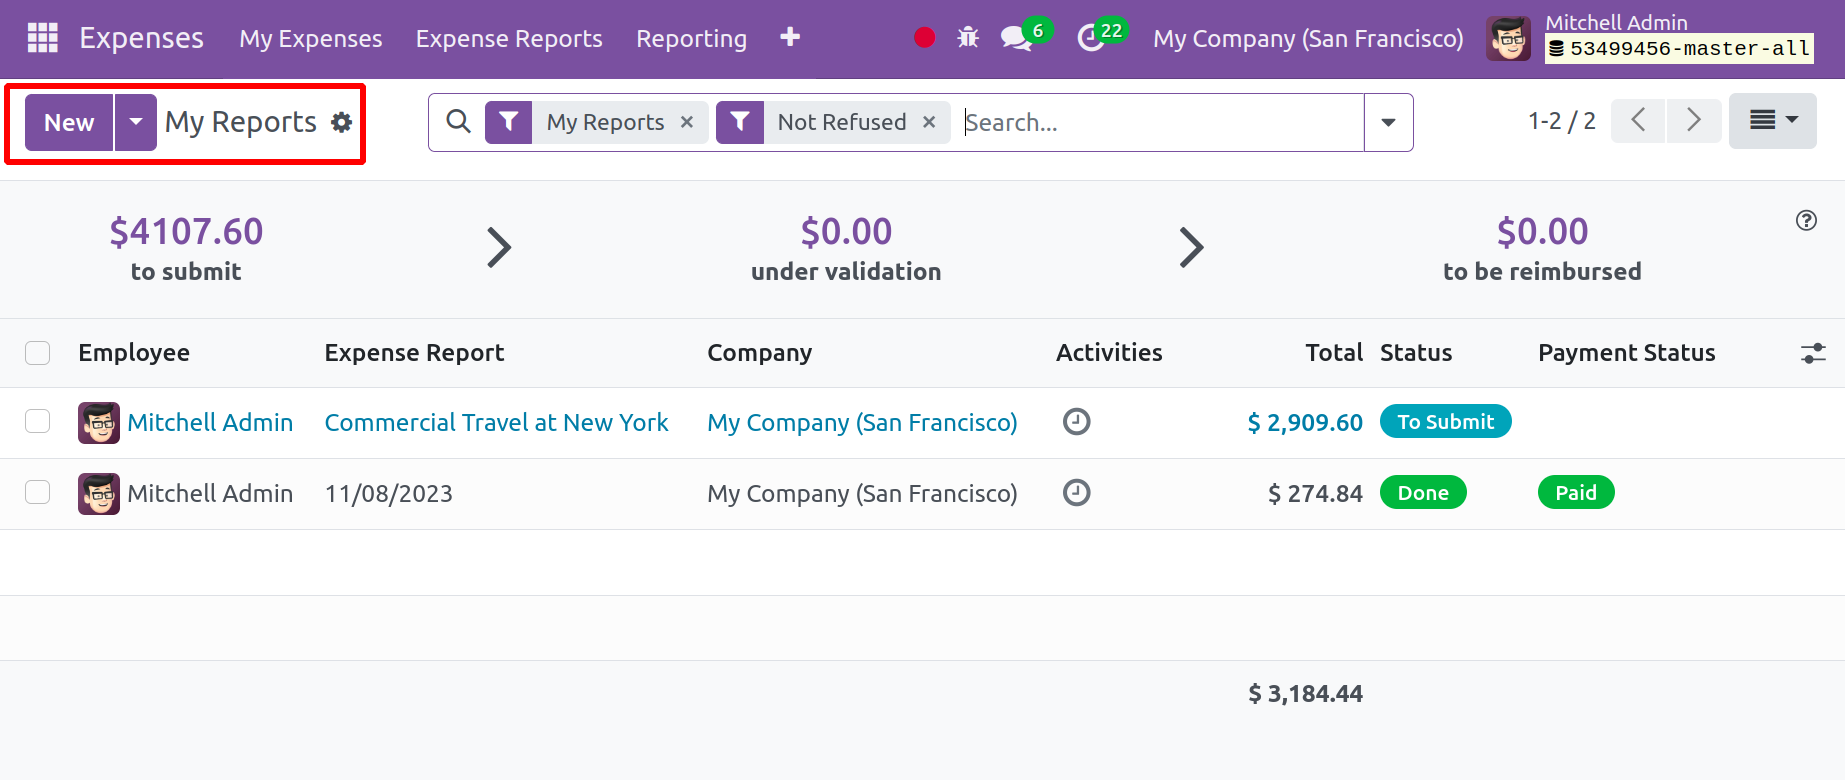
Options like the employee's name, the expenditure report, the firm name, the activities,
the status of the total amount, and the payment status are all visible there. You
can use the corresponding filters, group by, and favorites options. To add a new
report, use the NEW option.
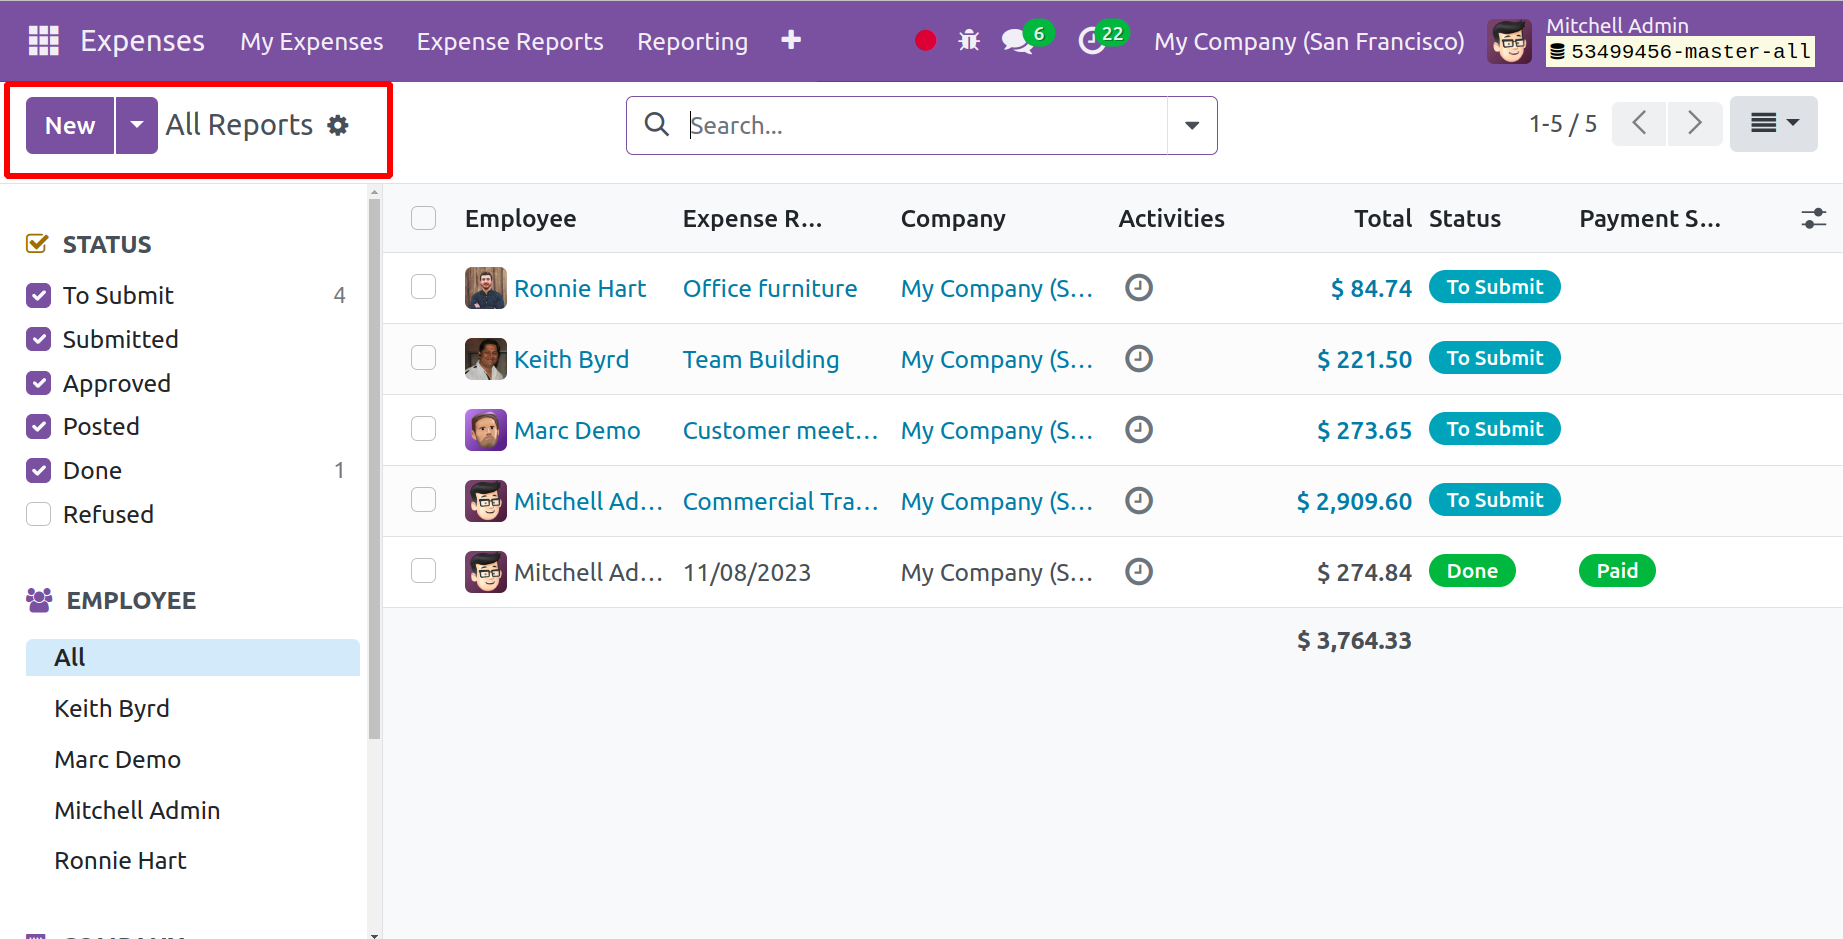
Expense Report
You can obtain reports on approved, posted, completed, submitted, posted, and many
other types of expenses by using the expense report menu included within the expense
management module. As seen in the screenshot below, the options will be on the left
side of the page.
Let's now examine the Configuration menu, which contains information on expense
categories and settings.
Expense Categories
You will find options like spending categories and settings options under the configuration
option. The following graphic illustrates how the expenditure categories page will
look.
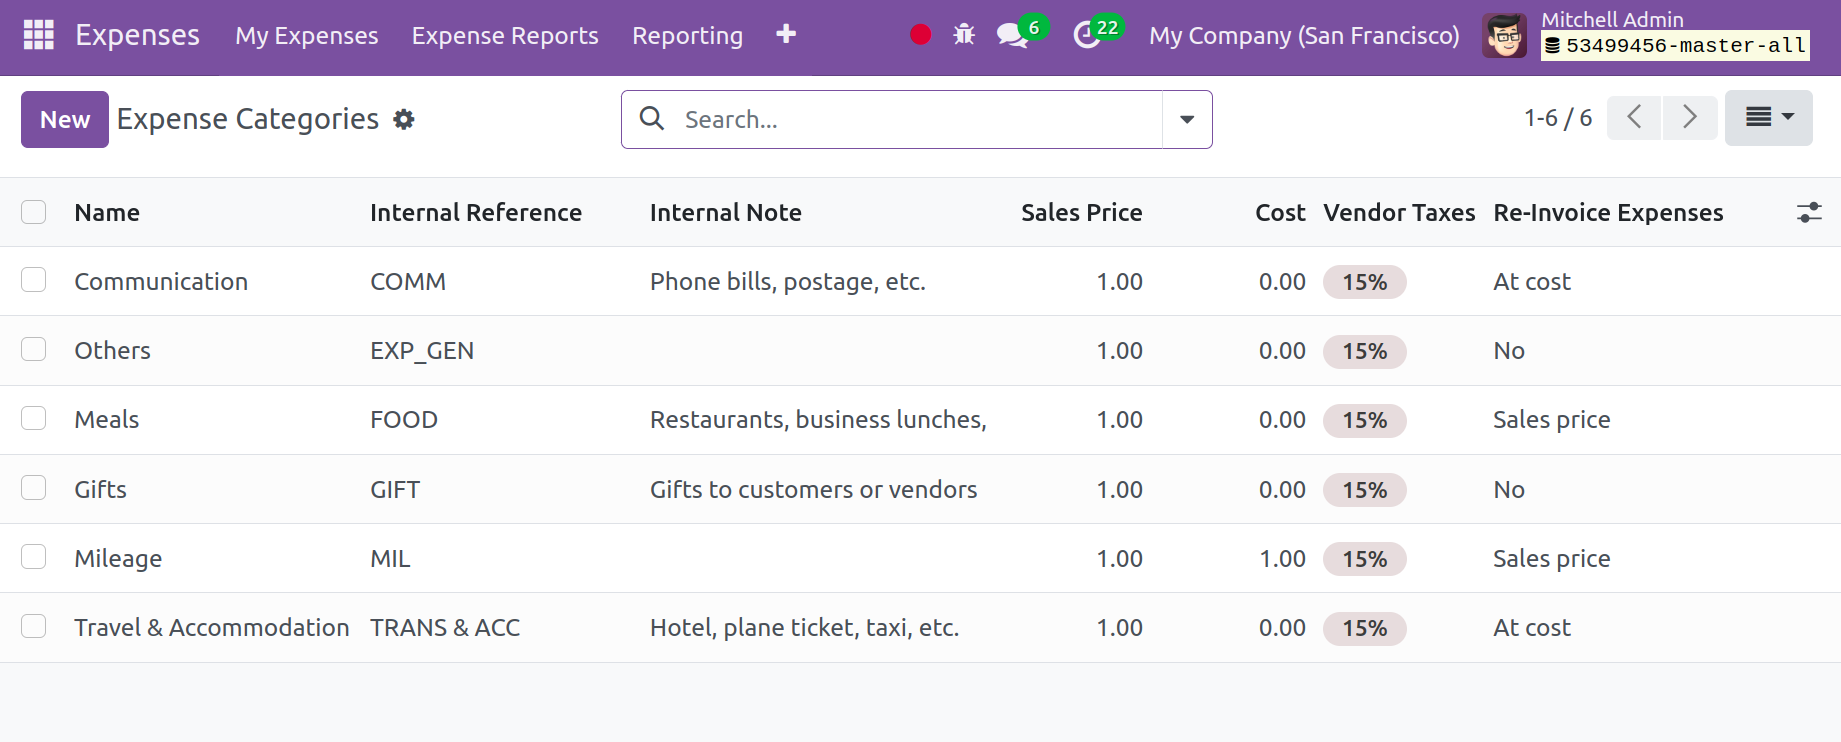
You may find the list of expense categories on the page dedicated to them. Accordingly,
you can utilize the group by, favorites, and filter features. Name, internal reference,
internal notes, sales price, cost, vendor taxes, and re-invoice fees are among the
details under each expense category. You may now use the New symbol that is available
on the left side of the page to establish a cost category that is comparable to
this one.
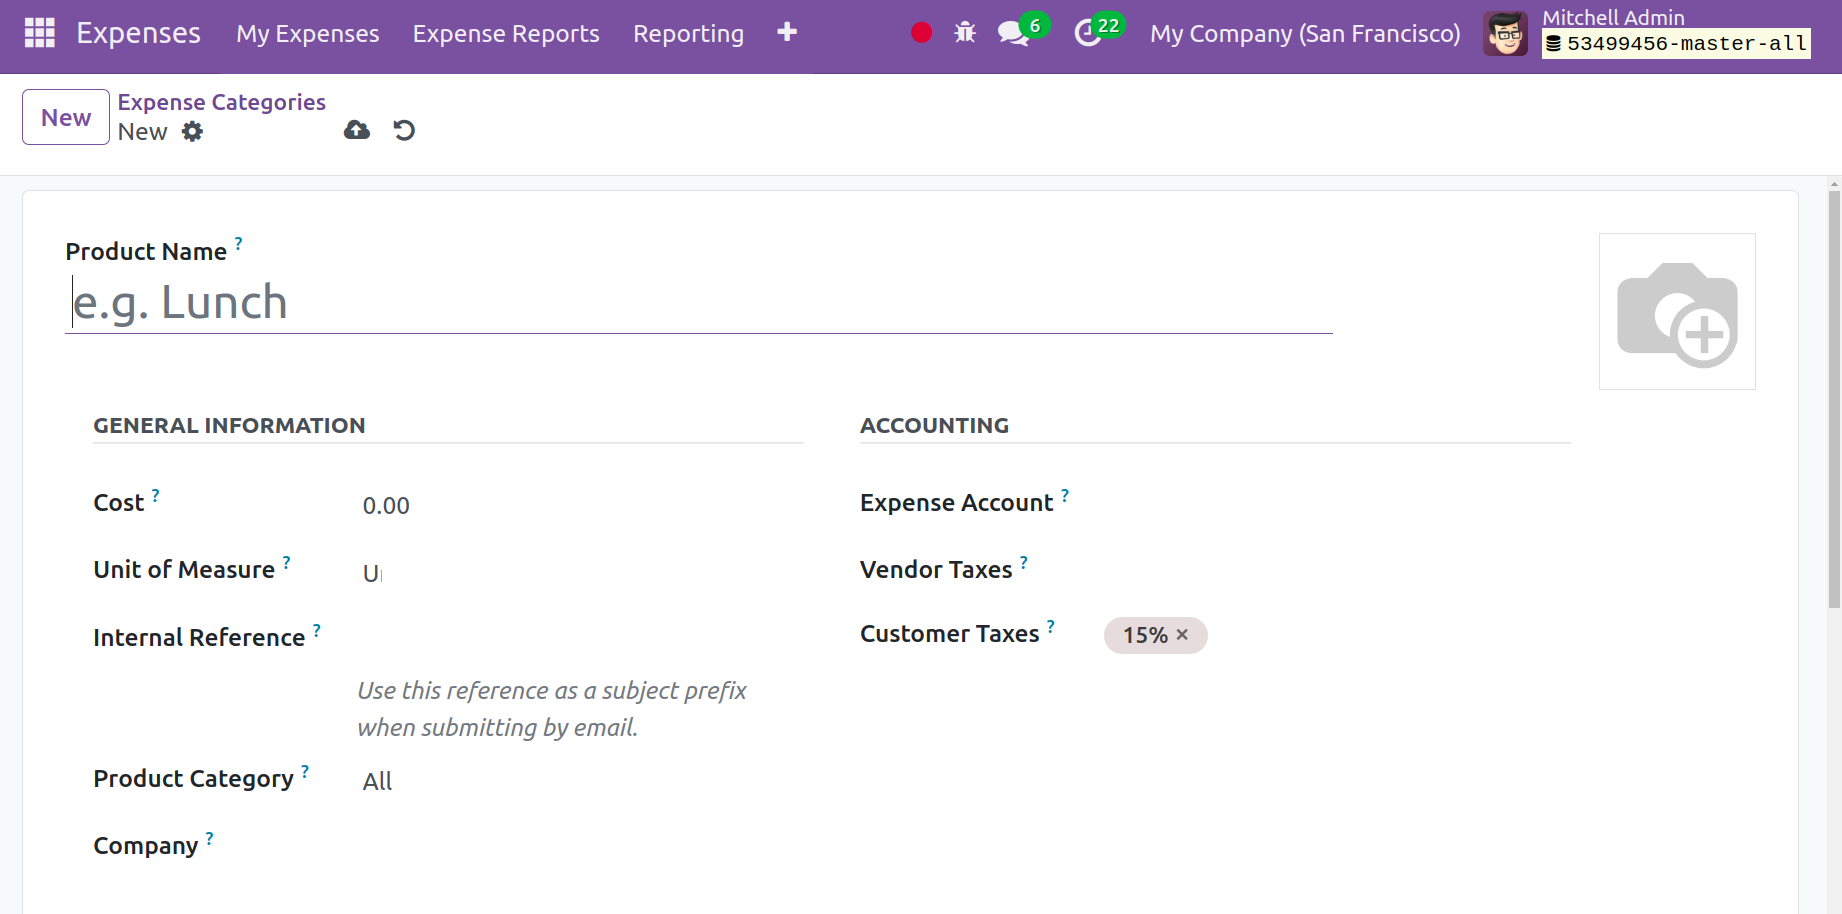
You can fill in the designated spaces on the expense categories creation page with
the product name and, if necessary, an image. You can now put the cost, unit of
measurement, internal reference, and company name, respectively, under that, in
the General Information tab. You may now include vendor and customer taxes, as well
as the specifics of the spending accounts, under the accounting tab. You can adjust
the re-invoice expenses to either no, at cost, or sales price in the invoicing tab.
Not only that, but there's also room for you to include internal remarks. Once you
have completed entering all of the information, you can proceed with the saving
procedure.
Settings
You now have several options under the Settings option. For example, you have sub-options
for incoming email, payslip reimbursement, and digitizing expenses under the expenses
option.
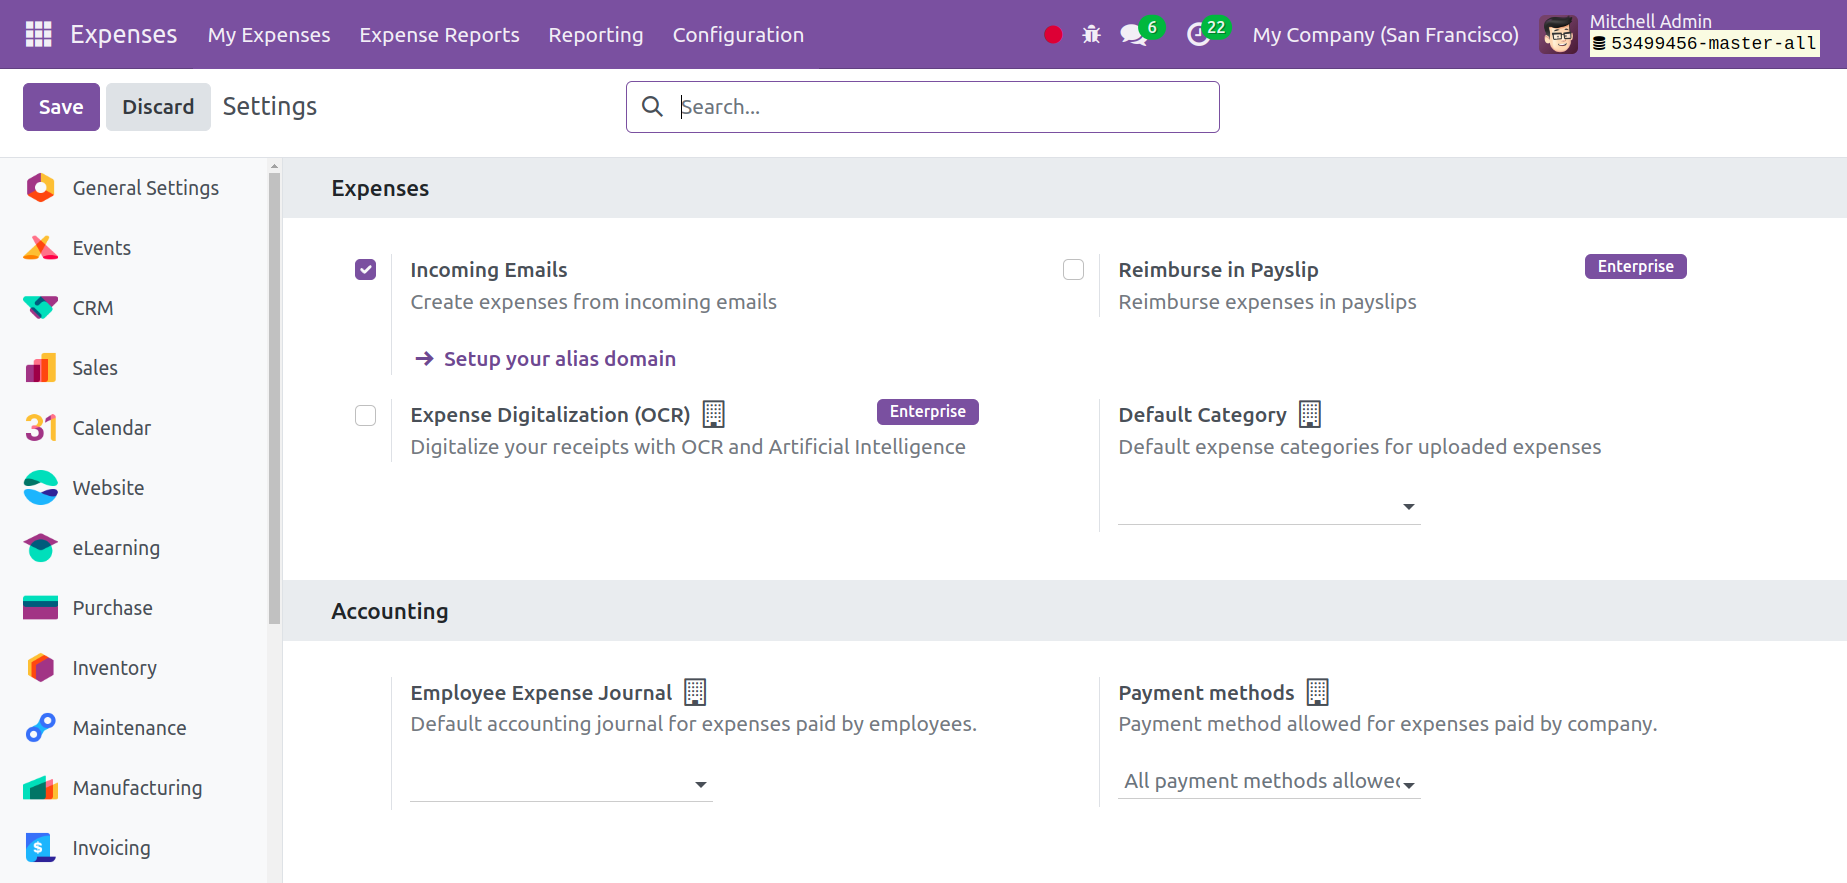
The default accounting journal for employee-paid expenses and the acceptable payment
method for company-paid expenses are also shown below. These will assist you with
default accounting journaling and payment options, respectively. The option for
incoming emails is one of those that assists you in deducting costs from incoming
emails. When a category's internal reference appears in the first word of the email
subject, the associated category is immediately set. The default category is the
default expense category for uploaded expenses and odoo 17 allows the use of specific
payment methods to pay employee expenses by the company as defined by ‘payment methods’.
One can remain it blank helps to support all payment methods.
Reporting
The expense analysis option is located in the reporting option, and it will look
like the screenshot below.
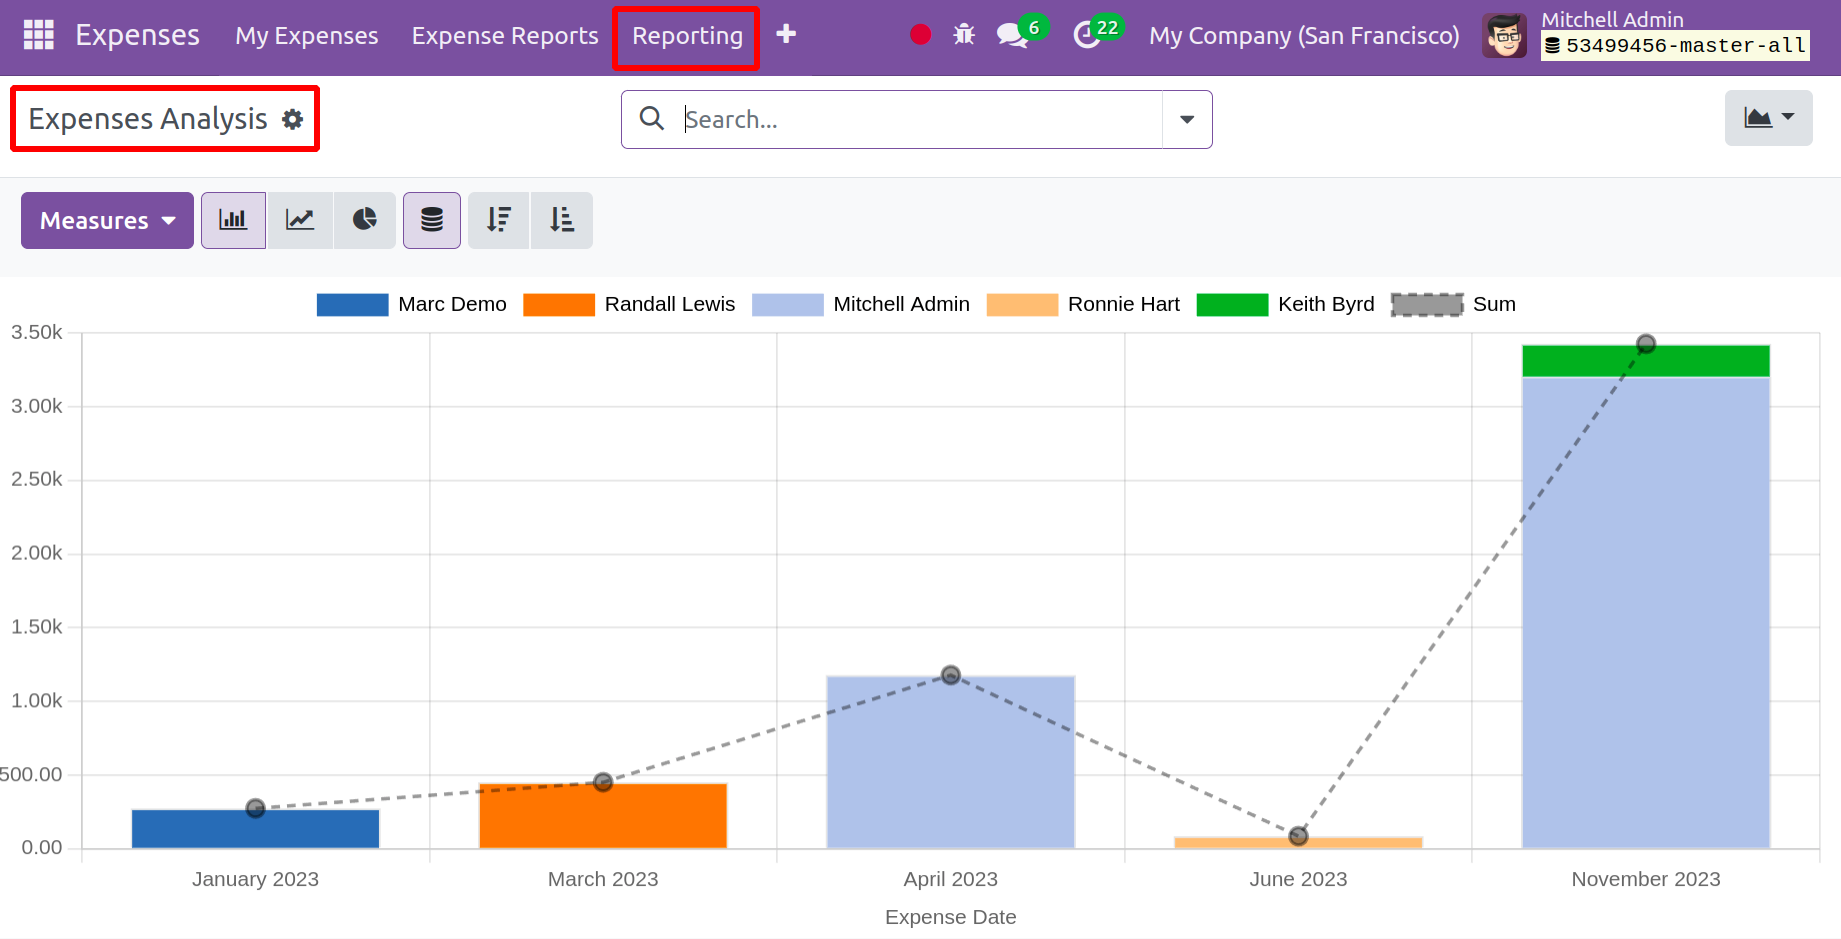
Measures with sub-options, including tax amount, tax amount in currency, total,
total in currency, and total untaxed amount in the currency, are available for usage
here. You can obtain useful reports on the company's operations expense management
here. The page is also available in graphical, list, Kanban, and pivot views. It
is also shown as a bar, line, and pie chart in the graphical mode. You can use the
many colors that are offered to you to represent the various personnel in the organization.
All things considered, the module aids in controlling and overseeing business spending.