eCommerce Management
Odoo offers a comprehensive eCommerce administration solution and integrates with other business modules with ease. With features like order processing, product catalog management, and website building, Odoo 17 provides businesses with an all-in-one platform for efficiently managing their online sales operations.
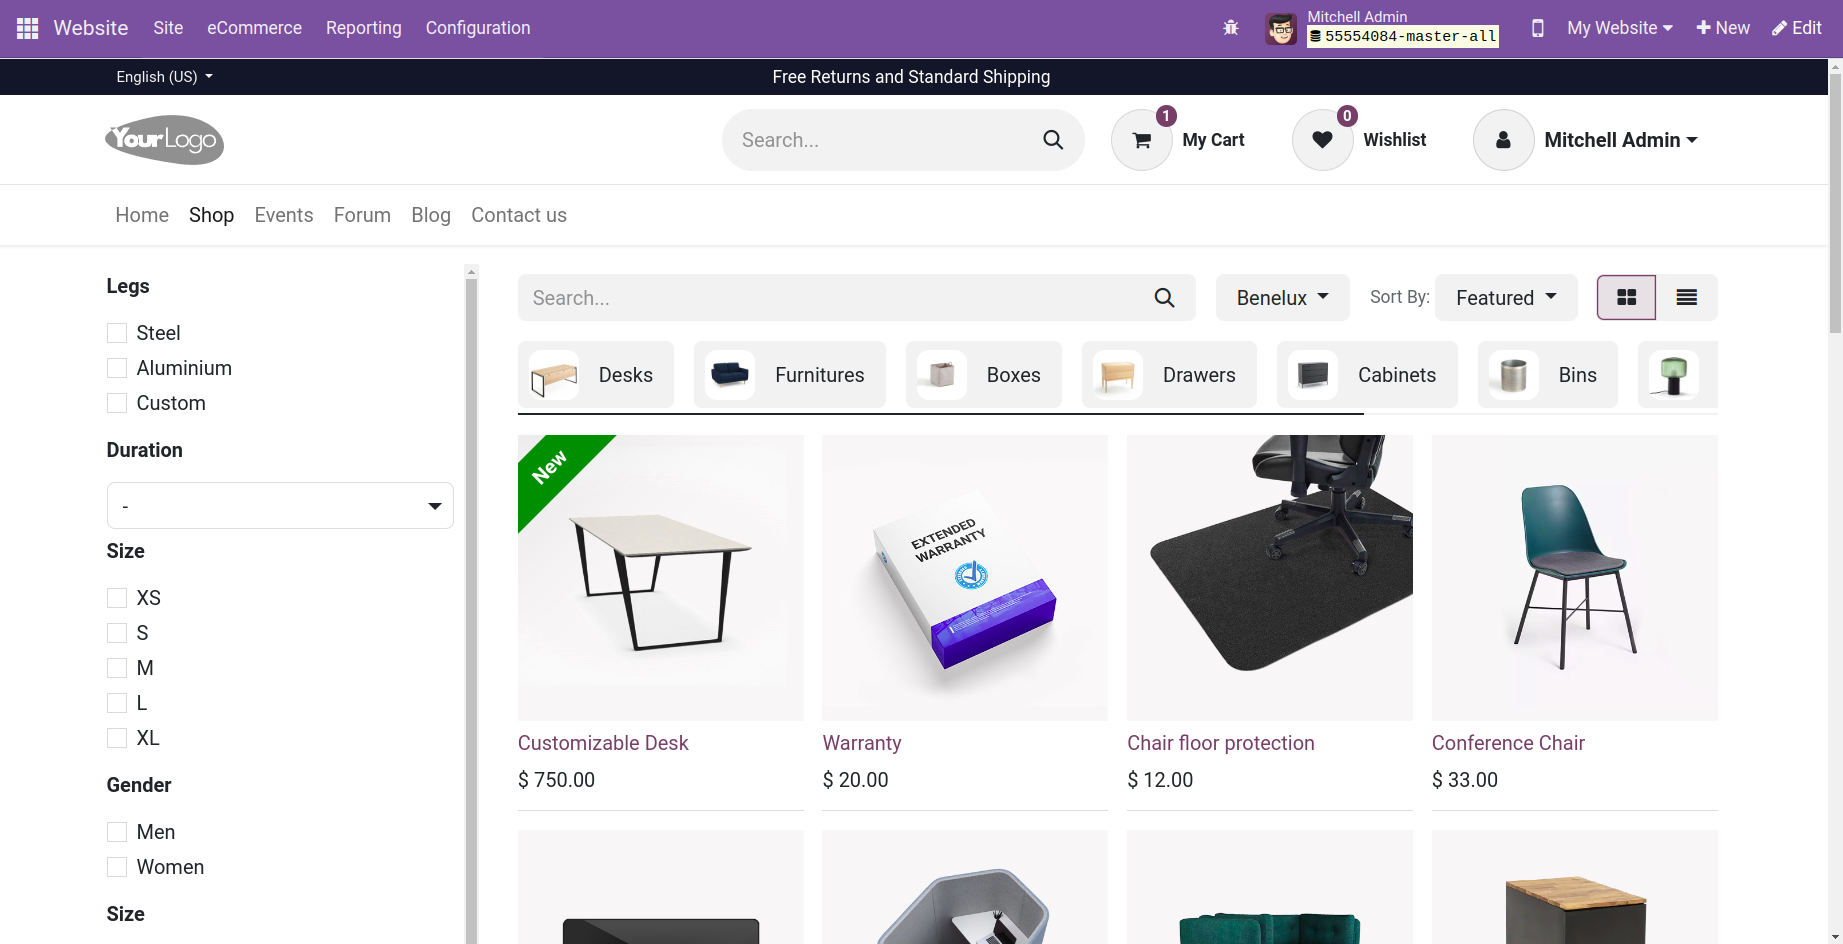
Following the installation of the eCommerce module, a new menu named Shop will be visible on the page. Customers can effortlessly purchase goods from there.
With the help of the Odoo 17 website builder, users may enhance the page's functionality and make it more user-friendly. Customers can also add ratings to our page by using the Rating block, which is easy to use and allows for the addition of certain themes, as demonstrated below.
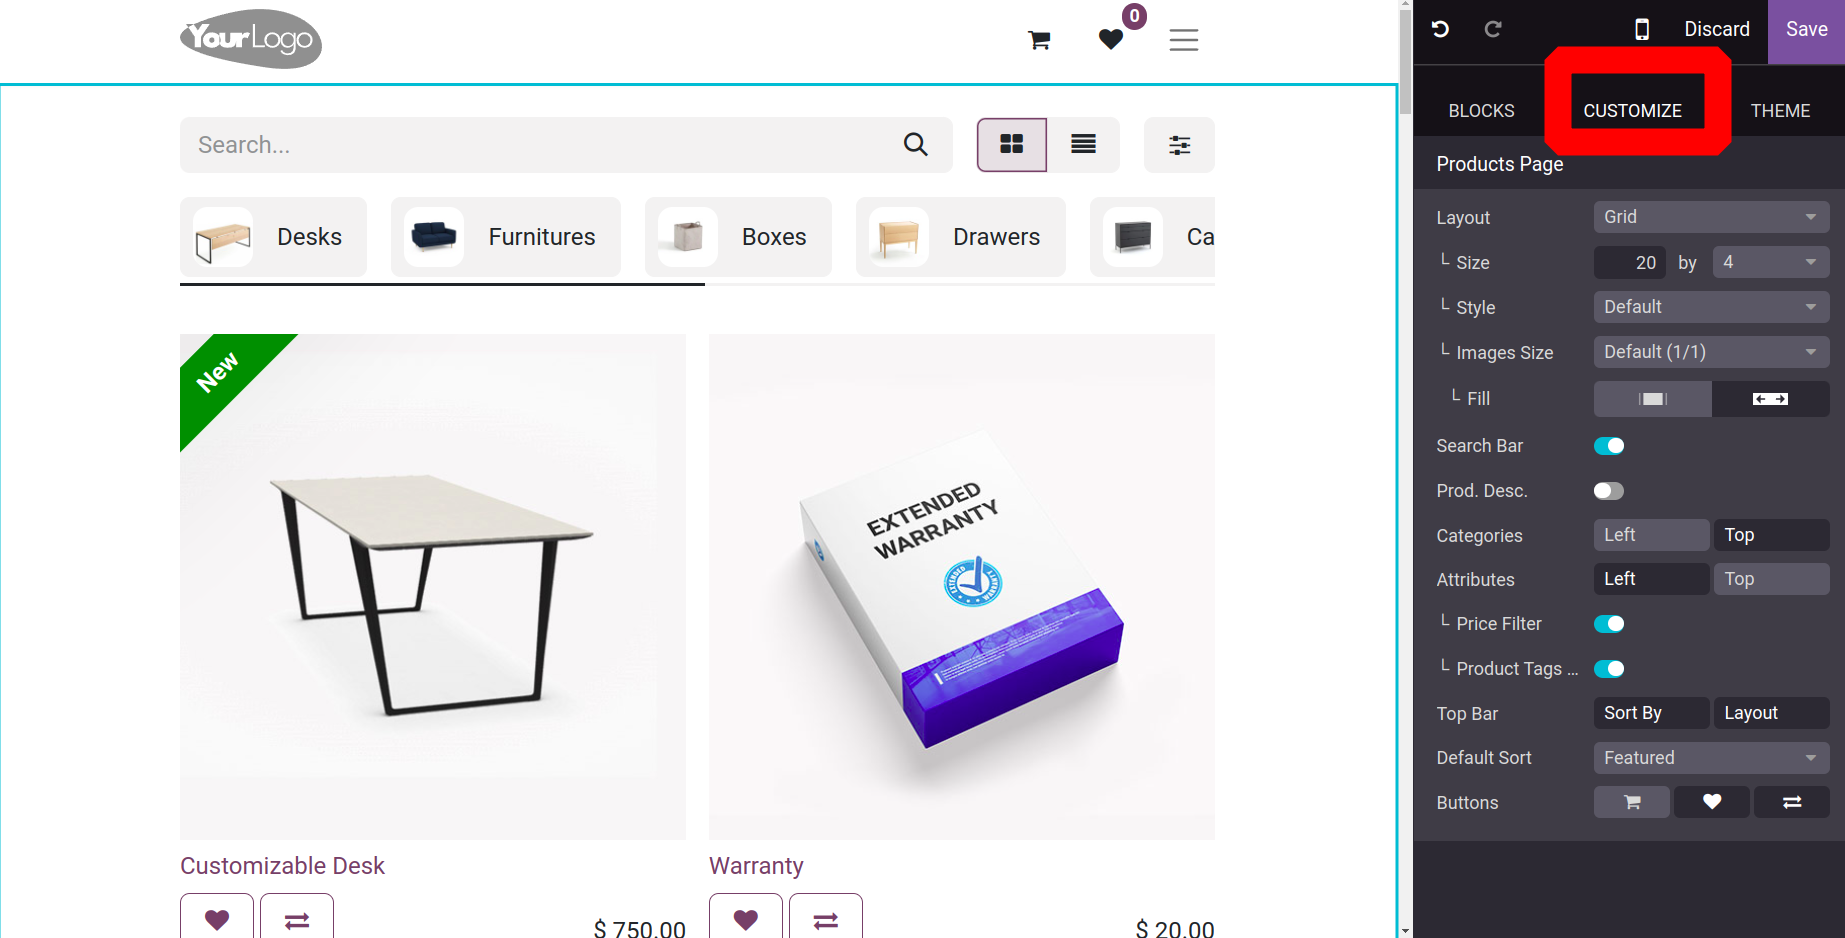
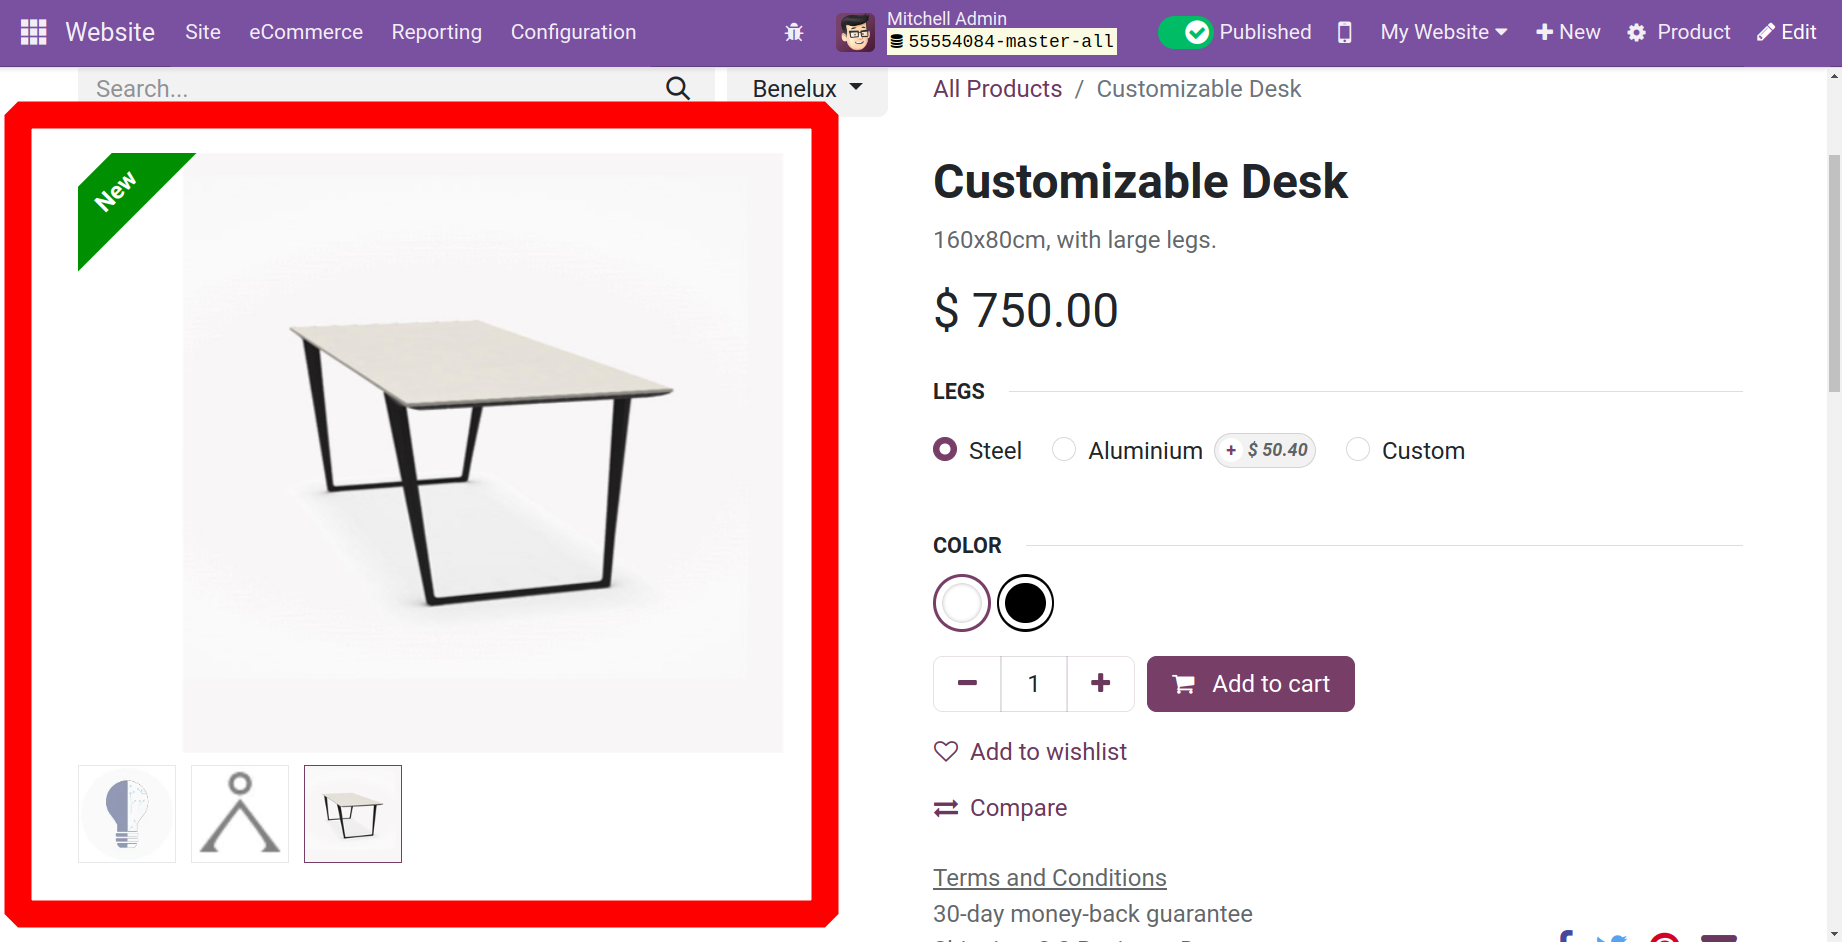
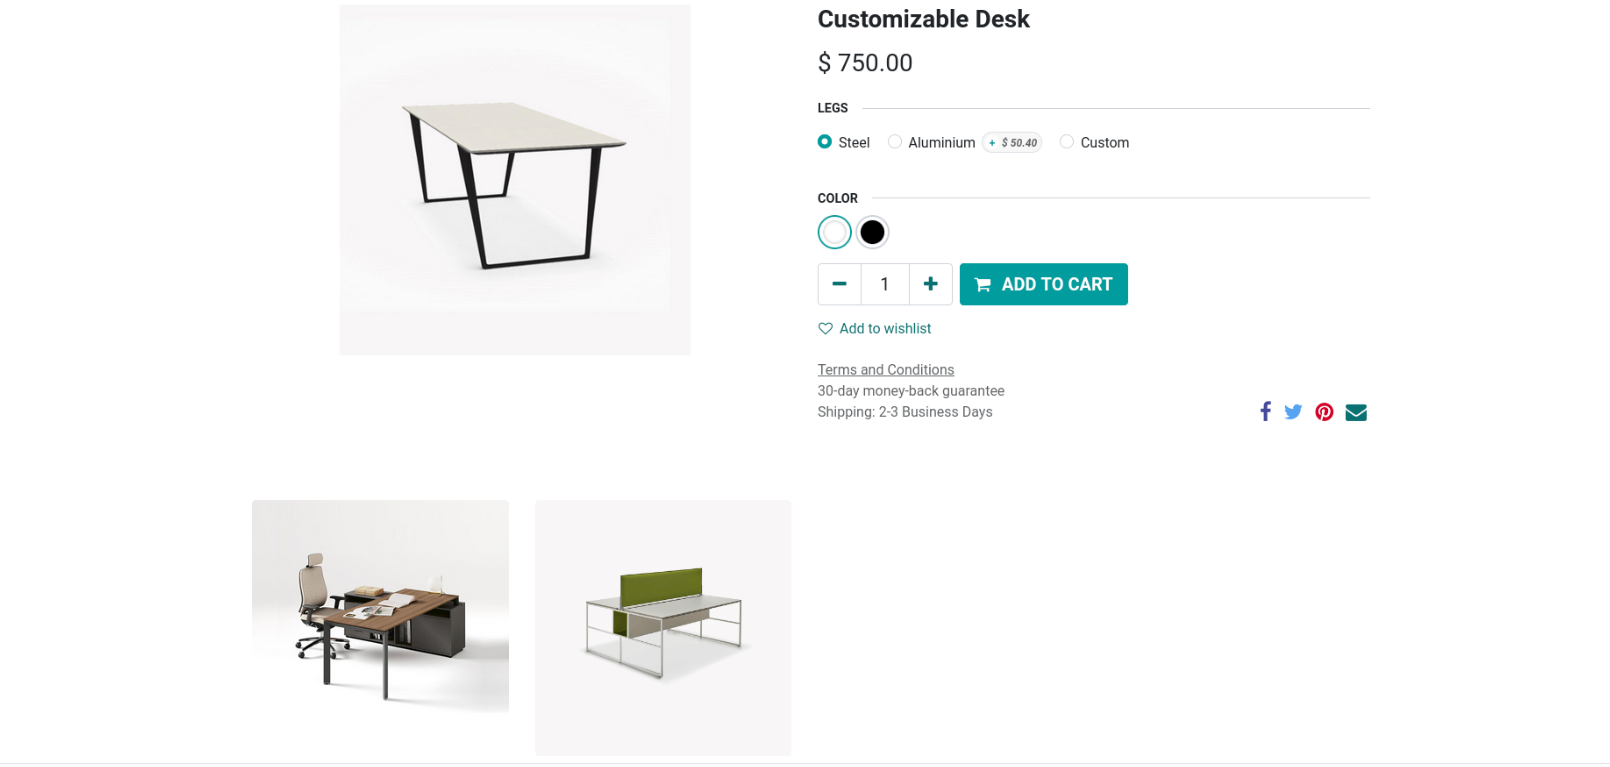
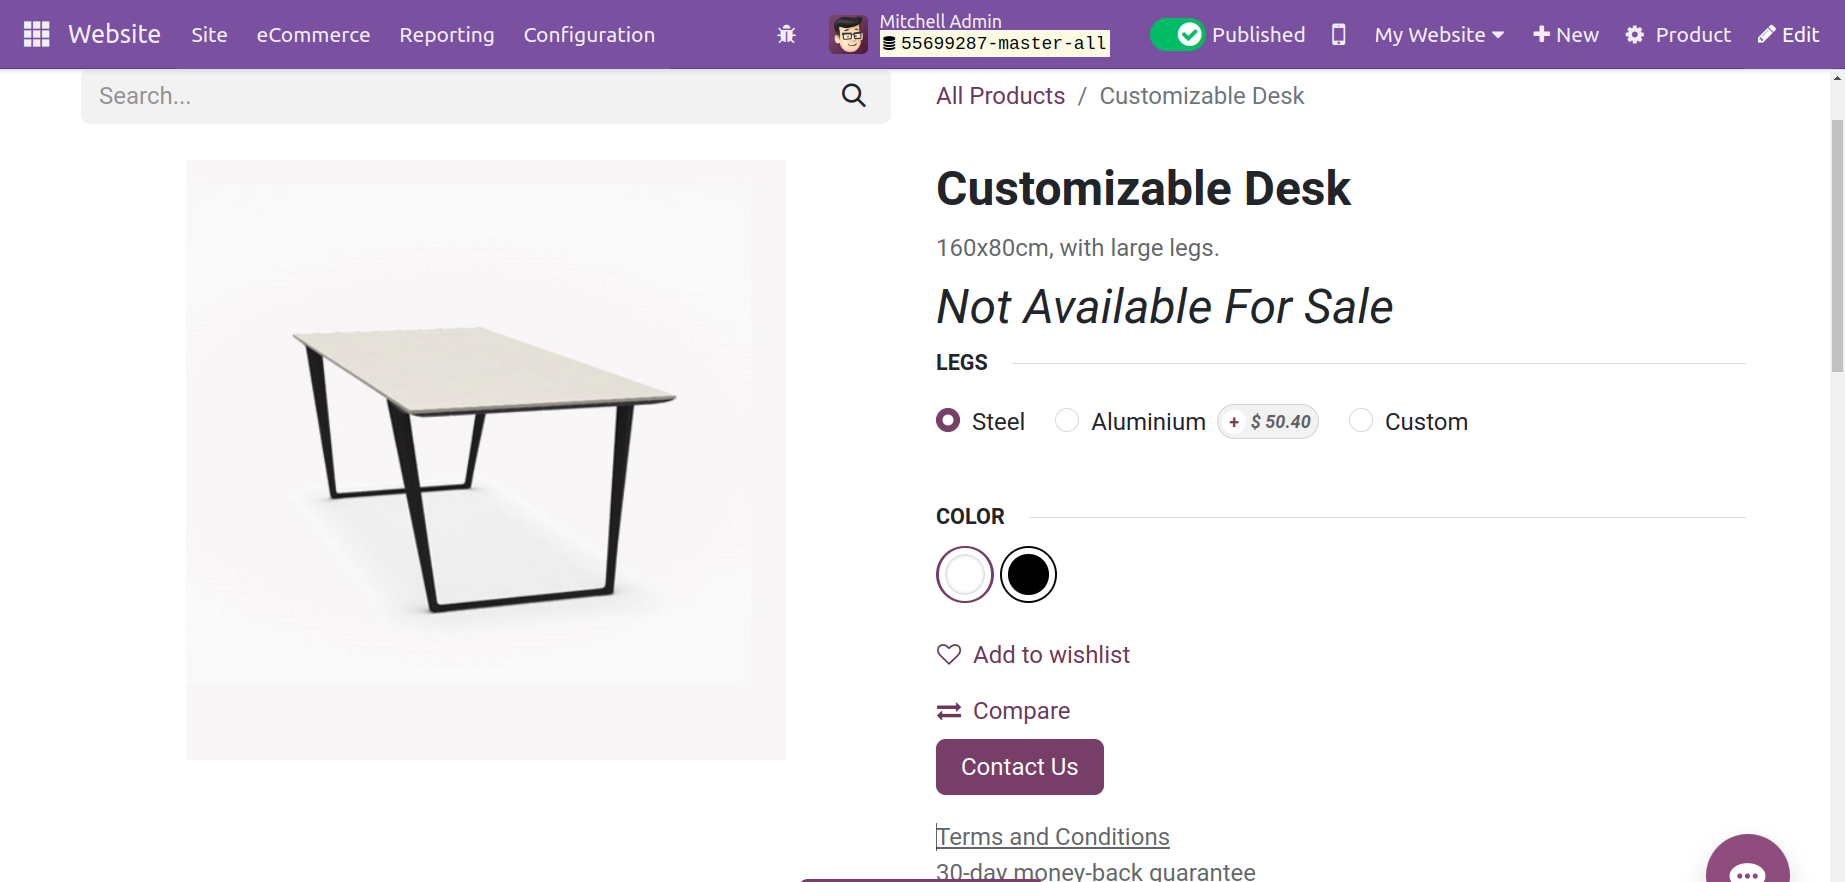
Odoo 17 allows the user to customize every aspect of the product across multiple pages. For example, on the shop page, when we select a product and select the edit option, we are presented with a number of features specific to the product pages, including layout, which includes a grid and options list, size, style, and top bar, among many other features. Additionally, there is a dedicated section for product customization that includes options for size, reordering, badges, and images.
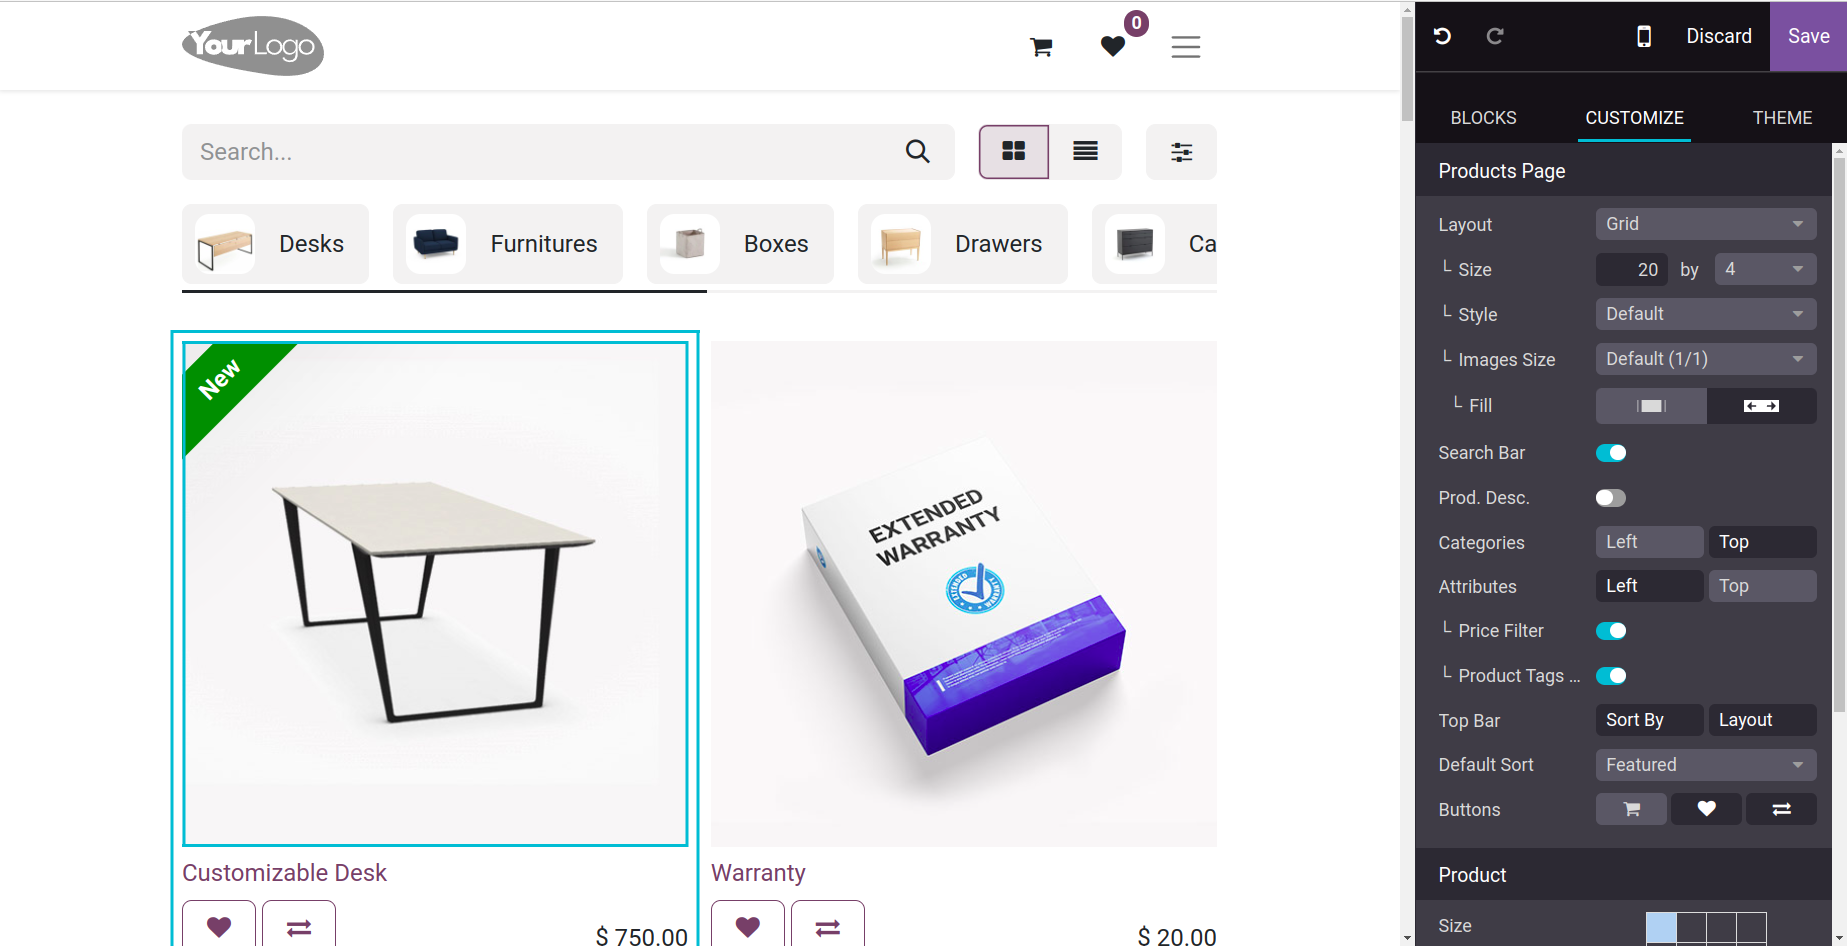
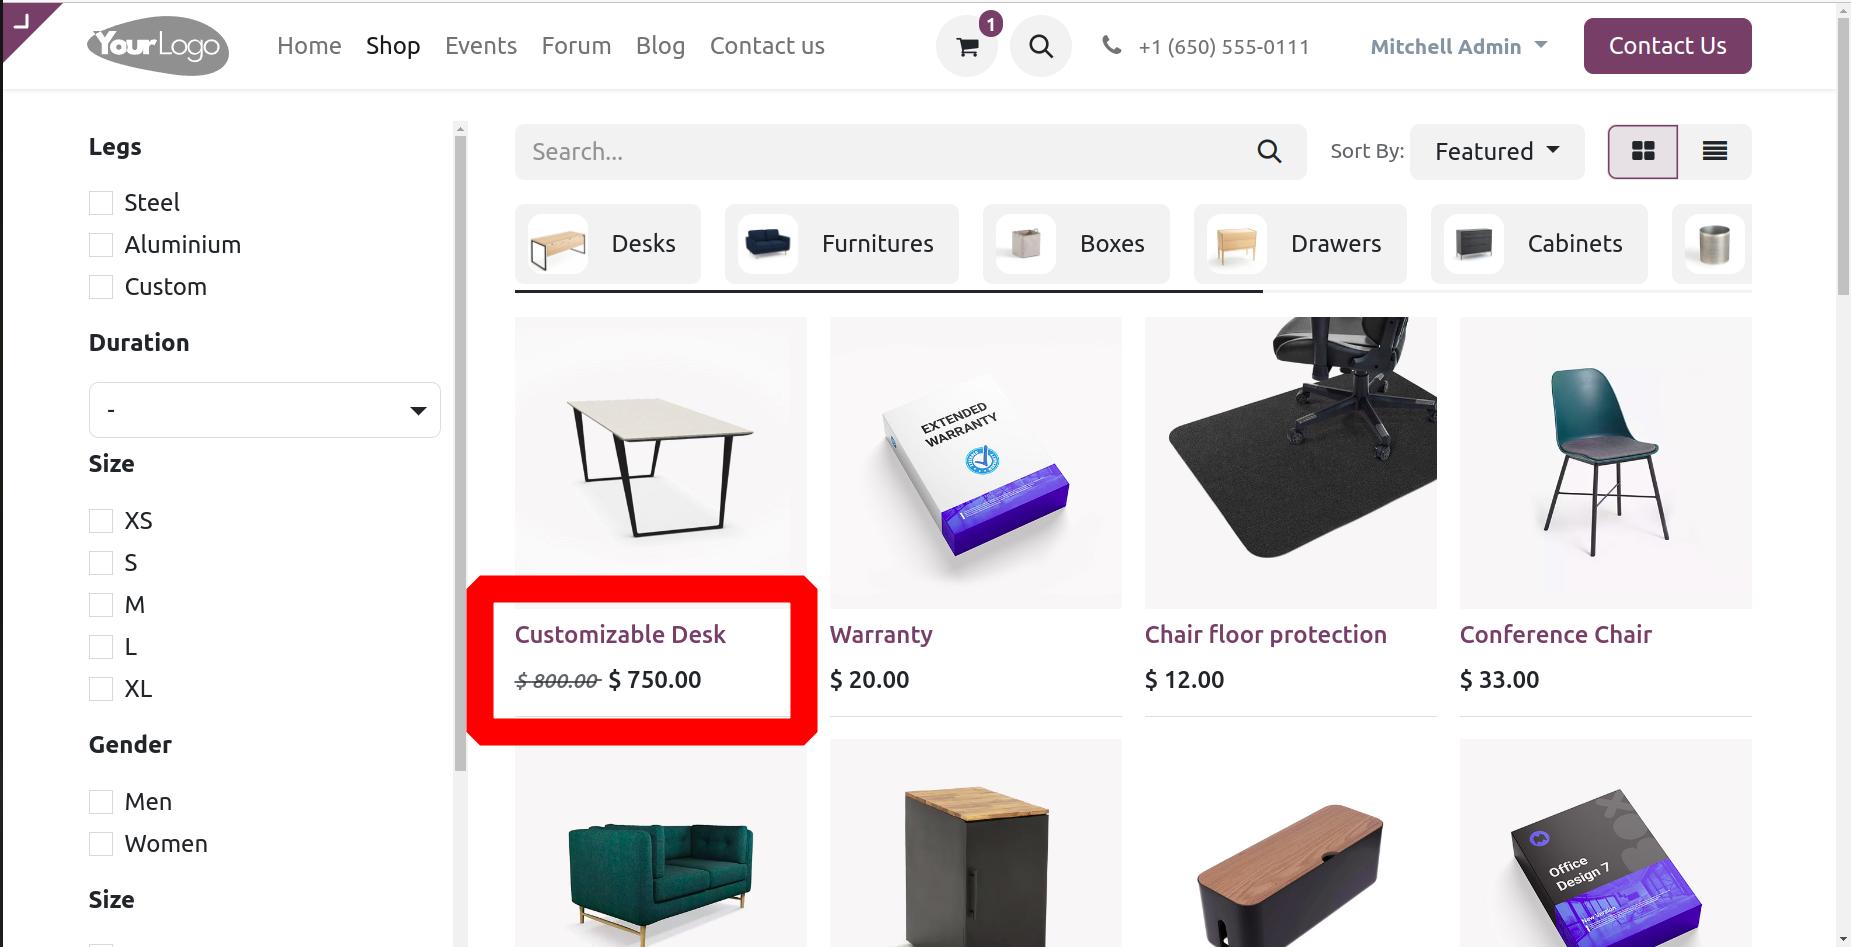
In order to make it easier for customers to access, the user can also add buttons like Add to Cart, Wishlist and Compare, as shown below.
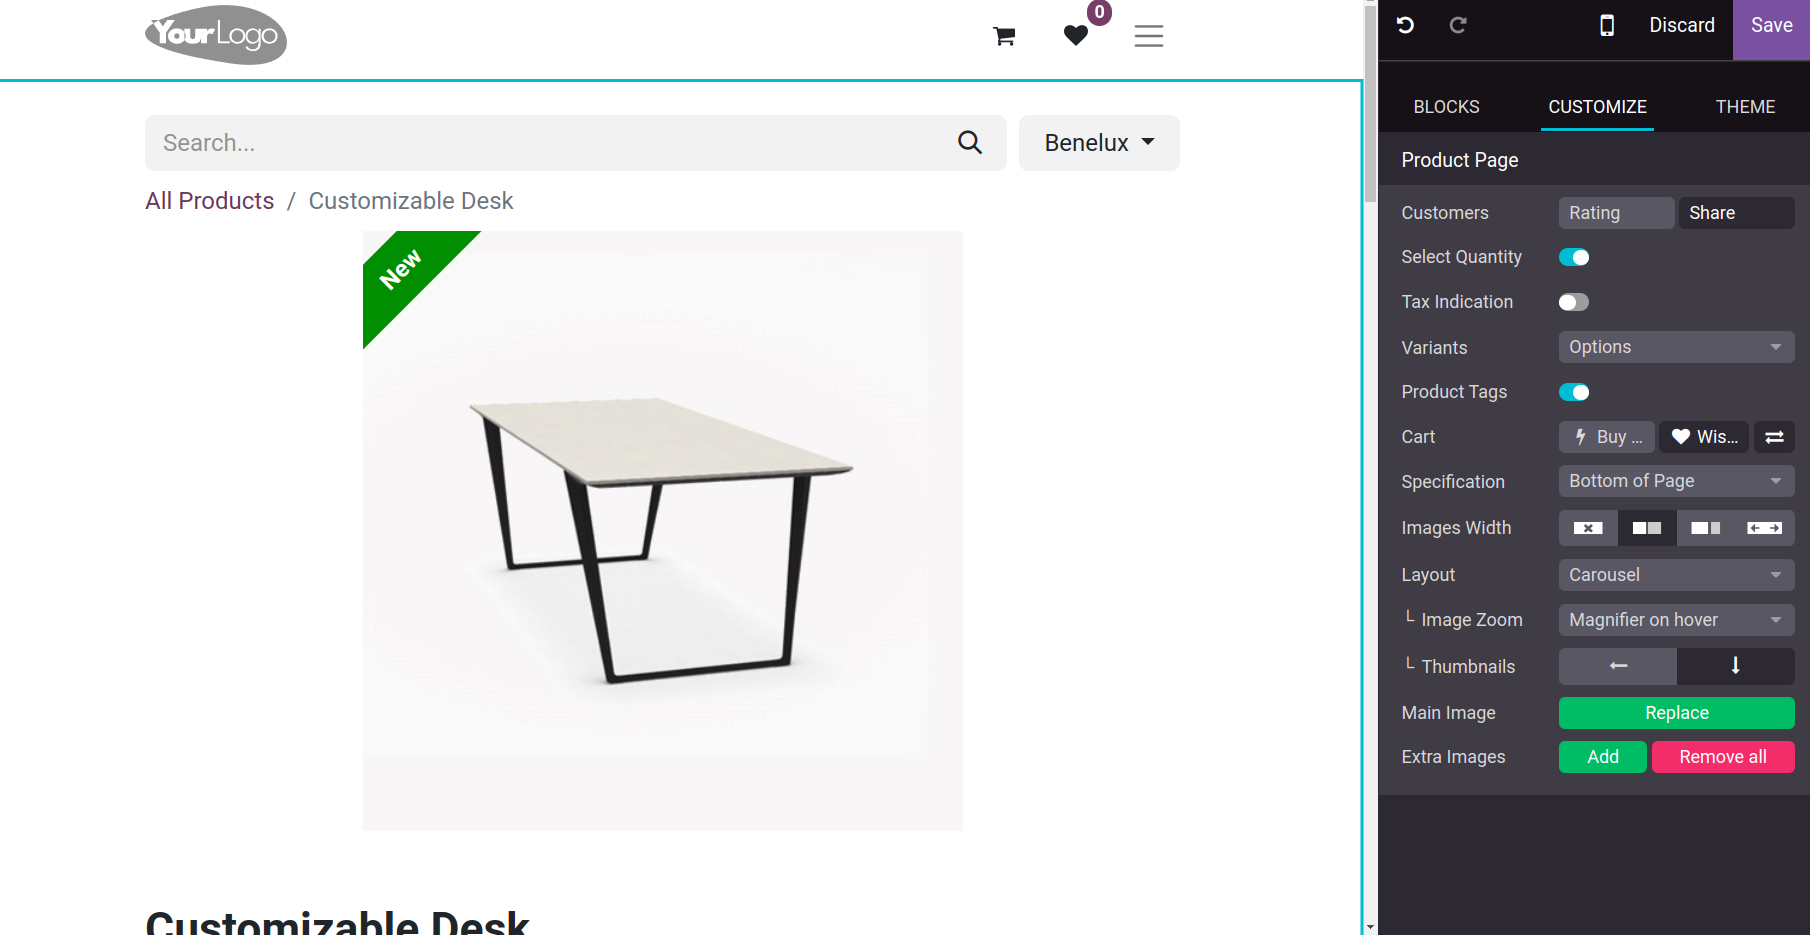
Additionally, as indicated below, the user has the opportunity to upload more images from the product's customization page. Odoo 17 also offers a tax indication feature, which makes it easier for customers to determine whether a product is tax-included or excluded. Using the "Extra Images" option on the product form located under the sales page, the user can also add several images to the product.

The customer can view all of these photographs from the website, as indicated below.
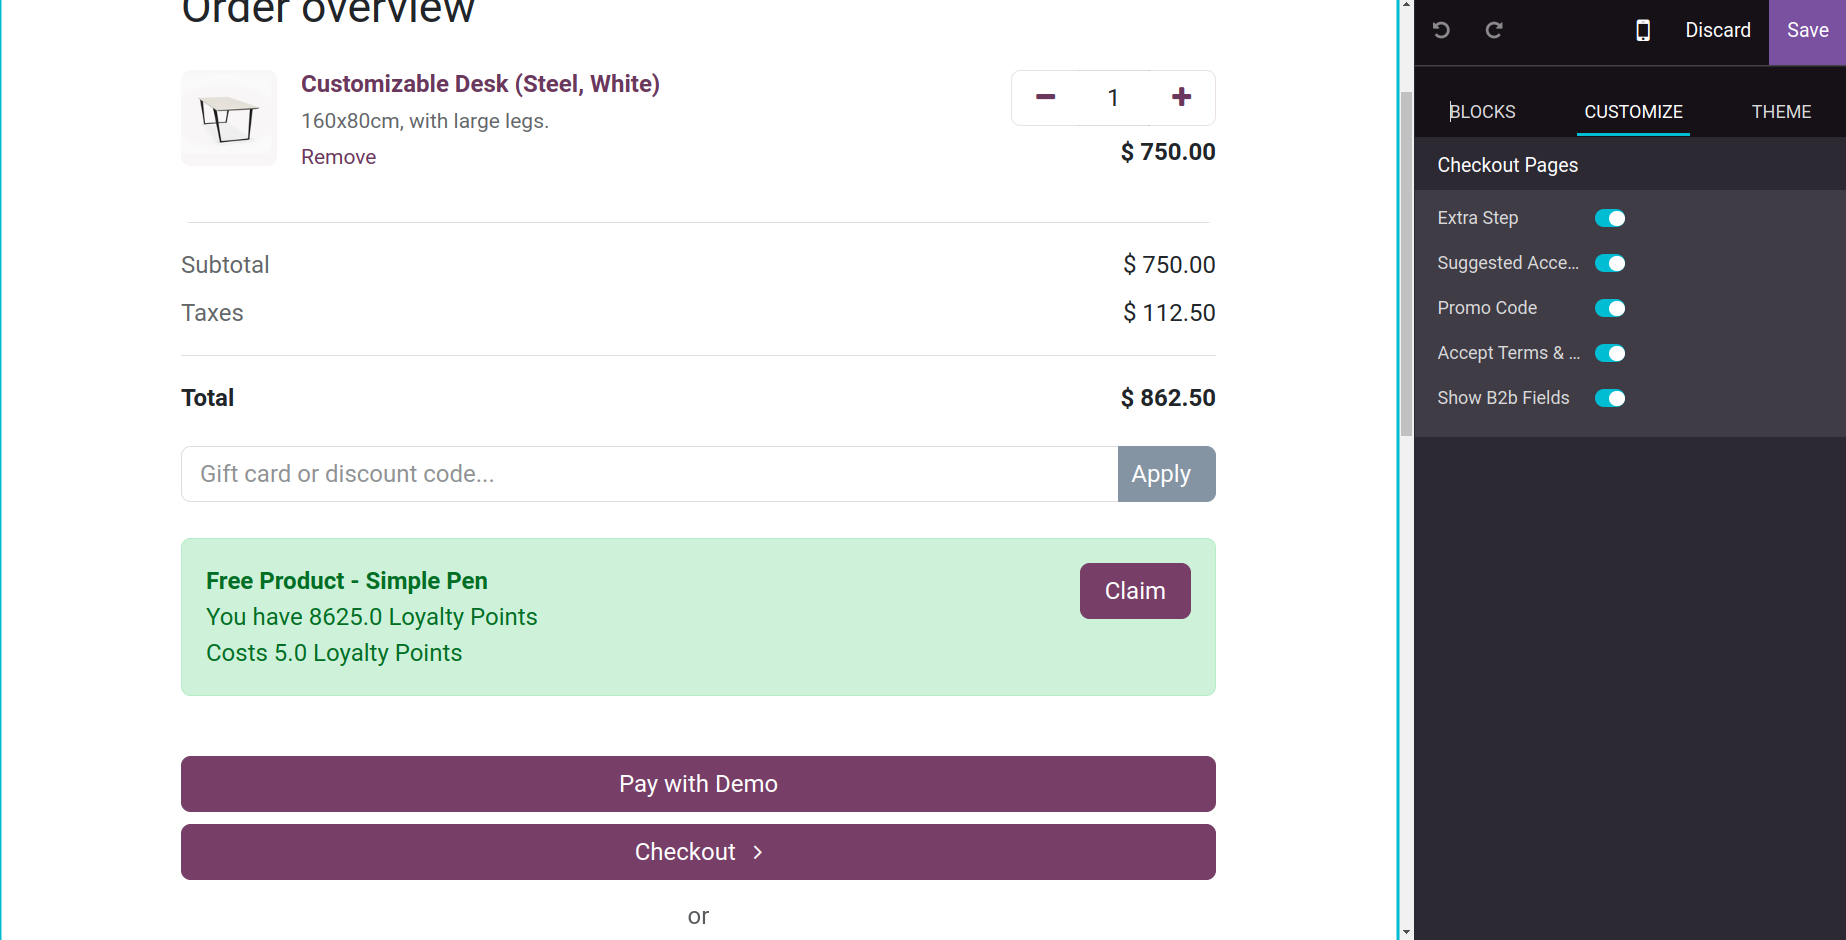
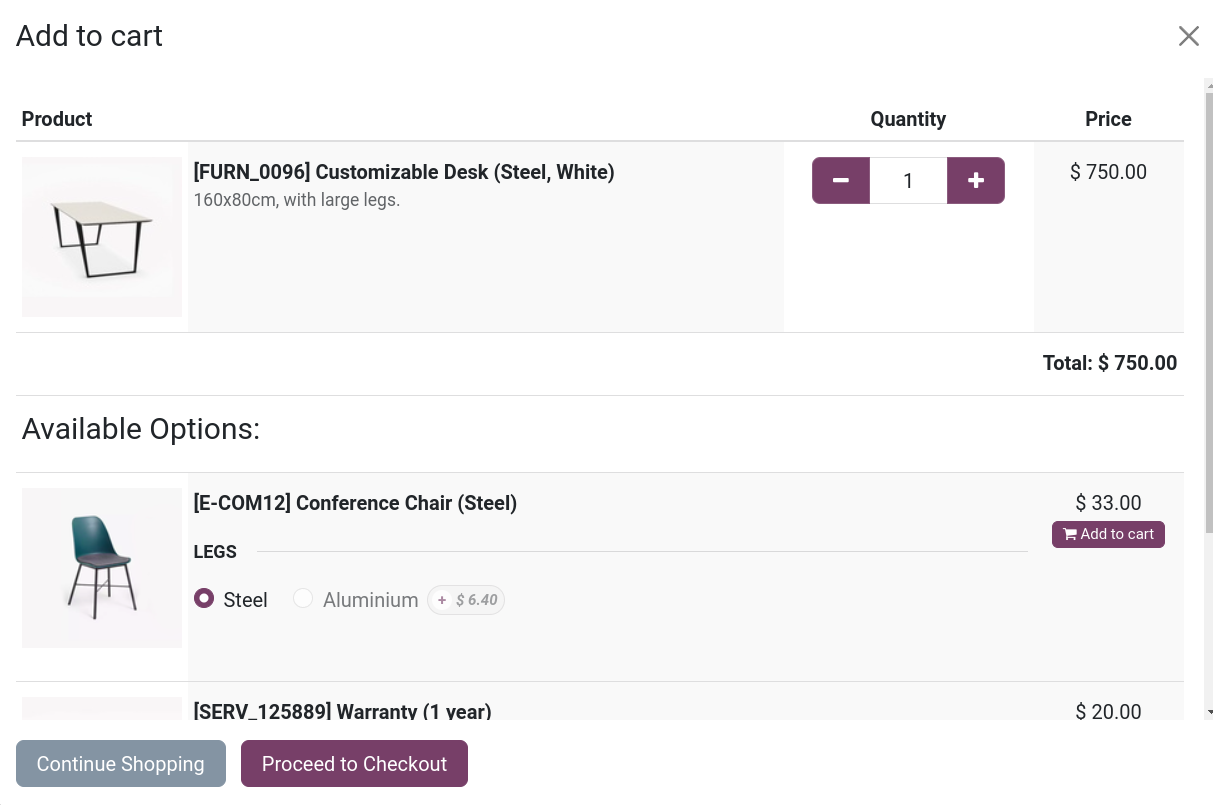
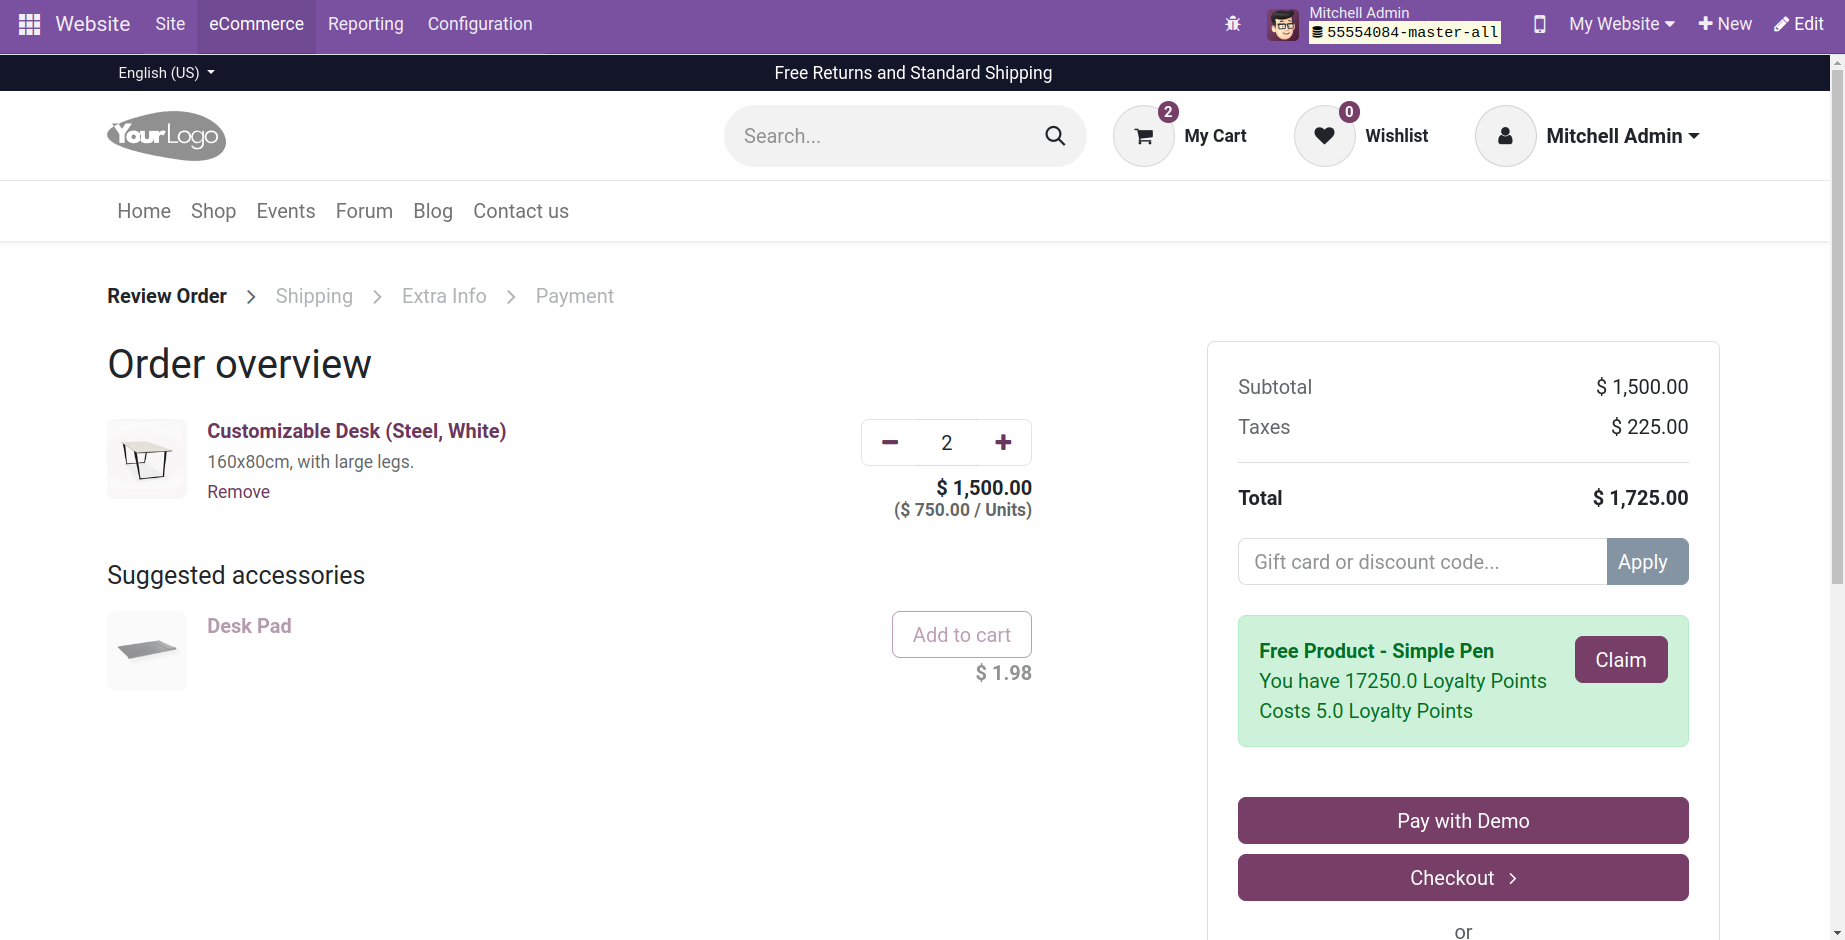
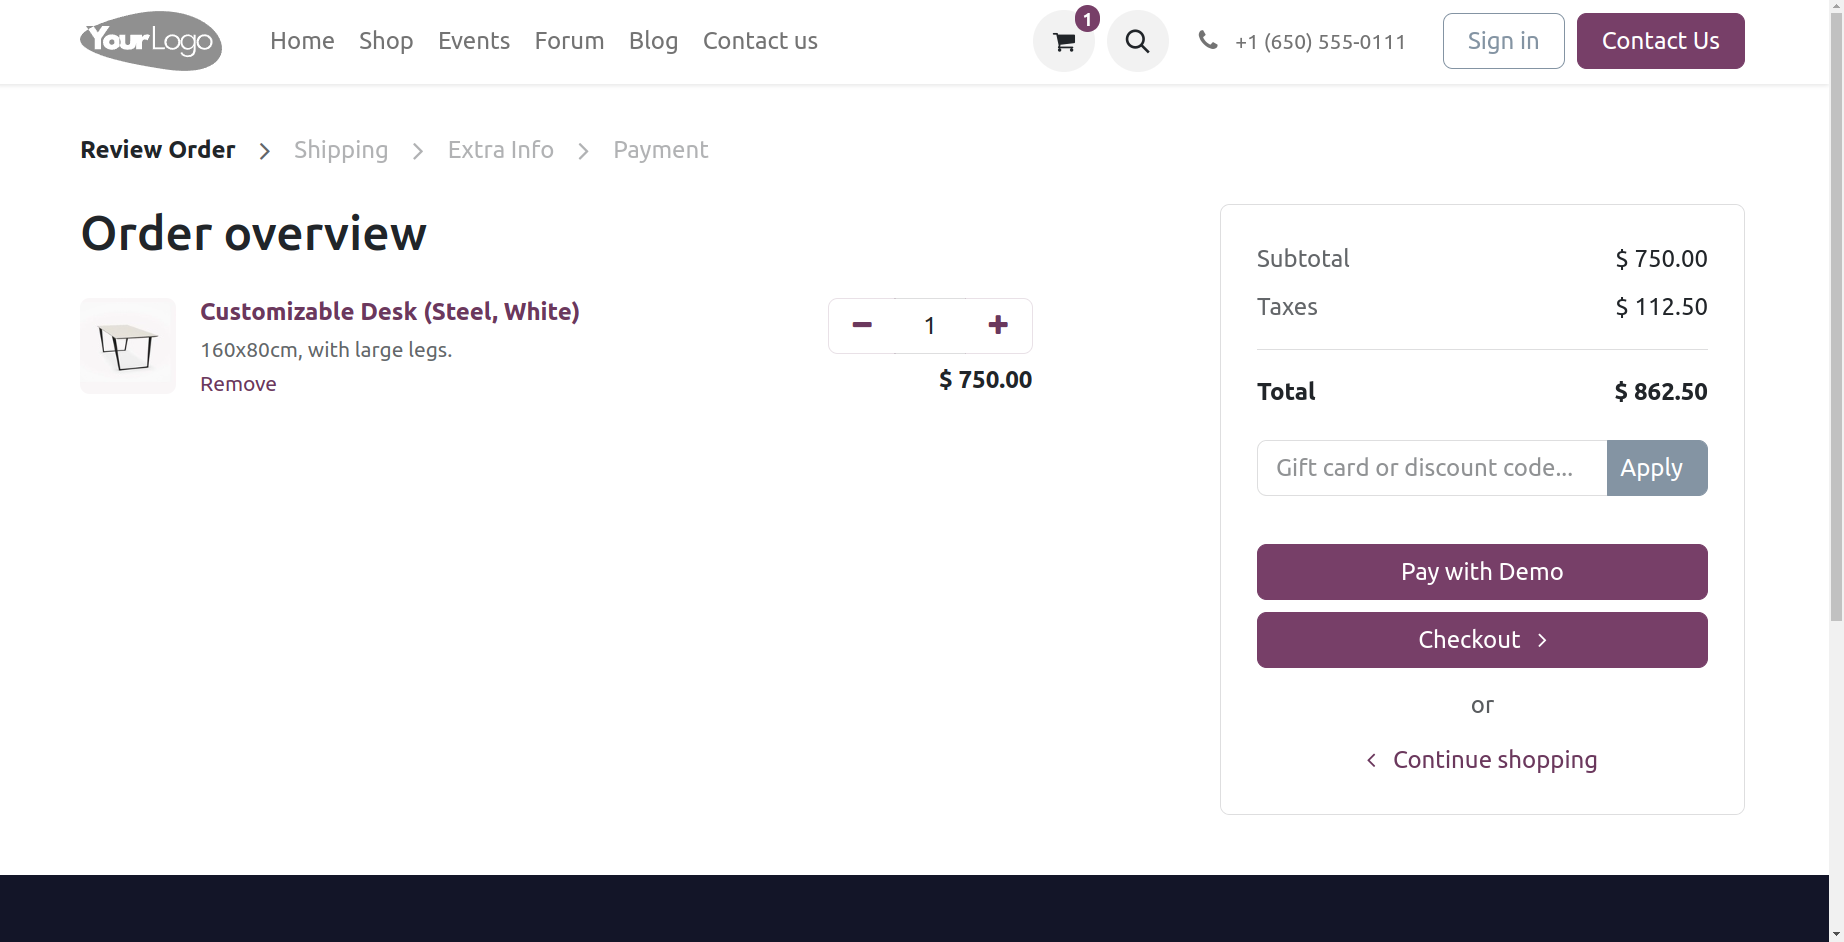
Various steps of the purchasing process allow for customization. For instance, the cart page itself offers options like Extra Step Option, Suggested Accessories, Promo Code, Accept Terms & Conditions, and Show b2b Fields, as demonstrated below.
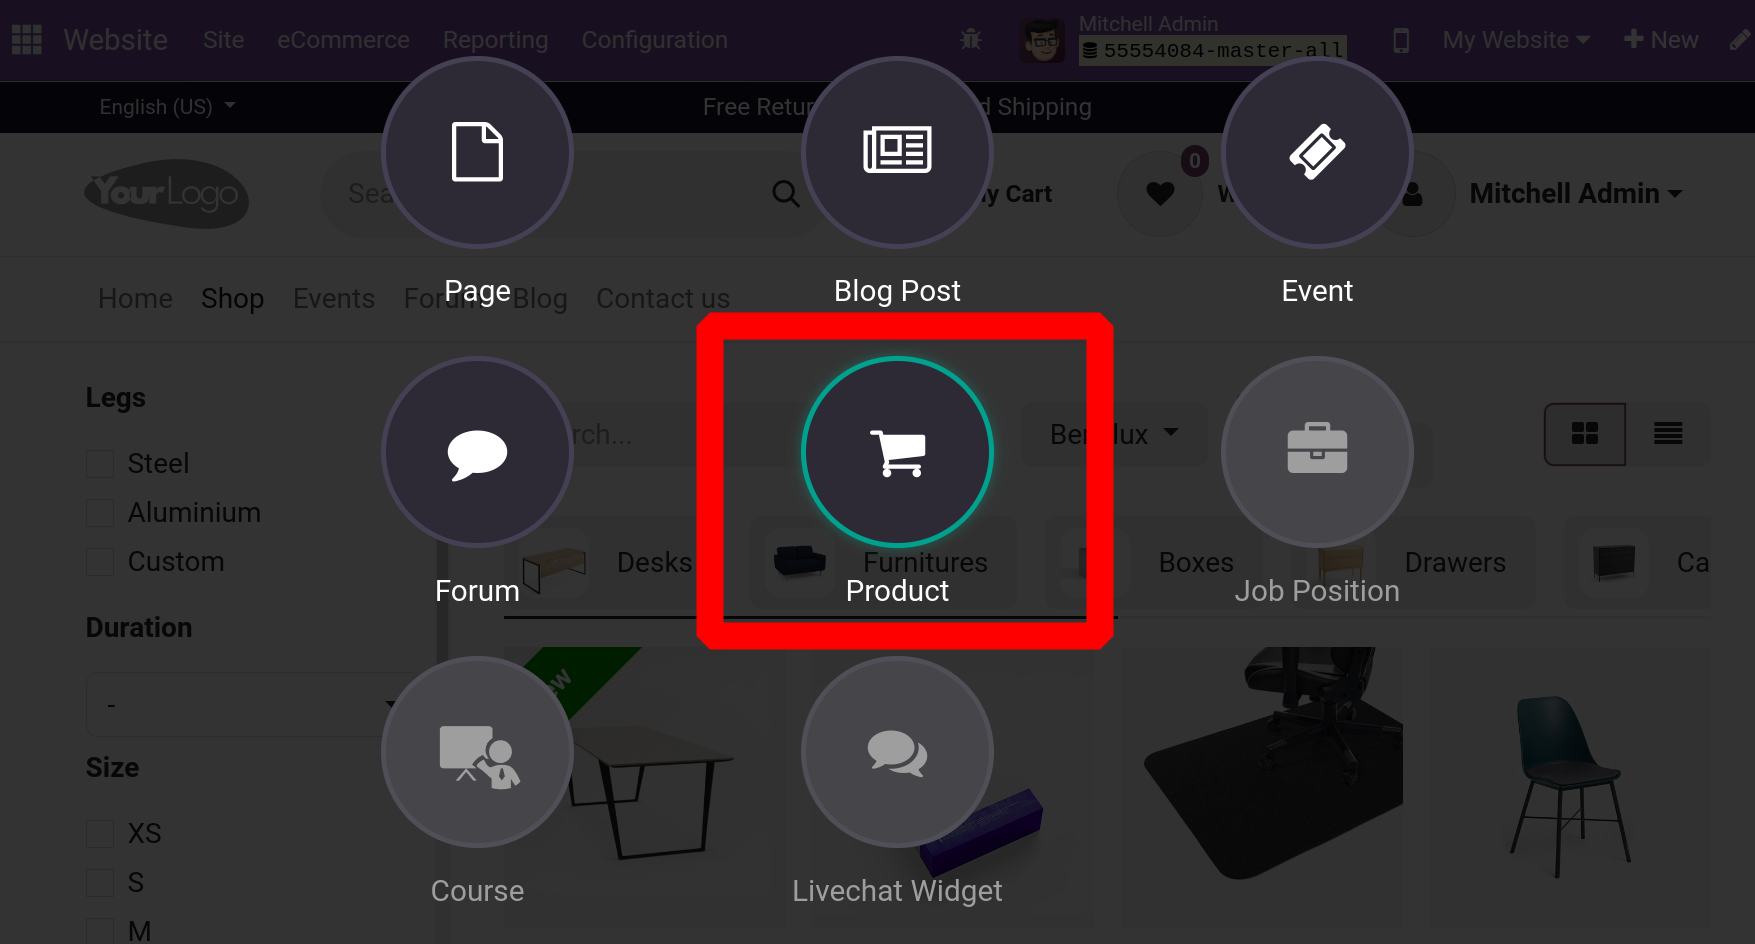
From the front end as well, users can easily add a new product to the eCommerce website. Click the +New button to add a new product.
Select the Product choice from the list of alternatives that appears, which includes pages, forums, and blogs, among others.
That will cause a new popup window to open so you can input the product details. Add the sales price, customer tax, and product name there. Next, store the item.

Users can then modify this area to add more blocks and add more customizations to the website.
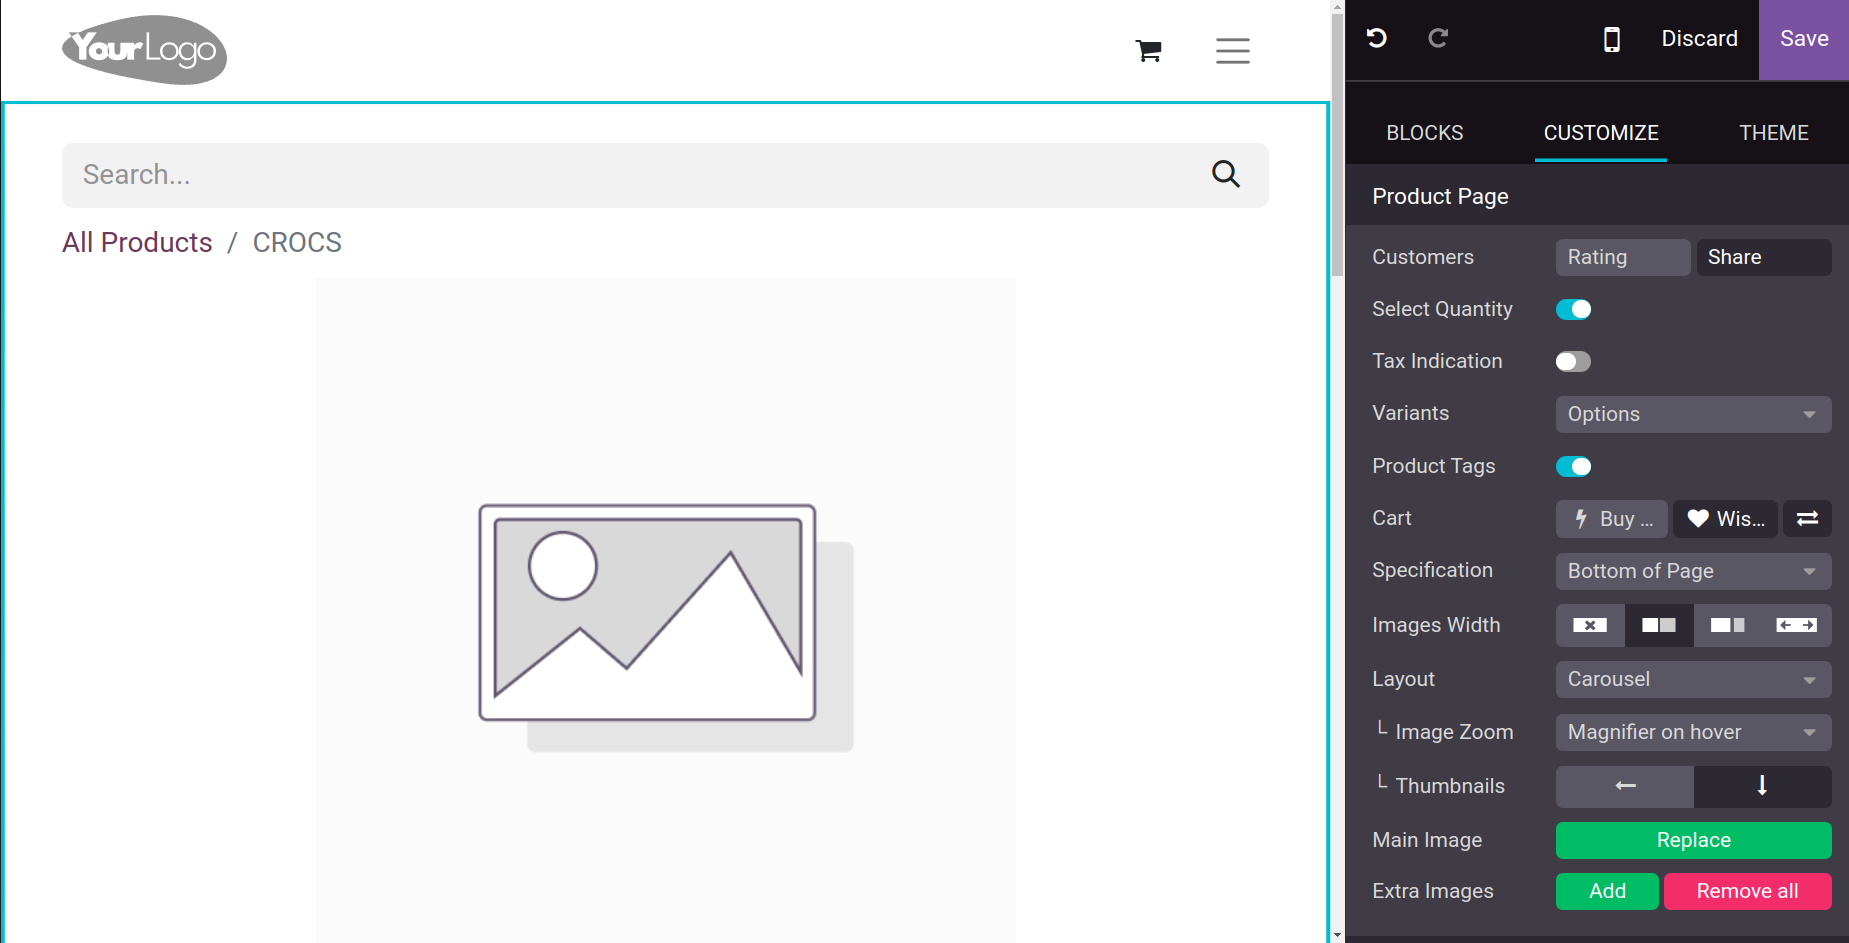
Users can add a picture of the product by selecting the Main Image option. Within the CUSTOMIZE section, there is an Extra Images option. You can post multiple images of the product on the website by using the Add button.

After that, it is possible to allow other customizations, such as customer sharing and rating. When the Customer Rating is enabled, a new rating star may show up beneath the product name. Customer Share options display social media sites like Facebook and Twitter in close proximity to the sharing terms and conditions. When the option to select quantity is enabled, buyers can select the amount and a tax indication will appear next to the product price in the TaxIndication section.
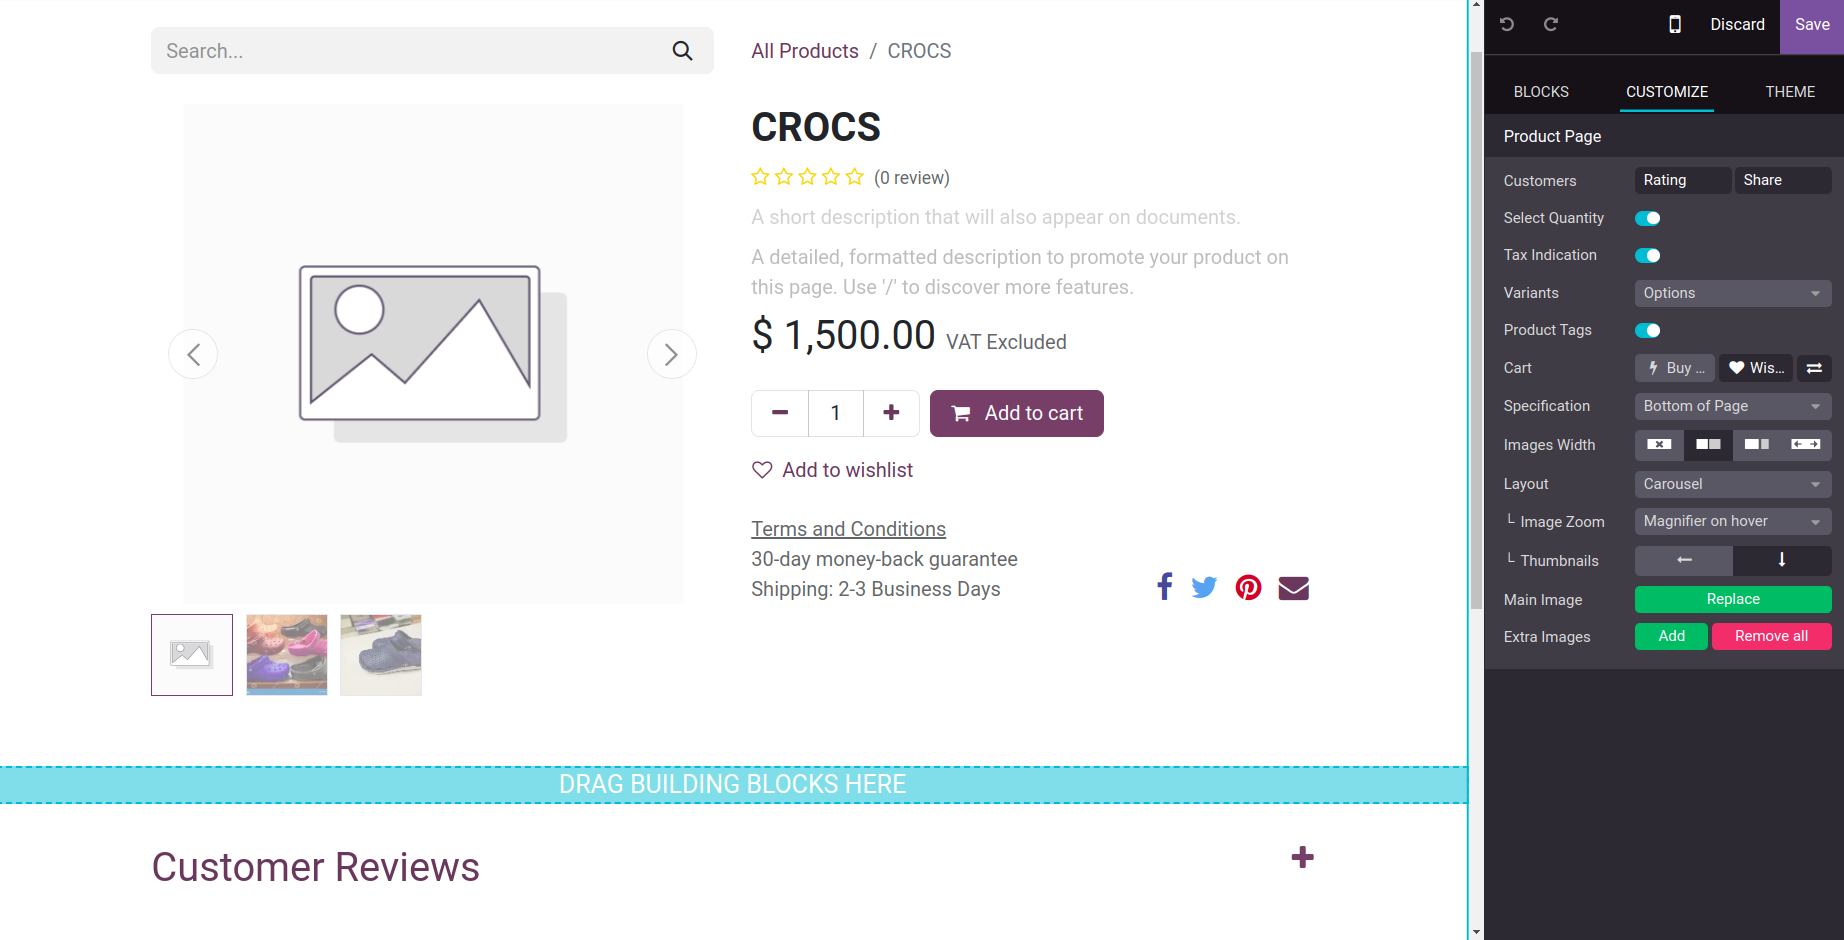
Additionally, personalization allows for the choice of product variants, buy, wishlist, and comparison options view. From there, details such as the specs, image width, layout, image zoom, and thumbnails can be provided.
Click "Save" once you've made all the necessary adjustments. After that, the product will be accessible on the website.
Order Management
Systems for managing orders are essential to the functioning of any kind of organization, regardless of size. A dedicated order management system will handle the operations of order management and the entire process with regard to both the company's purchases and orders, in line with the faster-paced operations of the modern world and the intention of advanced technologically based solutions that will cater to every aspect of the business's functioning. Orders will be placed, managed, received, and processed via the order management system, along with many other tasks like stock indication and order cancellation handling. With the use of specialized tools, all of these features and processes may be carried out methodically and profitably; Odoo 17 does this with the platform's clearly defined module.
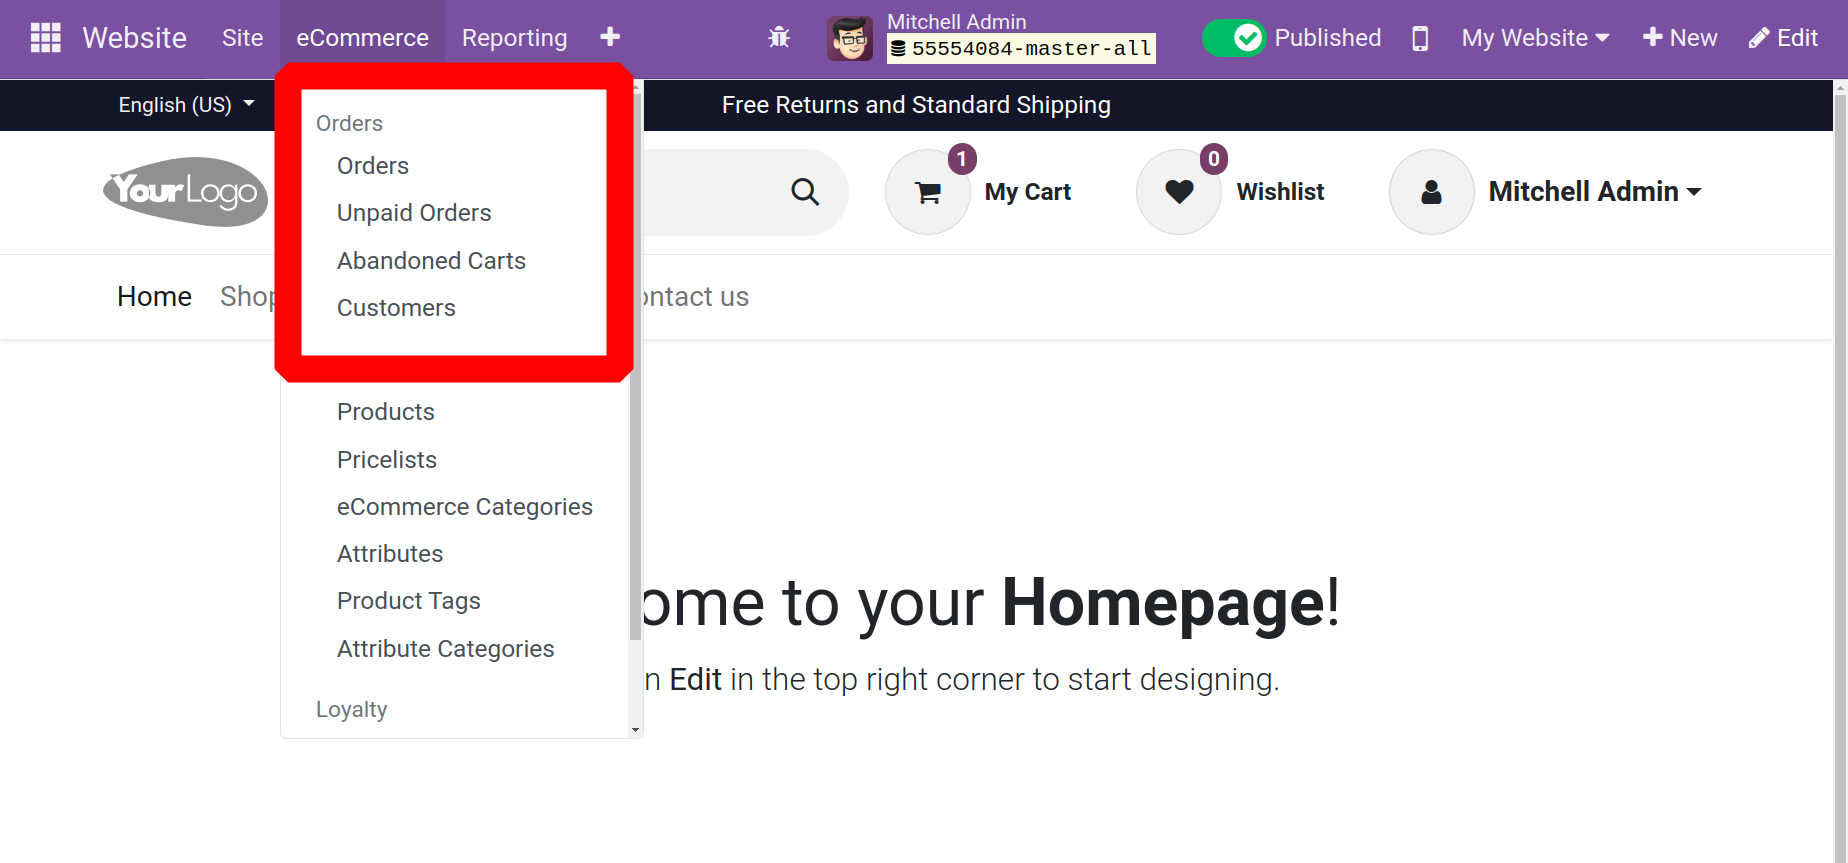
An eCommerce website's Orders section is meant to handle all order-related tasks. You can handle all of your orders and client data in one place with this feature. The Orders area has multiple options, such as "Orders, Unpaid Orders, Abandoned Carts, and Customers." It offers a thorough summary of every order, complete with order status, payment status, shipment information, customer information, delinquent orders, and other facts.
Orders
Despite the orders placed over the website, the Orders menu is displayed below.

You can pick and analyze each of these recordings in detail. You can view the window in many forms, including List, Kanban, and Activity, by utilizing the matching menu item located in the upper right corner of the window. All of the pertinent order details, including the order number, order date, website, customer, salesperson, activities, company, total, and invoice status, will be displayed in the List view. In the Salesperson field, the applicable salesperson's photo appears next to their name. Clicking the picture will initiate a chat with that salesperson. The system will present a popup chat window to you when you click this button, allowing you to proceed.
Unpaid Orders
You can keep an eye on and manage all orders with unpaid bills by selecting the Unpaid Orders option. As indicated below, when you choose Unpaid Orders from the E-Commerce option.
This section contains a list of all unpaid orders that the e-commerce website has created. Additionally, the user can keep track of all outstanding orders related to the business, including those from its retail and e-commerce divisions.
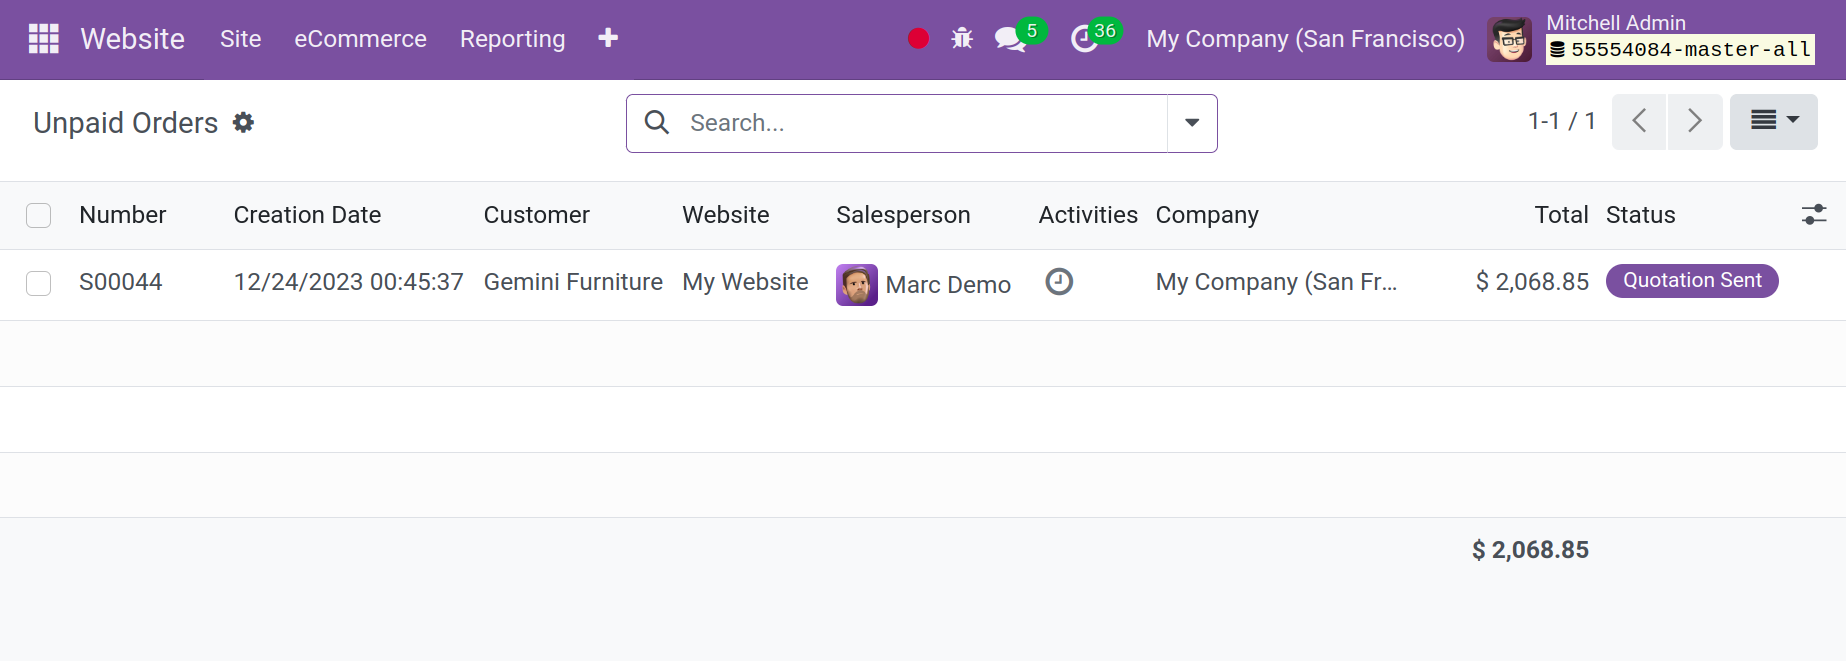
There will be displays for the total amount, the related company, the activities, the client, the salesperson, the creation date, the number of unpaid orders, the activities, and the order status. In addition, the total amount of overdue orders is shown beneath the window so you may quickly verify the amount owed.
Other options for sorting include the Favorite, Group By, Search, and Filter tabs. Orders can be found by searching, filtered based on payment status, and opened to view details using these options. From the order view, you may manage payments, create payment reminders, and cancel unfulfilled orders. Users may ensure that customers pay for their items by tracking payments with the use of this Unpaid Order E-commerce.
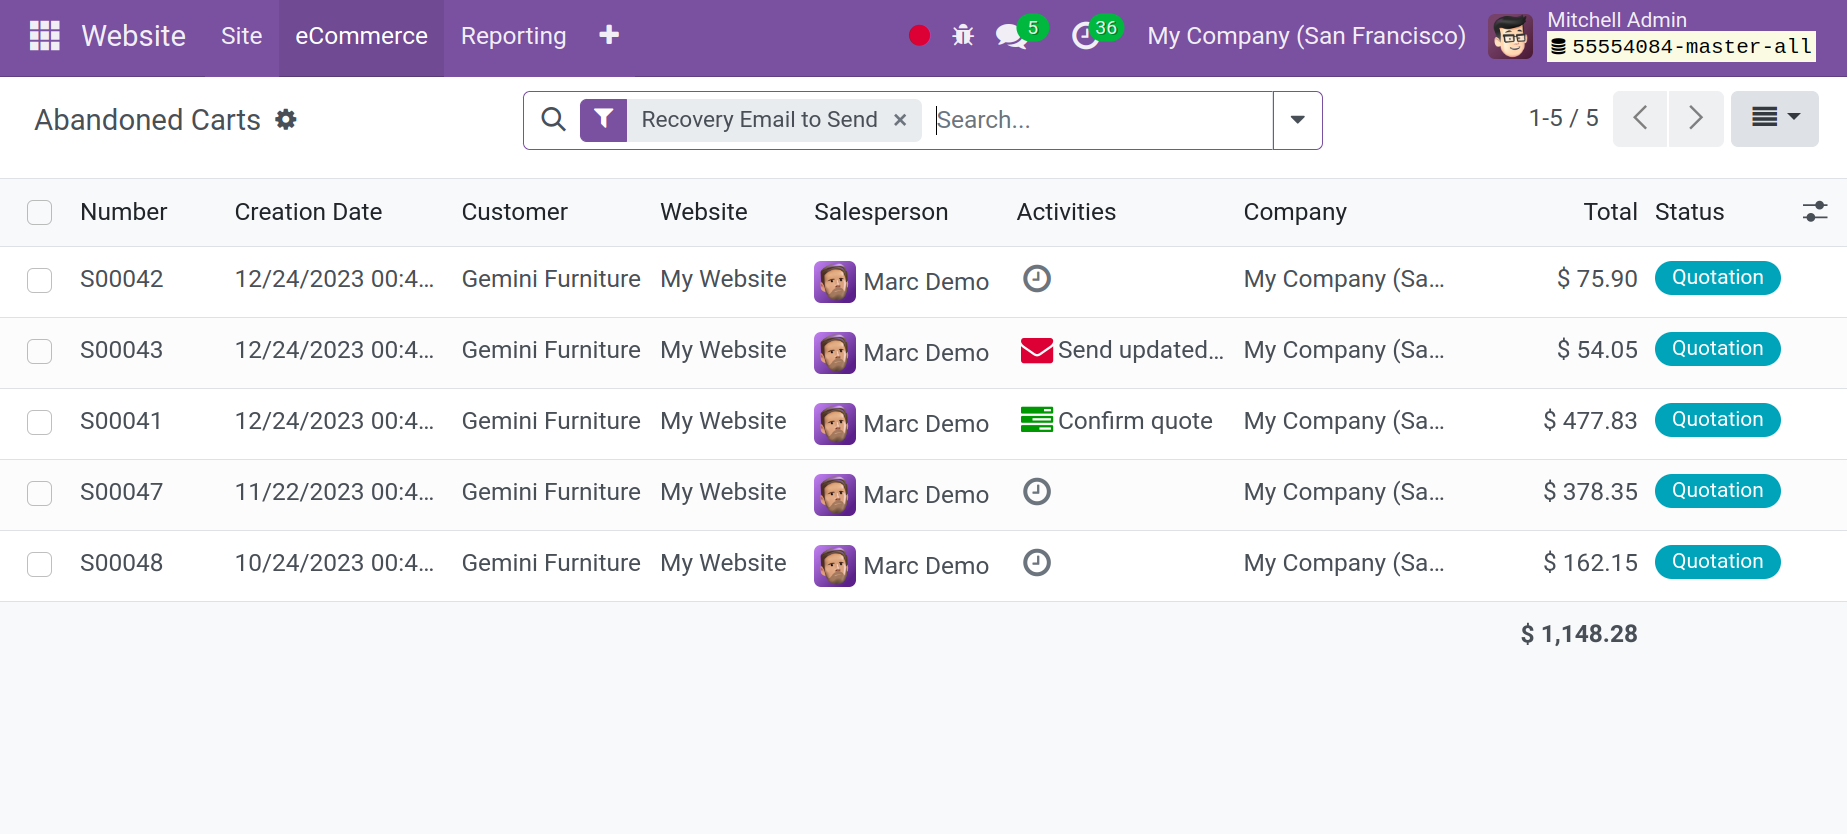
Abandoned Carts
The orders for abandoned carts are shown on an aspirate tab within the Orders menu. This menu lists all of the abandoned carts that customers have left behind, including those that were abandoned during the checkout process. This window allows you to rapidly view the abandoned carts on your website. It displays the number, creation date, customer, salesperson, activities, company total, and status of each cart, as indicated below.
All of the completed order carts and the products that the customer added but did not process for confirmation are visible to the user. Inquiring about the decision based on the individual orders of the abandoned cart, the user can also email the customers. The orders follow-up settings menu allows the user to personalize the abandoned cart recovery option, as seen below.
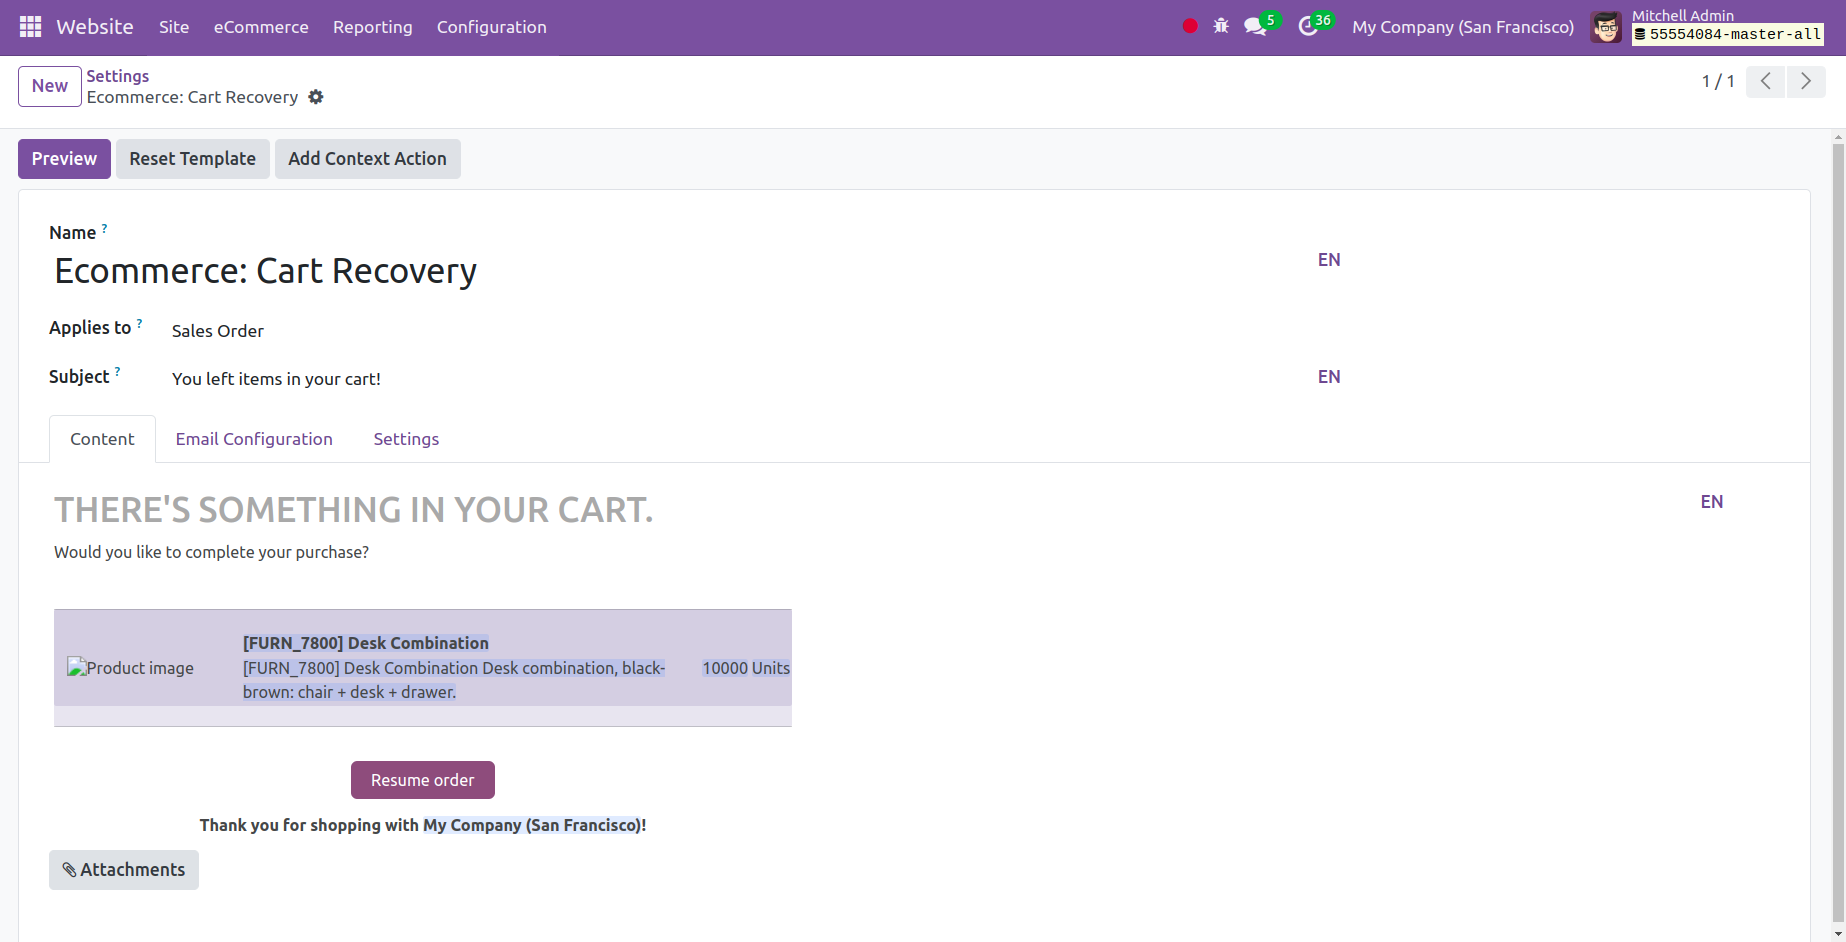
Here, we can also modify the Odoo 17 E-commerce abandoned cart email template and indicate the amount of time that should elapse before a cart is deemed abandoned. Additionally, the cart recovery email has an editing option, and the user can preview and reset the template in addition to setting other options from this page.
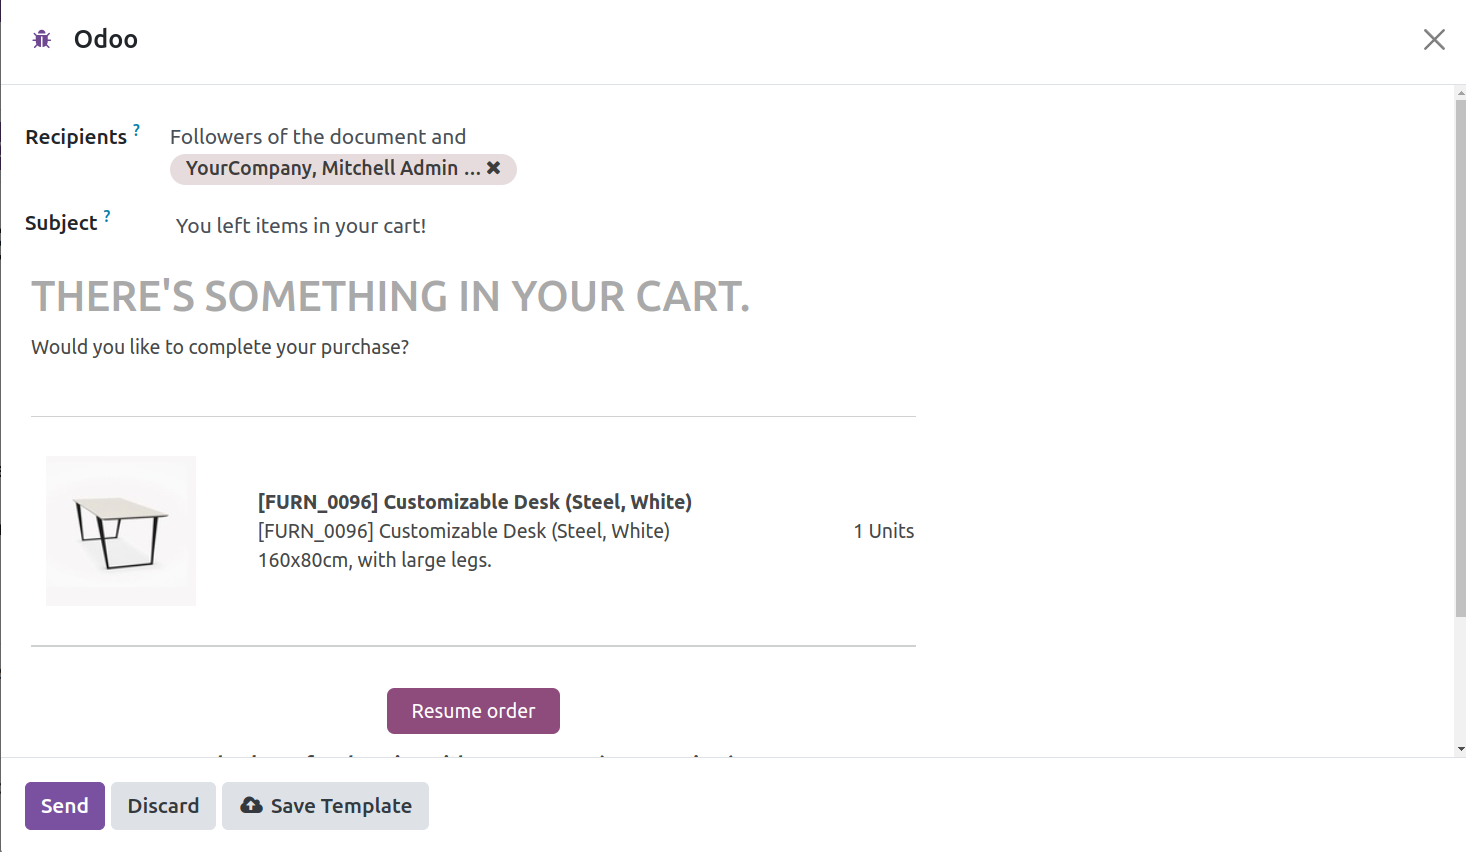
Assume that after adding an item to our online cart, we neglect to complete the payment and purchase of the item, as demonstrated below.
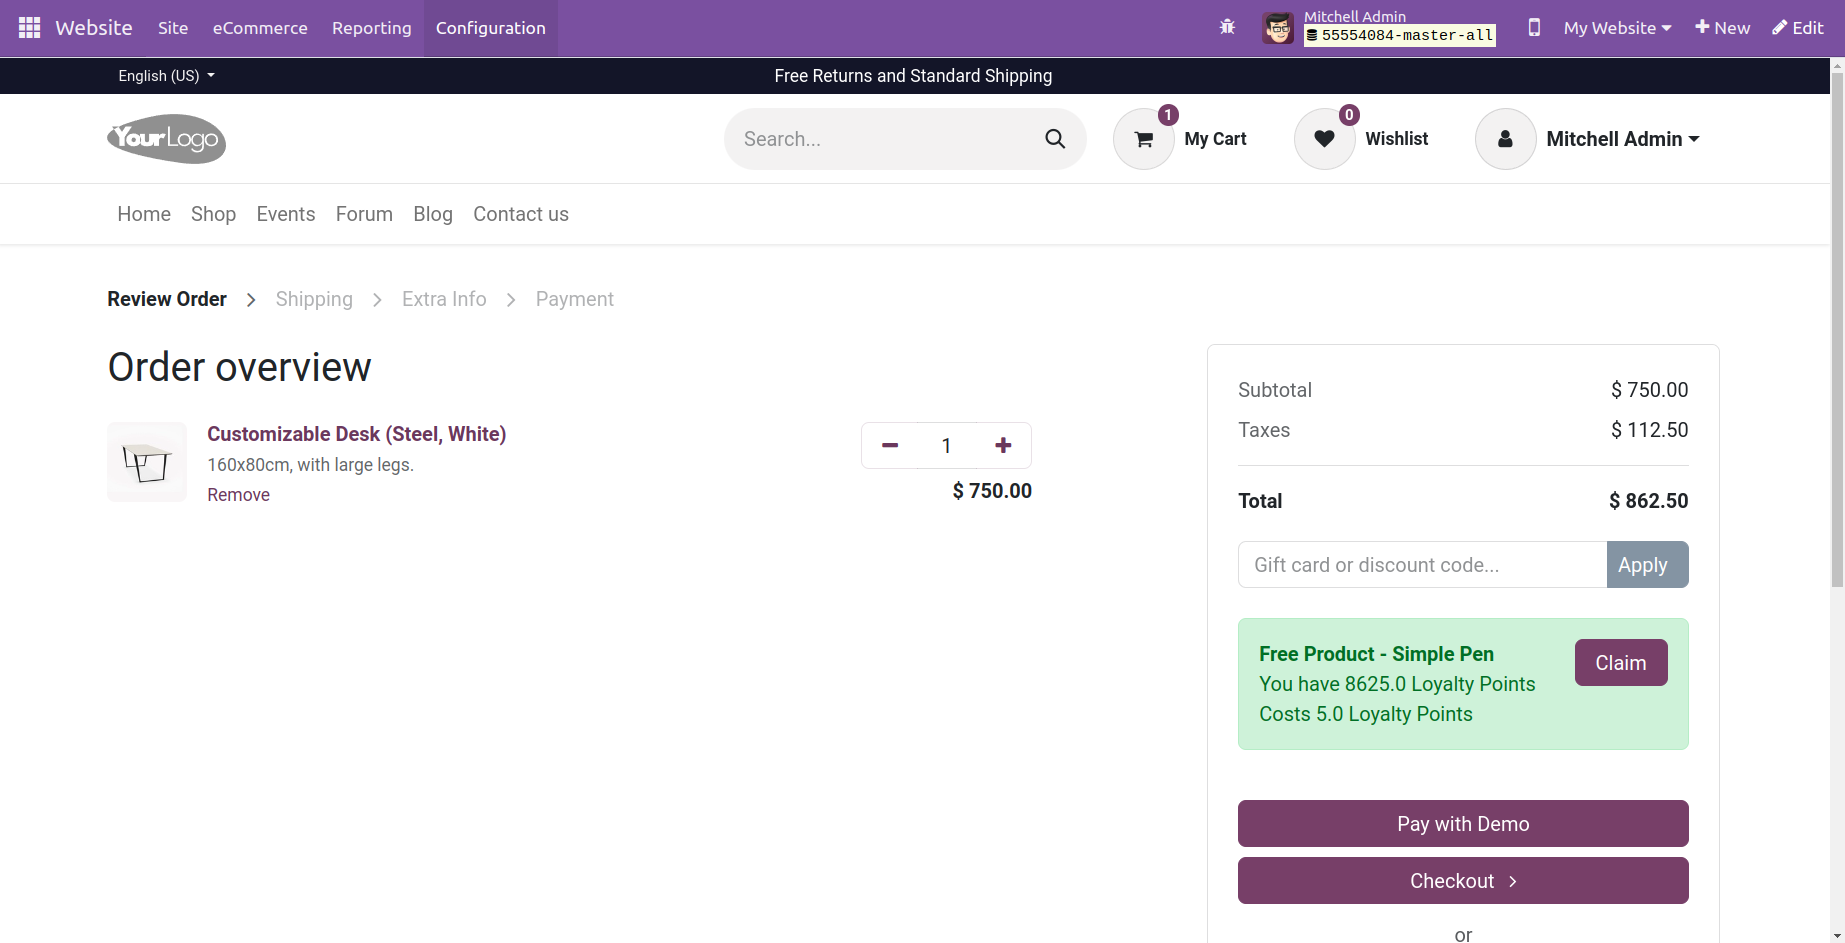
Therefore, once we've set a time limit, the customer will immediately receive an email asking them to finish the checkout process, as indicated below.
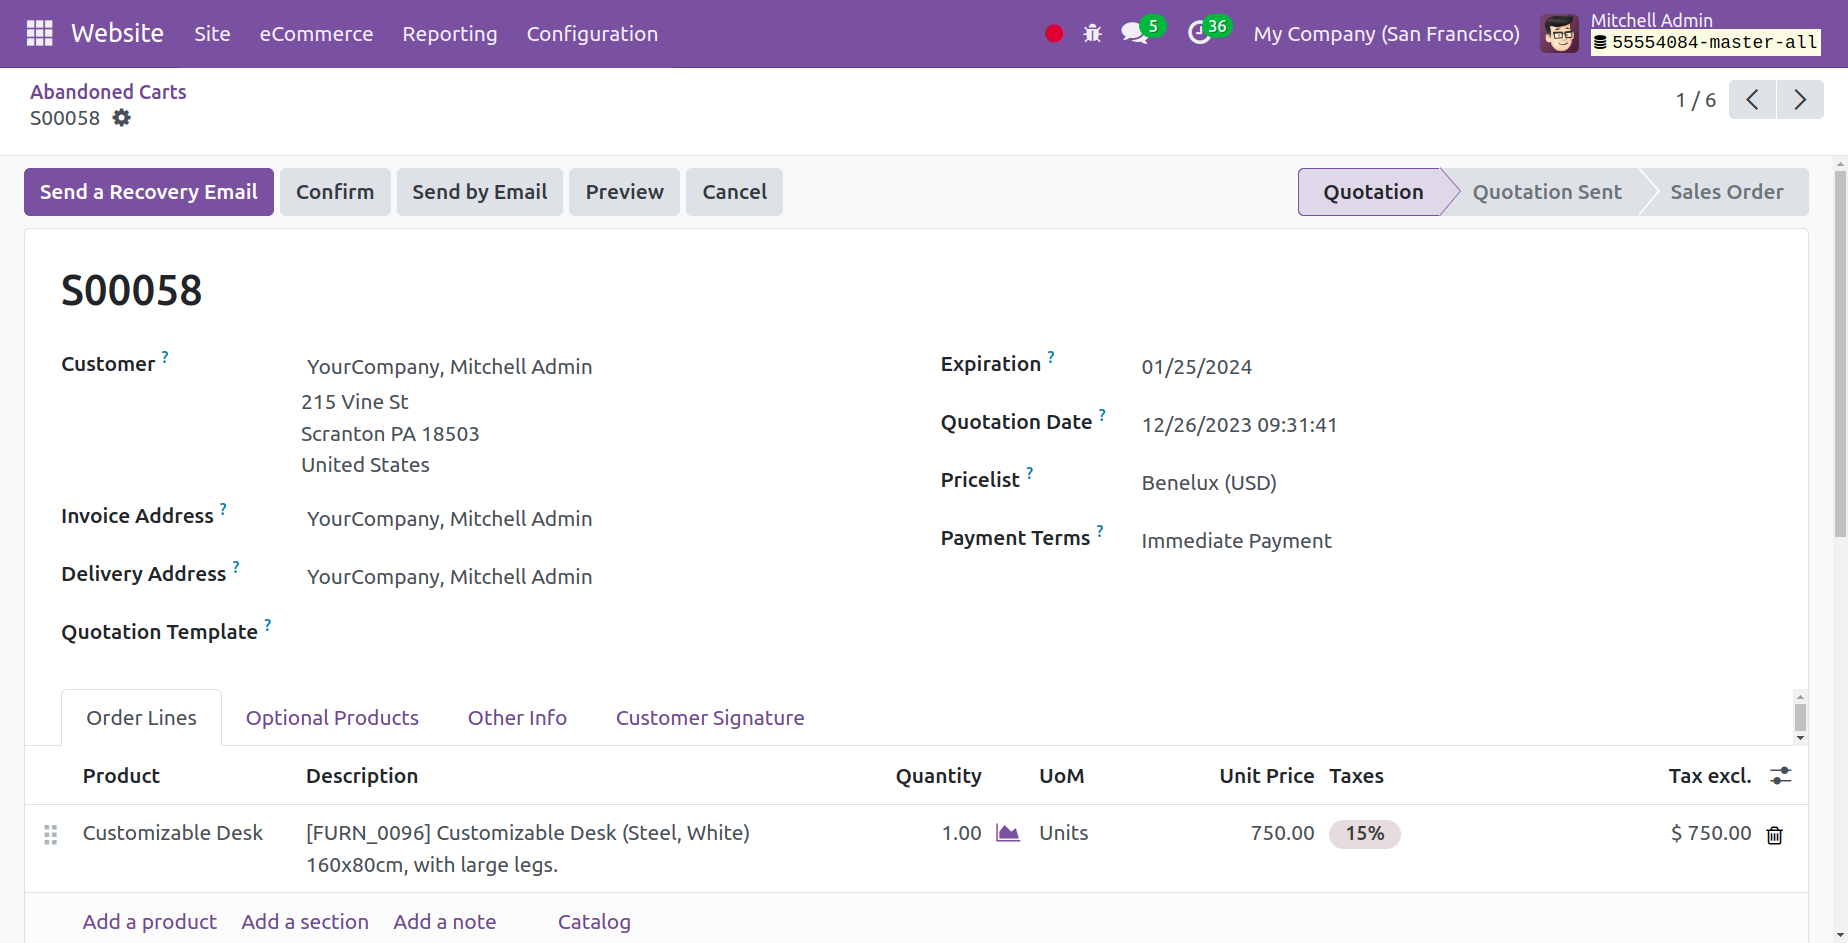
A pop-up window instructing us to write a letter to the receipt along with the relevant merchandise will show up as soon as we click the ‘Send a Recovery Email’ button.
Both a sales team and a single salesperson might be given the task of following up on orders. The user can customize the email template that will be sent to the consumer for recovery under the abandoned cart description. You can specify how long the email will continue to auto-send once a cart is abandoned.
Customers
Clients who have accounts on e-commerce websites can view all of their documents in one place. Clients must first check in to the eCommerce website. After that, they must click My Account after clicking on their username in the upper-right corner of the page. From there, customers may access their orders, invoices, quotes, and more.
The Odoo 17 Website module's eCommerce tab contains the Customer menu, which is used to manage customers.
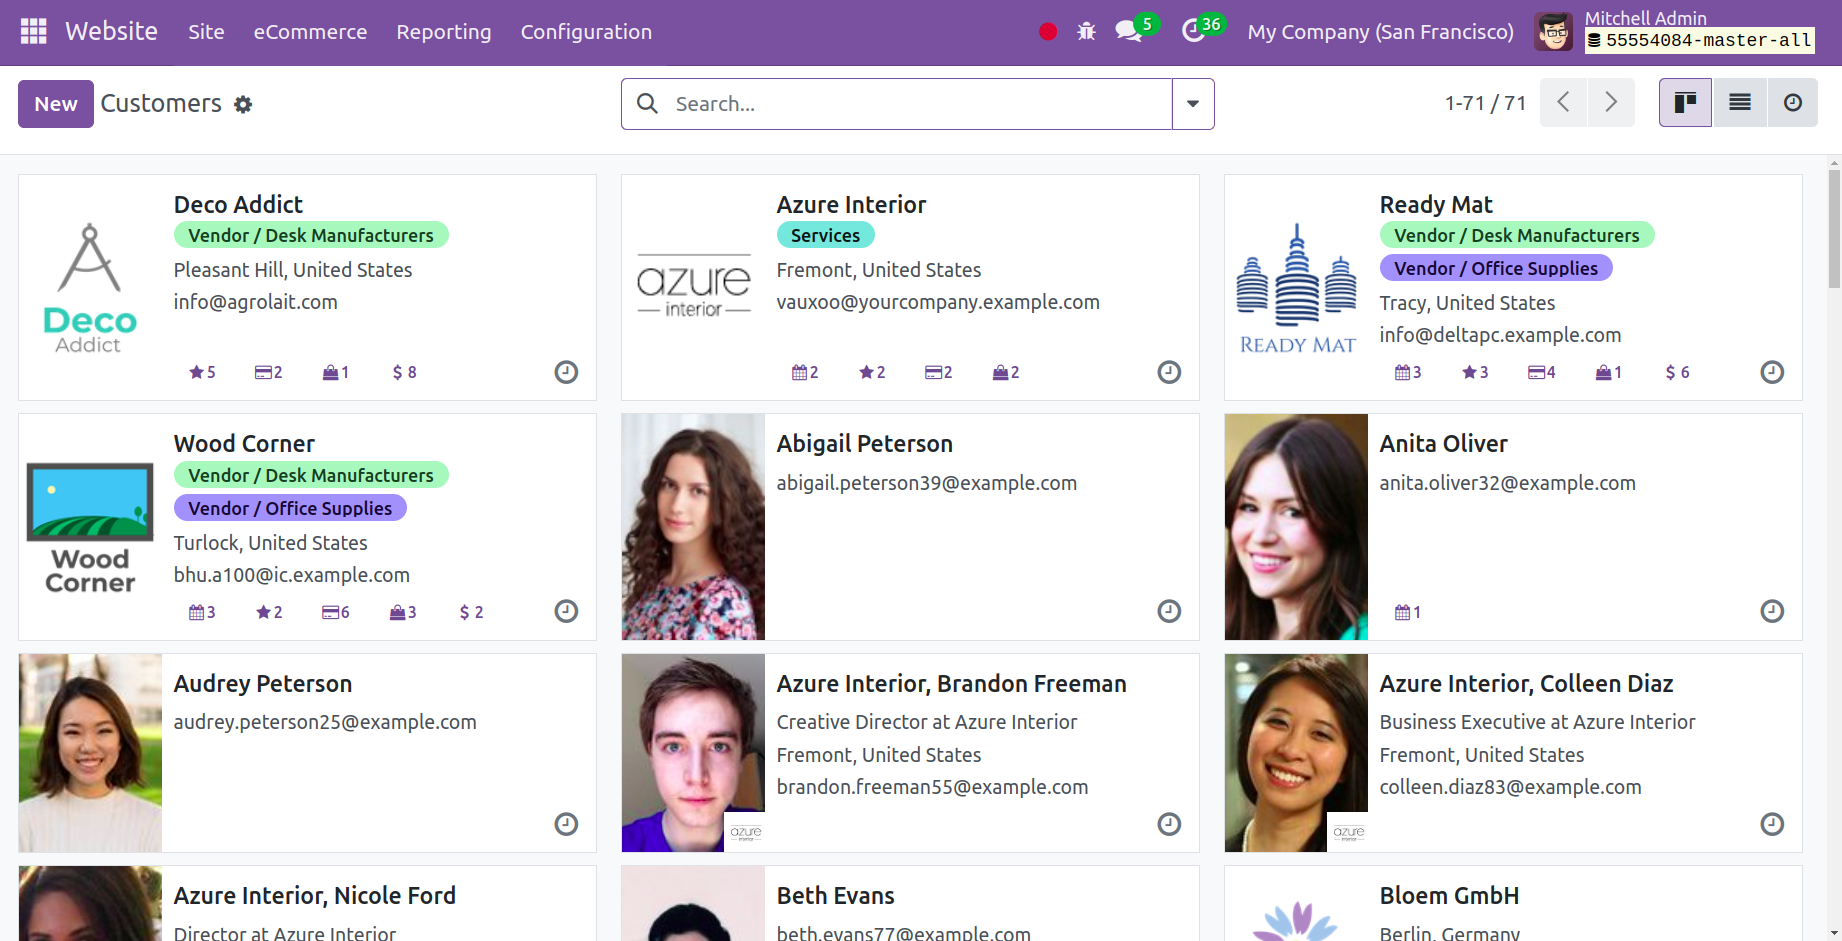
You may manage customer accounts, check customer information, keep tabs on customer activities, and take payments with this feature. In addition, it may construct client groups, send out email activities, make customer coupons and promotions, and carry out other duties. Additionally, the Customer's menu makes it simple for the company to keep track of its clientele, enabling them to customize each eCommerce experience for a superior outcome. The Customers menu will show all previously configured customer details, as seen in the screenshot above.
Product Management
An eCommerce website's Product section is meant to handle all product-related tasks. You can handle all of your offers and product data in one place with this feature. The Product area has multiple options, such as "Products, Pricelist, eCommerce Categories, Attributes, Product Tags, and Attribute Categories."

Products
You can create, import, and manage your product pages with the Odoo 17 Website app. The eCommerce menu of the website module has the Product option.
All of the Product Pages that are detailed in the platform will be managed via the Product window. The product name, website URL, categories, sales price, quantity on hand, unit of measurement, SEO optimized, and published dates are all listed here on each product page. Additionally, you can use a number of preset and custom filters on this page to filter your list. The list's default filters are: Services, Products, Manufactured Products, BoM Components, Published, Available in POS, Can be Sold, Can be Purchased, Can be Recurring, Can be Rented, Can be Expensed, Favourites, and Archived. The Add Custom Filter option, which is located at the bottom of the filter choice, can also be used to create new custom filters.
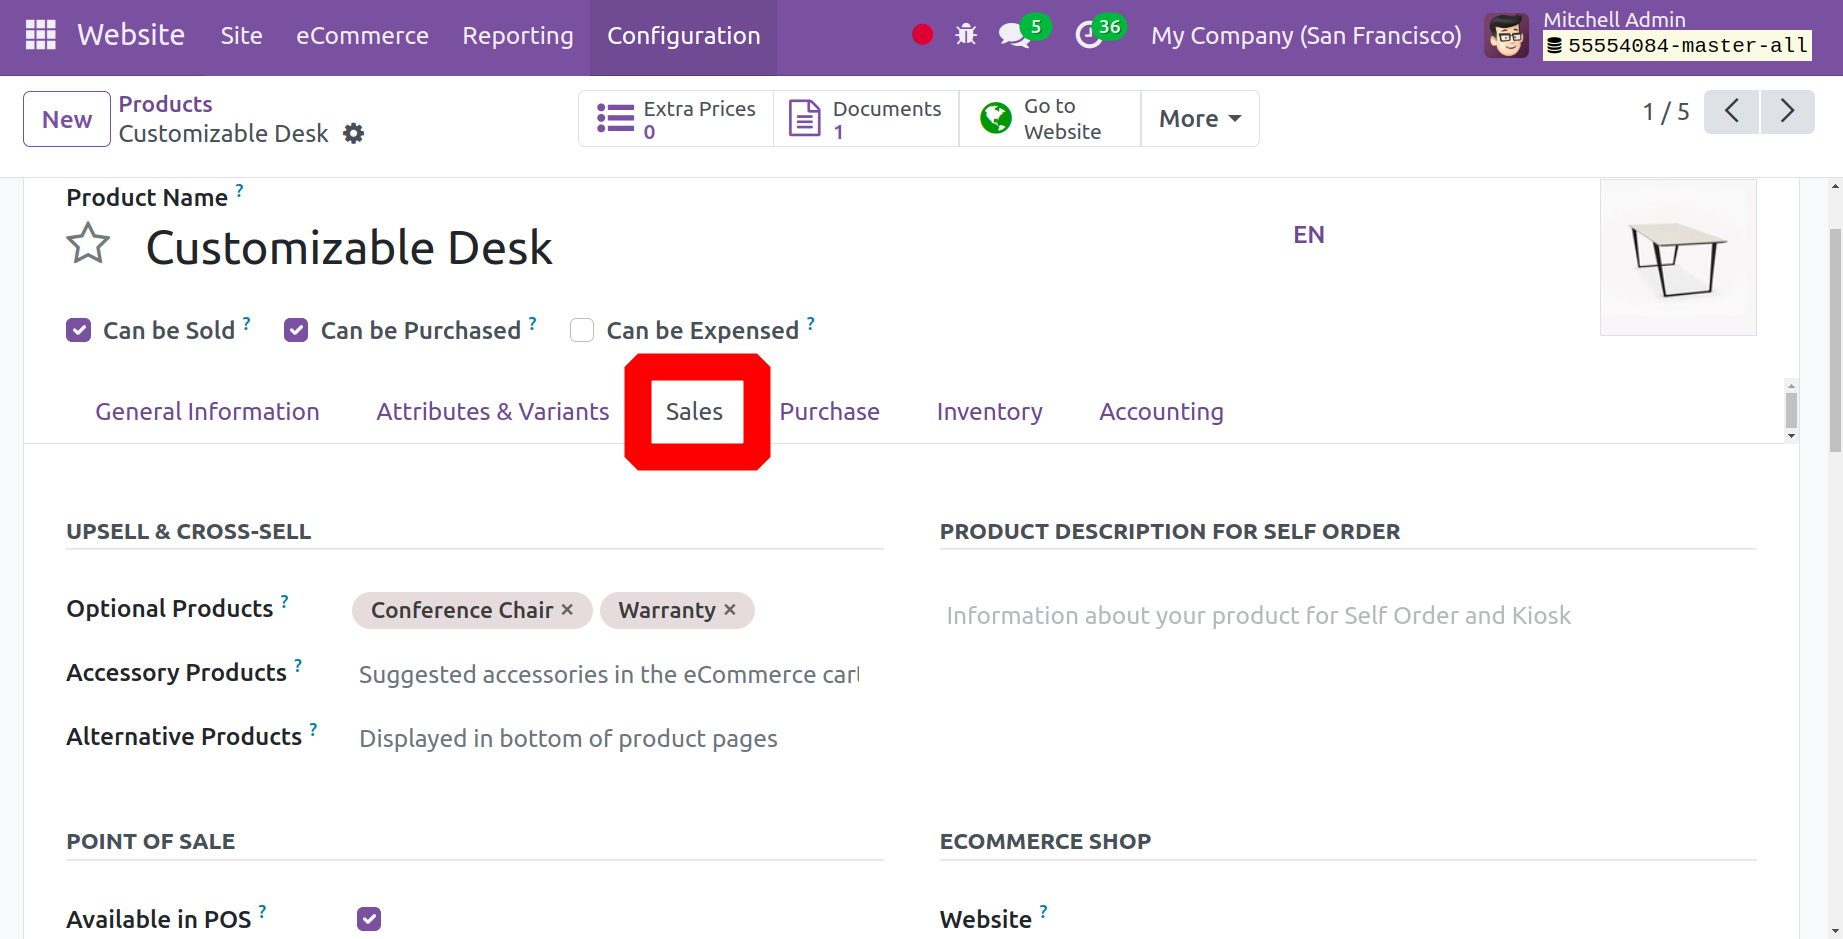
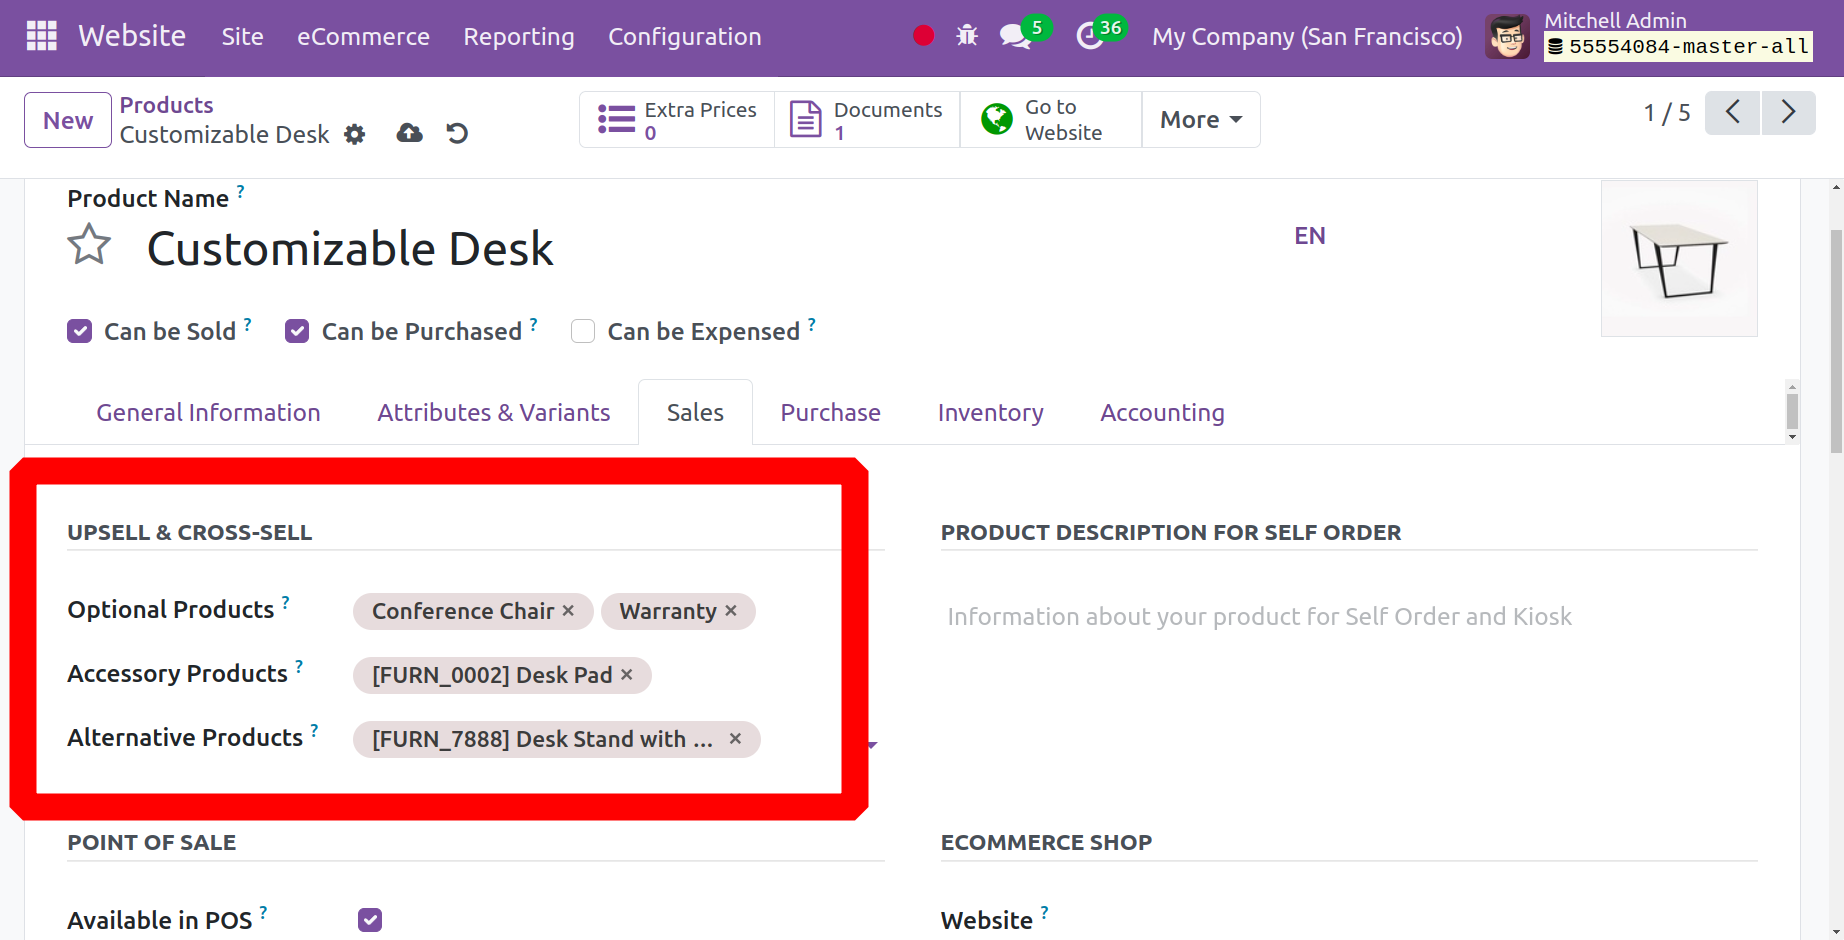
A section for an eCommerce shop is available in the Product form under the Sales tab. This section includes options for the Website, Categories, Out-of-Stock, Show Available Quantity, and Out-of-Stock Message. Additionally, there is an Upsell and cross-sell option that includes Optional Products, Accessory Products, and Alternative Products.
Optional Products: The products marked as optional are closely associated with the item placed in the cart (warranty, armrest, and LED base lighting, for instance, are supplementary components for Conference Chairs). As an additional step, a new screen shows when the main product is added to the cart.
Alternative Products: While they belong to the same category, alternative products differ in a number of ways, such as color, material, dimension, and more. These could also be different products related to the primary item. It is absolutely advised to suggest more expensive options for essential things in order to maximize your revenue. In this manner, your buyer will take more time to look through your catalog.
Accessory Products: The products that show up in shoppers' shopping baskets before they pay are known as accessory products. You could suggest a mouse or keyboard to someone who is purchasing a computer, for instance.
While adding this product to the cart, let's specify the optional product, accessory product, and alternative product to the product Customisable desk and see how these goods are displayed on the website.
Let's go to the website now and choose this product so that you can see the alternative product that has been assigned to it as indicated below within the product page.
Additionally, as soon as you add this item to the cart, a window that displays the optional goods that are linked to the primary item as indicated below appears, giving the buyer the option to select one of them.
Additionally, as you go to the checkout, you will notice that the companion product is displayed underneath as a suggestion for the primary product.
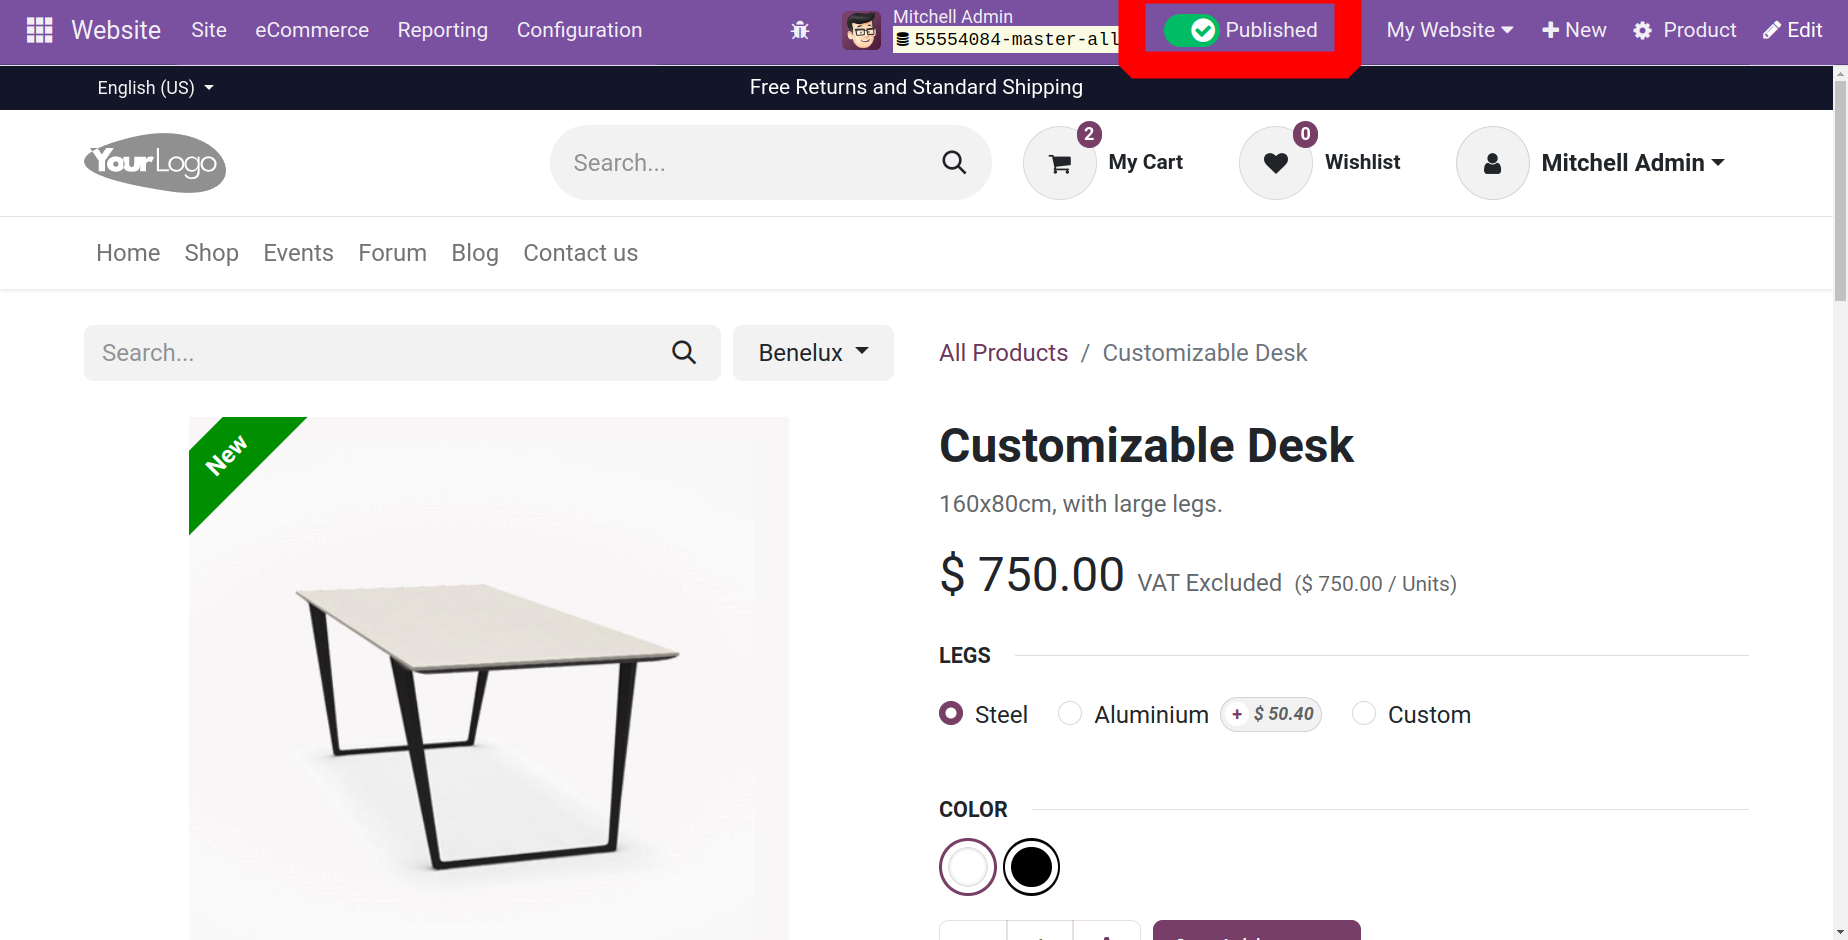
By default, when products are produced in your eCommerce catalog, they have the status Unpublished. Go to the Website Site Homepage, click on your primary store page, choose the product, and tick the Published checkbox located in the upper-right corner to enable product accessibility for visitors.
Pricelists
Creating many product pricelists is essential to operating a successful business. Based on certain criteria, a company can create a number of pricelists for particular clients for a given amount of time. The regulations that are applied to them will determine how the pricelist is updated. A company may change the cost of its goods and services in response to changes in the demand in the market or the time of year. So, you need to be careful and use a precise method when setting pricelists for your products if you want to manage a prosperous and successful firm.
A dedicated framework for making multiple product pricelists and discounts is included in Odoo 17 eCommerce and is managed via the Website module. Because these two modules are interconnected, you may manage every aspect of eCommerce from the Website module. Activate the Pricelists option under the Pricing tab of the Settings page, as shown below, to obtain the platform to configure the pricelist in the Odoo Website module.
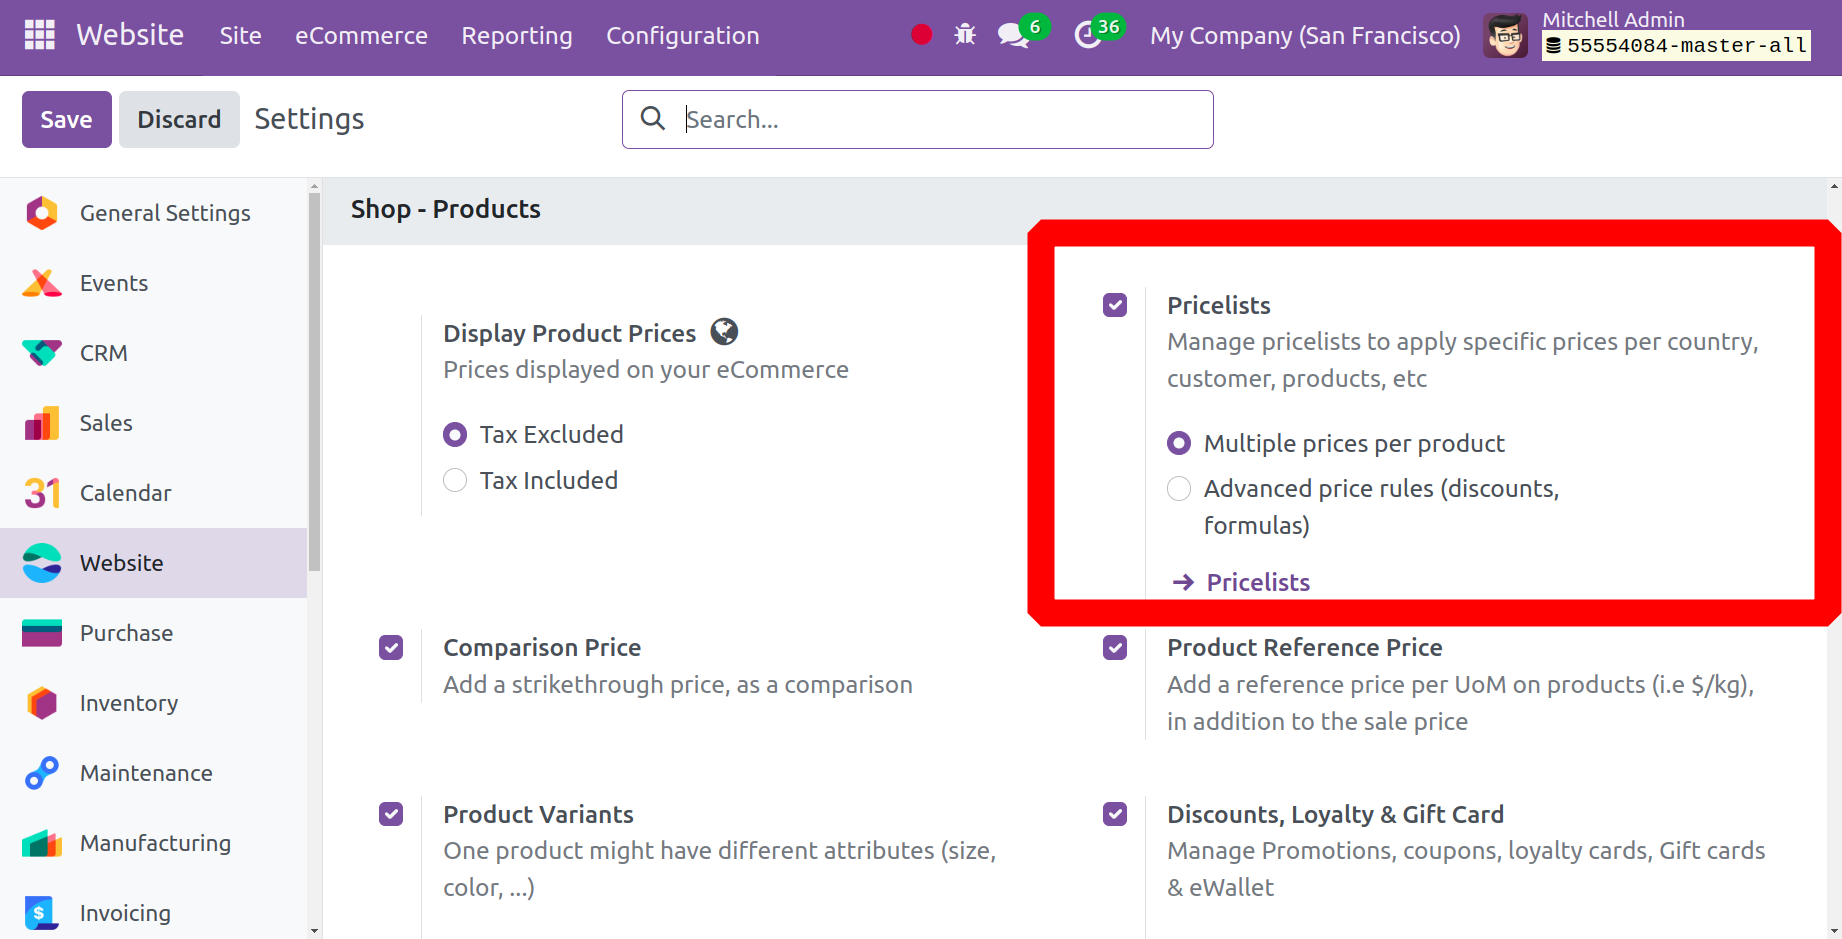
Once enabled, the user can view the Pricelist by selecting it from the website module's e-Commerce menu.
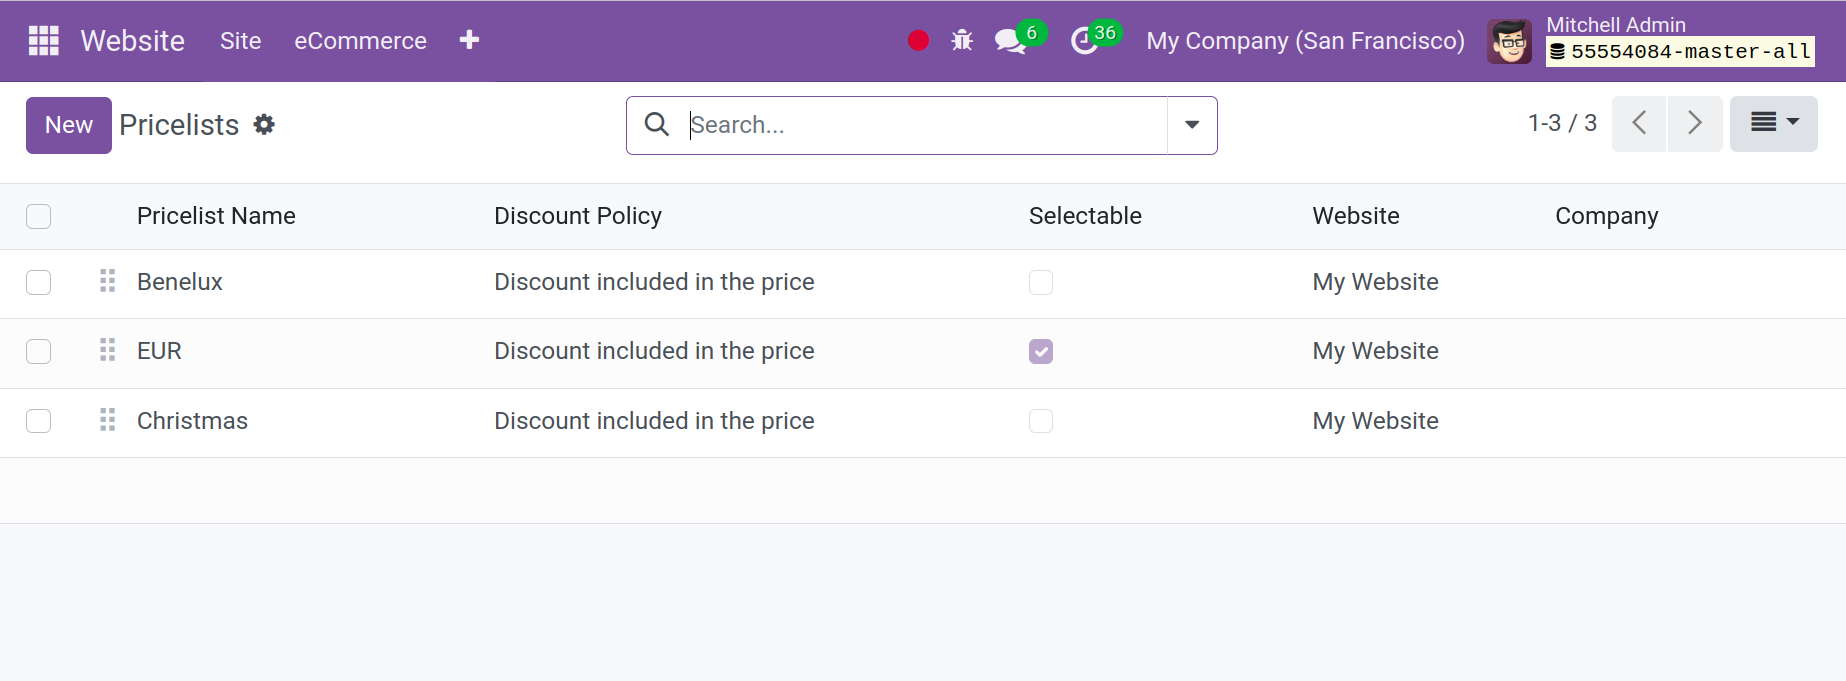
"Multiple Prices per Product" and "Advanced Price Rules" are the two categories of price lists.
While sophisticated pricing rules let you create pricelists with intricate price rules based on discounts and algorithms, multiple prices per product allow you to create pricelists with fixed prices for products. You can set different prices for various customer categories, such as registered customers, gold customers, regular customers, and so on, using the first option. You can define price change rules, including rounding, margins, discounts, and more, using the second option.
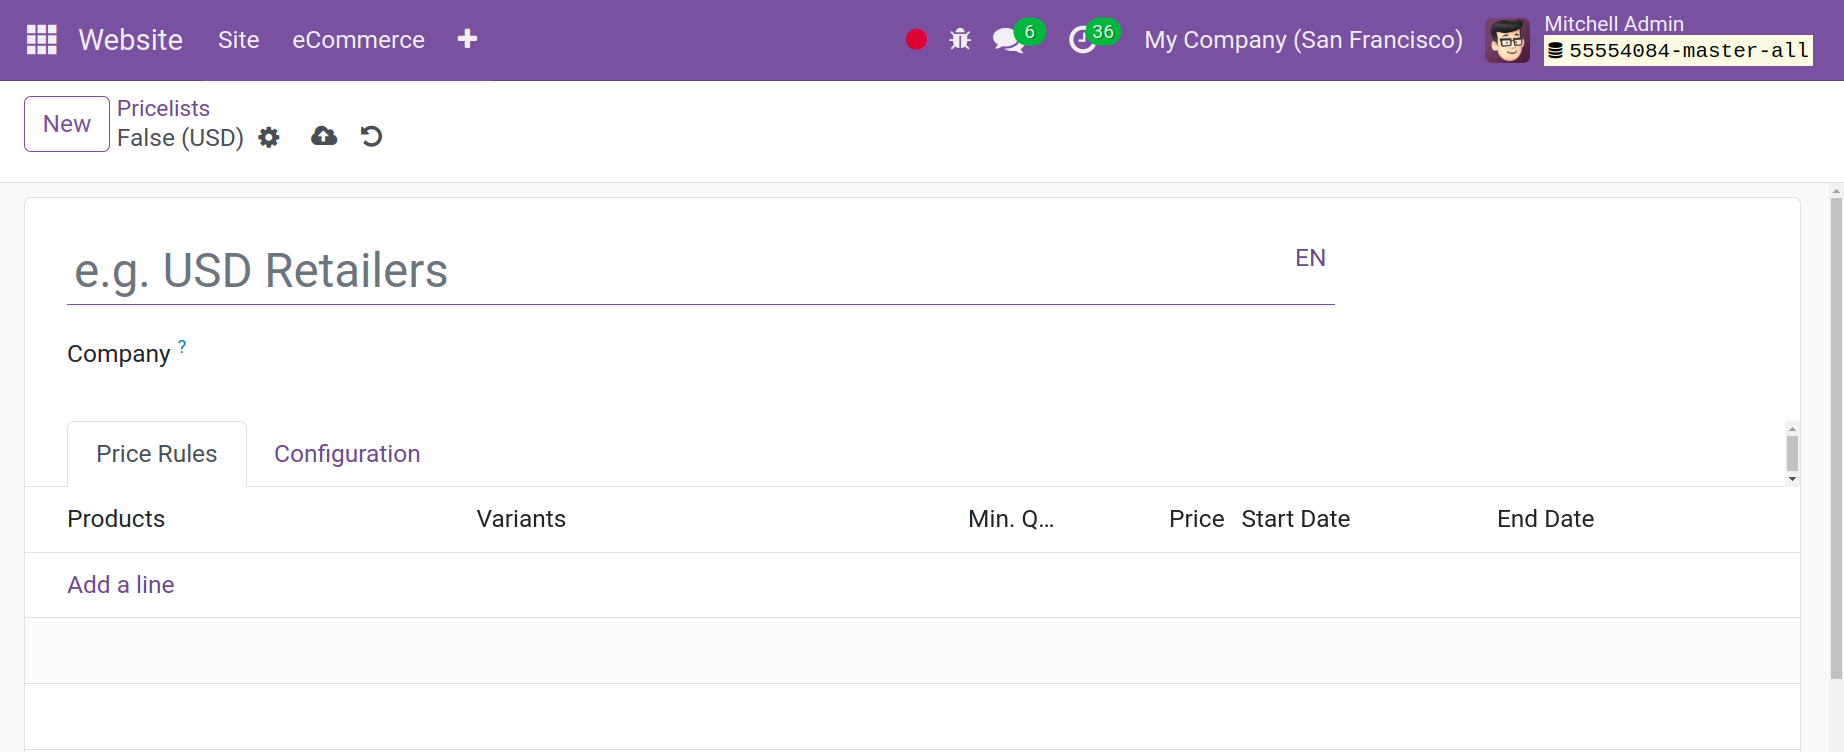
You can set up the products you wish to have in this pricing list by using the Add a Line option on the pricing Rules page. Leave the Products box empty if you wish to apply this pricing rule to every product. Enter the Minimum Quantity, Prices, Start Date, and End Date as indicated below in the respective fields.
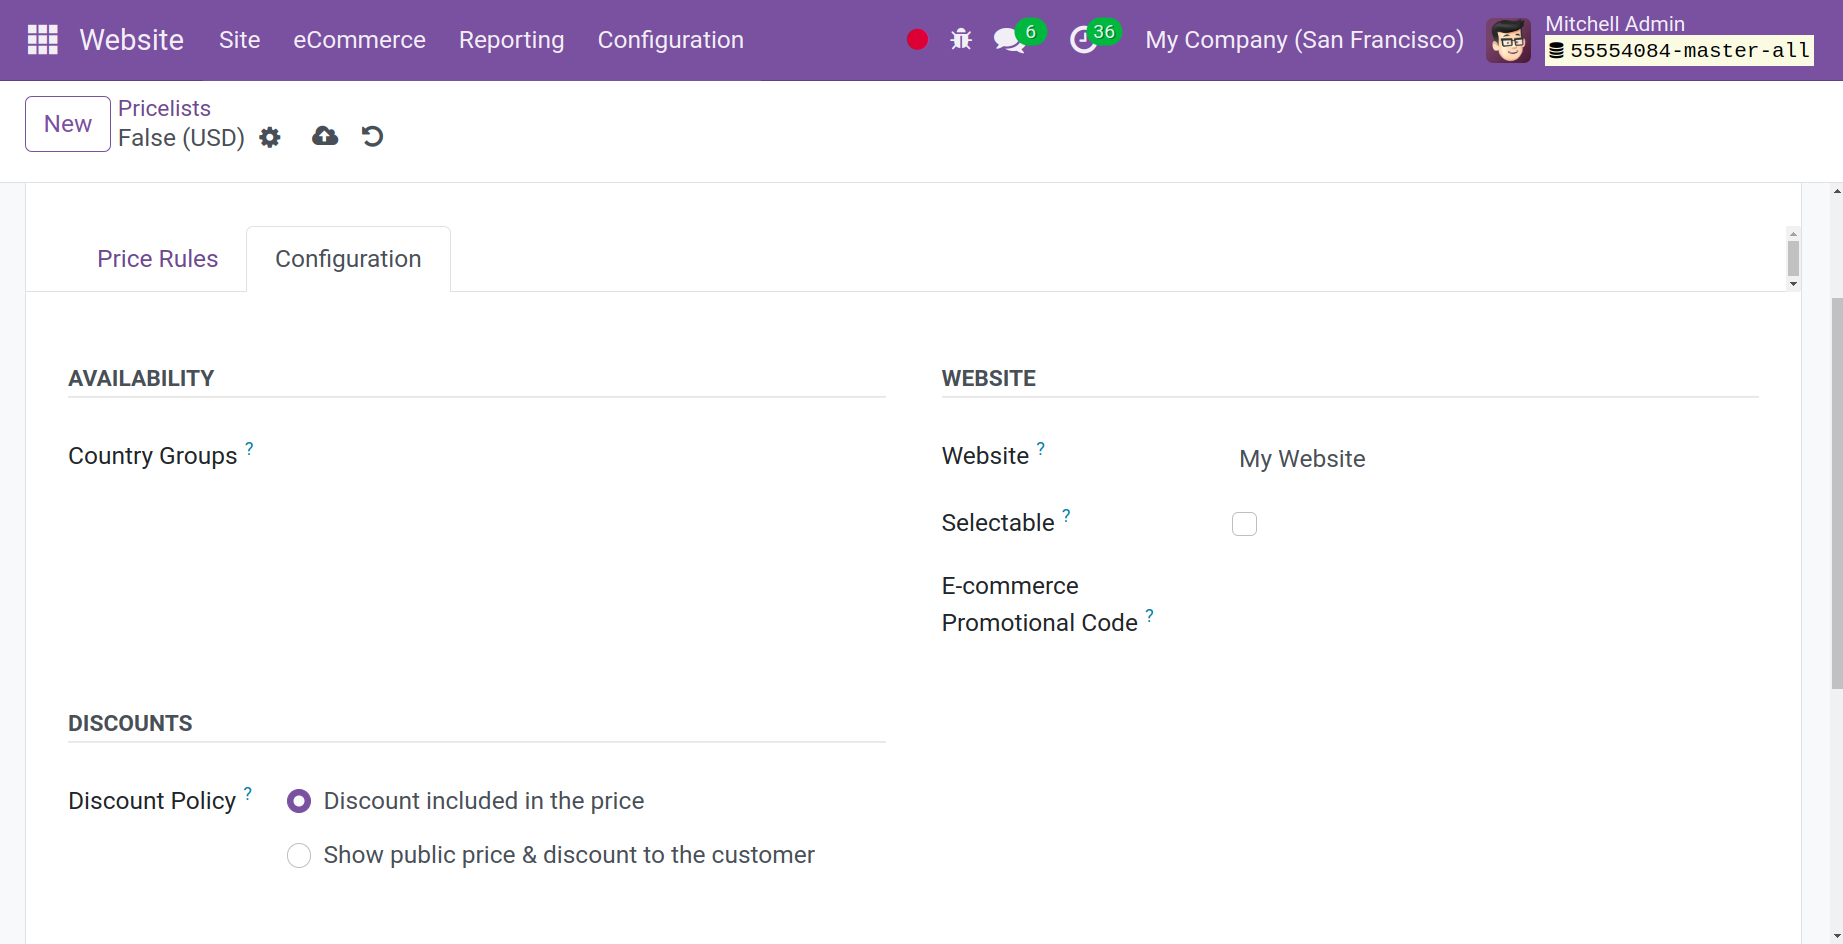
If enabled from the website module's settings, the Configuration tab allows you to define the Availability, Website, and Discounts fields. In the Availability section, you can add Country Groups where this pricing list is available. When a customer is established, the pricelist is automatically assigned using the nation group option. Thus, even if your salesman forgets to assign pricelist, the system will allocate automatically once the client's country is specified on the customer. Mention the Website and e-Commerce Promotional Code under the Website section, as indicated in the illustration above.

Customers who sell in different currencies and have price lists in foreign currencies can choose the relevant price list from the drop-down box next to the search bar.
eCommerce Categories
The 'e-Commerce Categories' menu in the Odoo 17 Website module is a sub-menu under the 'eCommerce' tab. Users can control the products and categories in their eCommerce accounts. Users are able to add, edit, and remove categories as well as link products to them. Using the 'eCommerce Categories' option, users may also alter the way their category pages are laid out, add product filters, and change how products are displayed on the page. Additionally, users can alter the SEO values for each category and upload images.
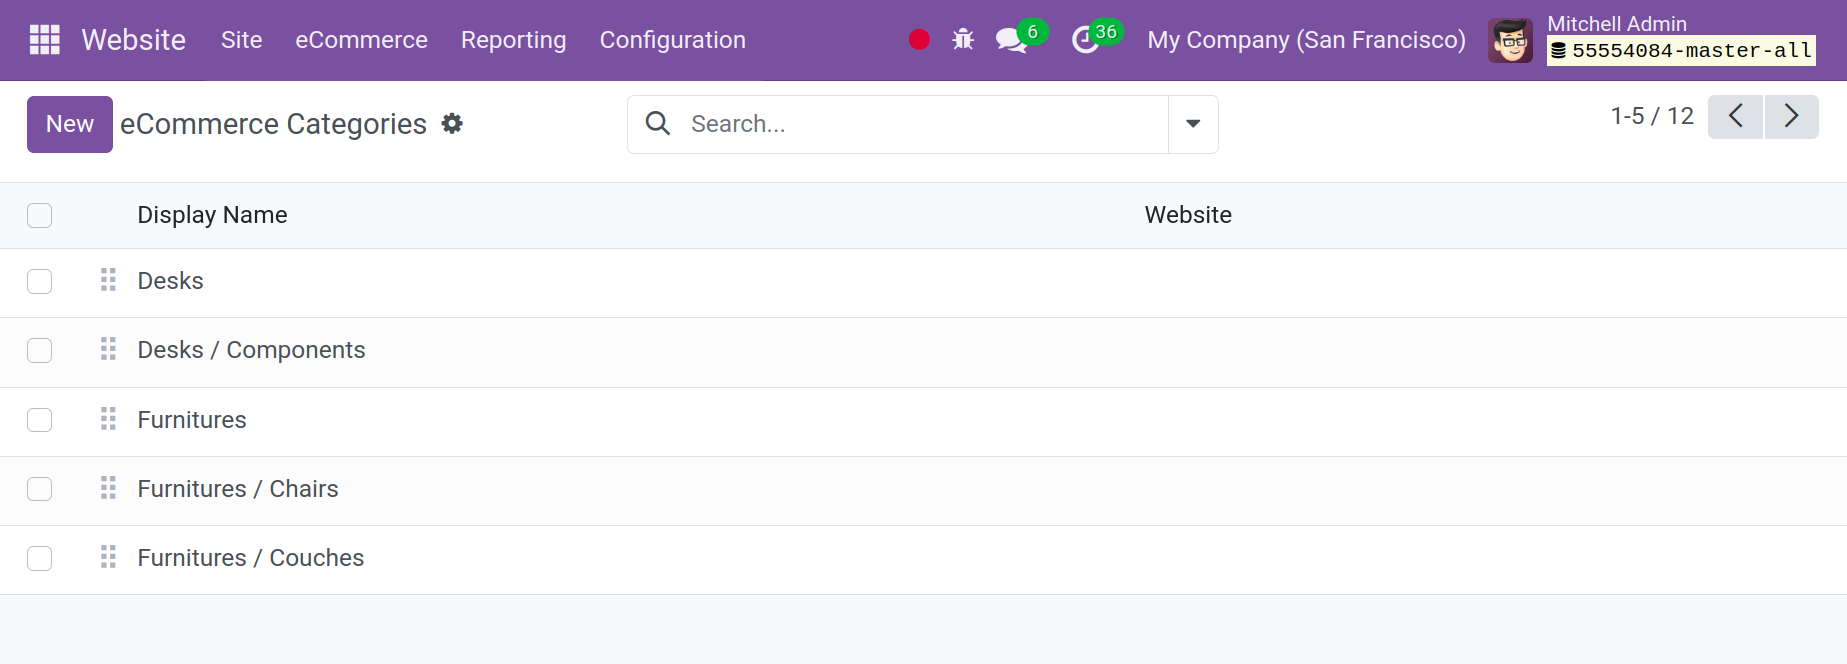
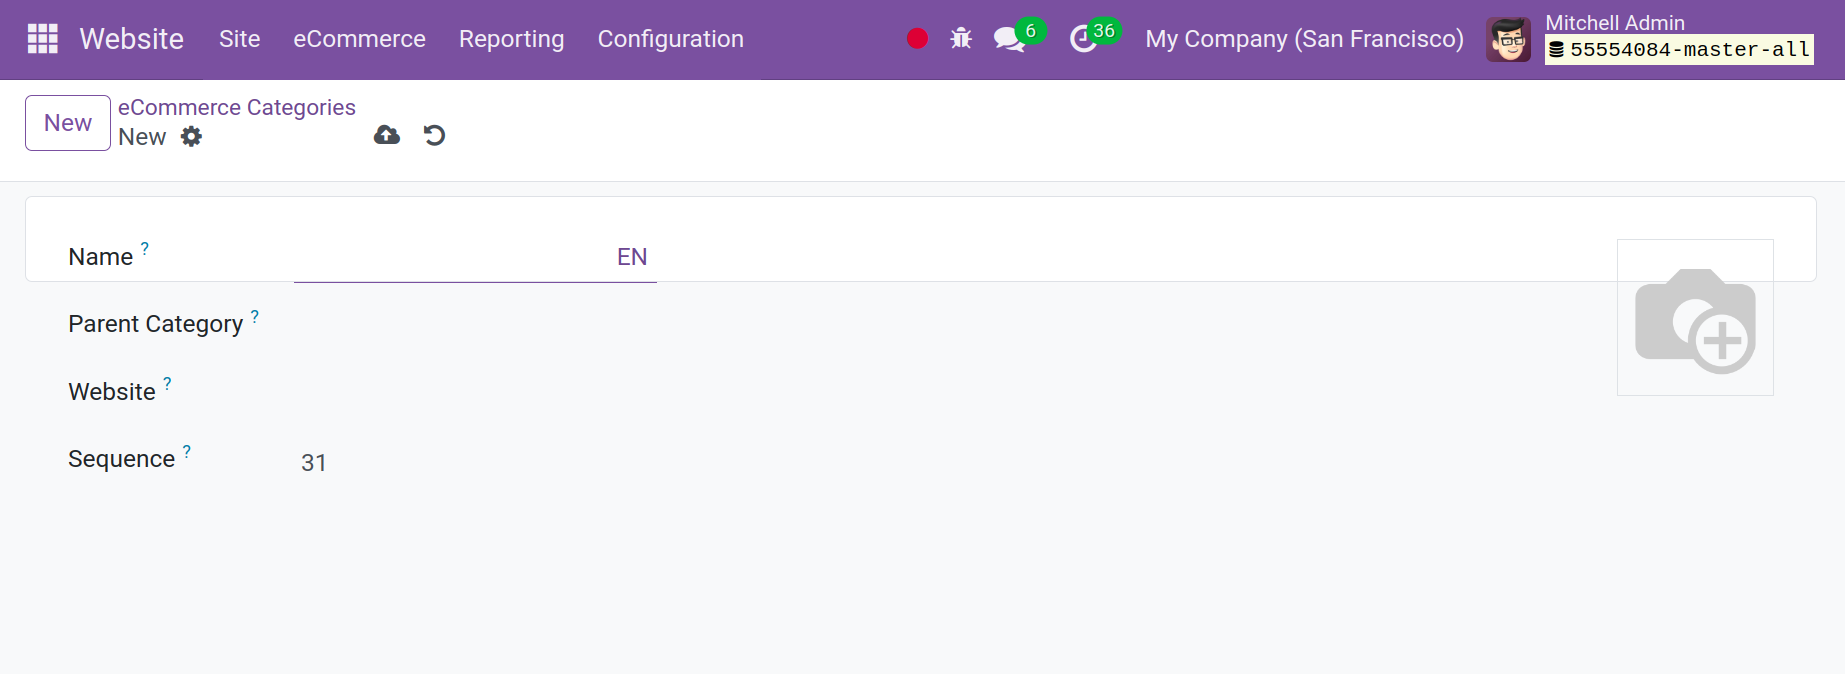
All eCommerce Categories, the Display Name, and the related Website can all be listed in the eCommerce window. Click the New button in the window's upper left corner to add a new category. The form for creating an eCommerce category will look somewhat like this.
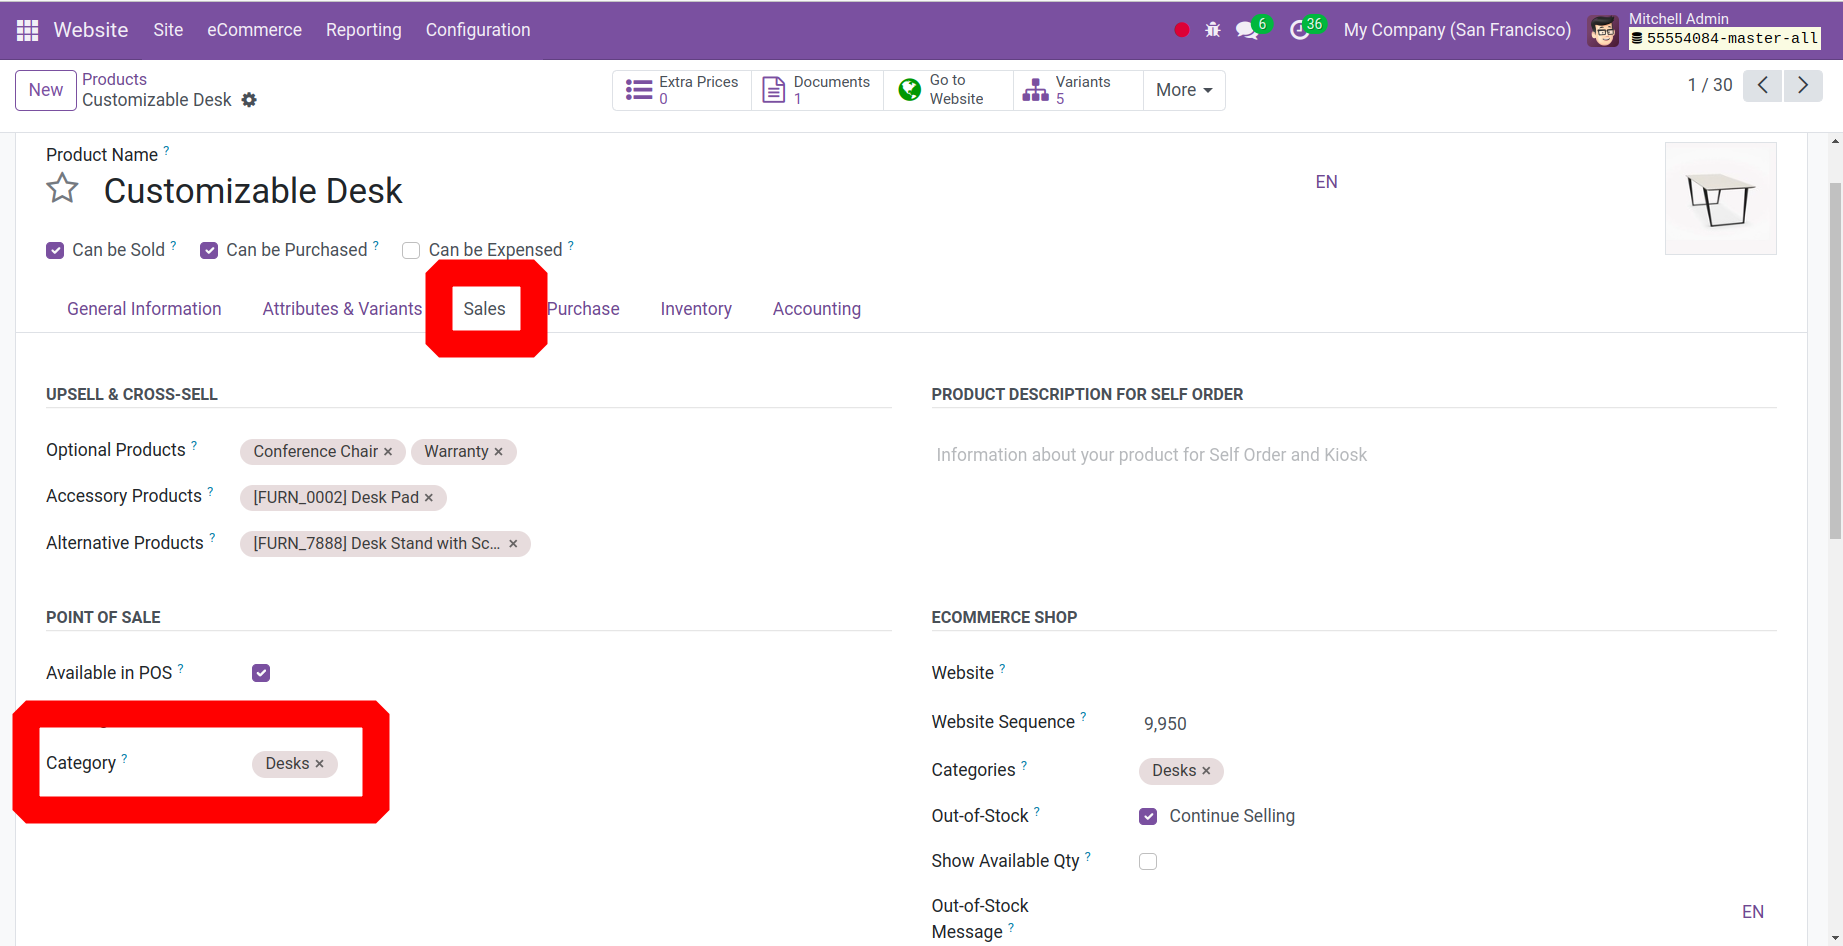
E-commerce categories let you classify your products and organize your website. Additionally, as can be seen below, these categories are assigned within the product under the Sales page.
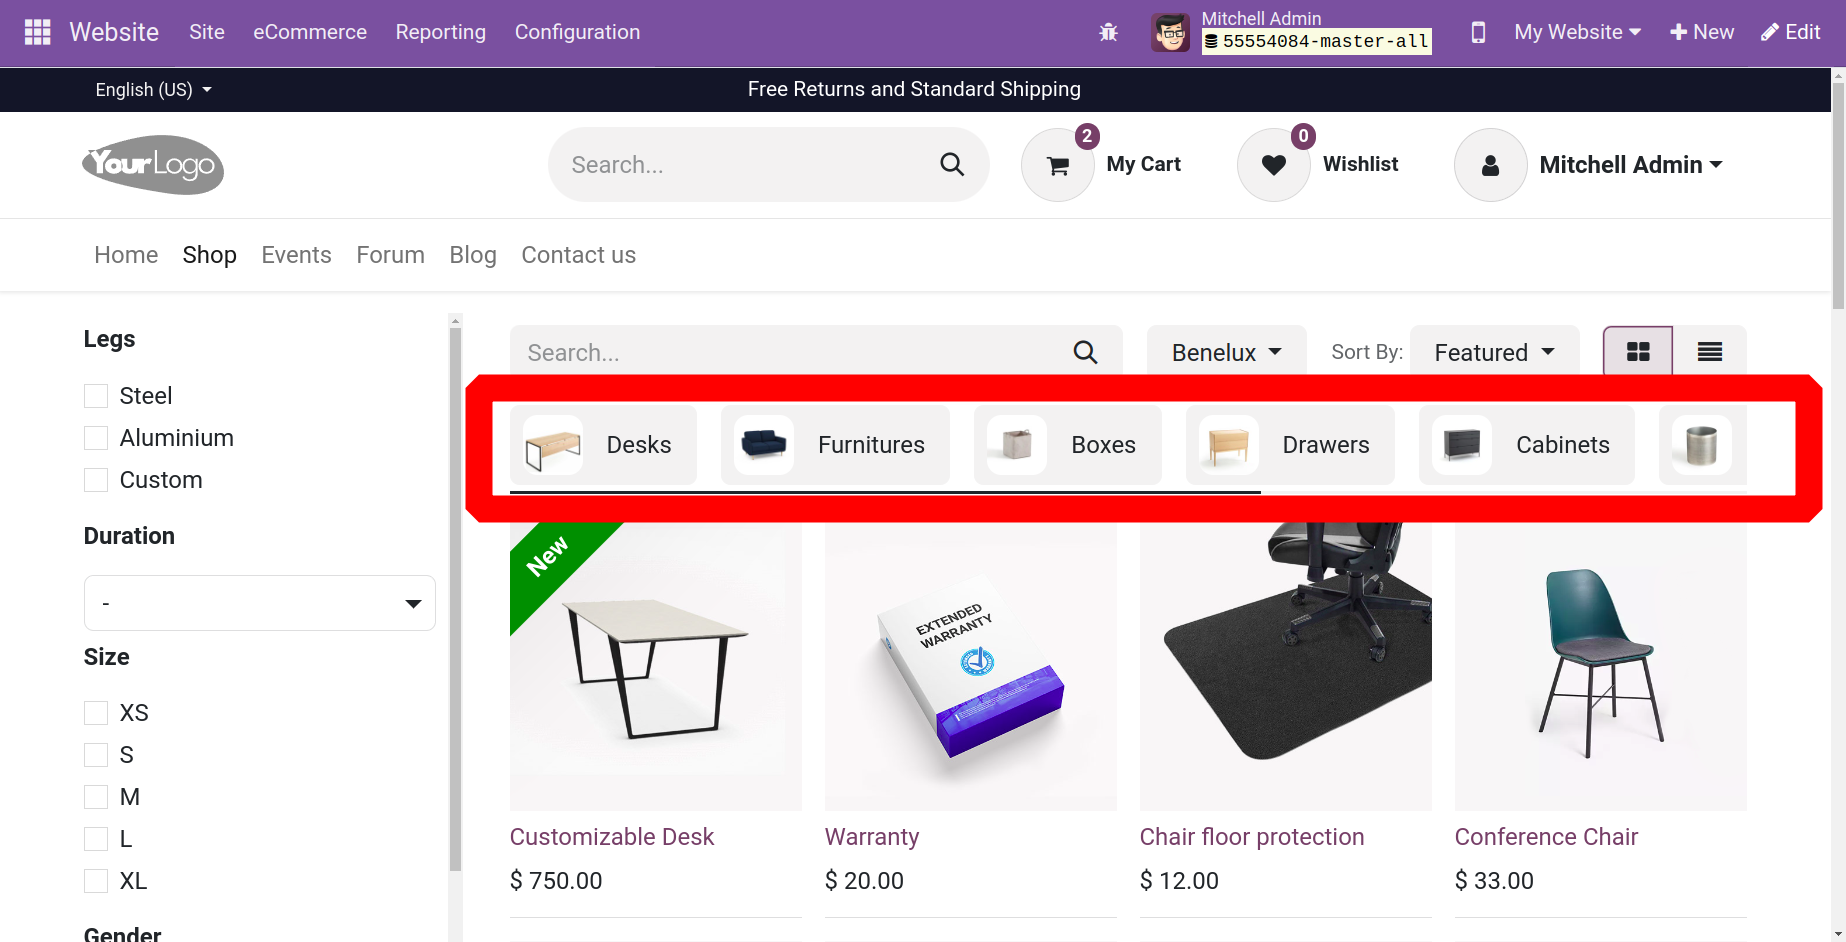
The website also features the categories that have been established, as seen below, making it simple to identify products.
Attributes
Product features are attributes that vary according to the product. Commodity qualities include things like size, color, brand, dimension, and more. Choose the Attributes option from the E-commerce menu of the website module to add a new attribute to your product.
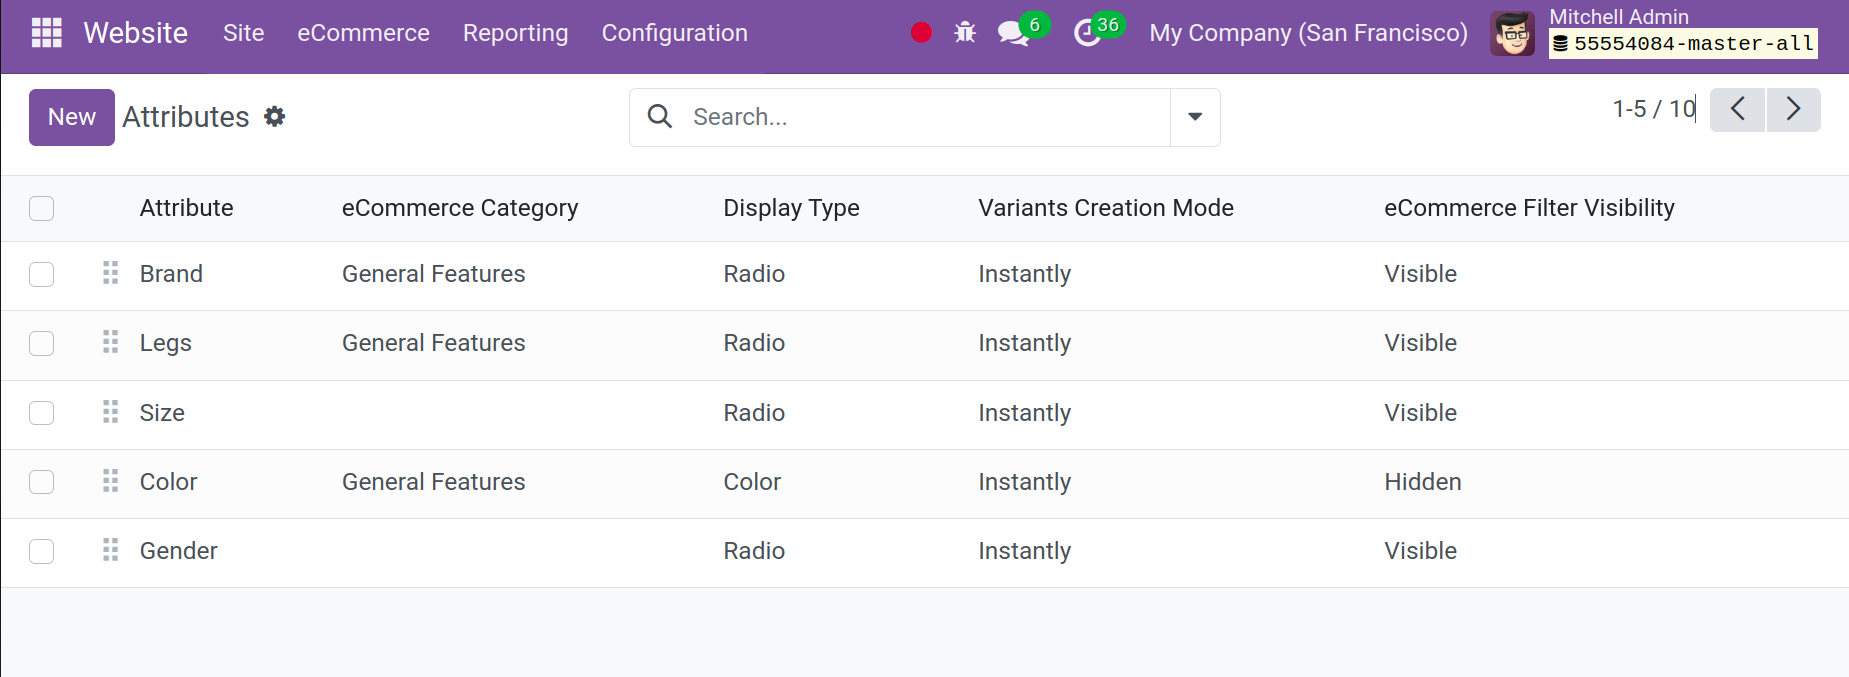
By choosing the New icon, you can add an attribute, as seen in the screenshot below.
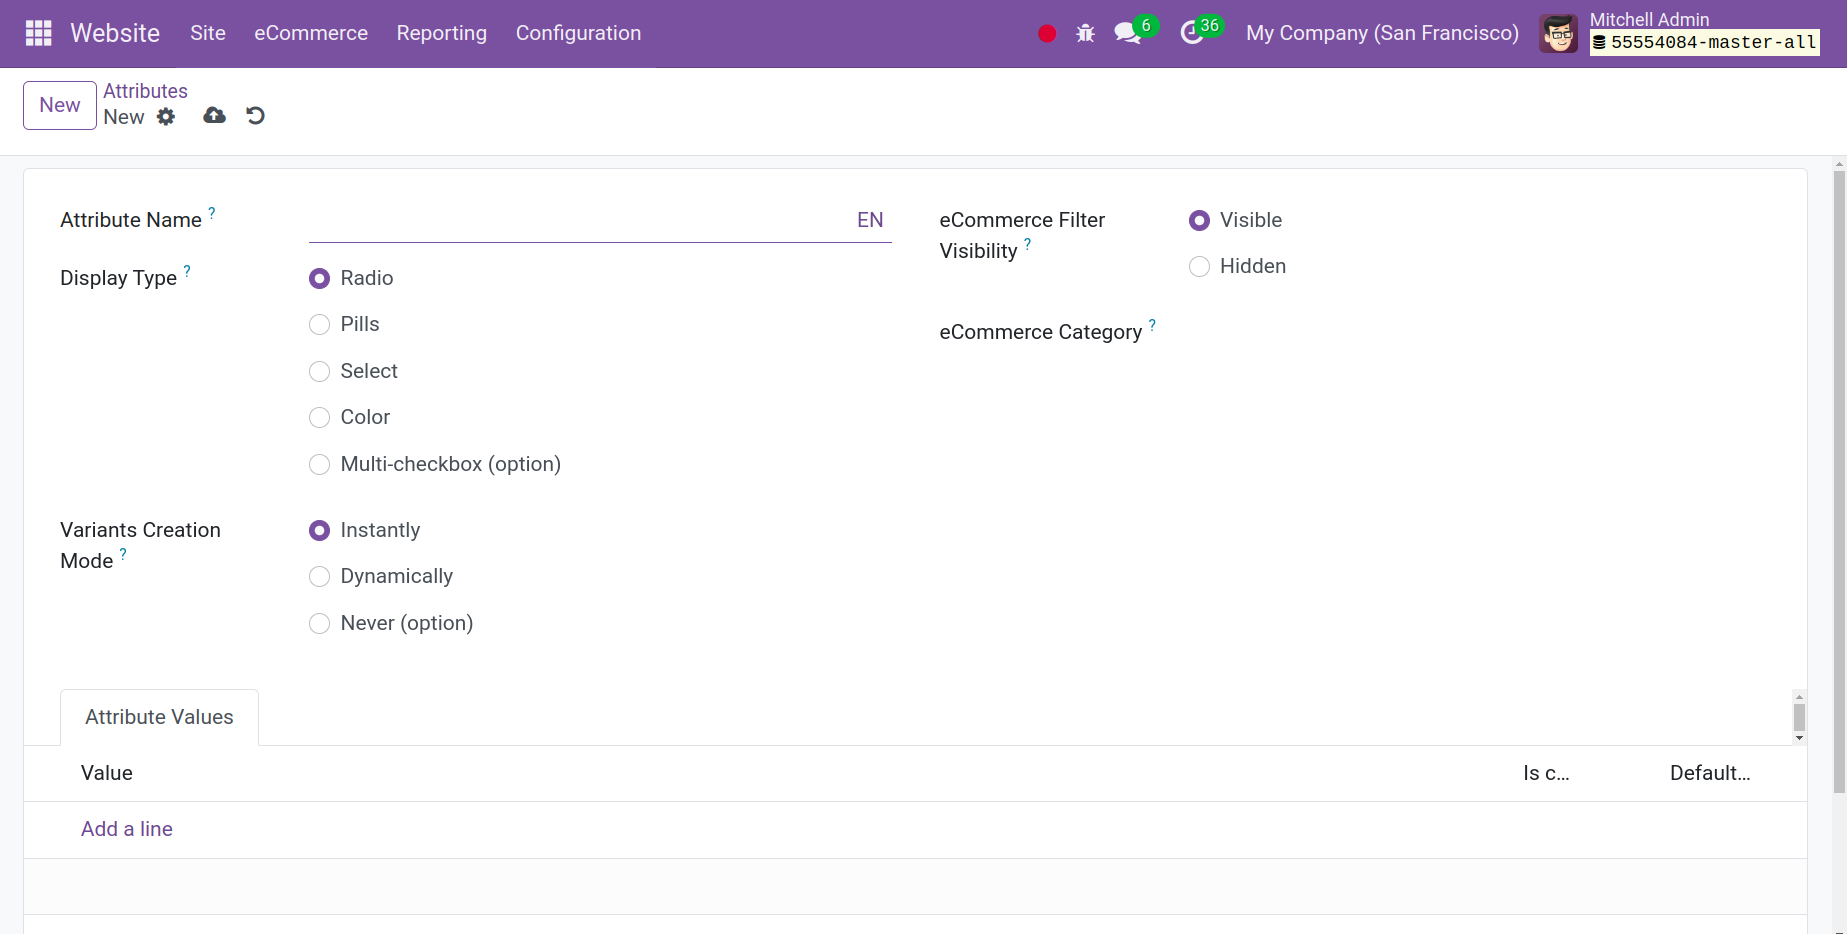
We can now process attributes like color, size, brands, and many more in the new window. The attribute form has a column to add the attribute value, as shown below, as well as options to add a name for your product attribute, the category it belongs to, several display types, multiple variation generation modes, and E-commerce filter visibility.
The user has the option to configure the Variants Creation Mode to instantaneous, never, or dynamic later on. If we select the Instantly option, we can generate every conceivable alternative as an attribute. When matching qualities are added to a sales order and the "Dynamically" option is chosen, each version is created. Conversely, choosing the Never option results in the creation of no variants. Once the desired attribute has been created, save it and apply it to goods that require an attribute.
Loyalty
Rewarding your customers with loyalty and promotion schemes is one way to keep them as customers. You can use this kind of program to persuade customers to keep buying goods or services from your business. Through these kinds of promotion programs, customers can interact with your business and gain additional benefits. Odoo 17's Loyalty and Promotion Programme makes it simple to implement these programs for your company.
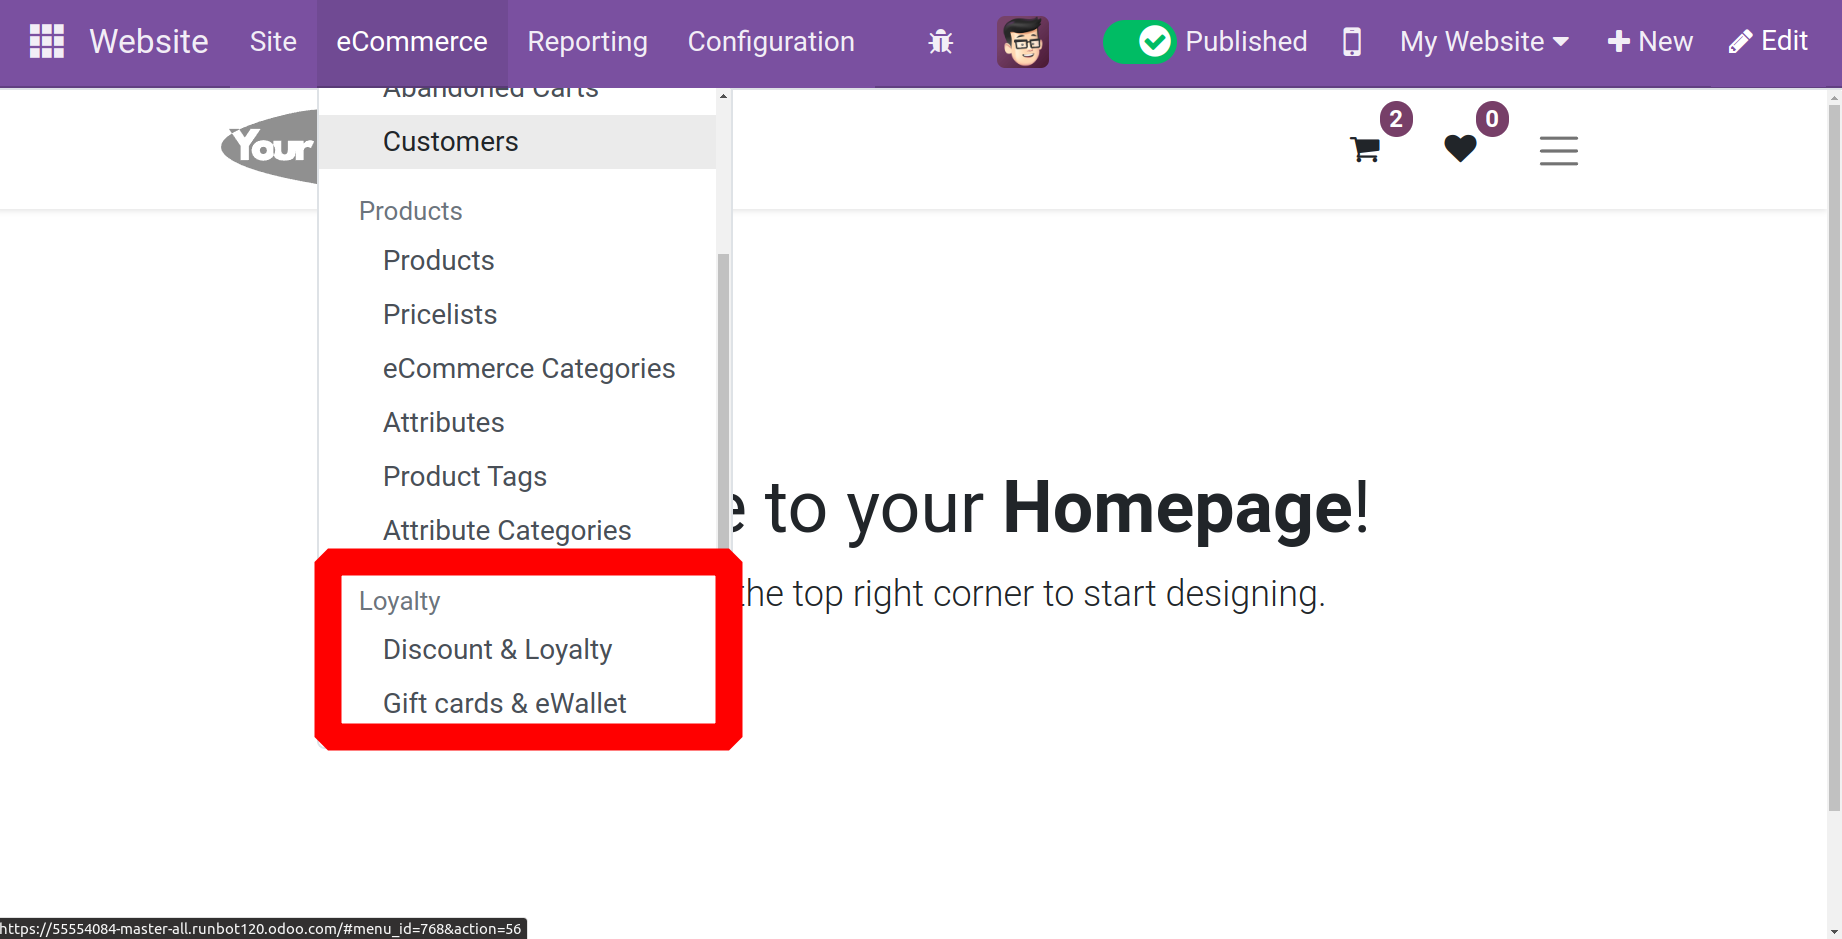
Gift cards, eWallets, and loyalty and discount opportunities are all included in the loyalty section. All of these are essential tools for an online store. The eCommerce menu of the website module, as displayed, is where users can access this module after enabling these capabilities from the module's settings.
Discount & Loyalty
Now let's click the New button to create a new program. To boost your sales, click the "new" button to launch a new window where you can create fresh offers for your clients. As seen in the screenshot below, you will be provided a specific location to specify the name of the program. In the Programme Name section, you can give the program a fitting title. Choose the Programme Type after that.
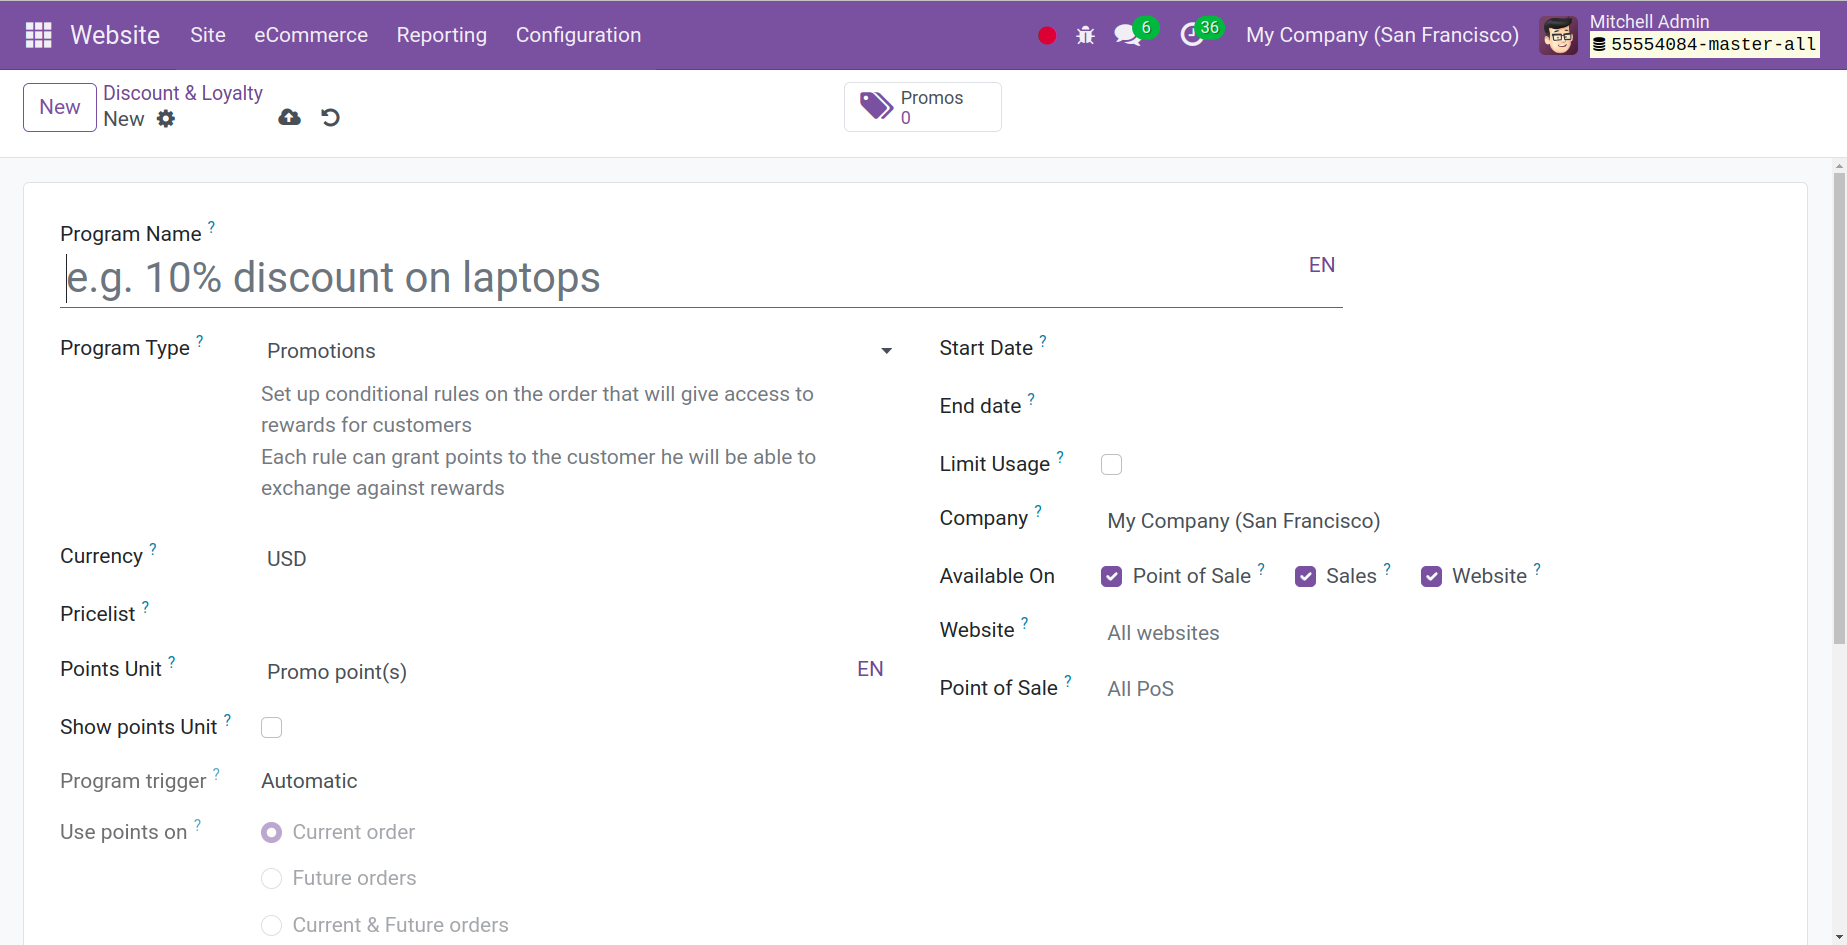
Coupons, Loyalty Cards, Discount Codes, Buy X Get Y, and Next Order Coupons can all be generated in one place with Odoo 17. These several program kinds are all made in a similar way. You can fill in the boxes with the Company, Points Unit, Currency, and Website. In the Validity section, you can specify the promotion program's expiration date. By turning on the restriction Use section and entering a restriction, you may also restrict how many times the promotion program can be utilized. The promotion program can be made available on Point of Sale, Sales, and the website by checking the matching fields in the Available On section.
By selecting the Add option beneath the Rules & Rewards menu, you can establish rules and suitable prizes.
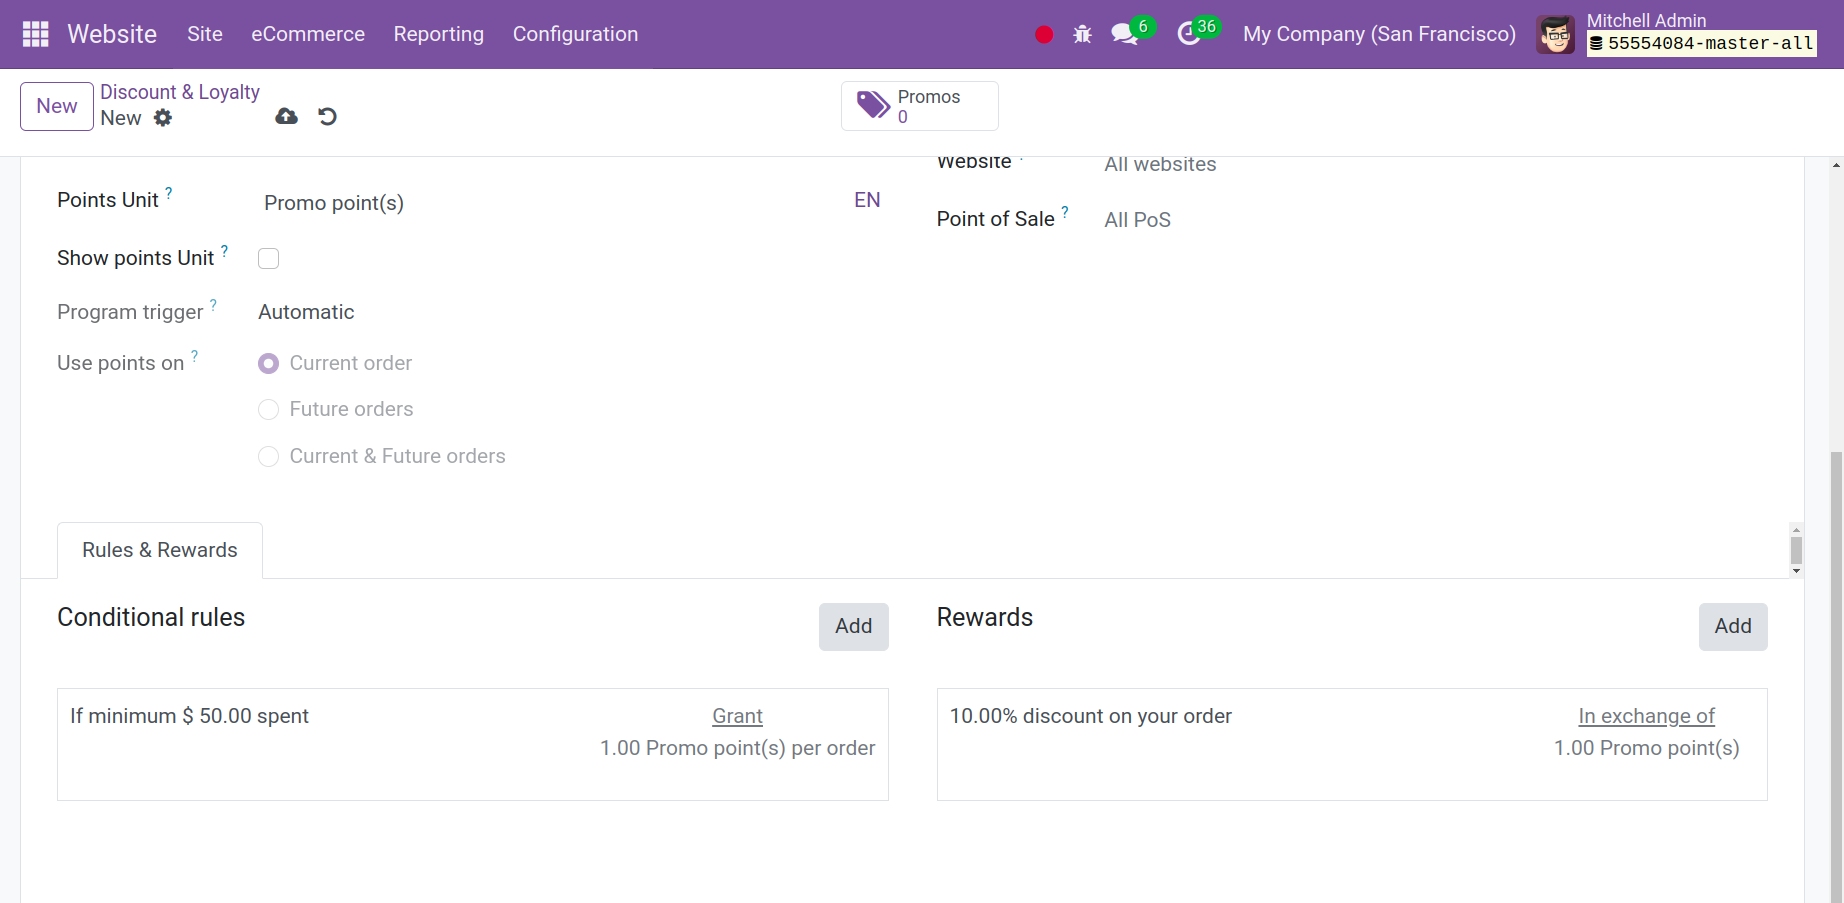
Click the Add button in the top right corner of the Rules tab to add Conditional Rules. You'll see a new pop-up appear to set rules, as shown below.
You can set the Minimum Quantity and Minimum Purchase Amount on the Conditions page in order to be eligible for this promotion scheme. By adding them in the appropriate fields, you may make this promotion available for particular Products, Categories, and Product Tags, enabling users to take advantage of the newly customized rule.
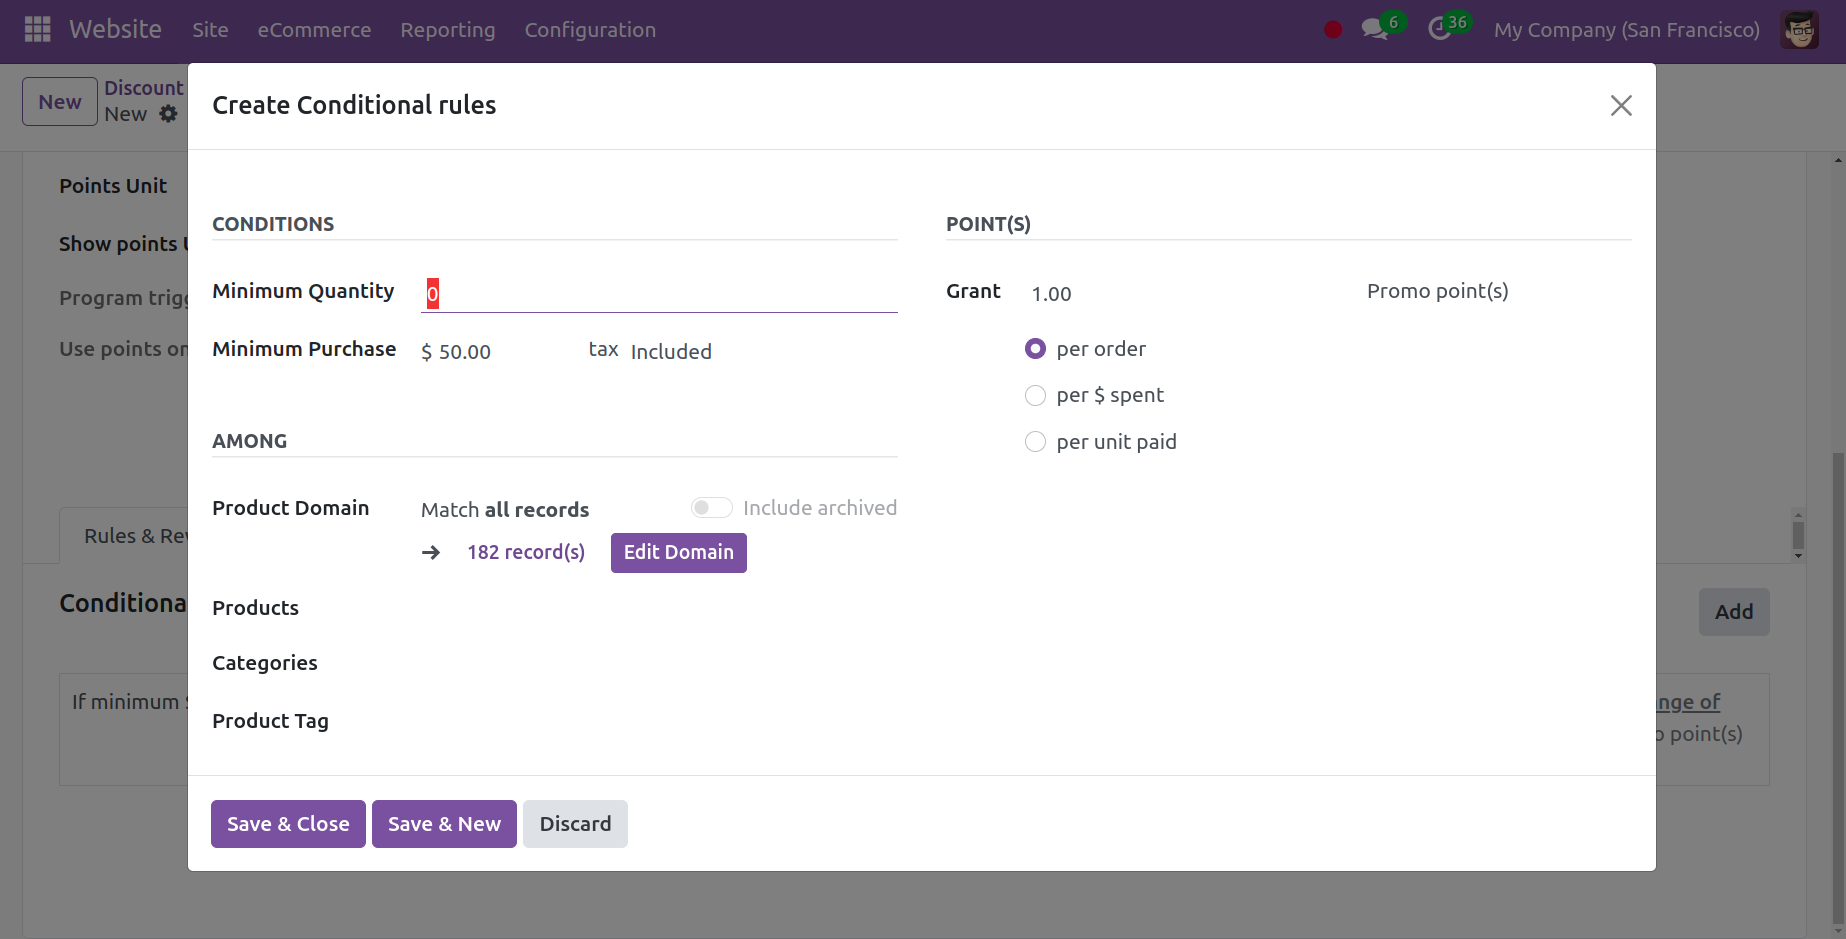
By selecting the Add option, you may include Rewards in the promotion program. A pop-up will appear on the screen as seen below.
Here, select between a discount, a free product, or free shipping as your reward kind. By choosing the Discount option, you may offer a discount to your consumer. Next, you can decide what portion of the discount you wish to provide your client. You can offer a discount on an Order, the Cheapest Product, or a Specific Product by choosing the appropriate option. Under the Discount tab, you can adjust the Maximum Discount offered as a reward.
Odoo 17 gives you the ability to reward people with freebies. By choosing the Reward Type as a Free Product, you can accomplish this.
You can enter the quantity of the free product in the Quantity Rewarded field. The reward product's description can be found in the Product section, and the related tags can be entered in the Product Tag box. If you would want to use free delivery as an incentive, you can choose the Max Discount.
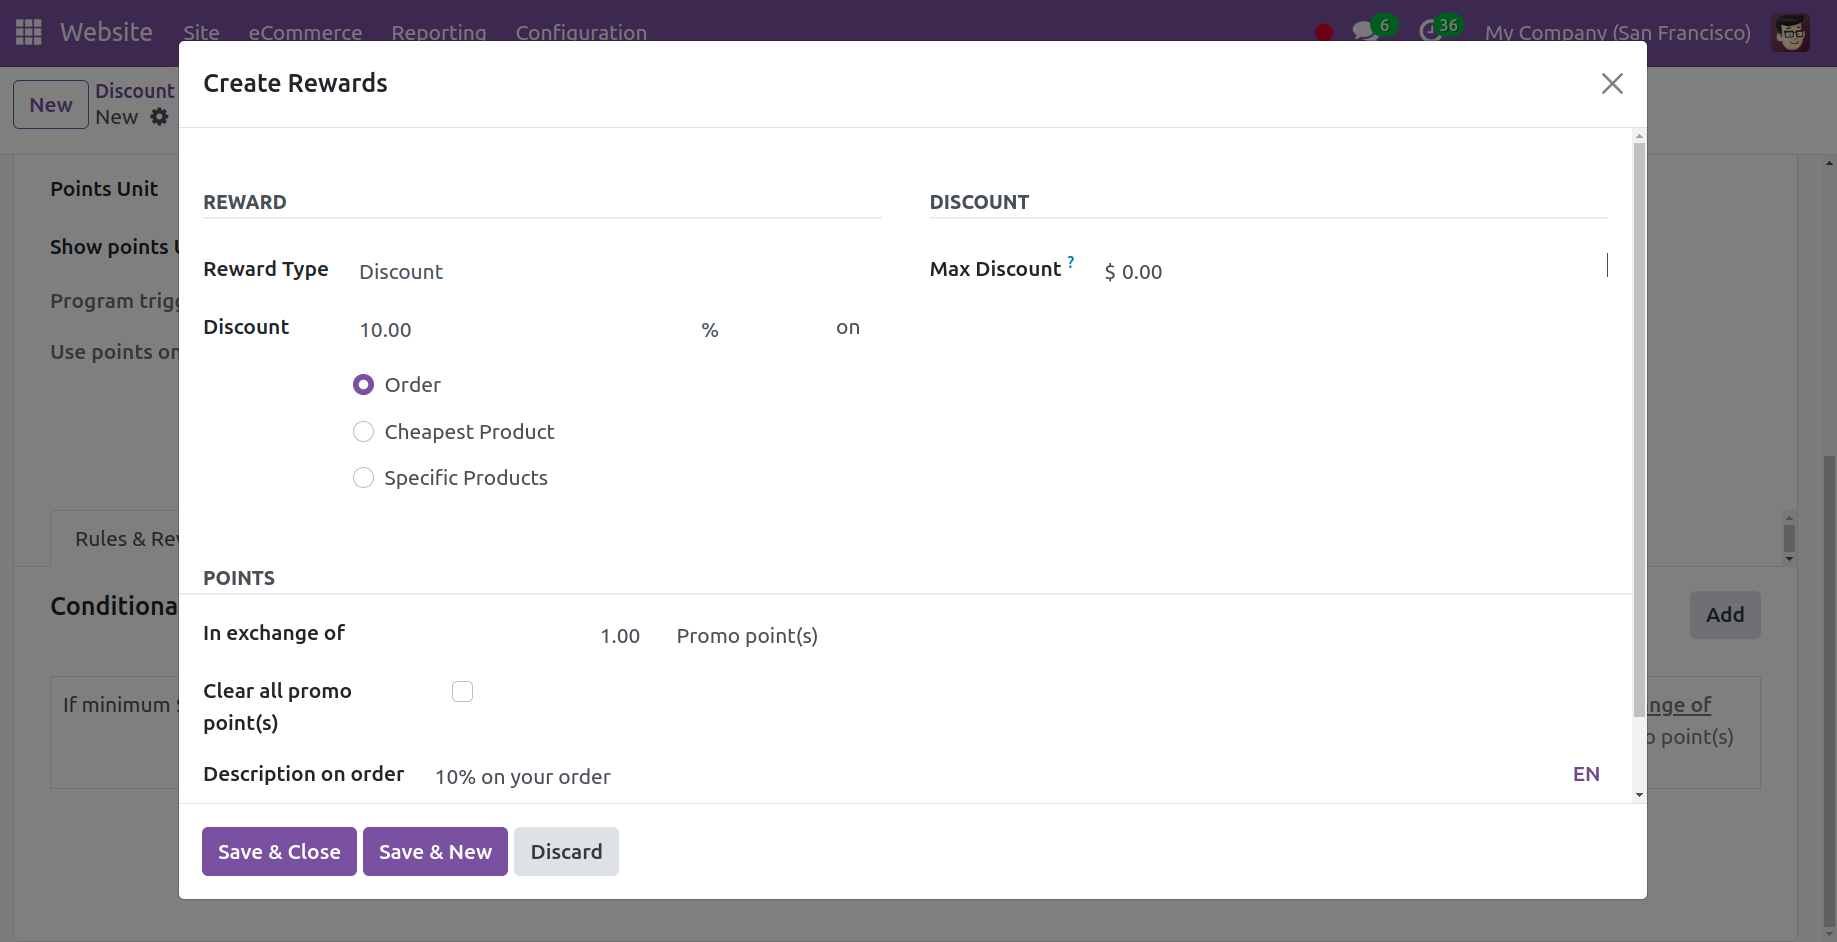
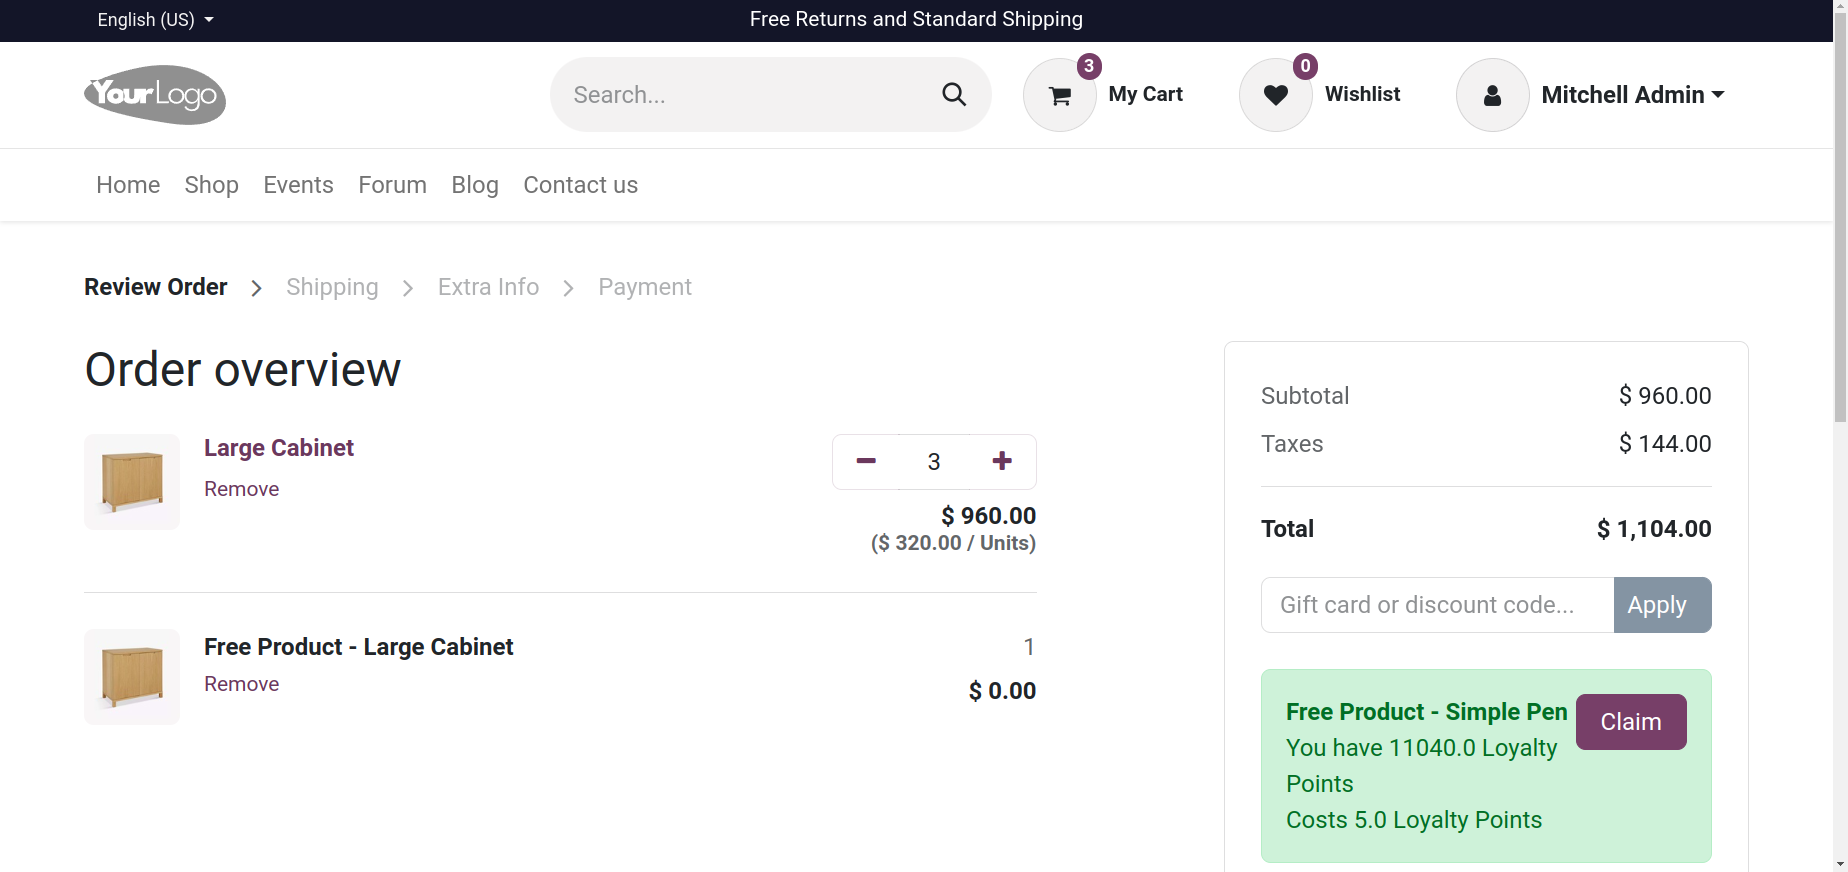
Assume for the moment that we have designed a marketing campaign like the one below: Buy three large cabinets, get one free, plus a complimentary item.
Let's go ahead and shop for a large cabinet. When we add the product to the cart in accordance with the guidelines set forth by the promotion program, we can observe that the complementary product is added to the cart as well, as seen in the example below.
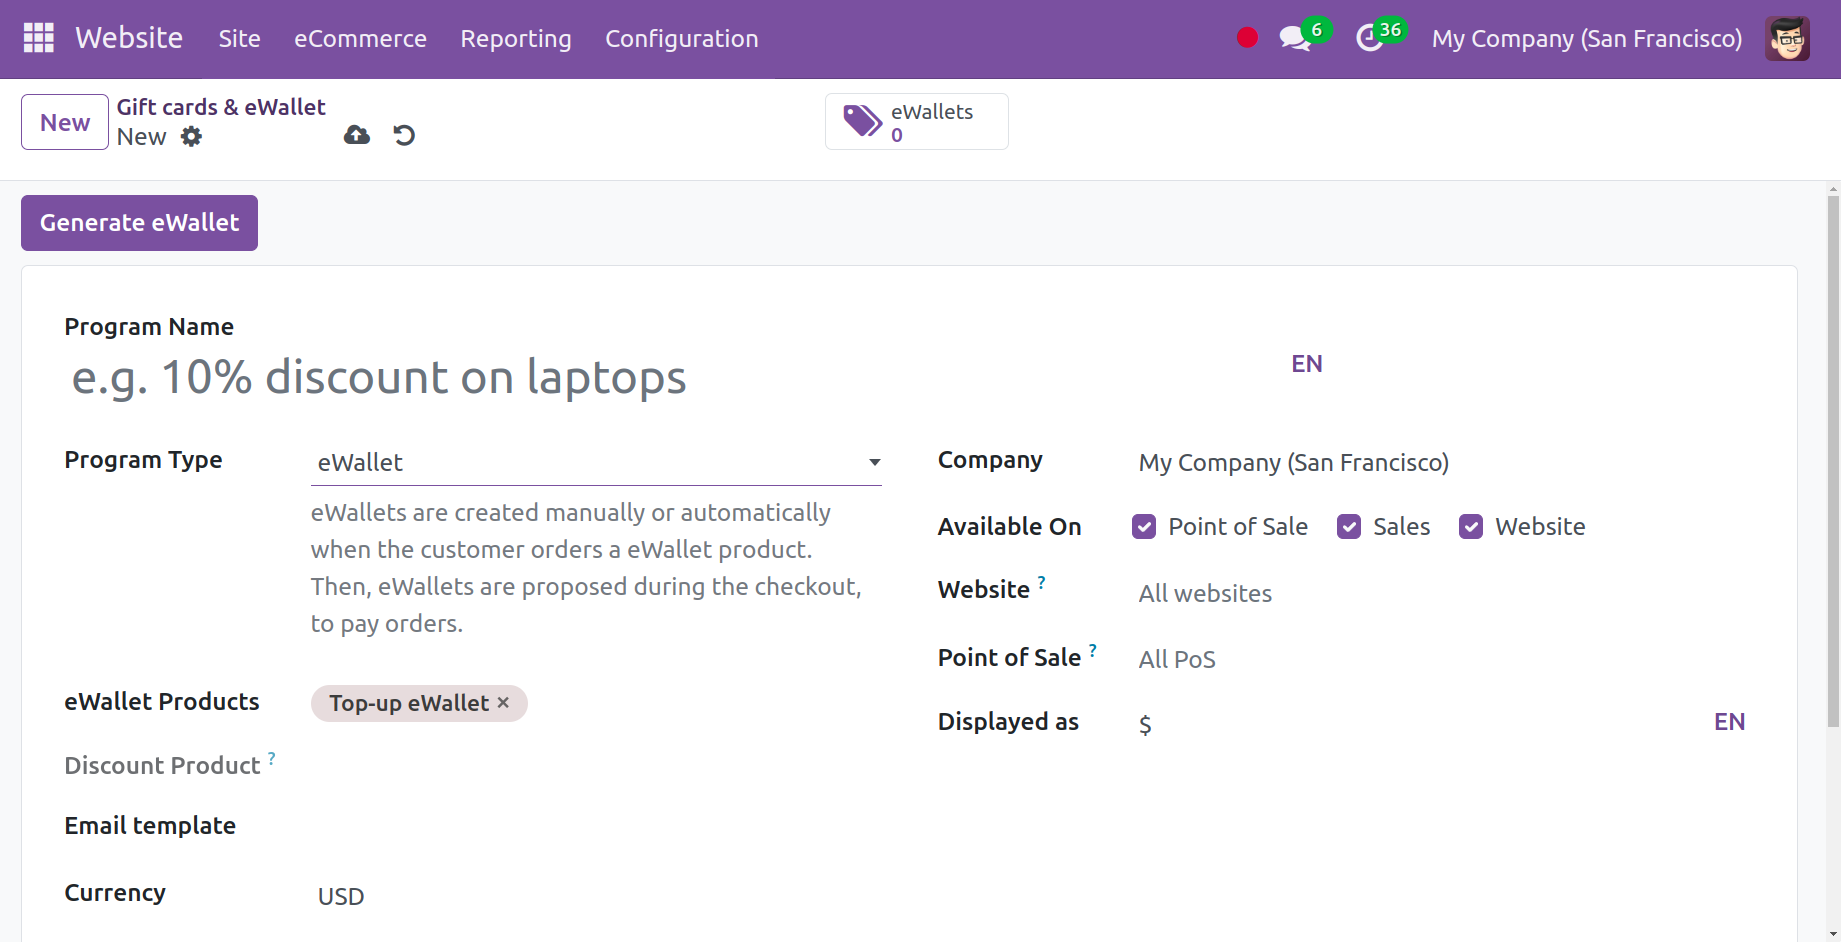
Gift cards & eWallet
A new menu for managing gift cards and eWallets is included in Odoo 17. The e-commerce module includes the eWallet feature. As seen in the graphic below, the platform shows a list of Gift Cards and eWallets together with information about the Programme Name, Programme Type, Name, Website, PoS Configuration, and Company.
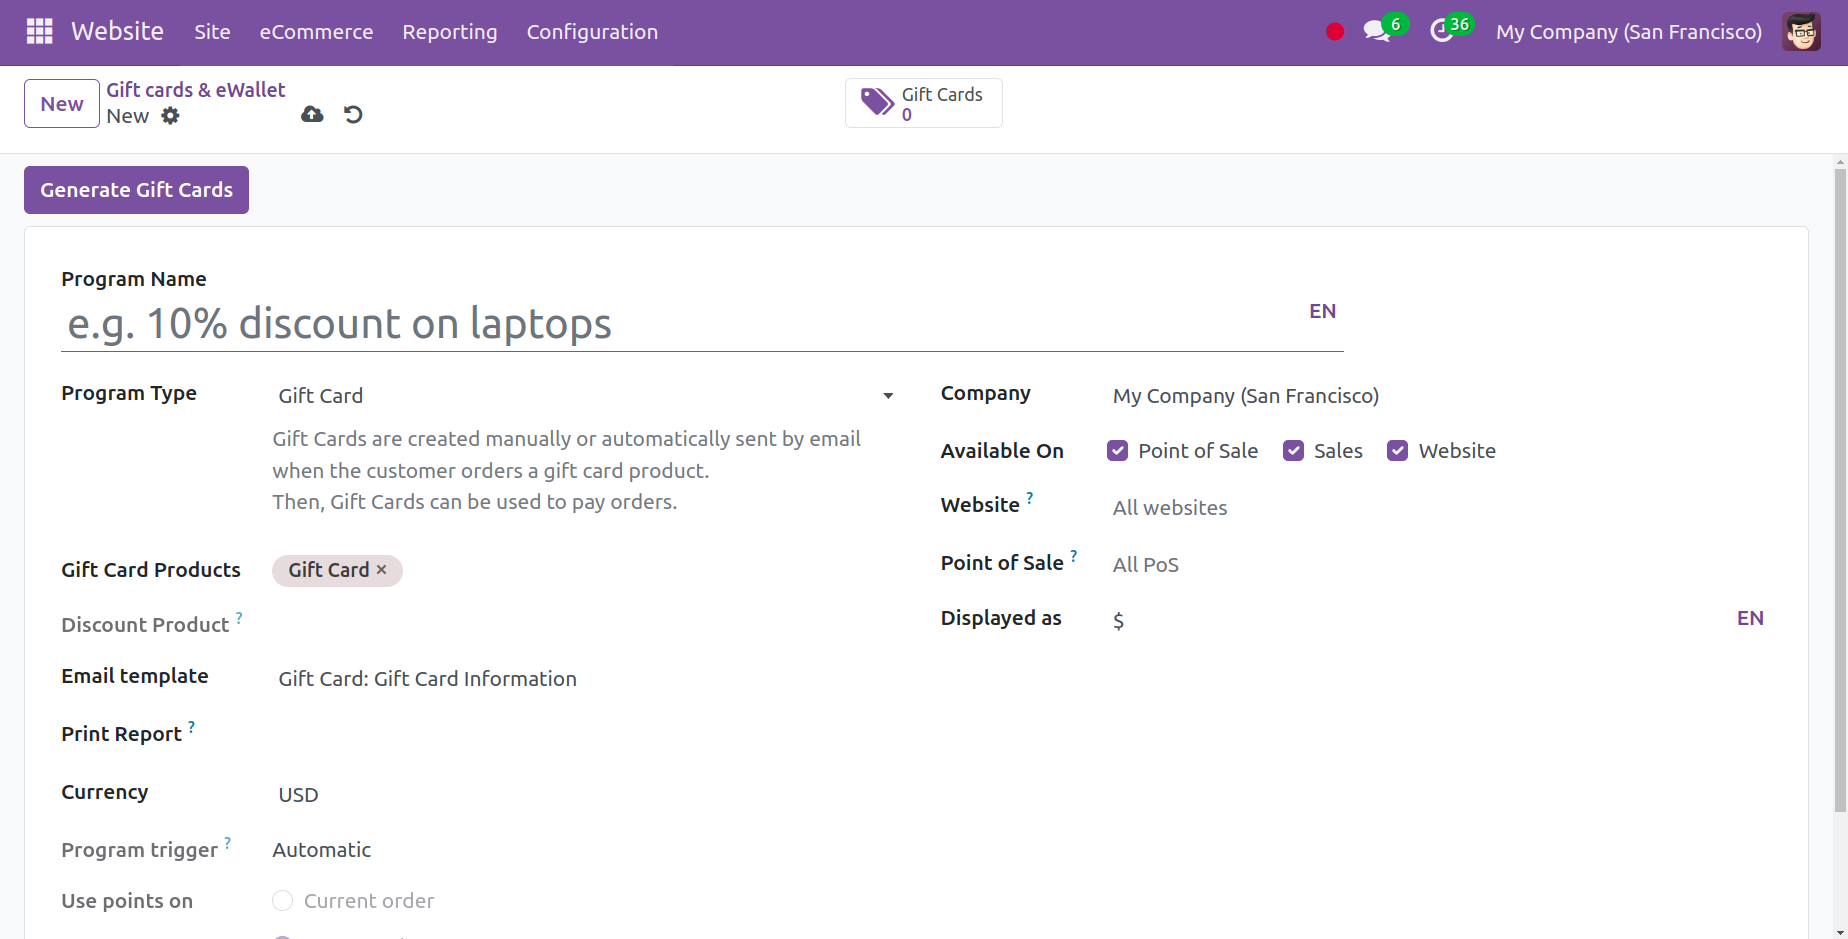
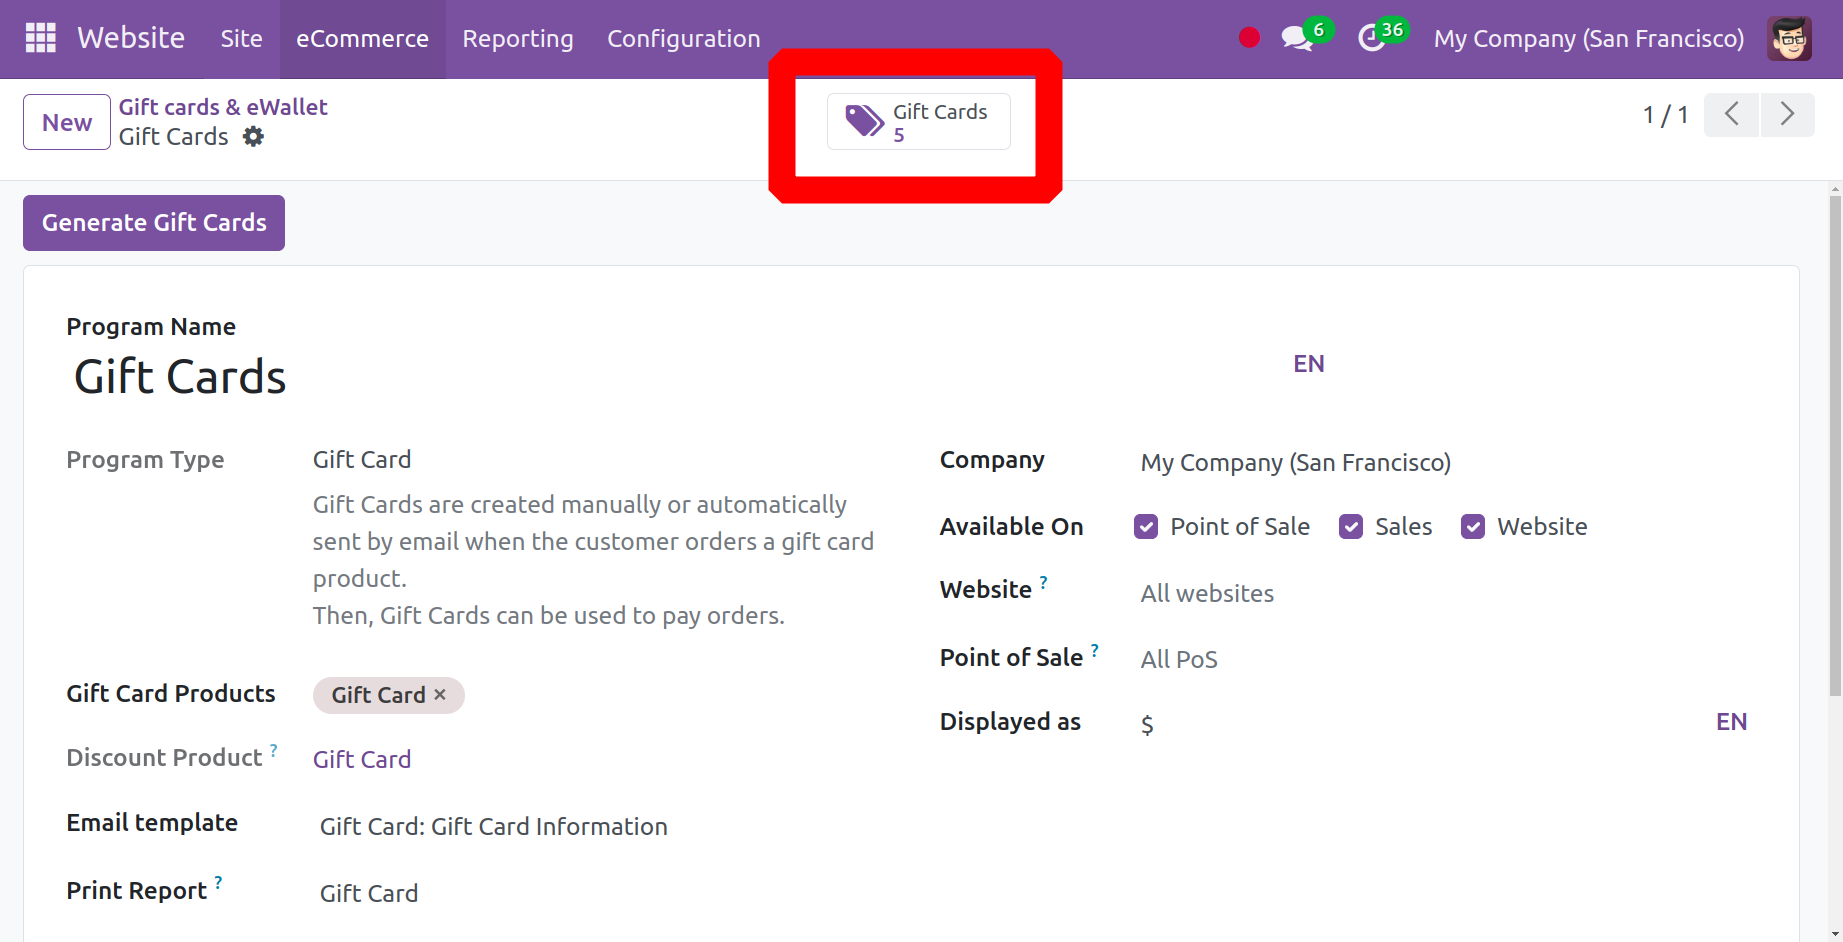
This part allows you to enter the name of the program. In the Programme kind box, you can specify the kind of program you wish to set up. It might be an eWallet or a gift card. First, let's discuss gift card generation. Gift cards are generated either automatically or manually and distributed via email when a customer purchases a product using a gift card. The Gift Cards can be used to pay for orders. You are able to activate product ids in the Gift Card Products box after choosing Gift Card as the Programme Type. In the Email Template area, you can upload an email template that will be used to send the gift card to the customer, should they be eligible. The generated gift cards from PoS will be printed using the Print Report option. You can designate the currency that is utilized for this gift card's transactions in the corresponding field. Once the company has been named, you can fill in the necessary boxes to allow this gift card to be used on the website, sales channel, and point of sale.
Click the Generate Gift Cards button—shown in the screenshot above—after creating the new gift cards. You'll see a pop-up box where you can enter any more details required to create the gift card.
Gift cards can be issued for specific customers or anonymously, depending on what you choose to enter in the "For" area. Odoo will offer extra fields where you may enter the Customers and Customer Tags if you would like to create gift cards for Selected Customers. You can select the total quantity of gift cards you wish to generate in the Quantity to Generate section. Kindly incorporate the points that consumers receive in the Gift Card Value section as well.
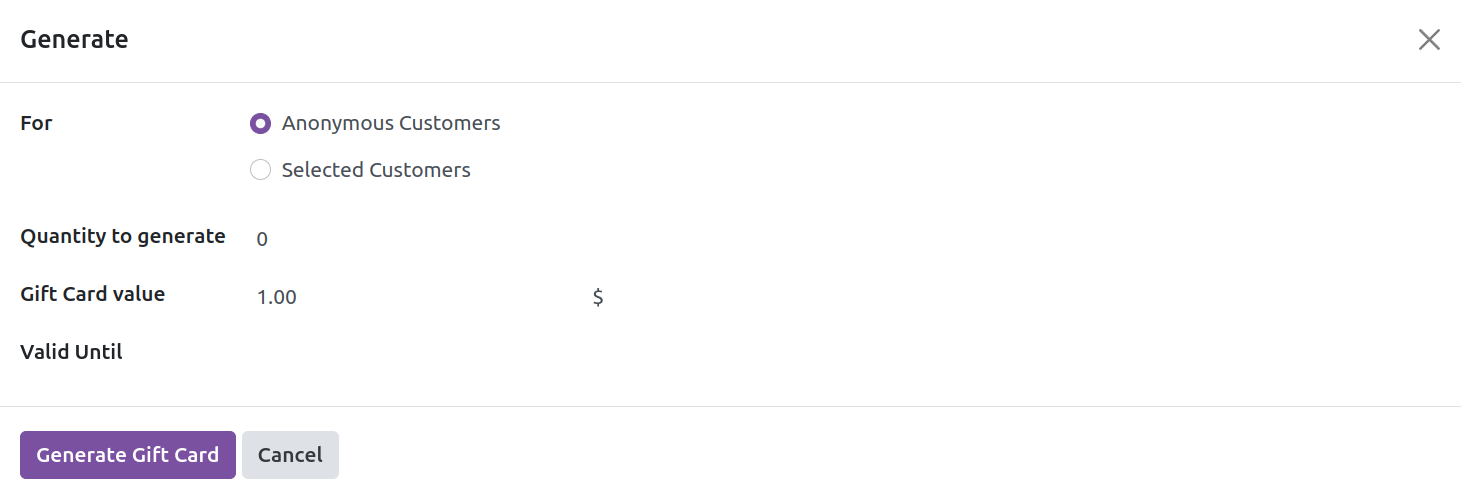
The validity period of these freshly created gift cards will be indicated in the Valid Until column. Ultimately, the required quantity of gift cards will be generated by clicking the Generate Gift Card button. By tapping the smart button on top, you may see them.
You may give your customers authority over their e-wallets so they can easily make payments by using the Odoo 17 Website e-wallet module. Money can be added to customers' wallets so they can use it to make purchases. When money is already in the wallet, your clients can make quick payments using the secure Odoo 17 Website Wallet. It enhances their purchasing experience because lengthy checkout processes are one of the main reasons customers abandon their shopping carts.
Assume for the moment that we have generated an eWallet code with the balance and expiration date displayed below for a newly established eWallet.
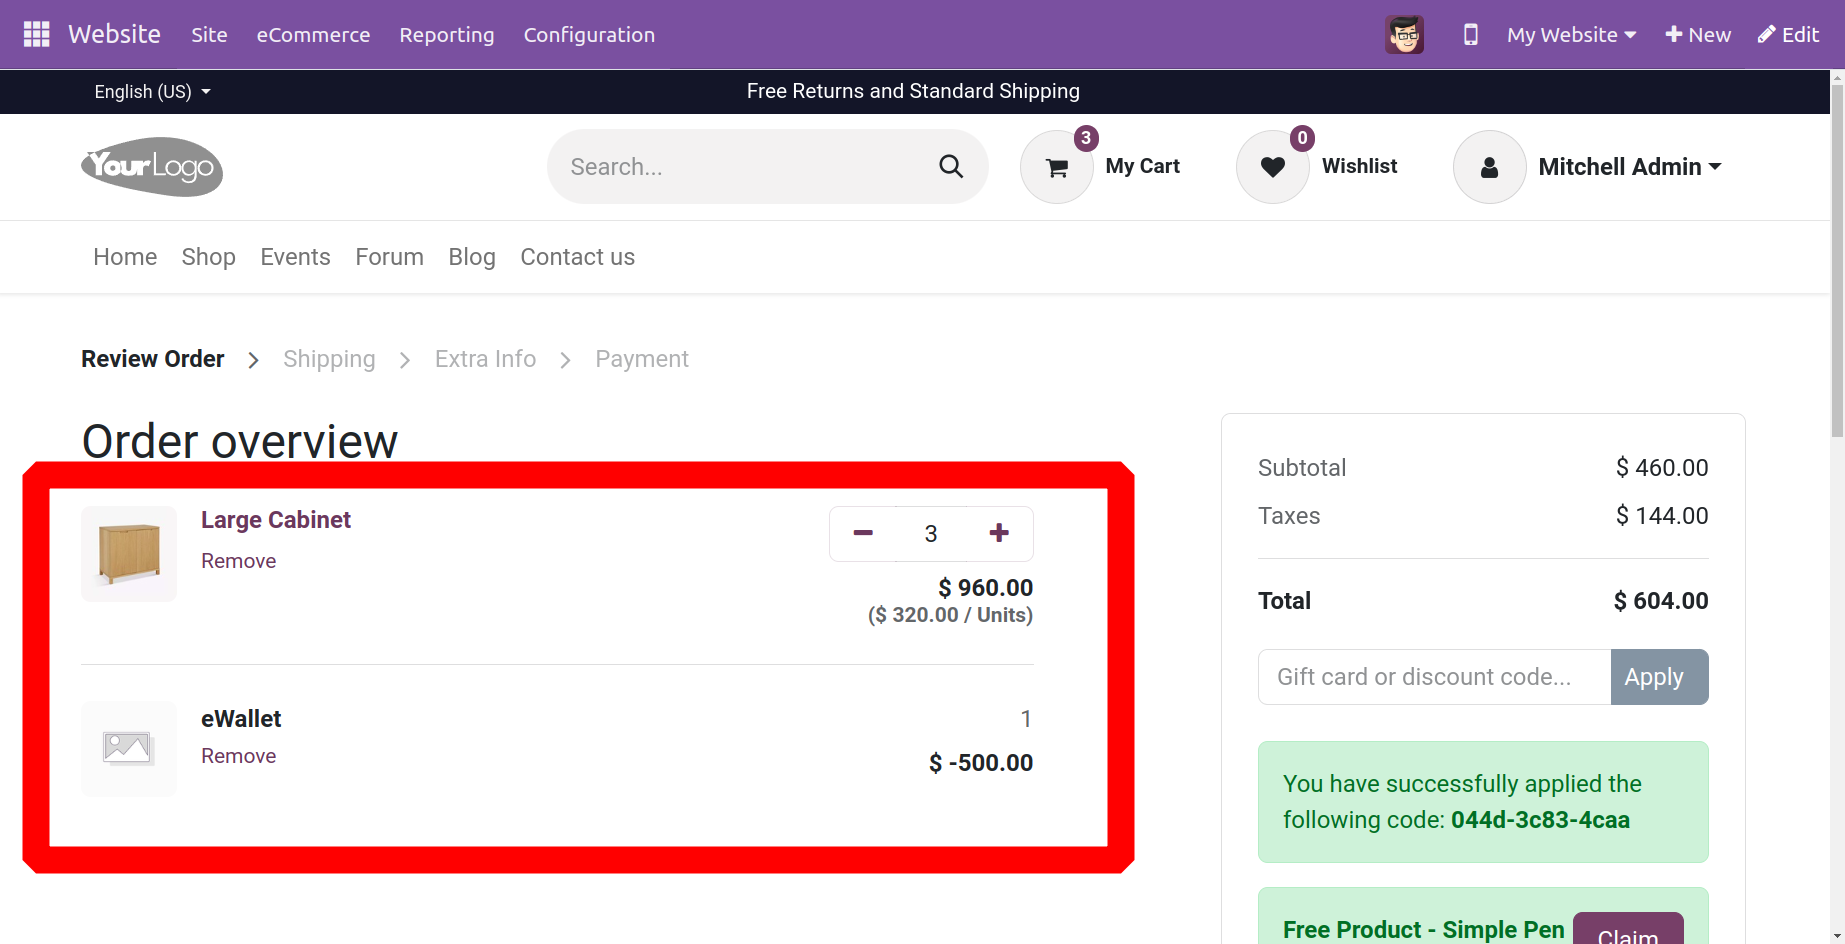
Let's visit a website and add an item to our cart. Upon checking out, the user will notice an option to pay using an eWallet, as pictured below.
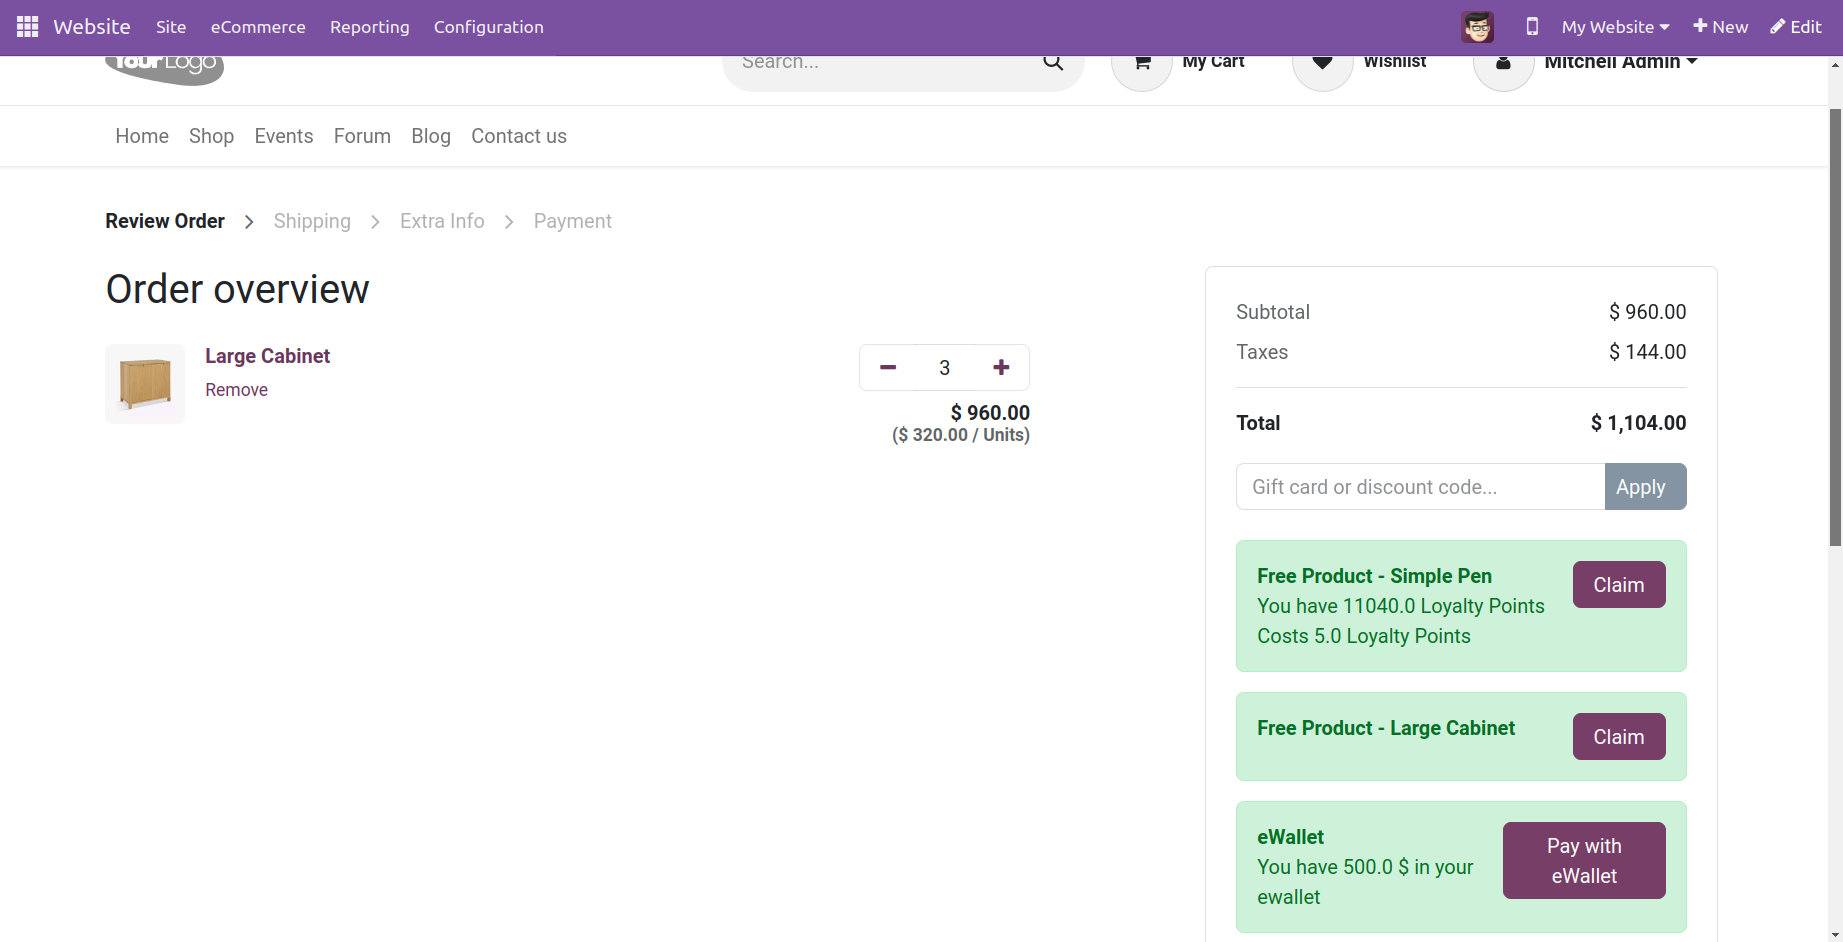
As you select the option, the product that we have already added, as indicated below, will be put into the cart along with the points.
Thus, the user can use the gift card and eWallet to improve the customer's shopping experience.
Payment Provider
Due to Odoo's integration with several payment processors, customers may make payments via your eCommerce website or their Customer Portals. They can set up automatic payments for sales orders, invoices, or subscriptions using their preferred payment methods, such as credit cards. Having a wide range of payment alternatives makes it easier for consumers to pay using a method they are familiar with and prefer, which boosts your chances of getting paid on time, if not quickly.
With the variety of online payment providers that Odoo offers for your website, your customers can pay however they like. To set up payment providers for the eCommerce app, navigate to the Website module Configuration Payment Providers. Turn on the payment processors you choose to use for your store and set them up the way you want.
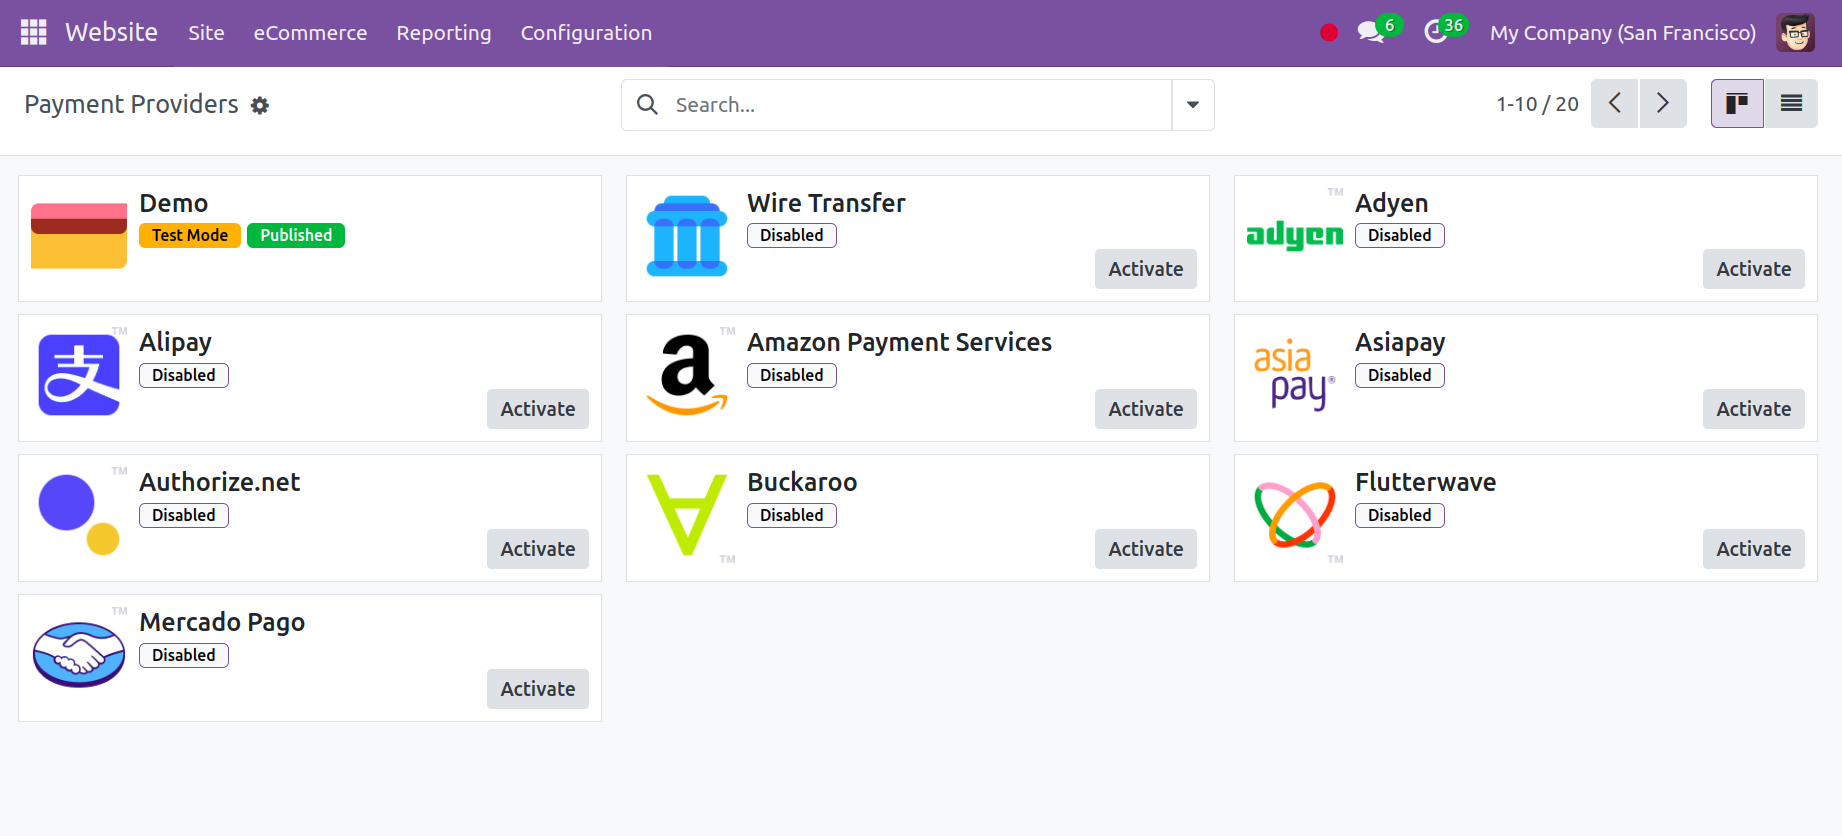
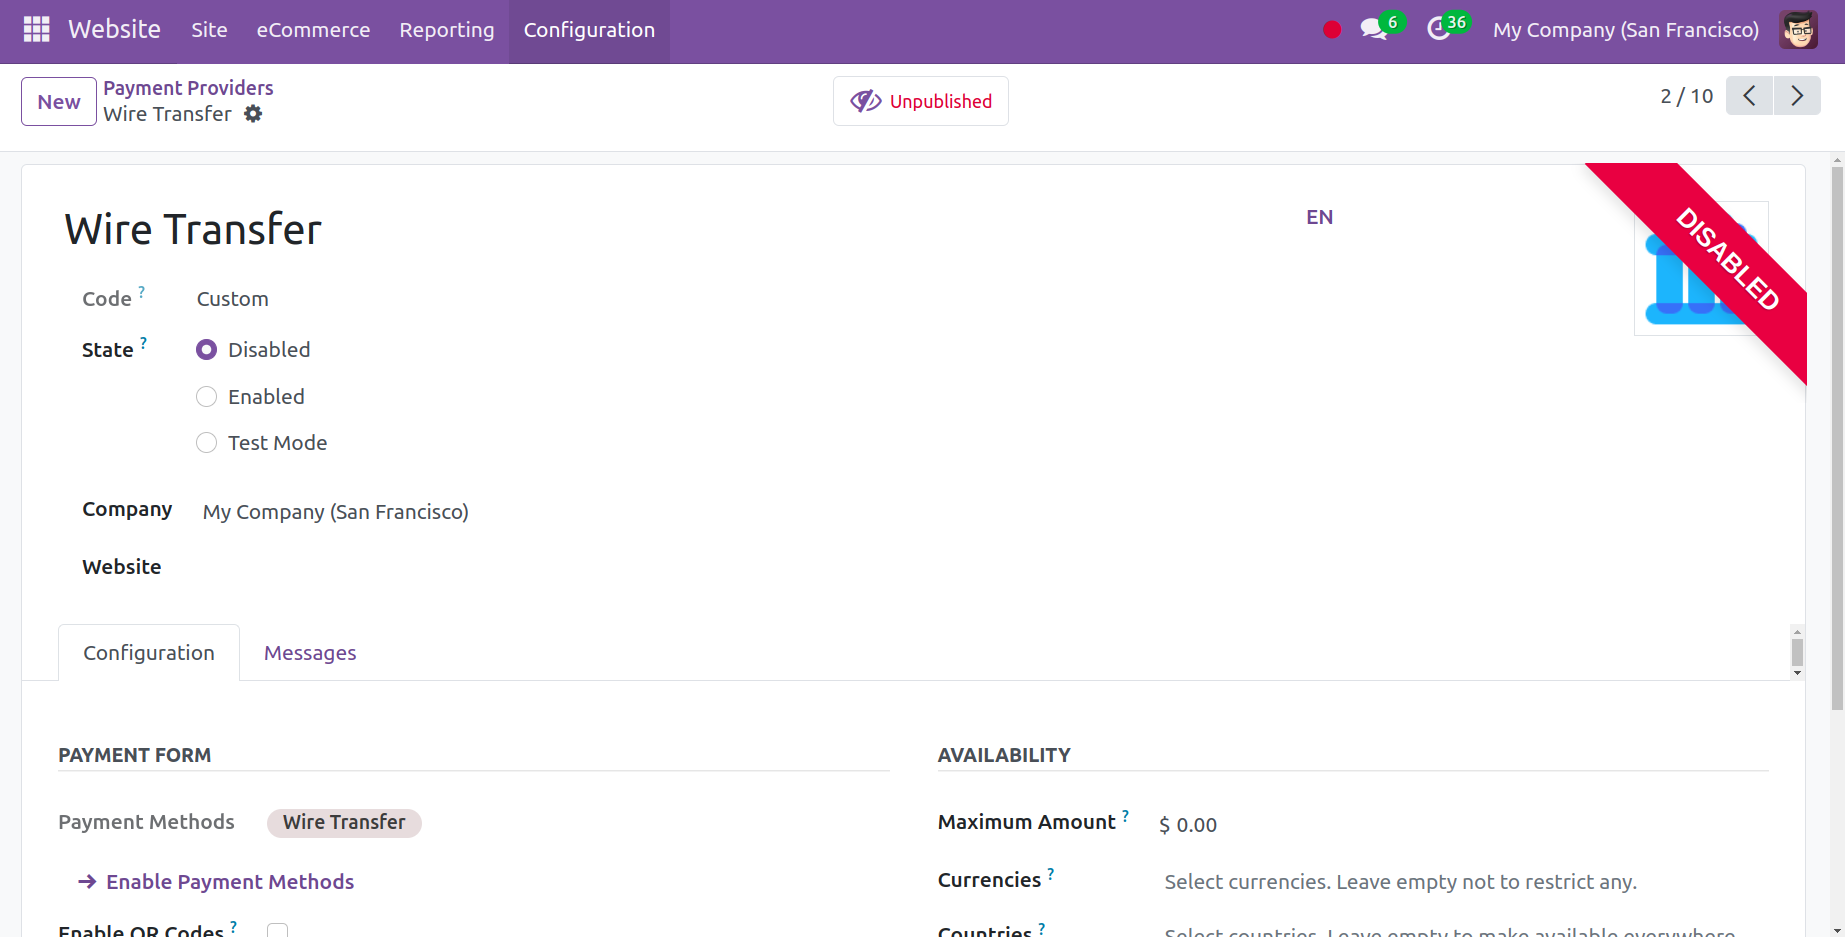
You may view the configuration of each Payment Acquirer in this area. A name for the Payment Acquirer appears at the top of the window. You can then choose on the platform whether the Payment Acquirer is in test mode, deactivated, or activated. This can be defined under the State field. To make the field active, choose the Enabled option. A test payment interface processes a fake payment when you enable Test mode. Use this mode while configuring the acquirer. After that, the accountable Company and Website can be found.
One of the new payment processors added in Odoo 16 is Mollie. The Netherlands-based payment platform is called Mollie. Mollie accepts all common online payment methods. You can grow your company in any way you choose with Mollie, whether it's by expanding internationally or focusing on a specific market.
Odoo requires your API Credentials, which are composed of your API Key (either the test or the live API Key, depending on the provider's settings) in order to connect to your Mollie account. You can copy and paste your login credentials from your Mollie account into the relevant fields under the Credentials page. To get your API key, log into your Mollie account, choose Developers API keys, and then copy your Test or Live API key.
Furthermore, Odoo 17 introduces a number of additional payment providers, including Asiapay, Flutterwave, Mercado Pago, Razorpay, Sips, and Buckaroo.
AsiaPay is an online payment business with its headquarters in Hong Kong that accepts payments from several Asian countries.
Whirlwind Online payment processor Flutterwave, with its headquarters in Nigeria, offers services to several African countries and payment gateways.
A number of currencies and payment options are accepted by Latin American online payment company Mercado Pago.
With its headquarters in India, Razorpay is an online payment processor that takes more than 100 different payment options.
A Dutch company called Buckaroo offers a variety of online payment methods.
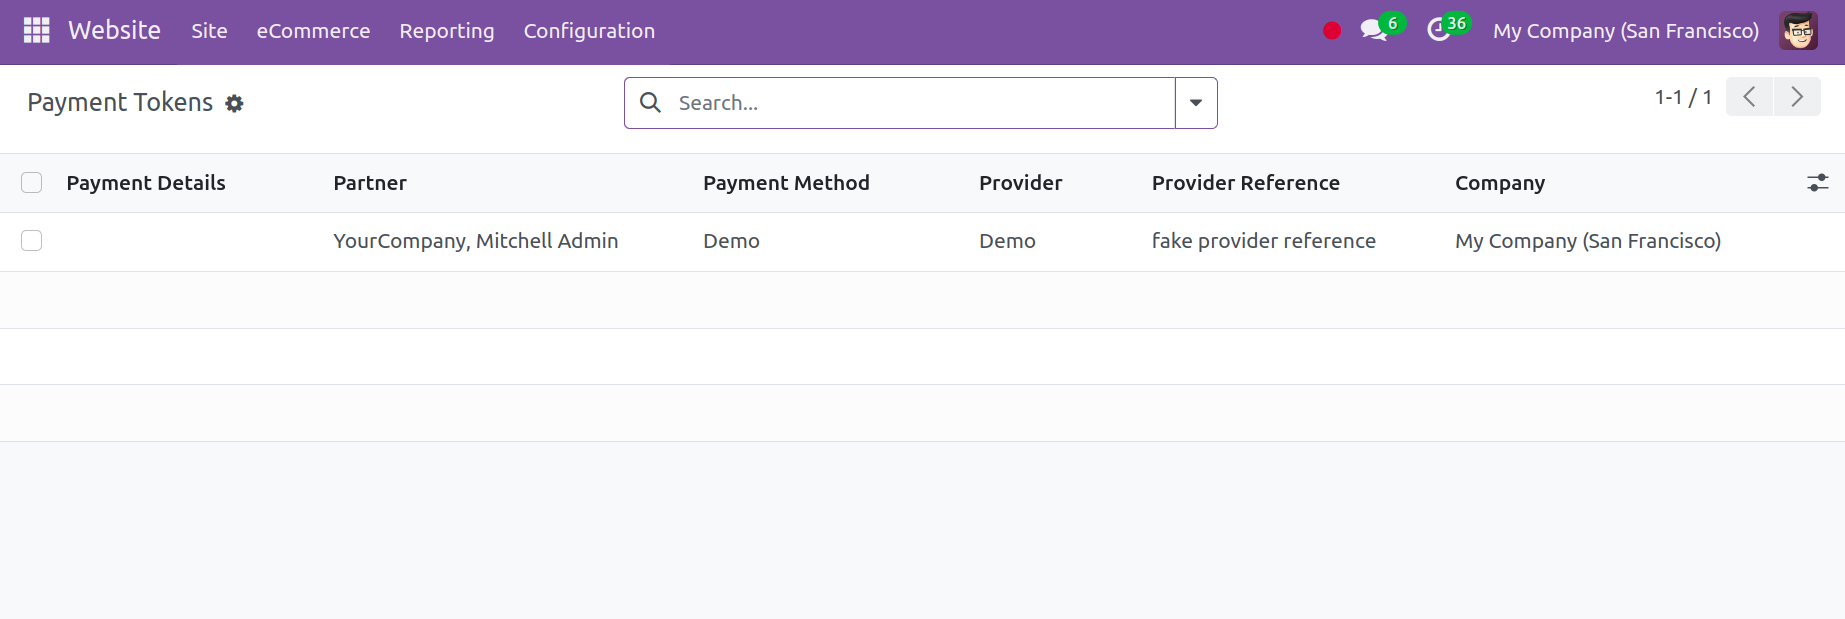
Payment Tokens
Use the Odoo 17 Website module's Payment Tokens option to create and manage payment tokens. Through the menu, customers can use tokenized payments—digital copies of their credit card data—to safely save their payment details, including credit card numbers, expiration dates, and security codes for use in future transactions. With just a few clicks and Payment Tokens, users may quickly and simply finish online purchases. Under the Payment Tokens option, users may view and manage client payment tokens in addition to setting up and managing payment partners. In addition, users can configure numerous alternative payment methods that work with payment tokens, such as PayPal, debit cards, and credit cards.
Payment Methods
Payment Methods are plainly required for any website that takes online payments. These instantly recognisable icons help users quickly determine which credit or debit cards, as well as online payment methods, are supported on your eCommerce site. It will therefore enhance customers' buying experiences at checkout and encourage website confidence.
The Odoo 17 Website module's Payment Methods menu allows users to configure the many payment methods that customers can use to purchase goods and services. From a selection of possible payment methods, users can select the one they want to use on their website.
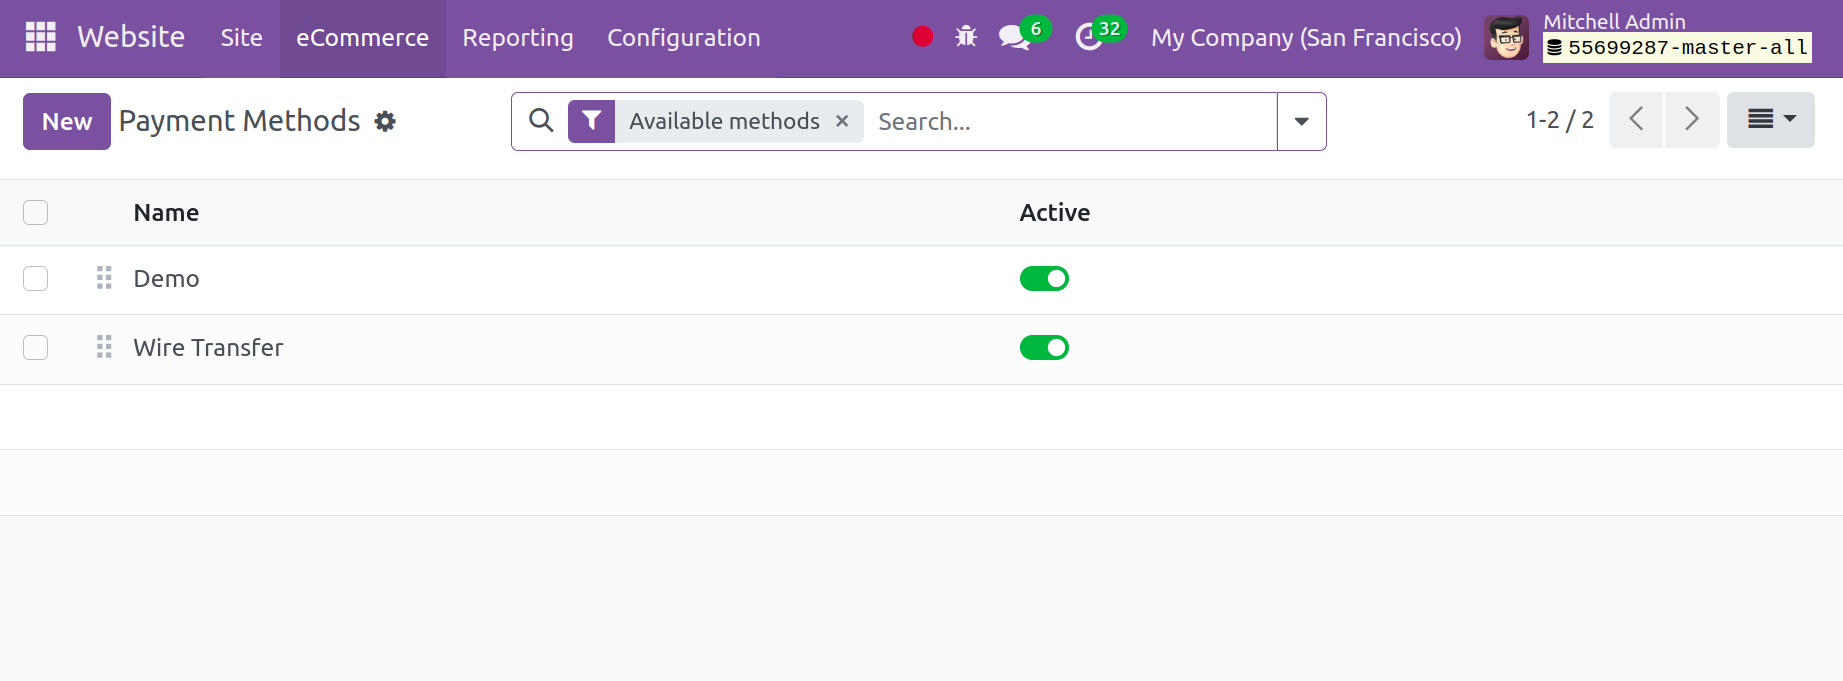
Available Payment Methods include VISA, MasterCard, Paypal, Stripe, Authorize.net, credit cards, and a host of others. Additionally, users can alter the symbols' appearance by adding details. This feature allows customers to choose their preferred payment method when making purchases.
Payment Transactions
The Payment Transactions option, found under the Configuration tab of the Odoo 17 Website module, allows users to view and manage the specifics of their payment transactions. You may examine and manage their payment transactions, as well as check payment history, when you have access to them. In addition, users can examine, capture, void, and refund transactions in addition to configuring automated refunds.
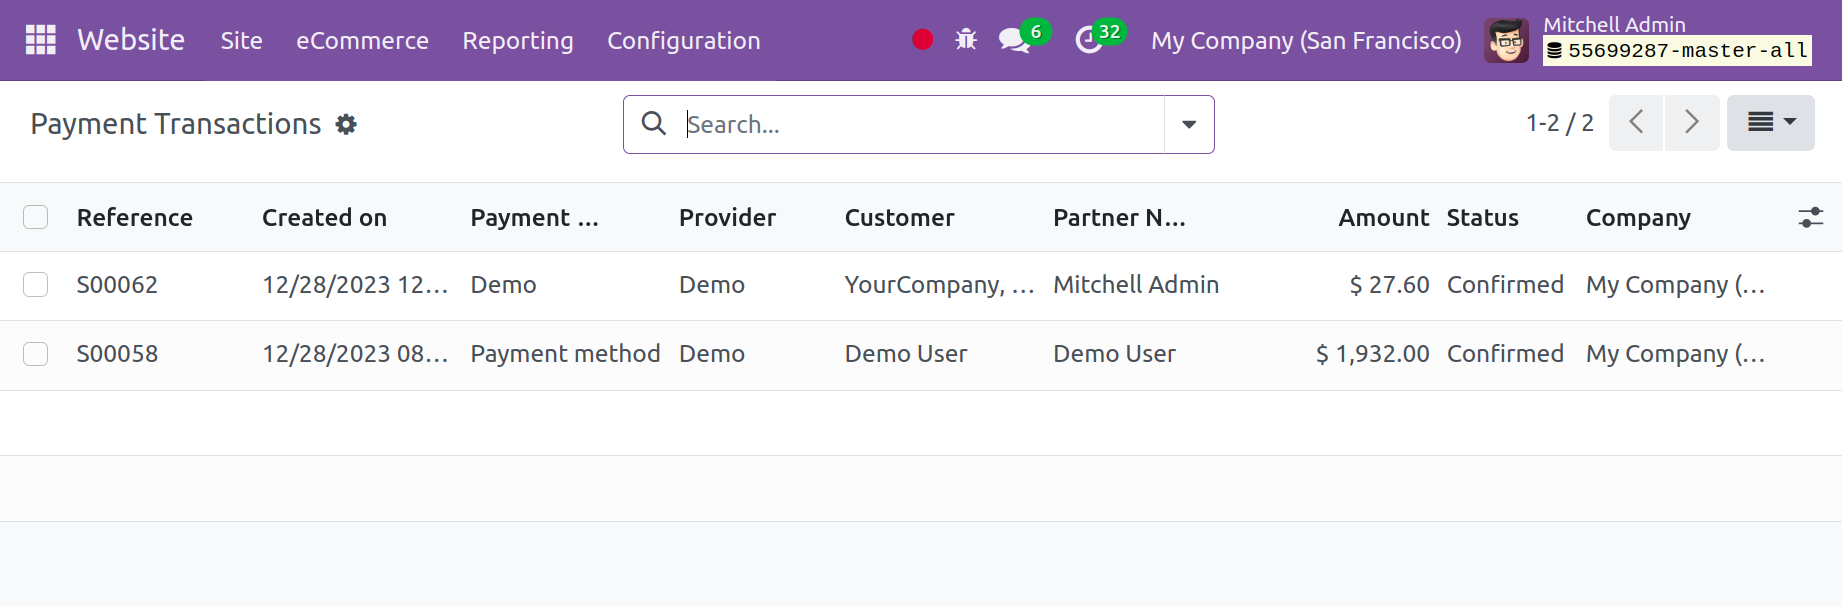
Selecting the Payment Transaction menu from the Configuration tab will bring you to the Payment Transaction window.
Shipping Methods
You can specify how products are delivered using multiple shipping options with Odoo. In order to improve product delivery management, Odoo has included dynamic capabilities in the website module that optimize your company's sales performance. There are several settings to enable in the Website module's Settings menu, as shown in the picture below.
By selecting the New button from the website module setup, as indicated below, you may add a new shipment method. You will be able to input details about the new shipment method on a newly created page.
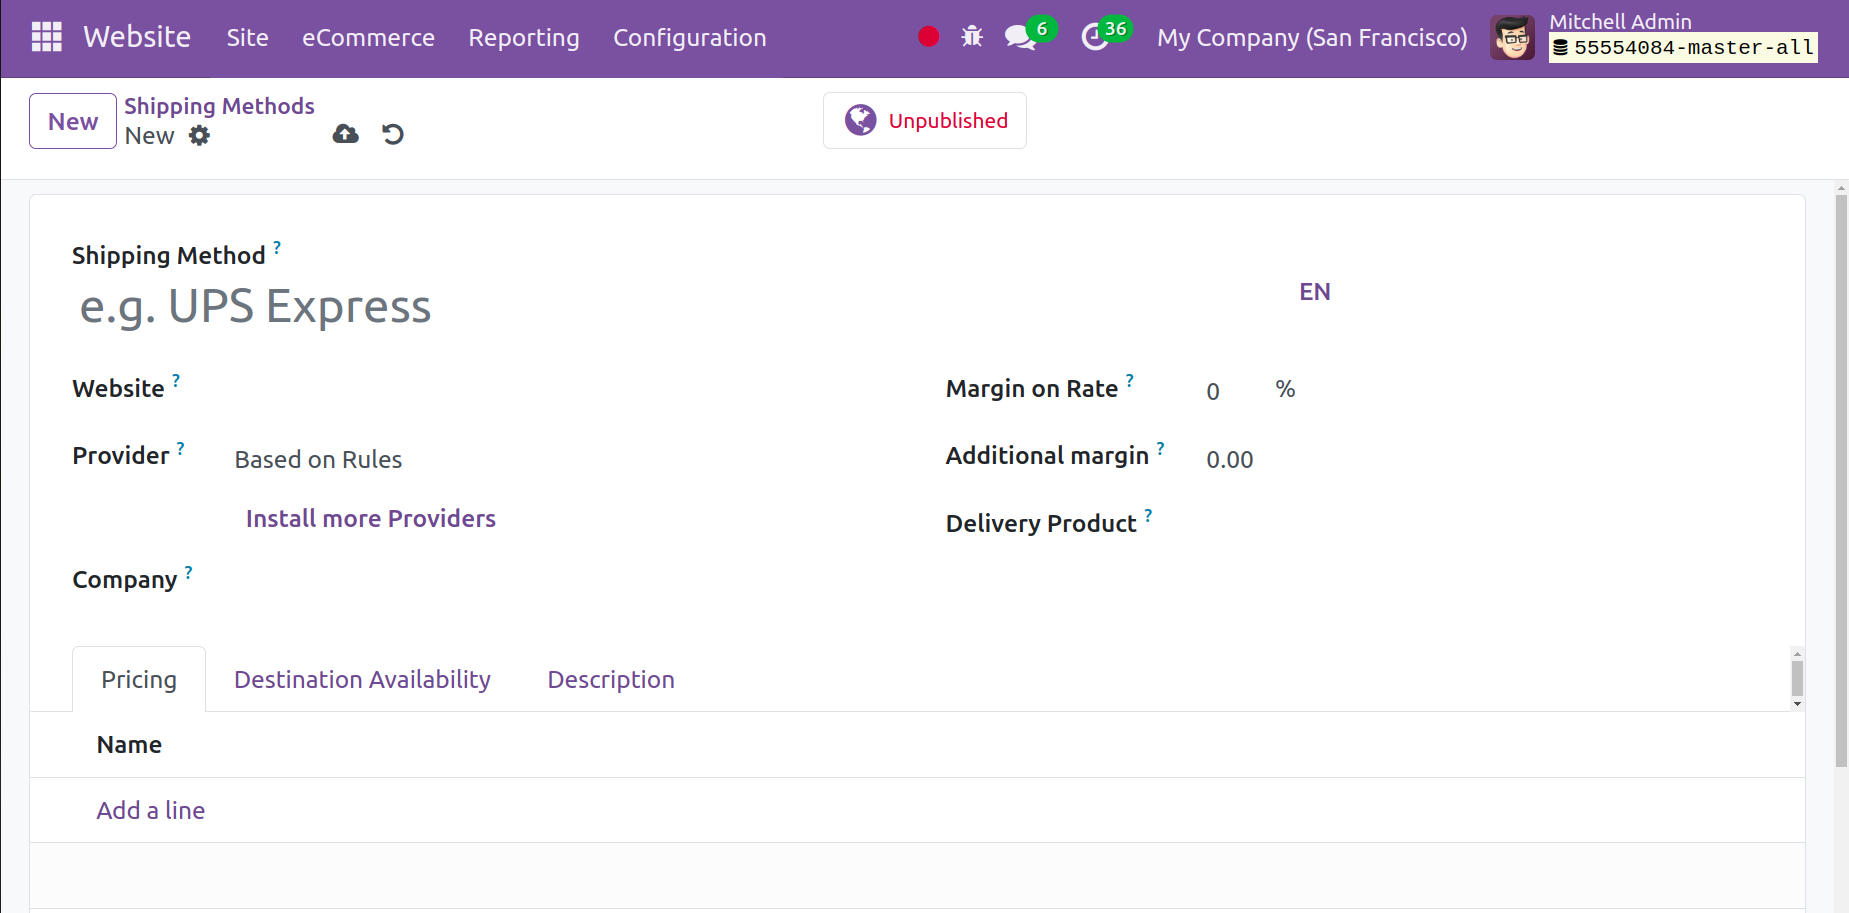
You can type the Shipping Method's name in the designated field. Once the Delivery Product, Company, and Website have been selected, add the Margin on Rate to the form.
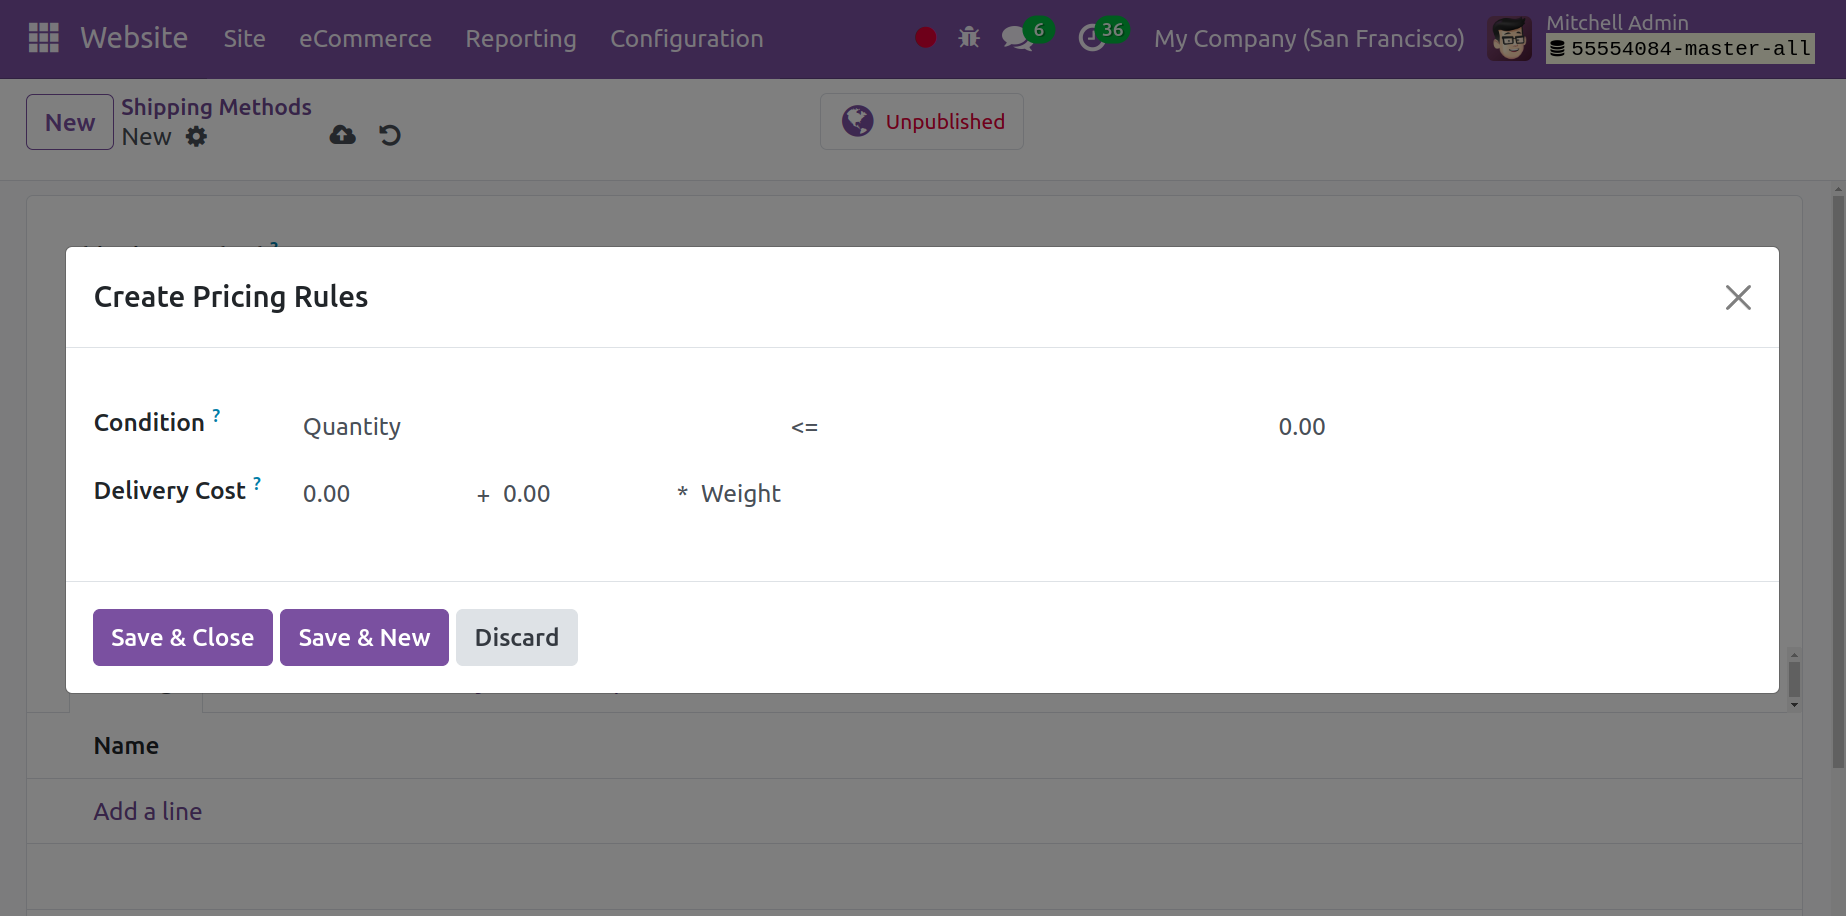
Enter the product you wish to deliver using this Shipping Method under Delivery Product. The percentage that will be added to the shipping cost is known as the rate margin. In the Provider box, you have the option of Fixed Price or Based on Rules. You can specify the Fixed Price on the Pricing tab if you select the Fixed Price option.
A new column where you can set up the rule depending on parameters like weight, quantity, price, volume, and weight*volume will appear if you select according to the rule.
Under the Destination Availability tab, you are able to designate the location where your delivery service is available. The delivery address of your consumer can also be used to filter the delivery companies. You can choose countries, stars, zip codes, and zip codes on this page. You can include a description of the delivery method in an extra box in Odoo, and it will appear on eCommerce as an online quote.

The delivery method selection process is made easy for customers using Odoo 17 when they make purchases online. At the time of checkout, the customer can add an additional shipping address when the Shipping Address option is enabled.
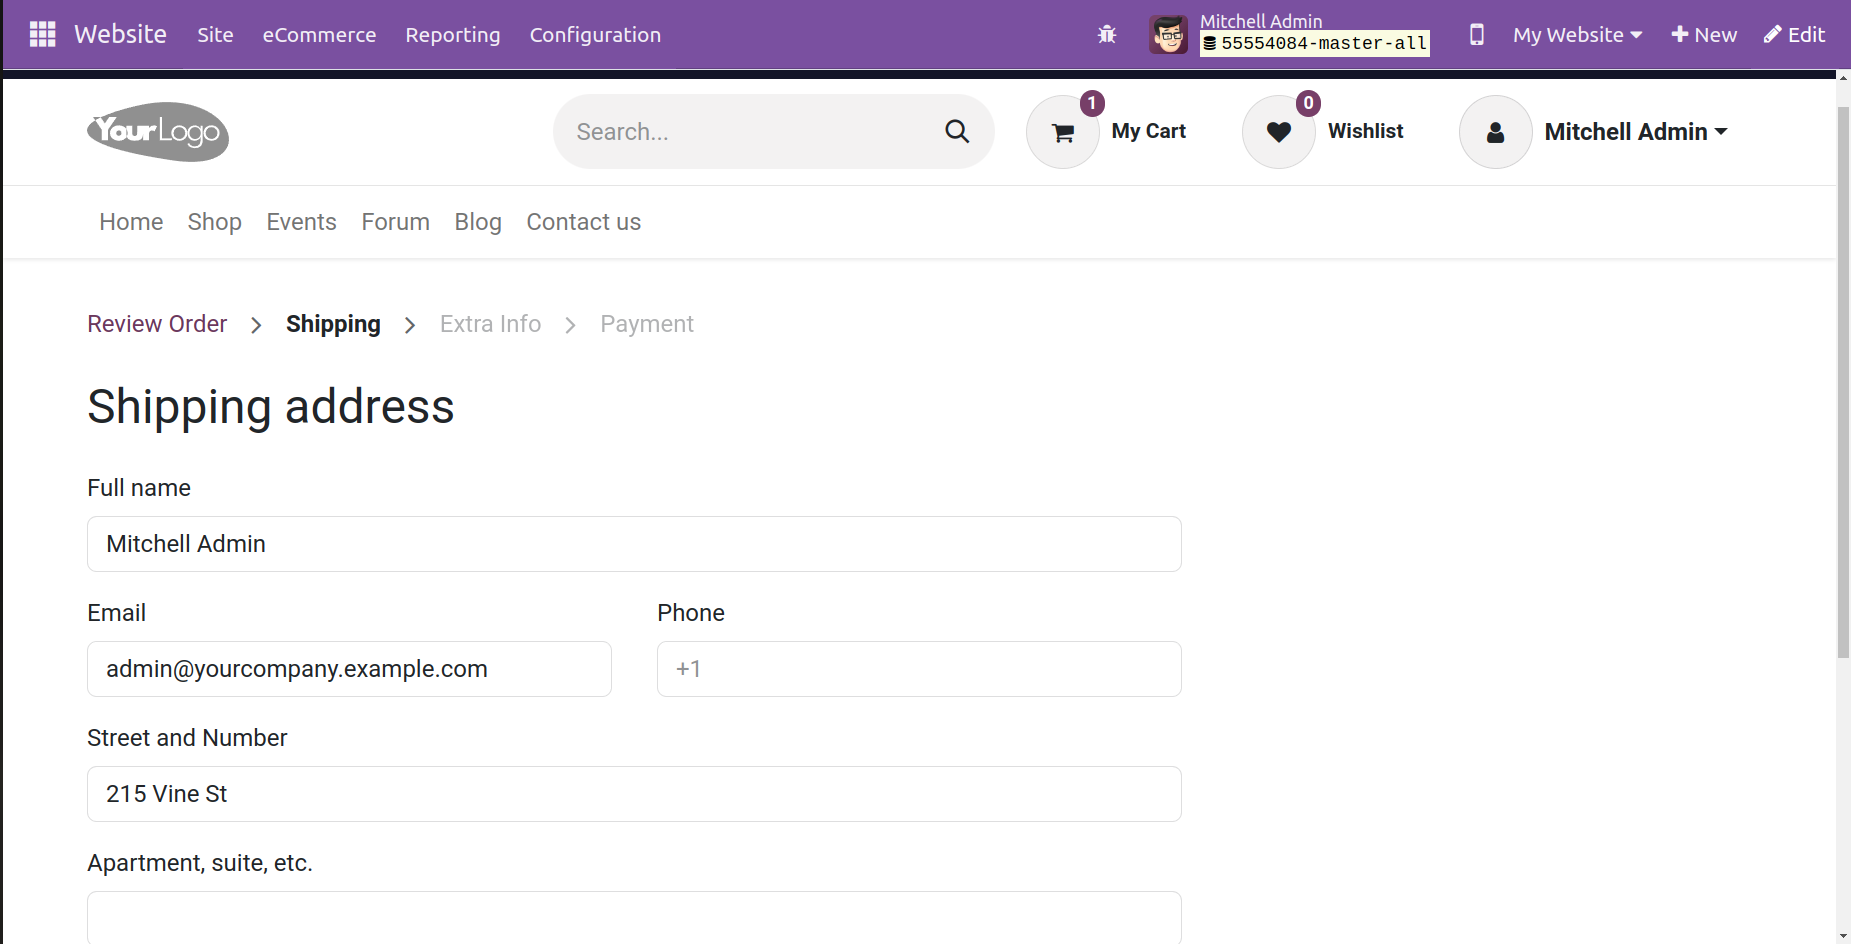
The shipping options for the chosen product will be displayed as indicated below throughout the Odoo checkout process.
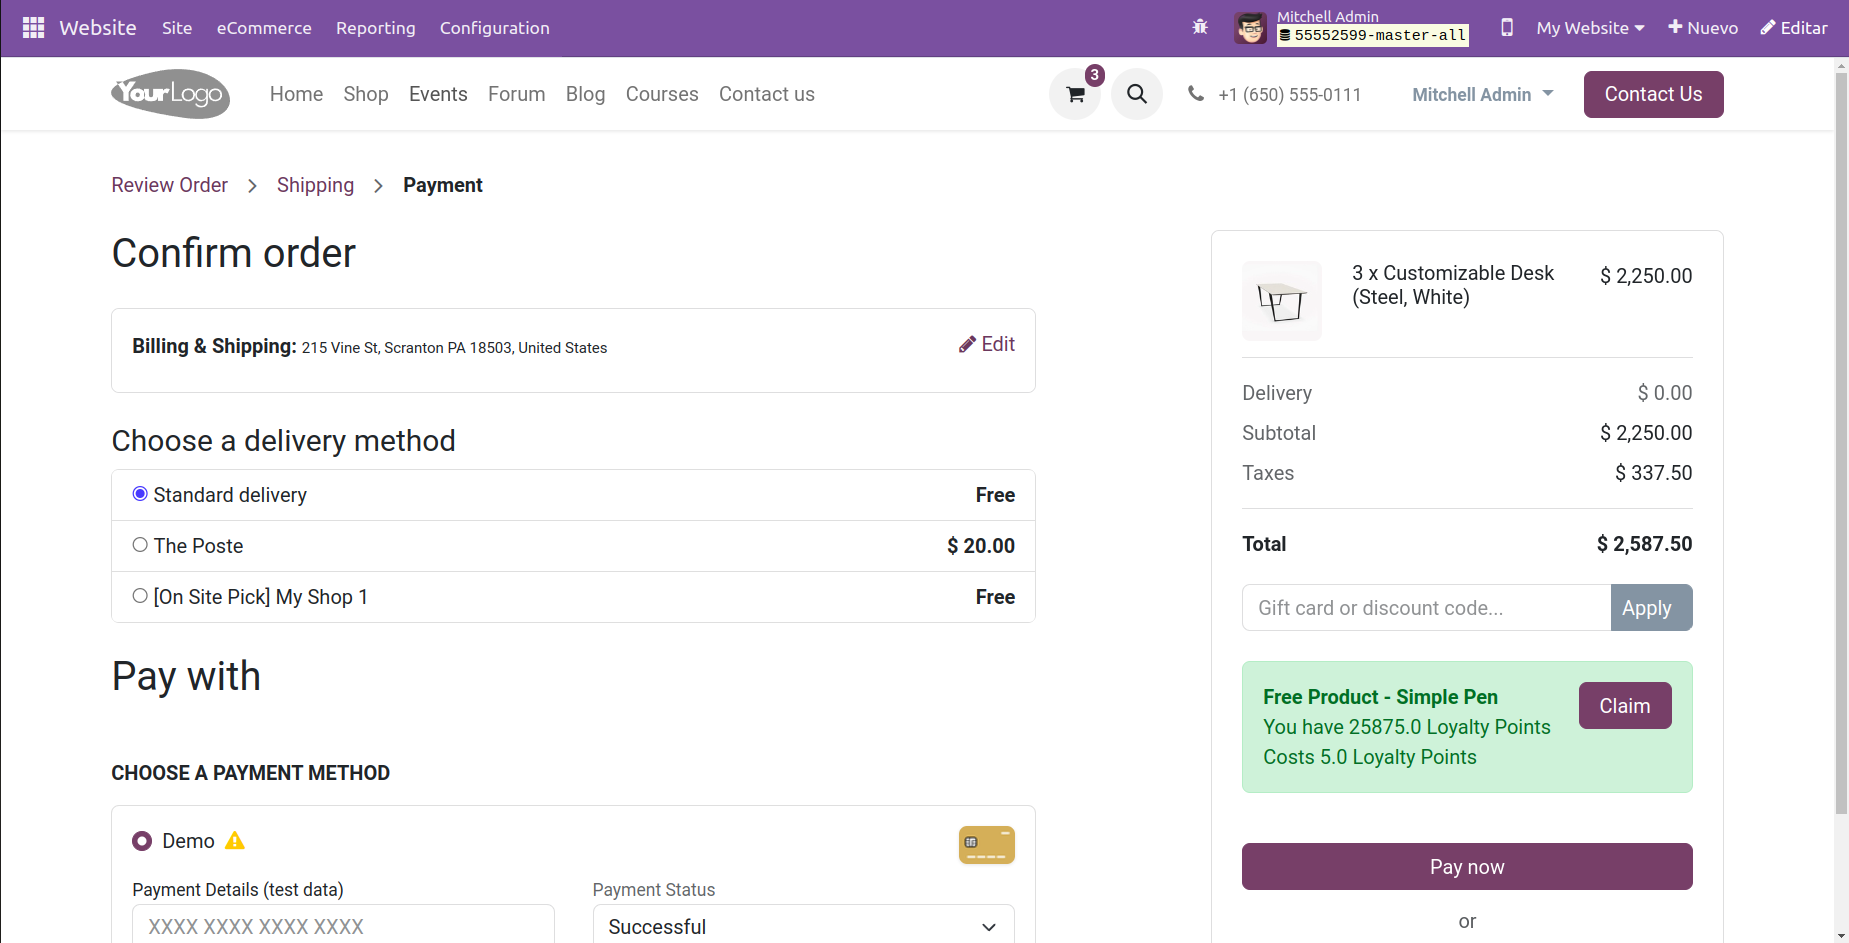
Select "Process Checkout" from the menu. You will proceed to the following stage of the checkout process with Odoo. You can enter your shipping and billing addresses here. When the locale is provided, Odoo shows all available shipping options. Clients can choose from a list of acceptable delivery options. Depending on the choice we select, the shipping costs might be displayed on the screen. The cost varies based on the delivery method. Once we've chosen a convenient payment option, we can pay the delivery fee and the purchase bill at the same time.
Settings
Checkout Process is the first option in the eCommerce settings. The following sections are included in the Shop checkout process, as indicated below.
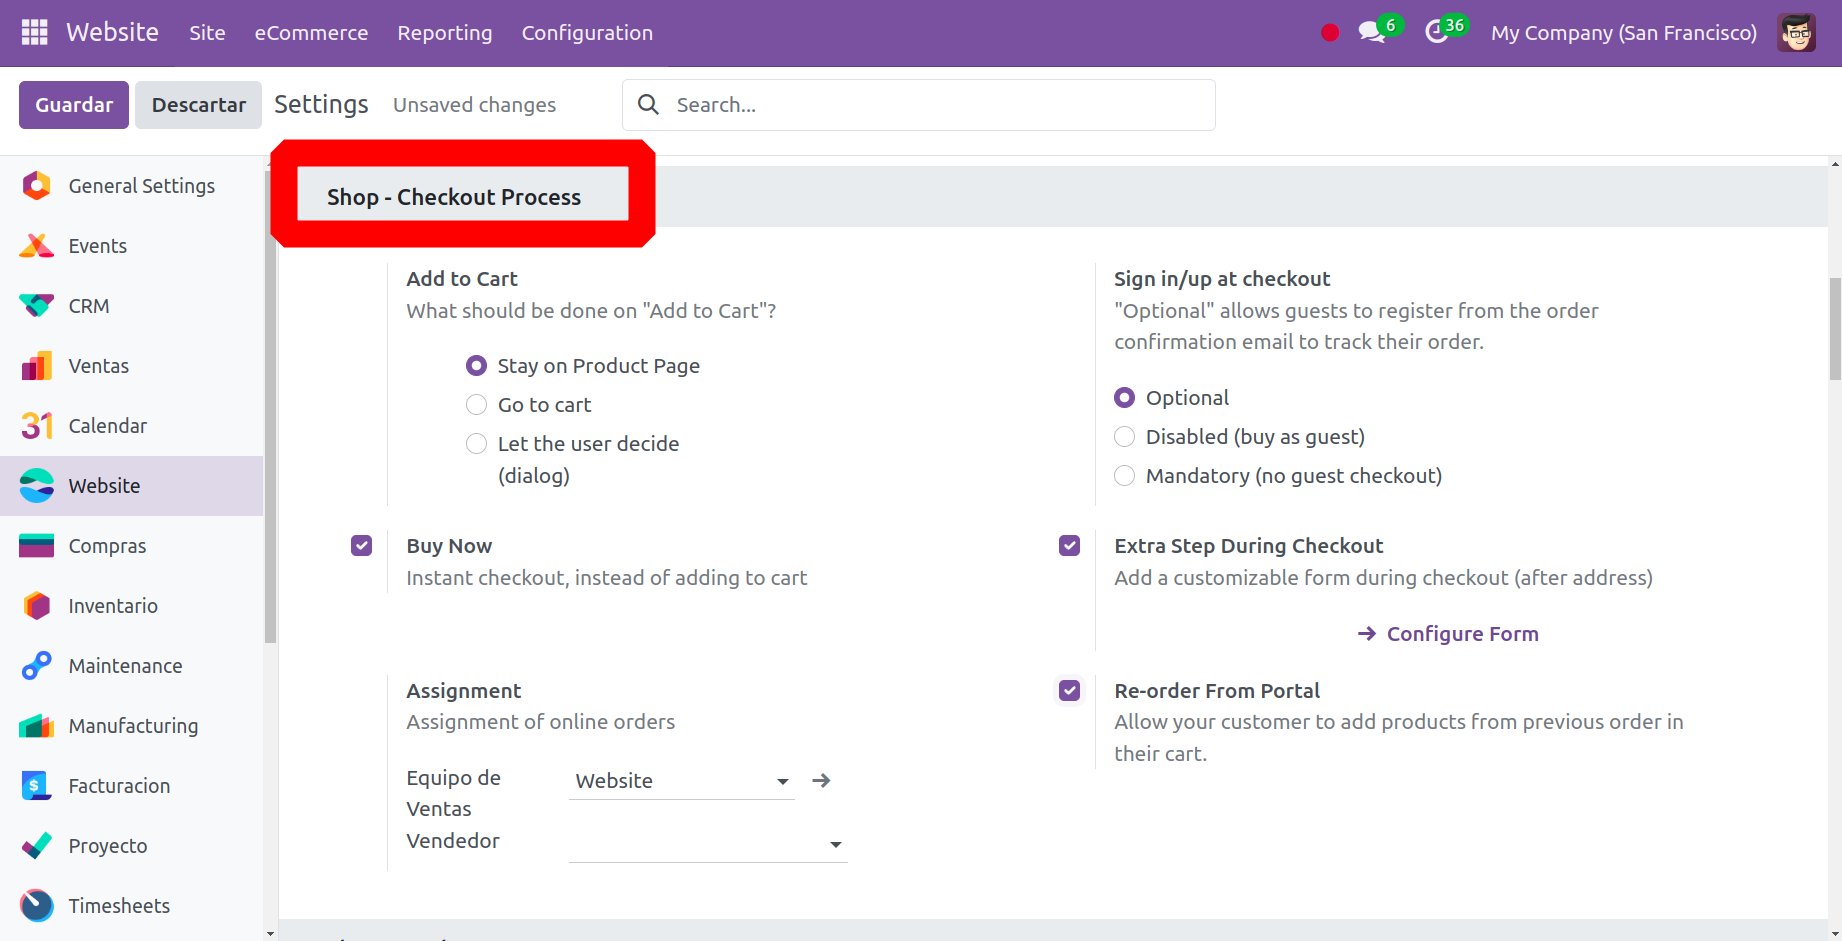
Add to Cart
Using the Add to Cart option in the 'Shop Check out Process' part of the Configuration Settings window of the Odoo 17 Website module, customers can add products to their shopping cart straight from the product page. By doing this, customers can see the items they've added to their cart and make adjustments as they go. Using the ‘Add to cart’ option, customers may quickly and easily finish their purchase without ever leaving the product page. Here is an option where you can choose between three options before hitting "Add to cart." The three options are "Stay on Product Page, Go to Cart, and Let the user decide (dialogue)"; you can choose the one you require.
For instance, as the screenshot below demonstrates, the product remains in the product stage even after it is added, and the cart's count rises.

Additionally, if we select the "Go to the cart" option, the product will be added to the cart and the page will reroute to the checkout, as seen below.
When a product is put to the cart and the user has the opportunity to choose (dialogue), they can choose to either check out or keep shopping, as indicated.
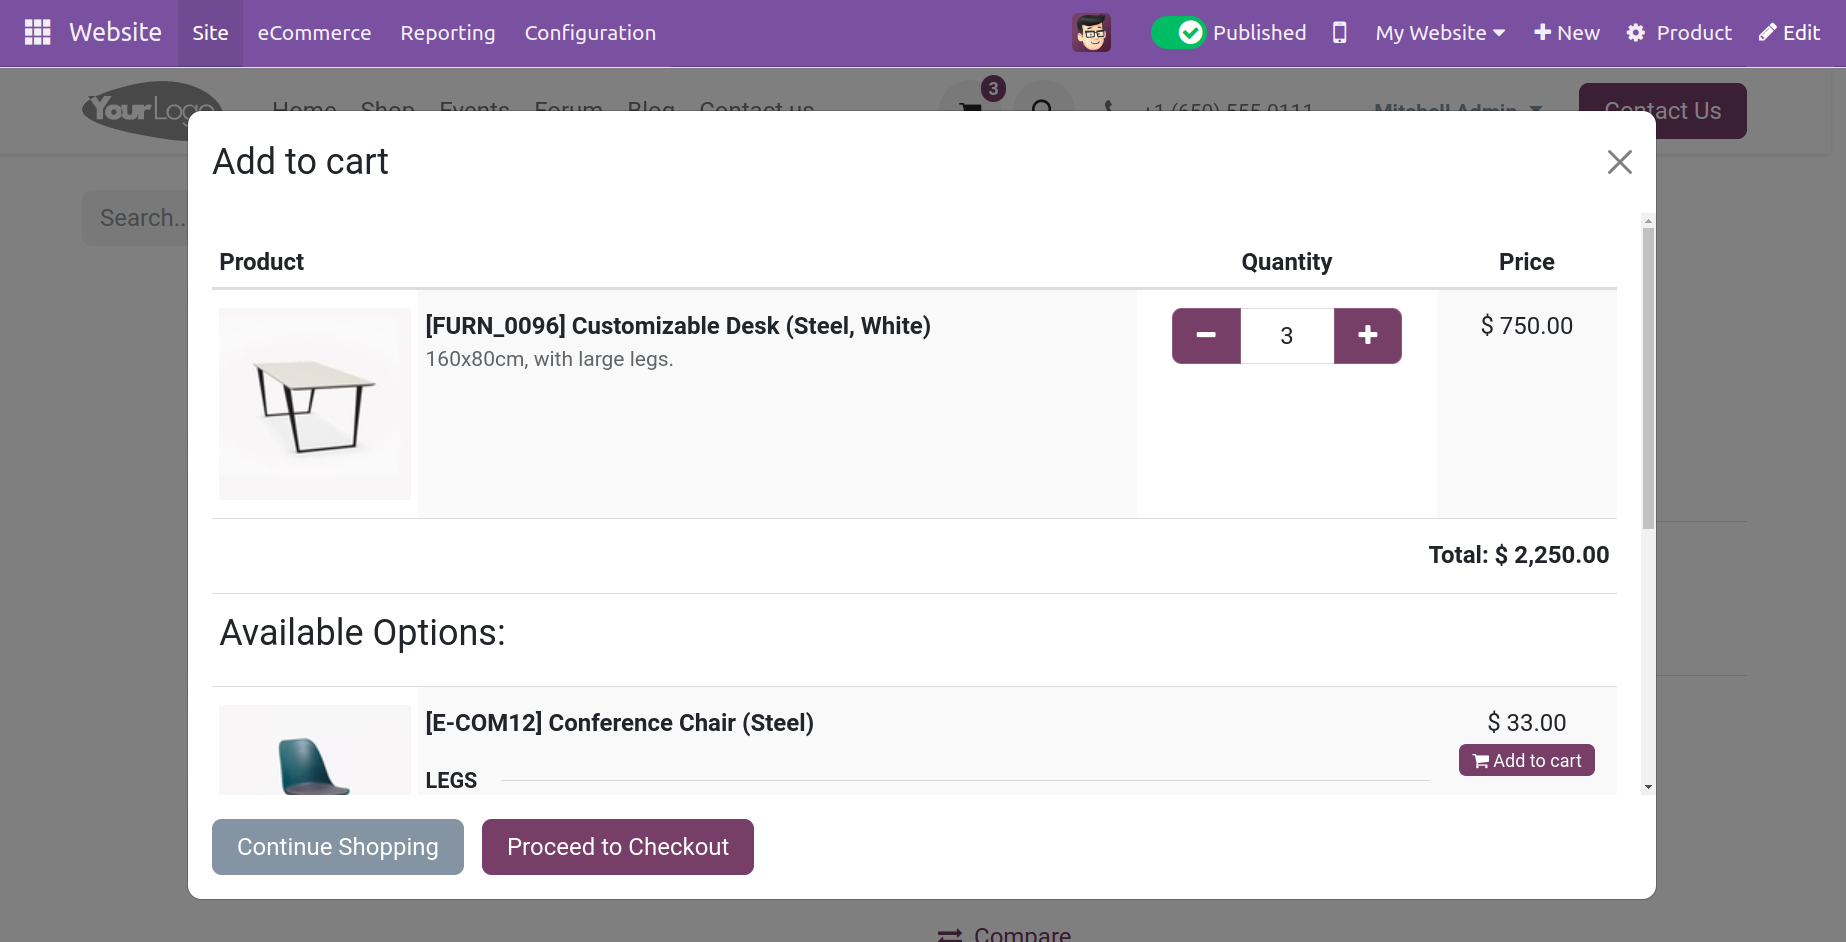
Buy Now
You don't even need to add the item to your cart to check out when you use the Buy Now option.
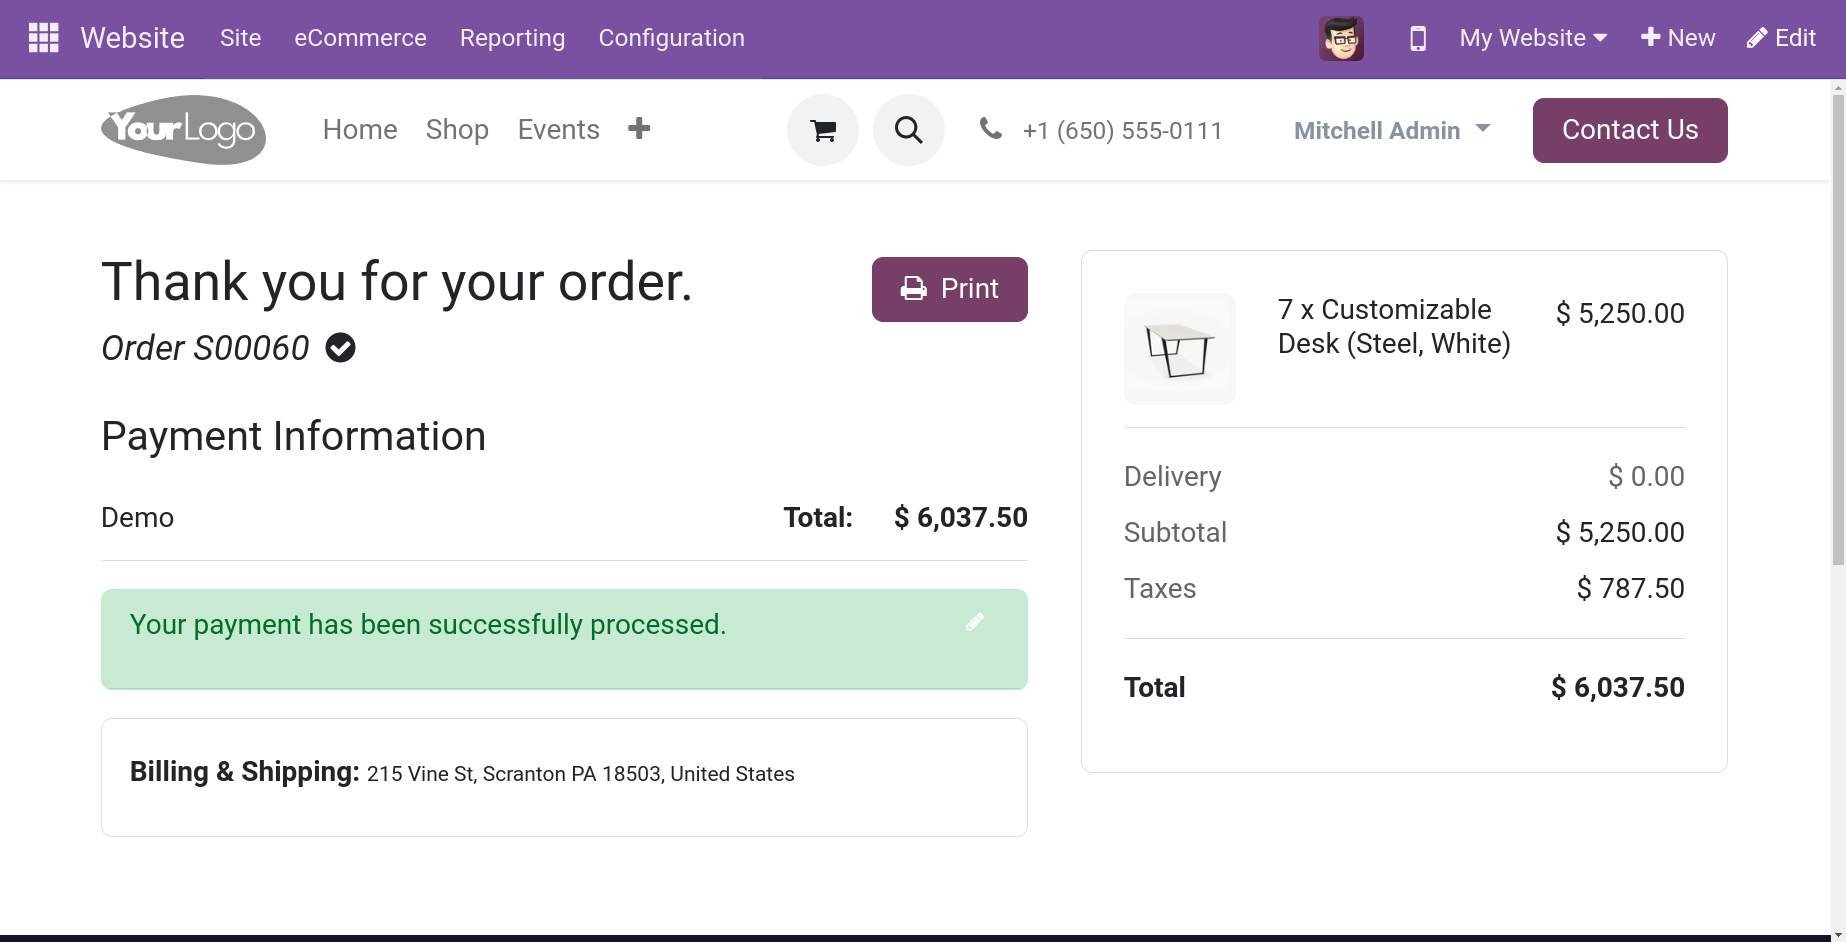
Re-order From Portal
To allow your customers to add items from a previous order to their cart, you can enable the Re-order From Portal option. Your consumer can add items from past orders to their cart with this functionality. Assume, for instance, that a consumer adds specific items to their cart and places the product sale order as indicated below.
The user can then use the same sales order to reorder the same product that was included in the previous sales order as indicated below after confirming the sale order and making the payment.
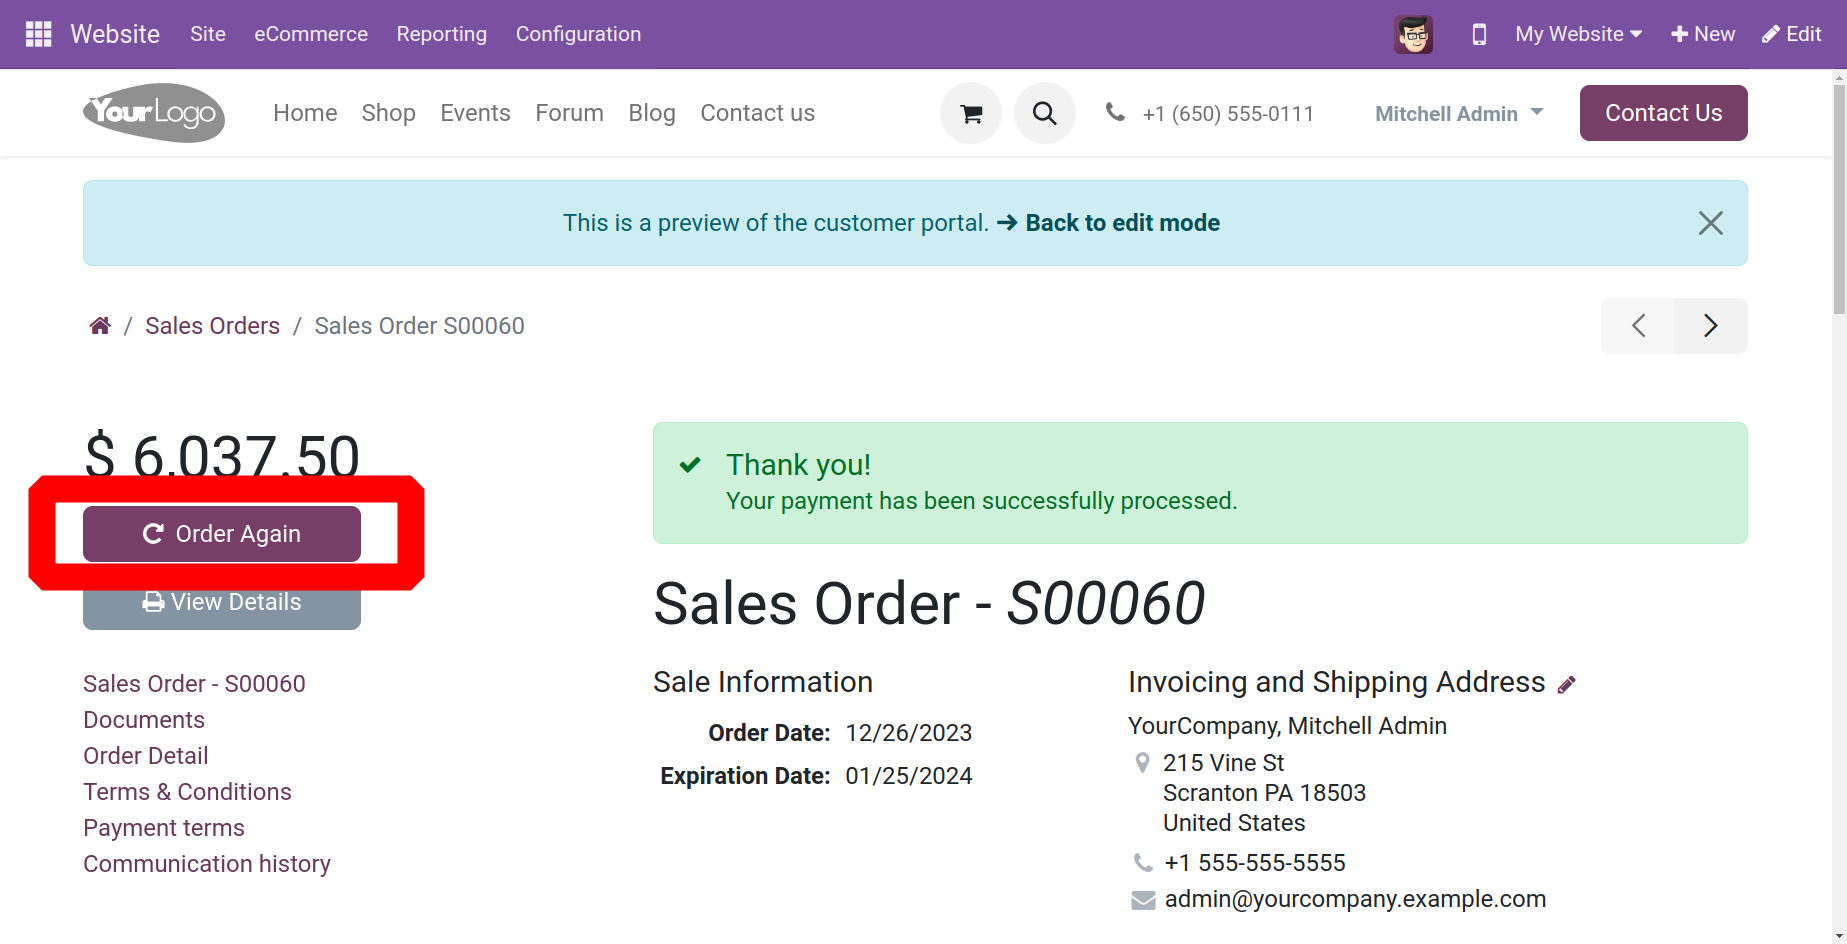
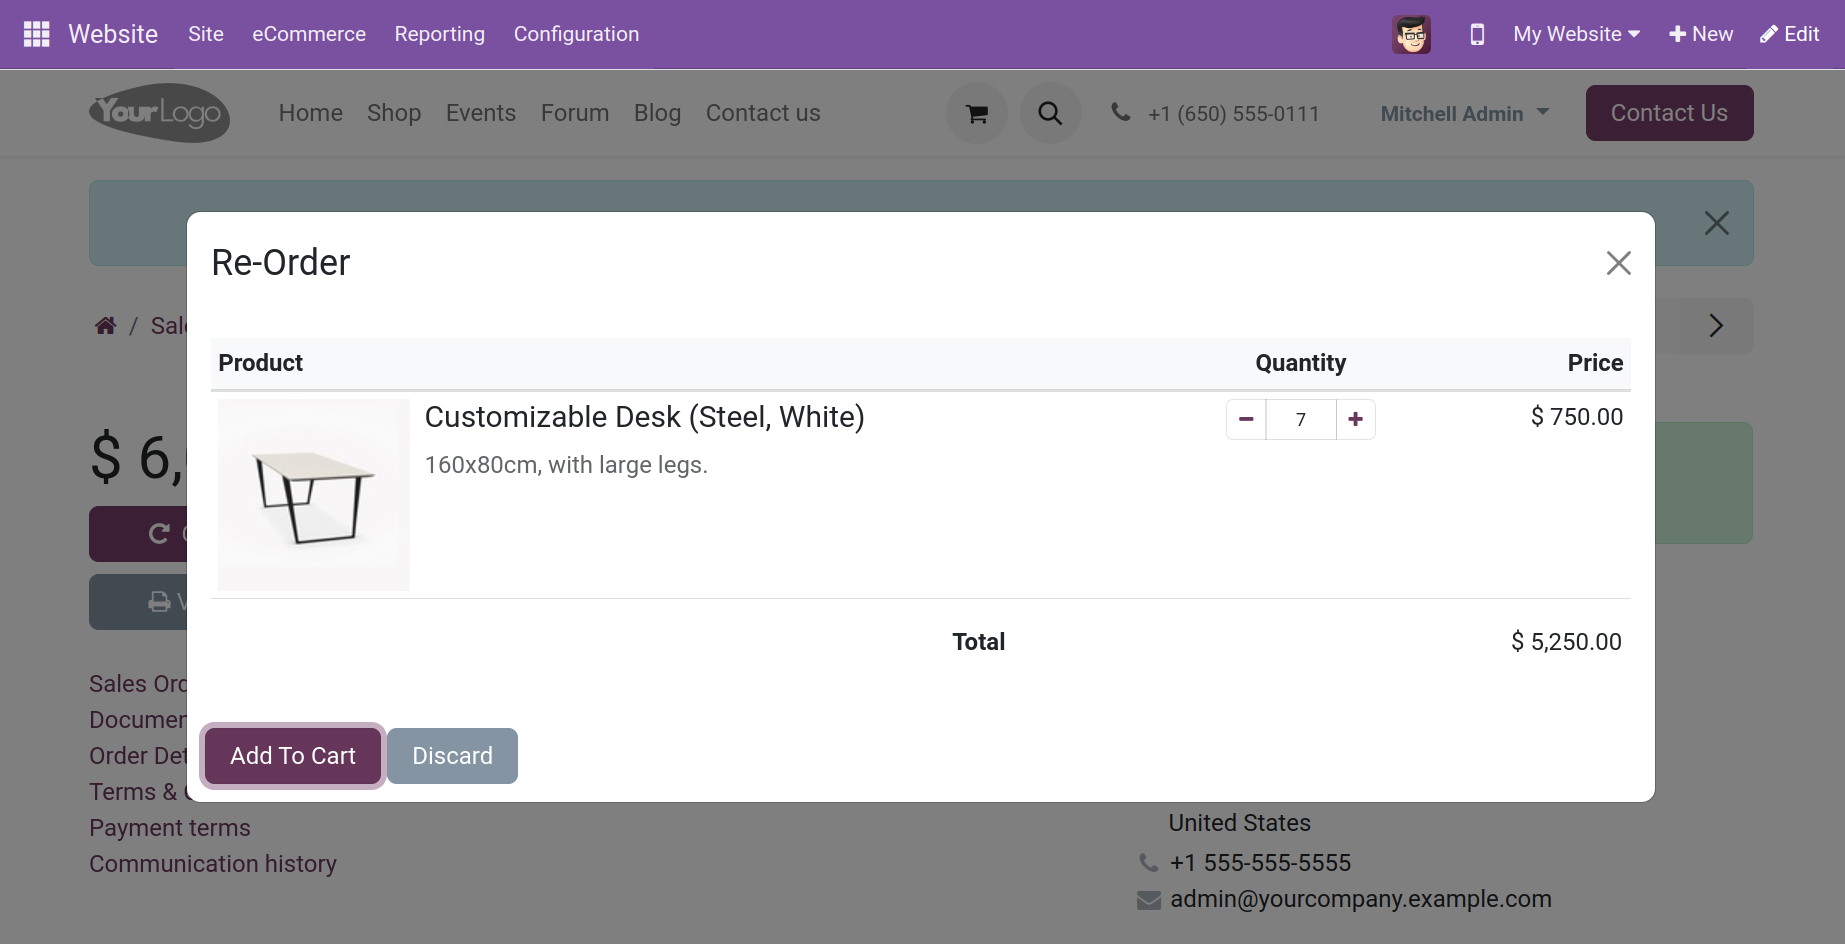
A window to add the product to the cart opens when the option to "Order again" is clicked in the sales order. This allows the consumer to order the same group of products by adding them to the cart.
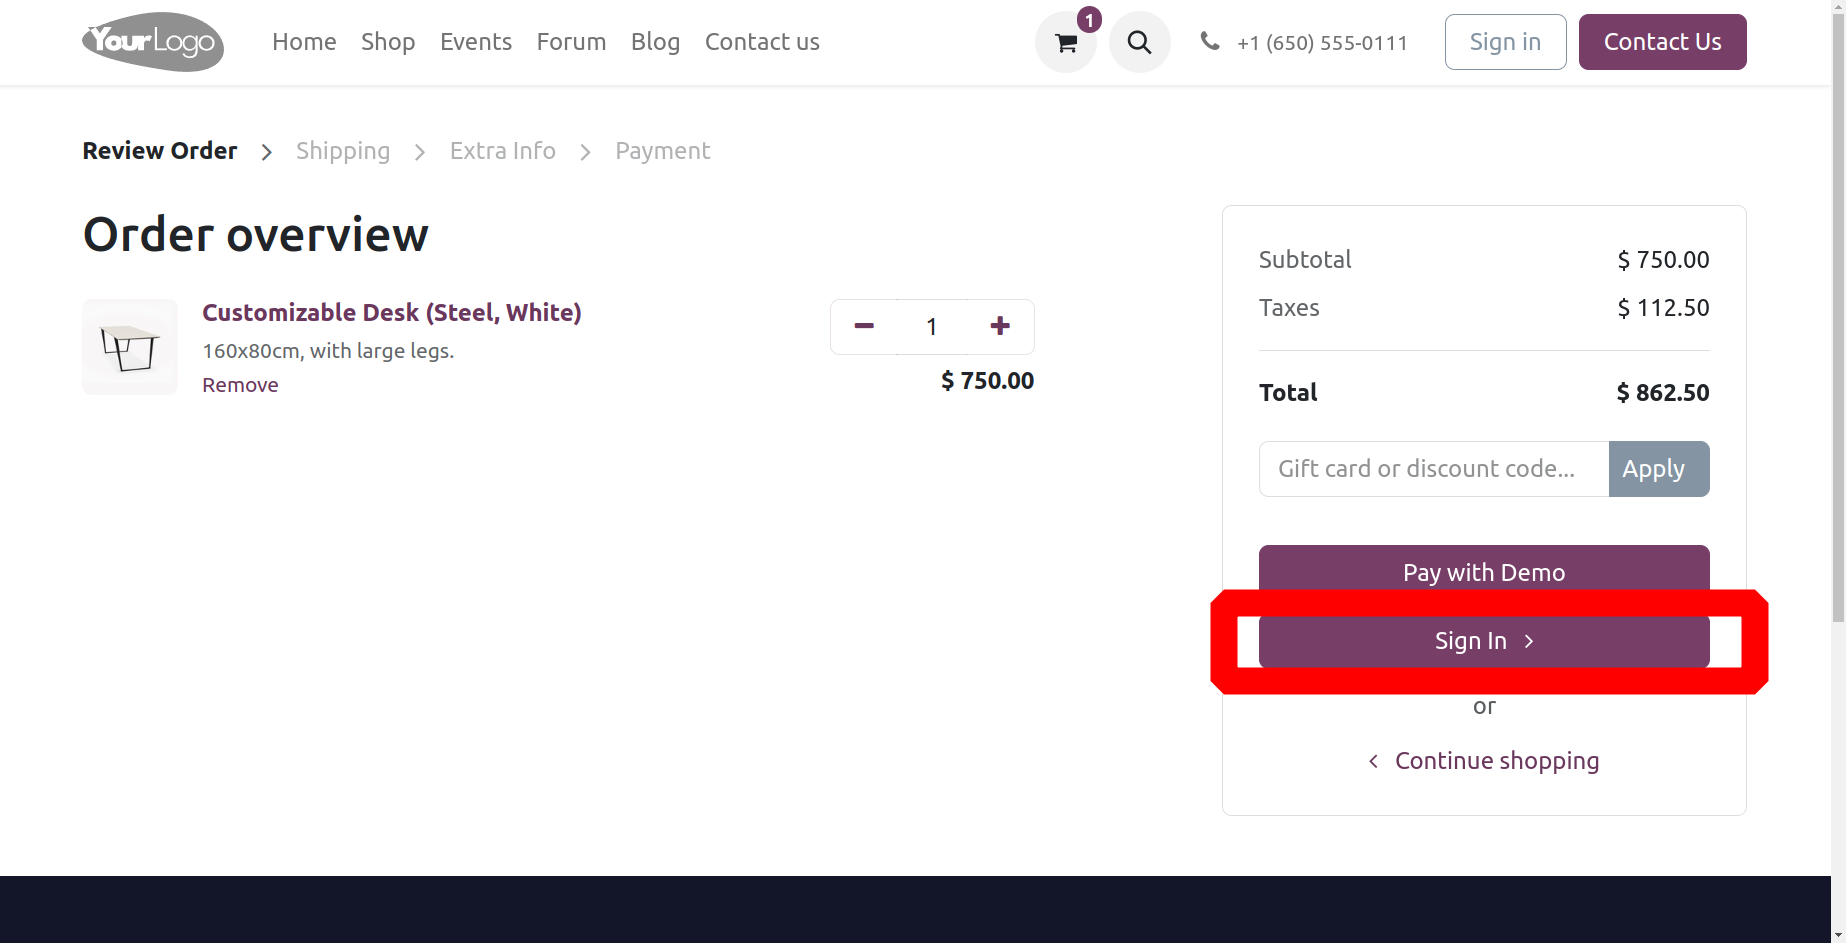
Sign in/up at check out
The Sign in/up at check out area has three options: Disabled (purchase as guest), Mandatory (no guest check out), and Optional. The phrase "Optional" allows customers to follow their order by signing up from the email that confirms their order.
Assuming that the option is set to Mandatory, the visitor will get the opportunity to sign in as seen below when they attempt to add items to their basket and complete the checkout process.
Additionally, as seen below, if the option is set to Disabled, the visitor can add items to the cart and check out without having to sign in.
Additionally, the user can purchase with or without the login process if the option is set to optional.
Extra Step During Checkout
By selecting the Extra Step at Checkout option, you may include a customizable form throughout the checkout process. You can modify these settings to personalize the form by using the arrow key.
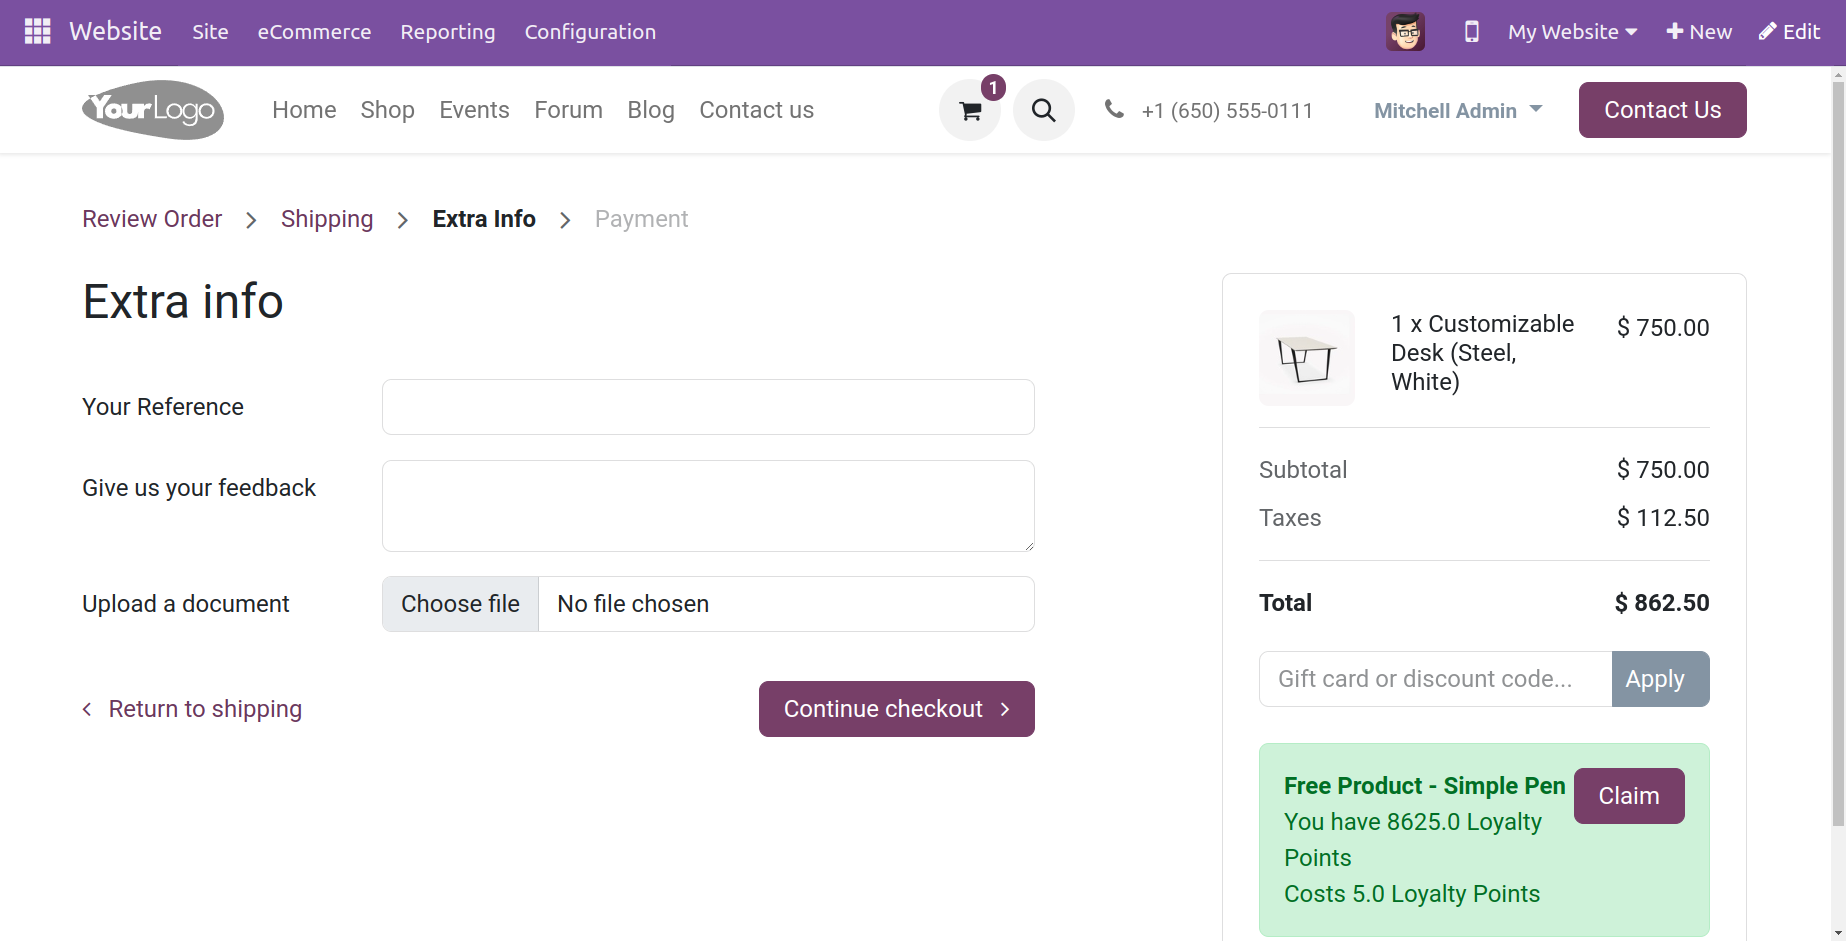
For instance, once a product is added to the cart and the user proceeds to the checkout, the Extra info option appears, allowing the consumer to submit more details as needed, as indicated above.

The same can also be customized, as seen below.
Assignment
The Sales Team and Salesperson for the online orders can be assigned here by using this option.
The Shop - Products area, which includes options like those listed below, is covered in the next section.
Display Product Prices
You can show pricing on your eCommerce website in two different ways: tax included and tax excluded, with the show Product pricing option.
Comparison Price
Users can compare the prices of various products using the Comparison Price option found in the Configuration Settings box of the 'Shop - Product' section of the Odoo 17 Website module. Because it lets consumers see both the product's original and discounted prices, the comparison price option is crucial for helping customers make informed decisions when making purchases.
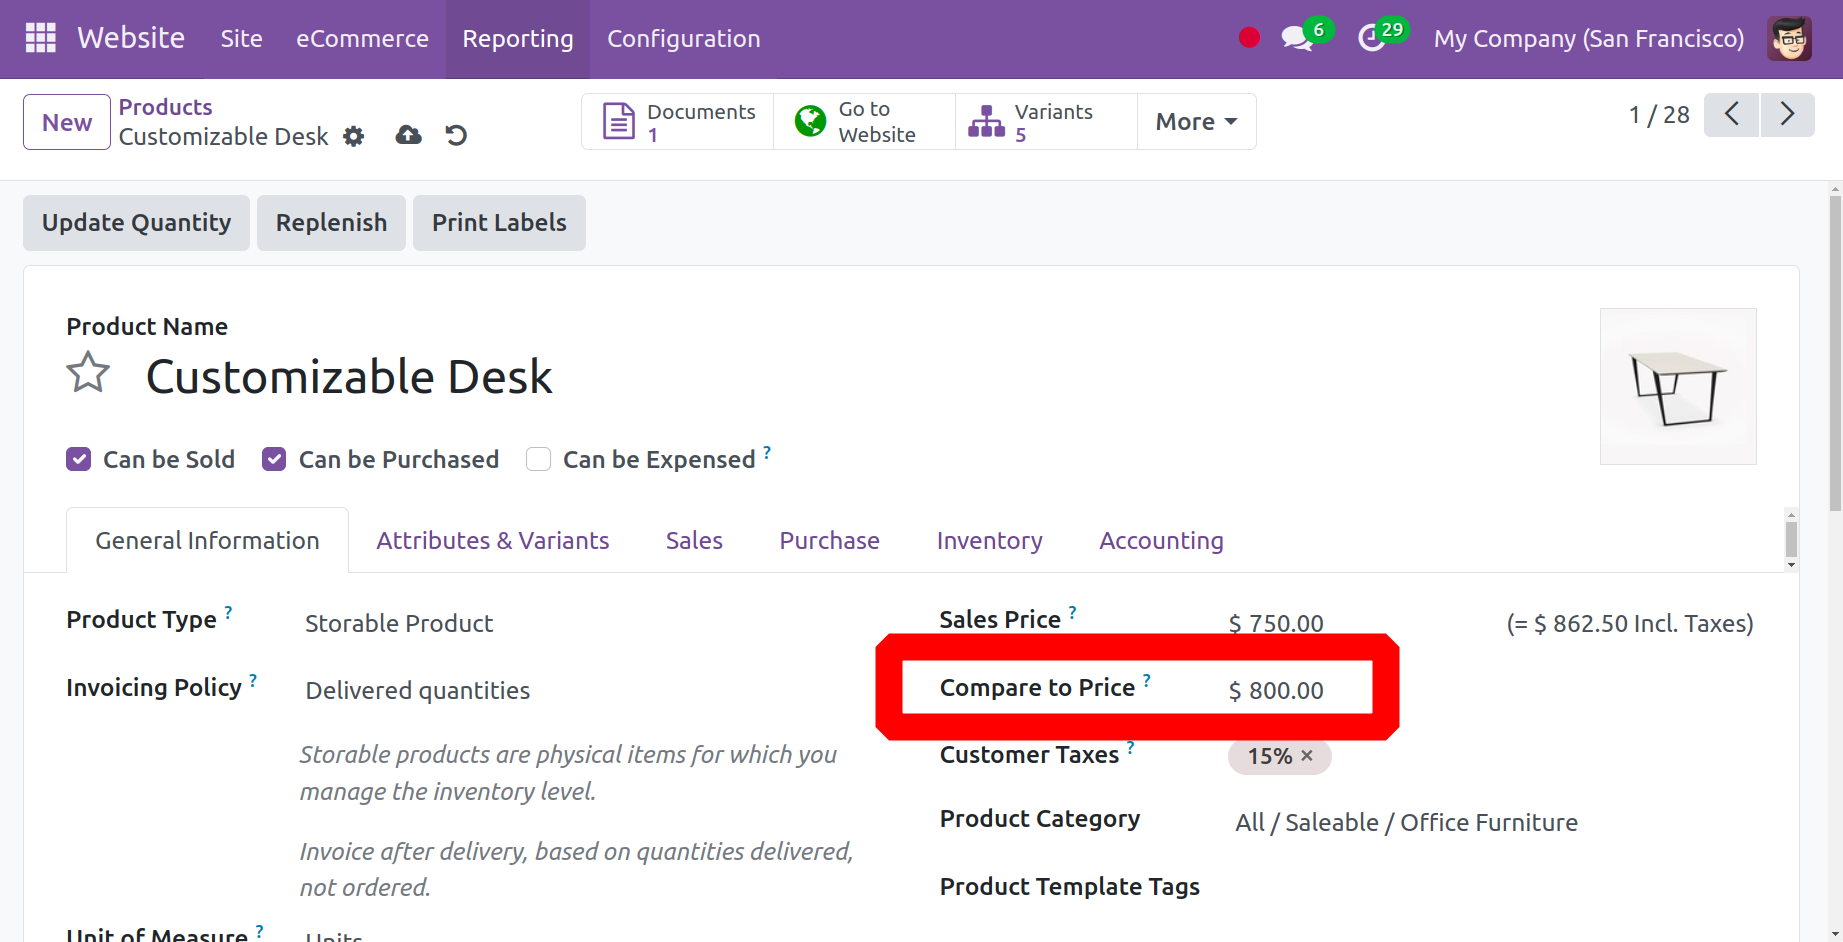
Enabling this option adds a new field called "Compared to Price" to the product form, as seen in the image above. We may enter a value here that will be struck through on the e-commerce page, as seen below.
Product Variants
You can alter a single product's size, color, and other characteristics by using product variants. Variant-using products can be managed at the product template level (which covers all of the attributes and variants of that product) or at the variant level (for individual variants).
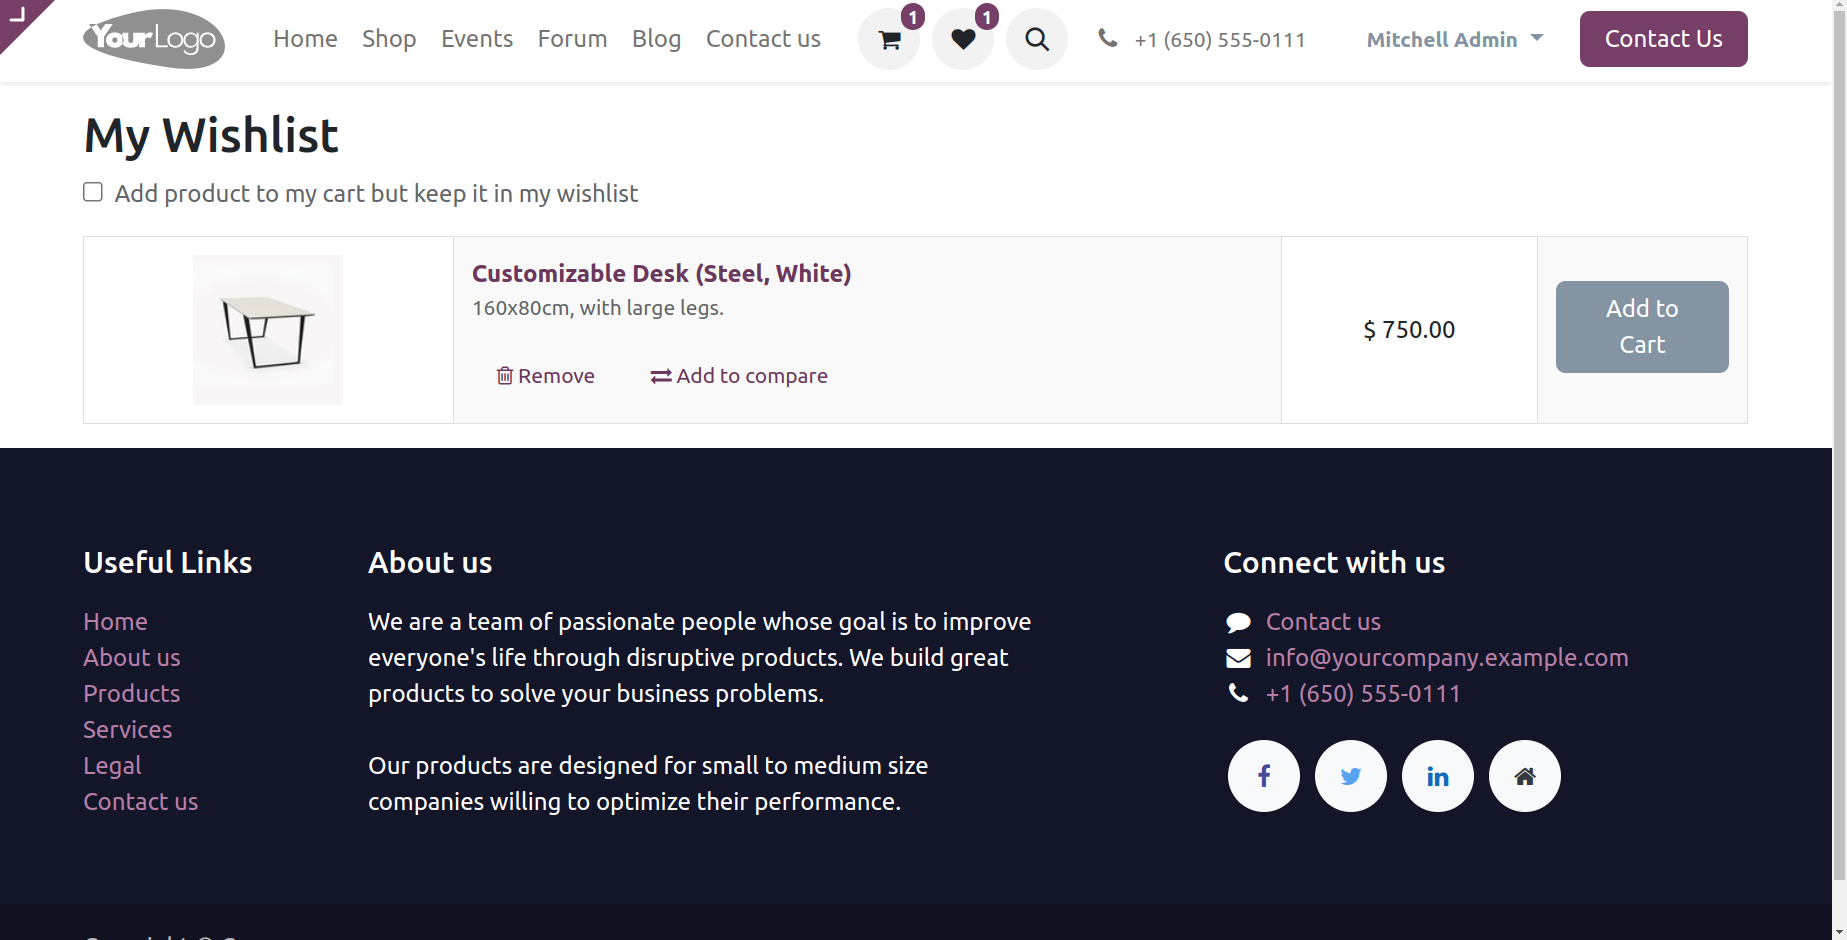
Wish Lists
Logged-in users can use this feature to track things they are interested in or create a personalised list of goods they want to buy. The ability for customers to add items to wishlists is a great way to track their favourite products and motivate them to make more purchases in the future.
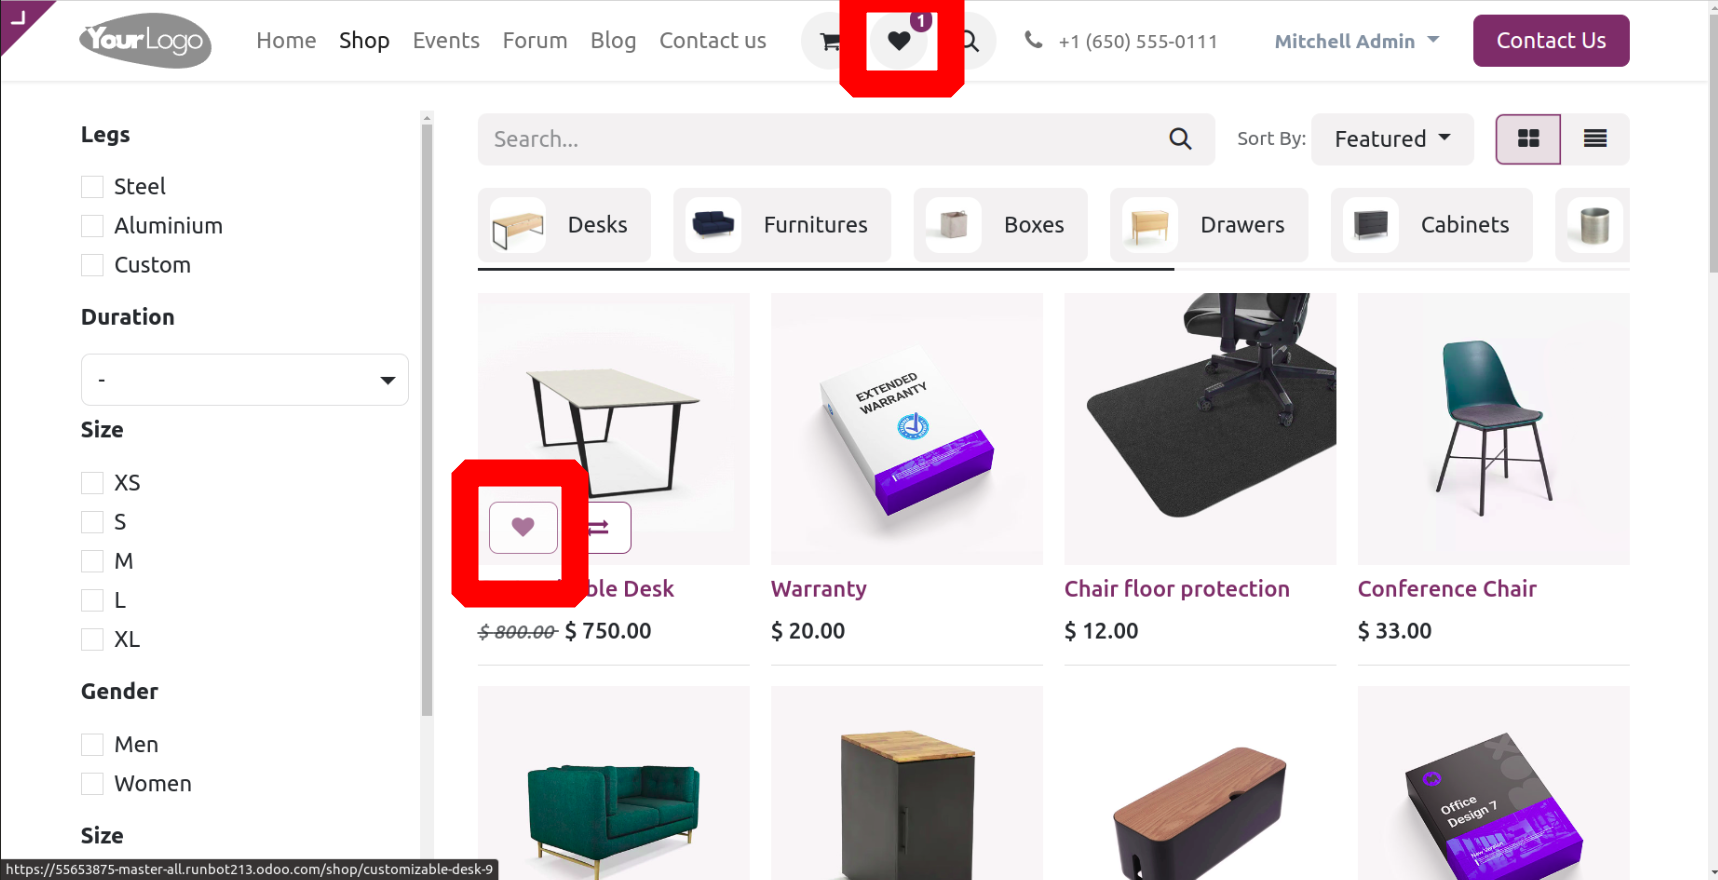
The wishlist symbol shows an increasing count when a product is added, as seen above, and upon opening it, the wishlist's contents are listed.
Inventory Defaults
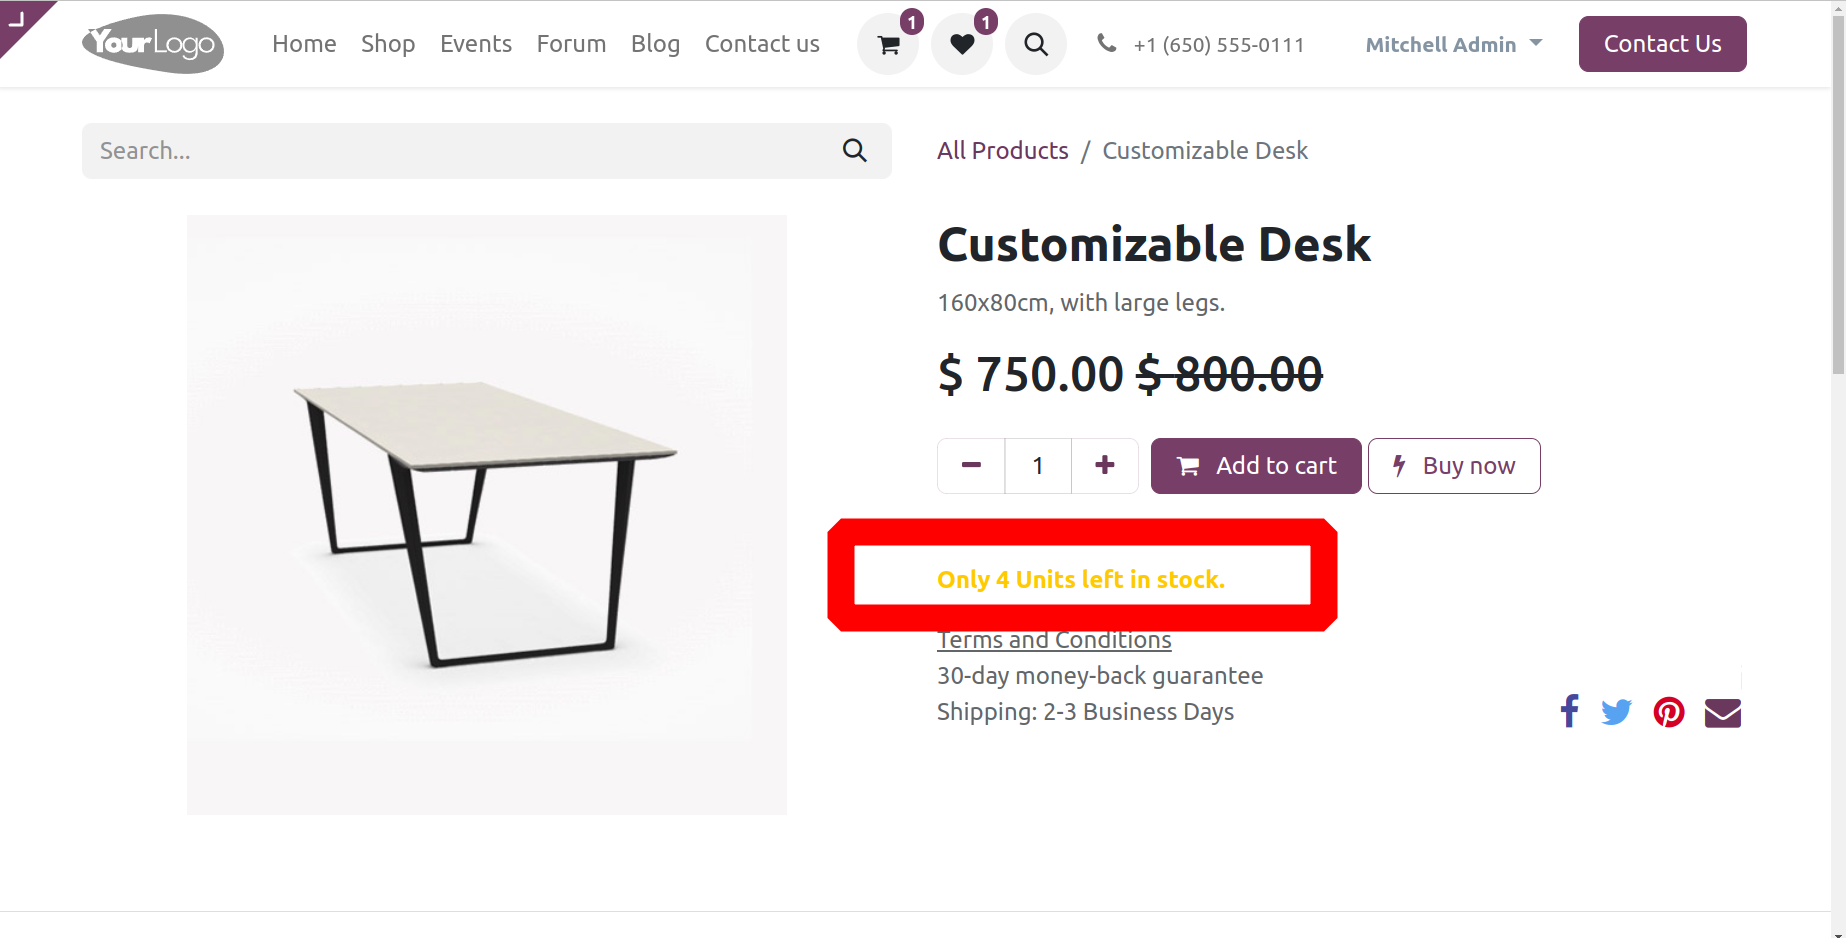
It is possible to display products with low quantities (on-hand-reserved) by using the Inventory Defaults option. In this connection, the Warehouse may be mentioned. Other options are Out-of-Stock and Show Available Quantity. In the Out of Stock column, you have the ability to enable or disable Continue Selling.
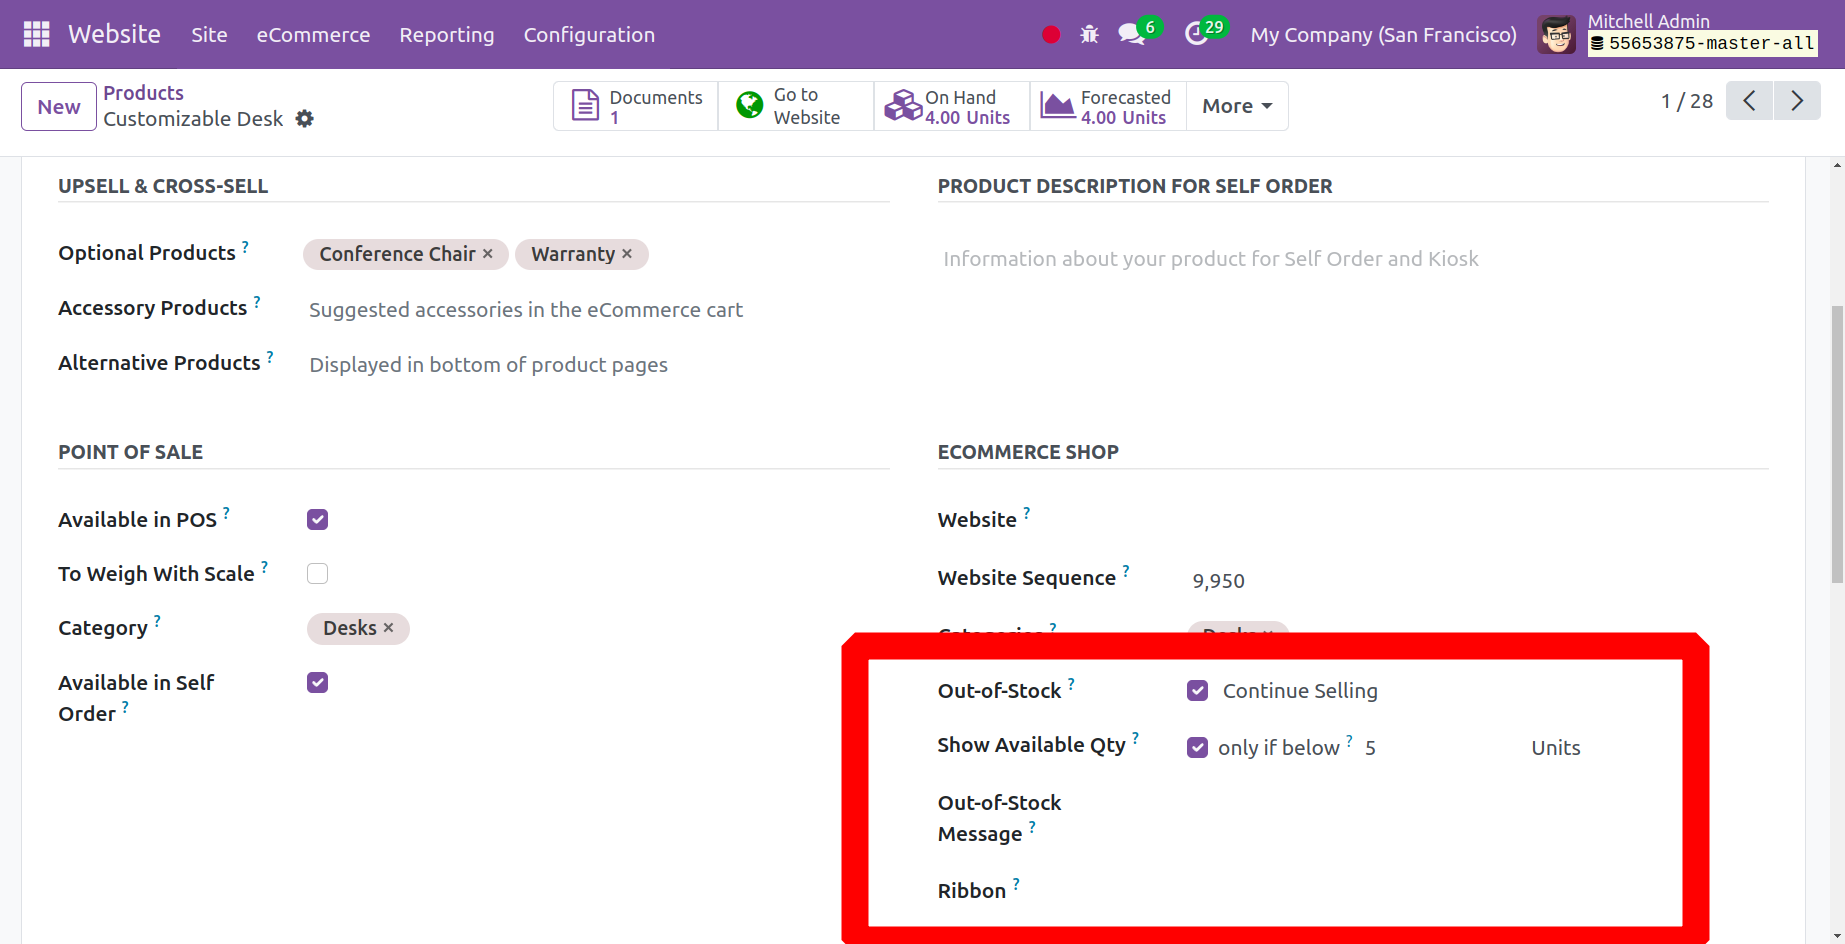
Here, the option for Out of Stock is set to Continue Selling, which means that items will be sold even if they are out of stock. The option for Show Available Quantity is set to When Below 5, meaning that if the product quantity is 4, the website will display the availability message as indicated below when we choose that product to add to our cart.
Product Reference Price
Using the product Reference Price option, you may add a reference price per unit of measurement (UoM) to products in addition to the sale price.
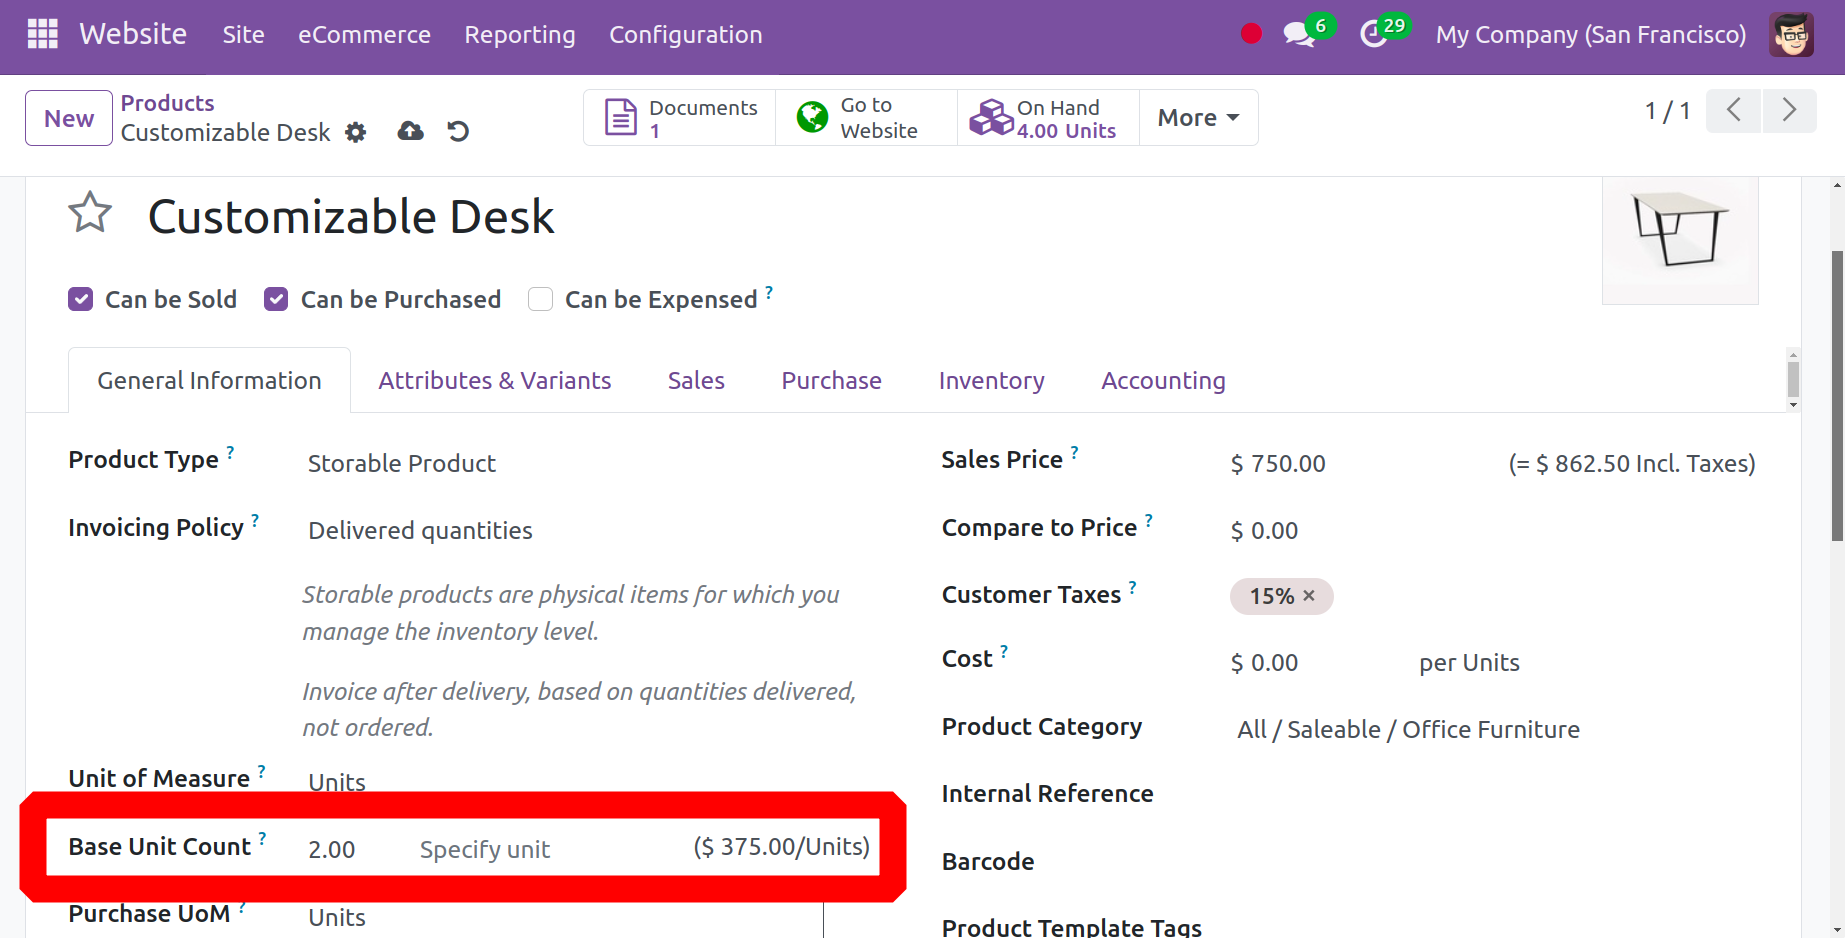
The base unit for the product can be added in the product form as previously indicated, and if the buyer adds it to their cart, it will also add a reference price per unit of measurement (i.e., $/kg) in addition to the sale price.
Product Comparison Tool
Customers can enable attribute-based product comparison with this option. Customers can compare products based on attributes by turning on the Product Comparison Tool. Once this specific field is activated, click the SAVE button.
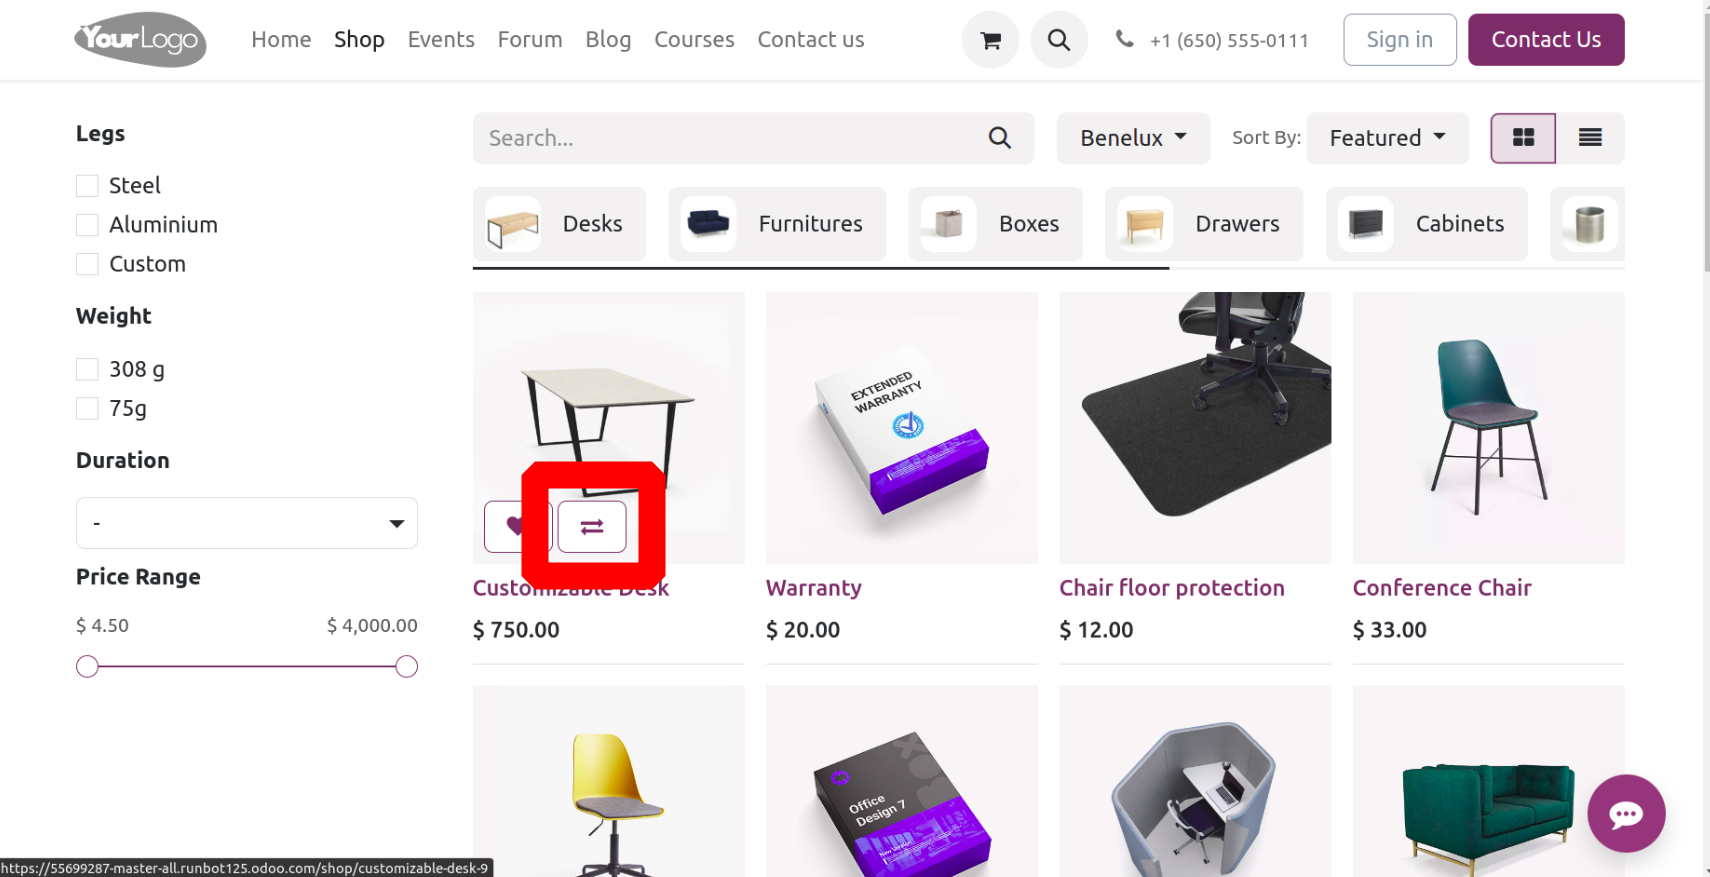
Now let's examine what occurs when visitors to your website do that. Users may notice the Compare icon inside each product in your online store, as seen in the screenshot above.
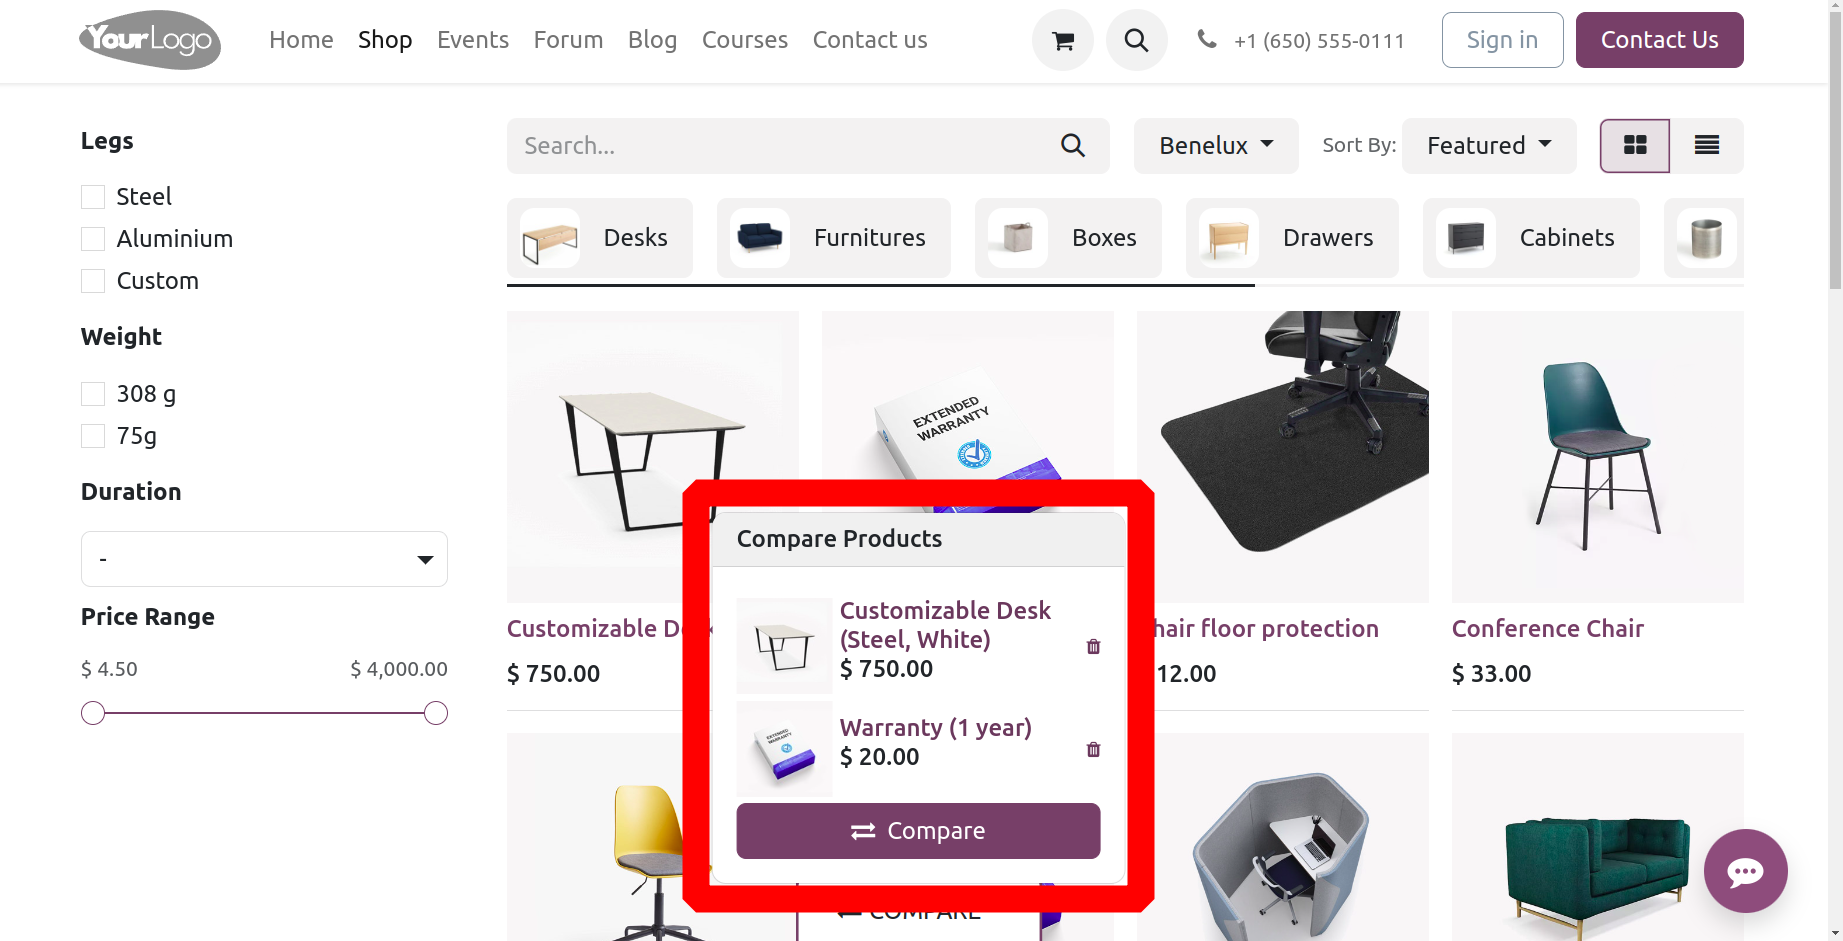
The product is added to the comparison menu when the comparison icon is clicked. You can include a lot of items in the comparison menu, as shown in the screenshot below.
Prevent Sale of Zero Priced Product
The user can configure their shop to stop the sale of any goods with a price of zero by selecting the 'Prevent Sale of Zero Priced goods' option in the section. This is advantageous for companies who would want to charge clients for everything they purchase rather than offer anything away. If this option is enabled, the system will automatically replace "Add to Cart" with "Contact Us" in the event that the product price is zero. This is a setting that you can enable or disable as needed. Assume that a product with a zero price indicates on its website that it is unavailable and offers a button to get in touch with the person in question, as seen below.
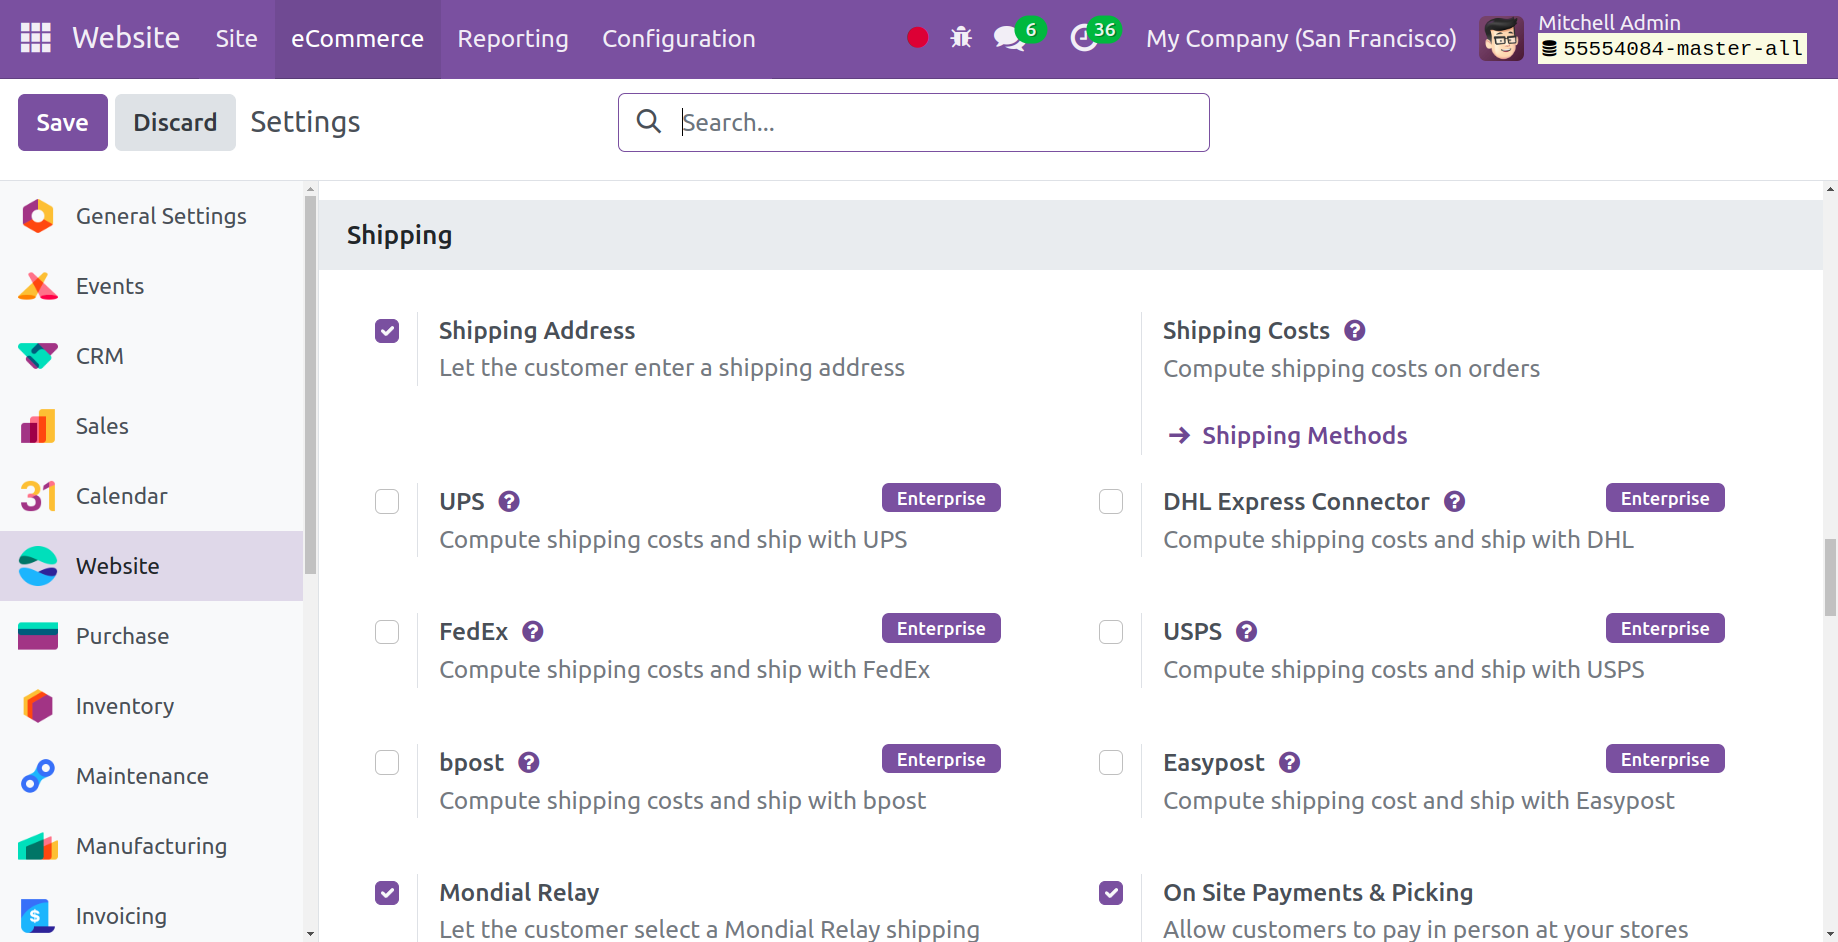
The features listed below are included in the Shipping area, some of which are exclusive to the enterprise edition.
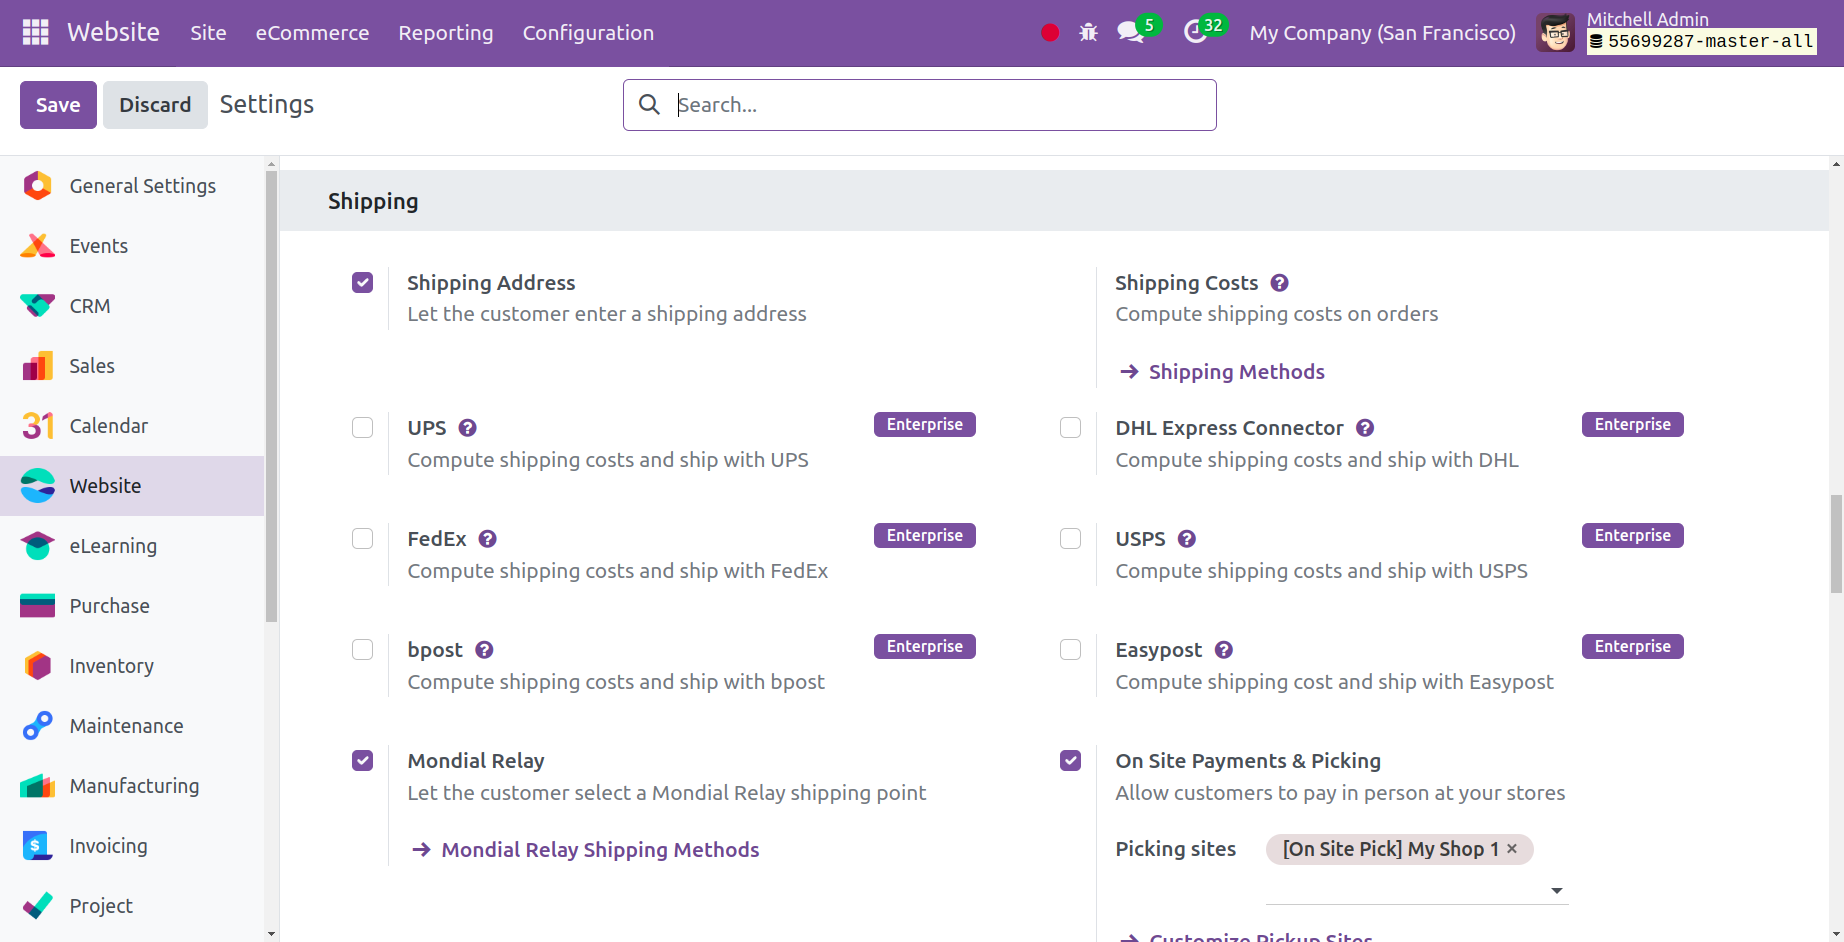
Several shipping options can be used in your Website module by turning them on in the Shipping section of the Configuration Settings. This page offers options for Shipping Address, Mondial Relay, Shipping Costs, and On-site Payments & Picking.
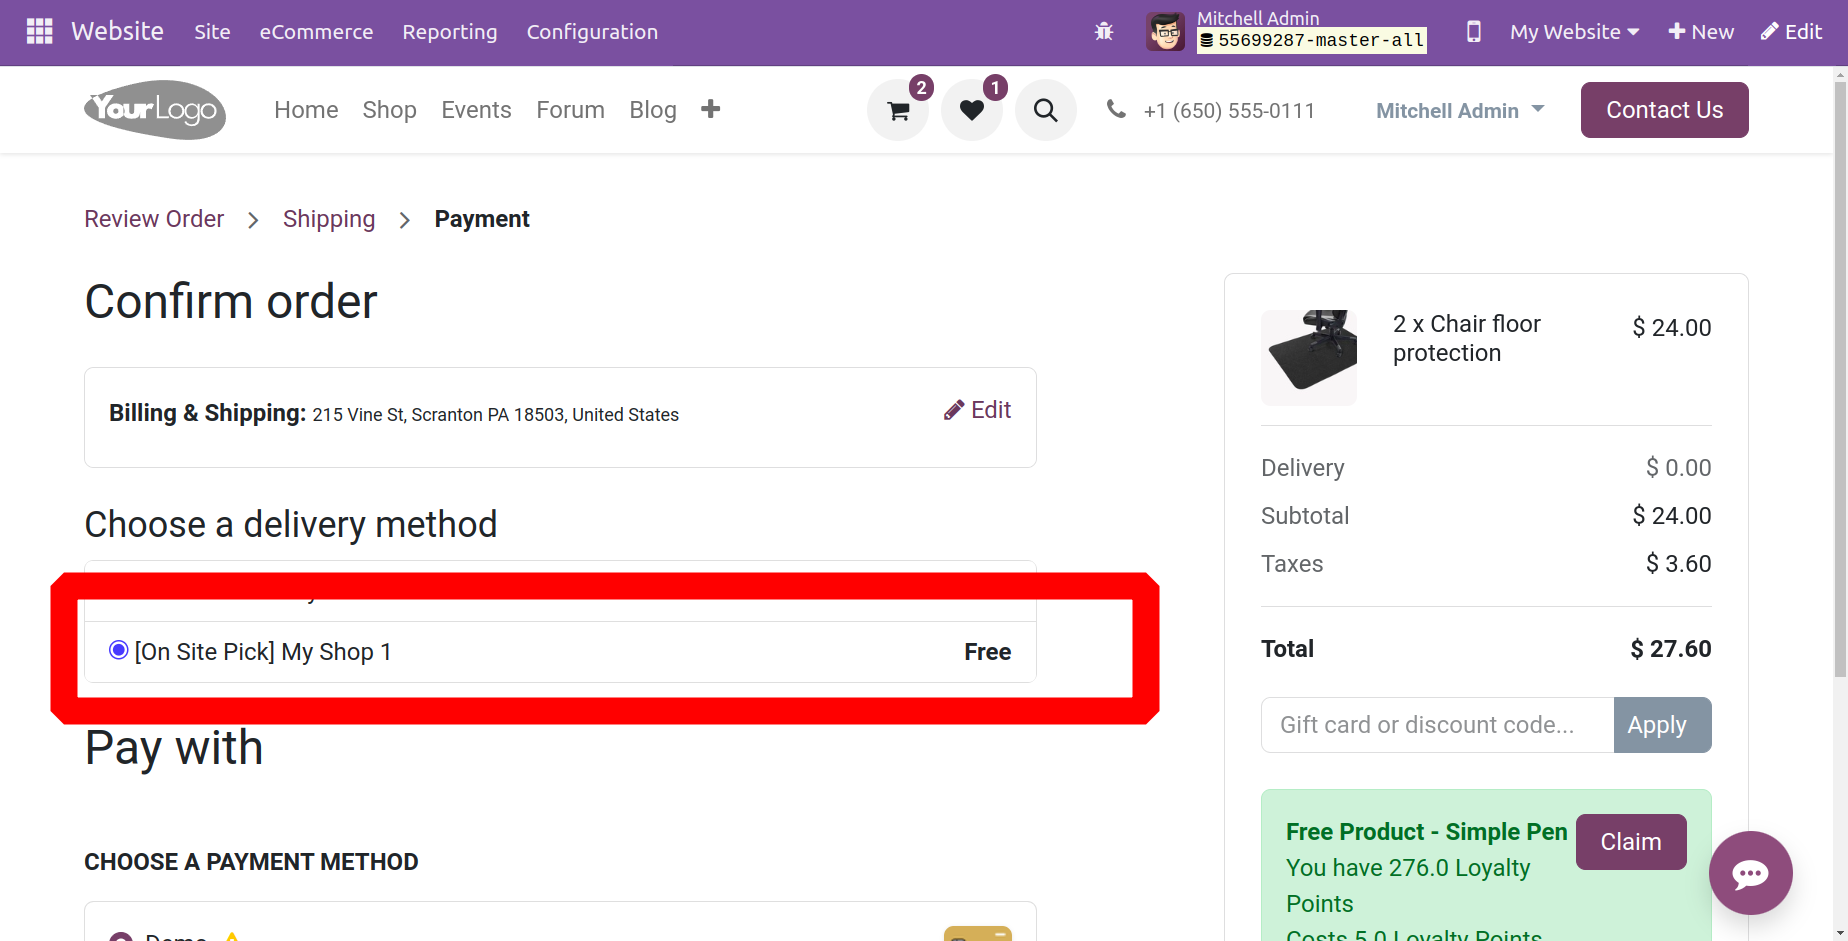
The consumer can select any item from the store, pay online, and pick from the store, among other options as indicated below, with the On Site Payment & Picking delivery option.
The features listed below, such as the Automatic Invoice and Invoicing Policy, are included in the next section, Invoicing.
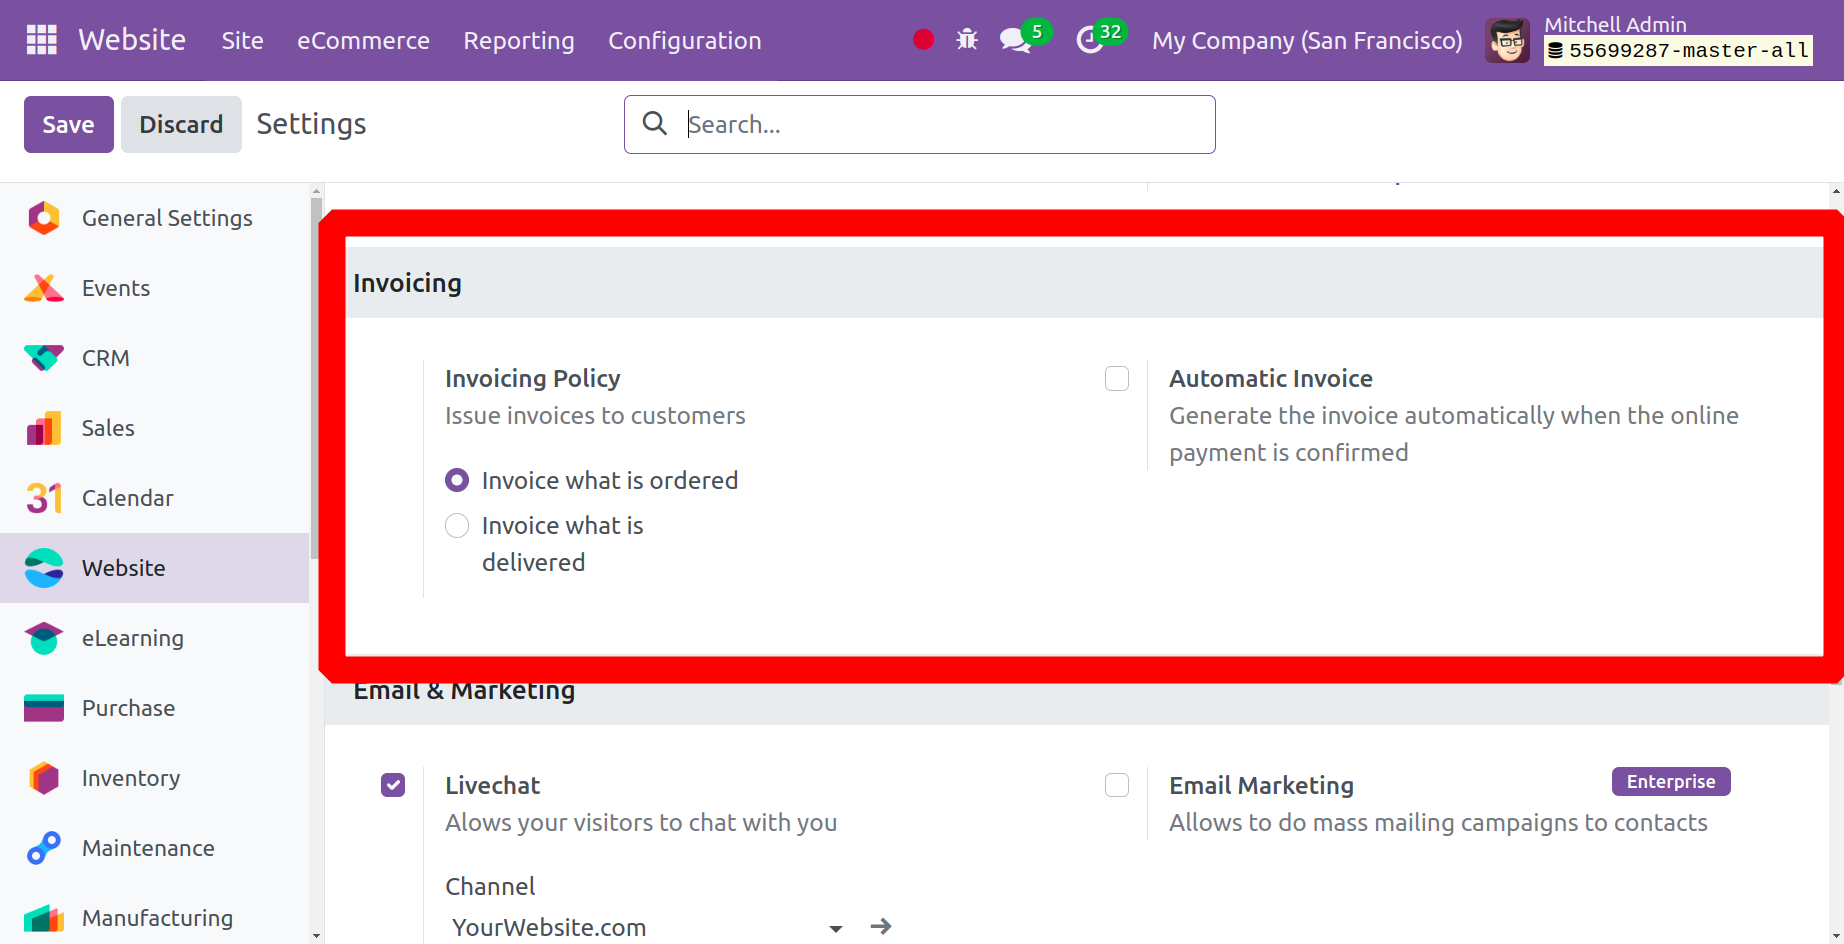
The Invoicing Policy gives you two options. These are the "Invoice what is delivered" and "Invoice what is ordered" options. You can use Automatic Invoice to have an invoice generated immediately as soon as an online payment is successfully received.
Various methods of invoicing may exist, contingent upon the policies of the business:
Since Odoo 17 Sales runs in default mode and follows the invoice what is ordered rule, customers will receive an invoice as soon as the sales order is confirmed.
As per the invoice that is delivered, customers will receive an invoice as soon as delivery is completed. Businesses who sell large amounts of food, liquids, or commodities are subject to this law. It is better to charge the quantity that was actually delivered in these situations because the quantity may vary somewhat.
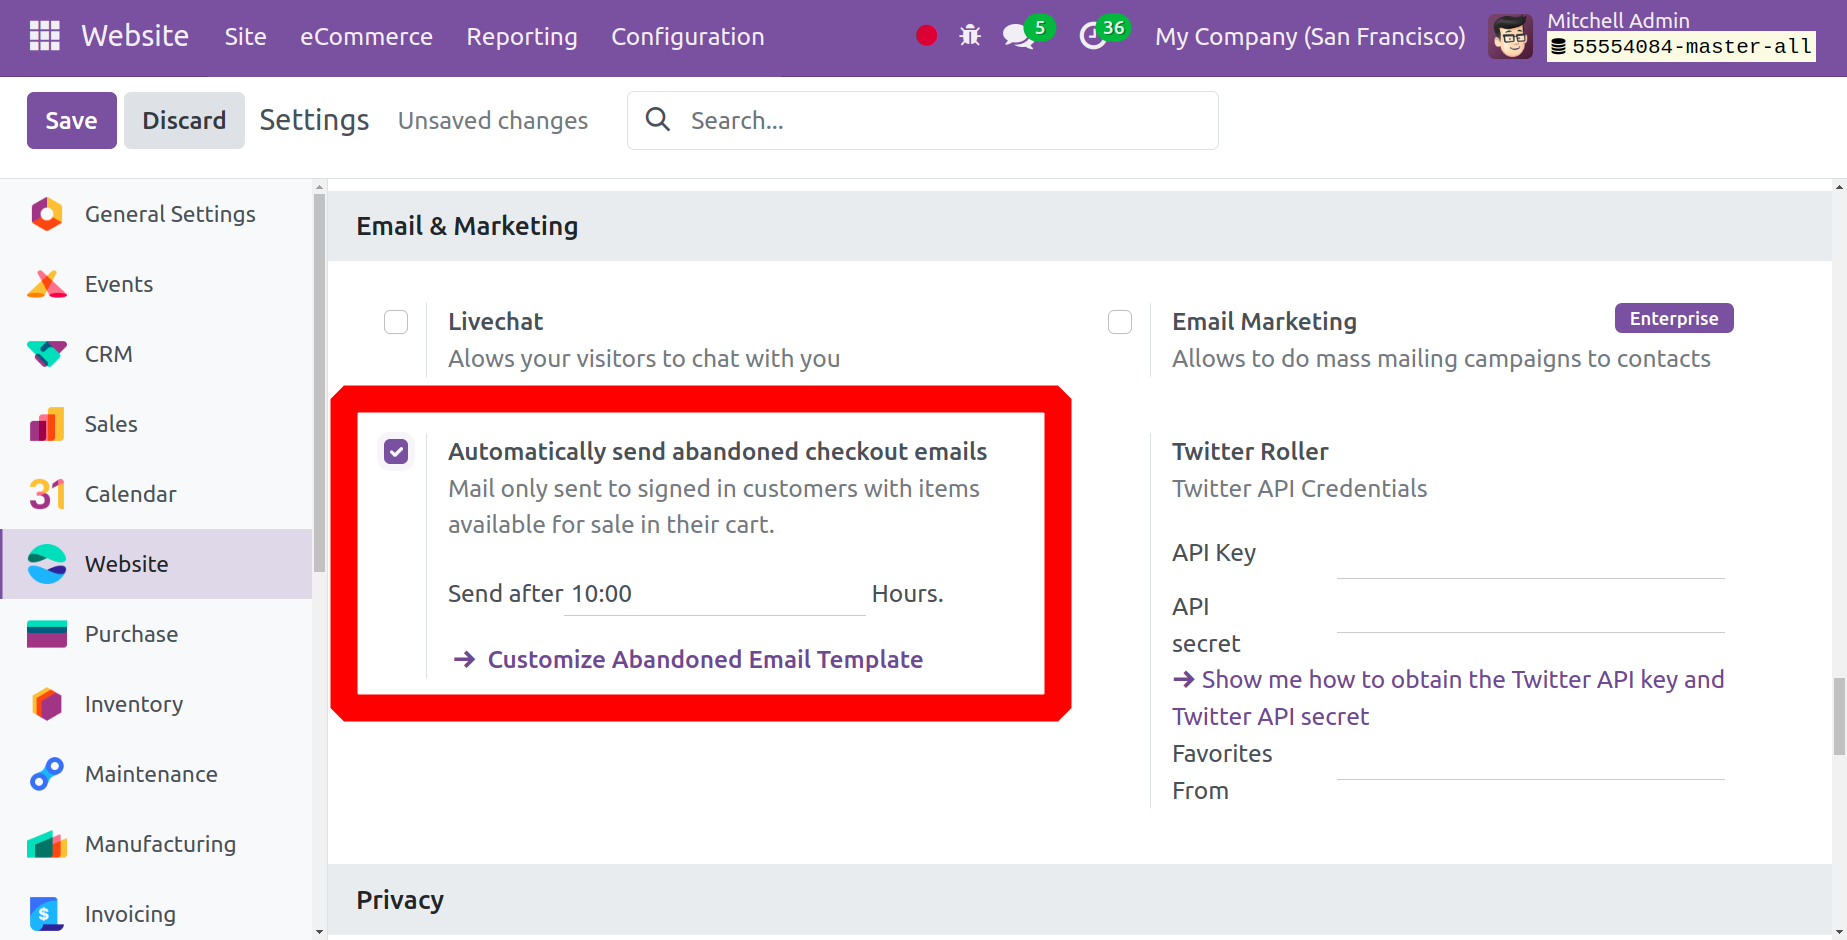
How to configure Twitter API access, which includes Twitter Roller, email marketing, live chat, and automatically sending emails to abandoned checkouts, is covered in the next section.
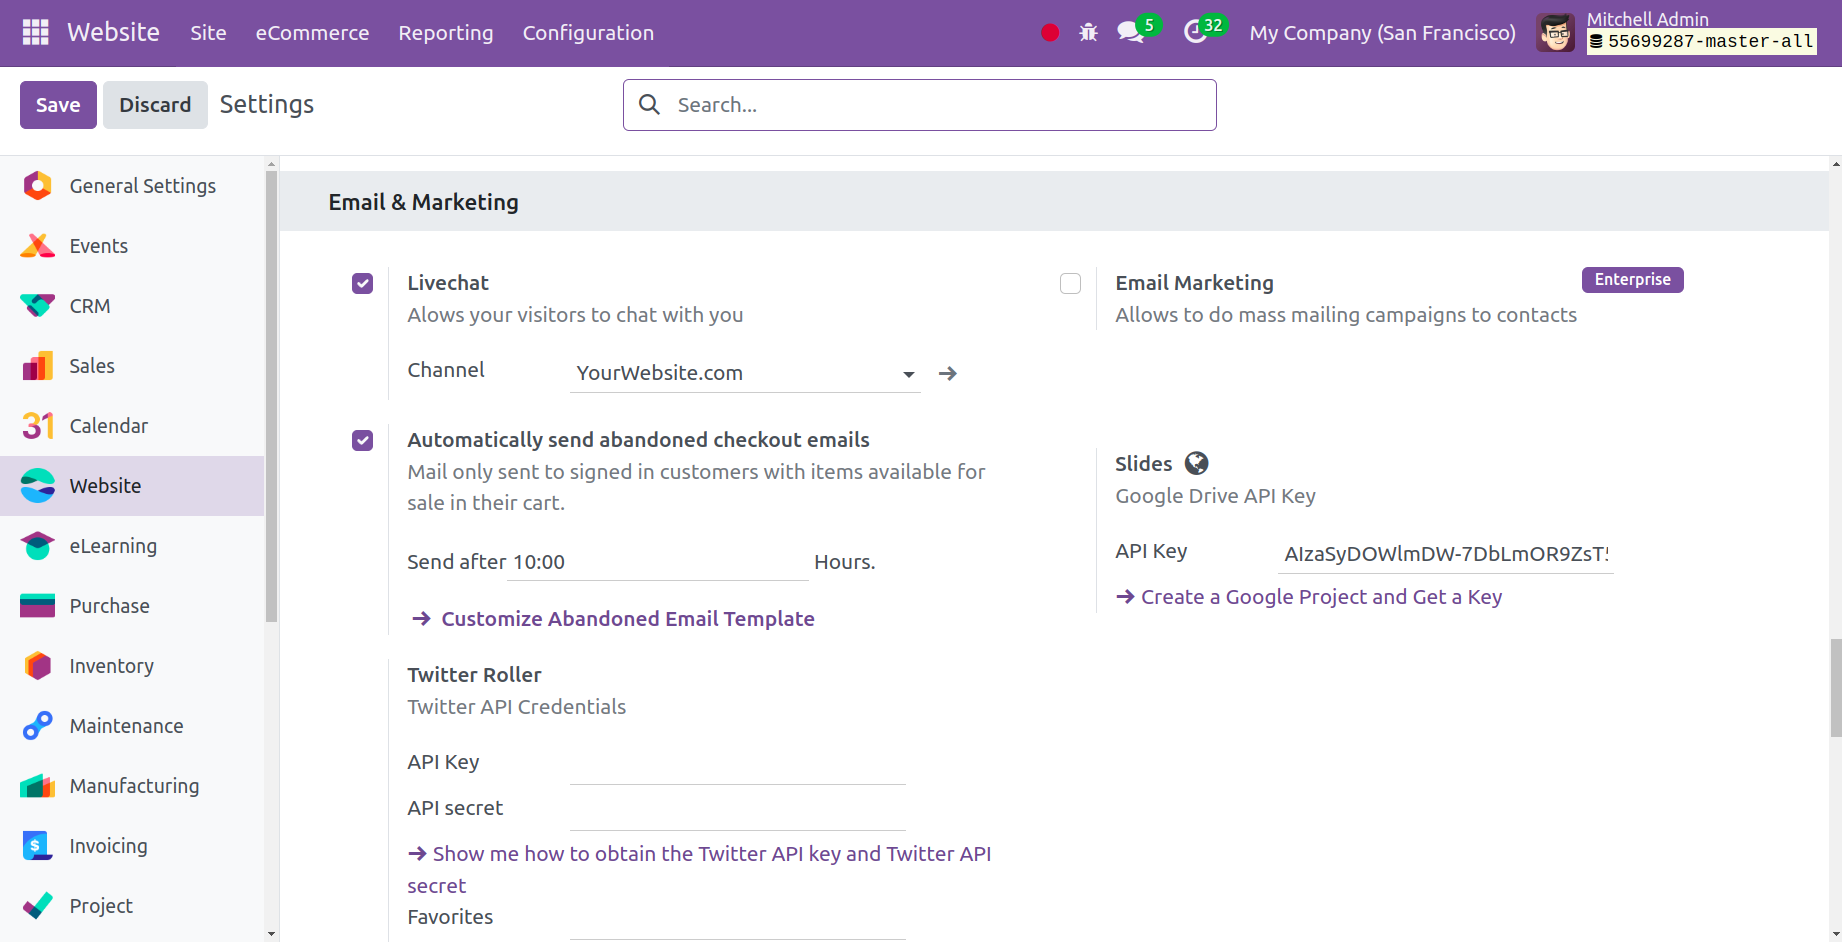
You may access Twitter Roller, Live Chat, and Email Marketing, and Automatically Send Abandoned Checkout Emails from this section.
The live chat option on your website allows visitors to communicate with you. It is from here that you may configure the channel and other settings. Email marketing can be used to conduct mass mailing campaigns to contacts. Customers who have logged in might receive emails from you informing them that the items in their cart are still available for purchase. Sending emails to customers who abandon their carts automatically makes this possible. You may set up Twitter API credentials with the Twitter Roller as well.
Out of all the communication methods, live chat has the highest rate of customer satisfaction. It allows for quick responses and allows your clients to carry on with their existing tasks while interacting with you because it is easily accessible.
Automatically send abandoned checkout emails
Customers are alerted about things in their cart that they may have forgotten about by using abandoned carts. It supports increasing sales as well as retaining customers.
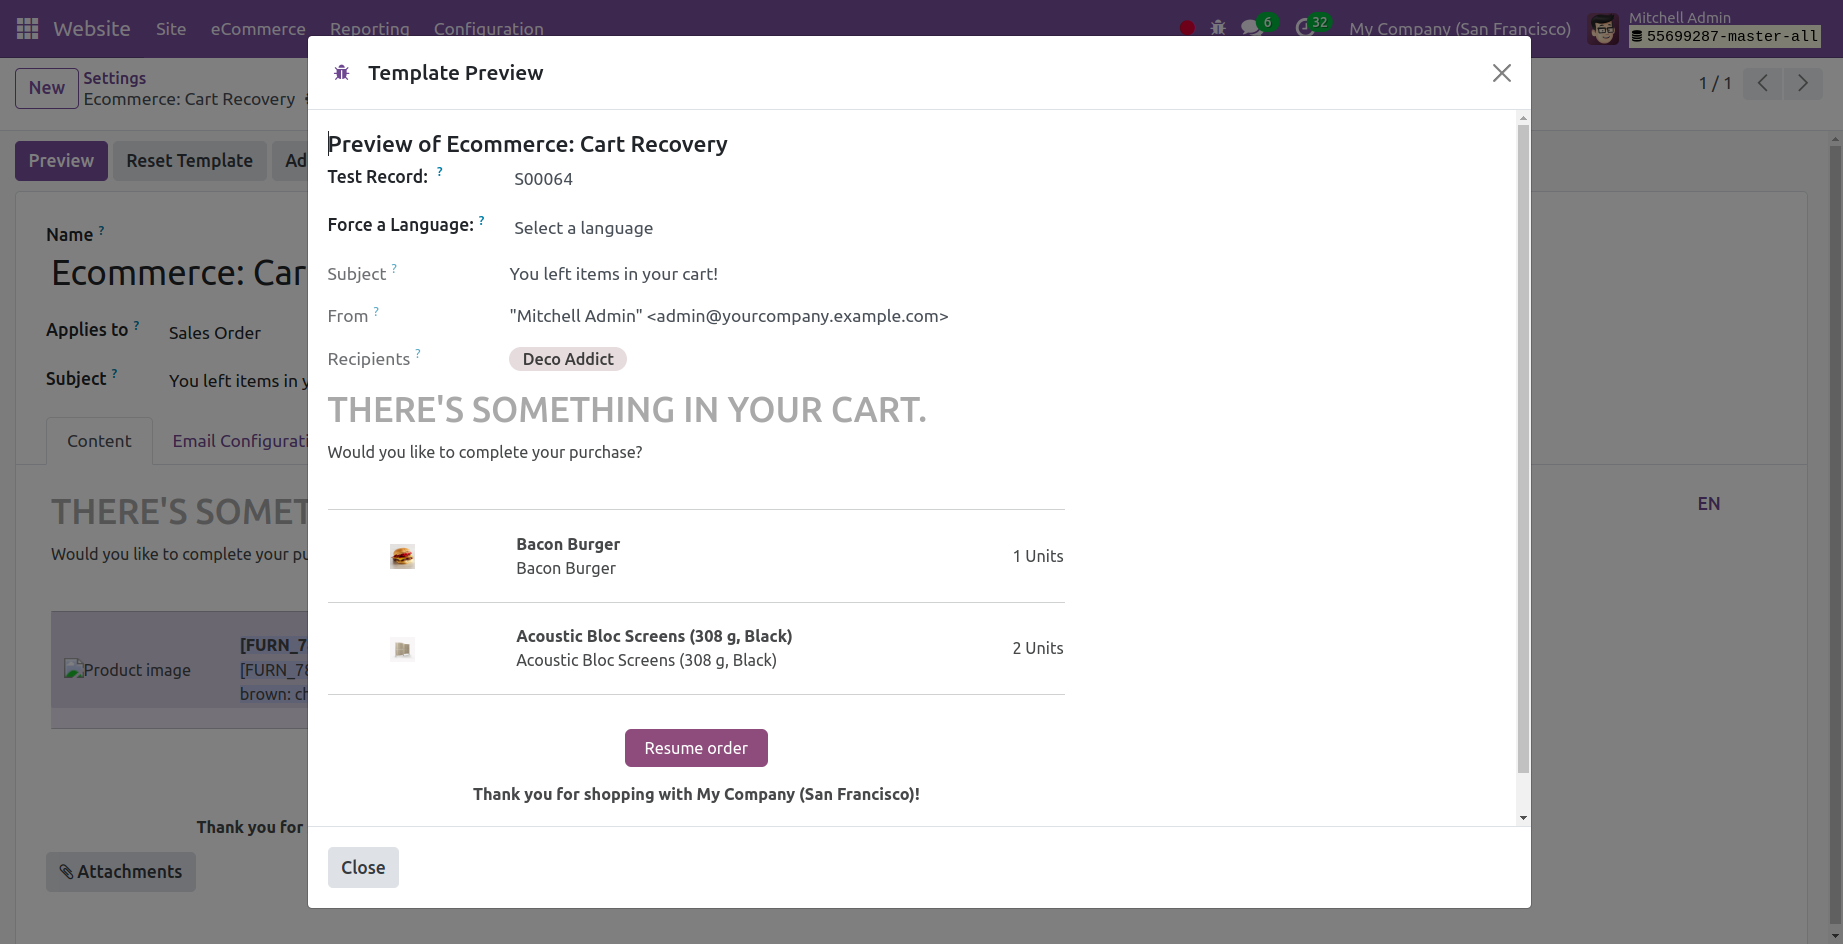
The Odoo Website Abandoned Cart Recovery helps you send reminder emails to your valuable customers who left the checkout process. Not every customer checks out after adding products to their cart. For various reasons, they regularly forget or have to end an engagement in the middle to attend to other responsibilities. Buyers usually enter their contact information prior to making a purchase, or they are potential consumers who have already registered on your website. Using the contact details they have supplied, you can remind them via email of the products they neglected to add to the cart.

Additionally, as seen below, a preview of the matching recovery template is available.
Online Sales Report
Users can get a summary of their online sales performance by selecting the Online Sales Analysis menu on the Reports page of the Odoo 17 Website module. A range of characteristics, including website traffic, online purchases, product sales, orders, and average order values, can be examined using the reports available in this menu. These reports can be used to identify goods that are performing well and might benefit from additional investment, or they can be used to indicate areas on the websites that want development, such as the need for more targeted advertising and promotional activities.

There are two modes available for the Online Sales Analysis window: Pivot and Graph. Above is a representation of the window in Graph view.
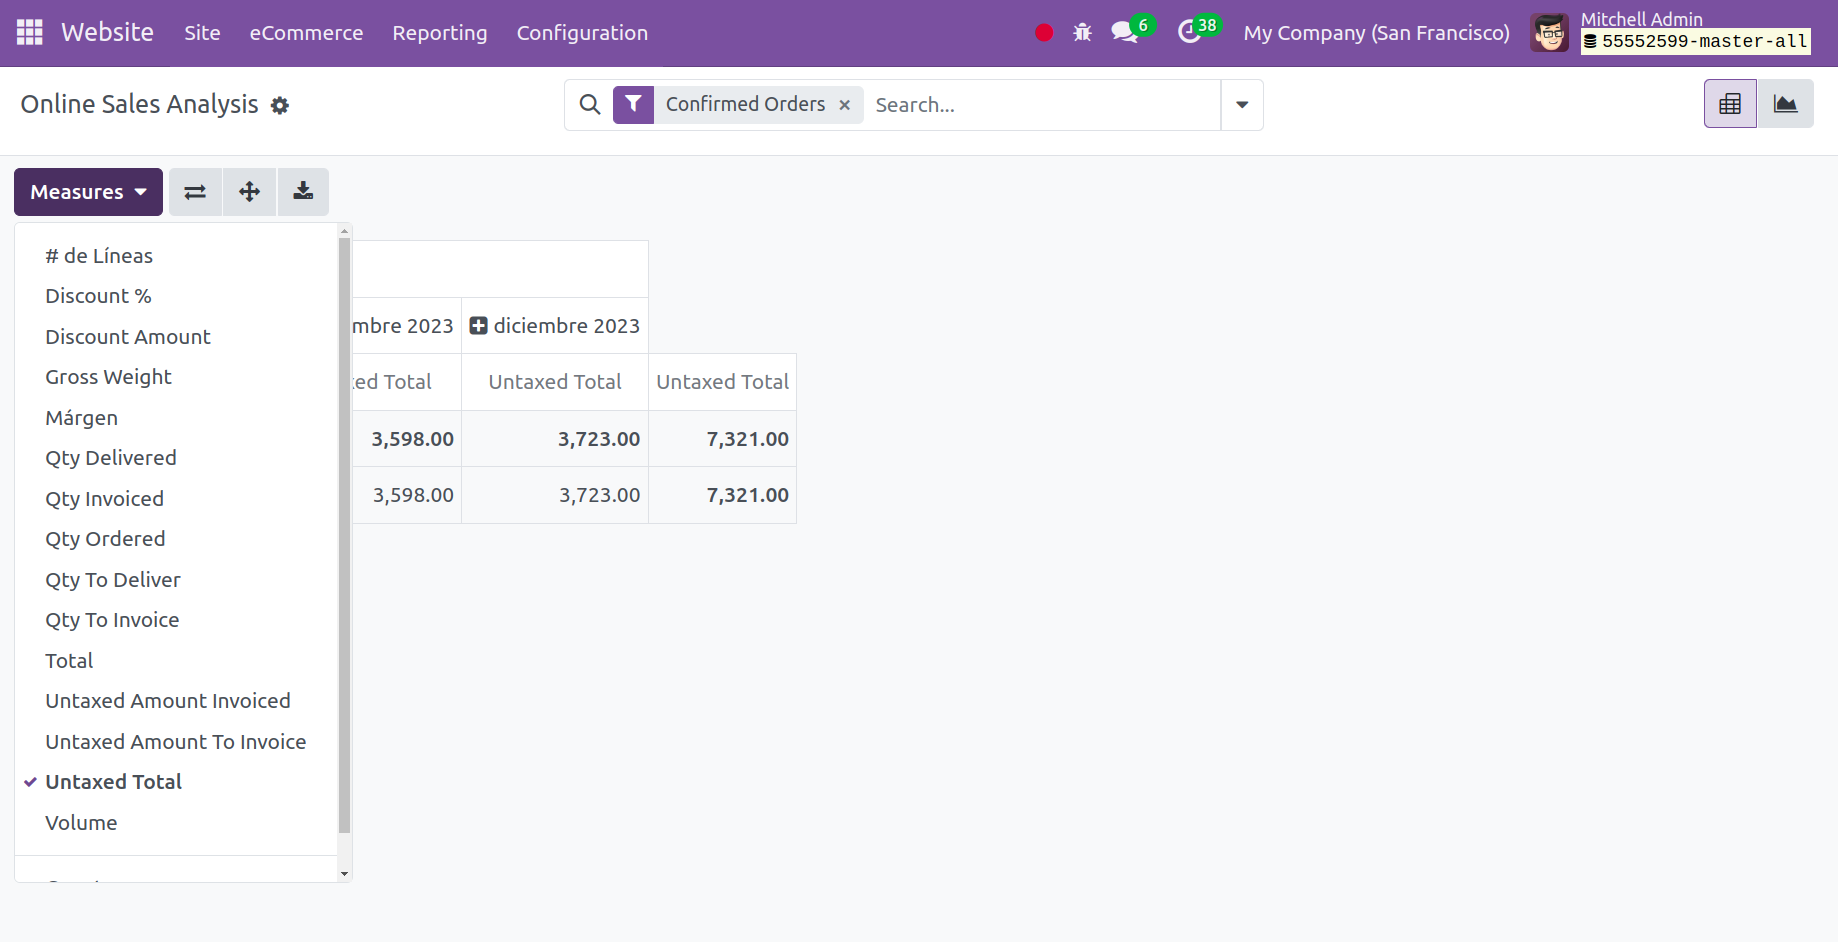
Using the measurements shown in the window's measurements tab, you can create sales analysis reports in a variety of metrics. A dropdown menu containing a lengthy list of options, including #of Lines, Discount, Discount Amount, Gross Weight, Margin, Quantity Delivered, Quantity Invoiced, Quantity Ordered, Quantity to Deliver, Quantity To Invoice, Total, Untaxed Amount Invoiced, Untaxed Amount To Invoice, Untaxed Total, Volume, and Count, will appear when you select the Measures tab.