Odoo 17 Helpdesk
Helpdesk
In order to effectively build your business, it is crucial to have a customer support system in place when dealing with clients. Every business needs to start with effective customer service. Your marketing and sales opportunities will increase if you provide the best customer service. The greatest way to develop a strong relationship with your clients is to meet their needs and promptly address any difficulties they may have. A specialized platform is provided by the cutting-edge Odoo 17 Help Desk module for carrying out customer service provider tasks. This module will let you address all consumer complaints and questions regarding your business. The help desk division of your business can utilize this module to take the necessary steps to address the reported issue
after a consumer files a ticket for service. Let's examine this module's functionality in this chapter.
You will arrive at the module's primary dashboard when you first launch it, as shown in the screenshot below.
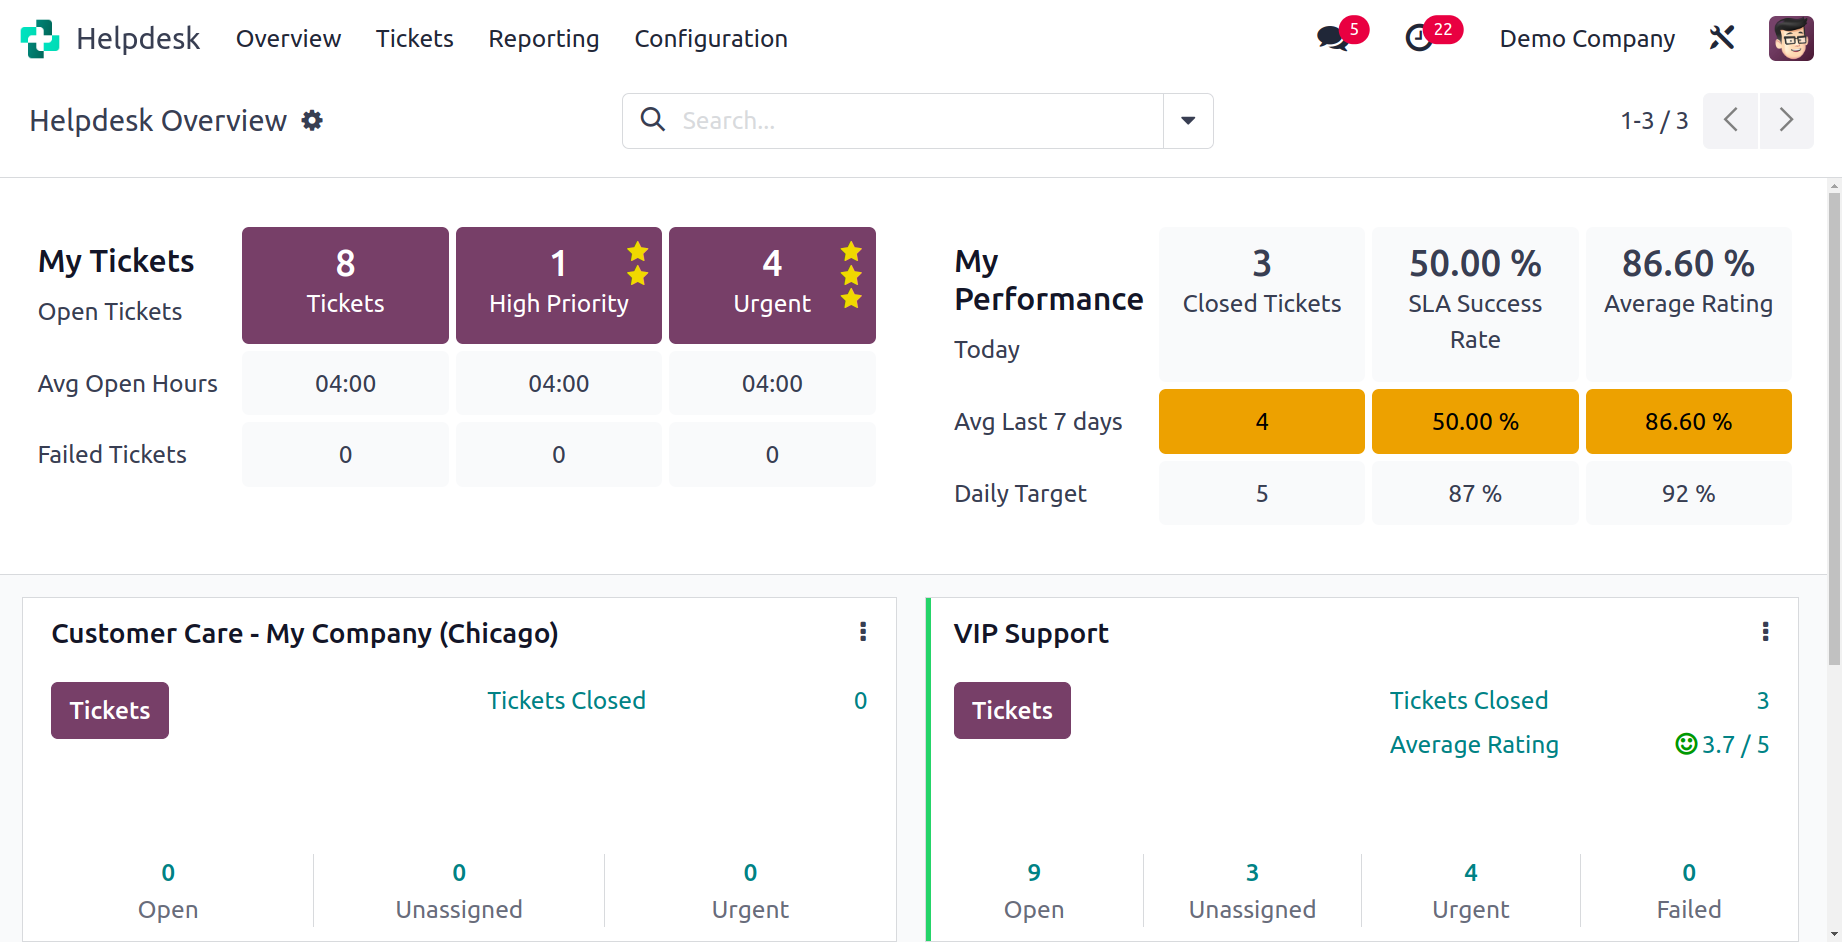
This is the module's Helpdesk Overview. You may see a summary of the module's main functions right here. In this window, you may access My Tickets and My Performance sessions. The window in the My Ticket session shows the quantity of open, urgent, and high-priority tickets. This page displays each ticket's average open hours. You can get the number of failed tickets in the corresponding ticket fields. The My Performance session can be used to do a performance analysis. Here, you can find all the data you need to assess performance, including Closed Tickets, Success Rate, and Average Rating for the current day and the previous seven days. The Daily Target is also displayed in this area.
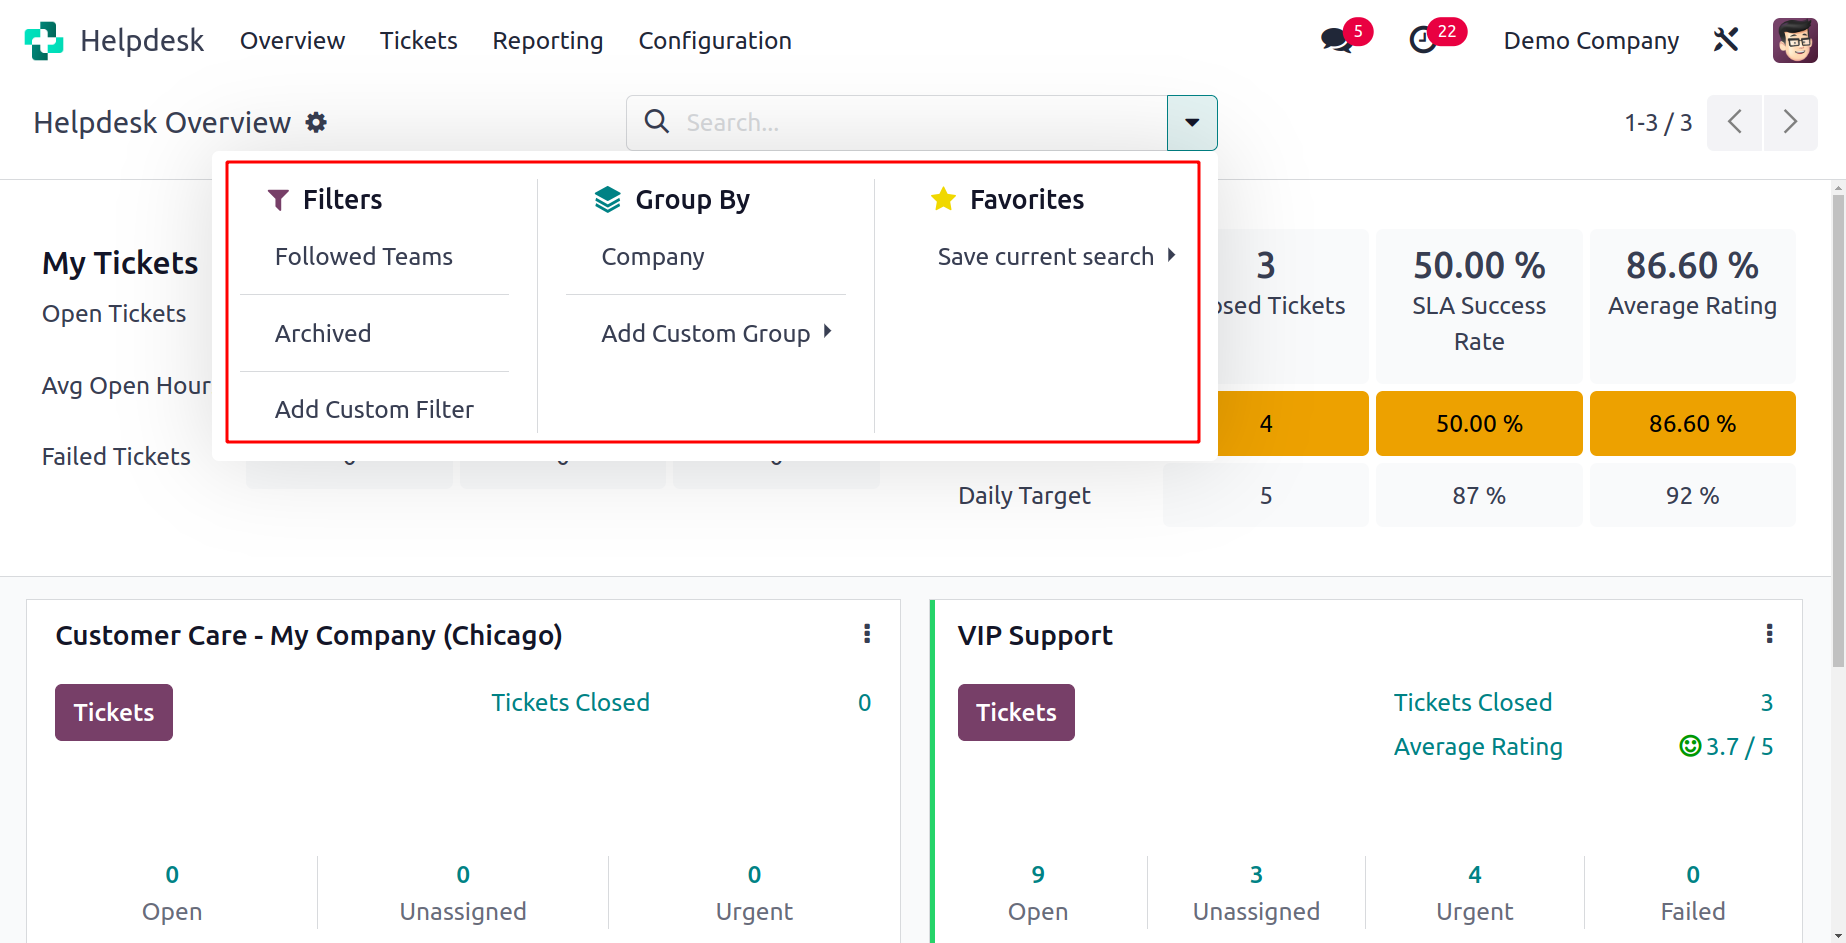
My Teams, Followed Teams, and Archived can all be used as filters. You can choose the Company as a grouping option in the Group By menu.
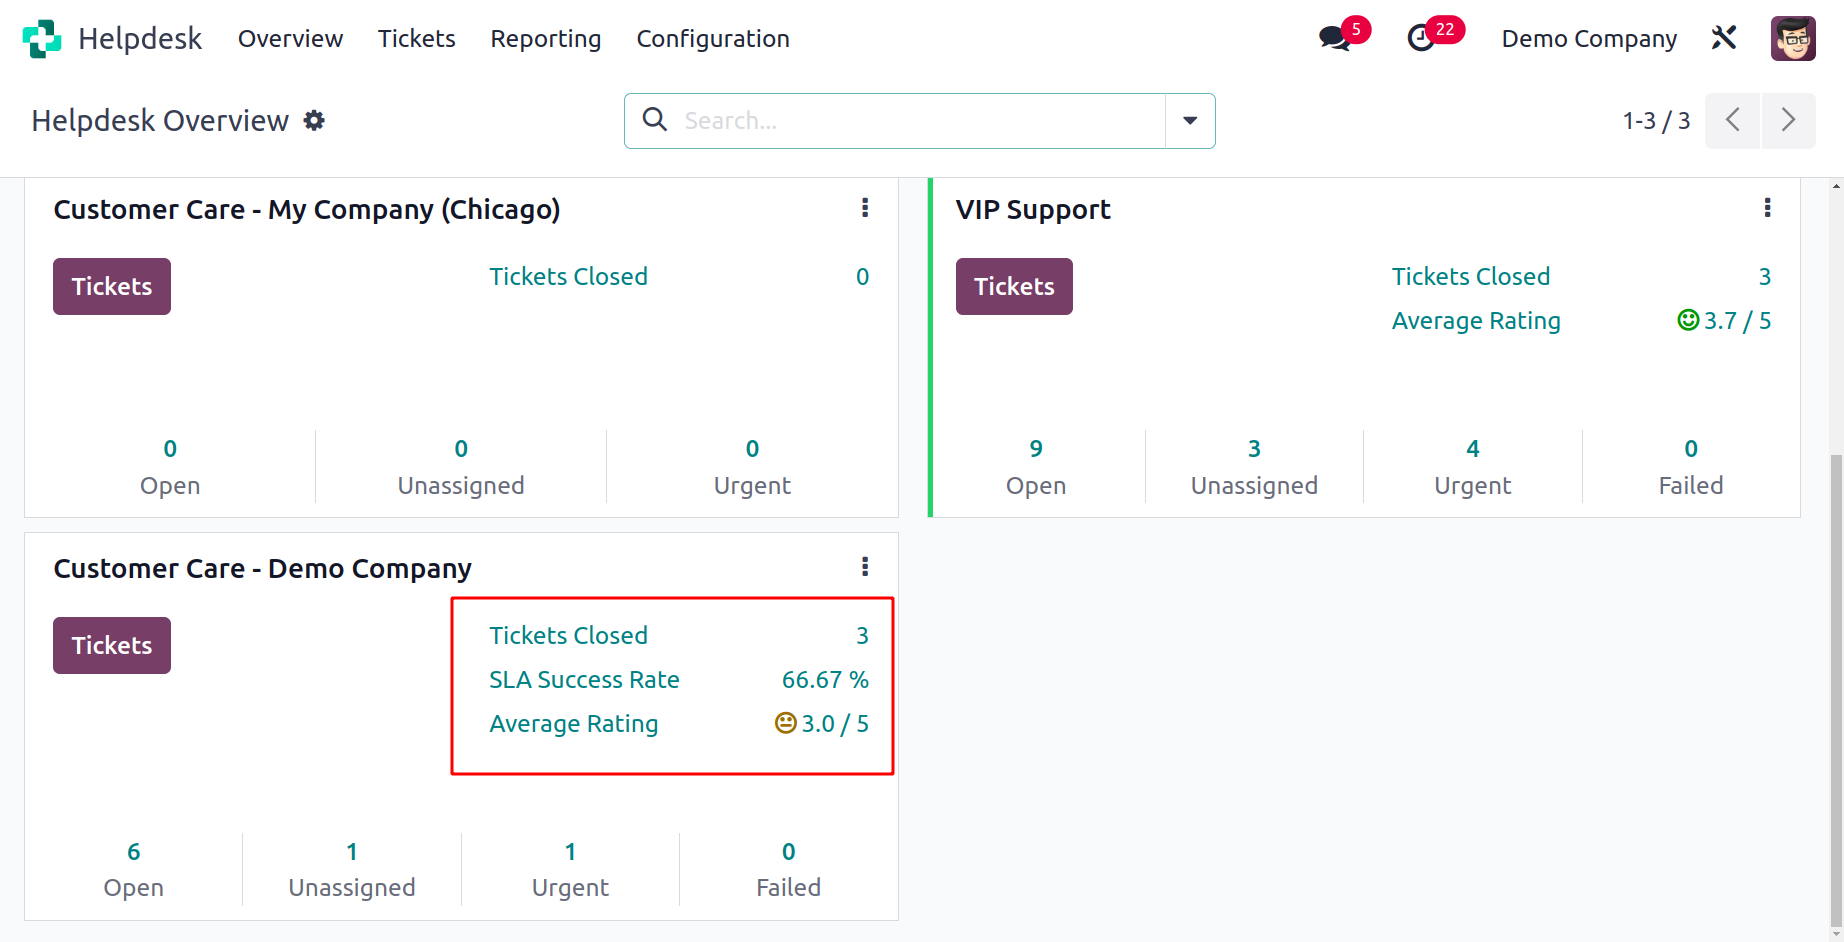
You can see the helpdesk team set up in your database right from the dashboard. Each support desk team's information is
displayed separately. The information includes the number of completed tickets, success rate, average rating, unassigned, urgent, and failed tickets, as well as the number of open tickets.
The tickets allocated to the specific support desk staff will be opened when you click the Tickets button.
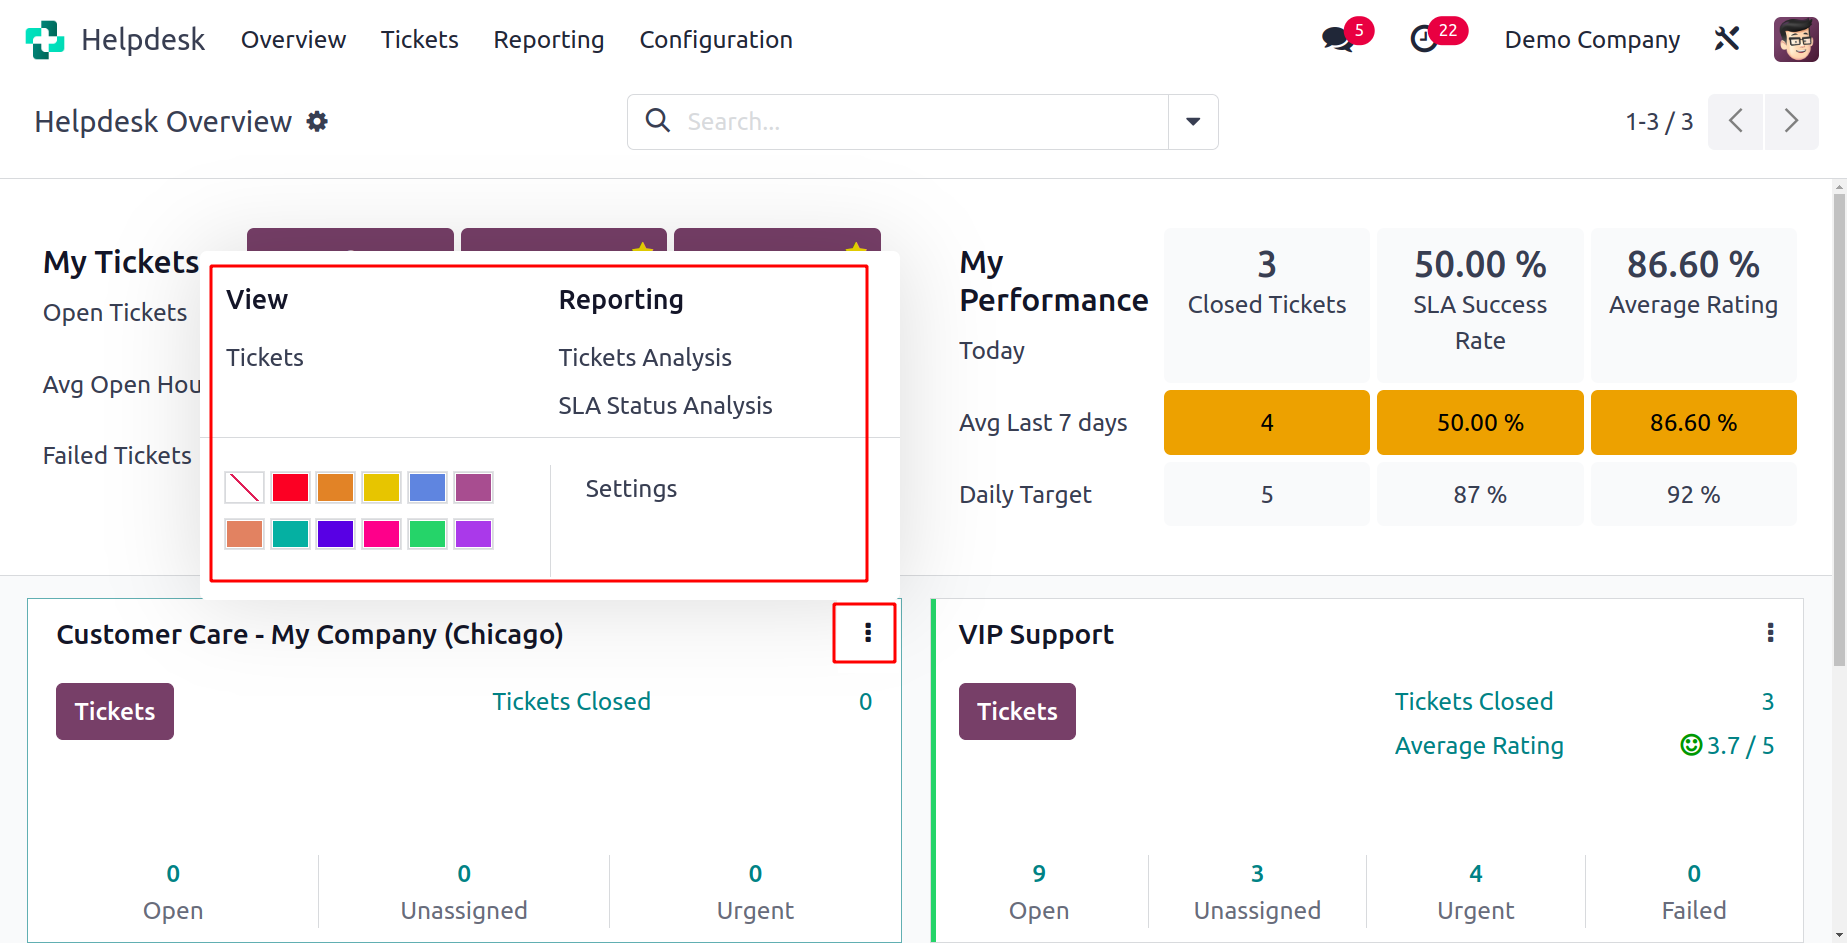
A new menu bar will appear when you click on the three vertical dots located in the upper right corner of the help desk team tab, as seen in the screenshot above. A view option to view the Tickets is available here. The buttons for Ticket Analysis and SLA Status Analysis are found under the Reporting option. You can use this dashboard to obtain a summary of the Help Desk module's operations.
Help Desk Team
You can set up various support desk teams in the Help Desk module to manage the tickets. This will enable you to respond swiftly and methodically to consumer concerns and questions. The admin can choose a help desk team to receive a new ticket when it is created in the module, and that team will be in charge of closing the ticket by the deadline.
The Help Desk Team option is located in the module's Configuration menu.
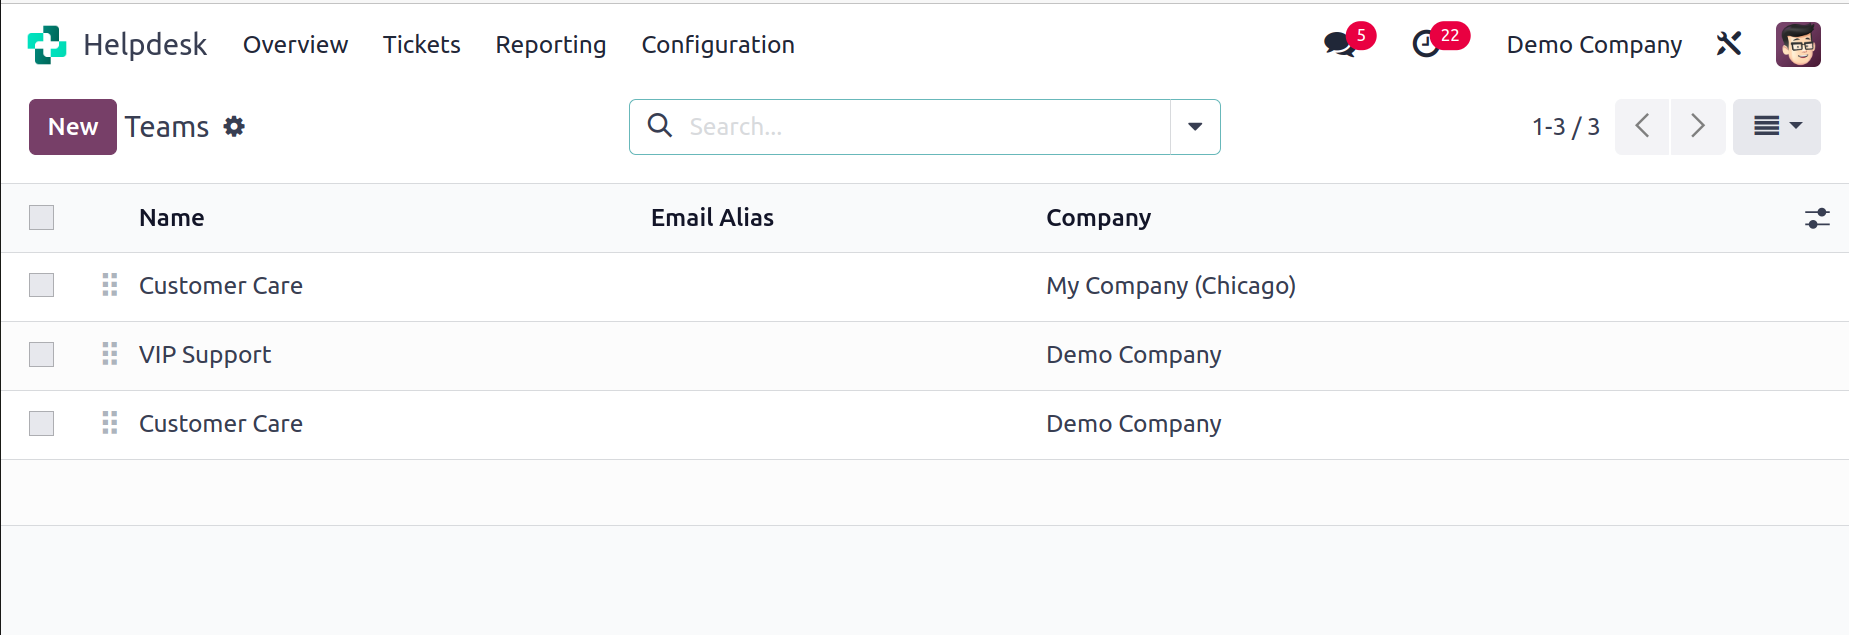
Teams for the help desk that are already configured can be seen here. The Name, Email Alias, and Company are included in the list's preview. A new help desk team can be created by selecting the New button.

The Team creation window's form view is displayed above. The team name can be entered in the box provided here. You can add one more line to the team's name to provide your coworkers and clients with a brief description of the team. Put the company's name in the designated field. The visibility of the team can be set using the Visibility & Assignment tab. You can choose who will be able to see this helpdesk team and its tickets in this section. You have the option of setting the
visibility to Invited portal users and all internal, Invited internal users, or All internal users.
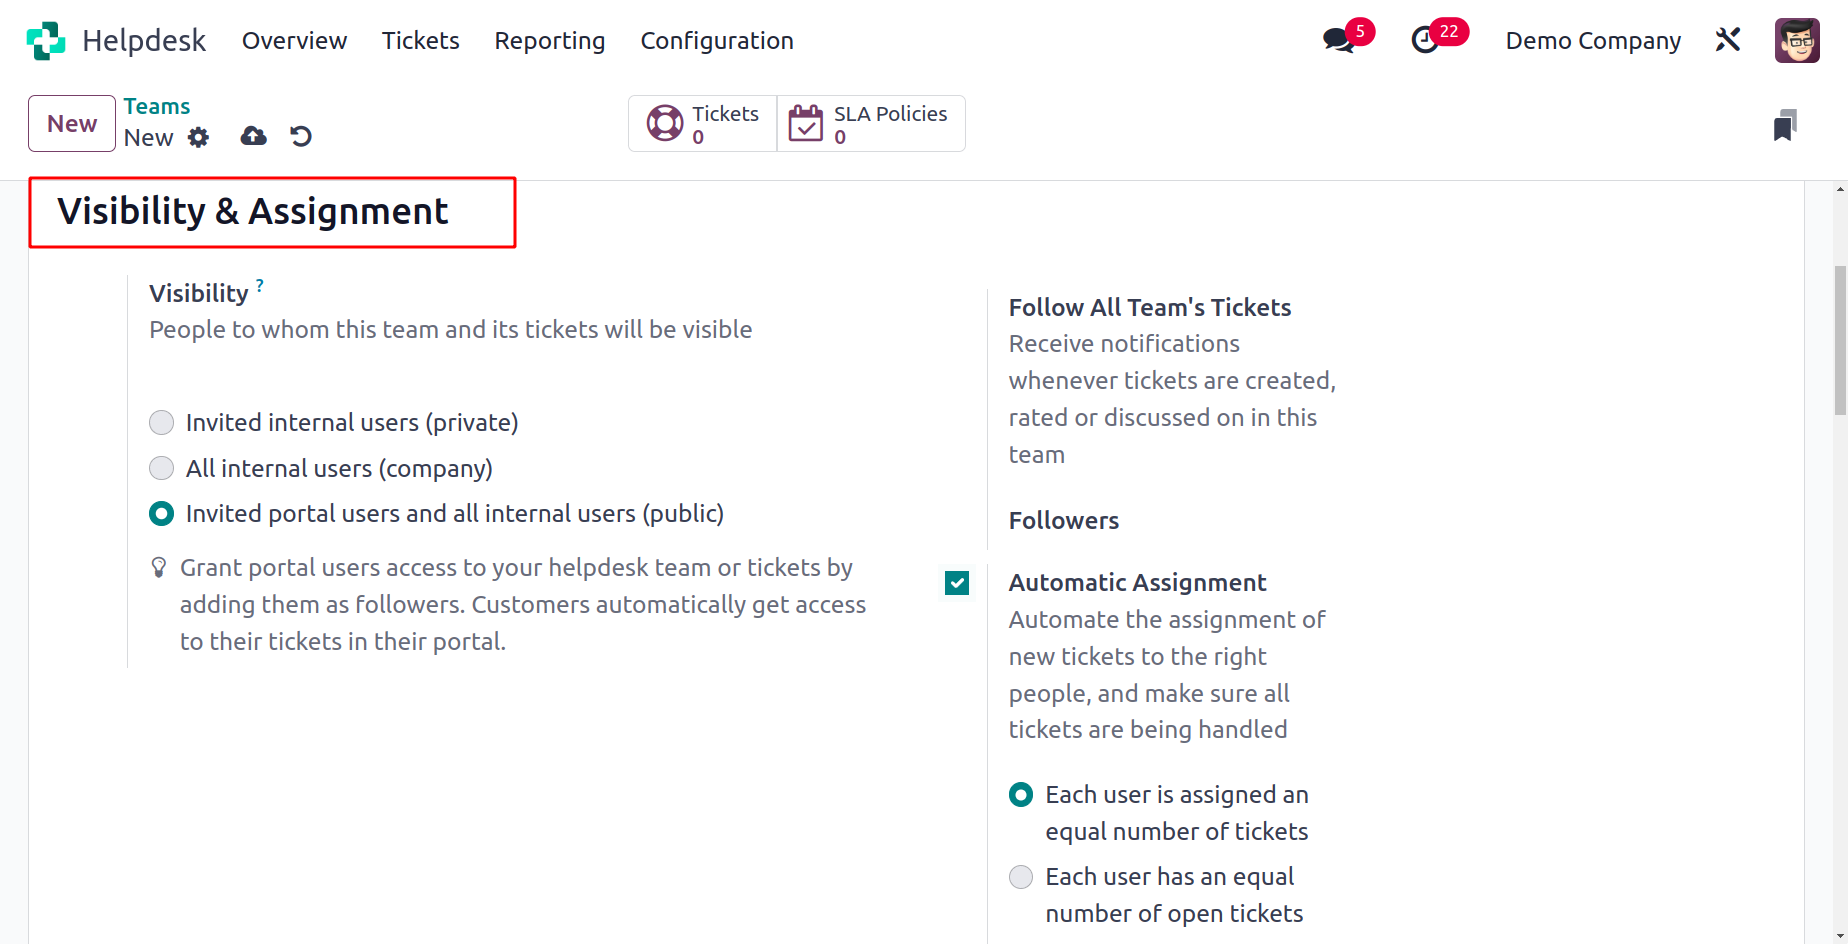
You can add this team's followers in the Followers area so that they are informed whenever new tickets are published, rated, or discussed in this team. You may ensure that all tickets are being handled by automating the assignment of new tickets to the appropriate parties by turning on Automatic Assignment. Each user is given an equal number of tickets, or each user
has an equal number of open tickets, which are the two options you have here for choosing the method of assignment.
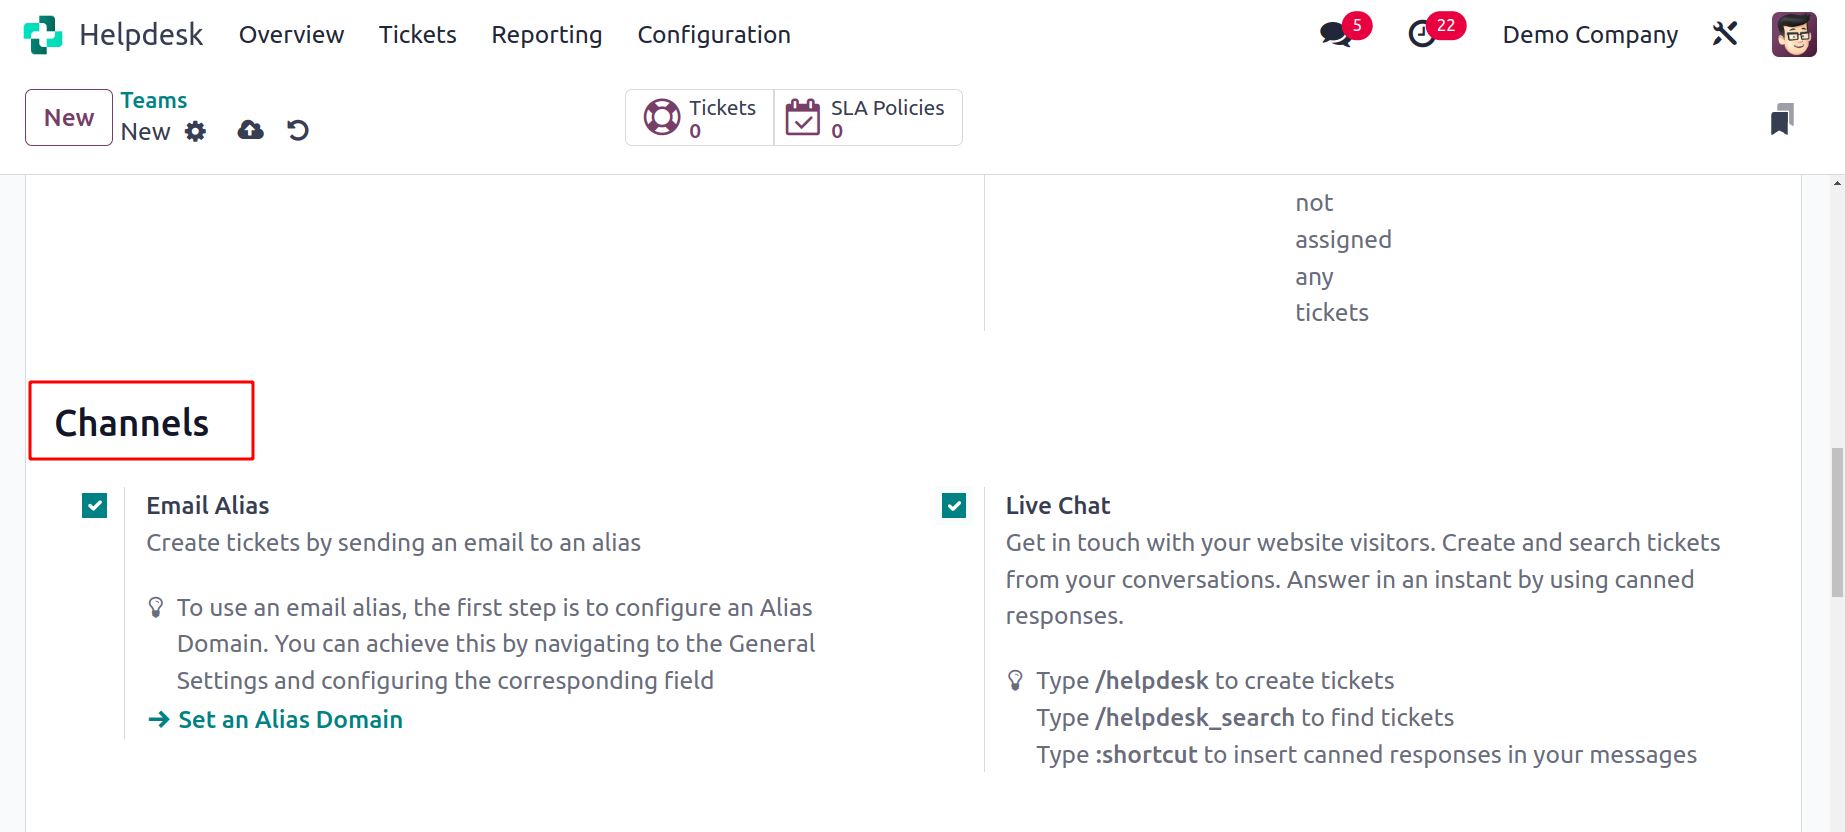
The channels for collecting tickets can be set up using the Channels tab. By sending an email to an alias, you can turn on the Email Alias feature to create tickets. In the provided box, you may set the email alias. By turning on the live chat feature, you can quickly connect with website visitors and enable a live chat feature on your website. You can turn on the website form to get tickets online.
You may maintain, share, and expand your knowledge library by using the Knowledge function. Create an Article in the provided field so that it will be the default page for the customer and the one to which their search will be limited. To share presentations and videos and group them into courses, turn on the eLearning option. The provided space can be used to mention the courses. By turning on the Community Forum option, you may allow your users to respond to one another's questions on a forum. In this window, there will be a place for you to mention the forums.
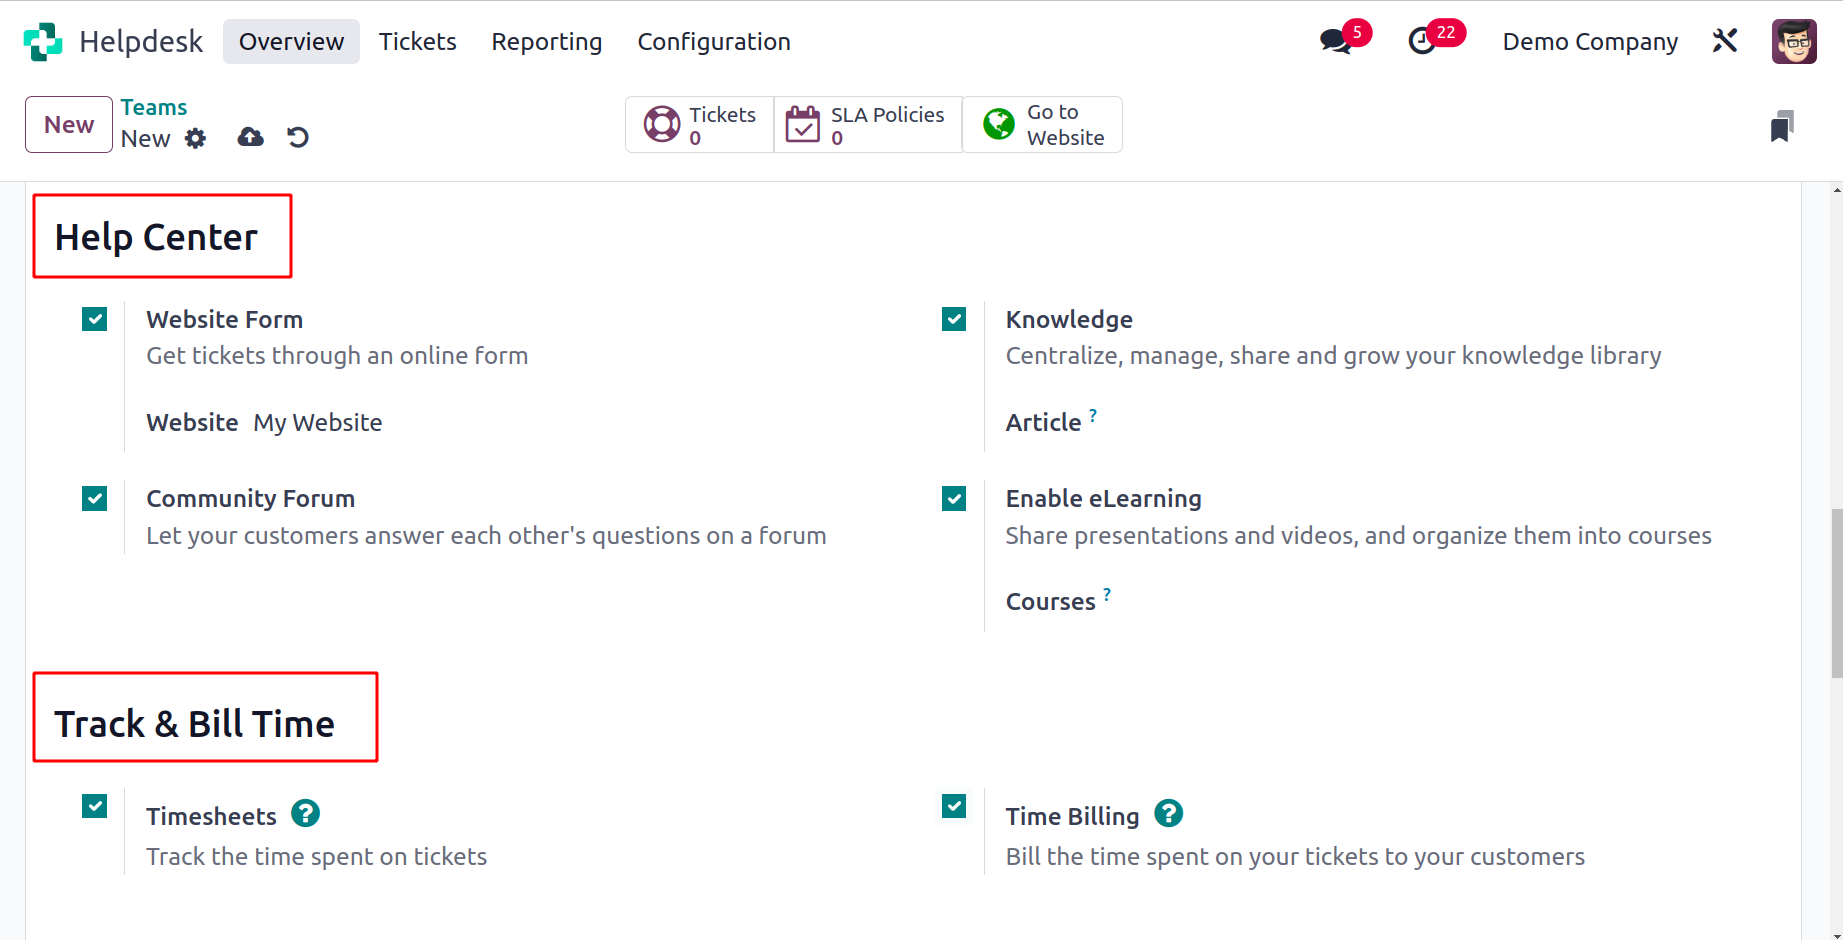
You may keep track of the time spent on tickets by turning on the Timesheets option. You can mention a project here, and the tickets from this helpdesk team will be tied to that project's timesheet. You can enable the Time Billing option from the Track & Bill Time menu in order to charge the appropriate client for the time spent working on your tickets.
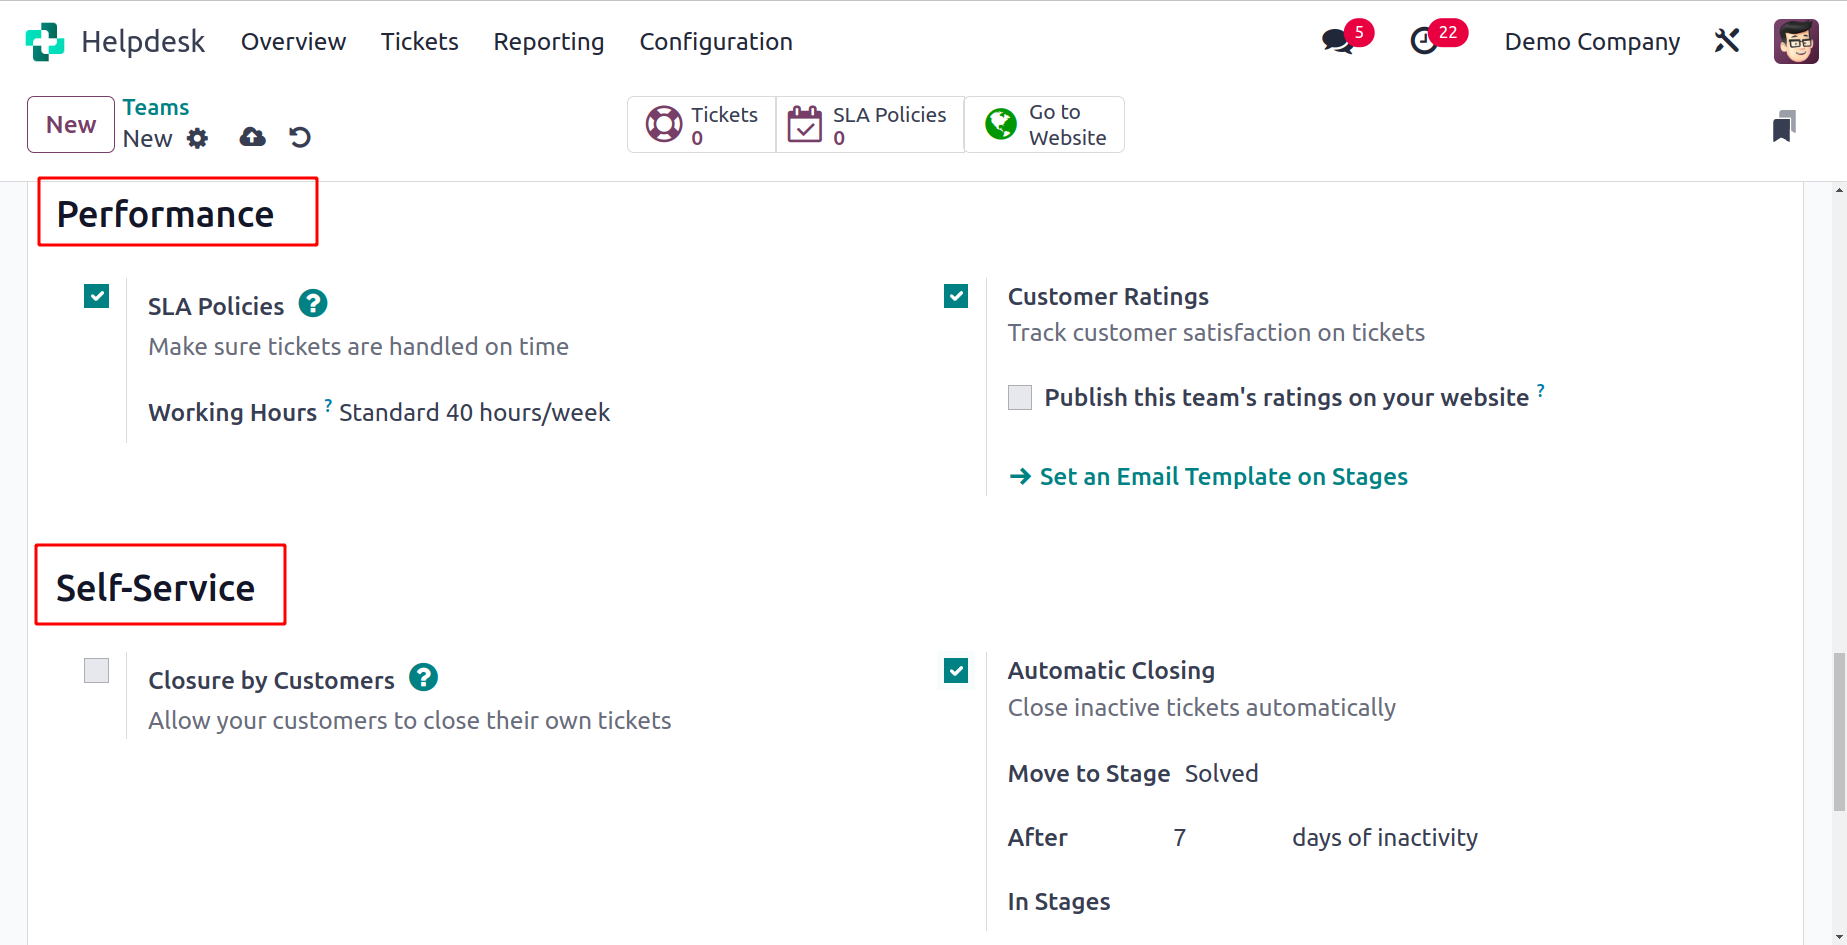
The tickets will be handled promptly after the SLA Policies are activated. Here, it is possible to specify the working hours that were utilized to establish the SLA Policies' deadline. You can utilize the Customer Ratings feature to monitor customer satisfaction with tickets. When you select this option,
a new field will appear that you can use to post this team's ratings on your website.
To automatically close the inactive tickets, turn on the Automatic Closing option.
You will be given a place to specify the stage to which the closed tickets will be transferred if you want to use this option. You can also enter days of inactivity here so that Odoo17 will automatically close tickets after the stated days of inactivity. Activating the Closure by Customer option will allow your customers to close their own tickets.
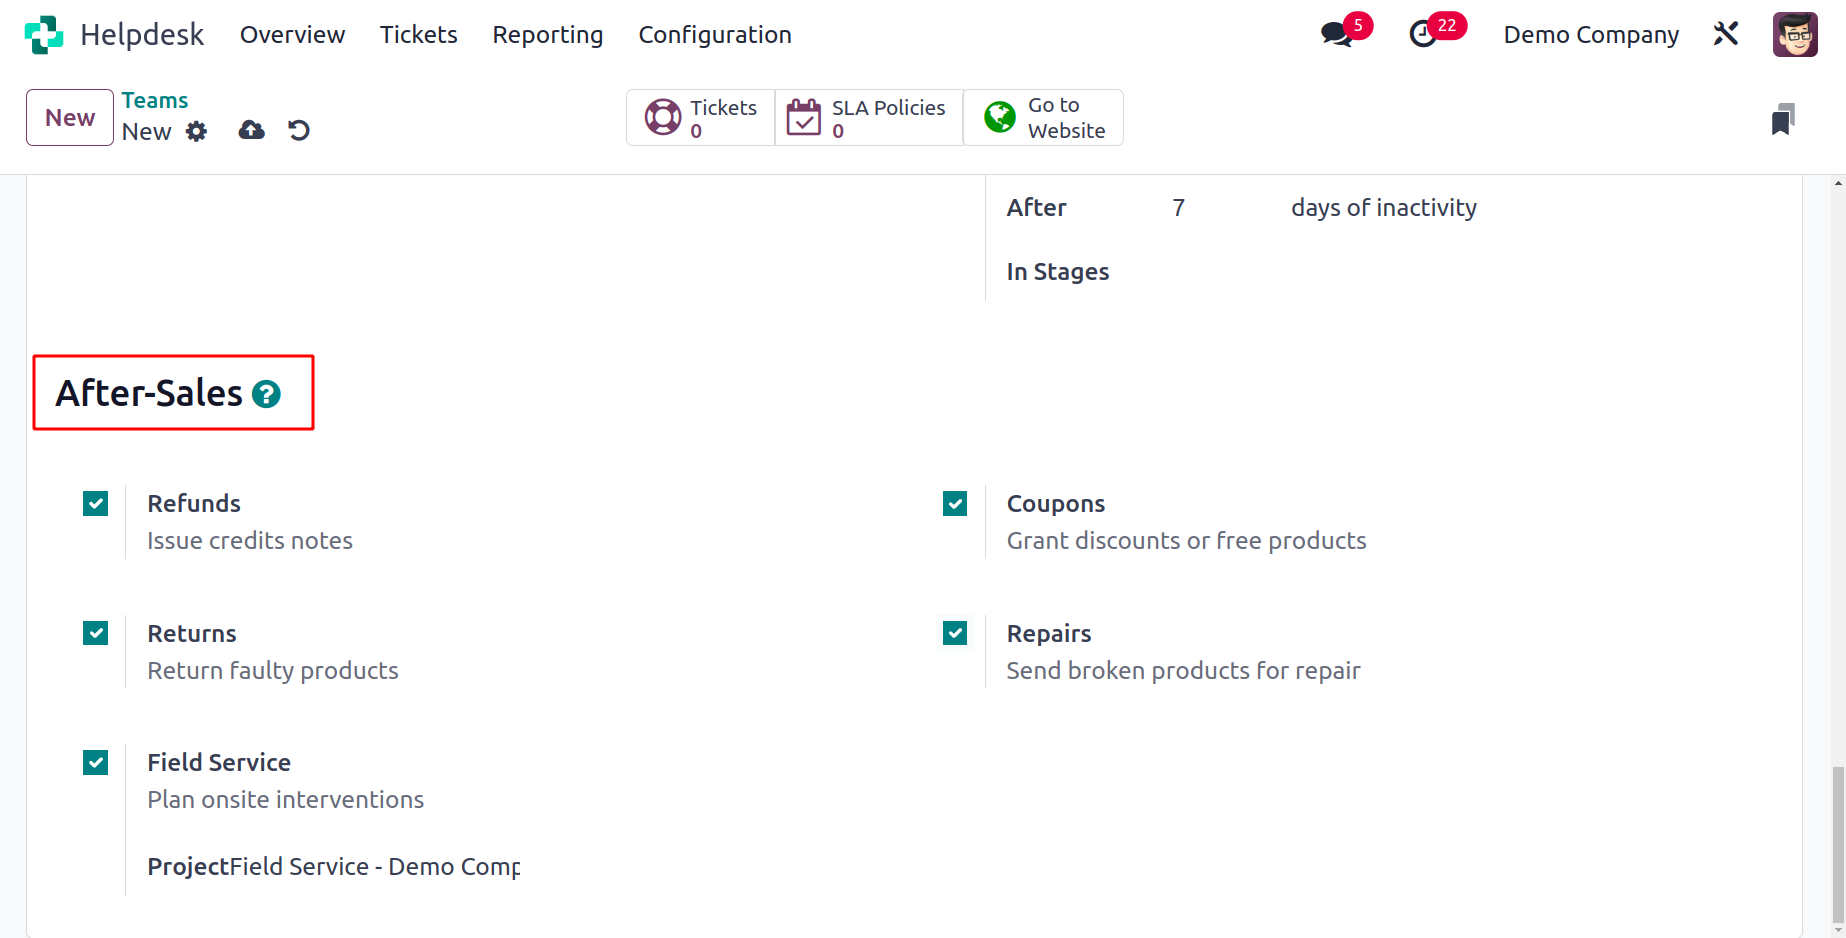
You can turn on the Refunds option in the After Sales page to give clients credit notes, the Returns option to send back defective goods, the Field Service option to schedule on-site interventions, the Coupons option to offer discounts or free goods, and the Repairs option to send damaged goods for repair. Your new helpdesk team is prepared for usage once all fields have been filled out.
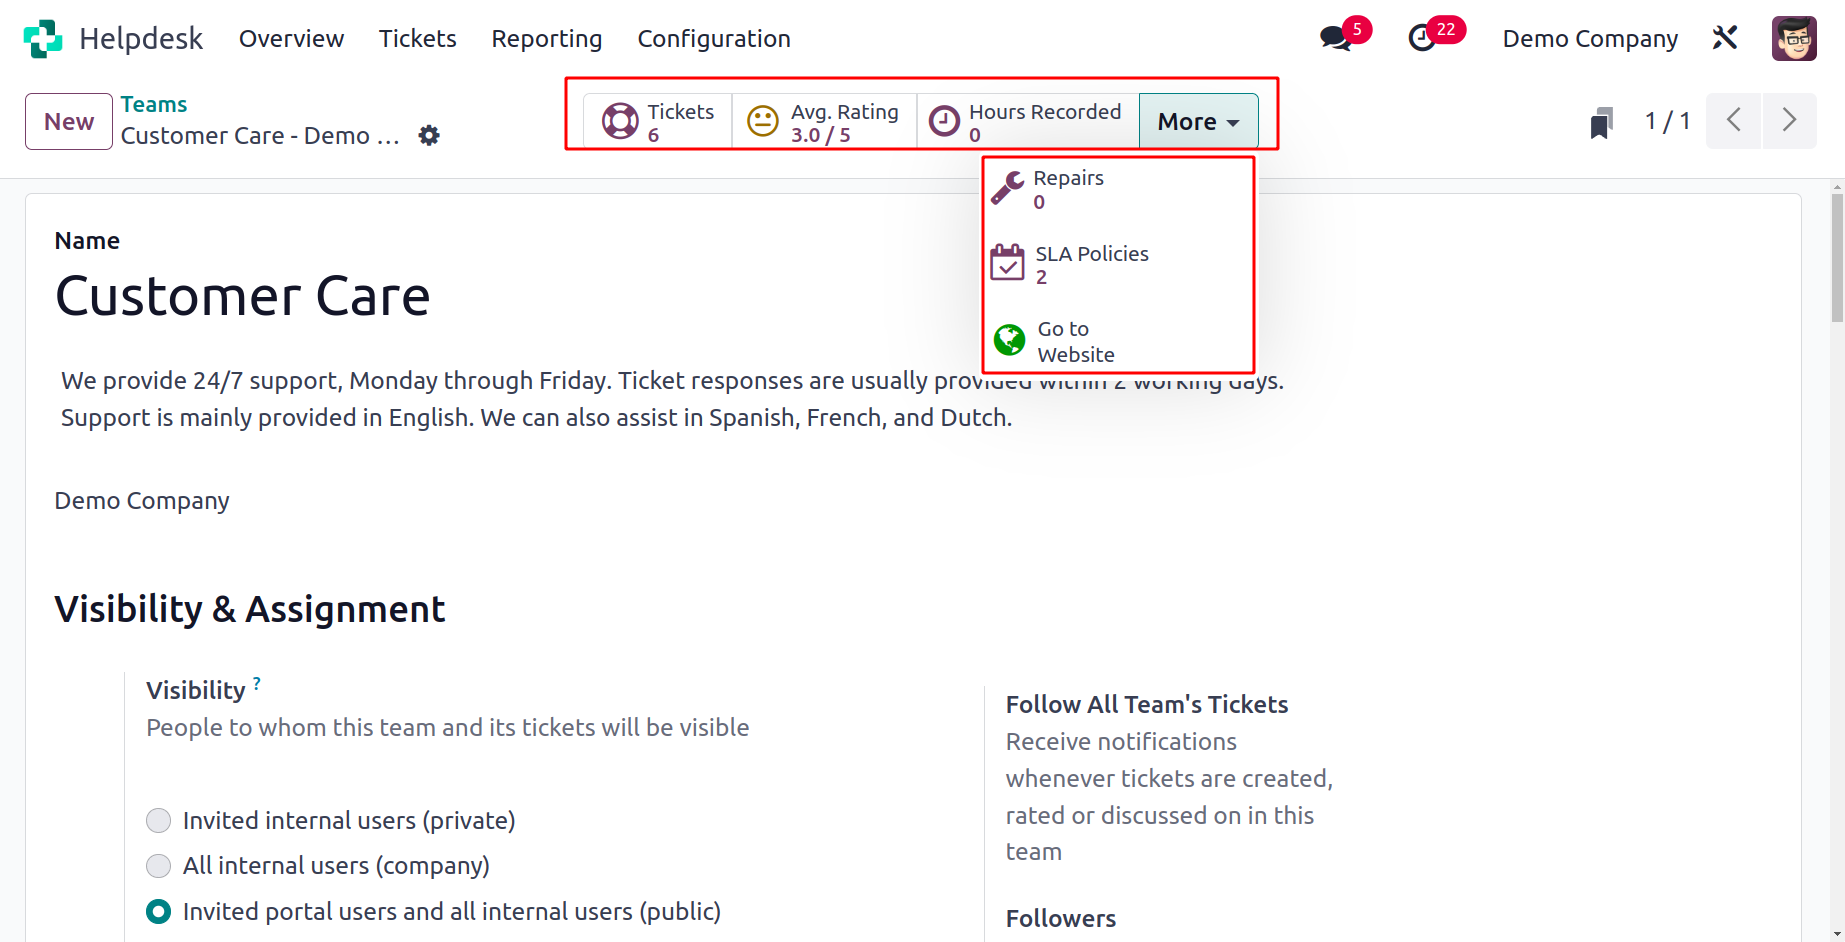
The user will receive some smart buttons on the form view, as seen in the screenshot above, to handle the operations linked to the helpdesk staff in one location. The list of tickets allocated to this specific helpdesk team is displayed through the Tickets button. The Avg.Rating smart button displays this team's customer satisfaction score. The Hours Recorded button displays the total number of working hours that have been logged for this helpdesk team. To handle the repair orders generated from this team's tickets, click the Repairs button. The relevant smart button will include the SLA Policies related to this.
You may access this team's website by clicking the Go To Website button.
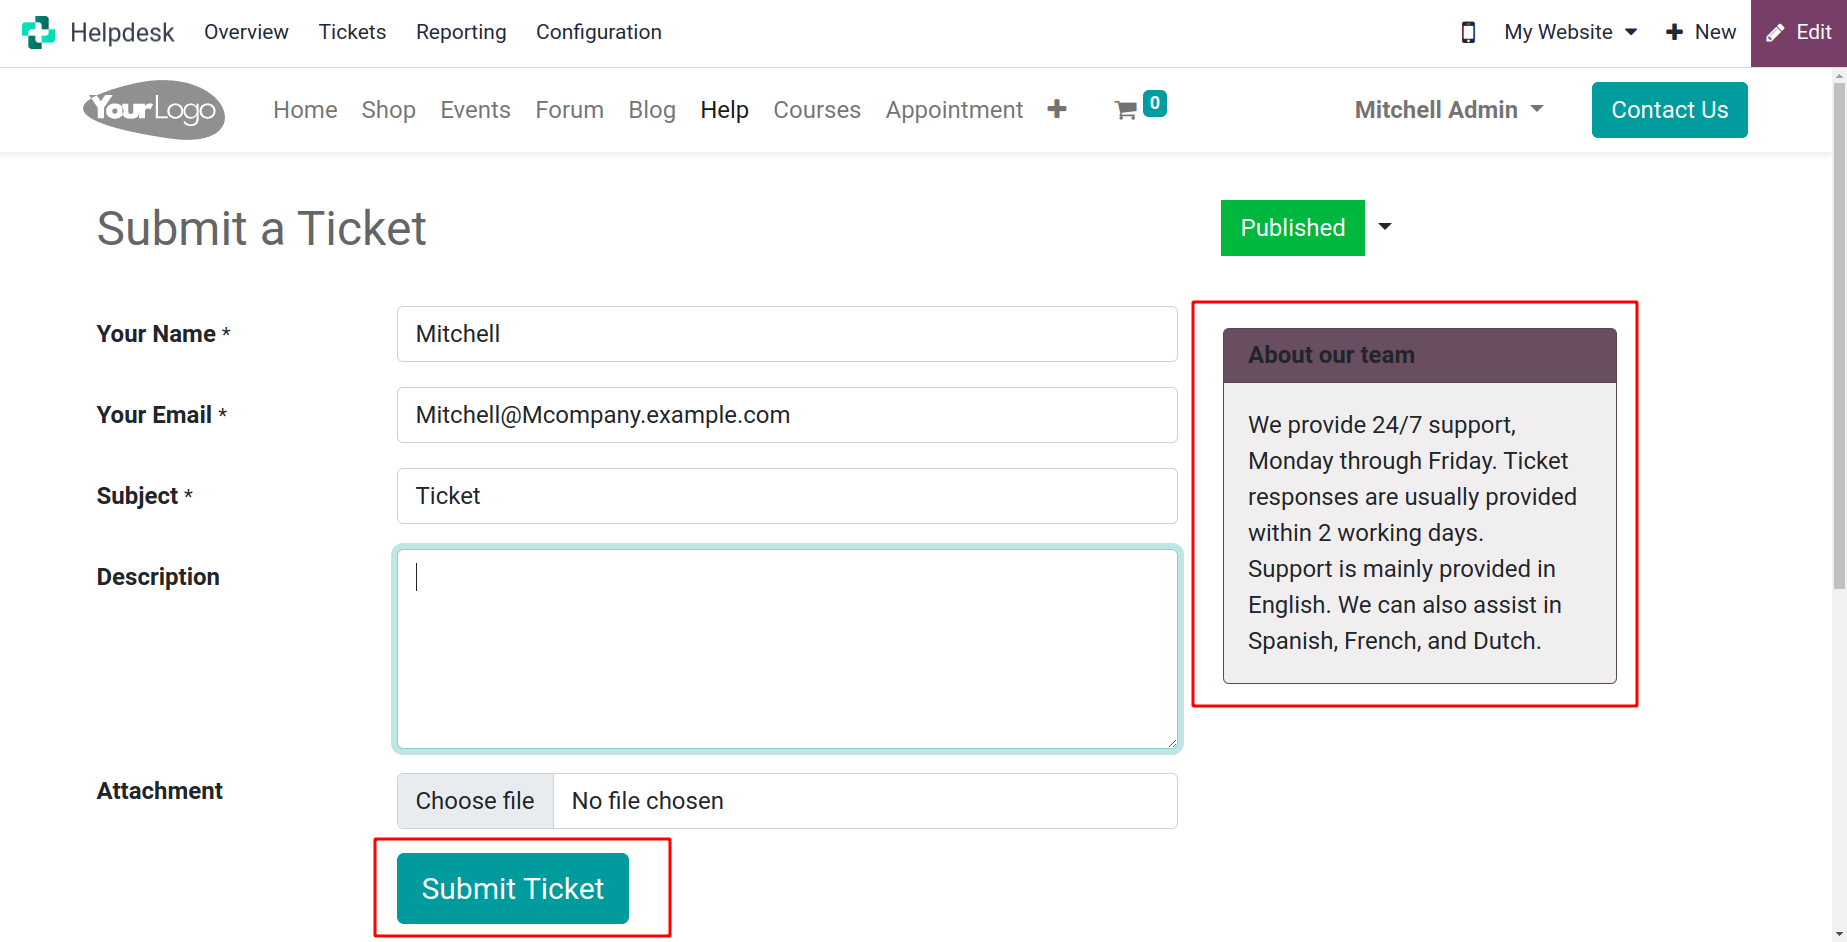
This is the helpdesk contact page's customer preview. On the right side of the screen, you can see the description you wrote for your team. This form can be used by the client to file a ticket. They can fill out this form, describe their problem, and press the "Submit Ticket" button. A new ticket will be generated in the Helpdesk module and immediately allocated to
the appropriate team when the customer clicks the Submit Ticket button.
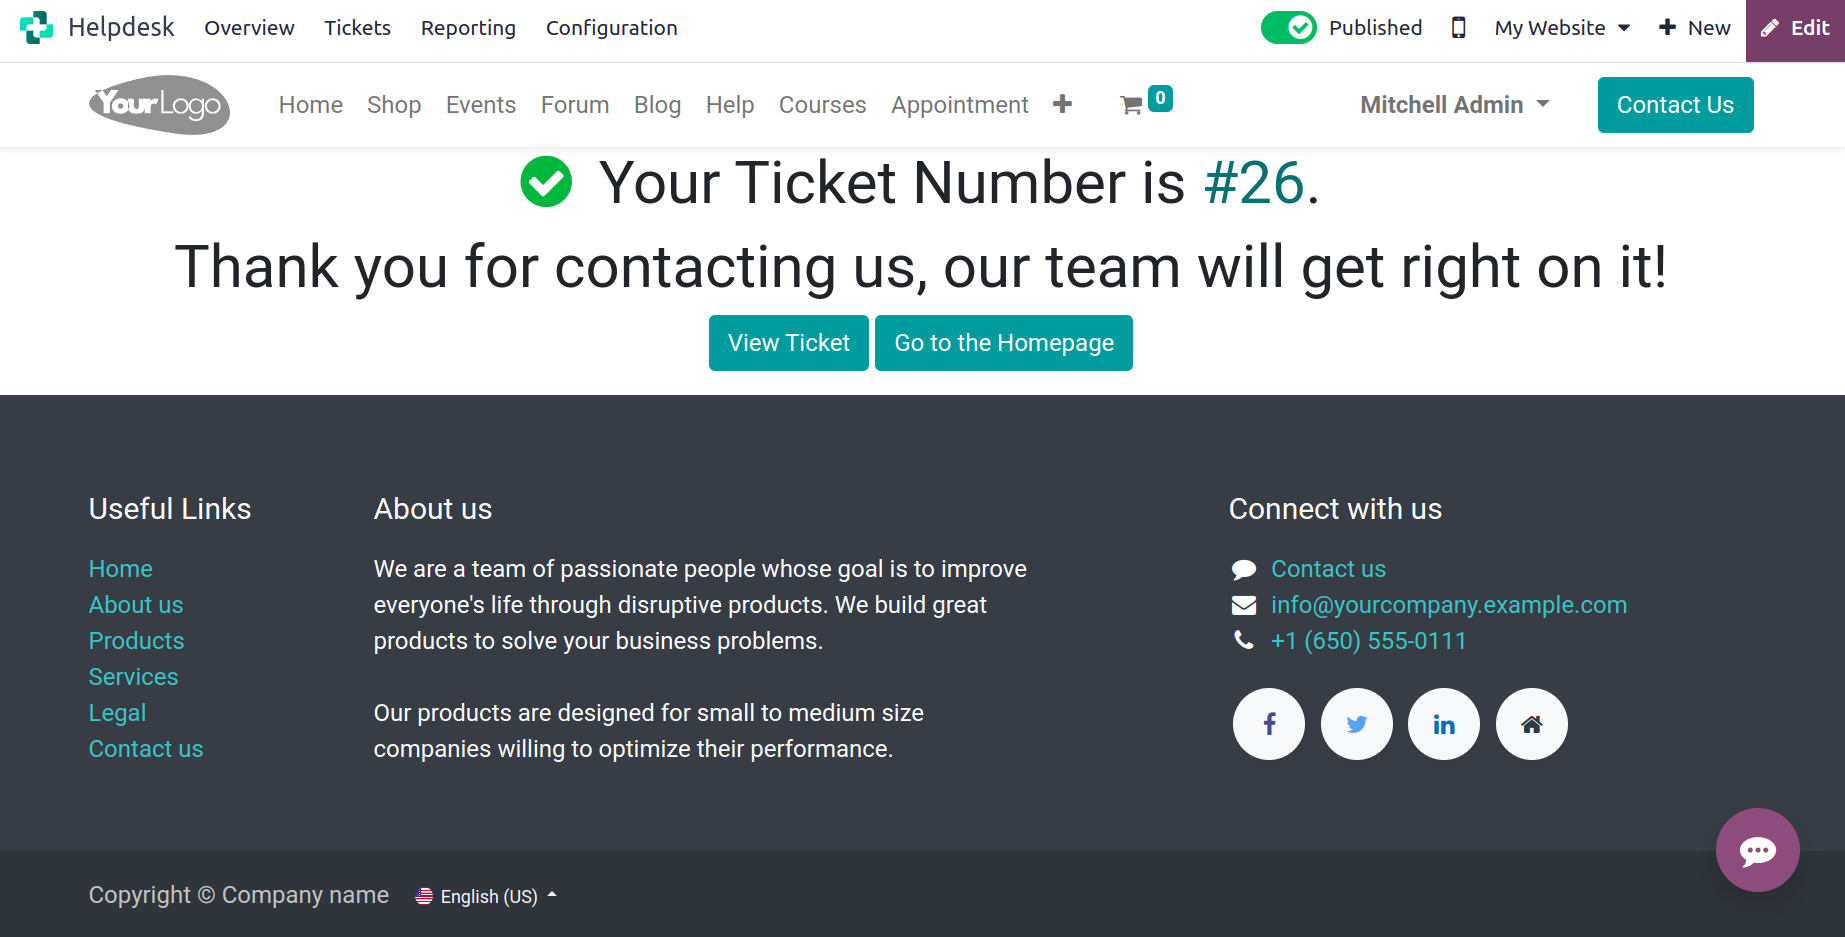
As seen in the screenshot above, the client will receive the ticket number and a message from the team. The allocated helpdesk team can now begin working on this ticket and finding a quick solution to the problem.
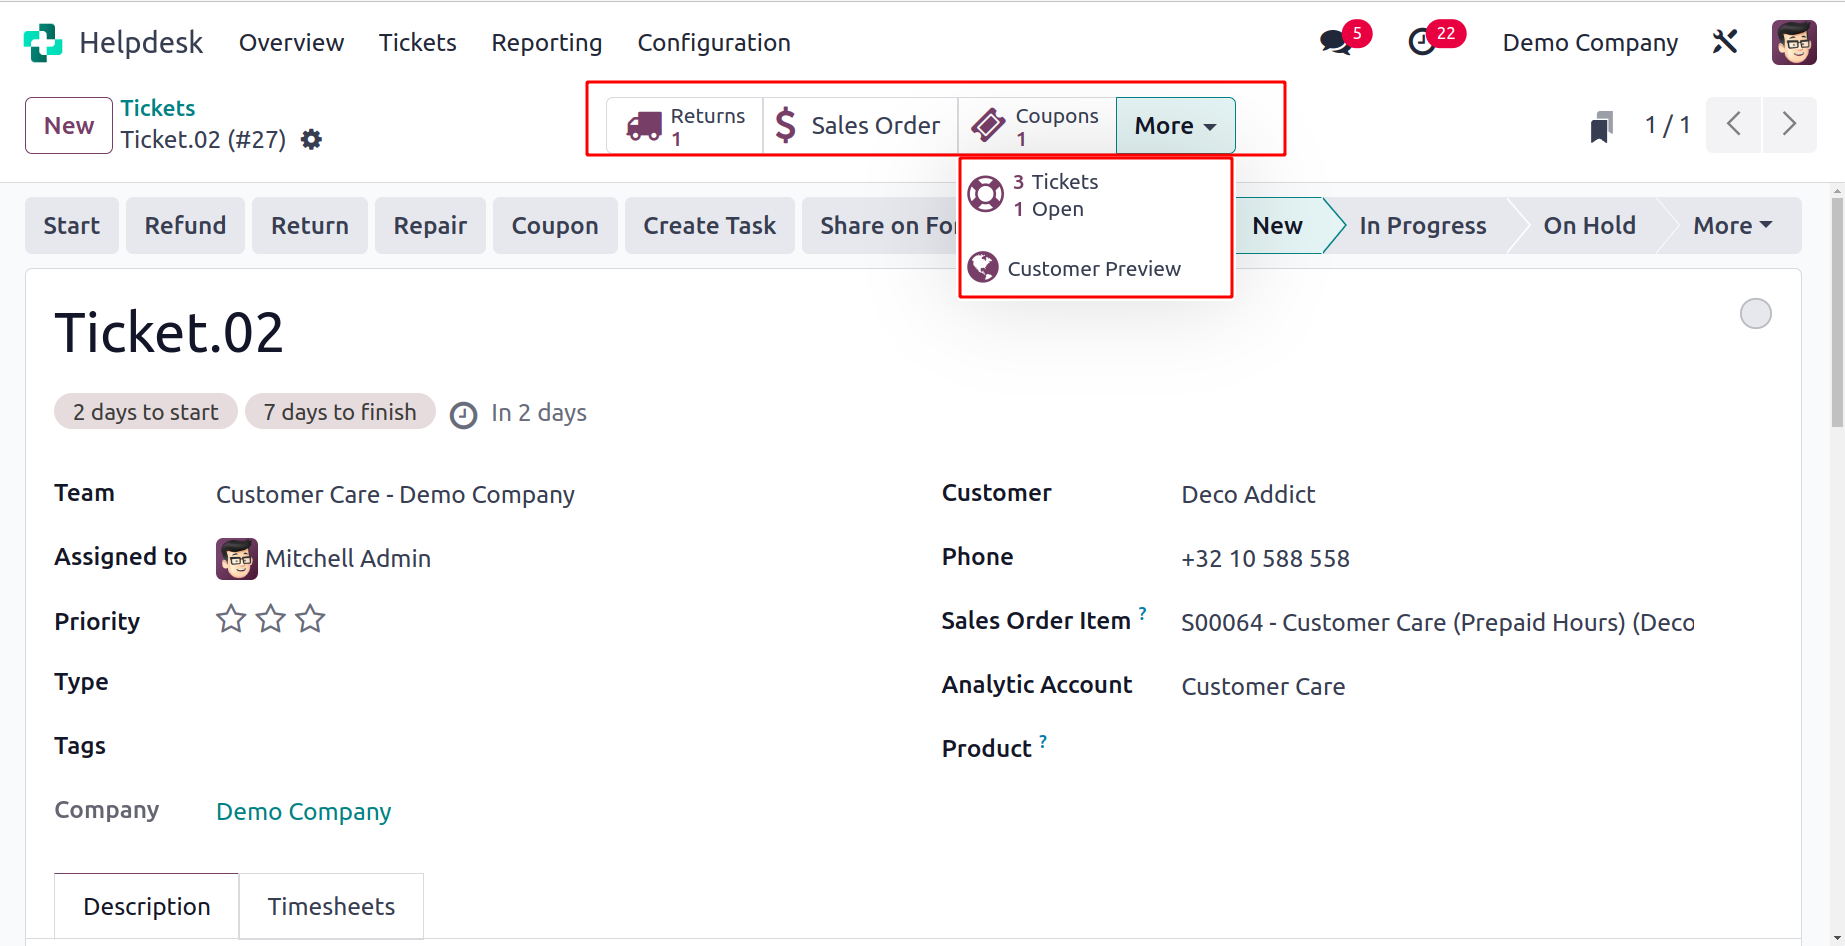
In the Helpdesk module's Tickets menu, you can manage the actions pertaining to this ticket.
Tickets
Customers can use a variety of channels in Odoo 17 to report problems or ask questions.
You may easily provide support to your clients with the aid of the Helpdesk module. The consumer has a variety of ways to contact a company's help desk team, including live chat, messages, the Contact Us page, forums, websites, emails, and phone calls. When a client requests any form of support from your business, you may document the problem by manually creating a ticket in the Helpdesk module. It's possible to automate the production of support desk tickets in Odoo 17.
All of these tickets will be managed in Odoo 17's Helpdesk module's Tickets menu.
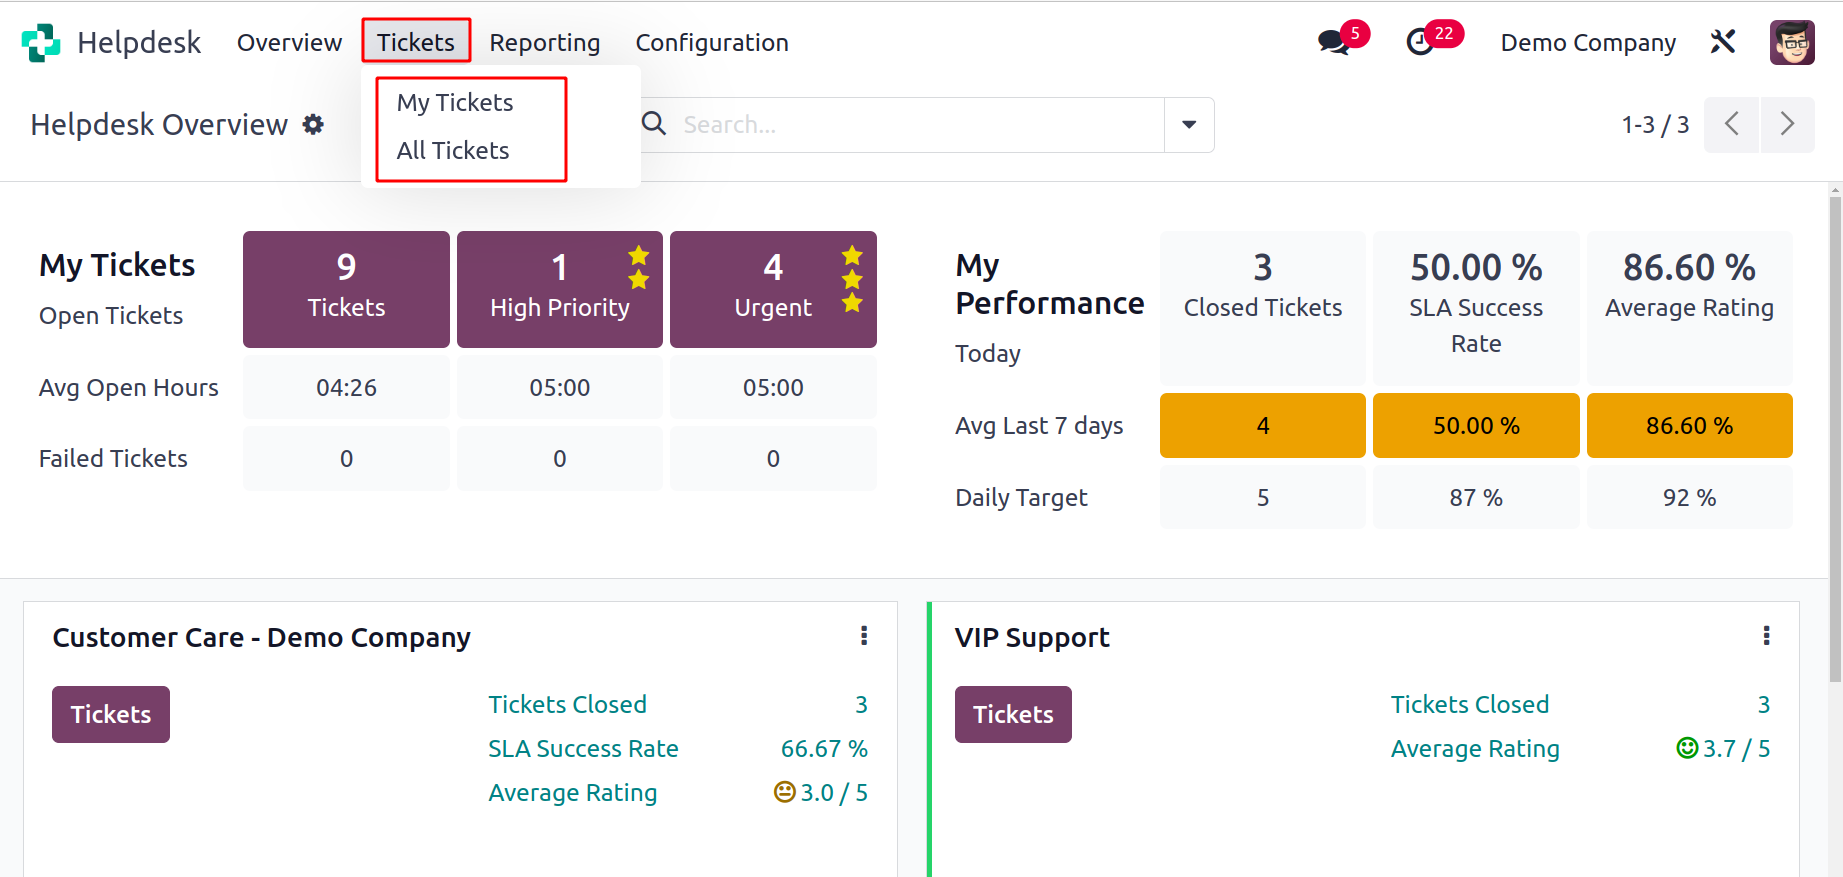
My Tickets and All Tickets options can be found under the Tickets menu. The My Tickets platform, as its name suggests, will display a list of the tickets that have been issued to you.
You can monitor all of your company's help desk teams' tickets with the All Tickets platform.
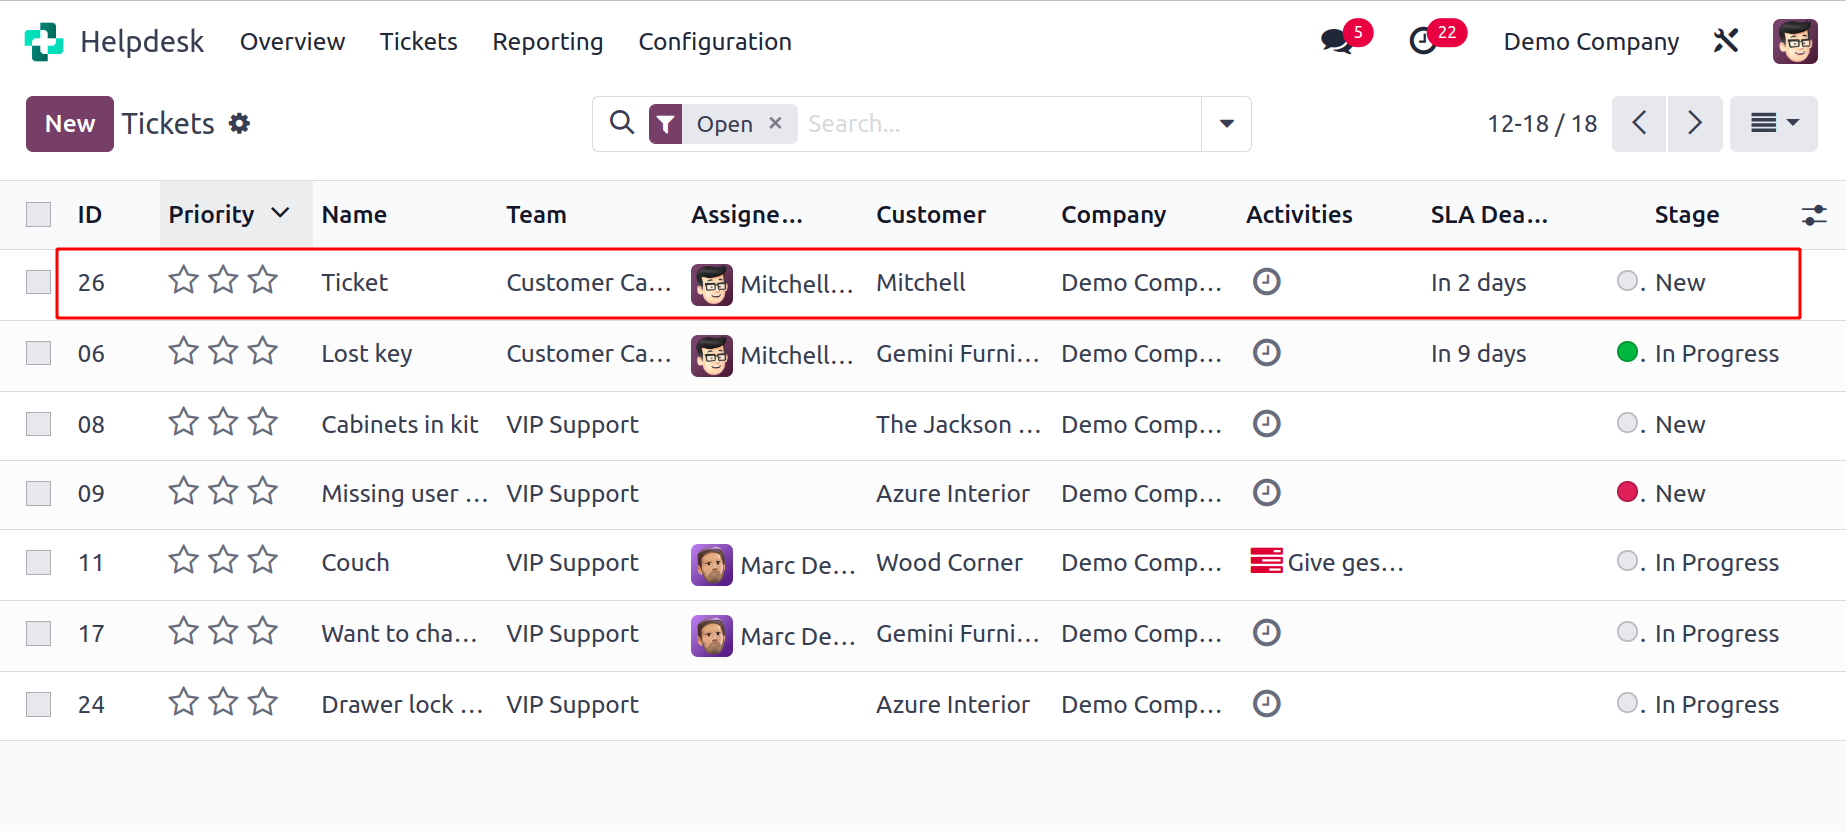
The image above represents the Tickets in the list view. Depending on your needs, you can also use the Kanban, Activity, Pivot, Graph, and Cohort views in addition to the list view. ID, Priority, Name, Team, Assigned to, Customer, Company, Activities, SLA Deadline, and Stage are all listed in the list's preview. By selecting new fields from the list that appears after clicking the menu icon in the list view's upper right corner, you can expand the view.
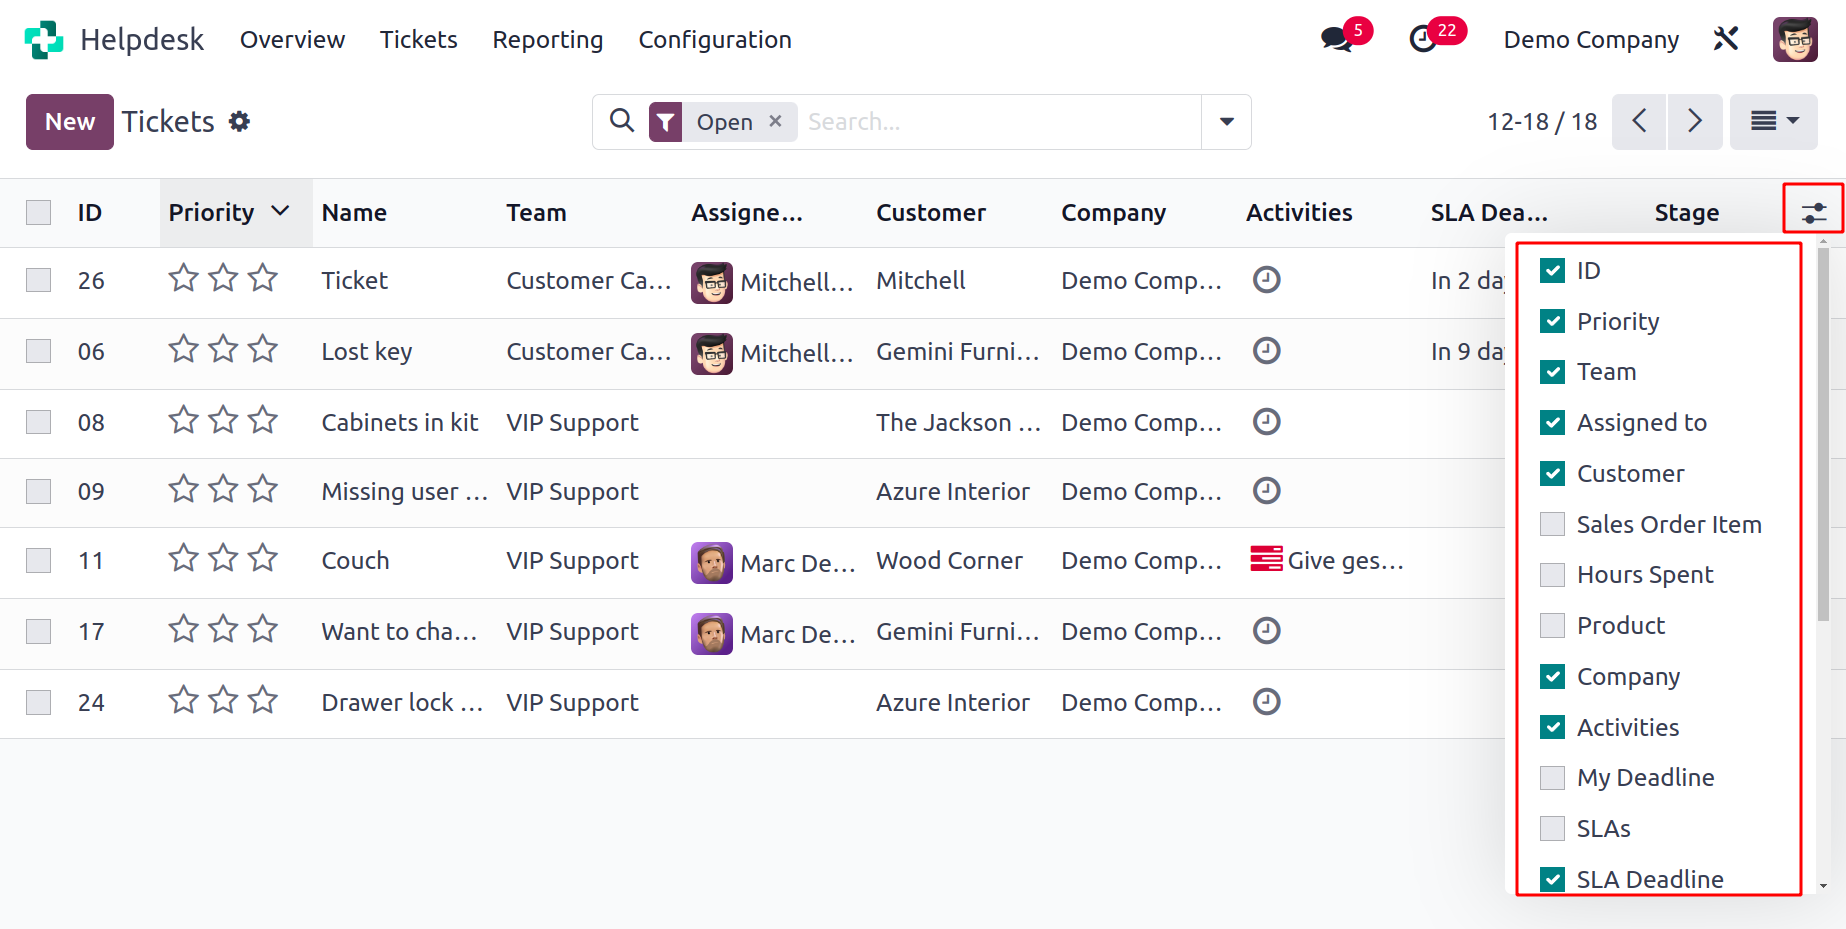
It is possible to activate the following items from this list: Sales Order Item, Hours Spent, Analytic Account, Product, SLSs, Creation Date, Last Updated On, Type, Tags, Rating, and Kanban State. The following default filters are available on this platform: My Tickets, My Team's Tickets, My Department, Followed, Unassigned, Urgent, High Priority, Medium Priority, Low Priority, SLA Success, SLA in Progress, SLA Failed, Tickets in Overtime, Open, Closed, Closed in Last 7 Days, Closed in Last 30 Days, Satisfied, Okay, Dissatisfied, No Rating, Creation Date, and Archived. To create unique filters for tickets, use the Custom Filter option. The following grouping options are available by default: Assigned to,
Team, Stage, Type, Priority, Status, Customer, Company, Analytic Account, and Creation Date.
You can use the New button to manually create a new ticket. This will take you to a new form where,
as seen in the screenshot, you can indicate the problem the customer has reported.
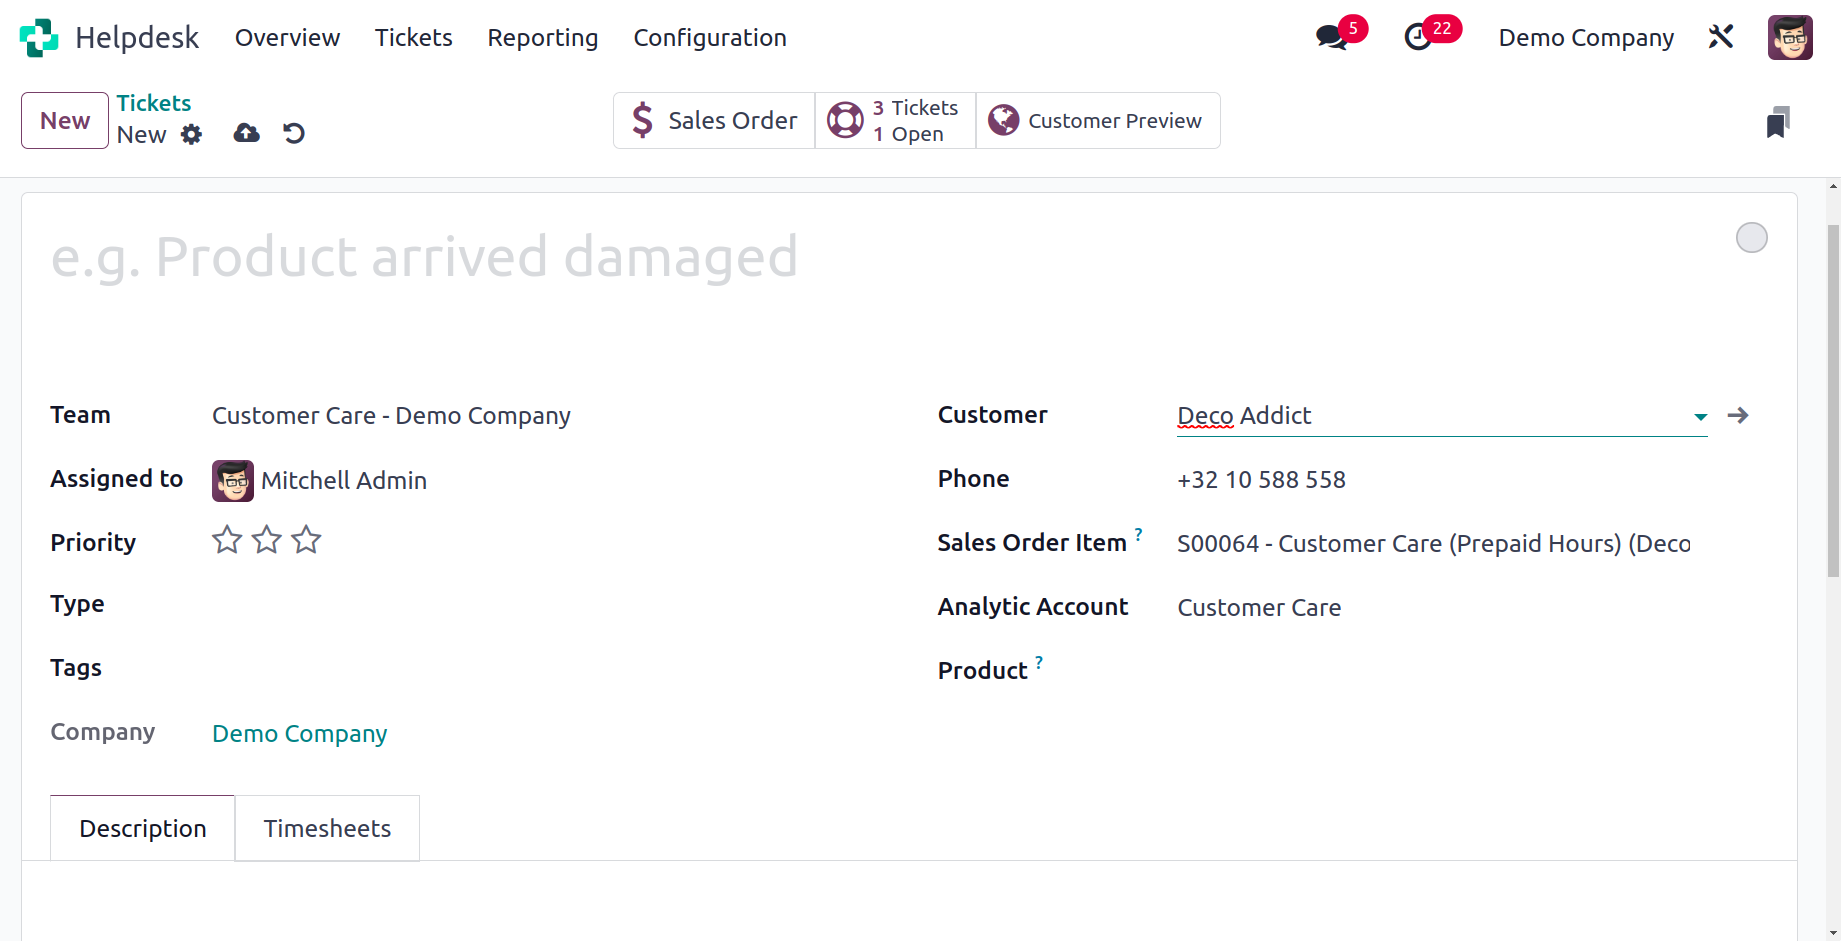
Enter a title for the ticket in the designated field. You can view the relevant SLA Policies and SLA Deadline in the appropriate field based on the Helpdesk Team you chose for this ticket. By entering the user in the allocated field, the ticket can be allocated to an employee. You can assign stars in the Priority area based on the ticket's priority. You can enter the Type, Tags, and Company information in the corresponding fields. The customer's name can be chosen from the drop-down menu. As soon as you choose the client name, the Email and Phone fields will automatically be filled in based on the predefined information. You can include the relevant sales order in the area labeled "Sales Order Items" if the ticket is being created for support regarding a particular item that was purchased. Mention the Analytical Account when you want to record the financial information about how this ticket was operated. You can mention the product in the Product field if the ticket relates to one of the company's products. Additionally, you may include the product's Lot or Serial Number. Now, any customized fields can be added to the form view using the Add a Property button. You can describe the problem the customer
has experienced as well as any details pertaining to the ticket in the Description area.
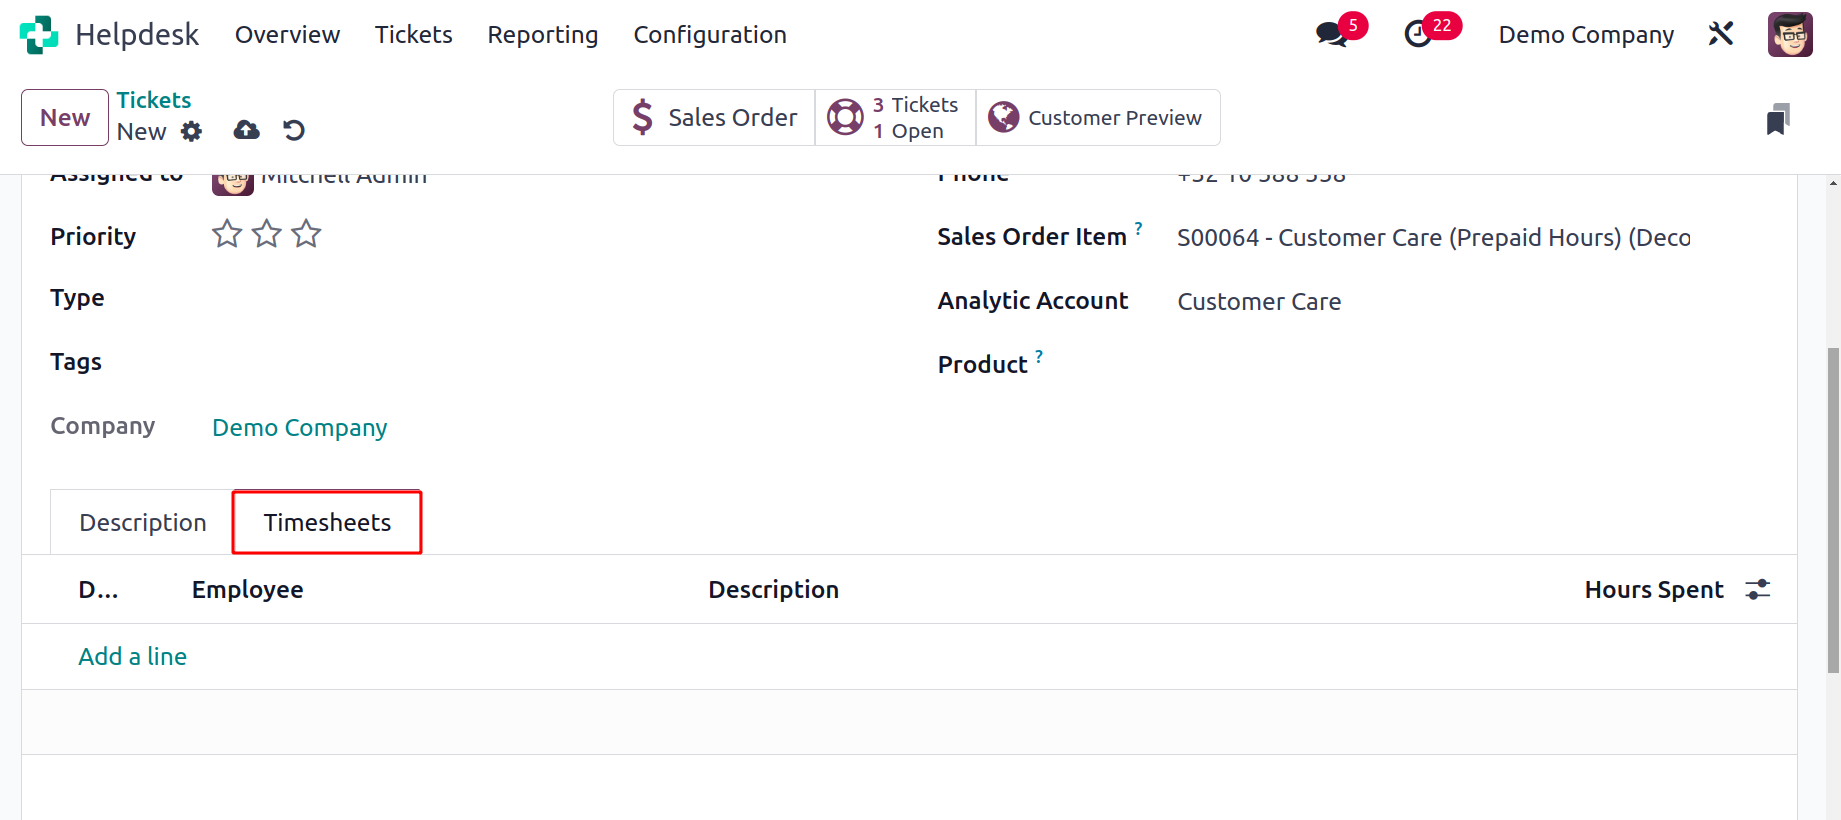
The time spent on the ticket to address the issue will be tracked in the Timesheet tab. Both human and automated methods are available for this. Several operation buttons will
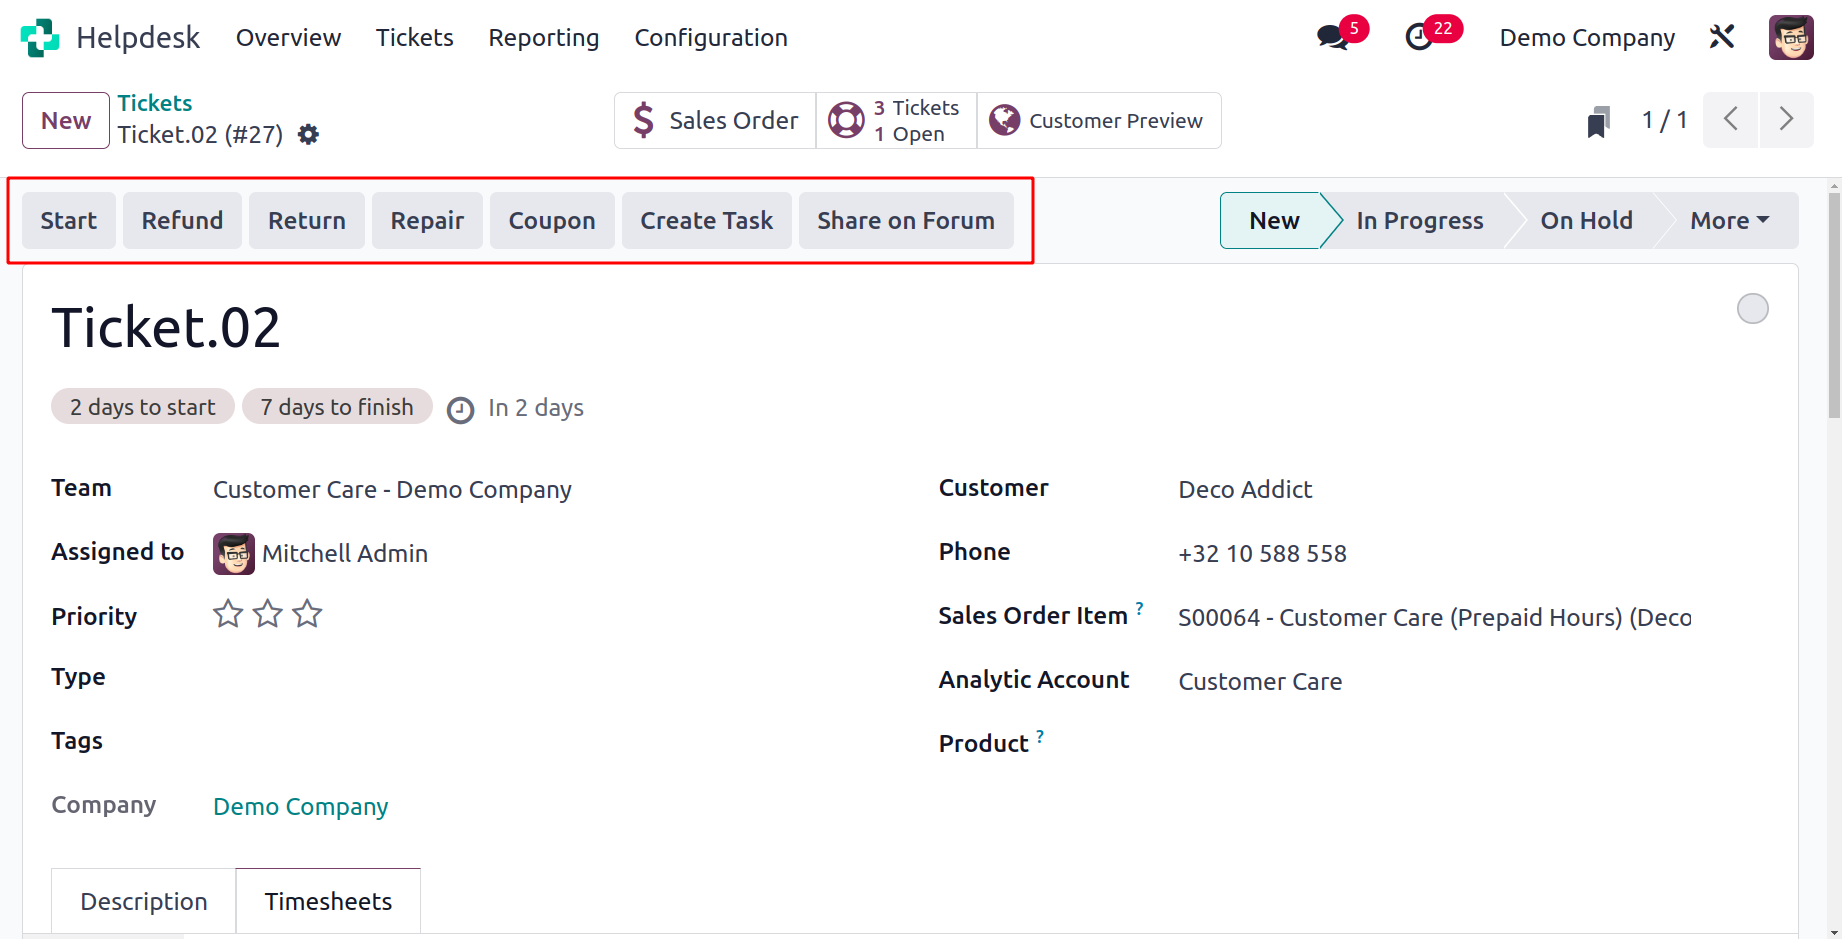
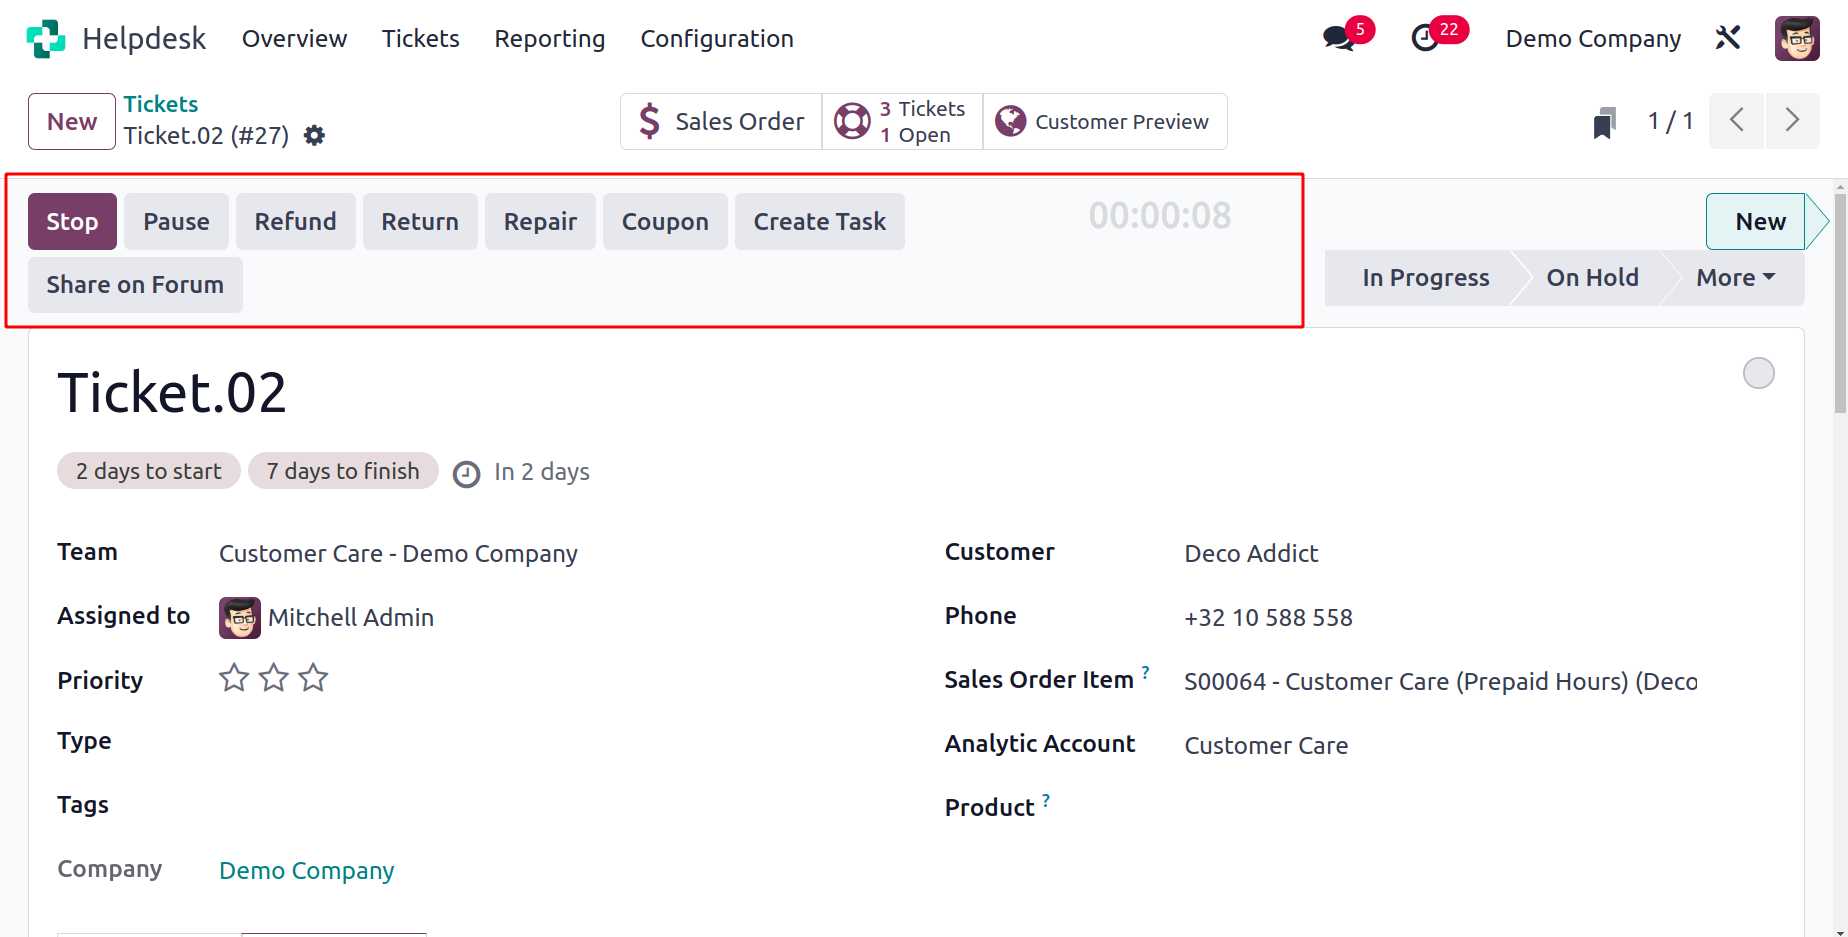
appear on the screen as soon as you have finished creating the ticket, as seen below.
The helpdesk team's time spent on this ticket can be tracked by pressing the Start button. The user can click the Start button to initiate work on the issue whenever a member
of this team does so. The time will begin to be recorded by Odoo17, as indicated below.
You can use the Stop button to end the timer after the task is finished.
A pop-up window will appear to confirm the time that Odoo17 has recorded.
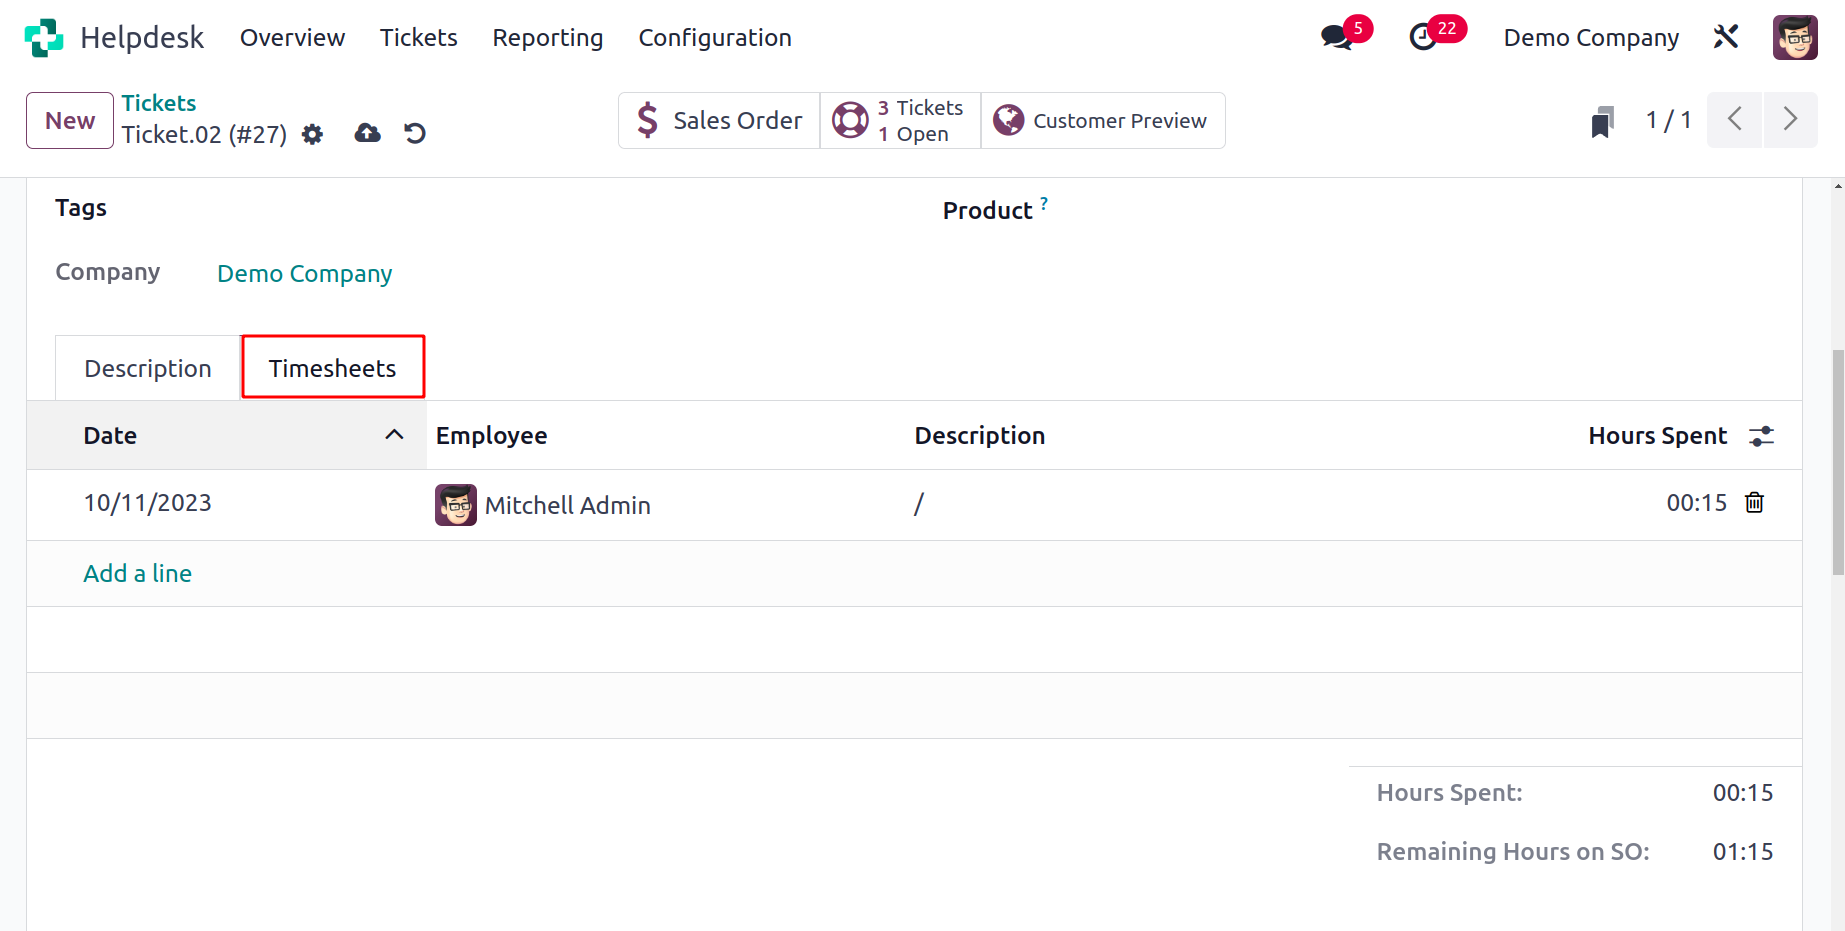
You can use the extra space after checking the time to describe the action. To enter time into a timesheet, use the Save button. You can view the confirmed time in the Timesheet tab.
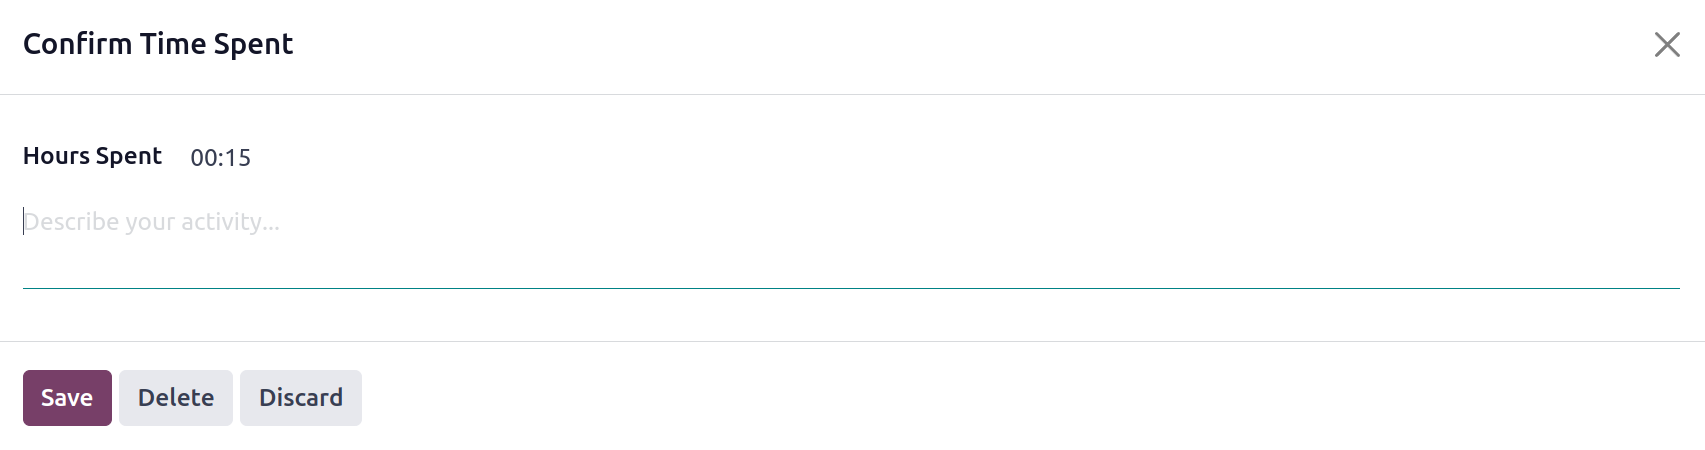
The Date, Employee, Description, and Hours Spent will all be displayed.
Under specific restrictions and regulations, businesses frequently provide refunds to customers in some circumstances. You can use the Refund button found on the Ticket form view to provide a customer with a refund. The pop-up window that appears after clicking the Refund button can be used to describe the Refund's specifics.
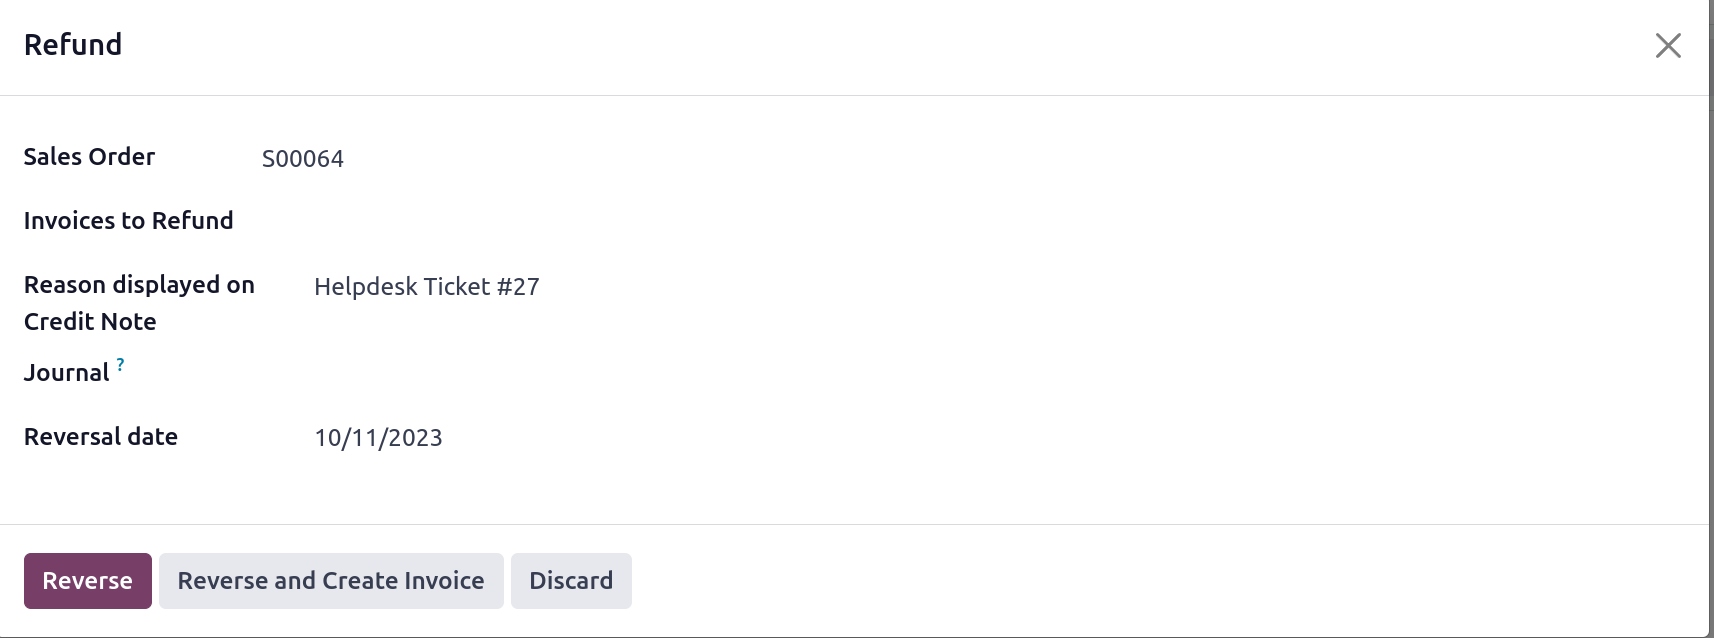
You can fill in the appropriate fields for Sales Order, Invoices to Refund, Reason, Reversal Date, and Journal here. The invoice will be reversed and a customer credit note will be generated when you click the Reverse button.
Use the Return button on the ticket to record the return if the consumer wants to return a product they bought from your business. A pop-up window appears when you press the Return button.
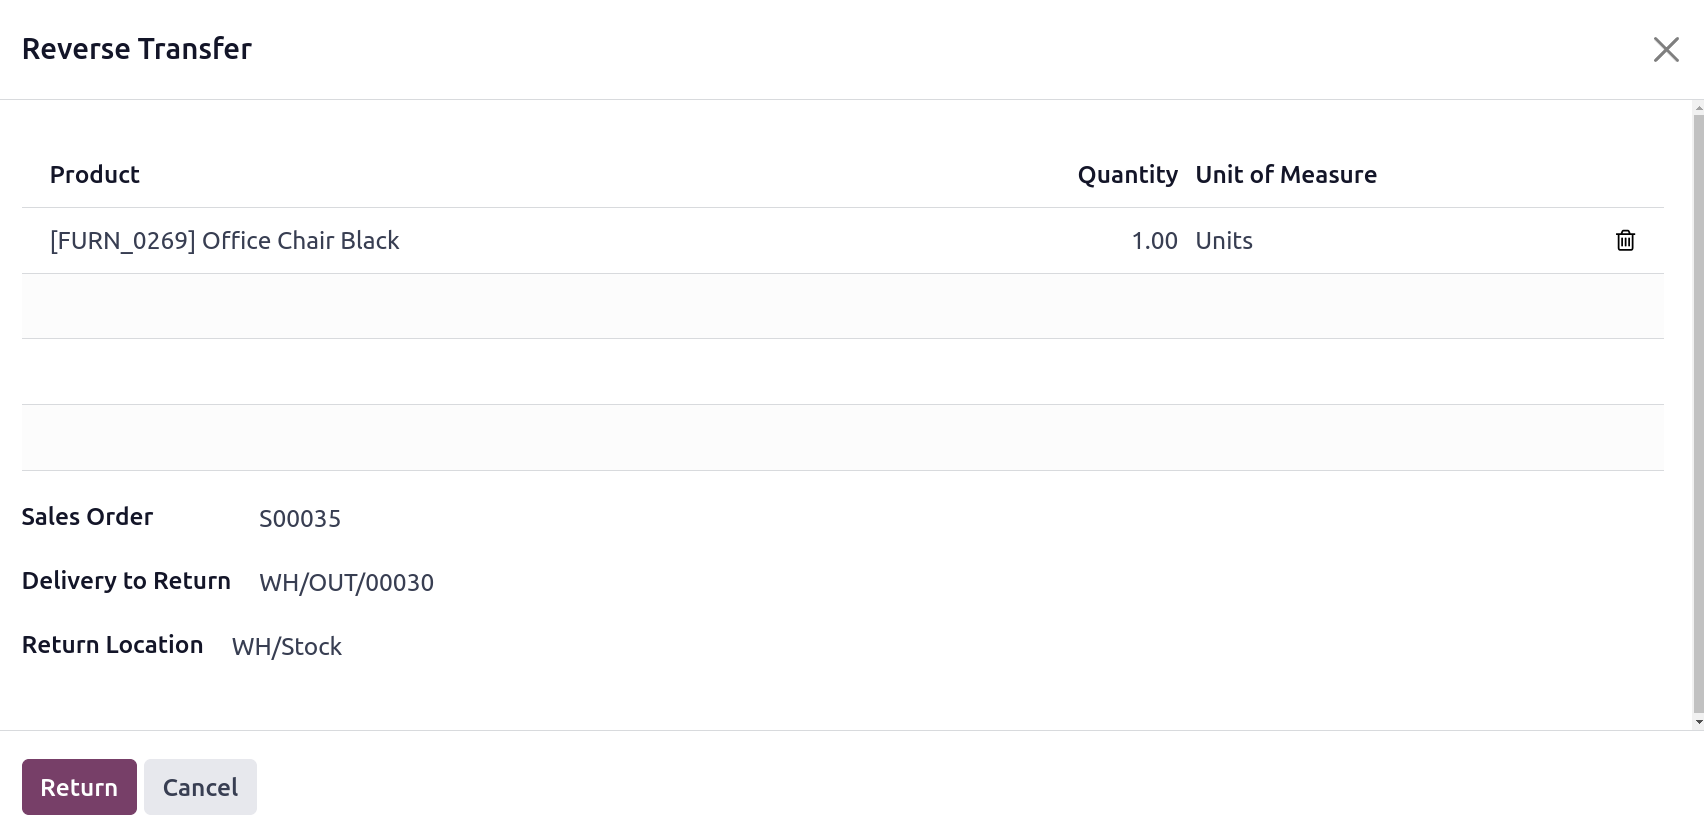
Here, Quantity and UoM will be available, along with the name of the product indicated in the ticket. In this window, you can also specify the Sales Order, Delivery
to Return, and Return Location information. Then, click the Return button.
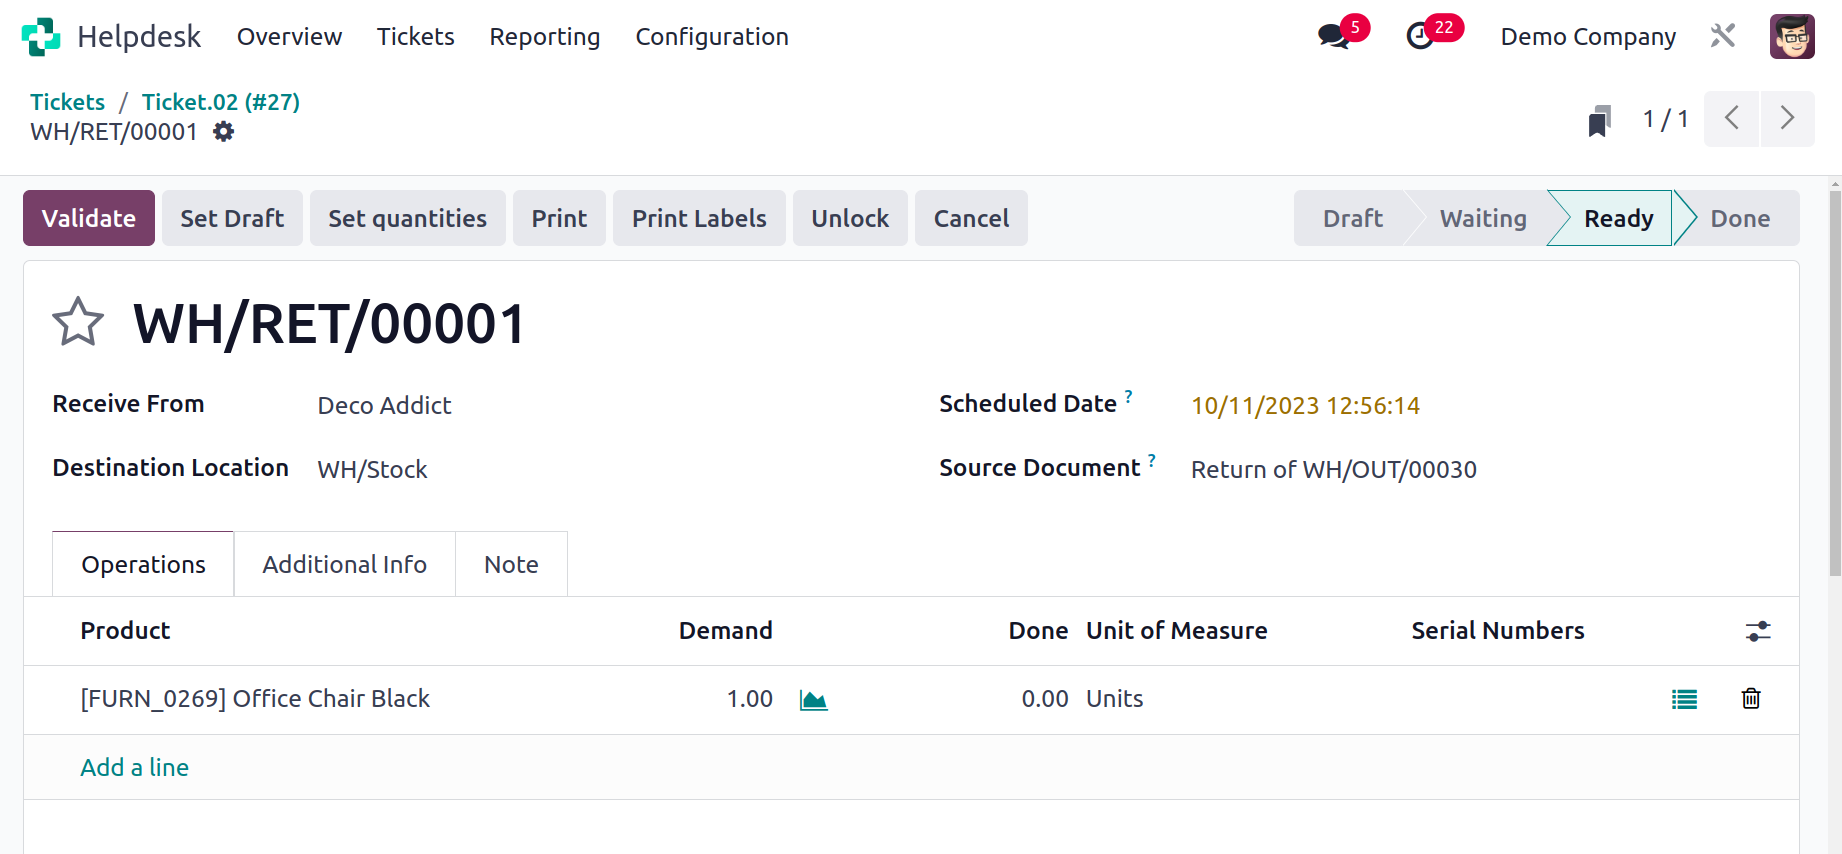
You will now receive a return order as seen in the picture above. After
reviewing the information provided in this window, you can click the Validate button to confirm the return.
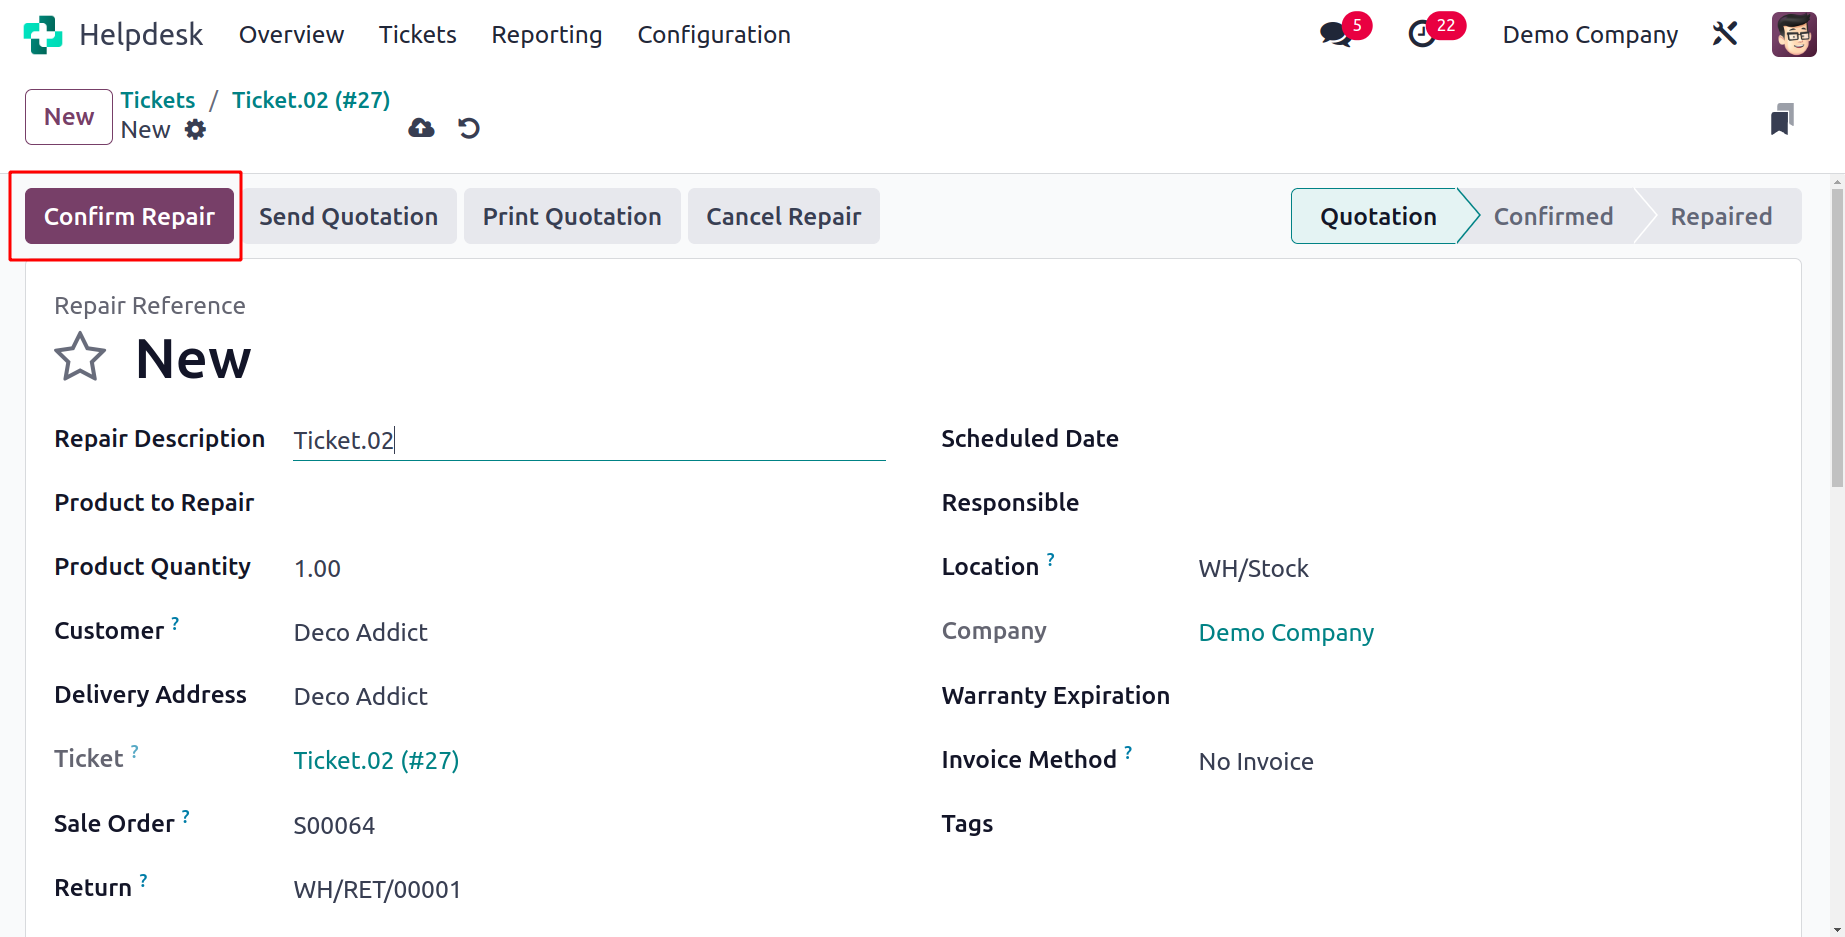
You can create a repair order for the product using the Repair button if the customer wants to have it repaired due to damage.
This will cause the product to produce a repair order. You can click the Confirm Repair button after reviewing the repair order.
Your consumers can receive gifts and coupons from you. You can send coupons to the appropriate consumer by using the Coupons button.
A pop-up window similar to the one below will appear when you click the coupon button.
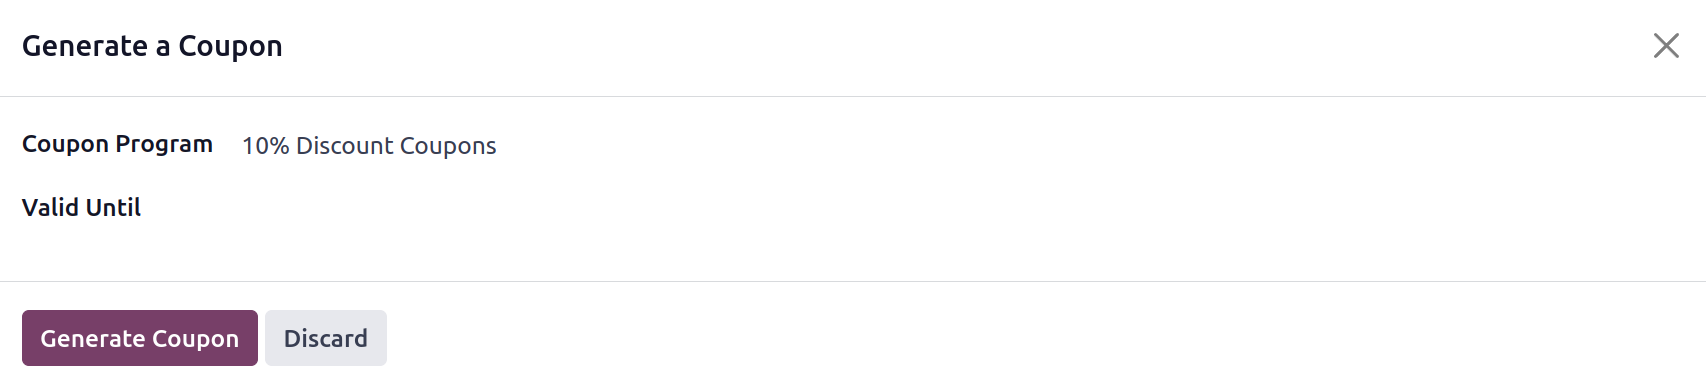
The Coupon Programme that you intend to provide to your consumer might be mentioned here.
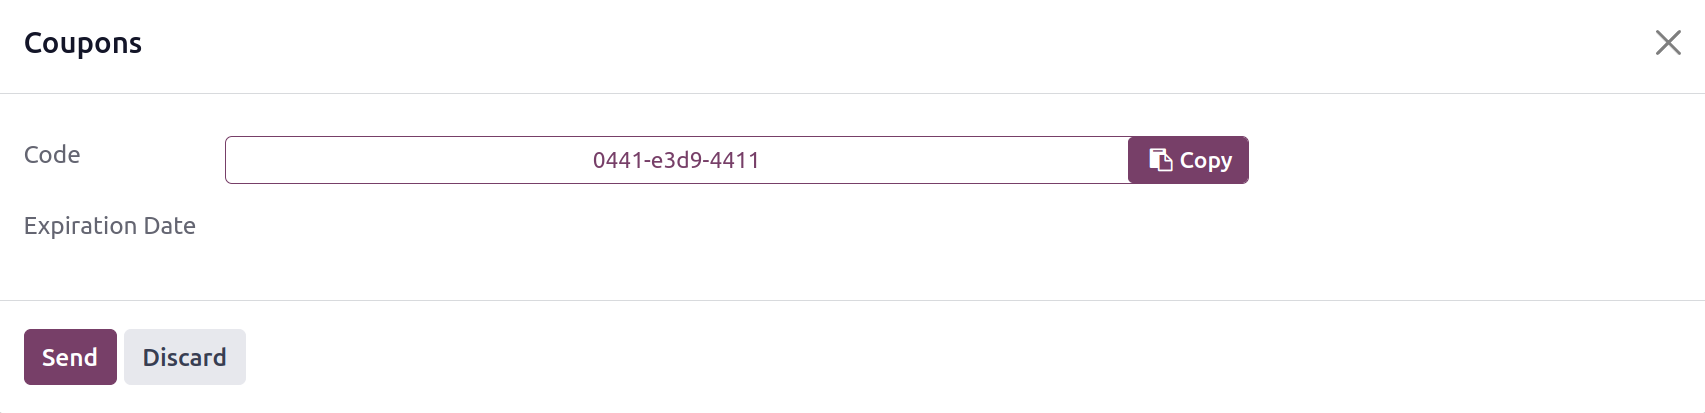
This pop-up window will include the promo code. You can send a voucher to the appropriate consumer by using the Send button.
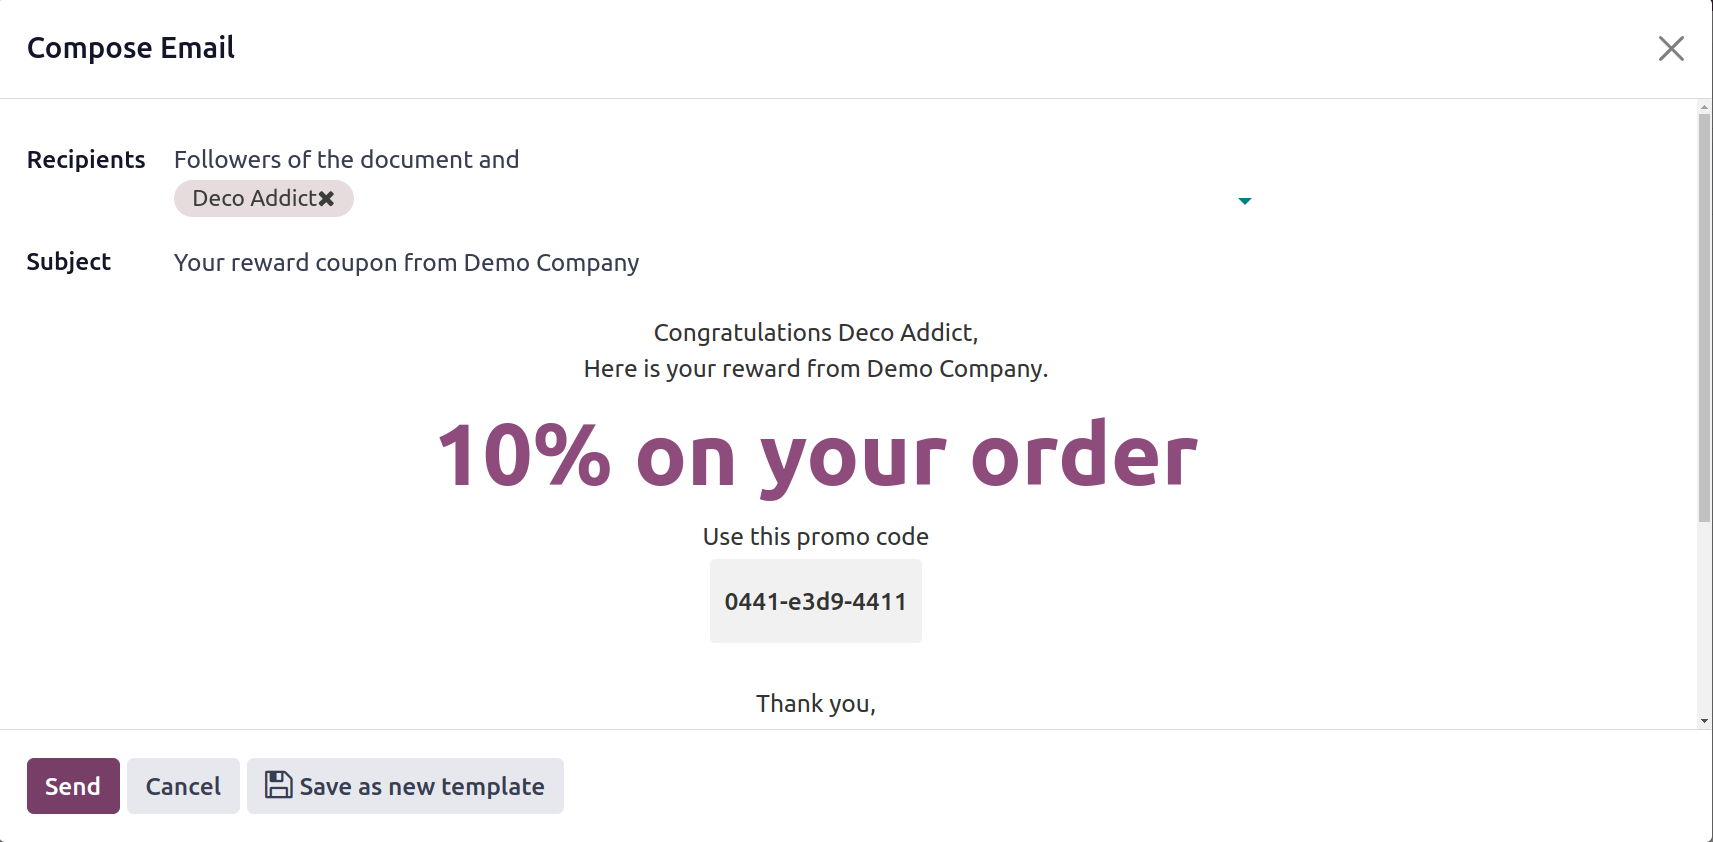
Odoo17 will automatically create an email containing the information about the coupon and an attachment, as
seen in the screenshot above. You can send coupons to your clients by using this procedure.
Some tickets call for field service activities to address the problem that the customer has raised. In such circumstances, you can establish brand-new tasks for field service activities using the Create Task button.
When you click on this button, a pop-up box will appear where you may enter the specifics of the new assignment.
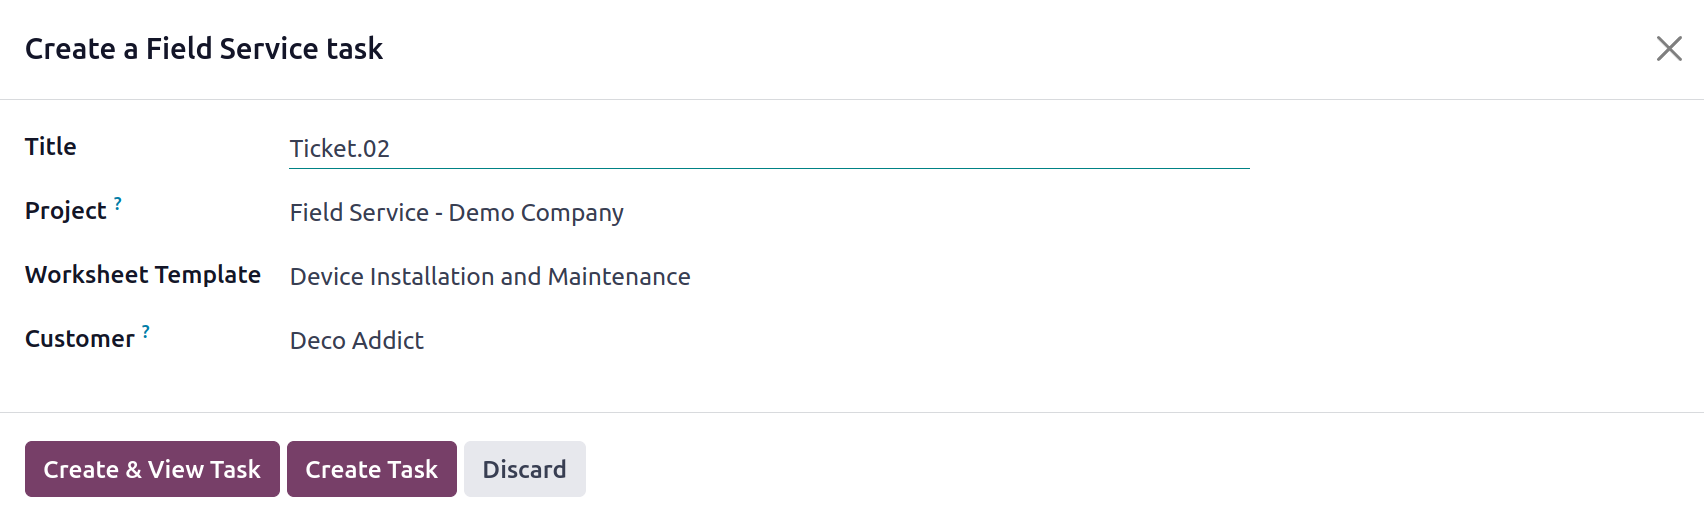
You may find information about the Title, Project, Worksheet Template, and Customers here. You can review the data and press the "Create Task" button. In the Odoo 17 Field Service module, a new task will be created as a
result. When the work is finished, you can close the ticket and handle the task from the Field Service module.
On forums, you can post a customer's question or problem so that other users can offer their opinions. You can click the Share on Forum icon to post the ticket to forums. You'll see a pop-up window similar to the one below.
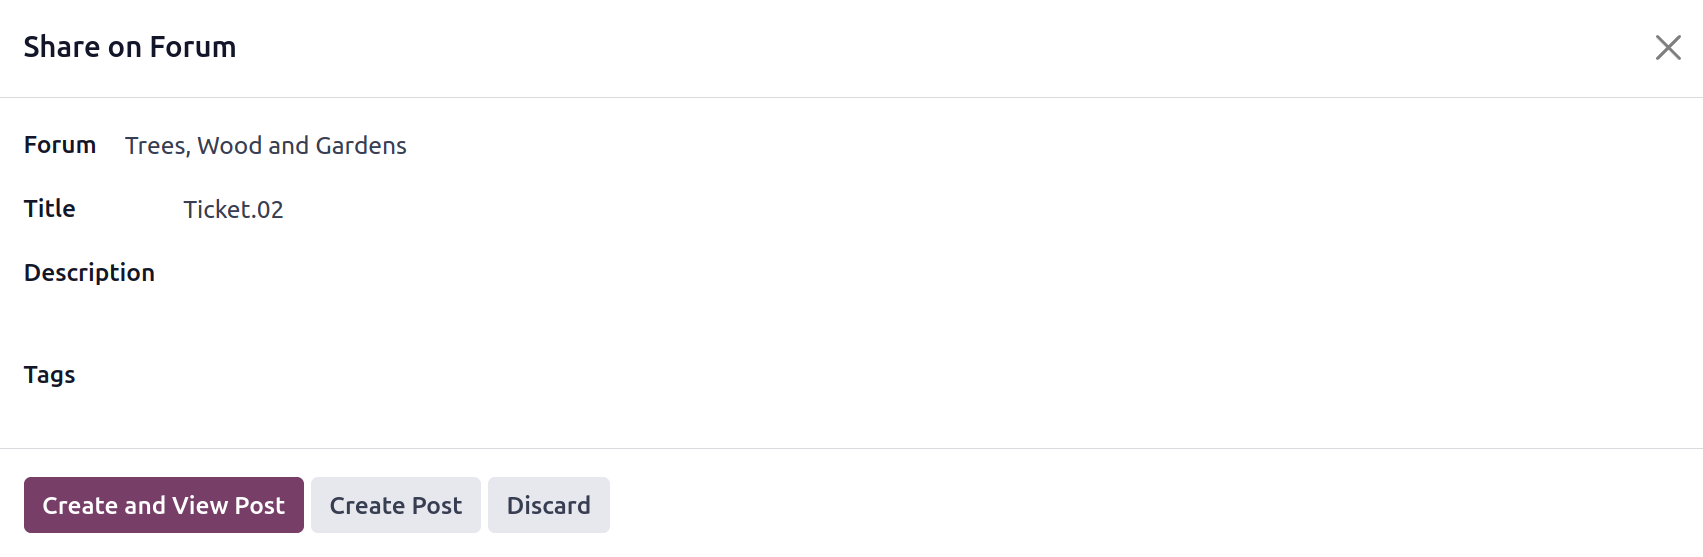
The Forum where you want to post this ticket might be mentioned here. In this window, enter a Title, along with a relevant Description and Tags. A new post will be created on the Forum you mentioned when you click the Create Post button.
The window will display the associated smart buttons, which can be used to manage the relevant operation straight from this window, depending on the operations you conduct on the ticket.
Types
The Types option, which can be used to produce different types of tickets, can be found under the Configuration menu of the Helpdesk module.
The list of already created ticket kinds will appear in a new window when you click on this option.
Clicking the New button will start a new line beneath the current list if you wish to create a new ticket type.
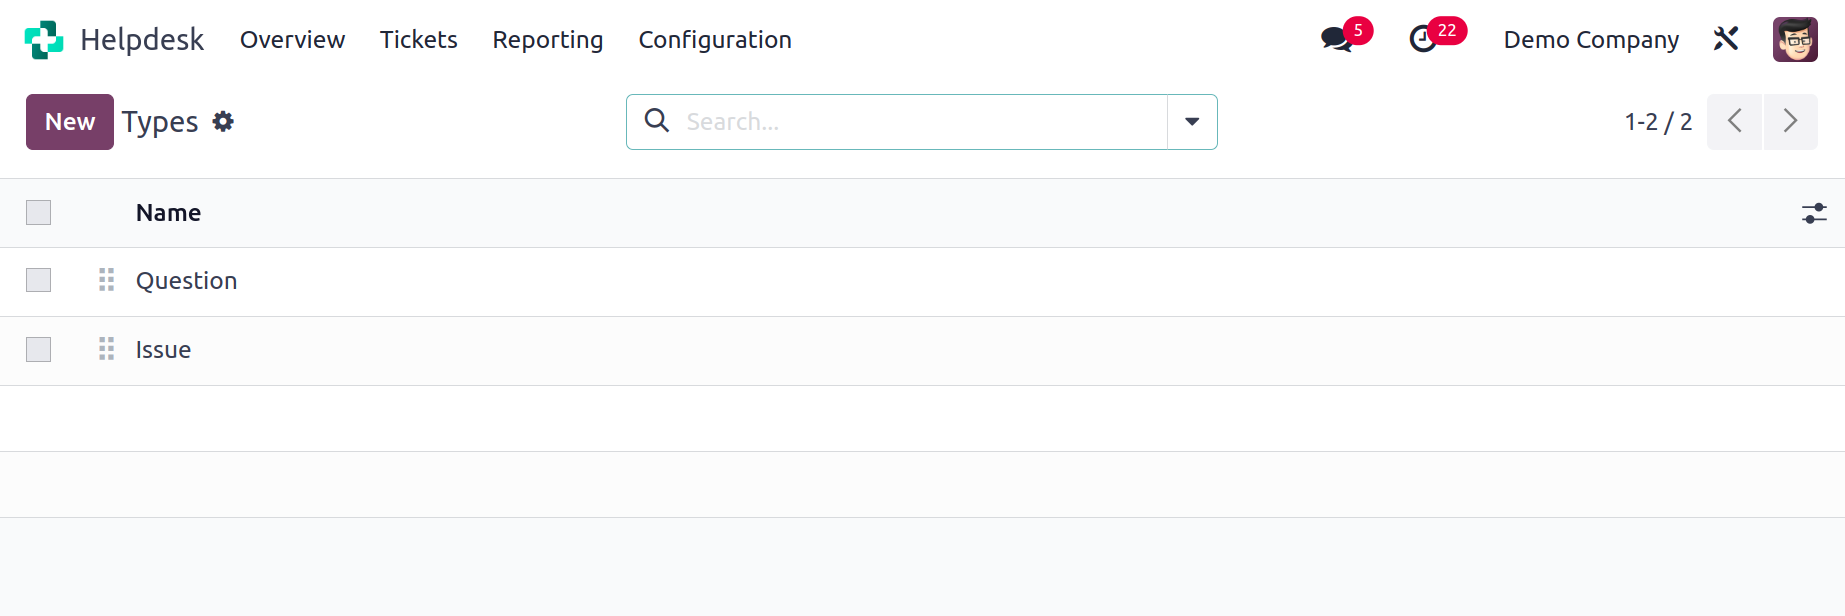
This line can be used to mention the new ticket type's
name. The Odoo17 Helpdesk module will update the ticket type by adding a new type when the Save button is clicked.
Stages
You can better comprehend the course of each help desk ticket by using stages. To arrange tickets according to their progress, you can construct multiple stages. This will also make it simpler for your teammates to determine the ticket's status by glancing at the stage.
You can go to the Configuration menu and choose the Stages option to add new stages for the helpdesk tickets.
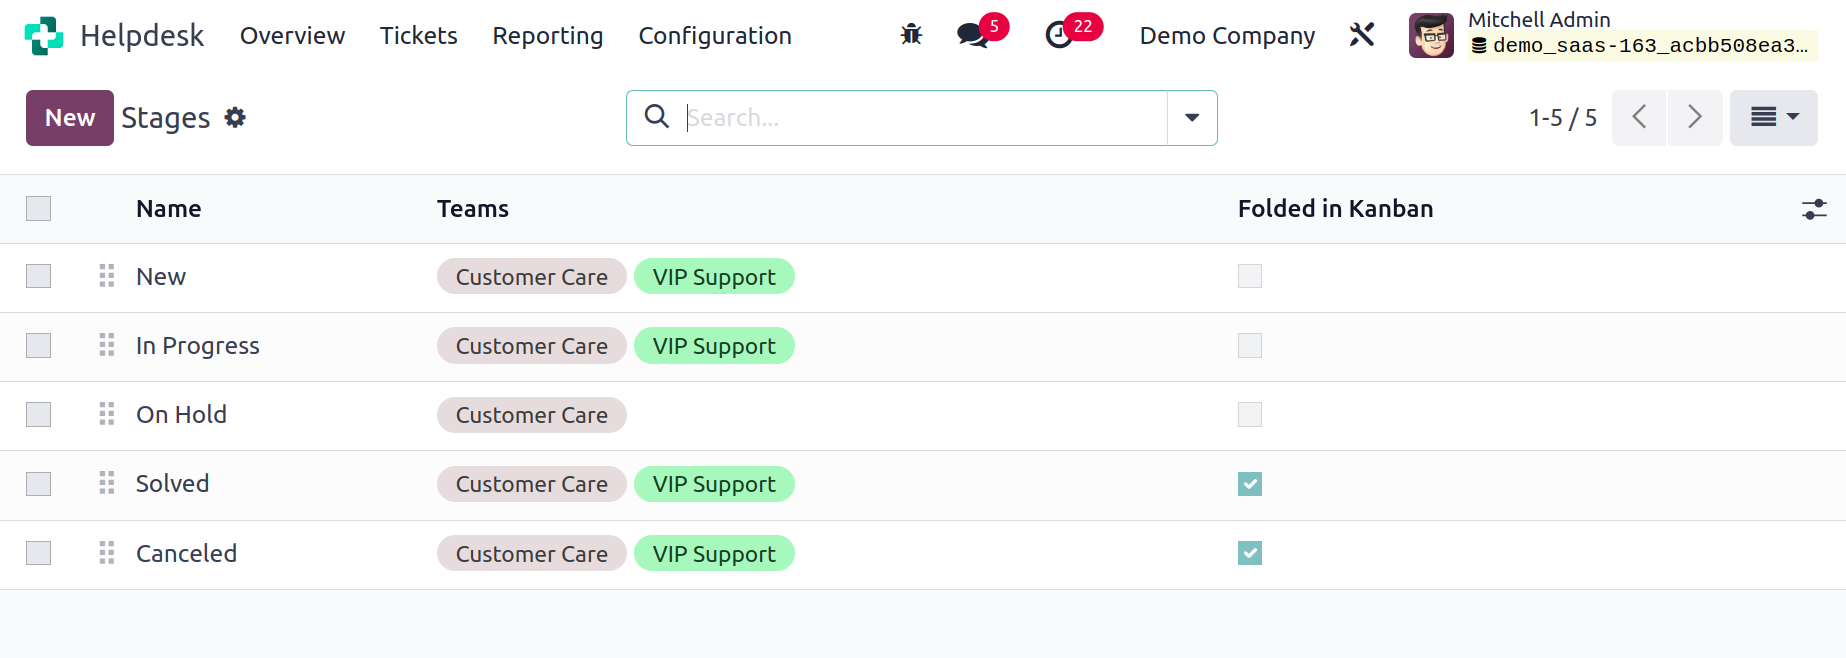
The Name and Teams of each stage produced in this module are shown below.

As seen in the above example, selecting the New button will launch a new form view where you can construct a stage. In the field provided, you can enter a Name for the stage. When a new ticket reaches this stage, add appropriate Email and SMS Templates to the associated fields so that they will be delivered to the corresponding customer. The names of the helpdesk team members who will be able to see this stage can be mentioned in the Teams box. To help your teammates understand the purpose of this new stage, add a description to it in the Stage Description area.
After inputting all the information, you may use this stage to organize the tickets in an orderly fashion.
SLA Policies
You can use SLA Policies in the Odoo 17 Helpdesk module to specify the terms and conditions between the
service provider and the client. Whatever service you offer your clients, it's critical to establish time limits and other ground rules before beginning any work on resolving their complaints. SLA guidelines will make it easier for both parties to agree on conditions for the helpdesk service. The target time to resolve the issue will be specified using SLA Policies on tickets.
The SLA Policies option can be found in the module's Configuration menu.
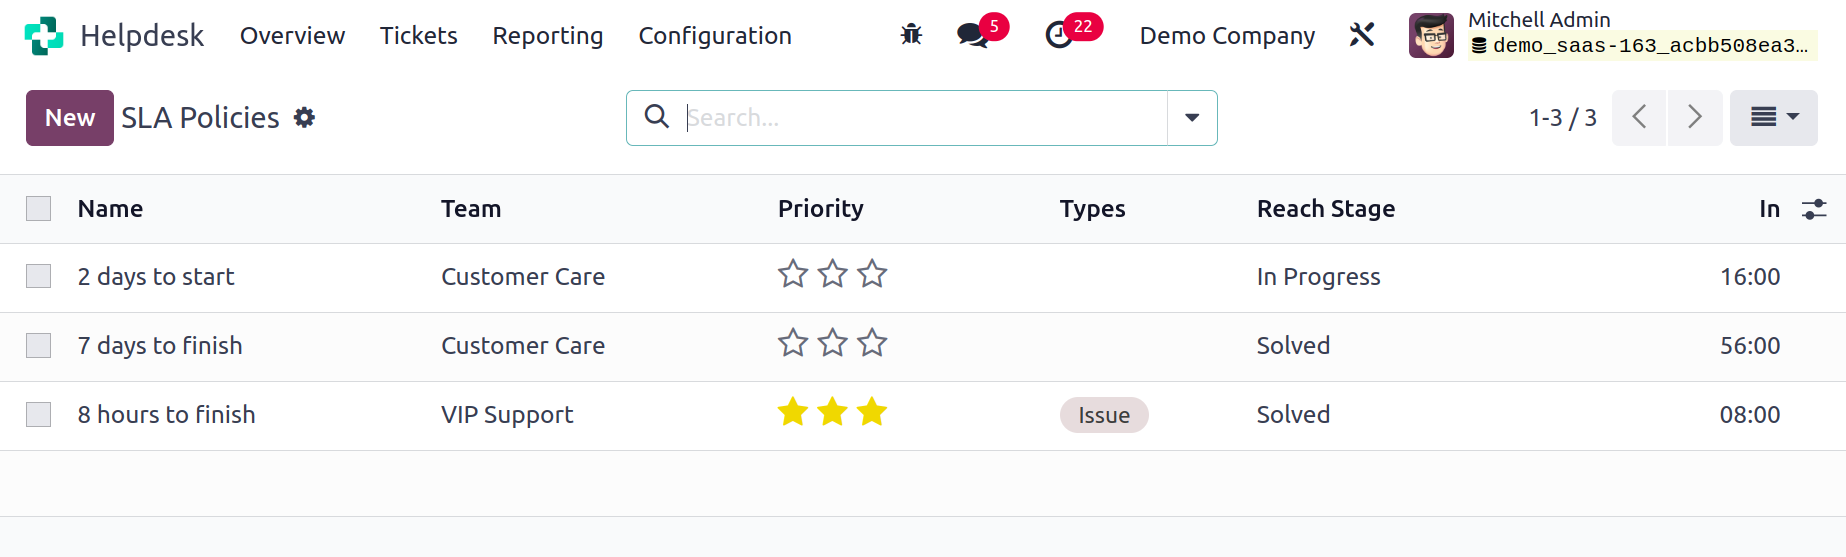
Name, Team, Priority, Types, In and Reach Stage, details of the SLA Policies are shown in this list view. To start a fresh one, click the New button.
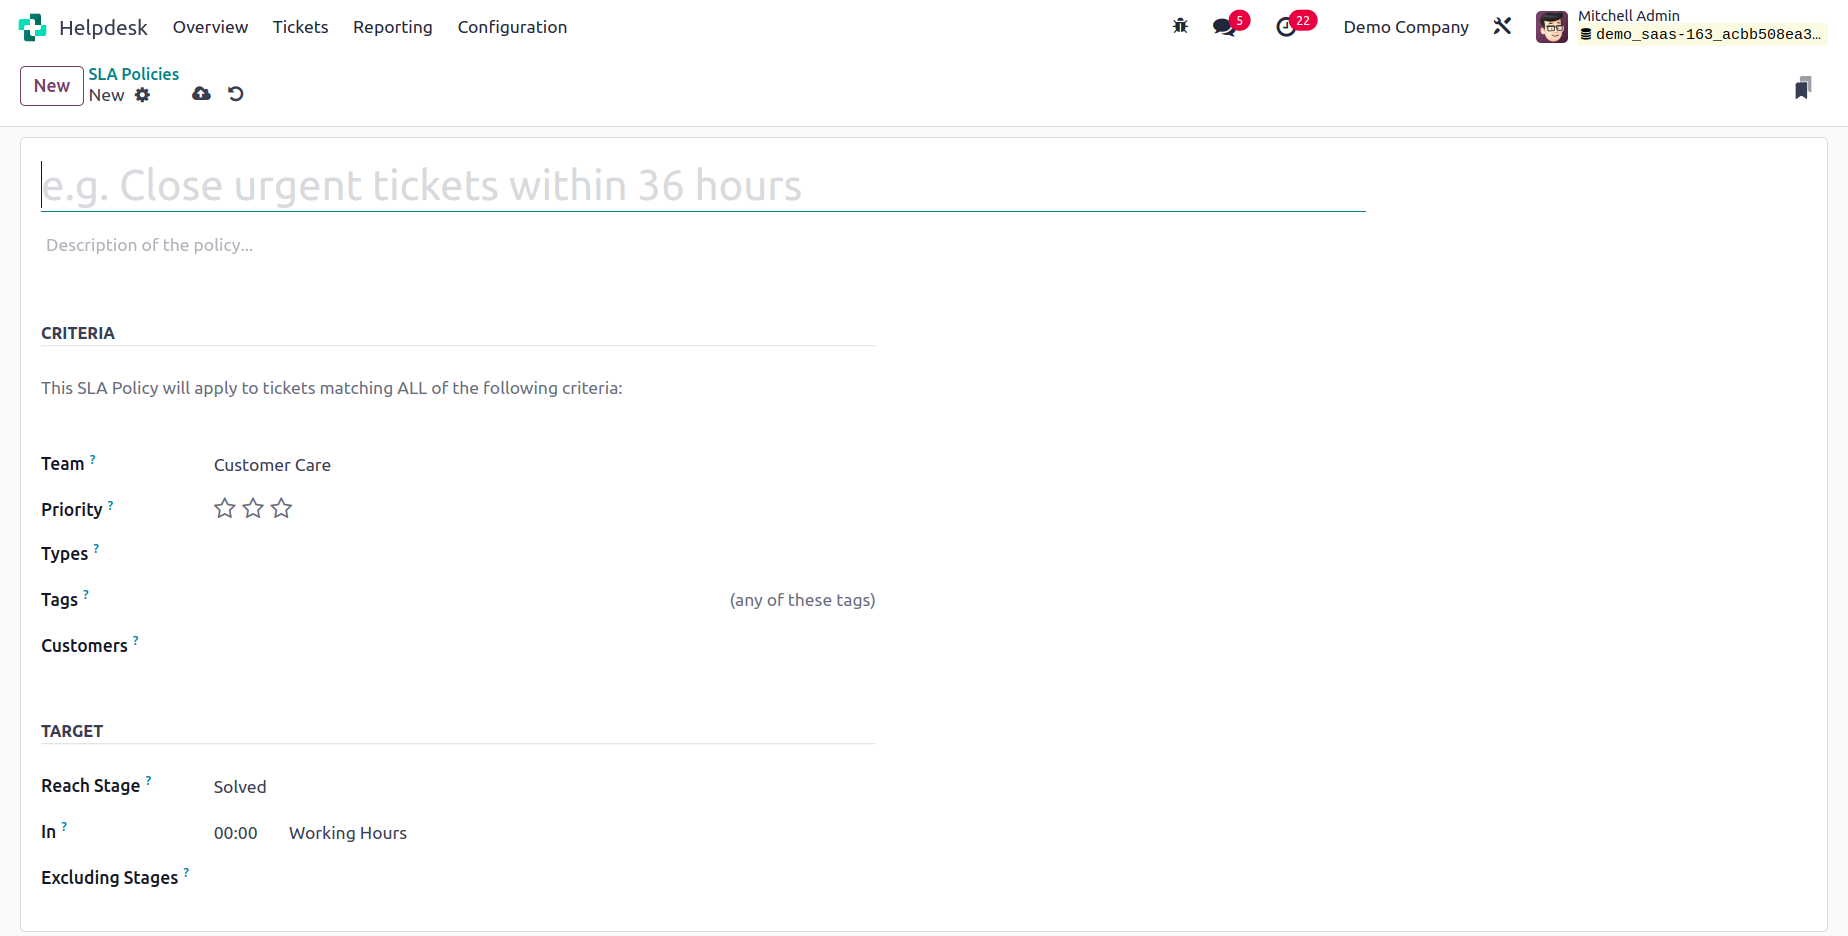
The provided field can be used to enter the policy's name. You will have more room to give a description of the policy. You can specify the name of the Team that is permitted to use this policy under the Criteria tab. You can choose the Priority, Types, Tags, Customers, and Sales Order Items to which this SLA Policy will apply in the corresponding fields. The minimum stage that a ticket must achieve to be covered by this policy can be set under the Target tab as Reach Stage. The minimum working hours needed to attain the target stage in order to comply with this policy might be mentioned in the ‘In’ field. To omit the time spent on a specific stage from the SLA calculation, add that stage to the Excluding Stages column. In the Odoo 17 Helpdesk module, SLA Policies are created in this manner.
Canned Responses
To communicate with your clients, you can use Odoo 17 to produce pre-written responses. Use these pre-written responses to respond to frequently requested inquiries and queries from your consumers. To create such Canned Responses in the Helpdesk module, select the Configuration option.
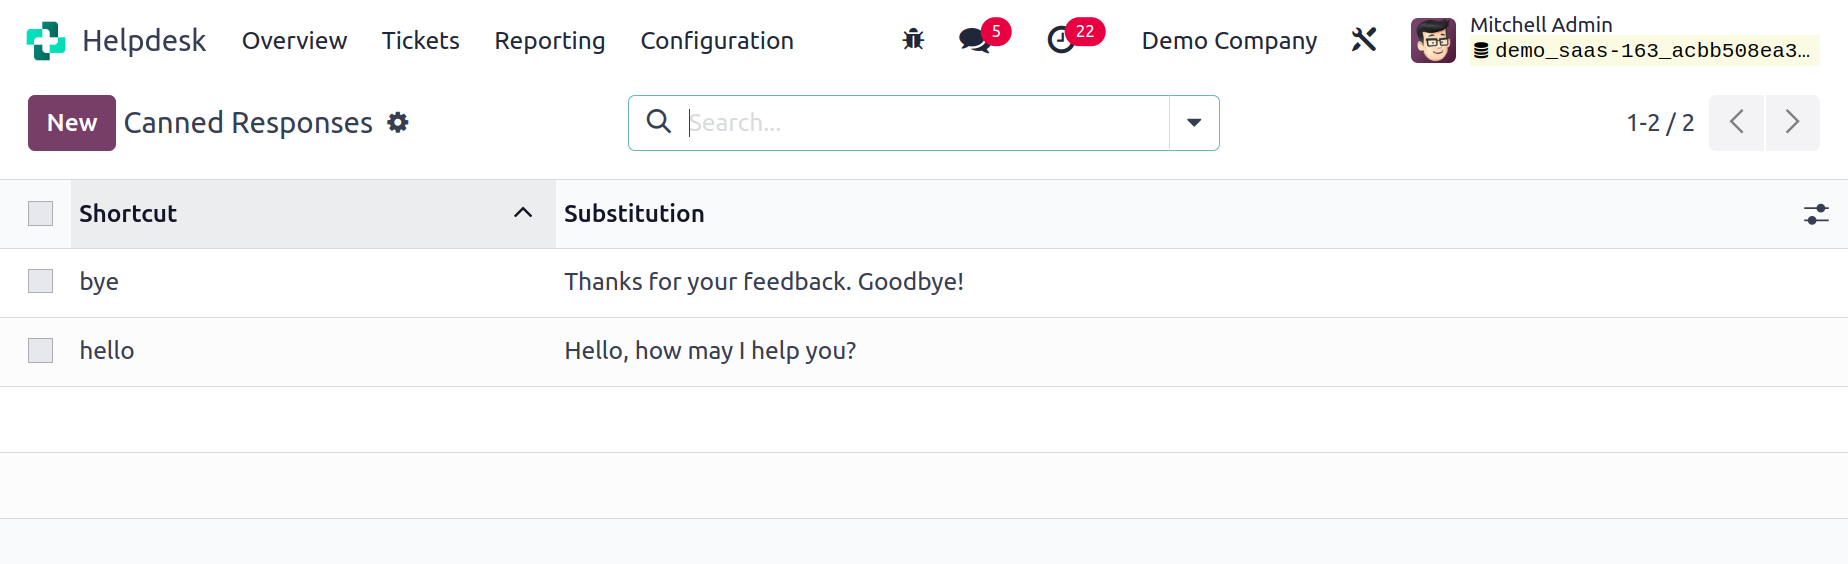
You may view the Shortcut and Substitution of different canned responses here. A new line where you can enter a new Canned Response will be opened when you click the New button. To save the new one to your system, press the Save button. In the chat box, type ":" to see the list of pre-written responses.
Reporting
You can use the Reporting platform included in the Helpdesk module to analyze the operations carried out there. All help desk operations will be thoroughly reported on by the dedicated reporting platform. You can use this report to assess the operations using a variety of factors. You can choose from options for Ticket Analysis, SLA Status Analysis, and Custom Ratings within the Reporting platform.
On the tickets that were recorded in the module, the Ticket Analysis platform will provide thorough reports. Using the customization tools offered by the Group By and Filters options, you can design unique reports.
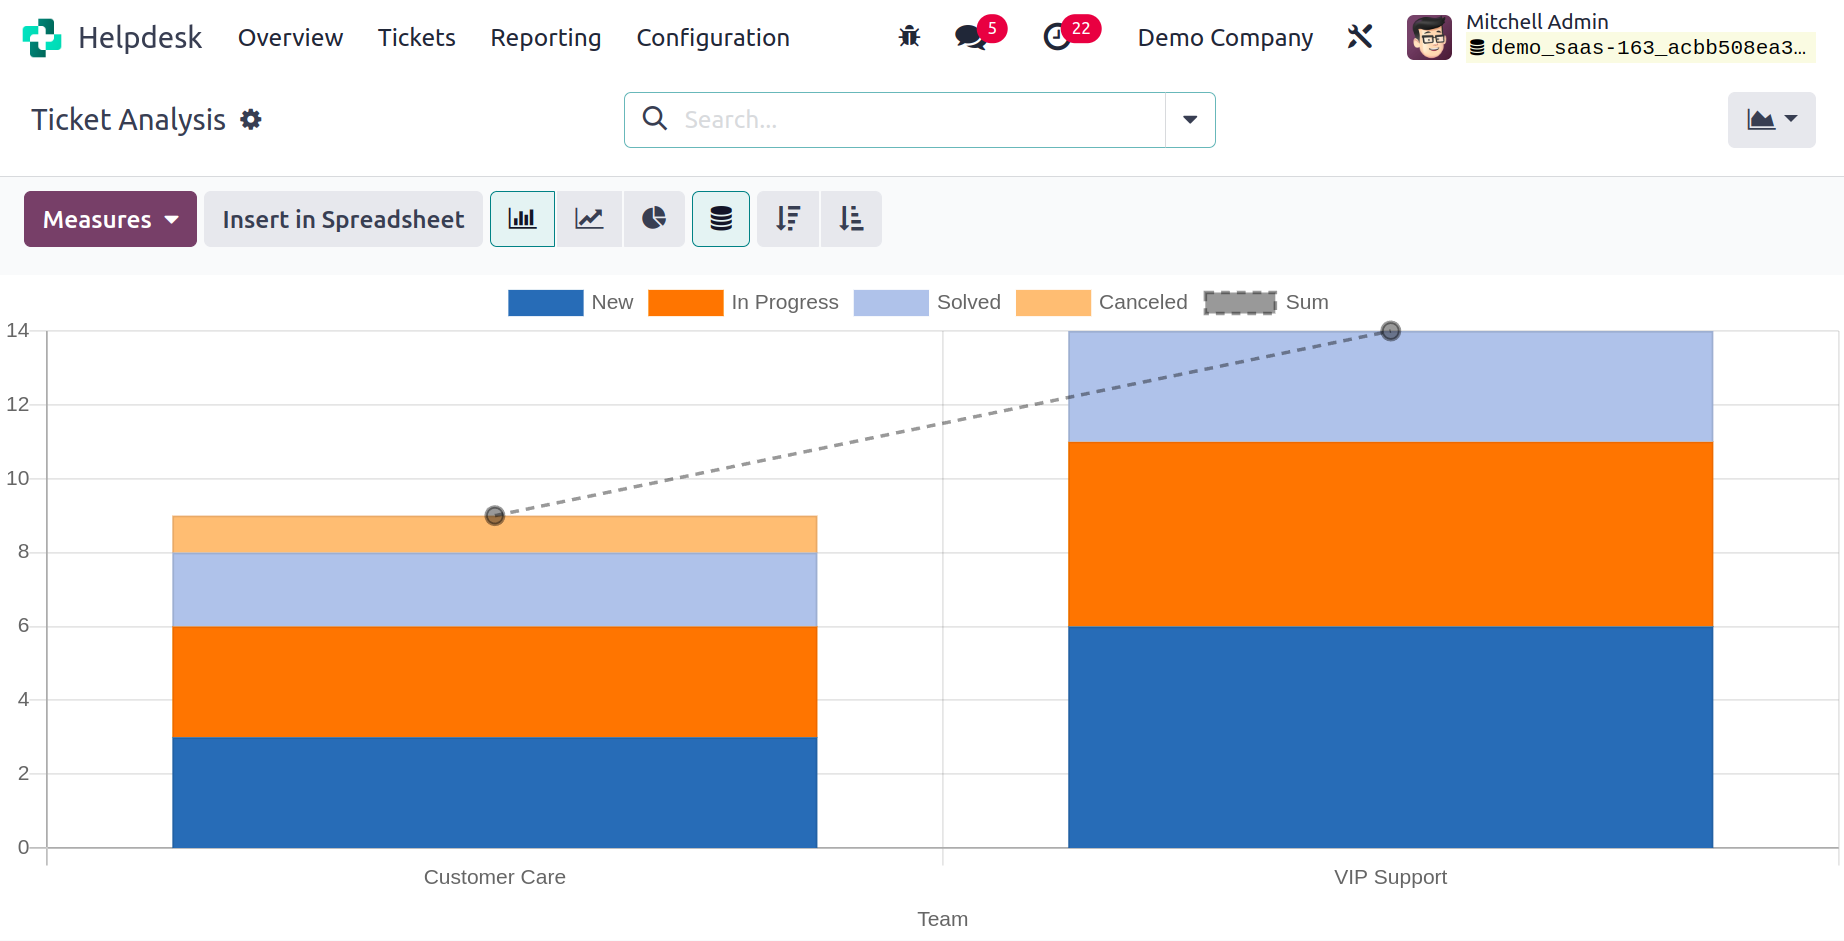
You can choose from the following filters by default: My Tickets, My Team's Tickets, My Department, Followed, Unassigned, Urgent, High Priority, Medium Priority, Low Priority, SLA Success, SLA in Progress, SLA Failed, Tickets in Overtime, Open, Closed, Closed in Last 7 Days, Closed in Last 30 Days, Satisfied, Okay, Dissatisfied, No Rating, Creation Date, and Archived. As the default grouping choice,
you can choose from Assigned to, Team, Stage, Type, Priority, Status, Customer, Company, Creation Date, SLA Deadline, and Closing Date.
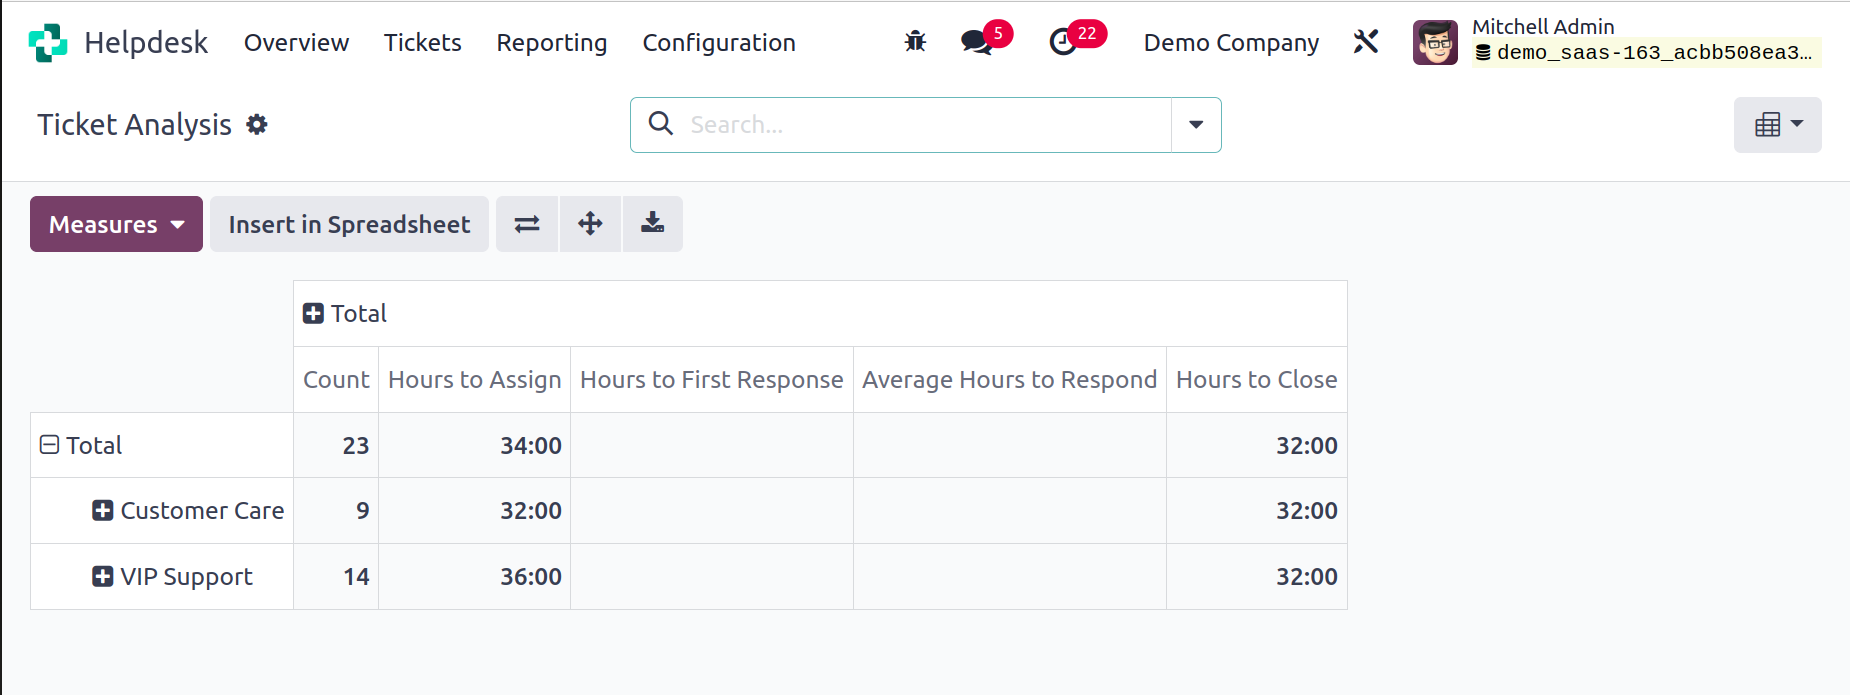
You can utilize average response times, open and spent hours, assigned and closed hours, first response times, SLA deadline times,
ratings, and counts as metrics. You can switch between the Graph, Pivot, and Cohort views of the report.
A summary of the SLA policies applied to various tickets will be provided by the SLA Status Analysis platform. On this platform, you may assess the status of such SLA policies.
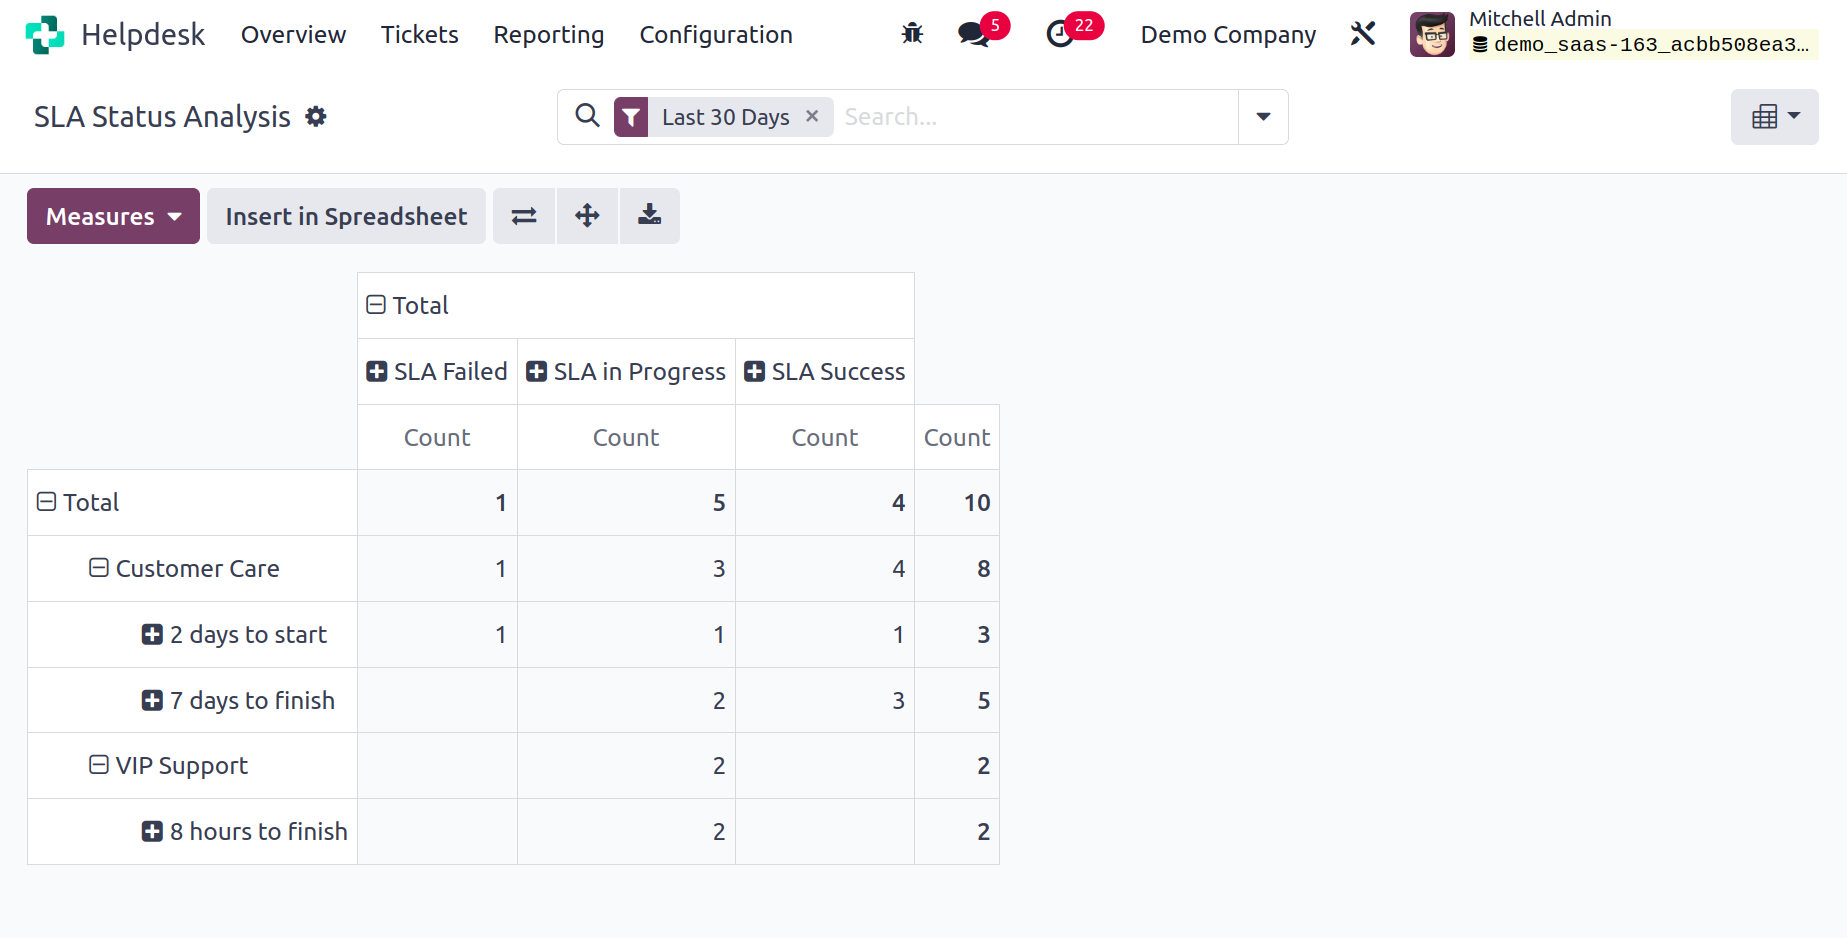
This platform will also include the Filters and Group By features, allowing you to create bespoke reports. Here, you can use working hours to assign, working hours to close, working hours to reach SLA, and Count as measures for the reports.
You can also use percentages of failed SLA, progressed SLA, and successful SLA.
The Customer Ratings platform will provide information about consumer opinions of your help desk services.
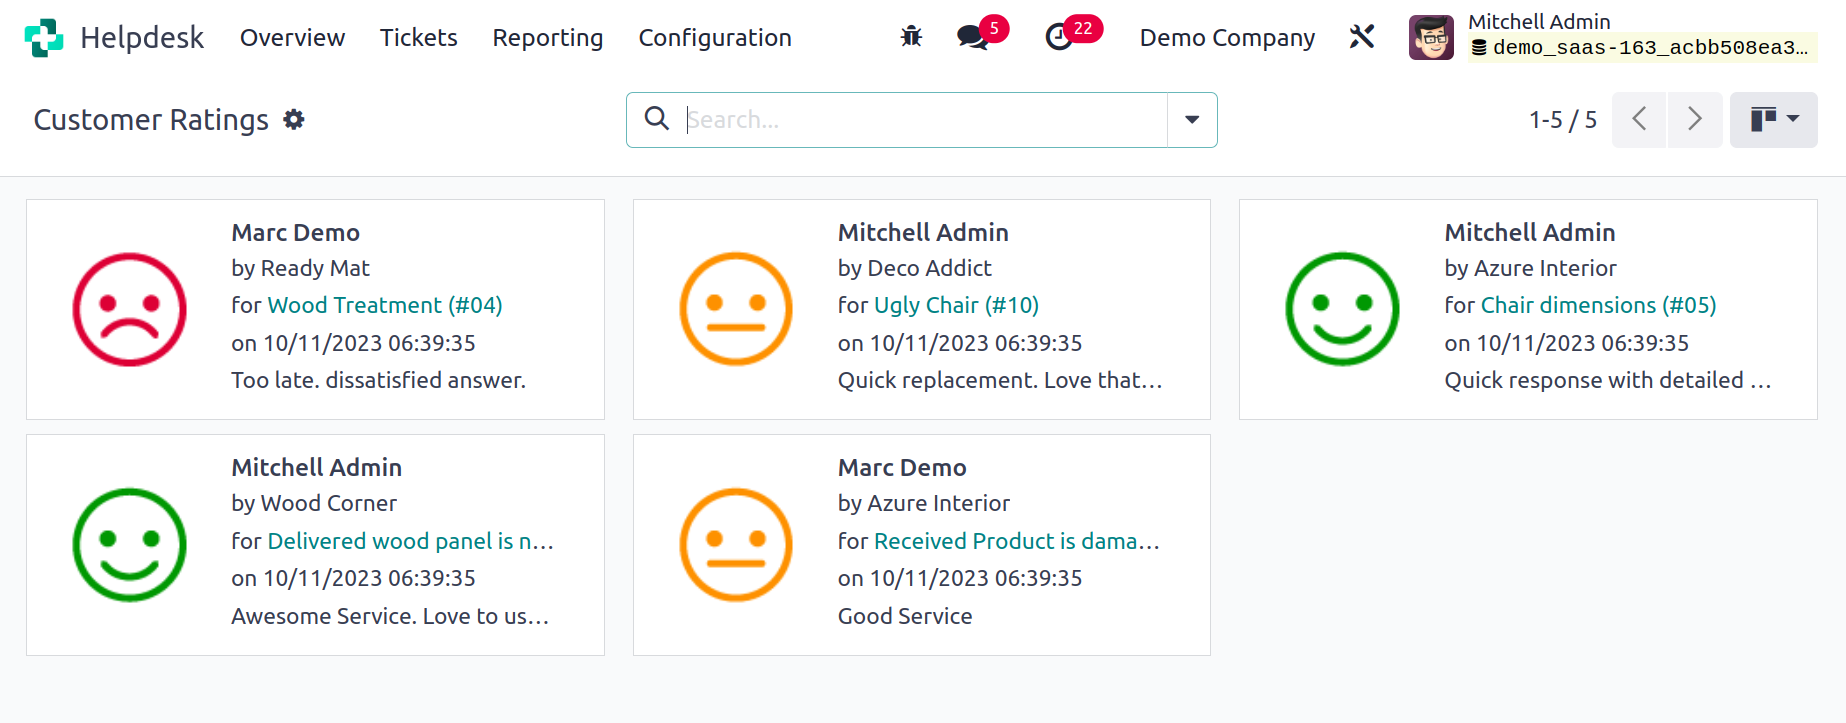
Customers' reviews are displayed in the window along with their names, the responsible employee's name,
the ticket's name, the date, and their opinions regarding the service.
The ideal option for your business to manage your customer support
services in one location is the Helpdesk module for Odoo 17.