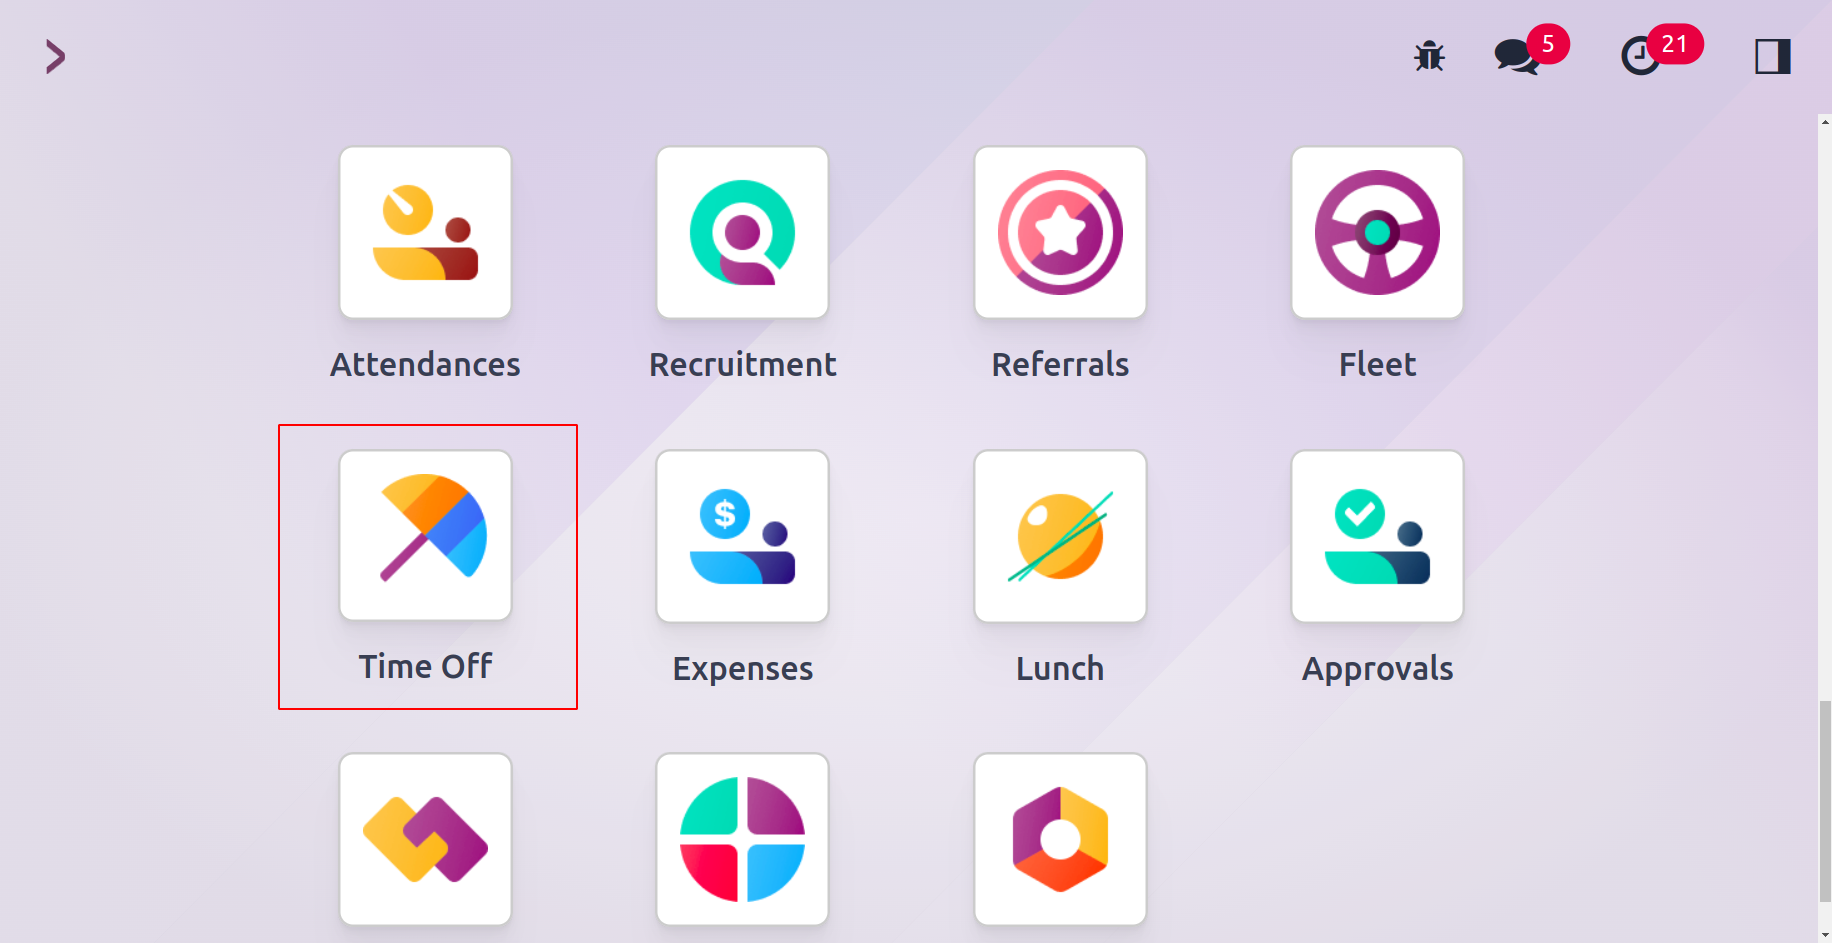
Time-Off Management
An organization's HR department must oversee numerous HR operations at once. One of these
HR tasks that needs to be done in a methodical way is managing employee leave and time
off requests. Reliable time off records are kept for each employee since they are used
in payroll calculations. You can effortlessly manage your company's leave management
with the use of an ERP solution. You can seek time off through the same website, and the
manager can grant your request. The leave records will be saved in the same database
without opening any other programs. We're referring to the Time Off module for Odoo 17.
The procedure of applying for leaves can be made simpler using the Time Off module.
Employee vacation time will be displayed on the module's advanced dashboard so that the
HR manager can quickly locate each employee's leave history. An employee can create a
leave application directly from the dashboard if they need to request time off. The
involved department will get the request, and the management can accept or reject it
from the same platform.
The main dashboard of Odoo 17 has a Time Off module option. You will arrive at the
module's My Time Off dashboard as soon as you launch it. On this dashboard, you can see
the time off that you've taken.
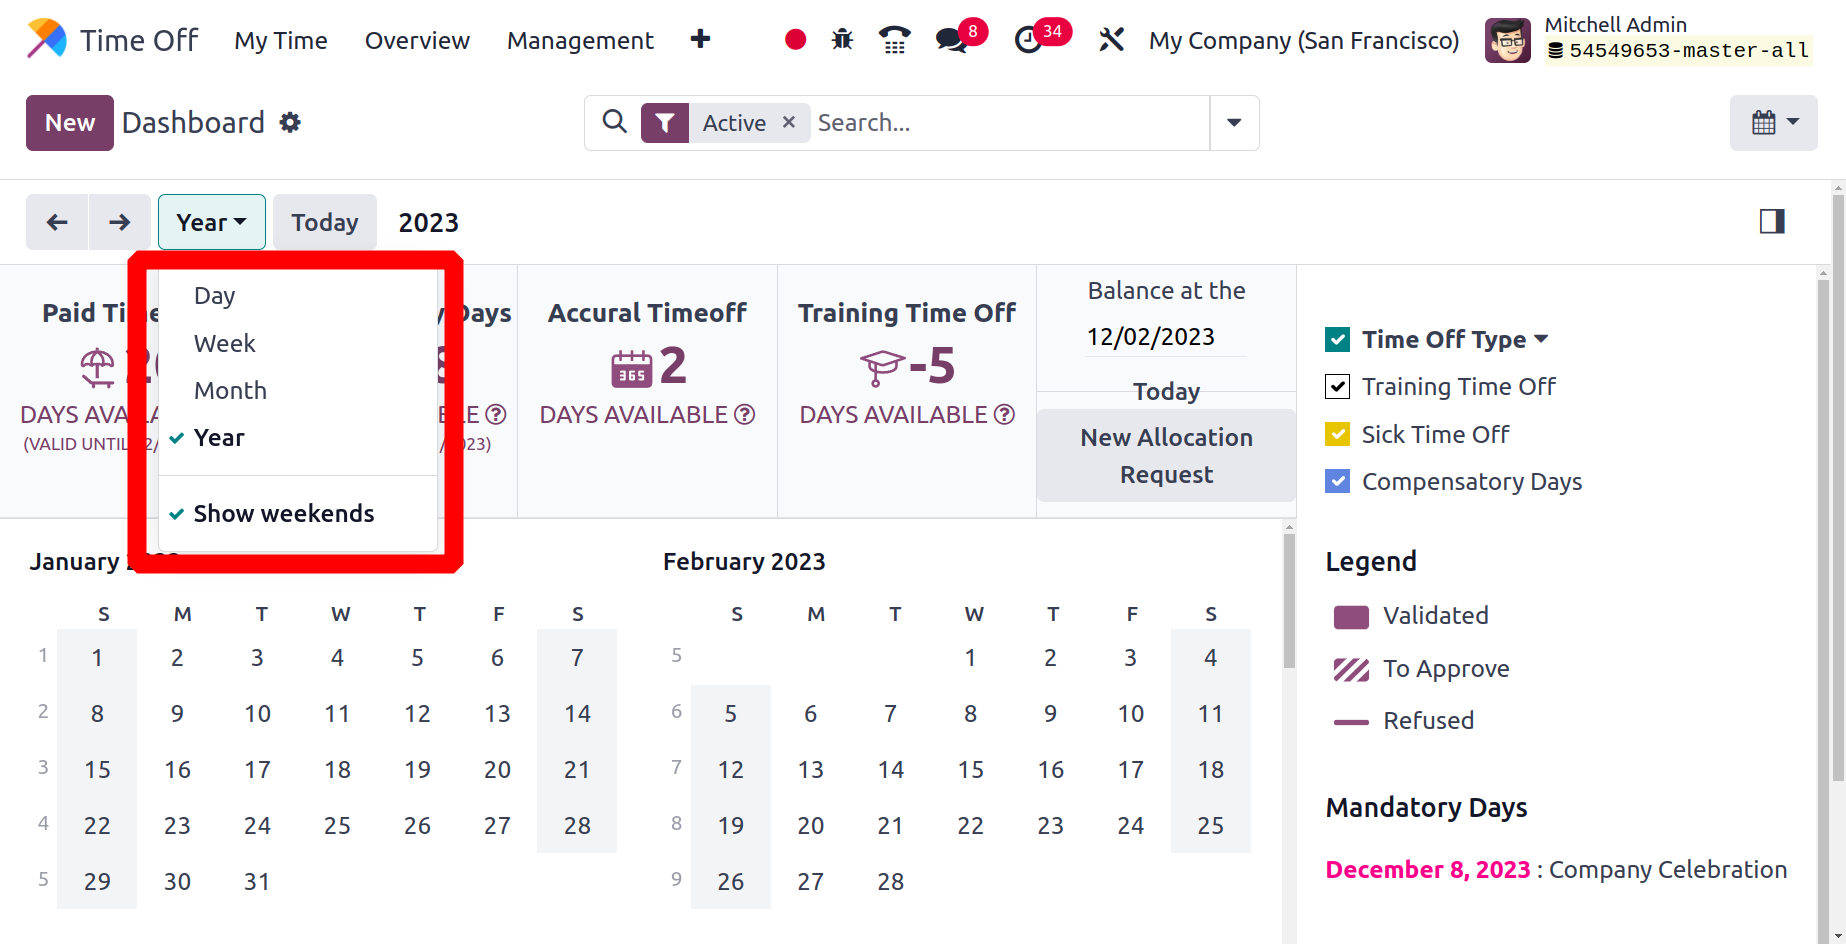
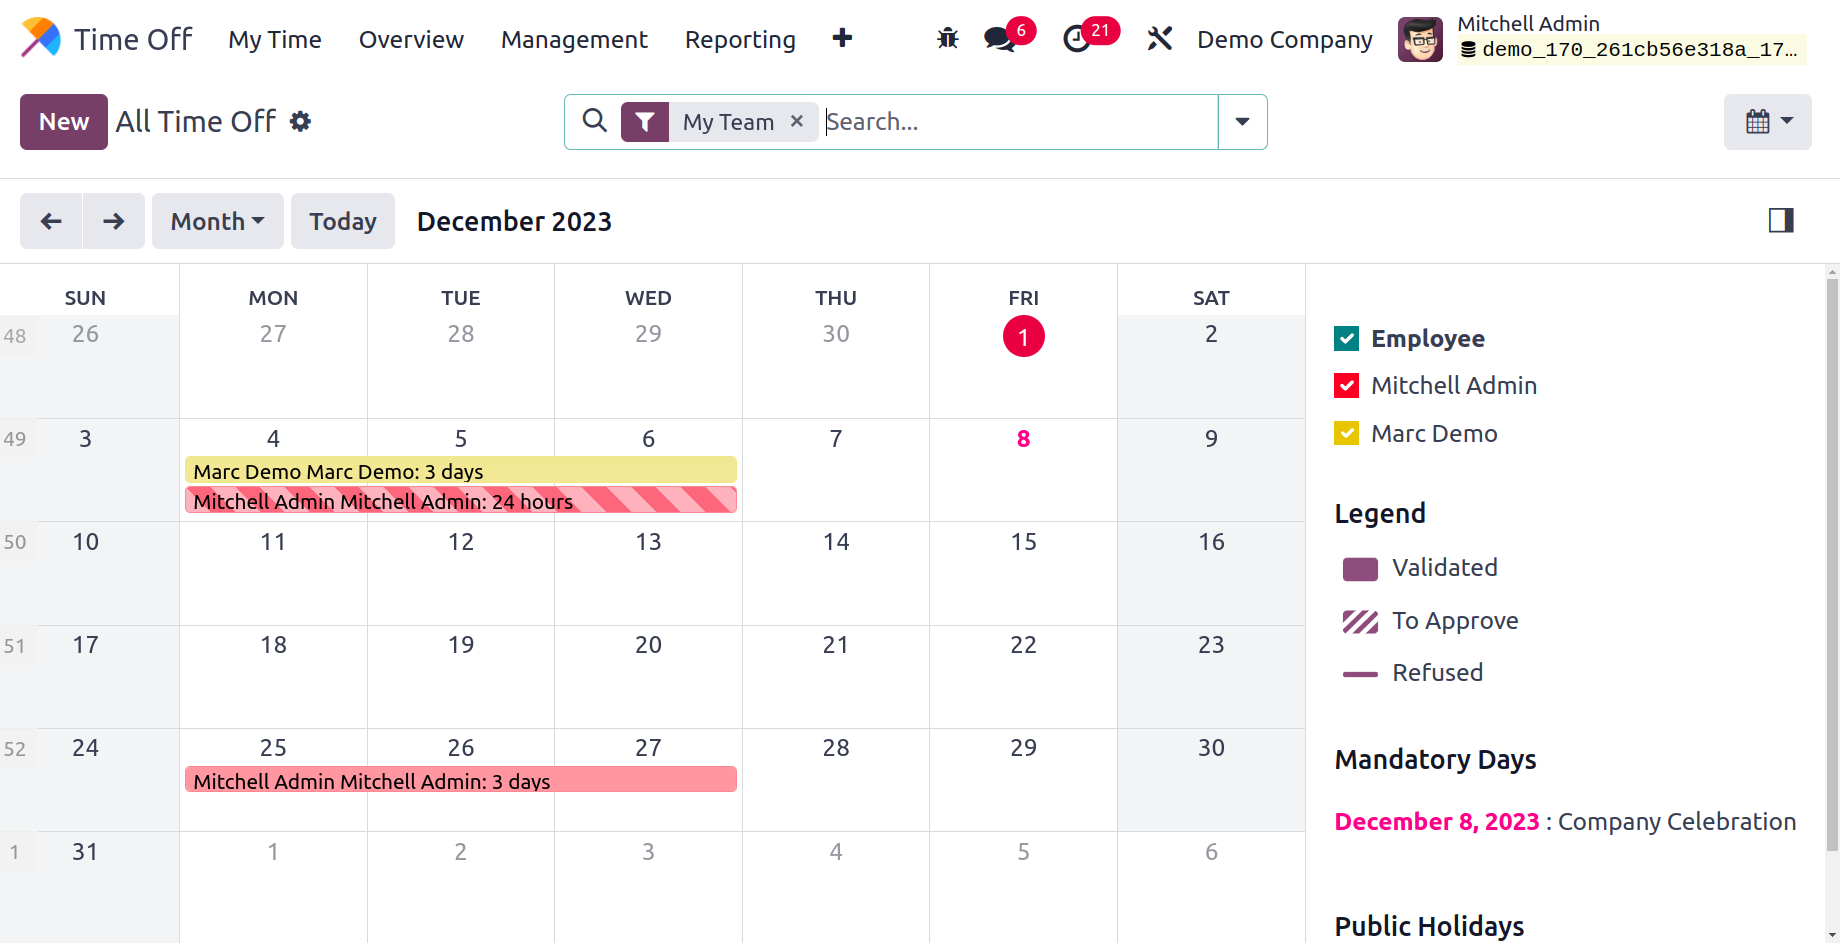
The dashboard can be seen daily, weekly, monthly, or annually, as shown in the screenshot
above. Here, we chose the year-long vacation schedule. Depending on the type of time
off, the employee's time off is displayed on the dashboard in various colors. On the
left side of the dashboard, the available time off types are displayed. Depending on
whether a request for time off is validated, approved, or rejected, the patterns on the
dashboard will alter. On the right side of the dashboard, the pattern for each type is
displayed. On the screen, you can see the employee's available Sick Time Off and
Compensatory Days for the entire working term.
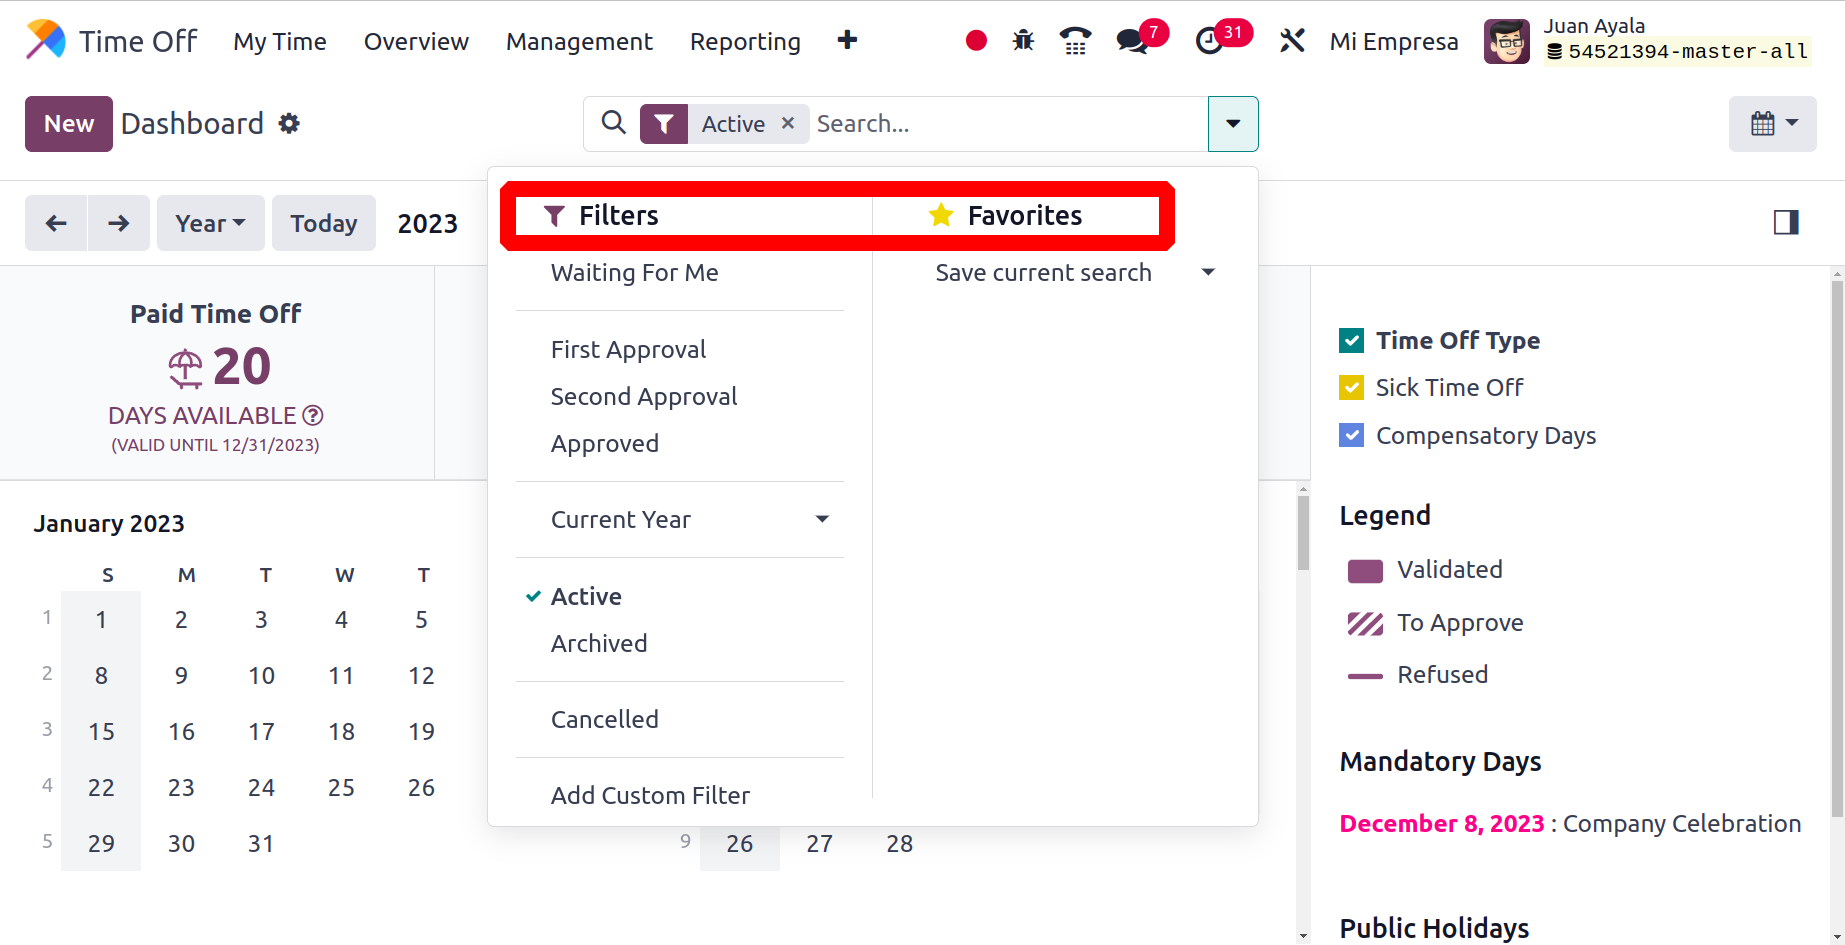
To Approve, Need Second Approval, Approved Time Off, Current Year, Start Date, Active
Time Off, Archived Time Off, and Canceled Time Off are the Filters that are accessible
for this window. You can click the New Time Off button to start a new Time Off request.
Additionally, you have the option of selecting the day you want to take a leave of
absence.
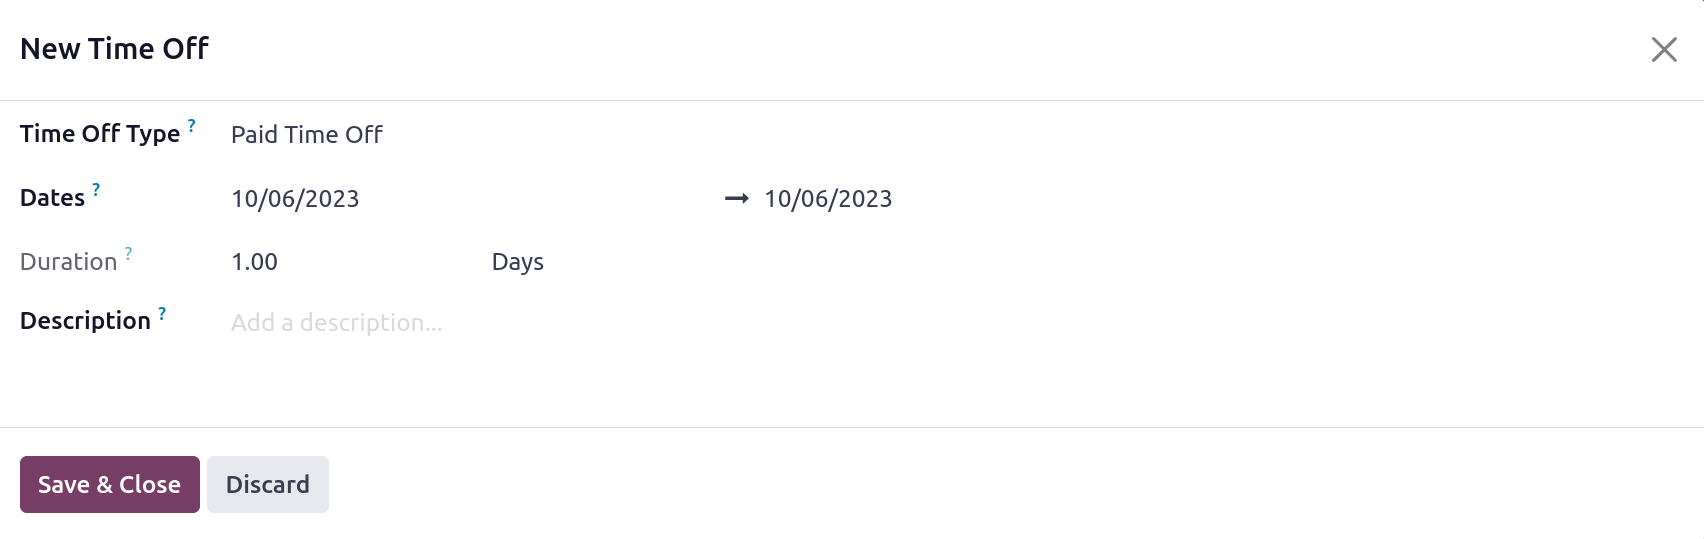
A pop-up window will appear, as displayed below. In this area, you can fill in the field
for the Time Off Type. From the drop-down menu, you can choose the appropriate option.
In the corresponding field, you can choose the Dates for your vacation, and the duration
of your time off will be calculated automatically based on the days you choose. You can
add a description of the time off in the Description field. When you click Save & Close,
the request is delivered to the relevant management for approval.
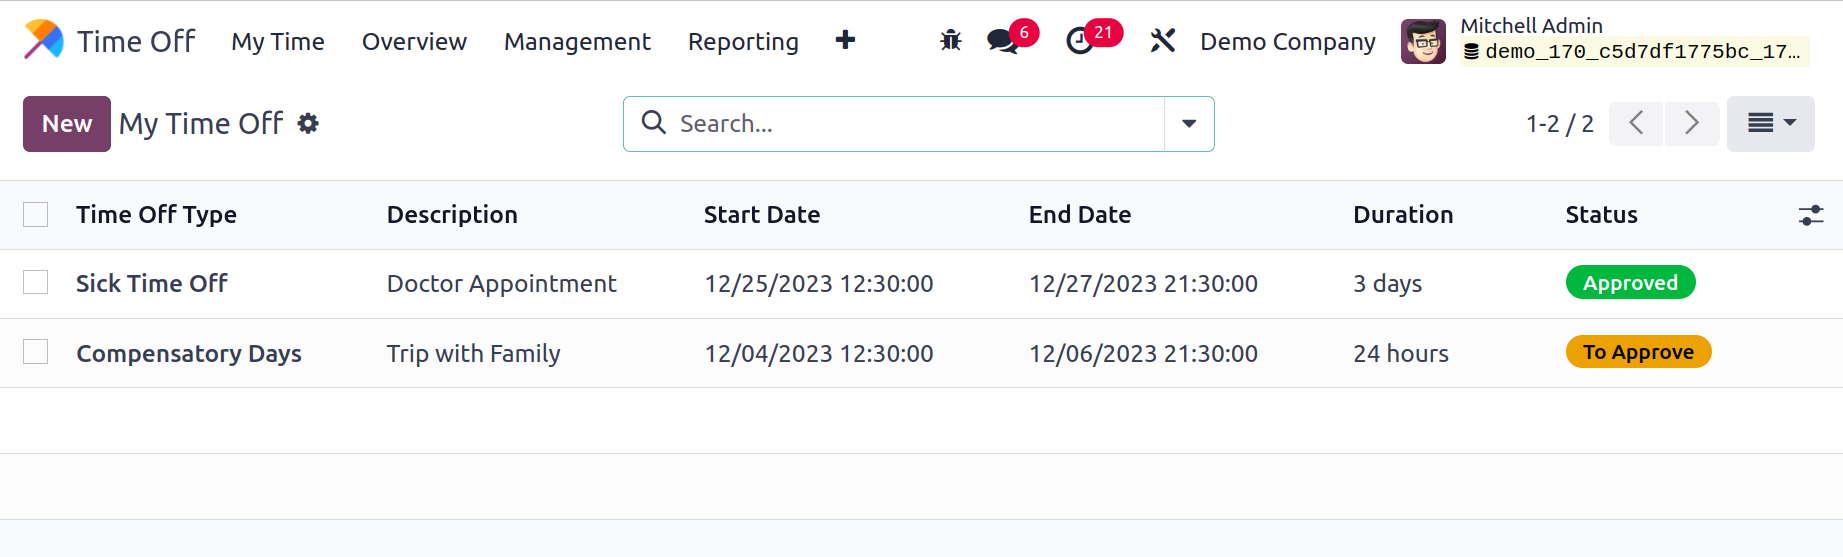
My Time off
Viewing all of the produced time off for the employee who logged in is possible with the
My Time Off option within the My Time Off menu. the kind of time off, its description,
its start and finish dates, its length, and its status. Click on the New button to add a
new time off.
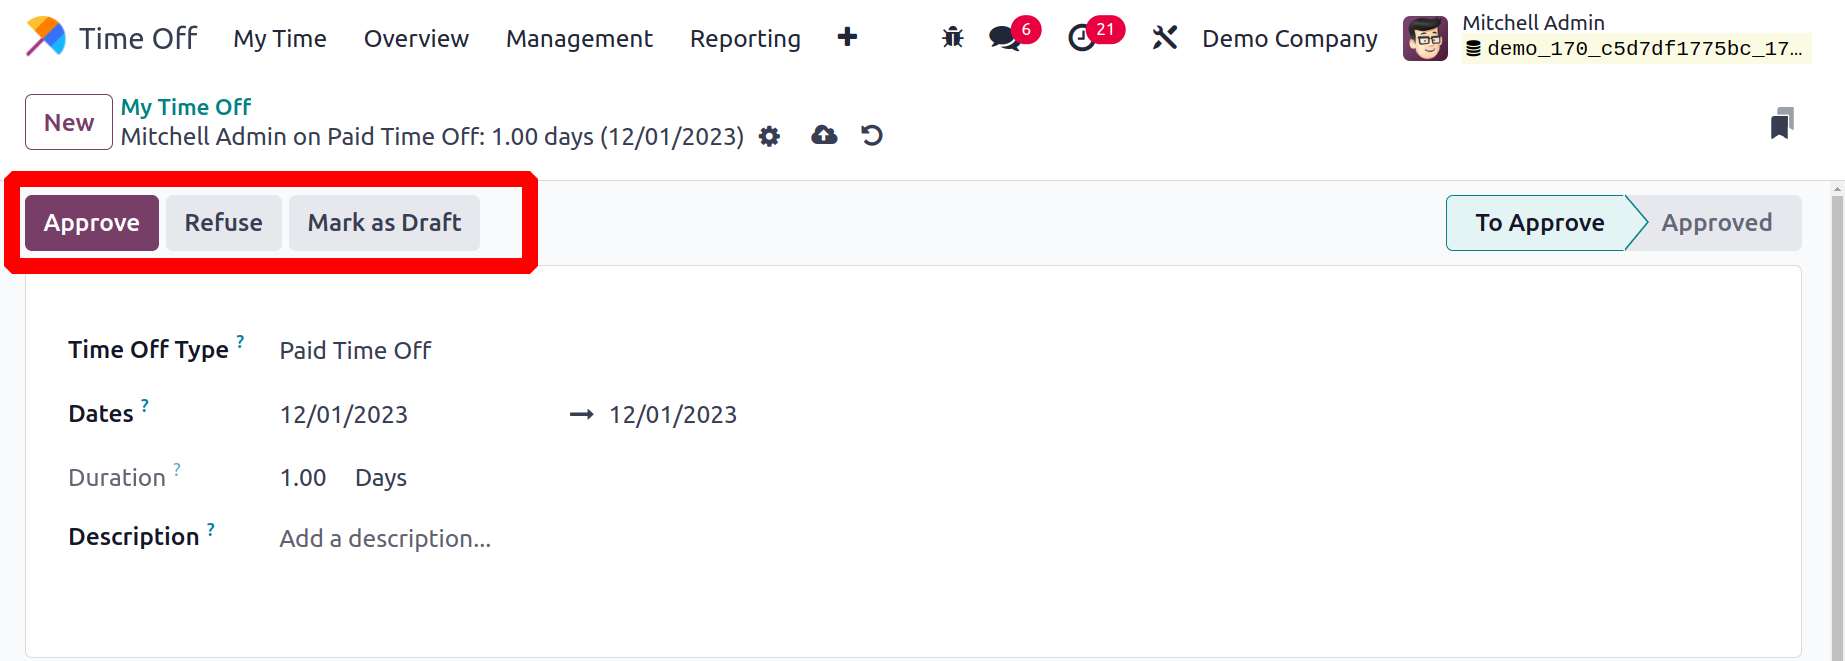
Select the TimeOff Type from the creation form, then enter the duration and dates from
and to. Bring up the description. Press the Approve button to grant the time off
request, or press the Refuse button to reject it.
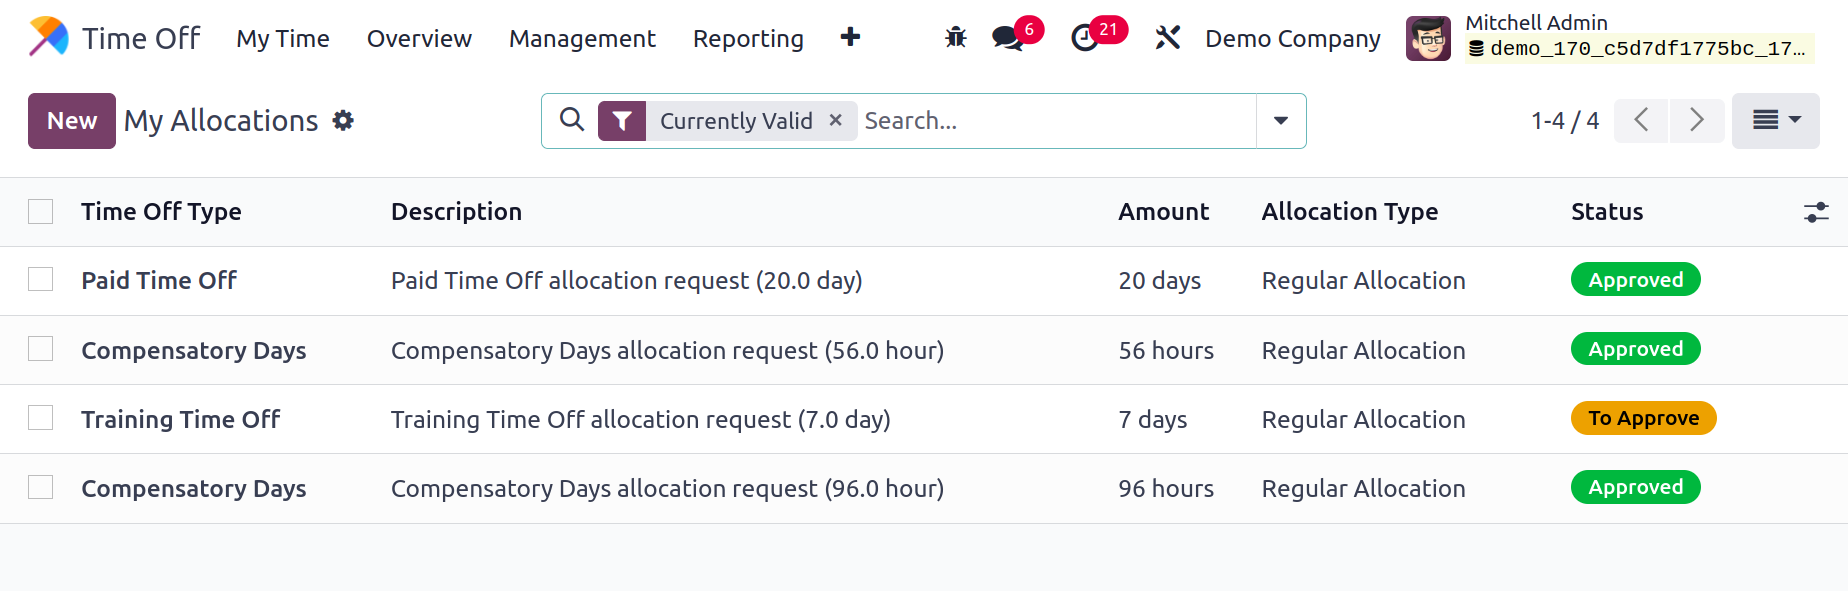
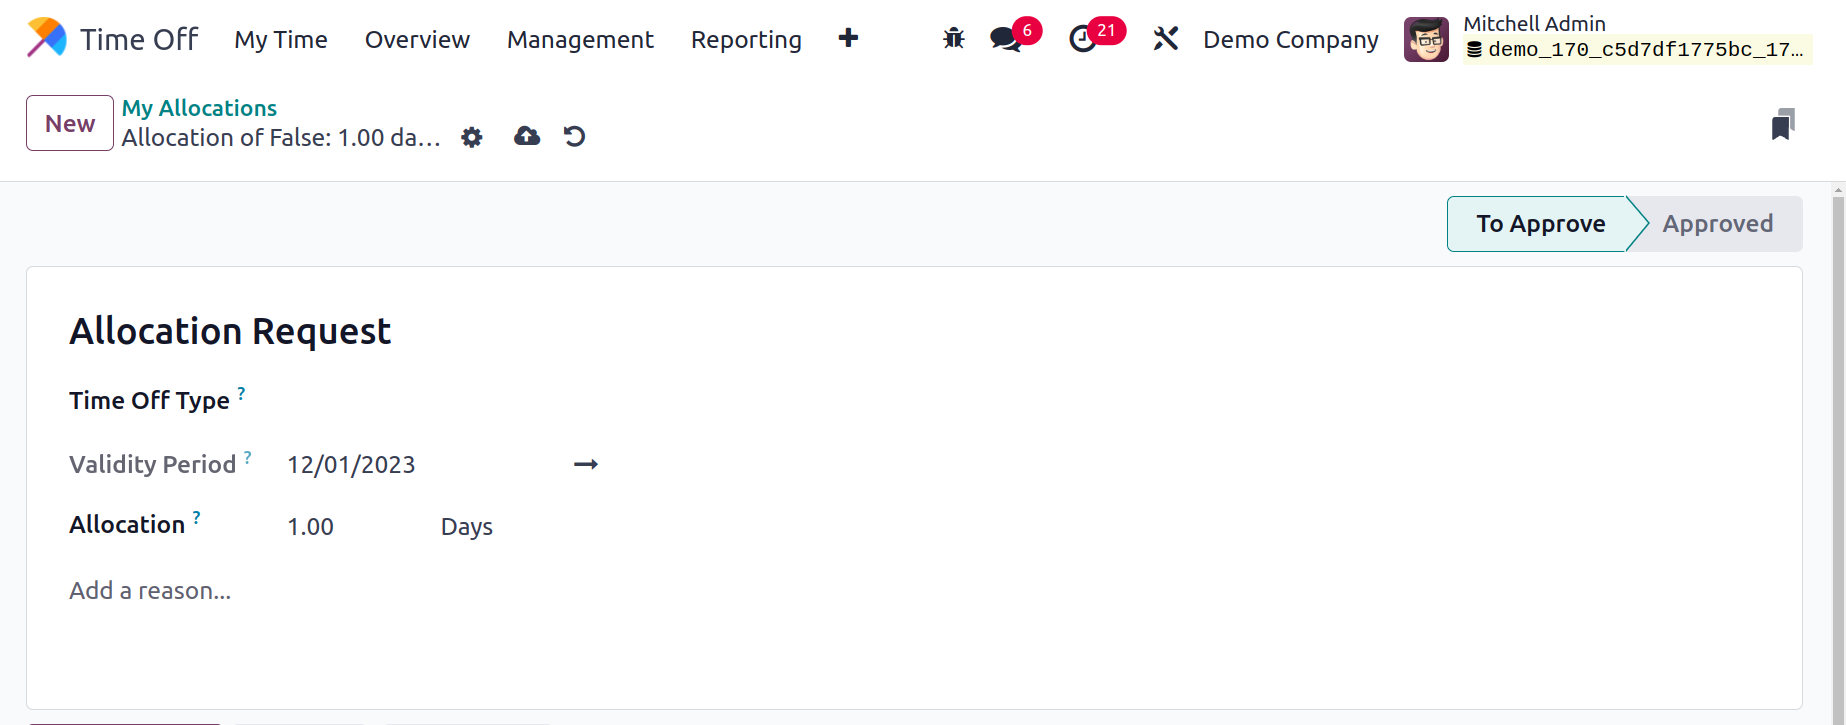
My Allocation
My Allocation, located under MyTimeoff, allows users to examine all of the allocations
they have made for themselves. The kind, amount, description, allocation type, and
status of time off. To add a new allocation for the same person who logged in, click the
New button.
You can enter the name of the allocation request here and choose the appropriate Time Off
Type from the list of options. The Allocation section allows you to enter the additional
number of days that you need. The notional amount of time allotted to the employee on
the first run of the plan, based on their prior start date, is contained in this
Allocation section for an Accrual Allocation. It is possible to manually edit this.
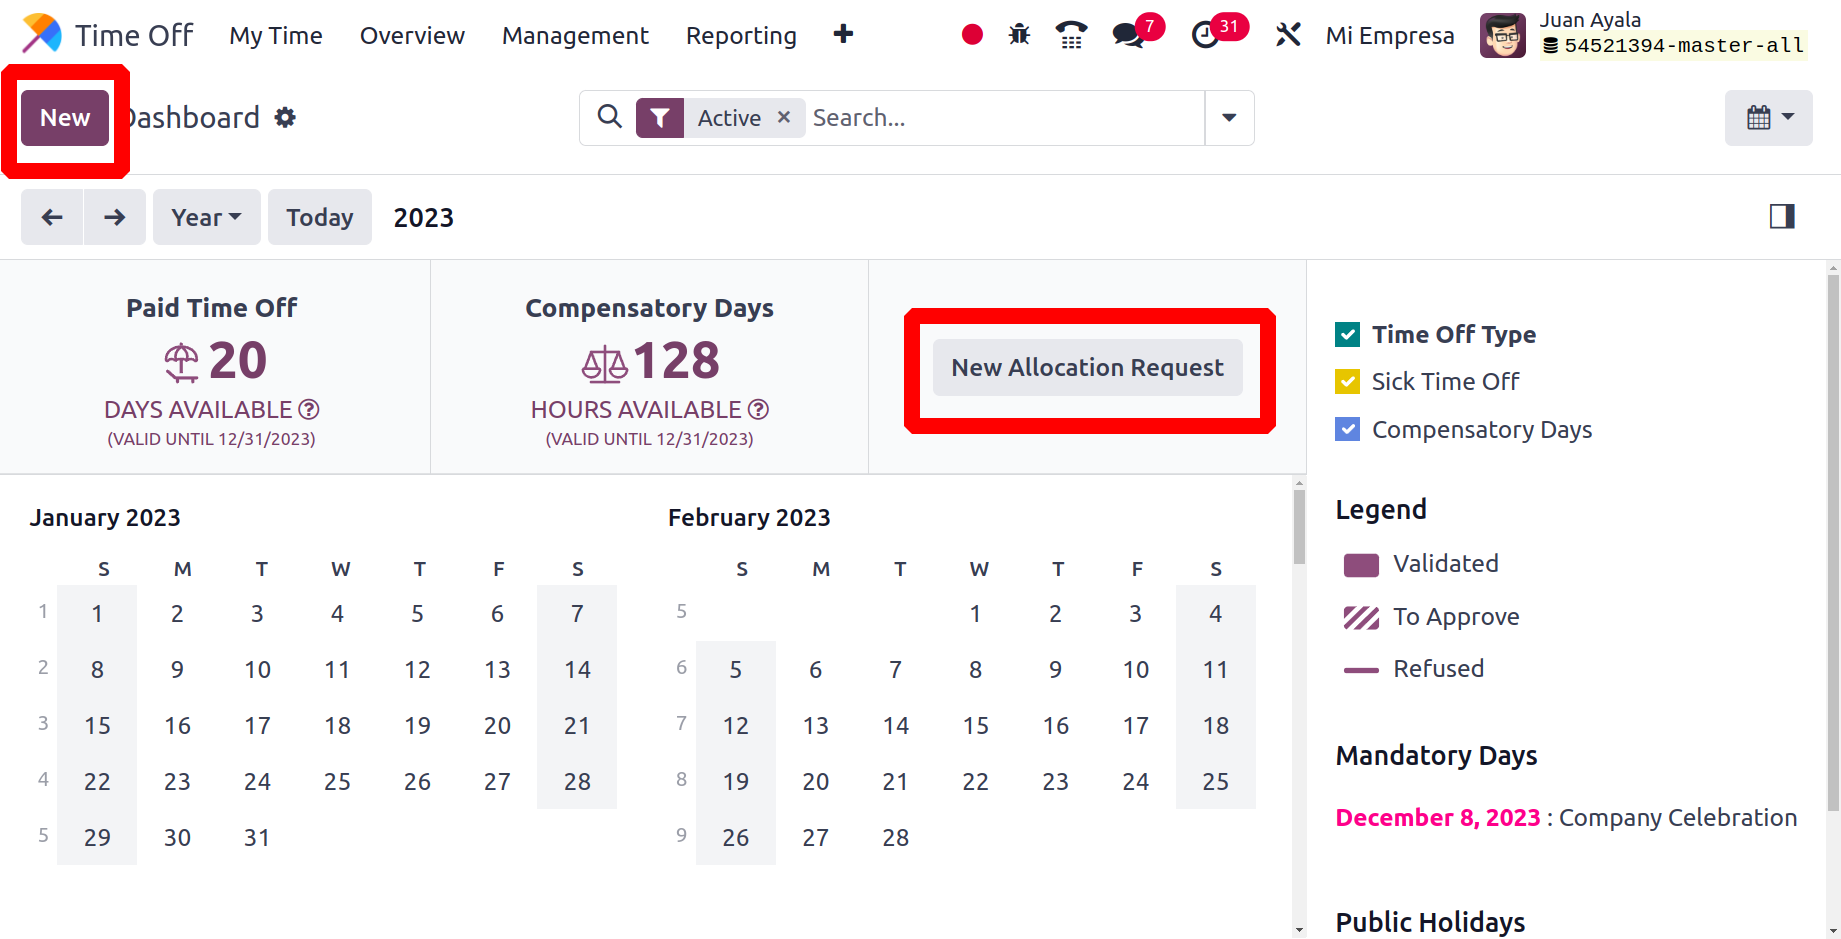
You can choose "New Allocation Request" from the time off the main dashboard. When
specific circumstances apply, this option is used to create allocation requests.
Employees can file allocation requests to request special permission if they need more
time off than what is allowed by law.
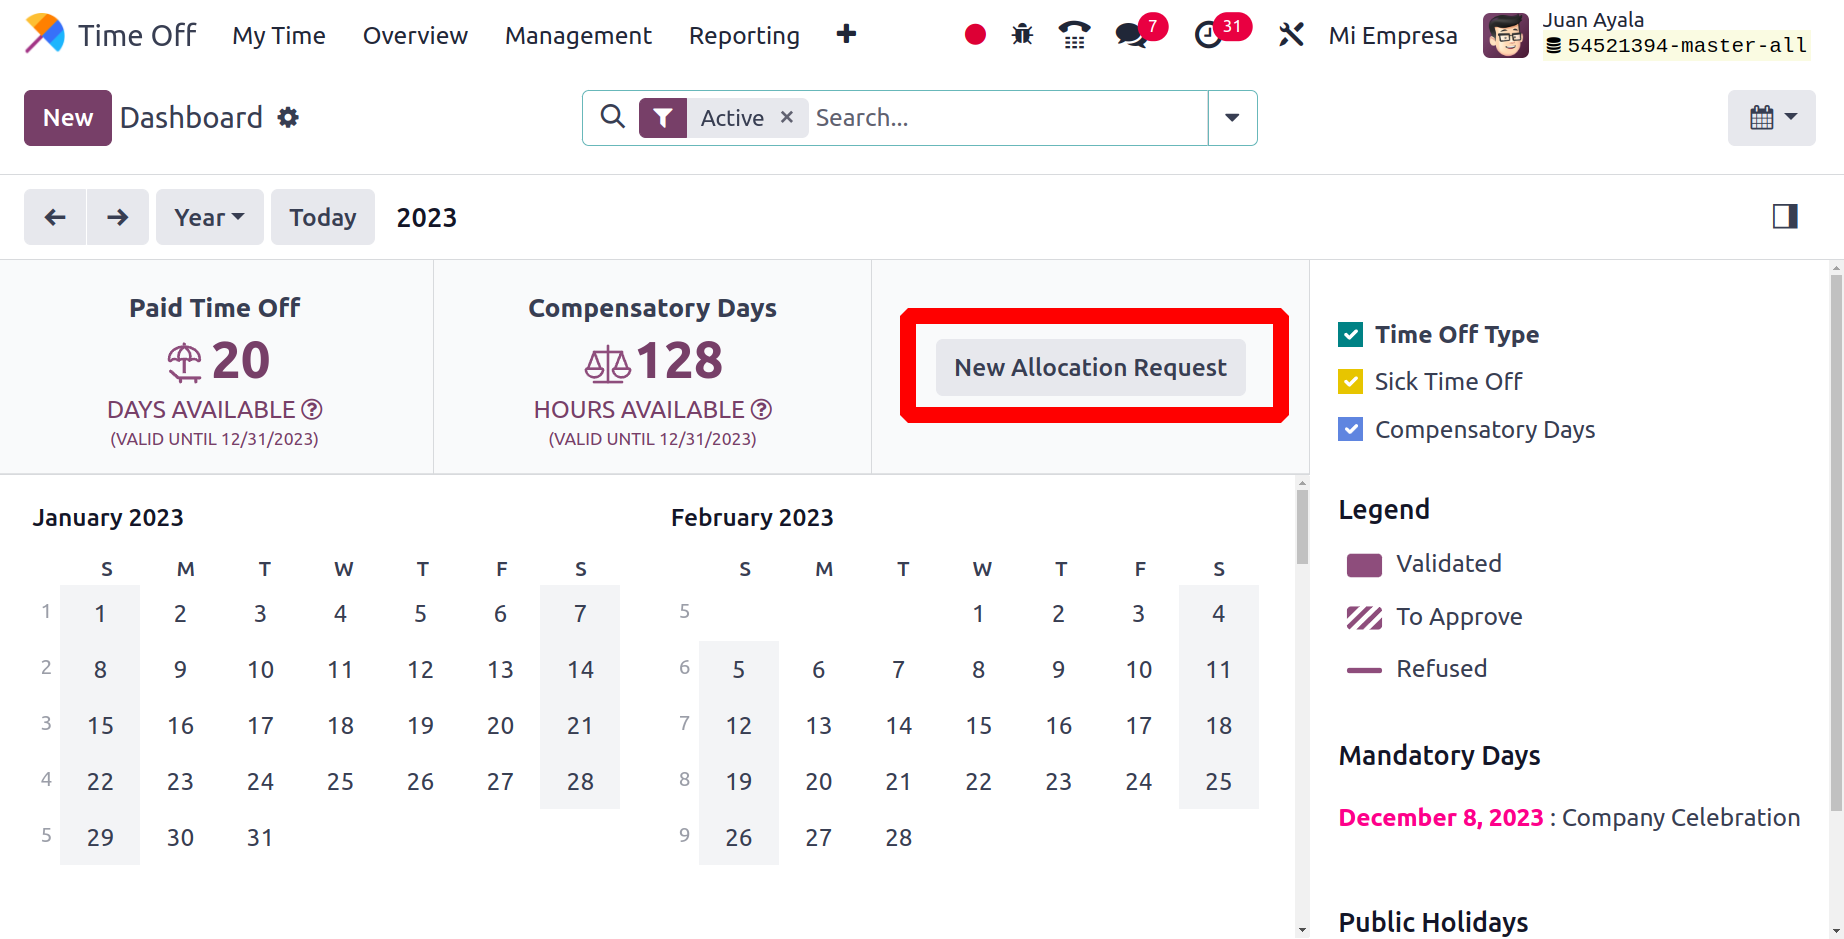
By selecting this option, you can create fresh allocation requests with ease. A new
pop-up window will appear as a result.
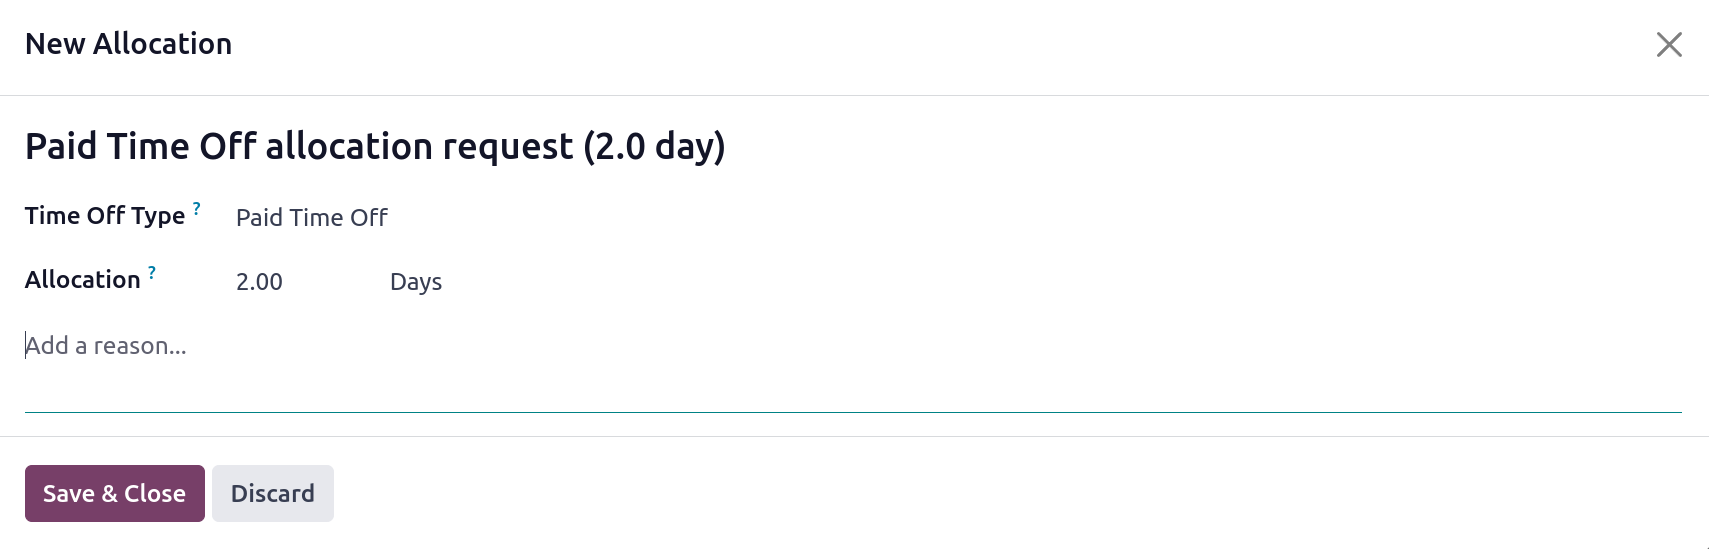
You can enter the name of the allocation request here and choose the appropriate Time Off
Type from the list of options. The Allocation section allows you to enter the additional
number of days that you need. Then click on Save & Close.
Overview
The time off for all employees are displayed in the Overview menu, which is accessible in
the Time Off module. The HR manager can utilize this window to keep track of everyone in
the company's employees' vacation schedules. The overview allows you to choose your
vacation time by Day, Month, or Year. As seen in the figure below, all employees'
created time off is displayed in a Gantt chart.
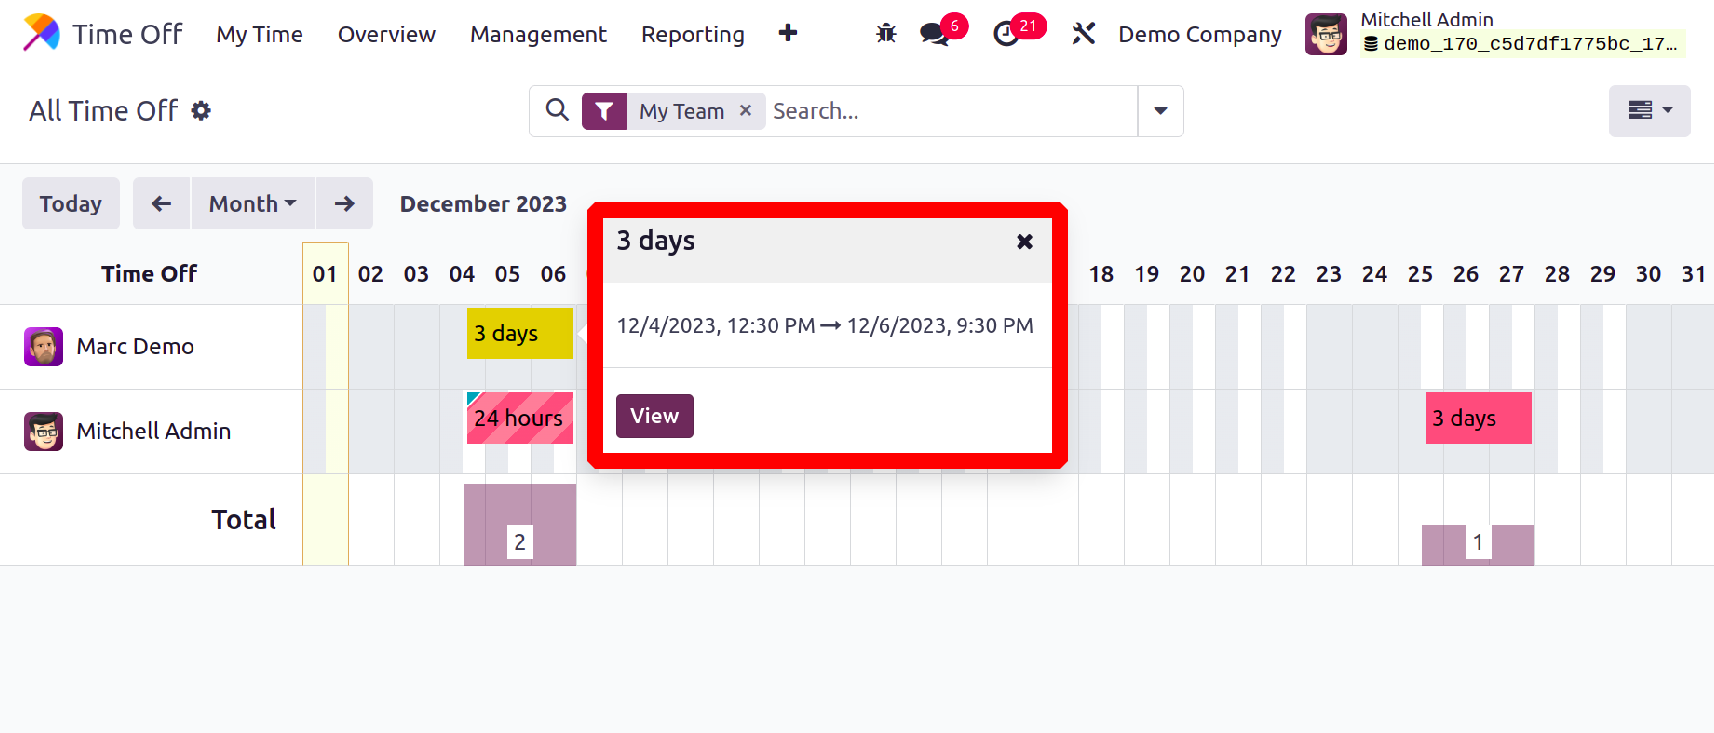
Based on the selected type of time off, the colors are displayed. To read the specifics,
click on the type of time off. The created Time Off can be viewed by clicking the View
button. There is also a Calendar view available as shown in the screenshot below.
Each employee's time off will be represented by a different color. On the left side of
the dashboard, you can see the colors given to each employee.
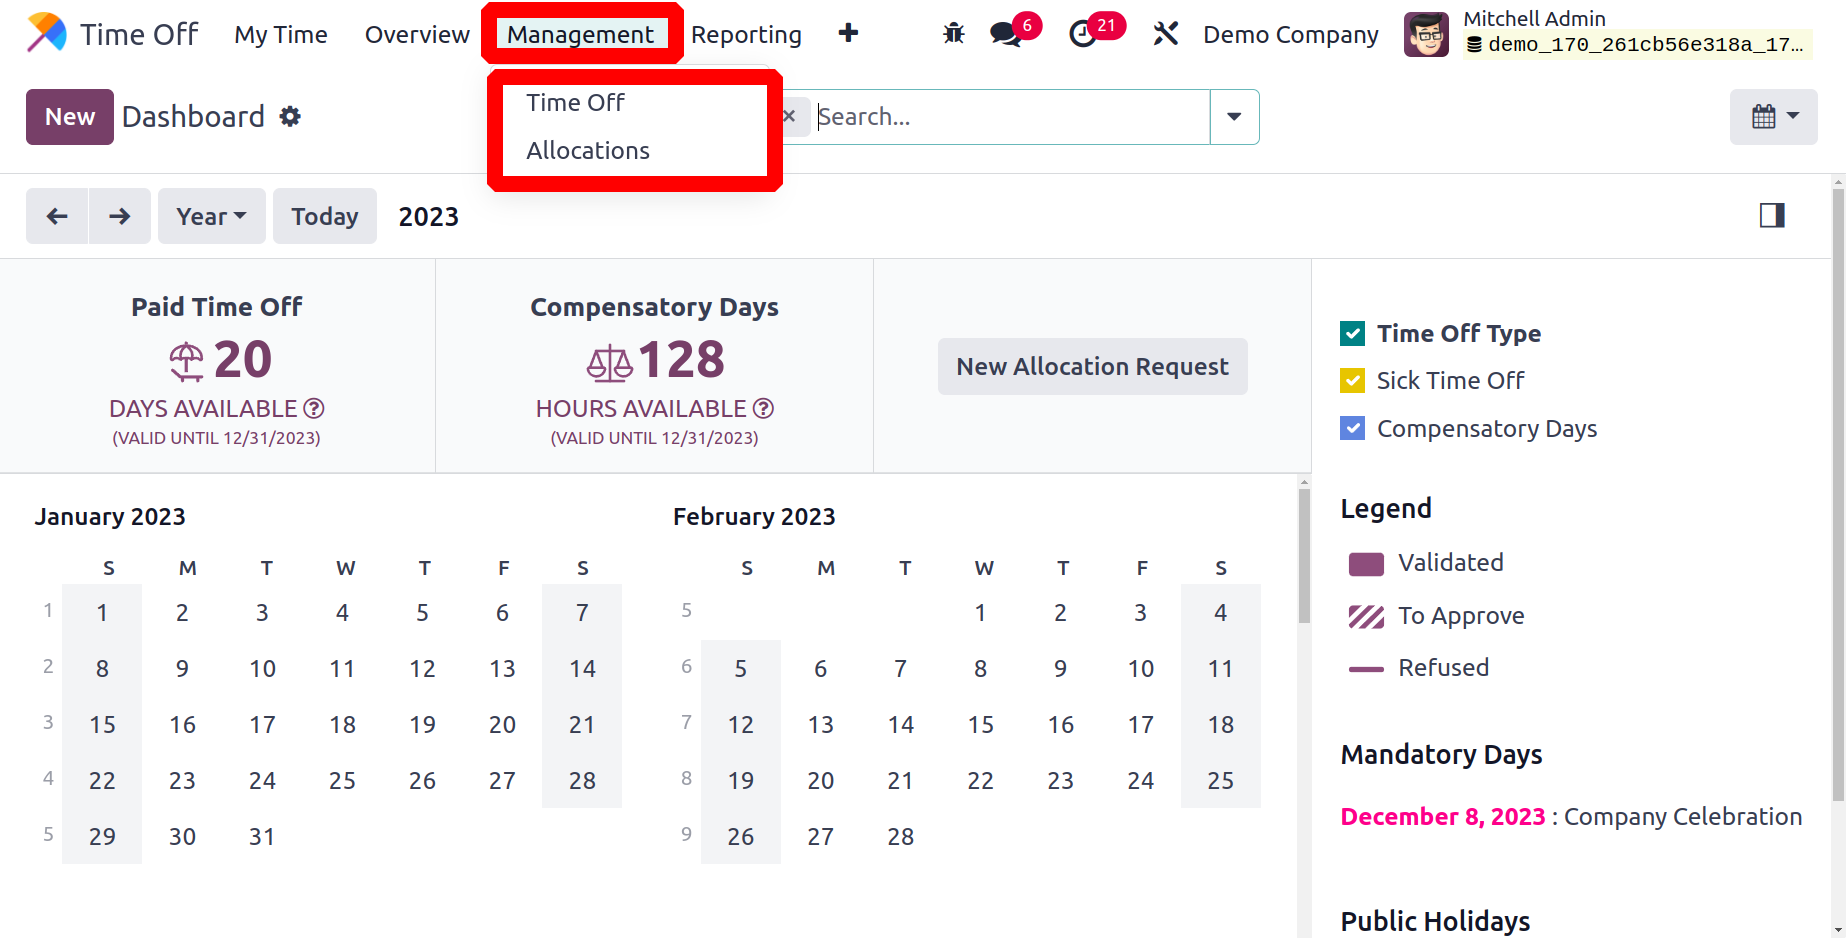
Management
The user can control personnel allocation and absences using the management menu. Thus,
there are two submenus under the Management menu: Allocation and Time Off.
Timeoff
The All TimeOff page displays all of the time off that has been accrued for each employee
in the organization. The name of the employee, the method of time off, the description
added, and the start, end, and duration status of the time off may all be seen there.
The user can verify their time off by clicking the Validate button, and they can deny
their time off by clicking the deny button.
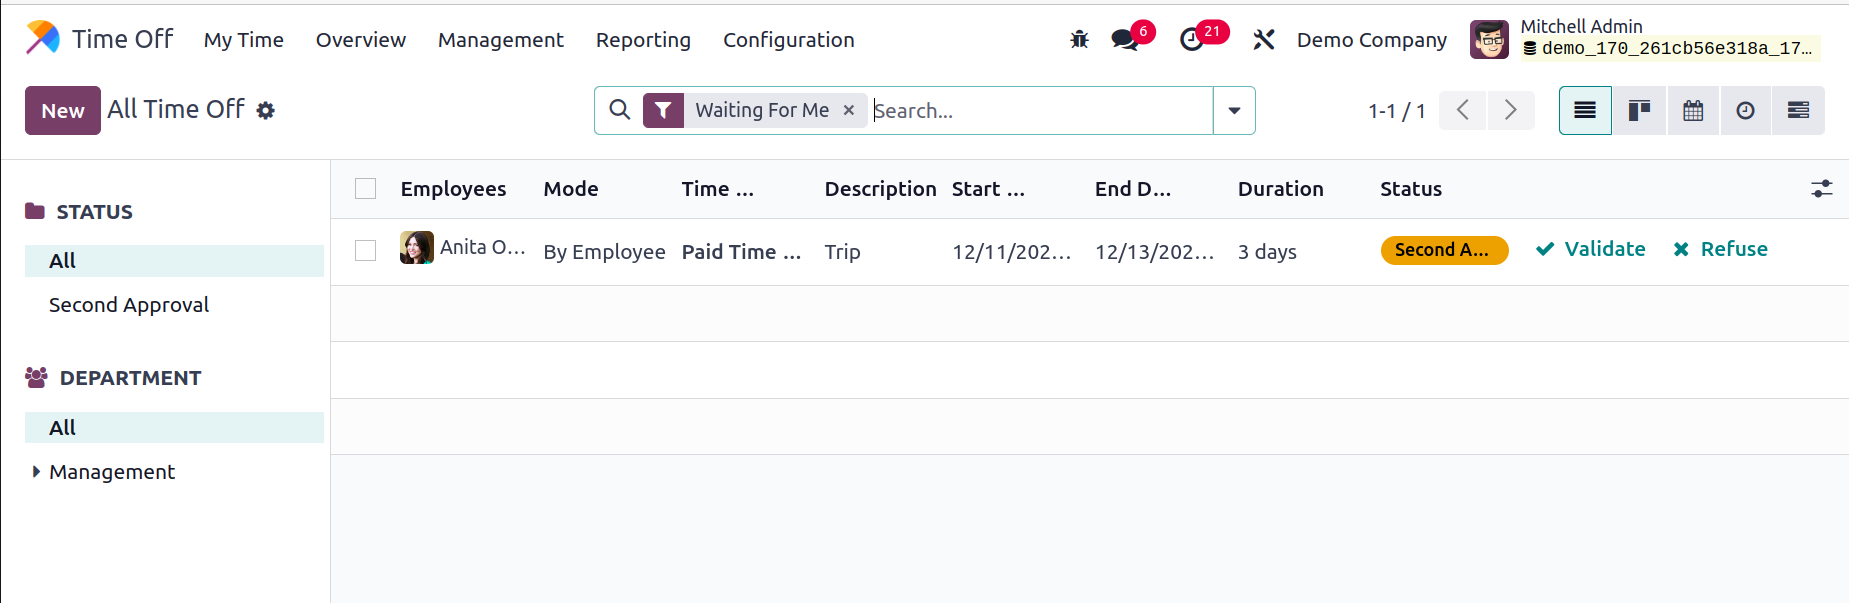
The user can filter the time off based on department and status using the options on the
left side of the interface. Click the New button to add a new time off.
Select the method for your time off: By Employee, By Company, By Department, or By
Employee Tag. If the mode is By Employee, choose the employees. Next, select the dates
and kind of time off. The Duration will be added based on the dates that you have
selected. Check on the Half Day after that to see if the employee needs a half day off.
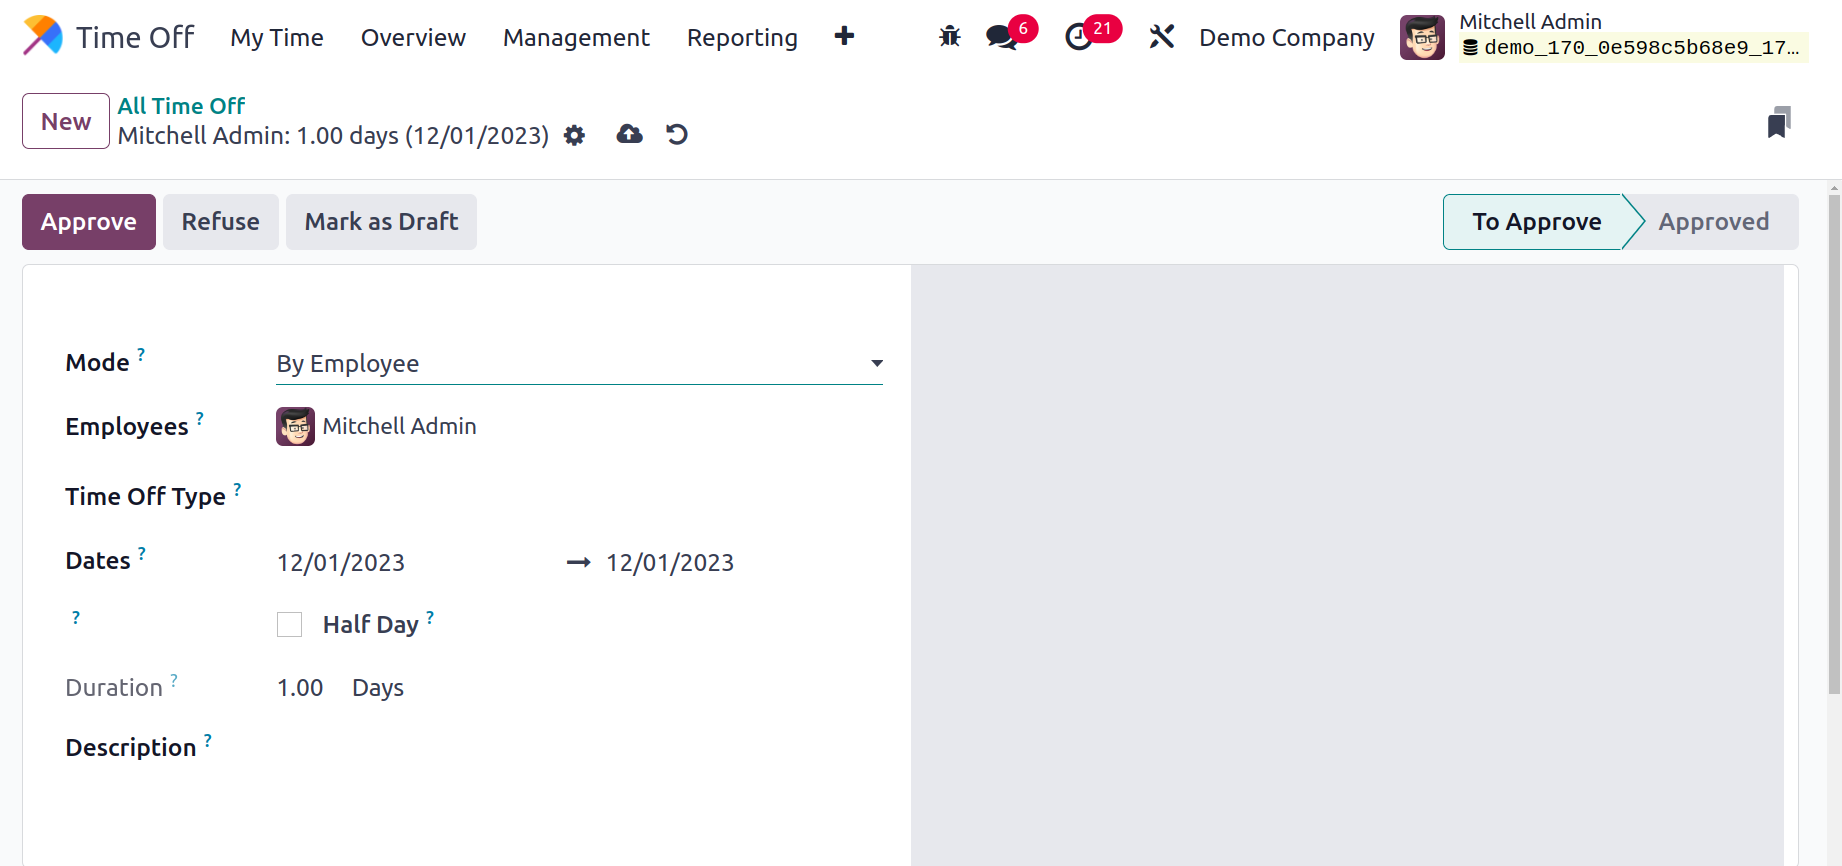
Using the Approve or Refuse option, the user can decide whether to approve or reject the
request for time off.
Allocation
All of the allocations made for each employee are viewable there, just like with time
off. The dashboard allows you to access information about the employee, time off type,
description, amount allocation type, and status. From then, the allocation has two
options: validate or refuse.
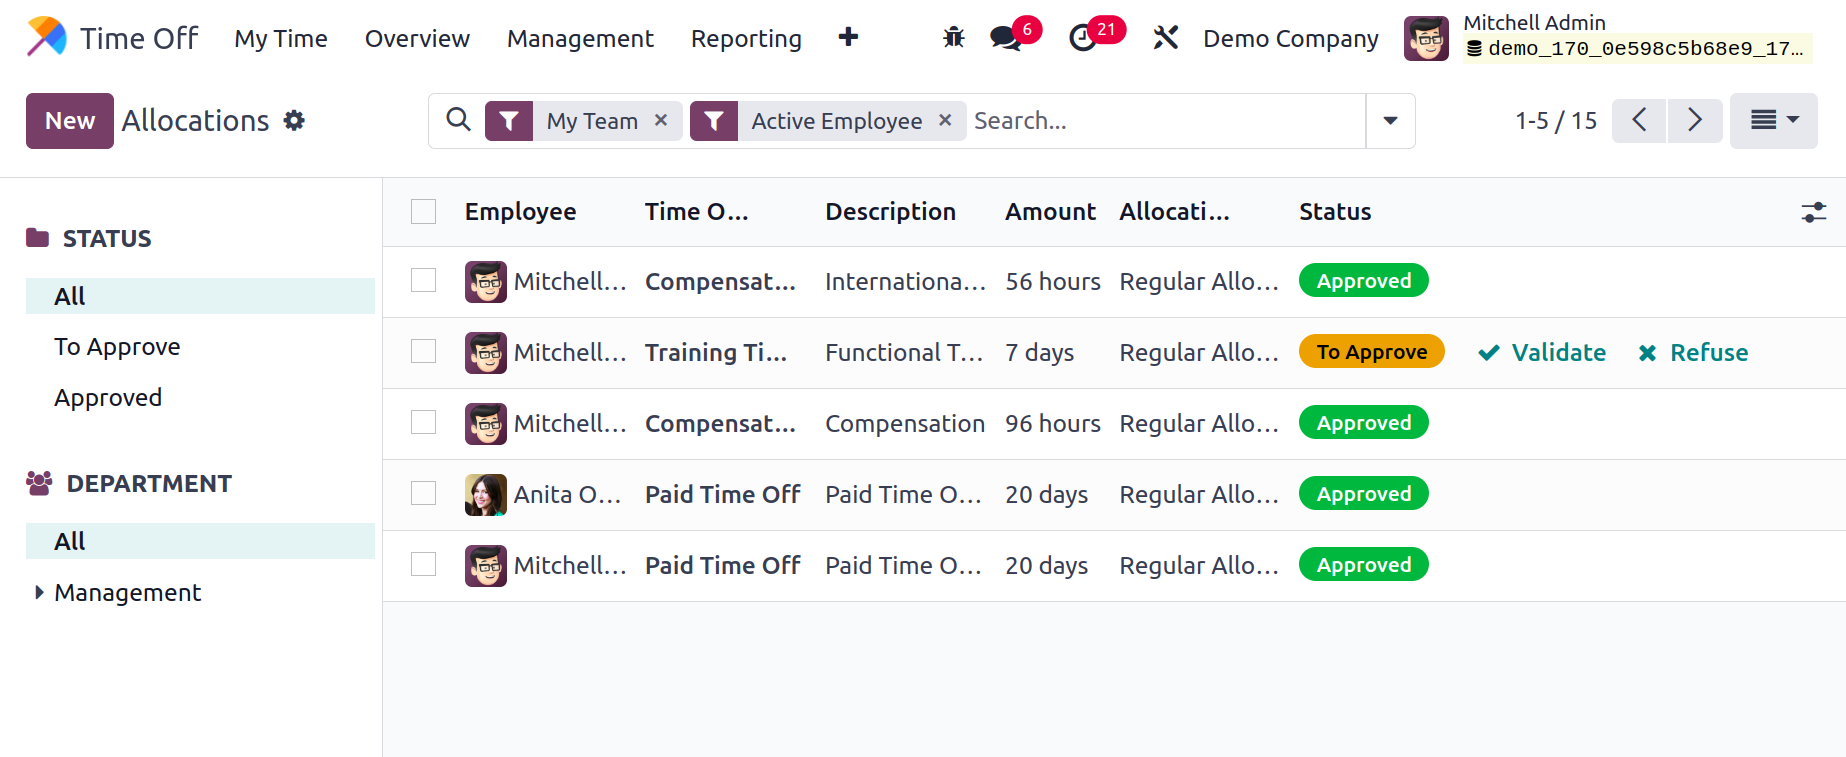
An allocation view based on STATUS or DEPARTMENT is provided on the left.
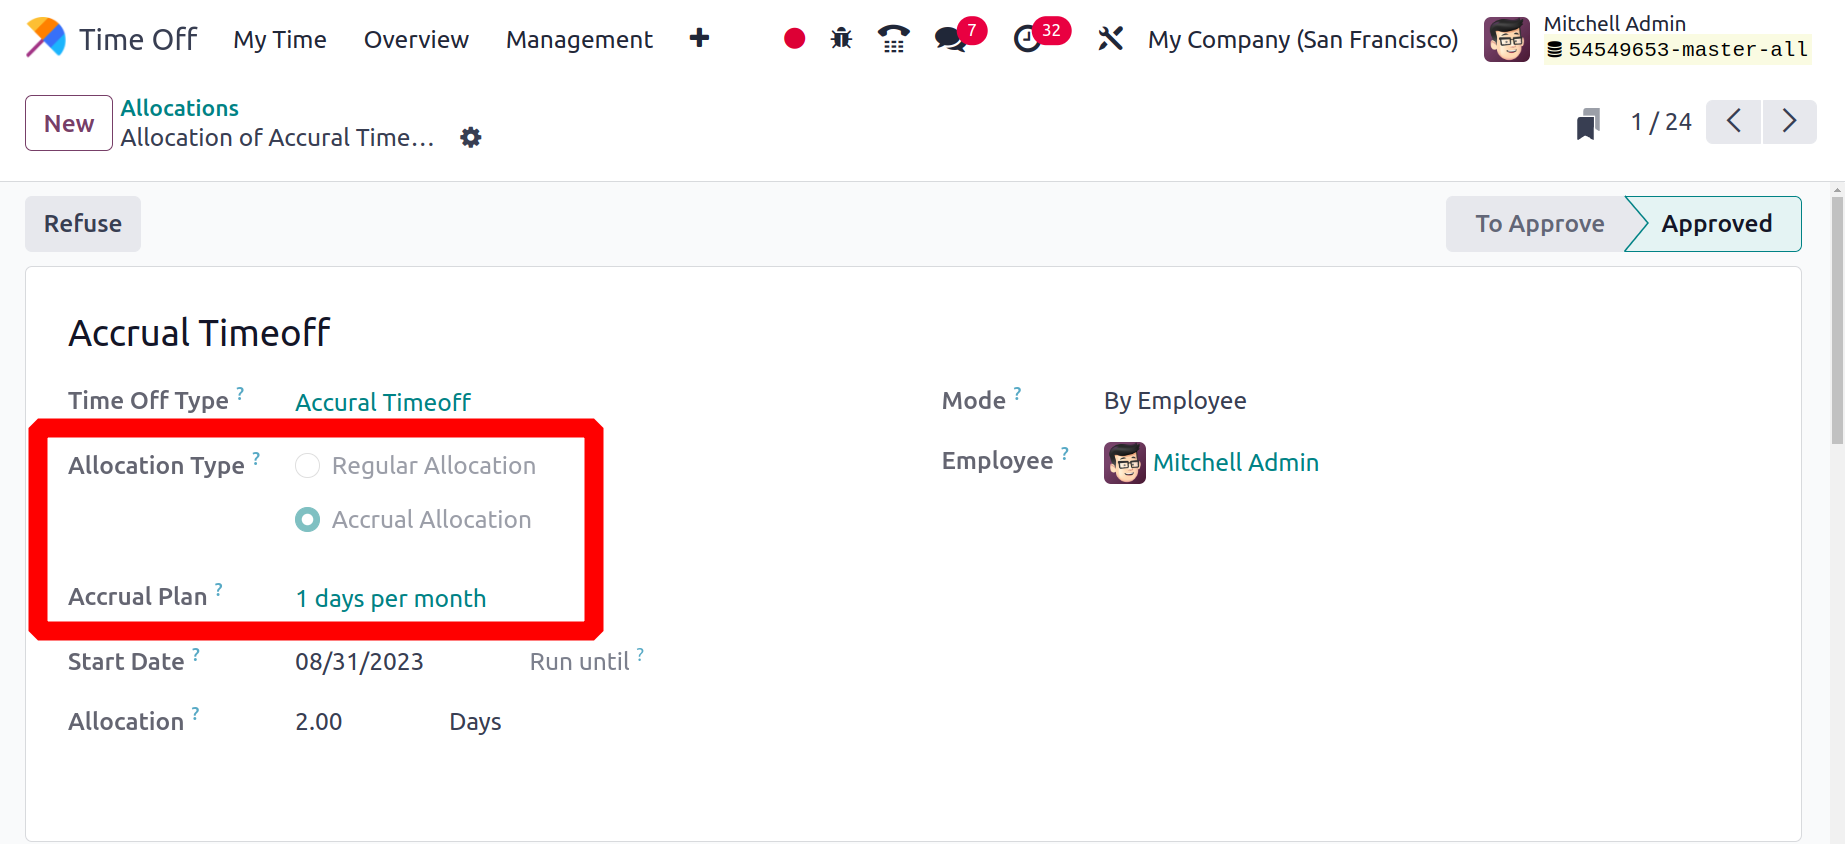
Select the "New" option in order to assign leaves.
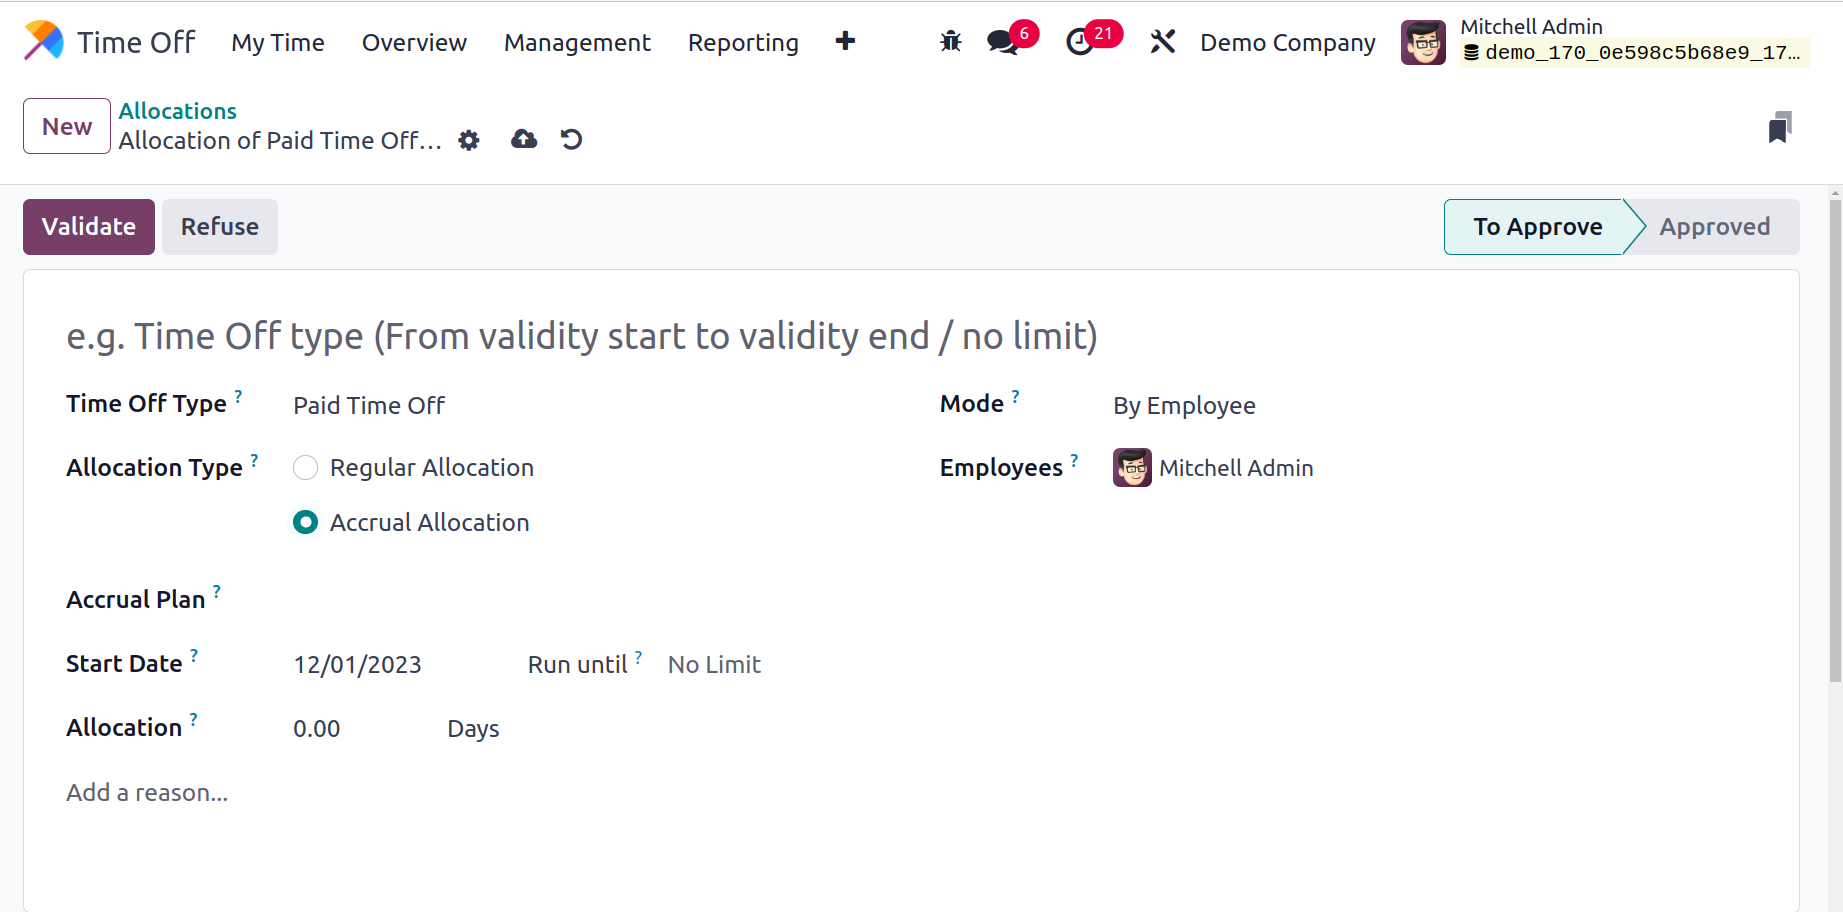
Add a reference and choose the Time Off Type. Choose the Allocation Type either Regular
Allocation or Accrual Allocation. If the allocation type is Accrual Allocation, then
select the Accrual Plan. then mention the Start Date and To dates for allocation and
reason. Mode can also be chosen there. The allocation is in the To Approve stage. Click
on the Validate button, then the Allocation stage changed to Approve stage.
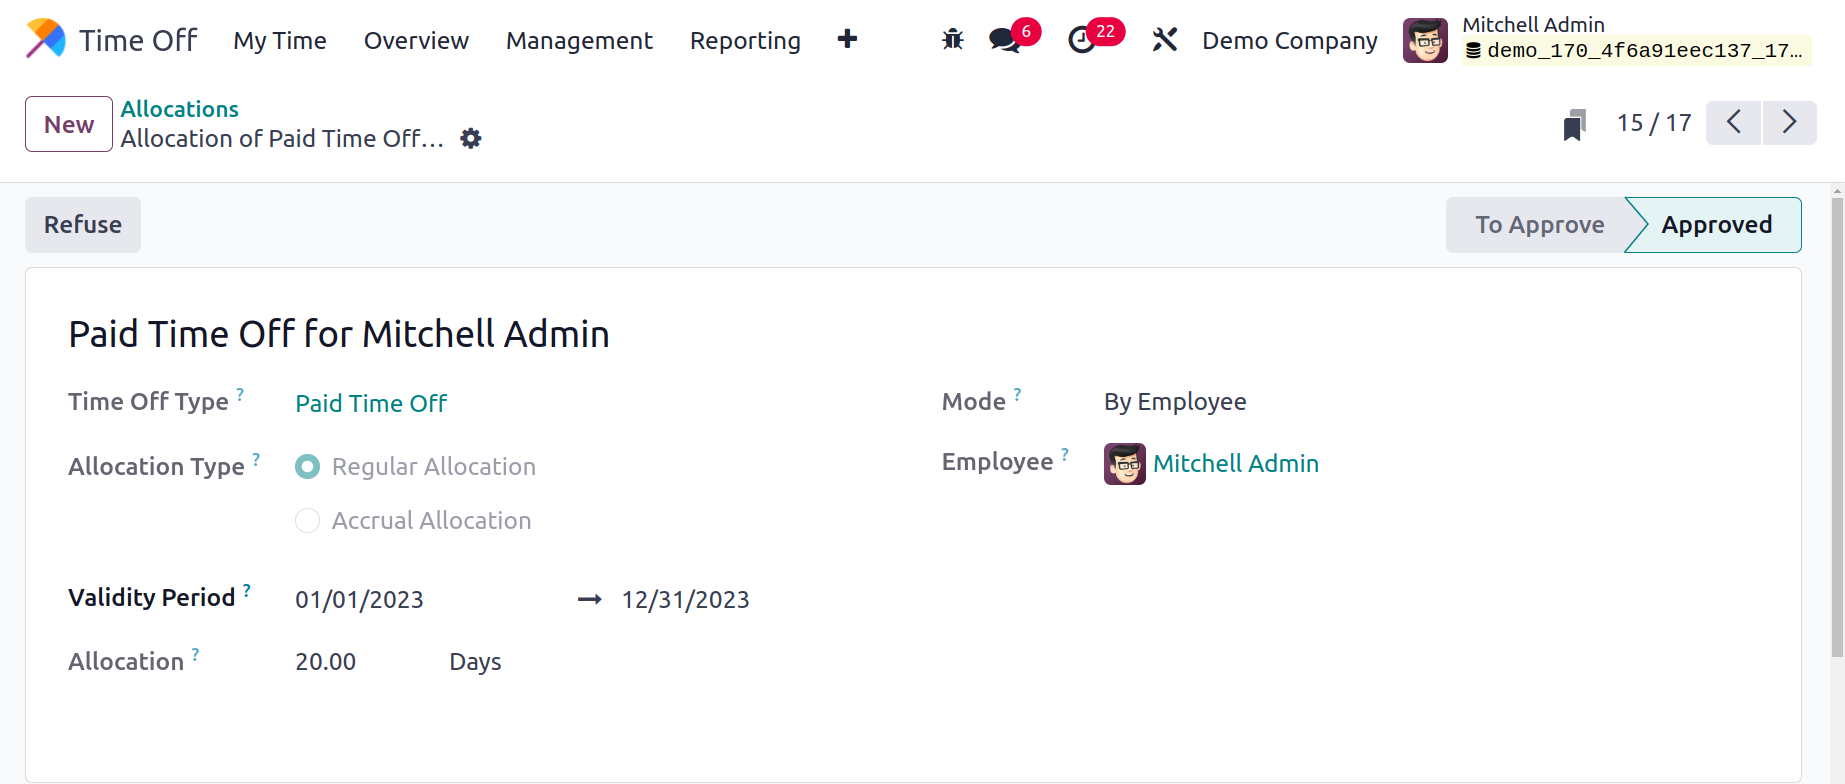
The created allocation can be viewed inside the Dashboard.
The user must select the Accrual Plan if the allocation type is accrual allocation. The
stage will change to Approved after the Allocation is approved.
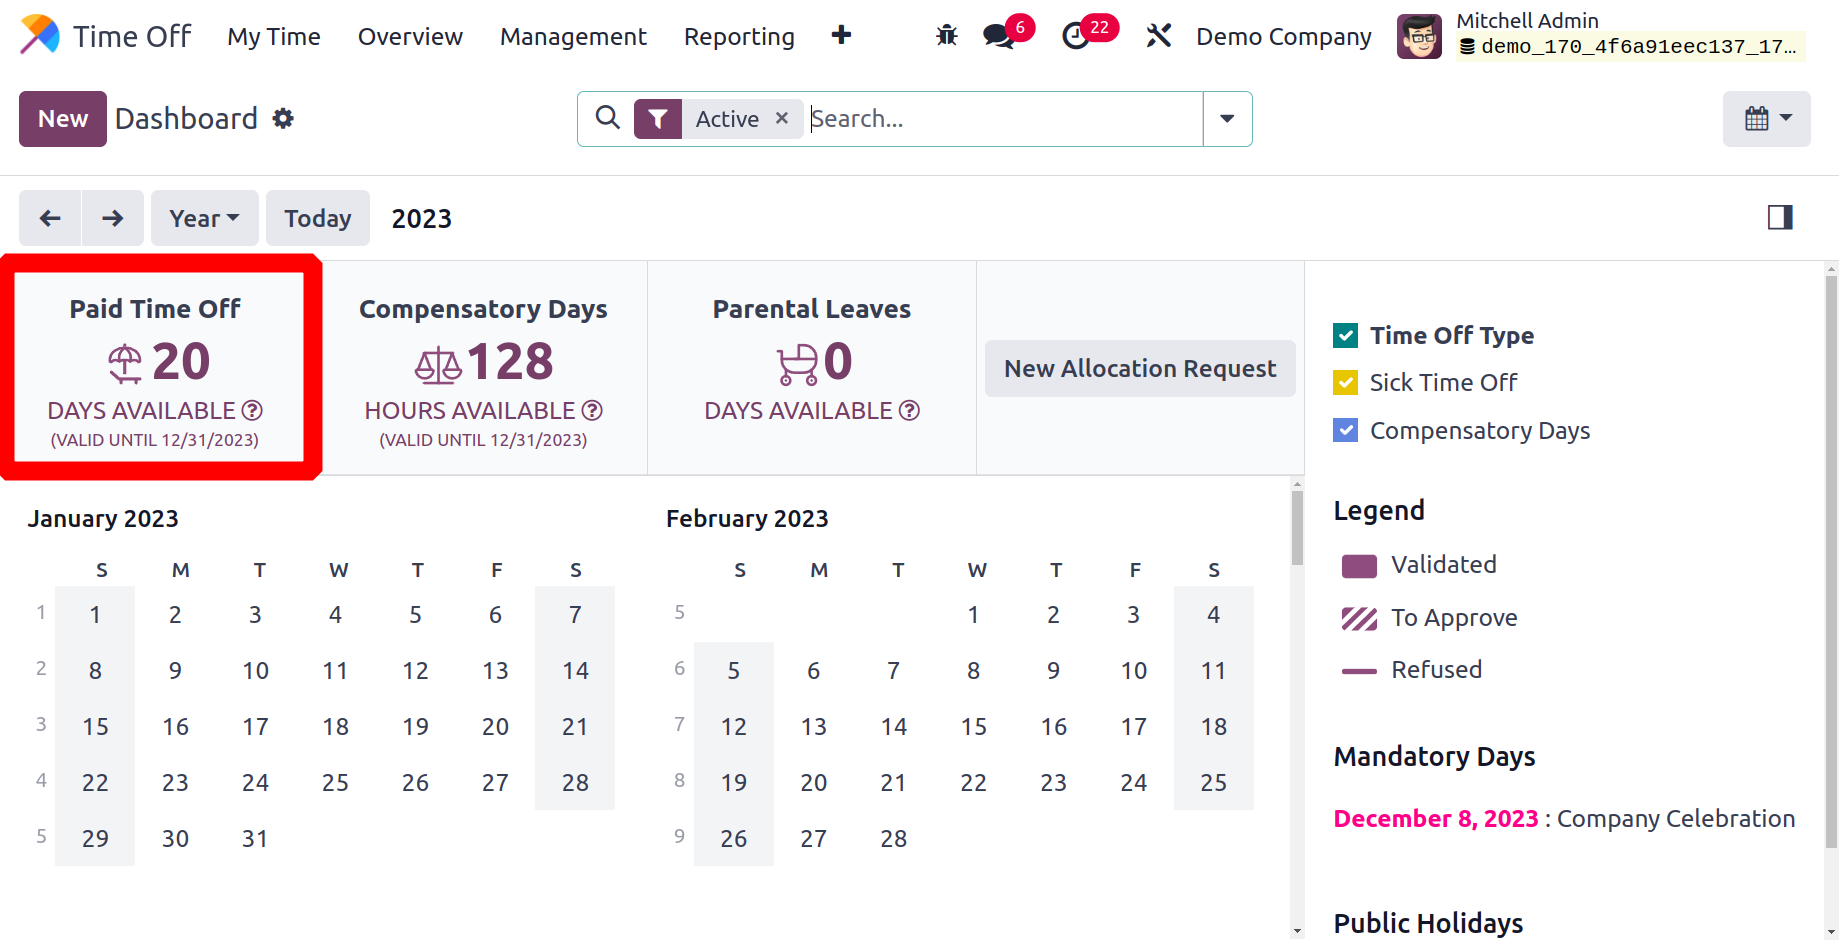
When leave allocation from the prior year is still pending, it will be displayed on the
dashboard. at the same time as the Balance at. The employee's future leave allocations
can now be checked by adding a date to the Balance at field.
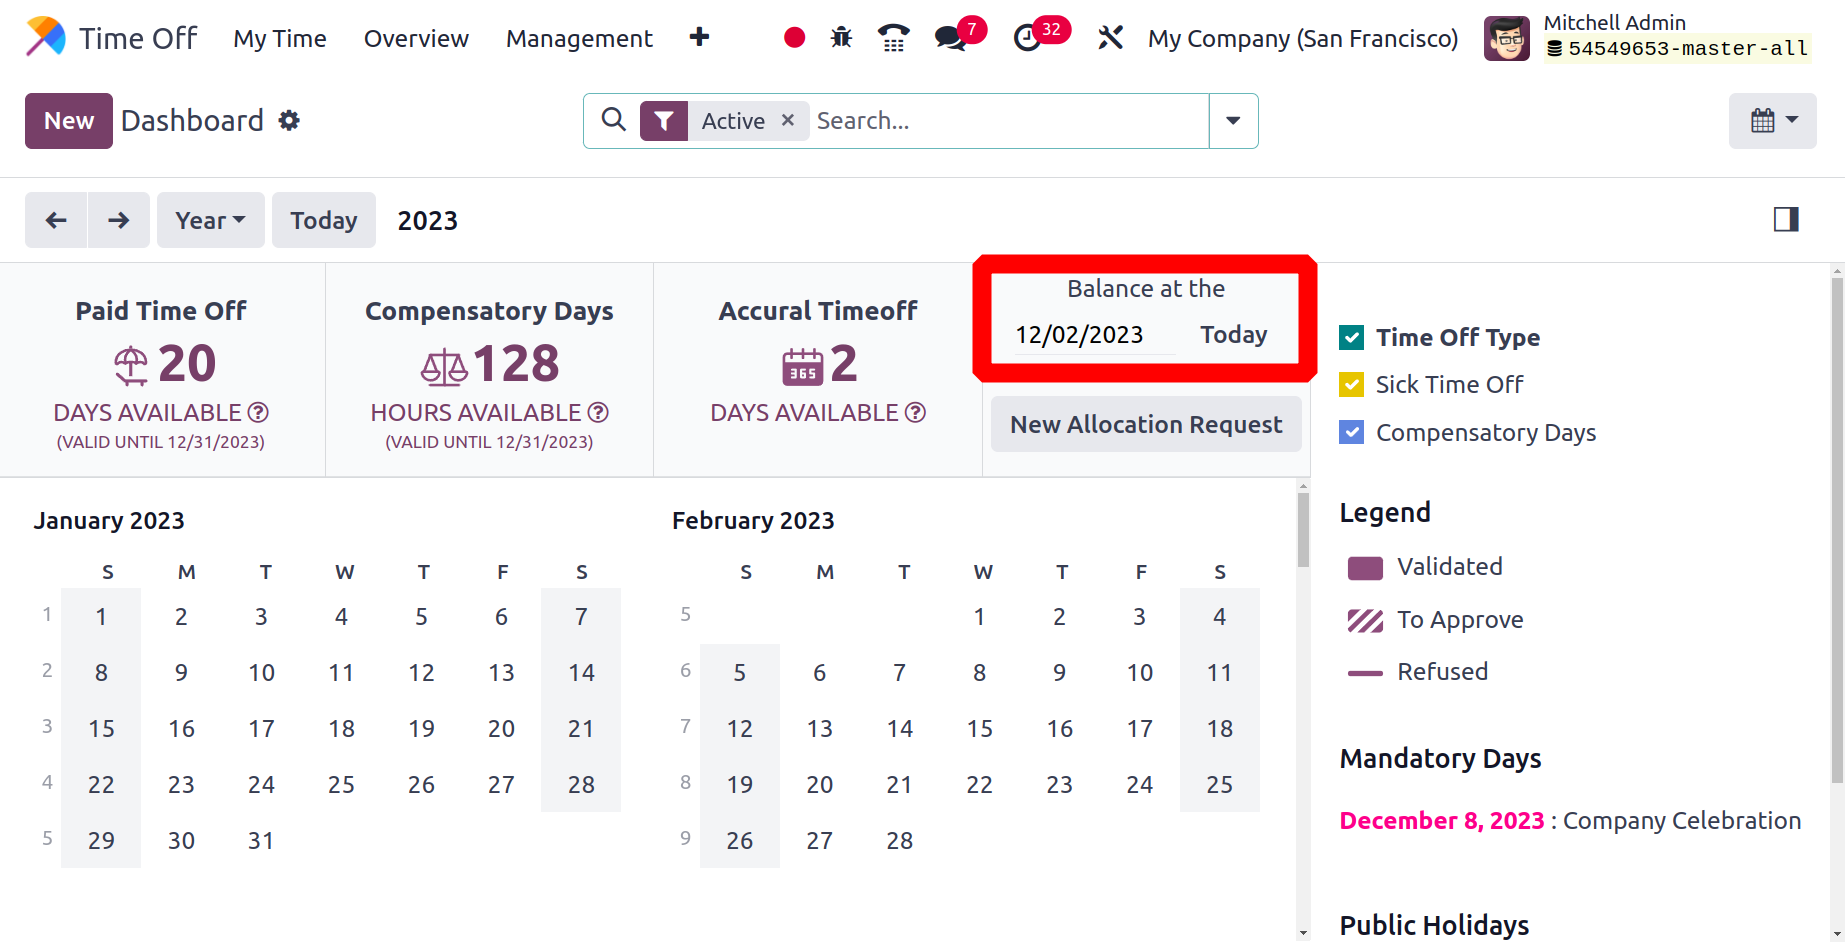
The dashboard displays a negative allocation in this instance, which occurs when an
employee requests more time off than the number of days allotted; the remaining days are
then displayed with a negative figure.
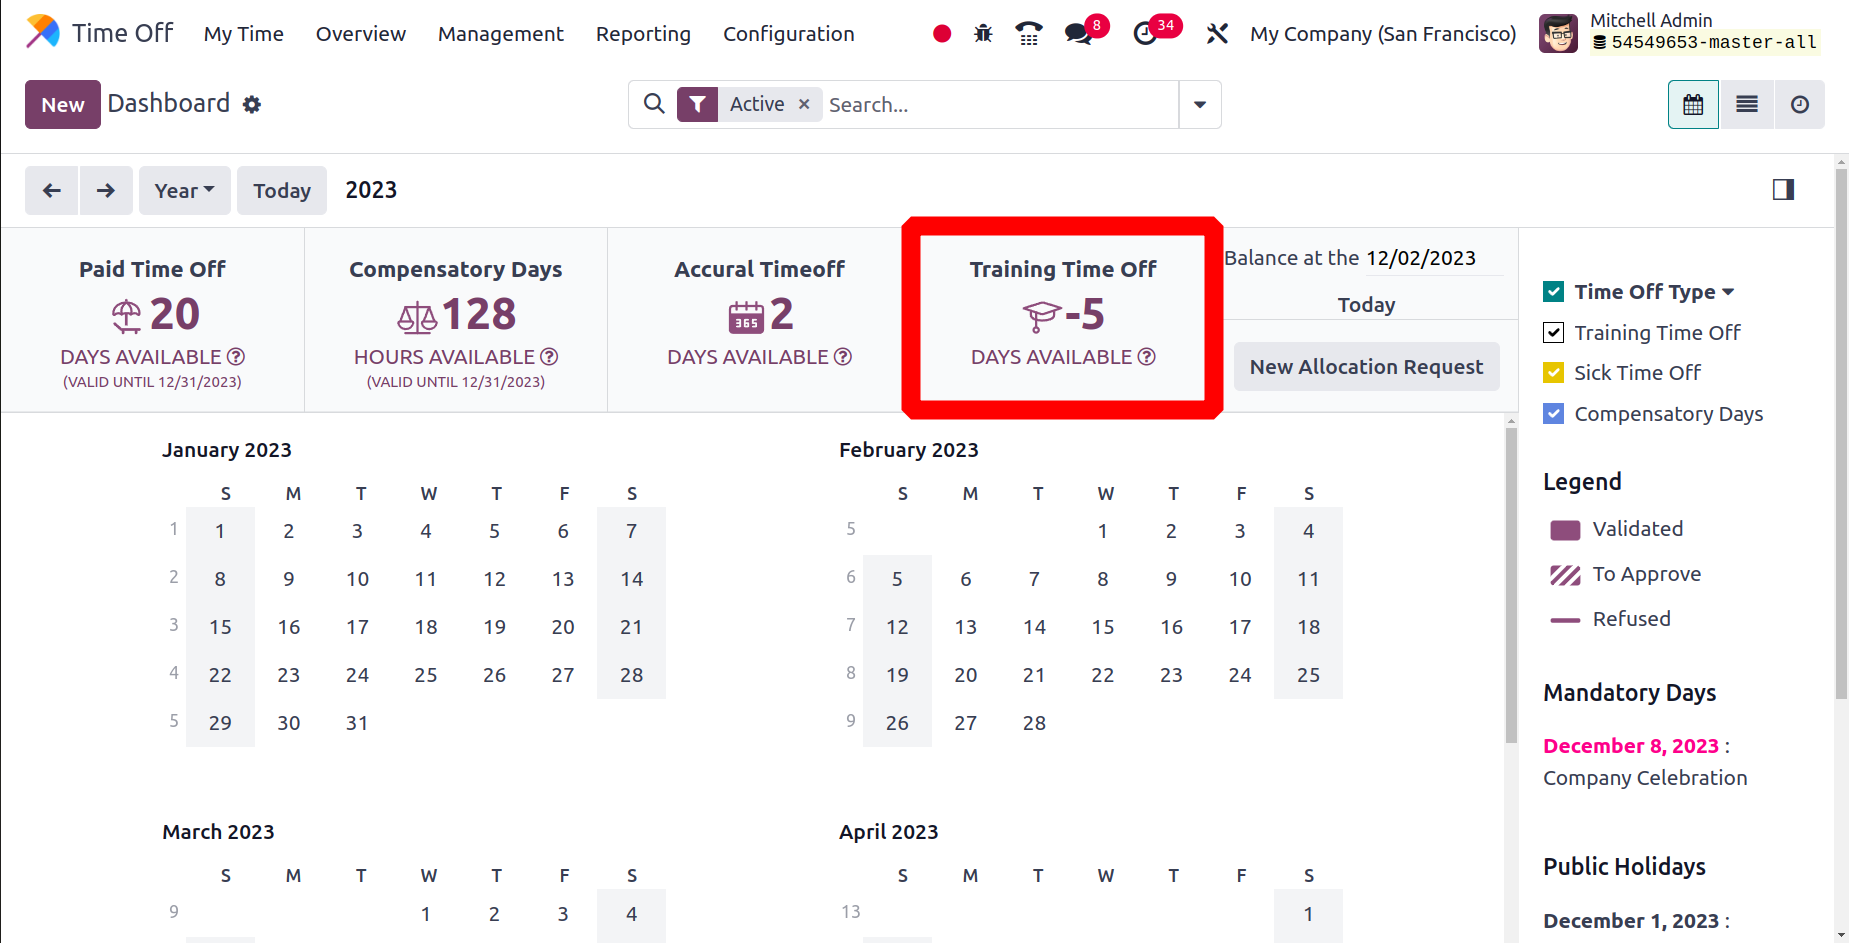
For instance, if an employee requests vacation from December 28, 2023, to January 12,
2024, or 12 days, out of the 7 days allotted for training time off, the dashboard will
display a negative indication for the remaining 5 days. The employee would only receive
a 15-day allocation if the HR Department had granted 20 days of leave under the same
time off type, meaning that the remaining 5 days would be deducted from the next
allocation.
Time Off Types
The Time Off Types option is available in the Configuration menu of the Time Off module,
and it will make it simple for you to establish a variety of time off types. Below is a
display of this platform's list view. The Display Name and Approval are seen here.
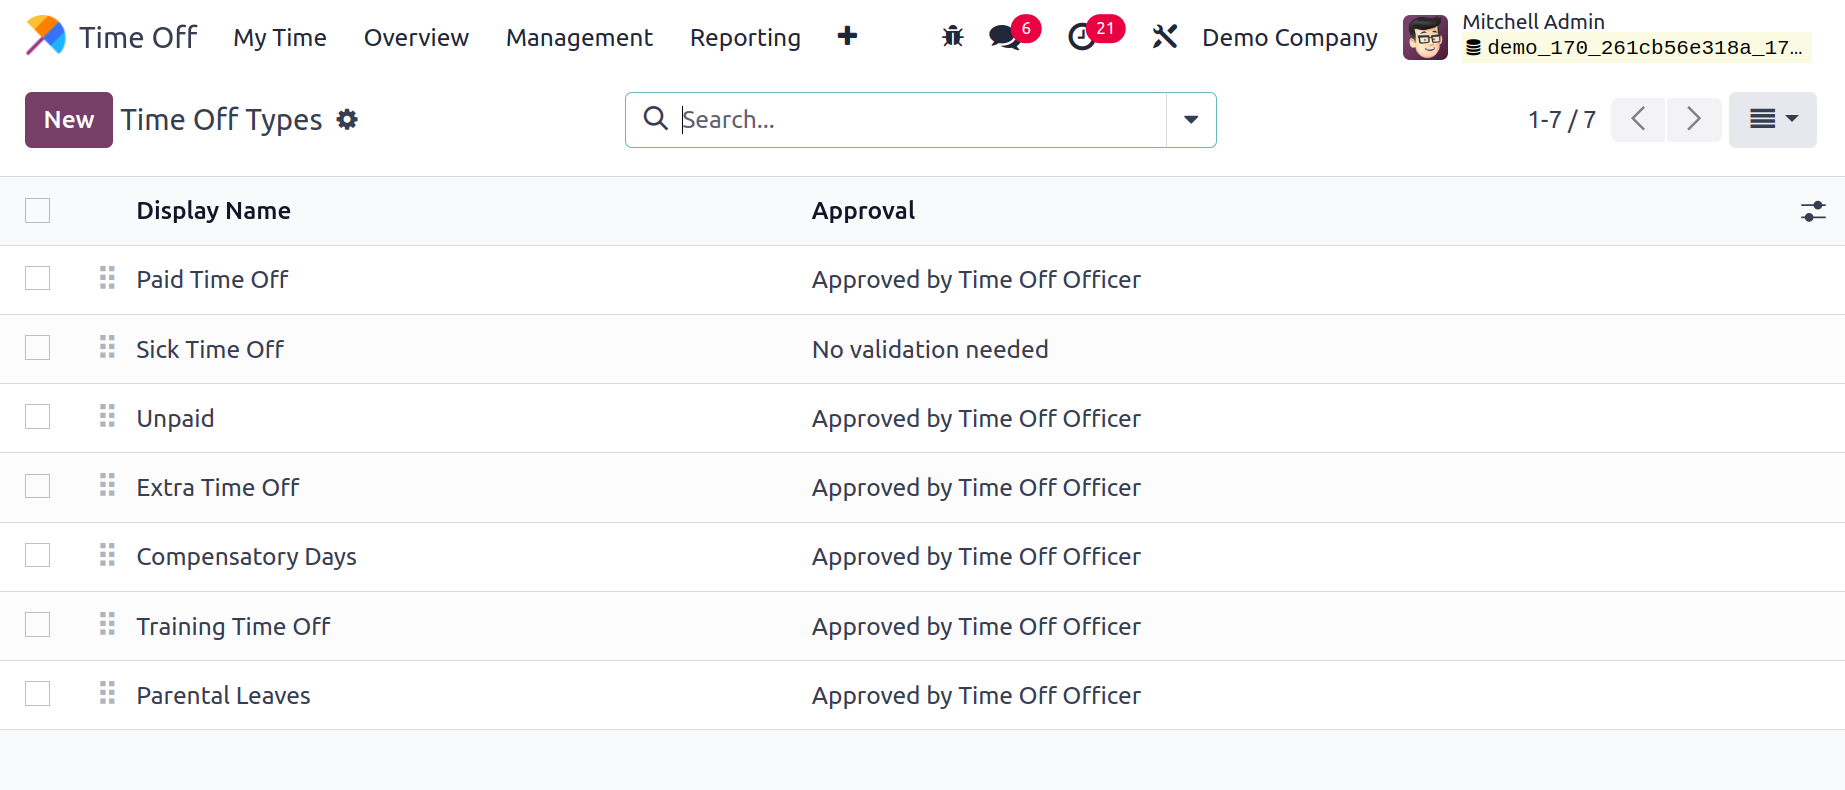
You can construct appropriate types for time off from this window based on your needs. To
start a new one, click the New button.
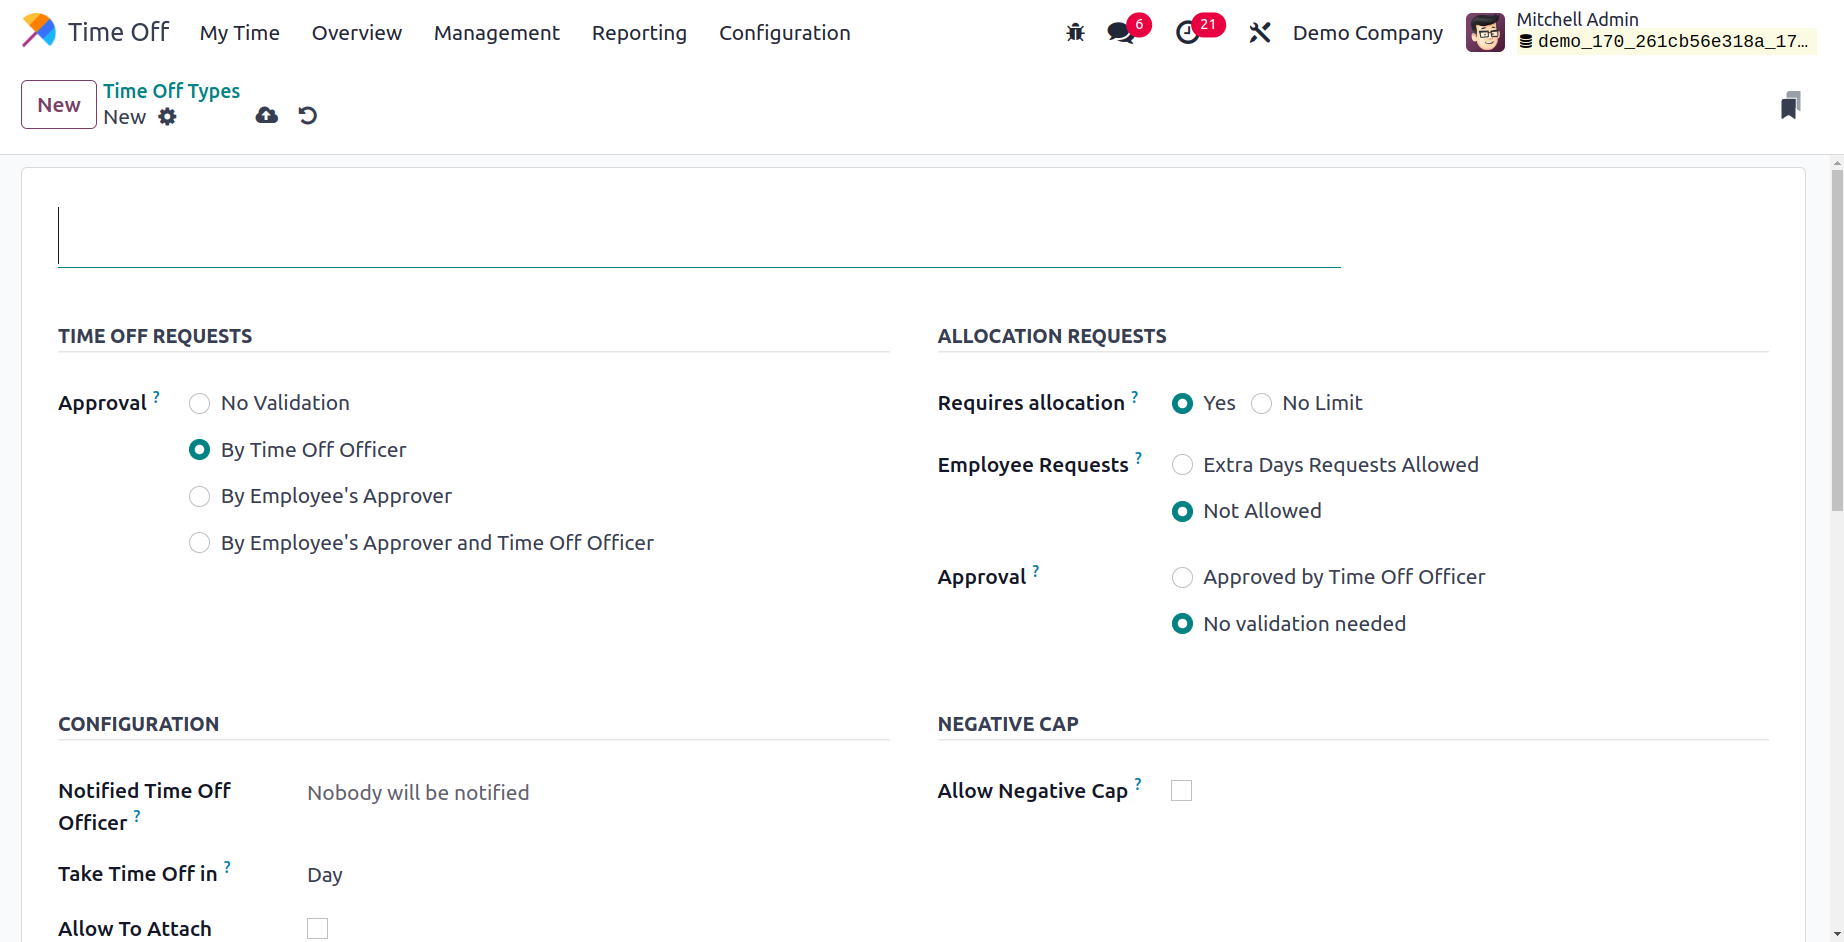
A form view similar to the one above will appear when you click the New button. Give this
time off type a name in the space provided. The TIME OFF REQUESTS tab allows you to
configure the criteria for approval. You can choose the No Validation option to get rid
of time off approvals. If not, you can select By Time Off Officer or By Employee's
Approver as the Approval Method. The request requires two approvals to be confirmed, as
shown by the choice of By Employee's Approver and Time Off Officer.
The time off officer who will be alerted to authorize time off or allocation is chosen
inside the Notified Time Off Officer. No one will be informed if it is vacant. You can
specify the length of the time off as a day, half day or hours in the Take Time Off
area.

When verifying this kind of time off request, include the Project and Timesheet to create
timesheets. Set Color and Cover Image for display. After inputting the required data,
the new Time Off type is ready.
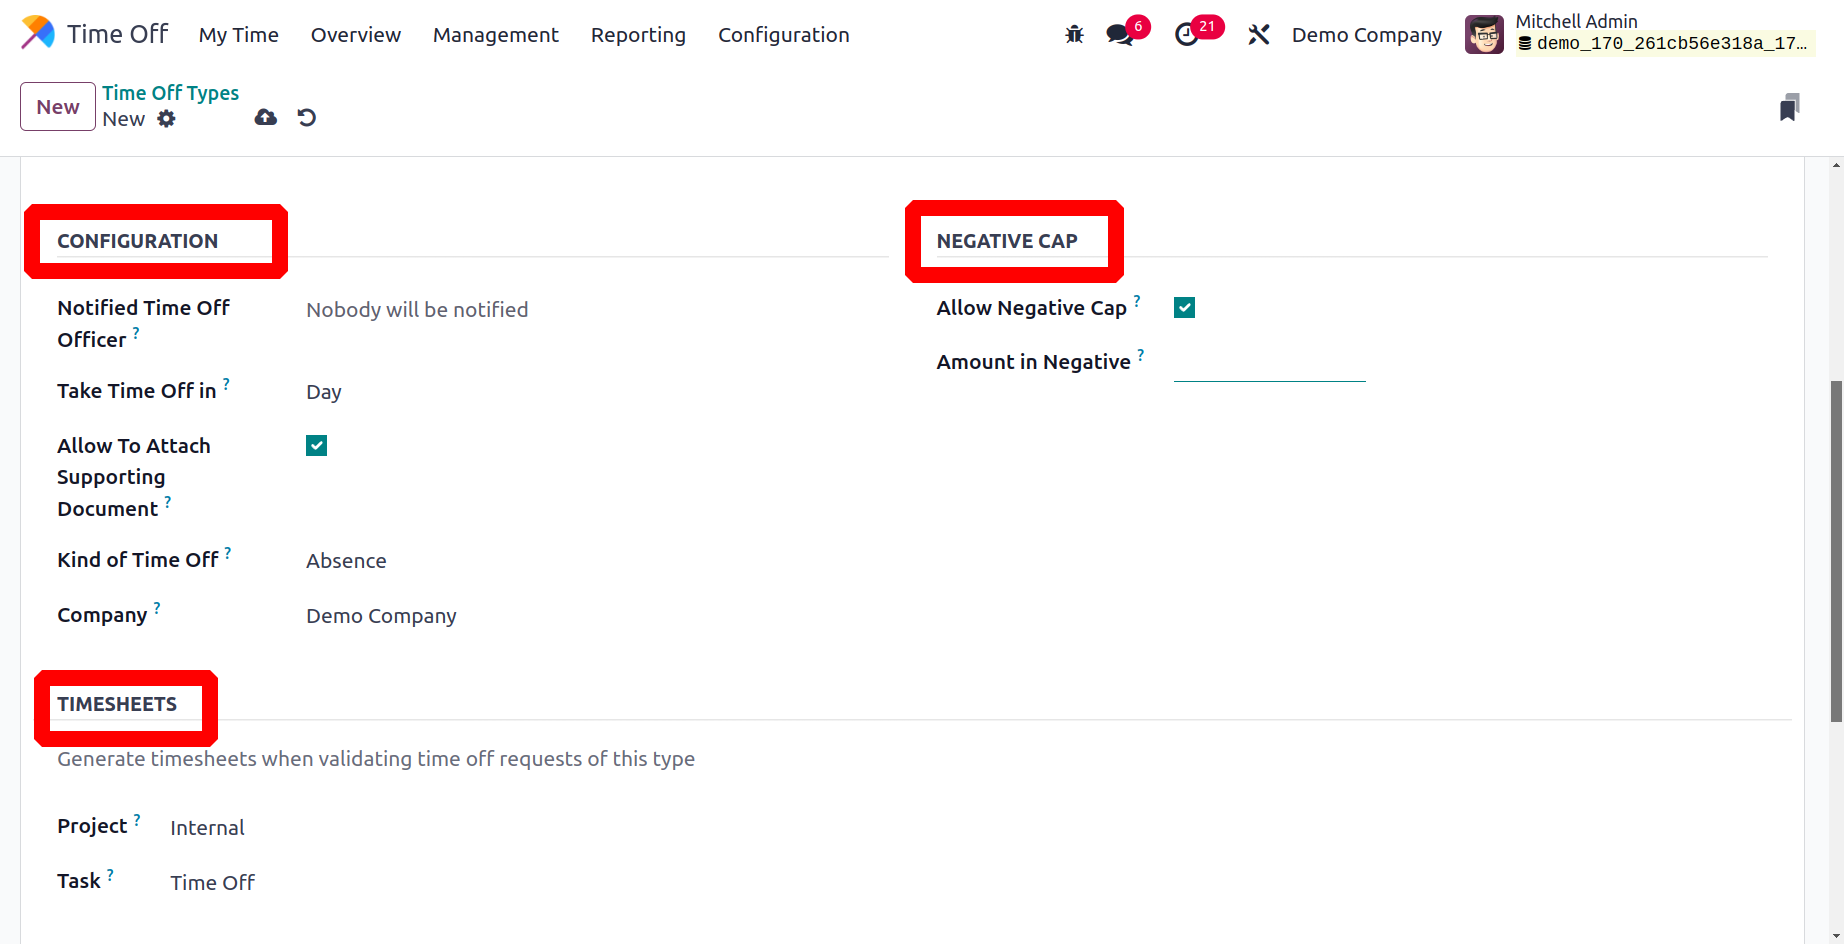
By turning on the corresponding field, you can permit the attachment of supporting
materials. The type of time off in the provided field might be either absence or worked
time. The accrual plan rate will be calculated using the distinction between working
hours and absence. The appropriate field will automatically contain the Company's name.
The field Requires Allocation is located in the Allocation Requests tab. By choosing Yes,
it is indicated that proper allocations must accompany any requests for time off. If
time off requests may be granted with no prior allotment, it may be specified as No
Limit. Employee Requests will appear as a new field if you choose the Yes option. By
selecting the Extra Days Requests Allowed option, the user can here ask for a personal
allotment. The user cannot request an allocation by choosing the Not Allowed option.
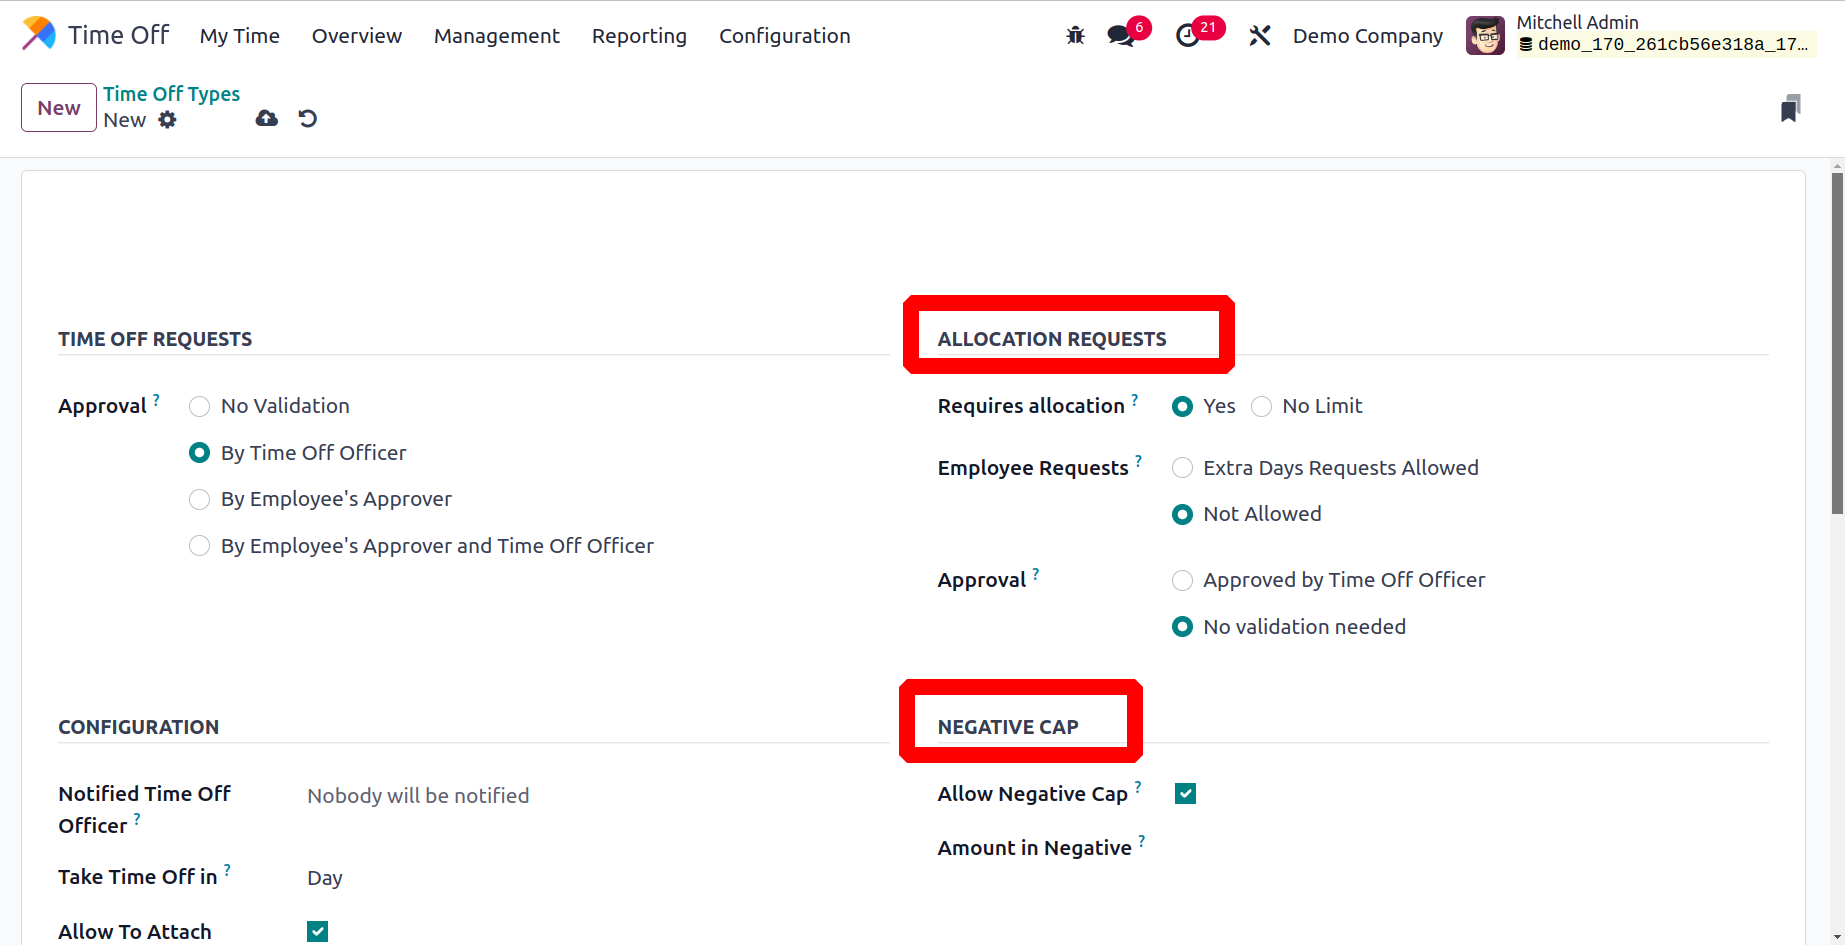
When Allow Negative Cap is enabled, user requests may surpass the allotted days,
resulting in a negative balance. Next, provide the maximum number of negative days that
this type of leave can be taken in the Amount in Negative , it must have a value of at
least one.
Accrual Plans
It is important to set adequate accrual plans in the Time Off module for accrual-type
allocations. These programs will benefit employees by accumulating paid time off. The
employee will receive additional time off allocations through accrual programs based on
specific guidelines. You can configure these rules to automate the accrual allocation of
time off from the Configuration menu of the Time Off module.
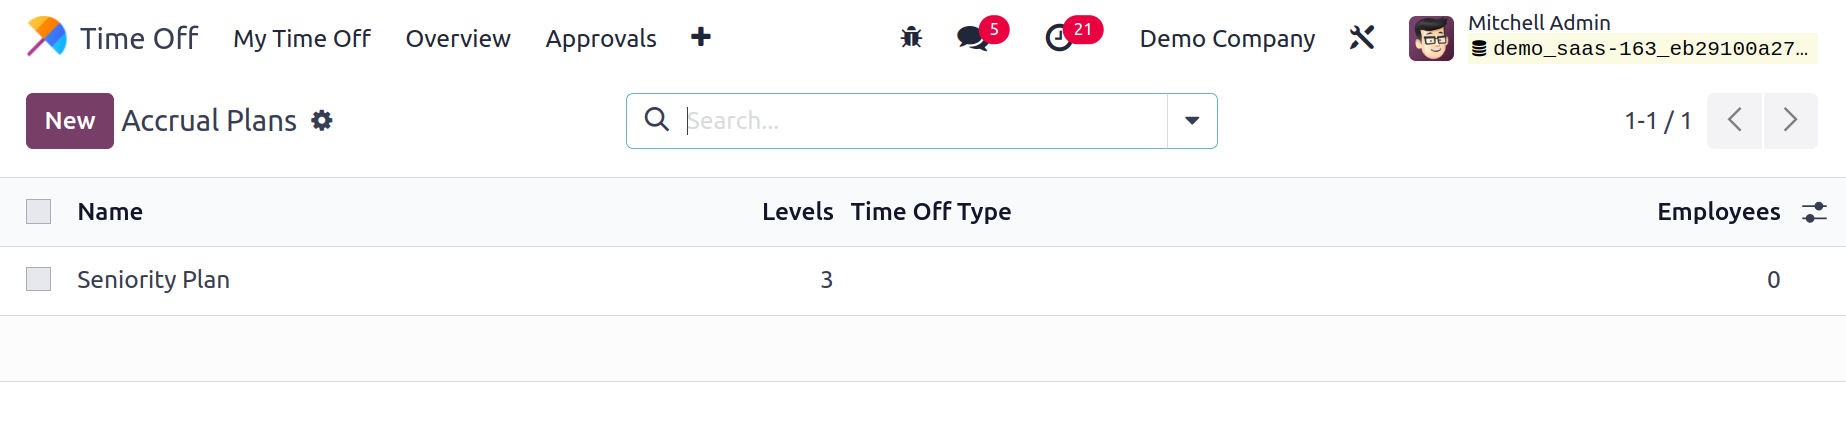
The list view of the Accrual Plans window is depicted in the screenshot above. The Name,
Levels, Time Off Type, and Employees will all be shown in list format. The New button
makes it simple to make new accrual plans. Below is a screenshot of the form view that
shows after selecting the New button.
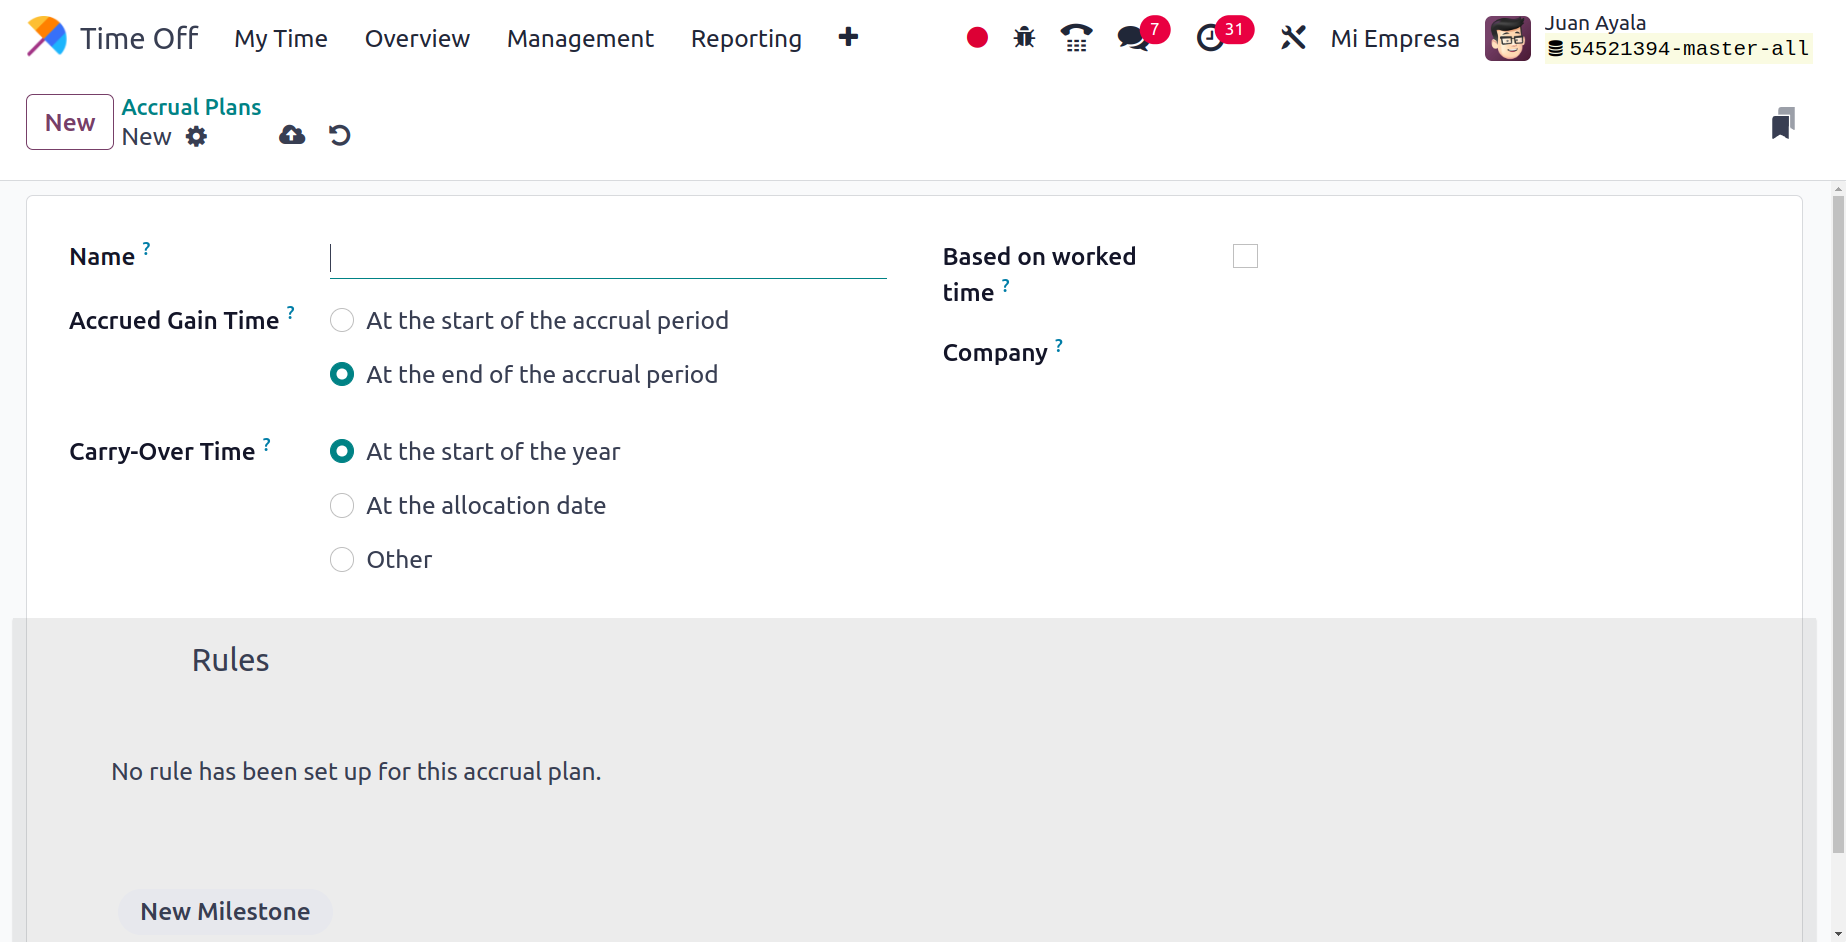
The Name option allows you to give the accrual plan a name. Next, bring up the Carry Over
Time and Accrued Gain Time. When the option "Based on Worked time" is selected, working
days—rather than calendar days—will be used to compute the accrual period.
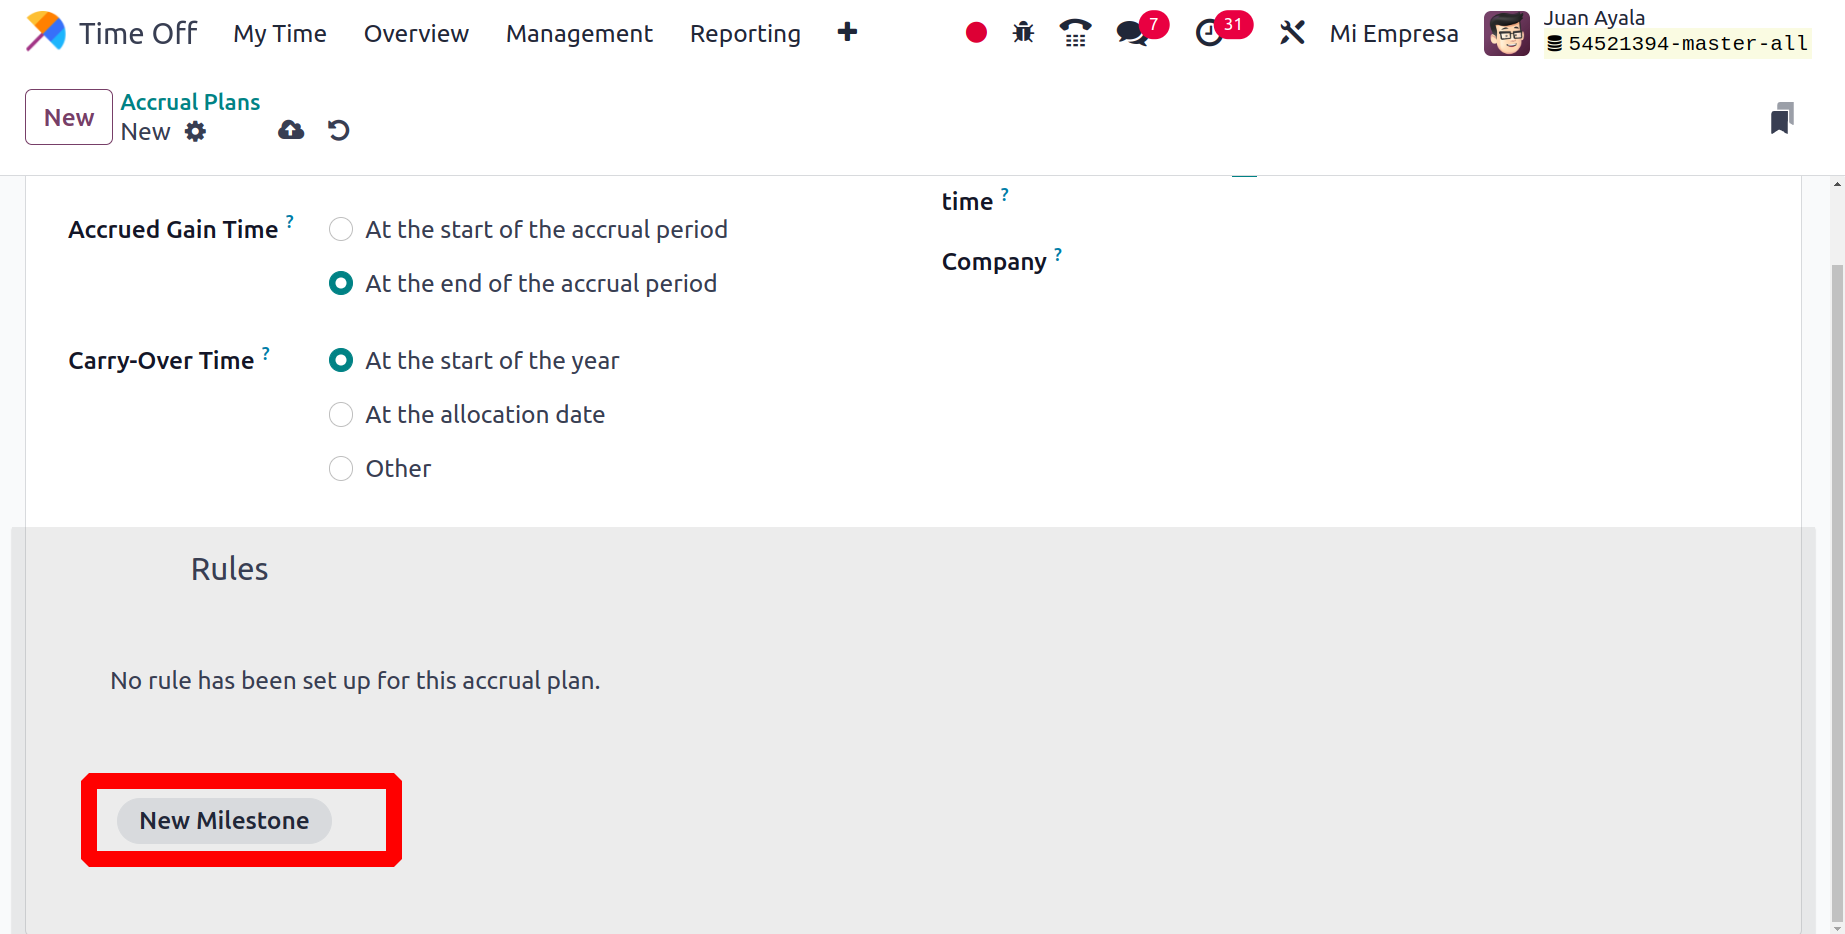
You can now modify the accrual plan's rules. You can do this by selecting the New
Milestone button. When you click on this button, Odoo17 will immediately present the new
pop-up as depicted below.
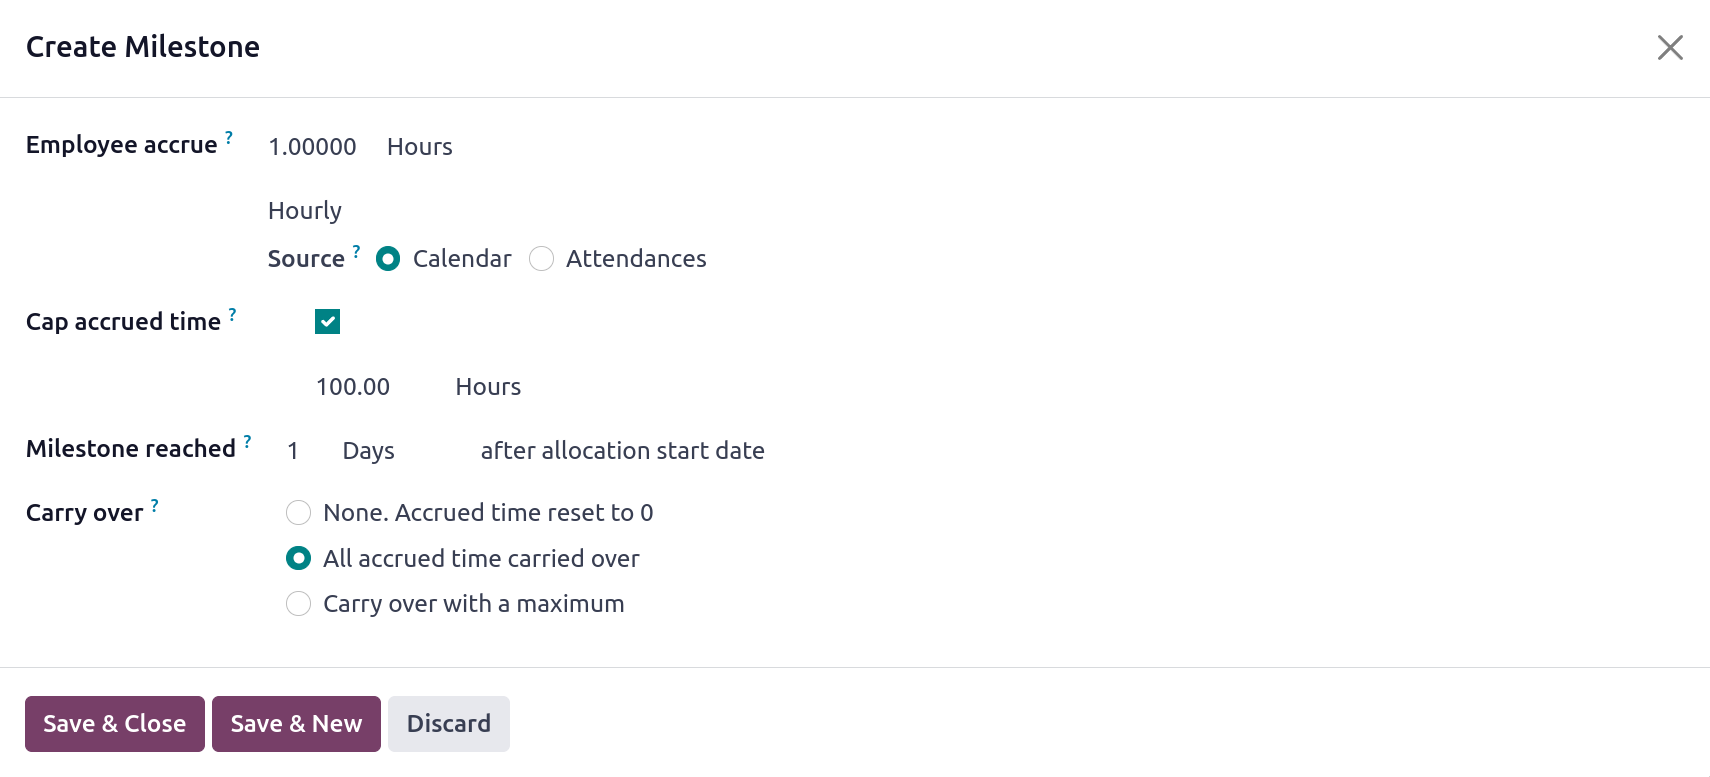
In the Employee accrue field, note how many hours or days will be added to the designated
Time Off for each period. They introduced a new field called Source if the Employee
accrue is set to hourly. The employee calendar and vacation time will be used to
calculate the number of work hours if the source is set to Calendar. If not, attendance
records will be used to determine the number of hours worked. After a predetermined
amount of time from the allocation start date, the accrual begins. In the Milestone
reached area, you can choose how many days, months, or years accrual is applied after.
Select the Carry Over after that. After adding more information, select Save & Close.
Public Holidays
You may access the Public Holidays platform, where you can customize the specifics of the
public holidays that are offered each year, from the Configuration menu of the Time Off
module. Below is a display of this platform's list view.
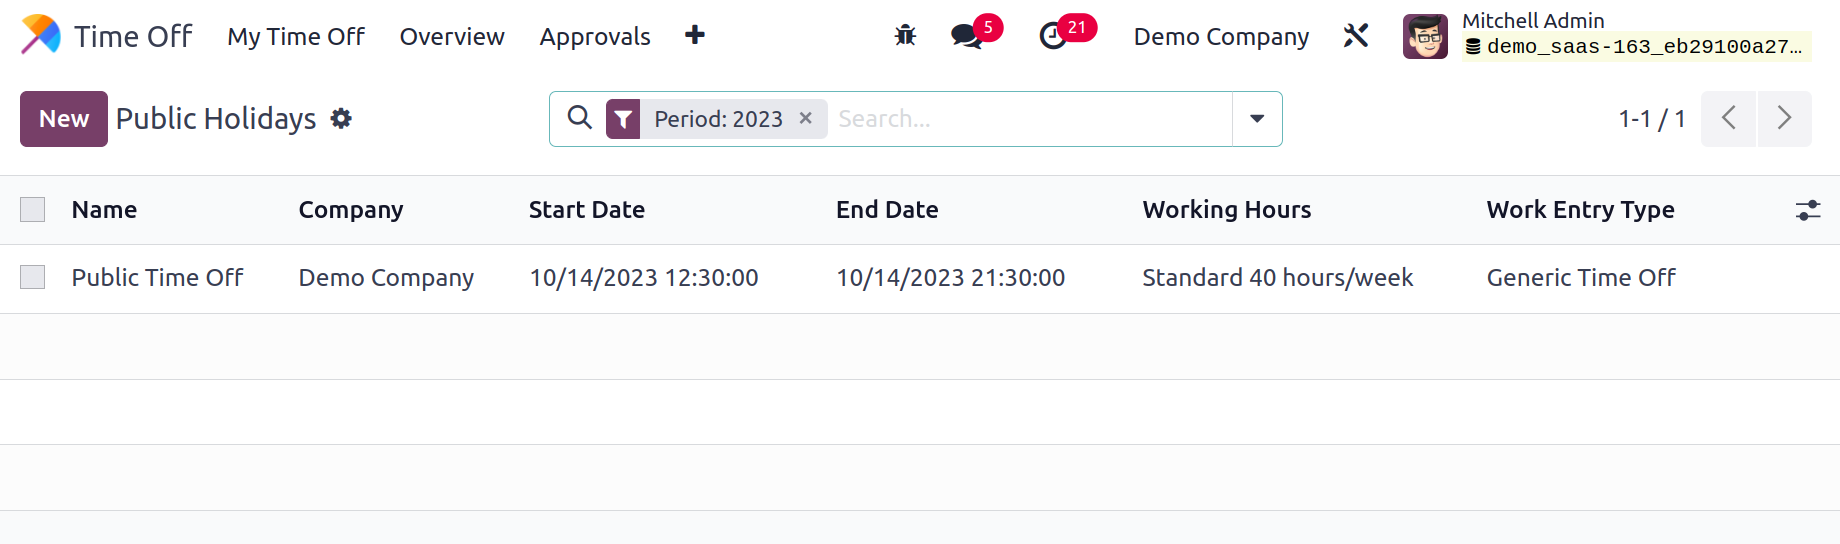
You can use the New button to add a public holiday to this module. Odoo17 will show a new
line on the screen after you hit this button so you may enter the Name, Company, Start
Date, End Date, Working Hours, and Work Entry Type. To add the holiday to your database,
click the Save button.
Mandatory Days
Odoo 17 added a brand-new function called Mandatory Days. The employee can utilize this
option to make a list of necessary days so they can make sure they are present on those
days. You might designate certain days as important days. The staff will be made aware
of their presence during that particular time period. The Configuration menu of the
module contains an option called Mandatory Days.
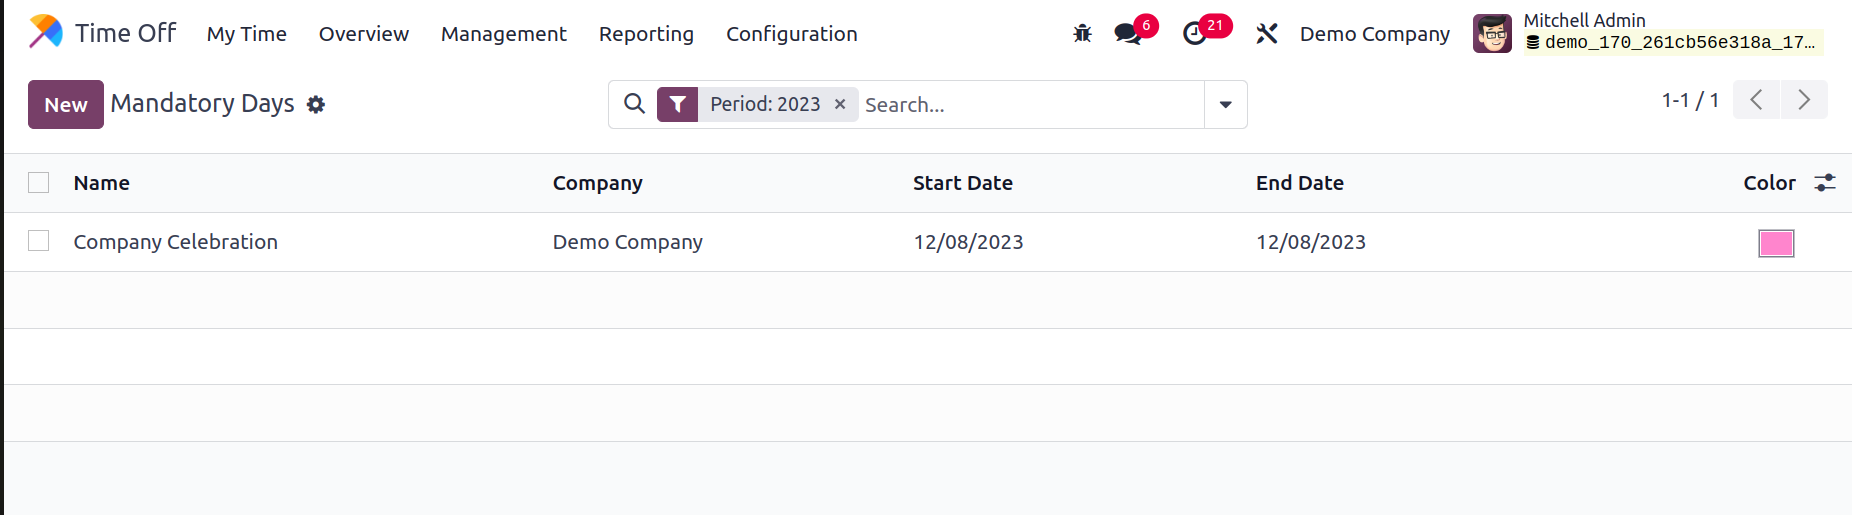
The Mandatory Days are displayed in the list form above. The Name, Company, Start Date,
End Date and Colour are all displayed in this pane. Your ability to add a new Mandatory
day will be aided by the New button. You will be given a new line where you may fill in
the relevant fields with the essential information. To save the new mandatory day, click
the Save button.
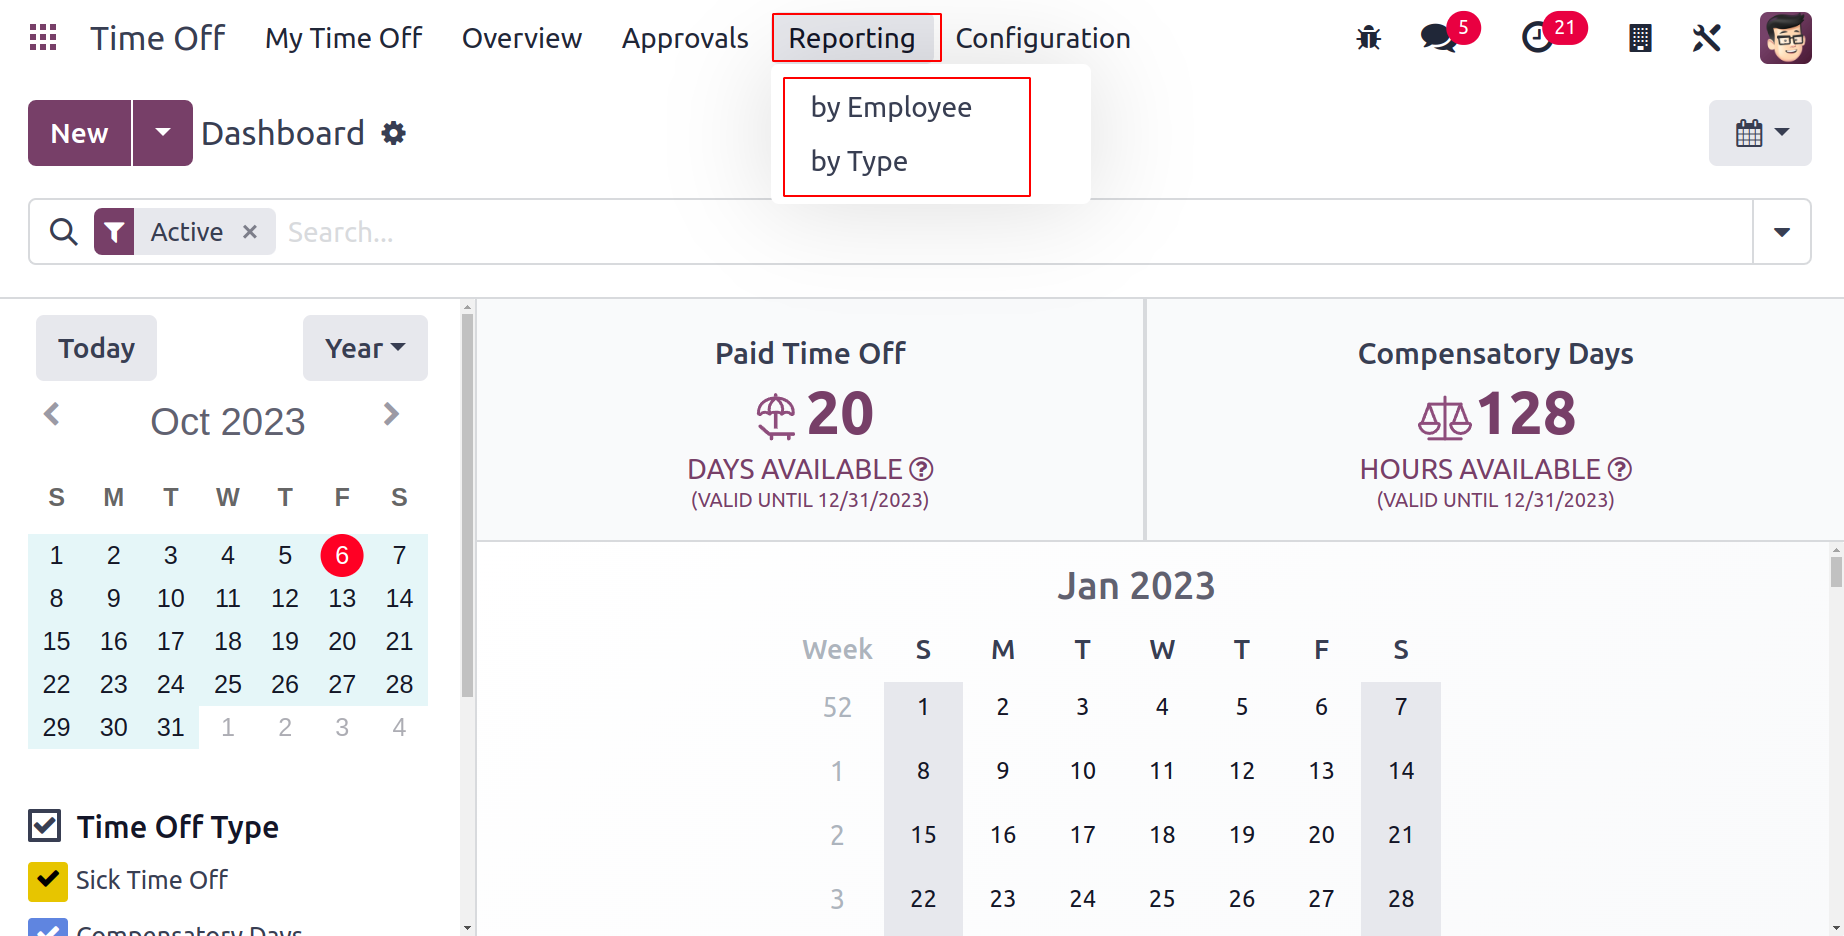
Reporting
You can access the Time Off module's Reporting menu to carry out the Time Off analysis.
On this platform, Odoo17 provides effective reports that can be used to comprehend the
time off that your employees have taken as well as other variables relating to time off
requests and allocations. You will receive time off reports broken down by type and
employee. Here, we'll go over each of these reports in more detail.
Time Off Analysis by Employee
The report of the time off based on employees will be displayed in the Time Off Analysis
by Employee. On this platform, the user will have access to Pivot, Graph, and Calendar
views. Below is a graphic showing the time off dependent on the employees.
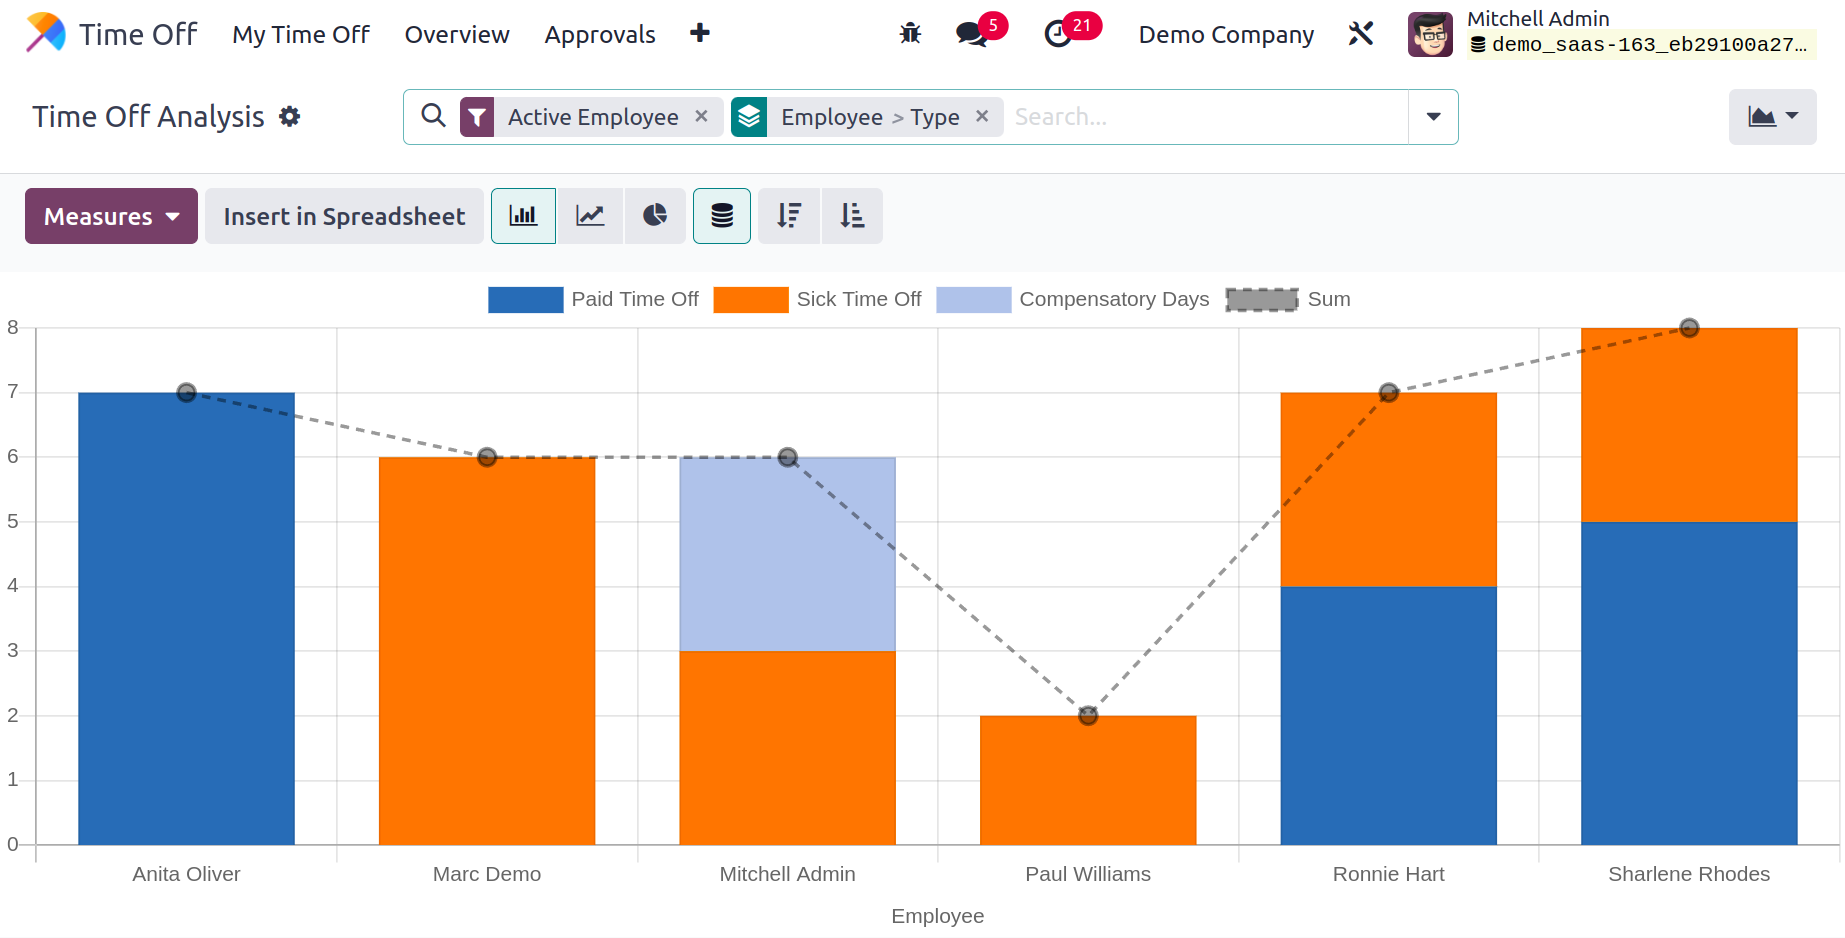
You can choose between a bar, pie, or line graph in the Graph view itself. Ascending and
descending order can be used to change the line and bar graphs. To Approve, Need Second
Approval, Approved Time Off, My Time Off, My Team, My Department, Active Employee,
Current Year, Start Date, Active Time Off, Archived Time Off, and Cancelled Time Off are
the available filers for the reports. The reports can be categorized according to
Employee, Type, Status, Company, and Start Date.
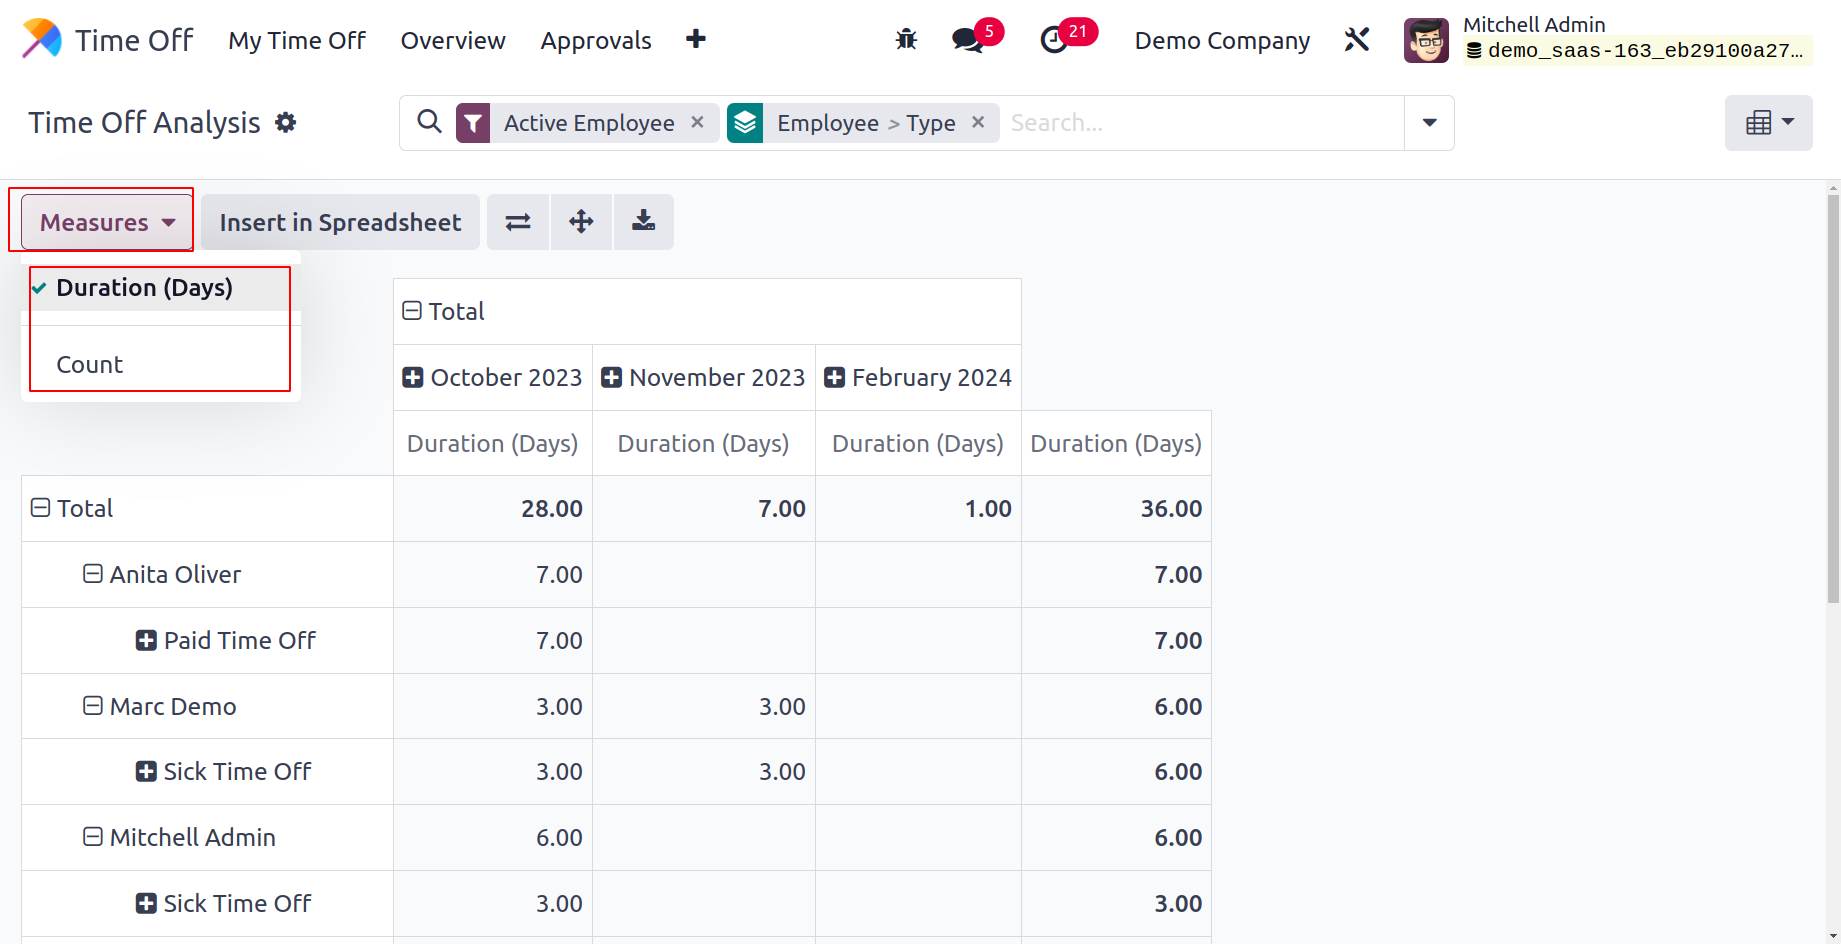
For the reports, you can utilize the Measures Duration and Count.
Time Off Analysis by Type
You may view the time off depending on types in a list on the Time Off Analysis by Type
platform.
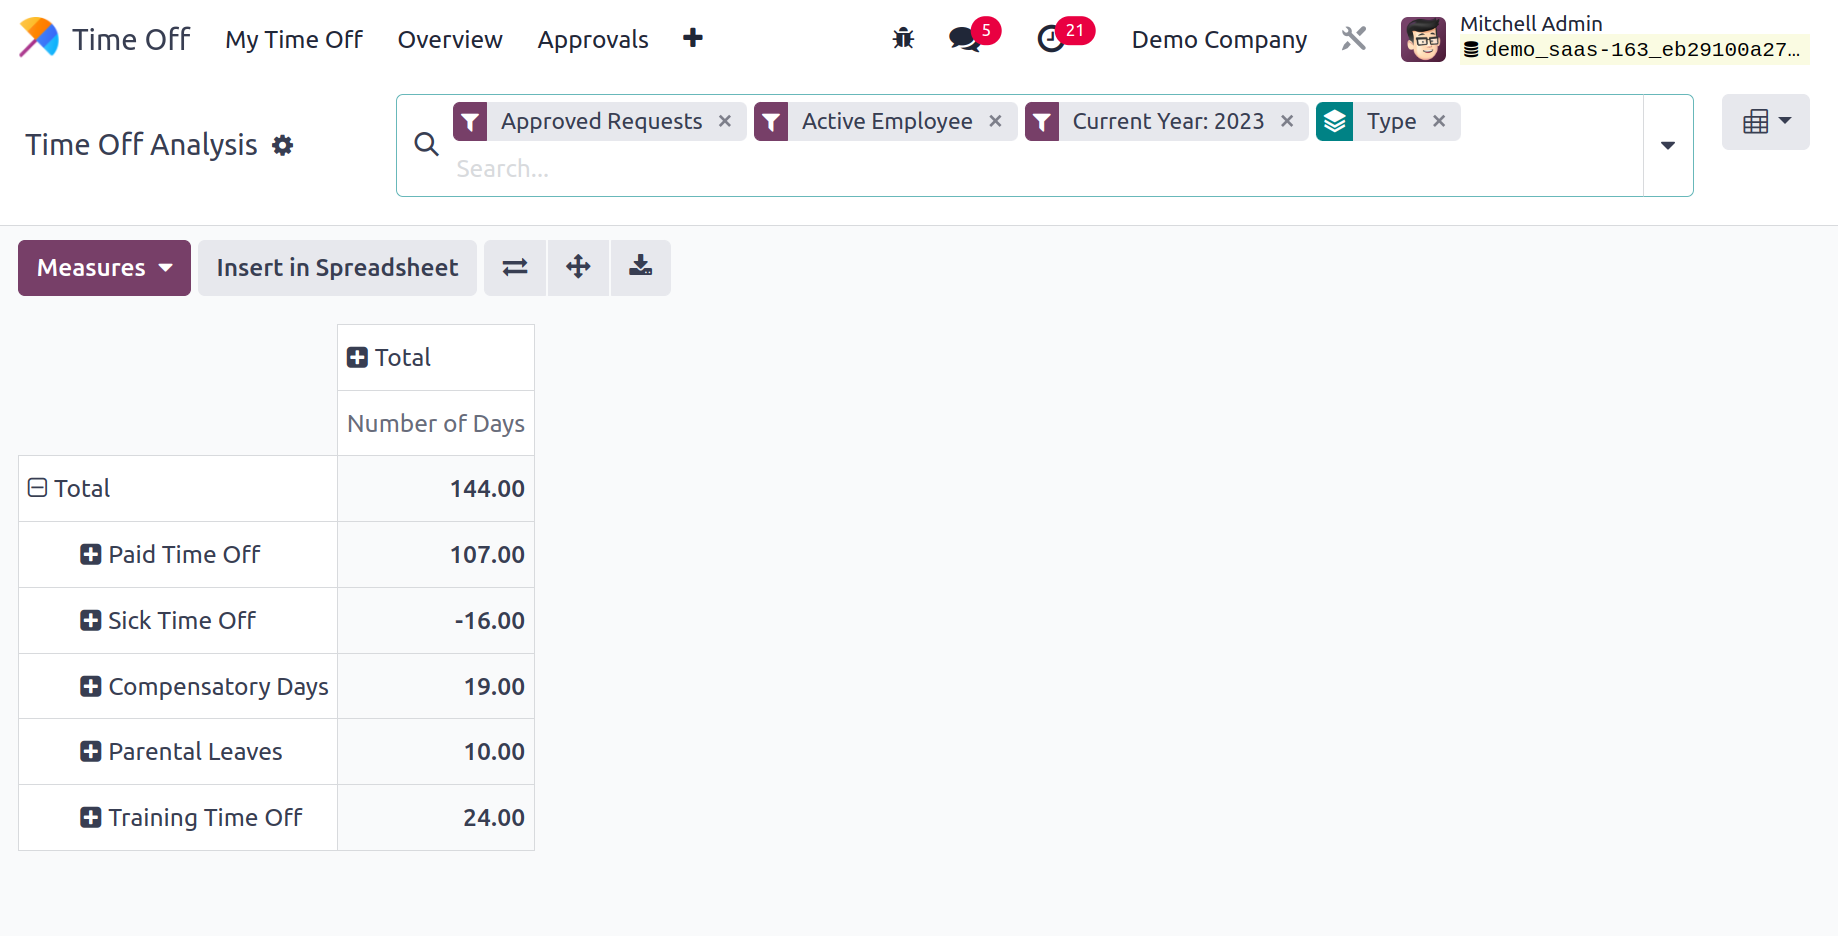
This platform can be viewed in List view and Pivot view by the user. Above is a display
of the list view. Details about the Employee, Days, Request Type, Start and End Dates,
Status, and Description are shown.
With the help of the Time Off module, Odoo17 will efficiently arrange and handle all
aspects of leave administration in your company.