Attendance Management
With an effective attendance management system in Odoo 17, users may monitor staff attendance marking, and assess reports. Today, managing attendance is a crucial requirement for any organization. With a system for tracking employee attendance, Odoo helps the police and HR departments. Using an attendance management system, you may learn when employees check in and out at a company. The Odoo 17 Attendance module makes it easy to pay employees in accordance with their work time attendance.
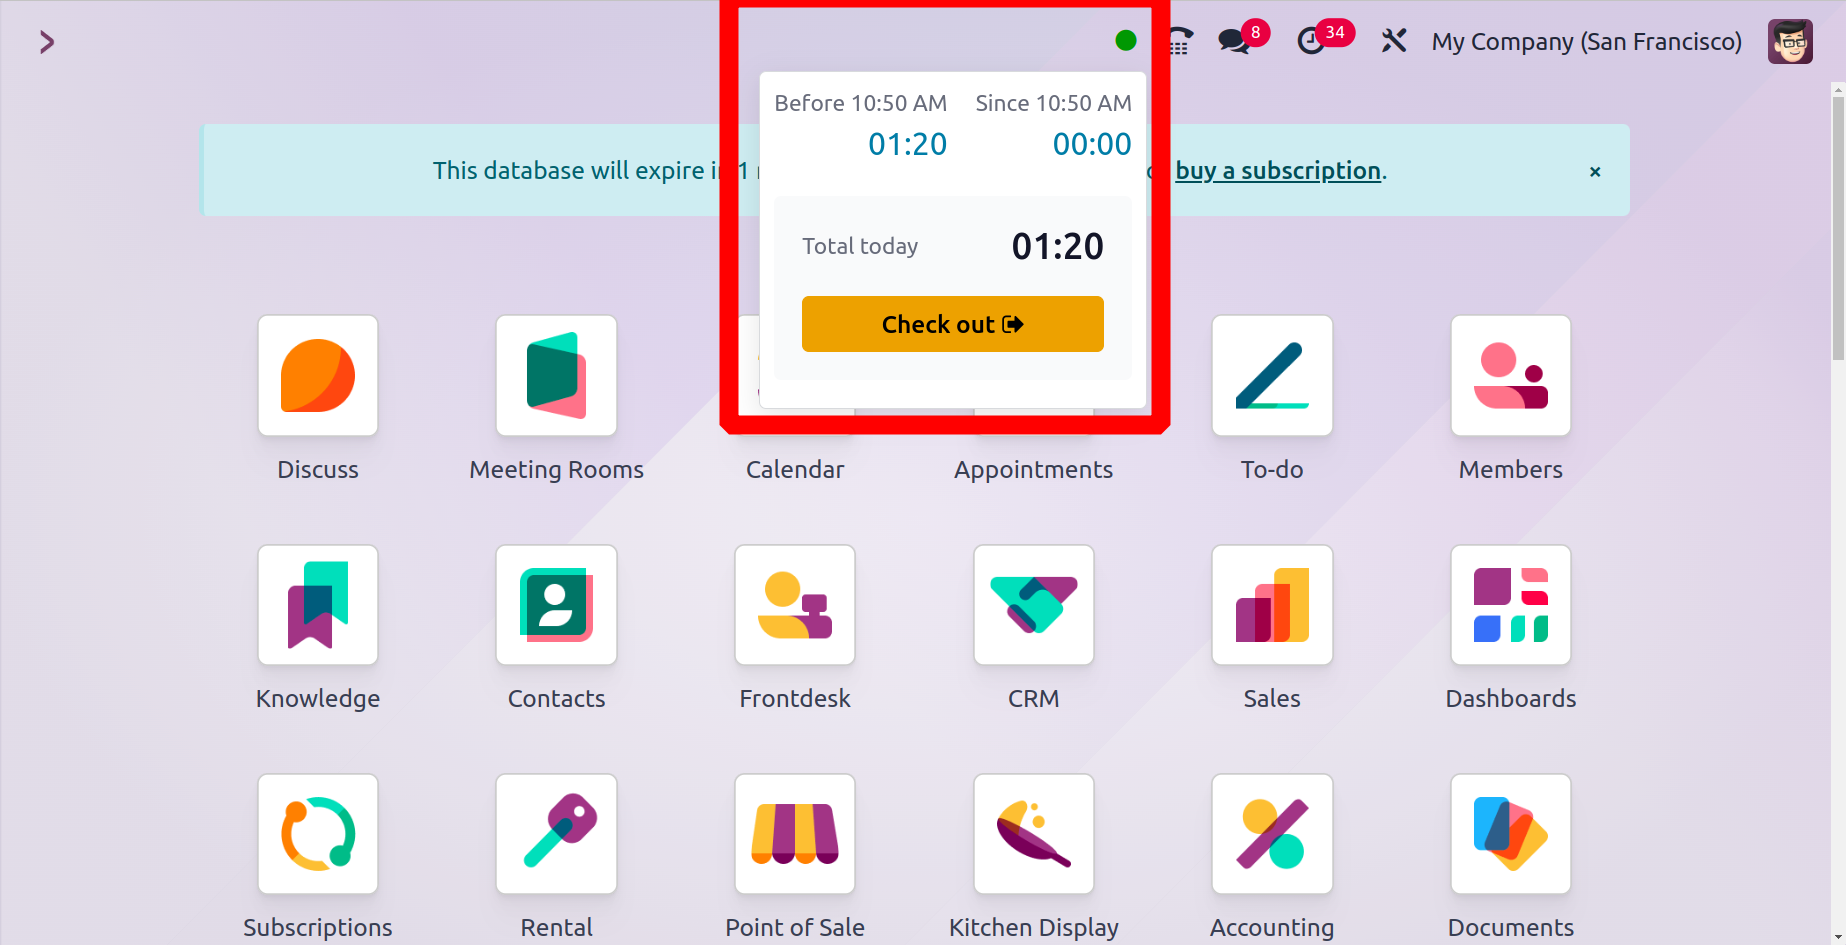
The Odoo 17 employee check-in feature may now be used from outside the app, as demonstrated in the screenshot below. The check-in time is clearly displayed. An employee can then finish their checkout by using the Check Out button. With Odoo 17, the Systray Check-In and Check-Out feature was added.
Overview
The Odoo 17 Attendance module can be used to know more about employee attendance.
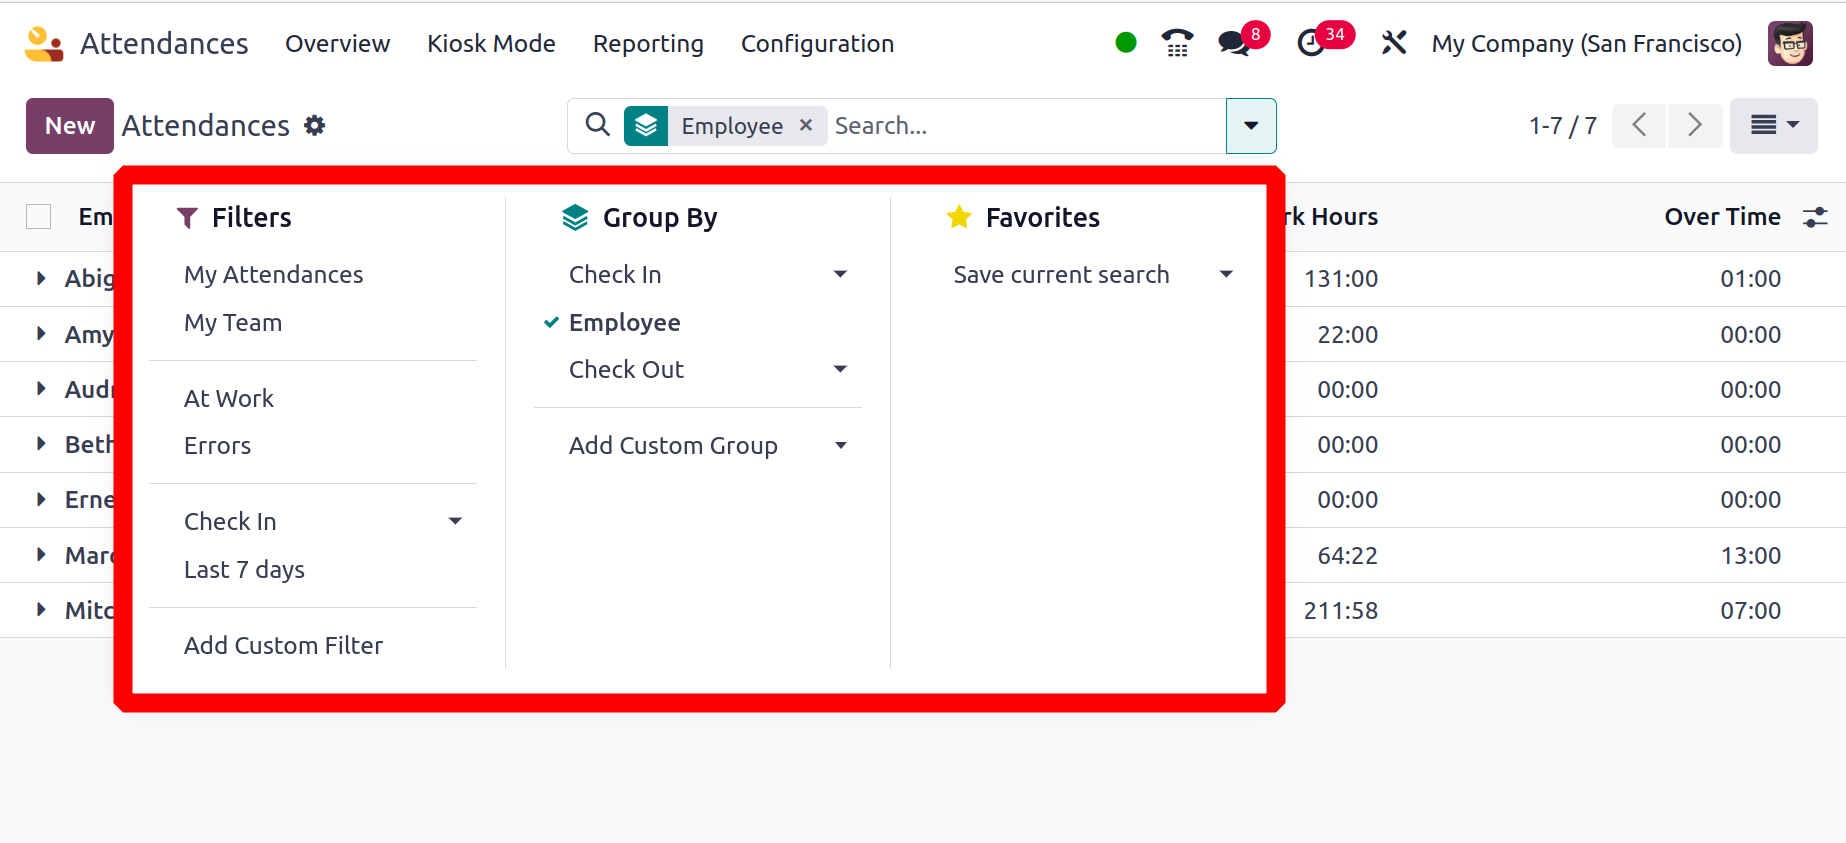
The view of the dashboard is displayed as follows. You can configure the view according to Day, Month, or Year. To access the previous and next Day, Month, or Year, use the two arrows that are positioned. On the dashboard, the Filter, Group, and Favorite options are located beneath the search bar.
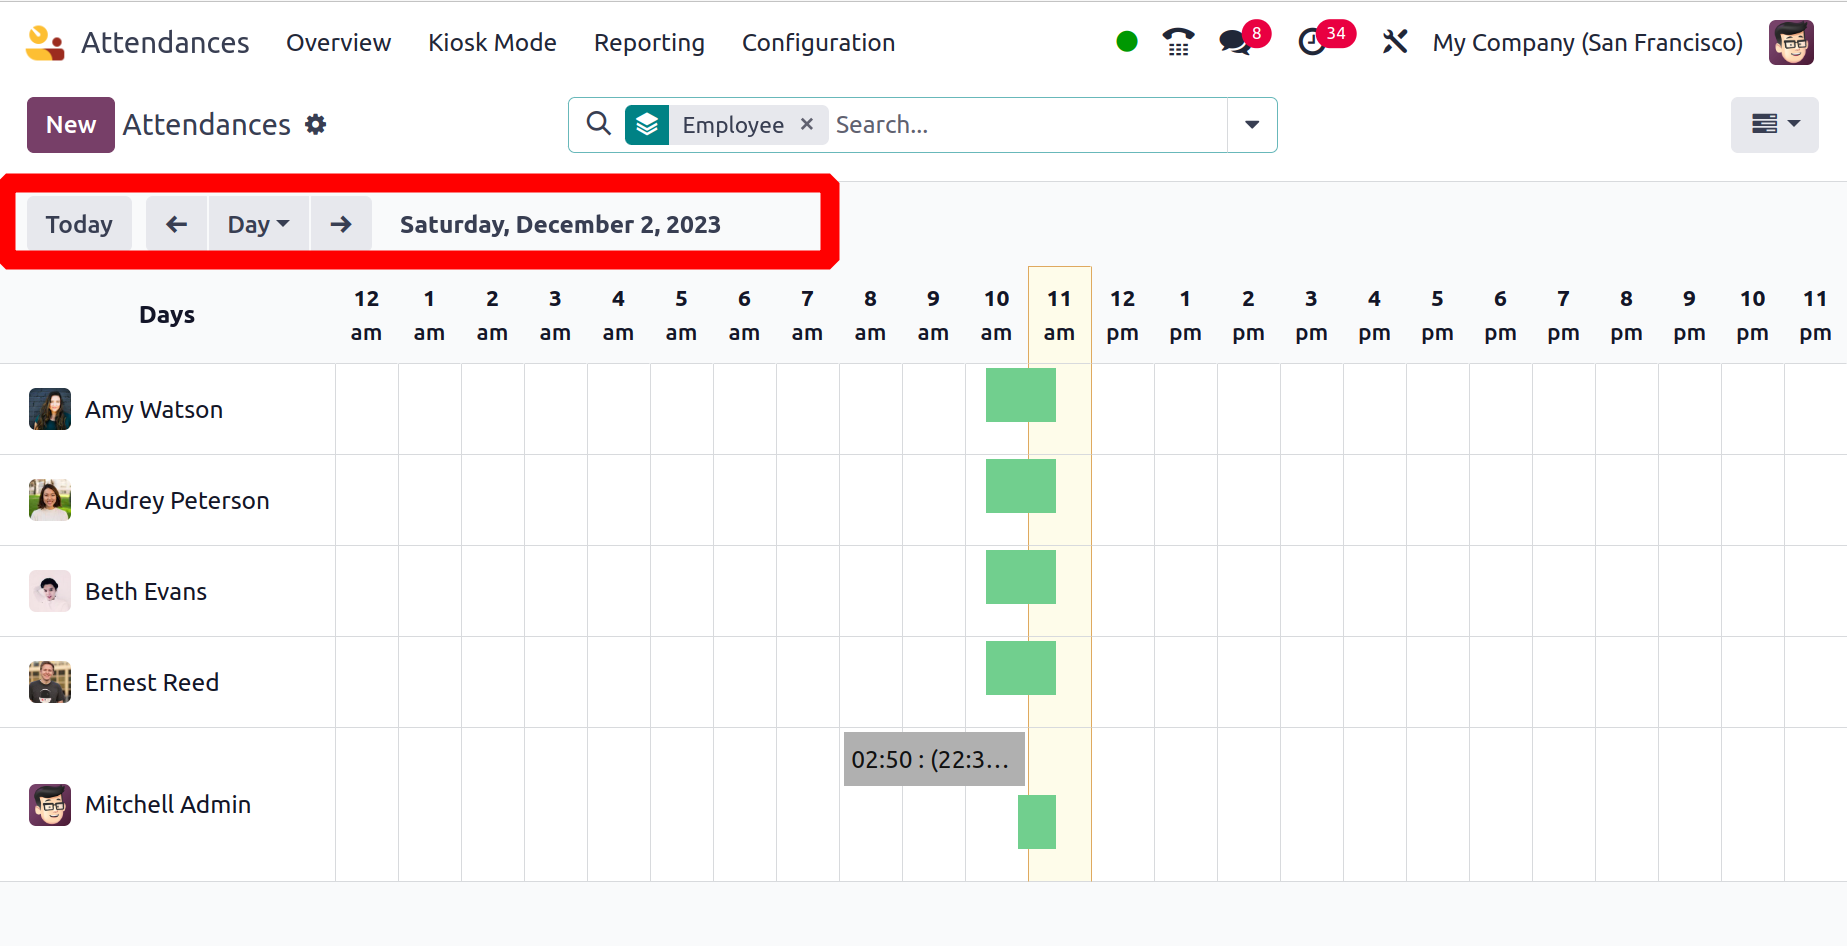
Access to information regarding employee attendance, including logged-in time, working hours, total working hours, break time, and overtime, is readily available from the dashboard itself.
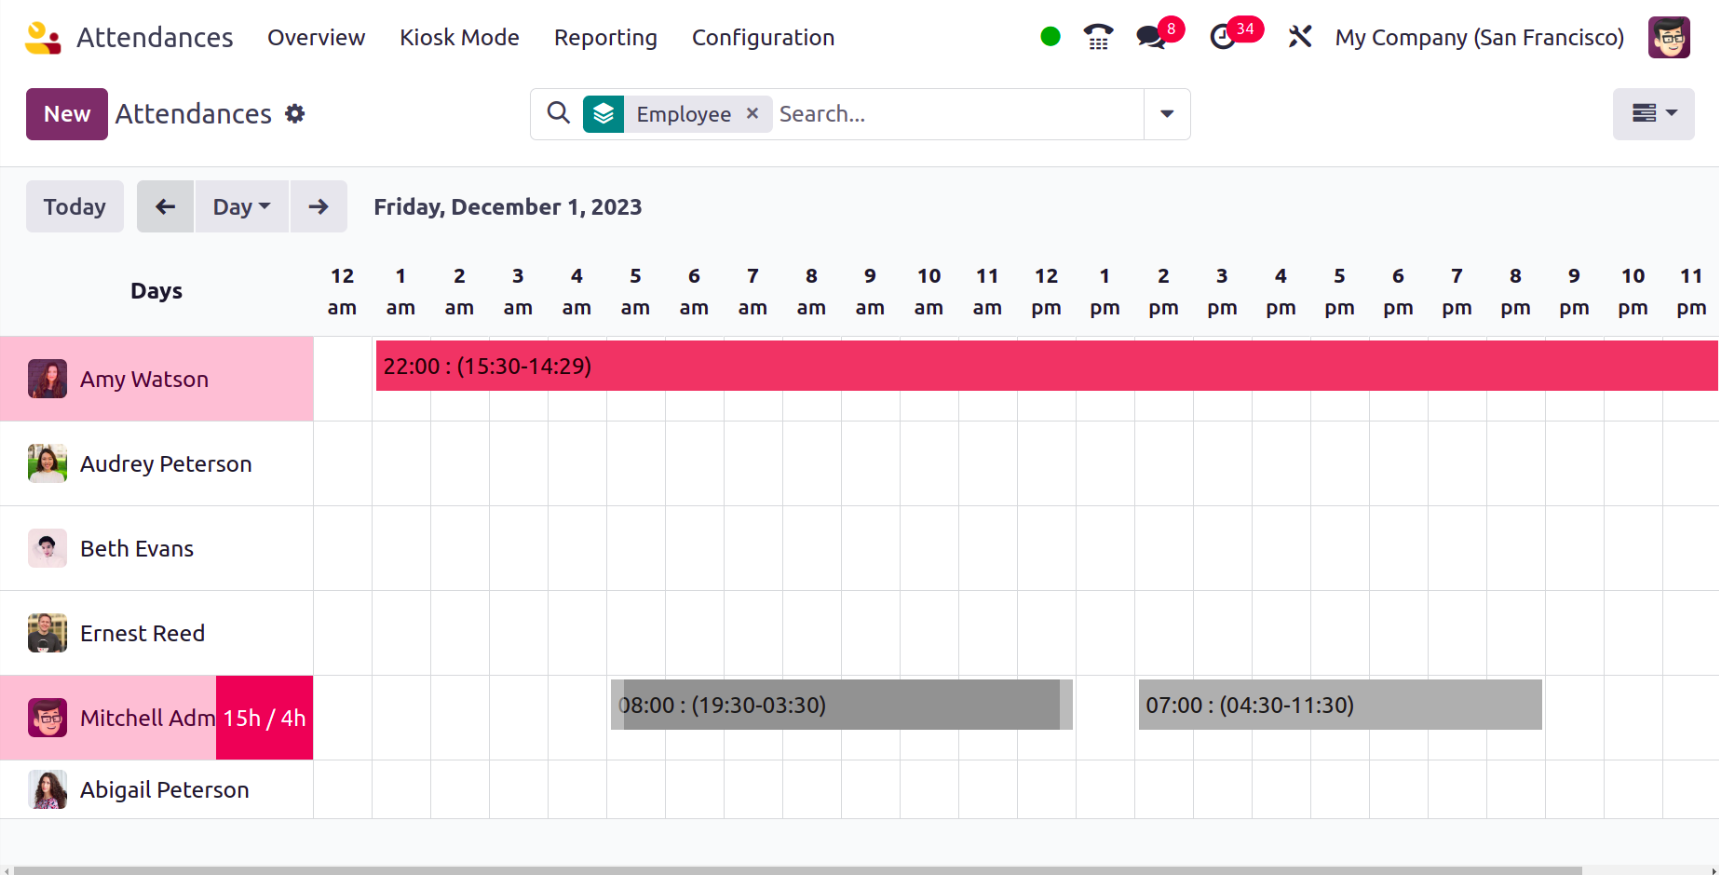
There are two color tones available to display the attendance: a light gray and a standard gray. The light gray color represents overtime. If an individual worked more than sixteen hours in a day, their name would be displayed in the red entry. The employee's name appears red on the left side of the screen, indicating that they entered extra hours inside the check-in information.
In Odoo 17, the attendance listview is also accessible. Details including the employee's name, check-in and check-out times, worked hours, and overtime are displayed in the list view.
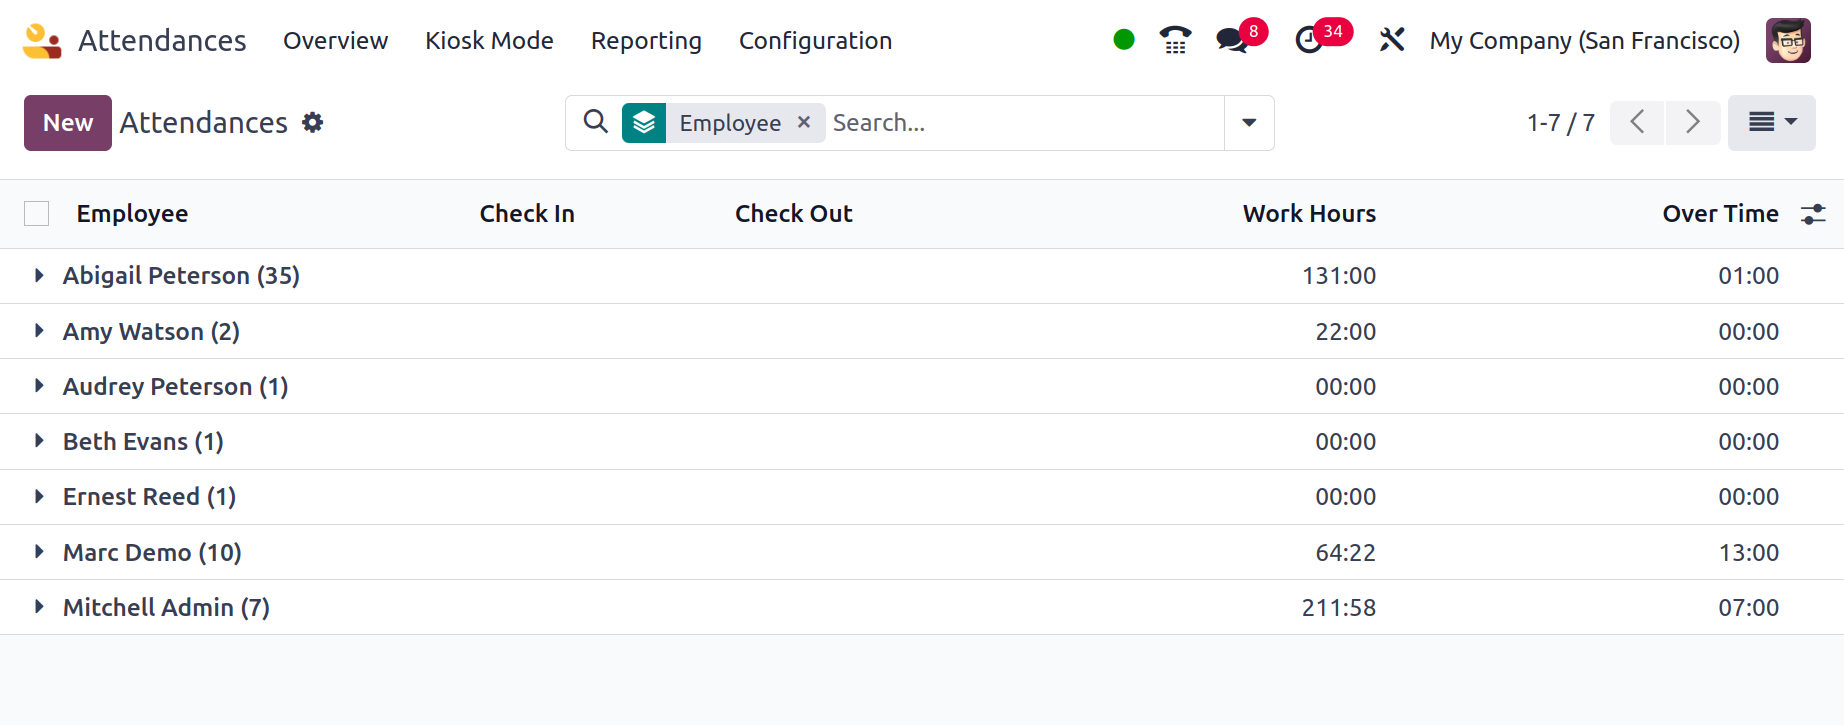
The attendance can be Filtered according to the following criteria: previous seven days, check-in, errors, team, and my attendance. The user can quickly locate and verify the errors in attendance by utilizing the filter Errors. It is possible to Group By the attendance based on check-in, check-out, and employees. The list view also offers a custom filter and group by options.
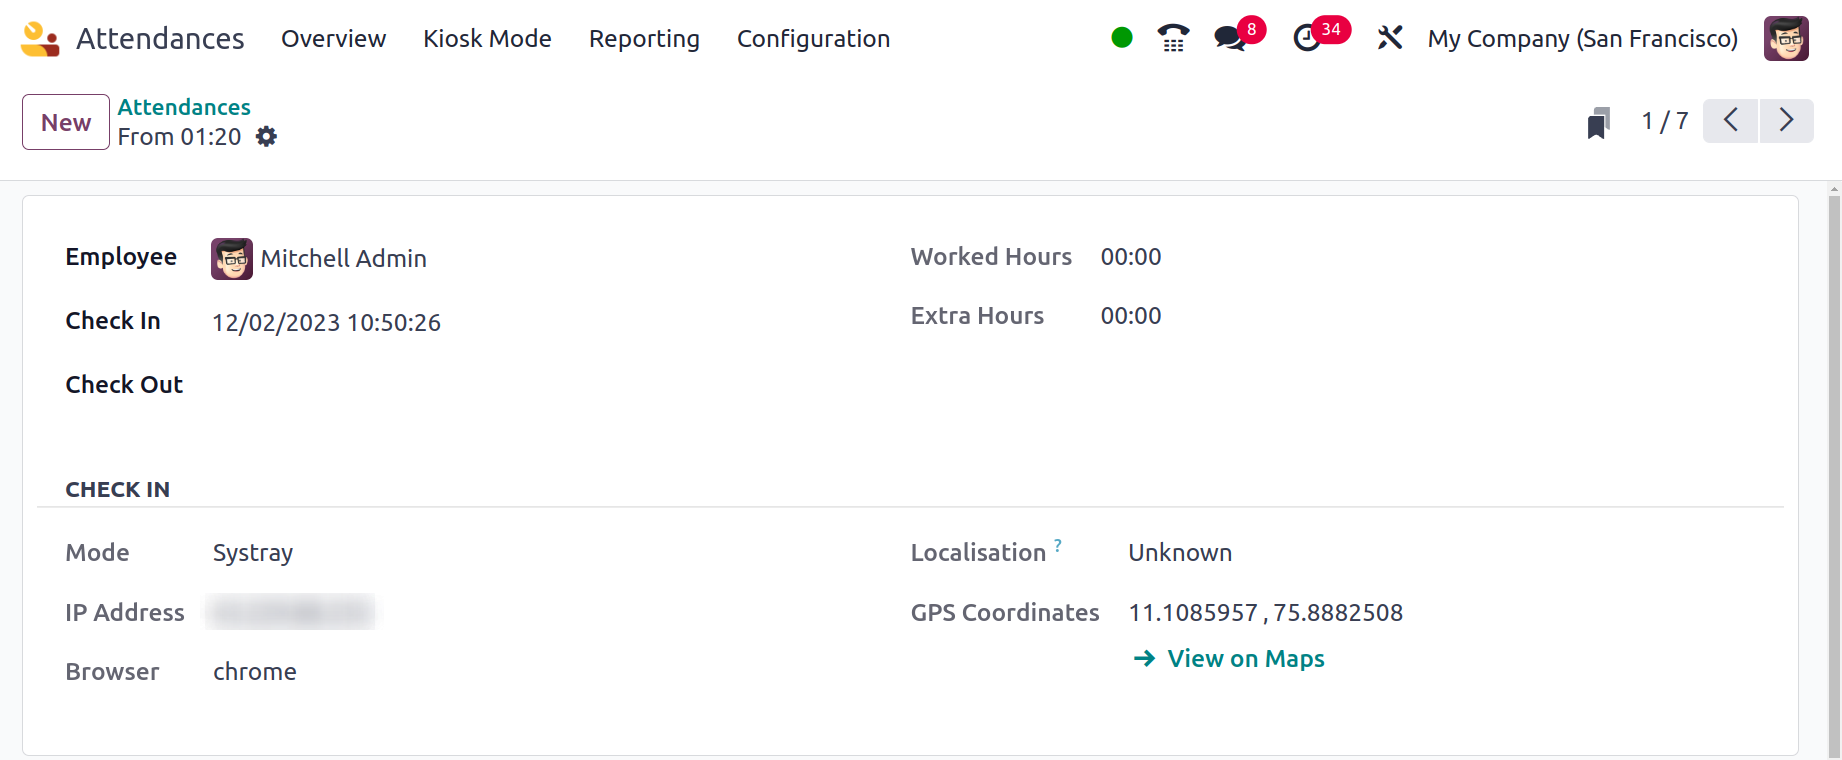
Upon opening an attendance, the details of the employee, including their name, check-in and check-out times, worked hours, and extra hours, are displayed. The additional check-in information, such as the browser, IP address, check-in mode, localization, and GPS coordinates. By selecting View on Maps, viewers are redirected to another map page where they can readily ascertain the exact locations of the personnel.
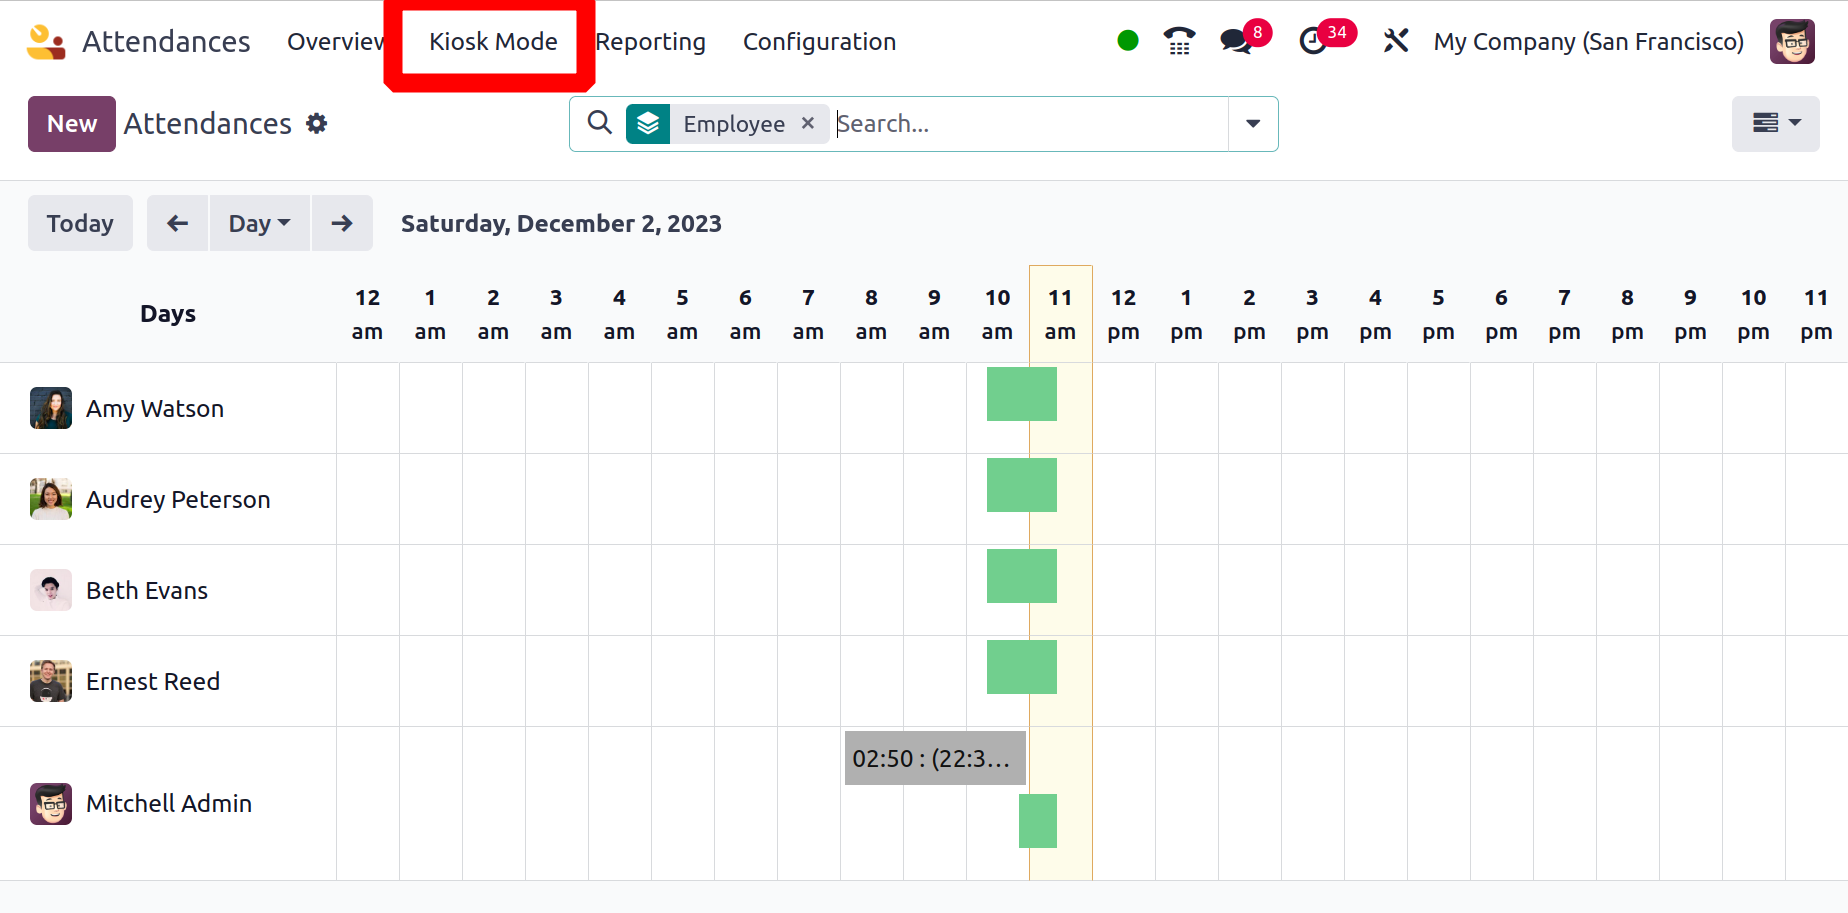
Kiosk Mode
Odoo17's kiosk mode enables you to connect to your company in a different way. You can access this approach in the Attendance module by choosing the Kiosk Mode option.
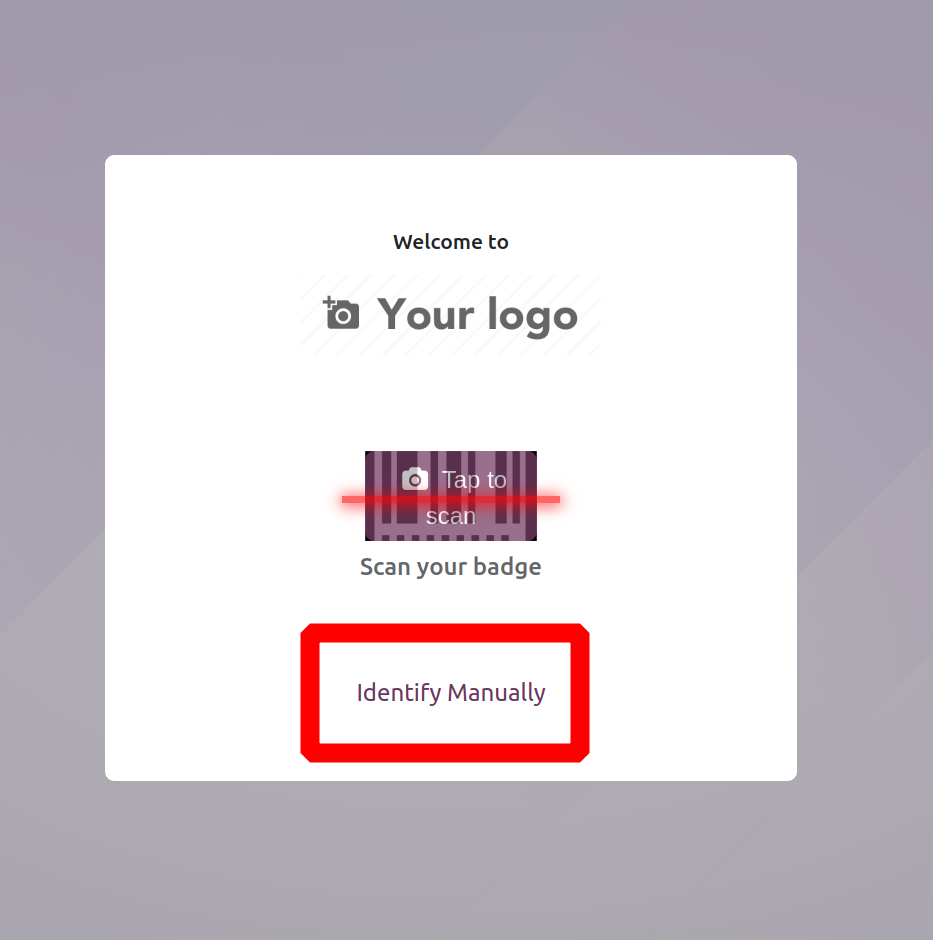
You see a new page after choosing the kiosk mode. You can see the options like TAP TO SCAN and Identify manually. The TAP TO SCAN button makes it simple to scan your badges. After selecting Identify Manually, you can manually identify the employee.
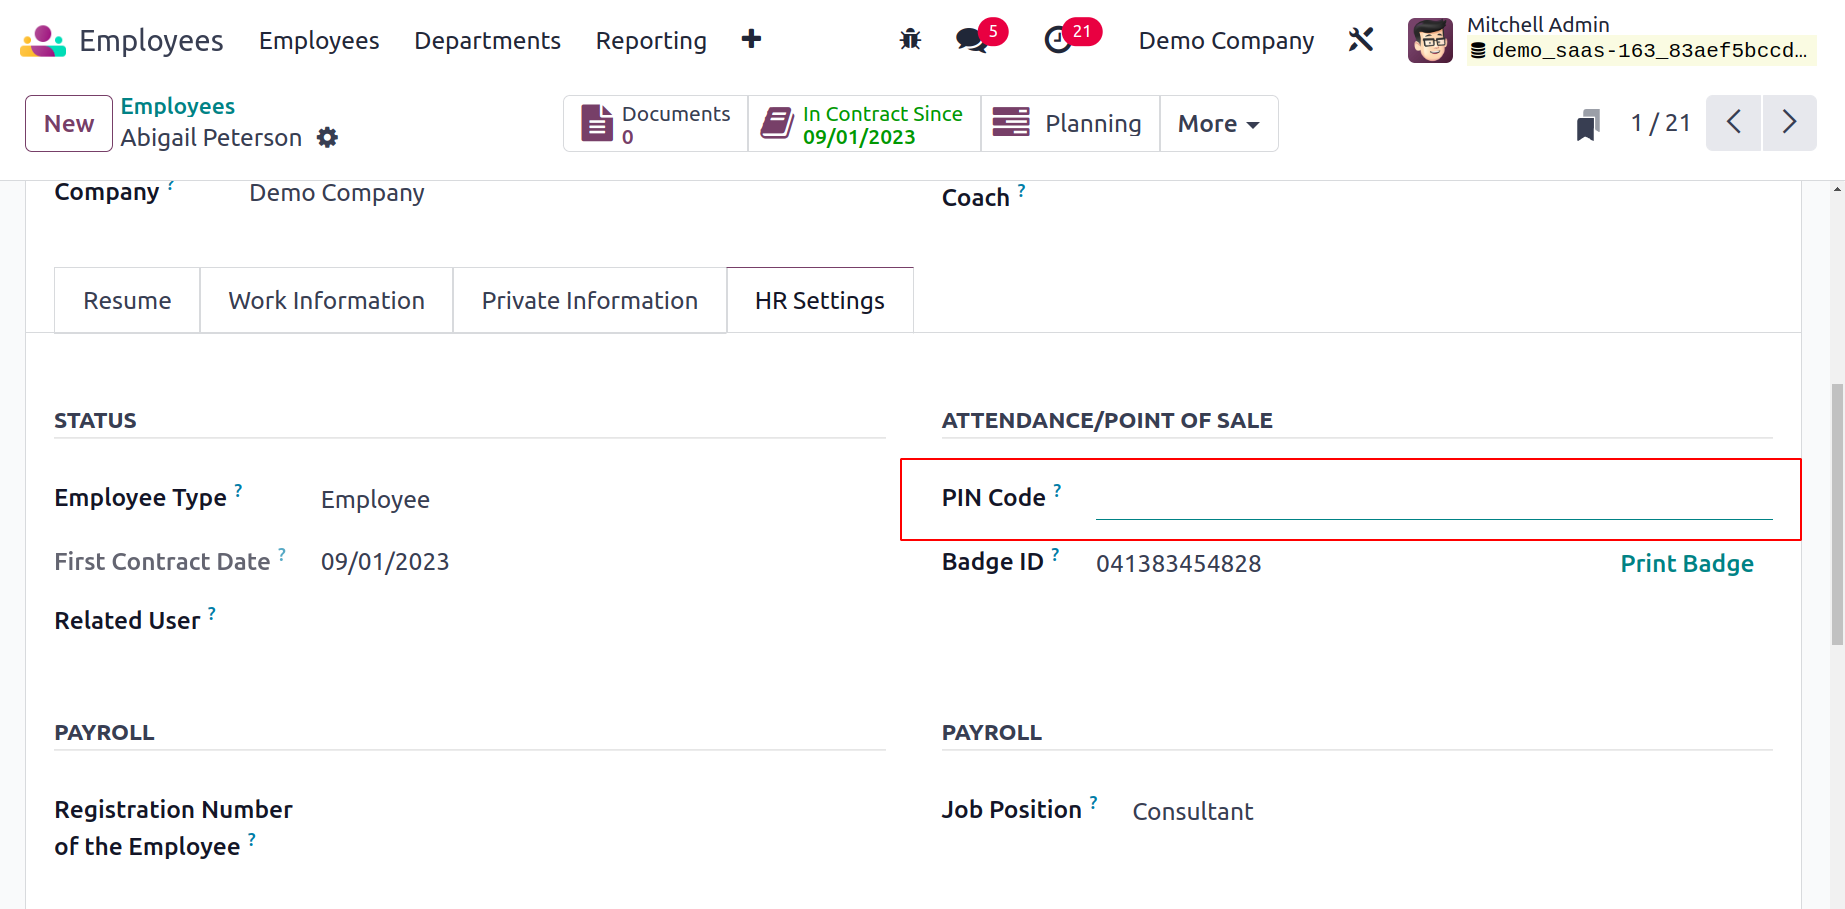
The Odoo17 system benefits from barcode integration at several stages of business operations. The employee ID card that is used to log in and out of the platform can be enhanced with a barcode. Once logged in to the window, an employee can scan the barcode using the reader. You can specify the employee barcode in the Employee window. For instance, go to the Employees module in Odoo 17 and choose your employee. The user can access the Badge ID option on the open page by selecting the HR Settings tab.
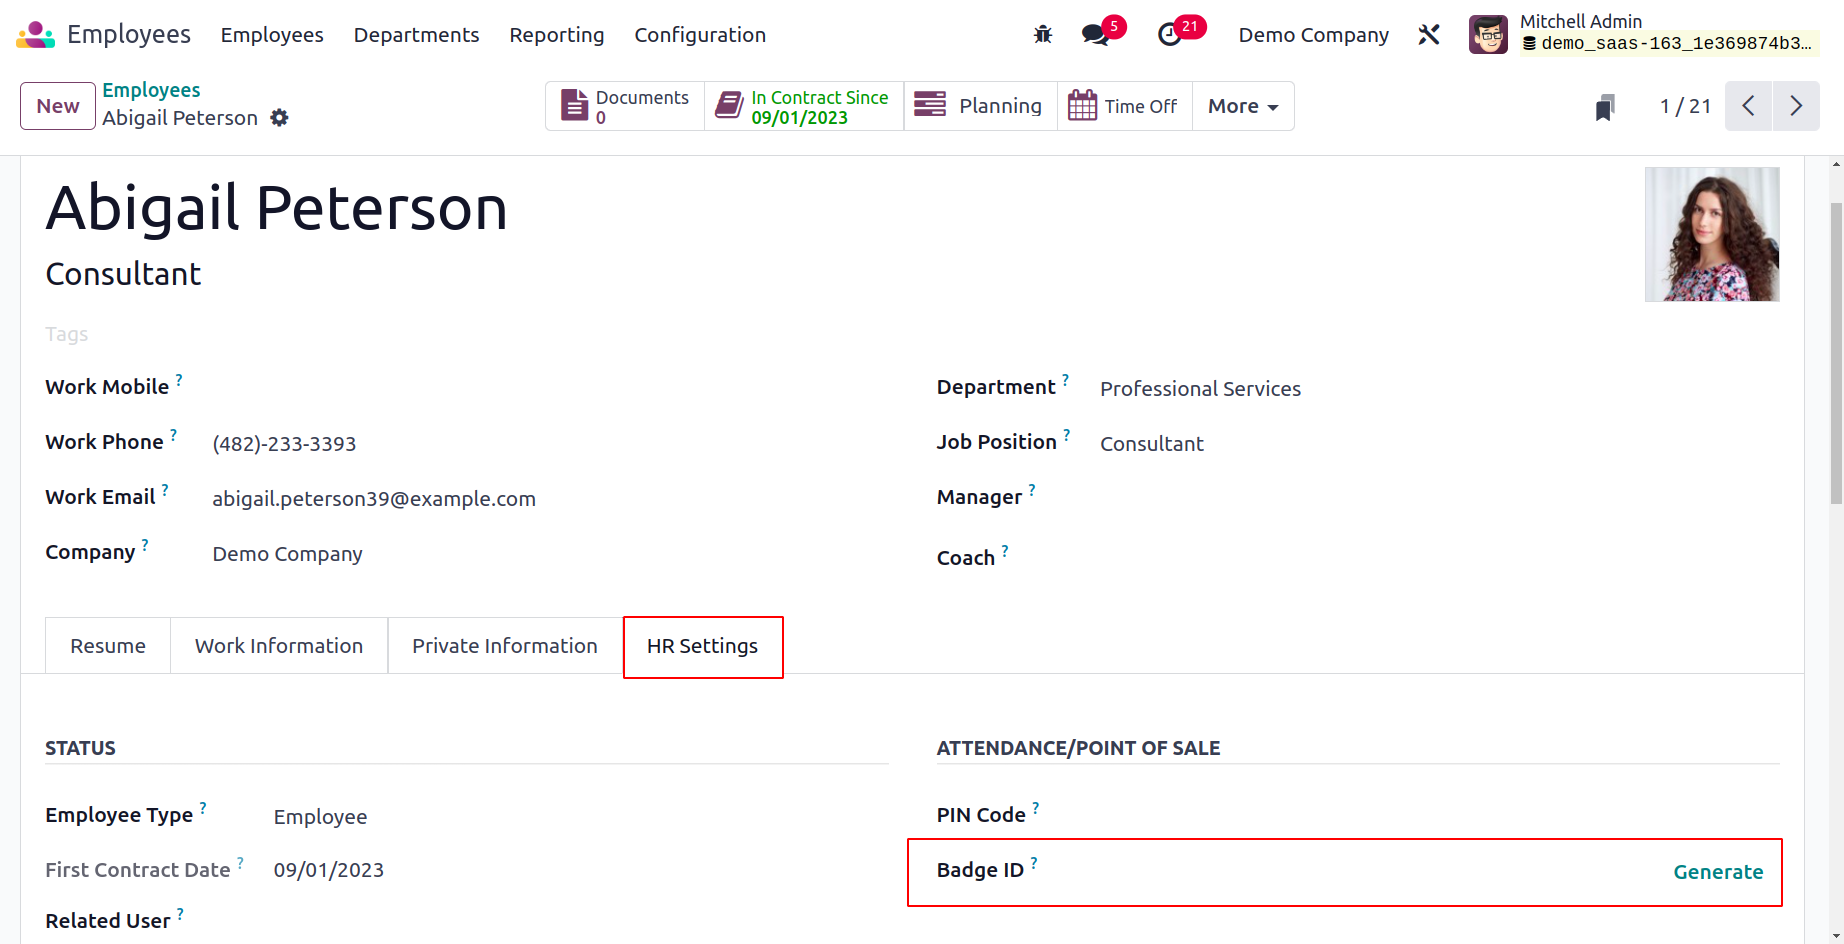
Click the Generate button in the Badge ID field to create the Badge ID automatically. As a result, the Badge ID field displays the automatically produced Badge ID. To download the information for the employee badge later, choose Print Badge.
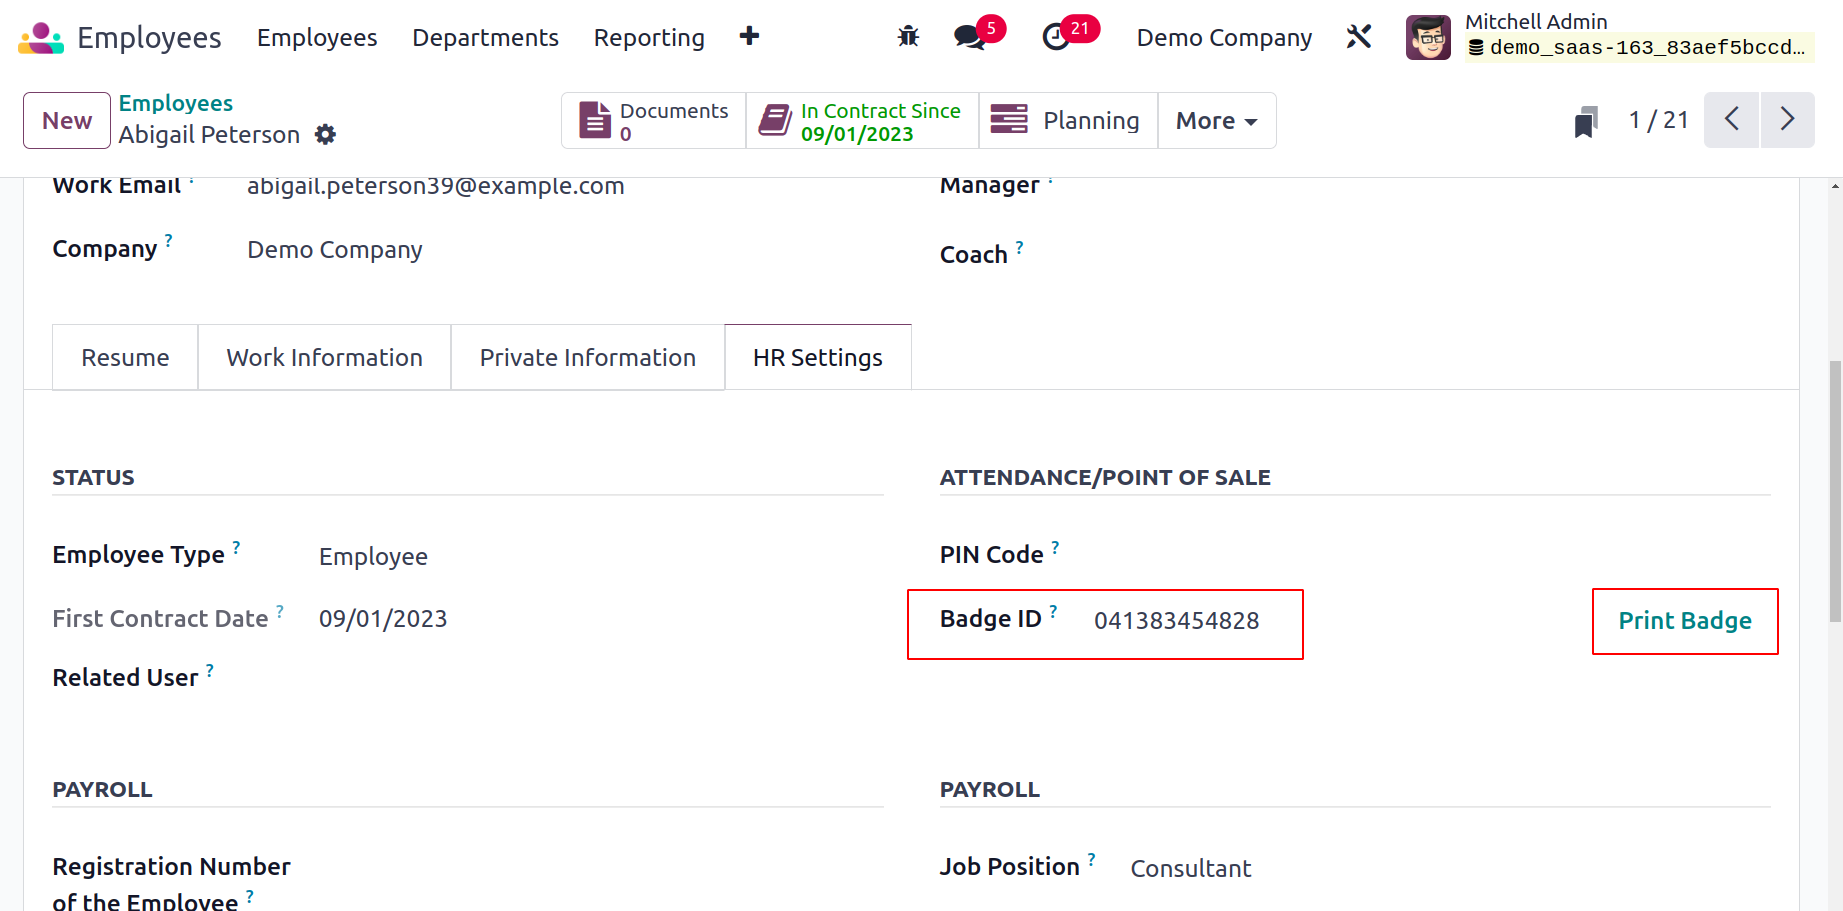
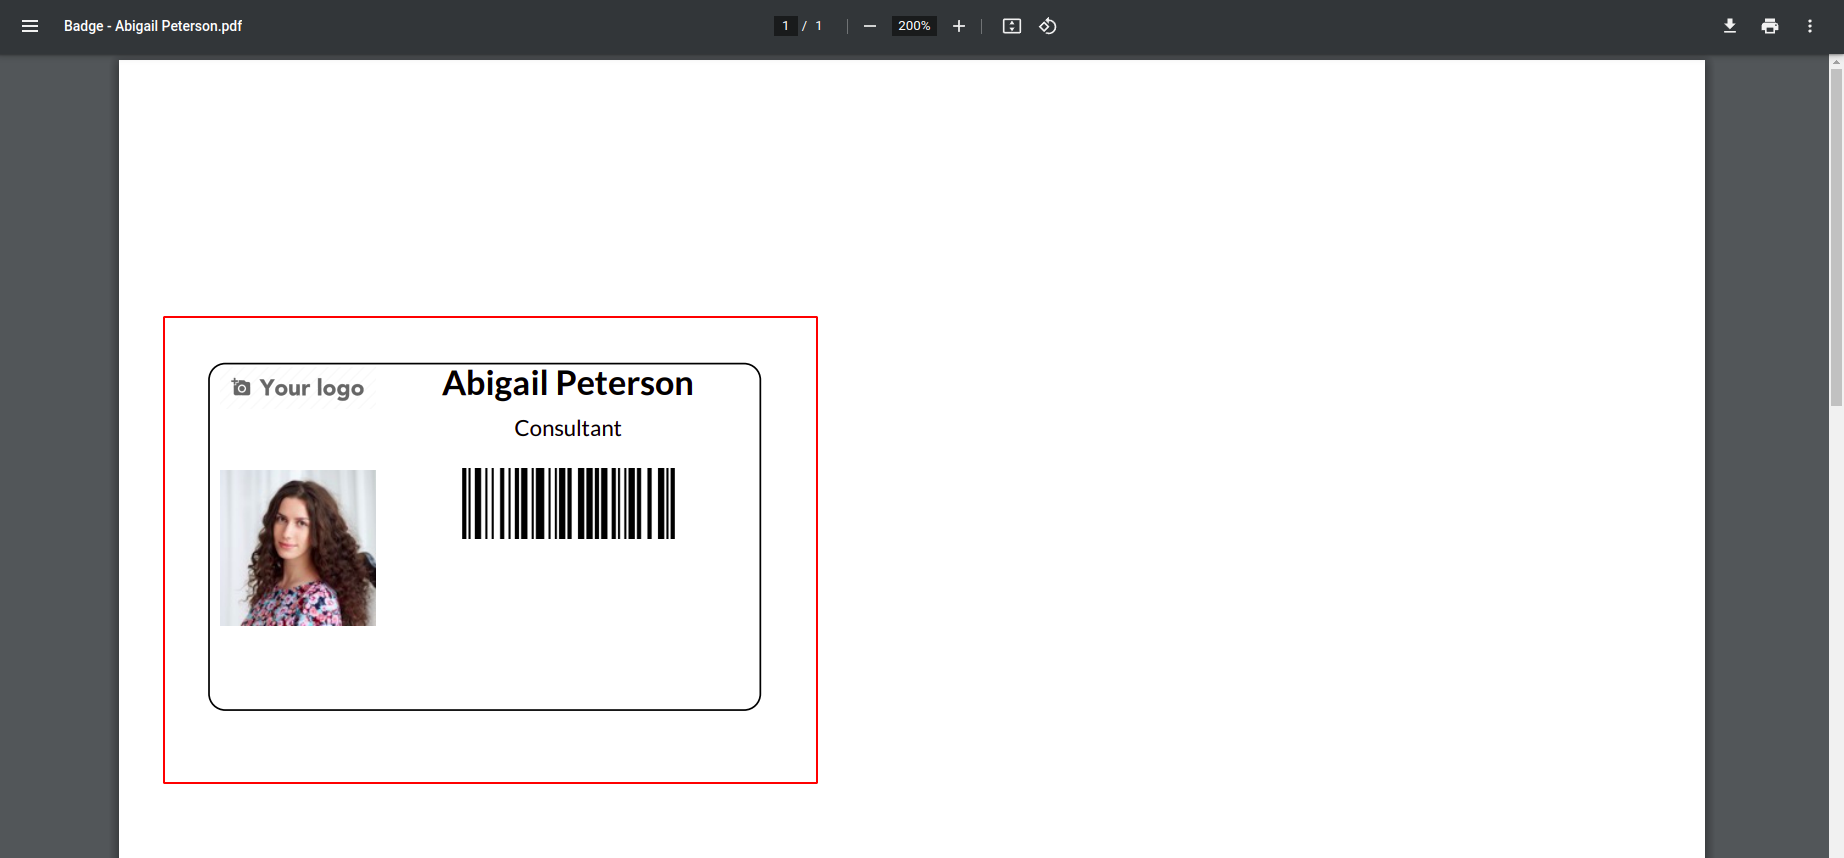
When you choose to ‘Print Badge’, the badge ID is printed into your system. As a result, we can provide each employee in a company with a badge ID.
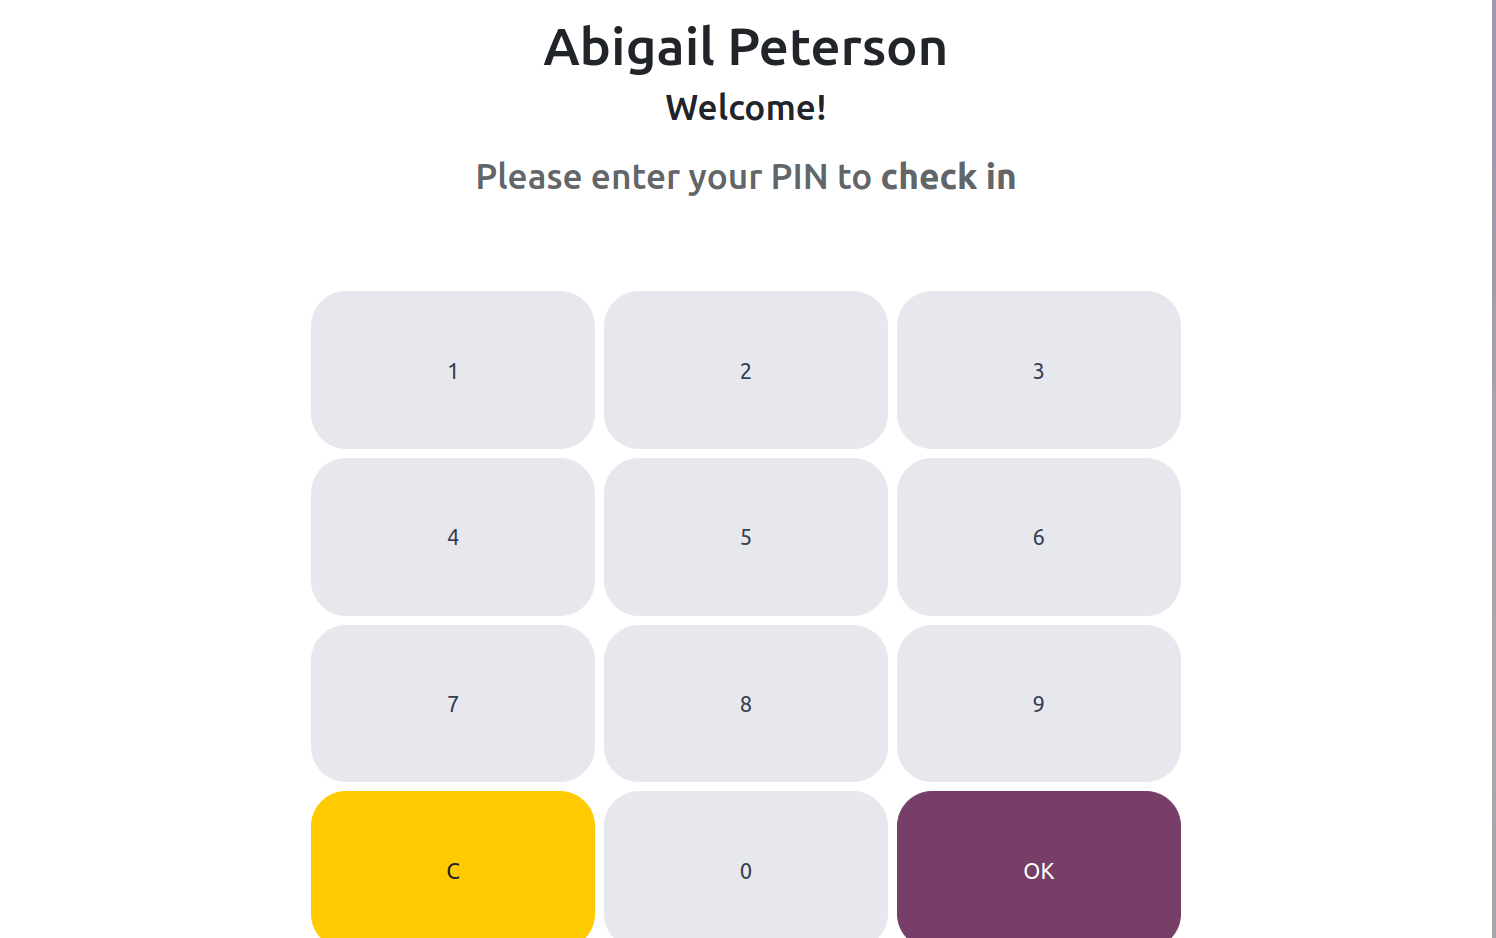
Similarly, each employee of a corporation might receive a PIN from us. To accomplish this, you must navigate to the Attendance module's Configuration > Settings box and turn on the Employee PIN option. It guarantees that you enter a PIN code to log into your employee profile. After activation, click the Settings' Save’ button.
Once you've entered employee data in Odoo 17, you may give each employee a special PIN number. In the Employees window's HR tab, there is a PIN Code option.
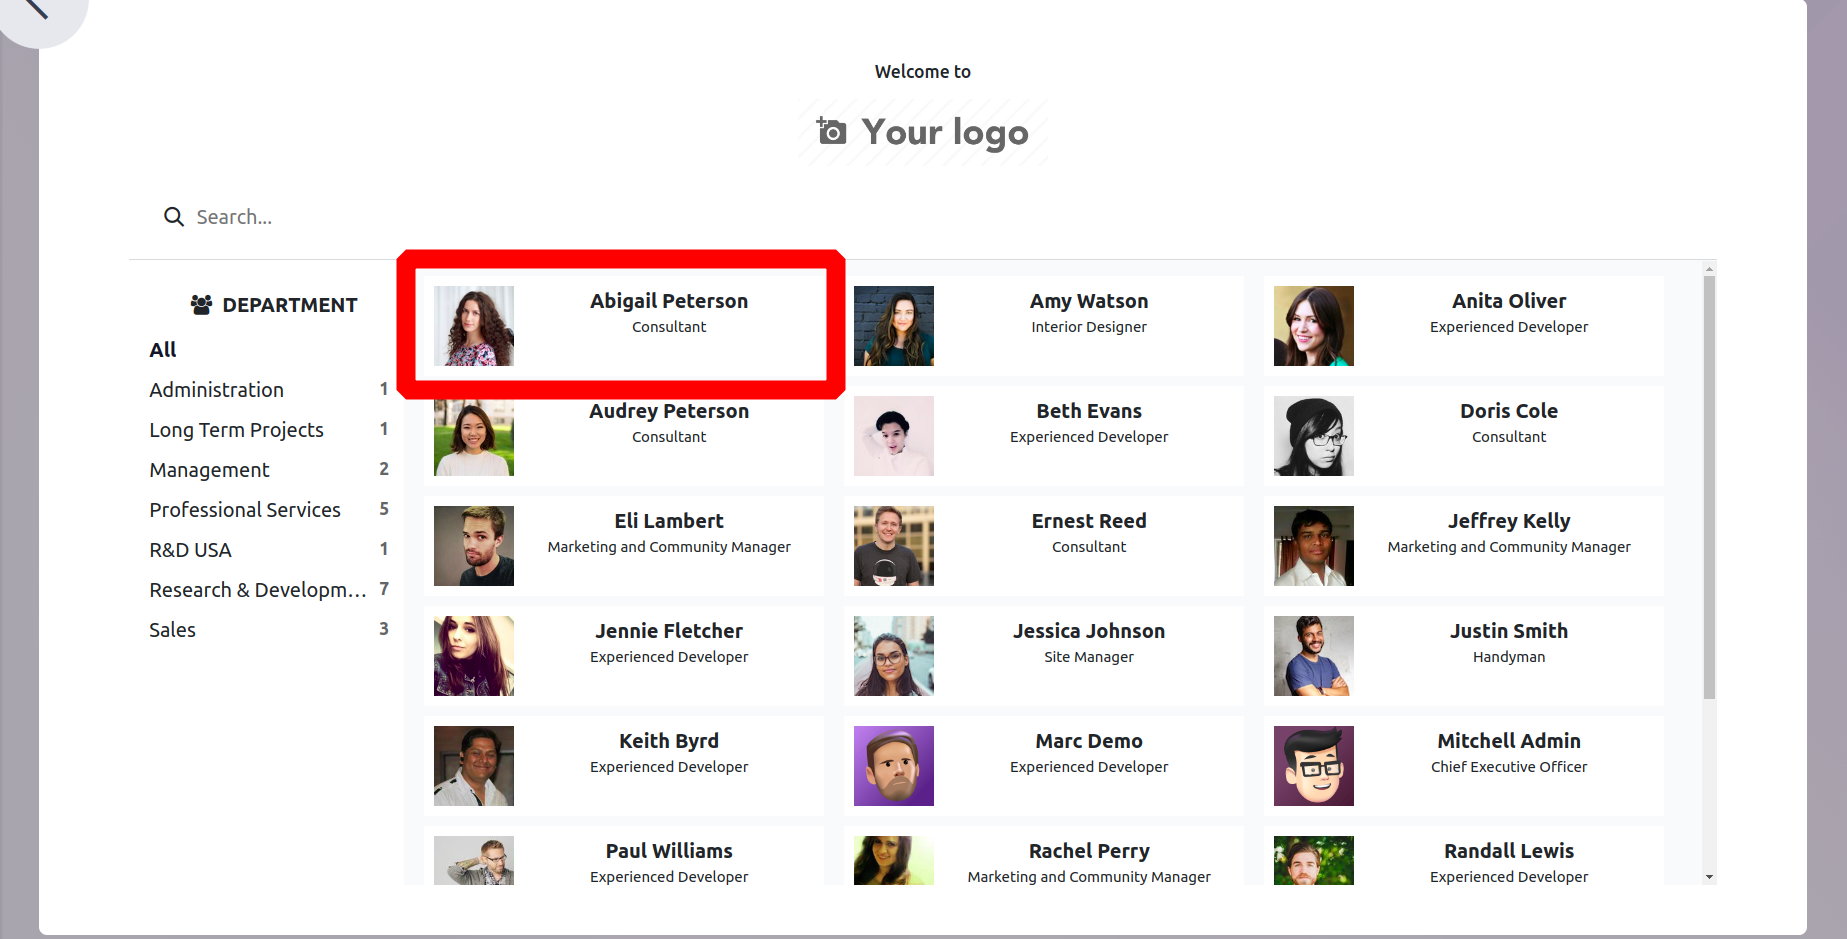
When an employee tries to log into the platform after you've set a pin action, Odoo17 displays an option for entering the pin code. Let's now look at how the Identify Manually option in Kiosk mode functions. Users who select the Identify Manually option can see the list of workers. You can select the appropriate employee names and make use of the grouping and filtering options. From the Employees window, you may select the specific employee you want.
When you input your PIN number and choose your employee record, the system displays the employee profile in kiosk mode so that you can check-in. Once you've added the PIN number, you can log in to work.
Then a window shows a welcome message, as shown in the screenshot below.
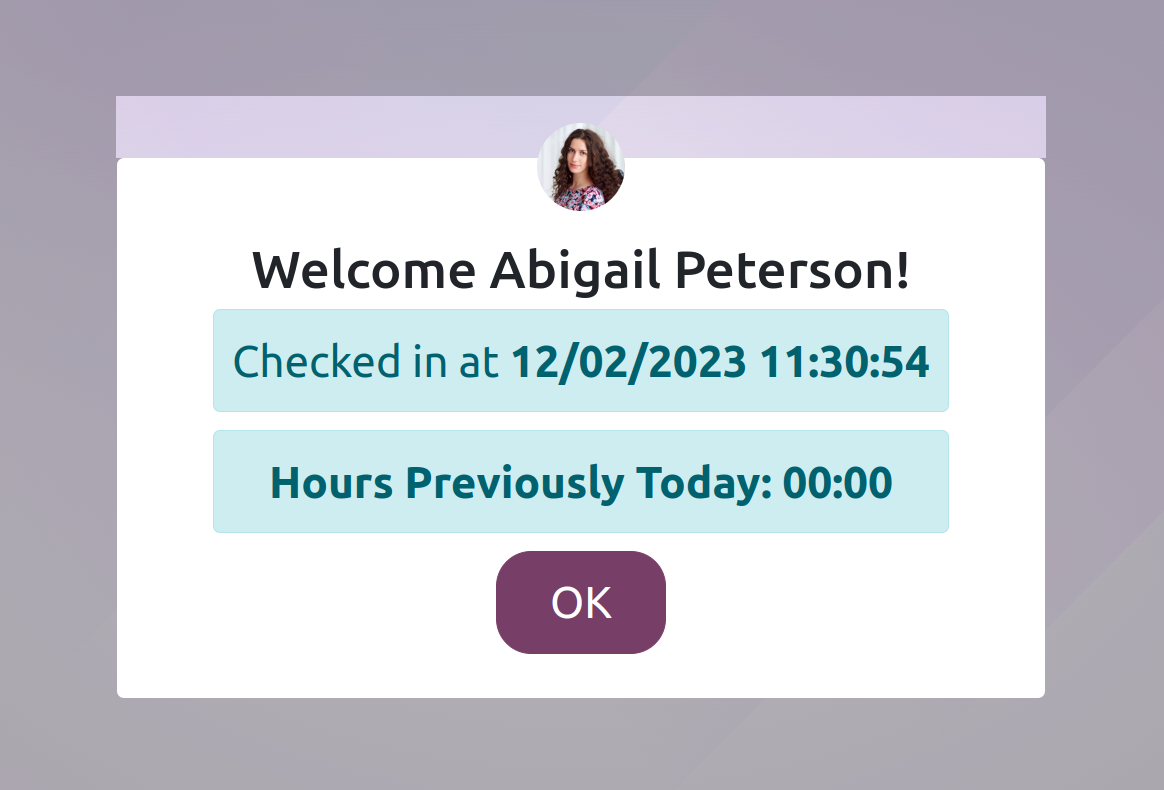
With the use of their PIN and badges that have been manually enabled via Kiosk Mode in Odoo17 Attendance, an employee can record their attendance.
Configuration
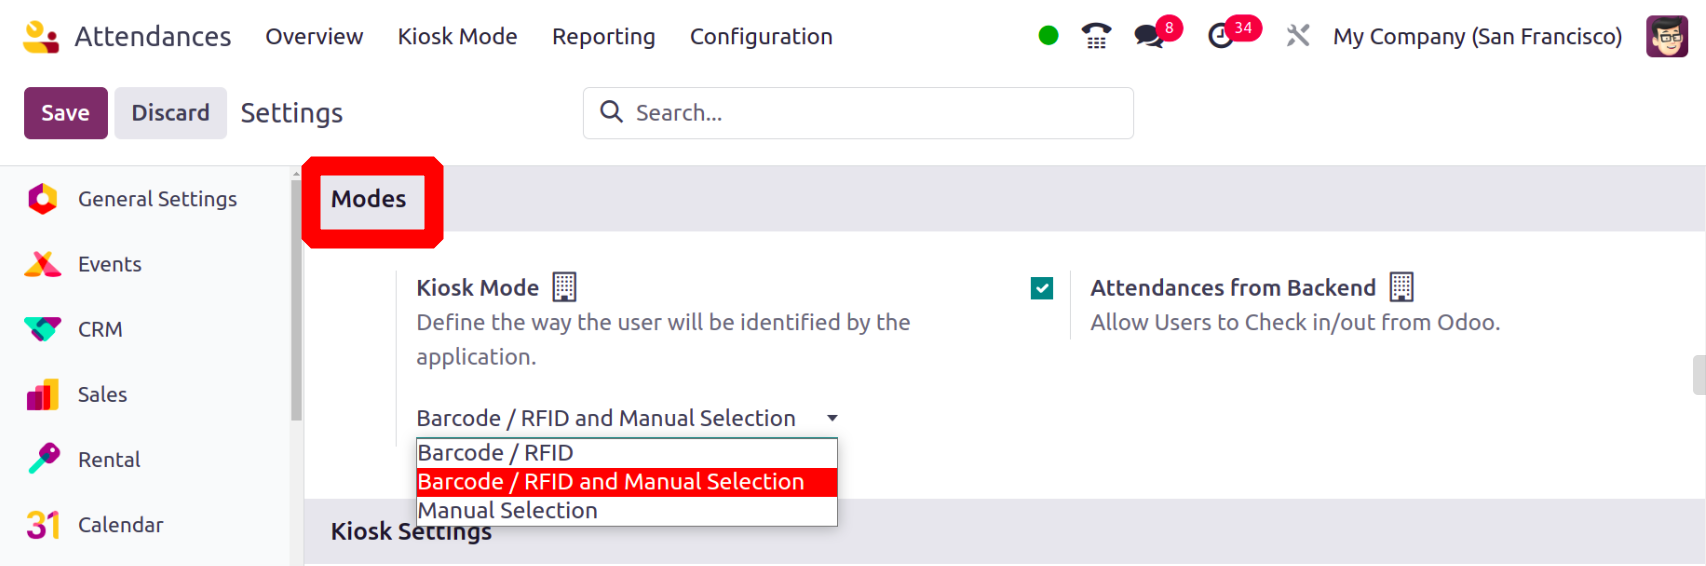
The Configuration feature of Odoo 17 Attendance allows users to handle additional settings pertaining to employee attendees. After selecting the Configurations tab, the user is presented with a Settings window. The user can see three areas in the Settings window: Modes, Kiosk Settings, and Extra hours.
Users can specify how they want to be identified by the kiosk application in the Kiosk Mode section after selecting a Mode. Then, users can check in and out of Odoo using the Attendances From Backend feature.
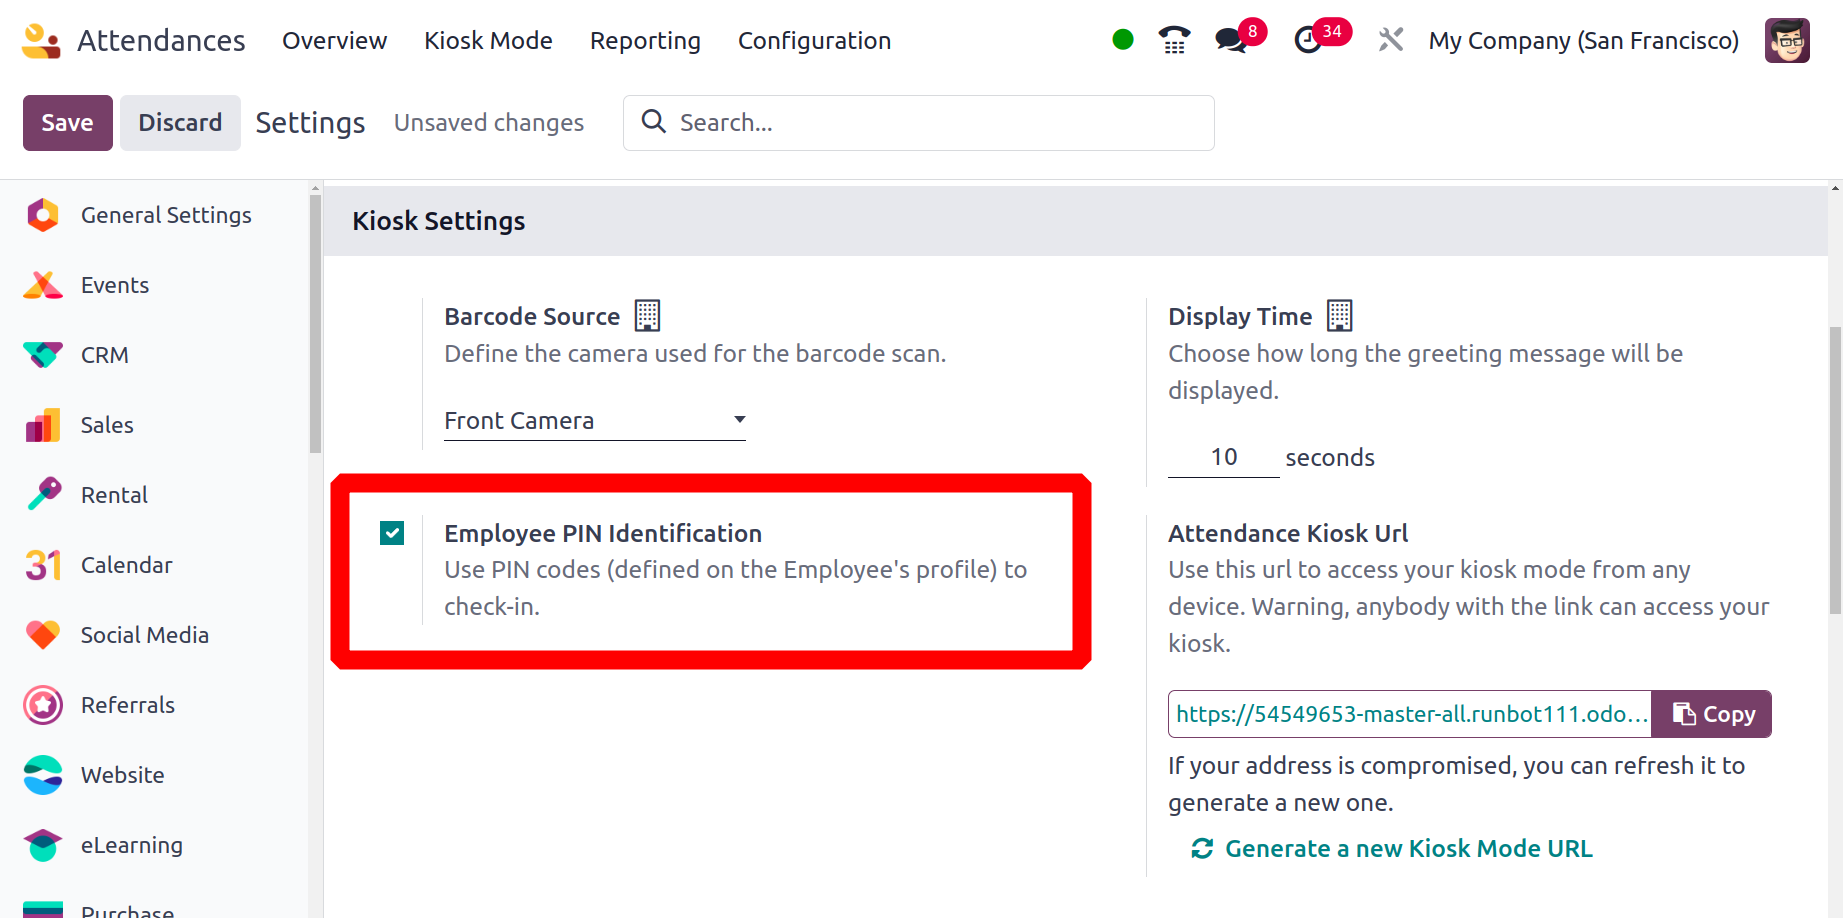
As soon as users view the Kiosk Settings section, users can identify each application. You can talk about the camera that was used to scan the barcodes under the Barcode Source option. Within the Display Time option, you can specify the duration in seconds for playing a greeting message. After activating the Employee PIN field, an employee can also sign in to work using PIN codes. Click the SAVE icon after entering each check-in/check-out data in Kiosk mode.
Participation uses the URL provided in the Attendance Kiosk Url section to access your kiosk mode on any device. Be advised that anyone with a connection can visit your kiosk. You can generate a new address by refreshing it in case it has been hacked.

Managing the extra hours set in the Odoo 17 Attendance module is the next step. You may find the Count Extra Hours option under the Extra Hours section to help with attendance counting. By turning on the Count Extra Hours option, it is possible to set the start date and compare attendance based on employee work hours. You can set a tolerance time that benefits both the employer and the employee under the Extra Hours tab. You can quickly grant the company particular working hours within the Tolerance Time in Favour of the Company. In the Tolerance Time in Favour of Employee column, you should also put the time that aids an employee and from which excess time is not subtracted.
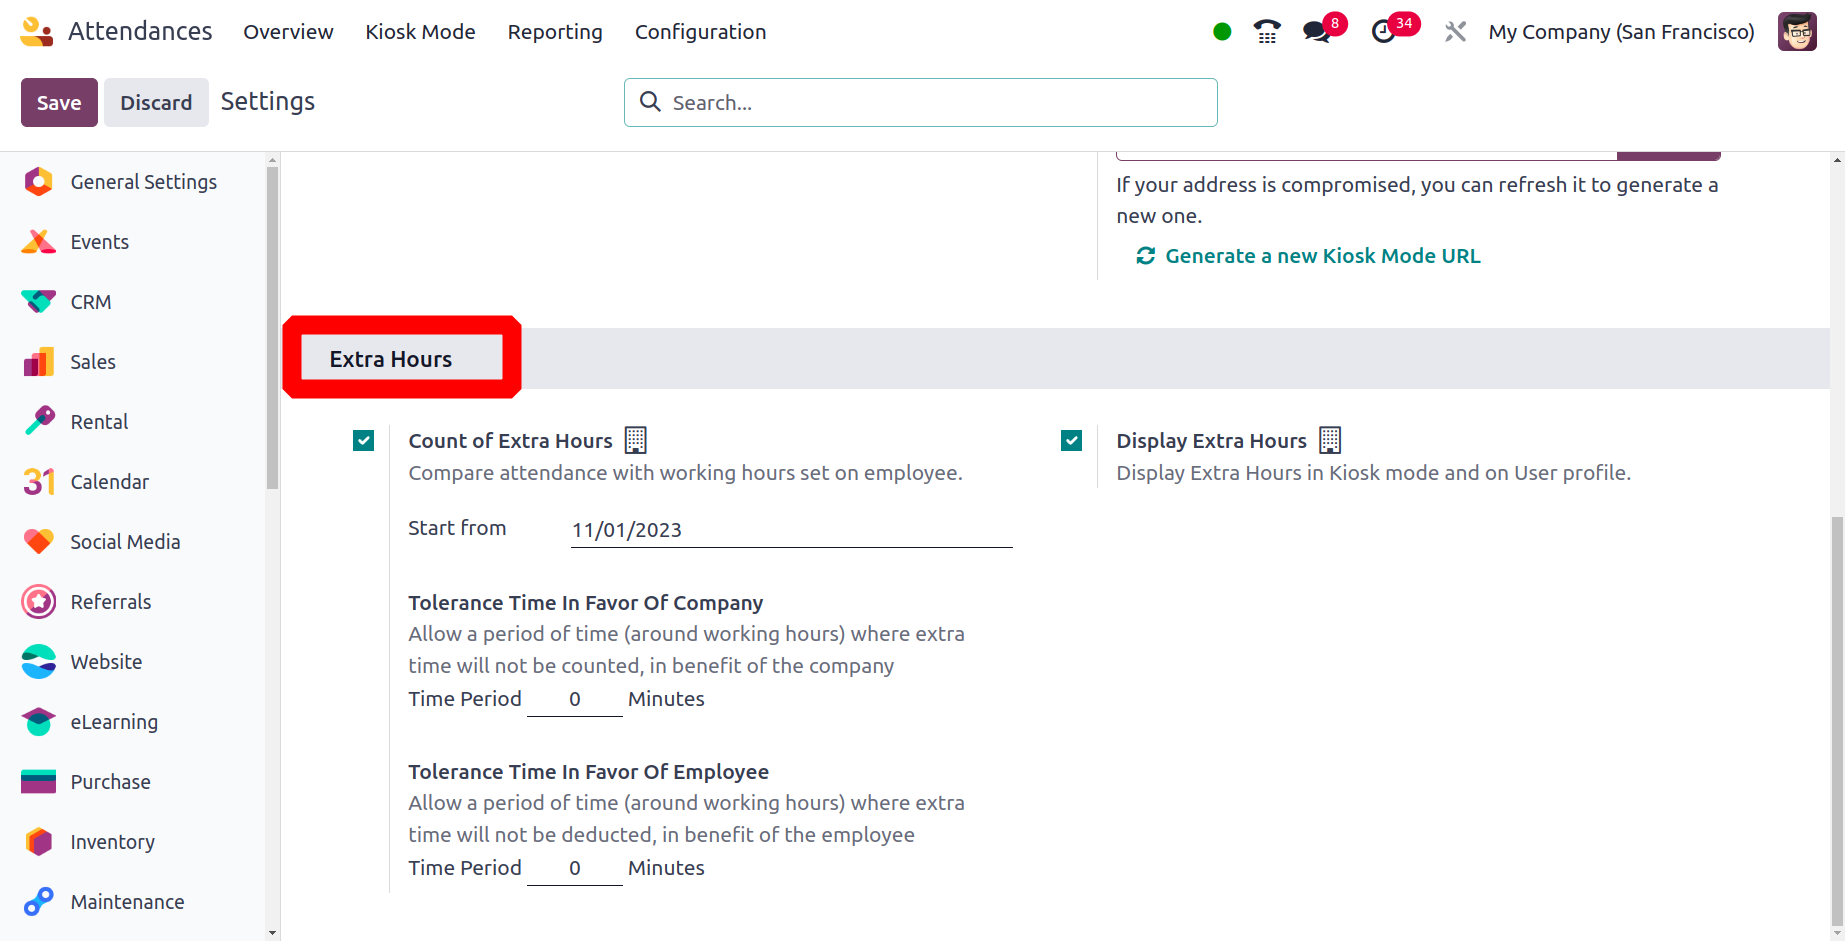
The option to "Display Extra Hours" will show an employee's extra hours on their user profile and in kiosk mode. Inside the Settings window, click the SAVE button.
Reporting
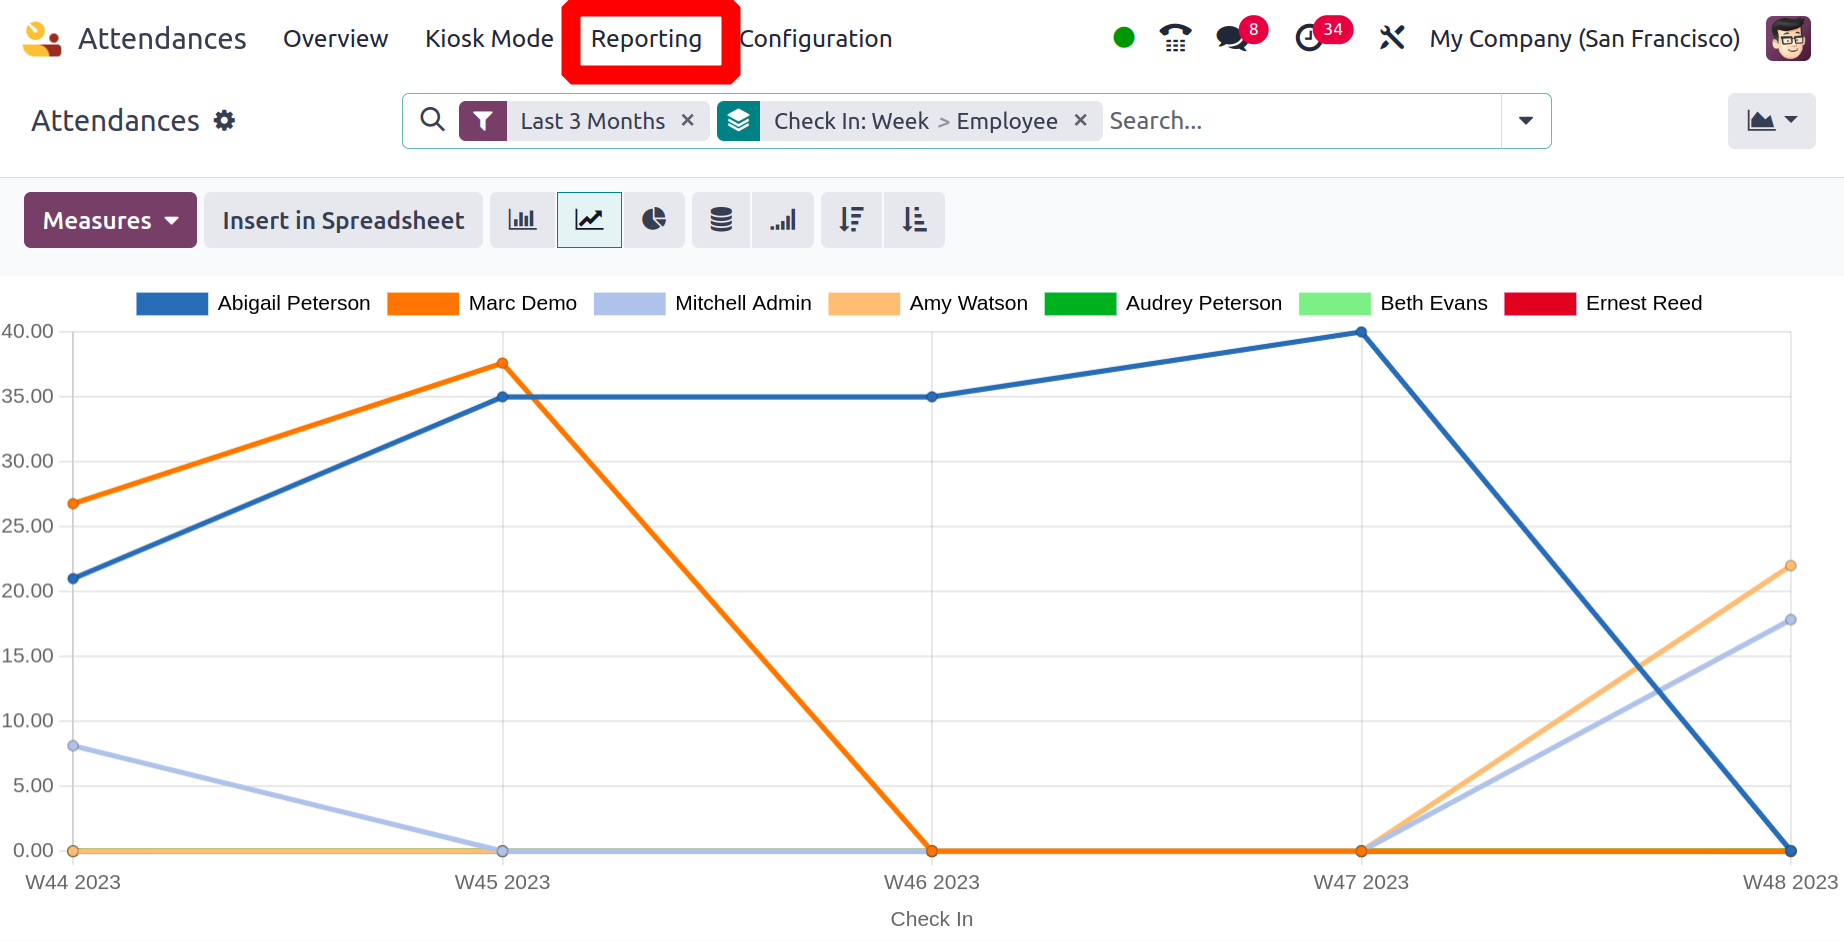
Employee attendance reports can be created by users on a weekly, monthly, or annual basis. When using Odoo 17 Attendance, select the Reporting tab to view attendance analysis reports. The employee check-in data is displayed on the X-axis of the Attendance Analysis window's graph, and the count is displayed on the Y-axis. On the graphical depiction, users can see the check-in information for each employee in a variety of colors. We can add specific numbers to the graph, such as the number of hours worked and employee overtime, by selecting the MEASURES icon.
The user can view the pivot table that details the aggregate number of working hours for each employee separately in the pivot view. The user can determine a worker's actual working hours in the organization based on each month.
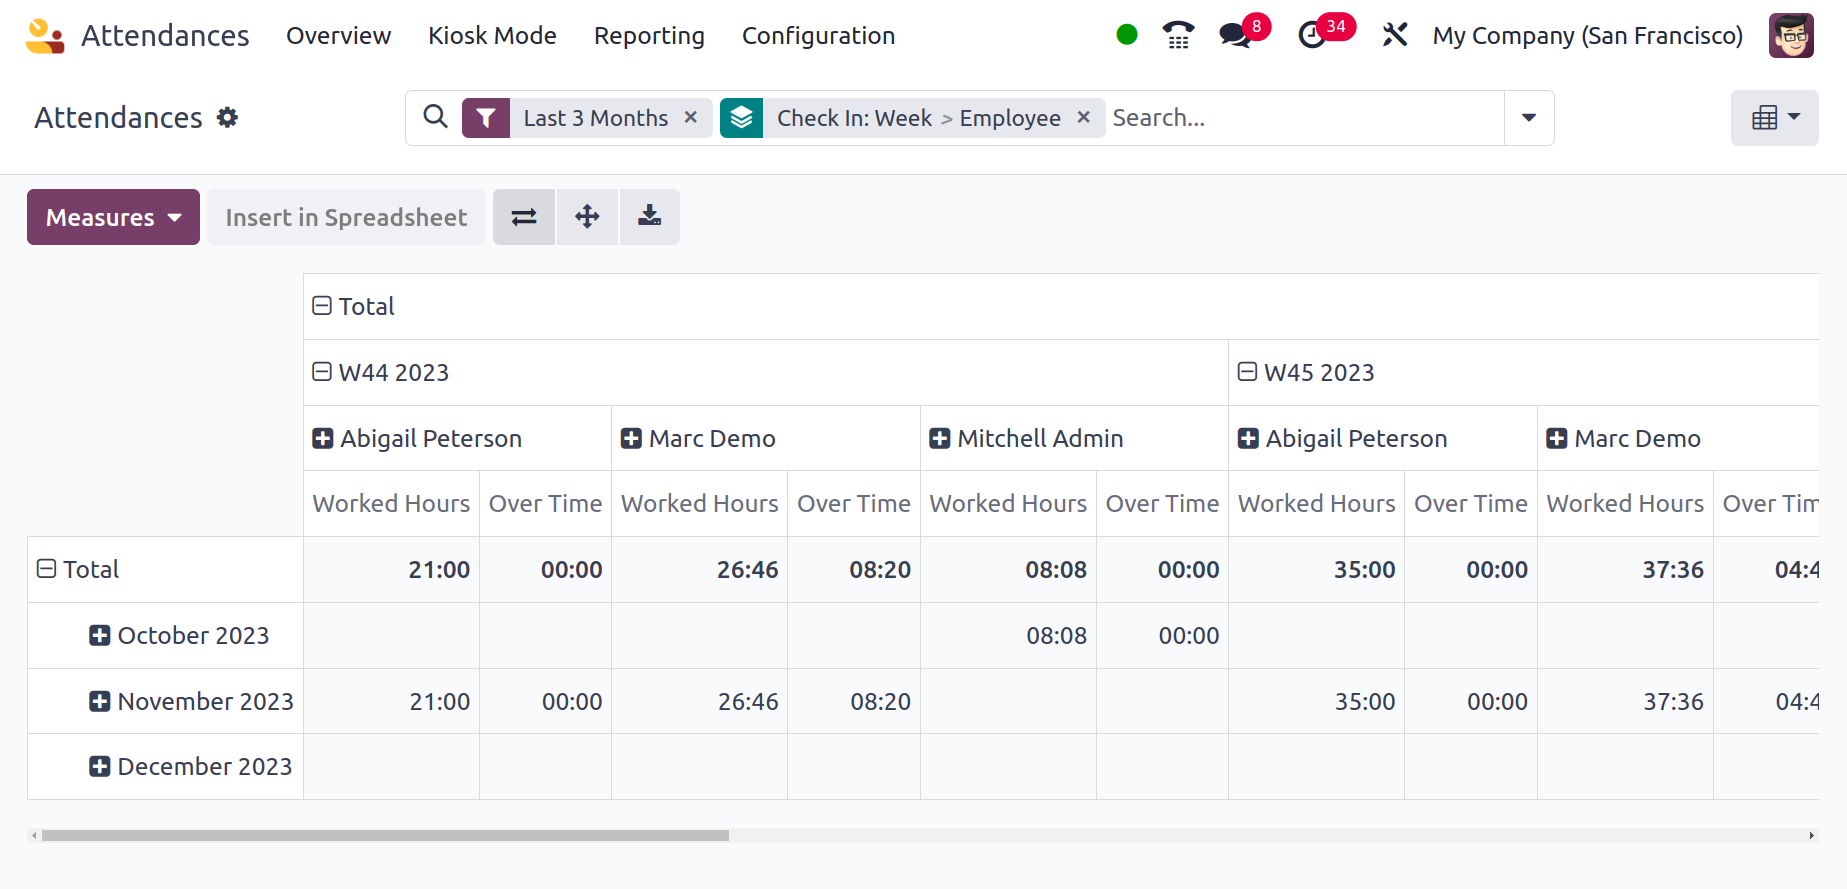
The Odoo 17 Attendance module makes it easy to manage the actual working hours of employees in a company. A company might assess reports to better understand the working capacities of its personnel and plan for the future.