Odoo 17 eCommerce Management
The eCommerce module of Odoo 17 offers businesses a unified platform to manage online stores, inventory,
sales, and customer interactions by integrating smoothly with its extensive business management suite.
With features like real-time inventory updates, safe online payments, and configurable product catalogs, Odoo 17's
eCommerce solution optimizes the entire online sales process for increased productivity and client pleasure.
A new eCommerce menu will be added to the website after installing the eCommerce module.
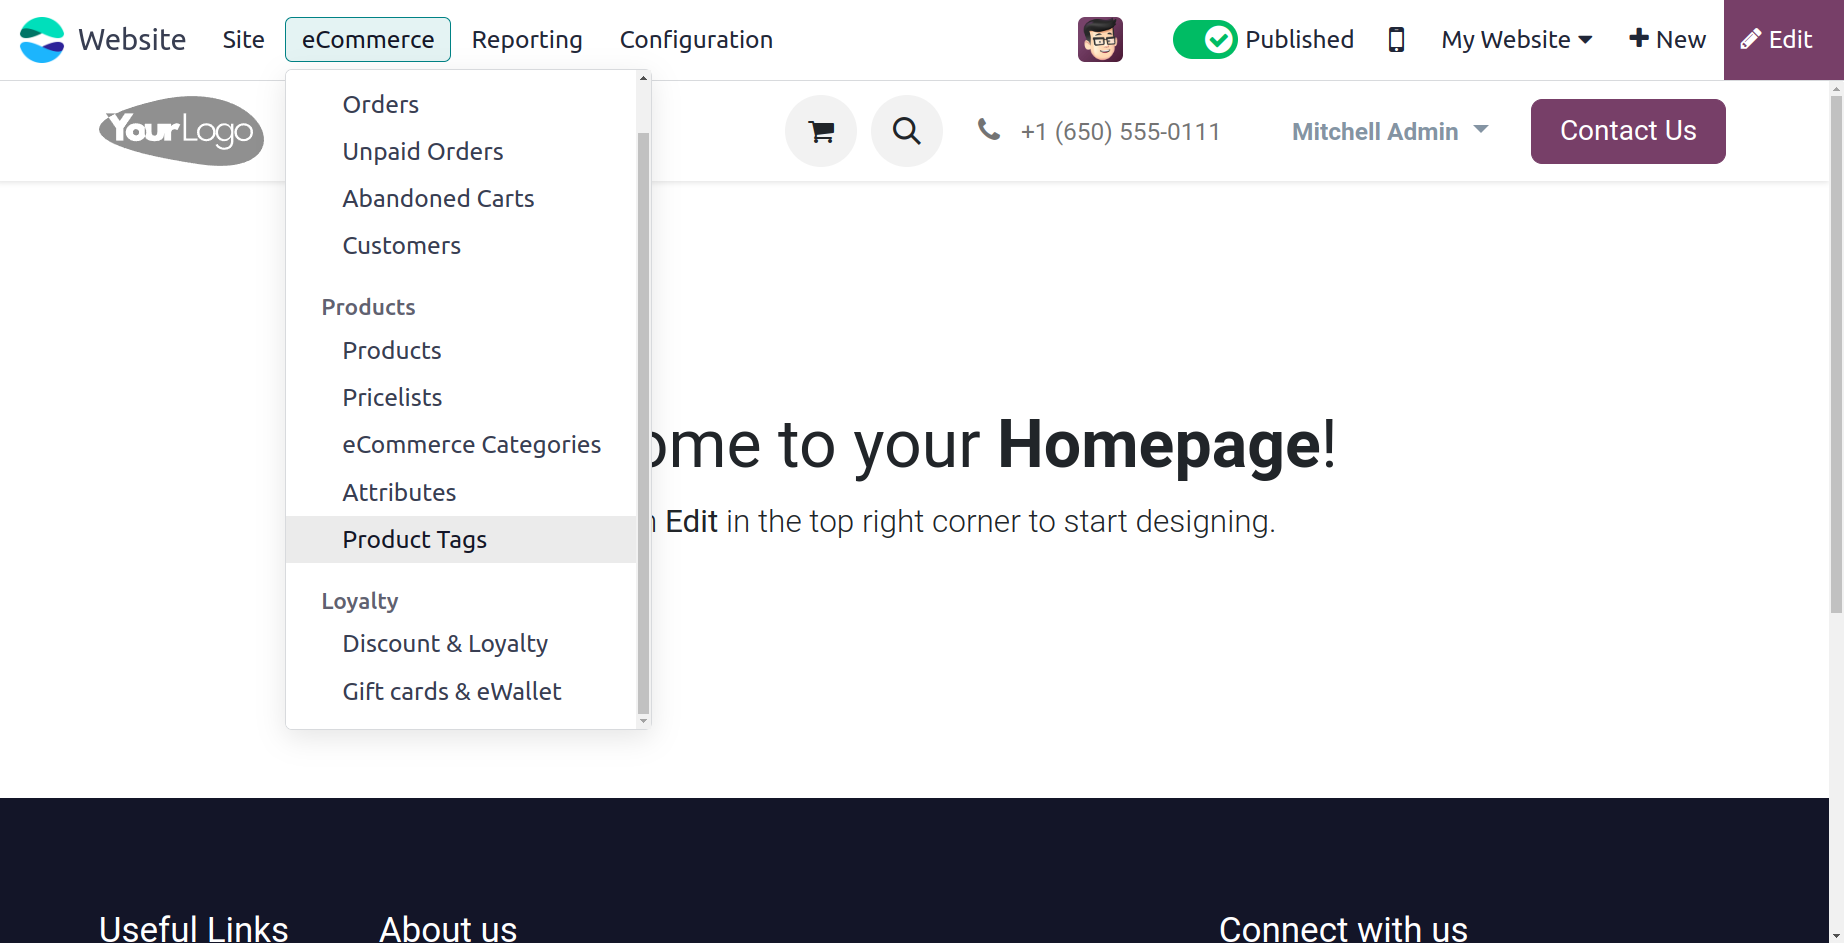
Orders
Orders, Unpaid Orders, Abandoned Carts, and Customers are among the sub-menus that are displayed in the Orders section under the eCommerce tab of the Odoo17 Website module. The Orders section, which was created specifically for order management
on the specialized Odoo platform, lists all of the orders that resulted from various eCommerce processes.
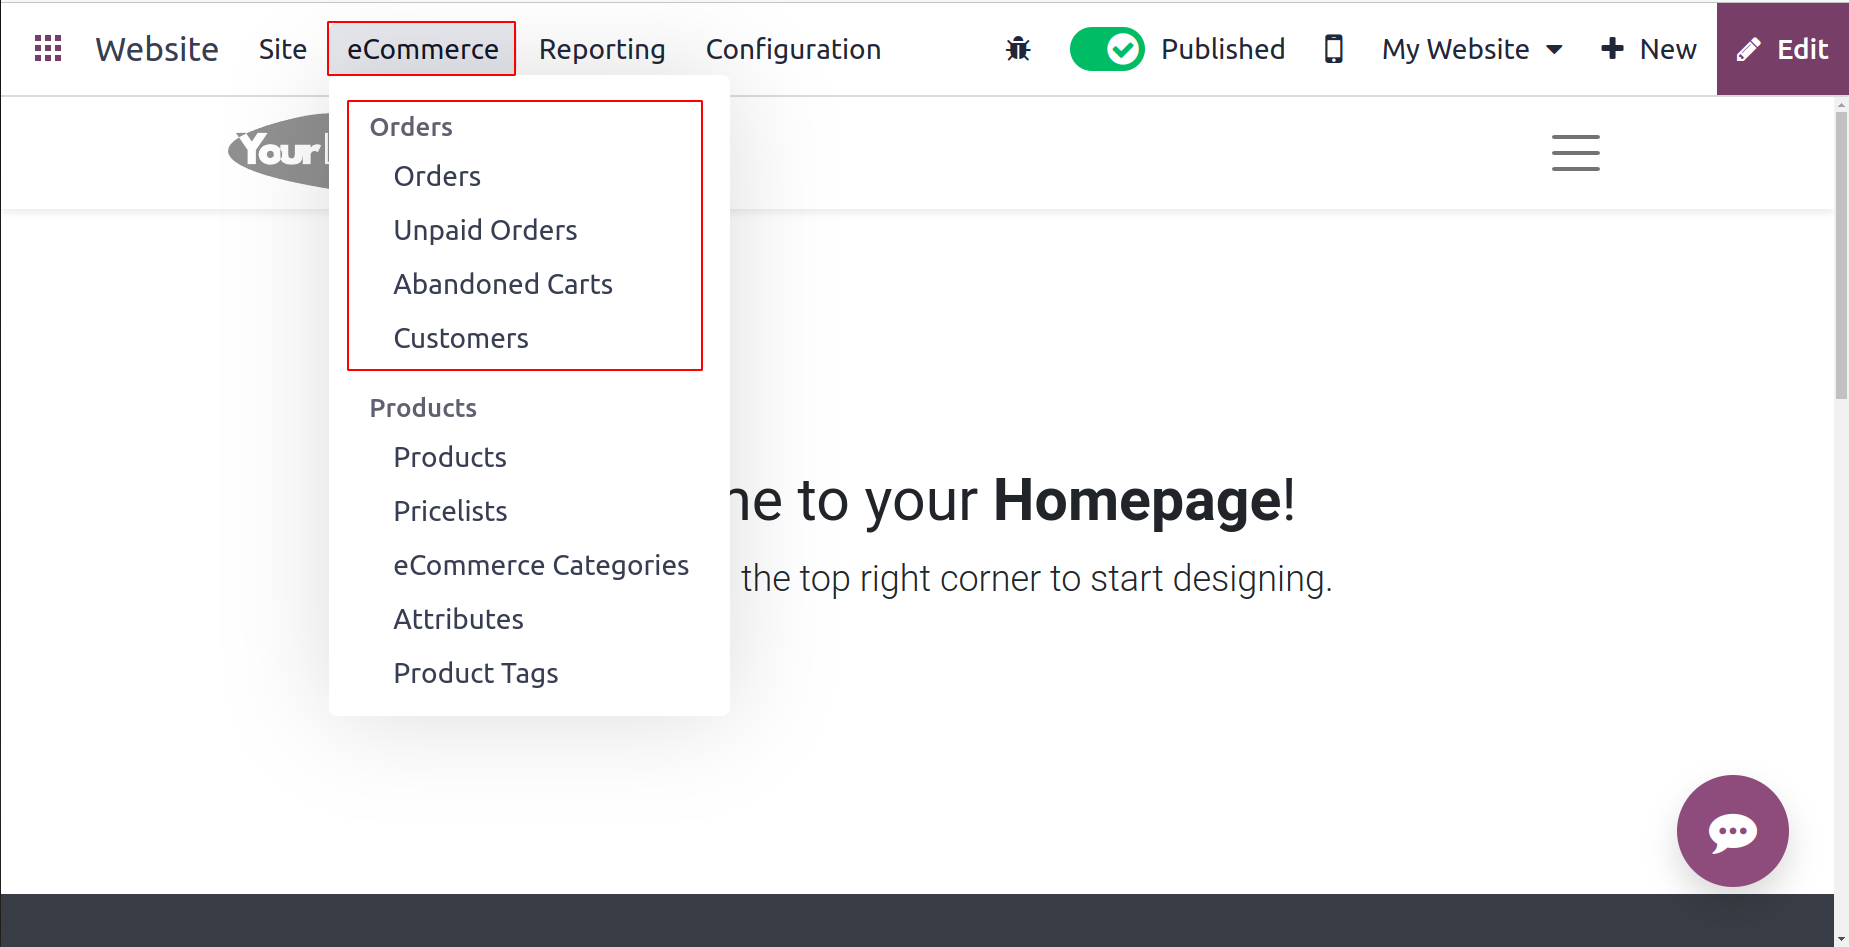
Let's go over each of the choices listed in this section in more depth. Orders are the first menu item accessible under this.
Orders
All of the orders may be viewed using the Order menu, which is located under the eCommerce tab of the Website module. Each order's tracking features are also displayed in this window. To open the window, select Orders from the menu.
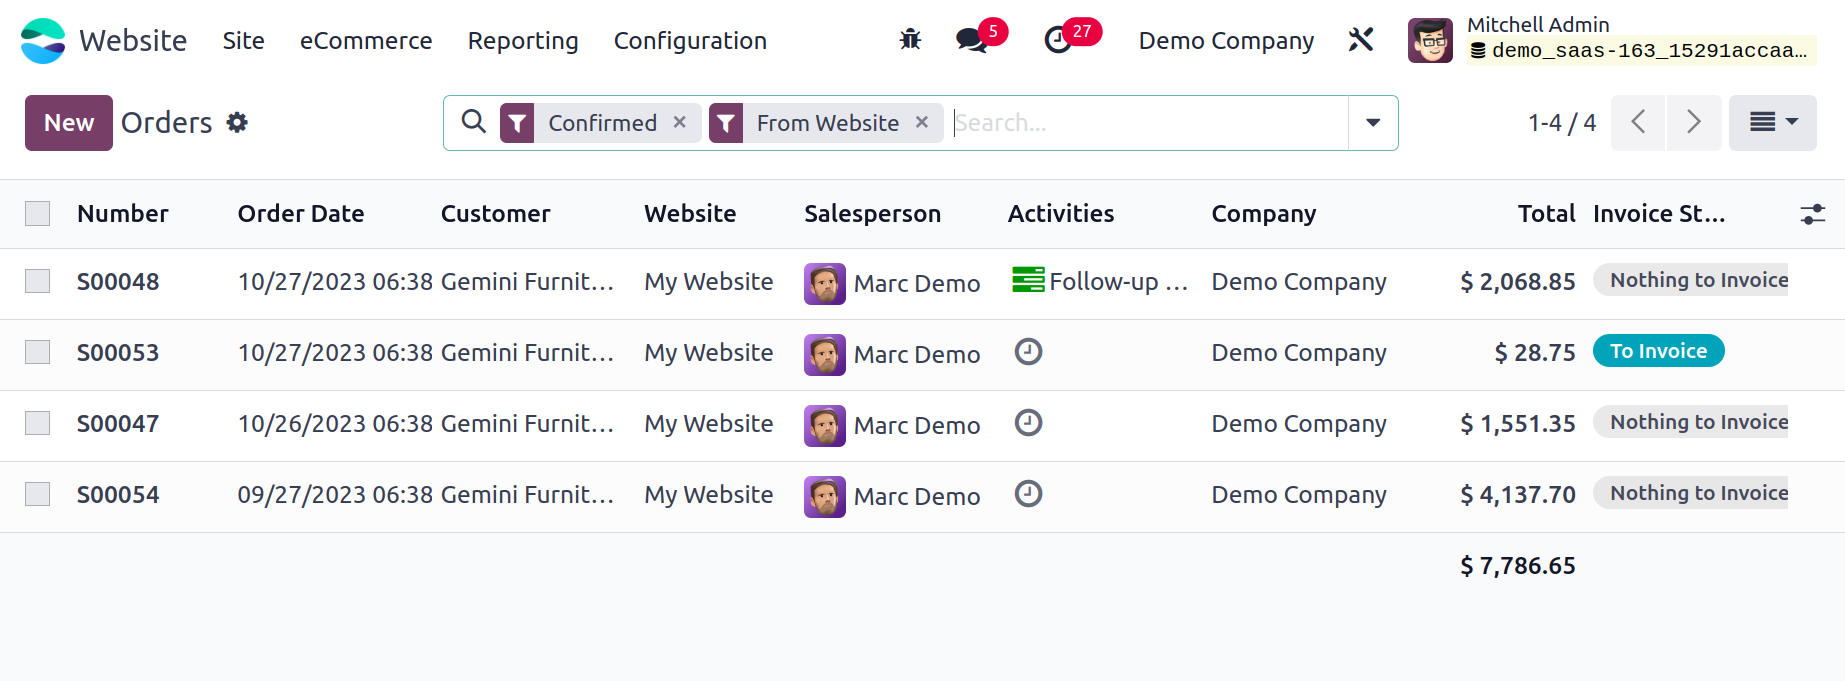
The Orders window is shown in the image above. As you can see, the window will provide a list of every order that has been received by the system, complete with the order number, order date, website, customer, salesperson, responsible company, next activity, total amount, and
status of the invoice. You can choose to view and examine each of these Order details in further depth.
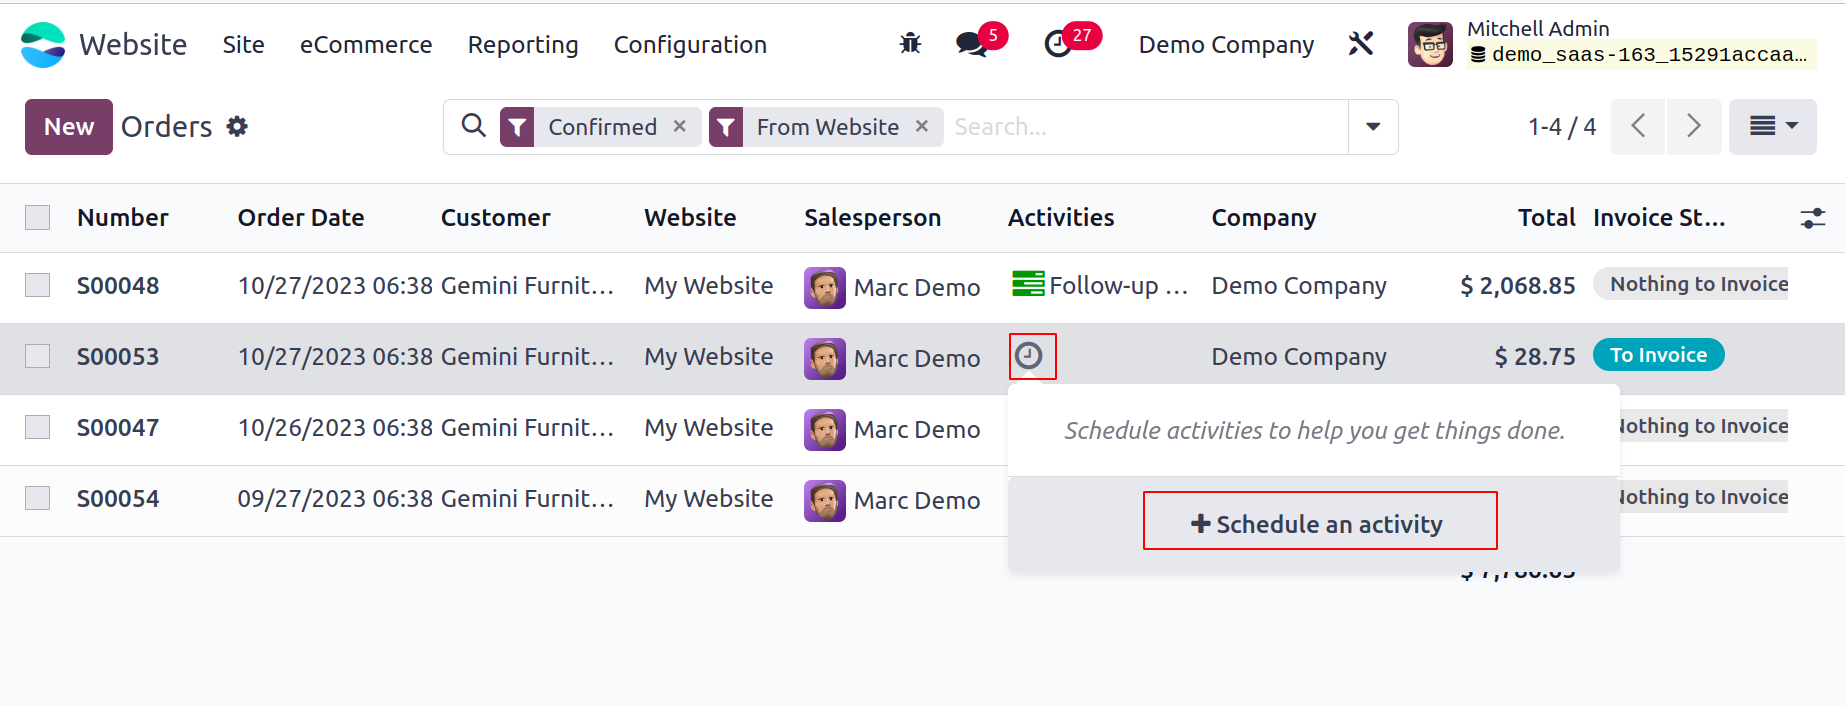
You can schedule any activity right from the Odoo window. You can click on the Next Activity icon to accomplish this. Next, a wizard will appear, allowing you to select the Schedule an activity button.
Additionally, the system lets you use a variety of pre-configured and adjustable sorting features to quickly find the information you need. This is the only use for which the Filters, Group By, Favorite, and Search options are intended.

Confirmed, Unpaid, Abandoned, Order Date (Month, Quarter, and Year), From Website, My Orders, and Add Custom Filter choices are the basic filters that are provided in the window. The window will only show confirmed orders if you choose the Confirmed option. You can apply the necessary filters in this way. Sales person, Customer, Order Date, and Add Custom Group options are the basic categorization options provided under the Group By options.
You may also view the window in List, Kanban, and Activity views thanks to the system.
Let's examine the Unpaid Orders option while we empty the Orders tab.
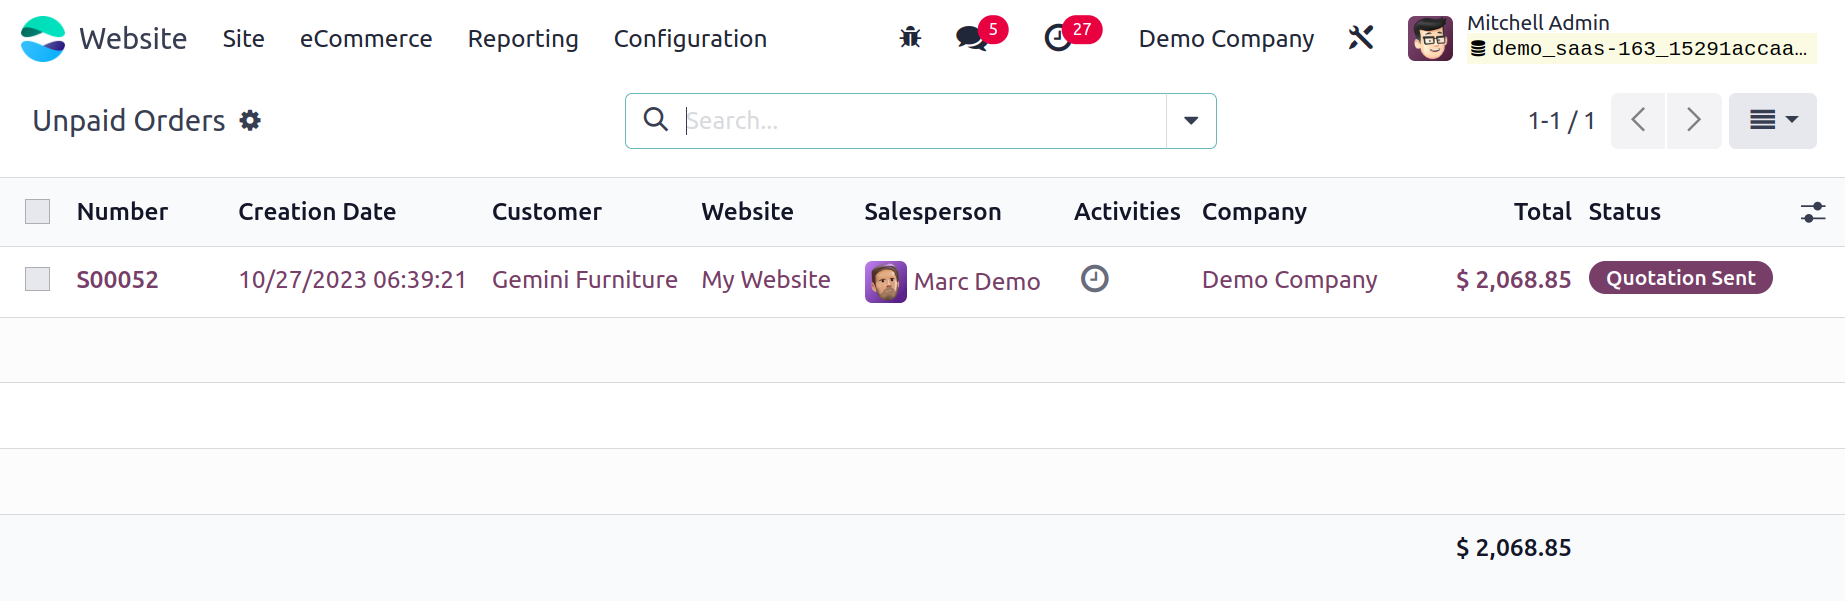
Unpaid Orders
To quickly identify unpaid orders and take appropriate action, all unpaid order details obtained from the eCommerce website will
be stored and maintained under the Unpaid Orders window. You can click on the Unpaid orders menu to open this window.
Let's investigate the next menu item: Abandoned Carts.
Abandoned Carts
Even the Abandoned Carts order information is tracked and described in the Odoo17 Website module's eCommerce tab. You can observe and comprehend the order carts that the guests have placed with the aid of the window. Furthermore, the products that have been added to this cart without any additional action or confirmation can also be viewed. This choice is a great approach to learn about the demands, opinions, interests, and shortcomings of your customers as well as the strengths and weaknesses of your company and products. You can inquire further about these consumers' decisions and choices by sending them emails after examining all of these abandoned carts. You may send these emails automatically with the aid of Odoo17.
You must configure an email template in the Odoo17 Website Settings in order to send automatically produced emails for abandoned cart recovery. When you send a recovery email automatically, the pre-approved email template will be presented by default. You can access the Odoo17 Website module's Settings window to accomplish this. As seen in the screenshot below, you can find the Automatically send abandoned checkout emails option in the Settings window under the Email & Marketing menu.
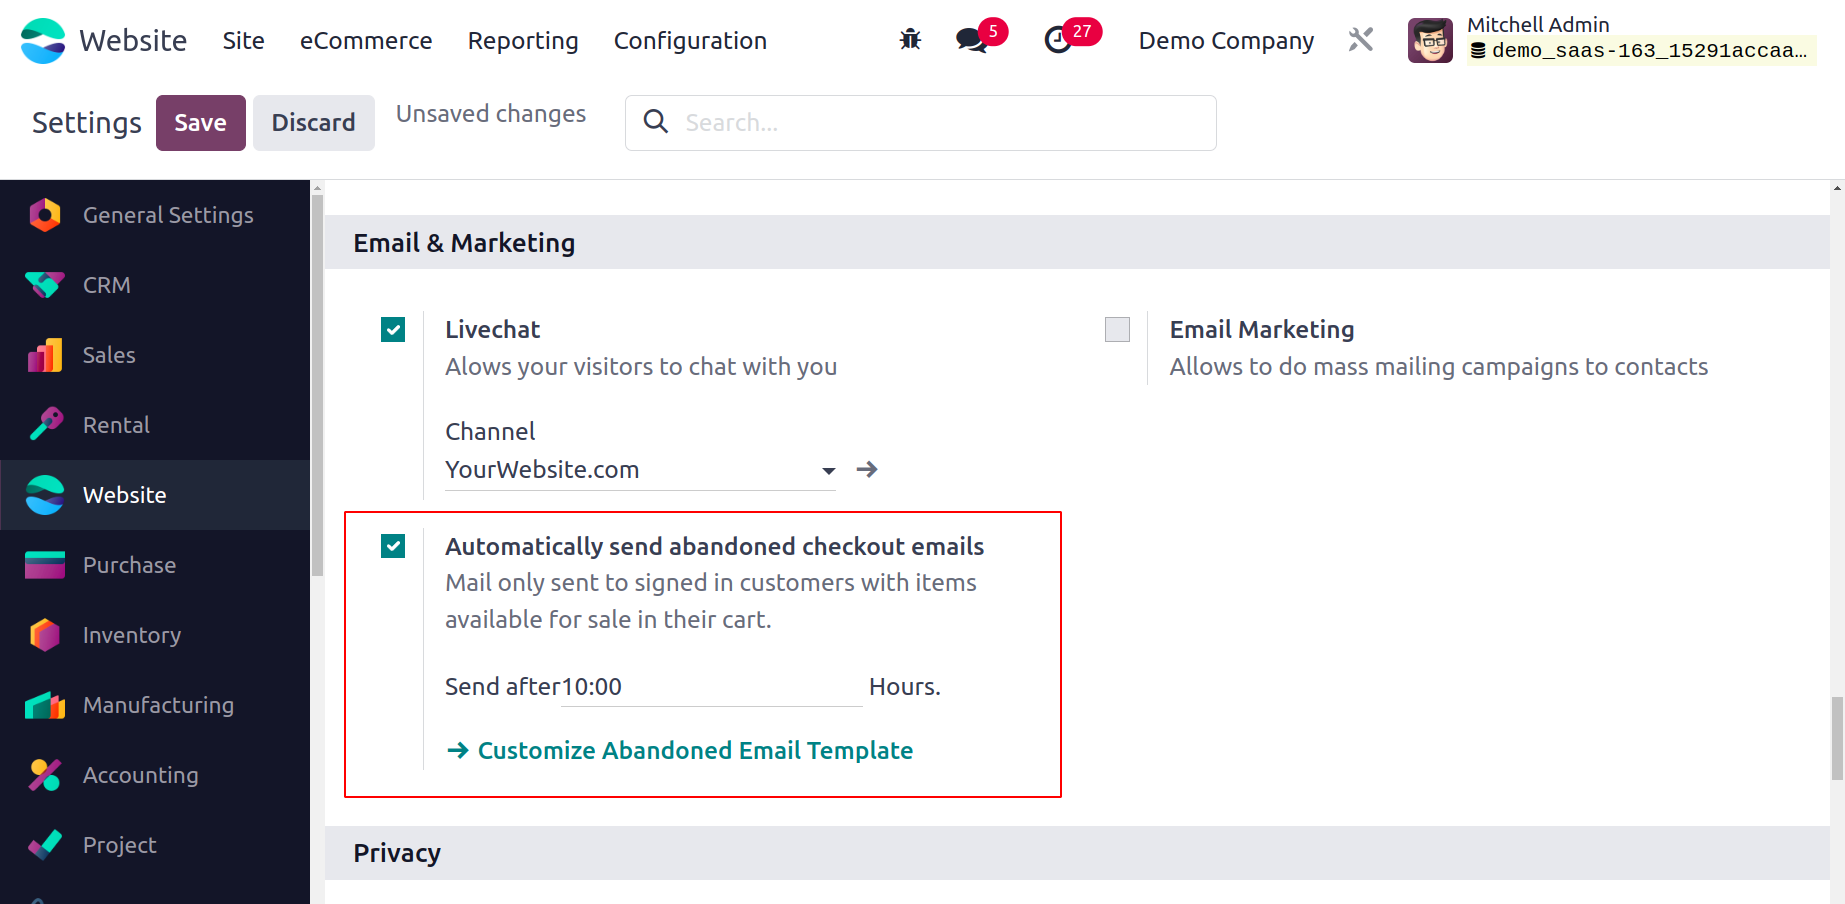
You can provide the hourly time after which the email will be sent in addition to the email template.
Let's now examine the window for abandoned carts. We may do this by selecting the Abandoned Carts menu from the eCommerce tab.
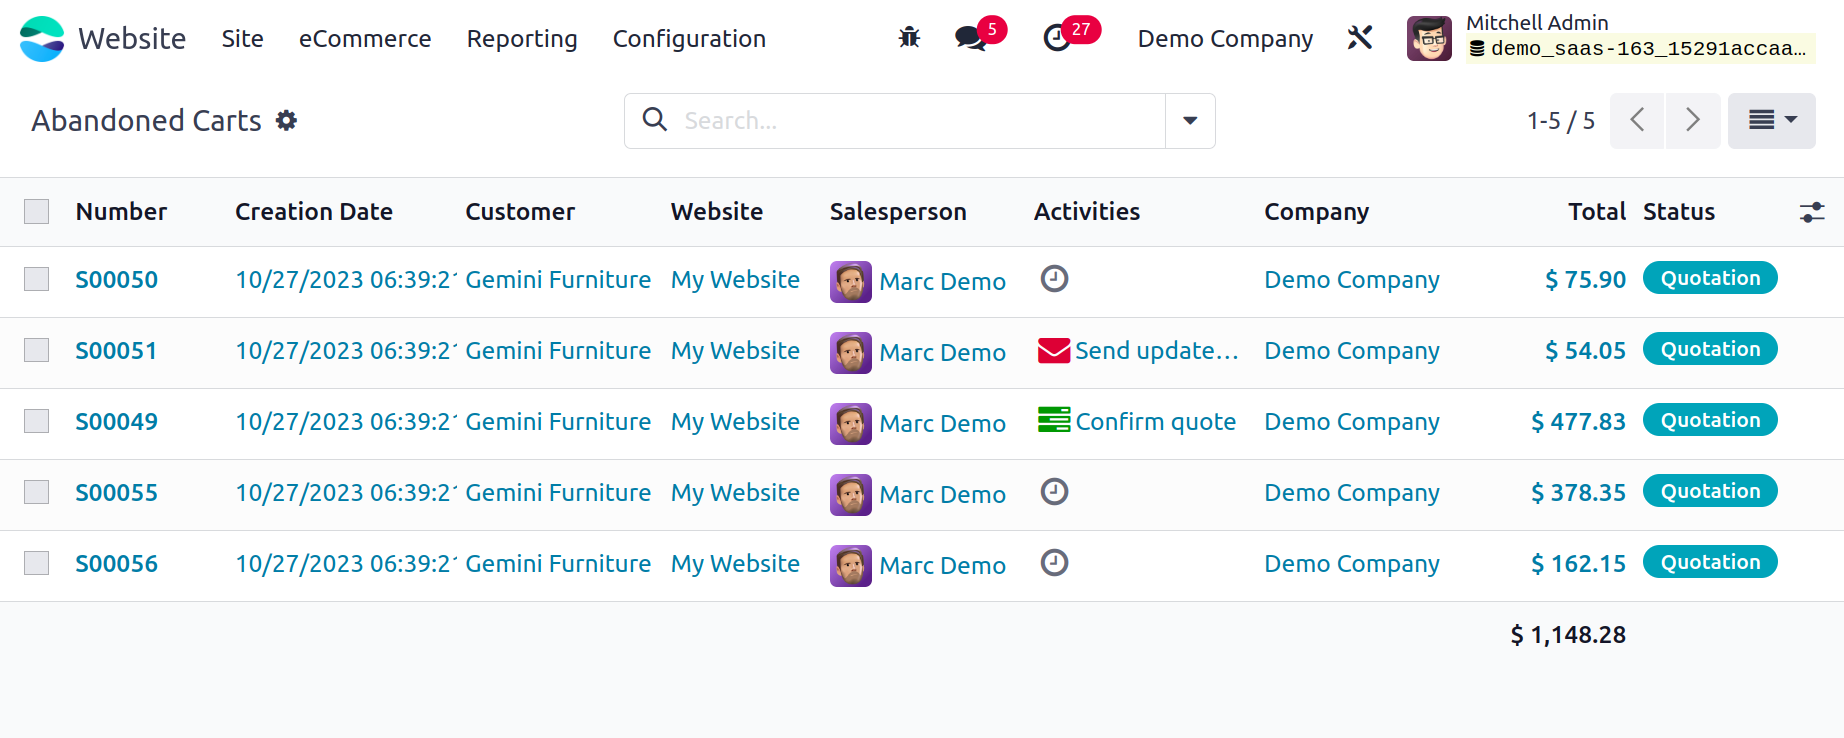
This window will show a sneak peek of the records for abandoned carts. With information like the Number, Creation Date, Customer, Salesperson, Next Activity, Company, Total, and Status included, each record is listed out. You can view the preview window in the Activity, List, and Kanban views as well. You can click on the salesperson's photo that is displayed in the window to have a direct conversation with them. As seen below, a chat pop-up window will appear, and you can use this wizard to communicate with the relevant salesperson.
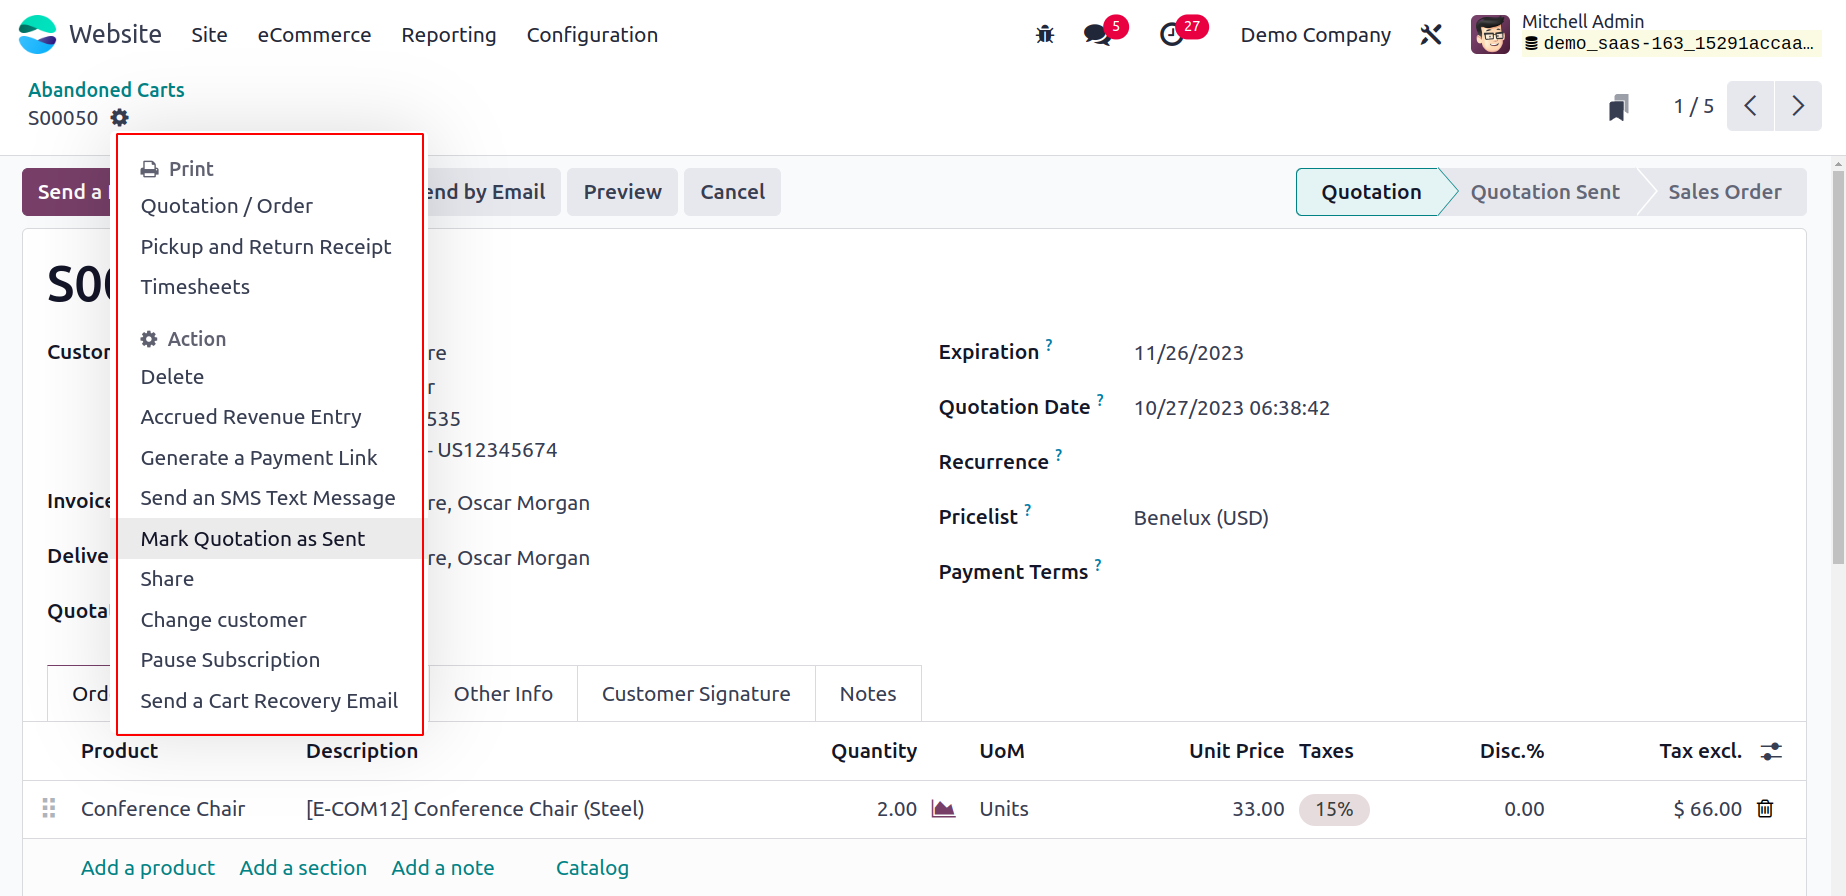
As seen below, each record in the window can be chosen and examined in further depth.
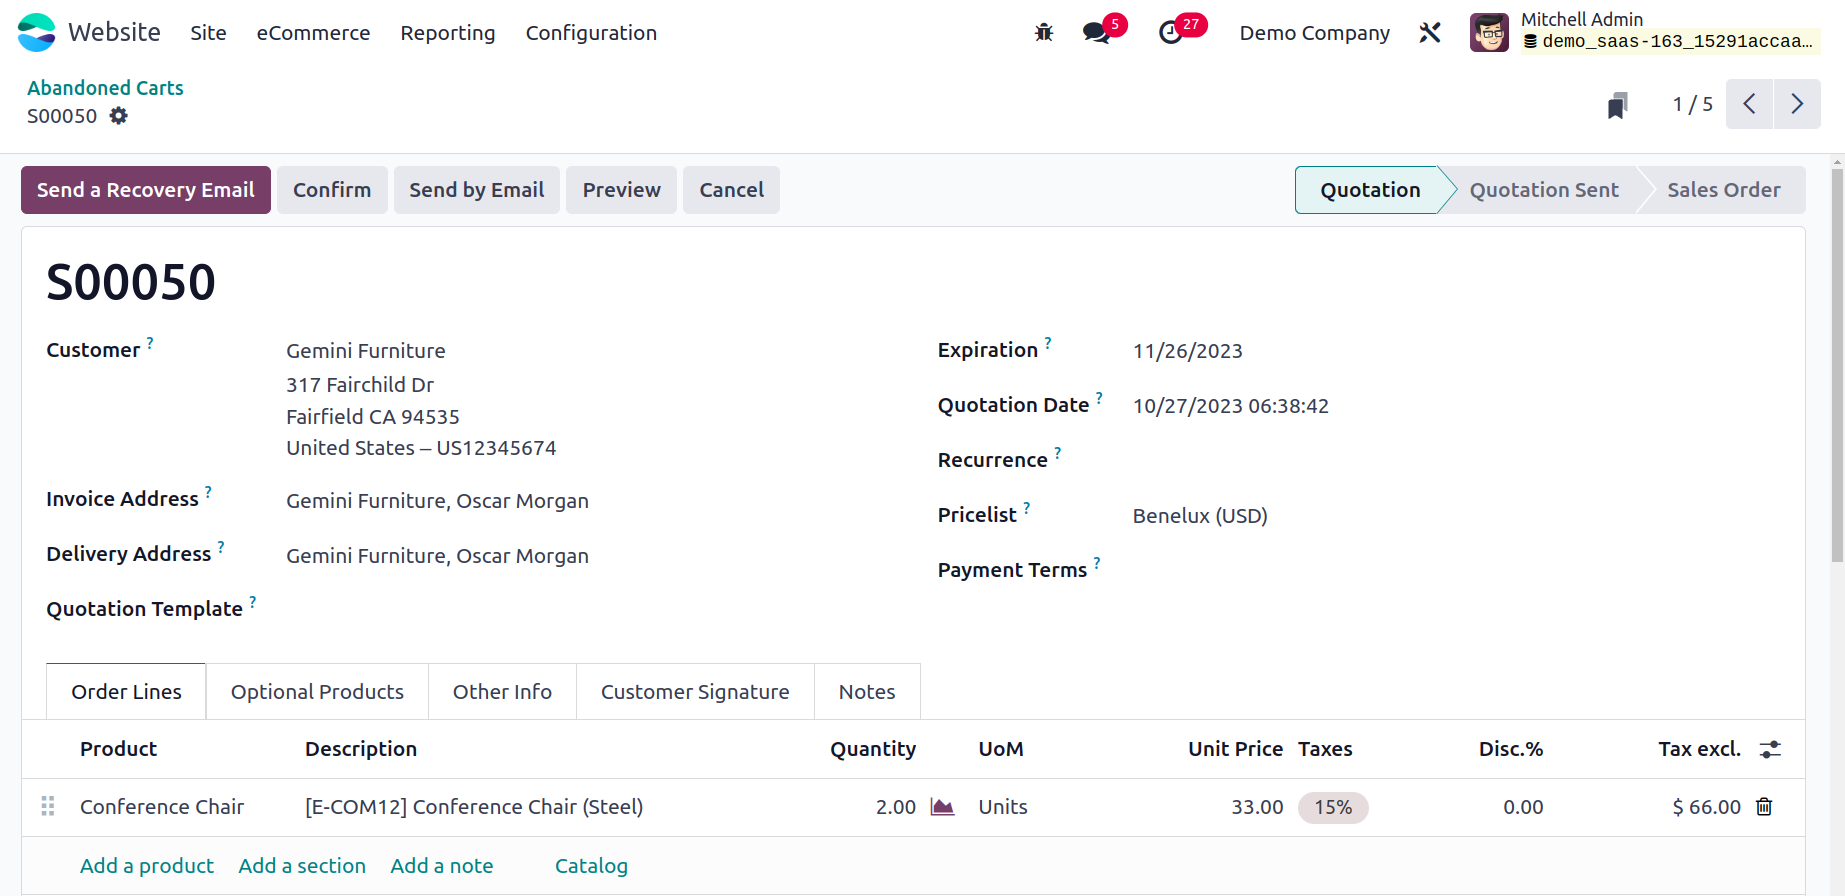
You will describe every detail of this record here. Additional options for actions include Send a Recovery Email, Confirm, and Cancel in this window. Additionally, the Print and Action button is visible in the window's upper right.
There are two submenus accessible through the Print button: Pickup and Return Receipt and Quotation/Order. The Delete, Accrued Revenue Entry, Generate a Payment Link, Share, Mark Quotation as Sent, and Send a Cart Recovery Email, etc. are located on the additional actions button.
We can talk about the menu for customers.
Customers
Last but not least, you may store all of your customer information in one location with the menu found under the eCommerce tab of the Odoo 17 Website module. Let's examine the window together.
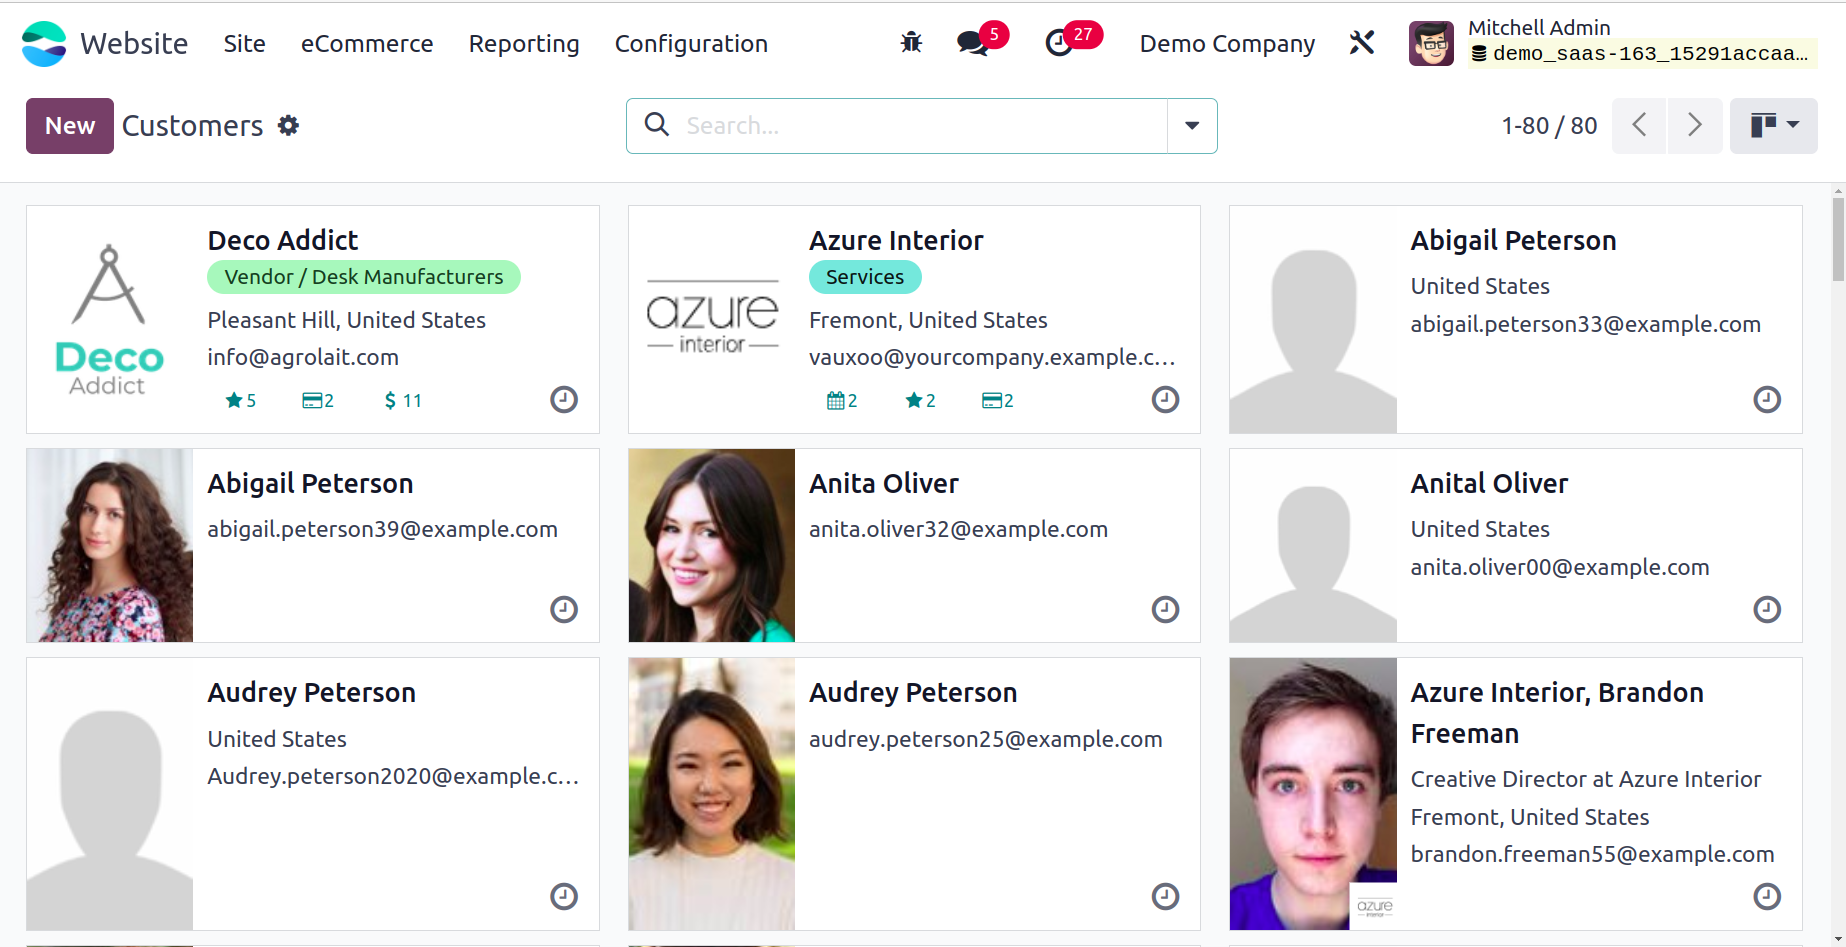
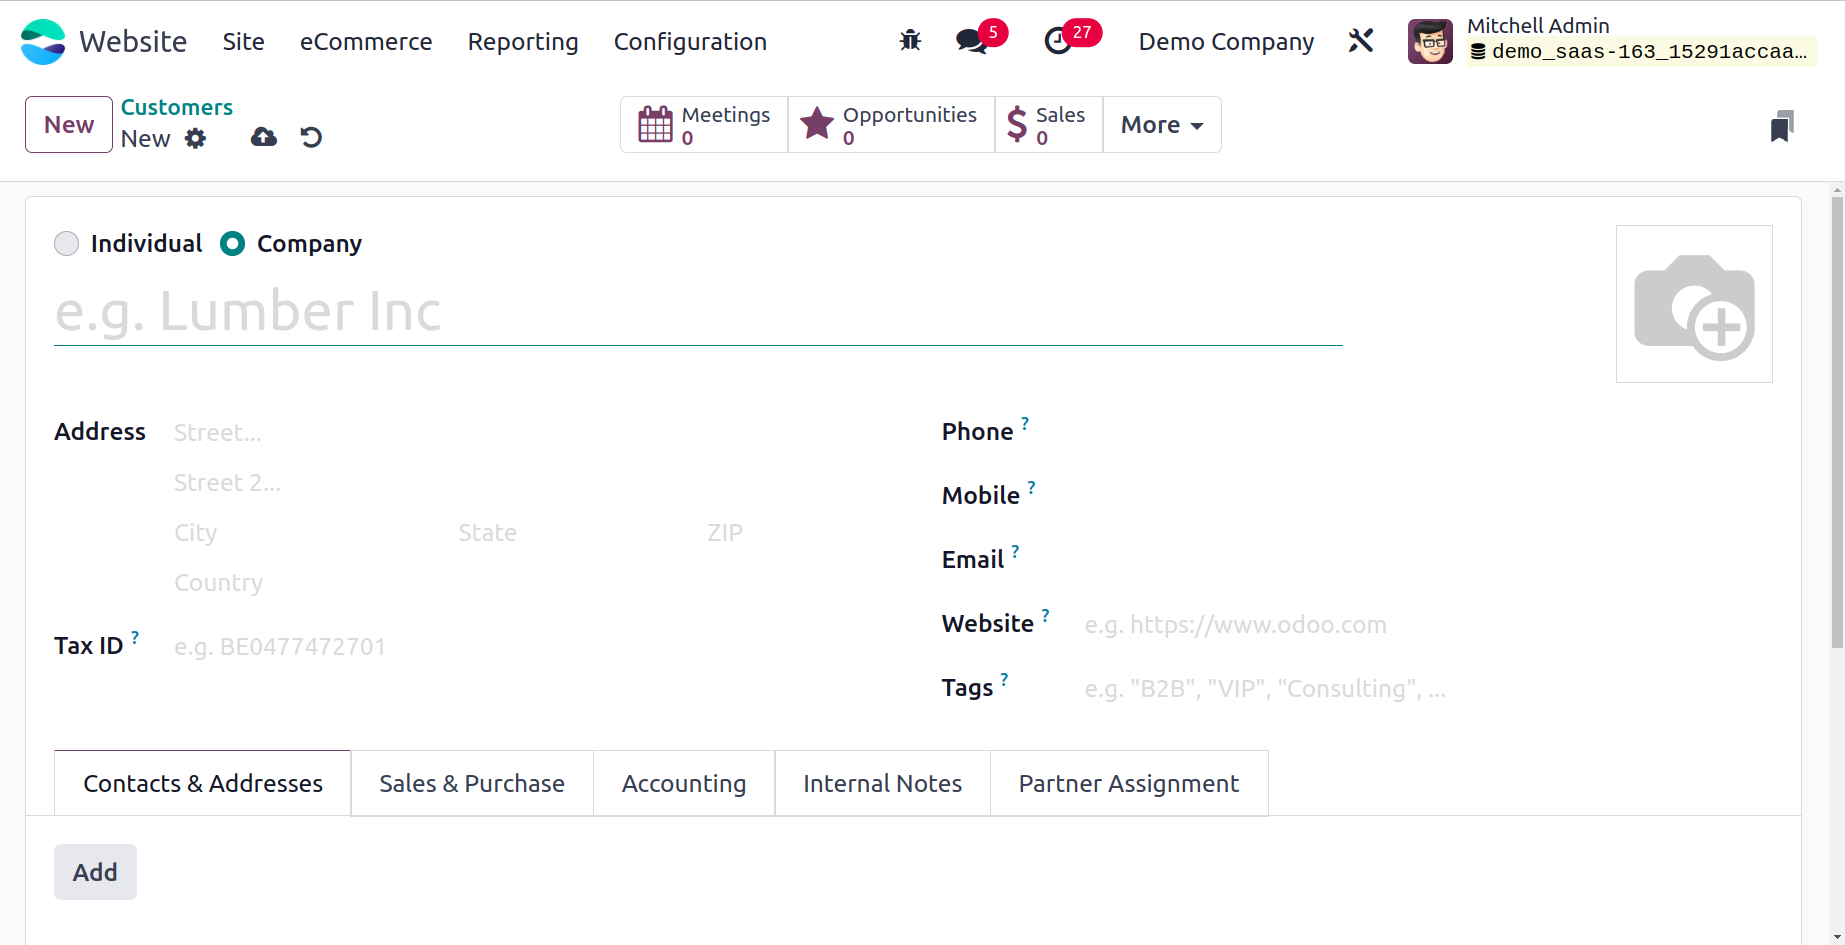
The Customers window can be viewed in List and Activity views in addition to the Kanban view that is shown in the above image. The Kanban view shows each employee's details in a structure akin to a card, and it provides the most crucial information along with the customer's photo. To view the customer in more detail, choose the appropriate card. The window has a number of pre-configured and modifiable sorting features, including search, favorite, group by, and filtering choices. You may rapidly filter and categorize your necessary data by using these options. Individuals, Companies, Customer Invoices, Vendor Bills, Subcontractors, and Archived are the default filters that are provided in the window. Additionally, you can use the default group to categorize your window by categories like Salesperson, Company, and Country. You can click the New button to create a new customer.
Next, draw a creation form similar to the one in the picture below.
We have already covered the Orders tab in the Odoo Website module; let's now examine the extent to which the module handles product administration tasks.
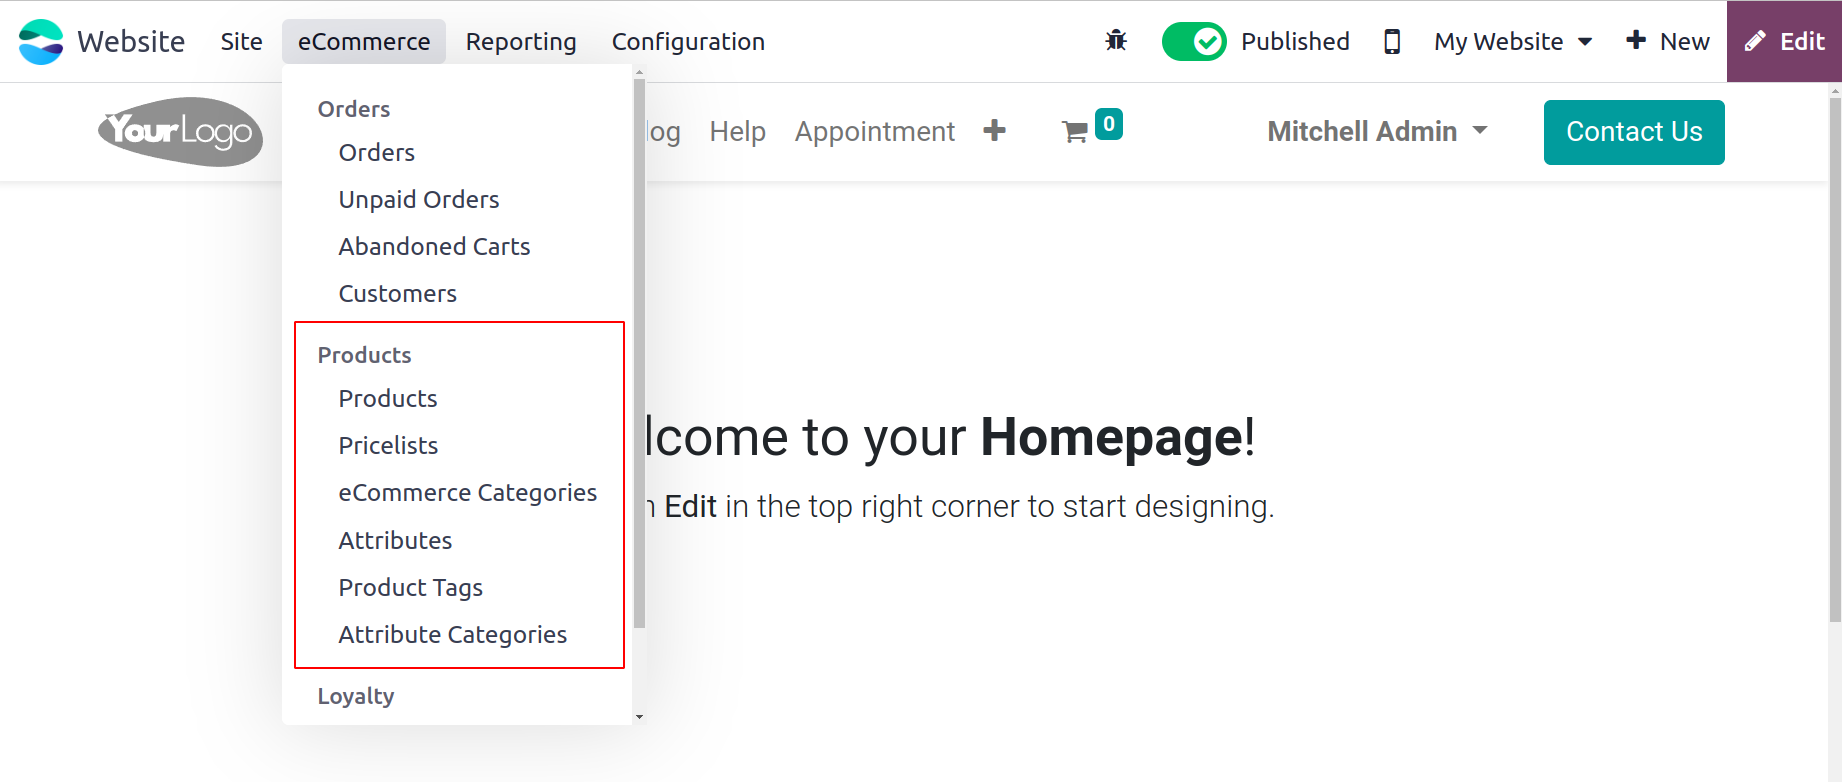
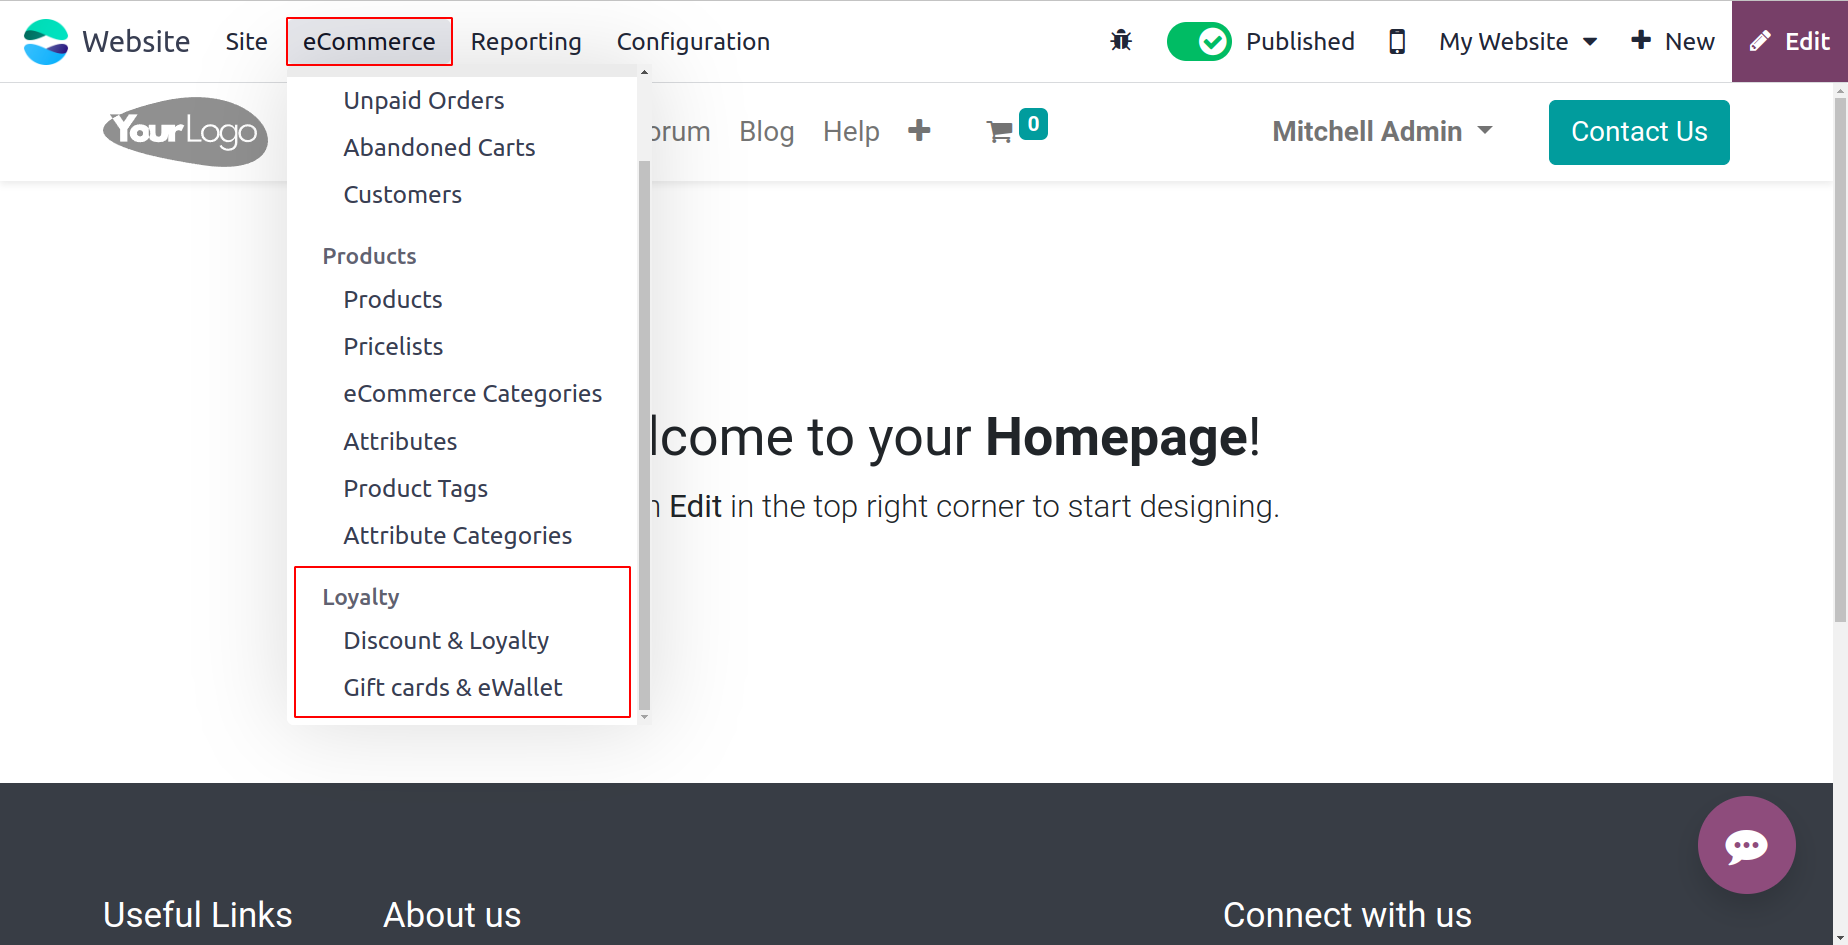
Products
Pricelists, eCommerce Categories, Attributes, Product Tags and Attribute Categories are among the settings accessible in the Configuration tab's Product section.
More about the product option is explained inside the Sales Module.
Pricelist
Different pricing methods for your goods or services can be efficiently established with the Odoo17 platform's Price List feature. One way to characterize the aspect of price lists is as a set of pricing or price
rules that can be used to determine a product's price depending on a variety of factors, including discounts, country, and season.
One more way to think of the Pricelist function as a localization feature is that the Odoo17 system lets you charge different prices for the same product depending on who buys it. You can designate a different price list for your devoted clientele if you like to provide them with additional offers. The Odoo17 Website module's ecommerce tab provides access to the Odoo
system's Price Lists menu. Prior to proceeding, make sure the Pricelist option is turned on in the Settings window.
Odoo gives you two options for applying price in this situation.
Multiple prices per product: Using this technique, price lists for different clients can be created for the same product. It is regarded as a pricing list with set prices for each product. For the same product, you can easily establish several pricing and apply them to the appropriate clients.
Advanced pricing rules (discounts, formulas): You can establish the rules using this feature by basing them on the cost of the product, the going rate, or another price list. To adjust the price, you can also use algorithms and discounts. Rounding off the price is also supported by the platform.
Let's start by talking about the multiple prices per product method. The Odoo17 Website module's Price List menu can be found under the eCommerce tab. To use it, first activate the option in the settings. The window's image is seen below.
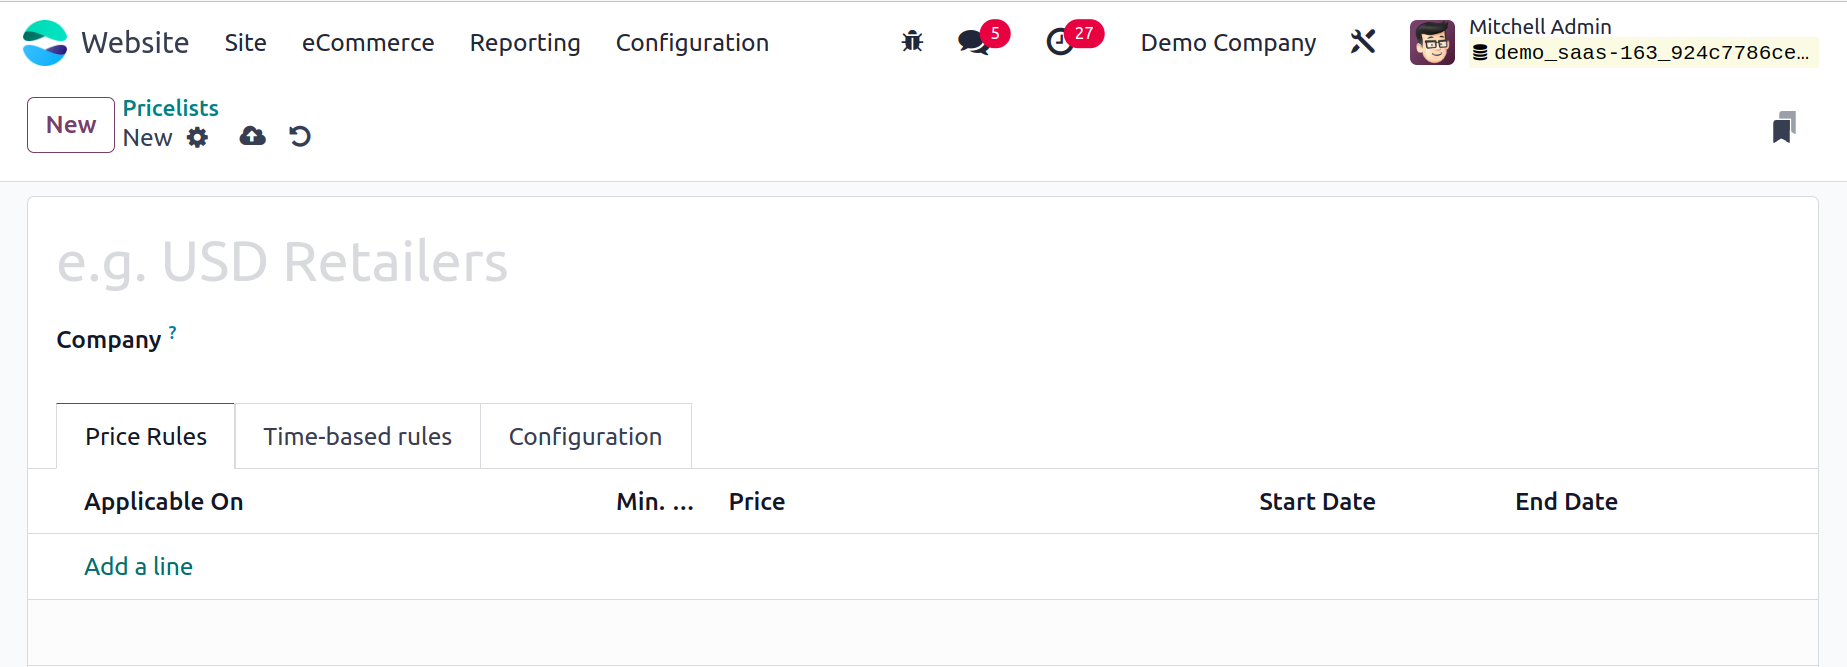
and Currency. You can make Price Lists Rules under the Price Rules tab.
All of the price lists that are described in the platform will be listed in this window, along with the Pricelist Name, Currency, Selectable, Website, and Company. You can click the New button to configure the new price lists.

As seen in the image below, you will be taken to the creation window. You can give the price lists a name in this creation window and fill in the designated fields with the Company and Currency. You can make Price Lists Rules under the Price Rules tab.
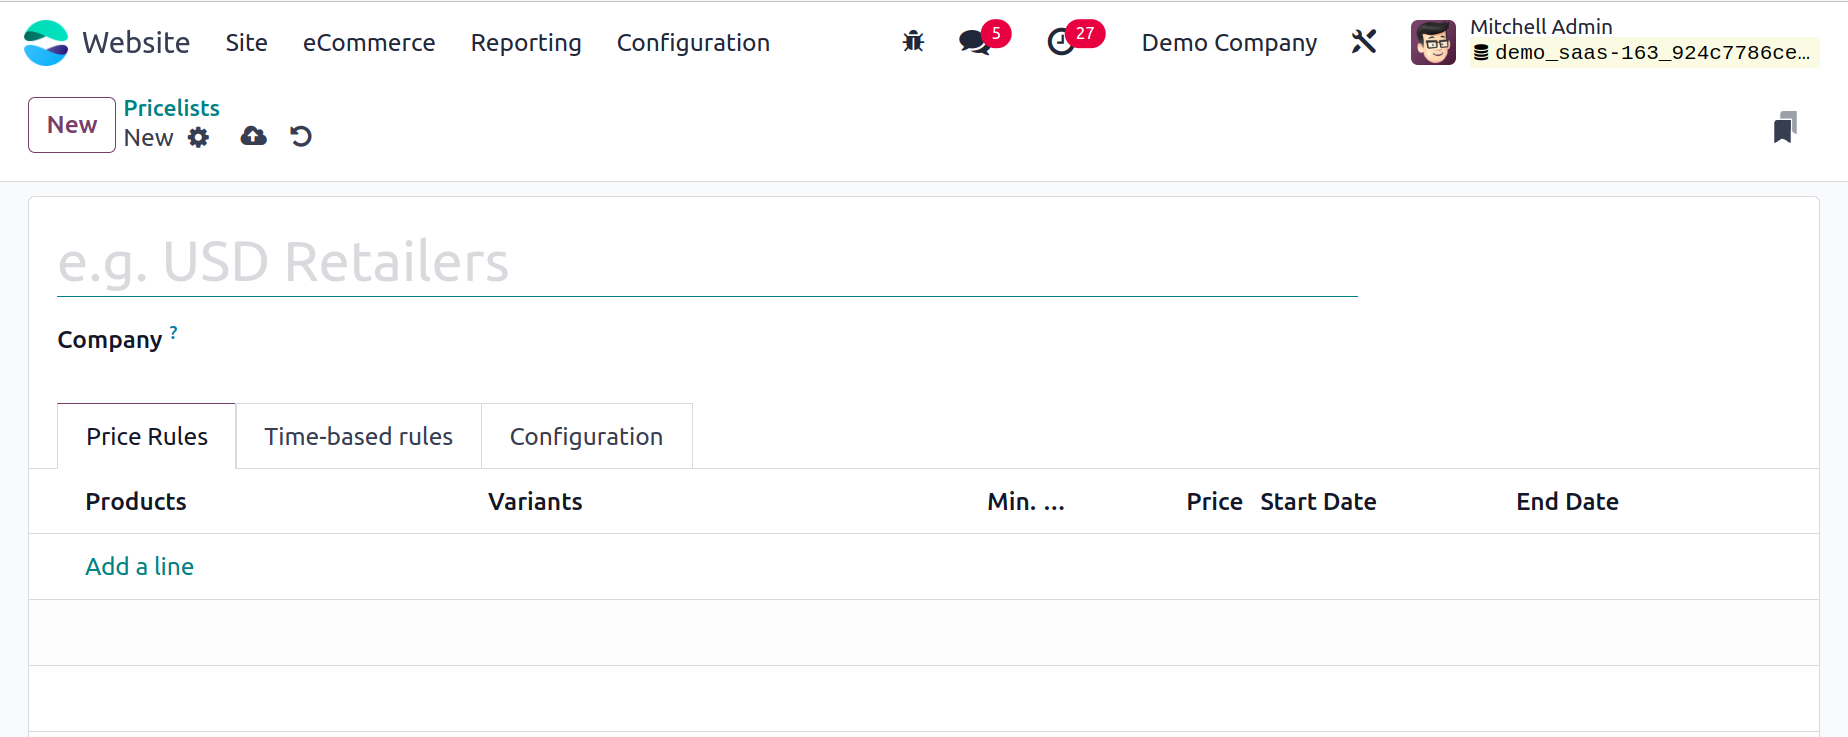
You can click the Add a Line button to accomplish this. You'll be able to supply information on products and product variations. Next, you can provide the product's Minimum Quantity, which will only apply to purchases of products that are higher than or equal to this Minimum Quantity when applying this pricing rule. Lastly, use the calendar pop-up to indicate the start and finish dates of this specific price list item.
Time based Rules can be added inside the Time-based Rules tab. You can specify the price list item's availability under the Configuration tab of the Pricelist window. In order to configure this price list for the chosen country, you can provide the Country Group. Additionally, you have the option to designate the website and enable the Selectable field so that the user can select this price list. You can get these specific price lists on your online shop page by turning on this field, as seen in the figure below.
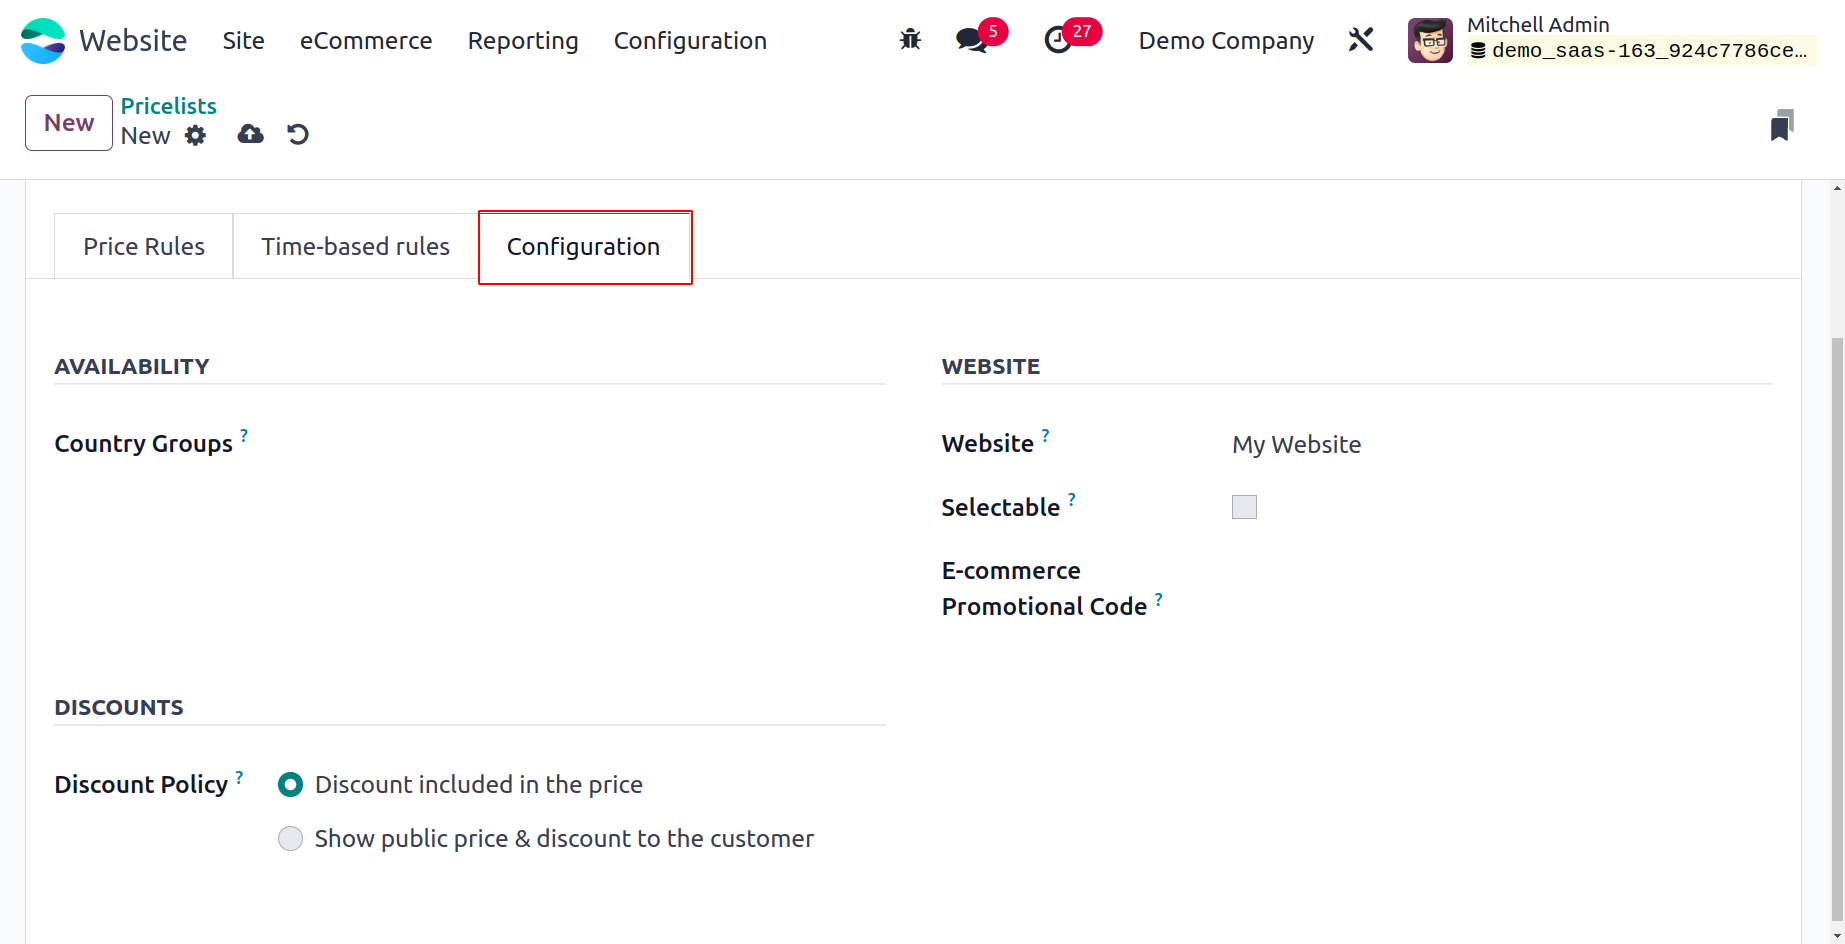
You can enter the eCommerce platform's promotional code in the E-commerce Promotional Code area. You can select the view of the discounted price on sale order lines with this discount option. Either "Discount included in the price" or "Show public price and discount to the customer" are two ways to specify the discount policy. You can
click the store button to store the newly created Pricelists after entering all the necessary data.
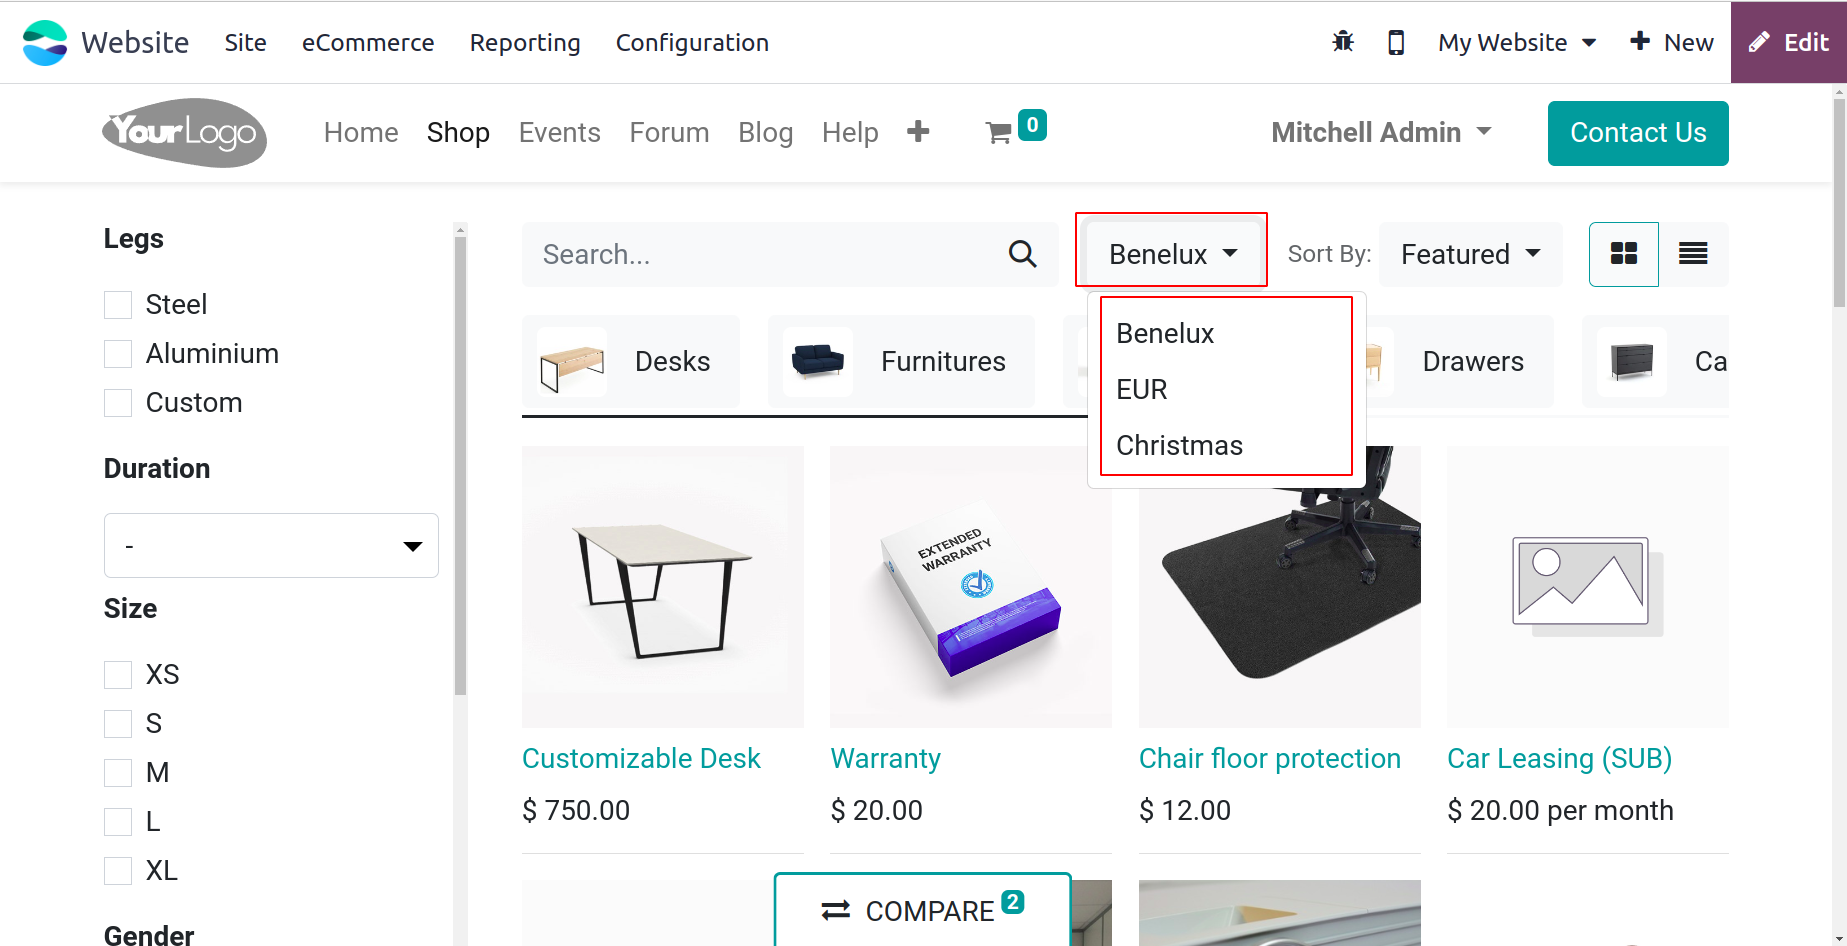
The pricing list that has been prepared and made available on the website can be selected from the upper right corner if the Selectable option is enabled.
We can now take a quick look at the Advanced price rules for the Pricelist technique. To activate this feature, navigate to the Website module's Settings menu.
You can now access the Pricelist creation window as previously mentioned.
You can provide price rules by clicking on the Add a line option found under the Price Rules tab after defining the Pricelist Name, Currency, and Company.
The Add a line button will cause a pop-up window to appear, similar to what's seen in the image below.

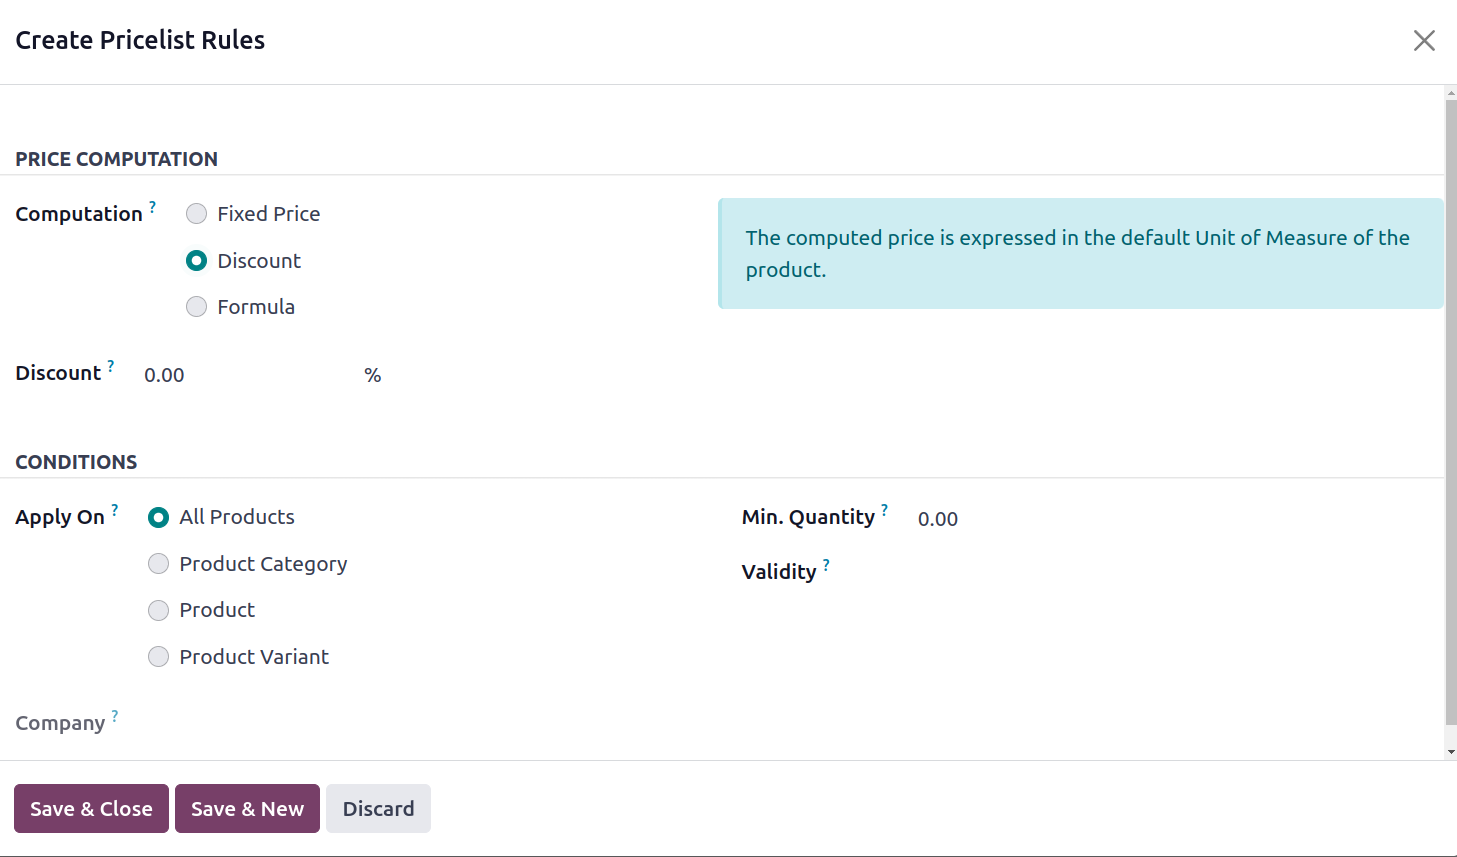
The Price Computation method can be mentioned here. If this method is used for a particular product, product category, or product variant, the related items can be added. Odoo gives you the option to configure pricing computation in
several ways using this method, including Fixed pricing, Discount, and Formula.
You will undoubtedly see an extra field to indicate Fixed Price if you select the Fixed Price option. Similarly, if you choose the Discount option, the window shows the Discount area where you can specify the percentage of the discount.
As seen in the image below, you will need to fill in extra fields while using "Formula."
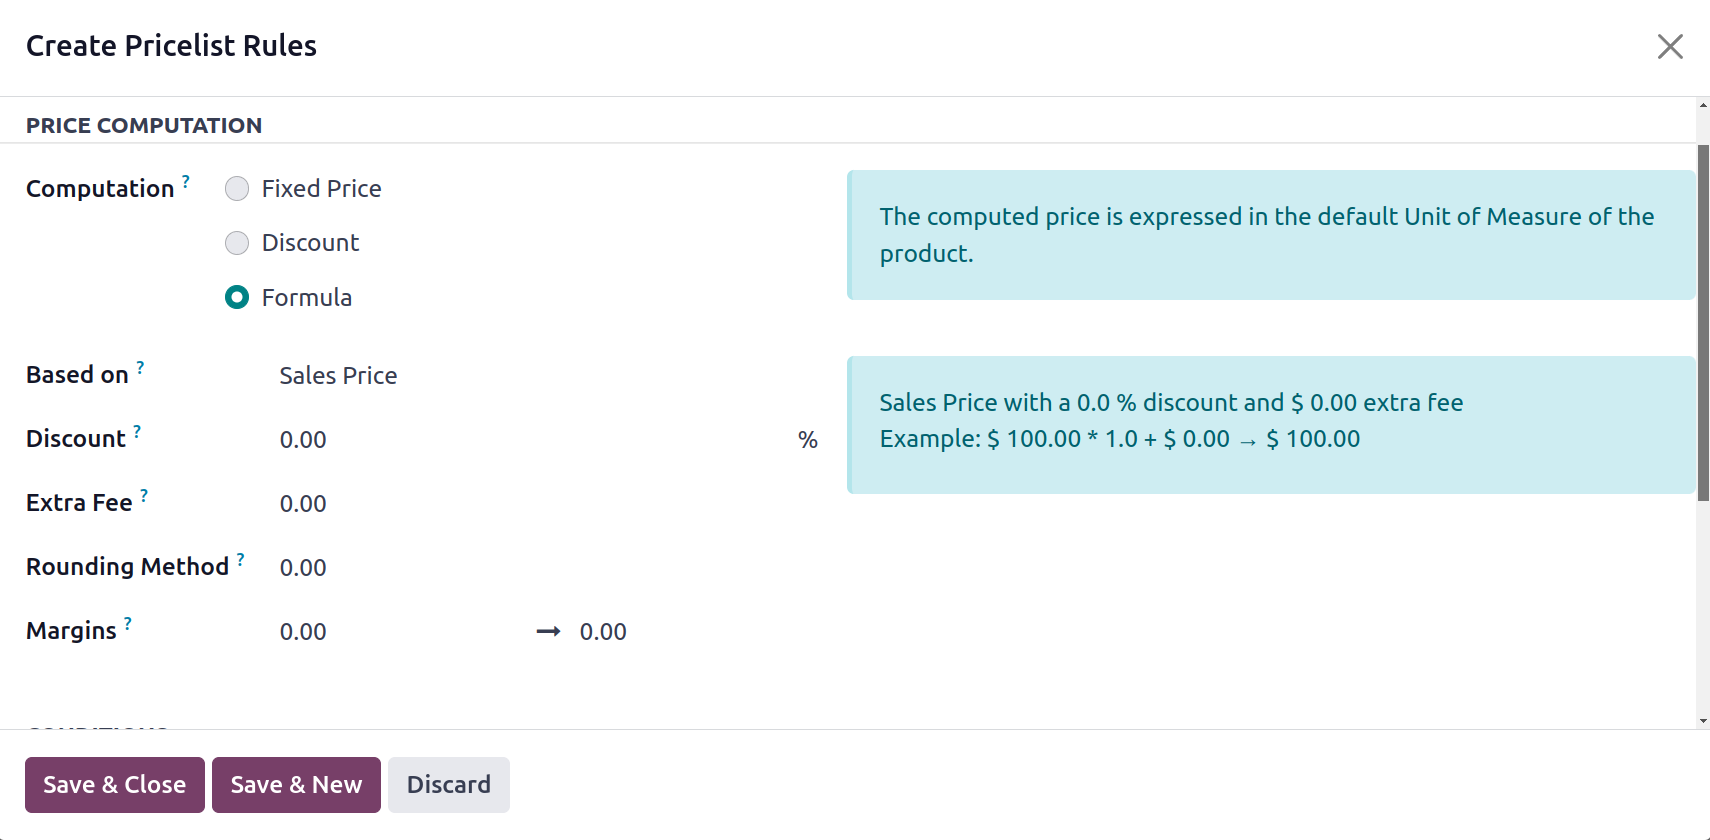
When you choose the Price Computation technique for the Formula, the following extra fields appear: Based on, Discount, Extra Fee, Rounding technique, and Margins. You can choose the base price for computation in the Based on the field. Here, you may use the drop-down menu to select an option that will work for your company's needs. The drop-down menu's selections consist of
- Sales Price: The Sales Price will be the base price if you want to use it.
- Cost Price: The base price can be set to the Cost Price by selecting the Cost Price.
- Other Pricelist: Utilizing a different pricelist to calculate the base price.
You can apply a markup by entering a negative discount in the Discount column. Next, you can enter the set amount to be added (if positive) or subtracted (if negative) from the amount determined after the discount in the Extra Fee area. The price will be set by the system to be a multiple of this figure by using the Rounding technique. Rounding will be implemented prior to the surcharge and following the discount. For instance, to have prices that finish in 9.99,
set the rounding 10 fee to -0.01. Additionally, you can provide the minimum margin above the base price in the Margins area.
Odoo provides four options in the Conditions section. You can choose an
appropriate option from these to apply pricelist items. The choices are All Product, Product Category, Product Variant, .
You can choose the All Products option if this rule is applicable to all products. To ensure that this rule only applies to products that fall within this specific category or its child categories,
you should use the Product Category option. You can choose the Product when using this price list is necessary for a particular product.
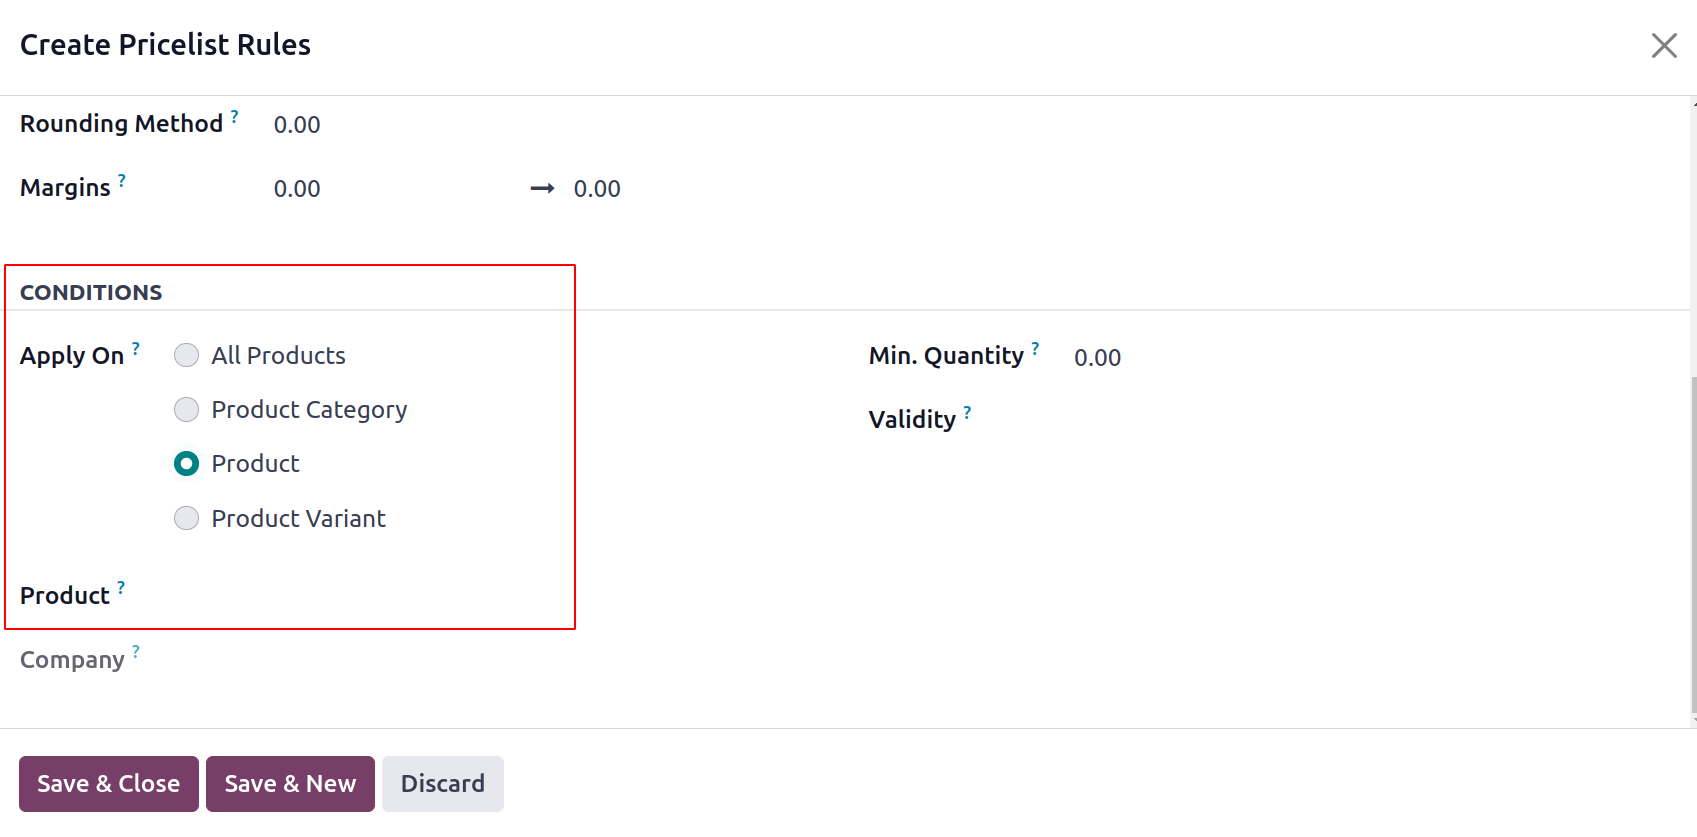
By selecting the available Product Variant option, you can similarly define the Product Variant. You can designate the Minimum Quantity for the rule to apply once the Conditions have been applied. The quantity purchased or sold must match or exceed the minimum amount entered in this area. It was stated using the product's default unit of measurement. Lastly, it is possible to specify the pricing rule's validity. The start and end date-time of the price lists item validation can be mentioned. The date that appears will be based on the time zone that you have selected. The subsequent steps for the multiple pricing per product and the advanced price rules are the same.
eCommerce Categories
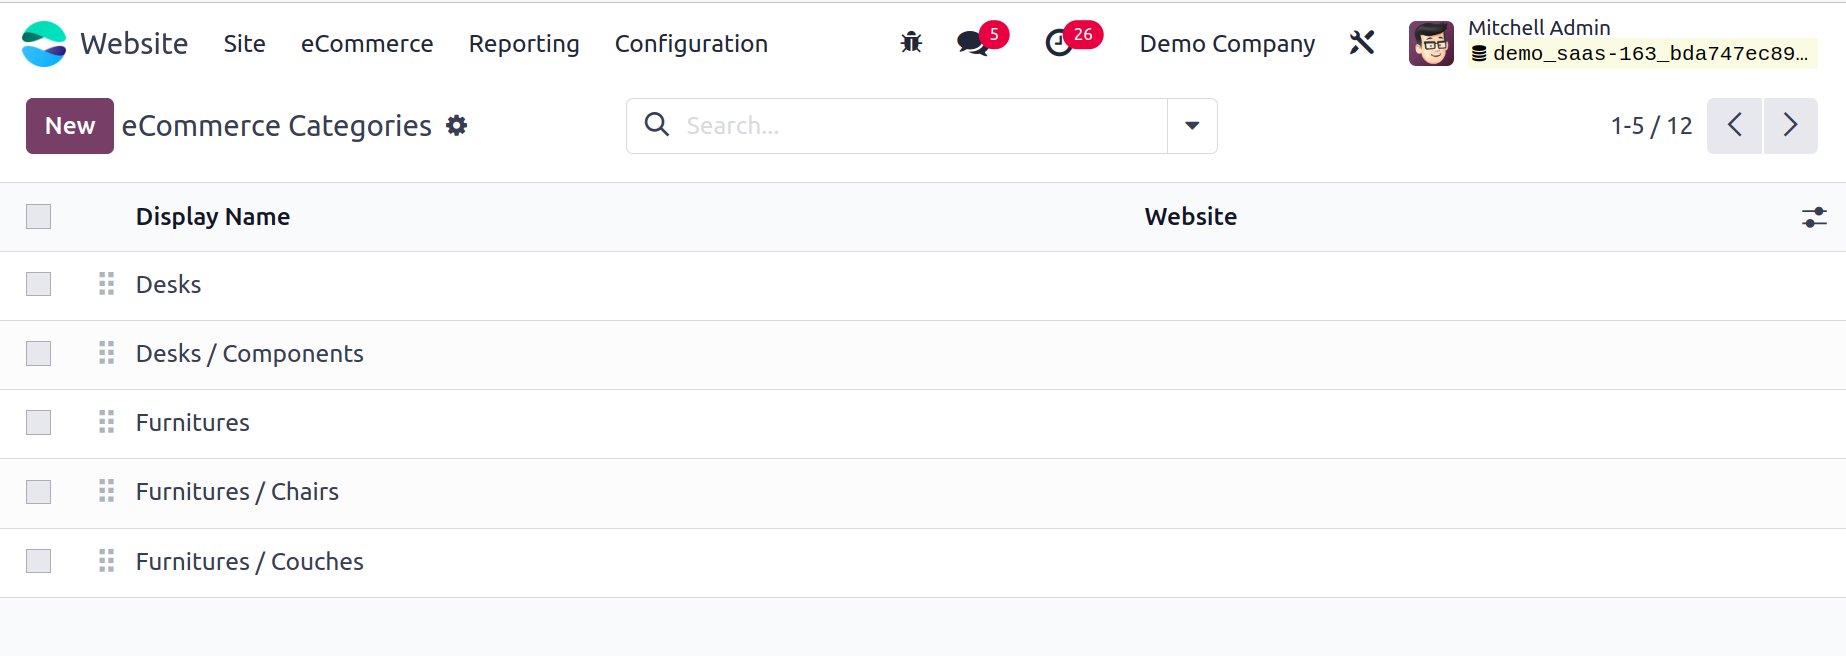
It is possible to set up different eCommerce Categories for products using the Odoo17 Website module. For the purpose of classifying and differentiating products on your eCommerce website, this function will be quite useful. We may click on the eCommerce Categories option to open the eCommerce Categories window. You will now see the window that is depicted in the image below, which allows you to view and access every eCommerce category that the platform has to offer.
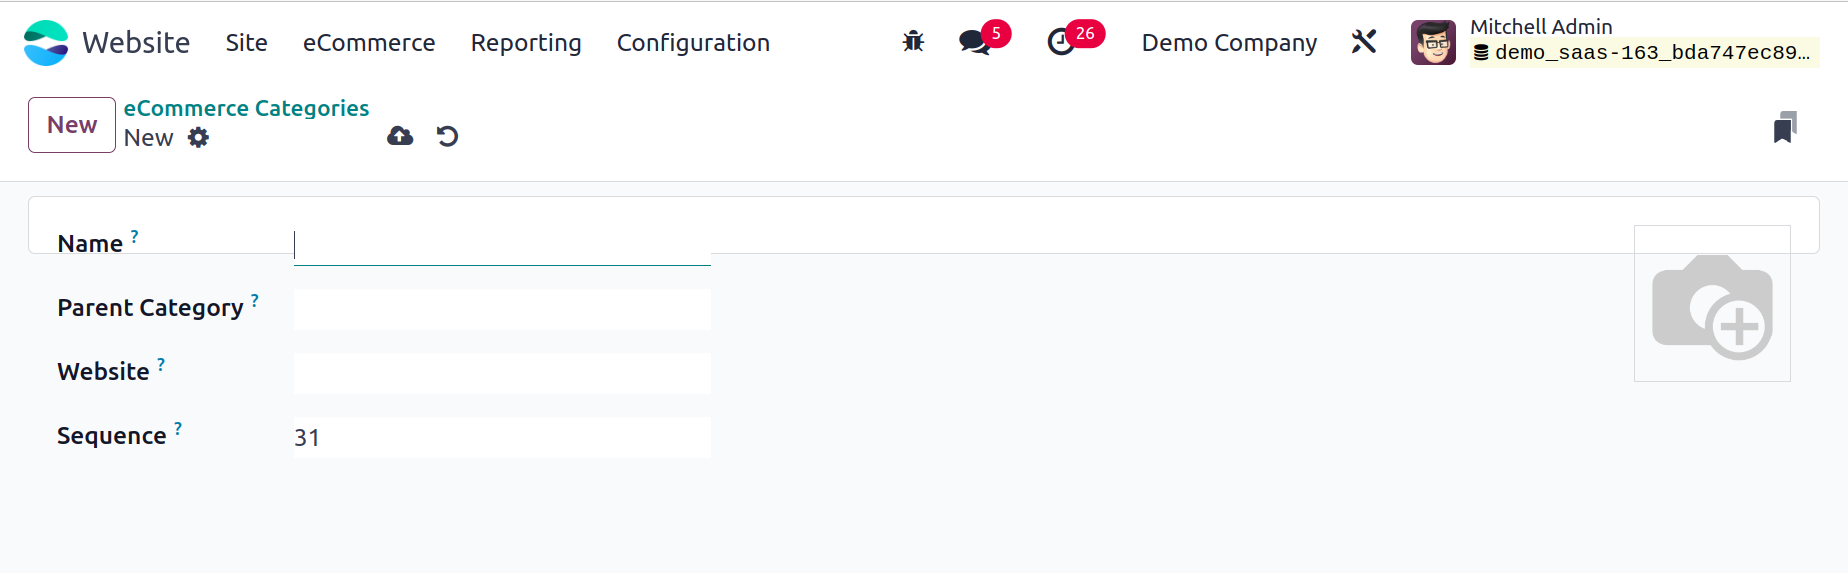
You can click the New button, which is located in the upper left corner of the window, to start a new one.
Here, you may provide the name and a picture of the eCommerce Category. You can include the Parent Category, the relevant Website and Sequence number in the designated boxes. Save the information for the new eCommerce Category after supplying all the necessary information.
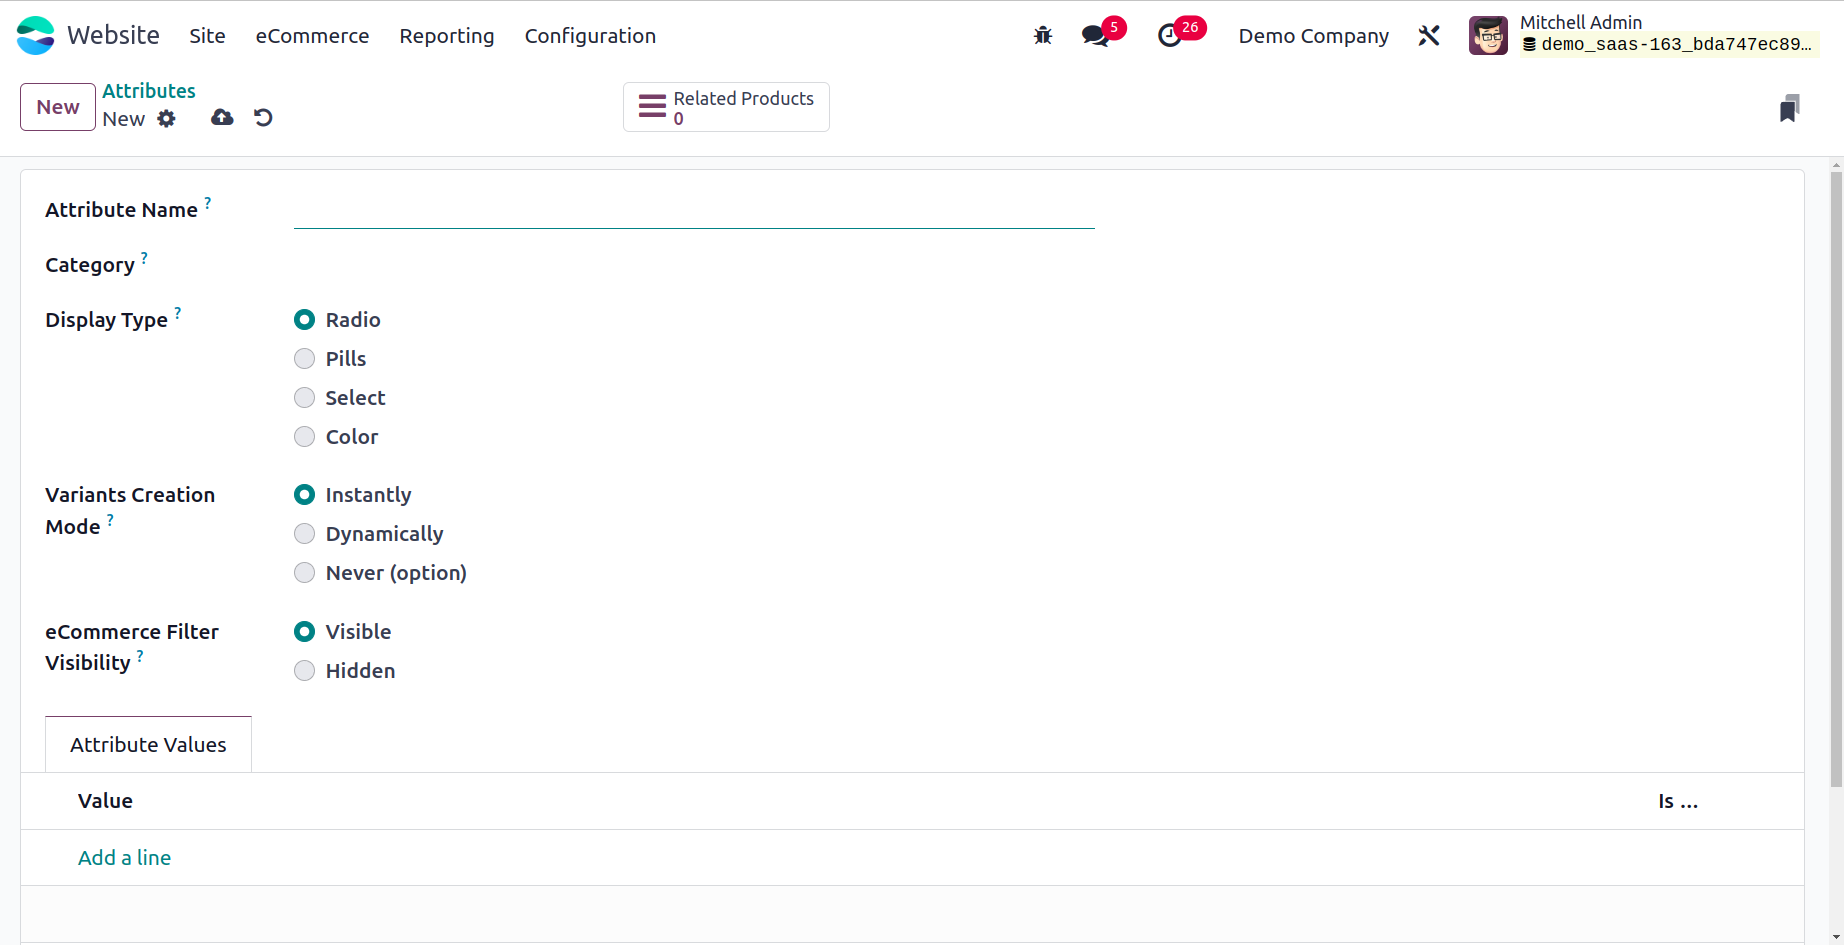
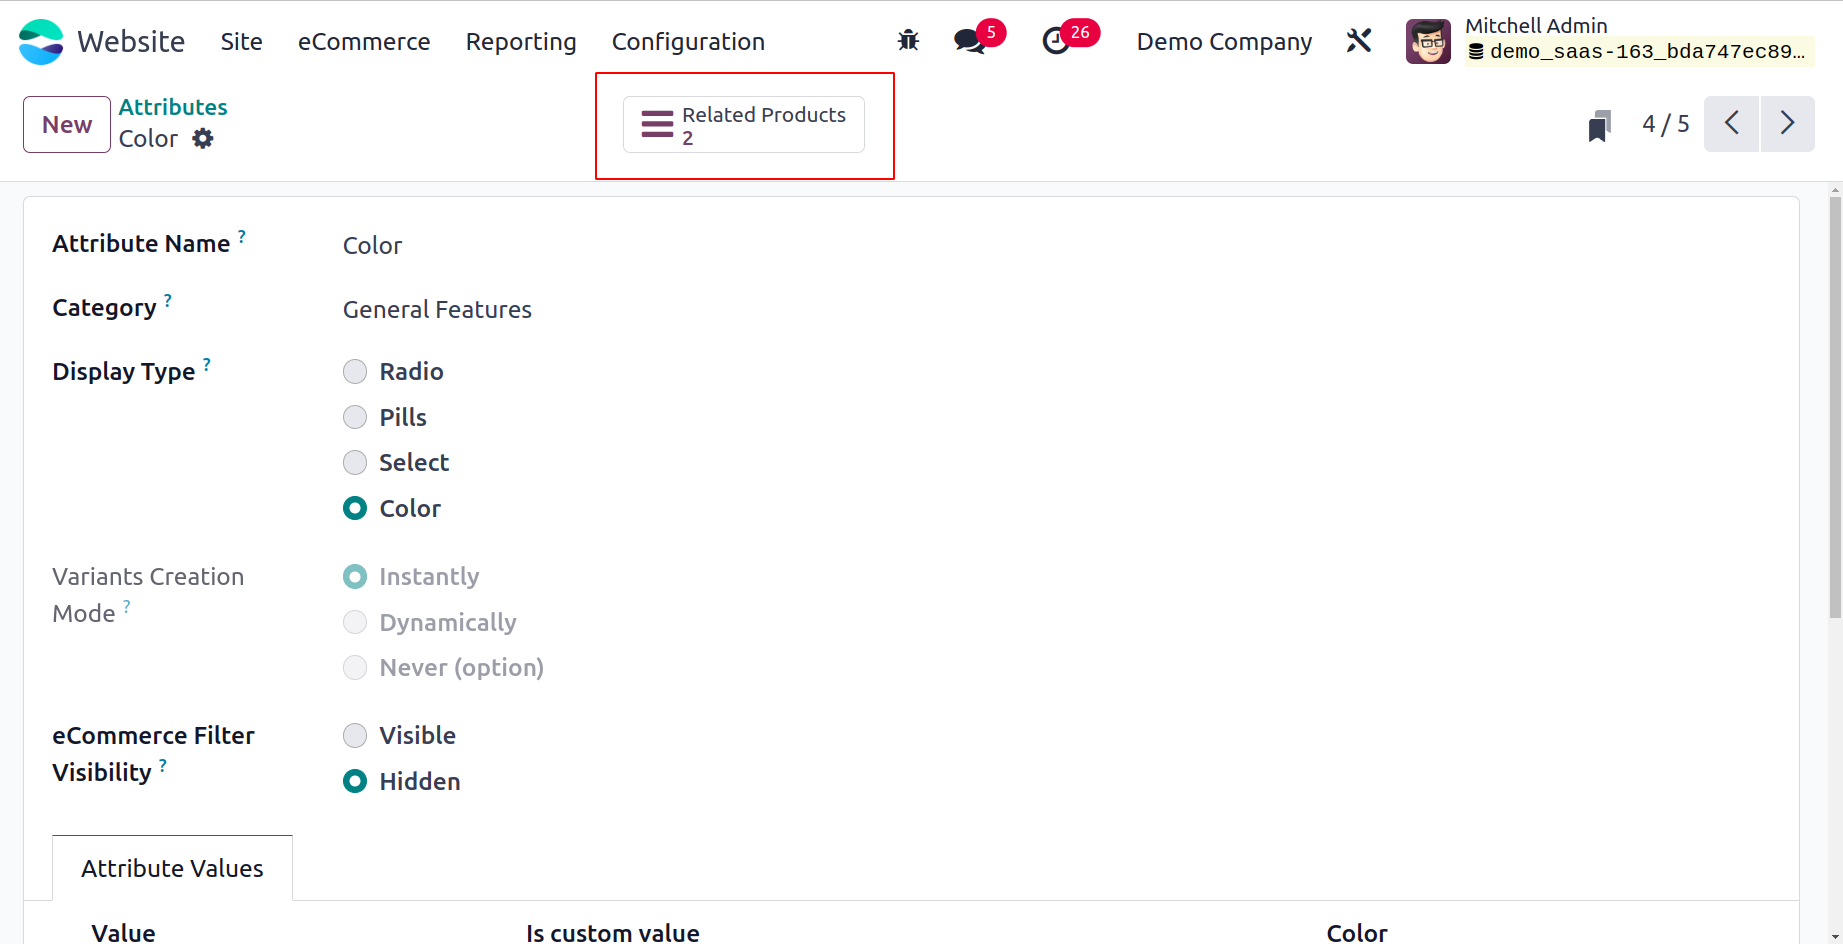
Attributes
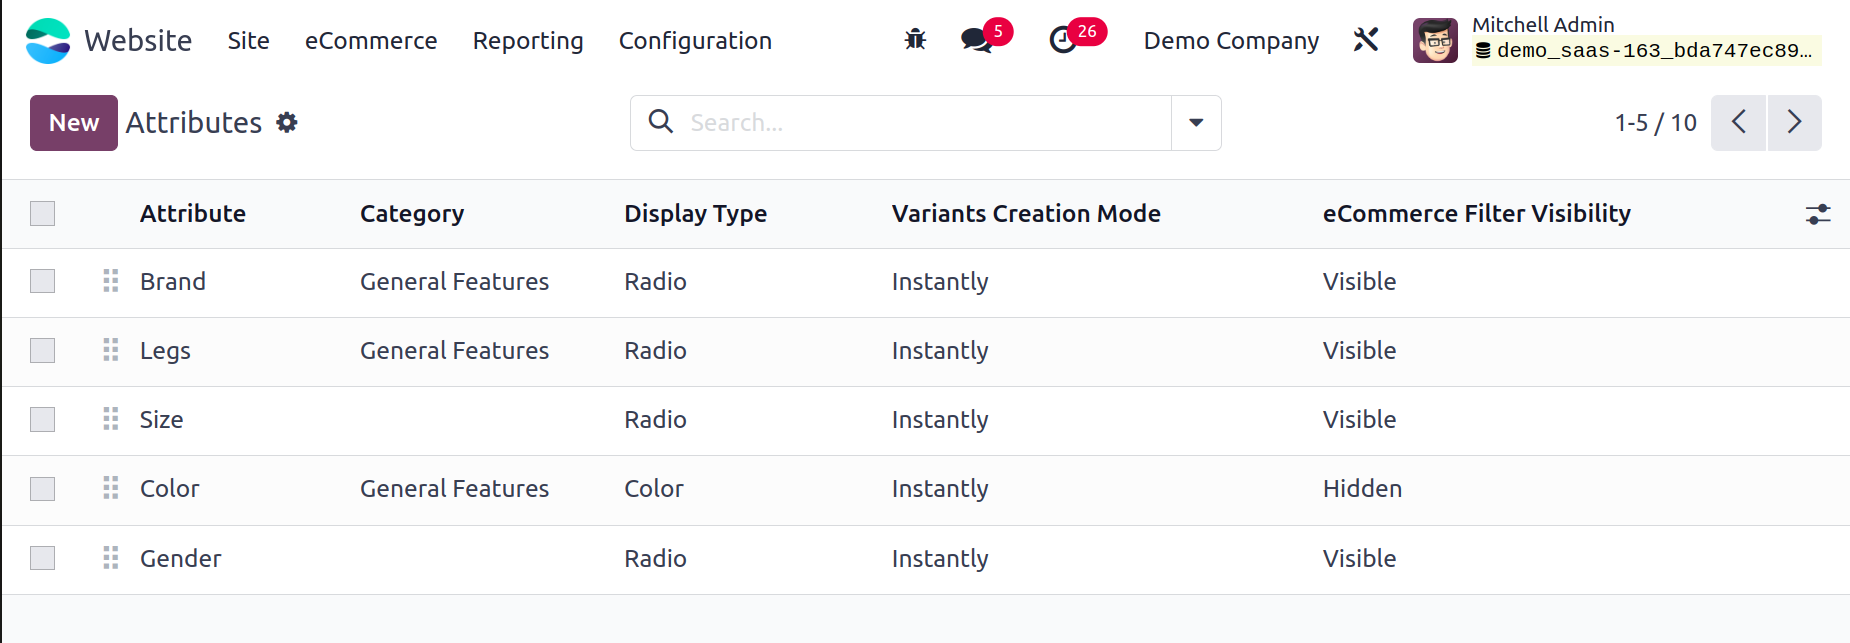
You may specify different product attributes with ease using the Attributes menu found under the eCommerce tab of the Odoo Website module. This menu is especially useful for eCommerce operations.
You can examine a preview of every attribute that is described in the platform by opening the Attribute pane. The window shows the key information about each attribute, including the name of the attribute, the category, the display type, the creation mode of variations, and the visibility of the eCommerce filter. Click on the corresponding record to view the preset
attribute in detail. You can click the New button to create a new attribute. Below is a picture of the creation window.
You must first enter an attribute name in the designated field. You can create a category later on in the category box to gather related attributes together under one section on the eCommerce comparison page. Additionally, the product configurator's display type can be chosen from a list in the Display Type box. Options like Radio, Pills, Select, and Colour are on the list. Likewise,
there are three options for the Variants Creation Mode: Instantly, Dynamically, and Never.
- Instantly: When you choose this option, all potential variations are made as soon as a product's attribute and values are added.
- Dynamically: Every variant is only made when the values and attributes that go with it are added to the sale order.
- Never: When choosing this option, the attribute's variants are never made.
It is possible to set the eCommerce Filter Visibility to either Visible or Hidden. By using the available Add a line option, you may define the value under the Attribute Values tab. Additionally, you can select a color from the color choice and activate the Is Custom Value option.
Additionally, a smart button labeled "Related Products" is visible in the upper right corner of the window.
The Related Products window can be reached directly by clicking this Related Products.
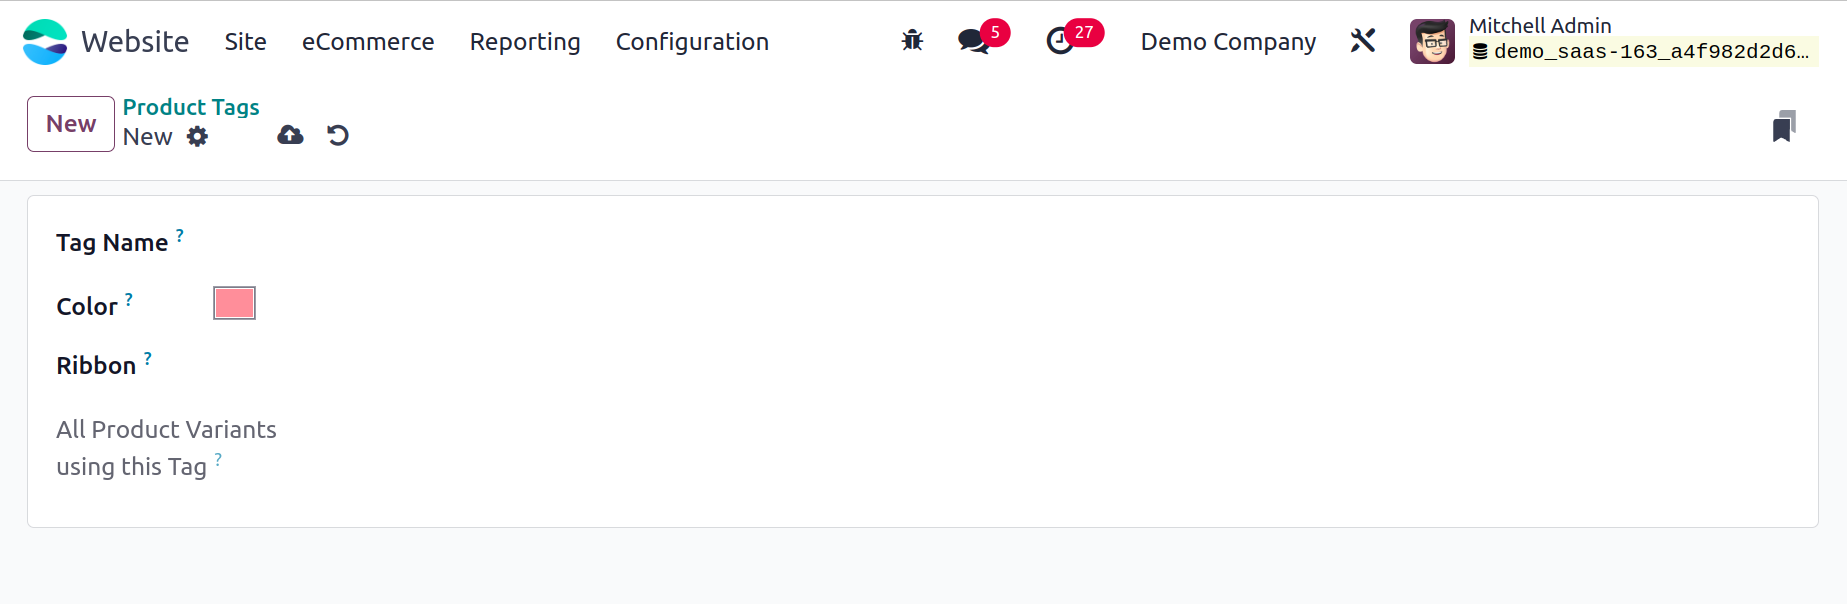
Product Tags
There is a product tags option beneath the product section. Click the New button to start a new one. Include the Ribbon, Colour, and Tag Name.
You can mention the product variants that use this tag in the relevant field.
Attribute Categories
You can specify multiple Attribute Categories using the Attribute Categories menu found in the Configuration tab of the Odoo Website module. The window will show each of the Attribute Categories that have already been described, along with the Category Name and Related Attributes.

In the same box, you can create a new attribute category by clicking the New button.
Let's now take a quick look at the Loyality feature.
Loyalty
Loyalty programmes can be easily integrated into websites by firms using Odoo17, a complete suite of business management software. The eCommerce
menu of Odoo 17 Website module gives a loyalty option. Gift cards and eWallets are available under the Loyalty.
Giving out gift cards and eWallets are seen as one of the more successful marketing techniques that can help increase online sales. In order to draw in clients, the eCommerce stores and this feature were integrated into the Odoo17 system. With the platform, you may efficiently customize eye-catching gift cards and eWallets for your clientele.
Discount & Loyalty
Many promotion programs like Promotions, Discount, Next Order Coupon, Buy X Get Y etc can also be available on the website too. To create a new one, click on the New button.
Rules and Rewards can be added inside the window.

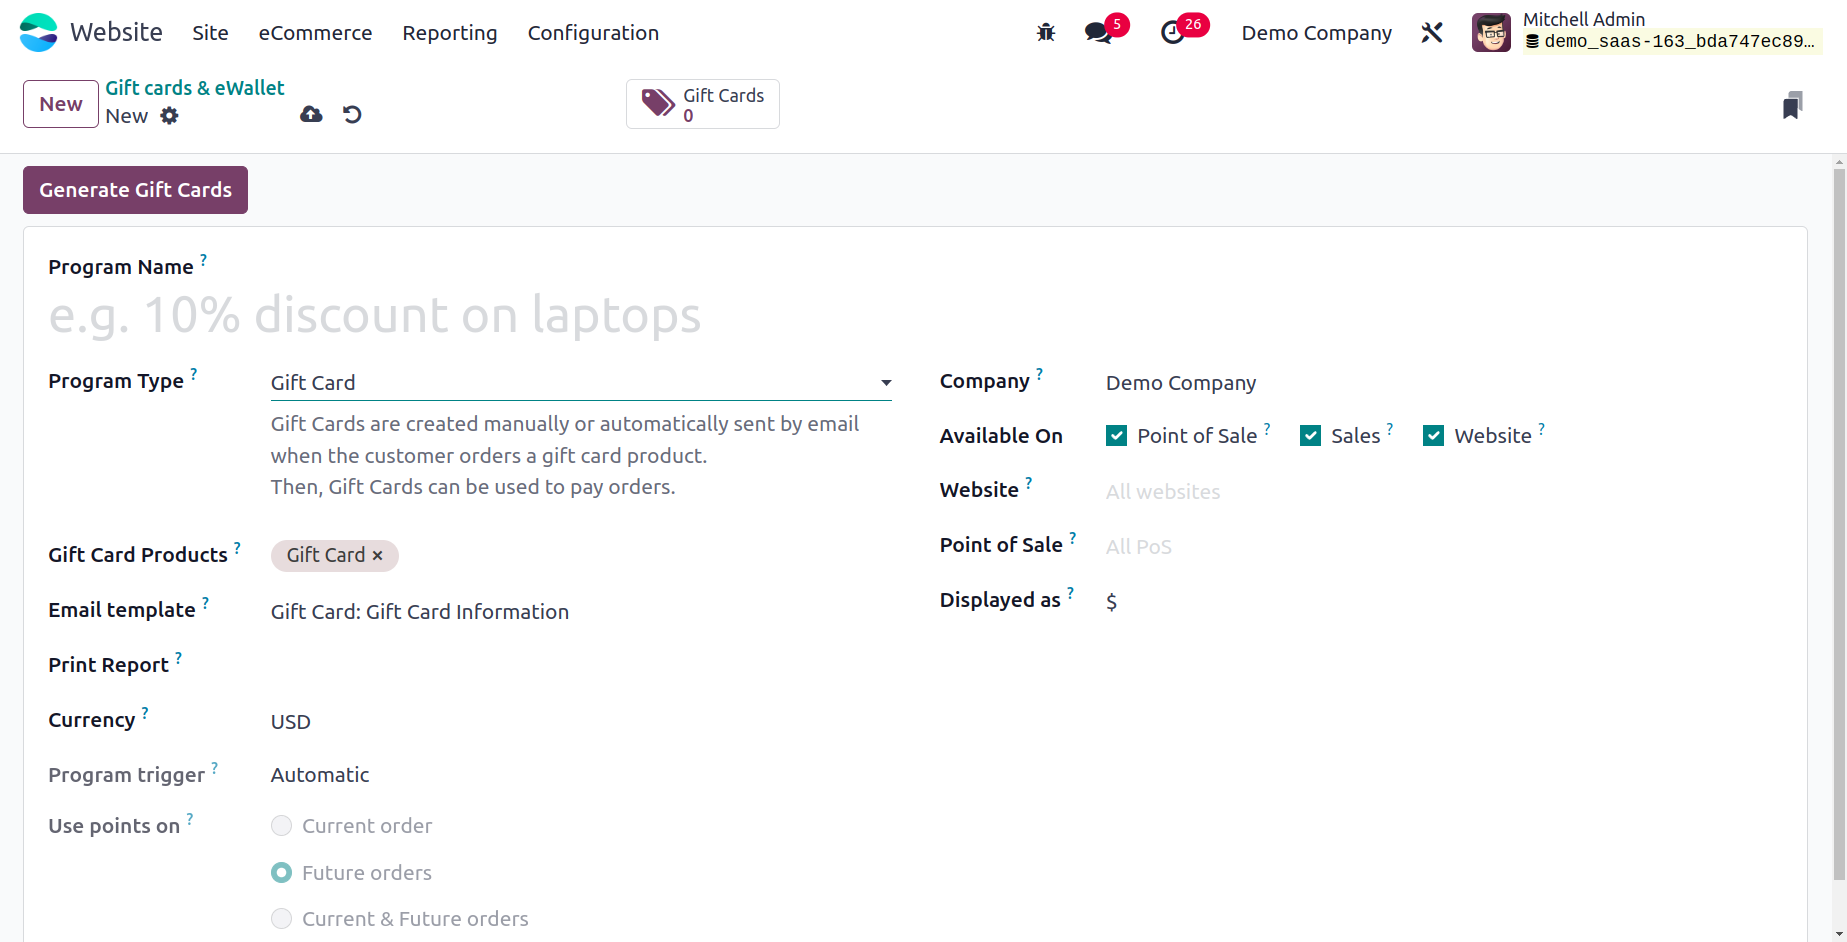
Gift Cards & eWallets
The Odoo17 website module's eCommerce tab is where you can find the Gift Card option. As seen below, you can view them in the Loyalty area under the eCommerce tab.
By selecting the Gift Cards & eWallets menu, you can access the Gift Cards and eWallets window. All of the pre-defined gift cards will be shown in the Gift Cards & eWallets
menu, along with the Code, Balance, and Status. You can click the New
button to create a new one. This is a picture of the creation window.
You can enter the program name in the "Program Name" section of this Gift Card creation window. Then choose the Program Type either Gift Card or eWallet. The gift card will be automatically generated for you, and you may use this secret code to make the transaction. The sale order line where this gift card was purchased will be shown on the buy line. Additionally, the POS order line where this gift card was purchased is mentioned in the Buy POS Order Line. Together with the Partner, you may also provide a description of the Initial Amount and Balance in the designated field. Once all the information has been entered, save it.
The created promotions or discounts can be added from the Cart page.

From the back end, it is also feasible to pay for and
dispatch eCommerce merchandise. The Configuration menu is where all of these choices are located. Let's give them all a look.
Configure eCommerce Website
In this age of "techie-apps," e-commerce is now essential to all business models. Through online platforms, eCommerce platforms significantly improve business. There are opportunities to offer goods and services online, businesses may expand globally, and customers can easily browse their products. Additionally, the Odoo ERP platform gives you a very
user-friendly eCommerce platform for your business and an exclusive eCommerce platform for running the firm.
Payment Provider
Several Payment Acquirers are provided by Odoo17, which can help your consumers make payments on your eCommerce website or through their customer portals. You can set up different Payment Acquirers for your eCommerce operations using the Payment Provider option found in the Odoo17 Website module. The Payment Provider will help your online shoppers pay for their purchases in a timely and convenient manner by offering appropriate payment options. The module's Configuration tab provides access to the Payment Provider menu. The eCommerce area, found under the Configuration tab, provides access to the menu.
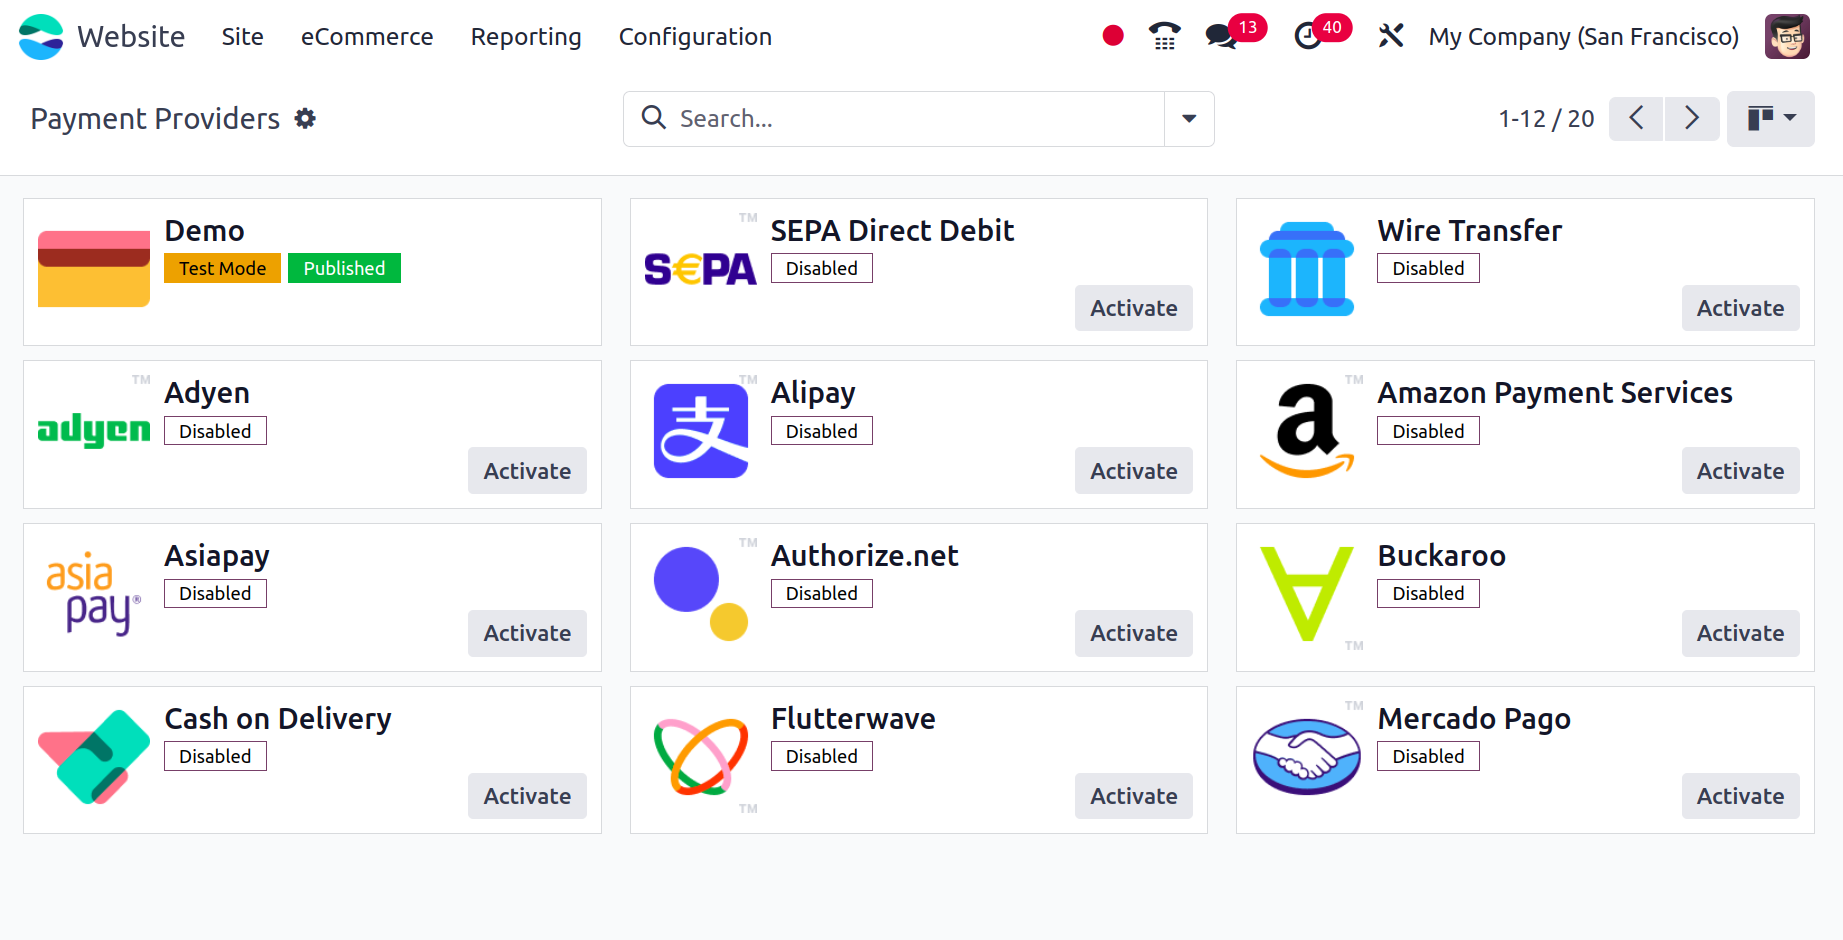
The Payment Acquirers window will appear when you click on the Payment Acquirers menu, as seen in the figure below.
A preview of every payment acquirer being deployed on the platform will be shown in the Payment Acquirers pane. You can click on the appropriate Payment Acquirer to obtain more information about each of these installed ones. We can choose the
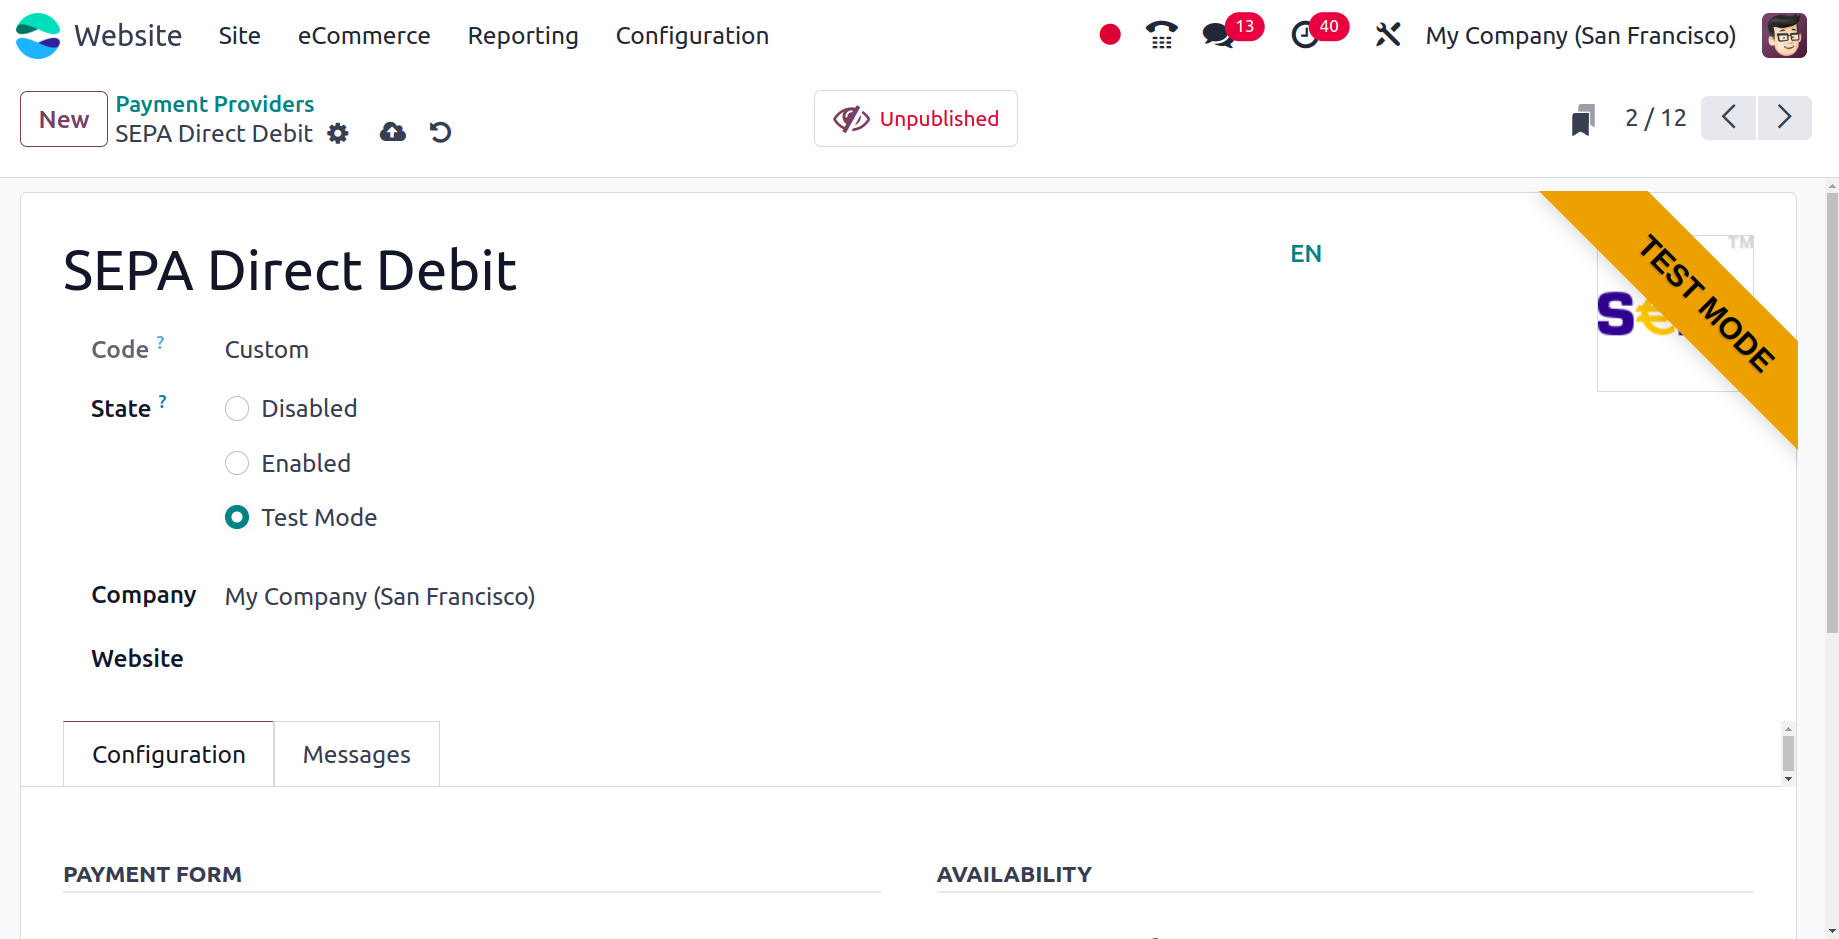
SEPA Direct Debit to make things more obvious, and the information is displayed as follows.
You may view the specific Payment Acquirer's configuration details here. The Name of the Payment Acquirer appears at the top of the window. Next, you may check the Payment Acquirer's status on the platform, including whether it's active, disabled, or in test mode. You can define this in the State field. Selecting the Enabled option will allow you to enable the field. When you enable the Test mode, a test payment interface processes
a fictitious payment. It is recommended that you set up the acquirer in this mode.
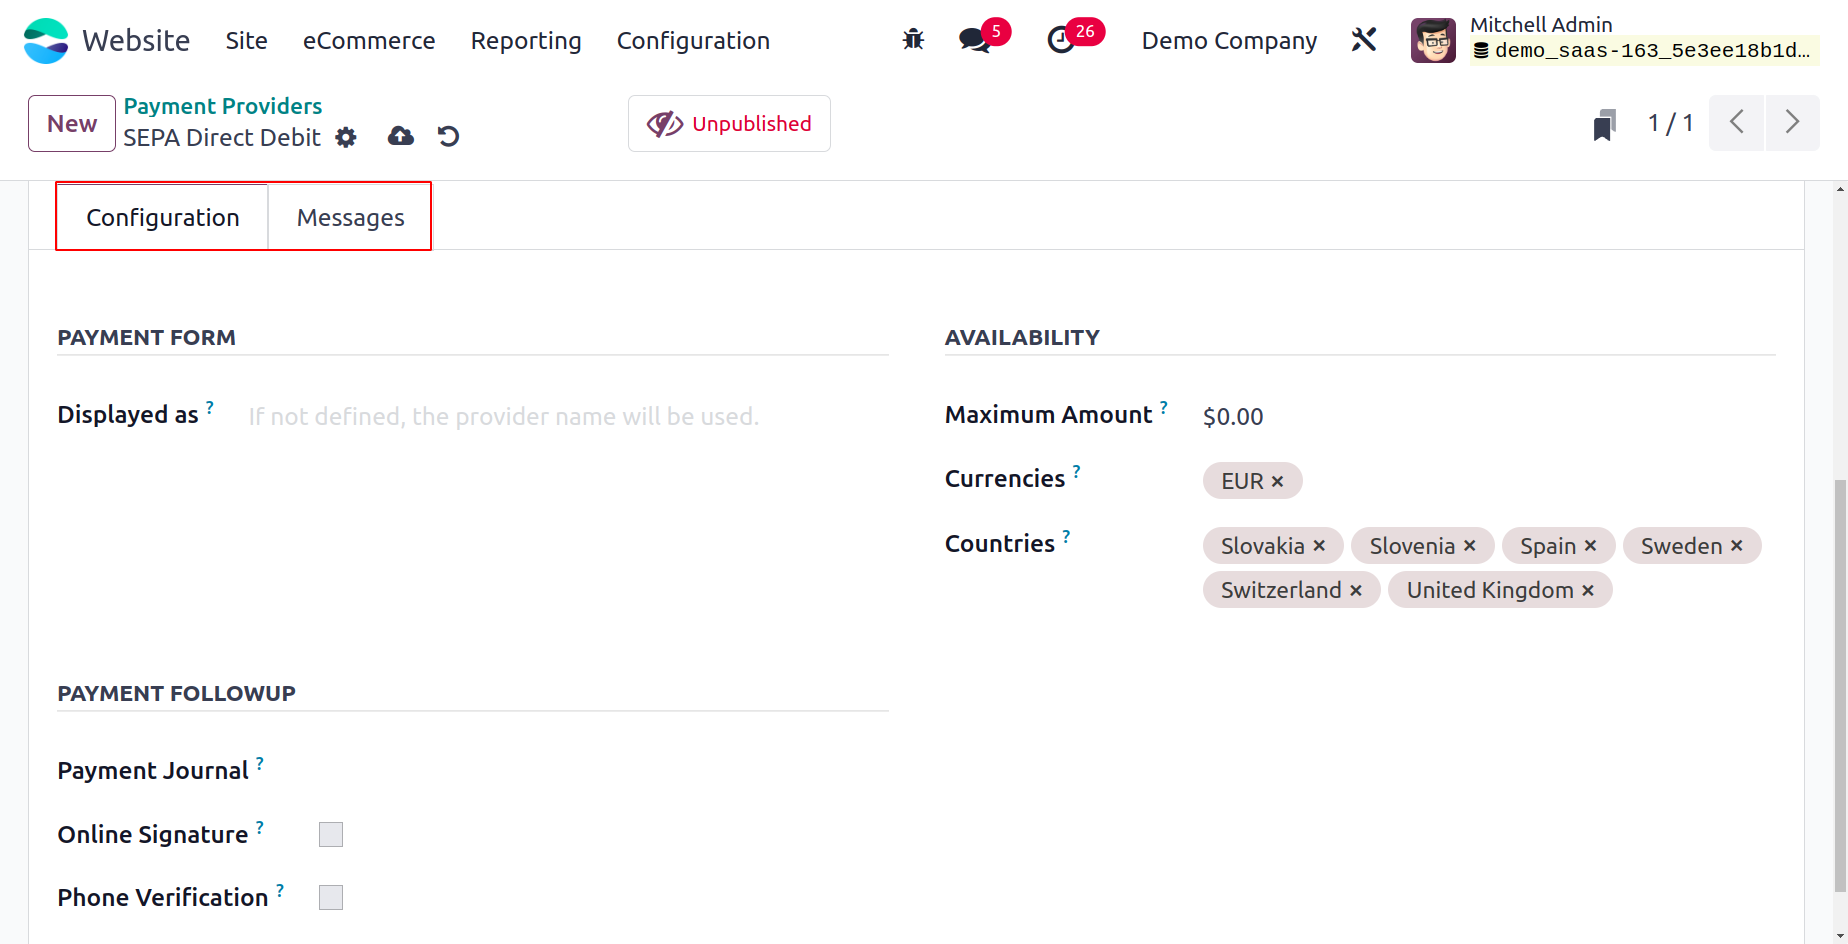
Subsequently, the accountable Company and Website may be identified. You can provide a description of the acquirer for your customers in the Configuration section "Displayed as" field, and your customers will see the payment acquirer with this name. In the Availability area, this payment acquirer should specify which countries it wants to be available for.
This item will be available for use in all countries if you do not designate anyone.
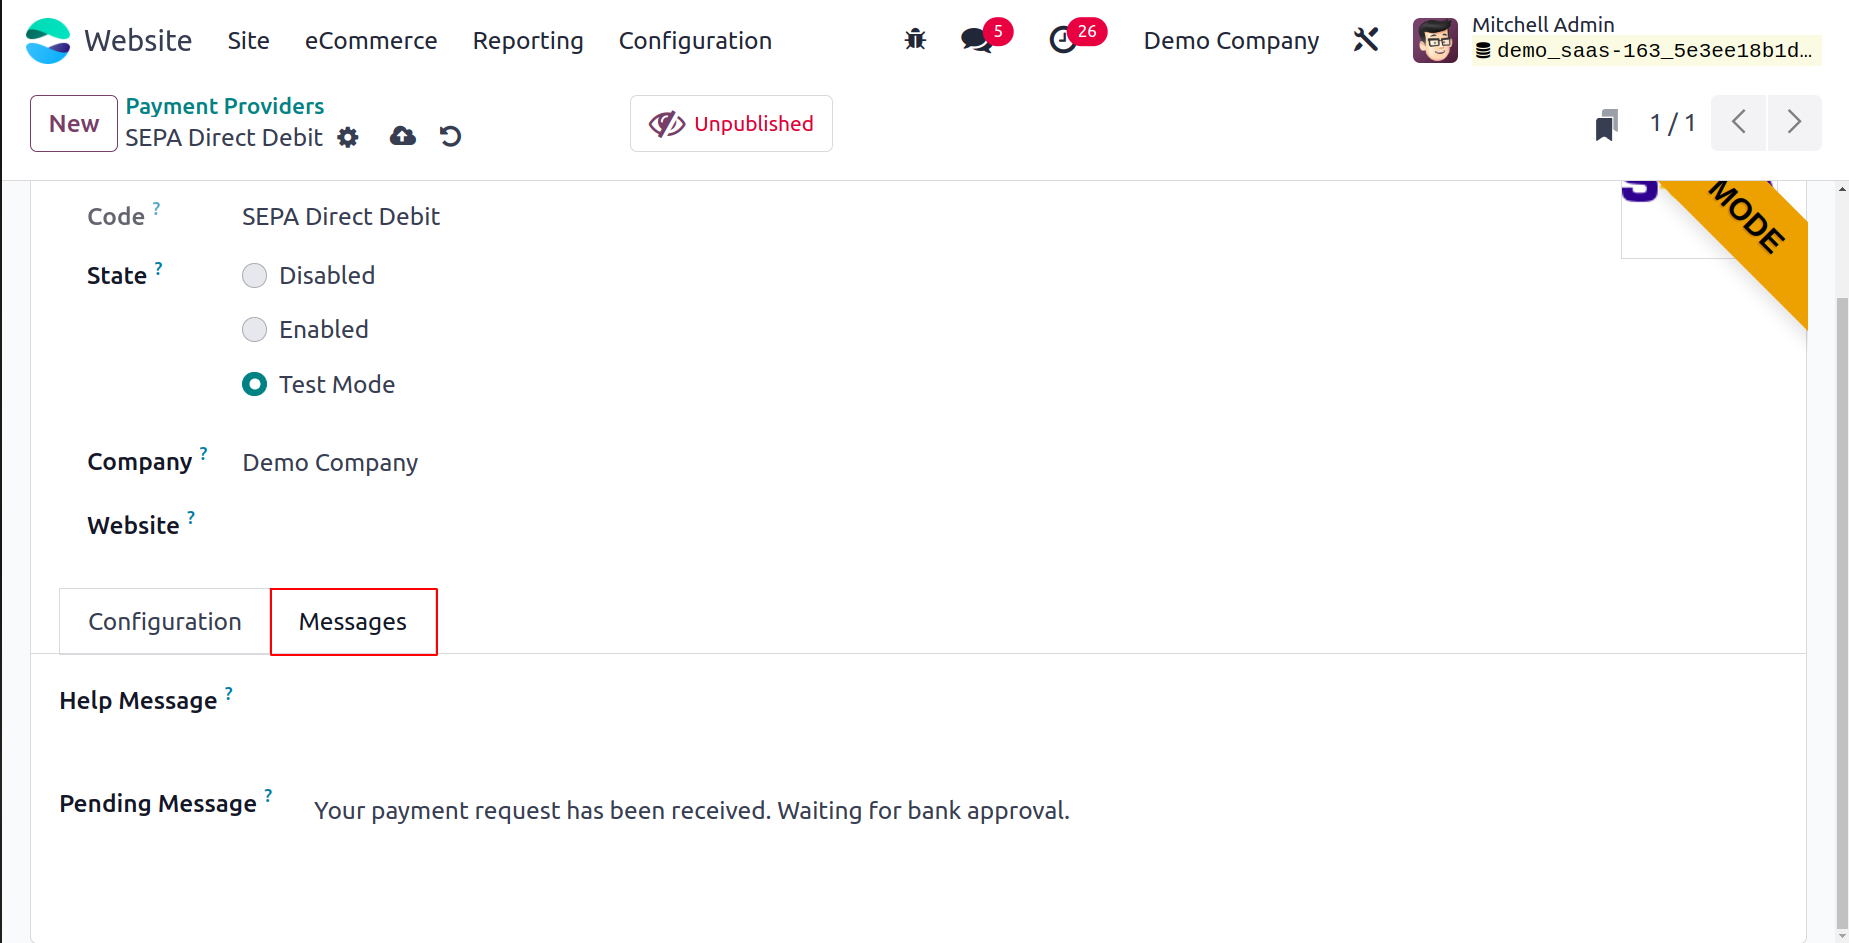
Additionally, there are a few more fields beneath the Payment Followup area when you scroll down this window. which are phone verification, online signature, and payment journal. You can designate the journal in which the successful transactions are posted by filling out the Payment Journal section. Likewise, in the event that a signature is needed to establish a new mandate, you can activate the Online Signature feature. In order to use an SMS code to verify phone numbers, you can also enable the Phone Verification feature. You can add the Help Message and Pending Message under the Messages tab.
Keep in mind that there are specific configuration processes and options for each Acquirer. Providing a range of payment acquirers will improve your odds of receiving payments on schedule and make it more pleasant for your clients to use their preferred payment method.
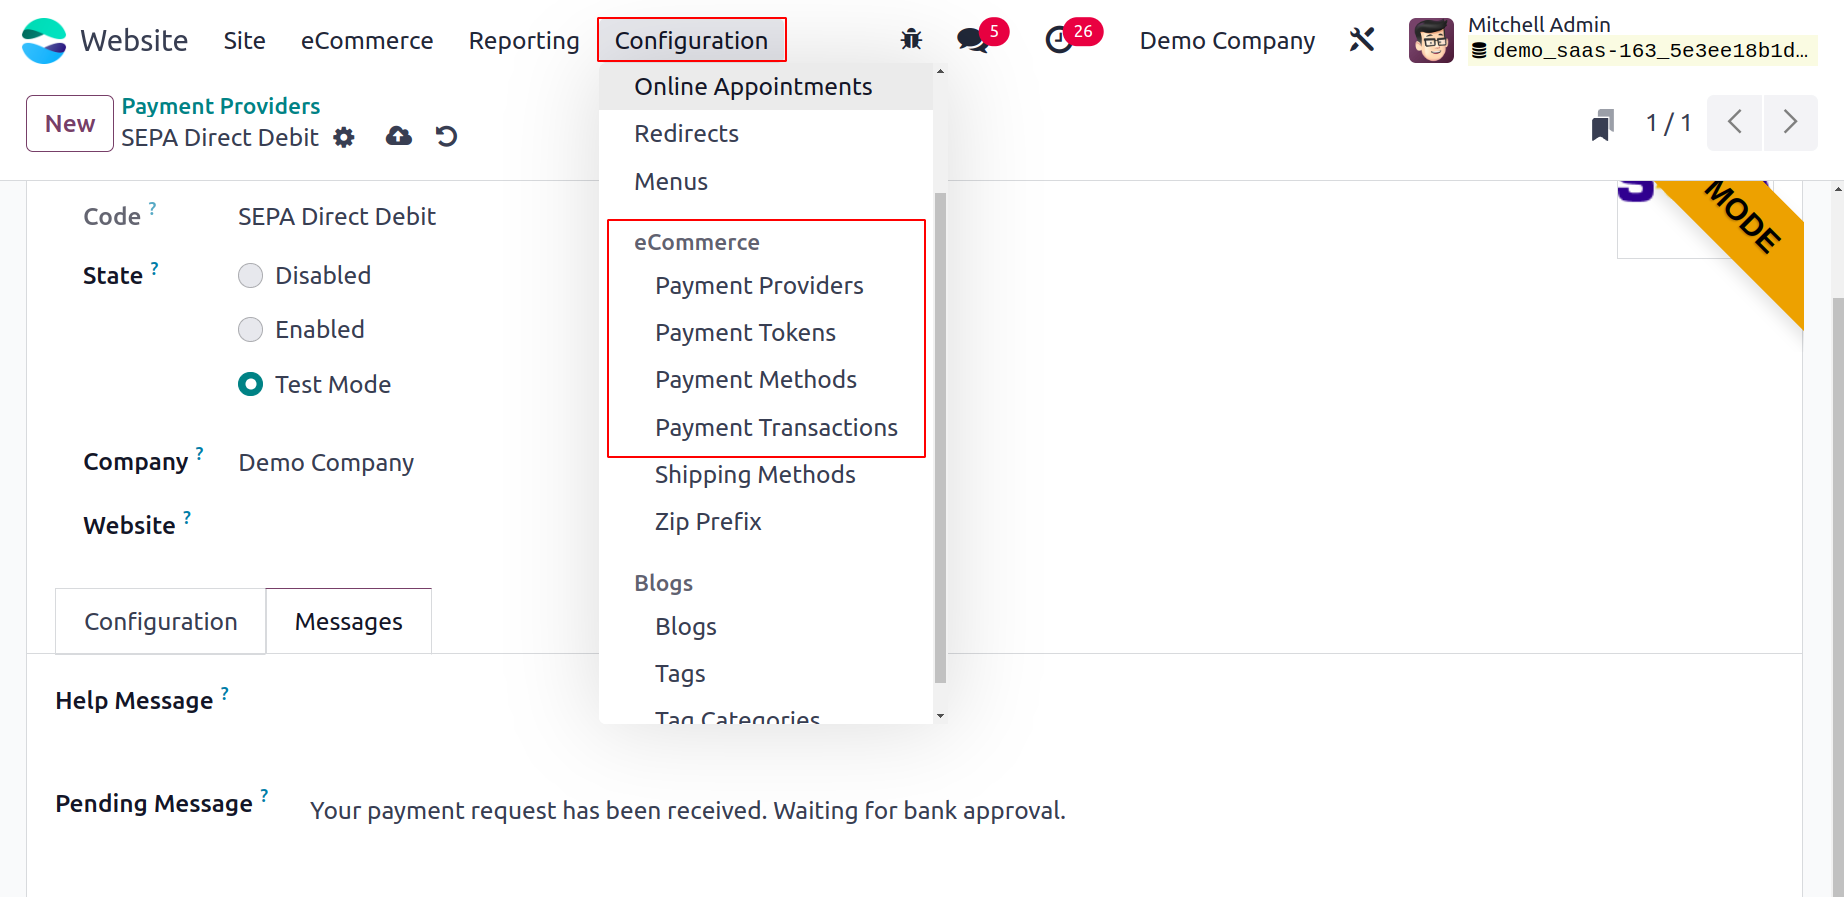
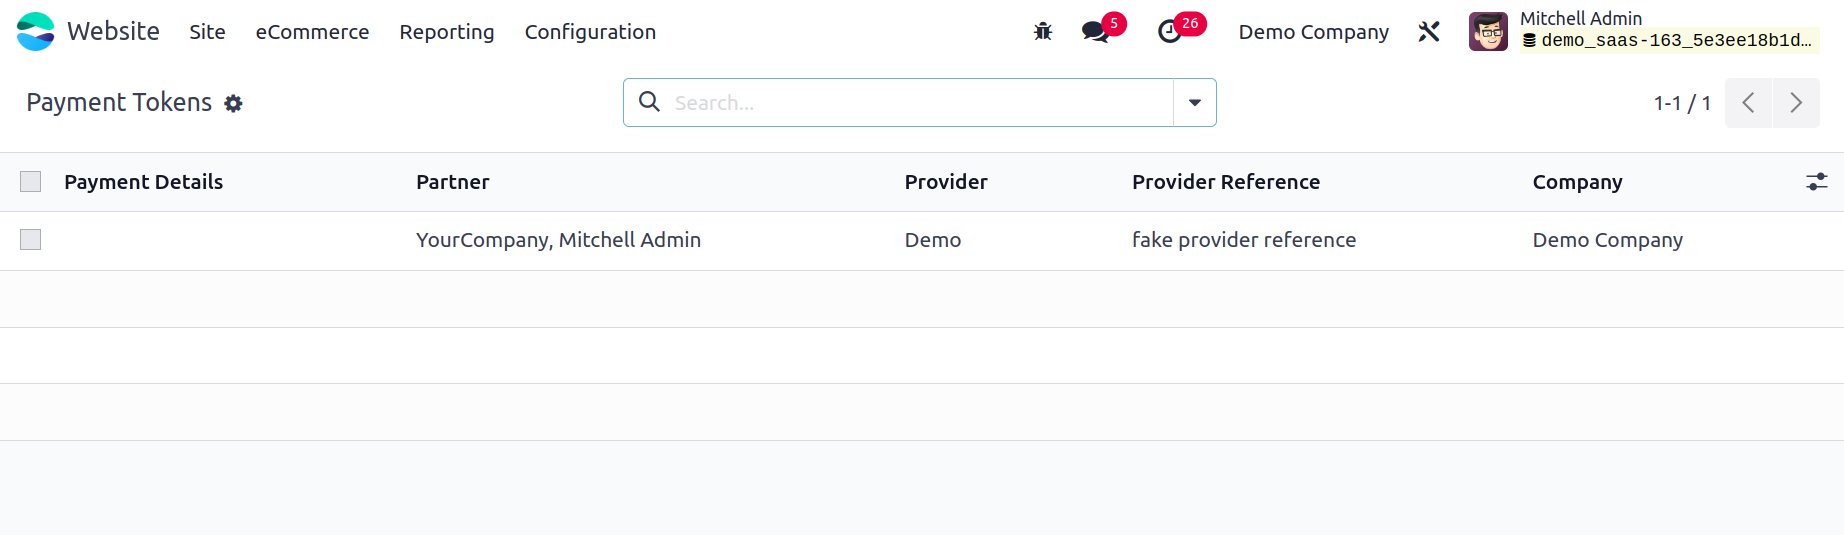
Since we are aware of the Payment Acquirers, the platform's functions are available. The platform will show extra features like Payment Tokens, Payment Icons, and Payment Transactions in the eCommerce section accessible under the Configuration tab of the module when you activate the Developer mode from the general settings.
Payment Tokens - save and reuse credit cards
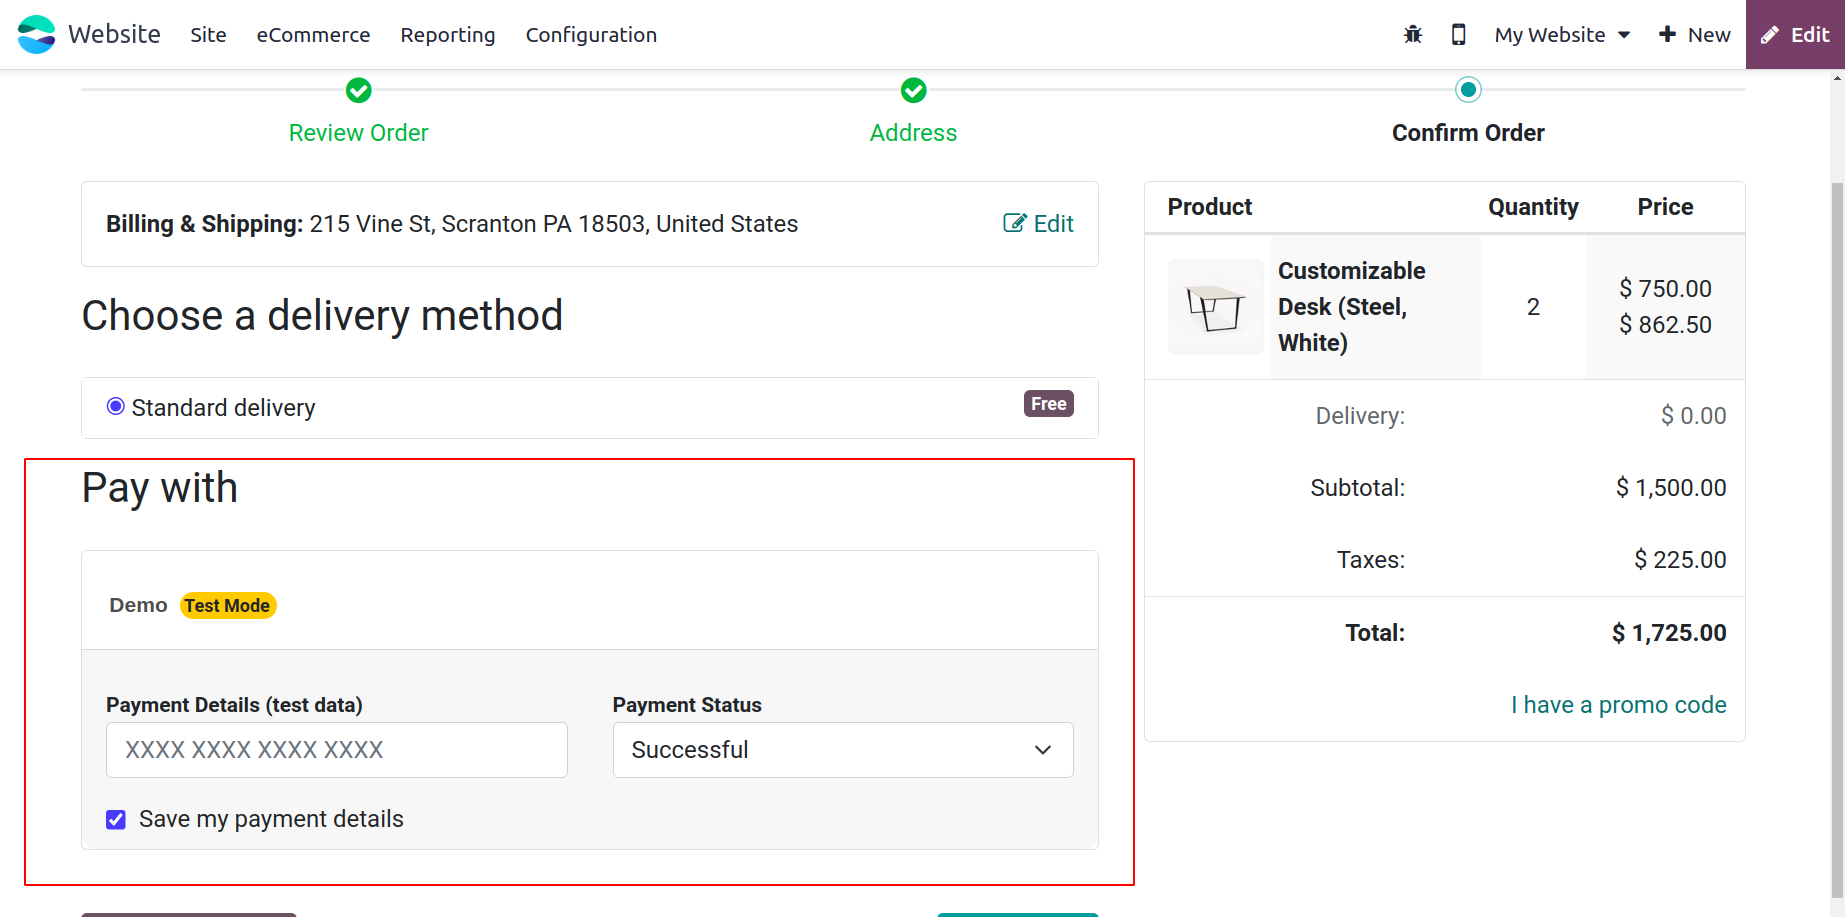
You can benefit from helpful save card features on the Odoo17 platform. You may store the payment tokens in your database with Odoo thanks to the save card capability. The card information will be kept in the payment tokens if the buyer made a transaction from your eCommerce store and paid with the easy payment acquirer. When paying for a product, the Odoo platform allows users to save their credit cards, which can then be used as payment tokens within the system. It can then be applied to further payments. You don't have to enter the payment information again. For the recurrent payments for the subscription, this option is advantageous.
We can now view the feature by selecting a product and confirming the payment.
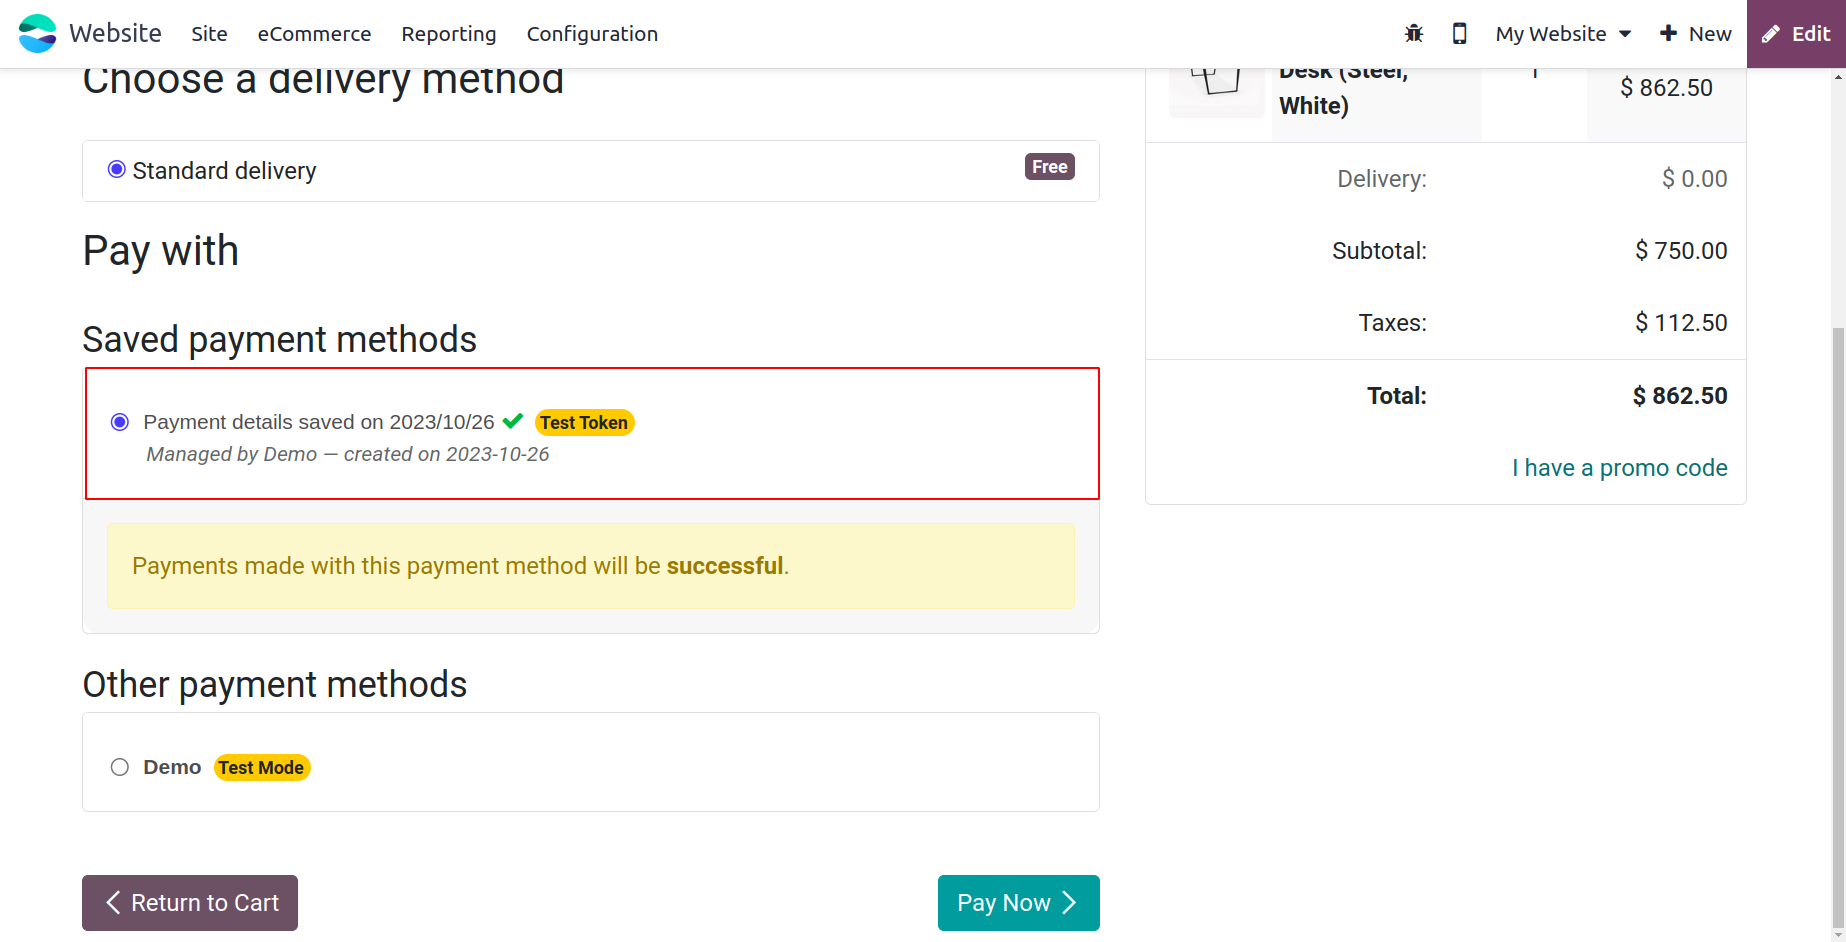
The option to "Save my payment details," as is indicated in the screenshot above, is visible here. To save your payment information, turn on this feature. You can then proceed with the payment process. Following successful payment, the card information will be automatically saved in the Odoo17 Website module's Configuration tab's Payment Tokens function.
To lower the risk factors associated with electronic payments, you or the relevant authorities can greatly benefit from the Payment Tokens function. By safeguarding credit card and payment information, it will assist you in securing databases and payment processes. This will be a great resource for additional references. Every time you pay on this website, the automatically created token will be displayed on your payment page. To make a payment via the payment gateways, just select the payment token (highlighted in the image below).
Let's now talk about the Payment Icons and methods.
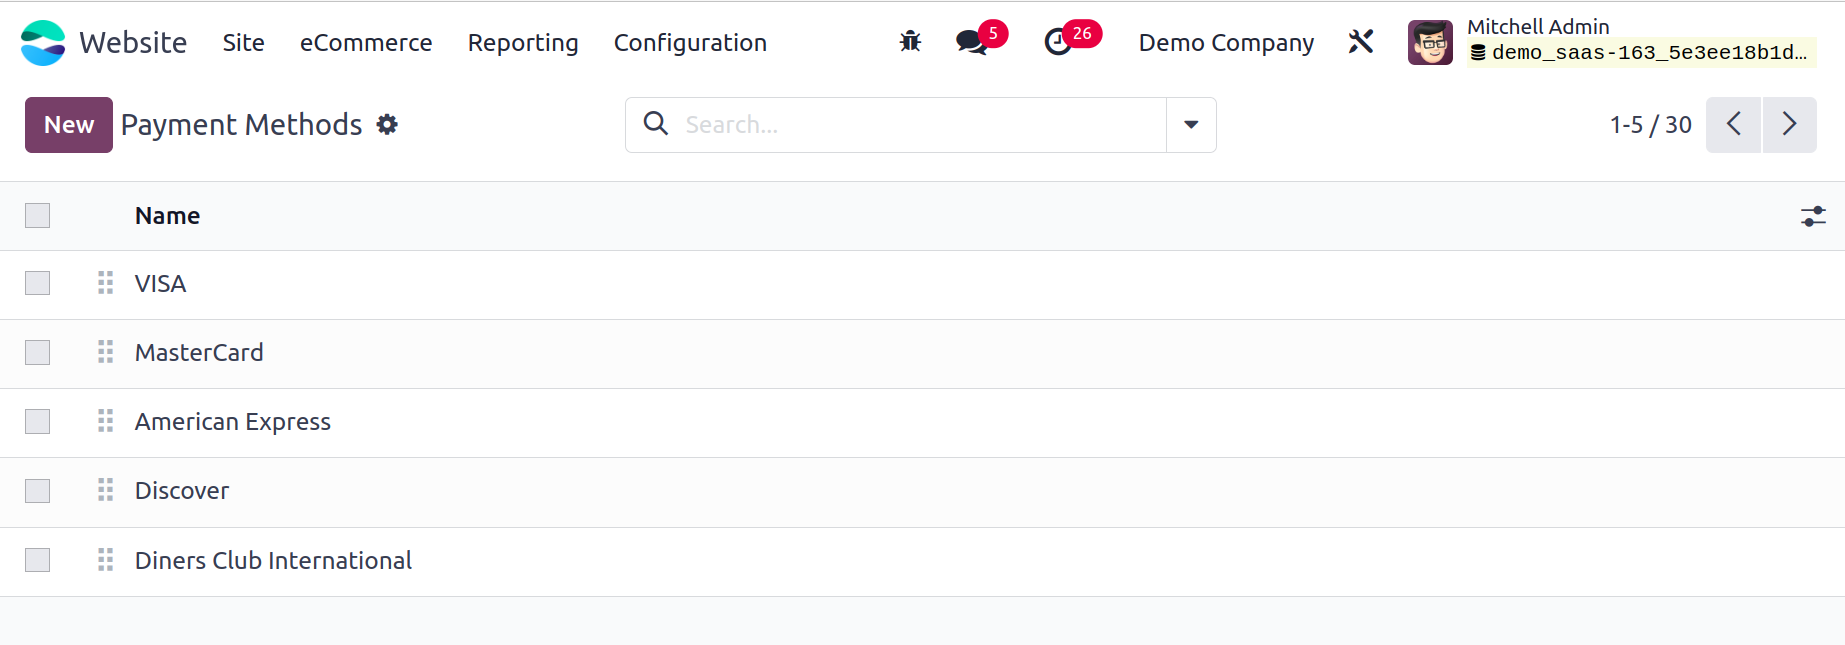
Payment Methods
One of the essential aspects that should be necessary for any website dealing with online payments is payment methods. The methods for payments will serve as identifiers. Your clients will gain insight into which online payment acquirer or gateway, as well as which credit or debit cards, are accepted on your e-commerce store. This feature will improve the checkout process for your customers and contribute to your website's increased acceptance.
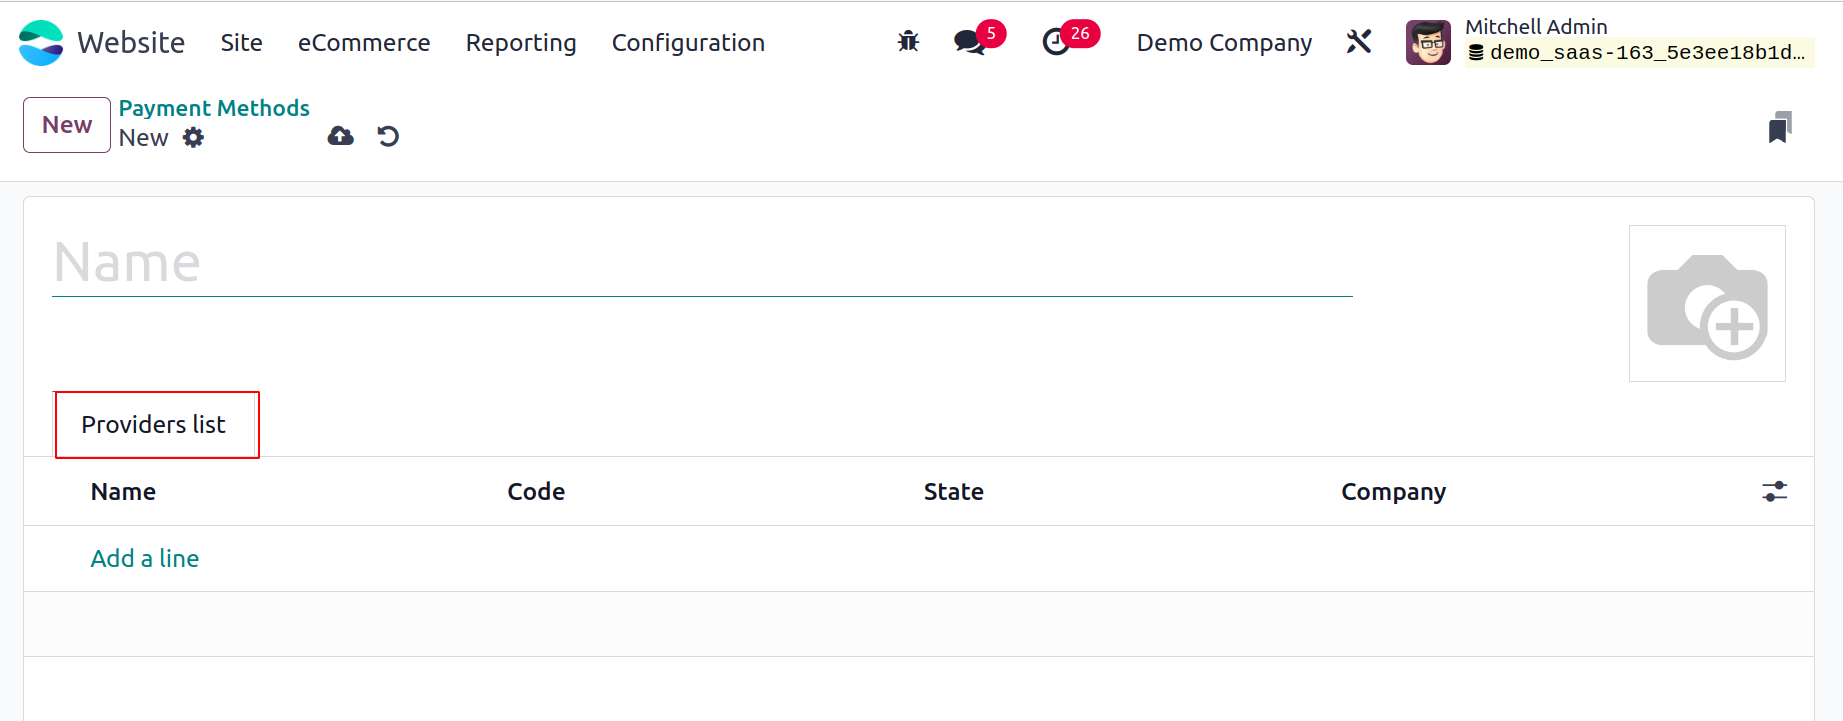
With a few clicks, the Odoo system enables you to configure different Payment Methods. Odoo allows you to add the proper payment icons when building new payment acquirers. You can click the Payment Methods menu by going to the Website module's Configuration tab and selecting it. The Payment Icons window, as seen in the image below, will open as soon as you click on this button.
All of the Payment Icons that have previously been specified on the platform will be seen in the Payment Methods window. You can click on the corresponding icon to view each one in greater detail. In the same way, you may click the New button in the upper left corner of the window to create a new Payment Icon.
In the designated space, you can include the image that was used to create this payment icon in addition to specifying its name. You can include the acquirers that support this payment icon in the Providers list tab. You can click the Add a line button to accomplish this.
Next, you will display every Acquirer that is utilized on the platform. By selecting the Save button after updating the list, you can save the updated payment icon.
Let's move on to the feature for payment transactions now.
Payment Transactions
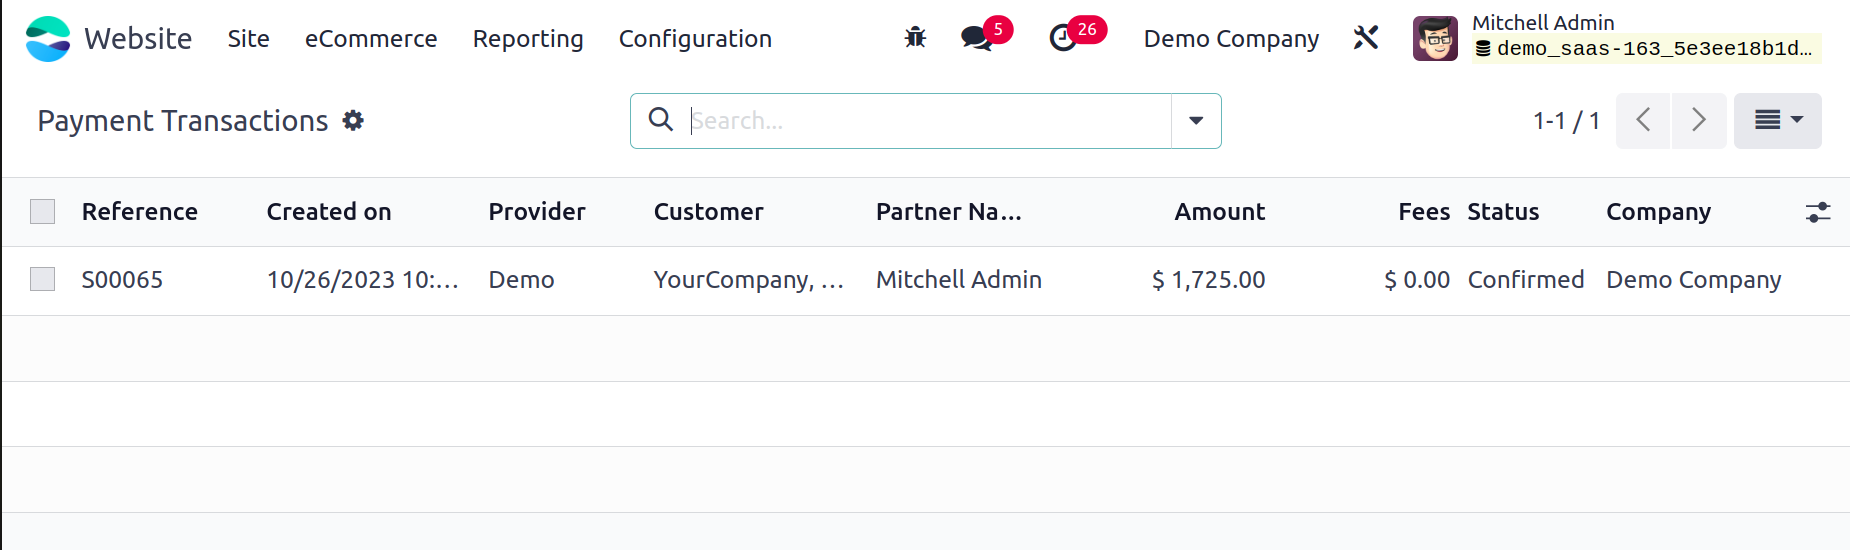
All past online transaction history will be retained in the Payment Transactions menu found under the Configuration tab of the Odoo17 Website module. This feature is going to be incredibly helpful, and it's going to be a great tool for future references. Online payments are, as we all know, incredibly convenient for consumers, but they pose some risks for the relevant authorities. Maintaining a record of your financial transactions will assist you in resolving any additional concerns and difficulties. Odoo17 will give you the ability to handle all of these problems using the Payment Transaction option. You can select the Payment Transaction option from the Configuration tab in order to see the Payment Transaction window.
All of the information pertaining to each payment transaction will be presented when you glance at this window. Reference number, creation date and time, acquirer, customer, partner name, amount, fees, status, and company are among the details.
Since we are aware of the Payment Acquires and its tier-level choices. Let's now examine the shipping methods.
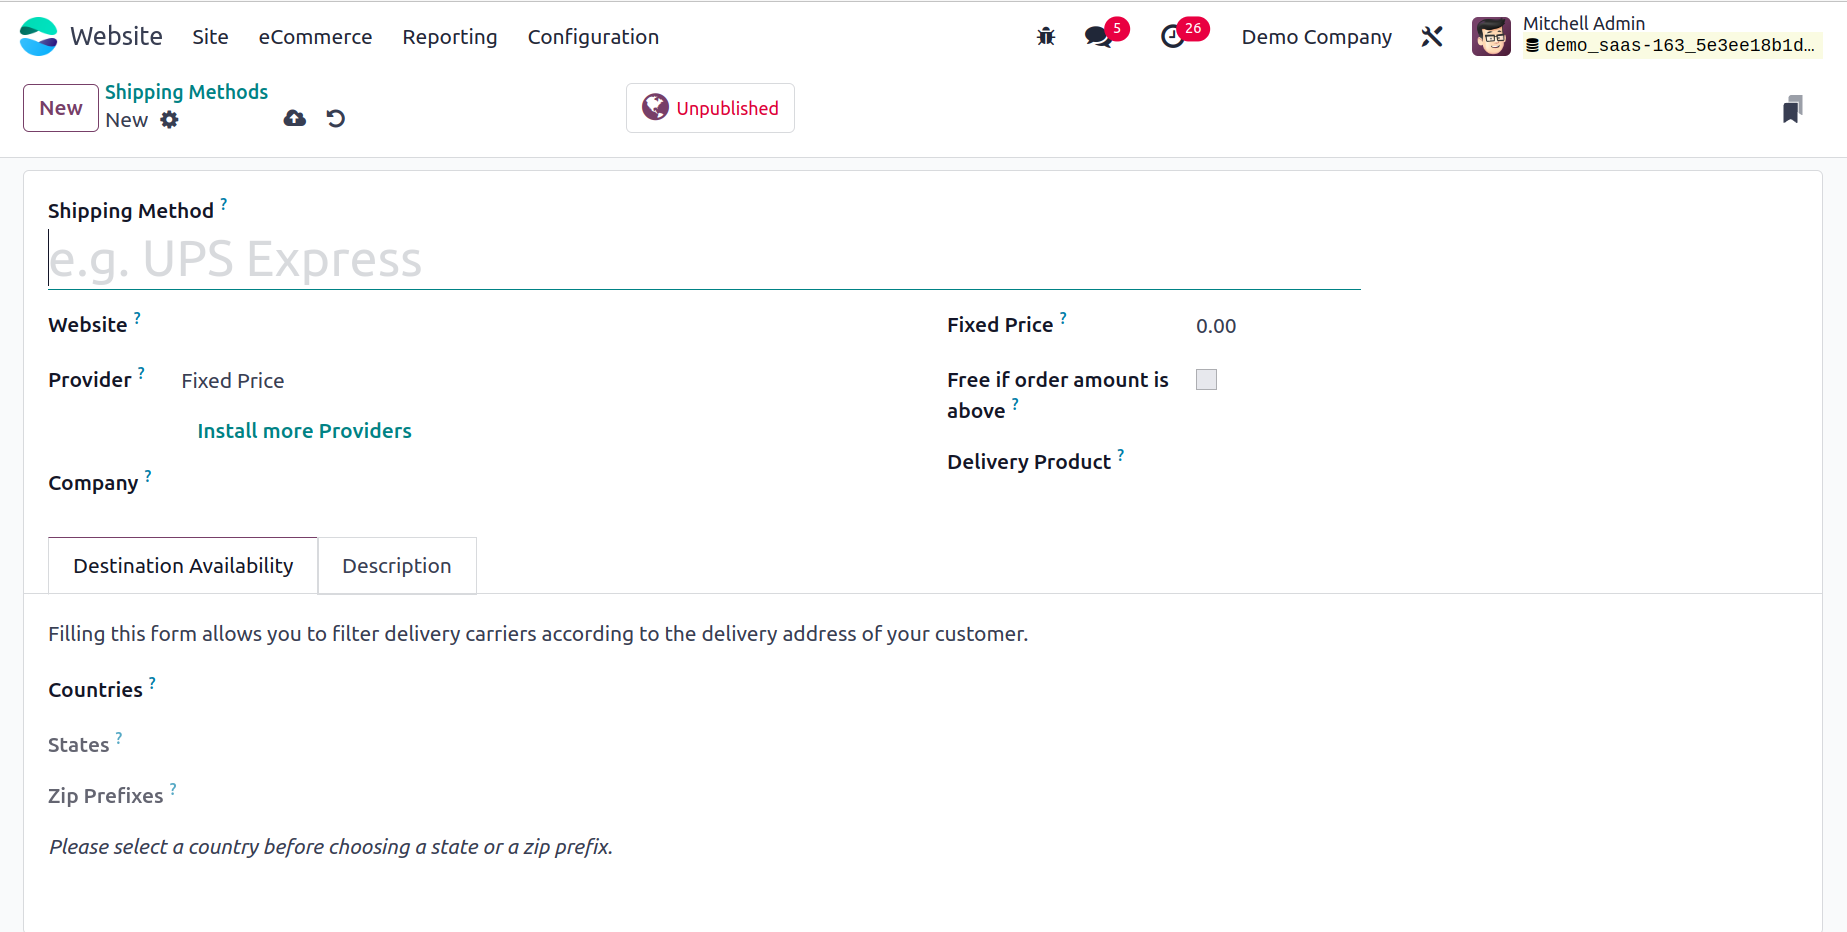
Shipping Methods
The eCommerce modules and Odoo17 website enable a number of delivery options as well. It's crucial to set up different shipping options in your system so that the ordered item can be quickly delivered to the right place. You may go to the module's Shipping Methods menu from the eCommerce section by selecting the Configuration tab.

We have already covered Odoo's Shipping Method functionality in the Odoo enterprise book's Inventory chapter. The Inventory module contains a detailed reference for it.
Shop Management
The website now has a Shop thanks to the eCommerce module. Customers can buy the things there. Now let's visit the eCommerce website's shop.
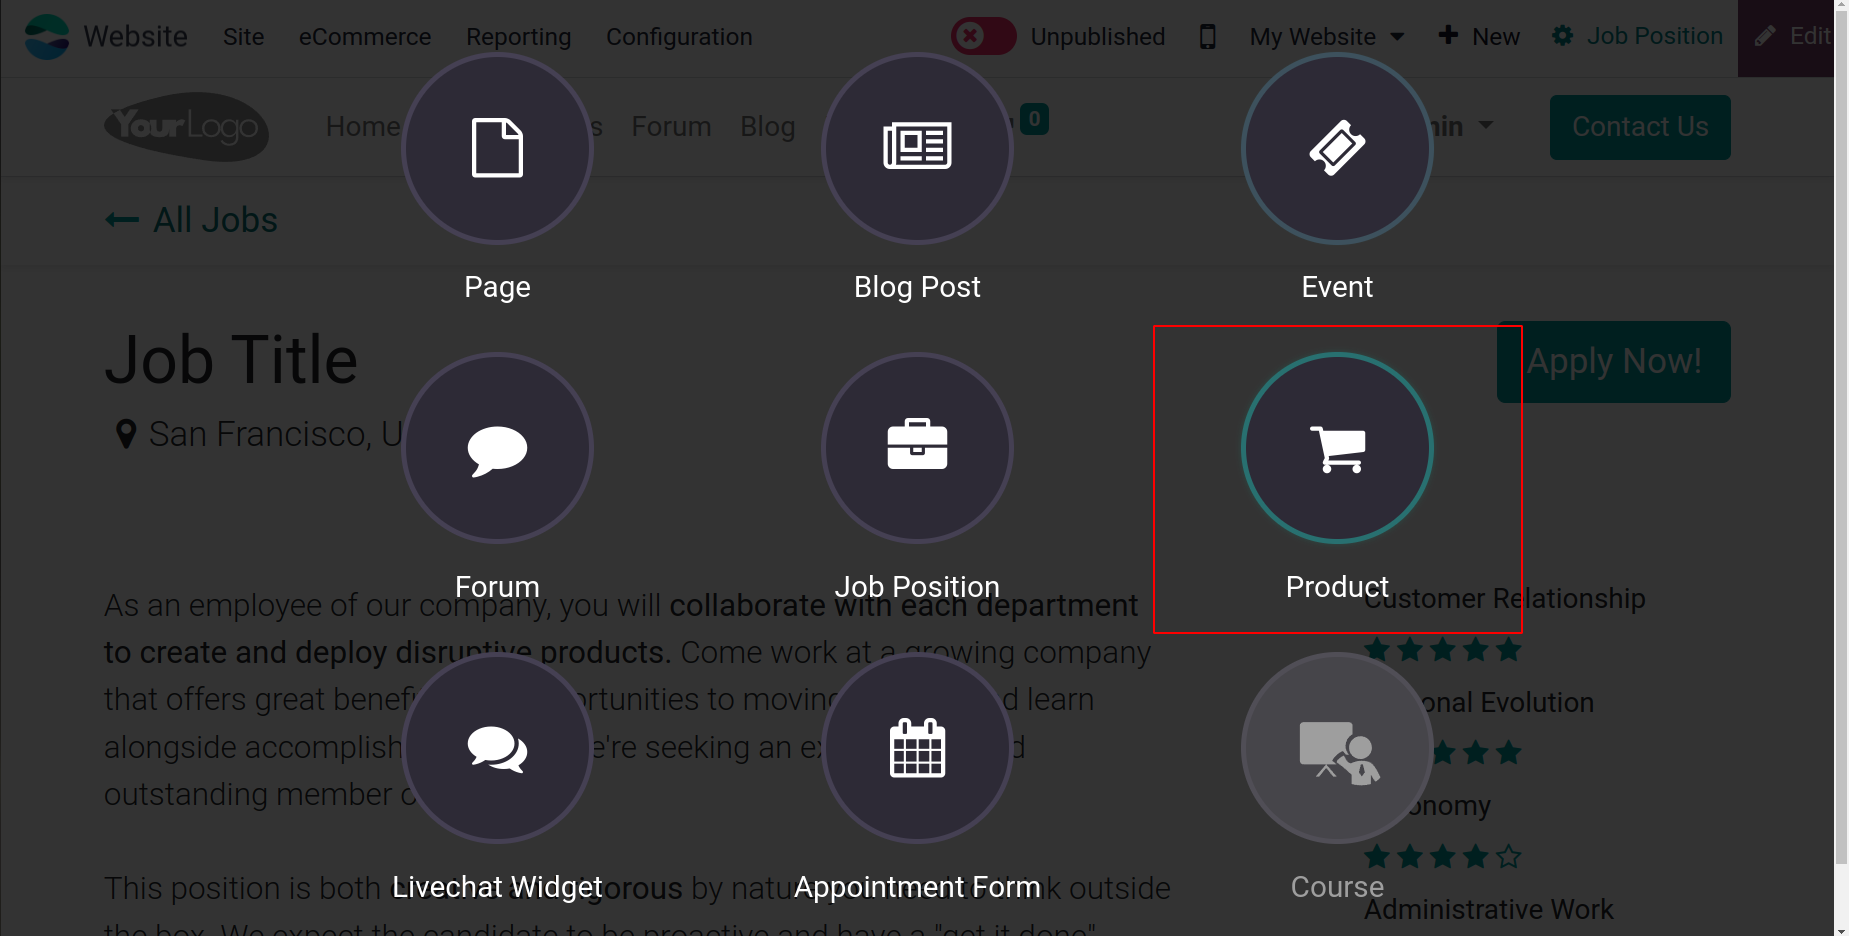
Prior to then, a new product can already be added to the website. Click the +New symbol in the upper right corner to accomplish that.
A few clicks will add a new product to your website. The +New button can also be
used to accomplish this. This button allows you to open the Product menu.
To open the pop-up window, click the product option.
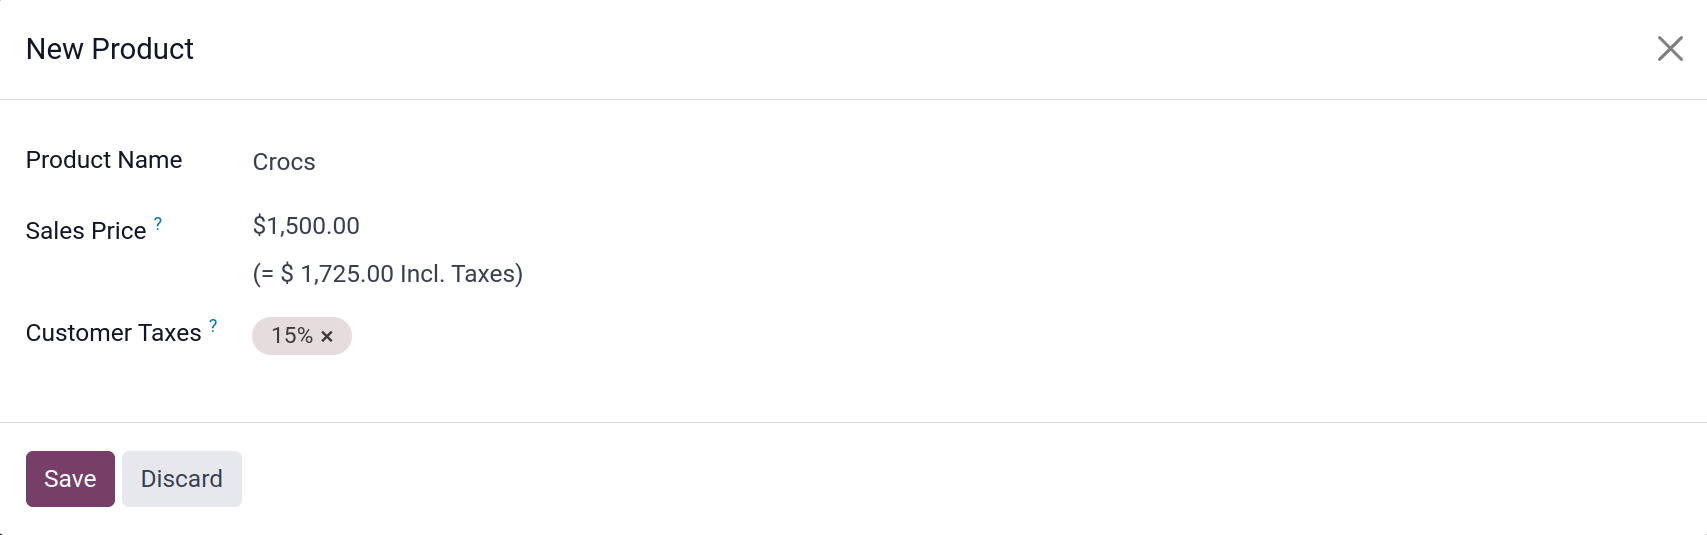
The Product Name may be mentioned here. After that, you may add information about the product to your website by clicking the Save button.
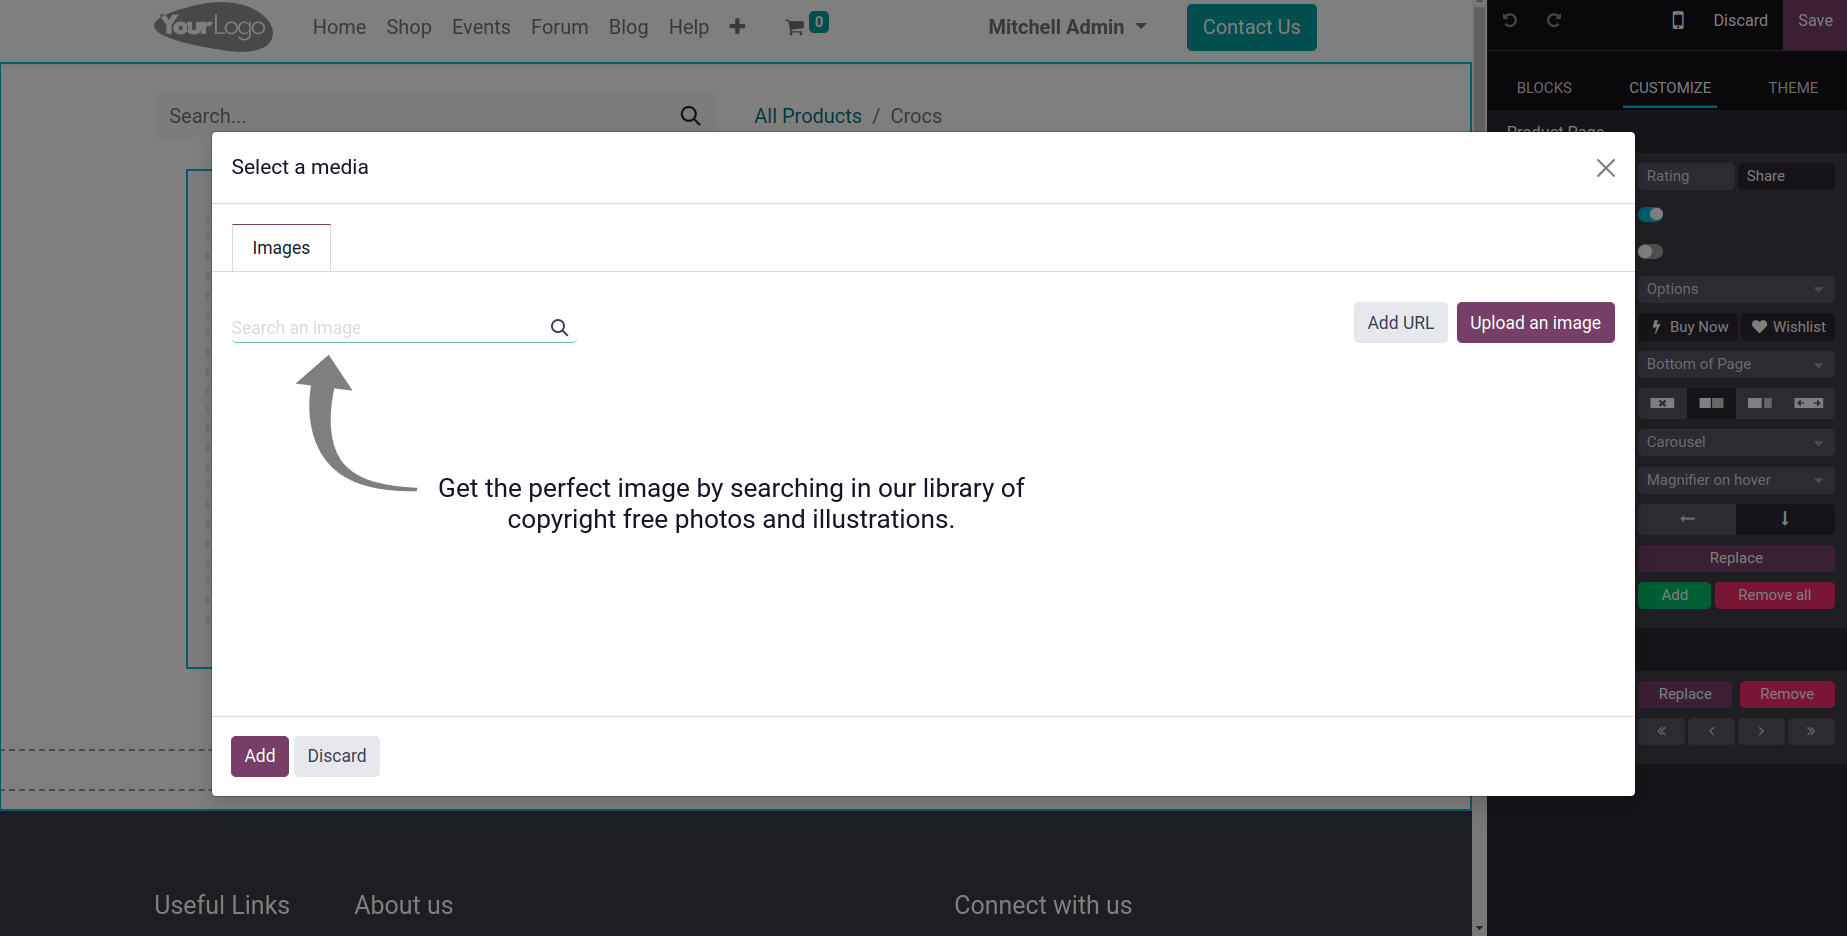
This window allows you to set up your new product. Just below the product name is a brief description that can be included in the text. You can also provide the product's image, quantity, and price. Double-clicking on the available space will allow you to add the image. After that, a pop-up window to add the image will appear.
The options to Upload Image, Add Url, and Search for an image are contained in this pop-up box. The window's editing features also assist you in creating a more flawless product page design. You can publish your new product on your website by clicking the SAVE button when you've finished editing.
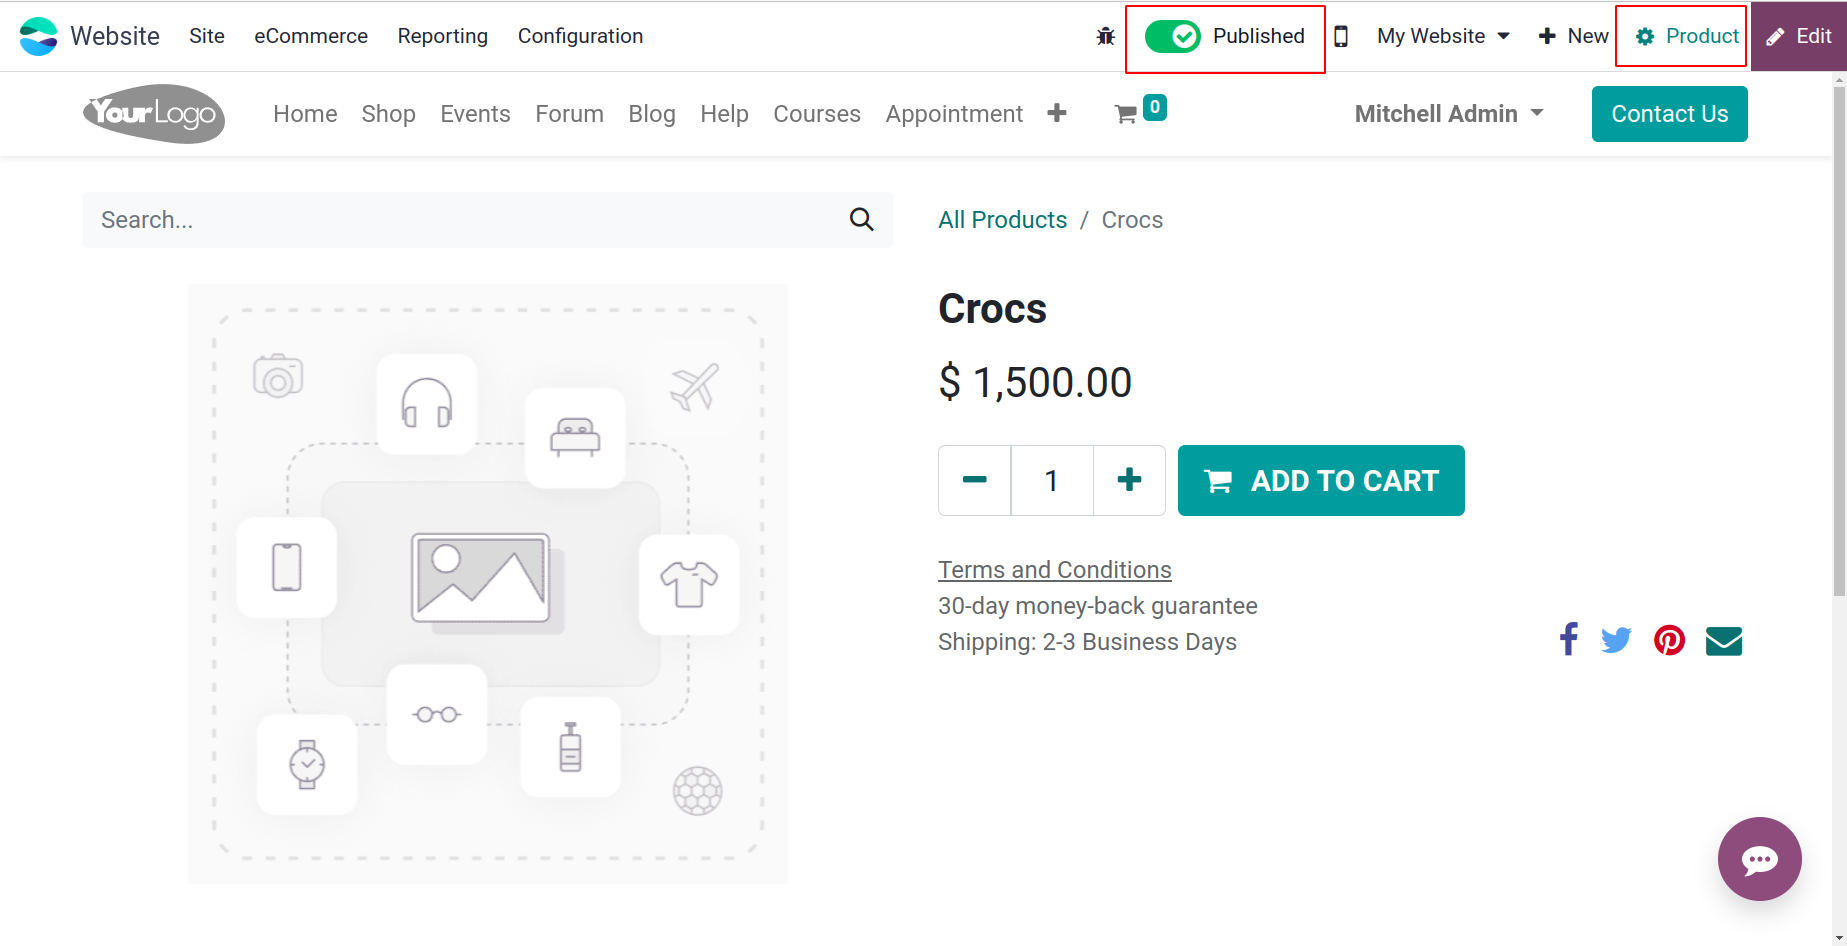
Then it leads to a website page. The product can be published from there. After that, to edit the product click on the Product button placed on the upper right corner.
You can accomplish this by selecting the Product description option and using the feature to provide a detailed description of the product. Let's open the Inventory module's product description window to see this. You can examine the eCommerce Shop area under the Sales tab in the Product creation window.
You can list the relevant websites in this section that showcase this specific product.
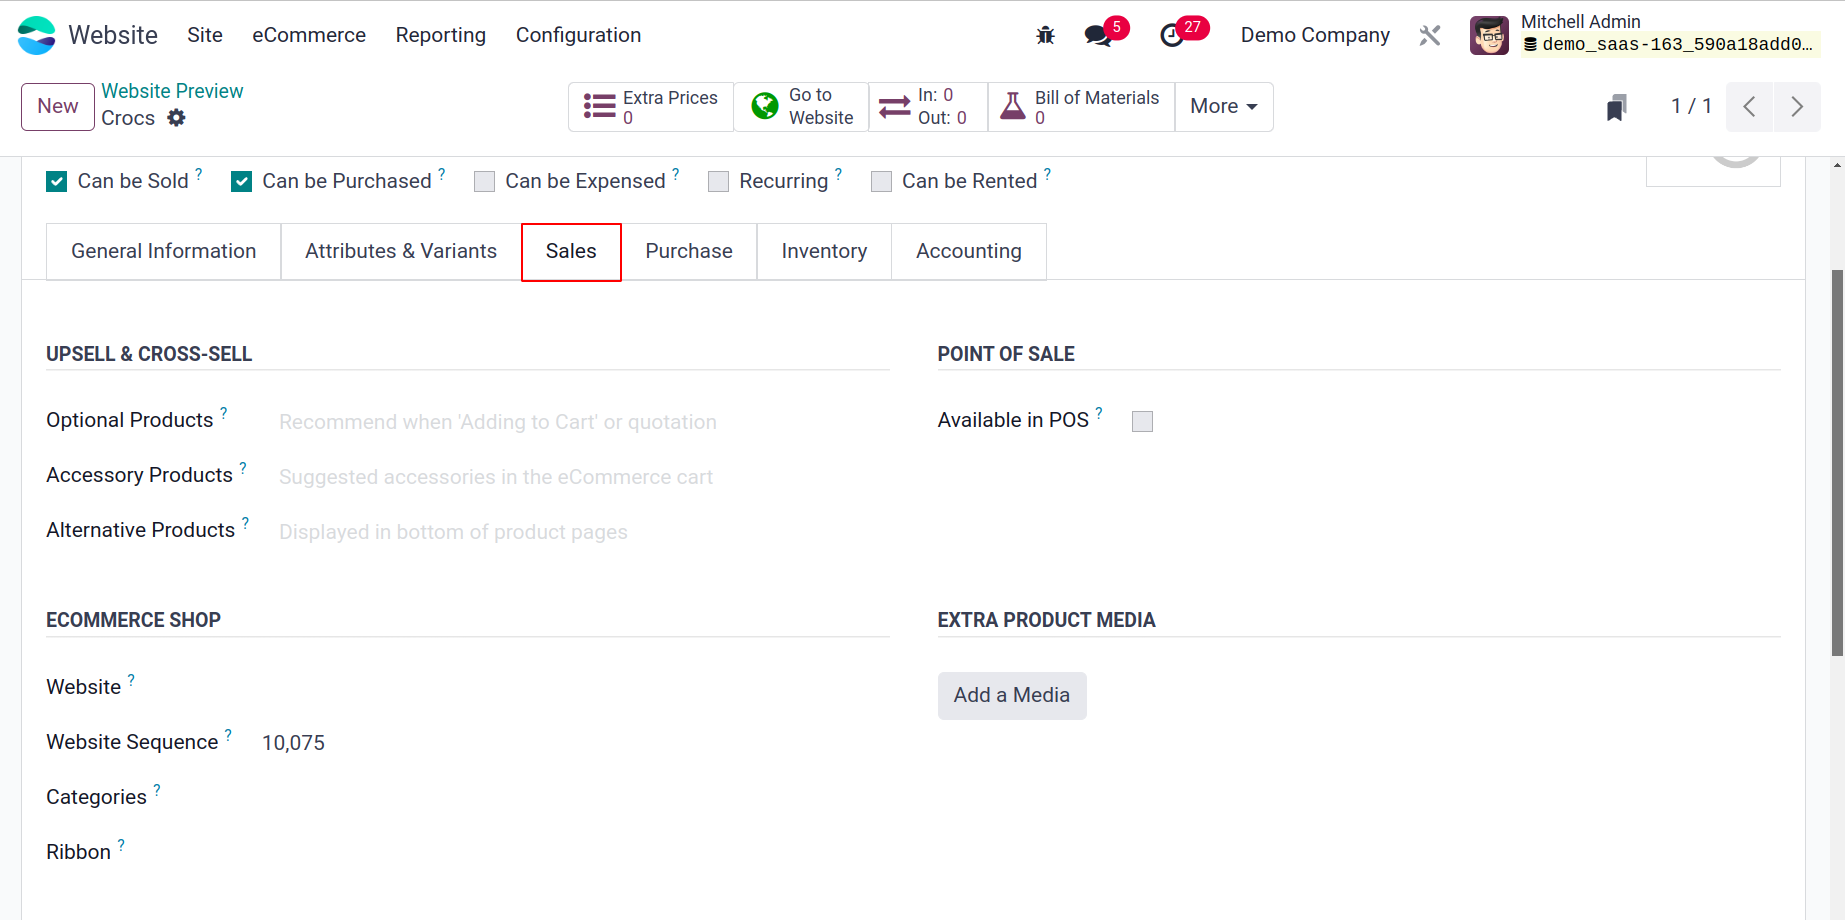
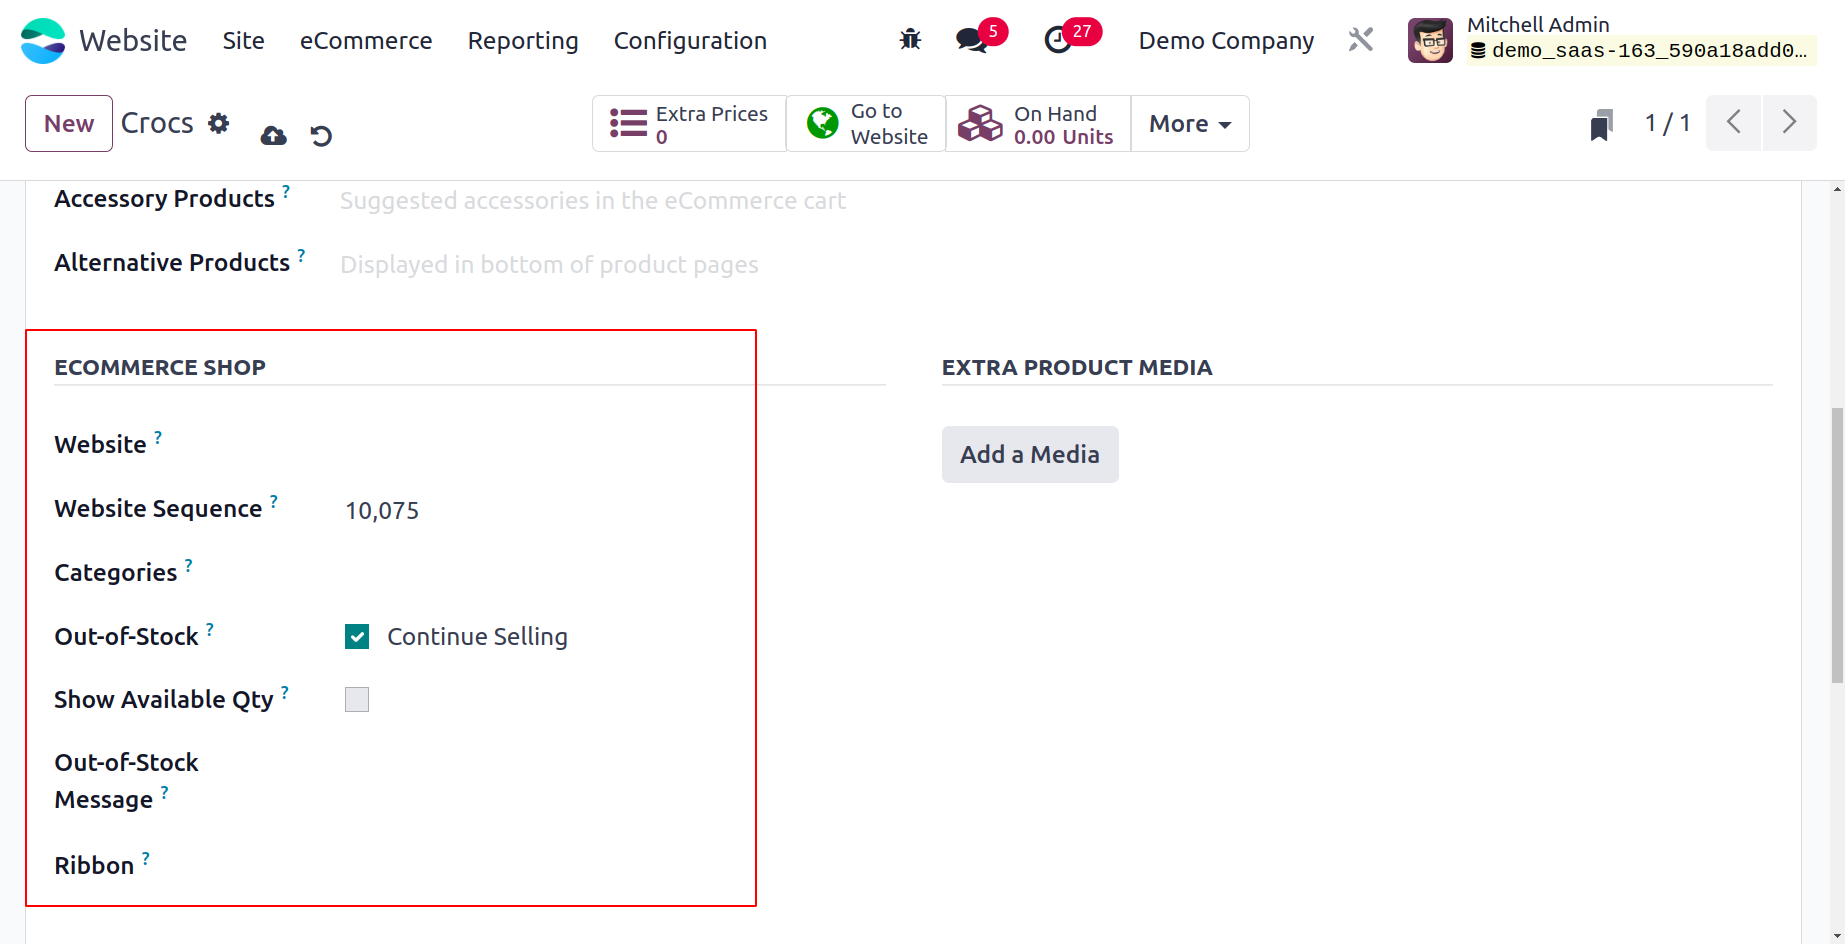
When you choose the Website option, a drop-down menu will appear with all of the website names that you have created on the platform. It's also acceptable for you to state the categories. The product will be offered in every eCommerce category you specify if you indicate it. To further enhance the operations, you can also enable the Show Available Quantity, Out-of-Stock, and Out-of-Stock Messages features.
Odoo 17 gives you the option to copy the product description and describe it on separate websites if you want to make the same product available for multiple websites. The Actions button provides access to the Duplicate option.
Product Catalog Customization
The Odoo17 Website module makes it simple to customize the Product Catalog that is shown on the business website. This might be carried out in accordance with your company's or business's specifications. Odoo offers a range of sophisticated customization possibilities to ensure flawless management of all activities.
The customize page is accessible from the online catalog, which offers a variety of customization possibilities. You may examine your website's product catalog by going to the Shops tab in the dashboard.
All of the products in your catalog will be shown in the image of the product catalog pane above. You can easily locate your product in the product catalog by using the search feature. Additionally, you have the option to sort the data by Name, Newest Arrival, and Price (both high to low and low to high).
These choices are accessible through the available Sort By option.
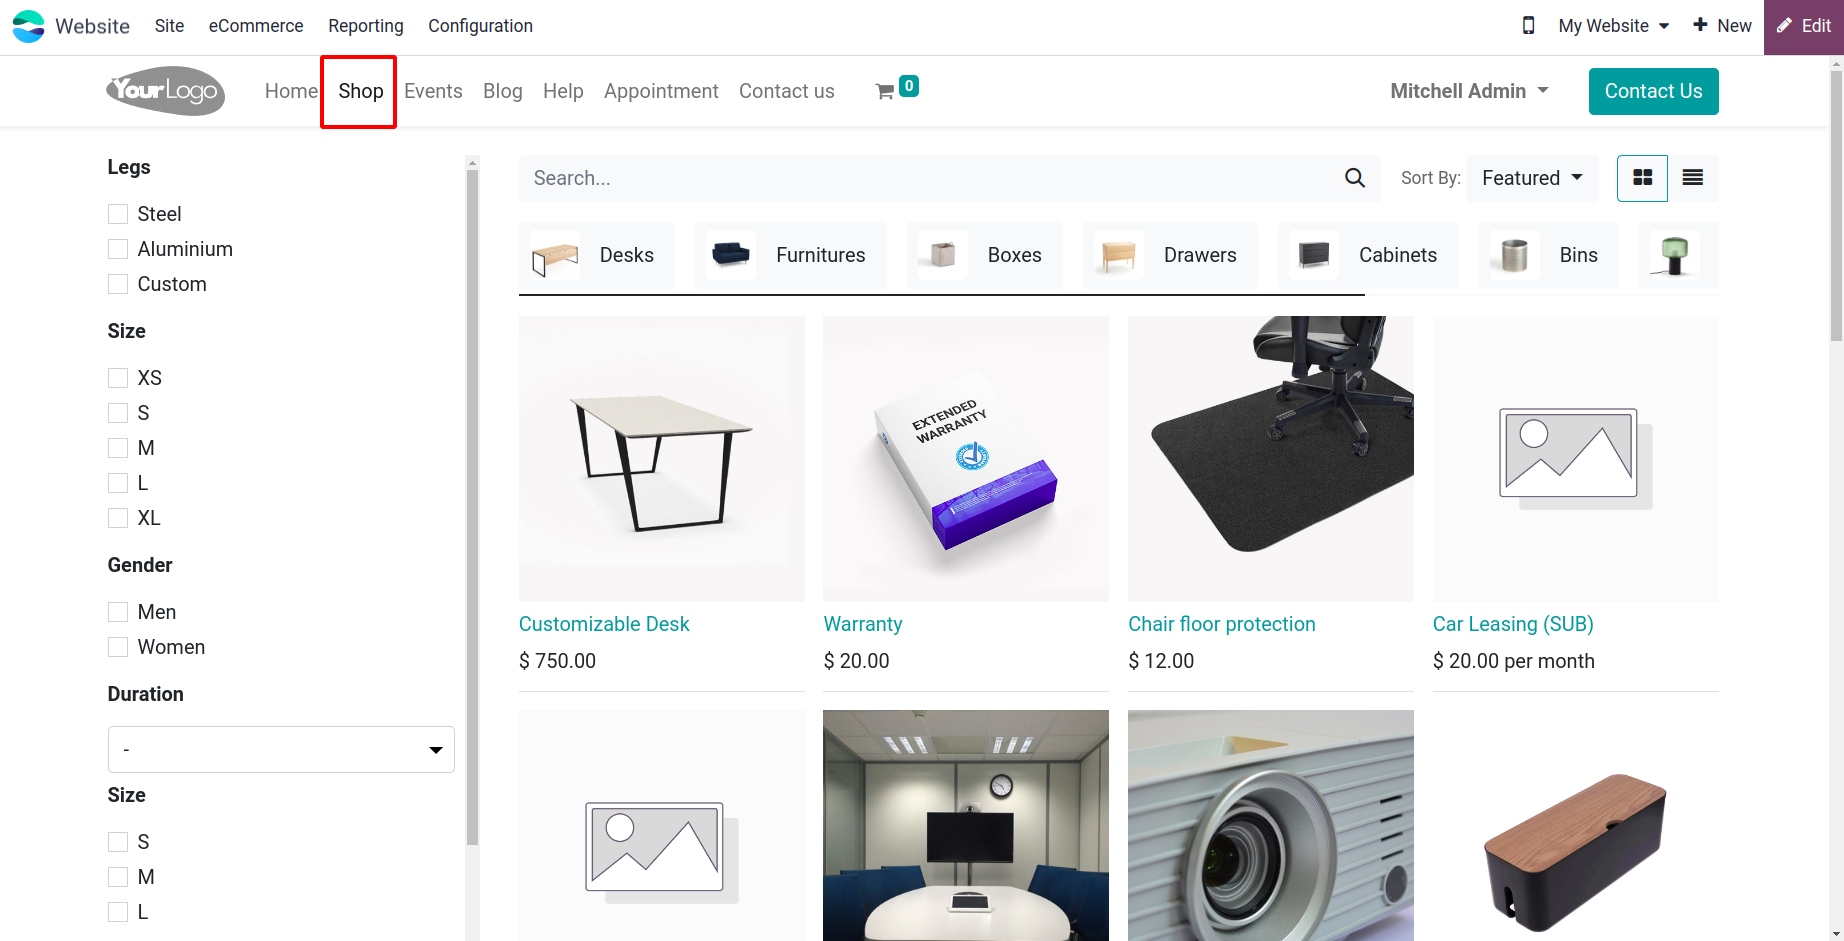
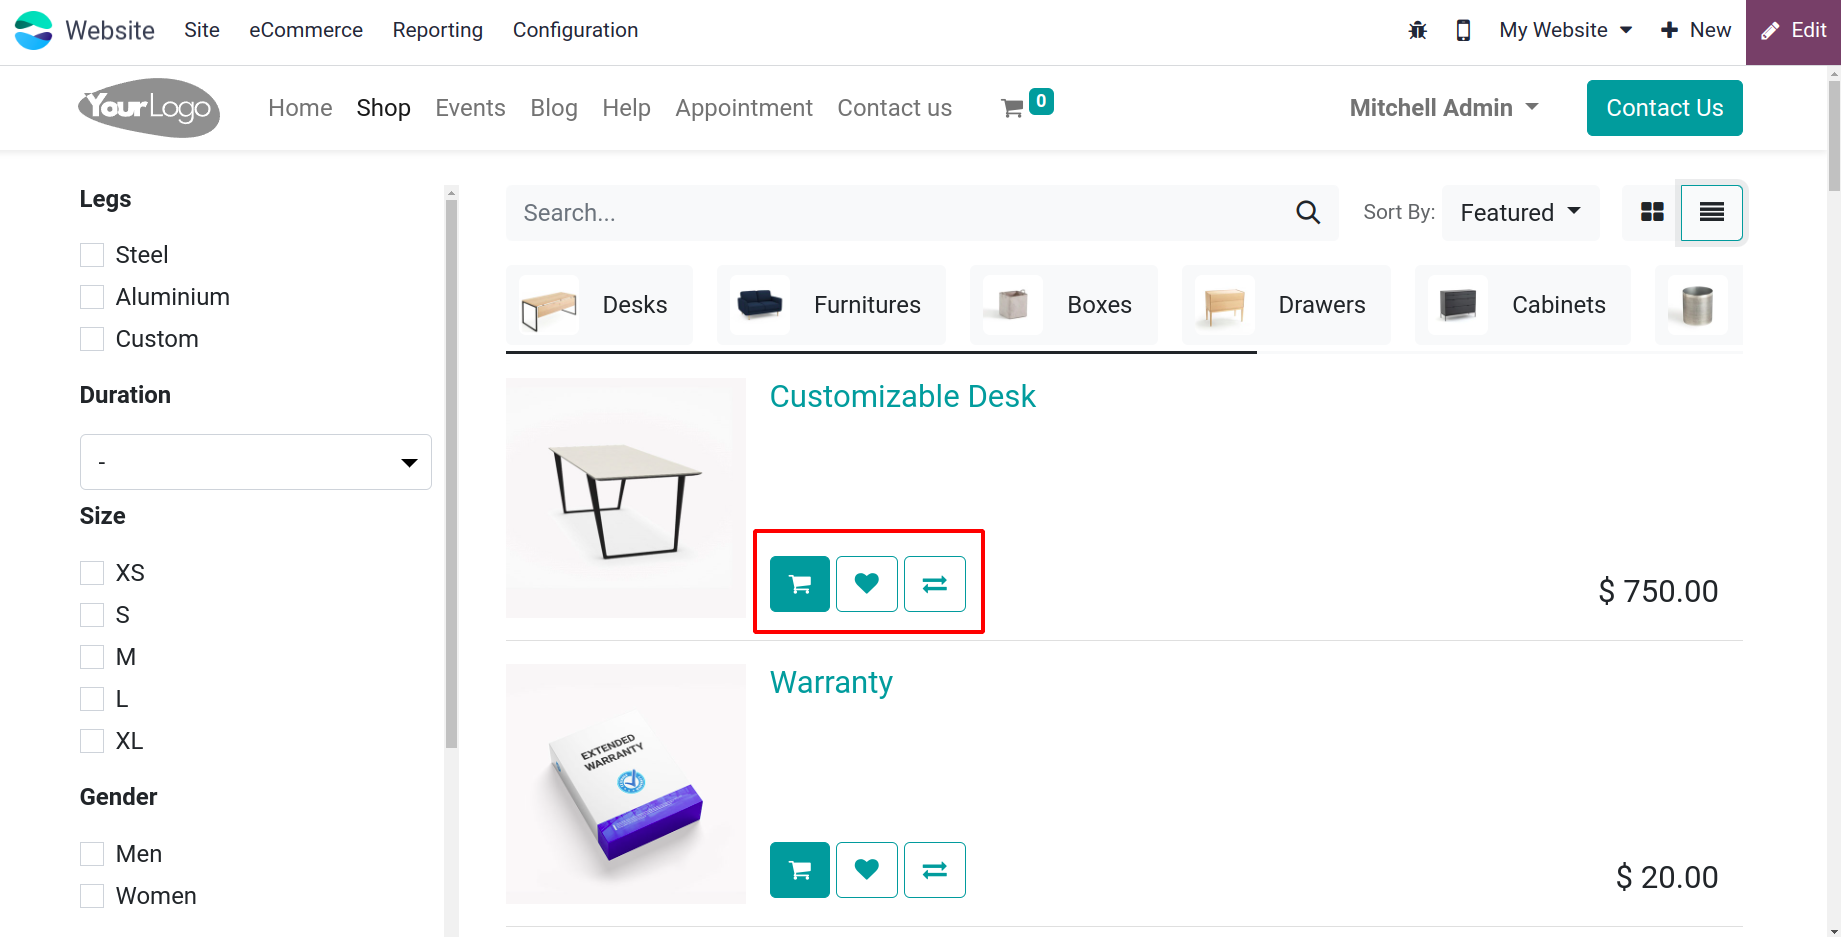
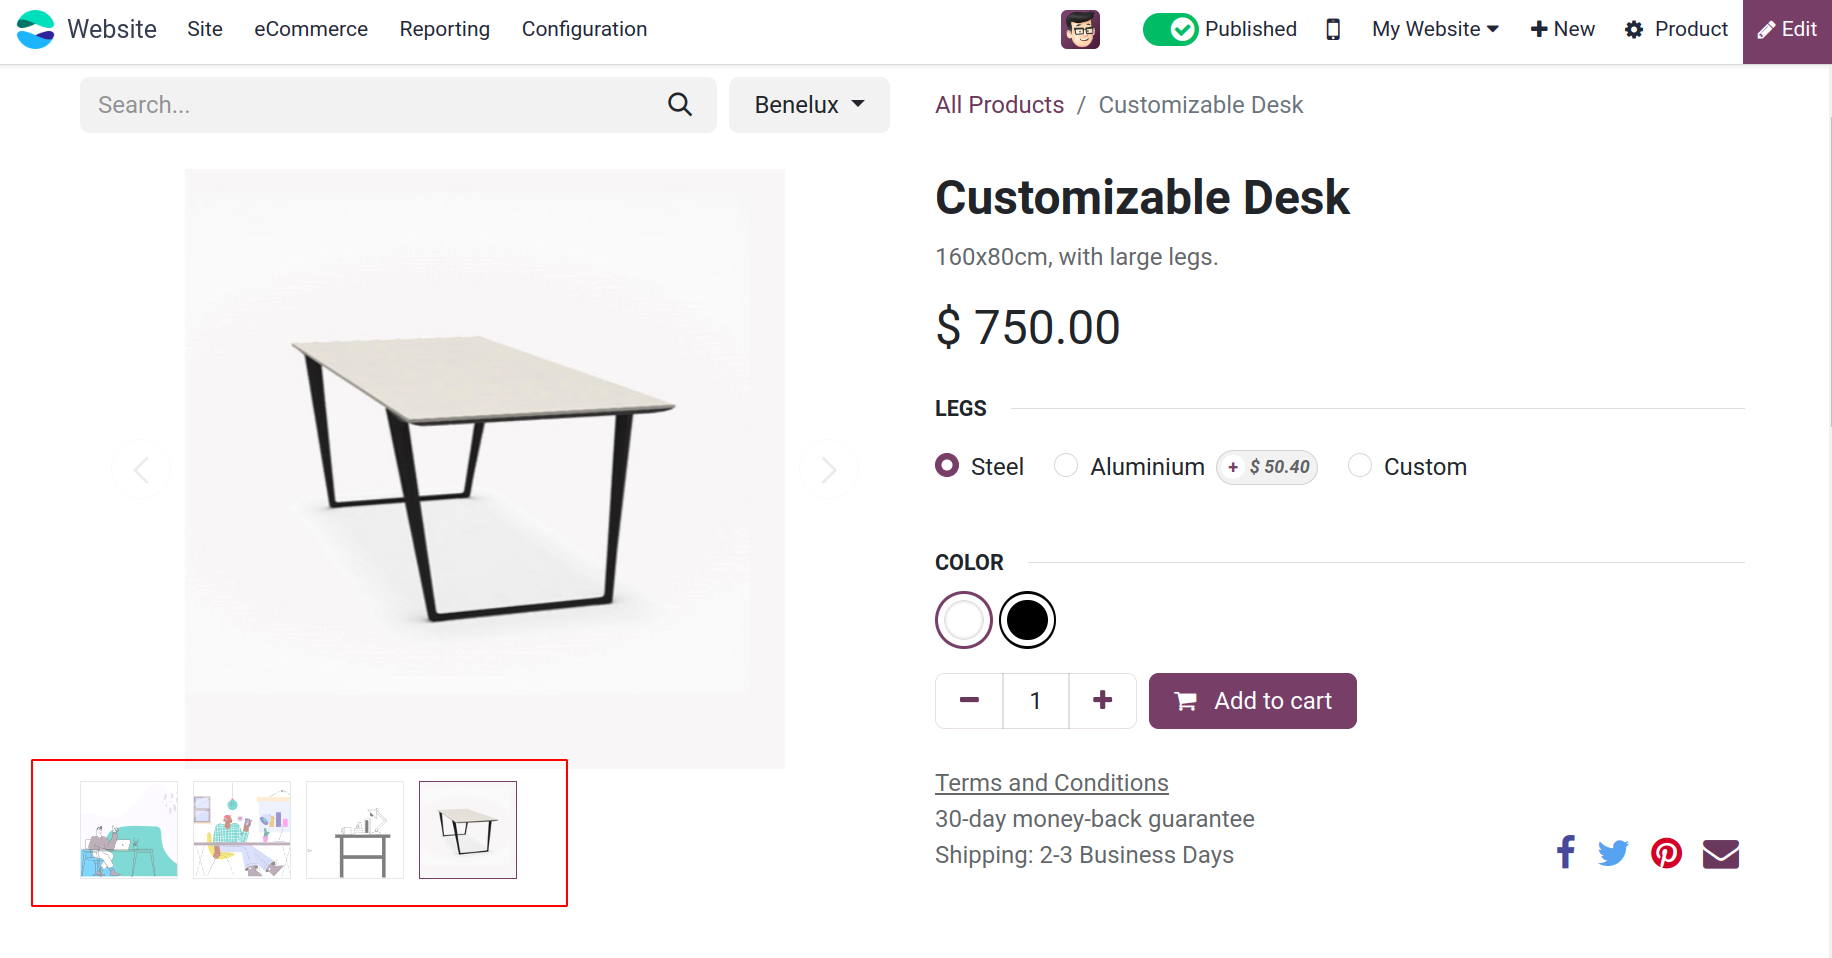
It is also possible to view the Shops page in List and Grid views. Below is a picture of the window's List view.
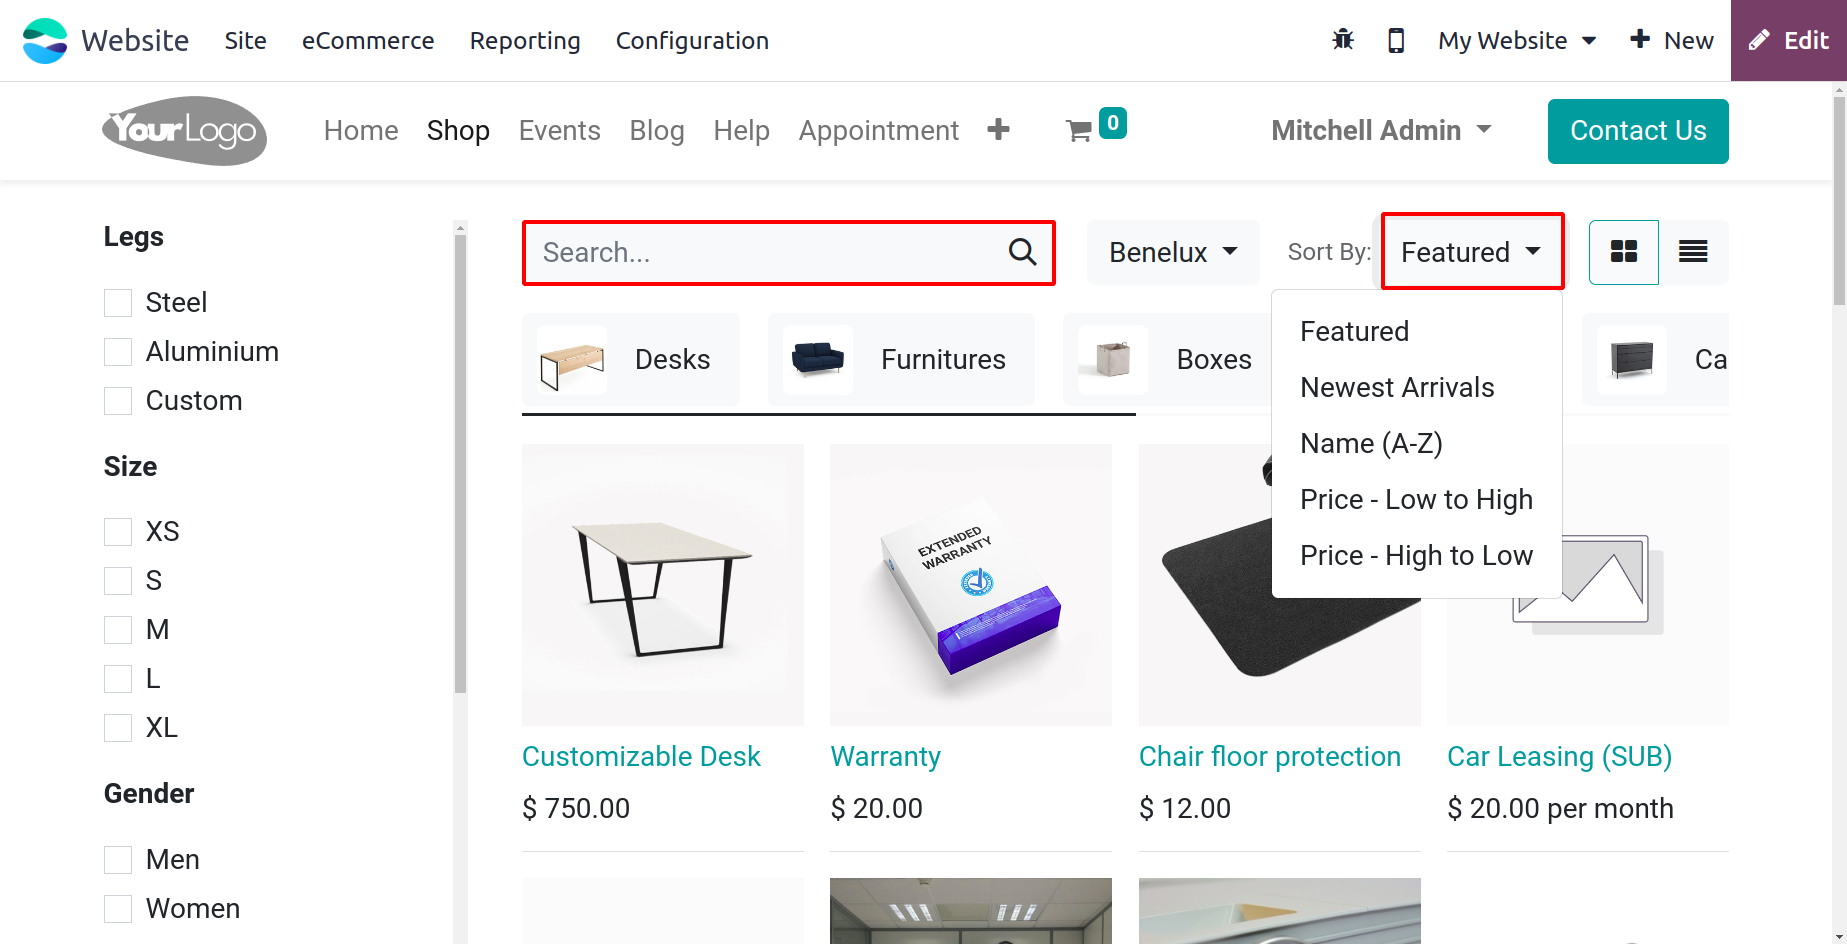
Every product on the list has its name, picture, and cost provided. The icons for completing different tasks, such as adding items to a wish list, comparing, and shopping cart, are always visible.
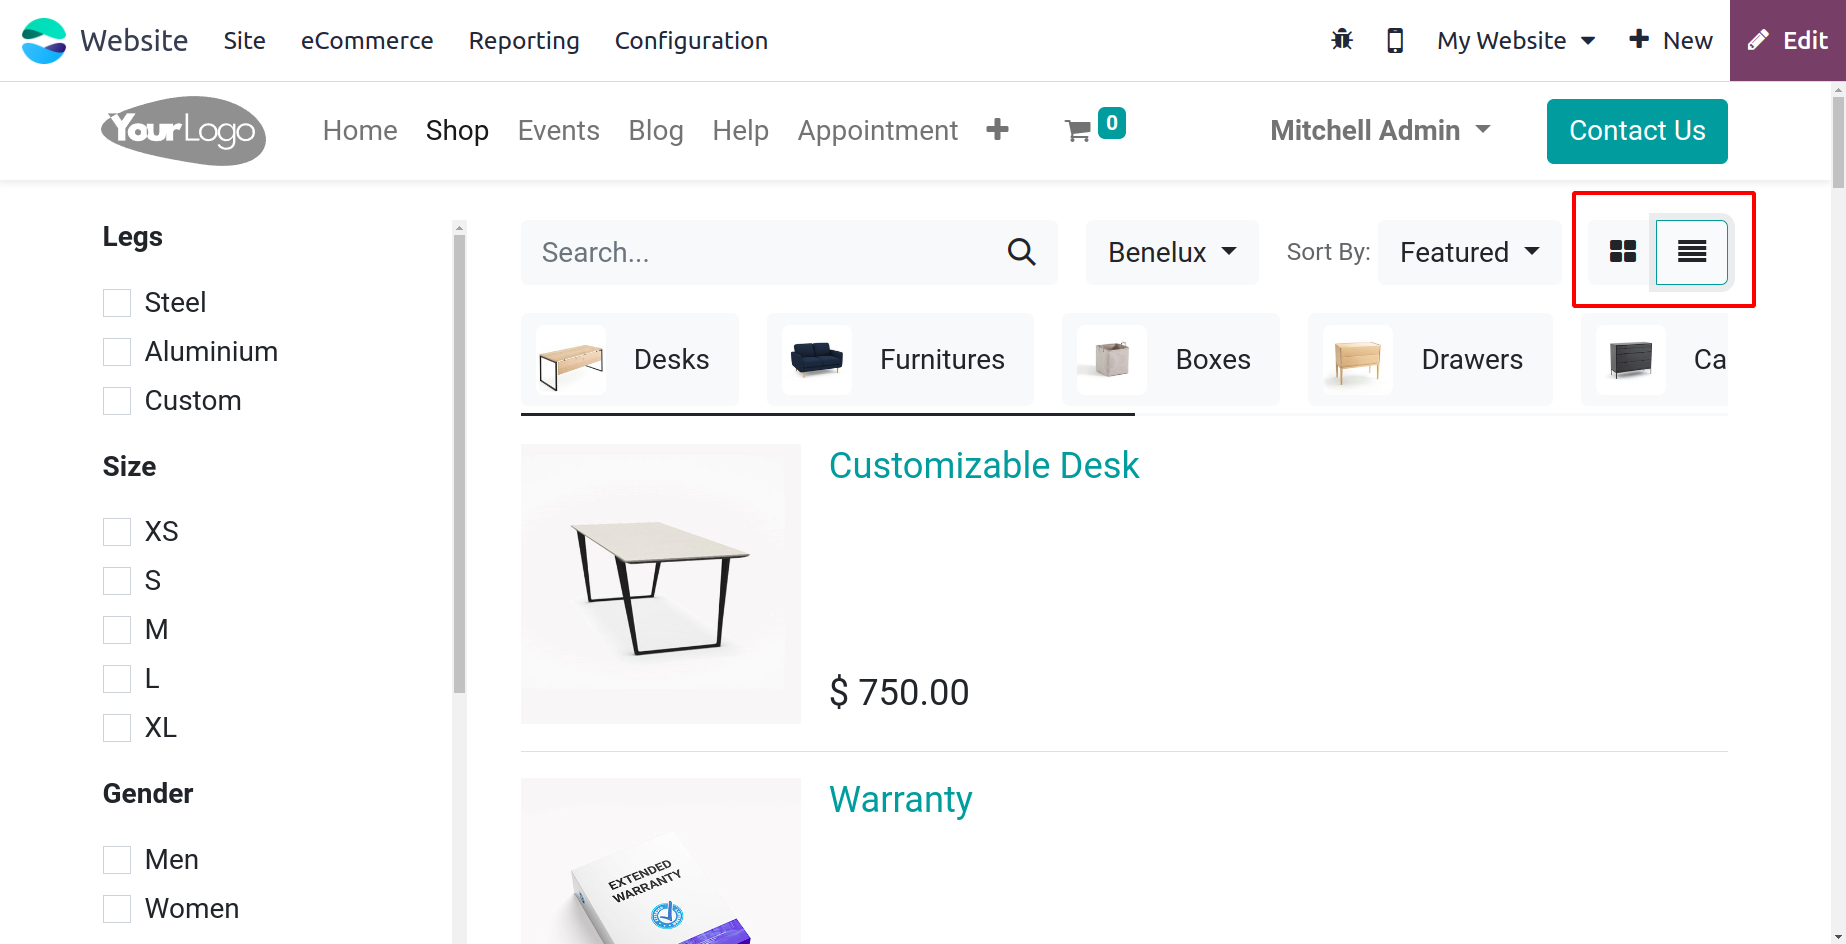
The several filtering choices are shown when you look at the left side of the page. In addition to many other criteria, you can filter the list by Legs, duration, size, gender, and fabric. On top of the window, you can see icons to access My Cart, Facebook, Twitter, and Instagram.
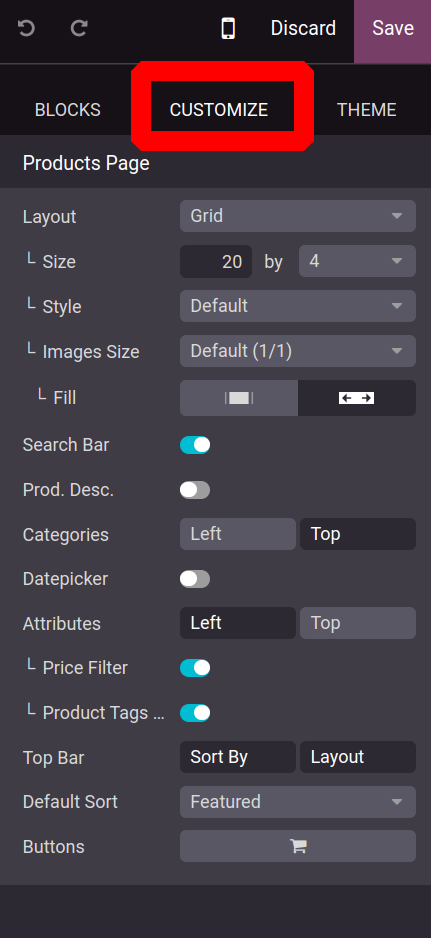
To add more customisations click on the Edit button.
There are two options for Product Layout: Grid View and List View.You can select the Size, Style, Image Type, and Fill.then enable the Search bar and the product description by turning on the Prod. Desc. Categories are displayed at the top or left of the screen. Only after enabled will the Price Filter and Product Tags be shown. The other features, such as the available Buttons, Default Sorting, and Top Bar, will thereafter be determined by this customization page.
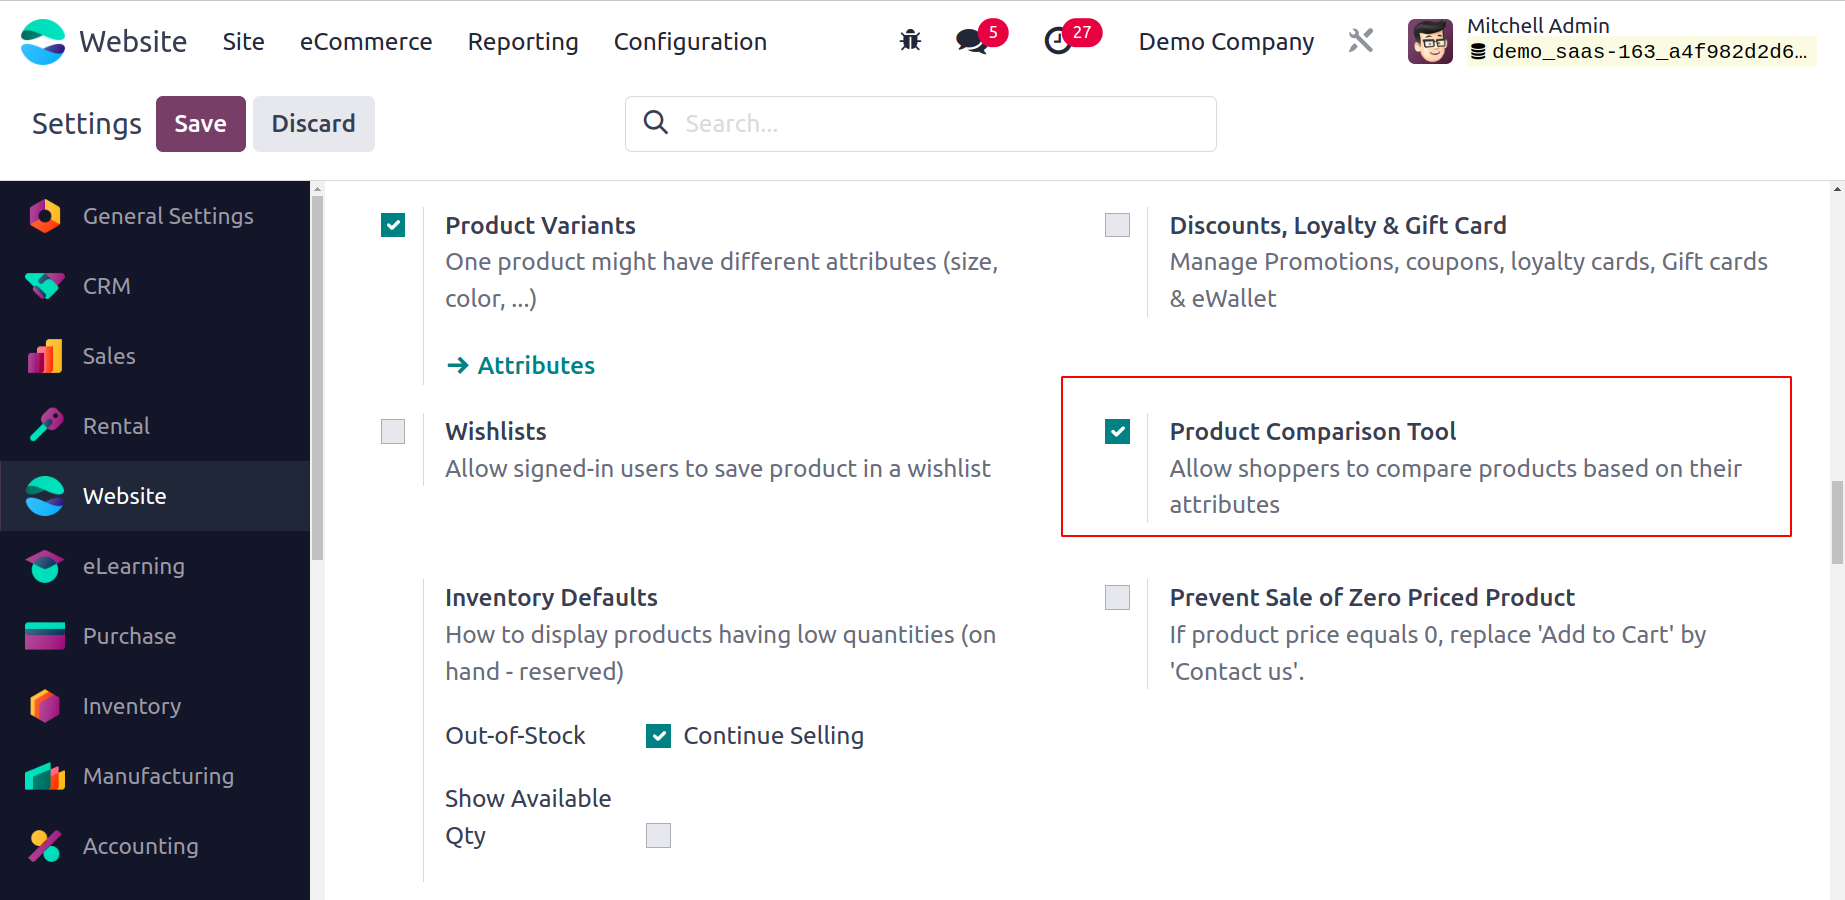
Product Comparison Option
Two products from the website shop can be compared. To get the compare option users must enable the Product Comparison Tool, available under the Shop-Product section from the Configuration settings. which allows the shoppers to compare products.
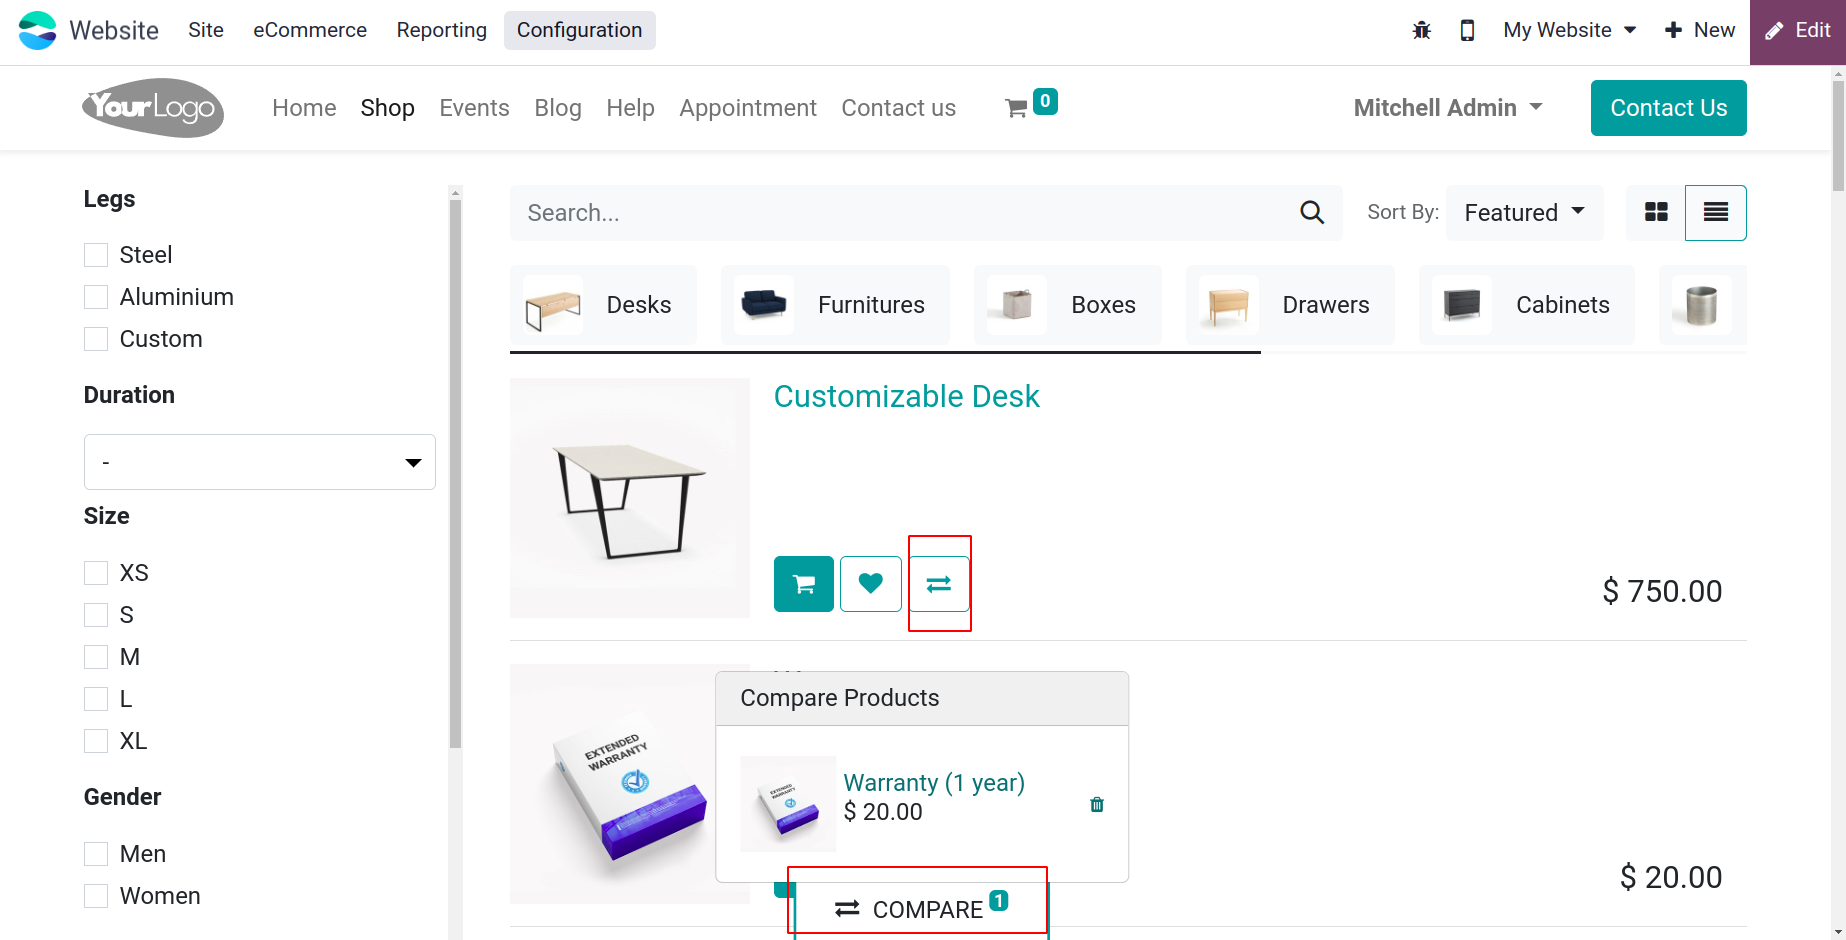
The stores page offers the chance to compare products. You can see a double arrow mark and it says "product comparison" under each product description.
Your product will be added to the COMPARE PRODUCTS page when you click on this Compare menu.
As seen in the image below, a pop-up window displaying every product that has been chosen will appear.
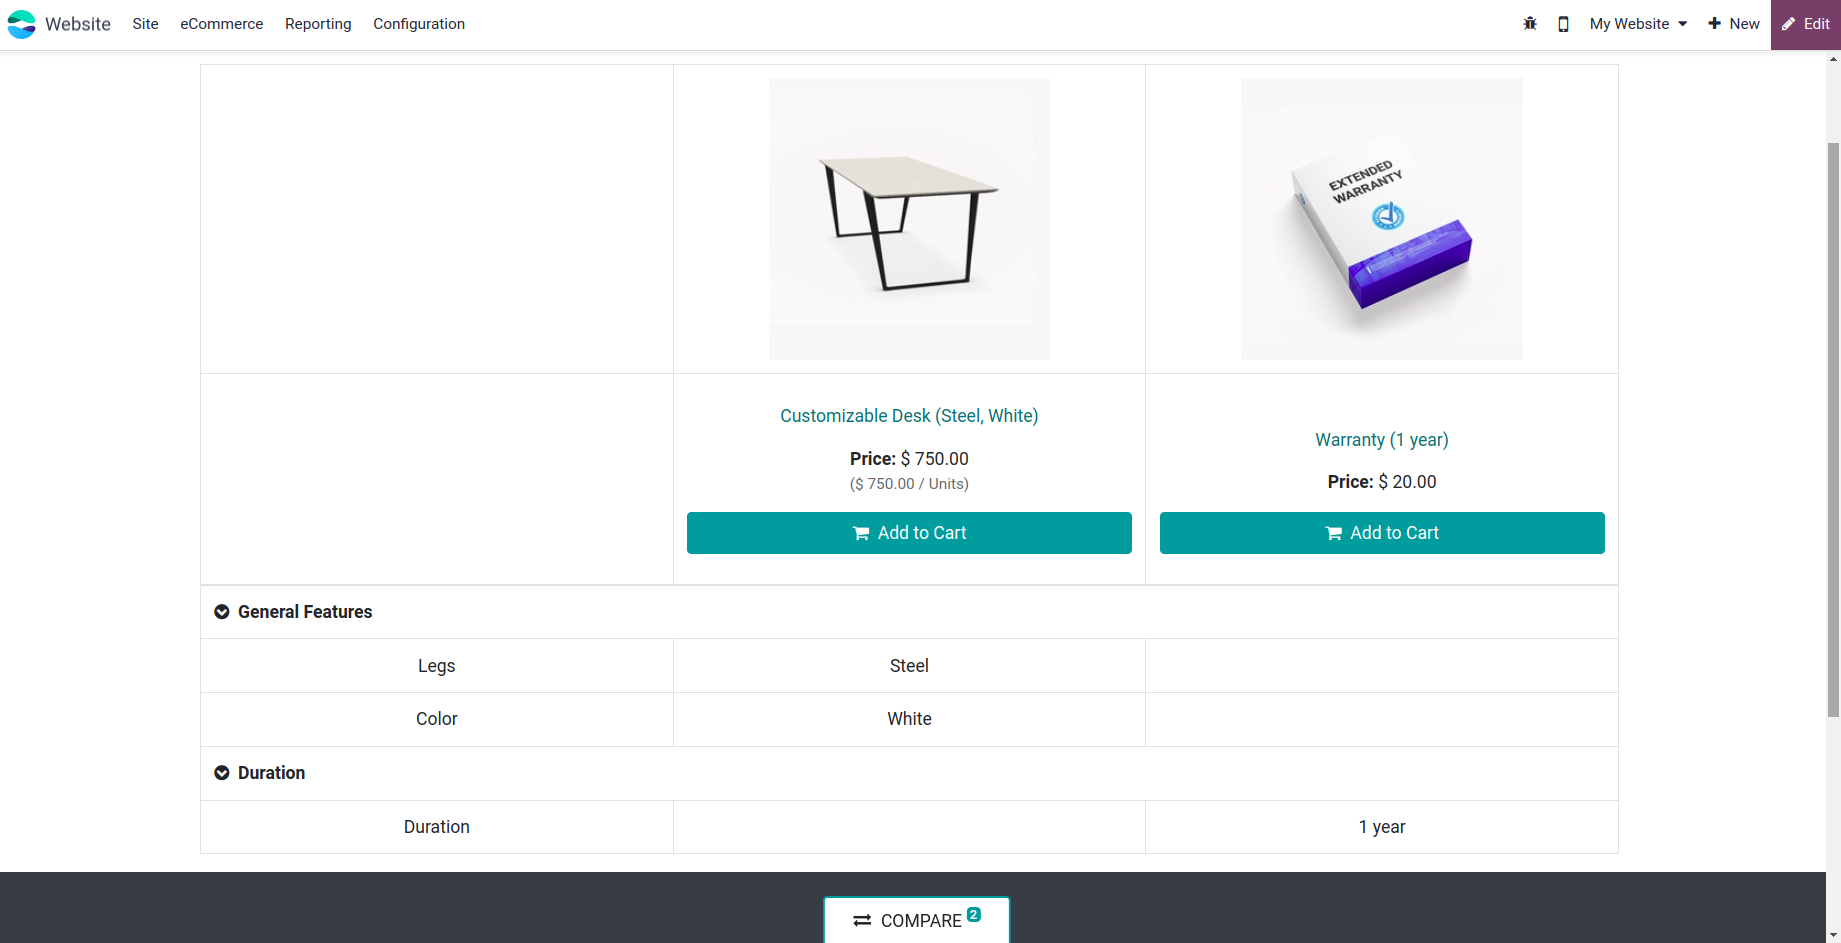
You can compare a maximum of four goods at once with Odoo17. As seen in the image below, clicking on the Compare button in the pop-up will direct you to a different page where you may view every product that has been selected.
Now that we have a strong understanding of the Website module's product comparison feature, let's examine the Wishlist functionality.
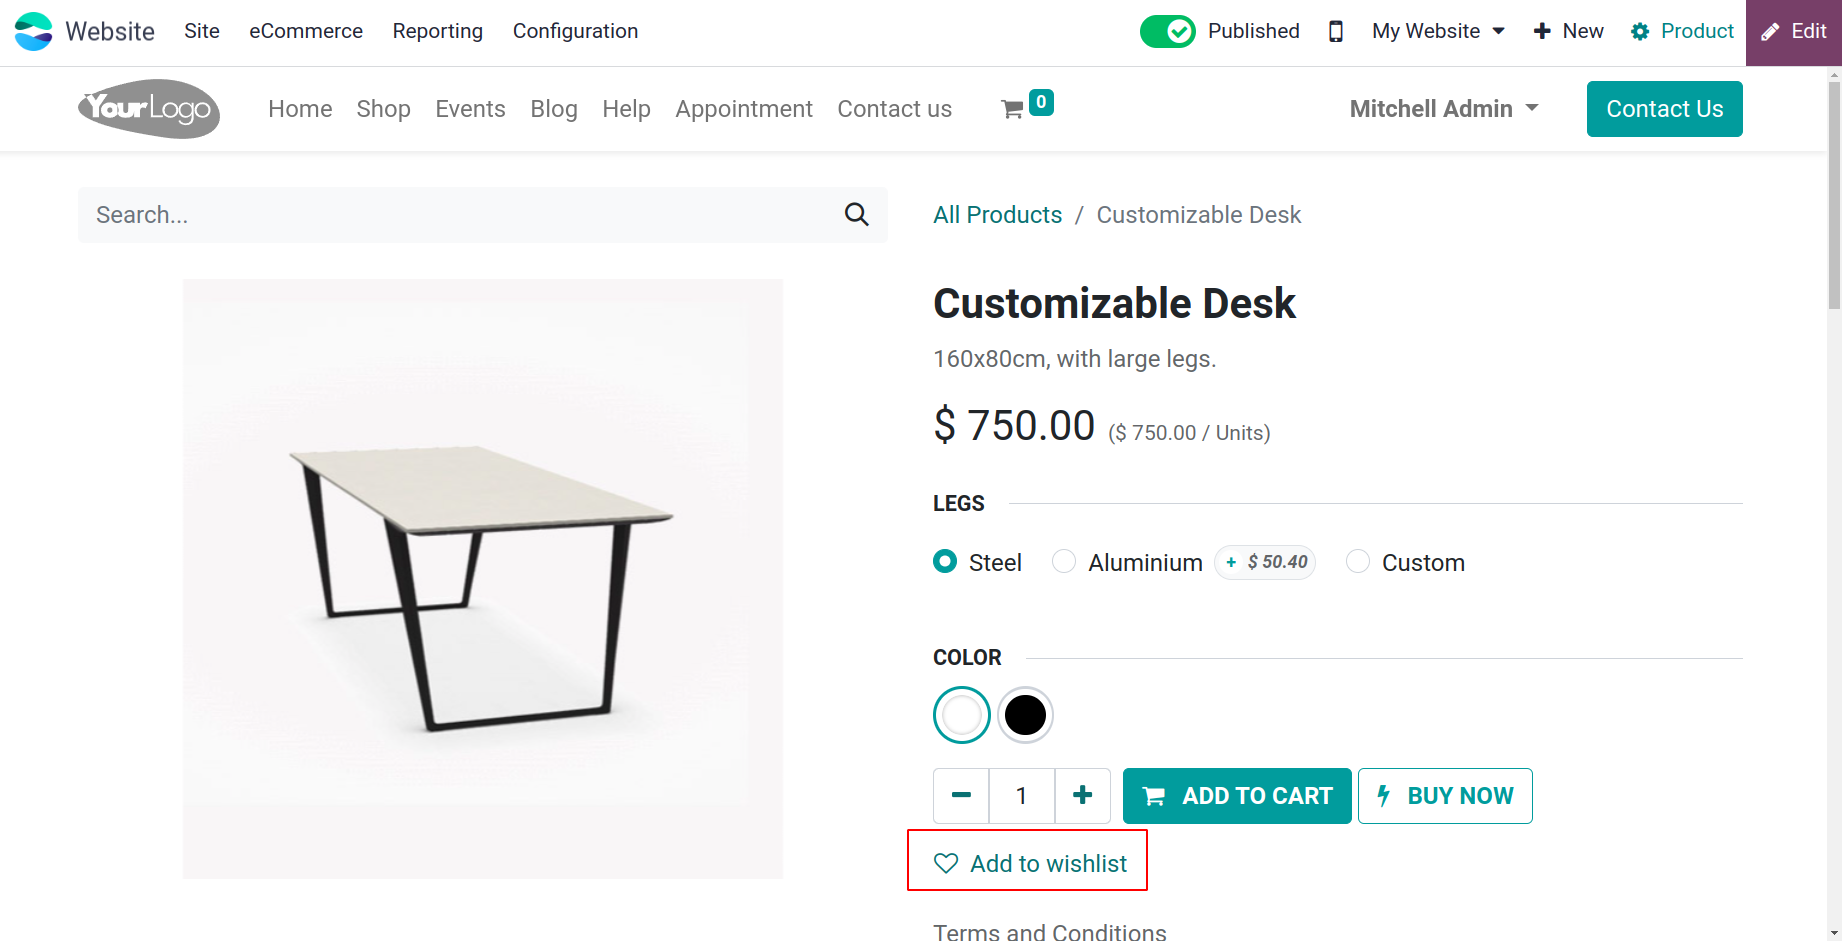
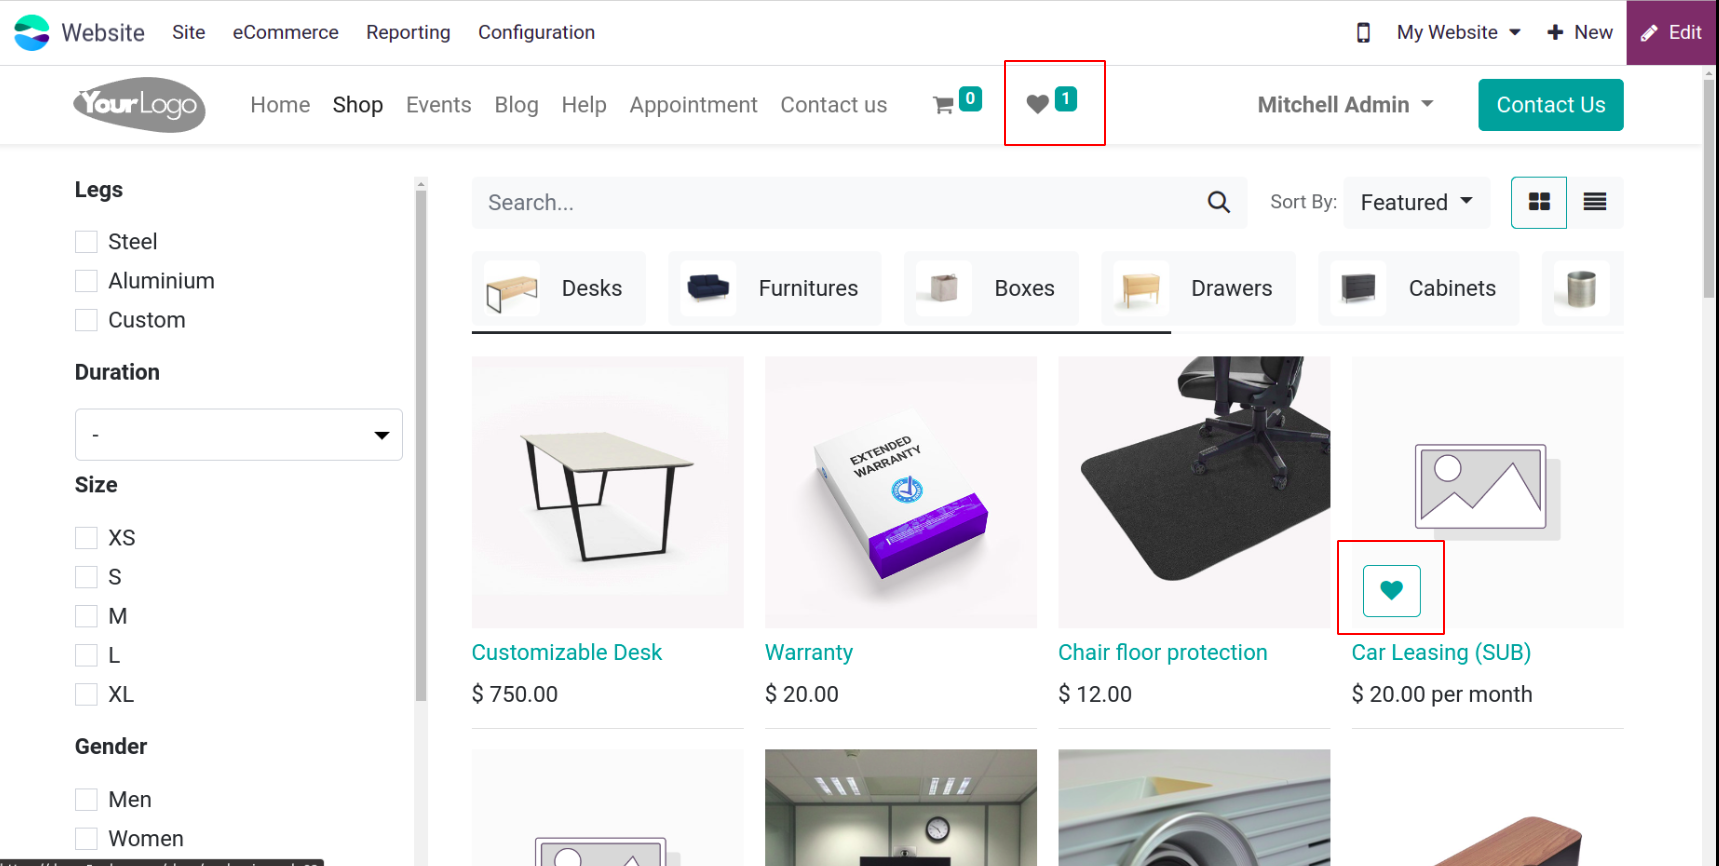
Wishlist
Odoo17 introduced the Wishlist feature in addition to the Product comparison option. The purpose of this wishlist option is to enhance the buying experience for your customers or visitors. Furthermore, by enabling customers to add their interesting products or products they may purchase in the future to a list without missing it, it can be seen as a marketing strategy. A customized collection of intriguing products can be kept by the buyer with the goal of purchasing them later. Additionally, each product description on the website page has a Wishlist option.
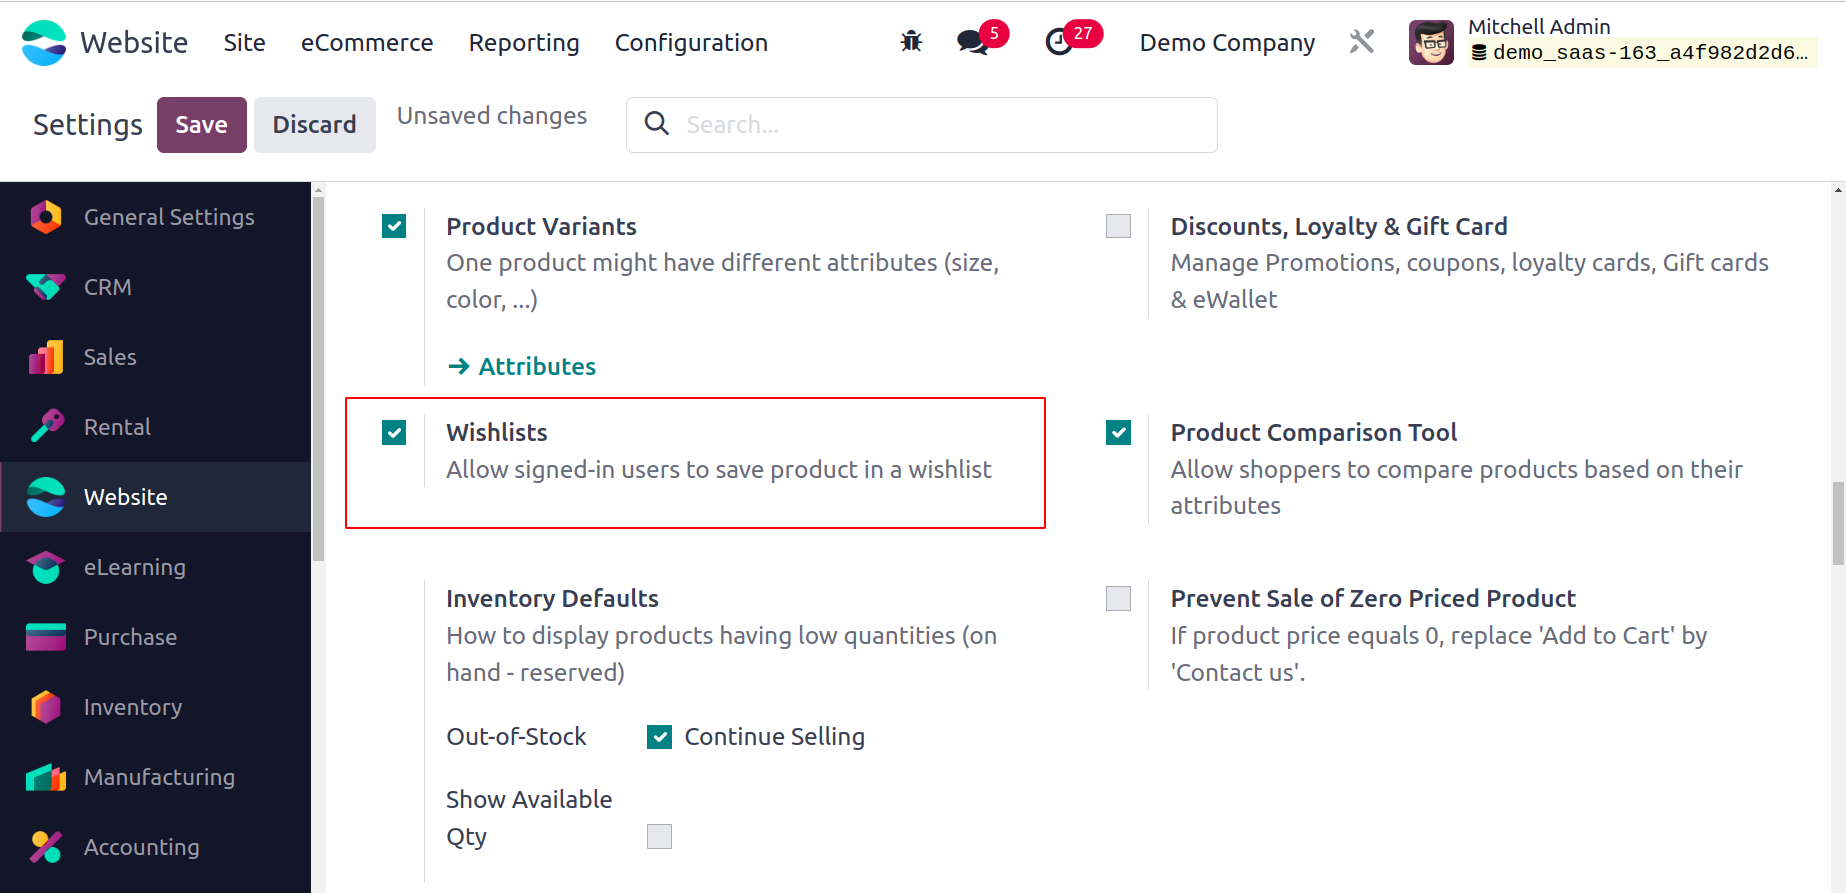
First enable the Wishlists option from Settings, under Configuration.
This option, which has a heart icon next to it, is ideal for customers who want to store their desired products in a user account that is different from the Cart option.

You can add as many items as you'd like to your wishlist. The wishlist sign at the top of the page, as shown in the image below, will notify users of every product they add to their wishlist.
Let's now examine the Cart option.
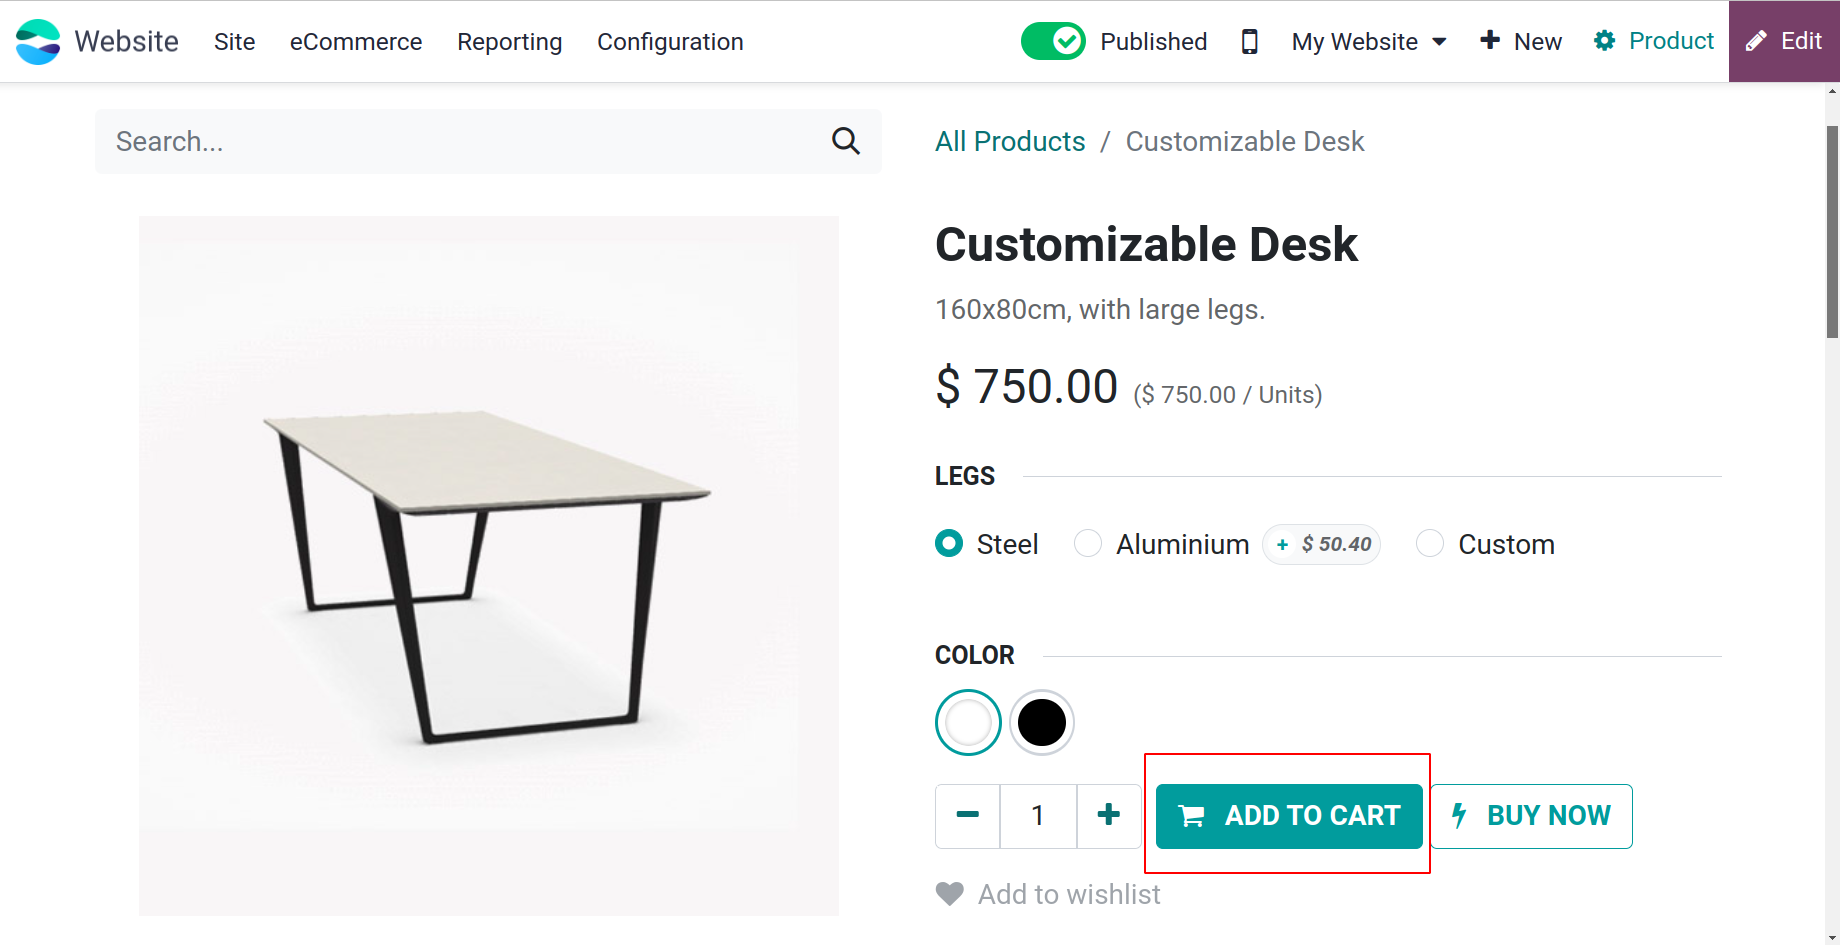
Add to cart
The Add to Cart feature is a must having feature for eCommerce business. The shoppers found it useful to enumerate in a separate area the necessary products they planned to buy. Customers will find it quite useful to purchase multiple things at once with the help of this temporary list. From the customizing menu, you can select the Add to Cart option. Following your activation, this choice will appear beneath each item on the page.
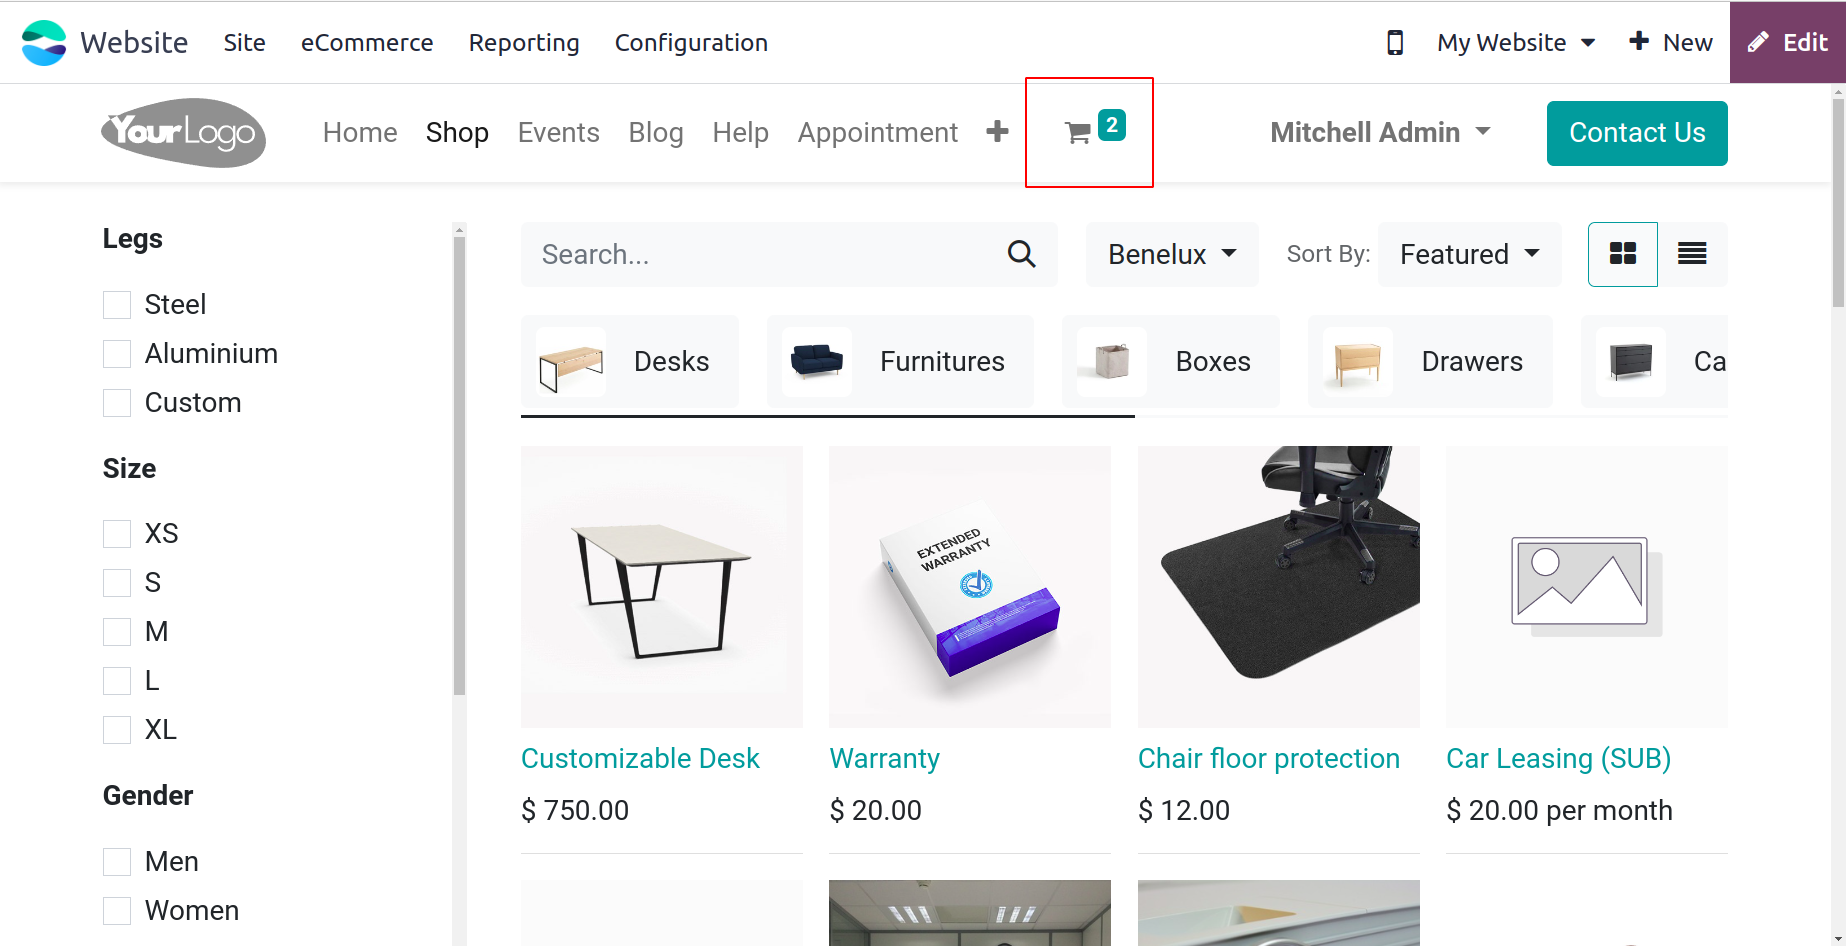
To add the item to your cart, simply click the Add To Cart button. After that, to see the products in your cart, click the Cart symbol that is displayed at the top of the page.
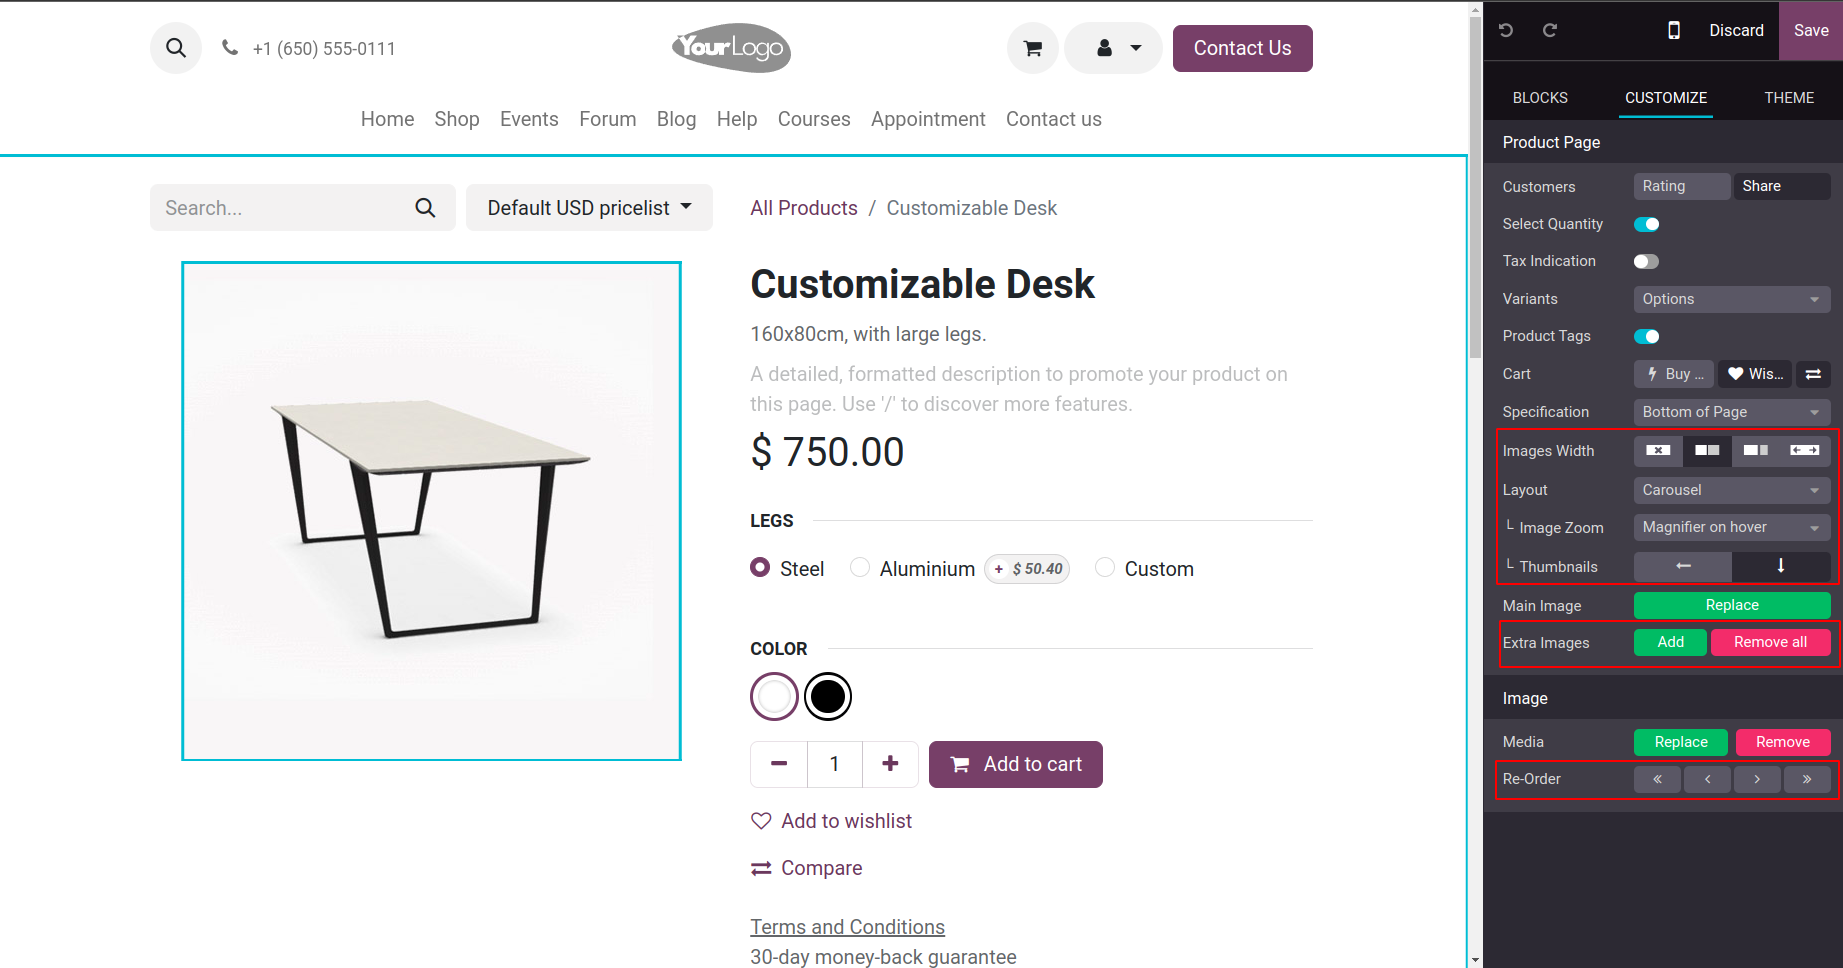
It is allowed to customize this page and multiple images. The Edit button allows you to do this.
The Extra Image allows you to add more images, and image with layout etc. are all managed.
It will be possible to arrange the extra images appear in the thumbnail at bottom or left.
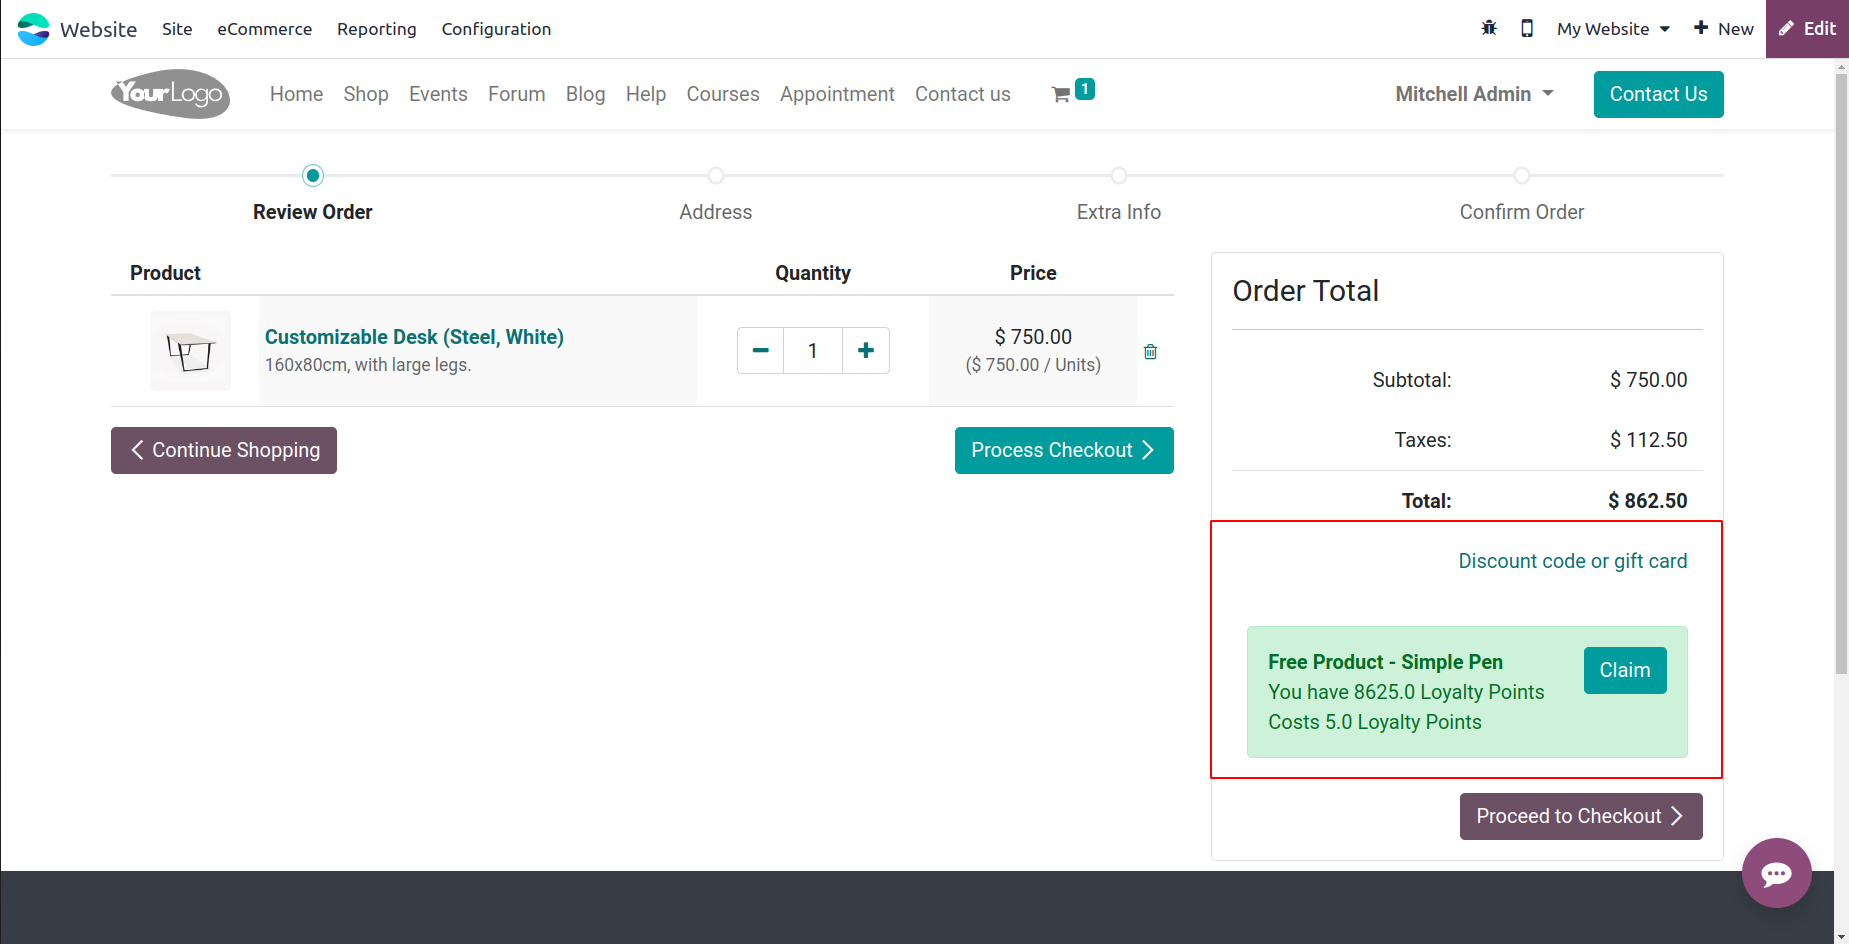
As seen in the above image, every item we placed on the cart page will be seen on that page. Details about any discounts or offers for the goods or services will also be shown in the cart. Furthermore, in the event that the customer chooses to purchase the suggested optional goods in addition to the primary product, the optional products that we have placed underneath the product description will also be shown. Click the Delete symbol to remove an item from the list. By clicking on the provided plus or minus button, you can also change the product's quantity. The window will also show the total price, taxes, and subtotal amount in addition to any applicable promo codes. You can drag the window down to see these details.
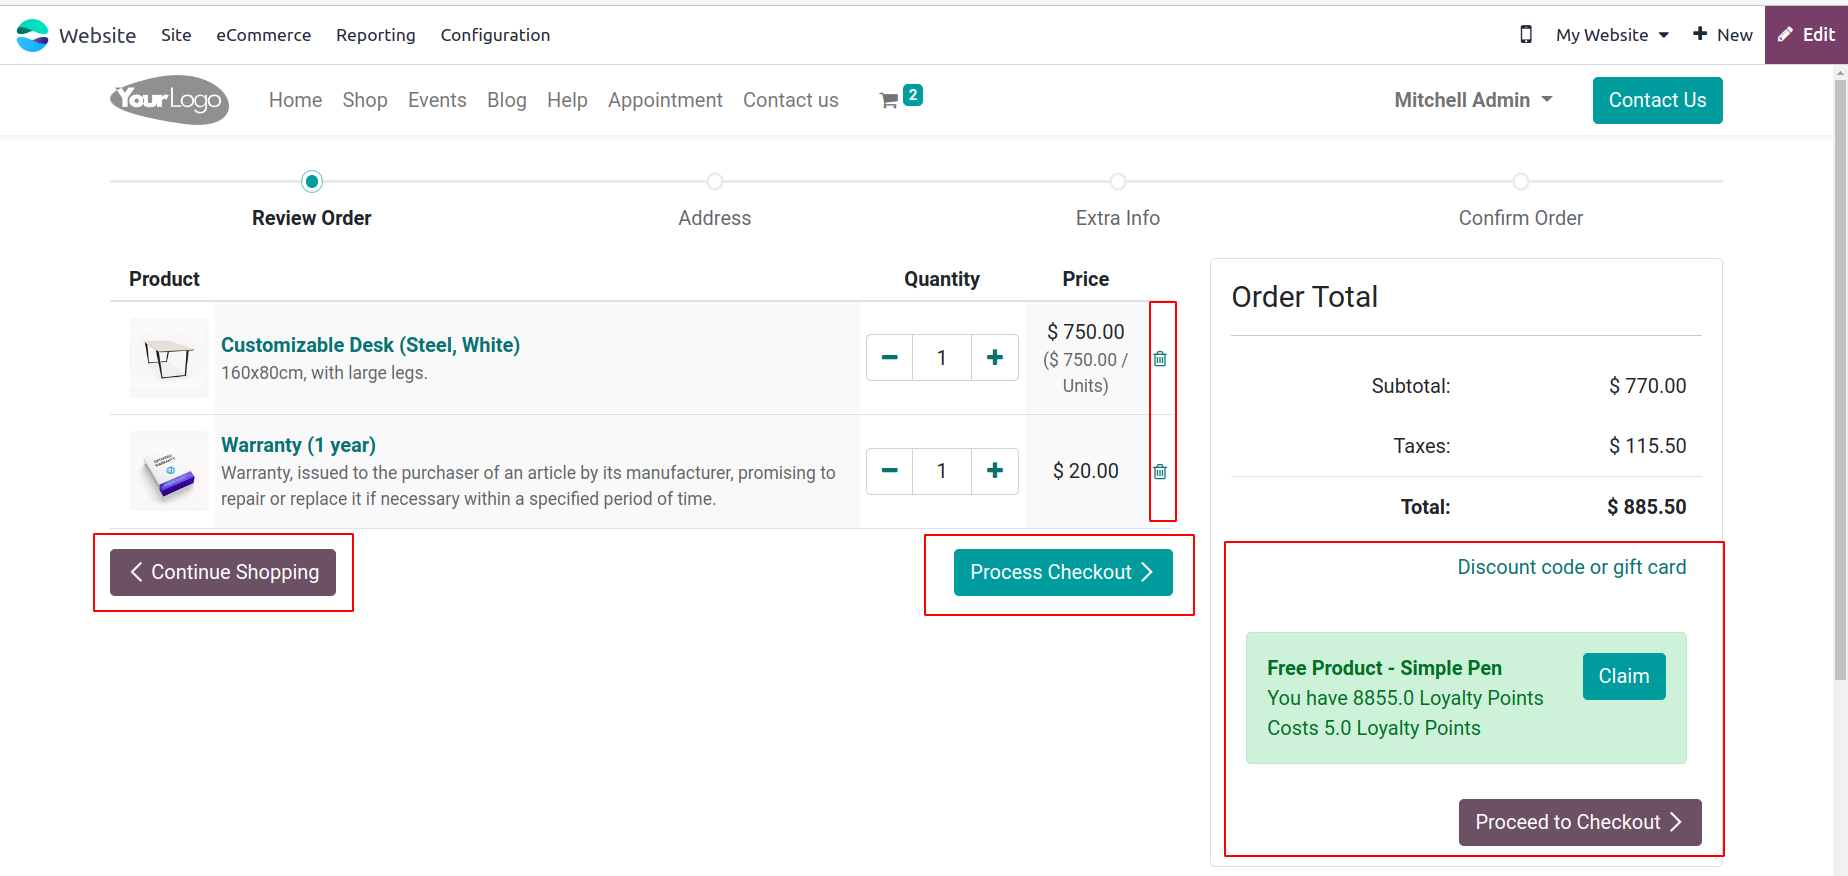
You can browse for further things by clicking the Continue Shopping button in the lower left corner of the window. By clicking on this button, you can return to the page with the product list. After you've examined and verified the contents of your cart, click the Process Check out button at the top right to complete the checkout process and submit your order. Your order details, invoice information, and payment information are now visible.
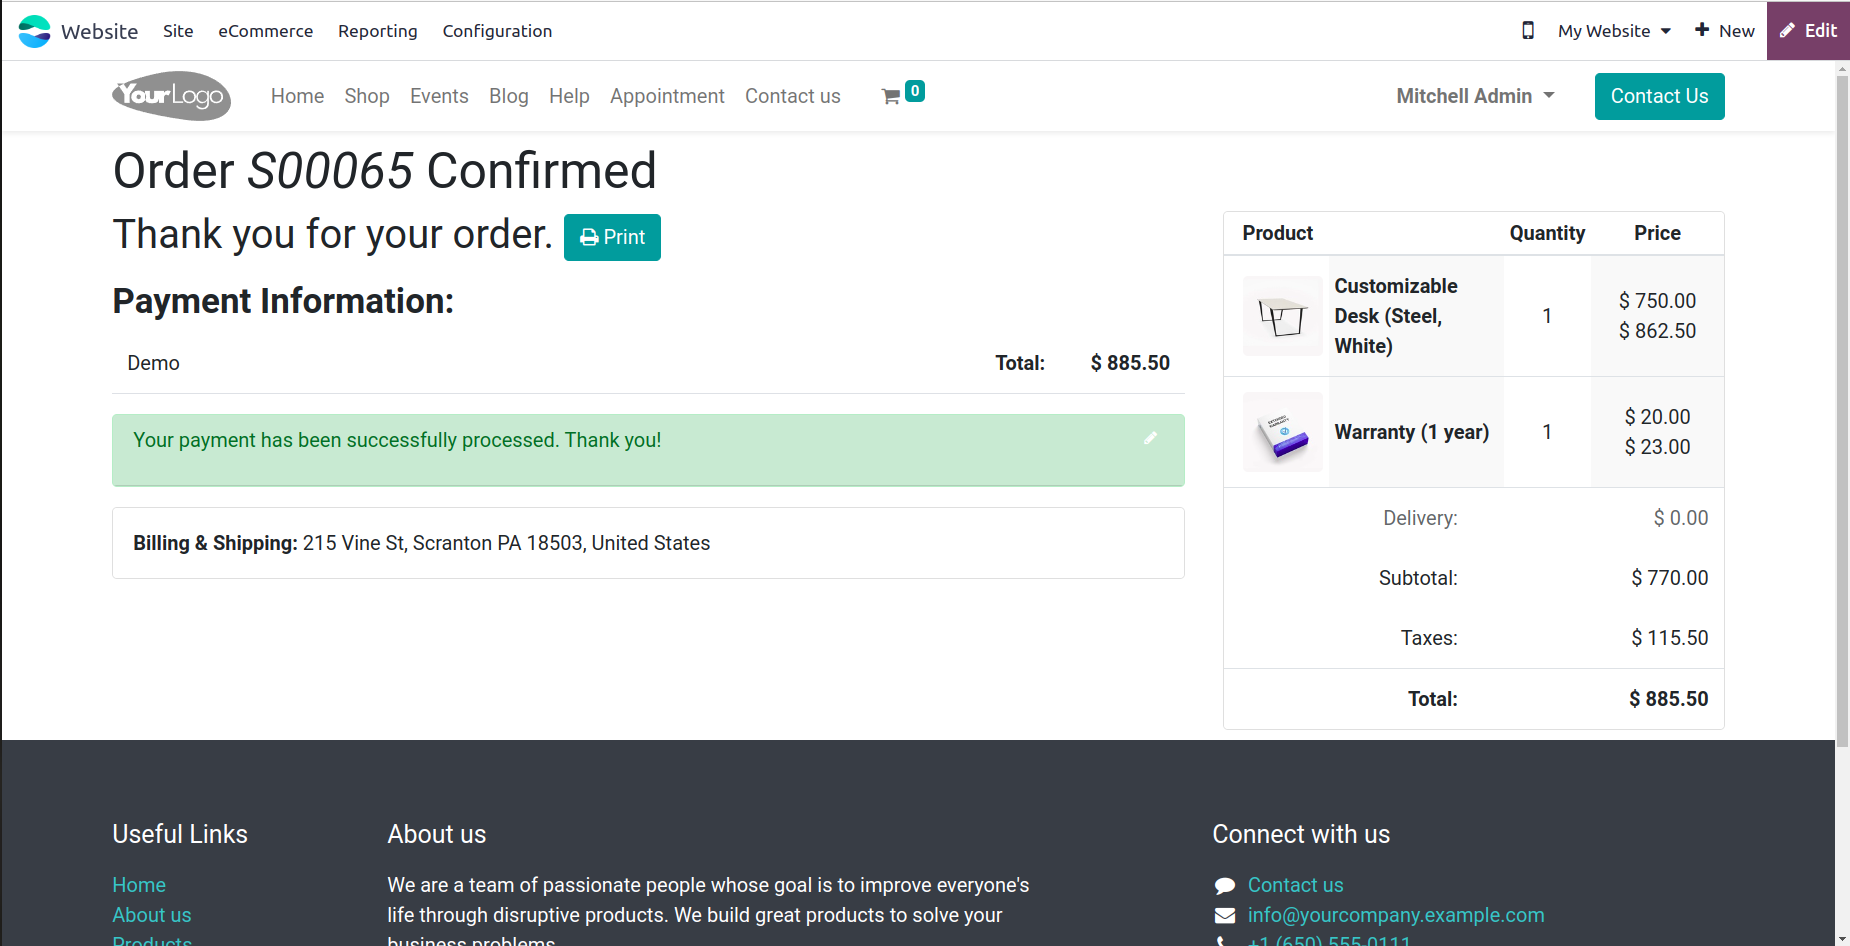
The alternatives for wire transfers and credit cards are visible. If you are using a credit card to make the payment, you can enter all necessary information. The Pay Now and Return to Cart buttons are located at the bottom of this window. Once the information has been confirmed, you can choose to Pay Now. If the payment is done successfully, you will see your payment details in the next window.
The platform allows for the installation of extra payment gateways and allows payments to be made in accordance with the many payment acquirers listed on the back end of the platform.
Let's talk about the Settings menu in eCommerce once we have a thorough understanding of the Add to Cart feature offered by the platform.
Settings
The Settings tab of the Odoo17 Website module offers an extensive number of extra features. To examine the options available, navigate to the Odoo 17 Website module's Settings pane. The Settings box has multiple options, each of which is described in a distinct section. The numerous sections that make up the window are
- Shop- Checkout Process
- Shop- Product
- Shop- Product
- Shipping
- Invoicing
Product-Checkout
The Website Settings window's Product-Checkout procedure section displays a number of elements connected to product checkout that you can enable to define your products only. Options like Add to Cart, Buy Now, Digital Content, Reorder from Portal, Sign in/up at Checkout, Extra Step During Checkout, and Assignment are available for you to view here.
Odoo provides you with the Add to Cart option, which will come in handy while handling cart operations. If you have selected the Stay on Product page option, you can continue to browse the website after adding an item to your cart. This implies that when a user adds an item to their cart, there won't be a redirect. When the option to "Go to cart" is selected, the cart page is redirected. The latter choice allows the user to select a dialogue box so they may make a decision.
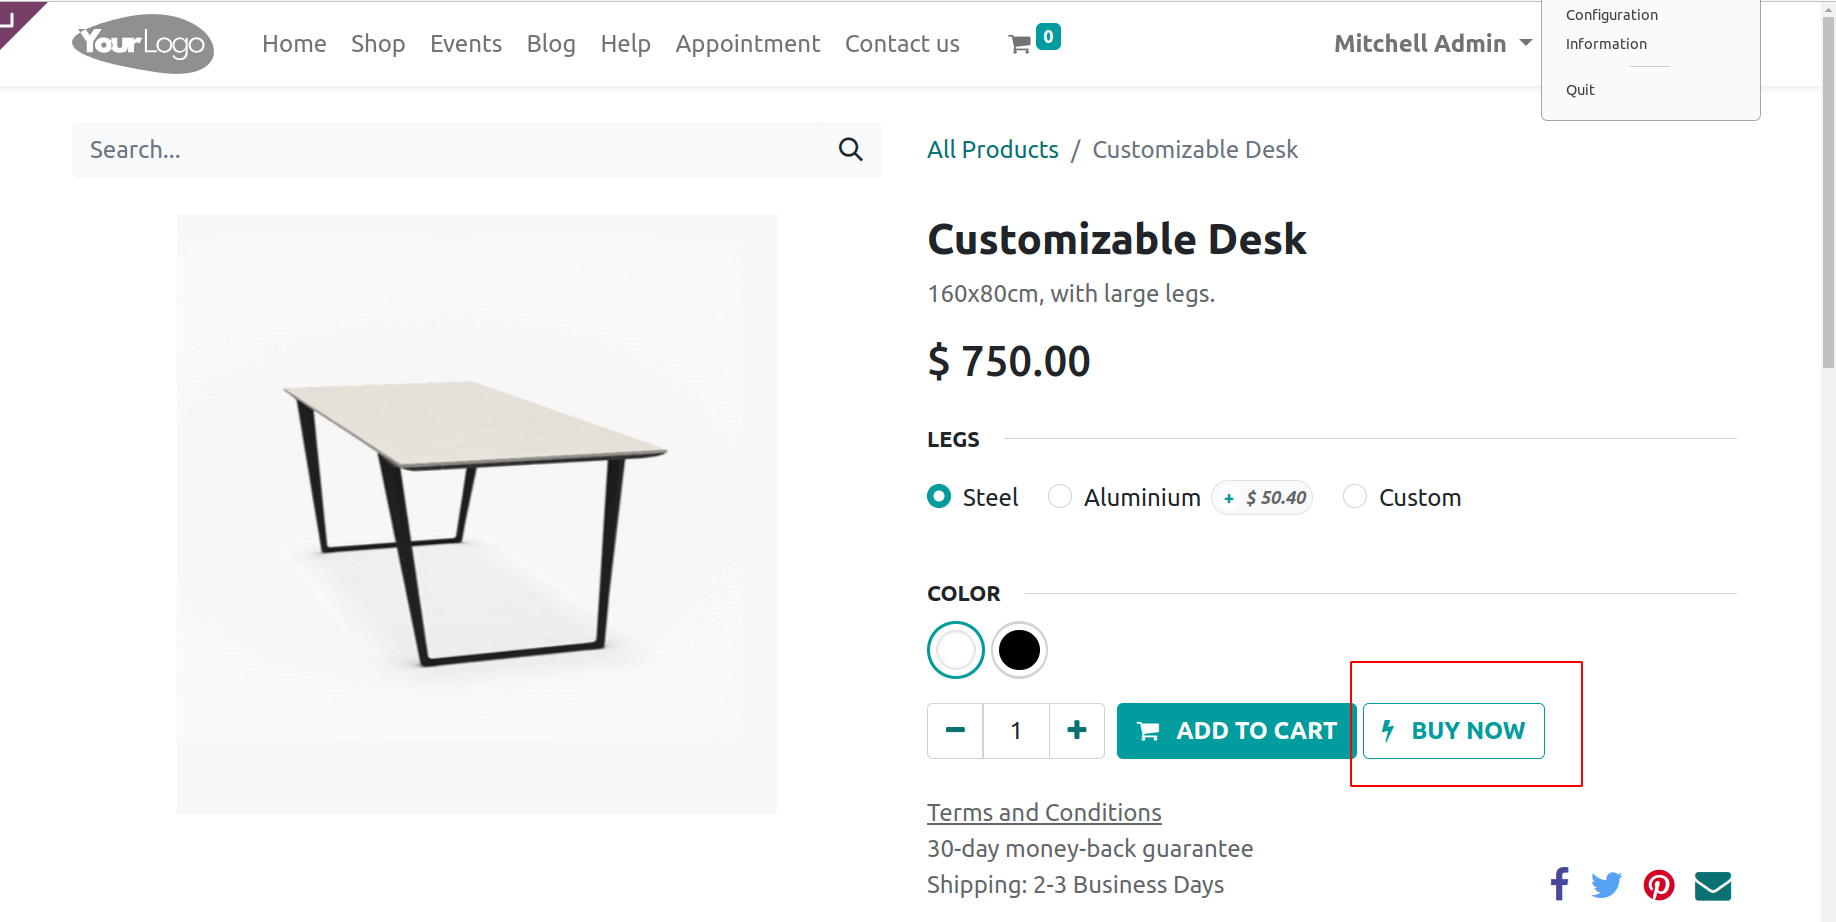
Enabled the Buy Now option. The product page of the eCommerce store has an extra Buy Now button that allows users to purchase the item without adding it to their cart.

To enable the Digital Content option, simply tick the box next to it. Additionally, you should click the available Save option to mark the modifications. If the payment is successful, you can use this option to give clients links to products or downloaded materials on the checkout confirmation page. Use the new files button to attach files to a product, then publish the files to do this. Digital content examples include electronic products and related materials that are produced and distributed online. Digital offerings include, but are not limited to, video lessons, webinars, study materials, electronic tickets, coupons, and more.
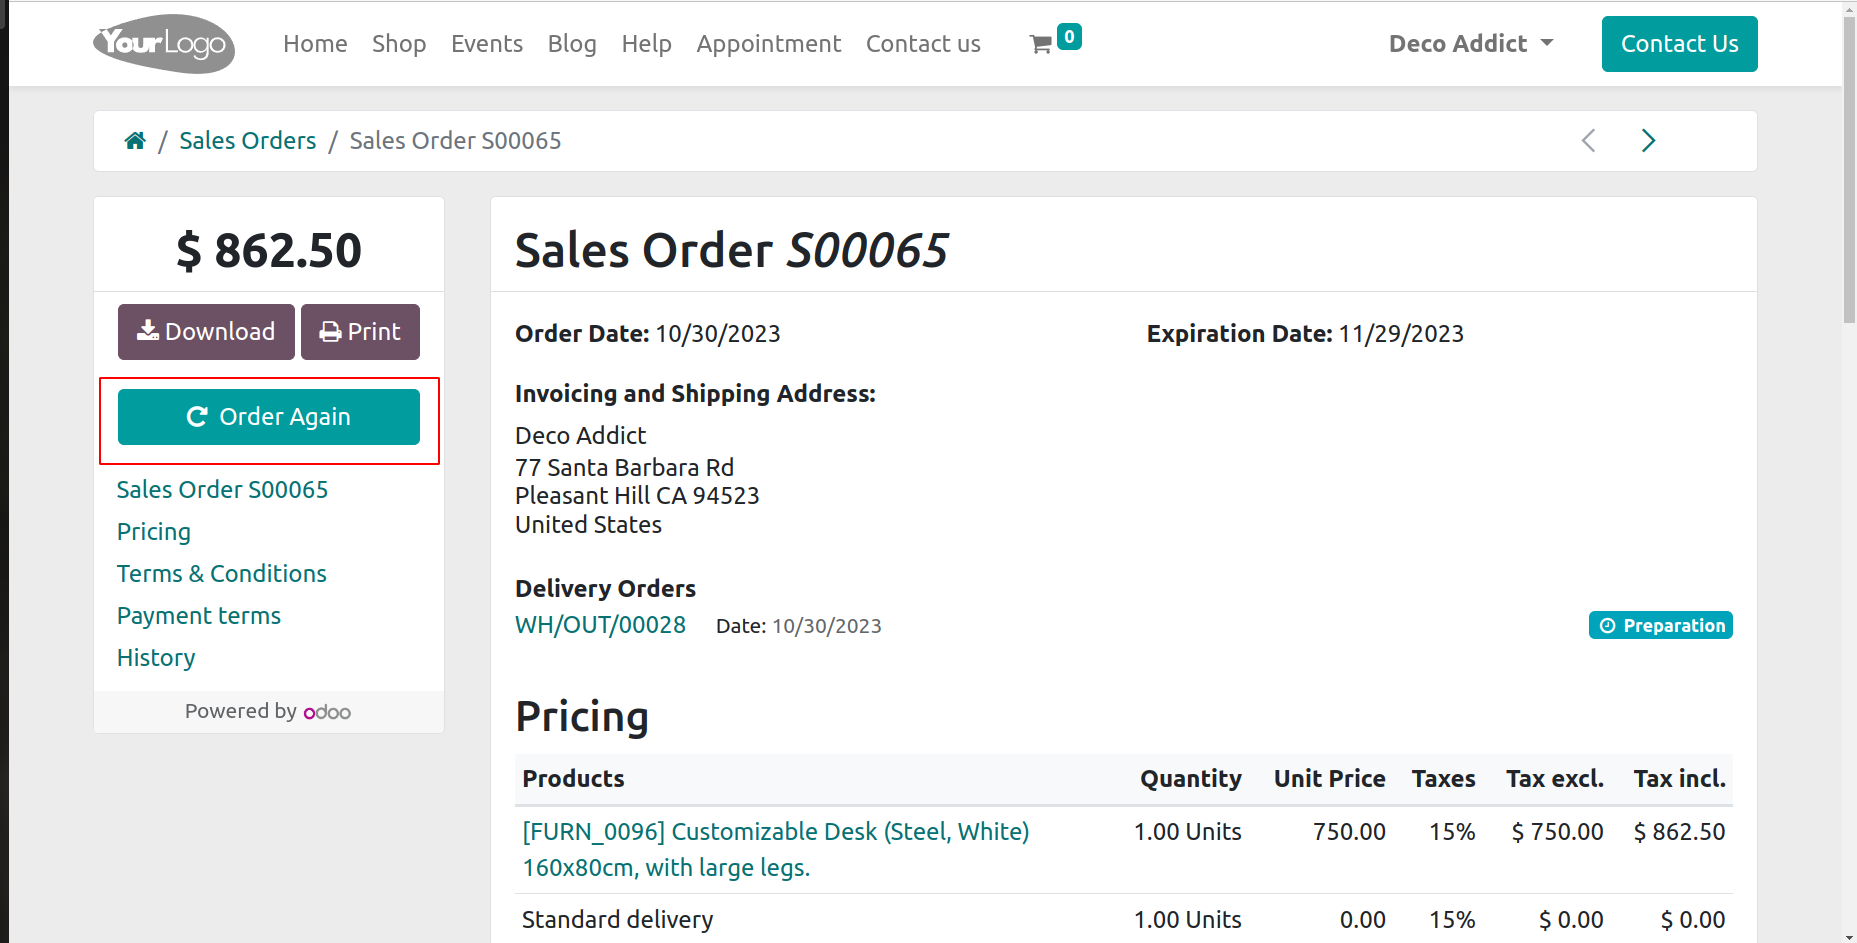
Customers can add products from their previous order to their cart by using the Reorder from portal option. This can be done by using the Order Again button.
Sign in/up at Checkout , there are three ways to sign in or up. The first is Optional and lets visitors follow their order by registering with the email that confirms their order. Disabled is the second option, allowing users to log in as guests. The final option—Mandatory—prevents visitors from checking out.
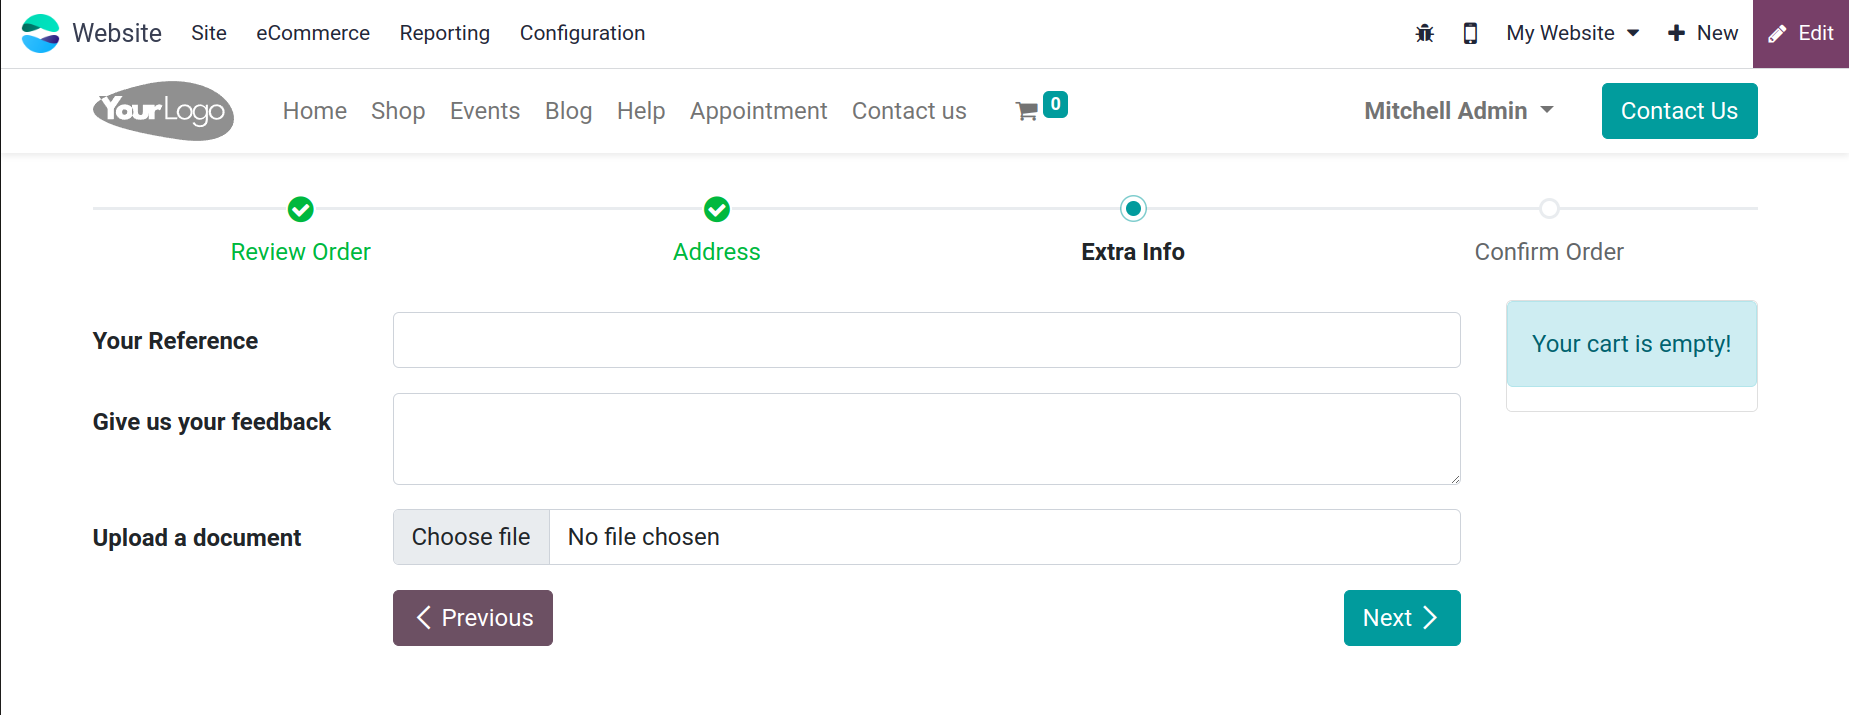
After the address form, the user can configure an additional customized form upon checkout by using the Extra Step During Checkout option.
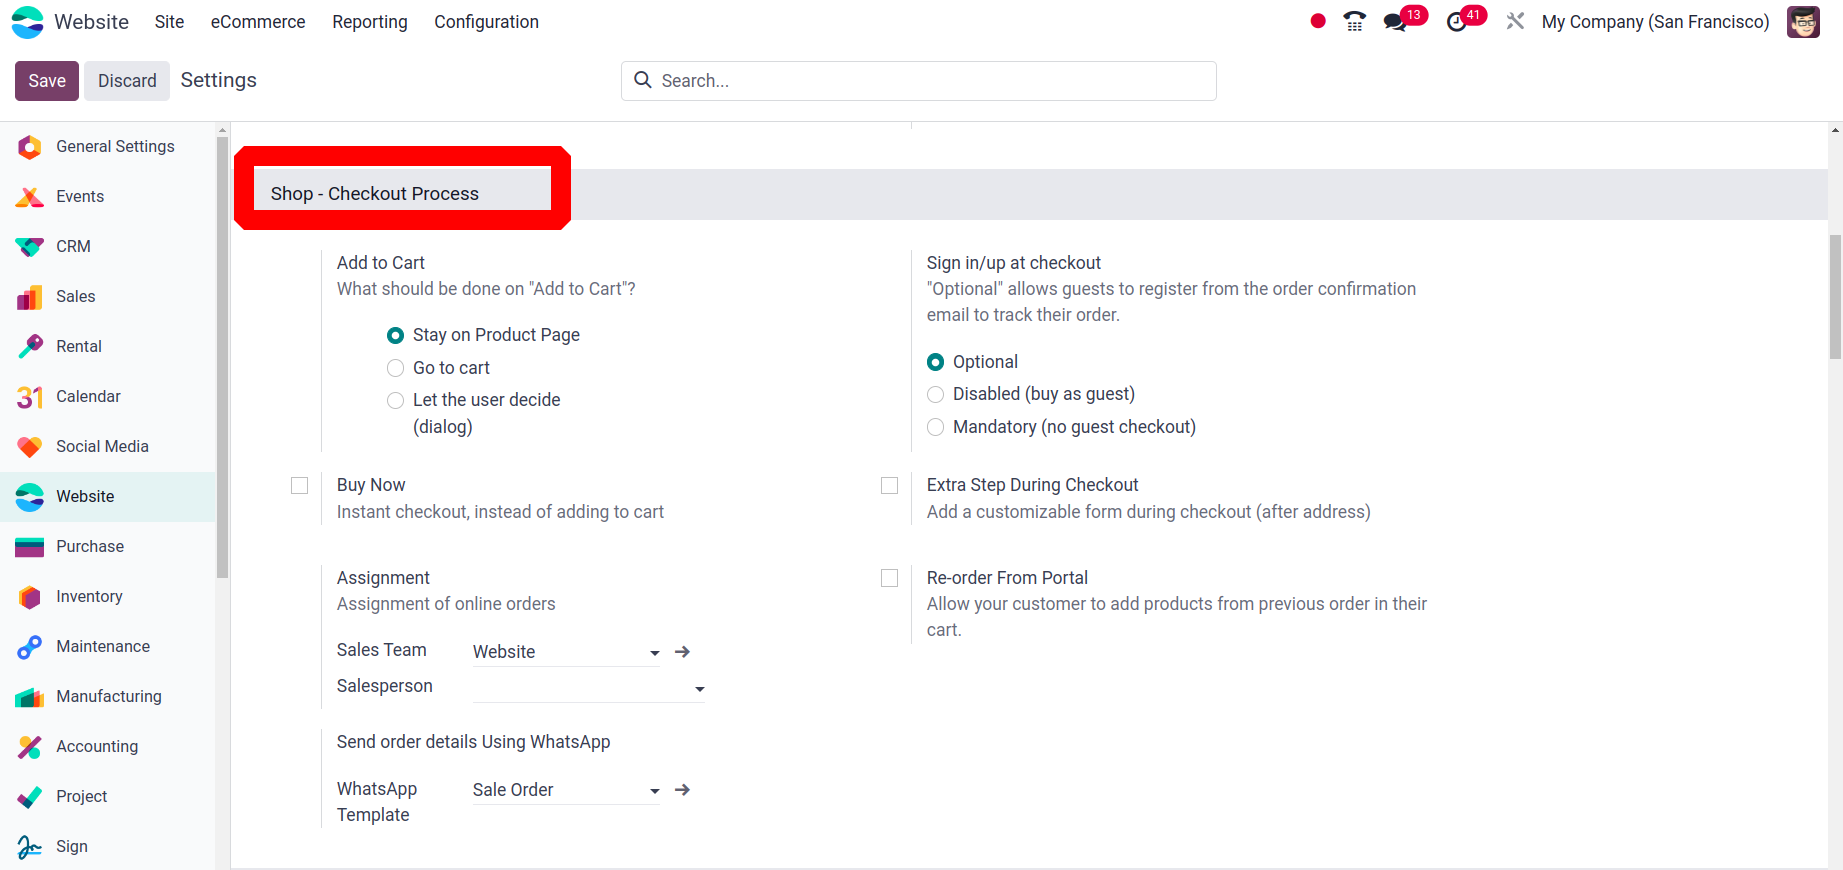
The user can designate a specific sales team and individual for the online orders by using the Assignment option. Add a WhatsApp Template there to communicate order data via WhatsApp.
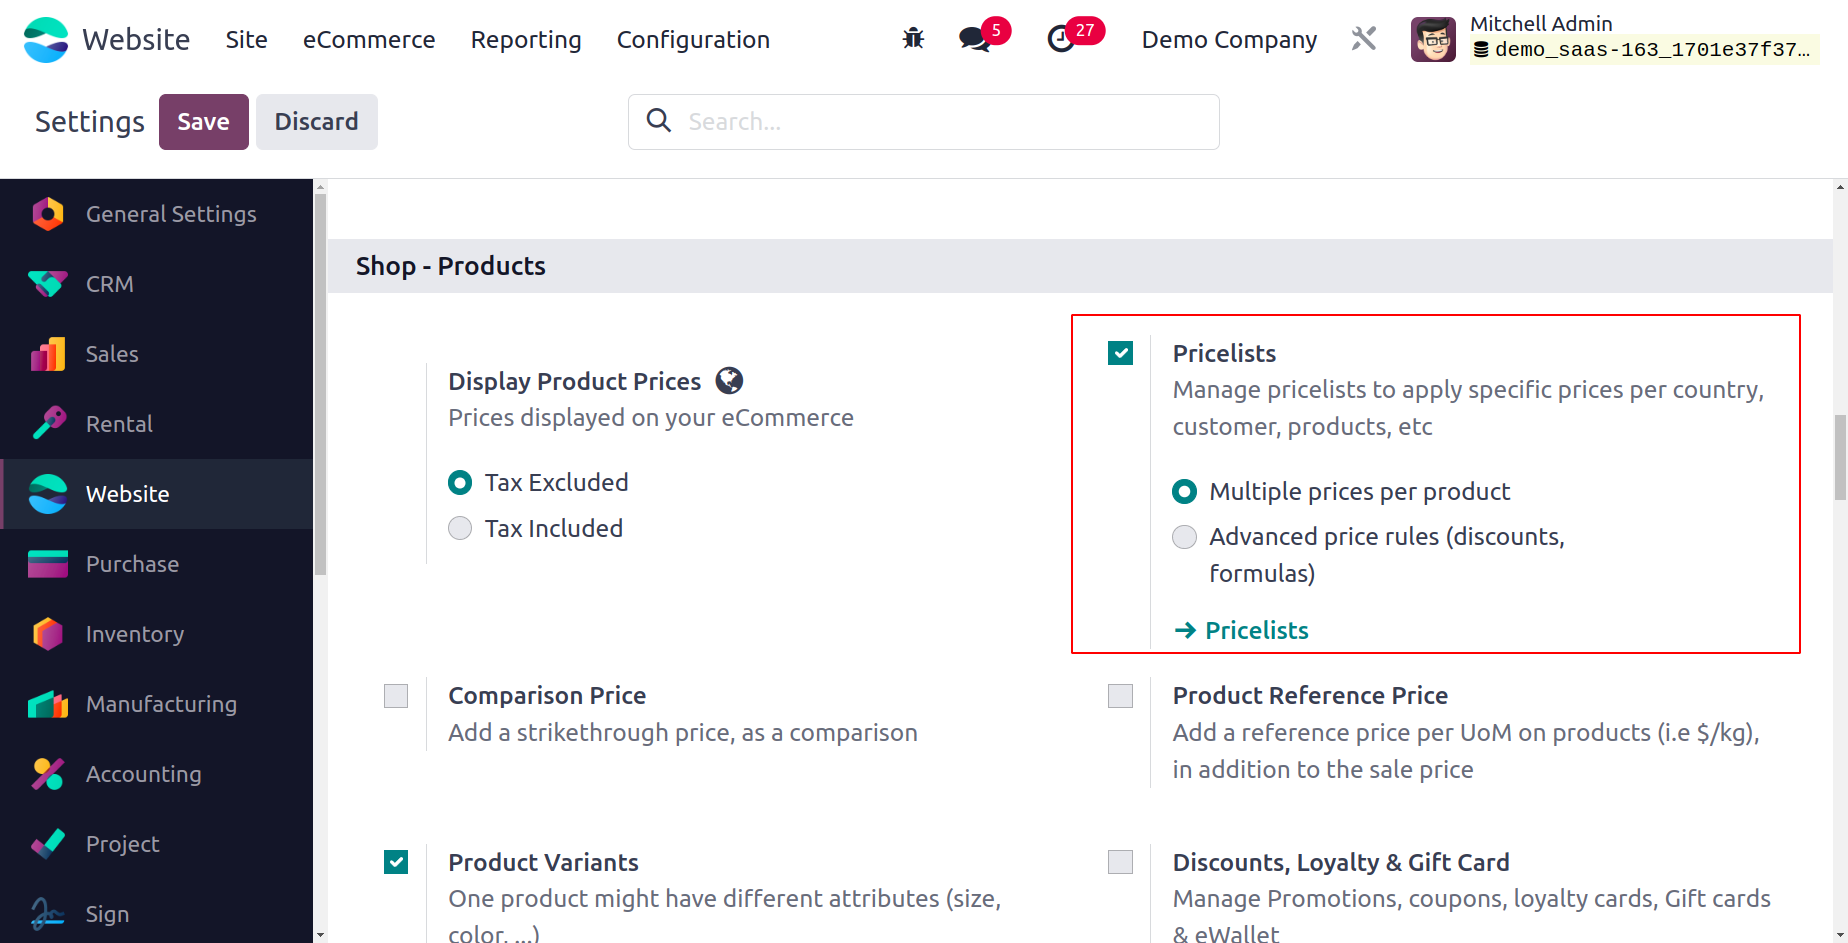
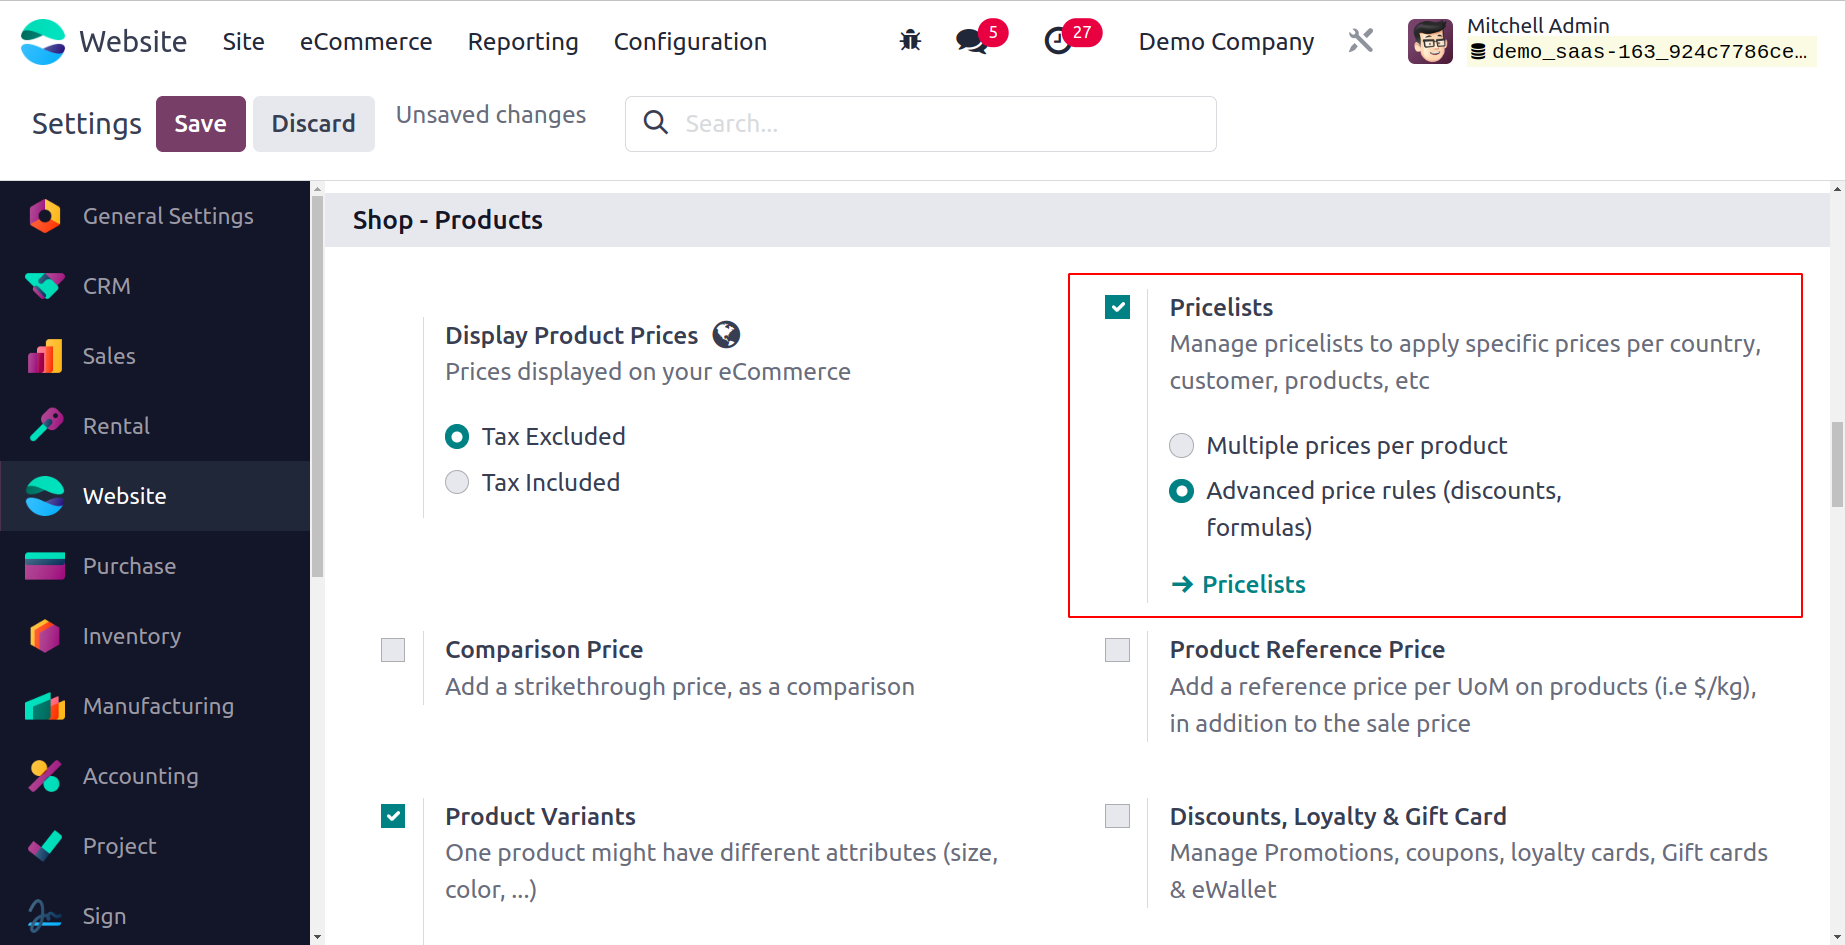
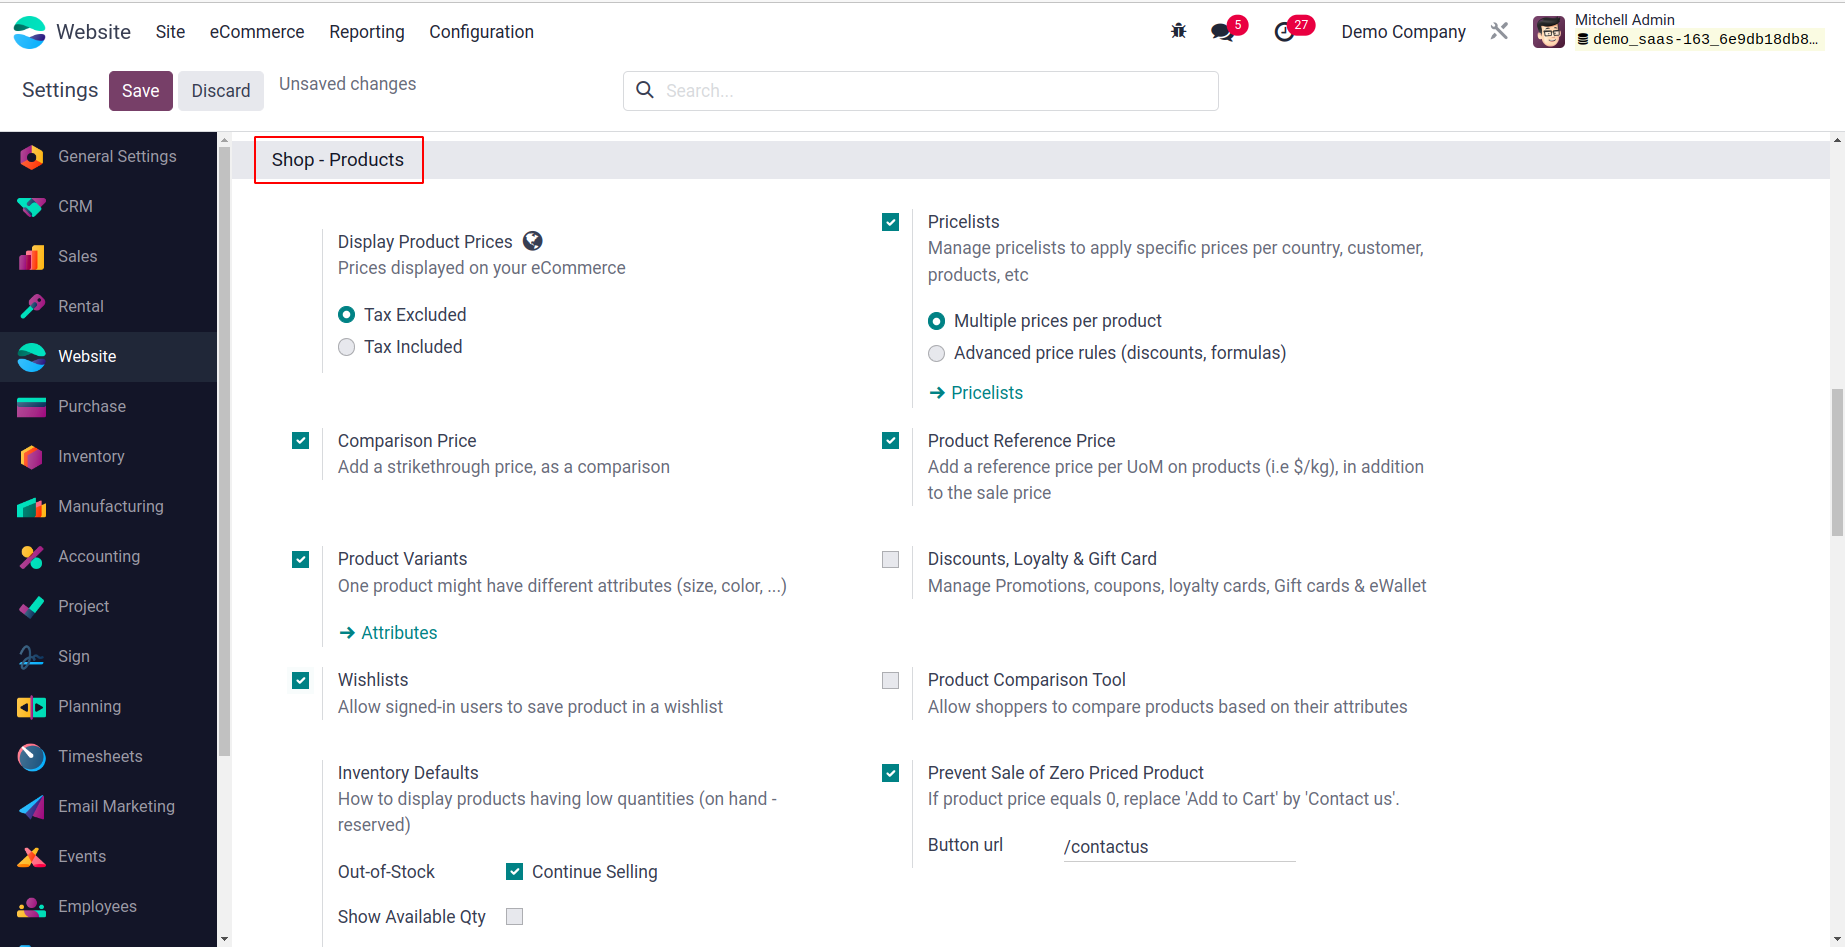
Display Product Prices, Comparison Price, Product Variants, Wish Lists, Inventory Defaults, Pricelists, Product Reference Price, Discounts, Loyalty & Gift Card, Product Comparison Tool, and Prevent Sale of Zero Priced Product are just a few of the options available in the Odoo Website Settings window under the Shop - Product section.
You have two options with Odoo to customize the Display Product Prices that are shown in the online catalog. By choosing the appropriate option, it can be completed in either a tax-excluded or tax-included manner. In addition, the Price Lists feature can be used to apply discounts, country-specific prices, and a host of other features. There are two methods to use this. Either different prices for each product or advanced pricing policies (calculations, discounts). In the first scenario, you can set prices and computation rules via Pricelists; in the second scenario, you can set multiple prices on the product configuration page (from the sales tab).
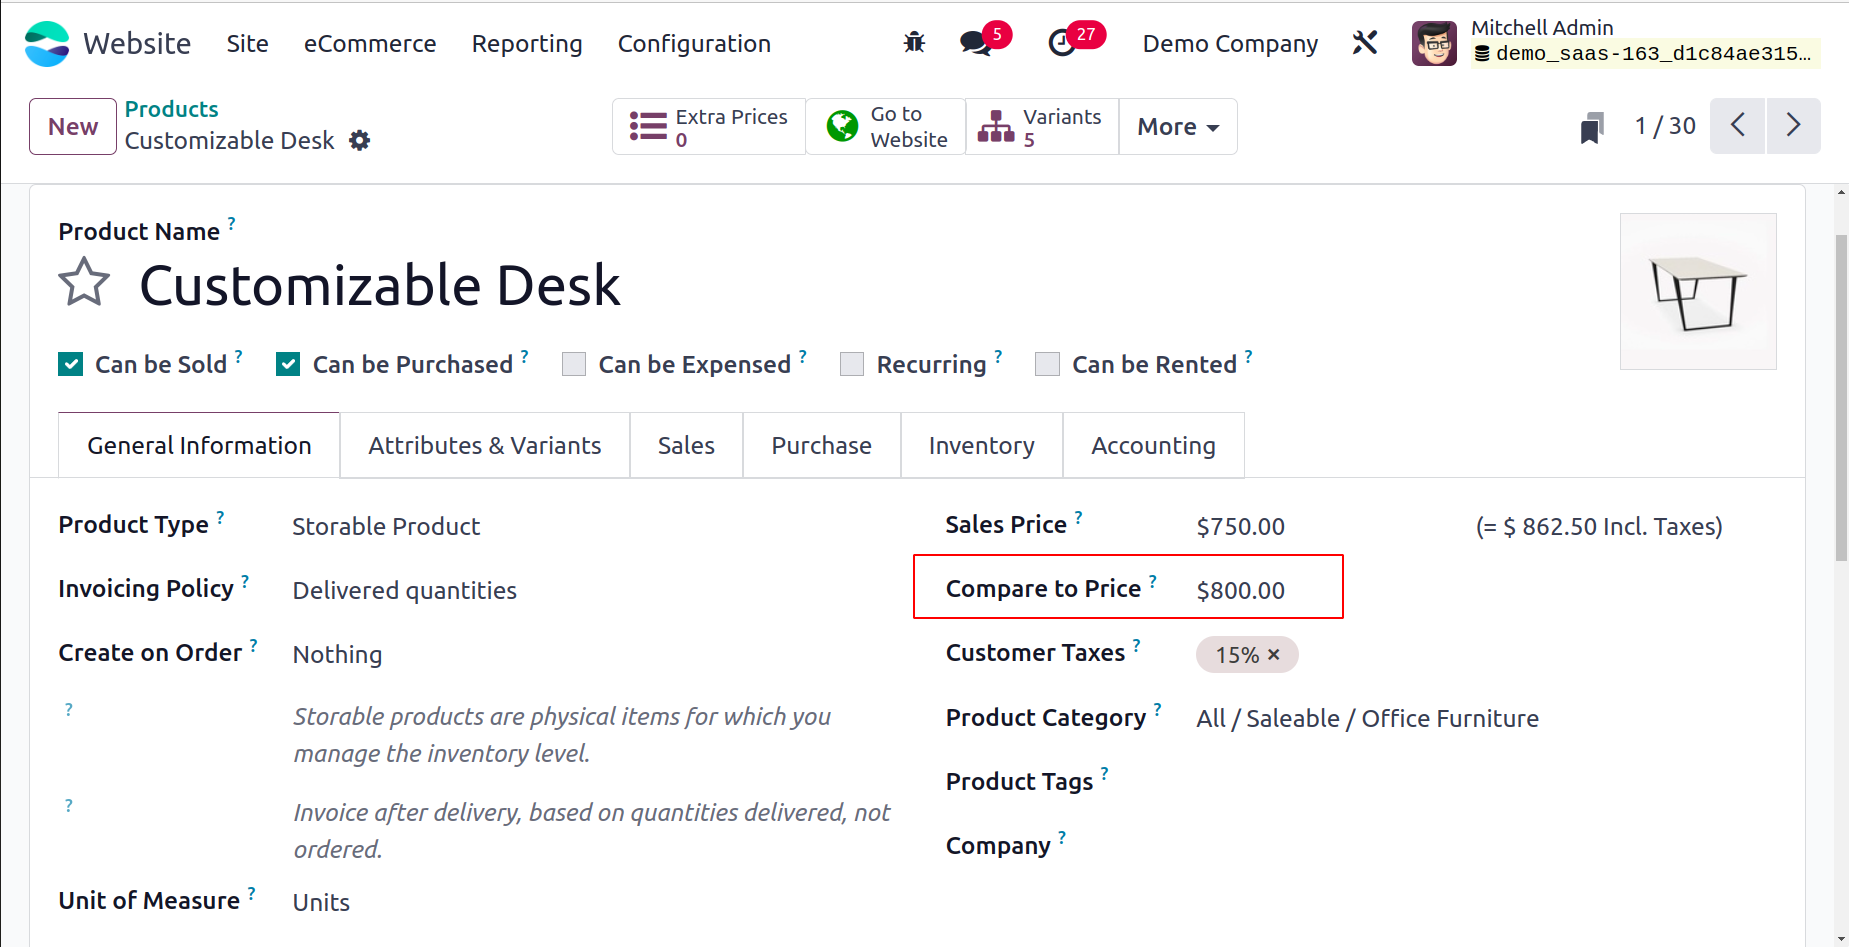
A new field to add the Compare to Price will appear on the product field once the Comparison Price option is enabled. Then, as a comparison, it is possible to display a strikethrough price.
The Product Reference Price is an option found in the Products section of the Odoo Website Settings window. This option will allow you to set a price per base unit of measurement to your products. When adding the product to the cart, you can configure many product variants by activating the Product Variants option.
Additionally, you can turn on the option for discounts, loyalty, and gift cards. With two distinct types of discount programmes that include promotions, coupon codes, loyalty cards, and gift cards, this is a useful tool for increasing sales. You can use the system to establish parameters for the programme, including minimum purchase amounts, consumers, items, and time frames. Free merchandise or discounts might be awarded as rewards. Additionally, the discounts may be expressed as a specific percentage or dollar amount. You can view a Gift Card option as well.
It is possible to configure the default availability mode for newly created storable products. To accomplish this, turn on the relevant field in the Inventory option. This is where you may define the warehouse. When a product runs out of stock, you can still sell it by turning on the corresponding option under the Inventory option. Under this same option, you can also display the quantity that is available. You can choose the quantity of units here. in order for the quantity of units below this unit to be shown as a personalized message.
Customers can add products to a Wishlist by activating the feature, which allows them to revisit the list at a later time and purchase the items they want. A useful tool that lets your customers compare products based on their features is the Product Comparison Tool.
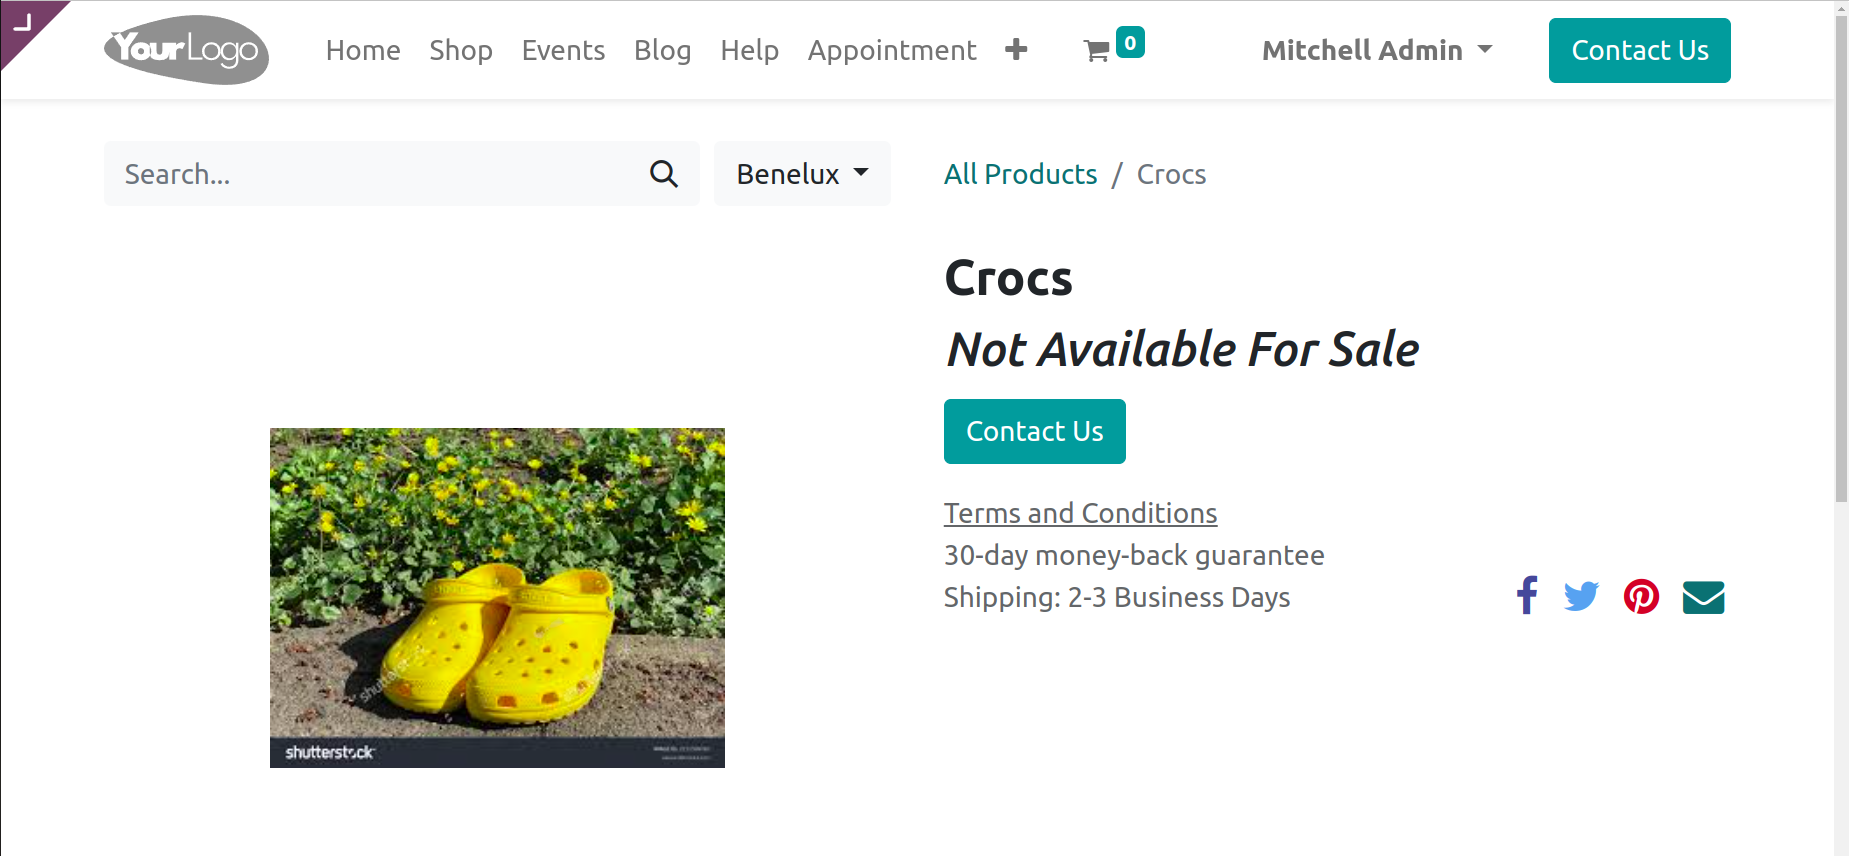
When Prevent Sale of Zero Priced Product is enabled, the Contact Us button will appear in lieu of the Add to Cart button when the product quantity is zero.
Odoo included a number of effective options in the Shipping tab of the Odoo Website Settings window to assist the platform's shipping operations. This section has the following options: DHL Express Connector, USPA, EasyPost, UPS, FedEx, bpost, Shipping Address, Shipping Costs, On Site Payments & Picking, and Mondial Relay. The customer can provide a shipping address by selecting the Shipping Address option. To determine the shipping charges for orders, you may also enable the Shipping Costs option. Additionally, you may calculate shipping costs and ship with this provider by activating other shipping providers including UPS, FedEx, bpost, DHL Express connection, USPA, and EasyPost.
The Invoicing policy for your products can be adjusted using the Invoicing option found in the Website Settings window. You may specify your Invoicing policy in two ways with Odoo: invoice what is delivered and invoice what is ordered. You can send bills to clients using any of these methods. If you choose to invoice what is ordered, Odoo can assist you in creating invoices for all quantities ordered.
Additionally, you have the ability to automatically generate an invoice upon confirmation of the online payment by activating the Automatic Invoice option.
You may also automatically send an email to the customer following checkout if you enable the option to "Automatically send abandoned checkout emails." Additionally, you may specify an Abandoned Email Template here, ensuring that the customer receives the email.
Online Sales Report
You can access the reporting area by choosing this menu. Below is a picture of the Online Sales Analysis window.
You can view this window to see a general overview of your eCommerce sales. You may create reports in both Graph and Pivot views with Odoo. You can generate reports in a number of different measures, including # of Lines, Discount %, Discount Amount, Gross Weight, Quantity Delivered, Quantity Invoiced, Quantity Ordered, Quantity To Deliver, Quantity To Invoice, Total, Untaxed Amount Invoiced, Untaxed Amount To Invoice, Untaxed Total, and Volume, in the Graph view (as shown in the image above). All of the measures listed above are available for viewing and access under the Measures tab.
In addition, the reports are available in stacked, bar, line, and pie chart formats. By selecting the appropriate icons, you may easily sort the reports in ascending and descending order. The pane additionally offers different sorting features. Order Date, Unpaid Orders, and Confirmed Orders are the basic Filters options that may be found under the Filters tab. Additionally, you can alter different filters according to the needs of your company. You can choose the Add Custom Filter option to accomplish this. You can quickly access your records by using these alternatives. You can organize your reports using the default group by options found in the Group By menu. The window's default Group By options are Website, Product, Product Category, Customer, Customer Country, Status, and Order Date. Customising groups is another option available to you here. You have two choices under the Favorites tab: Save the link menu and current search in the spreadsheet.
The Pivot view of the Online Sales Analysis is accessible by clicking on the Pivot menu icon in the upper right corner of the window. The window's image is seen below.

The report will appear in tabular form in the Pivot view. You can also produce reports in different metrics here. In a similar vein, you can use a variety of preset and editable choices like Filters, Group By, Favorite, and Search options. In addition, as shown in the screenshot below, the window provides the Insert in Spreadsheet as well as the Flip axis, Expand All, and Download XLSX choices.
Thus, with this eCommerce module in Odoo 17, managing online sales and e-commerce is now simple.