Project Management
A project's management and completion will be taxing if it is not set up in a systematic
way. Each organization implements a suitable management system to make job
administration for individual corporate initiatives simpler. Planning, task development,
work assignments, timesheet recording, completion of milestones, and billing for
finished projects are all included in project management. What if there was a one-stop
shop for the efficient handling of all a company's projects? To manage projects in an
organized manner, you can use the most recent version of Odoo17.
Projects can be created and tracked using the Project module. Due to the user's ability
to break down a project into several tasks and milestones, project management will be
carried out in a systematic manner. It is feasible to allocate each work at various
stages so that everyone can see how the main project develops.
By selecting the project module, Odoo17 will take you to the project module's main
dashboard. The project dashboard's Kanban view is displayed below.
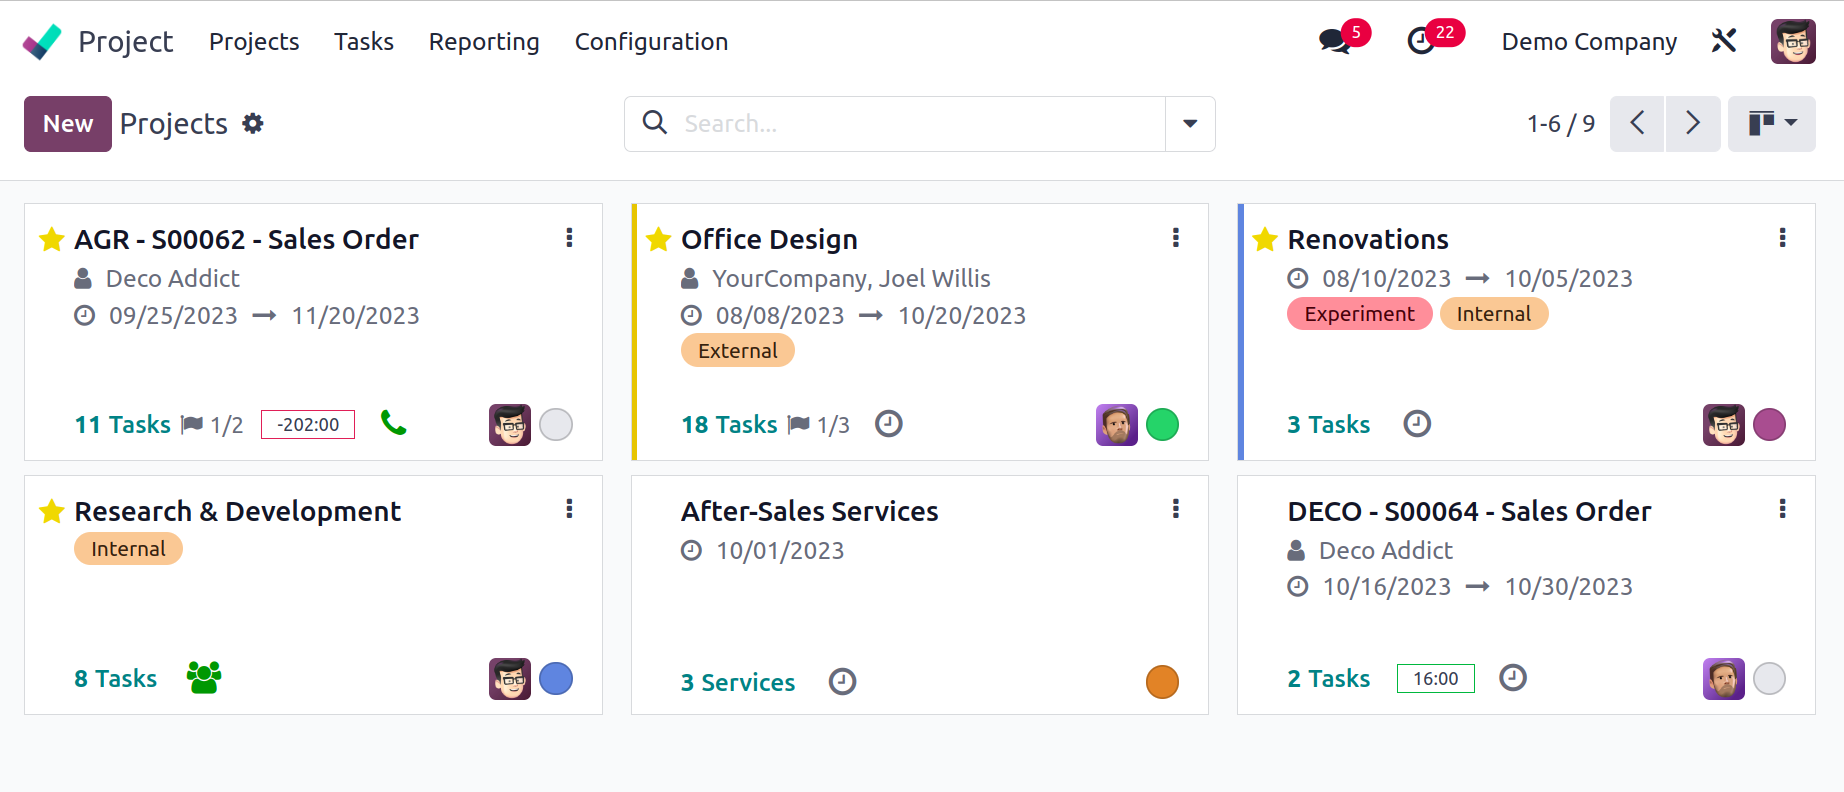
From the kanban view, you can see the projects that are already set up. Every project
lists the due date, the partner, the customer rating, the number of tasks involved, the
milestones, and the number of hours needed to do the work. Each project's status is
displayed in a variety of colors, each of which denotes a particular meaning, such as At
Risk, Off Track, On Hold, and On Track. To add the project to your favorites list, use
the star icon.
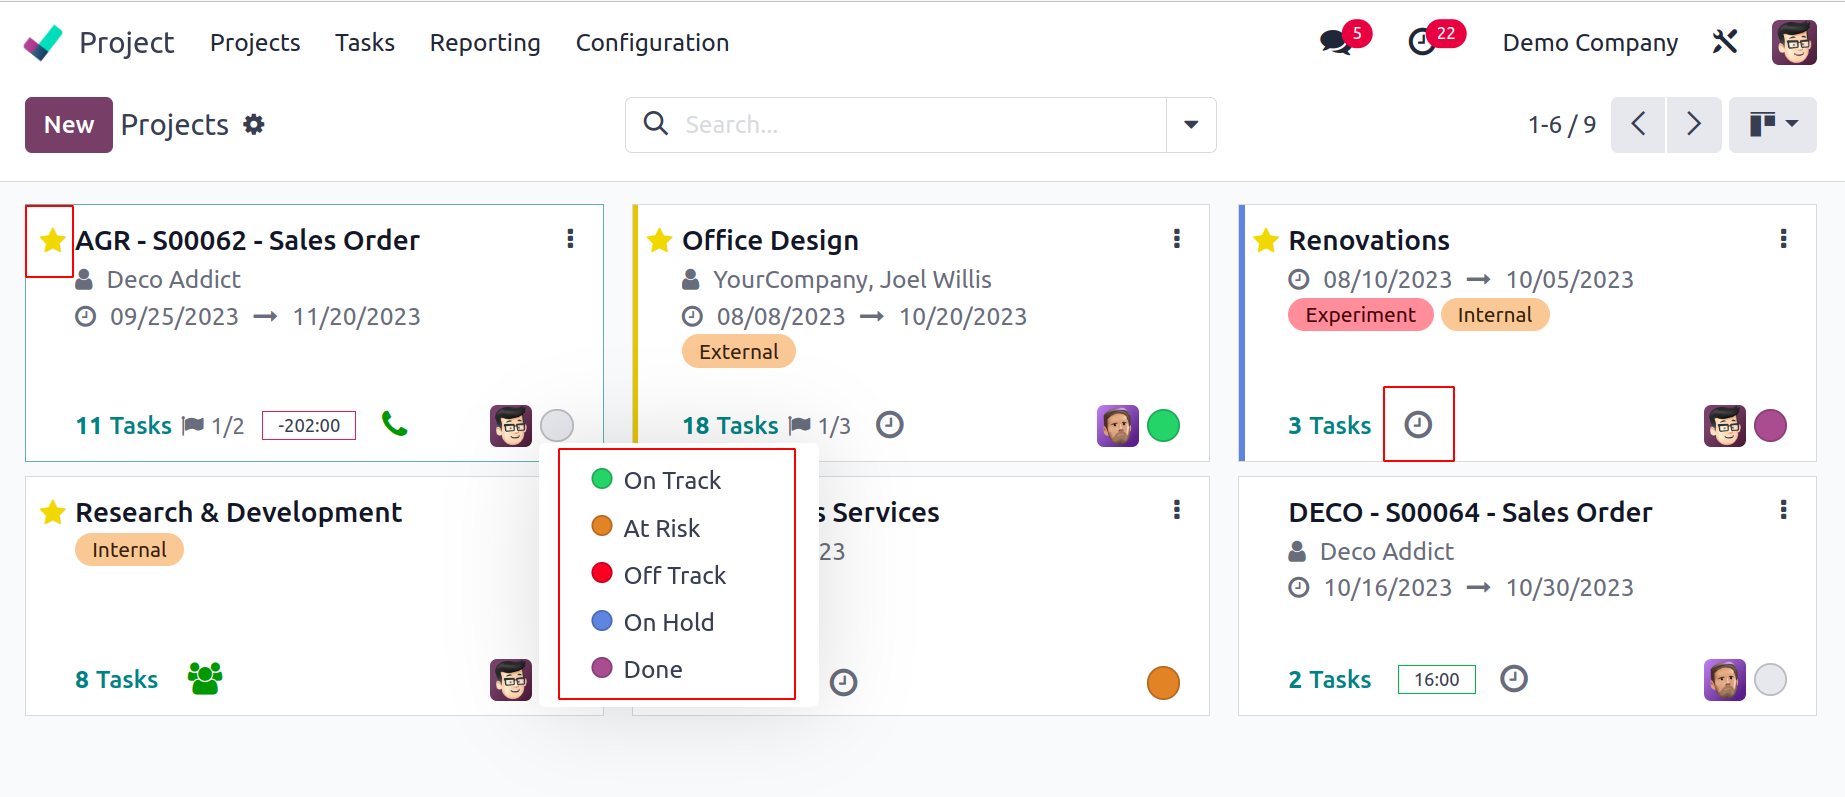
You can obtain a pop-up to schedule various tasks for the relevant project by clicking on
the tiny clock indicator.
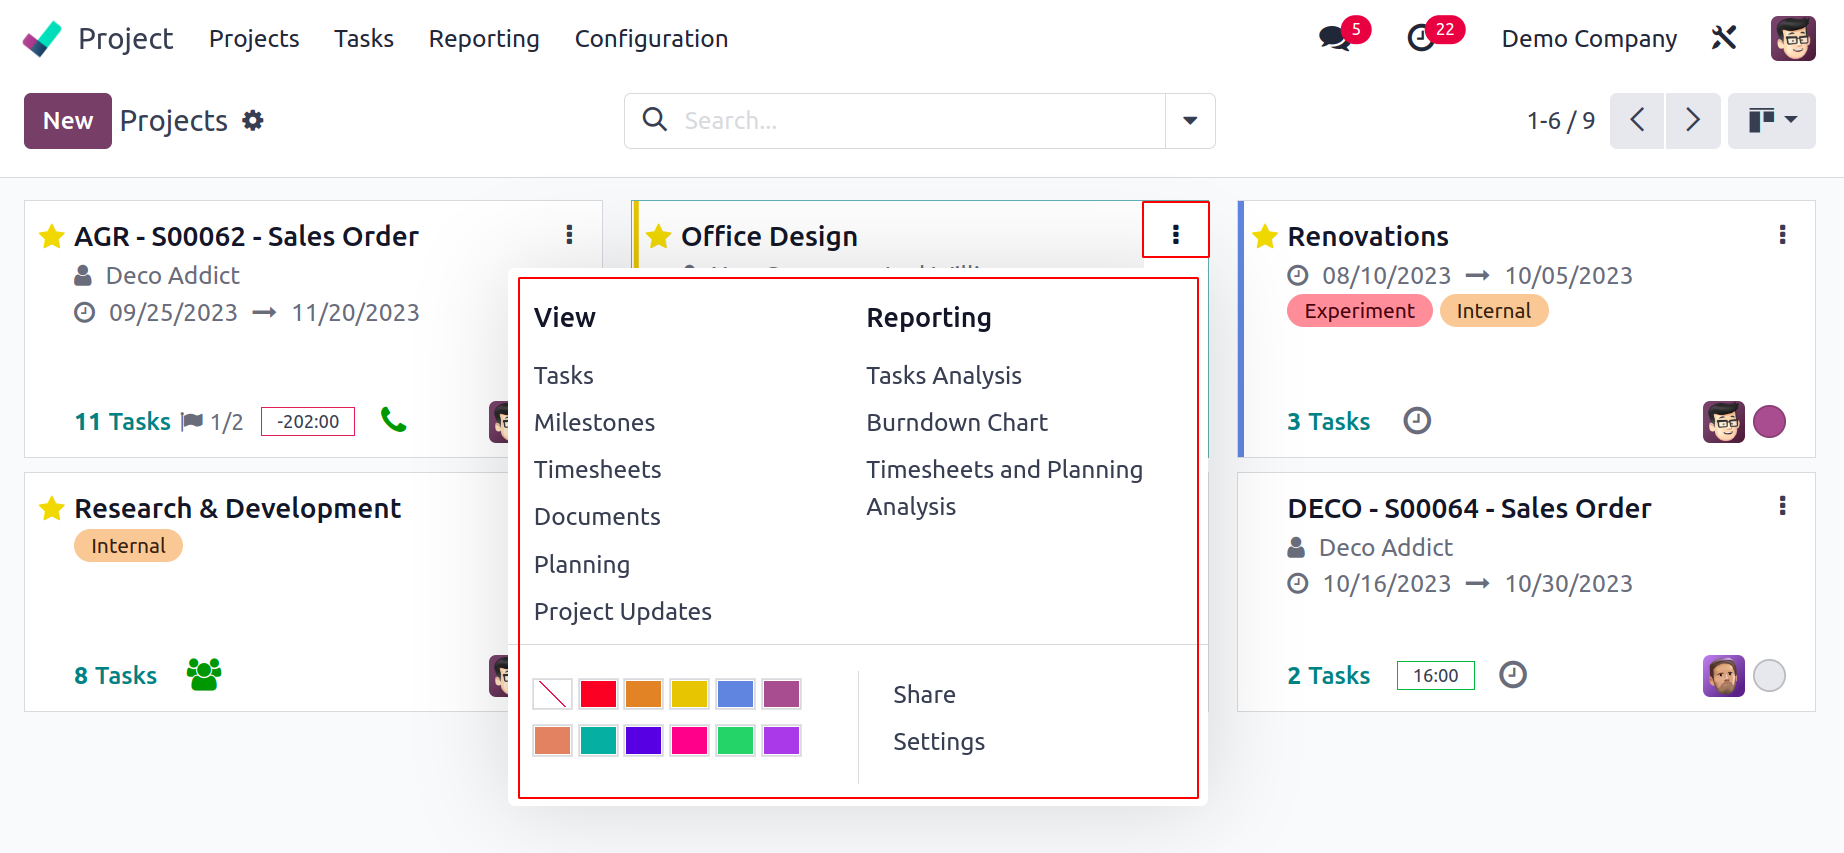
Each project's upper right corner contains a little three-dot menu with options for
viewing the Task, Milestones, Timesheets, Documents, Planning, and Project Updates. The
reports for the Task Analysis, Burndown Chart, Timesheet and Planning Analysis, and
Customer Ratings can all be found on this menu.
If you click the New button, a pop-up will display as seen below, allowing you to start a
new project.
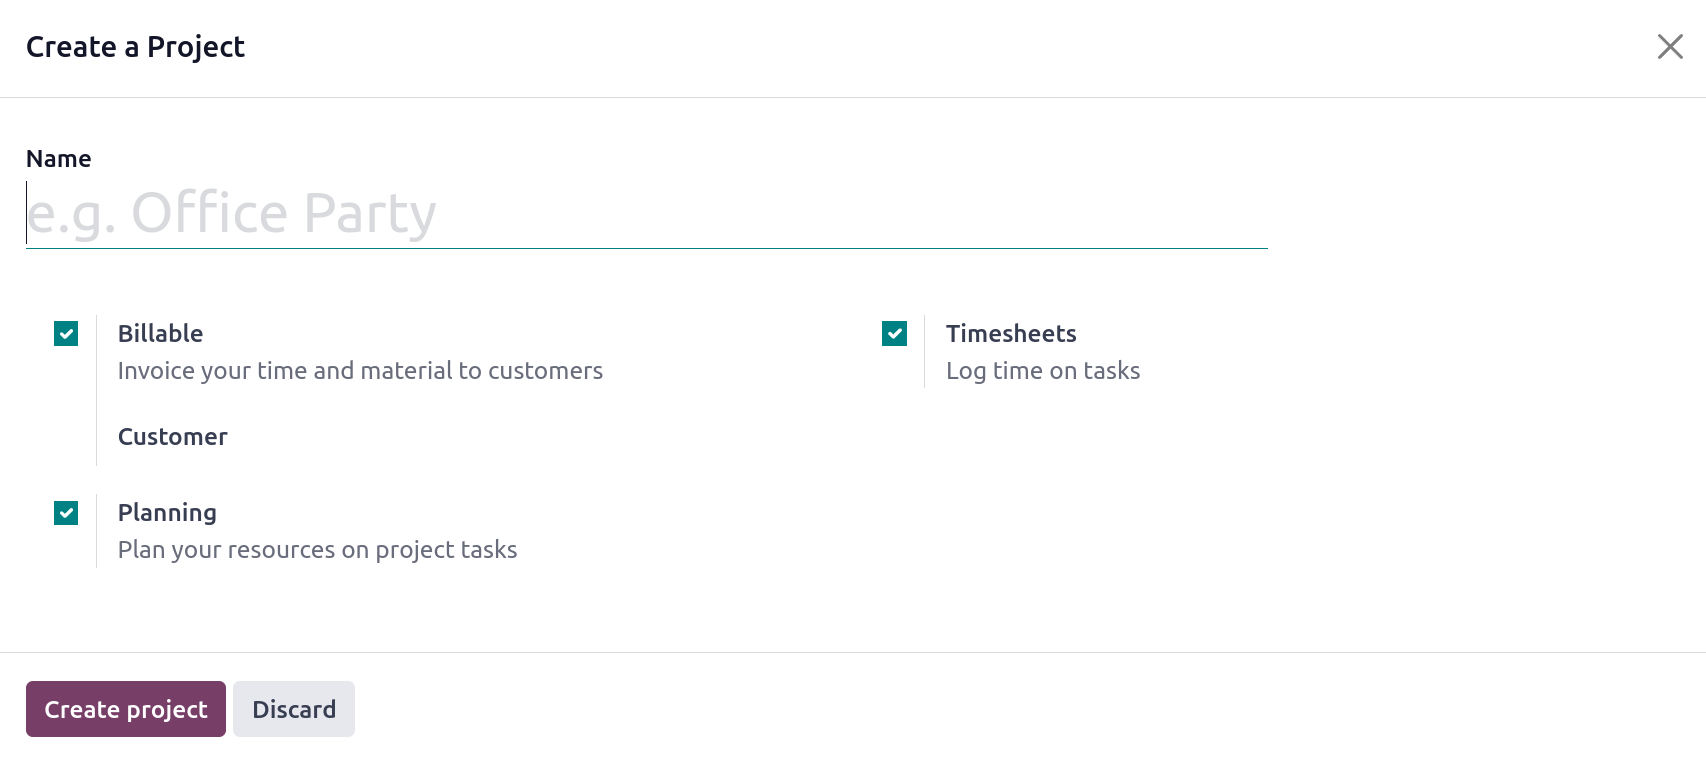
Enter the project's name in the appropriate field. If you want to send invoices to
clients for this project, turn on the Billable field. By turning on the Timesheets box,
you may keep track of the time spent on tasks inside this project. By turning on the
Planning option, you can allocate your resources to certain project tasks. Last but not
least, you can click the Create Project option to start a new project and open a new
window where you can add tasks to it.
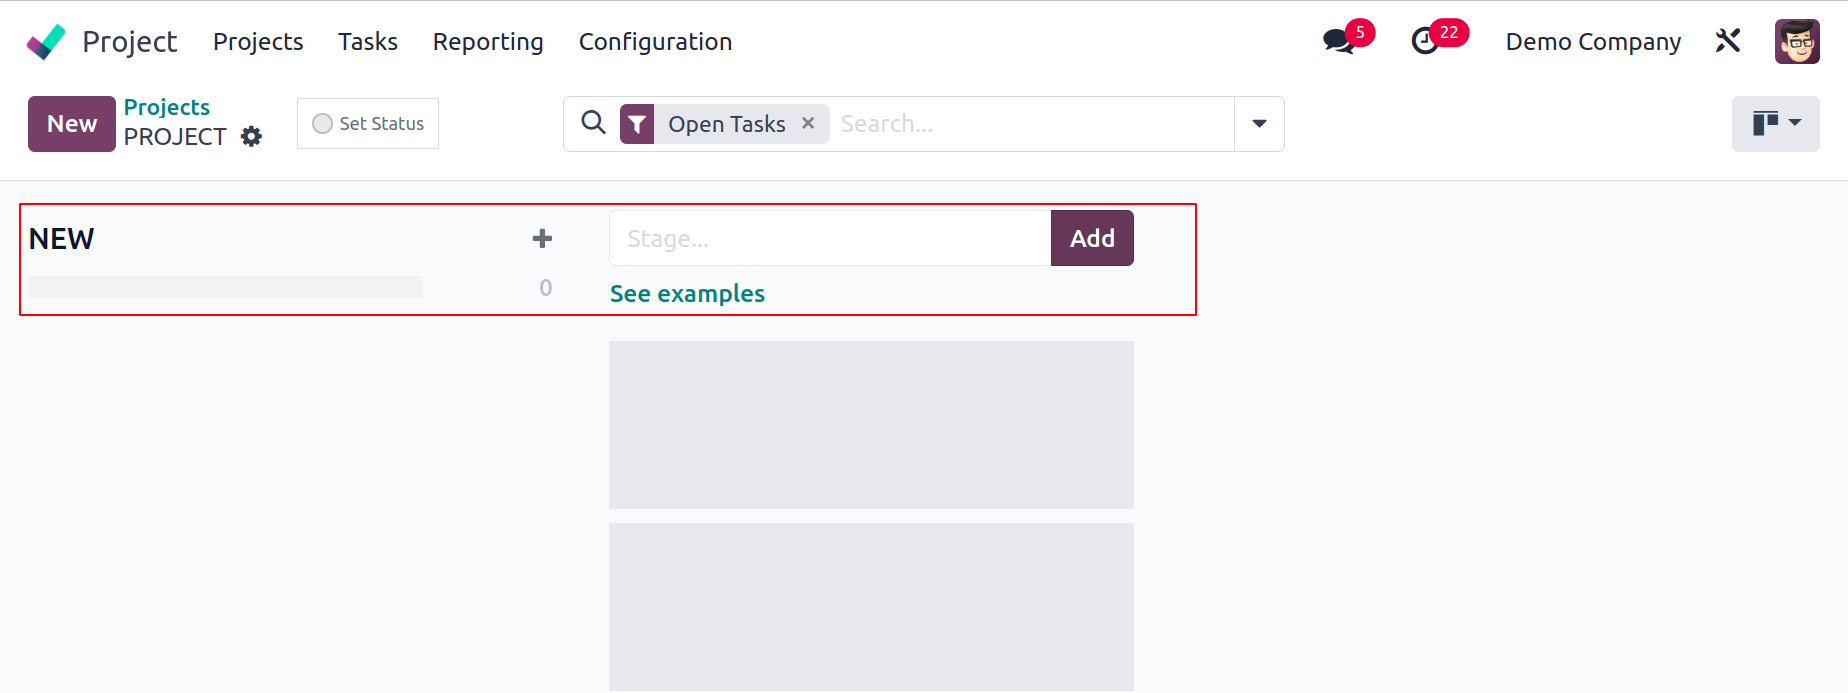
You can establish stages for the tasks before actually producing them for the project.
You can do this by entering the stage name in the appropriate field and then clicking
the Add button. You can create new task stages in a similar manner.
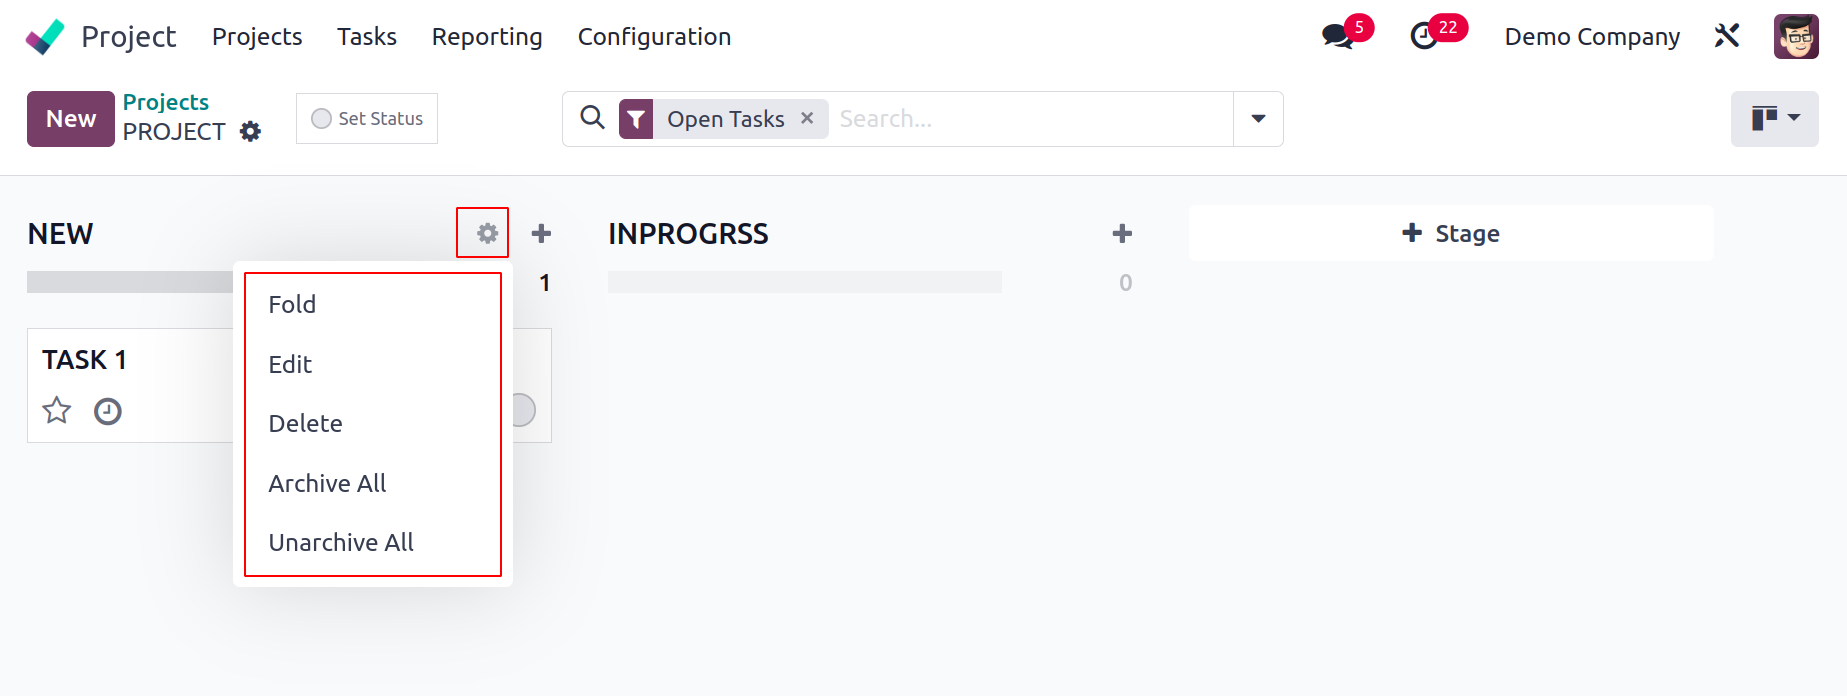
Options for Fold, Edit Stage, Delete, Archive All, and Unarchive All may be found under
the small settings icon that is present next to the stage's title.
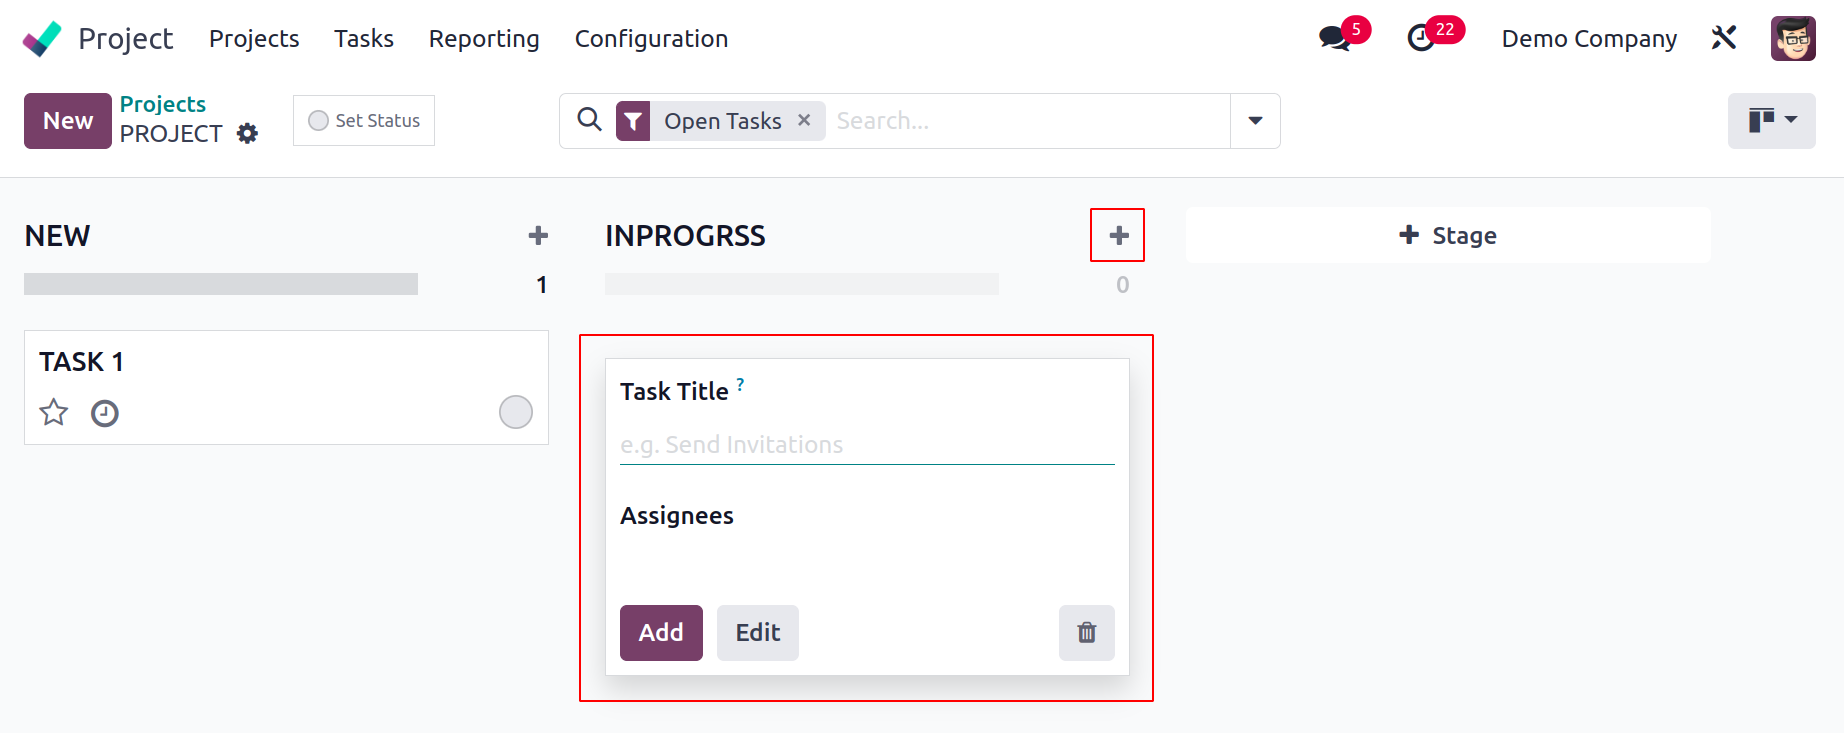
To rapidly add new tasks to a specific stage, click the plus icon. In the relevant
fields, you must include the Task Title and Assignees. You can click the Edit button to
add more information.
Here, you may find the names of the tasks, projects, and assignees. By connecting it to a
sales order item, you can mention Milestone in the space provided, which will assist in
delivering your services automatically when a milestone is met. To invoice the customer
for the time spent on the project, including the customer's name and the sales order
item. The task was added to the new stage three minutes ago, based on the time that is
displayed on the stage.
Set a deadline for the project. In Odoo 17, you can now provide the start and end dates
in the Deadline field. Then add the appropriate Labels. You can add a thorough
explanation of the work under the Description tab. You can activate the Timesheet option
from the module's Settings menu if you wish to keep track of the time spent on a project
or job.
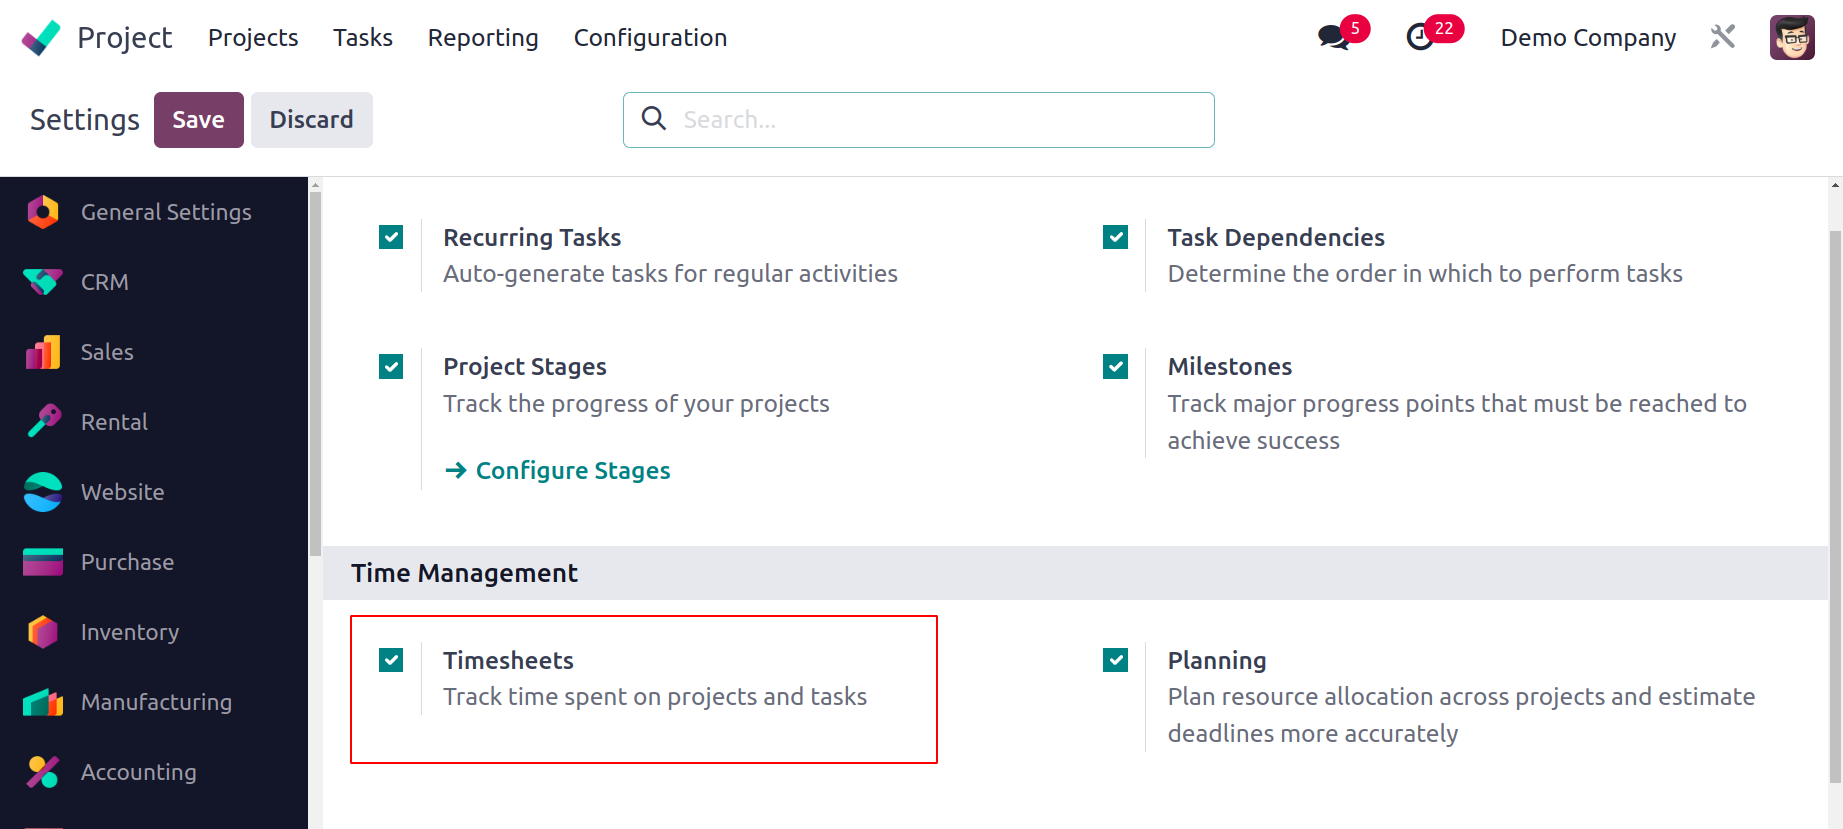
When this option is selected, the Timesheet tab will automatically appear in the task's
form view.
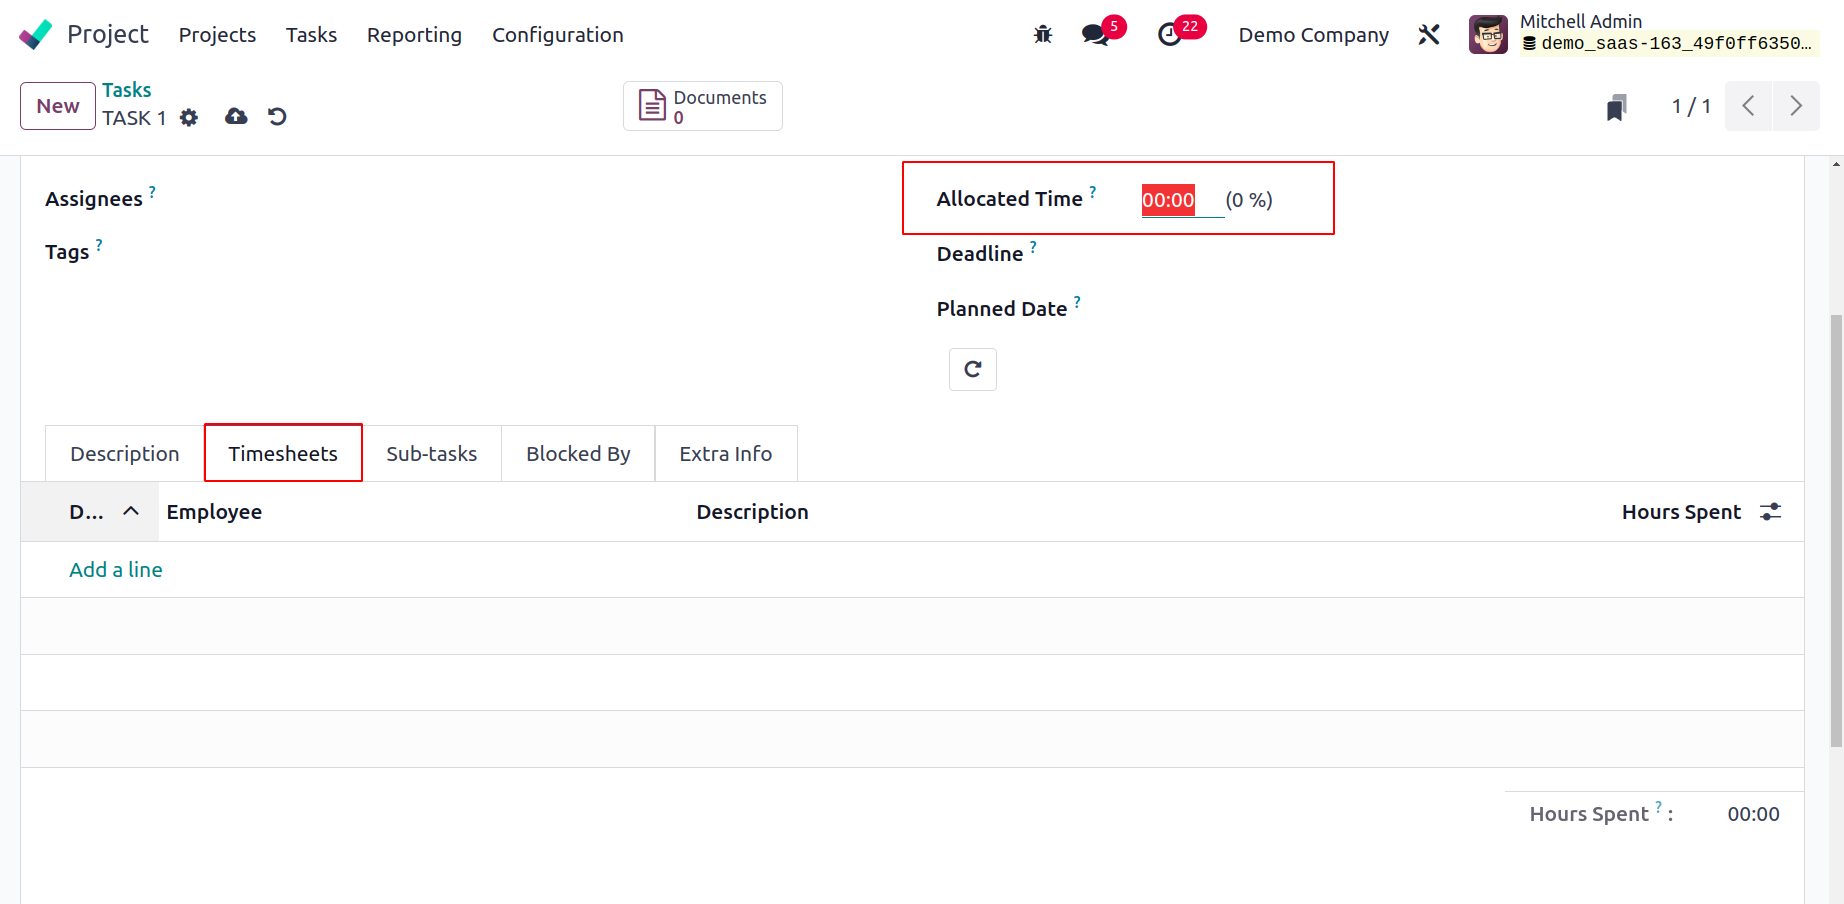
The Allocated Hours column can be used to specify the intended hours. Using the Add a
Line button, you may manually log the employees' time worked. You will find the task's
progress under this tab, based on the total number of hours spent on it.

You can divide your work into smaller milestones to help the project run more
efficiently. You can add them one at a time using the Add a Line button under the
Sub-Tasks tab. The Title, Assignees, Deadline, and Stage are among the details. To
obtain a detailed view of the sub-task after adding it, click the View Task button in
this tab.
There may be a variety of jobs to complete for some projects. It is crucial to specify
the tasks' order in such circumstances. The Task Dependencies function is located on the
Settings menu.
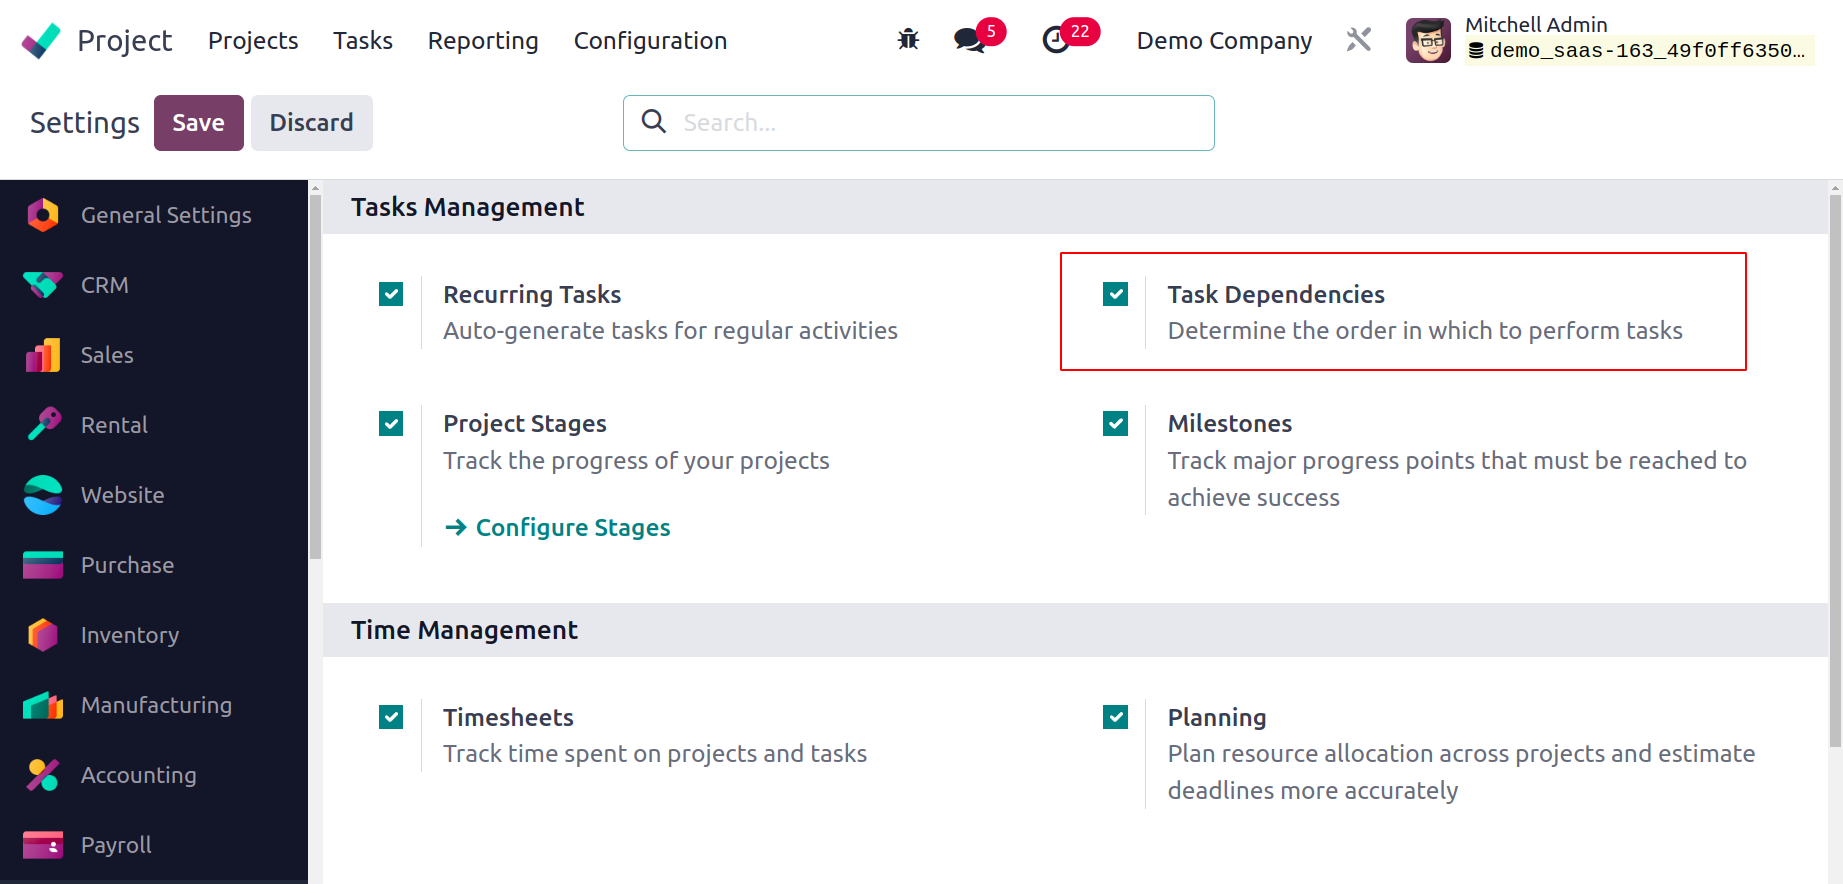
The order in which the tasks should be completed will be determined by this feature. When
you enable this feature, the task's form view will receive a new tab named Blocked By.
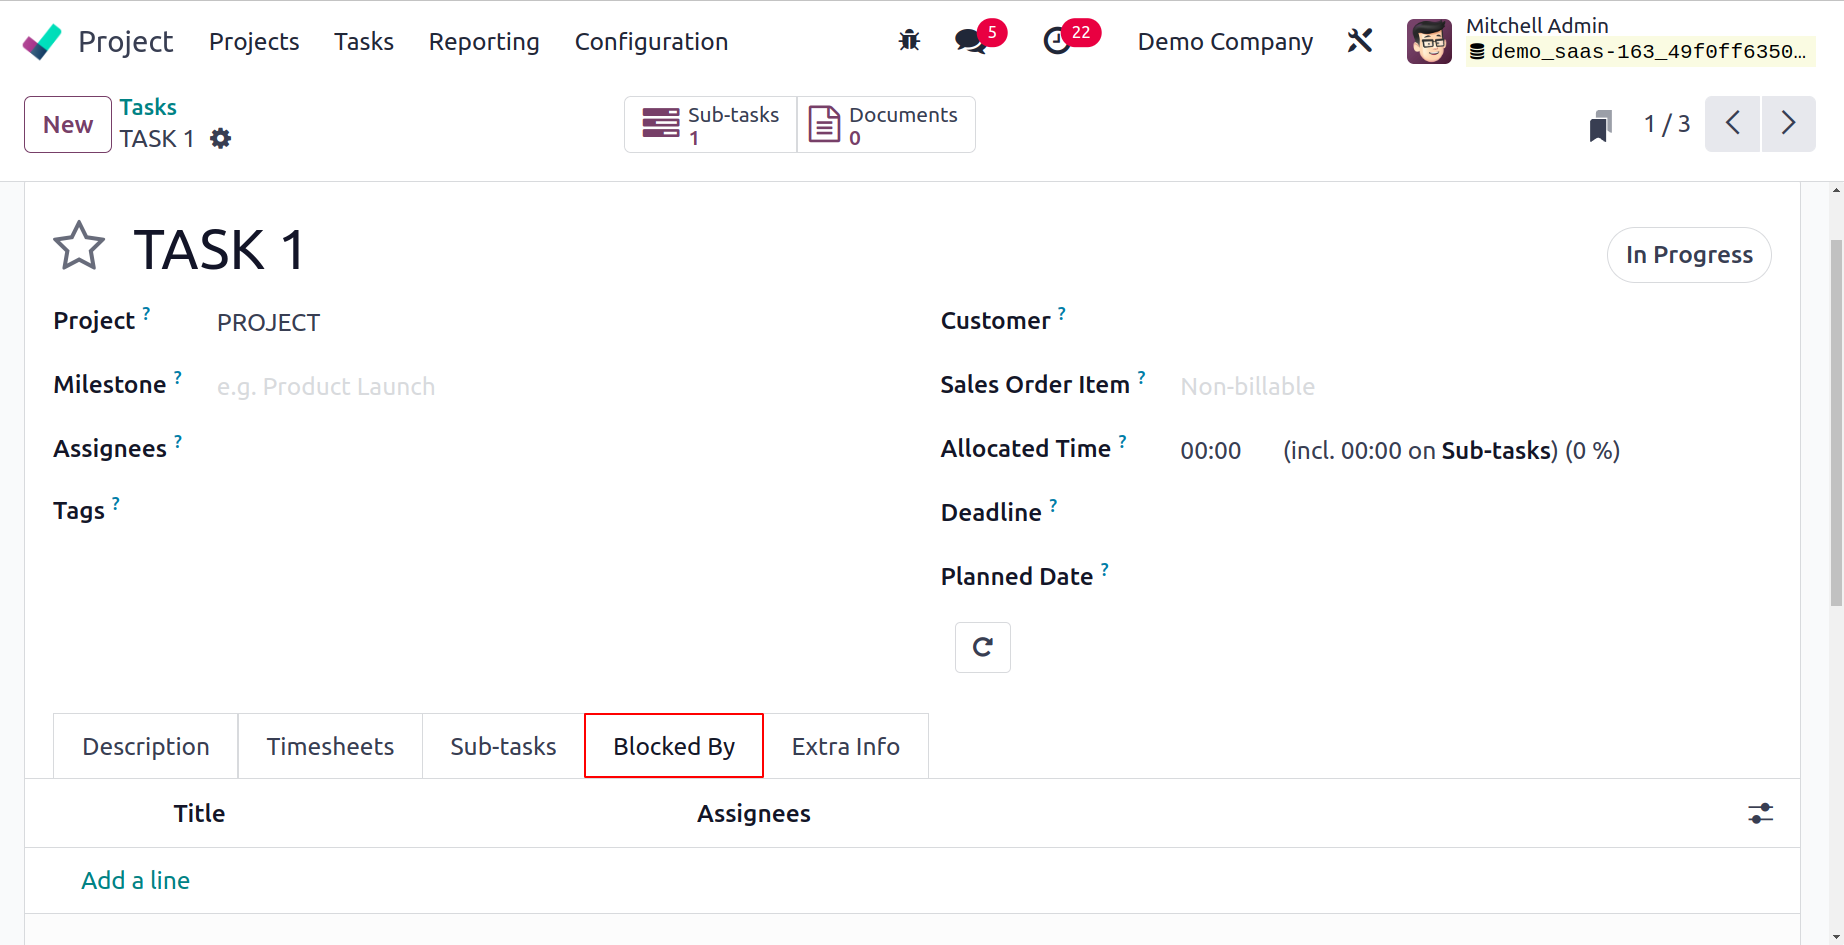
By utilizing the Add a Line button, you can block the other task from being completed if
you want to do this task before it.
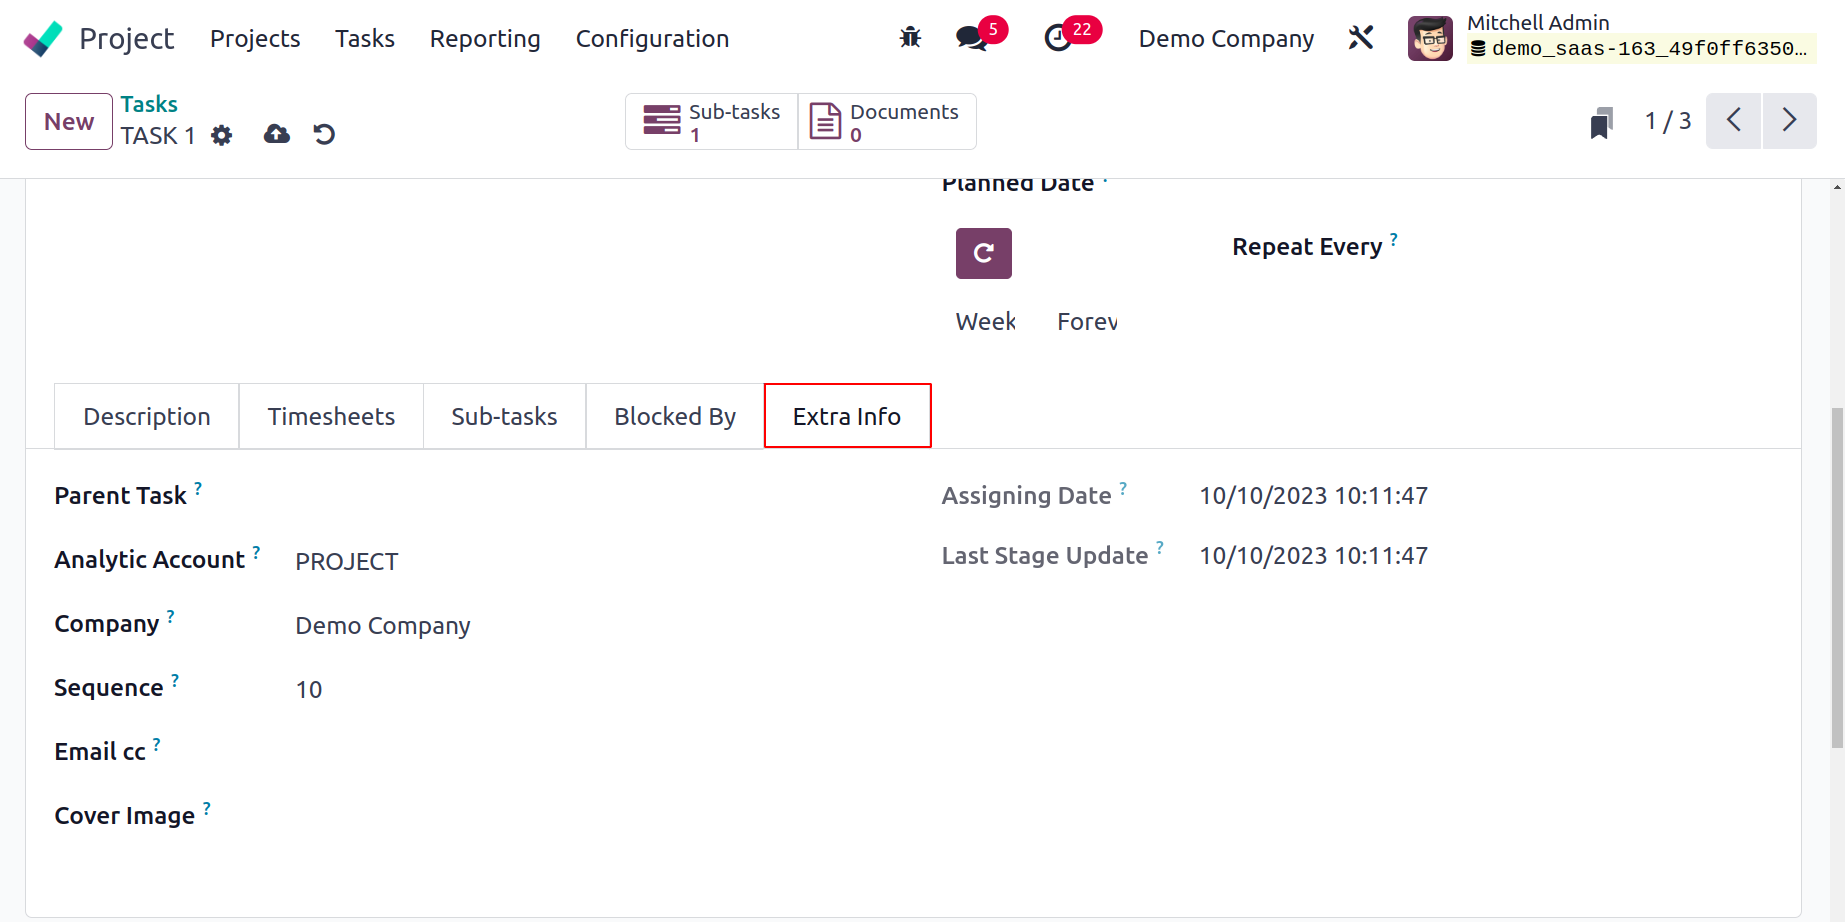
You can enable the Recurrent option and enter the period in the provided field to have
the task repeat itself at predetermined intervals.

You will receive a smart tab that displays the dates to complete this work and is based
on the interval you have chosen. When a task has a recurrence set, the recurring task
will continue to run automatically even after the current task has been marked as
completed.
The Parent Task, Analytic Account, Company, Sequence, Email cc, and Cover Image can all
be mentioned in the Extra Info tab. The corresponding fields will contain the Assigning
Date and Last Stage Update. This is how a new project gets tasks added to it.
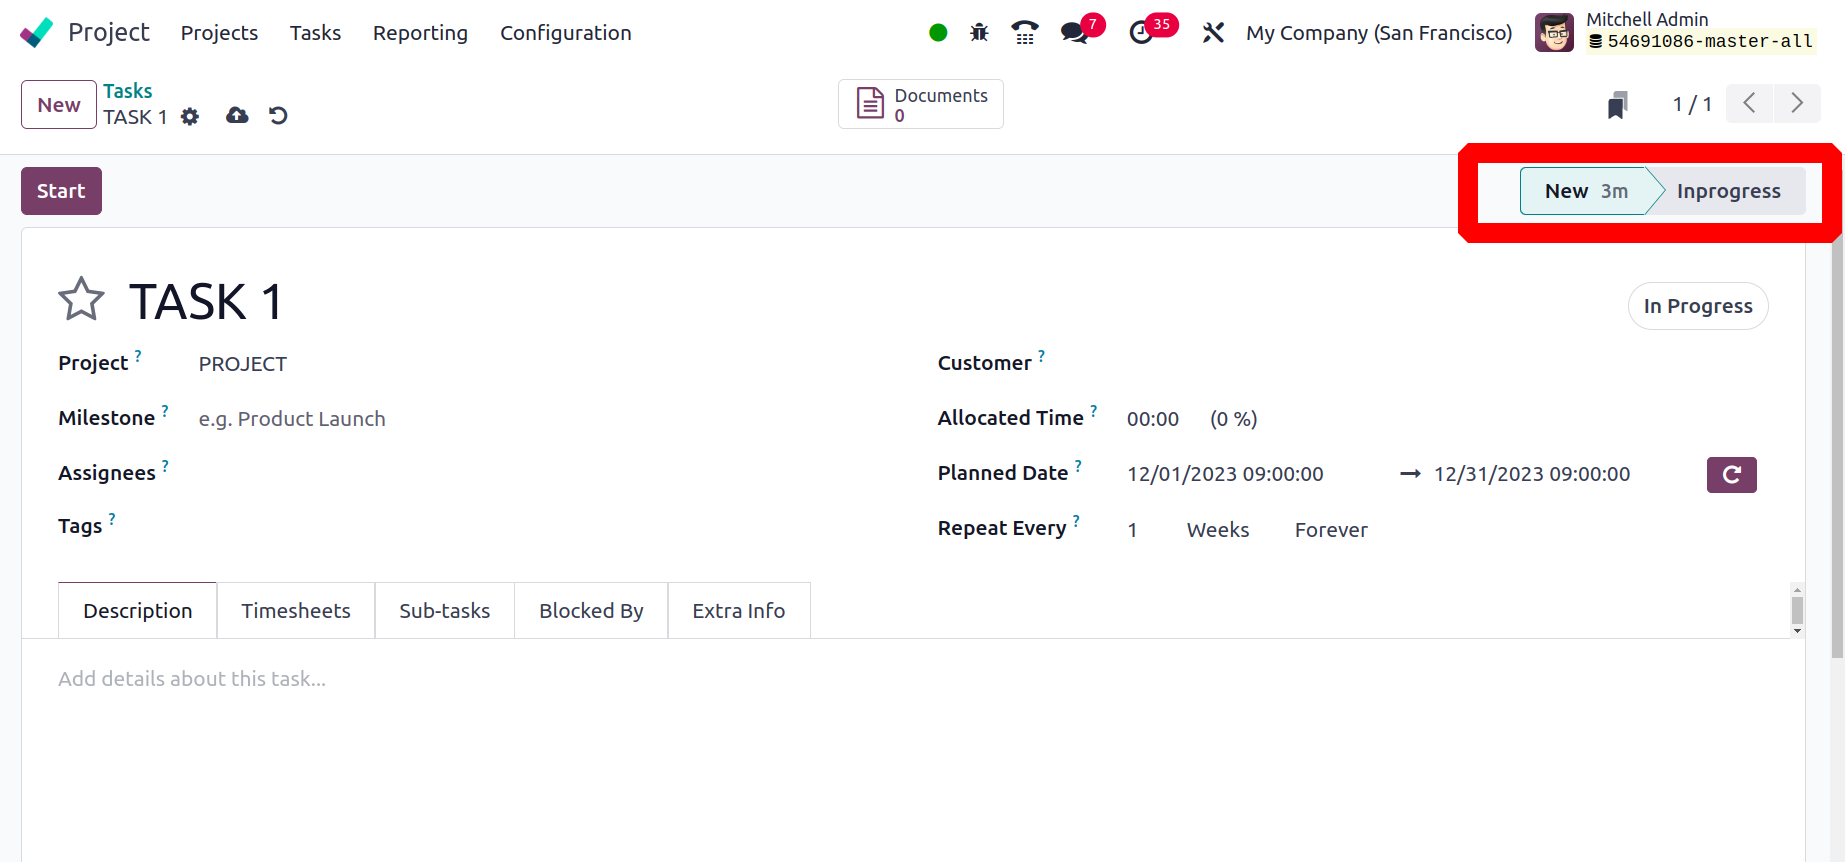
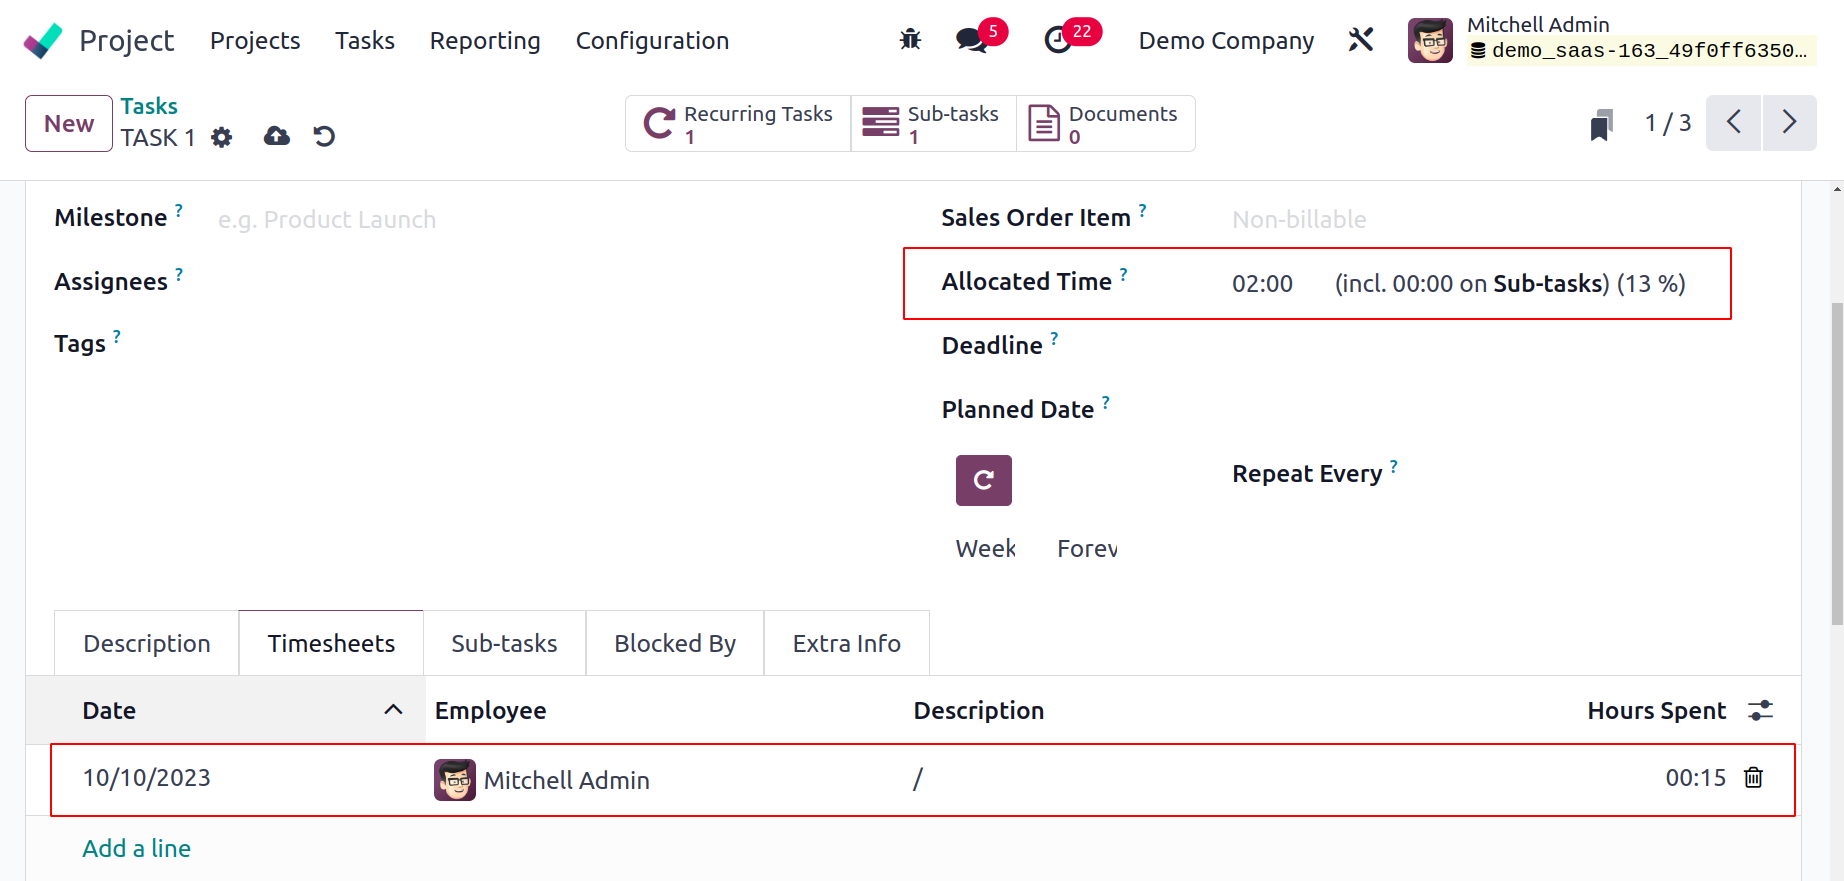
You will be able to access several smart buttons on the window once the task's
configuration is complete, as seen in the figure below.
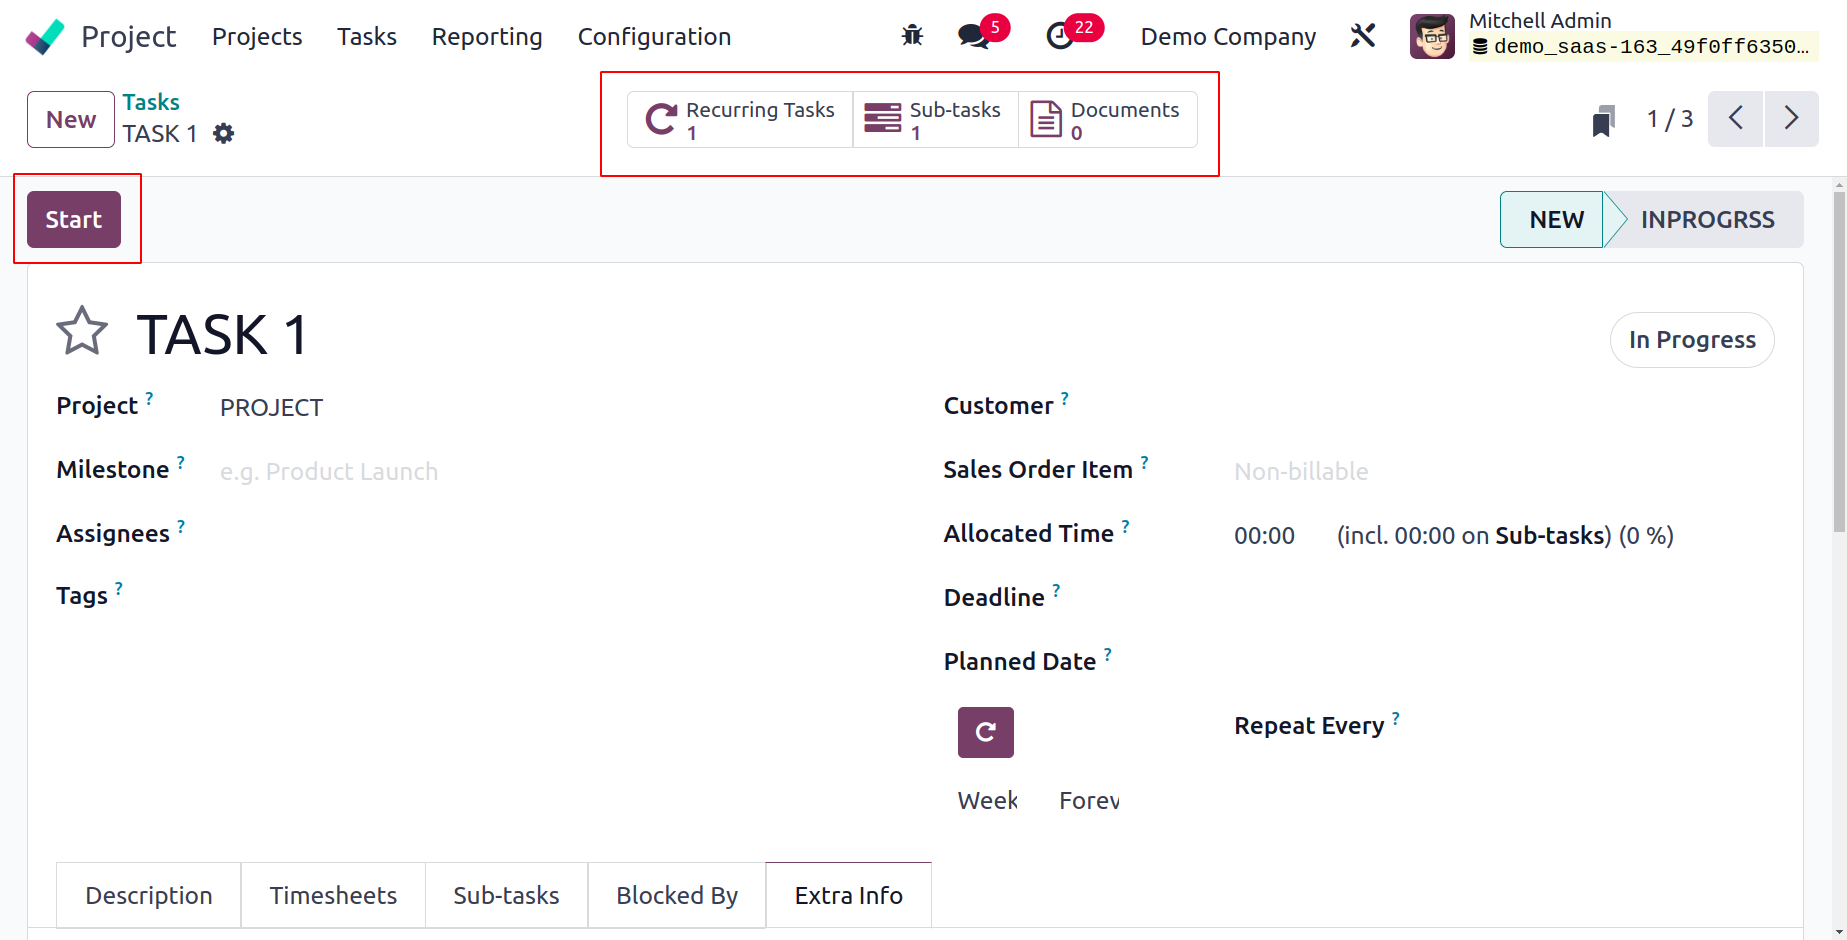
These smart buttons will display any related Recurring Tasks, Sub-tasks, and Documents
for the current task. The Start button may be found here and is used to keep track of
how much time you spend on this specific job. When you press this button, Odoo17 will
begin to log the time.

The Pause and Stop buttons are provided for carrying out the appropriate activities. You
can select the Stop button once you've finished the assignment. A pop-up window will
appear to confirm the time that was recorded.
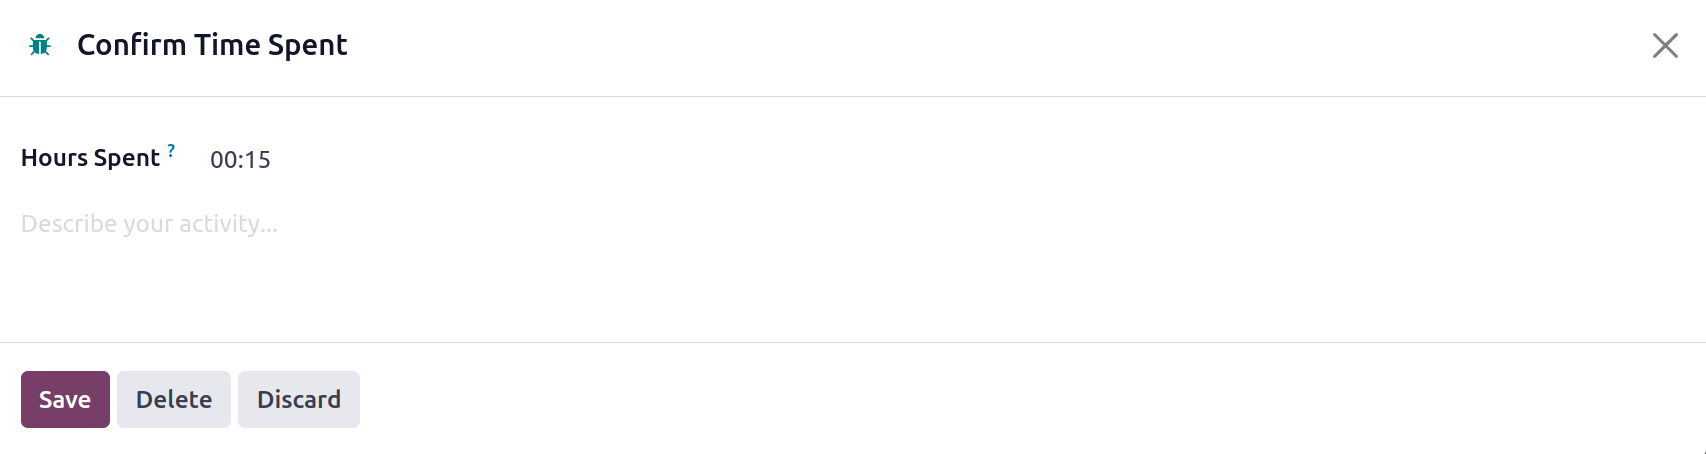
The pop-up window will display the Hours Spent, and you may fill in the blanks with a
description of your activities. Next, select the Save button.
The time that was tracked may now be seen in the form view's Timesheets tab. In this
page, you can view the task's Progress and Remaining Hours.
On this page, you can view the task's Progress and Remaining Hours.

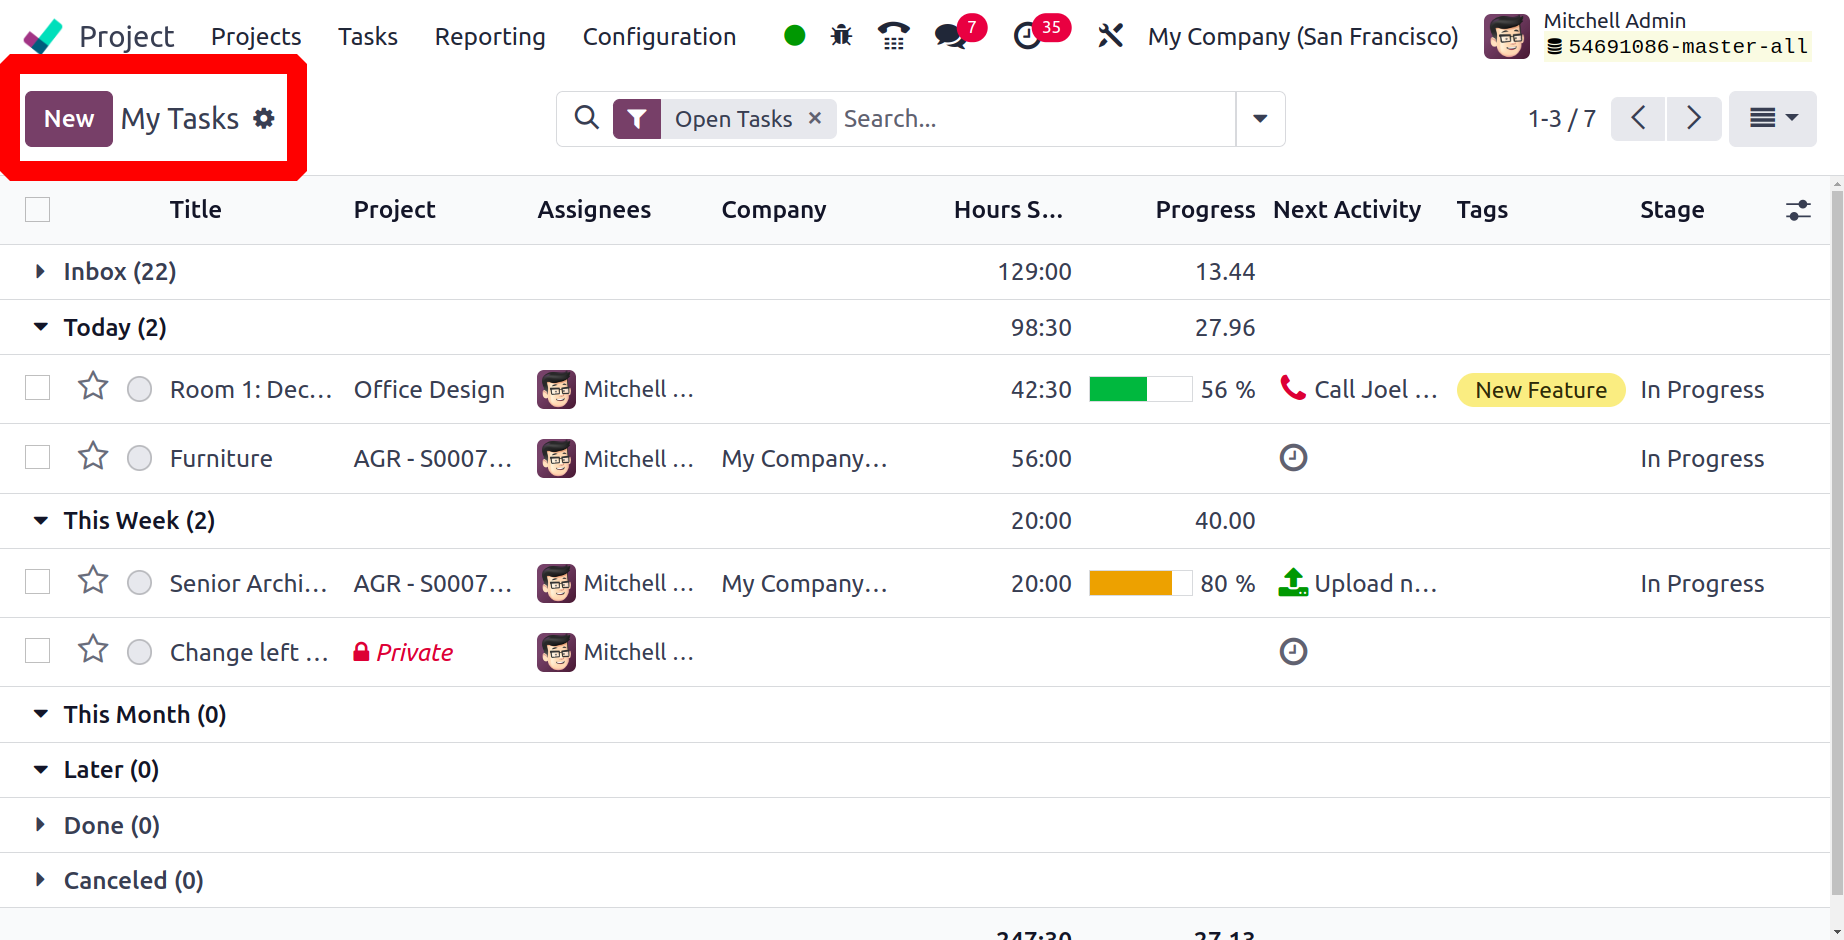
All tasks assigned to you will be tracked and recorded in the My Tasks menu found in the
Project module. These tasks can be managed in the Activity, Map, Pivot, Gantt, List,
Kanban, Calendar, and Activity views.
Projects
You will have a specific option under the Configuration menu to configure new projects in
addition to the main dashboard. From the Configuration menu of the module, choose the
Project option. All projects accessible in the module will be displayed in the window.
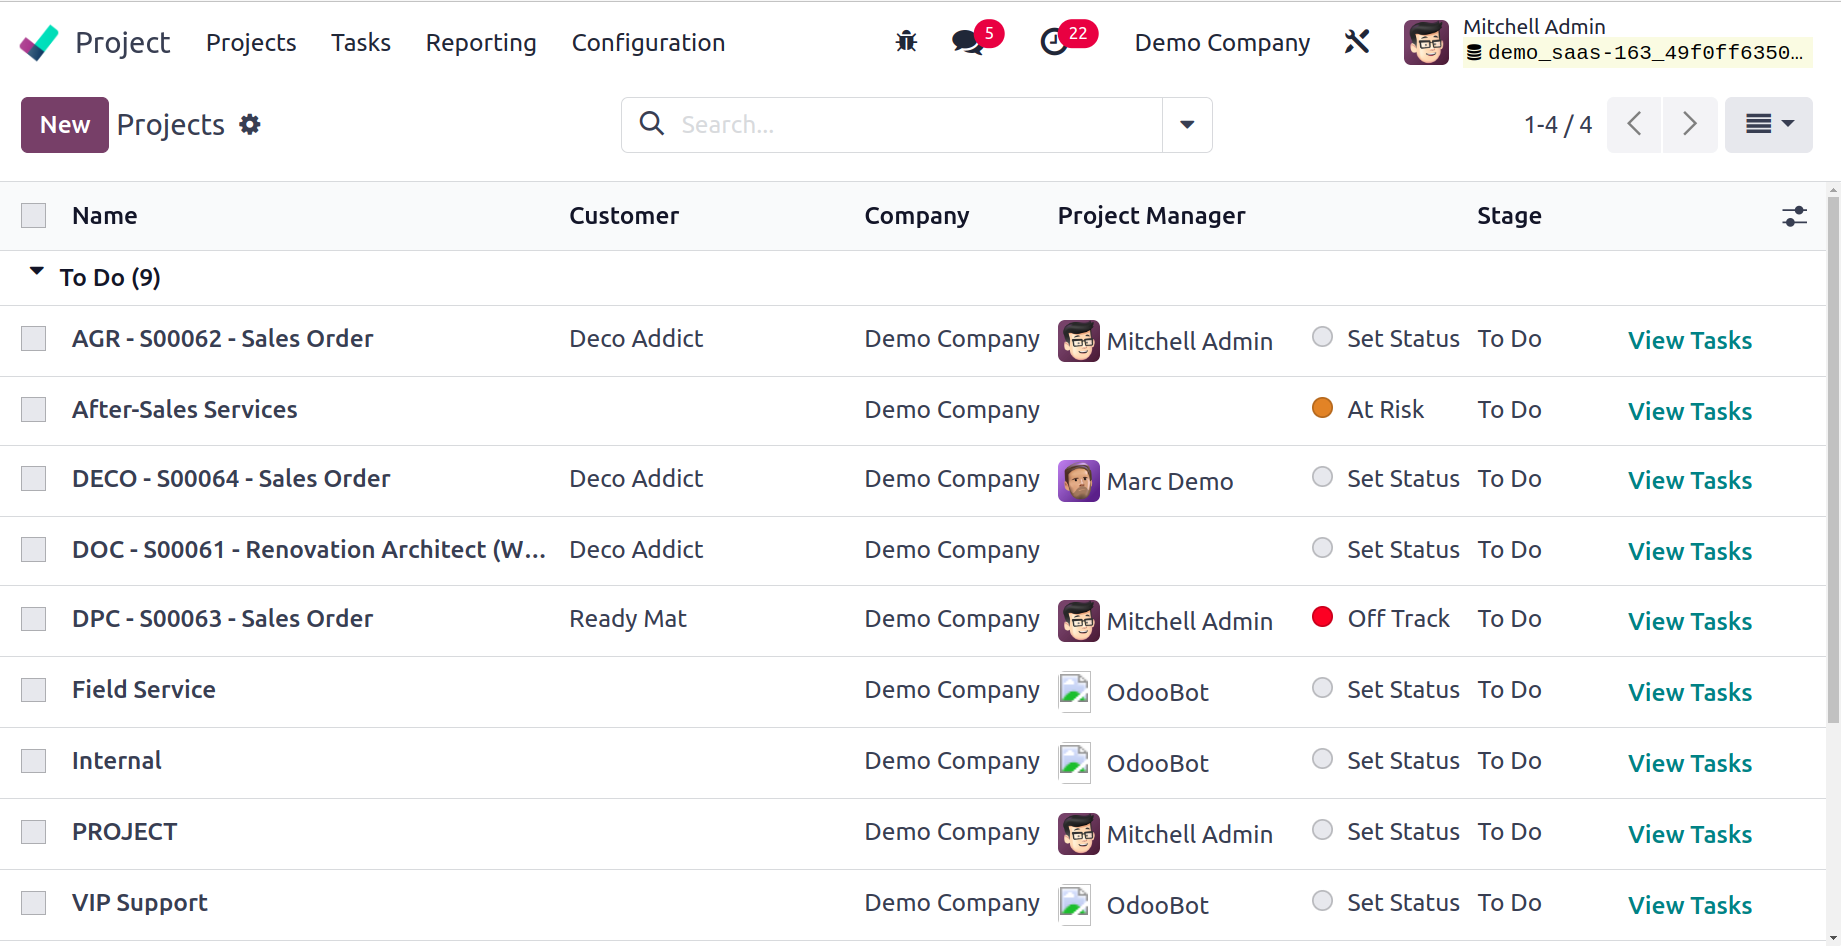
The preview of each project comprises the Name, Customer, Company, Start Date, End Date,
Allocated Hours, Project Manager, Status, and Stage, as seen in the screenshot above.
The Kanban, List, Gantt, Calendar, and Activity views are available for this window. To
add a new project, click the New button.
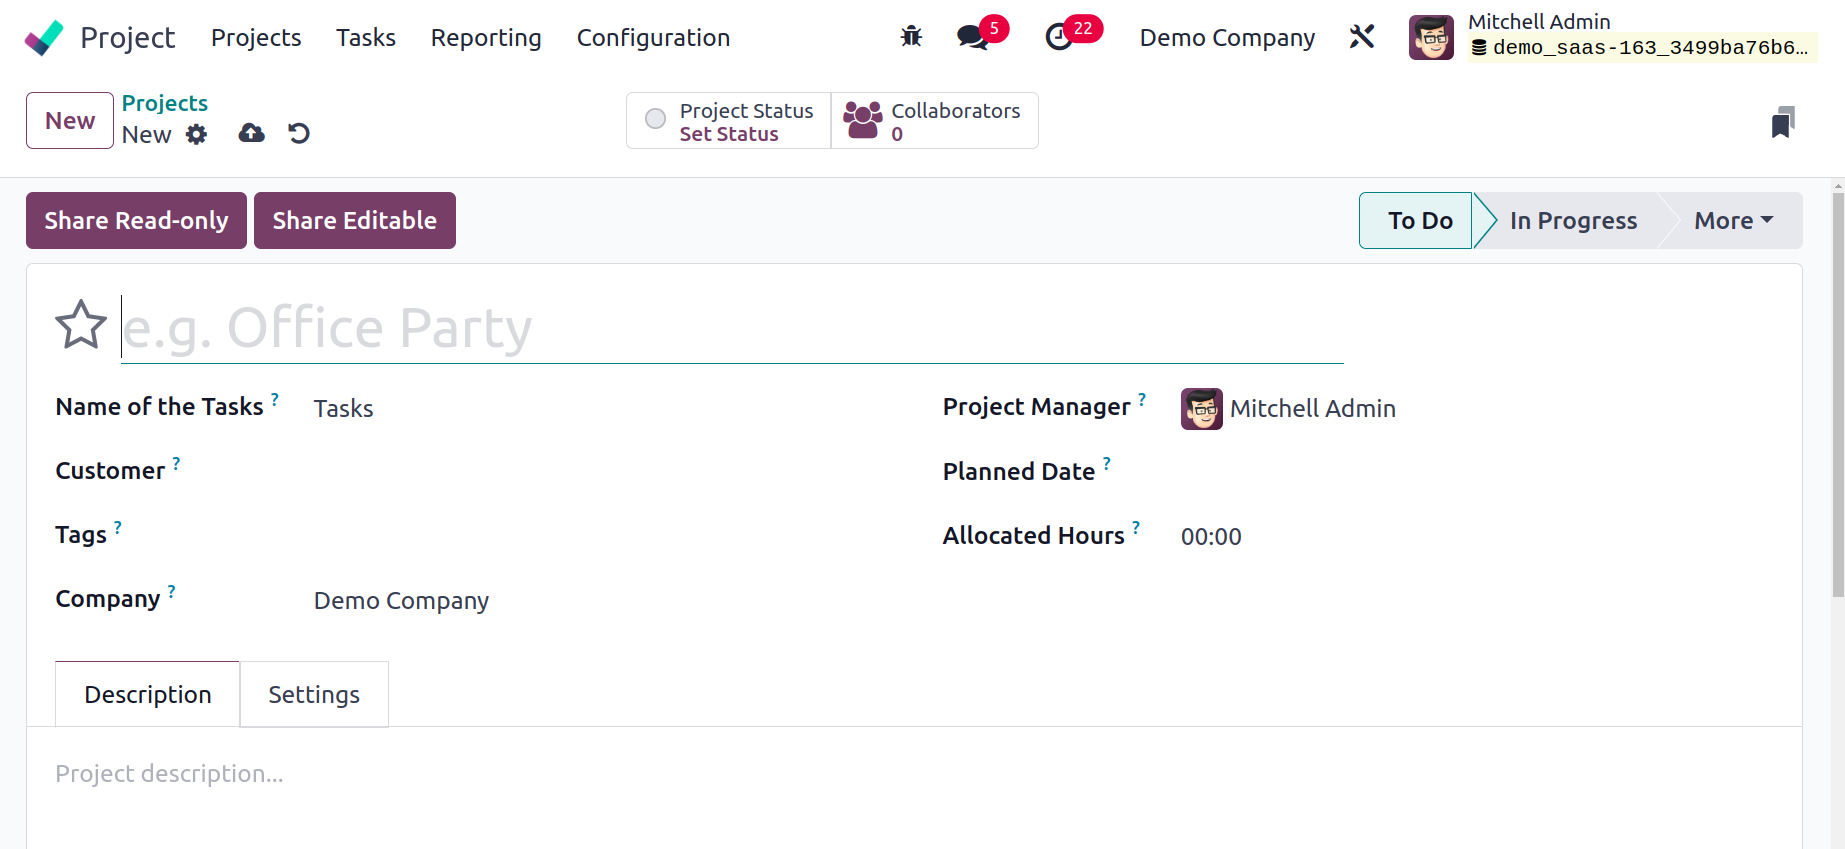
You can enter the project's name in the relevant field. The name of the tasks identifies
the name by which the tasks of the specific project are referred to. Fill in the
appropriate fields with Customer, Tags, Company, Project Manager, Planned Date, and
Allocated Hours. You can include project-related remarks on the Description tab.
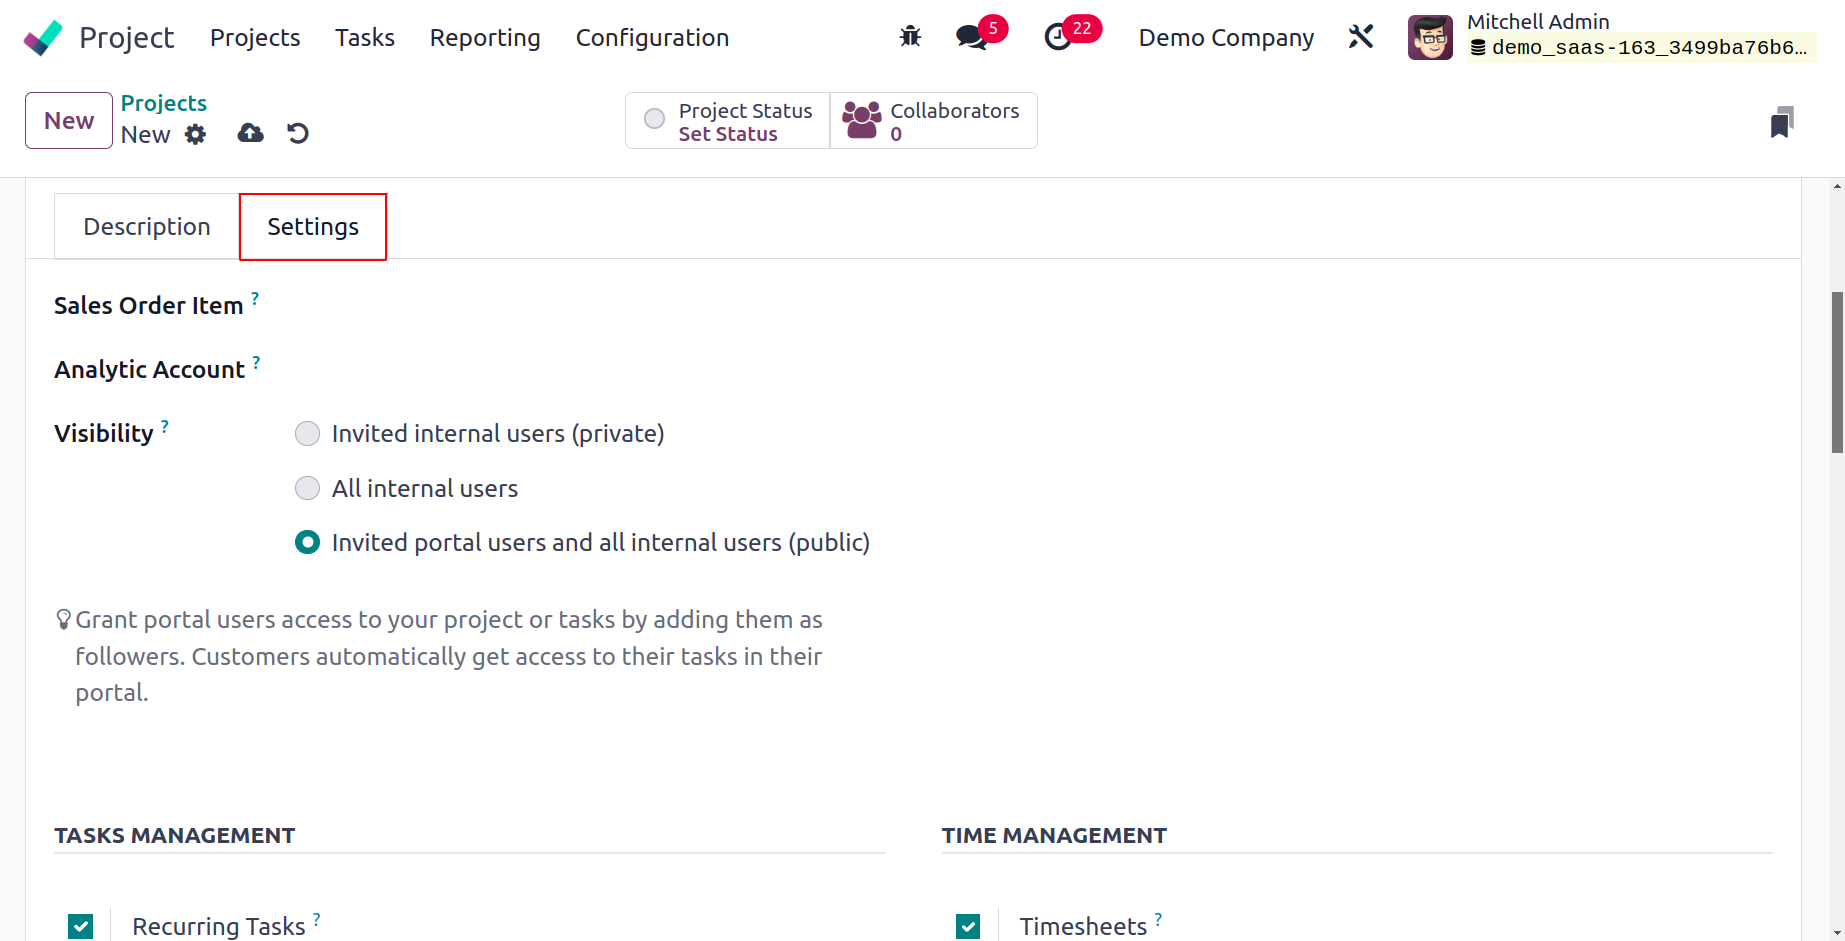
You can specify an analytical account to link and track the expenses and revenues of the
tasks, timesheets, and other project-related activities in the Analytic Account field
found under the Settings tab. Also, mark Who can see this project and its tasks will be
determined by the Visibility parameter. You have the option of setting the Visibility to
Invited Portal Users, Invited Internal Users, and All Invited Users.

You can activate Sub-tasks, Recurring Tasks, Task Dependencies, Milestones, Timesheets,
and Planning from the Task Management and Time Management sessions. The use of these
characteristics was already described earlier. You will see relevant fields in the form
view of this project's tasks based on the option you choose to enable.
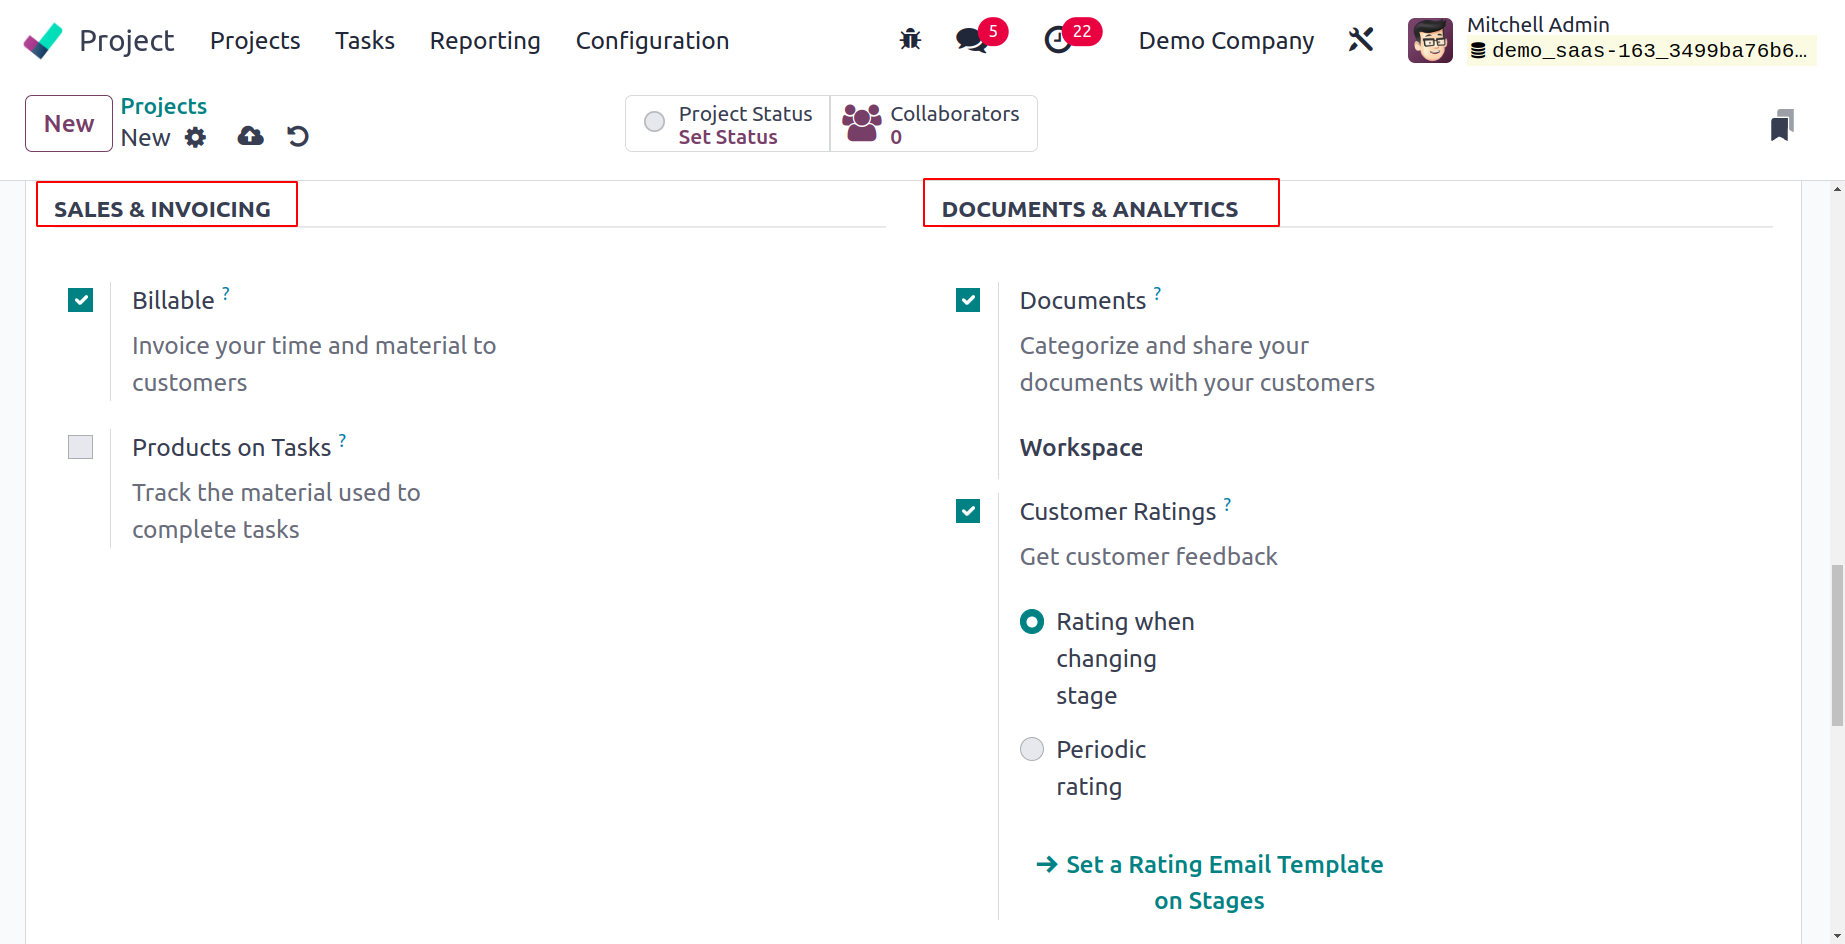
The Billable and Products on Tasks capabilities can be enabled under the SALES &
INVOICING session. These capabilities will assist you in tracking the materials required
to complete jobs and billing consumers for your time and materials, respectively. You
can enable the Documents feature to categorize and share your documents with your
customers from the Documents and Analytics section. The Workspace denotes a location
where all project documents will be organized into categories. Use the Customer Ratings
function to gather client feedback on projects.
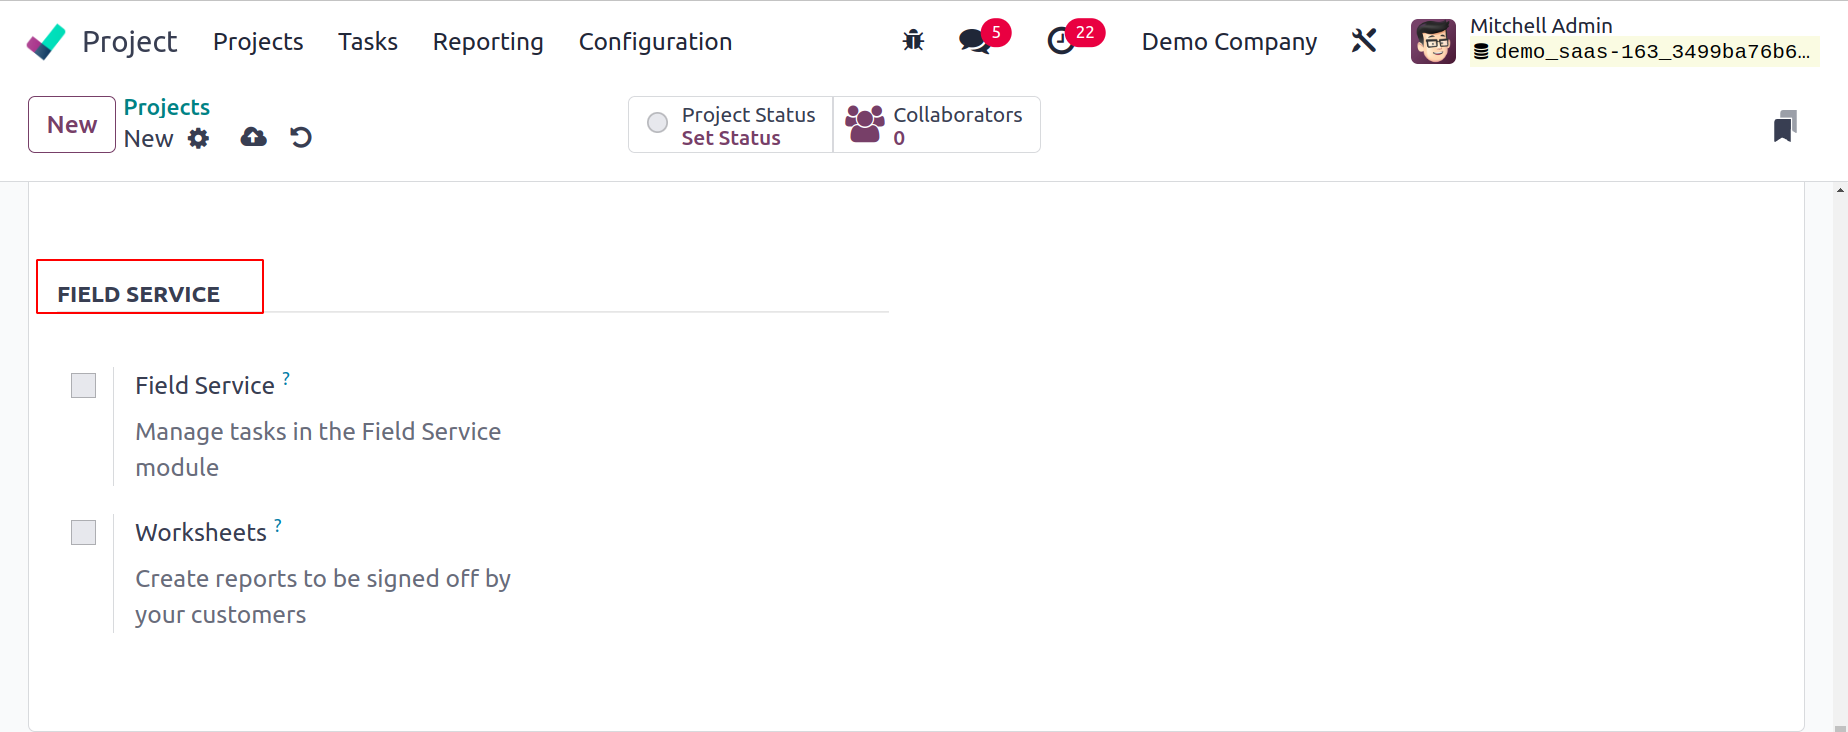
You can control the tasks in the field service module by turning on the "Field Service"
option. You can activate the Worksheets option to create reports that need to be
approved by your clients.
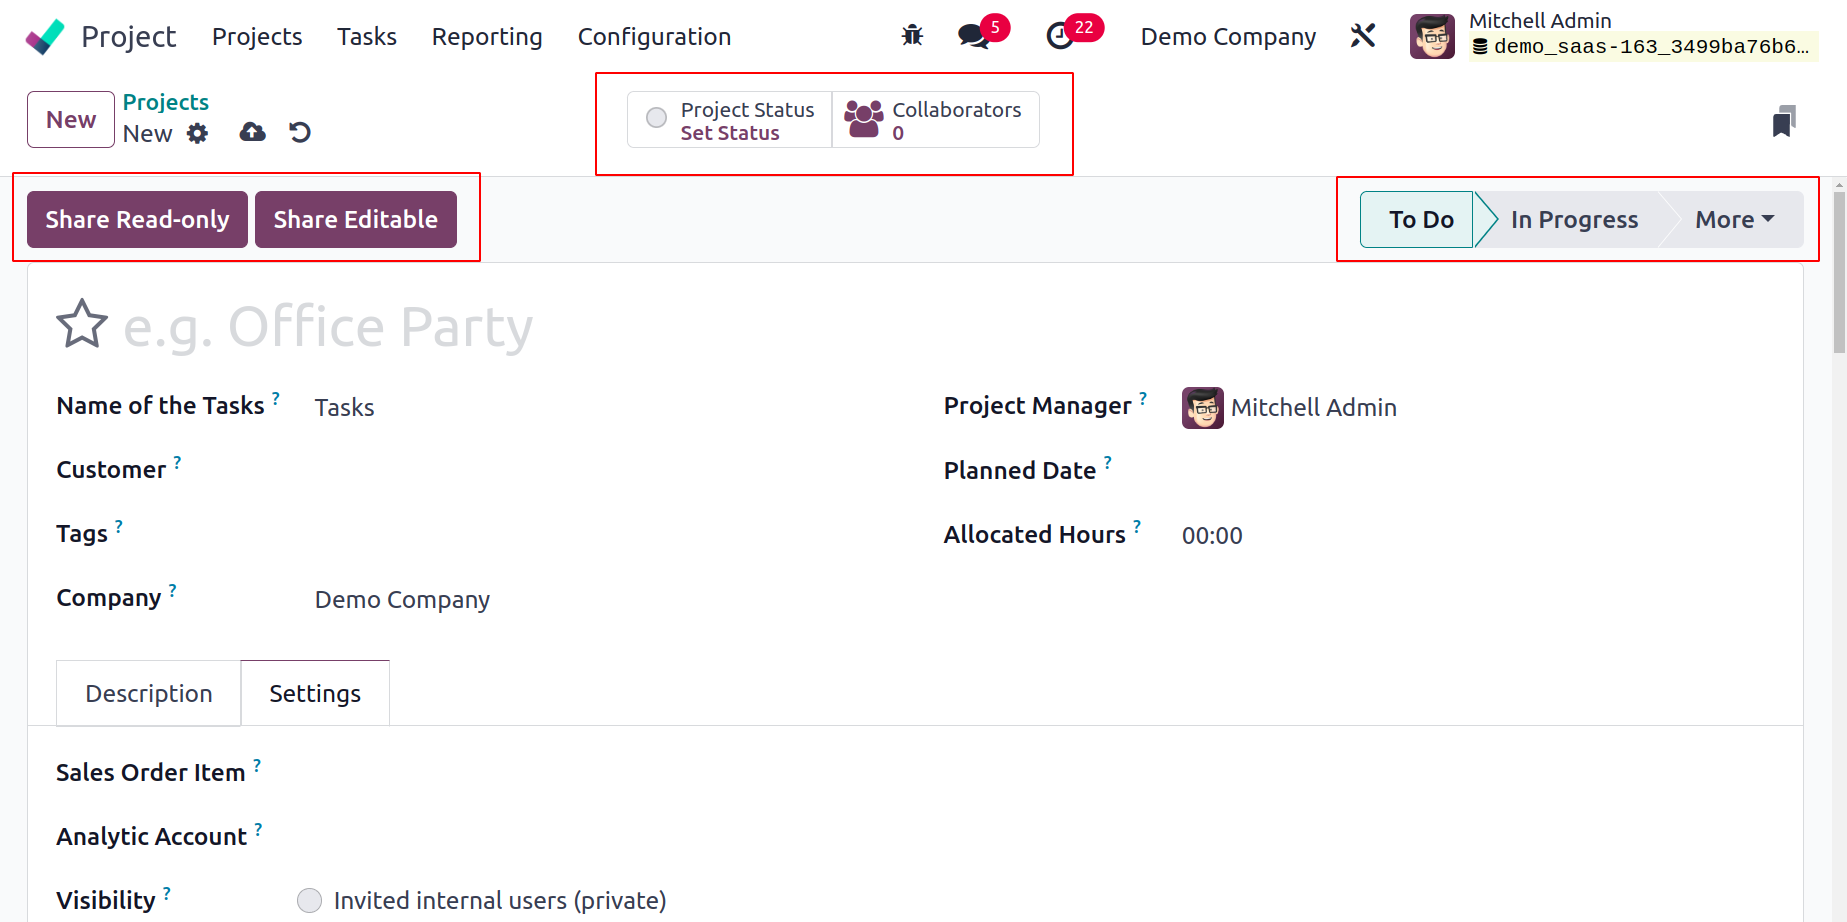
The portal user is taken to their portal when a project is shared in read-only mode. They
are unable to alter the tasks; they only view them. The kanban and list views of the
tasks are shown to the portal user when a project is shared in edit. They have the
ability to change a certain set of task fields. In any scenario, an internal user
without project access can still access a task if they are given the relevant URL (and
if the project is private, are among the followers).
Task
There are two options under the Task menu. My Tasks is one, while All Tasks is the other.
The tasks produced by the firm are displayed in both submenus.
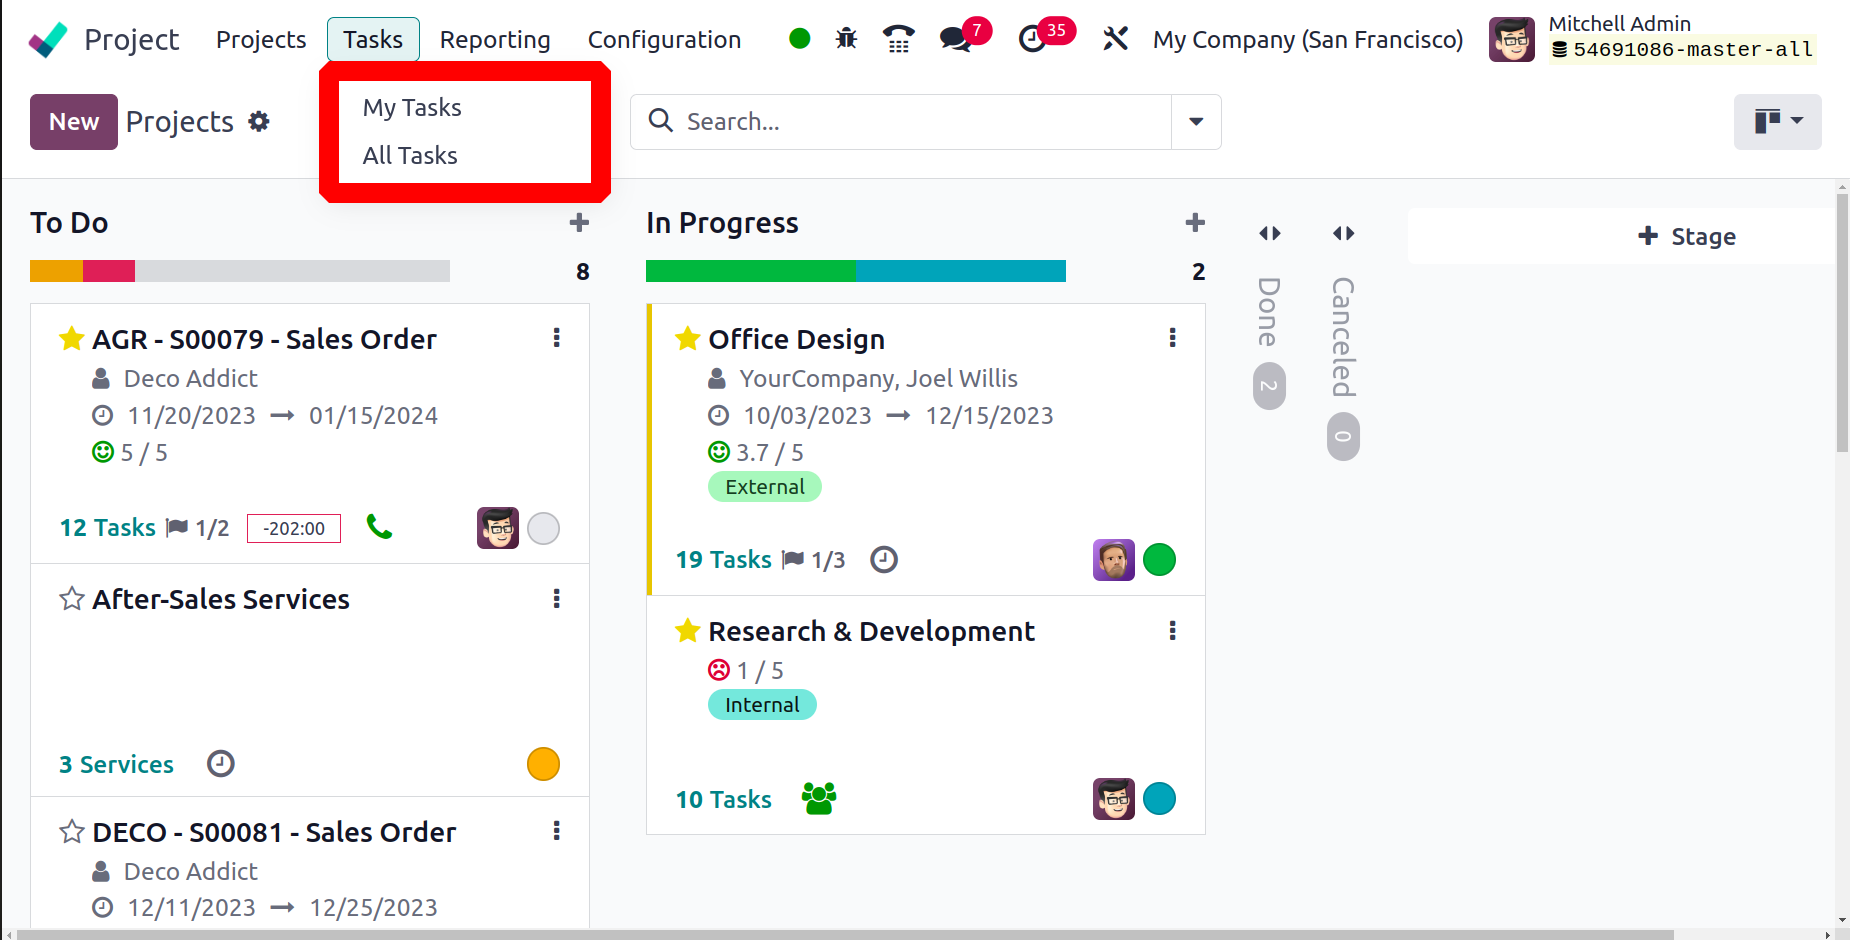
My Tasks
The tasks assigned to the user that is logged in are all displayed in My Tasks. Because
Mitchell Admin is the user that logs in, Mitchell Admin is the appointed person for all
tasks here. The user can add new tasks by clicking the New button. As we mentioned
previously, the task creation form is comparable.
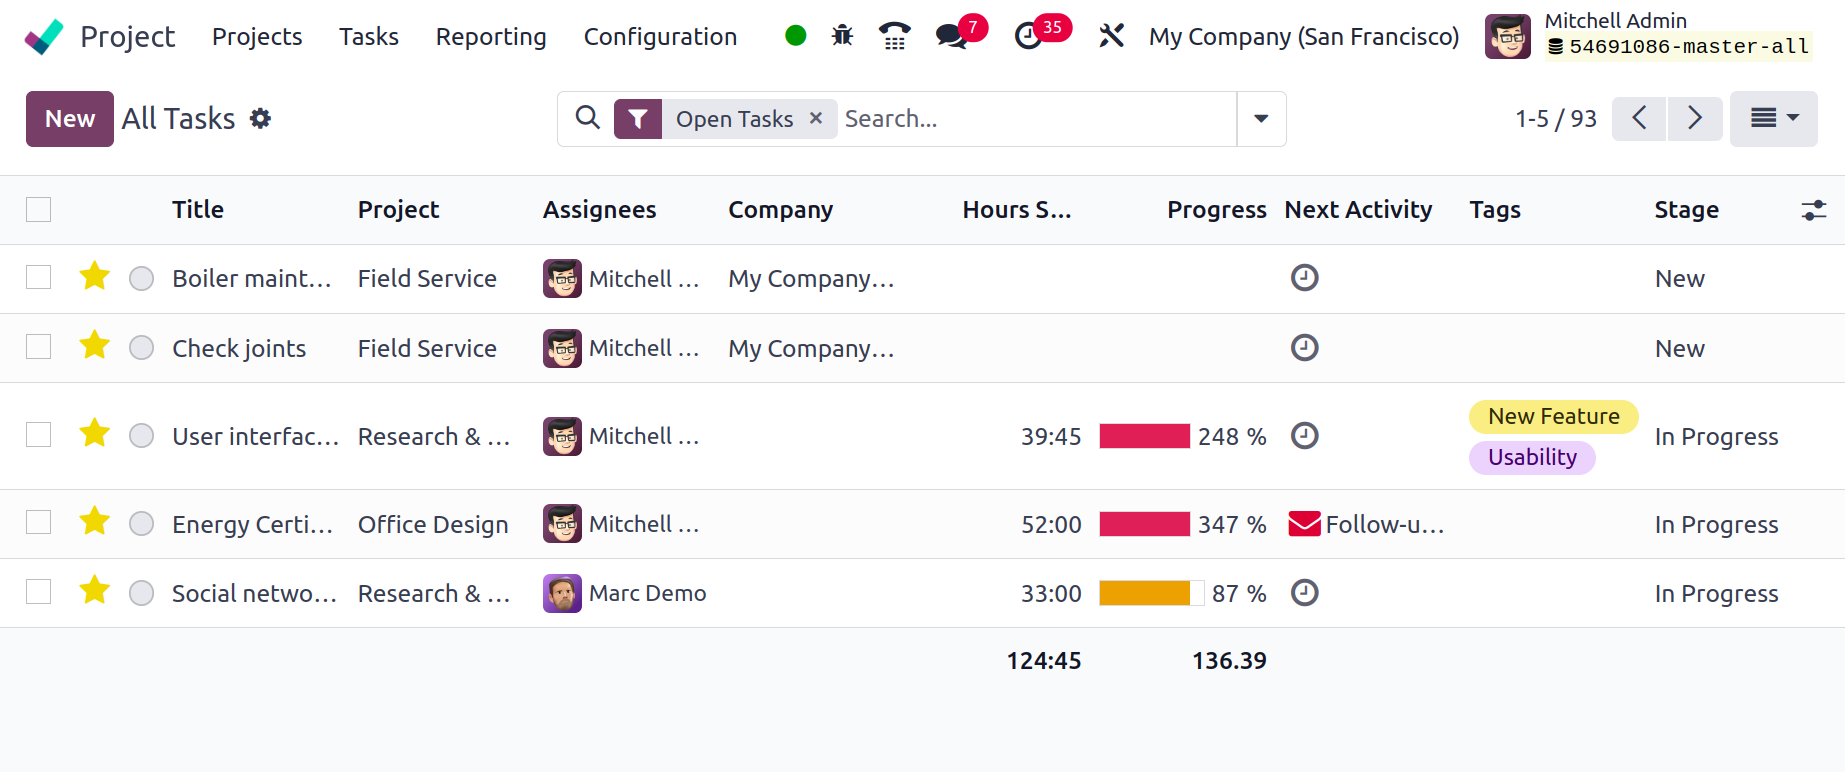
All Task
The All Task menu shows all tasks that have been created. A list of all the jobs assigned
to each user is shown under this All Task. Using the New button, additional tasks can
also be added to projects.
Configuration
The Project module's Configuration option gives users the ability to control Settings,
Project, Project Stages, Task Stages, Tags, and Activity Types. While creating projects
and tasks, we covered many of the Settings menu's choices in detail.
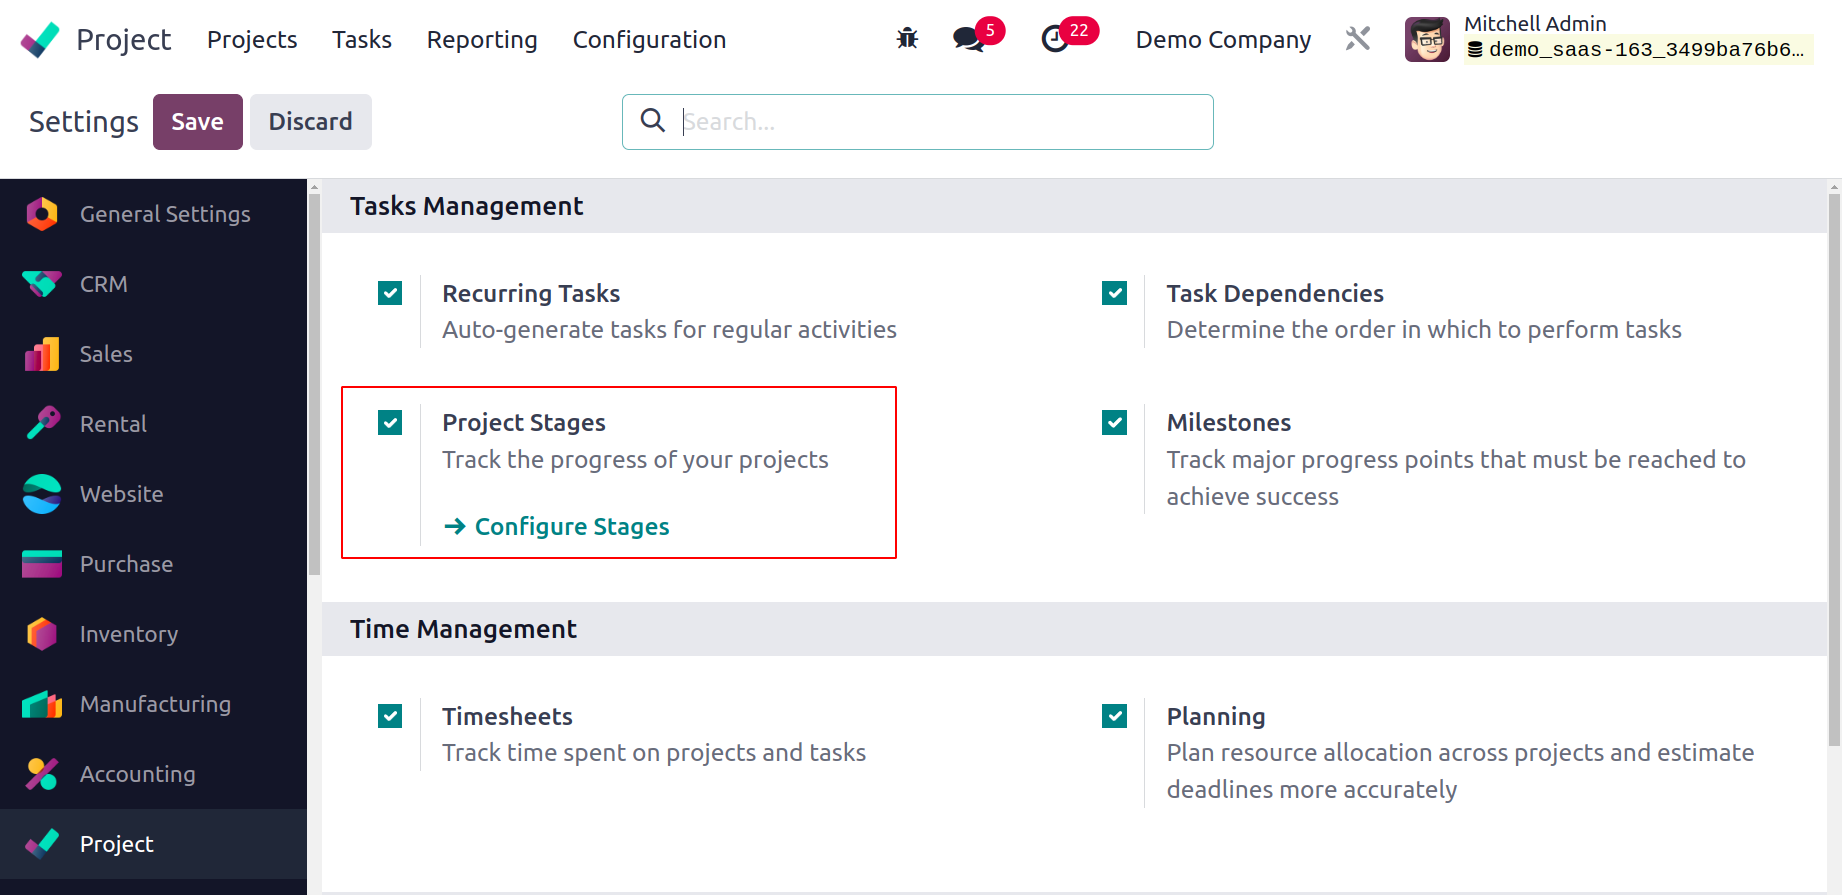
Project Stages
You can enable the Project Stages functionality by going to the module's Settings menu.
You can efficiently follow the development of your projects by enabling this feature.
You can arrange your projects based on how far along they are.
Once this feature is activated, the module's Configuration menu will contain the relevant
option. The pre-configured stages for your projects will be displayed on this platform.

You may see from here the names of the project stages. By selecting the New option, you
can add a new project stage. When you click on this button, a new line will appear under
the already-existing project stages where you can describe the new project stage.
If you want to fold this stage in the project's Kanban view, enable the Folded in Kanban
field. To save the new stage, click the Save button.
Default Plan
The Default Plan function is located in the Analytics tab of the Settings menu. Any
project, all of its tasks, and timesheets are related to an analytical account, which is
a part of a plan.
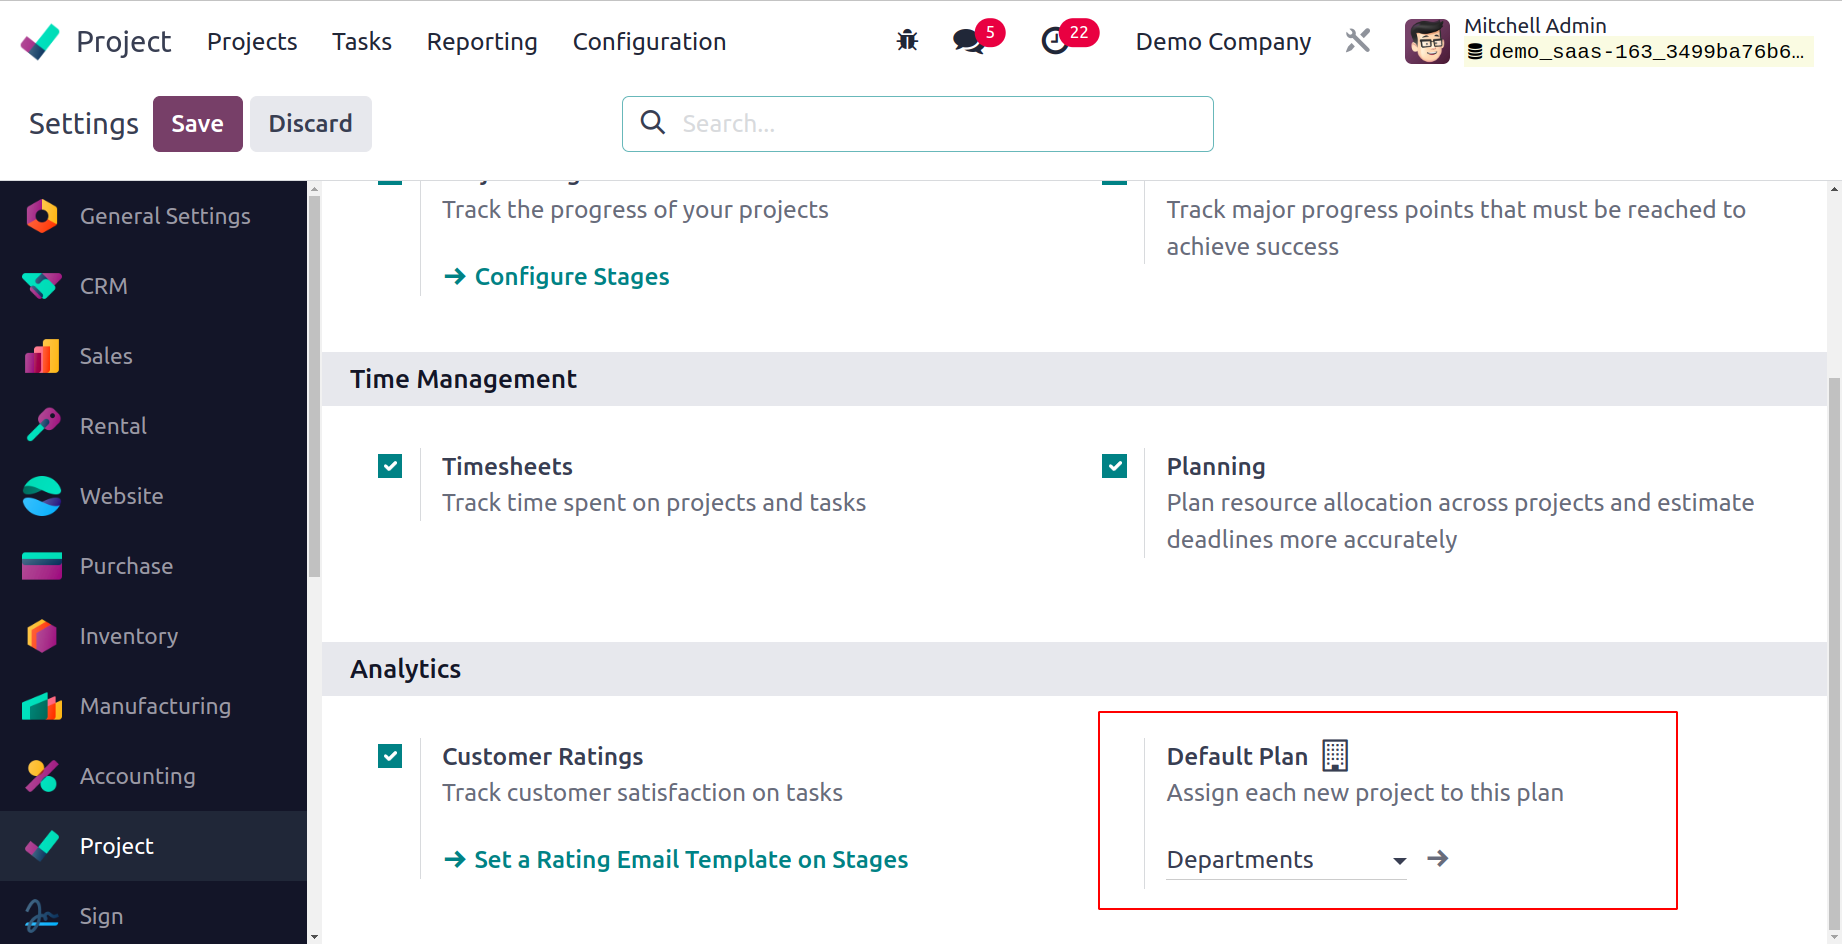
Odoo17 will automatically assign each new project to the default plan that you specify
here. It will monitor your project's financial success.
Task Stages
When developing tasks for a project, we talked about how to create new task stages. You
can access a different platform for controlling task phases here under the module's
Configuration menu. Once you divide activities up into stages based on how far along
they are, tracking them will become simple.
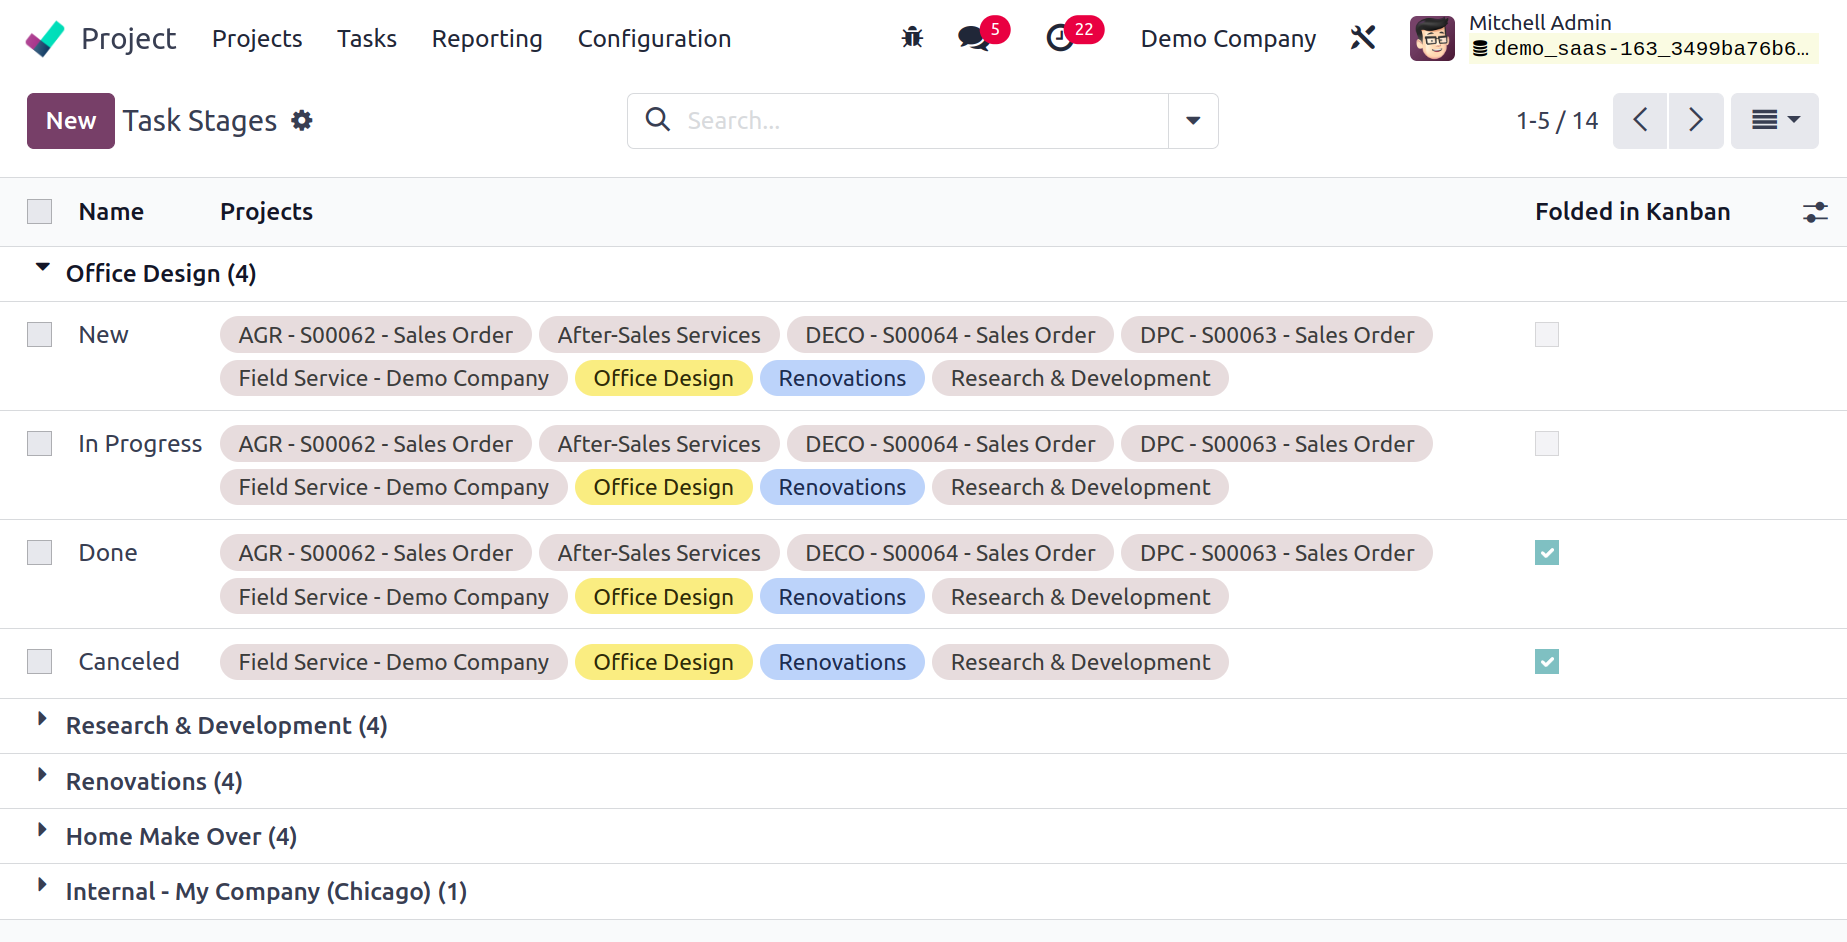
The Name and Projects of each task stage are displayed in the list view of the task
stages, as seen in the screenshot above. When you click the New button, a form view
where you can add a new task stage will open.

In the available space, give the task stage a name. In the relevant boxes, you can add an
SMS Template and an email Template. If configured, the client will be automatically
notified by email and SMS when the task reaches this point. When a task reaches this
stage, Odoo17 will automatically send the customer a rating request if you add a Rating
Email Template. The stage's sequence number will be available here, and you can adjust
it as necessary. You can turn on the Folded in Kanban option to fold this stage in the
Kanban view. You can specify specific projects in the Projects area if you only want to
add this stage to those projects. Additionally, according to your needs, you can modify
the stage description using the tooltips.
Tags
You can always make searching easier by using tags. In the majority of Odoo17 modules,
there are options to configure tags. You can also find the Tags option under the
Configuration menu in the Project module, as shown below.
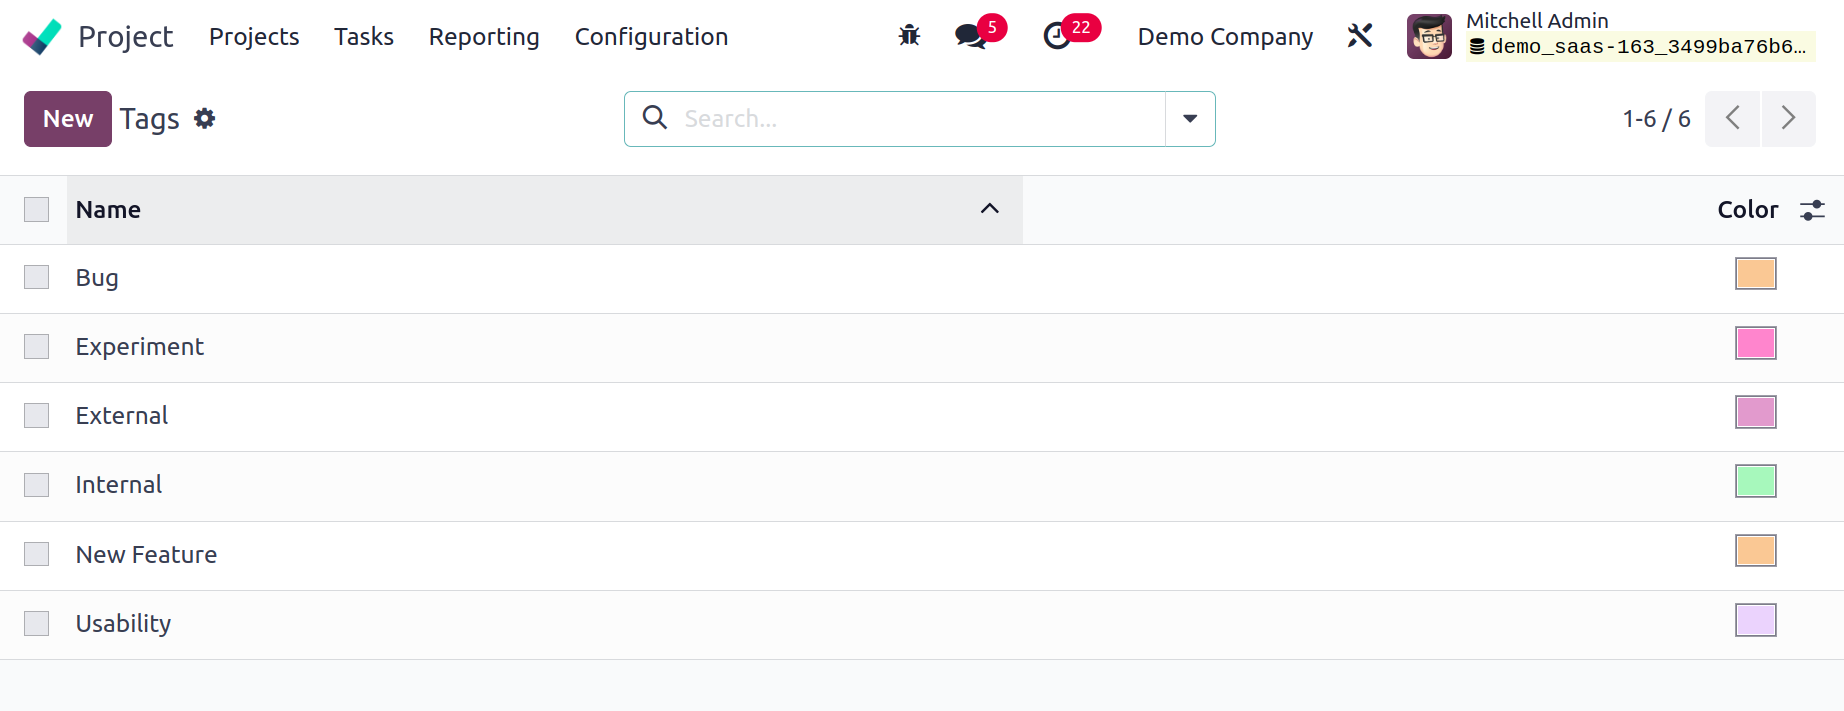
When you click the New button, a new line will appear where you may enter the name of the
new tag. To save the new tag, press the Save button.
Activity Types
It could be necessary to plan calls, emails, and meetings while completing work. As a
result, these activities can be set up using the Activity Types under the Configuration
menu. Additional activity types can be added by using New buttons.
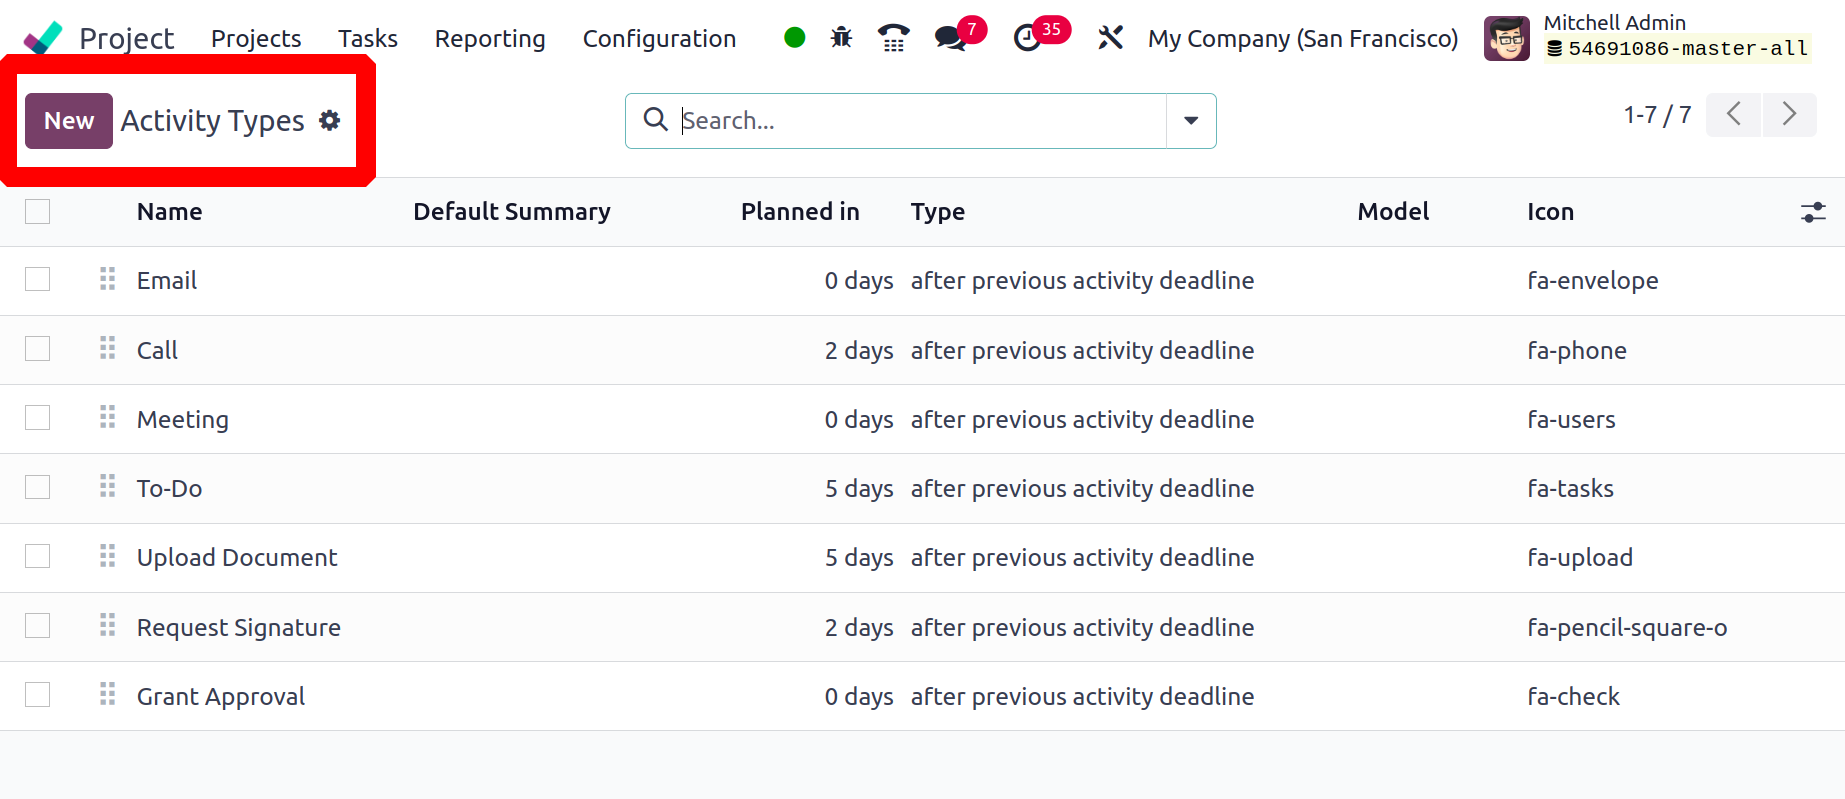
The activity name, action to be carried out during the activity, default user, model,
default summary, icon, decorating type, chaining type, suggestion, email template, and
timetable should all be added. Each module's process for creating an activity is thus
uniform.

Activity Plans
To finish the work, several activity plannings can also be placed inside the
configuration. Select the Activity Planning option from the Configuration menu to add
such plans. Then select the New option to add a new plan.
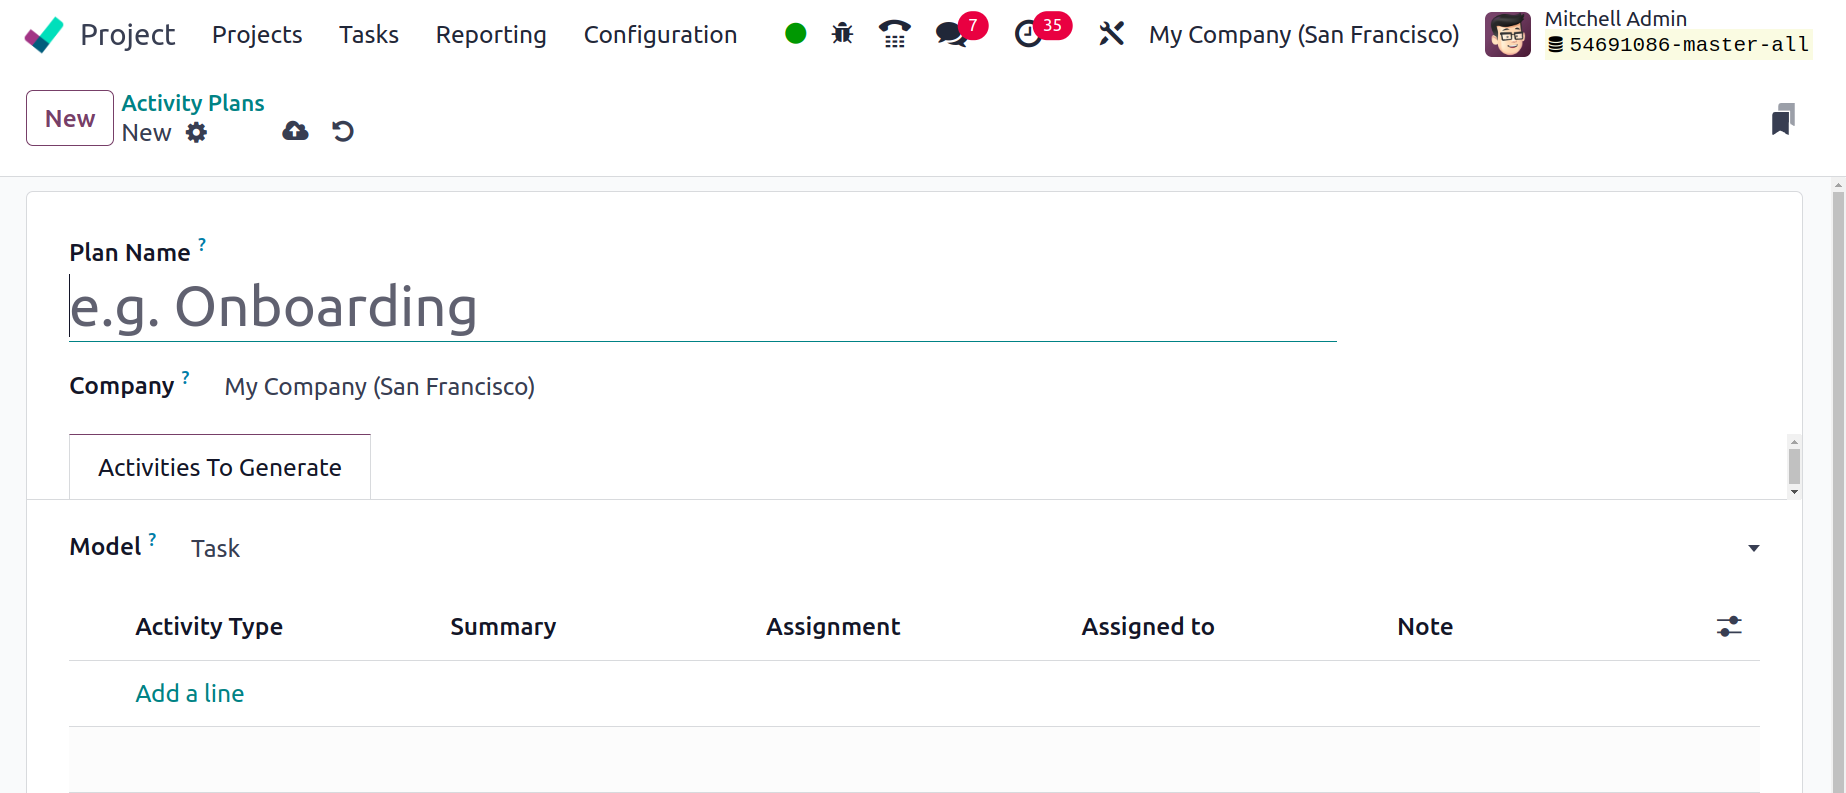
First, state the firm name and plan name. Next, use the Add a line to add the Activity
Types inside the Activities To Generate tab.
Reporting
The Project module in Odoo17 has the Reporting tool, which can be used to examine each
project and task listed in the database. In order to quickly pinpoint the areas that
require more focus and improvement, it is crucial to regularly evaluate all
project-related activities.
Task Analysis
You may access the Task Analysis platform, which can be used to go at the tasks entered
into Odoo17, under the Reporting menu of the Odoo17 Project module.
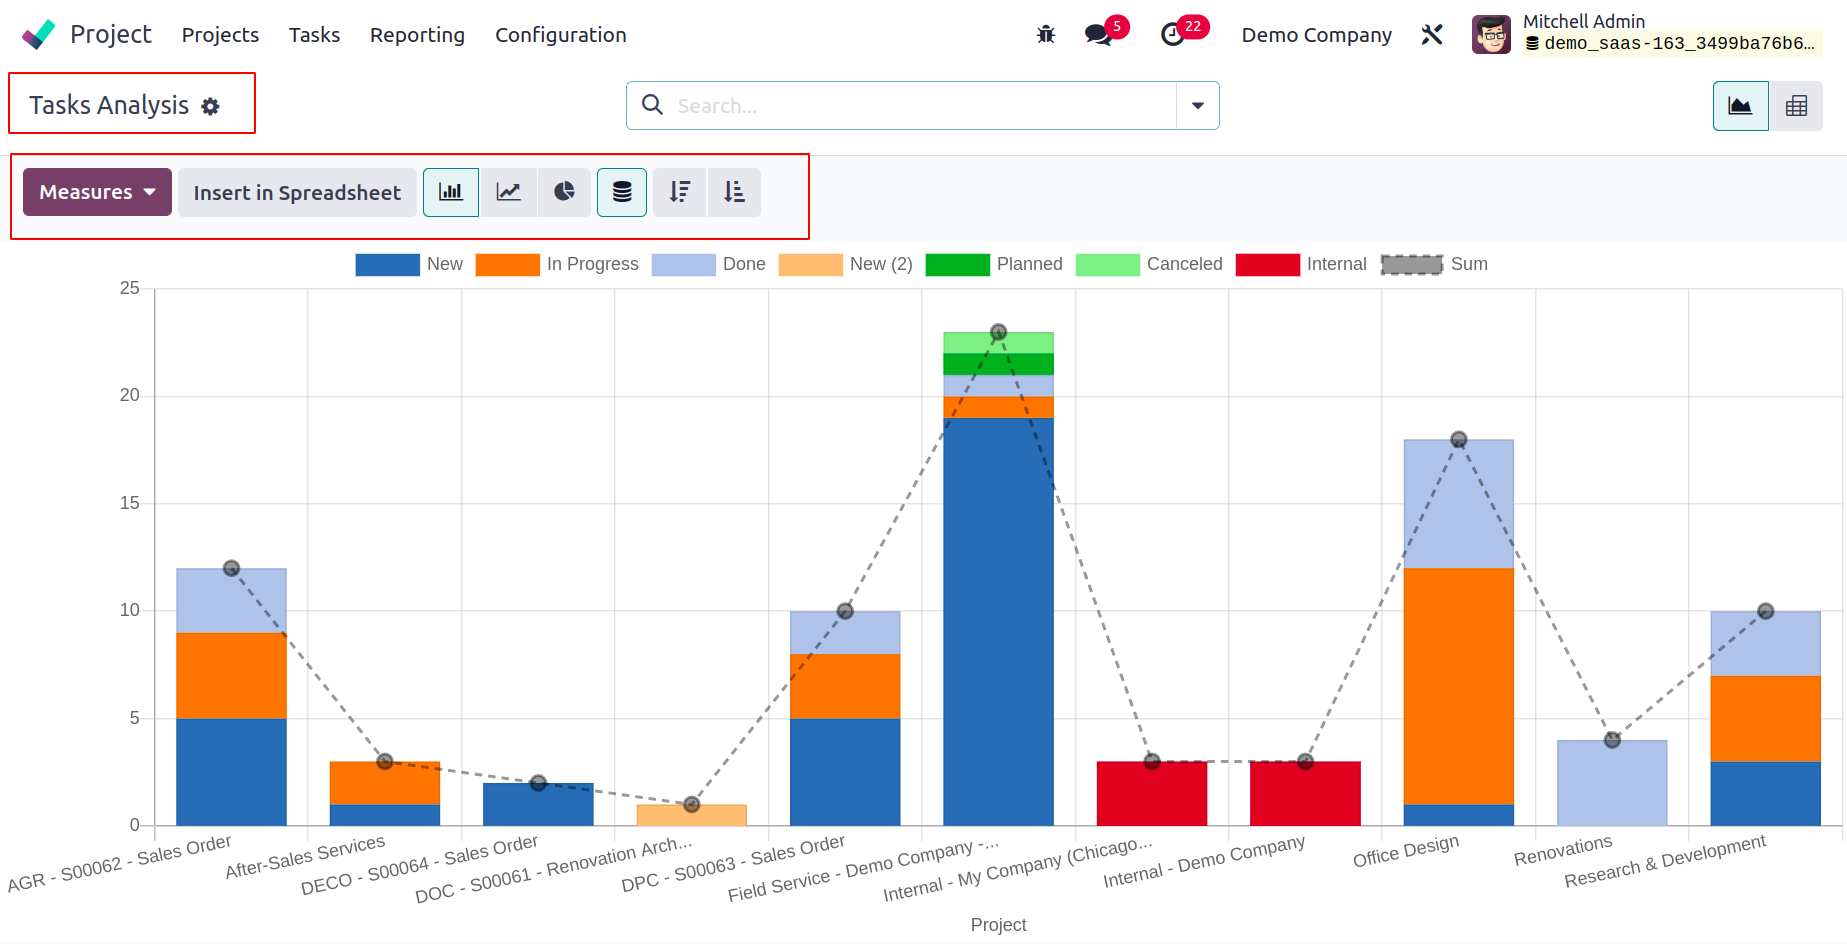
You can utilize the default Filters for reporting. My Tasks, Followed Tasks, My Team's,
Department's, Unassigned, Favorite Projects, Followed Tasks, Department's, Team's, High
Priority, Low Priority, Open, Closed, Late Milestones, Late Tasks, and Tasks in Overtime
are just a few of the categories you can sort by. With the Group By option, you can
choose from Stage, Personal Stage, Assignees, Ancestor Task, Milestone, Customer, Sales
Order Item, Kanban State, Deadline, and Creation Date. For the reports, you can utilize
Graphical and Pivot views.
In this section, you can choose to set the following measures: average rating, days till
deadline, effective hours, overtime, planned hours, progress, rating value, remaining
hours, working days until assignment, working days until closure, working hours until
assignment, working hours until closure, and count.
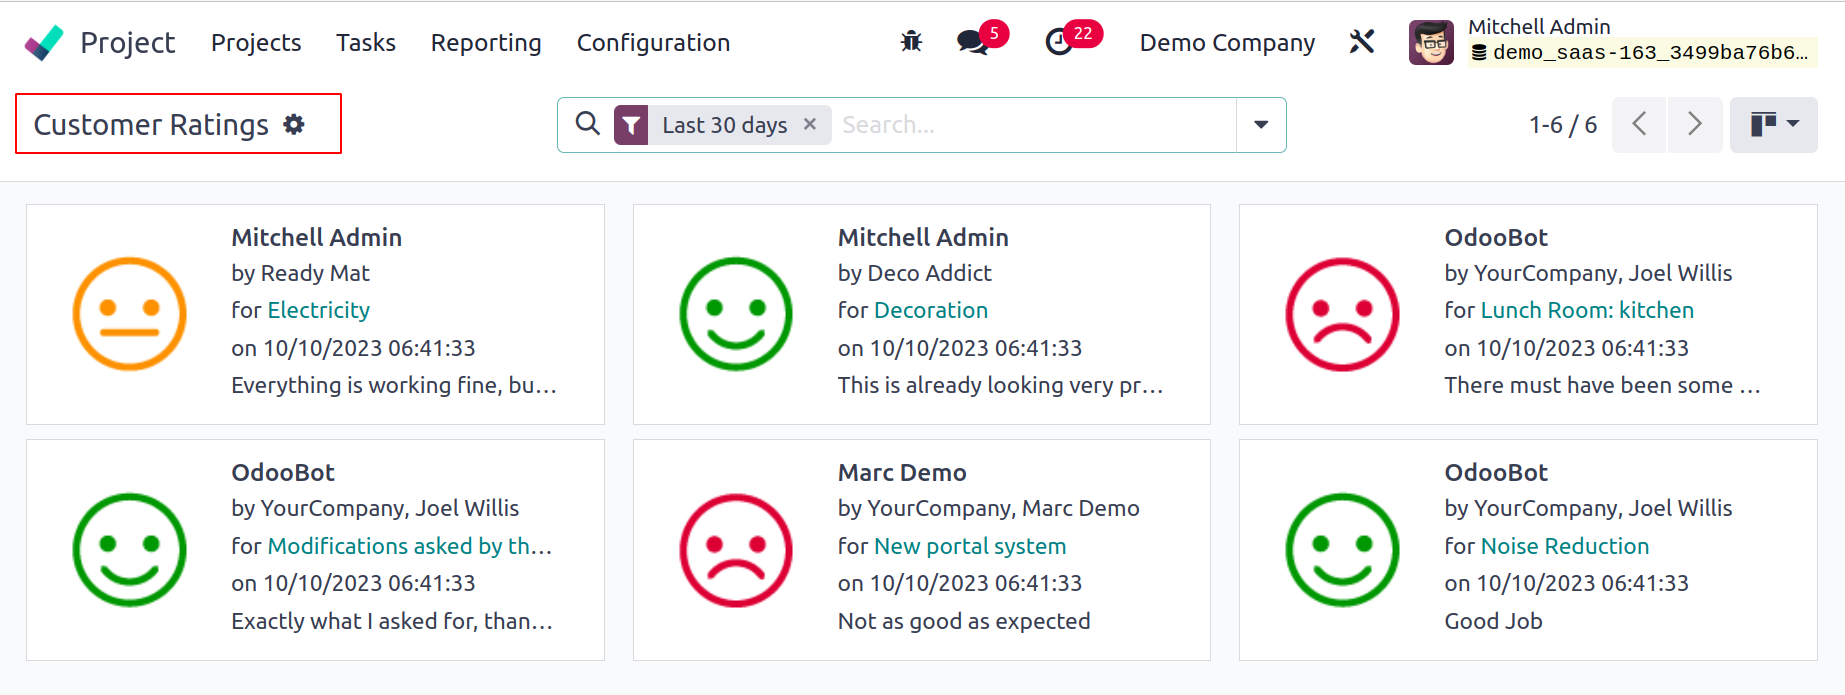
Customer Rating
In the Odoo Project module, it is possible to monitor client satisfaction on jobs. You
can do this by selecting the Customer Ratings option under Settings and turning it on.
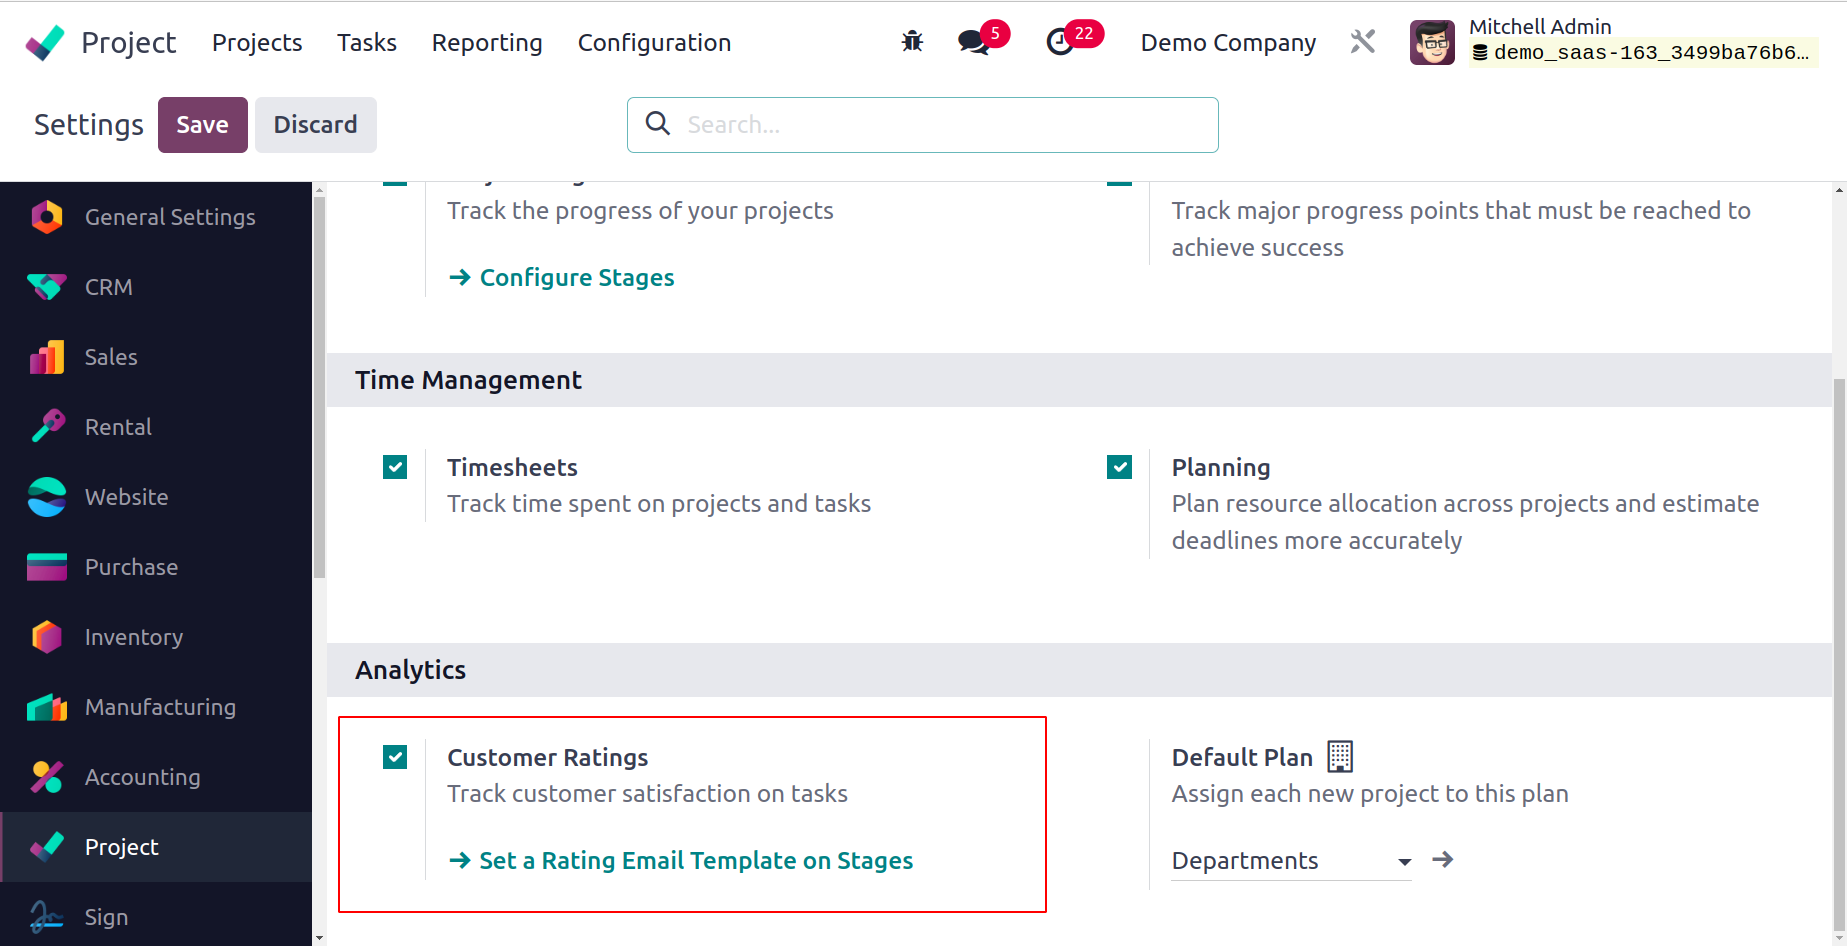
The Customer Ratings platform will be available under the Reporting menu once you've
turned on this option. This platform will keep track of consumer evaluations of your
project.
You may rely on the Odoo 17 Project module to track and manage the activities and
projects for your business.