Studio
Customized tools are a requirement for any business management tool for the efficient functioning of a business. As they are being specified after the start of the firm, these instruments will serve every component of the operational aspects with high efficacy and dependability. The Odoo17 platform will enable you to create clearly defined application-specific solutions that will aid in managing the operational facets of business operations. The platform is created using the Odoo17 Studio module to add sophisticated capabilities and clearly defined tools to create the ideal solution the organization requires.
The Odoo17 Studio module wasn't included in the platform's first release; however, as more customized modules became necessary and popular, a Translate View menu platform that supports the Odoo17 platform became accessible.
The Odoo 17 book gives details about the Studio module and the setup of the Approvals module based on the functional features of operations, making it simple to create custom application development with the help of available dedicated tools.
Creating new applications with the Studio module
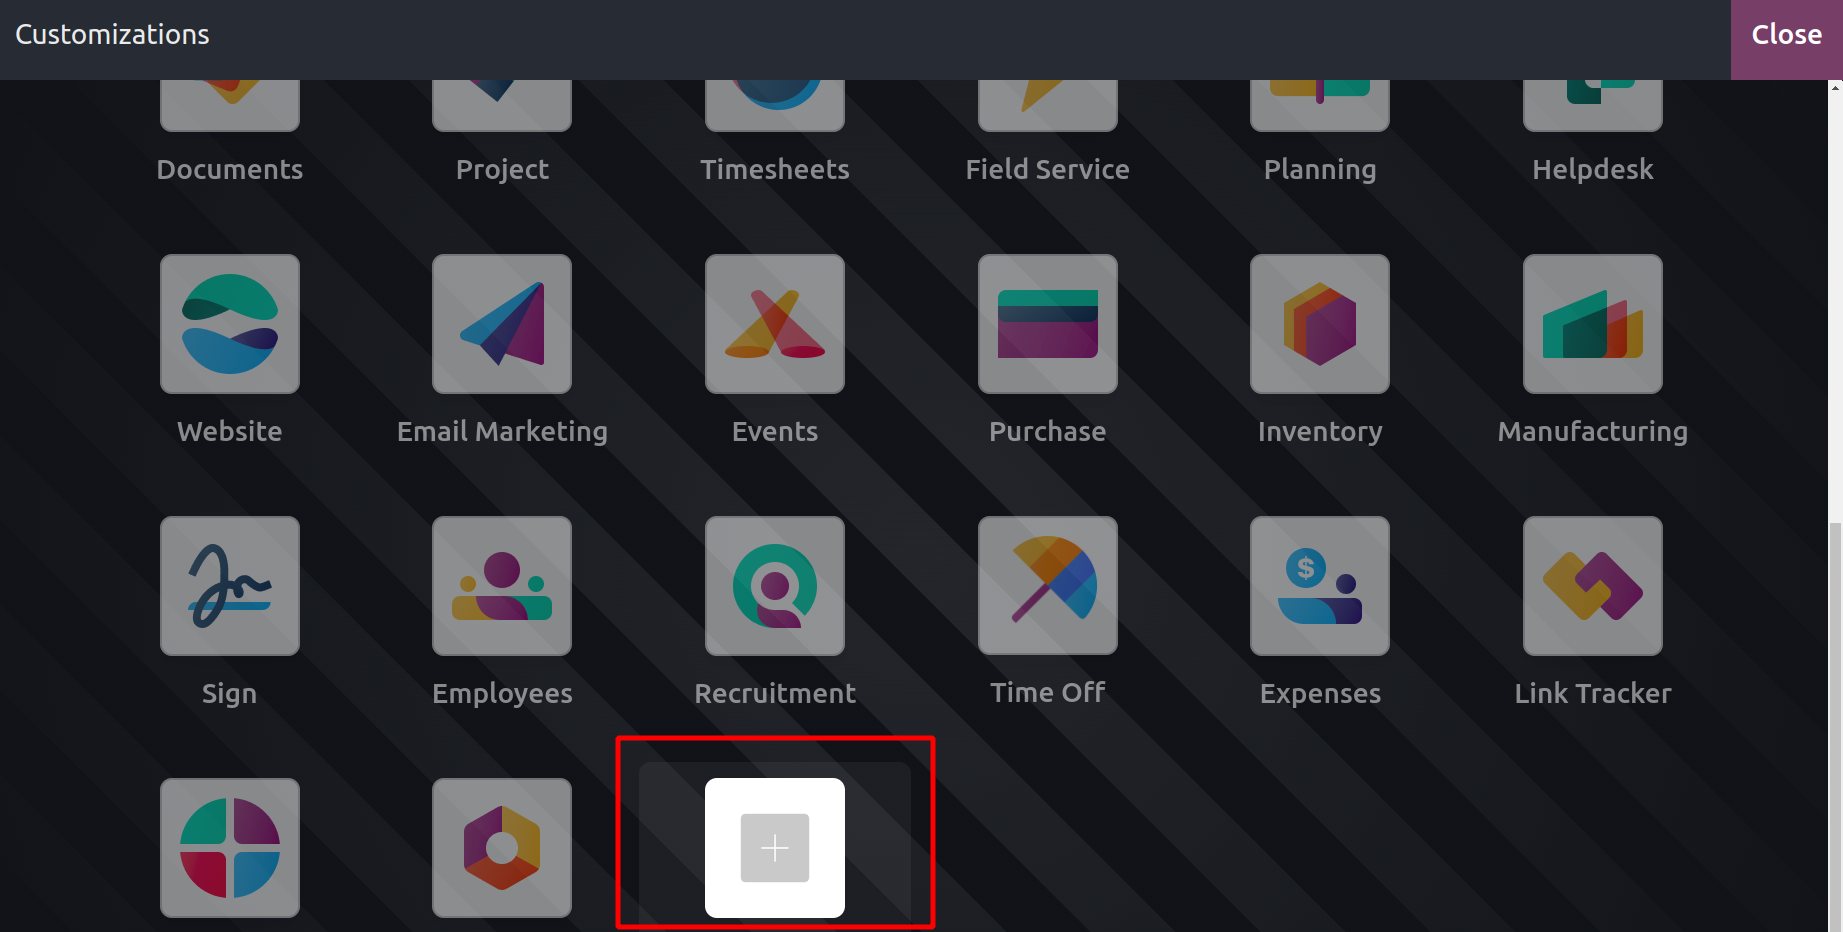
The Odoo17 Studio module is already included in the Enterprise edition of Odoo17, providing total flexibility to design and develop unique applications based on functional specifications. The Studio module's straightforward drag-and-drop framework will make it possible to define a variety of capabilities in accordance with the functional requirements of the platform. You can also develop a variety of apps using the Odoo Studio module, depending on the operational and functional needs of the organization. If you want to create a new application, you can choose the Studio module, where you will see the option to "add a new app," as seen in the screenshot below.
You will be presented with a window where Odoo17 Studio invites you to create a new application depending on your needs after selecting the Add New App option.
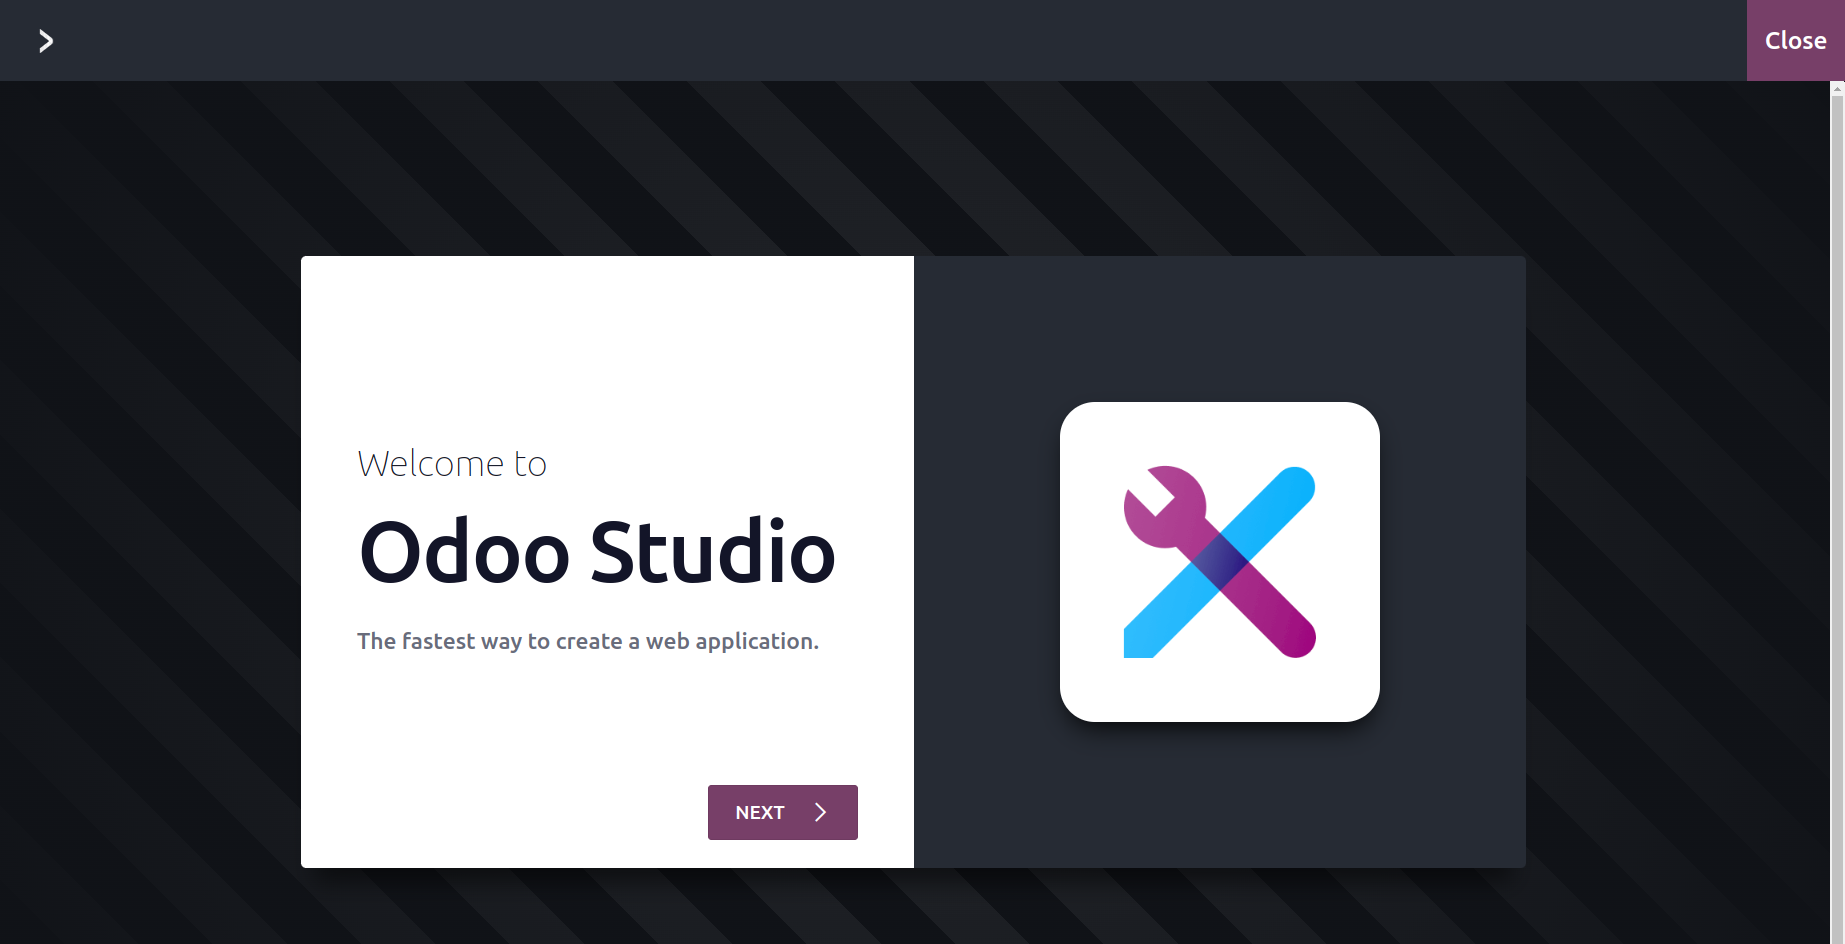
Choose the Next option, then start creating new apps based on your requirements.
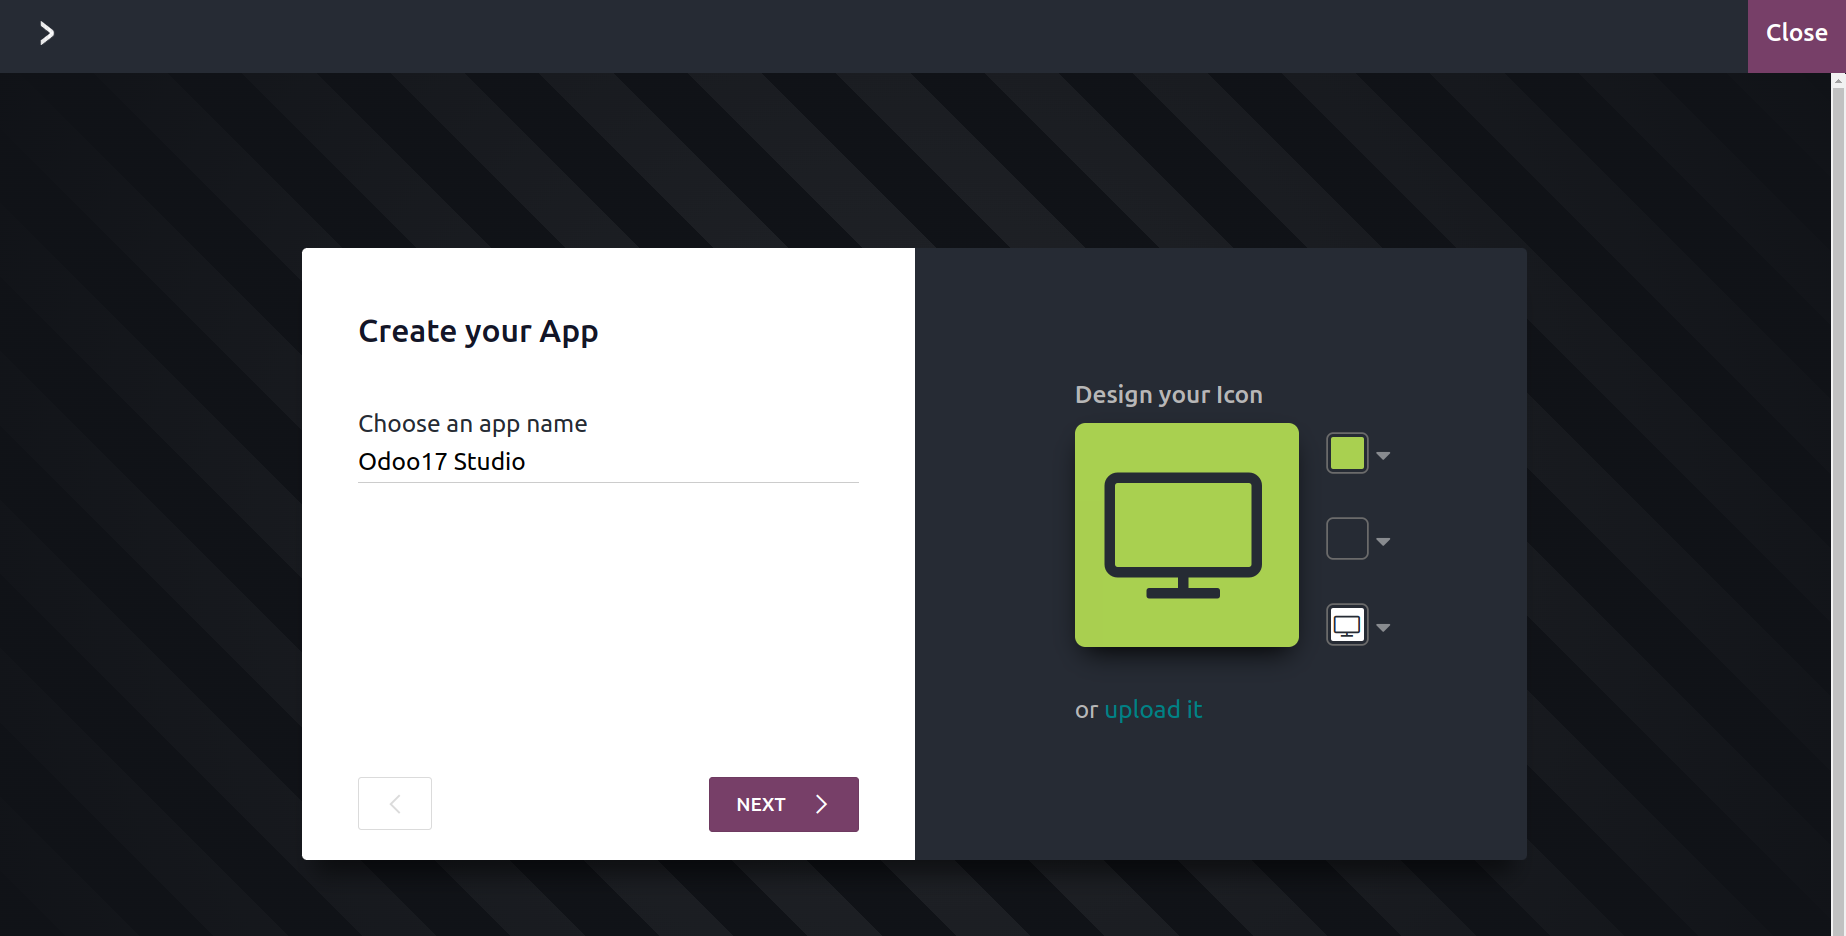
You must first provide a name for your new application and an icon for it. You can create these items using the default tools that are available, or you can upload an image from a local server location to serve as the icon, giving you complete control over all other aspects of the new application creation.
You must Create Your First Menu after choosing the Next arrow, as seen in the screenshot above, once the Name and the Icon of the new application already contain the following. Here, as stated in the corresponding section, you must enter the First Object Name. Additionally, whether it's a new model or an existing model, you need to specify it. Finally, use the following arrow option to access the menu where you can adjust the Model.

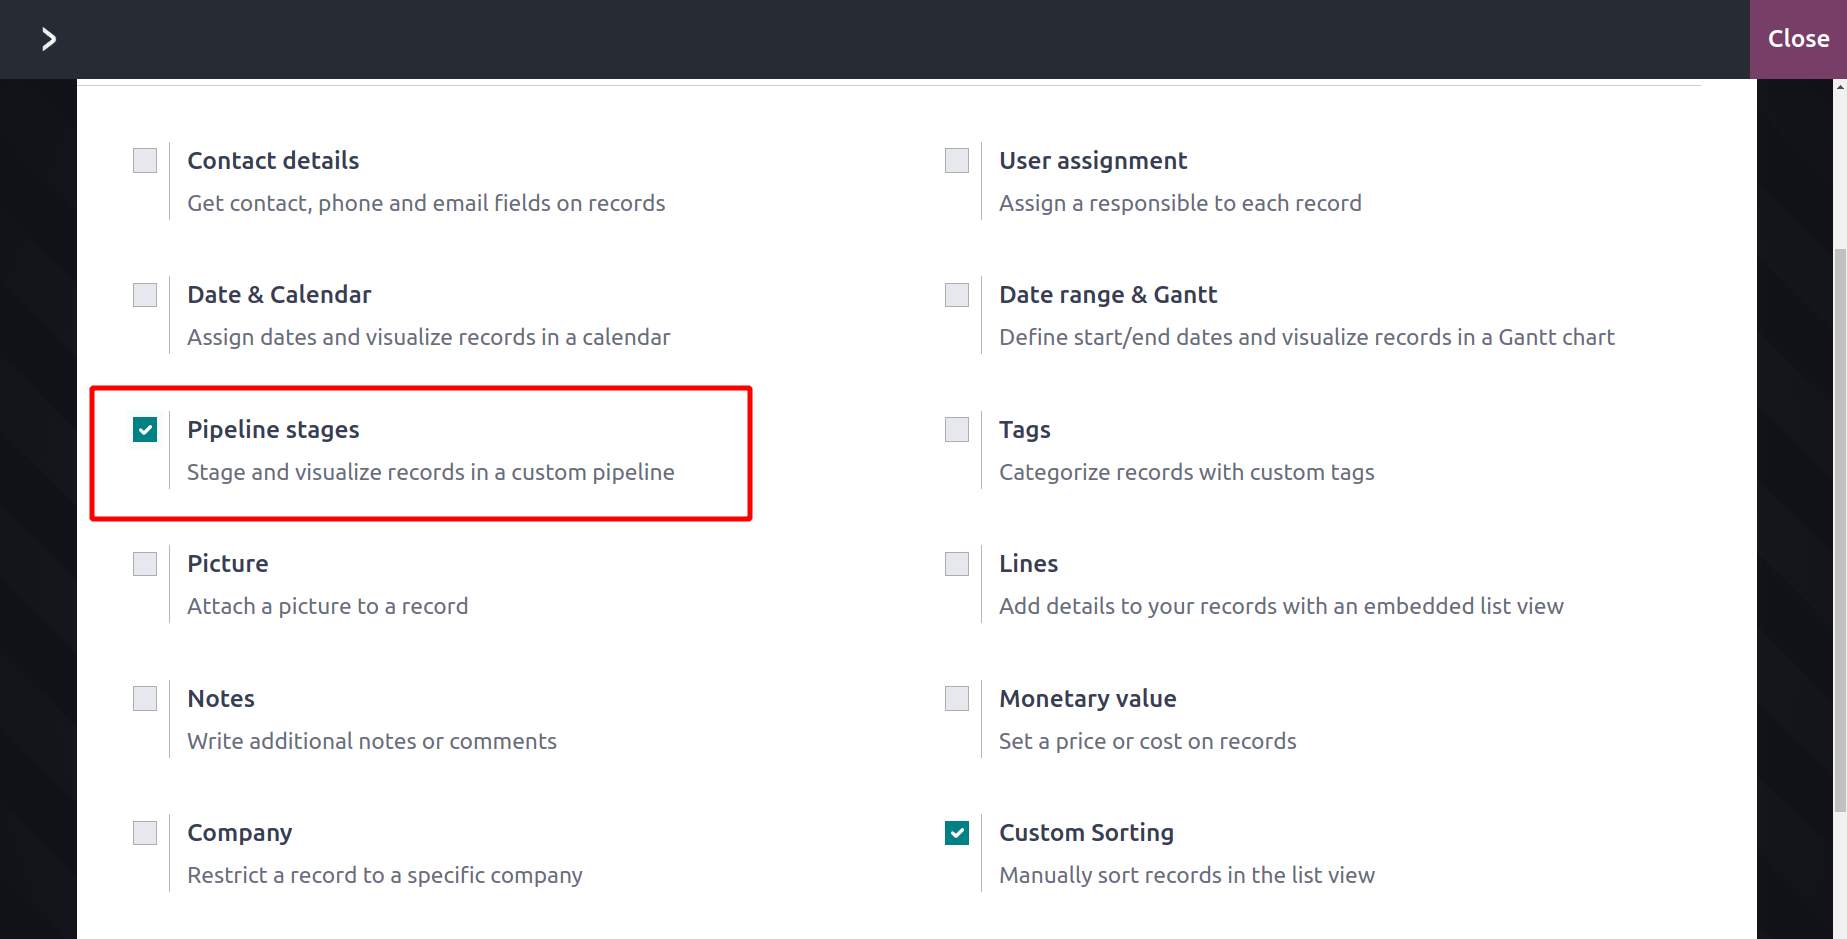
You will see a few suggested features that can be added to the model's Configuration menu. Based on the operational and functional requirements of the platform, these functions can be enabled or disabled. According to the suggestions given, you can enable or disable features like Contact data, User assignment, Date and calendar, Date range & Gantt, Pipeline stages, Tags, Pictures, Lines, Notes, Monetary value, Company, Custom Sorting, Chatter, Archiving, and many more.
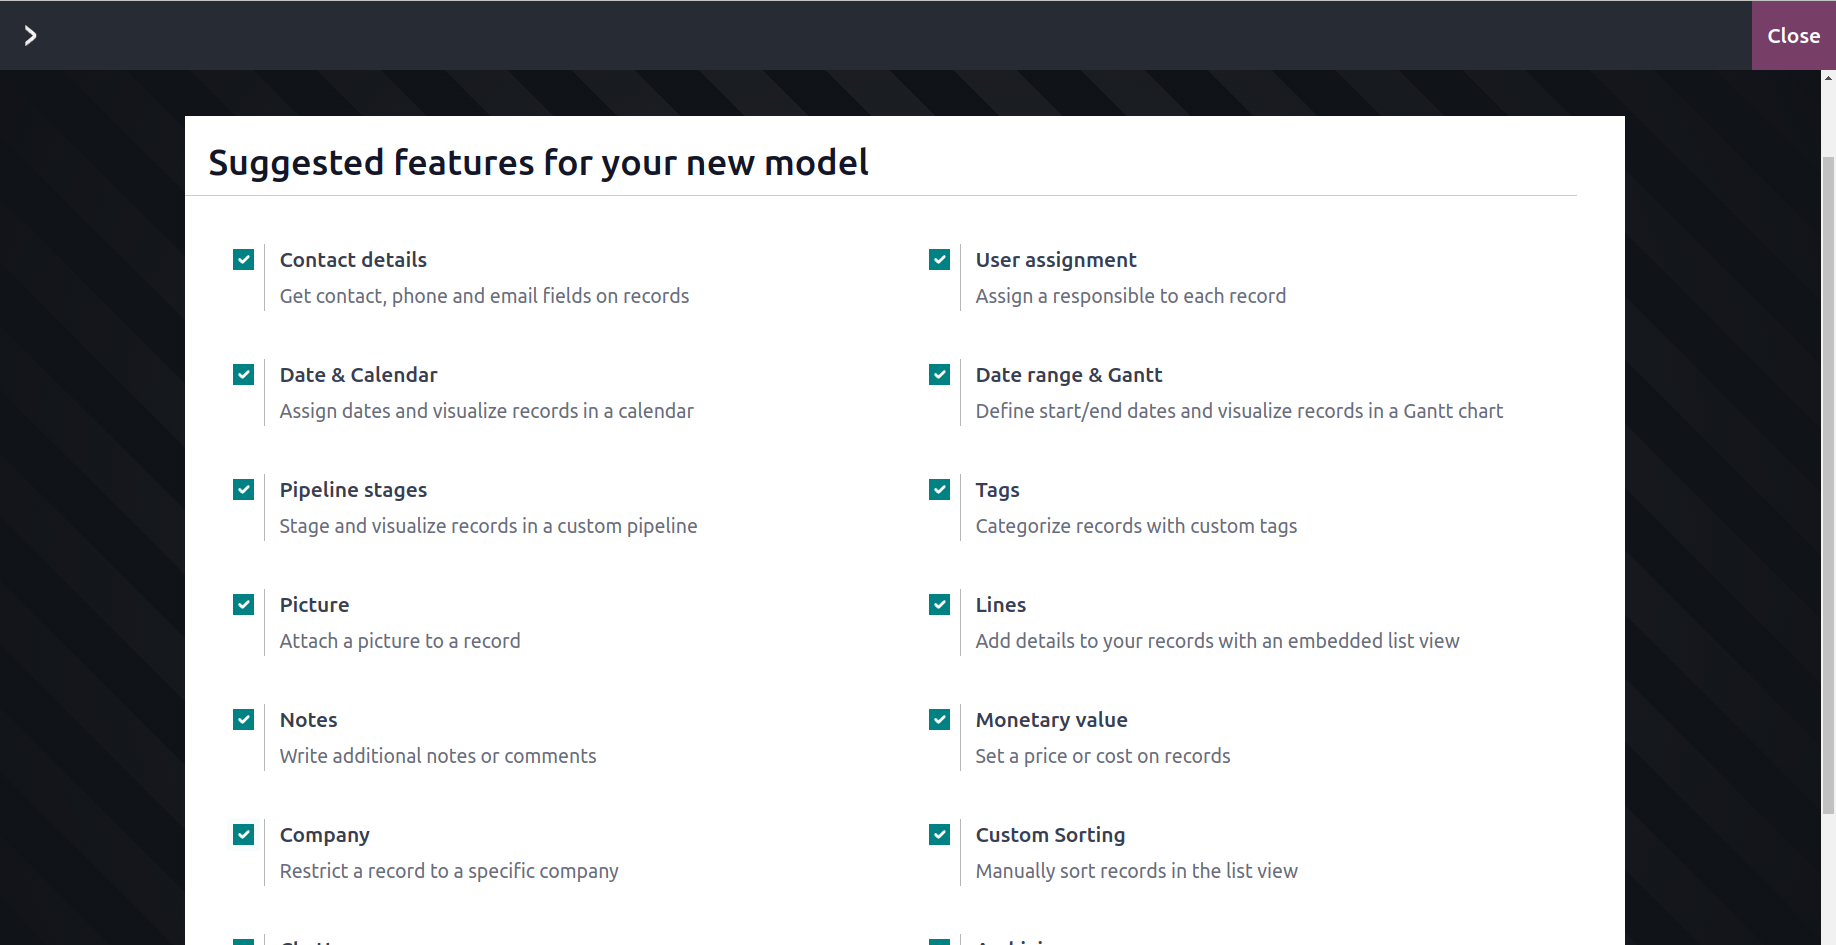
If the customer fills out their information in the application, it will be beneficial if the Contact Details function is enabled to a specific Field where the Contact Details can be created for the relevant menu. You can designate a dedicated User, or an organization employee, to be in charge of maintaining and reviewing the record using the User assignment tool. The user can choose a date on the calendar that will be displayed by using the Date & Calendar box to determine the date. The Start Date and End Date of the various elements, as well as a view of the dates in a Gantt view, can be described using the Date range & Gantt. This will help you gain a clear understanding of the dates that have been established. A field that has been defined in operations to represent the stage of each defined entry is called the Pipeline stage. This will display information on the corresponding menu entry and indicate the current stage, which can be modified by selecting the stages. Additionally, based on operational requirements, the Pipeline's stages can be specifically configured. The Tags field, which may be detailed in the new application window, will make sure that the defined items have tags attached to them, which will be useful for filtration and grouping purposes.
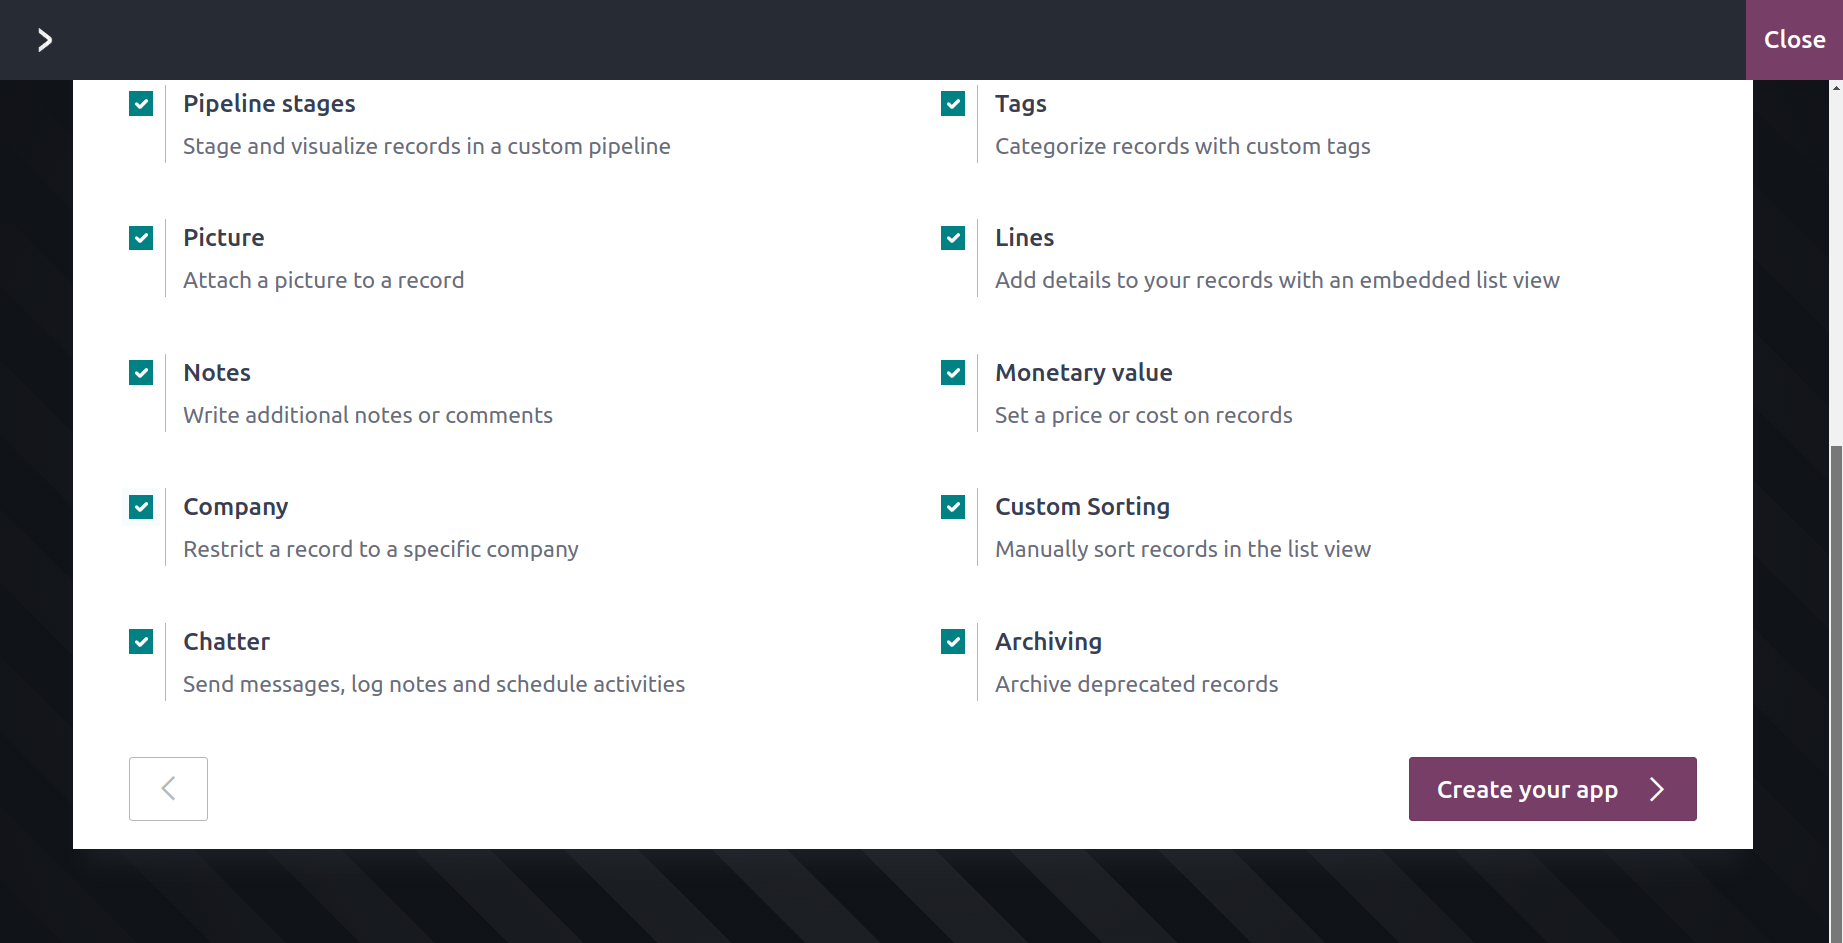
Whether it's a product or contact information, the image of the relevant entry will be displayed in the Picture box. The relevant lines of information or a description of any aspect can be defined in the Lines section. This could include the product description, address lines, terms and conditions, or any other aspect pertaining to the entry that is being described. The defined notes on the entries can be described in the Notes Field, which will alert users and other users while they are interacting with the relevant entry. The Monetary value. This feature will help to specify the price of the specific entry, whether it be a product, service, or entry of any kind. It is filed where the Value of the product or asset can be stated.
You can specify the firm to which the specific entry is related using the Company Field. This will be useful for business operations where different companies with different modes of operation are being defined. In the menu where all the entities are defined, the Custom Sorting feature of the entries that are defined will be useful. Additionally, the relevant Custom Sortings may be updated sometimes and stored as needed. The ability to activate chatter functionality will guarantee that users or customers have a chatter area where people can talk with one another. By unarchiving an entry, the Archiving field will make sure that it is archived for usage at a specific period of operation.
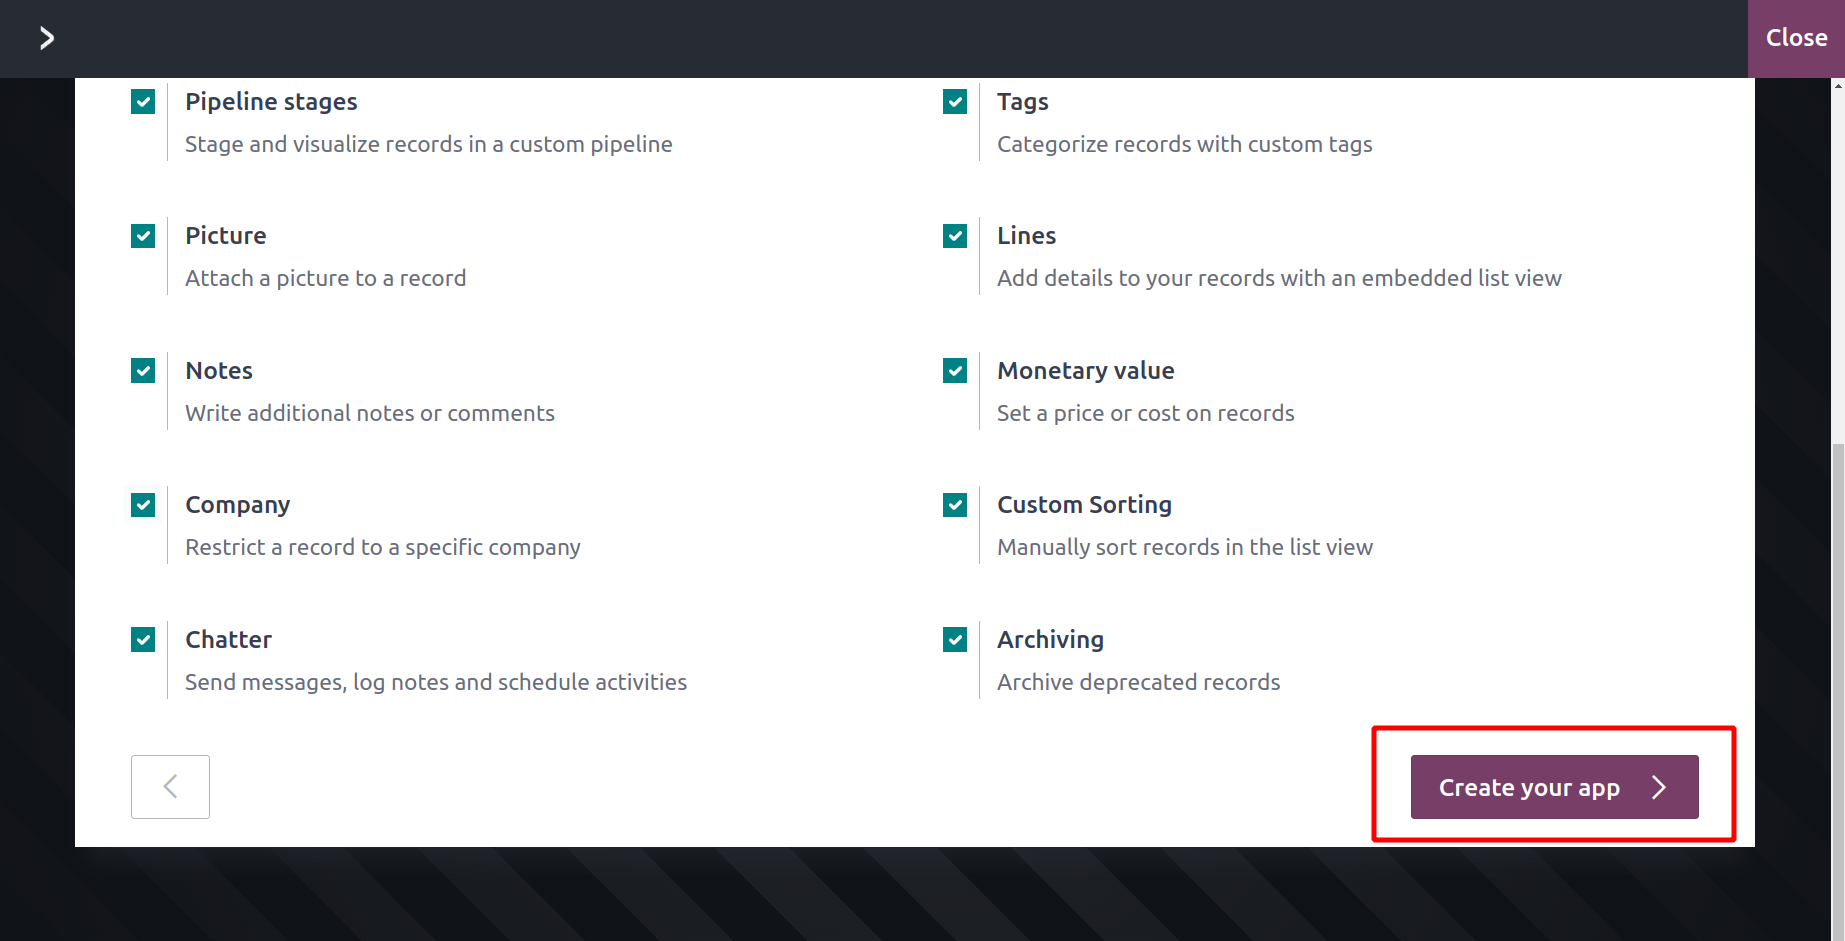
The following stage will continue with aspects of the building of the new apps once the configuration-based options are established and those that are enabled. You can choose the Create Your App option, which is seen in the image above. The window for configuring the app will open, as seen in the accompanying screenshot.

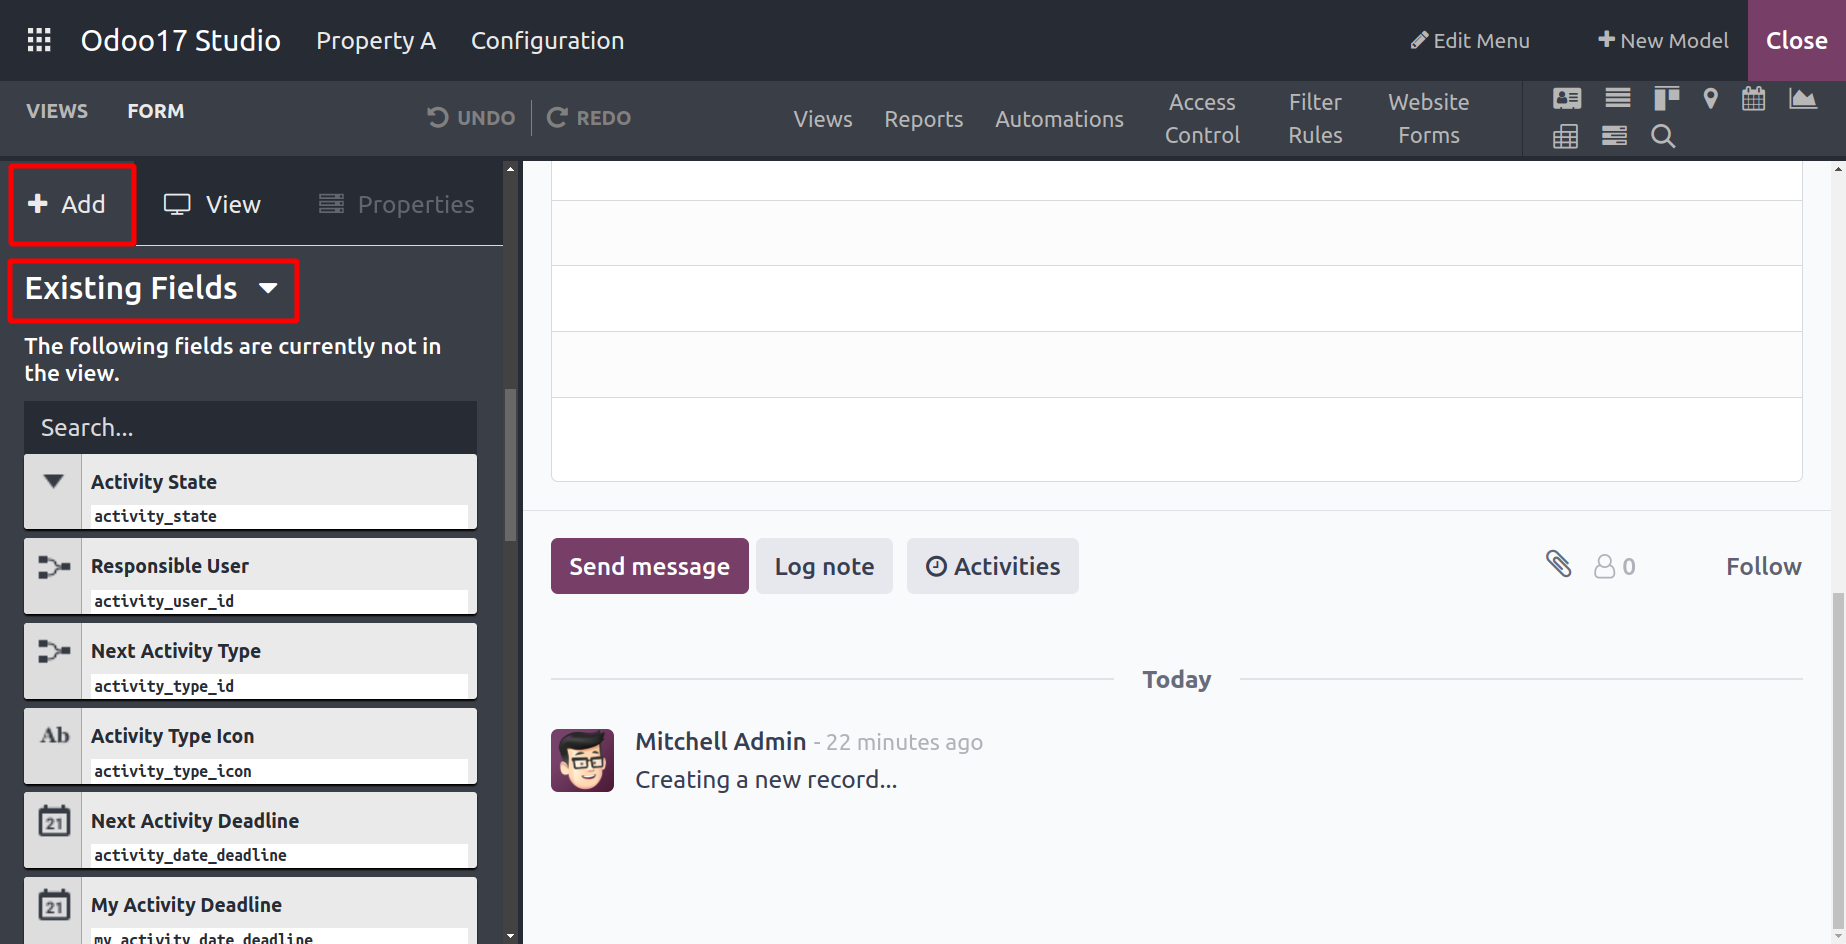
You will have the option to add the Field here based on the requirements of the activity. The first step is to choose, drag, and drop the Tabs or Columns needed for the application's activities into the desired position of the Application window, as shown on the right side of the accompanying screenshot. By choosing the appropriate icon from the menu and dragging and dropping it to the desired area of the program, you can add new fields. If you have selected an existing model for your application, you will be shown the Existing Fields, where you may inspect and reuse all of the established fields based on the changes required.
Additionally, the stages of operation of the menu of the relevant application may be altered according to demands, and the Log aspects of the menu, which are shown on the lower side of the menu, can also be customized according to needs.
Depending on your needs, you can add new pieces to the application window using the + Add functional menu. Based on the initial functional requirements of the application, you can add Tabs and Columns. The tabs are useful for collaborating several pieces of information into the created application. Additionally, on the relevant tabs, the application's choices can be sorted according to operational and functional requirements. Depending on the needs and usage of the program, these could be custom-built tabs.
Additionally, numerous operations Columns can be created, where they can explain the various sections in each application menu. The associated options will also be given a unique design and placement in the tabs and menus as a result. Additionally, the Columns can be set up according to the application's operating requirements and the purposes for which they are being used.
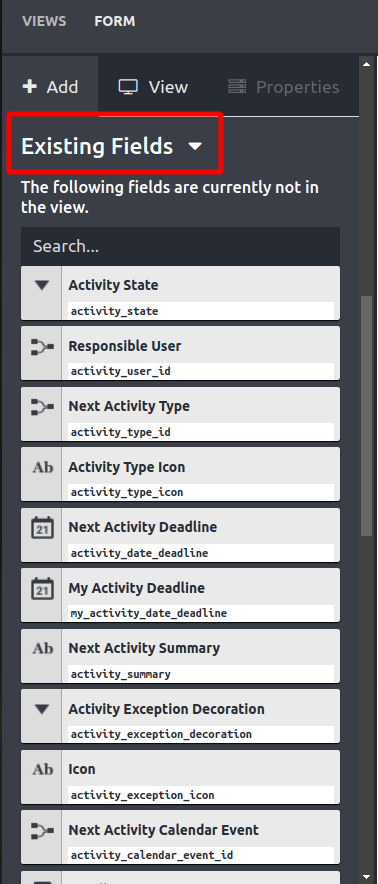
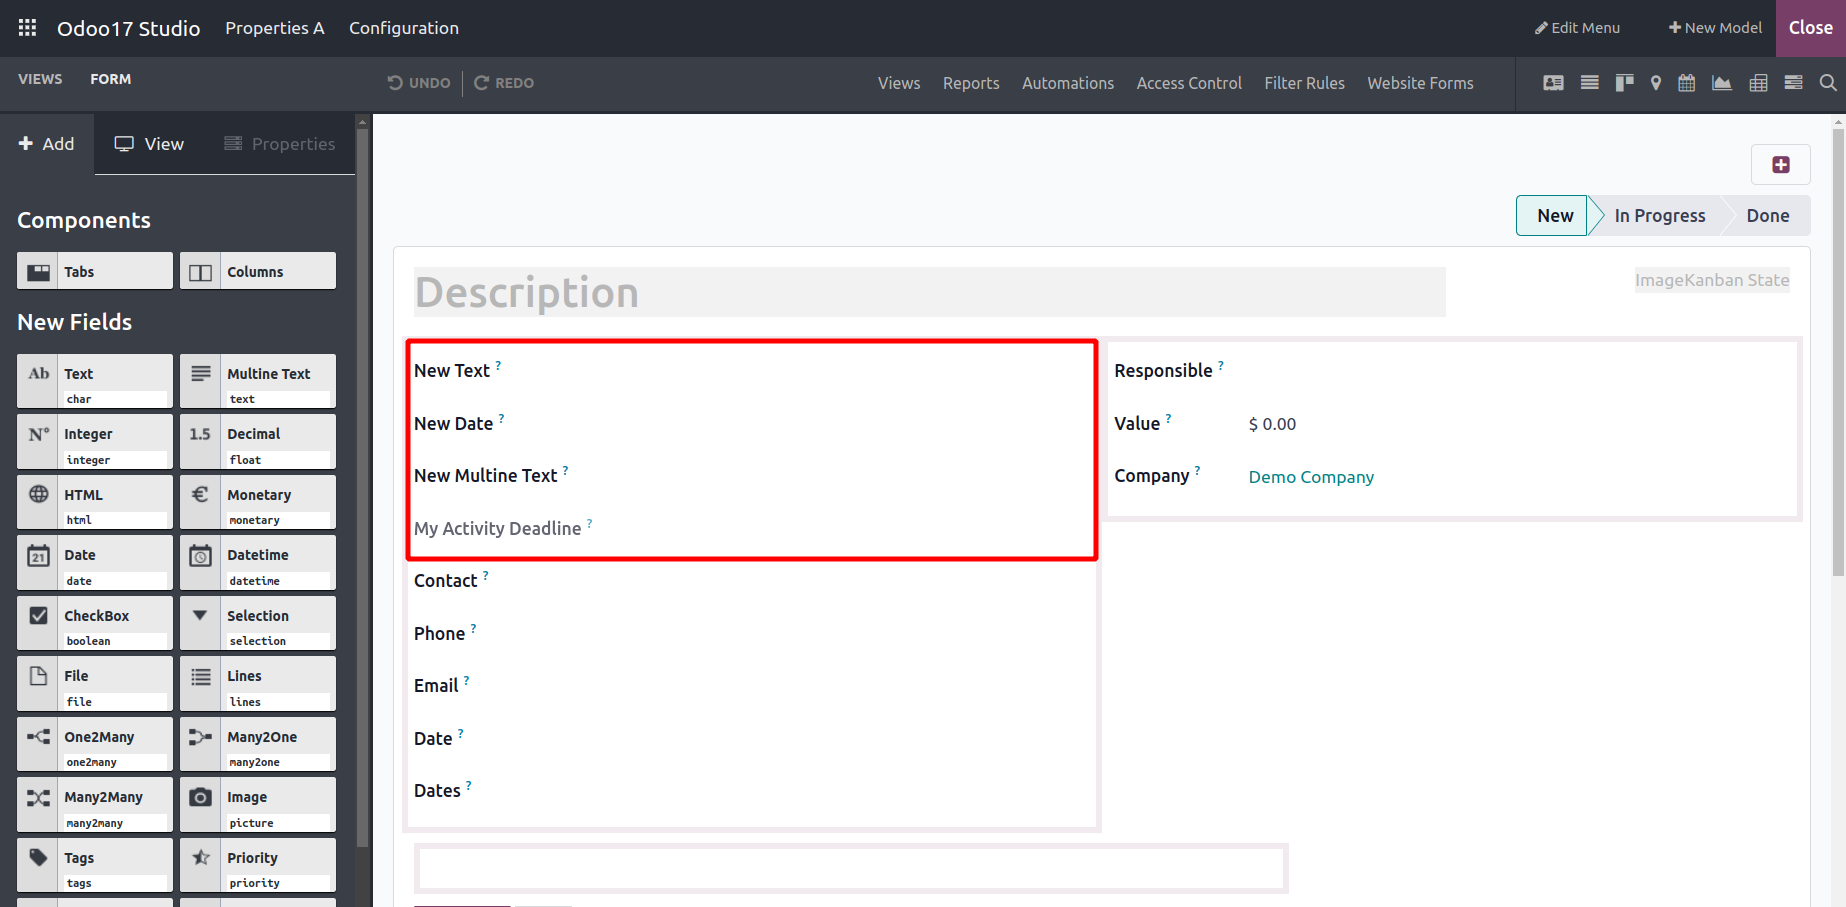
Once the Tabs and Columns have been described, they can be added to the application's operations area by selecting the appropriate one and dragging and dropping it there. The additional configuration settings for the relevant Tab and Column will make sure that the operational aspects are based on your functional requirements. The last step is to describe the fields. Here, you can add new fields, clarify existing fields, and build new fields based on existing ones. The New Fields section will show all the Fields that are not described in the application. If the model is already present in the Studio application, the Existing Fields are those that have already been defined in the model that you have chosen. There won't be any Existing Fields to be displayed, though, if you choose a new model to be used. You can specify and use many fields depending on the functional and operational requirements of the application by simply selecting each Field and dragging and dropping it to the proper area in the application window. You can specify fields like Image, Tags, Priority, Signature, Related Fields, Text, Multiline Text, Integer, Decimal, Html, Monetary, Date, Date & Time, Check Box, Selection, File, One2many, Many2one, Many2many, and many more. The Existing Fields will contain definitions for all the Fields that are not included in the New Fields.
The Existing Fields will be defined because we chose an existing module for the application that was constructed. The Existing Fields section over here will display all of the module's declared Fields. You can specify fields such as "Action Needed," "Activity Execution," "Activity Stage," "Activity Type," "Attachment," "Created by," "Created On," "Display Date," "Followers," "High Priority," "Icon," "ID," "Is Follower," "Last Updated Date," "Last Updated Time," "Main Attachment," "Message Delivered," "Next Activity," "
In the model that we have chosen, these Fields are already defined. Additionally, each field can be used several times depending on the operating tools' capabilities.
By dragging and dropping the necessary Fields to the appropriate areas of the application window, you can define the Fields that are needed for the application, whether they are New Fields or Existing Fields. Furthermore, if the user has the authority over the operational elements of the numerous Fields as operational and configurational aspects, an Odoo 17 developer can successfully handle the functional configuration aspects of the operations of the applicational options. The Fields defined in the application are shown in the following screenshot.
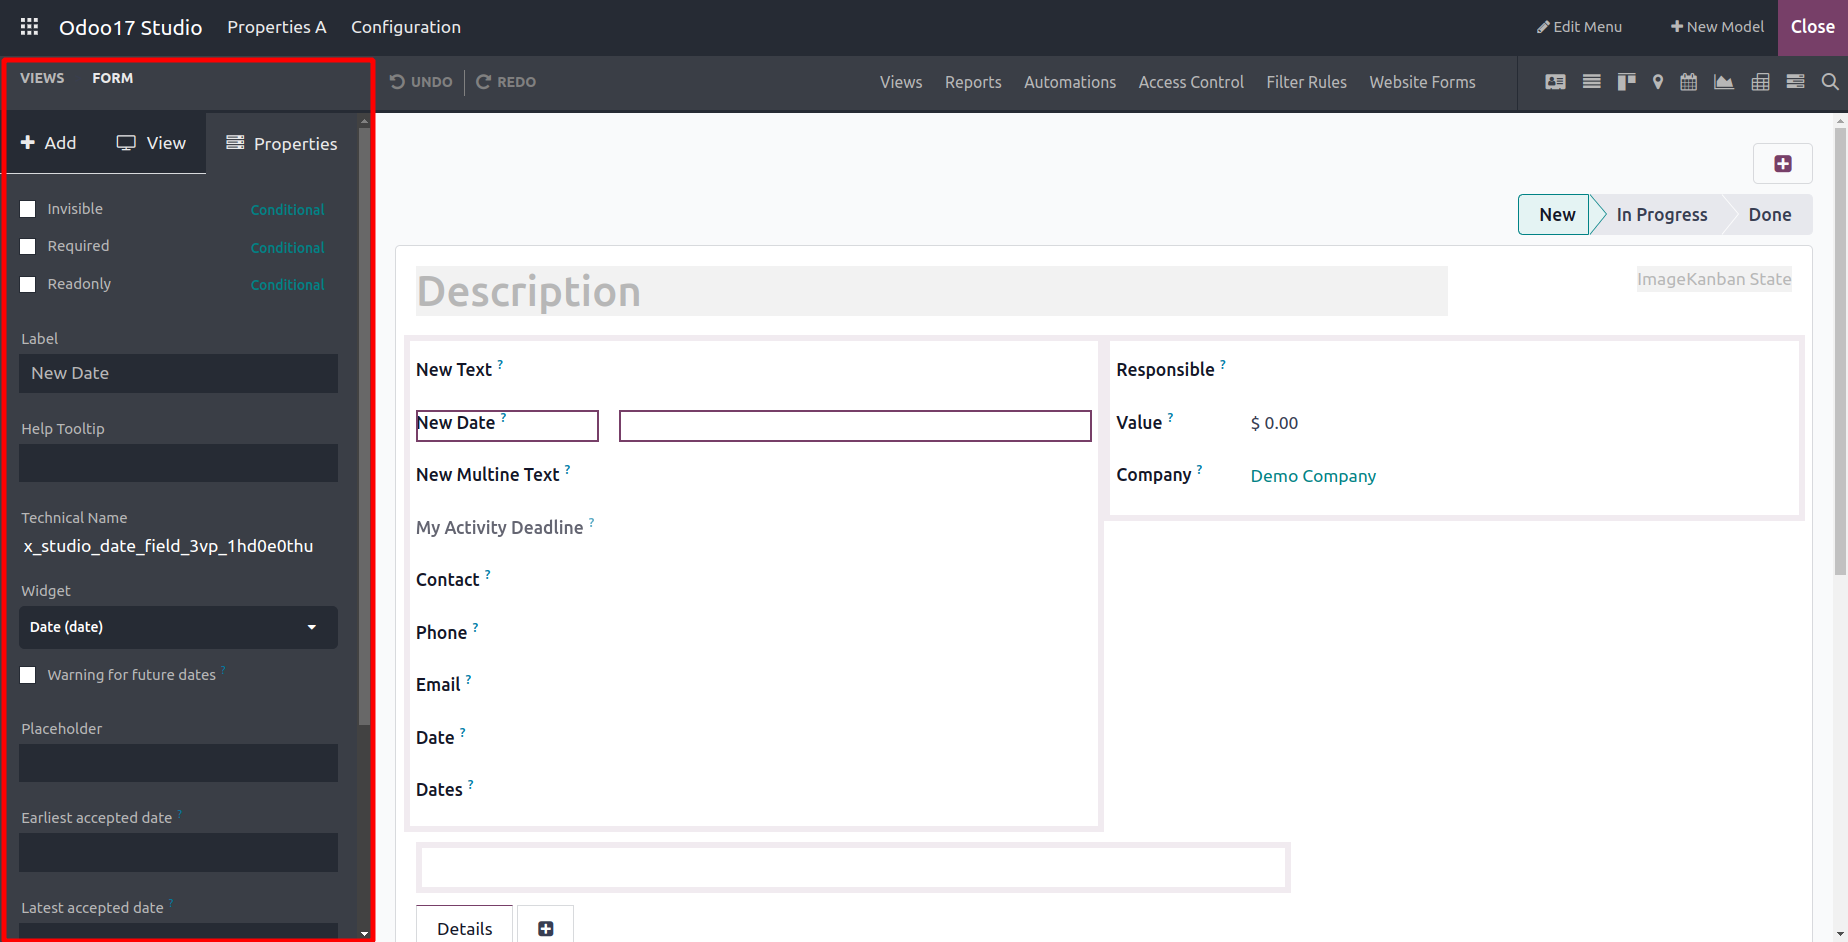
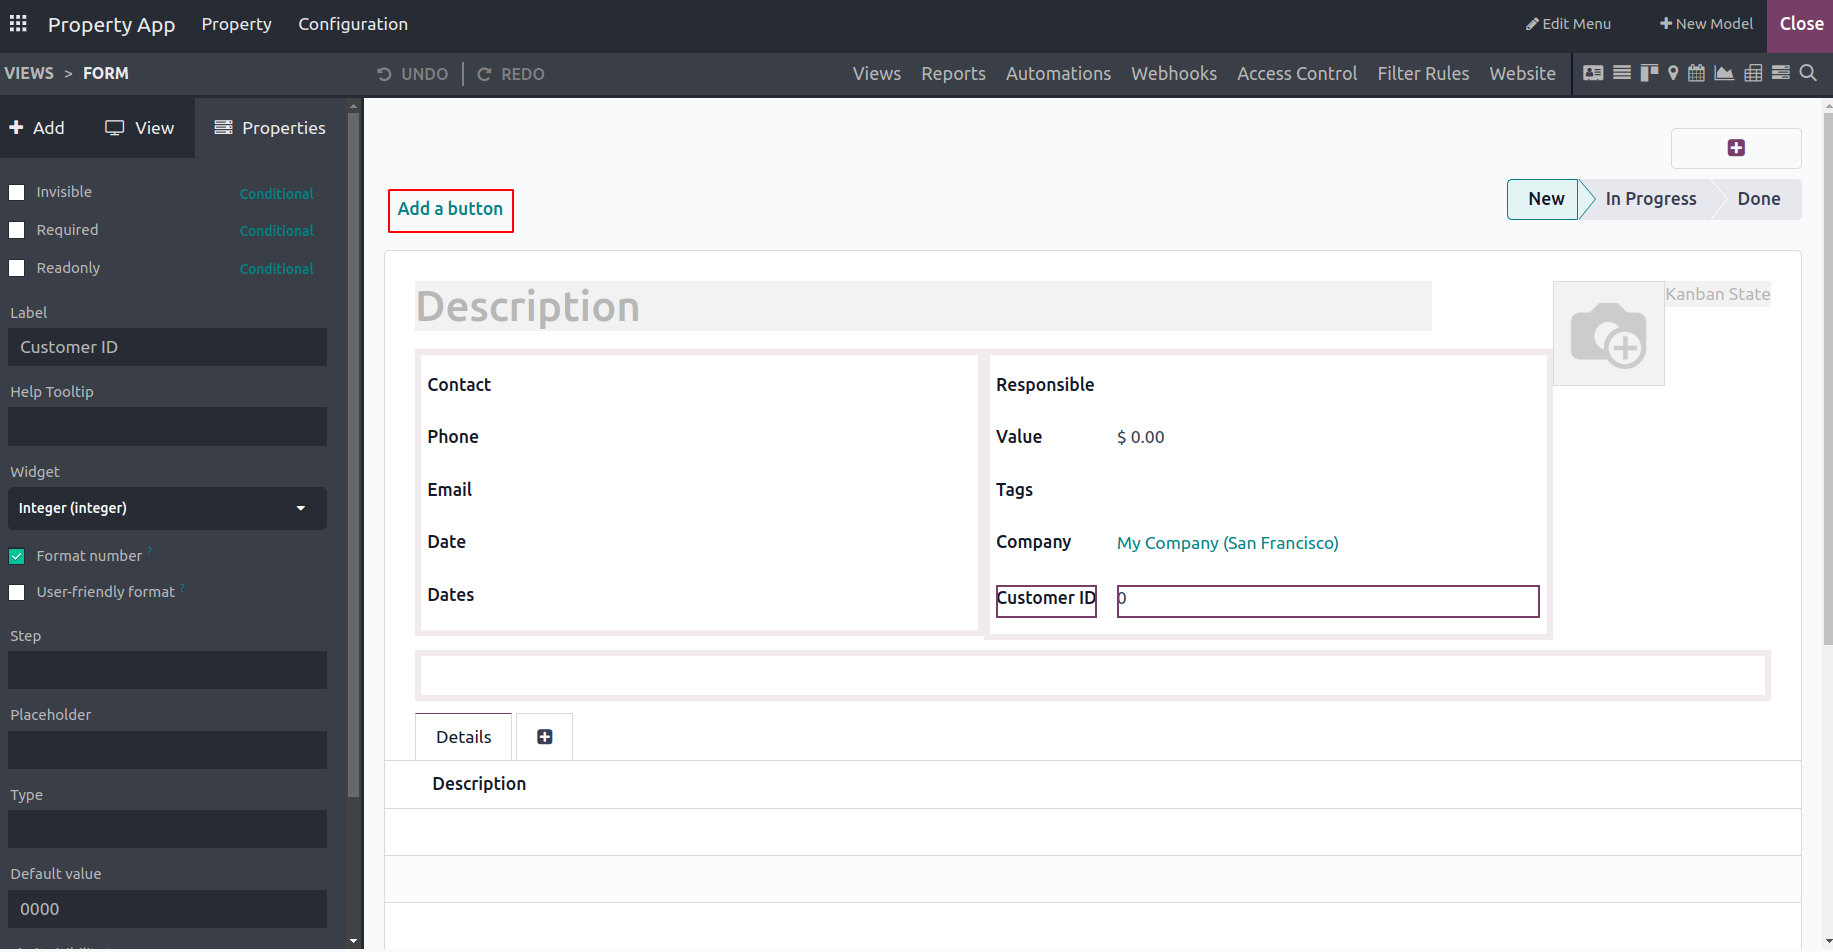
Selecting the appropriate Fields will display the Properties box, where all configurational components related to the Field can be created, allowing you to adjust its features and customize it. The applicable Field can be chosen as;
By turning on the Invisible field, you can make sure that the Field is hidden from users until the Authorized User makes it visible or if a User has the Authorization.
Enabling the Required Field will ensure that the appropriate one is necessary to be described in the applications menu while the entries are being defined.
Users will only be able to view the Content after the Read Only property is activated for a Field that is being described. They will not be given the option to alter or add to it.
Defining the Label will ensure that the Field is being labeled based on the description provided.
Enabling the HelpTooltip will ensure that the users are provided with helpful tips to fill in the respective field that is being described in the menu.
The PlaceHolder element is depicted initially in a text box where the Visitors can type in the details. Moreover, it provides information to the viewer on which details should be filled in.
The widget that should be described in the menu can be selected over here for the users to select for the entry.
The Default value of a Field can be defined for the menu where the application will be depicted with it.
Limit Visibility to Groups- The respective Groups to which the visibility of this field should be restricted can be defined here.
Additionally, a Remove From View Option is available, which will delete the Field from the application.
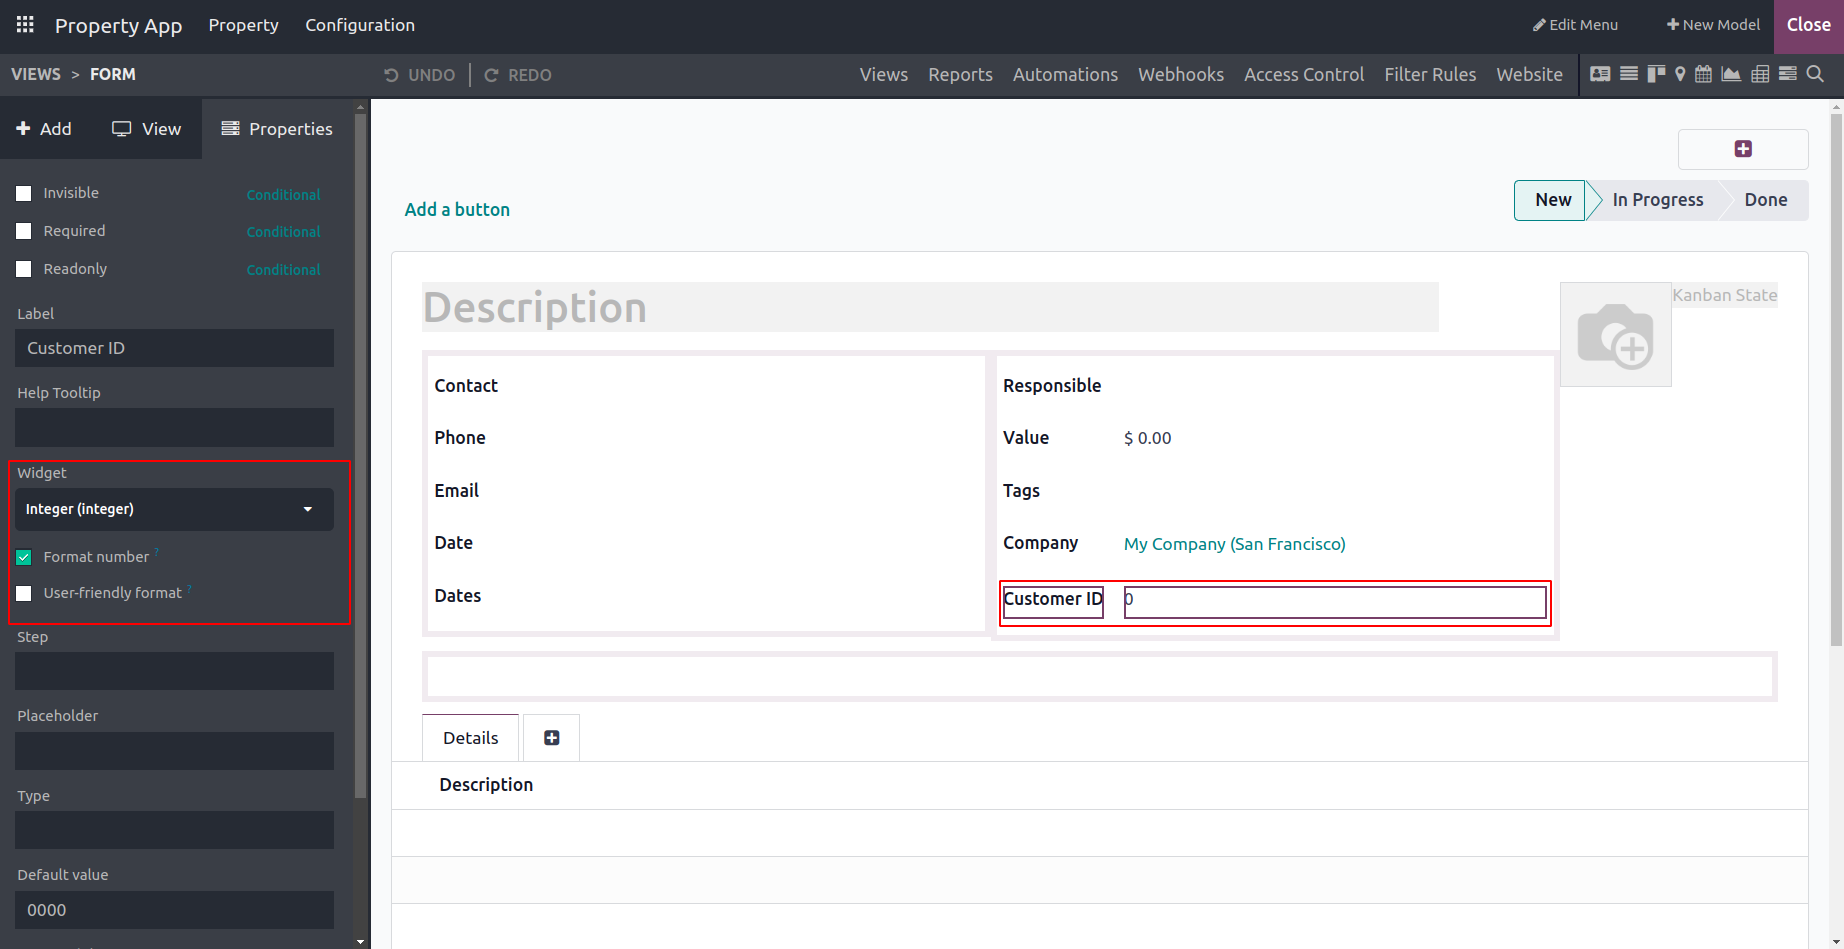
Also, number formats can be managed with a ‘format-number’ boolean for an integer field. Disabling the boolean ‘Format number’ helps to add integers without a ‘,’ in the integer number added at the customer ID field. Similarly, the ‘user-friendly format’ boolean helps to add a more human-readable format.
You will now be able to comprehend how the new application is created using the Odoo17 Studio Module, particularly with the aid of the utilization of the Fields, Tabs, and Columns of operation. Let's now proceed with the remaining steps in configuring the new application using the Odoo17 Studio Module. Let's continue by learning how the Smart Tabs may be defined in a specific menu using the Odoo17 Studio.
How can form views add smart tabs?
In terms of the instant actions that may be taken, the utilization of Smart tabs in the Odoo17 applications is extremely important. It will be possible for you to define numerous smart tabs of operations that can be used for direct functions with the aid of the Odoo17 Studio module. To configure the Smart Tab you can select the Studio applications for any module, and you will be depicted with the editing window, just as depicted in the following screenshot. Here, the + icon that is highlighted in the screenshot below can be chosen.
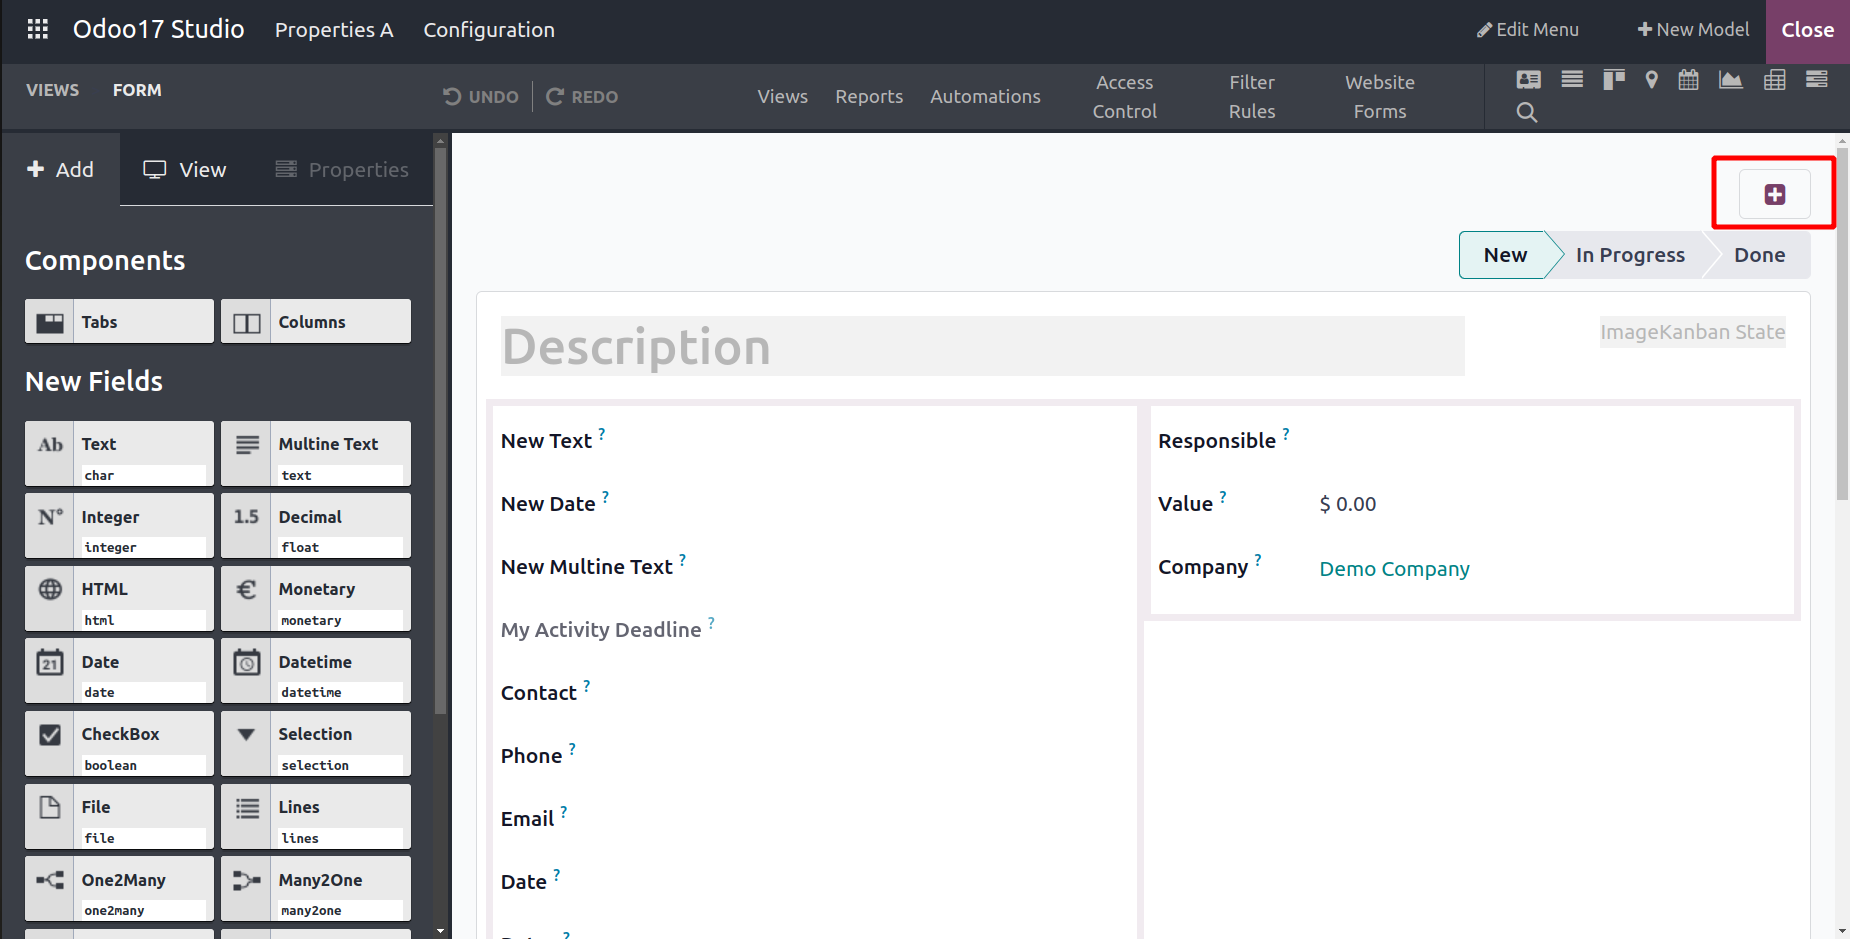
You will see the setup box after clicking the plus symbol to add the smart tabs. Here, the Label can be chosen and the Icon can be defined initially.
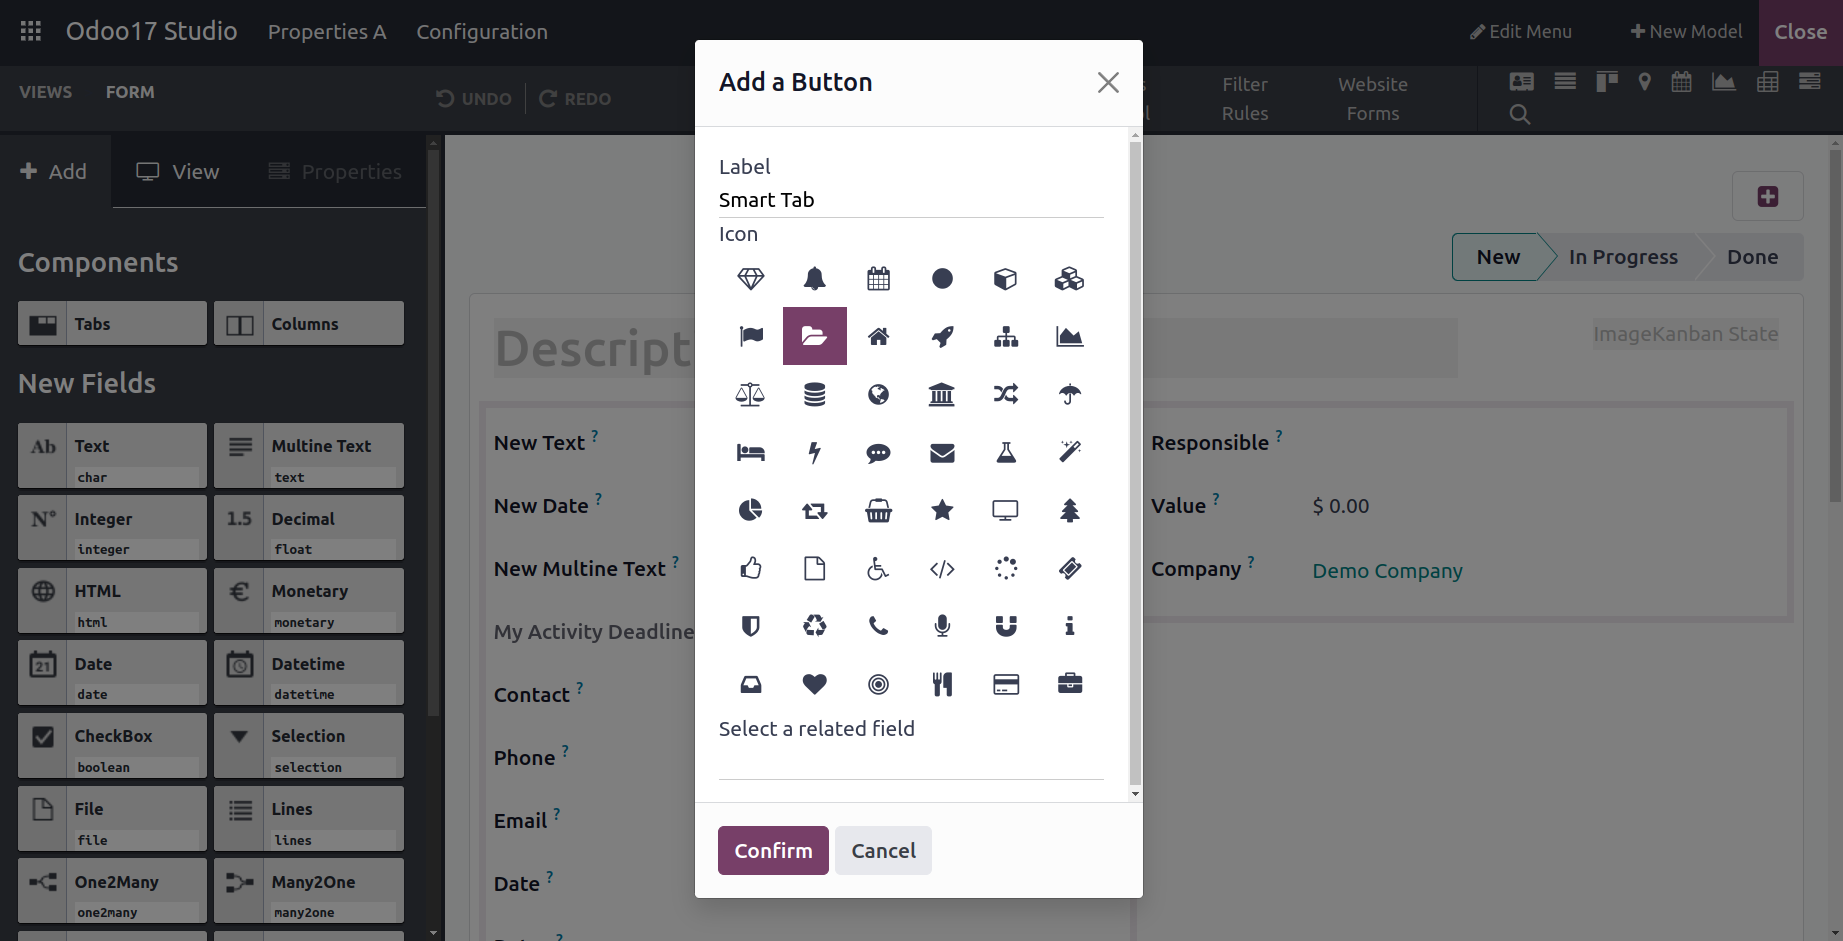
Additionally, choose a relevant field from those that have been defined for the platform where the smart tab action will be based.

Finally, the relevant Smart tab will be defined after clicking the Confirm button. Additionally, you can configure many smart buttons to a specified menu of both newly produced and pre-existing applications using the Studio module. Now let's move on to the section that defines the Pipeline Stage Configuration features of the Odoo17 Studio module.
How are pipeline stages determined?
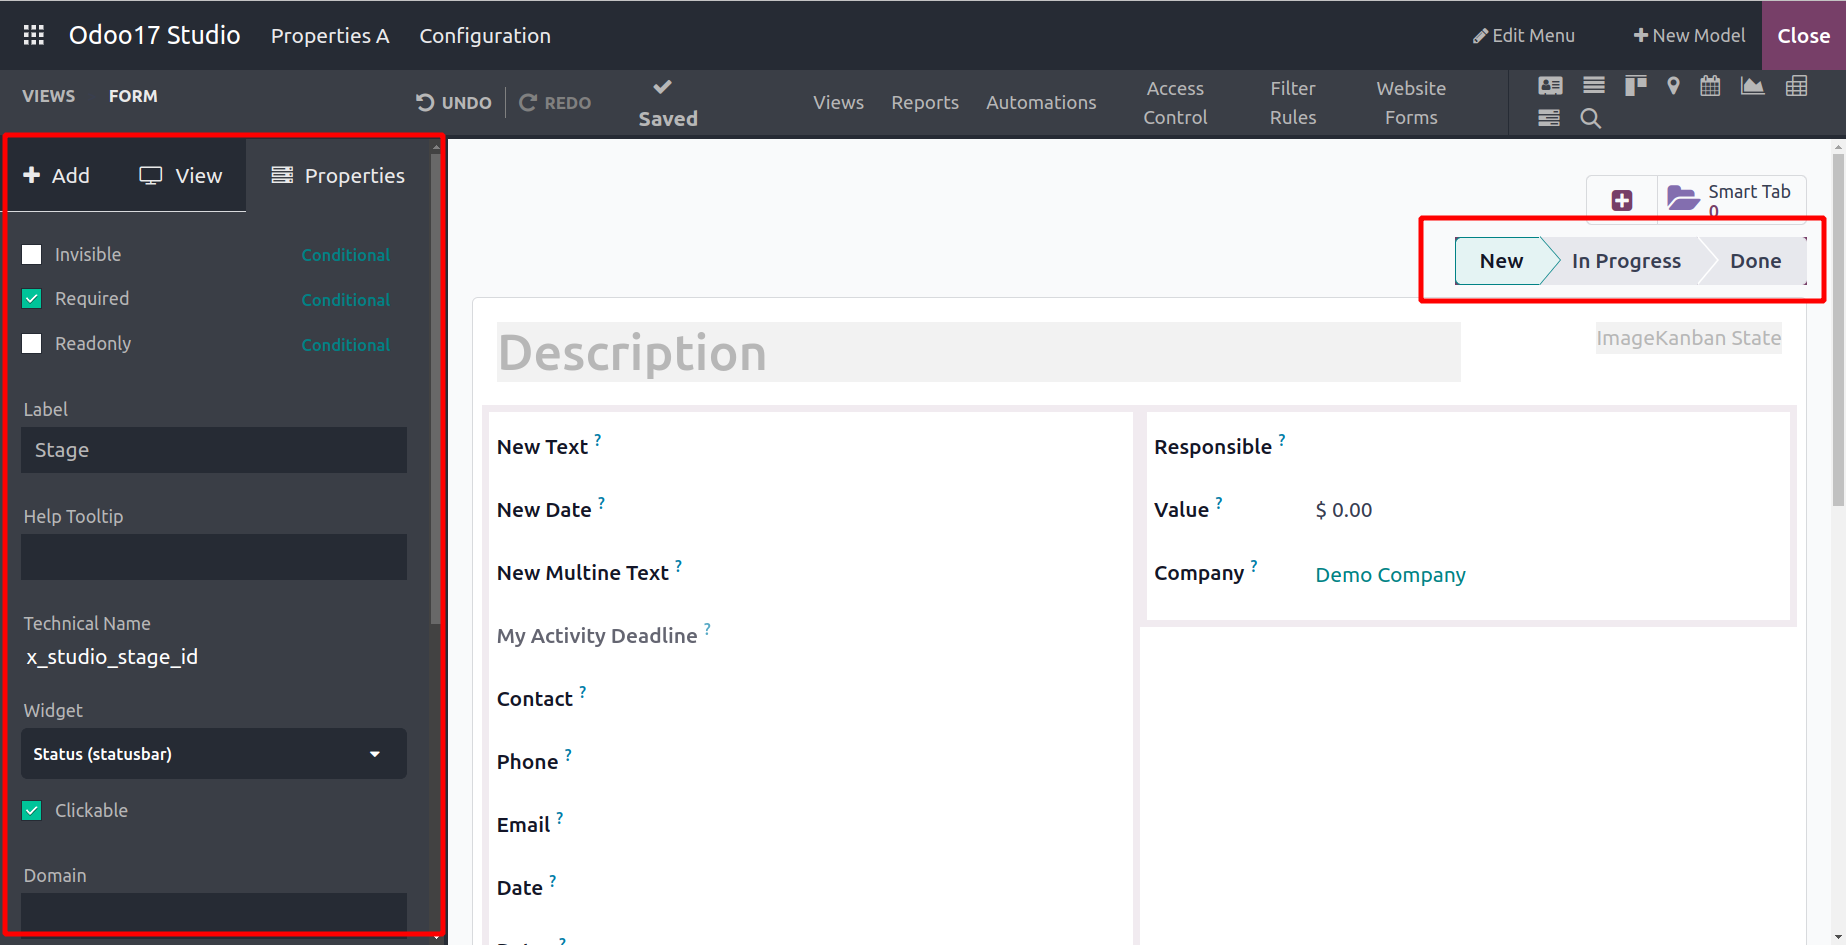
You can classify the entries depending on the stages of operations they are now in using the pipeline-based operations of the Odoo17 platform. The Odoo17 platform allows for the custom definition of these Stages, but before they can be described, the Stage options must be enabled and configured. The Pipeline Stages option needs to be enabled after describing the model of the apps made with Odoo17 Studio.
When you enable the Pipeline Stages option and choose the Form view for the configurations, the defined default stages will be shown. When you choose it, the Configuration options window shown in the following screenshot will appear. You can enable the Read-Only, Required, and Invisible settings here. Additionally, the options to activate the Label, HelpTooltip, Domain, Context, and Limit Visibility to Groups can be selected. The option to remove the relevant Field from view can also be chosen.
You can choose to define stages directly from the Odoo17 platform after they have been configured rather than through the Studio configuration box. Additionally, the Stages of the Pipeline can be specifically set in accordance with the requirements, and the specified Pipeline states will be shown in the menu. Let's go on to the following phase, where the Odoo17 Studio module is used to configure the sorting procedures in the List View.
How are the data in the List view sorted?
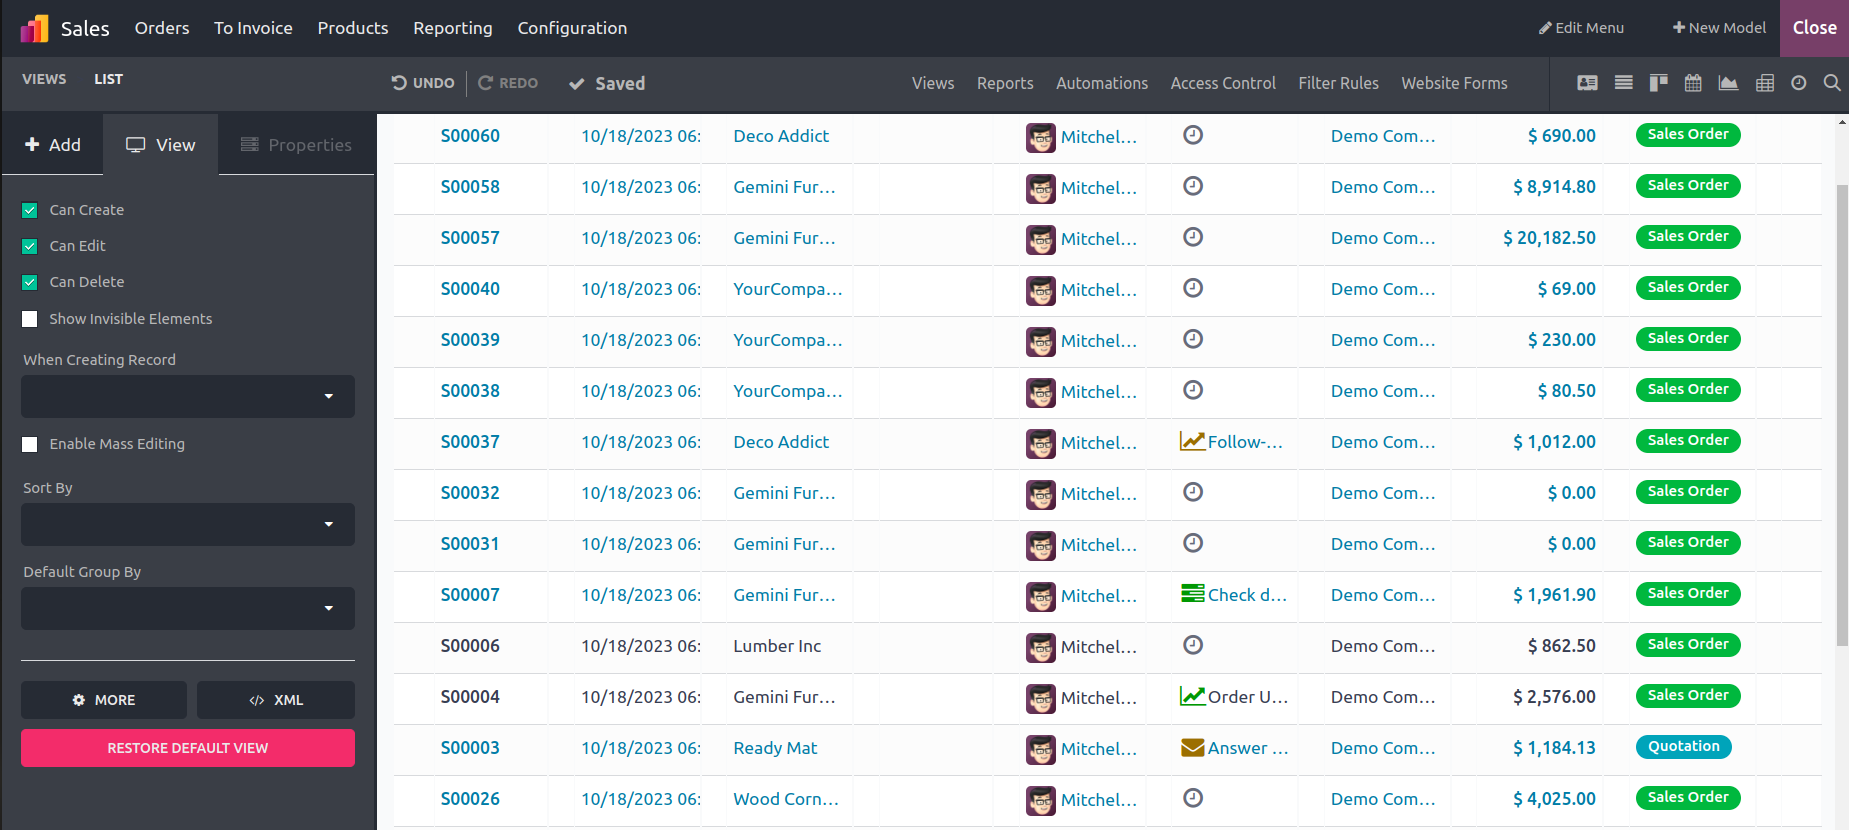
The information displayed in the List view will give a full description of each entry and is one type of view that includes thorough information. Any new apps that have been created using the Studio Module can have their List view configured. Additionally, with the aid of the Odoo Studio module, the current List view of all the applications that are available in Odoo can be customized with unique elements. Select the Studio module option in the List View of the program, and the configuration window will appear. The Sort By options are found under the view menu and include the following choices: Order Reference, Creation Date, Customer, Salesperson, Activities, Company, Total, Status, and Currency.
The elements described in the List View will be sorted depending on the sorting option defined once the Sorting operation is enabled based on the distinct options you have selected and the Studio Module is saved. The Odoo17 Studio module's Mass Editing capability is described in the next section.
How is mass editing accessible?
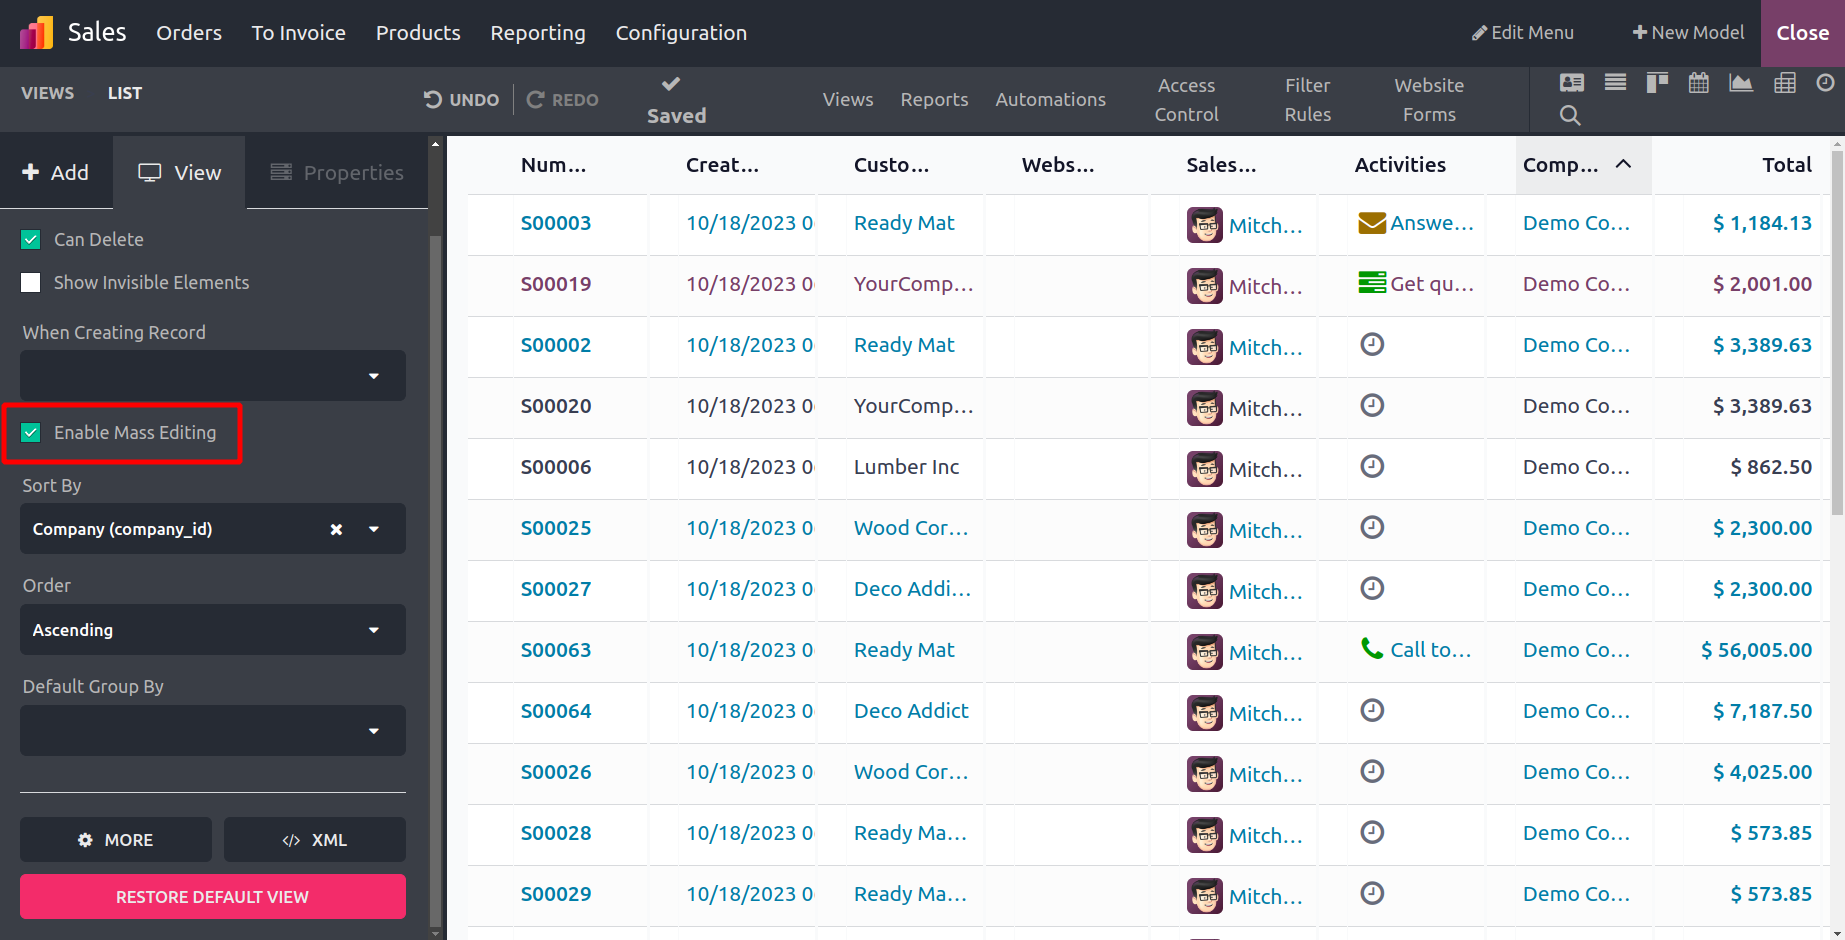
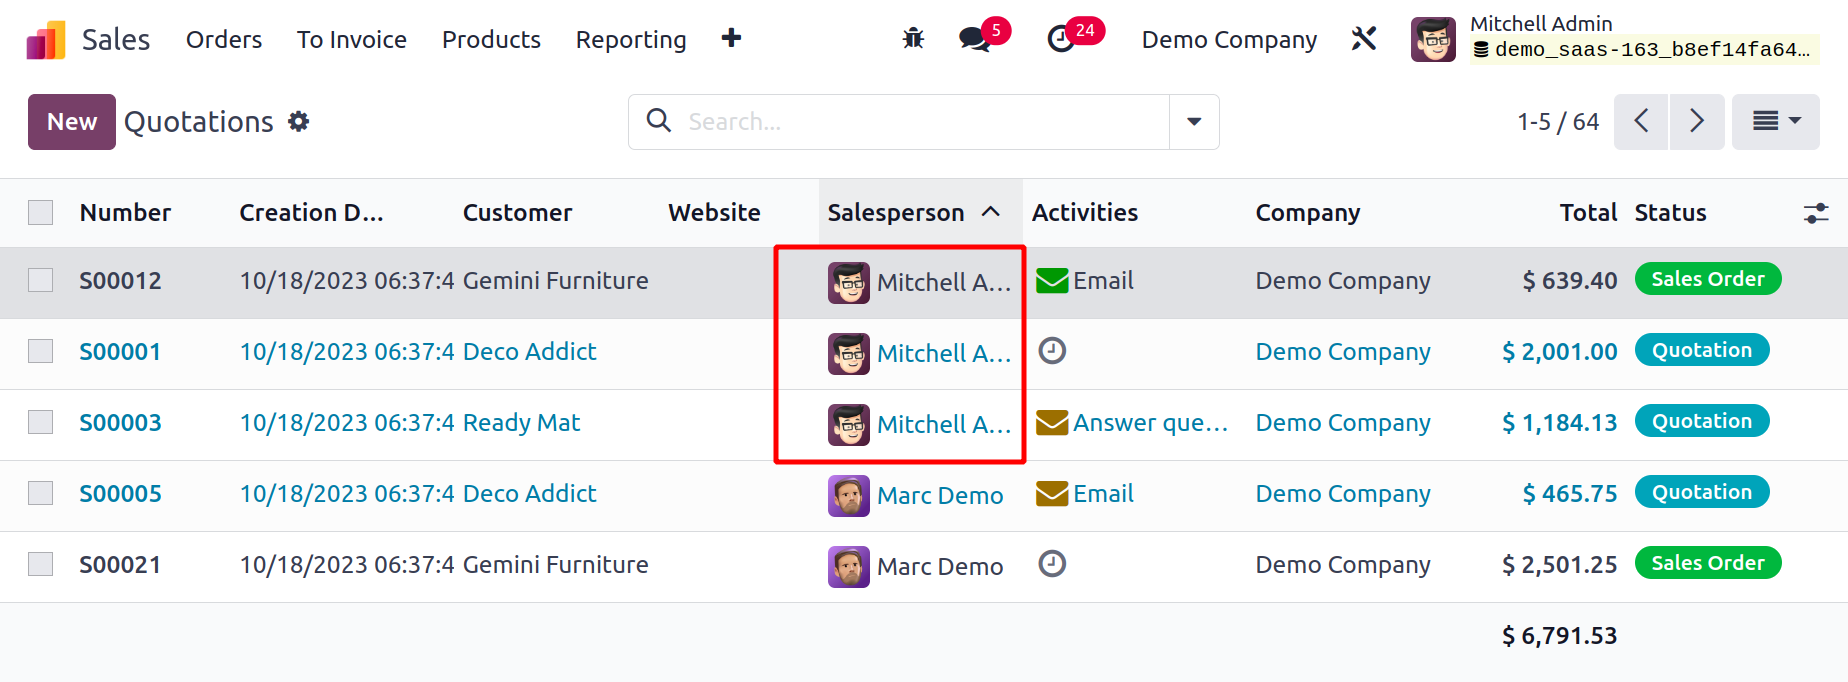
The Odoo17 platform offers mass editing of the entries that are being defined, making it simple to edit the material as a whole. The components of mass editing can be set by using the Odoo17 Studio module. You can choose to Enable Mass Editing in the View menu of the Odoo 17 Studio, giving the user the opportunity to perform any type of mass editing.
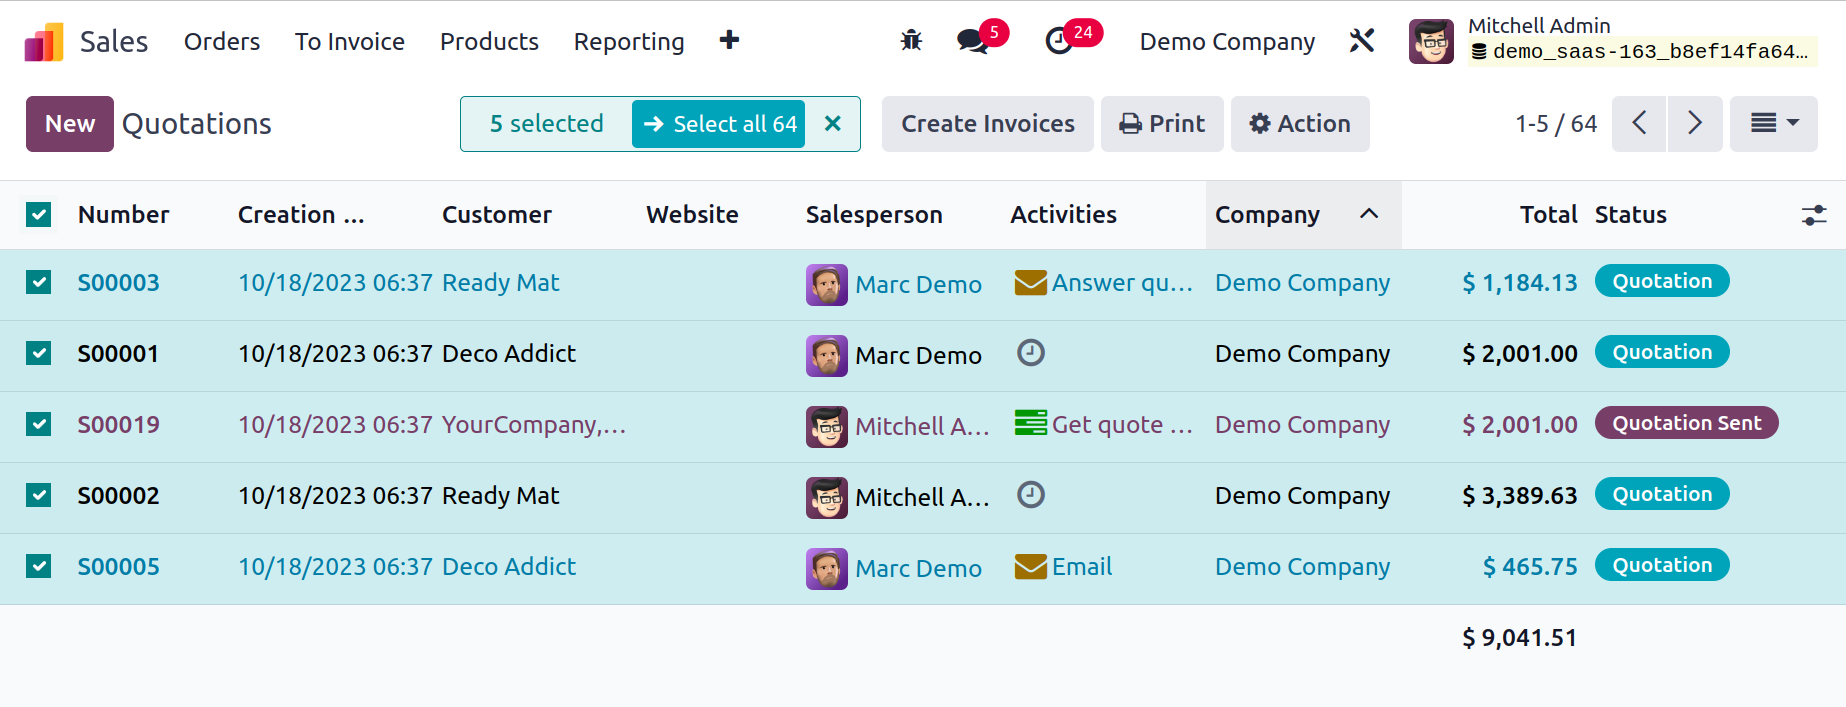
If you need to change the salesperson for any entries after the Mass Editing option has been enabled and saved in operation, you can select an entry by choosing the salesperson, and you will be presented with a list of all the available salespersons to choose from, as shown in the following screenshot.
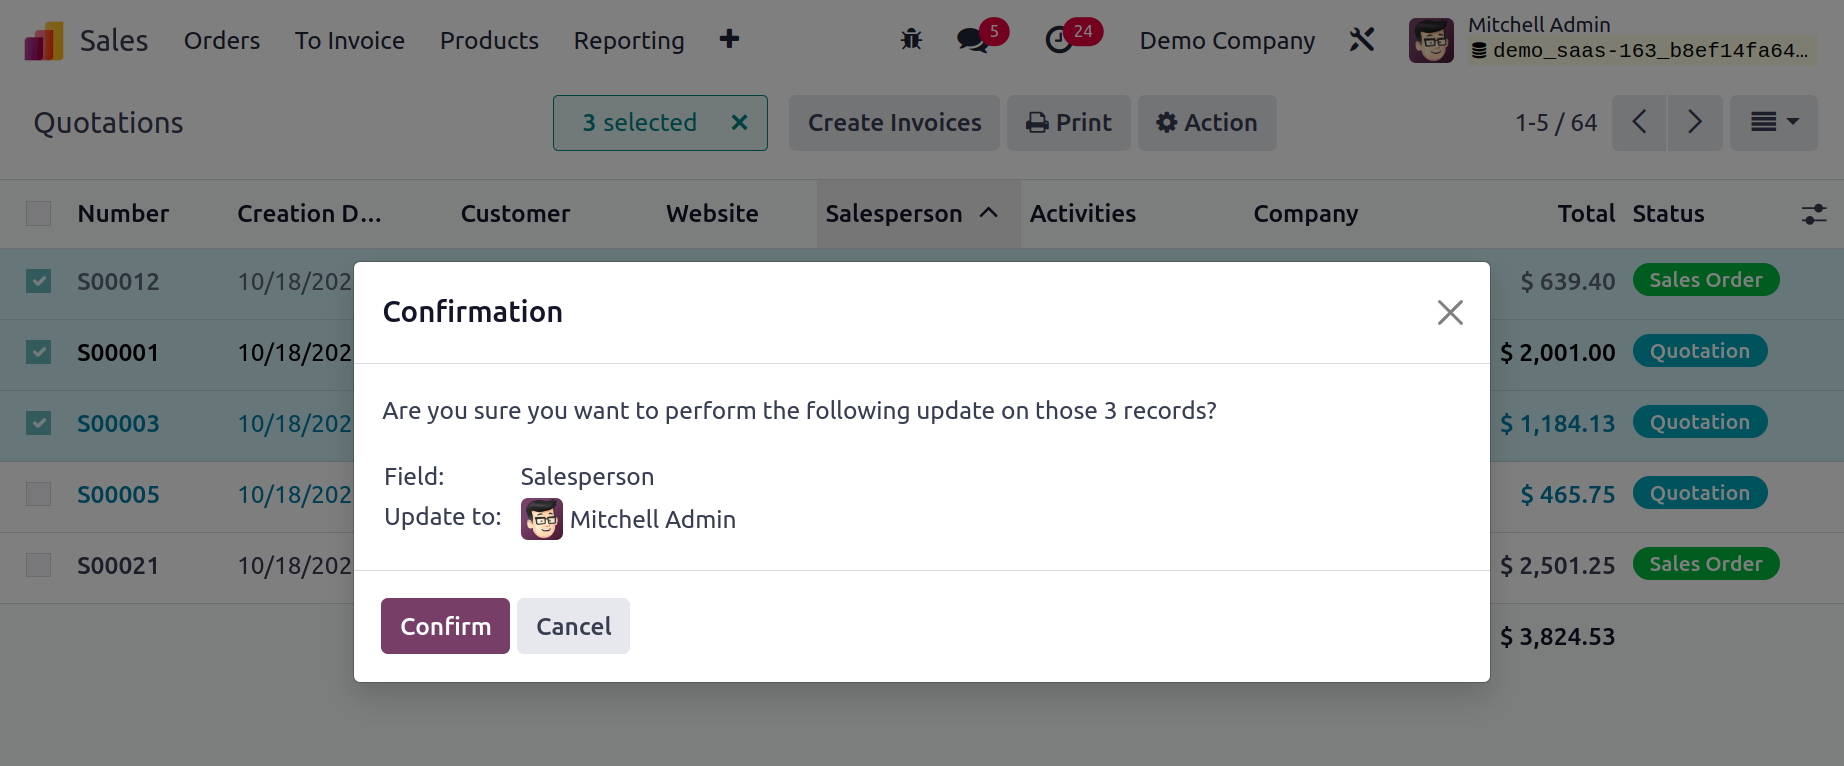
Once the appropriate Salesperson has been selected, you will see a confirmation window similar to the one in the screenshot below. By choosing the available OK option, the selected entries will be altered to reflect the appropriate Salesperson entry.
The entries that are defined and chosen for the mass editing will change, as shown in the screenshot below, which is highlighted.
The Configuration menus of the Odoo17 Studio module are described in detail in the next section, along with how you may use them to create outstanding solutions and useful operational tools for your Odoo17 application.
Adding a button to form View
Odoo 17 allows you to add a button to the form view. They can be added in both the list view and form view of Odoo 17. A button option is able to be seen in the form view and hitting on it allows you to create a button in the form view. See an example of adding a button in the form view.
This will prompt you to configure its properties, including a name for the button and to configure its behavior.
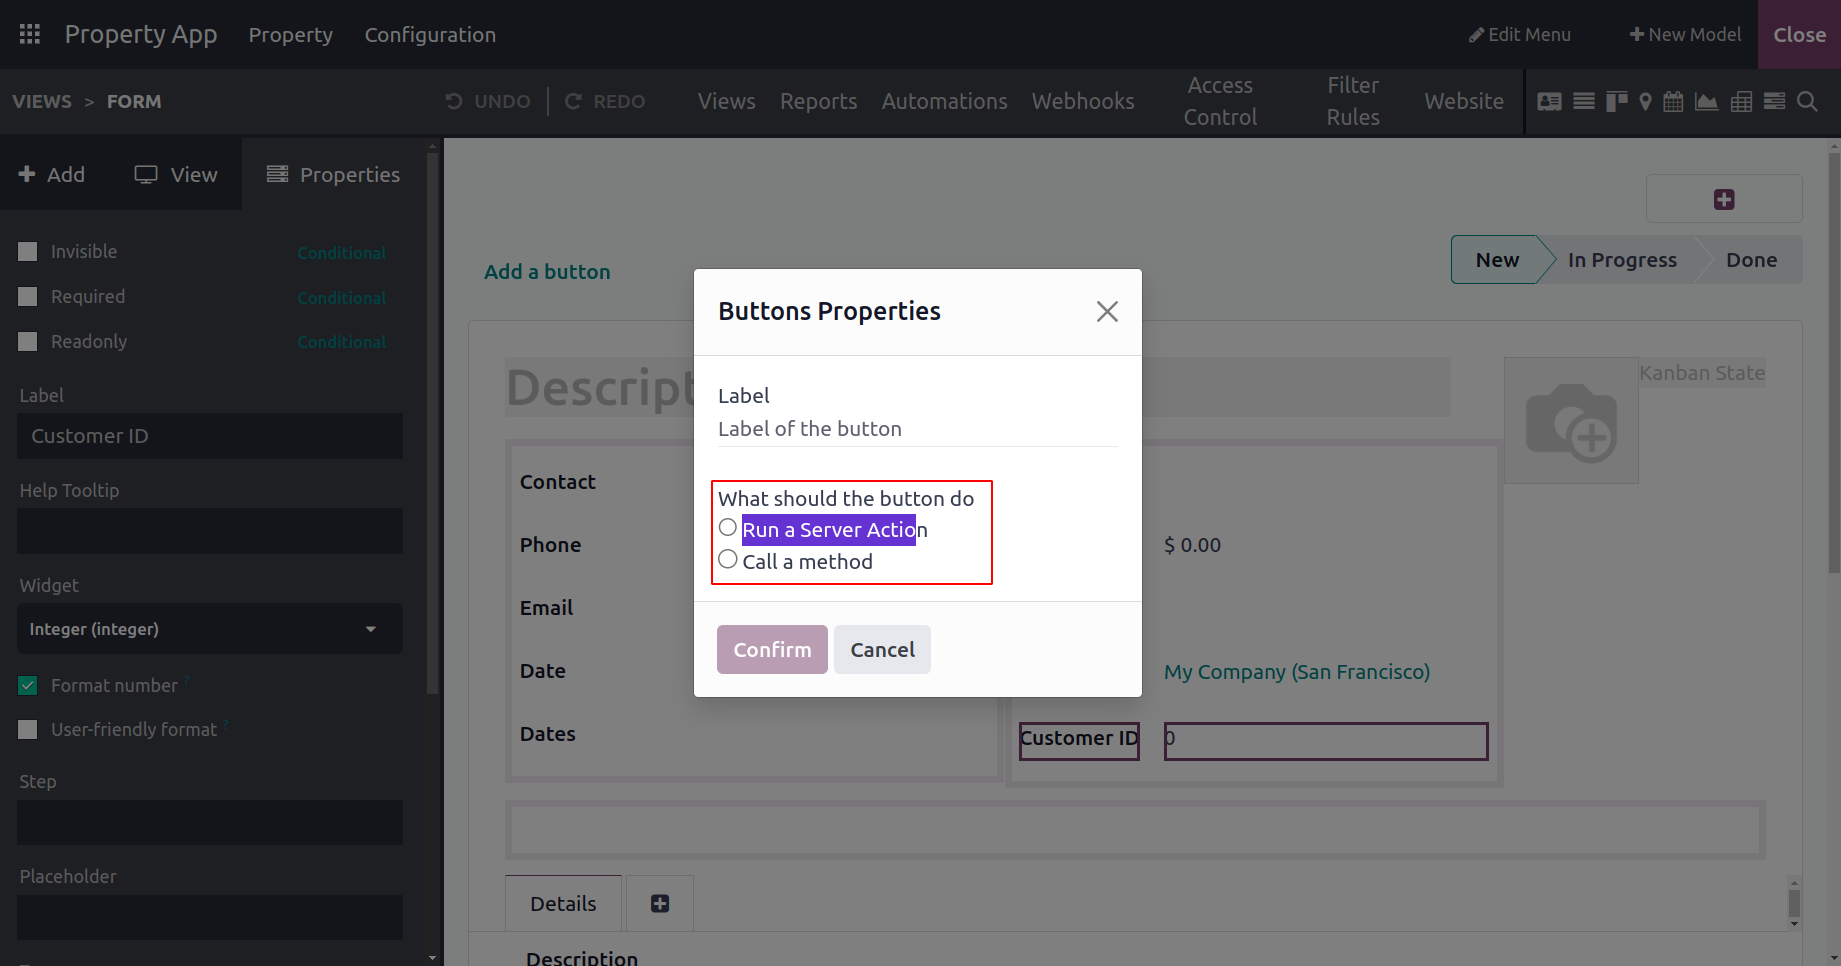
When hitting the button, a certain function trigger can be added either as a server action or call a method.
Server action can be created from the Setting itself. Activate developer mode and go to Settings > Technical > Actions > Server Actions and create one.
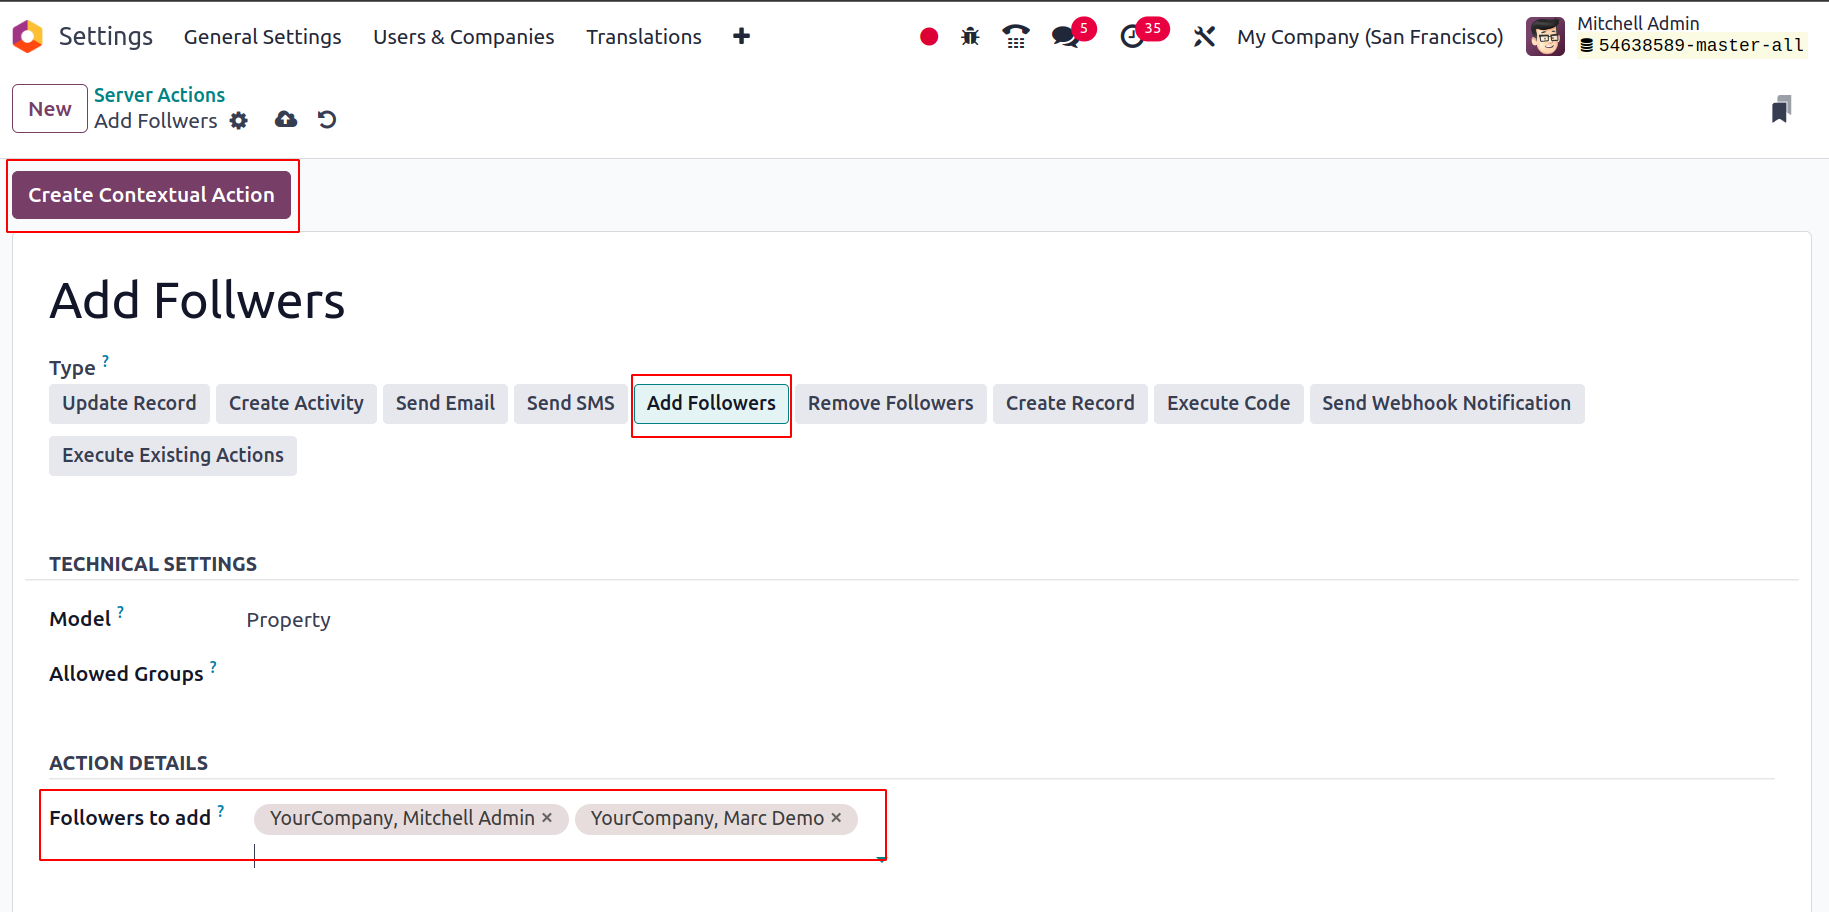
The ‘Create Contextual Action’ activates the server action and allows it to be added to the studio application.
Approval on Button
Sometimes approving records is inevitable to the company workflow based on the operation. Approval may have a different workflow; sometimes multiple approvals are required, Sometime employees have to follow a certain order of approval, and they need to be notified regarding the approval and all. All this can now be achieved with the Odoo 17 studio module.
As an example, consider approval for sale order confirmation. Let’s update the form view and set up approval on the confirm button.
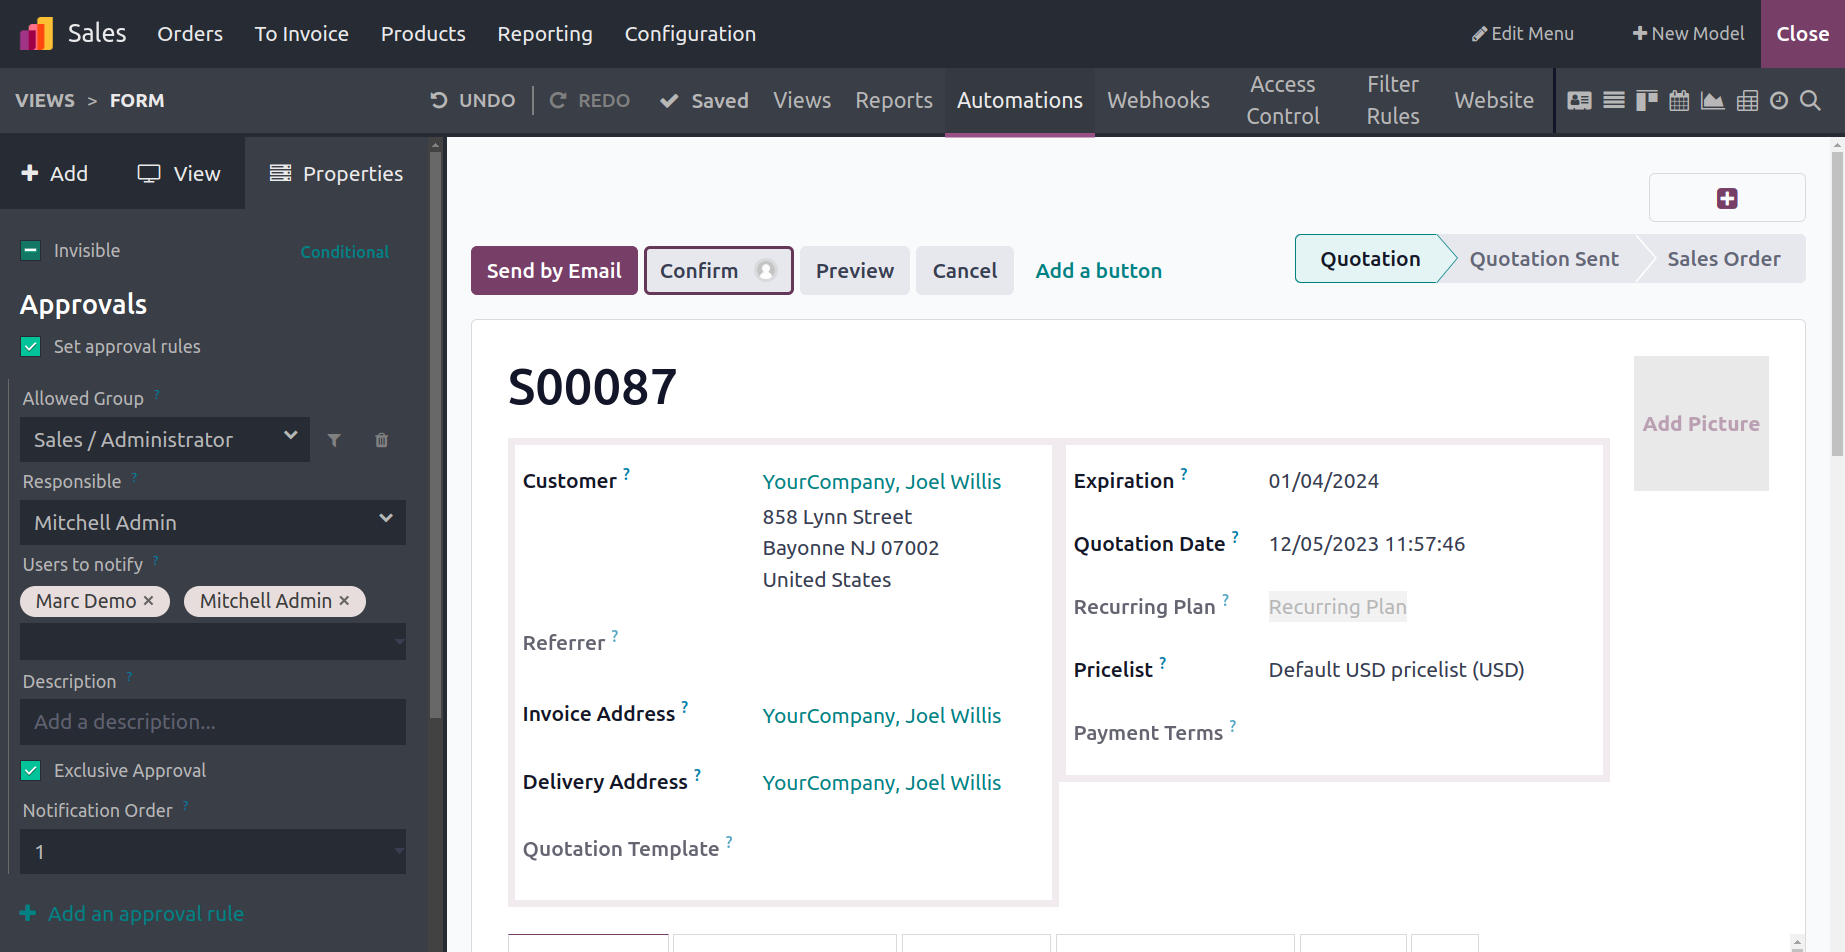
Click on the button where approvals need to be set and enable the boolean ‘Set approval rules’ to allow you to add approval. You can provide the allowed group to approve, responsible, and users to notify. The boolean ‘Exclusive order’ allows the users to approve exclusively, and notification order can be set in the provided field. This will help to receive notifications to the user for approval.
Multiple approvals can be configured by clicking the ‘+’ Add an approval option, which gives you additional fields to add groups, responsible, etc for the next approver.
You can make any kind of changes to the module by using the Odoo17 Studio module. Furthermore, the authorization and approval processes of the business will benefit from these changes. The approvals can be carried out and altered in accordance with the functional and operational requirements of the firm.
Configurational Menus in Odoo 17 Studio
For an application to help them define the operation and control of the apps depending on their needs, the majority of organizations search for a configurable and customizable operation tool. The development of the Odoo17 Studio is founded on the idea of maximum customizability in order to provide a superior solution for any shape, size, and manner of business operation. The studio module's unique menus will help to define the setup details for most of the operations. You will be able to define and create extraordinary operational applications in cooperation with the Fields and the specific menus. Let's continue by getting a detailed comprehension of the unique menus.
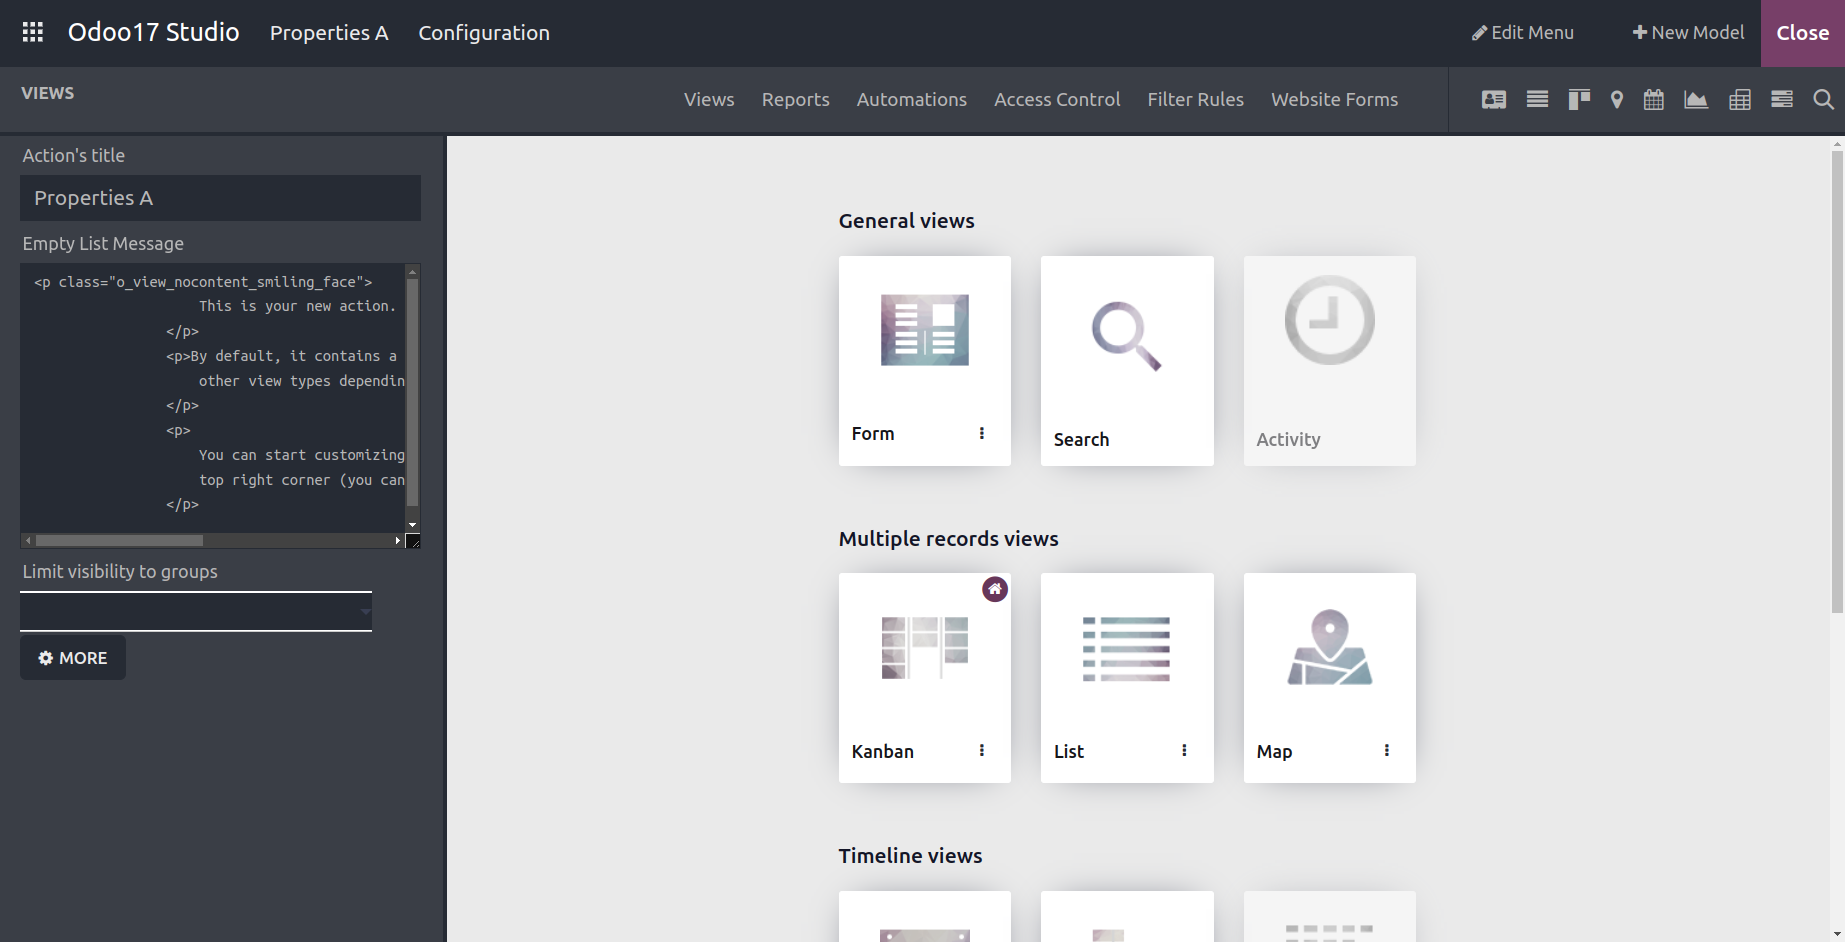
Views
Different Views for the apps menu can be created with the aid of the Odoo17 Studio Module Views menu. The unique Views, which are included by default, will assist in drawing more attention and provide information from the various menus, both of which will be quite helpful. The views for the menus can be defined using views like Form, Search, and Activity View.
Aspects of the Form View include the Title for the Form, Buttons for configuring the Form based on operational requirements, and a Print button that will immediately print the Form View from the window if paper format data is required. Additionally, depending on the situation, different Action components can be added, including Delete, Archive, Unarchive, Mark, and Unmark. It is also possible to include navigational elements, such as a breadcrumb trail, to make it easier to move between the many-from menus.
The various Filtering elements can be added under the Search view using Odoo17 Studio, where these tools can be utilized to sort out the necessary entries. Additionally, the Customization features for the use of the Filter options can be configured, giving the user complete control over how to utilize the Filter tool. The Chatter element can be added under the Activity View so that while scheduling the various events, the concerned users can discuss it. This will guarantee that all attendees are given a platform to debate it before the scheduled time. There are also several record views that can be defined, including list, kanban, and map views.
The List View can be readily customized by adding new Fields of operations, which will guarantee that the necessary instructions are shown in the List. features include Priority Filed, the Contact Field, and numerous others. The many Fields that have been detailed can also be made invisible, changed, and removed as necessary. The ability to remove certain operational aspects from the Kanban View, such as the Create and Edit buttons, will be useful in granting external people access to the portal while preventing the creation, modification, and removal of new and current items. Additionally, a specific Pipeline Status indicator can be added to the screen, giving a clear understanding of the operational phases. The elements like the Name and Address can be set to disappear in the Map View. Additionally, you may add Additional Fields that will help with the view and enable the Routing option, which will make it easier to interpret the address and go to the appropriate locations.
It is also possible to define Timeline Views like Calendar, Cohort, and Gantt Views. The configuration options, including the Start Date Field and the Stop Date Field, can be set under the Calendar View. Aspects of administration that can be configured include the Delay Field, Colour, All Day configuration, and Default Display mode. Both the Start Date Field and the Stop Date Field can be customized under the Cohort View. Additionally, the Timeline, Interval, Mode, and Measure Field can all be configured.
Furthermore, particular reports can be found using various Reporting Views like the Dashboard, Graph, and Pivot. A new dimension can be added to the Graph View while it is being produced, along with other features like Type, Sorting, First Dimension, Second Dimension, and Measure. Aspects like Column grouping, Row grouping - First level, Row grouping - Second level, Measures, and the Display count can be activated under the Pivot View depending on the situation.
The different menus of the applications will be established by using all of the Views configuration options offered by the Odoo17 Studio module, which will add clarity to the data being defined.
Now that we have a better understanding of the Reports menu in the Odoo17 Studio module, we can better configure the application.
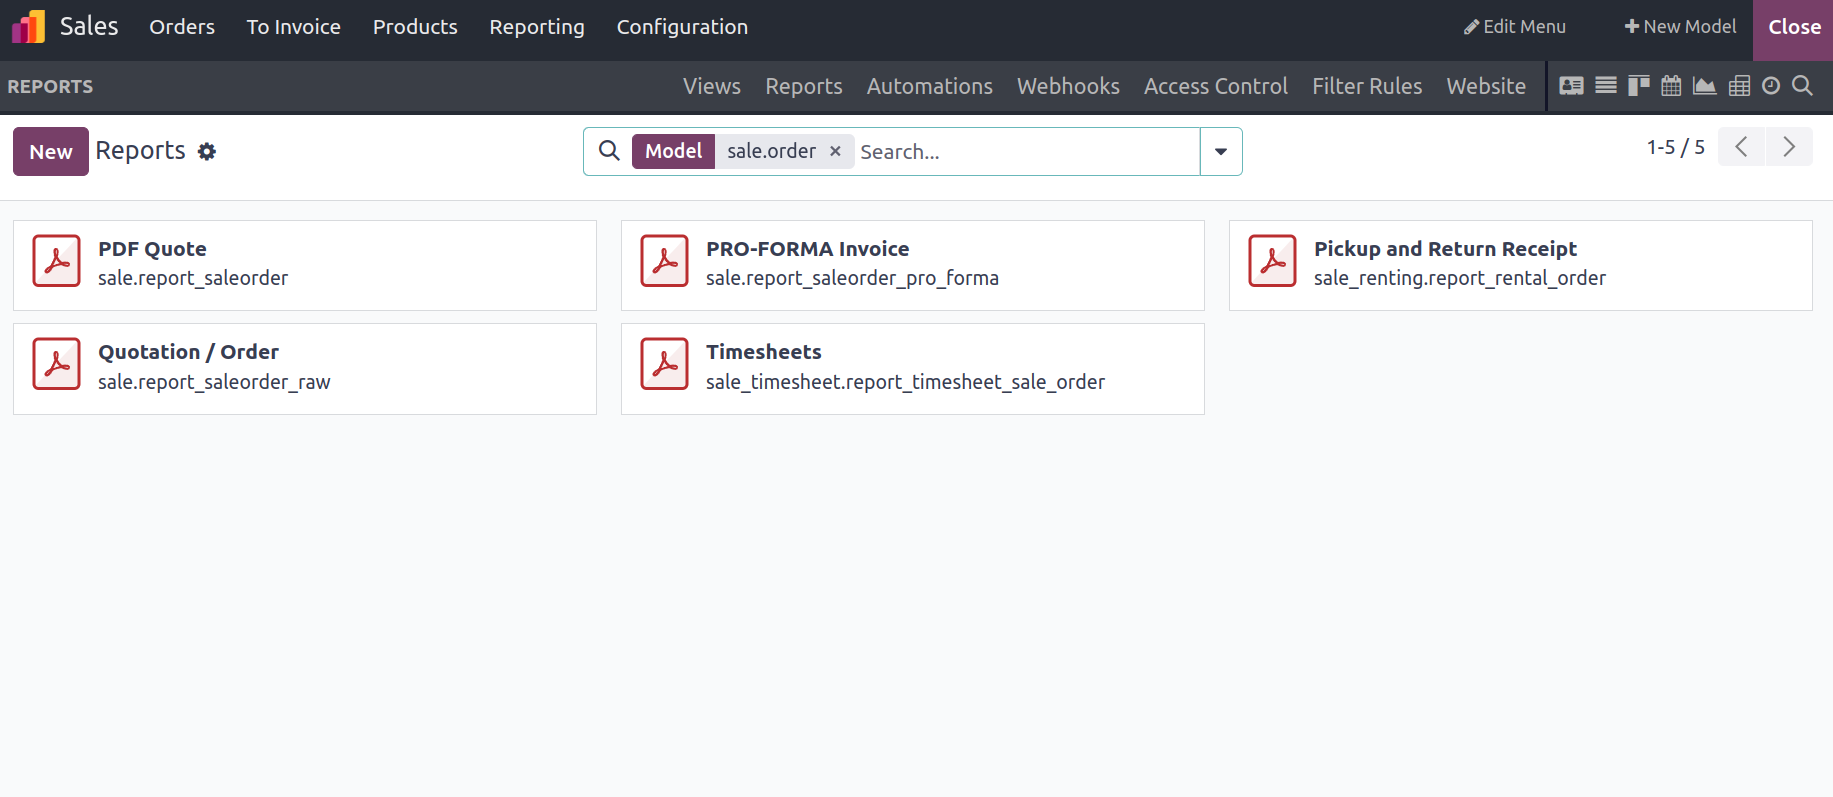
Reports
One of the more sophisticated components of the Odoo17 platform is reporting, and each module offers unique report production capabilities. To further enhance user-friendliness, the Odoo17 Studio module will enable you to create specific operation reports that offer a unique perspective on particular areas. The Odoo17 Studio module's Report menu offers you a plethora of options where you can easily construct both basic and complex reports.
The Odoo17 platform may be developed or revamped with options to customize. The drag-and-drop option in the previous version has been removed, and in Odoo 17 we are now using ‘/fields’ to add fields to the report. This makes customizing reports for end users. Additionally, there are preset tools and choices for digestion that can be used to configure the different reporting menus in the new apps that are being created. The definitions for all the reports created using the Odoo17 platform are located here. Additionally, the respective report in list form can be aided by the Search option, Filtering option, and Group by option.
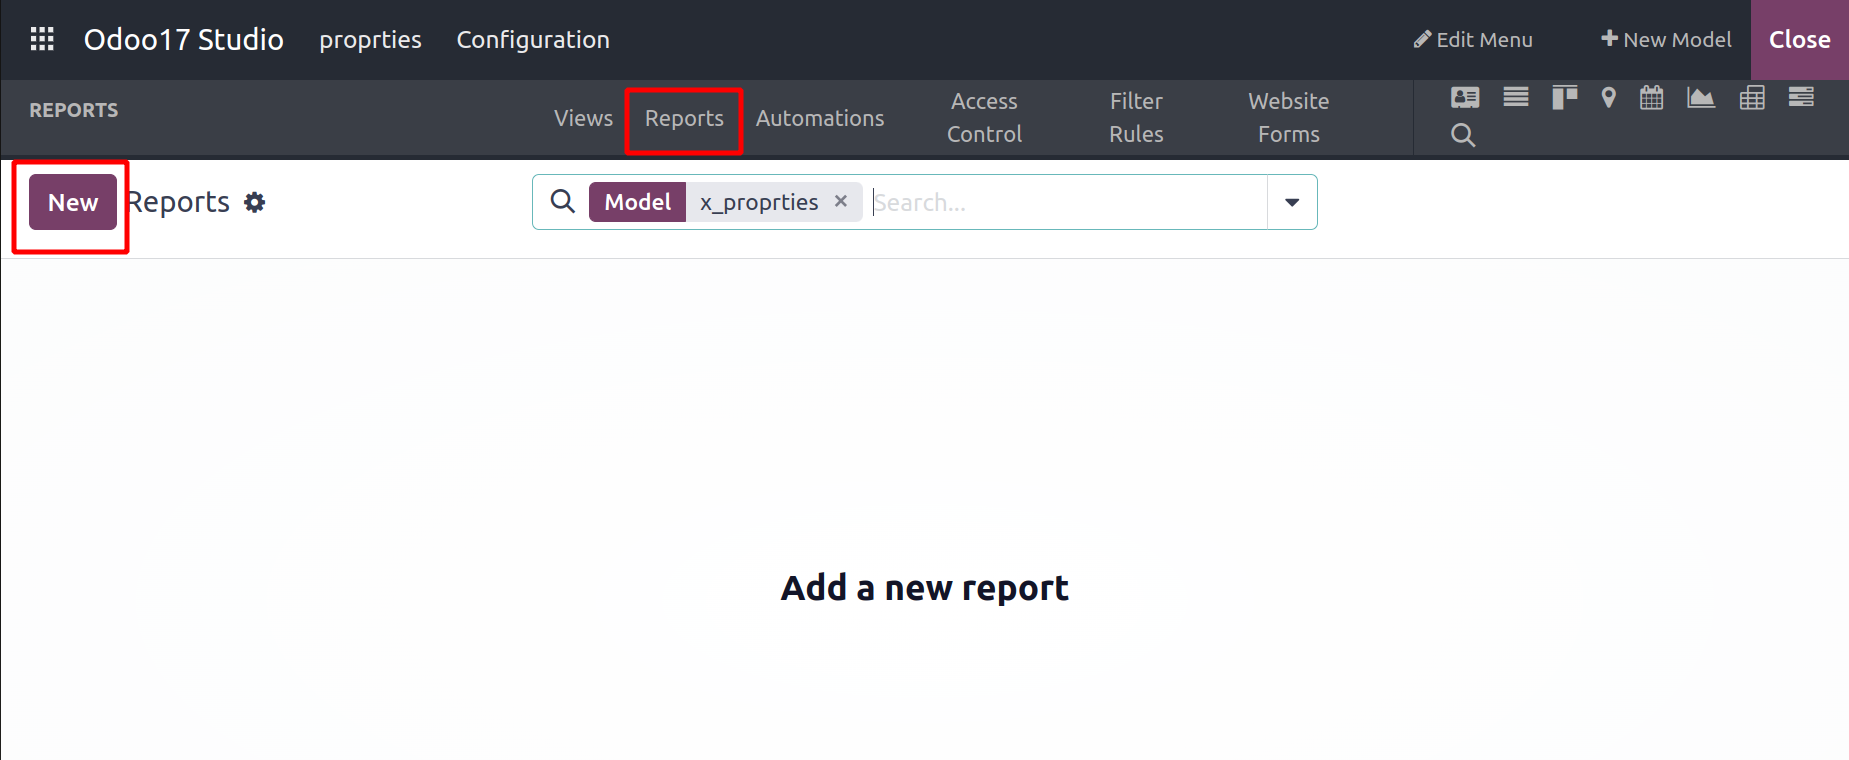
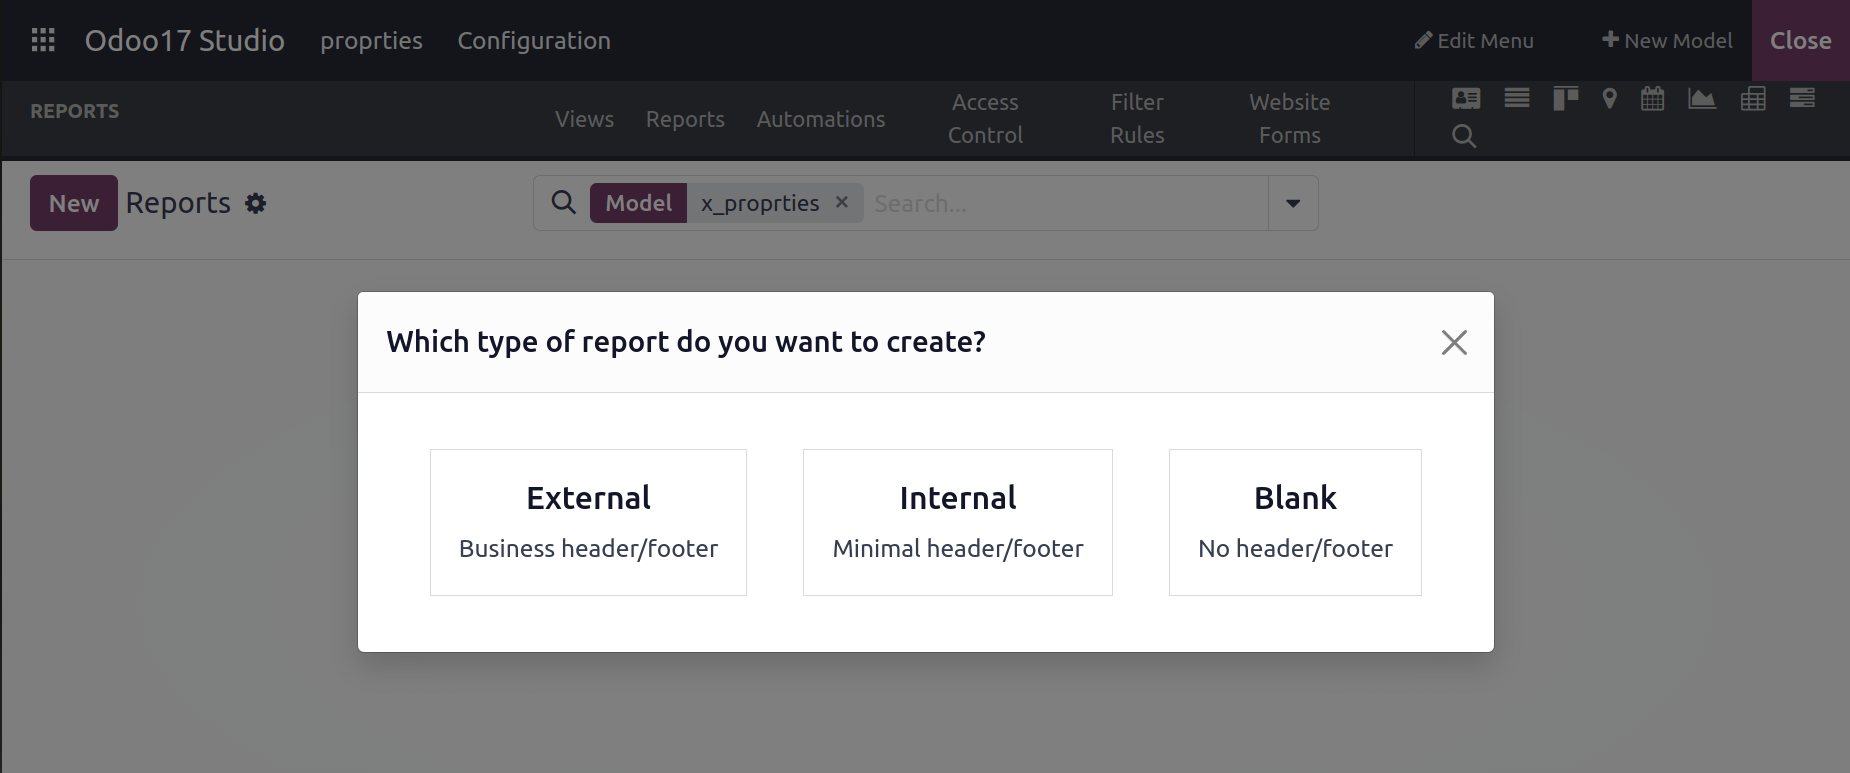
When creating new reports, you can choose the New option and choose whether you want to produce Blank Reports, External Reports, or Internal Reports. You will see the setup menu based on the Report Type you select, where you may define all the essential details for the Translate View menu.
The platform will present you with a window where the Report setup can be completed after the type of report to be prepared is selected, as seen in the accompanying image.
It is also possible to customize the existing reports in Odoo 17. Consider the example of reports in sales.
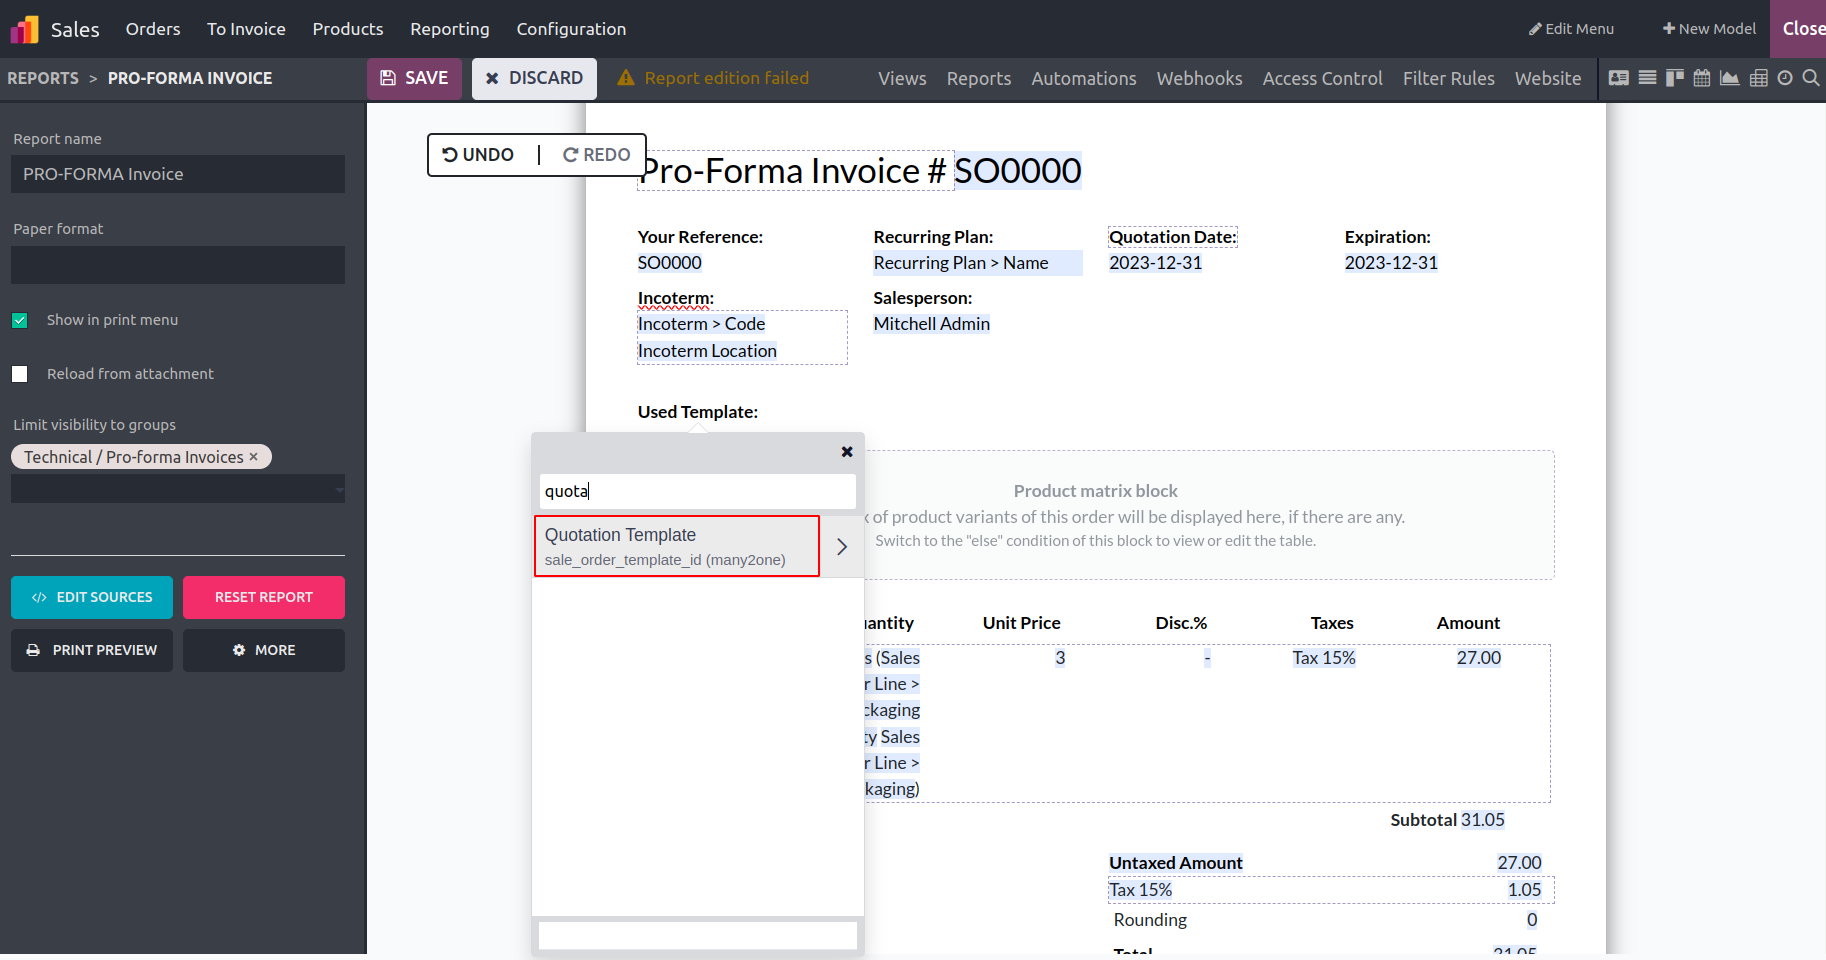
Choose the required report to be customized. The view shows each field in the report where end users can edit the filed name or even add new fields to the report. Considering the customization of ‘Proforma Invoice’, choose the respective report.
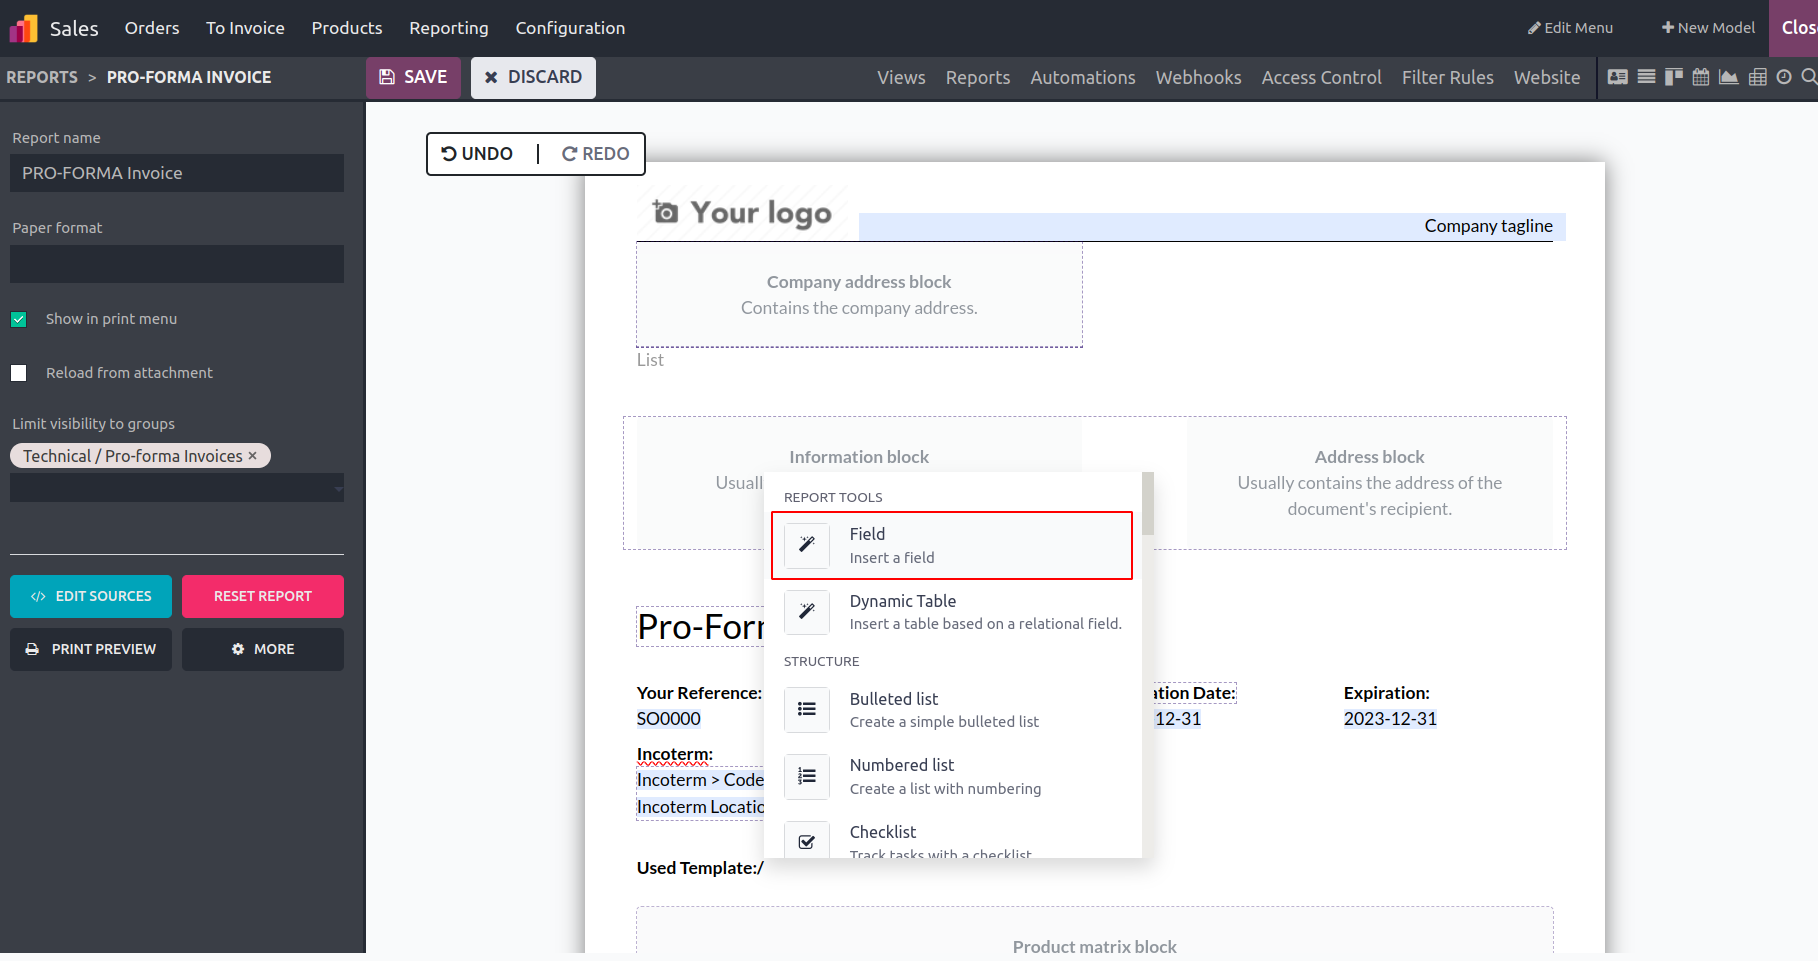
The report tool Field will allow the addition of a new field. While hitting on the filed report tool, it will pop up the fields to add.
Under the Report menu, you can select the Paper format and the Name of the report that needs to be defined before viewing it. The Limit Visibility to Groups settings allow for the definition of different user groups for the platform, ensuring that these groups can be identified. Additionally, you can enable the Print option to be displayed, ensuring that the user can easily print off reports that have been prepared from the same report window.
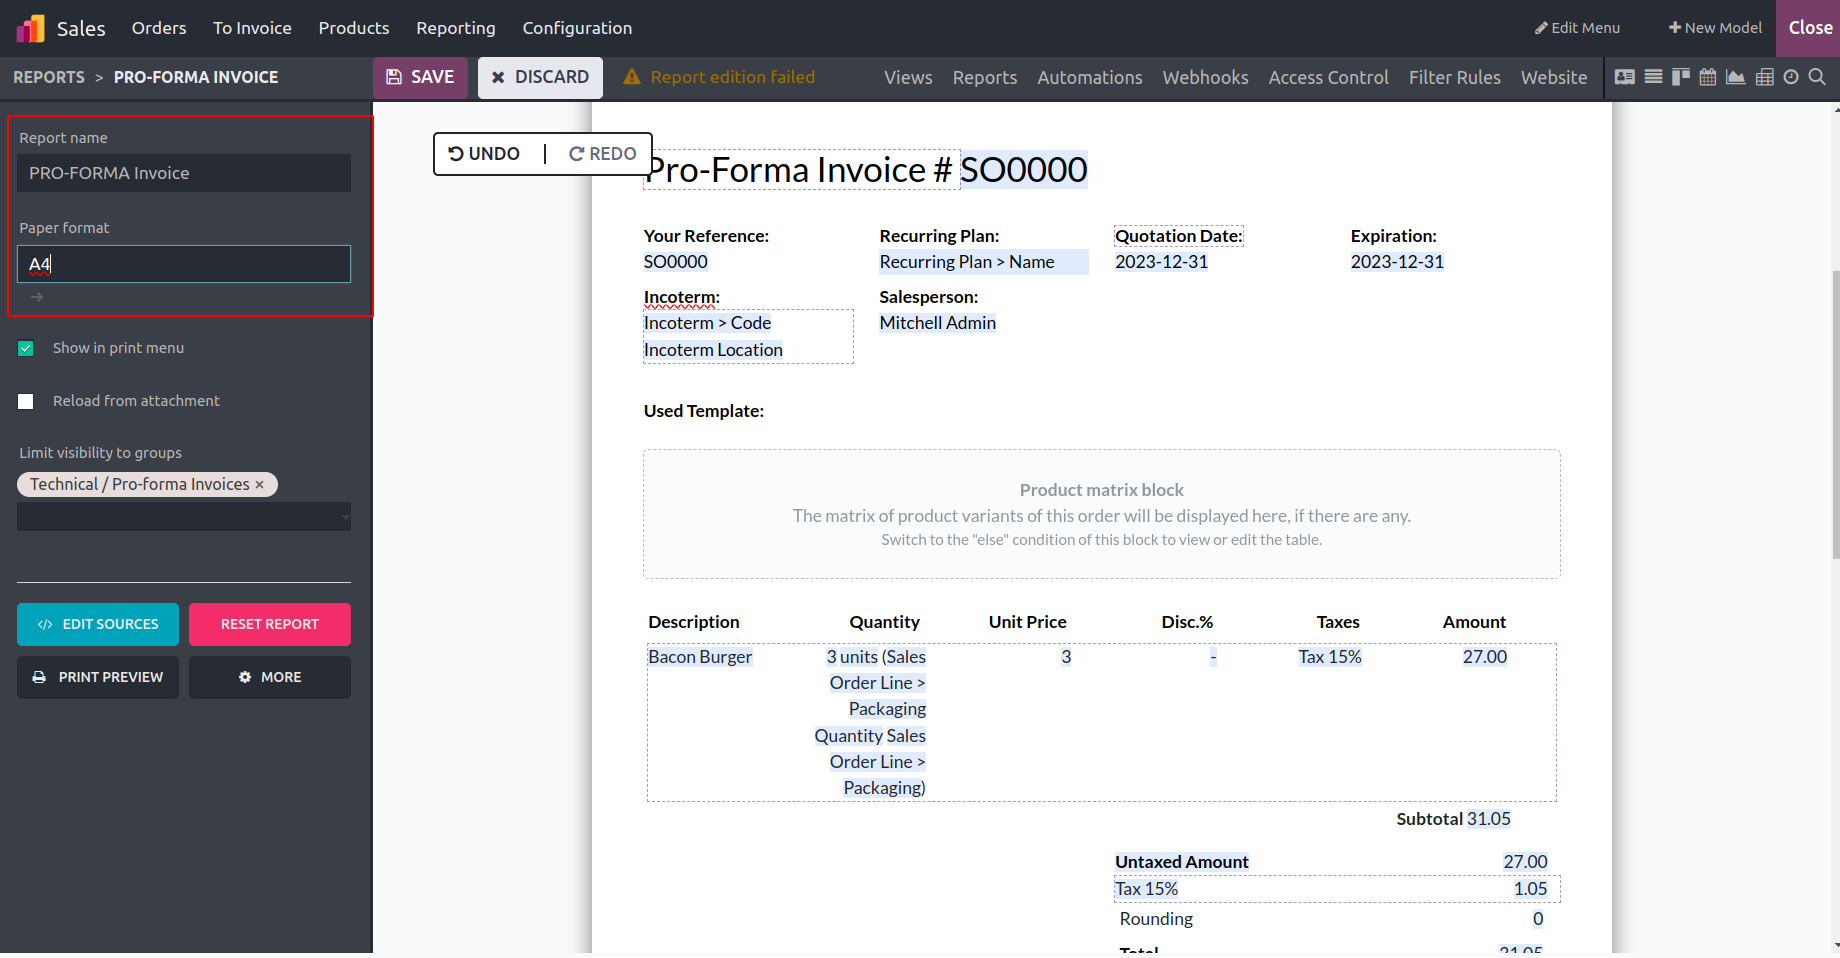
You may set up a variety of operations tools that are beneficial for business operations in the report menus that are configured with the help of the Odoo Studio module. by choosing Add from the Print menu and then the Reload form attachment option, which can be turned on or off depending on the operational requirements. The user can check the procedures by viewing a preview of the report that will be printed through the Print option, which is available. When new items are defined in a specific report, the Reload form Attachment operations will make sure that previously defined information is reloaded.
Let's move on to the next section, where we will discuss how to comprehend the Translate View of the Odoo17 Studio module.
Automated Actions
Today, automation plays a crucial role in how every part of daily life and company operations operate. As a result, the designers and developers of specialized solutions ought to incorporate the automation foundational tools into their operations. The Automation components of the apps being created will be defined with the aid of the Odoo 17 Studio module. Additionally, Odoo 17 is among the platforms that allow automation and is eager to include more automation components with each version.
The menu will display all of the Automated Actions specified in the selected existing application model. The Automated Actions can be searched from this specific Search menu. Additionally, you will be able to select from a lengthy list of dedicated Automated Actions from the menu using the Filtering and Group by options.

The application's functional requirements are as follows: you must supply the Action Name and pick the model in which the Automated Actions should function in order to create a new Automated Action. Additionally, from this menu, you can Activate and Deactivate the relevant Automated Action. The Action To-Do should also be defined and can be chosen from the list of defined platform activities. The tasks that need to be completed after the Automated Action is triggered into operation are known as the Action To-Do. For the Automated Actions to be activated, the Trigger of the Action can be specified. This will be the action performed on one of the entries or menus that will cause the corresponding Automated Action to be operational.
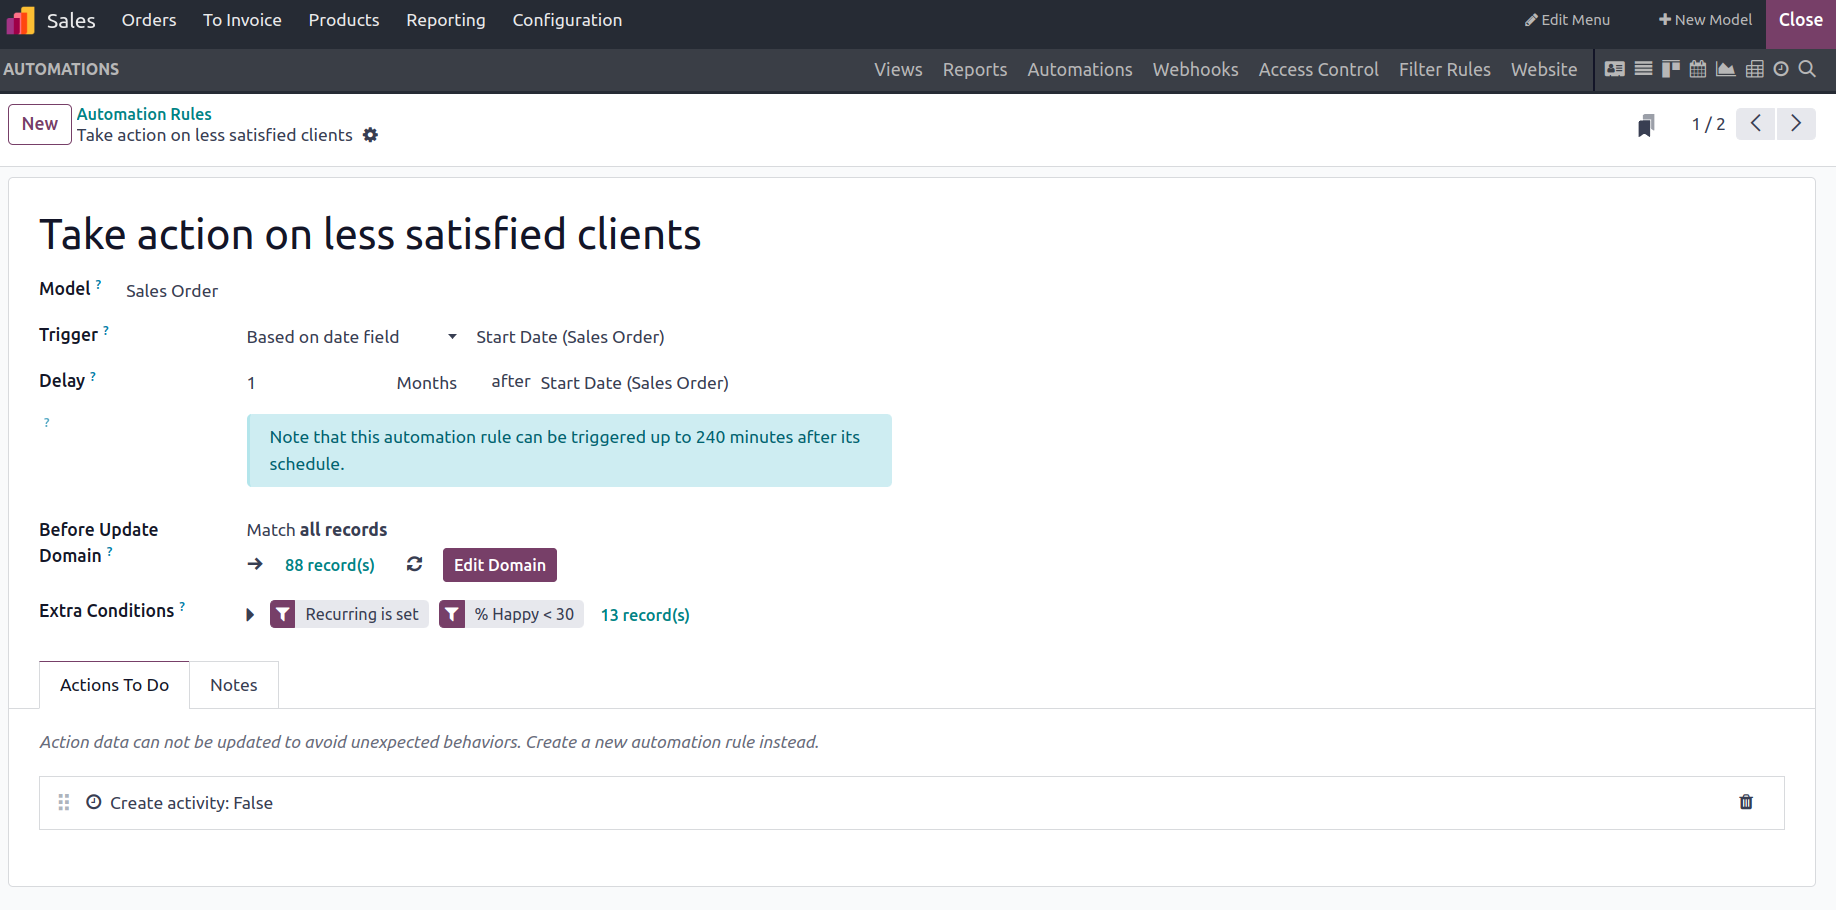
Now you have a better understanding of how Odoo17 Studio's Automated Actions menu may be set up to launch various Automated Actions for the operations of newly generated applications. Now let's move on to the section that describes the Odoo17 Studio platform's Access Control Lists menu.
Access Control Lists
An application or software solution functions significantly better when authorization and security are in place, especially when employed as management tools. Since they are aware of these factors, the Access Control Lists settings menu has been added to the Odoo 17 Studio module. The different Access Control facets of the procedure and the applications being created will be defined by this menu.
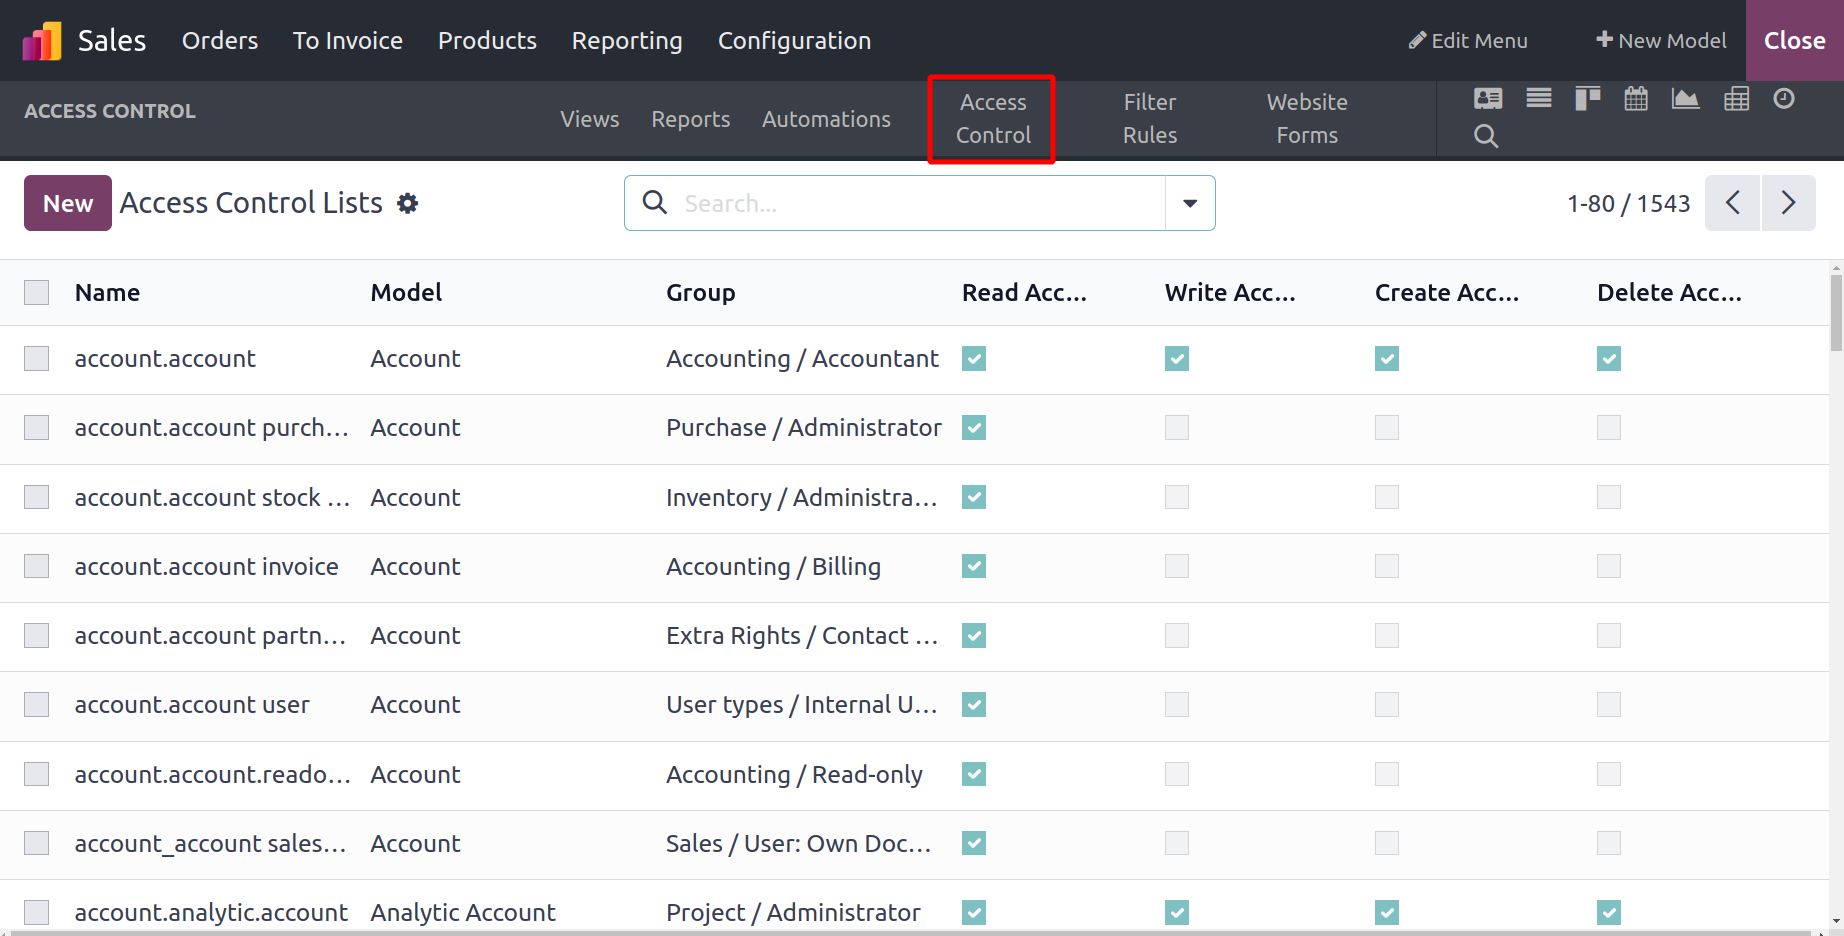
The Name, Model, Group, and several Access Categories, including Read Access, Write Access, Create Access, and Delete Access, which can be enabled or disabled using the tick box, will all be listed here, along with the Access Controls that have been established. Additionally, a search feature is available to assist with the various Access Control's searching requirements. Additionally, the Group By and Filtering tools will support the operational advantage of the operations by sorting them out based on necessity.
You can choose the New option to bring up the creation window, as seen in the following screenshot if you want to create a new Access Control. Here is the name of the group and the access control that can specify its operations. The Model Control should then be explained. You must enable the Active option in order to execute Access Control and activate it.
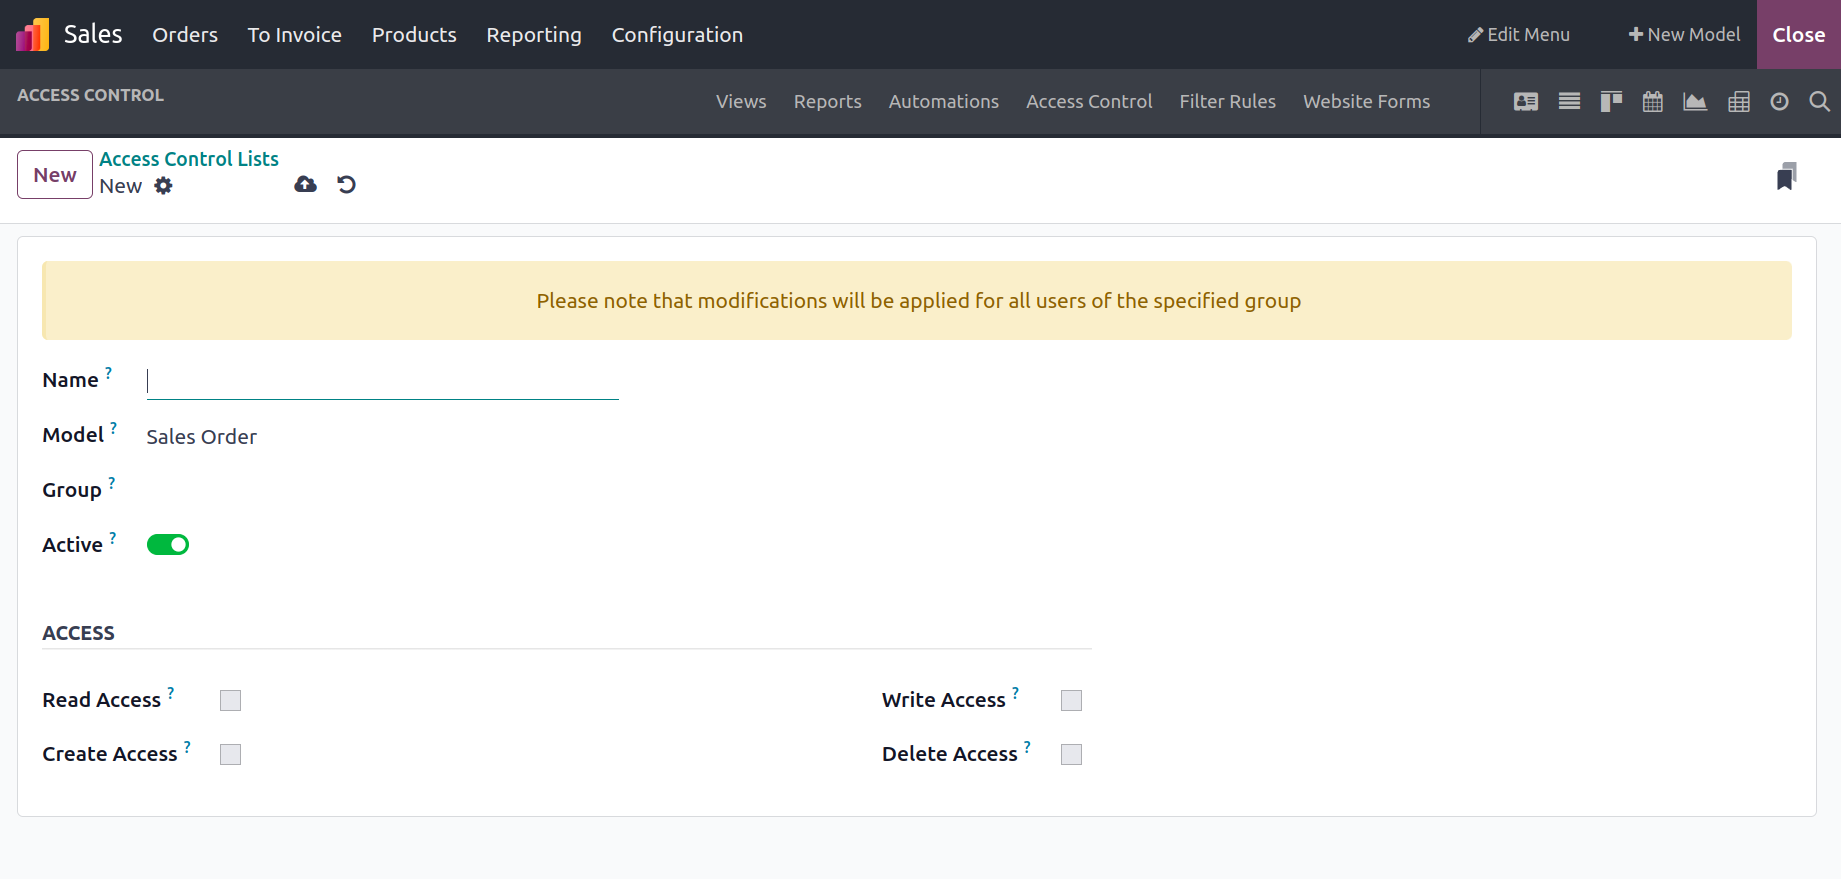
Additionally, depending on the needs, the access details, such as Read Access, Write Access, Create Access, and Delete Access, can be enabled or disabled. Additionally, whenever necessary, the designer has the opportunity to alter and modify the required percentage of the Access Control
The Access Control can be specifically defined based on the applications and serves as the focal point for all aspects of user permission. Now let's move on to the section that describes the Filter Rules.
Filter Rules
The Odoo17 Studio module's Filter Rules menu is a unique tool for configuring apps and is available there. Additionally, the Filtering components of the various menus of the apps being created with the Odoo Studio module will benefit from this menu's sophisticated operations features. Every filter rule that has been defined will be shown in the Filter Rules menu, along with the filter name, model, user, default filter, and action. Additionally, the defined Filter Rules' Default Filter action can be enabled or disabled.

You can choose the make and definition shown with a form as shown in the following screenshot to create a new Filter Rule. The Filter Name and the Available for User, Model, and Action that the Filter Rule should initiate must first be defined in this section. Additionally, you can choose the Default Filter option, which will set the appropriate Filter Rule as the default one when the application is used. The option that is defined as Active will make it active. The functional characteristics of the aforementioned websites will be taken into consideration while determining your own Filter Rule, which may be changed by selecting the Add Filter option. Additionally, the Context will be assigned based on the Filter Rule specified in the relevant Domain. There is also room for describing the Context's descriptive component.Along with the description, the Sort information for the appropriate Filter Rule will also be defined.
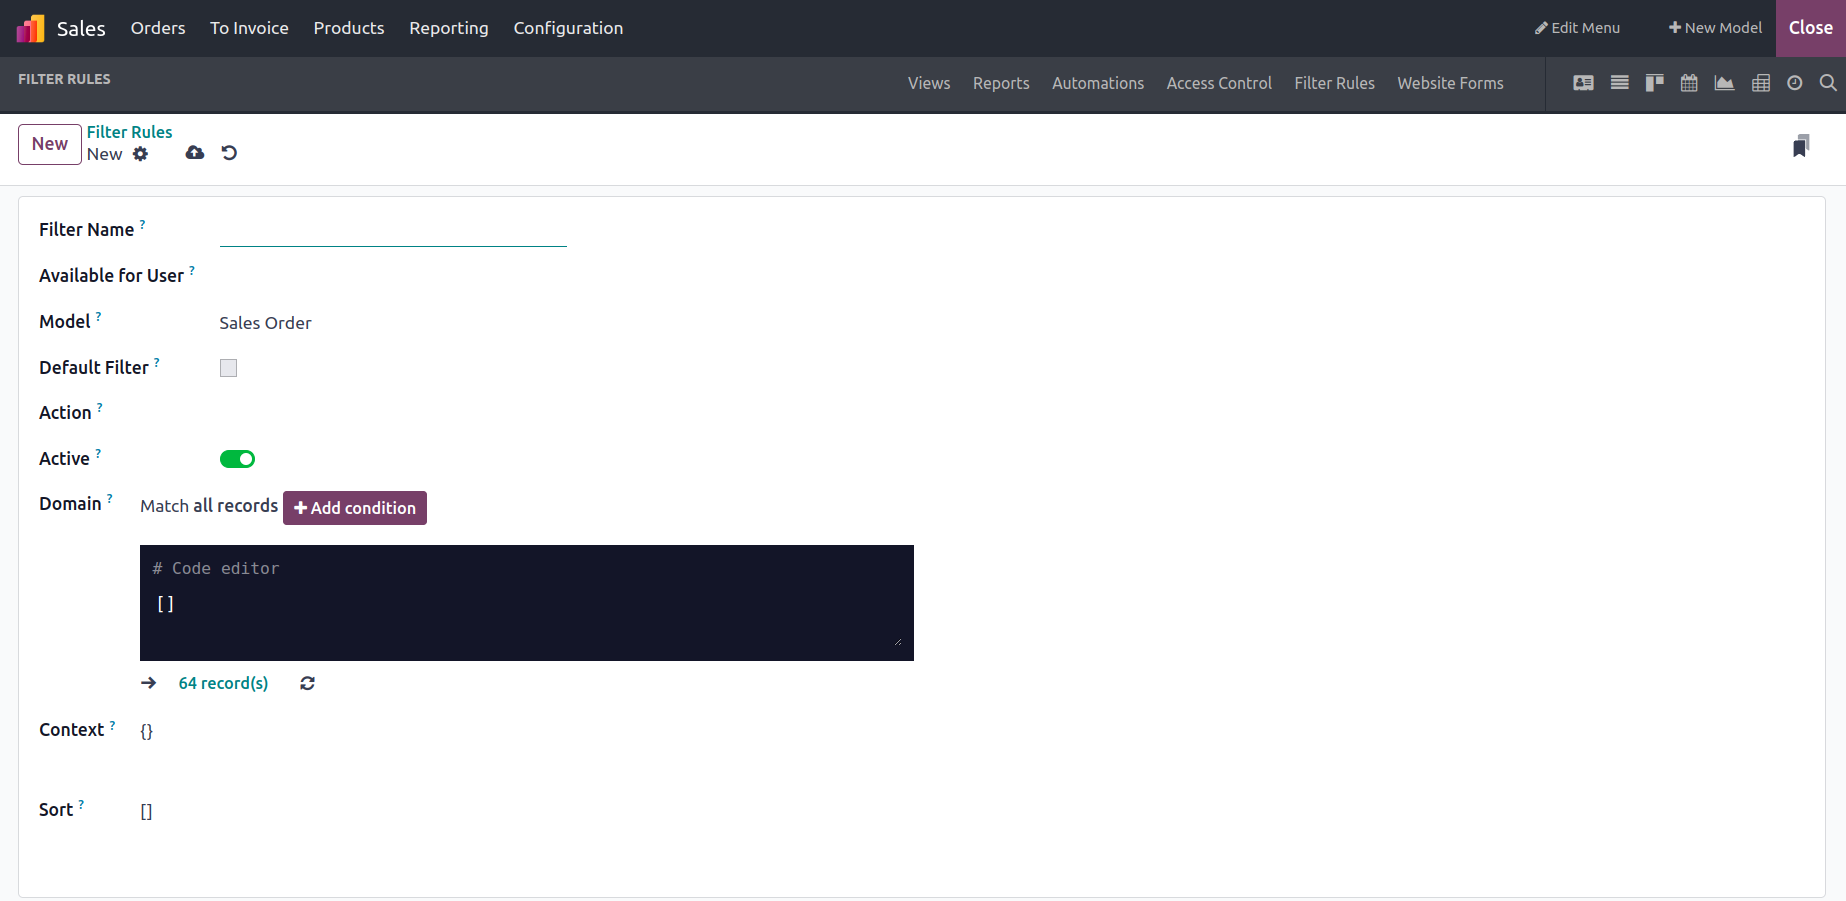
This will be helpful for the operation of the application and setting the Filter. All the Filter Rules generated in the Odoo17 platform for the new applications being developed may be adjusted and removed based on the needs by visiting the same menu.
As of right now, we will be able to comprehend the Filter Rule menu, which is present on the Odoo Studio module webpage and is a remarkable tool in relation to the aspects of the new applicant regarding the specific tools to the following section where the Website, the menu of the Odoo17 Studio module is being described.
Website Forms
It is vital to integrate the applications used in business management operations with the firm websites. The aspects of creating applications are covered by the Odoo 17 Studio module. The website integration is automatic, and the application's specific forms of operation can be specified. which can be characterized as essential elements of any business process. All of the forms that are currently being processed with each application model will be described here. Additionally, from here, new Forms can be made.
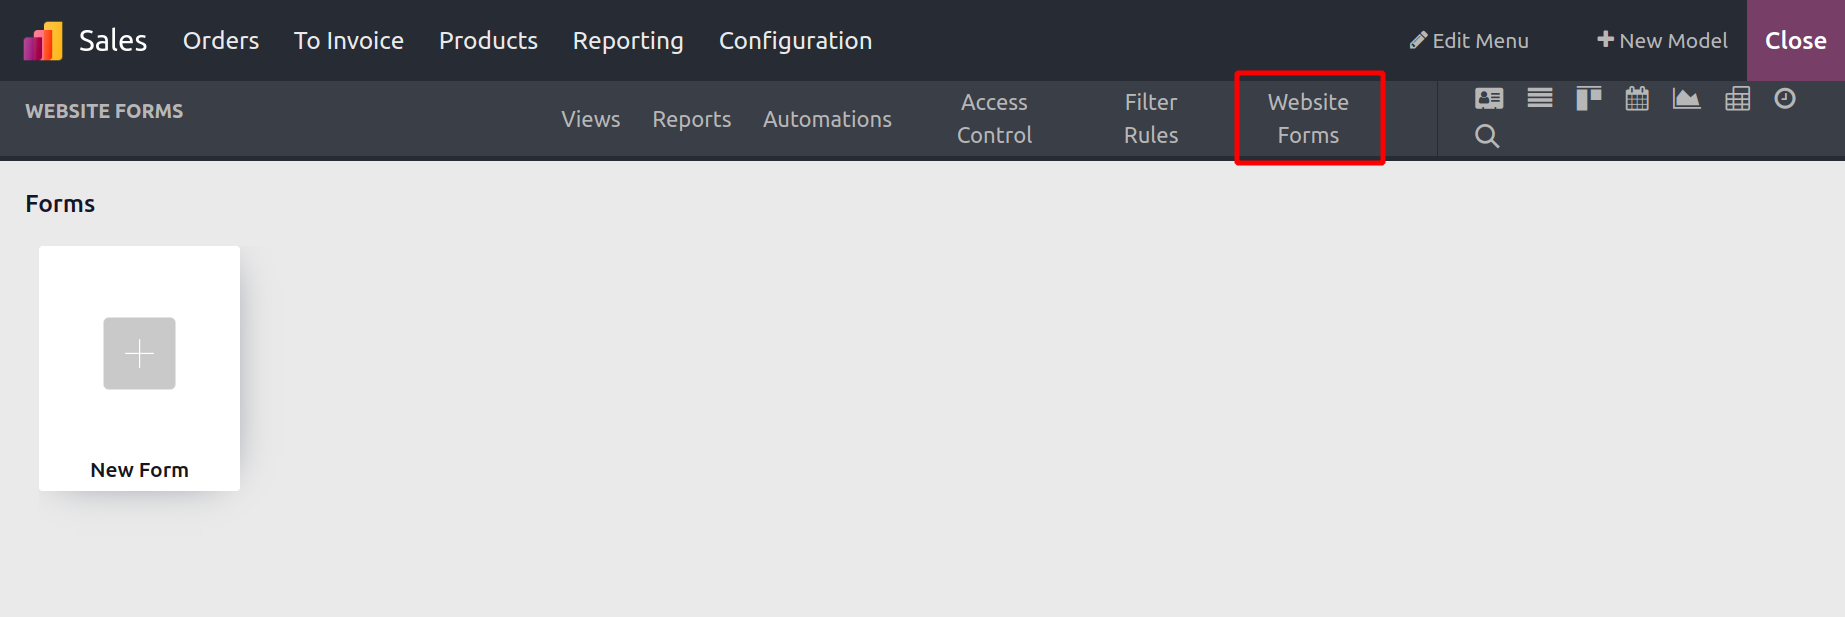
You can choose the New Form option to build a new form. This will take you to the business website, where a default form will already be set as seen in the following image. You will also have access to a menu for changing the webpage. The tools in the Website Builder tool are accessible to everybody.
In order to establish the Form on the website application, let's first briefly define the Odoo17 Website Builder tool.
An upcoming product, the Odoo17 Website Builder, will use a no-code method to handle the business' website construction needs. You can create remarkable web pages that are both instructive and user-friendly by dragging and dropping the unique modules of operation into the website's mentioned web pages. Additionally, there is a unique editor tool where the website's creators can add more features. The firm and its online sales operations will benefit from the ability of the eCommerce website to be operated from the same homepage.
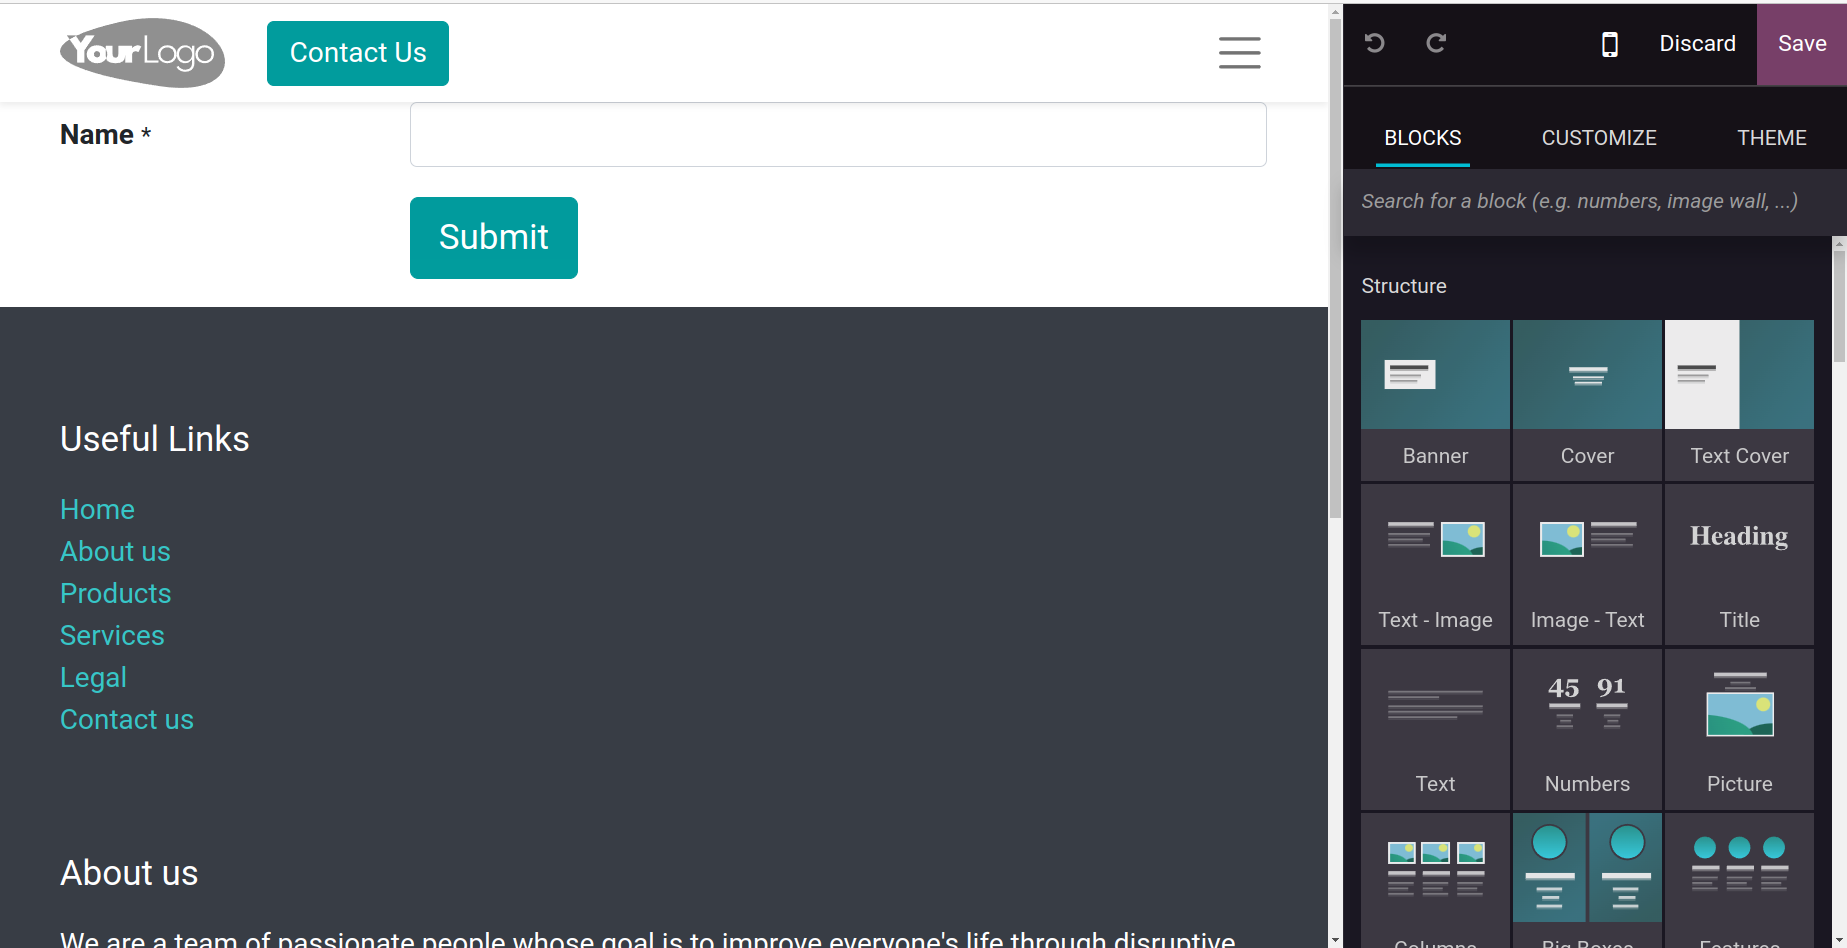
The Odoo17 website builder's Form block, which is provided, allows for the building of unique forms that are useful for the application's operations on the website. Additionally, these forms can be utilized to specify consumer inquiries, which is helpful in generating leads for fresh company chances.
A useful tool for defining a distinct menu where all of the Forms of a web page of an application may be defined is the Forms menu. Additionally, it's the last option pertaining to the unique capabilities offered in the Odoo 17 Studio module, which will support swiftly developing apps. Let's now comprehend the Odoo17 platform's Approvals module, where the Studio module defines the functions of the company's available Translate View menus.
To sum up, the Odoo17 Studio module is a fantastic tool that will give you important operational and functional aspects, allowing you to bring in customized tools that can be designed to meet your demands. Furthermore, the Odoo17 studio module is a remarkable and obvious instrument in business management with Odoo17, as it has the power to update both the configurational and current modules of operation.
This chapter will only provide an overview of the studio module. From module creation to fine-tuning views, generating reports, configuring settings, and implementing automated workflows, the Studio module empowers users to tailor their Odoo experience to precise business requirements. Read more comprehensive explanation in the Odoo 17 Studio book.