Odoo CRM General work flaw
The open source platform Odoo ERP regularly updates its features and options for better administrations. In 15 the version Odoo included more advanced features and also made the platform more user-friendly.
The operations in the Odoo CRM are undertaken with the assistance of the pipeline operations where each of the records is managed in different stages based on the status of the operations. The status can be created and customized based on the company requirements. The data in the new stage is considered as leads or new. If the quotation is sent for qualifying the lead, it will be represented in the Qualified ones. Then the possibilities of the opportunity can be analyzed in the Preposition stage, and finally, the successful business opportunity is presented in the Won stage.
Let us go through each options included in the Odoo CRM module
We have a look into the Dashboard window of the CRM module. The image of the CRM home dashboard window is given below.
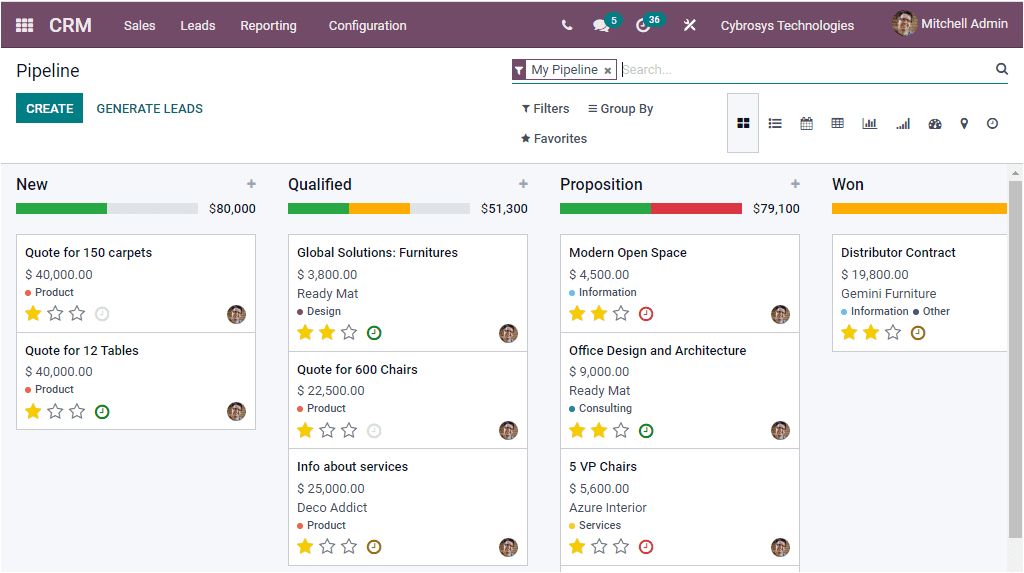
Here in this Home Dashboard window, you can view four different tabs named Sales, Leads, Reporting and Configuration. Under each of these tabs, Odoo nourishes with so many options and these options can be viewed by clicking on the respective tab. The window that we depicted above is the My Pipeline window. This window can also be accessed under the Sales tab available. Odoo depicts the Pipeline window in various views. Here we already viewed the Kanban format of the Pipeline window. In the Kanban view, the pipeline activities are displayed in different stages such as New, Qualified, Preposition, Won as we see in the above screenshot. Based upon your business requirements, you have the provision for adding more stages. For creating new stages, you can make use of the option Add a Column.
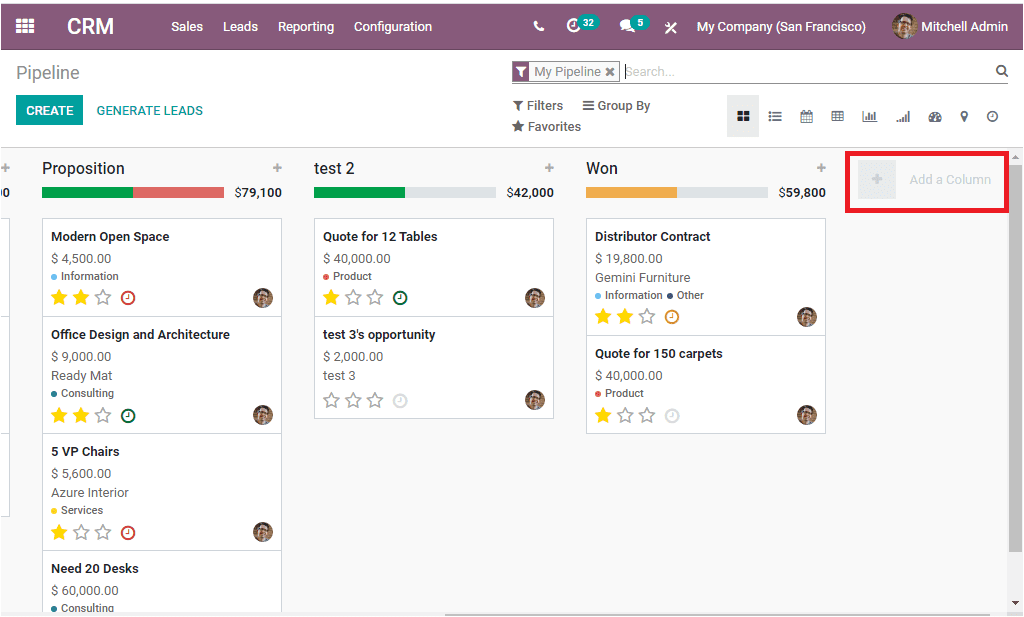
When you press on the Add a Column button, you are allowed to add a column title for the new stage and then you can click on the ADD button. In case if you want to delete the stage, you can press the escape button to discard the newly created stage.

Each of the stages in the CRM pipeline includes two configuring options. Which are the Settings button and Quick add button. The quick add button denotes the +icon available on the upper right corner of each stage defined. Just near the Quick Add button, you can access the Settings button. The settings option includes a drop down menu which contains the following options such as Fold, Edit Stage and Delete.
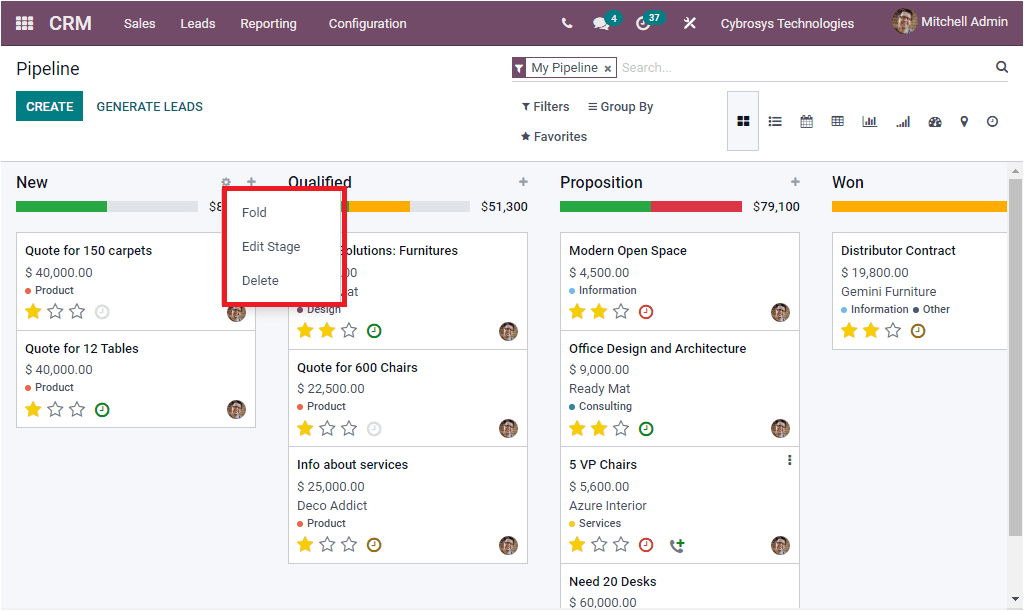
The Fold option allows you to fold the respective stage as shown in the below image.
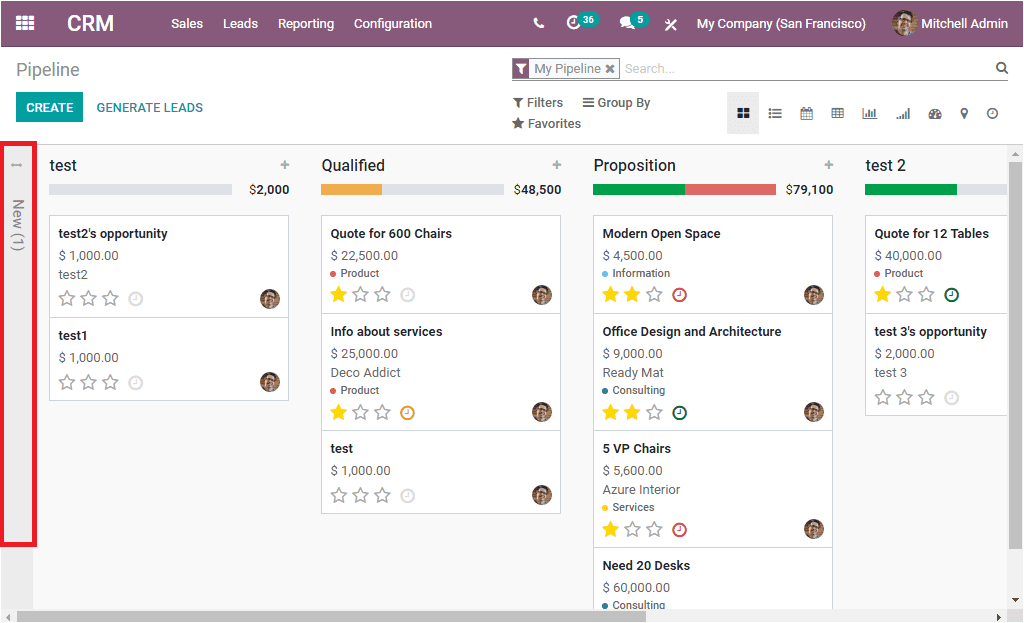
In the above window, you can see that the ‘New ‘ stage in the pipeline is now Folded. This option is very useful when we have so many stages in the pipeline or when there are no records in the stage to display. If you click on the Edit Stage button, a pop up window will appear as shown in the below image where you can make editing for the stage.

Here in the pop up you can provide the stage name and can enable or disable the options such as Is Won Stage? , Folded in Pipeline. Moreover, the Sales Team can be mentioned. So that the specific team that uses this stage is only able to see or use this stage. Finally you can enter the internal requirements for this stage. This option will allow you to give your team the requirements to move an opportunity to this stage. So that it will appear as a tooltip over the respective stage’s name. After completing all these steps, you can save the details by clicking on the SAVE button.
Now the last option available in the settings menu of each of the stages is the Delete option. This option allows you to remove the stage.
Now it is the time to click on the Quick add button to view what is its purpose. Upon selecting this button, you will get a dropdown menu as shown below.
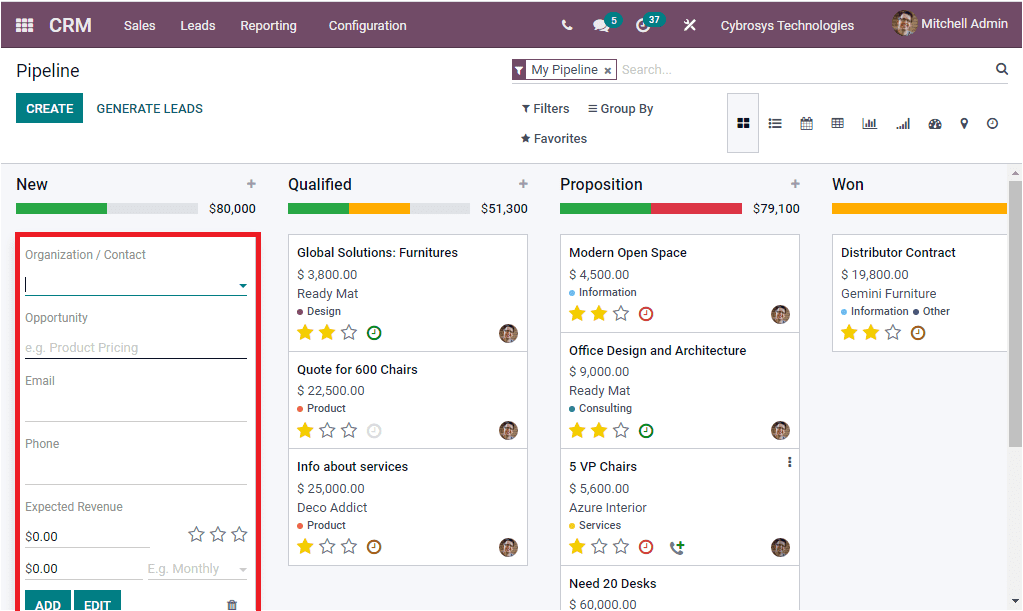
Here you can include all the required information on this lead or opportunity such as Name of Organization or Contact and other details such as Opportunity, Phone number, Email and Expected revenue. If the contact is selected from existing contact, the email and phone number will be auto allocated. The new records can also be created using the CREATE icon available.
The Expected Revenue of all opportunities in a stage can be seen on the right side of each stage as represented below.
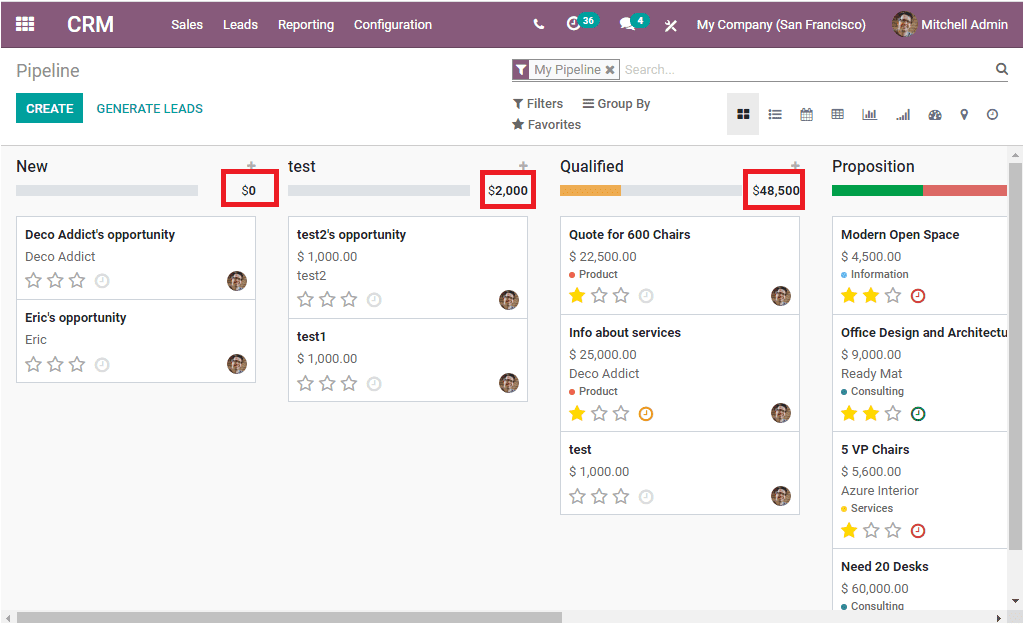
If the lead in the New stage qualifies for the next stage, then you can drag and drop to the corresponding or next stages and the expected revenue will be auto updated to that particular stage. The drag and drop option will make your operations more simple and effortless. Similarly, the priority of the opportunity can be marked as Medium, High and Very High with three star icons available. Additionally, the clock like menu available in each opportunity will allow you to easily schedule an activity. This option is the shortcut to create and schedule activities and the Odoo also gives you an exclusive menu for configuring activity types which will be discussed later.
Upon selecting the Clock menu, you will be displayed a pop up as given below.
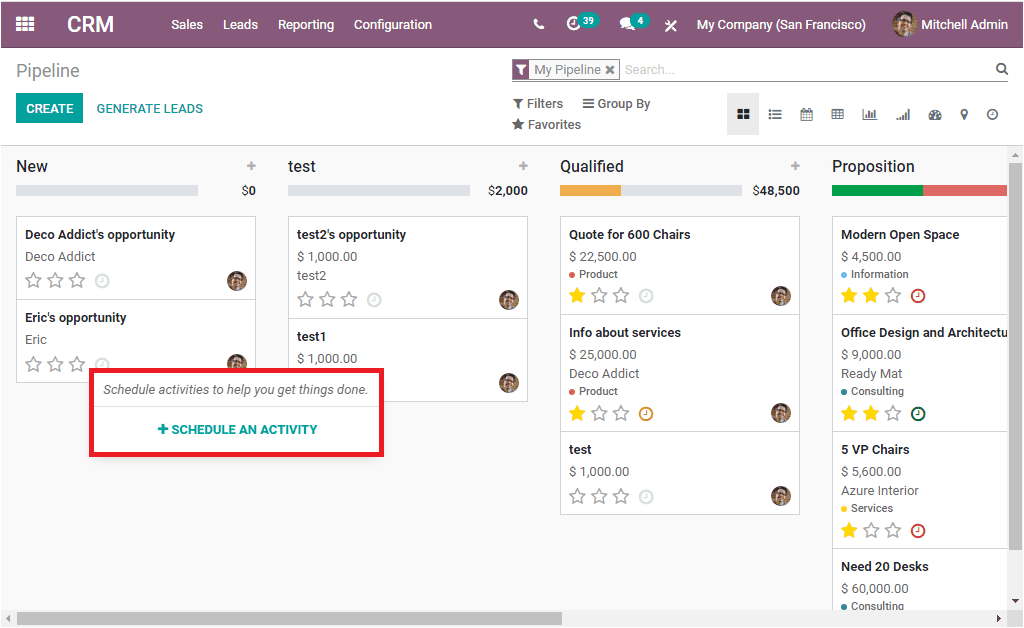
Now you can click on the SCHEDULE AN ACTIVITY button for accessing the window.
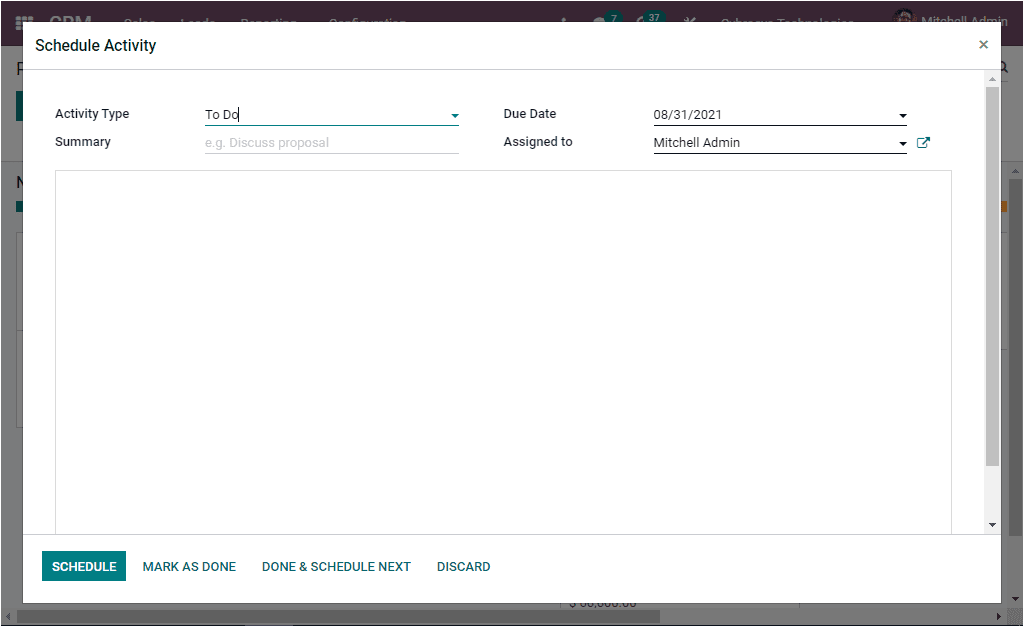
In the Schedule Activity window, you can allocate the Activity Type, all the activity types you configured in the activity setting will be displayed in the dropdown menu. After allocating the Activity Type, you can provide the Summary, due date, and mention the Assigned person. The description can be given in the box. After providing all the data, you can click on the SCHEDULE button to schedule the activity. You are also able to view the other buttons such as MARK AS DONE, DONE AND SCHEDULE NEXT, and DISCARD.
In the CRM pipeline the Schedule an Activity icon is displayed in different colors. The red color indicates the Overdue activities, the green color represents the planned activities and brown color indicates the activity scheduled for today. If activities are not scheduled yet, it will display as colorless.
Each of the records can be separately viewed by clicking on the respective record. Then you will be navigated to the respective window. For example if you select the ‘Quote for 150 carpets’ record, you will be depicted with the window as shown in the below image.
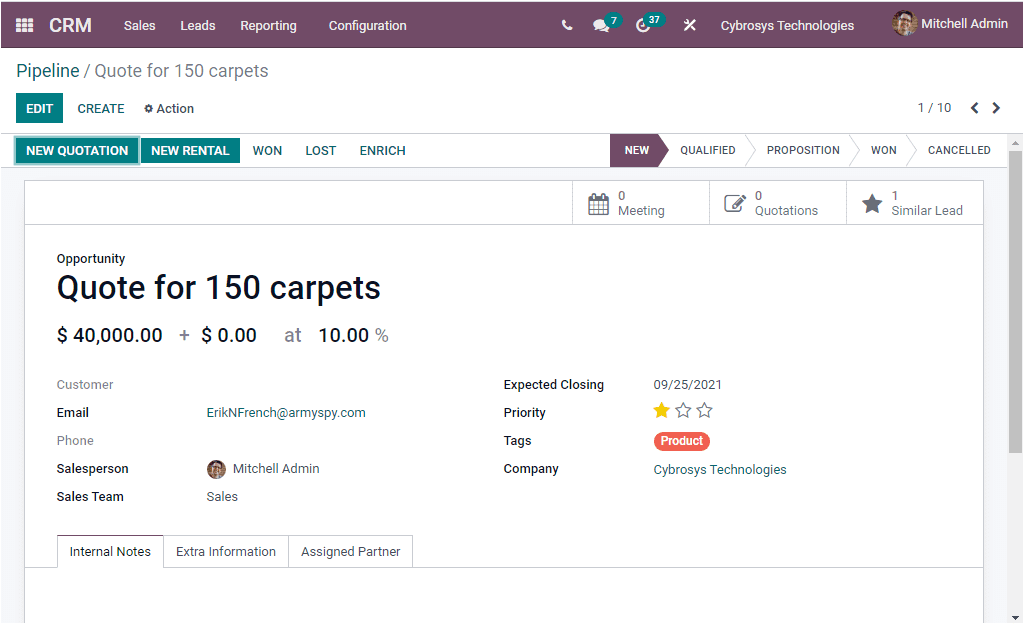
Here you can view all the given information. You can also edit the details by selecting the Edit option available in the top left corner. The stage of the opportunity is displayed in the right top of the window. In the left part of the window, you can view the options such as NEW QUOTATION, NEW RENTAL, WON, LOST and ENRICH. Moreover, some smart buttons also will display in the window for easily accessing the data such as Meeting, Quotations, and Similar Lead. These smart buttons may differ based on the application you have installed.
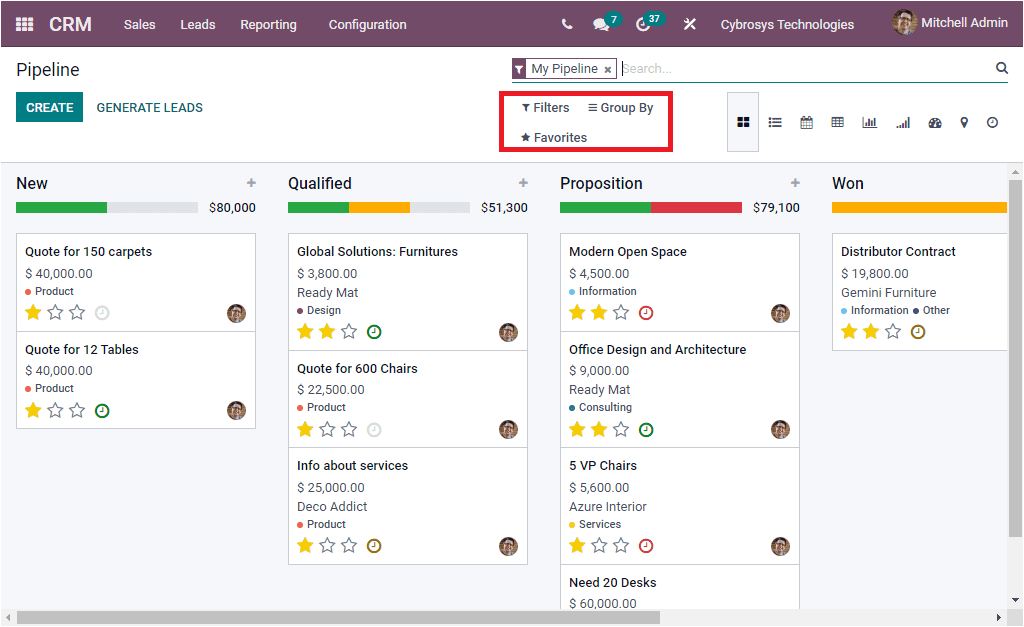
Back to the Pipeline window, where you can view the Filters, Group By, Favourite Search options on the top right side of the window. Odoo offers these options for almost all windows. These are the sorting functionalities which will allow you to Search, sort out, or re- group data with default and customizable options available.
As we discussed all the important aspects in the Kanban view of the Odoo 15 CRM Pipeline window, Now we can discuss the List view of the CRM Pipeline window. Before that let us have a look at the display image of the various Pipeline views available in the 15 CRM enterprise.
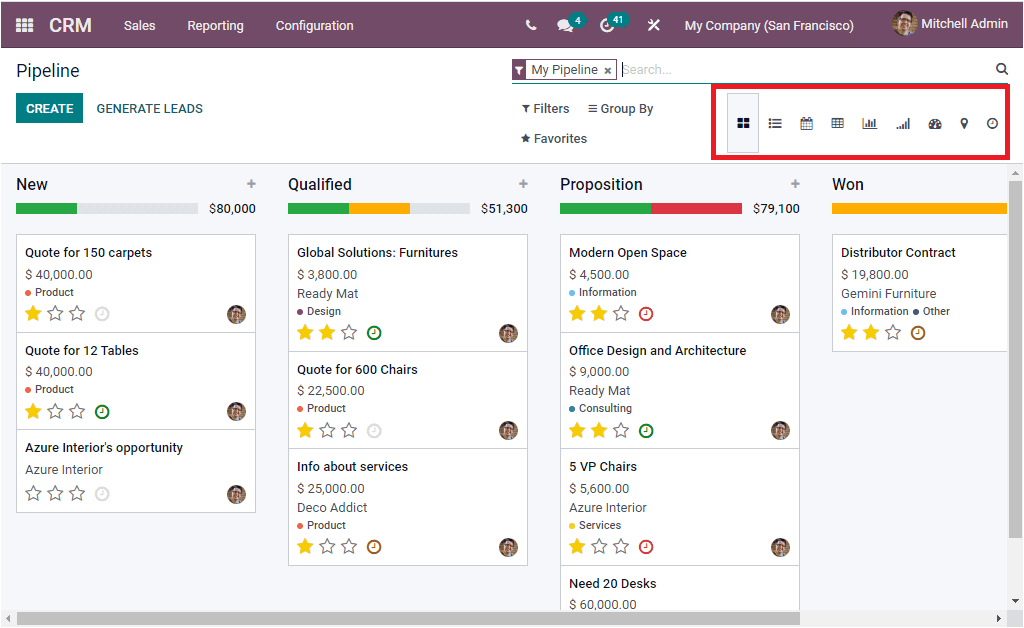
In the above window, the highlighted icons represent each of the views such as Kanban view, List view, Calendar, Pivot, Graph, Cohort, Dashboard, Map and Activity views respectively.
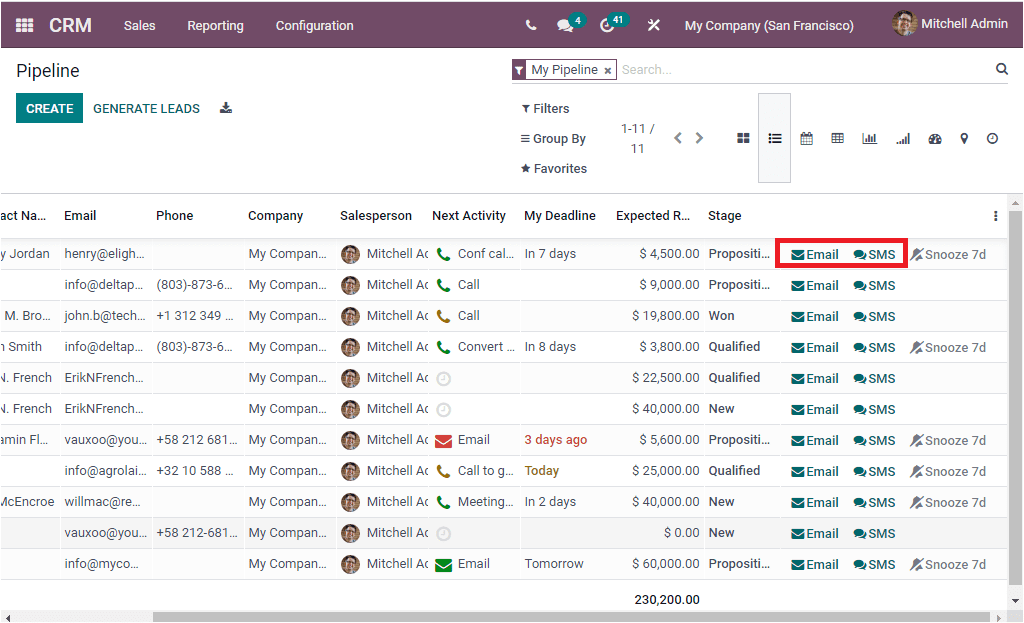
In the List view of the CRM Pipeline window, you have a clear view of your pipeline activities. All the created pipeline activities are listed along with the details of the Name of the opportunity, Contact Name, Email, Phone, Company, Salesperson, Next Activity, My Deadline, Expected Revenue, Stage. Each of the data in the window can be viewed by selecting the respective one as shown in the Kanban view. If you want to chat with the respective sales person, you can click on the profile photo. Then you will get a chatting widget as shown in the below image.
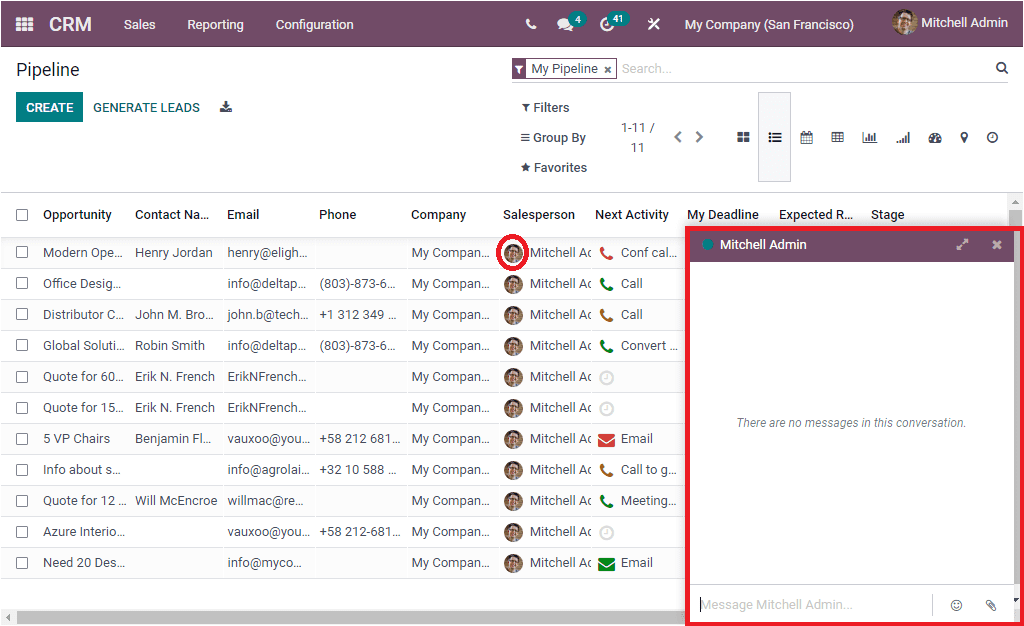
Moreover, the email can be created and sent by clicking on the Email button available. In the same way the SMS text message can be sent by clicking on the SMS icon available.
The Pipeline creation form will open when you click on the CREATE icon which can be seen on the upper left corner of the window. The model of the Creation form is given below.
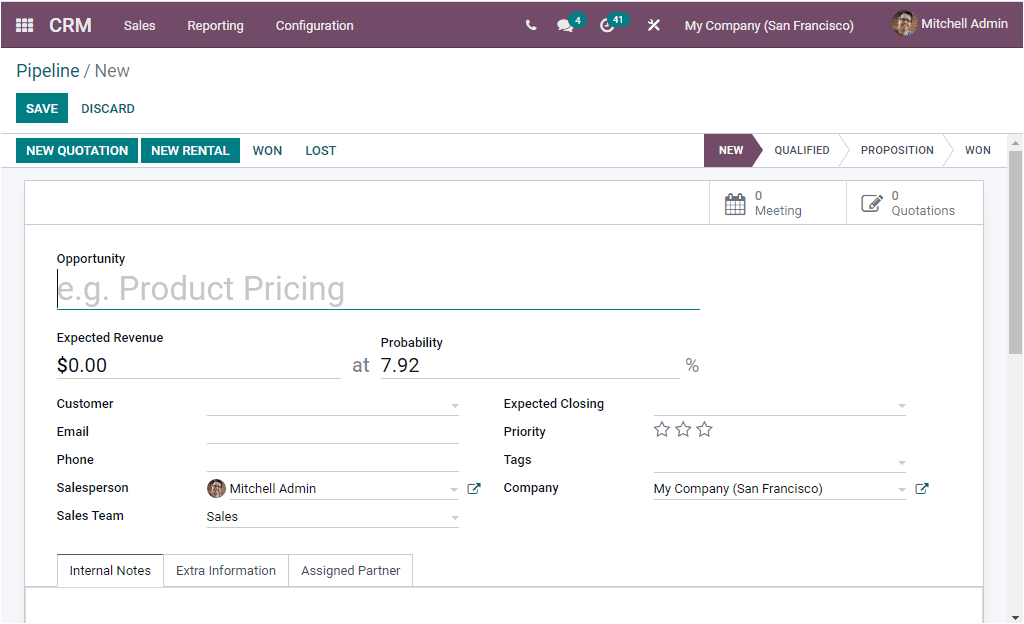
In this window, you can mention the Opportunity name and then you can allocate the Expected Revenue and Probability in percentage. In addition, you can specify the Customer Name, Email, Phone, Salesperson and Sales Team. The Expected closing date field means the estimate of the date on which the opportunity will be won.
Additionally, the Priority can be set medium, high or very high.

The tags can be given to easily identify the record and the Company name will be auto allocated. Under the Internal Note tab, you can type the internal notes if any. In the Extra Information tab, you can allocate the Contact information such as Company Name, Address, Website, Language and the Marketing information such as Name of the Campaign, Medium ( this is to identify the source of how this lead or opportunity have created such as Postcard, Email or Banner Ad etc) and the Source of the link. Additionally, you can give the Contact Name, Job Position and Mobile Number. Finally, the Miscellaneous info Referred By.
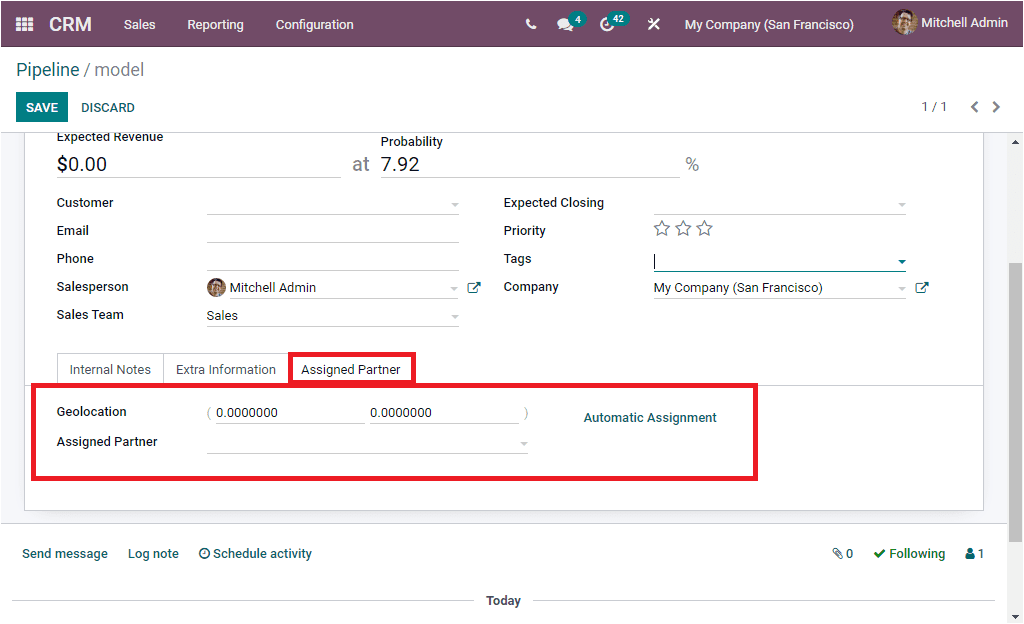
Under the Assigned Partner tab, you have the Geolocation, Assigned Partner, and Automatic Assignment options as shown below.
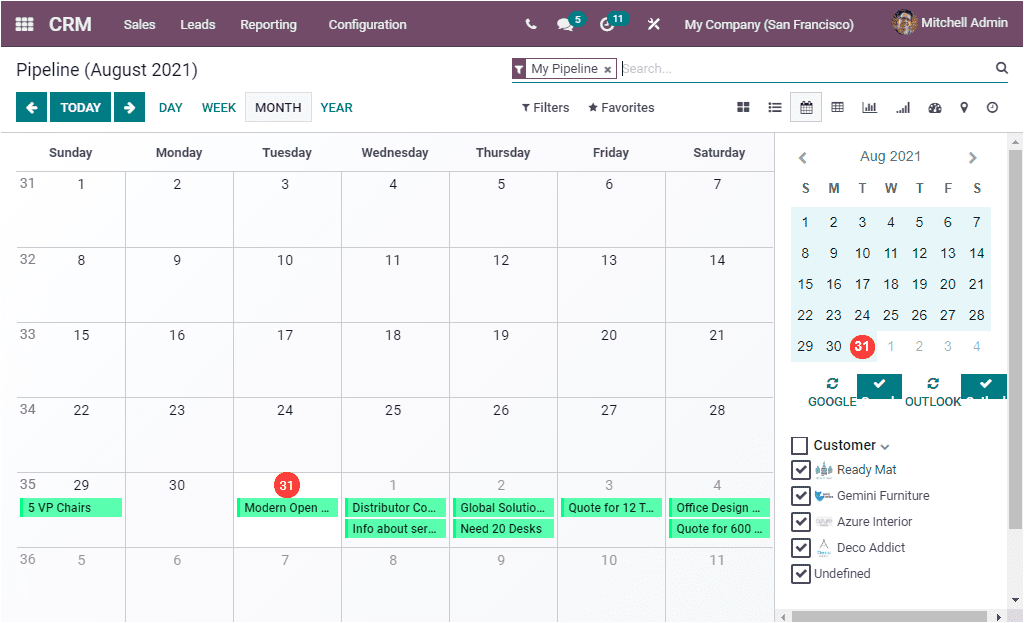
Now let us open the Calendar view of the CRM Pipeline window. This window will give you a clear vision on the pipeline activities in a calendar view.
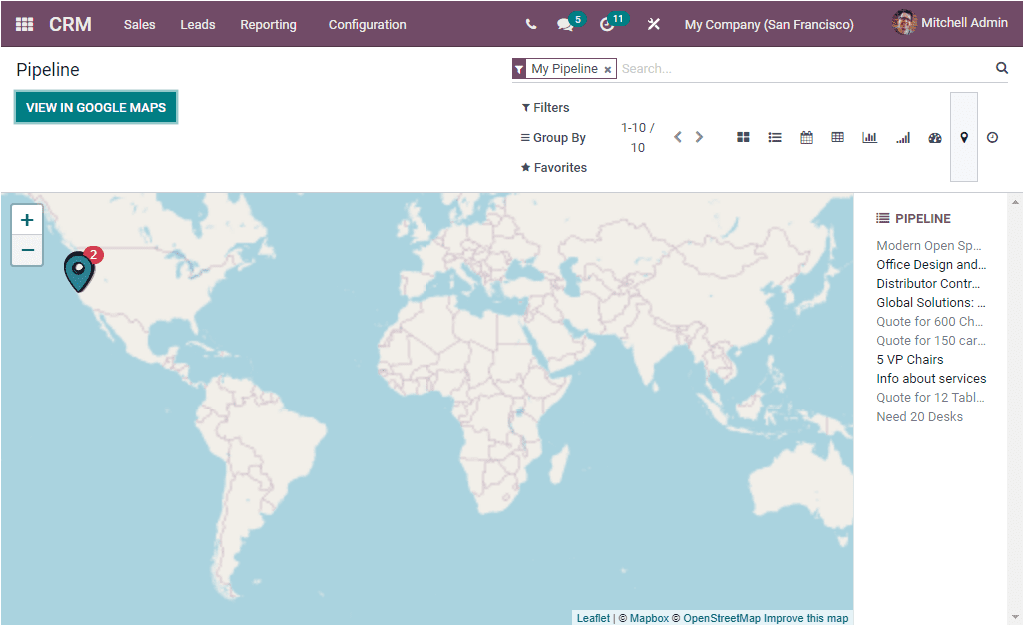
Moreover, you can view the Pipeline activities in google maps by selecting the view map icon available.
In the same way you can access the CRM Pipeline activities in other views such as Pivot view, Graph view, Cohort view, View Dashboard, and view Activity by clicking on the respective icon.
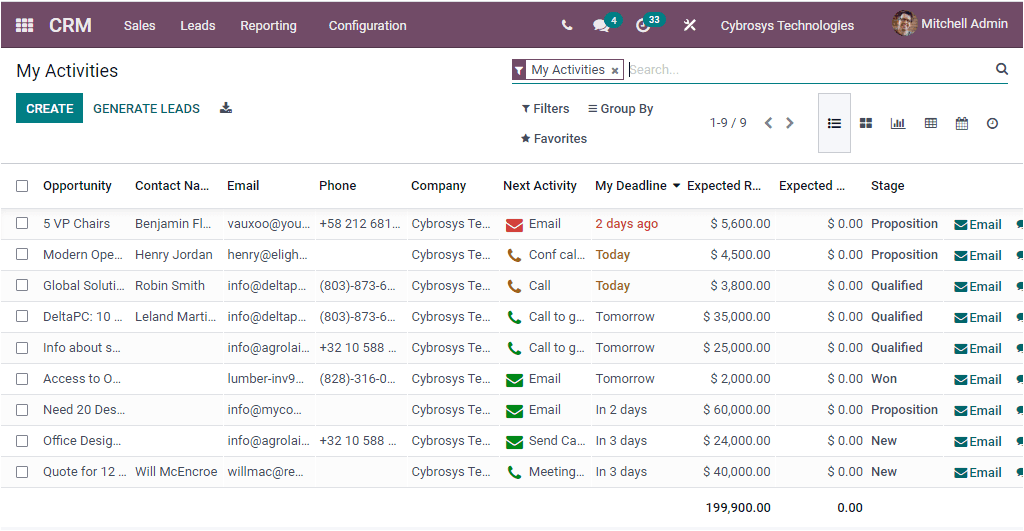
When we come to the My Activities window, you can view all your activities in the same way as displayed in the Pipeline window.
The next option available in the Sales Tab of the CRM module is My Quotations. Let us discuss the window in detail.
My Quotations
If the lead in the platform is turned into opportunities, you have an option to create quotations. This option is only available if you have installed the Sales module. The Odoo CRM module allows you to create quotations straight from the opportunity window. That means the Odoo system manages Quotations in the CRM module too, if you have installed the Sales module. The Quotations window can be accessed from the Sales tab available. The image of the Quotations window is depicted below.
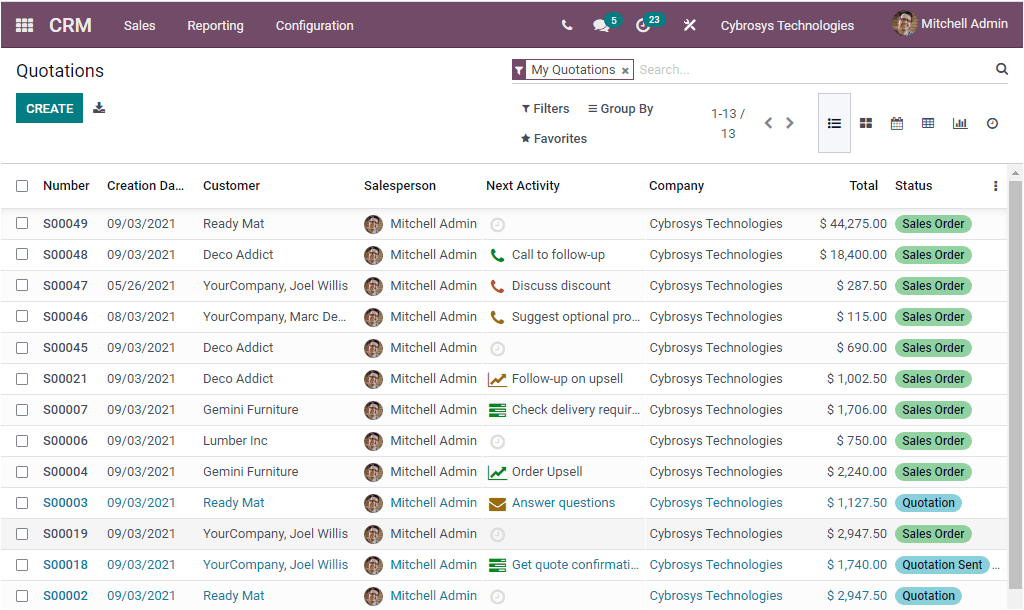
This window depicts all the predefined quotations and you also have the provision to create and manage new quotations. We can discuss it in detail in the Sales module. Moreover the Customers window and the Sales Teams window is also available in the CRM module. The Sales Teams and Customers window can be discussed later in the Sales module. The access to the sales team to the CRM module is a great advantage to the sales teams. The highly integrated nature of Odoo makes it possible.
As we clear on the Quotations window in the CRM platform and now let us discuss the Leads in the Odoo CRM.