Scheduling
By opening the Project module, you can view the schedule being arranged in the calendar form on the basis of the resource. It is very important to make the scheduling of the works based on different criteria. This will help in preventing overlapping and also makes sure that the works are completed on definite time. Having a schedule will establish a routine and thus creates a structure and discipline to the work.
In the Odoo 15 Planning module you can schedule the work on the basis of Resources, Role, Project and Sales Order.
At the displayed Schedule by Resource page you can view the calendar view in which the schedules of the employees are displayed. You can view the schedule of the day, week, month as well as of the year with the respective options. In case if the work is done in a systematic repetitive way, then you can select the COPY PREVIOUS button to copy the previous schedule to the calendar. Once planned the schedule can be published with the PUBLISH button.
With the filtering feature you can display the schedules which fall under categories such as Open Shifts, Open Shifts for my Rules, My Shifts, My Team, Human, Material, Published, Unpublished, Future, Past, Shifts in Conflict, To Schedule and Employees on Time Off.
In the same way the schedules can be grouped and displayed on the basis of Department, Resources, Role, Sales Order, Sales Order Item, Project, Tasks, Parent Task and Start Date.
Apart from all these, you can add new schedules to the calendar. Adding new schedules to the calendar will help in giving directions to the employees by assigning them their work and noticing them what activity must be done at the given time. To create a new schedule to the calendar, select the ADD button. A window named Open will be displayed, where you will have to select the shift of the schedule. These shift templates can be configured from the Configuration tab. By selecting the shift template, the details of the form will be automatically filled according to the template details. We will discuss this later. Otherwise you can create a new schedule without following the template. For that enter details such as:
Resource: Select the resource for which you want to make the schedule.
Role: Choose the role that needs to take up the schedule.
Project: Select the project under which the resource will be assigned.
Sales Order Item: Choose the sales order item which will be processed during the schedule.
Date: Mention from when to till the schedule will continue.
Allocated Time Percentage: You can mention the percentage of time the employee is supposed to work during the shift.
Allocated hours: Enter the time in hours which is permitted to the employee for the schedule.
Repeat: Enable the repeat option if the creating schedule must be repeated at certain intervals. After enabling, choose the intervals based on the number of weeks. It can be repeated forever, or you can mention until when.
Save as Template: Enable the option if you want to save the creating schedule as a template. By setting this as a template you can use the created schedule’s details for another schedule.
Notes: You can add any additional notes to the schedule at the space provided.
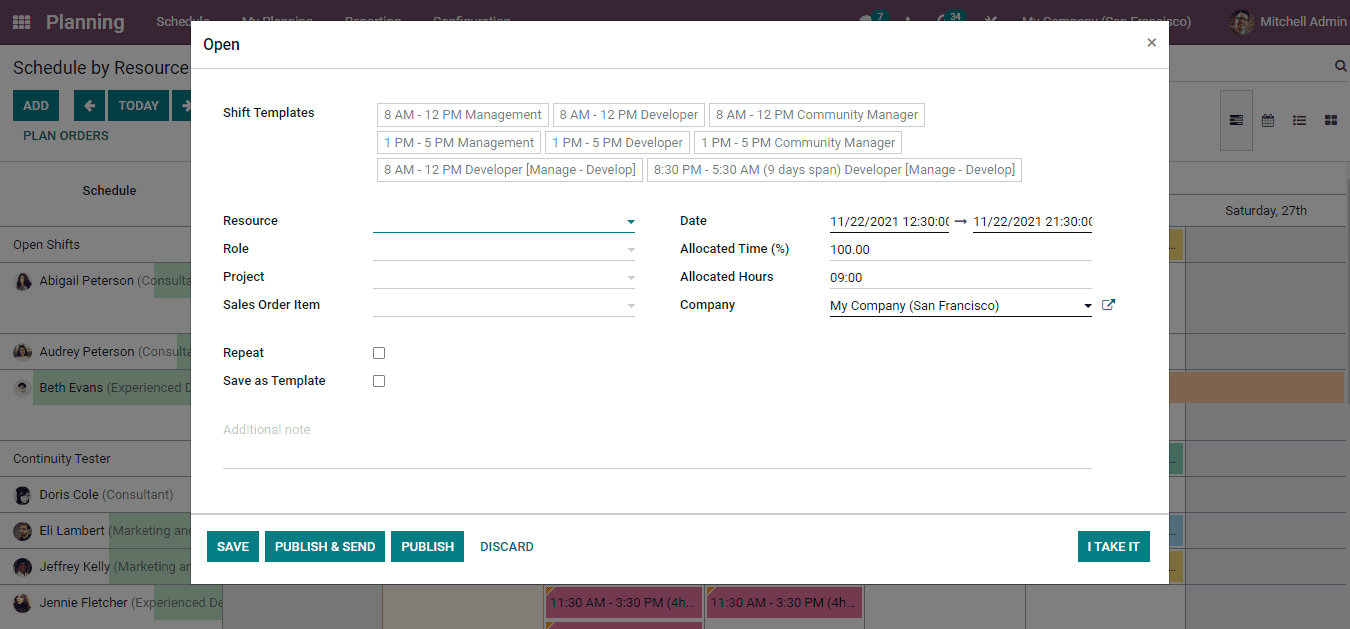
You can save the created schedule by selecting the SAVE button. The schedule can be published by selecting the PUBLISH button. In case you need to send the schedule as well as publish it, with clicking on the PUBLISH & SEND button you can do both.
In the same way you can create and add schedules by role, project and sales order.