Product Configuration
An effective Inventory management system must keep every aspect of the products being described in the platform. The Odoo Inventory management system includes a robust product management feature which will allow you to effectively track, manage, retain and configure your products in a most dynamic way. All the product and its details associated with the platform will be kept safe and allows you to add new products effortlessly.
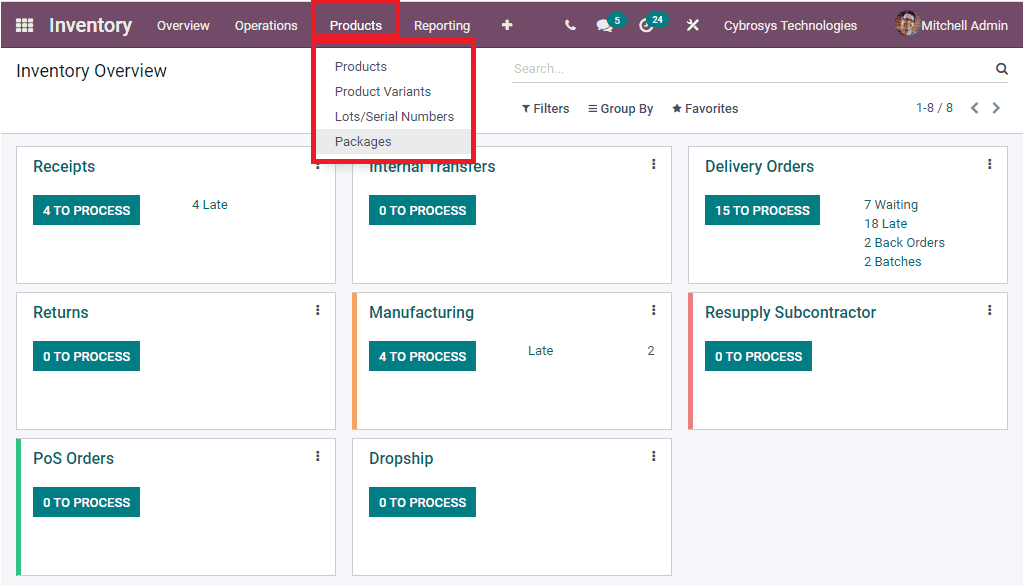
Products tab
For managing Product in a perfect way, Odoo invented a separate products tab with different sub menus. The sub menus included in the Products tab are Products, Product Variants, Lots/Serial Numbers, and Packages as depicted in the below image.
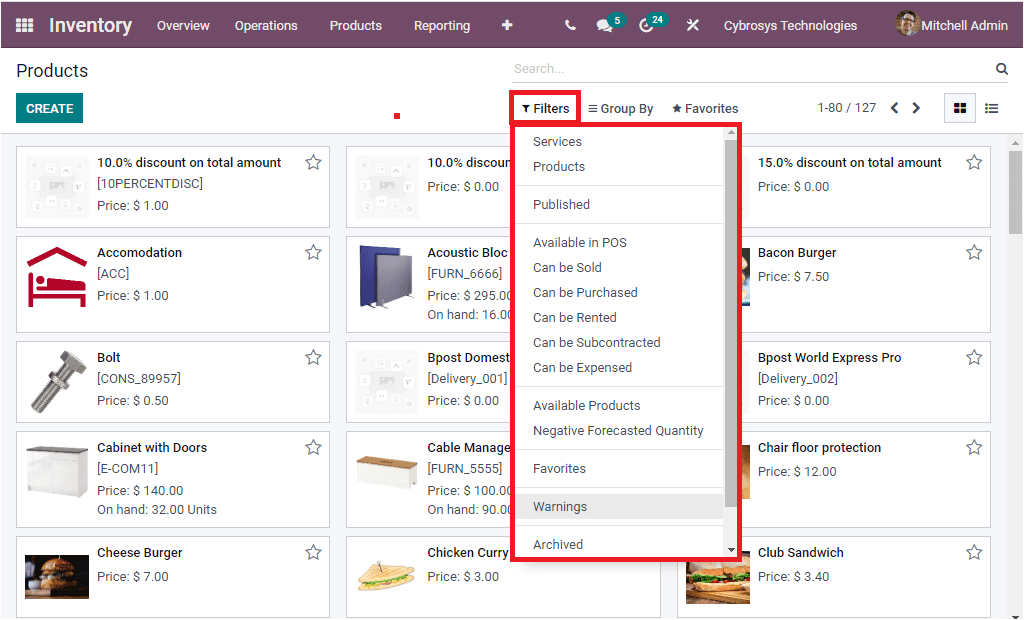
Upon selecting the Products menu, you will be entered into the Products window as depicted in the below screenshot.

Odoo designed this product window as a shelf to keep every product and its details that are already defined in the platform. The above window depicts the Kanban view of the Product window where you can view each product defined in the platform well arranged along with its details and image. In each of the Product descriptions, you can view a star icon that is called Favourite. This functionality allows you to mark or highlight your favourite or important products. Moreover, the Search bar available in the window will help you find out your specific records easily. Moreover, you can apply various default as well as custom made filters for quickly accessing your important or required records. The default filtering options available in this window are Services, Products, Published, Available in POS, Can be sold, Can be purchased, Can be Rented, Can be Subcontracted, Can be Expensed, Available Products, Negative Forecasted Quantity, Favourites, Warnings and Archived. You are also able to apply custom filters by clicking on the Add Custom Filters button available.
Likewise you can also arrange and view your products in groups based upon their common factors. The Group By button allows you to arrange your products in different groups. Here also you can apply default as well as customizable grouping functions. You can group your products based on the Product Type, Product Category, POS Product Category by default. Additionally, under the Favourites tab, you have the features such as Save current search, Import records, Link menu in spreadsheet, Add to my dashboard, and Add to Google spreadsheet.

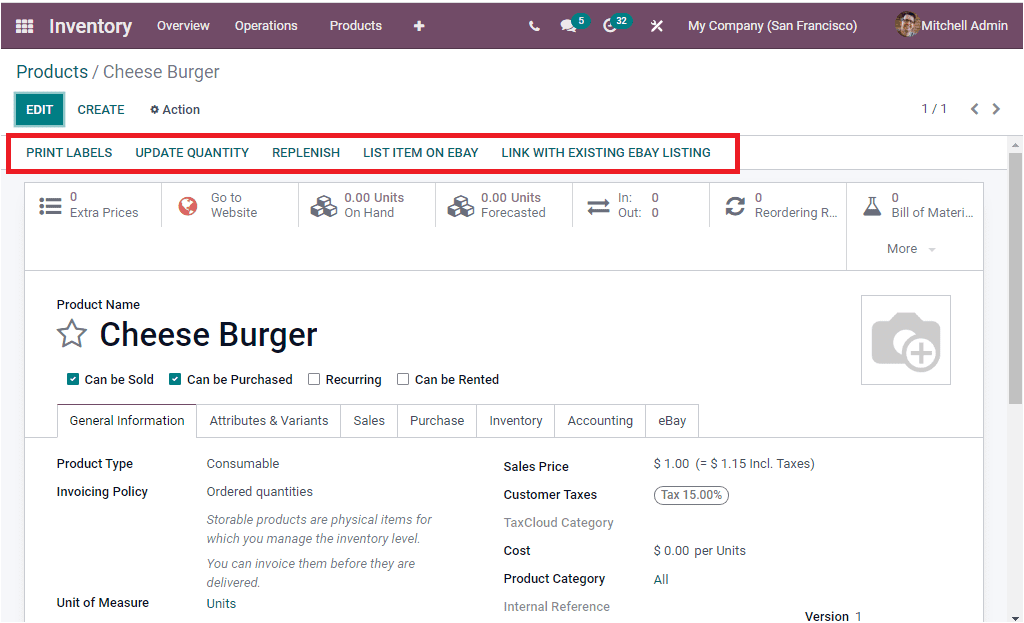
For viewing each product in the window in detail, you can just click on the required product. So that it will be opened and you can view all the details and also can have the provision to make changes in details if required. You can do it by clicking on the EDIT button available. For example, if you want to view the Acoustic Block Screens in detail, you can select it. Now you will be displayed with the detailed window as depicted below.
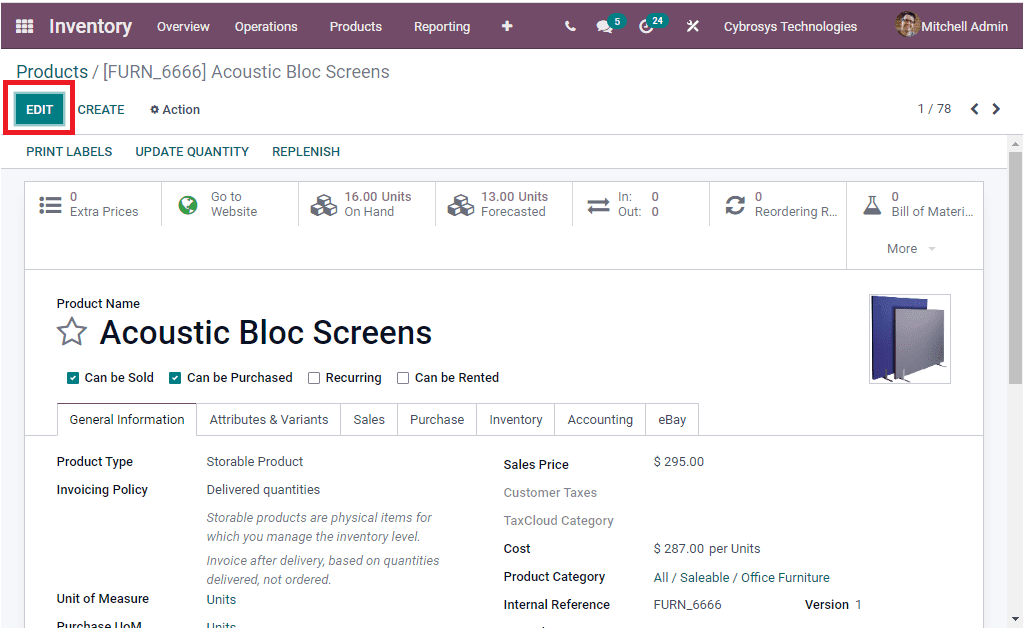
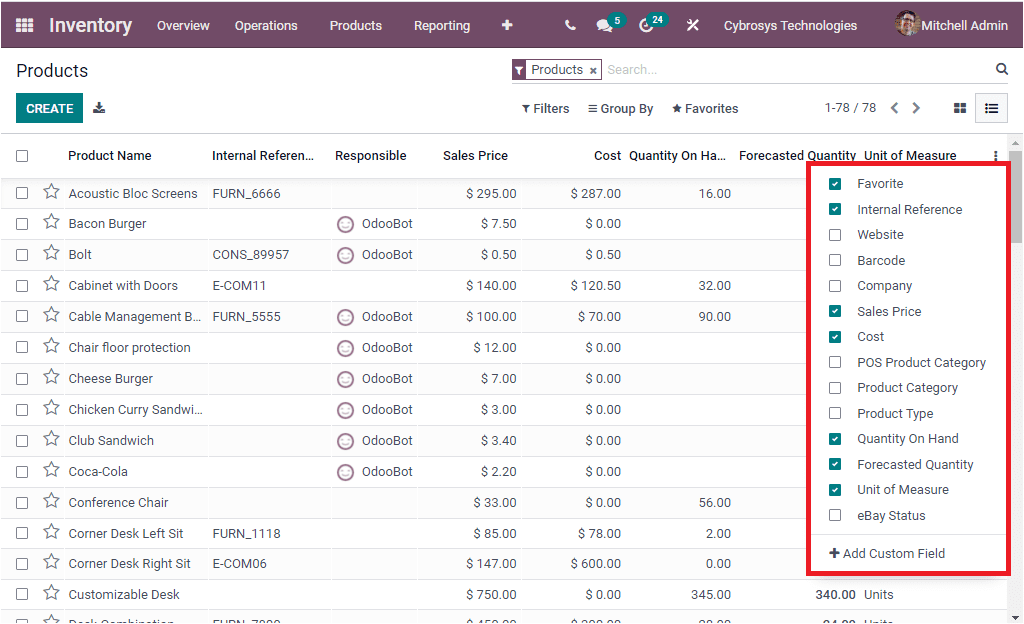
The EDIT option is highlighted in the window. The Odoo system that also manages the product window in a list format. The List view of the Product window can be accessed by clicking on the List view icon available on the top right corner of the window. The screenshot of the window is showcased below.
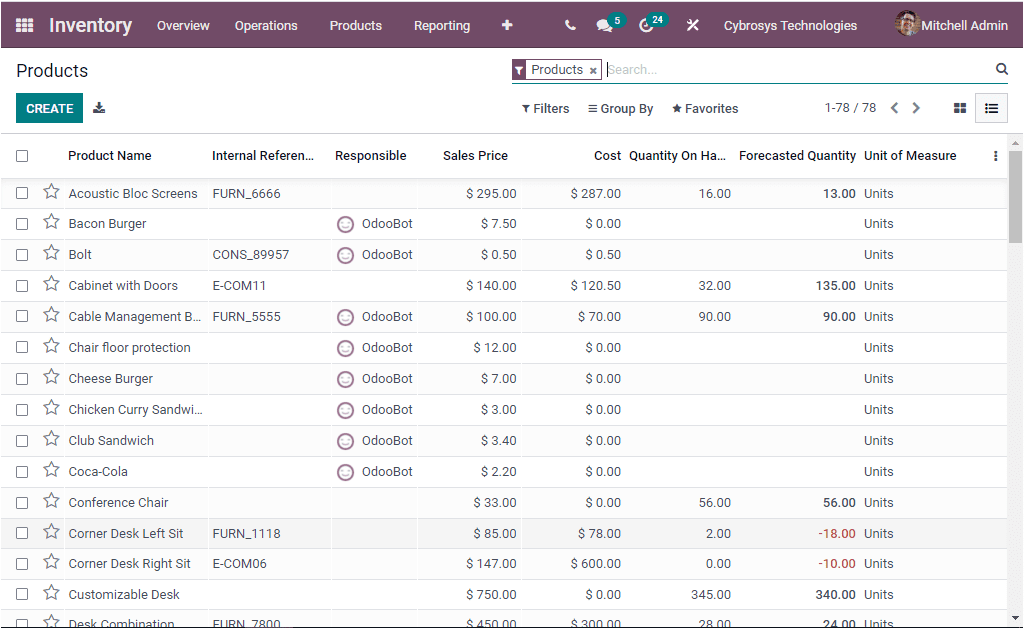
In the List view, the products are listed along with the Product Name, Internal Reference, Responsible person, Sales Price, Cost, Quantity On Hand, Forecasted Quantity, Unit of Measure. You are also able to include more fields by selecting the three dots available on the top right. Where you can view various default fields and you can also work with the Add Custom Field button for including more custom fields.
Now the CREATE button can be used for creating new products. The image of the product creation window is displayed below.
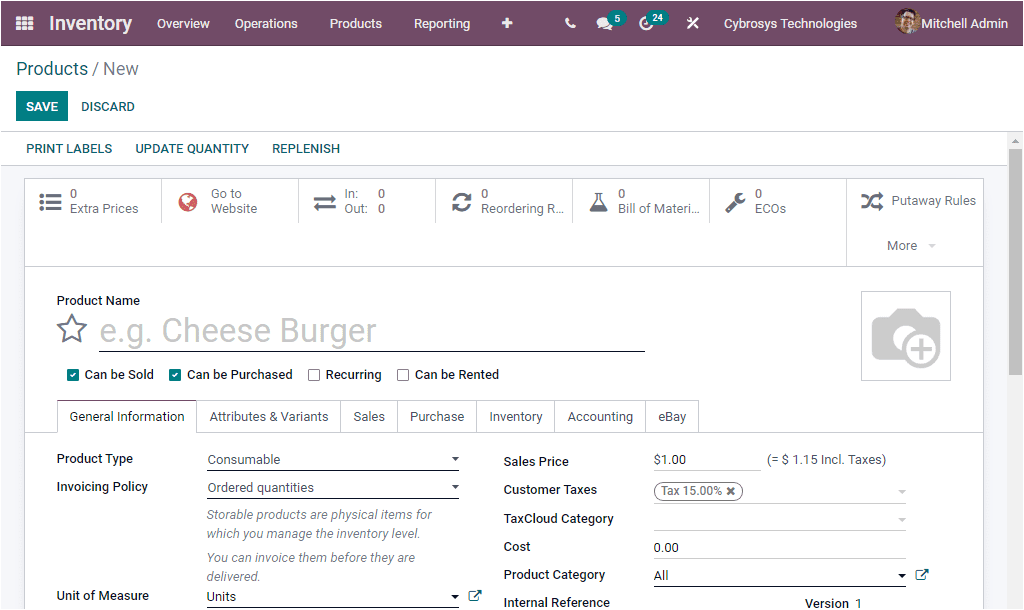
In this Product creation window, you can view various fields to fill. First of all you can allocate the Product Name and click on the star icon if the product is an important one. Then you can enable or disable the options such as Can be Sold, Can be Purchased, Recurring and Can be Rented. Then you can allocate an image related to this product in the space given. Under the General Information tab, you can mention the Product Type. This field is the most important field for the further processing of this specific product. In the dropdown menu, you can view various product types such as
- Storable
- Consumable
- Service
- Gift Card,
- Event ticket
- Event Booth
The Gift Card, Event Ticket and Event Booth are the new options included in the Odoo 15 version. Let us discuss each of them below.
Storable Products are the product types which can be stored and these physical products are stored and that must be recorded in Odoo system utilising the warehouse management feature and should be recorded the warehouse movement and delivery after confirming the sale. The delivery of this type of product is only possible if having sufficient stock. So storable products are always managed by Inventory to keep up the product stock by applying reordering rules intending to make sure the availability of the product stock. Also, when you fail to set reordering rules, the Odoo system will generate a warning message at the time of purchasing or creating a quotation by indicating that it does not have sufficient stock. So that you can easily identify the situations where you do not have enough stock.
Consumable Products are the product types which Odoo considers as having sufficient stock. In this type of products you are not required to manage inventory stock and not needed to manage on hand quantity and forecasted quantity of products. These products can be directly received from the supplier and can be delivered to the customer. That is, Odoo handles it as the product that always has enough stock.
Service Products in Odoo are the services. That is all the services that the company offers to the customers are considered as the Service products and it can be identified as the non material products. This service type will not be taken care of in stock operation and also it cannot be stored as a stock. But the assumption of the services as the product type will be helpful for easily operating your business.
Gift Card, Event Ticket and Event Booths are also considered as the Service products and it will be very useful product types while creating and defining the operations on the products and also it will be very helpful for sorting out the details or products.
After allocating the Product Type, you can specify the Invoicing Policy. You can either select Ordered quantities or Delivered quantities. You can select the Ordered quantities option if you want to invoice them before they are delivered. And also you can select the Delivered quantities option to invoice them after the delivery. In this case invoices are created based on the quantities delivered.
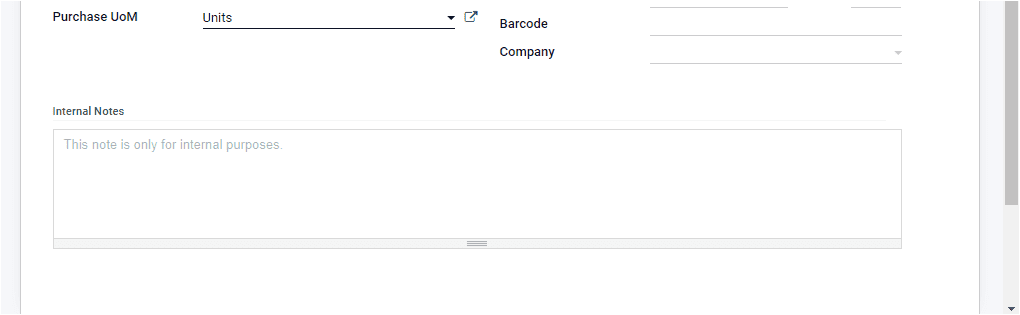
Moreover, you can define the Unit of Measure and Purchase Unit of Measure. The price at which the product is sold to customers can be allocated in the Sales Price field. Then the default Customer Taxes used when selling the product can be allocated along with the TaxCloud Category. The Cost and the Product Category, Internal Reference, Barcode, Company can be allocated. Finally you can provide an Internal Note in the given box.
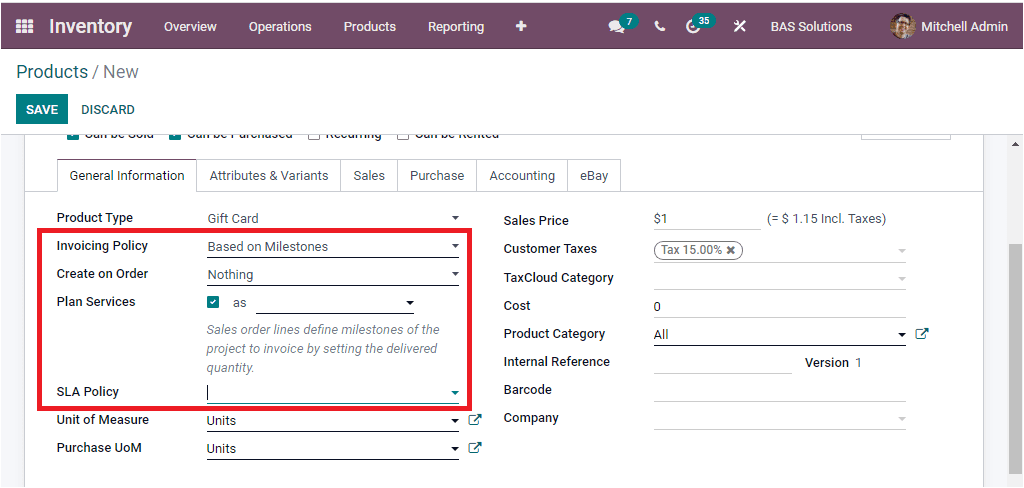
If you are choosing Service, Gift Card, Event Ticket, or Event Booth as the product type, the options for the Invoicing policy will be changed. Here you can view three invoicing policies. They are Prepaid/Fixed Price, Based on Timesheets, Based on Milestones. In the case of Prepaid/Fixed Price, invoice ordered quantities as soon as this service is sold. If you are setting Invoicing policy Based on Timesheets, the invoice is based on timesheets (delivered quantity) on projects or tasks you will create later on. In the case of Based on Milestones, Sale order lines define milestones of the project to invoice by setting the delivered quantity. Moreover, you can also view the additional fields such as Create on Order, Plan Services and SLA Policies options as highlighted in the below image.
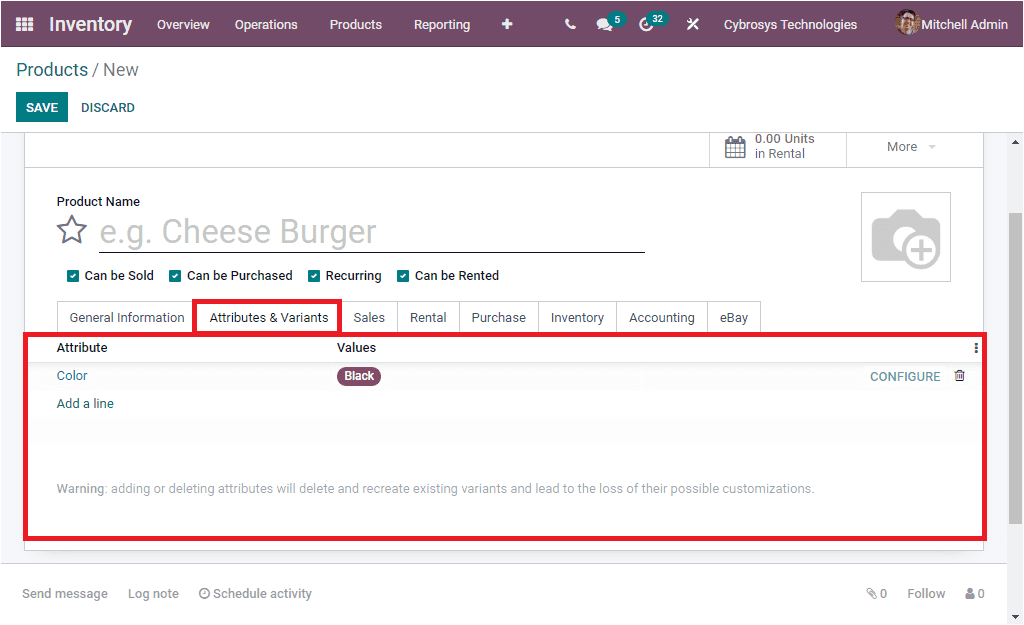
The Attributes & Variants tab of the product creation form will allow you to define the product attributes and values. This can be done by selecting the Add a line option available.
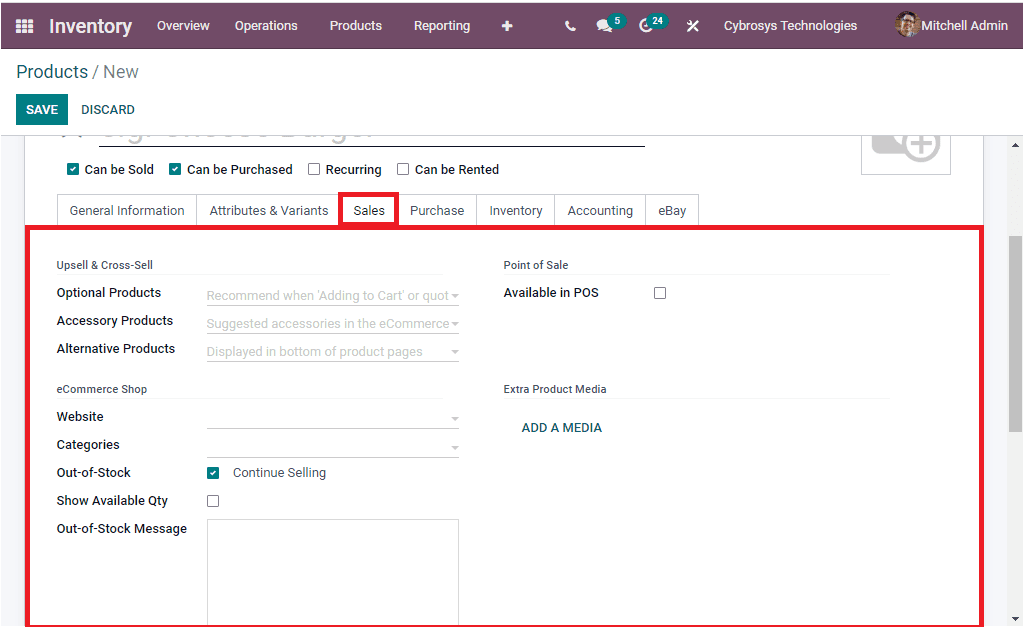
Under the Sales tab of the Product creation window, you can fill the fields available under the Upsell and Cross-sell section. First you can fill the Optional Products field where you can allocate the optional product associated with the product if any. Then you can provide the Accessory products and Alternative Products details. Optional products are the products that can be bought together with the main product which would be the product directly related to the main product. The optional product will improve the usages and operations of your main product. This is considered as the cross selling strategy. For example, if you are selling a laptop, you can offer warranty, OS software,and other extra components to them. If we consider Accessory products, it is the accessory products suitable for the main product. For example, you can offer, keyboard or mouse along with the main product Laptop. When we come to the case of Alternative products, it is the products in the same category with different attributes. That is the color, material, size,etc may vary. Then the eCommerce shop details such as Websites (if the platform manages multiple websites), Categories can be allocated. If you assign the categories, the product will be available in each mentioned eCommerce category. Moreover, you can enable or disable the Out-of-Stock field. Show Available Qty field can be enabled along with quantity. In addition, the Out-of-Stock message can be mentioned in the box given. Furthermore, you can enable the option Available in POS if you want this product to appear in the Point of Sale.
Then you have the Extra Product Media where you have the option to add a photograph of the product or can upload an URL. For creating this record, you can click on the ADD A MEDIA button. Here you can create a record by clicking on the ADD A MEDIA button. With this action you will be depicted a pop up window for creating Extra Product media as shown in the below screenshot.
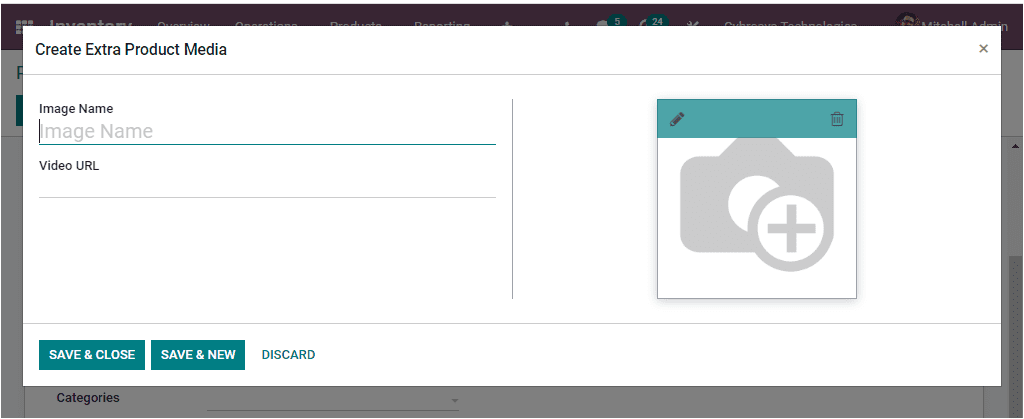
In this pop up window you can include the Image Name and the Image along with the Video URL. The final field you need to fill under this sales tab is the Sales Description. Here in this field, you can give a description of the product that you need to convey to your customers. This description will be copied to every Sale order, Delivery order, and Customer Invoice/Credit Note.

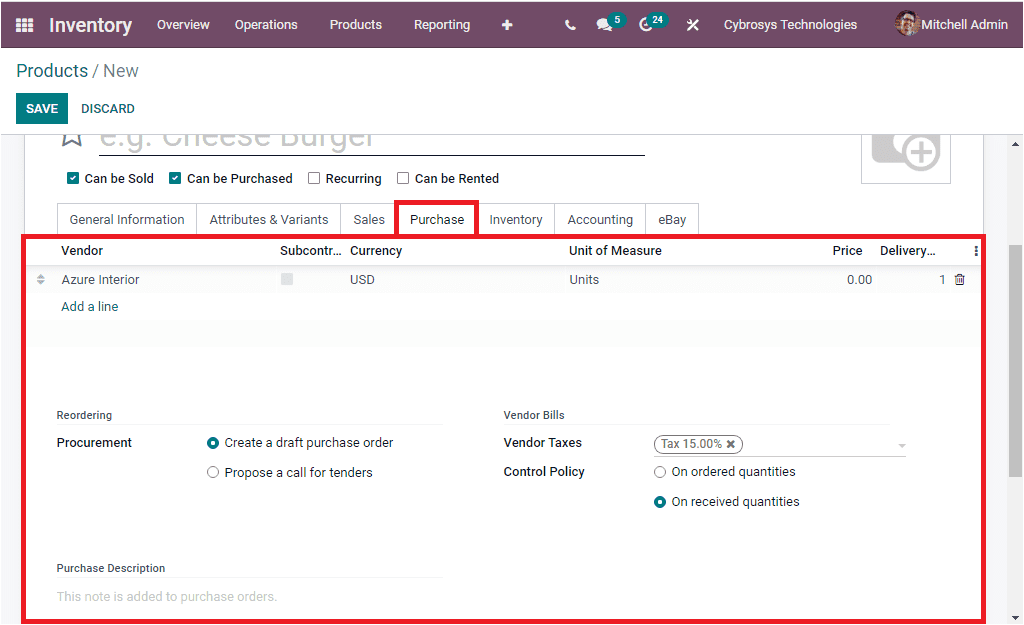
Now let us discuss the Purchase tab of the Product creation window. Under the Purchase tab, you can include the purchase details on the product. The Vendors can be described along with the Currency, Price, Delivery Lead Time and many other details. Delivery Lead Time option allows you to mention the number of days that is required to deliver a product. The multiple vendors can be allocated using the Add a line option available. In the Reordering section, you can manage reordering by selecting between the two options given for Procurement. The two options provided are Create a draft purchase order and Propose a call for tenders. In the case of the former one, the system will create a draft purchase order based on your product configuration and if you enable the people a call for tenders option, the system will create a draft call for tender. So that your company never runs out of stock. Additionally, in the Vendor Bills, the default Vendor Taxes used when buying the product can be allocated along with the Control Policy. The Control Policy can be set up either On ordered quantities or On received quantities. After that, you can include a Purchase Description
and this description will be added to the purchase orders.
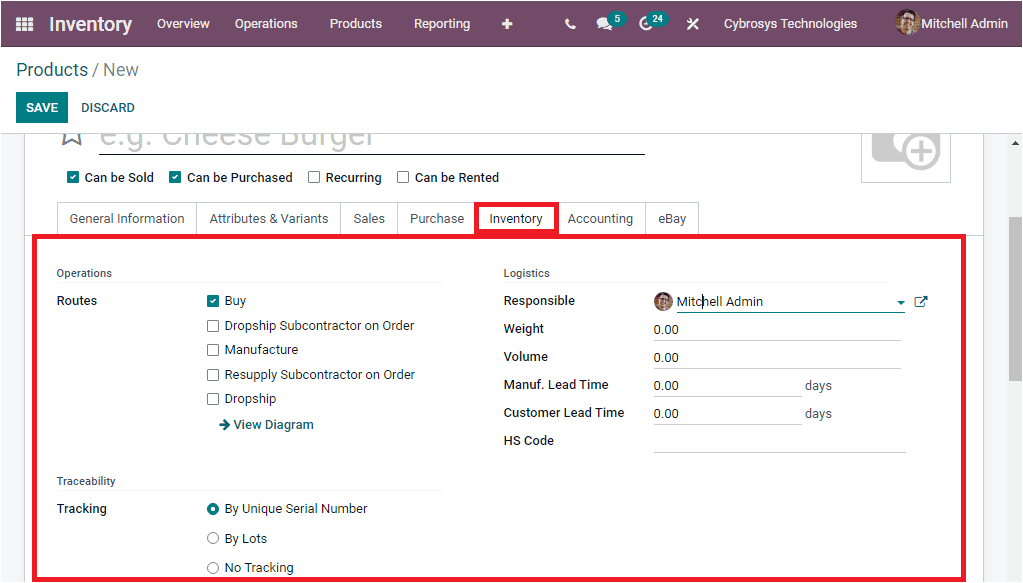
Under the Inventory tab of the Product creation window, you can set up the Inventory operations on the respective product. The Routes of operations can be defined as Whether it is Bought, Manufactured, Dropship Subcontractor on Order, Resupply Subcontractor on Order, and Dropship. Moreover the Tracking and Traceability factors can be chosen between the options displayed such as By Unique Serial Number, By Lots, No Tracking. This will be very effective for ensuring the traceability of a storable product in your warehouse. The notable difference between Lot and Unique Serial numbers is that the Lot number defines together for a group of identical products but in the case of Unique Serial Numbers as it indicates it is a unique one and this unique number identifies a single specific product. Similarly the Logistic information such as Weight, Volume, Manufacturing Lead Time in days, Customer Lead Time in days(which is the Delivery lead time in days. It is the number of days promised to the customer between the confirmation of the sale order and the delivery. ) and the HS Code. HS Code is the standardized code for international shipping and goods declaration. In addition the Responsible persons details should be added and this user will be responsible for the next activities related to logistic operations of this product.
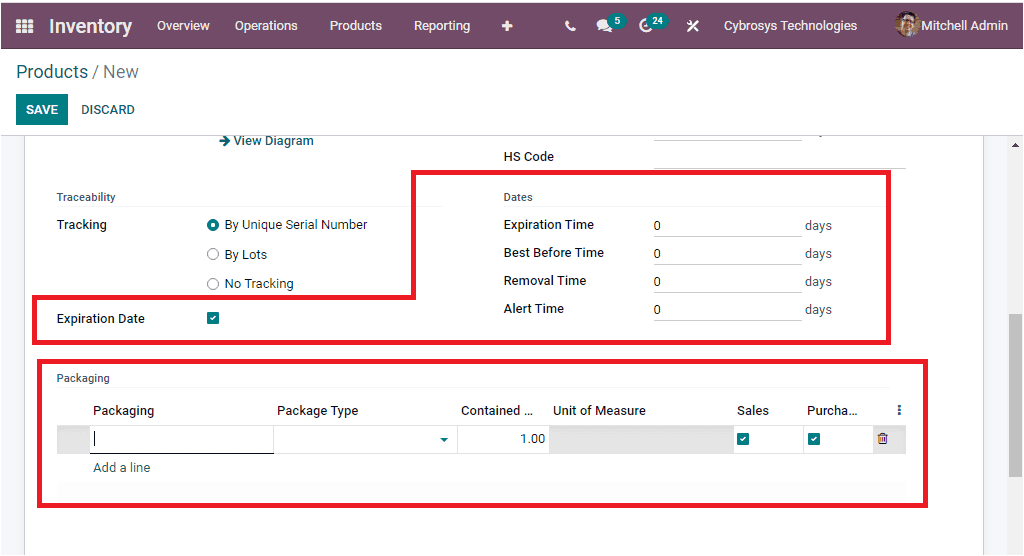
You can also view more options under this Inventory tab when you scroll the window down. The Expiration Date option can be enabled or disabled based on your requirements. If you are enabling this option, you have the possibility to specify the dates to manage product expiration on both the product and on the corresponding lot /serial numbers. So that you can define the Expiration Time, Best Before Time, Removal Time, and Alert Time. Under the Packaging section, you can provide different ways to package the same product. This can be done by selecting the Add a line option available. Where you can provide the Packaging, Package Type, Contained Quantity, and many other aspects.
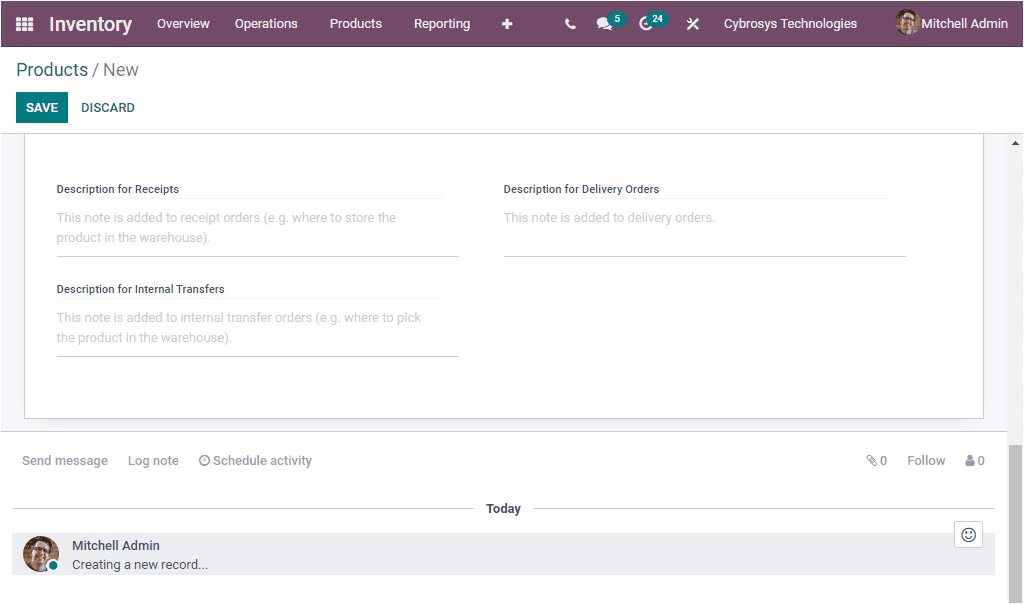
Finally you might be able to provide Descriptions for Receipts, Delivery Orders, Internal Transfers separately in the provided space.
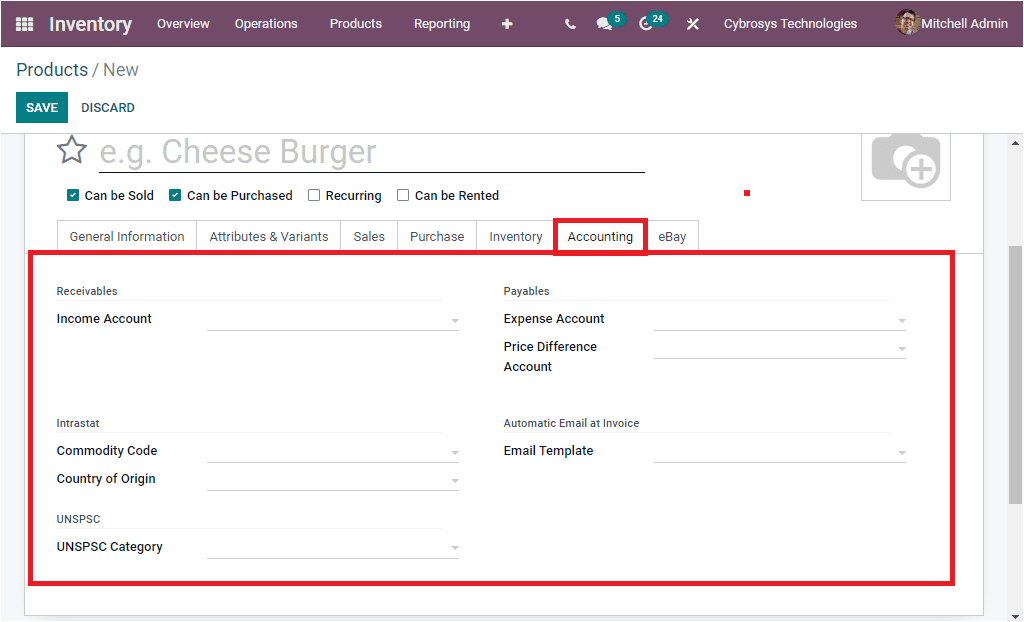
Now let us move on to the Accounting tab of the Product creation window. The financial statements of the respective product can be allocated under this tab. The financial operations of the product can be described in both Receivable and Payable aspects. That is your company specific Income Account, Expense Account, Price Difference Account can be defined. Moreover, the Commodity Code, Country of Origin, UNSPSC Category related to this product, and an Email Template for sending automatic email at invoice can be provided.
And finally under the tab, you can activate the Sell on eBay option for selling the product on eBay. Then you can provide the details such as Title (the title should not be exceeded from 80 characters), Subtitle (the subtitle is restricted to 55 characters), Item Condition, Category, Store category, Payment Policy, Return Policy, Shipping Policy, Listing Type, Starting Price for Auction, Buy It Now Price, Duration. Additionally you can activate the options such as Allow Best Offer, and Private Listing if required. Under the eBay description you can describe the product characteristics along with the Description Template. When you provide all these details, you can save the details by clicking on the SAVE button.
Apart from these described options, the Product creation window also includes various smart tabs in the top of the window as highlighted in the below image.
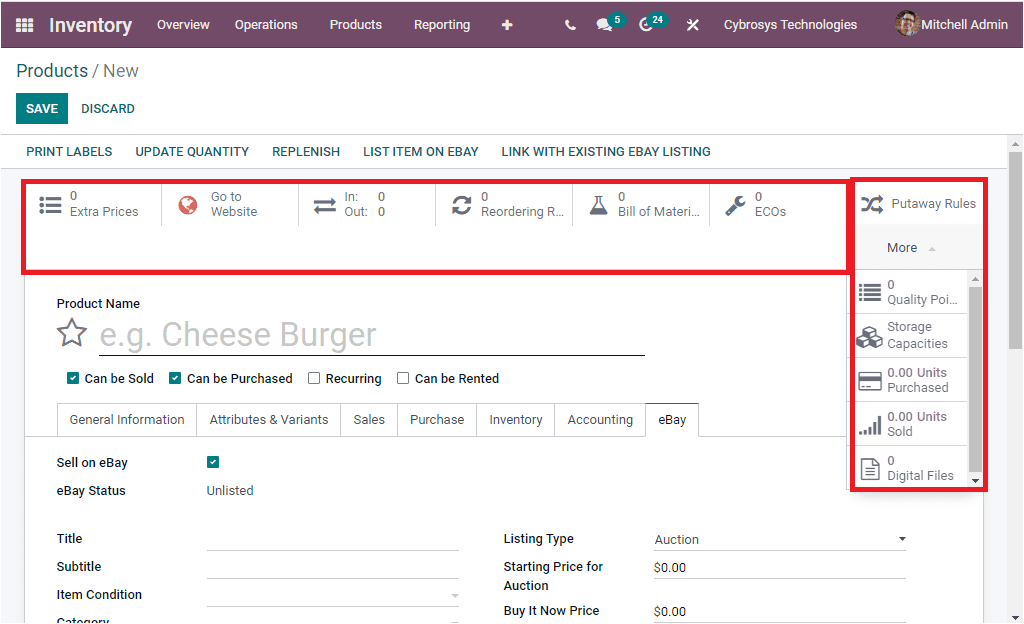
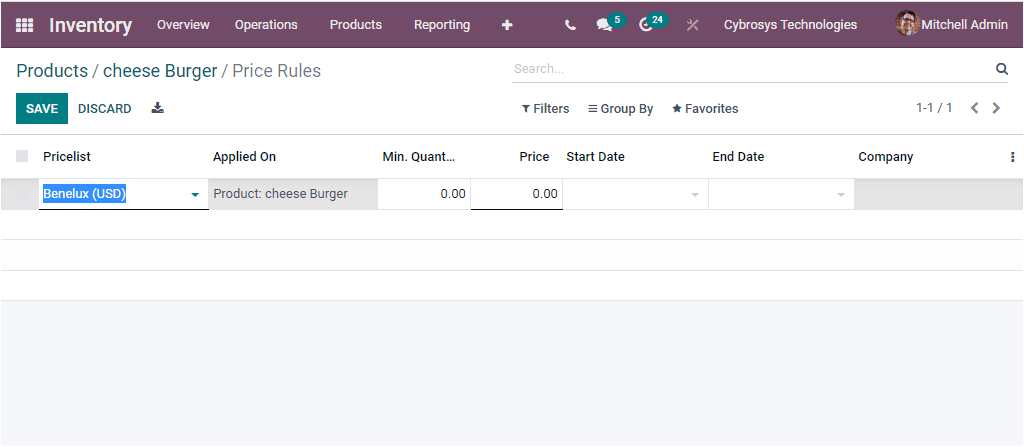
The smart button named Extra Prices will allow you to define price rules for this particular product. If you click on the button, you will be navigated to the Price rules window where you can create price rules.
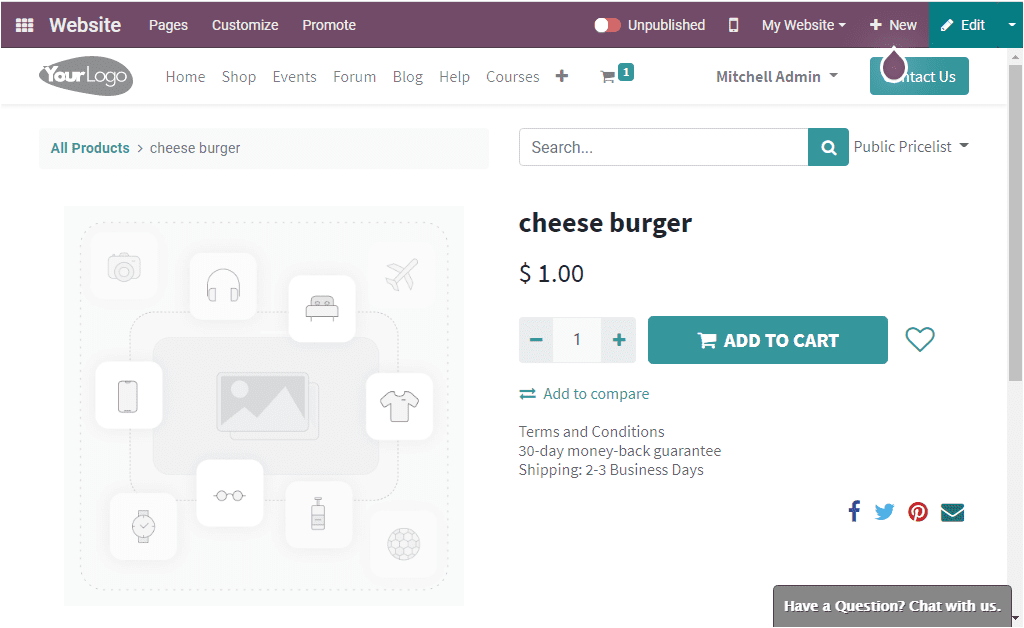
Likewise, you can directly jump into the website window by clicking on the GO to Website button available. Where you can view the website view of the defined product.
In the same way you can also check the Units On Hand, Units Forecasted, In Out Product moves, Reordering rules, Bill of Material, ECOs, Putaway Rules, Storage Capacities, Units purchased, Units Sold, Digital Files, Quality Control Points buttons for viewing the respective window. Similarly, the PRINT LABELS, UPDATE QUANTITY, REPLENISH, LIST ITEM ON EBAY, LINK WITH EXISTING EBAY LISTING menus can be viewed.
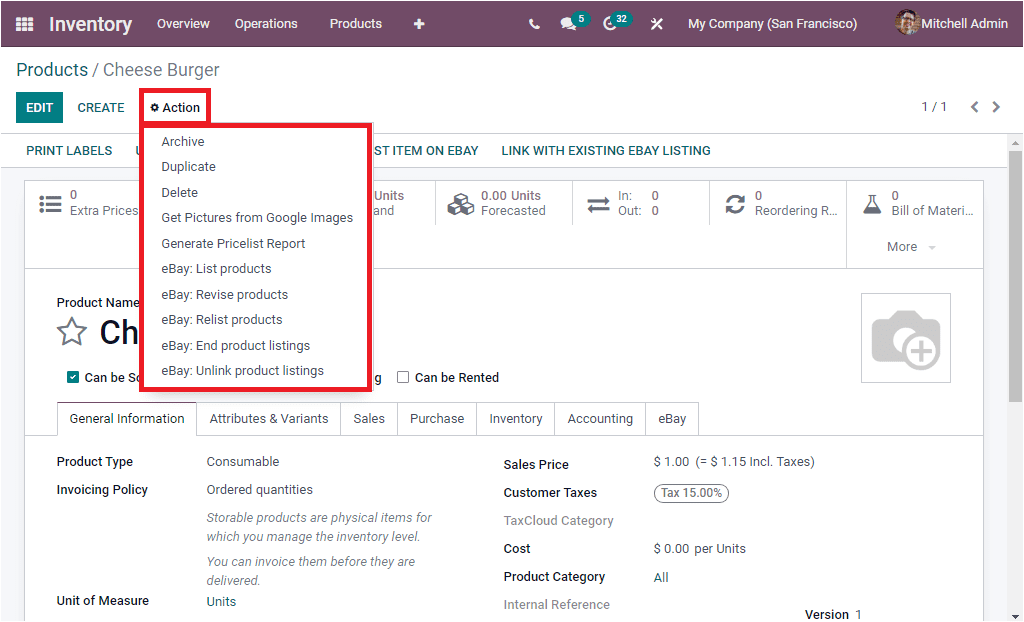
Moreover, the additional actions can be performed by clicking on the Action button available. The Action button includes various options such as Archive, Duplicate, Delete, Get Pictures from Google Images, Generate Pricelist Report, eBay: List Products,eBay : Revice products, eBay:Relist products, eBay: End product listings, eBay : Unlike product listings.
So far we were discussing how Odoo manages products in its Inventory module and we had a detailed analysis on the Product creation window. Now let us move on to the Product Variants window.