Marketing Automation
The Campaign Management system in the Odoo platform is the perfect way to create automated, targeted, and excellent marketing campaigns within seconds. With the help of this simple system, you can effortlessly automate your workflows and also can effortlessly rate your business.
The Odoo Marketing Automation enables you to segregate your prospect database comfortably with a flawless gadget by applying a combination of demographic and behavioral attributes. What's more, the system assists you in conveying the right message to suitable prospects at the right time. The system helps to attain the contacts and sign on them to the campaign when they meet the criteria.
The advanced work flaw is the main advantage of the module, which allows you to create and customize workflows with an advanced visual interface, resulting in better functioning of the module. The actions set up in the workflow will be very effective in understanding the pulse of your campaign.
The Test mode available in the system allows you to run your workflow on a test contact to study the flow of events in action clearly. The advanced and dynamic reporting and statistics make you understand the performance of your campaign with KPIs such as open rate, bounce rate, clicks, and many more aspects. Moreover, the system allows you to track the visitors.
The Triggers are the highlight of the system, which permits and makes it easy to set delays between your workflow actions. So you can easily arrange time-based conditions for your campaigns. Moreover, the default building blocks help you to create awesome emails within seconds. You can either start from scratch or use the predefined themes. Similarly, the various default as well as customizable filtering or categorizing options will let you acquire the required data quickly.
The module also allows you to automate your workflow by sending specific emails at the right time. The intuitive and easy-to-use drag and drop interface will offer you a comprehensive guide over your email content and its layout. The predefined building blocks help you to design clean paragraphs, contents, images, and many more aspects without applying a code. It will also help you to automate messages in the form of SMSs for better personal interaction. The highly integrated nature of the module helps you to integrate this module with almost all other modules like CRM, eCommerce, Email Marketing, SMS Marketing, Events, Helpdesk and many more.
The home dashboard window of the Odoo Marketing Automation will describe the preview of the already created campaigns in both Kanban view and List view. The screenshot of the window in Kanban view is portrayed below.
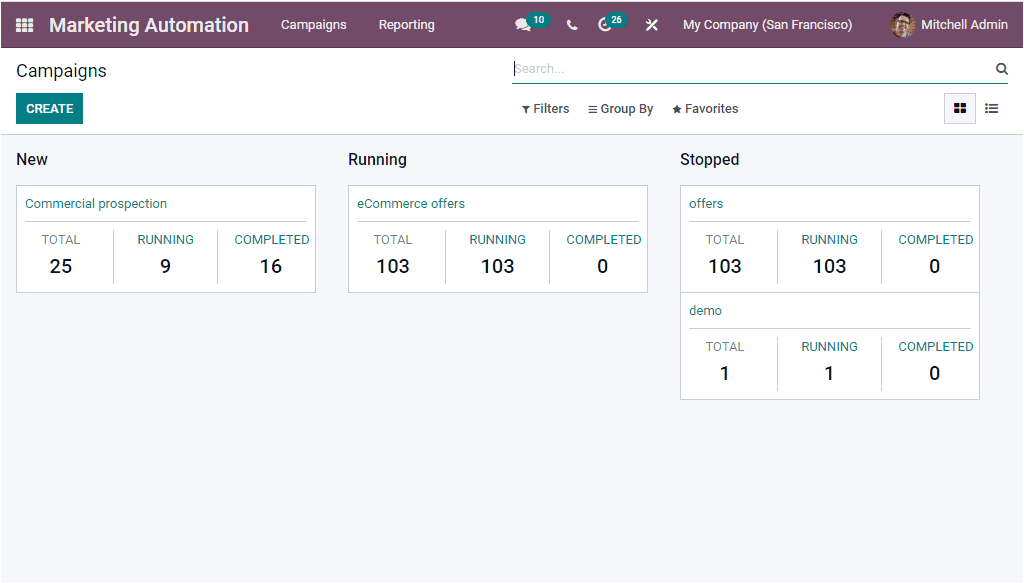
Campaigns are managed based upon their stages of operation as New, Running, and Stopped. Each of the Campaign previews includes details such as the Name of the Campaign, the Total number of campaigns, Running campaign, and Completed campaign as you see in the above screenshot. If you want to view the window in List format, you can click on the List view menu icon. Let us have a look at the image.
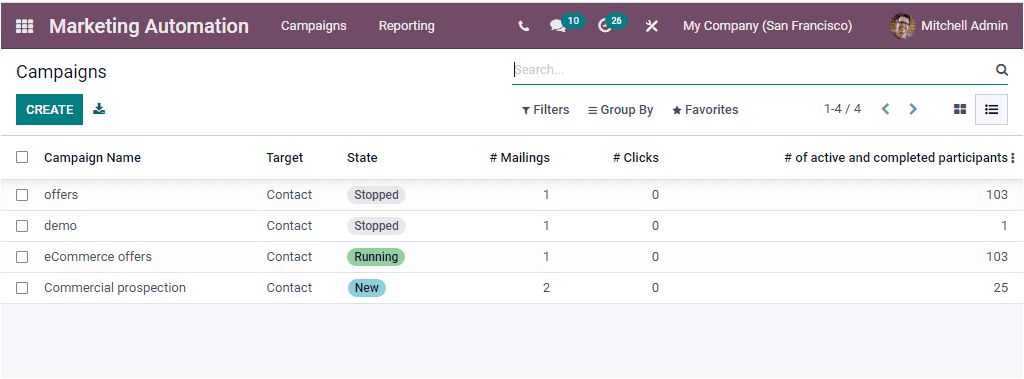
Here also, the window perfectly lists the Campaign Name, Target, State, Number of Mailings, Number of Clicks, Number of active and completed participants. If you want to view each Campaign in detail, you can click on the respective one. You also have the provision to edit the details if required. Above all, the system allows you to apply various default and customizable sorting options for quickly acquiring your required data. You can use the Filters, Group By, Favourite and Search options for doing it. The default Filters options available under the Filters tab are New, Running, Stopped, and Archived. The Export All menu available just near the CREATE button allows you to export all the details in the window into an excel sheet.
You can click on the CREATE button to create new campaigns. Now we can look at how the creation window will look and what are the details needed to provide in the window.
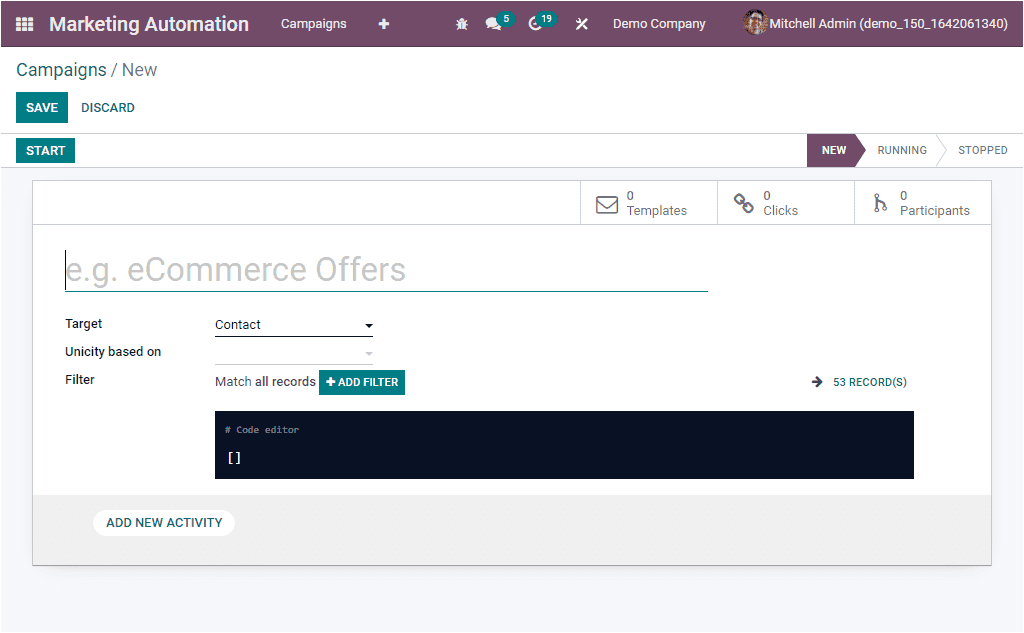
In the Campaigns creation form, you can describe the Name of the Campaign in the specified area. After that, the targeted groups can be selected using the dropdown menu available so that the Campaign will be sent only for the targeted audience and not for all. next you will see the Unicity based on field, this field will help you to avoid duplicate mail to the same target. For example, for model ‘customers’, select the email field here if you don't want to process records which have the same email address.
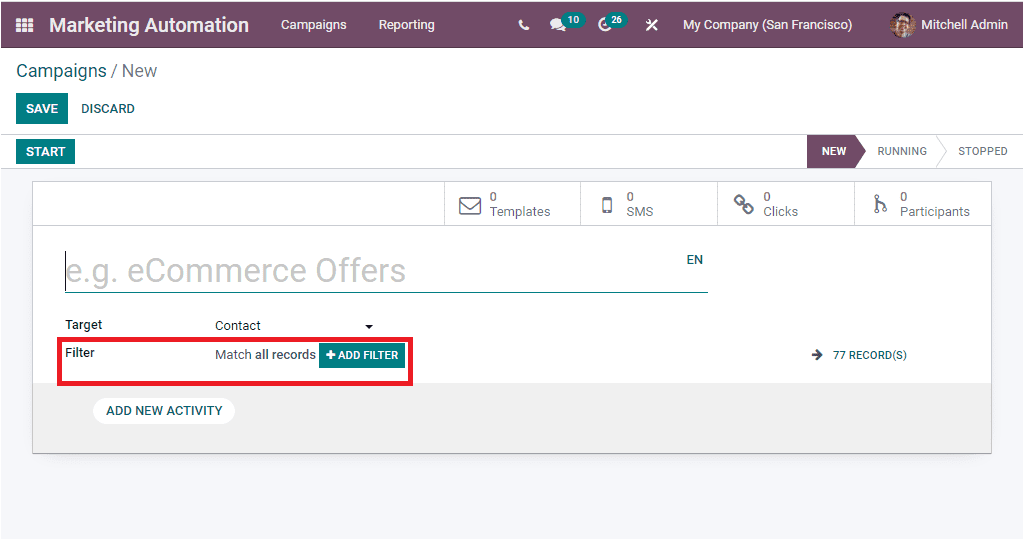
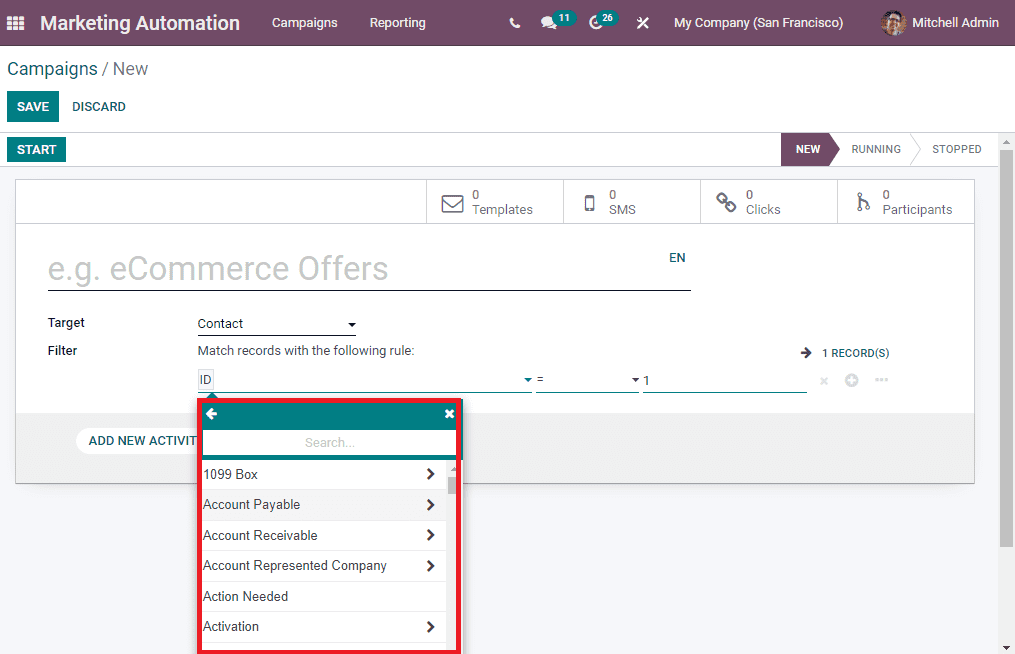
To make a list more precise, you can apply filters. You can add many advanced filters here. For that, you can click on the +ADD FILTER button as highlighted in the image below.
Now you can apply rules to match the records with the rules. For doing it, The system will depict a long list where you also have the search options.
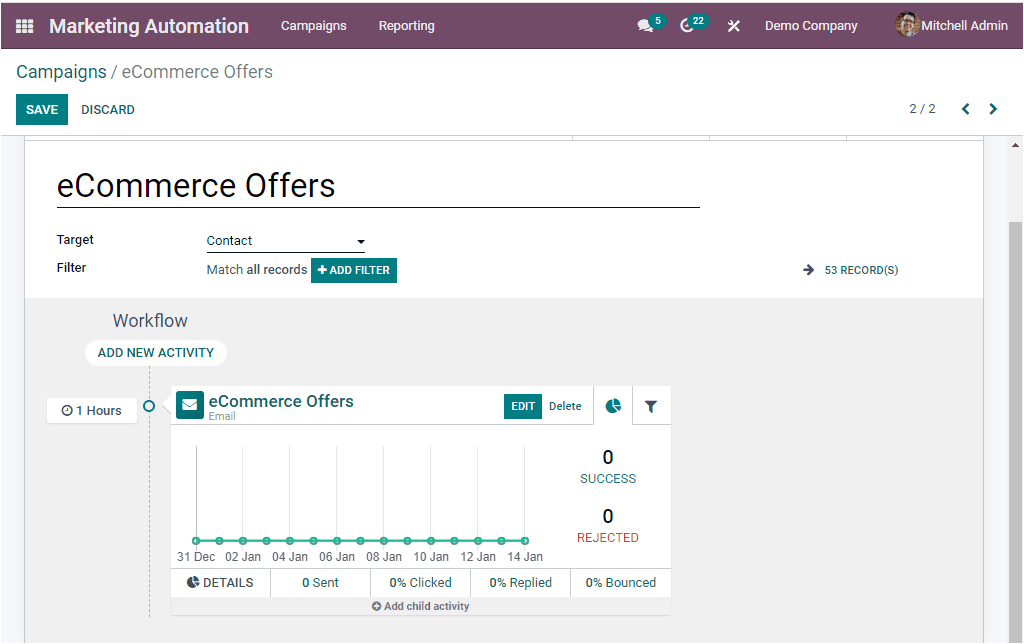
Moreover, the bottom left of the window depicts an option called ADD NEW ACTIVITY. You can use this option to create new activities for including new activities into the campaigns.
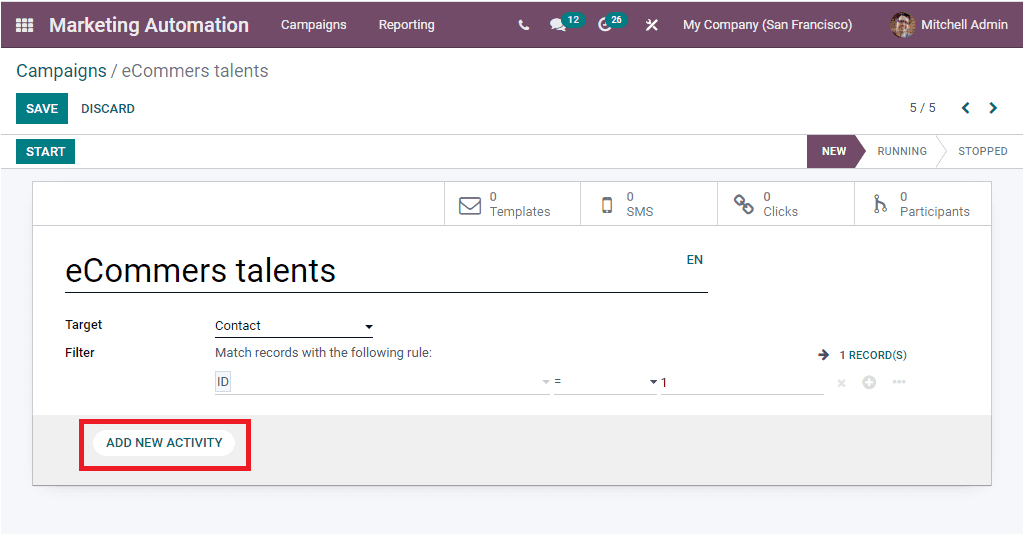
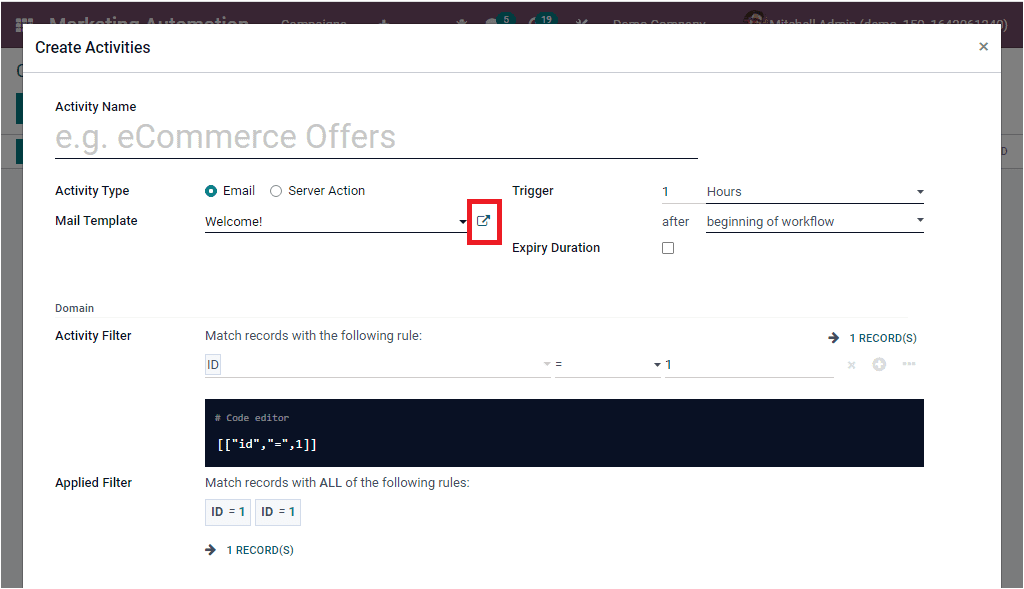
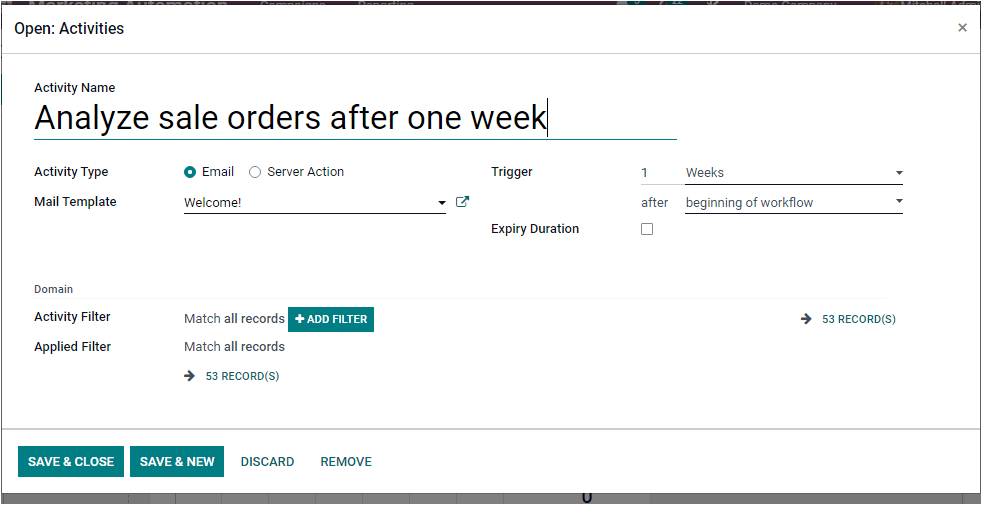
Let us click on the ADD NEW ACTIVITY button to understand the option. Now you will depict a create Activities creation window as shown in the image below.

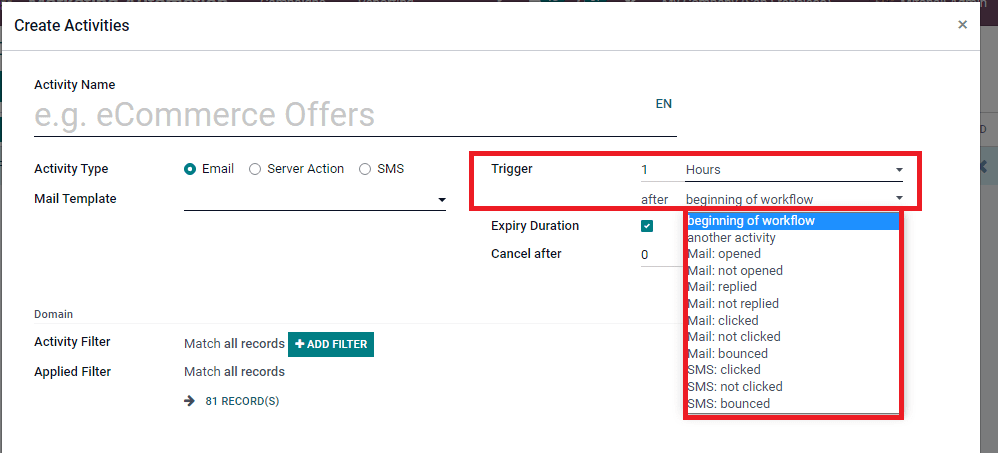
Here you can provide the Activity Name. Then you can allocate the Activity Type. It can be selected in between the options such as Email, Server Action, or SMS. If you have installed the SMS Marketing module, the SMS activity type is also available. The Male Template can be described using the dropdown menu. Additionally, in the Trigger field, you can choose the interval for sending trigger messages to your audience. Odoo allows you to set it in a different time period based on your preferences, in Hours, Days, Weeks, or Months after the beginning of Workflow, Another Activity, Mail: opened, Mail: Not opened, Mail: Replied, Mail: not replied, Mail: clicked, Mail: not clicked, Mail: bounced, SMS: clicked, SMS: not clicked, and SMS: bounced.
Moreover, the Validity Duration of the activity can be specified by activating the Expiry Duration field. You can check the box near the option expiration date to activate this option. If you check the box, a new field comes under this option where you can provide the amount of time in Hours, Days, Weeks, or Months.
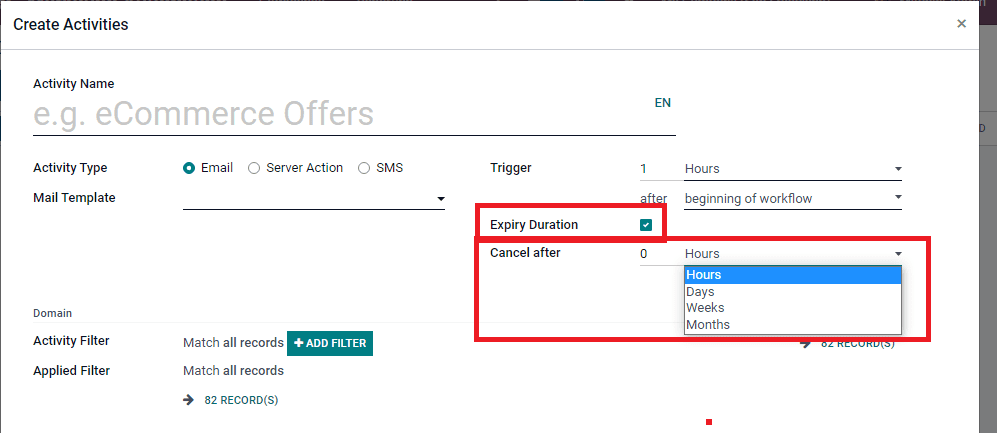
This option is very useful for ensuring your actions are not executed after a specific amount of time after the scheduled date. You can successfully offer time-limited offers, upcoming events, and many more for your customers by implementing this option.
In the Domain section of the activities creation window, you have the Activity Filter and Applied Filter fields. In the Activity Filter field, you can specify the domain that applies to this activity and its child activities. Similarly, the activity will only be performed if the record satisfies this domain, obtained from the combination of the activity filter and its inherited filter. Once you give all the details, you can click on the SAVE button to save the details.
Configuring email template
The link button available on the Mail Template selection field allows you to create and configure email templates.
You can click on the link button (which is highlighted in the above image) or type Mail template if you are creating a new mail template. otherwise you can choose the previously configured mail template from the dropdown menu by clicking on the Mail Template field. If you are creating and configuring a new template, you will navigate into a new window as shown in the image below.
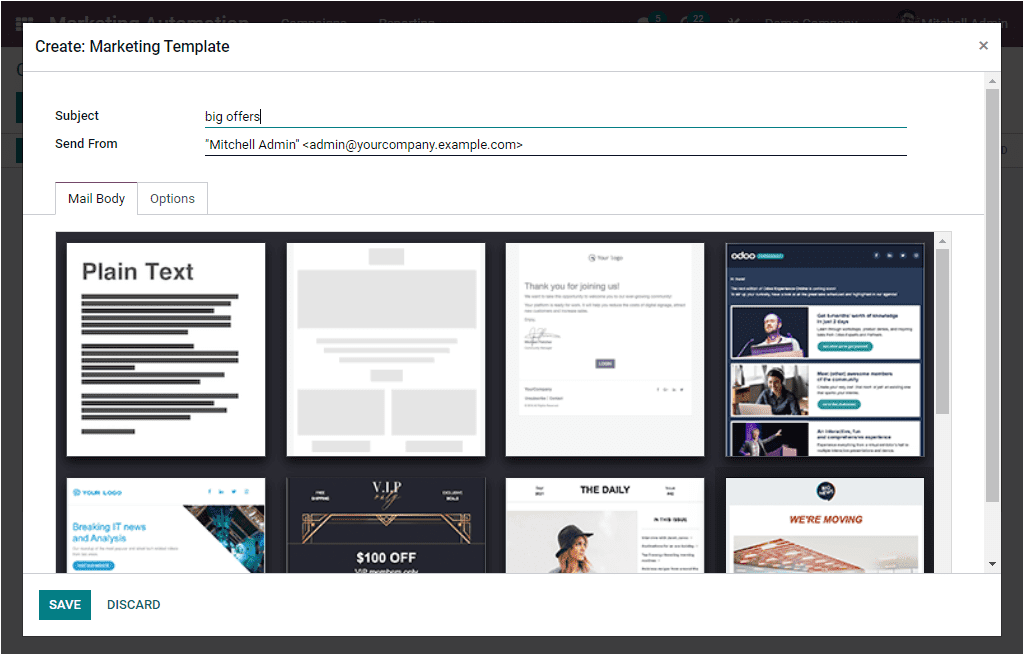
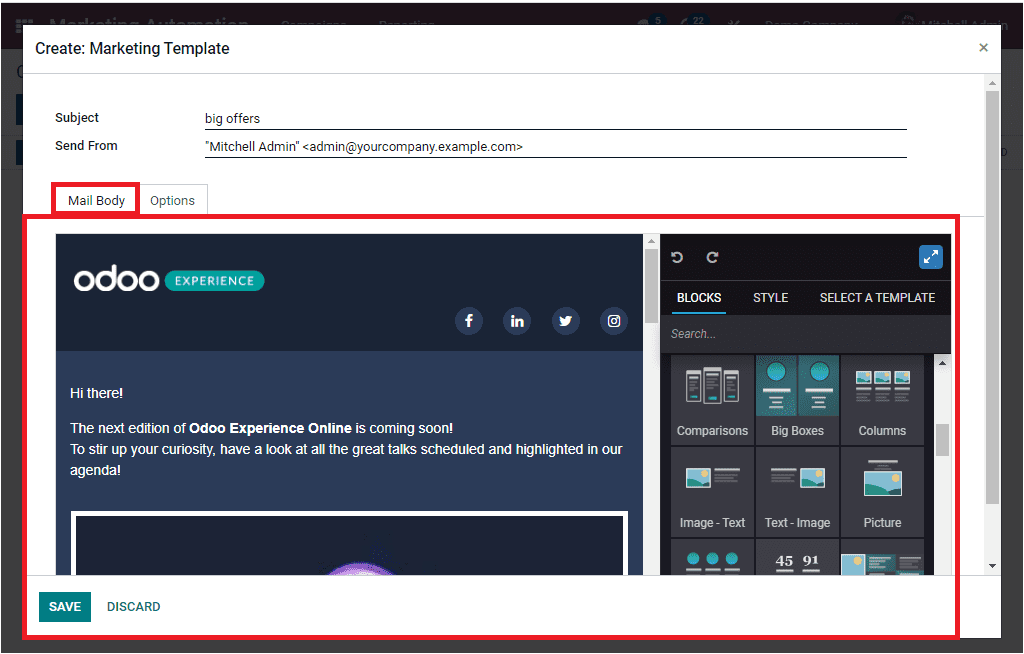
The subject of the mail and the from address will be displayed in the Subject and Send From field. The mail body can be customized using the various models available. You can drag and drop the required building blocks to design the mail body.
Moreover, under the Options tab, you can find various options and the screenshot of the tab is depicted below.
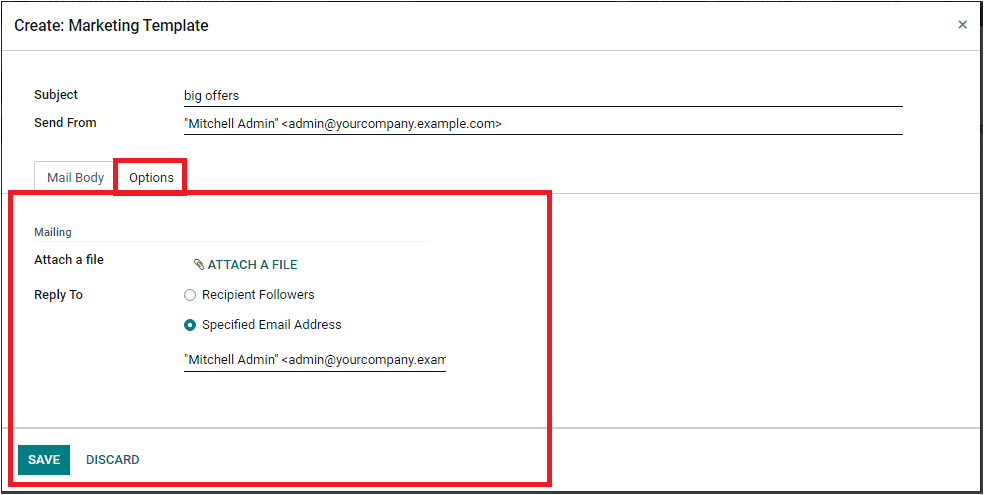
Here you can attach a file by clicking on the ATTACH A FILE option. Similarly you can choose the preferred reply to address. If you are selecting Specified Email Address option, the respective address should be given. After giving all the information, you can click on the SAVE button. by saving the details, the activity will be created and saved.
Now the Workflow is depicted in the respective Campaigns as shown in the image below.
If you want to schedule more activities for your campaign, you can schedule it using the same method. So you can click on the ADD NEW ACTIVITY button and then create activities.
Once you provide all the details, you can click on the SAVE & CLOSE button. Now the new activity will also be scheduled and you can view it in your Campaign.
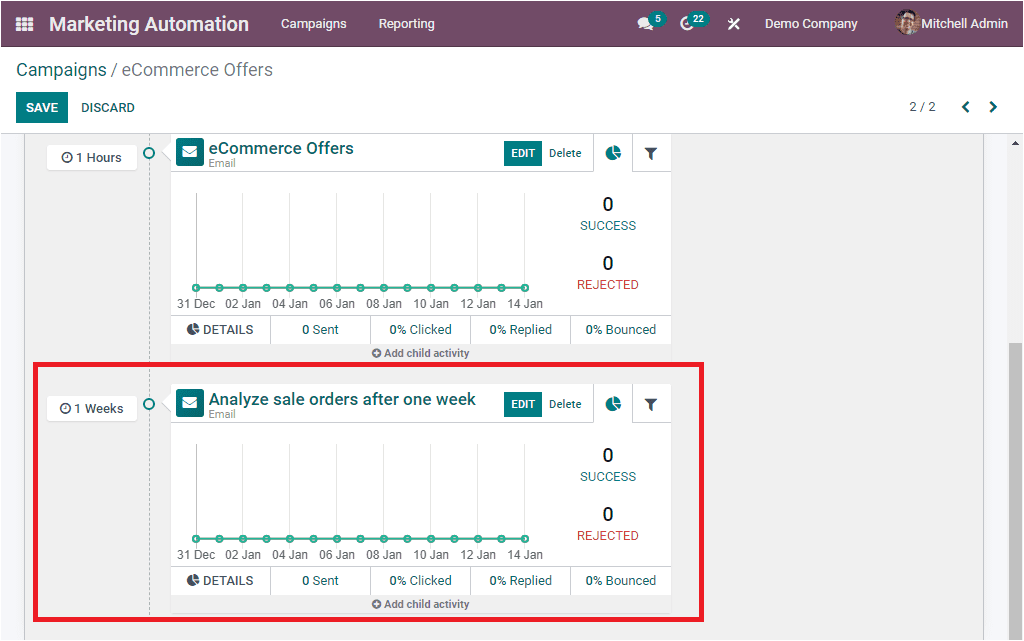
Using the same method, you can add multiple new activities.
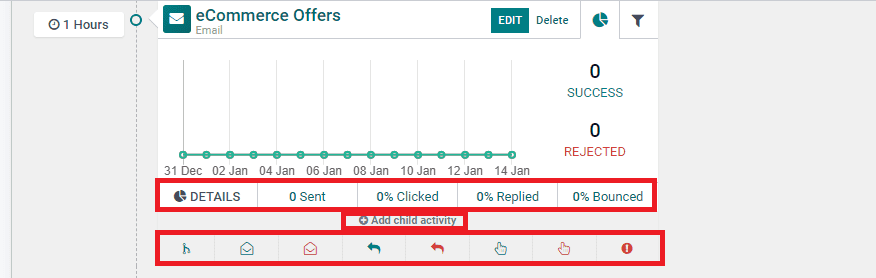
When you look at the activity, you can view various options. The EDIT, Delete, Graph, and Filter options are available on the top right side of the screen. You can use these icons for performing the respective actions.
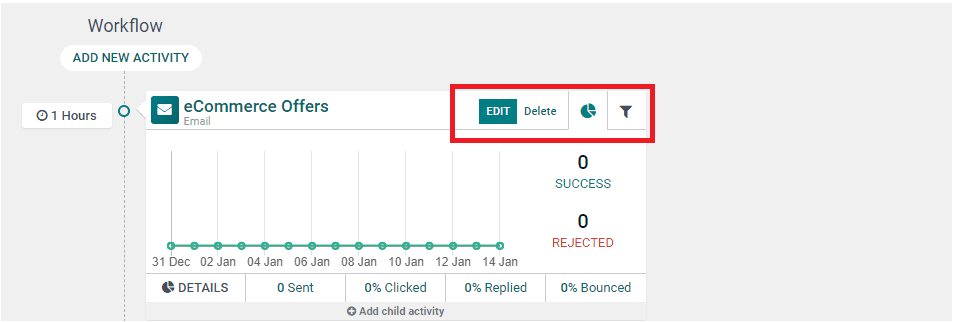
The number of successes and rejects is displayed on the screen. In the bottom, you can see the Details, Sent, Clicked, Replied, and Bounced options for understanding the respective actions.
Moreover, there is an option to create a child activity to the main activity. For viewing this option you can bring your mouse cursor on the Add child activity menu available at the bottom of the activity. Now you will depict the drop down bar to create child activity as highlighted in the screenshot below.
Here you have different options such as
Add Another Activity
Mail Opened
Mail Not Opened
Mail Replied
Mail Not Replied
Mail Clicked
Mail Not Clicked
Mail Bounced
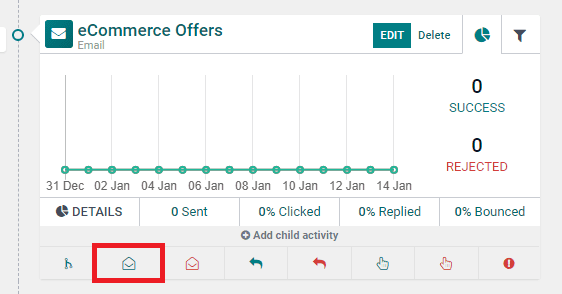
For all these actions you can create a child activity. To do this you can click on the corresponding menu. For example, if you want to create a child activity that wants to be triggered if the recipient opens the mail, you can click on the Mall Opened icon as highlighted in the image below.
Then you will depict the activity scheduling window, where you can give the details. Here we can select the Server Action as the Activity Type. Then describe the Server Action. When you look at the Trigger field, you can see that the field is auto allocated.
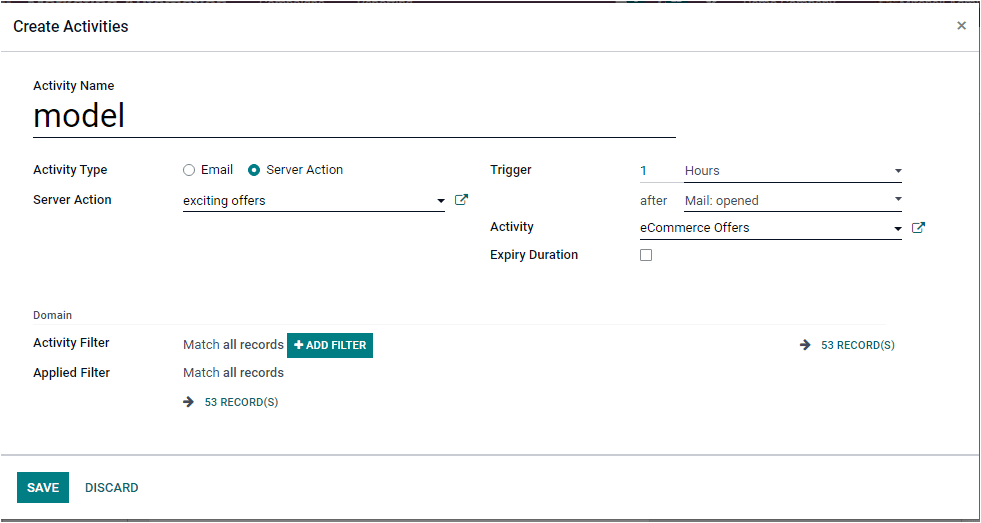
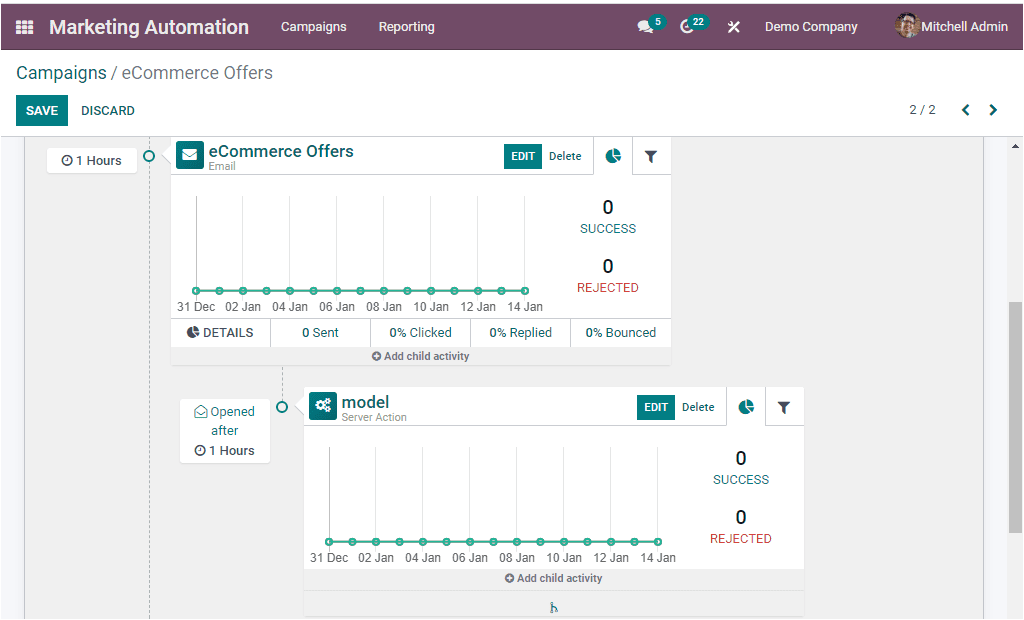
You can provide all the required details and then click the SAVE button to save the details. Now you will see that the child activity is created for the first activity in your campaign window.
After scheduling all the activities, you can save the Campaign by clicking on the SAVE button available on the top left side of the window. The newly created and saved Campaign will be listed in the Campaigns dashboard window.

If any modification is required for your campaign, you can click on the EDIT menu. If you want to start the Campaign, you can click on the START button, which can be accessed from the left side of the window, just below the EDIT button. Now you can see that the stage of operation of the Campaign will be changed from NEW stage to Running.
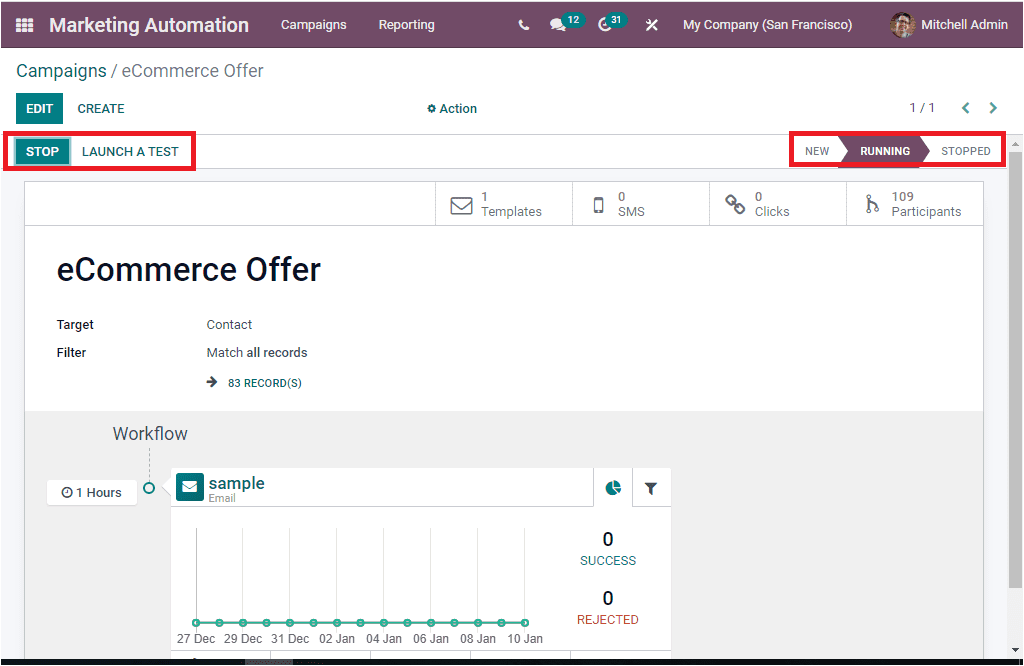
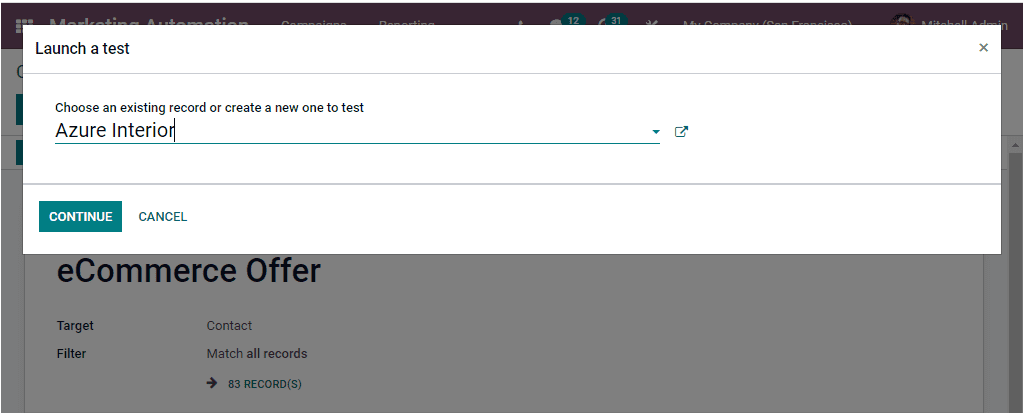
The STOP button allows you to stop the campaign if needed. Also, you can use the LAUNCH A TEST button to launch a test campaign. When you click on the LAUNCH A TEST button, you will depict a pop-up where you have the provision to choose an existing record or create a new one to test. Then click on the CONTINUE button.
Apart from all these possibilities, Odoo also allows you to get a direct link to the various windows in the form of smart buttons. You can access it from the top of the window, as highlighted in the image below.
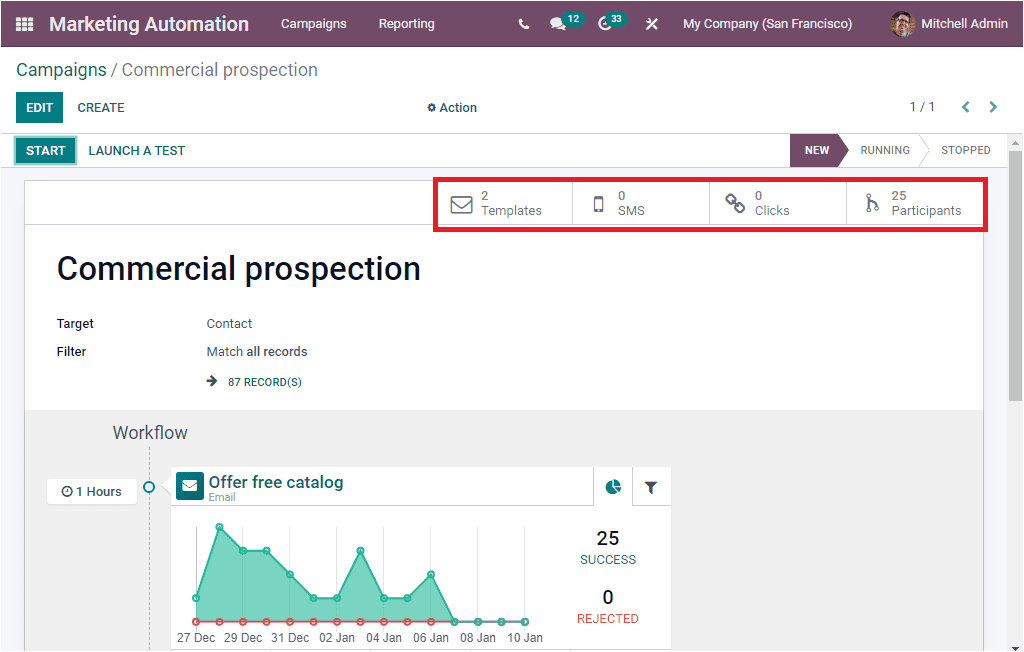
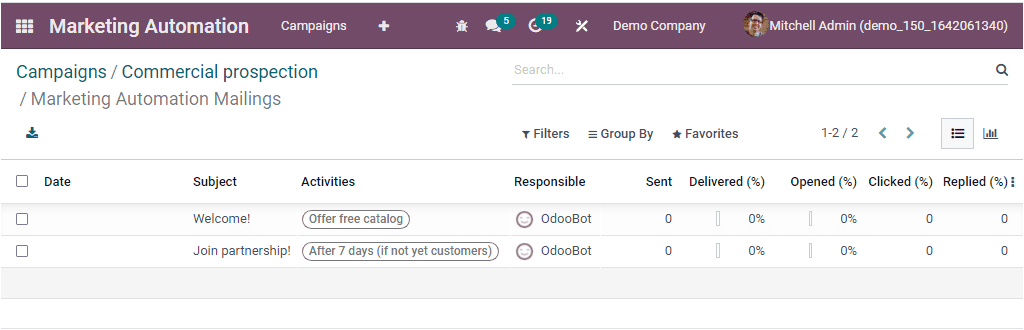
Participants, Tests, Clicks, SMS, and Templates are the smart buttons displayed here, and based upon the modules you installed in your system, it may vary. The Clicks button will display the number of clicks they get. When you select the Clicks button, you will enter into the Link Statistics window where you can view all the data that the Link trackers are created when mailings with links are sent to track how many clicks they get. in the case of Templates smart button, it allows you to jump into the Marketing Automation Mailings window as shown in the image below.
The Tests smart button displays the number of tests done and you can click on the button to navigate into the respective window to view the test details that you have done.
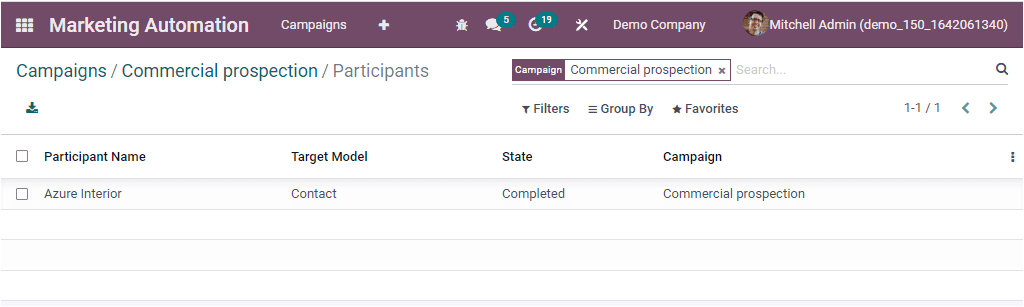
When you click on the Participants button, you will depict the participants' list, as shown in the image below.
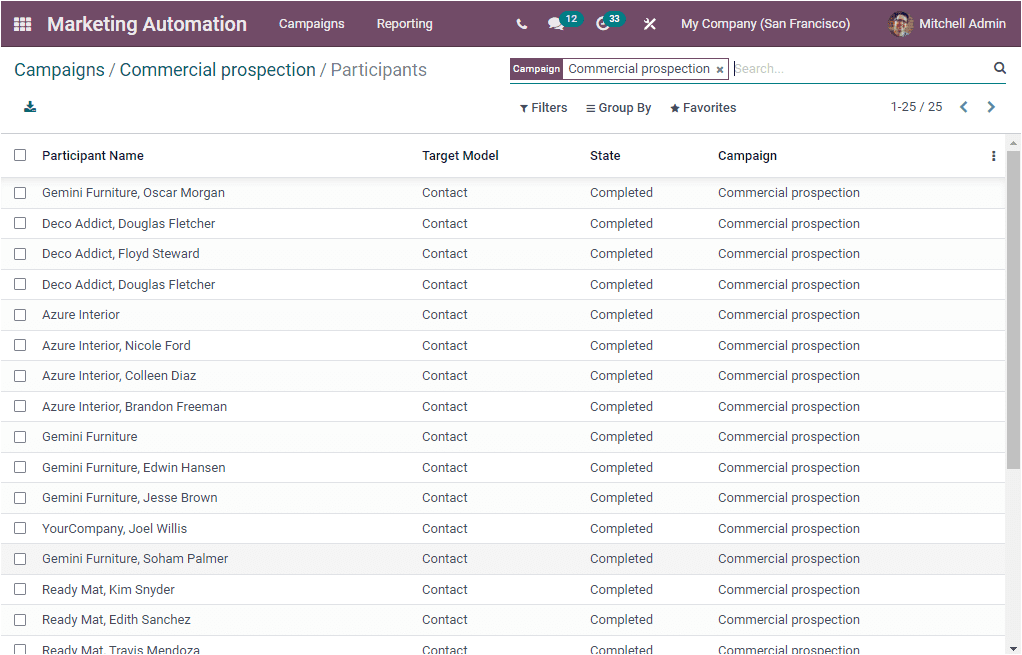
The record of each participant described here can be selected. Upon selecting it, you can find the activities scheduled for that particular participant. For viewing the window, let us click on the first participant, Gemini Furniture, Oscar Morgan, available on the above list.
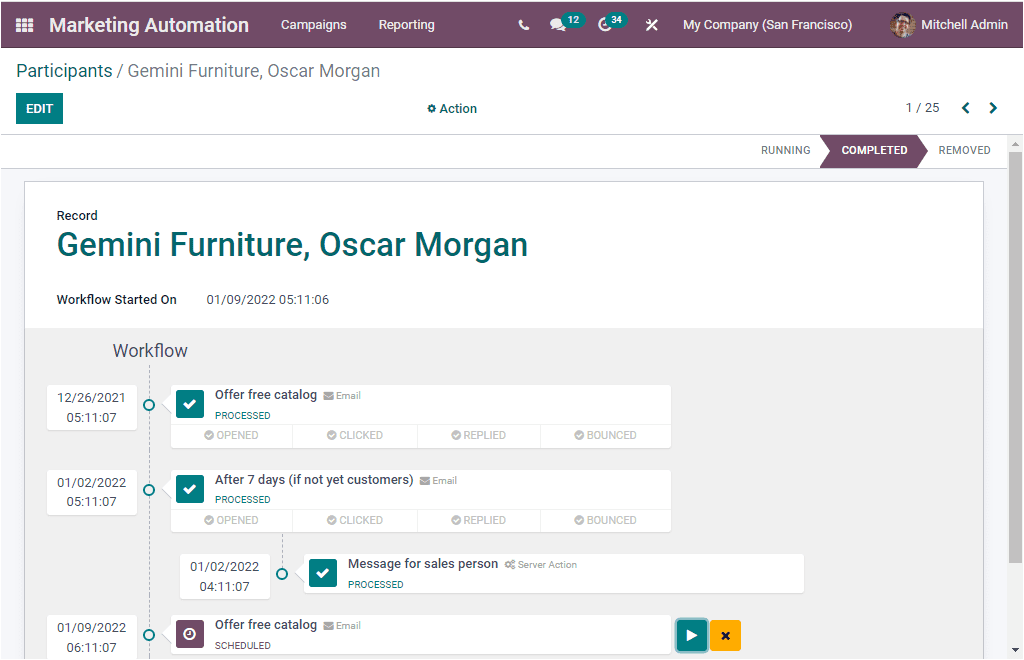
The window will depict all the information and the workflow systematically. To run the activity, you can click on the play button.
As we are clear on the functioning of Odoo 15 Marketing Automation and now let us have a look at the Reporting section of the module.