Sign
The Sign module available in the Odoo ERP platform is exclusively designed for sending, signing, and approving documents digitally. The intuitive interface of the module with the drag and drop fields help you to upload your pdf easily and effectively.
The module acts as a powerful tool to get documents signed up faster without using paper and pen. Getting signed as early as possible will result in better productivity and reduce the document signing complexities.
The Odoo Sign module offers you an advanced system to send, sign, and approve documents by preparing contacts with the help of the default blocks that can easily drag and drop. Also, will easily submit the signature requests and help to track the status of each sent document
The Sign module in Odoo is more secure. All the communications on the documents are encrypted to ensure that the responsible people can only get the content and the document. Moreover, the system ensures the document’s integrity. All the authoritative documents are under control, and any actions on the document, such as read, sign, etc., will be encrypted to enhance security.
Moreover, the system helps to make reports like audit reports to all parties at any time or moment. All the documents signed through the Odoo Sign module will be valid electronic signatures under EU Regulation 910/2014 (eIDAS), in and US ESIGN Act. It also supports the need for electronic signatures for almost all countries.
By implementing this module, you can forget the hidden and unexpected costs such as printing, copying, faxing, scanning, shredding, and posting. You can access everything online from anywhere at any time. You can never expect the missing of important documents anymore.
In addition, you will be able to save more and more time without needing to wait for hours, days, or even weeks to get all parties signed. With the Odoo Sign module, you can perform it with a few simple clicks. Similarly, it will help you to reduce errors and risks associated with document signing.
Let us list out some of the important features of the Odoo Sign module:
- The editable fields of the document can be customized with the assistance of the drag and drop facilities.
- The repetitive signature can be automated with the help of templates for saving more time and effort to keep productive.
- The Odoo Sign module supports multiple signatures. It will be very useful for making a document to be signed public and giving everyone a chance to sign their own copy without needing to follow or do more actions on them.
- The Odoo Sign module allows you to automatically send your signed document to a third party chosen as a follower.
- The auto-archiving feature of the module will help you to keep every document archived on your private server.
- The Odoo Sign module has the ability to automatically send a final document to the respective inboxes if a document is successfully completed.
- The status notifications and alerts will be received within seconds as your documents are signed.
- The well-structured system will enable you a complete view of the templates, signatures in different states such as in progress, signed, and other aspects.
- The module will be supported in any device such as ios and android.
- The module allows the client to draw his signature straight on the screen.
- The drag and drop feature allows you to add dynamic content fields in the correct place where you want them to present.
- The system supports signatures in different forms such as handwritten fonts, drawing with your mouse, finger or even possible for loading a scan of your signature.
- You can specify the required actions for validating a document because the system supports full signature, initials, text, name, email, phone, and company.
- The end to end encrypted feature ensures the safety of the module
To get access to the Odoo Sign module, what you want to do first is to install the module from Odoo applications. Then you can click on the Sign module meu icon to open the module.
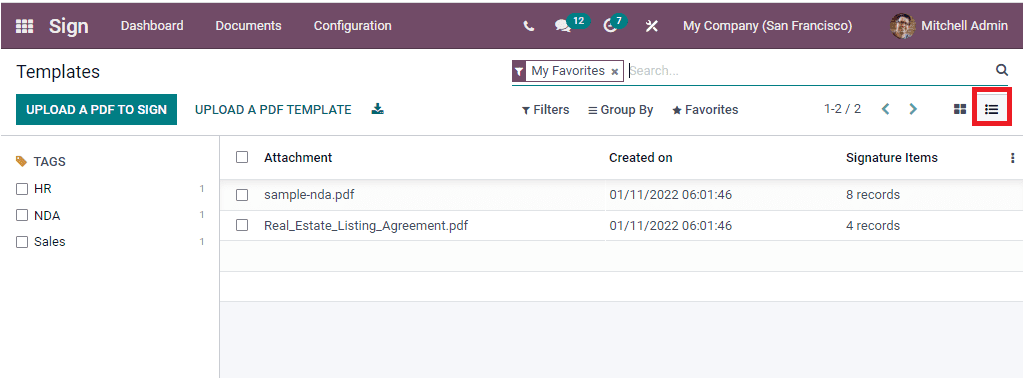
The home dashboard window of the module will depict the templates where you can see the preview of the templates that are already created in the platform. The screenshot of the dashboard window is depicted below.
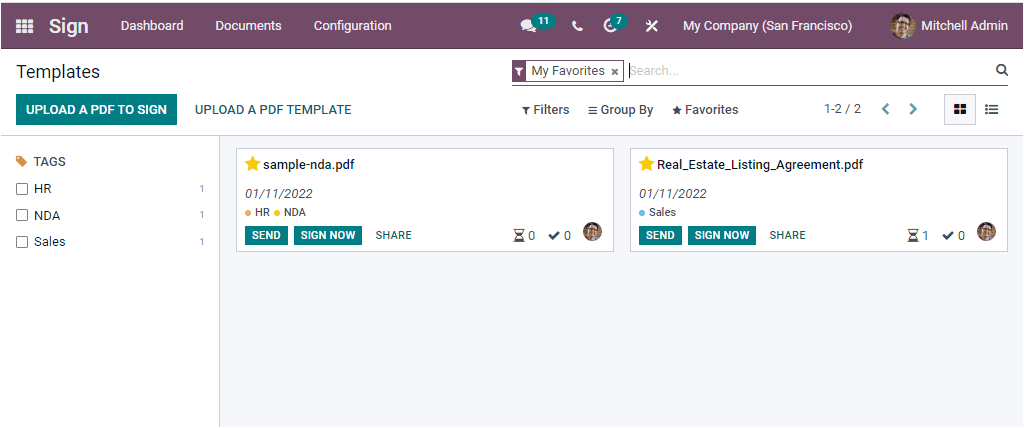
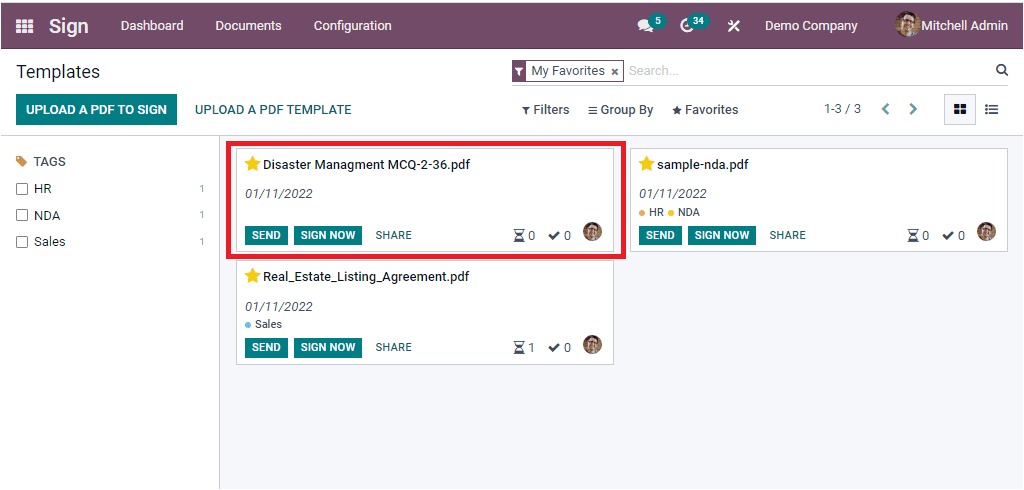
The above screenshot is the Kanban view of the Templates or dashboard window of the module. You can also access this module in List view by selecting the List view menu icon. As you can see in the screenshot, the right portion of the window will portray all the templates that you created on the platform. Each of the templates will be arranged in a separate card-like structure, and it is a more suitable way of representation to understand the data easily. It includes a short description of the respective template, such as the name of the pdf, date, defined tags, SEND, SIGN NOW, and SHARE button. Also, icons for viewing the number of documents in progress for this template, the Number of documents signed for this template, and the photograph of the responsible person are available on the right bottom of each Template record. In Addition, the drop-down menu triggers on each record will include various useful options. To access the dropdown menu, you can click on the three dots available on the top right of each record, which is highlighted in the below image.
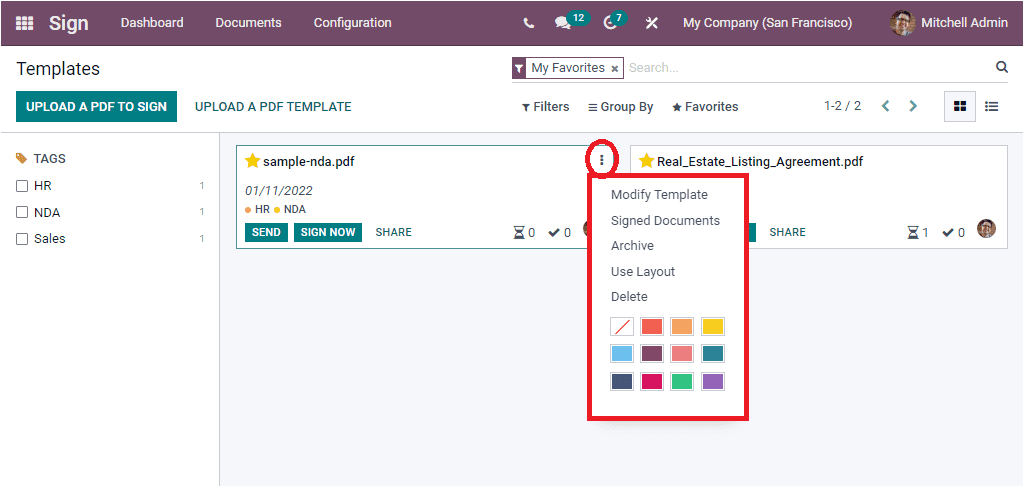
The dropdown menu includes the options such as Modify Templates, Signed Documents, Archive, Use Layout, and Delete. Moreover, the different colors given in the dropdown window can be used to mark your template with a distinct color to identify the template quickly.
The left portion of the window is designed to categorize and sort out the details in the Templates window based upon the defined tags. This option is very useful, especially if you have so much data to manage.
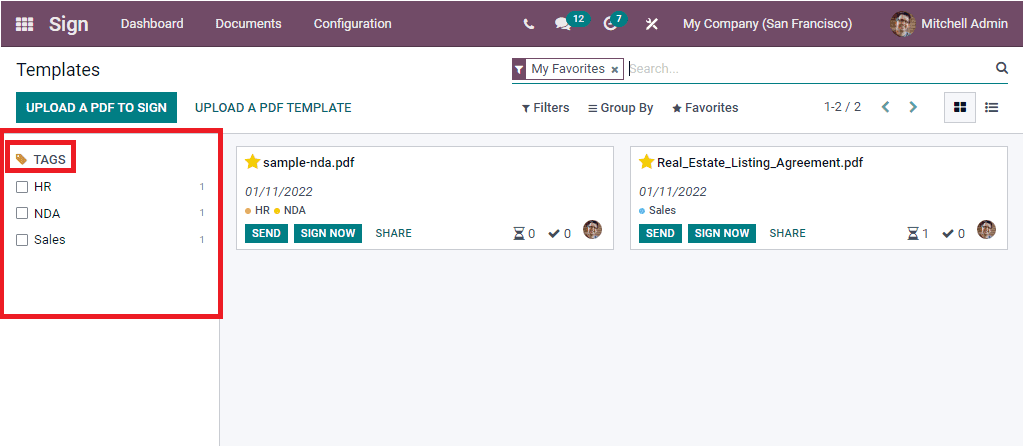
The various default and customizable string functionalities are filled under the Filters, Group By, Favourite, and Search tabs which can also be viewed and selected from the top of the window. The default filters added under the Filters tab are My Templates and My Favourites.
Now we can have a look at the List view of the window. For that, we can click on the List view menu icon that can be accessed from the top right corner of the window.
When we look at the top right side of the window, you can view the UPLOAD A PDF TO SIGN and UPLOAD A PDF TEMPLATE button along with the Export All button.
The UPLOAD A PDF TO SIGN button can be used to upload a PDF from your system to sign them. So if you want to sign a document, you can click on this button and select the pdf document from your system for the signing process. Odoo also makes it possible to update a PDF template by clicking on the UPLOAD A PDF TEMPLATE option. After clicking it, you can select the required PDF from the system. Now the PDF will be uploaded to the Odoo system, and you will receive the preview of the newly uploaded pdf as shown in the image below.
You can click on the preview to view the pdf in detail in the Odoo system.

The above image depicts the detailed view of the pdf. Here you can view various options. When you look at the left side of the window, you will see multiple fields, as highlighted in the image below.
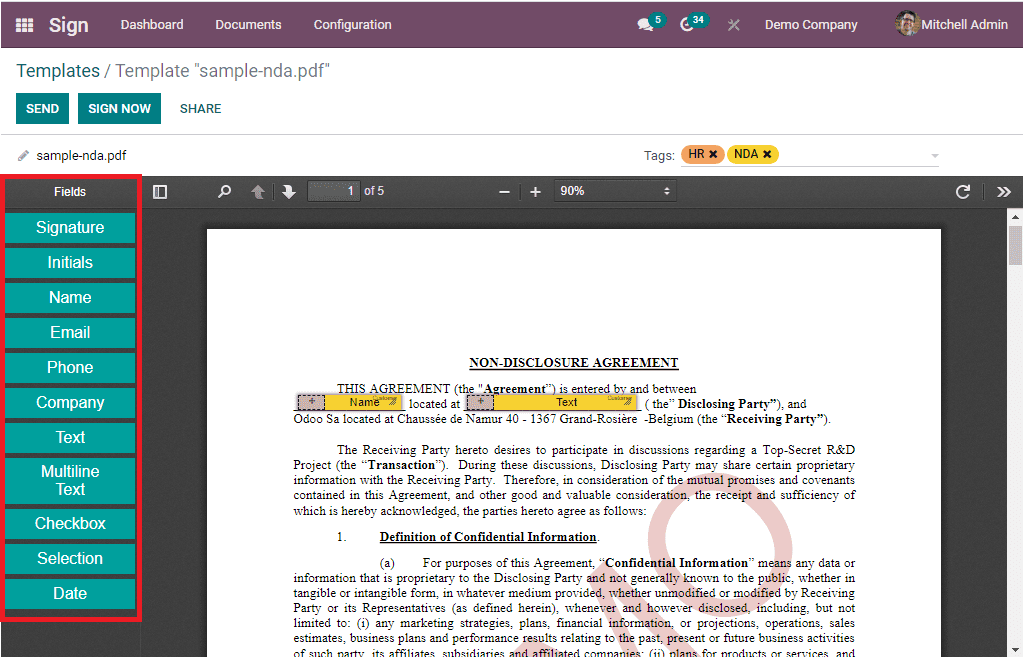
The different fields included are Signature, Initials, Name, Email, Phone, Company, Text, Multiline Text, Checkbox, Selection, and Date. You can drag all these fields and drop them into your pdf to include the details in the corresponding fields. For example, if you want to add a signature to the pdf, you can drag the Signature field from the left to the pdf and drop them in the specified space. You can select the applied fields from the pdf to fill in the details and for validation. That is, if you want to use the signature field to the pdf, you can click on the field. Then you will depict a pop-up as shown below.
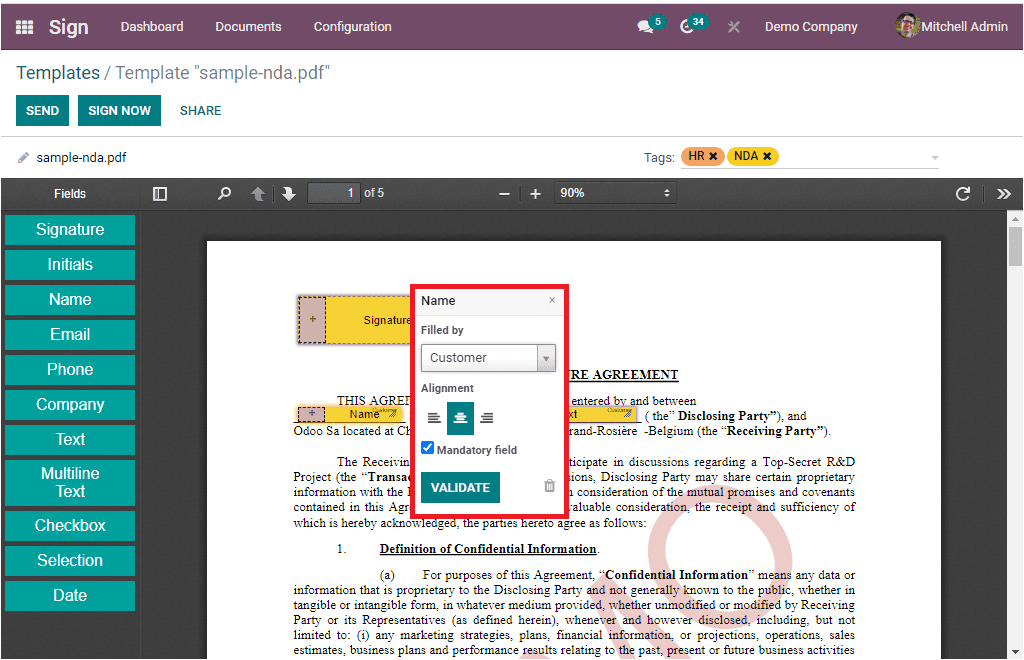
Now you can click on the field to define the person whose signature you are required to have at the specified place. The pop-up will depict the list of people such as Customer, Company, Employee, HR, and Responsible. From this list, you can select suitable people. If the added field is mandatory to be filled by the designated person, you can mark it in the dropdown. For validating the details, you can click on the VALIDATE button.
Also, you can add some tags in the Tag field to easily recognize the document template.
First, you can add the name field to the document by dragging the Name field.
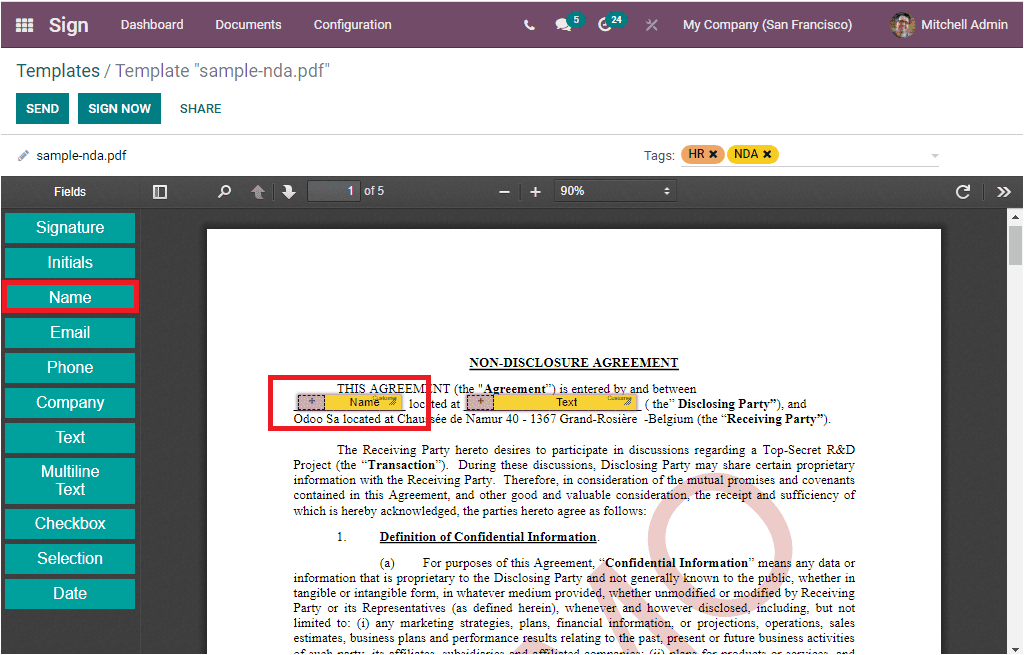
The Name field(all other fields) can be resized by clicking on the +icon and also can be moved to anywhere. Similarly, you can see a raw to mention who is the person needed to sign the document. That is, this assigned person will be responsible to populate the field. You can configure more responsible persons, and the Roles menu will assist you to configure it. The Roles menu can be accessed from the Configuration tab, and we can discuss the menu in detail later. You can simply click on them to view the pop up as shown in the image below.

You can even mention whether it is a mandatory field or not. And then validate it by clicking on the VALIDATE button. Then you will be able to add the Signature field to the document by using the same drag and drop method. Also, you can use the Date and other required fields in your documents. After providing all the details required to fill the relevant fields in the document, you can click on the SAVE button to save it. Now the PDF template will be held in your system.
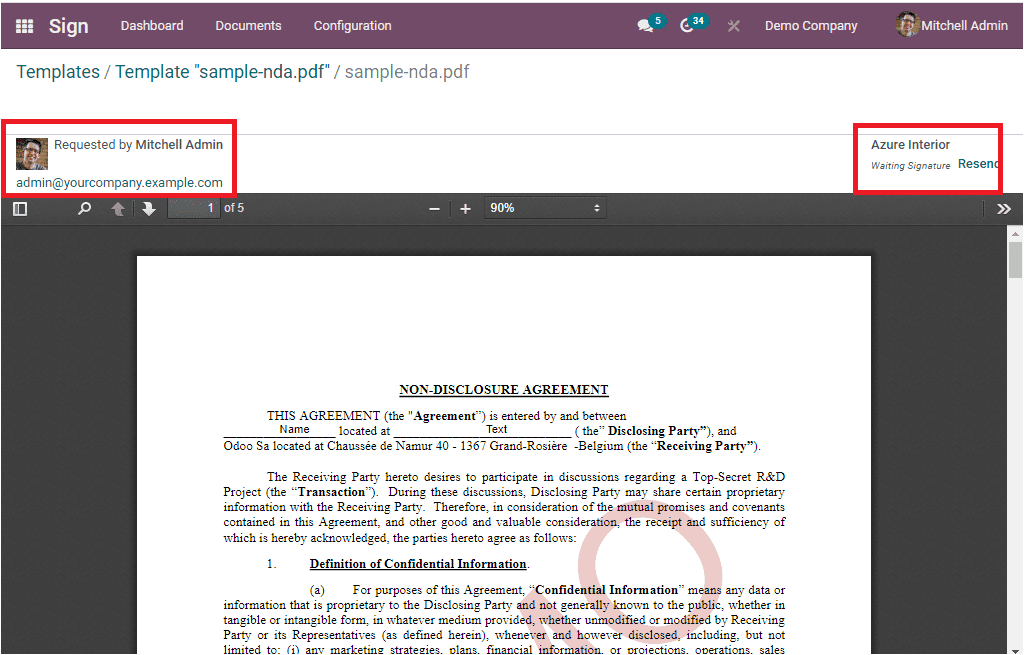
When you look at the top right side of the window, you will depict the SEND, SIGN NOW, and SHARE buttons. The SEND button allows you to send the document to the associated person. The SIGN NOW button can be used for signing the document. If you want to share the document, click on the SHARE button.
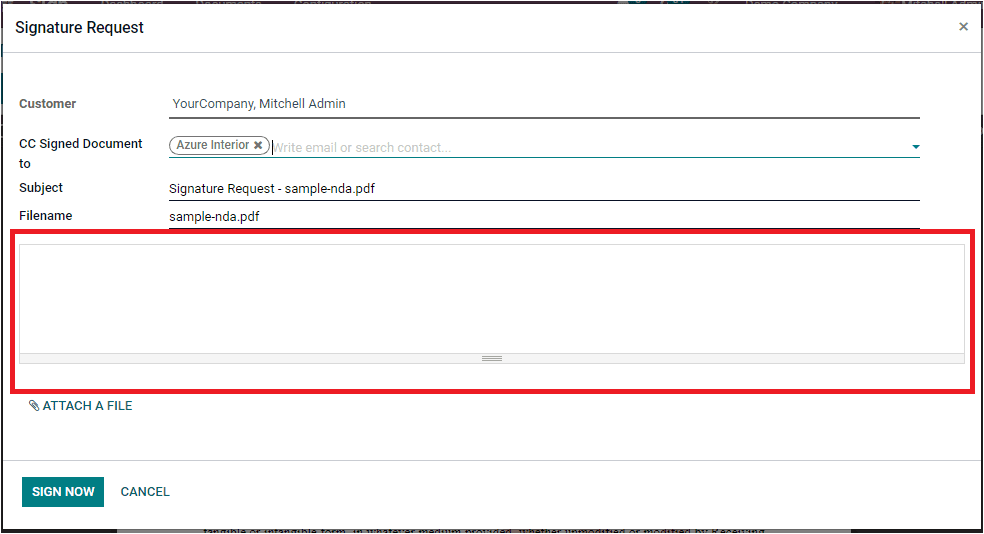
When you click on the SEND button, a new pop-up window will depict as shown in the screenshot given.

In this opened pop-up window, you can mention the respective people’s name to whom the document will be sent in the Name field. The subject of the email and file name will be auto allocated in the Subject and Name field. It can also be modified if required. The Signature Request tab allows you to include a message that can be sent to signers of the specified document. In addition, the CCSigned Document tab enables you to mention the email or contact name of the person if you want to add cc for the signed document and can include the message to be sent to the followers of the signed document. If you have anything to attach with this, you can attach it by clicking on the ATTACH A FILE button available. After providing the details, you can click on the SEND button. Now you will depict the document where the system will notify that the document was waiting for getting signed and the details of the send party are also depicted.
The Resend option available on the top right helps you to resend the invitation.
When we come in the case of SIGN NOW BUTTON, you will also depict a Signature Request pop-up window where the Customer, Subject, and the File name will be auto allocated. You can mention the email or the contact details of the followers of the signed document in the CC Signed Document to field. It is also possible to include the message to be sent to followers of the signed document in the given box.
Then you can click on the SIGN NOW button. It is ready to sign the document.
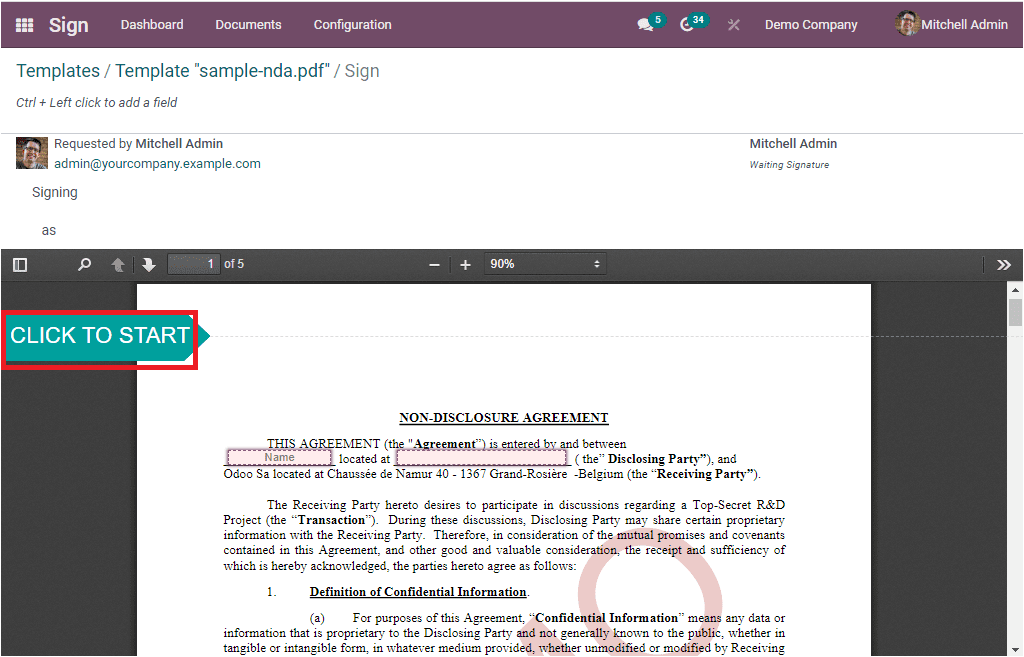
Here, you can click on the CLICK TO START button to fill each required field. Odoo points to each field and shows the next without missing any single field.
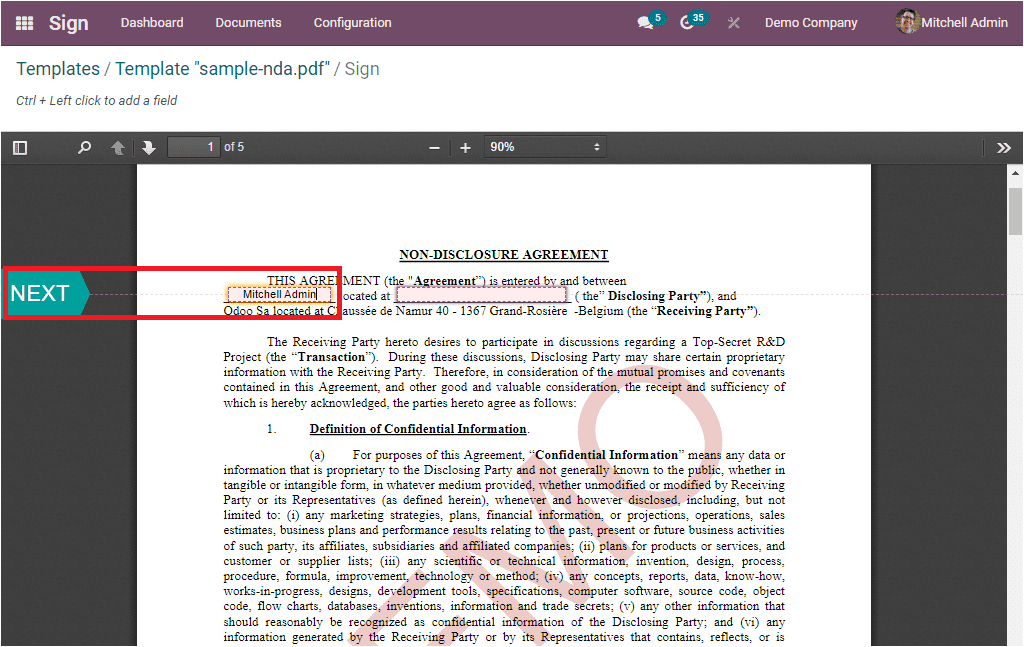
In the exact model, you will be taken from the beginning to the end of the document. After filling the first column, you will enter into the next filling area. In the Signature field, the system will depict a pop up window for marking it. The image of the pop-up window is given below.
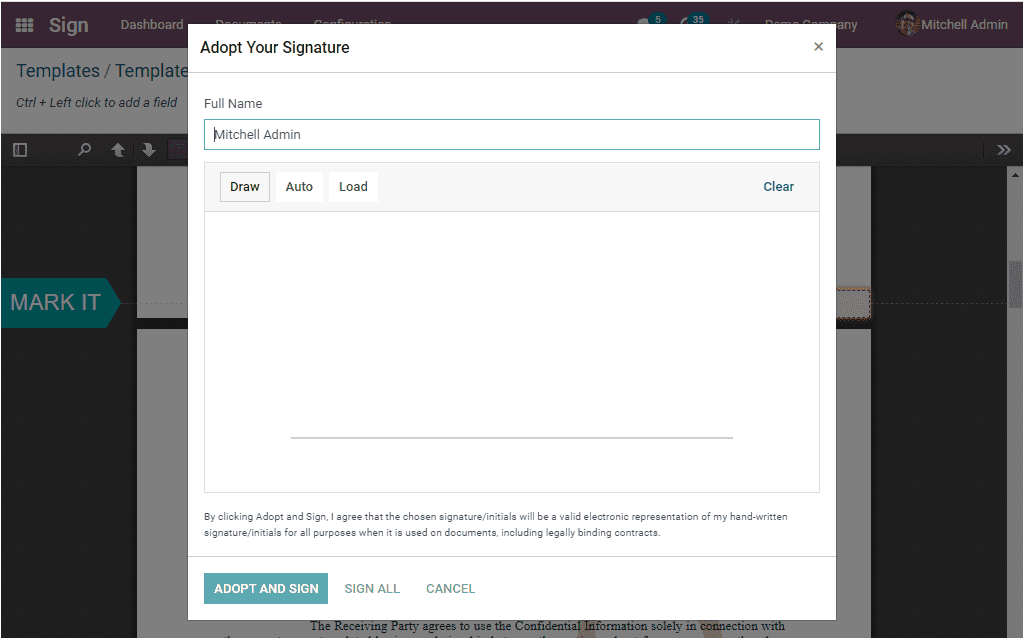
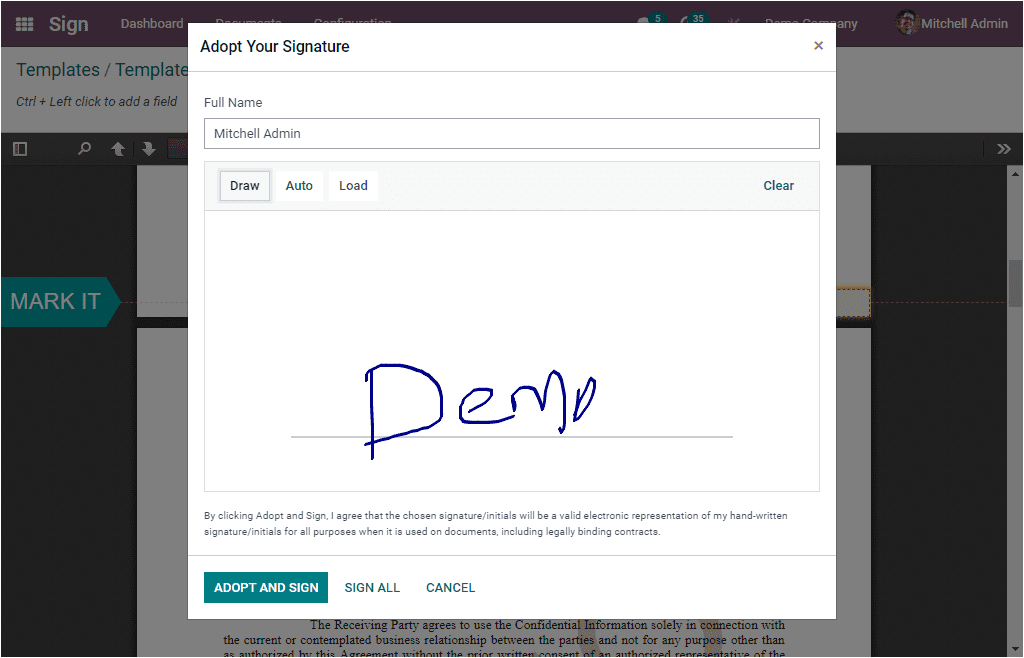
This window is designed to adopt your signature. First, you can fill in the full name in the Full Name field. Then you have the option for signing. Odoo offers you various signature choices so that you can define your signature in different ways. Here is the DRAW option. By selecting this option, the customer can sign the document with a digital pen, mouse pointer, or other.
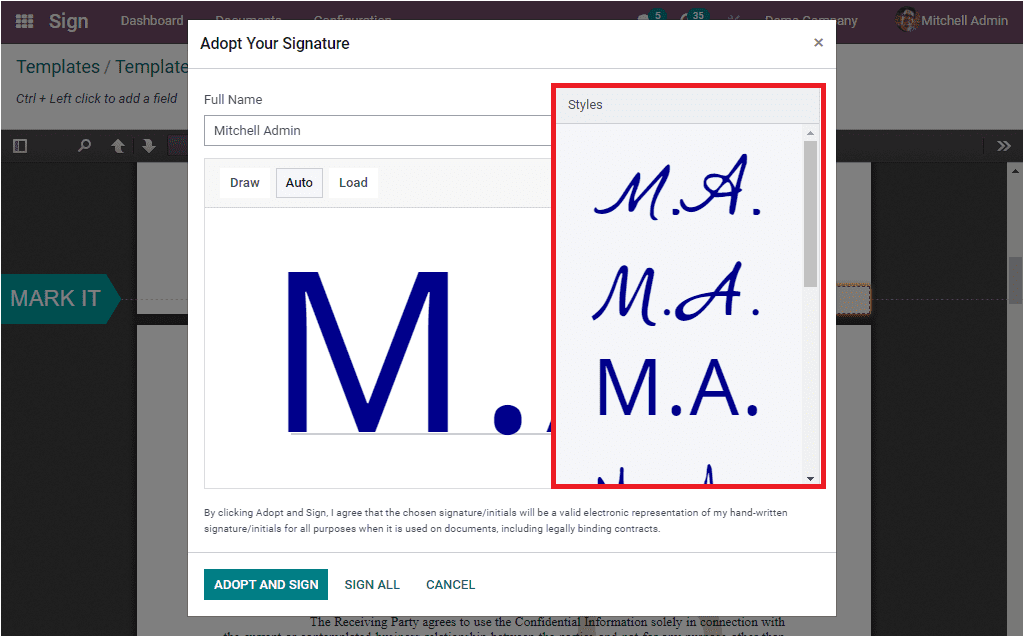
Then there is an Auto option. Here, the customer can access various signature styles, and the system allows them to choose their required style.
The Load option allows the customer to load their signature from their system.

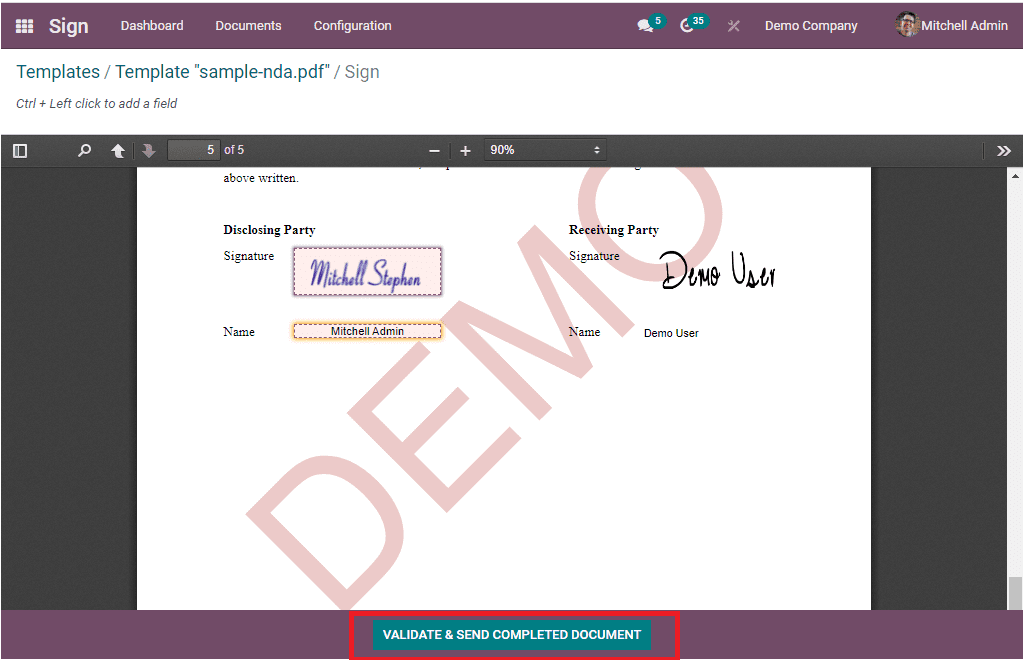
Moreover, the system will depict a declaration message that you can see in the above screenshot. After selecting the preferred way, the customer can press the ADOPT AND SIGN button. By clicking on this button, the person accepts that the signature confirmed will be a legally binding electronic representation of their signature. Once you have filled all the fields in the document, you can click on the VALIDATE AND SEND COMPLETED DOCUMENT button from the bottom of the document.
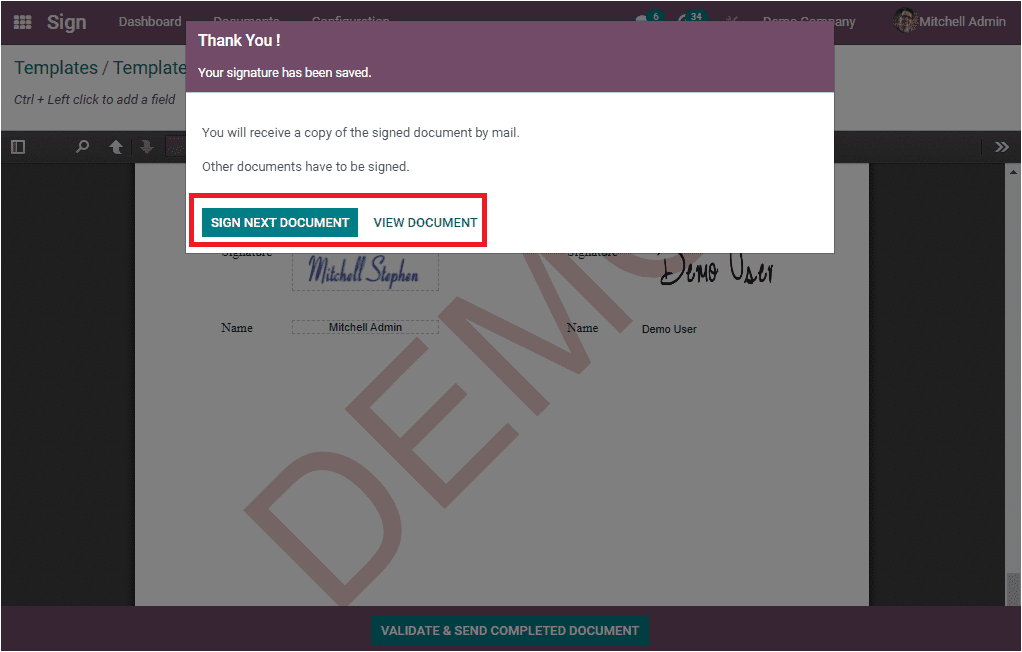
Then you will receive a pop-up that explains that the signature is saved, and the customer will receive a copy of the signed document by email. If any other documents have to be signed, it will also be mentioned in the pop-up, and you can access the button to SIGN NEXT DOCUMENTand also a VIEW DOCUMENT button.
When you click on the VIEW DOCUMENT button, you will be able to view the document.
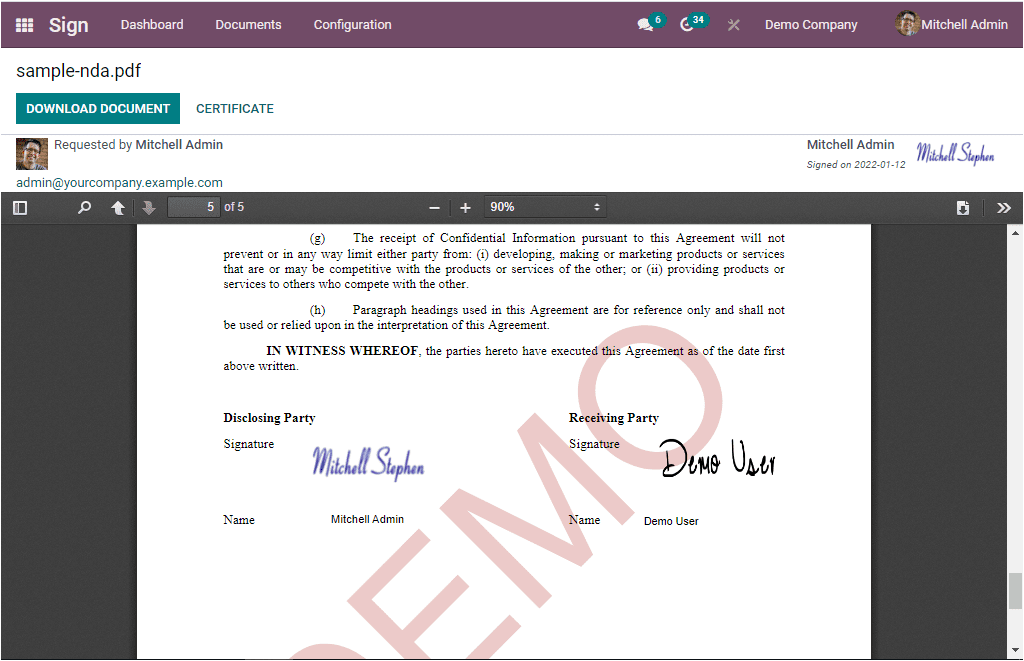
The DOWNLOAD DOCUMENT and CERTIFICATE buttons are also available on the top left portion of the window. The signed document can be downloaded by clicking on the DOWNLOAD DOCUMENT button.
Let us have a look at the Documents tab available on the module